

PHILIPS RQ1061 User Manual
3
B
A
E
C
D
F
G
J
K
I
H
1

4

ENGLISH 6
DEUTSCH
ESPAÑOL 39
FRANÇAIS
ITALIANO 73
NEDERLANDS
PORTUGUÊS
TÜRKÇE 124
22
56
90
107
RQ1091, RQ1061, RQ1051
6
ENGLISH
Introduction
Thank you for buying this Philips shaver. Please read
this user manual, as it contains information about the
wonderful features of this shaver as well as some tips
to make shaving easier and more enjoyable.
Important
Read this user manual carefully before you use the
shaver and the charger. Save the user manual for
future reference.
Danger
Make sure the adapter does not get wet.
-
Warning
Be careful with hot water. Always check if the
water is not too hot, to prevent your hands from
getting burnt.
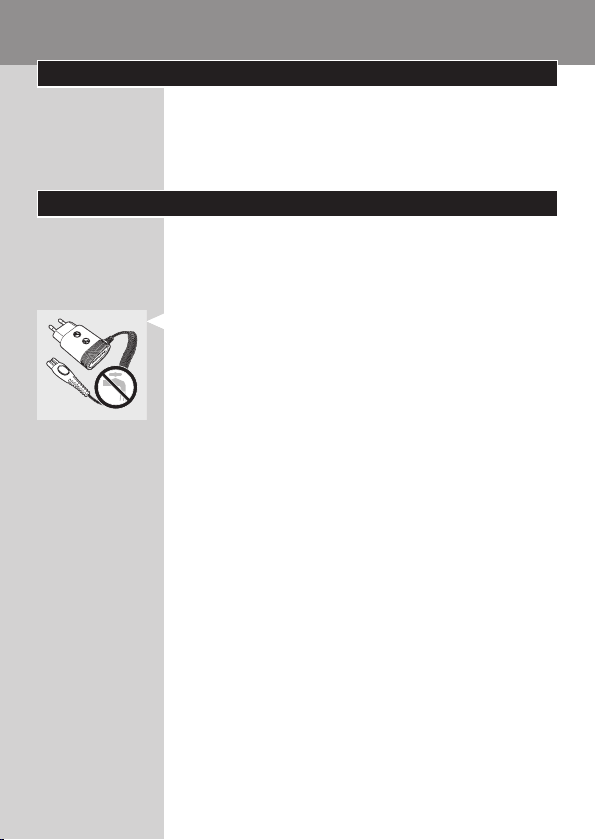
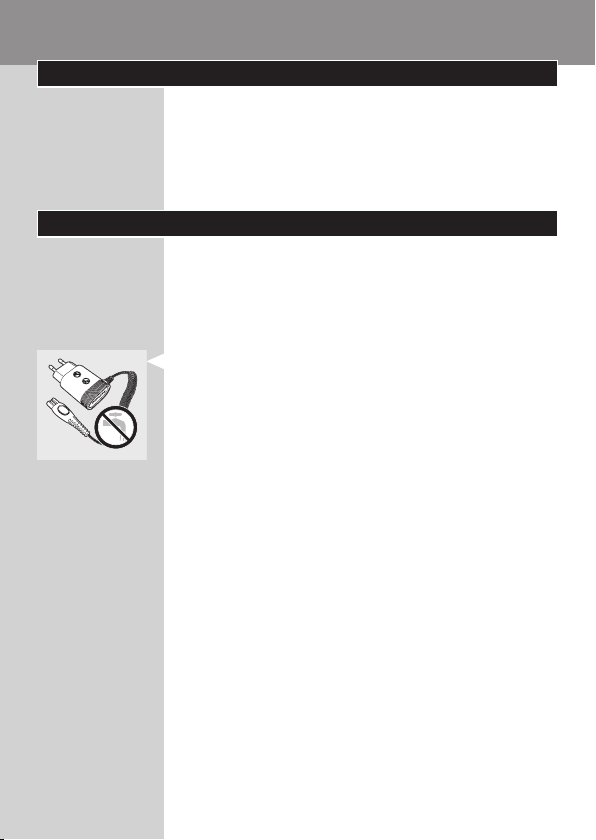
The adapter contains a transformer. Do not cut
off the adapter to replace it with another plug, as
this causes a hazardous situation.
The shaver and the charger are not intended for use
by persons (including children) with reduced physical,
sensory or mental capabilities, or lack of experience
and knowledge, unless they have been given
supervision or instruction concerning use of the
appliances by a person responsible for their safety.
Children should be supervised to ensure that they
do not play with the shaver and the charger.
Caution
Do not use the shaver, the charger or the adapter
if it is damaged.
Charge and store the shaver at a temperature
between 5°C and 35°C.
Always put the protection cap on the shaver
to protect the shaving heads when you are travelling.
ENGLISH 7
Never use scouring pads, abrasive cleaning agents
or aggressive liquids such as petrol or acetone to
clean the appliance.
Only use the adapter supplied.
If the adapter is damaged, always have it replaced
with one of the original type in order to avoid a
hazard.
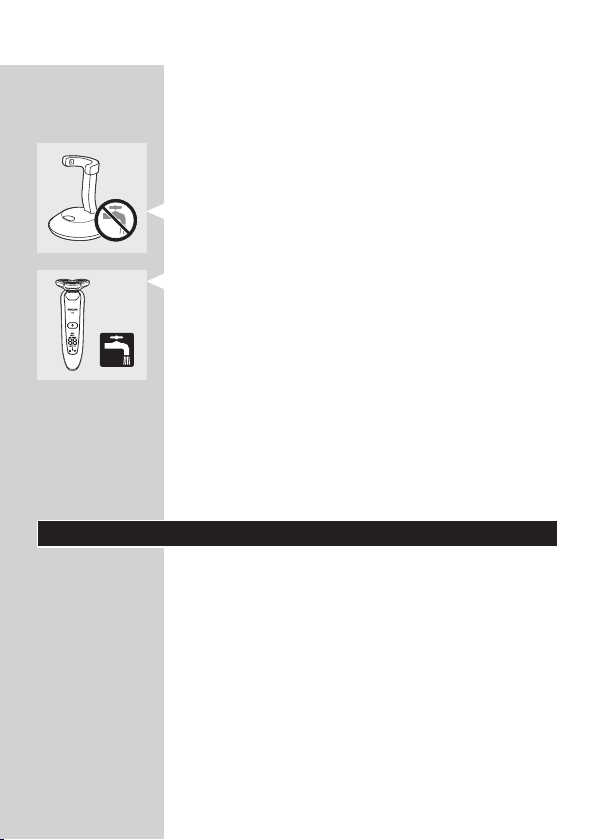
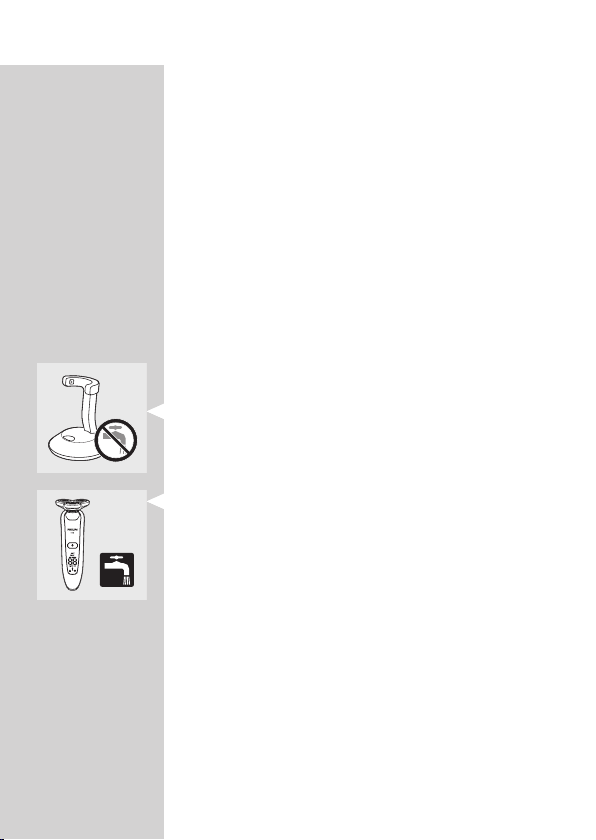
Never immerse the charger in water, nor rinse it
under the tap.
Compliance with standards
The shaver complies with the internationally
approved IEC safety regulations and can be safely
cleaned under the tap.
These Philips appliances comply with all standards
-
regarding electromagnetic elds (EMF). If handled
properly and according to the instructions in this
user manual, the appliances are safe to use based
on scientic evidence available today.
General
The adapter transforms 100-240 volts to a safe
low voltage of less than 24 volts.
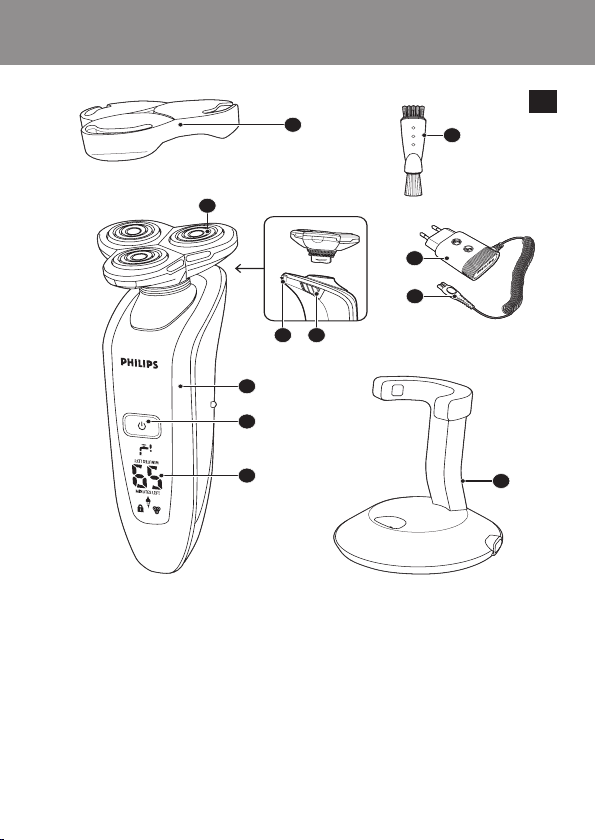
Overview (Fig. 1)
A Protection cap
B Shaving unit
C Trimmer
D Trimmer on/off slide
E Shaver (RQ1090/RQ1060/RQ1050)
F Shaver on/off button
G Display
H Cleaning brush
I Adapter
J Small plug
K Charger
ENGLISH8
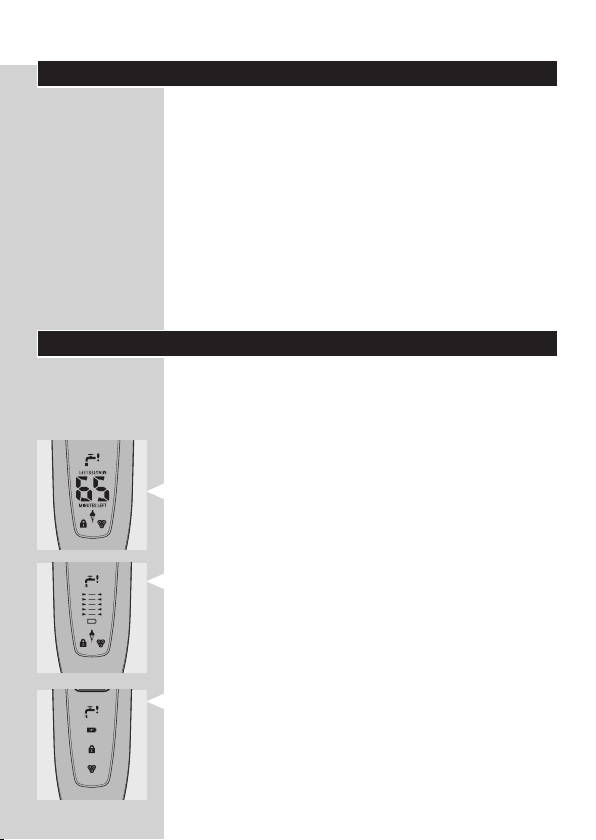
The display
Before you use the shaver for the rst time, remove
the protective foil from the display.
The three shaver types (RQ1090, RQ1060 and
RQ1050) have different displays, which are shown in
the gures below.
RQ1090
-
RQ1060
-
RQ1050
-
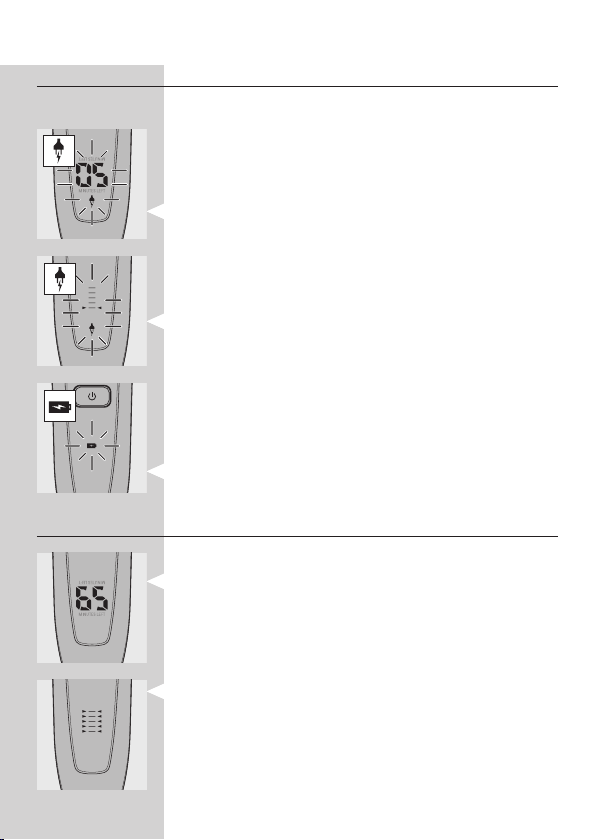
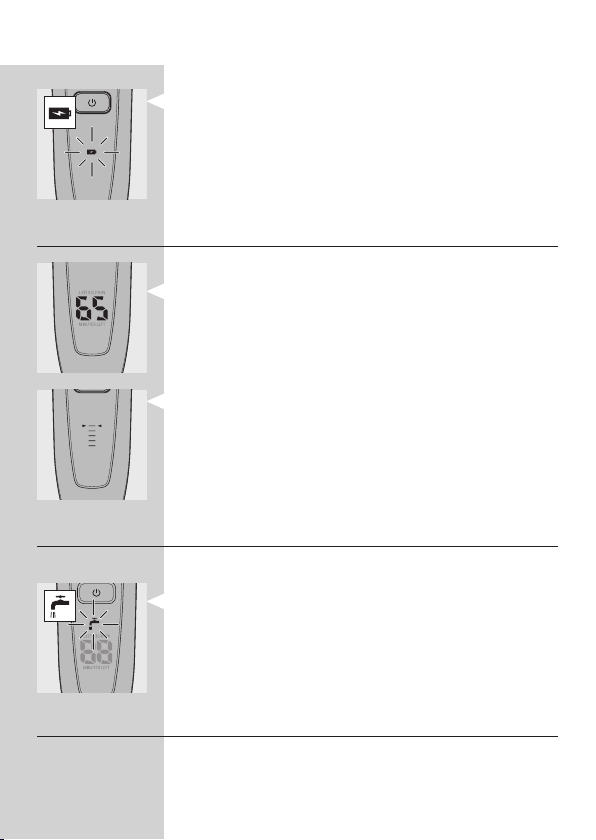
Charging
Charging takes approx. 1 hour.
When you place the shaver in the charger, the
display automatically switches off after
approx. 5 hours.
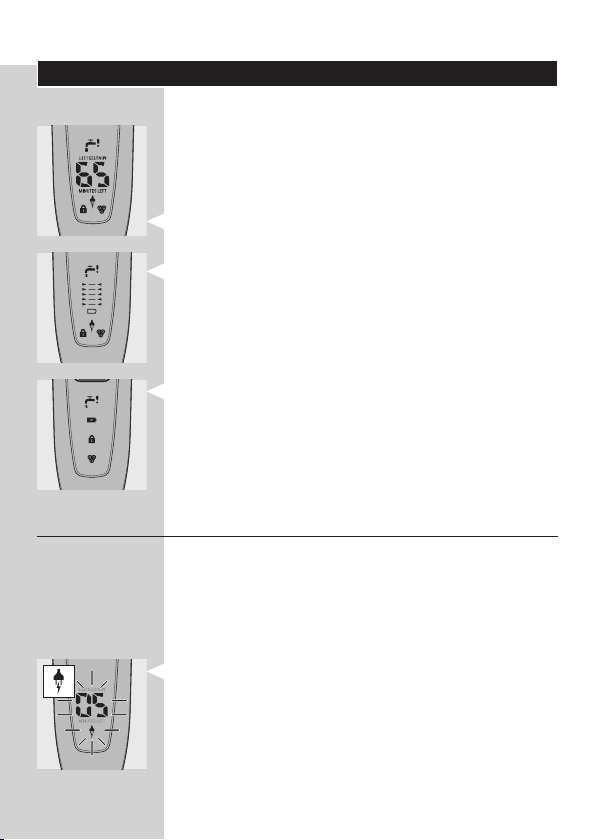
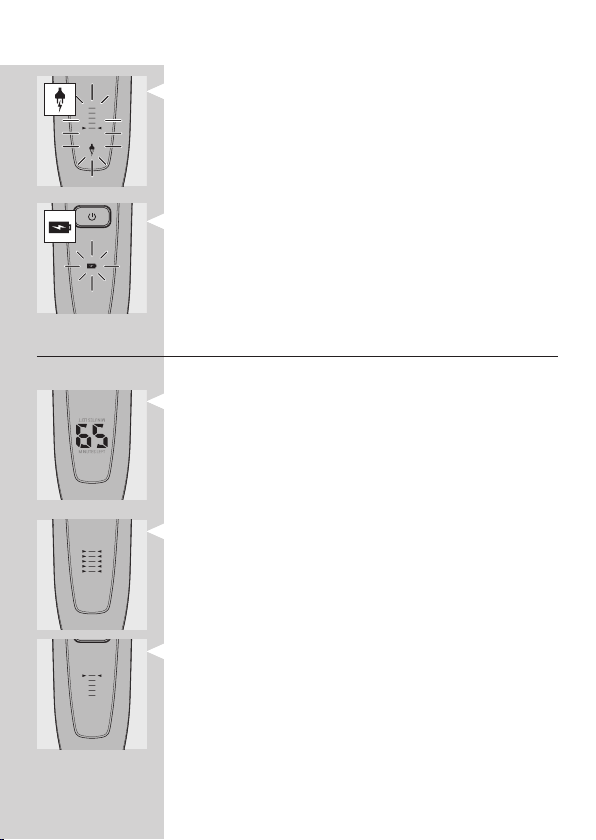
RQ1090
-
When the shaver is charging, the minutes
indication and the plug symbol ash.
The shaving minutes increase until the shaver is
fully charged.
ENGLISH 9
RQ1060
When the shaver is charging, the plug
-
symbol ashes.
First the arrowheads of the bottom charge level
-
ash, then the arrowheads of the second level
ash, and so on until the shaver is fully charged.
RQ1050
When the shaver is charging, the battery symbol
-
ashes blue.
Battery fully charged
RQ1090
When the battery is fully charged, the minutes
indication is visible on the display and the plug
symbol disappears from the display.
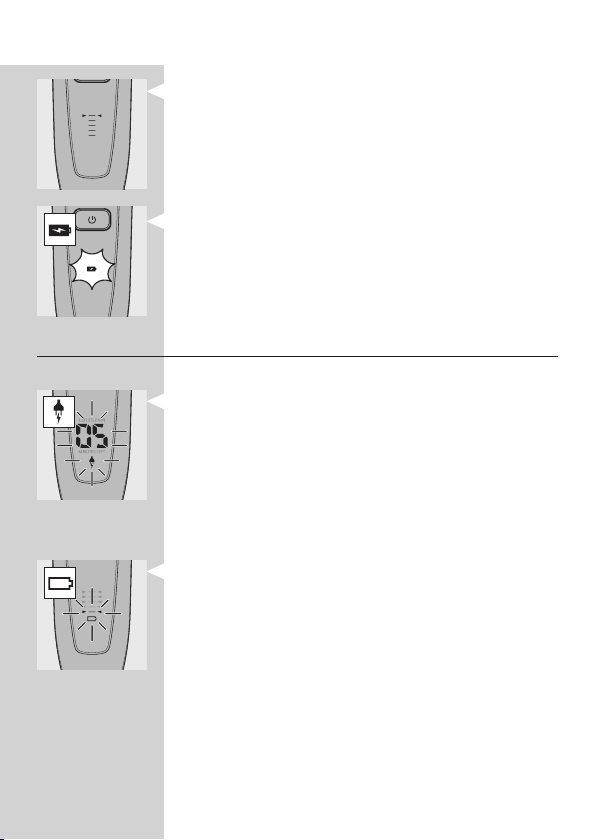
RQ1060
When the battery is fully charged, all arrowheads
and all charge level lights light up blue continuously
and the plug symbol disappears from the display.
When you remove the shaver from the charger,
the arrowheads of the top charge level light up
blue to indicate that the battery is full.
ENGLISH10
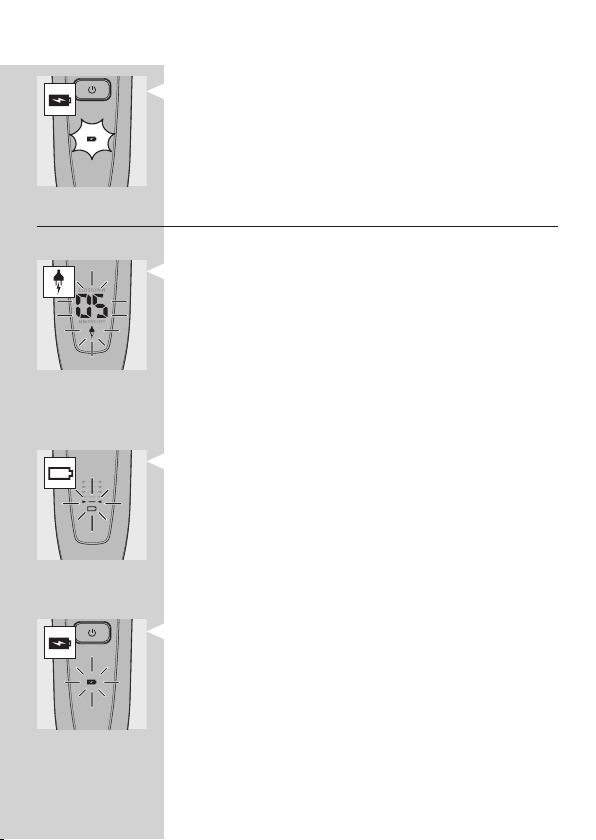
RQ1050
When the battery is fully charged, the battery
symbol lights up blue continuously.
Battery low
RQ1090
When the battery is almost empty (when there
are only 5 or fewer shaving minutes left), the
minutes indication and the plug symbol start to
ash.
When you switch off the shaver, the shaving
-
minutes and the plug symbol continue to ash for
a few more seconds. You hear a beep when there
are no minutes left.
RQ1060
When the battery is almost empty (when there
are only 5 or fewer shaving minutes left), the
battery symbol ashes red and the arrowheads of
the bottom charge level ash blue.
When you switch off the shaver, the battery
symbol and the arrowheads of the bottom charge
level continue to ash for a few seconds.
RQ1050
When the battery is almost empty (when there
are only 5 or fewer shaving minutes left), the
battery symbol lights up red.
When you switch off the shaver, the battery
-
symbol starts to ash for a few seconds.
ENGLISH 11
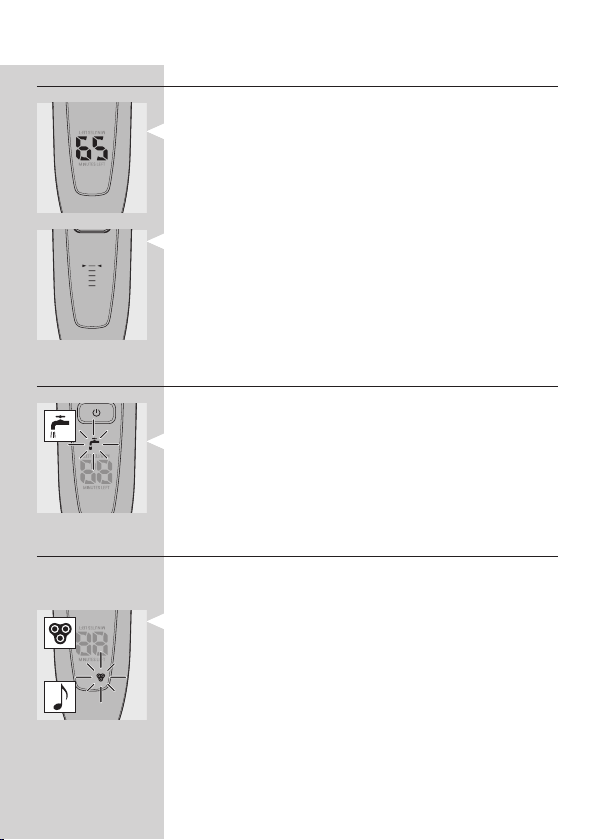
Remaining battery capacity
RQ1090
The remaining battery capacity is indicated by the
number of shaving minutes shown on the display.
RQ1060
The remaining battery capacity is indicated by the
-
ashing arrowheads of a particular charge level
Clean shaver
For optimal shaving performance, we advise you to
clean the shaver after every use.
The tap symbol ashes to remind you to clean the
shaver.
Note: The displays of types RQ1060 and RQ1050 look
different but show the same indication.
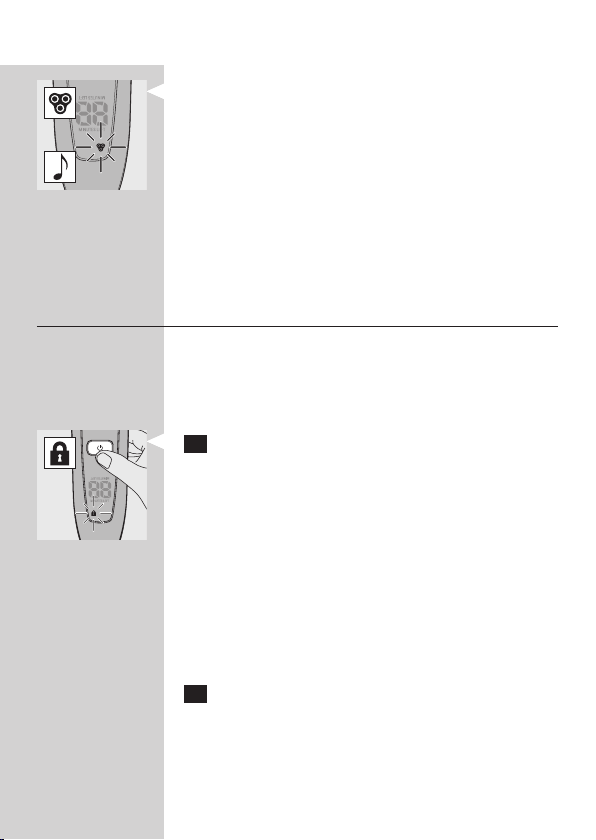
Replace shaving unit
For maximum shaving performance, we advise you
to replace the shaving unit every two years.
To remind you to replace the shaving unit, the
-
shaving unit symbol ashes (all types) and you
hear a beep when you switch off the shaver
(RQ1090 only). This happens at the end of
7 successive shaves to remind you to replace the
shaving unit.
Note: The displays of types RQ1060 and RQ1050 look
different but show the same indication.
ENGLISH12
Travel lock
You can lock the shaver when you are going to
travel. The travel lock prevents the shaver from being
switched on by accident.
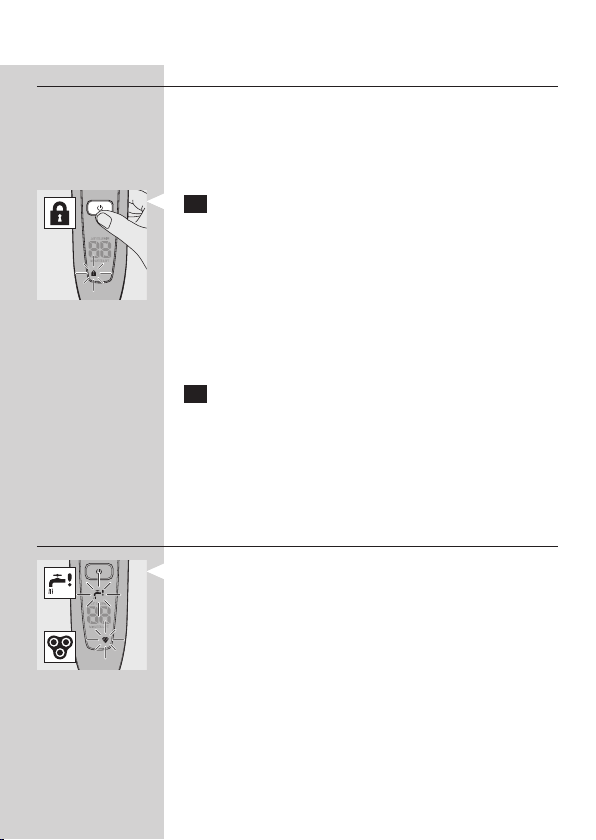
Activating the travel lock
1 Press the on/off button for 3 seconds to enter
the travel lock mode.
The lock symbol appears on the display (all
,
types) and you hear a beep (RQ1090 only) to
indicate that the travel lock has been activated.
Note: The displays of types RQ1060 and RQ1050 look
different but show the same indication.
Deactivating the travel lock
1 Press the on/off button for 3 seconds.
The motor starts running to indicate that the
,
travel lock has been deactivated.
The shaver is now ready for use again.
Note: When you place the shaver in the plugged-in
charger, the travel lock is automatically deactivated.
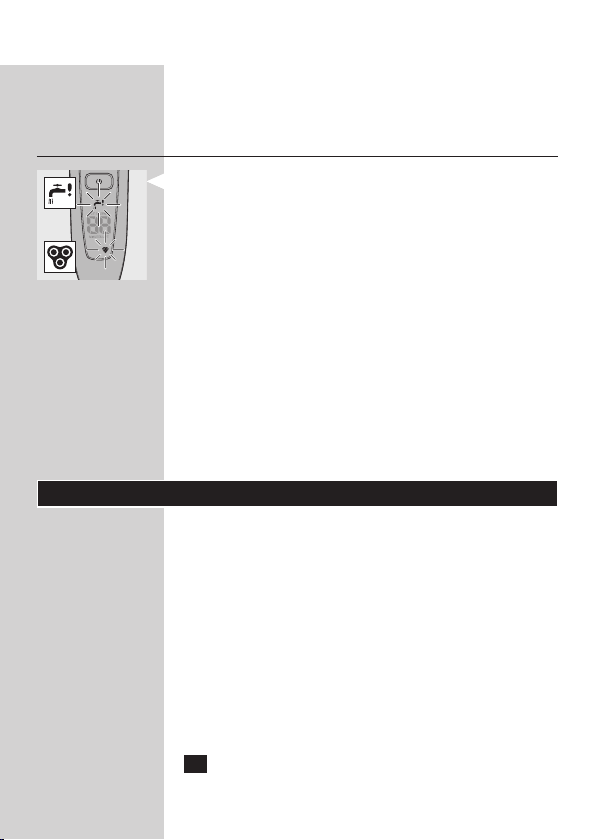
Blocked shaving heads
If the shaving heads are blocked, the shaving unit
symbol and the tap symbol with exclamation mark
ash. In this case, the motor cannot run because
the shaving heads are soiled or damaged.
Note: The displays of types RQ1060 and RQ1050 look
different show the same indication.
When this happens, you have to clean the shaving
unit or replace it.
The shaving unit symbol and the tap symbol
-
with exclamation mark continue to ash until you
unblock the shaving heads.
ENGLISH 13
Charging
Charging takes approx. 1 hour.
A fully charged shaver has a shaving time of up to
65 minutes, which is enough for approx. 21 shaves.
The actual shaving time is calculated by the shaver.
If you have a heavy beard, the shaving time may be
less than 65 minutes. The shaving time may also vary
over time, depending on your shaving behaviour and
beard type.
Quick charge
After the shaver has charged for 5 minutes,
it contains enough energy for one shave.
1 Put the small plug in the charger.
2 Put the adapter in the wall socket.
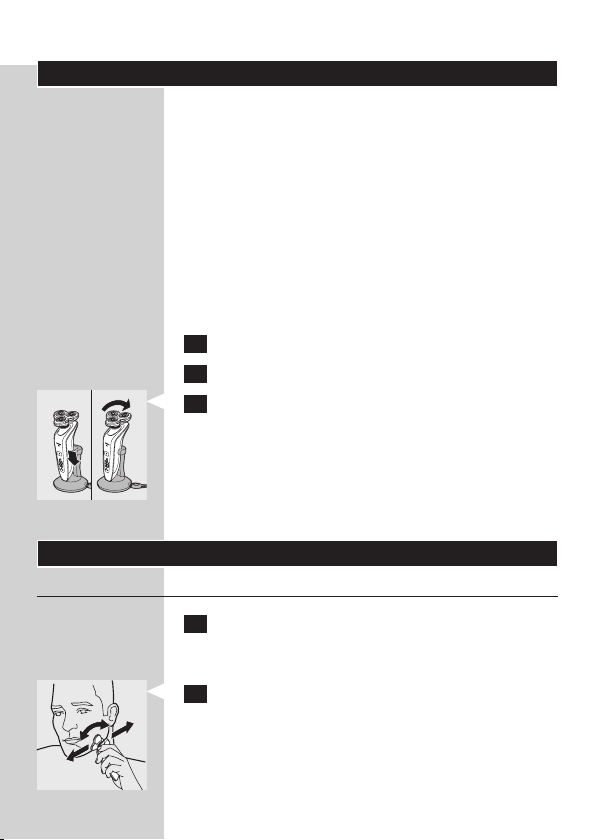
3 Place the shaver in the charger. Press the
shaver tightly into the holder to lock into place.
Note: RQ1090 only: If the shaver is placed correctly,
you hear a beep.
The display shows that the shaver is charging
,
(see chapter ‘The display’).
Using the shaver
Shaving
1 Press the on/off button once to switch on the
shaver.
The display lights up for a few seconds.
,
2 Move the shaving heads over your skin. Make
both straight and circular movements.
Shaving on a dry face gives the best results.
Your skin may need 2 or 3 weeks to get
accustomed to the Philips shaving system.
ENGLISH14
3 Press the on/off button once to switch off the
shaver.
The display lights up for a few seconds and then
,
shows the remaining battery capacity (RQ1090/
RQ1060 only).
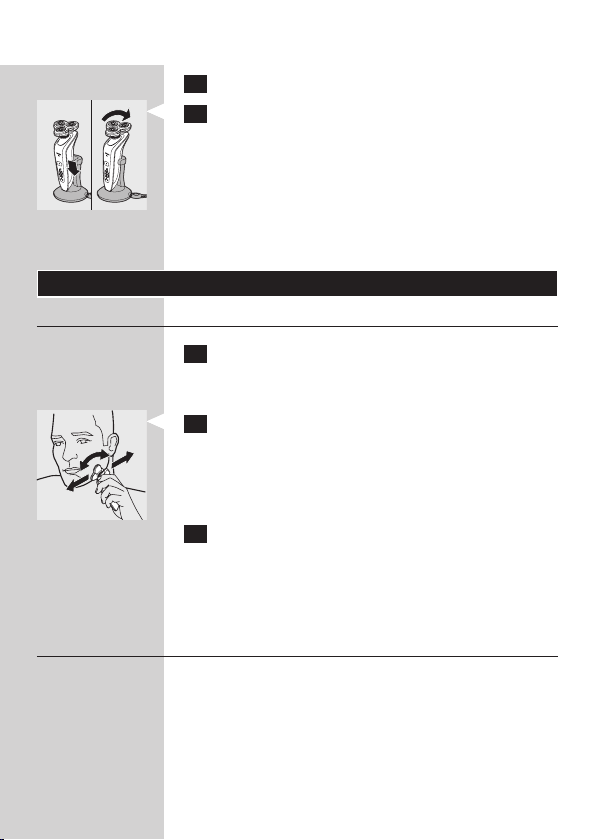
Trimming
You can use the trimmer to groom your sideburns
and moustache.
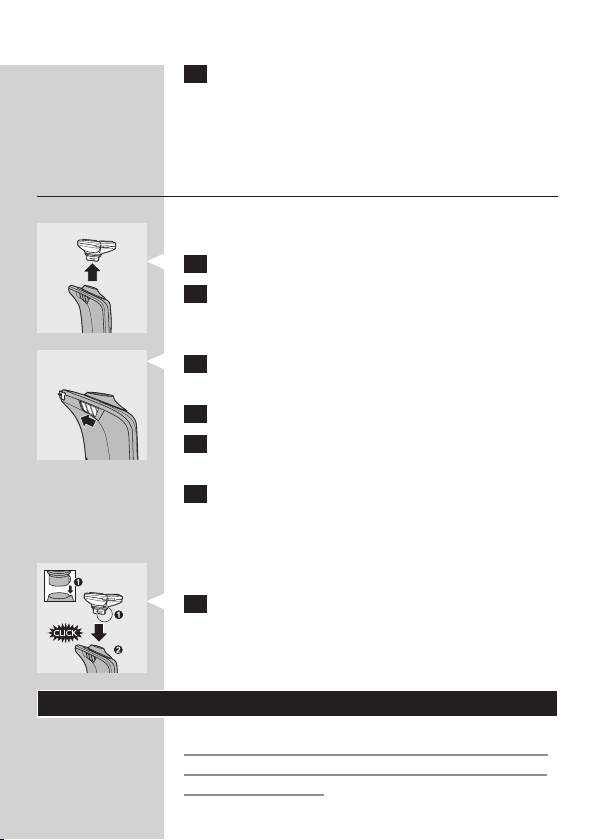
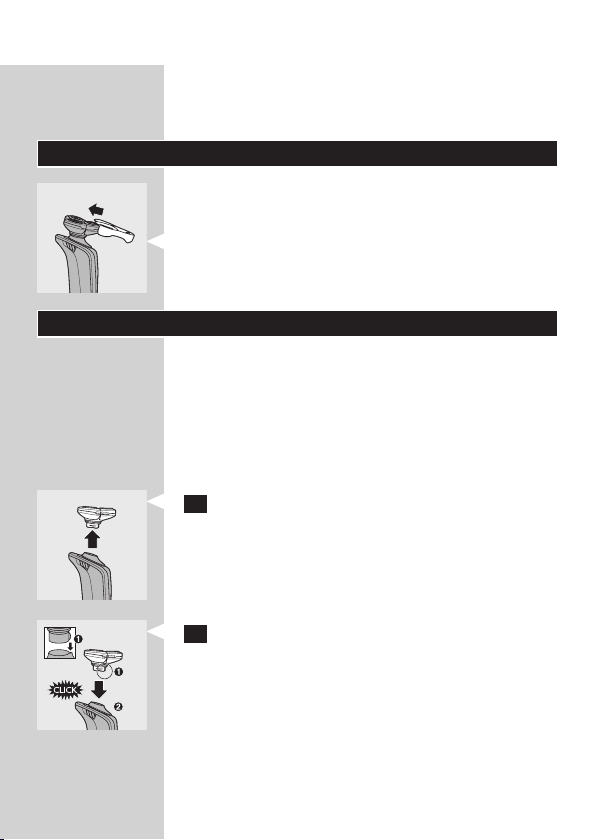
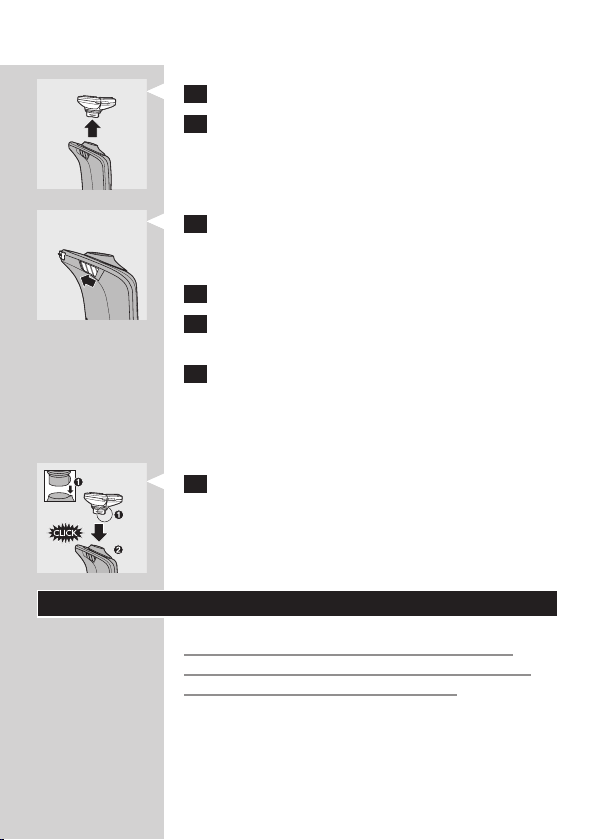
1 Pull the shaving unit off the shaver.
2 Press the on/off button once to switch on the
shaver.
The display lights up for a few seconds.
,
3 Press the trimmer slide forwards to slide out
the trimmer.
4 You can now start trimming.
5 Press the trimmer slide backwards to retract
the trimmer.
6 Press the on/off button once to switch off the
shaver.
The display lights up for a few seconds and then
,
shows the remaining battery capacity (RQ1090/
RQ1060 only).
7 Insert the lug of the shaving unit into the slot
in the top of the shaver (1). Then press the
shaving unit downwards (2) to attach it to the
shaver (‘click’).
Cleaning and maintenance
Never use scouring pads, abrasive cleaning agents
or aggressive liquids such as petrol or acetone to
clean the appliance.
ENGLISH 15
Be careful with hot water. Always check if the
-
water is not too hot, to prevent your hands from
getting burnt.
Clean the shaver after every shave for optimal
-
shaving performance.
You can clean the outside of the shaver with a
-
damp cloth.
Regular cleaning guarantees better shaving
-
performance.
Cleaning the shaving unit under the tap
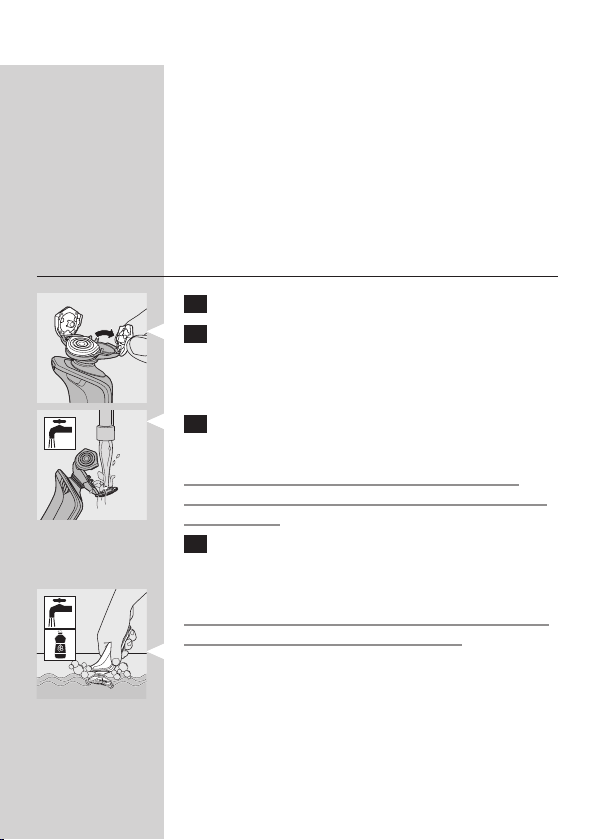
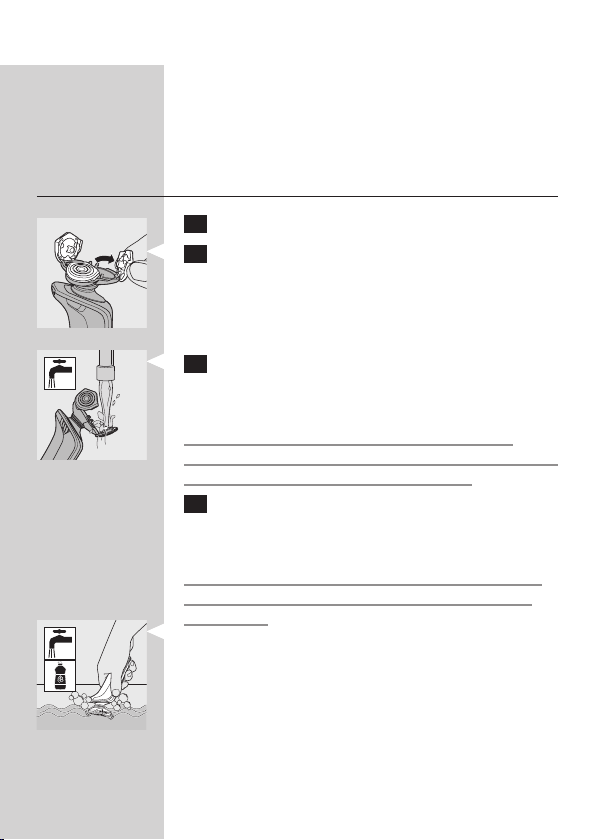
1 Switch off the shaver.
2 Pull open the three shaving heads one by one.
3 Rinse all three shaving heads and all three hair
chambers under a hot tap for 30 seconds.
Be careful with hot water. Always check if the
water is not too hot, to prevent your hands from
getting burnt.
4 Carefully shake off excess water and leave the
shaving heads open to let the shaving unit dry
completely.
Never dry the shaving unit with a towel or tissue,
as this may damage the shaving heads.
For thorough cleaning, switch on the shaver and
,
immerse the shaving unit in hot water with some
liquid soap for 30 seconds. You can also clean the
shaving unit with some alcohol.
ENGLISH16
Cleaning the shaving unit with the brush supplied
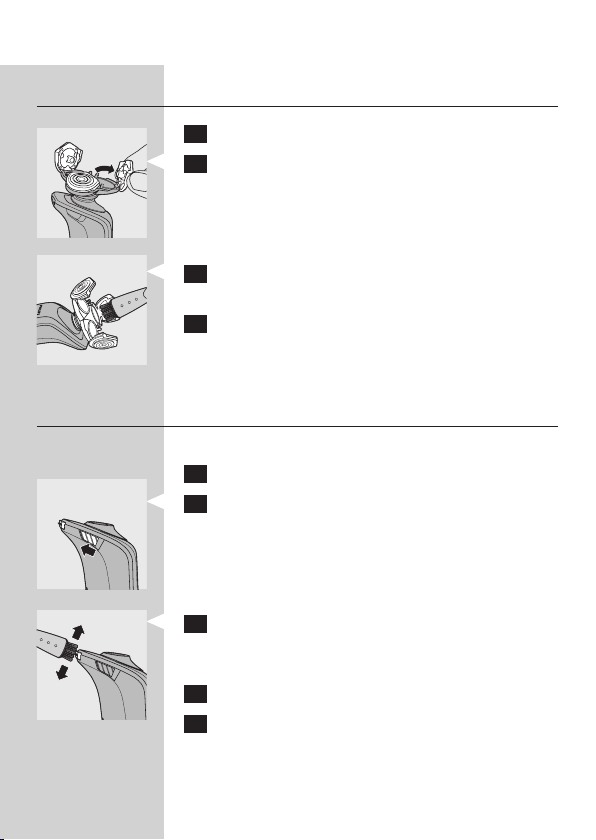
1 Switch off the shaver.
2 Pull open the three shaving heads one by one.
3 Clean the shaving heads and the hair chambers
with the brush supplied.
4 Close the shaving heads.
Cleaning the trimmer with the brush supplied
Clean the trimmer every time you have used it.
1 Switch off the shaver.
2 Press the trimmer slide forwards to slide out
the trimmer.
3 Clean the trimmer with the short-bristled side
of the brush supplied. Brush up and down along
the trimmer teeth.
4 Switch the shaver on and off and repeat step 3.
5 Press the trimmer slide backwards to retract
the trimmer.
ENGLISH 17
Tip: For optimal trimmer performance, lubricate the
trimmer teeth with a drop of sewing machine oil every
six months.
Storage
There are two ways to store the shaver or to take it
with you when you travel:
put the shaver in the charger.
-
slide the protection cap onto the shaving unit to
-
prevent damage to the shaving heads.
Replacement
Replace the shaving unit when the shaving unit
symbol appears on the display. Replace a damaged
shaving unit right away.
For maximum shaving performance, we advise you
to replace the shaving unit every two years.
Only replace the shaving unit with an original RQ10
Philips arcitec Shaving Unit.
1 Pull the old shaving unit off the shaver.
2 Insert the lug of the new shaving unit into the
slot in the top of the shaver (1). Then press the
shaving unit downwards (2) to attach it to the
shaver (‘click’).
ENGLISH18
Ordering parts
The following parts are available:
HQ8500 adapter
-
RQ10 Philips arcitec Shaving Unit
-
HQ110 Philips Shaving Head Cleaning Spray
-
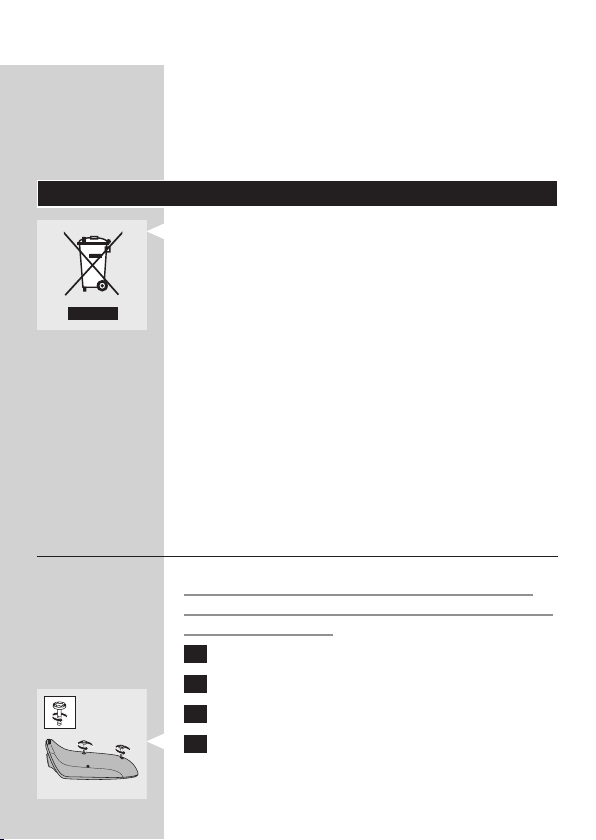
Environment
Do not throw away the appliances with the
-
normal household waste at the end of their life,
but hand them in at an ofcial collection point for
recycling. By doing this, you help to preserve the
environment.
The built-in rechargeable shaver battery contains
-
substances that may pollute the environment.
Always remove the battery before you discard or
hand in the shaver at an ofcial collection point.
Dispose of the battery at an ofcial collection
point for batteries. If you have trouble removing
the battery, you can also take the appliance to a
Philips service centre. The staff of this centre will
remove the battery for you and will dispose of it
in an environmentally safe way.
Disposal of the shaver battery
Only remove the battery when you discard the
shaver. Make sure the battery is completely empty
when you remove it.
1 Remove the shaver from the charger.
2 Let the shaver run until it stops.
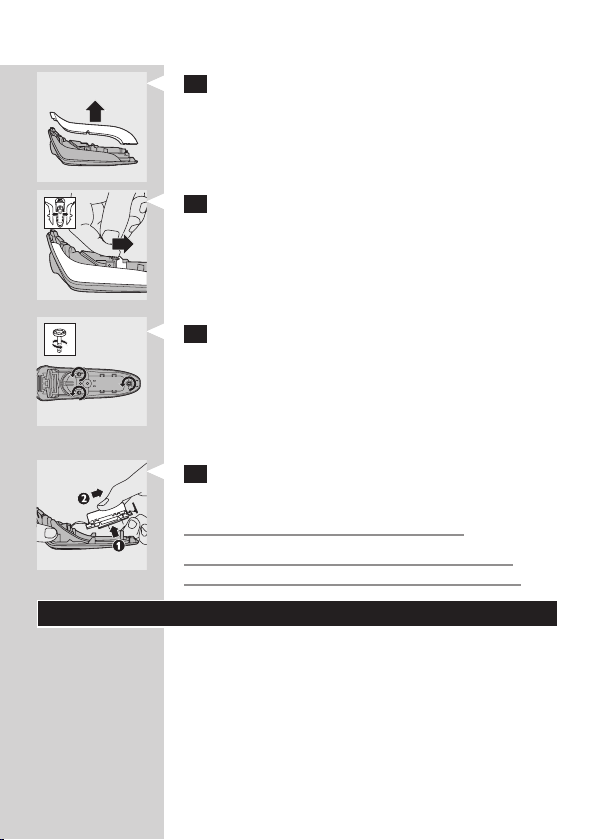
3 Pull the shaving unit off the shaver.
4 Undo the 2 screws on the back of the shaver.
ENGLISH 19
5 Insert a screwdriver between the front and
back panel to open the shaver.
6 Remove the side panels.
7 Unscrew the 3 screws on the inside of the
shaver and remove the back cover.
8 Pull the wires out of the motor unit and
remove the battery.
Be careful, the battery strips are sharp.
Do not put the shaver back into the plugged-
in charger after you have removed the battery.
Guarantee & service
If you need information or if you have a problem,
please visit the Philips website at www.philips.com
or contact the Philips Customer Care Centre in
your country (you nd its phone number in the
worldwide guarantee leaet). If there is no Customer
Care Centre in your country, go to your local Philips
dealer or contact the Service Department of Philips
Domestic Appliances and Personal Care BV.

ENGLISH20
Guarantee restrictions
The shaving heads (cutters and guards) are not
covered by the terms of the international guarantee
because they are subject to wear.
Frequently asked questions
1
Why doesn’t the shaver shave as well as it used
to?
The shaver may not be properly clean. Switch
-
on the shaver and immerse the shaving unit in
hot water with some liquid soap (see chapter
‘Cleaning and maintenance’).
The shaving heads may be damaged or
-
worn. Replace the shaving unit (see chapter
‘Replacement’).
2 Why doesn’t the shaver work when I press the
on/off button?
The battery may be empty. Recharge the battery
-
(see chapter ‘Charging’).
The travel lock may be activated. Press the on/off
-
button for 3 seconds to deactivate the travel lock.
The shaving unit is soiled or damaged to such an
-
extent that the motor cannot run. In this case,
the shaving unit symbol, the tap symbol and
the exclamation mark ash. When this happens,
you have to clean the shaving unit or replace it.
Immerse the shaving unit in hot water with some
liquid soap.
The temperature of the shaver may be too high.
-
In this case, the shaver does not work and the
exclamation mark on the display ashes. As soon
as the temperature of the shaver has dropped
sufciently, you can switch on the shaver again.

ENGLISH 21
3 Why is the shaver not fully charged after I
charged it in the charger?
You may not have placed the shaver in the charger
-
properly. Make sure you press the shaver until it
locks into place.
22
DEUTSCH
Einführung
Herzlichen Glückwunsch zu Ihrem neuen Philips
Rasierer! Lesen Sie bitte diese Bedienungsanleitung
sorgfältig durch, da sie nützliche Informationen zu
den Funktionen dieses Rasierers sowie Tipps für eine
noch einfachere und angenehmere Rasur enthält.
Wichtig
Lesen Sie diese Bedienungsanleitung vor dem
Gebrauch des Rasierers und des Ladegeräts
aufmerksam durch und bewahren Sie sie für eine
spätere Verwendung auf.
Gefahr
Achten Sie darauf, dass der Adapter nicht nass
-
wird.
Warnhinweis
Gehen Sie vorsichtig mit heißem Wasser um.
-
Achten Sie darauf, dass das Wasser nicht zu heiß
ist und Sie sich nicht die Hände verbrühen.
Der Adapter enthält einen Transformator. Ersetzen
-
Sie den Adapter keinesfalls durch einen anderen
Stecker, da dies den Benutzer gefährden kann.
Der Rasierer und das Ladegerät sind für Benutzer
-
(einschl. Kinder) mit eingeschränkten physischen,
sensorischen oder psychischen Fähigkeiten bzw.
ohne jegliche Erfahrung oder Vorwissen nur dann
geeignet, wenn eine angemessene Aufsicht oder
ausführliche Anleitung zur Benutzung der Geräte
durch eine verantwortliche Person sichergestellt
ist.
Achten Sie darauf, dass Kinder nicht mit dem
-
Rasierer und dem Ladegerät spielen.
DEUTSCH 23
Achtung
Benutzen Sie den Rasierer, das Ladegerät bzw.
-
den Adapter nicht, wenn Beschädigungen daran
erkennbar sind.
Laden und verwahren Sie den Rasierer bei
-
Temperaturen zwischen 5°C und 35°C.
Um eine Beschädigung der Scherköpfe zu
-
vermeiden, sollten Sie auf Reisen immer die
Schutzkappe auf den Rasierer setzen.
Benutzen Sie zum Reinigen des Geräts keine
-
Scheuerschwämme und -mittel oder aggressive
Flüssigkeiten wie Benzin oder Azeton.
Verwenden Sie ausschließlich den
-
mitgelieferten Adapter.
Wenn der Adapter defekt oder beschädigt ist, darf
-
er nur durch ein Original-Ersatzteil ausgetauscht
werden, um Gefährdungen zu vermeiden.
Tauchen Sie das Ladegerät keinesfalls in Wasser.
-
Spülen Sie es auch nicht unter ießendem Wasser
ab.
Normerfüllung
Der Rasierer erfüllt die internationalen IEC-
-
Sicherheitsvorschriften und kann ohne Bedenken
unter ießendem Wasser gereinigt werden.
Diese Philips Geräte erfüllen sämtliche Normen
-
bezüglich elektromagnetischer Felder (EMF).
Nach aktuellen wissenschaftlichen Erkenntnissen
sind die Geräte sicher im Gebrauch, sofern
sie ordnungsgemäß und entsprechend den
Anweisungen in dieser Bedienungsanleitung
gehandhabt werden.
Allgemeines
Der Adapter wandelt Netzspannungen von 100
-
bis 240 Volt in eine sichere Betriebsspannung von
unter 24 Volt um.
DEUTSCH24
Übersicht (Abb. 1)
A Schutzkappe
B Schereinheit
C Langhaarschneider
D Ein-/Ausschalter Langhaarschneider
E Rasierer (RQ1090/RQ1060/RQ1050)
F Ein-/Ausschalter Rasierer
G Display
H Reinigungsbürste
I Adapter
J Kleiner Stecker
K Ladegerät
Das Display
Entfernen Sie vor dem ersten Gebrauch des
Rasierers die Schutzfolie vom Display.
Die drei Rasierermodelle (RQ1090, RQ1060 and
RQ1050) verfügen über unterschiedliche Displays,
wie auf den nachstehenden Abbildungen dargestellt.
RQ1090
-
RQ1060
-
RQ1050
-
DEUTSCH 25
Laden
-
Die Ladedauer beträgt ca. 1 Stunde.
Wenn Sie den Rasierer in das Ladegerät stellen,
-
schaltet sich das Display nach ca. fünf Stunden
automatisch aus.
RQ1090
-
Während des Ladevorgangs blinken
die Minutenanzeige und das Steckersymbol.
-
Die in Minuten angegebene Rasierzeit verlängert
sich, bis der Rasierer vollständig aufgeladen ist.
RQ1060
Das Steckersymbol blinkt während des
-
Ladevorgangs.
Zunächst blinkt die unterste Reihe der
-
Pfeilsymbole der Ladestandsanzeige, dann die
zweite und so weiter, bis der Rasierer vollständig
aufgeladen ist.
RQ1050
Während des Ladevorgangs blinkt das
-
Batteriesymbol blau.
Akku voll aufgeladen
RQ1090
-
Bei voll geladenem Akku gibt das Display
die verfügbare Rasierzeit in Minuten an, das
Steckersymbol erlischt.
RQ1060
Bei voll geladenem Akku leuchten alle Pfeile
-
und alle Ladestandsanzeigen konstant blau, das
Steckersymbol im Display erlischt.
DEUTSCH26
Wenn Sie den Rasierer aus dem Ladegerät
-
herausnehmen, leuchtet die oberste Pfeilreihe der
Ladestandsanzeige blau. Daran erkennen Sie, dass
der Akku vollständig geladen ist.
RQ1050
Ist der Akku vollständig geladen, leuchtet das
-
Batteriesymbol konstant blau.
Akku fast leer
RQ1090
Ist der Akku fast leer (es verbleiben nur noch 5
-
Minuten oder weniger an Rasierzeit), beginnen die
Minutenanzeige und das Steckersymbol zu blinken.
Wenn Sie den Rasierer ausschalten, blinken die
-
Minutenanzeige und das Steckersymbol einige
Sekunden lang weiter. Sind keine weiteren
Rasierminuten übrig, ertönt ein akustisches Signal.
RQ1060
Ist der Akku fast leer (es verbleiben nur noch
-
5 Minuten oder weniger an Rasierzeit), blinkt das
Batteriesymbol rot und die unterste Pfeilreihe der
Ladestandsanzeige blau.
Wenn Sie den Rasierer ausschalten, blinken das
-
Batteriesymbol und die unterste Pfeilreihe der
Ladestandsanzeige einige Sekunden lang weiter.
DEUTSCH 27
RQ1050
Ist der Akku fast leer (es verbleiben nur noch
-
5 Minuten oder weniger an Rasierzeit), leuchtet
das Batteriesymbol rot.
-
Wenn Sie den Rasierer ausschalten, blinkt das
Batteriesymbol einige Sekunden lang.
Verbleibende Akkukapazität
RQ1090
Die verbleibende Akkukapazität ist anhand der
-
Rasierzeit erkennbar, die im Display in Minuten
angegeben ist.
RQ1060
Die verbleibende Akkukapazität erkennen Sie
-
daran, welche Pfeilreihe der Ladestandsanzeige
blinkt.
Den Rasierer reinigen
Für eine optimale Rasierleistung empfehlen wir, den
Rasierer nach jedem Gebrauch zu reinigen.
-
Das blinkende Wasserhahnsymbol erinnert
Sie daran, dass der Rasierer gereinigt werden muss.
Hinweis: Die Displays der Modelle RQ1060 und
RQ1050 sehen zwar etwas anders aus, bieten aber die
gleichen Anzeigen.
Die Schereinheit auswechseln
Für eine optimale Rasierleistung empfehlen wir, die
Schereinheit alle zwei Jahre auszuwechseln.
DEUTSCH28
Wenn es an der Zeit ist, die Schereinheit
-
auszuwechseln, blinkt das Schereinheitssymbol
(alle Modelle), und beim Ausschalten des Rasierers
ertönt ein akustisches Signal (nur RQ1090). Dies
geschieht nach jeweils 7 aufeinander folgenden
Rasuren, um Sie an das Austauschen der
Schereinheit zu erinnern.
Hinweis: Die Displays der Modelle RQ1060 und
RQ1050 sehen zwar etwas anders aus, bieten aber die
gleichen Anzeigen.
Reisesicherung
Sie können den Rasierer für die Reise sichern.
Dadurch verhindern Sie ein versehentliches
Einschalten des Geräts.
Die Reisesicherung aktivieren
1 Halten Sie den Ein-/Ausschalter 3 Sekunden
lang gedrückt, um in den Reisesicherungsmodus
zu gelangen.
Das Sicherungssymbol erscheint im Display (alle
,
Modelle), ein akustisches Signal (nur RQ1090)
zeigt Ihnen an, dass die Reisesicherung aktiviert
wurde.
Hinweis: Die Displays der Modelle RQ1060 und
RQ1050 sehen zwar etwas anders aus, haben aber die
gleichen Anzeigen.
Die Reisesicherung deaktivieren
1 Halten Sie den Ein-/Ausschalter 3 Sekunden
lang gedrückt.
Der Motor beginnt zu laufen. Daran erkennen
,
Sie, dass die Reisesicherung deaktiviert ist.
Der Rasierer ist nun wieder einsatzbereit.
DEUTSCH 29
Hinweis: Wenn Sie den Rasierer in das angeschlossene
Ladegerät setzen, wird die Reisesicherung automatisch
deaktiviert.
Blockierte Scherköpfe
Wenn die Scherköpfe blockiert sind,
-
blinken das Schereinheitssymbol und
das Wasserhahnsymbol mit Ausrufezeichen. Dies
zeigt an, dass der Motor nicht laufen kann, weil die
Scherköpfe verschmutzt oder beschädigt sind.
Hinweis: Die Displays der Modelle RQ1060 und
RQ1050 sehen zwar etwas anders aus, bieten aber die
gleichen Anzeigen.
In diesem Fall müssen Sie die Schereinheit reinigen
-
oder auswechseln.
Das Schereinheitssymbol und das
-
Wasserhahnsymbol mit dem Ausrufezeichen
blinken weiter, bis Sie die Blockade der Scherköpfe
gelöst haben.
Laden
Die Ladedauer beträgt ca. 1 Stunde.
Ein voll aufgeladener Rasierer hat eine Rasierzeit von
bis zu 65 Minuten. Das reicht für etwa 21 Rasuren.
Die tatsächliche Rasierzeit wird vom Rasierer
berechnet. Bei starkem Bartwuchs beträgt sie unter
Umständen weniger als 65 Minuten. Zudem kann sie
je nach Rasierverhalten oder Barttyp im Laufe der
Zeit variieren.
Schnellauadung
Nachdem das Gerät 5 Minuten lang aufgeladen
wurde, reicht die Akkukapazität für eine Rasur.
1 Stecken Sie den kleinen Stecker in das
Ladegerät.
DEUTSCH30
2 Stecken Sie den Adapter in die Steckdose.
3 Setzen Sie den Rasierer in das Ladegerät ein.
Drücken Sie in fest in die Halterung, damit der
Kontakt hergestellt wird.
Hinweis: Nur RQ1090: Wenn der Rasierer richtig
eingesetzt ist, ertönt ein akustisches Signal.
,
Das Display zeigt an, dass der Rasierer geladen
wird (siehe Kapitel “Das Display”).
Den Rasierer benutzen
Rasieren
1 Drücken Sie den Ein-/Ausschalter einmal, um
den Rasierer einzuschalten.
,
Das Display leuchtet für einige Sekunden auf.
2 Führen Sie die Scherköpfe mit geraden und
kreisenden Bewegungen über die Haut.
-
Die beste Rasur erzielen Sie bei trockener Haut.
Es kann 2 bis 3 Wochen dauern, bis sich Ihre Haut
-
an das Philips Schersystem gewöhnt hat.
3 Drücken Sie den Ein-/Ausschalter einmal, um
den Rasierer auszuschalten.
,
Das Display leuchtet einige Sekunden lang auf
und zeigt dann die verbleibende Akkukapazität
an (nur RQ1090/RQ1060).
Schneiden
Der Langhaarschneider eignet sich zum Schneiden
von Koteletten und Schnurrbart.
DEUTSCH 31
1 Ziehen Sie die Schereinheit vom Rasierer ab.
2 Drücken Sie den Ein-/Ausschalter einmal, um
den Rasierer einzuschalten.
Das Display leuchtet für einige Sekunden auf.
,
3 Schieben Sie den Schiebeschalter für
den Langhaarschneider nach vorne. Der
Langhaarschneider wird herausgeschoben.
4 Nun können Sie mit dem Schneiden beginnen.
5 Schieben Sie den Schiebeschalter zurück, um
den Langhaarschneider wieder einzuziehen.
6 Drücken Sie den Ein-/Ausschalter einmal, um
den Rasierer auszuschalten.
Das Display leuchtet einige Sekunden lang auf
,
und zeigt dann die verbleibende Akkukapazität
an (nur RQ1090/RQ1060).
7 Stecken Sie die Führung der Schereinheit in
den Schlitz oben am Rasierer (1). Drücken
Sie die Schereinheit dann nach unten (2), so
dass sie mit einem “Klick” auf dem Rasierer
einrastet.
Reinigung und Wartung
Benutzen Sie zum Reinigen des Geräts keine
Scheuerschwämme und -mittel oder aggressive
Flüssigkeiten wie Benzin oder Azeton.
Gehen Sie vorsichtig mit heißem Wasser um.
-
Achten Sie darauf, dass das Wasser nicht zu heiß
ist und Sie sich nicht die Hände verbrühen.
Für eine optimale Rasierleistung empfehlen wir,
-
den Rasierer nach jedem Gebrauch zu reinigen.
DEUTSCH32
Sie können den Rasierer von außen mit einem
-
feuchten Tuch reinigen.
Regelmäßige Reinigung sorgt für eine bessere
-
Leistung des Geräts.
Die Schereinheit unter ießendem Wasser
reinigen
1 Schalten Sie den Rasierer aus.
2 Öffnen Sie die drei Scherköpfe nacheinander,
indem Sie daran ziehen.
3 Spülen Sie alle drei Scherköpfe sowie alle drei
Haarauffangkammern unter ießendem heißem
Wasser 30 Sekunden lang aus.
Gehen Sie vorsichtig mit heißem Wasser um.
Achten Sie darauf, dass das Wasser nicht zu heiß ist
und Sie sich nicht die Hände verbrühen.
4 Schütteln Sie überschüssiges Wasser sorgfältig
ab und lassen Sie die Scherköpfe offen, bis die
Schereinheit vollständig getrocknet ist.
Trocknen Sie die Schereinheit niemals mit einem
Tuch ab, um Beschädigungen der Scherköpfe zu
vermeiden.
Um den Rasierer gründlich zu reinigen, schalten
,
Sie ihn ein und tauchen Sie die Schereinheit
30 Sekunden lang in heißes Wasser, in das Sie
etwas Flüssigseife gegeben haben. Alternativ dazu
können Sie die Schereinheit auch mit Alkohol
reinigen.
 Loading...