

Philips RQ 1053 User Manual
3
4
A
B
C
D
E
F
H
I
J
G
K

4

ENGLISH 6
DANSK 22
SUOMI 38
NORSK 54
SVENSKA 70
RQ1091,RQ1061,RQ1053,RQ1051
6
ENGLISH
Introduction
Thank you for buying this Philips shaver. Please read
this user manual, as it contains information about the
wonderful features of this shaver as well as some tips
to make shaving easier and more enjoyable.
Important
Read this user manual carefully before you use the
shaver and the charger. Save the user manual for
future reference.
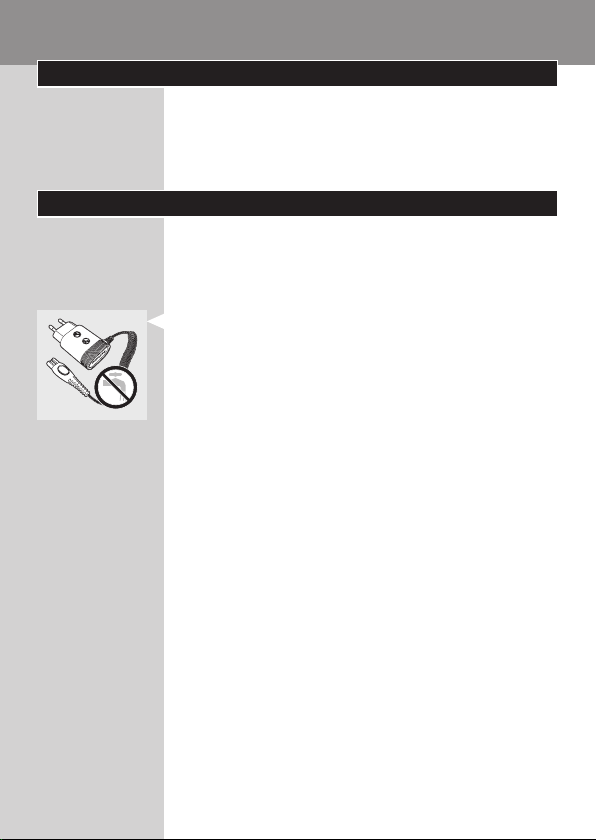
Danger
- Make sure the adapter does not get wet.
Warning
- Be careful with hot water. Always check if the
water is not too hot, to prevent your hands from
getting burnt.
- The adapter contains a transformer. Do not cut
off the adapter to replace it with another plug, as
this causes a hazardous situation.
- The shaver and the charger are not intended for
use by persons (including children) with reduced
physical, sensory or mental capabilities, or lack of
experience and knowledge, unless they have been
given supervision or instruction concerning use of
the appliances by a person responsible for their
safety.
- Children should be supervised to ensure that they
do not play with the shaver and the charger.
Caution
- Do not use the shaver, the charger or the adapter
if it is damaged.
- Charge and store the shaver at a temperature
between 5°C and 35°C.
ENGLISH 7
- Always put the protection cap on the shaver
to protect the shaving heads when you are
travelling.
- Never use scouring pads, abrasive cleaning agents
or aggressive liquids such as petrol or acetone to
clean the appliance.
- Only use the adapter supplied.
- If the adapter is damaged, always have it replaced
with one of the original type in order to avoid a
hazard.
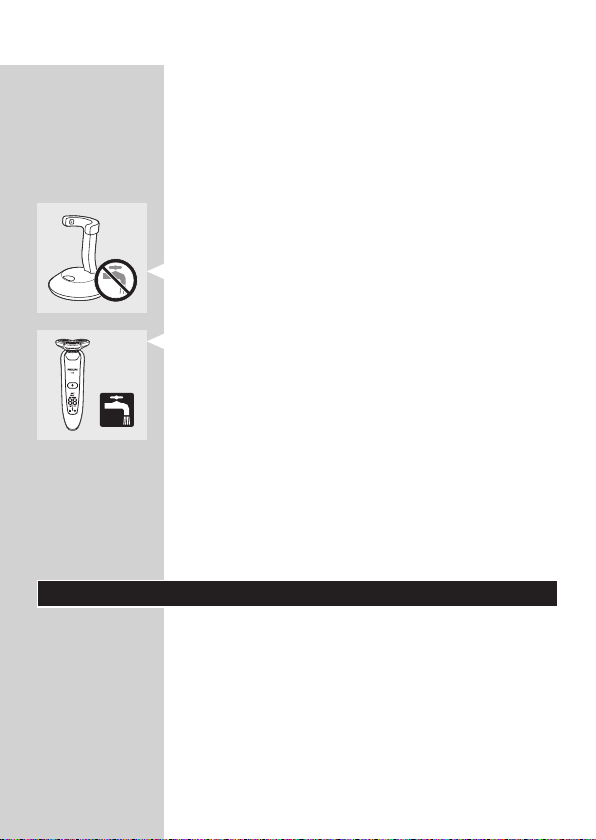
- Never immerse the charger in water, nor rinse it
under the tap.
Compliance with standards
- The shaver complies with the internationally
approved IEC safety regulations and can be safely
cleaned under the tap.
- These Philips appliances comply with all standards
regarding electromagnetic elds (EMF). If handled
properly and according to the instructions in this
user manual, the appliances are safe to use based
on scientic evidence available today.
General
- The adapter transforms 100-240 volts to a safe
low voltage of less than 24 volts.
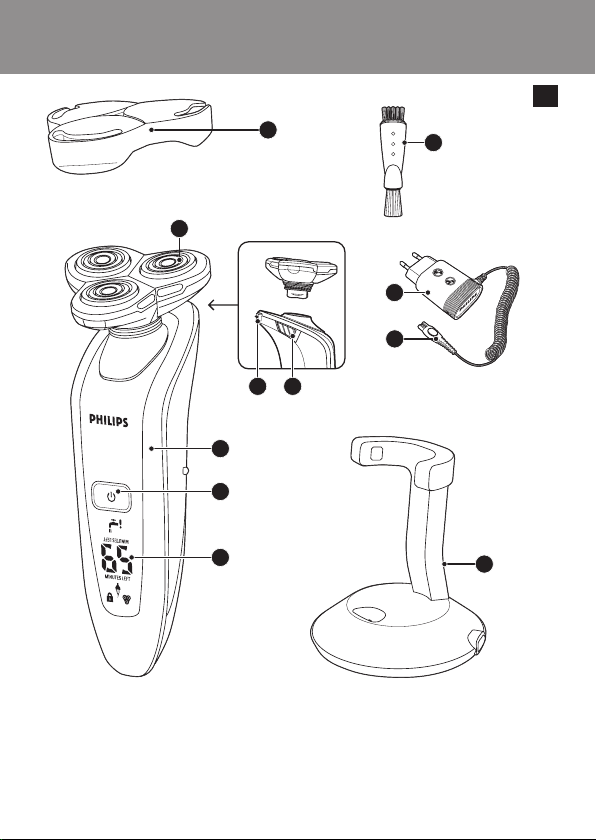
Overview (Fig. 4)
A Protection cap
B Shaving unit
C Trimmer
D Trimmer on/off slide
E Shaver (RQ1090/RQ1060/RQ1053/RQ1050)
F Shaver on/off button
G Display
H Cleaning brush
I Adapter

ENGLISH8
J Small plug
K Charger
The display
Before you use the shaver for the rst time, remove
the protective foil from the display.
The three shaver types (RQ1090, RQ1060, RQ1053
and RQ1050) have different displays, which are
shown in the gures below.
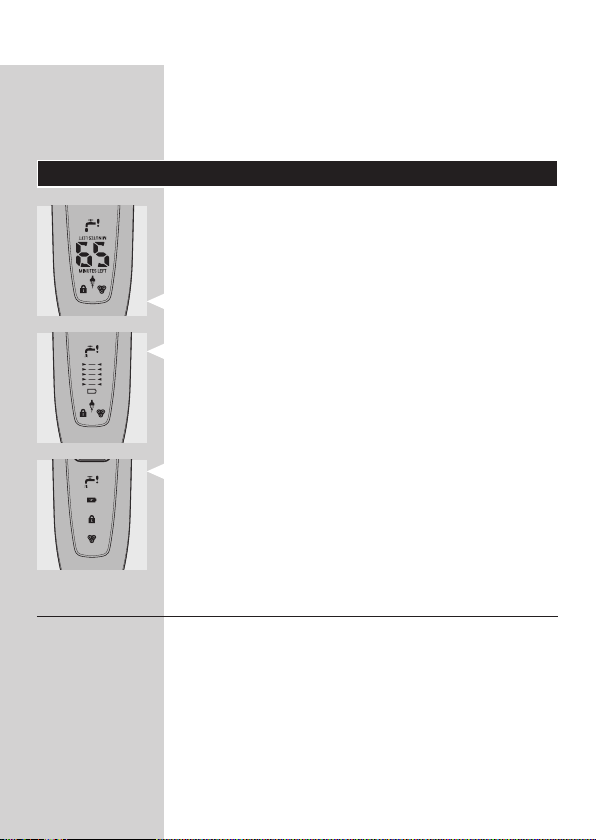
- RQ1090
- RQ1060
- RQ1053/RQ1050
Charging
- Charging takes approx. 1 hour.
- When you place the shaver in the charger, the
display automatically switches off after approx. 5
hours.

ENGLISH 9
RQ1090
- When the shaver is charging, the minutes
indication and the plug symbol ash.
- The shaving minutes increase until the shaver is
fully charged.
RQ1060
- When the shaver is charging, the plug
symbol ashes.
- First the arrowheads of the bottom charge level
ash, then the arrowheads of the second level
ash, and so on until the shaver is fully charged.
RQ1053/RQ1050
- When the shaver is charging, the battery symbol
ashes blue.
Battery fully charged
RQ1090
- When the battery is fully charged, the minutes
indication is visible on the display and the plug
symbol disappears from the display.
RQ1060
- When the battery is fully charged, all arrowheads
and all charge level lights light up blue continuously
and the plug symbol disappears from the display.

ENGLISH10
- When you remove the shaver from the charger,
the arrowheads of the top charge level light up
blue to indicate that the battery is full.
RQ1053/RQ1050
- When the battery is fully charged, the battery
symbol lights up blue continuously.
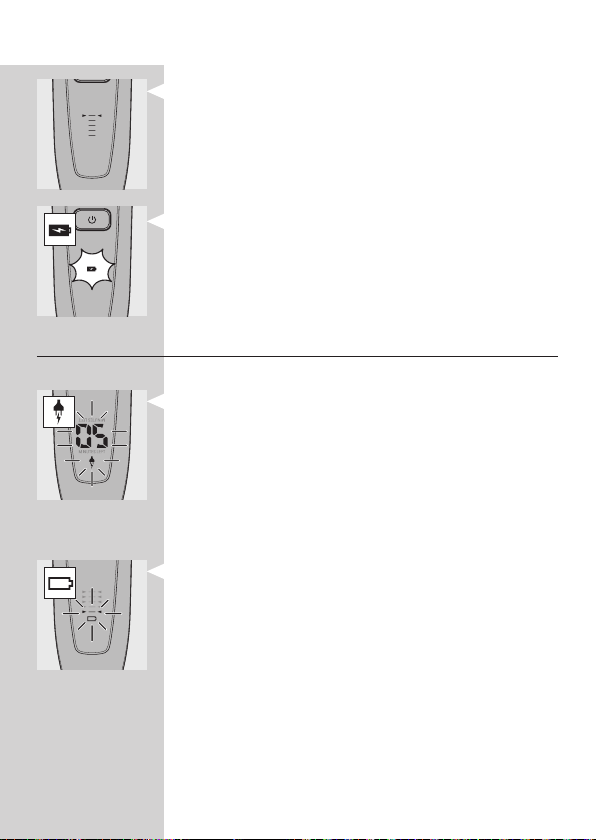
Battery low
RQ1090
- When the battery is almost empty (when there
are only 5 or fewer shaving minutes left), the
minutes indication and the plug symbol start to
ash.
- When you switch off the shaver, the shaving
minutes and the plug symbol continue to ash for
a few more seconds. You hear a beep when there
are no minutes left.
RQ1060
- When the battery is almost empty (when there
are only 5 or fewer shaving minutes left), the
battery symbol ashes red and the arrowheads of
the bottom charge level ash blue.
- When you switch off the shaver, the battery
symbol and the arrowheads of the bottom charge
level continue to ash for a few seconds.

ENGLISH 11
RQ1053/RQ1050
- When the battery is almost empty (when there
are only 5 or fewer shaving minutes left), the
battery symbol lights up red.
- When you switch off the shaver, the battery
symbol starts to ash for a few seconds.
Remaining battery capacity
RQ1090
- The remaining battery capacity is indicated by the
number of shaving minutes shown on the display.
RQ1060
- The remaining battery capacity is indicated by the
ashing arrowheads of a particular charge level
Clean shaver
For optimal shaving performance, we advise you to
clean the shaver after every use.
- The tap symbol ashes to remind you to clean the
shaver.
Note: The displays of types RQ1060, RQ1053 and
RQ1050 look different but show the same indication.
Replace shaving unit
For maximum shaving performance, we advise you
to replace the shaving unit every two years.

ENGLISH12
- To remind you to replace the shaving unit, the
shaving unit symbol ashes (all types) and you
hear a beep when you switch off the shaver
(RQ1090 only). This happens at the end of 7
successive shaves to remind you to replace the
shaving unit.
Note: The displays of types RQ1060, RQ1053 and
RQ1050 look different but show the same indication.
Travel lock
You can lock the shaver when you are going to
travel. The travel lock prevents the shaver from being
switched on by accident.
Activating the travel lock
1 Press the on/off button for 3 seconds to enter
the travel lock mode.
, The lock symbol appears on the display (all
types) and you hear a beep (RQ1090 only) to
indicate that the travel lock has been activated.
Note: The displays of types RQ1060, RQ1053 and
RQ1050 look different but show the same indication.
Deactivating the travel lock
1 Press the on/off button for 3 seconds.
, The motor starts running to indicate that the
travel lock has been deactivated.
The shaver is now ready for use again.
Note: When you place the shaver in the plugged-in
charger, the travel lock is automatically deactivated.

ENGLISH 13
Blocked shaving heads
- If the shaving heads are blocked, the shaving unit
symbol and the tap symbol with exclamation mark
ash. In this case, the motor cannot run because
the shaving heads are soiled or damaged.
Note: The displays of types RQ1060, RQ1053 and
RQ1050 look different show the same indication.
- When this happens, you have to clean the shaving
unit or replace it.
- The shaving unit symbol and the tap symbol
with exclamation mark continue to ash until you
unblock the shaving heads.
Charging
Charging takes approx. 1 hour.
A fully charged shaver has a shaving time of up to 65
minutes, which is enough for approx. 21 shaves.
The actual shaving time is calculated by the shaver.
If you have a heavy beard, the shaving time may be
less than 65 minutes. The shaving time may also vary
over time, depending on your shaving behaviour and
beard type.
Quick charge
After the shaver has charged for 5 minutes,
it contains enough energy for one shave.
1 Put the small plug in the charger.
2 Put the adapter in the wall socket.
3 Place the shaver in the charger. Press the
shaver tightly into the holder to lock into place.
Note: RQ1090 only: If the shaver is placed correctly,
you hear a beep.

ENGLISH14
, The display shows that the shaver is charging
(see chapter ‘The display’).
Using the shaver
Shaving
1 Press the on/off button once to switch on the
shaver.
, The display lights up for a few seconds.
2 Move the shaving heads over your skin. Make
both straight and circular movements.
- Shaving on a dry face gives the best results.
- Your skin may need 2 or 3 weeks to get
accustomed to the Philips shaving system.
3 Press the on/off button once to switch off the
shaver.
, The display lights up for a few seconds and then
shows the remaining battery capacity (RQ1090/
RQ1060 only).
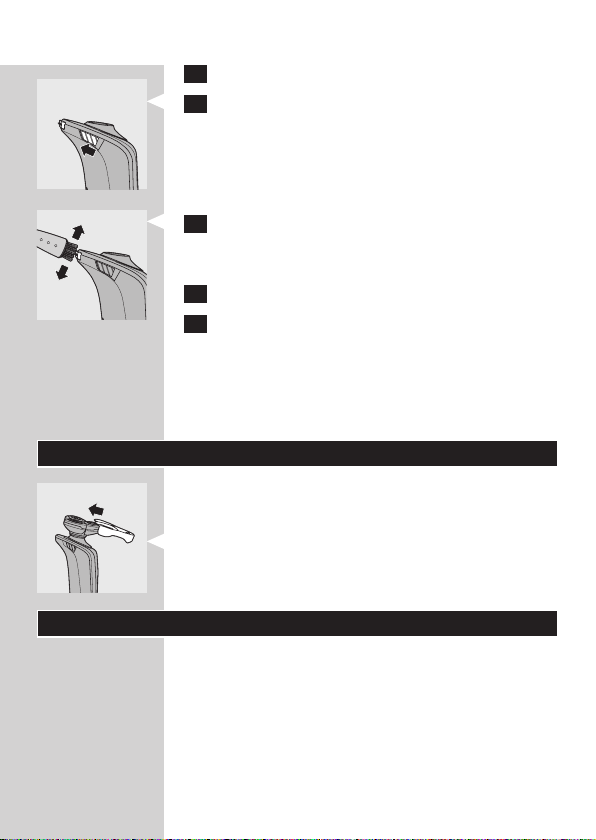
Trimming
You can use the trimmer to groom your sideburns
and moustache.
1 Pull the shaving unit off the shaver.
2 Press the on/off button once to switch on the
shaver.
, The display lights up for a few seconds.
3 Press the trimmer slide forwards to slide out
the trimmer.
4 You can now start trimming.

ENGLISH 15
5 Press the trimmer slide backwards to retract
the trimmer.
6 Press the on/off button once to switch off the
shaver.
, The display lights up for a few seconds and then
shows the remaining battery capacity (RQ1090/
RQ1060 only).
7 Insert the lug of the shaving unit into the slot
in the top of the shaver (1). Then press the
shaving unit downwards (2) to attach it to the
shaver (‘click’).
Cleaning and maintenance
Never use scouring pads, abrasive cleaning agents
or aggressive liquids such as petrol or acetone to
clean the appliance.
- Be careful with hot water. Always check if the
water is not too hot, to prevent your hands from
getting burnt.
- Clean the shaver after every shave for optimal
shaving performance.
- You can clean the outside of the shaver with a
damp cloth.
- Regular cleaning guarantees better shaving
performance.
Cleaning the shaving unit under the tap
1 Switch off the shaver.
2 Pull open the three shaving heads one by one.
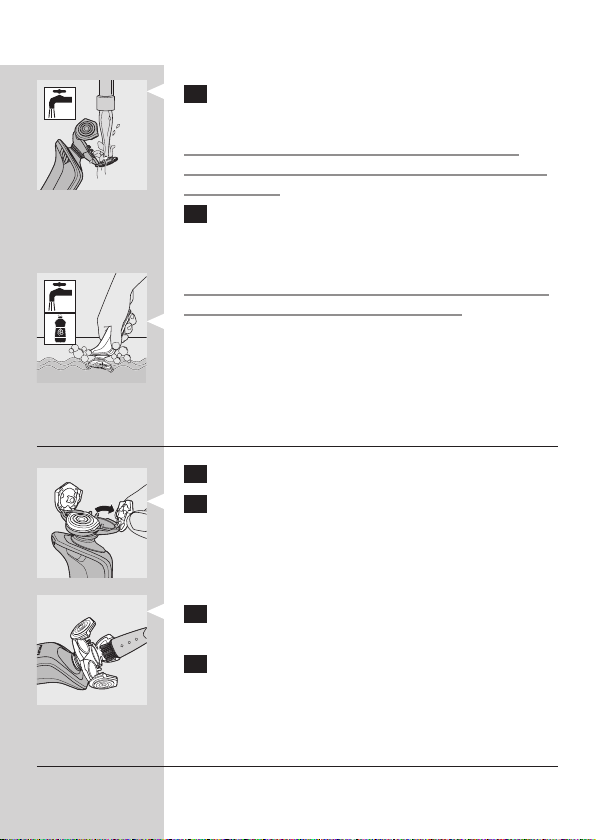
ENGLISH16
3 Rinse all three shaving heads and all three hair
chambers under a hot tap for 30 seconds.
Be careful with hot water. Always check if the
water is not too hot, to prevent your hands from
getting burnt.
4 Carefully shake off excess water and leave the
shaving heads open to let the shaving unit dry
completely.
Never dry the shaving unit with a towel or tissue,
as this may damage the shaving heads.
, For thorough cleaning, switch on the shaver and
immerse the shaving unit in hot water with some
liquid soap for 30 seconds. You can also clean the
shaving unit with some alcohol.
Cleaning the shaving unit with the brush supplied
1 Switch off the shaver.
2 Pull open the three shaving heads one by one.
3 Clean the shaving heads and the hair chambers
with the brush supplied.
4 Close the shaving heads.
Cleaning the trimmer with the brush supplied
Clean the trimmer every time you have used it.
ENGLISH 17
1 Switch off the shaver.
2 Press the trimmer slide forwards to slide out
the trimmer.
3 Clean the trimmer with the short-bristled side
of the brush supplied. Brush up and down along
the trimmer teeth.
4 Switch the shaver on and off and repeat step 3.
5 Press the trimmer slide backwards to retract
the trimmer.
Tip: For optimal trimmer performance, lubricate the
trimmer teeth with a drop of sewing machine oil every
six months.
Storage
There are two ways to store the shaver or to take it
with you when you travel:
- put the shaver in the charger.
- slide the protection cap onto the shaving unit to
prevent damage to the shaving heads.
Replacement
Replace the shaving unit when the shaving unit
symbol appears on the display. Replace a damaged
shaving unit right away.
For maximum shaving performance, we advise you
to replace the shaving unit every two years.
Only replace the shaving unit with an original RQ10
Philips arcitec Shaving Unit.

ENGLISH18
1 Pull the old shaving unit off the shaver.
2 Insert the lug of the new shaving unit into the
slot in the top of the shaver (1). Then press the
shaving unit downwards (2) to attach it to the
shaver (‘click’).
Ordering parts
The following parts are available:
- HQ8500 adapter
- RQ10 Philips arcitec Shaving Unit
- HQ110 Philips Shaving Head Cleaning Spray
Environment
- Do not throw away the appliances with the
normal household waste at the end of their life,
but hand them in at an ofcial collection point for
recycling. By doing this, you help to preserve the
environment.
- The built-in rechargeable shaver battery contains
substances that may pollute the environment.
Always remove the battery before you discard or
hand in the shaver at an ofcial collection point.
Dispose of the battery at an ofcial collection
point for batteries. If you have trouble removing
the battery, you can also take the appliance to a
Philips service centre. The staff of this centre will
remove the battery for you and will dispose of it
in an environmentally safe way.
ENGLISH 19
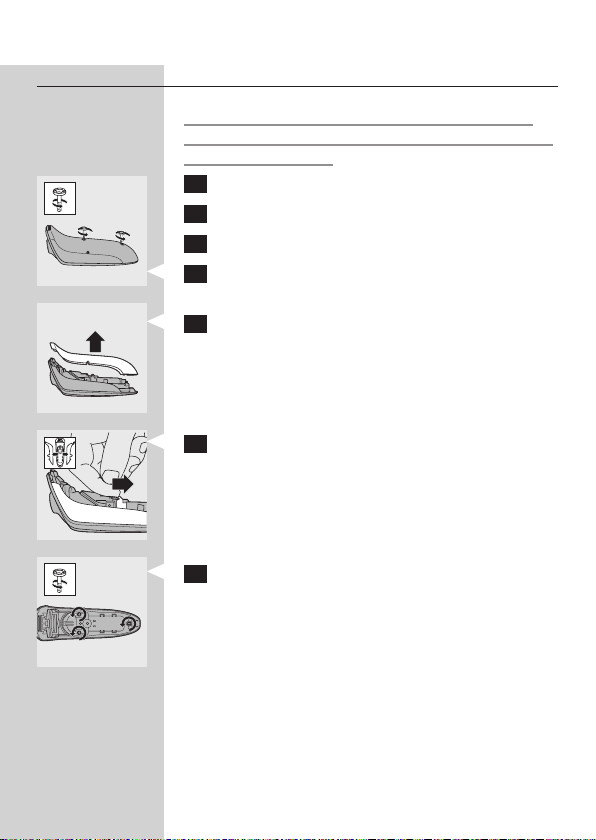
Disposal of the shaver battery
Only remove the battery when you discard the
shaver. Make sure the battery is completely empty
when you remove it.
1 Remove the shaver from the charger.
2 Let the shaver run until it stops.
3 Pull the shaving unit off the shaver.
4 Undo the 2 screws on the back of the shaver.
5 Insert a screwdriver between the front and
back panel to open the shaver.
6 Remove the side panels.
7 Unscrew the 3 screws on the inside of the
shaver and remove the back cover.

ENGLISH20
8 Pull the wires out of the motor unit and
remove the battery.
Be careful, the battery strips are sharp.
Do not put the shaver back into the plugged-
in charger after you have removed the battery.
Guarantee & service
If you need information or if you have a problem,
please visit the Philips website at www.philips.com
or contact the Philips Customer Care Centre
in your country (you nd its phone number in
the worldwide guarantee leaet). If there is no
Customer Care Centre in your country, go to
your local Philips dealer or contact the Service
Department of Philips Domestic Appliances and
Personal Care BV.
Guarantee restrictions
The shaving heads (cutters and guards) are not
covered by the terms of the international guarantee
because they are subject to wear.
Frequently asked questions
1 Why doesn’t the shaver shave as well as it used
to?
- The shaver may not be properly clean. Switch
on the shaver and immerse the shaving unit in
hot water with some liquid soap (see chapter
‘Cleaning and maintenance’).
- The shaving heads may be damaged or
worn. Replace the shaving unit (see chapter
‘Replacement’).

ENGLISH 21
2 Why doesn’t the shaver work when I press the
on/off button?
- The battery may be empty. Recharge the batter y
(see chapter ‘Charging’).
- The travel lock may be activated. Press the on/off
button for 3 seconds to deactivate the travel lock.
- The shaving unit is soiled or damaged to such an
extent that the motor cannot run. In this case,
the shaving unit symbol, the tap symbol and
the exclamation mark ash. When this happens,
you have to clean the shaving unit or replace it.
Immerse the shaving unit in hot water with some
liquid soap.
- The temperature of the shaver may be too high.
In this case, the shaver does not work and the
exclamation mark on the display ashes. As soon
as the temperature of the shaver has dropped
sufciently, you can switch on the shaver again.
3 Why is the shaver not fully charged after I
charged it in the charger?
- You may not have placed the shaver in the charger
properly. Make sure you press the shaver until it
locks into place.

22
DANSK
Introduktion
Tak, fordi du har købt denne Philips shaver. Vi beder
dig venligst læse brugsvejledningen igennem, da
den indeholder informationer om shaverens unikke
funktioner og tips til at gøre barbering nemmere
og sjovere.
Vigtigt
Læs denne brugervejledning grundigt, før du
tager shaveren og opladeren i brug. Gem
brugervejledningen til eventuel senere brug.
Fare
- Sørg for, at stikket ikke bliver vådt.
Advarsel
- Vær forsigtig med varmt vand. Kontrollér altid, at
vandet ikke er for varmt, så du ikke skolder dine
hænder.
- Adapteren indeholder en transformer og må ikke
klippes af og udskiftes med et andet stik, da dette
kan være meget risikabelt.
- Shaveren og opladeren er ikke beregnet til at
blive brugt af personer (herunder børn) med
nedsatte fysiske og mentale evner, nedsat følesans
eller manglende erfaring og viden, medmindre
de er blevet vejledt eller instrueret i apparatets
anvendelse af en person, der er ansvarlig for deres
sikkerhed.
- Shaveren og opladeren bør holdes uden for børns
rækkevidde for at sikre, at de ikke kan komme til
at lege med apparaterne.
Forsigtig
- Undlad at bruge shaveren, opladeren
eller adapteren, hvis disse er beskadiget.

DANSK 23
- Shaveren skal oplades og opbevares ved en
temperatur mellem 5° C og 35° C.
- Sæt altid beskyttelseskappen på shaveren for at
beskytte skærhovederne, når du rejser.
- Brug aldrig skuresvampe eller skrappe
rengøringsmidler så som benzin, acetone eller
lignende til rengøring af apparatet.
- Brug kun den medfølgende adapter.
- Hvis adapteren beskadiges, skal den altid udskiftes
med en original adapter af samme type for at
undgå enhver risiko.
- Opladeren må aldrig kommes ned i vand eller
skylles under vandhanen.
Overholdelse af standarder
- Produktet opfylder de internationalt godkendte
IEC-sikkerhedsregler og kan skylles under rindende
vand uden risiko.
- Disse Philips-apparater overholder alle
standarder for elektromagnetiske felter (EMF).
Ved korrekt anvendelse i overensstemmelse
med instruktionerne i denne brugsvejleding,
er apparaterne sikre at anvende, ifølge den
videnskabelige viden, der er tilgængelig i dag.
Generelt
- Adapteren omformer 100 -240 V til en sikker
lavspænding under 24 V.
Oversigt (g. 4)
A Beskyttelseskappe
B Skærenhed
C Trimmer
D Trimmer on/off-skydekontakt
E Shaver (RQ1090/RQ1060/RQ1053/RQ1050)
F Shaver on/off-knap
G Display
DANSK24
H Rensebørste
I Adapter
J Lille stik
K Oplader
Displayet
Inden du bruger shaveren første gang, skal du fjerne
beskyttelsesfolien fra displayet.
De tre shavertyper (RQ1090, RQ1060, RQ1053
og RQ1050) har forskellige displays, som vises i
gurerne nedenfor.
- RQ1090
- RQ1060
- RQ1053/RQ1050
Opladning
- En fuld opladning tager ca. 1 time.
- Når du sætter shaveren i opladeren, slukker
displayet automatisk efter ca. fem timer.

DANSK 25
RQ1090
- Når shaveren oplader, blinker minutindikatoren og
stiksymbolet.
- Minuttallet for barberingstid stiger, indtil shaveren
er fuldt opladet.
RQ1060
- Når shaveren oplader, blinker stiksymbolet.
- Først blinker pilene på bundniveauet for
batterikapaciteten, derefter på andet niveau og så
fremdeles, indtil shaveren er fuldt opladet.
RQ1053/RQ1050
- Når shaveren oplader, blinker batterisymbolet blåt.
Fuldt opladet batteri
RQ1090
- Når batteriet er fuldt opladet, bliver
minutindikatoren synlig i displayet, og stiksymbolet
forsvinder.
RQ1060
- Når batteriet er fuldt opladet, lyser alle pile og
alle opladeniveauer konstant blåt, og stiksymbolet
forsvinder fra displayet.
DANSK26
- Når du fjerner shaveren fra opladeren, lyser
pilehovederne for topniveauet for ladningen blåt
for at indikere, at batteriet er fuldt opladet.
RQ1053/RQ1050
- Når batteriet er fuldt opladet, lyser
batterisymbolet konstant blåt.
Lavt batteriniveau
RQ1090
- Når batteriet næsten er tomt (når der er 5 eller
færre barberingsminutter tilbage), begynder
minutindikatoren og stiksymbolet at blinke.
- Når du slukker for shaveren, blinker
barberingsminuttallet og stiksymbolet endnu et
par sekunder. Du hører et bip, når der ikke er ere
minutter tilbage.
RQ1060
- Når batteriet næsten er tomt (når der er 5
eller færre barberingsminutter tilbage), blinker
batterisymbolet rødt, og pilene på bundniveauet
for batterikapacitet blinker blåt.
- Når du slukker for shaveren, blinker
batterisymbolet og pilene på bundniveauet for
batterikapacitet endnu et par sekunder.

DANSK 27
RQ1053/RQ1050
- Når batteriet næsten er tomt (når der er 5
eller færre barberingsminutter tilbage), lyser
batterisymbolet rødt.
- Når du slukker for shaveren, blinker
batterisymbolet i et par sekunder.
Resterende batterikapacitet
RQ1090
- Den resterende batterikapacitet indikeres ved
antallet af barberingsminutter vist i displayet.
RQ1060
- Den resterende batterikapacitet indikeres ved de
blinkende pile på det aktuelle kapacitetsniveau
Rengør shaveren
For at bevare optimal barberingsevne, anbefales
det, at du rengør shaveren, hver gang den har været
brugt.
- Vandhanesymbolet blinker for at minde dig om
at rengøre shaveren.
Bemærk: Displayet på type RQ1060, RQ1053 og
RQ1050 ser anderledes ud, men viser den samme
indikation.

DANSK28
Udskiftning af skærenhed
For at bevare optimal barberingsevne anbefales det
at udskifte skærenheden hvert andet år.
- Skærenhedssymbolet blinker (alle modeller) for at
minde dig om udskiftning af skærenheden, og du
hører et bip, når shaveren slukkes (kun RQ1090).
Dette sker ved afslutningen af 7 barberinger i træk
for at minde dig om, at skærenheden bør udskiftes.
Bemærk: Displayet på type RQ1060, RQ1053 og
RQ1050 ser anderledes ud, men viser den samme
indikation.
Rejselås
Du kan låse shaveren, når du skal ud at rejse.
Rejselåsen forhindrer, at shaveren tændes utilsigtet.
Aktivering af rejselåsen
1 Tryk på on/off-knappen i 3 sekunder for at
aktivere rejselås-funktionen.
, Låsesymbolet ses i displayet (alle modeller), og
du hører et bip (kun RQ1090) for at indikere, at
rejselåsen er blevet aktiveret.
Bemærk: Displayet på type RQ1060, RQ1053 og
RQ1050 ser anderledes ud, men viser den samme
indikation.
Deaktivering af rejselåsen
1 Tryk på on/off-knappen i 3 sekunder.
, Motoren starter for at indikere, at rejselåsen er
blevet deaktiveret.
Shaveren er nu klar til brug igen.
Bemærk: Når du placerer shaveren i den tilsluttede
oplader, deaktiveres rejselåsen automatisk.
 Loading...