

Philips ReCare 7.0 R User Manual
Please read this entire manual carefully
before operating your new recumbent
bike and save it for future use.
User manual
Register your product and get support at
www.philips.com/welcome
PTE7000MR
ReCare
Recumbent bike
7.0 R

Thank you for your recent purchase of the Philips physical
rehabilitation recumbent bike, 7.0 R Philips physical therapy and exercise solutions provide simple, reliable products that oer the most
relevant feedback to caregivers and users to achieve best-in-class
outcomes and empower individuals to build condence in rebuilding
and maintaining healthy lifestyles and keep in touch with their
communities.
Your new product has been manufactured by one of the world’s
leading medical product manufactures. It is backed by one of the
most comprehensive warranties in the industry. Through our dealers,
distributors and manufacturer’s representatives, we will do all we can
to provide many years of successful and prosperous ownership.
Your warranty and service needs will be addressed either through
your regional sales representative or our highly trained service
technicians.
It is their responsibility to provide you with both the technical
knowledge and access to service personnel to make your ownership
experience more informed, and resolve any issues quickly.
Product registration
Register your product and get support at :
www.philips.com/welcome .
This will ensure we have all your details quickly at hand in dealing with
any after sales support. For fastest support visit us online for chat and
self service solution at :
www.philips.com/support .
Philips therapy solutions
Delivering better outcomes

Contents
Important safety instructions 5
Important electrical information
Important operation instructions 10
Application specication 11
Operating principle 13
Signicant physical characteristics 13
8
Signicant performance characteristic
14
Intended user prole 15

42
46
64
69
72
Operating the 7.0 R 17
Features 19
Data transfer software instructions 38
Operation of your new bike 22
Using a heart rate transmitter
Assembly instructions for 7.0 R
Maintenance
Specications
Description of packaging symbols
5
Attention
Read all instructions in this manual before using this device.
Danger
To reduce the risk of electric shock disconnect your from the
electrical outlet prior to cleaning and/or service work.
Warning
• Do not modify this equipment without authorization of the
manufacturer.
• To reduce the risk of burns, re, electric shock, or injury to persons,
install the bike on a at level surface with access to a 90 to
240-volt AC, 50/60 Hz, 15-amp grounded outlet. Do not use an
extension cord unless it is 16awg or larger, with only one outlet on
the end. The bike should be the only appliance in the electrical circuit.
Do not attempt to disable the grounded plug by using improper
adapters, or in any way modify the cord set; a serious shock or re
hazard may result along with computer malfunctions.
• Use this device only for it’s intended use as described in this
manual.
• Keep children away from the bike. There are moving parts, obvious
pinch points and other caution areas that can cause harm.
• Except as instructed for use of the device, keep hands away from all
moving parts.
Important
safety
instructions

6
• Keep the electrical cord away from heated surfaces and out of all
travel lanes and do not operate the bike if the cord or plug is
damaged.
• The pulse sensors are not medical devices. Various factors, including
the user’s movement, may aect the accuracy of heart rate readings.
The pulse sensors are intended only as exercise aids in determining
heart rate trends in general.
• Heart rate monitoring system may be inaccurate. Over exercise may
result in injury or death. If you feel faint stop exercising immediately.
• Ensure there is a minimum space on the sides of the bike of two feet
for proper operation, easy access and to prevent possible injuries to
others standing or walking nearby. There should be a minimum of at
least one foot of free space at the front and rear of the unit.
• Do not use any after market parts on this device, other than those
recommended by Philips.
• Do not attempt any servicing or adjustments other than those
described in this manual. All else must be left to trained service
personnel familiar with electro-mechanical equipment and authorized under the laws of the country in question to carry out maintenance and repair work.
• Installation and assembly of this product should be performed by
trained personnel only.

7
• Hold the handlebar for support when getting on or o the bike.
• To avoid injury please observe all minimum and maximum seat
adjustment settings.
• Never drop or insert any object into any openings.
• Do not use outdoors.
• To disconnect, turn all controls to the o position then remove the
plug from the outlet.
• This device is designed for commercial use and will meet the
demands of orthopedic, sports wellness and general conditioning
programs.
• Do not attempt to use your bike for any purpose other than for the
purpose it is intended.
• Warning: The adjustable crank arms may become entangled in pant
legs if the pant legs are loose tting. To avoid injury roll up the pant
legs or secure the pant legs in some other fashion.
• The ywheel in the bike does not have a freewheel, but is directly
connected to the pedals. The bike is equipped with auto-braking
software that will stop the ywheel when it detects the user is trying
to stop pedaling. In the unlikely event that the electronics fails, or
the Auto-brake function is disabled in the software, a spinning
ywheel can make the bike dicult to stop when pedaling at higher
RPM(Revolutions per minute). There is an emergency brake lever
provided that will stop the ywheel when pressed.

8
Warning
• Never remove any cover without rst disconnecting AC power. If
voltage varies by 10% or more outside of specied range (90 to 240
V), the performance of your bike may be aected. Such conditions
are not covered under your warranty. If you suspect the voltage is
low, contact your local power company or a licensed electrician for
proper testing.
• Never expose this bike to rain or moisture. This product is not
designed for use outdoors, near a pool or spa, or in any other high
humidity environment.
• The recumbent bike is not protected against the ingress of water or
particulate matter.
• The recumbent bike is not suitable for use in an oxygen rich environment.
• If not stated otherwise Philips devices are designed for operation in
normal climatic surroundings (IEC 60601-1):
- Temperature: + 10° ... + 36° C
- Relative humidity: 30 ... 90 % (non condensing)
- Air pressure: 700 ... 1060 mbar
- Maximum operating altitude: approx. 10,000 feet (3000m), with
out pressurization
- Transport and store the devices at a temperature of – 20° ...
+ 50° C.
Important
electrical
information
9
Grounding instructions
• This product must be grounded. In the unlikely event that the
bike’s electrical system should malfunction or breakdown
grounding provides a path of least resistance for electric current,
reducing the risk of electric shock. This product is equipped with
a cord having an equipment-grounding plug. The plug must be
plugged into an appropriate outlet that is properly installed and
grounded in accordance with all local codes and ordinances.
Danger
• Improper connection of the equipment-grounding conductor can
result in a risk of electric shock. Check with a qualied electrician
or serviceman if you are in doubt as to whether the product is
properly grounded. Do not modify the plug provided with the
product if it will not t the outlet; have a proper outlet installed
by a qualied electrician.

10
• Never use your bike during an electrical storm. Surges may occur in
your facility power supply that could damage the bike’s compnents.
• All users should have medical clearance before starting any rigorous
exercise program. This is especially important for persons with a
history of heart disease or other high risk factors.
• The user should adjust the seat to a position that is comfortable
during exercise. The console has a program in the setup menu that
can aid in setting the correct seat position.
• Start at a safe exercise level. Do not allow the user to be over
exerted. Symptoms to watch for, but not limited to, are: shortness of
breath or diculty in breathing, pain or discomfort, feeling faint.
• Make sure the user warms up and cools down properly to avoid over
taxing the cardio vascular system. Allow three to ve minutes of
warm up and cool down during each exercise session.
Important
operation
instructions

11
Medical purpose
• Patient warm up before physical therapy session.
• Have the patient pedal to improve range of motion after
knee/hip/ankle surgery.
• Allow patients to perform cardiovascular exercise.
Intended patient population
• There is no particular restriction on age, gender, height and nationality.
• Maximal patient’s weight is 200kg.
• Patient must be ambulatory.
• Patient should have medical clearance before starting any rigorous
exercise program. This is especially important for person with a history
of heart disease or other high risk factors.
Intended part of the body or type of tissue applied to or
interacted with:
• Contact site: hands, feet, and trunk
• Condition: should not have any trauma
Application
specication
12
Intended conditions of use
• Environment including hygienic requirements
- General: intended for indoors use. This product is not designed
for use outdoors, near a pool or spa, or in any other high humidity
environment.
- Conditions of visibility:
Ambient luminance: standard ambient room lighting is sucient.
Viewing distance: 1 m
Viewing angle: 120°
- Physical
Temperature range: 10°C ~ 36°C
Relative humidity range: 30% R.H. ~ 90% R.H., non condensing
- Hygienic requirements: there is no particular restriction on
hygienic requirements.
• Frequency of use
- Dependent on therapist’s plan.
• Location
- Intended for hospital use, clinic use, home use and research in
academic institutions.
• Mobility
- The product is intended to be xed.
2
3
1
2
1

13
The patient pushes the pedals with their feet. The operator can
increase the workload using the Up and Down Key on the console.
When the workload change is requested an electromagnet is
energized at eld strengths relative to the workload requested. The
magnetic eld generated by the coil is induced into a ywheel
creating eddy currents to ow in the ywheel. The eddy currents then
create an opposing magnetic eld to the electromagnetic eld
creating more or less resistance at the pedal, determined by
workload setting by the operator.
Operating
principle
Please refer to Features of 7.0 R manual.
Signicant
physical
characteristics

14
Please refer to “Unique uses for the 7.0 R” in Operating
the 7.0 R.
Signicant
performance
characteristic

15
Intended
user
prole
Intended operator
• There is no particular restriction on age, gender, height, weight,
ability and culture.
• Education: University or above
• Knowledge: The operator should read the User’s Manual before use.
• Discipline: The operator should receive training from the manufacturer before use.
• Experience: The operator must have experience in physical therapy.
• Background: The operator must be a major in physical therapy.
• Professional competence: The operator should have the physical
therapist license.
Intended installer
• There is no particular restriction on age, gender, height, weight,
ability and culture.
• Education: High School or above
• Knowledge: The installer shall be able to manipulate this product
properly.
• Discipline: The installer shall be given a specic training by manufacturer.
• Experience: The installer must have experience in product assembly
and disassembly.
• Background: The installer must be electro-mechanically trained.
• Professional competence: Normal vision ability required.

16

17
The recumbent bike is intended to be used in aiding in the physical
rehabilitation process for patients with orthopedic and neurological
problems. Also used in sports medicine, wellness and general
conditioning programs.
Typical applications for this type of product are:
• Patient warm up before physical therapy session.
• Have the patient pedal to improve range of motion after knee/hip/
ankle surgery.
• Allow patients to perform cardiovascular exercise
Unique uses for the 7.0 R
• Adjustable crank allows patients to pedal in smaller range of knee
motion, from 15 degrees to full range.
• Symmetry program measures distance between left and right step
lengths. Graphical Bio-feedback display motivates patients to maintain even step symmetry between left and right legs.
Operating
the 7.0 R

18
Other features of the 7.0 R
• Work range up to 750 watts (60 RPM) when level settings are at 15
watts per level
(see Setup under Console section for Level settings).
• Indexed seat positioning accommodates users from 147 cm to 200 cm
(4’ 10” to 6’ 7”).
• Heart Rate monitoring using the optional heart rate chest-strap.
Heart rate measurements are not for medical use
The heart rate function on this product is not a medical device and
should not be relied on when accurate readings are necessary. Some
people, including those in a cardiac rehab program, may benet from
using an alternate heart rate monitoring system like a chest or wrist
strap. Various factors, including movement of the user, may aect the
accuracy of your heart rate reading. The heart rate reading is intended
only as an exercise aid for measuring heart rate trends in general.
19
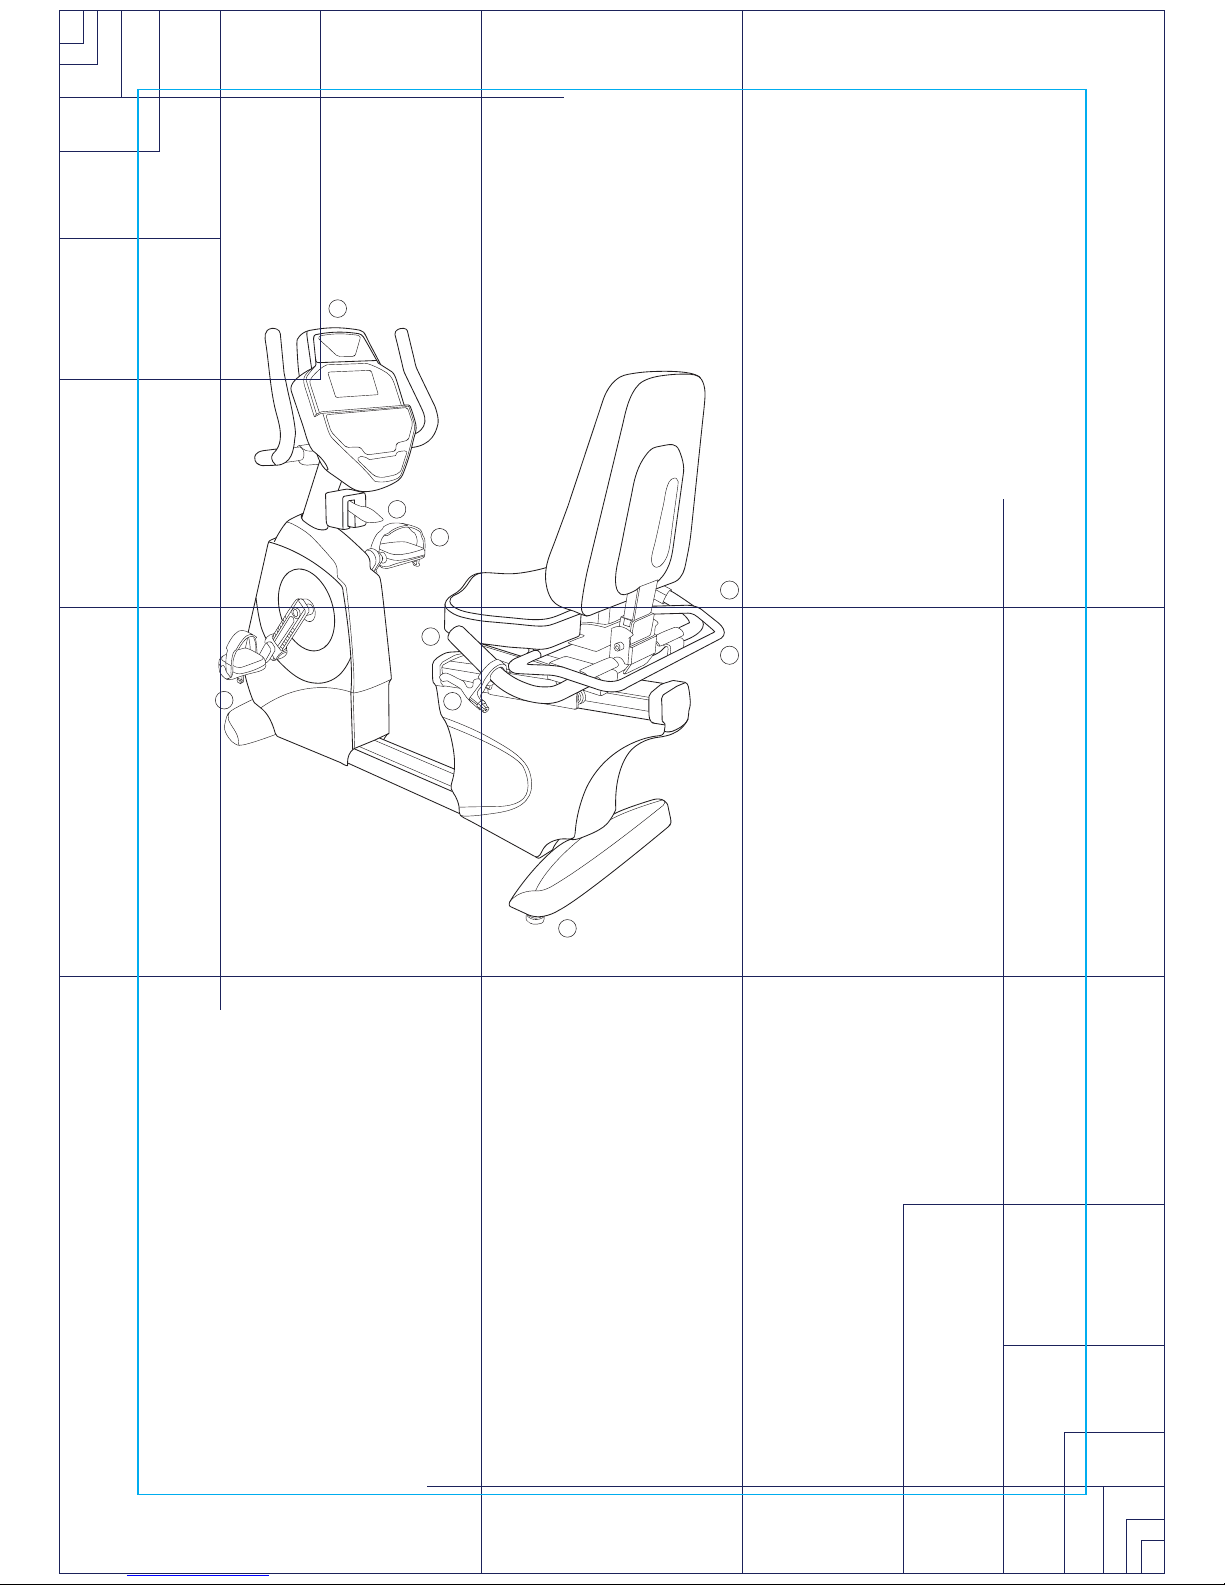
7.0 U – Upright bike
Parts and adjustments
1. Electronic console
2. Mechanical brake
3. Pedal adjustment
4. A.C. Power input
5. Seat swivel adjustment
6. Hand pulse sensors
7. Seat back angle adjustment
8. Leveling glide
9. Seat angle adjustment
Optional parts (not shown)
2.1 Neurological pedal set
Features
1
2
3
4
5
9
6
8
7

20
The 7.0 R is an easy product to set up and use, from the adjustments to
the intuitive interface. This section explains how to set up, adjust and
operate your 7.0 R.
Leveling the 7.0 R
Once the 7.0 R is assembled, and placed on a at level oor, it may
be necessary to adjust the leveling glides on the bottom of the unit
to ensure proper stability of the 7.0 R. Use a 1/2” wrench to loosen
the top nut of the leveler. Adjust the levelers by hand as necessary to
remove any wobble in the unit. Then tighten the top nut against the
bottom of the stabilizer tube. Make sure the bottom nut remains
cinched against the leveling foot.
Connecting to A.C. power
The 7.0 R has a built-in universal power supply. You can plug the 7.0
R into any A.C. power source from 90 to 240 volts, 50 to 60 Hz. The
A.C. input is located in the front of the unit. The input module has an
input connector for the line cord, a power switch and a 5 amp fuse.
Turn the power switch to o when the 7.0 R is not in use.
Adjusting the seat fore/aft position
Squeeze the brake handle located on the left side handle bar. Move
the seat slightly until the seat lock clicks in place. There is anumbered
scale located on the aluminum seat slide tube for repeatable settings. Seatposition is indicated by the front of the seat carriage lining
up with the number on the scale.
Adjusting the seat back angle
The seat back angle can be adjusted for comfort, but also may be
adjusted to change the hip angle for patients. To adjust the seat back
angle, squeeze the brake handle located on the left side handle bar
and move the seat back to the desired position. There is a numbered
scale located just below the seat back cushion for repeatable settings.
Rotating the swivel seat
Lift the handle behind the seat to disengage the latch. Rotate the
seat to the desired position; lower the handle when approaching
position to activate latch. The seat will latch into place every 45
degrees

21
Pedal adjustment
Loosen the knob on the adjustable crank and pull up to disengage
the pin. Slide the pedal up or down the crank arm to the desired
setting then tighten the knob. There is a numbered scale for repeatability and a program in the Set Up function of the console that can
assist in setting up the pedal position to accommodate various
patient knee angles.
Warning : Avoid wearing pants with loose tting legs as they may get
caught on the crank arm while pedaling.
Auto-braking feature
The 7.0 R has built-in sensing technology and software that will automatically stop the ywheel when it senses the user is attempting to
stop pedaling. This Auto-braking software can be disabled during
program set up before beginning a session. The Auto-Brake is set to
o for the Symmetry and VO2 programs and can be turned on during
program set up.
Mechanical brake lever function
The brake’s ywheel is also equipped with a mechanical brake that
can be activated to stop the ywheel by pressing down on the lever.
17
22
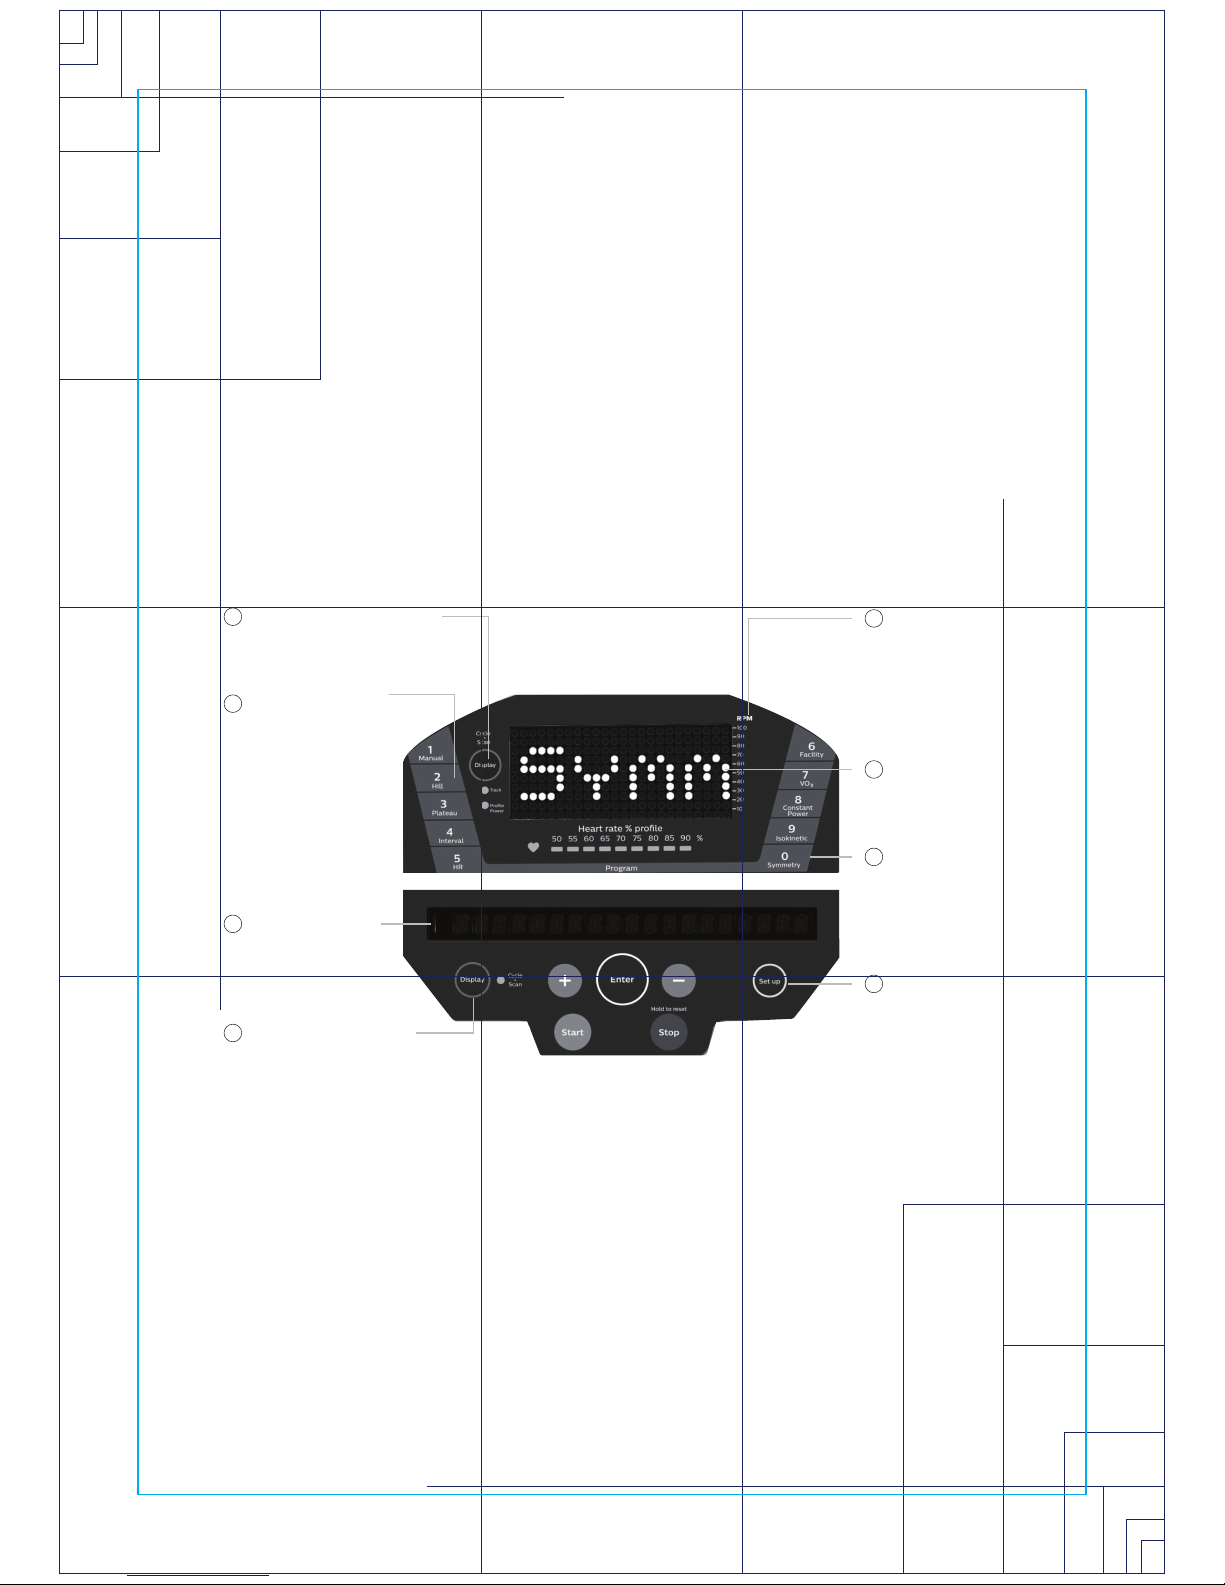
7.0 R electronic console
Power on
When initially powered on the console will perform an internal
self-test. During this time all the lights will turn on for a short time.
The dot matrix display will then show a software version (i.e. VER 1.0)
and the message window will display an odometer reading. The
odometer reading displays how many hours the bike has been used
and how many virtual miles the bike has been ridden. The display will
look like this: ODO 123 MI 123 HRS.
Operation
of your
new bike
3
o
r g
v
w
a t t s l r
o
RPM scale for
isokinetics only
5
Dot matrix
display
6
Program keys
7
Function keys
8
Program keys
2
Message window
3
Change data display
4
Change graphic display
1
A

23
The odometer will remain displayed for only a few seconds then the
console will go to the start up display, also known as Idle Mode. The
message window will be scrolling the start up message. You may now
begin to use the 7.0 R.
The console will automatically power down after 20 minutes of inactivity. Press any key to wake the console up again. Always turn o the
main power switch when the 7.0 R is not in use.
Console operation
Set up
The Set Up key function will allow you to enter patient data, set seat
and pedal adjustments for various knee ranges of motion and customize the settings of the 7.0 R. When the Set Up key is pressed the rst
option in the menu appears. Use the up/down arrows to scroll through
the menu and press the enter key to select an option.
Set up menu
• Patient data
- Age : used in VO2 and heart rate programs.
- Gender : used in VO2 program.
- Weight : used in METS and Calorie calculations and VO2 program.
- Height : used in the Symmetry program.
• Seat position
- User may input desired knee exion angles (6 options) and the
software will calculate the seat’s vertical position and pedal
posi tion settings.
- This feature is intended to aid in patient set up but may not be the
nal settings as patient’s body symmetry may vary slightly.
- This program uses the height from the Patient Data settings fo
limb length. The seat Fore/Aft position is assumed to be in the
center of the adjustment range.
24
The six knee angle options are:
• R Min (Right leg minimum exion)
L Min (Left leg minimum exion)
• R Max (Right leg maximum exion)
L Max (Left leg maximum exion)
• R Max (Right leg maximum exion)
L Min (Left leg minimum exion)
• R Min (Right leg minimum exion)
L Max (Left leg maximum exion)
• R Max (Right leg maximum exion)
R Min (Right leg minimum exion)
• L Max (Left leg maximum exion)
L Min (Left leg minimum exion)
• Watts per row
- Adjusts the scale of the dot matrix when power (watts) is
displayed. The default setting is 10 watts per row. The default of 10
watts per row means the full display (all 10 rows lit) equal 100
watts.
- The setting can be adjusted from 10 to 100 watts per row of lights
on the graph.
• Level Scale
- Set the amount of change in the level adjustment of workload
(resistance at the pedals) each time the arrow keys are pressed.
- This feature allows you to have very ne increments of resistance
for physically challenged patients or set very high resistance
levels for sports training. The default setting is; Fine, 5 watts per
level. The three options are:
Fine – 5 watts per level (at 60 RPM)
Medium – 10 watts per level (at 60 RPM)
Coarse – 15 watts per level (at 60 RPM)
Quick start
This is the quickest way to start an exercise session. After the console
powers up you just press the Start key to begin; this will initiate the
Quick start mode. In Quick start, the Time will count up from zero, all
workout data will start to accrue and the workload may be adjusted
manually by pressing the Up or Down key. The dot matrix will display a
workload level at the lowest resistance. As you increase the workload
more rows will light indicating a harder workout. The bike will get harder
to pedal as the rows increase.
1
2
3
 Loading...