

' • s
^ * H y
i 1
Rsium Your Owner's Hegistratior
Card Within 10 Days.
n»glinrli>g ^Eur J]ii[ichiui^iritu4n|i4ltr4]|»
№ rioAivc oil nflhrii tMfinfili
Vaii'‘rfl «nllHwf ba JE A MA-&NAVQX
Mr4r, CArnpiBbe <nd riBil VAUr OviEriBr'l.
negiilTAllDn Cird loday ba «ruiir« y^vr ligM lo
wAn-.feniy vBrik9lii>n, EWf’ev conhnvliDrv.
siwcvil lenvtcfd ind uvinns-
Know These Safety Symbols.
¿Tliii ’’bdltotlightnlng'' Irvdiui^j
uniniulDlDd noil vi«l whliin vAur unH'¡^Mcii
4TUV bUlKU Ml AlKtillAll iIVKk. Fo# |tlt Hirty [>i
«VBrvDrMin VDurh44JMihald.ple*»da eh:
mnovc priMfUE^ EI^VfrlE^.
^ Tho ‘‘Bilda>TVriiGnpDinl*ClllEIllMlbiDrElCl
lajiEMtbpy ihhlE;liyieE*th«uldr№l lhB«nd?iBEf
MBfa4E>ni clGsaly ba pywaEH o{i«ri[ing jnd
prA4]|q>T<4.
CAUTION
Read Opefating Iratructions
Carehjlty.
Tha lEvIdEAubiQn lEiEiiir ETEdriEf4iein
lakB-hll BdVBnbSflAGF VAUrprEKlEKt'snUEIV
lijnEit*L Mid «E4vr4 yOSr* UIb. rnlisilQ
AparBb»EI>n. SEbEdEHl'IlTiiElDUt.RciEf bh*M1d£»«d
Inf riddioniv «44y[r lipk *nd WirrAEl^V
inhirniMiDn badny.
___
> Ji
№ ».■ L'
ie-'j •1.
- .‘l i. • i'uirVlfr-'i
' T. ’ ^9
Table of Contents
Features
Location Of TV Controls
Antenna Connections
......................
..........................
3
4
AC Power ............................................ 5
External Power Input Terminal
Remote Control Unit
...........................
...........
5
6
When Turned On For The First Time . 7
Operating Procedure
...........................
7
Setting The Clock .............................. 8
Setting The Timers ............................ 8
Programming Channels
Cable TV Operation
....................
.........................
9
10
Sleep Timer Operation ...................... 10
Remote Control Battery Requirements 10
AudioA/ideo Input Jack Operation •• • 11
External Speaker Jack Operation
....
11
Earphone Jack Operation ................. 11
Howto Adjust ForThe Best Picture
...
12
Before Calling For Service................. 13
WARNING: TO REDUCE THE RISK OF
FIRE OR ELECTRIC SHOCK, DO NOT
EXPOSE THIS APPLIANCE TO RAIN OR
MOISTURE.
22 Pushbutton Infrared Remote Control which operates your
TV set.
VHF/UHF/155 channel tuner for receiving standard broad
cast or cable TV channels.
Programming channels for quick and easy selection of
favorite stations available in your area.
On-screen graphics which display helpful information in the
operation and adjustment of feature control settings such as
channel, programming, timer settings picture, etc.
Every Day Timer enables you to select and watch a specific
channel at the preset time everyday.
One Time Timer enables you to select and watch a specific
channel at the preset time in a day.
Sleep Timer which automatically turns the TV OFF at preset
times.
Please read all the information in this manual to fully
understand the features of your set and ensure years of safe,
reliable operation. Besides explaining the operation of your
set, this manual also contains important warranty, safety,
and service tips information.
CAUTION : TO PREVENT ELECTRIC SHOCK, DO
NOT USE THIS (POLARIZED) PLUG WITH AN EXTEN
SION CORD, RECEPTACLE OR OTHER OUTLET UN
LESS THE BLADES CAN BE FULLY INSERTED TO
PREVENT BLADE EXPOSURE.
RISK OF ELECTRIC SHOCK
CAUTION: TO REDUCE THE RISK OF ELECTRIC SHOCK,
DO NOT REMOVE COVER (OR BACK). NO USERSERVICEABLE PARTS INSIDE. REFER SERVICING TO
QUALIFIED SERVICE PERSONNEL.
The exclamation point within an equilateral triangle is
intended to alert the user to the presence of important
operating and maintenance (servicing) instructions in the
literature accompanying the appliance.
Please attach your sales receipt to this book and keep it for
future reference.
Model No.
Serial No.
Purchase Date
CAUTION
DO NOT OPEN
The lightning flash with arrowhead symbol, within an
equilateral triangle, is intended to alert the user to the
presence of uninsulated "dangerous voltage" within the
product's enclosure that may be of sufficient magnitude to
constitute a risk of electric shock to persons.

Location Of TV Controls
O Front Speaker
d Remote Control Sensor
O Volume Buttons
O Channel Buttons
0 Power Switch
0 Telescopic Antenna
0 DC Input Jack
0 Earphone Jack
0
Audio Input Jack
0 Video Input Jack
0 EXT. Speaker Jack
0 Rod ANT. Wire
EXT. ANT. Terminal
Antenna Connections
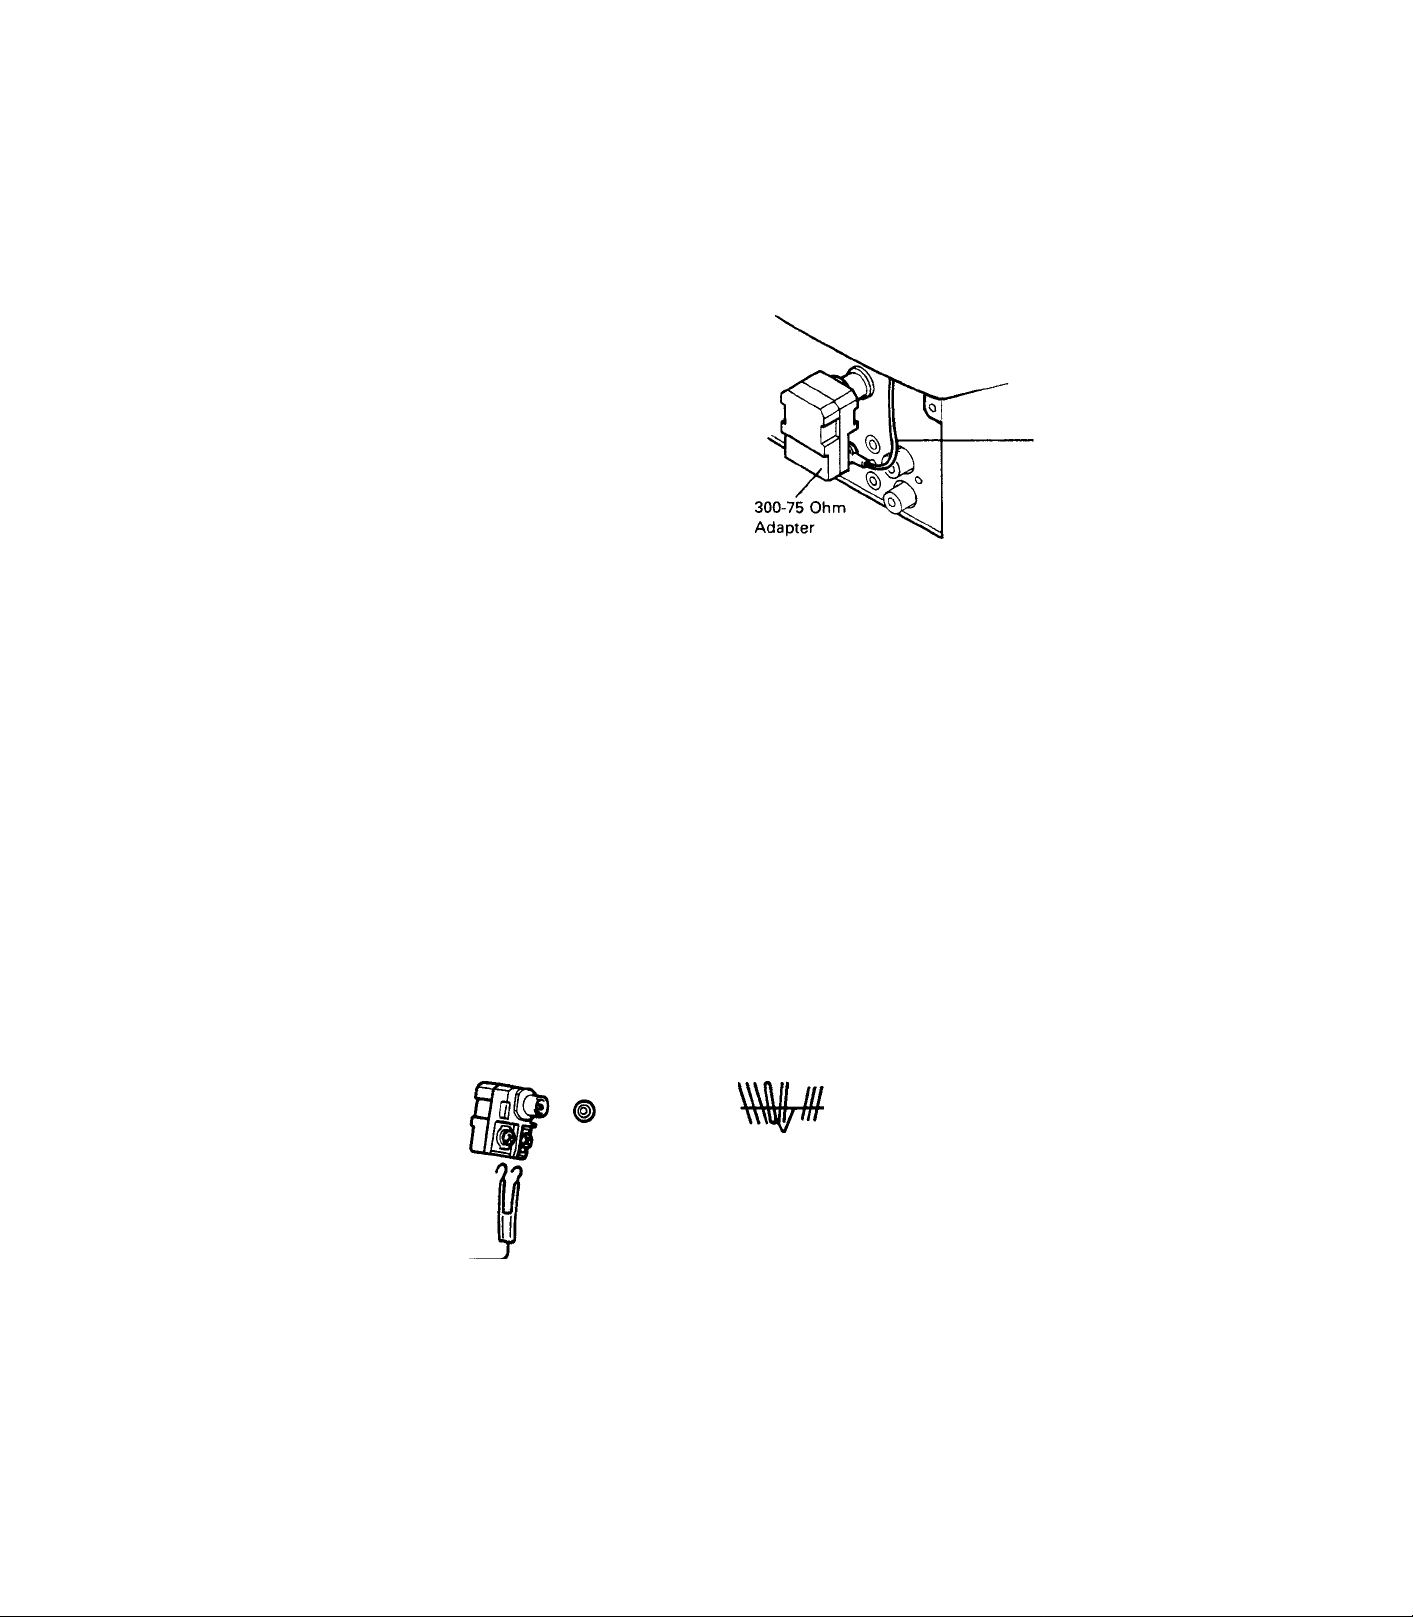
Built-in Antenna
Be sure that Rod ANT. Wire is connected to EXT. ANT. ter
minal using 300-75 ohm adapter.
Extend the telescopic antenna and adjust its direction,
length and angle for best reception.
Outdoor Antenna
If reception from the built-in rod antenna is unsatisfactory,
you can use the antenna terminal on the back of the TV to
connect an external antenna.
Before you make one of the connections as described be
low, fold the telescopic antenna into place.
UHF/VHF Connector
The single 75 ohm connector for UHFA/HF provides an
easy and quick connection of your antenna or cable sys
tem. The following examples describe the different ways
for connecting various antenna systems.
Antenna Lead-In
There are two possible types of wires coming in from your
antenna or cable system, either 300 ohm twin lead cable
or 75 ohm coaxial cable.
Connecting Rod Ant.
■ Rod Ant. Wire
1. If your antenna has a twin lead cable, you must use an
adapter (supplied) like the one shown in the illustration.
First attach the antenna wires to the screws on the
adapter; then push the end of the adapter onto the ter
minal on the back of the TV.
Outdoor Combination Antennas
1
300-75 Ohm
Adapter
4835 218 27003
*
Rear of TV
Twin Lead-in
From Antenna
Attach to Adapter
2. If your system uses coaxial cable, connect it directly
onto the terminal on your TV.
Coaxial Lead-in
From Either a
VHF/UHF Combination
Antenna or
Cable TV Service
Antenna Connector
Rear of TV
=t= Connect only one antenna twin lead-in to this adapter.
To order any optional accessories contact your dealer or call the toll-free accessory ordering number (1-800-292-6066).

AC Power
Your TV operates on 120 volts, 60 Hz {normal household current) and has a polarized plug. If you are unable to insert the
plug fully into the outlet, try reversing the plug. Do not defeat the safety feature of this polarized plug.
External Power Input Terminal
A DC car adapter cord is included with your TV. This cord
can be connected to the DC 12 V input terminal on the
back of the set. The other end of the cord can plug into
the cigarette lighter socket of your car, as illustrated. The
TV will operate using this DC power source, in the same
manner as AC power.
IMPORTANT: The polarity of the DC 12V input terminal is
of a nonconventional nature. Attaching a DC power cord
of reverse polarity will cause the 4 amp fuse to blow.
Therefore, use the DC car adapter cord included with your
TV.
NOTES FOR CAR USE
1. While the car is moving, it may be difficult to obtain good reception due to signal variations.
2. Under the following conditions it is recommended to operate the TV with the engine idling.
a) Very low outside temperatures may cause difficult engine starts.
b) Viewing the receiver for more than just a few hours. (For personal safety when in a vehicle with engine idling always
keep a window slightly open to prevent from possibly being overcome by engine fume leaks.)
3. Do not operate the set when starting the engine to avoid overloading the engine.
4. When finished viewing, turn off POWER and disconnect DC car cord from cigarette lighter. Failure to do so may dis
charge your car battery.
5. Always keep the cigarette lighter socket of the car clean. If the socket is dirty with cigarette ash, the resulting bad contact
may overheat the car cord plug.

Remote Control Unit
O POWER
Press the Power button on the Remote Control once to
turn the set ON. Press it again to turn the set OFF.
O NUMERIC CHANNEL BUTTONS
Direct channel selection. For channels 1 through 9, press
the "0" button first and then your desired channel number
(For example: for channel 4 press 0-4, not 4). For channels
10 through 99, press the two digits in order (for channel
26 press 2-6). Be sure to press the second digit within 3
seconds after the first digit or the set will select the chan
nel only for the first number pressed. The "0" button also
selects AM or PM when setting the clock or timer.
0 TIMER
Use this button to set clock, sleep time, every day timer
and one time timer.
O DISPLAY
Press this button to choose between the different on
screen display modes. The on-screen display remains for
12 seconds after pressing this button.
0 VOLUME-UP, DOWN
Press either the Volume (Up) or (Down) button to increase
or decrease the sound level as desired. (The volume level
is displayed on the screen when the level is changed.)
This button allows you to go back to the previous viewed
channel. For example; If you select channel 11 and then
switch to channel 2, using the channel number buttons,
just press the A/CH button and the TV set will automati
cally be switched to the previous channel. Press the A/CH
button again to return to channel 2.
O STATUS/EXIT
Press the Status/Exit button to display the Channel being
viewed and clock. Press again to turn off display.
NOTE: This feature does not work in the program mode.
© SELECT BUTTON (+, -)
These buttons are used for adjusting, selecting or cancell
ing functions.
© CHANNEL-UP, DOWN
To change the channel, press either the Channel Up or
Down button. If you press and hold either button, the
channels will continue to change. The number of the chan
nel being viewed will be displayed ort the screen.
® MUTE
Press the Mute button to turn off the sound portion of the
program. (When the Mute button is pressed, "MUTE" dis
play will appear in red.) This is convenient when answer
ing a telephone. Press the Mute button again or press
Volume Up or Down to restore sound.

When Turned On For The First Time
1. Press the power switch. CH3 and + + :-+- + AM appear
on the screen as shown in.
2. Set the clock. (Refer to the section SETTING THE
CLOCK.)
3. Preset the channels. (Refer to the section AUTOMATIC
CHANNEL PROGRAMMING.)
Operating Procedure
TV Operation
blink
O Press the Power button.
B Press the Display button to display TV/AA^ adjustment
screen. Press — button to place in TV mode. (See AudioA/ideo section for operations using accessory AA/
equipment.)
El Press the Display button again to display NORMAL/
CABLE adjustment screen. Press — button to select
NORMAL (ANTENNA) mode. (See Cable TV Operation
section for cable systems.)
□ Press the Display button to display PICTURE ADJUST/
RESET adjustment screen. If you want to adjust color
and picture controls, press — button. (Refer to the sec
tion HOW TO ADJUST FOR THE BEST PICTURE.)
B Press the Display button to display PROGRAM CH
MANUAL/AUTO. If you want to program channel num
bers into the TV scanning system manually, press —
button. (Refer to the section MANUAL CHANNEL
PROGRAMMING.)
m Press Exit button to clear the screen.
NOTE: Each adjustment screen remains for approximately
12 seconds then disappears.
B
"DISPLAY"
B
"DISPLAY"
B Press the Channel A. (Up)/ ▼ (Down) buttons to select
a desired channel. You can also select a desired chan
nel directly with number buttons on the Remote Con
trol unit.
B Press the Volume A (Up)/ ▼ (Down) buttons to in
crease or decrease the volume level as desired. The
volume level is displayed on the lower portion of the
screen with a bar graph.
NOTE: If you desire to check the channel number you are
watching or to display the channel number, press the Status/Exit button on the Remote Control unit. The channel
number and time display will appear on the screen.
NOTE: If you want to return to the normal mode after
pressing — or + button, press Status/Exit button once or
press display button until normal mode.
□
"DISPLAY"
m
"DISPLAY"

Setting The Clock
(Can Only Be Done With Remote Control Unit)
П Press the Timer button. H—(-:++AM will blink or digits
indicating the time will appear on the screen.
NOTE; When resetting the time, press + button to initiate
the reset sequence, time digits will blink.
В Set the current time by using the number buttons 0-9.
NOTE: When setting time you must enter four digits. For
hour 1-9 enter "0" first, then desired time.
B When the current time is displayed on the screen,
press + button. The time stops blinking and "AM" or
"PM" begins to blink.
□ Select "AM" or "PM" with the number button "0" (AM/
PM).
B Press + button. The "AM" or "PM" stops blinking.
B After setting the correct time, press Exit button. The
Time display will disappear from the screen.
Setting The Timers
(Can Only Be Done With Remote Control Unit)
EVERY DAY TIMER
You can set the Timer to have the TV turn on a specific channel at the same time everyday.
(See opposite page for illustration steps)
D Press the Timer button three times to set the EVERY
DAY timer setting mode.
B If EVERY DAY timer has never previously been set,
"++ ++:-+-+AM" blinks, enter the desired channel
number using the Number buttons (enter "0" before
single digit channels). Then press + button. Digit(s) in
dicating the desired channel will appear and the
"++:++" or digits indicating the time will blink.
NOTE: If resetting EVERY DAY timer, press the + button
to initiate reset sequence, then enter the desired channel.
ONE TIME TIMER
You can set the timer to have the TV turn on a desired channel at a preselected time.
(1) Press the Timer button in four times to set the ONE
DAY timer setting mode.
B Set the desired turn on time using the Number buttons
0-9, then press the + button.
Q The "AM" or "PM" indicator will blink. Select "AM" or
"PM" with the "0" ("AM/PM") number button.
B Press the + button.
B Press the Status/Exit button.
(2) Follow the steps (2) ~ (6) of EVERY DAY TIMER SEC
TION.

Automatic Channel Programming
This function allows you to automatically program locally
available channels into the TV scanning system.
D If not in the program mode, press the Display button
until PRG CH MANUAL/AUTO displays on the screen.
Press + button.
B The channel number will continue to change until the
next active channel is found.
B The color of the channel number on the screen auto
matically changes from red to green when the channel
is programmed (added into the TV scan system).
B The unit sequences through all the channels until the
last active channel is found.
B When auto channel programming is completed, the
lowest programmed channel reappears on the screen.
B Press the Exit button to clear the screen.
Manual Channel Programming
This function allows you to program locally available
channels manually into the TV scanning system.
O If not in the program mode, press the Display button
until PRG CH MANUAL/AUTO displays on the screen.
Press — button to select MANUAL. The red color of a
channel number will indicate that this channel has not
been programmed (added into the TV scan system).
B Press channel A (Up)/^ (Down) button (or numeric
channel buttons on the Remote Control) to select a de
sired channel.
B Press the -1- button. The channel number on display
changes color from red to green, indicating the channel
is programmed.
El Repeat steps (2) and (3) to set any other channels.
B Press the Exit button to clear the screen.
To Cancel Programmed Channels
D Press the Display button until MANUAI7AUT0 displays
on the screen. Press — button to select MANUAL.
B Press Channel ^ (Up)/^ (Down) button (or use num
ber buttons on the Remote Control) to select the chan
nel you wish to cancel (or drop from TV scan system).
B Press the — button. The channel color changes from
green to red.
El Repeat steps (2) and (3) to cancel other channels.
B Press the Exit button to clear the screen.
NOTE: If the AC cord is unplugged or a power failure
occurs for an extended period (more than 30 min.), it may
be necessary to re-program the desired channels.
9

Cable TV Operation
In CATV (Cable Television) systems, programs are brought
into the home on VHF channels 2-13, mid-band channels
A-l, super band channels J-W, hyper band channels
AA-CCC, ultra band channels W + 30 — W +58, and sub
midband channels (5A, A5-A1). Press the Display button
until NORMALVCABLE select displays on the screen. Press
+ button to receive these cable channels. Channels 2
through 13 are selected directly. Channel A can be tuned
in by selecting number 14 on this TV, channel B by select
ing number 15, and so on as follows:
Channel number on TV
Corresponding CATV Channel
20
21 22 23
G H 1 J
14
A
24
25
K L M
15 16
C 0 E F
B
27
26
N
17
18
28 29 30
0 P
19
Q
Sleep Timer Operation
The Remote Control has a count down timer which auto
matically turns the TV off at the end of the preset time.
Push the Timer button until SLEEP++ appears on the
D
TV screen in place of the time display.
Push the + button repeatedly to set the desired sleep
time (10, 20, 30--- or 90 minutes). When the button is
released, the timer will begin counting down. To turn
off the sleep time display, press Status/Exit button
once or press Timer button until return to the normal
mode.
You can check the time remaining for a sleep timer set
ting by pressing the Status/Exit button once. To turn
off the sleep time display, press Status/Exit button
once again.
31
32
R
S
42
43
FF
QQ HH
W-t-6 W+7 W-t-8 W-H9
53
54 55
QQ
RR
W-H7 W-H8 W-H9 W+20 WH-21
64
65
BBS
ccc
W-T28 W+29 W-H30 W-(-31
75
76
W-l-39 W+40 WH-41 W-H42 W-l-43 W-t-44 W-l-45 W-(-46 W-T47 W-l-48 W-f49
66
87
W-+50 W+51 W-T52 W-I-S3 W-T54 W-rS5 W-l-56 W+S7 W-t-S8
97
»8
A3
A2
34
33
T U
44 45
SS TT UU
66
77
88
99
A1 SA
35 36
46 47 48 49 50
II JJ KK LL
W-HO W-H1 W-H2 W+13 W-t-14 W-H5 W-H6
57
56
67 68
W-H32 W-H33 W-t-34 W-l-35 W+36 W-(-37 W-l-38
79
78
89 90 91
1
V W AA BB
37 38 39 40 41
W-H
58 59
W WW XX
W-H22 W-T23 W-H24 W-I-2S WH-26 W+27
70
69
81
80
92 93
W-l-2
MM
60 61
71 72
82 83
CC DO EE
W-T3 W-t-4
NN
YY
94
W-t-5
51
OO
62 63
ZZ
73
84 85
95 96
AS
52
PP
AAA
74
A4
Most CATV systems use letters to designate channels but
others use numbers. To tune in a numbered channel,
select the same number on the TV. Consult your local
Cable TV company to find out which of these channels are
receivable and which type of Cable system is used in your
area. (Some cable TV systems use scrambled or encoded
signals and require special converters to receive these
channels.)
Channel And Volume Memory
When the TV set is turned off with the Power switch, the
last channel selected and volume level remain in the same
position.
^ Remaining time
30'CH3
9:00 AM
B To cancel the sleep timer function, press the Timer but
ton to SLEEP mode. Press the + button until the
"++" displays or press the Power button to turn the
TV OFF.
Remote Control Battery Requirements
The Remote control unit requires two 1.5 volt "AA" size
batteries. The Battery Compartment is located on the back
of the unit.-To open, press down on the lid and slide to
ward the bottom of the unit. Install the batteries exactly as
shown by the diagram in the compartment.
NOTE: If one or both of the batteries are reversed the Re
mote Control wilt not operate and the unit may be
damaged.
This Remote control unit uses an infrared wireless control
system. This means that the remote commands are sent
out as invisible light. For best operation, be sure to oper
ate the Remote control within its 24' (approximate) range
and aim the Remote control directly at the Remote Control
Sensor window on the lower front of the TV. Please note
that furniture or other solid objects can block the path of
the infrared light. Dark walls might absorb the light.
Do not allow strong sunlight to fall on the front panel of
the TV as this may affect the operation of the remote con
trol. In this case, turn the TV away from the light or darken
the room slightly.
NOTE: The remote control will be inoperable if the batter
ies lose their charge. Replace them with new batteries.
10

Audio/Video input Jack Operation
Video Input And Audio Input Jacks
Your TV set is equipped with Video and Audio input jacks.
This feature allows the TV to be used to monitor audio
and video signals from other sources such as a VCR,
Camera, Computer etc.
Playing Back From A VCR Or Monitoring A Camera, Com
puter etc.
D Connect AA/ cables (not included) from the Audio out
put and Video output jacks on the VCR, Camera or
Computer to the Audio input and Video input jacks on
the TV set, as shown.
B Press Display button until TV/AA/ mode select displays
on the screen. Then press -|- button to place in AA/
mode.
El Press the Status/Exit button.
Q Operate the VCR, Camera or Computer in a normal
manner (as described in its Operating Manual). The TV
will monitor what is being played or recorded on the
VCR, Camera or Computer.
NOTE: When you turn the TV OFF and then back ON
while in the Video mode, the TV/A/V mode remains in the
/W mode.
NOTE: After enjoying the VCR or video camera playback,
remember to set the TV/A/V mode to the TV mode in
order to resume normal TV viewing.
To order any optional cables or other accessories con
tact your dealer or call the toll-free accessory ordering
number (1-800-292-6066).
NOTE: When pressing the Numeric channel, channel-up,
down or Status/Exit button in A/V mode, "A/V" display will
appear on the screen.
External Speaker Jack Operation
You may connect a 8-ohm speaker (not supplied) with a
3.5 mm input plug to Ext. Speaker Jack on the TV. The
built-in TV speaker is disconnected automatically.
Earphone Jack Operation
Insert an Earphone (SBA2117A01) (not supplied) plug into
the Earphone jack for private listening. When using the
earphone, the internal speaker is automatically shut off.
11

How to Adjust For The Best Picture
Q Press the Display button until Picture Adjust/Select
mode appears on the screen. Then press — button to
select the Adjust Picture.
3 Press the Display button until the picture adjustment
(Contrast, Brightness, Tint, Color and Sharpness) you
wish to change appears on the screen.
3 Press the — or + button to adjust the selected function
to your preference. A bar scale is displayed at the bot
tom of the screen as the change is made.
See chart below:
□ After adjustment, press Exit button.
NOTE: When picture adjust mode appears on the screen,
pressing + button resets all functions to their center
adjustment position.
Operating Chart
FUNCTION — Button •*
CONTRAST Weak
BRIGHTNESS
Display
Button
NOTE: Channel number is not displayed in the picture
control mode.
SHARPNESS Soft
COLOR
TINT
Dark Light
Pale Deep
Skin tones
become
purplish
--------
► + Button
Strong
Sharp
Skin tones
become
greenish
12

Before Calling For Service
Remember! Charges for TV installation, adjustment of customer controls or repair of antenna systems outside the TV are
not covered under your warranty. Be sure to make these simple checks before calling for service. These tips can save you
time and money.
Problem
No Power
No Picture
No Sound
No Color
Wrong Color
Picture too light or too dark
Picture Interference
Action
* Unplug set from wall outlet 60 seconds.
Then replug set into outlet and switch TV ON again.
* Check that antenna lead terminal connection is properly connected at the set.
* Check connections on the antenna.
* Check the TV/AV display for correct position. The AN mode with no signal source
will create a blank screen.
* Check the Volume control.
* Check the Mute button.
* Check COLOR setting.
* Is station transmitting color?
Try another channel.
* Adjust COLOR and TINT controls.
* Adjust the BRIGHT and CONTRAST controls.
* Check antenna for shorted or broken lead-in wires.
* Reposition antenna.
* Possible station trouble or local interference (electric motors, etc.). Try another chan
nel or adjust the antenna to minimize.
*
Remote control not working
* Check the batteries.
13


Limited Warranty
LIMITED WARRANTY
Color Television
• 90 Day Carry-In Service Labor Warranty
• One (1) Year Exchange On Warranty Parts
• Two (2) Year Exchange Warranty on Color Picture Tube
* For purchases in Canada, refer to Canadian Warranty.
This warranty gives you specific legal rights and you may have other rights which vary from state to state.
Parts and Labor During First 90 Days
For Ninety (90) Days from the date of purchase, an Authorized Service
Center will repair any product defect and replace any defective part,
including the picture tube without charge to you for parts or labor.
Replacement Parts After 90 Days
If within one ( 1 ) year - two years for a picture tube- after the date of
purchase, a part is found defective and needs to be replaced, an
Authorized Service Center will supply to yoti a new or, at our option,
rebuilt part without charge to you for the replacement part. After 90 days
from the date of purchase, you must pay for all labor, transportation and
service charges. Replacement parts and picture tubes in.stalled during the
TV warranty period are warranted only for the balance of the original TV
warranty period.
Who Is Protected?...Where?
This warranty is extended to the original retail purchaser for products
purchased and used in the U.S.A., Puerto Rico and the Virgin Islands . If
you move within these areas, an Authorized Service Center in your area
will honor this warranty for the remainder of the original warranty period.
YOU MUST PRESENT PROOF OF THE DATE ON WHICH THE
TV WAS FIRST PURCHASED (SALES RECEIPT OR OTHER
EVIDENCE) WHEN REQUESTING SERVICE OR
REPLACEMENT PART WARRANTY PERFORMANCE.
What the Purchaser Must Do
Before you call for service, check your operating instruction booklet. A
slight adjustment of the customer controls discus,sed in your instruction
booklet may save you a service call.
If you require service during the warranty period, you must take your TV
to an Authorized Service Center and pick it up after completion of
service. The Service Center mu.st be allowed to keep defective parts.
After the first 90 days of the warranty period, the cost of .service labor is
your responsibility.
Warranty service will be performed by an Authorized Service Center. We
suggest that you contact your dealer, if your dealer does not operate an
Authorized Service Center, he will direct you to the Authorized Service
Center engaged by him to service the product he .sells.
You may also contact the nearest Philips Factory Service Centers (.see the
Factory Service Center address directory supplied with your product
literature) to obtain both In and Out-of-Warranty repair for your product.
Warranty Exclusions
Your Warranty Does Not Cover:
Labor charges for set installation or set-up, adjustment of customer or
preference controls, and installation or repair of antenna .systems outside
the TV set.
Product repair and/or part replacement becau.se of misuse, accident,
unauthorized repair or other cause not within the control of Philips
Consumer Electronics Company.
Reception problems caused by signal conditions or cable or antenna
systems outside the TV.
A television purchased, used or .serviced outside the U.S.A., Puerto Rico
and the Virgin Islands, or used for commercial or institutional purposes.
Incidental or con.sequential damages resulting from the product. Some
states do not allow the exclusion of incidental or consequential damages,
so the above exclusion may not apply to you .
ALL IMPLIED WARRANTIES INCLUDING IMPLIED
WARRANTIES OF MERCHANTABILITY AND FITNESS FOR A
PARTICULAR PURPOSE, ARE LIMITED IN DURATION TO
THE DURATION OF THIS EXPRESS WARRANTY. Some states
do not allow limitations on how long an implied warranty lasts, so the
above limitation may not apply to you.
IMPORTANT REMINDER
PLEASE FILL OUT AND MAIL YOUR WARRANTY
REGISTRATION CARD PROMPTLY. IT WILL BE EASIER FOR US
TO NOTIFY YOU IF IT SHOULD EVER BE REQUIRED. THE
RETURN OF THE WARRANTY REGISTRATION CARD IS NOT A
CONDITION TO WARRANTY COVERAGE.
PHILIPS SERVICE COMPANY
P.O. BOX 555 • JEFFERSON CITY,
TENNESSEE 37760
(615)475-0317
15
ST220

IB6303-2
1111-M70530 T9411-3
Printed in Malaysia
 Loading...