


 Loading...
Wireless Home Entertainment System |
MX6000i |
Need help? Call us!
Philips representatives are ready to help you with any questions about your new product.We can guide you through Connections, First-time Setup, or any of the Features. We want you to start enjoying your new product right away!
CALL US BEFORE YOU CONSIDER RETURNING THE PRODUCT!
1-800-531-0039
or
Visit us on the web at www.philips.com
|
|
|
RT |
|
|
|
|
O |
A |
||
|
M |
P |
|
|
N |
I |
|
Return |
T |
||
|
|
! |
|||
|
|
|
|
|
|
your Warranty Registration Card within 10 days
S |
|
|
E |
E |
E |
ID |
|
|
|
S |
|
|
|
W H Y IN |
|
Return your Warranty Registration card today to
ensure you receive all the benefits you’re entitled to.
•Once your Philips purchase is registered, you’re eligible to receive all the privileges of owning a Philips product.
•So complete and return the Warranty Registration Card enclosed with your purchase at once, and take advantage of these important benefits.
Warranty
Verification
Registering your product within 10 days confirms your right to maximum protection under the terms and conditions of your Philips warranty.
Owner
Confirmation
Your completed Warranty Registration Card serves as verification of ownership in the event of product theft or loss.
Model
Registration
Returning your Warranty Registration Card right away guarantees you’ll receive all the information and special offers which you qualify for as the owner of your model.
|
|
|
|
|
T |
|
|
|
|
|
|
|
|
A |
I |
O |
|
|
|
|
|
|
R |
|
|
|
N |
|
|
|
|
|
T |
|
|
|
|
|
|
|
|
I |
S |
|
|
|
N |
|
|
G |
|
|
|
|
|
|
E |
||
|
|
|
|
|
|
|
E |
||
E |
|
Hurry! |
D |
||||||
R |
|
||||||||
|
|
|
|
|
|
|
|
E |
|
S |
|
|
|
|
|
|
W |
D |
|
|
|
|
|
|
|
|
|||
Y |
|
|
|
|
|
|
|||
|
|
|
|
|
|
|
|||
|
A |
|
|
|
|
|
|
||
|
|
|
D |
|
|
|
I |
|
|
|
|
|
|
|
|
T |
|
|
|
|
|
|
0 |
|
|
|
|
|
|
|
|
|
1 |
N I |
H |
|
|
||
|
|
|
|
|
|
||||
|
|
|
|
|
|
|
|||
Congratulations on your purchase, welcome to the “family!”
Philips product owner:
Thank you for your confidence in Philips.You’ve selected one of the best-built, -backed products available today. And we’ll do everything in our power to
you happy with your purchase for many years to come.
a member of the Philips “family,” you’re entitled to protection by one of the comprehensive warranties and outstanding service networks in the industry.
What’s more, your purchase guarantees you’ll receive all the information and special offers for which you qualify, plus easy access to accessories from our convenient home shopping network.
most importantly you can count on our uncompromising commitment to total satisfaction.
of this is our way of saying welcome – and thanks for investing in a Philips product.
Sincerely,
Lawrence J. Blanford
President and Chief Executive Officer
S.Remember, to get the most from your Philips product, you must return your Warranty Registration Card within 10 days. So please mail it to us right now!
MAC5097
Know these
safety symbols
C A U T I O N
RISK OF ELECTRIC SHOCK
DO NOT OPEN
CAUTION: TO REDUCE THE RISK OF ELECTRIC SHOCK, DO NOT
REMOVE COVER (OR BACK). NO USER-SERVICEABLE PARTS
INSIDE. REFER SERVICING TO QUALIFIED SERVICE PERSONNEL.
tThis “bolt of lightning” indicates uninsulated material within your unit may cause an electrical shock. For
the safety of everyone in your household, please do not remove product covering.
sThe “exclamation point” calls attention to features for which you should read the enclosed literature closely to
prevent operating and maintenance problems.
WARNING: TO PREVENT FIRE OR SHOCK HAZARD, DO NOT EXPOSE THIS EQUIPMENT TO RAIN OR MOISTURE.
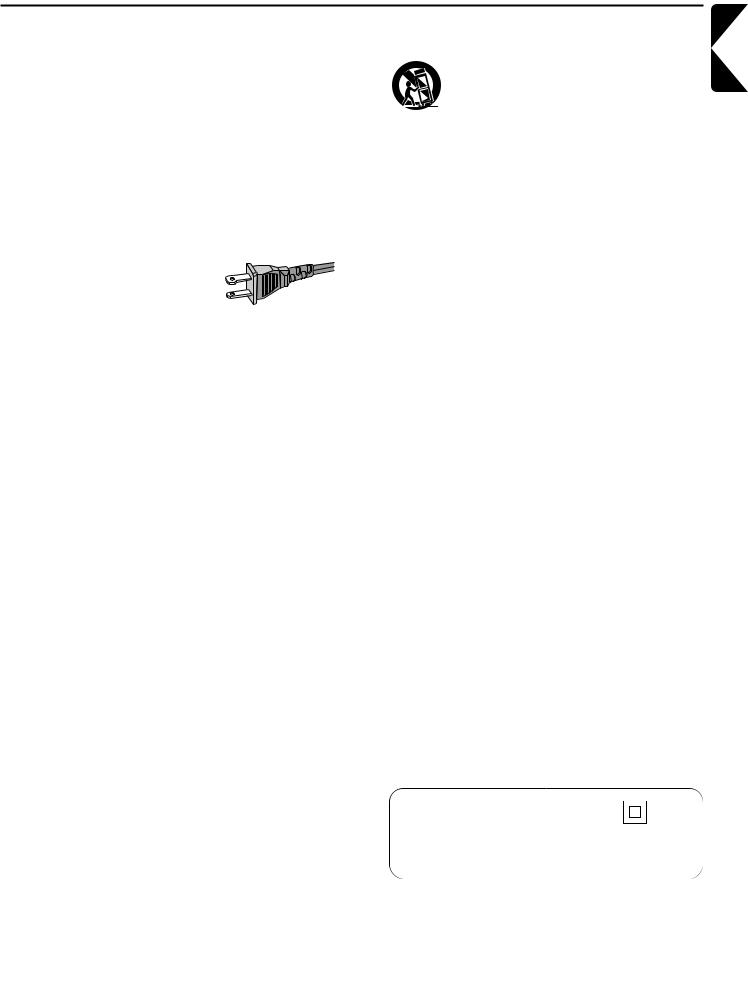
CAUTION: To prevent electric shock, match wide blade of plug to wide slot, and fully insert.
For Customer Use
Enter below the Serial No. which is located on the rear of the cabinet. Retain this information for future reference.
Model No. ___________________________
Serial No. ____________________________
Visit our World Wide Web Site at http://www.philips.com
IMPORTANT SAFETY INSTRUCTIONS
1. |
Read these instructions. |
11. |
|
2. |
Keep these instructions. |
12. |
|
3. |
Heed all warnings. |
||
|
|||
4. |
Follow all instructions. |
|
|
5. |
Do not use this apparatus near water. |
|
|
6. |
Clean only with dry cloth. |
13. |
|
7. |
|
||
Do not block any ventilation openings. Install in |
|
||
|
accordance with the manufacturer´s instructions. |
14. |
|
|
|
8.Do not install near any heat sources such as radiators, heat registers, stoves, or other apparatus (including amplifiers) that produce heat.
9. Do not defeat the safety |
|
|
|
purpose of the polarized or |
|
15. |
|
grounding-type plug. A polarized plug |
AC Polarized |
||
has two blades with one wider than |
Plug |
|
|
the other. A grounding type plug has two blades and a third |
|
||
grounding prong.The wide blade or the third prong are |
● |
||
provided for your safety. If the provided plug does not fit |
|||
|
|||
into your outlet, consult an electrician for replacement of |
● |
||
the obsolete outlet. |
|
|
|
10.Protect the power cord from being walked on or |
● |
||
pinched, particularly at plugs, convenience receptacles, and |
|
||
16.
the point where they exit from the apparatus.
Class II equipment symbol
This symbol indicates that the unit has a double insulation system.
English
3

Canada
English:
This digital apparatus does not exceed the Class B limits for radio noise emissions from digital apparatus as set out in the Radio Interference Regulations of the Canadian Department of Communications.
Français:
Cet appareil numérique n'émet pas de bruits radioélectriques dépassant les limites applicables aux appareils numériques de Classe B prescrites dans le Règlement sur le Brouillage Radioélectrique édicté par le Ministère des Communications du Canada.
CAUTION
Use of controls or adjustments or performance of procedures other than herein may result in hazardous radiation exposure or other unsafe operation.
The unit complies with the FCC-Rules, Part 15 and with 21 CFR 1040.10. Operation is subject to the following two conditions:
1.This device may not cause harmful interference, and
2.This device must accept any interference received, including interference that may cause undesired operation.
Tested To Comply
With FCC Standards
FOR HOME OR OFFICE USE
This equipment has been tested and found to comply with the limits for a Class B digital device, pursuant to Part 15 of the FCC Rules.These limits are designed to provide reasonable protection against harmful interference in a residential installation.This equipment generates, uses, and can radiate radio frequency energy and, if not installed and used in accordance with the instructions, may cause harmful interference to radio communications. However, there is no guarantee that interference will not occur in a particular installation. If this equipment does cause harmful interference to radio or television reception, which can be determined by turning the equipment off and on, the user is encouraged to try to correct the interference by one or more of the following measures:
–Reorient or relocate the receiving antenna.
–Increase the separation between the equipment and the receiver.
–Connect the equipment into an outlet on a circuit different from that to which the receiver is connected.
–Consult the dealer or an experienced radio/TV technician for help.
4

Contents
Important safety instructions ––––––––––––––––– 3
General information
Supplied accessories –––––––––––––––––––––––––––– 7 Setup –––––––––––––––––––––––––––––––––––––––– 7 Maintenance ––––––––––––––––––––––––––––––––––– 7 Disc handling –––––––––––––––––––––––––––––––––– 7 Environmental information –––––––––––––––––––––––– 7
Remote control
Inserting the batteries ––––––––––––––––––––––––––– 8 Using the remote control –––––––––––––––––––––––– 8 Using the remote control to control a Philips TV ––––––– 8
Controls ––––––––––––––––––––––––––––––––––– 10
Connections –––––––––––––––––––––––––––––––– 11
Connecting …
Assembling of the speakers –––––––––––––––––––––– 12 Attaching the front speakers to the subwoofers ––– 12 Attaching the mini speaker stands to
the rear speakers ––––––––––––––––––––––––––– 12 Attaching the rear speakers to the wall –––––––––– 12 Positioning of the speakers and the subwoofers –––––– 12 Connecting the speakers and the subwoofers –––––––– 13 How to use the click fit connectors ––––––––––––– 13 Connecting the tuner antennas ––––––––––––––––––– 13 Connecting the FM antenna ––––––––––––––––––– 13 Connecting the AM antenna –––––––––––––––––– 13 Connecting the TV ––––––––––––––––––––––––––––– 14 Using Component Video (PR PB Y) –––––––––––––– 14 Using Composite Video (CVBS) –––––––––––––––– 14 Using S-Video –––––––––––––––––––––––––––––– 14 Connecting audio equipment ––––––––––––––––––––– 15 Connections for playback ––––––––––––––––––––– 15 Connection for digital or analog recordings ––––––– 15 Connecting to power supply ––––––––––––––––––––– 16 Switching on the system –––––––––––––––––––––––– 16 Selecting a source ––––––––––––––––––––––––––––– 16 Switching to Eco Power standby –––––––––––––––––– 16
Settings for the TV
Check if you see a picture ––––––––––––––––––––––– 17 No picture or distorted picture ––––––––––––––––––– 17 TV Shape –––––––––––––––––––––––––––––––––––– 17
Using the System Menu –––––––––––––––––––––– 18
Volume and sound
Adjusting the Volume ––––––––––––––––––––––––––– 19 Adjusting Bass,Treble, Loudness and ClearVoice –––––– 19 Listening through Headphones ––––––––––––––––––– 19 Adjusting the Surround Sound –––––––––––––––––––– 19
Internet and PC Link
General information on INTERNET and PC LINK ––––– 20 Requirements to use Internet media services ––––– 20 Requirements to use PC LINK ––––––––––––––––– 20 How to ensure a good wireless connection ––––––– 20 Network name (SSID) ––––––––––––––––––––––– 20 WEP encryption –––––––––––––––––––––––––––– 20
Before connecting ––––––––––––––––––––––––––––– 21
A)Wireless home network with
wireless router ––––––––––––––––––––––––––––– 21
B)PC with a wireless network card
or with a wireless USB adapter ––––––––––––––––– 23
C)Wired home network with a router ––––––––––––– 24
D)PC only with a network interface (Ethernet) card –– 25 Registration –––––––––––––––––––––––––––––––––– 26 About “My.Philips.com” ––––––––––––––––––––––––– 26 Reviewing and changing network settings ––––––––––– 26 Internet services –––––––––––––––––––––––––––––– 27 PC LINK ––––––––––––––––––––––––––––––––––––– 27 Using the colored multifunction buttons – SUBTITLE, ANGLE, ZOOM and AUDIO –––––––––––––––––––– 28 INFO! ––––––––––––––––––––––––––––––––––––––– 28 FAVORITES –––––––––––––––––––––––––––––––––– 28
Adding a service to your favorites –––––––––––––– 28 Accessing your favorites –––––––––––––––––––––– 28 Recently used media services – RECENT ––––––––––– 29 Multiple users – USER –––––––––––––––––––––––––– 29 Adding a new user –––––––––––––––––––––––––– 29 Selecting a user –––––––––––––––––––––––––––– 29 Removing a user –––––––––––––––––––––––––––– 29
Disc
General Information –––––––––––––––––––––––––––– 30 Playable Discs ––––––––––––––––––––––––––––––––– 30 Region Codes –––––––––––––––––––––––––––––––– 30 Available disc Features –––––––––––––––––––––––––– 30 Disc Playback ––––––––––––––––––––––––––––––––– 31
Selecting next disc –––––––––––––––––––––––––– 31 Resume ––––––––––––––––––––––––––––––––––––– 31 Chapter Preview –––––––––––––––––––––––––––––– 31 Chapter/track selection ––––––––––––––––––––––––– 32 Forward and Reverse Searching ––––––––––––––––––– 32 Searching in the System Menu –––––––––––––––––––– 32
Time Search ––––––––––––––––––––––––––––––– 32 Fast, Slow ––––––––––––––––––––––––––––––––– 33
Still Picture/Frame-by-Frame Playback –––––––––––––– 33
English
5

English
Contents
Disc
Repeat –––––––––––––––––––––––––––––––––––––– 33 Shuffle –––––––––––––––––––––––––––––––––––––– 33 Program ––––––––––––––––––––––––––––––––––––– 34 Programming tracks/chapters/titles –––––––––––––– 34 Playing a program ––––––––––––––––––––––––––– 34 Reviewing / Deleting programmed tracks –––––––– 34 Clearing the entire program ––––––––––––––––––– 34 Disc Menu ––––––––––––––––––––––––––––––––––– 35 Audio ––––––––––––––––––––––––––––––––––––––– 35 Subtitles ––––––––––––––––––––––––––––––––––––– 35 Camera Angle –––––––––––––––––––––––––––––––– 35 Zoom –––––––––––––––––––––––––––––––––––––– 35
Selecting the menu language, country,
audio language and subtitle language ––––––––––––––– 36 Menu Language –––––––––––––––––––––––––––– 36 Country –––––––––––––––––––––––––––––––––– 36 Default Audio –––––––––––––––––––––––––––––– 36 Default Subtitle –––––––––––––––––––––––––––– 36
Playback Control (PBC) ––––––––––––––––––––––––– 36
Switching PBC on/off –––––––––––––––––––––––– 36 Playing a (Super) Video CD with PBC ––––––––––– 36 Playing MP3 discs –––––––––––––––––––––––––––––– 37 Playing picture CDs –––––––––––––––––––––––––––– 38 Rotating a picture –––––––––––––––––––––––––––––– 38 Playing a slide show –––––––––––––––––––––––––––– 38
Access Control ––––––––––––––––––––––––––––– 39
Parental Level –––––––––––––––––––––––––––––– 39 Change Pin –––––––––––––––––––––––––––––––– 39 Disc Lock ––––––––––––––––––––––––––––––––– 39 If you forget your Pin –––––––––––––––––––––––– 39
System Menu – Picture settings
Adjusting the Picture Settings ––––––––––––––––––––– 40 Color Settings ––––––––––––––––––––––––––––– 40 Brightness ––––––––––––––––––––––––––––––––– 40 Contrast –––––––––––––––––––––––––––––––––– 40 Sharpness ––––––––––––––––––––––––––––––––– 40 Saturation ––––––––––––––––––––––––––––––––– 40 Video Shift –––––––––––––––––––––––––––––––– 40
System Menu – Audio settings
Night Mode –––––––––––––––––––––––––––––––––– 41 Analogue Output –––––––––––––––––––––––––––––– 41 Digital Output –––––––––––––––––––––––––––––––– 41 Speaker layout, speaker distances and volume balance –– 42
System Menu – Additional features
Help Line and Status window –––––––––––––––––––– 43 Sleep timer –––––––––––––––––––––––––––––––––– 43 Adjusting the display brightness ––––––––––––––––––– 43 Online upgrade ––––––––––––––––––––––––––––––– 43 Resetting the Streamium System –––––––––––––––––– 43
Tuner
Tuning to radio stations ––––––––––––––––––––––––– 44 Automatic Preset Programming ––––––––––––––––––– 44 Storing favorite radio stations manually ––––––––––––– 44 Selecting a favorite radio station –––––––––––––––––– 44 Deleting a favorite radio station ––––––––––––––––––– 45
Deleting all favorite radio stations ––––––––––––––––– 45 Changing the order of favorite radio stations ––––––––– 45
Troubleshooting ––––––––––––––––––––––––– 46–47
Technical data –––––––––––––––––––––––––––––– 48
Warranty –––––––––––––––––––––––––––––––––– 49
6
General information
Supplied accessories
Your Streamium DVD System is delivered with:
–2 front, 1 center and 2 rear speakers
–2 subwoofers built into the speaker stands
–7 speaker cables
–1 RCA-style audio cable (white and red plugs)
–1 Composite Video (CVBS) cable (yellow)
–1 Component Video cable (red/blue/green)
–1 FM antenna
–1 AM loop antenna
–1 AC power cable
–1 Category 5 Ethernet cable
–1 remote control
–2 batteries type AA
Maintenance
Clean the unit with a soft, slightly dampened, lint-free cloth. Do not use any cleaning agents as they may have a corrosive effect.
Do not expose the unit, batteries or discs to humidity, rain, sand or excessive heat (caused by heating equipment or direct sunlight).
Always keep the trays of your unit closed to protect the lens from dust. Do not use any commonly available lens cleaning discs, as they
may damage the optical lens of the unit.
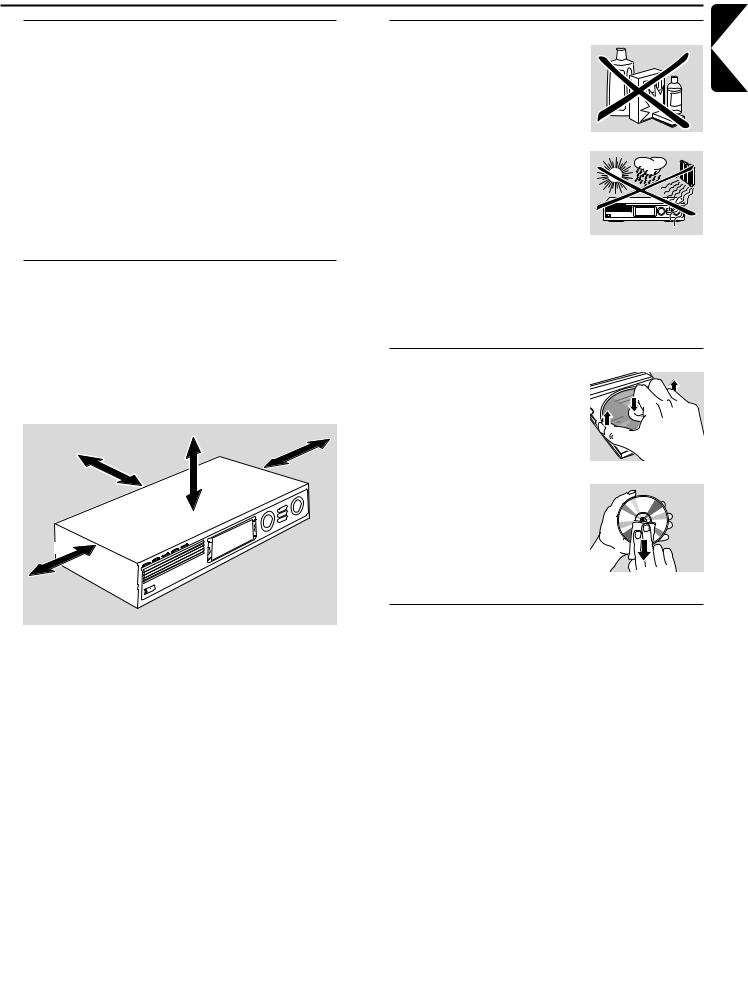
Setup
Place the unit on a flat, hard, and stable surface. Do not place the unit on a carpet.
Do not position the unit on top of other equipment that might heat it up (e.g. receiver or amplifier).
Do not put anything under the unit (e . g. CDs, magazines).
Allow at least 10 cm clearance from the rear and top of the unit and 5 cm from the left and right to prevent overheating.
5 cm
10 cm
10 cm
5 cm
Do not block the ventilation openings.
Do not expose the unit to dripping or splashing.
Do not place any sources of danger (e. g. liquid filled objects, lighted candles) on the unit.
Active mobile phones near the unit may cause malfunctions.
The lens may cloud over when the unit is moved from cold to warm surroundings. Playing a disc is not possible then. Leave the unit in a warm environment until the moisture evaporates.
Disc handling
To take a disc out of its box easily, press the center spindle while lifting it. Always hold a disc by the edge and put it back in its box after use.
Never attach a sticker to a disc. If you want to label a disc, use a soft, felt-tipped pen and write only on the printed side.
To clean a disc, wipe it in a straight line from the center toward the edge using a soft, lint-free cloth. Any cleaning agents may damage the disc!
Environmental information
All redundant packing material has been omitted.We have tried to make the packaging easy to separate into three single materials: cardboard (box), polystyrene foam (buffer) and polyethylene (bags, protective foam sheet).
Your unit consists of materials which can be recycled if disassembled by a specialized company. Please observe the local regulations regarding the disposal of packing materials, dead batteries and old equipment.
English
7
English
Remote control
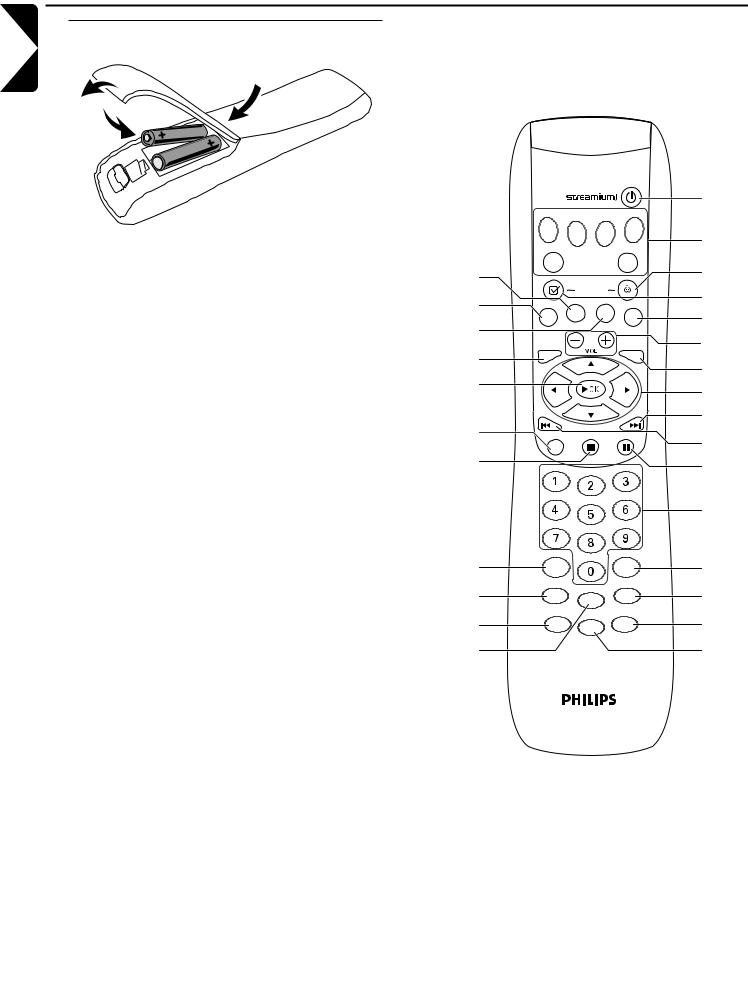
Inserting the batteries
|
|
|
|
|
1 Open the battery compartment of the remote control. |
|
|||
2 Insert two alkaline batteries, type AA (R06, UM-3), |
≥ |
|||
|
according to the + and – indications. |
|||
|
|
|||
3 Close the battery compartment. |
§ |
|||
|
Do not combine old and new or different types of |
∞ |
||
|
|
|||
|
batteries. |
≤ |
||
|
|
|
|
|
|
Remove batteries if they are discharged or if the remote |
£ |
||
|
control will not be used for a long time. |
|||
|
|
|||
|
Batteries contain chemical substances, so they should |
|
||
|
be disposed of properly. |
™ |
||
|
|
|
|
|
|
Using the remote control |
¡ |
||
1Aim the remote control directly at the remote sensor of the Streamium System.
2Select the source you wish to control by pressing one of the source buttons on the remote control, e. g.TV,TUNER.
3 Next, select the desired function, e. g. 2OK. )
Using the remote control to |
( |
|
control a Philips TV |
* |
|
When TV is selected, the remote control will control some |
||
|
||
functions on your Philips TV, e. g. |
& |
|
– 0–9 select a TV channel. |
||
|
||
– SYSTEM MENU switches the system menu of the TV |
|
|
on/off. |
|
|
– 1, 2, 3, 4 navigate in the system menu. |
|
|
– S, T select the previous/next TV channel. |
|
|
– 9 exits the system menu of the TV. |
|
|
– MUTE mutes the sound on the TV. |
|
|
– INFO! switches TV text on/off. |
|
|
To control the TV, aim the remote control directly at the TV. |
|
DVD INTERNET |
PC LINK TUNER |
||
TV |
|
|
AUX |
|
(UN) MARK |
VIEW |
|
|
FAVORITES |
|
|
SUBTITLE |
ANGLE |
ZOOM |
AUDIO |
|
|
||
SYSTEM |
|
|
DISC |
MENU |
|
|
MENU |
RETURN |
|
RESUME |
–- |
ABC |
DEF |
|
|
|
GHI |
JKL |
MNO |
|
|
|
PQRS |
TUV |
WXYZ |
|
|
|
SOUND |
.@ |
SURROUND |
|
|
|
SHUFFLE |
INFO ! |
RECENT |
|
|
|
REPEAT |
MUTE |
USER |
|
|
1
2
3
4
5
6
7
8
9
0
!
@
#
$
%
^
8

Remote control
12
switches the unit to standby (off).To activate the unit, press any source button.
2source buttons
INTERNET connects to the Internet PC LINK connects to the PC
DVD selects discs 1–5. Press repeatedly.
TV plays the TV sound on the Streamium System. TUNER selects FM or AM radio. Press repeatedly. AUX selects AUX DIGITAL or AUX ANALOG. Press repeatedly.
3  VIEW FAVORITES
INTERNET,TUNER: shows your favorite Internet media services and radio stations
4  (UN)MARK FAVORITES
INTERNET,TUNER: marks and unmarks favorites
5AUDIO (blue button)
DVD: selects an audio channel (e. g. a different language) during playback of a DVD or (Super) Video CD INTERNET, PC LINK: multifunction button
6VOL+, –
adjust the volume
7DISC MENU
enters and exits the disc menu (DVD)
8 1 2 3 4
moves the cursor left, right, up or down in the menus TUNER: 3, 4 selects favorite radio stations,
1, 2 tunes to a radio station, press for 1 second to auto search for a radio station.
9 T
DVD: skips to the beginning of the next chapter/title/track of a disc; searches forward if pressed longer than 2 seconds. Press again for various search speeds.
TV: selects a higher channel.
0 S
DVD: skips to the beginning of the current or previous chapter/title/track of a disc; searches backward if pressed longer than 2 seconds. Press again for various search speeds.
TV: selects a lower channel.
!;
pauses playback
@0–9 to enter numbers 0–9 and characters
(to enter a number with two or more digits, press 0–9 repeatedly within 2 seconds)
#SURROUND
selects the different sound settings: multi-channel surround, Hall or stereo mode.
$RECENT
INTERNET, PC LINK: displays the last 20 items played
%USER
selects an active user
^MUTE
switches the speakers’ sound off or on again. TV: switches the sound on the TV off/on.
&INFO!
INTERNET, PC LINK: requests on-line information about currently playing item through e-mail (if available).
*REPEAT
selects the different repeat modes (depending on the media type); switches repeat mode off.
(SHUFFLE
plays tracks in random order
)SOUND
selects a different sound setting for bass, treble, loudness and clearvoice.
¡9
DVD: stops disc playback; clears a program if pressed longer than 2 seconds.
™RETURN
returns to the previous menu.
£2OK
starts playback, resumes playback, or confirms a selection.
≤SYSTEM MENU
DVD, INTERNET, PC LINK, AUX: enters the system menu.
∞ZOOM (yellow button)
shows a close up view of a particular portion of the picture on the TV screen,
INTERNET, PC LINK: multifunction button
§SUBTITLE (red button)
switches on or off the subtitles of a DVD during playback INTERNET, PC LINK: multifunction button
≥ANGLE (green button)
selects the camera angle (if available) of a DVD during playback
INTERNET, PC LINK: multifunction button
English
9

Controls
^ |
|
|
% $ |
# @ ! |
0 9 |
|||||||||||||||||||||
|
|
|
|
|
|
|
|
|
|
|
|
|
|
|
|
|
|
|
|
|
|
|
|
|
|
|
|
|
|
|
|
|
|
|
|
|
|
|
|
|
|
|
|
|
|
|
|
|
|
|
|
|
|
|
|
|
|
|
|
|
|
|
|
|
|
|
|
|
|
|
|
|
|
|
|
|
|
|
|
|
|
|
|
|
|
|
|
|
|
|
|
|
|
|
|
|
|
|
|
|
|
|
|
|
|
|
|
|
|
|
|
|
|
|
|
|
|
|
|
|
|
|
|
|
|
|
|
|
|
|
|
|
|
|
|
|
|
|
|
|
|
|
|
|
|
|
|
|
|
|
|
|
|
|
|
|
|
|
|
|
|
|
|
|
|
|
|
|
|
|
|
|
|
|
|
|
|
|
|
|
|
|
|
|
|
|
|
|
|
|
|
|
|
|
|
|
|
|
|
|
|
|
|
|
|
|
|
|
|
|
|
|
|
|
|
|
|
|
|
|
|
|
|
|
|
|
|
|
|
|
|
|
|
|
|
|
|
|
|
|
|
|
|
|
|
|
|
|
|
|
|
|
|
|
|
|
|
|
|
|
|
|
|
|
|
|
|
|
|
|
|
|
|
|
|
|
|
|
|
|
|
|
|
|
|
|
|
|
|
|
|
|
|
|
|
|
|
|
|
|
|
|
|
|
|
|
|
|
|
|
|
|
|
|
|
|
|
|
|
|
|
|
|
|
|
|
|
|
|
|
|
|
|
|
|
|
|
|
|
|
|
|
|
|
|
|
|
|
|
|
|
|
|
|
|
|
|
|
|
|
|
|
|
|
|
|
|
|
|
|
|
|
|
|
|
|
|
|
|
|
|
|
|
|
|
|
|
|
|
|
|
|
|
|
|
|
|
|
|
|
|
|
|
|
|
|
|
|
|
|
|
|
|
|
|
|
|
|
|
|
|
|
|
|
|
|
|
|
|
|
|
|
|
|
|
|
|
|
|
|
|
|
|
|
|
|
|
|
|
|
|
|
|
|
|
|
|
|
|
|
|
|
|
|
|
|
|
|
|
|
|
|
|
|
|
|
|
|
|
|
|
|
|
|
|
|
|
|
|
|
|
|
|
|
|
|
|
|
|
|
|
|
|
|
|
|
|
|
|
|
|
|
|
|
|
|
|
|
|
|
|
|
|
|
|
|
|
|
|
|
|
|
|
|
|
|
|
|
|
1 |
2 |
3 |
4 |
5 |
6 |
7 |
8 |
1STANDBY-ON
switches the unit on or to standby (off)
2 IR sensor for the remote control
3(same function as red button on the remote control) switches on or off the subtitles of a DVD during playback INTERNET, PC LINK: multifunction button
4 display
5(same function as green button on the remote control) selects the camera angle (if available) of a DVD during playback
INTERNET, PC LINK: multifunction button
6 1 2 3 4
moves left, right, up or down in the menus, selects favorite radio stations
79
DVD: stops disc playback; clears a program if pressed longer than 2 seconds.
8p
6.3 mm headphones jack
9VOLUME adjusts the volume
0;
pauses playback
!2OK
starts playback, resumes playback, or confirms a selection
@SOURCE
selects a source (DISC 1–5,TV,TUNER, AUX DIGITAL, AUX ANALOG, INTERNET, PC LINK)
# 
INTERNET,TUNER: shows your favorite Internet media services and radio stations
$(same function as RECENT on the remote control) INTERNET, PC LINK: displays the last 20 items played
% disc trays 1–5
^DISC 1–5, OPEN·CLOSE / opens/closes disc trays 1–5
10
Connections
% $ # |
@ |
|
|
|
ETHERNET |
|
|
|
|
|
|
FRONT |
|
|
|
|
|
|
|
|
|
LEFT |
|
|
|
|
|
|
|
|
|
FRONT |
|
|
|
|
|
|
|
|
|
RIGHT |
|
|
|
|
|
|
|
|
|
CENTRE |
|
|
|
|
|
|
|
|
|
SURR |
SUB-W |
|
|
|
|
CVBS |
|
ANTENNA |
|
DIGITAL |
|
|
|
|
|
|
|||
LEFT |
LEFT |
L |
|
|
|
|
AM |
FM |
|
|
|
OUT |
|
|
|
|
|||
SURR |
SUB-W |
|
|
|
|
|
|
|
|
|
|
|
|
|
|
|
|
||
RIGHT |
RIGHT |
DIGITAL |
|
|
|
|
|
P-SCAN |
|
|
|
R |
|
|
|
|
|
||
|
|
IN |
|
|
|
|
|
|
|
|
|
|
|
|
|
|
|
|
|
|
|
|
AUX IN |
TV IN |
LINE OUT |
S - VIDEO |
ON |
OFF |
|
|
|
|
|
AUDIO |
|
VIDEO OUT |
COMPONENT |
|
|
1 |
2 |
3 4 5 6 7 8 9 |
0 ! |
|
1 FRONT LEFT, FRONT RIGHT, CENTRE, |
|
7 VIDEO OUT/S-VIDEO |
|
|
SURR LEFT, SURR RIGHT |
|
|
connect to S-Video input of the TV |
|
FRONT LEFT: connect the front left speaker |
|
8 COMPONENT PR, PB,Y |
|
|
FRONT RIGHT: connect the front right speaker |
|
|
||
CENTRE: connect the center speaker |
|
|
connect to the corresponding Component video inputs of |
|
|
|
the TV |
|
|
SURR LEFT: connect the surround left speaker |
|
|
||
|
|
|
||
SURR RIGHT: connect the surround right speaker |
|
9 P-SCAN |
|
|
2 SUB-W LEFT, SUB-W RIGHT |
|
|
to switch on or off progressive scan |
|
|
|
|
|
|
connect the left and right subwoofers |
|
|
0 ANTENNA / AM |
|
3 AUX IN L, R |
|
|
connect the AM loop antenna |
|
|
|
|
|
|
connect to the left and right analog audio output jacks of |
! ANTENNA / FM |
|
||
external equipment (e. g. tape deck,VCR, …) |
|
connect the FM antenna cable |
|
|
4 TV IN L, R |
|
|
@ MAINS ~ |
|
connect to the left and right AUDIO OUT jacks of the TV |
After all other connections have been made, connect |
|||
5 LINE OUT L, R |
|
|
the power cable to the power outlet. |
|
|
|
|
|
|
connect to the left and right analog audio input jacks of an |
# ETHERNET |
|
||
external equipment (e. g. tape deck, …) |
|
|
connect to router, broadband Internet, or PC |
|
6 VIDEO OUT/CVBS |
|
|
$ DIGITAL OUT |
|
connect to the Composite Video input of the TV |
|
connect to the digital coaxial input of digital equipment |
||
% DIGITAL IN
connect to the digital coaxial output of digital equipment
Before starting with the connections, make sure all equipment you want to connect – as well as the Streamium System – are disconnected from the power outlets.
English
11
English
Connecting …
Before you make connections, make sure the unit is not connected to the power supply.
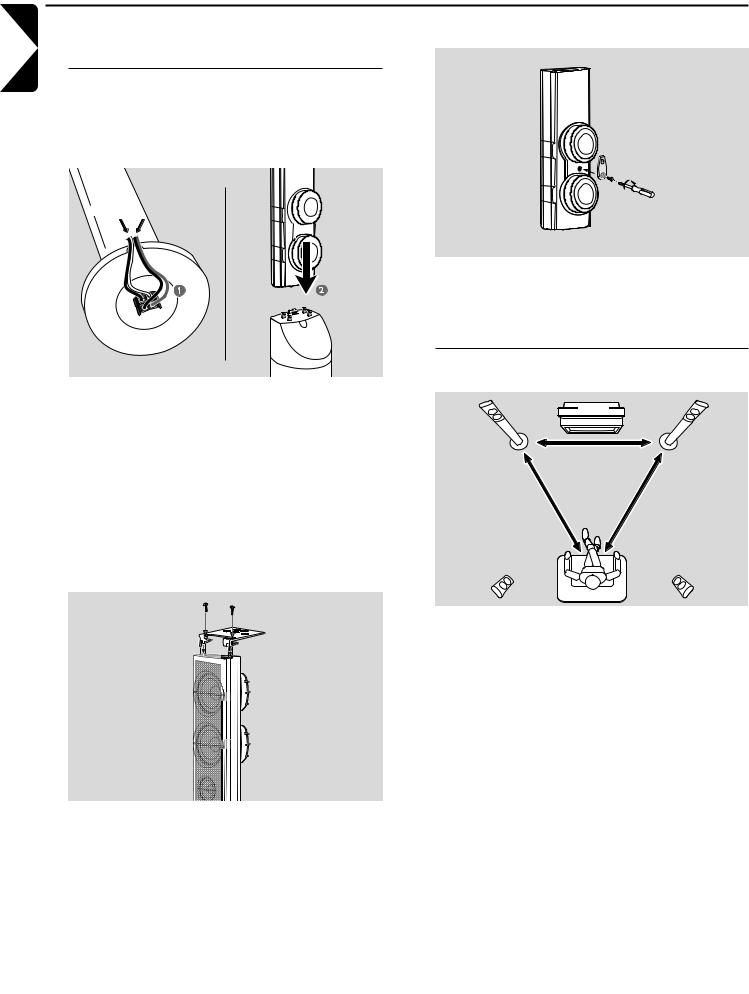
Assembling of the speakers
You can use the subwoofers as speaker stands for the front or for the rear speakers.The following text describes the setup of the subwoofers in the front.
Attaching the front speakers to the subwoofers
white (red) |
purple |
1Connect the speaker cables to the connectors on the bottom of the subwoofers before attaching the front speakers.
2Put the front speakers on top of the subwoofers and press them down gently until you hear a “click.”
The front speakers are now connected to the subwoofers.
3Next, attach the rear speakers to the wall or use the supplied mini speaker stands.
Attaching the mini speaker stands to the rear speakers
Attaching the rear speakers to the wall
1Attach the supplied bracket firmly to the rear of the rear speaker using the supplied screws.
2Hook the speaker carefully onto a screw in the wall, using the hole in the bracket.
Positioning of the speakers and the subwoofers
centre |
front L, |
front R, |
subwoofer |
subwoofer |
rear L |
rear R |
Attach a supplied speaker stand firmly to the bottom of each rear speaker using the supplied screws.
1Place the subwoofers with the front speakers at an equal distance to your TV.The distance between your listening position and the left and right front speakers should be approximately equal to the distance between the left and right front speakers.
2Place the center speaker on top of the TV.
3Place the left and right rear speakers to the left and right of your preferred listening position.
Notes:
Keep the speakers away from the room´s corners. Position the speakers at ear level.
Leave enough space between the left and right front speakers and the TV to avoid magnetic interference.
12
|
|
|
Connecting … |
|
|
|
|
|
Connecting the speakers and the |
Connecting the tuner antennas |
|
|
subwoofers |
|
|
We recommend connecting all speakers. At least the |
|
|
front speakers (left and right) and the subwoofers |
|
|
must be connected. If you do not connect all speakers, |
||
|
||
press SURROUND repeatedly to select STEREO after |
|
|
switching on the Streamium System. |
|
When connecting the speakers make sure the colors
of the speaker cables correspond with the colors of the ETHERNET connectors.
1Insert the supplied speaker cables into the click-fit connectors on the speakers.
2Then connect the speaker cables to the corresponding click-fit connectors on the rear of the unit so that the colors of the speaker connectors and the speaker cables match.
Speaker |
+ |
− |
Front Left |
white |
black |
Front Right |
red |
black |
Center |
green |
black |
Surround Left |
blue |
black |
Surround Right |
grey |
black |
Subwoofer Left |
purple |
black |
Subwoofer Right |
purple |
black |
How to use the click fit connectors
1Press down the clip and fully insert the stripped portion of the speaker cable into the socket.
2Release the clip again.
|
|
CVBS |
|
ANTENNA |
|
|
|
|
|
|
|
L |
|
|
|
AM |
FM |
R |
|
|
|
P-SCAN |
|
|
|
|
|
|
|
AUX IN |
TV IN |
LINE OUT S - VIDEO |
ON |
OFF |
|
|
AUDIO |
VIDEO OUT |
COMPONENT |
|
|
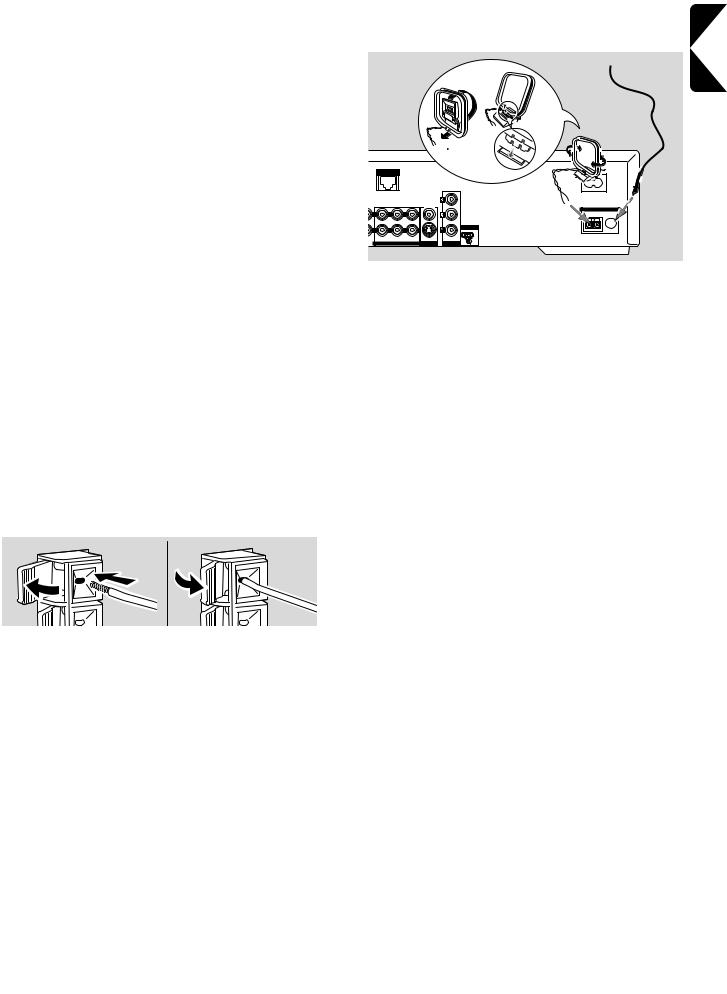
Connecting the FM antenna
1Connect the supplied FM antenna cable to the FM ANTENNA jack on the rear of the unit.
2Extend the antenna cable and put it in a position where the reception is best.
Connecting the AM antenna
1Assemble the supplied AM loop antenna as shown above.
2Connect the antenna to the AM ANTENNA jack on the rear of the unit.
3Place the antenna on a shelf or mount it on the wall in a position where the reception is best.
English
13

English
Connecting …
Connecting the TV
After connecting the speakers, choose one of several kinds of video connections, which differ in quality. For the availability of the necessary connectors on your TV, please read the user´s manual of your TV.
You only need one video connection between the TV and the Streamium System (Component Video, S-Video, or Composite Video).
S-Video or Component Video provides better picture quality than Composite Video.To use these connections, these options must be available on your TV.
Connect the Streamium System directly to the TV.
Using Component Video (PR PB Y)
Using Composite Video (CVBS)
COMPONENT
VIDEO IN
S-VIDEO
IN
AUDIO  Pr/Cr
Pr/Cr
OUT
Pb/Cb
VIDEO IN
Y
|
|
|
ETHERNET |
|
|
|
|
|
FRONT |
|
|
|
|
|
|
|
|
LEFT |
|
|
|
|
|
|
|
|
FRONT |
|
|
|
|
|
|
|
|
RIGHT |
|
|
|
|
|
|
|
|
CENTRE |
|
|
|
|
|
|
|
|
SURR |
SUB-W |
|
|
|
|
CVBS |
|
|
DIGITAL |
|
|
|
|
|
|
||
LEFT |
LEFT |
L |
|
|
|
|
|
|
SURR |
SUB-W |
OUT |
|
|
|
|
|
|
RIGHT |
RIGHT |
DIGITAL |
|
|
|
|
|
P-SCAN |
|
|
R |
|
|
|
|
||
|
|
IN |
|
|
|
|
|
|
|
|
|
|
|
|
|
|
|
|
|
|
AUX IN |
TV IN |
LINE OUT |
S - VIDEO |
ON |
OFF |
|
|
|
|
AUDIO |
|
VIDEO OUT |
COMPONENT |
|
COMPONENT
VIDEO IN
S-VIDEO
IN
AUDIO  Pr/Cr
Pr/Cr
OUT
Pb/Cb
VIDEO IN
Y
|
|
|
ETHERNET |
|
|
|
|
|
FRONT |
|
|
|
|
|
|
|
|
LEFT |
|
|
|
|
|
|
|
|
FRONT |
|
|
|
|
|
|
|
|
RIGHT |
|
|
|
|
|
|
|
|
CENTRE |
|
|
|
|
|
|
Pr |
|
SURR |
SUB-W |
|
|
|
|
CVBS |
|
|
DIGITAL |
|
|
|
|
|
|
||
LEFT |
LEFT |
L |
|
|
|
Pb |
|
|
SURR |
SUB-W |
OUT |
|
|
|
|
|
|
RIGHT |
RIGHT |
DIGITAL |
|
|
|
|
|
P-SCAN |
|
|
R |
|
|
|
|
||
|
|
IN |
|
|
|
|
|
|
|
|
|
|
|
|
Y |
|
|
|
|
|
AUX IN |
TV IN |
LINE OUT |
S - VIDEO |
|
|
|
|
|
ON |
OFF |
||||
|
|
|
|
AUDIO |
|
VIDEO OUT |
COMPONENT |
|
1Use the component video cables (red/blue/green) to
connect the Streamium System’s COMPONENT PR PB Y jacks to the corresponding Component Video Input jacks (or labelled as Pr/Cr Pb/Cb Y or YUV) on the TV.
2To hear the sound of the TV through this Streamium System, use the audio cables (white/red) to connect TV IN (L/R) jacks to the corresponding AUDIO OUT jacks on the TV.
3If you are using a Progressive Scan TV (TV must indicate Progressive Scan or ProScan capability,) set the P-SCAN switch (at the rear of the Streamium System) to ON.
Otherwise, set it to OFF.
Notes:
To set Video Output to ‘Y PB PR’, change the setting manually in the System Menu. See chapter “No picture or distorted picture.”
The progressive scan video quality is only possible through the COMPONENT PR PB Y output.
1Use the composite video cable (yellow) to connect the Streamium System’s CVBS jack to the video input jack (or labelled as A/V In,Video In, Composite) on the TV.
2To hear the sound of the TV through this Streamium System, use the audio cable (white/red) to connect TV IN (L/R) on the Streamium System to the corresponding AUDIO OUT jacks on the TV.
3Set the P-SCAN switch to OFF.
Using S-Video
COMPONENT
VIDEO IN
S-VIDEO
IN
AUDIO  Pr/Cr
Pr/Cr
OUT
Pb/Cb
VIDEO IN
 Y
Y
|
|
|
ETHERNET |
|
|
|
|
|
FRONT |
|
|
|
|
|
|
|
|
LEFT |
|
|
|
|
|
|
|
|
FRONT |
|
|
|
|
|
|
|
|
RIGHT |
|
|
|
|
|
|
|
|
CENTRE |
|
|
|
|
|
|
|
|
SURR |
SUB-W |
|
|
|
|
CVBS |
|
|
DIGITAL |
|
|
|
|
|
|
||
LEFT |
LEFT |
L |
|
|
|
|
|
|
SURR |
SUB-W |
OUT |
|
|
|
|
|
|
RIGHT |
RIGHT |
DIGITAL |
|
|
|
|
|
P-SCAN |
|
|
R |
|
|
|
|
||
|
|
IN |
|
|
|
|
|
|
|
|
|
|
|
|
|
|
|
|
|
|
AUX IN |
TV IN |
LINE OUT |
S - VIDEO |
ON |
OFF |
|
|
|
|
AUDIO |
|
VIDEO OUT |
COMPONENT |
|
1Use an S-Video cable (not supplied) to connect the Streamium System’s S-VIDEO jack to the S-Video input jack (or labelled as Y/C or S-VHS) on the TV.
2To hear the sound of the TV through this Streamium System, use the audio cable (white/red) to connect TV IN (L/R) on the Streamium System to the corresponding AUDIO OUT jacks on the TV.
3Set the P-SCAN switch to OFF.
14
Connecting …
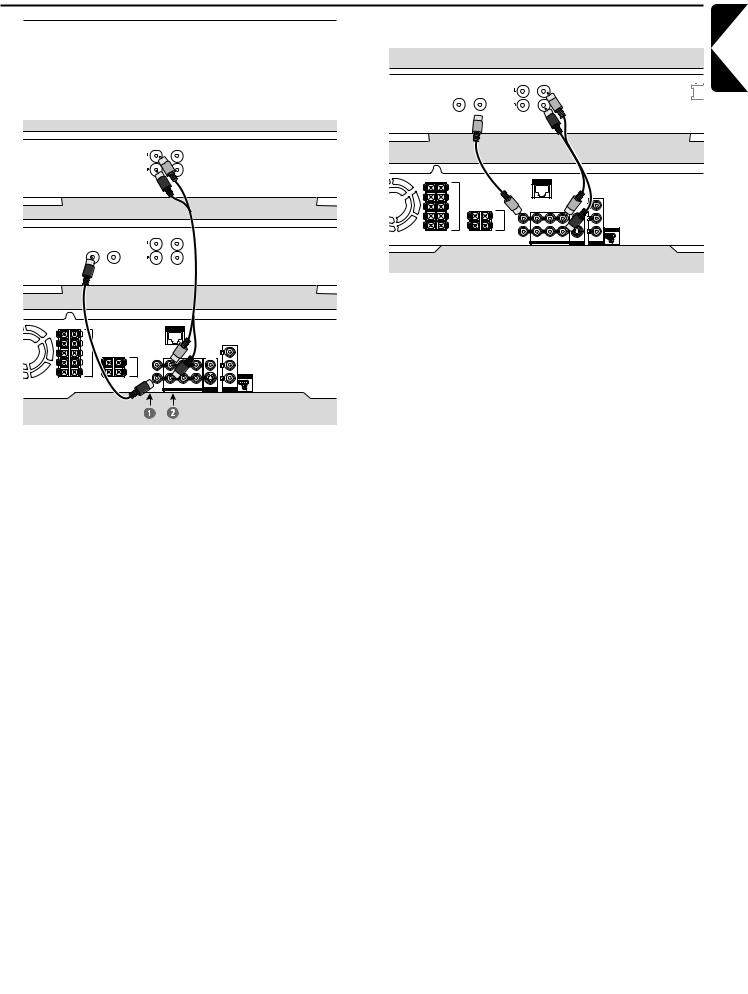
Connecting audio equipment
Connections for playback
To play the sound of additional audio equipment on the Streamium System, one digital and one analog connection are available.
ANALOG
OUT IN
Tape deck
OUT IN
CD recorder
OUT IN
DIGITAL |
ANALOG |
|
|
|
ETHERNET |
|
|
|
|
|
FRONT |
|
|
|
|
|
|
|
|
LEFT |
|
|
|
|
|
|
|
|
FRONT |
|
|
|
|
|
|
|
|
RIGHT |
|
|
|
|
|
|
|
|
CENTRE |
|
|
|
|
|
|
|
|
SURR |
SUB-W |
|
|
|
|
CVBS |
|
|
DIGITAL |
|
|
|
|
|
|
||
LEFT |
LEFT |
L |
|
|
|
|
|
|
SURR |
SUB-W |
OUT |
|
|
|
|
|
|
|
|
|
|
|
|
|
||
RIGHT |
RIGHT |
DIGITAL |
|
|
|
|
|
P-SCAN |
|
|
R |
|
|
|
|
||
|
|
IN |
|
|
|
|
|
|
|
|
|
|
|
|
|
|
|
|
|
|
AUX IN |
TV IN |
LINE OUT |
S - VIDEO |
ON |
OFF |
|
|
|
|
AUDIO |
|
VIDEO OUT |
COMPONENT |
|
1Connect a digital RCA-style cable to the DIGITAL IN of the Streamium System and to the digital output jack of the digital equipment.
2Connect an RCA-style audio cable to AUX IN (L/R) on the Streamium System and to the left and right analog output jacks of your tape deck, CD player, or similar.
Notes:
To use these connections, press AUX on the remote control repeatedly (or rotate SOURCE on the Streamium System) to
select AUX DIGITAL or AUX ANALOG.
You cannot connect a turntable to AUX IN.
Connection for digital or analog recordings
OUT |
IN |
~ AC M |
OUT IN
DIGITAL  ANALOG
digital or analog
|
|
|
ETHERNET |
|
|
|
|
|
FRONT |
|
|
|
|
|
|
|
|
LEFT |
|
|
|
|
|
|
|
|
FRONT |
|
|
|
|
|
|
|
|
RIGHT |
|
|
|
|
|
|
|
|
CENTRE |
|
|
|
|
|
|
|
|
SURR |
SUB-W |
|
|
|
|
CVBS |
|
|
DIGITAL |
|
|
|
|
|
|
||
LEFT |
LEFT |
L |
|
|
|
|
|
|
SURR |
SUB-W |
OUT |
|
|
|
|
|
|
RIGHT |
RIGHT |
DIGITAL |
|
|
|
|
|
P-SCAN |
|
|
R |
|
|
|
|
||
|
|
IN |
|
|
|
|
|
|
|
|
|
AUX IN |
TV IN |
LINE OUT |
S - VIDEO |
ON |
OFF |
|
|
|
|
AUDIO |
|
VIDEO OUT |
COMPONENT |
|
●To record the sound from the Streamium System to a digital system, connect a digital RCA-style cable to DIGITAL OUT on the Streamium System and to the DIGITAL IN jack of the digital equipment.
0When digital recording is not permissible, record the analog sound from the Streamium System. Use the audio cable (white/red) to connect LINE OUT (L/R) on the Streamium System to the corresponding AUDIO IN (L/R) jacks on the digital equipment.
0Refer to the Instruction Manual of the digital equipment on recording.
Recording is permissible insofar as copyright or other rights of third parties are not infringed upon.
When playing an MP3-CD on the Streamium System, no signal will be available using DIGITAL OUT.
This product incorporates Macrovision copyright protection technology that is protected by US patent no. 4631603, 4577216 and 4819098, as well as other intellectual property rights. Use of this copyright protection technology must be authorized by Macrovision Corporation, and is only intended for home use and other pay-per-view applications. Macrovision must provide written authorization for any other use. Change to the device, reverse engineering or disassembly is prohibited.
English
15
English
Connecting …
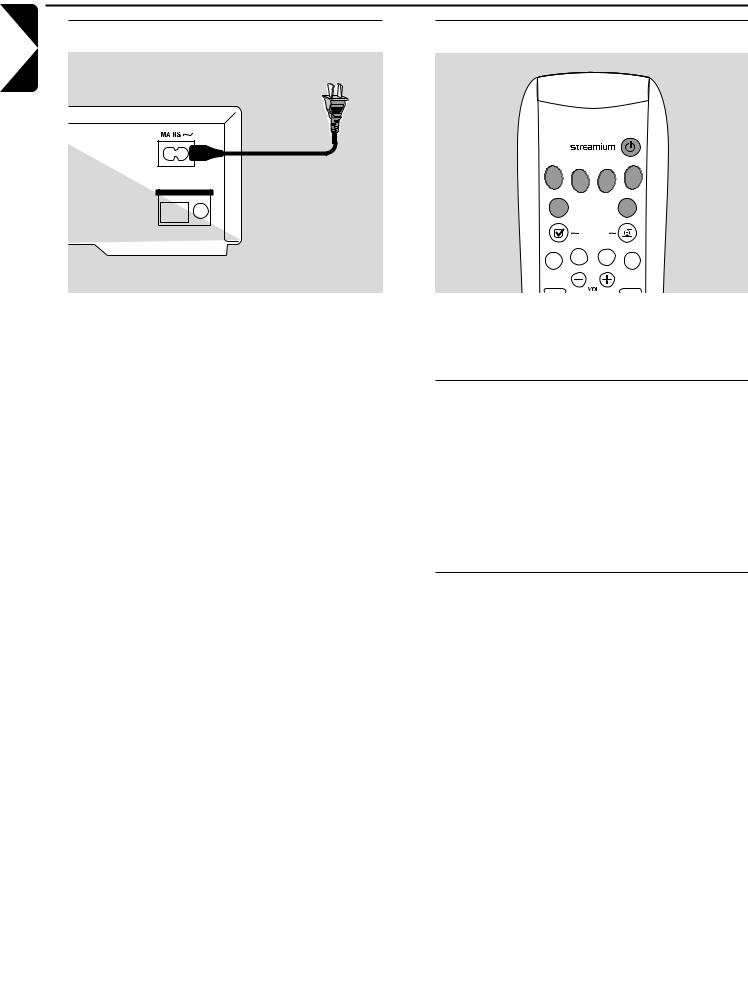
Connecting to power supply |
|
Switching on the system |
|
|
|
|
|
|
|
|
|
|
|
|
|
ANTENNA
AM FM
The type plate is located on the rear of the unit.
1Check whether the power voltage as shown on the type plate corresponds to your local power voltage. If it does not, consult your dealer or service organization.
2Make sure your TV is switched off before connecting the Streamium System to the power supply for the first time.
3Make sure all connections have been made before switching on the power supply.
4Connect the supplied power cable to MAINS ~ at the rear of the Streamium System and to the power outlet.
When the unit is switched to standby (off), it is still consuming some power. To disconnect the unit from the power completely, remove the power plug from the wall outlet.
To avoid overheating of the unit, a safety circuit has been built in.Therefore your unit may disconnect under extreme conditions. If this happens, unplug the unit and let it cool down before reusing it.
DVD INTERNET |
PC LINK TUNER |
||
TV |
|
|
AUX |
|
(UN) MARK |
VIEW |
|
|
FAVORITES |
|
|
SUBTITLE |
ANGLE |
ZOOM |
AUDIO |
|
|
||
SYSTEM |
|
|
DISC |
MENU |
|
|
MENU |
Press STANDBY-ON on the Streamium System or one of the source buttons on the remote control (DVD,TV,
TUNER, AUX, INTERNET, PC LINK) to switch on the Streamium System.
Selecting a source
Turn SOURCE on the Streamium System or press DVD, INTERNET, PC LINK,TUNER,TV or AUX on the remote control to select a source.
The selected source will be displayed.
On the remote control:
–To select disc 1, 2, … 5, press DVD repeatedly.
–To select equipment connected to AUX IN or DIGITAL IN on the Streamium System, press AUX repeatedly.
Switching to Eco Power standby
Press STANDBY-ON on the Streamium System or 2 on the remote control.
The STANDBY-ON button will light up on the system.
The display screen will go blank.
Note:The Streamium System will switch to Standby automatically after 20 minutes of no activities, if “Sleep timer” is switched on in the System Menu and if DVD or INTERNET is selected.
16
Loading...