

Page 1
For product information and support, visit
www.philips.com/dictation
LAN Docking Station
for the Digital Pocket Memo 9600/9620
LFH 9160
EN User manual 3
DE Benutzerhandbuch 27
FR Manuel de l‘utilisateur 53
ES Manual del usuario 79
Page 2

Page 3

User manual
ENGLISH
1 Welcome 4
1.1 Product highlights 4
1.2 What’s in the box 4
2 Important 5
2.1 Safety 5
2.2 Disposal of your old product 5
2.3 Technical support and warranty 5
3 Get started 6
3.1 Overview 6
3.2 System requirements 6
3.3 Installation 7
3.3.1 Installation using DHCP 7
3.3.2 Installation using the factory default IP
address 8
4 Configuration 9
4.1 Setting up the FTP server 9
4.2 Setting up the file upload directory on
your FTP server 10
4.3 Files stored in the file upload directory 10
4.4 Setting up the file upload user account on
your FTP server 11
4.5 FTP settings 11
4.6 Automatic file upload 12
4.7 Changing the IP address of the LAN
Docking Station 12
4.7.1 Assigning an IP address from DHCP 13
4.7.2 Assigning a static IP address 13
4.8 Changing the LAN Docking Station
administrator password 15
4.9 Assigning a comment to the LAN
Docking Station 15
4.10 Upgrading the LAN Docking Station
firmware 16
4.11 Resetting to factory defaults 17
5 LAN Docking Station
Administration Tool 18
5.1 Obtaining the Administration Tool
software 18
5.2 System requirements 18
5.3 Installation 18
5.4 First-time configuration 18
5.5 Overview of the LAN Docking Stations 19
5.6 Using the Initial Setup Installer to install a
LAN Docking Station 21
5.7 Changing the settings of multiple LAN
Docking Stations 22
5.8 Changing the settings of a single LAN
Docking Station 22
5.9 Upgrading the firmware of LAN Docking
Stations 23
6 Troubleshooting 24
3User manual
Page 4

Welcome1
Congratulations on your purchase and welcome
to Philips!
To fully benefit from the support that Philips
oers, visit our Website for support information
such as user manuals, software downloads,
warranty information and more:
www.philips.com/dictation.
Product highlights1.1
Simplify the dictation workflow:
Upload the dictation files from your Digital •
Pocket Memo directly to the network
without a PC or upload application
Reduce document creation time, transfer •
dictation files directly to your transcriptionist
Recharge the batteries of your Digital Pocket •
Memo while docked
Guaranteed security throughout the
entire dictation workflow:
Password protection of the LAN Docking •
Station
Support of SFTP file transfer•
Encryption of dictation (.dss) files•
Theft protection by Kensington lock•
for multiple authors
Minimum user training required•
Remote configuration and maintenance of the •
LAN docking station
Platform independent (key components •
function in Windows and Linux environments)
What’s in the box1.2
LAN Docking Station 9160•
Power Supply•
RJ45 network cable•
User manual•
Reduce total cost of IT ownership and
maintenance:
Save time by centralized software installation •
4 User manual
Page 5

Important2
Safety2.1
To avoid short circuit, do not expose the •
product to rain or water.
Do not expose the device to excessive •
heat caused by heating equipment or direct
sunlight.
Protect the cables from being pinched, •
particularly at plugs and the point where they
exit from the device.
Back up your files. Philips is not responsible •
for any loss of data.
Disposal of your old product2.2
and human health.
Batteries (including built-in rechargeable •
batteries) contain substances that may pollute
the environment. All batteries should be
disposed of at an ocial collection point.
Technical support and warranty2.3
This Philips product was designed and
manufactured to the highest quality standards.
If your Philips product is not working correctly
or is defective, contact your supplying Philips
Speech Processing dealer who will provide
you with the necessary information on how to
proceed.
If you have questions that your dealer cannot
answer or any other related question, visit
www.philips.com/dictation to contact us.
ENGLISH
Your product is designed and manufactured •
with high quality materials and components,
that can be recycled and re-used.
When this crossed-out wheeled bin •
symbol is attached to a product, it
indicates that the product is covered
by the European Directive 2002/96/
EC.
Please become informed about the local •
separate collection system for electrical and
electronic products.
Please act according to your local rules and •
do not dispose of old products with your
normal household waste. The correct disposal
of old products will help prevent potential
negative consequences for the environment
No components are user-serviceable. Do not
open or remove covers and do not insert
objects not suitable for the specific connectors.
Repairs may be made only by Philips service
centers and ocial repair facilities. Failure to do
so will void any warranty, stated or implied. Any
operation expressly prohibited in this manual,
any adjustments, or assembly procedures not
recommended or authorized in this manual will
void the warranty.
5User manual
Page 6
Get started3
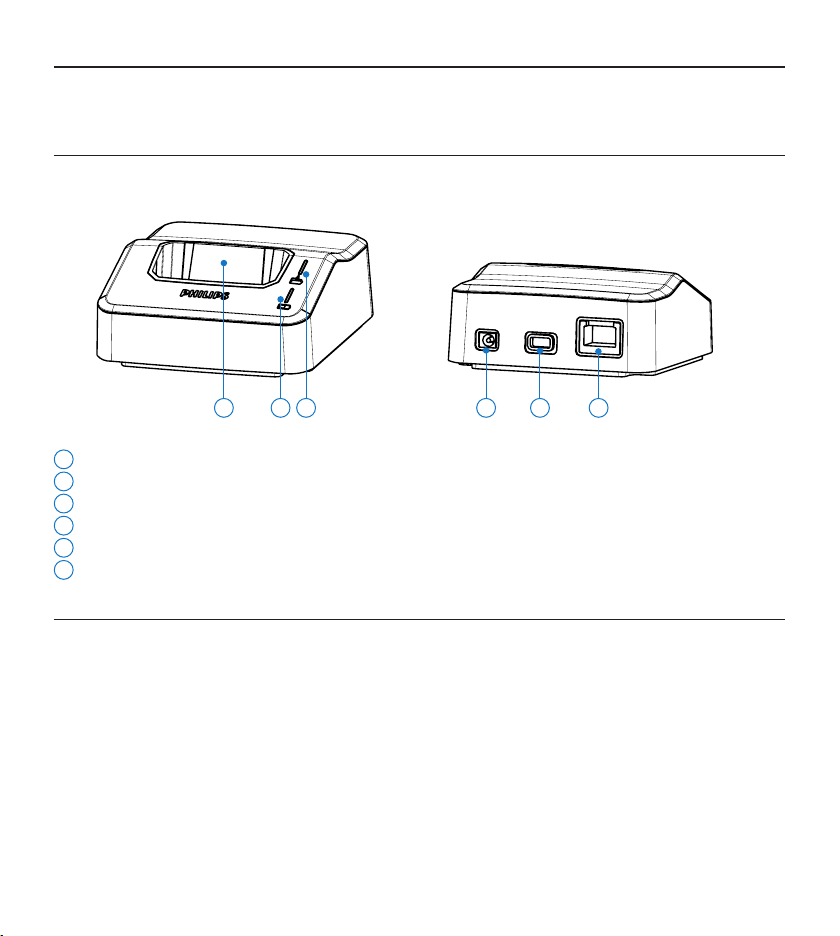
Overview3.1
1 2 3 4 5 6
1
Docking slot for the Digital Pocket Memo
2
Green LED indicates that the Digital Pocket Memo batteries are recharging
3
Yellow LED indicates that dictation files are being transferred
4
Power supply socket
5
Socket for Kensington lock
6
RJ45 network socket for connection to the Local Area Network
System requirements3.2
10/100 Mbit/s Local Area Network with RJ45 connections•
FTP server with a user account configured for the LAN Docking Station•
DHCP server (recommended)•
6 User manual
Page 7

3.3 Installation
When installing one or more new LAN Docking
Stations to your network, you can set it up in
one of two ways:
Use the DHCP service on your network •
to assign IP addresses to the LAN Docking
Stations based on the MAC address of each
LAN Docking Station, or
Set the LAN docking station to a default IP •
address to access the configuration interface
and assign a fixed IP address
The LAN Docking has a default configuration
setting to use the DHCP server to obtain its
IP address. This makes it easier to do a batch
installation of several LAN Docking Stations in
a corporate network. See Installation using DHCP
below for more information.
If your network does not support DHCP,
you can set the LAN Docking Station to use
a default static IP address to get started. See
Installation using the factory default IP address
below for more information.
3.3.1 Installation using DHCP
If your network has a DHCP server, follow
the steps below to install new LAN Docking
Stations:
Make a note of the MAC address of every 1
LAN Docking Station that you are about
to install (The MAC address can be found
on the bottom plate of the LAN Docking
Station).
Configure your DHCP server to assign an IP 2
address to each LAN Docking Station based
on the MAC address of each LAN Docking
Station. Refer to the documentation of your
DHCP server for more information.
Deploy the LAN Docking Stations 3
throughout your organization. Connect each
LAN Docking Station to the main power
supply with the included Philips power
supply. Connect each LAN Docking Station
to a free network socket using the RJ45
network cable.
Open a Web browser on your PC and load 4
the LAN Docking Station configuration
interface for each assigned IP address
to configure the LAN Docking Stations
individually. See Configuration on page 9 for
more information.
D Note
The LAN Docking Station is configured by
default to obtain an IP address from your DHCP
server. If this default setting has been changed,
you must reset the device to its factory default
settings before starting. Read Resetting to factory
defaults on page 17 for information on how
to reset the LAN Docking Station to factory
default settings.
E Tip
It is good practice to make a note of the
location and network socket number of
each LAN Docking Station before they are
deployed. You can enter this information into
the comment field of the LAN Docking Station
configuration interface, which will make it easier
ENGLISH
7User manual
Page 8

to troubleshoot and maintain LAN Docking
Stations in your network. See Assigning a
comment to the LAN Docking Station on page 15
for more information about assigning comments.
3.3.2 Installation using the factory default
IP address
If your network does not have a DHCP server,
follow these steps to install a new LAN Docking
Station:
Connect the LAN Docking Station to the 1
main power supply with the included Philips
power supply.
Connect the LAN Docking Station to a free 2
network socket using the RJ45 network
cable.
Slide a Digital pocket Memo 9600 or 9620 3
into the docking slot of the LAN Docking
Station.
Press and hold the 4
MENU button on the Digital Pocket Memo
FUNCTION and the
simultaneously for 3 seconds. The LAN
Docking Station will be configured to use
the static IP address 192.168.109.1 (subnet
mask 255.255.255.0).
Configure the network connetion settings 5
of your PC to use a static IP address
like 192.168.109.xxx and subnet mask
255.255.255.0 for the network socket that is
used to connect the LAN Docking Station.
Open a Web browser on your PC and enter 6
http://192.168.109.1 in the address field
Your user name and password is required. 7
Leave the
USER NAME field empty and enter
‚administrator‘ in the
PASSWORD field.
Change the IP address of the LAN Docking 8
Station according to your network policy.
See Assigning a static IP address on page 13
for more information.
Make any additional configuration changes as 9
you see fit. See Configuration on page 9 for
more information.
D Note
This procedure resets all configuration settings
of the LAN Docking Station to their factory
defaults.
C Important
If installing several LAN Docking Stations,
be sure to change the IP address of the LAN
Docking Station before connecting the next one
to the network. Failure to do so will result in
IP address conflicts, making the configuration
interface of the LAN Docking Station
inaccessible.
8 User manual
Page 9
4 Configuration
Once the LAN Docking Station is connected to
the network, it can be configured using a simple
HTML interface from any HTML4-compliant
Web browser.
There is also an Administration Tool that can
be used to manage and update the configuration
settings of several LAN Docking Stations (batch
update). See LAN Docking Station Administration
Tool on page 18 for more information.
To open the LAN Docking Station configuration
interface, follow these steps:
Open a Web browser on your PC.1
Enter the IP address of the LAN Docking 2
Station that you want to configure into the
ENGLISH
address field of the Web browser.
The Web browser prompts you for a user 3
name and password. Leave the user name
field empty and enter the administrator
password. If you are accessing the
configuration interface for the first time, the
default password is ‚administrator‘.
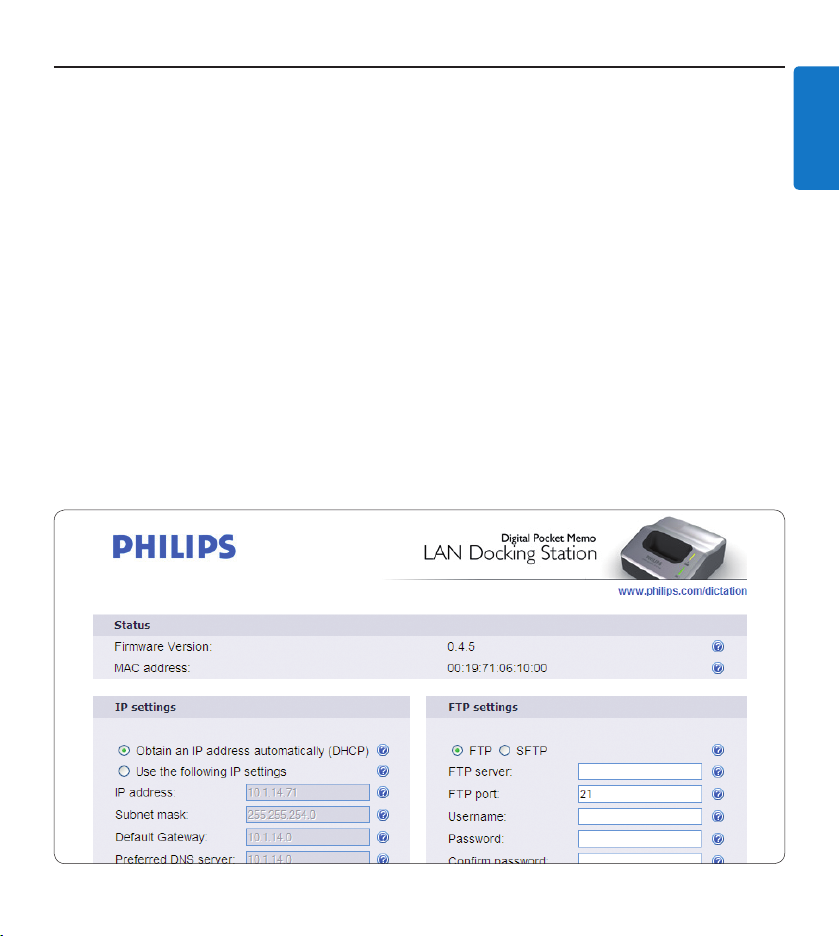
The configuration interface appears with 4
the following panels: Status, IP settings, FTP
settings, Automatic file upload, Comments,
Firmware upgrade and Administrator
password.
9User manual
Page 10

4.1 Setting up the FTP server
The LAN Docking Station can automatically
upload dictation files to an FTP server when a
Digital Pocket Memo is connected.
The LAN Docking Station has been tested with
a number of FTP servers for the Windows and
Linux platforms. It should also function with
any other FTP server conforming to the FTP
protocol specifications standard. The following
FTP servers have been tested with the LAN
Docking Station:
Microsoft Internet Information Server•
WS FTP Server•
WinSSHD•
FileZilla Server•
freeftpd•
OpenSSHD•
If you have multiple LAN Docking Stations
on your network, there is no need to create
a dierent file upload directory for each
installation. The LAN Docking Station was
designed to work more eciently with a single
shared file upload directory.
E Tip
It is a good practice to make the file upload
directory available to employees at your
organization as a shared network folder
that they can map to a drive letter on their
computers. This makes it quick and easy for
them to pick up dictation jobs, and allows you
to control access to the uploaded dictation files
using the existing user and group configuration
in your network domain.
D Note
The LAN Docking Station opens FTP data
connections in passive mode. If there is a
firewall between the LAN Docking Station
and your FTP server, make sure that the LAN
Docking Station can connect to port numbers
used for passive data transfer. Refer to the
User Manual of your FTP server for more
information.
Setting up the file upload directory 4.2
on your FTP server
Create a directory on the FTP server to store
uploaded dictation files. This dictory will be
referred to as the ‚file upload directory‘ in this
user guide.
10 User manual
Files stored in the file upload 4.3
directory
When dictation files are uploaded from a Digital
Pocket Memo, the LAN Docking Station creates
a subdirectory with the serial number of the
Digital Pocket Memo under the file upload
directory and places all uploaded files there. The
file names of the uploaded files are composed of
the name of the author, the sequential number
of the file, and the .DSS file extension.
The LAN Docking Station also creates a
“configuration” subdirectory in the file upload
directory and creates a file named MAC_config.
txt, where MAC is the MAC address of the
LAN Docking Station. These files contain
configuration information for the LAN Docking
Page 11

Station and are used by the Administration Tool.
See LAN Docking Station Administration Tool on
page 18 for more information.
Setting up the file upload user 4.4
account on your FTP server
Create a user account on your FTP server
that the LAN Docking Station will use to
upload dictation files. This user account needs
the following access rights to the file upload
directory:
Create subdirectories•
Create and write files•
List directory contents•
The user name and password for this user
account must be entered at the LAN Docking
Station configuration interface. See the next
chapter for details.
4.5 FTP settings
Once you have your FTP server set up, you
must configure the LAN Docking Station to use
it. To configure the FTP settings, follow these
steps:
Open the LAN Docking Station 1
configuration interface by entering its IP
address in your Web browser or using the
LAN Docking Station Administration Tool.
If your FTP server can accept secure (SFTP) 2
connections, check the
SFTP radio button
on the FTP settings panel. Otherwise, check
the
FTP radio button on the FTP settings
panel.
Enter the domain name or IP address of 3
your FTP server into the
FTP SERVER field.
The FTP server does not have to be on the
the local area network. If you reference
the FTP server using its domain name,
make sure that at least one DNS server is
configured (see Assigning a static IP address
on page 13) or that you are using DHCP
(see Assigning an IP address from DHCP on
page 13).
Enter the port number of your FTP server 4
into the
FTP PORT field. The port number
should be 21 for FTP or 22 for SFTP,
unless your FTP server is configured with a
nonstandard port number.
Enter the name of the FTP user account 5
into the
USERNAME field. This should be
the user account you have set up to receive
dictation file uploads from the LAN Docking
Station. See Setting up the FTP server on page
9 for more information.
Enter the password of the FTP user account 6
into the
PASSWORD field and confirm
the password by typing it again into the
CONFIRM PASSWORD field.
Enter the path to the directory to receive 7
dictation files into the
PATH ON SERVER
field. If you want to use the default directory
of the user account, leave the field empty.
Press the 8
SUBMIT button at the bottom of
the FTP settings panel in order to save your
changes.
ENGLISH
11User manual
Page 12

4.6 Automatic file upload
The automatic file upload settings let you
configure which dictation files are automatically
uploaded to the FTP server when a Digital
Pocket Memo is connected to the LAN Docking
station.
Open the LAN Docking Station 1
configuration interface by entering its IP
address in your Web browser or using the
Administration tool.
Choose how the automatic file upload 2
settings should be determined:
If you want the configuration settings •
of the connected Digital Pocket Memo
to determine which dictation files
are uploaded, then check the
CONFIGURATION DEFINES FILES TO
UPLOAD
radio button and skip to step 5.
DPM
Refer to the Digital Pocket Memo User
Manual on configuring automatic file
upload settings.
If you want to configure automatic file •
upload settings here, check the
DOCKING STATION DEFINES UPLOAD
SETTINGS
radio button. In this case,
LAN
configuration settings of the connected
Digital Pocket Memo will be ignored.
Choose which files should be uploaded 3
when a Digital Pocket Memo is connected
to the LAN Docking Station:
Check the •
UPLOAD ALL DICTATION FILES
radio button if you want all dictation files
to be uploaded when a Digital Pocket
Memo is connected.
Check the •
EOL DICTATION FILES ONLY
radio button if you only want to upload
dictation files that have been marked
finished with the EOL (End-of-Letter)
button.
Check the 4
DELETE UPLOADED check box
if you want to delete dictation files from
the Digital Pocket Memo that have been
successfully uploaded to the FTP server.
Clear the check box if you want to leave the
uploaded files on the Digital Pocket Memo.
Press the 5
SUBMIT button at the bottom of
the panel to save your changes.
12 User manual
Page 13

4.7 Changing the IP address of the LAN
Docking Station
You can assign a static IP address to the LAN
Docking Station or have the LAN Docking
station use the DHCP service on your network
to obtain an IP address automatically.
4.7.1 Assigning an IP address from DHCP
D Note
If you are installing the LAN Docking Station for
the first time, please follow the instructions in
the chapter Installation on page 7.
To have the LAN Docking Station obtain an IP
address automatically from the DHCP server on
your network, follow these steps:
Make a note of the MAC address of the 1
LAN Docking Station. The MAC address can
be found on the bottom plate of the LAN
Docking Station.
Configure your DHCP server to assign an IP 2
address to the LAN Docking Station based
on the MAC address of the LAN Docking
Station. Refer to the documentation of your
DHCP server for more information.
Open the LAN Docking Station 3
configuration interface by entering its IP
address in your Web browser or using the
LAN Docking Station Administration Tool.
Check the 4
AUTOMATICALLY (DHCP)
OBTAIN IP ADDRESS
check box on the
IP Settings panel.
Click the 5
SUBMIT button at the bottom of
the IP settings panel in order to save your
changes. The LAN Docking Station will
obtain an IP address from the DHCP server
immediately and every time it is powered
on.
D Note
The IP address of the LAN Docking Station
is updated immediately, so its configuration
interface will no longer be accessible from the
old IP address.
4.7.2 Assigning a static IP address
D Note
If you are installing the LAN Docking Station
for the first time, follow the instructions in the
chapter Installation on page 7.
ENGLISH
13User manual
Page 14

E Tip
To display the current IP address assigned to a
LAN Docking Station and its MAC address, slide
a Digital Pocket Memo 9600 or 9620 into the
docking slot and press the
RIGHT SMART BUTTON on the Digital Pocket
MENU button and
Memo simultaneously.
To assign a static IP address to the LAN
Docking Station, follow these steps:
Open the LAN Docking Station 1
configuration interface by entering its IP
address in your Web browser or using the
LAN Docking Station Administration Tool.
Check the 2
SETTINGS
USE THE FOLLOWING IP
check box on the IP settings
panel.
Enter the IP address you want to assign 3
to the LAN Docking Station into the
ADDRESS
field.
IP
Enter the subnet mask for this IP address 4
into the
SUBNET MASK field.
Enter the IP address of your network 5
gateway into the
DEFAULT GATEWAY field.
Enter the IP address of a DNS server on 6
your network into the
field. A DNS server is only required
SERVER
PREFERRED DNS
if you reference your FTP server using a
domain name on the FTP settings panel
(see FTP settings on page 11). Leave the field
empty if you do not want to specify a DNS
server.
You can enter the IP address of another 7
DNS server into the
field. This alternate DNS server will
SERVER
ALTERNATE DNS
only be used if the preferred DNS server is
not available. Leave the field empty if you
don‘t want to specify an alternate DNS
server.
Press the 8
SUBMIT button at the bottom of
the IP settings panel in order to save your
changes. The LAN Docking Station will
change its IP address immediately and will
attempt to use this static IP address every
time it is powered on.
D Note
The IP address of the LAN Docking Station
is updated immediately, so its configuration
interface will no longer be accessible from the
old IP address.
C Important
When assigning a static IP address to the LAN
Docking Station, make sure that the address
you assign is available on your network. If the
IP address is already in use on your network,
the configuration interface of the LAN Docking
14 User manual
Page 15

Station will not be accessible. You can resolve
this situation by freeing up the IP address on
the network and powering the LAN Docking
Station o then back on, or by resetting the
LAN Docking Station to factory default settings.
See Resetting to factory defaults on page 17 for
more information.
Changing the LAN Docking Station 4.8
administrator password
To access the configuration interface of the LAN
Docking Station, you must enter a password.
The factory default password is ‚administrator‘.
The administration password protects the
settings of the LAN Docking Station against
unauthorized access. It is highly recommended
that you change the default password when you
first log on to the configuration interface.
Type the new password into the 1
ADMINISTRATOR PASSWORD field on the
password settings panel.
Confirm the password by typing it again into 2
the
CONFIRM PASSWORD field.
Press the 3
SUBMIT button at the bottom of
the password settings panel.
D Note
If the password and the confirmation do not
match, you will get an error pop-up message
after pressing the
SUBMIT button. If this
happens, start over from step 1.
C Important
When you access the configuration interface
of the LAN Docking Station, your password is
sent over the network in clear text format. Do
not use your domain administrator password
or any existing network password for the LAN
Docking Station.
E Tip
If you have several LAN Docking Stations in
your network, it is advisable to use the same
administrator password for each. This makes
it easier to access them from the LAN Docking
Station Administration Tool (see page 18).
4.9 Assigning a comment to the LAN
Docking Station
You can assign comments to each LAN Docking
Station. Assigning comments is not required, but
it can help you identify individual LAN Docking
Stations within your organization.
ENGLISH
Enter the name of the oce (where the 1
LAN Docking Station is installed) along
with a comment in the the comments panel.
This will help you identify this LAN Docking
Station.
Press the 2
SUBMIT button at the bottom of
the comments panel to save your changes.
15User manual
Page 16

D Note
The ROOM field is limited to 128 characters;
the COMMENT field is limited to 255
characters.
Upgrading the LAN Docking Station 4.10
firmware
Occasionally Philips may release new versions
of the firmware with bug fixes and feature
improvements. Visit the support center at www.
philips.com/dictation to check if a new firmware
version is available for the LAN Docking Station.
The current version of the firmware is displayed
at the top of the configuration interface on the
STATUS panel.
Download the latest firmware (.bcd file) 1
from www.philips.com/dictation.
Save the .bcd file to to a network location 2
that the LAN Docking Station can access.
This can be either an FTP server or an
HTTP Web server.
Open the LAN Docking Station 3
configuration interface by entering its IP
address in your Web browser or using the
LAN Docking Station Administration Tool.
Select the type of server (FTP, SFTP, HTTP) 4
where you have saved the .bcd file.
Enter the domain name or IP address of 5
the server hosting the firmware file into
the
SERVER field (the server does not have
to be on your Local Area Network). If you
reference the server using its domain name,
make sure that at least one DNS server is
configured (see Assigning a static IP address
on page 13) or that you are using DHCP
(see Assigning an IP address from DHCP on
page 13).
Enter the port number of your server 6
into the
PORT field. Unless your server
is configured to use nonstandard port
numbers, you should use 21 for an FTP
server, 22 for an SFTP connection and 80 for
an HTTP Web server.
If your server requires authentication to 7
download the firmware file, enter the name
of the user account, the password, and
confirm the password. Otherwise leave
the
USERNAME, PASSWORD and CONFIRM
PASSWORD text fields empty.
Enter the full path and file name to the .bcd 8
file of the new firmware into the
text field.
SERVER
Press the 9
UPGRADE NOW button to start
PATH ON
the upgrade process.
16 User manual
Page 17

D Note
Once the firmware upgrade is complete, the
LAN Docking Station will restart. You may get
disconnected from the configuration interface.
4.11 Resetting to factory defaults
Follow these steps to reset the LAN Docking
Station to its factory default configuration
settings:
B Warning: When you reset the LAN
Docking Station, all your configuration settings
will be lost.
The configuration settings of the LAN 4
Docking Station will reset to their factory
defaults, and the LAN Docking Station will
restart. The IP address of the LAN Docking
Station will be set to 192.168.109.1 (subnet
mask 255.255.255.0).
Open the LAN Docking Station 5
configuration interface by entering its IP
address in your Web browser.
You will be prompted to enter a user name 6
and a password. Leave the user name field
empty and enter ‚administrator‘ in the
PASSWORD field.
Change the IP address of the LAN Docking 7
Station according to your network policy.
See Changing the IP address of the LAN
Docking Station on page 13 for more
information.
ENGLISH
Make sure that the LAN Docking Station is 1
connected to the main power supply using
the Philips power supply.
Slide a Digital pocket Memo 9600 or 9620 2
into the docking slot of the LAN Docking
Station.
Press and hold the 3
MENU button on the Digital Pocket Memo
FUNCTION and the
simultaneously for 3 seconds.
17User manual
Page 18

5 LAN Docking Station
Microsoft Windows Installer 3.1•
Microsoft Core XML Services (MSXML) 6.0•
Administration Tool
The Administration Tool allows the network
administrator to quickly overview the status of
up to 100 LAN Docking Stations connected to
a network and make configuration changes to
them from a centralized user interface.
Obtaining the Administration Tool 5.1
software
The Administration Tool is sold separately. Contact your local reseller for more information.
System requirements5.2
Hardware
IBM PC or compatible computer•
Pentium III, 1 GHz, 512 MB RAM•
10 MB hard disk space (350 MB if .NET and •
additional third party software installation is
required)
CD-ROM drive•
LAN connection•
Operating System
Windows 2000 (with service pack 4)•
Windows XP (with service pack 2)•
Windows Vista•
Windows Server 2003•
Software
Microsoft .NET Framework 2.0•
If a required software cannot not be found on
the target computer, the installer will attempt
to install it.
Installation5.3
To install the Administration tool on your PC:
Insert the Administration Tool CD into your 1
CD-ROM drive.
The Administration Tool set-up program 2
starts automatically. If not, open the
Administration Tool CD contents in
Windows Explorer and run the setup.exe file.
Follow the on-screen instructions of the 3
set-up program to install the Administration
Tool on your PC.
First-time configuration5.4
The Administration Tool collects information
about the LAN Docking Stations in your
network by collecting the LAN Docking
Stations’ identification files from a shared
upload directory on your FTP server. See Setting
up the FTP server on page 10 for information
about setting up your FTP server. Afterwards, a
connection is established to each LAN Docking
Station to read its configuration data.
When you run the Administration Tool for
the first time, you will be prompted to enter
the connection data of the FTP server and
18 User manual
Page 19

the administration password to allow direct
communication with the LAN Docking Stations.
FTP server settings can also be accessed at a
later time by clicking the SETTINGS button in
the file menu.
If the directory is mapped to a shared network
folder:
Check the1
LOCAL NETWORK DRIVE radio
button.
Enter the absolute path to the shared 2
upload directory or click the
BROWSE
button and select the folder.
Enter an administration password for direct 3
connections with LAN Docking Stations in
the
PASSWORD field and confirm it in the
RE-ENTER field.
Click 4
OK at the bottom of the configuration
dialog.
If the directory is not mapped to a shared network
folder:
Check the 1
FTP SERVER radio button.
Enter the 2 IP address or domain name of the
FTP server in the
Enter the 3 FTP port number in the
SERVER field.
PORT field.
Unless your FTP server is configured to use
a nonstandard port number, this should be
21.
Enter the 4 user name and the password of the
account needed to log on to the FTP server
into the
Click the 5
USERNAME and PASSWORD fields.
OK button at the bottom of the
configuration dialog.
D Note
You will not be able to administer any LAN
Docking Stations until you provide valid
connection data to the FTP server and a valid
administration password.
C Important: Remember that you can only
administer LAN Docking Stations sharing the
same FTP settings and administration password
at a time!
ENGLISH
Overview of the LAN Docking 5.5
Stations
Upon start-up, the Administration Tool
automatically retrieves configuration data
from any LAN Docking Station, that placed
an identification file within the shared upload
directory on the FTP server, and displays the
data record in the application’s main pane.
19User manual
Page 20

Double-clicking on a LAN Docking Station in
the list opens its configuration interface in the
system’s default browser.
A LAN Docking Station is regarded on line
if both the connection to the device was
established and its configuration data could
be retrieved successfully. The on line status
is represented by a green or a red dot in the
ONLINE STATUS column.
Every LAN Docking Station will display the
following information:
Its MAC address•
Its IP address•
The date and time when it was last used •
(or when a Digital Pocket Memo was last
connected).
Additionally, the following settings are displayed
for all online LAN Docking Stations:
The firmware version of the LAN Docking •
Station
The MAC address of the LAN Docking •
Station
A flag that indicates whether the LAN •
Docking Station is configured via a DHCP
server
The IP address settings of the LAN Docking •
Station, including the IP address, the subnet
mask, the gateway address, and any Domain
Name Server addresses
A flag indicates if the LAN Docking Station •
connects to an FTP or an SFTP server for file
upload
The FTP/SFTP server settings of the LAN •
Docking Station, including the hostname and
port of the server, as well as the username,
password and path on the server
A flag that indicates whether the file upload •
settings of the LAN Docking Station are
taken from the Digital Pocket Memo or from
20 User manual
Page 21

the LAN Docking Station itself
A flag indicates if all files (or only EOL •
dictation files) will be uploaded to the FTP/
SFTP. For this setting to take eect, the LAN
Docking Station must be in charge of the file
upload settings!
A flag that indicates whether the dictation •
files will be deleted from the Digital Pocket
memo after they are uploaded to the FTP/
SFTP server by the LAN Docking Station. For
this setting to take eect, the LAN Docking
Station must be in charge of the file upload
settings!
Any commentary data, including an oce •
name or description and a general comment
The administration password of the LAN •
Docking Station
The date and time when the LAN Docking •
Station was last used (a Digital Pocket Memo
was last connected)
D Note
Only online LAN Docking stations can be
administered from the Administration Tool.
C Important
You should use the RELOAD button (below
the file menu of the Application tool) often to
refresh the status of the LAN Docking Stations
in your network.
Using the Initial Setup Installer to 5.6
install a LAN Docking Station
The Initial Setup Installer oers a comprehensive
and easy to use interface to initally configure the
settings of a LAN Docking Station. Follow the
steps below to install a LAN Docking Station.
Connect the LAN Docking Station to the 1
PC that is running the Administration Tool,
or to your LAN, via a crossed LAN cable.
Open the 2 Initial Setup Installer by clicking on
the tool bar button.
Specify the current IP address of the 3
LAN Docking Station in the
ADDRESS
IP SETTINGS4
field.
CURRENT IP
You can assign a static IP address to the
LAN Docking Station or have it use the
DHCP service on your network to obtain
an IP address automatically in the IP settings
panel of the Initial Setup Installer dialog
• Assigning an IP address via DHCP: To
have the LAN Docking Station obtain
an IP address automatically from the
DHCP server on your network, check the
OBTAIN AN IP ADDRESS AUTOMATICALLY
radio button. See Assigning an IP
(DHCP)
address from DHCP on page 13 for further
information.
• Assigning a static IP address: To assign
a static IP address to the LAN Docking
Station, check the
IP SETTINGS
USE THE FOLLOWING
radio button and enter the IP
address settings, including the IP address,
the subnet mask, the gateway address, and
the Domain Name Server addresses.
FTP SETTINGS5
Enter the hostname and port of the server,
as well as the username, the password and
the path on the server. If the FTP server can
ENGLISH
21User manual
Page 22

accept secure connections, you may use this
feature by checking the
SFTP radio button.
For further information, refer to FTP settings
on page 11. For information on setting up
the FTP server, refer to chapter Setting up
the FTP server on page 10.
AUTOMATIC FILE UPLOAD SETTINGS6
The automatic file upload settings let
you configure which dictation files are
automatically uploaded to the FTP server
when a Digital Pocket Memo is connected
to the LAN Docking Station. For further
information, refer to Automatic file upload on
page 12.
ADMINISTRATION PASSWORD7
Enter an administration password for the
LAN Docking Station.
COMMENTS8
You may enter any commentary data about
the LAN Docking Station in the comments
panel. For further information, see Assigning
a comment to the LAN Docking Station on
page 15.
Press the 9
CONFIGURE button at the bottom
of the Initial Setup Installer panel to submit
the settings to the LAN Docking Station.
Changing the settings of multiple 5.7
LAN Docking Stations
The Administration Tool allows for quick
reconfiguration of the most important settings
of one or multiple LAN Docking Stations.
Configure FTP settings, administration 1
password, DHCP activation and automatic
file upload settings in the global settings
form, which is located below the
Administration Tool’s main pane.
Select the LAN Docking Stations you want 2
to update.
Click the 3
SUBMIT CHANGES button in the
bottom right corner. An overview of the
settings is displayed. These settings will be
sent to the LAN Docking Stations after
confirmation by clicking the
OK button.
The result of the operation of each LAN
Docking Station is shown in a result
window. Clicking the
CANCEL button will
close the overview, but will keep the new
settings stored for later submission. Upon
clicking the
UNDO CHANGES button, any
stored settings will be deleted.
D Note
Settings can only be uploaded to LAN Docking
Stations that are currently online.
Changing the settings of a single 5.8
LAN Docking Station
Many of the settings of the LAN Docking
Station can be changed directly in the data
record in the Administration Tool’s main pane.
These are:
A flag indicates wether the LAN Docking •
Station is configured via a DHCP server (or
not) in the DHCP column.
A flag indicates if the LAN Docking Station •
connects to an FTP or an SFTP server (for file
upload) in the USE SFTP column.
22 User manual
Page 23

A flag indicates if the file upload settings of •
the LAN Docking Station are taken from
the Digital Pocket Memo or from the LAN
Docking Station itself in the USE DPM
UPLOAD SETTINGS column.
A flag indicates if all files (or EOL dictation •
files only) get uploaded to the FTP/SFTP
server by the LAN Docking Station in the
UPLOAD ALL column. For this setting to take
eect, the LAN Docking Station has to be in
charge of the file upload settings!
A flag indicates wheter the dictation files will •
be deleted from the Digital Pocket Memo
after they were uploaded to the FTP/SFTP
server by the LAN Docking Station in the
DELETE UPLOADED column. For this setting to
take eect, the LAN Docking Station has to
be in charge of the file upload settings!
Some commentary data, including a room •
description and a general comment on the
LAN Docking Station in the ROOM and
COMMENT column.
Enter your changes directly in the fields of 1
the Administration Tool’s main pane.
Click the 2
SUBMIT CHANGES button in
the bottom right corner of the form. An
overview of the settings is displayed. These
settings will be sent to the LAN Docking
Stations after confirmation by clicking the
OK button. The result of the operation of
each LAN Docking Station is shown in a
result window. Clicking the
CANCEL button
will close the overview, but will keep the
new settings stored for later submission.
Upon clicking the
UNDO CHANGES button,
any stored settings will be deleted.
D Note
Settings can only be uploaded to LAN Docking
Stations that are currently online.
C Important
Changes made to a single LAN Docking Station
have precedence over any settings made in the
global settings form that apply to the same LAN
Docking Station!
Upgrading the firmware of LAN 5.9
Docking Stations
Download the latest firmware (.bce file) 1
from www.philips.com/dictation
Save the .bcd file to to a network location 2
that the LAN Docking Station can access.
This can be an FTP server or an HTTP Web
server.
Click on the 3
FIRMWARE UPGRADE button on
the symbol bar of the Administration Tool
Select the type of server (FTP, SFTP, HTTP) 4
where the .bcd file is saved.
Enter the domain name or IP address of the 5
server hosting the firmware file into the
SERVER field.
Enter the port number of your server 6
into the
PORT field. Unless your server
is configured to use non-standard port
numbers, you should use 21 for an FTP
server, 22 for an SFTP connection and 80 for
an HTTP Web server.
If your server requires authentication to 7
ENGLISH
23User manual
Page 24

download the firmware file, enter the name
of the user account, the password, and
confirm the password. Otherwise leave
the
USERNAME, PASSWORD and CONFIRM
PASSWORD text fields empty.
Enter the full path and file name to the .bcd 8
file of the new firmware into the
text field.
SERVER
Press the 9
UPGRADE NOW button to start
PATH ON
the upgrade process.
D Note
The current firmware version of a LAN Docking
Station can be found in the
FIRMWARE column
of the Administration Tool’s main pane.
C Important
A firmware upgrade will be uploaded to all LAN
Docking Stations that appear online in the main
pane of the Administration Tool, and may take a
few minutes to complete. During the firmware
upgrade process, a LAN Docking Station
will temporarily go oine and will go back
online when the upgrade process is complete.
After upgrading, reload the main pane (click
the RELOAD button) and check the current
firmware version.
Troubleshooting6
Configuration
Displaying the current IP address and the
MAC address of a LAN Docking Station
To display the current IP address assigned to a
LAN Docking Station and its MAC address, slide
a Digital pocket Memo 9600 or 9620 into the
docking slot and press the
RIGHT SMART BUTTON on the Digital Pocket
Memo simultaneously.
The LAN Docking Station configuration
window does not show up in the Web
browser when entering the IP address
Verify if the Docking Station is connectd to •
the mains power supply.
Verify if you use the correct network cable. •
Only use a crossover cable, when you directly
connect the LAN Docking station to the PC.
Check your TCP/IP configuration. If you do •
not use DHCP, do you have configured the
LAN Docking Station according to your
network policy? If you use DHCP, has the
DHCP Server assigned an IP-address to the
LAN Docking Station? (search for the IP
address)
If you use DHCP (the default), has the DHCP •
server assigned an IP address?
Can you ping the IP address in the Command •
window?
Verify if you can enable error logging on the •
target FTP server to find the cause of the
problem.
MENU button and the
24 User manual
Page 25

The LAN Docking Station configuration
window can be opened but files created
on the Digital Pocket Memo are not
transferred to the target FTP Server
Verify if the FTP server is running on the •
target file server.
Verify if the FTP server is set up correctly •
(Settings of: user names, user passwords, port
number, dictation target folder, folder access
and write rights).
Verify if the FTP address of the FTP server •
configured correctly in the LAN Docking
Station.
Verify if the firewall between the LAN •
Docking Station and the target FTP server is
open for FTP trac (deault port 21).
Verify if the LAN Docking Station has full •
access and write rights to the target file folder
of the FTP Server.
Verify if there is a proxy server between •
the LAN Docking Station and the target
FTP server. Can the proxy be configured
in “transparent mode” to allow the LAN
Docking Station to connect?
Can you enable logging on the FTP server to •
find the cause of the problem?
Forgot your administrator password?
If you have forgotten your administrator
password, see Resetting to factory defaults on
page 17.
Errors on the display of the Digital Pocket
Memo
The Digital Pocket Memo displays the
error message:
FAILED:
- - REASON:
No Files
This is no failure. This message is displayed,
when no dictation files are on the device when
you connect it to the LAN Docking Station and
it tries to upload dictations to the FTP server.
The Digital Pocket Memo displays the
error message:
FAILED:
- - REASON:
NETWORK OR
SERVER PROBLEM
Verify if you have configured the FTP settings •
properly
Verify if you have configured the FTP settings •
for firmware upgrade properly
File upload
File upload does not work, but the
LAN Docking Station shows up in the
Administration Tool
Verify if you have configured the LAN Docking
Station with the correct FTP settings?
ENGLISH
25User manual
Page 26

Not all dictations are uploaded to the
FTP server
Open the LAN Docking Station configuration
interface by entering its IP address in your Web
Error log ‚Can not download from server
– wrong filename or access denied‘
The error indicates that the download of an •
upgrade file from the FTP server failed.
browser or using the LAN Docking Station
Administration Tool and check the ‘Automatic
file upload’ settings. Activate
STATION DEFINES UPLOAD SETTINGS
UPLOAD ALL DICTATION FILES.
LAN DOCKING
and select
Administration Tool
A LAN Docking Station does not show up
in the Administration tool overview list
The reason is most likely that the LAN Docking
Error logs
Station was unable to connect to the FTP
server. Check the following:
How to enable error logging on the LAN
Docking Station
When access to the LAN Docking Station is
possible using the configuration interface, type
http://ip.addr.of.dock/web/log.txt in the address
field of the Web browser to open an error text
logging file.
Verify if the LAN Docking Station is •
connected to the main power supply.
Verify if the LAN Docking Station is •
connected to the network.
Is the IP address of the LAN Docking Station •
configured properly?
Are the FTP settings of the LAN •
Docking Station the same as those in the
When access to the LAN Docking Station is not
Administration tool?
possible through the web browser:
Go to the LAN Docking Station and make 1
sure it is powered.
Disconnect the LAN cable connected to the 2
LAN Docking Station.
Dock a Digital Pocket Memo into the LAN 3
Docking Station.
To copy the error log.txt file to the memory 4
card press the
SMART BUTTON
MENU button and the LEFT
(left hand side below the
LC-Display) on the Digital Pocket Memo
simulataneously.
Connect the Digital Pocket Memo to a 5
PC using a USB cable and view the log.txt
file available in the root directory of the
memory card.
26 User manual
Page 27

Page 28

Technical data
Connectivity
Docking connector: 8 pin male•
LAN connector: RJ45 network socket•
Socket for Kensington lock•
Accessories
RJ45 network cable•
User manual•
Green Specifications
Compliant to 2002/95/EC (RoHS)•
Lead-free soldered product•
Convenience
Green LED indicates that the Digital Pocket •
Memo batteries are recharging
Yellow LED indicates that dictation files are •
being transferred
Operation conditions
Temperature: 5° - 45° C / 41° - 113° F•
Humidity: 10 % - 90 %•
Dimensions
Product dimensions (W x D x H): •
78 x 78 x 35 mm / 3.07 x 3.07 x 1.38 "
Net weight: 143 g / 5.0 oz•
System requirements LAN Docking
Station
10/100 Mbit/s Local Area Network with RJ45 •
connections
FTP server with a user account configured •
for the LAN Docking Station
DHCP server (recommended)•
System requirements Administration Tool
Hardware:
IBM PC or compatible computer•
Pentium III, 1 GHz, 512 MB RAM•
10 MB hard disk space (350 MB if .NET and •
additional third party software installation is
required)
CD-ROM drive•
LAN connection•
Software:
Windows 2000 (with service pack 4), •
Windows XP (with service pack 2),
Windows Vista or
Windows Server 2003
Microsoft .NET Framework 2.0•
Microsoft Windows Installer 3.1•
Microsoft Core XML Services (MSXML) 6.0•
Power
Power supply: 6 V DC / 850mA•
Power consumption: 800 mA max.•
Page 29

Declaration of Conformity
Tested to comply with FCC standards
FOR HOME OR OFFICE USE
Model Number: LFH 9160
Trade Name: Philips LAN Docking Station 9160
Responsible Party: Philips Speech Processing
Address: 64 Perimeter Center East, Atlanta, GA 30346, USA
Telephone number: (888) 260-6261
Website: www.philips.com/dictation
This device complies with Par t 5 of the FCC Rules. Operation is subject to the following two conditions:
) This device may not cause harmful interference.
2) This device must accept any interference received, including interference that may cause undesired operation.
The CE mark confirms that the device corresponds to the relevant guidelines of the
European Union.
The cardboard used for packaging can be recycled. This electronic device contains
recyclable material.
Disclaimer and Notices
Philips performs extensive testing with the most popular configurations. However, since PC addons and device drivers are updated continually, conflict-free operation cannot be guaranteed.
Page 30

Discover the comprehensive range of high-end dictation products from Philips
www.philips.com/dictation
Specifications are subject to change without notice.
Trademarks are the property of Royal Philips Electronics or their respective owners.
© 2008 Royal Philips Electronics. All rights reserved.
Document version 2.0, 2008/09/01.
5103 109 9666.4
 Loading...