

Philips HR7727/62, HR7727/60, HR7727/02 User Manual [cs]

English Page 3
J∑zyk polski Strona 17
Russkij Stranica 31
âesky Strana 45
Slovensky Strana 59
Magyar 73. oldal
Eesti Lehekülg 87
Latviski 101. lappuse
Lietuvißkai Puslapis 115
Український Стор. 129
Hrvatski Stranica 143
Sloven{~ina Str. 157
Româniă Pagina 171

3
L
M
G
J
H
I
P
D
C
B
K
O
F
E
A
N
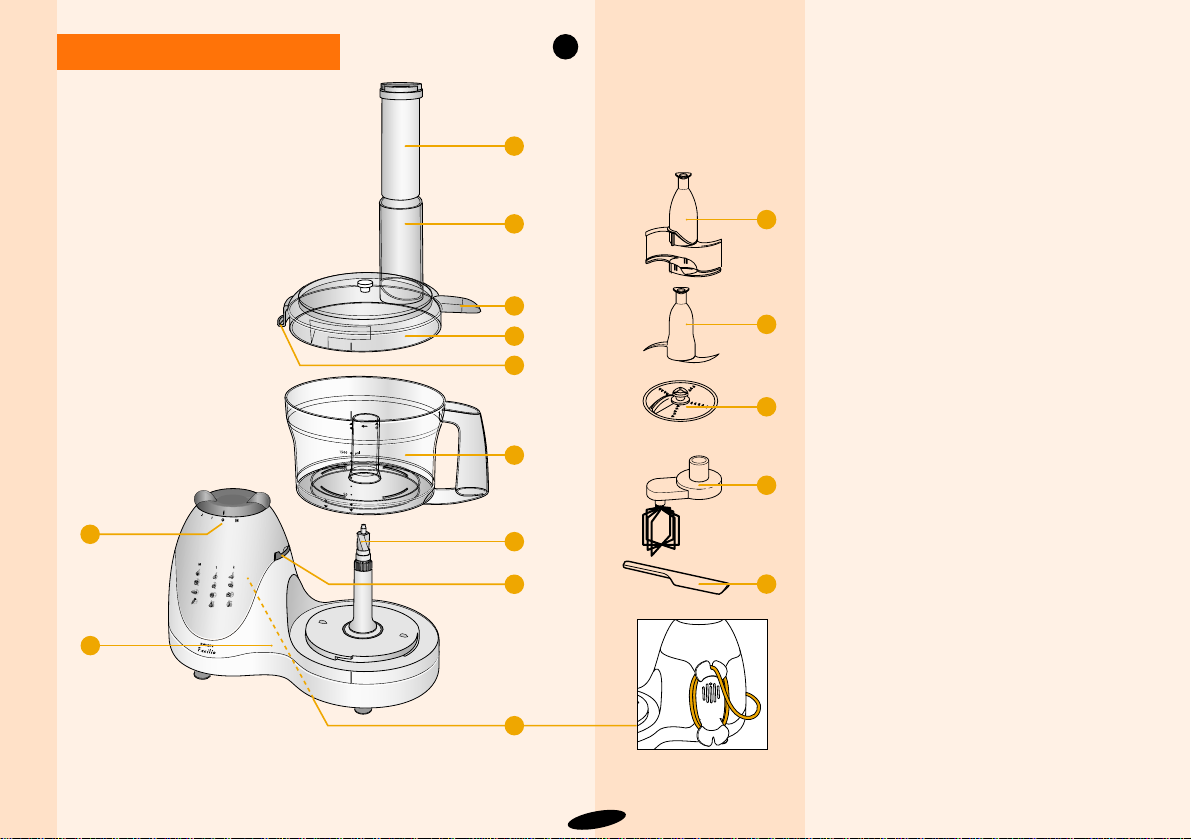
General description (fig. 1)
A Motor unit
B Bowl
C Lid of bowl
D Peg of lid (activates and deactivates the
safety lock)
E Projection (covers the opening in the
handle)
F Built-in safety lock
G Blade £
H Slicing/grating disc (medium/fine,
double-sided) ≠
I Beater ß
J Kneading accessory ©
K Driving shaft
L Chute
M Pusher
N Speed control
O = Off
1 - 2 = variable speed control
(1 = lowest speed; 2 = highest speed)
M = Moment/Pulse button
(appliance runs as long as button is
pressed)
O Cord clip (for fixing the cord when
wrapped)
P Spatula
1
English

Automatic cut-out
Read these instructions carefully before you start using the
appliance
To prevent damage due to overheating, your appliance has been
equipped with an automatic cut-out system. In case of overheating, this
system will automatically cut off the power supply to the appliance.
If you follow the instructions below, you can switch on the appliance
again after you have let it cool down for 15 minutes.
If your appliance suddenly stops running:
- Pull the mains plug out of the socket
- Set the switch to position O
- Let the appliance cool down for 15 minutes
- Put the mains plug back in the socket
- Switch on the appliance again.
Please contact your Philips dealer or an authorised Philips service centre
if the automatic cut-out system is activated time and again.
Symbols on the appliance
To the left of the symbols on the appliance representing the various
applications you will find an icon of the accessory to be used. Above
this icon, the most appropriate speed for that particular application has
been indicated: M (= pulse setting) or speeds 1 to 2 (see table on pages
8, 9 and 10).
Important
• Read the directions for use and look at the illustrations before you
start using the appliance.
• Remove the protective cover from the blade each time you use it.
• Be very careful when you pick up the blade and the slicing/grating
discs. They are very sharp!
• Thoroughly clean the parts that will come into contact with food
before you use the appliance for the first time.
• Place the lid on the bowl in the right position. The built-in safety
lock will now be deblocked and you will be able to turn on the
appliance.
• Never let the appliance run unattended.
• Never let children run the appliance.
• When you are mixing liquids, do not exceed the maximum content
indicated on the bowl (top line of the graduation).
• Do not exceed the maximum amounts and processing times
indicated in the table.
• Wait until moving parts have stopped running before you remove
the lid of the appliance.
• Never put your fingers or objects (e.g. a spatula) in the chute while
the appliance is running. Only the pusher is to be used for this
purpose.
• Never immerse the motor unit in water or any other liquid. Do not
rinse it either.
• Unplug the appliance after use.
• If the mains cord of this appliance is damaged, it must only be
replaced by Philips or their service representative, as special tools
and/or parts are required.
• Keep these directions for use for future reference.
4

1
2
3
CLICK
4
CLICK
5
CLICK
6
7
8
9
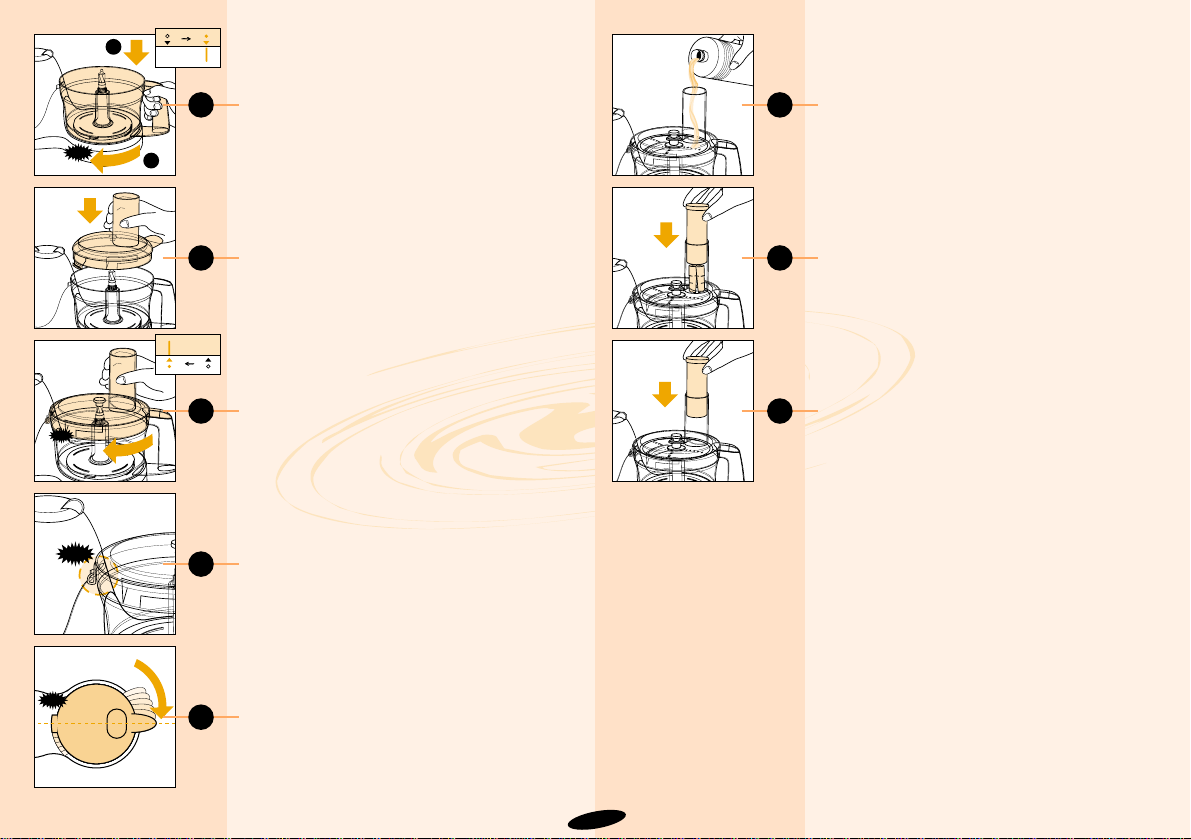
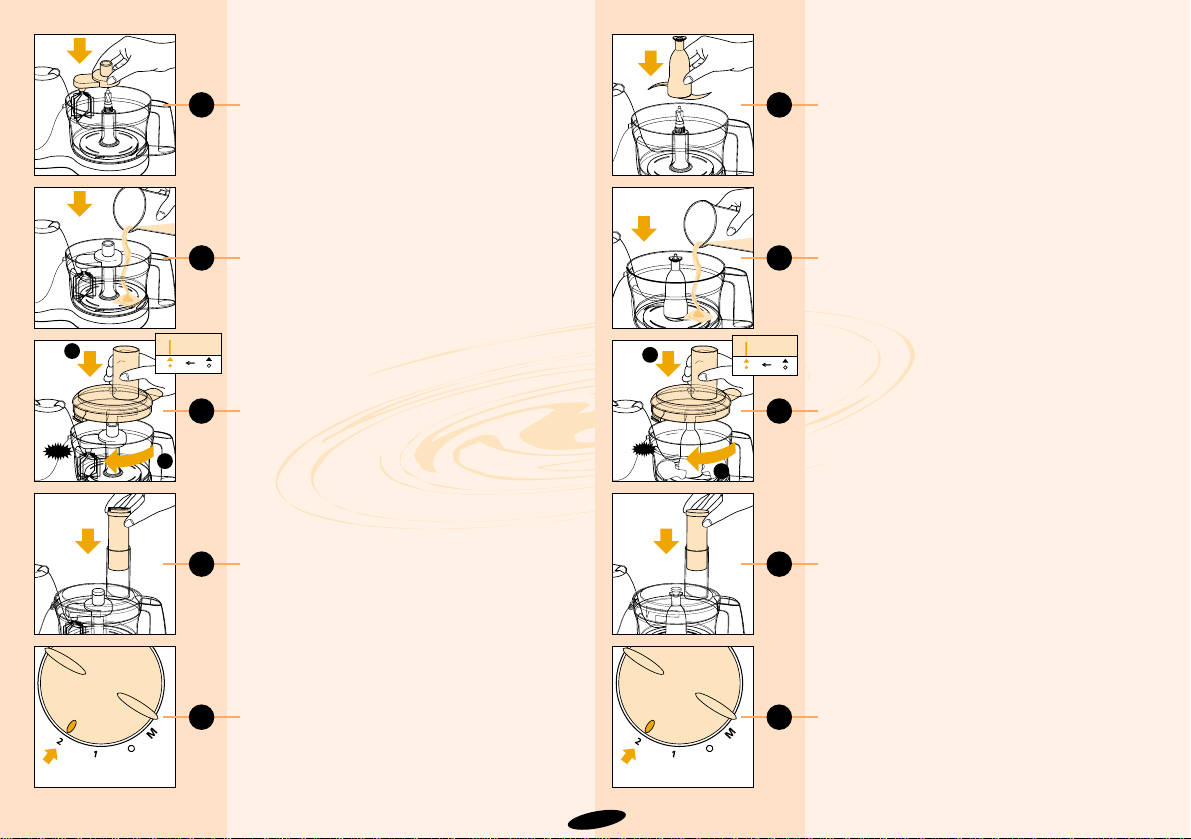
Placing the bowl (B) (fig. 2)
- Put the bowl on the food processor as
shown (1).
- Turn the handle in the direction of the
arrow until the bowl cannot be moved any
further and you hear a ‘click’(2).
Placing the lid (C)
- Put the lid on the bowl as shown in fig. 3.
- Turn the lid with some force in the direction
of the arrow until the lid will not move any
further and you hear a ‘click’ (fig. 4-5).
- Make sure that the mark on the lid and the
arrow on the bowl are directly opposite
each other. The projection of the lid will
now cover the opening in the handle of the
bowl (fig. 6).
Chute (L) and pusher (M)
• The chute can be used to add liquid and
solid ingredients (fig. 7).
• Use the pusher to push ingredients through
the chute (fig. 8).
• You can also use the pusher to close the
chute while the appliance is running to
prevent dust or drops of liquid from
escaping through the chute (fig. 9).
Built-in safety lock
The motor unit as well as the lid (C) have
been provided with marks. The appliance will
only function if the arrow on the motor unit is
placed directly opposite the mark on the lid.
In this position, the projection (E) of the lid
will cover the opening in the handle of the
bowl.
How to use the appliance
Note: the appliance will only function if the
bowl (B) and the lid (C) have been placed on
the motor unit in accordance with the
instructions in this booklet.
Set the speed control (N) to the position
indicated in the tables on pages 8-10 and
switch the appliance on. When you have
doubts about the right speed, always select
the highest speed (setting 2).
5
CLICK
2

10
11
12
Blade (G) £
Be careful: the cutting edges of the blade
are very sharp!
• The blade can be used for chopping,
mixing, blending, pureeing and preparing
puff pastry, crumble and shortcrust pastry.
- Remove the protective cover from the
blade (fig. 10).
- Put the bowl on the motor unit (fig. 2) and
fit the blade onto the driving shaft (fig. 11).
- Put the ingredients in the bowl (fig. 12).
- Fasten the lid onto the bowl and put the
pusher in the chute.
- Set the speed control (N) to the position
indicated in the table and switch the
appliance on. If you have doubts about the
correct speed, always select the highest
speed (position 2).
- The applications/recipes mentioned in the
table, will be ready after 10-60 seconds.
Tips:
• It is better not to chop large chunks with
the blade; pre-cut them into pieces of
approximately 3 cm before putting them in
the food processor.
• The appliance chops very quickly; let it run
for short periods at a time, also when you
are using the pulse setting (M), to prevent
the food from becoming too finely chopped.
• Do not let the appliance run for too long
when you are chopping (hard) cheese; the
cheese will get too hot and will start to melt
and become lumpy.
• If food sticks to the blade or to the inside of
the bowl:
- turn the appliance off;
- remove the lid from the bowl;
- remove the ingredients from the blade or
the inside of the bowl with a spatula.
• Do not chop very hard ingredients like
coffee beans, nutmeg and ice cubes. They
could cause the blade to get blunt. Check
the table for the appropriate speed and
setting.
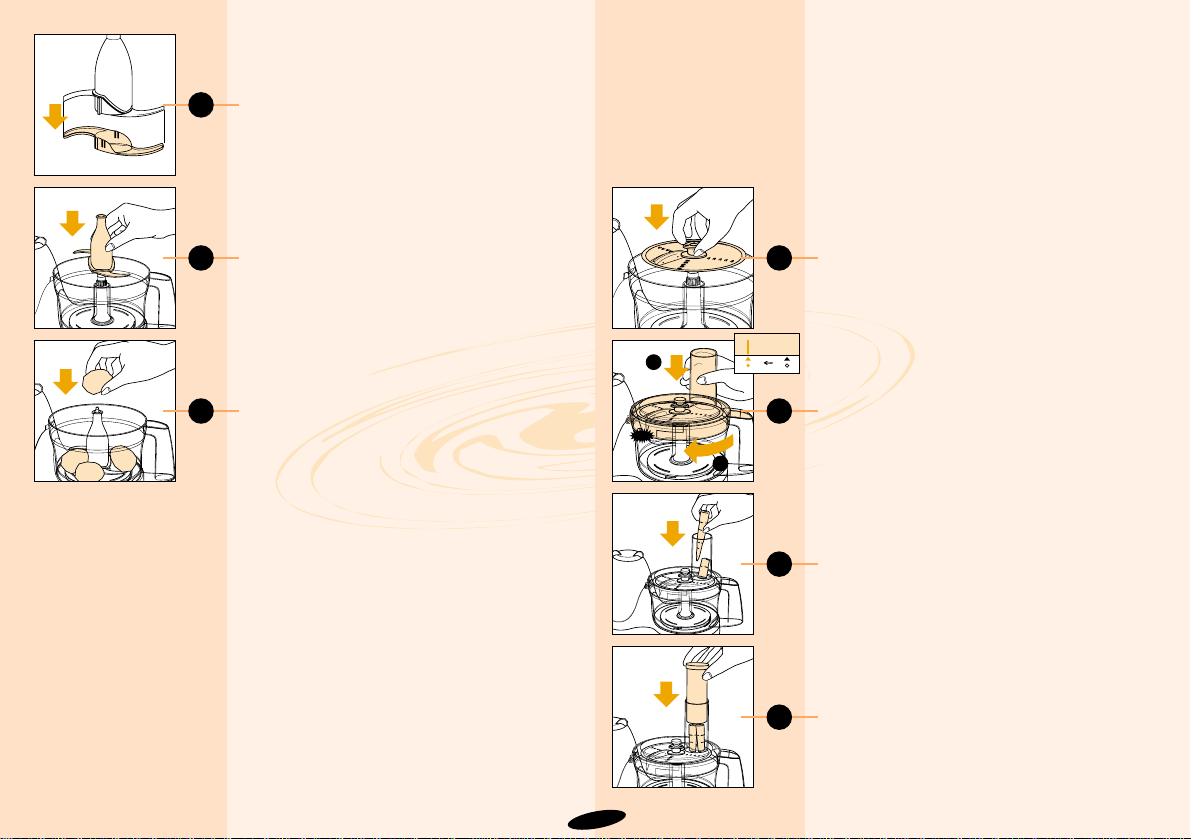
Slicing/grating disc (H) ≠
Be careful: the cutting edges of the disc
are very sharp!
Only grasp the plastic part in the middle of
the disc.
- Put the bowl on the motor unit (fig. 2).
- Put the slicing or grating disc in place
(fig. 13).
- Put the lid on the bowl (fig. 14).
- Put the ingredients in the chute (fig. 15).
- Press the pusher lightly onto the
ingredients in the chute.
- For grating and slicing: set the speed
control to position 2 (maximum speed).
- If you want to cut soft vegetables or fruits,
you can also select a lower speed setting
(see table).
- Press the ingredients slowly and steadily
down with the pusher (fig. 16).
Tips:
• Pre-cut large chunks to make them fit into
the chute.
• Fill the chute evenly for the best results.
• When you have to cut large amounts of
food, process only small batches at a time
and empty the bowl regularly between
batches.
6
13
CLICK
1
2
14
15
16

17
18
1
2
CLICK
19
20
21
Beater (I)
ß
• You can use the beater to beat eggs, egg
whites, toppings for desserts, instant
pudding and whipping cream.
Do not use the beater for making batter or
cake mixture!
- Put the bowl on the motor unit (fig. 2) and
fit the beater onto the driving shaft
(fig. 17).
- Put the ingredients in the bowl (fig. 18) and
fasten the lid onto the bowl (fig. 19).
- Put the pusher in the chute to close it
(fig. 20).
- Set the speed control (N) to the position
indicated in the tables and switch the
appliance on. If you have doubts about the
correct speed, always select the highest
speed (position 2) (fig. 21).
- The applications/recipes mentioned in the
table, will be ready after 2-5 minutes.
Kneading accessory (J) ©
• The kneading accessory can be used for
kneading bread dough and for mixing
batters and cake mixtures.
- Put the bowl on the motor unit (fig. 2) and
fit the kneading accessory onto the driving
shaft (fig. 22).
- Put the ingredients in the bowl (fig. 23) and
fasten the lid onto the bowl (fig. 24).
- Put the pusher in the chute to close it
(fig. 25).
- Set the speed control (N) to position 2
(= maximum speed) (fig. 26). The dough,
batter or cake mixture will be ready after
1 - 3 minutes.
Cleaning
• Always unplug the appliance before you
start cleaning the motor unit.
• You can clean the motor unit with a damp
cloth. Do not immerse the motor unit in
water and do not rinse it either.
• Always clean the parts that have come into
contact with food in hot water with
washing-up liquid immediately after use.
• Clean the blade and the slicing disc very
carefully. The cutting edges are very sharp!
• Make sure that the cutting edges of the
blade and the slicing disc do not come into
contact with hard objects: this could cause
them to become blunt.
7
22
23
CLICK
1
2
24
25
26
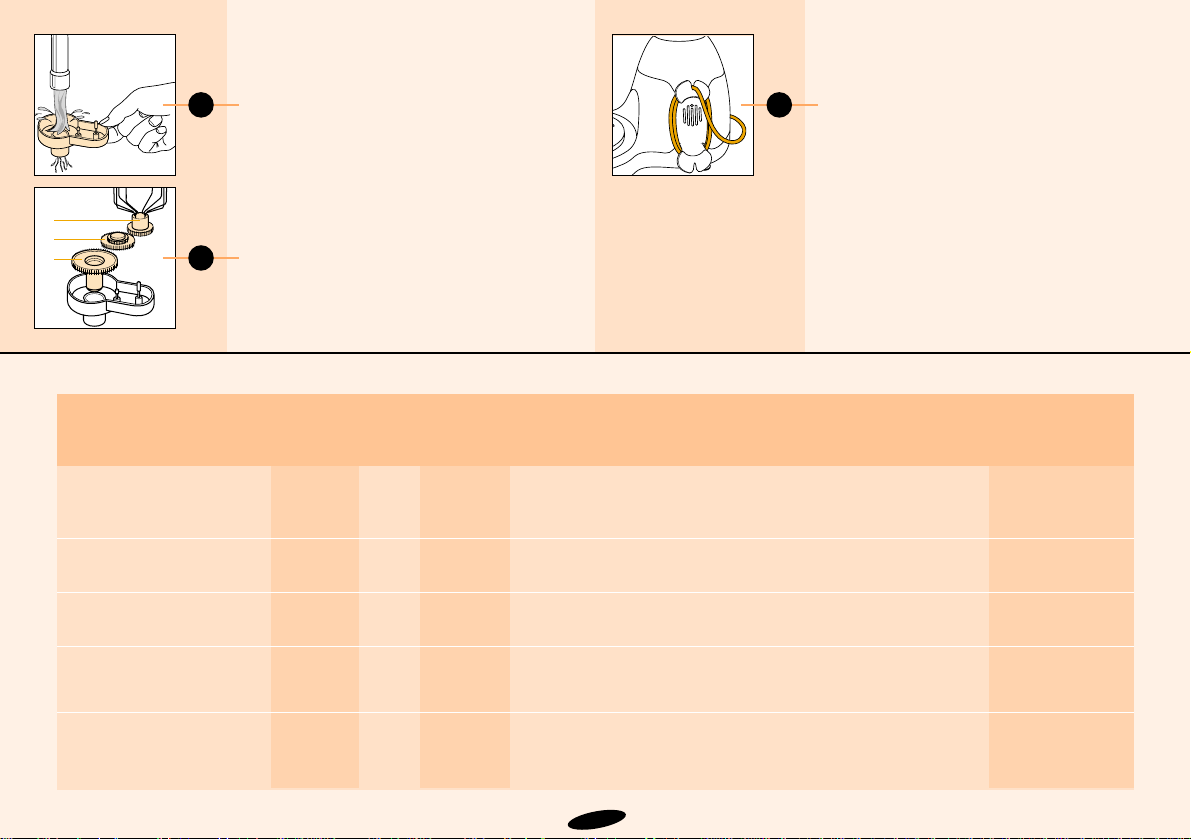
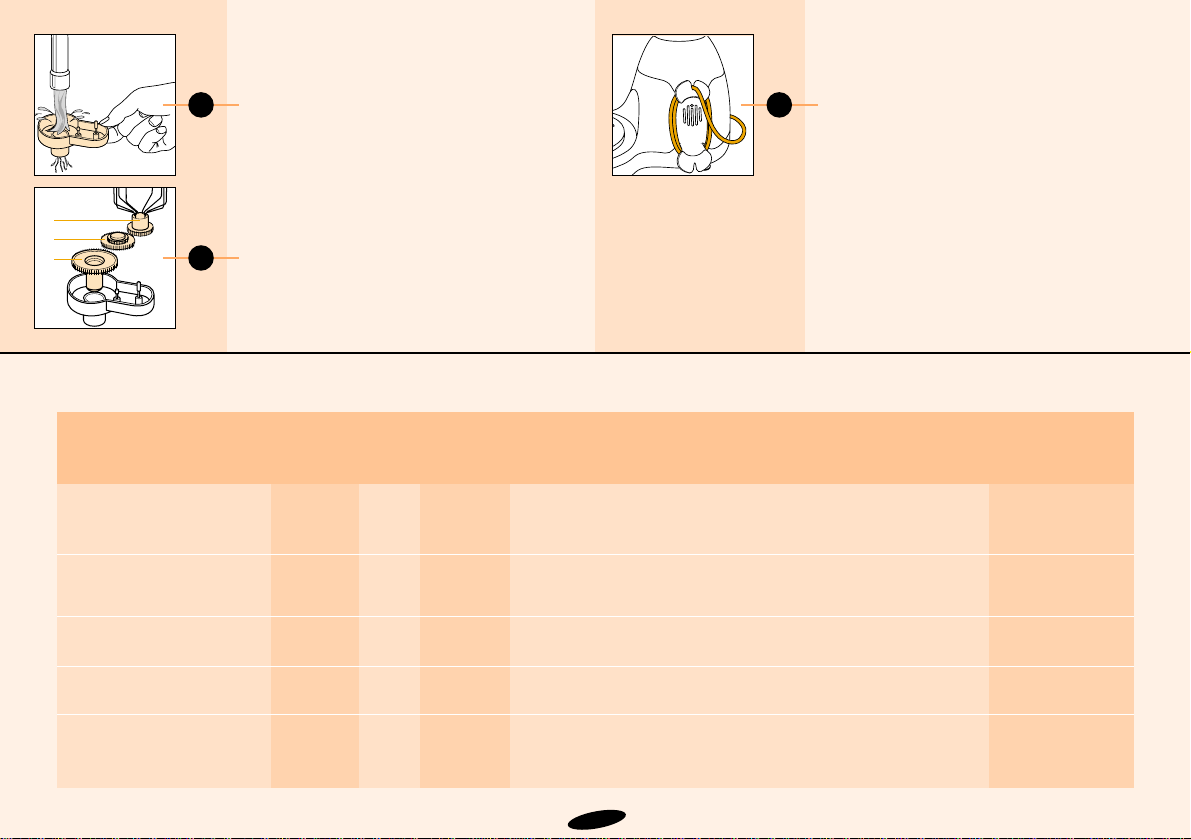
• The gearwheels of the beater can be
detached and cleaned very easily
(fig. 27-28).
• Certain ingredients may cause
discolorations on the surface of the
accessories. This does not have a negative
effect; the discolorations usually disappear
after some time.
• Wrap the (excess) mains cord around the
reel on the back of the appliance (fig. 29).
8
27
2
1
3
28
29
Apples, carrots,
celeriac
- grating/slicing
Breadcrumbs
- chopping
Butter cream (crème au
beurre)
Cheese (Parmesan)
- grating
Cheese (Gouda)
- grating
500 g
100 g
300 g
200 g
200 g
2 / M
2
2
2
1
Cut the fruit/vegetables into pieces that
fit into the chute. Fill the chute with the
pieces and grate them while pressing the pusher lightly.
Use dry, crisp bread
Use soft butter for a light result
Use a piece of rindless Parmesan and cut it into pieces that fit into the
chute
Cut the cheese into pieces that fit into
the chute. Press carefully with the pusher.
Salads, raw
vegetables
Breadcrumbed
dishes, au gratin
dishes
Desserts, pastry,
toppings
Garnishing,
soups, sauces,
au gratin dishes
Sauces, pizzas,
au gratin dishes,
fondue
≠
£
£
≠
≠
Ingredients Max. Speed Accessory Procedure Applications
quantity setting

9
Chocolate
- chopping
Dough (tarts, pies,
dumplings)
- kneading
Dough (bread)
- kneading
Dough (pizza)
- kneading
Dough (yeast)
- kneading
Dough (shortcrust)
- kneading
Egg whites
- whisking
Fruit (e.g. apples, peaches,
bananas)
- chopping
Herbs (e.g. parsley)
- chopping
Leeks, cucumbers,
carrots
- slicing
200 g
300 g
flour
700 g
flour
700 g
flour
500 g
flour
500 g
flour
4 egg
whites
500 g
min.
75 g
min.
1 piece
2 / M
2
2
2
2
2
2
M
2 / M
2 / M
Use hard, plain chocolate. Break into
pieces of 2 cm. Use the pulse setting (M) during the first few seconds and
then switch to max. speed to chop very finely.
Use cold margarine and cold water. Put flour into the bowl and add the
margarine cut into pieces of 2 cm. Mix at max. speed until the dough has
become crumbly, then add cold water while mixing. Stop as soon the
dough starts to turn into a ball. Allow the dough to cool before further
processing.
Mix warm water with yeast and sugar. Add flour, butter and salt and knead
the dough for approx. 90 seconds. Leave to rise for 30 minutes.
Same procedure as for bread dough. Knead the dough for approx. 1
minute.
First mix yeast, warm milk and some sugar. Add flour, sugar, salt, eggs
and soft margarine. Knead the dough until it stops sticking to the bowl
(approx. 1 minute). Leave it to rise for 30 minutes.
Use cold margarine, cut into pieces of 2 cm. Put all the ingredients in the
bowl and knead until the dough has turned into a ball. Allow the dough to
cool before further processing.
Use the eggs at room temperature.
Note: Use at least two egg whites
Tip: Add a little lemon juice to prevent the fruit from discolouring
Wash and dry the herb(s) before chopping
Fill the chute with leeks, pieces of cucumber or carrots and press carefully
with the pusher.
Garnishing, sauces,
pastry,
puddings, mousses
Fruit tarts, apple
dumplings, pies,
quiches.
Bread
Pizzas, tarts
Luxury bread
Apple pies, sweet
biscuits, open fruit
flans
Puddings, soufflés,
meringues
Salads
Sauces, soups,
garnishing, herb
butter
Soups, salads,
quiches.
£
£
©
£ / ©
©
£
ß
£
£
≠
Ingredients Max. Speed Accessory Procedure Applications
quantity setting

10
Mayonnaise
- emulsifying
Meats, fish, poultry
- lean meat
- streaky meat
Mixture (sponge)
- whisking
Mixture (cake)
- mixing
Nuts
- chopping
Onions
- chopping
- slicing
Potatoes, cooked
- pureeing
Soups
- blending
Vegetables
- chopping
Whipping cream
- whipping
3 eggs
500 g
400 g
3 eggs
4 eggs
250 g
500 g
500 g
750 g
potatoes
500 ml
500 g
400 ml
1 - 2
2 / M
2 / M
2 / 1
2
2 / M
2 / M
2 / M
1 - 2
2
2
1
Use all ingredients at room temperature. Note: use at least one big egg,
two small eggs or two big egg yolks.
First remove sinews and (fish) bones. Cut the meat/fish into cubes of
3 cm. Use the pulse setting for a coarser chopping result.
Ingredients at room temperature. Whisk the mixture of eggs and sugar at
maximum speed until stiff. Then add the sifted flour. Continue whisking
carefully at speed 1.
Ingredients at room temperature. Mix the softened butter and the sugar
until the mixture is smooth and creamy. Then add milk, eggs and flour
respectively.
Use the pulse setting (M) for coarse chopping or maximum speed for fine
chopping.
Peel the onions and cut them into 4 pieces. Note: use at least 100 g.
Peel the onions and cut them into pieces that fit into the chute. Note: use
at least 100 g.
Do not overcook the potatoes. The amount of milk necessary depends on
the kind of potato used. Use warm milk (max. 80°C). Add the milk slowly
while the metal blade is rotating.
Use cooked vegetables
Pre-cut into cubes of 3 cm and chop them with the blade.
Use cream that has been cooled in the
refrigerator.
Note: use at least 125 ml cream.
French fries,
salads, fondue,
garnishing and
barbecue sauces.
Steaks tartare,
hamburgers
Minced meat
Sponge cakes, Swiss
rolls, pastry
Various cakes
Salads, bread,
almond paste,
puddings
Salads, cooked food
Oven dishes,
puree
Soups, sauces
Soups, raw
vegetables,
salads
Garnishing, cream,
pastry,
ice cream mixtures
£
£
£
ß/ ©
£
£
£
≠
£
£
£
ß
Ingredients Max. Speed Accessory Procedure Applications
quantity setting
11
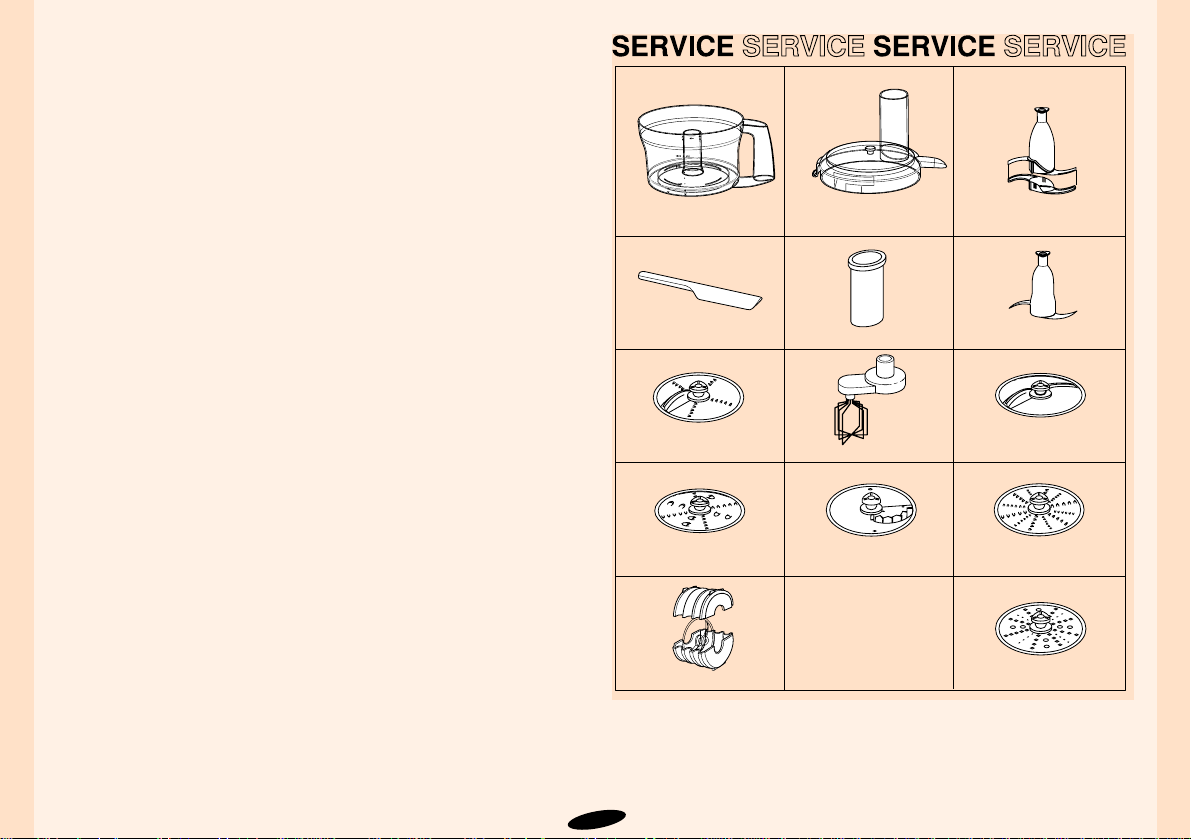
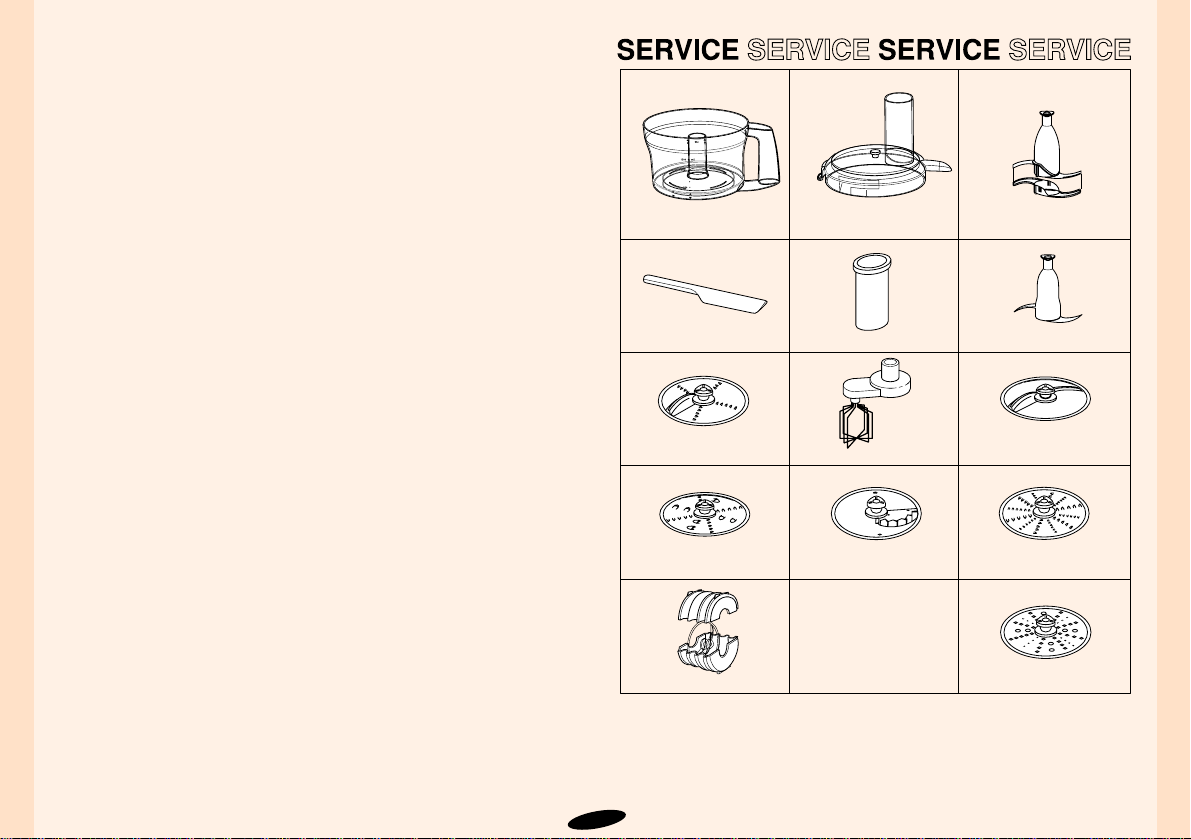
Parts
The following items are standard accessories:
- Bowl (B)
- Lid (C)
- Blade (G) £
- Slicing/grating disc (H) ≠
- Beater (I) ß
- Kneading accessory (J) ©
- Pusher (M)
- Spatula (P)
The following additional accessories are available:
- Slicing disc § (double-sided) (n°. 4203 065 61950).
- Grating disc ¶ (double-sided, coarse) (n°. 4203 065 61970).
- Grating disc • (double-sided, fine) (n°. 4203 065 61960).
- Potato grating disc (n°. 4203 065 61840)
- Single-sided slicing disc for french fries and e.g. swedish turnip
HR 2912 (n°. 4203 065 61830).
- Storage box for discs HR 2922 (n°. 4203 065 61860)
Ask your supplier if these accessories are also available in your country.
If you want to order additional parts or replacements, please mention the
relevant service and/or type numbers.
4822 418 10343
4203 065 61990
4203 065 61980
4822 442 01336
4203 065 62000
4203 065 61880
4203 065 61930
4203 065 61940
4203 065 61950
4203 065 61970
4203 065 61860
4203 065 61830
4203 065 61960
4203 065 61840

12
Mayonnaise £
2 eggs
2 tsp mustard
1 tsp salt
pepper to taste
3 tsp lemon juice
500 ml oil
The ingredients must be at room temperature!
Put the eggs, mustard, salt, pepper and lemon juice in the bowl.
Mix with the blade until the salt is dissolved and then pour the oil
gradually through the chute onto the rotating blade.
Tips:
For tartare sauce: add parsley, gherkins and hard-boiled eggs.
For cocktail sauce: add 30 ml crème fraîche, a dash of whisky, 2 tsp of
tomato paste and a dash of ginger syrup to 100 ml mayonnaise.
Chocolate/vanilla cake £
(for a cake tin of approx. 30 cm)
250 g soft butter
250 g sugar
250 g self-raising flour
5 eggs
1 pinch of salt
2 sachets of vanilla sugar or a few drops of
vanilla essence
25 g cocoa
15 g sugar
75 ml water
Put the butter, sugar and vanilla sugar in the bowl and mix the
ingredients at maximum speed until the mixture is white and creamy.
Mix in the eggs one by one. Only add the next egg when the previous
one has been completely absorbed into the mixture.
Sift the flour and salt into the mixture and run the appliance at medium
speed.
Mix the cocoa, the sugar and the water until a smooth paste is obtained.
Put half of the cake mixture into another bowl.
Add the cocoa paste to the mixture in the food processor bowl and mix it
at medium speed.
Fill the cake tin with alternate layers of chocolate and plain mixture.
Level the surface.
Bake the cake in the centre of a preheated oven (150°C) for 60 to 75
minutes.
Tip:
To make a marbled cake, transfer one half of the cake mixture to
another bowl and stir 2 level tbsp of sieved cocoa powder through it.
Put the chocolate mixture in the tin and spoon the plain mixture onto it.
Use a fork or spoon to swirl through the mixture to create a marbled
effect.
Recipes

13
Pizza ©£
(for 3 round pizzas)
400 g plain flour
40 ml oil
1 tsp sugar
1 tsp salt
1 sachet dried yeast
240 ml water
For the topping:
1 onion
2 cloves garlic
2 level tbsp olive oil
400 ml sieved tomatoes
2 tsp mixed Italian herbs (dried or fresh)
salt, pepper and some sugar
ingredients to be spread on the sauce: olives, salami, artichokes,
mushrooms, anchovies, Mozzarella cheese, peppers, grated mature
cheese, ham and olive oil according to taste.
Put water, yeast and sugar in the bowl and mix the ingredients for
approx. 15 seconds, using the kneading accessory.
Add flour, oil and salt and knead the dough at maximum speed for
approx. 1 minute.
Form the dough into a ball and put it in a bowl. Cover the bowl with a
damp cloth and leave the dough to rise in a warm place for about 45
minutes.
Use the blade to chop the onion and the garlic and fry until transparent.
Add the sieved tomatoes and the herbs and simmer the sauce for about
10 minutes.
Season to taste with salt, pepper and sugar.
Allow the sauce to cool.
Heat the oven to 250°C.
Roll out the dough out on a floured worktop and make three round
shapes.
Place the dough on a greased baking tray.
Spread the sauce on the pizzas, put the desired ingredients on top,
scatter some grated cheese on top of them and drip some olive oil over
them.
Bake for 12 to 15 minutes.
If you would like to make a larger pizza, please keep in mind that the
maximum amount of flour you can process with this food processor is
700 g (total amount of dough of 1.2 kg)
White bread ©
(for a baking tin of approx. 30 cm)
500 g plain flour
15 g butter
25 g fresh yeast (or 20 g dried yeast)
approx. 260 ml water
10 g salt
10 g sugar
Mount the kneading accessory.
Put the flour, salt, sugar and butter in the bowl. Add yeast and water.
Replace the lid without the pusher. Select maximum speed and knead
the dough for about 2 minutes.
Remove the dough from the food processor bowl and put it in a large
bowl. Cover it with a damp cloth and allow the dough to rise in a warm
place for 20 minutes.
After rising, flatten the dough and roll into a ball. Leave it to rise for
another 20 minutes.
Flatten the dough again, and leave to rise for yet another 20 minutes.
Flatten it again and roll it out.
Put the dough in a greased baking tin, leave it to rise for another 45
minutes and bake it in the lower part of a preheated oven for approx. 35
minutes (225°C).
If you would like to make a larger loaf of bread, please keep in mind that
the maximum amount of flour you can process with this food processor
is 700 g (total amount of dough of 1.2 kg)

14
Carrot salad ≠£
(for 6 persons)
1 small onion
2 level tbsp ginger syrup
2 level tbsp lemon juice
1
⁄2 tsp salt
1
⁄2 tsp ginger
6 level tbsp vegetable oil
600 g carrots
Chop the onion in the food processor, using the blade.
Add ginger syrup, lemon juice, salt and oil and mix all the ingredients for
a few seconds at speed 1.
Replace the blade with the coarse grating disc.
Scrape the carrots and cut them into pieces of approx. 6 cm. Place the
carrots in the food chute and grate them onto the ginger dressing.
Toss the salad in a bowl.
Potato au gratin £≠
(side dish for 4 persons)
10 g butter
750 g peeled potatoes
250 ml whipping cream
150 ml milk
pinch of nutmeg
salt and pepper
Preheat the oven to 180°C
Mix the cream, milk, nutmeg, salt and pepper with the blade
Grease an ovenproof dish with butter.
Slice the potatoes with the fine slicing disc onto the mixture in the bowl.
Stir thoroughly (by hand) to coat the potatoes with the mixture.
Arrange the potatoes in layers in the ovenproof, greased dish and pour
the remainder of the creamy mixture on top of them.
Bake the dish in the oven for approx. 60 minutes until the potatoes start
to turn brown on top.
Tip:
You can add garlic, chopped and fried onions and pieces of bacon to
the mixture.
Scatter some grated cheese over the potatoes before putting them in
the oven.
New potatoes need to cook in the oven for approx. 15 minutes longer.
Crêpes ß
(for 4-5 persons)
200 g flour
pinch of salt
3 eggs
500 ml milk
butter
Pour the milk into the bowl. Add the flour, salt and eggs.
Mix with the beater, starting at low speed, until a homogeneous batter
is obtained.
Pour some batter into a hot frying pan with melted butter and cook the
crêpe on both sides.
Tip:
You can fill the crêpes with jam, apricot sauce or with ham, cheese or
mushrooms.

15
Milkshake £
(for 2-3 milkshakes)
200 g fresh fruit (e.g. strawberries, raspberries,
bananas)
1 tsp lemon juice
sugar or honey to taste
200ml cold milk
2 scoops vanilla ice cream
Puree the fruit with the lemon juice and the sugar or honey, using the
bowl.
Add the milk and the ice cream and mix until the mixture is frothy.
Tips:
Instead of fresh fruit, use 2 level tbsp strong coffee and 2 tbsp cocoa.
Substitute mocha or chocolate ice cream for the vanilla ice cream.
Baby food £
(4 portions)
100 g meat (chicken, beef)
200 g carrots
130 g potatoes
4 tsp butter or corn oil
Cut the washed and peeled carrots in pieces of 2 cm and cook them for
20 minutes.
Cook the unpeeled potatoes and the meat.
Put the cooked carrots in the bowl.
Cut the peeled potatoes and the meat in pieces of 4 cm and put them in
the bowl as well.
Add the butter or corn oil and approx. 200 ml cooking liquid of the
carrots.
Blend the ingredients for 30 seconds at maximum speed.
Broccoli soup £ ≠
(for 4 persons)
50 g mature Gouda cheese
300 g cooked broccoli (stalks and florets)
cooking liquid of the broccoli
2 cooked potatoes, cut in pieces
2 stock cubes
2 tbsp whipping cream
curry, salt, pepper, nutmeg
Grate the cheese.
Put the cooked broccoli and the pieces of cooked potatoes and some of
the cooking liquid in the bowl and mix with the blade at maximum
speed.
Fill up with the rest of the cooking liquid to a level of 750 ml.
Put the stock cubes in the soup.
Transfer the soup to a pan and bring it to the boil while stirring.
Stir the grated cheese through the soup and season with curry, salt,
pepper and nutmeg.
Add the cream.

16
You are not satisfied with the way the appliance functions?
If the appliance does not function the way you expect it to, consult the following table and read the relevant sections in the directions for use!
Possible solution:
Turn bowl and/or lid in the direction indicated as far as possible (until you hear a ‘click’).
Make sure that the arrows on the bowl and on the appliance as well as on the bowl and on the lid are
placed directly opposite each other (see fig. 2 and 6).
This is probably the automatic cut-out system that has cut off the power supply to the appliance
because it has overheated.
- Unplug the appliance
- Set the switch to position O
- Let the appliance cool down for 15 minutes
- Put the mains plug back in the socket
- Switch on the appliance again.
If the automatic cut-out system is activated repeatedly, contact your Philips dealer or the Philips
Service Centre in your country.
Select the correct speed. Look at the indications on the appliance and in the directions for use.
You can try adding some lemon juice or salt. Make sure the beater and the bowl are grease-free and
select the right speed.
Use the beater. Use cooled whipping cream (approximately 6 °C).
Only use the beater to whip cream, eggs/egg whites and liquids. Do not use it to prepare batter, cake
mixture or dough!
Follow the instructions given in the directions for use carefully. Never add too much water.
Always use the accessory indicated in the table.
Do not exceed the maximum kneading time indicated.
Problem:
The switch does not function
The appliance has suddenly
stopped running
The chopping, slicing or grating
result is not optimal
The result when whisking eggs is
not optimal
The result when whipping cream
is not optimal
The beater slips or bends
The dough is swung around in
the bowl

17
L
M
G
J
H
I
P
D
C
B
K
O
F
E
A
N
OPIS (rys. 1)
A Cz´Êç nap´dowa urzàdzenia
B Pojemnik
C Pokrywa pojemnika
D Zatrzask (zamyka i otwiera
wbudowany zamek bezpieczeƒstwa)
E Dziobek (zamyka otwór w ràczce)
F Wbudowany zamek bezpieczeƒstwa
G Metalowy nó˝ £
H Dwustronna tarcza tnàca na
plastry/wiórki (Êrednie i drobne) ≠
I Ubijak ß
J Mieszak ©
K Wa∏ek nap´dowy
L Lej wsypowy
M Popychacz
N Regulator pr´dkoÊci obrotów
O = wy∏àcznik
1-2 = regulator zmiany obrotów
(1 = najni˝sza pr´dkoÊç;
2 = najwy˝sza pr´dkoÊç)
M = przycisk moment/puls (urzàdzenie
dzia∏a, gdy przycisk jest wciÊni´ty)
O Klips do zamocowania zwini´tego
przewodu
P ¸opatka
1
polski

Automatyczny wy∏àcznik
Przed pierwszym u˝yciem urzàdzenia, przeczytaj uwa˝nie t´
instrukcj´.
Aby zapobiec uszkodzeniu urzàdzenia spowodowanego jego
przegrzaniem, robot kuchenny zosta∏ wyposa˝ony w system
automatycznego wy∏àczania. W przypadku przegrzania system ten
automatycznie wy∏àczy dop∏yw pràdu do urzàdzenia. JeÊli b´dziesz
przestrzegaç poni˝szych wskazówek, ponowne uruchomienie robota
kuchennego b´dzie mo˝liwe po odczekaniu 15 minut, a˝ urzàdzenie
ostygnie.
JeÊli robot kuchenny nagle przestanie pracowaç:
- Wyjmij wtyczk´ z gniazdka Êciennego
- Przestaw wy∏àcznik na pozycj´ O
- Odczekaj 15 minut, a˝ urzàdzenie ostygnie
- Ponownie w∏ó˝ wtyczk´ do gniazdka Êciennego
- W∏àcz urzàdzenie.
JeÊli automatyczny wy∏àcznik b´dzie uaktywnia∏ si´ ponownie,
skontaktuj si´ ze sklepem lub punktem serwisowym firmy Philips.
Symbole na urzàdzeniu
Na lewo od symboli oznaczajàcych ró˝ne funkcje widniejà rysunki
akcesoriów, których nale˝y u˝ywaç do poszczególnych celów.
Nad rysunkami znajdujà si´ wskazówki dotyczàce pr´dkoÊci obrotów
najodpowiedniejszej do danej czynnoÊci: pozycja „M“ (ustawienie
pulsacyjne) albo pr´dkoÊci l lub 2 (szczegó∏y podane sà w tabeli na
stronach 22, 23 i 24).
WA˚NE
• Przed pierwszym u˝yciem urzàdzenia przeczytaj instrukcj´ i
zapoznaj si´ z ilustracjami.
• Zawsze przed u˝yciem zdejmuj z ostrza ochronnà os∏onk´.
• Zachowaj szczególnà uwag´ przy obchodzeniu si´ z
metalowym no˝em i tarczami tnàcymi. Sà one bardzo ostre!
• Przed pierwszym u˝yciem umyj te cz´Êci, które b´dà mia∏y
bezpoÊrednià stycznoÊç z ˝ywnoÊcià.
• Zamocuj w odpowiedni sposób przykrywk´ na pojemniku.
Wówczas odblokuje si´ wbudowany zamek bezpieczeƒstwa i
b´dzie mo˝na uruchomiç urzàdzenie.
• Nie pozostawiaj pracujàcego urzàdzenia bez nadzoru.
• Nie pozwól dzieciom uruchamiaç urzàdzenia.
• Gdy mieszasz lub miksujesz p∏yny, nie nape∏niaj pojemnika
powy˝ej wskaênika oznaczajàcego maksymalny poziom.
• Nie przekraczaj maksymalnych iloÊci produktów i czasu pracy
urzàdzenia podanych w tabeli.
• Przed zdj´ciem pokrywy z pojemnika odczekaj, a˝ przestanà
si´ obracaç ruchome cz´Êci urzàdzenia.
• Podczas pracy urzàdzenia nigdy nie wk∏adaj do leja
wsypowego palców ani ˝adnych przedmiotów, na przyk∏ad
∏opatki. Do tego celu mo˝na u˝ywaç wy∏àcznie popychacza.
• Nie p∏ucz ani nie wk∏adaj cz´Êci silnikowej do wody. Nie
sp∏ukuj jej te˝ pod bie˝àcà wodà.
• Po zakoƒczeniu pracy wyjmij wtyczk´ z gniazdka sieciowego.
• JeÊli przewód jest uszkodzony, musi byç wymieniony w
autoryzowanym punkcie serwisowym firmy Philips, gdy˝ do tego
celu potrzebne sà specjalne narz´dzia lub cz´Êci zamienne.
• Zachowaj t´ instrukcj´ na przysz∏oÊç.
18
CLICK
2
3
CLICK
4
CLICK
5
CLICK
6
7
8
9
Nak∏adanie pojemnika (B) rys. 2
- Na∏ó˝ pojemnik zgodnie z rysunkiem (1).
- Przesuwaj ràczk´ pojemnika w kierunku
wskazanym strza∏kà a˝ do oporu i do
momentu, gdy us∏yszysz
charakterystyczne klikni´cie (2).
Zak∏adanie pokrywy (C)
- UmieÊç pokryw´ zgodnie z rysunkiem 3.
- Przesuwaj pokryw´ w kierunku
wskazanym przez strza∏k´ a˝ do oporu i
do momentu, gdy us∏yszysz
charakterystyczne klikni´cie(4-5).
- Oznakowanie na pokrywie i na uchwycie
pojemnika znajdà si´ wówczas w tym
samym punkcie. Dziobek pokrywy
zamknie otwór w uchwycie pojemnika
(rys. 6).
Lej wsypowy (L) i popychacz (M)
• Lej wsypowy s∏u˝y do dodawania
sk∏adników p∏ynnych i sta∏ych (rys. 7).
• Do przepychania produktów przez lej
wsypowy u˝ywaj wy∏àcznie popychacza
(rys. 8).
• Podczas pracy urzàdzenia popychacz
mo˝e znajdowaç si´ w leju jako
zatyczka. W ten sposób unikniesz
rozchlapywania i rozpryskiwania (rys.9).
Wbudowany zamek bezpieczeƒstwa
Cz´Êç silnikowa i pokrywa (C) zosta∏y
oznakowane. Jedynie wtedy, gdy strza∏ka
na cz´Êci silnikowej znajdzie si´
dok∏adnie naprzeciwko symbolu na
pokrywie, odblokuje si´ wbudowany
zamek bezpieczeƒstwa, co umo˝liwia
uruchomienie urzàdzenia. W tej pozycji
dziobek (E) zamyka otwór w ràczce
pojemnika.
Jak obs∏ugiwaç urzàdzenie
Uwaga: Urzàdzenie mo˝e byç
uruchomione tylko wtedy, gdy pojemnik
(B) i pokrywa (C) zostanà umieszczone
na cz´Êci silnikowej zgodnie ze
wskazówkami zawartymi
w niniejszej instrukcji.
Ustaw regulator pr´dkoÊci obrotów (N) na
pozycj´ zalecanà w tabeli na stronach 22,
23 i 24 i w∏àcz urzàdzenie. W razie
wàtpliwoÊci co do w∏aÊciwej pr´dkoÊci,
wybierz wy˝sze ustawienie (ustawienie 2).
19
1
2
10
11
12
Metalowy nó˝ (G) £
UWAGA: Kraw´dzie no˝a sà bardzo
ostre!
• Metalowy nó˝ mo˝e byç u˝ywany do
rozdrabniania, mieszania, miksowania,
ucierania, ubijania oraz wyrabiania ciast.
- Zdejmij os∏onk´ ochronnà z no˝a
(rys. 10).
- Za∏ó˝ pojemnik na cz´Êç silnikowà
(rys. 2) i metalowy nó˝ na wa∏ek
nap´dowy (rys. 11).
- W∏ó˝ sk∏adniki do pojemnika (rys. 12).
- Za∏ó˝ pokryw´ i w∏ó˝ popychacz do leja
wsypowego.
- Ustaw regulator obrotów (N) na pozycj´
wskazanà w tabeli i w∏àcz urzàdzenie.
W razie wàtpliwoÊci co do w∏aÊciwej
pr´dkoÊci, wybierz wy˝sze ustawienie
(ustawienie 2).
- Opisane w tabeli rezultaty b´dà gotowe
w ciàgu 10-60 sekund.
PORADY:
• Metalowym ostrzem nie nale˝y
rozdrabniaç zbyt du˝ych kawa∏ków. Przed
w∏o˝eniem do robota pokrój wi´ksze
kawa∏ki na kostki wielkoÊci ok. 3 cm.
• Robot rozdrabnia bardzo szybko.
W∏àczaj go na krótki czas (dotyczy to
tak˝e pulsacyjnego ustawienia na
pozycji M). W ten sposób produkty nie
b´dà nadmiernie rozdrobnione.
• Przy rozdrabnianiu (twardego) sera
uwa˝aj, aby urzàdzenie nie pracowa∏o
za d∏ugo - w przeciwnym wypadku ser
si´ ogrzeje i rozpuÊci.
• JeÊli produkty przyklejà si´ do ostrza lub
do wn´trza pojemnika:
- wy∏àcz robot kuchenny;
- zdejmij pokryw´;
- usuƒ ∏opatkà produkty z ostrza i
Êcianek pojemnika.
• Nie rozdrabniaj zbyt twardych
sk∏adników, takich jak ziarna kawy,
ga∏ka muszkato∏owa lub kostki lodu,
gdy˝ mogà one st´piç ostrze. Sprawdê
w tabeli odpowiednie ustawienia
i pr´dkoÊç obrotów.
Tarcza tnàca na plastry i na wiórki (H) ≠
UWAGA: Tnàce kraw´dzie tarczy sà
bardzo ostre!
Zawsze trzymaj tarcz´ za Êrodkowy
plastikowy uchwyt.
- Za∏ó˝ pojemnik na cz´Êç silnikowà (rys. 2).
- Za∏ó˝ tarcz´ tnàcà (rys. 13).
- Zamknij pokryw´ (rys. 14).
- Dodawaj sk∏adniki przez lej wsypowy
(rys. 15).
- Produkty lekko przyciÊnij popychaczem.
- Do ci´cia na wiórki lub na plastry ustaw
regulator na pozycj´ 2 (maksymalna
pr´dkoÊç obrotów).
- Do ci´cia mi´kkich owoców i warzyw,
mo˝esz wybraç ni˝szà pozycj´ (patrz
tabela).
- Sk∏adniki przesuwaj powoli i ze sta∏ym
naciskiem za pomocà popychacza
(rys. 16).
PORADY:
• Wi´ksze kawa∏ki potnij na mniejsze, tak
by mieÊci∏y si´ do leja.
• Wype∏niaj lej równomiernie.
• JeÊli przetwarzasz du˝e iloÊci sk∏adników,
podziel je na mniejsze partie i opró˝niaj
pojemnik po rozdrobnieniu ka˝dej porcji.
20
13
CLICK
1
2
14
15
16
17
18
1
2
CLICK
19
20
21
Ubijak (I)
ß
• Ubijak s∏u˝y do ubijania jajek, piany z
jajek, polew, puddingów i Êmietany.
Nie nale˝y u˝ywaç go do wyrabiania
ciast!
- Za∏ó˝ pojemnik na cz´Êç silnikowà
(rys. 2) i zamocuj ubijak na wa∏ek
nap´dowy (rys. 17).
- UmieÊç sk∏adniki w pojemniku (rys. 18) i
zamknij pokryw´ (rys. 19).
- Zamknij lej wsypowy popychaczem
(rys. 20).
- Ustaw regulator (N) na pozycj´
wskazanà w tabeli i w∏àcz urzàdzenie.
W razie wàtpliwoÊci co do ustawienia,
wybierz ustawienie 2 (maksymalna
pr´dkoÊç obrotów)- (rys. 21).
- Rezultaty opisane w tabeli b´dà gotowe
w ciàgu 2-5 minut.
Mieszak (J) ©
• Mieszak przeznaczony jest do
wyrabiania ciast.
- Zamontuj pojemnik na cz´Êç silnikowà
(rys. 2). Nast´pnie na∏ó˝ mieszak na
wa∏ek nap´dowy (rys. 22).
- Wrzuç sk∏adniki do pojemnika (rys. 23) i
nakryj pojemnik pokrywà (rys. 24).
- Zamknij lej zasypowy popychaczem
(rys. 25).
- Nastaw regulator na pozycj´ 2
(maksymalna pr´dkoÊç obrotów)
(rys. 26). Ciasto b´dzie gotowe w ciàgu
1-3 minut.
Mycie
• Przed myciem cz´Êci nap´dowej, wyjmij
wtyczk´ z gniazdka Êciennego.
• Cz´Êç nap´dowà mo˝esz wytrzeç
wilgotnà szmatkà. Nigdy nie zanurzaj tej
cz´Êci w wodzie ani nie sp∏ukuj jej pod
bie˝àcà wodà.
• Cz´Êci stykajàce si´ z ˝ywnoÊcià umyj w
ciep∏ej wodzie z dodatkiem p∏ynu do
mycia naczyƒ natychmiast po u˝yciu.
• Zachowaj ostro˝noÊç podczas mycia
metalowego no˝a i tarcz tnàcych:
kraw´dzie sà bardzo ostre!
• Upewnij si´, czy kraw´dzie tnàce nie
stykajà si´ z twardymi przedmiotami,
gdy˝ mo˝e to spowodowaç ich
st´pienie.
21
22
23
CLICK
1
2
24
25
26
• PierÊcienie ubijaka mo˝na ∏atwo
rozmontowaç i umyç (rys. 27-28).
• Niektóre sk∏adniki mogà powodowaç
przebarwienia na akcesoriach. Nie ma to
jednak ˝adnego wp∏ywu na ich dzia∏anie.
Przebarwienia zazwyczaj znikajà po
jakimÊ czasie.
• Owiƒ nadmiar przewodu wokó∏ szpuli z
ty∏u urzàdzenia (rys. 29).
22
27
2
1
3
28
29
Jab∏ka, marchew, seler
- ucieranie
- krojenie
Grzanki
- rozdrabnianie
Krem maÊlany
Ser (Parmezan)
- tarcie
Ser (Gouda)
- tarcie
500 g
100 g
300 g
200 g
200 g
2 / M
2
2
2
1
Pokrój jab∏ka lub warzywa na kawa∏ki mieszczàce si´ do leja. Nape∏nij
lej kawa∏kami i przyciskaj je lekko popychaczem.
U˝yj suchego, chrupiàcego chleba
U˝yj mi´kkiego mas∏a, aby krem by∏ lekki.
Weê ser Parmezan bez skórki. Pokrój go w kawa∏ki mieszczàce si´
do leja. Przyciskaj delikatnie popychaczem.
Pokrój ser w kawa∏ki mieszczàce si´ do leja. Przyciskaj delikatnie
popychaczem.
Sa∏atki, surówki.
Potrawy
z grzankami,
zapiekane potrawy
Desery, ciasta,
polewy
Garnie, zupy, sosy,
dania zapiekane.
Sosy, pizza, dania
rozdrobnione,
founde.
≠
£
£
≠
≠
Produkty Maks. Usta Akcesoria Obróbka Zastosowanie
iloÊç wienie
obrotów
Dwie kolumny (ustawienia obrotów i akcesoria) do uzupe∏nienia odpowiednimi wartoÊciami i symbolami

23
Czekolada
- rozdrabnianie
Ciasta (tarty, ciasta z
owocami, jab∏ka w cieÊcie)
- mieszanie
Ciasto
(chlebowe)
- mieszanie
Ciasto (pizza)
- mieszanie
Ciasto (dro˝d˝owe)
- mieszanie
Ciasto kruche
- mieszanie
Piana z bia∏ek
- Ubijanie
Owoce
( np. jab∏ka, brzoskwinie,
banany)
- rozdrabnianie
Zio∏a
- siekanie
Por, ogórek. marchew
- krojenie
200 g
300 g
màki
700 g
màki
700 g
màki
500 g
màki
500 g
màki
Bia∏ka z
4 jajek
500 g
Min. 75 g
Min.
1 sztuka
2 / M
2
2
2
2
2
2
M
2 / M
2 / M
U˝yj twardej czekolady bez dodatków, po∏am na kawa∏ki o wielkoÊci
2cm; przez pierwsze kilka sekund ustaw robot na pozycj´ pulsacyjnà
M. Nast´pnie przestaw na poz. 2, aby czekolada by∏a bardzo drobno
starta
U˝yj margaryny z lodówki oraz zimnej wody. Wsyp màk´ do
pojemnika. Do∏ó˝ margaryn´ poci´tà na dwucentymetrowe kawa∏ki.
Mieszaj na poz. 2, a˝ mieszanina b´dzie przypominaç kulki chlebowe.
Nast´pnie dodaj zimnà wod´, ciàgle mieszajàc. Przerwij, gdy tylko
ciasto uformuje si´ w kul´. Ostudê ciasto przed dalszà obróbkà.
Wymieszaj ciep∏à wod´ z dro˝d˝ami i cukrem. Dadaj màk´, mas∏o i
sól. Wyrabiaj ciasto przez oko∏o 90 sekund. Odczekaj 30 minut, by
ciasto wyros∏o.
Post´puj tak samo jak przy cieÊcie na chleb. Wyrabiaj ciasto przez
1 minut´.
Wymieszaj dro˝d˝e z ciep∏ym mlekiem i odrobinà cukru. Dodaj màk´,
sól, jajka i mi´kkà margaryn´. Wyrabiaj ciasto a˝ przestanie
przyklejaç si´ do Êcianek pojemnika (oko∏o 1 min.). Odczekaj 30
minut, a˝ wyroÊnie.
U˝yj margaryny z lodówki, potnij na dwucentymetrowe kawa∏ki. W∏ó˝
wszystkie sk∏adniki do pojemnika jednoczeÊnie. Mieszaj, a˝ ciasto
uformuje si´ w kul´ (ok. 1 min.). Ostudê przed dalszà obróbkà.
Weê jajka o temperaturze pokojowej. Uwaga: u˝yj bia∏ek z co
najmniej 2 jajek.
Porada: aby zapobiec utracie koloru, dodaj sok z cytryny.
Przed siekaniem umyj i wysusz zio∏a.
W∏ó˝ warzywa do leja wsypowego i przyciÊnij popychaczem.
Przystrajanie, sosy,
ciasta,
puddingi, musy.
Tarty owocowe,
jab∏ka w cieÊcie,
ciasta, quiches
Chleb
Pizza, tarty
Placek dro˝d˝owy
Szarlotka, s∏odkie
herbatniki, ciastka z
owocami
Pudding, suflet,
bezy
Sa∏atki
Sosy, zupy,
garnie, mas∏o
zio∏owe.
Zupy, sa∏atki,
quiches.
£
£
©
£ / ©
©
£
ß
£
£
≠
Produkty Maks. Usta Akcesoria Obróbka Zastosowanie
iloÊç wienie
obrotów

24
Majonez
- emulsjonowanie
Mi´so, ryby drób
(chude mi´so)
(mi´so ˝ylaste)
Biszkopt
(ubijanie)
Ciasto
- mieszanie
Orzechy
- rozdrabnianie
Cebule
- rozdrabnianie
- krojenie
Gotowane
ziemniaki
- miksowanie
Zupy
- miksowanie
Warzywa
- rozdrabnianie
Bita Êmietana
- ubijanie
3 jajka
500 g
400 g
3 jajka
4 jajka
250 g
500 g
500 g
750 g
ziemniaków
500 ml
400 ml
1 - 2
2 / M
2 / M
2 / 1
2
2 / M
2 / M
2 / M
1 - 2
2
2
1
U˝yj sk∏adników o temperaturze pokojowej. Uwaga: weê co najmniej
jedno du˝e jajko lub dwa ma∏e lub dwa du˝e ˝ó∏tka.
Najpierw usuƒ b∏ony, koÊci lub oÊci. Pokrój mi´so na kawa∏ki o
wielkoÊci 3 cm.
Aby uzyskaç grubsze kawa∏ki, nastawiç robot na pozycj´ pulsacyjnà M.
Sk∏adniki w temperaturze pokojowej. Ucieraj mieszank´ jajek z
cukrem na maksymalnym ustawieniu do momentu, gdy b´dzie
sztywna. Nast´pnie dodaj przesianà màk´. Delikatnie ubijaj na
pr´dkoÊci 1.
Sk∏adniki w temperaturze pokojowej. Ubijaj mi´kkie mas∏o z cukrem,
a˝ osiàgnie g∏adkà konsystencj´. Nast´pnie dodaj mleko, jajka i
màk´.
Aby uzyskaç grubsze wiórki ustaw pozycj´ pulsacyjnà (M); aby
uzyskaç drobniejsze wiórki – wybierz maksymalne ustawienie.
Obierz cebul´ ze skórki i przekrój jà na çwiartki. Weê co najmniej
100 g cebuli. Nast´pnie w∏ó˝ cebul´ do leja. Uwaga: rozdrabniaç co
najmniej 100 gram.
U˝yç gotowanych warzyw
Najpierw pokrój na trzycentymetrowe kawa∏ki, a nast´pnie rozdrabniaj
je metalowym ostrzem.
U˝yj Êmietany sch∏odzonej w lodówce.
Uwaga: weê co najmniej 125 ml Êmietany.
Frytki, sa∏atki,
founde, garnie oraz
sosy
barbecue.
Stek tatarski,
hamburgery, mi´so
siekane
Ciasto
biszkoptowe,
rogaliki, ciasta
Ró˝ne ciastka
Sa∏atki, chleb
orzechowy, pasta
migda∏owa,
pudding.
Sa∏atki, dania
gotowane.
Dania pieczone,
puree
Zupy, sosy.
Zupy, surówki
warzywne, sa∏atki.
Przystrajanie,
kremy, ciasta, lody.
£
£
£
ß/ ©
£
£
£
≠
£
£
£
ß
Produkty Maks. Usta Akcesoria Obróbka Zastosowanie
iloÊç wienie
obrotów
25
Akcesoria
Nast´pujàce akcesoria nale˝à do wyposa˝enia standardowego:
- pojemnik (B)
- pokrywa (C)
- metalowy nó˝ (G) £
- tarcza tnàca na plastry i wiórki (H) ≠
- ubijak (I) ß
- mieszak (J) ©
- popychacz (M)
- ∏opatka (P)
Nast´pujàce akcesoria sà dost´pne jako dodatkowe wyposa˝enie:
- dwustronna tarcza tnàca na plastry § (nr 4203 065 61950).
- dwustronna tarcza tràca na grube wiórki ¶ (nr 4203 065 61970).
- dwustronna tarcza tràca na drobne wiórki • (nr 4203 065 61960).
- tarcza do tarcia ziemniaków (4203 065 61840)
- jednostronna tarcza do ci´cia frytek i rzepy HR 2912
(4203 065 61830)
- Pojemnik do przechowywania tarcz HR 2922 (nr 4203 065 61860).
Zapytaj w sklepie firmowym, czy te akcesoria sà dost´pne w Polsce.
JeÊli chcesz zamówiç dodatkowe akcesoria lub zamieniç jakieÊ
cz´Êci, prosimy powo∏ywaç si´ na odpowiednie numery serwisowe
lub numery typów.
4822 418 10343
4203 065 61990
4822 442 01336
4203 065 61980
4203 065 61960
4203 065 61970
4203 065 61930
4203 065 61940
4203 065 61950
4203 065 61830
4203 065 62000
4203 065 61880
4203 065 61840
4203 065 61860

26
Majonez £
2 jajka
2 ∏y˝eczki musztardy
1 ∏y˝eczka soli
pieprz do smaku
3 ∏y˝eczki soku z cytryny
500 ml oleju
Sk∏adniki powinny mieç temperatur´ pokojowà!
Do pojemnika w∏o˝yç jajka, musztard´, sól, pieprz i wlaç sok z cytryny.
Mieszaç no˝em, a˝ sól si´ rozpuÊci, nast´pnie stopniowo wlewaç do
pojemnika olej przez lej zasypowy na obracajàce si´ ostrze.
Rady:
Aby otrzymaç sos tatarski, nale˝y dodaç pietruszk´, korniszony i
jajka na twardo.
Aby otrzymaç sos koktajlowy, do 100 ml majonezu nale˝y dodaç
330 ml Êwie˝ej Êmietanki, odrobin´ whisky, 2 ∏y˝eczki pasty
pomidorowej i odrobin´ syropu imbirowego.
Ciasto czekoladowo-waniliowe £
(przepis na placek o d∏ugoÊci oko∏o 30cm.)
250 g mi´kkiego mas∏a
250 g cukru
250 g màki
5 jajek
szczypta soli
2 torebki cukru waniliowego lub kilka kropli
esencji waniliowej
25 g kakao
15 g cukru
75 ml wody
Do pojemnika w∏ó˝ mas∏o, cukier, cukier waniliowy i mieszaj
sk∏adniki na najwy˝szych obrotach, a˝ do uzyskania bia∏ej i
kremowej konsystencji. Wymieszaj po kolei jajka, jedno po drugim.
Kolejne jajko dodawaj dopiero, gdy poprzednie zostanie zupe∏nie
wch∏oni´te w mas´. Wsyp màk´ i sól i ustaw robot na Êrednià
pr´dkoÊç.
Wymieszaj kakao, cukier i wod´ na g∏adkà mas´. Prze∏ó˝ po∏ow´
ciasta do innej miski. Dodaj mas´ kakaowà do ciasta w pojemniku i
wymieszaj razem na Êredniej pr´dkoÊci.
Wyk∏adaj brytfann´ na przemian warstwami ciasta bia∏ego i
kakaowego. Wyrównaj powierzchni´.
Piecz po Êrodku rozgrzanego uprzednio piekarnika (150°C) przez
okolo 60-75 minut.
Rada:
Aby uzyskaç ciasto marmurkowe, prze∏ó˝ po∏ow´ ciasta do innej
miski i wymieszaj jà z dwiema ∏y˝kami sto∏owymi kakao w proszku.
W∏ó˝ mas´ czekoladowà do brytfanny i wk∏adaj na nià ∏y˝kà bia∏e
ciasto. ¸y˝kà lub widelcem zakr´caj ciasto, by uzyskaç wzór
marmurkowy.
PRZEPISY

27
Pizza © £
(przepis na trzy okràg∏e pizze)
Ciasto:
400 g màki
40 ml oleju
1 ∏y˝eczka cukru
1 ∏y˝eczka soli
1 paczka dro˝d˝y suszonych
240 ml wody.
Sos:
1 cebula
2 zàbki czosnku
2 p∏askie ∏y˝ki oleju z oliwek
400 ml przetartych pomidorów
2 ∏y˝eczki mieszanki suszonych lub Êwie˝ych
w∏oskich zió∏, sól, pieprz, cukier.
Dodatki do pizzy: oliwki, salami, karczochy, grzyby, krewetki, ser
mozzarella, papryka, tarty dojrza∏y ser, szynka i olej z oliwek
zale˝nie od gustu.
Wlaç wod´, w∏o˝yç dro˝d˝e i cukier do pojemnika i miksowaç
mieszakiem sk∏adniki przez ok. 15 sekund.
Dodaç màk´, oliw´ oraz sól i wyrabiaç ciasto na najwy˝szych
obrotach przez minut´.
Uformowaç z ciasta kul´ i prze∏o˝yç do innego pojemnika.
Pozostawiç do wyroÊni´cia, przykryte wilgotnà Êciereczkà, na
45 minut.
Metalowym ostrzem posiekaç cebul´ i czosnek. Podsma˝yç, a˝
b´dà szkliste.
Dodaç przetarte pomidory, zio∏a, podgrzewaç przez oko∏o 10 minut.
Doprawiç solà, pieprzem i cukrem.
Odczekaç, a˝ sos ostygnie.
Nagrzaç piecyk do 250°C.
Na powierzchni posypanej uprzednio màkà rozwa∏kowaç ciasto i
uformowaç trzy okràg∏e blaty.
U∏o˝yç ciasto na nat∏uszczonej brytfannie. Polaç sosem, u∏o˝yç
dodatki, posypaç po wierzchu tartym serem i skropiç kilkoma
kroplami oliwy.
Piec przez 12-15 minut.
JeÊli chcesz zrobiç wi´kszà pizz´, pami´taj, ˝e maksymalna iloÊç
màki, jakà mo˝na przetworzyç jednorazowo w robocie kuchennym to
700 g (ca∏kowita waga ciasta 1,2 kg).
Placek dro˝d˝owy ©
(Przepis na brytfann´ o d∏ugoÊci oko∏o 30 cm.)
500 g màki
15 g mas∏a
25 g Êwie˝ych dro˝d˝y (lub 20 g suszonych
dro˝d˝y) 260 ml wody
10 g soli
10 g cukru.
Zamontuj mieszak.
W∏ó˝ do pojemnika màk´, sól, cukier i mas∏o. Dodaj dro˝d˝e i wod´.
Za∏ó˝ pokryw´ bez popychacza. Ustaw maksymalnà pr´dkoÊç i
wyrabiaj ciasto oko∏o 2 minut.
PrzenieÊ ciasto z pojemnika do innej, du˝ej miski. Przykryj je
wilgotnà Êcierkà i odczekaj 20 minut, a˝ ciasto uroÊnie w ciep∏ym
miejscu.
Rozwa∏kuj wyroÊni´te ciasto i uformuj je w kul´. Odczekaj kolejne
20 minut, by uros∏o w cieple.
Znowu rozwa∏kuj je i odczekaj kolejne 20 minut, by uros∏o.
Rozwa∏kuj je i uformuj w kul´.
W∏ó˝ ciasto do wysmarowanej t∏uszczem brytfanny. Odczekaj
kolejne 45 minut, a˝ uroÊnie. Piecz w dolnej cz´Êci nagrzanego
uprzednio piekarnika w temperaturze ok. 225°C przez ok. 35 minut.
JeÊli chcesz upiec wi´kszy bochenek, pami´taj, ˝e maksymalna
iloÊç màki, jakà mo˝na przetworzyç jednorazowo w robocie
kuchennym to 700g (ca∏kowita waga ciasta 1,2 kg).

28
Sa∏atka z marchewki
(dla 6 osób)
1 ma∏a cebula
2 p∏askie ∏y˝ki sto∏owe syropu imbirowego
2 p∏askie ∏y˝ki sto∏owe soku cytrynowego
pó∏ ∏y˝eczki soli
pó∏ ∏y˝eczki imbiru
6 p∏askich ∏y˝ek sto∏owych oleju roÊlinnego
600 g marchewki
Posiekaj cebul´ w robocie kuchennym, u˝ywajàc metalowego no˝a.
Dodaj syrop imbirowy, sok cytrynowy, sól, olej i mieszaj wszystkie
sk∏adniki przez kilka sekund na najni˝szych obrotach.
Zastàp metalowy nó˝ tarczà tràcà na grube wiórki. Oskrob marchew
i potnij jà na szeÊciocentymetrowe kawa∏ki. W∏ó˝ marchew do leja
zasypowego i Êcieraj jà na imbirowy sos. Podrzucaj sa∏atk´ w
pojemniku.
Zapiekane ziemniaki £ ≠
Przystawka dla 4 osób)
10 g mas∏a
750 g obranych ziemniaków
250 ml bitej Êmietany
150 ml mleka
szczypta ga∏ki muszkato∏owej
sól i pieprz
Podgrzaç piekarnik do temperatury 180°C.
Wymieszaç Êmietan´, mleko, ga∏k´ muszkato∏owà, sól i pieprz przy
u˝ycia metalowego ostrza.
Posmarowaç naczynie ˝aroodporne mas∏em.
U˝ywajàc tarczy tnàcej na cienkie plastry, pokroiç ziemniaki i
wy∏o˝yç je na mas´ w pojemniku.
U∏o˝yç ziemniaki warstwami w naczyniu ˝aroodpornym i zalaç
resztkà sosu.
Piec w piekarniku oko∏o 60 minut a˝ ziemniaki zarumienià si´.
Rady:
Mo˝na dodaç czosnku, posiekanej i podsma˝onej cebuli oraz
kawa∏ki boczku.
Przed wstawienie do piekarnika, ziemniaki mo˝na posypaç startym
serem.
M∏ode ziemniaki nale˝y trzymaç w piekarniku oko∏o 15 minut d∏u˝ej.
NaleÊniki ß
(dla 4-5 osób)
200 g màki
szczypta soli
3 jajka
500 ml mleka
mas∏o
Wlej mleko do pojemnika. Dodaj màk´, sól i jajka. Wymieszaj
ubijakiem, zaczynajàc na niskich obrotach, a˝ powstanie jednorodne
rzadkie ciasto.
Wlej odrobin´ ciasta na goràcà patelni´ posmarowana
rozpuszczonym mas∏em i sma˝ naleÊniki po obu stronach.
Rady:
NaleÊniki mo˝na prze∏o˝yç d˝emem, sosem morelowym lub szynkà,
serem bàdê pieczarkami.

29
Koktajl mleczny £
(dla 2-3 osób)
200 g Êwie˝ych owoców (np. truskawek, malin,
bananów)
1 ∏y˝eczka soku z cytryny
cukier lub miód do smaku
200 ml zimnego mleka
2 ga∏ki lodów waniliowych.
Zmiksowaç owoce z sokiem cytrynowym, cukrem lub miodem w
pojemniku robota.
Dodaç mleko i lody; mieszaç, a˝ powstanie piana.
Rady:
Zamiast Êwie˝ych owoców mo˝na u˝yç 2 p∏askich ∏y˝ek mocnej
kawy lub kakao. Wtedy nale˝y zastàpiç lody waniliowe lodami mocca
lub czekoladowymi.
Potrawka dla dzieci £
(4 porcje)
100 g mi´sa (kurczak, wo∏owina)
200 g marchewki
130 g ziemniaków
4 ∏y˝eczki mas∏a lub oleju kukurydzianego.
Obranà i umytà marchew pociàç na dwucentymetrowe kawa∏ki i
gotowaç przez 20 minut.
Ugotowaç ziemniaki w ∏upinach i mi´so.
W∏o˝yç ugotowanà marchewk´ do pojemnika.
Pociàç obrane z ∏upiny ziemniaki i mi´so na czterocentymetrowe
kawa∏ki i w∏o˝yç je do pojemnika.
Dodaç mas∏o lub olej kukurydziany i oko∏o 200 ml. Wody pozosta∏ej
z gotowania marchewki.
Miksowaç sk∏adniki przez 30 sekund na najwy˝szych obrotach.
Zupa z broku∏ £ ≠
(dla 4 osób)
50 g dojrza∏ego sera gouda
300 g gotowanych broku∏ (∏odygi i kwiaty)
woda pozosta∏a po gotowaniu broku∏
2 gotowane pokrojone ziemniaki
2 kostki roso∏owe
2 ∏y˝ki bitej Êmietany
curry, sól, pieprz, ga∏ka muszkato∏owa.
Zetrzeç ser.
Utrzeç na najwy˝szych obrotach za pomocà metalowego no˝a
gotowane broku∏y z gotowanymi ziemniakami i odrobinà wody
pozosta∏ej z gotowania broku∏.
Do masy i wody pozosta∏ej z gotowania dodaç kostki roso∏owe.
Wszystko wlaç do pojemnika z miarkà i dope∏niç do 750 ml.
Przelaç zup´ do rondla i zagotowaç ciàgle mieszajàc.
Dodaç tarty ser i doprawiç curry, solà, pieprzem, ga∏kà
muszkato∏owà.
Dodaç Êmietan´.

30
JeÊli robot kuchenny nie pracuje prawid∏owo
JeÊli robot kuchenny nie pracuje prawid∏owo, prosimy o zapoznanie si´ z poni˝szym zestawieniem. Prosimy te˝ o sprawdzenie
odpowiednich fragmentów niniejszej instrukcji!
Ewentualne rozwiàzanie problemu
Za∏ó˝ pojemnik lub pokryw´ we w∏aÊciwy sposób i obróç we wskazanym kierunku (a˝ us∏yszysz
„klikni´cie“).
Upewnij si´, czy strza∏ki na pojemniku i na urzàdzeniu, a tak˝e na pojemniku i pokrywie znajdujà
si´ dok∏adnie naprzeciw siebie (patrz rys. 2 i 6)
Prawdopodobnie automatyczny wy∏àcznik odcià∏ dop∏yw pràdu do urzàdzenia z powodu jego
przegrzania.
- Wy∏àcz urzàdzenie z pràdu
- Przestaw w∏àcznik na pozycj´ O
- Odczekaj 15 minut a˝ urzàdzenie ostygnie
- Ponownie w∏ó˝ wtyczk´ do gniazdka Êciennego
- W∏àcz urzàdzenie
Wybierz odpowiednià pr´dkoÊç obrotów. Zwróç uwag´ na oznakowania na urzàdzeniu oraz w
instrukcji.
Dodaj nieco soku z cytryny lub szczypt´ soli. Upewnij si´, ˝e ubijak i pojemnik nie sà
zat∏uszczone oraz wybierz odpowiednià pr´dkoÊç obrotów.
U˝yj ubijaka. Najlepiej ubijaç Êmietan´ sch∏odzonà uprzednio w lodówce do temperatury ok. 6°C.
U˝ywaj ubijaka wy∏àcznie do ubijania Êmietany, jajek, piany z bia∏ek i p∏ynów. Nie u˝ywaj go do
wyrabiania ciast.
Bardzo dok∏adnie przestrzegaj wskazówek podanych w przepisie. Nie dodawaj za du˝o wody.
U˝ywaj nasadki wskazanej w tabeli. Nie przekraczaj okreÊlonego maksymalnego czasu
wyrabiania ciasta.
Problem
Nie dzia∏a w∏àcznik.
Urzàdzenie nagle przestaje
dzia∏aç
Niezadowalajàce rezultaty
rozdrabniania, ci´cia lub
ucierania.
Niezadowalajàce rezultaty
ubijania piany
Niezadowalajàce rezultaty
ubijania Êmietany.
Ubijak zeÊlizguje si´ lub
zakrzywia
Ciasto wiruje wokó∏ Êcianek
pojemnika.
31
L
M
G
J
H
I
P
D
C
B
K
O
F
E
A
N
Obwee opisanie (ris. 1)
A Korpus qlektroprivoda
B Haπa
C Kryπka haπi
D Vystup kryπki (vklühaet i otklühaet
vstroennuü zawitnuü blokirovku)
E Kromka kryπki (zakryvaet otverstie v
ruhnom zaxvate)
F Vstroennaä zawitnaä blokirovka
G Metalliheskij noΩ
£
H Dvuxstoronnij disk lomterezka/terka
(dlä srednego i melkogo izmel´heniä)
≠
I Vzbivatel´
ß
J Prisposoblenie dlä zameπivaniä
testa
©
K Val qlektroprivoda
L Zagruzohnoe okno dlä piwevyx
produktov
M Tolkatel´
N Pereklühatel´
0 = vyklüheno
1-2 = ustanovka skorosti
(1 = nizkaä skorost´,
2 = vysokaä skorost´)
M = Knopka Ostanovki/Impul´s
(dlä raboty pribora derΩite knopku v
naΩatom sostoänii)
O Sekciä dlä namotki πnura (dlä xraneniä
πnura v svernutom vide)
P Lopatka
1
Russkij
 Loading...