

Philips HD8323/08, HD8325/08, HD8327/47, HD8325/47, Poemia HD 8323 Operating Instructions Manual
...
OPERATING INSTRUCTIONS
BEDIENUNGSANLEITUNG
MODE D’EMPLOI
INSTRUCCIONES DE USO
READ THESE INSTRUCTIONS CAREFULLY BEFORE USING THE MACHINE.
VOR DEM GEBRAUCH DER MASCHINE IST DIE VORLIEGENDE BEDIENUNGSANLEITUNG AUFMERKSAM ZU LESEN.
LIRE ATTENTIVEMENT CE MODE D'EMPLOI AVANT D’UTILISER LA MACHINE.
LEER ATENTAMENTE ESTAS INSTRUCCIONES DE USO ANTES DE USAR LA MÁQUINA.
Register your product and get support at
www.philips.com/welcome
EnglishDeutschFrançaisEspañol
Type HD 8323 / HD 8325 / HD8327
• 2 •
Fig.- Abb. (A) Fig.- Abb. (B)
20 cm
8 in
20 cm
8 in
20 cm
8 in
40 cm
16 in
20 cm
8 in
4 65
1
2 3
7 8 9 10
11
13
14
12
16
17
18
19
20
15
• 3 •
Fig.- Abb. (1) -
Fig.- Abb. (4) -
Fig.- Abb. (7) -
Fig.- Abb. (10) -
Fig.- Abb. (2) -
Fig.- Abb. (5) -
Fig.- Abb. (8) -
Fig.- Abb. (11) -
Fig.- Abb. (3) -
Fig.- Abb. (6) -
Fig.- Abb. (9) -
Fig.- Abb. (12) -
• 4 •
Fig.- Abb. (13) -
Fig.- Abb. (16) -
Fig.- Abb. (19) -
Fig.- Abb. (22) -
Fig.- Abb. (14) -
Fig.- Abb. (17) -
Fig.- Abb. (20) -
Fig.- Abb. (23) -
Fig.- Abb. (15) -
Fig.- Abb. (18) -
Fig.- Abb. (21) -
Fig.- Abb. (24) -
• 5 •
Fig.- Abb. (25) -
Fig.- Abb. (28) -
Fig.- Abb. (31) -
Fig.- Abb. (34) -
Fig.- Abb. (26) -
Fig.- Abb. (29) -
Fig.- Abb. (32) -
Fig.- Abb. (35) -
Fig.- Abb. (27) -
Fig.- Abb. (30) -
Fig.- Abb. (33) -
Fig.- Abb. (36) -
• 6 •
1 GENERAL INFORMATION
The co ee machine is suitable for preparing 1 or 2 cups of
espresso co ee and is provided with a swivel steam and hot
water wand. The controls on the front side of the machine are
labelled with easy-to-read symbols.
The machine has been designed for domestic use and is not
suitable for professional, continuous use.
Warning. No liability is held for damage caused
by:
• Incorrect use not in accordance with the intended
purposes;
• Repairs not carried out in authorised service
centres;
• Tampering with the power cord;
• Tampering with any part of the machine;
• Use of non-genuine spare parts and accessories;
• Failure to descale the machine and storage at
temperatures below 0°C.
In these cases, the warranty is not valid.
1.1 To Simplify Manual Reading
The warning triangle indicates the
instructions that are important
for user’s safety. Please carefully
follow these instructions to avoid serious injury!
References to illustrations, parts of the appliance or controls,
etc. are indicated by numbers or letters. Whenever possible,
refer to the illustration.
This symbol is used to highlight information
th at is p ar ti cu lar ly imp or ta nt to e ns ure op tim al
use of the machine.
The illus trations cor responding to t he text can be fo und
on the rst pages of the manual. Please refer to these
pages while reading the operating instructions.
1.2 How to use these Operating
Instructions
Keep these operating instructions in a safe place and make
them available to anyone who may use the co ee machine.
For further information or in case of problems, please refer to
an authorised service centre.
2 TECHNICAL SPECIFICATIONS
The manufacturer reserves the right to make changes to the
technical speci cations of the product.
Nominal Voltage - Power Rating - Power Supply
See label on the appliance
Housing Material
Plastic
Size (w x h x d) (mm)
210 x 300 x 280
Weight
3.9 kg
Power Cord Length
1.3 m
Control Panel
Front side
Filter Holder
Pressurized type
Pannarello
Special for cappuccinos
Water Tank
1.25 litres – Removable type
Pump Pressure
15bar
Boiler
Stainless steel type
Safety Devices
Thermal fuse
3 SAFETY REGULATIONS
Never allow water to come into contact with any of the
electrical parts of the machine: Danger of short circuit!
Overheated steam and hot water may cause scalding!
Do not direct the steam or hot water jet towards body
parts. Handle the steam/hot water spout with care:
Danger of scalding!
Intended Use
The co ee machine is intended for domestic use only. Do
not make any technical changes or use the machine for
unauthorised purposes since this would create ser ious hazards!
The appliance is not to be used by persons (including children)
with reduced physical, mental or sensory abilities or with
scarce experience and/or expertise, unless they are supervised
by a person responsible for their safety, or they are instructed
by this person on how to properly use the machine.

• 7 •
English
Power Supply
Only connect the co ee machine to a suitable socket. The
voltage must correspond to that indicated on the machine’s
label.
Power Cord
Never use the co ee machine if the power cord is defective or
damaged. If damaged, the power cord must be replaced by
the manufacturer or an authorised service centre. Do not pass
the power cord around corners, over sharp edges or over hot
objects and keep it away from oil.
Do not use the power cord to carry or pull the co ee machine.
Do not pull out the plug by the power cord or touch it with wet
hands.
Do not let the power cord hang freely from tables or shelves.
For the Safety of Others
Prevent children from playing with the machine.
Children are not aware of the risk s related to electric h ousehold
appliances. Do not leave the machine packaging materials
within the reach of children.
Danger of Burns
Never direc t jets of overheated steam an d/or hot water toward s
yourself or others. Always use the handles or knobs provided.
Do not disconne ct (remove) the pressurized lter holder during
co ee brewing. Hot water drips may spill out of the brew unit
during the warming phase.
Do not brew co ee when the machine is overheated, namely
when both “
” and “ ” lights are on.
Machine Location
Place the co ee machine in a safe place, where there will be no
danger of overturning or injury.
Hot water or overheated steam may spill out of the machine:
Danger of scalding!
Do not keep the machine at a temperature below 0°C. Frost
may damage the machine.
Do not use the co ee machine outdoors.
In order to preven t its housing from mel ting or being damaged,
do not place the machine on very hot surfaces and close to
open ames.
Cleaning
Be fore cle aning the mach ine, t urn it o by p ressing the ON /OFF
button, then pull out the plug from the socket. Wait for the
machine to cool down.
Never immerse the machine in water!
It is strictly forbidden to tamper with the internal parts of the
machine.
Water left in the tank for several days should not be used for
food purposes. Wash the tank and ll it with fresh drinking
water.
Suitable Location for Operation and
Maintenance
To ensure a correct and e cient performance of the co ee
machine, we recommend following the instructions below:
• Choose a level surface.
• Choose a location that is su ciently well-lit, clean and
near an easily reachable socket.
• Allow for a minimum distance from the sides of the
machine as shown in (Fig.A).
Storing the Machine
If the machine is to remain inactive for a long time, turn it
o and unplug it. Store it in a dry place, out of the reach of
children. Keep it protected from dust and dirt.
Repairs / Maintenance
In case of failure, problems or a suspected fault resulting from
the falling of the machine, immediately remove the plug
from the socket. Never attempt to operate a faulty machine.
Servicing and repairs may only be carried out by Authorised
Service Centres. All liability for damages resulting from work
not carried out by professionals is declined.
Fire Safety Precautions
In case of re, use carbon dioxide (CO2) extinguishers. Do not
use water or dry powder extinguishers.
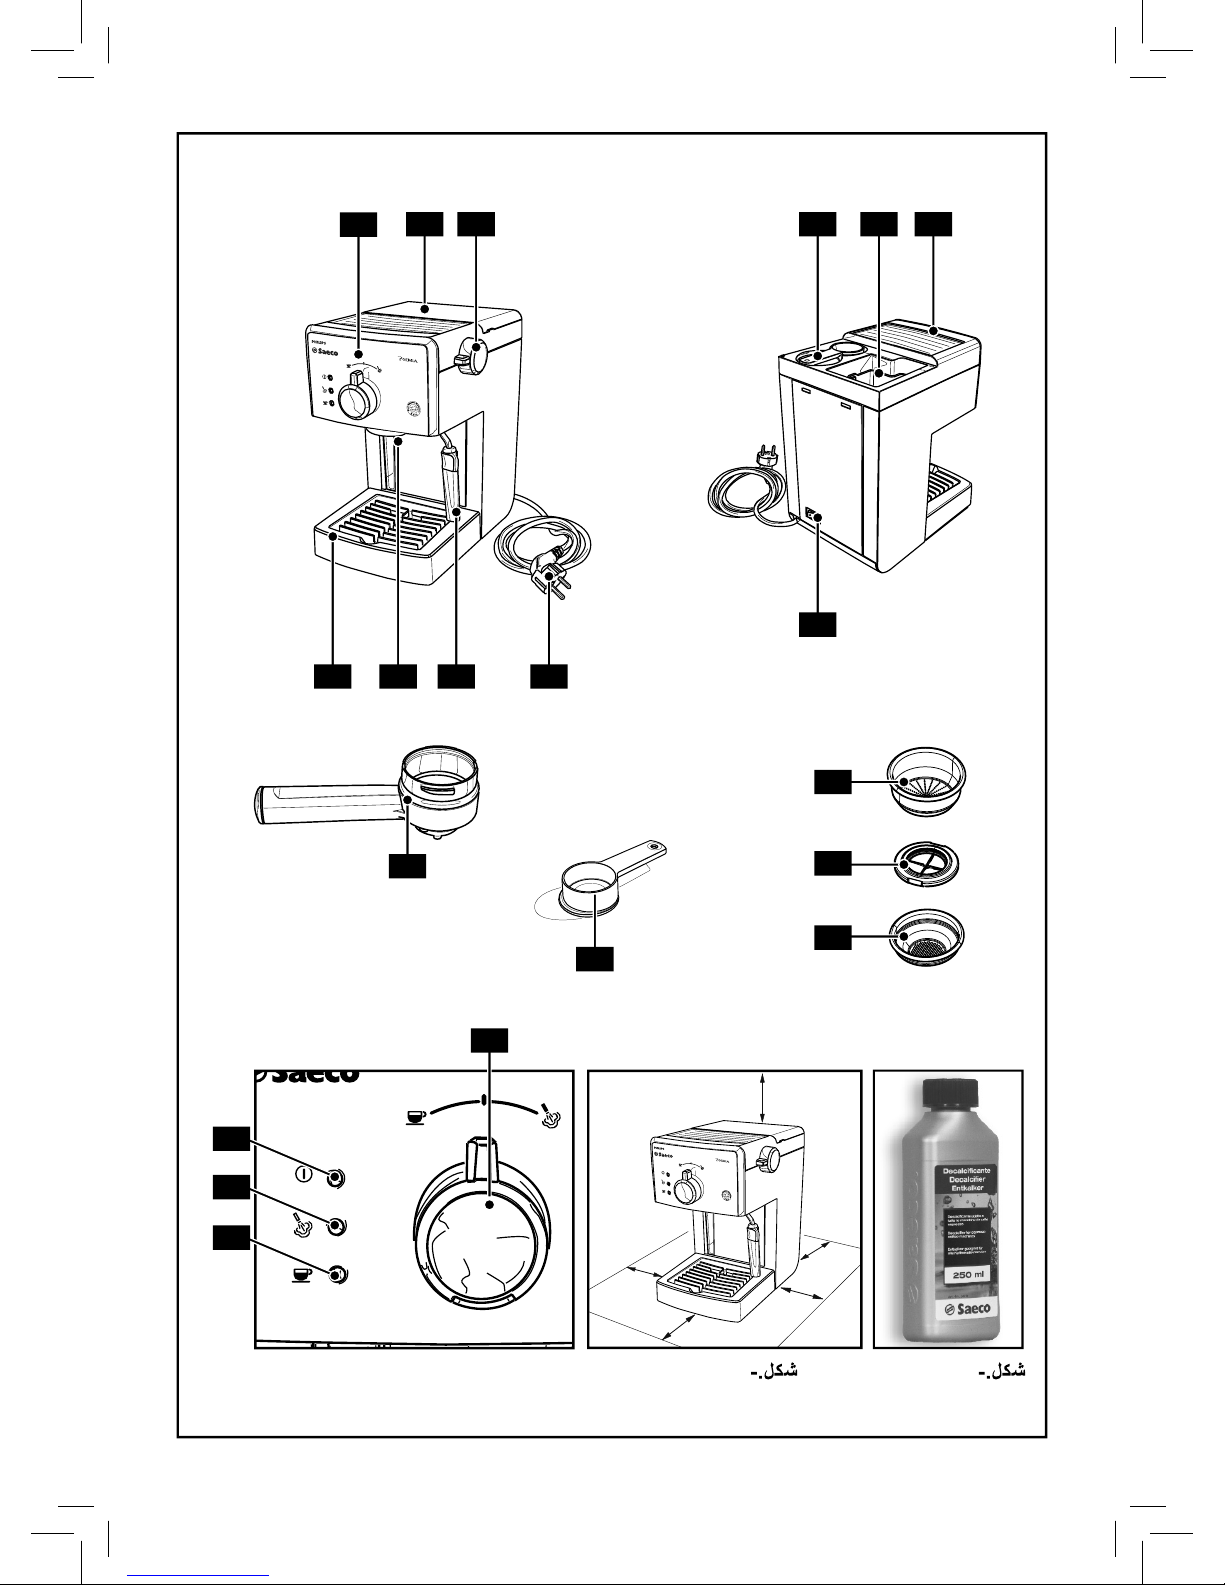
Key to Machine Components (Page 2)
1 Control panel
2 Water tank lid
3 Hot water/steam knob
4 Seat for accessories
5 Water tank
6 Cup holder rest
7 Water recovery tray + grill
8 Brew unit
9 Steam wand (Pannarello)
10 Power cord
11 ON/OFF button
12 Pressurized lter holder
13 Ground co ee measuring scoop
14 Ground co ee lter
(single piece for 1 or 2 co ee(s))
15 Pod lter adapter
16 Co ee pod lter
17 Selection knob
18 "Machine on" light
19 "Steam ready" light
20 Co ee/Water light - "Machine ready"
• 8 •
4 INSTALLATION
For your own and other people safety, follow the
"Safety Regulations" indicated in Section 3 carefully.
4.1 Packaging
The original packaging has been designed to protect the
machine during shipping. We recommend keeping the
packaging material for possible future transport.
4.2 Installation Instructions
Before installing the machine, read the following safety
instructions carefully:
• Place the machine in a safe place;
• Make sure children cannot play with the machine;
• Do not place the machine on hot surfaces or near open
a m e s .
The co ee machine is now ready to be connected to the
electrical network.
Note: It is recommended to wash the
components before using them for the rst
time and/or after they have not been used for a certain
period of time.
4.3 Machine Connection
Electric power may be very dangerous! It is
therefore necessary to strictly follow the safety
regula tions. Do not use faulty power c ords! Faulty cord s
and plugs must be replaced immediately in Authorised
Service Centres.
The voltage of the appliance has been pre-set by the
manufacturer. Check that the voltage matches the indication
on the data plate placed at the bottom of the appliance.
• Check that the ON/OFF button (11) is set on “0” before
connecting the machine to the electrical network.
• Insert the plug into a wall socket with suitable power
voltage.
4.4 Water Tank
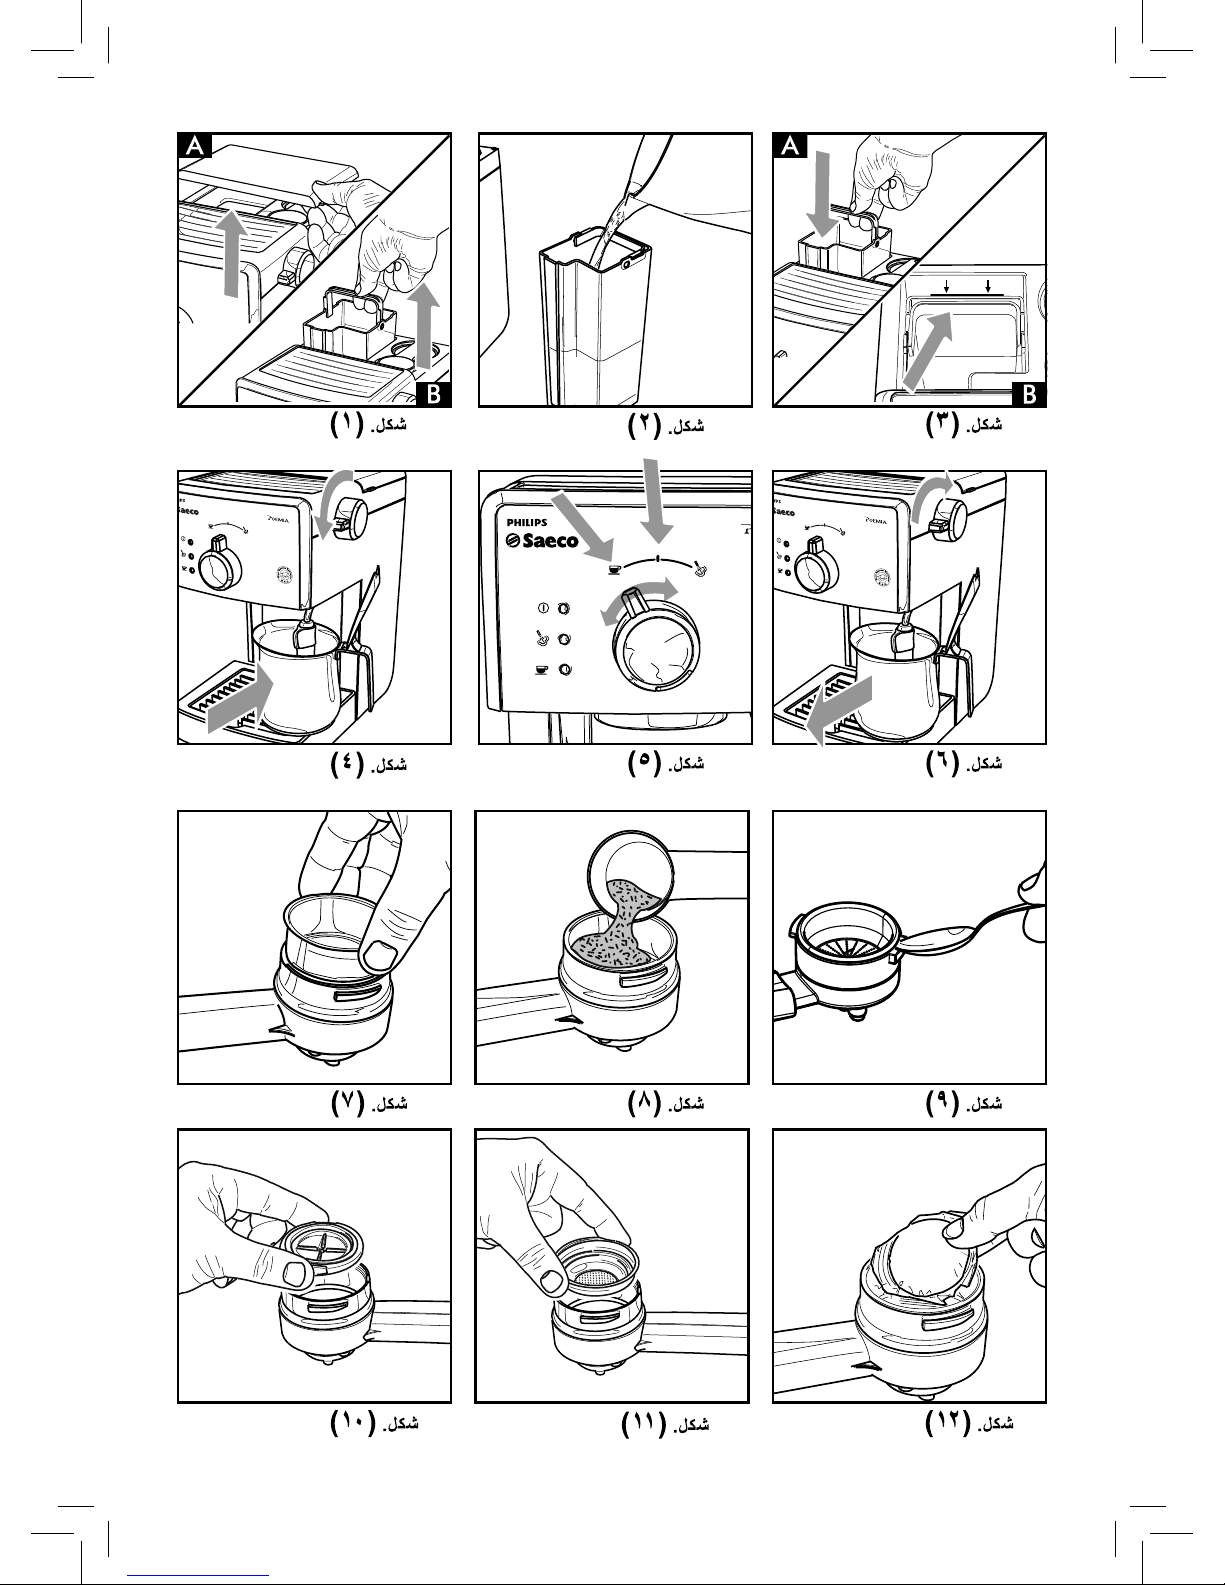
• (Fig.1A) - Remove the lid from the water tank (2) by lifting
it.
• (Fig.1B) - Remove the water tank (5).
• (Fig.2) - Rinse and ll it with fresh drinking water taking
care not to over ll.
Fill the tank only with fresh, non-sparkling,
drinking water. Hot water or any other liquid
may damage the tank. Do not operate the machine if
water is not present: Make sure there is enough water
in the tank.
• (Fig.3A) - Insert the water tank making sure that it has
been properly repositioned in its former seat and then
reposition the lid (2).
After lling the water tank, place it back
into the machine. Make sure that the tank is
correctly inserted into the machine by pushing it rmly
until its limit stop in order to avoid water leaks from
the bottom - THE REFERENCE MARK INDICATED IN FIG. 3B
SHOULD BE FULLY VISIBLE.
4.5 Circuit Priming
At the beginning, after dispensing steam or when the water
tank is empty, the machine’s water circuit must be primed.
• Press the ON/OFF button (11) and switch it to the "I"
position. The light (18) will turn on to indicate that the
machine is on.
• (Fig.4) - Place a container under the steam wand
(Pannarello).
• O pen the "hot water/steam" knob (3) by turning it counter-
clockwise.
• (Fig.5) - Set the selection knob (17) to the "
" position.
• Wait until a steady jet of water ows out of the steam
wand (Pannarello).
• (Fig.5) - Set the selection knob (17) to the "
" position.
• Close the "hot water/steam" knob (3) by turning it
clockwise. Remove the container.
4.6 Using the Machine for the First Time
or after a Period of Inactivity
This simple operation ensures optimum brewing and must be
performed:
- At rst start-up;
- When the machine remains inactive for a long time (more
than 2 weeks).
Dispensed water must be emptied into an
adequ ate d rain. It is n ot suitabl e for food use . If
the container lls up during the cycle, stop dispensing
water and empty the container before resuming the
operation.
• (Fig.2) - Rinse the tank and ll it again with fresh drinking
water.
• 9 •
English
• (Fig.4) - Place a container under the s team wand (Pannarello).
Open the knob (3) by turning it counter-clockwise.
(Fig.5) - Set the selection knob (17) to the " " position.
• Dispense the whole water tank content from the steam/
hot water wand (Pannarello). To end the operation, set the
selection knob (17) to the "
" position and close the knob
(3) by turning it clockwise.
• (Fig.2) - Fill the tank with fresh drinking water.
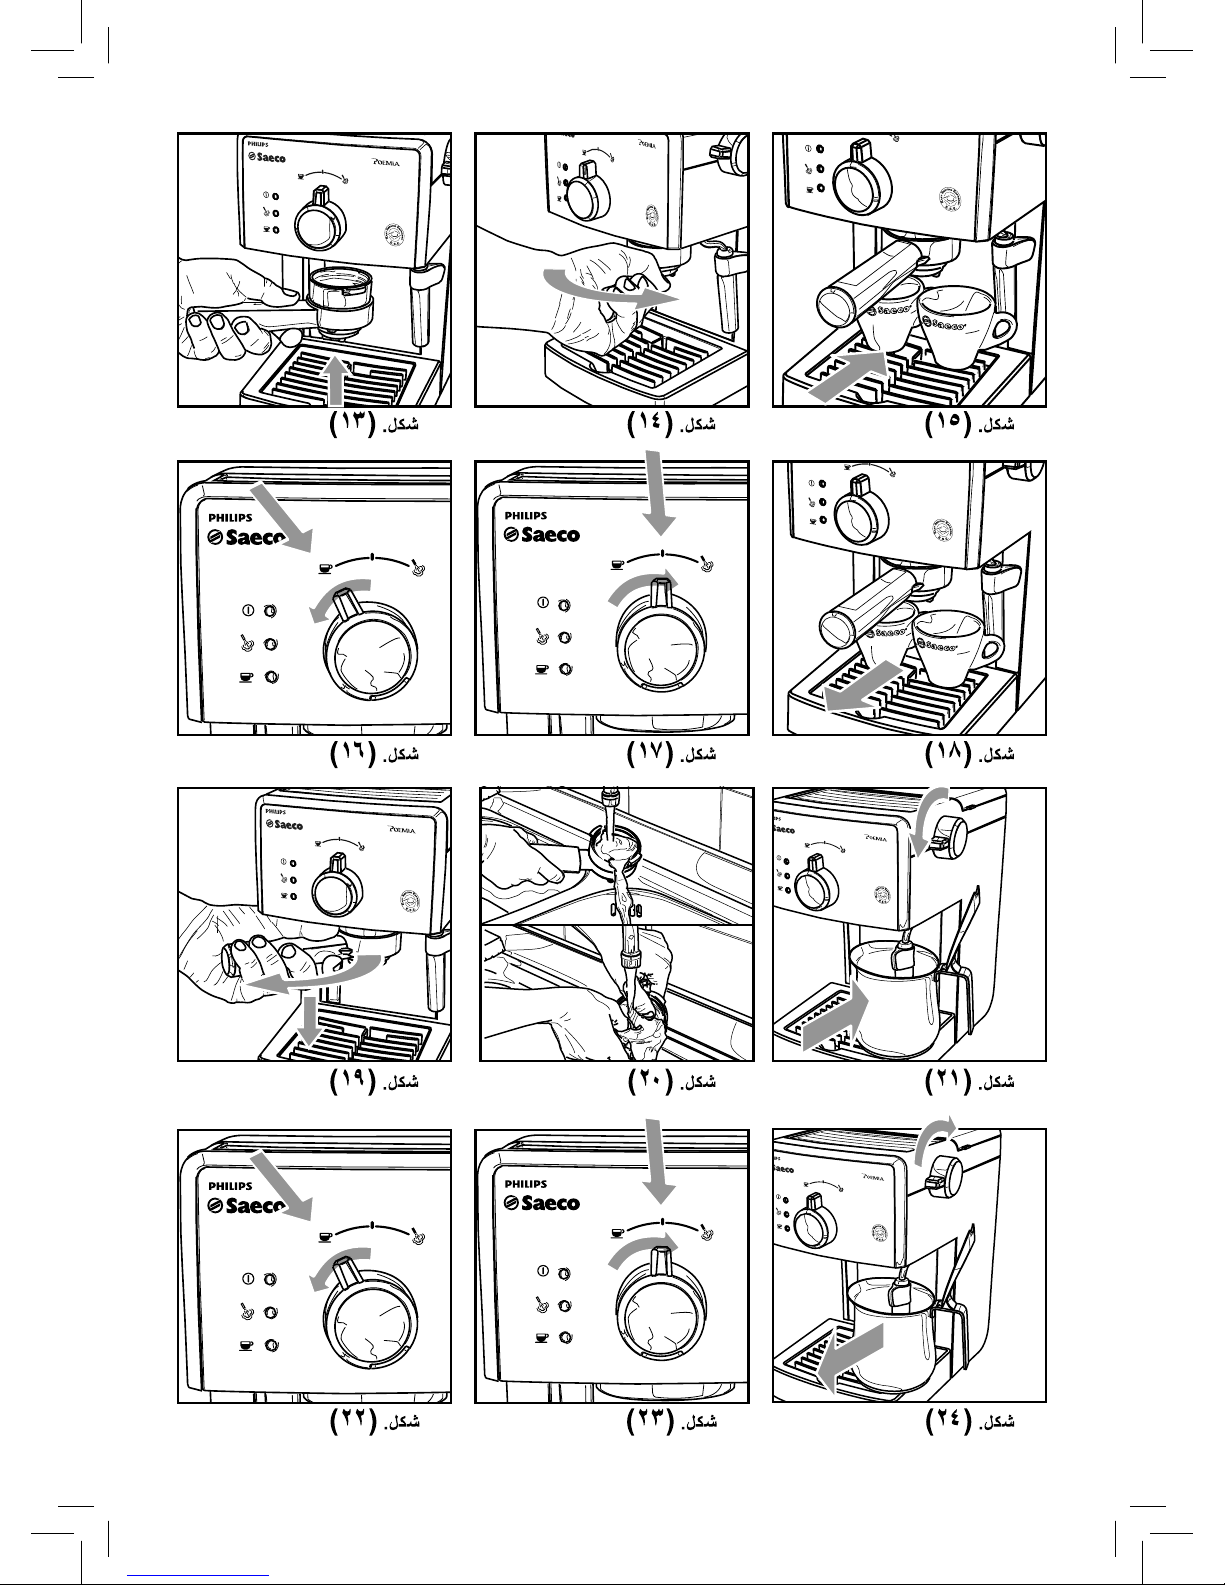
• (Fig.13-14) - Insert the lter holder into the brew unit (8)
from the bottom and turn it from left to right until it locks
into place.
• (Fig.15) - Place a suitable container under the lter
holder.
• (Fig.16) - Turn the selection knob (17) to the "
"
position and dispense all the water in the tank.
(Fig.17) - Once the tank is empty, stop dispensing and
switch the selection knob (17) to the "
" position.
• Fill the tank again and wait until the "machine ready" light
(20) turns on.
• (Fig.19) - Rem ove t he lter h older f rom the u nit b y turning
it from right to left and rinse it with fresh drinking water.
The machine is now ready; please see related sections for
operating details on how to brew co ee and dispense steam.
5 COFFEE BREWING
Warning! During the co ee brewing it is
forbidden to remove the pressurized lter
holder by manually turning it clockwise. Danger of
burns.
• During this operation, the "machine ready" light (20) may
ash; this is to be considered as a standard and not a faulty
operating mode.
• Before using the machine, make sure that the hot water/
steam knob (3) is closed and that there is enough water in
the tank.
• Press the ON/OFF button (11) and switch it to the "I"
position.
• Wait until the "machine ready" light (20) turns on. The
machine is now ready for co ee brewing.
Accessories for co ee brewing are placed in
a specially designed seat to make operations
easy and immediate.
If the ground co ee measuring scoop and/or the lters
are required, lift the cover (2) and take what you need
(Fig.35 e Fig.36).
5.1 Using Ground Coff ee
• (Fig.7) - Inser t the lter (14) in the pressurize d lter holder
(12); the lter is already inserted when using the machine
for the rst time.
• (Fig.13) - Insert the lter holder into the b rew unit (8) from
the bottom.
• (Fig.14) - Turn the lter holder from left to right until it
locks into place. Release the pressurized lter holder grip.
The handle will slightly turn to the left. This movement
guarantees proper lter holder performance.
• (Fig.16) - Preheat the pre ssurized lte r holder by switching
the selection knob (17) to the "
" position until some
water spills out of it. This is to be done only for the rst
co ee brewing.
• (Fig.17) -When 150cc of water have owed out, set the
selection knob (17) to the "
" position to stop brewing.
• (Fig.19) - Remove the lter holder from the machine by
turning it from right to left and pour out any water left. As
the machine is tted with the special lter (14), there is no
need to change the lter to make one or two co ees.
• (Fig.35) - Remove the measuring scoop from the
machine.
• (Fig.8) - Add 1-1.5 measuring scoop(s) for single co ee
and 2 measuring scoops for double co ee. Remove any
co ee residues from the rim of the lter holder.
• (Fig.13) - Insert the lter holder (12) into the brew unit (8)
from the bottom.
• (Fig.14) - Turn the lter holder from left to right until it
locks into place.
• (Fig.15) - Tak e 1 or 2 preheated cups and place them
under the pressurized lter holder. Make sure that they are
correctly placed under the co ee brewing nozzles.
• (Fig.14) - Switch the selection knob (17) to the "
"
position.
• When the desired quantity of co ee has been obtained,
turn the selection knob (17) to the "
" position to stop
co ee brewing. Wait a few seconds after brewing has
stopped, then remove the cups of co ee (Fig.18).
• (Fig.19) - Remove the pressurized lter holder and empty
out the remaining co ee residues.
Note: If a small quantity of water remains
in the lter holder, this has to be considered
as absolutely normal and is due to the lter holder
features.
Important Note: The lter (14) should be kept
clean to guarantee perfect results. Clean daily
after use.
• 10 •
5.2 Using Coff ee Pods
• (Fig.9) - Use a co ee spoon to remove the lter for ground
co ee (14) from the pressurized lter holder (12).
• (Fig.10) - Insert the co ee pod adapter (15) - with the
convex part facing down - into the pressurized lter holder
(12).
• (Fig.11) - Then, insert the po d lter (16) into the pressurized
lter holder (12).
• (Fig.13) - Insert the pressurized lter holder into the brew
unit (8) from the bottom.
• (Fig.14) - Turn the lter holder from left to right until it
locks into place. Release the grip from the pressurized
lter holder. The handle is automatically slightly turned
leftwards.
This movement guarantees proper pressurized lter holder
performance.
• (Fig.16) - Preheat the pre ssurized lte r holder by switching
the selection knob (17) to the "
" position until some
water spills out of it. This is to be done only for the rst
co ee brewing.
• (Fig.17) -When 150cc of water have owed out, set the
selection knob (17) to the "
" position to stop brewing.
• (Fig.19) - Remove the pressurized lter holder from the
machine by turning it from right to left and pour out any
water left.
• (Fig.12) - Insert the pod into the lter holder and make
sure the paper of the pod does not overhang the lter
holder.
• (Fig.13) - Insert the pressurized lter holder into the brew
unit (8) from the bottom.
• (Fig.14) - Turn the lter holder from left to right until it
locks into place.
• Take 1 preheated cup and place it under the lter holder.
Check that it is correctly placed under the co ee brewing
nozzles.
• (Fig.16) - Switch the selection knob (17) to the "
"
position.
• (Fig.17) - When the desired quantity of co ee has been
obtained, turn the selection knob (17) to the "
" position
to stop co ee brewing, and then remove the co ee cup.
• (Fig.19) - Wait a few seconds after brewing, then remove
the lter holder and dispose of the used pod.
Important Note: The lter (16) and the adapter
(15) should be kept clean to guarantee perfect
results. Clean daily after use.
6 TIPS FOR CHOOSING COFFEE
As a general rule any type of co ee available on the market can
be used. However, co ee is a natural product and its avour
changes according to its origin and blend; it is therefore a good
idea to try di erent types of co ee in order to nd the most
suited to your personal taste.
For optimal results, we recommend using espresso machine
blends. As a rule, co ee should always come out of the
pressurized lter holder, without dripping.
The co ee brewing speed can be modi ed by slightly changing
the amount of co ee in the lter and/or using a di erent co ee
grind.
Saeco recommends using ESE single-dose co ee pods for a
tasty co ee and easier cleaning and preparing.
BEFORE PERFORMING ANY OPERATIONS RELATED
TO HOT WATER/STEAM DISPENSING, MAKE SURE
THAT THE STEAM WAND (PANNARELLO) IS DIRECTED OVER
THE WATER RECOVERY TRAY.
7 HOT WATER
Danger of scalding! Dispensing may be pr eceded
by small jets of hot water. The wand can reach
high temperatures: Do not touch it directly with bare
hands.
• Press the ON/OFF button (11) and switch it to the "I"
position.
• Wait until the "machine ready" light (20) turns on. The
machine is now ready.
• (Fig.21) - Place a container or a tea glass under the steam
wand (Pannarello).
• (Fig.21) - Open the knob (3) by turning it counter-
clockwise.
• (Fig.22) - Set the selection knob (17) to the "
"
position.
• (Fig. 23) - When the de sired quantity of hot water has be en
dispensed, set the selection knob (17) to the "
" position.
• (Fig.24) - Close the knob (3) by turning it clockwise.
• Remove the hot water container.
• 11 •
English
8 STEAM / CAPPUCCINO
Danger of scalding! Dispensing may be preceded
by small jets of hot water. The wand can reach
high temperatures: Do not touch it directly with bare
hands.
• Press the ON/OFF button (11) and switch it to the "I"
position.
• Wait until the "machine ready" (20) light turns on.
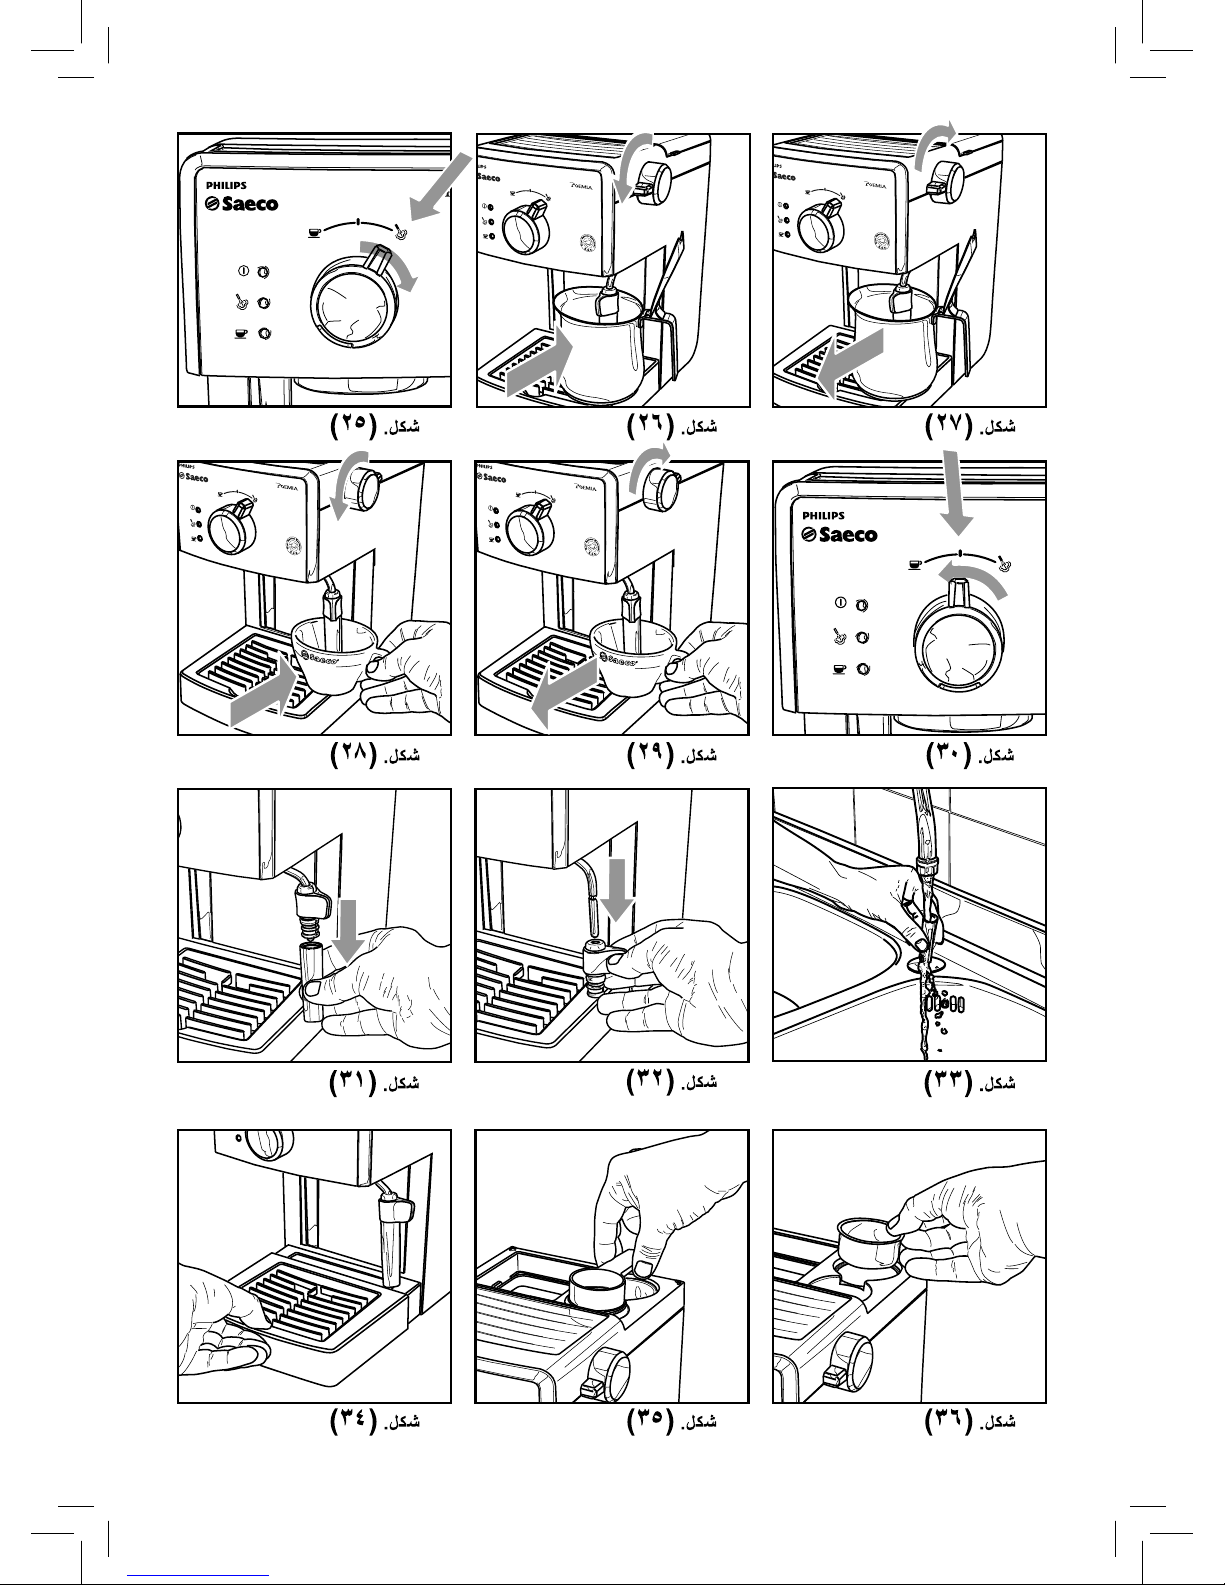
• (Fig.25) - Set the selection knob (17) to the "
" position.
The light (20) turns o .
• Wait until the light (19) turns on. The machine is now ready
for steam dispensing.
• (Fig.26) - Place a container under the steam wand.
• (Fig.26) - Open the knob (3) for a few seconds, so that
remaining water ows out of the s team wand (Pannarello).
In a short time only steam will come out.
• (Fig.27) - Close the knob (3) and remove the container.
• Fill 1/3 of the container you wish to use to prepare
cappuccino with cold milk.
Use cold milk to get a better result.
• (Fig.28) - Immerse the steam wand in the milk and open
the knob (3) by turning it counter-clockwise. Turn the milk
container with slow upward movements so that it warms
up evenly.
A maximum dispensing of 60 seconds is
recommended.
• Once nished, close the knob (3) by turning it clockwise
and remove the cup with frothed milk.
• (Fig.30) - Set the selection knob (17) to the "
" position.
If both "
" and " " lights are on, the temperature of
the machine is too high for brewing co ee.
• Prime the circuit as described in Section 4.5 to make the
machine ready for use.
Note: The machine is ready when the "machine
ready" light
is permanently on.
Important Note: If it is not possible to brew
cappuccino as described, prime the circuit as
explained in Section 4.5 and then repeat the steps.
The same procedure can be performed to heat
other beverages.
• After this operation, clean the steam wand with a wet
cloth.
9 CLEANING
Maintenance and cleaning can only be carried out when the
machine is cold and disconnected from the electrical network.
• Do not immerse the machine in water or place any of its
parts in a dishwasher.
• Do not use spirit, solvents and/or aggressive chemical
agents.
• We recommend cleaning the water tank and re lling it
with fresh water daily.
• (Fig.31-33) - Every day, after heating milk, remove the
external part of the Pannarello and wash it with fresh
drinking water.
• (Fig.31-32-33) - Clean the steam wand weekly. To do this,
the following operations have to be performed:
- Remove the external part of the Pannarello (for standard
cleaning);
- Remove the upper part of the Pannarello from the steam
wand;
- Wash the upper part of the Pannarello with fresh drinking
water;
- Wash the steam wand with a wet cloth and remove any
milk residues;
- Reposition the upper part in the steam wand (make sure
it is completely inserted).
Reassemble the external part of the Pannarello.
• (Fig.34) - Empty and clean the drip tray every day.
• Use a soft, dampened cloth to clean the appliance.
• (Fig.20) - Perform the following operations to clean the
pressurized lter holder:
- (Fig.9) - Remove the lter and wash it thoroughly with
hot water.
- Remove the adapter (if tted) and wash it thoroughly
with hot water.
- Wash the internal part of the pressurized lter holder.
• Do not dry the machine and/or its components using a
microwave and/or standard oven.
• (Fig.35-36) - Clean the seat for accessories with a damp
cloth every week to remove any co ee or dust residues.
Note: Do not wash the pressurized lter holder
in the dishwasher.
• 12 •
10 DESCALING
Limescale builds up with the use of the appliance; the machine
needs des caling every 1-2 months and/or whenever a re duction
in water ow is noticed. Use the Saeco descaling solution only.
In case of con ict, priority must be given
to what is indicated in the operation and
maintenance manual over the instructions provided on
separately sold accessories and materials.
Use the Saeco descaling solution (Fig.B).
Its formula has been designed to ensure
better machine performance and operation for its
whole operating life. If correctly used, it also avoids
alterations in the brewed product. Before starting a
descaling cycle make sure that: THE WATER FILTER (if
used) HAS BEEN REMOVED.
Never drink the descaling solution or any
products dispensed until the cycle has been
carried out to the end. Never use vinegar as a descaling
solution.
1 (Fig.13-14) - Insert the lter holder into the brew unit (8)
from the bottom and turn it from left to right until it locks
into place.
2 (Fig.1B) - Remove and empty the water tank.
3 (Fig.2) - Pour HALF the content of the Saeco concentrated
descaling solution into the water tank, then ll the tank
with fresh drinking water up to the MAX level.
4 Switch on the machine by pressing the ON/OFF button (11)
and switch it to the "I" position.
(Fig.21) - Fill up (as described in Section 7 of the manual)
2 cups of water (about 150ml each) from the steam / hot
water wand and turn o the machine by pressing and
switching the ON/OFF button (11) to the "0" position.
5 Let the descaling solution sit for about 15-20 minutes with
the machine o .
6 Switch on the machine by pressing the ON/OFF button (11).
(Fig.21) - Fill up (as described in Section 7 of the manual)
two cups of water (about 150 ml each) from the steam /
hot water wand. Then turn the machine o by means of
the ON/OFF button (11) and leave it o for 3 minutes.
7 Repeat the operations described in step 6 until the water
tank is completely empty.
8 (Fig.2) - Rinse the tank and ll it completely with fresh
drinking water.
9 Place a container under the lter holder.
10 Switch on the machine by pressing the ON/OFF but ton (11);
turn the selection knob (17) to the "
" position and, by
means of the lter holder, dispense the whole content of
the tank. Set the selection knob (17) to the "
" position to
stop dispensing.
11 (Fig.2) - Fill the tank again with fresh water.
(Fig.21) - Place a large enough container under the steam
wand (Pannarello). Open the water dispensing knob (3) by
turning it counter-clockwise.
(Fig.22) - Turn the selection knob (17) to the "
"
position and dispense the whole content of the tank by
means of the steam / hot water wand.
12 (Fig.23) - After dispensing water, set the selection knob
(17) to the "
" position to stop dispensing.
(Fig.24) - Close the water dispensing knob (3) by turning it
clockwise.
13 Repeat the operations from point (8) once again fo r a total
of 4 tanks.
14 (Fig.19) - Re move the lter hol der f rom the un it by tur ning
it from right to left and rinse it with fresh drinking water.
The descaling cycle is now complete.
(Fig.2) - Fill the tank again with fresh water. If necessary,
prime the circuit as described in Section 4.5.
The descaling solution must be disposed of
according to the manufacturer’s instructions
and/or regulations in force in the country of use.
11 DISPOSAL
- The packing materials can be recycled.
- Appliance: Unplug the appliance and cut the power cord.
- Deliver the appliance and power cord to a service center or
public waste disposal facility.
This product complies with eu directive 2002/96/EC.
The symbol
on the product or on its packaging
indicates that this product may not be treated as household
waste. Instead it shall be handed over to the applicable
collection point for the recycling of electrical and electronic
equipment.
By ensuring this product is disposed of correctly, you will help
prevent potential negative consequences for the environment
and human health, which could otherwise be caused by
inappropriate waste handling of this product. For more
detailed information about recycling of this product, please
contact your local city o ce, your household waste disposal
service or the shop where you purchased the product.

• 13 •
English
Problem Possible Causes Solution
The machine does not turn on.
The machine is not connected to the
electrical network.
Connect the machine to the electrical network.
The pump is very noisy. No water in the tank. Re ll with water (Section 4.4).
The co ee is too cold.
The "machine ready" light (20) was o
while switching the selection knob (17) to
the "
" position.
Wait until the "machine ready" light (20) turns
on.
The lter holder is not inserted for
preheating (Section 5).
Preheat the lter holder.
The cups are cold. Preheat the cups with hot water.
The milk does not froth.
It is not possible to prepare a
cappuccino.
Not suitable milk: Powdered milk or lowfat milk has been used.
Use only cold, whole milk.
Dirty Pannarello. Clean the Pannarello as described in Section 9.
No steam left in the boiler.
Prime the circuit (Section 4.5) and repeat the
steps described in Section 8.
The co ee is brewed too fast,
crema does not form.
There is too little co ee in the lter
holder.
Add co ee (Section 5).
The grind is too coarse. Use a di erent blend (Section 6).
Co ee is old or not suitable. Use a di erent blend (Section 6).
Old or not suitable pod. Change the pod.
One component missing in the lter
holder.
Make sure that all components are present and
properly installed.
Co ee is not brewed or brewed
in drips only.
No water. Re ll with water (Section 4.4).
The grind is too ne. Use a di erent blend (Section 6).
Co ee pressed in the lter holder. Shake the ground co ee.
There is too much co ee in the lter
holder.
Reduce the quantity of co ee in the lter holder.
Knob (3) is open. Close knob (3).
The machine has limescale build-up. Descale the machine (Section 10).
The lter in the lter holder is clogged. Clean the lter (Section 9).
Not suitable pod. Change type of pod.
Co ee ows out of the edges.
The lter holder is incorrectly inserted in
the brew unit.
Insert the lter holder correctly (Section 5).
The upper edge of the lter holder is
dirty.
Clean the rim of the lter holder.
The pod is inserted incorrectly.
Insert the pod correctly. Make sure it does not
come out of the lter holder.
There is too much co ee in the lter
holder.
Reduce the quanti ty of co ee usin g the measuring
scoop.
Please contact the customer service for any problems not covered in the above table or when the suggested
solutions do not solve the problem.
• 14 •
1 ALLGEMEINES
Die Ka eemaschine eignet sich für die Zubereitung von 1
oder 2 Tassen Espresso und ist mit einer drehbaren Düse für
die Dampf- und die Heißwasserausgabe ausgestattet. Die
Bedienelemente auf der Vorderseite des Geräts sind mit einfach verständlichen Symbolen gekennzeichnet. Die Maschine
wurde für den Einsatz im Haushalt entwickelt und eignet sich
daher nicht für den Dauerbetrieb im gewerblichen Einsatz.
Achtung. In folgenden Fällen wird für eventuelle Schäden keine Haftung übernommen:
• Falsche und nicht den vorgesehenen Verwendungszwecken entsprechende Verwendung;
• Reparaturen, die nicht in autorisierten Kundendienststellen durchgeführt wurden;
• Veränderungen am Netzkabel;
• Veränderungen an beliebigen Bestandteilen der
Maschine;
• Verwe ndung von anderen als origi nalen Ersatz- und
Zubehörteilen;
• Fehlende Entkalkung und Lagerung in Räumen bei
Temperaturen unter 0°C.
In diesen Fällen erlischt die Garantie.
1.1 Hinweise zur einfacheren Lektüre
Das Warndreieck weist auf alle
wichtigen Hinweise für die Sicher-
heit des Benutzers hin. Diese Hinweise sind strikt zu beachten, um schwere Verletzungen zu vermeiden!
Der Bezug auf Abbildungen, Teile des Geräts oder Bedienelemente usw. erfolgt über Zahlen oder Buchstaben. In diesem
Falle wird auf die Abbildung verwiesen.
Mit diesem Symbol werden Informationen gekennzeichnet, auf die besonders geachtet wer-
den muss, um den Betrieb der Maschine zu optimieren.
Die dem Text entsprechenden Abbildungen be nden
sich auf den ersten Seiten des Handbuchs. Diese Seiten
sind beim Lesen der vorliegenden Bedienungsanleitung zu berücksichtigen.
1.2 Gebrauch dieser Bedienungsanlei-
tung
Bewahren Sie diese Bedienungsanleitung an einem sicheren
Ort auf und legen Sie sie der Maschine immer bei, wenn diese
von anderen Personen benutzt wird.
Für weitere Informationen oder bei Problemen wenden Sie
sich bitte an die autorisierten Kundendienststellen.
2 TECHNISCHE DATEN
Der Hersteller behält sich das Recht vor, technische Änderungen am Produkt vorzunehmen.
Nennspannung - Nennleistung - Stromversorgung
Siehe Typenschild auf dem Gerät
Material Gehäuse
Kunststo
Abmessungen (L x H x T) (mm)
210 x 300 x 280
Gewicht
3,9 kg
Kabellänge
1,3 m
Bedienfeld
Auf der Vorderseite
Filterhalter
Druckverdichtet
Pannarello
Spezialzubehör für Cappuccinos
Wassertank
1,25 Liter - herausnehmbar
Pumpendruck
15 bar
Durchlauferhitzer
Rostfreier Edelstahl
Sicherheitsvorrichtungen
Thermosicherung
3 SICHERHEITSVORSCHRIFTEN
Die unter Strom stehenden Teile dürfen keinesfalls mit
Wasser in Berührung kommen: Kurzschlussgefahr! Der
heiße Dampf und das heiße Wasser können Verbrennungen verursachen! Den Dampf- oder Heißwasserstrahl keinesfalls auf Körperteile richten. Die Düse für
die Dampf-/Heißwasserausgabe vorsichtig berühren:
Verbrennungsgefahr!
Sachgemäßer Gebrauch
Die Ka eemaschine ist ausschließlich für den Betrieb in Haushalten vorgesehen. Technische Änderungen und unsachgemäßer Gebrauch sind wegen der damit verbundenen Risiken
verboten! Die Maschine ist nicht dazu bestimmt, von Personen
(einschließlich Kindern) mit eingeschränkten körperlichen oder
geistigen Fähigkeiten oder einer Beeinträchtigung der Sinnesorgane bzw. von Personen ohne ausreichende Erfahrung oder
Kompetenz verwendet zu werden, es sei denn, sie werden von

• 15 •
Deutsch
einer Person überwacht, die für ihre Sicherheit verantwortlich
ist oder sie werden im Gebrauch der Maschine geschult.
Stromversorgung
Die Ka eemaschine darf ausschließlich an eine geeignete
Steckdose angeschlossen werden. Die Spannung muss mit
derjenigen übereinstimmen, die auf dem Typenschild des Geräts angegeben ist.
Netzkabel
Die Ka eemaschine darf keinesfalls mit defektem Netzkabel
betrieben werden. Bei Schäden am Netzkabel muss dieses
vom Hersteller oder von dessen Kundendienst ausgetauscht
werden. Das Net zkabel darf nicht in Ec ken, über scharfe Kanten
oder auf sehr heißen Gegenständen verlegt werden. Es sollte
vor Öl geschützt werden.
Die Ka eemaschine darf nicht am Kabel getragen oder gezogen werden. Der Stecker darf nicht durch Ziehen am Kabel
herausgezogen werden. Er sollte nicht mit nassen Händen
berührt werden.
Der freie Fall des Netzkabels von Tischen oder Regalen sollte
vermieden werden.
Schutz anderer Personen
Kinder beaufsichtigen, damit sie nicht mit dem Gerät spielen.
Kinder können die Gefahrensituationen, die durch Haushaltsgeräte entstehen können, nicht abschätzen. Die für die Verpackung der Maschine benutzten Materialien sollten nicht in
Reichweite von Kindern aufbewahrt werden.
Verbrennungsgefahr
Den Heißwasser- oder Dampfstrahl keinesfalls auf sich selbst
oder auf andere Personen richten. Stets die entsprechenden
Gri e oder Regler benutzen.
Der Druck lterhalter darf keinesfalls während der Ausgabe des
Ka ees herausgenommen (abgenommen) werden. Während
der Aufheizphase der Brühgruppe besteht die Möglichkeit des
Austritts von Tropfen heißen Wassers.
Keinen Ka ee ausgeben, wenn sich die Maschine in Übertemperatur be nden, d.h. wenn die LED “
” und “ ” gleichzei-
tig au euchten.
Standort
Die Ka eemaschine sollte an einem sicheren Ort aufgestellt
werden, an dem nicht die Gefahr des Umkippens oder der Verletzung von Personen besteht.
Es besteht die Möglichkeit des Austritts von heißem Wasser
oder Dampf: Verbrennungsgefahr!
Die Maschine sollte Temperaturen von unter 0°C nicht ausgesetzt werden. Es besteht die Gefahr, dass die Maschine durch
gefrierendes Wasser beschädigt wird.
Die Ka eemaschine darf nicht im Freien betrieben werden.
Die Maschine nicht auf heißen Flächen oder in der Nähe von
o enem Feuer aufstellen, da das Gehäuse schmelzen oder auf
andere Art beschädigt werden könnte.
Reinigung
Bevor die Maschine gereinigt wird, muss sie mit der Taste ON/
OFF ausgeschaltet und dann der Stecker von der Steckdose
abgenommen werden. Darüber hinaus abwarten, bis die Maschine abgekühlt ist.
Die Maschine keinesfalls in Wasser tauchen!
Der Versuch von Eingri en im Inneren der Maschine ist strengstens verboten.
Wasser, das einige Tage lang im Wassertank verblieben ist, darf
nicht für Le bensmittelzw ecke genutzt o der getrunken werden .
Den Tank reinigen und mit frischem Trinkwasser füllen.
Raumbedarf für den Betrieb und die Wartung
Für einen korrekten und einwandfreien Betrieb der Ka eemaschine sollten folgende Empfehlungen berücksichtigt werden:
• Eine ebene Au age äche auswählen.
• Der Raum sollte ausreichend beleuchtet und hygienisch
unbedenklich sein und die Steckdose muss leicht zugänglich sein.
• Gemäß den Angaben in der Abbildung (Abb. A) einen Mindestabstand von den Maschinenwänden berücksichtigen.
Aufbewahrung der Maschine
Wird die Maschine für längere Zeit nicht benutzt, so ist sie
auszuschalten und der Stecker ist aus der Steckdose zu ziehen.
An einem trockenen und für Kinder unzugänglichen Ort aufbewahren. Vor Staub und Schmutz schützen.
Reparaturen/Wartungsarbeiten
Die Maschine bei Störungen, Defekten oder dem Verdacht auf
Defekte nach einem Sturz nicht verwenden und unverzüglich
den Netzstecker ziehen. Eine defekte Maschine keinesfalls in
Betrieb setzen. Eingri e und Reparaturen dürfen ausschließlich von autorisierten Kundendienststellen vorgenommen
werden. Im Falle von nicht fachgerecht ausgeführten Eingriffen wird jede Haftung für eventuelle Schäden abgelehnt.
Brandschutz
Im Fall eines Brandes einen Kohlensäurelöscher (CO2) verwenden. Keinesfalls sind Wasser- oder Pulverlöscher einzusetzen.
 Loading...