

Page 1
HD7762
EN User manual 4
DA Brugervejledning 12
FI Käyttöopas 20
FR Mode d’emploi 28
IT Manuale utente 37
NL Gebruiksaanwijzing 46
NO Brukerhåndbok 56
SV Användarhandbok 64
Page 2
1
Page 3

Page 4

1 Introduction
3 Important
Congratulations on your purchase and welcome
to Philips! To fully benet from the suppor t that
Philips offers, register your product at
www.philips.com/welcome.
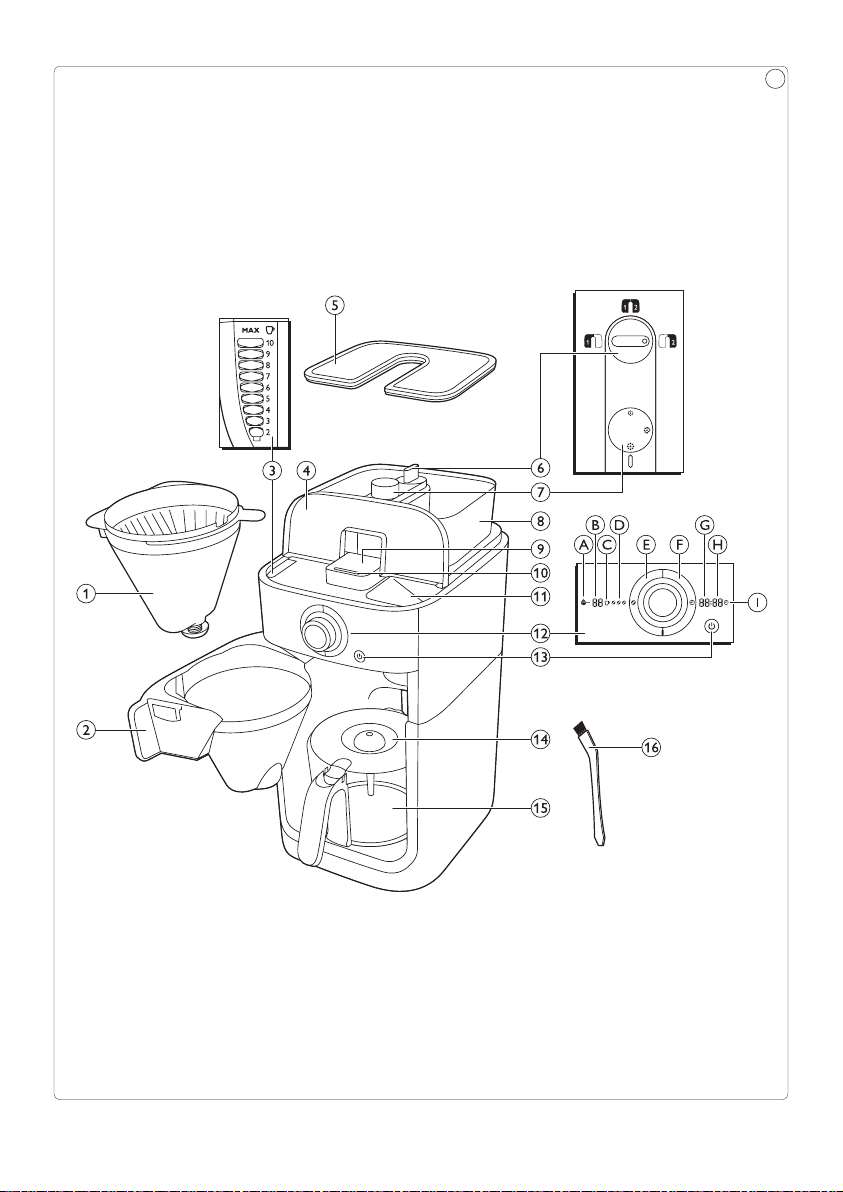
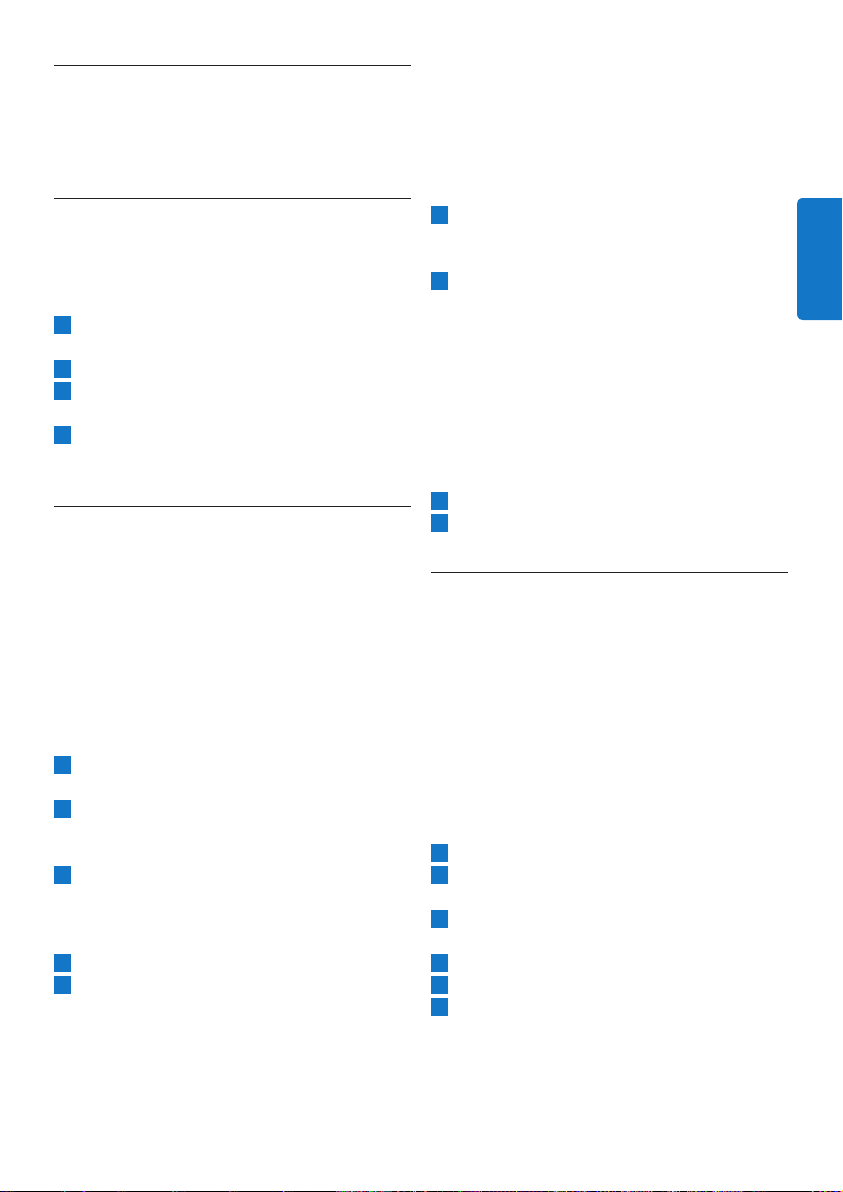
2 General
description (Fig. 1)
1 Filter basket
2 Filter basket holder
3 Water level indicator
4 Water reservoir lid
5 Bean container lid
6 Container selector
7 Coarseness knob
8 Duo coffee bean container
9 Grinder funnel lid
10 Lock of grinder funnel lid
11 Water lling hole
12 Display
A Pre-ground coffee icon
B Number of cups
C Coffee cup icon
D Strength select coffee bean icon
E Strength select button
F Timer button
G Hour indication
H Minute indication
I Timer icon
13 On/off button
14 Glass jug lid
15 Glass jug
16 Cleaning brush
4
Read this user manual carefully
before you use the appliance and
save it for future reference.
3.1 Danger
• Never immerse the appliance
in water or any other liquid, nor
rinse it under the tap.
3.2 Warning
• Check if the voltage indicated
on the bottom of the appliance
corresponds to the local mains
voltage before you connect the
appliance.
• If the mains cord is damaged, you
must have it replaced by Philips,
a service centre authorised
by Philips or similarly qualied
persons in order to avoid a
hazard.
• This appliance can be used by
children aged from 8 years and
above and by persons with
reduced physical, sensory or
mental capabilities or lack of
experience and knowledge if
they have been given supervision
or instruction concerning use of
the appliance in a safe way and
if they understand the hazards
involved. Cleaning and user
maintenance shall not be made
by children unless they are older
than 8 and supervised. Keep the
appliance and its cord out of
reach of children aged less than
8 years.
Page 5

• Children shall not play with the
appliance.
• Do not let the mains cord hang
over the edge of the table or
worktop on which the appliance
stands.
• Do not touch the grinding burrs
of the appliance, especially when
the appliance is connected to the
mains.
• Keep the packaging materials
(plastic bags, cardboard buffers,
etc.) out of the reach of children,
as they are not a toy.
• Do not touch the hot surfaces of
the appliance when it operates.
• This appliance is designed to
grind beans and make coffee.
Use it correctly and with care to
avoid scalding by hot water and
steam.
• Do not empty the water
reservoir by tilting the appliance,
it can damage the appliance.
Only empty the water reservoir
by following the ush instruction.
• Do not use the appliance if
the plug, the mains cord or the
appliance itself is damaged.
• If a problem occurs that you
cannot solve by means of
this user manual, contact the
Consumer Care Centre in your
country. If the problem cannot
be solved, take the appliance to
a service centre authorised by
Philips for examination or repair.
Do not attempt to repair the
appliance yourself, otherwise
your guarantee becomes invalid.
3.3 Caution
• Do not place the appliance on
a hot surface and prevent the
mains cord from coming into
contact with hot surfaces.
• Unplug the appliance if problems
occur during grinding or brewing
and before you clean it.
• Do not move the appliance while
it is operating.
• The appliance becomes hot during
use.
Let the appliance cool down
before you store it.
• During brewing, the lower part of
the appliance and the bottom of
the jug become hot.
• After you have unpacked
the appliance, make sure it
is complete and undamaged.
If in doubt, do not use the
appliance but contact the
Consumer Care Centre in your
country.
• This appliance is intended for
normal household use only.
It is not intended for use in
environments such as staff
kitchens of shops, ofces, farms
or other work environments.
Nor is it intended to be used by
clients in hotels, motels, bed and
breakfasts and other residential
environments.
3.4Electromagneticelds
(EMF)
This Philips appliance complies with all applicable
standards and regulations regarding exposure to
electromagnetic elds.
ENGLISH
5
Page 6
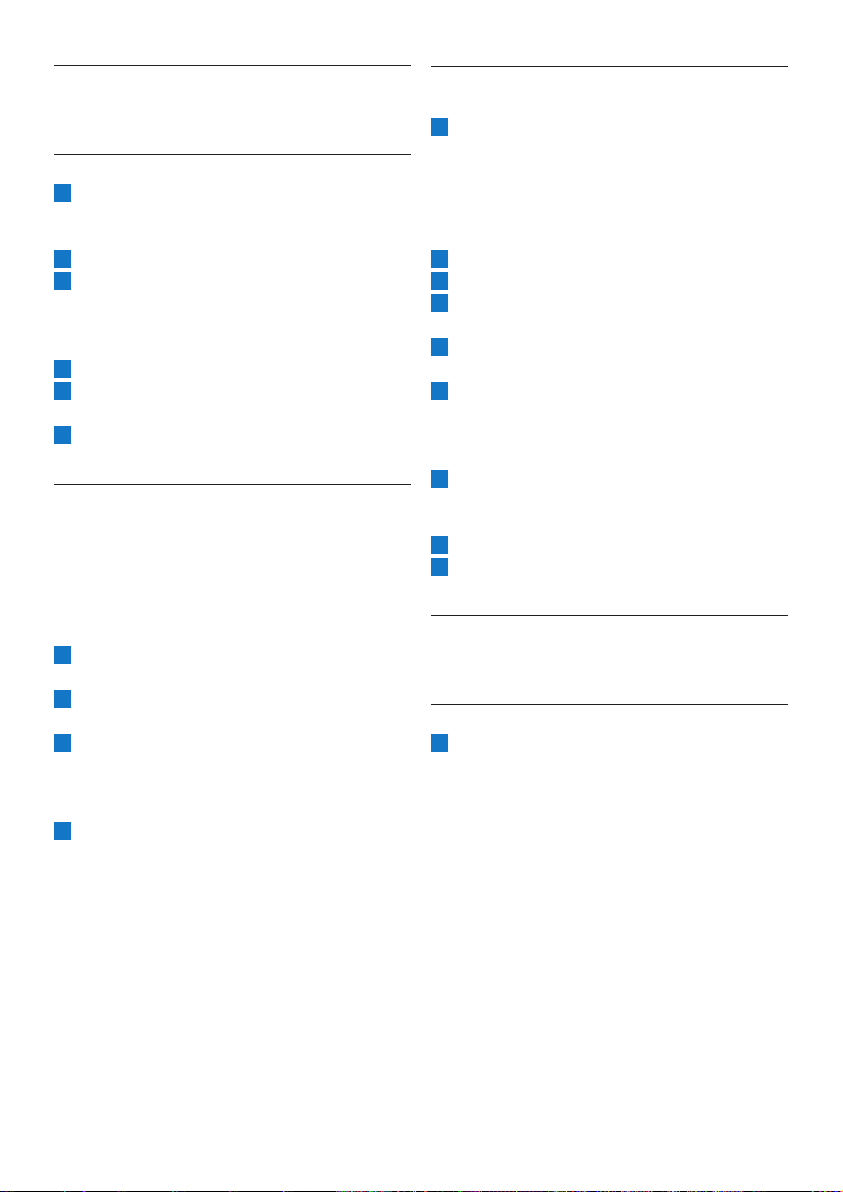
4 Beforerstuse
4.1 Setting the clock
1 Put the mains plug in the wall socket.
• 00:00 ashes on the display to indicate
that you have to set the clock time.
2 Turn the knob to set the hour (Fig. 2).
3 Press in the centre of the knob to conrm the
hour (Fig. 3).
• The minutes start to ash to indicate that
you have to set the minutes.
4 Turn the knob to set the minutes (Fig. 4).
5 Press in the centre of the knob to conrm the
minutes (Fig. 5).
6 The display shows the set clock time.
The coffeemaker is ready for use.
4.2 Setting the automatic
switch off time
You can adjust the time after which the appliance
automatically switches off. The default time is set to
30 minutes. You can adjust this time to a maximum
of 120 minutes. If you want to adjust the automatic
switch off time, follow the steps below.
1 Make sure the appliance is switched off
(but the mains plug is in the wall socket).
2 Press and hold in the centre of the knob until
the display starts to ash.
3 Turn the knob to increase or decrease the
time. 1 is 10 minutes, 2 is 20 minutes,
3 is 30 minutes and so on until 12 is 120
minutes.
4 Press in the centre of the knob to conrm the
minutes.
D
Note:
The appliance always saves the last setting.
4.3 Flushing the appliance
You need to ush the coffeemaker once before
rst use.
1 Open the water reser voir lid. Fill the water
reservoir with fresh cold water up to the
8-cup indication. (Fig. 6)
D
Note:
Do not put coffee beans or ground coffee in
the appliance.
2 Close the water reser voir lid.
3 Put the jug in the appliance (Fig. 7).
4 Press the on/off button (Fig. 8).
• The display lights up.
5 Press the strength select button (Fig. 9).
6 Turn the knob to choose the pre-ground
coffee setting (Fig. 10).
• The pre-ground coffee icon lights up.
7 Press in the centre of the knob to conrm.
Then press in the centre of the knob again to
start the ushing process (Fig. 11).
8 Let the appliance operate until the ushing
process has been completed.
9 Empty the jug.
5 Using the appliance
5.1 Filling the water reservoir
1 Open the water reser voir lid and ll the water
reservoir with the required amount of cold
water. (Fig. 6)
When you open the water reservoir lid, there
are indications for 2 to 10 cups on the inside
of the appliance. You can use these indications
to determine how much water to put in the
water reservoir. The reection changes from
light to dark per lled cup of water. You can
also use the water level indicator on the jug.
D
Note:
Do not ll the water reservoir beyond the
10-cup indication.
6
Page 7
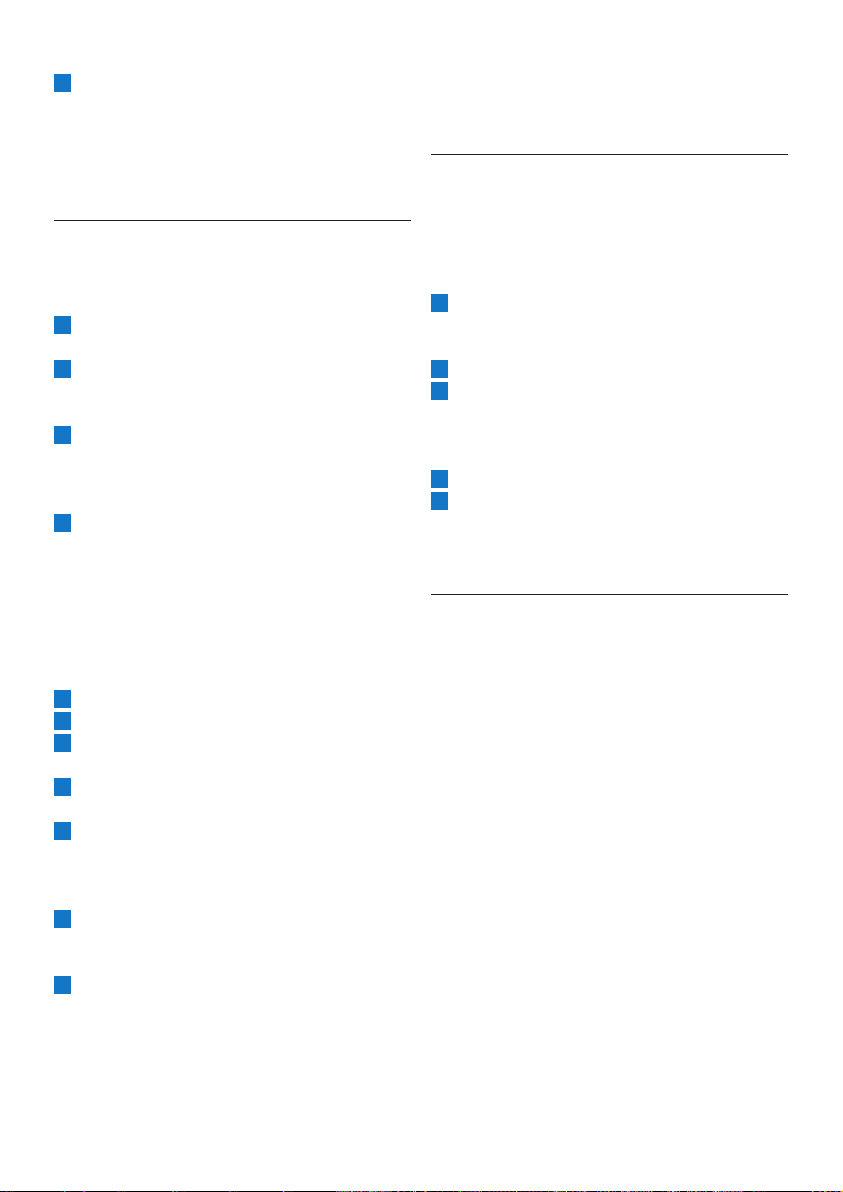
5.2 Using coffee beans
B Warning:
Always keep the water reservoir lid closed when
you ll the coffee bean container with coffee
beans. Otherwise coffee beans can fall into the
water reservoir and block up the water inlet.
1 Remove the coffee bean container lid. (Fig. 12)
2 Fill the duo coffee bean container with
coffee beans. You can ll the duo coffee bean
container with two different types of coffee
beans. Make sure there are enough coffee
beans in the container for the amount of
coffee you want to brew (Fig. 13).
D
Note:
Always make sure the coffee bean container is
at least half full.
B Warning:
Whenever you switch between coffee bean
containers or coffee beans, there will always
be traces of coffee left of the previously
ground type of coffee beans. Clean the
grinder funnel after you switch to a new type
of coffee bean to prevent this.
D
Note:
Depending on your taste, you can either
select one of the two types of coffee beans or
a mix of both types.
9 Press the on/off button on the front of the
appliance (Fig. 8).
• The number of cups starts to ash.
10 To select the number of cups, turn the knob
until the desired number of cups appears on
the display (Fig. 18).
ENGLISH
B
Warning:
To prevent the grinder from jamming, do not
use unroasted or caramelised beans.
We advise to use coffee beans instead of
espresso beans as this may cause damage.
3 To open the lter basket holder, pull at its tab
on the right side of the coffeemaker (Fig. 14).
4 Take a paper lter (type 1x4 or no. 4) and
fold the sealed edges to prevent tearing and
folding. Place the paper lter in the lter
basket. (Fig. 15)
5 Close the lter basket holder.
6 Put the jug in the appliance. (Fig. 7)
7 Turn the coarseness knob to select
the desired type of grind (from ne to
coarse). (Fig. 16)
E
Tip:
The coarseness knob allows you to
choose between nine different settings.
We preselected 3 optimal settings but you
can also choose any setting in between the
icons. We advise you to experiment with
the different grind settings to nd out which
setting you prefer.
8 Turn the container selector to choose between
the two types of coffee beans (Fig. 17).
D
Note:
Make sure that the number of cups you select
with the 2-10 cups button is consistent with
the amount of water in the water reservoir.
Please keep in mind that the coffeemaker
uses all the water in the water reservoir. If you
select a number of cups that is smaller than
the amount of water, the coffee becomes
weaker than you intended.
11 Press in the centre of the knob to conrm the
number of cups.
12 Press the strength select button. (Fig. 9)
• The coffee bean icons start to ash.
13 Turn the knob to select the desired coffee
strength (mild: 1 bean, medium: 2 beans or
strong: 3 beans) (Fig. 10).
• The display shows the selected coffee
strength.
E
Tip:
We advise you to experiment with the
amount of water to nd out which strength
you prefer. If you select a number of cups that
is higher than the amount of water, the coffee
becomes stronger. If you select a number of
cups that is smaller than the amount of water,
the coffee becomes weaker.
7
Page 8
14 Press in the centre of the knob to conrm,
Then press in the centre of the knob again to
start the brewing process (Fig. 19).
• The grinder grinds the required amount
of coffee beans.
15 Wait until the coffeemaker has stopped
brewing before you remove the jug.
D
Note:
After brewing, coffee drips from the lter
basket for several seconds.
5.3 Using pre-ground coffee
If you want to use pre-ground coffee instead of
coffee beans, follow the steps below.
1 Open the water reser voir lid and ll the water
reservoir with the required amount of cold
water. (Fig. 6)
2 To open the lter basket holder, pull at its tab
on the right side of the coffeemaker (Fig. 14).
3 Take a paper lter (type 1x4 or no. 4) and
fold the sealed edges to prevent tearing and
folding. Place the paper lter in the lter
basket (Fig. 15).
4 Put pre-ground coffee in the paper lter.
D
Note:
You can adjust the strength of the coffee to your
own personal taste. For a medium-strong cup of
coffee, use one measuring spoon (approximately
6g) of ground coffee for each cup (120ml).
For stronger coffee, use 1.5 measuring spoons of
ground coffee for each cup of coffee.
5 Close the lter basket holder.
6 Put the jug in the appliance (Fig. 7).
7 Press the on/off button (Fig. 8).
• The display lights up.
8 Press the strength select button (Fig. 9).
9 Turn the knob to choose the pre-ground
coffee setting (Fig. 10).
• The pre-ground coffee icon lights up.
10 Press in the centre of the knob to conrm.
Then press in the centre of the knob again to
start the brewing process (Fig. 11).
11 Wait until the coffeemaker has stopped
brewing before you remove the jug.
D
Note:
After brewing, coffee drips from the lter
basket for several seconds.
5.4 Setting the timer
The timer enables you to program the time at
which you want the brewing process to start.
Make sure all steps of brewing coffee are taken
with either preground coffee or coffee beans
before setting the timer.
1 Press the timer button. (Fig. 20)
• On the display 00:00 ashes to indicate
that you have to set the timer.
2 Turn the knob to set the hour (Fig. 21).
3 Press in the centre of the knob to conrm the
hour (Fig. 22).
• The minutes starts to ash to indicate that
you have to set the minutes.
4 Turn the knob to set the minutes (Fig. 23).
5 Press in the centre of the knob to conrm the
minutes (Fig. 24).
• The timer is set and the brewing process
will start at the preset time.
5.5 Drip stop function
The drip stop function enables you to remove
the jug from the coffeemaker before the brewing
process is nished. When you remove the jug,
the drip stop stops the ow of coffee into the jug.
D
Note:
The brewing process does not stop when you
remove the jug. If you do not put the jug back
into the appliance within 20 seconds, the lter
basket overows.
8
Page 9
6 Cleaning and
maintenance
6.1 Cleaning after every use
B Warning:
Never immerse the appliance in water or any
other liquid, nor rinse it under the tap.
1 Press the on/off button on the front of the
appliance to switch off the appliance. (Fig. 25)
2 Remove the mains plug from the wall socket.
3 Wipe the outside of the coffeemaker with a
damp cloth (Fig. 26).
4 Clean the lter basket and the jug in the
dishwasher or with hot water and some
washing-up liquid.
6.2 Cleaning the grinder funnel
Whenever you switch between coffee bean
containers or coffee beans, there will always be
traces left of the previously ground type of coffee
beans that can affect the taste of your coffee.
Clean the grinder funnel every 1 to 2 weeks
or whenever you switch between coffee bean
containers to prevent freshly ground coffee and
traces in the grinder funnel from mixing together.
After you switch to a new type of coffee beans,
follow the steps below to ensure optimal taste.
1 Press the on/off button on the front of the
appliance to switch off the appliance (Fig. 25).
2 To open the lter basket holder, pull at its tab
on the right side of the coffeemaker (Fig. 14).
3 Take a paper lter (type 1x4 or no. 4) and
fold the sealed edges to prevent tearing and
folding. Place the paper lter in the lter
basket. (Fig. 15)
4 Close the lter basket holder.
5 To open the grinder funnel lid, insert the at
end of the cleaning brush handle into the lock
and press it down (Fig. 27).
D Note:
If you want to clean the grinder funnel quickly
by brush only, please continue with step 7.
If you want to prevent ground coffee traces
from affecting the taste of your new coffee
beans, please continue with step 6.
6 Press and hold the strength select button for
4 seconds (Fig. 28).
• The grinder starts cleaning itself.
7 When the grinder has stopped cleaning,
use the cleaning brush to brush ground
coffee residues into the lower part of the
funnel (Fig. 29).
• The ground coffee residues fall into the
lter basket.
B
Warning:
Do not drop the brush in the grinder
funnel.
8 Close the lid of the grinder funnel.
9 Remove the paper lter with the ground
coffee residues and throw it away.
6.3 Descaling the coffeemaker
Descale the coffeemaker when you notice
excessive steaming or when the brewing time
increases. It is advisable to descale it every two
months. Only use white vinegar to descale,
as other products may cause damage to the
coffeemaker.
B
Warning:
Never use vinegar with an acetic acid content of
8% or more, natural vinegar, powder descalers or
tablet descalers to descale the appliance, as this
may cause damage.
1 Open the water reser voir lid.
2 Fill the water reservoir with 8 cups of white
vinegar (4% acetic acid) and 2 cups of
water (Fig. 6).
3 Place a paper lter (no. 4) in the lter basket
and close the lter basket holder (Fig. 15).
4 Put the empty jug in the appliance (Fig. 7).
5 Put the mains plug in the wall socket.
6 Press the on/off button on the front of the
appliance to switch on the appliance (Fig. 8).
• The display lights up.
ENGLISH
9
Page 10

7 Press the strength select button and turn
the knob to choose the pre-ground coffee
setting (Fig. 10).
8 Press in the centre of the knob to conrm.
Then press in the centre of the knob again to
start the brewing process (Fig. 11).
9 Wait until half of the vinegar-water solution
has owed into the jug. Then press the on/off
button to stop the brewing process and let
the solution act for at least
15 minutes (Fig. 30).
10 Press the on/off button to switch the
coffeemaker back on (Fig. 8).
11 Press in the centre of the knob once to
let the appliance complete the brewing
process (Fig. 31).
12 Empty the jug and throw away the paper lter.
13 Fill the water reservoir with cold water
and press in the centre of the knob twice
to start another brewing process. Let the
coffeemaker complete the entire brewing
process and empty the jug.
14 Repeat step 13 until the water no longer
tastes or smells like vinegar.
15 Clean the lter basket and the jug in the
dishwasher or with hot water and some
washing-up liquid.
16 Press the on/off button on the front of the
appliance to switch off the appliance.
7 Ordering accessories
To buy accessories or spare parts, visit
www.shop.philips.com/service or go to your
Philips dealer. You can also contact the Philips
Consumer Care Centre in your country
(see the worldwide guarantee leaet for contact
details).
8 Recycling
• This symbol on a product means that the
product is covered by European Directive
2012/19/EU. Inform yourself about the local
separate collection system for electrical
and electronic products. Follow local rules
and never dispose of the product with
normal household waste. Correct disposal
of old products helps prevent negative
consequences for the environment and
human health (Fig. 32).
9 Guarantee and
support
If you need information or support, please
visit www.philips.com/support or read the
separate worldwide guarantee leaet.
10 Troubleshooting
This chapter summarises the most common
problems you could encounter with the appliance.
If you are unable to solve the problem with the
information below, visit www.philips.com/
support for a list of frequently asked questions
or contact the Consumer Care Centre in your
country.
The appliance does not work.
• Put the mains plug in the wall socket and press
the on/off button on the front of the appliance
to switch on the appliance.
• Make sure that the voltage indicated on the
appliance corresponds to the local mains voltage.
• Fill the water reservoir with water.
• Close the lid of the grinder funnel.
10
Page 11

When I use the grinder, the coffee is too weak.
• Make sure the number of cups you select with
the 2-10 cups button is consistent with the
amount of water in the water reservoir.
Please keep in mind that the coffeemaker uses
all the water in the water reservoir.
• Use the strength select button to set the coffee
strength to ‘strong’.
• When you use coffee beans, make sure you do
not press the pre-ground coffee button,
as this switches off the grinder.
• Use coffee beans of a stronger blend or avour.
• Make sure the selected number of cups is
consistent with the amount of water in the
water reservoir.
When I use pre-ground coffee, the coffee is too weak.
• Make sure the amount of pre-ground coffee in
the lter is consistent with the amount of water in
the water reservoir. Please keep in mind that the
appliance uses all the water in the water reservoir.
• Use ground coffee of a stronger blend or avour.
• To increase the coffee strength, increase the amount of
pre-ground coffee or decrease the amount of water.
• The lter overows when I remove the jug from
the appliance while it is brewing coffee.
• If you remove the jug for more than 20 seconds
during the brewing process, the drip stop causes the
lter basket to overow. Also note that the coffee
does not reach its full taste before the end of the
brewing process. Therefore we advise you not to
remove the jug and pour out the coffee before the
end of the brewing process.
The coffee is not hot enough.
• Preheat the jug with hot water before you start
brewing coffee.
• The coffee in the jug cools down faster if you
brew only a few cups. The coffee stays hot
longer if you brew 10 cups, which is a full jug.
• Use thin-walled cups, because they absorb less
heat from the coffee than thick-walled cups.
• Do not use milk that comes directly out of the
fridge.
• Descale the appliance. See section ‘Descaling
the coffeemaker’ in chapter ‘Cleaning and
maintenance’.
The coffeemaker does not start cleaning the
grinder funnel.
• Make sure that the coffeemaker is connected to
the mains.
•
Make sure that you open the lid of the grinder
funnel before you press and hold the grinder button.
• Press and hold the grinder button for 4 seconds
until the grinder starts cleaning itself.
• The appliance works but makes a beeping
sound.
• Please check if the lid of the grinder funnel is
closed properly.
• The coffee beans seem to be used up quickly.
• It may look as if the coffee beans are used up
quickly. To ensure a perfect cup of coffee, a
certain amount of ground coffee is required.
The amount of coffee beans the appliance uses
to get the perfect amount of ground coffee is
normal.
ENGLISH
The appliance continues to drip long after the
brewing process has ended.
• The dripping is caused by condensation
of steam. It is completely normal that the
appliance drips for some time.
• If the dripping does not stop, the drip stop may
be clogged. To clean the drip stop, pull at the
tab of the lter basket holder on the right side
of the coffeemaker to open the holder. Take out
the lter basket. Then rinse the lter basket and
the drip stop under the tap.
• If you remove the jug for more than 20 seconds
during the brewing process, the drip stop
causes the lter basket to overow.
11
Page 12

1 Introduktion
3 Vigtigt
Tillykke med dit køb og velkommen til Philips!
For at få fuldt udbytte af den support, Philips
tilbyder, skal du registrere dit produkt på
www.philips.com/welcome.
2 Generel
beskrivelse(g.1)
1 Filterkurv
2 Holder til lterkurv
3 Vandstandsindikator
4 Låg til vandtank
5 Låg til beholder til bønner
6 Beholdervælger
7 Knap til formalingsgrad
8 Dobbeltbeholder til kaffebønner
9 Låg til møllekværnens tragt
10 Lås på låget til møllekværnens tragt
11 Vandpåfyldningshul
12 Display
A Ikon for formalet kaffe
B Antal kopper
C Ikon for kaffekop
D Ikon med kaffebønne for valg af
kaffestyrke
E Knap til valg af kaffestyrke
F Timer-knap
G Timeangivelse
H Minutangivelse
I Ikon for timer
13 On/off-knap
14 Låg til glaskande
15 Glaskande
16 Rensebørste
Læs denne brugsvejledning
omhyggeligt igennem, inden
apparatet tages i brug, og gem den
til eventuelt senere brug.
3.1 Fare
• Apparatet må aldrig kommes
ned i vand eller andre væsker,
ej heller skylles under vandhanen.
3.2 Advarsel
• Kontrollér, om
spændingsangivelsen i bunden
af apparatet svarer til den lokale
netspænding, før du slutter strøm
til apparatet.
• Hvis netledningen beskadiges,
må den kun udskiftes af
Philips, et autoriseret Philipsserviceværksted eller en
tilsvarende kvaliceret fagmand
for at undgå enhver risiko.
• Dette apparat kan bruges af
børn fra 8 år og opefter og
personer med reducerede
fysiske, sensoriske eller
mentale evner eller manglende
erfaring og viden, hvis de er
blevet instrueret i sikker brug
af apparatet og forstår de
medfølgende risici. Rengøring og
brugervedligeholdelse må ikke
foretages af børn, medmindre
de er ældre end 8 og er under
opsyn. Hold apparatet og dets
ledning uden for rækkevidde af
børn under 8 år.
12
Page 13

• Lad ikke børn lege med
apparatet.
• Lad aldrig ledningen hænge ud
over kanten af det bord eller den
plads, som apparatet står på.
• Undgå at røre ved slutskiverne
til formaling på apparatet, især
når apparatet er tilsluttet en
stikkontakt.
• Hold emballagen (plastikposer,
pap, karton osv.) uden for børns
rækkevidde. Det er ikke legetøj.
• Rør aldrig ved apparatets varme
dele under betjening.
• Dette apparat er designet til at
male bønner og lave kaffe. Brug
det korrekt og med omhu for at
undgå skoldning fra varmt vand
og damp.
•
Tøm ikke vandtanken ved at vippe
apparatet, da det kan beskadige
apparatet. Tøm kun vandtanken
i overensstemmelse med
vejledningen.
• Brug aldrig apparatet, hvis netstik,
netledning eller selve apparatet
er beskadiget.
•
Hvis der opstår problemer,
du ikke kan løse ved hjælp af
brugsvejledningen, bedes du
kontakte det lokale Philips
Kundecenter. Hvis ikke problemet
kan løses, skal du medbringe
apparatet til et autoriseret
Philips-serviceværksted, så de
kan undersøge eller reparere det.
Forsøg aldrig selv at reparere
apparatet, da reklamationsretten i
så fald bortfalder.
3.3 Forsigtig
• Stil aldrig apparatet på et
varmt underlag, og sørg for, at
netledningen ikke kommer i
berøring med varme ader.
• Tag stikket ud af stikkontakten,
hvis der opstår problemer under
formaling eller brygning samt før
rengøring af apparatet.
• Flyt ikke apparatet under brug.
• Apparatet bliver varmt under
brug.
Lad apparatet køle af, før du
stiller det væk.
• Den nederste del af maskinen og
kandens bund bliver varm under
kaffebrygningen.
• Efter udpakningen af apparatet
skal du kontrollere, at det er
helt og ubeskadiget. Anvend ikke
apparatet, hvis du er i tvivl.
Du bedes i stedet kontakte det
lokale Philips Kundecenter.
• Dette apparat er kun beregnet
til normal anvendelse i hjemmet.
Det er ikke beregnet til brug i
miljøer som personalekøkkener
i butikker, på kontorer, på gårde
eller andre arbejdspladser. Det
er heller ikke beregnet til brug af
gæster på hoteller, moteller,
på bed and breakfasts eller i
andre værelser til udlejning.
3.4 Elektromagnetiske felter
(EMF)
Dette Philips-apparat overholder alle branchens
gældende standarder og regler angående
eksponering for elektromagnetiske felter.
DANSK
13
Page 14
4 Før apparatet tages i
brug
4.1 Indstilling af uret
1 Sæt stikket i en stikkontakt.
• 00:00 lyser på displayet for at indikere,
at du skal indstille klokkeslættet.
2 Drej på knappen for at indstille
timetallet (g. 2).
3 Tryk midt på knappen for at bekræfte
timetallet (g. 3).
• Minuttallet begynder at blinke for at
indikere, at du skal indstille antal minutter.
4 Drej på knappen for at indstille
minuttallet (g. 4).
5 Tryk midt på knappen for at bekræfte
minuttallet (g. 5).
6 Displayet viser klokkeslættet. Kaffemaskinen er
klar til brug.
4.2 Indstilling af automatisk
slukketid
Du kan ændre tidsrummet, hvorefter apparatet
slukker automatisk. Standardtidsrummet er
indstillet til 30 minutter. Du kan ændre dette
tidsrum til maks. 120 minutter. Hvis du ønsker at
justere den automatiske slukketid, skal du følge
nedenstående trin.
1 Kontrollér, at apparatet er slukket
(men stikket er sat i stikkontakten).
2 Tryk og hold nede midt på knappen, indtil
displayet begynder at blinke.
3
Drej knappen for at øge eller mindske tidsrummet.
1 er 10 minutter, 2 er 20 minutter, 3 er 30
minutter og så videre, indtil 12 er 120 minutter.
4 Tryk midt på knappen for at bekræfte
minuttallet.
D
Bemærk:
Apparatet gemmer altid den sidste indstilling.
4.3 Gennemskylning
Du skal gennemskylle kaffemaskinen før første brug.
1 Åbn låget til vandtanken. Fyld vandtanken med
friskt, koldt vand op til markering for 8
kopper. (g. 6)
D
Bemærk:
Put ikke kaffebønner eller malet kaffe i
apparatet.
2 Luk låget til vandtanken.
3 Sæt kanden i apparatet (g. 7).
4 Tryk på on/off-knappen (g. 8).
• Displayet lyser.
5 Tryk på knappen til valg af kaffestyrke (g. 9).
6 Drej knappen for at vælge indstillingen til
formaling af kaffe (g. 10).
• Ikonet for formaling af kaffe lyser.
7 Tryk midt på knappen for at bekræfte.
Tryk derefter midt på knappen igen for at
starte skylningen (g. 11).
8 Lad apparatet køre, indtil skylningen er afsluttet.
9 Tøm kanden.
5 Sådan bruges
apparatet
5.1 Påfyldning af vandtanken
1 Åbn låget til vandtanken, og fyld vandtanken
med den påkrævede mængde koldt
vand. (g. 6) Når du åbner låget til
vandtanken, er der markeringer for 2 til
10 kopper på indersiden af apparatet.
Du kan bruge disse markeringer til at
bestemme, hvor meget vand du vil putte
i vandtanken. Reeksionen skifter fra lys til
mørk pr. fyldt kop vand. Du kan også bruge
vandstandsindikatoren på kanden.
D
Bemærk:
Fyld aldrig vandtanken til op over mærket for
10 kopper.
14
Page 15

5.2 Brug af kaffebønner
B Advarsel:
Hold altid låget til vandtanken lukket, når du fylder
beholderen til kaffebønner med kaffebønner.
Ellers kan kaffebønnerne falde ned i vandtanken
og blokere for vandindtaget.
1 Fjern låget til kaffebønnebeholderen. (g. 12)
2 Fyld dobbeltbeholderen med kaffebønner.
Du kan fylde dobbeltbeholderen med to
forskellige slags kaffebønner. Sørg for, at der er
nok kaffebønner i beholderen til den mængde
kaffe, du vil brygge (g. 13).
D
Bemærk:
Sørg altid for, at beholderen til kaffebønner er
mindst halvt fuld.
B
Advarsel:
For at undgå, at kaffekværnen tilstoppes,
må du ikke bruge uristede eller
karamelliserede bønner. Vi anbefaler,
at du bruger kaffebønner i stedet for
espressobønner, da dette kan beskadige den.
3 For at åbne holderen til lterkurven
skal du trække i tappen på højre side af
kaffemaskinen (g. 14).
4 Tag et papirlter (type 1x4 eller nr. 4),
og ombuk de forseglede kanter, så det
ikke går i stykker eller falder sammen.
Placer papirlteret i lterkurven. (g. 15)
5 Luk holderen til lterkurven.
6 Sæt kanden i apparatet. (g. 7)
7
Drej på knappen til formalingsgrad for at vælge
den ønskede type maling (fra n til grov). (g. 16)
E Tip:
Knappen til formalingsgrad giver dig mulighed
for at vælge mellem ni forskellige indstillinger.
Vi har forudvalgt 3 optimale indstillinger,
men du kan også vælge alle indstillinger mellem
ikonerne. Vi anbefaler, at du eksperimenterer
med forskellige malingsindstillinger for at nde
ud af, hvilken indstilling, du foretrækker.
8 Drej beholder vælgeren for at vælge mellem
de to slags kaffebønner (g. 17).
B Advarsel:
Når du skifter mellem kaffebønnebeholderne
eller kaffebønnerne, vil der altid være rester
af kaffe tilbage fra den tidligere malede
kaffebønnetype. For at undgå dette bør du
rengøre møllekværnens tragt, når du har
skiftet til en ny type kaffebønner.
D
Bemærk:
Afhængigt af din smag kan du enten vælge en
af de to typer kaffebønner eller en blanding af
begge typer.
9 Tryk på tænd/sluk-knappen foran på
apparatet (g. 8).
• Antallet af kopper begynder at blinke.
10 Du vælger antallet af kopper ved at dreje
knappen, indtil det ønskede antal kopper vises
på skærmen (g. 18).
D
Bemærk:
Sørg for, at det antal kopper, du vælger med
knappen 2-10 CUPS, passer med mængden af
vand i vandtanken. Husk på, at kaffemaskinen
bruger alt vandet i vandtanken. Hvis du vælger
et antal kopper, der er mindre end mængden
af vand, bliver kaffen tyndere end beregnet.
11
Tryk midt på knappen for at bekræfte antal kopper.
12 Tryk på knappen til valg af kaffestyrke. (g. 9)
• Ikonet for kaffebønner begynder at blinke.
13 Drej knappen for at vælge den ønskede
kaffestyrke (mild: 1x bønner, middel: 2x
bønner eller kraftig: 3x bønner) (g. 10).
• Displayet viser den valgte kaffestyrke.
E
Tip:
Vi anbefaler, at du eksperimenterer med
mængden af vand for at nde ud af din
foretrukne styrke. Hvis du vælger et antal
kopper, som er højere end mængden
af vand, bliver kaffen stærkere. Hvis du
vælger et antal kopper, der er mindre end
mængden af vand, bliver kaffen svagere.
14 Tryk midt på knappen for at bekræfte.
Tryk derefter midt på knappen igen for at
starte brygningen (g. 19).
• Kværnen maler den påkrævede mængde
kaffebønner.
DANSK
15
Page 16
15 Vent, indtil kaffemaskinen er stoppet med at
brygge, inden du fjerner kanden.
D
Bemærk:
Efter brygningen drypper der kaffe fra
lterkurven i ere sekunder.
5.3 Brug af formalet kaffe
Hvis du vil bruge formalet kaffe i stedet for
kaffebønner, skal du følge nedenstående trin.
1 Åbn låget til vandtanken, og fyld vandtanken med
den påkrævede mængde koldt vand. (g. 6)
2 For at åbne holderen til lterkurven
skal du trække i tappen på højre side af
kaffemaskinen (g. 14).
3 Tag et papirlter (type 1x4 eller nr. 4),
og ombuk de forseglede kanter, så det ikke går
i stykker eller falder sammen.
Placer papirlteret i lterkurven (g. 15).
4 Put formalet kaffe i papirltret.
D
Bemærk:
Du kan regulere kaffestyrken, så den passer til
din egen personlige smag. Ønsker du en kop
kaffe af mellemstyrke, skal du bruge én måleske
(ca. 6 g) med malet kaffe pr. kop (120 ml).
For at få en stærkere kop kaffe, skal du bruge
1,5 måleske med malet kaffe pr. kop.
5 Luk holderen til lterkurven.
6 Sæt kanden i apparatet (g. 7).
7 Tryk på on/off-knappen (g. 8).
• Displayet lyser.
8 Tryk på knappen til valg af kaffestyrke (g. 9).
9 Drej knappen for at vælge indstillingen til
formaling af kaffe (g. 10).
• Ikonet for formaling af kaffe lyser.
10 Tryk midt på knappen for at bekræfte. Tryk
derefter midt på knappen igen for at starte
brygningen (g. 11).
11 Vent, indtil kaffemaskinen er stoppet med at
brygge, inden du fjerner kanden.
5.4 Indstilling af timeren
Timeren gør det muligt at programmere det
tidspunkt, hvor brygningen skal starte. Sørg for,
at alle kaffebrygningstrin er taget med enten
formalet kaffe eller kaffebønner, før du indstiller
timeren.
1 Tryk på timer-knappen. (g. 20)
• På displayet blinker 00:00 for at angive,
at du skal indstille timeren.
2 Drej på knappen for at indstille
timetallet (g. 21).
3 Tryk midt på knappen for at bekræfte
timetallet (g. 22).
• Minuttallet begynder at blinke for at
indikere, at du skal indstille antal minutter.
4 Drej på knappen for at indstille
minuttallet (g. 23).
5 Tryk midt på knappen for at bekræfte
minuttallet (g. 24).
• Timeren er indstillet, og brygningen star ter
på det angivne tidspunkt.
5.5 Drypstop-funktion
Drypstop-funktionen gør det muligt at fjerne kanden
fra kaffemaskinen, inden bryggeprocessen er færdig.
Når du fjerner kanden, stopper drypstop-funktionen
kaffens løb ned i kanden.
D Bemærk:
Brygningen stopper ikke, når du fjerner kanden.
Hvis du ikke stiller kanden tilbage i apparatet
inden for 20 sekunder, yder lterkurven over.
D
Bemærk:
Efter brygningen drypper der kaffe fra
lterkurven i ere sekunder.
16
Page 17
6 Rengøring og
vedligeholdelse
6.1 Rengøring efter hver brug
B Advarsel:
Apparatet må aldrig kommes ned i vand eller
andre væsker, ej heller skylles under vandhanen.
1 Tryk på tænd/sluk-knappen foran på apparatet
for at slukke for apparatet. (g. 25)
2 Tag stikket ud af stikkontakten.
3 Tør kaffemaskinens yderside af med en fugtig
klud (g. 26).
4 Rengør lterkurven og kanden i
opvaskemaskinen eller med varmt vand og
noget opvaskemiddel.
6.2 Rengøring af
møllekværnens tragt
Når du skifter mellem beholderne til kaffebønner
eller mellem kaffebønner, vil der altid være rester af
den tidligere malede kaffebønnetype, der kan påvirke
smagen af din kaffe. Rengør møllekværnens tragt for
hver 1-2 uger, eller når du skifter mellem beholderne
til kaffebønner, for at undgå, at friskkværnet kaffe og
rester i møllekværnens tragt blandes sammen.
Når du skifter til en ny type kaffebønner, bør du følge
nedenstående trin for at sikre optimal smag.
1 Tryk på tænd/sluk-knappen foran på apparatet
for at slukke for apparatet (g. 25).
2 For at åbne holderen til lterkurven
skal du trække i tappen på højre side af
kaffemaskinen (g. 14).
3 Tag et papirlter (type 1x4 eller nr. 4),
og ombuk de forseglede kanter, så det ikke
går i stykker eller falder sammen. Placer
papirlteret i lterkurven. (g. 15)
4 Luk holderen til lterkurven.
5 Du kan åbne låget til møllekværnens tragt ved
at sætte den ade ende af rengøringsbørstens
greb i låsen og trykke ned (g. 27).
D Bemærk:
Hvis du vil rengøre møllekværnens tragt
hurtigt kun med børsten, skal du fortsætte
med trin 7. Hvis du vil undgå, at smagsstoffer
fra formalet kaffe påvirker smagen af dine nye
kaffebønner, skal du fortsætte med trin 6.
6 Tryk på knappen for valg af kaffestyrke,
og hold den nede i 4 sekunder (g. 28).
• Kværnen begynder at rengøre sig selv.
7 Når kværnen har stoppet
rengøringsprocessen, skal du bruge
rengøringsbørsten til at børste rester af malet
kaffe ned i nederste del af tragten (g. 29).
• De malede kafferester falder ned i
lterkurven.
B
Advarsel:
Undgå at tabe børsten ned i
møllekværnens tragt.
8 Luk låget til møllekværnens tragt.
9 Fjern papirlteret med de malede kafferester,
og smid det væk.
6.3 Afkalkning af kaffemaskine
Afkalk kaffemaskinen, hvis der kommer meget
damp ud, eller hvis bryggetiden forlænges.
Det anbefales at afkalke maskinen hver anden
måned. Brug kun hvid eddike til at afkalke, da
andre produkter kan beskadige kaffemaskinen.
B
Advarsel:
Brug aldrig eddike med et indhold af eddikesyre
på 8 % eller mere, naturlig vineddike eller
afkalkningmidler i pulver eller tabletform til at
afkalke apparatet, da dette kan medføre skader.
1 Åbn låget til vandtanken.
2 Fyld vandtanken med 8 kopper hvid eddike
(4% eddikesyre) og 2 kopper vand (g. 6).
3 Placer et papirlter (nr. 4) i lterkurven,
og luk holderen til lterkurven (g. 15).
4 Sæt den tomme kande i apparatet (g. 7).
5 Sæt stikket i en stikkontakt.
6 Tryk på tænd/sluk-knappen foran på apparatet
for at tænde for apparatet (g. 8).
• Displayet lyser.
DANSK
17
Page 18

7 Tryk på knappen til valg af kaffestyrke, og drej
knappen for at vælge indstillingen til formaling
af kaffe (g. 10).
8 Tryk midt på knappen for at bekræfte.
Tryk derefter midt på knappen igen for at
starte brygningen (g. 11).
9 Vent, indtil halvdelen af opløsningen af
eddike og vand er løbet ned i kanden. Tryk
derefter på tænd/sluk-knappen for at stoppe
brygningen, og lad opløsningen trække i
mindst 15 minutter (g. 30).
10 Tryk på tænd/sluk-knappen for at tænde for
kaffemaskinen igen (g. 8).
11 Tryk én gang midt på knappen for at lade
apparatet gennemføre brygningen (g. 31).
12 Tøm kanden, og smid papirltret ud.
13 Fyld vandtanken med koldt vand, og tryk to
gange midt på knappen for at starte en ny
brygning. Lad kaffemaskinen gennemføre hele
brygningen, og tøm kanden.
14 Gentag trin 13, indtil vandet ikke længere
smager eller lugter af eddike.
15 Rengør lterkurven og kanden i
opvaskemaskinen eller med varmt vand og
noget opvaskemiddel.
16 Tryk på tænd/sluk-knappen foran på apparatet
for at slukke for apparatet.
8 Genanvendelse
• Dette symbol på et produkt betyder, at
produktet er omfattet af EU-direktivet
2012/19/EU. Hold dig orienteret om
systemet for særskilt indsamling af elektriske
og elektroniske produkter. Følg lokale regler,
og bortskaf aldrig produktet sammen med
almindeligt husholdningsaffald. Korrekt
bortskaffelse af udtjente produkter er med til
at forhindre negativ påvirkning af miljøet og
menneskers helbred (g. 32).
9 Reklamationsret og
support
Hvis du har brug for hjælp eller support, bedes du
besøge www.philips.com/support eller læse i
den separate folder “World-Wide Guarantee”.
10Fejlnding
7 Bestilling af tilbehør
For at købe tilbehør eller reservedele kan du
besøge www.shop.philips.com/service
eller gå til din Philips-forhandler. Du kan også
kontakte det lokale Philips Kundecenter i dit land
(se folderen “World-Wide Guarantee” for at få
kontaktoplysninger).
18
Dette kapitel opsummerer de mest almindelige
problemer, der kan forekomme ved brug af
apparatet. Har du brug for yderligere hjælp og
vejledning, så besøg www.philips.com/support
for at se en liste over ofte stillede spørgsmål, eller
du kan kontakte dit lokale Philips Kundecenter.
Apparatet fungerer ikke.
• Sæt stikket i en stikkontakt, og tryk på on/off-
knappen på forsiden af apparatet for at tænde
for det.
• Kontroller, at den angivne netspænding på
apparatet svarer til den lokale netspænding.
• Fyld vandtanken med vand.
• Luk låget til møllekværnens tragt.
Page 19

Når jeg bruger kværnen, smager kaffen for svagt.
• Sørg for, at det antal kopper, du vælger med
knappen til 2-10 kopper, passer med mængden
af vand i vandtanken. Husk på, at kaffemaskinen
bruger alt vandet i vandtanken.
• Brug knappen til valg af kaffestyrke til at indstille
kaffens styrke til “strong” (stærk).
• Når du bruger kaffebønner, skal du sørge for, at
du ikke trykker på knappen til formaling af kaffe,
da det slukker for kværnen.
• Brug kaffebønner med en stærkere blanding
eller smag.
• Sørg for, at det valgte antal kopper passer med
mængden af vand i vandtanken.
Kaffen er ikke tilstrækkelig varm.
• Forvarm kanden med varmt vand, før du star ter
brygningen.
• Kaffen i kanden mister hurtigere varmen, hvis
du kun brygger nogle få kopper. Kaffen bevarer
varmen længere, hvis du brygger 10 kopper, så
kanden er fyldt.
• Brug tynde kopper, fordi de absorberer mindre
varme fra kaffen end tykke kopper.
• Brug ikke mælk, der kommer direkte fra
køleskabet.
• Afkalk apparatet. Se “Afkalkning af
kaffemaskinen” i afsnittet “Rengøring og
vedligeholdelse”.
DANSK
Når jeg bruger formalet kaffe, er kaffens styrke for
svag.
• Sørg for, at mængden af formalet kaffe i lteret
passer med mængden af vand i vandtanken.
Husk på, at apparatet bruger alt vandet i
vandtanken.
• Brug malet kaffe med en stærkere blanding eller smag.
• For at øge kaffens styrke, skal du øge mængden
af formalet kaffe eller reducere mængden af vand.
• Filteret yder over, når jeg fjerner kanden fra
apparatet, mens det brygger kaffe.
• Hvis du fjerner kanden i mere end 20 sekunder
under brygningen, får drypstoppet lterkur ven til
at løbe over. Vær også opmærksom på, at kaffen
ikke opnår sin fulde smag, før brygningen er
fuldført. Vi fraråder derfor, at du fjerner kanden
og skænker kaffen, før brygningen er afsluttet.
Apparatet fortsætter med at dryppe et stykke tid
efter endt brygning.
• Det skyldes kondensering af damp. Det er helt
normalt, at apparatet drypper et stykke tid.
• Hvis kaffemaskinen ikke stopper med at dryppe,
kan drypstop-funktionen være tilstoppet.
Rengør drypstoppet ved at trække i tappen
på holderen til lterkurven på højre side
af kaffemaskinen for at åbne holderen. Tag
lterkurven ud. Skyl derefter lterkurven og
drypstoppet under vandhanen.
• Hvis du fjerner kanden i mere end 20 sekunder
under brygningen, får drypstoppet lterkurven
til at løbe over.
Kaffemaskinen starter ikke rengøring af
møllekværnens tragt.
• Sørg for, at kaffemaskinen er sluttet til
stikkontakten.
• Sørg for at åbne låget til møllekværnens tragt,
inden du holder knappen til møllekværnen nede.
• Tryk og hold knappen til kværnen nede i
4 sekunder, indtil kværnen begynder at rengøre
sig selv.
• Apparatet virker, men udsender en biplyd.
• Kontroller, om låget til møllekværnens tragt er
lukket ordentligt.
• Det lader til, at kaffebønnerne hurtigt er brugt op.
• Det kan godt se ud til, at kaffebønnerne hur tigt
er brugt op. For at få en perfekt kop kaffe er
en vis mængde formalet kaffe påkrævet. Den
mængde kaffebønner, apparatet bruger for at få
den perfekte mængde formalet kaffe, er normal.
19
Page 20

1 Johdanto
3 Tärkeää
Onnittelut ostoksestasi ja tervetuloa
Philips-tuotteiden käyttäjäksi! Hyödynnä Philipsin
tuki ja rekisteröi tuotteesi osoitteessa
www.philips.com/welcome.
2 Yleiskuvaus (Kuva 1)
1 Suodatinkori
2 Suodatinkorin teline
3 Vesimäärän ilmaisin
4 Vesisäiliön kansi
5 Papusäiliön kansi
6 Säiliönvalitsin
7 Jauhatuksen säätönuppi
8 Kaksiosainen papusäiliö
9 Myllyn suppilon kansi
10 Myllyn suppilon kannen lukko
11 Vedentäyttöaukko
12 Näyttö
A Valmiiksi jauhetun kahvin kuvake
B Kuppien määrä
C Kahvikupin kuvake
D Kahvin vahvuuden kahvipapukuvake
E Kahvin vahvuuden valintapainike
F Ajastinpainike
G Tunnin ilmaisin
H Minuutin ilmaisin
I Ajastinkuvake
13 Virtapainike
14 Lasikannun kansi
15 Lasikannu
16 Puhdistusharja
Lue tämä käyttöopas huolellisesti
ennen käyttöä ja säilytä se
myöhempää tarvetta varten.
3.1 Vaara
• Älä upota laitetta veteen tai
muuhun nesteeseen. Älä myöskään
huuhtele sitä vesihanan alla.
3.2 Varoitus
• Tarkista, että laitteen pohjassa
oleva jännitemerkintä vastaa
paikallista verkkojännitettä, ennen
kuin liität laitteen sähköverkkoon.
• Jos virtajohto on vahingoittunut,
se on oman turvallisuutesi
vuoksi hyvä vaihdattaa Philipsin
valtuuttamassa huoltoliikkeessä
tai muulla ammattitaitoisella
korjaajalla.
• Laitetta voivat käyttää yli 8-vuotiaat
lapset ja henkilöt, joiden fyysinen
tai henkinen toimintakyky on
rajoittunut tai joilla ei ole kokemusta
tai tietoa laitteen käytöstä, jos heitä
on neuvottu laitteen turvallisesta
käytöstä tai tarjolla on turvallisen
käytön edellyttämä valvonta ja
jos he ymmärtävät laitteeseen
liittyvät vaarat. Yli 8-vuotiaat lapset
voivat puhdistaa tai huoltaa laitetta
valvonnan alaisena. Pidä laite ja
sen johto poissa alle 8-vuotiaiden
ulottuvilta.
20
Page 21

• Lasten ei pidä leikkiä laitteella.
• Älä jätä virtajohtoa roikkumaan
sen pöydän tai työtason reunan
yli, jonka päällä laite on.
• Älä koske laitteen jauhimiin, kun
laite on liitetty pistorasiaan.
• Laitteen pakkausmateriaalit
(kuten muovipussit ja
pahvipakkaukset) eivät ole
leikkikaluja. Pidä ne poissa lasten
ulottuvilta.
• Älä koske kuumiin pintoihin
laitteen ollessa päällä.
• Laite on tarkoitettu kahvipapujen
jauhatukseen ja kahvin
valmistukseen. Ole varovainen
käyttäessäsi laitetta, sillä kuuma
vesi ja höyry voivat aiheuttaa
palovammoja.
• Älä tyhjennä vesisäiliötä kallistamalla
laitetta, koska se voi vahingoittaa
laitetta. Tyhjennä vesisäiliö laitteen
mukana tulleen ohjeen mukaisesti.
• Älä käytä laitetta, jos pistoke,
johto tai itse laite on vaurioitunut.
• Jos et voi ratkaista
ongelmatilannetta tämän
käyttöohjeen ohjeiden
avulla, ota yhteyttä Philipsin
kuluttajapalvelukeskukseen.
Jos ongelmaa ei voi ratkaista,
toimita laite tutkittavaksi
tai korjattavaksi Philipsin
valtuuttamaan huoltoliikkeeseen.
Jos yrität korjata laitetta itse, sen
takuu mitätöityy.
3.3 Varoitus
• Älä aseta laitetta kuumalle alustalle
ja pidä huoli, ettei virtajohto
kosketa mitään kuumaa pintaa.
• Irrota pistoke pistorasiasta
ennen laitteen puhdistamista tai
jos suodatuksen tai jauhamisen
aikana ilmenee ongelmia.
• Älä siirrä laitetta käytön aikana.
• Laite kuumenee käytön aikana.
Anna laitteen jäähtyä, ennen kuin
asetat sen säilytykseen.
• Laitteen alaosa ja kannun pohja
kuumenevat kahvin valmistuksen
aikana.
• Kun olet poistanut laitteen
pakkauksesta, varmista, että
laite on ehjä ja kaikki osat
ovat tallella. Jos et ole varma
laitteen toiminnasta, älä käytä
laitetta, vaan ota yhteyttä
kuluttajapalvelukeskukseen.
• Tämä laite on tarkoitettu vain
tavalliseen kotitalouskäyttöön. Sitä
ei ole tarkoitettu käytettäväksi
henkilökuntaruokaloissa
myymälöissä, toimistoissa,
maatiloilla tai muissa
työympäristöissä. Sitä ei ole
myöskään tarkoitettu hotellien
tai muiden majoitusliikkeiden
vieraiden käyttöön.
3.4 Sähkömagneettiset kentät
(EMF)
Tämä Philips-laite vastaa kaikkia sähkömagneettisia
kenttiä (EMF) koskevia standardeja ja säännöksiä.
SUOMI
21
Page 22
4 Käyttöönotto
4.1 Kellonajan asettaminen
1 Työnnä pistoke pistorasiaan.
• Näytössä vilkkuu luku 00:00 osoituksena
siitä, että kellonaika on asetettava.
2 Aseta tunti kier tämällä säädintä (Kuva 2).
3 Vahvista tuntiasetus painamalla säätimen
keskiosaa (Kuva 3).
• Minuutit alkavat vilkkua osoitukseksi siitä,
että minuutit on asetettava.
4 Aseta minuutit kier tämällä säädintä (Kuva 4).
5 Vahvista minuuttiasetus painamalla nupin
keskiosaa (Kuva 5).
6 Näytössä näkyy määritetty kellonaika.
Kahvinkeitin on käyttövalmis.
4.2 Automaattisen
sammutusajan asettaminen
Voit säätää aikaa, jonka kuluttua laitteen virta
katkeaa automaattisesti. Oletusaika on asetettu
30 minuuttiin. Voit säätää tämän ajan enintään
120 minuuttiin. Jos haluat säätää automaattisen
sammutuksen ajan, seuraa alla olevia ohjeita.
1 Varmista, että laitteen virta on katkaistu (mutta
virtajohto on kytketty pistorasiaan).
2 Pidä säädintä painettuna, kunnes näyttö alkaa
vilkkua.
3 Lisää tai vähennä aikaa kääntämällä säädintä.
1 on 10 minuuttia, 2 on 20 minuuttia,
3 on 30 minuuttia ja niin edelleen,
kunnes 12 on 120 minuuttia.
4 Vahvista minuuttiasetus painamalla nupin
keskiosaa.
D
Huomautus:
Laite tallentaa aina viimeisimmän asetuksen.
4.3 Laitteen huuhtelu
Huuhtele kahvinkeitin ennen ensimmäistä käyttöä.
1 Avaa vesisäiliön kansi. Täytä vesisäiliö
raikkaalla, kylmällä vedellä enintään 8 kupin
merkkiin asti (Kuva 6).
D
Huomautus:
Älä aseta kahvipapuja tai kahvijauhetta laitteeseen.
2 Sulje vesisäiliön kansi.
3 Aseta kannu laitteeseen (Kuva 7).
4 Paina käynnistyspainiketta (Kuva 8).
• Näytön merkkivalot syttyvät.
5 Paina kahvin vahvuuden
valintapainiketta (Kuva 9).
6 Valitse valmiiksi jauhetun kahvin asetus
kiertämällä säädintä (Kuva 10).
• Valmiiksi jauhetun kahvin kuvake näkyy
näytössä.
7 Vahvista valinta painamalla säätimen keskiosaa.
Aloita sitten huuhtelu painamalla säädintä
uudelleen (Kuva 11).
8 Jätä laite käyntiin, kunnes huuhtelu on loppunut.
9 Tyhjennä kannu.
5 Käyttö
5.1 Vesisäiliön täyttäminen
1 Avaa vesisäiliön kansi ja kaada vesisäiliöön
tarvittava määrä kylmää vettä. (Kuva 6)
Kun avaat vesisäiliön kannen, näet laitteen
sisällä olevat merkinnät 2–10 kupille. Voit
arvioida vesisäiliöön laitettavan veden määrän
näiden merkkien avulla. Heijastus muuttuu
vaaleasta tummaksi jokaisen vesikupillisen
kohdalla. Voit myös käyttää kannun vesimäärän
ilmaisinta.
D
Huomautus:
Täytä vesisäiliö enintään 10 kupin merkkiin asti.
22
Page 23

5.2 Kahvipapujen käyttö
B Varoitus:
Pidä vesisäiliön kansi suljettuna, kun täytät
kahvipapusäiliön kahvipavuilla, jotta kahvipavut
eivät putoa vesisäiliöön ja tuki vedentäyttöaukkoa.
1 Avaa papusäiliön kansi. (Kuva 12)
2 Täytä kaksiosainen papusäiliö kahvipavuilla. Voit
käyttää kahta eri papulaatua. Varmista,
että säiliössä on tarpeeksi kahvipapuja
haluamasi kahvimäärän keittämiseen (Kuva 13).
D
Huomautus:
Varmista aina, että kahvipapusäiliö on ainakin
puolillaan.
B
Varoitus:
Älä käytä paahtamatonta kahvia tai
sokeroituja papuja, jotta kahvimylly ei jumiudu.
Suosittelemme käyttämään kahvipapuja
espressopapujen sijaan, sillä espressopavut
saattavat vahingoittaa keitintä.
3 Avaa suodatinkorin teline vetämällä
kielekkeestä kahvinkeittimen oikealla
puolella (Kuva 14).
4 Ota suodatinpaperi (koko 1x4 tai nro 4)
ja taivuta reunat repeytymisen ja kasaan
painumisen välttämiseksi. Aseta suodatinpaperi
suodatintelineeseen. (Kuva 15)
5 Sulje suodatinkorin teline.
6 Aseta kannu laitteeseen. (Kuva 7)
7 Valitse jauhatustyyppi (hienosta
karkeaan) kiertämällä jauhatuksen
valintasäädintä. (Kuva 16)
E
Vinkki:
Jauhatuksen säätimellä voit valita yhdeksän
eri asetusta. Olemme valinneet valmiiksi 3
suositeltua asetusta, mutta voit valita muitakin
asetuksia kuvakkeiden välillä. Kannattaa kokeilla
eri vaihtoehtoja, jotta löydät sinun makuusi
sopivat asetukset.
8 Valitse käytettävät kahvipavut kiertämällä
säiliönvalitsinta (Kuva 17).
B Varoitus:
Kahvipapusäiliötä tai kahvipapulajia
vaihdettaessa keittimeen jää aina hieman
edellistä kahvijauhetta, joka voi vaikuttaa kahvin
makuun. Voit välttää makujen sekoittumisen
puhdistamalla myllyn suppilon aina, kun käytät
uudentyyppisiä kahvipapuja.
D
Huomautus:
Voit valita makusi mukaan kahden papulajin
sekoituksen tai jommankumman papulajin yksinään.
9 Paina laitteen etupuolella olevaa
virtapainiketta (Kuva 8).
• Kuppien määrän ilmaisin alkaa vilkkua.
10 Valitse kuppien määrä kiertämällä säädintä,
kunnes näytössä on haluamasi luku (Kuva 18).
D
Huomautus:
Varmista, että 2–10 kupin painikkeella
valitsemiesi kupillisten määrä vastaa
vesisäiliössä olevan veden määrää. Muista, että
kahvinkeitin käyttää kaiken vesisäiliössä olevan
veden. Jos valitset vähemmän kupillisia kuin
vettä, kahvista tulee aiottua laihempaa.
11 Vahvista kuppien määrä painamalla säätimen
keskiosaa.
12 Paina kahvin vahvuuden
valintapainiketta. (Kuva 9)
• Kahvipapukuvakkeet alkavat vilkkua.
13 Aseta kahvin vahvuus kier tämällä säädintä
(mieto: 1 papu, keskivahva: 2 papua,
vahva 3 papua) (Kuva 10).
• Näytössä näkyy valittu kahvin vahvuus.
E
Vinkki:
Kokeilemalla erilaisia vesimäärän asetuksia
saat selville, millaisesta vahvuudesta pidät.
Saat vahvempaa kahvia valitsemalla veden
määrää suuremman kuppien määrän.
Vastaavasti kahvista tulee miedompaa,
jos kuppien määrä on pienempi kuin
veden määrä.
14 Vahvista valinta painamalla säätimen keskiosaa.
Aloita sitten suodatus painamalla säädintä
uudelleen (Kuva 19).
• Kahvimylly jauhaa tarvittavan määrän
kahvipapuja.
SUOMI
23
Page 24
15 Älä poista kannua, ennen kuin kahvinkeitin on
lopettanut suodatuksen.
D
Huomautus:
Suodatuksen jälkeen kahvipisaroita tippuu
suodatinkorista muutamien sekuntien ajan.
5.3 Valmiiksi jauhetun kahvin
käyttö
Jos haluat käyttää valmista kahvijauhetta
kahvipapujen sijasta, noudata seuraavia ohjeita.
1 Avaa vesisäiliön kansi ja kaada vesisäiliöön
tarvittava määrä kylmää vettä. (Kuva 6)
2 Avaa suodatinkorin teline vetämällä
kielekkeestä kahvinkeittimen oikealla
puolella (Kuva 14).
3 Ota suodatinpaperi (koko 1x4 tai nro 4)
ja taivuta reunat repeytymisen ja kasaan
painumisen välttämiseksi. Aseta suodatinpaperi
suodatintelineeseen (Kuva 15).
4 Annostele kahvijauhe suodatinpaperiin.
D
Huomautus:
Voit säätää itse kahvin vahvuutta. Saat
keskivahvaa kahvia käyttämällä yhden
mittalusikallisen (noin 6 g) kahvijauhetta kuppia
(120 ml) kohden. Saat vahvempaa kahvia
käyttämällä 1,5 mittalusikallista kuppia kohden.
5 Sulje suodatinkorin teline.
6 Aseta kannu laitteeseen (Kuva 7).
7 Paina käynnistyspainiketta (Kuva 8).
• Näytön merkkivalot syttyvät.
8 Paina kahvin vahvuuden
valintapainiketta (Kuva 9).
9 Valitse valmiiksi jauhetun kahvin asetus
kiertämällä säädintä (Kuva 10).
• Valmiiksi jauhetun kahvin kuvake näkyy
näytössä.
10 Vahvista valinta painamalla säätimen keskiosaa.
Aloita sitten suodatus painamalla säädintä
uudelleen (Kuva 11).
11 Älä poista kannua, ennen kuin kahvinkeitin on
lopettanut suodatuksen.
D Huomautus:
Suodatuksen jälkeen kahvipisaroita tippuu
suodatinkorista muutamien sekuntien ajan.
5.4 Ajan asettaminen
Ajastimella voit valita ajan, jolloin haluat
kahvinsuodatuksen alkavan. Varmista, että valmiiksi
jauhetusta tai kahvipavuista valmistettavan kahvin
kaikki esivalmisteluvaiheet on tehty, ennen kuin
asetat ajastimen.
1 Paina ajastinpainiketta. (Kuva 20)
• Näytössä vilkkuu luku 00:00 osoituksena
siitä, että kellonaika on asetettava.
2 Aseta tunti kier tämällä säädintä (Kuva 21).
3 Vahvista tuntiasetus painamalla säätimen
keskiosaa (Kuva 22).
• Minuutit alkavat vilkkua osoitukseksi siitä,
että minuutit on asetettava.
4 Aseta minuutit kier tämällä säädintä (Kuva 23).
5 Vahvista minuuttiasetus painamalla nupin
keskiosaa (Kuva 24).
• Ajastin on nyt asetettu, ja suodatus
käynnistyy ajastettuna aikana.
5.5 Tippalukkotoiminto
Tippalukon ansiosta voit ottaa kannun
kahvinkeittimestä ennen kuin kahvi on suodatettu
kokonaan. Kun otat kannun, tippalukko estää
kahvia valumasta.
D
Huomautus:
Suodatus ei keskeydy, kun otat kannun pois.
Jos et laita kannua takaisin laitteeseen 20 sekunnin
kuluessa, kahvi valuu suodatinkorista yli.
24
Page 25

6 Puhdistus ja huolto
6.1 Laitteen puhdistus jokaisen
käytön jälkeen
B Varoitus:
Älä upota laitetta veteen tai muuhun nesteeseen.
Älä myöskään huuhtele sitä vesihanan alla.
1 Sammuta keitin laitteen etupuolella olevasta
virtapainikkeesta. (Kuva 25)
2 Irrota pistoke pistorasiasta.
3 Pyyhi kahvinkeittimen ulkopuoli kostealla
liinalla (Kuva 26).
4 Puhdista suodatinkori ja kannu
astianpesukoneessa tai kuumalla vedellä ja
muutamalla tipalla astianpesuainetta.
6.2 Myllyn suppilon
puhdistaminen
Kahvipapusäiliötä tai kahvipapulajia vaihdettaessa
keittimeen jää aina hieman edellistä kahvijauhetta,
joka voi vaikuttaa kahvin makuun. Puhdista myllyn
suppilo 1–2 viikon välein tai valmistaessasi kahvia
uudentyyppisistä pavuista, jotta eri kahvilajit eivät
sekoitu. Noudata alla olevia ohjeita, kun vaihdat
kahvipapulajista toiseen.
1 Sammuta keitin laitteen etupuolella olevasta
virtapainikkeesta (Kuva 25).
2 Avaa suodatinkorin teline vetämällä kielekkeestä
kahvinkeittimen oikealla puolella (Kuva 14).
3 Ota suodatinpaperi (koko 1x4 tai nro 4)
ja taivuta reunat repeytymisen ja kasaan
painumisen välttämiseksi. Aseta suodatinpaperi
suodatintelineeseen. (Kuva 15)
4 Sulje suodatinkorin teline.
5 Avaa myllyn suppilon kansi asettamalla
puhdistusharjan kahva lukkoon ja painamalla
sitä alaspäin (Kuva 27).
D
Huomautus:
Jos haluat puhdistaa myllyn suppilon nopeasti
käyttämällä vain harjaa, siirry vaiheeseen 7.
Jos et halua, että edellisestä suodatuksesta
jääneet kahvijauheet vaikuttavat uusien
kahvipapujen makuun, siirry vaiheeseen 6.
6 Paina kahvin vahvuuden valintapainiketta
4 sekuntia (Kuva 28).
• Kahvimyllyn puhdistustoiminto käynnistyy.
7 Kun kahvimyllyn puhdistus on valmis, siirrä
kahvijauheen jäämät harjalla suppilon
alaosaan (Kuva 29).
• Kahvijauheen jäämät putoavat
suodatinkoriin.
B
Varoitus:
Älä pudota harjaa myllyn suppiloon.
8 Sulje myllyn suppilon kansi.
9 Poista suodatinpaperi, jossa on kahvijauheen
jäämät, ja heitä se pois.
6.3 Kalkinpoisto
kahvinkeittimestä
Poista kalkki kahvinkeittimestä, kun huomaat
liiallista höyryämistä tai kun suodatusaika pitenee.
Suosittelemme kalkinpoistoa kahden kuukauden
välein. Käytä kalkinpoistossa vain ruokaetikkaa, sillä
muut tuotteet saattavat vahingoittaa kahvinkeitintä.
B
Varoitus:
Älä koskaan käytä laitteen kalkinpoistoon
etikkaa, jonka vahvuus on 8 % tai
enemmän, luonnonetikkaa äläkä jauhe- tai
tablettikalkinpoistoainetta, koska ne voivat
aiheuttaa vaurioita.
1 Avaa vesisäiliön kansi.
2 Kaada vesisäiliöön 8 kupillista pöytäetikkaa
(4 % etikkaa) ja 2 kupillista vettä (Kuva 6).
3 Aseta suodatinpaperi (nro 4) suodatinkoriin ja
sulje suodatinkorin teline (Kuva 15).
4 Aseta tyhjä kannu laitteeseen (Kuva 7).
5 Työnnä pistoke pistorasiaan.
6 Käynnistä laite etupuolella olevasta
käynnistyspainikkeesta (Kuva 8).
• Näytön merkkivalot syttyvät.
7 Valitse valmiiksi jauhetun kahvin asetus
painamalla kahvin vahvuuden valintapainiketta
ja kiertämällä säädintä (Kuva 10).
8 Vahvista valinta painamalla säätimen keskiosaa.
Aloita sitten suodatus painamalla säädintä
uudelleen (Kuva 11).
SUOMI
25
Page 26

9 Odota, kunnes puolet etikka-vesiliuoksesta
on valunut kannuun. Keskeytä sitten suodatus
painamalla virtapainiketta ja anna liuoksen
vaikuttaa vähintään 15 minuuttia (Kuva 30).
10 Käynnistä kahvinkeitin uudelleen painamalla
virtapainiketta (Kuva 8).
11 Paina säätimen keskiosaa kerran ja anna
keittimen suodattaa koko vesimäärä (Kuva 31).
12 Tyhjennä kannu ja heitä suodatinpaperi pois.
13 Aloita toinen suodatus täyttämällä vesisäiliö
kylmällä vedellä ja painamalla säätimen keskiosaa
kahdesti. Anna kahvinkeittimen suodattaa koko
vesimäärä ja tyhjennä sitten kannu.
14 Toista vaihetta 13, kunnes vesi ei enää maistu
eikä haise etikalle.
15 Puhdista suodatinkori ja kannu
astianpesukoneessa tai kuumalla vedellä ja
muutamalla tipalla astianpesuainetta.
16 Sammuta keitin laitteen etupuolella olevasta
virtapainikkeesta.
7 Tarvikkeiden
8 Kierrätys
• Tämä kuvake osoittaa, että tuote kuuluu
Euroopan parlamentin ja neuvoston
direktiivin 2012/19/EU soveltamisalaan.
Ota selvää sähkölaitteille ja elektronisille
laitteille tarkoitetusta kierrätysjärjestelmästä
alueellasi. Noudata paikallisia sääntöjä äläkä
hävitä tuotetta tavallisen talousjätteen
mukana. Vanhojen tuotteiden asianmukainen
hävittäminen auttaa ehkäisemään ympäristölle
ja ihmisille koituvia haittavaikutuksia (Kuva 32).
9 Takuu ja tuki
Jos haluat tukea tai lisätietoja, käy Philipsin
verkkosivuilla osoitteessa
www.philips.com/support tai lue erillinen
kansainvälinen takuulehtinen.
tilaaminen
Voit ostaa lisävarusteita ja varaosia osoitteessa
www.shop.philips.com/service tai
Philips-jälleenmyyjältä. Voit myös ottaa yhteyden
Philipsin kuluttajapalvelukeskukseen (katso
yhteystiedot kansainvälisestä takuulehtisestä).
26
10 Vianmääritys
Tähän osaan on koottu tavallisimmat laitteen
käytössä ilmenevät ongelmat. Ellet löydä
ongelmaasi ratkaisua seuraavista tiedoista,
lue osoitteesta www.philips.com/
supportvastauksia usein kysyttyihin kysymyksiin
tai ota yhteys maasi asiakaspalveluun.
Laite ei toimi.
• Työnnä pistoke pistorasiaan ja kytke virta
laitteen etupuolella olevalla virtakytkimellä.
• Varmista, että laitteen jännitemerkintä vastaa
paikallista verkkojännitettä.
• Täytä vesisäiliö vedellä.
• Sulje myllyn suppilon kansi.
Page 27

Kun käytän kahvimyllyä, kahvi on liian mietoa.
• Varmista, että 2–10 kupin painikkeella
valitsemiesi kupillisten määrä vastaa vesisäiliössä
olevan veden määrää. Muista, että kahvinkeitin
käyttää kaiken vesisäiliössä olevan veden.
• Valitse kahvinvoimakkuuden säätöpainikkeella
asetukseksi “vahva”.
• Käyttäessäsi kahvipapuja varmista, ettet paina
valmiiksi jauhetun kahvin painiketta, sillä se
kytkee kahvimyllyn pois käytöstä.
• Käytä vahvempia kahvipapuja.
• Varmista, että kuppien määrä vastaa vesisäiliössä
olevan veden määrää.
Kun käytän kahvijauhetta, kahvi on liian mietoa.
• Varmista, että kahvijauheen määrä
suodattimessa vastaa vesisäiliössä olevan
veden määrää. Muista, että laite käyttää kaiken
vesisäiliössä olevan veden.
• Käytä vahvempaa kahvijauhetta.
• Lisää kahvin vahvuutta lisäämällä kahvijauheen
määrää tai vähentämällä veden määrää.
• Kahvi valuu suodattimesta yli, kun kannu
poistetaan laitteesta suodatuksen aikana.
• Jos poistat kannun keittimestä yli 20 sekunniksi
suodatuksen aikana, tippalukko aiheuttaa sen,
että suodatinkori täyttyy ja valuu yli.
Huomioi myös, että kahvin täyteläinen maku
muodostuu vasta suodatuksen loppuvaiheessa.
Siksi kannua ei kannata poistaa ja kahvia kaataa
kuppiin, ennen kuin suodatus on valmis.
Kahvi ei ole tarpeeksi kuumaa.
• Lämmitä kannu kuumalla vedellä ennen kahvin
valmistamista.
• Kahvi jäähtyy kannussa nopeammin, jos valmistat
vain muutaman kupillisen kahvia. Kahvi säilyy
kuumana pidempään, jos keität 10 kupillista eli
täyden kannun kahvia.
• Käytä ohuita kahvikuppeja, jotka haihduttavat
kahvista vähemmän lämpöä kuin paksut kupit.
• Älä käytä suoraan jääkaapista otettua maitoa.
• Poista kalkki laitteesta. Katso kohtaa Kalkinpoisto
luvussa Puhdistus ja huolto.
Kahvinkeitin ei puhdista myllyn suppiloa.
• Varmista, että kahvinkeittimen virtajohto on
kytketty pistorasiaan.
• Varmista, että myllyn suppilon kansi on avattu
ennen kahvimyllypainikkeen painamista.
• Paina kahvimyllypainiketta 4 sekunnin ajan,
kunnes puhdistus alkaa.
• Laite toimii, mutta siitä kuuluu merkkiääni.
• Tarkista, onko myllyn suppilon kansi suljettu
kunnolla.
• Kahvipavut näyttävät kuluvan nopeasti.
• Vaikuttaa ehkä siltä, että kahvipavut kuluvat
loppuun nopeasti. Täydellisen kahvikupillisen
valmistukseen tarvitaan kuitenkin tietty määrä
jauhettua kahvia. Laite käyttää normaalin määrän
kahvipapuja, jotta se saa tarpeeksi jauhettua
kahvia ja voi valmistaa täydellisen kahvikupillisen.
SUOMI
• Laitteesta tippuu kahvia pitkään suodatuksen
jälkeen.
• Tippuminen johtuu höyryn tiivistymisestä.
On normaalia, että kahvipisaroita tippuu jonkin aikaa.
• Jos tippuminen jatkuu, tippalukko voi olla
tukossa. Puhdista tippalukko avaa suodatinteline
vetämällä kahvinkeittimen oikealla puolella
olevasta kielekkeestä. Irrota suodatinteline.
Huuhtele suodatinteline ja tippalukko
juoksevalla vedellä.
• Jos nostat kannun keittimestä yli 20 sekunniksi
suodatuksen aikana, tippalukko aiheuttaa sen,
että suodatinkori täyttyy ja valuu yli.
27
Page 28

1 Introduction
3 Important
Félicitations pour votre achat et bienvenue dans
l’univers Philips ! Pour proter pleinement de
l’assistance Philips, enregistrez votre produit sur
le site à l’adresse suivante : www.philips.com/
welcome.
2 Description
générale(g.1)
1 Porte-ltre
2 Support pour porte-ltre
3 Indicateur de niveau d’eau
4 Couvercle du réservoir d’eau
5 Couvercle du réservoir à grains de café
6 Sélecteur de réservoir
7 Sélecteur de mouture
8 Double réservoir à grains de café
9 Couvercle de l’entonnoir du moulin
10 Verrou du couvercle de l’entonnoir du moulin
11 Orice de remplissage d’eau
12 Afcheur
A Icône de mouture du café
B Nombre de tasses
C Icône de tasse à café
D Icône de sélection d’intensité
E Bouton de sélection d’intensité
F Bouton du programmateur
G Indicateur d’heure
H Indicateur de minutes
I Icône du minuteur
13 Bouton marche/arrêt
14 Couvercle de la verseuse en verre
15 Verseuse en verre
16 Brossette de nettoyage
28
Lisez attentivement ce mode d’emploi
avant d’utiliser l’appareil et conservezle pour un usage ultérieur.
3.1 Danger
• Ne plongez jamais l’appareil dans
l’eau, ni dans d’autres liquides et
ne le rincez pas sous le robinet.
3.2 Avertissement
• Avant de brancher l’appareil,
vériez que la tension indiquée
sur la base correspond à la
tension secteur locale.
• Si le cordon d’alimentation est
endommagé, il doit être remplacé
par Philips, par un Centre Service
Agréé Philips ou par un technicien
qualié an d’éviter tout accident.
• Cet appareil peut être utilisé
par des enfants âgés de 8 ans
ou plus, des personnes dont les
capacités physiques, sensorielles ou
intellectuelles sont réduites ou des
personnes manquant d’expérience
et de connaissances, à condition
que ces enfants ou personnes
soient sous surveillance ou qu’ils
aient reçu des instructions quant à
l’utilisation sécurisée de l’appareil
et qu’ils aient pris connaissance des
dangers encourus. Le nettoyage
et l’entretien ne doivent pas être
réalisés par des enfants sauf s’ils
sont âgés de plus de 8 ans et sous
surveillance. Tenez l’appareil et son
cordon hors de portée des enfants
de moins de 8 ans.
Page 29

• Les enfants ne doivent pas jouer
avec l’appareil.
• Ne laissez pas le cordon pendre
de la table ou du plan de travail
sur lequel l’appareil est posé.
• Ne touchez pas aux meules de
l’appareil, surtout lorsque ce
dernier est branché.
• Les emballages (sacs en plastique,
cartons de protection, etc.) ne
sont pas des jouets. Tenez-les hors
de portée des enfants.
• Ne touchez pas les surfaces
chaudes de l’appareil pendant
son fonctionnement.
• Cet appareil est conçu pour
moudre des grains de café et
préparer du café. Respectez les
consignes d’utilisation et manipulez
l’appareil avec précaution pour
éviter les brûlures dues à l’eau
chaude et à la vapeur.
• Ne videz pas le réservoir d’eau en
inclinant l’appareil, vous risqueriez
d’endommager ce dernier.
Pour vider le réservoir d’eau,
suivez les instructions de rinçage.
• N’utilisez jamais l’appareil si la
prise, le cordon d’alimentation
ou l’appareil lui-même est
endommagé.
• Si vous ne parvenez pas à
résoudre le problème à l’aide de
ce mode d’emploi, contactez le
Service Consommateurs Philips
de votre pays. Si le problème
persiste, conez votre appareil à
un Centre Service Agréé Philips
pour vérication ou réparation.
N’essayez jamais de réparer
l’appareil vous-même ; toute
intervention par des personnes
non qualiées entraîne l’annulation
de la garantie.
3.3 Attention
• Ne posez jamais l’appareil sur
une surface chaude et veillez à
ce que le cordon d’alimentation
ne soit pas en contact avec des
surfaces chaudes.
• Débranchez toujours l’appareil
en cas de problème lors de son
fonctionnement et avant de le
nettoyer.
• Ne déplacez pas l’appareil en
cours d’utilisation.
• L’appareil devient chaud pendant
l’utilisation. Laissez-le refroidir
avant de le ranger.
• La partie inférieure de l’appareil
et le fond de la verseuse
sont très chauds pendant la
préparation du café.
• Une fois l’appareil déballé, vériez
qu’il n’est pas endommagé et
qu’il ne manque aucune pièce.
En cas de doute, n’utilisez pas
l’appareil et contactez le Service
Consommateurs de votre pays.
• Cet appareil est destiné à un usage
domestique normal uniquement. Il
n’est pas destiné à être utilisé dans
des environnements tels que des
cuisines destinées aux employés
dans les entreprises, magasins et
autres environnements de travail.
Il n’est pas non plus destiné à être
utilisé par des clients dans des
hôtels, motels, chambres d’hôtes et
autres environnements résidentiels.
FRANÇAIS
29
Page 30

3.4 Champs
électromagnétiques (CEM)
Cet appareil Philips est conforme à toutes les
normes et à tous les règlements applicables relatifs
à l’exposition aux champs électromagnétiques.
4 Avant la première
utilisation
4.1 Réglage de l’heure
1 Branchez le cordon d’alimentation sur la prise
secteur.
• Sur l’afcheur, « 00:00 » clignote pour
indiquer que vous devez régler l’heure.
2 Tournez le bouton pour régler l’heure (g. 2).
3 Appuyez au centre du bouton pour conrmer
l’heure (g. 3).
• Les minutes commencent à clignoter pour
indiquer que vous devez régler les minutes.
4 Tournez le bouton pour régler les
minutes (g. 4).
5 Appuyez au centre du bouton pour conrmer
les minutes (g. 5).
6 L’heure dénie apparaît sur l’afcheur.
La cafetière est prête à l’emploi.
4.2 Réglage de la durée de
l’arrêt automatique
Vous pouvez régler la durée au bout de laquelle
l’appareil s’éteint automatiquement. La durée par
défaut est de 30 minutes. Vous pouvez modier
cette durée jusqu’à un maximum de 120 minutes.
Si vous souhaitez régler la durée de l’arrêt
automatique, suivez les étapes ci-dessous.
1 Assurez-vous que l’appareil est éteint
(mais que le cordon d’alimentation est
branché sur la prise murale).
2 Maintenez enfoncé le centre du bouton jusqu’à
ce que l’afcheur commence à clignoter.
3 Tournez le bouton pour augmenter ou
diminuer la durée. 1 correspond à 10 minutes,
2 correspond à 20 minutes, 3 correspond à
30 minutes, et ainsi de suite jusqu’à ce que
12 corresponde à 120 minutes.
4 Appuyez au centre du bouton pour conrmer
les minutes.
D
Remarque :
L’appareil enregistre toujours le dernier
réglage sélectionné.
4.3 Rinçage de l’appareil
Rincez la cafetière avant sa première utilisation.
1 Soulevez le couvercle du réservoir d’eau.
Remplissez le réservoir avec de l’eau froide
jusqu’à l’indication 8 tasses. (g. 6)
D
Remarque :
Ne mettez pas de grains de café ou de café
moulu dans l’appareil.
2 Fermez le couvercle du réservoir d’eau.
3 Placez la verseuse dans l’appareil (g. 7).
4 Appuyez sur le bouton marche/arrêt (g. 8).
• L’afcheur s’allume.
5 Appuyez sur le bouton de sélection
d’intensité (g. 9).
6 Tournez le bouton pour choisir le réglage de
la mouture (g. 10).
• L’icône de mouture du café s’allume.
7 Appuyez au centre du bouton pour conrmer.
Puis, appuyez à nouveau au centre du
bouton pour commencer le processus de
rinçage (g. 11).
8 Laissez l’appareil fonctionner jusqu’à ce que le
processus de rinçage soit terminé.
9 Videz la verseuse.
30
Page 31

5 Utilisation de
l’appareil
5.1 Remplissage du réservoir
1
Ouvrez le couvercle du réservoir d’eau et
remplissez le réservoir avec la quantité d’eau
froide requise. (g. 6) Lorsque vous ouvrez le
couvercle du réservoir d’eau, vous pouvez voir
des indications pour 2 à 10 tasses à l’intérieur
de l’appareil. Vous pouvez les utiliser pour
déterminer la quantité d’eau à mettre dans le
réservoir. Le reet passe de clair à foncé par tasse
d’eau remplie. Vous pouvez également utiliser
l’indicateur de niveau d’eau sur la verseuse.
D Remarque :
Ne remplissez pas le réservoir d’eau au-delà
de l’indication 10 tasses.
5.2 Utilisation avec des grains
de café
B Avertissement :
Veillez à ce que le couvercle du réservoir d’eau
soit toujours fermé lorsque vous remplissez le bac
à grains. Dans le cas contraire, les grains de café
risquent de tomber dans le réservoir d’eau et de
bloquer l’orice de remplissage.
1 Retirez le couvercle du réservoir à grains de
café. (g. 12)
2 Remplissez le double réservoir à grains de
café. Vous pouvez remplir le double réservoir
avec deux types de grains de café différents.
Assurez-vous de mettre sufsamment de
grains de café dans le bac pour préparer la
quantité de café souhaitée (g. 13).
D
Remarque :
Vériez à chaque utilisation que le bac à grains
est au moins à moitié rempli.
B Avertissement :
N’utilisez pas de grains de café caramélisés
ou non torréés, cela risquerait d’entraver
le bon fonctionnement du moulin. Il est
conseillé d’utiliser des grains de café au lieu de
grains de café expresso, car ceux-ci peuvent
endommager l’appareil.
3 Pour ouvrir le suppor t pour porte-ltre,
tirez sur la languette située sur le côté droit
de la cafetière ltre (g. 14).
4 Prenez un ltre en papier (type 1x4 ou n° 4)
et rabattez les bords du ltre pour éviter de
le déchirer ou de le plier. Placez le ltre en
papier dans le porte-ltre. (g. 15)
5 Fermez le suppor t du por te-ltre.
6 Placez la verseuse dans l’appareil. (g. 7)
7 Tournez le sélecteur de mouture pour
sélectionner le type de mouture souhaité
(de n à épais). (g. 16)
E
Conseil :
Vous avez le choix entre neuf niveaux de
mouture. Trois réglages optimaux sont
indiqués par des icônes, mais vous pouvez
choisir n’importe quel autre réglage entre
ces icônes. Nous vous conseillons d’essayer
différents niveaux de mouture pour trouver
celui que vous préférez.
8 Tournez le sélecteur de réservoir pour choisir
un des deux types de grains de café (g. 17).
B
Avertissement :
Quand vous changez de réservoir ou de
type de grains de café, il reste des traces
du précédent type de café. Pour éviter cela,
nettoyez l’entonnoir du moulin lorsque vous
changez de type de grains.
D
Remarque :
Selon votre goût, vous pouvez choisir un des
deux types de grains de café ou un mélange
des deux.
9 Appuyez sur le bouton marche/arrêt sur le
devant de l’appareil (g. 8).
• Le nombre de tasses commence à clignoter.
FRANÇAIS
31
Page 32

10 Pour sélectionner le nombre de tasses,
tournez le bouton jusqu’à ce que le nombre
souhaité s’afche (g. 18).
D
Remarque :
Assurez-vous que le nombre de tasses
sélectionné à l’aide du bouton pour 2-10 tasses
correspond à la quantité d’eau dans le réservoir
d’eau. Notez que la cafetière utilise toute l’eau
présente dans le réservoir. Si vous sélectionnez
un nombre de tasses inférieur à la quantité
d’eau, le café sera plus doux que prévu.
11 Appuyez au centre du bouton pour conrmer
le nombre de tasses.
12 Appuyez sur le bouton de sélection
d’intensité. (g. 9)
• Les icônes de grain de café commencent
à clignoter.
13 Tournez le bouton pour sélectionner
l’intensité du café souhaitée (doux : 1 grain,
moyen : 2 grains ou fort : 3 grains) (g. 10).
• L’intensité du café sélectionnée apparaît
sur l’afcheur.
E
Conseil :
Nous vous conseillons d’essayer différentes
quantités d’eau pour trouver l’intensité
que vous préférez. Si vous sélectionnez
un nombre de tasses plus élevé que la
quantité d’eau, le café sera plus fort. Si vous
sélectionnez un nombre de tasses plus petit
que la quantité d’eau, le café sera plus doux.
14 Appuyez au centre du bouton pour conrmer.
Puis, appuyez à nouveau au centre du bouton
pour lancer le cycle de préparation (g. 19).
• Le moulin moud la quantité de grains de
café correspondante.
15 Attendez que la cafetière ltre ait terminé la
préparation avant de retirer la verseuse.
D
Remarque :
Une fois la préparation terminée, le café
continue de s’écouler du porte-ltre pendant
quelques secondes.
5.3 Utilisation avec du café
moulu
Si vous souhaitez utiliser du café moulu et non des
grains de café, suivez les instructions ci-dessous.
1 Ouvrez le couvercle du réservoir d’eau et
remplissez le réservoir avec la quantité d’eau
froide requise. (g. 6)
2 Pour ouvrir le support pour porte-ltre, tirez
sur la languette située sur le côté droit de la
cafetière ltre (g. 14).
3 Prenez un ltre en papier (type 1x4 ou n° 4)
et rabattez les bords du ltre pour éviter de
le déchirer ou de le plier. Placez le ltre en
papier dans le porte-ltre (g. 15).
4 Versez du café moulu dans le ltre en papier.
D
Remarque :
Vous pouvez régler l’intensité du café selon vos
goûts. Pour une tasse de café moyen-fort, mettez
l’équivalent d’une cuillère de mesure (environ
6 g) par tasse (120 ml). Pour un café plus fort,
comptez 1,5 cuillère de café moulu par tasse.
5 Fermez le support du por te-ltre.
6 Placez la verseuse dans l’appareil (g. 7).
7 Appuyez sur le bouton marche/arrêt (g. 8).
• L’afcheur s’allume.
8 Appuyez sur le bouton de sélection
d’intensité (g. 9).
9 Tournez le bouton pour choisir le réglage de
la mouture (g. 10).
• L’icône de mouture du café s’allume.
10 Appuyez au centre du bouton pour conrmer.
Puis, appuyez à nouveau au centre du bouton
pour lancer le cycle de préparation (g. 11).
11 Attendez que la cafetière ltre ait terminé la
préparation avant de retirer la verseuse.
D
Remarque :
Une fois la préparation terminée, le café
continue de s’écouler du porte-ltre pendant
quelques secondes.
5.4 Réglage du minuteur
Le minuteur vous permet de programmer
l’heure à laquelle vous souhaitez que le cycle de
préparation du café débute. Assurez-vous que
toutes les étapes de préparation du café sont
32
Page 33

suivies avec du café moulu ou des grains de café
avant de régler le minuteur.
1 Appuyez sur le bouton du minuteur. (g. 20)
• Sur l’afcheur, « 00:00 » clignote pour
indiquer que vous devez régler le minuteur.
2 Tournez le bouton pour régler l’heure (g. 21).
3 Appuyez au centre du bouton pour conrmer
l’heure (g. 22).
• Les minutes commencent à clignoter
pour indiquer que vous devez régler les
minutes.
4
Tournez le bouton pour régler les minutes (g. 23).
5 Appuyez au centre du bouton pour conrmer
les minutes (g. 24).
• Le minuteur est maintenant réglé et le
cycle de préparation commencera à
l’heure programmée.
5.5 Fonction stop-goutte
La fonction stop-goutte vous permet de retirer
la verseuse de la cafetière avant que le cycle de
préparation ne soit ni. Lorsque vous retirez la
verseuse, le système stop-goutte empêche le café
de s’écouler.
D
Remarque :
Le cycle de préparation ne s’arrête pas lorsque
vous retirez la verseuse. Si vous n’avez pas remis la
verseuse dans l’appareil au bout de 20 secondes,
le porte-ltre déborde.
6 Nettoyage et
entretien
6.1 Nettoyage après chaque
utilisation
B Avertissement :
Ne plongez jamais l’appareil dans l’eau, ni dans
d’autres liquides et ne le rincez pas sous le robinet.
1 Appuyez sur le bouton marche/arrêt sur le
devant de l’appareil pour l’éteindre. (g. 25)
2 Retirez le cordon d’alimentation de la prise
secteur.
3 Essuyez l’extérieur de la cafetière à l’aide d’un
chiffon humide (g. 26).
4 Nettoyez le porte-ltre et la verseuse dans le
lave-vaisselle ou à l’eau chaude, avec un peu
de liquide vaisselle.
6.2 Nettoyage de l’entonnoir
du moulin
Quand vous changez de réservoir ou de type de
grains de café, ceux qui ont été précédemment
moulus laissent des traces et le goût de votre café
peut s’en trouver altéré. Nettoyez l’entonnoir du
moulin toutes les une à deux semaines ou quand
vous changez de réservoir à grains pour éviter
que le café fraîchement moulu et les traces dans
l’entonnoir du moulin ne se mélangent.
Pour réduire cet effet, suivez les étapes ci-dessous
après avoir changé de type de grains de café.
1 Appuyez sur le bouton marche/arrêt sur le
devant de l’appareil pour l’éteindre (g. 25).
2 Pour ouvrir le support pour porte-ltre,
tirez sur la languette située sur le côté droit
de la cafetière ltre (g. 14).
FRANÇAIS
33
Page 34

3 Prenez un ltre en papier (type 1x4 ou n° 4)
et rabattez les bords du ltre pour éviter de
le déchirer ou de le plier. Placez le ltre en
papier dans le porte-ltre. (g. 15)
4 Fermez le suppor t du por te-ltre.
5
Pour ouvrir le couvercle de l’entonnoir du moulin,
insérez le côté plat de la brosse de nettoyage
dans le verrou et appuyez vers le bas (g. 27).
D Remarque :
Si vous voulez nettoyer rapidement
l’entonnoir du moulin à la brosse uniquement,
veuillez passer à l’étape 7. Si vous voulez éviter
que les traces de café moulu affectent le goût
de vos nouveaux grains de café, veuillez passer
à l’étape 6.
6 Maintenez le bouton de sélection d’intensité
enfoncé pendant 4 secondes (g. 28).
• Le moulin commence à se nettoyer.
7 Lorsque le moulin a terminé son nettoyage,
utilisez la brosse de nettoyage pour faire
tomber les résidus de café moulu dans la
partie basse de l’entonnoir (g. 29).
• Les résidus de café moulu tombent dans
le porte-ltre.
B
Avertissement :
Ne laissez pas tomber la brosse dans
l’entonnoir du moulin.
8 Fermez le couvercle de l’entonnoir du moulin.
9 Enlevez le ltre en papier avec les résidus de
café moulu et jetez-le.
6.3 Détartrage de la cafetière
Détartrez votre cafetière ltre lorsque vous
remarquez une vapeur excessive ou lorsque le
temps de préparation augmente. Il est conseillé
d’effectuer un détartrage tous les deux mois.
Utilisez uniquement du vinaigre blanc car d’autres
produits pourraient l’endommager.
B
Avertissement :
An d’éviter tout dommage, n’utilisez jamais
de vinaigre blanc (à teneur en acide acétique
supérieure ou égale à 8 %), de vinaigre naturel,
de détartrant en poudre ou en tablette pour
détartrer l’appareil.
1 Ouvrez le couvercle du réservoir d’eau.
2 Remplissez le réservoir d’eau avec 8 tasses
de vinaigre blanc (4 % d’acide acétique) et
2 tasses d’eau (g. 6).
3 Placez un ltre en papier (n° 4) dans le
porte-ltre et fermez le support pour
porte-ltre (g. 15).
4 Placez la verseuse vide dans l’appareil (g. 7).
5 Branchez le cordon d’alimentation sur la prise
secteur.
6 Appuyez sur le bouton marche/arrêt sur le
devant de l’appareil pour l’allumer (g. 8).
• L’afcheur s’allume.
7 Appuyez sur le bouton de sélection d’intensité
et tournez-le pour choisir le niveau de
mouture (g. 10).
8 Appuyez au centre du bouton pour conrmer.
Puis, appuyez à nouveau au centre du bouton
pour lancer le cycle de préparation (g. 11).
9 Attendez que la moitié de la solution vinaigre-
eau se soit écoulée dans la verseuse. Appuyez
ensuite sur le bouton marche/arrêt pour
arrêter le cycle de préparation et laissez agir
pendant au moins 15 minutes (g. 30).
10 Rallumez la cafetière ltre en appuyant sur le
bouton marche/arrêt (g. 8).
11 Appuyez au centre du bouton pour
laisser l’appareil terminer le cycle de
préparation (g. 31).
12 Videz la verseuse et jetez le ltre en papier.
13 Remplissez le réservoir d’eau avec de l’eau
froide et appuyez deux fois au centre du
bouton pour commencer un nouveau cycle de
préparation. Laissez la cafetière ltre terminer
le cycle de préparation et videz la verseuse.
14 Répétez l’étape 13 jusqu’à ce que l’eau n’ait
plus le goût ni l’odeur du vinaigre.
15 Nettoyez le porte-ltre et la verseuse dans le
lave-vaisselle ou à l’eau chaude, avec un peu
de liquide vaisselle.
16 Appuyez sur le bouton marche/arrêt sur le
devant de l’appareil pour l’éteindre.
34
Page 35

7 Commande
10 Dépannage
d’accessoires
Pour acheter des accessoires ou des pièces de
rechange, visitez le site Web
www.shop.philips.com/service ou
rendez-vous chez votre revendeur Philips. Vous pouvez
également contacter le Service Consommateurs
Philips de votre pays (voir le dépliant de garantie
internationale pour les coordonnées).
8 Recyclage
• La présence de ce symbole sur un produit
indique que ce dernier est conforme
à la directive européenne 2012/19/UE.
Renseignez-vous sur les dispositions en
vigueur dans votre région concernant la
collecte séparée des appareils électriques et
électroniques. Respectez les réglementations
locales et ne jetez pas le produit avec les
ordures ménagères ordinaires. La mise au
rebut correcte d’anciens produits permet de
préserver l’environnement et la santé (g. 32).
9 Garantie et
assistance
Si vous avez besoin d’une assistance ou
d’informations supplémentaires, consultez le site
Web www.philips.com/support ou lisez le
dépliant séparé sur la garantie internationale.
Cette rubrique présente les problèmes les plus
courants que vous pouvez rencontrer avec votre
appareil. Si vous ne parvenez pas à résoudre le
problème à l’aide des informations ci-dessous,
rendez-vous sur www.philips.com/support pour
consulter les questions fréquemment posées, ou
contactez le Service Consommateurs de votre pays.
L’appareil ne fonctionne pas.
• Branchez le cordon d’alimentation sur la prise
secteur et appuyez sur le bouton marche/arrêt
sur le devant de l’appareil pour l’allumer.
• Assurez-vous que la tension indiquée sur
l’appareil correspond bien à la tension secteur
locale.
• Remplissez le réservoir d’eau.
• Fermez le couvercle de l’entonnoir du moulin.
Lorsque j’utilise le moulin, le café est trop léger.
• Assurez-vous que le nombre de tasses
sélectionné à l’aide du bouton pour 2-10 tasses
correspond à la quantité d’eau dans le réservoir
d’eau. Notez que la machine à café utilise toute
l’eau présente dans le réservoir.
• Réglez le bouton de sélection d’intensité sur
« strong » (fort) pour changer l’intensité du
café.
• Lorsque vous utilisez des grains de café, veillez
à ne pas appuyer sur le bouton de mouture du
café car cela désactive le moulin.
• Utilisez des grains de café à l’arôme plus intense
ou au goût plus fort.
• Assurez-vous que le nombre de tasses
sélectionné correspond à la quantité d’eau dans
le réservoir.
FRANÇAIS
3535
Page 36

Lorsque j’utilise du café moulu, le café est trop léger.
• Assurez-vous que la quantité de café moulu
dans le ltre correspond à la quantité d’eau
dans le réservoir d’eau. Notez que l’appareil
utilise toute l’eau présente dans le réservoir.
• Utilisez un café moulu à l’arôme plus intense ou
au goût plus fort.
• Pour plus d’intensité, augmentez la quantité de
café moulu ou diminuez la quantité d’eau.
• Le ltre déborde lorsque je retire la verseuse
au cours d’un cycle de préparation.
• Si vous retirez la verseuse pendant plus de
20 secondes pendant le cycle de préparation
du café, le système stop-goutte risque de faire
déborder le porte-ltre. Notez également que
le café prend tout son arôme uniquement à la
n d’un cycle complet. Nous vous conseillons
donc de ne pas retirer la verseuse et de ne pas
servir le café tant que le cycle de préparation
n’est pas terminé.
L’appareil continue à goutter, longtemps après la
n du cycle de préparation du café.
• Ce phénomène est causé par la condensation
de la vapeur. Il est tout à fait normal que
l’appareil goutte pendant quelques instants.
• Si l’appareil n’arrête pas de goutter, le système
stop-goutte est peut-être obstrué. Pour
nettoyer le système stop-goutte, tirez sur la
languette du support pour porte-ltre sur le
côté droit de la cafetière ltre pour ouvrir le
support. Retirez le por te-ltre. Ensuite, rincez
le porte-ltre et le système stop-goutte sous le
robinet.
• Si vous retirez la verseuse pendant plus de
20 secondes pendant le cycle de préparation
du café, le système stop-goutte risque de faire
déborder le porte-ltre.
Le café n’est pas assez chaud.
• Préchauffez la verseuse à l’eau chaude avant de
préparer du café.
• Le café dans la verseuse refroidit plus
rapidement si vous ne préparez que quelques
tasses. Le café reste chaud plus longtemps
si vous préparez 10 tasses, c’est-à-dire une
verseuse pleine.
• Utilisez des tasses à parois nes car celles-ci
absorbent moins de chaleur que les tasses à
parois épaisses.
• N’utilisez pas de lait qui vient de sortir du
réfrigérateur.
• Détartrez l’appareil. Consultez la section
« Détartrage de la cafetière » du chapitre
« Nettoyage et entretien ».
La cafetière ne nettoie pas l’entonnoir du moulin.
• Assurez-vous que la cafetière est branchée.
• Veillez à ouvrir le couvercle de l’entonnoir du
moulin avant de maintenir enfoncé le bouton
de nettoyage du moulin.
• Maintenez enfoncé le bouton de nettoyage du
moulin pendant 4 secondes jusqu’à ce que le
moulin commence le nettoyage.
• L’appareil fonctionne, mais émet un signal
sonore.
• Vériez si le couvercle de l’entonnoir du moulin
est correctement fermé.
• Les grains de café semblent avoir été utilisés
rapidement.
• Il se peut que les grains de café semblent avoir
été utilisés rapidement. Pour garantir une tasse
de café parfaite, une certaine quantité de café
moulu est nécessaire. La quantité de grains
de café que l’appareil utilise pour obtenir la
quantité parfaite de café moulu est normale.
36
Page 37

1 Introduzione
3 Importante
Congratulazioni per l’acquisto e benvenuti
in Philips! Per trarre il massimo vantaggio
dall’assistenza Philips, registrate il vostro prodotto
su www.philips.com/welcome.
2 Descrizione
generale(g.1)
1 Cestello del ltro
2 Portaltro
3 Indicatore del livello dell’acqua
4 Coperchio del serbatoio dell’acqua
5 Coperchio del contenitore dei chicchi di caffè
6 Selettore contenitore
7 Manopola di regolazione della macinatura
8 Doppio contenitore di caffè in grani
9 Coperchio dell’imboccatura del macinacaffè
10 Blocco del coperchio dell’imboccatura del
macinacaffè
11 Foro di riempimento dell’acqua
12 Display
A Icona del caffè pre-macinato
B Numero di tazze
C Icona della tazza di caffè
D Icona di selezione dell’intensità del caffè
E Pulsante di selezione dell’intensità
F Pulsante del timer
G Indicatore dell’ora
H Indicatore dei minuti
I Icona del timer
13 Pulsante on/off
14 Coperchio della caraffa di vetro
15 Caraffa di vetro
16 Spazzolina per la pulizia
Prima di utilizzare l’apparecchio,
leggete attentamente il presente
manuale e conservatelo per
eventuali riferimenti futuri.
3.1 Pericolo
• Non immergete l’apparecchio
nell’acqua o in altri liquidi e non
risciacquatelo sotto l’acqua corrente.
3.2 Avviso
• Prima di collegare l’apparecchio,
controllate che la tensione indicata
sulla parte inferiore dell’apparecchio
corrisponda a quella locale.
• Nel caso in cui il cavo di
alimentazione fosse danneggiato,
dovrà essere sostituito presso
i centri autorizzati Philips, i
rivenditori specializzati oppure da
personale debitamente qualicato,
per evitare situazioni pericolose.
•
Quest’apparecchio può essere usato
da bambini a partire da 8 anni di età
e da persone con capacità siche,
sensoriali o mentali ridotte o prive
di esperienza o conoscenze adatte a
condizione che tali persone abbiano
ricevuto assistenza o formazione per
utilizzare l’apparecchio in maniera
sicura e capiscano i potenziali pericoli
associati a tale uso. La manutenzione
e la pulizia non devono essere
eseguite da bambini se non di età
superiore a 8 anni e in presenza di
un adulto. Tenete l’apparecchio e il
relativo cavo fuori dalla portata di
bambini di età inferiore a 8 anni.
ITALIANO
37
Page 38

• Evitate che i bambini giochino
con l’apparecchio.
• Assicuratevi che il cavo di
alimentazione non penda dal
bordo del tavolo o dal piano
di lavoro su cui è posizionato
l’apparecchio.
• Non toccate le unità
di macinatura del caffè
dell’apparecchio, specialmente
quando quest’ultimo è collegato
alla corrente.
• Tenete il materiale di imballaggio
(buste di plastica, protezioni in
cartone, ecc.) fuori dalla portata
dei bambini poiché non sono
giocattoli.
• Durante il funzionamento
dell’apparecchio non toccate le
superci incandescenti.
• Questo apparecchio è
progettato per macinare e
preparare il caffè. Utilizzatelo
correttamente e con cautela per
evitare ustioni dovute al vapore e
all’acqua calda.
• Non svuotate il serbatoio
dell’acqua inclinando
l’apparecchio onde evitare
di danneggiarlo. Svuotate il
serbatoio dell’acqua seguendo
esclusivamente le istruzioni per la
pulizia.
• Non utilizzate l’apparecchio se
la spina, il cavo di alimentazione
o l’apparecchio stesso sono
danneggiati.
• Se si verica un problema
che non riuscite a risolvere
consultando il presente
manuale, rivolgetevi al Centro
Assistenza Clienti del vostro
paese. Se il problema risulta
irrisolvibile, rivolgetevi a un
centro autorizzato Philips
per un controllo ed eventuali
riparazioni. Non tentate di
riparare l’apparecchio per evitare
di invalidare la garanzia.
3.3 Attenzione
• Non appoggiate l’apparecchio
su una supercie calda e fate in
modo che il cavo di alimentazione
non venga a contatto con
superci incandescenti.
• Scollegate l’apparecchio dalla
presa di corrente se si vericano
problemi durante la macinazione
o la preparazione del caffè e
prima di pulirlo.
• Non spostate l’apparecchio
mentre è in funzione.
• Durante l’uso, l’apparecchio si
surriscalda. Lasciatelo raffreddare
prima di riporlo.
• Durante la preparazione
del caffè, la parte inferiore
dell’apparecchio e il fondo della
caraffa diventano caldi.
• Quando togliete l’apparecchio
dalla confezione, controllate
che sia integro e che non abbia
subito danni. In caso di dubbi,
non utilizzatelo ma rivolgetevi
al centro assistenza clienti del
vostro paese.
38
Page 39

• Questo apparecchio è destinato
esclusivamente ad un uso
domestico e non deve essere
utilizzato in ambienti quali cucine
dei dipendenti all’interno di punti
vendita, ufci, aziende agricole o
altri ambienti lavorativi. Non deve
essere altresì utilizzato dai clienti
di hotel, motel, Bed & Breakfast e
altri ambienti residenziali.
3.4 Campi elettromagnetici
(EMF)
Questo apparecchio Philips è conforme a tutti
gli standard e alle norme relativi all’esposizione ai
campi elettromagnetici.
4.2 Impostazione del tempo di
spegnimento automatico
Potete regolare il tempo trascorso il quale
l’apparecchio si spegne automaticamente. Il
tempo predenito è di 30 minuti. Potete regolare
il tempo su un massimo di 120 minuti. Se volete
regolare il tempo di spegnimento automatico,
seguite i passaggi riportati di seguito.
1 Assicuratevi che l’apparecchio sia spento
(ma che la spina sia inserita nella presa a muro).
2 Tenete premuto al centro della manopola
nché il display inizia a lampeggiare.
3 Ruotate la manopola per aumentare o
diminuire il tempo. 1 corrisponde a 10 minuti,
2 a 20 minuti, 3 a 30 minuti e così via no a
12 che corrisponde a 120 minuti.
4 Premete il centro della manopola per
confermare i minuti.
D
Nota:
l’apparecchio salva sempre l’ultima impostazione.
4 Primo utilizzo
4.1 Impostazione dell’orologio
1 Inserite la spina nella presa di corrente a muro.
• Sul display lampeggiano le cifre 00:00 a
indicare che è necessario impostare l’ora.
2 Ruotate la manopola per impostare
l’ora (g. 2).
3 Premete il centro della manopola per
confermare l’ora (g. 3).
• I minuti iniziano a lampeggiare a indicare
che è necessario impostare i minuti.
4 Ruotate la manopola per impostare i
minuti (g. 4).
5 Premete il centro della manopola per
confermare i minuti (g. 5).
6 Il display mostra l’ora impostata. La macchina
del caffè è pronta per l’uso.
4.3 Come lavare l’apparecchio
La macchina per caffè all’americana deve essere
pulita al primo utilizzo.
1 Aprite il coperchio del serbatoio dell’acqua
e riempitelo con acqua fredda pulita no
all’indicazione 8 tazze. (g. 6)
D
Nota:
Non mettete caffè in grani o caffè macinato
nell’apparecchio.
2 Chiudete il coperchio del serbatoio dell’acqua.
3 Posizionate la caraffa nell’apparecchio (g. 7).
4 Premete il pulsante on/off (g. 8).
• Il display si accende.
5 Premete il pulsante di selezione
dell’intensità (g. 9).
6 Ruotate la manopola per scegliere
l’impostazione del caffè pre-macinato (g. 10).
• L’icona del caffè pre-macinato si accende.
7 Premete il centro della manopola per
confermare, quindi premetelo di nuovo per
avviare il processo di pulizia (g. 11).
8 Lasciate la macchina per caffè all’americana
in funzione nché il processo di pulizia non è
stato completato.
9 Svuotate la caraffa.
ITALIANO
39
Page 40

5 Modalità d’uso
dell’apparecchio
5.1 Riempimento del serbatoio
dell’acqua
1 Aprite il coperchio del serbatoio dell’acqua e
riempite il serbatoio con acqua fredda nella
quantità richiesta. (g. 6)
Quando aprite il coperchio del serbatoio
dell’acqua, troverete le indicazioni da 2 a 10
tazze. Potete utilizzare queste indicazioni per
determinare la quantità d’acqua da inserire
nel serbatoio. Il colore cambia da chiaro
a scuro per ogni tazza riempita di acqua.
Inoltre, potete utilizzare l’indicatore del livello
dell’acqua nella caraffa.
B Avviso:
per evitare che il macinacaffè si blocchi, non
usate chicchi di caffè non tostati o caramellati.
Consigliamo di usare caffè in grani non per
espresso, poiché potrebbero causare danni
all’apparecchio.
3 Per aprire il por taltro, tirate la linguetta
presente sul lato destro della macchina per
caffè all’americana (g. 14).
4 Prendete un ltro di car ta (tipo 1x4 o n. 4)
e piegate i margini sigillati per evitare che
si rompano. Posizionate il ltro nel relativo
portaltro. (g. 15)
5 Chiudete il por taltro.
6 Posizionate la caraffa nell’apparecchio. (g. 7)
7 Ruotate la manopola di regolazione
della macinatura per selezionare il tipo
desiderato (dalla macinatura ne a quella
grossolana). (g. 16)
D
Nota:
non riempite il serbatoio dell’acqua oltre
l’indicazione di 10 tazze.
5.2 Utilizzo di caffè in grani
B Avviso:
Tenete sempre il coperchio del serbatoio
dell’acqua chiuso quando riempite il contenitore
del caffè in grani. In caso contrario eventuali grani
di caffè possono cadere nel serbatoio dell’acqua e
bloccare l’ingresso dell’acqua.
1 Rimuovete il coperchio del contenitore del
caffè in grani. (g. 12)
2 Riempite il doppio contenitore di caffè in grani
con caffè in grani. Potete riempirlo con due
tipi diversi di caffè. Assicuratevi che la quantità
di caffè in grani sia sufciente per l’erogazione
del caffè desiderato (g. 13).
D
Nota:
assicuratevi che il contenitore del caffè in grani
sia sempre almeno mezzo pieno.
E
Consiglio:
la manopola di regolazione della macinatura
vi consente di scegliere tra nove impostazioni
diverse. Abbiamo preselezionato 3 eccellenti
impostazioni ma potete sceglierne anche altre
presenti tra le icone. Vi consigliamo di provare
varie impostazioni di macinatura per scoprire
quella che preferite.
8 Ruotate il selettore del contenitore per
scegliere tra due tipi di caffè in grani (g. 17).
B
Avviso:
cambiando contenitori di caffè in grani o tipi
di chicchi di caffè, è probabile che rimangano
residui lasciati dalla macinatura precedente o
dal caffè in grani precedentemente impiegato.
Per evitare che ciò accada, pulite l’imboccatura
del macinacaffè.
D
Nota:
in base al vostro gusto, potete selezionare uno
dei due tipi di caffè in grani oppure un mix di
entrambi i tipi.
9 Premete il pulsante on/off sulla par te
anteriore dell’apparecchio (g. 8).
• Il numero delle tazze inizia a lampeggiare.
40
Page 41

10 Per selezionare il numero di tazze, ruotate la
manopola nché il numero desiderato non
appare sul display (g. 18).
D
Nota:
Assicuratevi che il numero di tazze selezionato
tramite il pulsante 2-10 CUPS sia compatibile
con la quantità di acqua presente nel
serbatoio. Tenete presente che la macchina
per caffè utilizza tutta l’acqua nel serbatoio. Se
selezionate un numero di tazze inferiore alla
quantità di acqua, il caffè sarà meno forte.
11 Premete il centro della manopola per
confermare il numero di tazze.
12 Premete il pulsante di selezione
dell’intensità. (g. 9)
• Le icone del caffè in grani iniziano a
lampeggiare.
13 Ruotate la manopola per selezionare l’intensità
del caffè desiderata (leggera: 1 chicco; media: 2
chicchi; forte: 3 chicchi) (g. 10).
• Sul display viene visualizzata l’intensità
selezionata.
E
Consiglio:
vi consigliamo di provare varie quantità di
acqua per scoprire l’intensità che preferite.
Se selezionate un numero di tazze più
alto rispetto alla quantità di acqua, il caffè
sarà più intenso. Se, invece, selezionate un
numero di tazze inferiore alla quantità di
acqua, il caffè sarà meno intenso.
14 Premete il centro della manopola per
confermare, quindi premetelo di nuovo per
avviare l’erogazione (g. 19).
• Il macinacaffè macina la quantità richiesta
di caffè in grani.
15 Prima di rimuovere la caraffa attendete nché
la macchina per caffè all’americana non ha
terminato l’erogazione.
D
Nota:
Dopo l’erogazione, il caffè gocciola dal cestello
del ltro per diversi secondi.
5.3 Utilizzo di caffè premacinato
Se volete usare caffè pre-macinato invece di caffè
in grani, seguite i passaggi riportati sotto.
1 Aprite il coperchio del serbatoio dell’acqua e
riempite il serbatoio con acqua fredda nella
quantità richiesta. (g. 6)
2 Per aprire il portaltro, tirate la linguetta
presente sul lato destro della macchina per
caffè all’americana (g. 14).
3 Prendete un ltro di car ta (tipo 1x4 o n. 4)
e piegate i margini sigillati per evitare che
si rompano. Posizionate il ltro nel relativo
portaltro (g. 15).
4 Posizionate il caffè pre-macinato nel ltro di
carta.
D
Nota:
potete regolare l’intensità del caffè in base
al vostro gusto personale. Per una tazza di
caffè medio-forte, usate un misurino (circa 6
g) di caffè macinato per ogni tazza (120 ml).
Per un caffè più forte, utilizzate un misurino e
mezzo di caffè macinato per ogni tazza.
5 Chiudete il por taltro.
6 Posizionate la caraffa nell’apparecchio (g. 7).
7 Premete il pulsante on/off (g. 8).
• Il display si accende.
8 Premete il pulsante di selezione
dell’intensità (g. 9).
9 Ruotate la manopola per scegliere
l’impostazione del caffè pre-macinato (g. 10).
• L’icona del caffè pre-macinato si accende.
10 Premete il centro della manopola per
confermare, quindi premetelo di nuovo per
avviare l’erogazione (g. 11).
11 Prima di rimuovere la caraffa attendete nché
la macchina per caffè all’americana non ha
terminato l’erogazione.
D
Nota:
Dopo l’erogazione, il caffè gocciola dal cestello
del ltro per diversi secondi.
ITALIANO
41
Page 42

5.4 Impostazione del timer
Il timer vi consente di programmare l’orario
desiderato per l’inizio dell’erogazione. Assicuratevi
che tutte le fasi di preparazione del caffè siano
svolte con caffè premacinato o in chicchi prima di
impostare il timer.
1 Premete il pulsante del timer. (g. 20)
• Sul display lampeggiano le cifre 00:00 a
indicare che è necessario impostare il
timer.
2 Ruotate la manopola per impostare
l’ora (g. 21).
3 Premete il centro della manopola per
confermare l’ora (g. 22).
• I minuti iniziano a lampeggiare a indicare
che è necessario impostarli.
4 Ruotate la manopola per impostare i
minuti (g. 23).
5 Premete il centro della manopola per
confermare i minuti (g. 24).
• Il timer viene impostato e il processo di
erogazione del caffè inizierà all’ora scelta.
5.5 Funzione antigoccia
La funzione antigoccia vi permette di rimuovere
la caraffa dalla macchina per caffè all’americana
prima che il processo di erogazione sia terminato.
Quando rimuovete la caraffa, il sistema antigoccia
interrompe il usso di caffè al suo interno.
D
Nota:
il processo di erogazione non si interrompe
quando viene rimossa la caraffa. Se non inserite
nuovamente la caraffa nell’apparecchio entro 20
secondi, il caffè fuoriesce dal cestello del ltro.
6 Pulizia e
manutenzione
6.1 Pulizia dopo ogni utilizzo
B Avviso:
Non immergete l’apparecchio nell’acqua o in altri
liquidi e non risciacquatelo sotto l’acqua corrente.
1 Premete il pulsante on/off sulla
parte anteriore dell’apparecchio per
spegnerlo. (g. 25)
2 Scollegate la spina dalla presa a muro.
3 Pulite con un panno umido la supercie
esterna della macchina per caffè (g. 26).
4 Pulite il cestello del ltro e la caraffa in
lavastoviglie oppure con acqua calda e
detersivo.
6.2 Pulizia del dell’imboccatura
del macinacaffè
Cambiando contenitori di caffè in grani o tipi
di chicchi di caffè, è probabile che rimangano
residui lasciati dalla macinatura precedente o dal
caffè in grani precedentemente impiegato, i quali
possono alterare il gusto del caffè. Per evitare
che il caffè macinato e le tracce nell’imboccatura
del macinacaffè si mescolino, pulite l’imboccatura
del macinacaffè ogni 1/2 settimane o quando
cambiate i contenitori di caffè in grani. Se avete
cambiato il tipo di caffè in grani, seguite i passaggi
riportati di seguito per assicurare un gusto
ottimale.
1 Premete il pulsante on/off sulla
parte anteriore dell’apparecchio per
spegnerlo (g. 25).
2 Per aprire il por taltro, tirate la linguetta
presente sul lato destro della macchina per
caffè all’americana (g. 14).
3 Prendete un ltro di car ta (tipo 1x4 o n. 4)
e piegate i margini sigillati per evitare che
si rompano. Posizionate il ltro nel relativo
portaltro. (g. 15)
4 Chiudete il por taltro.
42
Page 43

5 Per aprire il coperchio dell’imboccatura
del macinacaffè, inserite la parte piatta
dell’impugnatura della spazzolina per la pulizia
nel sistema di blocco e premetela verso il
basso (g. 27).
D
Nota:
se volete pulire l’imboccatura del macinacaffè
rapidamente utilizzando solo la spazzolina,
continuate con il passaggio 7. Se volete evitare
che le tracce di caffè macinato alterino il gusto
del vostro nuovo caffè in grani, continuate con
il passaggio 6.
6 Tenete premuto il pulsante di selezione
dell’intensità per 4 secondi (g. 28).
• Il macinacaffè inizia la pulizia automatica.
7 Quando il macinacaffè ha terminato la pulizia,
usate l’apposita spazzolina per rimuovere
i residui di caffè macinato nella parte inferiore
dell’imboccatura (g. 29).
• I residui di caffè macinato cadono nel
cestello del ltro.
B
Avviso:
non fate cadere la spazzolina
nell’imboccatura del macinacaffè.
8 Chiudete il coperchio dell’imboccatura del
macinacaffè.
9 Togliete il ltro di carta con i residui di caffè
macinato e gettatelo via.
6.3 Pulizia anticalcare
Se la macchina per caffè emette vapore in
eccesso o ha un tempo di erogazione prolungato,
eseguite la pulizia anticalcare. Consigliamo di
eseguire la pulizia anticalcare ogni due mesi. Per
la decalcicazione, utilizzate solo aceto bianco,
poiché gli altri prodotti potrebbero causare danni
alla macchina.
B
Avviso:
Non utilizzate mai aceto con un contenuto
pari o superiore all’8% di acido acetico, aceto
naturale, anticalcare in polvere o in tavolette per
rimuovere il calcare dall’apparecchio per evitare di
danneggiarlo.
1 Aprite il coperchio del serbatoio dell’acqua.
2 Riempite il serbatoio dell’acqua con 8 tazze di
aceto bianco (4% acido acetico) e 2 tazze di
acqua (g. 6).
3 Posizionate un ltro di carta (n. 4) nel cestello
del ltro e chiudete il portaltro (g. 15).
4 Posizionate la caraffa vuota
nell’apparecchio (g. 7).
5 Inserite la spina nella presa di corrente a muro.
6 Premete il pulsante on/off sulla
parte anteriore dell’apparecchio per
accenderlo (g. 8).
• Il display si accende.
7 Premete il pulsante di selezione dell’intensità
e ruotate la manopola per scegliere
l’impostazione del caffè pre-macinato (g. 10).
8 Premete il centro della manopola per
confermare, quindi premetelo di nuovo per
avviare l’erogazione (g. 11).
9 Attendete nché la metà della soluzione
di aceto-acqua non si sia riversata nella
caraffa, quindi premete il pulsante on/off per
interrompere il processo di erogazione e
lasciate riposare la soluzione per almeno 15
minuti (g. 30).
10 Premete il pulsante on/off per accendere
nuovamente la macchina per caffè
all’americana (g. 8).
11 Premete una volta il centro della manopola
per lasciare che l’apparecchio completi il
processo di erogazione (g. 31).
12 Svuotate la caraffa e gettate il ltro di carta.
13 Riempite il serbatoio dell’acqua con acqua
fredda e premete due volte il centro della
manopola per avviare un altro processo di
erogazione del caffè. Lasciate che la macchina
per caffè all’americana abbia completato
l’intero processo di erogazione e svuotate la
caraffa.
14 Ripetete il passaggio 13 no a quando l’acqua
non perde il sapore o l’odore di aceto.
15 Pulite il cestello del ltro e la caraffa in
lavastoviglie oppure con acqua calda e
detersivo.
16 Premete il pulsante on/off sulla parte
anteriore dell’apparecchio per spegnerlo.
ITALIANO
43
Page 44

7 Ordinazione degli
10 Risoluzione dei
accessori
Per acquistare accessori o parti di ricambio,
visitate il sito www.shop.philips.com/service
oppure recatevi presso il vostro rivenditore
Philips. Potete contattare anche il centro assistenza
Philips del vostro paese (per i dettagli di contatto,
consultate l’opuscolo della garanzia internazionale).
8 Riciclaggio
• Questo simbolo indica che il prodotto non
può essere smaltito con i normali riuti
domestici (2012/19/UE).
• Ci sono due situazioni in cui potete restituire
gratuitamente il prodotto vecchio a un
rivenditore:
1 Quando acquistate un prodotto nuovo, potete
restituire un prodotto simile al rivenditore.
2 Se non acquistate un prodotto nuovo, potete
restituire prodotti con dimensioni inferiori
a 25 cm (lunghezza, altezza e larghezza) ai
rivenditori con supercie dedicata alla vendita
di prodotti elettrici ed elettronici superiore
ai 400 m2.
• In tutti gli altri casi, attenetevi alle normative di
raccolta differenziata dei prodotti elettrici ed
elettronici in vigore nel vostro paese:
un corretto smaltimento consente di evitare
conseguenze negative per l’ambiente e per la
salute.
9 Garanzia e
assistenza
problemi
Questo capitolo riassume i problemi più comuni
che potreste riscontrare con l’apparecchio.
Se non riuscite a risolvere il problema con
le informazioni riportate sotto, visitate il sito
www.philips.com/support per un elenco
di domande frequenti o contattate il centro
assistenza clienti del vostro paese.
L’apparecchio non funziona.
• Inserite la spina di alimentazione nella presa a
muro e premete il pulsante on/off sulla parte
anteriore dell’apparecchio per accenderlo.
• Vericate che la tensione indicata
sull’apparecchio corrisponda a quella della
tensione locale.
• Riempite d’acqua il serbatoio.
• Chiudete il coperchio dell’imboccatura del
macinacaffè.
Quando si utilizza il macinacaffè, il gusto del caffè
risulta troppo leggero.
• Assicuratevi che il numero di tazze selezionato
tramite il pulsante 2-10 tazze sia compatibile
con la quantità di acqua presente nel serbatoio.
Tenete presente che la macchina per caffè
utilizza tutta l’acqua nel serbatoio.
• Usate il pulsante di selezione dell’intensità per
impostare l’intensità del caffè su “for te”.
• Quando usate il caffè in grani, assicuratevi di
non premere il pulsante del caffè pre-macinato
poiché in questo modo il macinacaffè si spegne.
• Usate caffè in grani di una miscela/gusto più
forte.
• Assicuratevi che il numero di tazze selezionato
sia compatibile con la quantità di acqua
presente nel serbatoio.
Per assistenza o informazioni, visitate il sito Web
all’indirizzo www.philips.com/support oppure
leggete l’opuscolo della garanzia internazionale.
44
Page 45

Quando si usa caffè pre-macinato, l’aroma risulta
troppo leggero.
• Assicuratevi che la quantità di caffè
pre-macinato nel ltro sia compatibile con la
quantità di acqua presente nel serbatoio.
Tenete presente che l’apparecchio utilizza tutta
l’acqua nel serbatoio.
• Usate caffè macinato di una miscela/gusto più
forte.
• Per aumentare l’intensità del caffè, aumentate
la quantità di caffè pre-macinato o diminuite la
quantità di acqua.
• Il ltro trabocca quando viene rimossa la caraffa
dall’apparecchio durante la preparazione del
caffè.
• Se rimuovete la caraffa per più di 20 secondi
durante il processo di erogazione, il sistema
antigoccia causa la fuoriuscita del caffè dal
cestello del ltro. Tenete inoltre presente che
l’intensità nale del caffè si raggiunge solo
a conclusione del processo di erogazione.
Vi consigliamo pertanto di non rimuovere la
caraffa e di non versare il caffè prima della ne
del processo di erogazione.
L’apparecchio continua a perdere acqua anche
molto tempo dopo il processo di erogazione.
• La fuoriuscita di acqua è causata dalla
condensazione del vapore. Si tratta di un
fenomeno normale che può vericarsi.
• Se il problema persiste, il sistema antigoccia
potrebbe essere ostruito. Per pulirlo, tirate
la linguetta del portaltro presente sul lato
destro della macchina all’americana per aprire
il portaltro. Estraete il cestello del ltro e
risciacquatelo sotto l’acqua corrente insieme al
sistema antigoccia.
• Se rimuovete la caraffa per più di 20 secondi
durante il processo di erogazione, il sistema
antigoccia causa la fuoriuscita del caffè dal
cestello del ltro.
Il caffè non è abbastanza caldo.
• Preriscaldate la caraffa con acqua calda prima di
preparare il caffè.
• Il caffè nella caraffa si raffredda più velocemente
se volete preparare solo qualche tazza. Il caffè
resta caldo più a lungo se preparate 10 tazze,
che corrispondo a una caraffa piena.
• Utilizzate tazze sottili perché assorbono meno
calore dal caffè rispetto a quelle spesse.
• Non utilizzate latte appena tolto dal frigorifero.
• Eseguite la pulizia anticalcare. Consultare la
sezione “Pulizia anticalcare” nel capitolo “Pulizia
e manutenzione”.
La macchina per caffè non avvia la pulizia
dell’imboccatura del macinacaffè.
• Assicuratevi che la macchina per caffè sia
collegata all’alimentazione.
• Assicuratevi di aprire il coperchio
dell’imboccatura del macinacaffè prima di
premere il rispettivo pulsante.
• Tenete premuto il pulsante del macinacaffè per
4 secondi nché non inizia automaticamente la
pulizia.
• L’apparecchio funziona ma emette un segnale
acustico.
• Vericate che il coperchio dell’imboccatura del
macinacaffè sia chiuso correttamente.
• I chicchi di caffè sembrano nire rapidamente.
• Potrebbe sembrare che i chicchi di caffè
niscano rapidamente. Per ottenere una tazza
di caffè perfetta, è necessaria una certa quantità
di caffè macinato. La quantità di caffè in grani
utilizzata dall’apparecchio per ottenere la giusta
quantità di caffè macinato è normale.
ITALIANO
45
Page 46

1 Introductie
3 Belangrijk
Gefeliciteerd met uw aankoop en welkom bij
Philips! Als u volledig wilt proteren van de
ondersteuning die Philips biedt, registreer uw
product dan op www.philips.com/welcome.
2 Algemene
beschrijving(g.1)
1 Filtermandje
2 Filtermandhouder
3 Waterniveau-indicator
4 Deksel van waterreservoir
5 Deksel van kofebonenreservoir
6 Reservoirkeuzeknop
7 Maalgraadknop
8 Dubbel kofebonenreservoir
9 Klepje maalmolentrechter
10 Slot in klepje maalmolentrechter
11 Watervulopening
12 Display
A Pictogram voor voorgemalen kofe
B Aantal koppen
C Pictogram van kofekop
D Pictogrammen van kofebonen voor
kofesterkte
E Kofesterkteknop
F Timerknop
G Uuraanduiding
H Minutenaanduiding
I Timerpictogram
13 Aan-uitknop
14 Deksel van glazen kan
15 Glazen kan
16 Reinigingsborsteltje
Lees deze gebruiksaanwijzing
zorgvuldig door voordat u het
apparaat gaat gebruiken. Bewaar de
gebruiksaanwijzing om deze zo nodig
later te kunnen raadplegen.
3.1 Gevaar
• Dompel het apparaat nooit in water
of een andere vloeistof en spoel het
ook niet af onder de kraan.
3.2 Waarschuwing
• Controleer of het voltage
aangegeven op de onderkant
van het apparaat overeenkomt
met de plaatselijke netspanning
voordat u het apparaat aansluit.
• Indien het netsnoer beschadigd
is, moet u het laten vervangen door
Philips, een door Philips geautoriseerd
servicecentrum of personen met
vergelijkbare kwalicaties om gevaar
te voorkomen.
46
Page 47

• Dit apparaat kan worden gebruikt
door kinderen vanaf 8 jaar en
door personen met verminderde
lichamelijke, zintuiglijke of geestelijke
capaciteiten of weinig ervaring en
kennis, mits zij toezicht of instructie
hebben ontvangen aangaande veilig
gebruik van het apparaat, en zij de
gevaren van het gebruik begrijpen.
Reiniging en onderhoud mogen
alleen door kinderen worden
uitgevoerd die ouder zijn dan 8 en
alleen onder toezicht. Houd het
apparaat en het snoer buiten bereik
van kinderen die jonger zijn dan 8
jaar oud.
• Kinderen mogen niet met het
apparaat spelen.
• Laat het snoer niet over de rand
van de tafel of het aanrecht
hangen waarop het apparaat staat.
• Raak de maalschijven van
het apparaat niet aan, vooral
niet wanneer het apparaat is
aangesloten op netspanning.
• Houd de verpakkingsmaterialen
(plastic zakken, kartonnen buffers
enz.) buiten het bereik van
kinderen. De verpakkingsmaterialen
zijn geen speelgoed.
• Raak de hete oppervlakken van
het apparaat niet aan wanneer
het apparaat in werking is.
• Dit apparaat is ontworpen om
bonen te malen en dan kofe
te zetten. Gebruik het apparaat
voorzichtig en op de juiste wijze
om verbranding door heet water
en stoom te voorkomen.
• Leeg het waterreservoir
niet door het apparaat te
kantelen. Dit kan het apparaat
beschadigen. Leeg het
waterreservoir alleen door de
spoelinstructie te volgen.
• Gebruik het apparaat niet indien
de stekker, het netsnoer of het
apparaat zelf beschadigd is.
• Als u er niet in slaagt een
probleem op te lossen met
behulp van de informatie in deze
gebruiksaanwijzing, neem dan
contact op met het Consumer
Care Centre in uw land. Als
het probleem niet kan worden
opgelost, breng het apparaat dan
naar een door Philips geautoriseerd
servicecentrum voor onderzoek
of reparatie. Probeer niet zelf het
apparaat te repareren, omdat uw
garantie hierdoor komt te vervallen.
3.3 Let op
• Plaats het apparaat niet op een
heet oppervlak en voorkom dat
het netsnoer in contact komt
met hete oppervlakken.
• Haal de stekker van het apparaat
uit het stopcontact als er tijdens
het malen van bonen of het
kofezetten problemen optreden,
en voordat u het apparaat gaat
schoonmaken.
• Verplaats het apparaat niet
wanneer het in werking is.
• Het apparaat wordt heet tijdens
gebruik. Laat het apparaat
afkoelen voor u het opbergt.
NEDERLANDS
47
Page 48

• Tijdens het kofezetten worden
het onderste deel van het
apparaat en de onderkant van de
kan heet.
• Controleer nadat u het apparaat
hebt uitgepakt, of het compleet
en onbeschadigd is. Als u twijfelt,
gebruik het apparaat dan niet
en neem contact op met het
Consumer Care Centre in uw land.
•
Dit apparaat is uitsluitend bedoeld
voor normaal huishoudelijk gebruik.
Het apparaat is niet bedoeld voor
gebruik in personeelskeukens van
bijvoorbeeld winkels, kantoren,
boerderijen of vergelijkbare
werkomgevingen en ook niet voor
gebruik door gasten van hotels,
motels, bed & breakfasts en andere
verblijfsaccommodaties.
3.4 Elektromagnetische velden
(EMV)
Dit Philips-apparaat voldoet aan alle toepasbare
richtlijnen en voorschriften met betrekking tot
blootstelling aan elektromagnetische velden.
4 Voor het eerste
gebruik
4.1 De kloktijd instellen
1 Steek de stekker in het stopcontact.
• Op het display knippert 00:00 om aan te
geven dat u de kloktijd moet instellen.
2 Draai aan de knop om het uur in te
stellen (g. 2).
3 Druk in het midden van de knop om het uur
te bevestigen (g. 3).
• De minuten beginnen te knipperen om aan
te geven dat u de minuten moet instellen.
4 Draai aan de knop om de minuten in te
stellen (g. 4).
5 Druk in het midden van de knop om de
minuten te bevestigen (g. 5).
6 Het display toont de ingestelde kloktijd.
De kofezetter is klaar voor gebruik.
4.2 De automatische
uitschakeltijd instellen
U kunt de tijd instellen waarop het apparaat
automatisch wordt uitgeschakeld. De standaardtijd
is ingesteld op 30 minuten. U kunt deze tijd
aanpassen tot een maximum van 120 minuten.
Als u de automatische uitschakeltijd wilt
aanpassen, volg dan onderstaande stappen.
1 Zorg ervoor dat het apparaat is uitgeschakeld
(laat de stekker wel in het stopcontact zitten).
2 Houd het midden van de knop ingedrukt tot
het display begint te knipperen.
3 Draai de knop om de tijd langer of korter te
maken. 1 is 10 minuten, 2 is 20 minuten,
3 is 30 minuten enz. Dit gaat door tot
12 is 120 minuten.
4 Druk in het midden van de knop om de
minuten te bevestigen.
D
Opmerking:
Het apparaat slaat altijd de laatst gekozen
instelling op.
48
Page 49

4.3 Het apparaat doorspoelen
Voor het eerste gebruik dient u de kofezetter
eenmaal door te spoelen.
1 Open het deksel van het waterreservoir.
Vul het waterreservoir met vers koud water
tot de 8-kopsaanduiding. (g. 6)
D
Opmerking:
Vul het apparaat niet met kofebonen of
gemalen kofe.
2 Sluit het deksel van het waterreservoir.
3 Plaats de kan in het apparaat (g. 7).
4 Druk op de aan/uitknop (g. 8).
• Het display gaat branden.
5 Druk op de kofesterkteknop (g. 9).
6 Draai aan de knop om de instelling voor
voorgemalen kofe te kiezen (g. 10).
• Het pictogram voor voorgemalen kofe
gaat branden.
7 Druk in het midden van de knop om uw
keuze te bevestigen. Druk vervolgens
opnieuw in het midden van de knop om het
doorspoelproces te starten (g. 11).
8 Laat het apparaat werken tot het
doorspoelproces is voltooid.
9 Leeg de kan.
5 Het apparaat
gebruiken
5.1 Het waterreservoir vullen
1 O
pen het deksel van het waterreservoir en
vul het waterreservoir met de benodigde
hoeveelheid koud water. (g. 6)
Wanneer u het deksel van het waterreservoir
opent, zijn er aan de binnenzijde van het apparaat
aanduidingen voor 2 tot 10 kopjes. Hieraan kunt
u zien hoeveel water u in het waterreservoir
moet doen. De reectie verandert van licht
in donker per gevulde kop. U kunt ook de
waterniveau-indicator op de kan gebruiken.
D Opmerking:
Vul het waterreservoir nooit tot boven de
10-kopsaanduiding.
5.2Metkofebonen
B Waarschuwing:
Houd altijd het deksel van het waterreservoir
gesloten wanneer u het kofebonenreservoir met
kofebonen vult. Anders kunnen de kofebonen in het
waterreservoir vallen en de waterinlaat verstoppen.
1 Verwijder het deksel van het
kofebonenreservoir. (g. 12)
2 Vul het dubbele kofebonenreservoir
met kofebonen. U kunt het dubbele
kofebonenreservoir vullen met twee
verschillende soorten kofebonen.
Zorg ervoor dat er genoeg kofebonen in het
reservoir zitten voor de hoeveelheid kofe die
u wilt zetten (g. 13).
NEDERLANDS
D
Opmerking:
Zorg er altijd voor dat het
kofebonenreservoir ten minste voor de helft
is gevuld.
49
Page 50

B Waarschuwing:
Gebruik geen ongebrande of
gekaramelliseerde bonen, anders kan de
molen vastlopen. We raden u aan kofebonen
te gebruiken in plaats van espressobonen,
anders kan de machine beschadigd raken.
3 Trek aan het lipje op de rechterkant van de
ltermandhouder om de ltermandhouder te
openen (g. 14).
4 Neem een papieren lterzakje
(type 1x4 of nr. 4) en vouw de naden
om, om scheuren en dichtklappen tijdens
het kofezetten te voorkomen. Plaats het
lterzakje in de ltermand. (g. 15)
5 Sluit de ltermandhouder.
6 Plaats de kan in het apparaat. (g. 7)
7 Draai de maalgraadknop naar de gewenste
maling; van jn tot grof. (g. 16)
E
Tip:
Met de maalgraadknop kunt u kiezen uit
negen verschillende instellingen. We hebben
3 optimale instellingen voorgeselecteerd maar
u kunt ook kiezen voor een instelling tussen
de pictogrammen. Experimenteer met de
verschillende maalgraden om te ontdekken bij
welke instelling u de kofe het lekkerst vindt.
8 Draai aan de reservoirkeuzeknop om
tussen de twee soorten kofebonen te
kiezen (g. 17).
B
Waarschuwing:
Telkens als u een ander bonenreservoir of
andere kofebonen gebruikt, blijven er resten
achter van de vorige kofebonen die zijn
gemalen. Maak daarom de maalmolentrechter
schoon nadat u een ander bonenreservoir of
andere kofebonen hebt gekozen.
D
Opmerking:
Afhankelijk van uw smaak kunt u een van de
twee soorten kofebonen of een combinatie
van beide soorten selecteren.
9 Druk op de aan/uitknop op de voorzijde van
het apparaat (g. 8).
• Het aantal koppen begint te knipperen.
10 Selecteer het aantal koppen door aan de knop
te draaien tot het gewenste aantal koppen op
het display wordt weergegeven (g. 18).
D
Opmerking:
Zorg ervoor dat het aantal koppen dat u instelt
met de 2-10-kops knop overeenkomt met de
hoeveelheid water in het waterreservoir.
Bedenk daarbij wel dat de kofezetter al het
water in het waterreservoir gebruikt. Als het
aantal koppen dat u kiest minder is dan de
hoeveelheid water in het reservoir, dan wordt
de kofe slapper.
11 Druk in het midden van de knop om het
aantal koppen te bevestigen.
12 Druk op de kofesterkteknop. (g. 9)
• De pictogrammen van de kofebonen
beginnen te knipperen.
13 Draai aan de knop om de gewenste
kofesterkte te selecteren (mild: 1 boon;
normaal: 2 bonen; sterk: 3 bonen) (g. 10).
• Op het display verschijnt de geselecteerde
kofesterkte.
E
Tip:
We raden u aan te experimenteren met
de hoeveelheid water om uw favoriete
sterkte te bepalen. Als u een aantal koppen
selecteert dat groter is dan de hoeveelheid
water, wordt de kofe sterker. Als u een
aantal koppen selecteert dat kleiner is dan
de hoeveelheid water, wordt de kofe milder.
14 Druk in het midden van de knop om uw
keuze te bevestigen. Druk vervolgens
opnieuw in het midden van de knop om het
kofezetten te starten (g. 19).
• De molen maalt de noodzakelijke
hoeveelheid kofebonen.
15 Wacht tot de kofezetter is gestopt met
kofezetten voordat u de kan verwijdert.
D
Opmerking:
Na het kofezetten druppelt er nog enkele
seconden kofe uit de ltermand.
50
Page 51

5.3Metvoorgemalenkofe
Volg de onderstaande stappen als u voorgemalen
kofe wilt gebruiken in plaats van kofebonen.
1 Open het deksel van het waterreservoir en
vul het waterreservoir met de benodigde
hoeveelheid koud water. (g. 6)
2 Trek aan het lipje op de rechterkant van de
ltermandhouder om de ltermandhouder te
openen (g. 14).
3 Neem een papieren lterzakje (type 1x4 of
nr. 4) en vouw de naden om, om scheuren
en dichtklappen tijdens het kofezetten
te voorkomen. Plaats het lterzakje in de
ltermand (g. 15).
4 Schep voorgemalen kofe in het lterzakje.
D
Opmerking:
U kunt de kofesterkte aanpassen aan uw
eigen voorkeur. Voor een kop kofe met
normale sterkte gebruikt u één maatlepel
(circa 6 gram) gemalen kofe per kop
(120 ml). Voor sterkere kofe gebruikt u
1,5 maatlepel gemalen kofe per kop.
5 Sluit de ltermandhouder.
6 Plaats de kan in het apparaat (g. 7).
7 Druk op de aan/uitknop (g. 8).
• Het display gaat branden.
8 Druk op de kofesterkteknop (g. 9).
9 Draai aan de knop om de instelling voor
voorgemalen kofe te kiezen (g. 10).
• Het pictogram voor voorgemalen kofe
gaat branden.
10 Druk in het midden van de knop om uw
keuze te bevestigen. Druk vervolgens
opnieuw in het midden van de knop om het
kofezetten te starten (g. 11).
11 Wacht tot de kofezetter is gestopt met
kofezetten voordat u de kan verwijdert.
5.4 De timer instellen
Met de timer kunt u de tijd programmeren
waarop u wilt dat de kofe wordt gezet.
Zorg ervoor dat alle stappen voor het
kofezetten zijn gedaan met lterkofe of
kofebonen voordat u de timer instelt.
1 Druk op de timerknop. (g. 20)
• Op het display knippert 00:00 om aan te
geven dat u de timer moet instellen.
2
Draai aan de knop om het uur in te stellen (g. 21).
3 Druk in het midden van de knop om het uur
te bevestigen (g. 22).
• De minuten beginnen te knipperen om aan
te geven dat u de minuten moet instellen.
4 Draai aan de knop om de minuten in te
stellen (g. 23).
5 Druk in het midden van de knop om de
minuten te bevestigen (g. 24).
• De timer is ingesteld en de kofe wordt
op de ingestelde tijd gezet.
5.5 Druppelstopfunctie
Dankzij de druppelstopfunctie kunt u de kan
uit de kofezetter verwijderen voordat het
kofezetten is beëindigd is. Wanneer u de kan
verwijdert, zorgt de druppelstop ervoor dat er
geen kofe meer in de kan stroomt.
D
Opmerking:
Het kofezetproces stopt niet wanneer u de kan
verwijdert. Als u de kan niet binnen 20 seconden
terugzet in het apparaat, loopt de ltermand over.
NEDERLANDS
D
Opmerking:
Na het kofezetten druppelt er nog enkele
seconden kofe uit de ltermand.
51
Page 52

6 Schoonmaken en
onderhoud
6.1 Schoonmaken na ieder
gebruik
B Waarschuwing:
Dompel het apparaat nooit in water of een andere
vloeistof en spoel het ook niet af onder de kraan.
1 Druk op de aan/uitknop op de voorzijde
van het apparaat om het apparaat uit te
schakelen. (g. 25)
2 Haal de stekker uit het stopcontact.
3 Veeg de buitenkant van de kofezetter schoon
met een vochtige doek (g. 26).
4 Maak de ltermand en de kan schoon in de
vaatwasmachine of met warm water en een
beetje afwasmiddel.
6.2 De maalmolentrechter
schoonmaken
Telkens als u het andere kofebonenreservoir of
andere kofebonen gebruikt, blijven er resten achter
van de vorige kofebonen die zijn gemalen. Maak de
maalmolentrechter om de 1 tot 2 weken of telkens
wanneer u het andere kofebonenreservoir gebruikt
om te voorkomen dat de resten met de versgemalen
kofe worden vermengd. Stapt u over naar een
nieuwe soort kofebonen, volg dan de onderstaande
stappen om een optimale smaak te garanderen.
1 Druk op de aan/uitknop op de voorzijde
van het apparaat om het apparaat uit te
schakelen (g. 25).
2 Trek aan het lipje op de rechterkant van de
ltermandhouder om de ltermandhouder te
openen (g. 14).
3 Neem een papieren lterzakje (type 1x4 of
nr. 4) en vouw de naden om, om scheuren
en dichtklappen tijdens het kofezetten
te voorkomen. Plaats het lterzakje in de
ltermand. (g. 15)
4 Sluit de ltermandhouder.
5 Als u het klepje van de maalmolentrechter
wilt openen, steekt u de platte kant van het
handvat van het schoonmaakborsteltje in het
slot en drukt u het naar beneden (g. 27).
D
Opmerking:
Als u de maalmolentrechter snel wilt
schoonmaken met alleen het borsteltje,
gaat u verder met stap 7. Als u wilt
voorkomen dat resten van gemalen kofe
van invloed zijn op de smaak van uw nieuwe
kofebonen, gaat u verder met stap 6.
6 Houd de kofesterkteknop 4 seconden
ingedrukt (g. 28).
• De molen reinigt zichzelf.
7 Wacht tot de molen klaar is met reinigen en
gebruik daarna het schoonmaakborsteltje om
resten gemalen kofe naar het onderste deel
van de trechter te borstelen (g. 29).
• De resten gemalen kofe vallen in de
ltermand.
B
Waarschuwing:
Laat het borsteltje niet in de
maalmolentrechter vallen.
8 Sluit het deksel van de maalmolentrechter.
9 Verwijder het lterzakje met de resten
gemalen kofe en gooi het weg.
6.3Dekofezetterontkalken
Ontkalk de kofezetter wanneer het apparaat
buitensporig veel stoom produceert of wanneer
het kofezetten langer duurt. Het is raadzaam om
iedere twee maanden te ontkalken. Gebruik alleen
blanke azijn om te ontkalken; andere producten
kunnen de kofezetter beschadigen.
B
Waarschuwing:
Gebruik nooit azijn met een azijnzuurpercentage
van 8% of hoger, natuurazijn, een ontkalker op
poederbasis of een ontkalker in tabletvorm om
het apparaat te ontkalken, omdat dit schade kan
veroorzaken.
1 Open het deksel van het waterreservoir.
2 Vul het waterreservoir met 8 koppen blanke
azijn (4% azijnzuur) en 2 koppen water (g. 6).
52
Page 53

3 Plaats een lterzakje (nr. 4) in de ltermand en
sluit de ltermandhouder (g. 15).
4 Plaats de lege kan in het apparaat (g. 7).
5 Steek de stekker in het stopcontact.
6 Druk op de aan/uitknop op de voorzijde
van het apparaat om het apparaat in te
schakelen (g. 8).
• Het display gaat branden.
7 Druk op de kofesterkteknop en draai aan
de knop om de instelling voor voorgemalen
kofe te selecteren (g. 10).
8 Druk in het midden van de knop om uw
keuze te bevestigen. Druk vervolgens
opnieuw in het midden van de knop om het
kofezetten te starten (g. 11).
9 Wacht tot de helft van de azijn-wateroplossing
in de kan is gelopen. Druk vervolgens op
de aan/uitknop om het kofezetproces te
stoppen en de oplossing minimaal 15 minuten
te laten inwerken (g. 30).
10 Druk op de aan/uitknop om de kofezetter
weer in te schakelen (g. 8).
11 Druk eenmaal in het midden van de knop
om het apparaat het kofezetproces te laten
voltooien (g. 31).
12 Leeg de kan en gooi het lterzakje weg.
13 Vul het waterreservoir met koud water en
druk tweemaal in het midden van de knop
om het kofezetproces nogmaals te starten.
Laat het kofezetapparaat het volledige
kofezetproces doorlopen en leeg de kan.
14 Herhaal stap 13 tot het water niet meer naar
azijn smaakt of ruikt.
15 Maak de ltermand en de kan schoon in de
vaatwasmachine of met warm water en een
beetje afwasmiddel.
16 Druk op de aan/uitknop op de voorzijde van
het apparaat om het apparaat uit te schakelen.
7 Accessoires
bestellen
Ga naar www.shop.philips.com/service
om accessoires en reserveonderdelen te kopen
of ga naar uw Philips-dealer. U kunt ook contact
opnemen met het Philips Consumer Care Centre
in uw land (zie het ‘worldwide guarantee’vouwblad voor contactgegevens).
8 Recycling
• Dit symbool op een product betekent dat het
product voldoet aan EU-richtlijn
2012/19/EG. Win inlichtingen in over
de gescheiden inzameling van afval van
elektrische en elektronische producten.
Volg de lokale regels en gooi het product
nooit weg bij het gewone huishoudelijke
afval. Door u op de juiste manier van
oude producten te ontdoen, voorkomt u
negatieve gevolgen voor het milieu en de
volksgezondheid (g. 32).
9 Garantie en
ondersteuning
Als u informatie of ondersteuning nodig hebt, ga
dan naar www.philips.com/support of lees het
‘worldwide guarantee’-vouwblad.
NEDERLANDS
53
Page 54

10 Problemen oplossen
Dit hoofdstuk behandelt in het kort de problemen
die u kunt tegenkomen tijdens het gebruik
van het apparaat. Als u het probleem niet kunt
oplossen met de informatie hieronder, ga dan naar
www.philips.com/support voor een lijst met
veelgestelde vragen of neem contact op met het
Consumer Care Centre in uw land.
Het apparaat werkt niet.
• Steek de stekker in het stopcontact en druk
op de aan/uitknop op de voorzijde van het
apparaat om het apparaat in te schakelen.
• Controleer of het voltage dat is aangegeven op
het apparaat overeenkomt met de plaatselijke
netspanning.
• Vul het waterreservoir met water.
• Sluit het deksel van de maalmolentrechter.
Als ik de molen gebruik, is de kofe te slap.
• Zorg ervoor dat het aantal koppen dat u instelt
met de 2-10-kops knop overeenkomt met
de hoeveelheid water in het waterreservoir.
Bedenk daarbij wel dat de kofezetter al het
water in het waterreservoir gebruikt.
• Gebruik de kofesterkteknop om de
kofesterkte op ‘sterk’ in te stellen.
• Als u kofebonen gebruikt, zorg er dan voor dat
u niet op de knop voor voorgemalen kofe drukt,
aangezien hierdoor de molen wordt uitgeschakeld.
• Gebruik kofebonen van een sterkere melange
of smaak.
• Controleer of het gekozen aantal koppen
overeenkomt met de hoeveelheid water in het
waterreservoir.
Als ik voorgemalen kofe gebruik, is de kofe te slap.
• Zorg ervoor dat de hoeveelheid voorgemalen
kofe in het lter in overeenstemming is met
de hoeveelheid water in het waterreservoir.
Bedenk daarbij wel dat het apparaat al het
water in het waterreservoir gebruikt.
• Gebruik gemalen kofe van een sterkere
melange of smaak.
• Gebruik meer voorgemalen kofe of minder
water om sterkere kofe te verkrijgen.
• Het lter stroomt over wanneer ik de kan
tijdens het kofezetten uit het apparaat
verwijder.
• Als u de kan tijdens het kofezetproces
meer dan 20 seconden verwijdert, zal de
druppelstop de ltermand doen overstromen.
Denk er bovendien aan dat de kofe zijn
volledige smaak niet bereikt voor het einde
van het kofezetproces. Daarom raden wij
u aan de kan niet te verwijderen en geen
kofe uit te schenken voor het einde van het
kofezetproces.
Het apparaat blijft nog lang doordruppelen nadat
het kofezetproces is voltooid.
• Het druppelen wordt veroorzaakt door de
condensatie van stoom. Het is volkomen
normaal dat het apparaat nog even blijft
doordruppelen.
• Als het druppelen niet stopt, zit de druppelstop
mogelijk verstopt. Om de druppelstop
schoon te maken, trekt u aan het lipje van de
ltermandhouder aan de rechterkant van de
kofezetter om de houder te openen. Verwijder
de ltermand. Spoel vervolgens de ltermand
en de druppelstop af onder de kraan.
• Als u de kan tijdens het kofezetproces meer
dan 20 seconden verwijdert, zal de druppelstop
de ltermand doen overstromen.
54
Page 55

De kofe is niet heet genoeg.
• Verwarm de kan voor met heet water voordat
u kofe gaat zetten.
• De kofe in de kan koelt sneller af als u maar
een paar koppen kofe zet. De kofe blijft
langer warm als u 10 koppen kofe zet. Dit is
een volle kan.
• Gebruik dunwandige koppen omdat deze de
hitte van de kofe minder absorberen dan
dikwandige koppen.
• Gebruik geen melk die net uit de koelkast komt.
• Ontkalk het apparaat. Zie ‘De kofezetter
ontkalken’ in hoofdstuk ‘Schoonmaken en
onderhoud’.
Het kofezetapparaat begint niet met het
schoonmaken van de maalmolentrechter.
• Zorg ervoor dat het kofezetapparaat is
aangesloten op een stopcontact.
• Zorg ervoor dat u het deksel van de
maalmolentrechter opent voordat u de
molenknop ingedrukt houdt.
• Houdt de molenknop 4 seconden ingedrukt tot
de molen zichzelf begint te reinigen.
Het apparaat werkt maar maakt een piepend
geluid.
• Controleer of het klepje van de
maalmolentrechter goed is gesloten.
• Het lijkt alsof de kofebonen te snel op zijn.
• Het kan lijken alsof de kofebonen snel op zijn.
Om verzekerd te zijn van een perfect kopje
kofe is een bepaalde hoeveelheid gemalen
kofe vereist. De hoeveelheid kofebonen
die het apparaat gebruikt voor de perfecte
hoeveelheid gemalen kofe is normaal.
55
Page 56

1 Innledning
3 Viktig
Gratulerer med kjøpet og velkommen til Philips!
Du får best mulig nytte av støtten som Philips
tilbyr, hvis du registrerer produktet ditt på
www.philips.com/welcome.
2 Generell
beskrivelse(g.1)
1 Filterkurv
2 Filterkurvholder
3 Vannivåindikator
4 Lokk på vannbeholder
5 Lokk til beholder for bønner
6 Beholdervelger
7 Knapp for grovhet
8 Duo-kaffebønnebeholder
9 Lokk til kaffekverntrakten
10 Lås på lokket til kaffekverntrakten
11 Påfyllingsåpning for vann
12 Skjerm
A Ikon for forhåndsmalt kaffe
B Antall kopper
C Ikon for kaffekopp
D Ikon for valg av kaffebønnestyrke
E Knapp for styrkevalg
F Timerknapp
G Timeindikator
H Indikator for minutter
I Timerikon
13 Av/på-knapp
14 Glasskannelokk
15 Glasskanne
16 Rengjøringsbørste
56
Les denne brukerveiledningen nøye
før du bruker apparatet, og ta vare
på den for senere referanse.
3.1 Fare
• Apparatet må ikke senkes ned
i vann eller annen væske og
må heller ikke skylles under
rennende vann.
3.2 Advarsel
• Før du kobler til apparatet, må
du kontrollere at spenningen
som er angitt på undersiden av
apparatet, stemmer overens med
nettspenningen.
• Hvis ledningen er ødelagt, må
den alltid skiftes ut av Philips, et
servicesenter som er godkjent av
Philips, eller lignende kvaliser t
personell, slik at man unngår
farlige situasjoner.
• Dette apparatet kan brukes
av barn som er 8 år eller eldre
og av personer med nedsatt
sanseevne eller fysisk eller psykisk
funksjonsevne, eller personer
med manglende erfaring eller
kunnskap, dersom de får tilsyn
eller instruksjoner om bruk av
apparatet på en sikker måte, og
hvis de forstår risikoen. Rengjøring
og brukervedlikehold skal ikke
utføres av barn med mindre de
er eldre enn 8 år og er under
oppsyn. Oppbevar apparatet og
ledningen utilgjengelig for barn
som er yngre enn 8 år.
Page 57

• Barn skal ikke leke med
apparatet.
• Ikke la ledningen henge over
kanten på bordet eller benken
der apparatet står.
• Ikke ta på maleverket på
apparatet, det gjelder spesielt når
det er koblet til en strømkilde.
• Oppbevar emballasjen
(plastposer, pappmellomlegg
osv.) utenfor barns rekkevidde –
den er ikke et leketøy.
• Ikke berør de varme overatene
på apparatet mens det er i bruk.
• Dette apparatet er utviklet for å
male bønner og lage kaffe. Bruk
det riktig og forsiktig for å unngå å
bli skåldet av varmt vann og damp.
• Ikke tøm vannbeholderen ved
å vippe på apparatet, ettersom
det kan skade apparatet. Bare
tøm vannbeholderen ved å følge
skylleinstruksjonene.
• Du må ikke bruke apparatet hvis
støpselet, ledningen eller selve
apparatet er ødelagt.
• Hvis det oppstår et problem du
ikke kan løse ved hjelp av denne
brukerveiledningen, tar du kontakt
med forbrukersenteret i landet
der du bor. Hvis problemet ikke
kan løses, tar du apparatet med til
et servicesenter som er godkjent
av Philips, for å få det undersøkt
eller reparert. Ikke prøv å reparere
apparatet selv. Hvis du gjør det, vil
ikke garantien gjelde lenger.
3.3 Forsiktig
• Ikke plasser apparatet på en
varm overate, og pass på at
ledningen ikke kommer i kontakt
med varme overater.
• Koble fra apparatet før du rengjør
det, og hvis det oppstår problemer
under malingen eller traktingen.
• Ikke ytt på apparatet når det er
i bruk.
• Apparatet blir varmt ved bruk. La
apparatet avkjøles før du setter
det bort.
• Under traktingen blir den nedre
delen av apparatet og bunnen av
kannen varme.
• Etter at du har pakket ut
apparatet, må du kontrollere at
det er helt og uskadet.
Hvis du er i tvil, må du ikke bruke
apparatet, men ta kontakt med
kundesenteret i landet der du bor.
• Dette apparatet er kun beregnet
for vanlig bruk i hjemmet. Det er
ikke beregnet for bruk på f.eks.
bedriftskjøkken, butikker, kontorer,
bondegårder eller andre
arbeidsmiljøer. Det er heller ikke
beregnet for å brukes av kunder
på hoteller, moteller eller i andre
typer bomiljøer.
3.4 Elektromagnetiske felt
(EMF)
Dette Philips apparatet overholder alle aktuelle
standarder og forskrifter for eksponering for
elektromagnetiske felt.
NORSK
57
Page 58

4 Før bruk første gang
4.1 Stille klokken
1 Sett støpselet i stikkontakten.
• 00:00 blinker på skjermen for å varsle om
at du må stille klokken.
2 Vri på knappen for å angi ønsket
klokkeslett (g. 2).
3 Trykk på midten av knappen for å bekrefte
den valgte timen (g. 3).
• Minuttene begynner å blinke for å varsle
om at du må angi ønskede minutter.
4 Vri på knappen for å angi ønskede
minutter (g. 4).
5 Trykk på midten av knappen for å bekrefte
minuttene (g. 5).
6 Skjermen viser det innstilte klokkeslettet.
Kaffetrakteren er klar til bruk.
4.2 Stille inn automatisk
avslåingstid
Du kan justere hvor lang tid det tar før apparatet
automatisk slår seg av. Standardtiden er
30 minutter. Du kan justere denne tiden til
maksimalt 120 minutter. Hvis du vil justere
automatisk avslåingstid, følger du trinnene nedenfor.
1 Sørg for at apparatet er slått av
(støpselet skal fremdeles stå i stikkontakten).
2 Trykk på og hold nede midten av knappen til
skjermen begynner å blinke.
3 Vri på knappen for å øke eller redusere tiden.
1 er 10 minutter, 2 er 20 minutter,
3 er 30 minutter og så videre frem til 12,
som er 120 minutter.
4 Trykk på midten av knappen for å bekrefte
minuttene.
4.3 Skylle apparatet
Du må skylle kaffetrakteren én gang før bruk.
1 Åpne lokket på vannbeholderen.
Fyll vannbeholderen med kaldt vann opp til
indikatorenfor8kopper(g.6).
D
Merk:
Ikke legg kaffebønner eller malt kaffe i apparatet.
2 Lukk lokket til vannbeholderen.
3 Sett kannen i apparatet (g. 7).
4 Trykk på av/på-knappen (g. 8).
• Displayet begynner å lyse.
5 Trykk på knappen for styrkevalg (g. 9).
6 Vri på knappen for å velge innstillingen for
forhåndsmalt kaffe (g. 10).
• Ikonet for forhåndsmalt kaffe lyser.
7 Trykk på midten av knappen for å bekrefte.
Trykk deretter på midten av knappen på nytt
for å starte skylleprosessen (g. 11).
8 La apparatet kjøre til skylleprosessen er fullført.
9 Tøm kannen.
5 Bruke apparatet
5.1 Fylle vanntanken
1 Åpne lokket på vannbeholderen,
og fyll vannbeholderen med mengden kaldt
vann som kreves. (g. 6) Når du åpner lokket til
vannbeholderen, ser du merker for
2 til 10 kopper på innsiden av apparatet.
Du kan bruke disse merkene til å nne ut
hvor mye vann du skal ha i vannbeholderen.
Reeksjonen endres fra lys til mørk per kopp
med vann som fylles på. Du kan også bruke
vannivåindikatoren på kannen.
D
Merk:
Apparatet lagrer alltid den sist brukte innstillingen.
58
D
Merk:
Ikke fyll vannbeholderen med vann over
indikatoren for 10 kopper.
Page 59

5.2 Bruke kaffebønner
B Advarsel:
Hold alltid lokket på vannbeholderen lukket
når du fyller kaffebønnebeholderen med
kaffebønner. Hvis ikke kan kaffebønner falle ned i
vannbeholderen og blokkere vanninntaket.
1 Ta av lokket på
kaffebønnebeholderen. (g. 12)
2 Fyll duo-kaffebønnebeholderen
med kaffebønner. Du kan fylle duokaffebønnebeholderen med to forskjellige
typer kaffebønner. Kontroller at det er nok
kaffebønner i beholderen for den mengden
kaffe du ønsker å trakte (g. 13).
D
Merk:
Sørg alltid for at kaffebønnebeholderen er
minst halvfull.
B
Advarsel:
Hvis du vil forhindre at kvernen settes
ut av funksjon, må du ikke bruke ubrente
eller karamelliserte bønner. Vi anbefaler
at du bruker kaffebønner i stedet for
espressobønner, da espressobønner kan
medføre skade.
3 Hvis du vil åpne lterkurvholderen,
trekker du i tappen på høyre side av
kaffetrakteren (g. 14).
4 Ta et papirlter (type 1x4 eller nr. 4)
og brett de forseglede kantene for å
forhindre rifter og folder. Plasser papirlteret i
lterkurven. (g. 15)
5 Lukk lterkurvholderen.
6 Sett kannen i apparatet. (g. 7)
7 Vri på knappen for grovhet for å velge ønsket
type maling (fra n til grov). (g. 16)
E
Tips:
Knappen for grovhet gjør at du kan velge
mellom ni forskjellige innstillinger. Vi har
forhåndslagret tre optimale innstillinger,
men du kan også velge mellom alle innstillinger
mellom ikonene. Vi anbefaler at du prøver deg
frem med ulike maleinnstillinger til du nner
den du foretrekker.
8 Vri på beholdervelgeren for å velge mellom
de to typene kaffebønner (g. 17).
B
Advarsel:
Når du veksler mellom beholdere for
kaffebønner eller kaffebønner, vil det alltid
være spor igjen av den tidligere typen
kaffebønner som ble malt. Du må rengjøre
kaffekverntrakten for å forhindre dette når du
bytter til en ny type kaffebønner.
D
Merk:
Avhengig av hvilken smak du vil ha, kan du
enten velge én av de to kaffebønnetypene
eller en blanding av begge typer.
9 Trykk på av/på-knappen foran på
apparatet (g. 8).
• Antall kopper begynner å blinke.
10 Vri knappen til ønsket antall kopper vises på
skjermen, for å velge antall kopper (g. 18).
D
Merk:
Kontroller at antallet kopper du velger med
knappen for 2–10 kopper, samsvarer med
mengden vann i vannbeholderen.
Vær oppmerksom på at kaffetrakteren bruker
alt vannet i vannbeholderen. Hvis du velger et
antall kopper som er mindre enn mengden
vann, blir kaffen svakere enn du hadde tenkt.
11 Trykk på midten av knappen for å bekrefte
antall kopper.
12 Trykk på knappen for styrkevalg. (g. 9)
• Ikonet for kaffebønner begynner å blinke.
13 Vri på knappen for å velge ønsket kaffestyrke
(mild: 1 bønne, medium: 2 bønner eller sterk:
3 bønner) (g. 10).
• Skjermen viser den valgte kaffestyrken.
E
Tips:
Vi anbefaler at du prøver deg frem med
mengde vann for å nne ut hvilken styrke
du foretrekker. Hvis du velger et antall
kopper som er større enn mengde vann,
blir kaffen sterkere. Hvis du velger antall
kopper som er mindre enn mengde vann,
blir kaffen svakere.
NORSK
59
Page 60

14 Trykk på midten av knappen for å bekrefte, og
trykk deretter på midten av knappen på nytt
for å starte trakteprosessen (g. 19).
• Maleren maler det nødvendige antallet
kaffebønner.
15 Vent til kaffetrakteren har sluttet å trakte før
du fjerner kannen.
D
Merk:
Etter traktingen drypper det kaffe fra
lterkurven i ere sekunder.
5.3 Bruke forhåndsmalt kaffe
Hvis du ønsker å bruke forhåndsmalt kaffe i stedet
for kaffebønner, følger du trinnene nedenfor.
1 Åpne lokket på vannbeholderen, og fyll
vannbeholderen med mengden kaldt vann
som kreves. (g. 6)
2 Hvis du vil åpne lterkurvholderen,
trekker du i tappen på høyre side av
kaffetrakteren (g. 14).
3 Ta et papirlter (type 1x4 eller nr. 4)
og brett de forseglede kantene for å
forhindre rifter og folder. Plasser papirlteret i
lterkurven (g. 15).
4 Legg den forhåndsmalte kaffen i papirlteret.
D
Merk:
Du kan justere styrken på kaffen i henhold til
din personlige smak. For en middels sterk kopp
kaffe, må du bruke en måleskje (cirka 6 g) med
malt kaffe for hver kopp (120 ml). For sterkere
kaffe må du bruke 1,5 måleskjeer med malt kaffe
for hver kopp kaffe.
5 Lukk lterkurvholderen.
6 Sett kannen i apparatet (g. 7).
7 Trykk på av/på-knappen (g. 8).
• Displayet begynner å lyse.
8 Trykk på knappen for styrkevalg (g. 9).
9 Vri på knappen for å velge innstillingen for
forhåndsmalt kaffe (g. 10).
• Ikonet for forhåndsmalt kaffe lyser.
10 Trykk på midten av knappen for å bekrefte.
Trykk deretter på midten av knappen på nytt
for å starte trakteprosessen (g. 11).
11 Vent til kaffetrakteren har sluttet å trakte før
du fjerner kannen.
D
Merk:
Etter traktingen drypper det kaffe fra
lterkurven i ere sekunder.
5.4 Stille inn timeren
Med timeren kan du programmere tidspunktet
du vil at traktingen skal starte. Sørg for at alle
trinnene i kaffetraktingen er unnagjort med enten
ferdigmalt kaffe eller kaffebønner før du stiller inn
timeren.
1 Trykk på timerknappen. (g. 20)
• 00:00 blinker på skjermen for å varsle om
at du må stille timeren.
2 Vri på knappen for å angi ønsket
klokkeslett (g. 21).
3 Trykk på midten av knappen for å bekrefte
den valgte timen (g. 22).
• Minuttene begynner å blinke for å varsle
om at du må angi ønskede minutter.
4 Vri på knappen for å angi ønskede
minutter (g. 23).
5 Trykk på midten av knappen for å bekrefte
minuttene (g. 24).
• Timeren er angitt og trakteprosessen
starter ved forhåndsinnstilt klokkeslett.
5.5 Dryppstoppfunksjon
Dryppstoppfunksjonen gjør at du kan fjerne
kannen fra kaffetrakteren før traktesyklusen
er ferdig. Når du fjerner kannen, sørger
dryppstoppfunksjonen for at det slutter å renne
kaffe inn i kannen.
D
Merk:
Trakteprosessen stopper ikke når du fjerner
kannen. Hvis du ikke setter kannen tilbake på
varmeplaten innen 20 sekunder,
renner lterkurven over.
60
Page 61

6 Rengjøring og
vedlikehold
6.1 Rengjør etter hver gangs
bruk
B Advarsel:
Apparatet må ikke senkes ned i vann eller annen
væske og må heller ikke skylles under rennende vann.
1 Trykk på av/på-knappen på forsiden for å slå
av apparatet. (g. 25)
2 Ta ut støpselet av stikkontakten.
3 Tørk av utsiden av kaffetrakteren med en
fuktig klut (g. 26).
4 Rengjør lterkurven og kannen i
oppvaskmaskinen eller med varmt vann og litt
oppvaskmiddel.
6.2 Rengjøre kaffekverntrakten
Når du veksler mellom beholdere for kaffebønner
eller kaffebønner, vil det alltid være spor igjen av
den tidligere typen kaffebønner som ble malt, som
kan påvirke smaken på kaffen.
Rengjør kaffekverntrakten hver eller annenhver
uke eller når du bytter beholdere for kaffebønner,
for å forhindre at nymalt kaffe og spor etter kaffe i
kaffekverntrakten blandes sammen. Når du bytter
til en ny type kaffebønner, må du følge trinnene
nedenfor for å sikre optimal smak.
1 Trykk på av/på-knappen på forsiden for å slå
av apparatet (g. 25).
2 Hvis du vil åpne lterkurvholderen,
trekker du i tappen på høyre side av
kaffetrakteren (g. 14).
3 Ta et papirlter (type 1x4 eller nr. 4)
og brett de forseglede kantene for å
forhindre rifter og folder. Plasser papirlteret i
lterkurven. (g. 15)
4 Lukk lterkurvholderen.
5 Hvis du vil åpne lokket til kaffekverntrakten,
må du sette den ate enden av håndtaket på
rengjøringsbørsten inn i låsen, og trykke den
ned (g. 27).
D Merk:
Hvis du vil rengjøre kaffekverntrakten raskt
kun med børsten, fortsetter du med trinn 7.
Hvis du vil forhindre at spor fra malt kaffe
påvirker smaken av nye kaffebønner, fortsetter
du med trinn 6.
6 Trykk og hold knappen for styrkevalg inne i
re sekunder (g. 28).
• Kvernen begynner å rengjøre seg selv.
7 Når kvernen har avsluttet rengjøringen, må du
bruke rengjøringsbørsten til å børste restene
av den malte kaffen inn i den lavere delen av
trakten (g. 29).
• Restene av den malte kaffen faller ned
i lterkurven
B
Advarsel:
Ikke mist børsten i kaffekverntrakten.
8 Lukk lokket på kaffekverntrakten.
9 Ta ut papirlteret med restene av den malte
kaffen, og kast det i søppelet.
6.3 Avkalke kaffetrakteren
Kaffetrakteren bør avkalkes når du ser at det
kommer mye damp eller traktetiden økes.
Det anbefales at du avkalker den annenhver
måned. Bruk bare hvit eddik til å avkalke, ettersom
andre produkter kan skade kaffetrakteren.
B
Advarsel:
Bruk aldri hvit eddik med 8 % syre eller mer, naturlig
eddik, avkalkingspulver eller avkalkingstabletter for å
avkalke apparatet. Dette kan føre til skader.
1 Åpne lokket til vannbeholderen.
2 Fyll vannbeholderen med 8 kopper hvit eddik
(4 %) og 2 kopper vann (g. 6).
3 Plasser et papirlter (no. 4) i lterkurven,
og lukk lterkurvholderen (g. 15).
4 Sett den tomme kannen i apparatet (g. 7).
5 Sett støpselet i stikkontakten.
6 Trykk på av/på-knappen på forsiden for å slå
på apparatet (g. 8).
• Displayet begynner å lyse.
NORSK
61
Page 62

7 Trykk på knappen for styrkevalg og vri
på knappen for å velge innstillingen for
forhåndsmalt kaffe (g. 10).
8 Trykk på midten av knappen for å bekrefte.
Trykk deretter på midten av knappen på nytt
for å starte trakteprosessen (g. 11).
9 Vent til halvparten av eddikblandingen har rent
ned i kannen. Deretter trykker du på av/påknappen for å stoppe trakteprosessen og lar
blandingen ligge i minst 15 minutter (g. 30).
10 Trykk på av/på-knappen for å slå
kaffetrakteren på igjen (g. 8).
11 Trykk på midten av knappen én gang for å la
apparatet fullføre trakteprosessen (g. 31).
12 Tøm kannen, og kast papirlteret.
13 Fyll vannbeholderen med kaldt vann, og trykk
på midten av knappen to ganger for å starte
en ny trakteprosess. La kaffetrakteren fullføre
hele trakteprosessen, og tøm kannen.
14 Gjenta trinn 13 til vannet ikke lenger smaker
eller lukter eddik.
15
Rengjør lterkurven og kannen i oppvaskmaskinen
eller med varmt vann og litt oppvaskmiddel.
16 Trykk på av/på-knappen på forsiden for å slå
av apparatet.
7 Bestille tilbehør
Hvis du vil kjøpe tilbehør eller reservedeler, kan
du gå til www.shop.philips.com/service eller
gå til en Philips-forhandler. Du kan også ta kontakt
med Philips’ forbrukerstøtte i landet der du bor
(se i garantiheftet for kontaktinformasjon).
8 Resirkulering
• Dette symbolet på et produkt betyr
at produktet omfattes av EU-direktiv
2012/19/EU. Gjør deg kjent med lokale
innsamlingsordninger for elektriske
og elektroniske produkter. Følg lokale
bestemmelser, og kast aldri produktet med
vanlig husholdningsavfall. Riktig deponering av
gamle produkter bidrar til å forhindre negative
konsekvenser for helse og miljø (g. 32).
9 Garanti og støtte
Hvis du trenger kundestøtte eller informasjon, kan
du gå til www.philips.com/support eller lese
i garantiheftet.
10 Feilsøking
Dette avsnittet gir en oppsummering av de
vanligste problemene som kan oppstå med
apparatet. Hvis du ikke kan løse problemet ved
hjelp av informasjonen nedenfor, kan du gå til
www.philips.com/support for å se en liste
over vanlige spørsmål, eller du kan kontakte
forbrukerstøtten i landet der du bor.
Apparatet virker ikke.
• Sett støpselet i en stikkontakt, og trykk på av/
på-knappen foran på apparatet for å slå det på.
• Kontroller at spenningen som er angitt
på apparatet, stemmer overens med
nettspenningen.
• Fyll vannbeholderen med vann.
• Lukk lokket på kaffekverntrakten.
62
Page 63

Når jeg bruker maleren, er kaffen for svak.
• Sørg for at antallet kopper du velger med
knappen for 2–10 kopper, passer til mengden
vann i vannbeholderen. Husk at kaffetrakteren
bruker alt vannet i vannbeholderen.
• Bruk knappen for styrkevalg for å angi
kaffestyrken til sterk.
• Når du bruker kaffebønner, må du sørge for
ikke å trykke på knappen for forhåndsmalt kaffe,
siden maleren da blir slått av.
• Bruk kaffebønner fra en sterkere blanding eller smak.
• Pass på at det valgte antallet kopper samsvarer
med mengden vann i vannbeholderen.
Kaffen er ikke varm nok.
• Varm opp kannen med varmt vann før du
begynner å trakte kaffe.
• Kaffen i kannen avkjøles raskere hvis du bare
trakter noen få kopper. Kaffen holder seg varm
lenger hvis du trakter 10 kopper, som utgjør en
full kanne.
• Bruk tynne kopper ettersom de absorberer
mindre varme fra kaffen enn tykke kopper.
• Ikke bruk melk som kommer direkte fra
kjøleskapet.
• Avkalke apparatet. Se Avkalke kaffetrakteren i
avsnittet Rengjøring og vedlikehold.
Når jeg bruker forhåndsmalt kaffe, blir kaffen for svak.
• Sørg for at mengden med forhåndsmalt
kaffe i lteret passer til mengden vann i
vannbeholderen. Husk at apparatet bruker alt
vannet i vannbeholderen.
• Bruk malt kaffe fra en sterkere blanding eller smak.
• For å øke styrken på kaffen kan du øke
mengden forhåndsmalt kaffe eller redusere
mengden vann.
• Filteret renner over når jeg fjerner kannen fra
apparatet mens det trakter kaffe.
• Hvis du fjerner kannen i mer enn 20 sekunder i
løpet av trakteprosessen, gjør dryppstoppen at
lterkurven renner over. Vær også oppmerksom
på at kaffen ikke blir så smakfull som den skal
være, før på slutten av trakteprosessen. Derfor
anbefaler vi at du ikke fjerner kannen og heller
ut kaffe før trakteprosessen er ferdig.
Apparatet fortsetter å dryppe lenge etter at
trakteprosessen er ferdig.
• Dryppingen forårsakes av kondens fra dampen.
Det er helt normalt at apparatet drypper en stund.
• Hvis dryppingen ikke stopper, kan dryppstoppet
være blokkert. Du rengjør dryppstoppet ved å
trekke i tappen på lterkurvholderen på høyre
side på kaffetrakteren for å åpne holderen. Ta
ut lterkurven. Skyll deretter lterkurven og
dryppstoppet under springen.
• Hvis du fjerner kannen i mer enn 20 sekunder i
løpet av trakteprosessen, fører dryppstoppet til
at lterkurven renner over.
Kaffetrakteren begynner ikke å rengjøre
kaffekverntrakten.
• Kontroller at kaffetrakteren er koblet til
strømnettet.
• Pass på at du åpner lokket til kaffekverntrakten
før du trykker på og holder inne kvernknappen.
• Trykk på og hold inne kvernknappen i re
sekunder til kvernen begynner å rengjøre seg selv.
• Apparatet jobber, men du hører en pipelyd.
• Undersøk om lokket på kaffekverntrakten er
ordentlig lukket.
• Det virker som om kaffebønnene blir brukt opp
så raskt.
• Det ser kanskje ut som om kaffebønnene
blir brukt opp raskt. For å sikre et perfekt
kopp kaffe er det nødvendig med en bestemt
mengde malt kaffe. Mengden kaffebønner
apparatet bruker for å få perfekt mengde malt
kaffe, er normal.
NORSK
63
Page 64

1 Introduktion
3 Viktigt
Grattis till inköpet och välkommen till Philips!
För att dra maximal nytta av den support som
Philips erbjuder kan du registrera din produkt på
www.philips.com/welcome.
2 Allmän
beskrivning (Bild 1)
1 Filterkorg
2 Filterkorghållare
3 Vattennivåindikator
4 Lock till vattenbehållaren
5 Bönbehållarlock
6 Behållarväljare
7 Grovleksvred
8 Duobehållare för kaffebönor
9 Lock till kvarntratt
10 Lås till kvarntrattens lock
11 Hål för vattenpåfyllning
12 Teckenfönster
A Ikon för förmalet kaffe
B Antal koppar
C Kaffekoppsikon
D Ikon för val av kaffebönstyrka
E Knapp för val av styrka
F Timerknapp
G Timangivelse
H Minutangivelse
I Timerikon
13 På/av-knapp
14 Lock till glaskanna
15 Glaskanna
16 Rengöringsborste
Läs användarhandboken noggrant
innan du använder apparaten och
spara den för framtida bruk.
3.1 Fara
• Sänk aldrig ned apparaten i
vatten eller någon annan vätska
och skölj den inte under kranen.
3.2 Varning
• Kontrollera att den nätspänning
som anges på apparatens
undersida motsvarar den lokala
nätspänningen innan du kopplar
in den.
• Om nätsladden är skadad måste
den alltid bytas ut av Philips,
något av Philips auktoriserade
serviceombud eller liknande
behöriga personer för att
undvika olyckor.
• Den här apparaten kan användas
av barn från 8 års ålder, personer
med olika funktionshinder samt
av personer som inte har kunskap
om apparaten såvida det sker
under tillsyn eller om de har
informerats om hur apparaten
används på ett säkert sätt och
de eventuella medförda riskerna.
Rengöring och användarunderhåll
får utföras av barn om de är äldre
än 8 år och under tillsyn av vuxen.
Håll apparaten och dess sladd
utom räckhåll för barn under 8 år.
64
Page 65

• Barn ska inte leka med apparaten.
• Se till att nätsladden inte hänger
över kanten på bordet eller
arbetsbänken där apparaten står.
• Rör inte vid apparatens malskivor,
i synnerhet då apparaten är
ansluten till elnätet.
• Förvara förpackningsmaterialet
(plastpåsar, kartong osv.) utom
räckhåll för barn, eftersom det
inte är en leksak.
• Rör inte vid apparatens varma
delar när den används.
• Apparaten är utvecklad för att
mala kaffebönor och brygga kaffe.
Använd den på rätt sätt och med
varsamhet så att du inte bränner
dig på hett vatten eller ånga.
• Töm inte vattenbehållaren
genom att luta apparaten
eftersom kan det skada
apparaten. Töm bara
vattenbehållaren enligt
sköljningsinstruktionerna.
• Använd inte apparaten om
stickkontakten, nätsladden eller
själva apparaten är skadad.
• Om ett problem uppstår som du
inte kan lösa med hjälp av den här
användarhandboken kontaktar du
Philips kundtjänst i ditt land.
Om problemet fortfarande inte
kan lösas tar du med apparaten
till ett av Philips auktoriserade
serviceombud för undersökning
och reparation. Försök inte
reparera apparaten själv. Om du
gör det upphör garantin att gälla.
3.3 Försiktighet
• Placera inte apparaten på en
varm yta, och förhindra att
nätsladden kommer i kontakt
med varma ytor.
• Dra ur sladden om problem
uppstår under malning eller
bryggning och innan du rengör
apparaten.
• Flytta inte apparaten medan den
är igång.
• Apparaten blir varm under
användning. Låt apparaten svalna
innan du ställer undan den.
• Vid bryggning blir den nedre
delen av apparaten och kannans
underdel varma.
• Se till att alla delar är med och
att apparaten inte är skadad när
du har packat upp den. Om du
känner dig osäker ska du inte
använda apparaten utan kontakta
kundtjänsten i ditt land.
• Apparaten är endast avsedd för
normalt hushållsbruk. Den är inte
avsedd för användning i miljöer
som personalkök i verkstäder, på
kontor eller i andra arbetsmiljöer.
Den är inte heller avsedd att
användas av kunder på hotell,
motell, bed and breakfast och i
andra boendemiljöer.
3.4 Elektromagnetiska fält
(EMF)
Den här Philips-produkten uppfyller alla tillämpliga
standarder och regler gällande exponering av
elektromagnetiska fält.
SVENSKA
65
Page 66

4 Före första
användningen
4.1 Ställa klockan
1 Sätt in stickkontakten i vägguttaget.
• På skärmen blinkar 00:00 för att ange att
du behöver ställa klockan.
2 Vrid på knappen för att ställa in timme (Bild 2).
3 Tryck i mitten av knappen för att bekräfta
timme (Bild 3).
• Minuterna börjar blinka för att ange att du
behöver ställa in minuterna.
4 Vrid på knappen för att ställa in minut (Bild 4).
5 Tryck i mitten av knappen för att bekräfta
minut (Bild 5).
6 I teckenfönstret visas den inställda tiden.
Kaffebryggaren är klar för användning.
4.2 Inställning av tid för
automatisk avstängning
Du kan justera tiden efter vilken apparaten stängs
av automatiskt. Standardtiden är inställd på
30 minuter. Du kan justera tiden till max
120 minuter. Om du vill justera tiden för
automatisk avstängning följer du stegen nedan.
1 Se till att apparaten är avstängd (men att
stickkontakten sitter i vägguttaget).
2 Tryck in mitten av knappen och håll intryckt
tills teckenfönstret börjar blinka.
3
Vrid på knappen om du vill öka eller minska tiden.
1 är 10 minuter, 2 är 20 minuter,
3 är 30 minuter och så vidare tills
12 är 120 minuter.
4 Tryck i mitten av knappen för att bekräfta
minut.
D
Obs!
Apparaten sparar alltid den senaste inställningen.
4.3 Skölja igenom apparaten
Du måste skölja igenom kaffebryggaren en gång
före första användningen.
1 Öppna locket till vattenbehållaren.
Fyll på med rent kallvatten till
vattenbehållarens markering för
8 koppar (Bild 6).
D
Obs!
Lägg inte i kaffebönor eller malet kaffe i
apparaten.
2 Stäng locket till vattenbehållaren.
3 Ställ kannan i apparaten (Bild 7).
4 Tryck på på/av-knappen (Bild 8).
• Teckenfönstret tänds.
5 Tryck på knappen för val av styrka (Bild 9).
6 Vrid på knappen för att välja inställningen för
förmalet kaffe (Bild 10).
• Ikonen för förmalet kaffe tänds.
7 Tryck i mitten av knappen för att bekräfta.
Tryck sedan i mitten av knappen en gång till
för att starta spolningsprocessen (Bild 11).
8 Kör apparaten tills spolningsprocessen är slutförd.
9 Töm kannan.
5 Använda apparaten
5.1 Fylla på vattenbehållaren
1 Öppna locket till vattenbehållaren och fyll
vattenbehållaren med den mängd kallt vatten
som krävs. (Bild 6)
När du öppnar locket till vattenbehållaren
kan du se markeringar för 2–10 koppar
på apparatens insida. Med hjälp av dessa
markeringar kan du avgöra hur mycket
vatten du ska hälla i vattenbehållaren.
Avspeglingen ändras från ljus till mörk för
varje fylld kopp vatten. Du kan också använda
vattennivåindikatorn på kannan.
D
Obs!
Fyll inte vattenbehållaren över
10-koppsmarkeringen.
66
Page 67

5.2 Med kaffebönor
B Varning!
Håll alltid locket till vattenbehållaren stängt när du
fyller behållaren för kaffebönor med kaffebönor.
Annars kan kaffebönor ramla ner i vattenbehållaren
och blockera påfyllningshålet för vatten.
1 Ta av locket från behållaren för
kaffebönor. (Bild 12)
2 Fyll duobehållaren för kaffebönor med
kaffebönor. Du kan fylla duobehållaren för
kaffebönor med två olika typer av kaffebönor.
Se till att det nns tillräckligt med kaffebönor
i behållaren för mängden kaffe du vill
brygga (Bild 13).
D
Obs!
Se alltid till att behållaren för kaffebönor är
minst halvfull.
B
Varning!
För att förhindra att kvarnen blockeras, använd
inte orostade eller karamelliserade bönor.
Vi råder dig att använda kaffebönor istället för
espressobönor eftersom de kan orsaka skada.
3 För att öppna lterkorghållaren, dra i iken på
högra sidan av kaffebryggaren (Bild 14).
4 Ta ett papperslter (typ 1x4 eller nummer 4)
och vik de förslutna kanterna för att förhindra
att ltret rivs sönder eller viks.
Lägg pappersltret i lterhållaren. (Bild 15)
5 Stäng lterkorghållaren.
6 Ställ kannan i apparaten. (Bild 7)
7 Vrid på grovleksvredet för att välja önskad
malningstyp (från n till grov). (Bild 16)
E
Tips:
Med grovleksvredet kan du välja mellan nio
olika inställningar. Vi har förvalt 3 optimala
inställningar men du kan också välja någon
inställning mellan ikonerna. Vi rekommenderar
att du experimenterar med de olika
malningsinställningarna för att ta reda på vilken
inställning du föredrar.
8 Vrid på behållarväljaren för att välja mellan de
två typerna av kaffebönor (Bild 17).
B
Varning!
När du växlar mellan behållarväljaren för
kaffebönor eller använder en ny sorts
kaffebönor, nns det alltid kafferester från den
tidigare malningstypen av kaffebönor kvar.
Rengör kvarntratten när du har bytt till en ny
typ av kaffeböna för att få bort dem.
D
Obs!
Beroende på tycke och smak kan du antingen
välja någon av de två typerna av kaffebönor
eller en blandning av båda typerna.
9 Tryck på på/av-knappen på framsidan av
apparaten (Bild 8).
• Antalet koppar börjar blinka.
10 För att välja antalet koppar, vrid på
knappen tills önskat antal koppar visas på
skärmen (Bild 18).
D
Obs!
Se till att antalet koppar du väljer med
knappen 2–10 koppar stämmer överens med
mängden vatten i vattenbehållaren.
Kom ihåg att kaffebryggaren använder allt
vatten i vattenbehållaren. Om du väljer ett
lägre antal koppar än mängden vatten blir
kaffet blir svagare än du tänkt.
11 Tryck i mitten av knappen för att bekräfta
antal koppar.
12 Tryck på knappen för val av styrka. (Bild 9)
• Kaffebönsikonen börjar blinka.
13 Vrid på knappen för att välja den önskade
kaffestyrkan (mild: 1 böna, medel: 2 bönor
eller stark: 3 bönor) (Bild 10).
• Den inställda kaffestyrkan visas i
teckenfönstret.
SVENSKA
67
Page 68

E Tips:
Vi rekommenderar att du experimenterar
med mängden av vatten att ta reda på
vilken styrka du föredrar. Om du väljer ett
antal koppar som är högre än mängden
vatten, blir kaffet starkare. Om du väljer
ett antal koppar som är mindre än
mängden vatten, blir kaffet svagare.
14 Tryck i mitten av knappen för att bekräfta.
Tryck sedan i mitten av knappen en gång till
för att starta bryggningsprocessen (Bild 19).
• Kvarnen mal rätt mängd kaffebönor.
15 Vänta tills kaffebryggaren har slutat brygga
innan du tar bort kannan.
D
Obs!
När bryggningen är klar droppar det kaffe från
lterkorgen i några sekunder.
5.3 Med förmalet kaffe
Om du vill använda förmalet kaffe i stället för
kaffebönor följer du stegen nedan.
1 Öppna locket till vattenbehållaren och fyll
vattenbehållaren med den mängd kallt vatten
som krävs. (Bild 6)
2 För att öppna lterkorghållaren, dra i iken på
högra sidan av kaffebryggaren (Bild 14).
3 Ta ett papperslter (typ 1x4 eller nummer 4)
och vik de förslutna kanterna för att förhindra
att ltret rivs sönder eller viks.
Lägg pappersltret i lterhållaren (Bild 15).
4 Lägg förmalet kaffe i pappersltret.
D
Obs!
Du kan justera kaffestyrkan efter din egen
personliga smak. För en medelstark kopp kaffe
använder du ett kaffemått (cirka 6 g) malet kaffe för
varje kopp (120 ml). För starkare kaffe använder du
1,5 kaffemått malet kaffe för varje kopp kaffe.
5 Stäng lterkorghållaren.
6 Ställ kannan i apparaten (Bild 7).
7 Tryck på på/av-knappen (Bild 8).
• Teckenfönstret tänds.
8 Tryck på knappen för val av styrka (Bild 9).
9 Vrid på knappen för att välja inställningen
för förmalet kaffe (Bild 10).
• Ikonen för förmalet kaffe tänds.
10 Tryck i mitten av knappen för att bekräfta.
Tryck sedan i mitten av knappen en gång till
för att starta bryggningsprocessen (Bild 11).
11 Vänta tills kaffebryggaren har slutat brygga
innan du tar bort kannan.
D
Obs!
När bryggningen är klar droppar det kaffe från
lterkorgen i några sekunder.
5.4 Ställa in timern
Med timern kan du ställa in tiden för när
bryggningen ska star ta. Se till att alla steg för
kaffebryggningen antingen är för förmalet eller för
kaffebönor innan du ställer in timern.
1 Tryck på timerknappen. (Bild 20)
• På skärmen blinkar 00:00 för att ange att
du behöver ställa in timern.
2 Vrid på knappen för att ställa in
timme (Bild 21).
3 Tryck i mitten av knappen för att bekräfta
timme (Bild 22).
• Minuterna börjar blinka för att ange att du
behöver ställa in minuterna.
4 Vrid på knappen för att ställa in
minut (Bild 23).
5 Tryck i mitten av knappen för att bekräfta
minut (Bild 24).
• Timern är inställd och bryggningen börjar
på den förinställda tiden.
5.5 Droppstopp
Droppstoppet gör att du kan ta bort kannan från
kaffebryggaren innan bryggningen avslutas.
När du tar bort kannan avbryter droppstoppet
ödet av kaffe in i kannan.
D
Obs!
Bryggningen avbryts inte när du tar bort
kannan. Om du inte ställer tillbaka kannan på sin
plats i apparaten inom 20 sekunder svämmar
lterkorgen över.
68
Page 69

6 Rengöring och
underhåll
6.1 Rengöring efter varje
användning
B Varning!
Sänk aldrig ned apparaten i vatten eller någon
annan vätska och skölj den inte under kranen.
1 Tryck på apparatens på/av-knapp på
apparatens framsida för att stänga av
den. (Bild 25)
2 Ta ut stickkontakten ur vägguttaget.
3 Torka av kaffebryggarens utsida med en fuktig
trasa (Bild 26).
4 Rengör lterkorgen och kannan i diskmaskinen
eller med varmt vatten och lite diskmedel.
6.2 Rengöra kvarntratten
När du växlar mellan behållarväljaren för
kaffebönor eller använder en ny sorts kaffebönor,
kommer det alltid att nnas kvar rester från den
tidigare malda typen av kaffebönor som kan
påverka kaffets smak. Rengör kvarntratten med
1 till 2 veckors mellanrum eller när du byter
behållarväljare för kaffebönor för att förhindra att
nymalet kaffe och rester i kvarntratten blandas.
När du har bytt till en ny typ av kaffebönor följer
du stegen nedan för att få bästa möjliga smak.
1 Tryck på apparatens på/av-knapp på
apparatens framsida för att stänga av
den (Bild 25).
2 För att öppna lterkorghållaren, dra i iken på
högra sidan av kaffebryggaren (Bild 14).
3 Ta ett papperslter (typ 1x4 eller nummer 4)
och vik de förslutna kanterna för att förhindra
att ltret rivs sönder eller viks.
Lägg pappersltret i lterhållaren. (Bild 15)
4 Stäng lterkorghållaren.
5 Öppna locket till kvarntratten genom att föra
in den platta delen av rengöringsborstens
handtag i låset och tryck det nedåt (Bild 27).
D
Obs!
Om du endast vill rengöra kvarntratten snabbt
med borsten kan du fortsätta till steg 7.
Om du vill förhindra att malna kafferester
påverkar smaken på de nya kaffebönorna kan
du fortsätta till steg 6.
6 Håll ned knappen för val av styrka i
4 sekunder (Bild 28).
• Kvarnen börjar göra rent sig själv.
7 När kvarnen har slutat rengöra kan du
borsta bort rengöringsborsten att borsta
bort malda kafferester i den undre delen av
tratten (Bild 29).
• Kafferesterna hamnar i lterkorgen.
B
Varning!
Tappa inte borsten i kvarntratten.
8 Stäng locket på kvarntratten.
9 Ta bort pappersltret med kafferesterna och
släng det.
6.3 Kalka av kaffebryggaren
Avkalka kaffebryggaren när mängden ånga eller
bryggningstiden ökar. Vi rekommenderar att du
avkalkar kaffebryggaren varannan månad.
Använd bara vit ättika när du avkalkar,
eftersom andra produkter kan skada kaffebryggaren.
B
Varning!
Använd aldrig ättika med ättiksyra på över
8 %, naturlig vinäger, avkalkningspulver eller
avkalkningstabletter till att avkalka apparaten,
eftersom det kan orsaka skada.
1 Öppna locket till vattenbehållaren.
2 Fyll vattenbehållaren med åtta koppar ättika
(4 % ättiksyra) och två koppar vatten (Bild 6).
3 Sätt i ett papperslter (nummer
4) i lterkorgen och stäng
lterkorghållaren (Bild 15).
SVENSKA
69
Page 70

4 Ställ den tomma kannan i apparaten (Bild 7).
5 Sätt in stickkontakten i vägguttaget.
6 Tryck på apparatens på/av-knapp på
apparatens framsida för att starta den (Bild 8).
• Teckenfönstret tänds.
7 Tryck på knappen för val av styrka och
vrid på knappen för att välja den förvalda
kaffeinställningen (Bild 10).
8 Tryck i mitten av knappen för att bekräfta.
Tryck sedan i mitten av knappen en gång till
för att starta bryggningsprocessen (Bild 11).
9 Vänta tills hälften av ättikslösningen har runnit
ned i kannan. Avbryt sedan bryggningen
genom att trycka på på/av-knappen och låt
lösningen verka i minst en kvart (Bild 30).
10 Tryck på på/av-knappen för att slå på
kaffebryggaren igen (Bild 8).
11 Tryck i mitten av knappen två gånger för att
låta apparaten avsluta bryggningen (Bild 31).
12 Töm kannan och kasta pappersltret.
13 Fyll vattenbehållaren med kallt vatten och
tryck i mitten av knappen två gånger för att
starta en ny bryggning. Låt kaffebryggaren
avsluta hela bryggningen och töm kannan.
14 Upprepa steg 13 tills vattnet inte längre
smakar eller luktar ättika.
15 Rengör lterkorgen och kannan i diskmaskinen
eller med varmt vatten och lite diskmedel.
16 Tryck på apparatens på/av-knapp på
apparatens framsida för att stänga av den.
8 Återvinning
• Den här symbolen innebär att produkten
omfattas av EU-direktivet 2012/19/EU.
Ta reda på var närmaste återvinningsstation
för elektriska och elektroniska produkter
nns. Följ de lokala bestämmelserna och släng
aldrig produkten bland normalt hushållsavfall.
Korrekt kassering av gamla produkter bidrar
till att förhindra negativ påverkan på miljö och
hälsa (Bild 32).
9 Garanti och support
Om du behöver information eller support kan
du gå till www.philips.com/support eller läsa
garantibroschyren.
10 Felsökning
I det här kapitlet sammanfattas de vanligaste
problemen som kan uppstå med apparaten.
Om du inte kan lösa problemet med hjälp av
informationen nedan kan du gå till
www.philips.com/support och läsa svaren på
vanliga frågor. Du kan även kontakta kundtjänst i
ditt land.
7 Beställa tillbehör
Om du vill köpa tillbehör eller reservdelar kan du
gå till www.shop.philips.com/service eller en
Philips-återförsäljare. Du kan även kontakta Philips
kundtjänst i ditt land (kontaktinformation nns i
garantibroschyren).
70
Apparaten fungerar inte.
• Sätt i stickkontakten i vägguttaget och slå på
apparaten genom att trycka på på/av-knappen
på framsidan.
• Kontrollera att den spänning som anges på
apparaten överensstämmer med den lokala
nätspänningen.
• Fyll vattenbehållaren med vatten.
• Stäng locket på kvarntratten.
Page 71

När jag använder kvarnen blir kaffet för svagt.
• Kontrollera att det antal koppar du väljer med
knappen för 2–10 koppar överensstämmer
med mängden vatten i vattenbehållaren. Kom
ihåg att allt vatten som nns i kaffebryggarens
vattenbehållare används vid bryggning.
• Välj starkare kaffe med knappen för val av
kaffestyrka.
• När du använder kaffebönor måste du vara
noga med att inte trycka på knappen för
förmalet kaffe, eftersom du då stänger av
kvarnen.
• Använd en starkare blandning eller kaffebönor
med mer smak.
• Kontrollera att det antal koppar du väljer
överensstämmer med mängden vatten i
vattenbehållaren.
När jag använder förmalet kaffe blir kaffet för svagt.
• Se till att mängden förmalet kaffe i ltret
stämmer överens med mängden vatten
i vattenbehållaren. Tänk på att apparaten
använder allt vatten i vattenbehållaren.
• Använd en starkare blandning eller malet kaffe
med mer smak.
• Du kan öka kaffestyrkan genom att öka mängden
förmalet kaffe eller minska mängden vatten.
• Filtret svämmar över när jag tar bort kannan
från apparaten under pågående bryggning.
• Om du tar bort kannan i mer än 20 sekunder
under bryggningen får droppstoppet
lterkorgen att svämma över. Tänk även på att
kaffet inte får sin fulla smak förrän i slutet av
bryggningen.
Vi rekommenderar därför att du inte tar bort
kannan och häller upp kaffe förrän bryggningen
är klar.
Apparaten fortsätter droppa långt efter att
bryggningen är klar.
• Droppet beror på kondenserad ånga. Det är
helt normalt att apparaten droppar ett tag.
• Om det inte slutar droppa kan droppstoppet
vara igentäppt. Rengör droppstoppet genom
att dra i iken på lterkorghållaren som sitter
på kaffebryggarens högra sida och öppna
hållaren. Ta ut lterkorgen och skölj den sedan
tillsammans med droppstoppet under kranen.
• Om du tar bort kannan i mer än 20 sekunder
under bryggningen får droppstoppet
lterkorgen att svämma över.
Kaffet är inte tillräckligt varmt.
• Värm kannan med varmt vatten innan du börjar
brygga kaffe.
• Kaffet i kannan svalnar fortare om du bara
brygger några koppar. Kaffet håller sig varmt
längre om du brygger 10 koppar,
vilket motsvarar en full kanna.
• Använd tunna koppar, eftersom de absorberar
mindre värme från kaffet än tjocka koppar.
• Använd inte mjölk som kommer direkt ur
kylskåpet.
• Avkalka apparaten. Se avsnittet Kalka av
kaffebryggaren i kapitlet Rengöring och
underhåll.
Kaffebryggaren börjar inte rengöra kvarntratten.
• Se till att kaffebryggaren är ansluten till elnätet.
• Se till att du öppnar locket till kvarntratten innan
du trycker på och håller kvarnknappen intryckt.
• Håll kvarnknappen intryckt i 4 sekunder tills
kvarnen börjar rengöra sig själv.
• Apparaten fungerar men gör ett pipljud.
• Kontrollera om locket till kvarntratten är
ordentligt stängt.
• Det verkar som om kaffebönorna går åt snabbt.
• Det kan se ut som om kaffebönorna går åt
snabbt. För att få en perfekt kopp kaffe krävs en
viss mängd malet kaffe. Den mängd kaffebönor
apparaten använder för att få den perfekta
mängden malet kaffe är normalt.
SVENSKA
71
Page 72

Page 73

Page 74

Page 75

2 3 4 5
2x
2x
6 7 8 9
10
14 15 16 17
18
11 12 13
19 20 21
Page 76

22 23 24 25
4 sec.
1/2
1x
26 27
30
28 29
31 32
Page 77

Page 78

© 2015 Koninklijke Philips Electronics N.V.
All rights reserved.
Document order number: 4222.200.0639.5
 Loading...