Philips GC 7619 User Manual [ru]

0 (0)

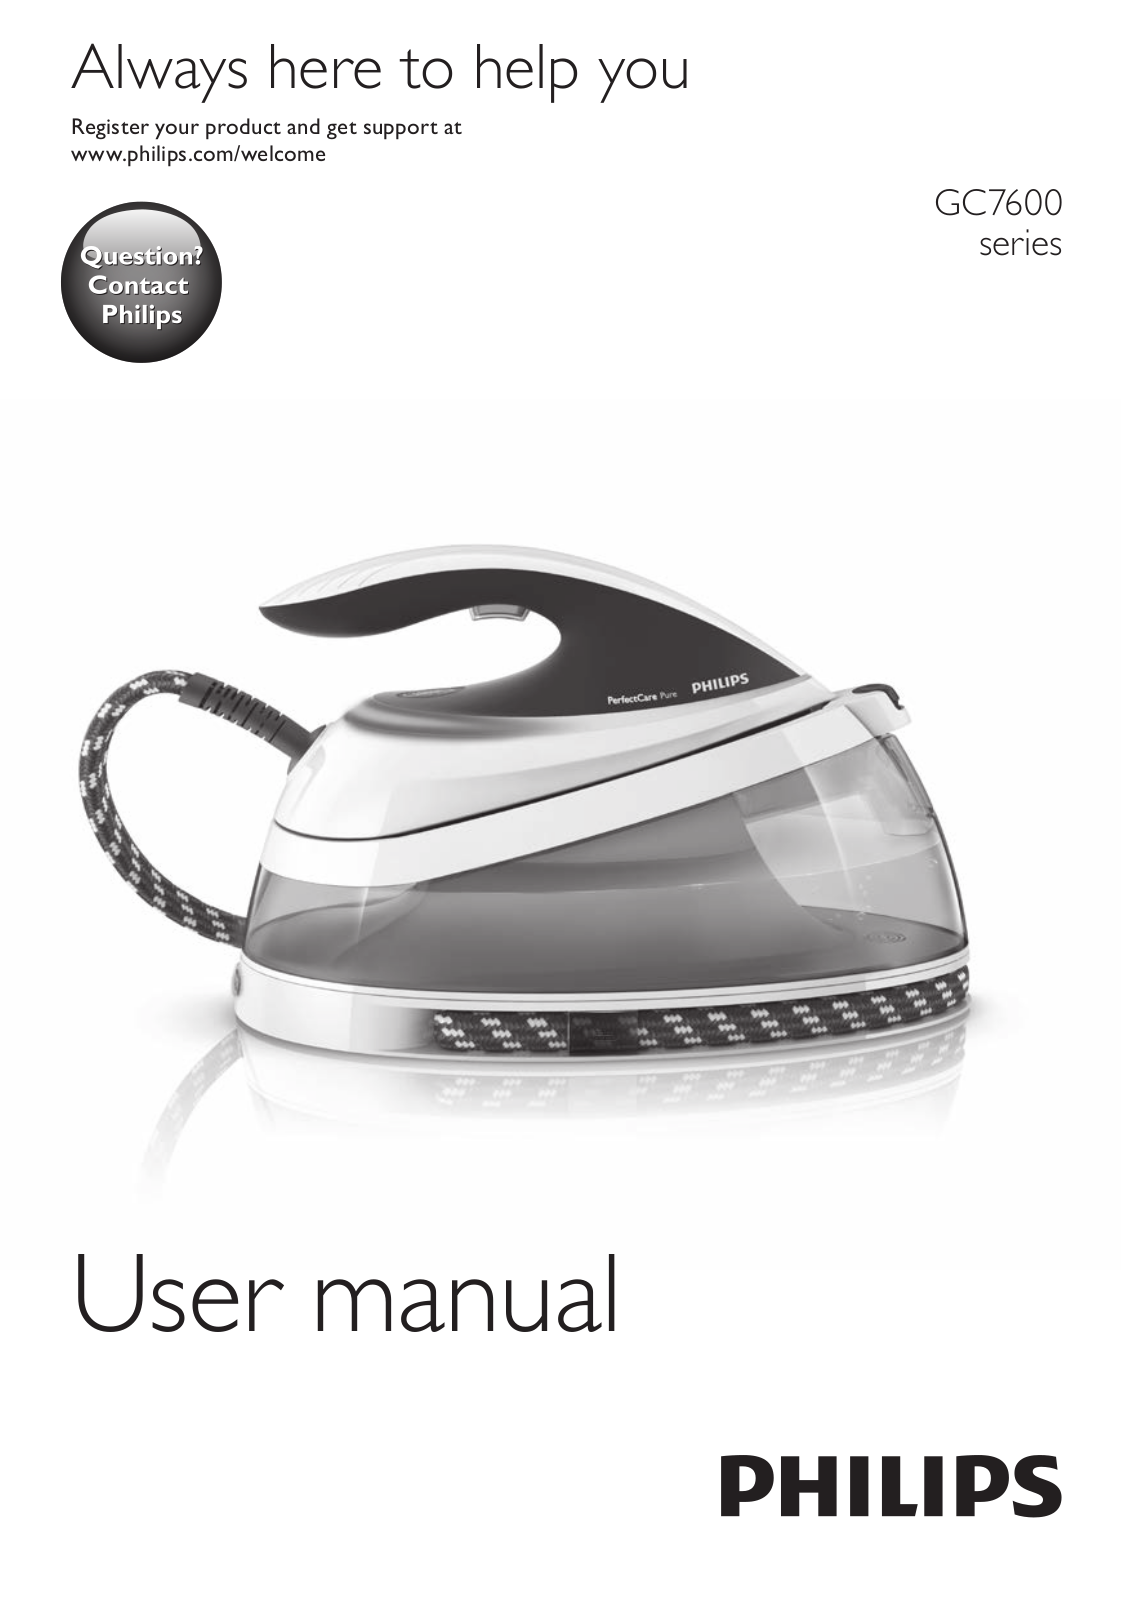
Always here to help you

Register your product and get support at www.philips.com/welcome

GC7600 series

User manual

Philips GC 7619 User Manual

4

-- ANTI-CALC: Important information: -- ANTI-CALC:Důležité informace:

-- Wkłady antywapienne — ważne informacje -- ANTI-CALCAR:informaţii importante:

-- Картридж очистки от накипи.Важная информация.

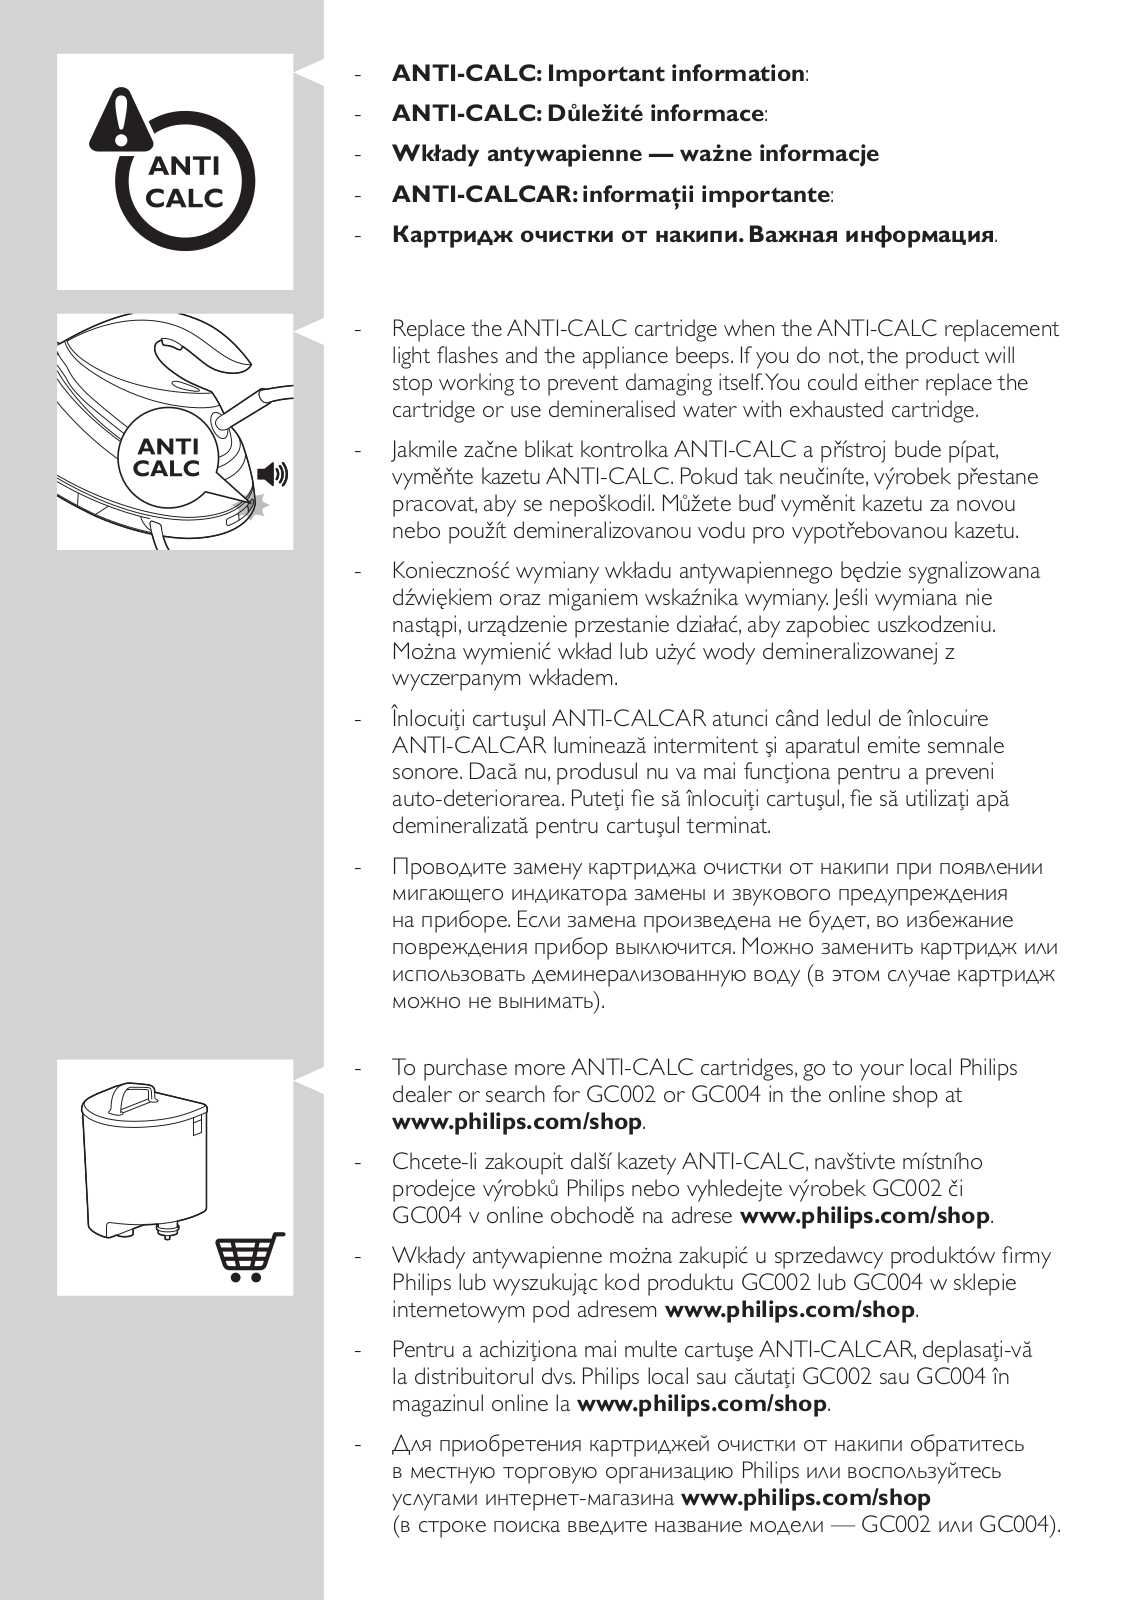
-- Replace the ANTI-CALC cartridge when the ANTI-CALC replacement light flashes and the appliance beeps. If you do not, the product will stop working to prevent damaging itself.You could either replace the cartridge or use demineralised water with exhausted cartridge.

-- Jakmile začne blikat kontrolka ANTI-CALC a přístroj bude pípat, vyměňte kazetu ANTI-CALC. Pokud tak neučiníte, výrobek přestane pracovat, aby se nepoškodil. Můžete buď vyměnit kazetu za novou nebo použít demineralizovanou vodu pro vypotřebovanou kazetu.

-- Konieczność wymiany wkładu antywapiennego będzie sygnalizowana dźwiękiem oraz miganiem wskaźnika wymiany. Jeśli wymiana nie nastąpi, urządzenie przestanie działać, aby zapobiec uszkodzeniu. Można wymienić wkład lub użyć wody demineralizowanej z wyczerpanym wkładem.

-- Înlocuiţi cartuşul ANTI-CALCAR atunci când ledul de înlocuire ANTI-CALCAR luminează intermitent şi aparatul emite semnale sonore. Dacă nu, produsul nu va mai funcţiona pentru a preveni auto-deteriorarea. Puteţi fie să înlocuiţi cartuşul, fie să utilizaţi apă demineralizată pentru cartuşul terminat.

-- Проводите замену картриджа очистки от накипи при появлении мигающего индикатора замены и звукового предупреждения на приборе. Если замена произведена не будет, во избежание

повреждения прибор выключится. Можно заменить картридж или использовать деминерализованную воду (в этом случае картридж можно не вынимать).

-- To purchase more ANTI-CALC cartridges, go to your local Philips dealer or search for GC002 or GC004 in the online shop at www.philips.com/shop.

-- Chcete-li zakoupit další kazety ANTI-CALC, navštivte místního prodejce výrobků Philips nebo vyhledejte výrobek GC002 či GC004 v online obchodě na adrese www.philips.com/shop.

-- Wkłady antywapienne można zakupić u sprzedawcy produktów firmy Philips lub wyszukując kod produktu GC002 lub GC004 w sklepie internetowym pod adresem www.philips.com/shop.

-- Pentru a achiziţiona mai multe cartuşe ANTI-CALCAR, deplasaţi-vă la distribuitorul dvs. Philips local sau căutaţi GC002 sau GC004 în magazinul online la www.philips.com/shop.

-- Для приобретения картриджей очистки от накипи обратитесь в местную торговую организацию Philips или воспользуйтесь услугами интернет-магазина www.philips.com/shop

(в строке поиска введите название модели — GC002 или GC004).

English 6

Čeština 14

Polski 22

Română 30

Русский 38

GC7600 series

6 English

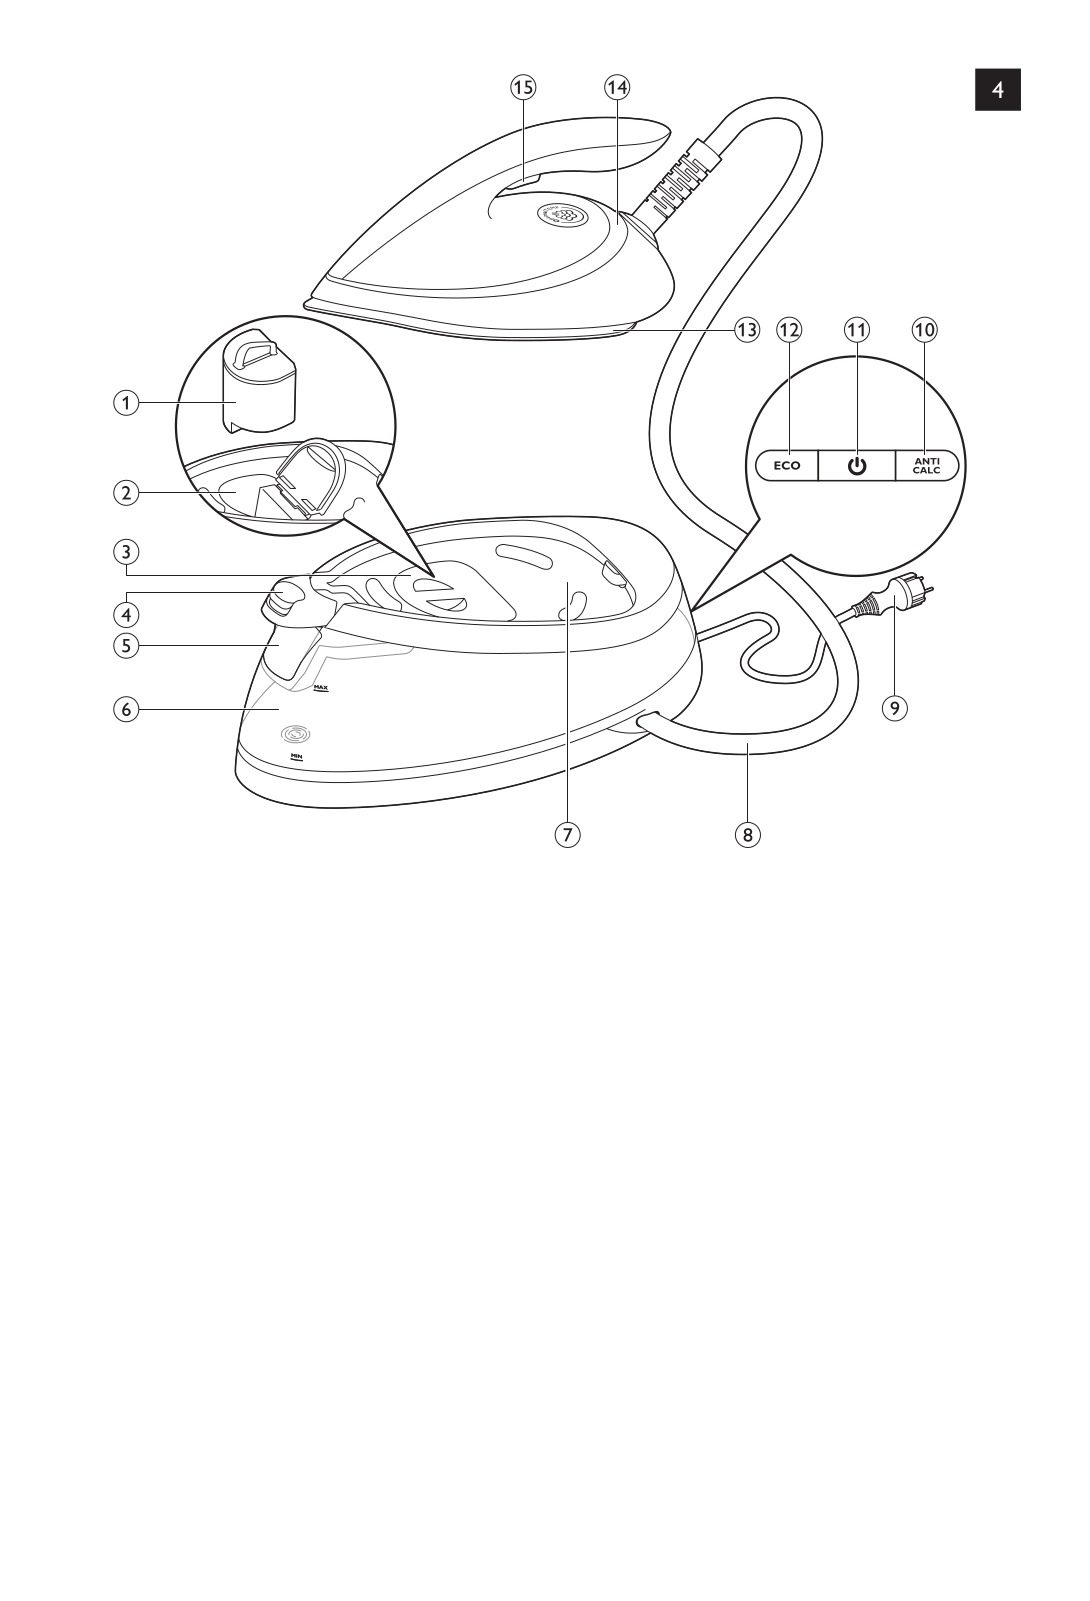
General description (Fig. 4)

1 ANTI-CALC cartridge

2ANTI-CALC cartridge compartment

3 ANTI-CALC cartridge compartment lid

4 Carry lock release button (specific types only)

5Filling funnel lid

6 Water tank with water level indicator

7 Iron platform

8 Supply hose

9Mains cord with plug

10ANTI-CALC cartridge replacement light

11On/off button with power-on light

12ECO button with light

13Soleplate

14’Iron ready’ light

15Steam trigger/steam boost button

Important

Read the separate important information leaflet and the user manual carefully before you use the appliance.Save both documents for future reference.

To fully benefit from the support that Philips offers, register your product at www.philips.com/welcome.

Before first use - Placing theANTI-CALC cartridge

Note:The appliance does not produce steam if the ANT-CALC cartridge is not in place.

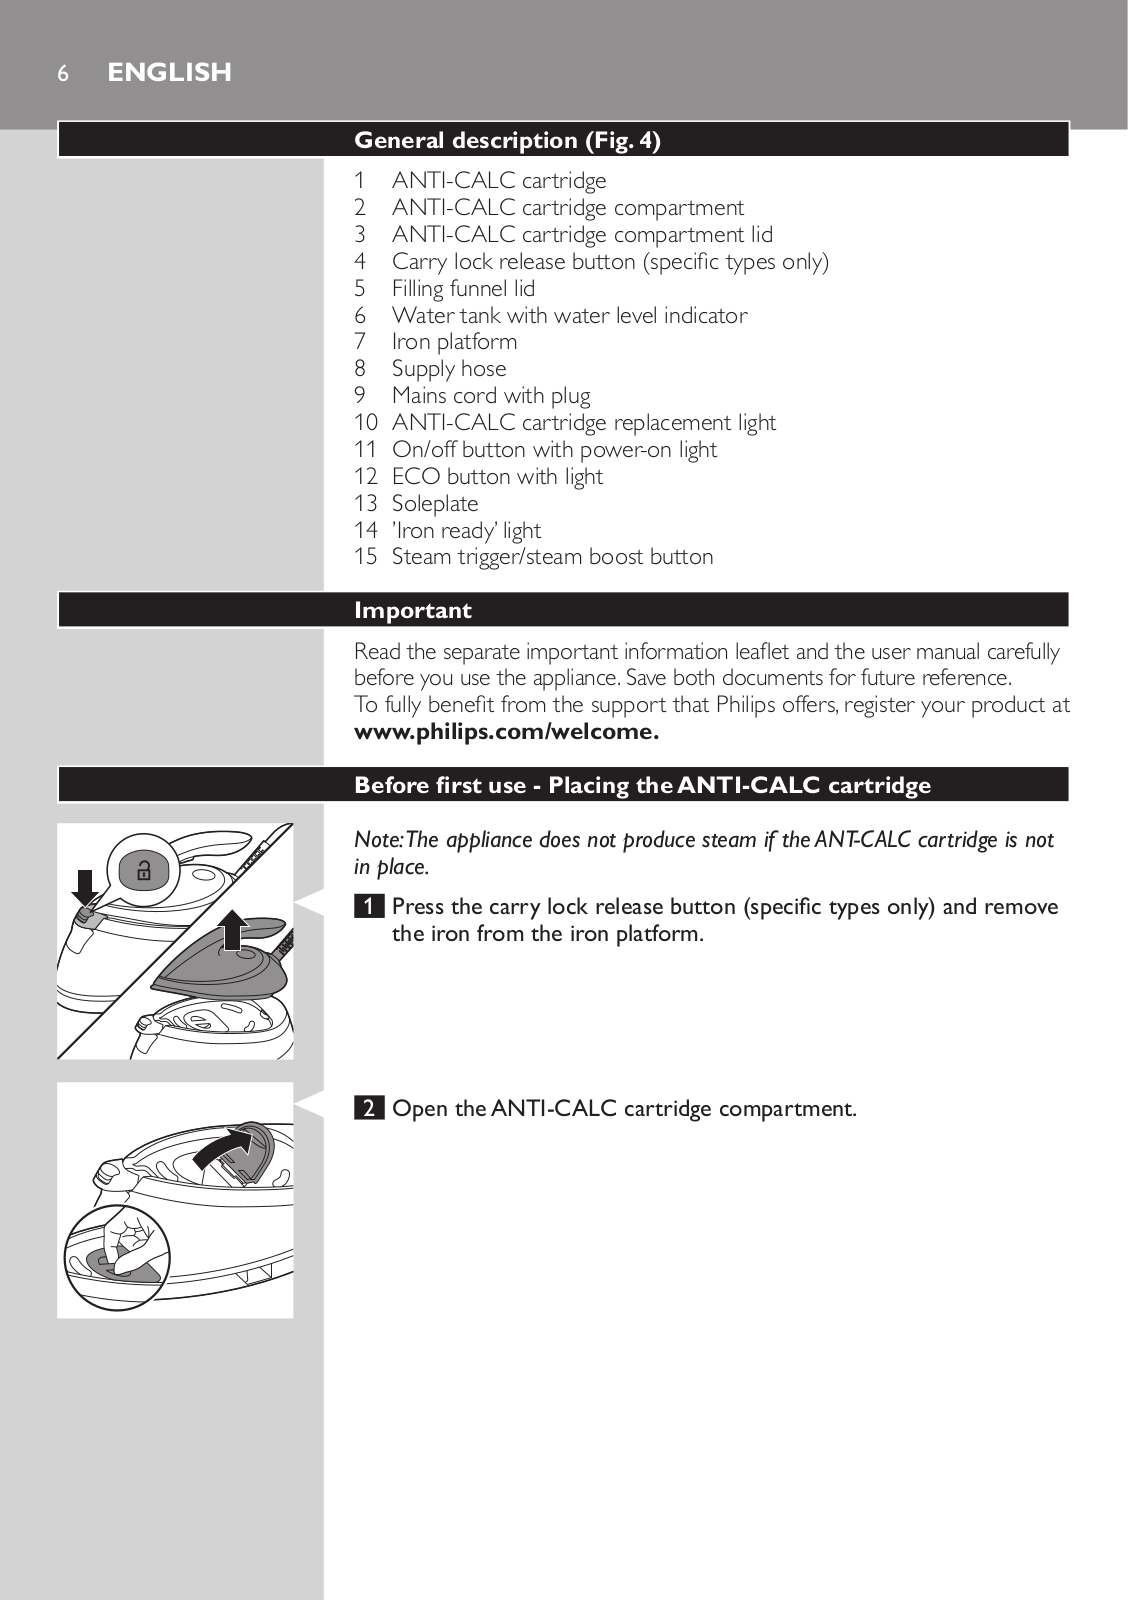
1 Press the carry lock release button (specific types only) and remove the iron from the iron platform.

2 Open the ANTI-CALC cartridge compartment.

English 7

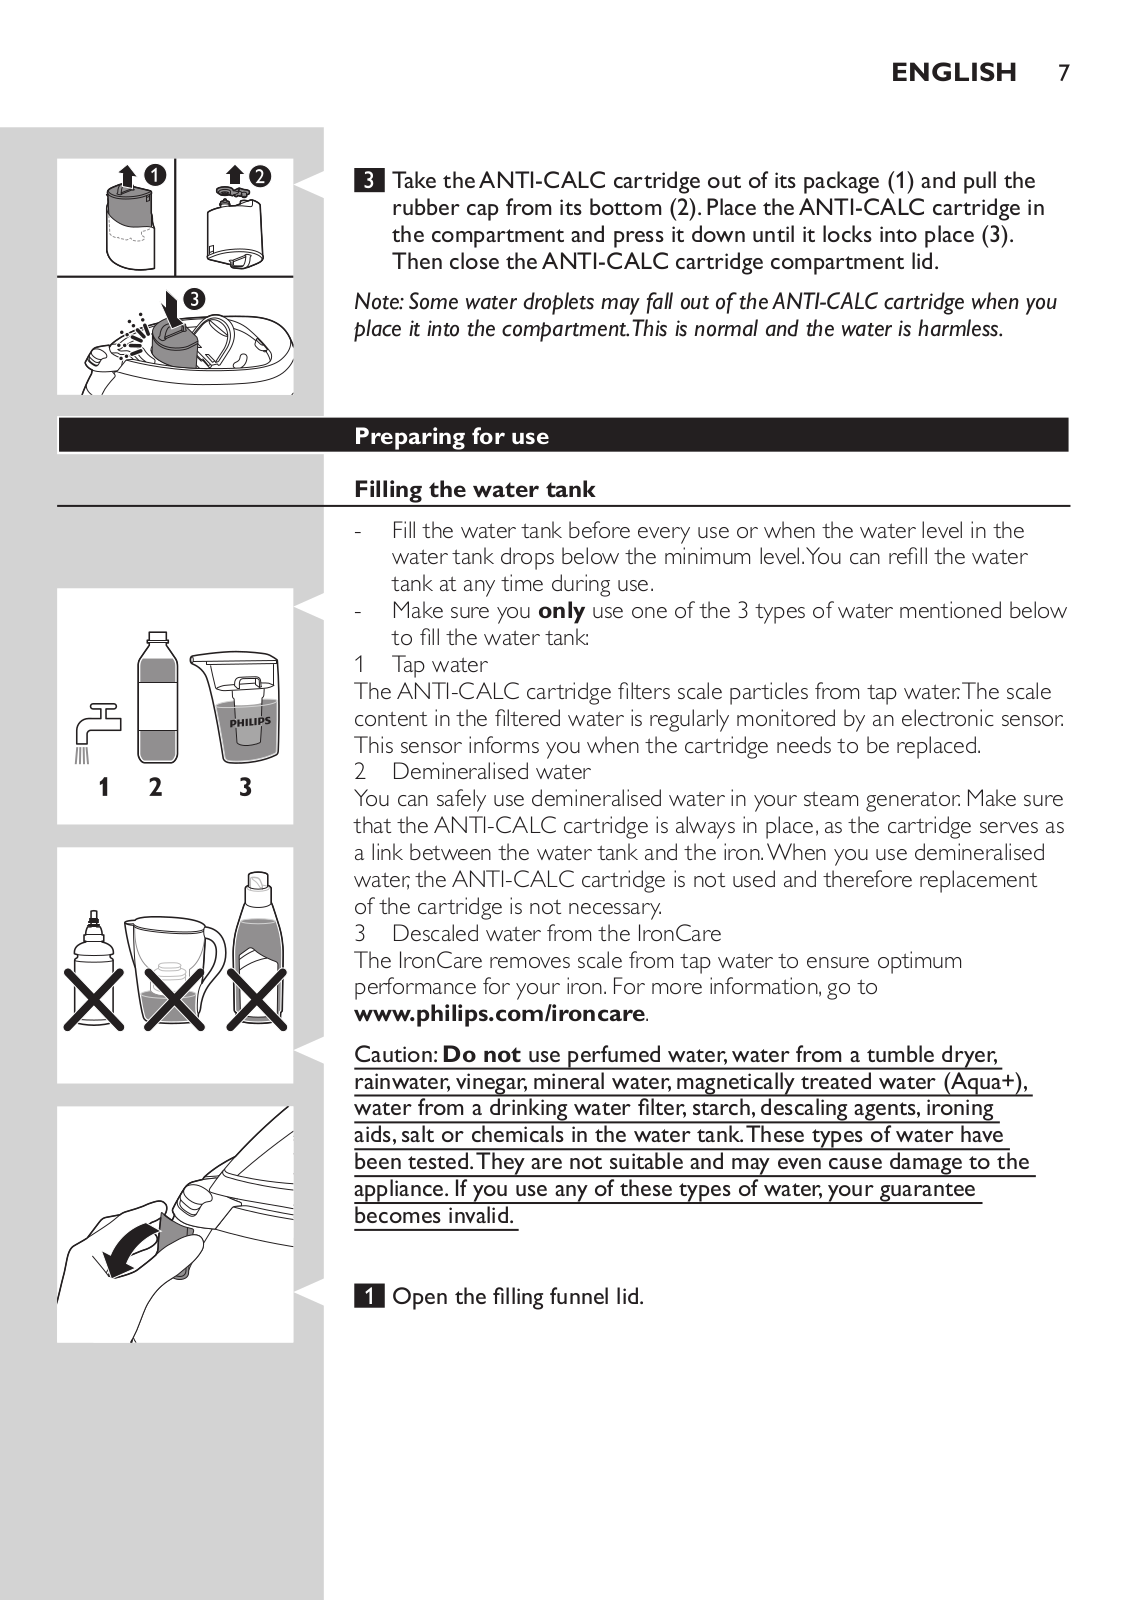
3Take theANTI-CALC cartridge out of its package (1) and pull the rubber cap from its bottom (2).Place theANTI-CALC cartridge in the compartment and press it down until it locks into place (3).

Then close the ANTI-CALC cartridge compartment lid.

Note: Some water droplets may fall out of the ANTI-CALC cartridge when you place it into the compartment.This is normal and the water is harmless.

Preparing for use

Filling the water tank

-- Fill the water tank before every use or when the water level in the water tank drops below the minimum level.You can refill the water tank at any time during use.

-- Make sure you only use one of the 3 types of water mentioned below to fill the water tank:

1 Tap water

The ANTI-CALC cartridge filters scale particles from tap water.The scale content in the filtered water is regularly monitored by an electronic sensor. This sensor informs you when the cartridge needs to be replaced.

2Demineralised water

You can safely use demineralised water in your steam generator. Make sure that the ANTI-CALC cartridge is always in place, as the cartridge serves as a link between the water tank and the iron.When you use demineralised water, the ANTI-CALC cartridge is not used and therefore replacement of the cartridge is not necessary.

3Descaled water from the IronCare

The IronCare removes scale from tap water to ensure optimum performance for your iron. For more information, go to www.philips.com/ironcare.

Caution: Do not use perfumed water, water from a tumble dryer, rainwater,vinegar,mineral water,magnetically treated water (Aqua+), water from a drinking water filter,starch,descaling agents,ironing aids,salt or chemicals in the water tank.These types of water have been tested.They are not suitable and may even cause damage to the appliance. If you use any of these types of water, your guarantee becomes invalid.

1 Open the filling funnel lid.

8 English

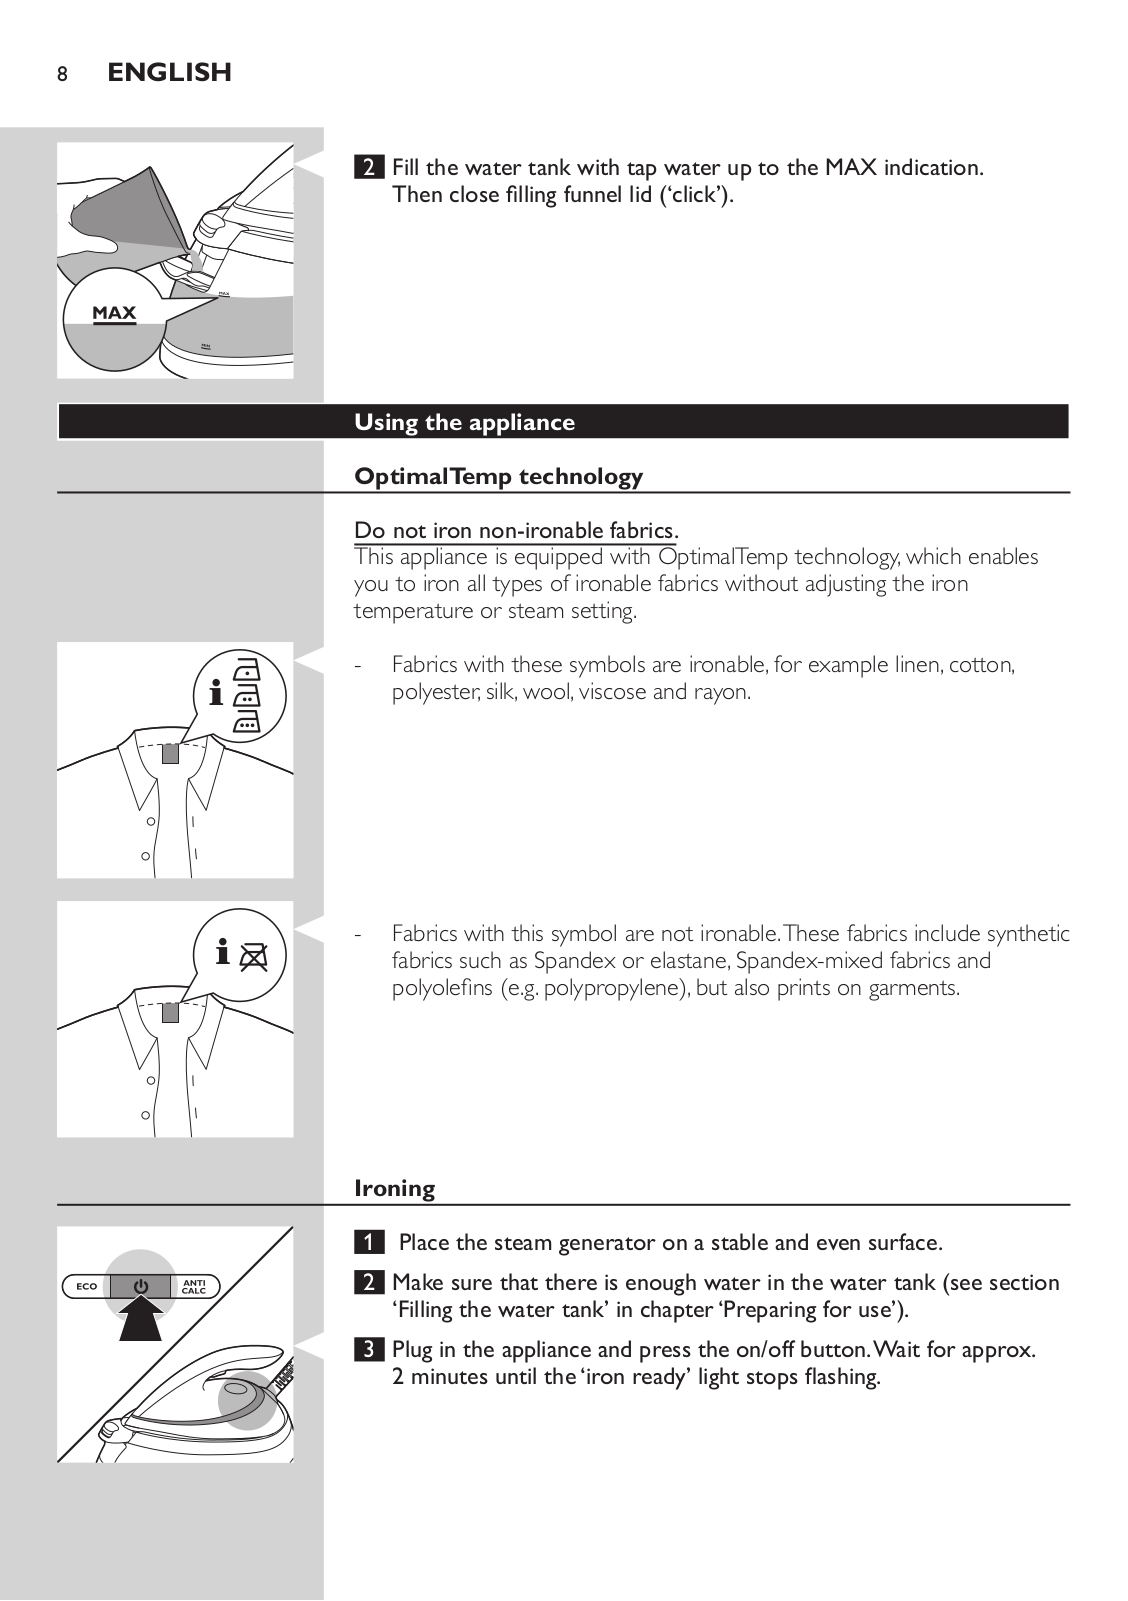
2Fill the water tank with tap water up to the MAX indication.

Then close filling funnel lid (‘click’).

Using the appliance

OptimalTemp technology

Do not iron non-ironable fabrics.

This appliance is equipped with OptimalTemp technology, which enables you to iron all types of ironable fabrics without adjusting the iron temperature or steam setting.

-- Fabrics with these symbols are ironable, for example linen, cotton, polyester, silk, wool, viscose and rayon.

-- Fabrics with this symbol are not ironable.These fabrics include synthetic fabrics such as Spandex or elastane, Spandex-mixed fabrics and polyolefins (e.g. polypropylene), but also prints on garments.

Ironing

1 Place the steam generator on a stable and even surface.

2 Make sure that there is enough water in the water tank (see section

‘Filling the water tank’ in chapter‘Preparing for use’).

3 Plug in the appliance and press the on/off button.Wait for approx.

2 minutes until the‘iron ready’ light stops flashing.

English 9

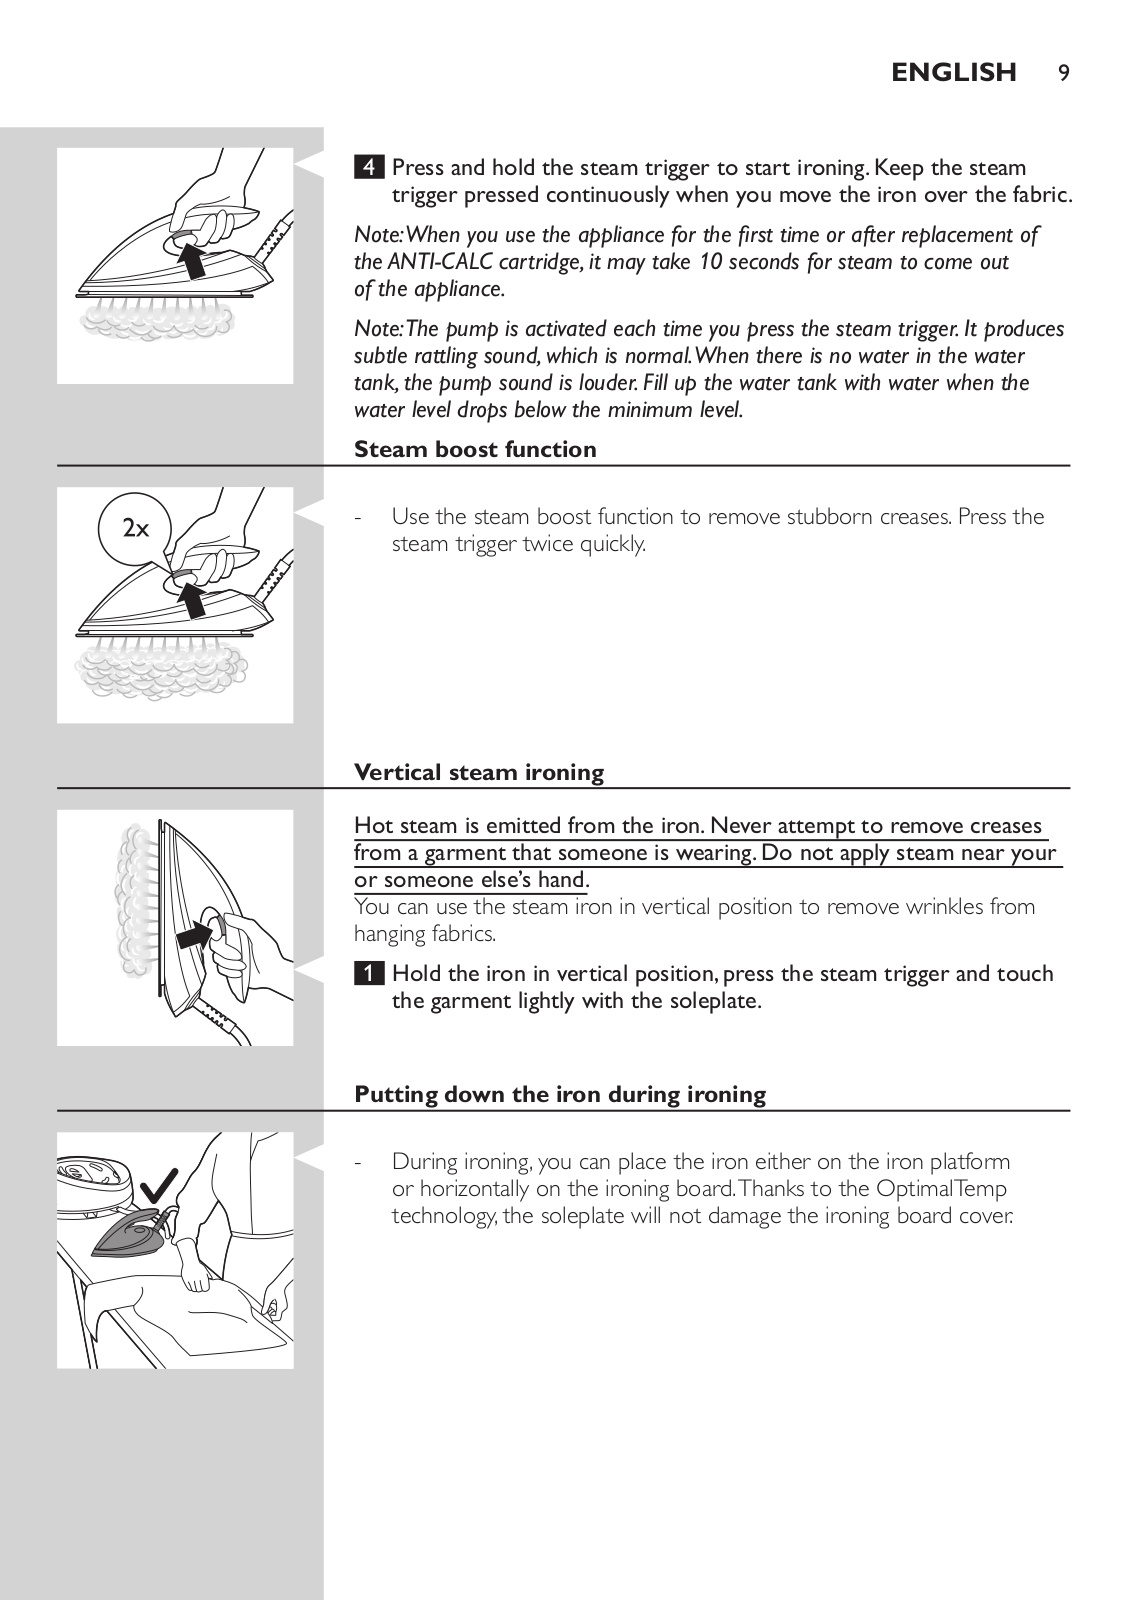
4Press and hold the steam trigger to start ironing. Keep the steam trigger pressed continuously when you move the iron over the fabric.

Note:When you use the appliance for the first time or after replacement of the ANTI-CALC cartridge, it may take 10 seconds for steam to come out

of the appliance.

Note:The pump is activated each time you press the steam trigger. It produces subtle rattling sound, which is normal.When there is no water in the water tank, the pump sound is louder. Fill up the water tank with water when the water level drops below the minimum level.

Steam boost function

-- Use the steam boost function to remove stubborn creases. Press the steam trigger twice quickly.

Vertical steam ironing

Hot steam is emitted from the iron.Never attempt to remove creases from a garment that someone is wearing. Do not apply steam near your or someone else’s hand.

You can use the steam iron in vertical position to remove wrinkles from hanging fabrics.

1Hold the iron in vertical position,press the steam trigger and touch the garment lightly with the soleplate.

Putting down the iron during ironing

-- During ironing, you can place the iron either on the iron platform or horizontally on the ironing board.Thanks to the OptimalTemp technology, the soleplate will not damage the ironing board cover.

10 English

Energy saving

ECO mode

By using the ECO mode (reduced amount of steam), you can save energy without compromising on the ironing result.

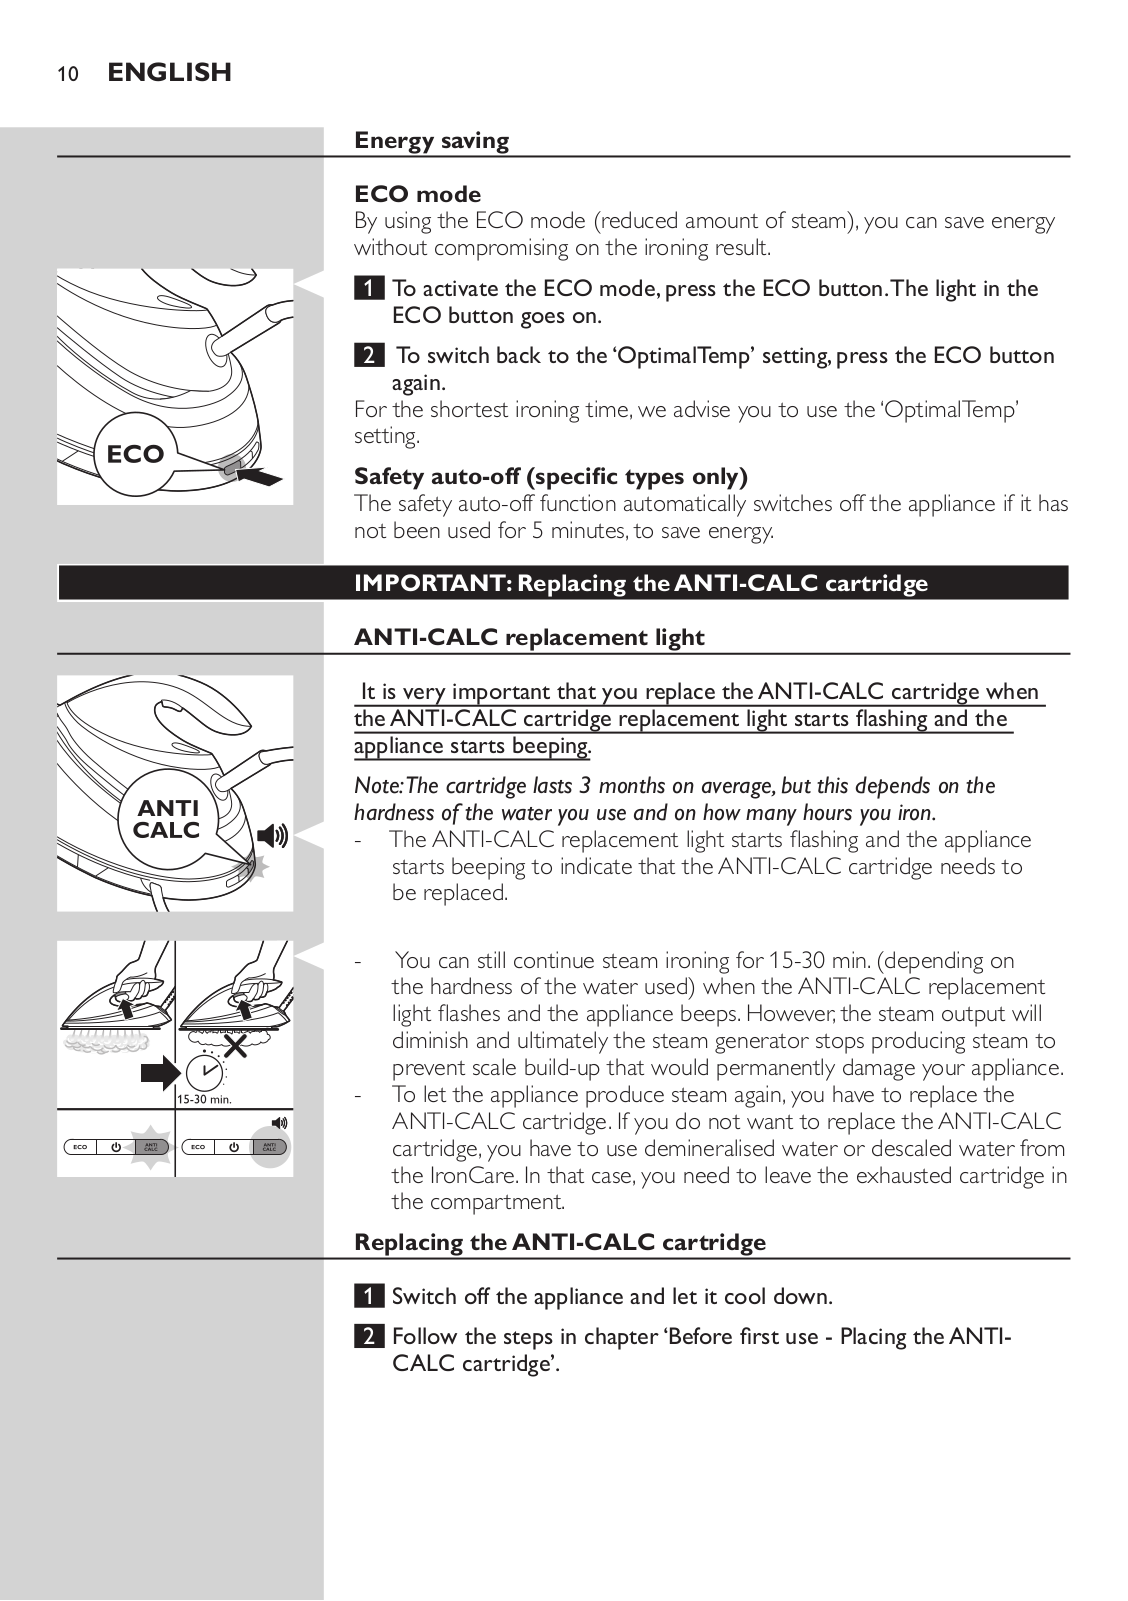
1 To activate the ECO mode,press the ECO button.The light in the ECO button goes on.

2 To switch back to the‘OptimalTemp’ setting,press the ECO button again.

For the shortest ironing time, we advise you to use the‘OptimalTemp’ setting.

Safety auto-off (specific types only)

The safety auto-off function automatically switches off the appliance if it has not been used for 5 minutes, to save energy.

IMPORTANT:Replacing theANTI-CALC cartridge

ANTI-CALC replacement light

It is very important that you replace theANTI-CALC cartridge when theANTI-CALC cartridge replacement light starts flashing and the appliance starts beeping.

Note:The cartridge lasts 3 months on average, but this depends on the hardness of the water you use and on how many hours you iron.

-- The ANTI-CALC replacement light starts flashing and the appliance starts beeping to indicate that the ANTI-CALC cartridge needs to be replaced.

--

--

You can still continue steam ironing for 15-30 min. (depending on the hardness of the water used) when the ANTI-CALC replacement light flashes and the appliance beeps. However, the steam output will diminish and ultimately the steam generator stops producing steam to prevent scale build-up that would permanently damage your appliance. To let the appliance produce steam again, you have to replace the ANTI-CALC cartridge. If you do not want to replace the ANTI-CALC

cartridge, you have to use demineralised water or descaled water from the IronCare. In that case, you need to leave the exhausted cartridge in the compartment.

Replacing theANTI-CALC cartridge

1Switch off the appliance and let it cool down.

2Follow the steps in chapter‘Before first use - Placing theANTICALC cartridge’.

English 11

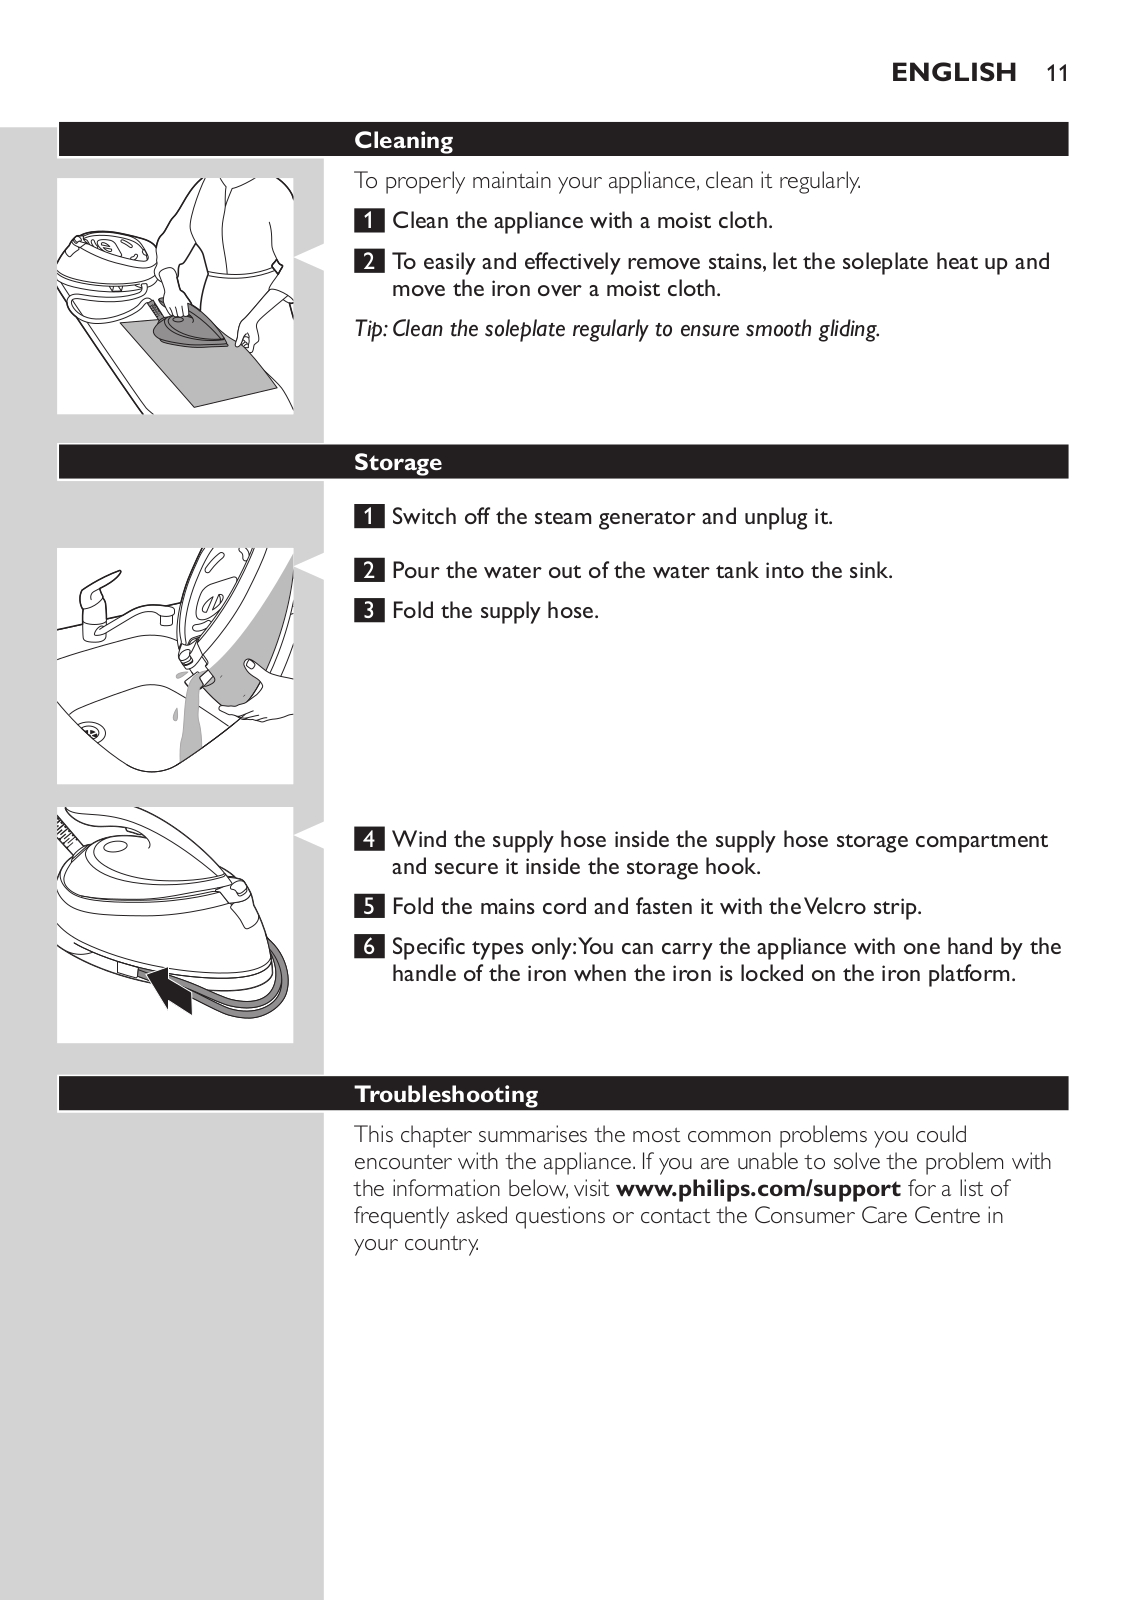
Cleaning

To properly maintain your appliance, clean it regularly.

1Clean the appliance with a moist cloth.

2To easily and effectively remove stains,let the soleplate heat up and move the iron over a moist cloth.

Tip: Clean the soleplate regularly to ensure smooth gliding.

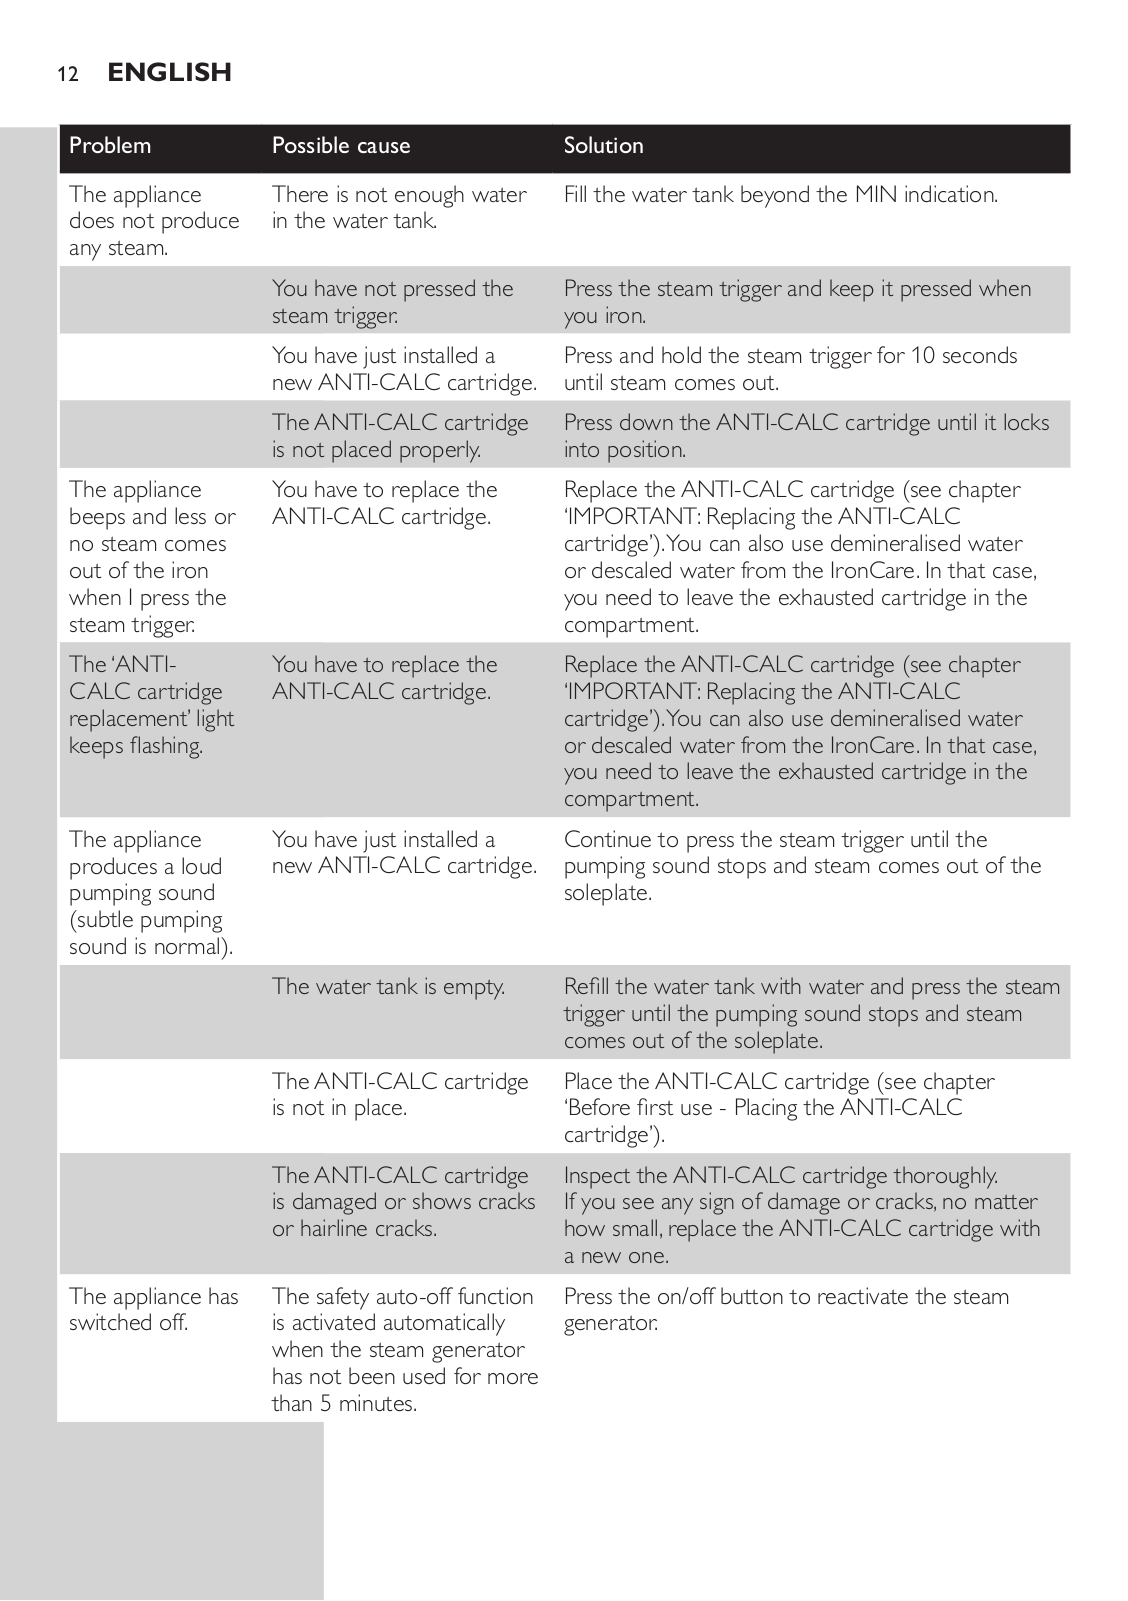
Storage

1Switch off the steam generator and unplug it.

2Pour the water out of the water tank into the sink.

3Fold the supply hose.

4Wind the supply hose inside the supply hose storage compartment and secure it inside the storage hook.

5 Fold the mains cord and fasten it with the Velcro strip.

6Specific types only:You can carry the appliance with one hand by the handle of the iron when the iron is locked on the iron platform.

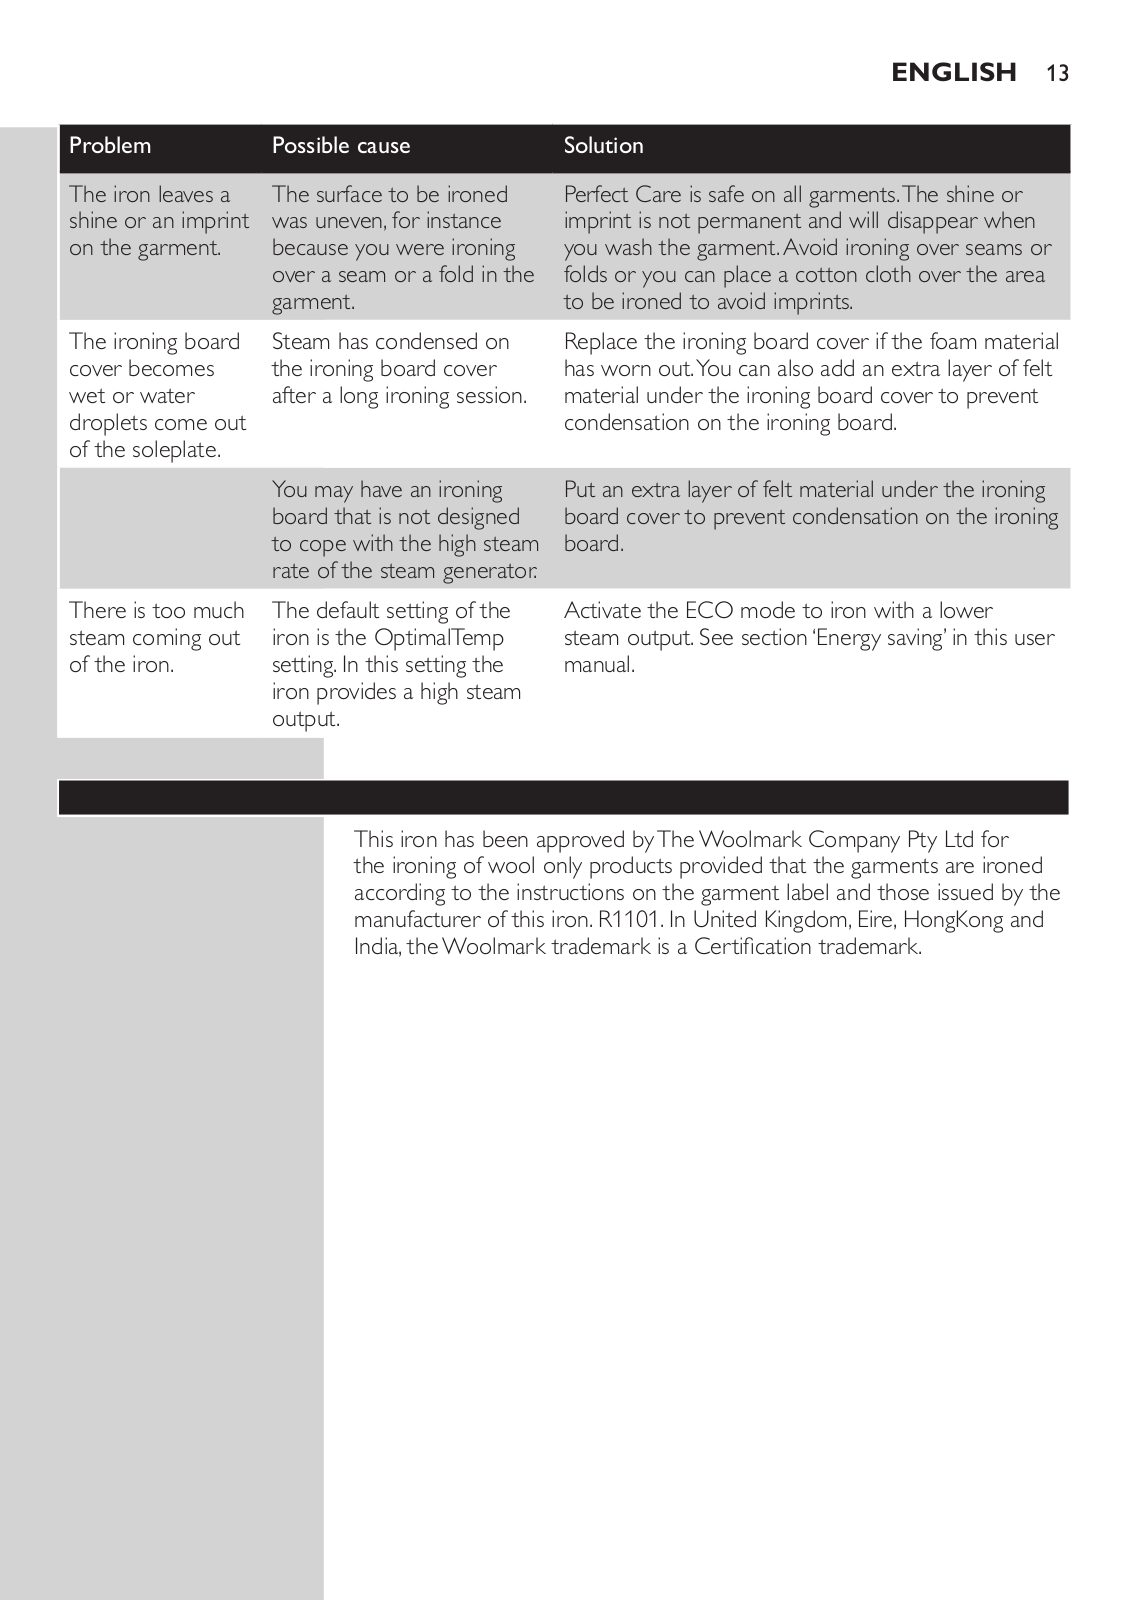
Troubleshooting

This chapter summarises the most common problems you could encounter with the appliance. If you are unable to solve the problem with the information below, visit www.philips.com/support for a list of frequently asked questions or contact the Consumer Care Centre in your country.

12 English

Problem

Possible cause

Solution


The appliance

There is not enough water

Fill the water tank beyond the MIN indication.

does not produce

in the water tank.


any steam.


The appliance beeps and less or no steam comes out of the iron when I press the steam trigger.

The‘ANTI-

CALC cartridge replacement’ light keeps flashing.

The appliance produces a loud pumping sound

(subtle pumping sound is normal).

The appliance has switched off.

You have not pressed the steam trigger.

You have just installed a new ANTI-CALC cartridge.

The ANTI-CALC cartridge is not placed properly.

You have to replace the

ANTI-CALC cartridge.

You have to replace the

ANTI-CALC cartridge.

You have just installed a new ANTI-CALC cartridge.

The water tank is empty.

The ANTI-CALC cartridge is not in place.

The ANTI-CALC cartridge is damaged or shows cracks or hairline cracks.

The safety auto-off function is activated automatically when the steam generator has not been used for more than 5 minutes.

Press the steam trigger and keep it pressed when you iron.

Press and hold the steam trigger for 10 seconds until steam comes out.

Press down the ANTI-CALC cartridge until it locks into position.

Replace the ANTI-CALC cartridge (see chapter ‘IMPORTANT: Replacing the ANTI-CALC cartridge’).You can also use demineralised water or descaled water from the IronCare. In that case, you need to leave the exhausted cartridge in the compartment.

Replace the ANTI-CALC cartridge (see chapter ‘IMPORTANT: Replacing the ANTI-CALC cartridge’).You can also use demineralised water or descaled water from the IronCare. In that case, you need to leave the exhausted cartridge in the compartment.

Continue to press the steam trigger until the pumping sound stops and steam comes out of the soleplate.

Refill the water tank with water and press the steam trigger until the pumping sound stops and steam comes out of the soleplate.

Place the ANTI-CALC cartridge (see chapter ‘Before first use - Placing the ANTI-CALC cartridge’).

Inspect the ANTI-CALC cartridge thoroughly.

If you see any sign of damage or cracks, no matter how small, replace the ANTI-CALC cartridge with a new one.

Press the on/off button to reactivate the steam generator.


English 13

Problem

Possible cause

Solution


The iron leaves a

The surface to be ironed

Perfect Care is safe on all garments.The shine or

shine or an imprint

was uneven, for instance

imprint is not permanent and will disappear when

on the garment.

because you were ironing

you wash the garment. Avoid ironing over seams or


over a seam or a fold in the

folds or you can place a cotton cloth over the area


garment.

to be ironed to avoid imprints.

The ironing board

Steam has condensed on

Replace the ironing board cover if the foam material

cover becomes

the ironing board cover

has worn out.You can also add an extra layer of felt

wet or water

after a long ironing session.

material under the ironing board cover to prevent

droplets come out


condensation on the ironing board.

of the soleplate.


You may have an ironing board that is not designed to cope with the high steam rate of the steam generator.

Put an extra layer of felt material under the ironing board cover to prevent condensation on the ironing board.

There is too much steam coming out of the iron.

The default setting of the iron is the OptimalTemp setting. In this setting the iron provides a high steam output.

Activate the ECO mode to iron with a lower steam output. See section‘Energy saving’ in this user manual.

This iron has been approved byTheWoolmark Company Pty Ltd for the ironing of wool only products provided that the garments are ironed

according to the instructions on the garment label and those issued by the manufacturer of this iron. R1101. In United Kingdom, Eire, HongKong and India, theWoolmark trademark is a Certification trademark.

14 Čeština

Všeobecný popis (Obr.4)

1 Kazeta ANTI-CALC

2Přihrádka pro kazetu ANTI-CALC

3Kryt přihrádky pro kazetu ANTI-CALC

4 Tlačítko uvolnění zámku pro přenášení žehličky (pouze specifické typy)

5Víko plnicího trychtýře

6 Nádržka na vodu s kontrolkou hladiny vody

7 Žehlicí plocha

8Přívodní hadice

9Napájecí kabel se zástrčkou

10Kontrolka výměny kazety ANTI-CALC

11Vypínač s kontrolkou zapnutí

12Tlačítko ECO s kontrolkou

13Žehlicí plocha

14Kontrolka „Žehlička připravena“

15Spoušť páry / tlačítko parního rázu

Důležité

Před použitím si pečlivě přečtěte uživatelskou příručku a samostatný letáček s důležitými informacemi. Uložte si oba dokumenty pro budoucí použití.

Chcete-li využívat všech výhod podpory nabízené společností Philips, zaregistrujte svůj výrobek na adrese www.philips.com/welcome.

Před prvním použitím – Umístění kazetyANTI-CALC

Poznámka:Přístroj nevytváří páru,pokud není na místě kazetaANT-CALC.

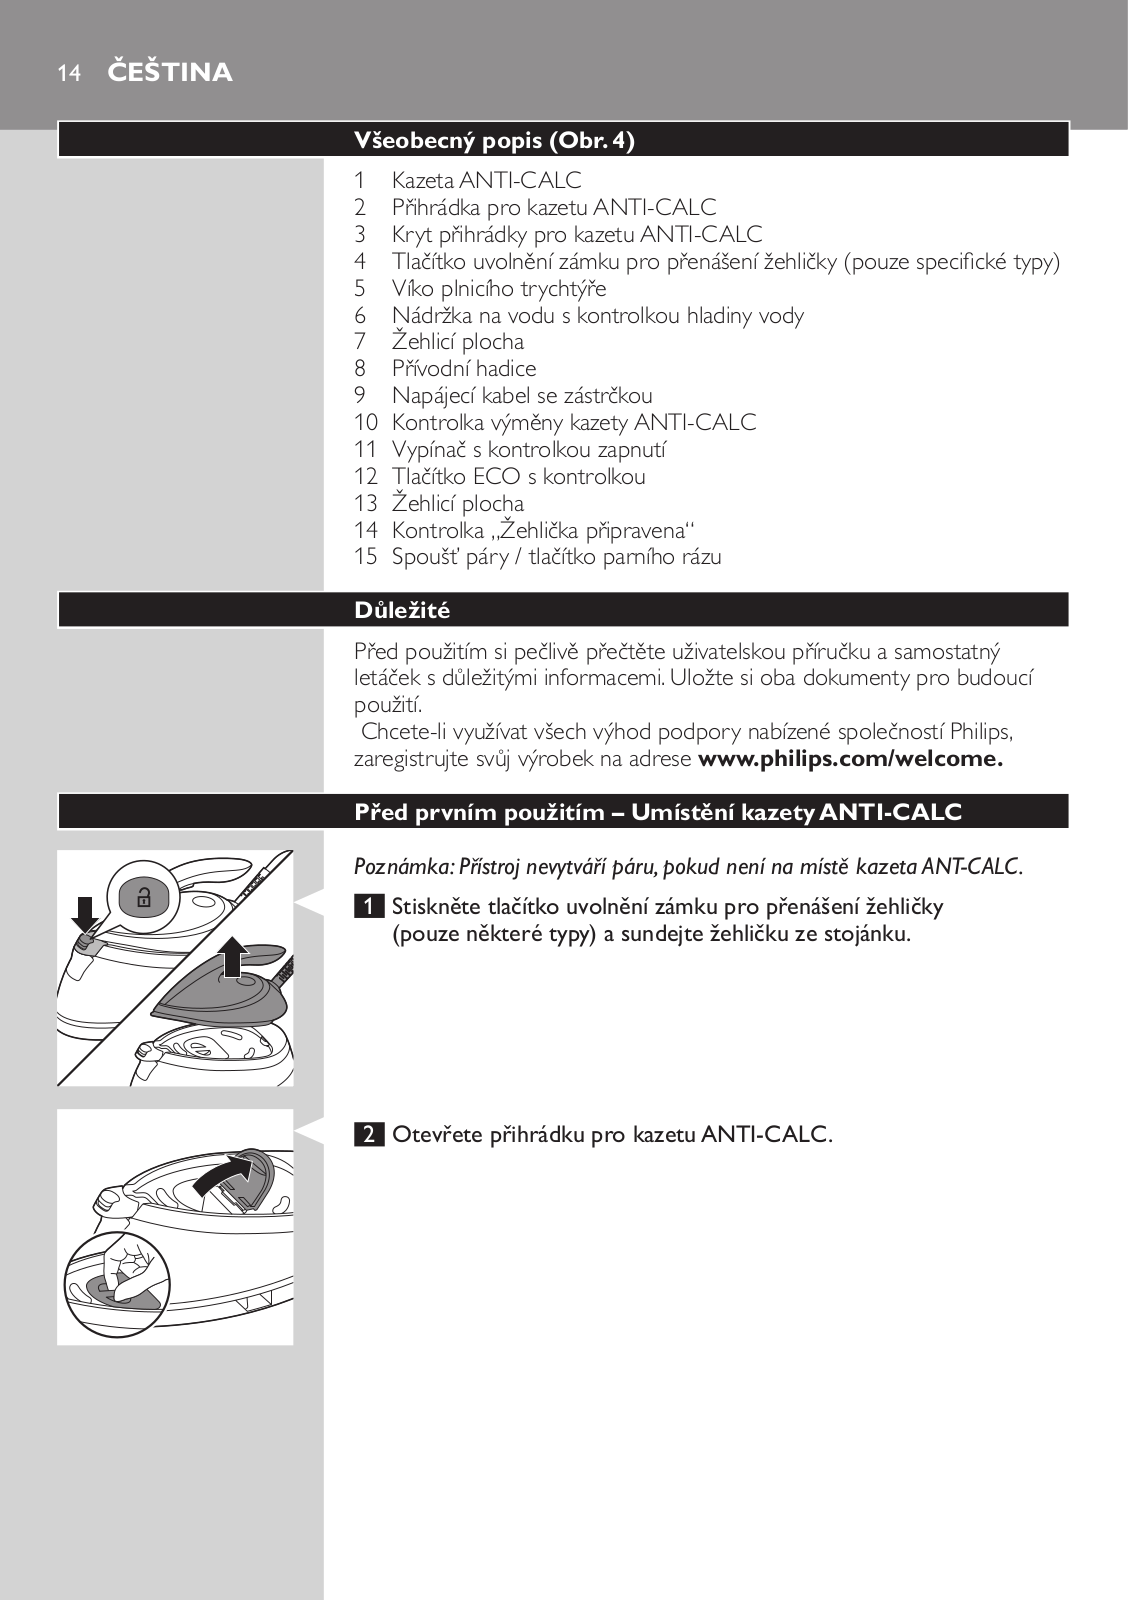
1 Stiskněte tlačítko uvolnění zámku pro přenášení žehličky (pouze některé typy) a sundejte žehličku ze stojánku.

2 Otevřete přihrádku pro kazetuANTI-CALC.

Čeština 15

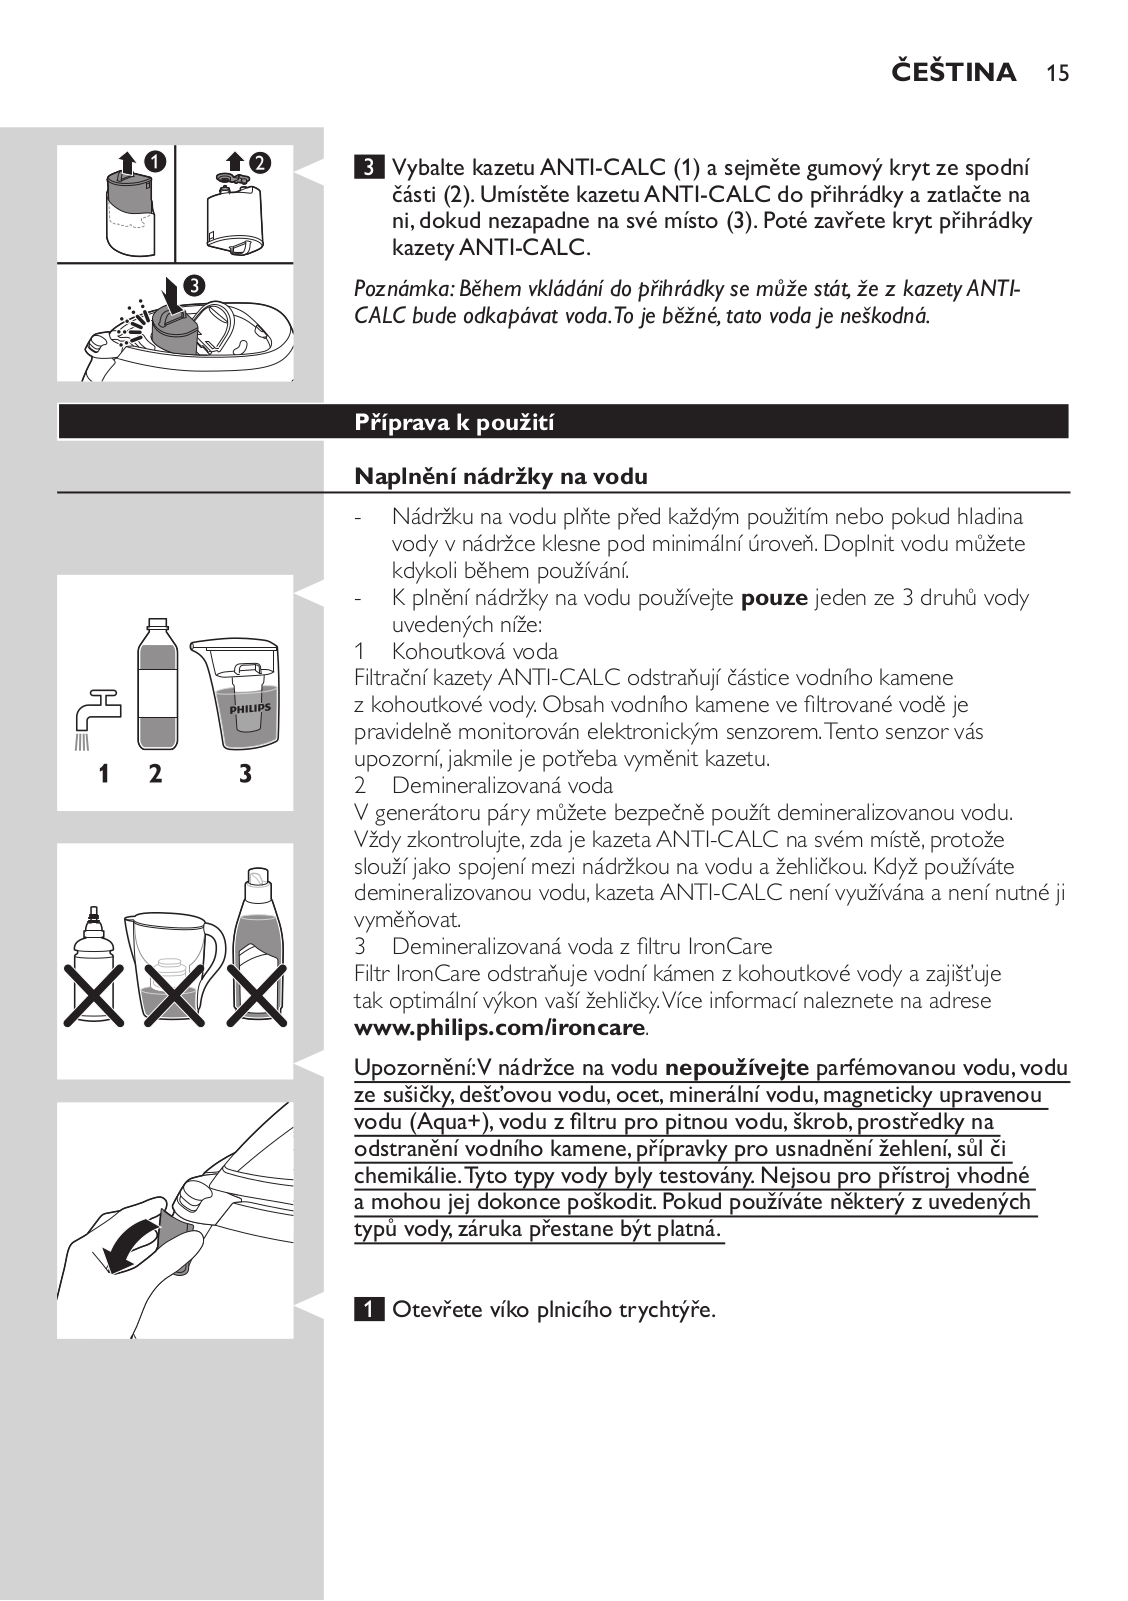
3Vybalte kazetuANTI-CALC (1) a sejměte gumový kryt ze spodní části (2).Umístěte kazetuANTI-CALC do přihrádky a zatlačte na ni,dokud nezapadne na své místo (3).Poté zavřete kryt přihrádky kazetyANTI-CALC.

Poznámka:Během vkládání do přihrádky se může stát,že z kazetyANTICALC bude odkapávat voda.To je běžné,tato voda je neškodná.

Příprava k použití

Naplnění nádržky na vodu

-- Nádržku na vodu plňte před každým použitím nebo pokud hladina vody v nádržce klesne pod minimální úroveň. Doplnit vodu můžete kdykoli během používání.

-- K plnění nádržky na vodu používejte pouze jeden ze 3 druhů vody uvedených níže:

1Kohoutková voda

Filtrační kazety ANTI-CALC odstraňují částice vodního kamene z kohoutkové vody. Obsah vodního kamene ve filtrované vodě je

pravidelně monitorován elektronickým senzorem.Tento senzor vás upozorní, jakmile je potřeba vyměnit kazetu.

2Demineralizovaná voda

V generátoru páry můžete bezpečně použít demineralizovanou vodu. Vždy zkontrolujte, zda je kazeta ANTI-CALC na svém místě, protože slouží jako spojení mezi nádržkou na vodu a žehličkou. Když používáte demineralizovanou vodu, kazeta ANTI-CALC není využívána a není nutné ji vyměňovat.

3Demineralizovaná voda z filtru IronCare

Filtr IronCare odstraňuje vodní kámen z kohoutkové vody a zajišťuje tak optimální výkon vaší žehličky.Více informací naleznete na adrese www.philips.com/ironcare.

Upozornění:V nádržce na vodu nepoužívejte parfémovanou vodu,vodu ze sušičky,dešťovou vodu,ocet,minerální vodu,magneticky upravenou vodu (Aqua+),vodu z filtru pro pitnou vodu,škrob,prostředky na odstranění vodního kamene,přípravky pro usnadnění žehlení,sůl či chemikálie.Tyto typy vody byly testovány.Nejsou pro přístroj vhodné

a mohou jej dokonce poškodit.Pokud používáte některý z uvedených typů vody,záruka přestane být platná.

1 Otevřete víko plnicího trychtýře.

Loading...
+ 33 hidden pages