

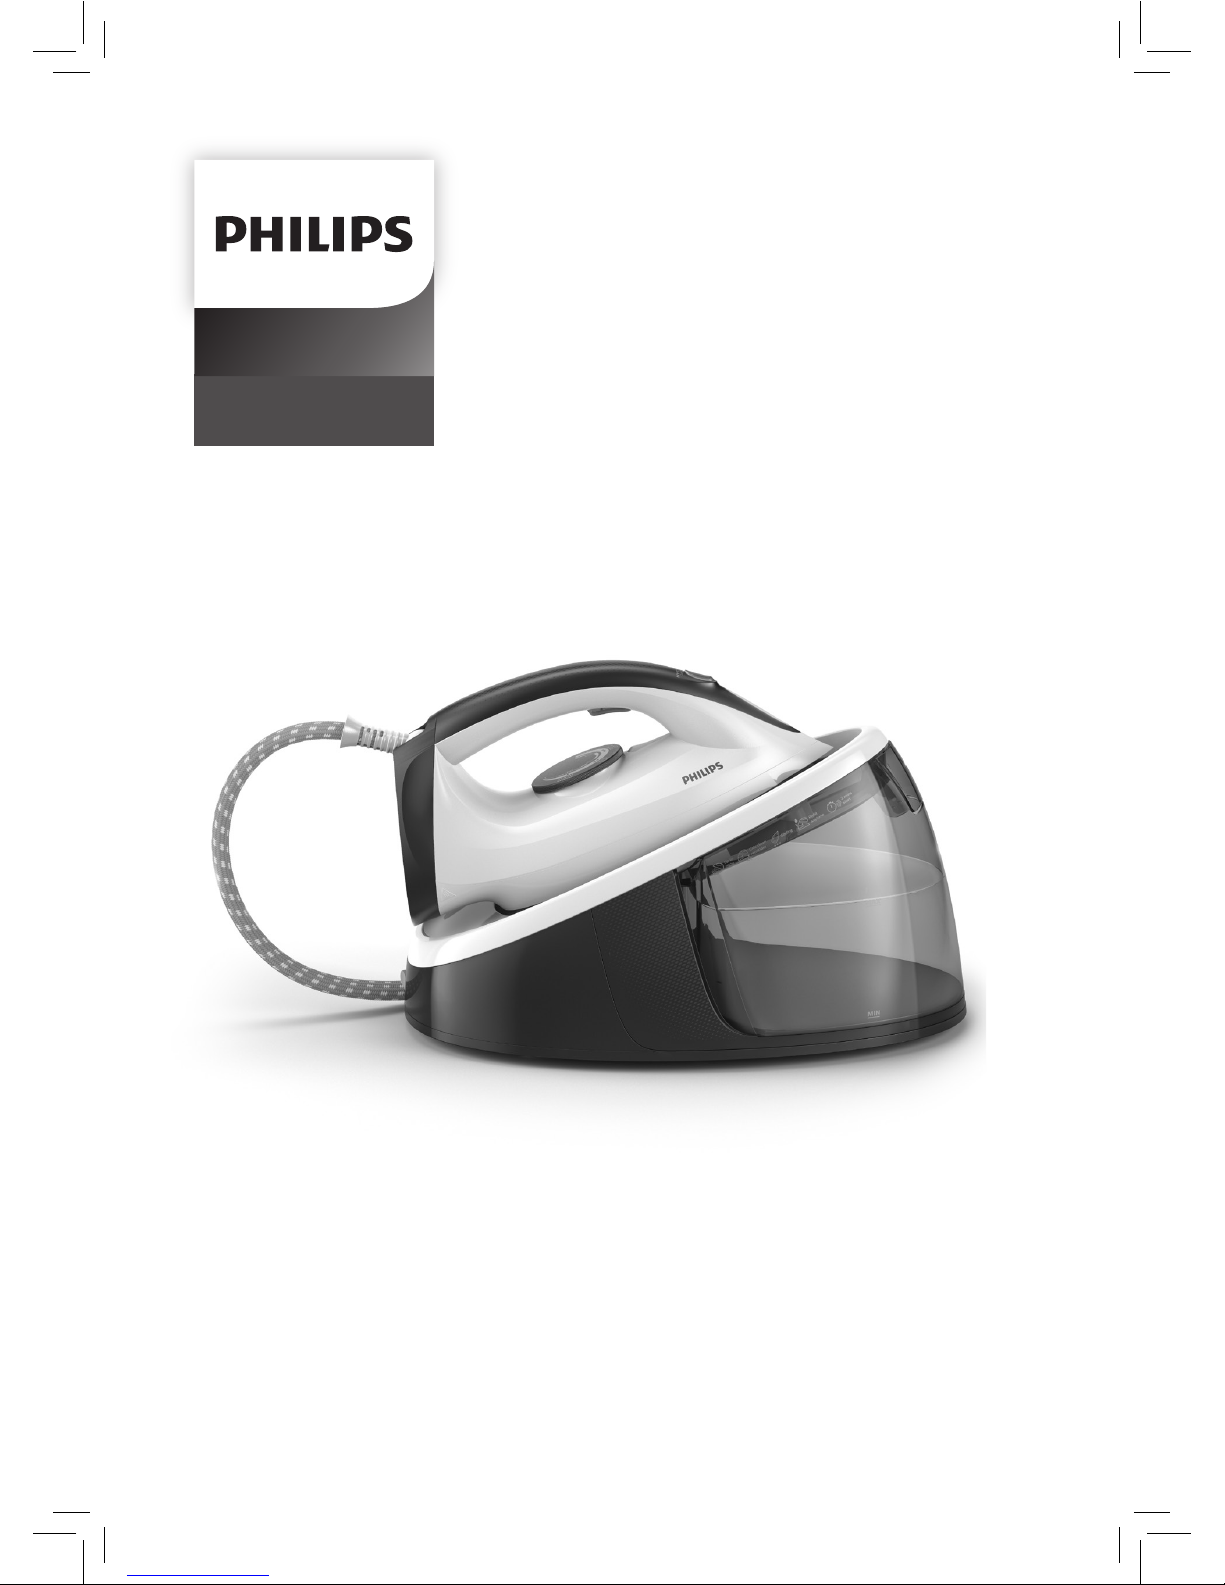
GC6704
FastCare Compact
User Manual
Gebrauchsanleitung


GC6704
ENGLISH 4
DEUTSCH 24

4 ENGLISH
Table of contents
Important 5
Exclusive technology from Philips 8
Compact ProVelocity technology 8
Product overview 9
Before rst use 10
Preparing for use 10
Type of water to use 10
Filling the water tank 10
Using your appliance 11
Heating up 11
Steam trigger 13
Steam boost function 14
Vertical ironing 14
Ironing tips 14
Cleaning and maintenance 15
Smart Calc-Clean System 15
Sound and light Calc-Clean reminder 15
Performing the Calc-Clean process with the
Calc-Clean container 16
Cleaning the soleplate 18
Storage 18
Guarantee and support 19
Troubleshooting 19
Technical information 23

5
ENGLISH
Important
Congratulations on your purchase and
welcome to Philips! To fully benet from
the support that Philips oers, register your
product at www.philips.com/welcome. Read
this user manual and the quick start guide
carefully before you use the appliance. Save
them for future reference.
Danger
- Never immerse the appliance in water.
Warning
- Do not use the appliance if the plug,
the mains cord, the supply hose or the
appliance itself shows visible damage or if
the appliance functions abnormally in any
way, or if the appliance has been dropped
or leaks. For repair or service, you must
have the appliance inspected by Philips,
a service centre authorised by Philips or
similarly qualied persons.
- Check if the voltage indicated on the
type plate corresponds to the local mains
voltage before you connect the appliance.
- Do not immerse the iron or the steam
generator in water.
- Do not leave the appliance unattended
when it is connected to the mains.
- This appliance can be used by children
aged from 8 years and above and persons
with reduced physical, sensory or mental
capabilities or lack of experience and
knowledge if they have been given
supervision or instruction concerning
use of the appliance in a safe way and
understand the hazards involved.

6
ENGLISH
- Children aged 8 or over are only allowed
to clean the appliance and perform the
Calc-Clean procedure under supervision.
- Keep the iron and its cord out of reach of
children less than 8 years of age when it is
switched on or cooling down.
- The appliance must be used and placed
on a at, stable, heat-resistant surface.
When you place the iron on its heel or its
stand, make sure that the surface on which
you place it is stable.
- Handle your iron carefully and never direct
the steam towards persons or animals as
your appliance gives o steam which can
cause burns.
- Specic types only: When engaging/disengaging the water tank, do not touch the
tip of the iron as the system is in operation.
- Do not let the mains cord and supply hose
come into contact with the hot soleplate of
the iron.
- Do not leave the appliance unattended
during the Calc-Clean process.
- Always perform the Calc-Clean process
with the Calc-Clean container and do not
interrupt the process.
- Do not allow children to play with the
appliance.
Caution: Hot water and steam comes out
from the soleplate.
- Specic types only: Do not let the iron rest
on its heel during the Calc-Clean process
as hot water comes out.
- Specic types only: The iron platform
(stand) can become extremely hot, and
may cause burns if touched. Let it cool
7
ENGLISH
down for 5 minutes when performing
cartridge replacement.
CAUTION: Hot surface
- Surfaces are liable to get hot during use
(for irons with hot symbol marked on the
appliance).
Caution
- Only connect the appliance to an earthed
wall socket.
- Fully unwind the mains cord before you
put the plug in the wall socket.
- The iron platform and the soleplate of
the iron can become extremely hot and
may cause burns if touched. If you want to
move the steam generator, do not touch
the iron platform.
- Always put the iron back on the iron
platform, switch o the appliance and
remove the plug from the wall socket after
you have nished ironing, when you clean
the appliance, ll or empty the water tank,
or even when you leave the appliance
even for a short while.
- Do not add perfumed water, water from
the tumble dryer, vinegar, starch, descaling
agents, ironing aids, chemically descaled
water or other chemicals, as they may
cause water leakage, brown staining or
damage to your appliance.
- The plug must only be connected
to a socket with the same technical
characteristics as plug.
- The lling hole must not be open during
operation.
8
ENGLISH
Electromagnetic elds (EMF)
This Philips appliance complies with all
applicable standards and regulations regarding
exposure to electromagnetic elds.
Recycling
- This symbol means that this product shall
not be disposed of with normal household
waste (2012/19/EU).
- Follow your country’s rules for the separate
collection of electrical and electronic
products. Correct disposal helps prevent
negative consequences for the environment
and human health.
Exclusive technology from Philips
Compact ProVelocity technology
This technology delivers continuous steam that
penetrates deeply to remove creases easily.
At the same time, it keeps the appliance more
compact and lighter than traditional steam
generators, for easier storage.
9
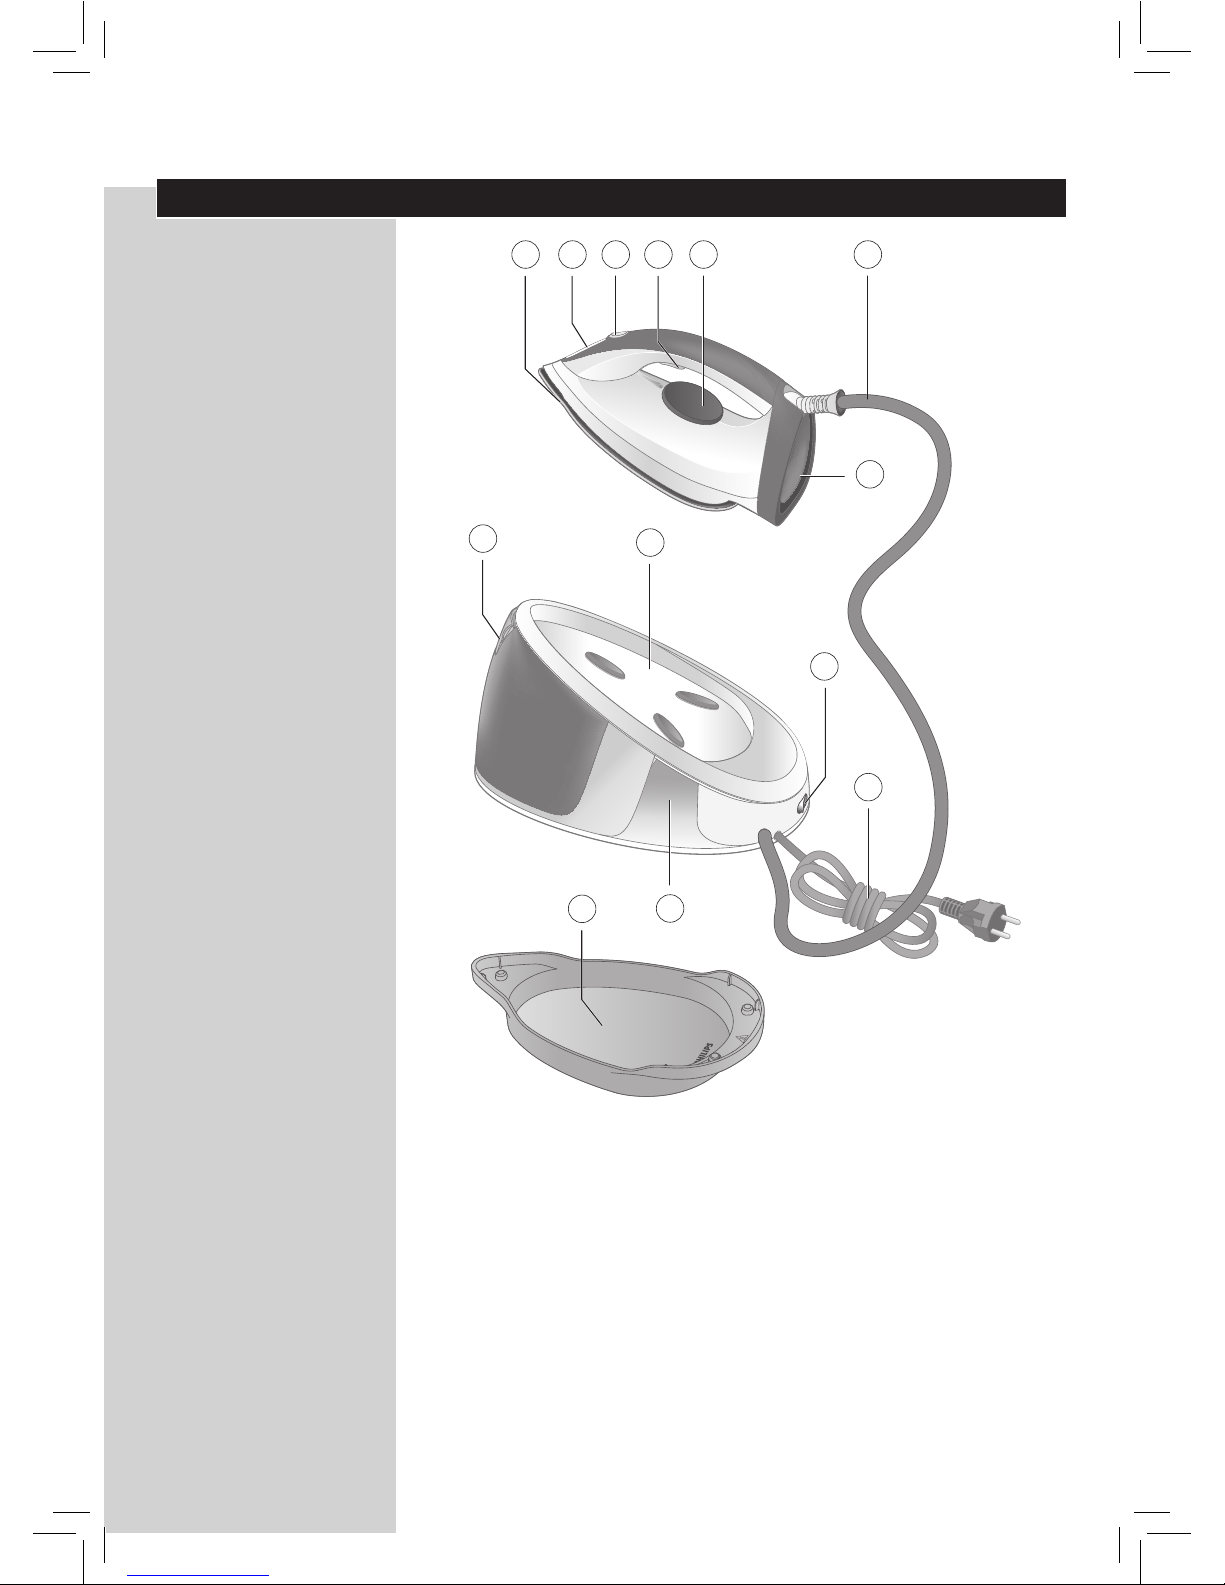
ENGLISH
Product overview
8
9
10
11
13
12
43 5 6
7
21
1 Soleplate
2 ‘Iron ready’ light
3 CALC-CLEAN button
with light
4 Steam trigger/Steam
boost
5 Temperature dial
6 Water supply hose
7 Heel
8 Water tank lling door
9 Iron platform
10 On/o switch
11 Mains cord with plug
12 Water supply hose and
mains cord storage
compartment
13 Smart Calc-Clean
container
10
ENGLISH
Before rst use
This appliance is intended for ironing and
refreshing fabrics only.
Remove all packaging material.
Always place the appliance on a stable and
horizontal surface.
Fill the water tank before every use.
Preparing for use
Type of water to use
This appliance has been designed to be used
with tap water. However, if you live in an area
with hard water, fast scale build-up may occur.
Therefore, it is recommended to use distilled or
demineralized water to prolong the lifetime of
the appliance.
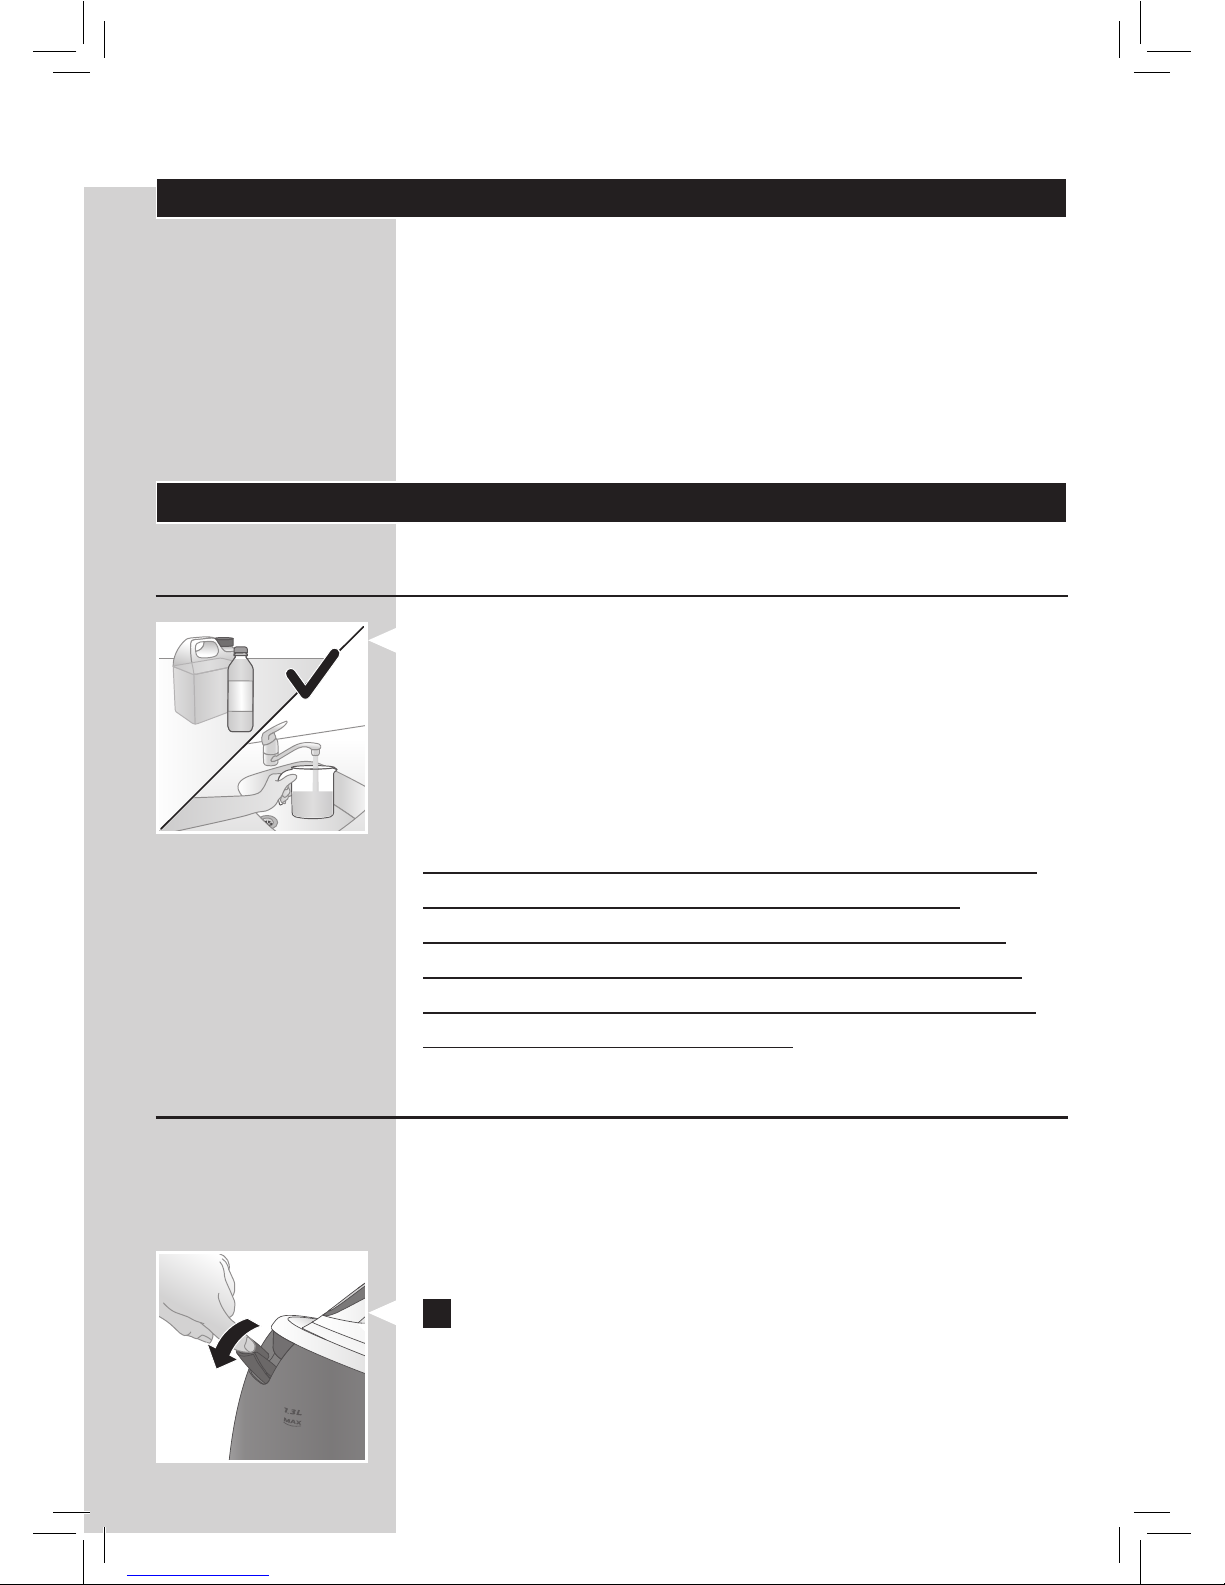
Warning: Do not use perfumed water, water
from the tumble dryer, vinegar, starch,
descaling agents, ironing aids, chemically
descaled water or other chemicals, as they
may cause water spitting, brown staining or
damage to your appliance.
Filling the water tank
Fill the water tank before every use or when
the water level in the water tank drops below
the minimum level. You can rell the water tank
at any time during use.
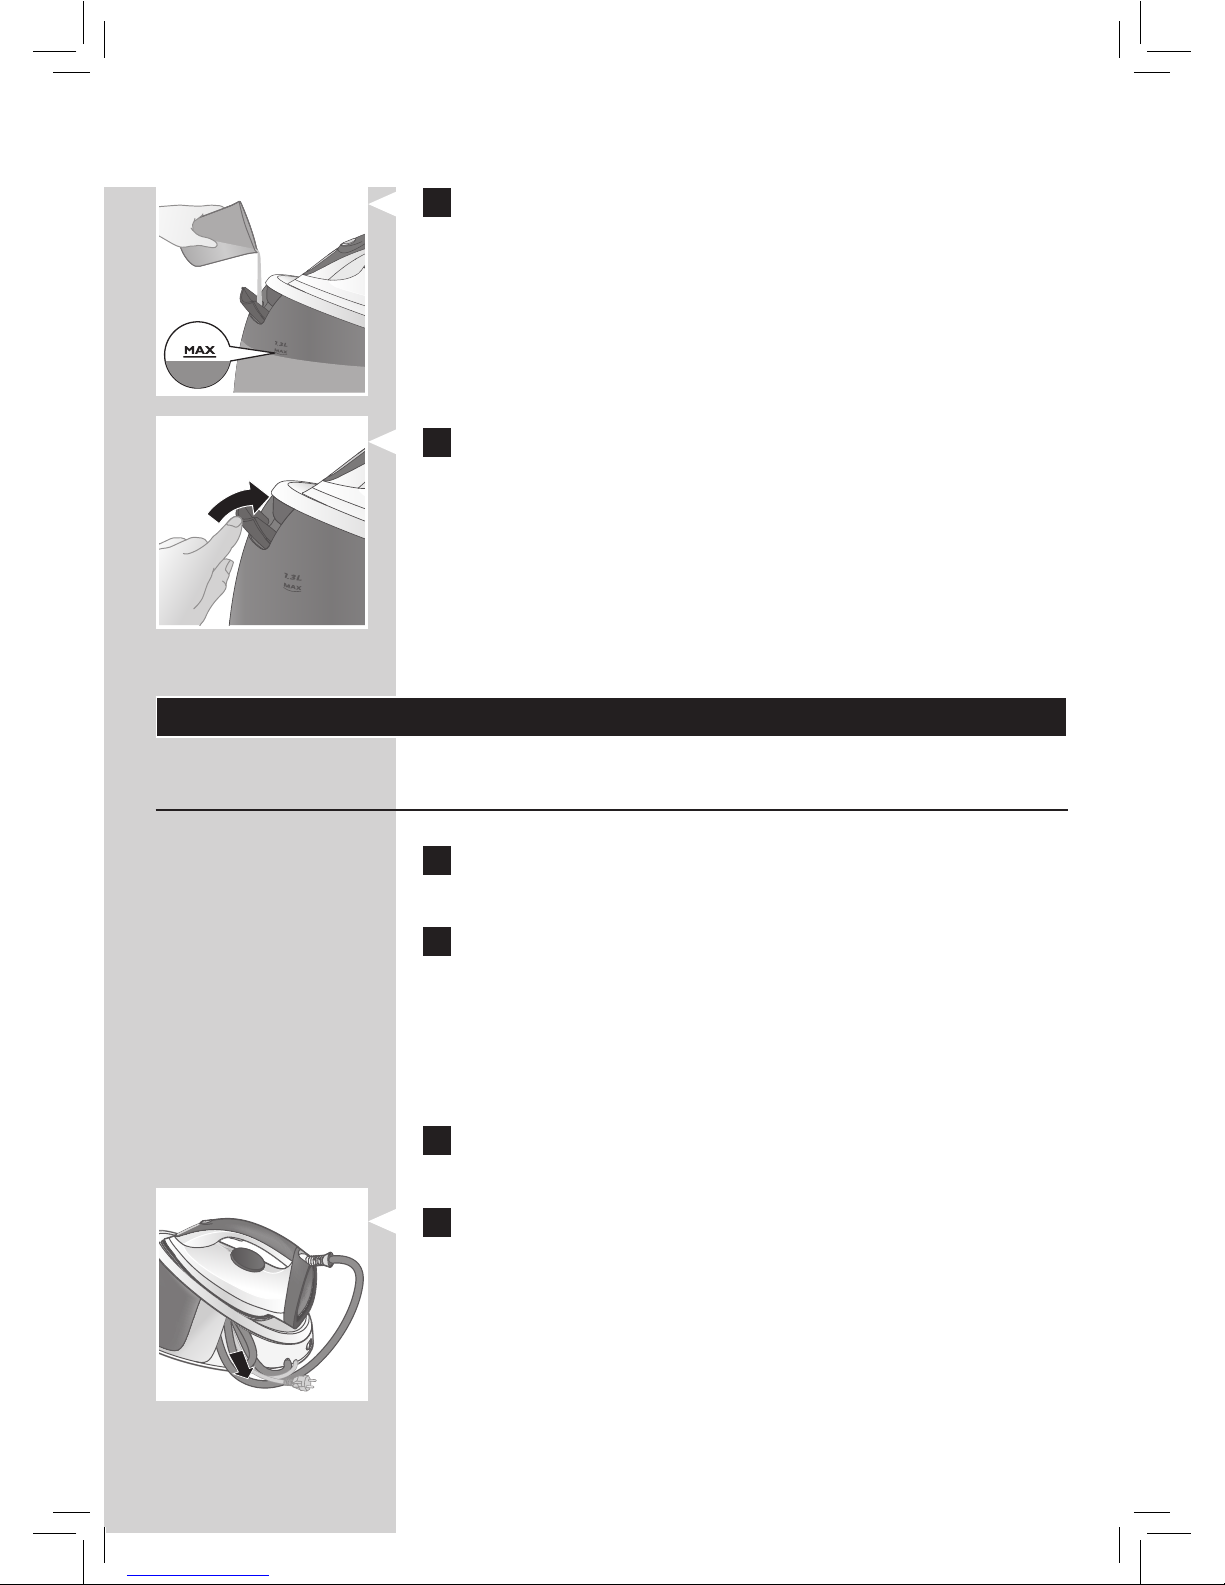
1 Open the water tank lling door.
11
ENGLISH
2 Fill the water tank up to the MAX indication.
Note: Do not ll the water tank beyond the
MAX indication to avoid spillage.
3 Close the water tank lling door (‘click’).
Note: Be careful when you tilt or carry the
appliance when the water tank is full, as
water may spill out.
Using your appliance
Heating up
1 Unfold your ironing board and set it to the
appropriate height.
2 Place the appliance on the ironing board, or
on a stable and even surface.
Note: In order to ensure safe ironing, make
sure the ironing board is sturdy and t to be
used with steam generator.
3 Make sure that there is enough water in the
water tank.
4 Remove the mains cord and water supply
hose from the storage compartment.
12
ENGLISH
5 Put the mains plug in an earthed wall
socket.
6 Press the on/o switch to switch on the
appliance.
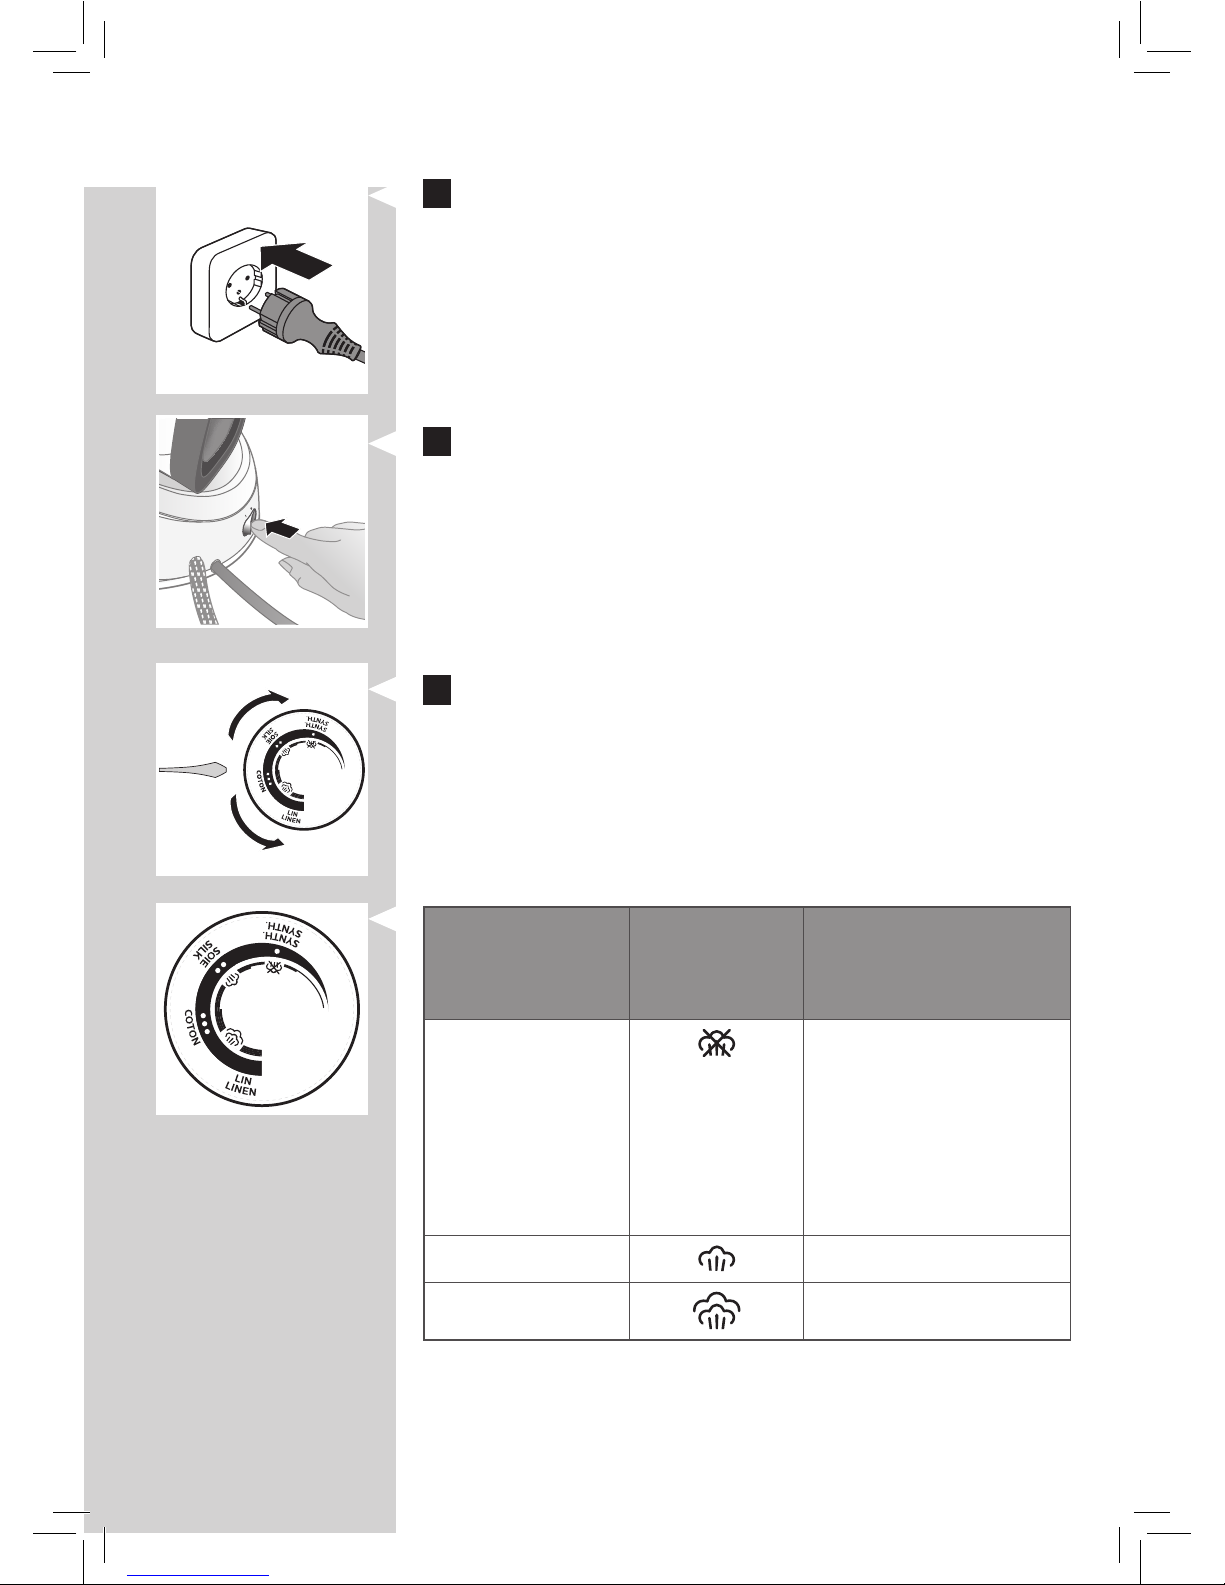
7 Turn the temperature dial to set the
appropriate temperature according to
the table. The appliance adjusts the
steam automatically depending on the
temperature chosen.
Temperature
setting
Automatic
steam
setting
Fabric type
SYNTH to ● Synthetic
fabrics (e.g.,
acetate, acrylic,
nylon, viscose,
polyamide,
polyester)
●●
Silk, wool
●●● to LINEN Cotton, linen
13
ENGLISH
Note: Refer to the garment label for
recommended temperature setting. Do not
iron non-ironable fabrics.
8 The ‘iron ready’ light start to ash to
indicate that the appliance is heating up.
9 When the appliance is ready for use, the
‘iron ready’ stops ashing and light up
continuously. This takes about 2 minutes.
Steam trigger
1 Press the steam trigger to start ironing.
Warning: Never direct steam at people.
Note: When you use the appliance for the
rst time, it may take 30 seconds for steam to
come out of the appliance.
Note: The pump is activated each time you
press the steam trigger. It produces subtle
rattling sound, which is normal. When there is
no water in the water tank, the pump sound is
louder. Fill up the water tank with water when
the water level drops below the minimum
level.
14
ENGLISH
Steam boost function
The steam boost function is designed to help
tackle dicult creases.
1 Press the steam trigger twice quickly to
release a powerful boost of steam for 3
seconds.
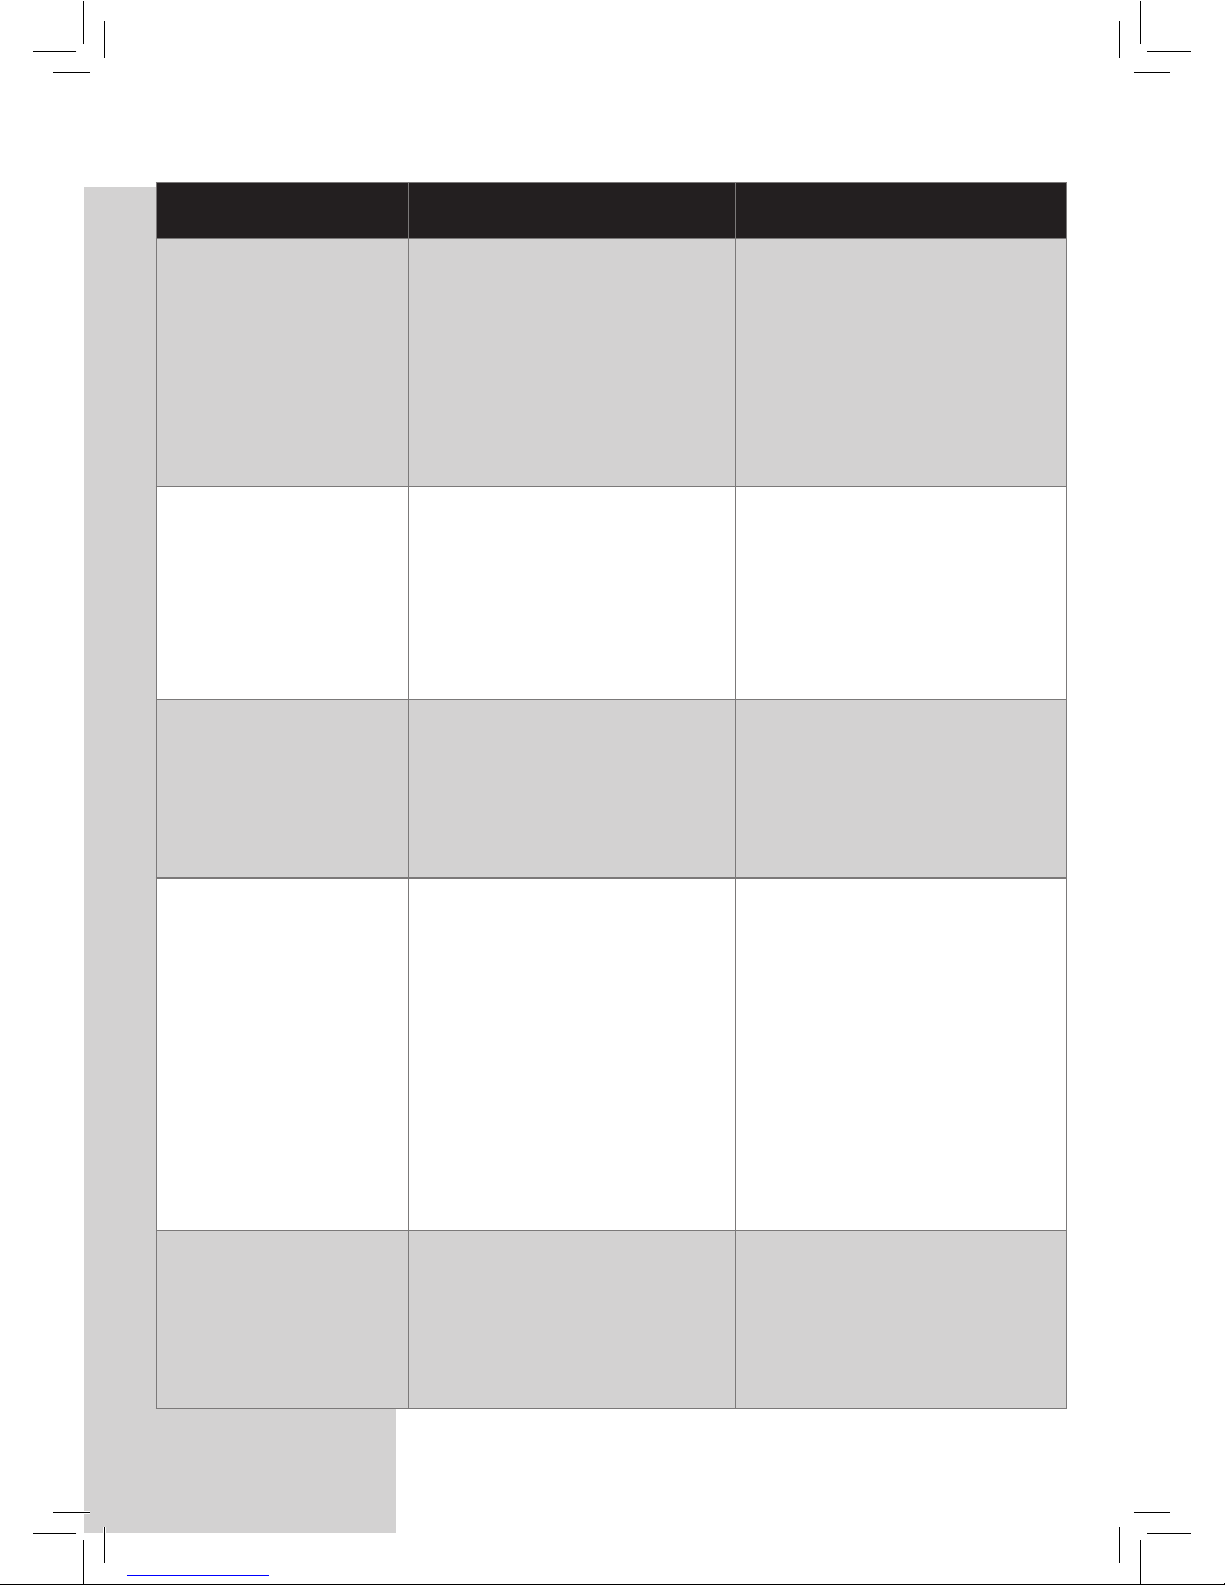
Vertical ironing
Warning: Hot steam is emitted from the iron.
Never attempt to remove wrinkles from a
garment while someone is wearing it. Do not
apply steam near your or someone else’s
hand.
You can use the steam iron in vertical position
to remove wrinkles from hanging fabrics.
1 Hold the iron in vertical position, press the
steam trigger and touch the garment lightly
with the soleplate and move the iron up
and down.
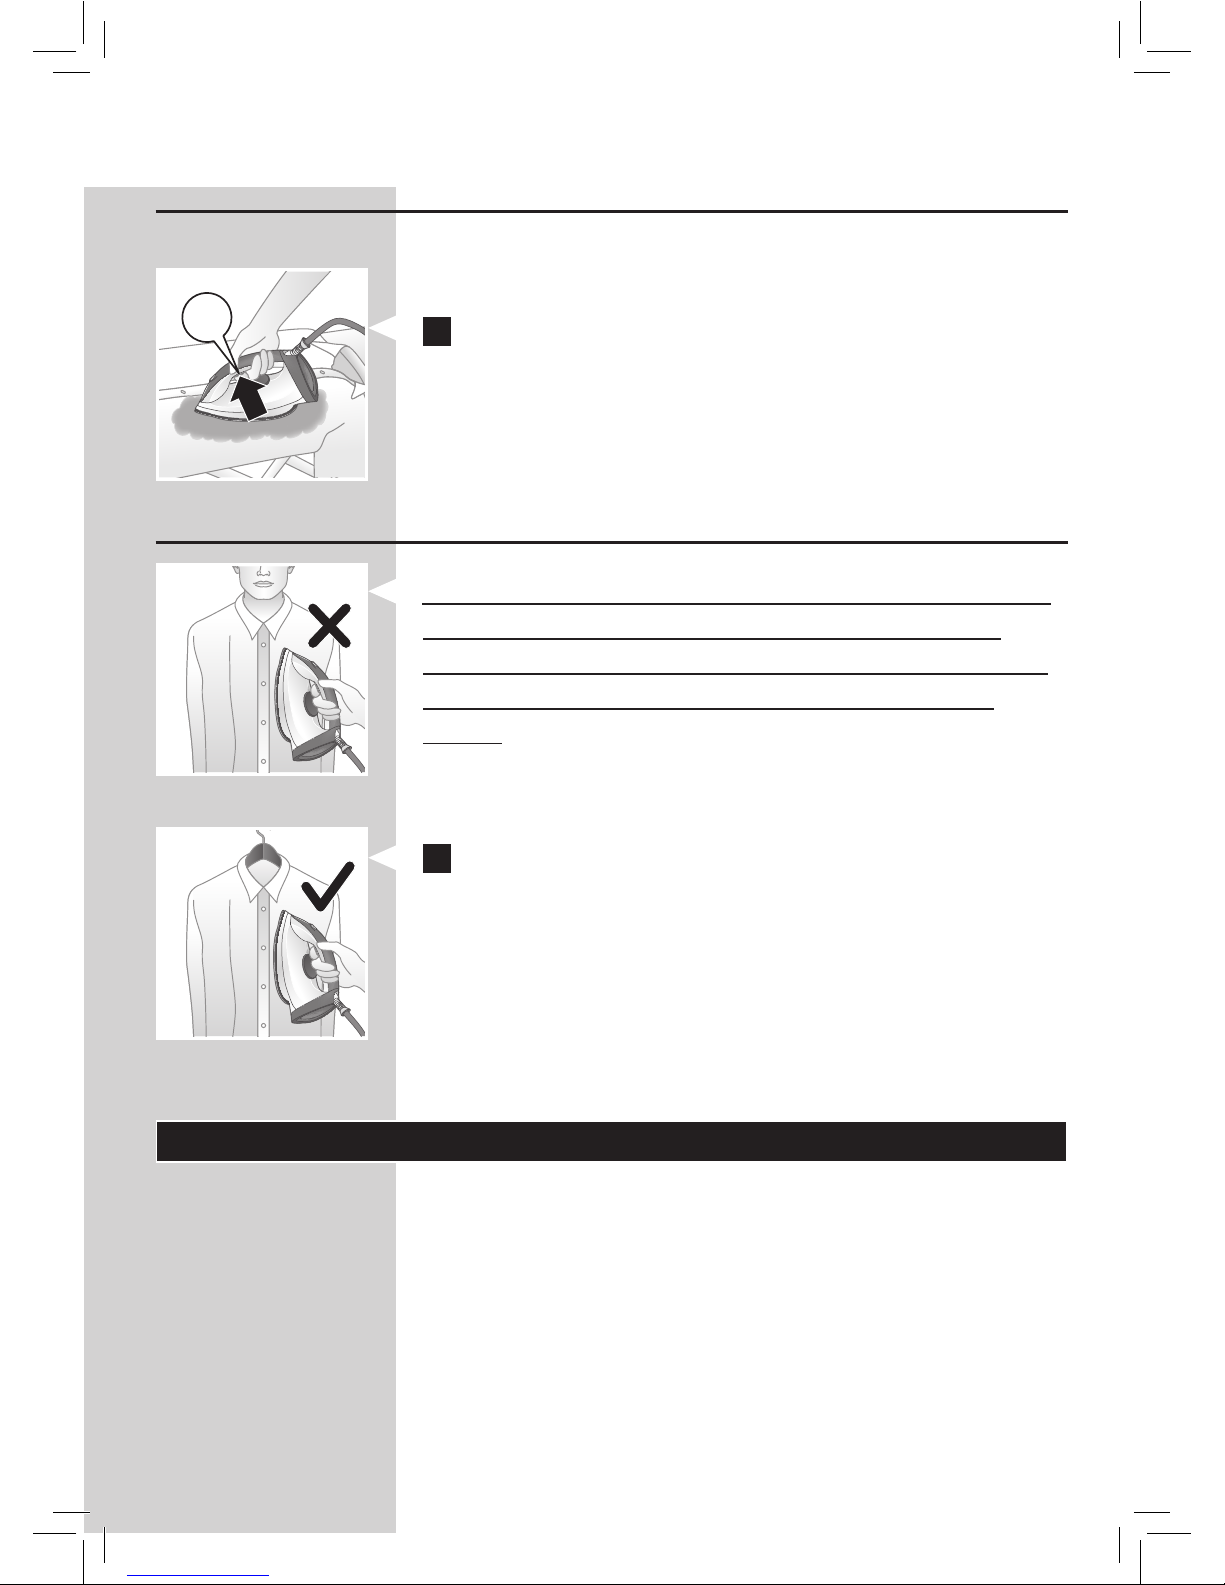
Ironing tips
Minimising wrinkles while drying
Start wrinkle removal early in the drying
process by spreading out your laundry properly
after washing and by putting garments on
hangers to make them dry naturally with fewer
wrinkles.
2x

15
ENGLISH
Best practice shirt ironing
Start with the time-consuming parts like collar,
cu links and sleeves. Next, iron the bigger
parts like front and back to prevent wrinkling
the bigger parts when you are busy ironing the
time-consuming parts.
Collar: When you iron a collar, start on its
underside and work from the outside (the
pointy end) inwards. Turn over and repeat. Fold
down the collar and press the edge for a more
crisp nish.
Buttons: Iron on the reverse side of the
buttons for more eective and faster ironing.
Cleaning and maintenance
Smart Calc-Clean System
Your appliance has been designed with a
Smart Calc-Clean system to ensure that
descaling and cleaning is done regularly. This
helps to maintain a strong steam performance
and prevents dirt and stains coming out of the
soleplate over time. To ensure that the cleaning
process is performed, the appliance gives
regular reminders.
Sound and light Calc-Clean reminder
After 1 to 3 months of use, the Calc-Clean
light starts ashing and the appliance starts
beeping to indicate that you have to perform
the Calc-Clean process.

16
ENGLISH
Besides that, a second defense step to protect
the appliance from scale is integrated: the
steam function gets disabled if descaling is
not done. After descaling is done, the steam
function will be restored. This takes place
regardless of the type of water used.
Note: The Calc-Clean process can be
performed at any time, even when the sound
and light reminder is not activated yet.
Performing the Calc-Clean process with the
Calc-Clean container
Warning: Do not leave the appliance
unattended during the Calc-Clean process.
Caution: Always perform the Calc-Clean
process with the Calc-Clean container. Do
not interrupt the process by lifting the iron up
from the Calc-Clean container, as hot water
and steam will come out of the soleplate.
1 Fill up the water tank halfway.
Note: Make sure that the appliance is
plugged in and switched ON during the CalcClean process.
2 Place the Calc-Clean container on the
ironing board or any other even, stable
surface.
3 Place the iron stably on the Calc-Clean
container.

17
ENGLISH
4 Press and hold the CALC-CLEAN button for
2 seconds until you hear short beeps.
Note: The Calc-Clean container has been
designed to collect scale particles and
hot water during the Calc-Clean process.
It is perfectly safe to rest the iron on this
container during the entire process.
5 During the Calc-Clean process, you hear
short beeps and a pumping sound.
Note: Hot water and steam come out from the
soleplate during Calc-Clean process.
6 Wait approximately 2 minutes for the
appliance to complete the process. When
the Calc-Clean process is completed, the
iron stops beeping and the CALC-CLEAN
light stops ashing.
7 Wipe the iron with a piece of cloth and put
it back on the base station.
Caution: The iron is hot.
8 As the Calc-Clean container becomes hot
during the Calc-Clean process, wait about 5
minutes before you touch it. Then carry the
Calc-Clean container to the sink, empty it
and store it for future use.
9 If necessary, you can repeat steps 1 to 8.
Make sure that you empty the Calc-Clean
container before you start the Calc-Clean
process.
Press 2 sec.
CALC CLEAN
2 min.

18
ENGLISH
Note: During the Calc-Clean process, clean
water may come out of the soleplate if no
scale has accumulated inside the iron. This is
normal.
For more information on how to carry out the
Calc-Clean process, refer to the videos in this
link: http://www.philips.com/descaling-iron.
Cleaning the soleplate
To properly maintain your appliance, clean it
regularly.
1 Clean the appliance with a moist cloth.
2 To easily and eectively remove stains, let
the soleplate heat up and move the iron
over a moist cloth.
Tip: Clean the soleplate regularly to ensure
smooth gliding.
Storage
1 Switch o the appliance and unplug it.
2 Pour the water out of the water tank into
the sink.
3 Fold the mains cord and water supply
hose together. Push them into the storage
compartment.

19
ENGLISH
Guarantee and support
If you need information or support, please
visit www.philips.com/support or read the
separate worldwide guarantee leaet.
Troubleshooting
This chapter summarises the most common
problems you could encounter with the
appliance. If you are unable to solve the
problem with the information below, visit
www.philips.com/support for a list of
frequently asked questions or contact the
Consumer Care Centre in your country.
Problem Possible cause Solution
The iron does
not produce any
steam.
There is not enough
water in the water
tank.
Fill the water tank
beyond the MIN
indication. Press and
hold the steam trigger
until steam comes out.
It may take up to 30
seconds until steam
comes out.
You did not press the
steam trigger.
Press and hold the
steam trigger until
steam comes out.
The steam function
has been disabled
until you have
performed the CalcClean process.
Perform the CalcClean process to
restore the steam
function. (see chapter
‘Cleaning and
maintenance’)

20
ENGLISH
Problem Possible cause Solution
At the start of your
ironing session, the
steam trigger has not
been pressed long
enough.
Press and hold the
steam trigger until
steam comes out. It
may take up to 30
seconds until steam
comes out.
You have set the
temperature dial to ●.
Steam is not available
at ●. To use the steam,
set the temperature
dial to ●● or higher.
The light of
the CALCCLEAN button
ashes and the
appliance beeps.
This is the Calc-Clean
reminder.
Perform the CalcClean after the CalcClean reminder is
given (see chapter
‘Cleaning and
maintenance’).
No steam
comes out of
the soleplate,
the light of
the CALCCLEAN button
ashes and the
appliance beeps.
You have not done or
have not completed
the Calc-Clean
process.
Perform the CalcClean process to
enable the steam
function again (see
chapter ‘Cleaning and
maintenance’).
The appliance
has switched o.
The auto shut-o
function is activated
automatically. The
appliance enters the
standy mode if it has
not been used for 15
minutes and switches
o if it has not been
used for another 10
minutes.
To switch on the
appliance again, set
the on/o switch to
“o” position and then
to “on” position.

21
ENGLISH
Problem Possible cause Solution
The appliance
produces a loud
pumping sound.
The water tank is
empty.
Fill the water tank
with water and press
the steam trigger until
the pumping sound
becomes softer and
steam comes out of
the soleplate.
Water droplets
come out of the
soleplate.
After the Calc-Clean
process remaining
water may drip out of
the soleplate.
Wipe the soleplate dry
with a piece of cloth.
If the Calc-Clean light
still ashes and the
appliance still beeps,
perform the CalcClean process (see
chapter ‘Cleaning and
maintenance’).
The Calc-Clean
process has not been
completed.
You have to perform
the Calc-Clean
process again (see
chapter ‘Cleaning and
maintenance’).
Steam condenses
into water in the hose
when you use steam
for the rst time or
have not used it for a
long time.
This is normal. Hold
the iron away from
the garment and press
the steam trigger. Wait
until steam instead of
water comes out of
the soleplate.
Dirty water
and impurities
come out of the
soleplate.
Impurities or
chemicals present
in the water have
deposited in the
steam vents and/or
soleplate.
Perform the CalcClean process
regularly (see chapter
‘Cleaning and
maintenance’).
22
ENGLISH
Problem Possible cause Solution
Steam condenses
into water in the hose
when you use steam
for the rst time or
have not used it for a
long time.
This is normal. Hold
the iron away from
the garment and press
the steam trigger. Wait
until steam instead of
water comes out of
the soleplate.
Water ushes
out of the
soleplate.
You have accidentally
started the CalcClean process (see
chapter ‘Cleaning and
maintenance’).
Switch o the
appliance. Then switch
it back on again. Let
the iron heat up until
the ‘iron ready’ light
lights up steadily.
The Calc-Clean
process does
not start.
You have not pressed
the CALC-CLEAN
button for 2 seconds
until the appliance
started beeping.
See chapter ‘Cleaning
and maintenance’.
The ironing
board cover
becomes wet, or
there are water
droplets on the
oor/garment.
Steam has condensed
on the ironing board
cover after a long
ironing session.
Replace the ironing
board cover if the
foam or felt material
has worn out. You can
also add an extra layer
of felt material under
the ironing board
cover to prevent
condensation on the
ironing board.
You have an ironing
board that is not
designed to cope with
the high steam rate of
the appliance.
Put an extra layer of
felt material under the
ironing board cover to
prevent condensation
on the ironing board.

23
ENGLISH
Technical information
- Rated power: 2000-2400W
- Rated voltage: 220-240V
- Rated frequency: 50-60 Hz

24 DEUTSCH
Inhalt
Wichtig! 25
Exklusive Technologie von Philips 29
Kompakte ProVelocity-Technologie 29
Produktübersicht 30
Vor dem ersten Gebrauch 31
Für den Gebrauch vorbereiten 31
Zu verwendende Wasserart 31
Füllen des Wasserbehälters 31
Ihr Gerät verwenden 32
Aufheizen 32
Dampfauslöser 35
Dampfstoß-Funktion 35
Vertikales Bügeln 35
Bügeltipps 36
Reinigung und Wartung 37
Intelligentes Calc-Clean-System 37
Akustische und visuelle Calc-Clean-
Erinnerung 37
Mithilfe des Calc-Clean-Behälters
entkalken 38
Reinigen der Bügelsohle 40
Aufbewahrung 40
Garantie und Support 41
Deutschland 41
Fehlerbehebung 41
Technische Daten 46

25
DEUTSCH
Wichtig!
Herzlichen Glückwunsch zu Ihrem Kauf
und willkommen bei Philips! Um das
Kundendienstangebot von Philips vollständig
nutzen zu können, sollten Sie Ihr Produkt
unter www.philips.com/welcome registrieren.
Lesen Sie diese Bedienungsanleitung und die
Kurzanleitung aufmerksam durch, bevor Sie
das Gerät verwenden. Bewahren Sie sie zur
späteren Verwendung auf.
Achtung!
- Tauchen Sie das Gerät niemals in Wasser!
Achtung
- Verwenden Sie das Gerät nicht, wenn
der Netzstecker, das Netzkabel, der
Verbindungsschlauch oder das Gerät
selbst beschädigt ist, das Gerät nicht
ordnungsgemäß funktioniert oder das
Gerät heruntergefallen ist bzw. leckt. Für
Service- oder Reparaturarbeiten müssen
Sie das Gerät von Philips, einem von
Philips autorisierten Service-Center oder
einer vergleichbar qualizierten Person
überprüfen lassen.
- Prüfen Sie vor Inbetriebnahme des Geräts,
ob die auf dem Typenschild angegebene
Betriebsspannung mit der örtlichen
Netzspannung übereinstimmt.
- Tauchen Sie das Bügeleisen oder die
Dampfeinheit niemals in Wasser.
- Lassen Sie das Gerät nicht unbeaufsichtigt,
solange es mit dem Stromnetz verbunden
ist.
- Dieses Gerät kann von Kindern ab
8 Jahren und Personen mit verringerten
physischen, sensorischen oder

26
DEUTSCH
psychischen Fähigkeiten oder Mangel
an Erfahrung und Kenntnis verwendet
werden, wenn sie bei der Verwendung
beaufsichtigt wurden oder Anweisung zum
sicheren Gebrauch des Geräts erhalten
und die Gefahren verstanden haben.
- Kinder ab 8 Jahren dürfen das Gerät nur
unter Aufsicht reinigen oder das CalcClean-Verfahren durchführen.
- Halten Sie das Bügeleisen und das
Netzkabel außerhalb der Reichweite von
Kindern unter 8 Jahren, wenn das Gerät
eingeschaltet ist oder abkühlt.
- Das Gerät darf nur auf einer ebenen,
stabilen und hitzebeständigen Oberäche
verwendet werden. Achten Sie darauf,
dass die Oberäche stabil ist, wenn Sie
das Bügeleisen aufrecht abstellen oder auf
den Ständer stellen.
- Gehen Sie mit dem Bügeleisen vorsichtig
um, und richten Sie den Dampfstoß
niemals auf Personen oder Tiere, da Ihr
Gerät Dampf ausgibt, der Verbrennungen
verursachen kann.
- Nur bestimmte Gerätetypen: Berühren
Sie beim Einsetzen/Entfernen des
Wasserbehälters nicht die Spitze des
Bügeleisens, da das System in Betrieb ist.
- Lassen Sie das Netzkabel und den
Verbindungsschlauch nicht mit der heißen
Bügelsohle in Kontakt kommen.
- Lassen Sie das Gerät während der
Entkalkung nicht unbeaufsichtigt.
- Führen Sie den Calc-Clean-Vorgang immer
mit dem Calc-Clean-Behälter durch, und
unterbrechen Sie den Vorgang nicht.
- Erlauben Sie Kindern nicht, mit dem Gerät
zu spielen.

27
DEUTSCH
Achtung: Heißes Wasser und heißer Dampf
treten aus der Bügelsohle aus.
- Nur bestimmte Gerätetypen: Stellen Sie
das Bügeleisen während des Calc-CleanVorgangs nicht aufrecht ab, da heißes
Wasser austritt.
- Nur bestimmte Gerätetypen: Die
Abstelläche des Bügeleisens kann
sehr heiß werden und bei Berührung
zu Verbrennungen führen. Lassen Sie
sie 5 Minuten abkühlen, bevor Sie die
Kartusche austauschen.
VORSICHT: Heiße Oberäche
- Es besteht eine hohe Wahrscheinlichkeit,
dass Oberächen während des Gebrauchs
heiß werden (beim Bügeleisen durch
das Symbol für „Heiß“ auf dem Gerät
angegeben).
Vorsicht
- Schließen Sie das Gerät nur an eine
geerdete Steckdose an.
- Wickeln Sie das Netzkabel vollständig
ab, bevor Sie den Stecker an die
Netzsteckdose anschließen.
- Die Abstelläche des Bügeleisens und die
Bügelsohle können sehr heiß werden und
bei Berührung zu Verbrennungen führen.
Berühren Sie keinesfalls die Abstelläche,
wenn Sie die Dampfbügelstation bewegen.
- Stellen Sie das Bügeleisen auf die
Abstelläche, schalten Sie das Gerät aus,
und ziehen Sie den Netzstecker aus der
Steckdose, wenn Sie das Bügeln beenden,
das Gerät reinigen, den Wasserbehälter
füllen bzw. leeren oder den Raum nur kurz
verlassen.

28
DEUTSCH
- Füllen Sie kein parfümiertes Wasser,
Wasser aus dem Wäschetrockner, Essig,
Stärke, Entkalkungsmittel, Bügelzusätze,
chemisch entkalktes Wasser oder andere
Chemikalien ein, da dies zu Austreten von
Wasser, braunen Flecken oder Schäden
am Gerät führen kann.
- Der Stecker darf nur an eine Steckdose
angeschlossen werden, die die gleichen
technischen Daten wie der Stecker hat.
- Die Einfüllönung muss während des
Betriebs geschlossen sein.
Elektromagnetische Felder
Dieses Philips Gerät erfüllt sämtliche Normen
und Regelungen bezüglich der Gefährdung
durch elektromagnetische Felder.
Recycling
- Dieses Symbol bedeutet, dass das Produkt
nicht mit dem normalen Hausmüll entsorgt
werden kann (2012/19/EU).
1. Altgeräte können kostenlos an geeigneten
Rücknahmestellen abgegeben werden.
2. Diese werden dort fachgerecht gesammelt
oder zur Wiederverwendung vorbereitet.
Altgeräte können Schadstoe enthalten,
die der Umwelt und der menschlichen
Gesundheit schaden können.
Enthaltene Rohstoe können durch ihre
Wiederverwertung einen Beitrag zum
Umweltschutz leisten.
3. Die Löschung personenbezogener Daten
auf den zu entsorgenden Altgeräten
muss vom Endnutzer eigenverantwortlich
vorgenommen werden.

29
DEUTSCH
4. Hinweise für Verbraucher in Deutschland:
Die in Punkt 1 genannte Rückgabe ist
gesetzlich vorgeschrieben. Sammelund Rücknahmestellen in Deutschland:
https://www.stiftung-ear.de/
Exklusive Technologie von Philips
Kompakte ProVelocity-Technologie
Diese Technologie bietet einen gleichmäßigen,
tief eindringenden Dampfausstoß zum
Entfernen hartnäckiger Falten. Das Gerät
ist dadurch kompakter und leichter als
herkömmliche Dampfbügeleisen und einfacher
aufzubewahren.

30
DEUTSCH
Produktübersicht
8
9
10
11
13
12
43 5 6
7
21
1 Bügelsohle
2 Bereitschaftsanzeige
3 Calc-Clean-Taste mit
Kontrollleuchte
4 Dampfauslöser/
Dampfstoß
5 Temperaturregler
6 Verbindungsschlauch
7 Rückkante
8 Füllabdeckung des
Wasserbehälters
9 Bügeleisen-Abstelläche
10 Ein-/Ausschalter
11 Netzkabel mit Stecker
12 Verbindungsschlauch
und Netzkabelfach
13 Intelligenter Calc-Clean-
Behälter

31
DEUTSCH
Vor dem ersten Gebrauch
Dieses Gerät ist nur zum Bügeln und
Aurischen von Textilien geeignet.
Entfernen Sie sämtliches Verpackungsmaterial.
Stellen Sie das Gerät stets auf eine stabile und
waagerechte Unterlage.
Füllen Sie den Wasserbehälter vor jedem
Gebrauch.
Für den Gebrauch vorbereiten
Zu verwendende Wasserart
Dieses Gerät wurde für die Verwendung mit
Leitungswasser entwickelt. Wenn Sie jedoch in
einer Region mit hartem Wasser leben, kann
es schnell zu Kalkablagerungen kommen.
Daher wird empfohlen, destilliertes oder
demineralisiertes Wasser zu verwenden, um
die Lebenszeit des Geräts zu verlängern.
Warnung: Verwenden Sie kein parfümiertes
Wasser, Wasser aus dem Wäschetrockner,
Essig, Stärke, Entkalkungsmittel,
Bügelzusätze, chemisch entkalktes Wasser
oder andere Chemikalien, da dies zu
Austreten von Wasser, braunen Flecken oder
Schäden am Gerät führen kann.
Füllen des Wasserbehälters
Füllen Sie den Wasserbehälter vor jedem
Gebrauch oder wenn der Wasserstand im
Wasserbehälter unter das Minimum fällt.
Während des Gebrauchs können Sie den
Wassertank jederzeit nachfüllen.

32
DEUTSCH
1 Önen Sie die Füllabdeckung des
Wasserbehälters.
2 Füllen Sie den Wasserbehälter bis zur MAX-
Markierung mit Wasser.
Hinweis: Füllen Sie den Wassertank nicht
über die Markierung MAX hinaus, um ein
Auslaufen zu verhindern.
3 Schließen Sie die Füllabdeckung des
Wasserbehälters, bis sie hörbar einrastet.
Hinweis: Seien Sie vorsichtig, wenn Sie das
Gerät mit vollem Wasserbehälter tragen oder
kippen, da Wasser austreten könnte.
Ihr Gerät verwenden
Aufheizen
1 Klappen Sie Ihr Bügelbrett aus, und stellen
Sie es auf die geeignete Höhe ein.
2 Platzieren Sie das Gerät auf einem
Bügelbrett oder einer stabilen und ebenen
Oberäche.
Hinweis: Für sicheres Bügeln sollte
das Bügelbrett stabil und für
Dampfbügelstationen geeignet sein.

33
DEUTSCH
3 Überprüfen Sie, ob sich genügend Wasser
im Wassertank bendet.
4 Nehmen Sie das Netzkabel und
den Verbindungsschlauch aus dem
Aufbewahrungsfach.
5 Stecken Sie den Netzstecker in eine
geerdete Steckdose.
6 Drücken Sie den Ein-/Ausschalter, um das
Gerät einzuschalten.
7 Drehen Sie den Temperaturregler gemäß
der Tabelle oben auf die gewünschte
Temperatur. Das Gerät passt den
Dampfstoß je nach Temperatur automatisch
an.

34
DEUTSCH
Temperatureinstellung
Automatische
Dampfeinstellung
Gewebeart
SYNTH auf ● Synthetik-
fasern (z. B.
Azetat, Acryl,
Nylon,
Viskose,
Polyamid,
Polyester)
●●
Seide, Wolle
●●● auf
LEINEN
Baumwolle,
Leinen
Hinweis: Weitere Informationen zur
empfohlenen Temperatureinstellung nden
Sie auf dem Etikett des Kleidungsstücks.
Bügeln Sie keine Stoe, die nicht zum Bügeln
geeignet sind.
8 Die Bereitschaftsanzeige blinkt und zeigt
damit an, dass das Gerät aufgeheizt wird.
9 Wenn das Gerät betriebsbereit ist, hört
die Bereitschaftsanzeige auf zu blinken
und leuchtet kontinuierlich. Dies nimmt
ungefähr 2 Minuten in Anspruch.

35
DEUTSCH
Dampfauslöser
1 Drücken Sie den Dampfauslöser, um mit
dem Bügeln zu beginnen.
Warnung: Richten Sie den Dampfstoß niemals
auf Personen.
Hinweis: Wenn Sie das Gerät zum ersten Mal
verwenden, kann es 30 Sekunden dauern, bis
Dampf aus dem Gerät austritt.
Hinweis: Die Pumpe wird jedes Mal aktiviert,
wenn Sie den Dampfauslöser drücken. Dabei
ist ein leiser Rasselton zu hören – das ist
normal. Wenn kein Wasser im Wassertank
vorhanden ist, ist das Geräusch der Pumpe
lauter. Füllen Sie den Wassertank mit Wasser
auf, wenn die Füllmenge des Wassers unter
das Minimum fällt.
Dampfstoß-Funktion
Die Dampfstoß-Funktion wurde entwickelt, um
hartnäckige Falten zu glätten.
1 Drücken Sie für einen drei Sekunden langen
kräftigen Dampfstoß den Dampfauslöser
zweimal schnell.
Vertikales Bügeln
Warnung: Aus dem Bügeleisen tritt heißer
Dampf aus. Versuchen Sie nicht, Falten aus
einem Kleidungsstück zu entfernen, das sich
am Körper bendet. Halten Sie Ihre Hände
vom Dampf entfernt.
2x

36
DEUTSCH
Sie können das Dampfbügeleisen in
senkrechter Position verwenden, um Falten aus
hängenden Kleidungsstücken zu entfernen.
1 Halten Sie das Bügeleisen in senkrechter
Position, drücken Sie den Dampfauslöser,
berühren Sie das Kleidungsstück vorsichtig
mit der Bügelsohle, und bewegen Sie das
Bügeleisen auf und ab.
Bügeltipps
Verringern von Falten beim Trocknen
Beginnen Sie mit der Faltenentfernung schon
früh beim Trocknen, indem Sie Ihre Wäsche
nach dem Waschen richtig ausbreiten und
Kleidungsstücke auf Kleiderbügel hängen,
damit Sie natürlich mit weniger Falten
trocknen.
Einfaches Hemdenbügeln
Beginnen Sie mit den schwierigen Stellen,
wie dem Kragen, den Manschettenknöpfen
und den Ärmeln. Bügeln Sie als Nächstes die
größeren Teile wie die Vorder- und Rückseite,
damit Sie den größeren Teilen keine Falten
hinzufügen, wenn Sie die zeitaufwändigen Teile
bügeln.
Collar: Wenn Sie einen Kragen bügeln, fangen
Sie an der Unterseite an, und arbeiten Sie sich
von außen (dem spitzen Ende) nach innen vor.
Umdrehen und wiederholen. Falten Sie den
Kragen nach unten, und drücken Sie das Gerät
auf den Rand für ein schöneres Finish.

37
DEUTSCH
Knöpfe: Bügeln Sie auf der Rückseite der
Knöpfe für ein eektiveres und schnelleres
Bügeln.
Reinigung und Wartung
Intelligentes Calc-Clean-System
Ihr Gerät ist mit einer intelligenten CalcClean-Funktion ausgestattet, die sicherstellt,
dass es regelmäßig entkalkt und gereinigt
wird. Damit soll die Dampeistung möglichst
lange Zeit erhalten bleiben und sichergestellt
werden, dass Schmutz und Flecken nicht nach
einiger Zeit aus der Bügelsohle austreten. Um
sicherzustellen, dass der Reinigungsvorgang
durchgeführt wird, erinnert das Gerät
regelmäßig daran.
Akustische und visuelle Calc-CleanErinnerung
Nach ein bis drei Monaten Verwendung
beginnt die Calc-Clean-Anzeige zu blinken,
und das Gerät gibt Signaltöne aus, um
anzuzeigen, dass der Entkalkungsvorgang
durchgeführt werden muss.
Außerdem ist das Gerät mit einer zusätzlichen
Schutzfunktion gegen Kalk ausgestattet: Die
Dampunktion wird deaktiviert, wenn der
Entkalkungsvorgang nicht durchgeführt wurde.
Nach dem Entkalken wird die Dampunktion
wieder aktiviert. Dies ndet unabhängig von
der Art des verwendeten Wassers statt.

38
DEUTSCH
Hinweis: Die Entkalkung kann jederzeit
durchgeführt werden, selbst wenn die
akustische und visuelle Erinnerung noch nicht
aktiviert ist.
Mithilfe des Calc-Clean-Behälters entkalken
Warnung: Lassen Sie das Gerät während der
Entkalkung nicht unbeaufsichtigt.
Achtung: Führen Sie die Entkalkung immer
mithilfe des Calc-Clean-Behälters durch.
Unterbrechen Sie den Vorgang nicht, indem
Sie das Bügeleisen vom Calc-Clean-Behälter
heben, da heißes Wasser und Dampf aus der
Bügelsohle austreten.
1 Füllen Sie den Wassertank bis zur Hälfte.
Hinweis: Vergewissern Sie sich, dass
das Gerät während des Entkalkens mit
der Stromversorgung verbunden und
EINGESCHALTET ist.
2 Stellen Sie den Calc-Clean-Behälter auf das
Bügelbrett oder eine andere gerade, stabile
Oberäche.
3 Stellen Sie das Bügeleisen sicher auf den
Calc-Clean-Behälter.

39
DEUTSCH
4 Halten Sie die CALC-CLEAN-Taste
2 Sekunden lang gedrückt, bis Sie kurze
Signaltöne hören.
Hinweis: Der Calc-Clean-Behälter wurde so
entwickelt, dass er Kalkpartikel und heißes
Wasser während der Entkalkung auängt.
Es ist völlig unbedenklich, das Bügeleisen
während des gesamten Vorgangs auf dem
Behälter abzustellen.
5 Während der Durchführung der Entkalkung
hören Sie kurze Signaltöne und ein
Pumpgeräusch.
Hinweis: Während des Calc-Clean-Vorgangs
treten heißes Wasser und Dampf aus der
Bügelsohle.
6 Warten Sie etwa 2 Minuten, bis das Gerät
den Vorgang abgeschlossen hat. Wenn der
Calc-Clean-Vorgang abgeschlossen ist,
hören die Tonsignale auf, und die CALCCLEAN-Anzeige hört auf zu blinken.
7 Wischen Sie das Bügeleisen mit einem
Tuch ab, und stellen Sie es wieder auf den
Aufheizsockel.
Achtung: Das Bügeleisen ist heiß.
8 Da der Calc-Clean-Behälter während
des Entkalkens heiß wird, warten Sie
ca. 5 Minuten, bevor Sie ihn berühren.
Tragen Sie den Calc-Clean-Behälter
zum Waschbecken, leeren Sie ihn aus,
und räumen Sie ihn für eine spätere
Verwendung auf.
2 Sekunden
lang drücken
Calc Clean
2 min.

40
DEUTSCH
9 Falls notwendig, können die Schritte 1 bis 8
wiederholt werden. Stellen Sie sicher, dass
Sie den Calc-Clean-Behälter entleeren,
bevor Sie den Vorgang starten.
Hinweis: Während des Entkalkens kann
sauberes Wasser aus der Bügelsohle
austreten, wenn sich kein Kalk im Bügeleisen
angesammelt hat. Das ist normal.
Weitere Informationen zur Entkalkung
nden Sie in den Videos auf dieser Website:
http://www.philips.com/descaling-iron.
Reinigen der Bügelsohle
Zu einer ordnungsgemäßen Wartung Ihres
Gerät gehört auch, es regelmäßig zu reinigen.
1 Reinigen Sie das Gerät mit einem feuchten
Tuch.
2 Um Flecken einfach und eektiv zu
entfernen, lassen Sie die Bügelsohle
aufheizen, und fahren Sie mit dem
Bügeleisen über ein feuchtes Tuch.
Tipp: Reinigen Sie regelmäßig die Bügelsohle,
um eine ausgezeichnete Gleitfähigkeit
sicherzustellen.
Aufbewahrung
1 Schalten Sie das Gerät aus, und ziehen Sie
den Netzstecker aus der Steckdose.
2 Gießen Sie das Wasser aus dem
Wasserbehälter ins Waschbecken.

41
DEUTSCH
3 Wickeln Sie das Netzkabel und den
Verbindungsschlauch zusammen auf. Legen
Sie sie in das Kabelfach.
Garantie und Support
Weitere Informationen und Unterstützung
erhalten Sie auf der Philips Website unter
www.philips.com/support, oder lesen Sie die
internationale Garantieschrift.
Deutschland
Telefon: +49 (0) 40 80 80 10 9 80 (zum
Festnetztarif)
Montag bis Freitag: 08:00 – 20:00 Uhr
Samstag: 09:00 - 18:00 Uhr
unter www.philips.de/support
Fehlerbehebung
In diesem Kapitel sind die häugsten Probleme
aufgeführt, die beim Gebrauch Ihres Geräts
auftreten können. Sollten Sie ein Problem
mithilfe der nachstehenden Informationen
nicht beheben können, nden Sie auf unserer
Website unter www.philips.com/support eine
Liste mit häug gestellten Fragen (FAQ), oder
wenden Sie sich an das Service-Center in
Ihrem Land.

42
DEUTSCH
Problem Mögliche Ursache Lösung
Das Bügeleisen
erzeugt keinen
Dampf.
Der Wasserbehälter ist
leer.
Füllen Sie den
Wasserbehälter über
die Markierung MIN
hinaus. Halten Sie
den Dampfauslöser
gedrückt, bis Dampf
austritt. Es kann bis
zu 30 Sekunden
dauern, bis Dampf
austritt.
Der Dampfauslöser
wurde nicht gedrückt.
Halten Sie den
Dampfauslöser
gedrückt, bis Dampf
austritt.
Die Dampunktion
wurde deaktiviert, bis
Sie eine Entkalkung
durchgeführt haben.
Führen Sie die
Entkalkung
durch, um die
Dampunktion
wieder zu
aktivieren. (Weitere
Informationen
nden Sie im Kapitel
„Reinigung und
Wartung“.)
Nach dem Beginn des
Dampfbügelns wurde
der Dampfauslöser
nicht lange genug
betätigt.
Halten Sie den
Dampfauslöser
gedrückt, bis Dampf
austritt. Es kann bis
zu 30 Sekunden
dauern, bis Dampf
austritt.

43
DEUTSCH
Problem Mögliche Ursache Lösung
Sie haben den
Temperaturregler auf ●
eingestellt.
Dampf ist auf ●
nicht verfügbar.
Wenn Sie Dampf
verwenden möchten,
stellen Sie den
Temperaturregler
des Bügeleisens auf
●● oder höher.
Der Anzeige der
CALC-CLEANTaste blinkt und
das Gerät gibt
einen Signalton
aus.
Dies ist die Calc-CleanErinnerung.
Führen Sie die CalcClean-Funktion
nach der CalcClean-Erinnerung
durch (siehe Kapitel
„Reinigung und
Wartung“).
Es tritt kein
Dampf aus der
Bügelsohle aus,
die Anzeige der
CALC-CLEANTaste blinkt, und
das Gerät gibt
einen Signalton
aus.
Sie sind nicht fertig
oder haben den
Entkalkungsvorgang
nicht vollendet.
Führen Sie die
Entkalkung
durch, um die
Dampunktion
wieder zu aktivieren
(siehe Kapitel
„Reinigung und
Wartung“).
Das Gerät ist
ausgeschaltet.
Die Abschaltautomatik
wird automatisch
aktiviert. Das Gerät
wechselt in den
Standby-Modus, wenn
es 15 Minuten nicht
verwendet wurde, und
schaltet sich aus, wenn
es weitere 10 Minuten
nicht verwendet wurde.
Um das Gerät wieder
einzuschalten,
stellen Sie den Ein-/
Ausschalter auf „Aus“
und dann wieder auf
„Ein“.

44
DEUTSCH
Problem Mögliche Ursache Lösung
Das Gerät
macht ein lautes
Pumpgeräusch.
Der Wasserbehälter ist
leer.
Füllen Sie den
Wasserbehälter mit
Wasser auf, und
drücken Sie den
Dampfauslöser, bis
das Pumpgeräusch
leiser wird und
Dampf aus der
Bügelsohle austritt.
Wasser tropft
aus der
Bügelsohle.
Nach dem Entkalken
kann das verbleibende
Wasser aus der
Bügelsohle austreten.
Wischen Sie die
Bügelsohle mit
einem Tuch trocken.
Wenn die CalcClean-Anzeige
noch immer blinkt
und das Gerät
Signaltöne ausgibt,
führen Sie den
Entkalkungsvorgang
durch (siehe Kapitel
„Reinigung und
Wartung“).
Der Entkalkungsvorgang
wurde nicht beendet.
Sie müssen den
Entkalkungsvorgang
erneut durchführen
(siehe Kapitel
„Reinigung und
Wartung“).

45
DEUTSCH
Problem Mögliche Ursache Lösung
Dampf wird im
Schlauch zu Wasser
kondensiert, wenn Sie
die Dampunktion zum
ersten Mal verwenden
oder längere Zeit nicht
verwendet haben.
Das ist normal.
Halten Sie das
Bügeleisen vom Sto
weg, und drücken Sie
den Dampfauslöser.
Warten Sie, bis
Dampf anstatt
Wasser aus der
Bügelsohle austritt.
Schmutziges
Wasser und Verunreinigungen
treten aus der
Bügelsohle aus.
Verunreinigungen
und Chemikalien
aus dem Wasser
haben sich in den
Dampfaustrittsdüsen
bzw. an der Bügelsohle
abgesetzt.
Führen Sie die
Entkalkung
regelmäßig durch
(Siehe Kapitel
„Reinigung und
Wartung“).
Dampf wird im
Schlauch zu Wasser
kondensiert, wenn Sie
die Dampunktion zum
ersten Mal verwenden
oder längere Zeit nicht
verwendet haben.
Das ist normal.
Halten Sie das
Bügeleisen vom Sto
weg, und drücken Sie
den Dampfauslöser.
Warten Sie, bis
Dampf anstatt
Wasser aus der
Bügelsohle austritt.
Wasser ießt aus
der Bügelsohle.
Sie haben
versehentlich den
Entkalkungsvorgang
gestartet (siehe
Kapitel "Reinigung und
Wartung").
Schalten Sie das
Gerät aus. Schalten
Sie es dann erneut
ein. Lassen Sie
das Bügeleisen
aufheizen, bis die
Bereitschaftsanzeige
dauerhaft leuchtet.

46
DEUTSCH
Problem Mögliche Ursache Lösung
Der Entkalkungsvorgang
startet nicht.
Sie haben die CalcClean-Taste nicht
2 Sekunden lang
gedrückt, bis das Gerät
Signaltöne ausgibt.
Weitere
Informationen
nden Sie im Kapitel
„Reinigung und
Wartung“.
Der
Bügelbrettbezug
wird nass, oder
es benden sich
Wassertropfen
auf dem Boden
bzw. Sto.
Dampf ist nach
langem Bügeln auf
dem Bügelbrettbezug
kondensiert.
Tauschen Sie den
Bügelbrettbezug
aus, wenn der
Schaumsto oder
Filz abgenutzt
ist. Sie können
eine zusätzliche
Filzschicht unter dem
Bügelbrettbezug
anbringen, um
Kondensation auf
dem Bügelbrett zu
verhindern.
Sie besitzen
möglicherweise ein
Bügelbrett, das für die
starken Dampfstöße
des Geräts nicht
geeignet ist.
Bringen Sie eine
zusätzliche Schicht
Filz unter dem
Bügelbrettbezug
an, um die
Kondensation auf
dem Bügelbrett zu
verhindern.
Technische Daten
- Nennleistung: 2000–2400 W
- Nennspannung: 220 - 240 V
- Nennfrequenz: 50 - 60 Hz


© 2018 Koninklijke Philips N.V.
All rights reserved
4239 001 15021
 Loading...