


Provapor
GC6268, GC6265, GC6263, GC6259, GC6257, GC6068,
GC6065, GC6063, GC6059, GC6057, GC6029, GC6021,
GC6018

2
3
J
G I
N
M
H
A
C
K
B
F
E
O
L
D

4

ENGLISH 6
DEUTSCH 15
FRANÇAIS 25
NEDERLANDS 34
ESPAÑOL 43
ITALIANO 52
PORTUGUÊS 61
GC6268,GC6265,GC6263,GC6259,GC6257,GC6068,GC6065,GC6063,GC6059,
GC6057,GC6029,GC6021,GC6018
5

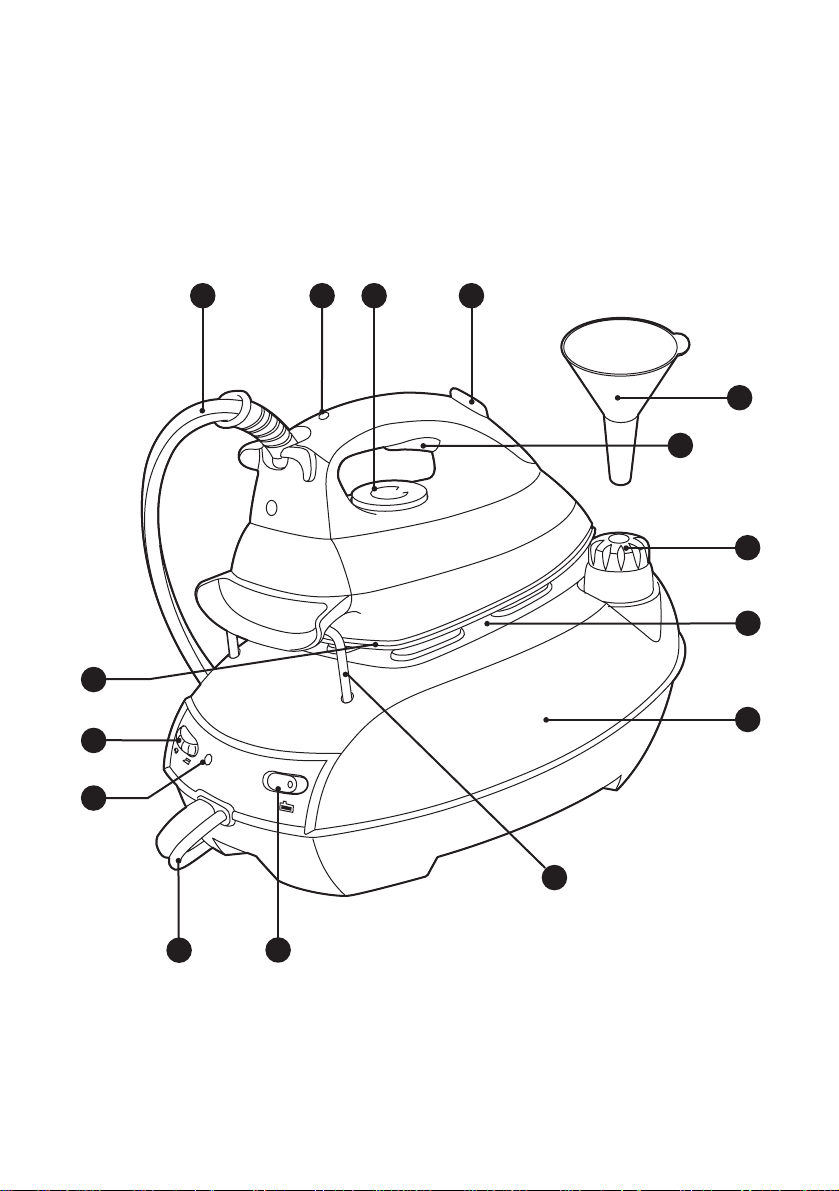
General description
A Cap of the steam tank
B Steam tank
C Iron stand
D On/off switch with built-in pilot light
E 'Steam tank heating up' pilot light (types GC6268/GC6265/
GC6068/GC6065 only).The pilot light goes out when the appliance
is ready for steam ironing
F Steam control (types GC6268/GC6265/GC6068/GC6065/
GC6029 only).
q = moderate steam
R = maximum steam
G Temperature pilot light
H Steam activator button
I Temperature dial
J Supply hose
K Soleplate
L Mains cord
M Anti-calc funnel (types GC6268/GC6068/GC6029 only)
N Shot of steam (types GC6268/GC6068/GC6029 only)
O Back rest for iron (types GC6268/GC6265/GC6263/GCGC6068/
GC6065/GC6063 only)
Important
For optimal safety,read these instructions carefully and look at the
illustrations before you start using the appliance.
- Do not put perfume, vinegar, starch,descaling agents or other
chemicals in the steam tank.
- Never use the appliance if it is damaged in any way. Regularly check if
the mains cord and the supply hose are still undamaged and safe.
- If the mains cord is damaged,it must be replaced by Philips,a service
centre authorised by Philips or similarly qualified persons in order to
avoid a hazard.
- Do not use any other cap on the steam tank than the cap that has
been supplied with the appliance, as this cap also functions as a safety
valve.
- Check if the voltage indicated on the bottom of the steam tank
corresponds to the mains voltage in your home before you connect
the appliance.
- Only connect the appliance to an earthed wall socket.
- Never immerse the iron or the steam tank in water.
- Never leave the iron unattended when it is connected to the mains.
- When you have finished ironing and even when you leave the iron
for a short while, unplug the iron and put it on the iron stand.
-Always place the steam tank on a stable, level and horizontal surface.
Do not put the steam tank on the soft part of the ironing board.
-Always place the iron on the iron stand.Do not put the hot iron on
the supply hose or the mains cord.
ENGLISH6

- The iron stand and the soleplate of the iron can become extremely
hot and may cause burns if touched.If you want to move the steam
tank,do not touch the iron stand.
- Do not allow the cord to come into contact with the soleplate when
it is hot.
- Infirm persons should not be allowed to use the appliance without
supervision. Keep an eye on children to make sure that they do not
play with the appliance.
- If steam escapes from under the steam tank cap when the appliance
is heating up,switch the appliance off and contact a service centre
authorised by Philips.
- Do not remove the cap from the steam tank when the steam tank is
under pressure. Follow the instructions under 'Fast refill' before
removing the cap.
Preparing the appliance for use
1 Check if the voltage indicated on the bottom of the steam tank
corresponds to the mains voltage in your home before you
connect the appliance.
2 Remove any sticker or protective foil from the soleplate and
clean the soleplate with a soft cloth.
3 Fully unwind the mains cord (L) and supply hose (J).
4 Place the steam tank (B) on a stable,level surface.
5 Place the iron on the iron stand (C).
Filling the steam tank
Never immerse the steam tank in water.
Do not open the cap when the appliance is hot and the steam tank is
still under pressure.
C
1 Make sure the on/off switch (D) has been set to 'off' and
remove the plug from the wall socket.
C
2 Slowly unscrew the cap (A) of the steam tank.
You may hear a sound when you remove the cap.This sound is caused
by the cold tank being under vacuum.This is perfectly normal.
ENGLISH 7
C
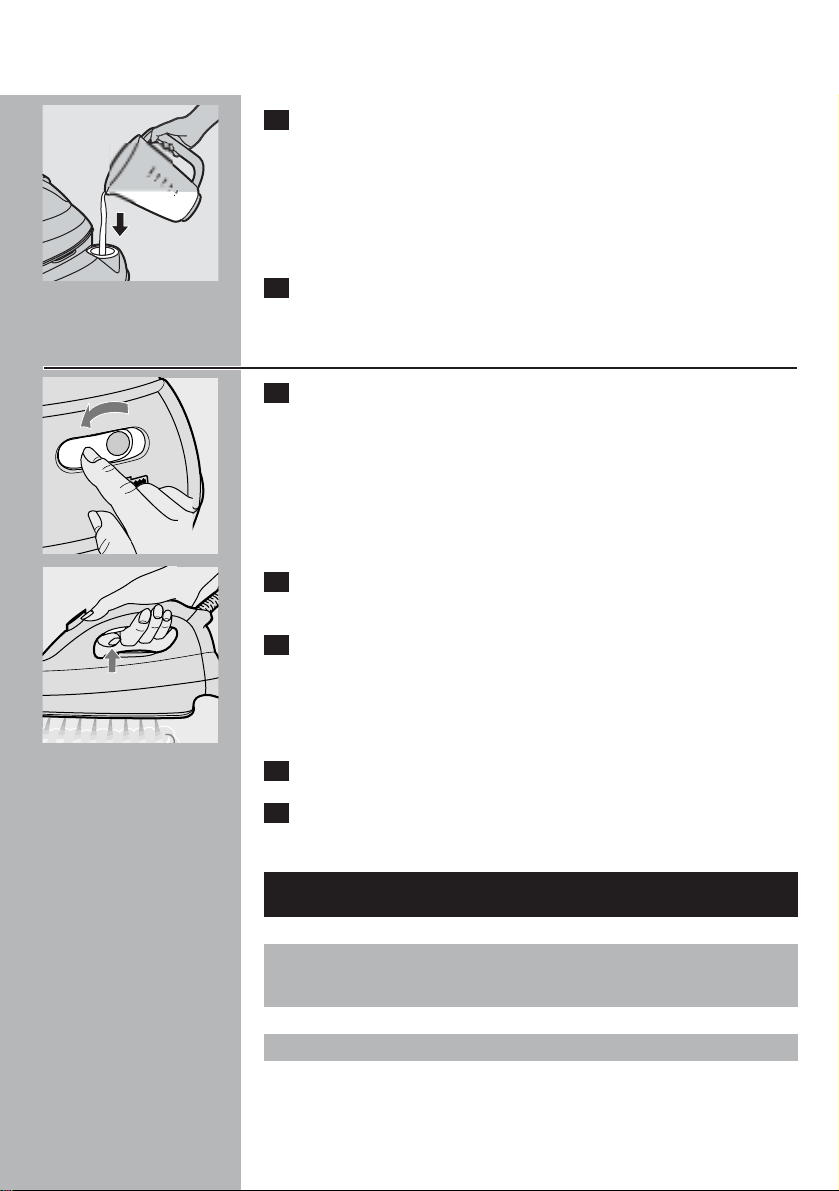
3 Pour water into the steam tank (max.1 litre).
Use tap water to fill the tank up to the maximum level.
If the tap water in your area is very hard, we advise you to mix tap
water with an equal portion of distilled water, or to use distilled water
only.
Do not use perfume, vinegar, starch or chemically descaled water.
4 Screw the cap tightly onto the filling aperture of the steam
tank.
Fast refill
C
1 First set the on/off switch (D) to 'off'.
C
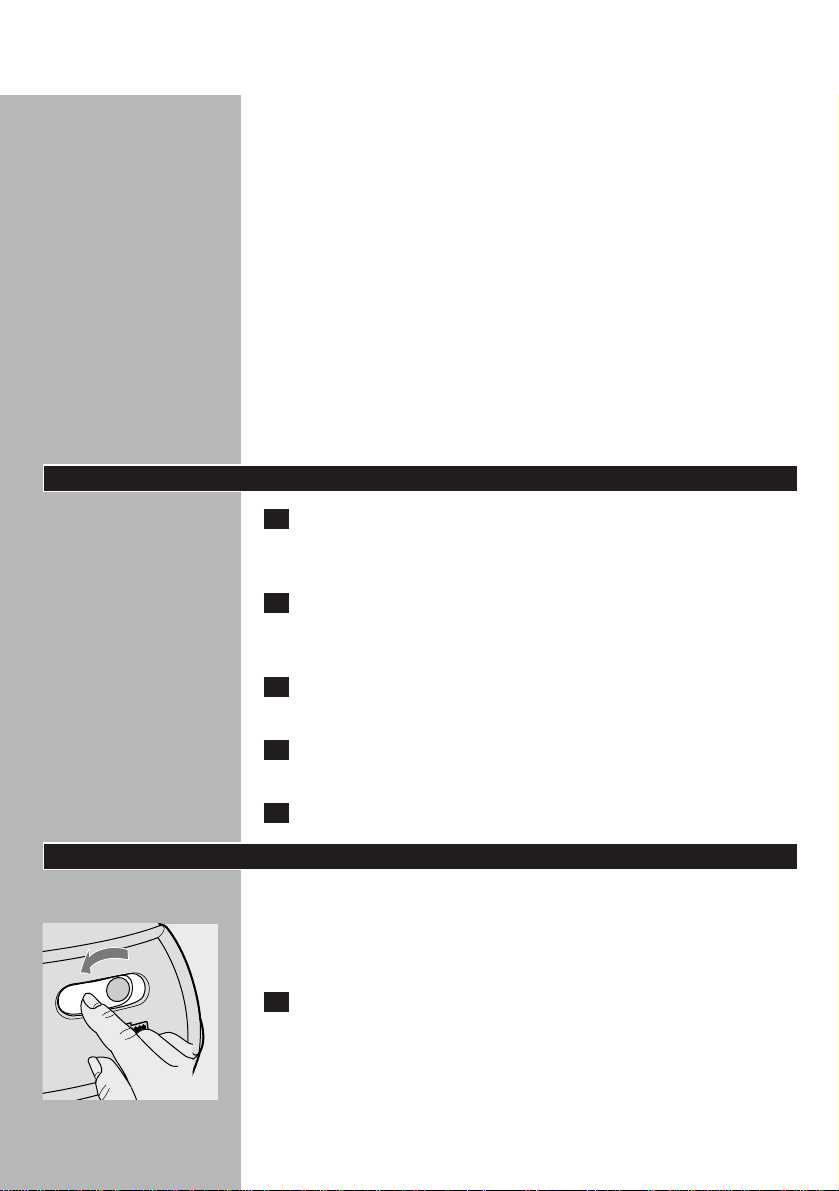
2 Press the steam activator button until you no longer hear any
steam escaping from the appliance.
3 Keep the steam activator button pressed in and slowly unscrew
the cap of the steam tank by turning it anti-clockwise.This will
depressurise the steam tank.
Make sure there is no remaining steam left in the steam tank.Place a
piece of rug over the cap while unscrewing.
4 Remove the mains plug from the wall socket.
5 Fill the steam tank as described in section 'Filling the steam
tank' and let the appliance heat up again.
ENGLISH8
Steam
control
-
q
R
Temperature
dial
1
2
3
Type of fabric
Synthetic fabrics, e.g.acetate,
acrylic,viscose,polyamide,
polyester,and silk
Wool
Cotton,linen
Please note:Z in the table
means that the article
cannot be ironed.
Label with ironing
instructions
B
C
D
Z

Setting the temperature
Always place the steam tank on a stable,level and horizontal surface
Do not put the steam tank on the soft part of the ironing board.
Always place the iron on the iron stand.Do not put the hot iron on
the supply hose or the mains cord.Make sure the cord does not come
into contact with the hot soleplate.
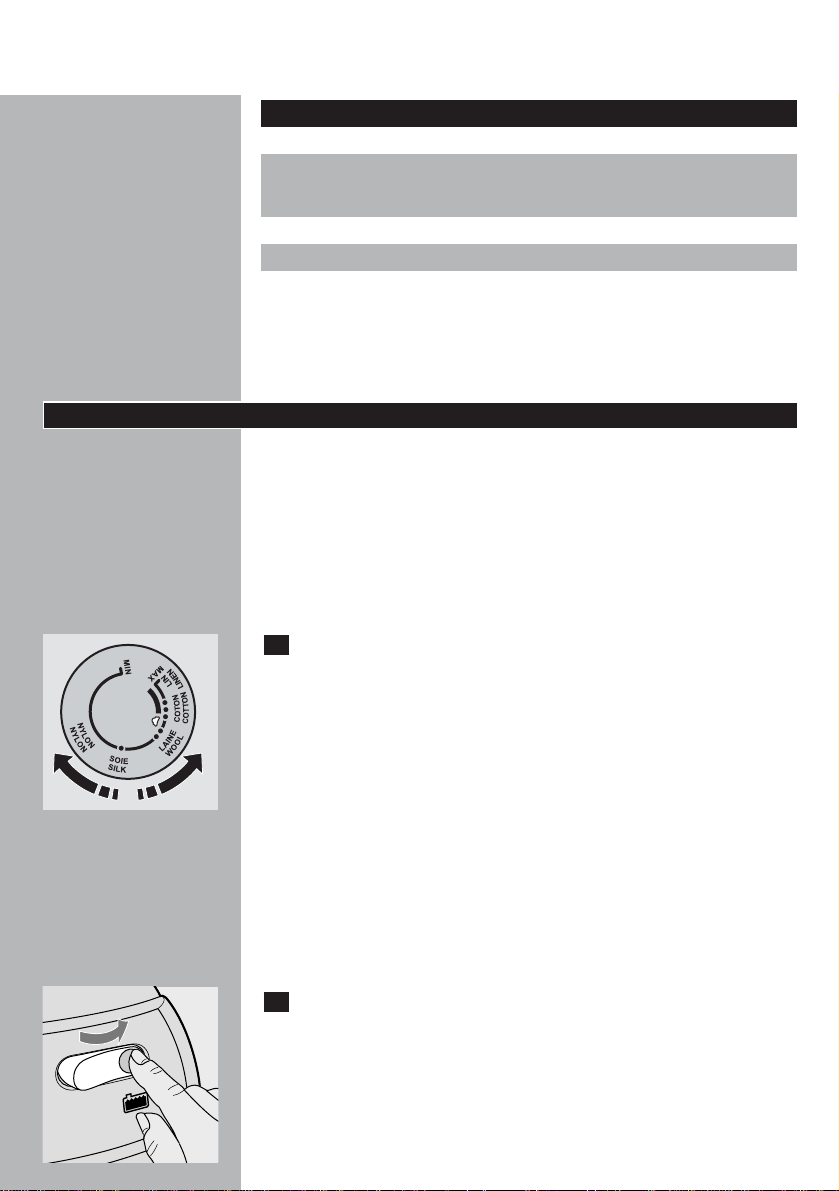
C
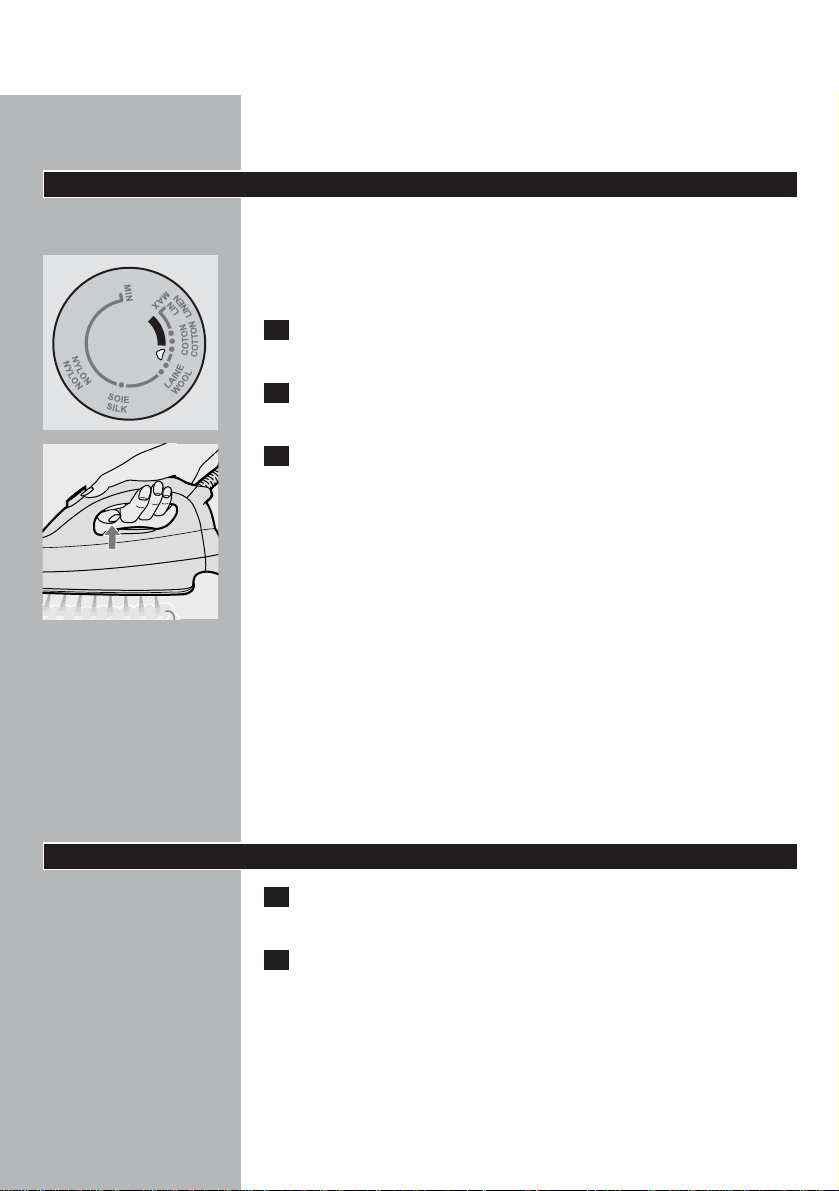
1 Set the temperature dial to the required ironing temperature
by turning it to the appropriate temperature indication.
- Check the garment label for the required ironing temperature:
- 1 Synthetic fabrics (e.g. acrylic, viscose, polyamide, polyester)
- 1 Silk
- 2 Wool
- 3 Cotton,linen
- When you do not know what kind of fabric the article is made of,
try to iron a spot which will be invisible when you wear it.
- Silk,woollen and synthetic materials:iron the reverse side of the
fabric to prevent shiny patches.
- Start ironing the articles that require the lowest ironing temperature,
such as those made of synthetic fibres.
C
2 Put the plug in the wall socket and let the appliance heat up by
setting the on/off switch (D) to 'on'.
3 Cold start:the steam tank and the soleplate will now be heated
up.The soleplate takes approximately 2 minutes to heat up and
the steam tank takes approximately 8 minutes to heat up.
4 Quick reheat:if you refill the steam tank during the ironing
process,the water in the steam tank will take approximately
6 minutes to heat up.
5 Types GC6268/GC6265/GC6068/GC6065/GC6029 only: as
soon as the water in the steam tank is hot enough for steam
ironing,the pilot light (E) will go out.You can now start ironing.
Tips
◗ If the fabric consists of various kinds of fibres,always select the
temperature required by the most delicate fibre, i.e.the lowest
temperature.For example:if an article consists of 60% polyester
and 40% cotton,it should be ironed at the temperature indicated
for polyester (1) and without steam.
◗ When steam ironing woollen fabrics,shiny patches may occur.You
can prevent this by using a dry pressing cloth or by turning the
article inside out and ironing the reverse side.
◗ Velvet and other fabrics that tend to acquire shiny patches should
be ironed in one direction only (along with the nap) while applying
very little pressure.
ENGLISH 9
◗ Do not use steam when you are ironing coloured silk.This could
cause stains.
Steam ironing
Make sure that there is enough water in the steam tank.
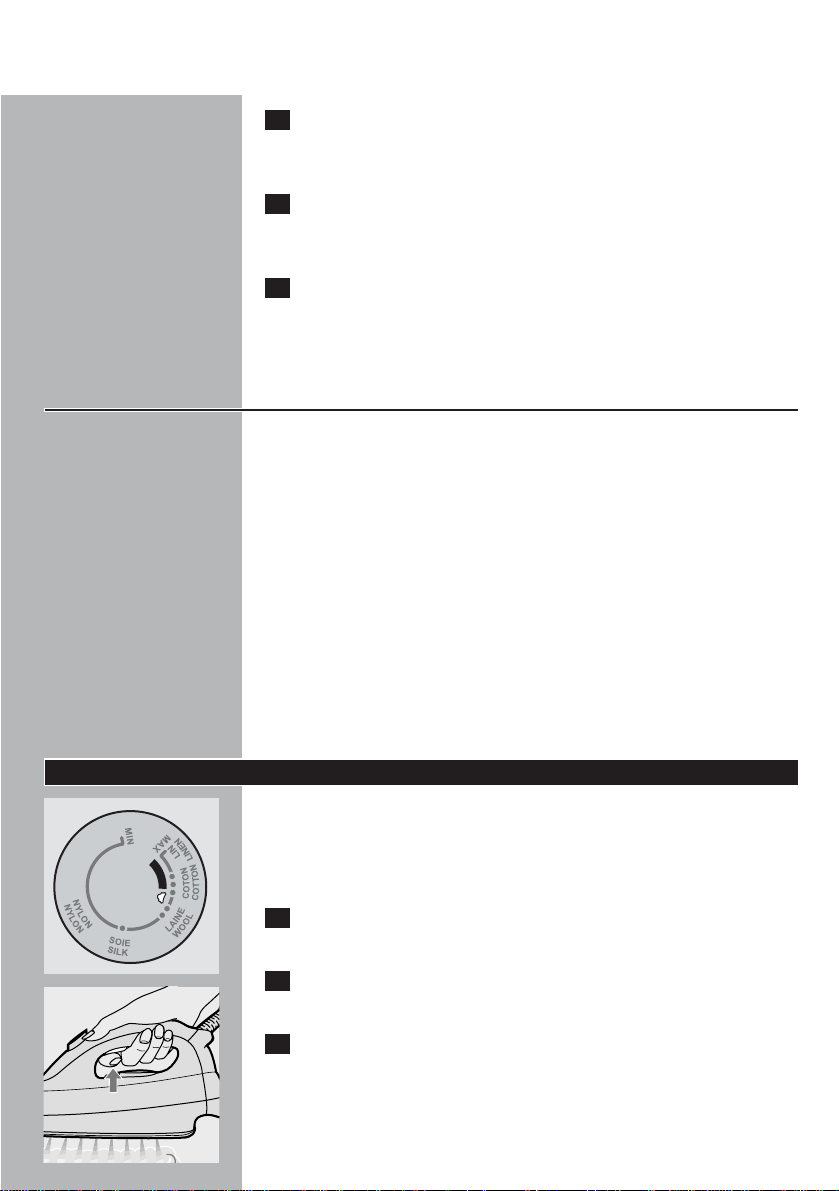
C
◗ Steam ironing is only possible at higher ironing temperatures
(temperature settings 2 to MAX).
1 Set the temperature dial to the recommended position.
See 'Setting the temperature'.
2 Wait until the 'steam tank heating up' pilot light has gone out.
C
3 Keep the steam activator button (H) pressed in while you are
steam ironing.
Types GC6268/GC6265/GC6068/GC6065/GC6029 only: During
steam ironing,pilot light G will go on from time to time to indicate that
the steam tank and the iron are being heated up to the right
temperature and pressure.You can simply continue ironing while this
happens.
If you have not used the steaming facility for some time,the steam that
was still present in the supply hose will have condensed into water.
When you start steam ironing again, this may cause some spluttering in
the appliance and a few droplets of water may escape from the
soleplate.
B
To prevent droplets from falling onto your garments, hold the iron over an
old cloth and press the steam activator button (H) until the steam
production has normalised before you start steam ironing again.
Ironing without steam
1 Set the temperature dial to the recommended position.
See 'Setting the temperature'.
2 Do not press the steam activator button (H).
◗ Some steam will escape if you press the steam activator button by
accident while you are ironing.If the steam tank is empty or has
not heated up yet,you will hear a clicking sound inside the tank.
This phenomenon is caused by the opening of the steam valve and
is perfectly harmless.
ENGLISH10

◗ If you have been ironing at a high temperature and subsequently
set the temperature dial (I) to a lower setting,wait until the
temperature pilot light (G) goes on again before you continue
ironing.This will prevent damage to your fabrics.
Other features
Steaming in vertical position
C
1 Hanging curtains and clothes (jackets,suits,coats) can be steam
ironed by holding the iron in vertical position.
Never direct the steam at people.
Shot of steam (types GC6268/GC6068/GC6029 only)
A powerful 'shot' of steam helps remove stubborn creases.
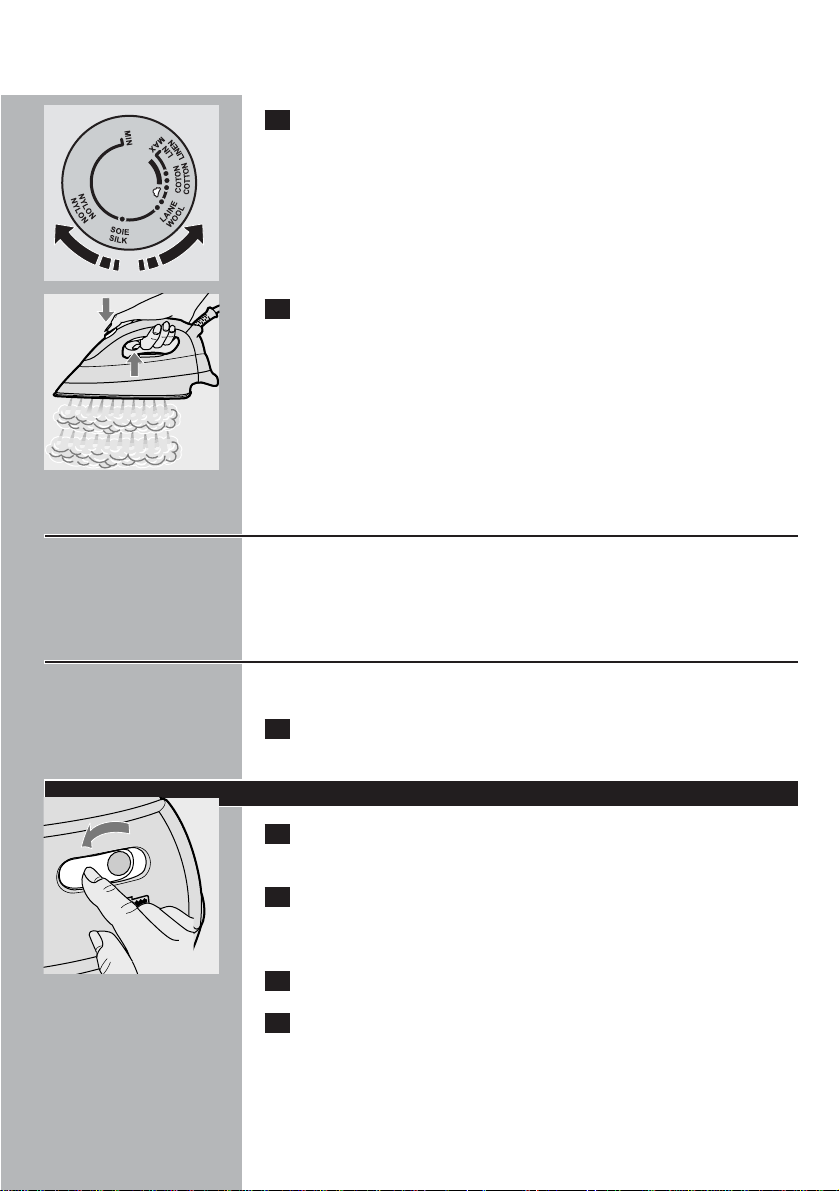
C
1 For a shot of steam:set the steam control (F) to R (the large
cloud) and set the temperature dial (l) to position 3 or
MAX.
C
2 Press both the steam activator button (H) and the shot-of-
steam button (N).
Variable steam (types GC6268/GC6265/GC6068/GC6065/
GC6029 only)
You can set the steam control (F) to q for moderate steam or to R
for maximum steam.
ENGLISH 11

Anti-calc funnel (types GC6268/GC6068/GC6029 only)
To ensure a longer lifetime of the iron.
1 Use the anti-calc funnel (M) when you fill the steam tank with
water.
After ironing
C
1 Switch the appliance off by setting the on/off switch (D) to 'off'.
2 Depressurise the steam tank by pressing the steam activator
button until you no longer hear any steam escaping from the
appliance.
3 Remove the mains plug from the wall socket.
4 Put the iron on the iron stand (C),set the steam control to
position q and let the appliance cool down before you put it
away.
Cleaning and maintenance
1 Remove the mains plug from the wall socket and let the iron
cool down before you start cleaning it.If you want to clean the
steam tank,follow the first four steps of the 'Fast refill' section.
Iron
1 Clean the iron with a damp cloth.
2 Wipe scale and any other deposits off the soleplate with a
damp cloth and a non-abrasive (liquid) cleaner.
Never immerse the iron in water nor rinse it under the tap.
Steam tank
Rinse the steam tank once a month or after you have used the
appliance approximately 10 times.
C
1 Remove the cap carefully.
ENGLISH12

C
2 Rinse the steam tank with only 500 ml of fresh water. Pour out
the water by holding the steam tank upside down over the
sink.
3 Screw the cap back onto the steam tank.
Storage
1 Make sure the iron has cooled down sufficiently before you put
it away.
2 Remove the mains plug from the wall socket and let the iron
cool down.
3 Empty the steam tank.
4 There are handgrips on either side of the steam tank for easy
transport.
5 Regularly check if the mains cord and the supply hose are still
undamaged and safe.
Guarantee & service
If you need information or if you have a problem, please visit the Philips
Web site at www.philips.com or contact the Philips Customer Care
Centre in your country (you will find its phone number in the
worldwide guarantee leaflet). If there is no Customer Care Centre in
your country,turn to your local Philips dealer or contact the Service
Department of Philips Domestic Appliances and Personal Care BV.
Troubleshooting
This chapter summarises the most common problems you could
encounter with your iron.Please read the different sections for more
details.If you are unable to solve the problem, please contact the
Philips Customer Care Centre in your country (you will find its phone
number in the worldwide guarantee leaflet). If there is no Customer
Care Centre in your country,turn to your local Philips dealer or the
nearest Philips service centre.
ENGLISH 13

Solution
This phenomenon will cease after a
short while.
These particles are harmless and they
will stop coming out of the soleplate
when you have used the iron a few
times.
Select the required ironing
temperature as indicated in these
instructions and the table.
Put the steam tank on a stable and
even surface.
This is normal. Hold the iron over an
old cloth and press the steam activator
button (H).The cloth will absorb the
drops.After a few seconds the steam
production will have normalised.
Set the on/off switch (D) to 'on'.
Wait until the pilot light has gone out.
To check if the iron is really producing
steam,hold a (cold) mirror in front of
the soleplate vents.
Clean the soleplate with a damp cloth.
Clean the soleplate with a damp cloth.
Select the recommended ironing
temperature.
Possible cause(s)
This is normal. Some parts of the iron
have been greased lightly in the
factory.
This is normal with a new iron.
The temperature dial (I) has been set
to a temperature that is too low for
steam ironing.
The steam tank has been placed on an
unstable and/or uneven surface.
When you start steam ironing, the
hose is cold.Steam condenses in the
hose, causing droplets of water to
escape from the soleplate.
The steam tank has not been switched
on.
The 'steam tank heating up' pilot light
is still on (types GC6268/GC6265/
GC6068/GC6065/GC6029 only).
Superheated (i.e. high-quality) steam is
hardly visible,especially when the
temperature dial has been set to
maximum position and even less so
when the ambient temperature is
relatively high.
Impurities or chemicals present in the
water have deposited on the soleplate.
You have been ironing at too high
temperatures.
Problem
Some smoke comes out of the
appliance after you have switched the
appliance on for the first time.
White particles come out of the
soleplate of your new iron.
Droplets of water escape from the
soleplate.
The appliance does not produce
steam.
I don't see any steam coming out of
the soleplate.
The soleplate is dirty.
ENGLISH14

DEUTSCH 15
Allgemeine Beschreibung
A Verschluss des Wassertanks
B Wassertank
C Abstellfläche für das Bügeleisen
D Ein-/Aus-Schalter mit integrierter Kontrolllampe
E Kontrolllampe "Wassertank heizt auf" (nur Typen GC6268/GC6265/
GC6068/GC6065);die Kontrolllampe erlischt, sobald das Gerät zum
Dampfbügeln bereit ist
F Dampfregler (nur Typen GC6268/GC6265/GC6068/GC6065/
GC6029);
q = wenig Dampf, R = viel Dampf
G Temperatur-Kontrolllampe
H Drucktaste für die Dampfzufuhr
I Temperaturregler
J Verbindungsschlauch
K Bügelsohle
L Netzkabel
M Antikalktrichter (nur Typen GC6268/GC6068/GC6029)
N Dampfstoß (nur Typen GC6268/GC6068/GC6029)
O Rückwärtige Bügeleisen-Halterung (nur Gerätetypen GC6268/
GC6265/GC6263/GC6068/GC6065 und GC6063)
Wichtig
Lesen Sie zu Ihrer Sicherheit zuerst diese Gebrauchsanweisung durch,
bevor Sie das Gerät zum ersten Mal benutzen.
- Füllen Sie weder Parfüm,Essig,Stärke,Entkalker noch andere
Chemikalien in den Wassertank.
-Verwenden Sie das Gerät niemals, wenn es in irgendeiner Hinsicht
defekt oder beschädigt ist.Prüfen Sie regelmäßig den
Verbindungsschlauch und das Netzkabel auf Unversehrtheit und
Sicherheit.
-Wenn das Netzkabel defekt oder beschädigt ist, darf es nur von einem
Philips Service-Center oder einer von Philips autorisierten Werkstatt
ausgetauscht werden,um ein Sicherheitsrisiko zu vermeiden.
-Verwenden Sie zum Verschließen des Wassertanks ausschließlich den
mitgelieferten Schraubverschluss. Dieser Verschluss dient auch als
Sicherheitsventil.
- Prüfen Sie vor dem ersten Gebrauch, ob die Spannungsangabe unter
dem Wassertank mit der örtlichen Netzspannung übereinstimmt.
-Verwenden Sie das Gerät ausschließlich an einer Schukosteckdose.
-Tauchen Sie das Bügeleisen oder den Wassertank niemals in Wasser.
- Lassen Sie das Gerät niemals unbeaufsichtig,solange es am Stromnetz
angeschlossen ist.
- Ziehen Sie stets den Netzstecker und stellen Sie das Bügeleisen auf
die Abstellfläche,wenn Sie das Bügeln beendet haben oder den Raum
- sei es auch nur für kurze Zeit - verlassen.
- Stellen Sie den Wassertank stets auf eine feste, ebene und
waagerechte Arbeitsfläche.Stellen Sie ihn nicht auf die weiche,
gepolsterte Fläche des Bügelbretts.
- Stellen Sie das Bügeleisen immer auf die Abstellfläche.Stellen Sie das
heiße Bügeleisen nie auf den Verbindungsschlauch oder das
Netzkabel.
- Die Abstellfläche und die Bügelsohle können sehr heiß werden und
bei Berührung zu Verbrennungen führen.Achten Sie beim Bewegen
des Wassertanks darauf, die Abstellfläche nicht zu berühren.
- Achten Sie darauf, dass das Netzkabel nicht mit der heißen
Bügelsohle in Kontakt kommt.
- Behinderte Personen sollten bei Benutzung des Geräts beaufsichtigt
werden.Achten Sie darauf,dass Kinder nicht mit dem Gerät spielen.
- Sollte während des Aufheizens aus der Einfüllöffnung Dampf
entweichen,schalten Sie das Gerät aus und setzen Sie sich mit einem
Philips Service Center in Verbindung.
- Nehmen Sie den Verschluss keinesfalls vom Wassertank, während
dieser unter Druck steht. Befolgen Sie die Anweisungen im Abschnitt
'Schnell-Nachfüllung',bevor Sie den Verschluss öffnen.
Vorbereitung zum Gebrauch
1 Prüfen Sie vor dem ersten Gebrauch,ob die Spannungsangabe
unter dem Wassertank mit der örtlichen Netzspannung
übereinstimmt.
2 Entfernen Sie die Schutzfolie und alle Aufkleber von der
Bügelsohle und reinigen Sie die Bügelsohle mit einem weichen
Tuch.
3 Ziehen Sie das Netzkabel (L) und den Verbindungsschlauch (J)
ganz heraus.
4 Stellen Sie den Wassertank (B) auf eine feste,ebene und
waagerechte Fläche.
5 Stellen Sie das Bügeleisen auf die Abstellfläche (C).
Den Wassertank füllen
Tauchen Sie den Wassertank niemals in Wasser.
Öffnen Sie den Verschluss nicht,wenn das Gerät heiß ist und der
Wassertank noch unter Druck steht.
C
1 Achten Sie darauf,dass der Ein/Aus-Schalter (D) auf "Off" (=
Aus) steht.Ziehen Sie außerdem den Netzstecker.
DEUTSCH16

DEUTSCH 17
C
2 Schrauben Sie den Verschluss (A) des Wassertanks langsam auf.
Möglicherweise hören Sie beim Lösen des Verschlusses ein Zischen
Das ist absolut normal. Ursache ist das Vakuum im kalten Wassertank.
C
3 Gießen Sie maximal 1 Liter Wasser in den Wassertank.
Füllen Sie den Tank mit Leitungswasser bis zur Höchststandsmarkierung.
Wenn das Leitungswasser in Ihrer Gegend sehr hart ist,mischen Sie es
zu gleichen Teilen mit destilliertem Wasser oder verwenden Sie
ausschließlich destilliertes Wasser.
Verwenden Sie weder Parfüm,Essig,Stärke noch chemisch entkalktes
Wasser.
4 Schrauben Sie den Verschluss fest auf die Einfüllöffnung des
Wassertanks.
Schnell-Nachfüllung
C
1 Stellen Sie zuerst den Ein/Aus-Schalter (D) auf "Off" = Aus.
C
2 Drücken Sie die Taste für die Dampfzufuhr,bis kein
entweichender Dampf mehr vernehmbar ist.
3 Halten Sie die Taste für die Dampfzufuhr gedrückt und öffnen
Sie den Verschluss des Wassertanks langsam,indem Sie ihn
gegen den Uhrzeigersinn drehen.Dabei entweicht der
Überdruck aus dem Tank.
Im Wassertank darf sich kein Dampf mehr befinden. Halten Sie beim
Öffnen ein Stück Stoff über den Verschluss.
4 Ziehen Sie den Netzstecker aus der Steckdose.
5 Füllen Sie den Wassertank gemäß der Beschreibung im
Abschnitt 'Den Wassertank füllen' und lassen Sie das Gerät
wieder aufheizen.
Einstellen der Bügeltemperatur
Stellen Sie den Wassertank stets auf eine feste, ebene und waagerechte
Arbeitsfläche. Stellen Sie ihn nicht auf die weiche, gepolsterte Fläche
des Bügelbretts.
Stellen Sie das Bügeleisen stets auf die Abstellfläche zurück.Achten Sie
darauf, dass Sie das heiße Bügeleisen nicht auf den Verbindungsschlauch
oder das Netzkabel stellen.Das Netzkabel darf nicht mit der heißen
Bügelsohle in Berührung kommen.
C
1 Stellen Sie den Temperaturregler auf die erforderliche
Bügeltemperatur,indem Sie ihn auf die entsprechende
Markierung drehen.
- Prüfen Sie das Etikett im Wäsche-/Kleidungsstück auf die
erforderliche Bügeltemperatur:
- 1 Synthetische Stoffe, z.B.Akryl,Viskose, Polyamid,Polyester
- 1 Seide
- 2 Wolle
- 3 Baumwolle, Leinen
- Ist Ihnen das Gewebe unbekannt,prüfen Sie die Bügeltemperatur an
einer Stelle, die unter normalen Bedingungen nicht sichtbar ist.
- Materialien aus Seide,Wolle und synthetischen Fasern: Bügeln Sie
diese Teile auf der Rückseite (von links),um zu vermeiden,dass
glänzende Stellen auftreten.
- Beginnen Sie stets mit den Textilien,die eine niedrige
Temperatureinstellung erfordern (z.B. Kunstfasern).
C
2 Stecken Sie den Netzstecker in die Steckdose und stellen Sie
den Ein/Aus-Schalter (D) auf "On" = Ein,damit sich das Gerät
aufheizt.
DEUTSCH18
Dampfregler
-
q
R
Temperaturregler
1
2
3
Gewebeart
Synthetics,z.B. Azetat,
Akryl,Viskose, Polyamid,
Polyester und Seide
Wolle
Baumwolle, Leinen
Wichtig:Das Zeichen Z
in der Tabelle bedeutet,
dass dieser Artikel nicht
gebügelt werden darf.
Bügelvorschriften
B
C
D
Z
DEUTSCH 19
3 Kaltstart:Der Wassertank und die Bügelsohle werden
aufgeheizt.Dies dauert bei der Bügelsohle ca.2 Minuten und
beim Wassertank ca.8 Minuten.
4 Nachheizen:Wenn Sie den Tank während des Bügelns
nachfüllen,dauert es ca.6 Minuten,bis das Wasser im
Wassertank aufgeheizt ist.
5 Nur T ypen GC6268/GC6265/GC6068/GC6065/GC6029:
Sobald das Wasser im Wassertank die erforderliche Temperatur
zum Dampfbügeln erreicht hat,erlischt die Kontrolllampe (E).
Nun können Sie mit dem Bügeln beginnen.
Hinweise
◗ Besteht das Gewebe aus verschiedenen Materialien,so wählen Sie
die Temperatur für das empfindlichste der Materialien,also die
niedrigste Temperatur.Besteht das Gewebe z.B. aus einer
Mischung von 60 % Polyester und 40 % Baumwolle,muss es mit
der Temperatur für Polyester (1) und ohne Dampf gebügelt
werden.
◗ Beim Dampfbügeln von Wollstoffen können sich glänzende Stellen
bilden.Das lässt sich durch die Verwendung eines trockenen
Bügeltuchs verhindern oder dadurch,dass Sie das Gewebe von der
Rückseite,von links,bügeln.
◗ Samt und andere Gewebe,die leicht glänzende Stellen bilden,
dürfen nur in einer Richtung (mit dem Strich) und unter nur
leichtem Druck gebügelt werden.
◗ Gefärbte Seide darf nicht mit Dampf gebügelt werden.Das könnte
Flecken verursachen.
Dampfbügeln
Achten Sie darauf, dass sich genügend Wasser im Wassertank befindet.
C
◗ Das Dampfbügeln ist nur bei höheren Temperaturen möglich
(zwischen 2 und MAX).
1 Stellen Sie den Temperaturregler auf die empfohlene Position.
Vgl.den Abschnitt "Die Temperatur einstellen".
2 Warten Sie,bis die Kontrolllampe "Wassertank heizt auf"
erlischt.
C
3 Beim Dampfbügeln muss die Drucktaste für die Dampfzufuhr
(H) gedrückt bleiben.
Nur T ypen GC6268/GC6265/GC6068/GC6065/GC6029:Beim
Dampfbügeln leuchtet gelegentlich die Kontrolllampe (G) auf,wenn
Wassertank und Bügelsohle wieder auf

die richtige Temperatur und den erforderlichen Druck gebracht
werden.Sie können das Bügeln ohne Unterbrechung fortsetzen.
Wenn Sie das Gerät längere Zeit nicht zum Dampfbügeln benutzt
haben,kann sich im Verbindungsschlauch Kondenswasser gebildet
haben.In diesem Fall können einige Tropfen Wasser aus der Bügelsohle
entweichen,sobald Sie wieder mit dem Dampfbügeln beginnen.
B
Damit das Kondenswasser nicht auf das Gewebe tropft,halten Sie,bevor
Sie mit dem Bügeln beginnen,das Bügeleisen über ein altes Stück Stoff
und drücken Sie die Taste für die Dampfzufuhr (H),bis sich die
Dampfentwicklung normalisiert hat.
Trockenbügeln
1 Stellen Sie den Temperaturregler auf die empfohlene
Temperatur.
Vgl.den Abschnitt "Die Temperatur einstellen".
2 Drücken Sie NICHT die Taste für die Dampfzufuhr (H).
◗ Drücken Sie während des Bügelns versehentlich die Taste für die
Dampfzufuhr,entweicht etwas Dampf.Ist der Wassertank leer
oder noch nicht aufgeheizt,hören Sie nur ein Klicken aus dem
Tank. Dieses Klicken rührt vom Öffnen des Dampfventils her und
ist völlig harmlos.
◗ Wenn Sie nach dem Bügeln mit höherer Temperatur am
Temperaturregler (I) eine niedrigere Temperatur einstellen, müssen
Sie warten,bis die Kontrolllampe (G) wieder aufleuchtet,bevor Sie
mit dem Bügeln fortfahren,um Schäden am Gewebe zu vermeiden.
Weitere Merkmale und Funktionen
Vertikaler Dampfstoß
C
1 Hängende Kleidung (Jacken,Anzüge, Mäntel) und Vorhänge
können mit senkrecht gehaltenem Bügeleisen aufgedämpft
werden.
Richten Sie den Dampstoß niemals auf Personen!
Dampfstoß (nur Typen GC6268/GC6068/GC6029)
Ein kräftiger Dampfstoß hilft,hartnäckige Falten zu beseitigen.
DEUTSCH20
DEUTSCH 21
C
1 Dampfstoß:Stellen Sie den Dampfregler (F) auf Position R
(große Wolke) und den Temperaturregler (I) auf Position 3
oder MAX.
C
2 Drücken Sie die Taste für die Dampfzufuhr (H) und die
Dampfstoßtaste (N).
Variodampf (nur Typen GC6268/GC6265/GC6068/GC62065/
GC6029)
Stellen Sie den Dampfregler (F) auf q,wenn wenig Dampf erzeugt
werden soll.In der Position R wird die maximale Menge Dampf
erzeugt.
Antikalktrichter (nur Typen GC6268/GC6068/6029)
Verlängert die Lebensdauer des Geräts.
1 Verwenden Sie den Antikalktrichter (M) beim Füllen des
Wassertanks.
Nach dem Bügeln
C
1 Schalten Sie das Gerät aus,indem Sie den Ein/Aus-Schalter (D)
auf "Off" = Aus stellen.
2 Lassen Sie den Druck aus dem Wassertank ab,indem Sie die
Taste für die Dampfzufuhr drücken,bis Sie keinen Dampf mehr
aus dem Gerät entweichen hören.
3 Ziehen Sie den Netzstecker aus der Steckdose.
4 Stellen Sie das Bügeleisen auf die Abstellfläche (C),bringen Sie
den Dampfregler in Position q und lassen Sie das Gerät
abkühlen,bevor Sie es wegräumen.

Reinigung und Wartung
1 Ziehen Sie den Netzstecker aus der Steckdose und lassen Sie
das Bügeleisen abkühlen,bevor Sie es reinigen.Führen Sie zum
Reinigen des Wassertanks die ersten 4 Schritte im Abschnitt
"Schnell-Nachfüllung" durch.
Das Bügeleisen
1 Reinigen Sie das Bügeleisen mit einem feuchten Tuch.
2 Wischen Sie Kalk und andere Ablagerungen auf der Bügelsohle
mit einem feuchten Tuch ab,auf das Sie ein mildes Spülmittel
auftragen können.
Tauchen Sie das Bügeleisen niemals in Wasser; spülen Sie es auch nicht
unter fließendem Wasser ab.
Der Wassertank
Spülen Sie den Wasertank mindestens einmal monatlich oder nach ca.
10 Benutzungen aus.
C
1 Schrauben Sie vorsichtig den Verschluss auf.
C
2 Spülen Sie den Wassertank mit nur 500 ml frischem Waser aus.
Gießen Sie das Wasser aus,indem Sie den Tank umgekehrt über
ein Spülbecken halten.
3 Schrauben Sie den Verschluss wieder auf den Wassertank.
Aufbewahrung
1 Lassen Sie das Bügeleisen abkühlen,bevor Sie es wegräumen.
2 Ziehen Sie den Netzstecker aus der Steckdose und lassen Sie
das Bügeleisen abkühlen.
3 Leeren Sie den Wassertank.
4 Mit den beiden Griffen an den Seiten des Wassertanks lässt sich
das Gerät bequem transportieren.
DEUTSCH22

DEUTSCH 23
5 Prüfen Sie Verbindungsschlauch und Netzkabel regelmäßig auf
Unversehrtheit und Sicherheit.
Garantie und Kundendienst
Weitere Informationen erhalten Sie im Internet unter www.philips.com.
Wenden Sie sich mit Problemen, Fragen und Wünschen gegebenenfalls
an das Philips Service Center in Ihrem Land (die Telefonnummer finden
Sie in der beiliegenden internationalen Garantieschrift).Gibt es in
Ihrem Land kein Philips Service Center,setzen Sie sich mit der
Kundendienstabteilung (Service Department) von Philips Domestic
Appliances and Personal Care B.V. in Verbindung.
Fehlerbehebung
In diesem Kapitel werden Probleme beschrieben,die gelegentlich bei
der Benutzung des Bügeleisens auftreten können.Details finden Sie in
den einzelnen Abschnitten. Können Sie ein Problem nicht lösen,setzen
Sie sich mit einem Philips Service Center in Verbindung (die
Telefonnummer finden Sie in der internationalen Garantieschrift).Gibt
es in Ihrem Land kein Philips Service Center,wenden Sie sich an Ihren
Philips Händler.

Abhilfe
Das tritt nach kurzer Zeit nicht mehr
auf.
Die Partikel sind harmlos und
verschwinden, nachdem Sie das
Bügeleisen einige Male benutzt haben.
Stellen Sie die Temperatur ein,die nach
den Angaben in dieser
Gebrauchsanweisung und der Tabelle
erforderlich ist.
Stellen Sie den Wassertank auf eine
stabile und ebene Fläche.
Das ist normal. Halten Sie das
Bügeleisen über ein altes Tuch und
drücken Sie die Taste für die
Dampfzufuhr (H).Das Tuch saugt das
Kondenswasser auf.Nach wenigen
Sekunden normalisiert sich die
Dampfzufuhr.
Stellen Sie den Ein/Aus-Schalter (D)
auf Position "On" = Ein.
Warten Sie,bis die Kontrolllampe
erlischt.
Halten Sie einen (kalten) Spiegel vor
die Löcher in der Bügelsohle, um zu
überprüfen,ob Dampf austritt.
Reinigen Sie die Bügelsohle mit einem
feuchten T uch.
Reinigen Sie die Bügelsohle mit einem
feuchten Tuch.Stellen Sie die
empfohlene Bügeltemperatur ein.
Vermutliche Ursache(n)
Das ist normal. Einige Teile des
Bügeleisens sind in der Fabrik leicht
eingefettet worden.
Das ist bei einem neuen Bügeleisen
ganz normal.
Der Temperaturregler (I) ist auf eine
zum Dampfbügeln zu niedrige
Temperatur eingestellt.
Der Wassertank wurde auf eine
instabile oder unebene Unterlage
gestellt.
Der Verbindungsschlauch ist zu Beginn
des Dampfbügelns noch kalt.Dann
kondensiert im Schlauch Dampf, der in
Tropfenform aus der Bügelsohle
austritt.
Der Wassertank ist nicht eingeschaltet.
Die Kontrolllampe "Wassertank heizt
auf" leuchtet noch (nur Typen
GC6268/GC6265/GC6068/GC6065/
GC6029).
Sehr heißer Dampf ist kaum sichtbar,
besonders wenn der Temperaturregler
auf der Maximalposition steht und die
Umgebungstemperatur ebenfalls relativ
hoch ist.
Verunreinigungen oder Chemikalien im
Wasser haben Rückstände
hinterlassen.
Sie haben bei zu hoher Temperatur
gebügelt.
Problem
Aus dem Gerät tritt nach dem ersten
Einschalten etwas Rauch aus.
Aus der Bügelsohle des neuen
Bügeleisens treten weiße Partikel aus.
Wasser tropft aus der Bügelsohle.
Das Gerät entwickelt keinen Dampf.
Aus der Bügelsohle tritt kein Dampf
aus.
Die Bügelsohle ist verschmutzt.
DEUTSCH24

Description générale
A Bouchon de chaudière
B Chaudière à vapeur
C Support du fer
D Bouton marche/arrêt avec témoin lumineux
E Témoin lumineux "chauffage chaudière" (modèles GC6268/
GC6265/GC6068/GC6065 uniquement).Le témoin lumineux
s'éteint lorsque l'appareil est prêt à l'emploi
F Bouton vapeur (modèles GC6268/GC6265/GC6068/GC6065/
GC6029 uniquement).
q = vapeur modérée R = vapeur maximum
G Indicateur température
H Bouton vapeur
I Thermostat
J Cordon d'alimentation
K Semelle
L Cordon secteur
M Entonnoir anti-calc (modèles GC6268/GC6068/GC6029
uniquement)
N Jet de vapeur (modèles GC6268/GC6068/GC6029 uniquement)
O Support arrière pour le fer (types GC6268/GC6265/GC6263/
GC6068/GC6065/GC6063 uniquement)
Important
Avant d'utiliser l'appareil,lisez soigneusement ces instructions et
regardez les images pour une sécurité optimale.
- Ne mettez pas de parfum,de vinaigre,amidon,détartrants ou
d'autres agents chimiques dans le réservoir d'eau.
- N'utilisez jamais le fer à repasser s'il est endommagé d'une façon
quelconque.Vérifiez toujours le cordon d'alimentation vapeur et le
cordon secteur pour vous assurer qu'ils ne sont pas endommagés.
- Si le cordon d'alimentation est endommagé,il ne doit être remplacé
que par un Centre Service Agréé Philips car des outils et/ou
composants spéciaux sont nécessaires.
- N'utilisez pas d'autre bouchon pour la chaudière que celui fourni
avec l'appareil,car ce bouchon fonctionne également comme
soupape de sûreté.
- Vérifiez que la tension indiquée sur le fond de la chaudière
correspond bien à la tension de votre secteur avant de brancher
l'appareil.
-Branchez la fiche dans la prise de courant.
- Ne plongez jamais le fer ou la chaudière dans l'eau.
- Ne laissez jamais le fer à repasser sans surveillance lorsqu'il est branché.
- Lorsque vous avez fini de repasser ou même si vous laissez le fer
pour un bref instant,débranchez-le et placez-le sur son support.
- Placez toujours la chaudière sur une surface stable et horizontale. Ne
placez pas la chaudière à vapeur sur une planche à repasser.
- Placez toujours le fer sur son support. Ne placez jamais le fer à
repasser sur le cordon d'alimentation ou sur le cordon secteur.
FRANÇAIS 25

- Le support du fer et la semelle peuvent devenir très chauds et donc
peuvent causer des brûlures si vous les touchez.Si vous voulez
déplacer la chaudière, ne touchez pas le support.
- Evitez le contact du cordon d'alimentation avec la semelle lorsqu'elle
est chaude.
- Cet appareil ne doit pas être manipulé par des personnes
handicapées sans surveillance.Tenez l'appareil hors de la portée des
enfants.Assurez-vous qu'ils ne peuvent pas jouer avec l'appareil.
-Si de la vapeur s'échappe par le bouchon de chaudière lorsque
l'appareil chauffe, arrêtez l'appareil et contactez un centre service
agréé Philips.
- Ne dévissez pas le bouchon de chaudière quand celle-ci est sous
pression.Avant de retirer le bouchon, suivez les instructions du
chapitre "Remplissage rapide".
Préparation à l'emploi
1 Vérifiez que la tension indiquée sur le fond de la chaudière
correspond bien à la tension de votre secteur avant de
brancher l'appareil.
2 Retirez toute étiquette ou feuille de protection de la semelle et
nettoyez-la avec un chiffon doux.
3 Déroulez complètement le cordon d'alimentation (L) et le
cordon secteur (J).
4 Placez la chaudière (B) sur une surface stable et horizontale.
5 Placez le fer sur son support (C).
Remplissage de la chaudière
Ne plongez jamais la chaudière dans l'eau.
N'ouvrez pas le bouchon lorsque l'appareil est très chaud et la
chaudière est sous pression.
C
1 Assurez-vous que le bouton marche/arrêt (D) est positionné
sur 'arrêt' et débranchez la fiche de la prise de courant.
C
2 Dévissez lentement le bouchon (A) de la chaudière.
Vous pouvez entendre un léger bruit lorsque vous dévissez le
bouchon.Ceci est tout à fait normal.
FRANÇAIS26

C
3 Versez de l'eau dans la chaudière (max.1 litre).
Remplissez le réservoir avec de l'eau du robinet jusqu'au niveau
maximum.
Si l'eau du robinet de votre région est très calcaire, il est conseillé de la
mélanger avec de l'eau déminéralisée.
N'utilisez jamais de parfum,de vinaigre,d'amidon ou d'eau détartrée
chimiquement.
4 Vissez fermement le bouchon sur l'orifice de remplissage de la
chaudière.
Remplissage rapide
C
1 D'abord positionnez le bouton marche/arrêt (D) sur 'arrêt'.
C
2 Maintenez le bouton vapeur appuyé jusqu'à ce que la vapeur
soit complètement éliminée de l'appareil.
3 Maintenez le bouton vapeur appuyé et dévissez légèrement le
bouchon de chaudière en tournant dans le sens inverse des
aiguilles d'une montre.La chaudière à vapeur est ainsi
dépressurisée.
Assurez-vous que la vapeur est complètement éliminée de l'appareil
Mettez un chiffon au-dessus du bouchon lorsque vous le dévissez.
4 Débranchez la fiche de la prise de courant.
5 Remplissez la chaudière comme il est décrit dans le chapitre
'Remplissage de la chaudière' et laissez l'appareil chauffer.
FRANÇAIS 27
Commande
de vapeur
-
q
R
Thermostat
1
2
3
Type de tissu
Fibres synthétiques,par ex.
acétate, acrylique, viscose,
polyamide,polyester et soie
Laine
Coton,lin
Veuillez noter que:Z dans
le tableau signifie que cet
article ne doit pas être
repassé.
Etiquette avec instructions de repassage
B
C
D
Z

Réglage de la température
Placez toujours la chaudière sur une surface stable et horizontale. Ne
placez pas la chaudière à vapeur sur une planche à repasser.
Placez toujours le fer sur son support. Ne placez jamais le fer à
repasser sur le cordon d'alimentation ou sur le cordon secteur. Evitez le
contact du cordon avec la semelle lorsqu'elle est chaude.
C
1 Mettez le thermostat sur la position souhaitée.
- Vérifiez toujours les températures de repassage figurant sur
l'étiquette des vêtements:
- 1 Fibres synthétiques (par ex.acrylique,viscose,polyamide,
polyester)
- 1 Soie
- 2 Laine
- 3 Coton,lin
- Si vous ne connaissez pas la composition des tissus,repassez en
commençant par la température la plus basse sur une partie interne
du vêtement et invisible de l'extérieur.
- La soie, la laine et autres fibres synthétiques doivent être repassés sur
l'envers pour éviter les taches.
- Commencez toujours le repassage des articles de fibres synthétiques
nécessitant la température la plus basse.
C
2 Branchez la fiche dans la prise de courant et laissez l'appareil
chauffer en positionnant le bouton marche/arrêt (D) sur
'marche'.
3 Début froid:L'eau de la chaudière et la semelle commencent à
chauffer. Le chauffage de la semelle dure environ 2 minutes et
de l'eau de la chaudière environ 8 minutes.
4 Réchauffage rapide:Si vous réchauffez la chaudière pendant le
repassage,l'eau de la chaudière chauffe pendant environ 6
minutes.
5 Les modèles GC6268/GC6265/GC6068/GC6065/GC6029
uniquement:Lorsque la chaudière est assez chaude pour
produire de vapeur,le témoin (E) s'éteint.Vous pouvez
maintenant commencer à repasser.
Suggestions
◗ Si le tissu est fait de plusieurs types de fibres, sélectionnez toujours
la température nécessaire pour la fibre la plus délicate,c.-à-d.la
température la plus basse.Par ex.si un article contient 60%
polyester et 40% coton,il doit être repassé à la température
indiquée pour le polyester (1) et sans vapeur.
FRANÇAIS28

◗ Lorsque vous repassez des articles en laine, le fer peut lustrer.
Pour éviter de lustrer les tissus,utilisez un chiffon sec ou repassez
l'article sur l'envers.
◗ Le velours et tissus qui ont tendance lustrer,doivent être repassés
dans une seule direction en exerçant une faible pression.
◗ Ne repassez pas à la vapeur les tissus de soie colorée. Ils
pourraient se lustrer.
Repassage à la vapeur
Assurez-vous qu'il y a suffisamment d'eau dans la chaudière.
C
◗ Vous pouvez repasser à la vapeur en utilisant les températures les
plus élevées (réglages de température 2 jusqu'à MAX).
1 Mettez le bouton de réglage de la température sur la position
conseillée.
Voir le chapitre "Réglage de la température".
2 Attendez jusqu'à ce que le témoin 'chauffage chaudière'
s'éteigne.
C
3 Maintenez appuyé le bouton vapeur (H) pendant le repassage à
la vapeur.
Modèles GC6268/GC6265/GC6068/GC6065/GC6029 uniquement:
Pendant le repassage à la vapeur, le témoin lumineux G s'allume de
temps en temps pour indiquer que le fer et l'eau de la chaudière sont
chauffés à la température et pression correctes.Vous pouvez continuer
à repasser.
La vapeur à l'intérieur du cordon de liaison se condense si vous
n'utilisez pas la vapeur pendant quelque temps.Lorsque vous
commencez le repassage à la vapeur, ce cordon est froid.De ce fait,
lorsque vous commencez à repasser quelques gouttes d'eau peuvent
sortir par la semelle.
B
Pour éviter de mouiller vos vêtements,tenez le fer au-dessus d'un chiffon
et appuyez sur le bouton vapeur (H) jusqu'à ce que l'appareil produise
de la vapeur normalement.
Repassage sans vapeur
1 Mettez le bouton de réglage de la température sur la position
conseillée.
Voir le chapitre "Réglage de la température".
2 N'appuyez pas sur le bouton vapeur (H).
FRANÇAIS 29

◗ De la vapeur peut s'échapper si vous appuyez sur le bouton de
vapeur accidentellement pendant le repassage.Si la chaudière est
vide ou pas encore chauffée,vous entendrez un cliquetis dû à
l'ouverture de la vanne vapeur. Ceci est tout à fait normal et sans
danger.
◗ Si vous avez repassé à une température élevée et en suite réglé le
thermostat (I) à une température inférieure,vous devez attendre
que la semelle du fer refroidisse un peu et que le témoin de
température (G) s'allume à nouveau avant de continuer le
repassage.Vous éviterez ainsi de détériorer les tissus plus fragiles.
Autres caractéristiques
Défroissage vertical
C
1 Les draperies et les vêtements (vestes,costumes,tailleurs,
manteaux) peuvent être repassés en tenant le fer en position
verticale.
Ne dirigez jamais le jet de vapeur vers des personnes.
Jet de vapeur (modèles GC6268/GC6068/GC6029
uniquement)
Un puissant jet de vapeur permet d'enlever les faux plis résistants.
C
1 Pour un jet de vapeur:réglez la commande de vapeur (F) sur la
position R (le nuage plus gros) et le thermostat (I) sur la
position 3 ou MAX.
C
2 Appuyez sur le bouton jet de vapeur (H) et sur le bouton
vapeur (N) simultanément.
FRANÇAIS30

Vapeur réglable (modèles
GC6268/GC6265/GC6068/GC6065/GC6029 uniquement)
Vous pouvez régler le bouton vapeur (F) sur q pour vapeur modérée
ou sur R pour vapeur maximum.
Entonnoir anti-calc (modèles GC6268/GC6068/GC6029
uniquement)
Pour assurer une plus grande longévité à votre fer à repasser.
1 Utilisez l'entonnoir anti-calc (M) (modèle GC6268 uniquement)
orsque vous remplissez la chaudière avec de l'eau.
Après le repassage
C
1 Arrêtez l'appareil en positionnant le bouton marche/arrêt (D)
sur 'arrêt'.
2 Dépressurisez la chaudière en maintenant le bouton vapeur
appuyé jusqu'à ce que la vapeur soit éliminée.
3 Débranchez la fiche de la prise de courant.
4 Placez le fer sur son support (C),réglez le thermostat sur la
position q et laissez le fer refroidir avant de le ranger.
Nettoyage et entretien
1 Retirez la fiche de la prise de courant et laissez le fer refroidir
avant de commencer à le nettoyer.Si vous voulez nettoyer la
chaudière,suivez les quatre premières étapes de la procédure
"Remplissage rapide".
Fer à repasser
1 Nettoyez le fer avec un chiffon humide.
2 Les particules de calcaire et autres salissures peuvent être
retirées de la semelle avec un chiffon humide ou un détérgent
(liquide) non-abrassif.
Ne plongez jamais le fer dans l'eau et ne le rincez pas non plus.
Chaudière à vapeur
Rincez la chaudière une fois par mois (ou après avoir utilisé l'appareil
10 fois environ).
FRANÇAIS 31

C
1 Dévissez le bouchon lentement,puis retirez-le.
C
2 Pour rincer la chaudière utilisez un demi litre d'eau.Puis versez
l'eau en tenant la chaudière à l'envers au-dessus de l'évier.
3 Revissez le bouchon sur la chaudière.
Rangement
1 Assurez-vous que le fer est complètement refroidi avant de le
ranger.
2 Débranchez l'appareil et laissez-le refroidir.
3 Videz la chaudière.
4 La chaudière est dotée de poignées pour faciliter le transport.
5 Vérifiez régulièrement si le cordon d'alimentation et le cordon
secteur ne sont pas endommagés.
Garantie et service
Pour plus d'informations,visitez notre Philips Web site:
www.philips.com ou veuillez contacter le Service Consommateurs
Philips de votre pays (vous trouverez le numéro de téléphone dans le
dépliant sur la garantie internationale). S'il n'y a aucun Service
Consommateurs Philips dans votre pays,contactez votre distributeur
ou le Service Department of Philips Domestic Appliances and Personal
Care BV.
Dépannage
Ce chapitre résume les problèmes les plus communs que vous pouvez
rencontrer avec votre fer à repasser. Lisez les différentes sections pour
plus de détails.Si vous ne pouvez pas résoudre le problème,veuillez
contacter le Service Consommateurs Philips de votre pays (vous
trouverez les numéros de téléphone dans le dépliant sur la garantie
internationale).
FRANÇAIS32

S'il n'y a aucun Service Consommateurs Philips dans votre pays
contactez votre revendeur ou un Centre Service Agréé Philips.
FRANÇAIS 33
Solution
Ce phénomène s'arrêtera après
quelque temps.
Ces particules sont inoffensives et ne
sortiront plus de la semelle après
plusieurs utilisations.
Sélectionnez la température de
repassage selon les instructions dans
ce mode d'emploi et du tableau.
Placez la chaudière à vapeur sur une
surface stable et/ou régulière.
C'est normal.Tenez le fer au-dessus
d'un chiffon et appuyez sur le bouton
vapeur (H). Après quelques secondes,
l'appareil produira à nouveau de la
vapeur.
Réglez le bouton (D) sur 'marche'.
Attendez que le témoin lumineux
s'éteigne.
Pour vérifier si le fer produit de la
vapeur, placez un miroir devant les
orifices de la semelle.
Nettoyez la semelle avec un chiffon
humide.
Nettoyez la semelle avec un chiffon
humide. Mettez le bouton de réglage
de la température sur la position
conseillée.
Cause(s) possible (s)
C'est normal. Certaines parties ont
été légèrement graissées.
C'est tout à fait normal lors de la
première utilisation.
Le thermostat (I) a été réglé sur une
position trop basse pour le repassage
à la vapeur.
La chaudière à vapeur a été placée sur
une surface instable et/ou irrégulière.
Lorsque vous commencez le
repassage à la vapeur, le cordon est
froid.La vapeur se condense dans le
cordon laissant des gouttes d'eau
sortir pas la semelle.
La chaudière n'a pas été mise en
marche.
Le témoin lumineux "chauffage
chaudière" est allumé (modèles
GC6268/GC6265/GC6268/GC6265/
GC6029 uniquement).
La vapeur surchauffée est difficile à
voir, surtout si le thermostat a été
réglé sur la position maximale et
surtout si la température ambiante est
relativement élevée.
Les impuretés ou des particules de
calcaire présentent dans l'eau se sont
déposées sur la semelle.
Vous avez repassé l'article à une
température trop élevée.
Problème
De la fumée sort du fer après avoir
mis en marche l'appareil la première
fois.
Des particules blanches sortent de la
semelle du fer neuf.
Des gouttes d'eau sortent par la
semelle.
L'appareil ne fait pas de vapeur.
Je ne vois pas la vapeur sortir par la
semelle.
La semelle est sale.

Algemene beschrijving
A Dop van de stoomtank
B Stoomtank
C Strijkmat
D Aan/uit schakelaar met ingebouwd controlelampje
E 'Stoomtank warmt op' controlelampje (alleen types
GC6268/GC6265/GC6068/GC6065).Het lampje gaat uit wanneer
het apparaat gereed is voor stroomstrijken.
F Stoomregelaar (alleen types GC6268/GC6265/GC6068/GC6065/
GC6029).
q = weinig stoom
R = veel stoom
G Temperatuurcontrolelampje
H Stoomtoevoerknop
I Temperatuurregelaar
J Toevoerslang
K Zoolplaat
L Netsnoer
M Anti-kalktrechter (alleen types GC6268/GC6068/GC6029)
N Stoomstoot (alleen types GC6268/GC6068/GC6029)
O Achtersteun voor strijkijzer (alleen types GC6268/
GC6265/GC6263/GC6068/GC6065,GC6063)
Waarschuwing
Voor optimale veiligheid: lees deze instructies aandachtig door en bekijk
de illustraties voordat u het strijkijzer gaat gebruiken
- Doe geen reukstof,azijn,waterontharders of andere chemicaliën in
de stoomtank.
- Gebruik het apparaat nooit als het op de een of andere manier
beschadigd is.Controleer regelmatig of het netsnoer en de
toevoerslang nog steeds onbeschadigd en veilig zijn.
- Indien het netsnoer beschadigd is,moet het vervangen worden door
Philips,een door Philips geautoriseerd servicecentrum of personen
met vergelijkbare kwalificaties om gevaar te voorkomen.
- Gebruik alleen de bijgeleverde dop op de stoomtank, aangezien deze
ook als veiligheidsventiel dient.
- Controleer voordat u het apparaat aansluit of de voltageaanduiding
aan de onderkant van de stoomtank overeenkomt met de
netspanning in uw woning.
- Sluit het apparaat alleen aan op een geaard stopcontact.
- Dompel het strijkijzer of de stoomtank nooit in water.
- Laat het apparaat nooit onbeheerd achter terwijl het op de
netspanning is aangesloten.
- Als u klaar bent met strijken en zelfs als u maar even bij het strijkijzer
wegloopt,haal dan altijd de stekker uit het stopcontact en zet het
strijkijzer op de strijkmat.
- Plaats de stoomtank op een stabiele, vlakke en horizontale
ondergrond. Plaats de stoomtank nooit op het zachte gedeelte van
de strijkplank.
NEDERLANDS34

- Plaats het hete strijkijzer altijd op de strijkmat. Plaats het hete
strijkijzer nooit op de toevoerslang of het netsnoer.
- De strijkmat en de zoolplaat van het strijkijzer kunnen zeer heet
worden en kunnen bij aanraking brandwonden veroorzaken.Als u de
stoomtank wilt verplaatsen,raak dan de strijkmat niet aan.
-Voorkom dat het snoer in aanraking komt met de hete zoolplaat.
- Houd toezicht op jonge kinderen om te voorkomen dat ze met het
apparaat gaan spelen.
- Als er stoom vanonder de dop van de stoomtank ontsnapt,schakel
dan het apparaat uit en neem contact op met een door Philips
geautoriseerd servicecentrum.
-Verwijder nooit de dop van de stoomtank wanneer die onder druk
staat.Volg de instructies onder het kopje 'Snel bijvullen' wanneer u
de dop verwijdert.
Klaarmaken voor gebruik
1 Controleer voordat u het apparaat aansluit of de
voltageaanduiding aan de onderkant van de stoomtank
overeenkomt met de netspanning in uw woning.
2 Verwijder stickers of beschermfolie van de zoolplaat en maak
hem schoon met een zachte doek.
3 Wikkel het netsnoer (L) en de toevoerslang (J) volledig af.
4 Plaats de stoomtank (B) op een stabiele,vlakke ondergrond.
5 Plaats het strijkijzer op de strijkmat (C).
Het vullen van de stoomtank.
Dompel de stoomtank nooit in water.
Verwijder nooit de dop van de stoomtank wanneer die onder druk
staat.
C
1 Zorg dat de aan/uit schakelaar (D) op 'uit' staat en haal de
stekker uit het stopcontact.
C
2 Schroef de dop (A) langzaam van de stoomtank.
Er kan een geluid ontstaan wanneer u de dop verwijdert. Dit geluid
wordt veroorzaakt doordat de koude tank luchtledig is.Dit is
gebruikelijk.
NEDERLANDS 35

C
3 Vul de stoomtank met water (maximaal 1 liter).
Vul de tank met kraanwater tot aan het maximumniveau.
Als het kraanwater in uw woongebied erg hard is, raden wij u aan het
water te mengen met een gelijke hoeveelheid gedistilleerd water, of
alleen gedistilleerd water te gebruiken.
Gebruik geen reukstof, azijn, stijfsel of een chemische waterontharder.
4 Schroef de dop stevig op de vulopening van de stoomtank.
Snel bijvullen
C
1 Zet eerst de aan/uit schakelaar (D) op 'uit'.
C
2 Druk op de stoomtoevoerknop (H) totdat u geen stoom meer
uit het apparaat hoort ontsnappen.
3 Houd de stoomtoevoerknop ingedrukt en verwijder langzaam
de dop van de stoomtank door hem linksom te draaien.Dit zal
de overdruk laten ontsnappen.
Plaats een doek over de dop wanneer u deze losdraait.Zorg ervoor
dat u alle stoom uit de tank laat ontsnappen.
4 Haal de stekker uit het stopcontact.
5 Vul de stoomtank met water zoals beschreven staat in 'Het
vullen van de stoomtank' en laat het apparaat weer opwarmen.
NEDERLANDS36
Stoomregelaar
-
q
R
Temperatuurregelaar
1
2
3
Soort materiaal
Synthetische stoffen (zoals
acetaat,acryl,viscose,
polyamide,polyester) en
zijde.
Wol
Katoen,linnen
Let op:Z in de tabel
betekent dat het kledingstuk
niet mag worden gestreken.
Label met strijkvoorschriften.
B
C
D
Z

Temperatuur instellen
Plaats de stoomtank op een stabiele, vlakke en horizontale ondergrond
Plaats de stoomtank nooit op het zachte gedeelte van de strijkplank.
Plaats het hete strijkijzer altijd op de strijkmat. Plaats het hete strijkijzer
nooit op de toevoerslang of het netsnoer.Voorkom dat het snoer in
aanraking komt met de hete zoolplaat.
C
1 Stel de gewenste temperatuur in door de temperatuurregelaar
naar de juiste temperatuurindicatie te draaien.
- Raadpleeg het label in uw kledingstuk voor de gewenste
strijktemperatuur.
- 1 Synthetische stoffen (bijv.acryl, viscose, polyamide, polyester)
- 1 Zijde
- 2 Wol
- 3 Katoen,linnen
- Als u niet zeker weet van welk materiaal uw kledingstuk is gemaakt,
probeer de gekozen strijktemperatuur dan eerst uit op een plek die
niet zichtbaar is tijdens het dragen.
- Zijde, wol en synthetische materialen: strijk de binnenkant van de
stoffen om glimmende plekken te voorkomen.
- Strijk eerst de kledingstukken die op de laagste temperatuur
gestreken moeten worden,zoals kleding gemaakt van synthetische
stoffen.
C
2 Steek de stekker in het stopcontact en laat het apparaat
opwarmen door de aan/uit schakelaar (D) op 'aan' te zetten.
3 Koude start:de stoomtank en de zoolplaat worden nu
opgewarmd.Het opwarmen van de zoolplaat duurt ongeveer
2 minuten en het opwarmen van de stoomtank duurt ongeveer
8 minuten.
4 Snel opwarmen:indien u de stoomtank tijdens het strijken
bijvult (zie 'Snel bijvullen'),duurt het ongeveer 6 minuten
voordat het water in de stoomtank opgewarmd is.
5 Alleen types GC6268/GC6265/GC6068/GC6065/GC6029:
zodra het water in de stoomtank warm genoeg is om te
stoomstrijken,gaat het controlelampje (E) uit.U kunt nu
beginnen met strijken.
Tips
◗ Als het materiaal uit meerdere soorten vezels bestaat,selecteer
dan altijd de temperatuur van de meest kwetsbare vezel,dus de
laagste temperatuur.Bijvoorbeeld:een kledingstuk bestaat voor
60% uit polyester en voor 40% uit katoen.Dit kledingstuk moet
gestreken worden op de aangegeven temperatuur voor polyester
(1) en zonder stoom.
NEDERLANDS 37

◗ Bij het stoomstrijken van wollen materialen kunnen glimmende
plekken ontstaan.Dit kunt u voorkomen door een droge persdoek
te gebruiken of door het kledingstuk binnenstebuiten te keren en
de binnenkant te strijken.
◗ Fluweel en andere stoffen die snel glimmende plekken krijgen
moeten in één richting gestreken worden (met de vleug mee)
zonder te veel druk uit te oefenen.
◗ Gebruik geen stoom wanneer u gekleurde zijde strijkt. Dit kan
vlekken veroorzaken.
Stoomstrijken
Zorg ervoor dat er voldoende water in de stoomtank zit.
C
◗ Stoomstrijken is alleen mogelijk bij hogere strijktemperaturen
(temperatuurstanden 2 to MAX).
1 Zet de temperatuurregelaar op de aanbevolen stand.
Zie 'Temperatuur instellen'.
2 Wacht tot het 'stoomtank warmt op' controlelampje is
uitgegaan.
C
3 Houd de stoomtoevoerknop (H) ingedrukt tijdens het
stoomstrijken.
Alleen types GC6268/GC6265/GC6068/GC6065/GC6029:tijdens het
stoomstrijken zal het temperatuurcontrolelampje (G) nu en dan
aanspringen om aan te geven dat de stoomtank en het strijkijzer
worden opgewarmd tot de juiste temperatuur en druk.U kunt dan
gewoon doorgaan met strijken.
Als u de stoomfunctie een tijdje niet heeft gebruikt, zal de stoom die
nog in de toevoerslang aanwezig was condenseren.Als u weer begint
met stoomstrijken kan dit wat gesputter in het apparaat veroorzaken
en kunnen er enkele druppels water uit de zoolplaat lekken.
B
Om te voorkomen dat er druppels op het kledingstuk vallen kunt u
voordat u verder gaat stoomstrijken het strijkijzer boven een oude doek
houden en op de stoomtoevoerknop (H) drukken totdat de
stoomuitstoot weer normaal is.
Strijken zonder stoom
1 Zet de temperatuurregelaar op de aanbevolen stand.
Zie 'Temperatuur instellen'.
2 Druk niet op de stoomtoevoerknop (H).
NEDERLANDS38

◗ Er kan wat stoom ontsnappen wanneer de stoomtoevoerknop per
ongeluk ingedrukt wordt tijdens het strijken.Als de stoomtank leeg
of niet opgewarmd is,hoort u een klikkend geluid binnenin de
tank.Dit wordt veroorzaakt door het openen van het
stoomventiel en is niet schadelijk.
◗ Wanneer u op een hoge temperatuur heeft gestreken en daarna
de temperatuurregelaar (I) op een lagere stand zet,wacht dan
totdat het temperatuurcontrolelampje (G) aanspringt voordat u
verder strijkt.Hierdoor voorkomt u beschadiging van de stof.
Overige functies
Stomen in verticale stand
C
1 Hangende gordijnen en kledingstukken (colberts,pakken,
jassen) kunt u stoomstrijken door het stoomstrijkijzer verticaal
te houden.
Richt de stoom nooit op mensen.
Stoomstoot (alleen types GC6268/GC6068/GC6029)
Deze krachtige stoomstoot helpt hardnekkige kreuken te verwijderen.
C
1 Zet voor een stoomstoot de stoomregelaar (F) op R (de
grote wolk) en de temperatuurregelaar (I) op stand 3 of
MAX.
C
2 Druk de stoomtoevoerknop (H) en de stoomstootknop (N)
samen in.
Variabele stoom (alleen types GC6268/GC6265/6068/
GC62065/GC6029)
U kunt de stoomregelaar (F) op q zetten voor weinig stoom of op R
voor veel stoom.
NEDERLANDS 39

Anti-kalktrechter (alleen types GC6268/GC6068/GC6029)
Garandeert een langere levensduur voor uw strijkijzer.
1 Gebruik de anti-kalktrechter (M) om de stoomtank te vullen
met water.
Na het strijken
C
1 Zet het apparaat uit door de aan/uit schakelaar (D) op 'uit' te
zetten.
2 Laat de overdruk uit de stoomtank ontsnappen door de
stoomtoevoerknop in te drukken totdat u geen stoom meer
uit het apparaat hoort komen.
3 Haal de stekker uit het stopcontact.
4 Plaats het strijkijzer op de strijkmat (C),zet de stoomregelaar
op stand q en laat het apparaat afkoelen voordat u het
opbergt.
Schoonmaken en onderhoud
1 Haal de stekker uit het stopcontact en laat het strijkijzer
afkoelen wanneer u het wilt schoonmaken.Als u de stoomtank
wilt schoonmaken,volg dan de eerste 4 stappen onder het
kopje 'Snel bijvullen'.
Strijkijzer
1 Maak het strijkijzer schoon met een vochtige doek.
2 Veeg schilfertjes en andere verontreinigingen van de zoolplaat
met een vochtige doek en een niet-schurend (vloeibaar)
schoonmaakmiddel.
Dompel het strijkijzer nooit in water en spoel het nooit af onder een
lopende kraan.
Stoomtank
Reinig de stoomtank één keer per maand of nadat u het apparaat
ongeveer 10 keer gebruikt heeft.
C
1 Verwijder voorzichtig de dop.
NEDERLANDS40

C
2 Spoel de stoomtank uit met slechts 500 ml vers water. Laat het
water uit de stoomtank lopen door hem omgekeerd boven de
gootsteen te houden.
3 Schroef de dop weer op de stoomtank.
Opbergen
1 Zorg ervoor dat het strijkijzer voldoende is afgekoeld voordat
u het opbergt.
2 Haal de stekker uit het stopcontact en laat het strijkijzer
afkoelen.
3 Leeg de stoomtank.
4 Met behulp van de handgrepen aan beide kanten van de
stoomtank kunt u deze makkelijk verplaatsen.
5 Controleer regelmatig of het netsnoer en de toevoerslang nog
steeds onbeschadigd en veilig zijn.
Garantie & service
Als u informatie nodig heeft of als u een probleem heeft,bezoek dan
onze W ebsite (www.philips.com),of neem contact op met het Philips
Customer Care Centre in uw land (u vindt het telefoonnummer in het
'worldwide guarantee' vouwblad).Als er geen Customer Care Centre
in uw land is,ga dan naar uw Philips dealer of neem contact op met de
afdeling Service van Philips Domestic Appliances and Personal Care BV.
Problemen oplossen
Dit hoofdstuk behandelt in het kort de problemen die u tegen kunt
komen tijdens het gebruik van uw strijkijzer.Lees de betreffende
hoofdstukken voor verdere details.Als u er niet in slaagt het probleem
op te lossen,neem dan contact op met het Philips Customer Care
Centre in uw land (het telefoonnummer vindt u in het 'worldwide
guarantee' vouwblad).Als er geen Customer Care Centre in uw land is,
ga dan naar uw Philips dealer of het dichtstbijzijnde Philips
servicecentrum.
NEDERLANDS 41

Oplossing
Dit houdt na enige tijd op.
Deze deeltjes zijn onschadelijk en
zullen niet langer uit de zoolplaat
komen wanneer u het strijkijzer enkele
keren gebruikt heeft.
Selecteer de juiste strijktemperatuur
zoals staat aangegeven in deze
gebruiksaanwijzing en de in tabel.
Plaats de stoomtank op een stabiele
en vlakke ondergrond.
Dit is gebruikelijk. Houd het strijkijzer
boven een oude doek en druk op de
stoomtoevoerknop (H). De doek
absorbeert de druppels. Na een paar
seconden zal de stoomuitstoot weer
normaal zijn.
Zet de aan/uitschakelaar (D) op 'aan'.
Wacht totdat het controlelampje
uitgaat.
Houd een (koude) spiegel voor de
openingen in de zoolplaat om te
controleren of er echt stoom uit het
strijkijzer komt.
Reinig de zoolplaat met een vochtige
doek.
Reinig de zoolplaat met een vochtige
doek.Selecteer de aanbevolen
strijktemperatuur.
Mogelijke oorzaak/oorzaken
Dit is gebruikelijk. Bepaalde delen van
het strijkijzer zijn in de fabriek licht
ingevet.
Dit is normaal wanneer het strijkijzer
nieuw is.
De temperatuurregelaar (I) staat
ingesteld op een temperatuur die te
laag is voor stoomstrijken.
De stoomtank staat op een onstabiele
en/of onregelmatige ondergrond.
Wanneer u begint met stoomstrijken
is de toevoerslang koud. Stoom
condenseert dan in de slang hierdoor
lekken er waterdruppels uit de
zoolplaat.
De stoomtank staat niet aan.
Het 'stoomtank warmt op'
controlelampje brandt nog (alleen
types GC6268/GC6265/GC6068/
GC6065/GC6029).
Oververhitte stoom (d.w.z.stoom van
een hoge kwaliteit) is nauwelijks
zichtbaar, vooral wanneer de
temperatuurregelaar op de hoogste
stand staat en wanneer de
omgevingstemperatuur relatief hoog is.
Onzuiverheden en chemicaliën in het
water hebben zich op de zoolplaat
afgezet.
U heeft op te hoge temperaturen
gestreken.
Probleem
Er komt rook uit het strijkijzer
wanneer u het apparaat voor de
eerste keer aanzet.
Er komen witte deeltjes uit de
zoolplaat van het nieuwe strijkijzer
Er druppelt water uit de zoolplaat.
Het apparaat geeft geen stoom.
Ik zie geen stoom uit de zoolplaat
komen
De zoolplaat is vuil.
NEDERLANDS42

ESPAÑOL 43
Descripción general
A Tapón del depósito del vapor
B Depósito de vapor
C Soporte para la plancha
D Interruptor Encendido/Apagado (On/Off) con piloto incorporado.
E Piloto "Depósito del vapor calentándose" (sólo en modelos
GC6268/GC6265/GC6068 y GC6065 ).El piloto se apaga cuando
el aparato está listo para planchar con vapor.
F Control del vapor (sólo en modelos GC6268/GC6265/GC6068/
GC6065 y GC 6029).
q = Vapor moderado.
R = Vapor máximo.
G Piloto de la temperatura
H Botón activador del vapor
I Dial de la temperatura
J Manguera conductora
K Suela
L Cable de red
M Embudo antical (sólo en modelos GC6268/GC6068 y GC6029)
N Supervapor (sólo en modelos GC6268/GC6068 y GC6029)
O Soporte para sujetar la parte trasera de la plancha (sólo modelos
GC6268/GC6265/GC6263/GC6068/GC6065 y GC6063)
Importante
Para lograr mayor seguridad,antes de empezar a usar el aparato lea
cuidadosamente estas instrucciones y mire las ilustraciones.
- No ponga perfume, vinagre, almidón, agentes descalcificantes u otros
agentes químicos en el depósito de vapor .
- No use nunca el aparato si está deteriorado de algún modo.
Compruebe regularmente que el cable de red y la manguera
conductora no están deteriorados,y por lo tanto,son seguros.
- Si el cable de red estuviera dañado,deberá ser sustituido por Philips
o por un centro de servicio autorizado por Philips para evitar
situaciones de peligro.
- No use ningún otro tapón para el depósito del vapor que no sea el
que se suministra con el aparato ya que ese tapón también actúa
como válvula de seguridad.
- Antes de enchufar el aparato,compruebe si el voltaje indicado en el
fondo del depósito del vapor se corresponde con el de su hogar.
- Conecte el aparato sólo a un enchufe provisto de toma de tierra.
- No sumerja nunca la plancha o el depósito de vapor en agua.
- Cuando esté enchufado a la red,no deje nunca este aparato sin
vigilacia.
- Cuando haya acabado de planchar e incluso cuando deje la plancha
sola por poco tiempo,desenchúfela de la red y colóquela sobre el
soporte.
- Coloque siempre el depósito del vapor sobre una superficie estable,
plana y horizontal.No coloque el depósito del vapor en la parte
blanda de la tabla de planchar.

-Coloque siempre la plancha sobre el soporte. No ponga la plancha
caliente sobre la manguera conductora o el cable de red.
- El soporte y la suela de la plancha se calientan mucho y pueden
provocar quemaduras al tocarlos. Si quiere retirar el depósito de
vapor, no toque el soporte.
- No permita que el cable de red entre en contacto con la suela
cuando esta esté caliente.
- No permita que personas invalidas usen el aparato sin vigilancia.
Mantenga a los niños bajo vigilancia para asegurarse de que no
jueguen con el aparato.
- Si se escapa vapor por debajo del tapón del depósito del vapor
mientras el aparato está calentándose,desconecte el aparato y
póngase en contacto con un Servicio de Asistencia Técnica de
Philips.
- No quite el tapón del depósito de vapor cuando el depósito de
vapor esté bajo presión.Siga las instrucciones de la sección
"Rellenado rápido" antes de retirar el tapón.
Cómo preparar el aparato para su uso
1 Antes de enchufar el aparato,compruebe si el voltaje indicado
en el fondo del depósito del vapor se corresponde con el de
su hogar.
2 Quite cualquier etiqueta o lámina protectora de la suela de la
plancha y límpiela con un paño suave.
3 Desenrolle completamente el cable de red (L) y la manguera
conductora (J).
4 Coloque el depósito del vapor (B) sobre una superficie plana y
estable.
5 Coloque la plancha en el soporte (C).
Cómo llenar el depósito de vapor
Nunca sumerja el depósito de vapor en agua.
No quite el tapón si el aparato está caliente y si el depósito de vapor
tiene aún presión.
C
1 Asegúrese de que el interruptor Encendido/Apagado (On/Off)
(D) esté colocado en la posición Apagado (Off) y desenchufe el
aparato de la red.
ESPAÑOL44

ESPAÑOL 45
C
2 Desenrosque lentamente el tapón (A) del depósito de vapor.
Puede que oiga un sonido al quitar el tapón.La causa de este sonido es
el vacío que se ha creado en el depósito de vapor al enfriarse. Este
fenómeno es perfectamente normal.
C
3 Vierta agua en el depósito de vapor (1 litro como máximo).
Use agua del grifo para llenar el depósito de vapor hasta el nivel
máximo.
Si el agua del grifo tiene mucha cal en su zona,le aconsejamos que
mezcle agua del grifo y agua destilada a partes iguales o que sólo use
agua destilada.
No use perfume, vinagre, almidón o agua químicamente descalcificada.
4 Enrosque bien el tapón en la abertura de llenado del depósito
de vapor.
Rellenado rápido
C
1 Primero lleve el interruptor Encendido/Apagado (On/Off) (D) a
la posición Apagado (Off).
C
2 Presione el botón activador del vapor hasta que ya no oiga
ningún escape de vapor del aparato.
3 Mantenga apretado el botón activador del vapor y, lentamente
y girándolo en sentido contrario a las agujas del reloj,
desenrosque el tapón del depósito del vapor.Esto
despresurizará el depósito del vapor.
Asegúrese de que no queda vapor en el depósito de vapor.Al quitar el
tapón,cúbralo con un paño.
4 Desenchufe el aparato de la red.
5 Llene el depósito del vapor tal y como se describe en la
sección "Cómo llenar el depósito de vapor" y deje que el
aparato vuelva a calentarse.

Cómo ajustar la temperatura
Coloque siempre el depósito del vapor sobre una superficie estable
plana y horizontal.No coloque el depósito del vapor en la parte blanda
de la tabla de planchar.
Coloque siempre la plancha sobre el soporte. No ponga la plancha
caliente sobre la manguera conductora o el cable de red.Asegúrese de
que el cable no entra en contacto con la suela caliente.
C
1 Ajuste la temperatura de planchado adecuada girando el
mando de la temperatura hasta la indicación de temperatura
que desee.
- Consulte la etiqueta de la prenda para ajustar la temperatura
adecuada de planchado :
- 1 Fibras sintéticas (Por ejemplo,acrílicas, viscosa, poliamida,
poliester)
- 1 Seda
- 2 Lana
- 3 Algodón,lino
- Cuando no sepa de qué tipo de fibra está hecha la prenda,planche
una parte de ésta que no se vaya a ver cuando la use.
- Seda,materiales sintéticos y lana:para evitar manchas brillantes,
planche la prenda por el revés.
- Empiece planchando aquellas prendas que requieran la temperatura
de planchado más baja como,por ejemplo,las fabricadas con fibras
sintéticas.
C
2 Enchufe el aparato a la red y, con el interruptor
Encendido/Apagado (On/Off)(D) en la posición Encendido
(On),deje que se caliente.
3 Encendido frío:el depósito de vapor y la suela ya estarán
calientes.La suela tarda en calentarse aproximadamente
2 minutos y el depósito de agua unos 8 minutos.
ESPAÑOL46
Control
del vapor
-
q
R
Mando de la
temperatura
1
2
3
Tipo de tejido
Tejidos sintéticos (Como,
por ejemplo,acetato, viscosa,
poliamida,poliester) y seda.
Lana
Algodón,lino
Nota :Z en la tabla
significa que el artículo no
puede ser planchado.
Etiqueta con instrucciones de planchado
B
C
D
Z

ESPAÑOL 47
4 Recalentamiento rápido:en caso de que rellene el depósito de
agua durante el proceso de planchado,ésta tarda en calentarse
aproximadamente 6 minutos.
5 Sólo en modelos GC6268,GC6265 GC 068,GC6065 y
GC6029:en cuanto el depósito del vapor esté lo
suficientemente caliente para soltar vapor, el piloto (E) se
apagará.Ya puede empezar a planchar.
Consejos
◗ Si el tejido está compuesto de varios tipos de fibras, seleccione
siempre la temperatura adecuada para la fibra más delicada;es decir
la temperatura más baja.P or ejemplo,si un tejido está compuesto de
un 60% de poliester y un 40% de algodón,deberá plancharlo a la
temperatura indicada para el poliéster (1) y sin vapor .
◗ Al planchar con vapor prendas de lana,pueden aparecer brillos.
Para evitarlo,utilice un paño seco entre la plancha y la prenda,o
planche la prenda del revés.
◗ El terciopelo y otros tejidos en los que suelan aparecer brillos
debe plancharlos sólo en una dirección (siguiendo el pelo) y
presionando muy poco.
◗ No utilice vapor al planchar seda de color ya que pueden aparecer
manchas.
Cómo planchar con vapor
Asegúrese de que haya suficiente agua en el depósito de vapor.
C
◗ El planchado con vapor sólo es posible con las temperaturas más
altas de planchado (posiciones de temperatura 2 hasta MAX).
1 Ajuste el dial de la temperatura a la posición recomendada.
Consulte la sección "Cómo ajustar la temperatura".
2 Espere hasta que se haya apagado el piloto "Depósito del vapor
calentándose".
C
3 Mantenga apretado el botón activador de vapor (H) mientras
esté planchando con vapor.
Sólo en modelos GC6268,GC6265,GC6068, GC6065 y GC6029:
Durante el planchado con vapor,el piloto G se encenderá de vez en
cuando para indicar que el depósito del vapor y la suela se están
calentando hasta alcanzar la temperatura y presión adecuadas. Puede
seguir planchando mientras esto suceda.
Si hace algún tiempo que no ha usado la función de vaporizado,el
vapor que se quedó almacenado en la manguera conductora se habrá
condensado en forma de agua. Cuando vuelva a planchar con vapor,

puede que se produzca un chisporroteo en el aparato y que salgan
algunas gotitas de agua de la suela.
B
Para evitar que las gotitas caigan sobre la ropa, antes de empezar a
planchar sostenga la plancha sobre un paño viejo y presione el botón
activador de vapor (H) hasta que se haya normalizado la producción de
vapor.
Cómo planchar sin vapor
1 Ajuste el dial de la temperatura a la posición recomendada.
Consulte la sección "Cómo ajustar la temperatura".
2 No presione el botón activador de vapor (H).
◗ Si, accidentalmente, presiona el botón del vapor mientras está
planchando,se escapará un poco de vapor.Si el depósito de vapor
está vacío o no se ha calentado todavía,oirá un clic en el interior
del depósito.Esto se debe a la apertura de la válvula del vapor y es
totalmente inofensivo.
◗ Si ha estado planchando a una temperatura alta y de repente ajusta
el mando de la temperatura (I) a una posición más baja,espere
hasta que el piloto de la temperatura (G) se vuelva a iluminar
antes de seguir planchando.Esto evitará que los tejidos se
deterioren.
Otras funciones
Vaporizado en posición vertical
C
1 Las cortinas y prendas colgadas (chaquetas,trajes,abrigos)
pueden plancharse con vapor sosteniendo la plancha en
posición vertical.
No dirija nunca el vapor hacia las personas.
Supervapor (sólo en modelos GC6268/GC6068 y GC6029)
Se trata de un potente "chorro" de vapor que le ayudará a eliminar las
arrugas más rebeldes.
C
1 Para obtener el "supervapor":ajuste el mando del vapor (F) a la
posición R (la nube grande) y ajuste el mando de la
temperatura (I) a la posición 3 o MAX.
ESPAÑOL48

ESPAÑOL 49
C
2 Presione a la vez el botón activador de vapor (H) y el botón de
supervapor (N).
Vapor variable (sólo en modelos GC6268/GC6265/GC6068/
GC6065 y GC6029)
Puede colocar el control del vapor (F) en q para lograr un vapor
moderado o en R para un vapor máximo.
Embudo antical (sólo en modelos GC6268/GC6068 y
GC6029)
Para asegurarse de que la plancha dura más tiempo.
1 Utilice el embudo antical (M) cuando llene el depósito de vapor
con agua.
Después del planchado
C
1 Desconecte el aparato llevando el interruptor
Encendido/Apagado (On/Off) (D) a la posición Apagado (Off).
2 Despresurice el depósito de vapor presionando el botón
activador de vapor hasta que ya no salga vapor del aparato.
3 Desenchufe el aparato de la red.
4 Coloque la plancha sobre el soporte (C),ponga el control de
vapor en la posición q y déjela enfriar antes de guardarla.
Limpieza y mantenimiento
1 Desenchufe la plancha de la red y deje que se enfríe antes de
empezar a limpiarla.Si quiere limpiar el depósito de vapor,siga
los primeros cuatro pasos del proceso de "rellenado rápido".
Plancha
1 Limpie la plancha con un paño húmedo.
2 Limpie las incrustaciones de cal y otros depósitos de la suela
con un paño húmedo y un líquido limpiador no abrasivo.
Nunca sumerja la plancha en agua ni la enjuague bajo el grifo.

Depósito de vapor
Enjuague el depósito de vapor una vez al mes o tras haber usado el
aparato unas 10 veces.
C
1 Quite cuidadosamente el tapón.
C
2 Enjuague el depósito del vapor con sólo 500 ml de agua.Vierta
el agua sosteniendo el depósito del vapor boca abajo sobre el
fregadero.
3 Vuelva a enroscar el tapón en el depósito de vapor.
Cómo guardar la plancha
1 Asegúrese de que la plancha se ha enfriado suficientemente
antes de guardarla.
2 Desenchufe el aparato de la red y deje que se enfríe.
3 Vacíe el depósito de vapor.
4 Para moverla fácilmente,hay empuñaduras a cada lado del
depósito de vapor.
5 Compruebe con frecuencia que el cable de red y la manguera
conductora no están deteriorados y que,por lo tanto,siguen
siendo seguros.
Garantía y servicio
Si necesita información o si tiene algún problema,visite la página Web
de Philips en www.philips.com o póngase en contacto con el Servicio
Philips de Atención al Cliente de su país (hallará el número de teléfono
en el folleto de la Garantía Mundial). Si en su país no hay Servicio
Philips de Atención al Cliente,diríjase a su distribuidor local Philips o
póngase en contacto con el Service Department of Philips Domestic
Appliances and Personal Care BV.
ESPAÑOL50

ESPAÑOL 51
Guía de problemas
En este capítulo se recogen los problemas más comunes que pueden
surgir cuando utilice la plancha. Si desea más información, lea las
diferentes secciones.Si no puede solucionar el problema,póngase en
contacto con el Servicio Philips de Atención al Cliente de su país
(hallará el número de teléfono en el folleto de la Garantía Mundial).Si
en su país no hay Servicio Philips de Atención al Cliente, diríjase a su
distribuidor local Philips o al Servicio de Asistencia Técnica de Philips
más cercano.
Solución
Este fenómeno cesará al cabo de un
tiempo.
Estas partículas son inofensivas y
dejarán de salir cuando haya utilizado
la plancha unas cuantas veces.
Seleccione la temperatura de
planchado adecuada tal y como se
indica en estas instrucciones y en la
tabla.
Ponga el depósito de vapor en una
superficie estable y plana.
Esto es normal. Sostenga la plancha
sobre un paño viejo y presione el
botón activador del vapor (H).El paño
absorberá las gotas.Después de unos
pocos segundos,la producción de
vapor se habrá normalizado.
Lleve el interruptor
Encendido/Apagado (On/Off) a la
posición de Encendido (On).
Espere a que la lámpara piloto se
apague.
Para comprobar si la plancha está
realmente produciendo vapor,
sostenga un espejo (frío) frente a las
salidas de la suela.
Limpie la suela con un paño húmedo.
Limpie la suela con un paño húmedo.
Seleccione la temperatura de
planchado recomendada.
Posible(s) causa(s)
Esto es normal.Algunas piezas de la
plancha han sido ligeramente
engrasadas en la fábrica.
Es normal que esto suceda en una
plancha nueva.
El dial de la temperatura (I) ha sido
ajustado a una temperatura que es
demasiado baja para planchar con
vapor.
Se ha colocado el depósito de vapor
en una superficie inestable y/o que no
es plana.
Cuando empieza a planchar con vapor,
la manguera está fría. El vapor se
condensa en la manguera y salen
gotitas de agua por la suela.
No se ha puesto en marcha el
depósito del vapor.
El piloto "Depósito del vapor
calentándose" todavía está iluminado
(sólo en los modelos GC6268/
GC6265/GC6068/GC6065/GC6029).
El vapor supercalentado (es decir, de
alta calidad) apenas es visible,
especialmente cuando el dial de la
temperatura se ha ajustado a la
posición máxima y aún menos cuando
la temperatura ambiente es
relativamente alta.
Las impurezas o los agentes químicos
presentes en el agua se han
depositado en la suela.
Ha estado planchando a temperaturas
demasiado altas.
Problema
Sale un poco de humo del aparato
después de haberlo conectado por
primera vez.
Salen partículas blancas de la suela
de la plancha nueva.
Salen gotitas de agua de la suela
El aparato no produce vapor
No veo que salga vapor de la suela.
La suela está sucia

Descrizione generale
A Tappo del serbatoio vapore
B Serbatoio vapore
C Supporto ferro
D Interruttore on/off con spia incorporata
E Spia "Riscaldamento serbatoio vapore" (solo mod.
GC6268/GC6265/GC6068/GC6065).La spia si spegne quando
l'apparecchio è pronto per la stiratura a vapore.
F Controllo vapore (solo mod.GC6268/GC6265/GC6068/GC6065/
GC6029).
q = vapore moderato R = vapore massimo
G Spia termostato
H Pulsante attivatore vapore
I Quadrante termostato
J Cavo di alimentazione
K Piastra
L Cavo di alimentazione
M Imbuto anticalcare (solo mod.GC6268/GC6068/GC6029)
N Getto di vapore (solo mod.GC6268/GC6068/GC6029)
O Supporto posteriore per ferro (solo mod.GC6268/GC6265/
GC6263/GC6068/GC6065/GC6063).
Importante
Per maggior sicurezza,leggete attentamente le istruzioni e osservate le
illustrazioni prima di usare l'apparecchio.
- Non mettete profumi,aceto,prodotti disincrostanti o altre sostanze
chimiche nel serbatoio del vapore.
- Non usate l'apparecchio nel caso risultasse danneggiato in qualsiasi
modo.Controllare periodicamente le condizioni del cavo di
alimentazione e del cavo collegato alla presa elettrica.
- Nel caso il cavo di alimentazione fosse danneggiato,dovrà essere
sostituito da Philips,presso un Centro Autorizzato Philips o
personale comunque qualificato,per evitare situazioni a rischio.
-Per il serbatoio di vapore,utilizzate esclusivamente il tappo fornito
con l'apparecchio,che funziona anche da valvola di sicurezza.
-Prima di collegare l'apparecchio,controllate che la tensione indicata
sulla parte inferiore del serbatoio di vapore corrisponda a quella
della rete locale.
- Collegate sempre l'apparecchio ad una presa provvista di messa a
terra.
- Non immergete mai il ferro o il serbatoio del vapore nell'acqua.
- Non lasciate mai il ferro incustodito mentre è collegato alla presa di
corrente.
- Quando avete finito di stirare o quando dovete allontanarvi anche
solo per un attimo,togliete la spina dalla presa e mettete il ferro
sull'apposito supporto.
- Appoggiate sempre il serbatoio di vapore su una superficie stabile e
perfettamente piana.Non appoggiare il serbatoio sulla parte morbida
dell'asse da stiro.
ITALIANO52

ITALIANO 53
- Appoggiate sempre il ferro sull'apposito supporto.Non appoggiate il
ferro bollente sul cavo di alimentazione o sul cavo collegato alla
presa.
- Il supporto del ferro e la piastra possono diventare roventi e causare
ustioni se toccati.Se volete togliere il serbatoio,fate attenzione a non
toccare il supporto.
- Fate in modo che il cavo non venga a contatto con la piastra
bollente.
- L'apparecchio non deve essere usato da persone inferme senza la
supervisione di un adulto. Fate in modo che i bambini non possano
giocare con l'apparecchio.
- Nel caso di fuoriuscita di vapore dal tappo del serbatoio durante la
fase di riscaldamento dell'apparecchio,spegnete subito il ferro e
rivolgetevi ad un Centro Autorizzato Philips.
- Non togliete il tappo quando il serbatoio del vapore è sotto
pressione. Prima di togliere il tappo, seguite le istruzioni fornite in
"Riempimento rapido".
Come preparare l'apparecchio per l'uso
1 Prima di collegare l'apparecchio,controllate che la tensione
indicata sulla parte inferiore del serbatoio di vapore
corrisponda a quella della rete locale.
2 Togliete eventuali fogli adesivi o protettivi dalla piastra e pulite
quest'ultima con un panno morbido.
3 Srotolate completamente il cavo collegato alla presa (L) e il
cavo di alimentazione (J).
4 Appoggiate il serbatoio del vapore (B) su una superficie piatta e
stabile.
5 Appoggiare il ferro sul suo supporto (C).
Come riempire il serbatoio
Non immergete mai il serbatoio nell'acqua.
Non svitate il tappo quando l'apparecchio è caldo e il serbatoio del
vapore è ancora sotto pressione.
C
1 Controllate che l'interruttore on/off (D) sia in posizione "off" e
togliete la spina dalla presa.

ITALIANO
C
2 Svitate lentamente il tappo (A) del serbatoio vapore.
Svitando il tappo potreste sentire uno strano rumore, dovuto al fatto
che il serbatoio freddo è sotto vuoto.Si tratta di un fenomeno del
tutto normale.
C
3 Versate l'acqua nel serbatoio (max.1 litro).
Riempite il serbatoio con acqua del rubinetto, fino a raggiungere il
livello massimo.
Nel caso l'acqua della vostra zona fosse particolarmente dura, vi
consigliamo di mescolarla con la stessa quantità di acqua distillata o di
usare solo acqua distillata.
Non usate profumi,aceto,amido o acqua decalcificata chimicamente.
4 Avvitate con forza il tappo sul serbatoio vapore.
Riempimento rapido
C
1 Per prima cosa mettete l'interruttore on/off (D) in posizione
"off".
C
2 Premete il pulsante dell'attivatore di vapore fino a quando non
avvertite più la fuoriuscita di vapore dall'apparecchio .
3 Tenendo premuto il pulsante di attivatore vapore,svitate
lentamente il tappo del serbatoio,ruotando in senso antiorario,
per depressurizzare il serbatoio.
Controllate che non vi sia più vapore all'interno del serbatoio.Usate
uno straccio per svitare il tappo.
4 Togliete la spina dalla presa di corrente.
5 Riempite il serbatoio come indicato nella sezione "Come
riempire il serbatoio" e fate riscaldare nuovamente
l'apparecchio.
54

ITALIANO 55
Come impostare la temperatura
Appoggiate sempre il serbatoio di vapore su una superficie stabile e
perfettamente piana.Non appoggiare il serbatoio sulla parte morbida
dell'asse da stiro.
Appoggiate sempre il ferro sull'apposito supporto.Non appoggiate il
ferro sul cavo di alimentazione o su quello del vapore.
C
1 Impostate la temperatura richiesta ruotando il termostato nella
posizione corretta.
- Leggete l'etichetta apposta sui vestiti per conoscere l'esatta
temperatura di stiratura.
- 1 Fibre sintetiche (es.acrilico,viscosa,poliammide,poliestere)
- 1 Seta
- 2 Lana
- 3 Cotone, lino
- Se non conoscete la composizione di un tessuto,per stabilire la
temperatura giusta, fate una prova su un angolo del capo non visibile
quando indossato.
- Seta,lana e materiali sintetici:stirate il capo al rovescio per evitare
tracce di lucido.
- Iniziate a stirare i capi che richiedono una temperatura più bassa,
come ad esempio quelli in fibra sintetica.
C
2 Inserite la spina nella presa di corrente e lasciate riscaldare
l'apparecchio mettendo l'interruttore on/off (D) in posizione
"on".
3 Partenza a freddo:il serbatoio del vapore e la piastra iniziano a
riscaldarsi.La piastra impiega circa 2 minuti mentre il serbatoio
impiega 8 minuti per riscaldarsi.
4 Riscaldamento rapido:se riempite il serbatoio durante la
stiratura,l'acqua contenuta nel serbatoio impiegherà circa 6
minuti per riscaldarsi.
Regolatore
vapore
-
q
R
Termostato
1
2
3
Tipo di tessuto
Tessuti sintetici, ad es.
acetato,acrilico,
viscosa,poliammide,
poliestere e seta.
Lana
Cotone, lino
Nota:Z nella tabella
indica che il capo non
può essere stirato.
Etichetta con le
istruzioni per la stiratura.
B
C
D
Z

5 Solo mod.GC6268/GC6265/GC6068/GC6065/GC6029:non
appena l'acqua contenuta nel serbatoio vapore è
sufficientemente calda per la stiratura a vapore,la spia (E) si
spegnerà.A questo punto potete iniziare a stirare.
Consigli
◗ Nel caso di tessuti composti da fibre diverse, scegliete sempre la
temperatura richiesta per la fibra più delicata,quindi la più bassa.
Ad esempio:un capo composto per il 60% di poliestere e per il
49% di cotone deve essere stirato alla temperatura consigliata per
il poliestere (1),e senza vapore.
◗ Se stirati a vapore, i capi in lana possono risultare macchiati di
lucido.Per evitare questo inconveniente,mettete un panno
asciutto fra il capo da stirare e il ferro oppure stiratelo al rovescio.
◗ Il velluto e gli altri tessuti che tendono a diventare lucidi devono
essere stirati sempre nella stessa direzione (quella del pelo),
esercitando una leggerissima pressione.
◗ Non usate il vapore per stirare la seta colorata,per evitare di
macchiare il tessuto.
Stiratura a vapore
Controllate che ci sia una quantità d'acqua sufficiente nel serbatoio.
C
◗ La stiratura a vapore è possibile solo utilizzando le temperature
più alte (impostazioni da 2 a MAX).
1 Mettete il termostato nella posizione desiderata.
Vedere la sezione "Come impostare la temperatura".
2 Aspettate fino a quando non si spegnerà la spia "riscaldamento
serbatoio vapore".
C
3 Durante la stiratura a vapore,tenete premuto il pulsante
dell'attivatore di vapore (H).
Solo mod.GC6268/GC6265/GC6068/GC6065/GC6029:durante la
stiratura a vapore la spia G si accenderà di tanto in tanto per indicare
che il serbatoio e il ferro si stanno scaldando per raggiungere la giusta
temperatura e la giusta pressione.P otete com unque contin uare a stirare.
Dopo un certo periodo di inattività, il vapore ancora presente nel cavo
si sarà condensato sotto forma di acqua. Quando ricomincerete a
stirare, quindi, dalla piastra potrebbero fuoriuscire alcune gocce
d'acqua,con un leggero gorgoglio.
B
Per evitare che queste gocce finiscano sui vostri capi,tenete il ferro su
uno straccio e premete alcune volte il pulsante dell'attivatore di vapore
(H)
ITALIANO56

ITALIANO 57
fino a quando la produzione di vapore non si sarà normalizzata.A questo
punto,potete iniziare a stirare normalmente.
Stiratura senza vapore.
1 Mettete il termostato nella posizione consigliata
Vedere la sezione "Come impostare la temperatura".
2 Non premete il pulsante dell'attivatore di vapore (H).
◗ Premendo per sbaglio il pulsante dell'attivatore di vapore durante
la stiratura potrebbe fuoriuscire del vapore.Se il serbatoio è vuoto
o non è stato riscaldato,potreste sentire uno strano rumore
metallico all'interno dello stesso.Questo fenomeno è causato
dall'apertura della valvola del vapore ed è assolutamente innocuo.
◗ Se dopo aver stirato ad un'alta temperatura decidete di ridurre
quest'ultima usando l'apposito termostato (I),aspettate fino a
quando non si sarà riaccesa la spia della temperatura (G) prima di
continuare a stirare,per evitare di rovinare i tessuti.
Altre caratteristiche
Come stirare in posizione verticale
C
1 Per stirare a vapore le tende e i capi appesi (giacche,cappotti),
tenete il ferro in posizione verticale.
Non puntate mai il getto di vapore verso le persone.
Getto di vapore (solo mod.GC6268/GC6068/GC6029)
Il potente getto di vapore è utilissimo per eliminare le pieghe più
ostinate.
C
1 Per utilizzare il getto di vapore:impostate il regolatore di
vapore (F) in posizione R (la nuvoletta più grande) e il
termostato (I) in posizione 3 oppure MAX.

C
2 Premente contemporaneamente il pulsanto attivatore vapore
(H) e il pulsante getto di vapore (N).
Vapore variabile (solo mod.GC6268/GC6265/GC6068/
GC6065/GC6029)
Impostate il regolatore di vapore (F) in posizione q per un vapore
moderato oppure in posizione R per ottenere il massimo del vapore.
Imbuto anticalcare (solo mod.GC6268/GC6068/GC6029)
Garantisce una maggior durata del ferro.
1 Usate l'imbuto anticalcare (M) per riempire d'acqua il serbatoio
vapore.
Al termine della stiratura
C
1 Spegnete l'apparecchio mettendo l'interruttore on/off (D) in
posizione "off".
2 Depressurizzate il serbatoio del vapore tenendo premuto il
pulsante dell'attivatore di vapore fino a quando non avvertirete
più la fuoriuscita di vapore dall'apparecchio.
3 Togliete la spina dalla presa di corrente.
4 Appoggiate il ferro sul suo supporto (C),mettete il controllo
vapore in posizione q e lasciate raffreddare l'apparecchio
prima di riporlo.
Pulizia e manutenzione
1 Togliete la spina dalla presa e lasciate raffreddare l'apparecchio
prima di pulirlo.Se volete pulire il serbatoio vapore,seguite i
primi quattro punti riportati nella sezione "Riempimento
rapido".
Ferro
1 Pulite il ferro con un panno umido.
2 Togliete i residui di calcare dalla piastra usando un panno
umido e un detergente (liquido) non abrasivo.
ITALIANO58

ITALIANO 59
Non immergete mai il ferro nell'acqua, nè risciacquatelo sotto il
rubinetto.
Serbatoio del vapore
Risciacquate il serbatoio del vapore una volta al mese o dopo aver
usato l'apparecchio per una decina di volte.
C
1 Togliete il tappo con la massima attenzione.
C
2 Risciacquate il serbatoio con 500 ml di acqua pulita e
svuotatelo tenendolo capovolto sopra il lavandino.
3 Riavvitate il tappo sul serbatoio del vapore.
Come riporre il ferro
1 Ricordate di lasciar raffreddare il ferro prima di riporlo.
2 Togliete la spina dalla presa e lasciate raffreddare il ferro.
3 Svuotate il serbatoio.
4 Per facilitare il trasporto,il serbatoio del vapore è provvisto di
maniglie su entrambi i lati.
5 Controllate periodicamente le condizioni del cavo di
alimentazione e del cavo collegato alla presa.
Garanzia e assistenza
Se avete bisogno di assistenza o di ulteriori informazioni, vi preghiamo
di visitare il nostro sito web:www.philips.com oppure di contattare il
Centro Assistenza Clienti Philips del vostro Paese (per conoscere il
numero di telefono,vedere l'opuscolo della garanzia). Qualora nel
vostro Paese non ci fosse un Centro Assistenza Clienti,rivolgetevi al
rivenditore autorizzato Philips oppure contattate il Service
Departmente of Philips Domestic Appliances and Personal Care BV.

Localizzazione guasti
Questo capitolo riporta i problemi più comuni che potreste avere con
il vostro ferro.Per ulteriori informazioni,vi preghiamo di leggere i
diversi capitoli. Nel caso non riusciste a risolvere il problema, vi
preghiamo di contattare il Centro Assistenza Clienti Philips del vostro
paese (per conoscere il numero di telefono,vedere l'opuscolo della
garanzia). Qualora nel vostro Paese non ci fosse un Centro Assistenza
Clienti,rivolgetevi al rivenditore autorizzato Philips più vicino.
ITALIANO60
Soluzione
Questo fenomeno scomparirà da solo
nel giro di poco tempo.
Si tratta di particelle del tutto innocue:
il fenomeno è destinato a scomparire
dopo aver utilizzato il ferro per alcune
volte.
Selezionate la temperatura di stiratura
riportata nelle istruzioni e nella tabella.
Appoggiate il serbatoio del vapore su
una superficie stabile e piana.
E' del tutto normale: tenete il ferro su
un panno e premete alcune volte il
pulsante dell'attivatore di vapore (H).Il
panno assorbirà le goccioline e dopo
qualche secondo la produzione di
vapore si sarà normalizzata.
Mettete l'interruttore on/off (D) in
posizione "on".
Aspettate fino a quando si spegnerà la
spia.
Per controllare se il ferro eroga
vapore, mettete uno specchietto
(freddo) davanti ai fori della piastra.
Pulite la piastra con un panno umido.
Pulite la piastra con un panno umido.
Selezionate la temperatura di stiratura
consigliata.
Possibile causa
E' del tutto normale, in quando alcune
parti del ferro sono state leggermente
lubrificate in fabbrica.
Si tratta di un fenomeno normale
quando il ferro è nuovo.
Il termostato (I) è stato impostato ad
una temperatura troppo bassa per la
stiratura a vapore.
Il serbatoio del vapore è stato
appoggiato su una superficie instabile
e/o irregolare.
Quando iniziate a stirare, il cavo è
freddo e il vapore si condensa
all'interno,causando la fuoriuscita di
goccioline d'acqua dalla piastra.
Il serbatoio di vapore non è stato
acceso.
La spia "riscaldamento serbatoio
vapore" è ancora accesa (solo mod.
GC6268/GC6265/GC6068/GC6065/
GC6029).
Il vapore supercaldo (cioè di alta
qualità) è difficile da vedere,
soprattutto quando il termostato è
stato impostato sulla posizione
massima e ancora più se la
temperatura esterna è piuttosto
elevata.
Le impurità o le sostanze chimiche
presenti nell'acqua si sono depositate
sulla piastra.
State stirando ad una temperatura
troppo elevata.
Problema
Dopo aver acceso l'apparecchio per
la prima volta, si nota la fuoriuscita
di fumo.
Dalla piastra del ferro nuovo
fuoriescono particelle bianche.
Dalla piastra fuoriescono goccioline
d'acqua.
L'apparecchio non produce vapore.
Non si vede il vapore che fuoriesce
dalla piastra.
La piastra è sporca.

PORTUGUÊS 61
Descrição geral
A Tampa do reservatório de vapor
B Reservatório de vapor
C Suporte do ferro
D Botão ligar/desligar com lâmpada piloto
E Lâmpada piloto 'Reservatório de vapor em aquecimento'(somente
modelos GC6268/GC6265/GC6068/GC6065).A lâmpada apagase quando a máquina fica pronta para começar a passar a roupa.
F Controlo do vapor (apenas mod.GC6268/GC6265/GC6068/
GC6065 e GC6029).
q = vapor moderado R = vapor máximo
G Lâmpada da temperatura
H Botão para activar o vapor
I Rotor da temperatura
J Mangueira
K Base
L Cabo de alimentação
M Funil anti-calcário (apenas mod.GC6268/GC6068/GC6029)
N Jacto de vapor (apenas mod.GC6268/GC6068/GC6029)
O Descanso para o ferro (apenas mod.GC6268/GC6265/GC6263/
GC6068/GC6065 e GC6063)
Importante
Para sua segurança, antes de começar a usar o aparelho leia
atentamente as instruções e consulte as ilustrações fornecidas.
- Não deite perfume, vinagre, lixívia, produtos descalcificantes ou
outros químicos dentro do reservatório de vapor.
- Nunca se sirva do aparelho se ele apresentar qualquer tipo de dano
ou defeito.Verifique regularmente se o cabo de alimentação está em
boas condições de uso e de segurança.
- Se o fio se estragar, deverá ser substituído pela Philips,por um
concessionário autorizado pela Philips ou por pessoal devidamente
qualificado para se evitarem situações gravosas para o utilizador.
- Não se sirva de qualquer outra tampa no reservatório do vapor
além da que é fornecida com o aparelho,porque esta tampa
funciona como uma válvula de segurança.
-Verifique se a voltagem indicada na parte de baixo do reservatório
do vapor corresponde à voltagem da sua casa antes de ligar o
aparelho à corrente.
- Este aparelho só deverá ser ligado a uma tomada com terra.
- Nunca mergulhe o ferro ou o reservatório do vapor dentro de água.
- Nunca deixe o ferro ligado à corrente sem vigilância.
- Quando terminar o trabalho ou quando tiver que se afastar do ferro,
mesmo que seja por pouco tempo,desligue sempre da corrente e
coloque-o em posição de descanso.
- Coloque sempre o reservatório do vapor sobre uma superfície
estável,plana e horizontal.Não ponha o reservatório de vapor sobre
a parte macia da tábua de engomar.
Coloque sempre o ferro sobre o apoio.Não coloque o ferro quente
sobre a mangueira ou sobre o cabo de alimentação.

-- O apoio e a base do ferro podem ficar extremamente quentes e
provocar queimaduras quando se lhes toca.Se quiser deslocar a
caldeira do vapor,não toque no apoio do ferro.
- Não deixe que o cabo de alimentação fique em contacto com a
base quente do ferro.
-Pessoas trémulas não devem usar o aparelho sem a supervisão de
alguém.Tenha atenção às crianças e nunca as deixe brincar com o
aparelho.
- Se sair vapor por debaixo da tampa do reservatório quando o
aparelho estiver em aquecimento,desligue o aparelho e contacte um
centro de assistência autorizado pela Philips.
- Não retire a tampa do reservatório do vapor se este estiver sob
pressão.Siga as instruções dadas em 'Enchimento rápido' antes de
remover a tampa.
Preparação do aparelho
1 Verifique se a voltagem indicada na parte de baixo do
reservatório do vapor corresponde à voltagem da sua casa
antes de ligar o aparelho à corrente.
2 Retire qualquer autocolante ou película protectora da base do
ferro e limpe a base com um pano macio.
3 Puxe todo o fio (L) e a mangueira (J) para fora.
4 Coloque o reservatório do vapor (B) sobre uma superfície
estável e plana.
5 Coloque o ferro assente sobre o suporte (C).
Enchimento do reservatório de vapor
Nunca mergulhe o reservatório dentro de água.
Não abra a tampa se o aparelho estiver quente e se o reservatório do
vapor ainda estiver sob pressão.
C
1 Certifique-se que o botão de ligar/desligar (D) está na posição
'off' (desligado) e retire a ficha da tomada eléctrica.
C
2 Desenrosque lentamente a tampa (A) do reservatório do
vapor.
Quando se retira a tampa poderá ouvir-se um som.Este som é
causado pelo vácuo do reservatório ainda frio. É perfeitamente normal.
PORTUGUÊS62

PORTUGUÊS 63
C
3 Deite água para dentro do reservatório do vapor (máx.1 litro).
Use água da torneira para encher o reservatório até ao nível máximo.
Se a água da torneira da sua zona for muito dura, aconselha-se que
misture a água da torneira com água destilada, em proporcões iguais,
ou que use apenas água destilada.
Não use perfume, vinagre, lixívia ou água descalcificada quimicamente.
4 Aperte bem a tampa da abertura de enchimento do
reservatório de vapor.
Enchimento rápido
C
1 Comece por colocar o botão ligar/desligar (D) na posição 'off'.
C
2 Prima o botão activador do vapor até deixar de ouvir o vapor
a escapar-se do aparelho.
3 Mantenha o botão activador do vapor premido e lentamente
desaperte a tampa do reservatório do vapor,rodando para a
esquerda.Desta forma procederá à despressurização do
reservatório.
Certifique-se que já não resta vapor no reservatório.Coloque um
pedaço de pano sobre a tampa para a desenroscar.
4 Retire a ficha da tomada de corrente.
5 Encha o reservatório do vapor conforme se descreve na
secção 'Enchimento do reservatório do vapor' e deixe o
aparelho voltar a aquecer.
Vapor
-
q
R
Temperatura
1
2
3
Tipo de tecido
Tecidos sintéticos, isto é,
acetato,acrílico, viscose,
poliamide, poliester e seda
Lã
Algodão,linho
Tome atenção: Z na tabela
significa que a peça não
pode ser passada a ferro.
Etiqueta com instruções
B
C
D
Z

Selecção da temperatura
Coloque sempre o reservatório do vapor sobre uma superfície estável
plana e horizontal.Não ponha o reservatório de vapor sobre a parte
macia da tábua de engomar.
Coloque sempre o ferro em posição de descanso.Não ponha o ferro
quente sobre a mangueira ou sobre o cabo de alimentação.Certifique
se que o fio não fica em contacto com a base quente do ferro.
C
1 Regule o controlo da temperatura para a posição pretendida,
rodando-o até à indicação correspondente.
-Verifique a etiqueta da peça de roupa para saber qual a temperatura
indicada:
- 1 Tecidos sintéticos (por ex.: acrílico,viscose, poliamide, poliester)
- 1 Seda
- 2 Lã
- 3 Algodão,linho
- Quando não souber de que tipo de material é feito o tecido,
experimente primeiro num sítio que não fique à vista quando usar a
peça de roupa.
- Seda,lã e tecidos sintéticos:passe pelo avesso para evitar a formação
de brilho.
- Comece por passar os artigos que requeiram uma temperatura mais
baixa,como é o caso dos tecidos sintéticos.
C
2 Ligue a ficha à tomada de corrente e deixe o aparelho aquecer
rodando o botão de ligar/desligar (D) para a posição 'on'
(ligado).
3 Arranque a frio:o reservatório do vapor e a base começam a
aquecer.A base demora aproximadamente 2 minutos para
aquecer e o reservatório demora cerca de 8 minutos.
4 Reaquecimento rápido:se voltar a encher o reservatório do
vapor enquanto estiver a passar a roupa,a água do
reservatório demorará aproximadamente 6 minutos a aquecer.
5 Somente mod.GC6268/GC6265/GC6068/GC6065 e GC6029:
logo que a água do reservatório estiver suficientemente quente
para passar com vapor, a lâmpada piloto (E) apaga-se. Poderá,
então,começar o trabalho.
PORTUGUÊS64

PORTUGUÊS 65
Sugestões
◗ Se o tecido for constituído por vários tipos de fibras, seleccione
sempre a temperatura para as fibras mais delicadas,isto é,a
temperatura mais baixa.Por exemplo:se um artigo tiver 60% de
poliester e 40% de algodão,deverá ser passado à temperatura
adequada para poliester (1) e sem vapor.
◗ Quando passar a vapor tecidos de lã, podem ocorrer manchas de
brilho.Para o evitar,use um pano seco sobre o tecido ou vire do
avesso e passe a peça desta forma.
◗ O veludo e outros tecidos que têm tendência a ganhar manchas de
lustro devem ser engomados apenas numa direcção (no sentido do
fio do tecido) e exercendo muito pouca pressão.
◗ Não passe com vapor peças de seda coloridas para não provocar
manchas.
Passar com vapor
Verifique se o reservatório do vapor tem água suficiente.
C
◗ Só é possível passar com vapor nas temperaturas mais altas
(regulações entre 2 e MAX).
1 Regule a temperatura para a posição recomendada.
Consulte o capítulo 'Selecção da temperatura'.
2 Aguarde até que a lâmpada indicadora de 'reservatório do
vapor em aquecimento' se apague.
C
3 Mantenha o botão activador do vapor (H) premido quando
estiver a passar com vapor.
Apenas mod.GC6268/GC6265/GC6068/GC6065 e GC6029:
Enquanto estiver a passar com vapor,a lâmpada piloto G acende-se de
vez em quando para indicar que o reservatório e o ferro estão a
aquecer para a temperatura e a pressão certas.Continue a passar sem
problemas.
Se não se tiver servido da função de vapor por algum tempo, o vapor
que restar dentro da mangueira condensa-se e passa ao estado líquido.
Quando recomeçar a passar com vapor, poderá acontecer alguma fuga
e cairem algumas gotículas de água da base do ferro.
B
Para evitar que caiam gotas de água sobre a roupa, coloque o ferro
sobre um pano velho e prima o botão activador do vapor (H) até
normalizar a produção de vapor antes de começar novamente o
trabalho.

Passar sem vapor
1 Regule o selector da temperatura para a posição recomendada.
Consulte o capítulo 'Selecção da temperatura'.
2 Não prima o botão activador do vapor (H).
◗ Poderá escapar-se algum vapor se, involuntariamente,premir o
botão activador do vapor enquanto estiver a passar. Se o
reservatório estiver vazio ou ainda não tiver aquecido,ouvir-se-á
um ruído no interior do reservatório.Este fenómeno é provocado
pela abertura da válvula do vapor e é perfeitamente inofensivo.
◗ Se tiver estado a passar numa temperatura elevada e passar o
rotor da temperatura (I) para uma temperatura mais baixa,
aguarde até que a lâmpada piloto (G) volte a acender-se antes de
continuar a passar. Evitará,assim,estragar os tecidos.
Outras características
Passar com vapor na vertical
C
1 Pode passar os cortinados e a roupa (casacos,fatos,blusões)
pendurados,colocando o ferro na vertical.
Nunca dirija o vapor na direcção das pessoas.
Jacto de vapor (apenas mod.GC6268/GC6068/GC6029)
Um potente 'jacto' de vapor ajuda a remover vincos mais difíceis.
C
1 Para o jacto de vapor:regule o controlo do vapor (F) para R
(nuvem maior) e regule a temperatura (l) para a posição 3
ou MAX.
C
2 Pressione o botão activador do vapor (H) e o botão do jacto
de vapor (N).
PORTUGUÊS66

PORTUGUÊS 67
Vapor variável (somente mod.GC6268/GC6265/GC6068/
GC6065 e GC6029)
Pode regular o controlo do vapor (F) para q se quiser um vapor
moderado ou para R se quiser o vapor no máximo.
Funil anti-calcário (apenas mod.GC6268/GC6068/GC6029)
Para prolongar a vida do ferro.
1 Use o funil anti-calcário (M) para encher o reservatório do
vapor com água.
Quando terminar
C
1 Desligue o ferro colocando o botão ligar/desligar (D) na
posição 'off'.
2 Despressurize o reservatório do vapor premindo o botão
activador do vapor até deixar de ouvir qualquer vapor a sair
do aparelho.
3 Retire a ficha da tomada de corrente.
4 Coloque o ferro sobre o suporte (C),regule o controlo do
vapor para a posição q e deixe o aparelho arrefecer antes de
o guardar.
Limpeza e manutenção
1 Retire a ficha da tomada eléctrica e deixe o ferro arrefecer
antes de proceder à sua limpeza.Se quiser limpar o
reservatório do vapor,siga os primeiros quatro passos do
capítulo 'Enchimento rápido'.
Ferro
1 Limpe o ferro com um pano húmido.
2 Limpe o calcário e quaisquer outros vestígios de impurezas da
base do ferro com um pano húmido e um produto de limpeza
não abrasivo (líquido).
Nunca mergulhe o ferro dentro de água nem o enxague à torneira.
Reservatório do vapor
Enxague o reservatório do vapor uma vez por mês ou após cada 10
utilizações.

C
1 Retire a tampa com cuidado.
C
2 Enxague o reservatório do vapor apenas com 5 dl de água
limpa.Deite a água fora,virando o reservatório do vapor sobre
o lava-loiça.
3 Volte a enroscar a tampa do reservatório do vapor.
Arrumação
1 Antes de guardar o ferro,certifique-se que já arrefeceu o
suficiente.
2 Retire a ficha da tomada de corrente e deixe o ferro a
arrefecer.
3 Esvazie o reservatório do vapor.
4 O reservatório do vapor tem pegas de ambos os lados para
facilitar o seu transporte.
5 Verifique regularmente se o cabo de aliemntação e a mangueira
estão em boas condições de utilização e de segurança.
Garantia e assistência
Se necessitar de informações ou se tiver qualquer problema,por favor
visite a página Philips na Internet em www.philips.pt ou contacte o
Centro de Informação ao Consumidor Philips do seu país (o número
de telefone encontra-se no folheto da garantia mundial). Se não existir
um Centro de Informação ao Consumidor no seu país, dirija-se a um
agente Philips local ou ao Departamento de Service da Philips
Domestic Appliances and Personal Care BV.
Resolução de problemas
Este capítulo resume os problemas mais comuns que poderá encontrar
na utilização do seu ferro.Por favor,leia os diferentes capítulos para
mais detalhes.Se não conseguir resolver o problema,
PORTUGUÊS68

PORTUGUÊS 69
Solução
Este fenómeno cessará passado pouco
tempo.
Estas partículas são inofensivas e
deixarão de se formar e de sair pela
base do ferro após algumas utilizações.
Seleccione a temperatura correcta,
conforme indicado neste modo de
emprego e na tabela.
Coloque o reservatório sobre uma
superfície estável e plana.
É normal. Coloque o ferro sobre um
pano velho e prima o botão activador
do vapor (H).O pano absorverá as
gotas de água.Passados alguns
segundos,a produção de vapor estará
normalizada.
Regule o botão ligar/desligar (D) para
a posição 'on'.
Aguarde até a lâmpada se apagar.
Para verificar se o ferro está realmente
a produzir vapor, coloque um espelho
(frio) em frente dos orifícios da base
do ferro.
Limpe a base do ferro com um pano
húmido.
Limpe a base do ferro com um pano
húmido.Seleccione a temperatura
recomendada.
Causa(s) provável(eis)
É normal.Algumas peças do ferro
foram lubrificadas ligeiramente na
fábrica.
É normal quando o ferro é novo.
O rotor da temperatura (I) foi
colocado numa temperatura que é
muito baixa para passar com vapor.
O reservatório do vapor foi colocado
sobre uma superfície instável e/ou
irregular.
Quando se começa a passar, a
mangueira está fria. O vapor
condensa-se na mangueira,
provocando a saída de gotículas de
água através da base do ferro.
O reservatório do vapor não está
ligado.
A lâmpada piloto indicadora de
'reservatório de vapor em
aquecimento' ainda está acesa (apenas
mod.GC6268/GC6265/GC6068/
GC6065/GC6029)
O vapor sobreaquecido (isto é,de alta
qualidade) dificilmente se vê,
sobretudo se o rotor da temperatura
estiver na posição máxima e menos
ainda quando a temperatura ambiente
também for relativamente elevada.
Impurezas ou químicos existentes na
água depositaram-se na base do ferro.
Esteve a passar com temperaturas
muito altas.
Problema
Sai algum fumo do aparelho depois
de o ligar pela primeira vez.
Saiem partículas brancas da base do
ferro.
Gotículas de água escapam-se pela
base do ferro.
O aparelho não produz vapor.
Não se vê sair o vapor da base do
ferro.
A base está suja.
queira dirigir-se ao Centro de Informação ao Consumidor Philips do
seu país (encontrará o número do telefone no folheto da garantia
mundial).Se não existir um Centro de Informação ao Consumidor no
seu país,dirija-se a um agente Philips local ou ao concessionário Philips
mais próximo.

www.philips.com
4239 000 52874
u
 Loading...