

Page 1
Double Speed
GC6107, GC6104, GC6103
Page 2
234
Page 3
Page 4

Page 5
ENGLISH 6
POLSKI 15
ROMÂNĂ 25
РУССКИЙ 34
ČESKY 45
MAGYAR 54
SLOVENSKY 63
УКРАЇНСЬКА 72
HRVATSKI 81
EESTI 89
LATVISKI 98
LIETUVIŠKAI 107
SLOVENŠČINA 116
БЪЛГАРСКИ 125
SRPSKI 135
144
GC6107, GC6104, GC6103
Page 6

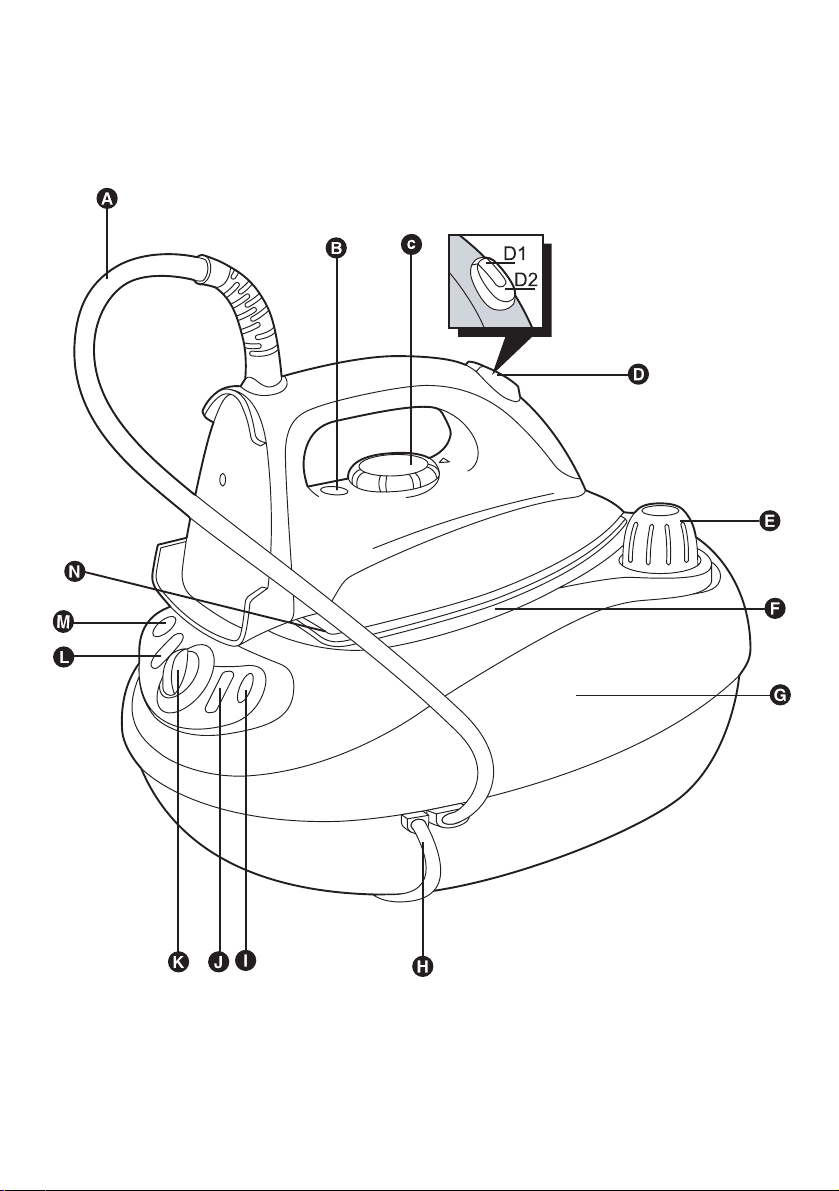
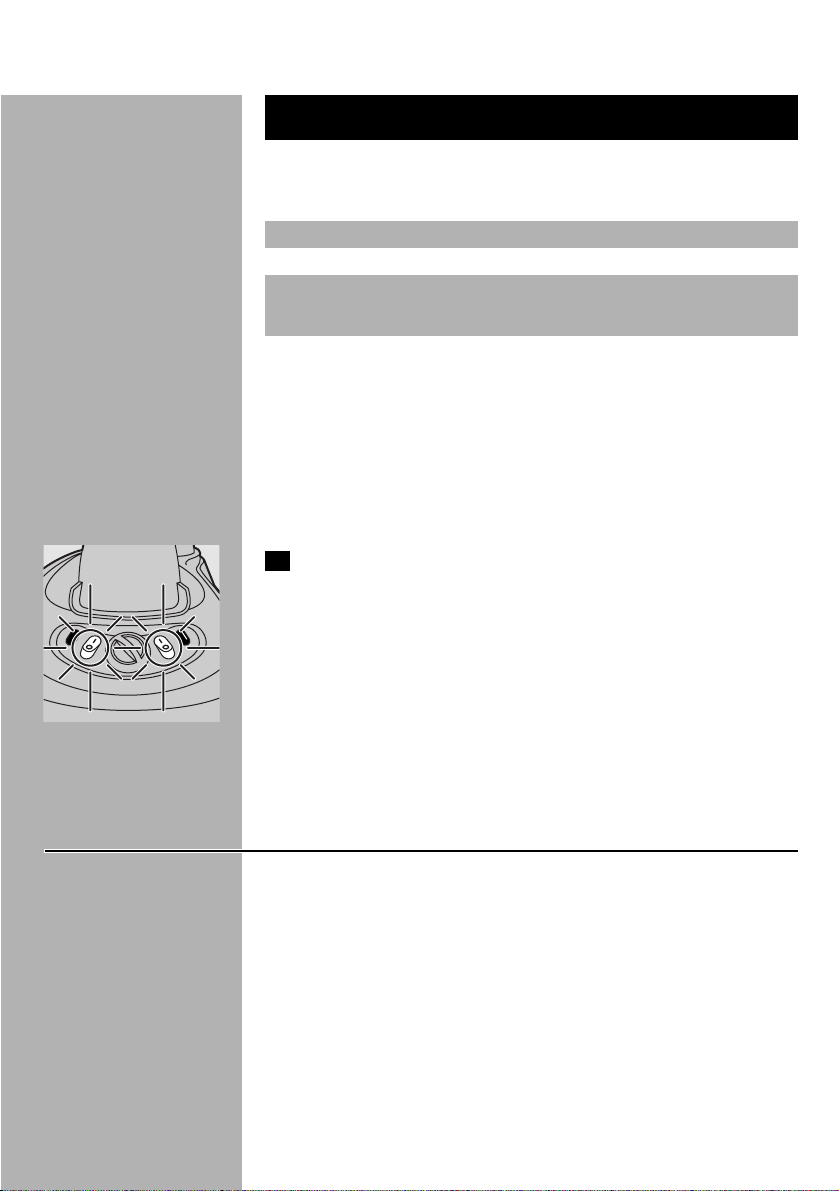
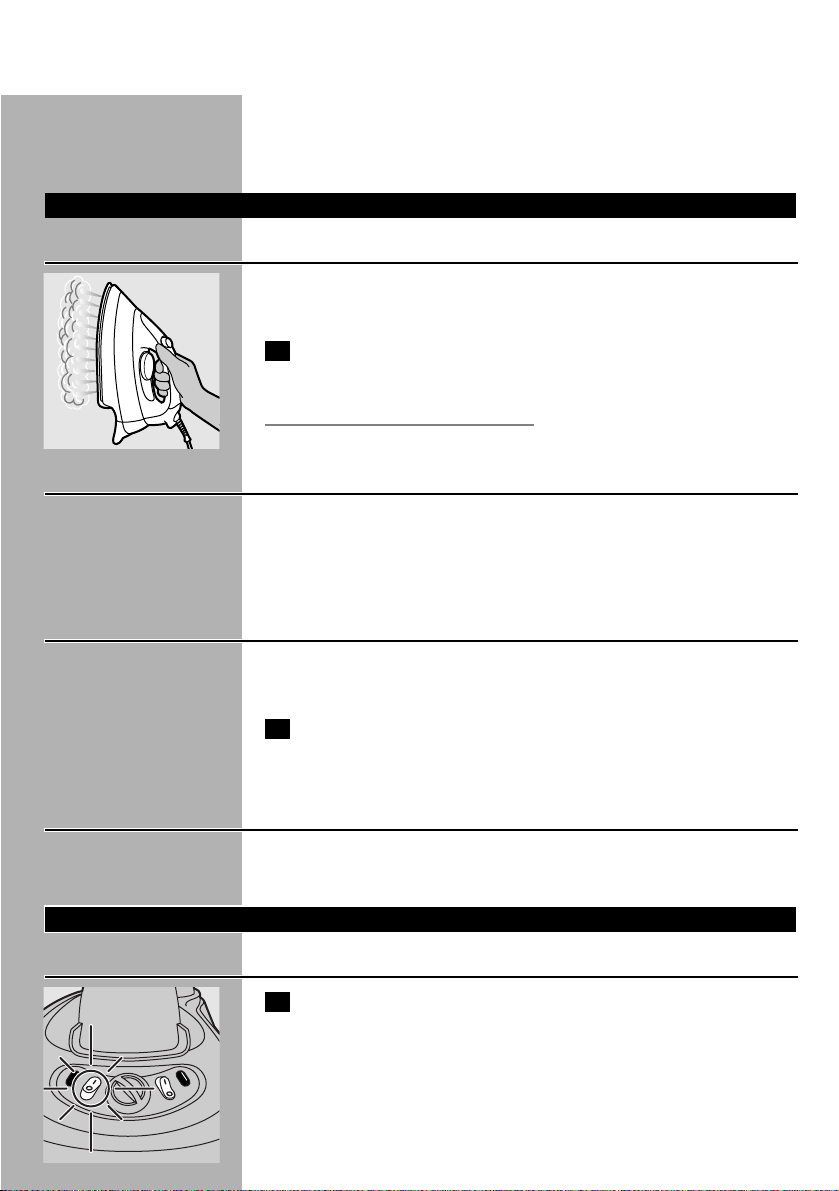
General description
A Supply hose
B Temperature light
C Temperature dial and indicator
D Steam activator and lock
- D1. Lock
- D2. Activator
E Cap of steam tank
F Iron stand
G Steam tank
H Mains cord
I Steam-ready light (GC6107 only)
J Steam tank switch with power-on light
K Steam control (GC6107/GC6104 only)
L Iron switch with power-on light
M 'Steam tank empty' light (GC6107 only)
N Soleplate
Important
Read these instructions for use carefully before using the appliance and
save them for future reference.
◗ Check if the voltage indicated on the type plate corresponds to
the local mains voltage before you connect the appliance.
◗ Only connect the appliance to an earthed wall socket.
◗ Do not use the appliance if the plug, the cord, the supply hose or
the appliance itself shows visible damage, or if the appliance has
been dropped or is leaking.
◗ Check the cord and the supply hose regularly for possible
damage.
◗ If the mains cord or the supply hose is damaged, it must be
replaced by Philips, a service centre authorised by Philips or
similarly qualified persons in order to avoid a hazard.
◗ Never leave the appliance unattended when it is connected to the
mains.
◗ Never immerse the iron or the steam tank in water.
◗ Keep the appliance out of the reach of children.
◗ Always place and use the iron and the steam tank on a stable,
level and horizontal surface. Do not put the steam tank on the
soft part of the ironing board.
◗ Do not allow the mains cord and supply hose to come into
contact with the soleplate when it is hot.
◗ The iron stand and the soleplate of the iron can become
extremely hot and may cause burns if touched.If you want to
move the steam tank, do not touch the stand.
ENGLISH6
Page 7

◗ When you have finished ironing, when you clean the appliance,
when you fill or empty the water tank and also when you leave
the iron even for a short while: set the steam control to position
O, put the iron on its heel and remove the mains plug from the
wall socket.
◗ Do not put perfume, vinegar, starch, descaling agents, ironing aids
or other chemicals in the water tank.
◗ If steam escapes from under the steam tank cap when the
appliance is heating up, switch the appliance off and tighten the
steam tank cap. If steam continues to escape when the appliance is
heating up, switch the appliance off and contact a service centre
authorised by Philips.
◗ Do not remove the cap from the steam tank when the steam tank
is still under pressure. Follow the instructions given later in this
manual.
◗ Do not use any other cap on the steam tank than the cap that has
been supplied with the appliance, as this cap also functions as a
safety valve.
◗ This appliance is intended for household use only.
Before first use
1 Remove any sticker or protective foil from the soleplate and
clean the soleplate with a soft cloth.
2 Fully unwind the mains cord and supply hose.
3 Place the steam tank on a stable, level surface.
4 Place the iron on the iron stand.
Preparing for use
Filling the steam tank
Never immerse the steam tank in water.
Do not open the cap when the iron and the steam tank are still hot.
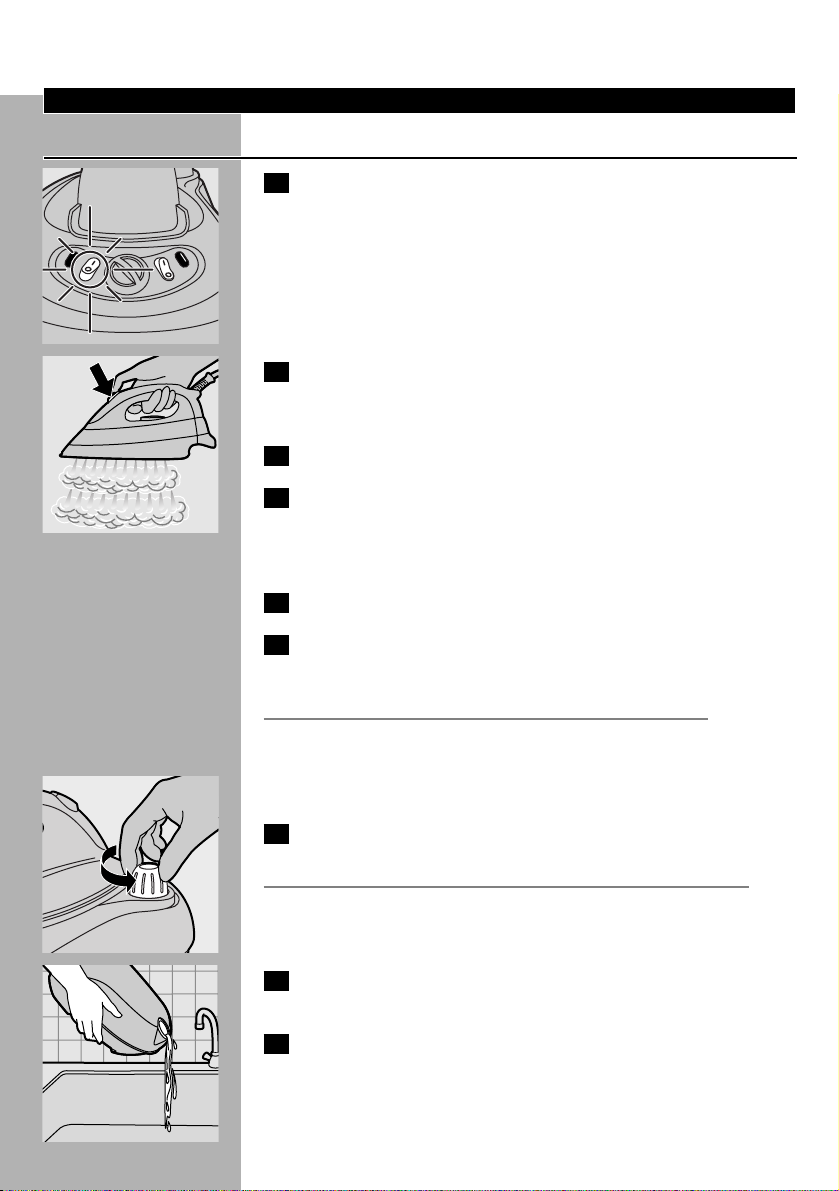
1 Remove the mains plug from the wall socket.
C
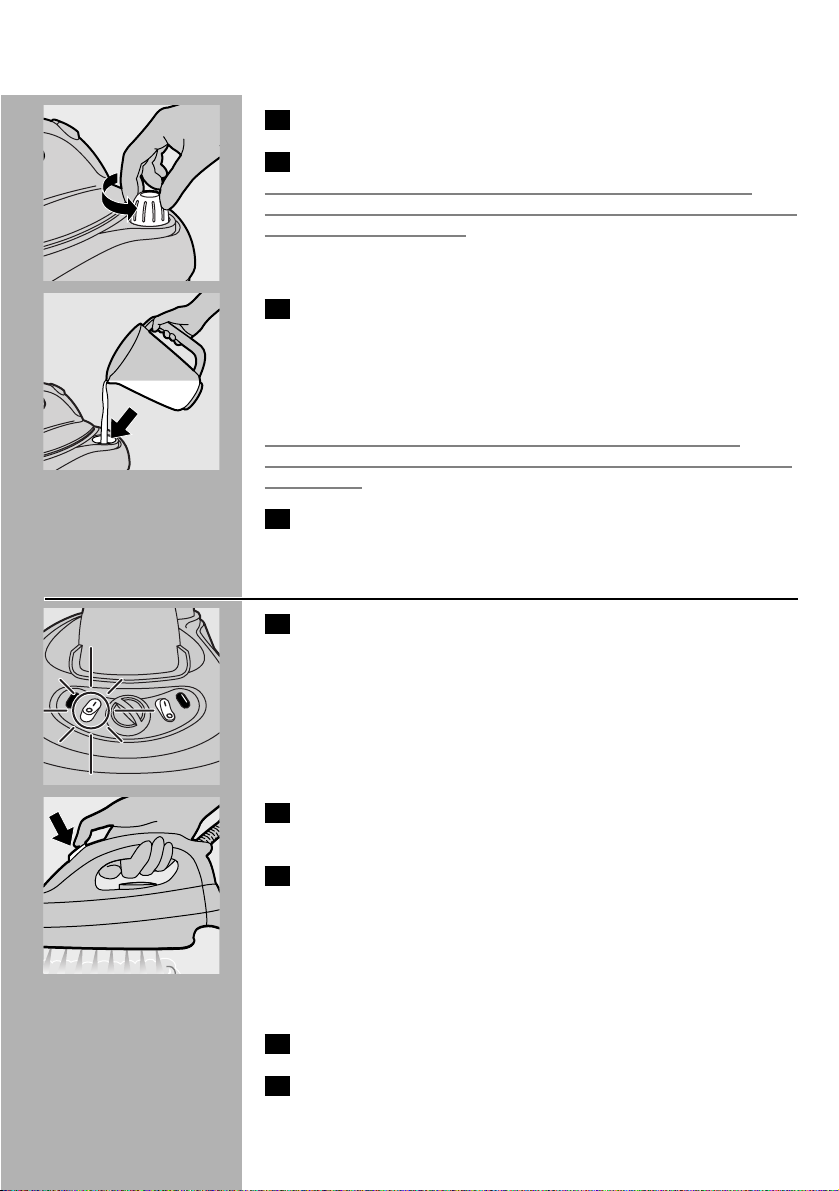
2 Slowly unscrew the cap of the steam tank.
You may hear a sound when you remove the cap.This sound is caused
by the vacuum or residual pressure inside the steam tank and is
perfectly normal.
ENGLISH 7
Page 8
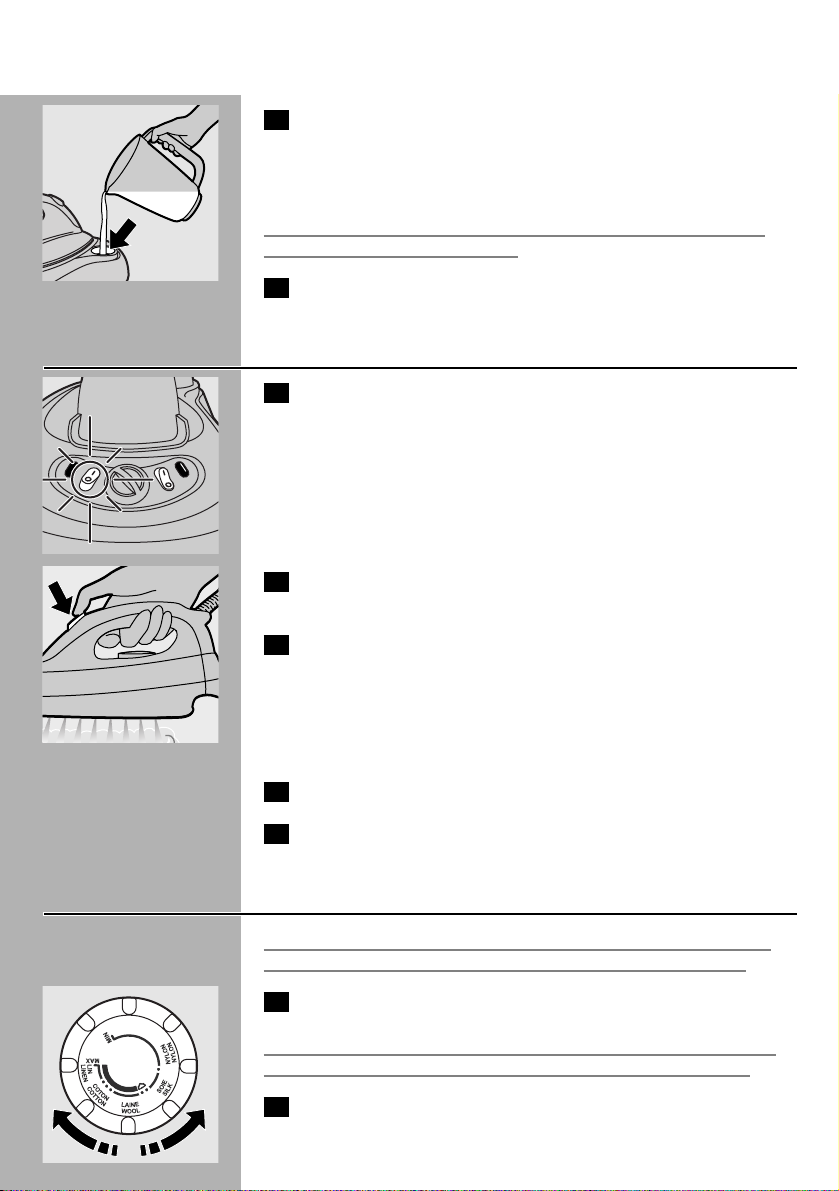
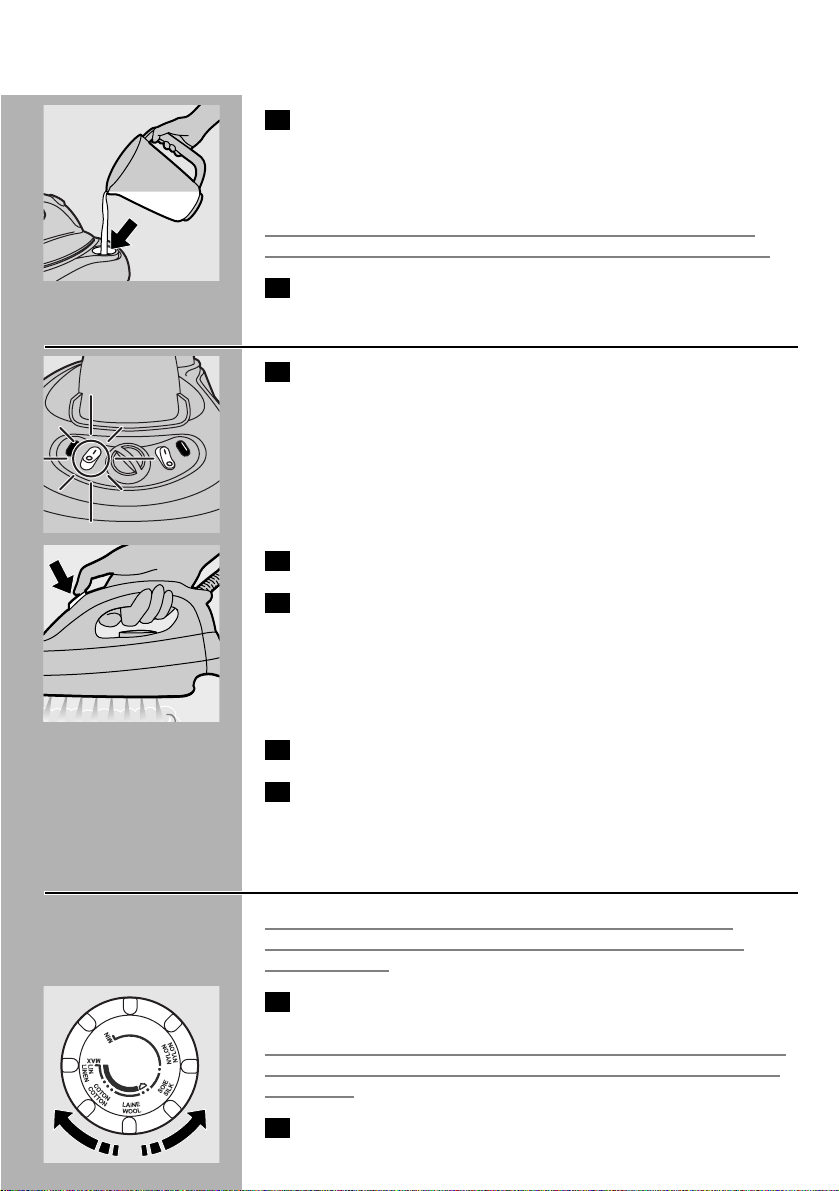
C
3 Pour water into the steam tank (max. 1 litre).
Use tap water to fill the tank.
◗ If the tap water in your area is very hard, we advise you to use
50% distilled water and 50% tap water.
Do not put perfume, vinegar, starch, descaling agents, ironing aids or
other chemicals in the steam tank.
4 Screw the cap tightly onto the filling aperture of the steam
tank.
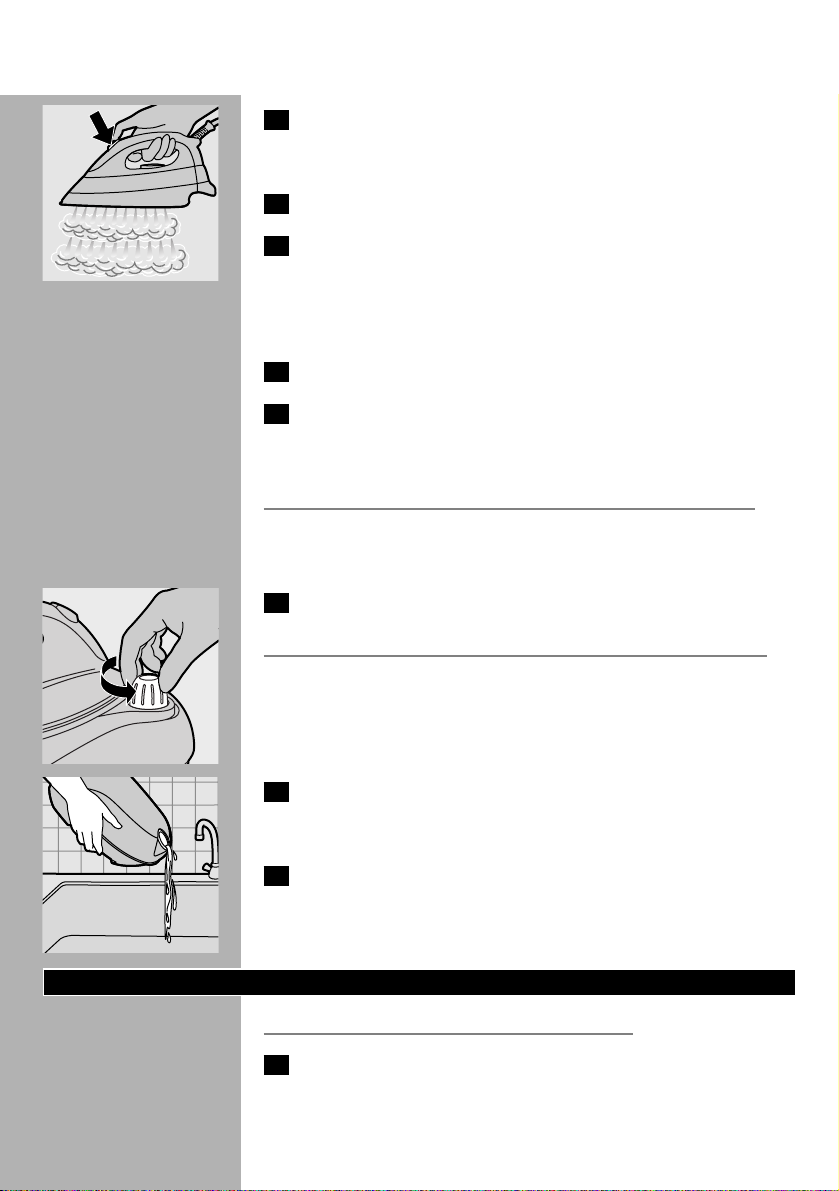
Fast refill
C
1 Keep the appliance plugged into the mains and make sure the
iron is on.Then set the steam tank switch to 'off'.
C
2 Press the steam activator until you no longer hear any steam
escaping from the appliance.
3 Keep the steam activator pressed in and slowly unscrew the
cap of the steam tank by turning it anticlockwise.This will
depressurise the steam tank.
Make sure there is no steam left in the steam tank. Place a piece of
cloth over the cap when unscrewing it.
4 Remove the mains plug from the wall socket.
5 Fill the steam tank as described in section 'Filling the steam
tank' and let the appliance heat up again.
Setting the temperature
Always place the steam tank on a stable, level and horizontal surface
Do not put the steam tank on the soft part of the ironing board.
1 Put the iron on the iron stand.
Do not put the hot iron on the supply hose or the mains cord. Make
sure the cord does not come into contact with the hot soleplate.
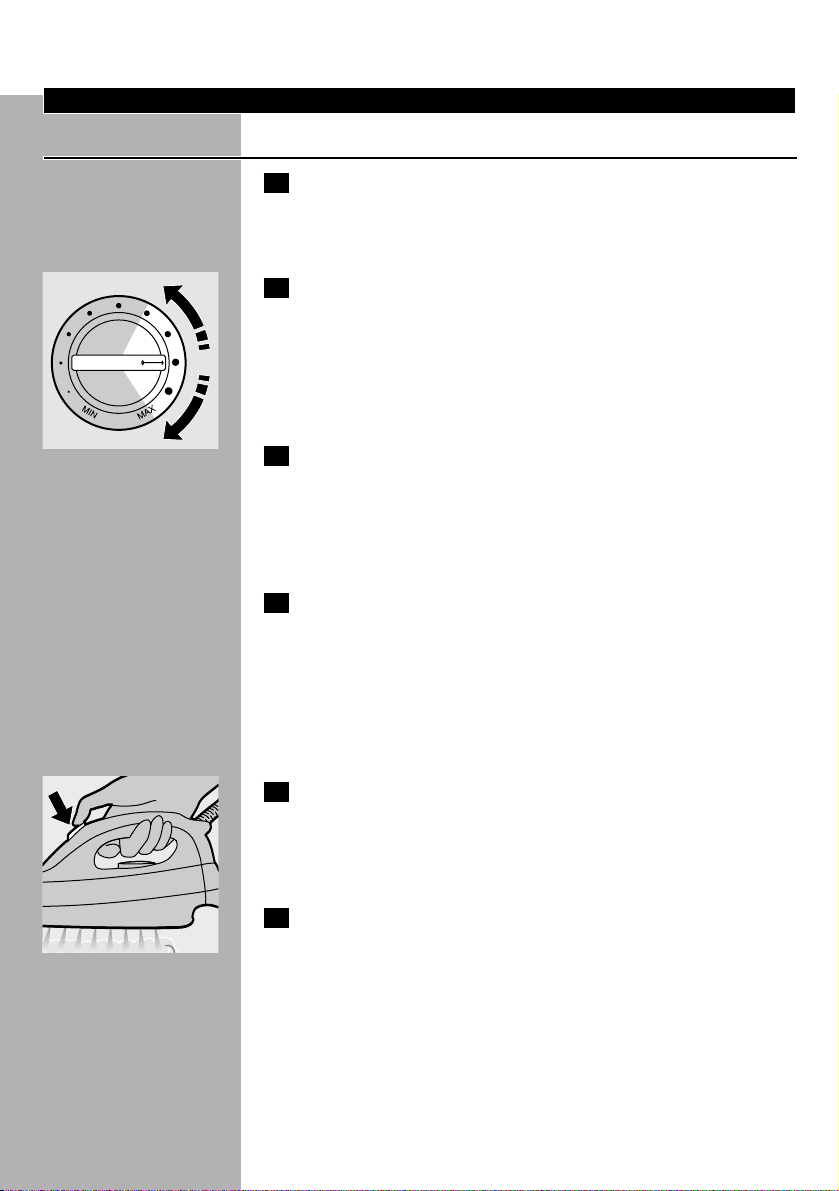
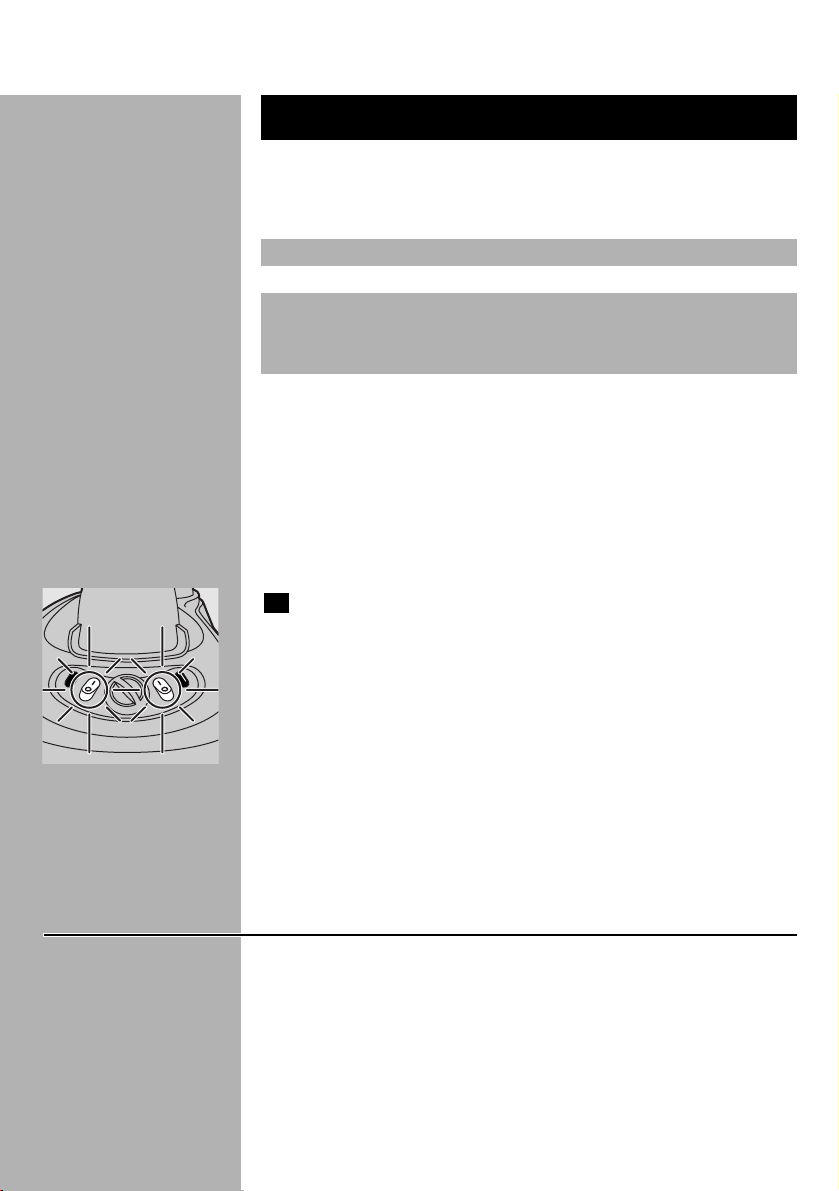
C
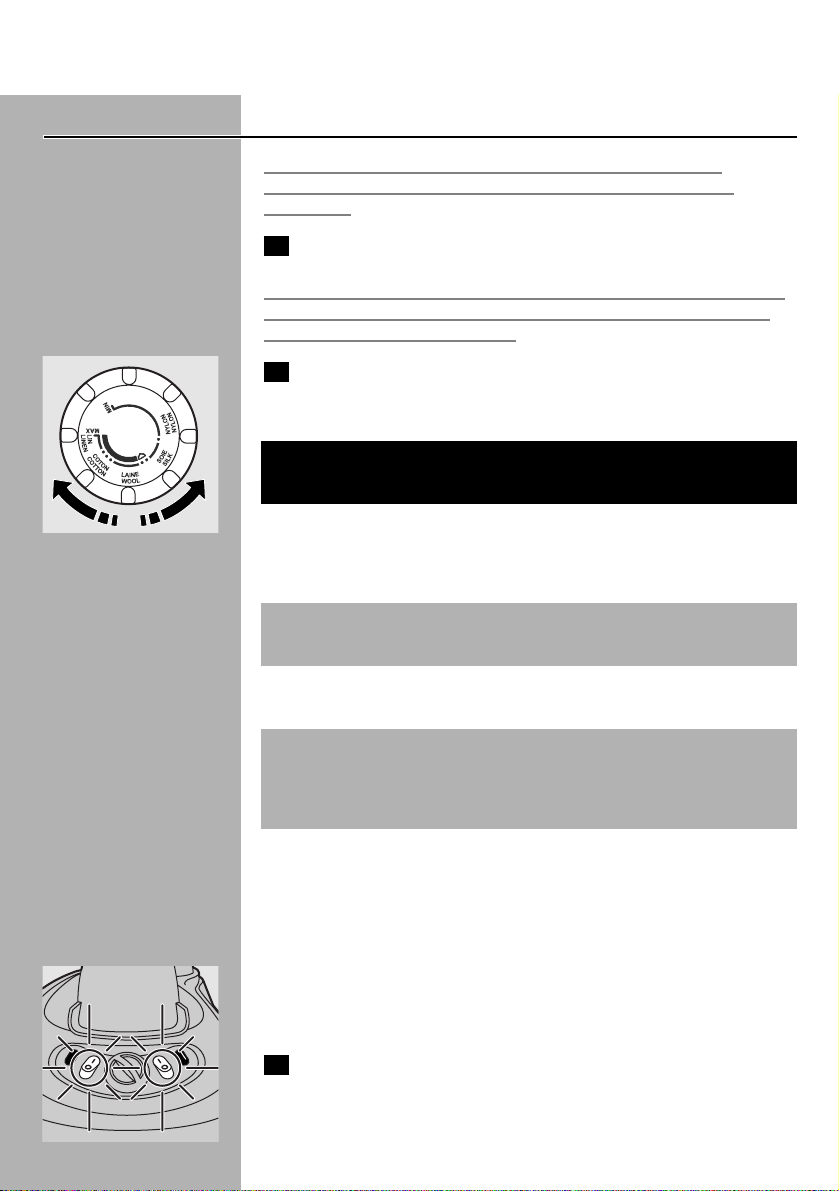
2 Set the required ironing temperature by turning the
temperature dial to the appropriate position.
Check the laundry care label for the required ironing temperature:
ENGLISH8
Page 9
If you do not know what kind(s) of fabric(s) an article is made of,
determine the right ironing temperature by ironing a part that will not
be visible when you wear or use the article.
Silk, woollen and synthetic materials: iron the reverse side of the fabric
to prevent shiny patches.
Start ironing the articles that require the lowest ironing temperature,
such as those made of synthetic fibres.
C
3 Put the mains plug in an earthed wall socket and set both the
steam tank switch and the iron switch to 'on'.The steam tank
and the soleplate will now heat up.
◗ The iron is hot enough when the temperature light goes out.
◗ During steam ironing the temperature light goes on from time to
time.This indicates that the iron is heating up to the right
temperature.
◗ If you have been ironing at a high temperature and subsequently
set the temperature dial to a lower setting, wait until the
temperature light goes on again before you continue ironing.This
will prevent damage to your fabrics.
Tips
- If the fabric consists of various kinds of fibres, always select the
temperature required by the most delicate fibre, i.e. the lowest
temperature. For example: if an article consists of 60% polyester and
40% cotton, it should be ironed at the temperature indicated for
polyester (1) and without steam.
- When steam ironing woollen fabrics, shiny patches may occur.You
can prevent this by using a dry pressing cloth or by turning the
article inside out and ironing the reverse side.
- Velvet and other fabrics that tend to acquire shiny patches should be
ironed in one direction only (along with the nap) while applying very
little pressure.
- Do not use steam when you are ironing coloured silk.This could
cause stains.
ENGLISH 9
Steam setting
MIN (see 'Ironing
without steam')
Low to medium
Medium to MAX
Temperature
setting
1
2
3
Type of fabric
Synthetic fabrics (e.g.
acetate, acrylic, viscose,
polyamide, polyester)
and silk
Wool
Cotton, linen
Please note that Z on
the label means that the
article cannot be ironed.
Symbol on
laundry care label
B
C
D
Z
Page 10
Using the appliance
Steam ironing
1 Make sure that there is enough water in the steam tank.
◗ Steam ironing is only possible at higher ironing temperatures
(temperature settings 2 to MAX).
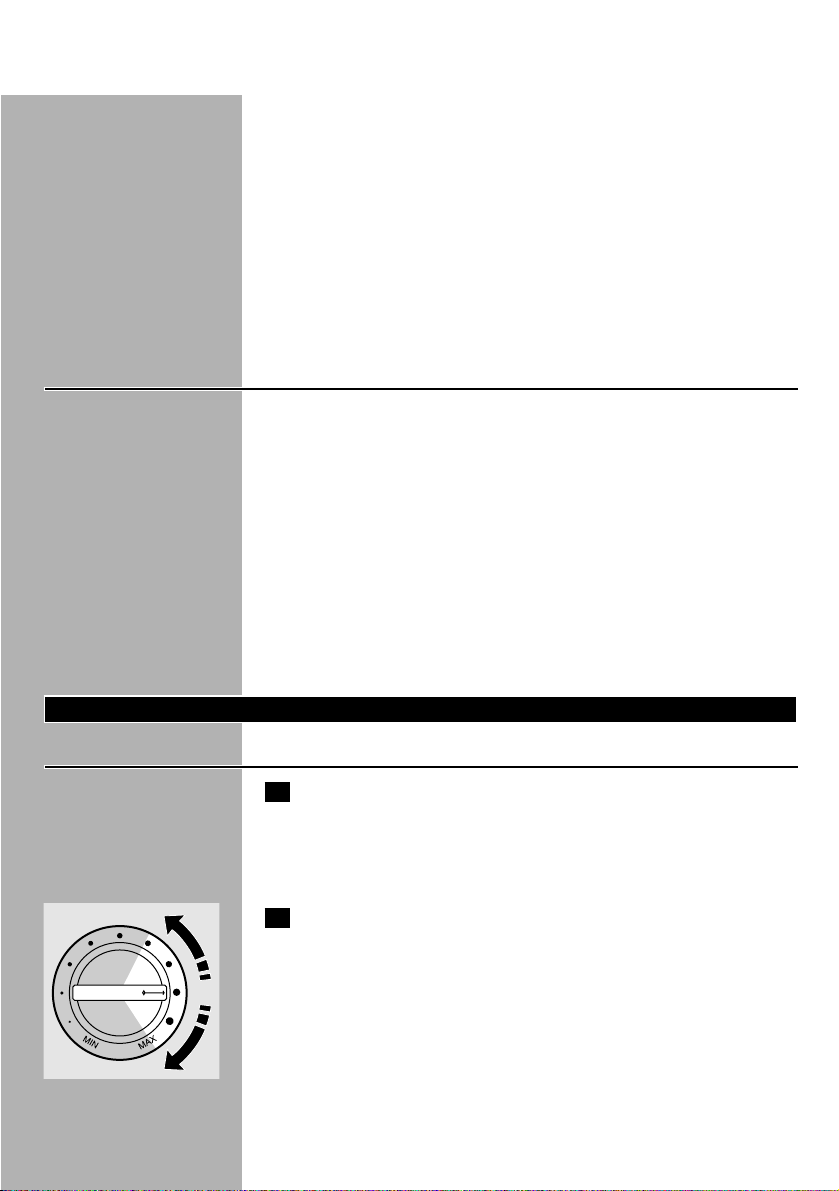
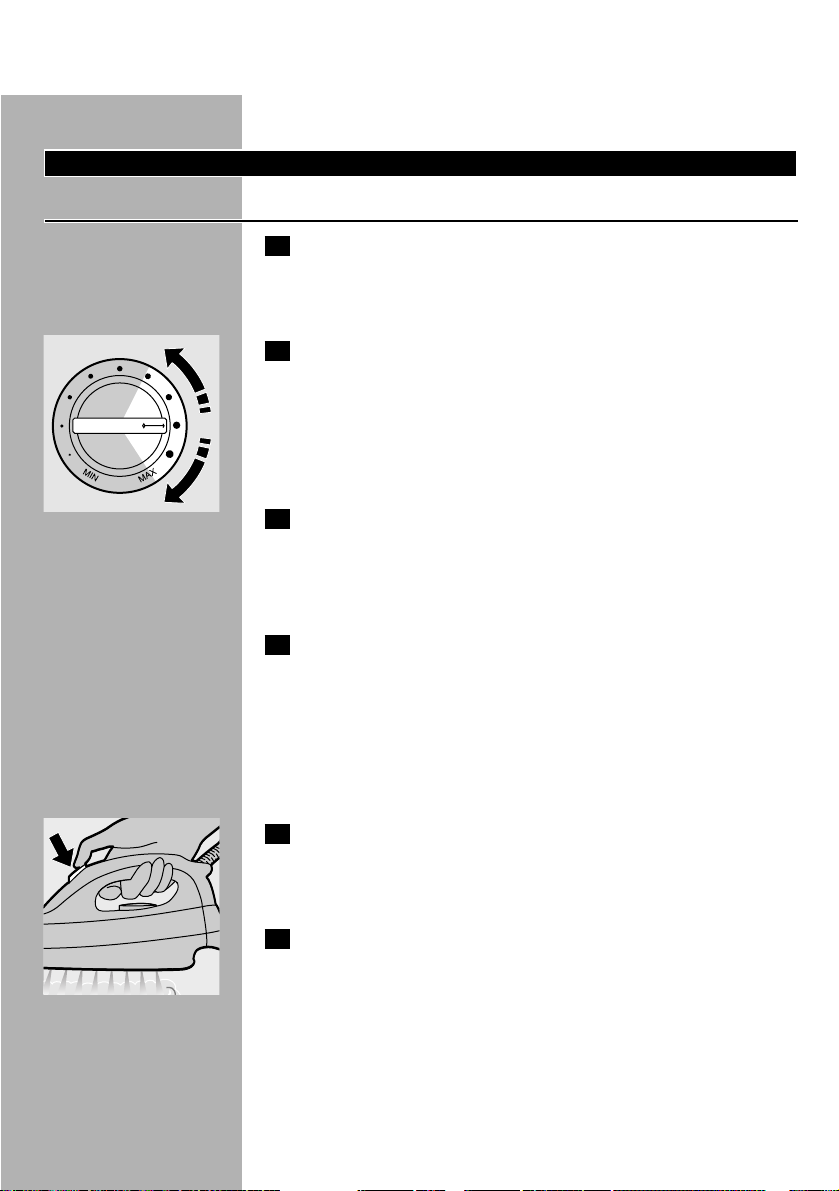
C
2 Select a steam setting suitable for the selected ironing
temperature:
- Select steam setting MIN (no steam) for temperature setting 1 (see
'Ironing without steam').
- Select a low to medium steam setting for temperature setting 2.
- Select a medium to MAX steam setting for temperature settings
3 to MAX.
3 The steam tank and the soleplate will now heat up.
- Cold start: the soleplate takes approximately 2 minutes to heat up
and the steam tank takes approximately 8 minutes to heat up.
- Quick reheat: if you refill the steam tank during the ironing process,
the water in the steam tank will take approximately 6 minutes to
heat up.
4 As soon as the water in the steam tank is hot enough for
steam ironing, the steam tank power-on light goes out
(GC6104, GC6103 only).The steam-ready light goes on
(GC6107 only).
◗ During steam ironing the steam-ready light goes on from time to
time.This indicates that the steam tank is being heated up to the
right temperature.
C
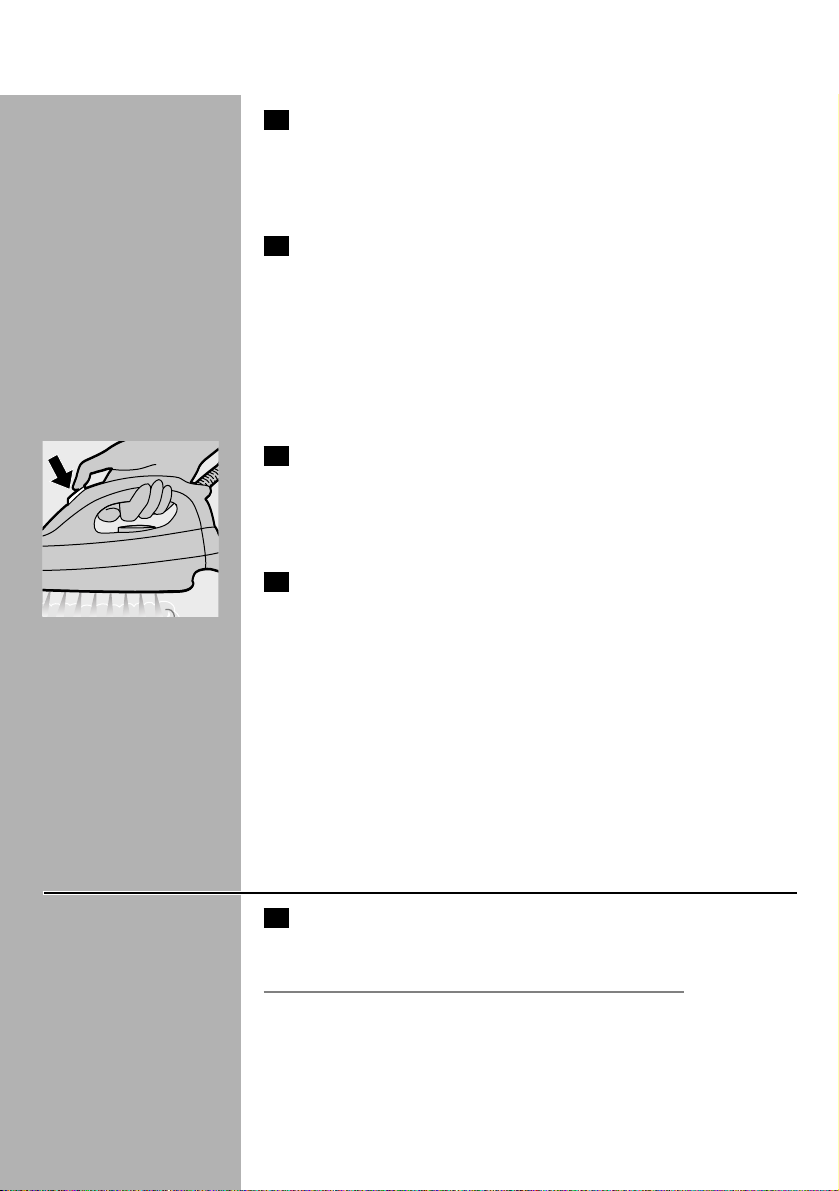
5 Keep the steam activator pressed in while you are steam
ironing.
◗ If you want to use the steam function continuously, slide the
steam activator lock to the locking position.
6 To stop steaming, release the steam activator lock.
If you have not used the steam function for some time, the steam that
was still present in the supply hose will have condensed into water.
When you start steam ironing again, this may cause some spluttering in
the appliance and a few droplets of water may escape from the
soleplate.
B
To prevent droplets from falling onto your garments, hold the iron over an
old cloth and press the steam activator until the steam production has
normalised before you start steam ironing again.
ENGLISH10
Page 11
Ironing without steam
1 Select the recommended ironing temperature (see chapter
'Preparing for use').
Do not press the steam activator while ironing.
◗ Some steam will escape if you press the steam activator by
accident while you are ironing.To avoid this, you can simply set
the steam tank switch to 'off' to cut off the steam supply
completely.
◗ If the steam tank is empty or has not heated up yet, you will hear
a clicking sound inside the tank.This phenomenon is caused by the
opening of the steam valve and is perfectly harmless.
Features
Vertical steam ironing
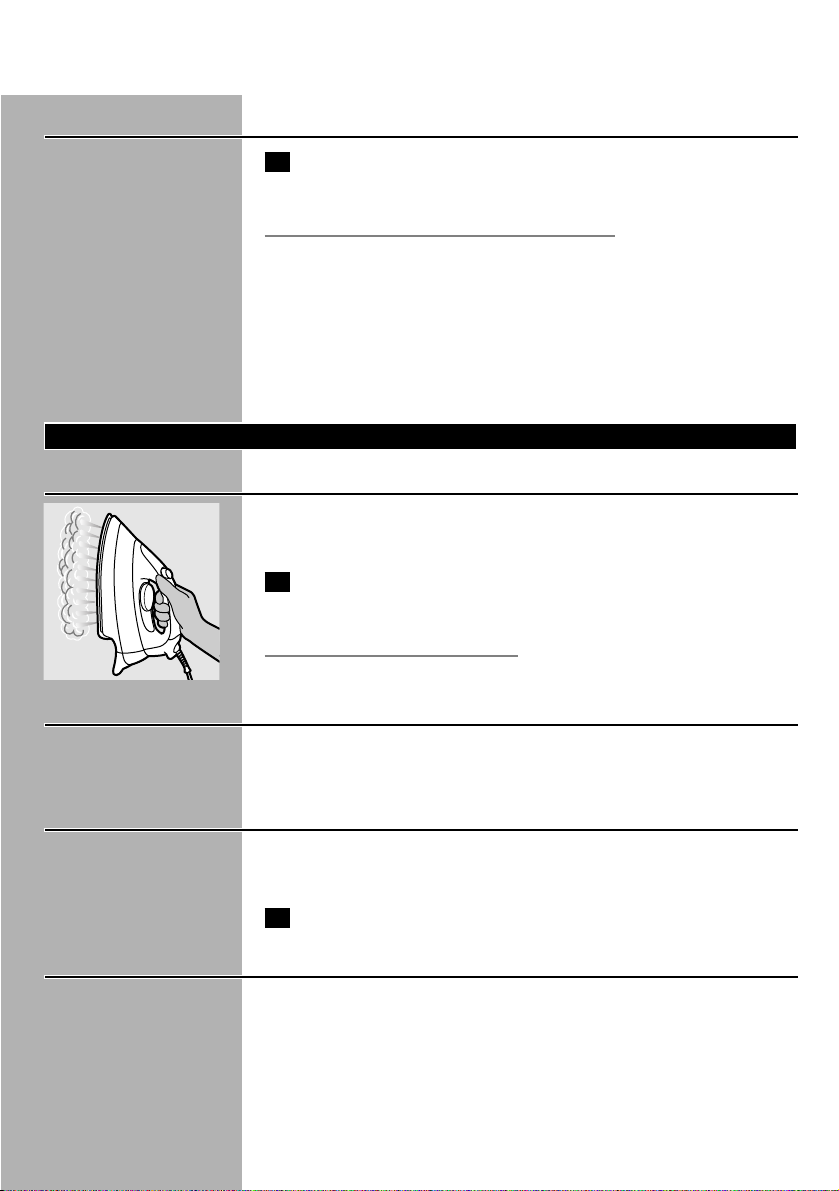
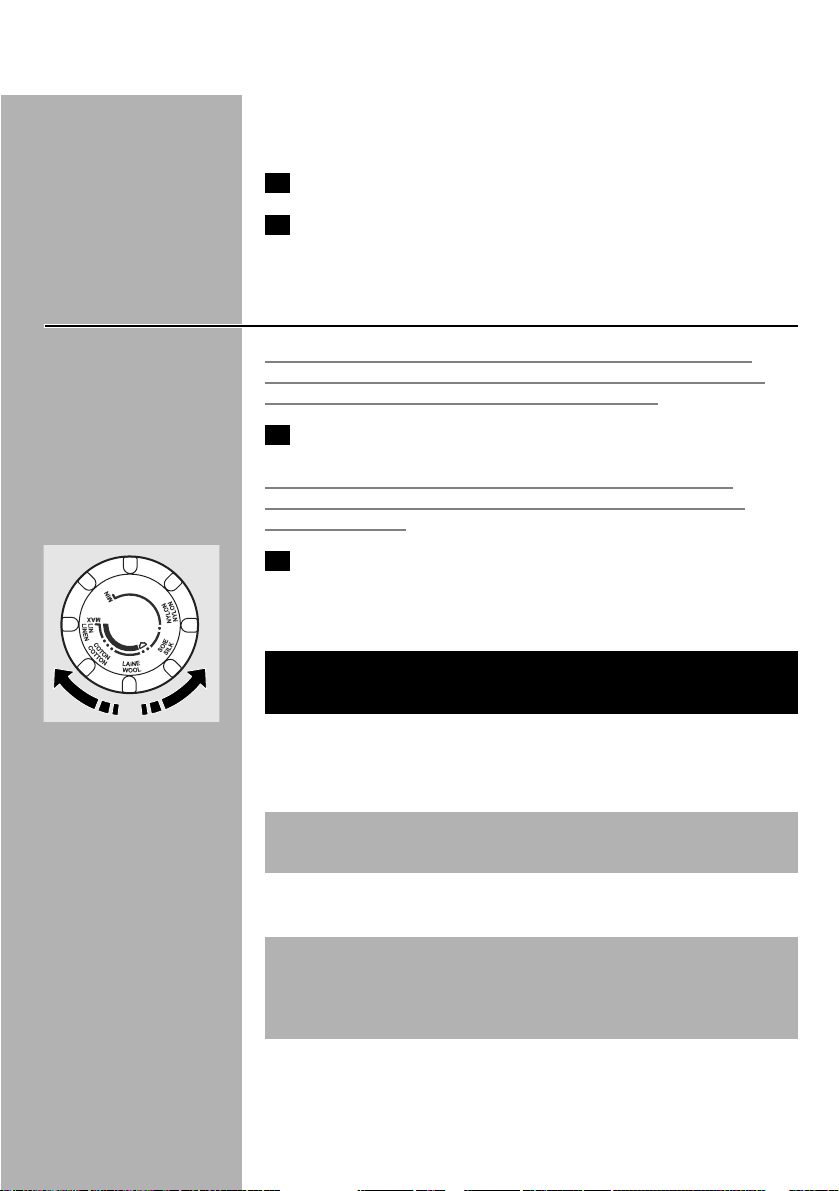
C
◗ Hanging curtains and clothes (jackets, suits, coats) can be steam
ironed by holding the iron in vertical position.
1 Press the steam activator. If you want to use the steam function
continuously, use the steam activator lock.
Never direct the steam at people.
Variable steam (GC6107 and GC6104 only)
The steam control is continuously adjustable and can be set to any
position between MIN and MAX (see chapter 'Preparing for use').
'Steam tank empty' light (GC6107 only)
When the water in the steam tank runs out during use, the 'steam tank
empty' light goes on.
1 Refill the steam tank with water (see chapter 'Preparing for use').
Steam-ready light (GC6107 only)
When the steam tank is ready for steam ironing, the steam-ready light
goes on.
ENGLISH 11
Page 12
Cleaning and maintenance
After ironing
C
1 To depressurise the steam tank, set the iron switch to 'on' and
the steam tank switch to 'off'.
C
2 Depressurise the steam tank by pressing the steam activator
until you no longer hear any steam escaping from the
appliance.
3 Remove the mains plug from the wall socket.
4 Put the iron on the iron stand, set the steam control to MIN
and let the appliance cool down before you start cleaning it.
Iron
1 Clean the iron with a damp cloth.
2 Wipe scale and any other deposits off the soleplate with a
damp cloth and a non-abrasive (liquid) cleaner.
Never immerse the iron in water nor rinse it under the tap.
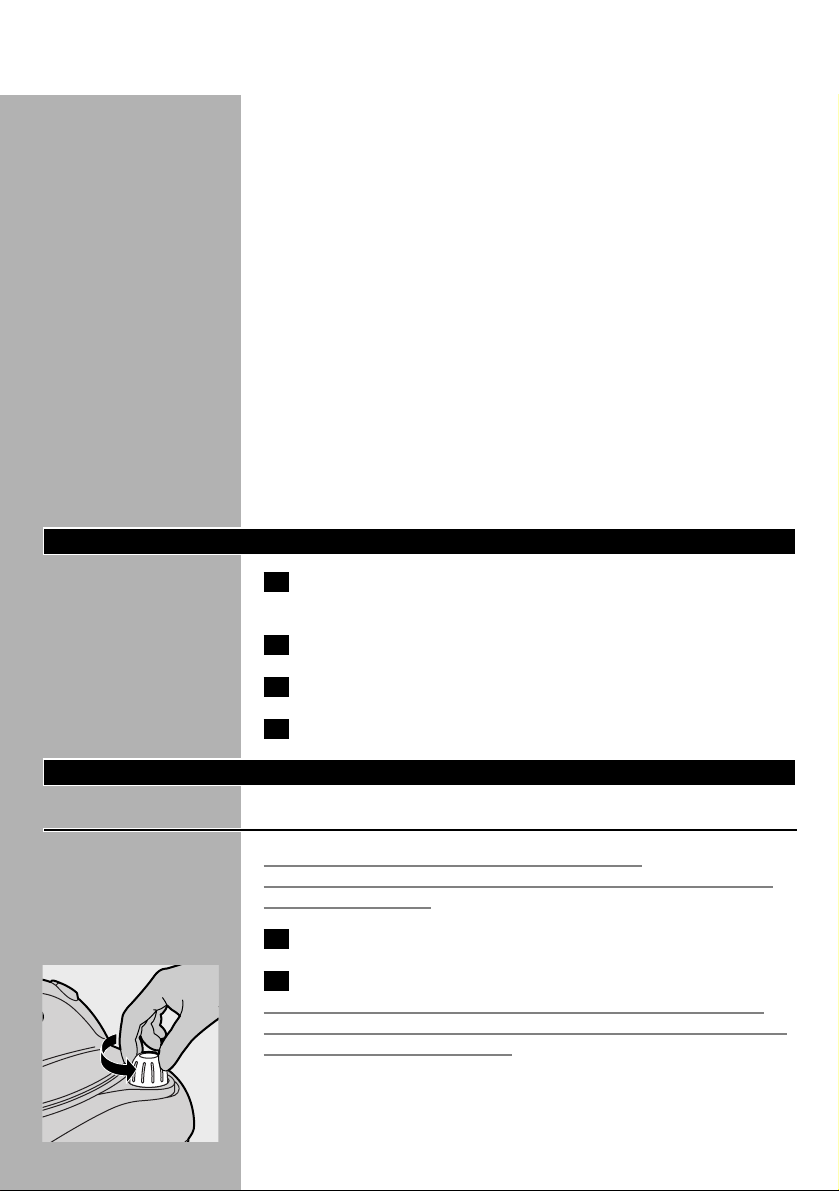
Steam tank
Rinse the steam tank once a month or after you have used the
appliance approximately 10 times.
C
1 Carefully remove the cap of the steam tank.
Let the appliance cool down sufficiently before removing the cap.
C
2 Rinse the steam tank with 500 ml of fresh water. Pour out the
water by holding the steam tank upside down over the sink.
3 Screw the cap back onto the steam tank.
ENGLISH12
Page 13
Storage
Make sure the iron has cooled down sufficiently before you put it away.
1 Remove the mains plug from the wall socket and let the iron
cool down.
2 Empty the steam tank.
3 Regularly check if the mains cord and the supply hose are still
undamaged and safe.
Environment
C
◗ Do not throw the appliance away with the normal household
waste at the end of its life, but hand it in at an official collection
point for recycling. By doing this you will help to preserve the
environment.
Guarantee & service
If you need information or if you have a problem, please visit the Philips
website at www.philips.com or contact the Philips Customer Care
Centre in your country (you will find its phone number in the
worldwide guarantee leaflet). If there is no Customer Care Centre in
your country, turn to your local Philips dealer or contact the Service
Department of Philips Domestic Appliances and Personal Care BV.
Troubleshooting
This chapter summarises the most common problems you could
encounter with your iron. Please read the different sections for more
details. If you are unable to solve the problem, please contact the
Philips Customer Care Centre in your country (you will find its phone
number in the worldwide guarantee leaflet). If there is no Customer
Care Centre in your country, turn to your local Philips dealer or the
nearest Philips service centre.
ENGLISH 13
Page 14

Solution
This phenomenon will cease after a
short while.
These particles are harmless and they
will stop coming out of the soleplate
when you have used the iron a few
times.
Select an ironing temperature that is
suitable for steam ironing
(temperature settings 2 to MAX).
Set the iron switch to 'on' and wait
until the iron is hot.
Put the steam tank on a stable and
even surface.
This is normal. Hold the iron over an
old cloth and press the steam
activator.The cloth will absorb the
drops. After a few seconds the steam
production will have normalised.
Set both the iron switch and the
steam tank switch to 'on'.
Wait 6 to 8 minutes for the steam
tank to heat up.
To check if the iron is really producing
steam, hold a (cold) mirror in front of
the soleplate vents.
Clean the soleplate with a damp cloth.
Clean the soleplate with a damp cloth.
Select the recommended ironing
temperature.
Possible cause
This is normal. Some parts of the iron
have been greased lightly in the
factory.
This is normal with a new iron.
The temperature dial has been set to
a temperature that is too low for
steam ironing.
The iron is not switched on.
The steam tank has been placed on an
unstable and/or uneven surface.
When you start steam ironing, the
hose is cold. Steam condenses in the
hose, causing droplets of water to
escape from the soleplate.
The steam tank and/or the iron
has/have not been switched on.
The steam tank is not hot enough to
produce steam.
Superheated (i.e. high-quality) steam is
hardly visible, especially when the
temperature dial has been set to
maximum position and even less so
when the ambient temperature is
relatively high.
Impurities or chemicals present in the
water have deposited on the
soleplate.
You have been ironing at too high
temperatures.
Problem
Some smoke comes out of the
appliance after it has been switched on
for the first time.
Dirt par ticles come out of the soleplate
of the new iron.
Droplets of water escape from the
soleplate.
The appliance does not produce any
steam.
There is no steam coming out of the
soleplate.
The soleplate is dirty.
ENGLISH14
Page 15
POLSKI 15
Opis urządzenia
A Wąż dopływu pary
B Lampka sygnalizacyjna temperatury
C Pokrętło temperatury i wskaźnik
D Przycisk włączania pary i jej blokada
- D1. Blokada pary
- D2. Przycisk włączania pary
E Nakrętka zbiornika pary
F Podstawa żelazka
G Zbiornik na parę
H Przewód zasilający
I Lampka sygnalizacyjna gotowości dostarczania pary (tylko dla
modelu GC6107)
J Przełącznik zbiornika pary z lampką sygnalizacyjną zasilania
K Regulator pary (tylko dla modelu GC6107/GC6104)
L Włącznik żelazka z lampką sygnalizacyjną zasilania
M Lampka sygnalizacyjna pustego zbiornika pary (tylko dla modelu
GC6107)
N Płyta prasująca
Ważne
Przed pierwszym użyciem urządzenia zapoznaj się dokładnie z
instrukcją jego obsługi i zachowaj ją na przyszłość, do ewentualnej
konsultacji.
◗ Przed podłączeniem urządzenia upewnij się, czy napięcie podane
na tabliczce znamionowej jest zgodne z napięciem w sieci
elektrycznej.
◗ Podłączaj urządzenie wyłącznie do gniazdka z uziemieniem.
◗ Nie używaj żelazka, jeśli wtyczka, przewód zasilający, wąż
elastyczny urządzenia lub samo urządzenie ma widoczne znaki
uszkodzenia, albo jeśli urządzenie zostało upuszczone lub
przecieka.
◗ Regularnie kontroluj przewód zasilający i wąż elastyczny w celu
upewnienia się, że nie mają żadnych uszkodzeń.
◗ Jeśli przewód zasilający lub wąż elastyczny urządzenia ulegnie
uszkodzeniu, musi zostać wymieniony w autoryzowanym punkcie
serwisowym firmy Philips lub przez osobę o odpowiednich
kwalifikacjach, co pozwoli uniknąć ewentualnego
niebezpieczeństwa.
◗ Nie pozostawiaj urządzenia bez uwagi, gdy jest ono podłączone do
sieci.
◗ Nigdy nie zanurzaj w wodzie żelazka ani zbiornika parowego.
◗ Przechowuj urządzenie w miejscu niedostępnym dla małych dzieci.
◗ Żelazko oraz zbiornik na parę zawsze umieszczaj i używaj ich na
stabilnej, równej i poziomej powierzchni. Nie kładź zbiornika na
parę na miękkiej części deski do prasowania.
Page 16
POLSKI16
◗ Nie pozwól, aby przewód i wąż elastyczny stykały się z rozgrzaną
stopą żelazka.
◗ Podstawa oraz stopa żelazka mogą się bardzo nagrzewać, a przy
dotknięciu mogą powodować oparzenia.Jeśli chcesz przesunąć
zbiornik parowy, nie dotykaj podstawy żelazka.
◗ Po skończeniu prasowania,podczas czyszczenia żelazka, podczas
napełniania lub opróżniania zbiornika na wodę, a także gdy
zostawiasz żelazko choćby na krótką chwilę: ustaw regulator pary
na pozycję O,ustaw żelazko w pozycji pionowej i wyjmij wtyczkę
z gniazdka ściennego.
◗ Do zbiornika na wodę nie wlewaj perfum, octu, krochmalu,
środków odwapniających, środków ułatwiających prasowanie ani
żadnych innych środków chemicznych.
◗ Jeśli podczas rozgrzewania się urządzenia spod nakretki na
zbiorniku pary ulatnia się para, należy wyłączyć urządzenie i
skontaktować się z autoryzowanym centrum serwisowym firmy
Philips. Jeśli podczas rozgrzewania się urządzenia ze zbiornika na
parę w dalszym ciągu ulatnia się para, należy wyłączyć urządzenie i
skontaktować się z autoryzowanym centrum serwisowym firmy
Philips.
◗ Gdy zbiornik pary jest pod ciśnieniem, nie zdejmuj z niego
nakrętki. Postępuj zgodnie ze wskazówkami zamieszczonymi w
dalszej części niniejszej instrukcji.
◗ Do zamykania zbiornika parowego używaj wyłącznie nakrętki
dostarczonej wraz z urządzeniem, ponieważ pełni ona także rolę
zaworu bezpieczeństwa.
◗ Urządzenie to przeznaczone jest wyłącznie do użytku domowego.
Przed pierwszym użyciem
1 Usuń wszelkie naklejki lub folię ochronną ze stopy żelazka i
przeczyść ją miękką ściereczką.
2 Rozwiń całkowicie przewód zasilający oraz wąż dopływu pary.
3 Ustaw zbiornik pary na stabilnej, równej powierzchni.
4 Stawiaj żelazko na specjalnej podpórce.
Przygotowanie do użycia
Napełnianie zbiornika parowego
Nigdy nie zanurzaj zbiornika parowego w wodzie.
Nie odkręcaj nakrętki na zbiorniku pary, gdy żelazko i zbiornik pary są
wciąż rozgrzane.
Page 17
POLSKI 17
1 Wyjmij wtyczkę z gniazdka ściennego.
C
2 Powoli odkręć nakrętkę ze zbiornika pary.
Podczas zdejmowania nakrętki możesz usłyszeć charakterystyczny
odgłos. Dźwięk ten wywołany jest przez podciśnienie w zbiorniku pary i
jest zjawiskiem normalnym.
C
3 Wlej wodę do zbiornika (maksymalnie 1 litr).
Wypełnij zbiornik wodą z kranu.
◗ Jeśli w Twojej okolicy woda z kranu jest bardzo twarda, radzimy
używać mieszaniny 50% wody z kranu i 50% wody destylowanej
(przeznaczonej do żelazek).
Do zbiornika pary nie wlewaj perfum, octu, krochmalu,środków
odwapniających, ułatwiających prasowanie, ani żadnych innych środków
chemicznych.
4 Dokręć szczelnie nakrętkę na otworze służącym do napełniania
zbiornika pary.
Szybkie napełnianie
C
1 Podłącz urządzenie do sieci i sprawdź,czy żelazko jest
włączone. Następnie ustaw przełącznik zbiornika pary na "off".
C
2 Wciskaj przycisk włączania pary tak długo, aż przestanie być
słyszalny odgłos pary wydobywającej się z urządzenia.
3 Utrzymując wciśnięty przycisk włączania pary,powoli odkręć
nakrętkę zbiornika pary,obracając nią w kierunku przeciwnym
do ruchu wskazówek zegara. Spowoduje to
rozhermetyzowanie zbiornika pary.
Sprawdź, czy w zbiorniku nie pozostała para. Odkręcaj nakrętkę zawsze
przykrytą szmatką.
4 Wyjmij wtyczkę z gniazdka ściennego.
5 Napełnij zbiornik zgodnie z opisem w rozdziale "Napełnianie
zbiornika" i odczekaj aż urządzenie nagrzeje się ponownie.
Page 18
POLSKI18
Ustawianie temperatury
Zbiornik parowy zawsze stawiaj na stabilnej, równej, poziomej
powierzchni. Nie należy ustawiać go na miękkiej części deski do
prasowania.
1 Stawiaj żelazko na specjalnej podpórce.
Uważaj, żeby nie postawić rozgrzanego żelazka na wężu dopływu pary
ani na przewodzie zasilającym. Upewnij się, że przewód zasilający nie
styka się z rozgrzaną płytą żelazka.
C
2 Ustaw żądaną temperaturę prasowania,obracając pokrętłem
regulatora temperatury do odpowiedniego położenia.
Sprawdź zaznaczoną na wszywce wymaganą temperaturę prasowania:
Jeśli nie wiesz, z jakiego rodzaju materiału wykonana jest prasowana
rzecz, znajdź właściwą temperaturę prasowania,prasując taką jej część,
która będzie niewidoczna podczas noszenia czy używania.
Jedwab, wełna i tkaniny syntetyczne prasuj po lewej stronie, aby ich nie
wyświecić.
Zacznij prasowanie od rzeczy wymagających najniższej temperatury, np.
uszytych z włókien syntetycznych.
C
3 Wetknij wtyczkę do uziemionego gniazdka ściennego i ustaw
oba przełączniki zbiornika pary i żelazka w położeniu "on".
Zbiornik pary oraz płyta żelazka zaczną się rozgrzewać.
Ustawienie pary
MIN (patrz:
"Prasowanie bez
pary")
Od położenia
najniższego do
średniego
Od położenia
średniego aż do
maksimum (MAX)
Ustawienie
temperatury
1
2
3
Rodzaj tkaniny
Tkaniny syntetyczne (np.
z włókien octanowych,
akrylowych, wiskozy,
poliamidu, poliestru) i
jedwab
Wełna
Bawełna, len
Zauważ, proszę,że
znajdujący się na
wszywce symbol Z
oznacza, iż tego artykułu
nie można prasować.
Symbol na wszywce
informacyjnej
prasowanej rzeczy.
B
C
D
Z
Page 19
POLSKI 19
◗ Lampka sygnalizacyjna temperatury gaśnie z chwilą
odpowiedniego rozgrzania się żelazka.
◗ Podczas prasowania parowego lampka sygnalizacyjna temperatury
będzie od czasu do czasu zapalała się. Oznacza to podgrzewanie
się żelazka do wybranej temperatury.
◗ Jeśli podczas pierwszej fazy prasowania żelazko było ustawione na
wysoką temperaturę, a następnie zmieniono ustawienie
temperatury,na niższą, wówczas prasowanie można wznowić z
chwilą ponownego zaświecenia się sygnalizacyjnej lampki
temperatury.Zapobiegnie to ewentualnemu uszkodzeniu
prasowanej tkaniny.
Porady
- Jeśli materiał składa się z różnych rodzajów włókien, zawsze ustawiaj
temperaturę dostosowaną do najbardziej delikatnego składnika, to
znaczy najniższą temperaturę. Dla przykładu: jeśli materiał składa się z
60% poliestru i 40% bawełny, należy go prasować zgodnie z
zalecaniami dla poliestru (1) i bez pary.
- Podczas prasowania parowego wełny, mogą pojawić się wyświecenia.
Aby temu zapobiec, prasuj ubranie przez suchą szmatkę lub po lewej
stronie.
- Aksamit i inne materiały podatne na wyświecenia należy prasować,
przesuwając żelazko tylko w jednym kierunku (zgodnie z włosem),
bardzo lekko naciskając.
- Nie używaj funkcji prasowania parowego do farbowanego jedwabiu.
Mogą pojawić się plamy.
Korzystanie z urządzenia
Prasowanie parowe
1 Upewnij się, czy w zbiorniku jest wystarczająca ilość wody.
◗ Prasowanie parowe możliwe jest wyłącznie przy wyższych
temperaturach prasowania (ustawienia temperatury: od 2 do
wartości MAX).
C
2 Wybierz ustawienie pary odpowiednio do wybranej
temperatury prasowania.
- Wybierz ustawienie MIN (brak pary) dla ustawienia temperatury 1
(patrz: "Prasowanie bez użycia pary" ).
- Wybierz ustawienie od niskiego do średniego dla ustawienia
temperatury 2.
- Wybierz ustawienie od średniego do MAX dla ustawień
temperatury od 3 do MAX.
Page 20
POLSKI20
3 Zbiornik pary oraz płyta żelazka zaczną się rozgrzewać.
- Zimny start: płyta żelazka rozgrzewa się w ciągu 2 minut, natomiast
zbiornik pary potrzebuje do rozgrzania się około 8 minut.
- Szybkie podgrzanie: Jeśli podczas prasowania ponownie napełnisz
zbiornik pary wodą,będzie ona podgrzewała się przez około 6 minut.
4 Kiedy woda znajdująca się w pojemniku jest wystarczająco
gorąca gaśnie lampka kontrolna w modelach GC6104 i
GC6103.W modelu GC6107 zapala się lampka kontrolna
gotowości wytwarzania pary
◗ Podczas prasowania parowego lampka sygnalizacyjna gotowości
do prasowania parowego będzie od czasu do czasu zapalała się.
Oznacza to, że następuje podgrzewanie się wody w zbiorniku pary
do odpowiedniej temperatury.
C
5 Podczas prasowania parowego utrzymuj wciśnięty przycisk
włączania pary.
◗ Jeśli funkcję pary chcesz wykorzystywać w sposób ciągły, zablokuj
przycisk włączania pary.
6 Aby spowodować zaprzestanie dostarczania pary,zwolnij
blokadę przycisku włączania pary.
Jeśli przez pewien czas nie jest używana funkcja pary, wówczas para
znajdująca się w wężu dopływu skrapla się. Przy ponownym
zastosowaniu prasowania parowego skroplona para może
rozpryskiwać się w urządzeniu i z płyty żelazka mogą skapywać krople
wody.
B
Aby nie dopuścić do skapywania kropel wody na prasowaną tkaninę,
przytrzymaj żelazko nad kawałkiem starej tkaniny i wciśnij przycisk
włączania pary na tak długo, aż emisja par y unormuje się, i dopiero
wtedy rozpocznij właściwe prasowanie.
Prasowanie bez pary
1 Wybierz zalecaną temperaturę prasowania (patrz:rozdział
"Przygotowanie do użycia").
Podczas prasowania nie wciskaj przycisku włączania pary.
◗ Jeśli podczas prasowania wciśniesz przycisk włączania pary, pewna
ilość pary ulotni się ze zbiornika.Aby do tego nie dopuścić,
możesz ustawić przełącznik zbiornika pary w położeniu "off", aby
całkowicie odciąć dopływ pary.
Page 21
POLSKI 21
◗ Jeśli zbiornik pary jest pusty lub jeszcze nie rozgrzał się, usłyszysz
kliknięcie wewnątrz zbiornika. Zjawisko to spowodowane jest
przez otwarcie zaworu pary i jest zupełnie nieszkodliwe.
Cechy
Pionowe prasowanie parowe
C
◗ Wiszące zasłony i ubrania (kurtki, garnitury, płaszcze) można
prasować, trzymając żelazko pionowo.
1 Wciśnij przycisk włączania pary.Jeśli chcesz korzystać z funkcji
pary w sposób ciągły,użyj blokady przycisku włączania pary.
Nigdy nie kieruj pary w stronę ludzi.
Zmienna ilość pary (tylko dla typów GC6107 i GC6104)
Regulacja pary odbywa się w sposób ciągły i można ją ustawić w
dowolnym położeniu pomiędzy MIN a MAX (patrz: rozdział
"Przygotowanie do użycia").
Lampka sygnalizacyjna pustego zbiornika pary (tylko dla
modelu GC6107)
Gdy woda w zbiorniku pary wyczerpie się podczas prasowania,
zaświeci się lampka sygnalizacyjna pustego zbiornika pary.
1 Napełnij wówczas zbiornik wodą (patrz rozdział:
"Przygotowanie do użycia").
Lampka sygnalizacyjna gotowości dostarczania pary (tylko dla
modelu GC6107)
Gdy zbiornik pary jest gotowy do prasowania parowego, zapali się
lampka sygnalizacyjna gotowości do prasowania parowego.
Mycie i konserwacja
Po zakończeniu prasowania
C
1 Aby rozhermetyzować zbiornik pary, ustaw przełącznik żelazka
w położeniu "on", zaś zbiornika pary w położeniu "off".
Page 22
POLSKI22
C
2 Rozhermetyzuj zbiornik pary,wciskając przycisk włączania pary
na tak długo,aż przestanie być słyszalny odgłos pary
wydobywającej się z urządzenia.
3 Wyjmij wtyczkę z gniazdka ściennego.
4 Umieść żelazko na jego podstawce, ustaw regulator pary w
pozycji MIN i zanim przystąpisz do jego czyszczenia, poczekaj,
aż się oziębi.
Żelazko
1 Przetrzyj żelazko wilgotną ściereczką.
2 Zetrzyj osady lub inne zanieczyszczenia ze stopy żelazka
wilgotną ściereczką z użyciem nieszorującego,płynnego środka
myjącego.
Nigdy nie zanurzaj żelazka w wodzie ani nie płucz go pod kranem.
Zbiornik parowy.
Płucz zbiornik pary raz na miesiąc lub po 10-krotnym użyciu żelazka.
C
1 Powoli zdejmuj nakrętkę ze zbiornika pary.
Przed zdjęciem nakretki musisz odczekać, aż wystarczająco ostygnie.
C
2 Opłucz starannie zbiornik pary,używając około 500 ml świeżej
wody.Wylej wodę do zlewu, odwracając zbiornik pary dnem
do góry.
3 Zakręć ponownie zakrętkę.
Przechowywanie
Przed odstawieniem żelazka odczekaj, aż ostygnie.
1 Wyjmij wtyczkę z gniazdka ściennego i odczekaj,aż żelazko
ostygnie.
Page 23
POLSKI 23
2 Opróżnij zbiornik pary.
3 Sprawdzaj regularnie, czy przewód sieciowy lub wąż
doprowadzający parę nie są uszkodzone.
Ochrona środowiska
C
◗ Nie wyrzucaj zużytego urządzenia wraz ze zwykłymi
odpadkami/śmieciami. Zanieś je do specjalnego punktu
zbierającego odpadki do utylizacji w celu ich utylizacji.W ten
sposób pomożesz chronić środowisko naturalne.
Gwarancja i serwis
Jeśli chcesz skorzystać z serwisu lub potrzebujesz informacji, bądź jeśli
masz jakiś problem, odwiedź naszą stronę w Internecie: www.philips.pl
lub skontaktuj się z Działem Obsługi Klienta firmy Philips (numer
telefonu znajdziesz w ulotce gwarancyjnej).
Rozwiązywanie problemów
W niniejszym rozdziale opisane są problemy, na które użytkownik
żelazka może natrafić najczęściej. Przeczytaj, proszę, uważnie
poszczególne punkty tego rozdziału. Jeśli nie udaje Ci się samodzielnie
rozwiązać problemu, skontaktuj się z Działem Obsługi Klienta (numer
telefonu znajdziesz w Karcie Gwarancyjnej). Jeśli w Twoim kraju nie ma
Działu Obsługi Klienta firmy Philips, zwróć się do sklepu lub punktu
serwisowego działu AGD firmy Philips.
Page 24

POLSKI24
Rozwiązanie problemu
Po krótkiej chwili zjawisko to zaniknie
samoistnie.
Cząstki te są nieszkodliwe i po
kilkakrotnym użyciu żelazka przestaną
wydobywać się z jego płyty.
Wybierz temperaturę prasowania
odpowiednią dla prasowania
parowego (ustawienia temperatury
pomiędzy 2 a MAX).
Ustaw przełącznik żelazka w pozycji
"on" i odczekaj, aż żelazko rozgrzeje
się.
Ustaw zbiornik na stabilnej i równej
powierzchni.
Jest to zjawisko normalne.Trzymając
żelazko nad jakąś szmatką, wciśnij
przycisk włączania pary. Na szmatkę
ściekną zbędne krople wody. Po kilku
sekundach emisja pary unormuje się.
Ustaw oba przełączniki żelazka i
zbiornika pary w położeniu "on".
Odczekaj od 6 do 8 minut, aż zbiornik
pary rozgrzeje się.
Aby sprawdzić, czy żelazko
rzeczywiście wytwarza parę, przyłóż
(zimne) lusterko do otworów stopy
prasującej.
Stopę żelazka należy czyścić miękką,
wilgotną ściereczką.
Stopę żelazka należy czyścić miękką,
wilgotną ściereczką.Wybierz zalecaną
temperaturę prasowania.
Ewentualna przyczyna
Jest to normalne zjawisko. Niektóre
części urządzenia zostały w fabryce
lekko naoliwione.
W przypadku nowego żelazka jest to
zjawisko normalne.
Pokrętło temperatury zostało
ustawione na temperaturze zbyt
niskiej dla prasowania parowego.
Żelazko nie jest włączone.
Zbiornik został ustawiony na
niestabilnej lub nierównej powierzchni
Gdy rozpoczynasz prasowanie, wąż
doprowadzający parę jest zimny. Para
skrapla się w wężu, powodując
kapanie wody ze stopy żelazka.
Nie zostały włączone zbiornik pary
i/lub żelazko.
Zbiornik pary nie jest wystarczająco
rozgrzany do wytwarzania pary.
Bardzo mocno nagrzana para
(wysokiej jakości) jest ledwie
widoczna, zwłaszcza gdy termostat
został ustawiony na maksymalną
temperaturę lub gdy temperatura
otoczenia jest wysoka.
Zanieczyszczenia obecne w wodzie
pozostawiły osad na stopie.
Prasowałaś/eś w za wysokiej
temperaturze.
Problem
Z nowego urządzenia, po pierwszym
włączeniu, wydobywa się niewielka ilość
dymu.
Z płyty nowego żelazka spadają cząstki
brudu.
Krople wody ściekają ze stopy żelazka.
Urządzenie nie wytwarza w ogóle pary.
Para nie wydobywa się ze stopy żelazka.
Stopa żelazka jest brudna.
Page 25

25
Descriere generală
A Furtun
B Led de temperatură
C Termostat şi indicator
D Activator abur şi piedică
- D1. Piedică
- D2.Activator
E Buşon al rezervorului de abur
F Suport fier
G Rezervor de abur
H Cablu de alimentare
I Led abur gata de utilizare (numai GC6107)
J Buton rezervor de abur cu led de alimentare
K Buton de reglare a aburului (doar GC6107/GC6104)
L Buton fier cu led de alimentare
M Led "rezervor de abur gol" (numai GC6107)
N Talpă
Important
Citiţi aceste instrucţiuni de utilizare cu atenţie înainte de a utiliza
aparatul şi păstraţi-le pentru consultări ulterioare.
◗ Verificaţi dacă tensiunea indicată pe plăcuţa de înregistrare
corespunde tensiunii locale înainte de a conecta aparatul.
◗ Conectaţi aparatul doar la o priză cu legătură la pământ.
◗ Nu folosiţi aparatul dacă ştecherul, cablul electric, furtunul de
alimentare sau aparatul prezintă deteriorări vizibile, dacă aţi scăpat
aparatul pe jos sau dacă acesta prezintă scurgeri.
◗ Verificaţi cu regularitate furtunul de alimentare şi cablul electric,
pentru a vă asigura că nu prezintă deteriorări.
◗ În cazul în care cablul electric sau furtunul de alimentare este
deteriorat, trebuie înlocuit de Philips, de un centru de service
autorizat Philips sau de personal calificat în domeniu pentru a
evita orice accident.
◗ Aparatul nu trebuie lăsat nesupravegheat în timp ce este conectat
la priză.
◗ Nu introduceţi niciodată fierul sau rezervorul în apă.
◗ Nu lăsaţi aparatul la îndemâna copiilor.
◗ Aşezaţi şi folosiţi întotdeauna fierul şi rezervorul de abur pe o
suprafaţă orizontală, plană şi stabilă. Nu aşezaţi niciodată fierul de
călcat pe partea moale a planşei de călcat.
◗ Nu atingeţi cablul electric sau furtunul de alimentare de talpa
fierului când aceasta este încinsă.
◗ Suportul fierului şi talpa se pot încinge foarte tare şi pot provoca
arsuri dacă le atingeţi. Dacă doriţi să mutaţi rezervorul cu abur, nu
atingeţi suportul pentru fier.
ROMÂNĂ
Page 26
26
◗ După ce aţi terminat de călcat, când curăţaţi aparatul, în timp ce
umpleţi sau goliţi rezervorul de apă sau chiar când faceţi o scurtă
pauză: poziţionaţi butonul pentru reglarea jetului de abur pe
poziţia O,puneţi fierul în poziţie verticală şi scoateţi aparatul din
priză.
◗ Nu turnaţi parfum, oţet, amidon,agenţi de îndepărtare a calcarului,
produse de călcare sau alte substanţe chimice în generatorul de
abur.
◗ Dacă scapă abur pe lângă buşonul rezervorului de abur în timpul
încălzirii aparatului, opriţi aparatul şi strângeţi bine buşonul. Dacă
aburul continuă să iasă când aparatul se încălzeşte, opriţi fierul de
călcat şi contactaţi un centru service autorizat de Philips.
◗ Nu scoateţi capacul rezervorului de abur dacă acesta este încă
sub presiune. Urmaţi instrucţiunile descrise în continuare în acest
manual.
◗ Nu folosiţi un alt buşon pentru închiderea rezervorului decât cel
furnizat cu aparatul, întrucât acesta funcţionează şi ca supapă de
siguranţă.
◗ Acest aparat este destinat exclusiv uzului casnic.
Înainte de prima utilizare
1 Îndepărtaţi orice autocolant sau folie protectoare de pe talpă şi
curăţaţi-o cu o cârpă moale.
2 Desfaceţi complet cablul de alimentare şi furtunul.
3 Poziţionaţi rezervorul de abur pe o suprafaţă stabilă, regulată.
4 Aşezaţi fierul de călcat pe suport.
Pregătire pentru utilizare
Umplerea rezervorului
Nu introduceţi niciodată rezervorul cu abur în apă.
Nu deschideţi buşonul atâta timp cât fierul de călcat şi rezervorul de
abur sunt încă fierbinţi.
1 Scoateţi ştecherul din priză.
C
2 Deşurubaţi încet buşonul rezervorului de abur.
Este posibil să auziţi un zgomot când deşurubaţi buşonul. Zgomotul
este provocat de vacuum sau de presiunea acumulată în rezervorul de
abur. Acest fenomen este normal.
ROMÂNĂ
Page 27
27
C
3 Turnaţi apă în rezervor (max. 1 litru).
Umpleţi rezervorul cu apă de la robinet.
◗ Dacă apa de la robinet din zona în care locuiţi este foarte dură,vă
sfătuim să folosiţi 50% apă distilată şi 50% apă de la robinet.
Nu turnaţi parfum, oţet, amidon, agenţi de îndepăr tare a calcarului
produse de călcare sau alte substanţe chimice în rezervorul de abur.
4 Închideţi rezervorul de abur strângând bine buşonul.
Umplere rapidă
C
1 Conectaţi aparatul la priză şi asiguraţi-vă că fierul este pornit.
Apoi reglaţi butonul rezervorului de abur pe poziţie "oprit".
C
2 Apăsaţi activatorul de abur până eliminaţi tot aburul din aparat.
3 Ţineţi activatorul de abur apăsat şi deşurubaţi încet buşonul
rezervorului de abur învârtindu-l în sens contrar acelor de
ceasornic.Astfel depresurizaţi rezervorul.
Asiguraţi-vă că nu a rămas deloc abur în rezervor. Folosiţi o cârpă când
desfaceţi buşonul.
4 Scoateţi ştecherul din priză.
5 Umpleţi rezervorul de abur cum este descris în capitolul
"Umplerea rezervorului" şi lăsaţi aparatul să se încălzească din
nou.
Reglarea temperaturii
Poziţionaţi întotdeauna rezervorul cu abur pe o suprafaţă stabil
regulată şi orizontală. Nu puneţi rezervorul pe suprafaţa moale a
planşei de călcat.
1 Aşezaţi fierul de călcat pe suport.
Nu aşezaţi fierul încins pe furtun sau pe cablul de alimentare.Aveţi grij
ca furtunul şi cablul de alimentare să nu vină în contact cu talpa încins
a aparatului.
C
2 Selectaţi temperatura de călcare adecvată reglând termostatul
pe poziţia potrivită.
ROMÂNĂ
Page 28
28
Dacă nu cunoaşteţi tipul de material al articolului, încercaţi să călcaţi o
porţiune de material ce nu se vede când purtaţi articolul respectiv,
pentru a determina temperatura corectă de călcare.
Ţesături sintetice, de mătase şi de lână: călcaţi ţesătura pe dos pentru a
nu lăsa pete strălucitoare.
Începeţi să călcaţi materialele care necesită temperatura cea mai
coborâtă, cum sunt cele din fibre sintetice.
C
3 Introduceţi ştecherul într-o priză împământată şi poziţionaţi
atât butonul rezervorului de abur cât şi butonul de pornire a
fierului de călcat pe poziţia "pornit". Rezervorul de abur şi talpa
aparatului încep să se încălzească.
◗ Fierul de călcat este suficient de încins când ledul de temperatură
se stinge.
◗ În timpul călcării cu abur ledul de temperatură se aprinde din când
în când.Aceasta arată că fierul se încălzeşte la temperatura
corectă.
◗ Dacă aţi călcat la o temperatură ridicată şi ulterior selectaţi o
temperatură mai scăzută, aşteptaţi până se aprinde ledul de
temperatură înainte de a vă apuca din nou de călcat.Astfel veţi
evita deteriorarea ţesăturilor.
Sugestii
- Dacă ţesătura este făcută din fibre diferite, selectaţi întotdeauna
temperatura indicată pentru fibra cea mai delicată, adică temperatura
cea mai mică. De ex., dacă un articol este confecţionat din poliester
60% şi din bumbac 40%, acesta trebuie călcat la temperatura indicată
pentru poliester (1) şi fără abur.
- Când călcaţi cu abur ţesături de lână, pot apărea pete pe material.
Pentru a evita apariţia petelor folosiţi o cârpă uscată pe care o
aşezaţi peste articol sau călcaţi pe dos.
- Catifeaua sau alte ţesături care au tendinţa de a forma pete
strălucitoare trebuie călcate într-o singură direcţie apăsând foarte uşor.
ROMÂNĂ
Reglaj de abur
MIN (a se vedea
"Călcarea fără abur")
De la inferior la mediu
De la mediu la MAX
Selectarea
temperaturii
1
2
3
Tipul ţesăturii
Ţesături sintetice (de
ex. acetat de celuloză,
fibre acrilice, vâscoză,
poliamide, poliester) şi
mătase
Lână
Bumbac, in
Vă atragem atenţia că
Z de pe etichete
înseamnă că articolul
nu poate fi călcat.
Simbol de pe
eticheta articolului
B
C
D
Z
Page 29
29
- Nu folosiţi abur când călcaţi mătase colorată. S-ar putea păta.
Utilizarea aparatului
Călcarea cu abur
1 Aveţi grijă să fie suficientă apă în rezervor.
◗ Călcarea cu abur este posibilă doar la temperaturi mari
(temperaturi cuprinse între 2 şi MAX).
C
2 Reglaţi aburul în funcţie de temperatura de călcare selectată:
- Reglaţi butonul de abur pe MIN (fără abur) pentru o temperatură de
călcare de 1 (a se vedea "Călcarea fără abur").
- Reglaţi butonul de abur între scăzut şi mediu pentru o temperatură
de călcare de 2.
- Reglaţi butonul de abur între mediu şi MAX pentru temperaturi de
călcare cuprinse între 3 to MAX.
3 Rezervorul de abur şi talpa fierului încep să se încălzească.
- Start rece:talpa fierului se încălzeşte în aproximativ 2 minute, iar
rezervorul de abur în aproximativ 8 minute.
- Reîncălzire rapidă: dacă umpleţi rezervorul în timp ce călcaţi, apa din
rezervor se va încălzi în aproximativ 6 minute.
4 Când apa din generatorul de abur e suficient de caldă pentru
călcarea cu abur, ledul de alimentare se stinge (doar GC6104,
GC6103). Ledul abur gata de utilizare se prinde (doar
GC6107).
◗ În timpul călcării cu abur, ledul abur gata de utilizare se aprinde din
când în când pentru a indica faptul că rezervorul de abur se
încălzeşte până la temperatura corectă.
C
5 În timpul călcării cu abur apăsaţi activatorul de abur.
◗ Dacă vreţi să călcaţi cu abur mai mult timp,culisaţi activatorul de
abur pe poziţia de blocare.
6 Dacă nu mai vreţi să călcaţi cu abur, deblocaţi piedica.
Aburul din interiorul furtunului se condensează dacă nu călcaţi câtva
timp cu abur. Când începeţi să călcaţi din nou cu abur, furtunul este
rece şi, prin urmare, este posibil să se scurgă câteva picături de apă din
talpa fierului de călcat.
B
Pentru a evita stropirea articolelor, puneţi fierul pe o cârpă înainte de a
începe să călcaţi din nou cu abur şi apăsaţi activatorul de abur până
când aparatul degajă din nou abur în mod normal.
ROMÂNĂ
Page 30

30
Călcarea fără abur
1 Selectaţi temperatura de călcare recomandată (a se vedea cap.
"Pregătire pentru utilizare").
Nu apăsaţi activatorul de abur în timp ce călcaţi.
◗ Dacă apăsaţi din greşeală activatorul de abur în timpul călcării,
fierul va degaja abur. Pentru a evita acest lucru, reglaţi butonul
rezervorului de abur pe poziţia "oprit" pentru a întrerupe
complet alimentarea cu abur.
◗ Dacă rezervorul cu abur este gol sau încă nu s-a încălzit, veţi auzi
un clic în interiorul acestuia.Acest fenomen este produs de
deschiderea valvei de abur şi nu afectează aparatul.
Caracteristici
Călcare cu abur în poziţie verticală
C
◗ Draperiile şi hainele (jachete, costume, paltoane) pot fi călcate cu
abur ţinând fierul în poziţie verticală.
1 Apăsaţi activatorul de abur. Dacă vreţi să călcaţi cu abur mai
mult timp, folosiţi piedica activatorului de abur.
Nu direcţionaţi niciodată aburul înspre oameni.
Jet de abur variabil (numai GC6107 şi GC6104)
Puteţi regla presiunea aburului în orice moment. Pentru aceasta, reglaţi
butonul de control al aburului pe orice poziţie între MIN şi MAX (a se
vedea cap. "Pregătire pentru utilizare").
Led "rezervor de abur gol" (numai GC6107)
Când nu mai este apă în rezervorul de abur pe parcursul utilizării
fierului, ledul "rezervor de abur gol" se aprinde.
1 Umpleţi rezervorul de abur cu apă (a se vedea cap. "Pregătire
pentru utilizare").
Led abur gata de utilizare
Când rezervorul este încălzit la temperatura necesară pentru călcarea
cu abur, ledul abur gata de utilizare se aprinde.
ROMÂNĂ
Page 31

31
Curăţare şi întreţinere
După călcare
C
1 Pentru a depresuriza rezervorul,reglaţi butonul fierului pe
"pornit" şi butonul rezervorului cu abur pe "oprit".
C
2 Eliminaţi aburul din rezervor apăsând activatorul de abur până
goliţi tot aparatul.
3 Scoateţi ştecherul din priză.
4 Aşezaţi fierul pe suport, reglaţi butonul de reglare a aburului pe
MIN şi lăsaţi aparatul să se răcească înainte de a-l curăţa.
Fier de călcat
1 Curăţaţi fierul cu o cârpă umedă.
2 Ştergeţi calcarul şi alte depuneri de pe talpă cu o cârpă umedă
şi cu un detergent (lichid) non-abraziv.
Nu introduceţi niciodată fierul de călcat în apă şi nici nu-l clătiţi sub jet
de apă.
Rezervor de abur
Clătiţi rezervorul de abur o dată pe lună sau după aproximativ 10
utilizări.
C
1 Deşurubaţi cu grijă buşonul rezervorului de abur.
Lăsaţi aparatul să se răcească suficient înainte de a deşuruba buşonul.
C
2 Clătiţi rezervorul de abur cu 500 ml de apă rece. Goliţi
rezervorul de abur vărsând apa în chiuvetă.
3 Înşurubaţi la loc buşonul rezervorului de abur.
ROMÂNĂ
Page 32

32
Depozitare
Lăsaţi întotdeauna fierul de călcat să se răcească înainte de a-l depozita.
1 Scoateţi ştecherul din priză şi lăsaţi fierul să se răcească.
2 Goliţi rezervorul de abur.
3 Verificaţi regulat dacă furtunul şi cablul de alimentare sunt
nedeteriorate.
Mediu
C
◗ Nu aruncaţi aparatul în gunoiul menajer la sfârşitul duratei de
funcţionare, ci duceţi-l la un punct de colectare autorizat pentru
reciclare. În acest fel, veţi ajuta la protejarea mediului înconjurător.
Garanţie şi service
Pentru informaţii suplimentare sau în cazul altor probleme, vă rugăm să
vizitaţi site-ul Philips www.philips.com sau să contactaţi Departamentul
Clienţi din ţara dumneavoastră (veţi găsi numărul de telefon în garanţia
internaţională). Dacă în ţara dumneavoastră nu există un astfel de
departament,contactaţi furnizorul dumneavoastră Philips sau
Departamentul Service pentru Aparate Electrocasnice şi Produse de
Îngrijire Personală Philips.
Depanare
Acest capitol include cele mai frecvente probleme ce pot apărea cu
fierul dumneavoastră de călcat. Pentru mai multe detalii, vă rugăm să
citiţi diferitele capitole. Dacă nu reuşiţi să rezolvaţi problema, vă rugăm
să contactaţi Centrul Consumatori Philips din ţara dumneavoastră (veţi
găsi numărul de telefon în garanţia internaţională).
Dacă în ţara dumneavoastră nu există un astfel de departament,
contactaţi furnizorul dumneavoastră Philips sau cel mai apropiat centru
service Philips.
ROMÂNĂ
Page 33

Soluţie
Acest fenomen va înceta după puţin
timp.
Aceste particule nu produc deteriorări
şi vor dispărea după câteva utilizări ale
fierului.
Selectaţi o temperatură de călcare
adecvată pentru călcarea cu abur
(temperaturi cuprinse între 2 şi
MAX).
Reglaţi butonul de pornire a fierului pe
poziţia "pornit" şi lăsaţi fierul să se
încălzească.
Poziţionaţi rezervorul cu abur pe o
suprafaţă stabilă şi regulată.
Este normal. Puneţi fierul deasupra
unei cârpe şi apăsaţi activatorul de
abur. Cârpa absoarbe picăturile. După
câteva secunde, fierul va degaj din nou
abur în mod normal.
Reglaţi butonul de pornire a fierului şi
butonul rezervorului de abur pe
poziţia "pornit".
Aşteptaţi 6-8 minute până se
încălzeşte rezervorul de abur.
Pentru a verifica dacă aparatul
produce abur, ţineţi o oglindă (rece) în
faţa orificiilor din talpă.
Ştergeţi talpa cu o cârpă umedă.
Ştergeţi talpa cu o cârpă umedă.
Selectaţi temperatura de călcare
recomandată.
Cauză posibilă
Acest lucru este normal. Unele
componente ale fierului au fost
lubrifiate puţin din fabrică.
Este normal pentru un fier nou.
Termostatul a fost reglat la o
temperatură prea scăzută pentru
călcarea cu abur.
Fierul nu este pornit.
Rezervorul cu abur a fost poziţionat
pe o suprafaţă instabilă şi/sau
neregulată.
Când începeţi să călcaţi cu abur,
furtunul este rece.Aburul se
condensează în interiorul acestuia
producând picături de apă care se
scurg prin talpă.
Rezervorul de abur şi/sau fierul nu
a(u) fost pornit(e).
Rezervorul nu s-a încălzit suficient ca
să producă abur.
Aburul supraîncălzit este greu
perceptibil, mai ales dacă termostatul a
fost reglat pe poziţia maximă sau dacă
temperatura mediului ambiant este
ridicată.
Impurităţi sau alţi agenţi chimici
prezenţi în apă s-au depus pe talpa
fierului.
Aţi călcat la temperaturi prea mari.
Problemă
Iese fum din aparat când îl pornesc
pentru prima dată.
Ies impurităţi din talpa fierului nou.
Ies picături de apă prin talpa aparatului.
Aparatul nu produce abur.
Din talpa fierului nu iese abur.
Talpa fierului de călcat este murdară.
ROMÂNĂ 33
Page 34

РУССКИЙ34
Общее описание
A Подающий шланг
B Индикатор нагрева
C Регулятор и индикатор нагрева
D Пароактиватор и фиксатор
- D1. Фиксатор
- D2. Активатор
E Колпачок контейнера-парогенератора
F Подставка для утюга
G Контейнер-парогенератор
H Сетевой шнур
I Сигнальный индикатор готовности пара (только для модели
GC6107)
J Кнопка включения нагрева контейнера-парогенератора с
индикатором питания
K Регулятор уровня пара (только для модели GC6107/GC6104)
L Выключатель утюга с индикатором питания
M Сигнальный индикатор«Нет воды в контейнере-
парогенераторе» (только для модели GC6107)
N Подошва утюга
Внимание
Внимательно прочитайте настоящую инструкцию перед началом
эксплуатации прибора и сохраните ее в качестве справочного
материала.
◗ Прежде чем подключить утюг к электросети, убедитесь в том,
что напряжение,указанное на заводской табличке,
соответствует напряжению электросети у вас дома.
◗ Подключайте электроприбор только к заземленной розетке
электросети.
◗ Не пользуйтесь утюгом с видимыми повреждениями сетевой
вилки, сетевого шнура, шланга подачи пара или самого утюга, а
также после падения или при протекании утюга.
◗ Регулярно производите осмотр сетевого шнура и шланга
подачи пара на наличие возможных повреждений.
◗ В случае повреждения сетевого шнура или шланга подачи
пара, их необходимо заменить в торговой организации или в
уполномоченном сервисном центре компании «Филипс», либо
иной организации с персоналом аналогичной квалификации,
чтобы обеспечить безопасную эксплуатацию прибора.
◗ Не оставляйте подключенный к электросети прибор без
присмотра.
◗ Запрещается погружать утюг или контейнер-парогенератор в
воду.
◗ Храните утюг в недоступном для детей месте.
Page 35

РУССКИЙ 35
◗ Всегда пользуйтесь утюгом и ставьте утюг и контейнер-
парогенератор на ровную и устойчивую горизонтальную
поверхность. Не ставьте контейнер-парогенератор на мягкие
участки гладильной доски.
◗ Следите за тем чтобы сетевой шнур и шланг подачи пара не
касались горячей подошвы утюга.
◗ Прикосновение к сильно нагретой подошве утюга и
подставке для утюга может привести к ожогам. Если вы
хотите переместить контейнер-парогенератор, не
прикасайтесь к подставке для утюга.
◗ По окончании глажения, при очистке электроприбора, во
время заполнения или опорожнения водонаборного
контейнера и даже если вы отходите от утюга на короткое
время, устанавливайте парорегулятор в положение О,ставьте
утюг вертикально на задний торец корпуса и вынимайте вилку
шнура питания из розетки электросети.
◗ Не добавляйте в контейнер-парогенератор духи, уксус,
крахмал, химические средства для удаления накипи, добавки
для глажения или другие химические средства.
◗ Если при нагревании прибора из-под колпачка контейнера-
парогенератора просачивается пар, отключите прибор от
электросети и плотнее завинтите колпачок. Если и после этого
при нагревании прибора продолжает выходить пар,
выключите его и обратитесь в уполномоченный сервисный
центр компании «Филипс».
◗ Не снимайте колпачок с контейнера-парогенератора, если он
все еще находится под давлением.
◗ Закрывайте отверстие контейнера-парогенератора только
колпачком,который входит в комплект поставки прибора,
поскольку этот колпачок одновременно является
предохранительным клапаном.
◗ Электроприбор предназначен только для бытовых целей.
Перед началом эксплуатации.
1 Удалите все наклейки и защитные пленки с подошвы утюга
и протрите ее мягкой тканью.
2 Полностью размотайте сетевой шнур и подающий шланг.
3 Установите контейнер-парогенератор на ровную,
устойчивую поверхность.
4 Установите утюг на подставку.
Page 36

РУССКИЙ36
Подготовка к использованию
Заполнение водой контейнера-парогенератора.
Запрещается погружать контейнер-парогенератор в воду.
Запрещается снимать колпачок, когда утюг и контейне
парогенератор все еще нагреты.
1 Выньте вилку шнура питания из розетки электросети.
C
2 Медленно отвинтите колпачок от контейнера-
парогенератора.
Вы можете услышать звук, когда будете снимать колпачок
Причиной возникновения звука является пониженное или
повышенное остаточное давление в контейнере-парогенераторе, и
это абсолютно нормально.
C
3 Залейте воду в контейнер-парогенератор (не более 1
литра).
Заполните контейнер-парогенератор водопроводной водой.
◗ В случае если водопроводная вода в вашей местности
слишком жесткая,рекомендуется использовать 50%
дистиллированной воды и 50% водопроводной воды.
Не добавляйте в контейнер-парогенератор духи, уксус, крахмал
химические средства для удаления накипи, добавки для глажени
или другие химические средства.
4 Плотно навинтите колпачок на водоналивное отверстие
контейнера-парогенератора.
Быстрая дозаправка
C
1 Оставьте прибор подключенным к электросети и
убедитесь, что утюг включен. Затем переведите
переключатель контейнера-парогенератора в положение
«выкл.».
C
2 Нажимайте на кнопку парообразования до тех пор, пока вы
не перестанете слышать звук пара, выходящего из
электроприбора.
3 Удерживая кнопку парообразования в нажатом положении,
медленно отвинтите колпачок контейнера-парогенератора,
поворачивая его против часовой стрелки и сбрасывая
давление в контейнере-парогенераторе.
Page 37
РУССКИЙ 37
Убедитесь, что в контейнере-парогенераторе не осталось пара.
При отвинчивании колпачка, положите на него кусок ткани.
4 Выньте вилку шнура питания из розетки электросети.
5 Заполните контейнер-парогенератор водой, как описано в
разделе «Заполнение контейнера-парогенератора», и дайте
электроприбору вновь нагреться.
Установка температуры.
Всегда устанавливайте контейнер-парогенератор на ровную и
устойчивую горизонтальную поверхность. Не ставьте контейне
парогенератор на мягкую часть гладильной доски.
1 Поставьте утюг на подставку для утюга.
Запрещается ставить горячий утюг на подающий шланг или
сетевой шнур. Убедитесь в том, что сетевой шнур не касаетс
горячей подошвы.
C
2 Установите требуемую температуру глажения, повернув
диск терморегулятора в нужное положение.
Убедитесь в том, что температура глажения соответствует типу
ткани, указанной на этикетке изделия:
Если вы не знаете, из какой ткани сшито изделие, определите
подходящую температуру, прогладив его на участке, незаметном
при носке или использовании.
Установка уровня
парообразования
MIN (см. раздел
«Сухое
глажение»).
От низкого до
умеренного
отпаривания
От умеренного до
усиленного
отпаривания MAX
Установка
температурного
режима
1
2
3
Тип ткани
Синтетические ткани
(например, ацетатные
волокна, акрил, вискоза,
полиамидные волокна,
полиэстер) и шелк
Шерсть
Хлопок, лен
Обратите внимание на
то, что ЗНАЧОК Z на
этикетке указывает на
то, что изделие не
подлежит глажению.
Значок на
этикетке
изделия
B
C
D
Z
Page 38

РУССКИЙ38
Изделия, изготовленные из шелка, шерсти и синтетических
материалов, следует гладить с изнанки, чтобы не допустить
появления лоснящихся пятен.
Начинайте глажение с изделий из синтетических волокон, для
которых требуется минимальная температура глажения.
C
3 Подключите сетевой шнур к заземленной розетке
электросети и установите переключатели контейнерапарогенератора и утюга в положение «вкл.».Контейнерпарогенератор и подошва утюга начнут нагреваться.
◗ Когда утюг нагреется до нужной температуры, контрольные
индикаторы погаснут.
◗ Во время глажения с отпариванием контрольный индикатор
будет время от времени загораться. Это свидетельствует о
том, что утюг нагревается до нужной температуры.
◗ Если после глажения при высокой температуре вы установили
диск терморегулятора в положение, соответствующее более
низкой температуре,то, прежде чем продолжить глажение,
подождите, пока вновь не загорится контрольный индикатор,
чтобы не повредить ткань.
Полезные советы
- Если в состав ткани входят волокна разных типов, всегда
устанавливайте температуру, которая соответствует волокнам,
требующим самого бережного обращения, т.е. минимальную
температуру. Например, если в составе ткани 60% полиэфирных
и 40% хлопчатобумажных волокон, то эту ткань следует гладить
при температуре, требуемой для полиэфира (1), и без
отпаривания.
- При глажении с отпариванием на шерстяных тканях могут
появиться лоснящиеся пятна. Во избежание появления пятен вы
можете гладить шерстяные изделия с изнанки или через сухую
ткань.
- Бархат и другие ткани, на которых легко образуются лоснящиеся
пятна, следует гладить только в одном направлении (по ворсу),
прикладывая минимальное давление.
- Не пользуйтесь функцией отпаривания при глажении цветных
шелковых тканей, чтобы не допустить появления пятен.
Использование утюга
Глажение с отпариванием.
1 Убедитесь, что в контейнере-парогенераторе достаточно
воды.
Page 39

РУССКИЙ 39
◗ Функция отпаривания может быть использована только при
более высоких температурах глажения (значения температуры
от 2 до MAX).
C
2 Выберите уровень парообразования подходящий для
заданной температуры глажения.
- Выберите уровень парообразования MIN(без отпаривания) для
заданной температуры глажения 1 (см. раздел «Сухое
глажение»).
- Для значения температуры 2,установите парорегулятор в
положение от низкого до умеренного отпаривания.
- Для значений температуры от 3 до MAX, установите
парорегулятор в положение от умеренного до усиленного
отпариванияMAX.
3 Контейнер-парогенератор и подошва утюга начнут
нагреваться.
- Для холодного утюга: для нагревания подошвы требуется
приблизительно 2 минуты, а для нагревания контейнерапарогенератора - приблизительно 8 минут.
- Быстрая дозаправка: при доливе воды в контейнерпарогенератор во время глажения, нагрев воды потребует
приблизительно 6 минут.
4 Как только вода в контейнере-парогенераторе нагреется до
температуры, достаточной для глажения с отпариванием,
светодиод нагрева контейнера-парогенератора погаснет
(только для моделей GC6104,GC6103). Загорится
светодиод готовности контейнера-парогенератора (только
для модели GC6107).
◗ Во время глажения с отпариванием сигнальный индикатор
готовности пара будет время от времени загораться. Это
свидетельствует о том, что контейнер-парогенератор
нагревается до нужной температуры.
C
5 Во время глажения с отпариванием удерживайте кнопку
парообразования в нажатом положении.
◗ При необходимости продолжительного отпаривания,
сдвиньте фиксатор кнопки парообразования в нужное
положение.
6 Для того чтобы прекратить отпаривание, освободите
кнопку парообразования от фиксации.
Page 40

РУССКИЙ40
Если вы не используете функцию отпаривания в течение
некоторого времени, то пар, находившийся в шланге, будет
конденсироваться с образованием воды. Когда вы снова начнете
глажение с отпариванием, то можете услышать шипение в
электроприборе и увидеть несколько капель, появившихся из
отверстий подошвы.
B
Для того чтобы не допустить попадания капель на вашу одежду,
прежде чем продолжить глажение с отпариванием, подержите
утюг над ненужной тканью, нажимая в это время на кнопку
парообразования, до тех пор, пока образование пара не
нормализуется.
Сухое глажение.
1 Выберите рекомендованное значение температуры
глажения (см. раздел «Подготовка прибора к работе»).
Во время глажения не нажимайте на кнопку парообразования.
◗ Если вы случайно нажмете на кнопку парообразования во
время глажения, произойдет выброс небольшого количества
пара. Чтобы этого не произошло, вы просто можете
полностью отключить подачу пара, установив переключатель
контейнера-парогенератора в положение «выкл.».
◗ Если в контейнере-парогенераторе нет воды или он еще не
нагрелся, вы услышите щелчок внутри контейнера. Этот звук
издает открывающийся клапан выброса пара, и он абсолютно
безопасен.
Возможности
Вертикальное отпаривание
C
◗ Занавески и другие висящие изделия (пиджаки, костюмы и
куртки) можно гладить с отпариванием, удерживая утюг в
вертикальном положении.
1 Нажмите на кнопку парообразования. При необходимости
продолжительного отпаривания, используйте фиксатор
кнопки парообразования.
Запрещается направлять струю пара на людей.
Page 41

РУССКИЙ 41
Функция переменного отпаривания
(только для моделей GC6107 и GC6104).
Парорегулятор всегда можно установить на новое значение в
интервале от MIN до MAX (см. раздел «Подготовка прибора к
работе»).
Индикатор отсутствия воды в контейнере-парогенераторе
«Нет воды в контейнере-парогенераторе»
(только для модели GC6107)
Если водав контейнере-парогенераторезакончится во время
работы прибора, загорится индикатор отсутствия воды в
контейнере-парогенераторе «Нет воды в контейнерепарогенераторе».
1 Дозаправьте водой контейнер-парогенератор (см. раздел
«Подготовка прибора к работе»).
Сигнальный индикатор готовности пара
(только для модели GC6107)
Когда контейнер-парогенератор будет готов к использованию,
загорится сигнальный индикатор готовности пара.
Очистка и уход.
После глажения.
C
1 Для сброса давления в контейнере-парогенераторе,
установите выключатель утюга в положение «вкл.»,а
переключатель контейнера-парогенератора - в положение
«выкл.».
C
2 Сбрасывайте давление в контейнере-парогенераторе,
нажимая на кнопку парообразования до тех пор, пока вы
не перестанете слышать звук пара, выходящего из
электроприбора.
3 Выньте вилку шнура питания из розетки электросети.
4 Поставьте утюг на подставку для утюга, установите
парорегулятор в MIN; и дайте прибору остыть перед его
очисткой.
Page 42

РУССКИЙ42
Утюг
1 Очищайте утюг с помощью влажной ткани.
2 Удалите накипь и другие загрязнения с подошвы утюга с
помощью куска ткани, смоченного неабразивным (жидким)
чистящим средством.
Запрещается погружать утюг в воду или мыть его под краном.
Контейнер-парогенератор
Промывайте контейнер-парогенератор раз в месяц или после
приблизительно 10 раз пользования утюгом.
C
1 Осторожно снимите колпачок с контейнера-
парогенератора.
Прежде чем начать снимать колпачок, дождитесь, пока прибор не
остынет.
C
2 Промойте контейнер-парогенератор 500 мл пресной воды.
Слейте воду, перевернув контейнер-парогенератор вверх
дном над раковиной.
3 Навинтите колпачок на место.
Хранение
Перед тем как убрать утюг, убедитесь, что он остыл.
1 Выньте вилку шнура питания из розетки электросети и
дайте утюгу остыть.
2 Слейте воду из контейнера-парогенератора.
3 Регулярно проверяйте состояние шнура питания и
подающего шланга, чтобы убедиться в их исправности и
безопасности.
Page 43

РУССКИЙ 43
Защита окружающей среды
C
◗ По окончании срока службы не выбрасывайте прибор вместе
с обычными бытовыми отходами, а сдавайте в специальные
пункты приема. Поступая так вы способствуете делу
сохранения окружающей среды.
Гарантийное и сервисное обслуживание
По поводу обслуживания, получения дополнительной информации,
или в случае возникновения каких-либо проблем, обращайтесь на
веб-сайт компании Филипс по адресу www.philips.ru или в центр
компании «Филипс» по обслуживанию потребителей в вашей
стране (вы найдете его номер телефона на международном
гарантийном талоне). Если подобный центр в вашей стране
отсутствует, обратитесь в вашу местную торговую организацию
компании «Филипс» или сервисное отделение компании Philips
Domestic Appliances and Personal Care BV.
Обнаружение и устранение неисправностей
В данном разделе коротко перечислены наиболее
распространенные проблемы, с которыми вы можете столкнуться
при пользовании утюгом. Для более подробной информации
прочитайте другие разделы руководства. Если вы не можете
устранить неполадки самостоятельно, обращайтесь в центр
компании «Филипс» по обслуживанию потребителей в вашей
стране (вы найдете его номер телефона в международном
гарантийном талоне). Если подобный центр в вашей стране
отсутствует, обратитесь в вашу местную торговую организацию
компании «Филипс» или в ближайший сервисный центр компании
«Филипс».
Page 44

РУССКИЙ44
Способ устранения
Через некоторое время выделение
дыма прекратится.
Эти частицы не опасны и они
перестанут выходить из подошвы
после нескольких раз пользования
утюгом.
Выберите значение температуры,
которое подходит для глажения с
отпариванием (значения
температуры от 2 до MAX).
Установите выключатель утюга в
положение «вкл.» и дождитесь, пока
утюг нагреется.
Установите контейнерпарорегулятор на устойчивую и
ровную поверхность.
Это нормально. Удерживая утюг
над ненужной тканью, нажмите на
кнопку парообразования.
Образующиеся капли впитаются в
ткань. Через несколько секунд
образование пара нормализуется.
Установите оба переключателя
(утюга и контейнерапарогенератора) в положение
«вкл.».
Для нагревания контейнерапарогенератора необходимо
подождать 6-8 минут.
Для того чтобы проверить,
образуется ли в действительности
пар, подержите напротив отверстий
подошвы (холодное) зеркало.
Протрите подошву утюга влажной
тканью.
Протрите подошву утюга влажной
тканью. Установите
рекомендованную температуру
глажения.
Возможная причина
Это нормально и связано с тем, что
на заводе некоторые детали утюга
были покрыты смазкой.
Это нормально для нового утюга.
Диск терморегулятора установлен
на температуру, недостаточно
высокую для глажения с
отпариванием.
Утюг не включился.
Контейнер-парорегулятор
установлен на неустойчивую и/или
неровную поверхность.
Вы начинаете гладить, когда шланг
еще холодный. Конденсация пара в
шланге приводит к появлению
капель воды на поверхности
подошвы.
Не включен контейнерпарогенератор и/или утюг.
Контейнер-парогенератор
недостаточно нагрет для
образования пара.
Сильно нагретый (т.е. высокой
степени нагрева) пар почти не
виден, особенно когда диск
терморегулятора установлен на
максимальную температуру, тем
более в случае относительно
высокой температуры окружающего
воздуха.
На подошве осаждаются
загрязнения или химические
средства, присутствующие в воде.
Вы гладите при слишком высоких
температурах.
Неполадка
При первом включении
электроприбора из утюга выделяется
некоторое количество дыма.
Из подошвы нового утюга выходят
загрязнения.
На поверхности подошвы утюга
появляются капли воды.
В приборе не образуется пар.
Из отверстий на подошве утюга не
появляется пар.
Подошва утюга грязная.
Page 45

45
Všeobecný popis
A Přívodní hadice
B Kontrolka teploty
C Regulátor a indikátor teploty
D Aktivátor páry se zámkem
- D1. Zámek
- D2.Aktivátor
E Uzávěr parního zásobníku
F Podstavec žehličky
G Parní zásobník
H Síťový kabel
I Kontrolka páry (pouze GC6107)
J Vypínač parního zásobníku s indikátorem
K Regulace páry (pouze GC6107/GC6104)
L Vypínač žehličky s indikátorem
M Indikátor prázdného zásobníku páry (pouze GC6107)
N Žehlicí plocha
Důležité
Před použitím přístroje přečtěte podrobně tento návod a uschovejte
ho pro případné pozdější nahlédnutí.
◗ Před prvním použitím zkontrolujte, zda údaj o napětí na typovém
štítku žehličky odpovídá napětí ve vaší světelné síti.
◗ Používejte vždy zásuvku s nulovým kolíkem.
◗ Přístroj přestaňte používat, pokud je viditelně poškozená síťová
zástrčka, kabel, přívodní hadice či samotný přístroj nebo došlo-li k
jeho pádu na zem či vytéká-li z něj voda.
◗ Pravidelně kontrolujte síťový přívod a hadici, zda nejsou
poškozené.
◗ Poškozený síťový kabel nebo přívodní hadice musí být vyměněna v
servisu firmy Philips nebo v servisu, který byl firmou Philips
autorizován, či obdobně kvalifikovaným pracovníkem.Zabráníte
tak případnému nebezpečí
◗ Spotřebič zapojený do zásuvky nikdy nenechávejte bez dozoru.
◗ Nikdy nesmíte žehličku nebo zásobník páry ponořit do vody.
◗ Dbejte na to, aby k přístroji neměly přístup děti.
◗ Žehličku a parní zásobník vždy umístěte a používejte na stabilním
a vodorovném podkladu.Nepokládejte parní zásobník na měkkou
část žehlicího prkna.
◗ Dbejte na to, aby se síťový kabel a přívodní hadice nedostala do
kontaktu s horkou žehlicí plochou žehličky.
◗ Podstavec žehličky i její žehlicí plocha jsou velmi horké a při
dotyku by vás popálily. Pokud chcete zásobník páry přemístit,
nedotýkejte se podstavce.
ČESKY
Page 46

46
◗ Když žehlení ukončíte, když žehličku čistíte, když její zásobník
plníte vodou a také když od ní třeba jen na malou chvíli odcházíte:
vždy předem nastavte regulátor páry do polohy O, postavte
žehličku na zadní stěnu a vytáhněte její zástrčku ze zásuvky.
◗ Do zásobníku vody nikdy nenalévejte parfémy, ocet, škrob nebo
prostředky k odstranění vodního kamene ani jiné chemikálie.
◗ Pokud při zahřívání přístroje uniká pára zpod uzávěru parního
zásobníku, přístroj vypněte a dotáhněte uzávěr parního zásobníku.
Pokud by pára při zahřívání stále unikala, vypněte přístroj a
kontaktujte autorizovaný servis Philips.
◗ Nesnímejte uzávěr parního zásobníku, je-li parní zásobník stále
pod tlakem. Postupujte podle instrukcí uvedeným dále v tomto
návodu.
◗ K uzavírání zásobníku páry nepoužívejte nikdy žádný náhradní
uzávěr než uzávěr, dodaný s přístrojem,protože ten má vestavěný
bezpečnostní ventil.
◗ Žehlička je určena výhradně k domácímu použití.
Před prvním použitím
1 Ze dna žehličky sejměte všechny nálepky i ochrannou fólii a
dno vyčistěte měkkým hadříkem.
2 Síťový kabel a přívodní hadici rozviňte do celé délky.
3 Parní zásobník umístěte na stabilní, vodorovnou plochu.
4 Žehličku položte do stojanu.
Příprava k použití
Plnění zásobníku páry
Zásobník páry nikdy nesmíte ponořit do vody.
Neotvírejte uzávěr, je-li žehlička a parní zásobník stále horký.
1 Vytáhněte síťovou zástrčku ze zásuvky.
C
2 Pomalu odšroubujte uzávěr parního zásobníku.
Při odnímání uzávěru se může ozvat zvuk.Tento zvuk je způsoben
podtlakem nebo zbytkovým tlakem uvnitř parního zásobníku a nejedná
se o žádnou poruchu.
C
3 Do zásobníku nalijte vodu (nejvýše 1 litr).
Pro naplnění zásobníku použijte vodu z kohoutku.
◗ Pokud je voda ve vaší oblasti příliš tvrdá, doporučujeme použít
50% destilované vody a 50% vody z kohoutku.
ČESKY
Page 47

47
Do parního zásobníku nikdy nedávejte parfém, ocet,škrob, odvápňovací
prostředky a jiné chemické látky.
4 Uzávěr pevně zašroubujte do plnicího otvoru parního
zásobníku.
Rychlé plnění
C
1 Ponechejte přístroj zapojený do elektrické sítě a přesvědčte se,
je-li žehlička zapnutá. Potom nastavte přepínač parního
zásobníku do polohy "off" (vypnuto).
C
2 Stiskněte aktivátor páry,dokud neuslyšíte, že již z přístroje
neuniká žádná pára.
3 Ponechejte aktivátor páry stisknutý a pomalu odšroubujte
uzávěr zásobníku páry jeho otáčením proti směru hodinových
ručiček.Tím dojde ke snížení tlaku v parním zásobníku.
Přesvědčte se, že v zásobníku páry již není žádná pára. Při
odšroubovávání uzávěru na něj položte kousek látky.
4 Vytáhněte síťovou zástrčku ze zásuvky.
5 Naplňte zásobník tak, jak je popsáno v odstavci "Plnění
zásobníku vodou" a zapněte ohřev.
Nastavení teploty
Přístroj vždy postavte na pevnou podložku ve vodorovné poloze. Nikdy
přístroj nestavte na měkkou část žehlicího prkna.
1 Položte žehličku na stojan žehličky.
Nepokládejte horkou žehličku na napájecí hadici či na síťový kabel
Dbejte na to, aby kabel nepřišel do kontaktu s horkou žehlicí plochou.
C
2 Nastavte teplotu žehličky otočením knoflíku regulátoru teploty
do odpovídající polohy.
Teplotu žehličky nastavte podle doporučené teploty na nášivce textilie:
ČESKY
Page 48

48
Jestliže neznáte druh žehlené textilie, zvolte správnou teplotu tak, že
zkušebně přežehlíte tu část textilie, která není běžně viditelná.
Hedvábí, vlna a syntetické materiály:žehlete z rubové strany,aby
nevznikaly lesklé skvrny.
Začněte vždy žehlit ty textilie, které vyžadují nejnižší teplotu, což bývají
syntetické tkaniny.
C
3 Zapojte síťovou zástrčku do uzemněné zásuvky a zapněte
vypínač parního zásobníku i vypínač žehličky. Parní zásobník a
žehlicí plocha se nyní začnou zahřívat.
◗ Jakmile indikátor teploty zhasne, je žehlička dostatečně teplá.
◗ Během žehlení se může indikátor teploty čas od času opět
rozsvítit.Tím je signalizováno, že se žehlička zahřívá na správnou
teplotu.
◗ Pokud jste žehlili na vysokou teplotu a následně jste regulátor
teploty nastavili na nižší hodnotu, počkejte před dalším žehlením,
dokud se indikátor teploty znovu nerozsvítí. Předejdete tak
poškození vašich tkanin.
Praktické rady
- Při žehlení kombinovaných tkanin, zvolte vždy teplotu, která je
povolena pro nejchoulostivější druh. Žehlíte-li například kombinaci
60 % polyestéru a 40 % bavlny, musíte zvolit maximální teplotu pro
polyestér, tedy 1 a žehlit bez páry.
- Když žehlíte s parou vlněné tkaniny, mohou se objevit lesklá místa.
Tomu můžete předejít tak, že žehlíte přes suchý hadřík nebo žehlíte z
rubové strany.
- Tatáž lesklá místa se mohou objevit i při žehlení sametu a jemu
podobných textilií. Žehlete je pouze jedním směrem (po vlasu) a na
žehličku nijak netlačte.
- Při žehlení barevného hedvábí nepoužívejte páru.To může též
vytvářet skvrny.
ČESKY
Nastavení páry
MIN (viz "Žehlení bez
páry")
Nízké až střední
Střední až MAX
Nastavení
teploty
1
2
3
Druh textilie
Syntetické látky (např.
acetát, akryl, polyamid,
polyester) a hedvábí
Vlna
Bavlna, plátno
Symbol na štítku Z
znamená, že oděv
nelze žehlit.
Symbol na cedulce
pro údržbu textilie
B
C
D
Z
Page 49

49
Používání žehličky
Žehlení s párou
1 Zkontrolujte, zda je v zásobníku dostatek vody.
◗ Žehlení s párou je možné pouze při nastavení vyšší teploty
(regulátor teploty mezi 2 a MAX).
C
2 Zvolte nastavení páry,které odpovídá zvolené teplotě žehlení:
- Zvolte nastavení páry MIN (bez páry) pro nastavenou teplotu 1 (viz
"Žehlení bez páry").
- Zvolte nastavení páry nízké až střední pro nastavenou teplotu 2.
- Zvolte nastavení páry střední až MAX pro nastavenou teplotu 3
až MAX.
3 Zásobník páry a žehlicí plocha se nyní začnou zahřívat.
- Studený start:zahřátí žehlicí plochy trvá přibližně 2 minuty a zahřátí
zásobníku páry asi 8 minut.
- Rychlé ohřátí: pokud naplníte zásobník páry během žehlení, ohřeje se
voda v parním zásobníku zhruba během 6 minut.
4 Jakmile je voda v zásobníku páry dostatečně ohřátá pro žehlení
s párou, kontrolka zapnutí parního zásobníku zhasne (pouze
GC6104, GC6103). Kontrolka páry se rozsvítí (pouze
GC6107).
◗ Během parního žehlení se indikátor parního zásobníku může čas
od času opět rozsvítit.To indikuje, že se parní zásobník ohřívá na
správnou teplotu.
C
5 Během žehlení s párou ponechejte aktivátor páry stisknutý.
◗ Pokud chcete používat parní funkci trvale, posuňte zámek
aktivátoru páry do zajištěné polohy.
6 Chcete-li zastavit páru, uvolněte zámek aktivátoru páry.
Pokud jste určitou dobu nepoužívali parní funkci, dojde ke sražení páry,
která zůstala v přívodní hadici, a k její přeměně na vodu. Při zahájení
dalšího žehlení pak může v přístroji docházet k prskání a z žehlicí plochy
může uniknout pár kapek vody.
B
Abyste zabránili kapání vodních kapek na oděv, podržte žehličku nad
starým kusem látky a stiskněte aktivátor páry, dokud nebude produkce
páry rovnoměrná a teprve pak začněte znovu žehlit.
ČESKY
Page 50

50
Žehlení bez páry
1 Zvolte požadovanou teplotu žehlení (viz kapitola "Příprava k
použití").
Během žehlení nedržte stisknutý aktivátor páry.
◗ Pokud během žehlení omylem stisknete aktivátor páry, může dojít
k vypuštění malého množství páry.Abyste tomu zabránili, můžete
jednoduše nastavit vypínač parního zásobníku do polohy "off"
(vypnuto).
◗ Je-li zásobník páry prázdný nebo se ještě nezahřál, uslyšíte
cvaknutí uvnitř zásobníku.Tento efekt je způsoben otevíráním
parního válce a je naprosto neškodný.
Další funkce
Vertikální žehlení s párou
C
◗ Zavěšené záclony a obleky (bundy, obleky, pláště) mohou být
žehleny s parou tak,že držíte žehličku ve svislé poloze.
1 Stiskněte aktivátor páry.Pokud chcete používat parní funkci
trvale, použijte zámek aktivátoru páry.
Parou nikdy nemiřte proti osobám.
Variabilní pára (pouze GC6107 a GC6104)
Regulátor páry lze kdykoliv nastavit do libovolné polohy mezi značkami
MIN a MAX (viz kapitola "Příprava k použití").
Indikátor prázdného zásobníku páry (pouze GC6107)
Pokud během provozu dojde k vyčerpání vody v parním zásobníku,
rozsvítí se indikátor prázdného zásobníku páry.
1 Doplňte vodu do parního zásobníku (viz kapitola "Příprava k
použití").
Kontrolka připravené páry (pouze GC6107)
Jakmile je zásobník páry připraven na parní žehlení, rozsvítí se indikátor
připravené páry.
ČESKY
Page 51

51
Čištění a údržba
Po ukončeném žehlení
C
1 Pro snížení tlaku v parním zásobníku nastavte přepínač žehličky
do polohy "on" (zapnuto) a přepínač parního zásobníku do
polohy "off" (vypnuto).
C
2 Snižte tlak páry v praním zásobníku stisknutím aktivátoru páry,
dokud neuslyšíte, že již z přístroje neuniká žádná pára.
3 Vytáhněte síťovou zástrčku ze zásuvky.
4 Položte žehličku na stojan, nastavte regulátor páry na MIN a
nechejte přístroj vychladnout, předtím než jej začnete čistit.
Žehlička
1 Žehličku čistěte pouze vlhkým hadříkem.
2 Zbytky vodního kamene i případné jiné nečistoty odstraňte ze
dna žehličky navlhčeným hadříkem nebo neabrasívním
(tekutým) čističem.
Nikdy nesmíte žehličku ponořit do vody ani ji oplachovat pod tekoucí
vodou.
Zásobník páry
Zásobník páry vypláchněte jednou za měsíc nebo přibližně po 10
použitích přístroje.
C
1 Opatrně sejměte uzávěr zásobníku páry.
Před sejmutím uzávěru nechejte přístroj dostatečně vychladnout.
ČESKY
Page 52

52
C
2 Vypláchněte zásobník páry pomocí 500 ml čisté vody. Otočte
zásobník nad umyvadlem dnem vzhůru a vodu vylijte.
3 Uzávěr našroubujte zpět.
Uchovávání žehličky
Před uložením žehličky se přesvědčte, že je dostatečně vychladlá.
1 Vytáhněte síťovou zástrčku ze zásuvky a nechte žehličku
vychladnout.
2 Vyprázdněte zásobník na páru.
3 Pravidelně kontrolujte síťový přívod a přívodní hadici zda
nejsou nijak poškozeny.
Ochrana životního prostředí
C
◗ Až přístroj doslouží, nevyhazujte jej do běžného domovního
odpadu, ale odevzdejte jej na oficiálním sběrném místě za účelem
recyklace. Přispějete tím k ochraně životního prostředí.
Záruka & servis
Pokud byste potřebovali jakoukoli informaci nebo měli nějaký problém,
podívejte se na internetovou stránku www.philips.com, případně
kontaktujte Informační středisko firmy Philips, jehož telefonní číslo
naleznete na letáčku s celosvětovou zárukou. Pokud není Informační
středisko ve vaší blízkosti, můžete kontaktovat místního dodavatele
výrobků Philips nebo Service Depar tment of Philips Domestic
Appliances and Personal Care BV.
ČESKY
Page 53

53
Řešení případných problémů
V této kapitole jsou uvedeny nejobvyklejší problémy, které by se mohly
vyskytnout u vaší žehličky.Více informací naleznete v jednotlivých
sekcích. Pokud nejste schopni problém sami vyřešit, kontaktujte
Informační středisko firmy Philips (telefonní číslo je uvedeno v letáku s
celosvětovou zárukou). Pokud není Informační středisko ve vaší
blízkosti, můžete kontaktovat místního dodavatele výrobků Philips nebo
autorizovaný servis Philips.
ČESKY
Řešení
Tento jev zakrátko zmizí.
Tyto částečky jsou neškodné a po
několika použitích žehličky přestanou z
žehlicí plochy vycházet.
Nastavte teplotu žehlení, která je
vhodná pro žehlení s párou (teplota
mezi 2 a MAX).
Nastavte vypínač žehličky do polohy
"on" a počkejte, až se žehlička ohřeje.
Postavte zásobník páry na stabilní,
vodorovnou plochu.
To je zcela běžný jev. Podržte žehličku
nad kouskem starém látky a stiskněte
aktivátor páry. Látka zachytí
odkapávající vodu. Po několika
sekundách se produkce páry ustálí.
Přepněte vypínač žehličky i vypínač
zásobníku páry do polohy "on".
Počkejte 6 až 8 minut,než se parní
zásobník ohřeje.
Tento jev lze zkontrolovat pomocí
(chladného) zrcátka, které podržíte
před dnem žehličky.
Dno žehličky čistěte vlhkým hadříkem.
Dno žehličky vyčistěte vlhkým
hadříkem. K žehlení zvolte
doporučenou teplotu.
Možná příčina
To je normální jev, protože některé
díly žehličky jsou z výroby lehce
potřeny tukem.
Tento jev je u nové žehličky běžný.
Regulátor teploty byl nastaven na
teplotu, která je příliš nízká pro parní
žehlení.
Žehlička není zapnutá.
Zásobník páry byl postaven na
nestabilní nebo nerovnou podložku.
Když začnete žehlit, přívodní hadice je
chladná. Na jejích stěnách se
kondenzuje pára a pak může několik
kapek odkapávávat ze dna žehličky.
Zásobník páry a/nebo žehlička není
zapnutá/zapnutý.
Zásobník páry není dostatečně horký,
aby produkoval páru.
Velmi horká pára je ztěží viditelná,
obzvláště když je regulátor teploty
nastaven na maximum a teplota okolí
je též relativně vysoká.
Na dně se usadily nečistoty nebo
chemické substance z vody.
Žehlili jste s příliš vysokou teplotou.
Problém
Po prvním zapnutí se z přístroje
mírně kouří.
Z žehlicí plochy nové žehličky
vycházejí částečky špíny.
Ze dna žehličky vytékají kapky vody
Přístroj neprodukuje žádnou páru.
Ze dna žehličky nevystupuje pára.
Dno žehličky je zašpiněné
Page 54

54
Általános ismertetés
A Gőzadagoló cső
B Hőmérsékletjelző lámpa
C Hőmérsékletszabályzó és -jelző gomb
D Gőzaktiváló és rögzítő gomb
- D1. Rögzített
- D2.Aktív
E Gőztank zárósapka
F Vasaló állvány
G Gőztank
H Hálózati kábel
I Gőz készenléti jelzőlámpa (csak GC 6107 típusnál)
J Gőztank kapcsoló gomb, működésjelző lámpával
K Gőzszabályzó (csak GC 6107/ GC 6104 típusoknál)
L Vasaló kapcsoló gomb,működésjelző lámpával
M „Gőztank üres" jelzőlámpa (csak GC 6107 típusnál)
N Vasalótalp
Fontos
A készülék használatba vétele előtt olvassa el a használati útmutatót.
Őrizze meg az útmutatót későbbi használatra.
◗ A készülék csatlakoztatása előtt ellenőrizze, megfelel-e az
adattáblán feltüntetett feszültség a helyi hálózati feszültséggel.
◗ A készüléket csak földelt fali konnektorhoz csatlakoztassa.
◗ Ne használja a készüléket, ha a csatlakozó dugó, a vezeték, a
tartozékkábel, vagy a készülék maga láthatóan megsérült,vagy ha
leejtette azt, illetve ha a készülék szivárog.
◗ A vezetéket és a tartozékkábelt rendszeresen ellenőrizze, nem
sérültek-e meg.
◗ Ha a hálózati csatlakozó kábel vagy a tartozékkábel megsérült, a
kockázatok elkerülése érdekében a javítást csak Philips szakszerviz
vagy Philips felhatalmazással rendelkező szakember végezheti el.
◗ A készüléket soha ne hagyja felügyelet nélkül, ha azt a hálózati
konnektorhoz csatlakoztatta.
◗ A vasalót vagy a gőztartályt soha ne merítse vízbe.
◗ A készüléket gyerekektől távol tartsa.
◗ A vasalót és a gőztartályt mindig stabil, vízszintes felületen
használja.A gőztartályt soha ne helyezze a vasalóállvány puha
felületére.
◗ Vigyázzon arra, hogy a hálózati kábel és a tartozékkábel soha ne
érjen a vasaló talpához, ha az felmelegedett.
◗ A vasalóállvány és a vasaló talpa felforrósodhat és ha megérinti,
megégetheti magát. Ha el akarja mozdítani a gőztartályt, ne érintse
meg az állványt.
MAGYAR
Page 55

55
◗ Ha befejezte a vasalást, ha tisztítja a készüléket, ha vizet tesz a
tartályba vagy kiüríti azt, illetve ha rövid ideig eltávozik a vasalótól:
állítsa a gőzszabályzót 0 pozícióra, állítsa a vasalót a végére és
húzza ki a hálózati csatlakozó dugót a fali konnektorból.
◗ Ne tegyen a víztartályba illatszert, ecetet, keményítőt, vízkőtlenítő
szert, vasalást segítő szert vagy más vegyszert.
◗ Ha a készülék felmelegedése közben a gőztartály sapkája alól gőz
szivárog ki, kapcsolja ki a vasalót és ellenőrizze, hogy a sapkát
megfelelően becsavarta-e.Amennyiben a gőzszivárgás tovább
folytatódik, kapcsolja ki a készüléket és vegye fel a kapcsolatot egy
Philips szerződött szervizpartnerrel.
◗ Ne vegye le a sapkát a gőztartályról, amíg a tartály nyomás alatt
van.A sapka levételéhez kövesse az útmutatóban később leírt
lépéseket.
◗ Ne használjon más sapkát a gőztartályhoz, csak a készülékkel
szállítottat, mivel a sapka egyúttal biztonsági szelepként is
működik.
◗ A termék kizárólag háztartási alkalmazásra készült.
Első használat előtt
1 Távolítson el minden címkét vagy védofóliát a vasalótalpról és a
talpat tisztítsa meg puha ruhával.
2 Teljesen tekerje ki a hálózati kábelt és a gőzadagoló csövet.
3 Helyezze a gőztankot stabil,vízszintes felületre.
4 Tegye a vasalót a vasalóállványra.
Előkészítés használatra
A gőztartály feltöltése
Soha ne merítse a gőztartályt vízbe.
Addig ne csavarja ki a gőzsapkát, míg a gőztank és a vasaló le nem hűlt.
1 Húzza ki a hálózati csatlakozó dugót a fali konnektorból.
C
2 Lassan tekerje ki a gőztank gőzsapkáját.
A sapka eltávolításakor kis sziszegő hangot hallhat. Ezt a gőztankban
lévő vakuum vagy a visszamaradt nyomás okozhatja, ami teljesen
normális a készülék működése után.
MAGYAR
Page 56

56
C
3 Töltsön vizet a gőztartályba (max. 1 liter).
A tank feltöltéséhez használjon csapvizet.
◗ Ha a lakhelyén túl kemény lenne a víz,akkor használjon fele-fele
arányban csapvizet és desztillált vizet.
Soha ne tegyen parfümöt, ecetet, keményítőt,vízkőtelenítő folyadékot
vasaláskönnyítő adalékot vagy más egyéb vegyi anyagot a gőztankba.
4 Mindig szorosan tekerje a helyére a zárókupakot, a gőztank
töltőnyílására.
Gyors újratöltés
C
1 A készüléket hagyja bekapcsolva. Majd a gőztankot kapcsolja ki.
C
2 Nyomja a gőzaktiváló gombot a készülékben visszamaradt gőz
teljes kigőzöléséhez.
3 Tartsa nyomva a gőzaktiváló gombot és lassan csavarja ki a
gőztank zárókupakját, az óramutató járásával ellentétes irányba.
Ezzel csökken a gőztank nyomása.
Ügyeljen rá, hogy ne maradjon gőz a gőztankban. A zárósapka
könnyebb lecsavarásához használjon egy darab ruhát.
4 Húzza ki a hálózati csatlakozó dugót a fali konnektorból.
5 Töltse fel a gőztartályt az 'A gőztartály feltöltése' c. rész szerint
és melegítse fel ismét a készüléket.
Hőmérséklet szabályozás
A gőztartályt mindig stabil,sík és vízszintes felületre helyezze. Ne tegye
a gőztartályt a vasalódeszka puha részére.
1 Helyezze a vasalót az állványra.
A forró vasalót ne tegye a gőzadagoló csőre vagy a hálózati kábelre
Ügyeljen rá, hogy a vezeték ne érintkezzen a forró vasalótalppal.
C
2 Állítsa be a kívánt hőmérsékletet a hőmérsékletszabályzó gomb
megfelelő pozícióba tekerésével.
Ellenőrizze a vasalandó ruha címkéjén a javasolt vasalási hőmérsékletet:
MAGYAR
Page 57

57
Ha nem tudja, milyen anyag(ok)ból készült a vasalandó ruhadarab, akkor
olyan rész próbavasalásával állapítsa meg a megfelelő hőfokot, mely
viseléskor vagy használatkor nem látszik.
Selyem, gyapjú és szintetikus anyagok: vasalja az anyag visszáját, hogy ne
keletkezzenek fényes foltok.
Kezdje a vasalást olyan ruhákkal, amelyekhez a legkisebb hőmérséklet
kell, pl.: a műszálas anyagokkal.
C
3 Dugja a hálózati dugót a fali konnektorba és kapcsolja be a
vasalót, és a gőztankot is.A gőztank és a vasalótalp megkezdi a
felmelegedést.
◗ Amikor a hőmérsékletjelző lámpa kialszik a vasaló elérte a
beállított hőmérsékletet.
◗ Gőzölős vasalás közben a hőmérsékletjelző lámpa időről időre
kialszik. Ez jelzi, hogy a vasaló folyamatosan a kívánt
hőmérsékletre melegszik fel.
◗ Ha magas hőmérsékletfokozaton vasalt,majd alacsonyabb
hőmérsékleten kívánja folytatni a vasalást, mielőtt folytatná, várjon
a vasalással addig, míg a hőmérsékletjelző lámpa kigyullad. Ezzel
megakadályozhatja, hogy a vasalandó anyag megégjen.
Javaslatok
- Ha az anyag különböző fajta szálakat tartalmaz, a hőmérsékletet
mindig a legkényesebb szálnak megfelelően válassza meg,tehát a
legkisebb hőmérsékleten vasaljon. Például: ha egy ruha 60%
poliésztert és 40% gyapotot tartalmaz, a poliészternek megfelelő
hőmérsékleten kell vasalni (1) és gőz nélkül.
- Ha gyapjú anyagokat vasal gőzzel, kifényesedhet az anyag. Ezt
elkerülheti, ha száraz vasalóruhát használ vagy ha kifordítja a ruhát és
a visszáján vasalja.
MAGYAR
Gőzfokozat
MIN (lsd. „Vasalás
gőz nélkülc.
fejezetet)
Alacsonytól
közepes fokozatig
Közepestől MAX
fokozatig
Hőmérséklet
beállítás
1
2
3
Az anyag típusa
Szintetikus anyag (pld.
acetát, akrill, viszkóz,
poliamid, poliészter) és
selyem
Gyapjú
Pamut, len
Vegye figyelembe,
hogy a Z jelzés a
címkén azt jelenti,
hogy a ruhadarab nem
vasalható.
Ruhaápolási címke
szimbólumai
B
C
D
Z
Page 58

58
- Bársonyt és más olyan anyagot, ami hajlamos kifényesedni, egy
irányban kell vasalni (szál mentén) és igen kis nyomással.
- Ha színes selymet vasal, ne használjon gőzt. Ez foltokat okozhat.
A készülék használata
Vasalás gőzzel
1 Ellenőrizze, hogy elég víz van a tartályban.
◗ Gőzölős vasalás csak magasabb hőmérsékleten lehetséges (2 és
MAX hőmérsékleti fokozat között).
C
2 Válassza ki a vasalási hőmérsékletnek megfelelő gőzölési
fokozatot:
- Válassza a MIN gőzfokozatot (nincs gőz) a 1 hőmérséklet fokozathoz
(lsd. 'Vasalás gőz nélkül' c. fejezetet).
- 2 hőmérséklethez válasszon az alacsony és közepes gőzfokozat
közül.
- 3 és MAX hőmérsékleti fokozat között válasszon a közepes és a
MAX gőzfokozat közül.
3 A gőztank és a vasalótalp megkezdi a felmelegedést.
- Hideg kezdés: a vasalótalpnak kb. 2 percre, míg a gőztanknak 8 percre
van szüksége, hogy felmelegedjen.
- Gyors felmelegedés: ha vasalás közben újratölti a tankot,a
gőztankban lévő víz kb. 6 perc alatt melegszik fel.
4 Amint a tartályban lévő víz elég forró a gőzölős vasaláshoz, a
tartályon lévő működést jelző lámpa elalszik (GC6104,
GC6103 típusoknál).A gőz készenléti lámpa kezd világítani
(GC6107 típusnál).
◗ Gőzölős vasalás közben a gőz készenléti lámpa időről időre
kigyullad. Ez jelzi, hogy a gőztank folyamatosan a kívánt
hőmérsékletre melegszik fel.
C
5 Gőzölés közben tartsa nyomva a gőzaktiváló gombot.
◗ Ha folyamatosan kíván gőzölni, csúsztassa a gőzaktiváló gombot
rögzítő pozícióba.
6 Amennyiben meg kívánja szüntetni a folyamatos gőzölést,
engedje fel a gőzaktiváló gombot a rögzítő pozícióból.
Ha már jó ideje nem gőzölt, az adagoló csőben maradt gőz lecsapódik
és vízzé alakul. Így amikor újra elkezd vasalni, ez befröcskölődhet a
vasalóba és a vasalótalpból néhány csepp víz fog távozhat.
MAGYAR
Page 59

59
B
Hogy megakadályozza, hogy a vasalóból kicsöpögő víz a ruhára essen,
tartsa a készüléket egy régi, elhasznált anyagdarab fölé és nyomja
folyamatosan a gőzaktiváló gombot, míg tökéletes gőz nem árad ki a
vasalótalpból.
Vasalás gőz nélkül
1 Válassza ki a javasolt vasalási hőmérsékletet (lsd. „Előkészítés
használatra" c. fejezetet).
Vasalás közben ne nyomja a gőzaktiváló gombot.
◗ Ha véletlenül megnyomná a gőzaktiváló gombot,némi gőzáram
előfordulhat. Hogy ezt elkerülje egyszerűen kapcsolja ki a
gőztankot.
◗ Ha a gőztank üres vagy még nem melegedett fel, kattogó hangot
hallhat a gőztank belsejéből. Ez jelzi a gőzszelep kinyílását és ez a
készülék működése szempontjából teljesen ártalmatlan jelenség.
Funkciók
Függőleges gőzölős vasalás
C
◗ Függő függönyöket és ruhákat (zakók,öltönyök,kabátok) gőzöléssel
vasalhat úgy,hogy a vasalót függőleges helyzetben tartja.
1 Nyomja meg a gőzaktiváló gombot. Ha folyamatosan kíván
gőzölni, használja a gőzaktiváló gomb rögzítő funkcióját.
Soha ne irányítsa a gőzt személyekre.
Változtatható gőz (csak GC 6107 és GC 6104 típusoknál)
A gőzszabályzó gomb folyamatosan igazítható és a MIN és MAX
fokozatok között bárhová beállítható (lsd. „Előkészítés használatra" c.
fejezetet).
Gőztank üresjelzőlámpa (csak GC 6107 típusnál)
Ha a víz használat közben fogy ki a gőztartályból, a gőztank
üresjelzőlámpa kigyullad.
1 Töltse fel a gőztankot vízzel (lsd.„Előkészítés használatra" c.
fejezetet).
Gőz készenléti jelzőlámpa (csak GC 6107 típusnál)
Ha a gőztank készen áll a gőzölős vasalásra, a gőz készenléti jelzőlámpa
kigyullad.
MAGYAR
Page 60

60
Tisztítás és karbantartás
Vasalás után
C
1 A gőz kieresztéséhez a készüléket hagyja bekapcsolva,és a
gőztankot kapcsolja ki.
C
2 A gőz kieresztéséhez tartsa nyomja a gőzaktiváló gombot addig,
míg a készülék ki nem gőzöli a maradék gőzt is.
3 Húzza ki a hálózati csatlakozó dugót a fali konnektorból.
4 Helyezze a vasalót az állványra,állítsa a gőzszabályzó gombot a
MIN fokozatra és hagyja lehűlni a készüléket,mielőtt nekilátna
a tisztításhoz.
Vasaló
1 A vasalót nedves ruhával tisztítsa.
2 A vasalótalpról a vízkövet és egyéb lerakódásokat (folyékony)
tisztítószerrel megnedvesített ruhával törölheti le, a tisztítószer
ne lehet súrolószer.
Soha ne merítse a vasalót vízbe és ne öblítse le vízcsap alatt.
Gőztartály
Öblítse ki a gőztartályt havonta egyszer, vagy 10 használat után.
C
1 Óvatosan csavarja le a gőztank zárósapkáját.
Mielőtt a zárókupakot eltávolítaná, hagyja teljesen lehűlni a készüléket.
C
2 Öblítse ki a gőztartályt 500 ml tiszta vízzel. Öntse ki a vizet a
tankból, úgy, hogy tartsa fejjel lefelé a mosdó fölé.
3 Csavarja vissza a sapkát a gőztartályra.
MAGYAR
Page 61

61
Tárolás
Mielőtt elrakná a vasalót, győződjön meg róla, hogy teljesen lehűlt.
1 Húzza ki a hálózati csatlakozó dugót a fali konnektorból és
hagyja lehűlni a vasalót.
2 Ürítse ki a gőztankot.
3 Rendszeresen ellenorizze, hogy a hálózati csatlakozókábel és a
goztömlő sértetlen és ép állapotban van-e.
Környezetvédelem
C
◗ Kérjük, hogy a használhatatlanná vált készüléket ne dobja a
háztartási hulladékgyűjtőbe, hanem hivatalos
hulladékújrahasznosítási gyűjtőhelyeken adja le. Ezzel Ön
hozzájárul a környezetünk megóvásához.
Jótállás és szerviz
Ha információra van szüksége, vagy valamilyen probléma merült fel,
akkor látogasson el a Philips honlapjára (www.philips.com), vagy
forduljon országa Philips vevőszolgálatához (a telefonszámot megtalálja
a világ minden részére vonatkozó garancialevélen). Ha országában nem
működik ilyen vevőszolgálat,forduljon a Philips helyi szaküzletéhez vagy
a Philips háztartási kisgépek és szépségápolási termékek üzletágának
vevőszolgálatához.
Hibaelhárítás
Ez a fejezet a legáltalánosabb problémákat sorolja fel, melyekkel a
készülék használata közben találkozhat.További részletekért olvassa el a
különböző részeket.Amennyiben nem sikerül elhárítania a hibát,
forduljon a lakhelye szerinti Philips Vevőszolgálathoz (telefonszám a
nemzetközi garancialevélen található). Ha országában nincs Philips
Vevőszolgálat, úgy forduljon kereskedőjéhez vagy a legközelebbi Philips
szervizhez.
MAGYAR
Page 62

Elhárítás
Ez a jelenség rövid idő múlva
megszűnik.
Ezek a részecskék teljesen
ártalmatlanok és a vasaló folyamatos
használatával teljesen megszűnnek.
Válasszon a gőzölős vasaláshoz
megfelelő hőmérsékletfokozatot (2
fokozat a MAX fokozatig).
A vasaló kapcsoló gombját állítsa
bekapcsolt pozícióba és várjon, míg a
vasaló felmelegszik.
Tegye a gőztartályt stabil és síma
felületre.
Ez teljesen normális.Tartsa a vasalót
egy régi, elhasznált anyagdarab fölé és
nyomja meg a gőzaktiváló gombot.Az
anyag felszívja a vízcseppeket. Néhány
másodperc múlva a gőztermelődés
normalizálódik.
Mindkét kapcsoló gombot, a vasalóét
és a gőztankét is állítsa bekapcsolt
pozícióba.
Várjon 6-8 percet, hogy a gőztank
felmelegedhessen.
Úgy ellenőrizheti, hogy a vasaló
termel-e gőzt, hogy egy (hideg) tükröt
tart a vasalótalp gőznyílásaival
szemben.
A vasalótalpat tisztítsa meg nedves
ruhával.
A vasalótalpat tisztítsa meg nedves
ruhával.Válassza az ajánlott vasalási
hőmérsékletet.
Lehetséges ok
Ez normális. A vasaló néhány részét a
gyárban bezsírozzák.
Ez teljesen normális egy új készülék
esetében.
Gőzölős vasaláshoz túl alacsony
hőmérséklet lett beállítva.
A vasaló nem kapcsol be.
A gőztartályt instabil és/vagy
egyenetlen felületre helyezte.
Mikor elkezd gőzzel vasalni, a
gőzadagoló cső hideg.A gőz
lecsapódik a csőben és emiatt
vízcseppek jönnek ki a vasalótalpból.
A gőztankot és/vagy a vasalót nem
kapcsolta be.
A gőztank nem elég forró, hogy gőzt
termeljen.
A túlfűtött (tehát jó minőségű) gőz
nehezen látható, különösen akkor,ha a
hőmérsékletszabályzó tárcsát a
legmagasabb pozícióra állította és még
nehezebben, ha a környező
hőmérséklet aránylag magas.
A víz vegyi szennyeződése rakódott le
a vasalótalpra.
Túl nagy hőmérsékleten vasalt.
Hiba
A készülék füstöl bekapcsolás után, az
első alkalommal.
Az új vasaló talpából piszok részecskék
távoznak.
A vasalótalpból vízcseppek szivárognak
ki.
A vasaló nem gőzöl.
Nem jön ki gőz a vasalótalpból
A vasalótalp piszkos
MAGYAR62
Page 63

SLOVENSKY 63
Opis zariadenia
A Dávkovacia hadica
B Kontrolné svetlo
C Nastavenie a indikátor teploty
D Vypínač naparovania a zámok
- D1. Zámok
- D2.Vypínač
E Uzáver zásobníka na paru
F Podstavec žehličky
G Zásobník na paru
H Kábel
I Kontrolné svetlo "Žehlička pripravená na naparovanie" (len model
GC6107)
J Vypínač ohrevu zásobníka na paru s kontrolným svetlom
K Ovládanie naparovania (len modely GC6107/GC6104)
L Vypínač ohrevu žehličky s kontrolným svetlom
M Kontrolné svetlo "Prázdny zásobník na paru" (len model GC6107)
N Žehliaca plocha
Dôležité upozornenie
Pred použitím zariadenia si pozorne prečítajte tento návod a odložte si
ho na neskoršie použitie.
◗ Pred tým ako zariadenie pripojíte do siete skontrolujte, či napätie
uvedené na štítku s označením modelu zariadenia súhlasí s
napätím v sieti.
◗ Zariadenie pripojte jedine do zásuvky s ochranným kolíkom.
◗ Ak je zástrčka, kábel, dávkovacia hadica na paru, alebo samo
zariadenie viditeľne poškodené, ak zariadenie spadlo, alebo z neho
uniká voda, nesmiete ho používať.
◗ Pravidelne kontrolujte,či kábel, alebo dávkovacia hadica na paru
nie je poškodená.
◗ Aby ste sa vyhli nebezpečným situáciám, poškodený napájací kábel,
alebo dávkovaciu hadicu zariadenia smie výmeniť jedine personál
spoločnosti Philips, servisného centra autorizovaného
spoločnosťou Philips, prípadne iná oprávnená osoba.
◗ Kým je zariadenie pripojené do siete, nikdy ho nenechávajte bez
dozoru.
◗ Žehličku ani zásobník na paru nesmiete nikdy ponoriť do vody.
◗ Zariadenie musí byť mimo dosahu detí.
◗ Žehličku a zásobník na paru vždy položte a používajte na
stabilnom, hladkom a vodorovnom povrchu. Zásobník na paru
neukladajte na mäkkú časť dosky na žehlenie.
◗ Kábel ani dávkovacia hadica na paru sa nesmie dotýkať horúcej
žehliacej plochy žehličky.
◗ Podložka na odkladanie žehličky a žehliaca plocha môžu byť veľmi
horúce a pri dotyku s týmito plochami si môžete spôsobiť vážne
popáleniny.Ak chcete premiestniť zásobník na paru, nedotýkajte
sa podložky na odkladanie žehličky.
Page 64

SLOVENSKY64
◗ Keď skončíte žehlenie,keď čistíte zariadenie, keď plníte, alebo
vyprázdňujete zásobník na vodu a tiež keď necháte žehličku čo len
na krátku chviľu stáť: ovládač naparovania nastavtedo polohy 0,
postavte žehličku do zvislej polohy a odpojte ju zo siete.
◗ Do zásobníka na vodu nepridávajte žiaden parfém, ocot, škrob,
prostriedky na odstránenie vodného kameňa,prípravky na
žehlenie, ani iné chemikálie.
◗ Ak počas ohrievania žehličky uniká para cez uzáver zásobníka na
paru, vypnite žehličku a uzáver utiahnite.Ak počas ohrievania
žehličky aj naďalej para uniká, vypnite žehličku a kontaktujte
servisné centrum autorizované spoločnosťou Philips.
◗ Kým je zásobník na paru pod tlakom, nesmiete otvárať jeho
uzáver. Postupujte podľa pokynov v tomto návode na použitie.
◗ Na uzatvorenie zásobníka na paru používajte len uzáver dodaný
spolu so zariadením, pretože tento uzáver slúži súčasne aj ako
bezpečnostný ventil.
◗ Toto zariadenie je určené len na použitie v domácnosti.
Pred prvým použitím
1 Odstráňte všetky nálepky a ochrannú fóliu zo žehliacej platne a
očistite ju mäkkou handričkou.
2 Kábel a dávkovaciu hadicu úplne odviňte.
3 Zásobník na paru postavte na stabilný, rovný povrch.
4 Žehličku postavte na podstavec.
Príprava na použitie
Plnenie zásobníka na vodu
Zásobník na vodu nikdy neponárajte do vody.
Kým je žehlička a zásobník na paru horúci, neotvárajte uzáver
zásobníka.
1 Zariadenie odpojte zo siete.
C
2 Pomaly odskrutkujte uzáver zásobníka na paru.
Keď otvoríte uzáver budete počuť zvláštny zvuk. Spôsobuje ho podtlak
alebo zvyškový pretlak v zásobníku na paru. Je to bežný jav.
C
3 Nalejte do zásobníka vodu (maximálne 1 liter).
Zásobník naplňte pitnou vodou.
◗ Ak je pitná voda vo Vašej oblasti príliš tvrdá, odporúčame Vám ju
zmiešať s destilovanou vodou v pomere 1:1.
Page 65

SLOVENSKY 65
Do zásobníka na paru nepridávajte žiaden parfém, ocot, škrob
prostriedky na odstránenie vodného kameňa, prípravky na žehlenie, ani
iné chemikálie.
4 Uzáver riadne naskrutkujte na plniaci otvor zásobníka na paru.
Rýchle doplnenie
C
1 Zariadenie ponechajte pripojené do siete a žehličku zapnutú.
Potom vypnite ohrev zásobníka na paru.
C
2 Stlačte dávkovanie pary a držte ho stlačené tak dlho,aby ste už
nepočuli zvuk unikajúcej pary.
3 Dávkovanie pary držte stlačené a pomaly odskrutkujte uzáver
zásobníka na paru proti smeru pohybu hodinových ručičiek.Tak
sa vyrovná tlak v zásobníku na paru s okolitým tlakom.
Uistite sa, že v zásobníku už nie je para. Pri otváraní položte na uzáver
zásobníka kúsok tkaniny.
4 Zariadenie odpojte zo siete.
5 Naplňte zásobník na paru podľa pokynov uvedených v časti
"Plnenie zásobníka na paru" a potom nechajte zariadenie znovu
zohriať.
Nastavenie teploty
Zásobník na paru postavte vždy na stabilnú, vyváženú a vodorovnú
podložku. Nikdy ho nepoložte na žehliacu dosku.
1 Žehličku položte na podstavec.
Horúcu žehličku nepoložte na dávkovaciu hadicu ani na kábel
Postarajte sa, aby sa dávkovacia hadica ani napájací kábel nedostali do
styku s horúcou žehliacou plochou.
C
2 Pomocou kolieska nastavte požadovanú teplotu žehlenia.
Skontrolujte, či nastavená teplota zodpovedá údaju na štítku odevu.
Page 66

SLOVENSKY66
Ak neviete z akého materiálu je oblečenie zhotovené, správnu teplotu
žehlenia určíte tak, že ožehlíte niektorú časť oblečenia, ktorú pri nosení
nebude vidieť.
Hodvábne, vlnené a syntetické materiály: žehlite opačnú stranu
oblečenia, aby na ňom nevznikli lesklé plochy.
Najskôr žehlite oblečenie, ktoré pri žehlení vyžaduje najnižšiu teplotu,
napr. oblečenie vyrobené zo syntetických vlákien.
C
3 Kábel pripojte do uzemnenej zásuvky a zapnite oba vypínače
ohrevu, zásobníka na paru aj žehličky. Zásobník na paru a tiež
žehliaca plocha žehličky sa začnú zohrievať.
◗ Keď sa žehlička zohreje, kontrolné svetlo ohrevu zhasne.
◗ Počas naparovania sa kontrolné svetlo ohrevu občas rozsvieti.
Znamená to, že žehlička sa zohrieva na požadovanú teplotu.
◗ Ak ste žehlili oblečenie pri vysokej teplote a následne nastavíte
nižšiu teplotu žehlenia, počkajte, kým sa kontrolné svetlo ohrevu
znovu rozsvieti, a až potom pokračujte v žehlení. Predídete tak
poškodeniu žehleného oblečenia.
Tipy
- Ak sú odevy vyrobené z rôznych druhov vlákna, teplotu žehlenia
zvoľte vždy podľa najcitlivejšieho druhu vlákna, t.j.najnižšiu teplotu.
Napríklad: ak je zloženie výrobku 60% polyesteru a 40% bavlny,
musíte tento kus oblečenia žehliť pri teplote určenej pre žehlenie
polyesteru (1) a bez naparovania.
- Ak žehlíte a naparujete vlnené výrobky, môžu vzniknúť lesklé plochy.
Môžete tomu predísť tak, že výrobok pri žehlení zakryjete suchou
tkaninou, alebo vlnený kus oblečenia prevrátite a ožehlíte jeho
vnútornú stranu.
- Výrobky zo zamatu a iných materiálov,na ktorých pri žehlení vznikajú
lesklé plôšky, by ste mali žehliť len v jednom smere (v smere, v
ktorom sú tkané) a žehličku pri tom tlačiť len veľmi málo.
- Ak žehlíte odev z farebného hodvábu, nepoužívajte naparovanie.V
opačnom prípade by sa mohli na odeve objaviť škvrny.
Nastavenie
naparovania
MIN (viď časť
"Žehlenie bez
naparovania")
Nízke až stredné
Stredné až MAX
Nastavenie
teploty
1
2
3
Typ vlákna
Syntetické vlákna (napr.
acetát, akryl, viskóza,
polyamid, polyester) a
hodváb
Vlna
Bavlna, ľan
Všimnite si, že symbol Z
na štítku znamená, že toto
oblečenie nesmiete žehliť.
Symbol na štítku
oblečenia
B
C
D
Z
Page 67

SLOVENSKY 67
Použitie zariadenia
Naparovanie
1 Uistite sa, že v zásobníku je dostatok vody.
◗ Naparovanie môžete použiť len pri žehlení pri vyššej teplote
(nastavenie 2 až MAX).
C
2 Nastavte naparovanie vhodné pre zvolenú teplotu pri žehlení:
- Nastavte MIN (bez naparovania), ak je nastavená teplota 1 (viď časť
"Žehlenie bez naparovania").
- Pri nastavení teploty 2 zvoľte nízke, alebo stredné nastavenie
naparovania.
- Pri nastavení teploty 3 až MAX zvoľte stredné, alebo maximálne
nastavenie naparovania.
3 Zásobník na paru a tiež žehliaca plocha žehličky sa začnú
zohrievať.
- Studený štart:zohriatie žehliacej plochy žehličky trvá asi 2 minuty,
zohriatie zásobníka na paru približne 8 minút.
- Rýchle ohriatie: ak počas žehlenia dopĺňate vodu v zásobníku na
paru, zohriatie vody v zásobníku bude trvať približne 6 minút.
4 Akonáhle sa voda v zásobníku na paru zohreje na teplotu
potrebnú pri naparovaní,kontrolné svetlo ohrevu zásobníka na
paru zhasne (len modely GC6104 a GC6103). Rozsvieti sa
kontrolné svetlo "Žehlička pripravená na naparovanie" (len
model GC6107).
◗ Počas naparovania sa kontrolné svetlo ohrevu občas rozsvieti.
Znamená to, že žehlička sa zohrieva na požadovanú teplotu.
C
5 Počas naparovania držte vypínač naparovania stlačený.
◗ Ak chcete používať naparovanie kontinuálne, pomocou zámku
uzamknite polohu vypínača naparovania.
6 Naparovanie vypnete tak,že uvoľníte zámok vypínača
naparovania.
Ak ste naparovanie dlhšie nepoužívali, para v dávkovacej hadici
skondenzuje. Ak znovu začnete s naparovaním, budete počuť v žehličke
chrčanie, alebo z otvorov v žehliacej ploche žehličky môže vytrysknúť
niekoľko kvapiek vody.
B
Aby počas žehlenia kvapky nepadli na žehlené oblečenie, žehličku
podržte nad kúskom starej tkaniny a vypínač naparovania podržte
stlačený dovtedy, kým naparovanie začne opäť riadne fungovať.
Page 68

SLOVENSKY68
Žehlenie bez naparovania
1 Nastavte odporúčanú teplotu žehlenia (viď kapitola "Príprava
na použitie").
Nestláčajte vypínač naparovania.
◗ Ak náhodou počas žehlenia stlačíte vypínač naparovania,unikne
trocha pary.Aby ste tomu predišli, vypnite vypínač ohrevu
zásobníka na paru.
◗ Ak je zásobník na paru prázdny, alebo sa ešte nezačal ohrievať,
budete v ňom počuť klikanie.Tento zvuk je spôsobený otváraním
ventila na paru a neznamená žiadne nebezpečenstvo.
*alšie vlastnosti
Naparovanie vo zvislej polohe
C
◗ Pomocou žehličky vo zvislej polohe môžete naparovať zavesené
záclony a oblečenie (saká, šaty,kabáty).
1 Stlačte vypínač naparovania.Ak chcete používať naparovanie
kontinuálne, uzamknite vypínač naparovania.
Otvory žehliacej platne nikdy nenasmerujte na ľudí.
Zmena intenzity naparovania (len modely GC6107 a GC6104)
Nastavenie naparovania môžete kedykoľvek zmeniť od minimálnej po
maximálnu intenzitu naparovania (viď kapitola "Príprava na použitie").
Kontrolné svetlo "Prázdny zásobník na paru"
(len model GC6107)
Ak sa počas naparovania vyprázdni zásobník na paru, rozsvieti sa
kontrolné svetlo "Prázdny zásobník na paru".
1 Nalejte vodu do zásobníka na paru (viď kapitola "Príprava na
použitie").
Kontrolné svetlo "Žehlička pripravená na naparovanie"
(len model GC6107)
Keď je voda v zásobníku na paru pripravená na naparovanie, rozsvieti sa
kontrolné svetlo "Žehlička pripravená na naparovanie".
Page 69

SLOVENSKY 69
Čistenie a údržba
Po žehlení
C
1 Aby ste vyrovnali tlak v zásobníku na paru s okolitým tlakom,
zapnite ohrev žehličky a vypnite ohrev zásobníka na paru.
C
2 Stlačte dávkovanie pary a držte ho stlačené tak dlho,aby ste už
nepočuli zvuk pary unikajúcej zo zariadenia.
3 Zariadenie odpojte zo siete.
4 Žehličku postavte na podstavec,ovládanie naparovania nastavte
na MIN a pred čistením nechajte zariadenie ochladiť.
Žehlička
1 Žehličku očistite pomocou vlhkej tkaniny.
2 Vlhkou tkaninou a neabrazívnym (tekutým) čistiacim
prostriedkom utrite vodný kameň a iné usadeniny na povrchu
žehliacej plochy.
Žehličku nikdy nesmiete ponoriť do vody, ani ju umývať pod tečúcou
vodou.
Zásobník na vodu
Zásobník na paru opláchnite raz mesačne, alebo vždy po 10 použitiach
zariadenia.
C
1 Pozorne otvorte uzáver zásobníka na paru.
Pred otvorením uzáveru nechajte zariadenie riadne vychladnúť.
Page 70

SLOVENSKY70
C
2 Zásobník na vodu opláchnite 500 ml čerstvej vody. Zásobník
otočte hore nohami a vodu vylejte do výlevky.
3 Uzáver naskrutkujte naspäť na otvor zásobníka na paru.
Odkladanie
Skôr, ako zariadenie odložíte, nechajte ho dostatočne vychladnúť.
1 Odpojte zástrčku zo zásuvky el. siete a žehličku nechajte
vychladnúť.
2 Vyprázdnite zásobník na paru.
3 Pravidelne kontrolujte,či sú napájací kábel a dávkovacia hadica
nepoškodené a či ich môžete bezpečne ďalej používať.
Životné prostredie
C
◗ Keď sa skončí životnosť zariadenia, neodhadzujte ho spolu s
bežným odpadom, ale zaneste ho na miesto oficiálneho zberu
kvôli recyklovaniu. Pomôžete tak zachovať životné prostredie.
Záruka a servis
Ak potrebujete informácie, alebo máte problém,prosíme Vás, aby ste
navštívili www stránku spoločnosti Philips - www.philips.com, alebo sa
obrátili na Centrum služieb zákazníkom spoločnosti Philips vo Vašej
krajine (telefónne číslo Centra nájdete v priloženom celosvetovo
platnom záručnom liste). Ak sa vo Vašej krajine toto Centrum
nenachádza, obráťte sa na miestneho predajcu výrobkov Philips, alebo
kontaktujte Oddelenie služieb Philips - divízia domáce spotrebiče a
osobná starostlivosť.
Page 71

SLOVENSKY 71
Riešenie problémov
V tejto kapitole sú uvedené najbežnejšie problémy, s ktorými sa môžete
stretnúť pri žehlení. *alšie informácie získate v jednotlivých častiach
návodu.V prípade,že nedokážete odstrániť vzniknutý problém,
kontaktujte Centrum starostlivosti o zákazníka spoločnosti Philips vo
Vašej krajine (telefónne číslo nájdete na celosvetovo platnom
záručnom liste). Ak vo Vašej krajine nie je Centrum starostlivosti o
zákazníka spoločnosti Philips, obráťte sa na predajcu výrobkov Philips,
alebo na najbližšie Servisné centrum spoločnosi Philips.
Riešenie
Po chvíli sa tento nedostatok stratí.
Tieto nečistoty nie sú nebezpečné a
po niekoľkých použitiach žehličky sa
úplne stratia.
Nastavte teplotu žehlenia vhodnú na
naparovanie (nastavenie teploty 2 až
MAX).
Vypínačom zapnite ohrev žehličky a
počkajte kým sa zohreje.
Zásobník na vodu postavte na stabilný
a rovný povrch.
Je to bežný jav.Žehličku podržte nad
kúskom starej tkaniny a stlačte vypínač
naparovania.Tkanina absorbuje kvapky
vody. Po niekoľkých sekundách sa
naparovanie obnoví.
Pomocou vypínačov zapnite ohrev
zásobníka aj žehličky.
Počkajte 6 až 8 minút, aby sa voda v
zásobníku zohriala.
Ak si chcete overiť, či zariadenie
skutočne produkuje paru, podržte
pred otvormi v žehliacej ploche
(studené) zrkadlo.
Očistite žehliacu plochu navlhčenou
tkaninou.
Očistite žehliacu plochu navlhčenou
tkaninou. Zvoľte odporúčanú teplotu
žehlenia.
Možná príčina
Je to normálne. Niektoré súčiastky v
žehličke sú z výroby chránené malým
množstvom mazadla.
V prípade novej žehličky je to bežný jav.
Nastavená teplota žehlenia je príliš nízka,
aby ste mohli použiť naparovanie.
Nie je zapnutý ohrev žehličky.
Zásobník na vodu ste postavili na
nestabilnú a/alebo krivú podložku.
Keď začínate s naparovaním, dávkovacia
hadica je chladná. Para začne v hadici
kondenzovať a preto z otvorou v
žehliacej ploche kvapká voda.
Nezapli ste ohrev zásobníka na paru
alebo ohrev žehličky.
Zásobník na paru nie je zohriaty na
požadovanú teplotu a preto sa
nevytvára para.
Prehriatu (veľmi kvalitnú) paru nemusíte
zbadať, predovšetkým, ak ste koliesko na
ovládanie teploty otočili do pozície pre
maximálnu teplotu, a tiež, ak je teplota
prostredia relatívne vysoká.
Na povrchu žehliacej plochy sa usadili
nečistoty alebo chemické prímesi
prítomné vo vode.
Žehlili ste pri príliš vysokej teplote.
Problém
Pri prvom zapnutí novej žehličky z
nej začal unikať dym.
Z otvorov v žehliacej ploche novej
žehličky vychádzajú nečistoty.
Z otvorov v žehliacej ploche
unikajú kvapky vody.
Žehlička nevytvára paru.
Z otvorov v žehliacej ploche
nevychádza para.
Žehliaca plocha je špinavá.
Page 72

УКРАЇНСЬКА72
Загальний опис
A Шланг
B Лампа температури
C Дисковий регулятор температури з індикатором
D Активатор пари з фіксатором
- D1.Фіксатор
- D2.Активатор
E Кришка парового бачку
F Підставка для праски
G Паровий бачок
H Шнур живлення
I Лампа готовності пари (тільки GC6107)
J Перемикач парового бачку з лампою ввімкнення
K Регулятор пари (тільки GC6107/GC6104)
L Вимикач праски з лампою ввімкнення
M Лампа "Паровий бачок порожній" (тільки GC6107)
N Підошва
Увага!
Прочитайте цю інструкцію уважно перед використанням пристрою
та зберігайте для подальшого використання.
◗ Перевірте, чи збігається напруга, вказана на табличці
характеристик, із напругою у мережі вашого будинку перед
тим, як приєднувати пристрій до мережі.
◗ Під'єднуйте пристрій лише до заземлених розеток.
◗ Не використовуйте пристрій,якщо штепсель, шнур, шланг або
сам пристрій мають видимі пошкодження, або якщо пристрій
падав або він має течу.
◗ Перевіряйте шнур та шланг регулярно на можливе
пошкодження.
◗ Якщо шнур або шланг пошкоджено, для запобігання
небезпеці його треба замінити у фірмі "Philips", у сервісному
центрі, уповноваженому фірмою "Philips", або його має
замінити кваліфікований спеціаліст.
◗ Ніколи не залишайте пристрій без нагляду, коли він
підключений до мережі.
◗ Ніколи не занурюйте пристрій чи паровий резервуар у воду.
◗ Тримайте пристрій подалі від дітей.
◗ Завжди ставте та використовуйте праску і паровий резервуар
на стійкій, рівній та горизонтальній поверхні. Не ставте
паровий резервуар на м'яку частину дошки для прасування.
◗ Не допускайте, щоб шнур або шланг торкався підошви, коли
вона гаряча.
◗ Підставка для праски та підошва праски можуть сильно
нагріватися, що може призвести до опіку, якщо до них
торкнутися. Якщо Вам потрібно зняти паровий бак, не
торкайтеся до підставки.
Page 73

УКРАЇНСЬКА 73
◗ Коли після закінчення прасування Ви чистите пристрій,коли
Ви заповнюєте або спустошуєте водяний резервуар,а також
якщо Ви залишаєте праску навіть на короткий час, ставте
регулятор інтенсивності пари у положення 0, встановлюйте
праску на п'яту та витягайте штепсель з розетки.
◗ Не заливайте парфуми, оцет, крохмаль, речовини для
видалення накипу, засоби для покращення прасування чи інші
хімічні речовини у водяний резервуар.
◗ Якщо пара виходить з-під кришки парового бачка, коли
пристрій нагрівається, вимкніть пристрій та щільніше закрийте
кришку бачка.Якщо пара продовжує виходити, коли пристрій
нагрівається, вимкніть пристрій та зв'яжіться з сервісним
центром, уповноваженим фірмою "Philips".
◗ Не знімайте ковпачка з парового резервуару, коли той
знаходиться під тиском. Дотримуйтесь зазначених нижче
інструкцій.
◗ Ніколи не використовуйте іншу кришку для парового
резевуара ніж ту, що входить до комплекту прилада, лише цю
кришку оснащено захістним клапаном.
◗ Цей пристрій призначений виключено для домашнього
використання.
Перед першим використанням праски
1 Зніміть з нагрівального елемента захисну або змащену клеєм
плівку і протріть його м'якою тканиною.
2 Повністю розмотуйте шнур та шланг.
3 Ставте паровий бачок на стійку рівну поверхню.
4 Ставте праску на підставку.
Підготовка до використання
Наповнення парового резервуару.
Ніколи не занурюйте паровий резервуар воду.
Не відкривайте кришку, поки праска та паровий бачок залишаютьс
гарячими.
1 Вимкніть вилку праски з розетки.
C
2 Повільно відгвинтіть кришку парового бачка.
Ви можете почути звук при знятті кришки.Цей звук спричинений
вакуумом або залишковим тиском всередині бачка і є природнім.
Page 74

УКРАЇНСЬКА74
C
3 Залийте воду у паровий резервуар (макс. 1 літр).
Наповнюйте бачок під краном.
◗ Якщо вода з-під крану у вашій місцевості надто жорстка,
радимо використовувати 50% дистильованої води й 50%
водопровідної.
Не заливайте у паровий бачок парфуми, оцет, крохмал
протинакипні засоби, засоби для прасування чи інші хімікати.
4 Пригвинчуйте кришку щільно до отвору парового бачка.
Швидке наповнення
C
1 Штепсель має бути вставлений у розетку, а праска
ввімкненою. Встановіть перемикач парового бачка на
"вимк".
C
2 Натискайте активатор пари, поки не припиниться вихід
пари з пристрою.
3 Тримайте активатор натиснутим та повільно відгвинчуйте
кришку з парового бачка, повертаючи її проти годинникової
стрілки.Це зніме тиск у паровому бачку.
Переконайтеся, що в бачку не залишається пари.При відкручуванні
покладіть на кришку ганчірку.
4 Вимкніть вилку праски з розетки.
5 Наповніть паровий резервуар, як описано у розділі
"Наповнення парового резервуару" та дайте пристрою
знову нагрітися.
Налаштування температури
Завжди кладіть паровий резервуар на жорстку, рівну т
горизонтальну поверхню. Не кладіть паровий резервуар на м'яку
частину прасувальної дошки.
1 Ставте праску на підставку.
Не ставте гарячу праску на шланг або шну
живлення.Переконайтеся, що шнур не контактує з гарячо
підошвою.
Page 75

УКРАЇНСЬКА 75
C
2 Встановіть потрібну температуру прасування, повернувши
регулятор температури у потрібне положення.
Подивіться припустиму температуру прасування на ярлику на
одежі, прикріпленому до одежі:
Якщо ви не знаєте, до якого типу відноситься тканина виробу,
визначте правильну температуру прасуванням шматка, який не є
видимим при носінні одежі.
Шовк, вовняні та синтетичні матеріали: Щоб тканина не лиснілася,
прасуйте зворотну сторону тканини.
Починайте прасування з речей, що потребують найнижчої
температури, наприклад, з синтетики.
C
3 Вставте штепсель у заземлену розетку і встановіть
перемикачі парового бачка та праски в положення
"вмк".Тепер паровий бак та підошва нагріваються.
◗ Праска достатньо нагріта, коли лампа температури згасає.
◗ Підчас прасування з парою лампа температури загорається час
від часу.Це означає, що праска нагрівається до потрібної
температури.
◗ Якщо ви прасували при високій температурі, а потім
встановили регулятор на нижчу температуру. зачекайте, поки
лампа температури не загориться знову, перед тим, як
продовжувати прасування.Це не дасть пошкодити вашу
тканину.
Поради
- Якщо одежа складається з різних типів тканини, завжди
вибирайте температуру, якої потребує найбільш делікатна
Установка пари
MIN (див.
"Прасування без
пари")
Від низької до
середньої
Від середньої до
MAX
Установка
температури
1
2
3
Тип тканини
Синтетичні тканини
(наприклад, ацетат,
акрил, віскоза,
поліамід, поліефір) та
шовк
Вовна
Бавовна, льон
Зверніть увагу, що Z
на етикетці означає,
що цю одежу не
можна прасувати.
Символ на етикетці
з інформацією про
прання
B
C
D
Z
Page 76

УКРАЇНСЬКА76
тканина, тобто найнижчу температуру. Наприклад: якщо одяг
складається з 60% поліефіру та 40% бавовни, його треба
прасувати при температурі, вказаній для поліефіру (1), без пари.
- При прасуванні вовняних тканин може виникати лиск. Ви можете
запобігти цьому, накладаючи суху тканину або повертаючи одяг
та прасуючи його зворотну сторону.
- Вельвет та деякі інші тканини можуть набувати лиску, тому їх
можна прасувати лише в одному напрямку (вздовж ворсу),
натискаючи дуже легко.
- Не застосовуйте пару при прасуванні кольорового шовку. Це
може спричинити появу плям.
Використання пристрою
Прасування з паром
1 Переконайтеся, що паровий резервуар достатньо
наповнений водою.
◗ Прасування з парою можливе тільки при вищій температурі
(установка температури від 2 до MAX).
C
2 Оберіть установку пари, що підходить для обраної
температури прасування:
- Оберіть положення пари MIN (немає пари) для температури 1
(див. "Прасування без пари").
- Оберіть положення пари від низького до середнього для
температури 2.
- Оберіть положення пари від середнього до MAX для
температури від 3 до MAX.
3 Тепер паровий бачок та підошва нагріваються.
- Холодне включення:На нагрівання підошви потрібно близько 2
хвилин, для парового бачка - близько 8 хвилин.
- Швидке прогрівання:Якщо ви наповнюйте паровий бачок підчас
прасування, на нагрівання води у резервуарі знадобиться близько
6 хвилин.
4 Щойно вода в резервуарі достатньо нагріється ,згасне
сигнальний вогник ввімкнення парового бачка(тільки
GC6104, GC6103). Загориться вогник готовності пари
(тільки GC6107).
◗ Підчас прасування з парою лампа готовності пари загорається
час від часу.Це означає, що паровий бачок нагрівається до
потрібної температури.
Page 77

УКРАЇНСЬКА 77
C
5 Утримуйте активатор пари натиснутим підчас прасування з
парою.
◗ Якщо ви бажаєте застосовувати функцію випуску пари
безперервно, пересуньте фіксатор активатора пари у
положення фіксації.
6 Щоб вимкнути подачу пари, відпустіть фіксатор активатора
пари.
Якщо ви деякий час не застосовували функцію випуску пари, пара,
що залишається у шлангу, конденсується в воду.Коли ви починаєте
прасувати з парою знову, це може спричинити деякий шум у
пристрою, і декілька крапель води можуть витекти з підошви.
B
Щоб запобігти потраплянню крапель на вашу одежу, тримаючи
праску над старою ганчіркою, натискайте активатор пари, поки
вихід пари не нормалізується, перед тим, як прасувати з парою
знову.
Прасування без пару
1 Оберіть потрібну температуру прасування (див.главу
"Підготовка до використання").
Не натискайте активатор пари підчас прасування.
◗ Якщо ви помилково натиснете активатор пари при прасуванні,
вийде трохи пари.Щоб запобігти цьому, ви просто можете
встановити перемикач парового бачка в положення "вимк",
щоб повністю перекрити подачу пари.
◗ Якщо паровий бачок порожній або не нагрівається, ви
чутимете клацання з бачка.Це явище спричиняється
відкриттям парового клапану та є безпечним.
Функції
Прасування з вертикальним виходом пари
C
◗ Гардини та одяг, що висить (піджаки, костюми, пальто), можна
прасувати з парою, тримаючи праску у вертикальному
положенні.
1 Натисніть активатор пари.Якщо ви бажаєте застосовувати
функцію пари безперервно, використовуйте фіксатор
активатора пари.
Ніколи не спрямовуйте пару на людей.
Page 78

УКРАЇНСЬКА78
Змінна пара (тільки GC6107 та GC6104)
Регулятор пари переставляється безступінчасто, і ви можете
обрати будь-яке положення між MIN і MAX (див. главу "Підготовка
до використання").
"Паровий бачок порожній" (тільки GC6107)
Коли вода в паровому бачку закінчується підчас використання,
загорається лампа "Паровий бачок порожній".
1 Наповніть водяний бачок водою (див. главу "Підготовка до
використання").
Лампа готовності пари (тільки GC6107)
Коли паровий бачок буде готовий до прасування з парою, лампа
готовності пари загориться.
Чищення і догляд за праскою
Після прасування
C
1 Щоб зняти тиск у бачку, встановіть вимикач праски у
положення "вмк", а вимикач бачка - у положення "вимк".
C
2 Щоб зняти тиск у паровому бачку, натискайте активатор
пари, поки не припиниться вихід пари з пристрою.
3 Вимкніть вилку праски з розетки.
4 Поставте праску на підставку, встановіть регулятор пари у
положення MINі дайте пристрою охолонути перед
чищенням.
Праска
1 Чистіть праску вологою ганчіркою.
2 Тканиною, змоченою у неабразивному (рідкому) засобі для
чистки прасок, витріть накип і будь-які інші відкладення з
нагрівального елементу.
Ніколи не занурюйте праску у воду та не мийте її під краном.
Page 79

УКРАЇНСЬКА 79
Паровий резервуар
Промивайте паровий бачок раз на місяць або після використання
пристрою прибл. 10 разів.
C
1 Обережно зніміть кришку парового бачка.
Дайте пристрою достатньо охолонути перед тим, як знімати
кришку.
C
2 Промийте бачок 500 мл свіжої води. Вилийте воду,
тримаючи паровий бачок догори дном над раковиною.
3 Надіньте кришку на паровий резервуар.
Зберігання
Переконайтеся, що праска охолонула достатньо перед тим, як
ставити її на зберігання.
1 Витягніть штепсель з розетки і дайте прасці охолонути.
2 Спорожніть паровий бачок.
3 Регулярно перевіряйте шнур живлення та шланг на
відсутність пошкоджень та безпеку.
Довкілля
C
◗ Не викидайте пристрій зі звичайним побутовим сміттям,
доставляйте його після того, як сплине термін використання,
до офіційного приймального пункту для переробки. Цим ви
допоможете зберегти довкілля.
Гарантія і обслуговування
Якщо Вам необхідна інформація або у Вас виникли проблеми,
зверніться до веб-сторінки компанії "Philips" - www.philips.com, або
зверніться до Центру обслуговування клієнтів компанії "Philips" у
Вашій країні (телефон Ви можете знайти на гарантійному
талоні).Якщо у Вашій країні немає Центру обслуговування клієнтів,
зверніться до місцевого ділера або зв'яжіться з Сервісним відділом
"Philips Domestic Appliаnces аnd Personаl Cаre BV".
Page 80

УКРАЇНСЬКА80
спосіб усунення
Це явище зникне через деякий час.
Ці частинки не є шкідливими і не
сиплються через декілька прасувань.
Оберіть температуру прасування,
придатну для прасування з парою
(установка температури від 2 до
MAX).
Встановіть вимикач праски в
положення "вмк" та зачекайте, поки
праска нагріється.
Встановіть паровий резервуар на
стабільну та рівну поверхню.
Це є природнім. Тримаючи праску
над старою ганчіркою, натискайте
активатор пари.Ганчірка вбирає
краплі.Через декілька секунд вихід
пари нормалізується.
Встановіть вимикачі на прасці та на
бачку в положення "вмк".
Зачекайте 6-8 хвилин, поки бачок
нагріється.
Щоб перевірити, чи виходить пара,
піднесіть холодне дзеркало до
підошви.
Очистіть підошву вологою
ганчіркою.
Очистіть підошву вологою
ганчіркою. Оберіть рекомендовану
температуру прасування.
Можлива причина
Це є нормальним. Деякі частини
змащені на заводі.
Це є звичайним для нової праски.
Регулятор температури встановлено
на занадто низьку для прасування з
парою температуру.
Праску не ввімкнено.
Паровий резервуар поставлено на
нестабільну чи нерівну поверхню.
Коли Ви починаєте прасувати, шланг
залишається холодним. Пара
конденсується на шлангу, тому вода
капає з підошви.
Паровий бачок або праску не
ввімкнено.
Паровий бачок не достатньо
гарячий для продукування пари.
Перегріту (тобто високоякісну) пару
важко побачити, особливо, коли
регулятор температури встановлено
на максимум і навіть менше, коли
температура оточуючого
середовища досить висока.
Речовини, що містяться у воді,
можуть спричиняти осадок на
підошві.
Ви прасуєте при занадто високій
температурі.
Несправність
Після першого ввімкнення
пристрою з пристрою може
виходити дим.
Частинки бруду можуть сипатися з
підошви нової праски.
Краплі води просочуються з
підошви.
З пристрою не виходить пара.
Пара не виходить з підошви.
Підошва брудна.
Можливі несправності.
У цій главі зведено основні складнощі, яки можуть виникнути при
використанні праски.Будь-ласка, за окремими подробицями
звертайтеся до окремих розділів.Якщо Ви не можете усунути
проблему самостійно, зверніться до Центру обслуговування клієнтів
фірми "Philips" у Вашій країні (номер телефону - на міжнародному
гарантійному талоні).Якщо у Вашій країні такого центру немає,
зверніться до місцевого ділера фірми "Philips" або до найближчого
сервісного центру "Philips".
Page 81

HRVATSKI 81
Opći opis
A Cijevo za dovod
B Svjetlo indikacije temperature
C Odabir temperature i indikator
D Aktivator pare i kočnica
- D1. Zaključano
- D2.Aktivator
E kapa spremišta za paru
F Postolje
G Spremište za paru
H Mrežni kabel
I Svjetlo indikacije pripreme pare (GC6107)
J Prekidač spremišta pare sa svjetlosnom indikacijom
K Kontrola pare (GC6107/GC6104)
L Prekidač glačala sa svjetlosnom indikacijom
M Svjetlosna indikacija ispražnjenosti spremišta pare (GC6107)
N Grijaća ploča
Važno
Prije uporabe aparata pažljivo pročitajte ove upute i sačuvajte ih za
kasniju uporabu.
◗ Prije nego što uključite aparat, provjerite da li napon naznačen na
pločici modela odgovara mrežnom naponu.
◗ Aparat spojite isključivo na uzemljenu zidnu utičnicu.
◗ Ne koristite aparat ako su utikač,kabel, crijevo za opskrbu parom
ili sam aparat oštećeni ili ako je aparat pao na pod ili ako
primjetite procurivanje vode.
◗ Regularno provjeravajte stanje mrežnog kabla i crijeva za dovod
pare zbog mogućih oštećenja.
◗ Ako je mrežni kabel oštećen,uvijek ga zamijenite originalnim u
ovlaštenom Philips servisu ili os strane kvalificirane osobe kako bi
izbjegli potencijalno opasne situacije.
◗ Nikad ne ostavljajte aparat bez nadzora kad je uključen u el.
struju.
◗ Nikada ne uranjajte glačalo ili spremnik za paru u vodu.
◗ Držite aparat izvan dohvata djece.
◗ Glačalo i spremište za paru uvijek koristite i držite na ravnoj i
stabilnoj podlozi. Ne stavljajte spremište za paru na meki kraj
daske za glačanje.
◗ Pazite da mrežni kabel ne dodje u kontakt s vrućom pločom
glačala.
◗ Postolje i grijaća ploča glačala mogu se jako zagrijati i prouzročiti
opekline. Želite li pomaknuti spremnik za paru, ne dodirujte
postolje.
◗ Po završetku glačanja,tijekom čišćenja,punjenja ili pražnjenja
spremnika za vodu i kad nakratko ostavite glačalo: postavite
kontrolu pare na položaj O,postavite glačalo u uspravni položaj i
izvucite mrežni kabel iz zidne utičnice.
Page 82

HRVATSKI82
◗ Nikada ne dodajte nikakve parfeme, osvježivače, kiseline ili bilo
kakve druge kamikalije u spremnik s vodom.
◗ Ako para izlazi ispod kape spremišta pare tijekom zagrijavanja
glačala, isključite aparat te dobro dotegnite kapu.Ako para i dalje
bježi ispod kape, isključite glačalo i kontaktirajte ovlašteni servis.
◗ Ne odvajajte poklopac spremišta za paru ako je spremište pod
pritiskom. Slijedite instrukcije dane kasnije u ovim uputama.
◗ Nemojte koristiti nijedan drugi pokrov spremnika za paru umjesto
isporučenog, jer on također funkcionira i kao sigurnosni ventil.
◗ Aparat je namijenjen isključivo za kućnu uporabu.
Prije prve uporabe
1 Uklonite bilo kakvu naljepnicu ili zaštitnu foliju sa donje ploče i
obrišite je mekom krpom.
2 Potpuno odmotajte mrežni kabel i crijevo za dovod.
3 Postavite spremište pare na stabilni u ravnu površinu.
4 Stavite glačalo na stalak.
Priprema za uporabu
Punjenje spremnika za paru
Nikada ne uranjajte spremnik za paru u vodu.
Ne otvarajte kapu dok su glačalo i spremište pare još vrući.
1 Izvucite mrežni kabel iz utičnice.
C
2 Polagano odvojite kapu od spremišta.
Tijekom odvajnja možete začuti zvuk.Taj zvuk je nastao zbog vakuuma
ili rezidualnog pritiska unutar spremišta.To je potpuno normalno.
C
3 Ulijte vodu u spremnik za paru (maks.1 l).
Koristite vodu iz slavine za punjenje spremišta.
◗ Ako je voda iz slavine vrlo tvrda, savjetujemo da koristite 50%
destilirane vode.
Ne stavljajte parfeme, kvasinu, sredstva za uklanjanje kamenca ili neke
druge kemikalije u spremište za paru.
4 Dobro zavrnite kapu na spremište za paru.
Page 83

HRVATSKI 83
Brzo nadopunjavanje
C
1 Ostavite aparat spojen na el.mrežu te provjerite da li je glačalo
uključeno.
C
2 Pritisnite aktivator pare sve dok para ne prestane izlaziti iz
aparata.
3 Držite aktivator pare pritisnut i polako odvrnite kapu spremišta
pare u smjeru obrnutim od kazaljke na satu.To će ukloniti
pritisak iz spremišta.
Provjerite da li je sva para izišla iz spremišta. Stavite komadić odjeće
preko kape prilikom odvrtanja.
4 Izvucite mrežni kabel iz utičnice.
5 Napunite spremnik vodom prema opisu u poglavlju "Punjenje
spremnika za paru" i pričekajte da se aparat ponovno zagrije.
Podešavanje temperature
Spremnik za paru uvijek postavite na stabilnu, ravnu i vodoravnu
površinu. Ne stavljajte spremnik za paru na meki dio daske za glačanje.
1 Stavite glačalo na stalak.
Ne stavljajte vruće glačalo na crijevo za dovod ili na mrežni kabel. Pazite
da mrežni kabel ili crijevo za dovod ne dođu u kontakt s vrućom
grijaćom pločom glačala.
C
2 Postavite željenu temperaturu glačanja postavom odabira u
odgovarajuću poziciju.
Provjerite odgovarajuću temperaturu na markici odjeće koju glačate.
Postava pare
MIN (vidi 'Glačanje
bez pare')
Malo do srednje
Srednje do MAX
Postava
temperature
1
2
3
Vrsta materijala
Sintetski materijali (acetat, akril,
viskoza, poliamid. poliester)
Vuna
Pamuk, lan
Opaska: Z na markici znači
da se oba odjeća ne smije
glačati.
Simbol na
markici odjeće
B
C
D
Z
Page 84

HRVATSKI84
Ako ne znate od kakve vrste materijala je(su) tkanina(e) napravljena(e),
odredite pravu temperaturu glačanja glačanjem dijela koji se neće
vidjeti kada odjenete ili dok koristite predmet.
Svila, vuna i sintetika: glačajte ih s obrnute strane kako bi izbjegli
nastajanje sjajnih mrlja.
Započnite s glačanjem tkanina kojima je potrebna najniža temperatura,
poput sintetike.
C
3 Utaknite mrežni kabel u uzemljenu utičnicu te uljučite glačalo i
spremište za paru. Spremište i glačalo će se početi zagrijavati.
◗ Glačalo je dovoljno vruće kada se svjetlo temperature ugasi.
◗ Tijekom glačanja sa parom svjetlo temperature se spradično pali i
gasi.To je indikacija da se glačalo povremeno zagrijava na
određenu temperaturu.
◗ Ako ste glačali na višoj temperaturi te ste postepeno odabirali
niže temperature glačanja, pričekajte da se svjetlo temperture
ponovo upali prije početka glačanja.
Savjeti
- Ako se materijal sastoji od različitih vlakana uvijek odaberite
temperaturu prikladnu za najosjetljivija vlakna,odnosno najnižu
temperaturu. Primjer: ako se materijal sastoji os 60% poliestera i 40%
pamuka, odaberite temperaturu za poliester (1) i glačajte bez pare.
- Pri glačanju vunenih materijala može doći do nastajanja sjajnih mrlja.
To možete spriječiti glačanjem preko suhe krpe ili glačanjem s
obrnute strane tkanine.
- Baršun i materijale kod kojih se lako pojave sjajne mrlje glačajte samo
u jednom smjeru (u smjeru vlakana) s vrlo blagim pritiskom glačala
na tkaninu.
- Materijale od obojene svile ne glačajte s parom jer to može
prouzročiti mrlje.
Uporaba aparata
Parno glačanje
1 Provjerite ima li u spremniku za paru dovoljno vode.
◗ Glačanje sa parom je moguće jedino na višim temperaturama.
(postavke 2 do MAX)
C
2 Selektirajte postavku za paru koja odgovara selektiranoj
temperaturi glačanja.
- Selektirajte postavu za paru na MIN (bez pare) za postavke
temperature 1 (vidi ' Glačanje bez pare').
- Selektirajte malo do srednje postavku za odabir temperature 2.
Page 85

HRVATSKI 85
- Selektirajte srednje do MAX za postavku temperature 3 do
MAX.
3 Spremište pare i grijaća ploča će se početi zagrijavati.
- Hladni start:Grijaća ploča treba cca 2 minute da se zagrije a
spremište pare treba cca 8 minuta za zagrijavanje.
- Brzo zagrijavanje: ako dopunjujete spremište pare tijekom glačanja,
vodi u spremištu će trebati cca. 6 minuta da se zagrije.
4 Odmah nakon što se voda u spremišto zagrije dovoljno za
parno glačanje, kontrolno svjetlo spremišta pare se ugasi.
(GC6104, GC6103). Kontrolno svjetlo za spremnost pare se
uključi (samo GC6107).
◗ Tijekom glačanja svjetlo se sporadično pali i gasi.To je indikacija da
se spremište pare zagrijava na radnu temperaturu.
C
5 Držite pritisnutim aktivator pare tijekom glačanja s parom.
◗ Želite li koristiti funkciju opare kontinuirano,zakočite aktivator
pare u poziciju 'zakočeno'.
6 Zaprestanak parenja,odpustite aktivator.
Ako niste koristili funkciju pare neko vrijeme, para koja je ostala u
crijevu za dovod se kondenzirala u vodu.. Kada započnete s parnim
glačanjem ponovno, tza će voda izazvati prskanje nekoliko kapljica vode
iz grijaće ploče.
B
Kako bi spriječili da smeće i kamenac pada po odjeći koju glačate, držite
glačalo iznad stare odjeće i pritisnite aktivator doke se protok pare ne
stabilizira prije nego počnete s glačanjem.
Glačanje bez pare
1 Sečektirajte prporučenu temperaturu glačanja (vidi poglavlje
'Priprema za uporabu')
Ne dirajteaktivator parre tijekom glačanja.
◗ Ako slučajno pritisnete aktivator pare tijekoma glačanja, nešto
pare će izaći. Kako bi to sprječili, možete jednostavno sključiti
spremište pare kako bi kompletno zaustavili dovod pare.
◗ Ako je spremište pare prazno ili se još nije dovoljno ugrijalo,
začuti ćete zvuk 'klikanja' unutar spremišta.To je potpuno
normalno i bezopasno.
Page 86

HRVATSKI86
Funkcije
Vertikalno glačanje sa parom
C
◗ Zavjese ili odjeću na vješalicama (jakne, odijela, kapute) možete
glačati držeći glačalo u okomitom položaju.
1 Pritisnite aktivator pare. Želite li koristiti funkciju pare
konstantno,koristite kočnicu aktivatora.
Nikada ne usmjerujte mlaz pare prema drugim osobama.
Varijabilni mlaz pare.(GC6107 i GC6104)
Kontrola pare je prilagodljiva te se može postaviti u bilo koju poziciju
između MIN i MAX (vidi poglavlje ' Priprema za uporabu')
Svjetlo 'Spremište za paru je prazno' (samo GC6107)
Kada nestane vode u spremištu paree tijekom uporabe, ovo svjetlo će
se upaliti.
1 Nadopunite spremište pare sa vodom (vidi poglavlje 'Priprema
za uporabu').
Kontrolno svjetlo pare. (GC6107)
Kada je spremište pare spremno za korištenje, upali se svjetlo-indikator.
Čišćenje i održavanje
Nakon glačanja
C
1 Kako bi izbacili pritisak iz spremišta,uključite glačalo i isključite
spremište.
C
2 Pritisnite aktivator pare kako bi izbacili preostalu paru iz
spremišta.
3 Izvucite mrežni kabel iz utičnice.
4 Stavite glačalo na stalak, postavite kontrolu pare na MIN te
ostavite aparta da se ohladi prije čišćenja.
Page 87

HRVATSKI 87
Glačalo
1 Brišite glačalo vlažnom krpom.
2 Kamenac i drugu nečistoću s grijaće ploče glačala očistite
vlažnom krpom i neabrazivnim (tekućim) sredstvom za
čišćenje.
Nikada ne uranjajte glačalo u vodu i ne ispirite ga pod slavinom.
Spremnik za paru
Isperite spremište za paru jednom mjesečno ako ste koristili glačalo
približno 10 puta.
C
1 Pažljivo odvojite kapu sa spremišta.
Prije toga, ostavite glačalo da se dovoljno ohladi.
C
2 Isperite spremište s apola litre hladne, svježe vode.
3 Vratite kapu spremnika na mjesto.
Pohranjivanje
Pazite da je glačalo potpuno hladno prije nego ga pohranite.
1 Izvucite mrežni kabel iz zidne utičnice i ostavite glačalo da se
ohladi.
2 Ispraznite spremište pare.
3 Redovito provjeravajte jesu li mrežni kabel i dovodna cijev
neoštećeni i sigurni za uporabu.
Zaštita okoliša
C
◗ Aparat ne odbacujte zajedno s ostalim kućnim smećem, već ga
odložite na za to predviđena prikupljališta. Na taj način
pridonosite zaštiti okoliša.
Page 88

HRVATSKI88
Rješenje
Ta pojava nakon kraćeg vremena
nestaje.
To je potpuno bezopasno i prestati će
nakon nekoliko uporaba.
Selektirajte temperaturu odgovarajuću
za glačanje sa parom (2 do MAX).
Uključite glačalo i pričekajte dase
dovoljno zagrije.
Postavite spremnik za paru na ravnu i
stabilnu površinu.
To je normalno. Držite glačalo iznad
stare odjeće i pritisnite aktivator pare.
Stara odjeća će apsorbirati kapljice.
Nakon par sekundi dotok pare će se
normalizirati.
Uključite spremište pare i glačalo.
Pričekajte 6-8 minuta kako bi se
spremište pare dovoljno ugrijalo.
Kako bi provjerili izlazi li para iz glačala,
držite (hladno) glačalo ispred otvora
grijaće ploče.
Očistite grijaću ploču vlažnom krpom.
Očistite grijaću ploču vlažnom krpom.
Odaberite preporučenu temperaturu
glačanja.
Mogući uzrok
To je normalno. Neki dijelovi glačala
lagano su podmazani prije isporuke.
To je normalno kod novog glačala.
Odabrana temperatura glačanja je
preniska za korištenje pare.
Glačlo nije uključeno.
Spremnik za paru je postavljen na
nestabilnu i/ili neravnu površinu.
Na početku parnoga glačanja cijev je
hladna. Para se kondenzira u cijevi i
voda istjeće iz grijaće ploče.
Spremište za paru je isključeno.
Spremište pare nije dovoljno vruće za
prozvodnju pare.
Jako vruća (odnosno, visokokvalitetna)
para je gotovo nevidljiva, posebno kad
je kontrola temperature postavljena na
maksimalni položaj i kad je
temperatura okoliša relativno visoka.
Na grijaćoj ploči nakupila se nečistoća
i kemikalije iz vode.
Glačali ste pri previsokim
temperaturama.
Problem
Dim izlazi iz aparata nakon što ste ga
uključili prvi puta.
Smeće izlazi iz grijaće ploče novog
glačala.
Iz grijaće ploće kaplje voda
Aparat ne proizvodi paru.
Iz grijaće ploče ne izlazi para.
Grijaća ploča je zaprljana.
Jamstvo i servis
Trebate li informaciju ili imate problem, molimo Vas posjetite nas na
našoj web stranici www. philips.com ili nazovite Philips predstavništvo u
Vašoj zemlji,Vašeg prodavača ili se javite u najbliži ovlašteni servis.
U slučaju problema
Ovo poglavlje sumarizira najčešće probleme na koje možete naići
tijekom rada. Ako niste u stanju riješiti problem uz pomoć savjeta iz
ovog poglavlja,obratite se u ovlašteni servis.
Page 89

EESTI 89
Kirjeldus
A Elastne voolik
B Temperatuuri märgutuli
C Temperatuuri valits ja indikaator
D Auruaktiveerija ja lukustus
- D1. Lukustus
- D2.Aktiveerija
E Aurupaagi kaas
F Triikraua alus
G Aurupaak
H Toitejuhe
I Auru märgutuli (ainult GC6107)
J Voolutoite märgutulega aurupaagi lüliti
K Aurukontroll (ainult GC6107/GC6104)
L Voolutoite märgutulega triikraua lüliti
M Märgutuli `Aurupaak tühi` (ainult GC6107)
N Tald
Pange tähele!
Lugege see kasutusjuhend hoolikalt läbi ja hoidke alles edaspidiseks.
◗ Enne seadme sisselülitamist kontrollige, kas seadme andmeplaadile
märgitud voolutugevus vastab kohalikule voolutugevusele.
◗ Ühendage seade ainult maandatud seinapistikusse.
◗ Ärge kasutage seadet, kui pistik, juhe,kaasasolev voolik või seade
ise on vigastatud, tilgub või lekib.
◗ Võimalike vigastuste avastamiseks kontrollige korrapäraselt
juhtme ja vooliku korrasolekut.
◗ Kui toitejuhe või voolik on vigastatud,tuleb ohtlike olukordade
vältimiseks see vahetada Philipsi hoolduskeskuses või
kvalifitseeritud spetsialisti poolt.
◗ Ärge kunagi jätke vooluvõrku ühendatud seadet järelvalveta.
◗ Ärge kastke triikrauda ega aurunõud kunagi vette.
◗ Hoidke seade laste käeulatusest eemal.
◗ Paigaldage ning kasutage triikrauda ja veepaaki ühtlasel, kindlal ning
horisontaalsel pinnal. Ärge pange aurupaaki pehmele triikimislaua
osale.
◗ Ärge laske juhtmel ega voolikul olla vastu tulist triikrauatalda.
◗ Triikraua alus ja tald võivad minna väga kuumaks ja puudutamise
korral põhjustada põletusi.Aurunõud vahetades ärge katsuge
alust.
◗ Kui lõpetate triikimise või puhastate seadet,kui täidate või
tühjendate veenõud või lahkute triikraua juurest kas või hetkeks,
siis: keerake aururegulaator O-asendisse, pange triikraud toele
seisma ja eemaldage pistik pistikupesast.
◗ Ärge pange lõhnaõli, äädikat, tärklist,katlakivivastaseid, triikimis-
või muid keemilisi aineid veepaaki.
Page 90

EESTI90
◗ Kui aurupaagist eraldub auru seadme soojenemise ajal,lülitage
seade välja ja paigaldage paagile kaas korralikult.Kui auru
eraldumine seadme soojenemise ajal jätkub, pöörduge Philipsi
volitatud hoolduskeskuse poole.
◗ Ärge eemaldage aurupaagi kaant, kui paak on veel rõhu all.Toimige
järgneva juhendi järgi.
◗ Kasutage aurunõu katmiseks ainult seda kaant, mis on seadmega
kaasas, sest sellel kaanel on ka turvalisuse funktsioon.
◗ Seade on ettenähtud kasutamiseks ainult koduses majapidamises.
Enne esimest kasutamist
1 Enne esmakasutust eemaldage triikraua tallalt kleebised või
kaitsekile. Puhastage talda pehme lapiga.
2 Kerige toitejuhe ja voolik lahti.
3 Pange aurupaak kindlale ja ühtlaselt tasasele pinnale.
4 Pange triikraud alusele.
Ettevalmistamine kasutamiseks
Aurunõu täitmine
Ärge kunagi kastke aurunõud vette.
Ärge avage kaant, kui triikraud ja aurupaak on veel tulised.
1 Võtke võrgupistik seinakontaktist välja.
C
2 Keerake aurupaagi kaas aeglaselt lahti.
Kaane eemaldamise käigus on kuulda mingit heli. See tekib rõhust
aurupaagi sisemuses ning on täiesti normaalne nähtus.
C
3 Valage vesi aurunõusse (maks. 1 liiter).
Kasutage paagi täitmiseks kraanivett.
◗ Kui piirkonnas, kus te elate, on väga kare vesi, soovitame paaki
valada 50% destilleeritud ja 50% kraanivett.
Ärge pange lõhnaõli, äädikat, tärklist, katlakivivastaseid, triikimis- või muid
keemilisi aineid veepaaki.
4 Keerake kaas korralikult aurupaagile.
Page 91

EESTI 91
Kiirtäitmine
C
1 Seade olgu sisselülitatud. Seejärel seadke aurupaagi lüliti
asendisse `off`.
C
2 Vajutage aurupaagi aktiveerijat, kuni seadmest ei tule enam
aurupahinat.
3 Hoidke auruaktiveerijat all ja keerake ettevaatlikult aurupaagi
kaant vastupäeva.Aurupaagist kaob rõhk.
Veenduge, et aurupaagis ei ole enam auru. Keerake riidetüki abil kaas
ära.
4 Võtke võrgupistik seinakontaktist välja.
5 Täitke aurunõu nii, nagu kirjeldatud pt. 'Aurunõu täitmine' ja
laske seadmel uuesti soojeneda.
Temperatuuri valik
Paigutage aurunõu kindlale alusele ja horisontaalsele pinnale.Ärge jätke
aurunõud triikimislaua pehmele osale.
1 Pange triikraud alusele.
Pange triikraud alati alusele või toele seisma. Ärge kunagi pange tulist
triikrauda voolikule ega toitejuhtmele. Kontrollige, et toitejuhe ega
voolik ei puutuks vastu tulist triikraua talda.
C
2 Seadke temperatuuri regulaator vastavasse asendisse.
Kontrollige triikimistemperatuuri valikut proovilapil.
Page 92
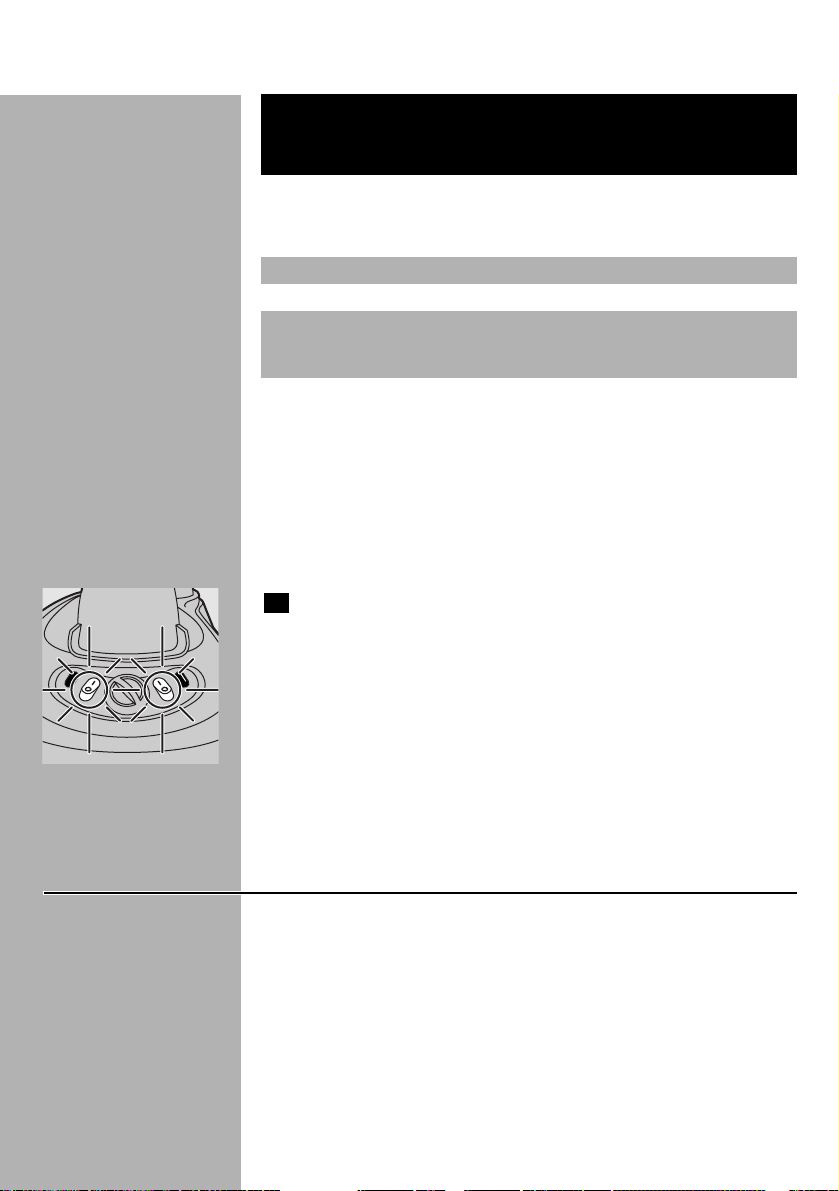
EESTI92
Kui te ei tea, millis(t)est materjali(de)st ese on valmistatud, tehke
triikimisproov kohas, mida eseme kandmisel ei ole näha või proovilapil.
Siidist, villasest ja sünteetilisi materjale triikige pahemalt poolt, et vältida
läikivate plekkide tekkimist.
Alustage nende esemete triikimist, mis nõuavad madalamat
triikimistemperatuuri,nagu näiteks esemed sünteetilistest kiududest.
C
3 Pange pistik maandatud seinapistikusse ja seadke nii aurupaagi
kaas kui triikraua lüliti asendisse `on`.Aurupaak ja tald
hakkavad soojenema.
◗ Kui temperatuuri märgutuli kustub,on triikraud piisavalt tuline.
◗ Auruga triikimise käigus temperatuuri märgutuli aegajalt kustub ja
sütib. Märgutuli näitab, et triikraud on saavutanud vajaliku
temperatuuri.
◗ Kui olete triikinud tulise triikrauaga,seadistage temperatuuri valits
madalamale temperatuurile, oodake enne triikimise jätkamist, kuni
temperatuuri märgutuli sütib taas. Nii väldite riideesemete
kahjustamise.
Märkused
- Kui materjal koosneb erinevatest kiududest, valige alati
triikimistemperatuur vastavalt kõige tundlikumale kiule s.o. madalaim
temperatuur.Näiteks: kui ese koosneb 60% polüester ja 40%
puuvillasest kiust, siis peaks triikima seda polüesterkiule ettenähtud
temperatuuril (1) ja auruta.
- Kui triigite villaseid kangaid auruga, võivad sinna tekkida läikivad
plekid. Seda on võimalik vältida kasutades triikimisel kuiva
pressimislappi või pöörates riideesemeid pahempidi.
- Sametit ja muid kangaid, mis hakkavad kergesti läikima, tuleks triikida
ainult ühes suunas ning vältida tugevat pressimist.
- Ärge kasutage auru värvitud siidi triikimisel.
Auru seadistus
MIN (vt "Triikimine
auruta`)
Madalast keskmiseni
Keskmisest kuni MAX
Temperatuuri
seadistus
1
2
3
Kanga liik
Sünteetilised kangad (nt
atsetaat, akrüül,viskoos,
polüamiid, polüester) ja
siid
Villane
Puuvill, linane
Pange tähele, et sümbol
Z tähendab, et riideeset
ei tohi triikida.
Sümbolid riietel
lubatud
triikimistemperatuuridega
B
C
D
Z
Page 93

EESTI 93
Seadme kasutamine
Aurtriikimine
1 Kontrollige, et aurunõus oleks piisavalt vett.
◗ Aurtriikimine on võimalik ainult kõrgete
triikimistemperatuuridega (temperatuuri seadistus 2 kuni
MAX).
C
2 Valige aurtriikimiseks vastav temperatuur:
- Pange auruvalits asendisse MIN (auruta) ja valige temperatuur 1 (vt
`Auruta triikimine`).
- Temperatuurile 2 valige madalast kuni keskmiseini.
- Temperatuurile 3 valige keskmisest kuni MAX asendini.
3 Nüüd hakkavad aurupaak ja tald soojenema.
- Külm alusutus: tald soojeneb ligi 2 minutit ja aurupaak ligi 8 minutit.
- Kiirsoojenemine: kui teete triikimistoimingu käiguskiirtäitmist,
soojeneb vesi aurupaagis ligi 6 minutit.
4 Kohe,kui veepaagis olev vesi on aurtriikimiseks piisavalt tuline,
kustub aurupaagi märgutuli (ainult GC6104, GC6103). Sütib
märgutuli, mis näitab aurtriikimiseks valmisolekut (ainult
GC6107).
◗ Aurtriikimise käigus aurumärgutuli aegajalt kustub ja sütib,
näidates et aurupaak on vastava temperatuuri saavutanud.
C
5 Kui triigite auruga,vajutage auruaktiveerijat.
◗ Kui soovite aurufunktsiooni kasutada jätkuvalt,pange
auruaktiveerija lukusti lukustusasendisse.
6 Auru katkestamiseks vabastge auruaktiveerija lukusti.
Kui te vahetevahel aurufunktsiooni ei kasuta, jääb aur voolikusse ning
tekitab vee kondenseerumise. Kui alustate auruga triikimist uuesti, võib
seadmest pritsmeid ja tallast vett tilkuda.
B
Selleks, et ära hoida veetilkade sattumist riietusesemetele, hoidke
triikrauda mingi vana riietuseseme kohal ning vajutage auruaktiveerijat
seni, kuni auru tekitamine normaliseerub.
Kuivtriikimine
1 Valige soovitatav triikimistemperatuur (vt pt `Ettevalmistus
kasutamiseks`).
Ärge vajutage auruaktiveerijat triikimise ajal.
Page 94

EESTI94
◗ Aur väljub, kui triikimise ajal vajutate auruaktiveerijat. Selle
völtimiseks pange aurupaagi lüliti asendisse `off`.
◗ Kui aurupaak on tühi või enam ei soojene, kostab aurupaagist
klõpsuvat heli. Selle nähtuse likvideerimiseks avage auruklapp, see
on täiesti ohutu.
Lisafunktsioonid
Vertikaalne aurtriikimine
C
◗ Rippuvaid kardinaid ja riietsuesemeid (jakke, ülikondi, mantleid) on
võimalik triikida ka vertikaalses asendis.
1 Vajutage auruaktiveerijat. Kui soovite aurufunktsiooni kestvalt
kasutada, kasutage auruaktiveerija lukustit.
Ärge kunagi suunake aurujuga inimeste poole.
Vahelduv aur (ainult GC6107 ja GC6104)
Aurukontroll-lülitit saab reguleerida ja selle võib panna MIN ja MAX
vahelistesse asenditesse (vt pt `Ettevalmistus kasutamiseks`).
Aurupaak on tühi`märgutuli (ainult GC6107)
Kui aurupaak saab kasutamise käigus tühjaks, sütib `aurupaak on tühi
`märgutuli.
1 Täitke aurupaak veega (vt pt `Ettevalmistus kasutamiseks`).
Märgutuli `Aur on valmis` (ainult GC6107)
Kui aurupaak on auruga triikimiseks valmis, sütib auru märgutuli.
Puhastamine ja hooldus
Pärast triikimist
C
1 Aurupaagi rõhust vabastamiseks pange triikraua lüliti asendisse
`onÍ ja aurupaagi lüliti asendisse `off`.
Page 95

EESTI 95
C
2 Vabasatage aurupaak rõhust vajutades auruaktiveerijat seni, kuni
seadmest ei kosta enam aurupahinat.
3 Võtke võrgupistik seinakontaktist välja.
4 Pange triikraud alusele, pange aurulüliti asendisse MIN ja laske
seadmel enne puhastamist jahtuda.
Triikimine
1 Puhastage triikrauda niiske lapiga.
2 Pühkige tallalt katlakivi ja sademed niiske lapi ja mitteabrasiivse
(vedela) puhastusvahendiga.
Ärge kunagi kastke triikrauda vette ega hoidke seda voolava vee all.
Aurunõu
Loputage aurupaaki kord kuus või pärast 10 kasutuskorda.
C
1 Eemaldage etttevaatlikult aurupaagilt kaas.
Enne kaane eemaldamist laske seadmel jahtuda.
C
2 Loputage aurupaaki 500 ml puhta veega. Hoidke aurupaaki
kraanikausi kohal ja valage vesi välja.
3 Keerake kaas aurunõule tagasi.
Hoidmine
Enne triikraua hoiule panemist veenduge, et see on jahtunud.
1 Eemaldage pistik pistikupesast ja laske triikraual maha jahtuda.
2 Tühjendage aurupaak.
3 Kontrollige regulaarselt, kas toitejuhe on vigastusteta ja ohutu.
Page 96

EESTI96
Keskkonnakaitse
C
◗ Ärge visake kasutusest kõrvaldatud seadet tavalise olmeprügi
hulka, vaid viige see vastavasse kogumispunkti. Olge
keskkonnasõbralik.
Garantii ja teenindus
Kui Te vajate informatsiooni või on Teil probleemid tekkinud, külastage
Philips Web lehekülge www.philips.com või võtke ühendus teie maa
Philipsi hoolduskeskusega (lisainfot ja telefoninumbrid leiate
garantiitalongilt). Kui Teie maal ei ole Philipsi hoolduskeskust, pöörduge
Philipsi toodete müüja poole või võtke ühendus Philipsi
koduhooldusseadmete ja isikliku hoolduse BV teenindusosakonnaga.
Rikete kõrvaldamine
Selles peatükis on tehtud kokkuvõte enam esinevatest riketest, mis
võivad tekkida. Lugege palun põhjalikuma teabe saamiseks erinevaid
lõike. Kui teil ei õnnestu riket omal jõul kõrvaldada, pöörduge Philips
hoolduskeskuse poole oma riigis (lisainfot ja telefoninumbrid leiate
garantiitalongilt). Kui Teie maal ei ole Philipsi hoolduskeskust, pöörduge
Philipsi toodete müüja poole või võtke ühendus Philipsi
koduhooldusseadmete teenindusosakonnaga.
Page 97

EESTI 97
Lahendus
See nähtus kaob mõne aja pärast.
Need ebemed on kahjutud ning
pärast mitmekordset kasutamist see
nähtus kaob.
Seadistage temperatuur kuni &@4,050
kuni MAX.
Pange lüliti asendisse `on` ja oodake,
kuni triikraud läheb tuliseks.
Pange aurunõu kindlale ja ühtlasele
pinnale.
See on normaalne. Hoikde triikrauda
vana riideeseme kohal ning vajutge
auru aktiveerijat. Riidetükk imeb
veetilgad. Pärast mõne sekundi
möödumist normaliseerub
aurufunktsioon.
Pange nii triikraua lüliti kui aurupaagi
lüliti asendisse `on`.
Oodake 6 kuni 8 minutit, kuni
aurupaak soojeneb.
Kontrollige, kas triikraud laseb auru,
hoides tallaavade läheduses külma
peeglit.
Puhastage talda niiske lapiga.
Puhastage talda niiske lapiga.Valige
soovitatud triikimistemperatuur.
Võimalik põhjus
See on normaalne. Mõned triikraua
osad on tehases pisut õlitatud.
Uue triiraua puhul on see normaalne
nähtus.
Valitud triikimistemperatuur on
aurtriikimiseks liiga madal.
Triikraud ei lülitu sisse.
Aurunõu on olnud paigutatud
ebaühtlasele ja ebakindlale pinnale.
Aurtriikimist alustades on
ühendustoru külm. Aur kondenseerub
torru, mis omakorda põhjustab vee
tilkumist tallast.
Aurupaak ja/või triikraud on/oli
väljalülitatud.
Aurupaagis ei ole auru.
Väga kuumenenud (kõrge
kvaliteediga) aur on vaevalt nähtav,
eriti kui temperatuur on seatud
maksimaalseks ja veel enam, kui
toatemperatuur on suhteliselt kõrge.
Mustus või kemikaalid, mida vesi
sisaldab, on sadestunud tallale.
Olete triikinud liiga kõrgel
temperatuuril.
Probleem
Esmakordselt sisse lülitades suitseb uus
triikraud pisut.
Uuue triikraua tallast väljuvad mustad
ebemed.
Vee tilkumine tallast
Triikrauast ei tule auru.
Aur ei jõua tallani
Tald on must
Page 98

98
Vispārīgs apraksts
A Tvaika padeves caurule
B Temperatūras signāllampiņa
C Temperatūras slēdzis un norāde
D Tvaika padeves taustiņš un aizslēgs
- D1.Aizslēgs
- D2. Padeves taustiņš
E Tvaika tvertnes vāciņš
F Gludekļa statīvs
G Tvaika tvertne
H Elektrovads
I Tvaika gatavības signāllampiņa (tikai modelim GC6107)
J Tvaika tvertnes slēdzis ar ieslēgšanas signāllampiņu
K Tvaika regulators (tikai modeļiem GC6107/GC6104)
L Gludekļa slēdzis ar ieslēgšanas signāllampiņu
M Signāllampiņa "Tvaika tvertne tukša" (tikai modelim GC6107)
N Gludekļa klātne
Svarīgi!
Pirms ierīces lietošanas rūpīgi izlasiet šīs pamācības un saglabājiet tās
turpmākām uzziņām.
◗ Pirms ierīces pievienošanas elektrotīklam pārbaudiet,vai uz
modeļa plāksnes norādītais spriegums atbilst elektrotīkla
spriegumam jūsu mājā.
◗ Pievienojiet ierīci tikai iezemētai elektrotīkla sienas
kontaktrozetei.
◗ Nelietojiet ierīci, ja redzami kontaktspraudņa, elektrovada, tvaika
padeves caurules vai ierīces bojājumi, no ierīces tek ūdens vai arī
tā ir nomesta vai nokritusi.
◗ Regulāri pārbaudiet, vai elektrovads un tvaika padeves caurule nav
bojāta.
◗ Lai izvairītos no bīstamām situācijām, bojāts elektrovads vai tvaika
padeves caurule jānomaina Philips pilnvarotā apkopes centrā vai
nomaiņa jāuztic līdzīgi kvalificētiem speciālistiem.
◗ Nekad neatstājiet elektrotīklam pievienotu ierīci bez uzraudzības.
◗ Nekad neiegremdējiet gludekli vai tvaika tvertni ūdenī.
◗ Glabājiet ierīci bērniem nepieejamā vietā.
◗ Vienmēr novietojiet un lietojiet gludekli un tvaika tvertni uz
stabilas, līdzenas un horizontālas virsmas. Nenovietojiet tvaika
tvertni uz gludināmā dēļa mīkstās daļas.
◗ Raugieties, lai elektrovads un tvaika padeves caurule nesaskaras ar
gludekļa klātni, kamēr tā ir karsta.
◗ Statīvs un klātne stipri sakarst un var radīt apdegumus, ja tiem
pieskaras. Ja vēlaties pārvietot tvaika tvertni, nepieskarieties
statīvam.
◗ Pēc gludināšanas, tīrot ierīci, piepildot vai iztukšojot ūdens tvertni
un arī atstājot gludekli bez uzraudzības pat uz īsu brīdi, pagrieziet
LATVISKI98
Page 99

99
tvaika padeves regulatoru O stāvoklī, novietojiet gludekli vertikāli
un izvelciet elektrovada kontaktspraudni no elektrotīkla sienas
kontaktrozetes.
◗ Nelejiet ūdens tvertnē smaržas, etiķi, cieti,līdzekļus katlakmens
notīrīšanai, gludināšanas palīglīdzekļus un citas ķīmiskas vielas.
◗ Ja uzkaršanas laikā tvaiks izplūst gar tvaika tvertnes vāciņu,
izslēdziet ierīci un cieši aizskrūvējiet tvaika tvertnes vāciņu. Ja
uzkaršanas laikā tvaiks turpina izplūst, izslēdziet ierīci un vērsieties
Philips pilnvarotā apkopes centrā.
◗ Nenoņemiet tvaika tvertnes vāciņu, ja tvertnē joprojām ir
paaugstināts spiediens. Ievērojiet turpmāk minētos norādījumus.
◗ Lietojiet tikai komplektā iekļauto tvaika tvertnes vāciņu, jo tas
darbojas arī kā drošības ventilis.
◗ Ierīce paredzēta lietošanai tikai mājturībā.
Pirms pirmās lietošanas reizes
1 Noņemiet no klātnes visas uzlīmes vai aizsargmateriālus un
noslaukiet to ar mīkstu drānu.
2 Pilnīgi atritiniet elektrovadu un tvaika padeves cauruli.
3 Novietojiet tvaika tvertni uz stabilas un līdzenas virsmas.
4 Novietojiet gludekli uz gludekļa statīva.
Sagatavošana lietošanai
Tvaika tvertnes piepildīšana
Nekad neiegremdējiet tvaika tvertni ūdenī.
Neatveriet vāciņu, kamēr gludeklis un tvaika tvertne vēl ir karsta.
1 Atvienojiet gludekli no elektrotīkla.
C
2 Lēni atskrūvējiet tvaika tvertnes vāciņu.
Noņemot vāciņu, var dzirdēt skaņu. Šo skaņu rada vakuums vai
spiediens tvaika tvertnē, un tā ir normāla parādība.
C
3 Ielejiet ūdeni tvaika tvertnē (maks. 1 litru).
Piepildiet tvertni ar krāna ūdeni.
◗ Ja apvidū, kur dzīvojat, ūdens ir ļoti ciets, ieteicams sajaukt 50%
krāna ūdens ar 50% destilēta ūdens.
Nelejiet tvaika tvertnē smaržas, etiķi, cieti, katlakmens notīrīšanas
līdzekļus, gludināšanas palīglīdzekļus un citas ķīmiskas vielas.
4 Cieši uzskrūvējiet vāciņu tvaika tvertnes piepildīšanas atverei.
LATVISKI
Page 100

100
Ātra ūdens iepildīšana
C
1 Atstājiet gludekli pievienotu elektrotīklam un pārliecinieties,ka
tas ir ieslēgts. Pēc tam noregulējiet tvaika tvertnes slēdzi "off"
stāvoklī.
C
2 Turiet piespiestu tvaika padeves taustiņu, līdz vairs nav
dzirdams, kā no ierīces izplūst tvaiks.
3 Turiet tvaika padeves taustiņu piespiestu un lēni atskrūvējiet
tvaika tvertnes vāciņu, griežot to pretēji pulksteņa rādītāju
kustības virzienam.Tādējādi tiek mazināts spiediens tvaika
tvertnē.
Pārliecinieties, ka tvaika tvertnē nav palicis tvaiks.Atskrūvējot vāciņu,
apklājiet to ar drānu.
4 Atvienojiet gludekli no elektrotīkla.
5 Piepildiet tvaika tvertni, kā norādīts nodaļā "Tvaika tvertnes
piepildīšana", un ļaujiet ierīcei atkal uzkarst.
Gludināšanas temperatūras regulēšana
Vienmēr novietojiet tvaika tvertni uz stabilas, līdzenas un horizontālas
virsmas. Nenovietojiet tvaika tvertni uz gludināmā dēļa mīkstās daļas.
1 Novietojiet gludekli uz gludekļa statīva.
Nenovietojiet karstu gludekli uz tvaika padeves caurules vai
elektrovada. Raugieties, lai elektrovads nesaskartos ar karsto klātni.
C
2 Izvēlieties vajadzīgo gludināšanas temperatūru, pagriežot
temperatūras regulatoru atbilstošajā stāvoklī.
Pārbaudiet, vai apģērbam, ko vēlaties gludināt, ir etiķete ar gludināšanas
norādījumiem.
TABULA (tagad dokumenta beigās)
LATVISKI
 Loading...