

Page 1
Provapor
GC6268, GC6265, GC6263, GC6259, GC6257, GC6068,
GC6065, GC6063, GC6059, GC6057, GC6029, GC6021,
GC6018
Page 2
2
Page 3
3
J
G I
N
M
H
A
C
K
B
F
E
O
L
D
Page 4

4
Page 5

ENGLISH 6
POLSKI 15
ROMÂNĂ 24
РУССКИЙ 33
ČESKY 43
MAGYAR 52
SLOVENSKY 61
УКРАЇНСЬКІЙ 70
HRVATSKI 79
EESTI 88
LATVISKI 96
LIETUVIŠKAI 105
SLOVENŠŚINA 114
БЪЛГАРСКИ 123
SRPSKI 133
GC6268, GC6265, GC6263, GC6259, GC6257, GC6068, GC6065, GC6063, GC6059,
GC6057, GC6029, GC6021, GC6018
5
Page 6
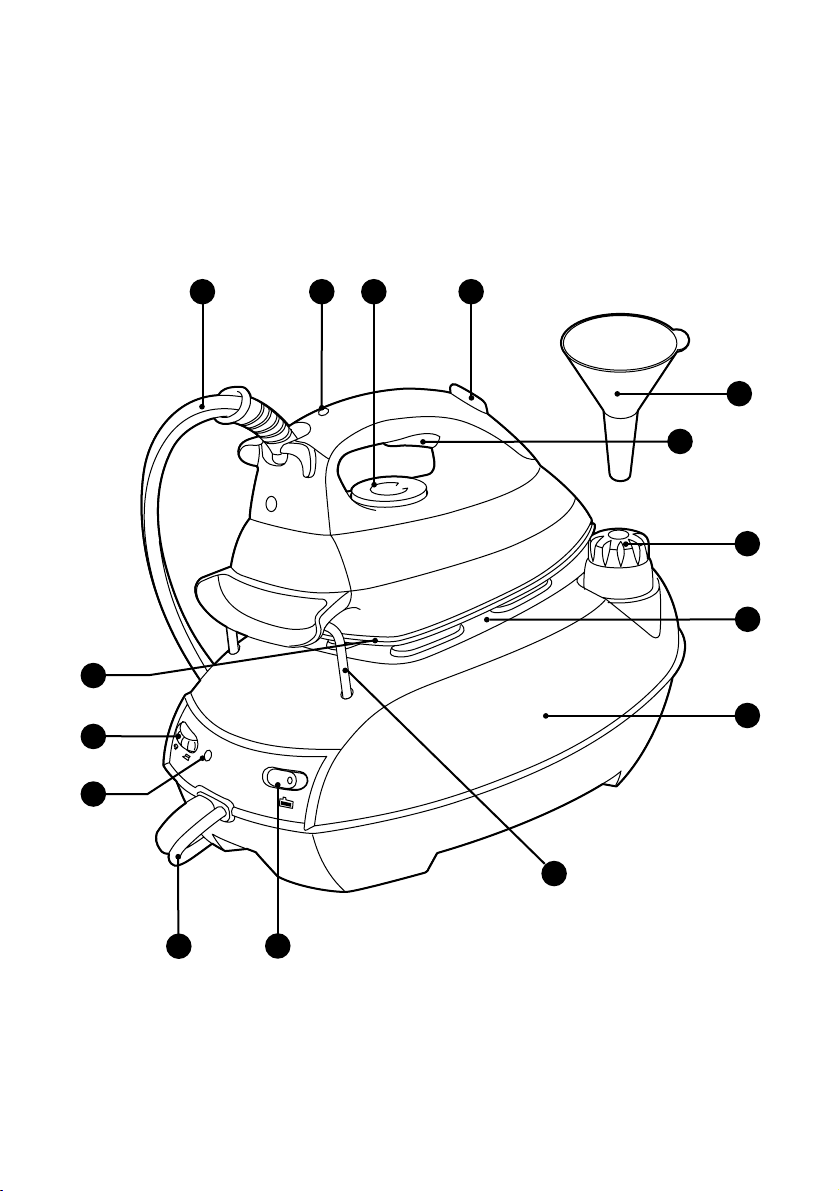
General description
A Cap of the steam tank
B Steam tank
C Iron stand
D On/off switch with built-in pilot light
E 'Steam tank heating up' pilot light (types GC6268/GC6265/
GC6068/GC6065 only).The pilot light goes out when the appliance
is ready for steam ironing
F Steam control (types GC6268/GC6265/GC6068/GC6065/
GC6029 only).
q = moderate steam R = maximum steam
G Temperature pilot light
H Steam activator button
I Temperature dial
J Supply hose
K Soleplate
L Mains cord
M Anti-calc funnel (type GC6268/GC6068/GC6029 only)
N Shot of steam (type GC6268/GC6068/GC6029 only)
O Back rest for iron (types GC6268/GC6265/GC6263/GC6068/
GC6065/GC6063 only)
Important
For optimal safety, read these instructions carefully and look at the
illustrations before you start using the appliance.
- Do not put perfume, vinegar, starch, descaling agents or other
chemicals in the steam tank.
- Never use the appliance if it is damaged in any way. Regularly check if
the mains cord and the supply hose are still undamaged and safe.
- If the mains cord is damaged, it must be replaced by Philips, a ser vice
centre authorised by Philips or similarly qualified persons in order to
avoid a hazard.
- Do not use any other cap on the steam tank than the cap that has been
supplied with the appliance, as this cap also functions as a safety valve.
- Check if the voltage indicated on the bottom of the steam tank
corresponds to the mains voltage in your home before you connect
the appliance.
- Only connect the appliance to an earthed wall socket.
- Never immerse the iron or the steam tank in water.
- Never leave the iron unattended when it is connected to the mains.
- When you have finished ironing and even when you leave the iron
for a short while, unplug the iron and put it on the iron stand.
- Always place the steam tank on a stable, level and horizontal surface.
Do not put the steam tank on the soft part of the ironing board.
- Always place the iron on the iron stand. Do not put the hot iron on
the supply hose or the mains cord.
- The iron stand and the soleplate of the iron can become extremely
hot and may cause burns if touched. If you want to move the steam
tank, do not touch the iron stand.
ENGLISH6
Page 7
- Do not allow the cord to come into contact with the soleplate when
it is hot.
- Infirm persons should not be allowed to use the appliance without
supervision. Keep an eye on children to make sure that they do not
play with the appliance.
- If steam escapes from under the steam tank cap when the appliance
is heating up, switch the appliance off and contact a service centre
authorised by Philips.
- Do not remove the cap from the steam tank when the steam tank is
under pressure. Follow the instructions under 'Fast refill' before
removing the cap.
Preparing the appliance for use
1 Check if the voltage indicated on the bottom of the steam tank
corresponds to the mains voltage in your home before you
connect the appliance.
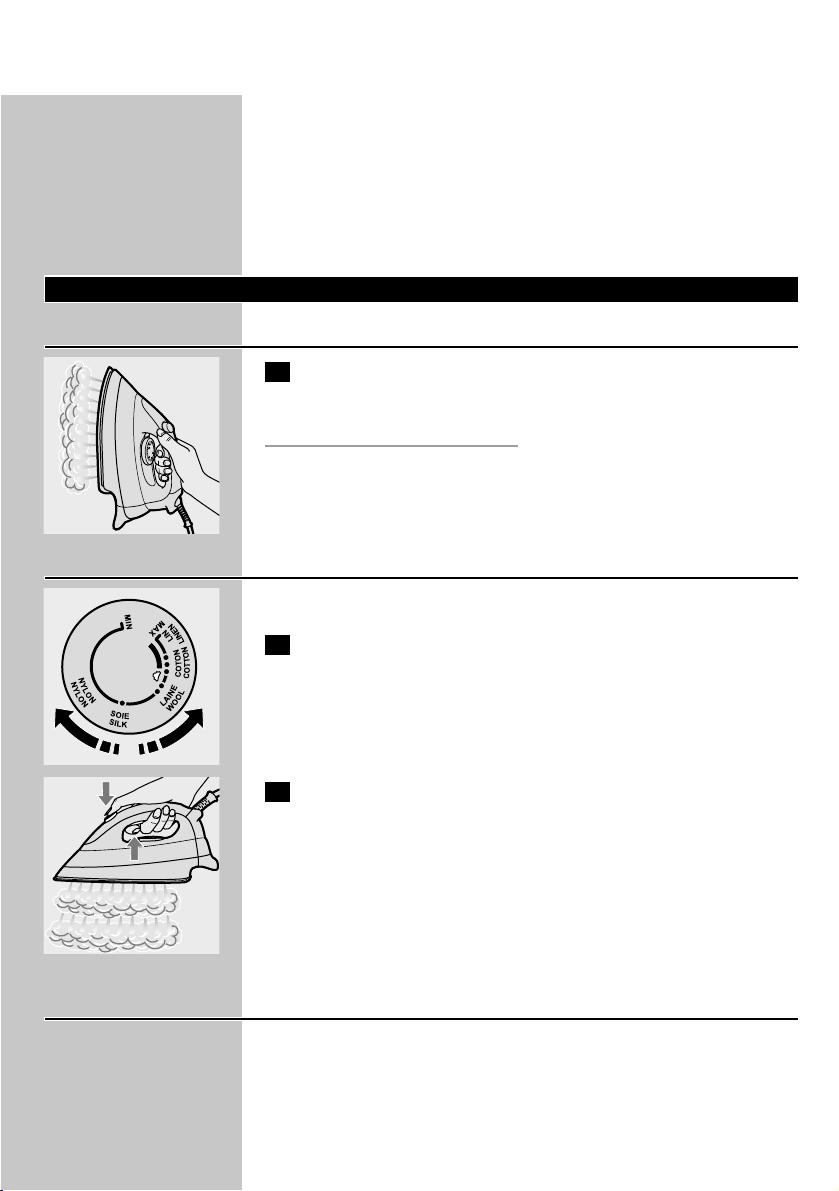
2 Remove any sticker or protective foil from the soleplate and
clean the soleplate with a soft cloth.
3 Fully unwind the mains cord (L) and supply hose (J).
4 Place the steam tank (B) on a stable, level surface.
5 Place the iron on the iron stand (C).
Filling the steam tank
Never immerse the steam tank in water.
Do not open the cap when the appliance is hot and the steam tank is
still under pressure.
C
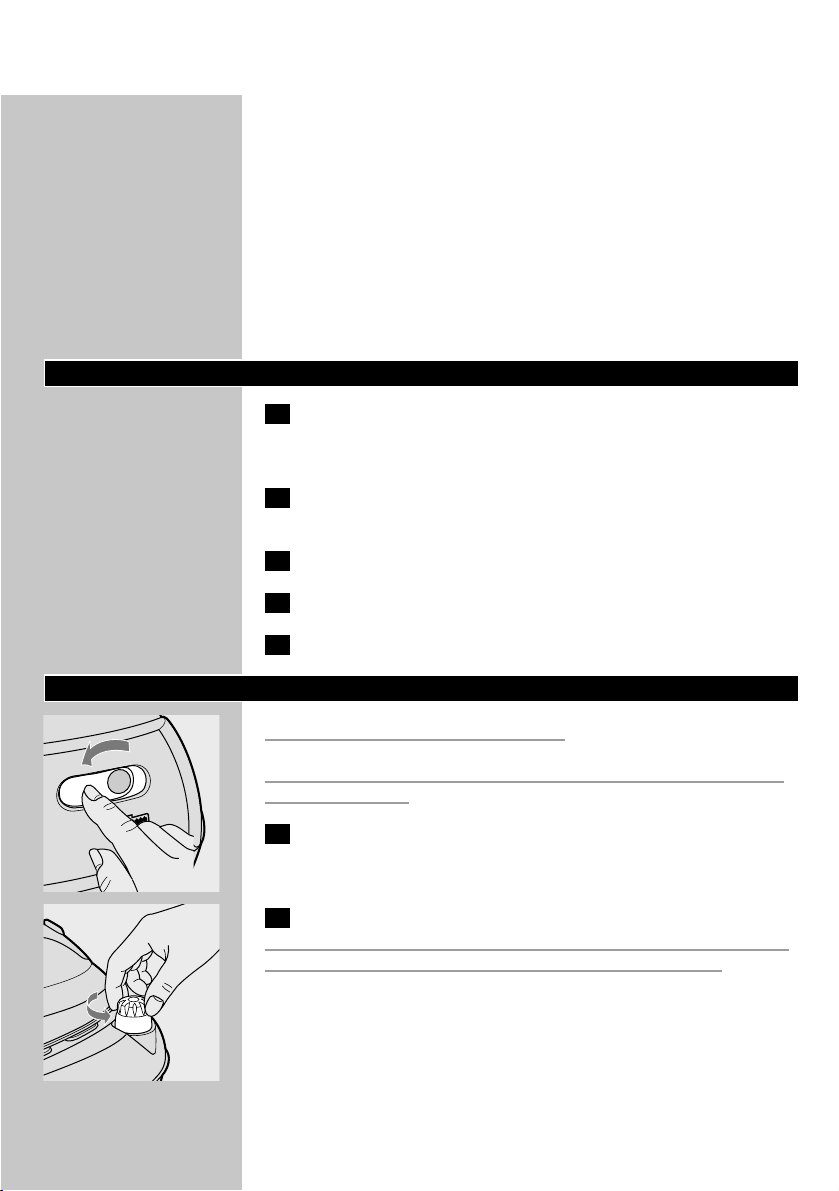
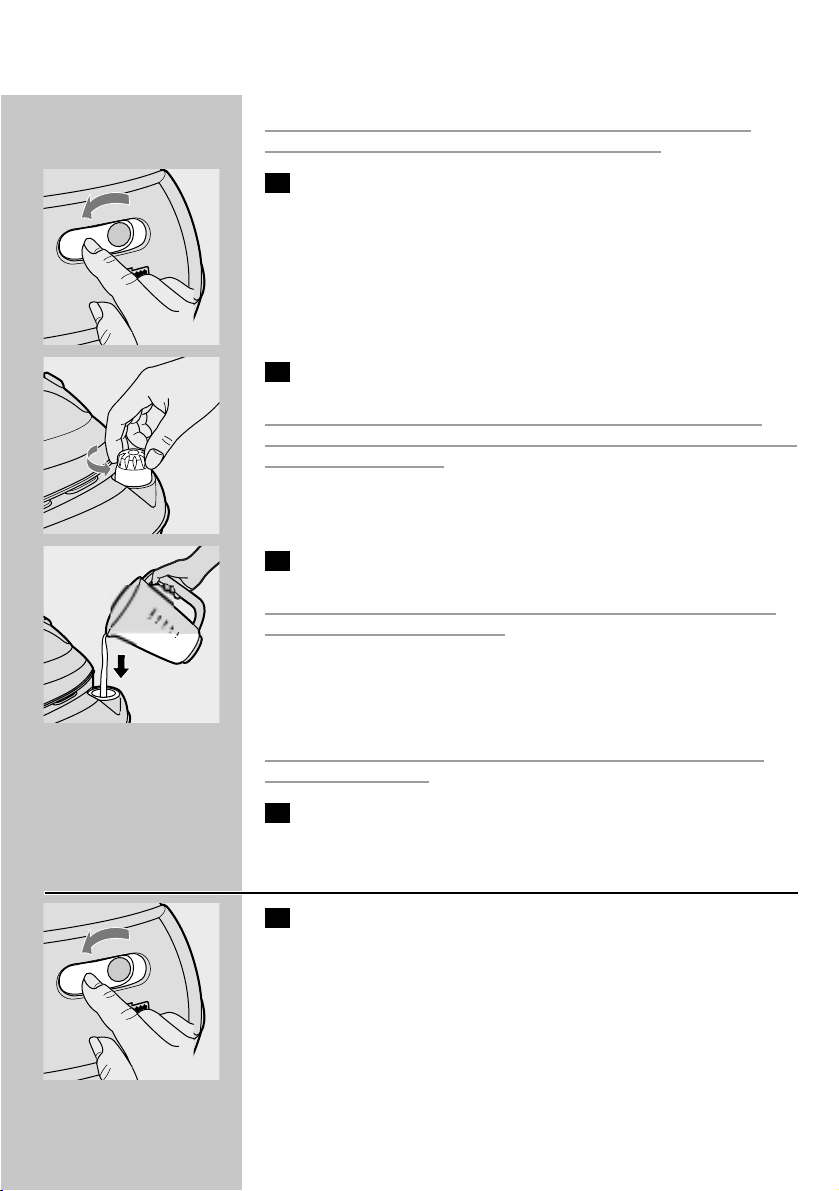
1 Make sure the on/off switch (D) has been set to 'off' and
remove the plug from the wall socket.
C
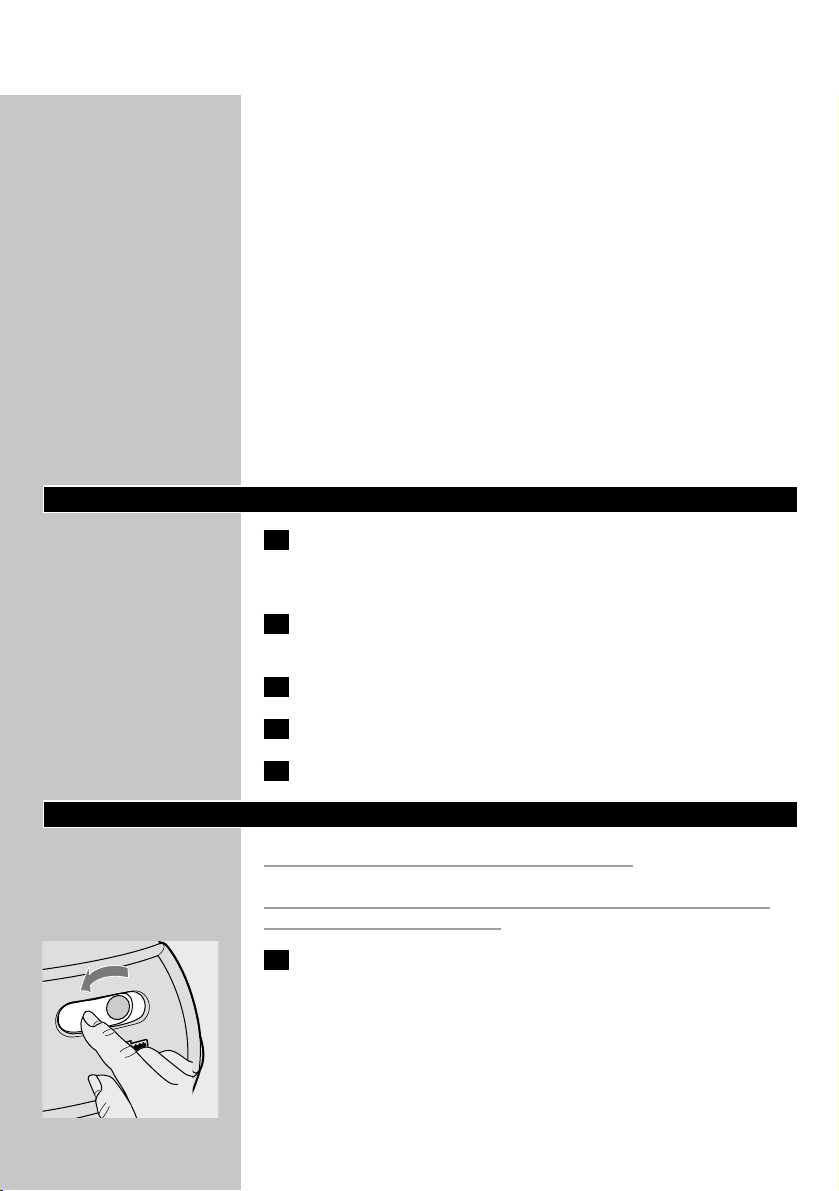
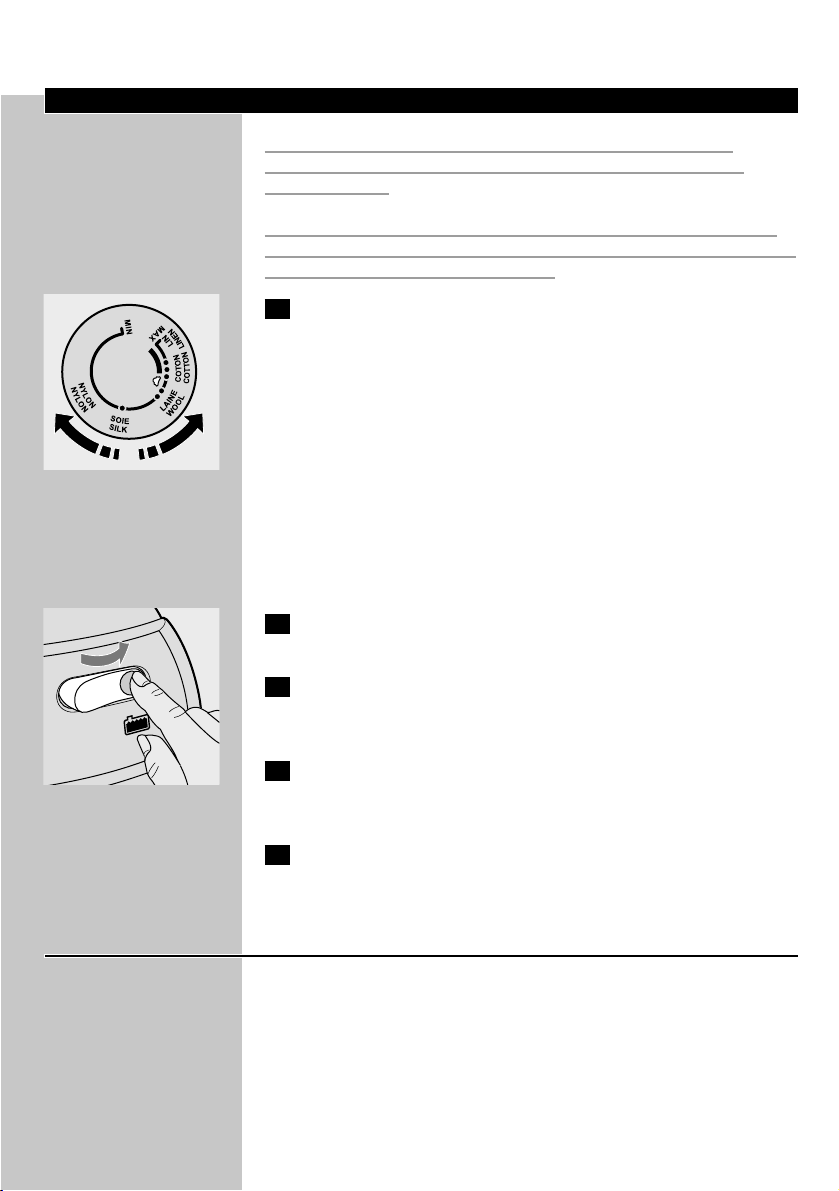
2 Slowly unscrew the cap (A) of the steam tank.
You may hear a sound when you remove the cap.This sound is caused
by the cold tank being under vacuum.This is perfectly normal.
ENGLISH 7
Page 8
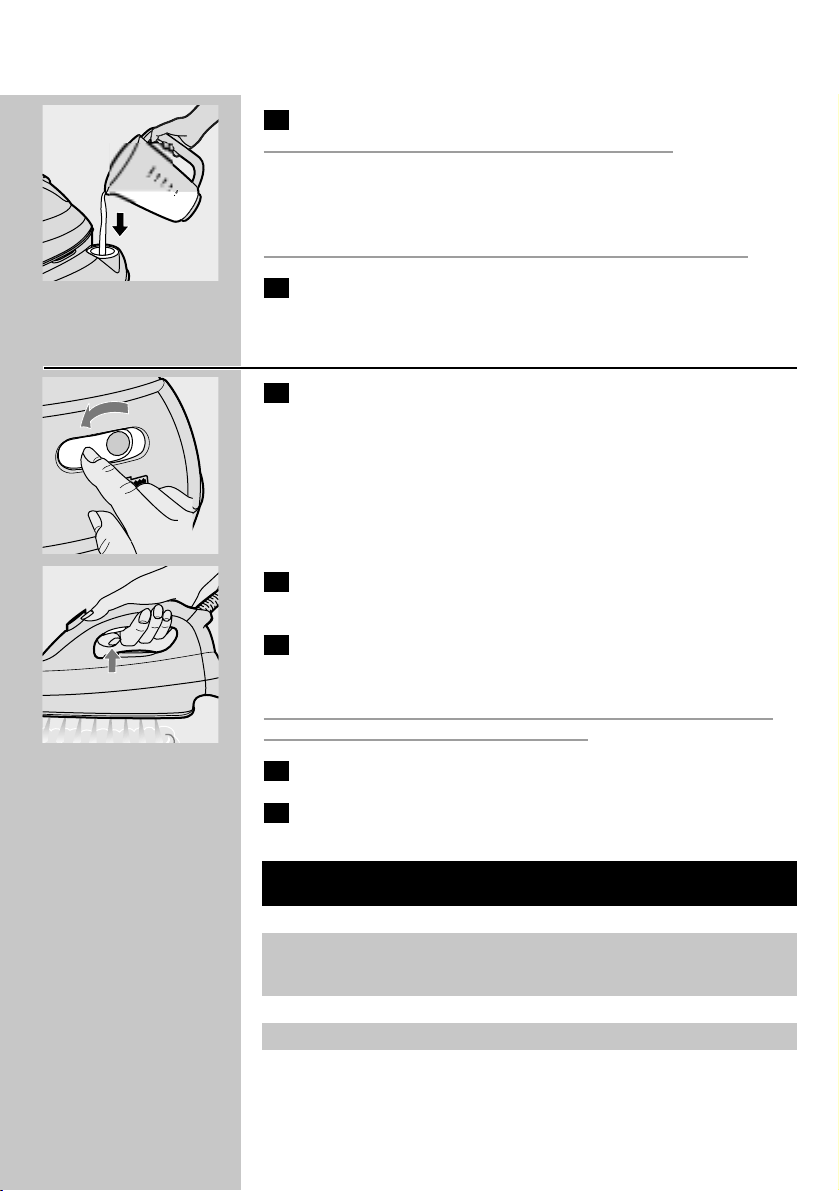
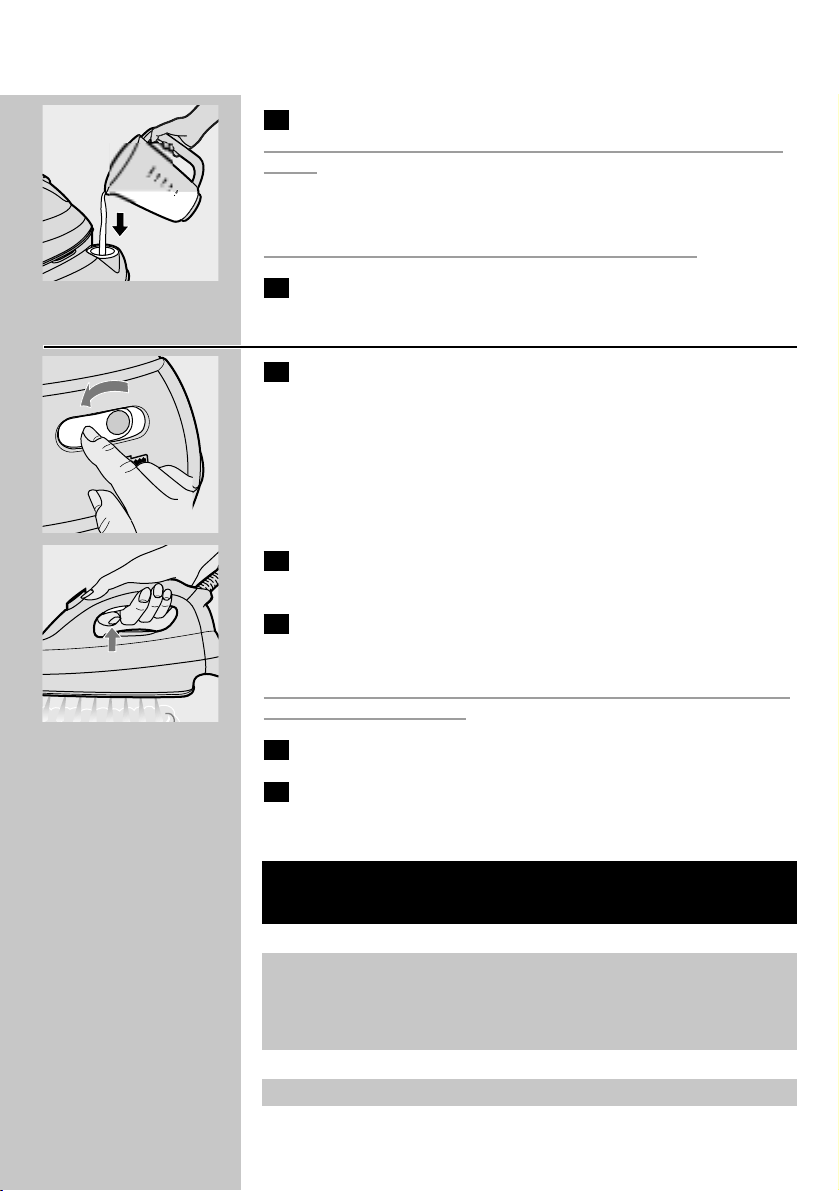
C
3 Pour water into the steam tank (max. 1 litre).
Use tap water to fill the tank up to the maximum level.
If the tap water in your area is very hard, we advise you to mix tap
water with an equal portion of distilled water, or to use distilled water
only.
Do not use perfume, vinegar, starch or chemically descaled water.
4 Screw the cap tightly onto the filling aperture of the steam
tank.
Fast refill
C
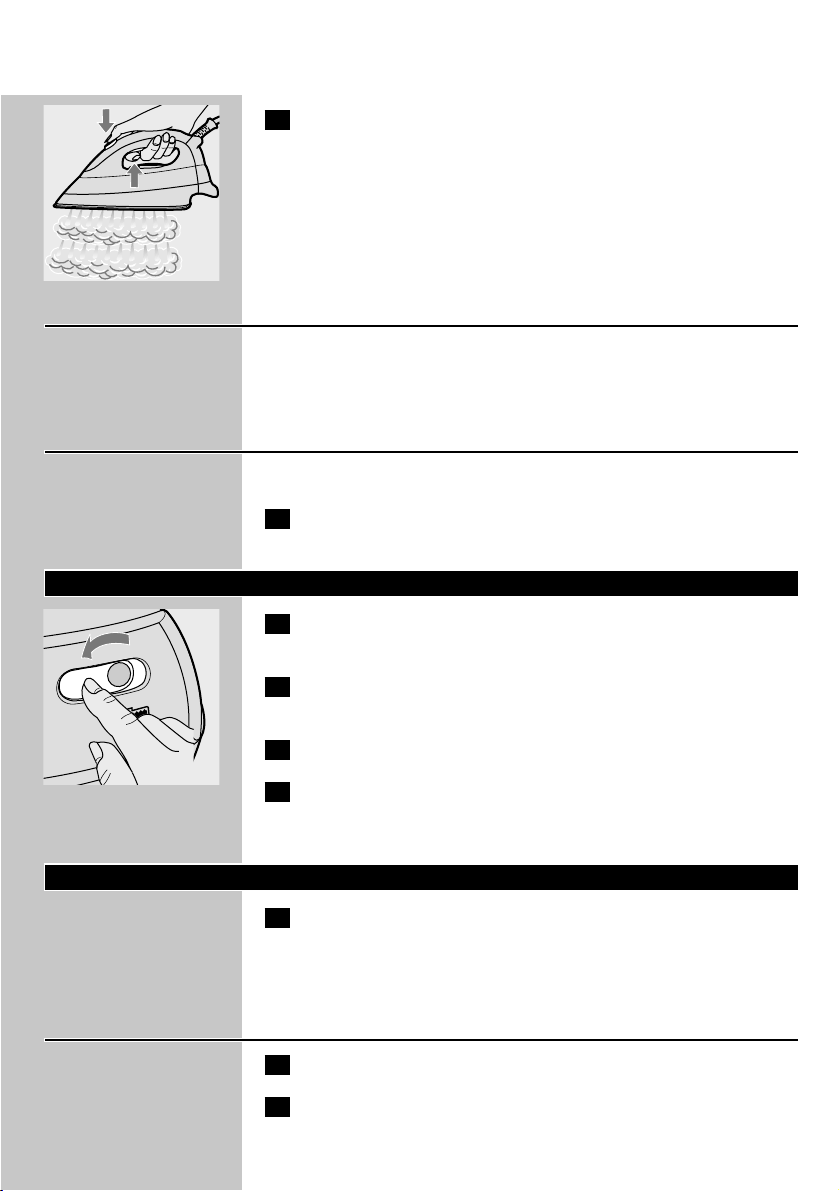
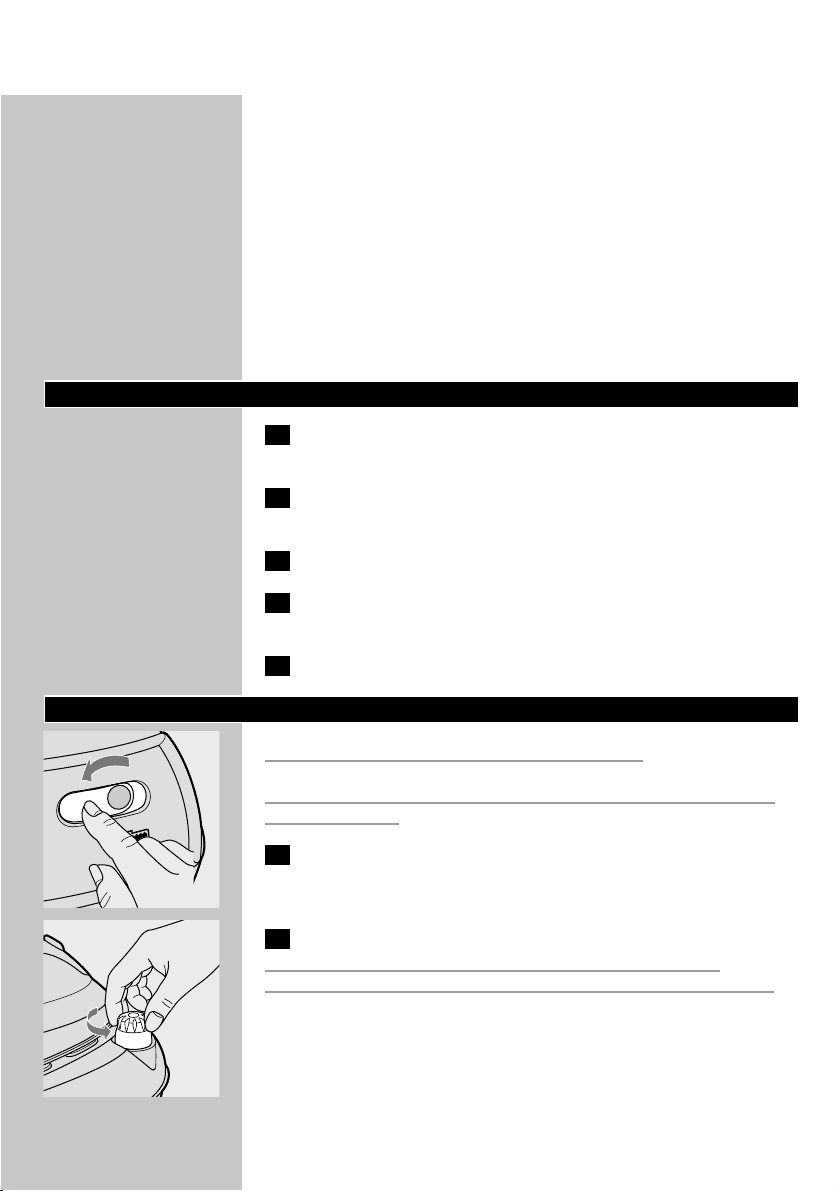
1 First set the on/off switch (D) to 'off'.
C
2 Press the steam activator button until you no longer hear any
steam escaping from the appliance.
3 Keep the steam activator button pressed in and slowly unscrew
the cap of the steam tank by turning it anti-clockwise.This will
depressurise the steam tank.
Make sure there is no remaining steam left in the steam tank. Place a
piece of rug over the cap while unscrewing.
4 Remove the mains plug from the wall socket.
5 Fill the steam tank as described in section 'Filling the steam
tank' and let the appliance heat up again.
ENGLISH8
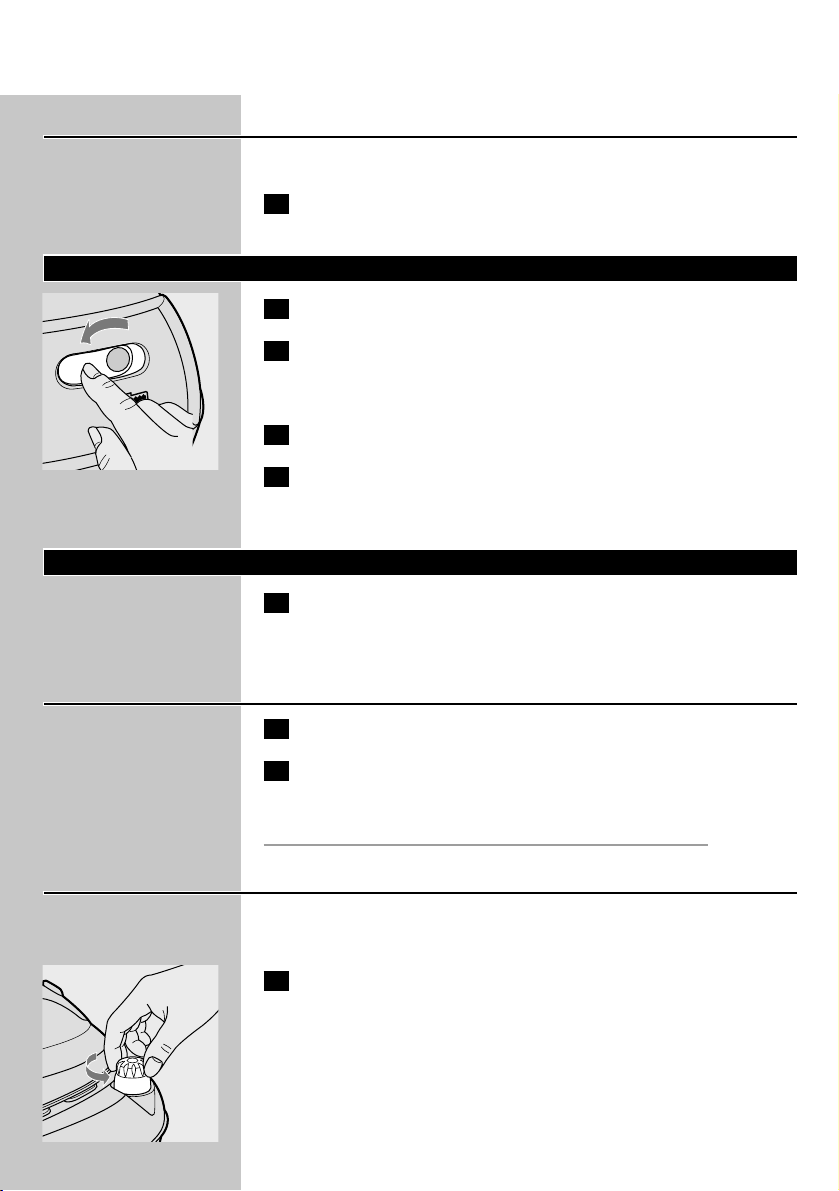
Steam
control
-
q
R
Temperature
dial
1
2
3
Type of fabric
Synthetic fabrics, e.g. acetate,
acrylic, viscose, polyamide,
polyester, and silk
Wool
Cotton, linen
Please note: Z in the table
means that the article
cannot be ironed
Label with ironing
instructions
B
C
D
Z
Page 9
Setting the temperature
Always place the steam tank on a stable, level and horizontal surface
Do not put the steam tank on the soft part of the ironing board.
Always place the iron on the iron stand. Do not put the hot iron on
the supply hose or the mains cord. Make sure the cord does not come
into contact with the hot soleplate.
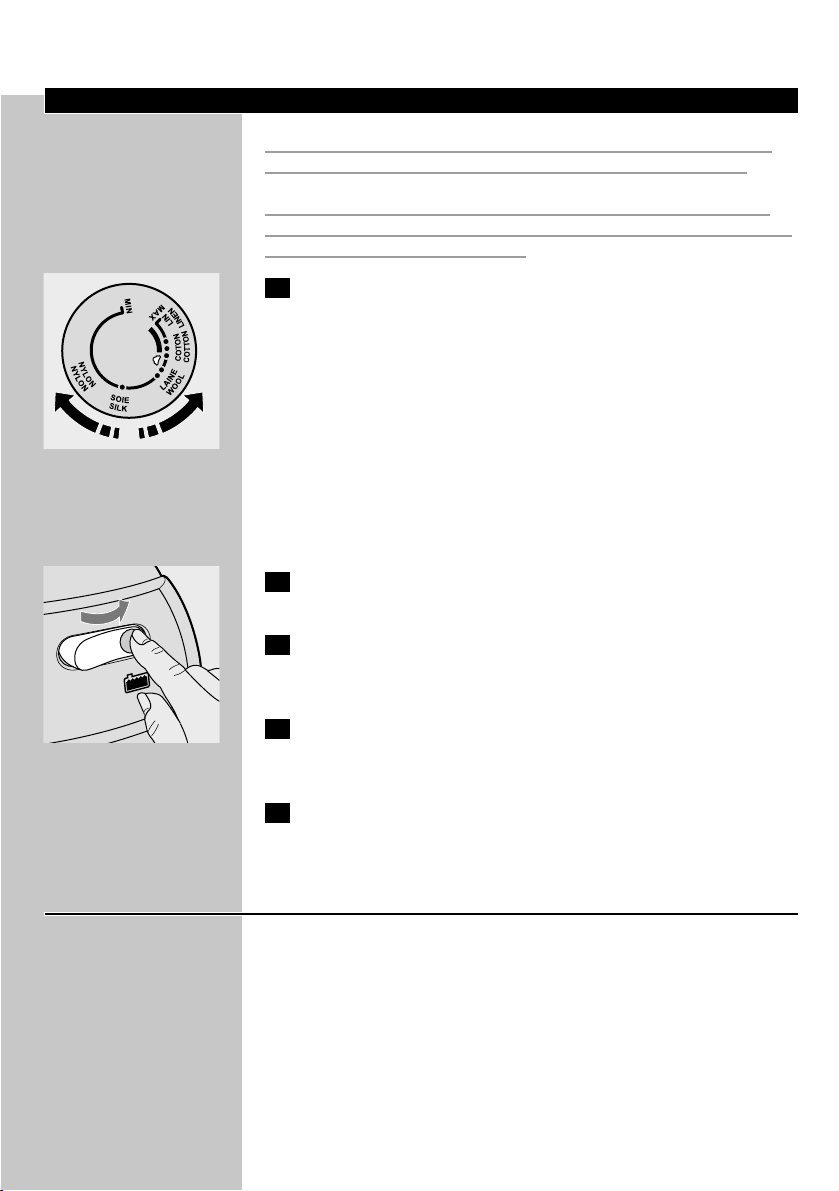
C
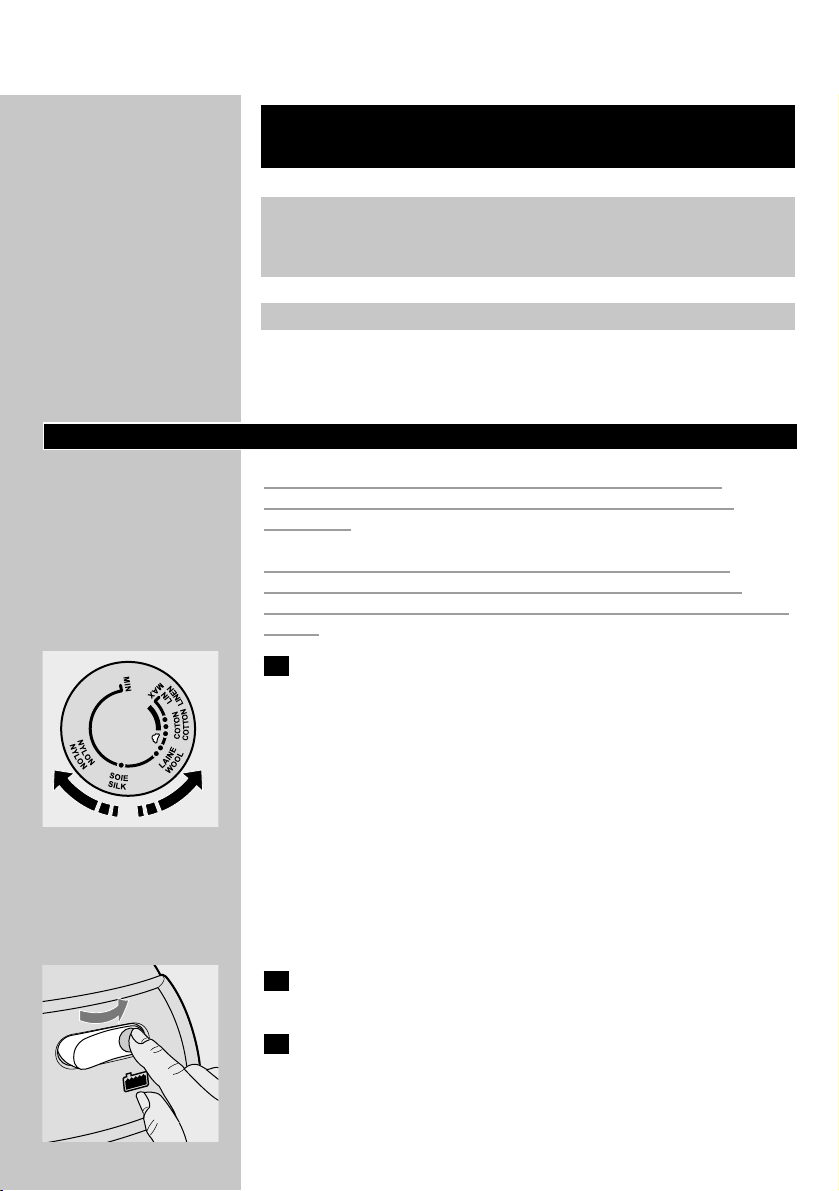
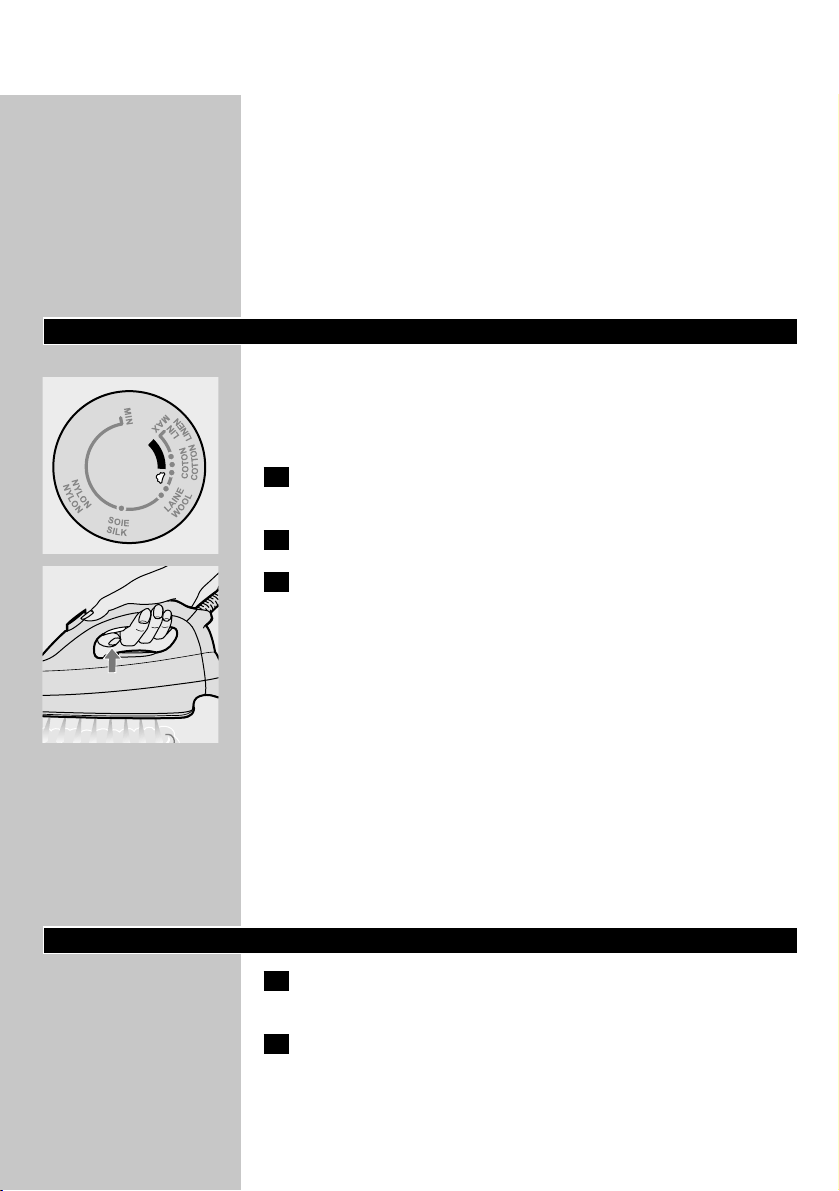
1 Set the temperature dial to the required ironing temperature
by turning it to the appropriate temperature indication.
- Check the garment label for the required ironing temperature:
- 1 Synthetic fabrics (e.g. acrylic, viscose, polyamide, polyester)
- 1 Silk
- 2 Wool
- 3 Cotton, linen
- When you do not know what kind of fabric the article is made of,
try to iron a spot which will be invisible when you wear it.
- Silk, woollen and synthetic materials: iron the reverse side of the
fabric to prevent shiny patches.
- Start ironing the articles that require the lowest ironing temperature,
such as those made of synthetic fibres.
C
2 Put the plug in the wall socket and let the appliance heat up by
setting the on/off switch (D) to 'on'.
3 Cold start: the steam tank and the soleplate will now be heated
up.The soleplate takes approximately 2 minutes to heat up and
the steam tank takes approximately 8 minutes to heat up.
4 Quick reheat: if you refill the steam tank during the ironing
process, the water in the steam tank will take approximately 6
minutes to heat up.
5 Types GC6268/GC6265/GC6068/GC6065/GC6029 only: as
soon as the water in the steam tank is hot enough for steam
ironing, the pilot light (E) will go out.You can now start ironing.
Tips
◗ If the fabric consists of various kinds of fibres, always select the
temperature required by the most delicate fibre, i.e. the lowest
temperature. For example: if an article consists of 60% polyester
and 40% cotton, it should be ironed at the temperature indicated
for polyester (1) and without steam.
ENGLISH 9
Page 10
◗ When steam ironing woollen fabrics, shiny patches may occur.You
can prevent this by using a dry pressing cloth or by turning the
article inside out and ironing the reverse side.
◗ Velvet and other fabrics that tend to acquire shiny patches should
be ironed in one direction only (along with the nap) while applying
very little pressure.
◗ Do not use steam when you are ironing coloured silk.This could
cause stains.
Steam ironing
Make sure that there is enough water in the steam tank.
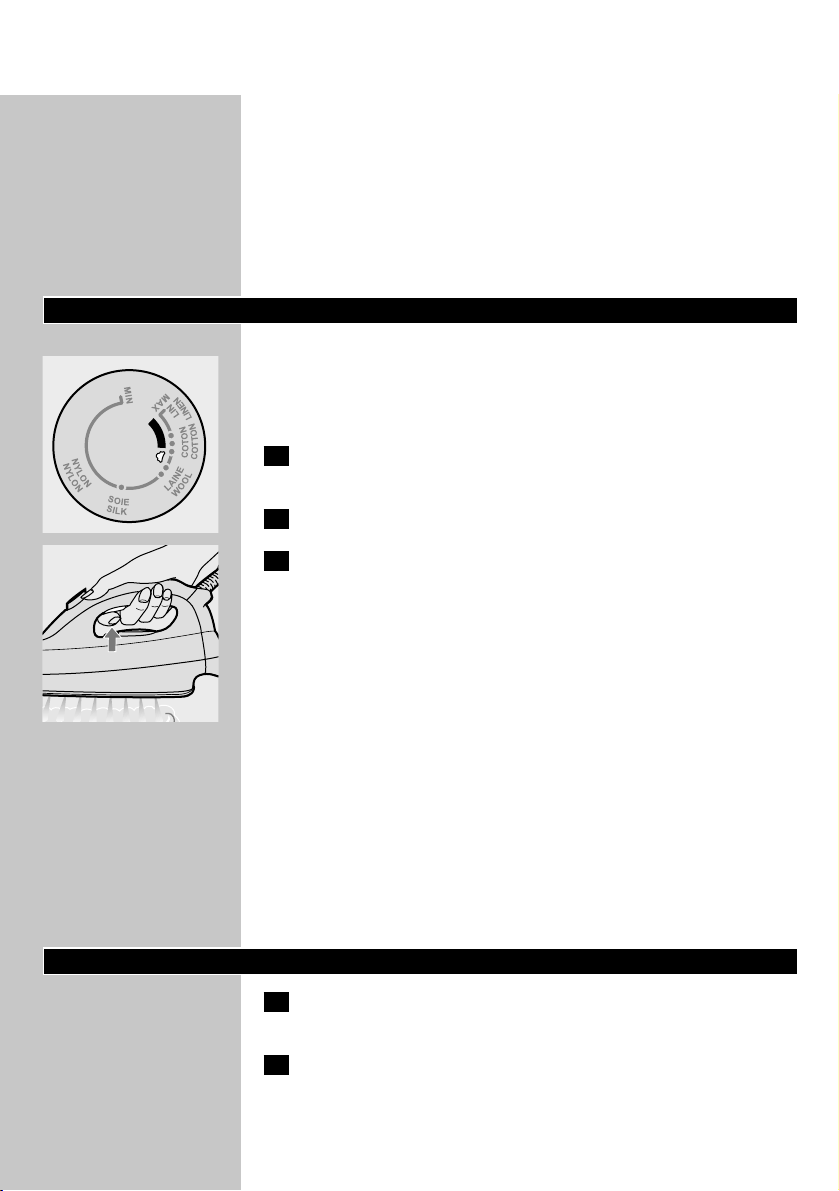
C
◗ Steam ironing is only possible at higher ironing temperatures
(temperature settings 2 to MAX).
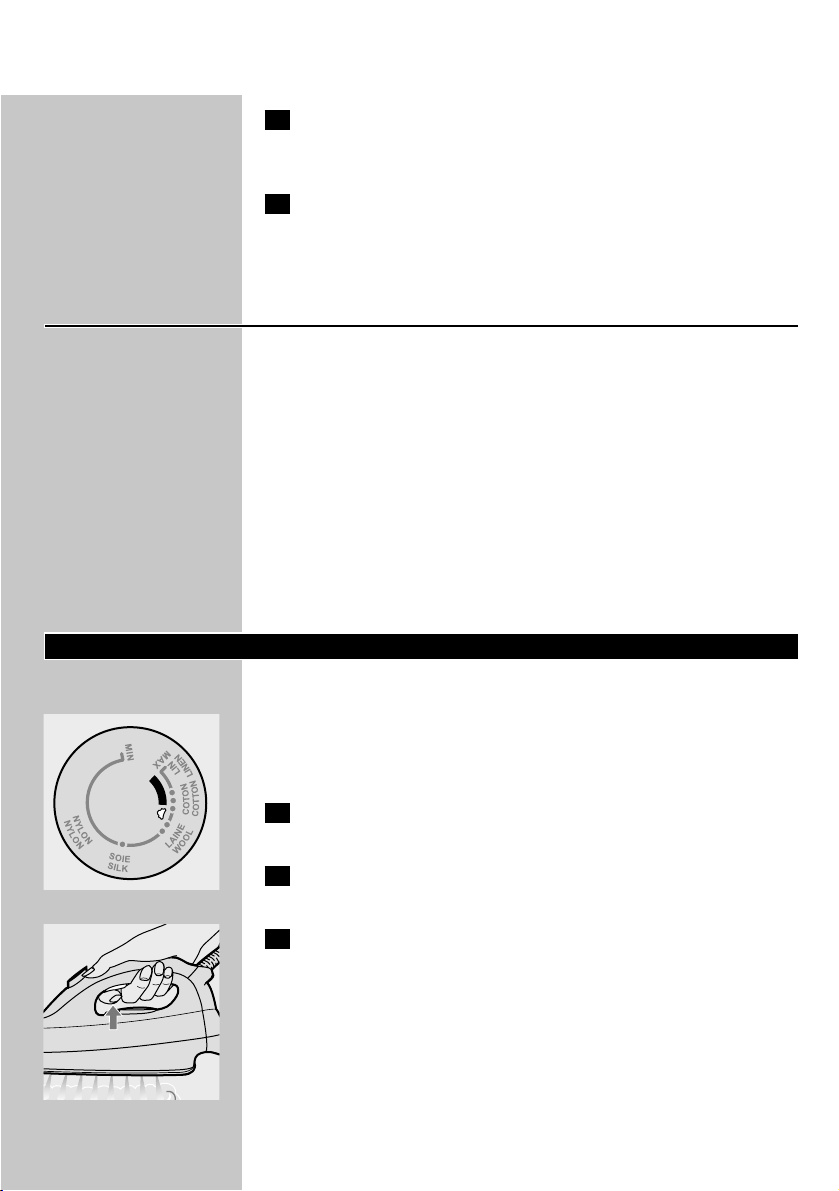
1 Set the temperature dial to the recommended position.
See 'Setting the temperature'.
2 Wait until the 'steam tank heating up' pilot light has gone out.
C
3 Keep the steam activator button (H) pressed in while you are
steam ironing.
Types GC6268/GC6265/GC6068/GC6065/GC6029 only: During
steam ironing, pilot light G will go on from time to time to indicate that
the steam tank and the iron are being heated up to the right
temperature and pressure.You can simply continue ironing while this
happens.
If you have not used the steaming facility for some time, the steam that
was still present in the supply hose will have condensed into water.
When you start steam ironing again, this may cause some spluttering in
the appliance and a few droplets of water may escape from the
soleplate.
B
To prevent droplets from falling onto your garments, hold the iron over an
old cloth and press the steam activator button (H) until the steam
production has normalised before you start steam ironing again.
Ironing without steam
1 Set the temperature dial to the recommended position.
See 'Setting the temperature'.
2 Do not press the steam activator button (H).
◗ Some steam will escape if you press the steam activator button by
accident while you are ironing.If the steam tank is empty or has
not heated up yet, you will hear a clicking sound inside the tank.
ENGLISH10
Page 11
This phenomenon is caused by the opening of the steam valve and
is perfectly harmless.
◗ If you have been ironing at a high temperature and subsequently
set the temperature dial (I) to a lower setting, wait until the
temperature pilot light (G) goes on again before you continue
ironing.This will prevent damage to your fabrics.
Other features
Steaming in vertical position
C
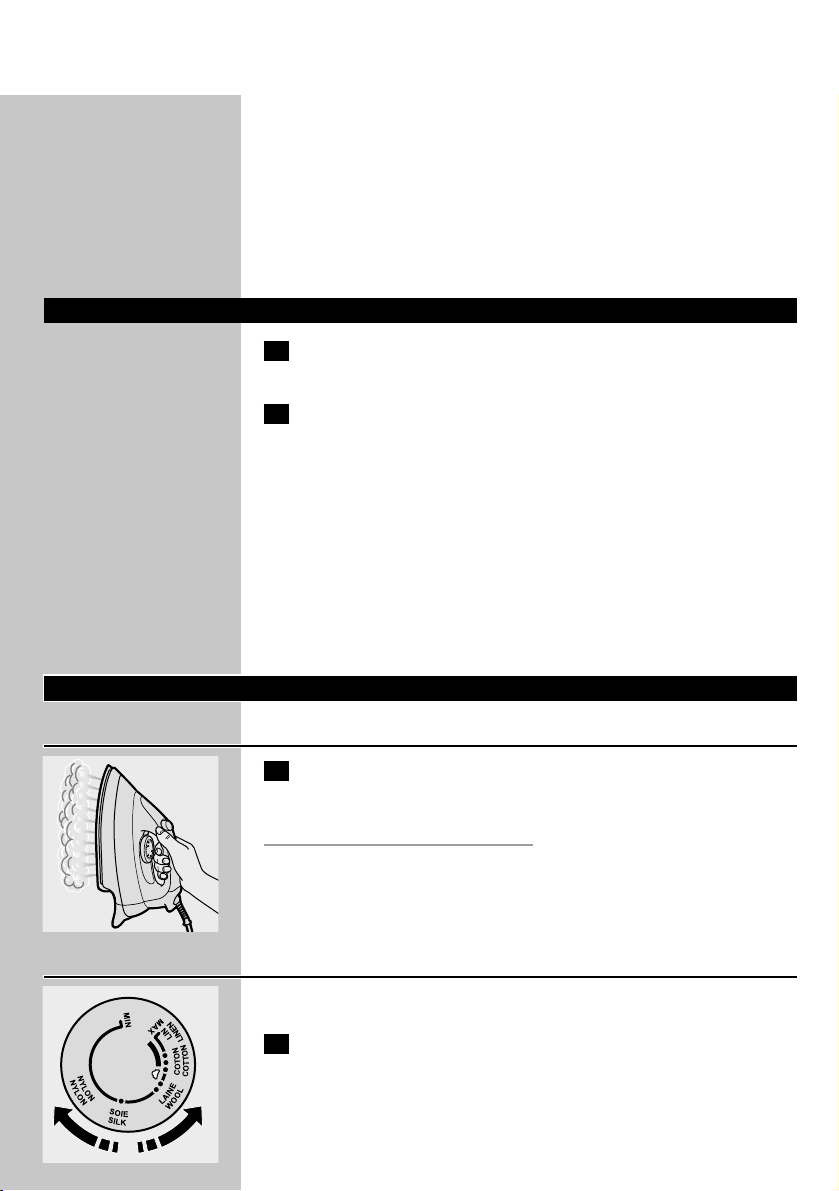
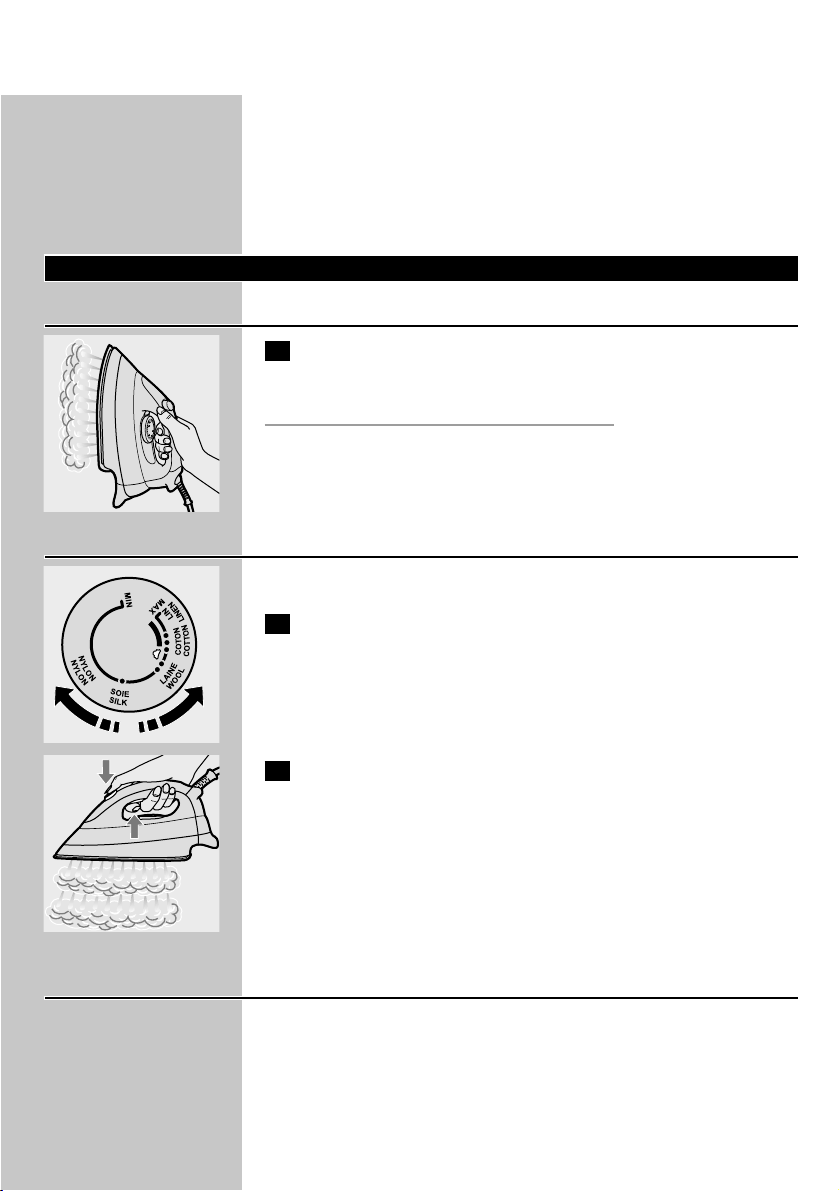
1 Hanging curtains and clothes (jackets, suits, coats) can be steam
ironed by holding the iron in vertical position.
Never direct the steam at people.
Shot of steam (types GC6268/GC6068/GC6029 only)
A powerful 'shot' of steam helps remove stubborn creases.
C
1 For a shot of steam: set the steam control (F) to R (the large
cloud) and set the temperature dial (l) to position 3 or
MAX.
C
2 Press both the steam activator button (H) and the shot-of-
steam button (N).
Variable steam (types GC6268/GC6265/GC6068/GC6065/
GC6029 only)
You can set the steam control (F) to q for moderate steam or to R
for maximum steam.
ENGLISH 11
Page 12
Anti-calc funnel (types GC6268/GC6068/GC6029 only)
To ensure a longer lifetime of the iron.
1 Use the anti-calc funnel (M) when you fill the steam tank with
water.
After ironing
C
1 Switch the appliance off by setting the on/off switch (D) to 'off'.
2 Depressurise the steam tank by pressing the steam activator
button until you no longer hear any steam escaping from the
appliance.
3 Remove the mains plug from the wall socket.
4 Put the iron on the iron stand (C), set the steam control to
position q and let the appliance cool down before you put it
away.
Cleaning and maintenance
1 Remove the mains plug from the wall socket and let the iron
cool down before you start cleaning it. If you want to clean the
steam tank, follow the first four steps of the 'Fast refill' section.
Iron
1 Clean the iron with a damp cloth.
2 Wipe scale and any other deposits off the soleplate with a
damp cloth and a non-abrasive (liquid) cleaner.
Never immerse the iron in water nor rinse it under the tap.
Steam tank
Rinse the steam tank once a month or after you have used the
appliance approximately 10 times.
C
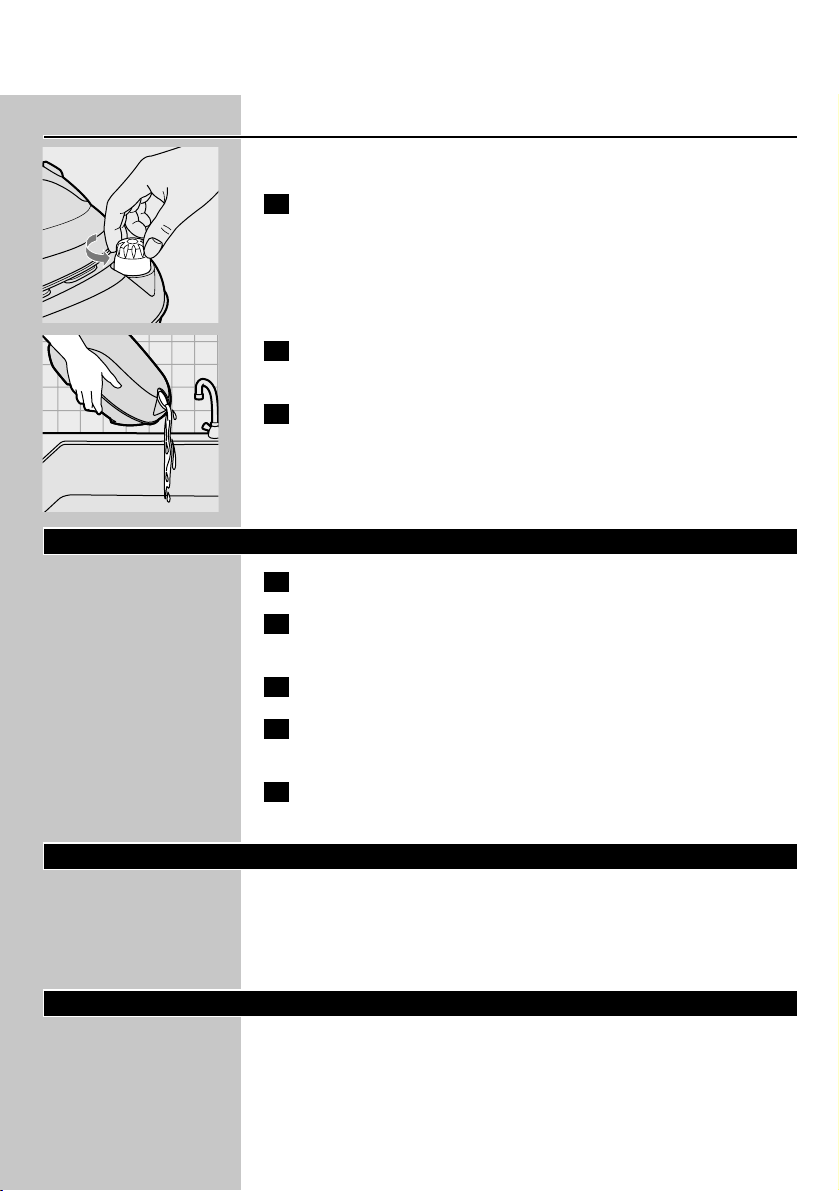
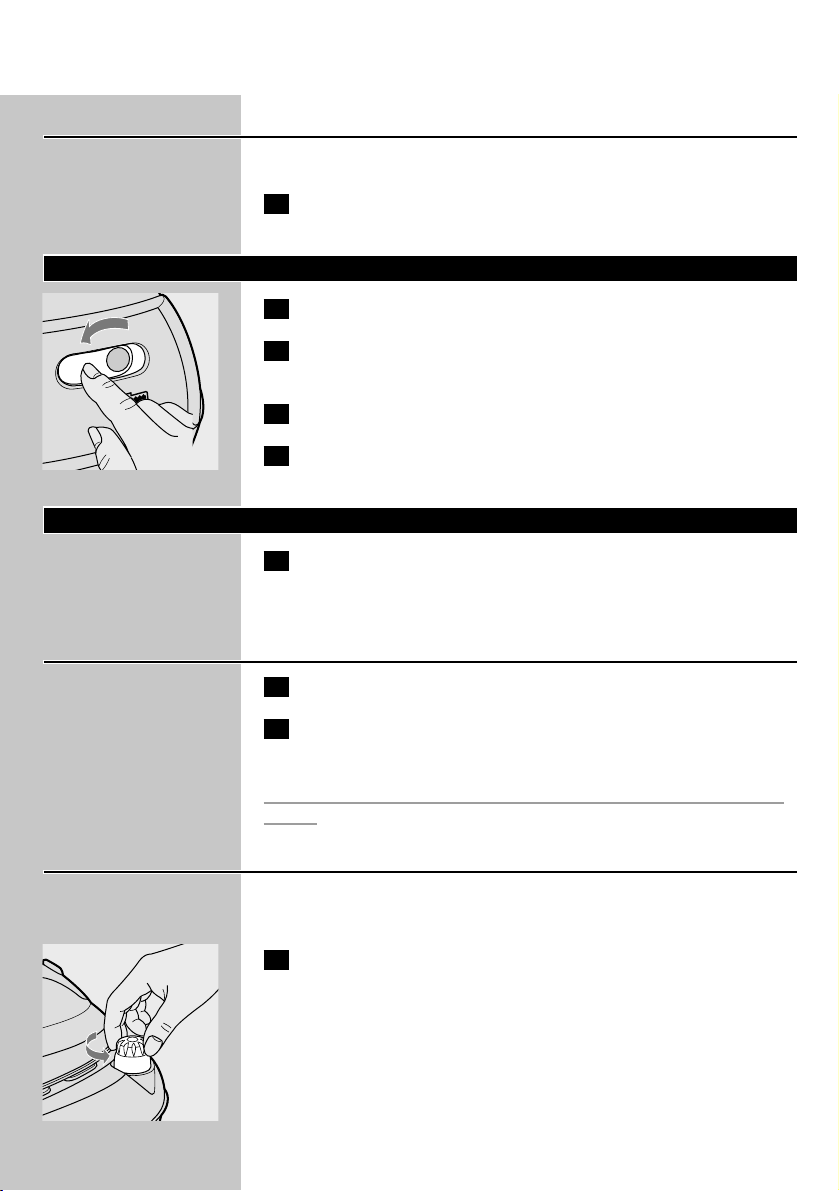
1 Remove the cap carefully.
ENGLISH12
Page 13
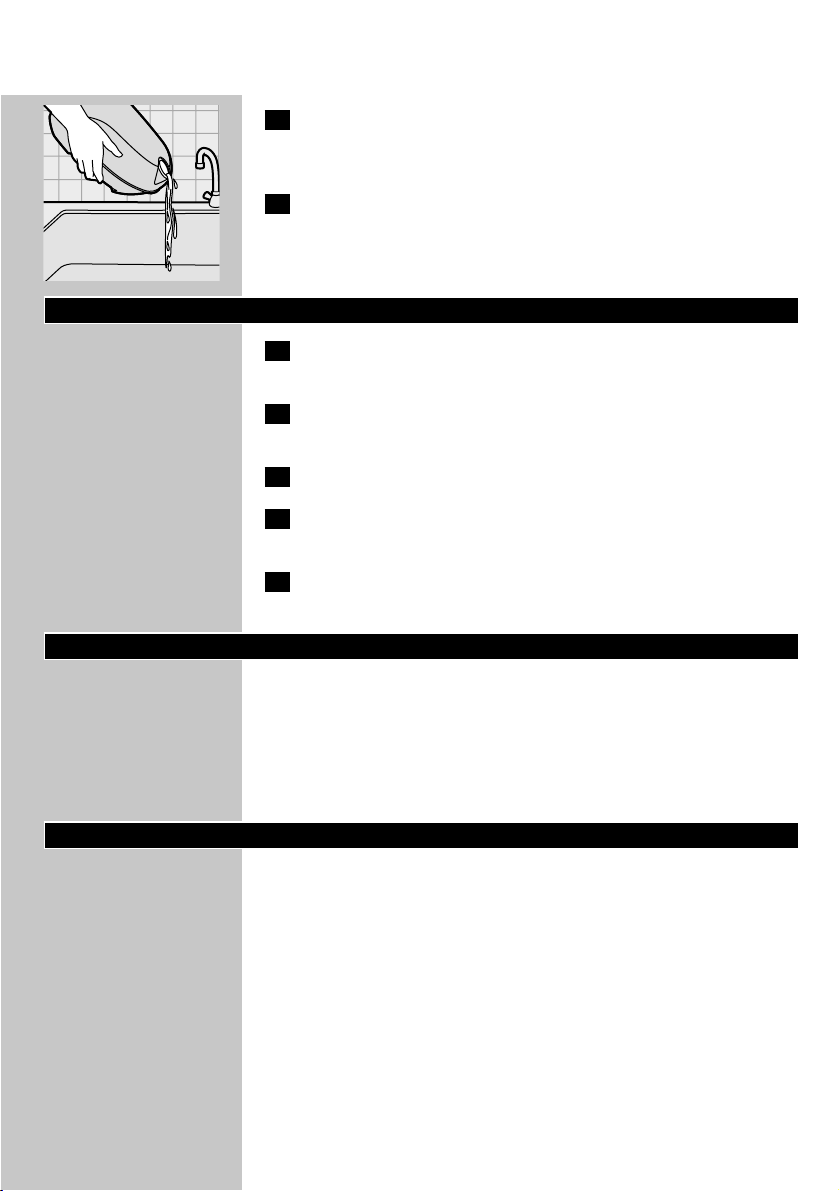
C
2 Rinse the steam tank with only 500 ml of fresh water. Pour out
the water by holding the steam tank upside down over the
sink.
3 Screw the cap back onto the steam tank.
Storage
1 Make sure the iron has cooled down sufficiently before you put
it away.
2 Remove the mains plug from the wall socket and let the iron
cool down.
3 Empty the steam tank.
4 There are handgrips on either side of the steam tank for easy
transport.
5 Regularly check if the mains cord and the supply hose are still
undamaged and safe.
Guarantee & service
If you need information or if you have a problem, please visit the Philips
Web site at www.philips.com or contact the Philips Customer Care
Centre in your country (you will find its phone number in the
worldwide guarantee leaflet). If there is no Customer Care Centre in
your country, turn to your local Philips dealer or contact the Service
Department of Philips Domestic Appliances and Personal Care BV.
Troubleshooting
This chapter summarises the most common problems you could
encounter with your iron. Please read the different sections for more
details. If you are unable to solve the problem, please contact the
Philips Customer Care Centre in your country (you will find its phone
number in the worldwide guarantee leaflet). If there is no Customer
Care Centre in your country, turn to your local Philips dealer or the
nearest Philips service centre.
ENGLISH 13
Page 14

Solution
This phenomenon will cease after a
short while.
These particles are harmless and they
will stop coming out of the soleplate
when you have used the iron a few
times.
Select the required ironing
temperature as indicated in these
instructions and the table.
Put the steam tank on a stable and
even surface.
This is normal. Hold the iron over an
old cloth and press the steam activator
button (H).The cloth will absorb the
drops. After a few seconds the steam
production will have normalised.
Set the on/off switch (D) to 'on'.
Wait until the pilot light has gone out.
To check if the iron is really producing
steam, hold a (cold) mirror in front of
the soleplate vents.
Clean the soleplate with a damp cloth.
Clean the soleplate with a damp cloth.
Select the recommended ironing
temperature.
Possible cause(s)
This is normal. Some parts of the iron
have been greased lightly in the
factory.
This is normal with a new iron.
The temperature dial (I) has been set
to a temperature that is too low for
steam ironing.
The steam tank has been placed on an
unstable and/or uneven surface.
When you start steam ironing, the
hose is cold. Steam condenses in the
hose, causing droplets of water to
escape from the soleplate.
The steam tank has not been switched
on.
The 'steam tank heating up' pilot light
is still on (types GC6268/GC6265/
GC6068/GC6065/GC6029 only).
Superheated (i.e. high-quality) steam is
hardly visible, especially when the
temperature dial has been set to
maximum position and even less so
when the ambient temperature is
relatively high.
Impurities or chemicals present in the
water have deposited on the soleplate.
You have been ironing at too high
temperatures.
Problem
Some smoke comes out of the
appliance after you have switched the
appliance on for the first time.
White particles come out of the
soleplate of your new iron.
Droplets of water escape from the
soleplate.
The appliance does not produce
steam.
I don't see any steam coming out of
the soleplate.
The soleplate is dirty.
ENGLISH14
Page 15
Opis urządzenia
A Zakrętka zbiornika parowego
B Zbiornik parowy
C Podstawa żelazka
D Włącznik z wbudowaną lampką kontrolną
E Lampka sygnalizacyjna "podgrzewania zbiornika pary" (tylko dla
typów GC6268/GC6265/GC6068/GC6065). Gdy urządzenie
będzie gotowe do prasowania parowego,lampka sygnalizacyjna
zgaśnie
F Regulator pary (tylko dla typów GC6268/GC6265/GC6068/
GC6065/GC6029).
q = umiarkowana ilość pary R = maksymalna ilość pary
G Lampka kontrolna temperatury
H Włącznik pary
I Pokrętło wyboru temperatury
J Wąż doprowadzający parę
K Stopa prasująca
L Przewód sieciowy
M Lejek z sitkiem zatrzymujący osady z wody (tylko dla typu
GC6268/GC6068/GC6029)
N Uderzenie parą (tylko dla typu GC6268/GC6068/GC6029)
O Tylna podpórka żelazka (dotyczy modeli GC6268/GC6265/
GC6263/GC6068/GC6065/GC6063)
Ważne
Aby zapewnić bezpieczne użytkowanie urządzenia, zanim włączysz je
po raz pierwszy,uważnie przeczytaj poniższą instrukcję i zapoznaj się z
ilustracjami.
- Do zbiornika pary nie wlewaj perfum, octu, krochmalu, środków
odwapniających ani żadnych innych środków chemicznych.
- Nigdy nie używaj urządzenia, jeśli jest ono w jakikolwiek sposób
uszkodzone. Regularnie sprawdzaj, czy przewód zasilający i wąż
doprowadzający parę nie uległy uszkodzeniu i czy ich użytkowanie
jest bezpieczne.
- Jeśli przewód zasilający ulegnie uszkodzeniu, musi zostać wymieniony
w autoryzowanym punkcie serwisowym firmy Philips, co pozwoli
uniknąć ewentualnego niebezpieczeństwa.
- Do zamykania zbiornika parowego używaj wyłącznie korka
dostarczonego wraz z urządzeniem, ponieważ pełni on także rolę
zaworu bezpieczeństwa.
- Przed podłączeniem urządzenia sprawdź, czy napięcie podane na
spodzie pojemnika parowego zgadza się z napięciem w domowej
instalacji elektrycznej.
- Podłączaj urządzenie wyłącznie do gniazdka z uziemieniem.
- Nigdy nie zanurzaj w wodzie żelazka ani zbiornika parowego.
- Nigdy nie zostawiaj podłączonego do sieci żelazka bez nadzoru.
- Jeśli skończyłaś/łeś prasowanie lub zamierzasz zrobić sobie chociaż
krótką przerwę, odłącz urządzenie od sieci, a żelazko postaw na
podstawie.
15POLSKI
Page 16
POLSKI16
- Zbiornik parowy zawsze stawiaj na stabilnej, równej, poziomej
powierzchni. Nie należy ustawiać go na miękkiej części deski do
prasowania.
- Zawsze kładź żelazko na specjalnej podpórce. Nie kładź rozgrzanego
żelazka na wężu dopływowym ani na kablu zasilającym.
- Podstawka i stopa żelazka mogą być bardzo gorące i przy
nieuważnym dotknięciu, mogą spowodować oparzenia. Jeżeli chcesz
usunąć zbiornik pary, nie dotykaj podstawki żelazka.
- Nie pozwalaj, aby przewód stykał się z rozgrzaną stopą żelazka.
- Osoby niepełnosprawne nie mogą obsługiwać urządzenia bez
nadzoru. Zwróć uwagę, by urządzeniem nie bawiły się dzieci.
- Gdy w czasie nagrzewania spod korka zamykającego zbiornik parowy
wydobywa się para, wyłącz urządzenie i skontaktuj się z
autoryzowanym punktem serwisowym firmy Philips.
- Gdy zbiornik pary jest pod ciśnieniem, nie zdejmuj z niego kapturka.
Przed zdjęciem kapturka stosuj się do instrukcji, zamieszczonej w
rozdziale "Szybkie napełnianie".
Przygotowanie urządzenia do użycia
1 Przed podłączeniem urządzenia sprawdź, czy napięcie podane
na spodzie pojemnika parowego zgadza się z napięciem w
domowej instalacji elektrycznej.
2 Usuń wszelkie naklejki lub folię ochronną ze stopy żelazka i
wymyj ją miękką ściereczką.
3 Rozwiń cały przewód sieciowy (L) i wąż doprowadzający (J).
4 Ustaw zbiornik parowy (B) na stabilnej i płaskiej powierzchni.
5 Umieść żelazko na podstawie (C).
Napełnianie zbiornika parowego
Nigdy nie zanurzaj zbiornika parowego w wodzie.
Gdy urządzenie jest rozgrzane i zbiornik pary znajduje się wciąż pod
ciśnieniem, nie otwieraj zakrętki.
C
1 Upewnij się, czy włącznik (D) jest ustawiony na pozycji
wyłączonej i wyjmij wtyczkę z gniazdka ściennego.
Page 17

POLSKI 17
C
2 Ostrożnie odkręć zakrętkę (A) zbiornika parowego.
Czynności tej może towarzyszyć charakterystyczny dźwięk. Jest to
zupełnie normalne zjawisko związane z faktem, że w zimnym zbiorniku
jest próżnia.
C
3 Wlej wodę do zbiornika (maksymalnie 1 litr).
Do napełnienia zbiornika do najwyższego poziomu używaj wody
wodociągowej.
Jeśli woda wodociągowa w Twojej okolicy jest bardzo twarda, zalecamy
wymieszanie jej w równych proporcjach z wodą destylowaną lub
używanie wyłącznie wody destylowanej.
Nie wlewaj do zbiornika perfum, octu, krochmalu ani wody chemicznie
odwapnionej.
4 Dokręć szczelnie zakrętkę otworu służącego do napełniania
zbiornika pary.
Szybkie napełnianie
C
1 Przestaw włącznik (D) na pozycję wyłączoną "off".
C
2 Wciśnij włącznik pary i trzymaj tak długo, aż nie będzie słychać
wydobywającej się pary.
3 Trzymając włącznik pary wciśnięty, powoli odkręcaj zakrętkę
zbiornika parowego w kierunku przeciwnym do ruchu
wskazówek zegara.W ten sposób zdekompresujesz powietrze
w zbiorniku.
Sprawdź, czy w zbiorniku nie pozostała para. Podczas odkręcania
zakrętki załóż na niego kawałek grubej tkaniny.
4 Wyjmij wtyczkę z gniazdka ściennego.
5 Napełnij zbiornik zgodnie z opisem w rozdziale "Napełnianie
zbiornika" i odczekaj aż urządzenie nagrzeje się ponownie.
Page 18
POLSKI18
Ustawianie temperatury
Zbiornik parowy zawsze stawiaj na stabilnej, równej, poziomej
powierzchni. Nie należy ustawiać go na miękkiej części deski do
prasowania.
Zawsze należy stawiać żelazko na podstawce. Nigdy nie stawiaj
gorącego żelazka na przewodzie doprowadzającym parę albo na
przewodzie sieciowym. Sprawdź czy przewód nie dotyka gorącej stopy
żelazka.
C
1 Ustaw termostat na wymaganej temperaturze prasowania.
- Sprawdź informacje dotyczące temperatury prasowania podane na
metkach ubrań.
- 1 Włókna syntetyczne (np. akryl, wiskoza, poliamid, poliester)
- 1 Jedwab
- 2 Wełna
- 3 Bawełna, len
- Jeśli nie znasz rodzaju tkaniny, z której wykonane jest ubrannie
przeznaczone do prasowania, wypróbuj temperaturę na
niewidocznym miejscu.
- Jedwab, wełna i tkaniny syntetyczne prasuj po lewej stronie, aby ich
nie wyświecić.
- Zacznij prasowanie od rzeczy wymagających najniższej temperatury,
np. uszytych z włókien syntetycznych.
C
2 Włóż wtyczkę do gniazdka sieciowego i ustaw włącznik (D) na
pozycji włączonej, by nagrzać żelazko.
3 Zimny start: zbiornik pary oraz stopa żelazka zaczną się
rozgrzewać.Do rozgrzania się stopy żelazka potrzeba 2 minut,
natomiast zbiornik pary potrzebuje do rozgrzania około 8
minut.
Regulator
pary
-
q
R
Ustawienie
termostatu
1
2
3
Rodzaj tkaniny
Tkaniny syntetyczne (np. z
włókien octanowych,
akrylowych, wiskozy,
poliamidu, poliestru) i jedwab
Wełna
Bawełna, len
Uwaga: Z w tabeli oznacza,
że dany artykuł nie nadaje
się do prasowania
Metki z instrukcją
dotyczącą
prasowania
B
C
D
Z
Page 19
POLSKI 19
4 Szybkie podgrzanie: Jeśli podczas prasowania ponownie
napełnisz zbiornik pary wodą, będzie ono potrzebować na
rozgrzanie się około 6 minut.
5 Tylko dla typów GC6268/GC6265/GC6068/GC6065/GC6029:
gdy woda w zbiorniku pary jest już wystarczająco gorąca do
prasowania parowego, lampka sygnalizacyjna (E) gaśnie.
Wówczas można rozpocząć prasowanie.
Porady
◗ Jeśli materiał składa się z różnych rodzajów włókien,zawsze
ustawiaj temperaturę dostosowaną do najbardziej delikatnego
składnika, to znaczy najniższą temperaturę. Dla przykładu: jeśli
materiał składa się z 60% poliestru i 40% bawełny,należy go
prasować zgodnie z zalecaniami dla poliestru (1) i bez pary.
◗ Podczas prasowania parowego wełny, mogą pojawić się
wyświecenia.Aby temu zapobiec, prasuj ubranie przez suchą
szmatkę lub po lewej stronie.
◗ Aksamit i inne materiały podatne na wyświecenia należy prasować,
przesuwając żelazko tylko w jednym kierunku (zgodnie z
włóknami), bardzo lekko naciskając.
◗ Nie używaj funkcji prasowania parowego do farbowanego
jedwabiu. Mogą pojawić się plamy.
Prasowanie parowe
Upewnij się, czy w zbiorniku jest wystarczająca ilość wody.
C
◗ Prasowanie parowe możliwe jest wyłącznie przy wyższych
temperaturach prasowania (ustawienia temperatury: od 2 do
wartości MAX).
1 Ustaw regulator temperatury na zalecaną pozycję.
Patrz rozdział "Ustawianie temperatury".
2 Odczekaj, aż zgaśnie lampka kontrolna "nagrzewania się
zbiornika parowego".
C
3 W trakcie prasowania parowego trzymaj włącznik pary (H)
wciśnięty.
Tylko dla typów GC6268/GC6265/GC6068/GC6065/GC6029: Podczas
prasowania parowego lampka sygnalizacyjna G będzie zapalać się od
czasu do czasu, wskazując, że zbiornik na parę i żelazko rozgrzewane są
do właściwej temperatury i ciśnienia. Można wówczas nadal
kontynuować prasowanie.
Page 20
POLSKI20
Jeśli przez jakiś czas nie korzystałeś/aś z funkcji prasowania parowego,
para znajdująca się w wężu, skropli się. Gdy ponownie zaczniesz
prasowanie parowe, z urządzenia mogą wydobywać się pewne dźwięki,
a ze stopy żelazka może wyciec kilka kropel wody.
B
Aby zapobiec zaplamieniu ubrań wodą, wciśnij włącznik parry (H),
trzymając żelazko nad starą szmatką, aż zacznie wydobywać się
normalna para.
Prasowanie bez pary
1 Ustaw regulator temperatury na zalecaną pozycję.
Patrz rozdział "Ustawianie temperatury".
2 Nie wciskaj włącznika pary (H).
◗ Jeśli podczas prasowania wciśniesz przycisk włączania pary,pewna
ilość pary ulotni się ze zbiornika. Jeśli zbiornik pary jest pusty lub
jeszcze nie rozgrzał się, usłyszysz kliknięcie wewnątrz zbiornika.
Zjawisko to spowodowane jest przez otwarcie zaworu pary i jest
zupełnie nieszkodliwe.
◗ Jeśli prasowałaś/eś w wysokiej temperaturze, a następnie chcesz
przestawić termostat (I) na niższe ustawienie,zanim zaczniesz
ponownie prasować, odczekaj aż lampka kontrolna temperatury
(G) zaświeci się ponownie. Dzięki temu nie uszkodzisz delikatnej
tkaniny.
Inne funkcje
Prasowanie w pozycji pionowej.
C
1 Wiszące zasłony i ubrania (kurtki, garnitury, płaszcze) można
prasować, trzymając żelazko pionowo.
Nigdy nie kieruj pary w stronę ludzi.
Uderzenie parą (tylko dla typów GC6268/GC6068/GC6029)
Silne "uderzenie" parą pomaga usunąć uporczywe zagniecenia.
C
1 Funkcja uderzenia parowego może być wykorzystana przy
ustawieniu regulatora pary (F) na pozycji R (duża chmurka) i
termostatu (I) na pozycji 3 lub MAX.
Page 21
POLSKI 21
C
2 Wciśnij zarówno przycisk włączania pary (H), jak i przycisk
wyrzutu pary (N).
Zmienna ilość pary (tylko dla typów GC6268/GC6265/GC6068/
GC6065/GC6029)
Regulator pary (F) możesz ustawić w pozycji q - dla umiarkowanej
ilości pary lub w pozycji R - dla maksymalnej ilości pary.
Wkłądka antywapienna (tylko dla typów GC6268/GC6068/
GC6029)
Aby zapewnić trwałość żelazka,
1 Korzystaj z lejka z sitkiem zatrzymującym osady z wody (M)
podczas napełniania zbiornika pary wodą.
Po zakończeniu prasowania
C
1 Wyłącz urządzenie, ustawiając włącznik (D) na pozycji
wyłączonej.
2 Rozhermetyzuj zbiornik parowy, przyciskając włącznik pary, aż
do chwili, gdy nie będzie słychać wydobywającej się pary.
3 Wyjmij wtyczkę z gniazdka ściennego.
4 Umieść żelazko na jego podstawce (C), ustaw regulator pary w
pozycji q i zanim odstawisz je do przechowania, poczekaj, aż
się oziębi.
Mycie i konserwacja
1 Przed przystąpieniem do czyszczenia wyjmij wtyczkę z gniazdka
sieciowego i poczekaj na ostudzenie się żelazka.Jeśli chcesz
oczyścić zbiornik pary,postępuj zgodnie z pierwszymi czterema
krokami, omówionymi w rozdziale "Szybkie napełnianie".
Żelazko
1 Przetrzyj żelazko wilgotną ściereczką.
2 Zetrzyj kamień i inne pozostałości ze stopy żelazka wilgotną
szmatką i płynnym nieszorującym środkiem czyszczącym.Nigdy
nie zanurzaj żelazka w wodzie ani nie płucz go pod kranem.
Page 22
POLSKI22
Zbiornik parowy
Płucz zbiornik pary raz na miesiąc lub po 10-krotnym użyciu żelazka.
C
1 Ostrożnie odkręć zakrętkę.
C
2 Wypłucz zbiornik, używając pół litra świeżej wody.Wylej wodę,
odwracając zbiornik do góry dnem nad zlewem.
3 Zakręć ponownie zakrętkę.
Przechowywanie
1 Przed odstawieniem żelazka odczekaj, aż ostygnie.
2 Wyjmij wtyczkę z gniazdka ściennego i odczekaj,aż żelazko
ostygnie.
3 Opróżnij zbiornik pary.
4 Po obu stronach zbiornika znajdują się uchwyty ułatwiające
przenoszenie urządzenia.
5 Sprawdzaj regularnie, czy przewód sieciowy lub wąż
doprowadzający parę nie są uszkodzone.
Gwarancja i serwis
Jesli potrzebujesz informacji lub gdy masz jakiś problem skontaktuj się z
Biurem Obsługi Klienta firmy Philips (nr telefonu znajdziesz w Karcie
Gwarancyjnej) lub najbliższym punktem serwisowym Artykułów
Gospodarstwa Domowego autoryzowanym przez firmę Philips.
Rozwiązywanie problemów
W niniejszym rozdziale opisane są problemy, z którymi użytkownik żelazka
może spotkać się najczęściej. Przeczytaj,proszę, uważnie poszczególne
punkty tego rozdziału, dotyczące szczegółów. Jeśli nie możesz samodzielnie
rozwiązać problemu, skontaktuj się z Biurem Obsługi Klienta lub najbliższym
punktem serwisowym AGD autoryzowanym przez firmę Philips (numery
telefonów znajdziesz w Karcie Gwarancyjnej)
Page 23

Rozwiązanie problemu
Po krótkiej chwili zjawisko to zaniknie
samoistnie.
Cząstki te są nieszkodliwe i po
kilkakrotnym użyciu żelazka przestaną
wydobywać się z jego stopy.
Ustaw wymaganą temperaturę zgodną
z instrukcjami i tabelą.
Ustaw zbiornik na stabilnej i równej
powierzchni.
Jest to normalne zjawisko. Potrzymaj
żelazko nad starą szmatką i wciśnij
włącznik pary (H). Szmatka wchłonie
krople wody. Po kilku sekundach
wydobywanie pary powróci do normy.
Ustaw włącznik (D) na pozycję
włączoną.
Poczekaj aż lampka zgaśnie.
Aby sprawdzić, czy żelazko
rzeczywiście wytwarza parę, przyłóż
(zimne) lusterko do otworów stopy
pracującej.
Stopę żelazka należy czyścić miękką,
wilgotną ściereczką.
Stopę żelazka należy czyścić miękką,
wilgotną ściereczką.Wybierz zalecaną
temperaturę prasowania.
Ewentualna przyczyna (y)
Jest to normalne zjawisko. Niektóre
części urządzenia zostały w fabryce
lekko naoliwione.
Jest to w przypadku nowego żelazka
zjawisko normalne.
Termostat (I) został ustawiony na
temperaturę za niską do prasowania
parowego.
Zbiornik został ustawiony na
niestabilnej lub nierównej powierzchni
Gdy rozpoczynasz prasowanie, wąż
doprowadzający parę jest zimny. Para
skrapla się w wężu, powodując kapanie
wody ze stopy żelazka.
Zbiornik parowy nie jest włączony.
Wciąż zapalona jest lampka
"podgrzewania zbiornika pary" (tylko
dla typów GC6268/GC6265/
GC6068/GC6065/GC6029).
Bardzo mocno nagrzana para
(wysokiej jakości) jest ledwie
widoczna, zwłaszcza gdy termostat
został ustawiony na maksymalną
temperaturę lub gdy temperatura
otoczenia jest wysoka.
Zanieczyszczenia obecne w wodzie
pozostawiły osad na stopie.
Prasowałaś/eś w za wysokiej
temperaturze.
Problem
Przy pierwszym włączeniu urządzenia,
wydobywa się z niego odrobina dymu.
Ze stopy nowego żelazka spadają białe
cząstki.
Krople wody kapią ze stopy żelazka.
Urządzenie nie wytwarza pary.
Nie widać pary wydostającej się ze
stopy żelazka.
Stopa żelazka jest brudna.
POLSKI 23
Page 24

ROMÂNĂ24
Descriere generală
A Capac pentru rezervor de abur
B Rezervor de abur
C Suport fier
D Buton pornire/oprire cu led încorporat
E Led "încălzire rezervor abur" (doar GC6268/GC6265/GC6068/
GC6065). Ledul se stinge când aparatul este gata pentru călcare cu
abur
F Buton abur (doar GC6268/GC6265/GC6068/GC6065/GC6029).
q = abur moderat R = abur maxim
G Indicator de temperatură
H Buton de activare a aburului
I Termostat
J Furtun
K Talpă
L Cablu de alimentare
M Pâlnie anticalcar (doar model GC6268/GC6068/GC6029)
N Jet de abur (doar model GC6268/GC6068/GC6029)
O Suport spate pentru fier (doar modelele
GC6268/GC6265/GC6263/GC6068/GC6065/GC6063)
Important
Pentru o siguranţă optimă, citiţi aceste instrucţiuni de utilizare cu
atenţie şi priviţi imaginile înainte de a utiliza aparatul.
- Nu turnaţi parfum, oţet, amidon, agenţi de îndepărtare a calcarului
sau alte substanţe chimice în rezervorul de abur.
- Nu folosiţi niciodată aparatul dacă este deteriorat.Verificaţi regulat
dacă furtunul şi cablul de alimentare sunt în stare bună de
funcţionare.
- Daca cordonul de alimentare este defect, inlocuirea lui va fi executată
la un centru service autorizat Philips sau de catre o persoana
autorizată.
- Nu folosiţi un alt capac pentru închiderea rezervorului decât cel
furnizat cu aparatul, întrucât acesta funcţionează şi ca supapă de
siguranţă.
- Verificaţi dacă tensiunea indicată la baza rezervorului cu abur
corespunde tensiunii locale înainte de a conecta aparatul.
- Conectaţi aparatul doar la o priză cu legătură la pământ.
- Nu introduceţi niciodată fierul sau rezervorul în apă.
- Aparatul nu trebuie lăsat nesupravegheat atâta timp cât este
conectat la priză.
- După ce terminaţi de călcat şi chiar şi atunci când faceţi o pauză,
scoateţi fierul din priză şi poziţionaţi-l pe suport.
- Poziţionaţi întotdeauna rezervorul cu abur pe o suprafaţă stabilă,
regulată şi orizontală. Nu puneţi rezervorul pe suprafaţa moale a
planşei de călcat.
- Aşezaţi întotdeauna fierul de călcat pe suport. Nu aşezaţi fierul încins
pe furtun sau pe cablul de alimentare.
Page 25
ROMÂNĂ 25
- Suportul fierului şi talpa se pot încinge foarte tare şi pot provoca
arsuri dacă le atingeţi. Dacă doriţi să mutaţi rezervorul cu abur, nu
atingeţi suportul pentru fier.
- Nu atingeţi talpa încinsă a fierului de călcat cu cablul de alimentare.
- Persoanele infirme trebuie să folosească aparatul doar sub
supraveghere. Aveţi grijă să nu se joace copiii cu aparatul.
- Dacă scapă abur pe lângă capacul rezervorului cu abur în timpul
încălzirii aparatului, opriţi aparatul şi contactaţi un centru service
autorizat de Philips.
- Nu scoateţi capacul rezervorului când acesta este sub presiune.
Respectaţi instrucţiunile din capitolul "Umplere rapidă" înainte de
scoaterea capacului.
Pregătirea aparatului pentru utilizare
1 Verificaţi dacă tensiunea indicată la baza rezervorului cu abur
corespunde tensiunii locale înainte de a conecta aparatul.
2 Îndepărtaţi orice autocolant sau folie protectoare de pe talpă şi
curăţaţi-o cu o cârpă moale.
3 Desfăşuraţi complet cablul de alimentare (L) şi furtunul (J).
4 Poziţionaţi rezervorul cu abur (B) pe o suprafaţă stabilă,
uniformă.
5 Aşezaţi fierul de călcat pe suport (C).
Umplerea rezervorului
Nu introduceţi niciodată rezervorul cu abur în apă.
Nu scoateţi capacul când aparatul este încălzit iar rezervorul de abur
este sub presiune.
C
1 Asiguraţi-vă că butonul pornire/oprire (D) a fost poziţionat pe
'oprire' şi scoateţi ştecherul din priză.
C
2 Deşurubaţi încet capacul (A) de pe rezervorul cu abur.
S-ar putea să auziţi un sunet când scoateţi capacul. Sunetul se
datorează rezervorului rece sub vid.Acest lucru este perfect normal.
Page 26
ROMÂNĂ26
C
3 Turnaţi apă în rezervor (max. 1 litru).
Folosiţi apă de la robinet pentru umplerea rezervorului până la nivelul
maxim.
Dacă apa de la robinet este foarte dură, vă sfătuim să o amestecaţi în
părţi egale cu apă distilată sau să folosiţi numai apă distilată.
Nu folosiţi parfum, oţet, amidon sau apă detartrată chimic.
4 Înşurubaţi bine capacul pe orificiul de umplere al rezervorului.
Umplere rapidă
C
1 Reglaţi mai întâi butonul pornire/oprire (D) pe 'oprire'.
C
2 Apăsaţi butonul de activare a aburului până ce tot aburul este
evacuat din aparat.
3 Ţineţi butonul de activare a aburului apăsat şi deşurubaţi încet
capacul rezervorului de abur, răsucindu-l în sens invers acelor
de ceasornic.Astfel veţi depresuriza rezervorul de abur.
Asiguraţi-vă că nu mai rămâne abur deloc în rezervor. Ţineţi capacul cu
un prosop când îl desfaceţi.
4 Scoateţi ştecherul din priză.
5 Umpleţi rezervorul de abur cum este descris în capitolul
'Umplerea rezervorului' şi lăsaţi aparatul să se încălzească din
nou.
Buton abur
-
q
R
Termostat
1
2
3
Tipul ţesăturii
Materiale sintetice (de ex.
fire din acetat de celuloză,
acrilic, vâscoză, piele
poliamidică, fibre
poliesterice) şi mătase
Lână
Bumbac, in
Observaţie: Z în tabel
înseamnă că articolul nu
poate fi călcat
Etichetă cu
instrucţiunile
pentru călcat
B
C
D
Z
Page 27
ROMÂNĂ 27
Reglarea temperaturii
Poziţionaţi întotdeauna rezervorul cu abur pe o suprafaţă stabil
regulată şi orizontală. Nu puneţi rezervorul pe suprafaţa moale a
planşei de călcat.
Aşezaţi întotdeauna fierul de călcat pe suport. Nu aşezaţi fierul încins
pe furtun sau pe cablul de alimentare. Aveţi grijă să nu atingeţi cablul de
alimentare de talpa încinsă a aparatului.
C
1 Reglaţi termostatul pe temperatura de călcare necesară.
- Verificaţi eticheta de pe articolul de îmbrăcăminte pentru
temperatura de călcare necesară.
- 1 Ţesături sintetice (de ex. fibre acrilice, vâscoză, poliamide,
poliester)
- 1 Mătase
- 2 Lână
- 3 Bumbac, pânză de in
- Dacă nu cunoaşteţi tipul de ţesătură al articolului de îmbrăcăminte,
încercaţi să călcaţi o porţiune pe dos.
- Ţesături sintetice, de mătase şi de lână: călcaţi ţesătura pe dos pentru
a nu lăsa pete strălucitoare.
- Începeţi să călcaţi materialele care necesită temperatura cea mai
coborâtă, cum sunt cele din fibre sintetice.
C
2 Introduceţi ştecherul în priză şi lăsaţi aparatul să se încălzească
reglând butonul pornire/oprire (D) pe 'pornire'.
3 Pornire rapidă:rezervorul de abur şi talpa fierului se vor încălzi.
Talpa aparatului se încălzeşte în aproximativ 2 minute, iar
rezervorul în aproximativ 8 minute.
4 Reîncălzire rapidă: dacă reumpleţi rezervorul de abur în timpul
călcării rufelor, apa din rezervor se va încălzi în aproximativ 6
minute.
5 Modele GC6268/GC6265/GC6068/GC6065/GC6029: când apa
din rezervor este suficient de încălzită pentru călcarea cu abur,
ledul (E) se va stinge. Puteţi începe să călcaţi.
Sugestii
◗ Dacă ţesătura este făcută din fibre diferite, selectaţi întotdeauna
temperatura indicată pentru fibra cea mai delicată, adică
temperatura cea mai mică. De ex., dacă un articol este făcut din
poliester 60% şi
Page 28
ROMÂNĂ28
din bumbac 40%, acesta trebuie călcat la temperatura indicată pentru
poliester (1) şi fără abur.
◗ Când călcaţi cu abur ţesături de lână, pot apărea pete pe material.
Pentru a evita apariţia petelor folosiţi o cârpă uscată pe care o
aşezaţi peste articol sau călcaţi pe dos.
◗ Catifeaua sau alte ţesături care au tendinţa de a forma pete
strălucitoare trebuie călcate într-o singură direcţie apăsând foarte
uşor.
◗ Nu folosiţi abur când călcaţi mătase colorată. S-ar putea păta.
Călcarea cu aburi
Aveţi grijă să fie suficientă apă în rezervor.
C
◗ Călcarea cu abur este posibilă doar la temperaturi ridicate (reglaje
de temperatură de la 2 la MAX).
1 Poziţionaţi termostatul pe poziţia indicată.
Consultaţi capitolul "Reglarea temperaturii".
2 Aşteptaţi până ce ledul "încălzire rezervor abur" se stinge.
C
3 Ţineţi apăsat butonul de activare a aburului (H) în timp ce
călcaţi cu abur.
Doar modelele GC6268/GC6265/GC6068/GC6065/GC6029:În
timpul călcării cu abur, ledul G se va aprinde din când în când pentru a
indica faptul că rezervorul şi fierul se încălzesc la temperatura şi
presiunea corectă. În acest timp, puteţi continua călcarea.
Dacă nu aţi folosit aburul o perioadă de timp, cantitatea de abur
rămasă în furtun se condensează transformându-se în apă. Când veţi
începe din nou să călcaţi cu abur, s-ar putea scurge câteva picături de
apă prin talpă.
B
Pentru a preveni scurgerea picăturilor pe rufe, ţineţi fierul deasupra unei
cârpe uzate şi apăsaţi butonul de activare a aburului (H) până ce
producerea aburului revine la normal.
Călcarea fără abur
1 Poziţionaţi termostatul pe poziţia indicată.
Consultaţi capitolul "Reglarea temperaturii".
2 Nu apăsaţi butonul de activare a aburului (H).
◗ În timpul călcării rufelor, dacă apăsaţi din greşeală pe butonul de
activare a aburului, fierul va degaja puţin abur. Dacă rezervorul este
gol sau nu s-a încălzit încă, veţi auzi un clichet în interiorul
Page 29
ROMÂNĂ 29
rezervorului.Acest fenomen este provocat de deschiderea valvei de
abur şi nu reprezintă un pericol.
◗ Dacă aţi călcat rufe la o temperatură ridicată şi apoi aţi poziţionat
termostatul pe un reglaj inferior, aşteptaţi până ce indicatorul de
temperatură (G) se aprinde din nou înainte de a continua să
călcaţi.Astfel, veţi evita deteriorarea ţesăturilor.
Alte caracteristici
Călcare în poziţie verticală
C
1 Draperiile şi hainele (jachete, costume, paltoane) pot fi călcate
cu abur ţinând fierul în poziţie verticală.
Nu direcţionaţi niciodată aburul înspre oameni.
Jet de abur (doar modele GC6268/GC6068/GC6029)
Un 'jet' de abur puternic ajută la călcarea cutelor dificile.
C
1 Pentru jet de abur: poziţionaţi butonul pentru abur (F) pe R
(nor mare) şi termostatul (I) pe poziţia 3 sau MAX.
C
2 Apăsaţi butonul de activare a aburului (H) şi butonul pentru jet
de abur (N).
Abur variabil (doar modele GC6268/GC6265/GC6068/
GC6065/GC6029)
Puteţi regla butonul pentru abur (F) pe poziţia q pentru abur moderat
sau pe R pentru jet maxim de abur.
Page 30
ROMÂNĂ30
Pâlnie anticalcar (doar modele GC6268/GC6068/GC6029)
Pentru a asigura o durată îndelungată de funcţionare a fierului de călcat.
1 Folosiţi pâlnia anticalcar (M) când umpleţi rezervorul de abur
cu apă.
După călcare
C
1 Opriţi aparatul reglând butonul pornire/oprire (D) pe 'oprire'.
2 Depresurizaţi rezervorul ţinând apăsat butonul de activare a
aburului până iese tot aburul.
3 Scoateţi ştecherul din priză.
4 Aşezaţi fierul pe suport (C), reglaţi butonul de abur pe poziţia
q şi lăsaţi aparatul să se răcească înainte de a-l depozita.
Curăţare şi întreţinere
1 Scoateţi ştecherul din priză şi lăsaţi fierul să se răcească înainte
de a-l curăţa. Dacă vreţi să curăţaţi rezervorul de abur,
respectaţi primele patru etape din capitolul "Umplere rapidă".
Fier de călcat
1 Curăţaţi fierul cu o cârpă umedă.
2 Ştergeţi talpa aparatului cu o cârpă umedă şi un detergent
neabraziv (lichid).
Nu introduceţi niciodată fierul de călcat în apă şi nici nu-l clătiţi sub jet
de apă.
Rezervor de abur
Clătiţi rezervorul de abur o dată pe lună sau după ce aţi folosit aparatul
de aproximativ 10 ori.
C
1 Scoateţi capacul cu grijă.
Page 31

ROMÂNĂ 31
C
2 Clătiţi rezervorul cu doar 500 ml apă curată.Vărsaţi apa în
chiuvetă ţinând rezervorul invers.
3 Înşurubaţi la loc capacul pe rezervorul de abur.
Depozitare
1 Asiguraţi-vă că fierul de călcat s-a răcit suficient înainte de a-l
depozita.
2 Scoateţi ştecherul din priză şi lăsaţi fierul să se răcească.
3 Goliţi rezervorul de abur.
4 Rezervorul este prevăzut cu mânere în părţi pentru facilitarea
transportului.
5 Verificaţi regulat dacă furtunul şi cablul de alimentare sunt
nedeteriorate.
Garanţie şi service
Pentru informaţii suplimentare sau în cazul unor probleme, vizitaţi siteul Philips la www.philips.com sau contactaţi Centrul Consumatori
Philips din ţara dumneavoastră (veţi găsi numărul de telefon în garanţia
internaţională). Dacă nu există un astfel de centru în ţara
dumneavoastră, apelaţi la furnizorul dumneavoastră Philips sau
contactaţi Departamentul Service pentru Aparate Electrocasnice şi de
Îngrijire Personală.
Depanare
Acest capitol include cele mai frecvente problemele ce pot apărea cu
fierul dumneavoastră de călcat. Pentru mai multe detalii, vă rugăm să
citiţi diferitele capitole. Dacă nu reuşiţi să rezolvaţi problema, vă rugăm
să contactaţi Centrul Consumatori Philips din ţara dumneavoastră (veţi
găsi numărul de telefon în garanţia internaţională). Dacă nu există un
astfel de centru în ţara dumneavoastră, apelaţi la furnizorul
dumneavoastră Philips sau la cel mai apropiat service Philips.
Page 32

Soluţie
Acest fenomen va înceta după puţin
timp.
Aceste particule nu sunt nocive şi nu
vor mai ieşi din talpa aparatului după
ce veţi folosi fierul de câteva ori.
Reglaţi termostatul pe temperatura de
călcare corectă conform instrucţiunilor
din tabel.
Poziţionaţi rezervorul cu abur pe o
suprafaţă stabilă şi regulată.
Acest lucru este normal. Ţineţi fierul
deasupra unei cârpe uzate, apăsaţi
butonul de activare a aburului (H).
Cârpa va absorbi picăturile de apă.
După câteva secunde se va normaliza
producerea de abur.
Reglaţi butonul pornire/oprire (D) pe
'pornire'.
Aşteptaţi până se stinge ledul.
Pentru a verifica dacă aparatul produce
abur, ţineţi o oglindă (rece) în faţa
orificiilor din talpă.
Ştergeţi talpa cu o cârpă umedă.
Ştergeţi talpa cu o cârpă umedă.
Selectaţi temperatura de călcare
recomandată.
Cauză posibilă
Acest lucru este normal. Unele
componente ale fierului au fost
lubrifiate puţin din fabrică.
Este un lucru normal în cazul
aparatelor noi.
Termostatul (I) a fost reglat la o
temperatură prea joasă pentru călcatul
cu abur.
Rezervorul cu abur a fost poziţionat
pe o suprafaţă instabilă şi/sau
neregulată.
Când începeţi să călcaţi cu abur,
furtunul este rece.Aburul se
condensează în interiorul acestuia
producând picături de apă care se
scurg prin talpă.
Rezervorul cu abur nu a fost pornit.
Ledul "încălzire rezervor abur" este
încă aprins (doar modelele
GC6268/GC6265/GC6029).
Aburul supraîncălzit este greu
perceptibil, mai ales dacă termostatul a
fost reglat pe poziţia maximă sau dacă
temperatura mediului ambiant este
ridicată.
Impurităţi sau alţi agenţi chimici
prezenţi în apă s-au depus pe talpa
fierului.
Aţi călcat la temperaturi prea mari.
Problemă
Iese puţin fum din aparat după ce aţi
pornit aparatul prima dată.
Ies particule albe din talpa aparatului
nou.
Ies picături de apă prin talpa aparatului.
Aparatul nu produce abur.
Nu văd aburul ieşind din talpa
aparatului.
Talpa fierului de călcat este murdară.
ROMÂNĂ32
Page 33

Общее описание
A Колпачок контейнера-парогенератора
B Контейнер-парогенератор
C Подставка для утюга
D Двухпозиционный выключатель (вкл./выкл.) со встроенным
сигнальным индикатором
E Сигнальный индикатор, указывающий на «нагревание
контейнера-парогенератора» (только для моделей
GC6268/GC6265/GC6068/GC6065). Сигнальный индикатор
гаснет, когда прибор готов к глажению с отпариванием
F Парорегулятор (только для моделей GC6268/GC6265/GC6068/
GC6065/GC6029). q = умеренное отпаривание; R =
усиленное отпаривание
G Сигнальный температурный индикатор
H Кнопка парообразования
I Диск терморегулятора
J Подающий шланг
K Подошва утюга
L Шнур питания
M Воронка для нейтрализации известкового налета (только для
модели GC6268/GC6068/GC6029)
N Усиленное отпаривание (только для модели GC6268/GC6068/
GC6029)
O Задняя подставка (только для моделей GC6268/GC6265/
GC6263/GC6068/GC6065/GC6063))
Внимание
В целях безопасной эксплуатации, прежде чем пользоваться
утюгом, прочитайте настоящее руководство и ознакомьтесь с
иллюстрациями.
- Не добавляйте в контейнер-парогенератор духи, уксус, крахмал,
химические средства для удаления накипи или другие
химические средства.
- Запрещается включать поврежденный прибор. Регулярно
проверяйте состояние шнура питания и подающего шланга,
чтобы убедиться в их исправности и безопасности.
- В случае повреждения сетевого шнура его необходимо
заменить только в торговой организации или в уполномоченном
сервисном центре компании «Филипс», или в сервисном центре
с персоналом аналогичной квалификации, чтобы обеспечить
безопасную эксплуатацию прибора.
- Закрывайте отверстие контейнера-парогенератора только
колпачком, который входит в комплект поставки прибора,
поскольку этот колпачок одновременно является
предохранительным клапаном.
- Перед подключением прибора убедитесь, что номинальное
напряжение, указанное на днище контейнера-парогенератора,
соответствует напряжению электросети у вас дома.
РУССКИЙ 33
Page 34

- Подключайте электроприбор только к заземленной розетке
электросети.
- Запрещается погружать утюг или контейнер-парогенератор в
воду.
- Не оставляйте включенный в сеть утюг без присмотра.
- После окончания глажения и даже если вы отходите от утюга на
короткое время, вынимайте вилку шнура питания из розетки
электросети и устанавливайте утюг на подставку.
- Всегда устанавливайте контейнер-парогенератор на ровную и
устойчивую горизонтальную поверхность. Не ставьте контейнерпарогенератор на мягкую часть гладильной доски.
- Ставьте утюг только на подставку. Запрещается ставить горячий
утюг на подающий шланг или шнур питания.
- Прикосновение к сильно нагретой подошве утюга и подставке
для утюга может привести к ожогам. Если вы хотите
переместить контейнер-парогенератор, не прикасайтесь к
металлической подставке для утюга.
- Следите за тем, чтобы шнур питания не касался горячей подошвы.
- Пожилые люди могут пользоваться утюгом только под
наблюдением. Не разрешайте детям играть с утюгом.
- Если во время нагревания электроприбора из-под колпачка
контейнера-парогенератора просачивается пар, отключите
прибор от электросети и обратитесь в сервисный центр,
уполномоченный компанией «Филипс».
- Запрещается снимать колпачок контейнера-парогенератора,
когда контейнер находится под давлением. Прежде чем снять
колпачок, ознакомьтесь с инструкцией раздела «Быстрая
дозаправка».
Подготовка прибора к работе
1 Перед подключением прибора убедитесь, что номинальное
напряжение, указанное на днище контейнерапарогенератора, соответствует напряжению электросети у
вас дома.
2 Удалите все наклейки и защитные пленки с подошвы утюга
и протрите ее мягкой тканью.
3 Полностью размотайте шнур питания (L) и подающий
шланг (J).
4 Установите контейнер-парогенератор (В) на ровную,
устойчивую поверхность.
5 Поставьте утюг на подставку для утюга (С).
Заполнение водой контейнера-парогенератора
Запрещается погружать контейнер-парогенератор в воду.
РУССКИЙ34
Page 35
Запрещается снимать колпачок, когда утюг нагрет, и контейне
парогенератор все еще находится под давлением.
C
1 Убедитесь в том, что выключатель вкл./выкл. (D) находится
в положении «выкл.», и выньте вилку шнура питания из
розетки электросети.
C
2 Медленно отвинтите колпачок (А) от контейнера-
парогенератора.
Вы можете услышать звук, когда будете снимать колпачок. Этот
звук издает холодный контейнер, находящийся под давлением. Это
абсолютно нормально.
C
3 Залейте воду в контейнер-парогенератор (не более 1
литра).
Заполните контейнер-парогенератор до отметки максимального
уровня водопроводной водой.
В случае если водопроводная вода в вашей местности слишком
жесткая, рекомендуется разбавить ее в соотношении 1:1
дистиллированной водой или использовать только
дистиллированную воду.
Не добавляйте в воду духи, уксус, крахмал и химические средст
для удаления накипи.
4 Плотно навинтите колпачок на водоналивное отверстие
контейнера-парогенератора.
Быстрая дозаправка
C
1 Прежде всего, установите двухпозиционный выключатель
(D) в положение «выкл.».
РУССКИЙ 35
Page 36

C
2 Нажимайте на кнопку парообразования до тех пор, пока вы
не перестанете слышать звук пара, выходящего из
электроприбора.
3 Удерживая кнопку парообразования в нажатом положении,
медленно отвинтите колпачок контейнера-парогенератора,
поворачивая его против часовой стрелки и сбрасывая
давление в контейнере-парогенераторе.
Убедитесь, что в контейнере-парогенераторе не осталос
При отвинчивании колпачка, положите на него кусок ткани.
4 Выньте вилку шнура питания из розетки электросети.
5 Заполните контейнер-парогенератор водой, как описано в
разделе «Заполнение контейнера-парогенератора», и дайте
электроприбору вновь нагреться.
Установка температуры
Всегда устанавливайте контейнер-парогенератор на ровную и
устойчивую горизонтальную поверхность. Не ставьте контейне
парогенератор на мягкую часть гладильной доски.
Ставьте утюг только на подставку. Запрещается ставить горячий
утюг на подающий шланг или шнур питания. Убедитесь в том, что
шнур питания не касается горячей подошвы.
C
1 Установите диск терморегулятора на требуемую
температуру глажения, повернув его в нужное положение
относительно указателя температуры.
- Убедитесь в том, что температура глажения соответствует типу
ткани, указанной на этикетке изделия:
РУССКИЙ36
Парорегулят
ор
-
q
R
Диск
терморегул
ятора
1
2
3
Тип ткани
Синтетические ткани
(например, ацетат, акрил,
вискоза, полиамид,
полиэфир) и шелк
Шерсть
Хлопок, лен
Обратите внимание на то,
что обозначение Z в
таблице указывает на то,
что изделие не подлежит
глажению
Бирка с
инструкциями по
глажению
B
C
D
Z
Page 37

- 1 Синтетические ткани (например, акрил, вискоза, полиамид,
полиэфир)
- 1 Шелк
- 2 Шерсть
- 3 Хлопок, лен
- Если вы не знаете, из какой ткани сшито изделие, попробуйте
сначала прогладить его на участке, незаметном при носке.
- Изделия, изготовленные из шелка, шерсти и синтетических
материалов, следует гладить с изнанки, чтобы не допустить
появления лоснящихся пятен.
- Начинайте глажение с изделий из синтетических волокон, для
которых требуется минимальная температура глажения.
C
2 Вставьте вилку шнура питания в розетку электросети и
дайте электроприбору нагреться, установив
двухпозиционный переключатель (D) в положение «вкл.».
3 Для холодного утюга: контейнер-парогенератор и подошва
утюга начнут нагреваться. Для нагревания подошвы
требуется приблизительно 2 минуты, а для нагревания
контейнера-парогенератора - приблизительно 8 минут.
4 Быстрая дозаправка: при доливе воды в контейнер-
парогенератор во время глажения, нагрев воды потребует
приблизительно 6 минут.
5 Только для моделей GC6268/GC6265/GC6068/
GC6065/GC6029: Контрольный индикатор (Е) погаснет, как
только вода в контейнере-парогенераторе нагреется до
температуры, достаточной для глажения с отпариванием.
После этого можно начинать глажение.
Полезные советы
◗ Если в состав ткани входят волокна разных типов, всегда
устанавливайте температуру, которая соответствует волокнам,
требующим самого бережного обращения, т.е. минимальную
температуру. Например, если в составе ткани 60% полиэфирных
и 40% хлопчатобумажных волокон, то эту ткань следует
гладить при температуре, требуемой для полиэфира (1), и без
отпаривания.
◗ При глажении с отпариванием на шерстяных тканях могут
появиться лоснящиеся пятна. Во избежание появления пятен
вы можете гладить шерстяные изделия с изнанки или через
сухую ткань.
◗ Бархат и другие ткани, на которых легко образуются
лоснящиеся пятна, следует гладить только в одном
направлении (по ворсу), прикладывая минимальное давление.
◗ Не пользуйтесь функцией отпаривания при глажении цветных
шелковых тканей, чтобы не допустить появления пятен.
РУССКИЙ 37
Page 38

Глажение с отпариванием
Убедитесь, что в контейнере-парогенераторе достаточно воды.
C
◗ Функция отпаривания может быть использована только при
более высоких температурах глажения (установка
температуры 2 до МАКС.).
1 Установите диск терморегулятора в рекомендованное
положение.
См. раздел «Установка температуры».
2 Подождите, пока не погаснет контрольный индикатор
«нагревание контейнера-парогенератора».
C
3 Во время глажения с отпариванием удерживайте кнопку
парообразования (Н) в нажатом положении.
Только для моделей GC6268/GC6265/GC6068/GC6065/GC6029:
Во время глажения с отпариванием контрольный индикатор G
будет время от времени загораться, указывая на нагревание
контейнера-парогенератора и утюга до достижения требуемых
температуры и давления. В это время вы можете просто
продолжать глажение.
Если вы не используете функцию отпаривания в течение
некоторого времени, то пар, находившийся в шланге, будет
конденсироваться с образованием воды. Когда вы снова начнете
глажение с отпариванием, то можете услышать шипение в
электроприборе и увидеть несколько капель, появившихся из
отверстий подошвы.
B
Для того чтобы не допустить попадания капель на вашу одежду,
прежде чем продолжить глажение с отпариванием, подержите
утюг над ненужной тканью, нажимая в это время на кнопку
парообразования (Н), до тех пор пока образование пара не
нормализуется.
Сухое глажение
1 Установите диск терморегулятора в рекомендованное
положение.
См. раздел «Установка температуры».
2 Не нажимайте на кнопку парообразования (Н).
◗ Если вы случайно нажмете на кнопку парообразования во
время глажения, произойдет выброс небольшого количества
пара. Если в контейнере-парогенераторе нет воды или он еще
не нагрелся, вы услышите щелчок внутри контейнера. Этот звук
издает открывающийся клапан выброса пара, и он абсолютно
безопасен.
РУССКИЙ38
Page 39

◗ Если после глажения при высокой температуре вы установили
диск терморегулятора (I) в положение, соответствующее более
низкой температуре,то, прежде чем продолжить глажение,
подождите, пока вновь не загорится контрольный индикатор
температуры (G), чтобы не повредить ткань.
Прочие характеристики
Функция вертикального отпаривания
C
1 Занавески и другие висящие изделия (пиджаки, костюмы и
куртки) можно гладить с отпариванием, удерживая утюг в
вертикальном положении.
Запрещается направлять струю пара на людей.
Усиленное отпаривание (только для моделей GC6268/
GC6068/GC6029)
Функция «Выброс пара» помогает разгладить неподатливые
складки.
C
1 Для вертикального отпаривания: установите парорегулятор
(F) в положение R (напротив большого облака) а диск
терморегулятора - в положение 3 или МАХ.
C
2 Нажмите одновременно кнопку парообразования (Н) и
кнопку усиленного отпаривания (N).
Функция переменного отпаривания (только для моделей
GC6268/GC6265/GC6068/GC6065/GC6029)
Вы можете установить парорегулятор (F) на q для умеренного
отпаривания, или на R для усиленного отпаривания.
Воронка для нейтрализации известкового налета (только
для моделей GC6268/GC6068/GC6029)
Обеспечивает более длительный срок службы утюга.
РУССКИЙ 39
Page 40

1 При заполнении контейнера-парогенератора водой
пользуйтесь воронкой для нейтрализации известкового
налета (M).
После глажения
C
1 Выключите электроприбор, установив переключатель
«вкл./выкл» (D) в положение «выкл.»
2 Для того чтобы сбросить давление в контейнере-
парогенераторе, нажимайте на кнопку парообразования до
тех пор, пока не будет слышен звук пара, выходящего из
электроприбора.
3 Выньте вилку шнура питания из розетки электросети.
4 Поставьте утюг на подставку для утюга (С), установите
парорегулятор в положение q и дайте утюгу остыть перед
тем, как убрать его.
Очистка и уход
1 Выньте вилку шнура питания из розетки электросети и
дайте утюгу остыть перед тем, как очистить его. Если вам
требуется очистить контейнер-парогенератор, следуйте
первым четырем пунктам раздела «Быстрая дозаправка».
Утюг
1 Очищайте утюг с помощью влажной ткани.
2 Протрите подошву влажной тканью,смоченной в
неабразивном (жидком) чистящем средстве, чтобы удалить
хлопья и другой налет.
Запрещается погружать утюг в воду или мыть его под краном.
Контейнер-парогенератор
Промывайте контейнер-парогенератор раз в месяц или после
приблизительно 10 раз пользования утюгом.
C
1 Осторожно снимите колпачок.
РУССКИЙ40
Page 41

C
2 Промойте контейнер-парогенератор всего 500 мл пресной
воды. Слейте воду, перевернув контейнер-парогенератор
вверх дном над раковиной.
3 Навинтите колпачок на место.
Хранение
1 Перед тем как убрать утюг, убедитесь, что он остыл.
2 Выньте вилку шнура питания из розетки электросети и
дайте утюгу остыть.
3 Слейте воду из контейнера-парогенератора.
4 С обеих сторон контейнера-парогенератора находятся
ручки, облегчающие его переноску.
5 Регулярно проверяйте состояние шнура питания и
подающего шланга, чтобы убедиться в их исправности и
безопасности.
Гарантийное и сервисное обслуживание
По поводу дополнительной информации или в случае
возникновения каких-либо проблем обращайтесь на Web-сайт
компании «Филипс» по адресу www. philips.com или в центр
компании «Филипс» по обслуживанию потребителей в вашей
стране (вы найдете его номер телефона на международном
гарантийном талоне). Если подобный центр в вашей стране
отсутствует, обратитесь в вашу местную торговую организацию
компании «Филипс» или сервисное отделение компании Philips
Domestic Appliances and Personal Care BV.
Обнаружение и устранение неисправностей
В данном разделе коротко перечислены наиболее
распространенные проблемы, с которыми вы можете столкнуться
при пользовании утюгом. Для более подробной информации
прочитайте другие разделы руководства. Если вы не можете
устранить неполадки самостоятельно, обращайтесь в центр
компании «Филипс» по обслуживанию потребителей в вашей
стране (вы найдете его номер телефона в международном
гарантийном талоне). Если подобный центр в вашей стране
отсутствует, обратитесь в вашу местную торговую организацию
компании «Филипс» или в ближайший сервисный центр компании
«Филипс».
РУССКИЙ 41
Page 42

Способ устранения
Через некоторое время выделение
дыма прекратится.
Эти частицы не опасны и они
перестанут выходить из подошвы
после нескольких раз пользования
утюгом.
Установите требуемую температуру
в соответствии с указаниями
данного руководства и таблицы.
Установите контейнерпарорегулятор на устойчивую и
ровную поверхность.
Это нормально. Удерживая утюг над
ненужной тканью, нажмите на
кнопку парообразования (Н).
Образующиеся капли впитаются в
ткань. Через несколько секунд
образование пара нормализуется.
Установите переключатель
«вкл./выкл.» (D) в положение «вкл.»
Подождите, пока не загорится
контрольный индикатор.
Для того чтобы проверить,
образуется ли в действительности
пар, подержите напротив отверстий
подошвы (холодное) зеркало.
Протрите подошву утюга влажной
тканью.
Протрите подошву утюга влажной
тканью. Установите
рекомендованную температуру
глажения.
Возможная(ые) причина(ы)
Это нормально и связано с тем, что
на заводе некоторые детали утюга
были покрыты смазкой.
Это нормально для нового утюга.
Диск терморегулятора (I)
установлен на температуру,
недостаточно высокую для глажения
с отпариванием.
Контейнер-парорегулятор
установлен на неустойчивую и/или
неровную поверхность.
Вы начинаете гладить, когда шланг
еще холодный. Конденсация пара в
шланге приводит к появлению
капель воды на поверхности
подошвы.
Не включен контейнерпарогенератор.
Продолжает гореть контрольный
индикатор «нагревание контейнерапарогенератора» (только для
моделей GC6268/GC6265/GC6068/
GC6065/GC6029).
Сильно нагретый (т.е. высокой
степени нагрева) пар почти не
виден, особенно когда диск
терморегулятора установлен на
максимальную температуру, тем
более в случае относительно
высокой температуры окружающего
воздуха.
На подошве осаждаются
загрязнения или химические
средства, присутствующие в воде.
Вы гладите при слишком высоких
температурах.
Неполадка
При первом включении
электроприбора из утюга
выделяется некоторое количество
дыма.
Из подошвы нового утюга выходят
частицы вещества белого цвета.
На поверхности подошвы утюга
появляются капли воды.
В приборе не образуется пар.
Из подошвы утюга не выходит пар.
Подошва утюга грязная.
РУССКИЙ42
Page 43

ČESKY 43
Všeobecný popis
A Uzávěr zásobníku páry
B Zásobník páry
C Podstavec žehličky
D Spínač/vypínač s kontrolkou
E Kontrolka ohřevu vody v zásobníku (pouze typy GC6268/GC6265/
GC6068 a GC6065). Kontrolka zhasne, jakmile je přístroj připraven
k žehlení s parou
F Regulace páry (pouze typy GC6268/GC6265/GC6068/GC6065/
GC6029)
q = střední pára R = maximum páry
G Kontrolka teploty
H Tlačítko aktivátoru páry
I Indikace teploty
J Napájecí hadice
K Dno žehličky
L Síťový přívod
M Nálevka proti vodnímu kameni (pouze typ GC6268/GC6068 a
GC6029)
N Parní impuls (pouze typ GC6268/GC6068 a GC6029)
O Zadní opěra pro žehličku (pouze typy GC6268/GC6265/GC6263/
GC6068/GC6065/GC6063)
Důležité
Z bezpečnostních důvodů pročtěte pečlivě následující pokyny a
sledujte přitom příslušná vyobrazení.
- Do zásobníku vody nikdy nenalévejte voňavky, škrob, prostředky proti
vodnímu kameni nebo jiné chemikálie.
- Nikdy přístroj nepoužívejte, pokud zjistíte jeho jakékoli poškození.
Pravidelně též kontrolujte síťový přívod a napájecí hadici, zda nejsou
poškozeny.
- Pokud by byl poškozen síťový přívod, musí být jeho výměna svěřena
organizaci, autorizované firmou Philips nebo shodně kvalifikovaným
pracovníkům, abyste předešli možnému nebezpečí.
- K uzavírání zásobníku páry nepoužívejte nikdy žádný náhradní uzávěr
než uzávěr, dodaný s přístrojem, protože ten má vestavěný
bezpečnostní ventil.
- Zkontrolujte, zda napětí,udané na typovém štítku přístroje, souhlasí s
napětím ve vaší světelné síti.
- Používejte vždy zásuvku s nulovým kolíkem.
- Nikdy nesmíte žehličku nebo zásobník páry ponořit do vody.
- Nikdy nenechávejte žehličku bez dozoru, pokud je zapnutá.
- Pokud ukončíte žehlení nebo pokud přístroj opouštíte, třeba jen na
malou chvíli, vždy ho předem odpojte od sítě a žehličku postavte na
její podstavec.
- Přístroj vždy postavte na pevnou podložku ve vodorovné poloze.
Nikdy přístroj nestavte na měkkou část žehlicího prkna.
- Vždy odkládejte žehličku na její podstavec. Nikdy se nesmíte horkou
žehličkou dotknout přívodního kabelu.
Page 44

ČESKY44
- Podstavec žehličky a dno žehličky mohou být velmi horké a při
dotyku mohou způsobit popáleniny. Jestliže si přejete přemístit
zásobník, nikdy se nedotýkejte horkého podstavce.
- Dbejte na to, aby přívodní kabel nikdy nepřišel do styku s horkým
dnem žehličky.
- Neobeznámené osoby by neměly s žehličkou pracovat bez dozoru.
Dávejte též pozor na děti a nedovolte jim,aby si s přístrojem hrály.
- Pokud by ze zásobníku unikala při ohřívání vody pára, obraťte se na
servis firmy Philips nebo na autorizovanou opravnu.
- Nikdy nesnímejte uzávěr zásobníku páry, dokud je ještě pára pod
tlakem. Před odejmutím uzávěru se seznamte s pokyny v odstavci
"Rychlé plnění".
Příprava přístroje k použití
1 Zkontrolujte, zda napětí, udané na typovém štítku přístroje,
souhlasí s napětím ve vaší světelné síti.
2 Ze dna žehličky sejměte všechny nálepky i ochrannou fólii a
dno vyčistěte měkkým hadříkem.
3 Zcela odviňte přívodní kabel (L) a napájecí hadici (J).
4 Zásobník páry (B) postavte na stabilní rovnou plochu.
5 Žehličku postavte na její podstavec (C).
Plnění zásobníku páry
Zásobník páry nikdy nesmíte ponořit do vody.
Nesnímejte nikdy uzávěr pokud je přístroj horký a zásobník páry je
ještě pod tlakem.
C
1 Zkontrolujte zda je spínač (D) v poloze "OFF" a vytáhněte
síťovou zástrčku ze zásuvky.
C
2 Zvolna odšroubujte uzávěr zásobníku páry (A).
Přitom se může ozvat syčivý zvuk.To je způsobeno přetlakem v
zásobníku a je to zcela normální.
Page 45

ČESKY 45
C
3 Do zásobníku nalijte vodu (nejvýše 1 litr).
Zásobník naplňte vodou z vodovodu až po značku maxima.
Pokud je ve vaší oblasti voda z vodovodu nadměrně tvrdá, smíchejte ji s
destilovanou vodou nebo použijte pouze destilovanou vodu.
Nepoužívejte žádné parfémy, ocet, škrob nebo chemicky upravovanou
vodu.
4 Uzávěr pevně dotáhněte na nalévací otvor zásobníku páry.
Rychlé plnění
C
1 Nejprve nastavte spínač/vypínač (D) do polohy "OFF".
C
2 Stiskněte tlačítko aktivátoru páry a držte je stisknuté tak
dlouho, dokud je slyšet unikající páru ze zásobníku.
3 Podržte tlačítko aktivátoru páry stisknuté a zvolna odšroubujte
uzávěr zásobníku páry otáčením proti směru pohybu
hodinových ruček.Tak odstraníte přetlak v zásobníku.
Přesvědčte se, že v zásobníku nezbyla žádná pára. Při otevírání můžete
uzávěr pro jistotu přikrýt kouskem hadříku.
4 Vytáhněte síťovou zástrčku ze zásuvky.
5 Naplňte zásobník tak, jak je popsáno v odstavci "Plnění
zásobníku vodou" a zapněte ohřev.
Regulátor
páry
-
q
R
Regulátor
teploty
1
2
3
Druh textilie
Syntetické materiály (např.
acetát, viskóza,polyamid,
polyestér) nebo hedvádí
Vlna
Bavlna, plátno
Poznámka: Z v tabulce
znamená, že textilie nesmí
být žehlena
Nášivka s pokyny
k žehlení
B
C
D
Z
Page 46

ČESKY46
Nastavení teploty
Přístroj vždy postavte na pevnou podložku ve vodorovné poloze. Nikdy
přístroj nestavte na měkkou část žehlicího prkna.
Žehličku postavte vždy na její podstavec. Nikdy ji nepokládejte na
napájecí hadici nebo na přívodní kabel. Dbejte na to, aby se přívodní
kabel nedostal do styku a horkým dnem žehličky.
C
1 Otáčením regulátoru teploty nastavte požadovanou teplotu.
- Zkontrolujte na nášivce doporučenou teplotu pro žehlení:
- Syntetické textilie (např. akrylát, viskóza, polyamid,polyestér)
- 1 Hedvábí
- 2 Vlna
- 3 Bavlna, plátno
- Pokud neznáte druh žehleného materiálu, doporučujeme realizovat
zkoušku na místě, které není při nošení viditelé.
- Hedvábí, vlna a syntetické materiály: žehlete z rubové strany, aby
nevznikaly lesklé skvrny.
- Začněte vždy žehlit ty textilie, které vyžadují nejnižší teplotu, což
bývají syntetické tkaniny.
C
2 Zasuňte síťovou zástrčku do zásuvky a spínač/vypínač (D)
nastavte do polohy "ON".
3 Studený start: voda v zásobníku a dno žehličky se nyní začnou
ohřívat. Dno žehličky potřebuje k ohřátí asi 2 minuty a voda v
zásobníku asi 8 minut.
4 Rychlý start: pokud plníte zásobník v průběhu žehlení, ohřeje se
voda v zásobníku asi za 6 minut.
5 Pouze typ GC6268/GC6265/GC6068/GC6065/GC6029:
jakmile je voda v zásobníku dostatečně teplá pro vytvoření
páry,kontrolka (E) zhasne. Nyní můžete začít žehlit.
Praktické rady
◗ Při žehlení kombinovaných tkanin, zvolte vždy teplotu, která je
povolena pro nejchoulostivější druh.Žehlíte-li například kombinaci
60 % polyestéru a 40 % bavlny,musíte zvolit maximální teplotu pro
polyestér, tedy 1 a žehlit bez páry.
◗ Když žehlíte s parou vlněné tkaniny, mohou se objevit lesklá místa.
Tomu můžete předejít tak, že žehlíte přes suchý hadřík nebo
žehlíte z rubové strany.
◗ Tatáž lesklá místa se mohou objevit i při žehlení sametu a jemu
podobných textilií. Žehlete je pouze jedním směrem (po vlasu) a
na žehličku nijak netlačte.
Page 47

ČESKY 47
◗ Při žehlení barevného hedvábí nepoužívejte páru.To může též
vytvářet skvrny.
Žehlení s parou
Zkontrolujte zda je v zásobníku dostatek vody.
C
◗ Žehlení s parou je realizovatelné pouze při nastavené vyšší teplotě
žehlení (nastavení 2 až MAX).
1 Regulátor teploty nastavte do doporučené polohy.
Viz odstavec "Nastavení teploty".
2 Vyčkejte až se voda v zásobníku dostatečně zahřeje a kontrolka
ohřevu zhasne.
C
3 Když žehlíte s parou, držte aktivační tlačítko (H) stisknuté.
Pouze typy GC6268/GC6265/GC6068/GC6065/GC6029:V průběhu
žehlení kontrolka (G) střídavě zhasíná a opět se rozsvěcuje.To je
důkazem toho, že termostat správně pracuje a pára je trvale k dispozici.
Proto můžete bez problémů žehlit.
Když po určitý čas páru nevyužíváte, může se v přívodní hadici
zkondenzovat voda.Když pak začnete znovu žehlit, tato voda může
malý okamžik ze dna žehličky prskat nebo odkapávat.
B
V takovém případě je vhodné podržet na okamžik žehličku nad starou
textilií a stisknout aktivační tlačítko (H), dokud nezačne vystupovat
pouze pára.
Žehlení bez páry
1 Regulátor teploty nastavte do doporučené polohy.
Viz odstavec "Nastavení teploty".
2 Nepoužívejte aktivační tlačítko páry (H).
◗ Pokud stisknete tlačítko aktivace páry náhodně během žehlení,
může uniknout trocha páry. Pokud je zásobník prázdný nebo není
dostatečně ohřátý, uslyšíte ze zásobníku klapnutí.To je způsobeno
otevřením ventilu páry a je to jev zcela neškodný.
◗ Když jste žehlili s nastavenou vyšší teplotou a otočíte regulátorem
(I) na nižší hodnotu, vyčkejte, až se kontrolka (G) znovu rozsvítí,
Teprve pak klesla teplota žehličky na nastavenou teplotu.
Page 48

ČESKY48
Další funkce žehličky
Žehlení ve svislé poloze
C
1 Zavěšené záclony a obleky (bundy, obleky, pláště) mohou být
žehleny s parou tak,že držíte žehličku ve svislé poloze.
Parou nikdy nemiřte proti osobám.
Parní impuls (pouze typy GC6268/GC6265/GC6029)
Výkonný parní impuls pomáhá vyrovnat velmi zmačkaná místa.
C
1 Pro parní impuls nastavte reguátor páry (F) do polohy R
(velký mrak) a regulátor teploty (I) do polohy 3 nebo
MAX.
C
2 Stiskněte aktivátor páry (H) a tlačítko parního impulsu (N).
Variabilní množství páry (pouze typy C6268/GC6265/GC6068/
GC6065/GC6029))
Regulátor páry F) můžete nastavit na q pro střední množství páry
nebo na R (pro maximum páry).
Nálevka proti vodnímu kameni (pouze typy
GC6268/GC6265/GC6029)
Zajišťuje delší životnost žehličky.
1 Při plnění zásobníku vodou používejte nálevku proti vodnímu
kameni (M).
Page 49

ČESKY 49
Po ukončeném žehlení
C
1 Vypněte přístroj nastavením spínače/vypínače (D) do polohy
"OFF".
2 Zrušte přetlak v zásobníku tak, že podržíte stisknuté aktivační
tlačítko páry, dokud budete slyšet, jak pára vystupuje.
3 Vytáhněte síťovou zástrčku ze zásuvky.
4 Postavte žehličku na její podstavec (C), nastavte regulátor páry
do polohy q a před uložením nechte žehličku zcela
vychladnout.
Čištění a údržba
1 Před čištěním vždy odpojte žehličku od sítě nechte ji
vychladnout. Pokud chcete čistit zásobník,postupujte podle
prvních čtyř kroků odstavce "Rychlé plnění".
Žehlička
1 Žehličku čistěte pouze vlhkým hadříkem.
2 Otřete dno žehličky od všech případných usazenin a zbytků
vodního kamene navlhčeným hadříkem, případně s přidáním
neabrasívního (tekutého) čisticího prostředku.
Nikdy nesmíte žehličku ponořit do vody ani ji oplachovat pod tekoucí
vodou.
Zásobník páry
Zásobník vypláchněte vždy jednou za měsíc nebo při častějším
používání po 10 použitích.
C
1 Opatrně sejměte uzávěr.
C
2 Vypláchněte zásobník asi půllitrem čisté vody. Pak vodu nad
dřezem vylijte tak, že zásobník držíte hlavou dolů.
3 Uzávěr našroubujte zpět.
Page 50

ČESKY50
Uchovávání žehličky
1 Než žehličku uložíte, přesvědčte se, že zcela vychladla.
2 Vytáhněte síťovou zástrčku ze zásuvky a nechte žehličku
vychladnout.
3 Vyprázdněte vodu ze zásobníku.
4 Na obou stranách zásobníku jsou rukojeti pro snadné
přenášení.
5 Pravidelně kontrolujte síťový přívod a přívodní hadici zda
nejsou nijak poškozeny.
Záruka a servis
Pokud byste potřebovali jakoukoli informaci, nebo se vyskytl nějaký
problém, nahlédněte na internetovou stránku www.philips.com,
případně kontaktuje Informační středisko firmy Philips, jehož telefonní
číslo naleznete na letáčku s celosvětovou zárukou.
Řešení případných problémů
Tento odstavec sumarizuje problémy, které se mohou běžně při práci s
žehličkou vyskytnout. Pro jednotlivé případy pročtěte pečlivě všechny
pokyny. Pokud by se vám nepodařilo problém vyřešit, kontaktujte
Informační středisko firmy Philips, jehož adresu i další spojení najdete na
konci letáčku s celosvětovou zárukou. Můžete se též obrátit na
nejbližšího prodejce nebo na nejbližší servis firmy Philips.
Page 51

ČESKY 51
Řešení
Tento jev zakrátko zmizí.
Tyto částice jsou neškodné a zmizí za
krátkou dobu používání nové žehličky.
Nastavte regulátor na správnou
teplotu pro žehlení s parou.
Postavte zásobník na stabilní a rovnou
podložku.
To je normální jev.Podržte žehličku
nad kusem látky a držte stisknuté
aktivační tlačítko (H) dokud nezačne
vystupovat pára. Za několik sekund je
již vše v pořádku.
Spínač/vypínač (D) nastavte do polohy
"ON".
Vyčkejte až kontrolka zhasne.
Tento jev lze zkontrolovat pomocí
(chladného) zrcátka, které podržíte
před dnem žehličky.
Do žehličky čistěte vlhkým hadříkem.
Dno žehličky vyčistěte vlhkým
hadříkem. K žehlení zvolte
doporučenou teplotu.
Možná příčina (příčiny)
To je normální jev,protože některé díly
žehličky jsou z výroby lehce potřeny
tukem.
To je u nové žehličky běžný jev.
Regulátor teploty (I) je nastaven na
příliš nízkou teplotu pro žehlení s
parou.
Zásobník páry byl postaven na
nestabilní nebo nerovnou podložku.
Když začnete žehlit, přívodní hadice je
chladná. Na jejích stěnách se
kondenzuje pára a pak může několik
kapek odkapávávat ze dna žehličky.
Nebylo zapnuto vytápění zásobníku.
Kontrolka ohřevu vody (u typů
GC6268/GC6265/GC6068/GC6065/
GC6029) svítí trvale.
Velmi horká pára je ztěží viditelná,
obzvláště když je regulátor teploty
nastaven na maximum a teplota okolí
je též relativně vysoká.
Na dně se usadily nečistoty nebo
chemické substance z vody.
Žehlili jste s příliš vysokou teplotou.
Problém
Po prvním zapnutí žehlička trochu
kouří.
Bílé částice odpadávají ze dna nové
žehličky.
Ze dna žehličky vytékají kapky vody
Přístroj neprodukuje páru.
Pára, vystupující ze dna žehličky, není
viditelná.
Dno žehličky je zašpiněné
Page 52
Általános ismertetés
A a vízmelegítő sapkája
B vízmelegítő
C vasalótartó
D be-ki kapcsoló gomb jelzőlámpával
E vízmelegítés-jelző lámpa (csak GC6268/GC6265/GC6068/GC6065
típusnál); ha kialszik, a készūlék készen áll a gőzölős vasalásra
F gőzmennyiség-szabályozó (csak GC6268/GC6265/GC6068/
GC6065/GC6029 típusnál);
q = mérsékelt gőz R = teljes erősségű gőz
G hőmérsékletjelző lámpa
H gőzölőgomb
I hőmérséklet-szabályozó tárcsa
J gőztömlő
K vasalótalp
L hálózati csatlakozókábel
M vízkőmentesítő tölcsér (csak GC6268/GC6068/GC6029 típusnál)
N gőzlövetgomb (csak GC6268/GC6068/GC6029 típusnál)
O Hátsó vasalótartó (csak GC6268/GC6265/GC6263/GC6068/
GC6065/GC6063 típusok esetén)
Fontos
A megfelelő biztonság érdekében a készūlék használatba vétele előtt
olvassa el figyelmesen ezt az útmutatót, és nézze meg az ábrákat.
- Ne töltsön a vízmelegítőbe illatszert, ecetet, keményítőt,
vízkőmentesítőt vagy más vegyszert.
- Ne használja a készūléket, ha az bármilyen módon megsérūlt.
Rendszeresen ellenőrizze, ép és biztonságos-e a hálózati
csatlakozókábel és a gőztömlő.
- Ha a csatlakozó vezeték meghibásodott, a kockázatok elkerülése
érdekében a javítást csak Philips szakszerviz vagy Philips
felhatalmazással rendelkező szakember végezheti el.
- A vízmelegítőhöz kizárólag a készūlékhez kapott sapkát használja,
mivel az egyúttal biztonsági szelepként is működik.
- Mielőtt a készūléket a hálózatra csatlakoztatná, ellenőrizze, hogy a
vízmelegítő alján feltūntetett hálózati feszūltség megegyezik-e az
otthonában lévővel.
- Kizárólag földelt fali aljzathoz csatlakoztassa a készūléket.
- Se a vasalót, se a vízmelegítőt ne merítse vízbe.
- Soha ne hagyja felūgyelet nélkūl a hálózatba csatlakoztatott vasalót.
- Ha befejezte a vasalást, vagy ha akár csak egy rövid időre is magára
hagyja a vasalót, húzza ki hálózati csatlakozódugóját, és helyezze a
készūléket a tartójára.
- A vízmelegítőt mindig szilárd, vízszintes, sima felūletre helyezze, ne
tegye a vasalódeszka puha részére.
- A vasalót mindig a tartójára helyezze. Ne tegye a forró vasalót a
gőztömlőre vagy a hálózati csatlakozókábelre.
MAGYAR52
Page 53

- A vasalótartó és a vasalótalp rendkívūl forró lehet, hozzájuk érve
megégetheti magát. Ha le szeretné venni a vízmelegítőt, ne érintse
meg a vasaló tartóját.
- Ügyeljen rá, hogy a hálózati csatlakozókábel ne érjen a forró
vasalótalphoz.
- Nem megfelelő erőben lévő személy csak felūgyelet mellett
használhatja a készūléket. Ügyeljen rá, hogy gyermekek ne
játszhassanak a készūlékkel.
- Ha a víz felmelegítésekor gőz áramlik ki a vízmelegítő sapkája alól,
kapcsolja ki a készūléket és forduljon a Philips valamely hivatalos
szakszervizéhez.
- Ne vegye le a nyomás alatt lévő vízmelegítő sapkáját.A sapka
eltávolítása előtt kövesse a ĒGyors újratöltéscímű rész útmutatását.
A készūlék előkészítése a használatra
1 Mielőtt a készūléket a hálózatra csatlakoztatná, ellenőrizze,
hogy a vízmelegítő alján feltūntetett hálózati feszūltség
megegyezik-e az otthonában lévővel.
2 Távolítson el minden címkét és védőfóliát a vasalótalpról, és
tisztítsa meg a talpat puha ruhával.
3 Csévélje le teljesen a hálózati csatlakozókábelt (L) és a
gőztömlőt (J).
4 Helyezze a vízmelegítőt (B) szilárd,vízszintes felūletre.
5 Helyezze a vasalót a tartójára (C).
A vízmelegítő feltöltése
Soha ne merítse vízbe a vízmelegítőt.
Ne csavarja le a sapkát, amikor a készūlék forró, és a vízmelegítő még
nyomás alatt áll.
C
1 Gondoskodjon róla, hogy a be-ki kapcsoló gomb (D) kikapcsolt
(Ēoff) állásban legyen, és húzza ki a csatlakozódugót a hálózati
aljzatból.
C
2 Óvatosan csavarja le a vízmelegítő sapkáját (A).
A sapka eltávolításakor hallható hangot az okozza, hogy a hideg tartály
nyomása kisebb a légköri nyomásnál.Ez teljesen normális jelenség.
MAGYAR 53
Page 54

C
3 Töltsön vizet a vízmelegítőbe (legfeljebb 1 litert).
A tartályt csapvízzel töltse meg, a maximális szintjelzésig.
Ha otthonában nagyon kemény a csapvíz, javasoljuk, hogy keverje
azonos mennyiségű desztillált vízzel, esetleg használjon pusztán
desztillált vizet.
Ne használjon illatszert, ecetet, keményítőt vagy vegyileg mésztelenített
vizet.
4 Csavarja rá a sapkát szorosan a vízmelegítő töltőnyílására.
Gyors újratöltés
C
1 Először is állítsa a be-ki kapcsoló gombot (D) kikapcsolt (Ēoff)
állásba.
C
2 Tartsa lenyomva a gőzölőgombot,amíg meg nem szűnik a
készūlékből kiáramló gőz hangja.
3 A gőzölőgombot lenyomva tartva, óvatosan csavarja le a
vízmelegítő sapkáját az óramutató járásával ellentétes irányban.
Ezzel nyomásmentesíti a vízmelegítőt.
Győződjön meg róla, hogy nem maradt gőz a vízmelegítőben
Lecsavarásakor tartson egy darab pokrócot a sapka fölé.
4 Húzza ki a csatlakozódugót a hálózati aljzatból.
5 Töltse fel a vízmelegítőt ĒA vízmelegítő feltöltésecímű rész
útmutatása alapján, és melegítse fel újra a vizet.
MAGYAR54
Gőzmennyis
ég-szabályozó
-
q
R
Hőmérsékle
t-szabályozó
1
2
3
Az anyag típusa
Műszálas anyagok (pl. acetát,
akril, viszkóz, poliamid,
poliészter) és selyem
Gyapjú
Pamut, len
Figyelem! A táblázat Z
jelzése azt jelenti, hogy az
anyag nem vasalható
Vasalási útmutató
címke
B
C
D
Z
Page 55

Hőmérséklet-szabályozás
A vízmelegítőt mindig szilárd, vízszintes, sima felūletre helyezze, ne tegye
a vasalódeszka puha részére.
A vasalót mindig a tartójára helyezze. Ne tegye a forró vasalót a
gőztömlőre vagy a hálózati csatlakozókábelre. Ügyeljen rá, hogy a
csatlakozókábel ne érjen a forró vasalótalphoz.
C
1 A hőmérséklet-szabályzó tárcsát a megfelelő jelzésre fordítva
állítsa be a kívánt vasalási hőfokot.
- Olvassa le a ruhacímkéről az előírt vasalási hőmérsékletet:
- 1 műszálas anyagok (pl. akril, viszkóz, poliamid, poliészter)
- 1 selyem
- 2 gyapjú
- 3 pamut, len
- Ha nem tudja, milyen anyagból készūlt a ruha, próbálja vasalni olyan
helyen, amely viseléskor nem látszik.
- Selyem, gyapjú és műszálas anyagok esetén a visszájáról vasalja az
anyagot, nehogy fényes foltok keletkezzenek.
- A legalacsonyabb vasalási hőfokot igénylő ruhadarabokkal kezdje a
vasalást (ilyenek például a műszálas anyagok)
C
2 Szúrja a csatlakozódugót a hálózati aljzatba, s a be-ki kapcsoló
gombot (D) bekapcsolt (Ēon) pozícióba állítva melegítse fel a
készūléket.
3 Hidegindítás:A vízmelegítő és a vasalótalp még nincs
felmelegítve.A vasalótalp körūlbelūl 2 perc alatt melegszik fel, a
vízmelegítőnek pedig mintegy 8 percig tart a víz felmelegítése.
4 Gyors utánmelegítés: Ha vasalás közben újratölti a vízmelegítőt,
körūlbelūl 6 perc alatt melegszik fel benne a víz.
5 Csak GC6268/GC6265/GC6068/GC6065/GC6029 típusnál:
Amint a vízmelegítőbe töltött víz eléri a gőzölős vasaláshoz
szūkséges hőmérsékletet, kialszik a jelzőlámpa (E).A vasaló
ekkor készen áll a gőzölős vasalásra.
Tanácsok
◗ Ha az anyag kūlönböző fajta szálakat tartalmaz, a hőfokot mindig a
legkényesebb azaz a legalacsonyabb hőmérsékletet igénylő szálnak
megfelelően válassza meg. Ha például egy ruha anyaga 60%
poliésztert és 40% pamutot tartalmaz, azt a poliészternek
megfelelő hőfokon (1), gőz nélkūl kell vasalni.
MAGYAR 55
Page 56

◗ Gyapjúanyagok gőzölős vasalásakor fényes foltok keletkezhetnek.
Ennek megelőzésére érdemes száraz vasalóruhát használni, vagy a
ruhát kifordítva, visszájáról vasalni az anyagot.
◗ Bársonyt és egyéb, kifényesedésre hajlamos anyagot egy irányban
(szál mentén), igen kis nyomással kell vasalni.
◗ Színes selyem vasalásakor ne használjon gőzt, mert foltok
keletkezhetnek az anyagon.
Vasalás gőzzel
Gondoskodjon róla, hogy elég víz legyen a vízmelegítőben.
C
◗ Gőzölős vasalás csak magasabb vasalási hőmérsékleten (2 és
MAX közötti hőmérséklet-beállítás mellett) lehetséges.
1 Fordítsa a hőmérséklet-szabályozó tárcsát a javasolt állásba.
Ld. a ĒHőmérséklet-szabályozáscímű részt.
2 Várja meg, amíg kialszik a vízmelegítés-jelző lámpa.
C
3 Gőzölős vasaláskor tartsa nyomva a gőzölőgombot (H).
Csak GC6268/GC6265/GC6068/GC6065/GC6029 típusnál:A gőzölős
vasaláskor időnként kigyulladó G lámpa azt jelzi, hogy bekapcsolt a
vízmelegítő és a vasalótalp megfelelő hőmérsékletre és nyomásra való
melegítése. Ilyenkor zavartalanul folytathatja a vasalást.
Ha a gőzölőberendezés egy ideig használatlan, a tömlőben maradt gőz
vízként lecsapódik. Ilyen esetben a gőzölős vasalás újbóli indításakor a
készūlék sercegő hangot adhat ki, s néhány csepp víz hagyhatja el a
vasalótalpat.
B
Ha nem szeretné, hogy vízcseppek kerūljenek a ruhára, akkor a gőzölős
vasalás újbóli indítása előtt emelje a vasalót egy régi ruhadarab fölé, s
tartsa ott benyomott gőzölőgombbal (H), amíg helyre nem áll a rendes
gőzkiáramlás.
Vasalás gőz nélkūl
1 Fordítsa a hőmérséklet-szabályozó tárcsát a javasolt állásba.
Ld. a ĒHőmérséklet-szabályozáscímű részt.
2 Ne nyomja meg a gőzölőgombot (H).
◗ Ha vasaláskor véletlenūl megnyomja a gőzölőgombot, azzal gőzt
ereszt ki.Amennyiben a vízmelegítő ūres vagy még nem meleg,
akkor kattogó hangot ad ki.Ezt a teljesen ártalmatlan jelenséget a
gőzszelep megnyitása okozza.
MAGYAR56
Page 57

◗ Ha magas hőmérsékleten vasalt, és utána alacsonyabb hőfokra
állítja a hőmérséklet-szabályzó tárcsát (I), akkor a vasalás folytatása
előtt várja meg a hőmérsékletjelző lámpa (G) kigyulladását. Ezzel
elkerūlheti az anyag károsodását.
Egyéb funkciók
Gőzölés fūggőleges helyzetben
C
1 Felakasztott fūggönyök és ruhák (zakók, öltönyök, kabátok) is
vasalhatók gőzöléssel: fūggőlegesen tartott vasalóval.
Soha ne irányítsa a gőzt emberre.
Gőzlövet (csak GC6268/GC6068/GC6029 típusnál)
Egy erőteljes Ēgőzlövetsegíthet a makacs gyűrődések eltávolításában.
C
1 Ha gőzlövetet szeretne, állítsa a gőzmennyiség-szabályozót (F)
R pozícióba (nagy felhő), a hőmérséklet-szabályozó tárcsát (l)
pedig fordítsa 3 vagy MAX állásba.
C
2 Nyomja meg egyszerre a gőzölőgombot (H) és a
gőzlövetgombot (N).
Gőzmennyiség-szabályozás (csak GC6268/GC6265/GC6068/
GC6065/GC6029 típusnál)
A gőzmennyiség-szabályozó (F) q állásában a készūlék mérsékelt gőzt,
R állásban pedig teljes erősségű gőzt ad.
Vízkőmentesítő tölcsér (csak GC6268/GC6068/GC6029
típusnál)
A vasaló hosszabb élettartamának biztosítására.
1 A vízmelegítőt a vízkőmentesítő tölcsér (M) segítségével töltse
meg vízzel.
MAGYAR 57
Page 58

Vasalás után
C
1 A be-ki kapcsoló gombot (D) kikapcsolt (Ēoff) pozícióba állítva
kapcsolja ki a készūléket.
2 Nyomásmentesítse a vízmelegítőt: tartsa lenyomva a
gőzölőgombot, amíg el nem hal a készūlékből kiáramló gőz
hangja.
3 Húzza ki a csatlakozódugót a hálózati aljzatból.
4 Helyezze a vasalót a tartójára (C), állítsa a gőzmennyiség-
szabályozót q állásba, s hagyja lehűlni a készūléket, mielőtt
eltenné.
Tisztítás és karbantartás
1 A vasaló tisztítása előtt húzza ki a csatlakozódugót a hálózati
aljzatból, és hagyja lehűlni a készūléket.Ha a vízmelegítőt
szeretné kitisztítani, akkor hajtsa végre a ĒGyors újratöltéscímű
rész első négy lépését.
Vasaló
1 A vasalót nedves ruhával tisztítsa.
2 Törölje le a vasalótalpról a vízkövet és minden más lerakódást
egy nedves ruhával, karcmentes (folyékony) tisztítószert
használva.
Soha ne merítse a vasalót vízbe, s ne öblítse vízcsap alatt.
Vízmelegítő
Havonta egyszer, illetve körūlbelūl minden tizedik használat után öblítse
ki a vízmelegítőt.
C
1 Óvatosan vegye le a vízmelegítő sapkáját.
C
2 Öblítse ki a vízmelegítőt 500 ml friss vízzel.A készūléket a
lefolyó fölött fejjel lefelé tartva, öntse ki belőle a vizet.
3 Csavarja vissza a sapkát vízmelegítőre.
MAGYAR58
Page 59
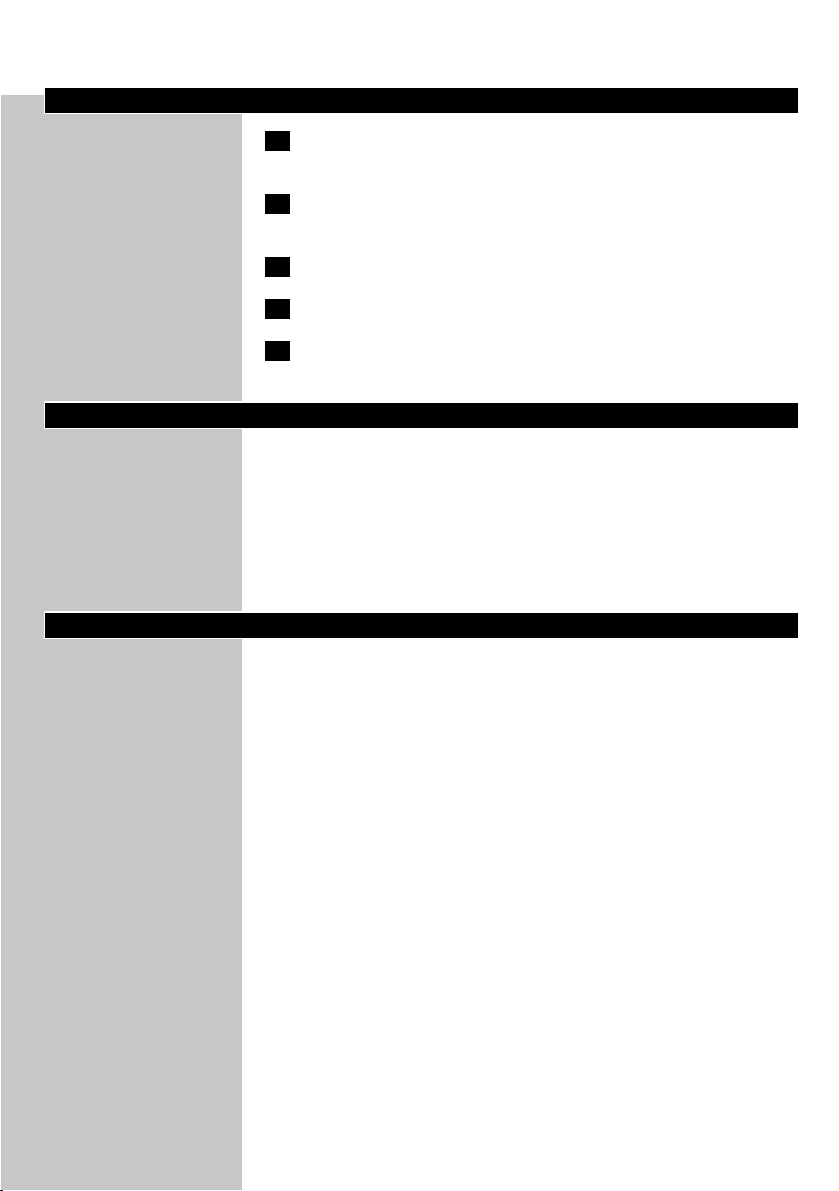
Tárolás
1 Csak úgy tegye el a vasalót, ha az már a megfelelő mértékben
lehűlt.
2 Húzza ki a csatlakozódugót a fali aljzatból, és hagyja lehűlni a
vasalót.
3 Ürítse ki a vízmelegítőt.
4 A vízmelegítő mozgatását kétoldalt fogantyúk könnyítik meg.
5 Rendszeresen ellenőrizze, ép és biztonságos-e a hálózati
csatlakozókábel és a gőztömlő.
Jótállás és szerviz
Ha információra van szūksége, vagy valamilyen probléma merūlt fel,
akkor látogasson el a Philips honlapjára (www.philips.com), vagy
forduljon országa Philips vevőszolgálatához (a telefonszámot megtalálja
a világ minden részére vonatkozó garancialevélen). Ha országában nem
működik ilyen vevőszolgálat,forduljon a Philips helyi szakūzletéhez vagy
a Philips háztartási kisgépek és szépségápolási termékek ūzletágának
vevőszolgálatához.
Hibaelhárítás
E fejezet egyes szakaszai a vasalóval kapcsolatos leggyakrabban
felmerūlő problémákat ismertetik részletesen. Amennyiben nem sikerūl
megoldania a problémát, forduljon országa Philips vevőszolgálatához (a
telefonszámot megtalálja a világ minden részére vonatkozó
garancialevélen). Ha országában nem működik ilyen vevőszolgálat,
forduljon a Philips helyi szakūzletéhez vagy legközelebbi
szakszervizéhez.
MAGYAR 59
Page 60

Megoldás
A jelenség hamarosan megszűnik.
Az ilyen ártalmatlan fehér részecskék
leválása a vasalótalpról a készūlék
néhányszori használata után megszűnik.
Állítsa be a megfelelő vasalási
hőmérsékletet az ebben az
útmutatóban és a táblázatban foglaltak
szerint.
Helyezze a vízmelegítőt szilárd,
vízszintes felūletre.
Ez normális jelenség.Tartsa a vasalót
egy régi ruha fölé, és nyomja meg a
gőzölőgombot (H).A ruha felszívja a
cseppeket. Néhány másodpercen belūl
helyreáll a rendes gőztermelés.
Állítsa a be-ki kapcsoló gombot (D)
bekapcsolt (Ēon) állásba.
Várja meg, amíg a jelzőlámpa kialszik.
Ha ellenőrizni szeretné a vasaló
gőztermelését, tartson egy (hideg)
tūkröt a vasalótalp gőznyílásai elé.
Tisztítsa meg a talpat nedves ruhával.
Tisztítsa meg a vasalótalpat nedves
ruhával. A javasolt vasalási hőfokot
állítsa be.
Lehetséges okok
Ez normális jelenség. A vasaló bizonyos
részeit a gyárban bezsírozzák.
Új vasaló esetében ez normális
jelenség.
A hőmérséklet-szabályozó tárcsával (I)
beállított hőfok túlságosan alacsony a
gőzölős vasaláshoz.
Labilis vagy egyenetlen felūleten áll a
vízmelegítő.
A gőzölős vasalás kezdetekor hideg a
tömlő.A benne lecsapódott gőz
vízcseppek formájában távozik a
vasalótalpon át.
Nincs bekapcsolva a vízmelegítő.
Világít a vízmelegítés-jelző lámpa (csak
GC6268/GC6265/GC6068/GC6065/
GC6029 típusnál).
A túlhevített (azaz jó minőségű) gőz
nehezen látható, kūlönösen ha
maximális hőfokra van állítva a
hőmérséklet-szabályozó tárcsa.
Viszonylag magas környezeti
hőmérséklet esetén a gőz még
kevésbé látható.
A vízben lévő szennyező- vagy vegyi
anyagok lerakódtak a vasalótalpra.
Túlságosan magas hőmérsékleten
vasalt.
Probléma
A készūlék előszöri bekapcsolásakor
egy kevés fūst száll ki belőle.
Fehér részecskék válnak le az új vasaló
talpáról.
Vízcseppek hagyják el a vasalótalpat.
A készūlék nem termel gőzt.
Nem látható a gőzkiáramlás a
vasalótalpból.
A vasalótalp piszkos.
MAGYAR62
Page 61

SLOVENSKY 61
Opis zariadenia
A Uzáver zásobníka na vodu
B Zásobník na vodu
C Podložka pre žehličku
D Hlavný vypínač so zabudovanou kontrolkou
E Kontrolné svetlo "Zohrievanie zásobníka na vodu" (len modely
GC6268/GC6265/GC6068 a GC6065). Kontrolné svetlo zhasne,
keď je zariadenie pripravené na naparovanie
F Ovládanie naparovania (len modely GC6268/GC6265/GC6068/
GC6065/GC6029)
q = stredne silný prúd pary, R = maximálny prúd pary
G Kontrolka teploty
H Tlačidlo na aktivovanie naparovania
I Krúžok na nastavenie teploty
J Dávkovacia hadica
K Žehliaca plocha
L Napájací kábel
M Lievik na zachytenie látok spôsobujúcich tvrdosť vody (len model
GC6268/GC6068 a GC6029)
N Výron pary (len model GC6268/GC6068 a GC6029)
O Opierka na pridržanie zadnej časti žehličky (len modely
GC6268/GC6265/GC6263/GC6068/GC6065/GC6063)
Dôležité upozornenie
Skôr, ako začnete zariadenie používať, si kvôli dodržaniu bezpečnosti pri
práci pozorne prečítajte tento návod na použitie a pozrite ilustrácie.
- Do zásobníka na vodu nepridávajte žiaden parfém, ocot,škrob,
prostriedky na odstránenie vodného kameňa, ani iné chemikálie.
- Ak je zariadenie poškodené, nesmiete ho používať.Pravidelne
kontrolujte, či sú napájací kábel a dávkovacia hadica v dobrom stave,
nepoškodené a či ich môžete ďalej bezpečne používať.
- Ak je poškodený kábel, musí ho vymeniť kvalifikovaný personál
spoločnosti Philips, alebo servisného centra autorizovaného
spoločnosťou Philips, aby sa predišlo nebezpečným situáciám.
- Na uzatvorenie zásobníka na vodu používajte len uzáver dodaný
spolu so zariadením, pretože tento uzáver slúži súčasne aj ako
bezpečnostný ventil.
- Pred tým ako zariadenie pripojíte do siete skontrolujte, či napätie
uvedené na spodnej časti zásobníka s vodou súhlasí s napätím v sieti
rozvodu elektriny.
- Zariadenie pripojte jedine do uzemnenej zásuvky.
- Žehličku ani zásobník na vodu nesmiete nikdy ponoriť do vody.
- Pokým je žehlička pripojená do siete nesmiete ju nikdy nechať bez
dozoru.
- Keď ukončíte žehlenie, ale tiež,keď aj na kratší čas žehlenie prerušíte,
odpojte žehličku zo siete a položte ju na jej podložku.
- Zásobník na vodu postavte vždy na stabilnú, vyváženú a vodorovnú
podložku. Zásobník na vodu nikdy nepoložte na žehliacu dosku.
Page 62

SLOVENSKY62
- Žehličku vždy odkladajte na podložku. Nikdy nepoložte horúcu
žehličku na dávkovaciu hadicu ani na napájací kábel.
- Podložka a žehliaca plocha môžu byť veľmi horúce a pri dotyku by
mohli spôsobiť popáleniny.Ak potrebujete presunúť zásobník s
vodou, nedotýkajte sa podložky žehličky.
- Keď je žehliaca plocha žehličky horúca, napájací kábel sa jej nesmie
dotknúť.
- Nedospelé osoby smú zariadenie používať len pod dozorom.
Dávajte pozor, aby sa deti nehrali so zariadením.
- Ak počas zohrievania zariadenia uniká cez uzáver zásobníka vodná
para, zariadenie vypnite a kontaktujte servisné stredisko autorizované
firmou Philips.
- Kým je para v zásobníku pod tlakom, neotvárajte uzáver zásobníka.
Pri otváraní uzáveru postupujte podľa návodu v časti "Rýchle
doplnenie".
Príprava zariadenia na použitie
1 Pred tým ako zariadenie pripojíte do siete skontrolujte,či
napätie uvedené na spodnej časti zásobníka s vodou súhlasí s
napätím v sieti rozvodu elektriny.
2 Odstráňte všetky nálepky a ochrannú fóliu zo žehliacej platne a
vyčistite ju mäkkou handričkou.
3 Úplne rozviňte napájací kábel (L) a dávkovaciu hadicu (J).
4 Zásobník na vodu (B) postavte na stabilnú,vyváženú podložku.
5 Žehličku položte na jej podložku (C).
Plnenie zásobníka na vodu
Zásobník na vodu nikdy neponárajte do vody.
Kým je zariadenie horúce a para v zásobníku pod tlakom, neotvárajte
uzáver zásobníka.
C
1 Uistite sa, že hlavný vypínač (D) je v polohe vypnuté "off" a
odpojte napájací kábel zo siete.
C
2 Pomaly odskrutkujte uzáver (A) zásobníka na vodu.
Pri otváraní uzáveru môžete počuť určitý zvuk.Tento zvuk spôsobuje
podtlak, ktorý sa vytvoril v chladnom zásobníku. Je to úplne prirodzené.
Page 63

SLOVENSKY 63
C
3 Nalejte do zásobníka vodu (maximálne 1 liter).
Zásobník naplňte vodou z kohútika až po značku maxima.
Ak je voda, ktorú používate príliš tvrdá, odporúčame Vám zmiešať vodu
z vodovodu s rovnakým množstvom destilovanej vody, alebo na plnenie
zásobníka používať len destilovanú vodu.
Nepoužívajte parfém, ocot, škrob, ani vodu, ktorej tvrdosť bola
chemicky upravená.
4 Uzáver naskrutkujte natesno na plniace hrdlo zásobníka.
Rýchle doplnenie
C
1 Najskôr vypnite hlavný vypínač (D) "off".
C
2 Stlačte tlačidlo na aktivovanie naparovania a podržte ho
stlačené tak dlho, kým už nepočujete unikať zo zariadenia paru.
3 Držte tlačidlo na aktiváciu naparovania stlačené a pomaly
odskrutkujte uzáver zásobníka na vodu tak,že ho otáčate proti
smeru pohybu hodinových ručičiek.Takto odtlakujete zásobník
na vodu.
Uistite sa, že v zásobníku nie je para pod tlakom.Vezmite kúsok tkaniny
a pomocou nej odskrutkujte uzáver.
4 Vytiahnite sieťovú zástrčku zo zásuvky el. siete.
5 Naplňte zásobník na vodu podľa pokynov uvedených v časti
"Plnenie zásobníka na vodu" a potom nechajte zariadenie znovu
zohriať.
Ovládanie
naparovania
-
q
R
Koliesko na
nastavenie
teploty
1
2
3
Typ vlákna
Syntetické tkaniny (napr.
acetát, akryl, viskóza,
polyamid, polyester) a hodváb
Vlna
Bavlna, ľan
Všimnite si prosím: Z v tabuľke
znamená, že výrobky z týchto
materiálov nesmiete žehliť
Štítok s pokynmi
na žehlenie
B
C
D
Z
Page 64

SLOVENSKY64
Nastavenie teploty
Zásobník na vodu postavte vždy na stabilnú, vyváženú a vodorovnú
podložku. Zásobník na vodu nikdy nepoložte na žehliacu dosku.
Žehličku vždy odkladajte na podložku.Ak je horúca, nepoložte ju na
hadicu, ktorá privádza paru zo zásobníka, ani na kábel. Postarajte sa, aby
sa kábel nedostal do styku s horúcou žehliacou plochou.
C
1 Koliesko nastavenia teploty otočte tak,aby ste podľa značky
zvolili požadovanú teplotu žehlenia.
- Teplotu žehlenia pre jednotlivé kusy prádla zistíte podľa označenia na
štítku:
- 1 Syntetické vlákna (napr. akrylové, viskózové, polyamidové,
polyesterové)
- 1 Hodváb
- 2 Vlna
- 3 Bavlna, ľan
- Ak neviete z akého materiálu je varobený žehlený kus oblečenia,
vyskúšajte ožehliť kúsok, ktorý pri nosení nebude vidno.
- Hodvábne, vlnené a syntetické materiály: žehlite opačnú stranu
oblečenia, aby na ňom nevznikli lesklé plochy.
- Najskôr žehlite oblečenie, ktoré vyžaduje najnižšiu teplotu žehlenia,
ako napr. oblečenie vyrobené zo syntetických vlákien.
C
2 Pripojte zariadenie do siete a nechajte ho zohriať sa tak, že
zapnete hlavný vypínač (D) "on".
3 Studený štart: teraz sa začne zohrievať zásobník na vodu a
žehliaca plocha žehličky. Žehliaca plocha potrebuje na zohriatie
asi 2 minúty a zohriatie vody v zásobníku trvá približne 8
minút.
4 Rýchle opätovné zohriatie: ak počas žehlenia dopĺňate vodu v
zásobníku, jej zohriatie bude trvať asi 6 minút.
5 Len modely GC6268/GC6265/GC6068/GC6065/GC6029:
hneď, ako voda v zásobníku dosiahne požadovanú teplotu,
zhasne kontrolné svetlo (E). Potom môžete začať so žehlením.
Tipy
◗ Ak sú odevy vyrobené z rôznych druhov vlákna,teplotu žehlenia
zvoľte vždy podľa najcitlivejšieho druhu vlákna,t.j. najnižšiu teplotu.
Napríklad: ak je zloženie výrobku 60% polyesteru a 40% bavlny,
musíte tento kus oblečenia žehliť pri teplote určenej pre žehlenie
polyesteru (1) a bez naparovania.
Page 65

SLOVENSKY 65
◗ Ak žehlíte a naparujete vlnené výrobky, môžu vzniknúť lesklé
plochy. Môžete tomu predísť tak,že výrobok pri žehlení zakryjete
suchou tkaninou, alebo vlnený kus oblečenia prevrátite a ožehlíte
jeho vnútornú stranu.
◗ Výrobky zo zamatu a iných materiálov, na ktorých pri žehlení
vznikajú lesklé plôšky, by ste mali žehliť len v jednom smere (v
smere, v ktorom sú tkané) a žehličku pri tom tlačiť len veľmi málo.
◗ Ak žehlíte odev z farebného hodvábu, nepoužívajte naparovanie.V
opačnom prípade by sa mohli na odeve objaviť škvrny.
Naparovanie
Uistite sa, že v zásobníku je dostatok vody.
C
◗ Naparovanie máte k dispozícii len počas žehlenia pri vyššej
teplote (nastavenie teploty 2 až MAX).
1 Ovládač teploty nastavte na požadovanú pozíciu.
Pozrite "Nastavenie teploty".
2 Počkajte kým zhasne kontrolka označujúca "zohrievanie
zásobníka na vodu".
C
3 Počas naparovania držte zatlačené tlačidlo na aktivovanie
naparovania (H).
Len modely GC6268/GC6265/GC6029: Počas naparovania sa občas
rozsvieti kontrolné svetlo G, ktoré informuje o tom, že zásobník na
vodu a žehlička sa zohrievajú na požadovanú teplotu.Ak sa tak stane,
pokračujte v žehlení.
Ak určitý čas nepoužívate naparovanie, para, ktorá sa nachádza v
dávkovacej hadici, skondenzuje na vodu. Keď opäť začnete s
naparovaním, možno začujete bublanie vo vnútri žehličky a spod
žehliacej plochy môže vypadnúť zopár kvapiek vody.
B
Aby ste sa vyhli pokvapkaniu žehlenej látky vodou, pri opätovnom použití
funkcie naparovania držte žehličku nad staršou látkou, stlačte a podržte
stlačené tlačidlo na aktivovanie naparovania (H), kým sa neobnoví
plynulé dávkovanie pary.
Žehlenie bez naparovania
1 Ovládač teploty nastavte na požadovanú pozíciu.
Pozrite "Nastavenie teploty".
Page 66

SLOVENSKY66
2 Nestláčajte tlačidlo na aktivovanie naparovania (H).
◗ Ak omylom počas žehlenia stlačíte tlačidlo naparovania,zo žehličky
unikne malé množstvo pary.Ak je zásobník prázdny, alebo sa ešte
nestačil zohriať, budete počuť kliknutie z vnútra zásobníka.Tento
neškodný zvuk spôsobuje otvorenie dávkovacieho ventilu.
◗ Ak ste najskôr žehlili pri vyššej teplote a potom otočili koliesko na
nastavenie teploty (I) na nižšiu teplotu,počkajte, kým kontrolka
teploty (G) nezhasne. Potom môžete pokračovať v žehlení.
Predídete tak poškodeniu žehleného oblečenia.
Ďalšie vlastnosti
Naparovanie vo zvislej polohe
C
1 Pomocou žehličky vo zvislej polohe môžete naparovať
zavesené záclony a oblečenie (saká, šaty, kabáty).
Paru nikdy nenasmerujte na ľudí.
Výron pary (len modely GC6268/GC6068/GC6029)
Silný "výron" pary Vám pomôže vyžehliť silno pokrčené miesta.
C
1 Ak potrebujete výron pary: nastavte ovládanie naparovania (F)
na R (veľký oblak) a koliesko na nastavenie teploty (I) otočte
do polohy 3 alebo MAX.
C
2 Súčasne stlačte tlačidlo naparovania (H) a tlačidlo aktivujúce
výron pary (N).
Variabilný prúd pary (len modely GC6268/GC6265/GC6068/
GC6065/GC6029)
Ovládanie naparovania (F) môžete nastaviť do pozície q na stredne
silné naparovanie, alebo R poskytujúcej maximálny prúd pary.
Page 67

SLOVENSKY 67
Lievik na zachytenie látok spôsobujúcich tvrdosť vody (len
modely GC6268/GC6068/GC6029)
Na zabezpečenie dlhšej životnosti Vašej žehličky.
1 Lievik na zachytenie látok spôsobujúcich tvrdosť vody použite
pri plnení zásobníka vodou.
Po žehlení
C
1 Zariadenie vypnite pomocou hlavného vypínača (D) "off".
2 Opakovane stláčajte tlačidlo na aktivovanie naparovania
dovtedy, kým zo zariadenia prestane unikať para,odtlakujete
tým zásobník na vodu.
3 Vytiahnite sieťovú zástrčku zo zásuvky el. siete.
4 Predtým, ako žehličku odložíte, položte ju na podložku (C),
ovládanie naparovania otočte do polohy q a nechajte ju
vychladnúť.
Čistenie a údržba
1 Skôr ako začnete s čistení, odpojte žehličku zo siete a nechajte
ju vychladnúť.Ak chcete vyčistiť zásobník na vodu, pokračujte
podľa prvých štyroch krokov uvedených v časti "Rýchle
doplnenie".
Žehlička
1 Žehličku očistite pomocou vlhkej tkaniny.
2 Pomocou navlhčenej tkaniny a čistiaceho prostriedku
(kvapalného), ktorý nepoškodí povrch žehliacej platne,
odstráňte z neho vodný kameň a všetky ostatné usadeniny.
Žehličku nikdy nesmiete ponoriť do vody, ani ju umývať pod tečúcou
vodou.
Zásobník na vodu
Zásobník na vodu vypláchnite aspoň raz mesačne, alebo po každom
desiatom použití.
C
1 Pozorne odmontujte jeho uzáver.
Page 68

SLOVENSKY68
C
2 Zásobník opláchnite 500 ml studenej vody.Vodu vylejete tak, že
nad výlevkou otočíte zásobník hore nohami.
3 Zásobník na vodu znovu uzatvorte tak, že naskrutkujete jeho
uzáver.
Uloženie
1 Pred odložením žehličky sa uistite, že je dostatočne
vychladnutá.
2 Žehličku odpojte zo siete a nechajte vychladnúť.
3 Vyprázdnite zásobník na vodu.
4 Po stranách zásobníka na vodu sú rúčky, ktoré uľahčujú
transport zariadenia.
5 Pravidelne kontrolujte,či sú napájací kábel a dávkovacia hadica
nepoškodené a či ich môžete bezpečne ďalej používať.
Záruka a servis
Ak potrebujete informácie, alebo máte problém,prosíme Vás, aby ste
navštívili www stránku spoločnosti Philips - www.philips.com, alebo sa
obrátili na Centrum služieb zákazníkom spoločnosti Philips vo Vašej
krajine (telefónne číslo Centra nájdete v priloženom celosvetovo
platnom záručnom liste). Ak sa vo Vašej krajine toto Centrum
nenachádza, obráťte sa na miestneho predajcu výrobkov Philips, alebo
kontaktujte Oddelenie služieb Philips - divízia domáce spotrebiče a
osobná starostlivosť.
Riešenie problémov
V tejto kapitole sú uvedené najbežnejšie problémy, s ktorými sa môžete
stretnúť pri žehlení. Ďalšie informácie získate v jednotlivých častiach
návodu.V prípade, že nedokážete odstrániť vzniknutý problém,
prosíme, kontaktujte Centrum starostlivosti o zákazníka spoločnosti
Philips vo Vašej krajine (číslo nájdete v celosvetovo platnom záručnom
liste).Ak vo Vašej krajine Centrum starostlivosti o zákazníka nepôsobí,
obráťte sa na predajcu výrobkov Philips, alebo na najbližšie Servisné
centrum Philips.
Page 69

SLOVENSKY 69
Riešenie
Po chvíli sa tento nedostatok stratí.
Tieto častice nie sú nebezpečné a po
niekoľkých použitiach žehličky sa
prestanú uvoľňovať.
Nastavte teplotu požadovanú pre
naparovanie podľa pokynov v tomto
manuále a v tabuľke.
Zásobník na vodu postavte na stabilný
a rovný povrch.
Je to normálne. Žehličku umiestnite
nad kus staršej látky a podržte stlačené
tlačidlo na aktivovanie naparovania (H).
Látka vodu absorbuje. Po niekoľkých
sekundách bude z otvorov v žehliacej
ploche rovnomerne prúdiť para.
Zapnite vypínač (D) do polohy "on".
Počkajte kým kontrolka zhasne.
Ak si chcete overiť, či zariadenie
skutočne produkuje paru, podržte
pred otvormi v žehliacej ploche
(studené) zrkadlo.
Očistite žehliacu plochu navlhčenou
tkaninou.
Očistite žehliacu plochu navlhčenou
tkaninou. Zvoľte odporúčanú teplotu
žehlenia.
Možná príčina (y)
Je to normálne. Niektoré súčiastky v
žehličke sú z výroby chránené malým
množstvom mazadla.
Tento jav je bežný, kým je žehlička
nová.
Koliesko na nastavenie teploty (I) ste
otočili tak, že nastavená teplota je príliš
nízka pre naparovanie.
Zásobník na vodu ste postavili na
nestabilnú a/alebo krivú podložku.
Keď začínate s naparovaním,
dávkovacia hadica je chladná. Para
začne v hadici kondenzovať a preto z
otvorou v žehliacej ploche kvapká
voda.
Nezapli ste ohrev zásobníka na vodu.
Kontrolné svetlo "zohrievanie
zásobníka na vodu" ešte stále svieti
(len modely GC6268/GC6265/
GC6068/GC6065/GC6029).
Prehriatu (veľmi kvalitnú) paru
nemusíte zbadať, predovšetkým, ak ste
koliesko na ovládanie teploty otočili do
pozície pre maximálnu teplotu, a tiež,
ak je teplota prostredia relatívne
vysoká.
Na povrchu žehliacej plochy sa usadili
nečistoty alebo chemické prímesi
prítomné vo vode.
Žehlili ste pri príliš vysokej teplote.
Problém
Pri prvom zapnutí, začal zo zariadenia
unikať dym.
Z otvorov v žehliacej ploche sa
uvoľňujú biele častice.
Z otvorov v žehliacej ploche unikajú
kvapky vody.
Zariadenie nevyrába paru.
Nevidím, že by z otvorov v žehliacej
ploche vychádzala para.
Žehliaca plocha je špinavá.
Page 70

УКРАЇНСЬКІЙ70
Загальний опис
A Кришка парового резервуара
B Паровий резервуар
C Підставка для праски
D Перемикач "вмк/вимк" із вбудованою лампою
E Сигнальна лампа "Нагрівання парового резервуару" (тільки
моделі GC6268/GC6265/GC6068/GC6065). Сигнальна лампа
згасає, коли пристрій стає готовим до прасування з парою.
F Регулятор пари (тільки моделі GC6268/GC6265/GC6068/
GC6065/GC6029). q = помірна пара R = найбільша пара
G Сигнальна лампа температури
H Кнопка подачі пари
I Регулятор температури
J Шланг
K Підошва
L Шнур живлення
M Протинакипна лійка (тільки модель GC6268/GC6068/GC6029)
N Випуск пари (тільки модель GC6268/GC6068/GC6029)
O Стійка для праски (тільки моделі GC6268/GC6265/GC6263/
GC6068/GC6065/GC6063).
Увага!
В цілях максимально безпечної експлуатації пристрою уважно
прочитайте ці інструкції та продивіться ілюстрації перед тим, як
почнете користуватися пристроєм.
- Не заливайте у паровий резервуар парфуми, оцет, крохмаль,
протинакипні засоби чи інші хімікати.
- Ніколи не застосовуйте пошкоджений пристрій. Регулярно
перевіряйте шнур живлення та шланг на відсутність пошкоджень
та безпеку.
- Якщо шнур для з`єднування з електромережею пошкоджений,
його можна замінити в сервісному центрі Philips або
кваліфікованою людиною для запобігання виникнення пожежі.
- Ніколи не використовуйте іншу кришку для парового резевуара
ніж ту, що входить до комплекту прилада, лише цю кришку
оснащено захістним клапаном.
- Перед тим, як вмикати пристрій, перевірте, чи співпадає значення
напруги, вказане на дні парового баку, напрузі у мережі Вашого
будинку.
- Під'єднуйте пристрій лише до заземлених розеток.
- Ніколи не занурюйте пристрій чи паровий резервуар у воду.
- Ніколи не залишайте підключений до електромережі пристрій
без нагляду.
- По закінченні прасування або навіть якщо Ви залишаєте праску
на короткий час, завжди виймайте шнур з розетки та ставте
праску на спеціальну підставку.
- Завжди кладіть паровий резервуар на жорстку, рівну та
горизонтальну поверхню. Не кладіть паровий резервуар на м'яку
частину прасувальної дошки.
Page 71

УКРАЇНСЬКІЙ 71
- Завжди ставте праску на підставку. Не ставте гарячу праску на
шланг або шнур живлення.
- Залізна підставка та підошва можуть стати дуже гарячими та
спричинити опікиу разі їх торкання. Якщо ви бажаєте
перемістити резервуар для пари, не торкайтеся залізних частин.
- Не давайте шнуру торкатися нагрітої підошви праски.
- Слабкі або хворі люди не повинні використовувати праску без
нагляду. Дивіться за дітьми, щоб вони не гралися з пристроєм.
- Якщо пара виходить з-під кришки парового резервуару, коли
прилад нагрівається, вимкніть прилад та зверниться до
авторизованого центру Philips.
- Не знімайте кришку з парового резервуару, коли резервуар
знаходиться під тиском. Виконуйте інструкції з розділу "Швидке
наповнення" перед тим, як знімати кришку.
Підготовка пристрою до використання.
1 Перед тим, як вмикати пристрій, перевірте, чи співпадає
значення напруги, вказане на дні парового баку, напрузі у
мережі Вашого будинку.
2 Зніміть з нагрівального елемента захисну або змащену клеєм
плівку і протріть його м'якою тканиною.
3 Повністю розмотайте шнур живлення (L) та шланг (J).
4 Встановіть паровий резервуар (В) на стійку рівну поверхню.
5 Встановіть праску на спеціальну підставку (С).
Наповнення парового резервуару.
Ніколи не занурюйте паровий резервуар воду.
Не відкривайте кришку гарячого пристрою та коли паровий
резервуар все ще знаходиться під тиском.
C
1 Переконайтеся, що перемикач "вмк/вимк" (D) встановлено
на "вимк" та витягніть шнур з розетки.
C
2 Повільно відкрутіть кришку (А) з парового резервуару.
Знімаючи кришку, Ви можете почути звук. Цей звук виник
внаслідок того, що холодний резервуар знаходиться у стан
вакууму. Це є цілком нормальним.
Page 72

УКРАЇНСЬКІЙ72
C
3 Залийте воду у паровий резервуар (макс. 1 літр).
Наповнюйте резервуар водою з-під крану до максимально
позначки.
Якщо вода з-під крану є дуже жорсткою, мі радимо змішати воду зпід крана з такою самою кількістю дистильованої води, або
використовувати одну дистильовану воду.
Не застосовуйте воду з парфумами, оцтом, крохмалем або воду з
хімічними засобами проти утворення накипу.
4 Пригвинчуйте кришку щільно до отвору парового
резервуара.
Швидке наповнення
C
1 Спочатку встановіть перемикач "вмк/вимк" (D) у положення
"вимк".
C
2 Натискайте кнопку подачі пари, поки не припиниться будь-
який звук від пари, що виходить із пристрою.
3 Тримайте кнопку подачі пари натиснутою та повільно
відкручуйте кришку парового резервуару, повертаючи її
проти годинникової стрілки. Це зніме тиск з парового
резервуару.
Переконайтеся, що з резервуара не виходить пара. При
відкручуванні покладіть на кришку ганчірку.
4 Витягнітьшнурізрозетки.
5 Наповніть паровий резервуар, як описано у розділі
"Наповнення парового резервуару" та дайте пристрою
знову нагрітися.
Page 73

Установлення температури
Завжди кладіть паровий резервуар на жорстку, рівну т
горизонтальну поверхню. Не кладіть паровий резервуар на м'яку
частину прасувальної дошки.
Завжди розташовуйте праску на залізній підставці. Не ставте праску
на підвідний рукав або на шнур живлення. Впевніться, що шну
живлення не контактує з гарячою підошвою.
C
1 Встановіть регулятор температури на потрібну температуру
прасування, повернувши його у відповідне положення.
- Потрібну температуру прасування Ви можете знайти на ярлику
від одягу.
- 1 Синтетичні тканини (наприклад, акрил, віскоза, поліамід,
поліефір)
- 1 Шовк
- 2 Вовна
- 3 Бавовна, льон
- Якщо Ви не знаєте, з якої тканини зроблений одяг, спробуйте
випрасувати ділянку, яку не буде видно при носінні одягу.
- Шовк, вовняні та синтетичні матеріали: Щоб тканина не
лиснілася, прасуйте зворотну сторону тканини.
- Починайте прасування з речей, що потребують найнижчої
температури, наприклад, з синтетики.
C
2 Вставте штекер у розетку, дайте пристрою нагрітися,
встановивши перемикач "вмк/вимк" (D) у положення "вмк".
3 Холодне включення: тепер паровий бак та підошва
нагріваються. Н нагрівання підошви потрібно близько
2 хвилин, для парового резервуара - близько 8 хвилин.
4 Швидке прогрівання: Якщо ви наповнюйте паровий
резервуар підчас прасування, на нагрівання води у
резервуарі знадобиться близько 6 хвилин.
УКРАЇНСЬКІЙ 73
Регулятор
викида пари
-
q
R
Регулятор
температури
1
2
3
Тип тканини
Синтетичні тканини
(наприклад, ацетат, акрил,
віскоза, поліамід, поліефір)
та шовк
Вовна
Бавовна, льон
Будь-ласка, майте на увазі:
Z у таблиці означає, що цю
одежу прасувати не можна
Ярлики з
інструкціями з
прасування
B
C
D
Z
Page 74

5 Тільки моделі GC6268/GC6265/GC6068/GC6065/GC6029 :
Як тільки вода у резервуарі нагріється достатньо,погасне
сигнальна лампа (Е). Тепер Ви можете починати прасування.
Поради
◗ Якщо одежа складається з різних типів тканини, завжди
вибирайте температуру, якої потребує найбільш делікатна
тканина, тобто найнижчу температуру. Наприклад: якщо одяг
складається з 60% поліефіру та 40% бавовни, його треба
прасувати при температурі,вказаній для поліефіру (1), без пари.
◗ При прасуванні вовняних тканин може виникати лиск. Ви
можете запобігти цьому, накладаючи суху тканину або
повертаючи одяг та прасуючи його зворотну сторону.
◗ Вельвет та деякі інші тканини можуть набувати лиску, тому їх
можна прасувати лише в одному напрямку (вздовж ворсу),
натискаючи дуже легко.
◗ Не застосовуйте пару при прасуванні кольорового шовку. Це
може спричинити появу плям.
Прасування з паром
Переконайтеся, що паровий резервуар достатньо наповнений
водою.
C
◗ Прасування з парою можливе тільки при високих
температурах (установки температури від 2 до MAX).
1 Встановітьрегулятортемпературинарекомендованезначення.
Дивіться розділ "Встановлення температури".
2 Почекайте, поки не згасне лампа "нагрівання парового
резервуар".
C
3 Тримайте кнопку подачі пари (Н) натиснутої підчас
прасування з парою.
Тільки моделі GC6268/GC6265/GC6068/GC6065/GC6029 : Підчас
прасування з парою сигнальна лампа G загорається час від часу,
показуючи, що паровий резервуар та праска нагріваються до
правильної температури й тиску. Якщо це відбувається, Ви можете
спокійно прасувати далі.
Якщо Ви не застосовуєте паровий пристрій деякий час, і пара все
ще знаходиться у ньому, у шлангу збирається конденсат. Коли Ви
починаєте прасувати знову, це може спричинити появу бриск із
пристрою, і декілька краплин води можуть з'явитися на підошві.
B
Щоб каплі не потрапляли на Вашу одежу, тримайте праску над
старою тканиною та натискайте кнопку подачі пари (Н), поки
подача пари не нормалізується, і Ви не зможете прасувати знову.
УКРАЇНСЬКІЙ74
Page 75

Прасування без пару
1 Встановітьрегулятортемпературинарекомендованезначення.
Дивіться розділ "Встановлення температури".
2 Не натискайте кнопку подачі пари (Н).
◗ Якщо ви помилково натиснете кнопку активатора пари при
прасуванні, вийде трохи пари. Якщо паровий резервуар
порожній або не нагрівається, Ви чутимете клацання з
резервуара. Це явище спричиняється відкриттям парового
клапану та є безпечним.
◗ Якщо Ви прасуєте при високій температурі, а потім
встановлюєте регулятор (І) у нижче положення, почекайте,
поки засвітиться лампа температури (G), перед тим, як
продовжувати прасування. Це дозволить запобігти псуванню
тканини.
Інші параметри
Подача пари у вертикальному положенні
C
1 Гардини та одяг, що висить (піджаки, костюми, пальто),
можна прасувати з парою, тримаючи праску у
вертикальному положенні.
Ніколи не спрямовуйте пару на людей.
Випуск пари (тільки моделі GC6268/GC6068/GC6029)
Потужний "викид" пари допомагає усунути складки, що не
піддаються звичайному прасуванню.
C
1 Для випуску пари: встановіть регулятор пари (F) на R
(велика хмарка) та встановіть регулятор температури на
3 або MAX.
C
2 Натисніть кнопку активатора пари (H) та кнопку випуску
пари (N).
УКРАЇНСЬКІЙ 75
Page 76

Регульована пара (тільки моделі GC6268/GC6265/GC6068/
GC6065/GC6029)
Ви можете встановлювати регулятор пари (F) на 5,113; для
помірної пари або на R для найбільшої пари.
Протинакипна лійка (тільки моделі GC6268/GC6068/
GC6029)
Щоб забезпечити довгий строк служби пристрою.
1 Застосовуйте протинакипну лійку (M), коли наповнюєте
резервуар водою.
Після прасування
C
1 Вимкніть пристрій, переставивши перемикач "вмк/вимк" (D)
у положення "вимк".
2 Зніміть тиск із парового резервуару, натискаючи кнопку
подачі пари, поки не буде чутися звук пари, що виходить із
пристрою.
3 Витягнітьшнурізрозетки.
4 Поставте праску на підставку (C), встановіть регулятор пари
у положення q і дайте пристрою охолонути.
Чистка і догляд за праскою
1 Витягніть шнур із розетки і дайте пристрою охолонути
перед чищенням. Якщо ви бажаєте почистити паровий
резервуар, спершу проробіть чотири кроки, описані у
розділі "Швидке наповнення".
Праска
1 Чистіть праску вологою ганчіркою.
2 Вапняний наліт та інші забруднення видаляються з
"підошви" за допомогою вологої ганчірки та неабразивного
(рідкого) засобу для чищення.
Ніколи не занурюйте праску у воду та не мийте її під краном.
Паровий резервуар
Промивайте паровий резервуар раз на місяць або після
використання пристрою прибл. 10 разів.
УКРАЇНСЬКІЙ76
Page 77

C
1 Обережно зніміть кришку.
C
2 Промийте паровий резервуар 500 мл свіжої води. Вилийте
воду, тримаючи резервуар донизу над умивальником.
3 Надіньте кришку на паровий резервуар.
Зберігання
1 Переконайтеся, що праска охолонула достатньо перед тим,
як ставити її на зберігання.
2 Вимкніть вилку з розетки і дайте прасці охолонути.
3 Спорожніть паровий резервуар.
4 На кожній стороні резервуару є ручки для полегшення
перенесення.
5 Регулярно перевіряйте шнур живлення та шланг на
відсутність пошкоджень та безпеку.
Гарантія та обслуговування
Якщовампотрібнаінформаціяабоякщоувасвиниклипроблеми,
просимовідвідатисторінкукомпаніїPhilips
умережіІнтернетзаадресоюwww.philips.com
абозвернітьсяуЦентробслуговуванняклієнтівкомпаніїPhilips
увашійкраїні(телефонніномеритакихцентрівдлярізнихкраїнсвітунаве
деніугарантійномуталоні).
ЯкщоувашійкраїнінемаєЦентруобслуговуванняклієнтівкомпаніїPhilips,
звернітьсядовашогомісцевогодилеракомпаніїPhilips
абозвернітьсяуВідділобслуговування(Service Department)
компаніїPhilips Domestic Appliances and Personal Care BV.
УКРАЇНСЬКІЙ 77
Page 78

Спосібусунення
Це явище зникне через деякий час.
Ці частинки не є шкідливими і не
сиплються через декілька прасувань.
Виберіть потрібну температуру за
цією інструкцією і таблицею.
Встановіть паровий резервуар на
стабільну та рівну поверхню.
Це є нормальним. Потримайте
праску на старій тканині, натискаючи
кнопку подачі пари (Н). Тканина
вбирає краплі. Через декілька секунд
подача пари нормалізується.
Встановіть перемикач (D) на "вмк".
Почекайте, поки сигнальна лампа
згасне.
Щоб перевірити, чи виходить пара,
піднесіть холодне дзеркало до
підошви.
Очистіть підошву вологою
ганчіркою.
Очистіть підошву вологою
ганчіркою. Оберіть рекомендовану
температуру прасування.
Можливапричина(причини)
Це є нормальним. Деякі частини
змащені на заводі.
Це є звичайним для нової праски.
Регулятор температури (І)
встановлено на температуру, яка є
надто малою для прасування з
парою.
Паровий резервуар поставлено на
нестабільну чи нерівну поверхню.
Коли Ви починаєте прасувати, шланг
залишається холодним. Пара
конденсується на шлангу, тому вода
капає з підошви.
Паровий резервуар не включено.
Сигнальна лампа "нагрівання
парового резервуару" горить
безперервно (тільки моделі GC6268/
GC6265/GC6068/GC6065/GC6029).
Перегріту (тобто високоякісну) пару
важко побачити, особливо, коли
регулятор температури встановлено
на максимум і навіть менше, коли
температура оточуючого
середовища досить висока.
Речовини, що містяться у воді,
можуть спричиняти осадок на
підошві.
Ви прасуєте при занадто високій
температурі.
Несправність
Трохи диму виходить з пристрою,
коли Ви його вмикаєте уперше.
З підошви нової праски сипляться
білі частинки.
Краплі води просочуються з
підошви.
Пара з пристрою не виходить.
Я не бачу пари, яка має виходити з
підошви.
Підошва брудна.
УКРАЇНСЬКІЙ78
Можливі несправності.
У цій главі зведено основні складнощі, яки можуть виникнути при
використанні праски. Будь-ласка, за подробицями звертайтеся до
окремих розділів. Якщо Ви не можете усунути проблему самостійно,
зверніться до Центру обслуговування клієнтів фірми "Philips" у Вашій
країні (номер телефону - на міжнародному гарантійному талоні).
Якщо у Вашій країні такого центру немає, зверніться до місцевого
ділера фірми "Philips" або до найближчого сервісного центру "Philips".
Page 79

HRVATSKI 79
Opći opis
A Pokrov spremnika za paru
B Spremnik za paru
C Postolje za glačalo
D Preklopka za uključenje/isključenje s ugrađenom kontrolnom
žaruljicom
E Kontrolna žaruljica za 'zagrijavanje spremnika za paru' (samo tipovi
GC6268/GC6265/GC6068/GC6065). Kontrolna žaruljica se gasi
kada je uređaj spreman za glačanje s parom
F Kontrola pare (samo tipovi GC6268/GC6265/GC6068/GC6065/
GC6029). q = umjerena para R = maksimalna para
G Kontrolna žaruljica temperature
H Tipka za aktiviranje pare
I Izbornik temperature
J Dovodna cijev
K Grijaća ploča glačala
L Mrežni kabel
M Lijevak za sprječavanje kamenca (samo tip GC6268/GC6068/
GC6029)
N Mlaz pare (samo tip GC6268/GC6068/GC6029)
O Stražnji oslonac glačala (samo tipovi GC6268/GC6265/GC6263/
GC6068/GC6065/GC6063)
Važno
Za optimalnu sigurnost, prije uporabe pažljivo pročitajte ove upute i
pogledajte slike.
- U spremnik za paru nemojte stavljati parfem, ocat, sredstvo za
čišćenje kamenca ili neke druge kemikalije .
- Nikada ne koristite aparat ako je na bilo koji način oštećen. Redovito
provjeravajte stanje mrežnog kabela i dovodne cijevi.
- Ako se mrežni kabel ošteti, mora se zamijeniti u ovlaštenom Philips
servisu kako bi izbjegli potencijalno opasne situacije.
- Nemojte koristiti nijedan drugi pokrov spremnika za paru umjesto
isporučenog, jer on također funkcionira i kao sigurnosni ventil.
- Prije priključenja na napajanje provjerite je li napon označen na dnu
spremnika za paru istovjetan naponu Vaše mreže.
- Aparat spojite isključivo na uzemljenu zidnu utičnicu.
- Nikada ne uranjajte glačalo ili spremnik za paru u vodu.
- Nikada ne ostavljajte glačalo bez nadzora kad je priključeno na
napajanje.
- Po završetku glačanja, te čak i kod kratkih prekida, odspojite glačalo iz
napajanja i postavite ga u uspravni položaj ili na postolje.
- Spremnik za paru uvijek postavite na stabilnu, ravnu i vodoravnu
površinu. Ne stavljajte spremnik za paru na meki dio daske za glačanje.
- Uvijek stavljajte glačalo na postolje za glačalo. Ne stavljajte vruće
glačalo na dovodnu cijev ili mrežni kabel.
- Postolje i grijaća ploča mogu se jako zagrijati i prouzročiti opekotine
ako se dodirnu. Želite li pomaknuti spremnik za paru, nemojte
dodirivati postolje glačala.
Page 80

HRVATSKI80
- Kabel ne smije doći u dodir s grijaćom pločom dok je vruća.
- Hendikepirane osobe ne smiju koristiti aparat bez nadzora. Ne
dozvolite djeci igranje aparatom.
- Primijetite li da ispod pokrova spremnika za paru tijekom zagrijavanja
aparata izlazi para, obratite se ovlaštenom servisu.
- Dok je pod tlakom, ne skidajte poklopac sa spremnika za paru.
Slijedite upute pod 'Brzo nadopunjavanje' prije skidanja poklopca.
Priprema aparata za uporabu
1 Prije priključenja na napajanje provjerite je li napon označen na
dnu spremnika za paru istovjetan naponu Vaše mreže.
2 Uklonite bilo kakvu naljepnicu ili zaštitnu foliju sa donje ploče i
obrišite je mekom krpom.
3 Sasvim razmotajte mrežni kabel (L) i dovodnu cijev (J).
4 Postavite spremnik za paru (B) na stabilnu i ravnu površinu.
5 Postavite glačalo na postolje (C).
Punjenje spremnika za paru
Nikada ne uranjajte spremnik za paru u vodu.
Ne otvarajte poklopac dok je aparat vruć, a spremnik za paru još uvijek
pod tlakom.
C
1 Preklopka za uključenje/isključenje (D) mora biti na položaju
"off", a mrežni kabel odspojen iz zidne utičnice.
C
2 Polako odvrnite pokrov (A) spremnika za paru.
Pri skidanju pokrova čuje se zvuk, jer je hladni spremnik pod vakumom
To je normalno.
C
3 Ulijte vodu u spremnik za paru (maks.1 l).
Vodom iz slavine napunite spremnik do maksimalne razine.
Ako je voda u vašem području vrlo tvrda, savjetujemo da je pomiješate
s jednakom količinom destilirane vode ili da koristite samo destiliranu
vodu.
Nemojte koristiti parfem, ocat, bjelilo ili vodu iz koje je kamenac
uklonjen kemijskim putem.
Page 81

HRVATSKI 81
4 Okretanjem pričvrstite pokopac čvrsto na otvor za punjenje
spremnika za paru.
Brzo nadopunjavanje
C
1 Prvo postavite preklopku za uključenje/isključenje (D) na "off".
C
2 Pritisnite tipku za aktiviranje pare dok iz aparata ne iziđe sva
para.
3 Zadržite tipku za aktiviranje pare pritisnutom i polako odvrnite
pokrov spremnika za paru ulijevo. Na taj način se smanjuje
pritisak spremnika za paru.
Provjerite da li je u spremniku ostalo još pare. Dok ga skidate, preko
poklopca držite krpu.
4 Izvucite mrežni kabel iz utičnice.
5 Napunite spremnik vodom prema opisu u poglavlju "Punjenje
spremnika za paru" i pričekajte da se aparat ponovno zagrije.
Kontrola
pare
-
q
R
Kontrola
temperature
1
2
3
Vrsta materijala
Sintetičke tkanine (npr.
acetat, akril, viskoza, poliamid,
poliester) i svila
Vuna
Pamuk, lan
Obratite pozornost: oznaka
Z u tablici znači da se
materijal ne može glačati
Etiketa s uputama
za glačanje
B
C
D
Z
Page 82

HRVATSKI82
Podešavanje temperature
Spremnik za paru uvijek postavite na stabilnu, ravnu i vodoravnu
površinu. Ne stavljajte spremnik za paru na meki dio daske za glačanje.
Uvijek postavite glačalo na postolje. Nemojte stavljati vruće glačalo na
dovodnu cijev ili mrežni kabel. Pazite da kabel ne dođe u kontakt s
vrućom grijaćom pločom.
C
1 Podesite potrebnu temperaturu glačanja zakretanjem kontrole
temperature na odgovarajući položaj.
- Provjerite temperature glačanja na oznakama tkanine:
- 1 Sintetika (primjerice, akril, viskoza, poliamid, poliester)
- 1 Svila
- 2 Vuna
- 3 Pamuk, lan
- Ako ne znate koji je materijal posrijedi, izglačajte dio tkanine koji nije
vidljiv pri nošenju.
- Svila, vuna i sintetika: glačajte ih s obrnute strane kako bi izbjegli
nastajanje sjajnih mrlja.
- Započnite s glačanjem tkanina kojima je potrebna najniža
temperatura, poput sintetike.
C
2 Utaknite mrežni kabel u zidnu utičnicu i pričekajte da se aparat
zagrije postavljanjem preklopke za uključenje/isključenje (D) na
"on".
3 Hladan početak: spremnik za paru i grijaća ploča glačala će se
sada zagrijati. Grijaćoj ploči glačala treba oko 2 minute da se
zagrije, dok spremniku za paru za zagrijavanje treba oko 8
minuta.
4 Brzo ponovno zagrijavanje: ako za vrijeme glačanja nadopunite
spremnik za paru, voda u spremniku za paru zagrijat će se za
oko 6 minuta.
5 Samo tipovi GC6268/GC6265/GC6068/GC6065/GC6029: čim
se voda u spremniku za paru zagrije dovoljno za glačanje s
parom, kontrolna žaruljica (E) će se ugasiti. Sada možete početi
glačati.
Savjeti
◗ Ako se materijal sastoji od različitih vlakana uvijek odaberite
temperaturu prikladnu za najosjetljivija vlakna, odnosno najnižu
temperaturu. Primjer: ako se materijal sastoji od 60% poliestera i
40% pamuka, odaberite temperaturu za poliester (1) i glačajte bez
pare.
◗ Pri glačanju vunenih materijala može doći do nastajanja sjajnih
mrlja.To možete spriječiti glačanjem preko suhe krpe ili glačanjem
s obrnute strane tkanine.
Page 83

HRVATSKI 83
◗ Baršun i materijale kod kojih se lako pojave sjajne mrlje glačajte
samo u jednom smjeru (u smjeru vlakana) s vrlo blagim pritiskom
glačala na tkaninu.
◗ Materijale od obojene svile ne glačajte s parom jer to može
prouzročiti mrlje.
Parno glačanje
Provjerite ima li u spremniku za paru dovoljno vode.
C
◗ Glačanje sparom moguće je samo kod glačanja na visokim
temperaturama (postave temperature 2 do MAX).
1 Postavite izbornik temperature na odgovarajući položaj.
Pogledajte odjeljak "Podešavanje temperature".
2 Pričekajte da se kontrolna žaruljica zagrijavanja spremnika za
paru ugasi.
C
3 Tijekom parnoga glačanja držite tipku za aktiviranje pare (H)
pritisnutom.
Samo tipovi GC6268/GC6265/GC6068/GC6065/GC6029: Za vrijeme
glačanja s aprom, kontrolna žaruljica G će se povremeno paliti i
pokazivati da li su spremnik za paru i glačalo zagrijani na odgovarajuću
temperaturu i tlak. Pritom možete jednostavno nastaviti glačati.
Ako neko vrijeme niste glačali s parom, para koja je ostala u dovodnoj
cijevi kondenzira se u vodu, tako da kod sljedećeg glačanja iz grijaće
ploče može isteći malo vode.
B
Kako bi izbjegli tu pojavu, prije glačanja postavite glačalo iznad stare
krpe i pritisnite tipku za aktiviranje pare (H) dok para ne počne
normalno izlaziti.
Glačanje bez pare
1 Postavite izbornik temperature na odgovarajući položaj.
Pogledajte odjeljak "Podešavanje temperature".
2 Nemojte pritisnuti tipku za aktiviranje pare (H).
◗ Ako pri glačanju slučajno pritisnete aktivator pare, izaći će
određena količina pare.Ako je spremnik za paru prazan ili se još
nije zagrijao, u spremniku ćete začuti zvuk kliktanja.Taj zvuk stvara
otvaranje ventila za paru potpuno je bezopasan.
◗ Ako ste glačali pri visokoj temperaturi i stoga postavili kontrolu
temperature (I) na niže podešenje, pričekajte da se prije nastavka
glačanja ponovo upali kontrolna žaruljica temperature (G). Na taj
način se sprječava oštećivanje tkanine.
Page 84

HRVATSKI84
Druge značajke
Glačanje s parom u okomitom položaju
C
1 Zavjese ili odjeću na vješalicama (jakne, odijela,kapute) možete
glačati držeći glačalo u okomitom položaju.
Nikada ne usmjerujte mlaz pare prema drugim osobama.
Mlaz pare (samo tipovi GC6268/GC6068/GC6029)
Snažni mlaz pare pomaže pri uklanjanju tvrdih nabora.
C
1 Za mlaz pare: postavite kontrolu pare (F) na R (veliki oblak) i
postavite kontrolu temperature (I) na položaj 3 ili MAX.
C
2 Pritisnite gumb za aktivaciju pare (H) i gumb za ispuštanje
mlaza pare (N).
Gradacija pare (samo tipovi GC6268/GC6265/GC6068/
GC6065/GC6029)
Kontrolu pare (F) možete postaviti na q za blagu paru ili na R za
maksimum pare.
Lijevak za sprječavanje kamenca (samo tip GC6268/GC6068/
GC6029)
Ova funkcija pomaže u održavanju duljeg radnog vijeka glačala.
1 Za punjenje spremnika za paru vodom upotrijebite lijevak za
sprječavanje kamenca (M).
Page 85

HRVATSKI 85
Nakon glačanja
C
1 Isključite aparat postavljanjem preklopke za
uključenje/isključenje (D) na "off".
2 Smanjite pritisak spremnika za paru pritiskom na tipku za
aktiviranje pare dok iz aparata ne iziđe sva para.
3 Izvucite mrežni kabel iz utičnice.
4 Stavite glačalo na postolje (C), postavite kontrolu pare na
poziciju q i ostavite glačalo da se ohladi prije nego što ga
spremite.
Čišćenje i održavanje
1 Izvadite mrežni kabel iz zidne utičnice i ostavite glačalo da se
ohladi prije čišćenja.Ako želite očistiti spremnik za paru,
slijedite prva četiri koraka iz dijela pod nazivom 'Brzo
nadopunjavanje'.
Glačalo
1 Brišite glačalo vlažnom krpom.
2 Očistite kamenac i druge nečistoće s grijaće ploče vlažnom
krpom i neabrazivnim (tekućim) sredstvom.
Nikada ne uranjajte glačalo u vodu i ne ispirite ga pod slavinom.
Spremnik za paru
Isperite spremnik za paru jednom mjesečno ili nakon što ste glačalo
koristili oko 10 puta.
C
1 Pažljivo skinite pokrov.
C
2 Isperite spremnik za vodu sa samo 500 ml svježe vode.Izlijte
vodu držeći spremnik za paru naopako iznad sudopera.
3 Vratite pokrov spremnika na mjesto.
Page 86

HRVATSKI86
Pohranjivanje
1 Provjerite da li se glačalo dovoljno ohladilo prije nego što ga
spremite.
2 Izvucite mrežni kabel iz zidne utičnice i ostavite glačalo da se
ohladi.
3 Ispraznite spremnik za paru.
4 Za lakši prijenos, s obje strane spremnika nalazi se ručka.
5 Redovito provjeravajte jesu li mrežni kabel i dovodna cijev
neoštećeni i sigurni za uporabu.
Jamstvo i servis
Ako Vam je potrebna informacija ili imate problem, posjetite Philips
web stranicu www.philips.com ili se obratite Philips predstavništvu u
Vašoj zemlji (telefonski brojevi se nalaze u priloženom jamstvu). Ako
takvo predstavništvo ne postoji u Vašoj zemlji, obratite se prodavatelju
ili ovlaštenom servisu.
U slučaju problema
Ovo poglavlje obrađuje najčešće probleme s kojima biste se mogli
susresti kod uporabe glačala. Pročitajte različita poglavlja za detaljnije
opise. Ako ne možete riješiti problem, obratite se Philipsovom
korisničkom centru u zemlji (telefonski broj nalazi se u brošuri za
svjetsko jamstvo).Ako u Vašoj zemlji nema takvog korisničkog centra,
obratite se lokalnom dobavljaču Philipsovih proizvoda ili najbližem
Philipsovom servisnom centru.
Page 87

HRVATSKI 87
Rješenje
Ta pojava nakon kraćeg vremena
nestaje.
Ti su komadići bezopasni i prestat će
izlaziti iz grijaće ploče nakon što glačalo
upotrijebite nekoliko puta.
Odaberite ispravnu temperaturu
glačanja prema opisu u ovim uputama i
tablici.
Postavite spremnik za paru na ravnu i
stabilnu površinu.
To je normalna pojava. Držite glačalo
iznad stare krpe i pritisnite tipku za
aktiviranje pare (H). Krpa upija vodu.
Nakon nekoliko sekundi para izlazi
normalno.
Postavite preklopku za
uključenje/isključenje (D) na "on".
Pričekajte da se kontrolna žaruljica
ugasi.
Kako bi provjerili izlazi li para iz glačala,
držite (hladno) ogledalo ispred otvora
grijaće ploče.
Očistite grijaću ploču vlažnom krpom.
Očistite grijaću ploču vlažnom krpom.
Odaberite preporučenu temperaturu
glačanja.
Mogući uzrok (uzroci)
To je normalno. Neki dijelovi glačala
lagano su podmazani prije isporuke.
To je normalna pojava kod novih
glačala.
Kontrola temperature (I) postavljena je
na prenisku vrijednost za parno
glačanje.
Spremnik za paru je postavljen na
nestabilnu i/ili neravnu površinu.
Na početku parnoga glačanja cijev je
hladna. Para se kondenzira u cijevi i
voda istjeće iz grijaće ploče.
Spremnik za paru nije uključen.
Kontrolna žaruljica za 'zagrijavanje
spremnika za paru' je još uvijek
uključena (samo tipovi GC6268/
GC6265/GC6068/GC6065/GC6029).
Jako vruća (odnosno, visokokvalitetna)
para je gotovo nevidljiva, posebno kad
je kontrola temperature postavljena na
maksimalni položaj i kad je
temperatura okoliša relativno visoka.
Na grijaćoj ploči nakupila se nečistoća i
kemikalije iz vode.
Glačali ste pri previsokim
temperaturama.
Problem
Nakon prvog uključenja iz aparata
izlazi dim.
Iz grijaće ploče glačala izlaze komadići
bijele boje.
Iz grijaće ploće kaplje voda
Iz glačala ne izlazi para.
Ne vidim da iz grijaće ploče izlazi para.
Grijaća ploča je zaprljana.
Page 88

Kirjeldus
A Aurunõu kaas
B Aurunõu
C Triikraua alus
D Sisse/välja lüliti sissemonteeritud signaallambiga
E Signaallamp 'Aurunõu soojeneb' (ainult mudelilGC6268/GC6265/
GC6068/GC6065). Signaallamp kustub, kui seade on valmis auruga
triikimiseks
F Aurukontroll (ainult mudelid GC6268/GC6265/GC6068/GC6065/
GC6029). q = keskmine aurupahvak R = maksimaalne aurupahvak
G Temperatuuri signaallamp
H Aurulaskmise nupp (aktiveeriv)
I Temperatuuriregulaator
J Ühendustoru
K Tald
L Toitejuhe
M Lehter katlakivieemaldajaga (ainult GC6268/GC6068/GC6029).
N Aurupahvak (ainult mudel GC6268/GC6068/GC6029)
O Triikraua tugi (ainult mudelid GC6268/GC6265/GC6263/GC6068/
GC6065/GC6063)
Pange tähele!
Optimaalse ohutuse tagamiseks tutvuge enne seadme kasutamist
käesoleva juhendi ja joonistega.
- Ärge pange aurunõusse lõhnaõli, äädikat, tärklist, katlakivi eemaldajat
ega muid kemikaale.
- Ärge kunagi kasutage seadet, kui sellel on mingeid vigastusi.
Kontrollige regulaarselt toitejuhet ja ühendustoru, et see ei oleks
vigastatud ega ohustaks teid.
- Kui toitejuhe on vigastatud, tuleb see uue vastu vahetada Philipsi,
Philipsi volitatud hooldekeskuses või lihtsalt vastavalt kvalifitseeritud
isiku poolt, et vältida ohtlikke olukordi.
- Kasutage aurunõu katmiseks ainult seda kaant, mis on seadmega
kaasas, sest sellel kaanel on ka turvalisuse funktsioon.
- Kontrollige, kas Teie koduse vooluvõrgu pinge vastab seadme
aurunõu taga olevale mudeliplaadile märgitud pingele enne seadme
vooluvõrku ühendamist.
- Ühendage seade ainult maandatud seinapistikusse.
- Ärge kastke triikrauda ega aurunõud kunagi vette.
- Ärge jätke vooluvõrku ühendatud triikrauda järelvalveta.
- Kui olete triikimise lõpetanud ja isegi, kui jätate triikimise lühikeseks
ajaks pooleli, võtke triikraud seinakontaktist välja ja asetage alusele.
- Paigutage aurunõu kindlale alusele ja horisontaalsele pinnale. Ärge
jätke aurunõud triikimislaua pehmele osale.
- Pange triikraud alati alusele. Ärge pange tulist triikrauda toitejuhtmele
ega ühendustorule.
- Triikraua alus ja tald lähevad väga tuliseks ja seetõttu ei tohi neid
puudutada. Kui tahate vahetada aurunõud, ärge katsuge triikraua jalast.
- Vältige tulise triikraua talla kontakti toitejuhtmega.
EESTI88
Page 89

- Kui aur tungib aurunõu kaane alt välja seadme soojenemise käigus,
lülitage seade välja ja võtke ühendus Philipsi teeninduskeskusega.
- Seade ei ole mõeldud kasutamiseks järelvalveta jäetud laste ega
haigete poolt. Ärge jätke väikseid lapsi järelvalveta ja kontrollige, et
nad seadmega ei mängiks.
- Ärge eemaldage aurunõud, kui see on rõhu all. Järgige nõu
eemaldamisel kasutusjuhendi pt " Kiirtäitmine".
Seadme kasutamiseks ettvalmistamine
1 Kontrollige, kas Teie koduse vooluvõrgu pinge vastab seadme
aurunõu taga olevale mudeliplaadile märgitud pingele enne
seadme vooluvõrku ühendamist.
2 Enne esmakasutust eemaldage triikraua tallalt kleebised või
kaitsekile. Puhastage talda pehme lapiga.
3 Kerige toitejuhe (L) ja ühendustoru (J) täielikult lahti.
4 Asetage aurunõu (B) kindlale ja tasasele pinnale.
5 Pange triikraud triikraua alusele (C) seisma.
Aurunõu täitmine
Ärge kunagi kastke aurunõud vette.
Ärge avage aurunõud, kui seade on tuline ja aurunõu on rõhu all.
C
1 Kontrollige, et sisse/välja lüliti (D) oleks seatud asendisse 'välja'
ja eemaldage toitepistik seinakontaktist.
C
2 Keerake kaas (A) aeglaselt aurunõult maha.
Kaane eemaldamise ajal kuulete susinat. Heli tuleb sellest, et külmas
veenõus oli vaakum. See on täiesti normaalne nähtus.
C
3 Valage vesi aurunõusse (maks. 1 liiter).
Kasutage kraanivett nõu täitmiseks maksimumtasemeni.
Kui kraanivesi on väga kare, soovitame kraanivett segada võrdse osa
destilleeritud veega või kasutada ainult destilleeritud vett.
Ärge kasutage lõhnaõli, äädikat, tärklist ega keemilisel teel puhastatud
vett.
EESTI 89
Page 90

4 Keerake aurunõu täitmisavale kaas täpselt peale.
Kiirtäitmine
C
1 Eelkõige seadke sisse/välja lüliti (D) asendisse 'vällja'.
C
2 Vajutage aurulaskmise nuppu,kuni seadmesse pole auru enam jäänud.
3 Hoidke aurulaskmise nuppu all ja keerake aeglaselt aurunõu
kaant vastupäeva. Sel moel vabaneb nõu surve alt.
Kontrollige, et aurunõusse ei oleks enam auru jäänud. Pange kaant lahti
keerates sinna peale lapp.
4 Võtke võrgupistik seinakontaktist välja.
5 Täitke aurunõu nii, nagu kirjeldatud pt. 'Aurunõu täitmine' ja
laske seadmel uuesti soojeneda.
Temperatuuri valik
Paigutage aurunõu kindlale alusele ja horisontaalsele pinnale. Ärge jätke
aurunõud triikimislaua pehmele osale.
Pange triikraud alati alusele seisma. Ärge asetage tulist triikrauda
ühendustorule või toitejuhtmele. Kontrollige, et juhe ei puutuks kokku
triikraua tulise tallaga.
C
1 Seadke temperatuuri regulaator vastavasse asendisse.
- Kontrollige, millisel temperatuuril tohib riideeset triikida.
- 1 Sünteetilised kangad (näit. akrüül, viskoos, polüamiid, polüester)
- 1 Siid
EESTI90
Aurukontroll
-
q
R
Temperatuu
ri regulaator
1
2
3
Kanga liik
Sünteetilised kangad (näit
atsetaat, akrüll,viskoos,
polüamiid, polüester) ja siid
Villane
Puuvill, linane
Märkus: Z tabelisse on
märgitud, et neid kangaid
triikida ei tohi
Triikimisjuhendiga
lipik
B
C
D
Z
Page 91

- 2 Villane
- 3 Puuvillane, linane
- Kui te ei tea, missugusest kangast on riideese on tehud, proovige seda
triikida sealt, mida pole kandmisel näha.
- Siidist, villasest ja sünteetilisi materjale triikige pahemalt poolt, et
vältida läikivate plekkide tekkimist.
- Alustage nende esemete triikimist, mis nõuavad madalamat
triikimistemperatuuri, nagu näiteks esemed sünteetilistest kiududest.
C
2 Pange seinapistik seina pistikupessa ja laske seadmel soojeneda
seades sisse/välja lüliti (D) asendisse 'sisse'.
3 Külm start: aurunõu ja triikrauatald hakkavad praegu
soojenema.Talla soojenemine võtab aega umbes 2 minutit ja
aurunõu ligi 8 minutit.
4 Kiire taassoojenemine: kui täidate aurunõu triikimise käigus
veelkord,soojeneb vesi aurunõus ligi 6 minutit.
5 Ainult GC6268/GC6265/GC6068/GC6065/GC6029: kohe, kui
vesi aurunõus on piisavalt tuline auruga triikimiseks,kustub
märgutuli (E). Nüüd võite uuesti triikimist alustada.
Märkused
◗ Kui materjal koosneb erinevatest kiududest, valige alati
triikimistemperatuur vastavalt kõige tundlikumale kiule s.o.
madalaim temperatuur. Näiteks:kui ese koosneb 60% polüester ja
40% puuvillasest kiust, siis peaks triikima seda polüesterkiule
ettenähtud temperatuuril (1) ja auruta.
◗ Kui triigite villaseid kangaid auruga, võivad sinna tekkida läikivad
plekid. Seda on võimalik vältida kasutades triikimisel kuiva
pressimislappi või pöörates riideesemeid pahempidi.
◗ Sametit ja muid kangaid, mis hakkavad kergesti läikima, tuleks
triikida ainult ühes suunas ning vältida tugevat pressimist.
◗ Ärge kasutage auru värvitud siidi triikimisel.
Aurtriikimine
Kontrollige, et aurunõus oleks piisavalt vett.
C
◗ Aurtriikimine on võimalik ainult kõrgemal triikimistemperatuuril
(temperatuuriseade 2 asendis MAX).
1 Seadke temperatuuri regulaator nõutavasse positsiooni.
Vt lõiku „Temperatuuri valik".
2 Oodake, kuni signaallamp 'aurunõu soojenemine' süttib.
EESTI 91
Page 92

C
3 Vajutage aurulaskmise nuppu (H),kui soovite auruga triikida.
Ainult GC6268/GC6265/GC6068/GC6065/GC6029.Aurtriikimise
käigus sütib signaallamp G aegajalt, andes märku, et triikraud on
jõudnud vastava temperatuuri ja rõhuni.Võite triikimist jätkata.
Kui te ei ole aurufunktsiooni kasutanud mõnda aega, kondenseerub
ühendustorusse jäänud aur tagasi veeks. Kui hakkate jälle auruga
triikima, võib see põhjustada vee purtsatamist ja tilkumist triikraua
tallast.
B
Et mitte rikkuda riideid, hoidke triikrauda mõne vana riietuseseme kohal
ja vajutage auruvabastuse nuppu (H), kuni auru hakkab eralduma
normaalsel viisil ja triikimine võib alata.
Kuivtriikimine
1 Seadke temperatuuri regulaator nõutavasse positsiooni.
Vt lõiku „Temperatuuri valik".
2 Ärge vajutage auruväljalaskmise nupule (H).
◗ Veidi auru vabaneb, kui kogemata vajutada auru aktiveerimisnuppu
triikimise ajal. Kui aurunõu on tühi või ei ole soojenenud, kuulete
klõpsatusi nõu sisemuses. See nähtus on põhjustatud auruklapi
avanemisest ja on täiesti ohutu.
◗ Kui olete triikinud kõrgel temperatuuril ja pärast seda tahate
temperatuuri regulaatorit (I) seada madalamale, siis enne triikimise
jätkamist oodake, kuni temperatuuri signaallamp süttib.See
ettevaatusabinõu hoiab ära riietusesemete rikkumise.
Lisafunktsioonid
Aurtriikimine vertikaalses asendis
C
1 Rippuvaid kardinaid ja riietsuesemeid (jakke, ülikondi, mantleid)
on võimalik triikida ka vertikaalses asendis.
Ärge kunagi suunake aurujuga inimeste poole.
Aurupahvak (ainult mudel GC6268/GC6068/GC6029)
Tugev aurupahvak aitab siledaks triikida sissekulunud kortse.
EESTI92
Page 93

C
1 Aurupahvakuks: seadke aurukontroll (F) asendisse R (suur
aurupilv) ja seadke temperatuuri regulaator (I) asendisse 3
või MAX.
C
2 Vajutage mõlemaid,nii auru aktiveerimis- (H) kui aurupahvaku
nuppu (N).
Muutlik aur (ainult mudel GC6268/GC6265/GC6068/GC6065/
GC6029)
On võimalik panna aurukontroll (F) asendisse q keskmise auru või
asendisse R, maksimaalse auru saamiseks.
Lehter katlakivieemaldajaga (ainult mudel GC6268/GC6068/
GC6029)
Triikraua kasutusea pikendamiseks
1 Aurunõud veega täites kasutage lehtrit katlakivieemaldajaga
(M).
Pärast triikimist
C
1 Lülitage seade välja seades lüliti sisse/välja asendisse 'välja'.
2 Vabastage aurunõu surve alt,vajutades auruvabastuse nupule,
kuni seadmest pole enam kuulda auru susinat.
3 Võtke võrgupistik seinakontaktist välja.
4 Pange triikraud alusele (C), keerake aurukontroll asendisse q ja
laske seadmel jahtuda enne hoiukohta panemist.
Puhastamine ja hooldus
1 Eemaldage toitejuhe seina pistikupesast ja laske triikraual
jahtuda enne, kui asute seda puhastama. Kui te soovite
puhastada aurunõud, teostage kõigepealt neli esimest toimingut
pt 'Kiirtäitmine'.
EESTI 93
Page 94

Triikimine
1 Puhastage triikrauda niiske lapiga.
2 Tallale tekkinud katlakivi ja mustust saab eemaldada niiske lapi
ja mitte- abrasiivse (vedela) puhastusvahendiga.
Ärge kunagi kastke triikrauda vette ega hoidke seda voolava vee all.
Aurunõu
Loputage aurunõud kord kuus või kui olete seadet umbes 10 korda
kasutanud.
C
1 Eemaldage ettevaatlikult kaas.
C
2 Täitke aurunõu ainult 500 ml värske veega.Valage vesi välja
hoides aurunõud kummuli kraanikausi kohal.
3 Keerake kaas aurunõule tagasi.
Hoidmine
1 Kontrollige, et triikraud oleks täiesti maha jahtunud enne selle
hoiukohta panemist.
2 Eemaldage pistik pistikupesast ja laske triikraual maha jahtuda.
3 Tühjendage aurunõu.
4 Aurunõu mõlemal pool on selle ümberpaigutamiseks käepidemed.
5 Kontrollige regulaarselt, kas toitejuhe on vigastusteta ja ohutu.
Garantii ja teenindus
Kui Te vajate informatsiooni või on Teil probleemid tekkinud, külastage
Philips Web lehekülge www.philips.com või võtke ühendus teie maa
Philipsi hoolduskeskusega (lisainfot ja telefoninumbrid leiate garantiitalongilt).
Kui Teie maal ei ole Philipsi hoolduskeskust, pöörduge Philipsi toodete
müüja poole või võtke ühendus Philipsi koduhooldusseadmete ja isikliku
hoolduse BV teenindusosakonnaga.\par
EESTI94
Page 95

Rikete kõrvaldamine
Selles lõigus on kokkuvõte enam esinevatest häiretest, mis võivad
juhtuda teie triikrauaga. Lugege erinevatest peatükkidest põhjalikumalt.
Kui häirete kõrvaldamine ei õnnestu, võtke ühendus Philipsi
hooldekeskusega oma riigis (telefoninumbri leiate garantiilehelt). Kui
teie riigis ei ole hoolduskeskust, pöörduge Philipsi toodetemüüja või
lähima Philipsi teeninduskeskuse poole.
EESTI 95
Lahendus
See nähtus kaob mõne aja pärast.
Need helbed on kahjutud ja see
nähtus kaob, kui olete triikrauda
mõned korrad kasutanud.
Seadke vastav triikimistemperatuur,mis
on märgitud selles kasutusjuhendis.
Pange aurunõu kindlale ja ühtlasele
pinnale.
See on normaalne. Hoidke triikrauda
Et mitte rikkuda riideid, hoidke
triikrauda mõne vana riietuseseme
kohal ja vajutage auruvabastuse nuppu
(H).Tilgad imenduvad riidesse. Mõne
sekundi pärast hakkab auru eralduma
normaalsel viisil.
Seadke sisse/välja lülititi (D) asendisse
'sisse'.
Oodake, kuni signaallamp kustub.
Kontrollige, kas triikraud laseb auru,
hoides tallaavade läheduses külma
peeglit.
Puhastage talda niiske lapiga.
Puhastage talda niiske lapiga.Valige
soovitatud triikimistemperatuur.
Võimalik(ud) põhjus(ed)
See on normaalne. Mõned triikraua
osad on tehases pisut õlitatud.
See on uue triikraua puhul tavaline
nähtus.
Temperatuuriregulaator (I) on auruga
triikimiseks liiga madalal temperatuuril.
Aurunõu on olnud paigutatud
ebaühtlasele ja ebakindlale pinnale.
Aurtriikimist alustades on ühendustoru
külm.Aur kondenseerub torru, mis
omakorda põhjustab vee tilkumist
tallast.
Aurunõu ei ole sisse lülitatud.
'Aurunõu soojeneb' signaallamp põleb
veel (ainult mudel GC6268/GC6265/
GC6068/GC6065/ GC6029).
Väga kuumenenud (kõrge kvaliteediga)
aur on vaevalt nähtav,eriti kui
temperatuur on seatud maksimaalseks
ja veel enam, kui toatemperatuur on
suhteliselt kõrge.
Mustus või kemikaalid, mida vesi
sisaldab, on sadestunud tallale.
Olete triikinud liiga kõrgel
temperatuuril.
Probleem
Esimesel kasutamisel võib triikraud
veidi suitseda. See nähtus kaob kiiresti.
Triikraua tallast tuleb välja valged
helbeid
Vee tilkumine tallast.
Seadmest ei tule auru.
Ma ei näe, et tallast tuleks auru.
Tald on must.
Page 96

Vispārīgs apraksts
A Tvaika tvertnes vāciņš
B Tvaika tvertne
C Statīvs
D Slēdzis ar iebūvētu signāllampiņu
E Tvaika tvertnes uzkaršanas signāllampiņa (tikai modeļiem
GC6268/GC6265/GC6068/GC6065). Signāllampiņa nodziest, kad
ierīce ir gatava gludināšanai ar tvaiku
F Tvaika padeves slēdzis (tikai modeļiem GC6268/GC6265/GC6068/
GC6065/GC6029) q = vidēji stipra tvaika padeve R = maksimāli
stipra tvaika padeve
G Temperatūras signāllampiņa
H Tvaika padeves taustiņš
I Temperatūras regulators
J Tvaika padeves caurule
K Gludekļa klātne
L Elektrovads
M Katlakmens nosēdumu piltuve (tikai modelim GC6268/GC6068/
GC6029)
N Tvaika strūkla (tikai modelim GC6268/GC6068/GC6029)
O Gludekļa aizmugures restītes (tikai modeļiem GC6268/
GC6265/GC6263/GC60683/GC6065/GC6063).
Svarīgi
Drošības apsvērumu dēļ pirms ierīces lietošanas rūpīgi izlasiet šīs
pamācības un apskatiet zīmējumus.
- Nelejiet tvaika tvertnē smaržas, etiķi, cieti, līdzekļus katlakmens
notīrīšanai vai citas ķīmiskas vielas.
- Nekādā gadījumā neizmantojiet ierīci, ja tā ir bojāta. Regulāri
pārbaudiet elektrovadu un tvaika padeves cauruli, tiem jābūt
nebojātiem un drošiem.
- Ja elektrības vads ir bojāts, tas jānomaina Philips autorizēta servisa
darbnīcā, lai izvairītos no bīstamām situācijām.
- Lietojiet tikai komplektā esošo tvaika tvertnes vāciņu, jo tas darbojas
arī kā drošības ventilis.
- Pirms pievienojat ierīci elektrotīklam, pārliecinieties, vai uz ierīces
marķējuma norādītais spriegums atbilst elektrotīkla spriegumam jūsu
mājā.
- Pievienojiet ierīci tikai iezemētai elektrotīkla sienas kontaktrozetei.
- Nekādā gadījumā neiegremdējiet gludekli vai tvaika tvertni ūdenī.
- Nekādā gadījumā neatstājiet elektrotīklam pievienotu gludekli bez
uzraudzības.
- Ja pabeidzat gludināšanu un pat ja atstājat gludekli uz īsu brīdi,
atvienojiet to no elektrotīkla sienas kontaktrozetes un novietojiet uz
statīva.
- Vienmēr novietojiet tvaika tvertni uz stabilas, līdzenas un horizontālas
virsmas. Nenovietojiet tvaika tvertni uz gludināmā dēļa mīkstās daļas.
- Vienmēr novietojiet gludekli uz statīva. Nenovietojiet karstu gludekli
uz tvaika padeves caurules vai elektrovada.
LATVISKI96
Page 97

- Gludekļa statīvs un klātne stipri sakarst un var radīt apdegumus, ja
tiem pieskaras. Ja vēlaties pārvietot tvaika tvertni, nepieskarieties
gludekļa statīvam.
- Raugieties, lai elektrovads nepieskartos gludekļa klātnei, kamēr tā ir
karsta.
- Vājnieki nedrīkst lietot ierīci bez uzraudzības. Raugieties, lai bērni
nerotaļājas ar ierīci.
- Ja tvaiks nāk ārā pa tvaika tvertnes vāciņu, kad ierīce sakarst, izslēdziet
ierīci un sazinieties ar Philips pilnvarotu remontdarbnīcu.
- Nenoņemiet tvaika tvertnes vāciņu, kamēr tvaika tvertnē ir
paaugstināts spiediens. Noņemot vāciņu, rīkojieties atbilstoši nodaļā
"Ātra ūdens iepildīšana" sniegtajiem norādījumiem.
Ierīces sagatavošana lietošanai
1 Pirms pievienojat ierīci elektrotīklam,pārliecinieties, vai uz
ierīces marķējuma norādītais spriegums atbilst elektrotīkla
spriegumam jūsu mājā.
2 Noņemiet no klātnes jebkuras uzlīmes vai aizsargmateriālus un
noslaukiet to ar mīkstu drānu.
3 Pilnīgi attiniet elektrovadu (L) un tvaika padeves cauruli (J).
4 Novietojiet tvaika tvertni (B) uz stabilas, līdzenas virsmas.
5 Novietojiet gludekli uz statīva (C).
Tvaika tvertnes piepildīšana
Nekādā gadījumā neiegremdējiet tvaika tvertni ūdenī.
Neatveriet vāciņu, kamēr ierīce ir karsta un tvaika tvertnē ir
paaugstināts spiediens.
C
1 Raugieties, lai slēdzis (D) būtu uzstādīts pretī iezīmei "off" un
izvelciet elektrovada kontaktspraudni no elektrotīkla sienas
kontaktrozetes.
C
2 Lēni atskrūvējiet tvaika tvertnes vāciņu (A).
Noņemot vāciņu, atskan troksnis. Šo skaņu izraisa aukstā tvertne, kurā ir
vakuums.Tas ir pilnīgi normāli.
LATVISKI 97
Page 98

C
3 Ielejiet tvaika tvertnē ūdeni (maks. 1 litru).
Piepildiet tvertni ar krāna ūdeni līdz maksimālā līmeņa iezīmei.
Ja krāna ūdens ir ļoti ciets, ieteicams to sajaukt ar vienādu daudzumu
destilēta ūdens vai izmantot tikai destilētu ūdeni.
Nelietojiet smaržas, etiķi vai ķīmiski attīrītu ūdeni.
4 Cieši uzskrūvējiet vāciņu tvaika tvertnes piepildīšanas atverei.
Ātra ūdens iepildīšana
C
1 Vispirms uzstādiet slēdzi (D) pret iezīmi "off".
C
2 Piespiediet tvaika padeves taustiņu, līdz vairs nedzirdat no
ierīces plūstam tvaiku.
3 Turiet tvaika padeves taustiņu piespiestu un lēni atskrūvējiet
tvaika tvertnes vāciņu, griežot to pretēji pulksteņrādītāju
kustības virzienam.Tas samazinās spiedienu tvaika tvertnē.
Pārliecinieties, ka tvaika tvertnē nav tvaika.Atskrūvējot vāciņu, pārklājiet
tam vilnas drānu.
4 Atvienojiet gludekli no elektrotīkla.
5 Piepildiet tvaika tvertni, kā norādīts nodaļā "Tvaika tvertnes
piepildīšana", un ļaujiet ierīcei atkal uzkarst.
LATVISKI98
Tvaika
regulators
-
q
R
Temperatūra
s regulators
1
2
3
Auduma veids
Sintētiski audumi (piemēram,
acetāts, akrila audums,
viskoze, poliamīds,
poliesteris) un zīds
Vilna
Kokvilna, linu audums
Lūdzu, ievērojiet:Z tabulā
nozīmē, ka šo apģērbu
nedrīkst gludināt
Etiķete ar
gludināšanas
pamācībām
B
C
D
Z
Page 99

Temperatūras regulēšana
Vienmēr novietojiet tvaika tvertni uz stabilas, līdzenas un horizontālas
virsmas. Nenovietojiet tvaika tvertni uz gludināmā dēļa mīkstās daļas.
Vienmēr novietojiet gludekli uz statīva. Nenovietojiet karstu gludekli uz
tvaika padeves caurules vai elektrovada. Pārliecinieties, ka elektrovads
nesaskaras ar karstu gludekļa klātni.
C
1 Noregulējiet temperatūras regulatoru vajadzīgajā stāvoklī,
pagriežot to atbilstoši gludināšanas temperatūras indikatoram.
- Pārbaudiet uz apģērba etiķetes norādīto vajadzīgo gludināšanas
temperatūru.
- 1 Sintētiskie audumi (piemēram, akrila audums, viskoze, poliamīds,
poliesteris)
- 1 Zīds
- 2 Vilna
- 3 Kokvilna, linu audums
- Ja nezināt, no kāda auduma apģērbs gatavots,atrodiet vietu, kas
valkājot nav redzama, un pagludiniet to,lai noskaidrotu vajadzīgo
gludināšanas temperatūru.
- Zīda, vilnas un sintētiskie audumi: gludiniet auduma otru pusi, lai
nerastos spīdīgi plankumi.
- Vispirms gludiniet tos apģērbus, kuriem nepieciešama viszemākā
gludināšanas temperatūra, piemēram, sintētisko šķiedru izstrādājumus.
C
2 Iespraudiet elektrovada kontaktspraudni elektrotīkla sienas
kontaktrozetē un ļaujiet ierīcei uzkarst,noregulējot slēdzi (D)
pret iezīmi 'on'.
3 Auksta gludekļa uzkarsēšana: tvaika tvertne un gludekļa klātne
tiek uzkarsēta. Gludekļa klātne uzkarst aptuveni 2 minūšu laikā,
tvaika tvertne uzkarst aptuveni 8 minūšu laikā.
4 Ātra atkārtota uzkarsēšana: ja piepildāt tvaika tvertni
gludināšanas laikā, ūdens uzkarsīs aptuveni 6 minūšu laikā.
5 Tikai modeļiem GC6268/GC6265/GC6068/GC6065/GC6029:
tiklīdz ūdens tvaika tvertnē ir pietiekami karsts, lai varētu
gludināt ar tvaiku, nodziest signāllampiņa (E).Tagad varat sākt
gludināšanu.
Padomi
◗ Ja audums sastāv no dažādām šķiedrām, vienmēr noregulējiet
temperatūru, kas nepieciešama visjutīgākās šķiedras audumam, t. i.,
viszemāko temperatūru. Piemēram,ja apģērbs sastāv no 60%
poliestera un 40% kokvilnas, tas jāgludina (&@4.049) temperatūrā,
kas norādīta poliesterim, un bez tvaika.
LATVISKI 99
Page 100

◗ Gludinot ar tvaiku vilnas audumus, uz tiem var izveidoties spīdīgi
plankumi. Lai no tā izvairītos, lietojiet sausu gludināšanas drānu vai
gludiniet auduma otru pusi.
◗ Samts un citi audumi, uz kuriem visbiežāk veidojas spīdīgi plankumi,
jāgludina tikai vienā virzienā, stipri uz tiem nespiežot.
◗ Negludiniet krāsotu zīdu ar tvaiku, jo tas var radīt traipus.
Gludināšana ar tvaiku
Pārliecinieties, vai tvertnē ir pietiekami daudz ūdens.
C
◗ Gludināt ar tvaiku iespējams tikai augstā gludināšanas temperatūrā
(temperatūras uzstādījumi 2 līdz MAX).
1 Noregulējiet temperatūras regulatoru stāvoklī,kas atbilst
gludināmā auduma tipam.
Sk. nodaļu "Temperatūras regulēšana".
2 Nogaidiet, līdz nodziest tvaika tvertnes uzkaršanas
signāllampiņa.
C
3 Gludinot ar tvaiku, turiet piespiestu tvaika padeves taustiņu (H).
Tikai modeļiem GC6268/GC6265/GC6068/GC6065/GC6029: gludinot
ar tvaiku, laiku pa laikam iedegsies signāllampiņa (G), norādot, ka tvaika
tvertne un gludeklis tiek uzkarsēti līdz nepieciešamajai temperatūrai un
spiedienam.Tajā laikā varat vienkārši turpināt gludināšanu.
Ja tvaika padeve kādu laiku nav lietota, tvaiks, kas bija tvaika padeves
caurulē, pārvēršas ūdenī. Uzsākot gludināt ar tvaiku,var būt dzirdama
šļakstēšana, un no klātnes var iztecēt daži ūdens pilieni.
B
Pirms sākat gludināt ar tvaiku, turiet gludekli virs nederīgas drānas un
piespiediet tvaika padeves taustiņu (H), līdz tvaika padeve ir
normalizējusies, lai novērstu ūdens izpilēšanu uz auduma.
Gludināšana bez tvaika
1 Noregulējiet temperatūras regulatoru stāvoklī,kas atbilst
gludināmā auduma tipam.
Sk. nodaļu "Temperatūras regulēšana".
2 Nepiespiediet tvaika padeves taustiņu (H).
◗ Ja gludināšanas laikā nejauši piespiežat tvaika padeves taustiņu, tiks
padots tvaiks. Ja tvaika tvertne ir tukša vai vēl nav uzkarsusi,
tvertnes iekšpusē būs dzirdams klikšķis.To rada tvaika ventiļa
atvēršanās, un tas ir pilnīgi nekaitīgs.
LATVISKI100
 Loading...