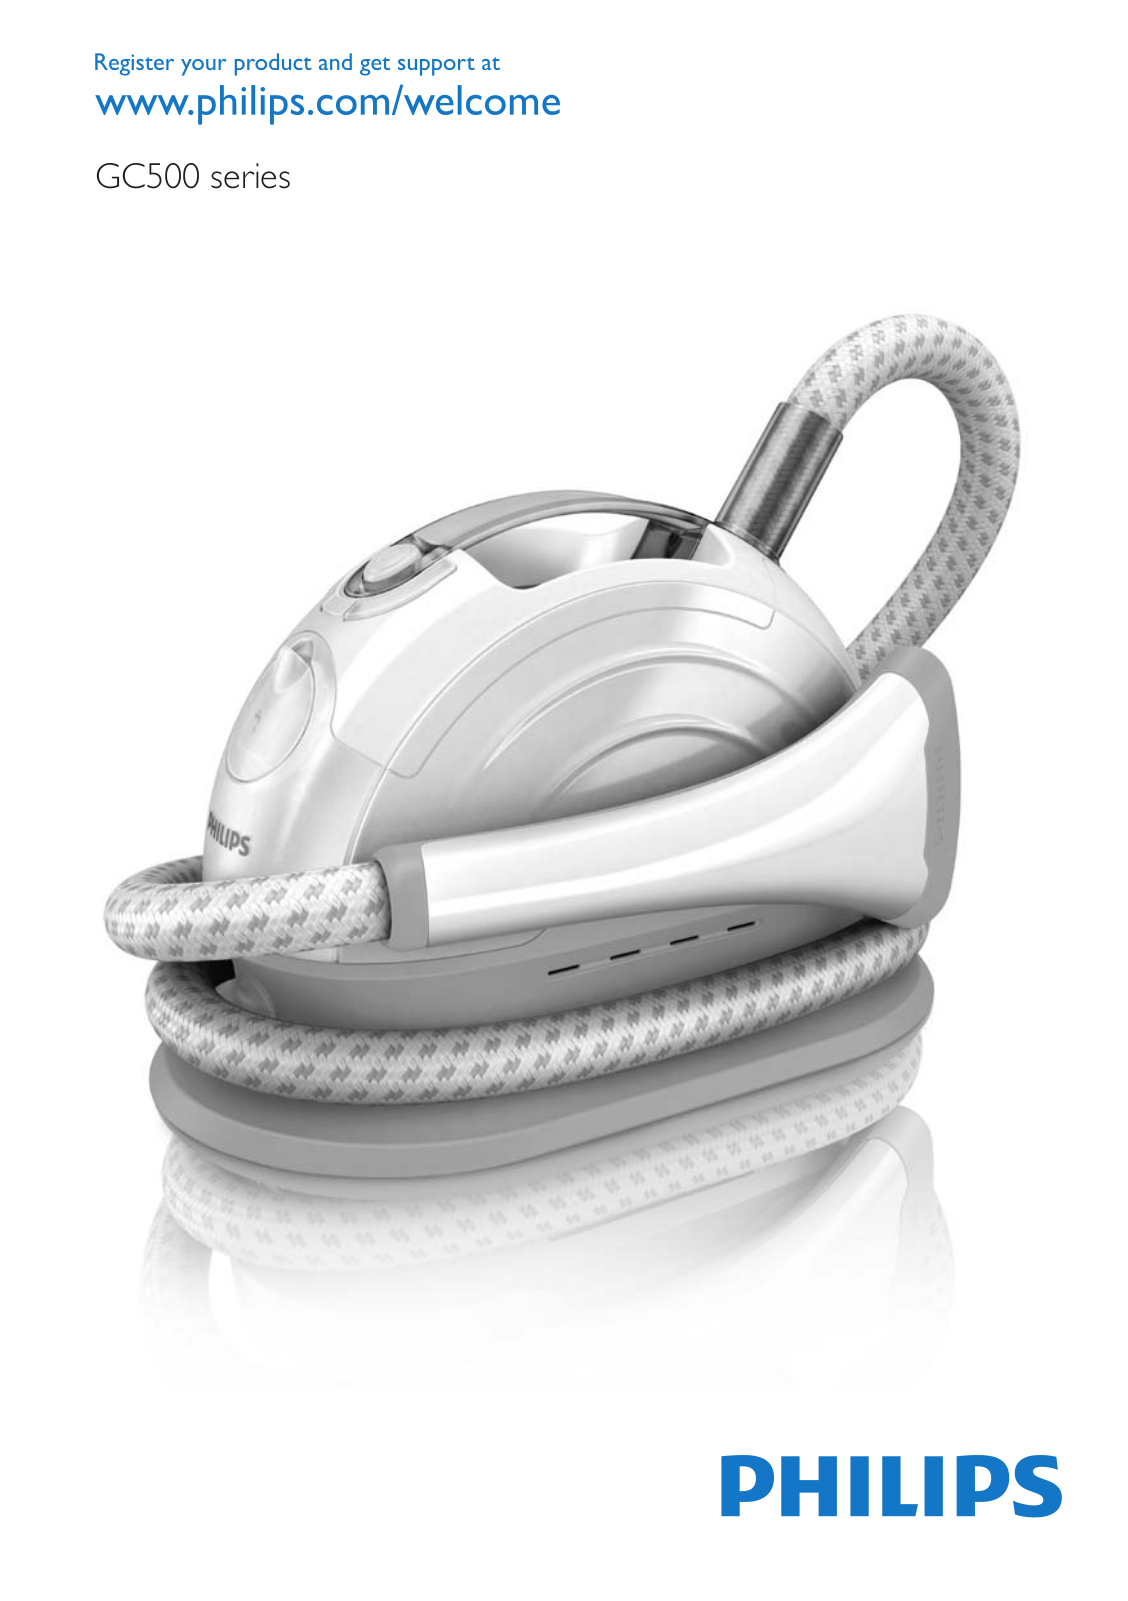
Philips GC500 User Manual

0 (0)

GC500 series

Philips GC500 User Manual

1

English 6 Indonesia 12

19

Bahasa Melayu 25

32

TiếngViệt 37

43

48

GC500 Series

6 English

Introduction

Congratulations on your purchase and welcome to Philips!To fully benefit from the support that

Philips offers, register your product at www.philips.com/welcome.

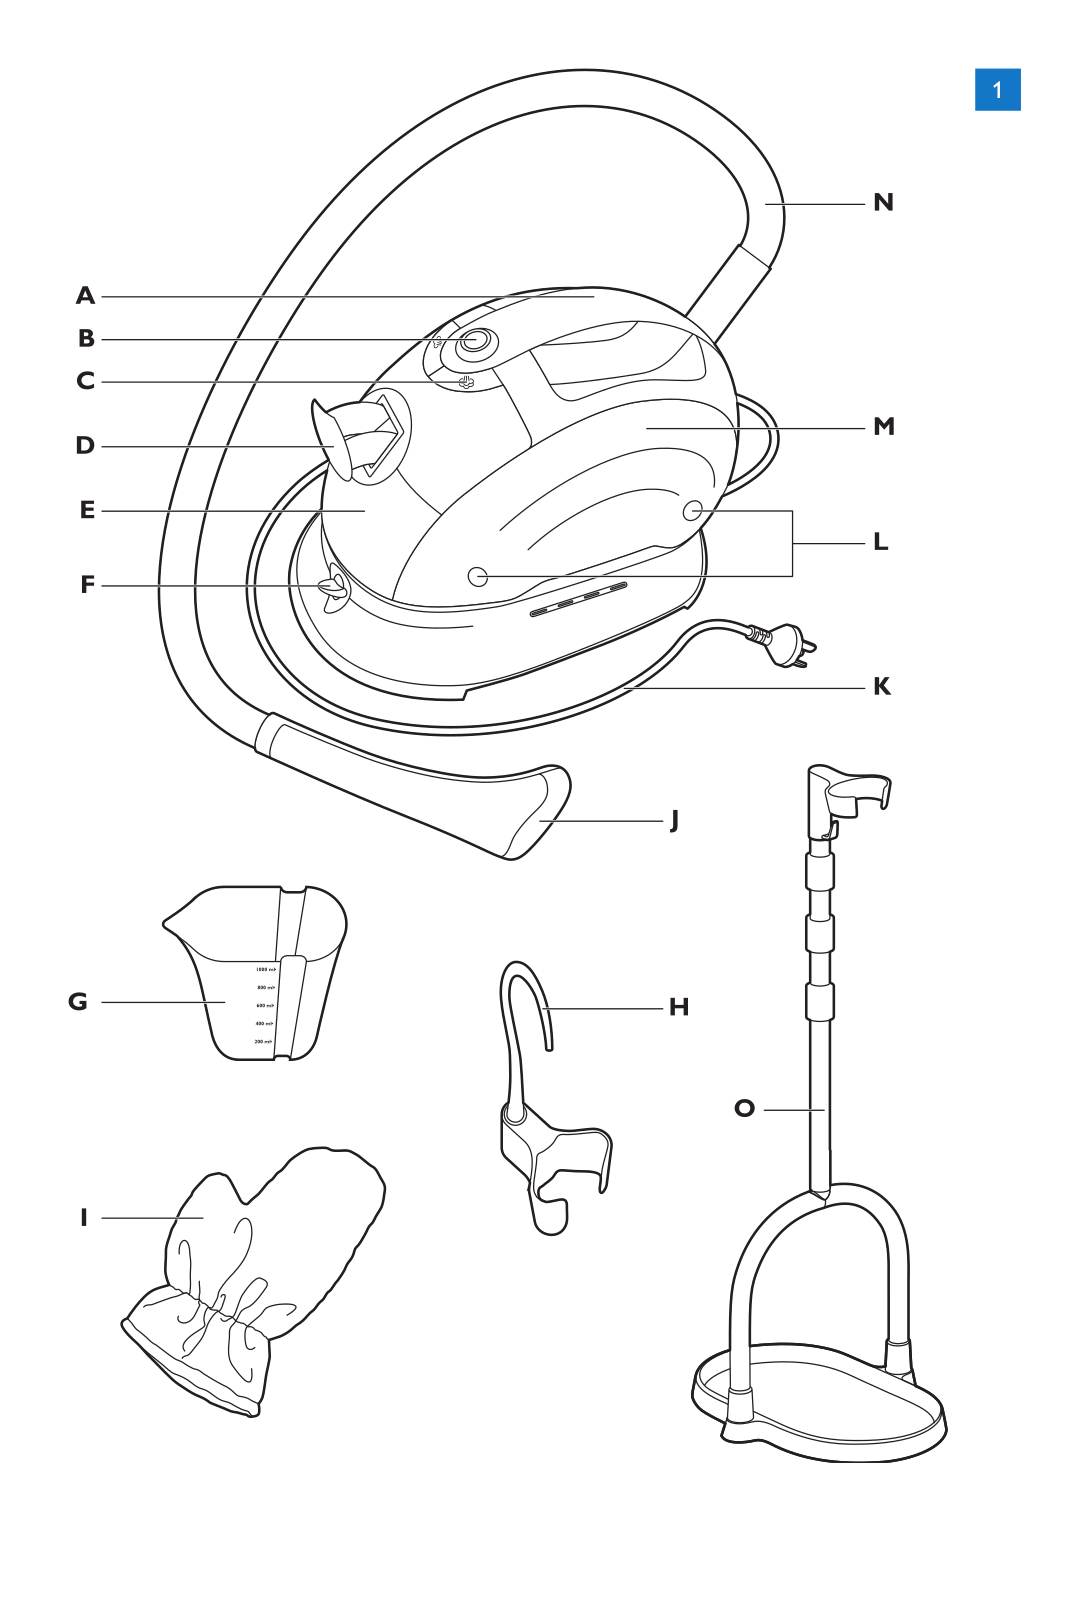
General description (Fig. 1)

ASteamer handle

BOn/off button

CSteam buttons (GC526/GC525/GC520 only) -- single cloud = low steam output

-- double cloud = high steam output

DFilling opening with cap

EWater tank

FDrainage opening with cap

GFilling cup

HSteamer head holder (GC520/GC510 only)

IGlove (GC526/GC525/GC520 only)

JSteamer head

KMains cord with plug

LRecesses for securing steamer head

MSteamer

NSteam supply hose

OHanging accessory (GC526/GC525/GC515 only)

Important

Read this user manual carefully before you use the appliance and save it for future reference.

Danger

-- Never immerse the appliance in water or any other liquid, nor rinse it under the tap. -- Beware of hot steam that comes out of the steamer. Steam can cause burns.

Warning

-- Check if the voltage indicated on the appliance corresponds to the local mains voltage before you connect the appliance.

-- Do not use the appliance if the plug, the mains cord, the supply hose or the appliance itself shows visible damage, or if the appliance has been dropped or leaks.

-- Always return the appliance to a service centre authorised by Philips for examination or repair. Do not attempt to repair the appliance yourself, otherwise the guarantee becomes invalid.

-- If the mains cord or the supply hose is damaged, you must have it replaced by Philips, a service centre authorised by Philips or similarly qualified persons in order to avoid a hazard.

-- Never leave the appliance unattended when it is connected to the mains.

-- This appliance is not intended for use by persons (including children) with reduced physical, sensory or mental capabilities, or lack of experience and knowledge, unless they have been given supervision or instruction concerning use of the appliance by a person responsible for their safety.

-- Children should be supervised to ensure that they do not play with the appliance.

-- The nozzle of the steamer head can become extremely hot and may cause burns if touched. -- Always unplug the appliance before you clean it or before you refill the water tank.

Caution

-- Only connect the appliance to an earthed wall socket.

-- Do not use the appliance when it is placed on a table or chair. Only use the appliance when it is placed on the floor. If the hose forms a U-shape, steam condenses in the hose and this causes irregular steam or water droplets to come out of the steamer head. 

English 7

-- Check the mains cord and the supply hose regularly for possible damage.

-- Do not let the mains cord and supply hose come into contact with hot steam when it the appliance is in operation.

-- When you have finished steaming, when you clean the appliance and also when you leave the appliance even for a short while, switch off the appliance and remove the mains plug from the wall socket.

-- Do not move the appliance while it is in use.

-- This appliance is intended for household use only. -- Never drag or pull the appliance across the floor.

Type of water to be used

-- Do not put perfume, vinegar, starch, descaling agents, ironing aids or other chemicals in the water tank.

-- You can use normal tap water. If the tap water in your area is very hard, we advise you to mix it with an equal amount of distilled water.

Electromagnetic fields (EMF)

This Philips appliance complies with all standards regarding electromagnetic fields (EMF). If handled properly and according to the instructions in this user manual, the appliance is safe to use based on scientific evidence available today.

Filling the water tank

Note:You can use normal tap water. If the tap water in your area is very hard, we advise you to mix it with an equal amount of distilled water.

Do not put perfume, vinegar, starch, descaling agents, ironing aids or other chemicals in the water tank.

Do not fill the water tank beyond the MAX indication.

Note:Always empty the water tank before you refill it.

1Open the cap of the filling opening.

2Fill the water tank up to the MAX level with the filling cup supplied (Fig. 2).

3Close the cap of the filling opening (‘click’).

Note:You can refill the water tank at any time.Always unplug the appliance before you start to refill the water tank.

Using the appliance

-- Make sure the water level in the water tank is above the MIN level at all times.

-- To prevent the hose from forming a U-shape, always place the steamer on the floor to ensure that the hose is straight. If you hear an excessive croaking sound or if the steam output is irregular, lift the steamer head from time to time to straighten the hose.This allows any condensation to flow back into the water tank (Fig. 3).

-- When you use the steamer, steam condenses inside the hose.When the hose forms a U-shape, this condensation cannot flow back into the water tank and causes a croaking sound and irregular steam output.To prevent this as much as possible, always place the steamer on the floor to ensure that the hose is straight. If you hear an excessive croaking sound or if the steam output is irregular, lift the steamer head from time to time to straighten the hose.This allows any condensation to flow back into the water tank (Fig. 4).

1Put the mains plug in an earthed wall socket (Fig. 5).

2Press the on/off button on top of the appliance to switch on the appliance (Fig. 6).

8

English

--

GC515/GC510:The on/off button lights up.

--

GC526/GC525/GC520:The steam button for high steam output lights up.


Let the water in the steam tank heat up.This takes approximately 2 minutes.

3


--

GC515/GC510:When the water in the water tank is ready for steaming, steam comes out


of the steamer head.

--

GC526/GC525/GC520: Press the appropriate steam button to select the desired steam output


(single cloud = low steam output, double cloud = high steam output) (Fig. 7).


Steaming garments

Never direct the steam at people.

Do not touch the steamer head nozzle while you are steaming.Keep it at a distance of at least 20cm from your body to prevent scalding.

Note:The steam supply hose becomes warm during steaming.This is normal.

Recommended ways to remove creases: -- Front of the collar: (Fig. 8)

Hold one tip of the collar with one hand.With the other hand, move the steamer head to and fro as shown by the arrows in the figure.

-- Back of the collar: (Fig. 9)

Pull down the collar and hold one tip of the collar with one hand.With the other hand, move the steamer head to and fro as shown by the arrows in the figure.

-- Front: (Fig. 10)

Move the steamer head up and down as shown by the arrows in the figure.

-- Pocket: (Fig. 11)

Hold the front of the garment with one hand. Move the steamer head upwards as shown by the arrow in the figure.

-- Back of the garment: (Fig. 12)

Move the steamer head up and down as shown by the arrows in the figure. -- Sleeve: (Fig. 13)

Hold the cuff of the sleeve with one hand.With the other hand, move the steamer head to and fro as shown by the arrows in the figure.

Steamer head holder (GC520/GC510 only)

You can use the steamer head holder to hang the steamer head on when you have to stop steaming for a moment, e.g. when you have to turn around the piece of clothing you are steaming. Hang the steamer head holder somewhere within reach of the garment you are steaming, for example on a garment rack.

Glove (GC526/GC525/GC520 only)

Put the glove on the hand you are using to hold a garment. The glove protects your hand against the steam from the steamer head.

Hanging accessory (GC526/GC525/GC515 only)

The steamer comes with a hanging accessory on which you can place your steamer, hang the garment for steaming, or hang the steamer head whenever you need to pause.

Note:Position the hanging accessory with the steamer in the right direction (Fig. 14).

Caution:Make sure the steamer is positioned in such a way that the supply hose connection points away from you and the supply hose does not get in the way. (Fig. 15)

English 9

Emptying the water tank after use

Always empty the water tank after use.

1 Press the on/off button to switch off the appliance (Fig. 16).

Note: It is normal that steam continues to come out of the steamer head for approx. 5 seconds after you switch off the appliance.

2Remove the mains plug from the wall socket (Fig. 17).

3Let the appliance cool down for at least 5 minutes.

4Turn the cap of the drainage opening to the‘unlocked’ position and empty the water tank into the sink (Fig. 18).

Note:The cap of the drainage opening cannot be removed from the water tank.

5Turn the cap of the drainage opening to the‘locked’ position.

Storage

1Switch off and unplug the appliance (Fig. 17).

2Empty the water tank (see chapter‘Using the appliance’,section‘Emptying the water tank after use’).

3Turn the steam supply hose anticlockwise (1), wind it around the steamer base (2) and place

the steamer head in the recess on the side of the steamer (3) (Fig. 19).

,, The magnets in the recess secure the steamer head in place.

4Wind the mains cord around the steamer base. (Fig. 20)

5Store the appliance in a safe and dry place.

GC526/GC525/GC515

1Place the steamer head in the holder provided on the hanging accessory.If required,adjust the height of hanging accessory for storage (Fig. 21).

2Wind the mains cord around the steamer base.

3Store the appliance in a safe and dry place.

Cleaning and maintenance

Always unplug the appliance before you clean it.

Never use scouring pads,abrasive cleaning agents or aggressive liquids such as alcohol,petrol or acetone to clean the appliance.

1Clean the appliance and wipe any deposits off the steamer head with a damp cloth and a non-abrasive liquid cleaning agent.

Emptying and rinsing the water tank

Let the appliance cool down for approx.5 minutes before you empty and rinse the water tank.

To prevent an excessive amount of water from dripping out of the steamer head during steaming, follow the steps below after every 5 times of use:

1Fill the water tank up to the MAX level.

2Turn the cap of the drainage opening to the‘unlocked’ position.

10 English

3Tilt the appliance to an angle of approx. 45° and empty the water tank into the sink.Make sure there is no more water flowing out of the drainage hole.

4Repeat steps 1, 2 and 3.

5Turn the cap of the drainage opening to the‘locked’ position.

Replacement

You can order the following items from a Philips service centre: -- steamer head holder

--

filling cup

--

glove

--

hanging accessory

Environment

-- Do not throw away the appliance with the normal household waste at the end of its life, but hand it in at an official collection point for recycling. By doing this, you help to preserve the environment (Fig. 22).

Guarantee and service

If you need service or information or if you have a problem, please visit the Philips website at www.philips.com or contact the Philips Consumer Care Centre in your country.You find its phone number in the worldwide guarantee leaflet. If there is no Consumer Care Centre in your country, go to your local Philips dealer.

Troubleshooting

This chapter summarises the most common problems you could encounter with the appliance. If you are unable to solve the problem with the information below, contact the Consumer Care Centre in your country.

Problem

Possible cause

Solution


The appliance does

There is a connection problem.

Check the mains plug and the wall

not heat up.


socket.


You have not switched on the

Press the on/off button to switch on


appliance.

the appliance.

The appliance does

The steamer has not heated up

Let the appliance heat up for approx.

not produce any

sufficiently.

2 minutes.

steam.


Steam has condensed in the hose.

Lift the steamer head to straighten


the hose.This allows any


condensation to flow back into the


water tank.

The water level is below the MIN level indication.

You have placed the steamer on a table or chair instead of on the floor.

Fill water tank to the MAX level indication.

Place the steamer on the floor.


English 11

Problem

Possible cause

Solution

The steam output is

Steam has condensed in the hose

Lift the steamer head to straighten

irregular.

or in the steamer head.

the hose.This allows any


condensation to flow back into the


water tank.


You have placed the steamer on a

Place the steamer on the floor.


table or chair instead of on the


floor.


Water droplets drip

Steam has condensed in the hose.

Lift the steamer head to straighten

from the steamer


the hose.This allows any

head.


condensation to flow back into the


water tank.

The appliance produces a croaking sound.

The steamer head does not stay fixed when I try to store it.

Water spills out of the filling opening when the cap is closed.

An excessive amount of water drips out of the steamer head when the appliance is heating up.

You have left the steamer head and/or the steam supply hose in horizontal position for a long time.

You have placed the steamer on a table or chair instead of on the floor.

When the hose forms a U-shape, condensation present in the hose cannot flow back into the water tank.

You have left the steamer head and/or the steam supply hose in horizontal position for a long time.

You have not placed the steamer head in the recess properly.

You have put too much water in the water tank

The water in the appliance is dirty or has been left inside the appliance for a long time.

Lift the steamer head to straighten the hose.This allows condensation to flow back into the water tank.

Place the steamer on the floor.

Lift the steamer head to straighten the hose.This allows any condensation to flow back into the water tank.

Lift the steamer head to straighten the hose.This allows condensation to flow back into the water tank.

Wind the hose anticlockwise around the steamer base and place the steamer head in the recess. See chapter ‘Storage’.

Do not fill the water tank above the

MAX level indication.

Remove all water from the water tank and rinse it with clean water (see chapter ‘Cleaning and maintenance’).

12 Indonesia

Pendahuluan

Selamat atas pembelian Anda dan selamat datang di Philips! Untuk memanfaatkan sepenuhnya dukungan yang ditawarkan Philips, daftarkan produk Anda di www.philips.com/welcome.

Gambaran umum (Gbr. 1)

AGagang penyembur uap

BTombol on/off

CTombol uap (hanya GC526/GC525/GC520 ) -- satu semburan uap = keluaran uap rendah -- dua semburan uap = keluaran uap tinggi

DLubang pengisian beserta tutup

ETangki air

FLubang pengurasan dengan tutup

GCangkir pengisi

HPenahan kepala penyembur uap (hanya GC520/GC510)

ISarung tangan (hanya GC526/GC525/GC520)

JKepala penyembur uap

KKabel listrik dengan steker

LLekukan untuk mengencangkan kepala penyembur uap

MPenyembur uap

NSelang pasokan uap

OAksesori penggantung (hanya GC526/GC525/GC515)

Penting

Bacalah petunjuk penggunaan ini dengan saksama sebelum Anda menggunakan alat dan simpanlah sebagai referensi di masa mendatang.

Bahaya

-- Jangan sekali-kali merendam alat di dalam air atau cairan apapun, jangan pula membilasnya di bawah keran.

-- Waspadalah terhadap uap panas yang keluar dari penyembur uap. Uap tersebut dapat menyebabkan luka bakar.

Peringatan

-- Periksalah apakah voltase pada alat sesuai dengan voltase listrik di rumah Anda, sebelum menghubungkan alat.

-- Jangan menggunakan alat jika steker, kabel listrik, selang pasokan atau alat itu sendiri menunjukkan kerusakan yang dapat dilihat, atau jika alat pernah terjatuh atau bocor.

-- Jika perlu memeriksa atau memperbaiki alat, bawalah selalu ke pusat layanan resmi Philips. Jangan berupaya memperbaiki sendiri alat tersebut, karena hal ini dapat membatalkan garansi.

-- Jika kabel listrik atau selang pasokan rusak, maka harus diganti oleh Philips, pusat layanan resmi Philips atau orang yang mempunyai keahlian sejenis agar terhindar dari bahaya.

-- Jangan sekali-kali meninggalkan alat tanpa pengawasan saat masih tersambung ke arus listrik.

-- Alat ini tidak dimaksudkan untuk digunakan oleh orang (termasuk anak-anak) dengan cacat fisik, indera atau kecakapan mental yang kurang, atau kurang pengalaman dan pengetahuan, kecuali jika mereka diberikan pengawasan atau petunjuk mengenai penggunaan alat oleh orang yang bertanggung jawab bagi keselamatan mereka.

-- Anak kecil harus diawasi untuk memastikan mereka tidak bermain-main dengan alat ini.

-- Nozel pada kepala penyembur uap dapat menjadi sangat panas dan menyebabkan luka bakar jika tersentuh.

-- Cabutlah selalu steker alat sebelum Anda membersihkannya atau sebelum Anda mengisi ulang tangki airnya.

Indonesia 13

Perhatian

-- Alat hanya boleh dihubungkan ke stopkontak dinding yang memiliki arde.

-- Jangan gunakan alat bila diletakkan di atas meja atau kursi. Gunakan alat hanya bila diletakkan di atas lantai. Jika selang berubah menjadi bentuk U, uap akan mengembun dalam selang dan ini menyebabkan uap yang tidak beraturan atau tetesan air keluar dari kepala penyembur uap. 

-- Periksalah kabel listrik dan selang pasokan secara teratur, kalau-kalau ada kerusakan.

-- Jangan biarkan kabel listrik dan selang pasokan bersentuhan dengan uap panas bila alat sedang digunakan.

-- Bila Anda sudah selesai menguapi, ketika membersihkan alat dan juga saat Anda meninggalkan alat meskipun hanya sebentar, matikan alat dan cabut steker listrik dari stopkontak dinding.

-- Jangan gerakkan alat saat sedang digunakan.

-- Alat ini hanya ditujukan untuk keperluan rumah tangga. -- Jangan menyeret atau menarik alat di lantai.

Jenis air yang digunakan

-- Jangan memasukkan parfum, cuka, kanji, zat pembersih kerak, bahan pelembut penyetrikaan atau bahan kimia lainnya ke dalam tangki air.

-- Anda dapat menggunakan air keran biasa. Jika air keran di daerah Anda sangat sadah, kami sarankan Anda untuk mencampurnya dengan air suling dalam jumlah yang sama.

Medan elektromagnet (EMF)

Alat dari Philips ini telah mematuhi semua standar yang berkenaan dengan medan elektromagnet

(EMF). Jika ditangani dengan benar dan sesuai dengan instruksi yang diberikan dalam petunjuk penggunaan ini, alat ini aman digunakan berdasarkan pada bukti ilmiah yang kini tersedia.

Mengisi tangki air.

Catatan:Anda dapat menggunakan air keran biasa.Jika air keran di daerah Anda sangat sadah,kami sarankan Anda untuk mencampurnya dengan air suling dalam jumlah yang sama.

Jangan memasukkan parfum,cuka,kanji,zat pembersih kerak,bahan pelembut penyetrikaan atau bahan kimia lainnya ke dalam tangki air.

Jangan mengisi tangki air melewati tanda batas MAKS.

Catatan:Selalu kosongkan tangki air terlebih dulu sebelum mengisi ulang.

1Buka tutup lubang pengisian.

2Isilah tangki air hingga batas MAX dengan cangkir pengisi yang disertakan (Gbr. 2).

3Pasang tutup lubang pengisian (hingga berbunyi‘klik’).

Catatan:Anda dapat mengisi ulang tangki air kapan saja.Cabutlah selalu steker alat sebelum Anda mengisi ulang tangki air.

Menggunakan alat

-- Pastikan batas air di tangki air selalu berada di atas batas MIN.

-- Untuk mencegah agar selang tidak berubah menjadi bentuk U, letakkan selalu penyembur uap di atas lantai untuk menjaga selang tetap lurus. Jika Anda mendengar bunyi menguak yang berlebihan atau jika keluaran uap tidak beraturan, sesekali angkatlah kepala penyembur uap untuk meluruskan selang. Ini agar kondensasi mengalir kembali ke tangki air (Gbr. 3).

-- Bila Anda menggunakan penyembur uap, uap akan mengembun di dalam selang. Bila selang berbentuk U, maka kondensasi ini tidak dapat mengalir kembali ke tangki air dan menyebabkan bunyi menguak dan keluaran uap yang tidak beraturan. Untuk mencegah hal ini, sebisa mungkin selalu letakkan penyembur uap di atas lantai untuk menjaga selang tetap lurus. Jika Anda mendengar bunyi menguak yang berlebihan atau jika keluaran uap tidak beraturan, sesekali

14 Indonesia

angkatlah kepala penyembur uap untuk meluruskan selang. Ini agar kondensasi mengalir kembali ke tangki air (Gbr. 4).

1Masukkan steker listrik pada stopkontak dinding yang memiliki arde (Gbr. 5).

2Tekan tombol on/off di bagian atas alat untuk menghidupkan alat (Gbr. 6).

-- GC515/GC510: Lampu tombol on/off menyala.

-- GC526/GC525/GC520: Lampu tombol uap untuk keluaran uap tinggi menyala.

3 Biarkan air dalam tangki uap memanas.Ini butuh waktu kurang lebih 2 menit.

-- GC515/GC510: Bila air di dalam tangki air sudah siap untuk menguapi, uap akan keluar dari kepala penyembur uap.

-- GC526/GC525/GC520:Tekan tombol uap yang sesuai untuk memilih keluaran uap yang diinginkan (satu semburan uap = keluaran uap rendah, dua semburan uap = keluaran uap tinggi) (Gbr. 7).

Menguapi pakaian

Jangan sekali-kali mengarahkan uap ke orang.

Jangan menyentuh nozel kepala penyembur uap selagiAnda menguapi.Jagalah jarak paling sedikit 20 cm dari badanAnda untuk mencegah melepuh.

Catatan:Selang pasokan uap menjadi hangat selama menguapi.Hal ini normal.

Cara yang direkomendasikan untuk menghilangkan kusut: -- Bagian depan kerah: (Gbr. 8)

Pegang salah satu ujung kerah dengan salah satu tangan. Dengan tangan satunya lagi, gerakkan kepala penyembur uap ke dan dari arah yang ditunjukkan oleh panah dalam gambar.

-- Bagian belakang kerah: (Gbr. 9)

Tarik kerah ke bawah dan pegang salah satu ujung kerah dengan salah satu tangan. Dengan tangan satunya lagi, gerakkan kepala penyembur uap ke dan dari arah yang diperlihatkan oleh panah dalam gambar.

-- Depan: (Gbr. 10)

Gerakkan kepala penyembur uap ke atas dan ke bawah seperti yang diperlihatkan oleh panah dalam gambar.

-- Saku: (Gbr. 11)

Pegang bagian depan pakaian dengan satu tangan. Gerakkan kepala penyembur uap ke atas seperti yang diperlihatkan oleh panah dalam gambar.

-- Bagian belakang pakaian: (Gbr. 12)

Gerakkan kepala penyembur uap ke atas dan ke bawah seperti yang diperlihatkan oleh panah dalam gambar.

-- Lengan baju: (Gbr. 13)

Pegang manset lengan baju dengan salah satu tangan. Dengan tangan satunya lagi, gerakkan kepala penyembur uap ke dan dari arah yang ditunjukkan oleh panah dalam gambar.

Penahan kepala penyembur uap (hanya GC520/GC510)

Anda dapat menggunakan penahan kepala penyembur uap untuk menggantung kepala penyembur uap atau bila Anda berhenti menguapi sejenak, misalnya bila Anda harus membalik pakaian yang sedang diuapi.

Gantunglah penahan kepala penyembur uap di tempat yang mudah dijangkau dari tempat Anda menguapi pakaian, misalnya di rak pakaian.

Sarung tangan (hanya GC526/GC525/GC520)

Kenakan sarung tangan pada tangan yang digunakan untuk memegang pakaian. Sarung tangan ini melindungi tangan Anda dari uap yang keluar dari kepala penyembur uap.

Indonesia 15

Aksesori penggantung (hanya GC526/GC525/GC515)

Penyembur uap disediakan dengan aksesori penggantung untuk menaruh pembuat uap, menggantung pakaian untuk diuapi, atau menggantung kepala penyembur uap jika diperlukan jeda.

Catatan:Posisikan aksesori penggantung dengan penyembur uap ke arah yang tepat (Gbr. 14).

Perhatian:Pastikan penyembur uap telah diposisikan sedemikian rupa sehingga titik sambungan selang pasokan menjauh dariAnda dan selang pasokan tidak masuk ke dalamnya. (Gbr. 15)

Mengosongkan tangki air setelah digunakan

Selalu kosongkan tangki air setelah digunakan.

1 Tekan tombol on/off untuk mematikan alat (Gbr. 16).

Catatan:Adalah hal yang normal bila uap terus keluar dari kepala penyembur uap selama kurang lebih 5 detik setelah mematikan alat.

2Lepaskan steker listrik dari stopkontak dinding (Gbr. 17).

3Biarkan alat menjadi dingin sekurangnya selama 5 menit.

4Putar tutup lubang pengurasan ke posisi‘terbuka’ dan kosongkan tangki air ke bak cuci (Gbr. 18).

Catatan:Tutup lubang pengurasan tidak dapat dilepas dari tangki air.

5Putar tutup lubang pengurasan ke posisi‘terkunci’.

Penyimpanan

1Matikan dan cabut alat dari stopkontak (Gbr. 17).

2Kosongkan tangki air (lihat bab‘Menggunakan alat’,bagian‘Mengosongkan tangki air setelah digunakan’).

3Putarlah selang pasokan uap berlawanan arah jarum jam (1), gulung ke sekeliling alas penyembur uap (2) dan letakkan kepala penyembur uap di lubang bagian samping penyembur

uap (3) (Gbr. 19).

,, Magnet di lubang tersebut akan menahan kepala penyembur uap pada tempatnya.

4Lilitkan kabel listrik di sekeliling alas penyembur uap. (Gbr. 20)

5Simpan alat di tempat yang aman dan kering.

GC526/GC525/GC515

1Letakkan kepala penyembur uap ke dudukan yang disediakan pada aksesori penggantung. Bila perlu setel tinggi aksesori penggantung untuk penyimpanan (Gbr. 21).

2Lilitkan kabel listrik di sekeliling alas penyembur uap.

3Simpan alat di tempat yang aman dan kering.

16 Indonesia

Membersihkan dan pemeliharaan

Lepaskan kabel listrik sebelumAnda membersihkan alat ini.

Jangan sekali-kali menggunakan sabut gosok,bahan pembersih abrasif atau cairan agresif seperti alkohol,bensin atau aseton untuk membersihkan alat.

1Bersihkan alat dan seka sisa kotoran yang keluar dari kepala penyembur uap dengan kain lembab dan bahan pembersih cair non abrasif.

Mengosongkan dan membilas tangki air

Biarkan alat mendingin selama sekitar 5 menit sebelumAnda mengosongkan dan membilas tangki air.

Untuk mencegah terlalu banyak air yang menetes keluar dari kepala penyembur uap selama penguapan, ikuti langkah berikut setelah tiap 5 kali pemakaian:

1Isi tangki air hingga level MAX.

2Putar tutup lubang pengurasan ke posisi‘terbuka’.

3Miringkan alat hingga bersudut kira-kira 45°,lalu kosongkan tangki air ke bak cuci.Pastikan tidak ada lagi air yang mengalir keluar dari lubang pengurasan.

4Ulangi langkah 1,2,dan 3.

5Putar tutup lubang pengurasan ke posisi‘terkunci’.

Penggantian

Anda dapat memesan item berikut dari pusat layanan Philips: -- penahan kepala penyembur uap

-- cangkir pengisi -- sarung tangan

-- aksesori penggantung

Lingkungan

-- Jangan membuang alat bersama limbah rumah tangga biasa jika alat sudah tidak dapat dipakai lagi, tetapi serahkan ke tempat pengumpulan barang bekas resmi untuk didaur ulang. Dengan melakukannya, berarti Anda ikut membantu melestarikan lingkungan (Gbr. 22).

Garansi dan layanan

Jika Anda memerlukan servis atau informasi atau mengalami masalah, harap kunjungi situs web Philips di www.philips.com atau hubungi Pusat Layanan Konsumen Philips di negara Anda. Anda dapat menemukan nomor teleponnya dalam pamflet garansi internasional. Jika tidak ada Pusat Layanan

Konsumen di negara Anda, kunjungi dealer Philips setempat.

Pemecahan masalah

Bab ini merangkum masalah-masalah paling umum yang mungkin Anda temui pada alat. Jika Anda tidak mampu mengatasi masalah dengan informasi di bawah ini, hubungi Pusat Layanan Pelanggan di negara Anda.


Indonesia 17

Masalah

Kemungkinan penyebab

Solusi

Alat tidak

Ada masalah sambungan.

Periksa steker listrik dan stopkontak dinding.

memanas.


Anda belum menyalakan alat.

Tekan tombol on/off untuk menghidupkan


alat.

Alat tidak

Penyembur uap tidak cukup

Biarkan alat memanas selama kurang lebih

menghasilkan uap.

panas.

2 menit.


Uap mengembun dalam selang.

Angkatlah kepala penyembur uap untuk


meluruskan selang. Ini berfungsi mengalirkan


kondensasi kembali ke tangki air.

Batas air berada di bawah tanda batas MIN.

Anda meletakkan penyembur uap di atas meja atau di kursi, bukan di atas lantai.

Isilah tangki air hingga tanda batas MAX.

Letakkan penyembur uap di atas lantai.

Keluaran uap Uap mengembun dalam selang tidak beraturan. atau dalam kepala penyembur

uap.

Anda meletakkan penyembur uap di atas meja atau di kursi, bukan di atas lantai.

Angkatlah kepala penyembur uap untuk meluruskan selang. Ini berfungsi mengalirkan kondensasi kembali ke tangki air.

Letakkan penyembur uap di atas lantai.

Air menetes dari

Uap mengembun dalam selang.

kepala


penyembur uap.


Anda meletakkan kepala


penyembur uap dan/atau selang


pasokan uap pada posisi


horizontal dalam waktu lama.


Anda meletakkan penyembur


uap di atas meja atau di kursi,


bukan di atas lantai.

Alat

Bila selang membentuk huruf U,

mengeluarkan

kondensasi yang ada dalam

bunyi menguak.

selang tidak dapat mengalir


kembali ke dalam tangki air.


Anda meletakkan kepala


penyembur uap dan/atau selang


pasokan uap pada posisi


horizontal dalam waktu lama.

Kepala

Anda tidak meletakkan kepala

penyembur uap

penyembur uap di lubangnya

tidak tertahan

dengan benar.

dengan erat saat


saya


menyimpannya.


Angkatlah kepala penyembur uap untuk meluruskan selang. Ini berfungsi mengalirkan kondensasi kembali ke tangki air.

Angkatlah kepala penyembur uap untuk meluruskan selang. Ini agar kondensasi mengalir kembali ke tangki air.

Letakkan penyembur uap di atas lantai.

Angkatlah kepala penyembur uap untuk meluruskan selang. Ini berfungsi mengalirkan kondensasi kembali ke tangki air.

Angkatlah kepala penyembur uap untuk meluruskan selang. Ini berfungsi mengalirkan kondensasi kembali ke tangki air.

Gulung selang berlawanan arah jarum jam ke sekeliling alas penyembur uap dan letakkan kepala penyembur uap di lubang. Lihat bab ‘Penyimpanan’.

Loading...
+ 39 hidden pages