

Page 1
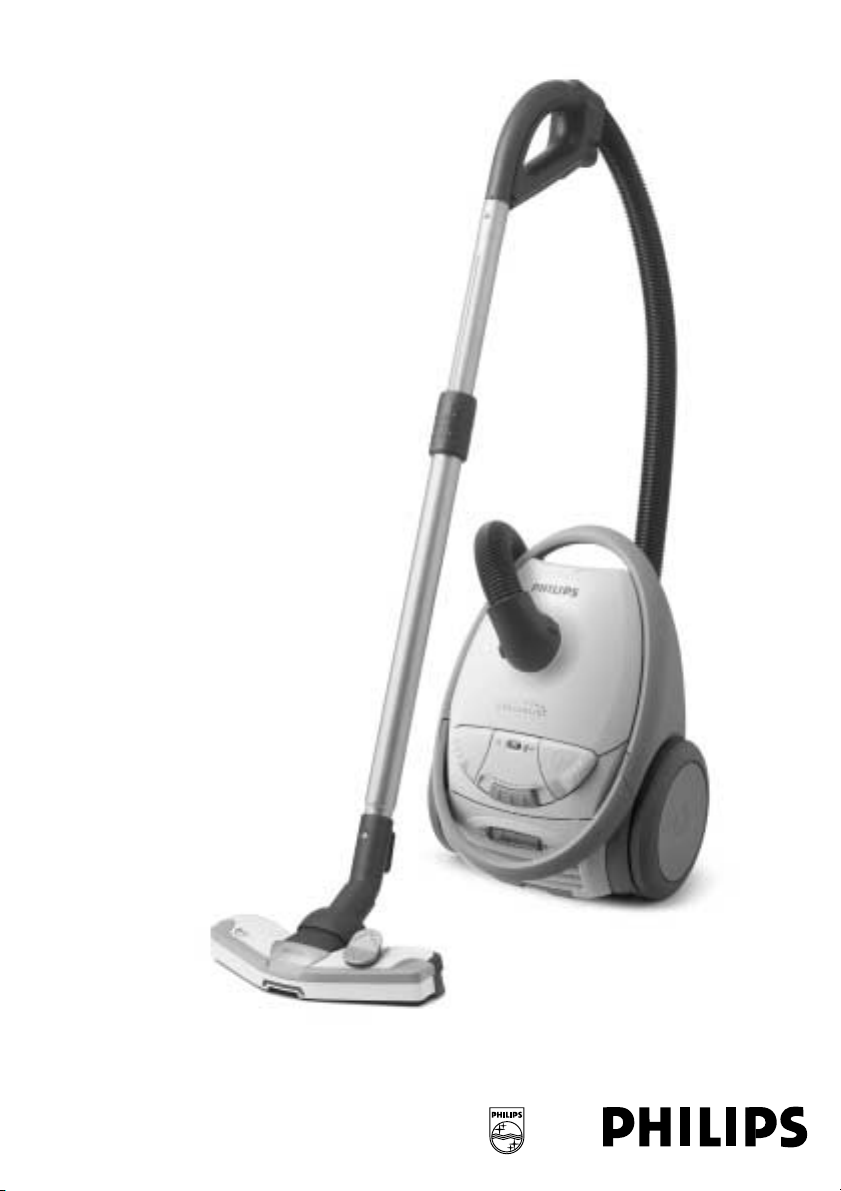
Specialist II
Page 2

2
Page 3
3
1
5
9
10
2
6
11
3
7
4
8
12
13
17
14
18
15
19
16
20
Page 4

4
Page 5

ENGLISH 6
12
17
5
FC9132, FC9130, FC9128, FC9126, FC9124, FC9122, FC9120
Page 6

6 ENGLISH
Important
◗ Only use Philips s-bag™ double-layer paper dustbags.
◗ Never suck up water or any other liquid. Never suck up flammable substances and do not
suck up ashes until they are cold.
◗ Only allow children to operate the vacuum cleaner under close supervision.
◗ Do not point the hose at the eyes or ears nor put it in your mouth when the vacuum cleaner
is switched on and the hose is connected to the vacuum cleaner.
◗ When the vacuum cleaner is used to suck up fine dust, the pores of the dustbag may become
clogged, causing the passage of air through the dustbag to become obstructed.As a result, the
dustbag-full indicator will indicate that the dustbag needs to be replaced, even though the
dustbag is not full at all.
◗ Never use the appliance without the Motor Protection Filter.This could damage the motor
and shorten the life of the appliance.
Preparing for use
Connecting accessories
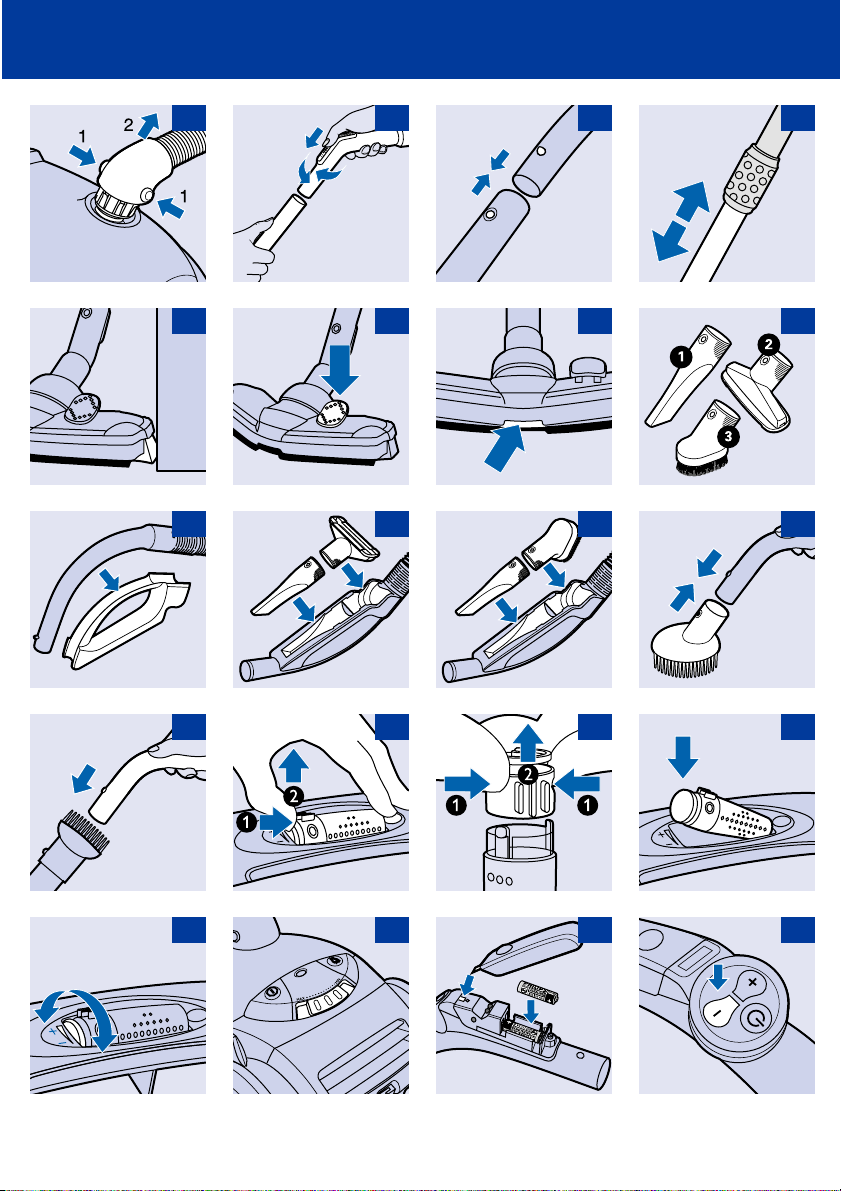
Hose
1 To connect the hose, push it firmly into the appliance ('click').
2 To disconnect the hose, push the buttons on the swivel and pull the hose out of the
appliance. (fig. 1)
Tube
There are two types of coupling systems. Depending on the type, this appliance is equipped with
one of them. See the systems displayed in the following pictures.
Conical coupling (specific types only)
1 Connect the tubes to the handgrip by inserting the narrow section into the wider section
while turning it a little. (fig. 2)
2 To disconnect the tubes from the handgrip, pull while turning a little.
Button coupling (specific types only)
1 Connect the tube to the handgrip by pressing the spring-loaded lock button on the handgrip
and inserting the handgrip into the tube. Fit the spring-loaded lock button into the opening in
the tube ('click'). (fig. 3)
2 To disconnect the tube from the handgrip, press the spring-loaded lock button and pull the
handgrip out of the tube.
3 Use the same method to connect and disconnect the other accessories.
Telescopic tube (specific types only)
1 Adjust the tube to the length you find most comfortable during vacuum cleaning. (fig. 4)
Tri-Active nozzle
1 The Tri-Active nozzle is a multi-purpose nozzle for carpets and hard floors. (fig. 5)
- The side brushes catch more dust and dir t at the sides of the nozzle and allow you to clean
better along furniture and other obstacles.
Page 7

Hard floor setting:
2 Push the rocker switch on top of the nozzle with your foot to make the brush strip come
out of the housing.At the same time the wheel will be lifted to prevent scratching and to
increase manoeuvrability. (fig. 6)
Carpet setting:
3 Push the rocker switch again to make the brush strip disappear into the nozzle housing.The
wheel will be lowered automatically.
◗ The opening at the front of the nozzle allows you to effectively suck up larger particles. (fig. 7)
Crevice tool, small nozzle and small brush
1 Connect the crevice tool (1), the small nozzle (2) or the small brush (3) directly to the
handgrip or to the tube. (fig. 8)
Accessory holder
1 The accessory holder can simply be snapped onto the handgrip. (fig. 9)
◗ There are two ways to store accessories in the accessory holder.
2 The crevice tool and small nozzle can be stored in the accessory holder by pushing them into
the holder. To detach them, pull them out of the holder. (fig. 10)
Please note the way in which the small nozzle must be placed in the accessory holder.
3 Instead of the small nozzle, the small brush can be stored in the accessory holder by pushing
it into the holder. (fig. 11)
Animal brush (specific types only)
While combing your dog or cat with the animal brush, dirt, loose hairs and knots will be removed.
Regular combing will keep the fur healthy.
1 Connect the animal brush to the handgrip ('click'). (fig. 12)
2 Place the vacuum cleaner as far away from the dog or cat as possible. Set the suction power
to the lowest setting.
3 For optimal results, move the brush through the fur of the cat or dog in one direction.
4 You can remove hairs from the animal brush by detaching it from the appliance and vacuum
cleaning it. (fig. 13)
7ENGLISH
Active Fragrance Control (specific types only)
The scent granules have been specially developed for use in your Philips vacuum cleaner. Only use
the s-fresh™ scent granules from Philips in your vacuum cleaner.
If the vacuum cleaner is equipped with Active Fragrance Control, keep it out of the reach of
children. Don't let children play with the appliance. Store the vacuum cleaner in a locked
cupboard if there are small children in the house.
These granules are not edible.
In case of eye contact, flush immediately with plenty of water.
Filling the cartridge
1 Place your thumb and index finger on the sides of the cartridge. Remove the cartridge from
the holder by pressing on the disc. (fig. 14)
Page 8

8 ENGLISH
2 Remove the cap of the cartridge by pulling while applying pressure on the small pressing
points. (fig. 15)
3 Open the package at the small opening at the top.
4 Fill the cartridge with the content of one whole package of scent granules.
5 Close the cartridge by putting the cap back onto it ('click').
6 Re-insert the cartridge into the holder ('click'). It only fits into the holder in one way. (fig. 16)
◗ Replace the granules when the cartridge no longer emits any fragrance.
Setting the amount of fragrance
1 You can set the amount of fragrance by turning the cartridge forwards (maximum emission)
and backwards (minimum emission). (fig. 17)
2 When you store the vacuum cleaner or don't want any fragrance to be emitted, close the
cartridge by turning it backwards until the openings of the cartridge are no longer visible.
Using the appliance
Adjusting suction power
1 You can adjust the suction power, while vacuum cleaning, with the slide control on top of the
appliance. (fig. 18)
2 Use maximum suction power for vacuum cleaning very dirty carpets and hard floors.
3 Use minimum power for vacuum cleaning curtains, table carpets, etc.
Infrared remote control (specific types only)
1 Place the batteries in the battery compartment. (fig. 19)
Make sure the - and + poles are pointing in the right direction.
◗ With the infrared remote control you can set the suction power to one of 5 different suction
power settings.When you switch the appliance on, it will always start running at the highest
suction power setting.
2 By pushing the - button, you will reduce the suction power by one setting. (fig. 20)
3 By pushing the + button, you will increase the suction power by one setting. (fig. 21)
4 Push the standby button to temporarily switch the vacuum cleaner off, for instance when you
have to move some furniture. (fig. 22)
5 To continue vacuum cleaning, simply press the - button or the + button.The appliance will
start operating at the previously selected suction power setting again.
Parking the tube
1 By inserting the ridge on the nozzle into the parking slot, you can park the tube in a
convenient position. (fig. 23)
Storage
1 You can put the appliance in upright position and attach the nozzle to the appliance by
inserting the ridge on the nozzle into the slot. (fig. 24)
Page 9

Replacement
The dustbag
1 Replace the dustbag as soon as the dustbag-full indicator changes colour. (fig. 25)
The dustbag is full when the colour of the indicator has changed when the nozzle is not placed
on the floor.
2 Switch the appliance off.
3 Open the cover by pulling it upwards. (fig. 26)
Place your fingers at the front of the cover and press with your thumb on the ridge on top of the
cover.
4 Lift the dustbag holder out of the appliance. (fig. 27)
Make sure you hold the dustbag upright when lifting it out of the appliance.
5 Remove the full dustbag from the holder by pulling the cardboard tag. (fig. 28)
When you do this, the dustbag will be automatically sealed.
6 Slide the cardboard of the new dustbag into the two grooves of the dustbag holder as far as
possible. Re-insert the dustbag holder into the vacuum cleaner. (fig.29)
You cannot close the cover if no dustbag has been inserted.
The mains cord
If the mains cord of the appliance is damaged, it must always be replaced by Philips or a service
centre authorised by Philips, as special tools and/or parts are required.
Cleaning and maintenance of filters
Motor Protection Filter
Every time you empty or replace the dustbag, clean the Permanent Motor Protection Filter.
1 Remove the dustbag holder with the dustbag. (fig. 27)
2 Take the Motor Protection Filter holder out of the appliance and clean the filter by shaking it
over a dustbin. (fig. 30)
3 Press the filter holder with the clean filter firmly into place to ensure that it fits properly at
the bottom. (fig. 31)
4 Place the dustbag holder with the dustbag back into the appliance.
Activated Carbon Filter (specific types only)
Instead of with the Motor Protection Filter, some appliances are equipped with an Activated Carbon
Filter.This filter neutralises smells produced by dir t in the dustbag.
1 Replace the Activated Carbon Filter every 6 months or when you notice that smell
absorption becomes less effective.
2 To replace the Activated Carbon Filter, see the Motor Protection Filter section, above. Instead
of cleaning the filter, you have to insert a new filter.
Motor Outlet Filter
The AFS Micro Filter located in the back of this appliance filters a large par t of the smallest particles
from the exhaust air by means of its electrostatically charged fibres.
9ENGLISH
Page 10

10 ENGLISH
1 Replace the AFS Micro Filter every six months
2 Open the filter grille. (fig.32)
3 Remove the old filter. (fig. 33)
4 Insert the new filter into the appliance.
5 Close the filter grille and push the left and right bottom corners until they snap home.
(fig. 34)
HEPA filter (specific types only)
Instead of with the AFS Micro Filter, this appliance can also be equipped with the special HEPA filter.
The HEPA Filter is able to remove at 99,99% of all particles down to 0.0003 mm in size from the
outlet air.This not only includes normal house dust, but also harmful microscopic vermin such as
house dust mites and their excrements, which are well-known causes of respirator y allergies.
1 Replace the HEPA Filter as soon as the pilot light of the filter-full indicator goes on (specific
types only). (fig. 35)
The HEPA Filter can be replaced in the same way as the AFS Micro Filter.
Ordering accessories
If you have any difficulties obtaining dustbags, filters or other accessories for this appliance, please
contact the Philips Customer Care Centre in your country or consult the worldwide guarantee
leaflet.
Ordering dustbags
- Philips s-bag™ paper dustbags are available under type number FC8021 (883802100000).
- Philips Clinic s-bag™ high filtration dustbags are available under type number FC8022
(883802201010).
- Philips Anti-odour s-bag™ paper dustbags are available under type number FC8023
(883802301010).
Ordering filters
- AFS Micro Filters are available under type number FC8030 (432200492910).
- HEPA Filters are available under type number FC8031 (432200492920).
- Activated Carbon Filters are available under type number FC8033 (48224802145).
Ordering scent granules
- Replacement kits with 4 packages of scent granules are available under type number FC8025
(883802501010).
Environment
To make recycling possible, the plastics used for this appliance have been coded.
The cardboard packaging has been made of recycled material and is fully recyclable.
Types with an infrared remote control only: remove the batteries when you discard the appliance.
Do not throw the batteries away with the normal household waste, but hand them in at an official
collection point.
Information & service
If you need information or if you have a problem, please visit the Philips Web site at www.philips.com
or contact the Philips Customer Care Centre in your country (you will find its phone number in the
worldwide guarantee leaflet). If there is no Customer Care Centre in your country, turn to your local
Philips dealer or contact the Service Depar tment of Philips Domestic Appliances and Personal Care BV.
Page 11

Troubleshooting guide
◗ The suction power is insufficient:
1 Check if the suction power control is in the required position (see 'Using the appliance').
2 Check if the dustbag is full. If necessary, replace the dustbag.
3 Check if the filters need to be replaced.
4 Check if the nozzle, tube or hose is blocked up.
5 To remove the obstruction, disconnect the blocked-up item and connect it (as far as possible)
in reverse position. Switch the vacuum cleaner on to make the airflow suck the obstructing
material out of the blocked-up item. (fig. 36)
◗ The infrared remote control does not function (specific types only)
™ It is possible that the batteries are not making proper contact or have not been inserted in the pro-
per way.
6 Remove the lid of the battery compartment and push the batteries back into place.
Make sure that the - and + poles are pointing in the right direction. (fig. 37)
™ The batteries are empty.
7 Replace the batteries. (fig. 37)
11ENGLISH
Page 12

12
◗ ™
◗
◗
◗
◗
◗
1
2
1
2
1
2
3
1
1
2
3
◗
Page 13

13
1
1
◗
2
3
1
2
3
4
™
1
2
3
4
5
6
◗
1
2
Page 14

14
◗
1
2
3
1
2
3
4
5
1
1
1
2
3
4
5
6
Page 15

15
1
2
1
2
3
4
1
2
1
2
3
4
5
1
Page 16

16
™
™
www.philips.com
◗
1
2
3
4
5
◗
™
6
™
7
Page 17

◗ ™
◗
◗
◗
◗
◗
1
2
17
1
2
1
2
3
1
1
2
Page 18

18
◗
◗
3
1
1
2
3
1
2
3
4
™
1
2
3
4
5
Page 19

19
6
◗
1
2
1
2
3
1
◗
2
3
4
5
1
1
1
2
3
Page 20

20
4
5
6
1
2
1
2
3
4
1
2
Page 21

21
1
2
3
4
5
1
™
™
Page 22

22
◗
™
™
1
2
3
4
5
6
7
Page 23

232425
Page 24

Page 25

Page 26

26
21
25
29
22
26
30
23
27
31
24
28
32
33
37
34
35
36
Page 27

27
Page 28

u
www.philips.com
4222 003 30321
 Loading...