

Page 1

FC8796, FC8794,
FC8792
Page 2

Page 3

2
3
19
2022
9
4
5
6 7
8
18
23
21
1
16
17
14
15
13
11 12
10
1
Page 4

Page 5

English 6
简体中文
16
Page 6

6
English
Introduction
Introduction
Congratulations on your purchase and welcome to Philips! To fully benefit from the support that
Philips offers, register your product at www.philips.com/welcome.
General description
1 Handle of dust container lid
2 Dust container lid
3 Filter unit
4 Dust container
5 Edge of top cover
6 Docking station sensor
7 Suction opening
8 Start/stop button
9 Side brushes
10 Shafts for mounting the side brushes
11 Front wheel
12 Suction opening
13 Side wheels
14 Sensors
15 Cover of the battery compartment
16 Mopping attachment (FC8796, FC8794)
17 Mopping pad (FC8796, FC8794)
18 Small plug
19 Adapter
20 Cleaning brush
21 Remote control
22 AAA batteries for remote control
23 Docking station
Remote control
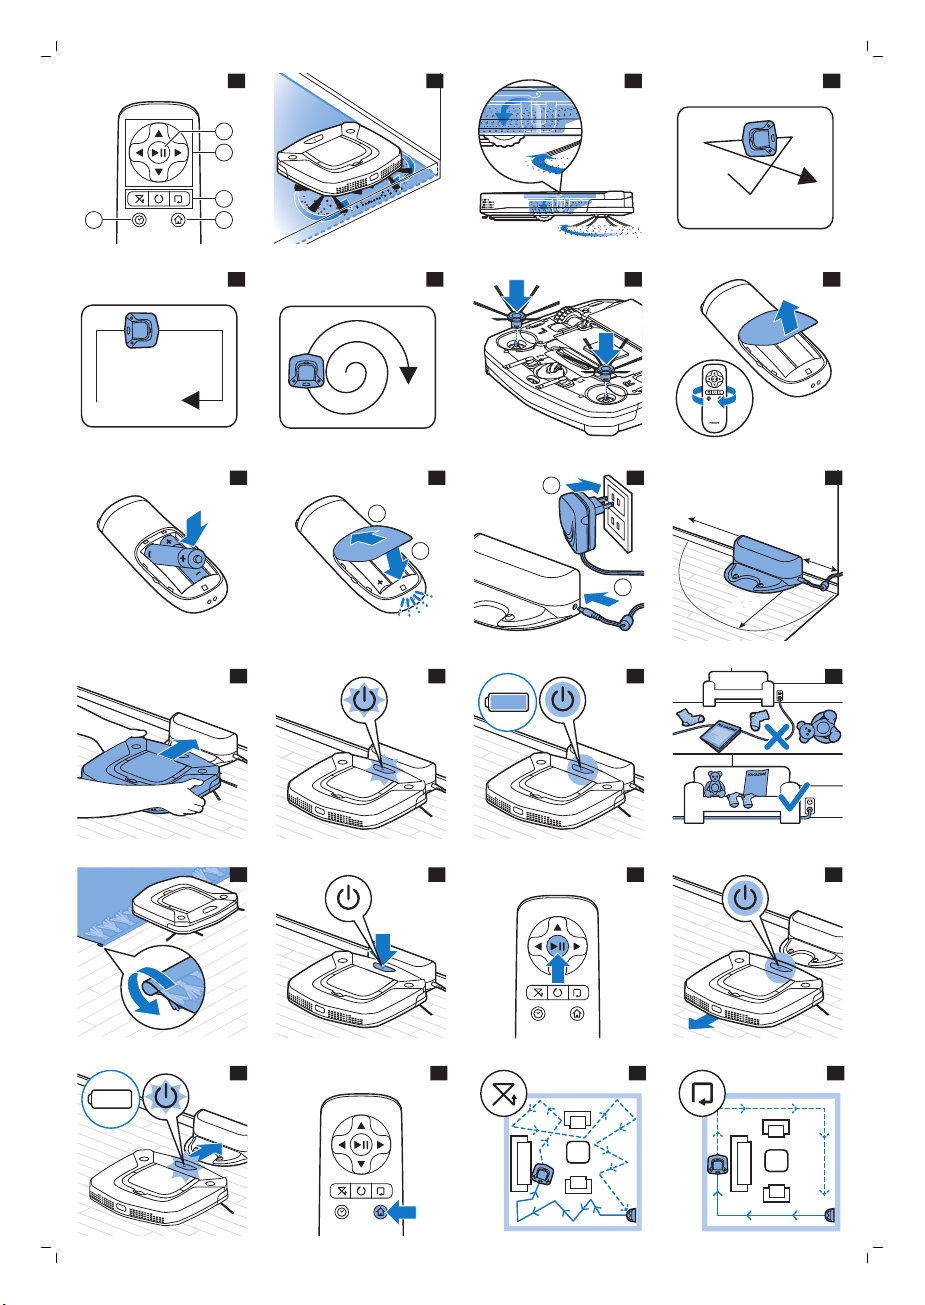
You can operate the robot with the remote control (Fig. 2). It has the following buttons:
1 Start/stop button
2 Navigation buttons
3 Cleaning mode buttons
4 Docking button
5 24-hour scheduler
How your robot works
What your robot cleans
This robot is equipped with features that make it a suitable cleaner to help you clean the floors in your
home.
The robot is especially suitable for cleaning hard floors, such as wooden, tiled or linoleum floors. It
may experience problems cleaning soft floors, such as carpet or rugs. If you use the robot on a carpet
English
Page 7

English
or rug, please stay close by the first time to see if the robot can deal with this type of floor. The robot
also needs supervision when you use it on very dark or shiny hard floors.
How your robot cleans
Cleaning system
The robot has a 3-stage cleaning system to clean your floors efficiently.
-
The two side brushes help the robot clean in corners and along walls. They also help to remove dirt
from the floor and move it towards the suction opening (Fig. 3).
-
The suction power of the robot picks up loose dirt and transports it through the suction opening
into the dust container (Fig. 4).
-
Types FC8796 and FC8794 come with a mopping attachment that can be attached to the robot to
mop your hard floor.
Cleaning patterns
In its auto cleaning mode, the robot uses an automatic sequence of cleaning patterns to clean each
area of the room optimally. The cleaning patterns it uses are:
1 Random pattern (Fig. 5)
2 Wall-following pattern (Fig. 6)
3 Spot-cleaning pattern (Fig. 7)
In its auto cleaning mode, the robot uses these patterns in a fixed sequence: random pattern, wallfollowing pattern, and spot-cleaning pattern.
When the robot has completed this sequence of patterns, it starts moving in random pattern again.
The robot continues to use this sequence of patterns to clean the room until the rechargeable battery
runs low, or until it is switched off manually.
7
Note: You can also select each mode individually by pressing the appropriate button on the remote
control (see 'Cleaning mode selection'). The robot continues cleaning in the selected cleaning mode
until you switch the robot off and on again.
How your robot avoids height differences
The robot has five drop-off sensors in its bottom. It uses these drop-off sensors to detect and avoid
height differences such as staircases.
Note: It is normal for the robot to move slightly over the edge of a height difference, as its front dropoff sensor is located behind the bumper.
Caution: In some cases, the drop-off sensors may not detect a staircase or other height difference
in time. Therefore monitor the robot carefully the first few times you use it, and when you operate it
near a staircase or another height difference. It is important that you clean the drop-off sensors
regularly to ensure the robot continues to detect height differences properly (see 'Cleaning the
robot').
Before first use
Mounting the side brushes
1 Unpack the side brushes and place the robot upside down on a table or on the floor.
2 Push the side brushes onto the shafts on the bottom of the robot (Fig. 8).
Page 8

8
English
Note: Make sure you attach the side brushes properly. Press them onto the shaft until you hear
them lock into position with a click.
Placing the batteries in the remote control
The remote control works on two AAA batteries.
1 Push the tab (1) to unlock the battery compartment lid (2) and remove the battery compartment lid
(Fig. 9).
2 Insert two AAA batteries (Fig. 10).
Note: Make sure the + and - poles point in the right direction.
3 To reattach the battery compartment lid, first insert the lug into the opening in the rim of the
compartment (1) and then push down the lid (2) until it locks with a click (Fig. 11). Now the remote
control is ready for use.
Preparing for use
Installing the docking station
1 Insert the small plug of the adapter into the socket on the docking station (1) and insert the adapter
into the wall socket (2) (Fig. 12).
2 Place the docking station on a horizontal, level floor against a wall.
Note: Make sure that there are no obstacles or height differences 150 cm in front, 30 cm to the right
and 100 cm to the left of the docking station (Fig. 13).
Charging
1 Place the robot on the plugged-in docking station (Fig. 14).
2 The start/stop button starts flashing (Fig. 15).
3 When the rechargeable battery is fully charged, the start/stop button lights up continuously (Fig.
16).
Preparing the room for a cleaning run
-
Before you start the robot on its cleaning run, make sure that you remove all loose and fragile
objects from the floor (Fig. 17).
-
Remove all cables, wires and cords from the floor to prevent the robot from getting entangled in
them.
-
If there is a rug with tassels in the room you want the robot to clean, fold the tassels under the rug
to prevent the robot from getting stuck on the tassels and to prevent the rug from getting damaged
(Fig. 18).
Using your robot
Using the remote control
1 Place the robot on the docking station or press the start/stop button on the robot (Fig. 19) to
activate the robot.
-
Now you can use the remote control to operate the robot.
Page 9

English
Starting and stopping
1 Press the start/stop button on the remote control (Fig. 20).
2 The start/stop button on the robot lights up continuously and the robot starts cleaning (Fig. 21).
3 The robot cleans in auto-cleaning mode until its battery runs low. In auto cleaning mode, it follows
repeated sequences of random, wall-following and spiral movements.
4 When the battery runs low, the start/stop button starts flashing quickly and the robot starts
searching for the docking station to charge (Fig. 22).
5 You can also press the start/stop button to interrupt or stop the cleaning run. If you press the
start/stop button again and there is still enough energy in the rechargeable battery, the robot
continues cleaning in the auto cleaning mode.
6 To make the robot return to the docking station before the rechargeable battery runs low, press
the docking button on the remote control (Fig. 23).
7 The start/stop button starts flashing and the robot returns to the docking station.
Cleaning mode selection
This robot has three individual cleaning modes that can each be activated by pressing the appropriate
button on the remote control.
Random mode
In this mode, the robot cleans the room in a mixed pattern of straight and crisscross movements (Fig.
24).
Wall-following mode
In this mode, the robot follows the walls of the room to give the area alongside the walls an extra
clean (Fig. 25).
9
Spot-cleaning mode
In this mode, the robot moves in an expanding spiral from a central point to clean the area thoroughly
(Fig. 26).
Note: The manually selected modes are only active for a couple of minutes. After that, the robot
switches to auto-cleaning mode.
Manual driving
You can drive the robot manually with buttons on the remote control.
1 Use the arrow buttons above and below and to the left and right of the start/stop button on the
remote control to navigate the robot through the room. (Fig. 27)
Note: Be careful when you drive the robot manually close to height differences and staircases.
Using the 24-hour scheduler
The 24-hour scheduler can be activated with the remote control. Make sure the robot is in standby
mode and is not positioned on the docking station.
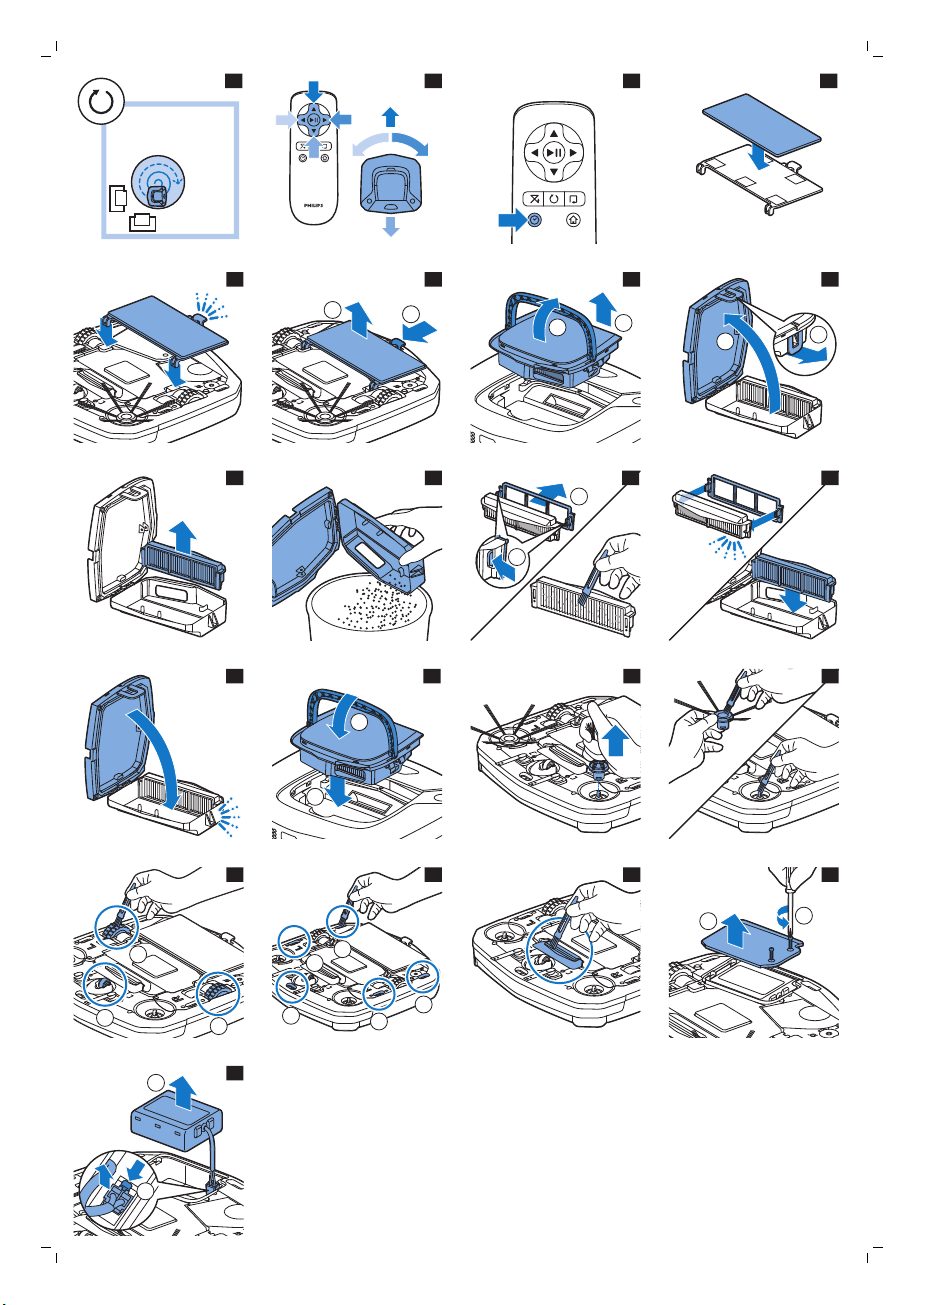
1 Press the 24-hour scheduler button (Fig. 28) on the remote control to activate the 24-hour
scheduler.
-
When you activate the 24-hour scheduler, you hear a sound and the display starts to flash
briefly every few seconds.
Page 10

10
English
-
The robot will start a cleaning run 24 hours after you activated the 24-hour scheduler. It will
continue to start a cleaning run at the same time every 24 hours until you deactivate the
24-hour scheduler.
2 To deactivate the 24-hour scheduler, press the 24-hour scheduler button. You will hear a sound
and the display will light up continuously to show the robot is in standby mode and the 24-hour
scheduler is no longer active.
Mopping with the robot
Types FC8796 and FC8794 come with a mopping attachment and a mopping pad for wet cleaning of
hard floors.
Attaching the mopping pad
1 Soak the mopping pad in water or wet the mopping pad under the tap. You can add a few drops of
a readily available floor cleaner that is suitable for your floor.
2 Squeeze the mopping pad thoroughly to ensure it is only damp instead of wet.
3 Attach the damp mopping pad to the mopping attachment by pushing the Velcro fasteners of the
mopping pad onto Velcro fasteners of the mopping attachment (Fig. 29).
4 Insert the attachment lugs of the mopping attachment into the two attachment holes located just
behind the wheels. Then press down until you hear a click (Fig. 30).
Cleaning floors with the mopping attachment
Note: To clean hard floors with the mopping attachment, you have to start the robot from a point in
the room you wish to clean. You cannot start the robot from its docking station with the mopping pad
attached.
1 Just press the start/stop button on the remote control to start the robot.
-
The robot continues mopping until its battery runs low and the robot stops.
Note: Detach the mopping pad and the mopping attachment before you send the robot to the
docking station with the docking button on the remote control or before you place the robot on the
docking station manually.
Detaching the mopping attachment
1 To detach the mopping attachment, press the tab (1) and pull up the mopping attachment to
remove it (2) (Fig. 31).
2 Pull the mopping pad off the mopping attachment.
3 To clean the mopping pad, wash it in the washing machine on a gentle cycle at a temperature of
60°C max.
Alarm signal
If the robot gets into trouble while cleaning (e.g., because a wheel jams or is no longer in contact with
the floor, or because a sensor can no longer detect the floor), you will hear a sound and the robot
stops. Press the start/stop button to switch the robot to standby mode and solve the problem that
causes the alarm signal, for instance by removing the obstacle that blocks the wheel, cleaning the
sensors, or picking up the robot and putting it down in a different place.
Page 11
English
Cleaning and maintenance
Emptying and cleaning the dust container
Empty and clean the dust container when the dust container is full.
1 Pull up the handle of the dust container lid and lift the dust container out of the dust container
compartment (Fig. 32).
2 Pull the tab on the side of the dust container to open the lid (Fig. 33).
3 Remove the filter unit from the dust container (Fig. 34).
4 Shake the dust container over a dustbin to empty it (Fig. 35).
5 You can clean the dust container under a lukewarm tap.
Caution: Do not clean the dust container in the dishwasher.
6 To clean the filters thoroughly, take the filter unit apart by pressing the tabs located on both sides
of the filter unit and taking the dust filter off the EPA filter. Then clean the EPA filter with the
cleaning brush supplied (Fig. 36).
7 Reassemble the filter unit, snap the EPA filter into the dust filter. Then place the filter unit back into
the dust container (Fig. 37).
Note: If you cleaned the dust container under the tap, please make sure it is dry before you reinsert
the filter unit.
8 Put the lid on the dust container and make sure it locks into place with a click (Fig. 38).
9 Put the dust container back into the dust container compartment and fold down the dust
container handle (Fig. 39).
Caution: Always make sure the filter unit is present inside the dust container. If you use the robot
without the filter unit inside the dust container, the motor will be damaged.
11
Cleaning the robot
To maintain good cleaning performance, you have to clean the drop-off sensors, the wheels, the side
brushes and the suction opening from time to time.
1 Place the robot upside down on a flat surface.
2 To clean the side brushes, grab them by the bristles and pull them off their shafts (Fig. 40).
3 Clean the side brushes and the shafts of the side brushes with the cleaning brush supplied (Fig. 41).
4 Remove dust or fluff from the front wheel and side wheels with the cleaning brush supplied (Fig.
42).
5 Remove dust or fluff from the dust or fluff from the drop-off sensors with the cleaning brush
supplied (Fig. 43).
Note: It is important that you clean the drop-off sensors regularly. If the drop-off sensors are dirty,
the robot may fail to detect height differences or staircases.
6 Use the cleaning brush supplied to clean the suction opening (Fig. 44).
7 Check the side brushes and the bottom of the robot for any sharp objects that could damage your
floor.
Ordering accessories
To buy accessories or spare parts, visit www.shop.philips.com/service or go to your Philips dealer.
You can also contact the Philips Consumer Care Center in your country (see the international warranty
leaflet for contact details).
Page 12

12
English
Replacement
Replacing the filter
Replace the EPA filter if it is very dirty or damaged (see 'Emptying and cleaning the dust container'). To
obtain a new EPA filter, go to www.philips.com/support.
Replacing the rechargeable battery
The rechargeable battery of the robot may only be replaced by qualified service engineers. Take the
robot to an authorized Philips service center to have the battery replaced when you can no longer
recharge it or when it runs out of power quickly. You can find the contact details of the Philips
Consumer Care Center in your country in the international warranty leaflet.
Replacing the side brushes
Replace the side brushes after some time to ensure proper cleaning results.
Note: Always replace the side brushes when you notice signs of wear or damage. We also recommend
that you replace both side brushes at the same time. To obtain new side brushes, go to
www.philips.com/support.
1 To replace the side brushes, grab the old side brushes by the bristles and pull them off their shafts.
2 Push the new side brushes onto the shafts.
Replacing the batteries of the remote control
1 Push the tab (1) to unlock the battery compartment lid (2) and remove the battery compartment lid
(Fig. 9).
2 Remove the empty AAA batteries from the battery compartment.
3 Insert two new AAA batteries (Fig. 10).
Note: Make sure the + and - poles point in the right direction.
4 To reattach the battery compartment lid, first insert the lug into the opening in the rim of the
compartment (1) and then push down the lid (2) until it locks with a click (Fig. 11). Now the remote
control is ready for use.
Note: Dispose of empty disposable batteries according to the local rules in your country.
Recycling
-
Do not throw away the product with the normal household waste at the end of its life, but hand it
in at an official collection point for recycling. By doing this, you help to preserve the environment.
-
This product contains a built-in rechargeable battery which shall not be disposed of with normal
household waste. Please take your product to an official collection point or a Philips service center
to have a professional remove the rechargeable battery.
-
Follow your country’s rules for the separate collection of electrical and electronic products and
rechargeable batteries. Correct disposal helps prevent negative consequences for the environment
and human health.
Page 13
English
Removing the rechargeable battery
Only remove the rechargeable battery when you discard the product. Before you remove
the battery, make sure that the product is disconnected from the wall socket and that
the battery is completely empty.
Take any necessary safety precautions when you handle tools to open the product and
when you dispose of the rechargeable battery.
Removing the rechargeable battery
Warning: Only remove the rechargeable battery when you discard the appliance. Make
sure the battery is completely empty when you remove it.
To remove the rechargeable battery, follow the instructions below. You can also take the robot to a
Philips service center to have the rechargeable battery removed. Contact the Philips Consumer Care
Center in your country for the address of a service center near you.
1 Let the robot run until the rechargeable battery is empty to make sure that the rechargeable
battery is completely discharged before you remove it and dispose of it.
2 Undo the screws of the battery compartment lid and remove the lid (Fig. 45).
3 Lift out the rechargeable battery and disconnect it (Fig. 46).
4 Take the robot and the rechargeable battery to a collection point for electrical and electronic
waste.
13
Troubleshooting
This chapter summarizes the most common problems you could encounter with the appliance. If you
are unable to solve the problem with the information below, visit www.philips.com/support for a list
of frequently asked questions or contact the Consumer Care Center in your country.
Problem
The robot does not start
cleaning when I press the
start/stop button.
The robot does not
respond when I press
one of the buttons.
The robot beeped and
stopped.
Possible cause Solution
The rechargeable battery is
empty.
The robot could not find the
docking station and the
battery ran out.
One or both wheels are stuck. Press the start/stop button. Remove the
One or both side brushes are
stuck.
The robot was lifted while it
was cleaning.
Charge the rechargeable battery (see
'Preparing for use').
Place the robot on the plugged-in
docking station. After a few seconds, the
robot beeps and the display lights up.
fluff, hair, thread or wire that is caught
around the wheel suspension.
Clean the side brushes (see 'Cleaning
the robot').
Press the start/stop button. Place the
robot on the floor. Then press the
start/stop button to make the robot
resume cleaning.
Page 14
14
English
Problem Possible cause Solution
The robot does not clean
properly.
The bristles of one or both side
brushes are crooked or bent.
Soak the brush or brushes in warm
water for a while. If this does not restore
the bristles to their proper shape,
replace the side brushes (see 'Replacing
the side brushes').
The filter in the dust container
is dirty.
The suction opening in the
bottom of the dust container is
clogged.
The front wheel is jammed
with hair or other dirt.
The robot is cleaning a very
dark or shiny surface, which
triggers the drop-off sensors.
This causes the robot to move
in an unusual pattern.
The robot is cleaning a floor
that reflects sunlight quite
strongly. This triggers the dropoff sensors and causes the
robot to move in an unusual
pattern.
Disassemble the filter unit. Clean the
dust filer and the EPA filter with a
toothbrush with soft bristles. You can
also rinse the dust filter under a tap.
If cleaning the EPA filter does not help
anymore, replace the filter with a new
one. We advise you to replace the EPA
filter at least once a year.
Clean the suction opening (see 'Cleaning
the robot').
Clean the front wheel (see 'Cleaning the
robot').
Press the start/stop button and then
move the robot to a lighter colored
piece of the floor. If the problem
continues to occur on lighter colored
floors, please go to
www.philips.com/support or contact the
Consumer Care Center in your country.
Close the curtains to block sunlight from
entering the room. You can also start
cleaning when the sunlight is less bright.
The rechargeable battery
can no longer be charged
or runs empty very fast.
The robot is moving in
circles.
The rechargeable battery has
reached the end of its life.
The robot is in spot-cleaning
mode.
Have the rechargeable battery replaced
by a Philips service center (see
'Replacing the rechargeable battery').
This is normal behavior. The spotcleaning mode can be activated when a
lot of dirt is detected on the floor for a
thorough clean. It is also part of the auto
cleaning mode. After approximately one
minute the robot resumes its normal
cleaning pattern. You can also stop the
spot-cleaning mode by selecting a
different cleaning mode on the remote
control.
You can also stop the spot-cleaning
mode by selecting a different cleaning
mode on the remote control.
Page 15

Problem Possible cause Solution
The robot cannot find the
docking station.
There is not enough room for
the robot to navigate towards
the docking station.
Try to find another place for the docking
station (see 'Installing the docking
station').
English
15
The robot is still actively
searching.
Give the robot around 20 minutes to
return to the docking station.
Page 16

简体中文
16
说明
简介
感谢您的惠顾,欢迎光临飞利浦! 为了让您能充分享受飞利浦提供的支持,请在 www.philips.com/welcome
上注册您的产品。
基本说明
1 集尘桶盖手柄
2 集尘桶盖
3 滤网部件
4 集尘桶
5 顶盖边缘
6 底座传感器
7 吸口
8 启动/停止按钮
9 侧毛刷
10 用于安装侧毛刷的轴
11 前轮
12 吸口
13 侧轮
14 传感器
15 电池仓盖
16 拖地附件(FC8796,FC8794)
17 清洁布(FC8796,FC8794)
18 小插头
19 适配器
20 清洁刷
21 遥控器
22 遥控器的 AAA 电池
23 底座
遥控器
您可以使用遥控器 (图 2)操作智能自动真空吸尘器。 它具有以下按钮:
1 启动/停止按钮
2 导航按钮
3 清洁模式按钮
4 插接按钮
5 24 小时调度器
扫地机器人如何工作
扫地机器人清洁哪些物体
本扫地机器人具有许多功能,是一款适合帮助您在家中清洁地板的理想清洁工具。
此扫地机器人尤其适合清洁硬地板,例如木制、瓷砖或油毡地板。 清洁软地板时可能会出现问题,例如地毯
或地垫。 如果您在地毯或地垫上使用扫地机器人,请在第一次使用之前先留心观察扫地机器人是否能够处理
这种类型的地板。 另外,当您在极暗或有光泽的坚硬地板上使用扫地机器人时,需要对其加以监控。
简体中文
Page 17

简体中文
智能自动真空吸尘器如何清洁
清洁系统
智能自动真空吸尘器利用 3 重清洁系统来高效清洁地面。
-
两个侧毛刷有助于智能自动真空吸尘器清洁角落以及墙角沿线。 它们还可帮助清除地板上的灰尘,并将其
移向吸口 (图 3)。
-
智能自动真空吸尘器的吸力可吸入松动的污垢,然后通过吸口将污垢输送到集尘桶 (图 4)。
-
FC8796 和 FC8794 类型都附带一个可连接到智能自动真空吸尘器的拖地附件,用于对硬地板进行拖地清
洁工作。
清洁方向图
在自动清洁模式下,智能自动真空吸尘器会使用自动的清洁方向图顺序,以最适宜的方式清洁房间内的各个区
域。 所使用的清洁方向图包括:
1 随机方向图 (图 5)
2 沿墙方向图 (图 6)
3 局部清洁方向图 (图 7)
在自动清洁模式下,智能自动真空吸尘器以固定顺序使用这些方向图: 随机方向图、沿墙方向图和局部清洁
方向图。
如果智能自动真空吸尘器已按此顺序使用完方向图,则将重新以随机方向图开始移动。 智能自动真空吸尘器
会继续按该顺序使用方向图来清洁房间,直至充电电池的电量不足或者将其手动关闭。
注意: 您还可以按遥控器 (请参见 '清洁模式选择')上的相应按钮,分别选择各个模式。 智能自动真空吸尘器
持续以选择的清洁模式进行清洁,直至您将其关闭然后重新打开。
智能自动真空吸尘器如何避开高度差
智能自动真空吸尘器底部配有五个跌落传感器。 智能自动真空吸尘器使用这些跌落传感器检测和避开楼梯等
有高度差的地方。
17
注意: 智能自动真空吸尘器轻轻移动以越过高度差的边缘是正常现象,因为正面的跌落传感器位于缓冲装置
后面。
警告: 在某些情况下,跌落传感器可能无法及时检测到楼梯或其他有高度差的地方。 因此,在最初几次使用
以及在楼梯或其他有高度差的地方附近使用时,应密切监控智能自动真空吸尘器的工作。 请务必定期清洁跌
落传感器,以确保智能自动真空吸尘器能继续正确 (请参见 '清洁智能自动真空吸尘器')检测到高度差。
首次使用之前
安装侧毛刷
1 打开侧毛刷包装,将智能自动真空吸尘器正面朝下置于桌子或地板上。
2 将侧毛刷推入智能自动真空吸尘器 (图 8)底部的轴上。
注意: 确保您已正确安装侧毛刷。 将侧毛刷按在轴上,直至您听到其咔哒一声锁定到位。
将电池装入遥控器
遥控器由两节 AA 电池供电。
1 按释放钮 (1) 打开电池舱盖 (2),并卸下电池仓盖 (图 9)。
2 插入两节 AA 电池 (图 10)。
注意: 确保电池的正负极没有装反。
Page 18

简体中文
18
3 要重新安装电池仓盖,请先将凸缘插入仓盖边缘 (1) 中的开口,然后向下推仓盖 (2),直至锁定到位并发出
“咔哒”一声 (图 11)。 遥控器就可以使用了。
使用准备
安装底座
1 将适配器的小插头插入底座上的插座 (1),将适配器插入电源插座 (2) (图 12)。
2 将底座放在靠墙的水平地板上。
注意: 确保底座 (图 13)正面 150 厘米、右侧 30 厘米、左侧 100 厘米没有障碍物或高度差。
充电
1 将智能自动真空吸尘器置于接通电源的底座 (图 14)上。
2 启动/停止按钮开始闪烁 (图 16)。
3 当充电电池充满电时,启动/停止按钮将持续亮起 (图 17)。
准备房间以进行清洁操作
-
在启动智能自动真空吸尘器进行清洁操作之前,确保清除地板上的 (图 18)所有散乱和易碎物体。
-
移除地板上的所有电缆、电线和绳索,以防止智能自动真空吸尘器被缠绕在其中。
-
如果您要使用智能自动真空吸尘器清洁的房间里铺有带流苏的地毯,请将流苏折叠到地毯下方,以防止智
能自动真空吸尘器被流苏卡住,或损坏 (图 19)地毯。
使用扫地机器人
启动和停止
1 按遥控器 (图 20)上的启动/停止按钮。
2 智能自动真空吸尘器上的启动/停止按钮持续亮起,吸尘器开始清洁 (图 21)。
3 智能自动真空吸尘器会以自动清洁模式进行清洁,直至电池电量不足。 在自动清洁模式下,智能自动真空
吸尘器会重复按照随机、沿墙和螺旋移动的顺序进行清洁。
4 如果电池电量不足,启动/停止按钮将开始快速闪烁,智能自动真空吸尘器会开始搜索底座进行充电 (图
22)。
5 您也可以按启动/停止按钮中断或停止清洁操作。 如果再次按启动/停止按钮且充电电池仍有足够的电量,
则智能自动真空吸尘器将继续以自动清洁模式进行清洁。
6 要使智能自动真空吸尘器在充电电池电量不足前返回到底座,请按遥控器 (图 23)上的插接按钮。
7 启动/停止按钮开始闪烁,同时智能自动真空吸尘器会返回到底座。
清洁模式选择
此智能自动真空吸尘器提供三种单独清洁模式,每种模式均可通过按遥控器上的相应按钮激活。
随机模式
在该模式下,智能自动真空吸尘器将使用直线运动和交叉运动 (图 24)的混合模式清洁房间。
沿墙模式
在该模式下,智能自动真空吸尘器将沿着房间的墙壁对墙边区域进行特别清洁 (图 25)。
Page 19

简体中文
局部清洁模式
在该模式下,智能自动真空吸尘器将按照从一个中心点向外延伸螺旋移动,以彻底 (图 26)清洁区域。
注意: 手动选定的模式仅处于启用状态数分钟。 之后,智能自动真空吸尘器会切换到自动清洁模式。
手动驱动
您可以使用遥控器上的按钮手动驱动智能自动真空吸尘器。
1 使用遥控器启动/停止按钮的上、下、左、右箭头按钮在房间 (图 27)内对吸尘器进行导航。
注意: 当您手动驱动吸尘器靠近有高度差的地方和楼梯时,请小心谨慎。
使用 24 小时调度器
您可以使用遥控器激活 24 小时调度器。 请确保智能自动真空吸尘器处于待机模式,并且未置于底座之上。
1 按遥控器上的 24 小时调度器按钮 (图 28),激活 24 小时调度器。
-
激活 24 小时调度器后,您将听到声音并且显示屏会开始每隔几秒短暂闪烁一次。
-
在激活 24 小时调度器的 24 小时后,智能自动真空吸尘器会开始清洁操作。 它会每隔 24 小时在同一时
间开始清洁操作,直至您禁用 24 小时调度器。
2 如需禁用 24 小时调度器,请按 24 小时调度器按钮。 您将听到声音并且显示屏会持续亮起,表示智能自动
真空吸尘器已处于待机模式,而 24 小时调度器也不再处于激活状态。
使用智能自动真空吸尘器拖地
FC8796 和 FC8794 类型都附带一个拖地附件和一块清洁布,用于对硬地板进行湿拖清洁。
安装清洁布
1 将清洁布浸泡在水中,或在水龙头下打湿。 您可以滴上几滴适合您地板的现成的地板清洁剂。
2 彻底挤干清洁布的水,确保只潮不湿。
3 将潮而不湿的清洁布安装到拖地附件,方法是将清洁布的维可牢紧固件推动到拖地附件 (图 29)的维可牢紧
固件上。
4 将拖地附件的附件凸缘插入正好位于滚轮后面的两个附件孔中。 然后向下按直到您听到“咔哒”一声 (图
30)。
使用拖地附件清洁地板
19
注意: 要使用拖地附件清洁硬地板,您必须从要清洁的房间中的某个位置启动智能自动真空吸尘器, 而不能
从安装有清洁布的底座来启动吸尘器。
1 只需按遥控器上的启动/停止按钮,即可启动智能自动真空吸尘器。
-
智能自动真空吸尘器会一直拖地,直至电池电量不足才会停止工作。
注意: 在使用遥控器上的插接按钮将智能自动真空吸尘器引导至底座前,或在您手动将吸尘器置于底座前,
请卸下清洁布和拖地附件。
卸下拖地附件
1 要卸下拖地附件,请按释放钮 (1),并向上提拖地附件 (2) 以将其卸除 (图 31)。
2 将清洁布从拖地附件中抽出。
3 要清洗清洁布,请将其放入洗衣机中使用轻柔模式和最高 60°C 的水温清洗。
Page 20
简体中文
20
警报信号
如果智能自动真空吸尘器在清洁过程中出现故障(例如,由于滚轮阻塞或不再与地板接触,或者由于传感器无
法再检测到地板),您将会听到声音,吸尘器将会停止工作。 按启动/停止按钮将智能自动真空吸尘器切换到
待机模式,然后解决导致发出警报信号的问题,例如采用移除阻塞滚轮的障碍物,清洁传感器,或提起智能自
动真空吸尘器将其放在其他位置等方法。
清洁和保养
倒空并清洁集尘盒
集尘桶已满时,倒空并清洁集尘桶。
1 向上拉集尘桶盖手柄,从集尘桶仓 (图 32)中提出集尘桶。
2 抽出集尘桶侧面的卡舍,以打开盖子 (图 33)。
3 从集尘桶 (图 34)中取出滤网部件。
4 在垃圾箱上晃动集尘桶将其倒空 (图 35)。
5 您可以在微温水龙头下清洗集尘桶。
警告: 切勿在洗碗机中清洗集尘桶。
6 要彻底清洁滤网,请分离滤网部件,方法是按滤网部件两侧的卡舍,并从 EPA 过滤网中取出灰尘滤网。 然
后,使用随附的清洁刷 (图 36)清洁 EPA 过滤网。
7 重新组装滤网部件,并将 EPA 过滤网卡入灰尘滤网。 然后,将滤网部件重新装回集尘桶 (图 37)。
注意: 如果您在水龙头下清洗了集尘桶,请确保在重新插入滤网部件前,集尘桶是干燥的。
8 将盖子放在集尘桶上,并确保盖子锁定到位并听到“咔哒”一声 (图 38)。
9 将集尘桶放回集尘桶仓,并折叠集尘桶手柄 (图 39)。
警告: 务必确保集尘桶内已放置好滤网部件。 如果您在集尘桶内未放置滤网部件的情况下使用智能自动真
空吸尘器,则马达将会受损。
清洁智能自动真空吸尘器
为保持良好的清洁效果,您必须经常清洁跌落传感器、滚轮、侧毛刷和吸口。
1 将吸尘器倒置在平面上。
2 要清洁侧毛刷,请抓住刷毛并将其从轴 (图 40)上取下。
3 使用随附的 (图 41)清洁刷来清洁侧毛刷及侧毛刷轴。
4 使用随附的 (图 42)清洁刷来清除前轮和侧轮的灰尘或绒毛。
5 使用随附的 (图 43)清洁刷来清除跌落传感器上的灰尘或绒毛。
注意: 务必定期清洁跌落传感器。 如果跌落传感器变脏,吸尘器可能无法检测到高度差或楼梯。
6 使用随附的清洁刷来清洁吸口 (图 44)。
7 检查吸尘器的侧毛刷和底部是否存在可能会损坏地板的尖锐物体。
更换
订购配件
要购买附件或备件,请访问 www.shop.philips.com/service 或联系您的飞利浦经销商。 您还可以联系所在国
家/地区的飞利浦客户服务中心(请参阅全球保修卡了解详细联系信息)。
Page 21

简体中文
更换滤网
如果 EPA 过滤网很脏或损坏 (请参见 '倒空并清洁集尘盒'),请进行更换。 要获得新的 EPA 过滤网,请访问
www.philips.com/support。
更换侧毛刷
一段时间后,请更换侧毛刷,以确保正常的清洁效果。
注意: 发现磨损或损坏迹象时务必更换侧毛刷。 另外,建议您同时更换两个侧毛刷。 要获得新的侧毛刷,请
访问 www.philips.com/support。
1 如需更换侧毛刷,请抓住旧侧毛刷的刷毛将其从轴上拆下。
2 将新侧毛刷推到轴上。
更换充电电池
只有具备资格的服务工程师,才能更换扫地机器人的充电电池。 当充电电池无法继续充电或耗电很快时,请
将扫地机器人送往授权的飞利浦服务中心,以更换电池。 您可以在国际保修卡上找到您所在国家/地区的飞利
浦客户服务中心的详细联系信息。
更换遥控器的电池
1 按释放钮 (1) 打开电池舱盖 (2),并卸下电池仓盖 (图 9)。
2 从电池仓中取出电量耗尽的 AAA 电池。
3 插入两节新的 AAA 电池 (图 10)。
注意: 确保电池的正负极没有装反。
4 要重新安装电池仓盖,请先将凸缘插入仓盖边缘 (1) 中的开口,然后向下推仓盖 (2),直至锁定到位并发出
“咔哒”一声 (图 11)。 遥控器就可以使用了。
注意: 根据您所在国家/地区的当地规章制度弃置电量耗尽的一次性电池。
21
拆下充电电池
警告: 必须在丢弃产品前取出充电电池。在取出电池时请确保电池电量已耗尽并与电源断开连
接。
按照以下步骤拆下充电电池。 您也可以将智能自动真空吸尘器送往飞利浦服务中心,由其拆下充电电池。 您
可联系所在国家/地区的飞利浦客户服务中心,获取您附近的服务中心地址。
1 让吸尘器运转,直至充电电池电量完全耗尽,以确保在您取出并弃置充电电池前,其已完全放电。
2 拧下电池仓盖的螺丝,然后取下仓盖 (图 45)。
3 取出充电电池并断开连接 (图 46)。
4 将智能自动真空吸尘器和充电电池送往电子电器垃圾回收点。
故障种类和处理方法
本章归纳了使用本产品时最常见的一些问题。如果您无法根据以下信息解决问题,请访问
www.philips.com/support 查阅常见问题列表,或联系您所在国家/地区的客户服务中心。
Page 22
简体中文
22
问题 可能的原因 解决方法
按启动/停止按钮时智能自
动真空吸尘器无法开始清
洁。
随意按下一个按钮时,智能
自动真空吸尘器没有反应。
智能自动真空吸尘器发
出“哔”声后停止工作。
智能自动真空吸尘器无法正
确清洁。
充电电池的电量已耗尽。 为充电电池 (请参见 '使用准备')充电。
智能自动真空吸尘器无法找到底
座,而且电池电量已经耗尽。
一个或多个滚轮被卡住。 按启动/停止按钮。 清除滚轮悬架周围吸附
一个或两个侧毛刷被卡住。 清洁侧毛刷 (请参见 '清洁智能自动真空吸尘
清洁时智能自动真空吸尘器被提起。按启动/停止按钮。 将智能自动真空吸尘器
一个或两个侧毛刷的刷毛已变形
或弯曲。
集尘盒中的滤网变脏。 拆卸滤网部件。 使用软毛牙刷清洁灰尘滤
集尘盒底部吸口被堵塞。 清洁吸口 (请参见 '清洁智能自动真空吸尘器
将智能自动真空吸尘器置于接通电源的底座
上。 几秒钟后,智能自动真空吸尘器发
出“哔”声,显示器亮起。
的绒毛、毛发、线头或线丝。
器')。
置于地板上。 然后按启动/停止按钮使智能
自动真空吸尘器继续清洁。
将毛刷在温水中浸泡一会儿。 如果这样做
不能使刷毛复原,则更换侧毛刷 (请参见 '更
换侧毛刷')。
网和 EPA 过滤网。 您还可以在水龙头下冲
洗灰尘滤网。
如果清洁 EPA 过滤网不再有用,请使用新
过滤网更换。 我们建议您至少每年更换一
次 EPA 过滤网。
')。
前轮被毛发或其他污垢卡住。 清洁前轮 (请参见 '清洁智能自动真空吸尘器
智能自动真空吸尘器在清洁颜色
极深或有光泽的地面时会触发跌
落传感器。 这将导致智能自动真
空吸尘器沿异常的方向图移动。
智能自动真空吸尘器正在清洁强
烈反射太阳光的地板。 这可能会
触发跌落传感器,导致智能自动
真空吸尘器沿异常的方向图移
动。
充电电池无法充电或耗电极快。充电电池达到了其寿命的终点。 充电电池应由飞利浦服务中心 (请参见 '更换
')。
按启动/关闭按钮,然后将智能自动真空吸
尘器移至颜色较浅的地板。 如果在颜色较
浅的地板上问题仍然存在,请访问
www.philips.com/support 或联系您所在国
家/地区的客户服务中心。
关闭窗帘,阻止太阳光射入房间。 您还可
以在阳光不那么明亮时开始清洁。
充电电池')更换。
Page 23
问题 可能的原因 解决方法
简体中文
23
智能自动真空吸尘器在绕圈
运动。
智能自动真空吸尘器无法找
到底座。
智能自动真空吸尘器处于局部清
洁模式。
没有足够的空间供智能自动真空
吸尘器导航到底座。
智能自动真空吸尘器仍在积极搜索。给智能自动真空吸尘器约 20 分钟时间让其
这属于正常现象。 彻底清洁过程中在地板
上检测到大量灰尘时,可能激活局部清洁模
式。 这也是自动清洁模式的一部分。 大约
一分钟后,智能自动真空吸尘器恢复正常清
洁模式。 您还可以通过在遥控器上选择不
同的清洁模式来停止局部清洁模式。
您还可以通过在遥控器上选择不同的清洁模
式来停止局部清洁模式。
请尝试将底座 (请参见 '安装底座')放置到其
他地方。
返回到底座。
Page 24

fillpage std
Page 25

Page 26
3
2
45
1
2345678910
1
2
11
1
2
12
1
米
1.5
米
30
厘米
1 m
3
0 cm
1.5 m
131415161718192021
222324252627282930
Page 27
1
2
31
1
1
32
2
1
333435
2
1
363738
1
2
39
40
41
1
2
3
42
1
2
3
4
5
43
44
1
1
45
2
1
46
Page 28

Page appears only if there are more than 24 figures
Page 29
Page 30

4222.003.4295.3 8/1/2018
> 75% 循环再造纸
>75% recycled paper
>75% papier recyclé
 Loading...