


Portable MP3-CD player
EXP 301
EXP 303
Audio
Audio
Toll Free Help Line
Ligne d’assistance en service libre
Linea de ayuda telefónica sin cargo
800-531-0039
Return your Warranty Registration card today to
ensure you receive all the benefits you’re entitled to.
•
Once your Philips purchase is registered,
you’re eligible to receive all the privileges
of owning a Philips product.
• So complete and return the Warranty
Registration Card enclosed with your
purchase at once, and take advantage
of these important benefits.
Warranty
Verification
Registering your product
within 10 days confirms
your right to maximum
protection under the
terms and conditions of
your Philips warranty.
Owner
Confirmation
Your completed Warranty
Registration Card serves
as verification of ownership in the event of product theft or loss.
Model
Registration
Returning your Warranty
Registration Card right
away guarantees you’ll
receive all the information
and special offers which
you qualify for as the
owner of your model.
t
This “bolt of lightning” indi-
cates uninsulated material
within your unit may cause an electrical shock. For the safety of everyone in your household, please do not
remove product covering.
s
The “exclamation point” calls
attention to features for
which you should read the enclosed
literature closely to prevent operating and maintenance problems.
WARNING: TO PREVENT FIRE
OR SHOCK HAZARD,DO NOT
EXPOSE THIS EQUIPMENT TO
RAIN OR MOISTURE.
CAUTION: To prevent electric
shock, match wide blade of plug to
wide slot, and fully insert.
For Customer Use
Enter below the Serial No. which is located on the rear of the cabinet. Retain this
information for future reference.
Model No. ________________________
Serial No. ________________________
Know these
ssaaffeettyy symbols
MAC5097
CAUTION
RISK OF ELECTRIC SHOCK
CAUTION: TO REDUCE THE RISK OF ELECTRIC SHOCK, DO NOT
REMOVE COVER (OR BACK). NO USER-SERVICEABLE PARTS
INSIDE. REFER SERVICING TO QUALIFIED SERVICE PERSONNEL.
DO NOT OPEN

3
8
9
0
!
@
7
P
S
E
E
L
T
I
T
•
M
U
B
L
A
L
B
U
M
•
T
I
T
L
E
B
B
D
S
E
E
D
O
M
M
A
R
G
O
R
P
A
H
C
R
A
E
S
E
A
S
U
R
A
CH
P
•
Y
A
L
P
S
T
O
P
6
5
4
#
$
%
^
&
O
F
F
•
R
E
S
U
M
E
•
H
O
L
D
L
I
N
E
O
U
T
/
O
.
L
O
V
N
E
P
3
2
1
(
*

Congratulations on your purchase,
and welcome to the “family!”
Dear Philips product owner:
Thank you for your confidence in Philips.You’ve selected one of the best-built,
best-backed products available today.And we’ll do everything in our power to
keep you happy with your purchase for many years to come.
As a member of the Philips “family,” you’re entitled to protection by one of the
most comprehensive warranties and outstanding service networks in the industry.
What’s more, your purchase guarantees you’ll receive all the information and
special offers for which you qualify, plus easy access to accessories from our
convenient home shopping network.
And most importantly you can count on our uncompromising commitment to
your total satisfaction.
All of this is our way of saying welcome – and thanks for investing in a Philips product.
Sincerely,
Lawrence J. Blanford
President and Chief Executive Officer
P.S. Remember, to get the most from your Philips product,you must
return your Warranty Registration Card within 10 days. So please
mail it to us right now!
Visit our World Wide Web Site at http://www.philips.com
I
T
O
A
N
R
T
S
I
G
E
R
S
Y
Hurry!
A
D
H
0
I
1
N
N
E
E
D
E
D
W
I
T

English ––––––––––––––––––––––––––––––––––––––––––––––––– 6
Français ––––––––––––––––––––––––––––––––––––––––––––––– 32
Español ––––––––––––––––––––––––––––––––––––––––––––––– 60
5
English
FrançaisEspañol
Canada
English:
This digital apparatus does not exceed the Class B limits
for radio noise emissions from digital apparatus as set
out in the Radio Interference Regulations of the
Canadian Department of Communications.
Français:
Cet appareil numérique n'émet pas de bruits
radioélectriques dépassant les limites applicables aux
appareils numériques de Classe B prescrites dans le
Règlement sur le Brouillage Radioélectrique édicté par
le Ministère des Communications du Canada.

English
6
1. Read these instructions.
2. Keep these instructions.
3. Heed all warnings.
4. Follow all instructions.
5. Do not use this apparatus
near water.
6. Clean only with dry cloth.
7. Do not block any ventilation
openings. Install in accordance
with the manufacturer´s
instructions.
8. Do not install near any heat
sources such as radiators, heat
registers, stoves,or other apparatus
(including amplifiers) that produce
heat.
9. Only use attachments/
accessories specified by the
manufacturer.
10 .
Use only with the
cart, stand, tripod,
bracket, or table
specified by the
manufacturer or sold with the
apparatus.When a cart is used, use
caution when moving the
cart/apparatus combination to
avoid injury from tip-over.
11.
Refer all servicing to qualified
service personnel. Servicing is
required when the apparatus has
been damaged in any way, such as
power-supply cord or plug is
damaged, liquid has been spilled or
objects have fallen into the
apparatus, the apparatus has been
exposed to rain or moisture, does
not operate normally, or has been
dropped.
12 . Battery usage CAUTION
– To prevent battery leakage which
may result in bodily injury or
damage to the unit:
● Install all batteries correctly,
+ and - as marked on the unit.
● Do not mix batteries (old and new
or carbon and alkaline, etc.).
● Remove batteries when the unit is
not used for a long time.
EL 6474-E003: 01/6
IMPORTANT SAFETY INSTRUCTIONS

Safety Instructions ––––––––––––––––––––––––––––––––––– 2, 6
Controls –––––––––––––––––––––––––––––––––––––––––––––– 8
Quick start ––––––––––––––––––––––––––––––––––––––––––– 9
General Information
Maintenance –––––––––––––––––––––––––––––––––––––––– 10
Environmental information ––––––––––––––––––––––––––––– 10
MP3 and AAC music files –––––––––––––––––––––––––––––– 11
Power supply
Batteries ––––––––––––––––––––––––––––––––––––––––––– 14
Power adapter –––––––––––––––––––––––––––––––––––––– 15
Headphones ––––––––––––––––––––––––––––––––––––––––– 15
Basic functions
Playing a disc ––––––––––––––––––––––––––––––––––––––– 16
Playing Enhanced Music CDs and Mixed Mode CDs ––––––––– 17
Pause ––––––––––––––––––––––––––––––––––––––––––––– 17
Volume and sound ––––––––––––––––––––––––––––––––––– 18
Selecting and searching ––––––––––––––––––––––––––––––– 19
Selecting an album ––––––––––––––––––––––––––––––––––– 20
Features
Programming track numbers ––––––––––––––––––––––––––– 21
Clearing the program ––––––––––––––––––––––––––––––––– 21
Storing the last position played – RESUME –––––––––––––––– 22
Locking all buttons – HOLD ––––––––––––––––––––––––––– 22
Selecting different playback possibilities – MODE ––––––––––– 23
ESP – Electronic Skip Protection –––––––––––––––––––––––– 24
Acoustic feedback ––––––––––––––––––––––––––––––––––– 24
Accessories
In-car connections ––––––––––––––––––––––––––––––––––– 25
Belt clip ––––––––––––––––––––––––––––––––––––––––––– 26
Troubleshooting –––––––––––––––––––––––––––––––––––––– 27
Limited warranty ––––––––––––––––––––––––––––––––––––– 30
7
Contents
English

1 OPEN2
opens the CD compartment
2 VOL E
adjusts the volume
3 9
stops playback, clears a program,
and switches off the unit
4 2;
switches the unit on, starts
playback and interrupts playback
5 §
skips forward and
searches forward
6 ESP
Electronic Skip Protection
prevents music interruptions
caused by shocks or vibrations
7 +
MP3-CD only: selects the next
album or skips forward
8 display
9 −
MP3-CD only: selects the
previous album or skips backward
0 DBB
Dynamical Bass Boost, selects
the bass enhancement
! MODE
selects the different playing
possibilities such as SHUFFLE
or REPEAT
@ PROGRAM
programs tracks and lets you
review the program
# OFF· RESUME · HOLD
OFF switches off RESUME
and HOLD
RESUME stores the last
position played
HOLD locks all buttons
$ ∞
skips backward and
searches backward
% LINEOUT/p
3.5 mm line out to connect
– the headphones
– this unit to the audio input
of your stereo equipment
^ 4.5V DC
to connect the external
power supply
& battery compartment
* type plate
( belt clip hole
8
Controls,refer to the illustrations on page 3
English
CAUTION
Use of controls or adjustments or performance of
procedures other than herein may result in hazardous
radiation exposure or other unsafe operation.
9
Quick start
English
!!!
12p
3 #
4 HOLD ➠ OFF 5 PLAY 2; 6 VOL E
/
O
F
F
•
R
E
S
U
M
E
•
H
O
L
D
L
I
N
E
O
U
T
/
.
L
O
V
N
E
P
O
O
F
F
•R
E
S
U
M
E
•
H
O
L
D
L
I
N
E
O
U
T
/
O
V
N
E
P
O
O
F
F
•
R
E
S
U
M
E
•
H
O
L
.
L
D
L
I
N
E
O
U
T
/
P
S
E
E
L
T
I
T
•
M
U
B
L
A
L
B
U
M
•
T
I
T
L
E
O
F
F
•
R
E
S
U
M
E
•
H
O
L
D
A
H
C
R
A
E
S
E
S
S
E
A
U
R
A
CH
P
•
Y
A
L
P
S
T
O
P
L.
O
V
N
E
P
O
.
L
O
V
N
E
P
O
O
P
E
N
V
O
L

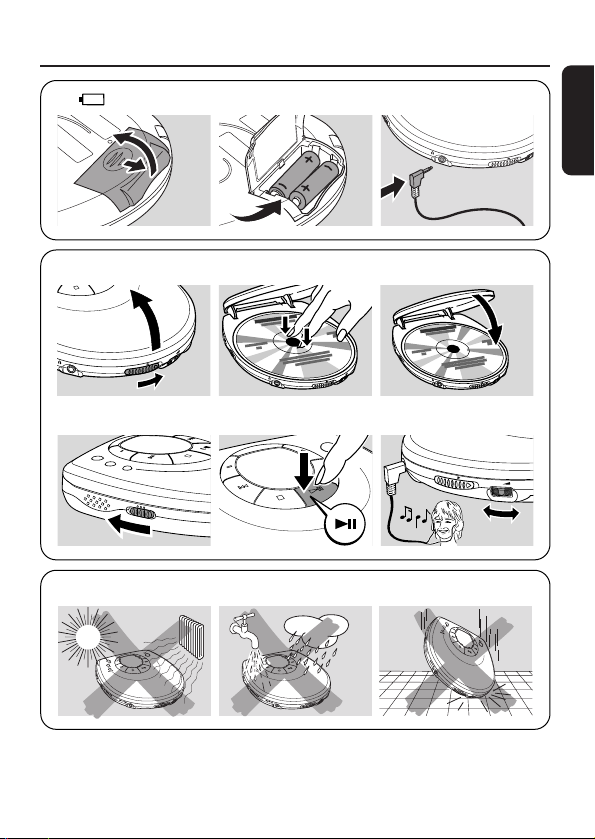
Maintenance
Do not touch the lens A of the unit.
Do not expose the unit, batteries or discs to
humidity, rain, sand or excessive heat (caused
by heating equipment or direct sunlight).
The lens may cloud over when the unit
is suddenly moved from cold to warm
surroundings. Playing is not possible then. Leave the unit in a warm
environment until the moisture evaporates.
Active mobile phones in the vicinity of this unit may cause malfunctions.
Avoid dropping the unit as this may cause damage.
Clean the unit with a soft, slightly dampened, lint-free cloth. Do not use any
cleaning agents as they may have a corrosive effect.
To clean a disc, wipe it in a straight line from the center toward the edge
using a soft, lint-free cloth.Cleaning agents may damage the disc.
Environmental information
All redundant packing material has been omitted.We have tried to make
the packaging easy to separate into three single materials: cardboard (box),
polystyrene foam (buffer) and polyethylene (bags, protective foam sheet).
Your set consists of materials which can be recycled if disassembled by
a specialized company. Please observe the local regulations regarding the
disposal of packing materials, dead batteries and old equipment.
10
General information
English

MP3 and AAC music files
The music compression technologies MP3 (MPEG Audio Layer 3) and AAC
(Advanced Audio Coding) reduce the digital data of an audio CD significantly
while maintaining CD-like sound quality.With MP3, for example, you can
record up to 10 hours of CD-like music on a single CD-ROM.This unit plays
MP3 and AAC music files.
How to get music files
Either download legal music files from the internet to your computer
harddisc or create them from your own audio CDs. For this, insert an audio
CD into your computer´s CD-ROM drive and convert the music using an
appropriate encoder software.To achieve a good sound quality, a bit rate of
128 kbps or higher is recommended for MP3 music files.
Some encoder software offers an option to protect music files, i.e. the files
can only be played on the computer which created them. If you burn such
files on a CD-ROM, you cannot play them on this unit.Make sure to
deactivate the protection option in the encoder software before creating
the music files. In this case you are responsible for adherence to all local or
international copyrights.
How to organize music files
In order to easily handle the large number of music files on a CD-ROM,
you can organize them in folders (“albums”).
The tracks of an album will be played in alphabetical order. If you want to
arrange them in a certain order, let the file names start with numbers.
For example:
001-ONEWORLD.MP3
002-FIRESTARTER.MP3
003-DEEP.MP3
11
General information
English

This unit will play all albums in alphabetical
order.An album name includes all folders
in which the album is located, e. g.the album
VERDI in CLASSIC has the album name
CLASSIC\VERDI.
The albums in the illustration will be played
in the following way:
CLASSIC 1
CLASSIC\MOZART 2
CLASSIC\VERDI 3
POP\BLUR 4
REGGAE 5
In POP, there are no MP3 or AAC files.
POP is therefore skipped.
There may be an album 0 that will be played
before all other albums.Album 0 contains all
tracks which you did not put into an album.
How to make a CD-ROM with MP3 or AAC files
Record (“burn”) the music files from your harddisc on a CD-ROM
with your computer´s CD burner.
Make sure the file names of the MP3 and AAC files end with .mp3
and .aac respectively.
When burning your MP3-CDs, use either ISO 9660 disc format or UDF.
CD burning software like “DirectCD” or others support the UDF format.
12
General information
English
ALBUM
1 CLASSIC
.mp3
.mp3
2 MOZART
.mp3
3 VERDI
.mp3
POP
4 BLUR
.mp3
5 REGGAE
.mp3

Supported formats
This unit supports:
– Disc format: ISO 9660, Joliet, Multisession, UDF, Enhanced Music CD,
Mixed Mode CD
– Music file formats: MP3,AAC
MP3 bit rate (data rate): 32–320 kbps and variable bit rate
AAC format: ISO 13818-7 MPEG-2 (low complexity profile),stereo,
ADTS and ADIF headers,AAC bit rate ≤ 160 kbps
– Total number of music files and albums: around 350
(with a typical file name length of 20 characters)
Note:The number of music files that can be played depends on the length of
the file names.With short file names, more files will be supported.
Visit the EXPANIUM homepage
http://www.expanium.philips.com
All trademarks used are owned by their respective owners.
The set complies with the FCC-Rules, Part 15 and with
21 CFR 1040.10. Operation is subject to the following two conditions:
1.This device may not cause harmful interference, and
2.This device must accept any interference received,including
interference that may cause undesired operation.
13
General information
English

Batteries (not supplied)
Inserting batteries
Open the battery compar tment and insert
2 alkaline batteries of type AA (LR6, UM3).
Do not use old and new or different types
of batteries in combination.
Remove batteries if they are empty or if the
unit will not be used for a long time.
Indication of empty batteries
● Replace the batteries or connect the power
adapter as soon as blinks and bAtt
is displayed.
Batteries contain chemical substances,
so they should be disposed of properly.
Average battery lifetime of 2 alkaline batteries
of type AA (LR6,UM3):
Playback of Audio disc MP3-CD
ESP off 20 hours 20 hours
ESP on 20 hours 13 hours
Note: 20 seconds after pressing 9, the display
is switched off.After 90 seconds, the unit switches
off automatically.
A
14
Power supply
English
TITLE

Power adapter
Only use the AY 3170 power adapter (4.5V/300 mA direct current, positive
pole to the center pin).Any other product may damage the unit.
1 Make sure the local voltage corresponds to
the adapter´s voltage.
2 Connect the power adapter to 4.5V DC on the
unit and to the power outlet.
Note:Always disconnect the adapter if you are
not using it.
Headphones
● Connect the supplied headphones to
LINE OUT/p.
Note: LINEOUT/p can also be used for
connecting this unit to your HiFi system. Set
VOL E on this unit to position 8 and adjust
volume and sound with your HiFi system.
Use your head when using headphones
Hearing safety
Do not play your headset a high volume. Hearing experts advise against
continuous extended play. If you experience a ringing in your ears, reduce
the volume or discontinue use.
Tr af fic safety
Do not use while operating a motorized vehicle. It may create a traffic hazard
and it’s illegal in many areas.You should use extreme caution or temporarily
discontinue use in potentially hazardous situations. Even if your headset is
an open-air type designed to let you hear outside sounds, don’t turn up the
volume so high that you can’t hear what’s around you.
15
Power supply/Headphones
English
O
F
F
•
R
E
S
U
M
E
•
H
O
L
D
L
I
N
E
O
U
T
/
.
L
O
V
N
E
P
O

Playing a disc
With this unit you can play
– all pre-recorded audio CDs
– all finalized audio CDR(W)s
– MP3-CDs (CD-ROMs with MP3
or AAC files)
1 Push the OPEN2 slider to open the
CD compartment.
2 Insert a disc, printed side up,by pressing gently
on the disc´s center so that it fits onto the hub.
Close the compartment by pressing it down.
3 Press 2; to start playback.
➜ Cd rEAd is displayed. Playback starts.
Audio disc:The current track number and
the elapsed playing time are displayed.
MP3-CD: MP3 or AAC is shown.
The current album number, track number
and the elapsed playing time are displayed.
4 Press 9 to stop playback.
➜ Audio disc: The total number of tracks
and the total playing time of the disc are
displayed.
MP3-CD:The total number of albums
and tracks are displayed.
5 To remove the disc, hold it by its edge and
press the hub gently while lifting the disc.
Note: After pressing 2; it may take some time
until the first MP3 or AAC track is played.
16
Basic functions
English
.
L
O
V
N
E
P
O
P
S
E
E
L
T
I
T
•
M
U
B
L
A
L
B
U
M
•
T
I
T
L
E
S
E
A
R
CH
O
F
F
•
RES
U
ME
•
H
O
L
D
L
I
N
E
O
U
A
H
C
R
A
E
S
E
S
U
A
P
•
Y
A
L
P
S
T
O
P
.
L
O
T
/
V
N
E
P

Playing Enhanced Music CDs and Mixed Mode CDs
On Enhanced Music CDs and Mixed Mode CDs there are audio CD tracks
as well as computer data (e. g.text files, pictures,MP3 files,…).
1 Insert the disc and press 2; to start playback.
➜ Cd rEAd is displayed.Playback starts. All audio CD tracks will be played.
2 If there are MP3 and AAC files on the disc,
MP3 or AAC is blinking.
Keep MODE pressed for 2 seconds to select
MP3 and AAC playback.
➜ Cd rEAd is displayed. Playback starts with
the first track of the first album.All MP3 and
AAC tracks will be played.
3 To return to audio CD playback, keep MODE
pressed for 2 seconds.
Note:To protect your headphones and your Hi-Fi
system from damage, you will hear no sound when
a computer (data) file is played. Press § to skip
to the next track.
Pause
1 Press 2; to interrupt playback.
➜ The time where playback was interrupted
will blink.
2 To resume playback press 2; again.
17
Basic functions
English
TITLE
AAC
MP3
A
L
B
U
M
•
T
I
T
L
E
B
B
D
S
E
A
R
C
H
E
D
O
M
M
A
R
G
O
R
P
TITLE
P
S
E
E
L
T
I
T
•
M
U
B
L
A
H
C
R
A
E
S
E
S
U
A
P
•
Y
A
L
P
S
T
O
P
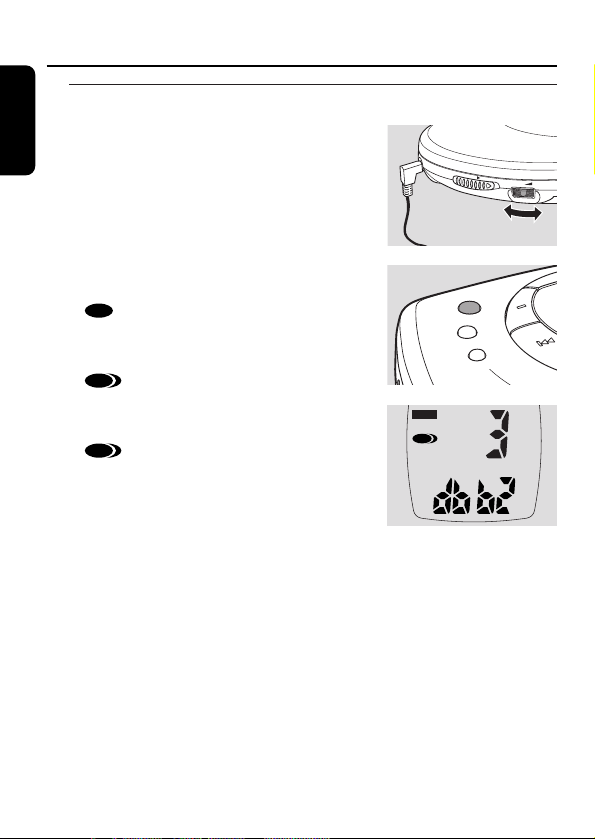
Volume and sound
Volume adjustment
● Adjust the volume by using VOL E.
Sound adjustment
1 Press DBB for a moderate bass enhancement.
➜ is shown and dbb1 is displayed.
2 Press DBB again for a strong bass
enhancement.
➜ is shown and dbb2 is displayed.
3 Press DBB again to switch off the bass
enhancement.
➜ disappears.
18
Basic functions
English
S
DBB
DBB
DBB
TITLE
DBB
O
P
E
N
V
O
L
A
L
B
U
M
•
T
I
T
L
E
B
B
D
E
D
O
M
M
A
R
G
O
PR

Selecting and searching (on all discs)
Selecting a track during playback
● Briefly press ∞ or § once or several times to
skip to the beginning of the current, previous
or subsequent track.
➜ Playback continues with the selected track.
Searching for a passage during playback
1 Keep ∞ or § pressed to find a particular
passage in backward or forward direction.
➜ Searching is started and playback continues
at a low volume.After 2 seconds, the search
speeds up.
2 Release the button at the desired passage.
➜ Normal playback continues.
Note: During REPEAT, SHUFFLE, SHUFFLE ALL,
MP3, AAC or while playing a program, searching is
only possible within the current track.
19
Basic functions
English
P
S
E
E
L
T
I
T
•
M
U
B
L
A
L
B
U
M
•
T
I
T
L
E
S
E
A
R
CH
A
H
C
R
A
E
S
E
S
U
A
P
•
Y
A
L
P
S
T
O
P

Selecting an album (on MP3-CDs only)
Selecting an album during playback
● Briefly press − or + once or several times to
skip to the first track of the current, previous
or subsequent album.
➜ The first track of the selected album is played.
Selecting a track during playback
1 Keep − or + pressed to skip quickly to previous
or subsequent MP3 or AAC tracks.
➜ Skipping starts and speeds up after 2 seconds.
2 Release the button at the desired track.
➜ Playback continues with the selected track.
Note:To skip from track to track at low speed,
use ∞ or §.
20
Basic functions
English
P
S
E
E
L
T
I
T
•
M
U
B
L
A
L
B
U
M
•
T
I
T
L
E
S
E
A
R
C
H
A
H
C
R
A
E
S
E
S
U
A
P
•
Y
A
L
P
S
T
O
P

Programming track numbers
You can select up to 50 tracks and store them in the memor y in a desired
sequence.You can store any track more than once.
1 Select a track with ∞ or §.
2 Press PROGRAM to store the track.
➜ PROGRAM is shown and P with the number
of stored tracks is displayed.
3 Select and store all desired tracks in this way.
4 If necessary, press 9 to stop normal playback.
Press 2; to start playback of the program.
➜ Playback of the program starts.
00
To add additional tracks to your program,
press 9 to stop playing the program and
continue with step 1.
00
You can review the program by pressing
PROGRAM for more than 3 seconds.
➜ All stored tracks are displayed in sequence.
Clearing the program
1 If necessary press 9 to stop playback.
2 Press 9 to clear the program.
➜ Clr is displayed, PROGRAM disappears
and the program is cleared.
Notes:
The program will also be cleared if you open
the CD compartment or interrupt the power
supply or if the unit switches off automatically.
After storing 50 tracks, FULL is displayed.
21
Features
English
S
TITLE
D
O
M
PR
B
B
E
D
M
A
R
G
O
PROGRAM
PROGRAM
A
L
B
U
M
•
T
I
T
L
E

Storing the last position played – RESUME
You can store the last position played.When restarting, playback continues
from where you have stopped.
1 Switch the slider to RESUME during playback
to activate RESUME.
➜ RESUME is shown.
2 Press 9 whenever you want to stop playback.
3 Press 2; to resume playback.
➜ Playback continues from where you have
stopped.
00
To deactivate RESUME, switch the slider
to OFF.
➜ RESUME disappears.
Locking all buttons – HOLD
You can lock all buttons of the unit.When you press any key, no action will be
executed then.
● Switch the slider to HOLD to activate HOLD.
➜ HOLD is shown and all buttons are locked.
When pressing any key, HoLd is displayed.
00
To deactivate HOLD, switch the slider to OFF.
➜ HOLD disappears.
22
Features
English
TITLE
O
F
F
•
R
E
S
U
M
E
RESUME
HOLD
•
H
O
L
D

Selecting different playback possibilities – MODE
It is possible to play tracks in random order or to repeat a track, an album or
the entire disc.
1 Press MODE repeatedly during playback to
select either:
– SHUFFLE (with MP3-CDs only):
All tracks of the current album are played
in random order until all of them have been
played once.
– SHUFFLE ALL: All tracks of the disc are
played in random order until all of them
have been played once.
– SHUFFLE REPEAT (with MP3-CDs only):
All tracks of the current album are played
repeatedly in random order.
– SHUFFLE REPEAT ALL:All tracks of the disc
are played repeatedly in random order.
– REPEAT:
Audio disc:The current track is played repeatedly.
MP3-CD:The current album is played repeatedly.
– REPEAT ALL:The entire disc is played repeatedly.
When playing a program, you can select either:
– SHUFFLE PROGRAM:All tracks of the program are played in random
order until all of them have been played once.
– SHUFFLE REPEAT PROGRAM: All tracks of the program are played
repeatedly in random order.
– REPEAT PROGRAM: All tracks of the program are played repeatedly.
2 Playback starts in the chosen mode after 2 seconds.
3 To return to normal playback, press MODE repeatedly until the display
indication disappears.
23
Features
English
S
SHUFFLE
TITLE
M
D
O
PR
B
B
E
D
R
G
O
M
A
REPEAT
ALL
A
L
B
U
M
•
T
I
T
L
E

ESP – Electronic Skip Protection
With a conventional portable disc player, the
music may stop while you are jogging, for
example.The Electronic Skip Protection
protects this unit against loss of sound caused
by light vibrations or shocks. Continuous
playback is ensured. ESP does not protect
the unit against damage caused by
dropping!
● Press ESP during playback to activate the skip
protection.
➜ ESP is shown and the protection is activated.
00
To deactivate the skip protection, press ESP
again.
➜ ESP disappears and the protection is
deactivated.
Acoustic feedback
An acoustic signal accompanies various key
operations.
● Keep DBB pressed for more than 2 seconds.
If the acoustic feedback has been deactivated:
➜ bEEP is displayed and the acoustic
feedback is activated.
If the acoustic feedback has been activated:
➜ no bEEP is displayed and the acoustic
feedback is deactivated.
24
Features
English
S
ESP
E
L
T
I
T
•
M
U
B
L
A
H
C
R
A
E
S
E
S
U
A
P
•
Y
A
L
P
S
T
O
P
TITLE
ESP
A
L
B
U
M
•
T
I
T
L
E
B
B
D
E
D
O
M
M
A
R
G
O
PR

In-car connections (supplied or optionally available)
Only use the AY 3545 car voltage converter (4.5 V DC, positive pole to the
center pin) and the AY 3501 car adapter cassette. Any other product may
damage the unit.
1 Put the unit on a horizontal, vibration-free and
stable surface. Make sure it is in a safe place,
where the unit is neither a danger nor an
obstacle to the driver and the passengers.
2 Connect the DC plug of the voltage converter
to 4.5V DC on the unit (only for a 12 V car
battery,negative grounding).
3 Insert the voltage converter into the cigarette
lighter jack. If necessary, clean the cigarette
lighter jack to obtain a good electrical contact.
4 Turn down the volume and connect the adapter cassette plug to
LINE OUT/p on the unit.
5 Carefully insert the adapter cassette into the car radio’s cassette compartment.
6 Make sure the cord does not hinder your driving.
7 Set VOL E on the unit to position 8. Start playback on the unit and adjust
the sound with the car radio controls.
Always remove the voltage converter from the cigarette lighter jack
when the unit is not in use.
Note: If your car radio has a LINE IN jack, it is better to use it for the
car radio connection instead of the adapter cassette. Connect the signal lead to
this LINE IN jack and to LINE OUT/p on the unit.
25
Accessories
English
4.5 V DC
P
S
E
E
L
T
I
T
•
M
U
B
L
A
A
L
B
U
M
•
H
T
C
I
T
R
L
A
E
E
S
B
B
D
E
S
S
E
A
U
R
A
C
P
H
•
Y
A
L
P
E
D
S
T
O
P
O
M
M
A
R
G
O
R
P
O
F
F
•
R
E
S
U
M
E
•
H
O
L
D
L
I
N
E
O
U
T
/
.
L
O
V
N
E
P
O

Belt clip
1 Align the belt clip as indicated in the illustration
and press on PUSH to insert the shaped pin of
the clip into the hole in the unit.
2 Turn the clip clockwise as indicated to lock the
belt clip to the unit.
3 To detach, gently lift the belt clip at the
indicated end and turn it counter-clockwise.
26
Accessories
English
1
2
PUSH

WARNING
Under no circumstances should you try to repair the unit yourself
as this will invalidate the guarantee.
If a fault occurs, first check the points listed,before taking the unit
for repair.If you are unable to solve a problem by following these
hints, consult your dealer or service center.
Problem Solution
No power, playback – Insert the batteries correctly.
does not start – Replace the batteries.
– Connect the power adapter securely.
HoLd indication – Deactivate HOLD.
and/or no reaction – Disconnect the unit from the power supply
to controls or take out the batteries for a few seconds.
No sound or – Press 2; to resume playback.
bad sound quality – Adjust the volume.
– The track is a data file. Press § to skip to
the next CD audio track.
– Check and clean the connections.
– Keep this unit away from active mobile
phones or strong magnetic fields.
no cd indication – Insert a disc, with the label facing up.
– Clean or replace the disc.
– Wait until the steamed up lens has cleared.
27
Troubleshooting
English

Problem Solution
nF dISC indication – Make sure the inserted CDR(W) is
finalized.
dAtA indication – Make sure you have inserted an audio disc
or an MP3-CD.
Prot indication – The music file is protected. Make sure the
and music file is protection option in your encoder software
not played is deactivated when creating a music file.
Music file is not played – Make sure the music file names end with
.mp3 or .aac
Missing directories on – Make sure the total number of files
MP3-CD and albums on your MP3-CD does not
exceed 350.
– Only albums with MP3 or AAC files
are shown.
The disc skips tracks – Clean or replace the disc.
– Make sure REPEAT,REPEAT ALL, SHUFFLE,
SHUFFLE ALL or PROGRAM is switched off.
Music is skipped – Play the music file on your computer. If the
or popping sound problem persists, encode the audio track
when playing an again and make a new CD-ROM.
MP3 or AAC file
28
Troubleshooting
English

Problem Solution
Music is interrupted – Switch on ESP.
and OOPS indication
In-car use: – Clean the cigarette lighter jack.
No power, playback – Switch on the ignition of your car.
does not start
In-car use: – Insert the adapter cassette correctly.
No sound or – Change the autoreverse direction of your
bad sound quality car cassette player.
– Let the unit adjust to the temperature in
the car.
29
Troubleshooting
English

PORTABLE COMPACT DISC
One Year Free Exchange
This product must be carried in for an exchange.
LIMITED WARRANTY
WHO IS COVERED?
You must have proof of purchase to exchange the product.A sales receipt or other
document showing that you purchased the product is considered proof of purchase.
Attach it to this owner’s manual and keep both nearby.
WHAT IS COVERED?
Warranty coverage begins the day you buy your product. For one year thereafter, a
defective or inoperative product will be replaced with a new,renewed or comparable
product at no charge to you.A replacement product is covered only for the original
warranty period.When the warranty on the original product expires, the warranty on the
replacement product also expires.
WHAT IS EXCLUDED?
Your warranty does not cover:
• labor charges for installation or setup of the product,adjustment of customer controls
on the product, and installation or repair of antenna systems outside of the product.
• product repair and/or part replacement because of misuse, accident, unauthorized
repair or other cause not within the control of Philips Consumer Electronics Company.
• reception problems caused by signal conditions or cable or antenna systems outside the
unit.
• a product that requires modification or adaptation to enable it to operate in any
country other than the country for which it was designed, manufactured,approved
and/or authorized, or repair of products damaged by these modifications.
• incidental or consequential damages resulting from the product.(Some states do not
allow the exclusion of incidental or consequential damages, so the above exclusion may
not apply to you.This includes, but is not limited to, prerecorded material, whether
copyrighted or not copyrighted.)
• a product that is used for commercial or institutional purposes.
WHERE IS EXCHANGE AVAILABLE?
You may exchange the product in all countries where the product is officially distributed
by Philips Consumer Electronics Company. In countries where Philips Consumer
Electronics Company does not distribute the product,the local Philips service
organization will attempt to provide a replacement product (although there may be a
delay if the appropriate product is not readily available).
BEFORE REQUESTING EXCHANGE...
Please check your owner’s manual before requesting an exchange.Adjustments of the
controls discussed there may save you a trip.
Philips Service Solutions Group, P.O. Box 2976,
Longview,Texas 75606, (903) 242-4800

EL4967E005 / MAC 4110 / 1-97
EXCHANGING A PRODUCT IN U.S.A.,
PUERTO RICO OR U.S.VIRGIN ISLANDS...
Contact your dealer to arrange an exchange. Or,ship the product, insured and freight
prepaid, and with proof of purchase enclosed, to the address listed below.
Small Product Service Center
Philips Service Company
907 Snapps Ferry Road, Plant 2, Building 6
Greeneville,TN 37743
(In U.S.A., Puerto Rico and U.S.Virgin Islands, all implied warranties,including implied
warranties of merchantability and fitness for a particular purpose, are limited in duration to
the duration of this express warranty. But, because some states do not allow limitations on
how long an implied warranty may last,this limitation may not apply to you.)
EXCHANGING A PRODUCT IN CANADA...
Please contact Philips at:
1-800-661-6162 (French Speaking)
1-800-363-7278 (English Speaking)
(In Canada, this warranty is given in lieu of all other warranties. No other warranties are
expressed or implied, including any implied warranties of merchantability or fitness for a
particular purpose. Philips is not liable under any circumstances for any direct,indirect,
special, incidental or consequential damages, howsoever incurred, even if notified of the
possibility of such damages.)
TO GET OUT-OF-WARRANTY EXCHANGE...
In U.S.A., Puerto Rico or U.S.Virgin Islands, contact Philips Service Company at
1-800-531-0039 to obtain the cost of out-of-warranty exchange.Then carefully pack the
product and ship it to the Small Product Service Center (address listed above).In Canada,
call the phone number listed above under “Exchanging a Product in Canada” to obtain the
cost of out-of-warranty exchange.
REMEMBER...
Please record the model and serial numbers found on the product below. Also, please fill
out and mail your warranty registration card promptly.It will be easier for us to notify you
if necessary.
MODEL # ____________________________________
SERIAL # ____________________________________
This warranty gives you specific legal rights.You may have other rights
which vary from state/province to state/province.
 Loading...