

Philips DVD-781 Service Manual
DVD-Video Player DVD703 /XX1
DVD703 /031 /691 /751 /781
Contents Page
1 Technical specifications and connection facilities 2
2 Warnings, laser safety instructions and notes 3
3 Directions for use 6
4 Mechanical instructions and exploded views 15
5 Diagnostic software descriptions and
troubleshooting 20
Block- and wiring diagram
6
Blockdiagram 39
Wiring diagram 40
7
Electrical diagrams and print-layouts Diagram PWB
Power supply 41 42-43
A/V Board Video control (Diagram A1) 44 46-47
A/V Board Audio (Diagram A2) 45 46-47
Display panel (Diagram D) 48 49
Bare board Standby 50 50
8 Electrical alignments 51
9 Circuit descriptions and 51
List of abbreviations 54
10 Spare part list 55
CL 16532007_071.eps
140201
©
Copyright 2001 Philips Consumer Electronics B.V. Eindhoven, The Netherlands.
All rights reserved. No part of this publication may be reproduced, stored in a
retrieval system or transmitted, in any form or by any means, electronic, mechanical,
photocopying, or otherwise without the prior permission of Philips.
Published by MW 0162 Service PaCE Printed in the Netherlands Subject to modification 5 3122 785 11100

GB 2 DVD703 /XX11.
Technical specifications
1. Technical specifications
Specifications
PLAYBACK SYSTEM
DVD-Video
Video CD & SVCD
CD (CD-Recordable and CD-Rewritable)
DVD+RW
OPTICAL READOUT SYSTEM
Lasertype Semiconductor AlGaAs
Numerical Aperture 0.60 (DVD)
Wavelength 650 nm (DVD)
DVD DISC FORMAT
Medium Optical Disc
Diameter 12cm (8cm)
Playing time One layer 2.15 h*
(12cm) Dual layer 4 h*
VIDEO FORMAT
DA Converter 10 bits
Signal handling Components
Digital Compression MPEG2 for DVD,
TV STANDARD (PAL/50Hz) (NTSC/60Hz)
Number of lines 625 525
Playback Multistandard (PAL/NTSC)
DVD
Horizontal Resolution 720 pixels 720 pixels
Vertical Resolution 576 lines 480 lines
VCD
Horizontal Resolution 352 pixels 352 pixels
Vertical Resolution 288 lines 240 lines
VIDEO PERFORMANCE
Video output 1 Vpp into 75 ohm
S-Video output Y: 1 Vpp into 75 ohm
Component video output Y: 1 Vpp into 75 ohm
Black Level Shift On/Off
Video Shift Left/Right
AUDIO FORMAT
Digital MPEG Compressed Digital
Analog Sound Stereo
Dolby Pro Logic downmix from Dolby Digital multi-channel sound
3D Sound (TruSurround) for vir tual 5.1 channel sound on 2 speakers
AUDIO PERFORMANCE
DA Converter 24 bits
DVD fs 96 kHz 4 Hz - 44 kHz
Video CD fs 44.1 kHz 4 Hz - 20 kHz
CD fs 44.1 kHz 4 Hz - 20 kHz
Signal-Noise (1kHz) 100 dB
Dynamic Range (1kHz) 97 dB
Crosstalk (1kHz) 110 dB
Distortion and Noise (1kHz) 88 dB
0.45 (VCD/CD)
780 nm (VCD/CD)
Two side 4.30 h*
Single layer
Two side 8 h*
Dual layer
MPEG1 for VCD
C: 0.3 Vpp into 75 ohm
P
R/CR PB/CB: 0.7 Vpp into 75 ohm
DTS/Dolby Digital
PCM 16, 20, 24 bits
fs 48 kHz 4 Hz - 22 kHz
fs, 44.1, 48, 96 kHz
CONNECTIONS
Y Output Cinch (green)
P
B/CB Output Cinch (blue)
P
R/CR Output Cinch (red)
S-Video Output Mini DIN, 4 pins
Video Output Cinch (yellow)
Audio L+R output Cinch (white/red)
Digital Output 1 coaxial
CABINET
Dimensions (w x h x d) 435 x 92 x 320 mm
Weight Approximately 4 Kg
GENERAL FUNCTIONALITY
Stop / Play / Pause
Fast Forward / Backward
Time Search
Step Forward / Backward
Slow Motion
Title / Chapter / Track Select
Skip Next / Previous
Repeat (Chapter / Title / All) or (Track / All)
A-B Repeat
Shuffle
Scan
New enhanced user graphical interface
Perfect Still with digital multi-tap filter
Zoom (xl.33, x2. x4) with picture enhancement
Screen Saver (Dim 75% after 15 minutes)
3D Sound (TruSurround)
Virtual Jog Shuttle
Audio and video bit rate indicator
DVD FUNCTIONALITY
Multi-angle Selection
Audio Selection (one out of maximum eight languages)
Subtitles Selection (one out of maximum 32 languages)
Aspect Ratio conversion (16:9, 4:3 Letterbox, 4:3 Pan Scan)
Parental Control and Disk Lock
Disc Menu support (Title Menu and Access Control)
Resume (5 discs) after stop / standby
Programming Titles/chapter s with Favorite Track Selection
VIDEO CD FUNCTIONALITY
Playback Control for VCD 2.0 discs
Disc Lock
Resume (5 discs) after stop / standby
Programming Tracks with Favorite Track Selection
AUDIO CD FUNCTIONALITY
Time Display (Total / Track / Remaining Track Time)
Full audio functionality with remote control
Programming with Favorite Track Selection
* typical playing time for movie with 2 spoken languages and 3 subtitle languages
Specifications subject to change without prior notice
IEC958 for CDDA / LPCM
IEC1937 for MPEG1/2, Dolby Digital and DTS
CL 16532007_009.eps
02-02-01
SPECIFICATIONS
19
Warnings and Laser safety instructions
2. Warnings and Laser safety instructions
GB
WARNING
All ICs and many other semi-conductors are
susceptible to electrostatic discharges (ESD).
Careless handling during repair can reduce
life drastically.
When repairing, make sure that you are
connected with the same potential as the
mass of the set via a wrist wrap with
resistance.
Keep components and tools also at this
potential.
F
ATTENTION
D
WARNUNG
GB 3DVD703 /XX1 2.
NL
Alle IC’s en vele andere halfgeleiders zijn
gevoelig voor elektrostatische ontladingen
(ESD).
Onzorgvuldig behandelen tijdens reparatie
kan de levensduur drastisch doen
verminderen.
Zorg ervoor dat u tijdens reparatie via een
polsband met weerstand verbonden bent met
hetzelfde potentiaal als de massa van het
apparaat.
Houd componenten en hulpmiddelen ook op
ditzelfde potentiaal.
I
WAARSCHUWING
AVVERTIMENTO
Tous les IC et beaucoup d’autres semiconducteurs sont sensibles aux décharges
statiques (ESD).
Leur longévité pourrait être considérablement
écourtée par le fait qu’aucune précaution
n’est prise a leur manipulation.
Lors de réparations, s’assurer de bien être
relié au même potentiel que la masse de
l’appareil et enfiler le bracelet serti d’une
résistance de sécurité.
Veiller a ce que les composants ainsi que les
outils que l’on utilise soient également a ce
potentiel.
Alle IC und viele andere Halbleiter sind
empfindlich gegen elektrostatische
Entladungen (ESD).
Unsorgfältige Behandlung bei der Reparatur
kann die Lebensdauer drastisch vermindern.
Sorgen sie dafür, das Sie im Reparaturfall
über ein Pulsarmband mit Widerstand mit
dem Massepotential des Gerätes verbunden
sind.
Halten Sie Bauteile und Hilfsmittel ebenfalls
auf diesem Potential.
GB
Safety regulations require that the set be restored to its original condition
and that parts which are identical with those specified be used.
NL
Veiligheidsbepalingen vereisen, dat het apparaat in zijn oorspronkelijke
toestand wordt terug gebracht en dat onderdelen, identiek aan de
gespecifieerde worden toegepast.
F
Les normes de sécurité exigent que l’appareil soit remis a l’état d’origine et
que soient utilisées les pièces de rechange identiques à celles spécifiées.
Tutti IC e parecchi semi-conduttori sono
sensibili alle scariche statiche (ESD).
La loro longevita potrebbe essere fortemente
ridatta in caso di non osservazione della piu
grande cauzione alla loro manipolazione.
Durante le riparazioni occorre quindi essere
collegato allo stesso potenziale che quello
della massa dell’apparecchio tramite un
braccialetto a resistenza.
Assicurarsi che i componenti e anche gli
utensili con quali si lavora siano anche a
questo potenziale.
D
Bei jeder Reparatur sind die geltenden Sicherheitsvorschriften zu beachten.
Der Originalzustand des Gerats darf nicht verandert werden.
Fur Reparaturen sind Original-Ersatzteile zu verwenden.
I
Le norme di sicurezza esigono che l’apparecchio venga rimesso nelle
condizioni originali e che siano utilizzati pezzi di ricambiago idetici a quelli
specificati.
SHOCK, FIRE HAZARD SERVICE TEST:
CAUTION: After servicing this appliance and prior to returning to customer, measure the resistance between
either primary AC cord connector pins (with unit NOT connected to AC mains and its Power switch ON), and the
face or Front Panel of product and controls and chassis bottom,
Any resistance measurement less than 1 Megohms should cause unit to be repaired or corrected before AC
power is applied, and verified before return to user/customer.
Ref.UL Standard NO.1492.
NOTE ON SAFETY:
Symbol
: Fire or electrical shock hazard. Only original parts should be used to replace any part with symbol
Any other component substitution(other than original type), may increase risk or fire or electrical shock hazard.
“Pour votre sécurité, ces documents
doivent être utilisés par des
spécialistes agrées, seuls habilités à
réparer votre appareil en panne.”
CL 96532065_002.eps
120799
GB 4 DVD703 /XX12.
Warnings and Laser safety instructions
LASER SAFETY
This unit employs a laser. Only a qualified service person should remove the cover or attempt to service this
device, due to possible eye injury.
LASER DEVICE UNIT
Type: Semiconductor laser GaAlAs
Wave length: 650 nm (DVD)
780 nm (VCD/CD)
Output Power: 7 mW (DVD)
10 mW (VCD/CD)
Beam divergence: 60 degree
USE OF CONTROLS OR ADJUSTMENTS OR PERFORMANCE OF PROCEDURE OTHER THAN THOSE
SPECIFIED HEREIN MAY RESULT IN HAZARDOUS RADIATION EXPOSURE.
AVOID DIRECT EXPOSURE TO BEAM
WARNING
The use of optical instruments with this product will increase eye hazard.
Repair handling should take place as much as possible with a disc loaded inside the player
WARNING LOCATION: INSIDE ON LASER COVERSHIELD
CAUTION VISIBLE AND INVISIBLE LASER RADIATI ON WHEN OPEN AVOID EXPOSURE TO BEAM
ADVARSEL SYNLIG OG USYNLIG LASERSTRÅLING VED ÅBNING UNDGÅ UDSÆTTELSE FOR STRÅLING
ADVARSEL SYNLIG OG USYNLIG LASERSTRÅLING NÅR DEKSEL ÅPNES UNNGÅ EKSPONERING FOR STRÅLEN
VARNING SYNLIG OCH OSYNLIG LASERSTRÅLNING NÄR DENNA DEL ÄR ÖPPNAD BETRAKTA EJ STRÅLEN
VARO! AVATT AESSA OLET ALTTIINA NÄKYVÄLLE JA NÄKYMÄTTÖMÄLLE LASER SÄTEILYLLE. ÄLÄ KATSO SÄTEESEEN
VORSICHT SICHTBARE UND UNSICHTBARE LASERSTRAHLUNG WENN ABDECKUNG GEÖFFNET NICHT DEM STRAHL AUSSETSEN
DANGER VISIBLE AND INVISIBLE LASER RADIATI ON WHEN OPEN AVO ID DIRECT EXPOSURE TO BEAM
AT TENTION RAYO NNEMENT LASER VISIBLE ET INVISIBLE EN CAS D'OUVERTURE EXPOSITION DANGEREUSE AU FAISCEAU
!
Warning for powersupply on position 1005
The primary side of the powersupply including the heatsink carries live mains voltage when the
player is connected to the mains even when the player is swiched off !
This primary area is not shielded so it is possible to touch copper tracks and/or components when
servicing the player. Service personnel have to take precautions to prevent touching this area or
components in this area .
The primary side of the powersupply has been indicated with a lightning stroke and a stripe-marked
printed on the printed wiring board
CL06532096_022.eps
060700

Warnings and Laser safety instructions
2.1 Notes
2.1.1 DVD-Module
For repair of the DVD-module ASD1, the service manual
3122 785 10840 has to be used.
2.1.2 Compair
For assistance with the repair process of the monoboard an
electronic Fault finding guidance has been developed , this
program is called COMPAIR.
This COMPAIR program is available on CDROM.
The Version of the CDROM for repair of the monoboard is
V1.3 and can be ordered with codenumber : 4822 727 21637.
This is an update CDROM , so when the COMPAIR CDROM
is used for the first time , one has to install the COMPAIR
ENGINE CDROM V1.2 first.
The V1.2 CDROM can be ordered with codenumber 4822
727 634 and has to registered after installation , the
procedure for registration is explained in the help file of the
program and in the booklet from the CDROM.
The cable to connect the monoboard with a PC can be
ordered with codenumber 3122 785 90017.
All the hardware and software requirements of the systems
necessary for working with COMPAIR is described on the
CDROM.
GB 5DVD703 /XX1 2.
GB 6 DVD703 /XX13.
2
Manufactured under license from Dolby Laboratories.
“Dolby” and the double-D symbol are trademarks of Dolby
Laboratories. Confidential Unpublished Works. ©1992-
1997 Dolby Laboratories, Inc. All rights reser ved.
This product incorporates copyright protection technology
that is protected by method claims of certain U.S. patents
and other intellectual property rights owned by Macrovision
Corporation and other rights owners. Use of this copyright
protection technology must be authorized by Macrovision
Corporation, and is intended for home and other limited
viewing uses only unless otherwise authorized by
Macrovision Corporation. Reverse engineering or
disassembly is prohibited.
LASER SAFETY
This unit employs a laser. Due to possible eye injury, only
a qualified service person should remove the cover or
attempt to service this device.
USE OF CONTROLS OR ADJUSTMENTS OR
PERFORMANCE OF PROCEDURES OTHER
THAN THOSE SPECIFIED HEREIN MAY
RESULT IN HAZARDOUS RADIATION
EXPOSURE.
LASER
Type Semiconductor laser GaAlAs
Wave length 650 nm (DVD)
780 nm (VCD/CD)
Output Power 7 mW (DVD)
10 mW (VCD/CD)
Beam divergence 60 degree
For Customer Use:
Read carefully the information located at the bottom of your DVD-VIDEO player and enter below the Serial No. Retain
this information for future reference.
Model No. DVD-VIDEO 703 Serial No. __________________________
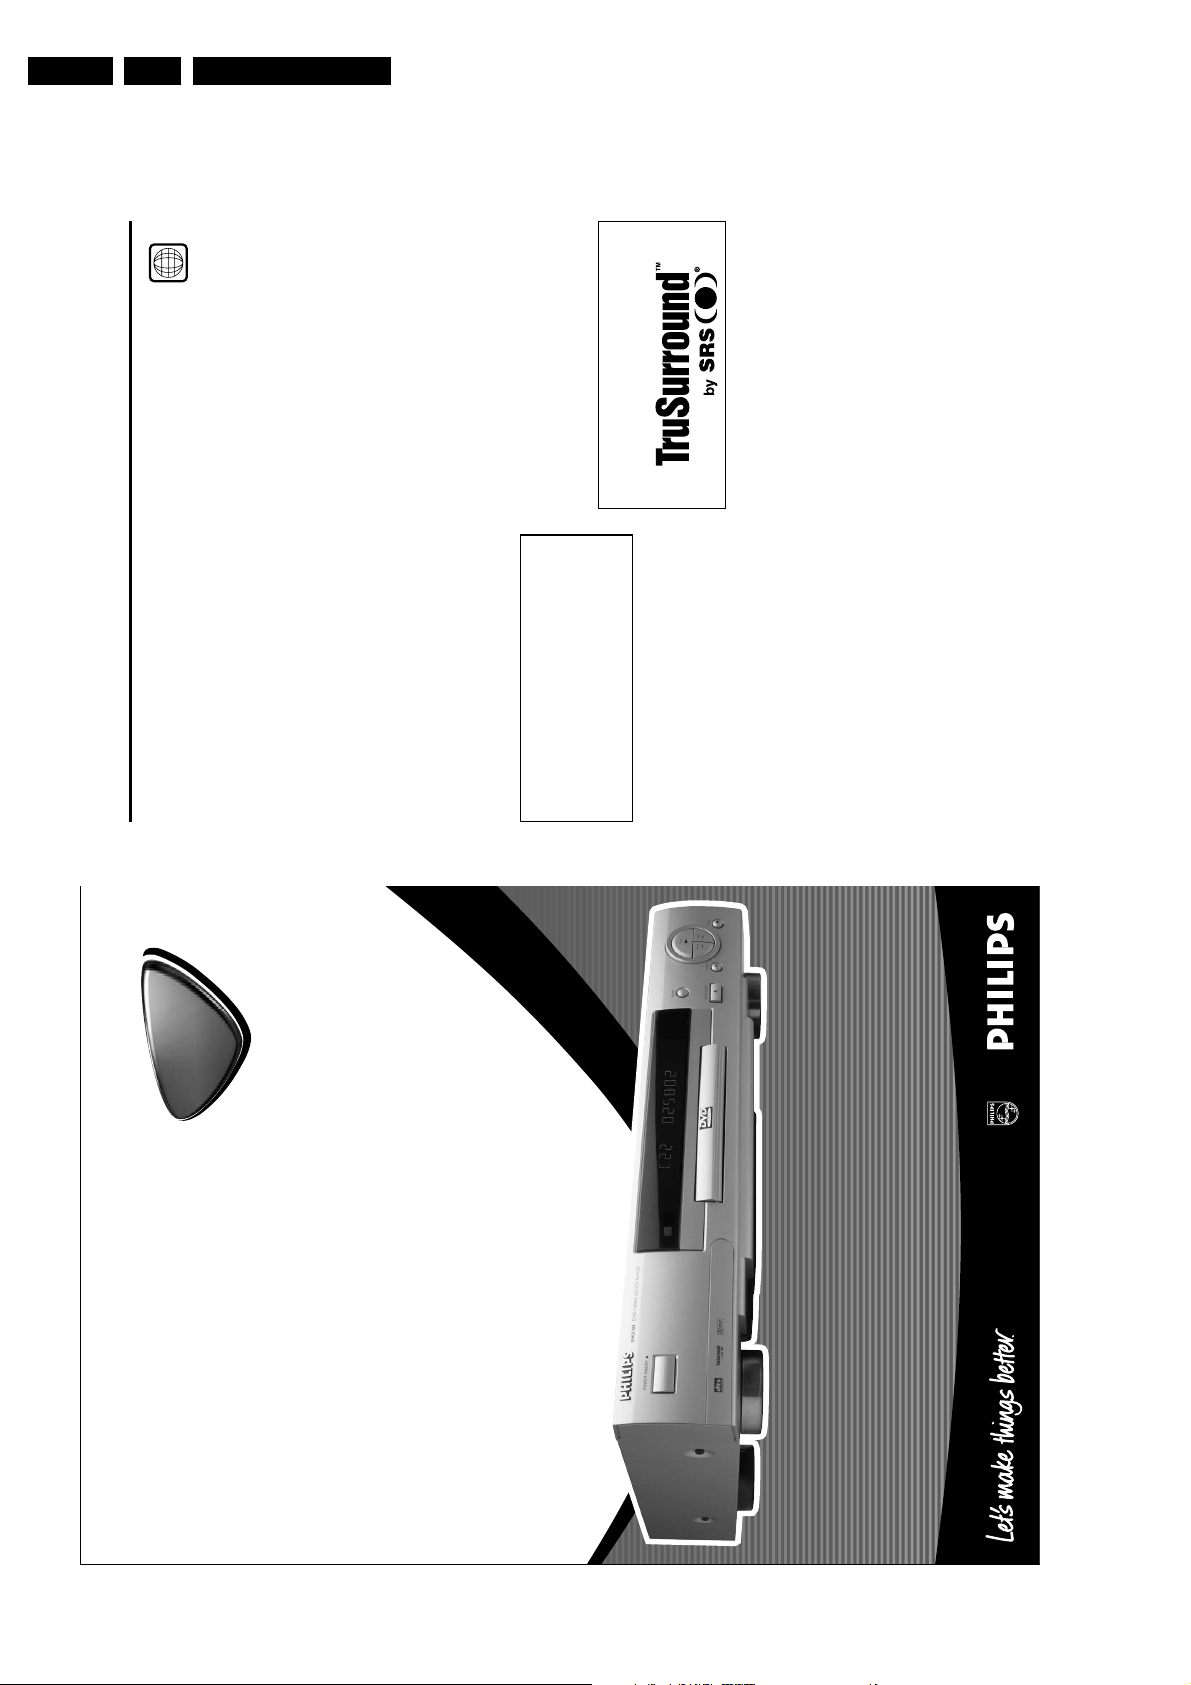
TruSurround and the SRS symbol are trademarks of SRS
Labs., Inc. Tr uSurround technology is manufactured under
license from SRS Labs., Inc.
General Information
G
ENERAL
I
NFORMATION
Manufactured under license from Digital Theater Systems ,
Inc. US Pat. No. 5,451,942 and other world-wide patents
issued and pending. “DTS” and “DTS DIGITAL SURROUND”
are trademarks of Digital Theater Systems, Inc. © 1996
Digital Theater Systems, Inc. All rights reser ved.
The region code for this set is 4.
4
Since it is usual for DVD movies to be released at
different times in different regions of the world, all
players have region codes and discs can have an optional
region code. If you load a disc of a different region code
to your player, you will see the region code notice on
the screen. The disc will not play and should be
unloaded.
NOTE:
PICTURES SHOWN MAYBE DIFFERENT
BETWEEN COUNTRIES.
NEVER MAKE OR CHANGE CONNECTIONS
WITH THE POWER SWITCHED ON.
CAUTION
VISIBLE AND INVISIBLE LASER RADIATION
WHEN OPEN AVOID EXPOSURE TO BEAM
(WARNING LOCATION: INSIDE ON LASER
COVERSHIELD OR THE BACKPLATE OF SET)
3. Directions for use
Directions for use
703
703
DVD-
DVD-
DVD Video Player
1

Directions for use
4
Introduction
Philips DVD-Video
Introduction
Your Philips DVD-Video player will play digital video discs
conforming to the universal DVD-Video standard. With it,
you will be able to enjoy full-length movies with true
cinema picture quality, as well as stereo or multi-channel
sound (depending on the disc and your playback setup).
The unique features on DVD-Video, such as selection of
sound track, subtitle languages and different camera angles
(again depending on the disc), are all supported.
In addition to DVD-Video discs, you will be able to play all
Video CDs and Audio CDs (including finalized CD
Recordable and CD Rewritable).
DVD-Video
You will recognize DVD-Video discs by the logo shown.
Depending on the material on the disc (a movie, video clips,
a drama series, etc.) the disc may have one or more Titles.
TITLE 1 TITLE 2
CHAPTER 1 CHAPTER 2 CHAPTER 1 CHAPTER 2 CHAPTER 3
DVD-VIDEO DISC
Video CD
You will recognize Video CDs by the logo
shown.
Super VCD (SVCD)
SVCD discs based on the Super VCD IO Standard refering
to Standard of Electronics Industry of the People’s Republic
of China.
Audio CD
Audio CDs contain music tracks only.
You will recognize Audio CDs by the logo
shown.
Unpacking
First check and identify the contents of your DVD-Video
player package.
You should have the following items.
– DVD-Video player
– Remote Control with batteries
– Audio cable
– Video cable
– Instructions for use
If any item is damaged or missing, contact your retailer or
Philips.
Keep the packaging material for future transportation.
Remote Control Battery
Installation
¶ Inser t batteries as indicated inside the batter y
compartment.
Caution: Do not mix old and new batteries. Never
mix different types of batteries (standard, alkaline ,
etc.).
+
-
+
-
Safety Information
¶ Do not expose the system to excessive moisture, rain, sand,
or heat sources.
¶ Place the player on a firm, flat surface.
¶ Keep the player away from domestic heating equipment
and direct sunlight.
¶ In a cabinet, allow about 2.5 cm (1 inch) of free space all
around the player for adequate ventilation.
¶ If the DVD-Video player cannot read CDs/DVDs correctly,
use a commonly available cleaning CD/DVD to clean the
lens before taking the DVD-Video player to be repaired.
Other cleaning methods may destroy the lens. Always keep
the tray closed to avoid dust on the lens.
¶ The lens may cloud over when the DVD-Video player is
suddenly moved from cold to warm surroundings. Playing a
CD/DVD is not possible then. Leave the power on for
about one hour with no disc in the unit until normal
playback is possible.
Cleaning Discs
¶ When a disc becomes dir ty, clean it with a cleaning cloth.
Wipe the disc from the center out, in a straight line.
¶ Do not use solvents such as benzine, thinner, commercially
available cleaners, or anti-static spray intended for analog
discs.
I
NTRODUCTION
GB 7DVD703 /XX1 3.
3
ONTENTS
C
Introduction
Philips DVD-Video Introduction------------------------- 4
Unpacking ---------------------------------------------------- 4
Remote Control battery installation -------------------- 4
Safety Information ------------------------------------------ 4
Cleaning Discs ---------------------------------------------- 4
Functional Overview
Front and Rear Panels ------------------------------------- 5
Remote Control -------------------------------------------- 6
Preparation
General Notes ---------------------------------------------- 7
Connecting to a TV ---------------------------------------- 7
Connecting to Optional Equipment ------------------- 7-8
NTSC/PAL Settings----------------------------------------- 8
General Explanation --------------------------------------- 8
Menu Bar/Status Window --------------------------------- 9
Temporary Feedback Field Icons ------------------------ 9
Personal Preferences----------------------------------- 9-10
Operation
Loading Discs----------------------------------------------- 11
Playing a DVD-Video and Video CD ------------------- 11
General Features --------------------------------------11-13
Special DVD features -------------------------------------13
Special Video CD & SVCD features --------------------14
Playing an Audio CD ---------------------------------- 14-15
Favorite Track Selection (FTS) Program ---------------15
Access Control
Access Control: Child Lock ----------------------------- 16
Access Control: Parental Control ------------------16-17
Before Requesting Service
Before Requesting Service -------------------------------18
Specifications
Specifications -----------------------------------------------19
Contents
GB 8 DVD703 /XX13.
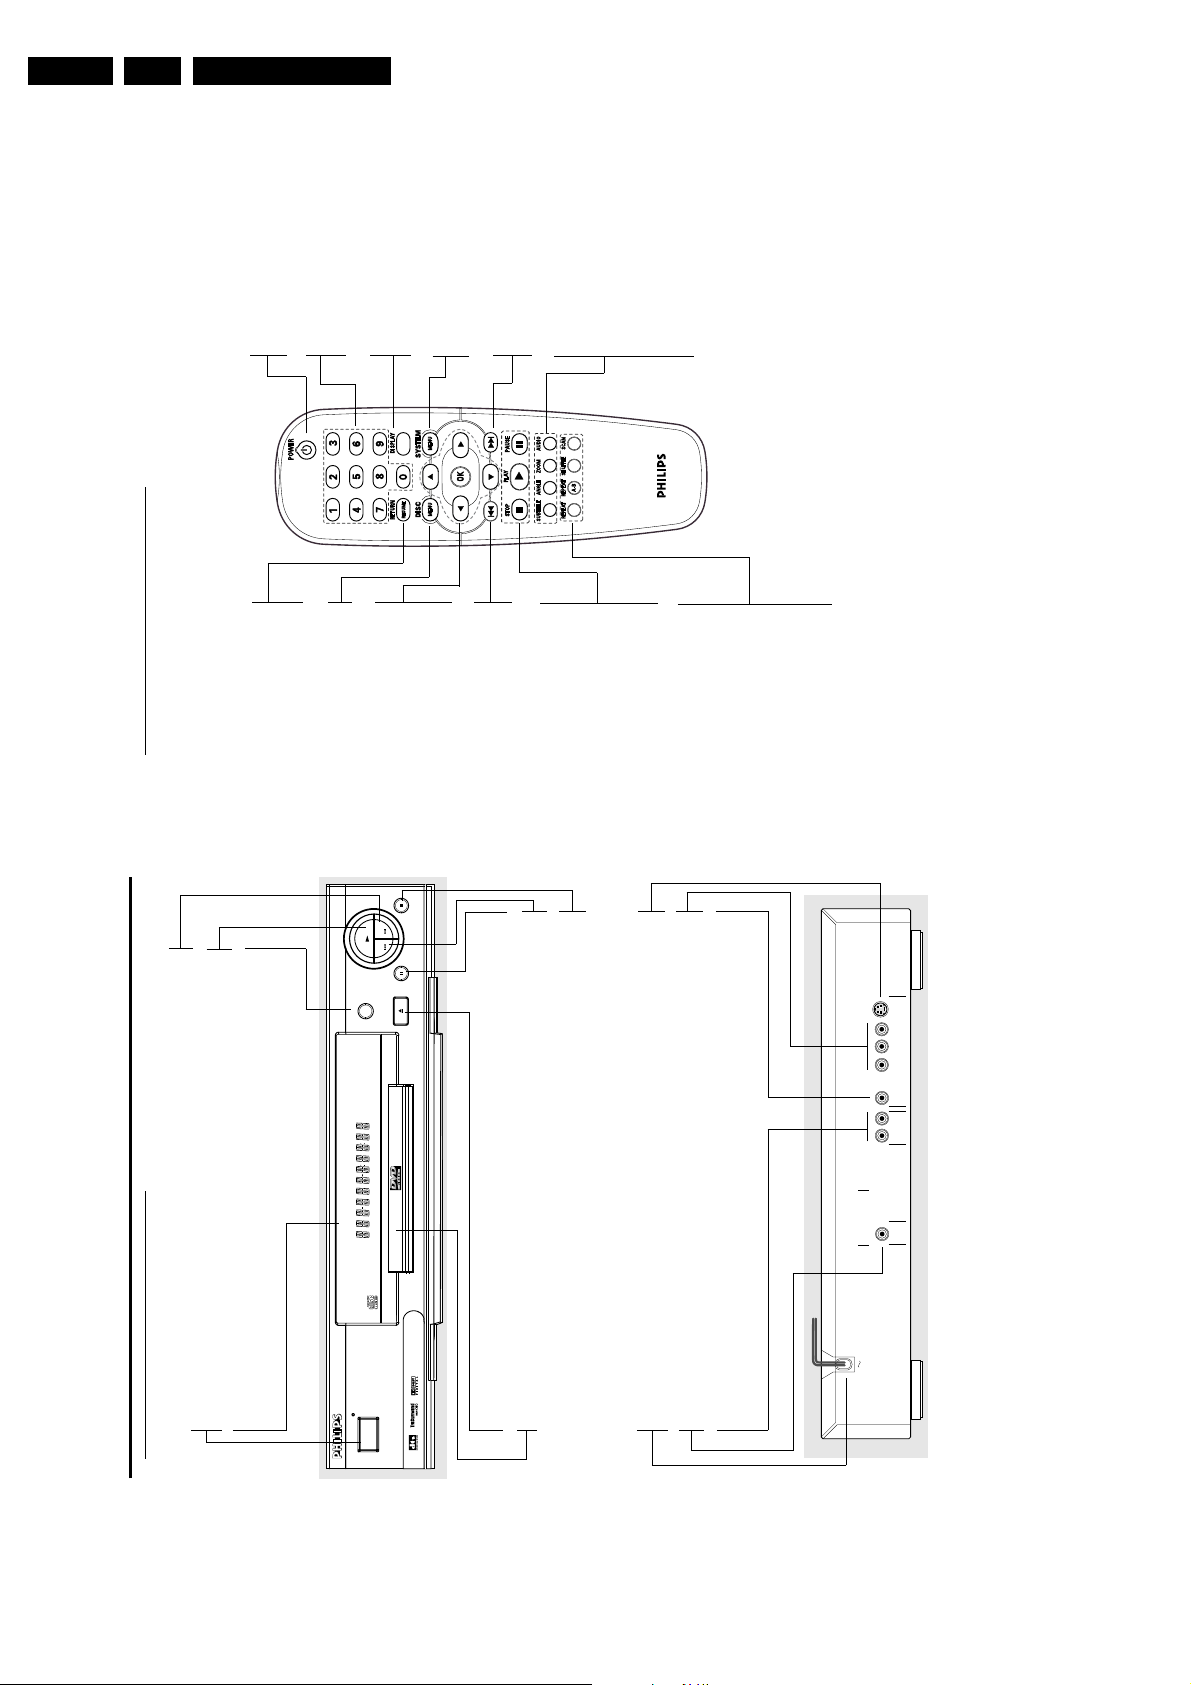
6
F
UNCTIONAL
O
VERVIEW
RETURN / RESUME
– go back to previous menu / to
continue playback after play
was stop
DISC MENU
– access menu of a DVD disc
1 2 3 4
– (left/right/up/down) to select
an item in the menu
OK
– acknowledge menu selection
S
– search backward* / go to a
previous chapter or track
STOP ( 9 )
– to stop playback
PLAY ( B )
– to star t playback
PAUSE ( ; )
– pause playback temporarily /
frame-by-frame playback
REPEAT
– repeat chapter, track, title, disc
REPEAT (A-B)
– repeat a specific segment
SHUFFLE
– play tracks in random order
SCAN
– play of the first 10 seconds of
each track/chapter within a disc
POWER B
– switches DVD ON or to standby/
on mode
0-9 numerical key pad
– to select numbered items in a
menu
DISPLAY
– displays bit rate indicator during
playback
SYSTEM MENU
– access or remove the player’s
menu
T
– search forward* / go to the next
chapter or track
SUBTITLE
– select a subtitle language
ANGLE
– select a DVD camera angle
ZOOM
– enlarge video image
AUDIO
– select an audio language
* Press and hold key for about two seconds
Remote Control
Directions for use
Front and Rear Panels
Functional Overview
SOUND
B PLAY
T NEXT
– to star t playback
– go to next chapter or track
– selects Stereo, Dolby Surround or
POWER ON/OFF
– switches the player to ON or OFF
DISPLAY
– shows the current status of the player
3D Sound (TruSurround)
NEXT
PLAY
PREV
SOUND
DVD/VIDEO CD/CD PLAYER
DVD 703
POWER ON/OFF
STOP
PAUSE
CLOSE
/
OPEN
by
S PREV
9 STOP
; PAU SE
– to stop playback
– to interrupt playback
– go to previous chapter or track
/ OPEN/CLOSE
– opens/closes the disc tray
Disc Tray
Y (VIDEO OUT)
B
/C
B
P
S-VIDEO (VIDEO OUT)
R
/C
R
P
– connect to a TV with S-Video (Y/C) inputs
MAINS (AC Power)
– connect to power source
Y inputs
B
/C
B
P
R
/C
R
CVBS (VIDEO OUT)
– connect to a TV with CVBS video inputs
– connect to a TV with P
DIGITAL AUDIO OUT
PCM-MPEG2-Dolby Digital-DTS
– connect to amplifier, receiver or stereo
COAXIAL (Digital audio out)
system
– connect to digital (coaxial) audio equipment
AUDIO OUT (Left/Right)
S-VIDEO
Y
B
/C
B
P
VIDEO OUT
R
/C
R
P
(CVBS)
L
R
AUDIO OUT
COAXIAL
Caution: Do not touch the inner pins of the jacks on the rear panel. Electrostatic discharge may cause
permanent damage to the unit.
5
VERVIEW
O
UNCTIONAL
F

Directions for use
8
TV
Y
X
Z
COAXIAL
DIGITAL AUDIO OUT
PCM-MPEG2-Dolby Digital-DTS
L
R
(CVBS)
VIDEO OUT
AUDIO OUT
S-VIDEO
Y
P
B
/C
B
P
R
/C
R
AMPLIFIER
A
F
Note:
– If the audio format of the digital output does not match the
capabilities of your receiver, the receiver will produce a strong,
distorted sound or no sound at all.
– Six Channel Digital Surround Sound via digital connection
can only be obtained if your receiver has a Digital Multi-
channel decoder.
– To see the selected audio format of the current DVD in the
Status Window, press SYSTEM MENU or Audio.
NTSC/PAL Settings
You can switch the NTSC/PAL setting of the DVD player to
match the video signal of your TV. This setting only affects
the television’s on-screen display that shows the stop and
setup modes. You may select either NTSC or PAL. To
change the DVD player setting to PAL or NTSC , follow the
steps below.1Press the POWER ON/OFF button on the front panel of
the DVD player to turn OFF the DVD player.2Press and hold 9 and T on the front of the DVD player.
While holding 9 and T press POWER ON/OFF.3After PAL or NTSC appears on the display panel of the
DVD player, release 9 and T at the same time. The PAL
or NTSC indicator that appears on the display panel
indicates the current setting.4To change the setting, press T within three seconds. The
new setting (PAL or NTSC) will appear on the display
panel.
General explanation
About this manual
This manual gives the basic instructions for operating the
DVD player. Some DVDs require specific operation or
allow only limited operation during playback. When this
occurs, the symbol Ä appears on the TV screen, indicating
that the operation is not permitted by the player or the
disc.
Remote control operation
¶ Unless stated, all operations can be performed by the
remote control. Always point the remote control directly at
the player, making sure there are no obstructions between
the remote and the player.
Corresponding keys on the front panel of the player can
also be used.
Menu bar operation
¶ A number of operations can be done with the menu bar
on the screen. The menu bar can be accessed by pressing
the cursor keys on the remote control.
¶ Pressing SYSTEM MENU while the menu bar is displayed
will clear the menu bar from the screen.
¶ The selected item will be highlighted, and the appropriate
cursor keys to operate it will be displayed below the icon.
¶ The symbols < or > indicates that more items are available
at the left/right of the menu bar. Press 1 or 2 to select
these items.
P
REPARATION
GB 9DVD703 /XX1 3.
Preparation
TV
General Notes
connect, there are various ways you could connect the
player. Use only one of the connections described below.
or other devices as necessary to make the best
¶ Depending on your TV and other equipment you wish to
¶ Please refer to the manuals of your TV, VCR, Stereo System
connections.
out jacks to the audio in jacks of your amplifier, receiver,
¶ For better sound reproduction, connect the player’s audio
YXA
Z
stereo or audio/video equipment. See ‘Connecting to
optional equipment’.
DIGITAL AUDIO OUT
PCM-MPEG2-Dolby Digital-DTS
Caution:
– Make sure the DVD player is connected directly
to the TV. Set the TV to the correct video input
S-VIDEO
Y
B
/C
B
P
VIDEO OUT
R
/C
R
P
(CVBS)
L
R
AUDIO OUT
COAXIAL
channel.
– Do not connect the player’s audio out jack to
Connecting to Optional
Equipment
Connecting to an amplifier equipped with
two channel analog stereo or Dolby
the phono in jack of your audio system.
– Do not connect your DVD player to the TV via
Connecting to a TV
your VCR. The DVD image could be distorted by
the copy protection system.
capabilities of your existing equipment.
¶ Make one of the following connections, depending on the
Surround
Y)
B
/C
B
P
R
/C
R
Component Video (P
Connect the Left and Right audio out jacks of the DVD
player to the audio left and right in jacks on your amplifier,
receiver or stereo system, using the supplied audio cable
1
Y video out jacks on the DVD
B
/C
B
P
R
/C
R
Connect the P
connection
1
(A).
Connecting to an amplifier equipped with
two channel digital stereo (PCM) or to an
Audio/Video receiver equipped with a
multi-channel decoder (Dolby Digital™,
MPEG 2 or DTS)
Connect the player’s coaxial digital audio out jack to the
corresponding coaxial digital audio in on your amplifier. Use
an optional digital audio cable (F).2You will need to activate the player’s digital output (see
‘Personal Preferences’).
Digital Multi-channel sound
1
Y cable (Z).
B
/C
B
P
R
/C
R
player to the corresponding in jacks on the TV using an
optional P
Connect the Left and Right audio out jacks of the DVD
player to the audio left/right in jacks on the TV (A).
S-Video (Y/C) connection
Connect the S-Video video out jack on the DVD player to
the S-Video in jack on the TV using an optional S-Video
cable (Y).2Connect the Left and Right audio out jacks of the DVD
player to the audio left/right in jacks on the TV (A).
2
1
CVBS connection
7
REPARATION
P
The digital multi-channel connection provides the best
Connect the CVBS video out jack on the DVD player to
on the front of the receiver.
sound quality. For this you need a multi-channel Audio/
Video receiver that supports one or more of the audio
formats supported by your DVD player (MPEG 2, Dolby
Digital™ or DTS). Check the receiver manual and the logos
the video in jack on the TV using the video cable supplied
(X).2Connect the Left and Right audio out jacks to the audio
left/right in jacks on the TV (A).
1
GB 10 DVD703 /XX13.
10
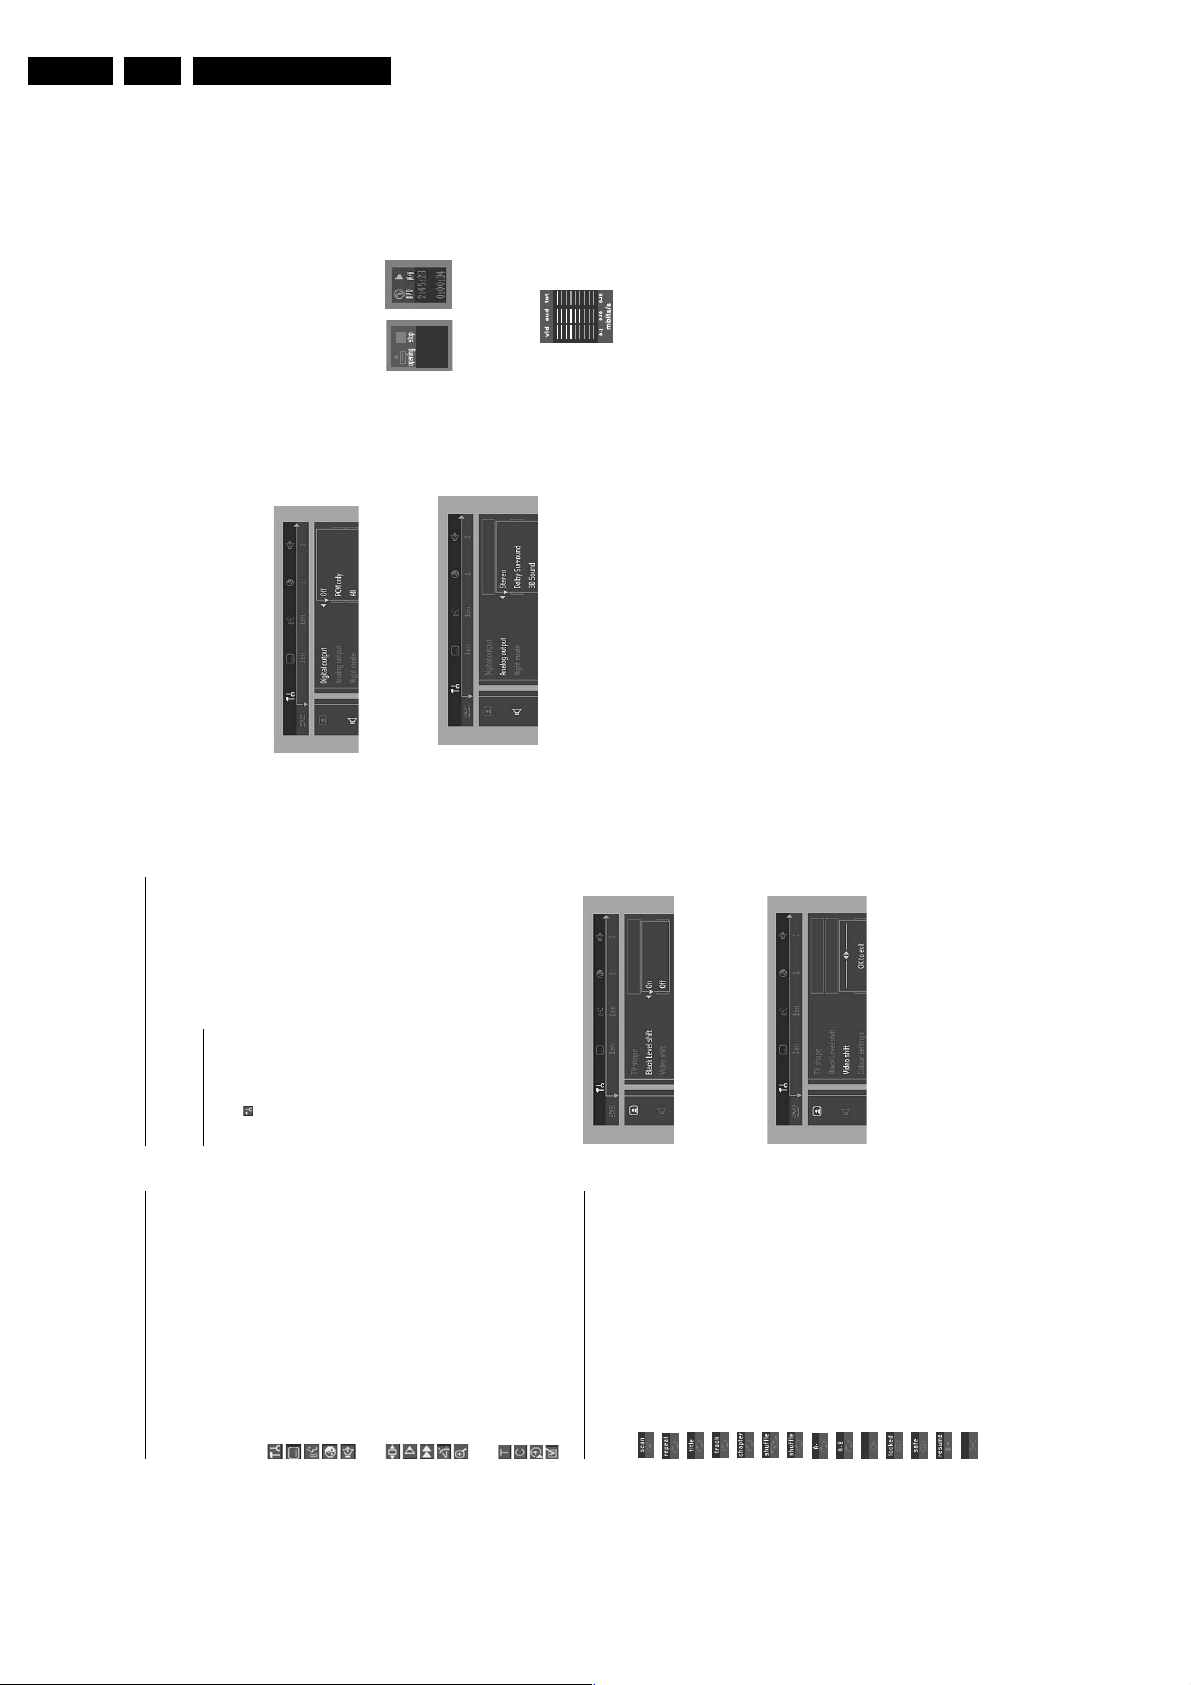
Sound
– Digital output
Factory setting: ALL. This means coaxial output is on. If you
are not connecting equipment with a digital input, change
the setting to OFF.
If your equipment doesn't include a digital multi-channel
decoder, set the digital output to PCM only (Pulse Code
Modulation).
– Analog output
Select Stereo, Dolby Surround or 3D Sound (TruSurround)
to match your system’s playback capability.
– Night Mode
Optimizes the dynamics of the sound for low volume
playback.
– Karaoke vocal
Put this setting to ON only when a multi-channel karaoke
DVD is being played. The karaoke channels on the disc will
then be mixed into a normal stereo sound.
Language
Select the required Menu, Audio and Subtitle language .
Audio language and Subtitle language can also be adapted
using the Menu bar.
Features
– Access Control
Access Control contains the following features:
Child Lock - When Child Lock is set to ON, a 4-digit code
must be entered in order to play discs.
Parental control - Allows the conditional viewing of DVDs
containing Parental Control information (see ‘Access
Control’).
– Status Window
Displays the current status of the player and is displayed
with the menu bar. When disc playback is stopped, it is
displayed with the ‘Tempor ary Feedback Field’ in the default
screen. See ‘On-Screen Display’ information.
The factory setting is ON. Select OFF to suppress display of
the Status Window.
– Bit Rate Indicator
When activated, the bit rate for video and audio as well as
the total bit rate is displayed. This is only applicable during
playback of DVD and SVCD discs.
– Help text
When set to ON, help text describes the icons selected.
Select OFF if you no longer require the help text.
P
REPARATION
Directions for use
9
REPARATION
P
in the menu bar.
➜ The Personal Preferences menu appear s.
submenus and submenu options.
➜ When a menu item is selected, the cursor keys (on the
remote control) to operate the item are displayed next to
the item.
Personal Preferences
You can set your own personal preferences on the player.
General operation:
Menu Bar/Status Window
As there are multiple menu bars, the items on the menu
bar are arranged according to usage and availability of
direct access keys. Pressing the SYSTEM MENU keys
repeatedly will toggle through menu bar 1, menu bar 2,
¶ Use the 1 2 3 4 keys to toggle through the menus,
¶ Press SYSTEM MENU on the remote control.
¶ Select
Personal Preferences
Subtitle Language
menu bar 3 and OFF.
Menu bar 1
The following items can be adapted:
¶ Press OK to confirm and return to the main menu.
Audio Language
Color
Sound
Menu bar 2
Picture
– TV Shape
If you have a wide screen (16:9) TV, select 16:9.
If you have a regular (4:3) TV, select 4:3.
Step by step playback
Slow motion
Fast motion
Angle
If you have a 4:3 TV, you can also select between:
Letterbox for a ‘wide-screen’ picture with black bars at the
Zoom
top and bottom of the screen, or Pan Scan, for a full-height
picture with the sides trimmed. If a disc supports the
format, the picture will be shown accordingly.
Title
Chapter
Menu bar 3
– Black level shift (NTSC users only)
Select ON for adapting the color dynamics to obtain richer
contrasts.
Time Search
Favorite Track Selection (FTS)
Temporary Feedback Field
Icons
Scan
– Video shift
Repeat All
Repeat Title
The factory centers the video on your TV screen. Use this
setting to personalize the position of the picture on your
TV by moving it to the left or right.
Repeat Track
Repeat Chapter
Shuffle
Shuffle Repeat
Repeat A to end
Repeat A-B
Angle
Child Lock On
Child Safe
Resume
Action prohibited
Directions for use
12
Search
¶ Select (FAST MOTION) in the menu
bar.
¶ Use the 4 keys to enter the FAST
MOTION menu.
¶ Use the 1 2 keys to select the required speed: -32, -8 or -4
(backward), or +4, +8, +32 (forward).
¶ Select 1 to play the disc at normal speed again.
¶ To exit FAST MOTION mode, press B or 3.
To search forward or backward through different speeds,
you can also hold down S or T.
Repeat
DVD-Video Discs - Repeat chapter/
title/disc
¶ To repeat the currently playing chapter,
press REPEAT.
➜
REPEAT
CHPT
appears on the player display.
¶ To repeat the title currently playing , press REPEAT a
second time
➜
REPEAT
TITL
appears on the display.
¶ To repeat the entire disc, press REPEAT a third time
➜
REPEAT
appears on the display.
¶ To exit Repeat mode, press REPEAT a fourth time .
Video CDs - Repeat track/disc
¶ To repeat the track currently playing , press REPEAT.
➜
REPEAT
TRK
appears on the player display.
¶ To repeat the entire disc, press REPEAT a second time.
➜
REPEAT
appears on the display and the screen.
¶ To exit Repeat mode, press REPEAT a third time.
Repeat A-B
To repeat a sequence in a title:
¶ Press REPEAT A-B at your chosen starting
point.
➜
A
- appears briefly on the screen.
¶ Press REPEAT A-B again at your chosen end point.
➜
REPEAT
A
-
B
appears briefly on the display, and the repeat
sequence begins.(
REPEAT
A
-
B
is displayed on the front panel
of the player)
¶ To exit the sequence, press REPEAT A-B.
Shuffle
DVD-Video discs
This shuffles the playing order of chapters
within a title, if the title has more than one chapter.
¶ Press SHUFFLE dur ing playback.
➜ SHUFFLE appears on the screen for about two
seconds.
¶ To return to normal playback, press SHUFFLE again.
Video CDs
¶ Press SHUFFLE during playback.
➜ SHUFFLE appears on the screen for about two
seconds.
¶ To return to normal playback, press SHUFFLE again.
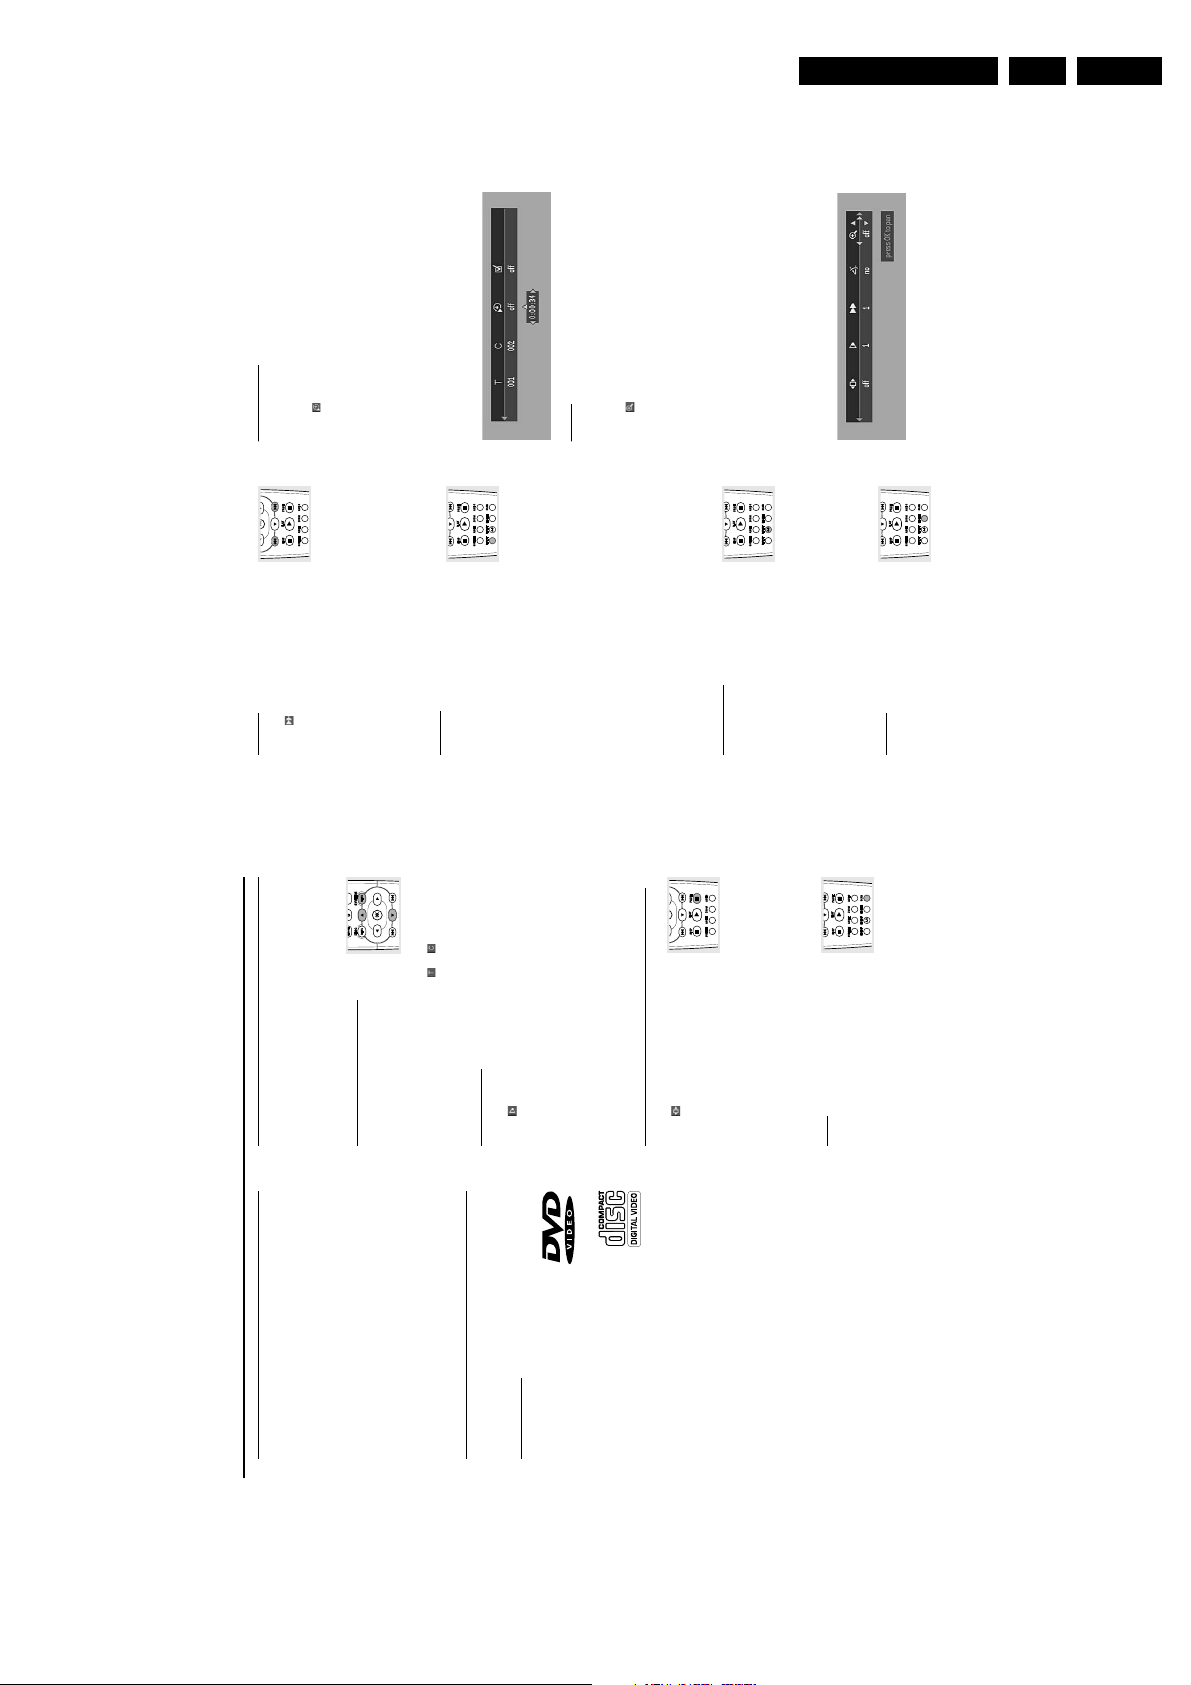
Time search
The Time Search function allows you to star t playing at any
chosen time on the disc.
¶ Select
(TIME SEARCH) in the menu bar.
¶ Press 4.
➜ The player will now go into PAUSE mode.
➜ A time edit box appears on the screen, showing the
elapsed playing time of the current disc.
¶ Use the digit keys to enter the required star t time. Enter
hours, minutes and seconds from left to right in the box.
➜ Each time an item has been entered, the next item will
be highlighted.
¶ Press OK to confirm the star t time.
➜ The time edit box will disappear and playback star ts
from the selected time on the disc.
Zoom
The Zoom function allows you to enlarge the video image
and to pan through the enlarged image.
¶ Select
(ZOOM).
¶ Press 3/4 to activate the ZOOM function and select the
required zoom factor: 1.33 or 2 or 4.
➜ The player will go into Pause mode.
➜ The selected zoom factor appear s below the Zoom icon
in the menu bar, and ‘Press OK to pan’ appears below the
menu bar.
➜ The picture will change accordingly.
¶ Press OK to confirm the selection.
➜ The panning icons appear on the screen.
¶ Use the 1 2 3 4 keys to pan across the screen.
¶ When OK is pressed only the zoomed picture will be
shown on the screen.
¶ To exit ZOOM mode:
– Press B to resume playback.
O
PERATION
GB 11DVD703 /XX1 3.
General Features
Note:
– Unless stated, all operations described are based on remote
control use. Some operations can be carried out using the
menu bar on the screen.
Moving to another title/
Loading Discs
Press OPEN/CLOSE on the front of the player to open the
disc tray.2Load your chosen disc in the tray, label side up.3Press OPEN/CLOSE again to close the tray.
Operation
1
➜ READ appears in the status window and on the player
or in the menu
chapter
display, and playback star ts automatically.
bar.
When a disc has more than one title or
chapter, you can move to another title/chapter as follows:
Note:
– If ‘Child Lock’ is set to ON and the disc inserted is not
authorized, the 4-digit code must be entered and/or the disc
Slow Motion
¶ Press 3 or 4 to select a title/chapter.
¶ Press SYSTEM MENU, then select
Playing a DVD-Video and
must be authorized (see ‘Access Control’).
Video CD
➜ The player will now go into PAUSE mode.
-1/2, -1/4 or -1/8 (backward), or +1/8, +1/4, +1/2 or +1
(forward).
¶ Use the 4 keys to enter the SLOW MOTION menu.
¶ Use the cur sor keys 1 2 to select the required speed: -1,
¶ Select 1 to play the disc at normal speed again.
¶ Select (SLOW MOTION) in the menu bar.
Playing a disc
¶ If ; is pressed, the speed will be set to zero (PAUSE).
tray, playback star ts automatically. The
status window of the player display shows
the type of disc loaded, as well as the disc’s
information and playing time.
¶ After inser ting the disc and closing the
¶ To exit slow motion mode, press B or 3.
¶ The disc may invite you to select an item from
¶ Use the 4 key to enter the picture by
¶ Select (STEP) in the menu bar.
a menu. If the selections are numbered, press
the appropriate numerical key; if not, use the
4 3 1 2 keys to highlight your selection, then press OK.
¶ The number of the current title and chapter are displayed.
¶ Playback may stop at the end of the Title and you may
return to the DVD disc menu. To go to the next title , press
picture menu.
Still Picture and Frame-by-frame playback
➜ The player will now go into PAUSE
mode.
picture frame.
You can also step forward by pressing ; repeatedly on the
¶ Use the cursor keys 1 2 to select the previous or next
B.
➜ The default screen will appear, giving information about
¶ To stop playback, press 9.
remote control.
¶ To exit STEP mode, press B or 3.
the current status.
stopped playback. Press B; when you see the Resume icon
. on the screen, press B again.
¶ You can resume playback from the point at which you
Scan
Scanning plays the first 10 seconds of each
chapter/index on the disc.
➜ The RESUME feature applies not only to the disc in the
player, but also to the last four discs you have played. Simply
reload the disc and press RESUME on the remote control
or, press B when you see the Resume icon . on the
screen, then press B again.
again or press B.
¶ Press SCAN.
¶ To continue playback at your chosen track, press SCAN
Note:
– DVDs may have a region code. Your player will not play
discs that have a region code different from the region code of
your player.
11
PERATION
O
GB 12 DVD703 /XX13.
14
Special Video CD & SVCD
Features
Playback Control (PBC)
¶ Load a Video CD with PBC and press B.
¶ Go through the menu with the keys indicated on the TV
screen until your chosen passage starts to play. If a PBC
menu consists of a list of titles, you can select a title directly.
¶ Enter your choice with the numerical keys (0-9).
¶ Press RETURN to go back to the previous menu.
¶ You may also set to PBC OFF under Personal
Preferences.
Playing an Audio CD
¶ After loading the disc, playback starts automatically.
¶ If the TV is on, the Audio CD screen appears.
¶ The number of tracks and the total playing time of the disc
will be shown on the screen.
¶ During playback, the current track number and its elapsed
playing time will be shown on the screen and on the player
display.
¶ Playback will stop at the end of the disc.
¶ To stop playback at any other time, press 9.
Pause
¶ Press ; during playback.
¶ To return to playback, press B .
Search
¶ To search forward or backward through
the disc at four times normal speed, hold
down S or T for about one second
during playback.
➜ Search begins, and sound is partially muted.
¶ To step up to eight times the normal speed, press S or
T again.
➜ Search goes to eight times the speed, and the sound is
muted.
¶ To return to four times the normal speed, press S or
T again.
¶ If the TV is on, search speed and direction are indicated on
the screen each time S or T is pressed.
¶ To end the search, press B to resume playback or press 9
to stop playback.
Moving to another track
¶ Press S or T briefly during playback to go to the
next track or to return to the beginning of the current
track.
¶ Press S twice briefly to step back to the previous tr ack.
¶ To go directly to any track, enter the tr ack number using
the numerical keys (0-9).
Shuffle
¶ Press SHUFFLE during playback.
➜ The order of the tr acks is changed.
¶ To return to normal playback, press
SHUFFLE again.
O
PERATION
Directions for use
13
PERATION
O
Special DVD Features
Checking the contents of DVD-Video discs:
Menus
DVDs may contain menus to navigate the disc and access
special features. To use the menu, press the appropriate
numerical key or use the 4, 3, 2, 1 keys to highlight your
selection, then press OK.
Title/Disc menu
➜ If the current title has a menu, the menu will appear on
the screen. Otherwise, the disc menu will be displayed.
¶ Press DISC MENU.
FTS-Video
titles and chapters (DVD) and favorite tracks and indexes
(VCD) for a particular disc in the player memory.
playback is activated. When the list is full, a new program
¶ The FTS-Video function allows you to store your favorite
will replace the last program on the list.
¶ FTS program can contain 20 items (titles, chapters).
¶ An programmed FTS will be placed on top of the list when
Storing an FTS-Video Program
¶ The program can be selected and played at any time.
¶ While playback is stopped, select VIDEO FTS c in the
menu bar.
➜ The VIDEO FTS menu appear s.
¶ Press 4 to open the menu.
Camera Angle
subtitle options, and chapters for the title.
¶ The menu can list camera angles, spoken language and
¶ Press 2 or 1 or FTS to select ON or OFF.
If the disc contains sequences recorded from different
¶ To remove the title menu, press DISC MENU again.
Storing titles/tracks
¶ Press 4 to select TITLES.
¶ Use 2 and 1 to select the required title.
¶ Press OK if you wish to store the entire title.
camera angles, the angle icon appears, showing the number
of available angles and the angle being shown currently. You
can then change the camera angle if you wish.
➜ After a while, playback changes to the selected angle. The
angle icon remains displayed until multiple angles are no
longer available.
¶ Use the 3/4 keys to select the required angle icon.
➜ The title number will be added to the list of selections.
Changing the audio language
¶ Select Y (AUDIO) in the menu bar.
¶ Press Y or 3/4 repeatedly to see the different languages.
Storing chapters/indexes
➜ The title number will be mar ked and the highlight moves
to the first available chapter number for this title.
¶ Press 4 on the selected title number.
¶ Use 2 and 1 to select the required chapter number.
Subtitles
¶ Select Z (SUBTITLE) in the menu bar.
¶ Press Z or 3/4 repeatedly to see the different subtitles.
➜ The title/chapter selection will be added to the list of
selections.
Erasing an FTS-Video Program
¶ Press OK to confirm the selection.
¶ Press SYSTEM MENU to exit the VIDEO FTS c menu.
¶ While playback is stopped, select VIDEO FTS c in the
menu bar.
¶ Use 4 to select PROGRAM.
Erasing all selections
¶ Use 2 and 1 to select the required number.
¶ Press OK to erase the selection.
¶ Press SYSTEM MENU to exit.
¶ While playback is stopped, select VIDEO FTS c in the
menu bar.
➜ All selections will be erased.
¶ Use 4 to select CLEAR ALL.
¶ Press OK.
¶ Press SYSTEM MENU to exit.
Directions for use
16
Access Control: Child Lock
(DVD-Video and Video CD)
Activating/deactivating the Child Lock
1
When disc playback is stopped, select ACCESS
CONTROL in the features menu using the 3/4 keys.2Enter a 4-digit code of your own choice.3Enter the code a second time.4Move to “CHILD LOCK” using the 3/4 keys.5Move to LOCK/UNLOCK using the 2 key.6Select LOCK using the 3/4 keys.7Press OK or 1 to confirm, then press 1 again to exit the
menu.
➜ Now unauthorized discs will not be played unless the
4-digit code is entered.
8
Select UNLOCK to deactivate the CHILD LOCK.
Note: Confirmation of the 4-digit code is necessary when:
– The code is entered for the very first time (see above),
– The code is changed (see ‘Changing the 4-digit code’),
– The code is cancelled (see ‘Changing the 4-digit code’).
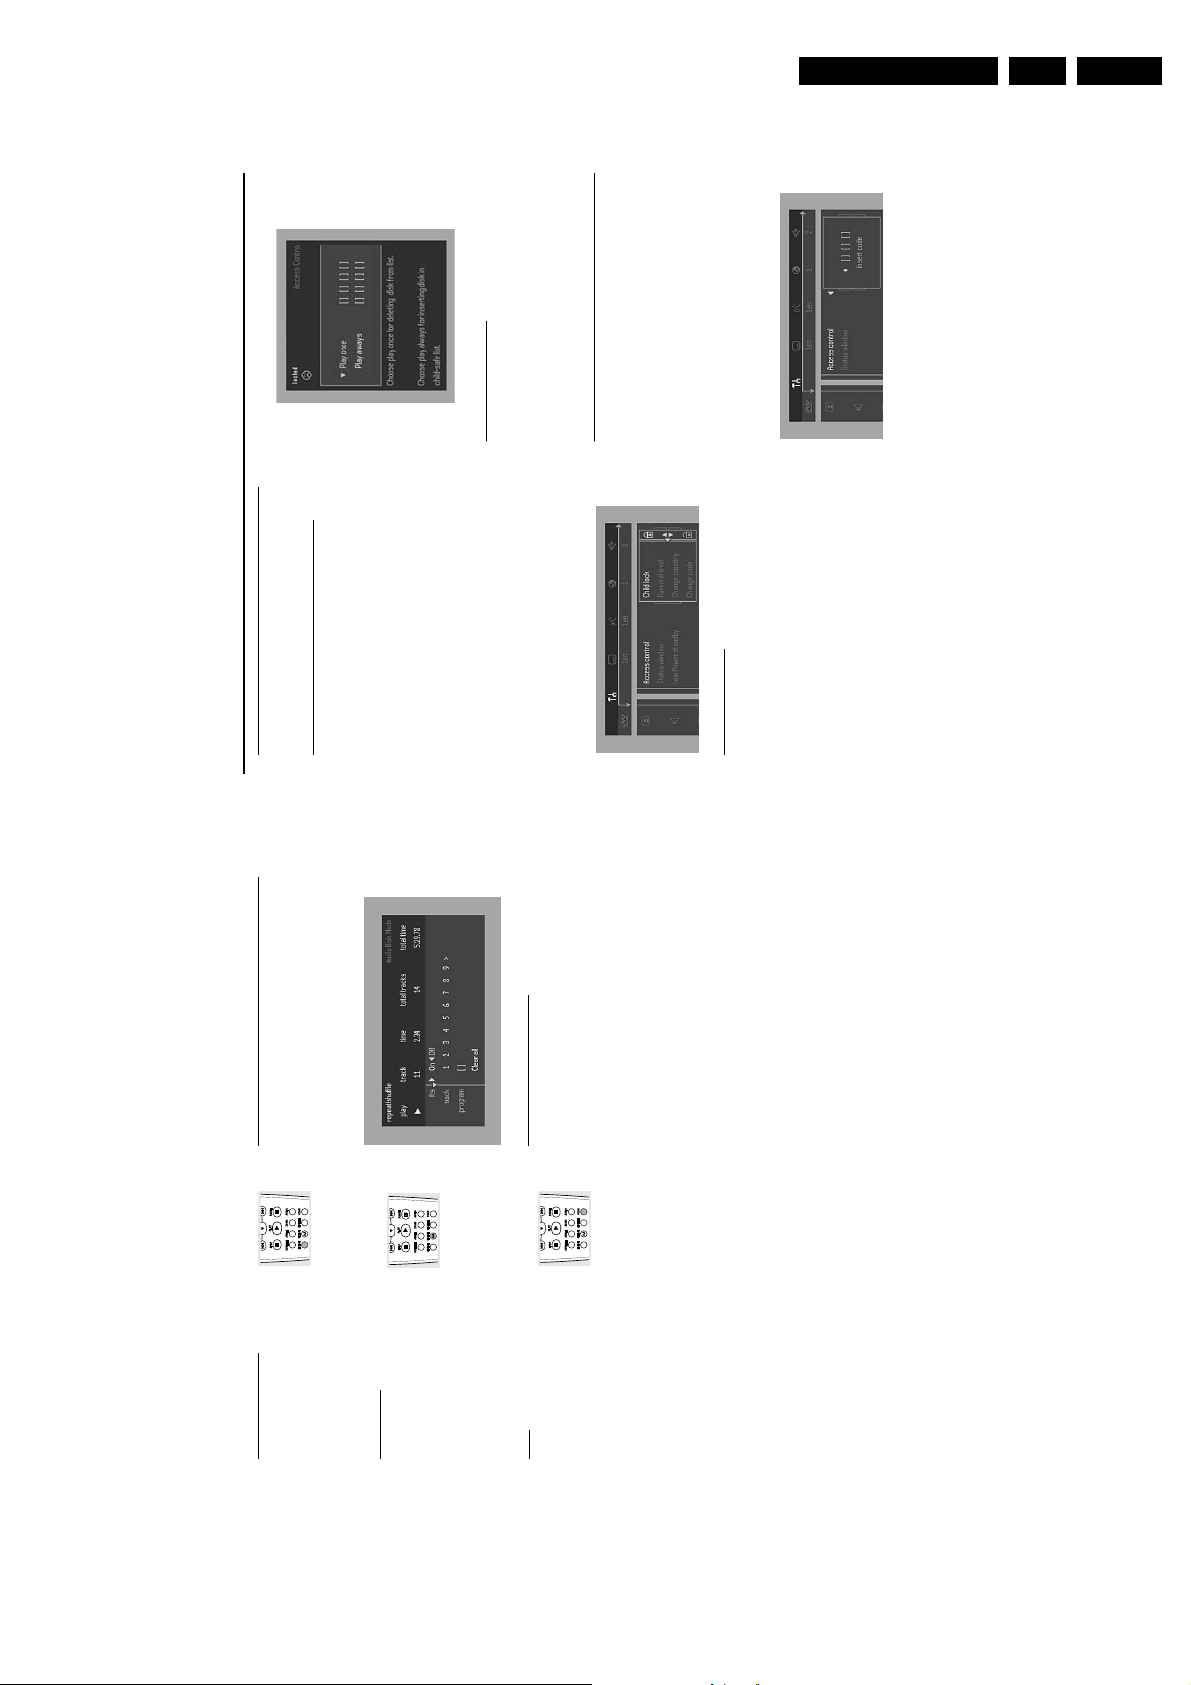
Authorizing discs
¶ Inser t the disc. See ‘Loading disc’.
➜ The ‘child protect’ dialog will appear.
You will be asked to enter your secret code for ‘Playback
Once ‘or ‘Playback Always.’ If you select ‘Playback Once’, the
disc can be played as long as it is in the player and the
player is ON. If you select ‘Playback Always’, the disc will
become child safe (authorized) and can always be played,
even if the Child Lock is set to ON.
Notes:
– The player memory maintains a list of 120 authorized
(‘Child safe’) disc titles. A disc will be placed in the list when
‘Playback Always’ is selected in the ‘child protect’ dialog.
– Each time a ‘c hild safe’ disc is played, it will be placed on
top of the list. When the list is full and a new disc is added, the
last disc in the list will be removed from the list.
– Double-sided DVDs may have a different ID for each side.
In order to make the disc ‘child safe’, each side has to be
authorized.
– Multi-volume VCDs may have a different ID for each
volume. In order to make the complete set ‘child safe’, each
volume has to be authorized.
Deauthorizing discs
¶ Inser t the disc. See ‘Loading disc’.
➜ Playback starts automatically.
¶ Press 9 while { is visible.
➜ The | will appear and the disc is now deauthorized.
Access Control: Parental
Control (DVD-Video only)
Movies on DVDs may contain scenes not suitable for
children. Therefore, discs may contain ‘Parental Control’
information which applies to the complete disc or to
certain scenes on the disc. These scenes are rated from 1
to 8, and alternative, more suitable scenes are available on
the disc. Ratings are country dependent. The ‘Parental
Control’ feature allows you to prevent discs from being
played by your children or to have certain discs played with
alternative scenes.
A
CCESS
C
ONTROL
Access Control
GB 13DVD703 /XX1 3.
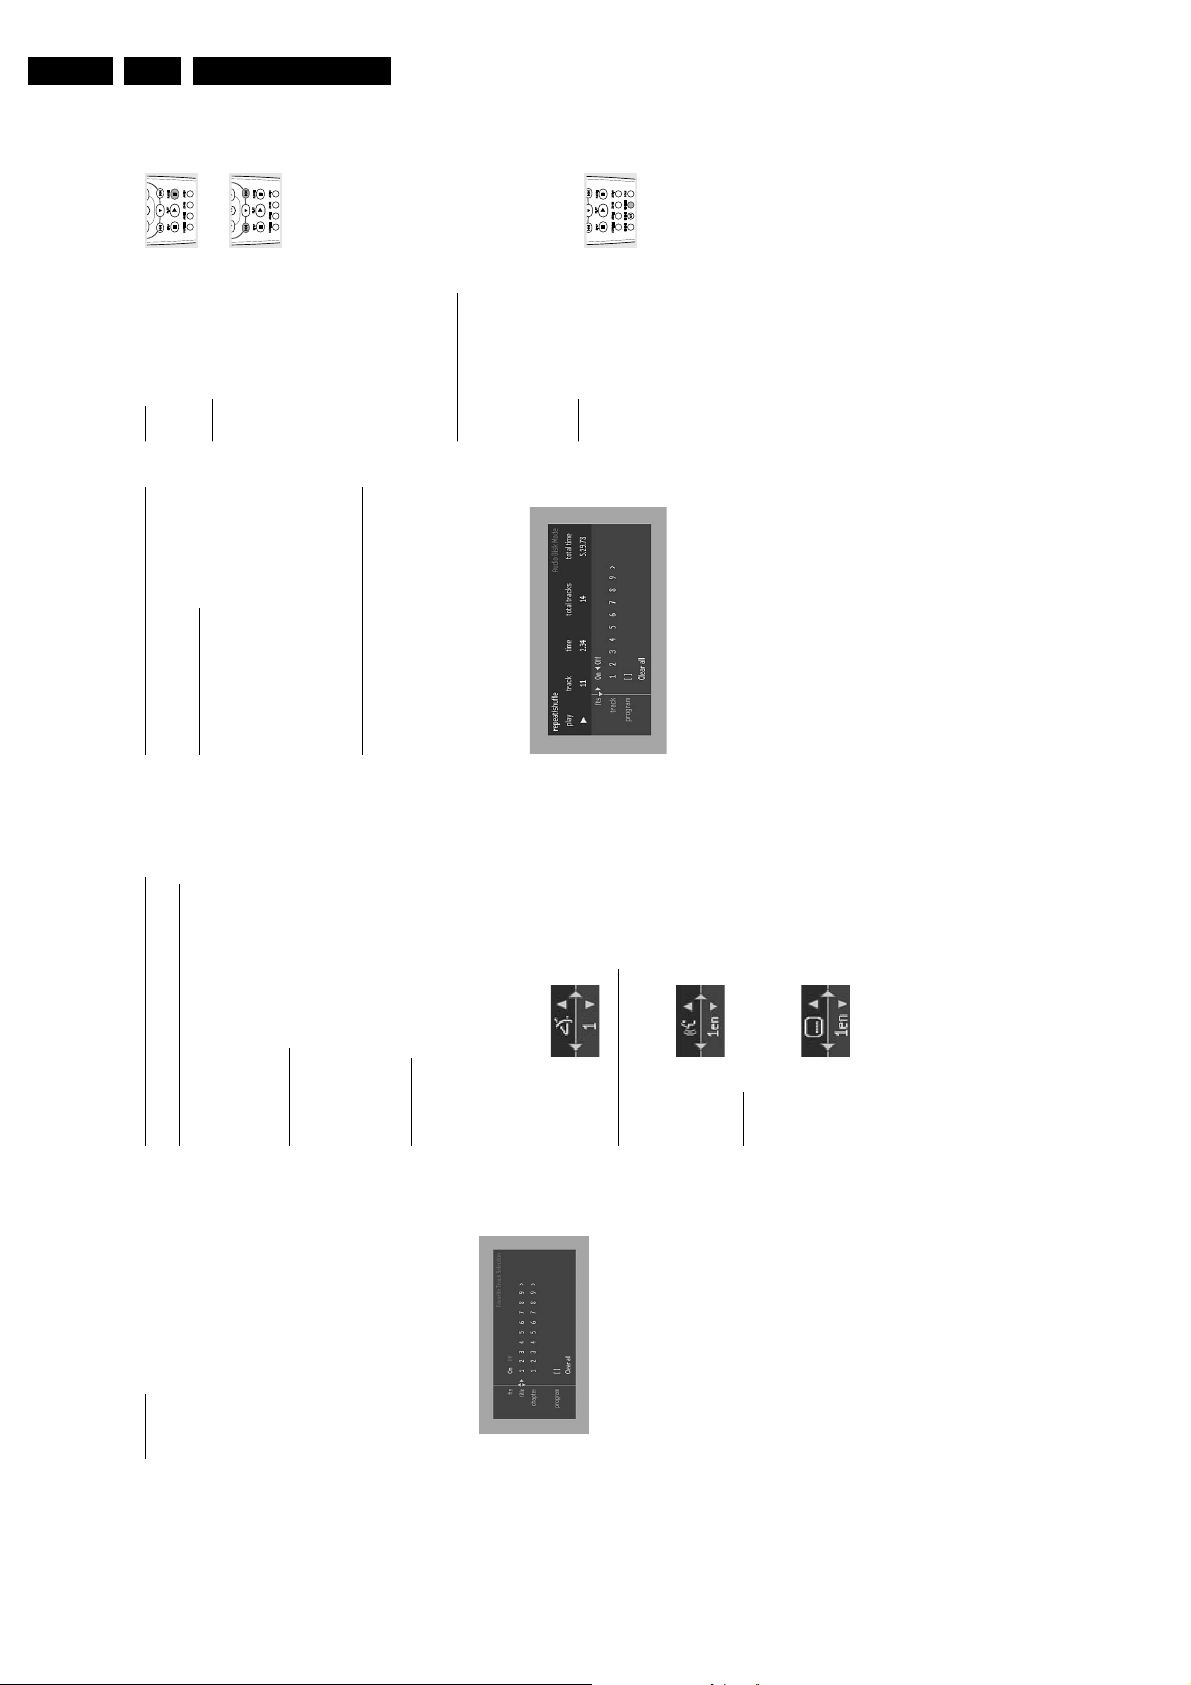
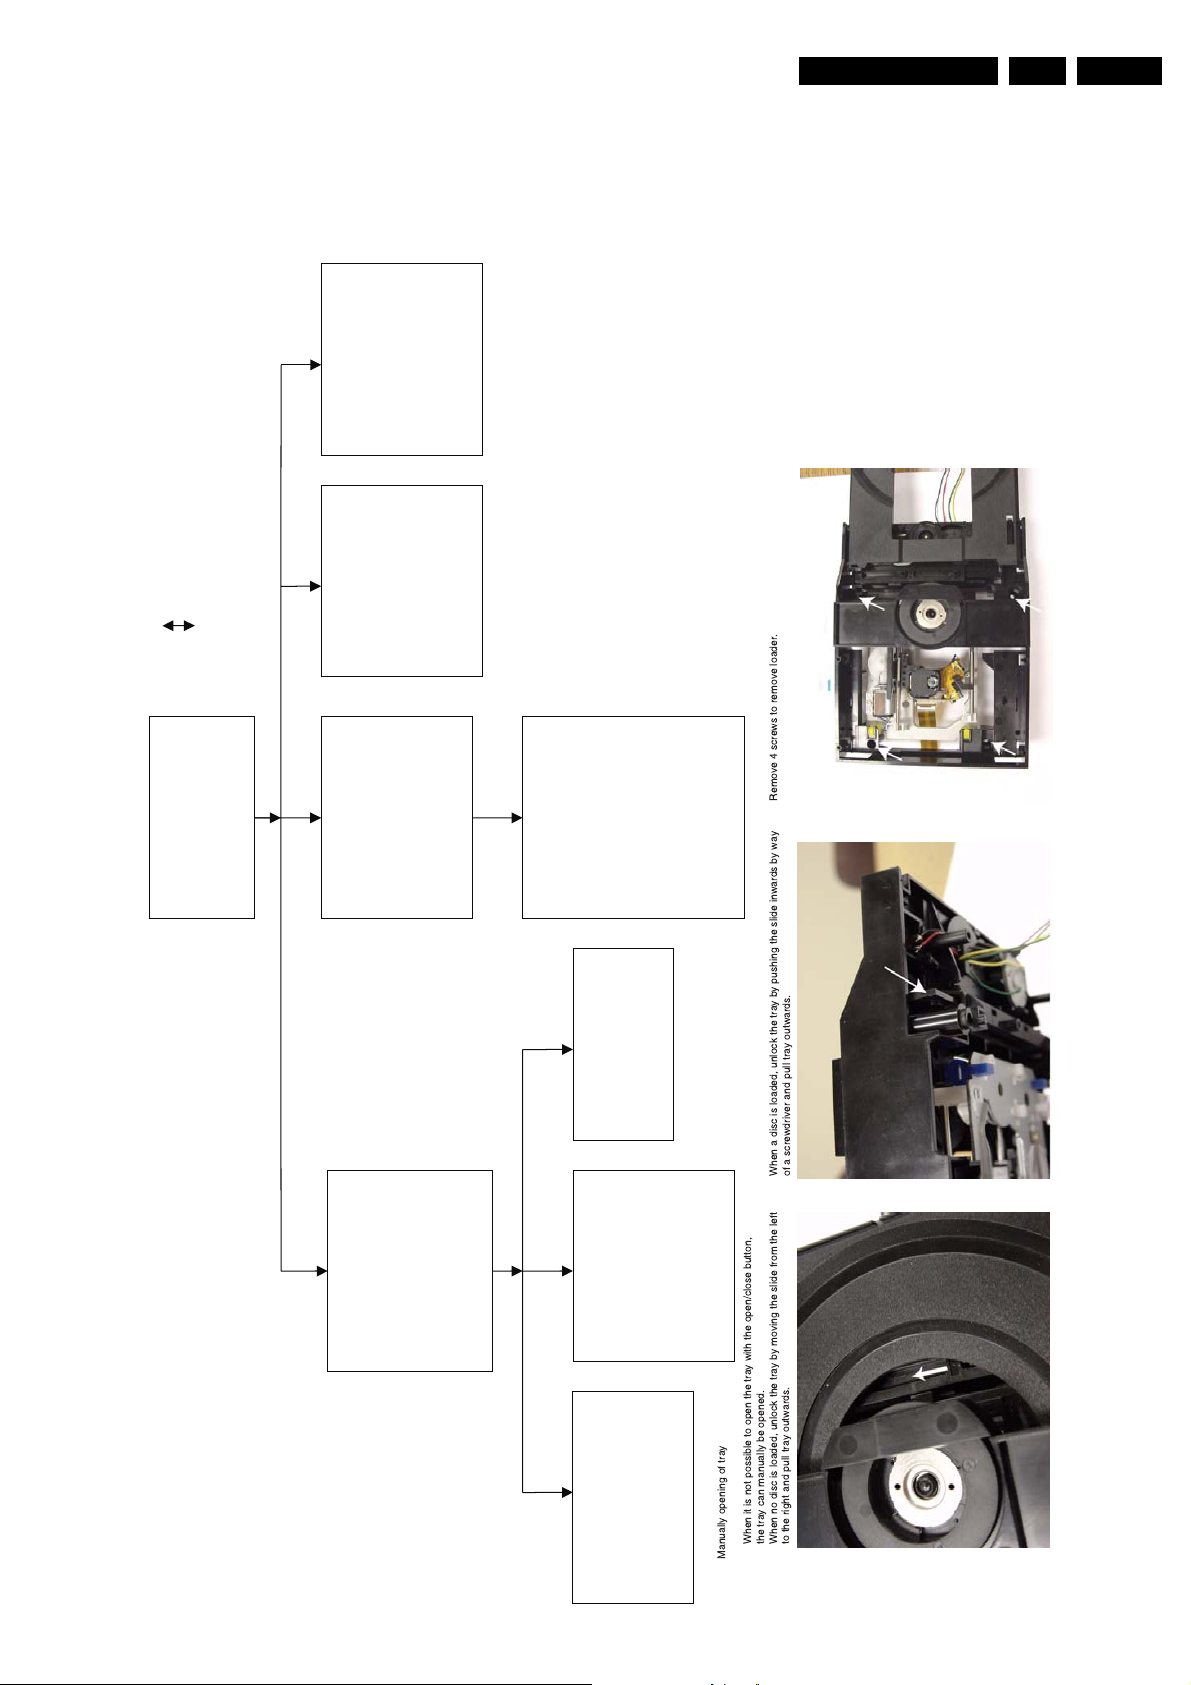
Favorite Track Selection (FTS)
Program
for a particular disc in the player memory.
¶ The FTS Program allows you to store your favorite tracks
¶ Each FTS Program can contain 20 tr acks.
appears on the display.
TRK
appears on the display.
REPEAT
REPEAT
¶ To repeat the track currently playing, press
➜
REPEAT.
➜
¶ To repeat the entire disc, press REPEAT a second time.
Repeat track/disc
¶ To exit Repeat mode, press REPEAT a third time.
Repeat A-B
To repeat a sequence:
¶ Press REPEAT A-B at your chosen starting
Storing an FTS Program
Load a disc and stop playback.2Use 4 to go to the list of available tracks.3Use 2 or 1 to select tracks from the list.
1
appears on the display, and the sequence begins to
B
- appears on the player display.
-
A
A
play repeatedly.
➜
point.
➜
¶ Press REPEAT A-B again at your chosen end point.
¶ To exit the sequence, press REPEAT A-B again.
Scan
Scanning plays the first 10 seconds of each
track on the disc.
To go directly to any track, enter the track number using
the numerical keys (0-9).
again or press B.
¶ Press SC AN.
¶ To continue playback at your chosen track, press SC AN
Store each track by pressing OK.
➜ The tr ack numbers will be added to the list.
➜ The number of tr acks and the playing time of the
program will be shown on the screen and the player display.
When your FTS Program is complete, press B to start
playback or, press 3 to go back to Stop mode. In either
4
case, the FTS Program will be automatically memorized.
Switching FTS ON/OFF
Use 3 4 to move to select desired tracks.2Use 2 or 1 to select either ON or OFF.
1
Erasing a track from an FTS Program1Use 4 to go to the list of selected tracks.2Use 2 and 1 to select the track number you wish to erase.3Press OK.
➜ The tr ack number will be erased from the list of selected
tracks.
Erasing the complete program1Use 4 to select CLEAR ALL, then press OK.
➜ The complete FTS Progr am for the disc will be erased.
15
PERATION
O
GB 14 DVD703 /XX13.
18
Before Requesting Service
If it appears that the DVD-Video player is faulty, first consult this checklist. Something may have been overlooked. Under no
circumstances should you attempt to repair the system yourself; this will invalidate the warranty.
Look for the specific symptom(s). Then perform only the actions listed to remedy the specific symptom(s).
Symptom Remedy
No power – Make sure the mains cord (AC Power) is properly connected.
– Check if there is power at the AC outlet by plugging in another appliance.
No picture – Check if the TV is switched on.
– Check the video connection.
Distorted picture – Check the disc for fingerprints and clean the disc with a soft cloth, wiping
from the center to the edge in a straight line.
– Sometimes a small amount of picture distortion may appear .This is not a
malfunction.
Completely distorted picture – If the picture is distor ted completely or if the picture rolls vertically,
or no color with player menu make sure the NTSC/PAL setting at the DVD player matches the video
signal of your television.
– If your TV video signal is NTSC , select the NTSC setting at the DVD player.
– If your video signal is PAL, select the PAL setting. - See NTSC/PAL SETTINGS.
Distorted or black/white picture – The disc format does not match your TV’s video signal (PAL/NTSC).
with DVD or Video CD
No sound – Check audio connections.
– If you are using a HiFi amplifier, try another sound source .
Distorted sound from HiFi – Check to make sure that no audio connections are made to the amplifier’s
amplifier phono input.
No audio at digital output – Check the digital connections.
– Check the settings menu to make sure the digital output is set to ALL or
PCM.
– Check if the audio format of the selected audio language matches your
receiver capabilities.
Disc can’t be played – Ensure the disc label is facing up.
– Clean the disc.
– Check if the disc is defective by trying another disc.
– Check to see if the disc is defective, badly scratched or warped (not flat).
No return to start-up screen when – Reset by switching the player off, then on again.
disc is removed – Check to see if the program requires another disc to be loaded.
The player does not respond to – Aim the remote control directly at the sensor on the front of the player.
the remote control – Remove any obstacles between the player and the remote control.
– Inspect or replace the batteries in the remote control.
Buttons do not work – In order to completely reset the player, unplug the AC cord from the AC
outlet. (Please ensure that the set is not in Initial Setup mode)
Player does not respond to some – Operations may not be permitted by the disc. Refer to the instructions of
operating commands during the disc.
playback
DVD-Video player cannot read – Use a commonly available cleaning CD/DVD to clean the lens before
CDs/DVDs sending the DVD-Video player for repair.
B
EFORE
R
EQUESTING
S
ERVICE
Directions for use
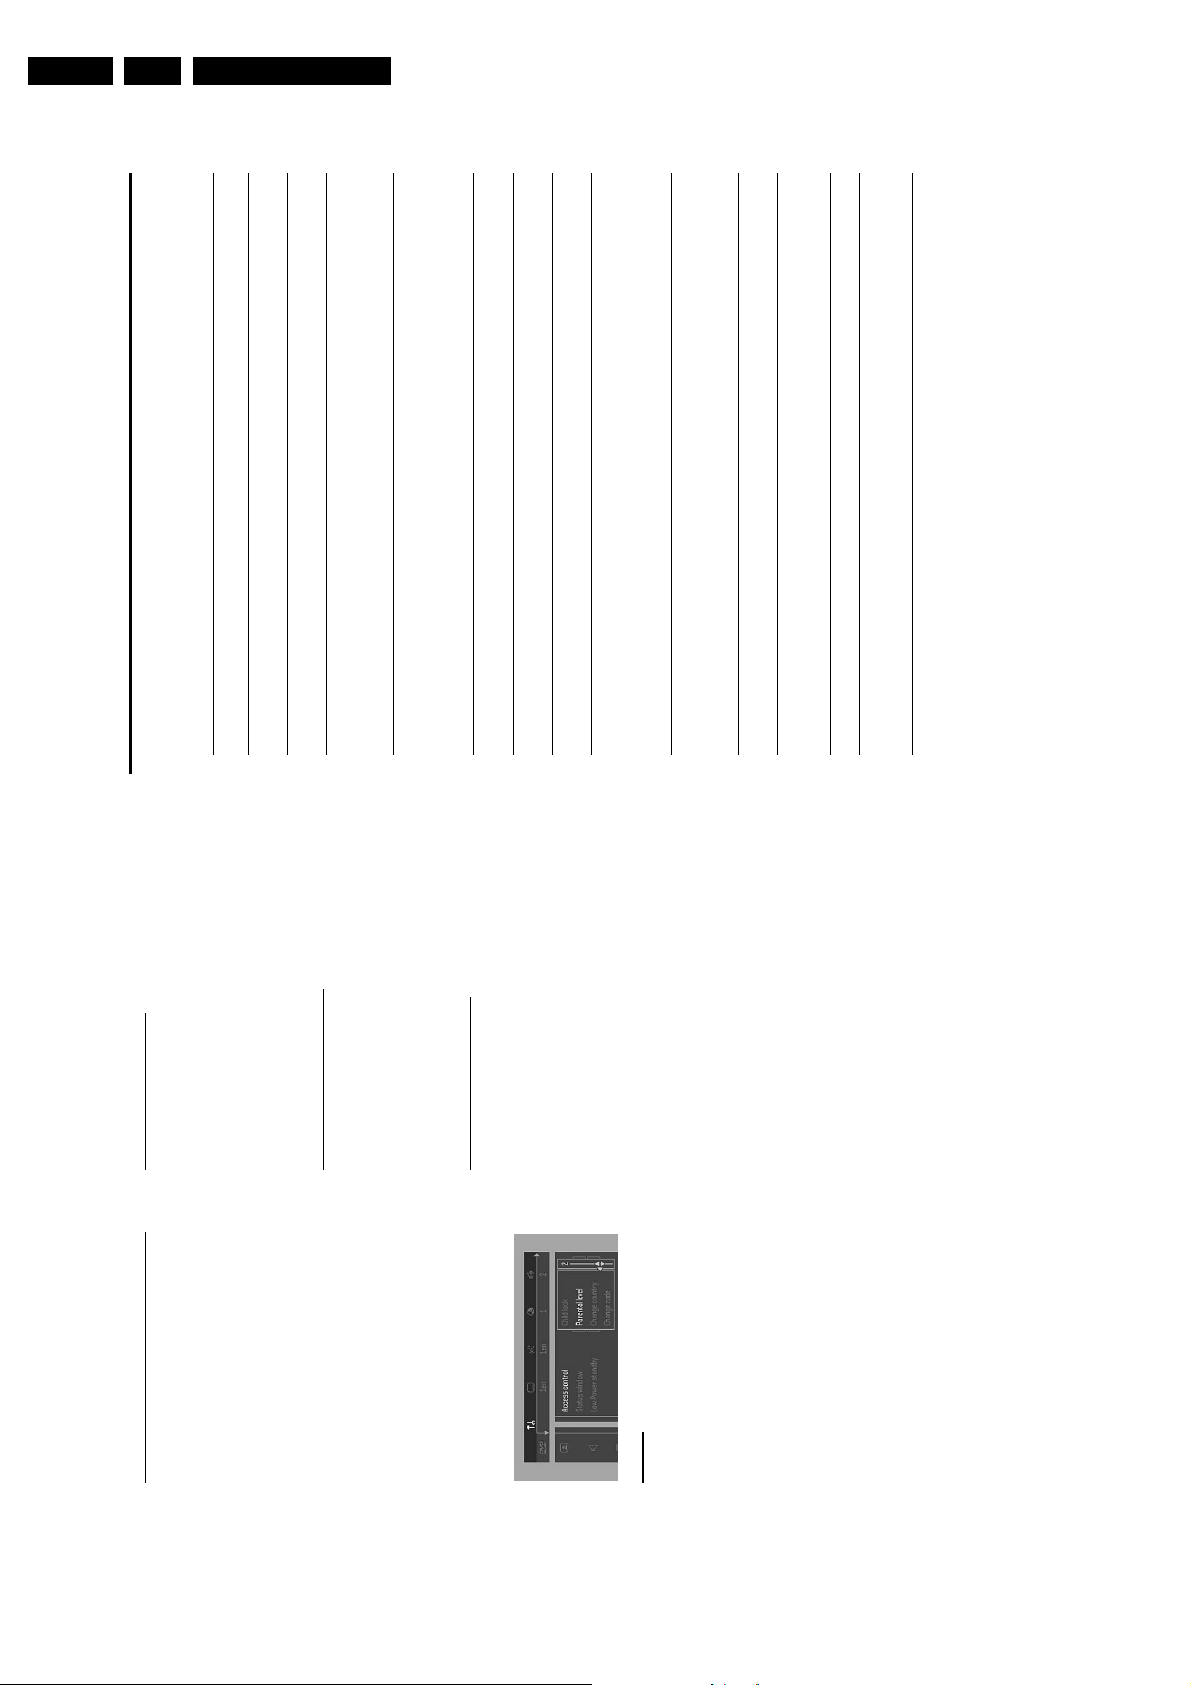
Changing the 4-digit code
When disc playback is stopped, select ACCESS
CONTROL in the features menu using the 3/4 keys.2Enter the old code.3Move to CHANGE CODE using the 4 key.4Press the 2 key.5Enter the new 4-digit code.6Enter the code a second time and reconfirm by pressing
OK.7Press 1 to exit the menu.
1
Activating/Deactivating Parental Control
When disc playback is stopped, select ACCESS
CONTROL in the features menu using the 3/4 keys.2Enter your 4-digit code. If necessary, enter the code a
second time.3Move to Parental Control using the 3/4 keys.4Move to VALUE ADJUSTMENT (1-8) using the 2 key.5Then use the 3/4 keys or the numerical keys on the
remote control to select a rating from 1 to 8 for the disc
1
If you forget your 4 digit code
inserted.
Rating 0 (displayed as ‘– –’):
Parental Control is not activated. The Disc will be played in
Press 9 to exit the ‘Child Protect’ screen.2Select ACCESS CONTROL in the features menu using
1
full.
Ratings 1 to 8:
The disc contains scenes not suitable for children. If you set
the 3/4 keys.3The 4-digit code can be cancelled by pressing 9 four times
in the ‘Access Control’ dialog.4You can then enter a new code (twice!) as descr ibed above
(Changing the 4 digit code).
a rating for the player, all scenes with the same rating or
lower will be played. Higher r ated scenes will not be played
unless an alternative is available on the disc. The alternative
must have the same rating or a lower one. If no suitable
alternative is found, playback will stop and the 4-digit code
has to be entered.
Parental Control Disclaimer
This DVD player features the PARENTAL CONTROL
system which is intended to activate when playing DVD
discs furnished with certain software coding. This is
according to technical standards adopted by the set maker
Press OK or 1 to confirm, then press 1 again to exit the
menu.
6
and disc content industries.
Please note that the PARENTAL CONTROL system
will not operate a DVD disc which is not furnished with the
appropriate software coding. Also note that at the time of
release of this DVD player, certain aspects of the technical
standards had not been settled between set makers and
the disc industries.
On this basis, Philips cannot guarantee the functioning of
the PARENTAL CONTROL system and denies any
Country
liability associated with unintended watching of disc
content.
If in doubt, please make sure the disc plays according to
your PARENTAL CONTROL settings before you allow
children access to the player.
When disc playback is stopped, select ACCESS
CONTROL in the features menu using the 3/4 keys.2Enter the 4-digit code.3Move to CHANGE COUNTRY using the 4 key.4Press the 2 key.5Select a country using 3/4.6Press OK or 1 to confirm, then press 1 again to exit the
menu.
1
17
ONTROL
C
CCESS
A
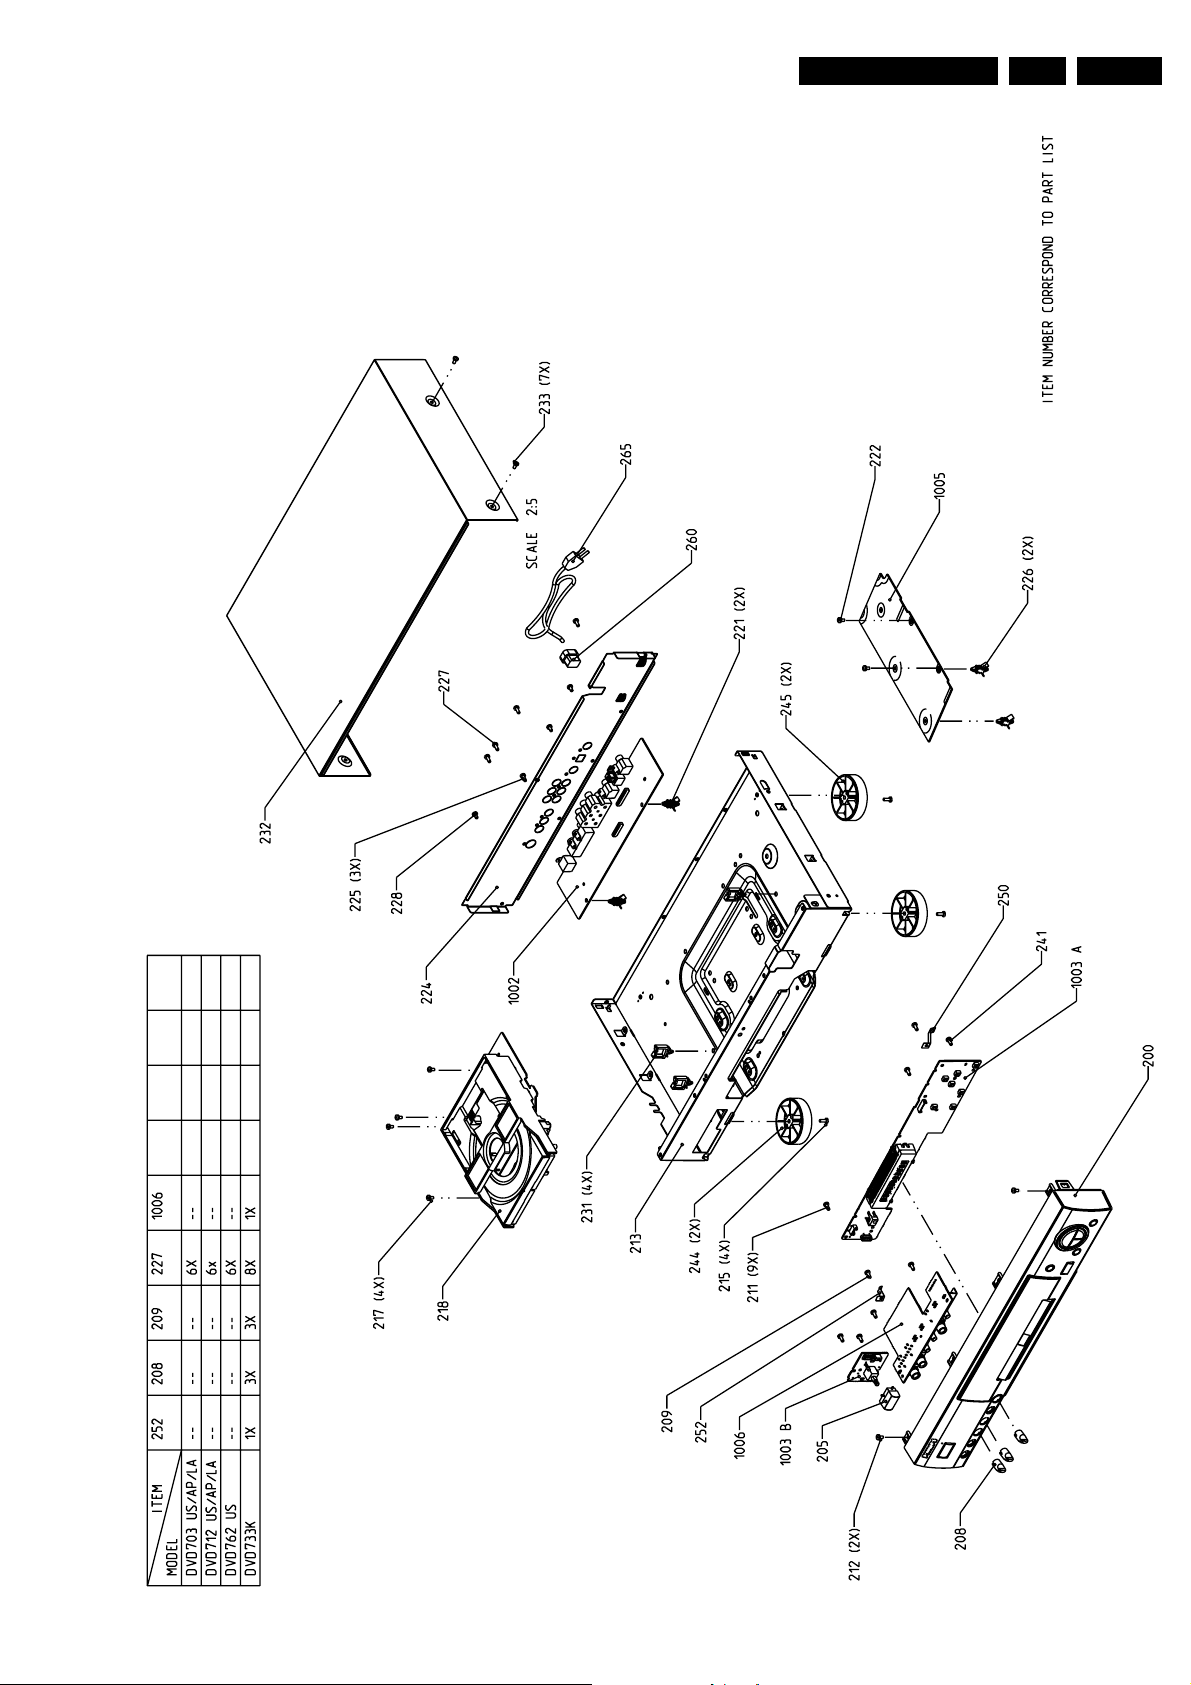
4. Mechanical instructions
4.1 Dismantling instructions
(board to frame)
226 (board to frame)
-> Remove 2 screws 222
-> Release snaps of 2 spacer
-> Demount board
(skt cinch to back-plate)
and screw 228 ( S-video
to back-plate )
-> Remove screws 227
221
-> Release snaps of 2 spacers
-> Demount board
Mounting
Demounting
Power supply unit 1005
-> Remove connections
A/V board 1002
-> Remove connections
Mechanical instructions
GB 15DVD703 /XX1 4.
130201
CL 16532007_057.eps
Cover 232
-> Remove 7 screws 233
-> Lift cover at rearside to
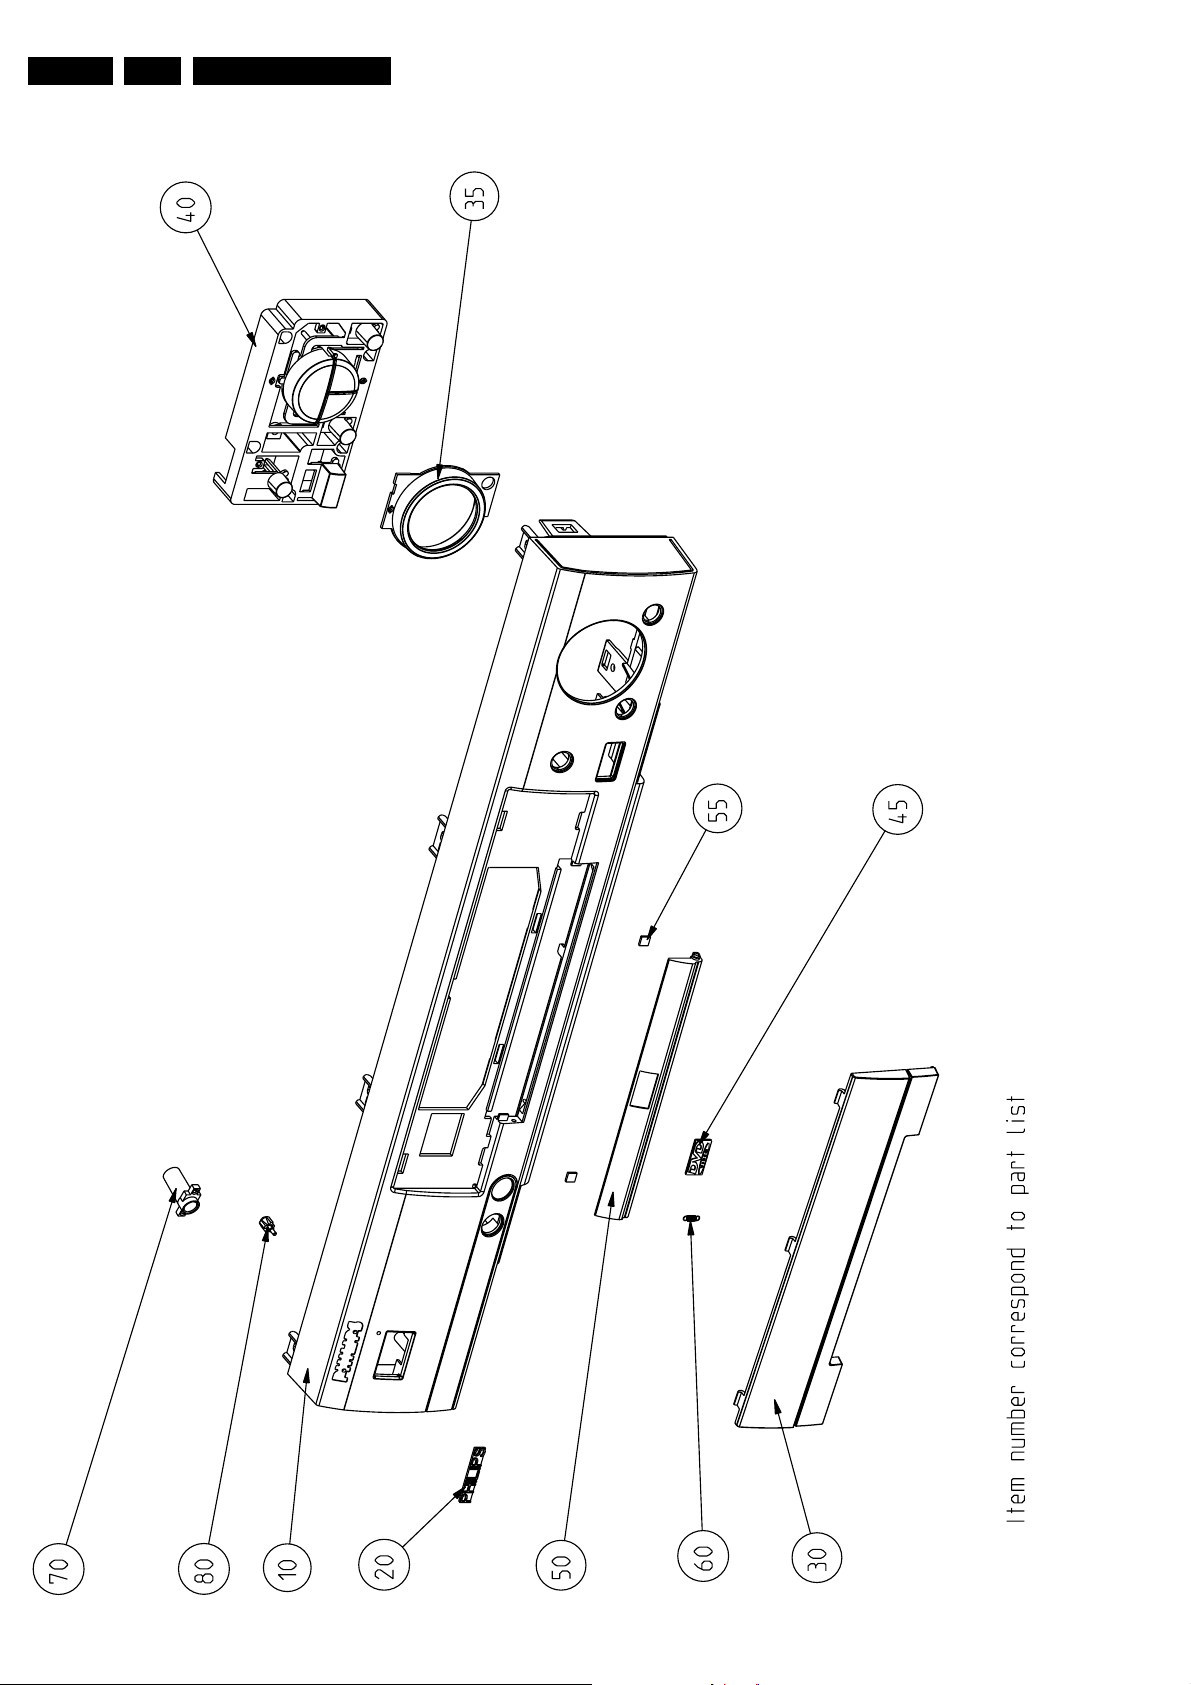
Remove 4 screws to remove loader.
DVD module
turntable motor and sledge
motor
(mono-board to VAL6011)
connection to OPU and wire
remove
Mono-board
DVD module 218
Front assy 200
( See instruction below )
-> Remove connections to
-> Open Tray
( front to frame )
-> Remove 2 screws 212
-> Unlock front from frame by
(module to frame)
-> Remove 4 screws 217
-> Demount module
releasing successively 6
snaps ( 2 each on the side,
top and bottom )
the set ( service position )
-> Place front assy in front of
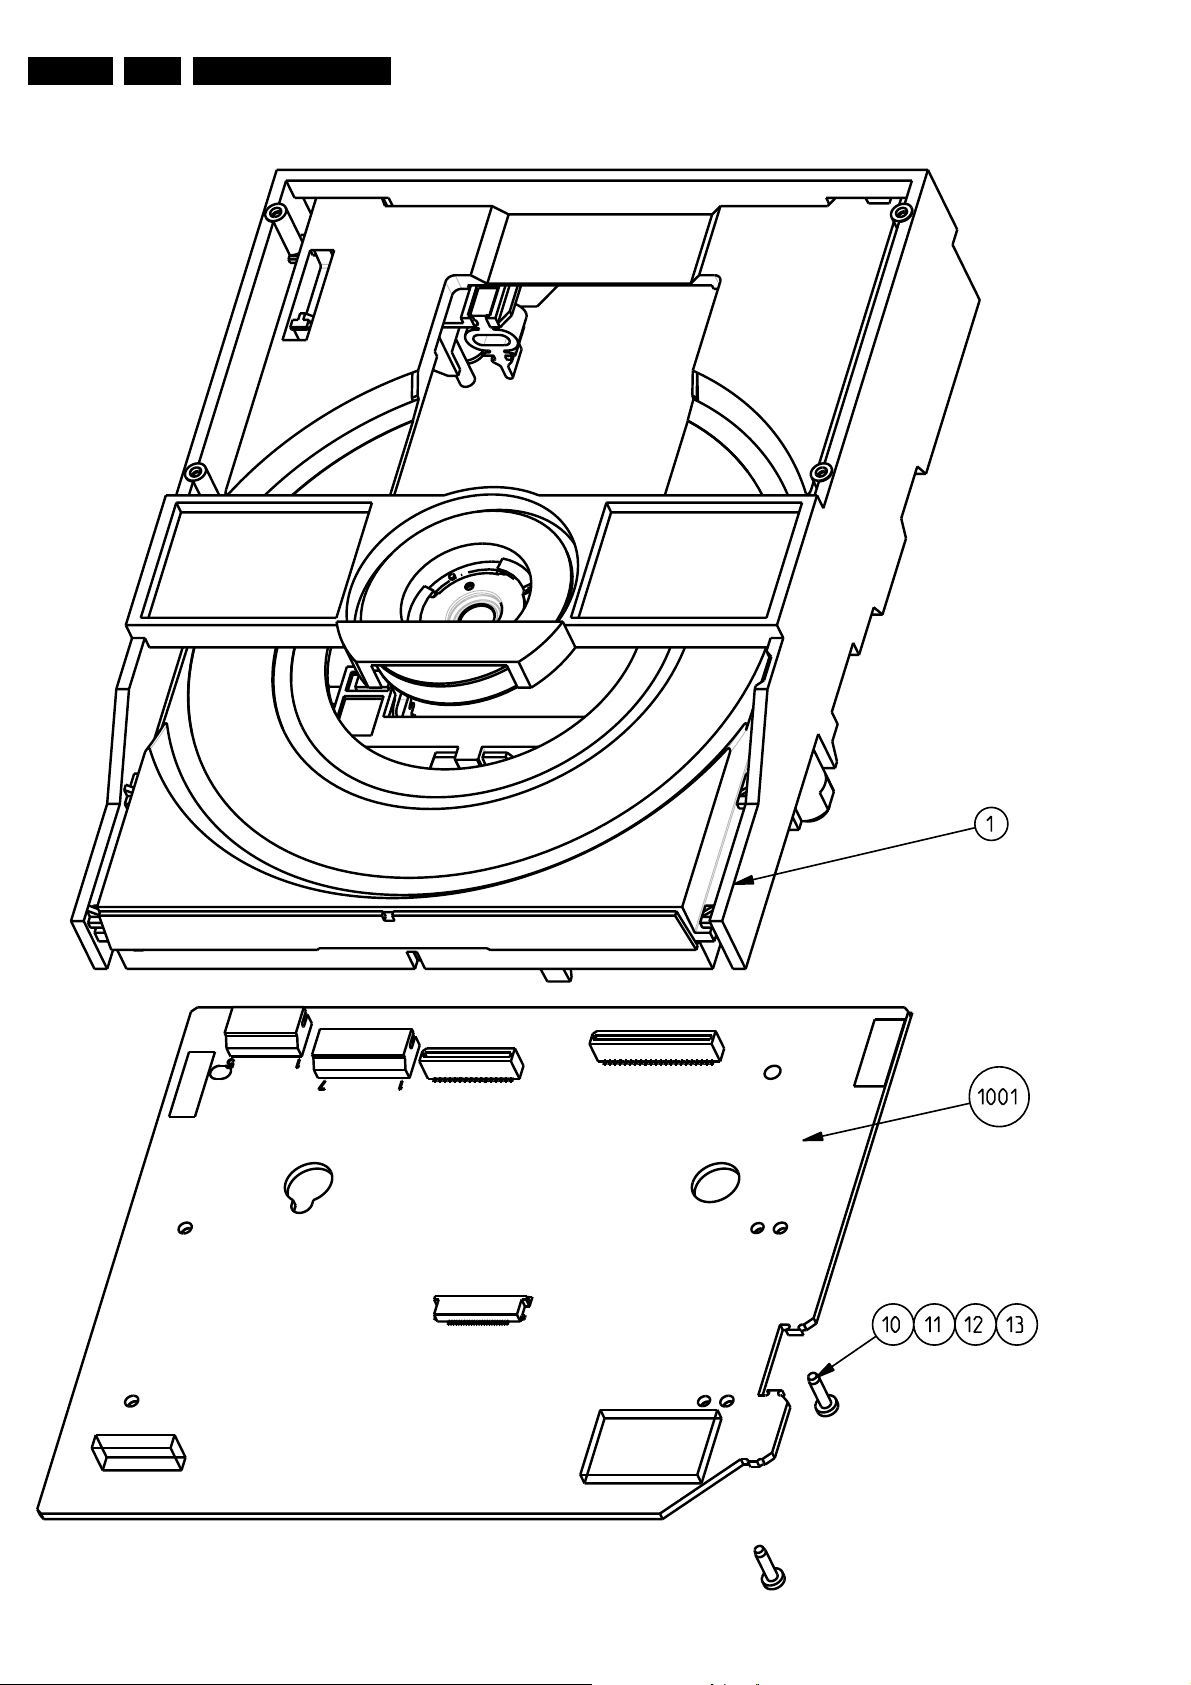
DVD Mono board
-> See also exploded view of
-> Remove flex connections to
-> Remove 4 screws 10 to 13
Standby board and switch
assy 1003B
-> Remove 2 screws 211
-> Demount board
by pulling it forward
Headphone board 1006
-> Remove connections
-> Remove 3 knobs 208
-> Remove carefully flex
(board to front) ,pay
-> Remove 3 screws 209
to the tray motor
-> Demount the board
attention to earth spring
252
-> Demount board
When a disc is loaded, unlock the tray by pushing the slide inwards by way
of a screwdriver and pull tray outwards.
DISMANTLING INSTRUCTIONS DVD703/XX1
See exploded view for item numbers and diversity table for items used
Display board 1003A
-> Remove connections
(board to front) ,pay attention
-> Remove 7 screws 211
to earth spring 250
-> Demount board
Manually opening of tray
When it is not possible to open the tray with the open/close button,
the tray can manually be opened.
When no disc is loaded, unlock the tray by moving the slide from the left
to the right and pull tray outwards.
GB 16 DVD703 /XX14.
4.2 Exploded views
Mechanical instructions
020201
CL 16532007_029.eps
Mechanical instructions
GB 17DVD703 /XX1 4.
140201
CL 16532007_031.eps
GB 18 DVD703 /XX14.
Mechanical instructions
CL06532147_001.eps
151100
 Loading...