

Philips DVD-761-K Service manual
DVD PLAYER
DVD761K
Service Manual
COMPACT
DIGITAL AUDIO
LIST OF CONTENTS
Page
PCB position ......................................................................... 1
Instruction for use ................................................................. 2
Block diagram ....................................................................... 17
Power board ........................................................................... 18
Servo module.......................................................................... 22
Mpeg board............................................................................. 24
AV board ................................................................................. 34
Front board ............................................................................. 41
Mic board ................................................................................ 44
Dismantling drawing ............................................................... 47
Service hints ........................................................................... 48
©
Copyright 2001 Philips Consumer Electronics BPAVC
All rights reserved. No part of this publication may be reproduced, stored in a retrieval system or
transmitted, in any form or by any means, electronic, mechanical, photocopying, or otherwise
without the prior permission of Philips.
Published by Green 0106 BPAVC
PCS 103 083
CLASS 1
LASER PRODUCT
GB
3141 785 22061
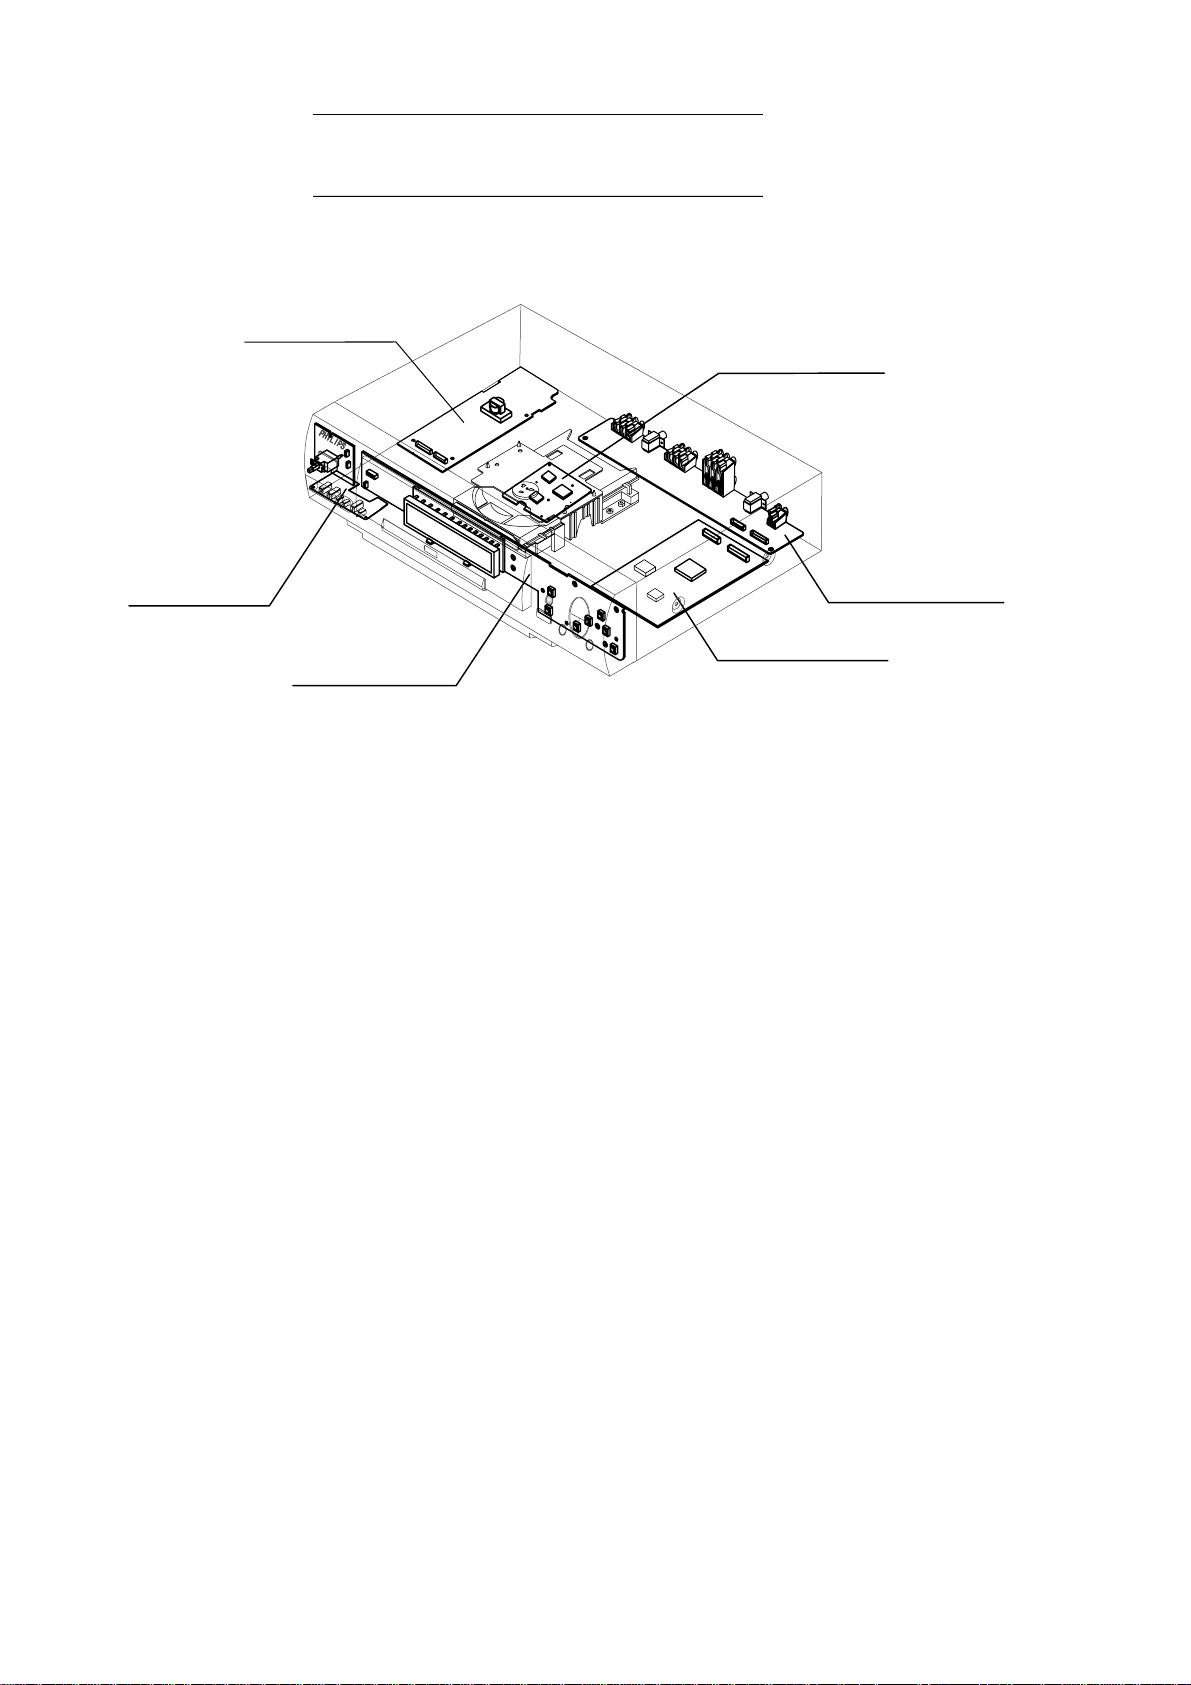
Power board
PCB Location
Servo board
MIC broad
Front board
Power board
Assembly 12NC: 3122 427 22530
MPEG board
Assembly 12NC: 3141 018 02020
Output board
MPEG board
Front board
Assembly 12NC: 3141 018 02040
MIC broad
Assembly 12NC: 3141 018 01980
Note: Power board is not mounted at BPAVC
PCS 103 084
2
Loader module
Assembly 12NC: 3141 018 02010
Output board
Assembly 12NC: 3141 018 02030

English instruction ..................................................................................... 1-32
LASER SAFETY
Contents
Australia & New Zealand Warranty ......................................................... 33-34
Specification ................................................................................................... 35
Region Code
Since it is usual for DVD movies to be released at different times in different
regions of the world, all players have region codes and discs can have an option
region code. If you load a disc of a different region code to your player, you will
see the region code notice on the screen. The disc will not play, and should be
unloaded.
The region code for Singapore is 3
3
The apparatus type is DVD761/69X
The region code for Australia & New Zealand is 4
4
The apparatus type is DVD761/75X
The region code for China is 6
6
The apparatus type is DVD761/93X
This unit employs a laser. Due to possible eye injury,only a
qualified service person should remove the cover or attempt
to service this device.
CAUTION:
USE OF CONTROLS OR ADJUSTMENTS OR
FERFORMANCE OF PROCEDURES OTHER THAN THOSE
SPECIFIED HEREIN MAY RESULT IN HAZARDOUS
RADIATION EXPOSURE.
LASER TYPE
Type semiconductor laser GaAlAs
Wave length 668nm
Output power 8.5mW
Beam divergence 60 degree
This product incorprates copyright protection
technology that is protected by method claims of certain
U.S. patents and other intellectual property rights owned
by Macrovision corporation, and itsintented for home
and the other limited viewing uses only unless otherwise
authorized by Macrovision Corporation. Reverse
engineering or diassambly is prohabitied.
Introduction
Entertainment for new century .................................................2
Introduction ...............................................................................2
Unpack ......................................................................................3
Maintains ..................................................................................3
Functional overview
Front panel ................................................................................4
Rear panel .................................................................................5
Display .....................................................................................6
Remote control ..............................................................................7
Connection
General explanation ....................................................................8
Video connection ......................................................................8
Audio connection ......................................................................9
General operation
Turn on the power ...................................................................10
Load disc ................................................................................10
Remote control battery installation ........................................10
Remote control operation ...........................................................10
Playing a DVD-video disc
Icons and OSD bar ..................................................................11
Video control during playback ...............................................12
Audio control during playback ................................................12
Playing title/chapter .................................................................13
Playing repeat .........................................................................13
Special DVD-features ...............................................................14
Setup Menu
Audio language .......................................................................22
Subtitle language .....................................................................22
Menu language ........................................................................22
Parental control .......................................................................23
Disc lock .................................................................................23
Screen size ..............................................................................24
Video output ...........................................................................24
Speaker setup ..........................................................................24
Favorite T rack Selection ..........................................................25
Digital output ..........................................................................26
Dynamic range.........................................................................26
TV output ................................................................................26
Color scheme ..........................................................................27
On-Screen Display language ..................................................27
Mode key
General indroduction ..............................................................28
Function explanation ...............................................................28
Disc maintains
Disc maintains ........................................................................31
Environmental information
Recycle announcement ...........................................................31
Before requesting service
Before requesting service .......................................................32
Manufactured under license from Dolby laboratories.
“Dolby”, “AC-3” and the doulbe-D symbol are trademarks
of Dolby laboratories. Confidential Unpublished Works.
C1992-1997 Dolby Laboratories , Inc. All right reserved.
PCS 103 085 PCS 103 085
Playing a SuperVCD/VCD/CD disc
Icons and OSD bar ..................................................................15
Video control during playback ..............................................16
Audio control during playback ...............................................16
Playing title/track ....................................................................17
Special VCD-features ...............................................................19
KARAOKE
General operation ...................................................................20
Extra functions ........................................................................20
Warranty
Australia & New Zealand warranty .........................................33
Specifications
Specifications .........................................................................35
3 3
Introduction
Entertainment for the new millennium
Video was never like this before! Digital video discs provide perfect
digital, studio-quality pictures; three dimensional digital, multi-channel
audio; story sequences screened from your choice of camera angle;
sound tracks in as many as eight languages; and up to 32 subtitles (if
available on disc).Whether you watch DVD-Video on wide-screen or
regular TV, you always see it the way it was meant to be.
Digital video
DVD-Video uses state-of-the-art MPEG2 data compression technology
to register an entire movie on a single 5-inch disc. DVD's variable bitrate
compression, running at up to 9.8 Mbits/second, captures even the most
complex pictures in their original quality.
The crystal-clear digital pictures have a horizontal resolution of over 500
lines, with 720 pixels (picture elements) to each line.This resolution is
more than double that of VHS, superior to Laser Disc, and entirely
comparable with digital masters made in recording studios.
DVD-Video discs conform to either the PAL or NTSC video standard.
This player can play both PAL and NTSC discs, presenting them in the ,
best possible way on your multi-standard TV screen.
As the universal video system of the future, DVD-Video offers optimal
pictures on any TV screen.
Introduction
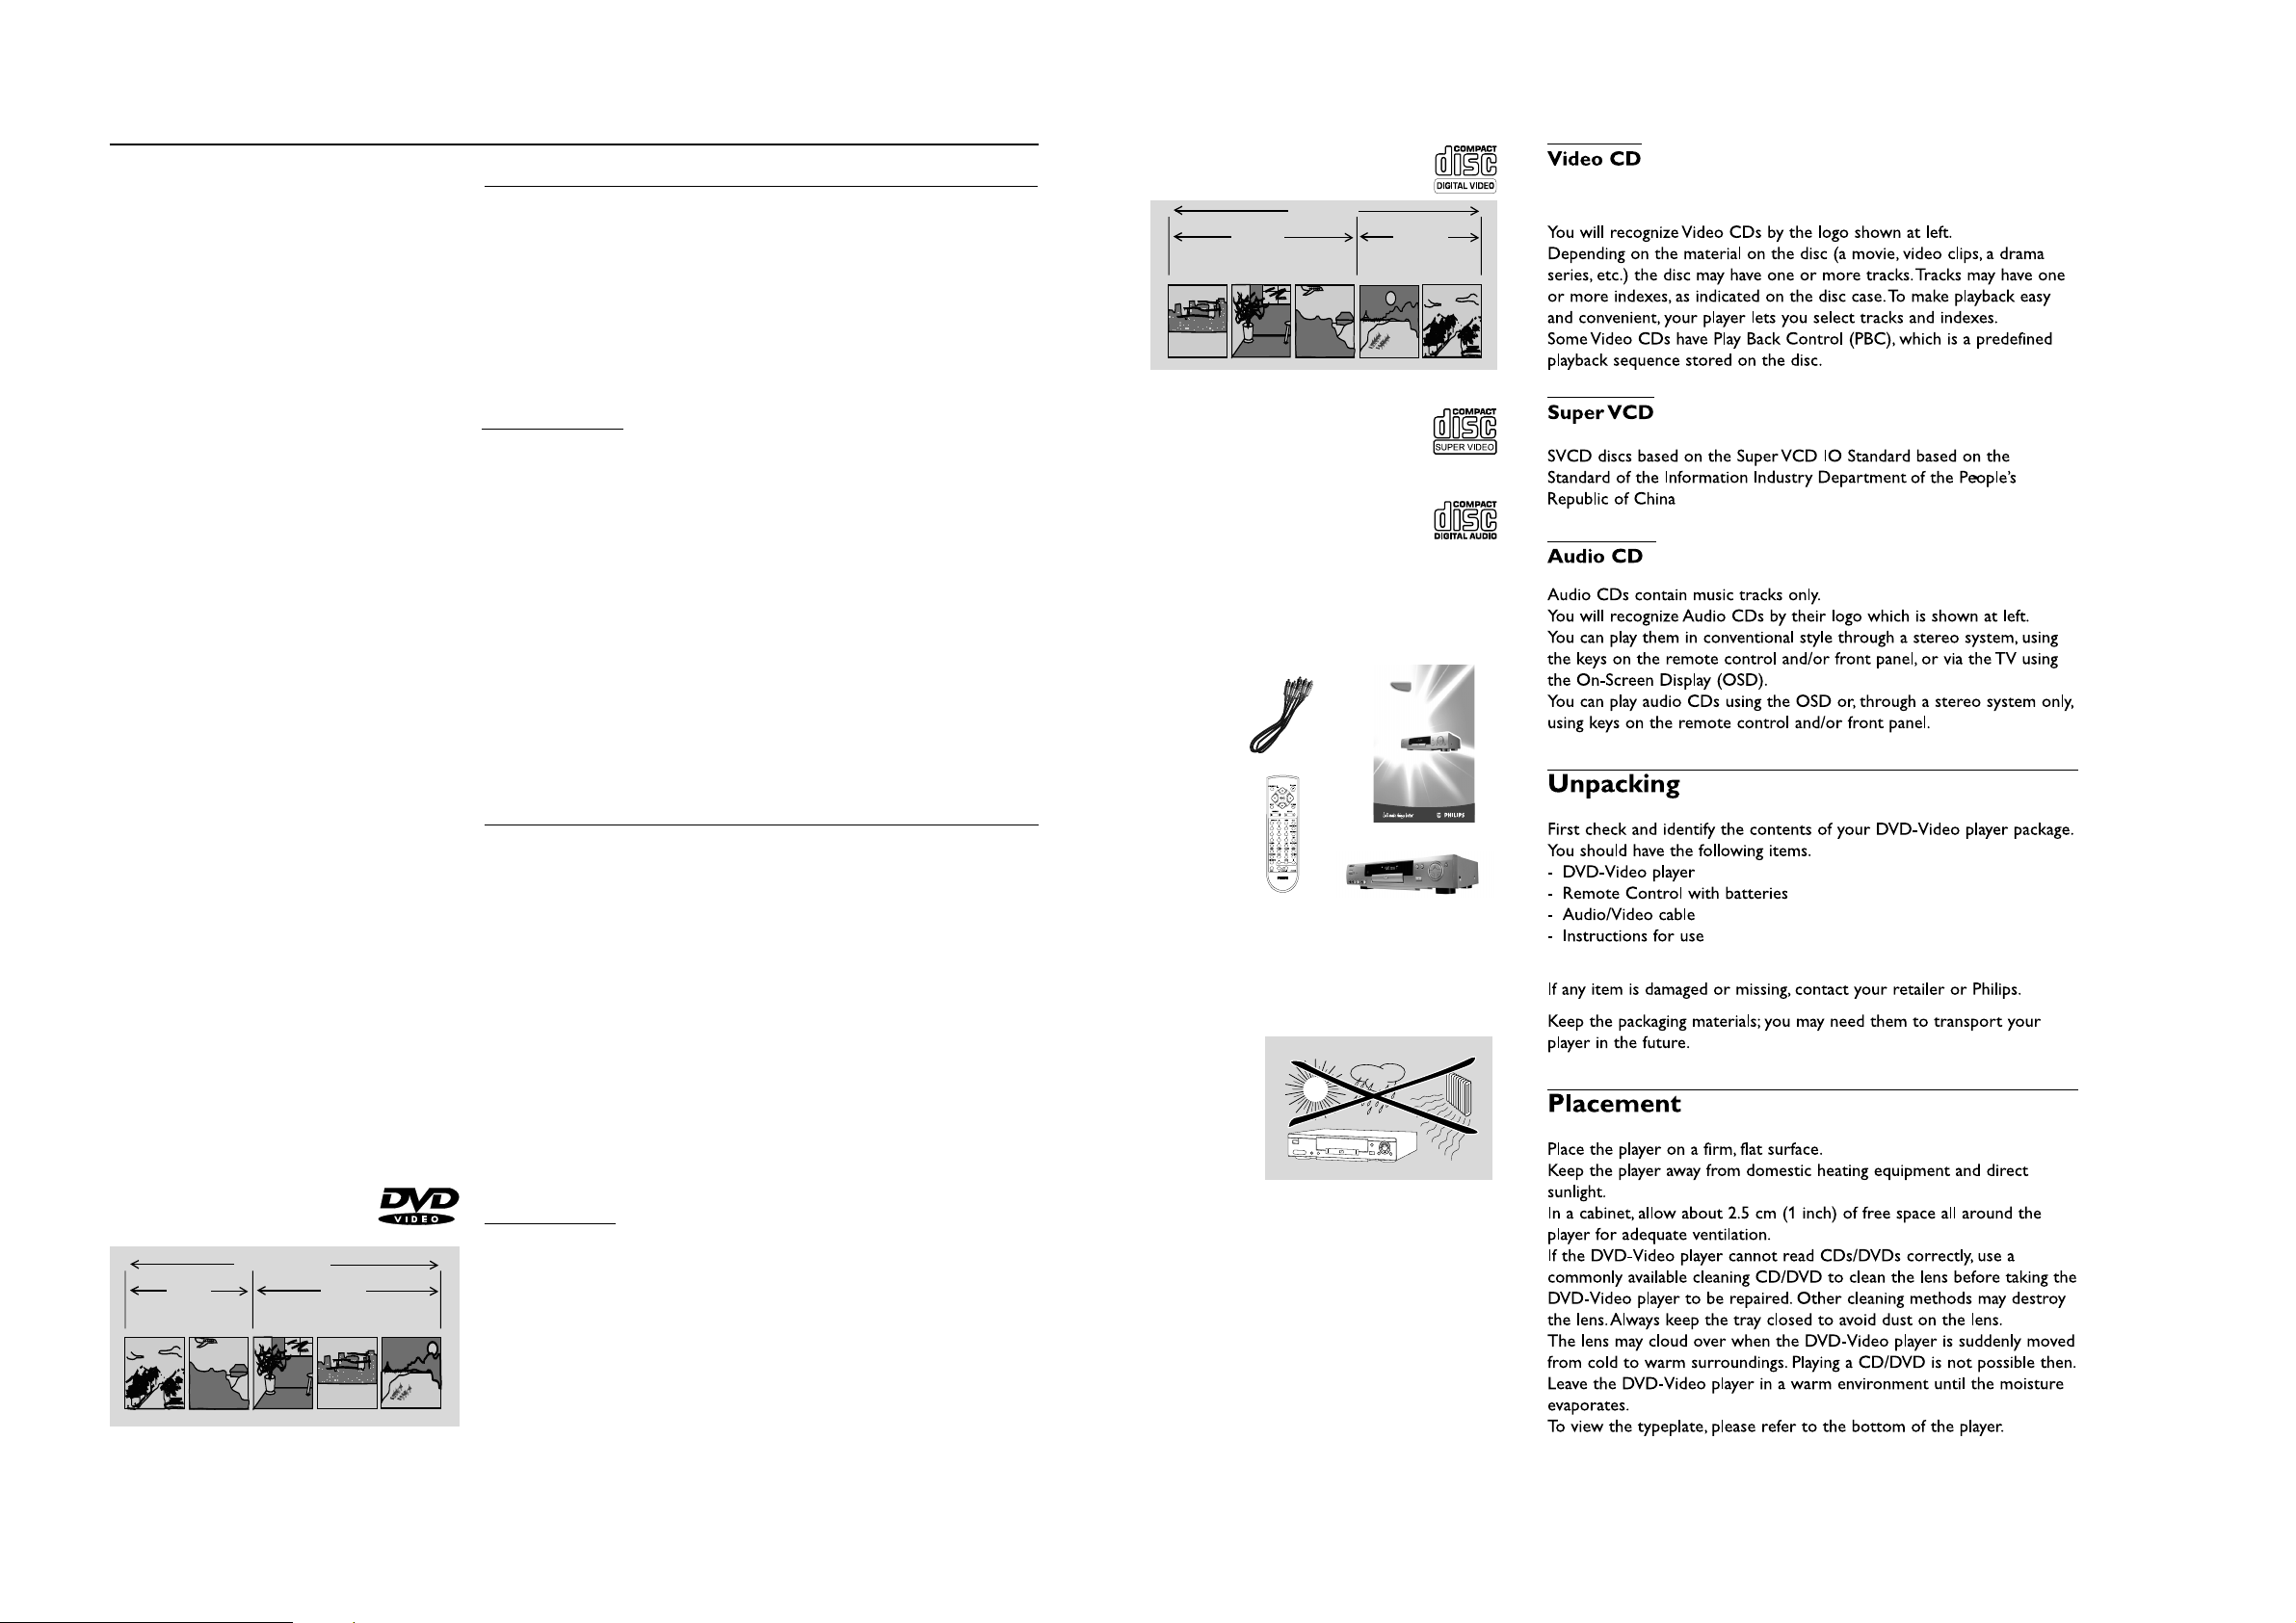
VIDEO CD
TRACK 1 TRACK 2
INDEX 1 INDEX 2 INDEX 1 INDEX 2 INDEX 3
DVD-VIDEO DISC
TITLE 1 TITLE 2
CHAPTER 1 CHAPTER 2 CHAPTER 1 CHAPTER 2 CHAPTER 3
Introduction
Your Philips DVD-Video player will play digital video discs conforming to
the universal DVD-Video standard. With it, you will be able to enjoy full-
length movies with true cinema picture quality, as well as stereo or
multi-channel sound (depending on the disc and your playback setup).
The unique features of DVD-Video, such as selection of sound track,
subtitle languages and different camera angles (again depending on the
disc), are all included. What's more, Philips Child Lock lets you decide
which discs your children will be able to see.
In addition to DVD-Video discs, you will be able to play all Video CDs
and Audio CDs ( excluding finalized CD Recordable and CD Rewritable).
You will find the On-Screen Display, player display, and remote control
make the player easy to use.This manual provides all the information you
will need, so read on!
DVD-Video
You will recognize DVD-Video discs by the logo shown on left.
Depending on the material on the disc (a movie, video clips, a drama
series, etc.) the disc may have one or more Titles. Each Title may have
one or more Chapters.To make playback easy and convenient, your
player lets you select Titles and playback Chapters.
/
PCS 103 086 PCS 103 086
4 4
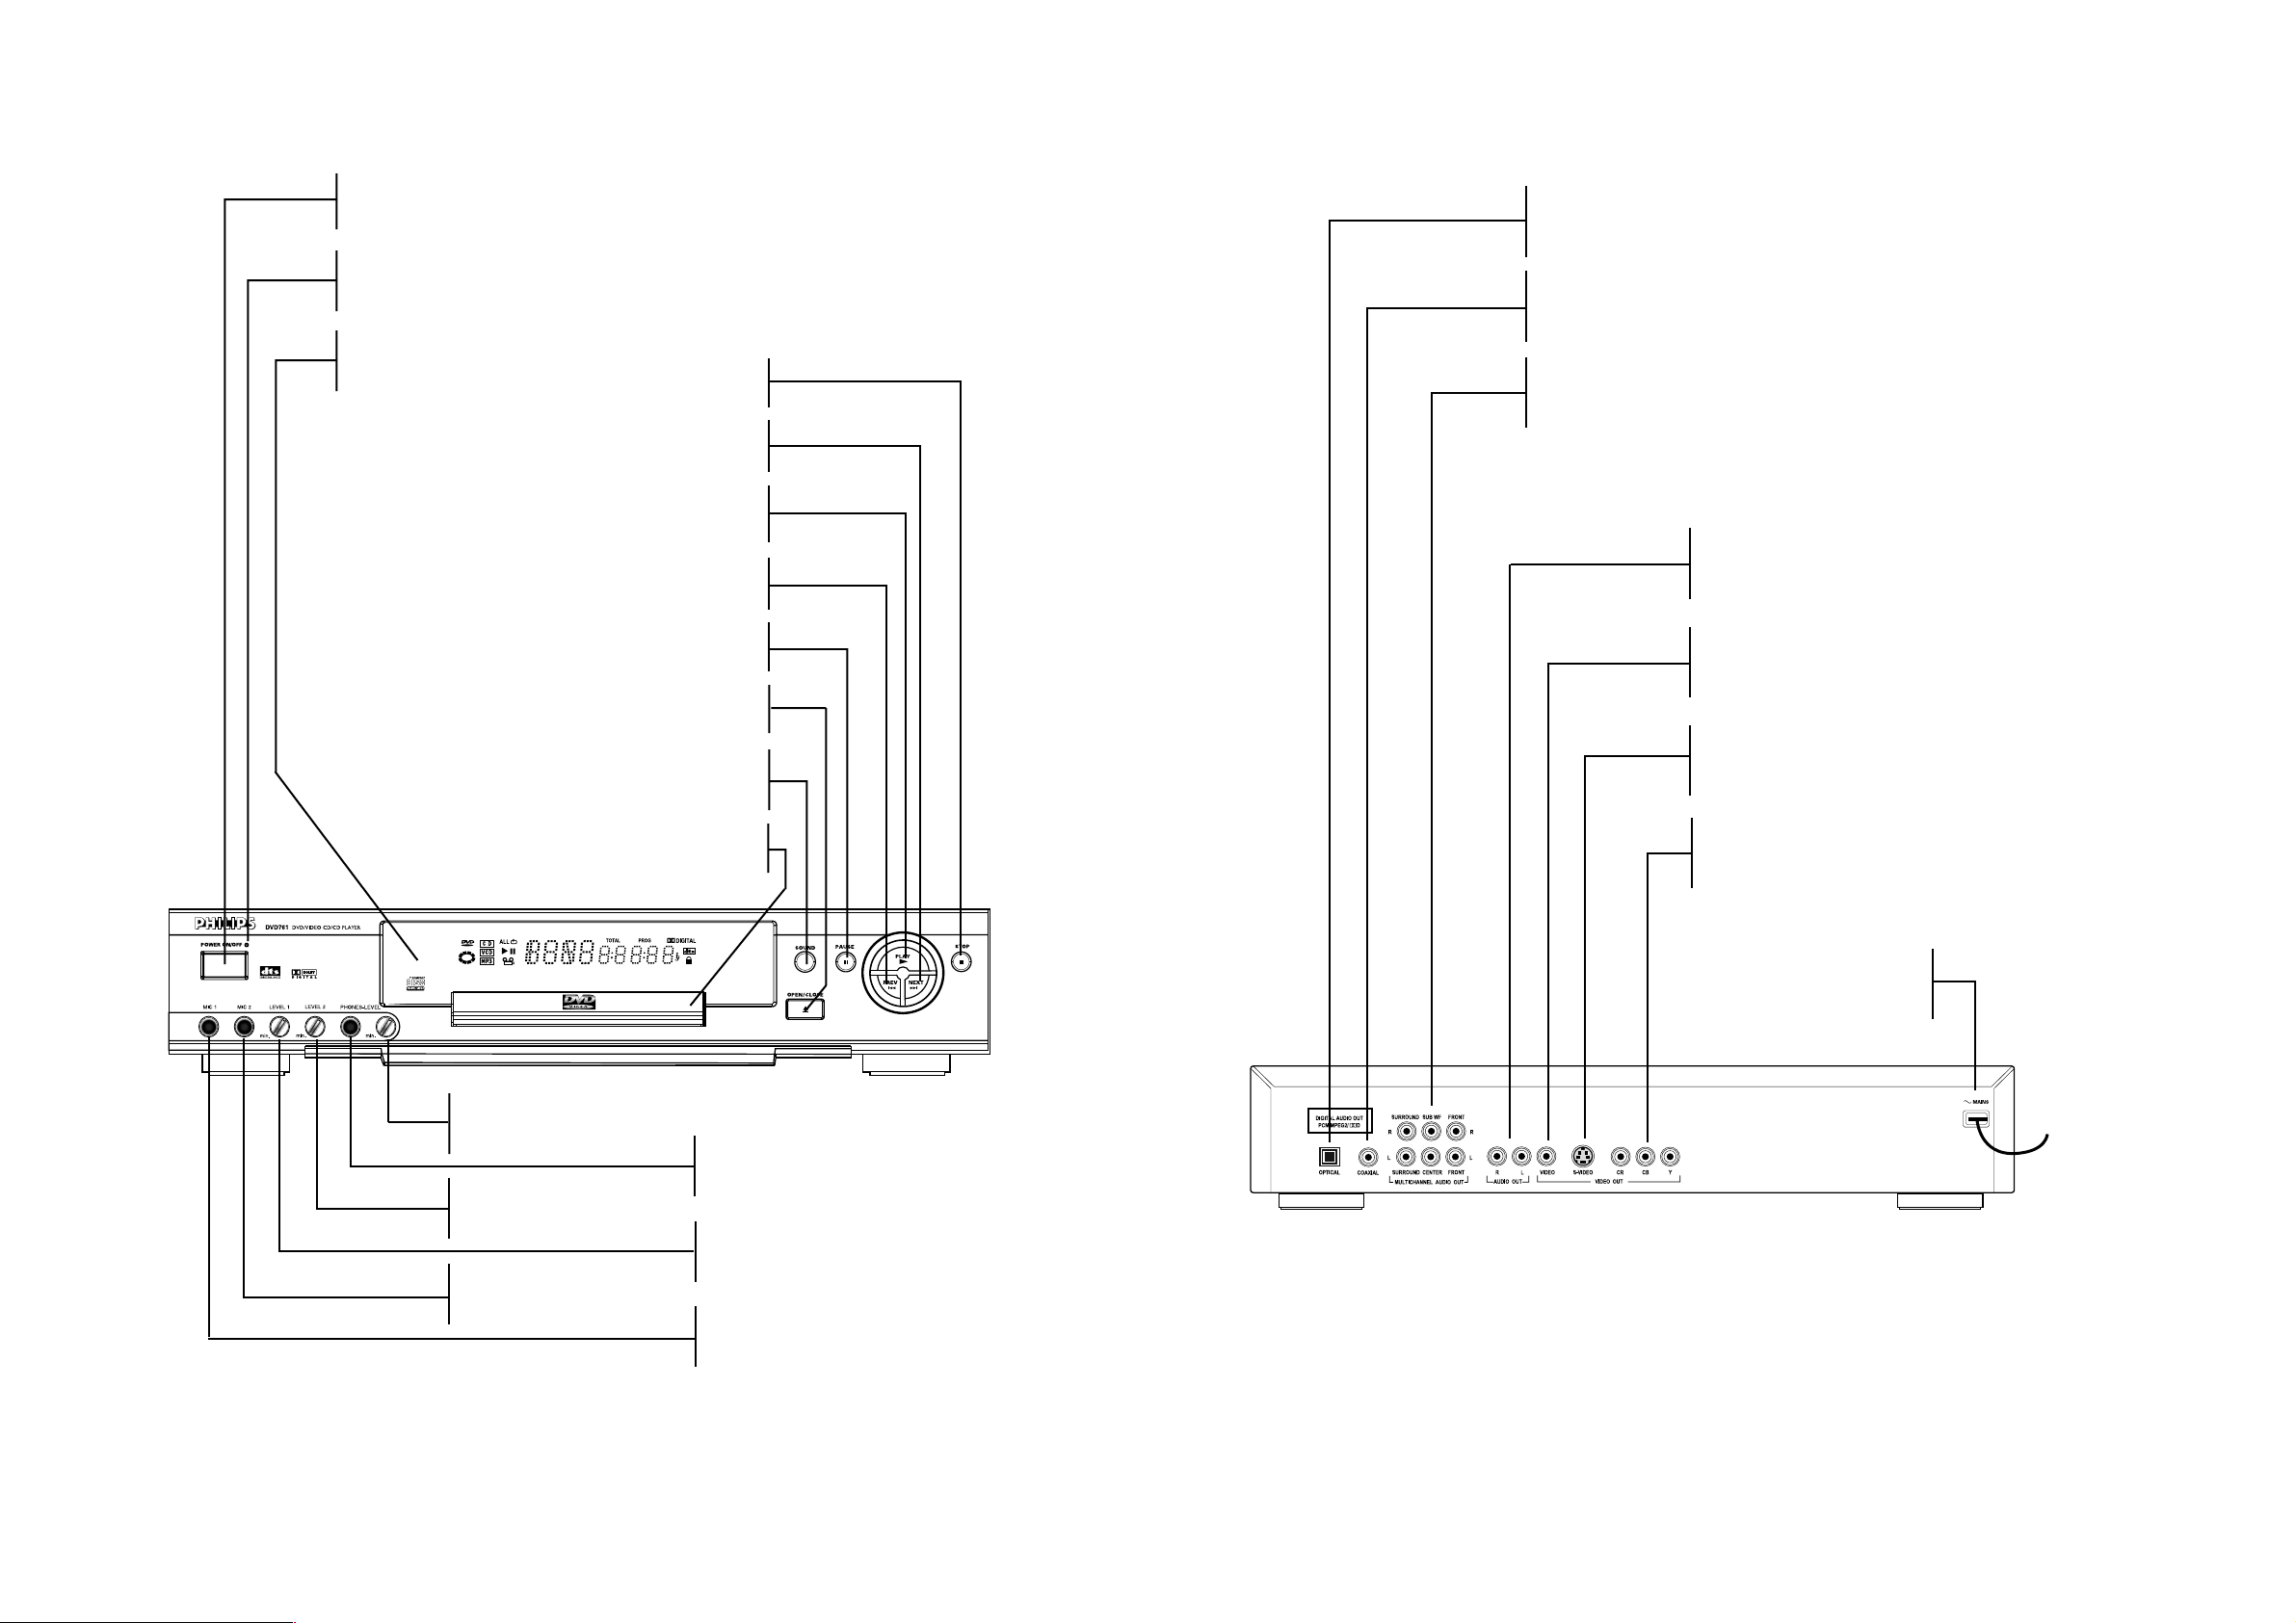
Functional overview
Functional overview
POWER ON/OFF
- Turn on/off the player
Standby indicator
- Light up the red when the player is in standby mode
Display
- Shows the current status of the player
T - NEXT title/chapter/track
9 STOP
2 PLAY - Starts Video/Audeo play
S - PREVious title/chapter/track
; PAUSE
/ OPEN/CLOSE
- Open/close the disc tray
- Select surround sound effect
SOUND
FRONT
REAR
Digital Audio out jack (optical)
- Connect to digital (optical) equipment
Digital Audio out jack (coaxial)
- Connect to digital (coaxial) equipment
Multichannel connection
- Connect to a multichannel receiver and a subwoofer
Audio out L/R (Lift/Right)
- Connect to an amplifier, receiver or stereo system
Video out jack (CVBS)
- Connect to a TV with CVBS video inputs
= Video out jack (S-Video)
- Connect to a TV with S-video (Y/C) inputs
Headphone volume control
MIC volume control 2
for karaoke
MIC socket 2
for karaoke
Disc tray
Headphone socket
MIC volume control 1
for karaoke
MIC socket 1
for karaoke
Video out jack (CR CB Y)
- Connect to a TV with CR CB Y video inputs
Main cable
- Connect to Main socket
CAUTION: Do not touch the inner pins of the jacks on the
rear panel connectors, Electrostatic discharge
may cause permanent damage to the unit.
PCS 103 087 PCS 103 087
5 5
Functional overview
Functional overview
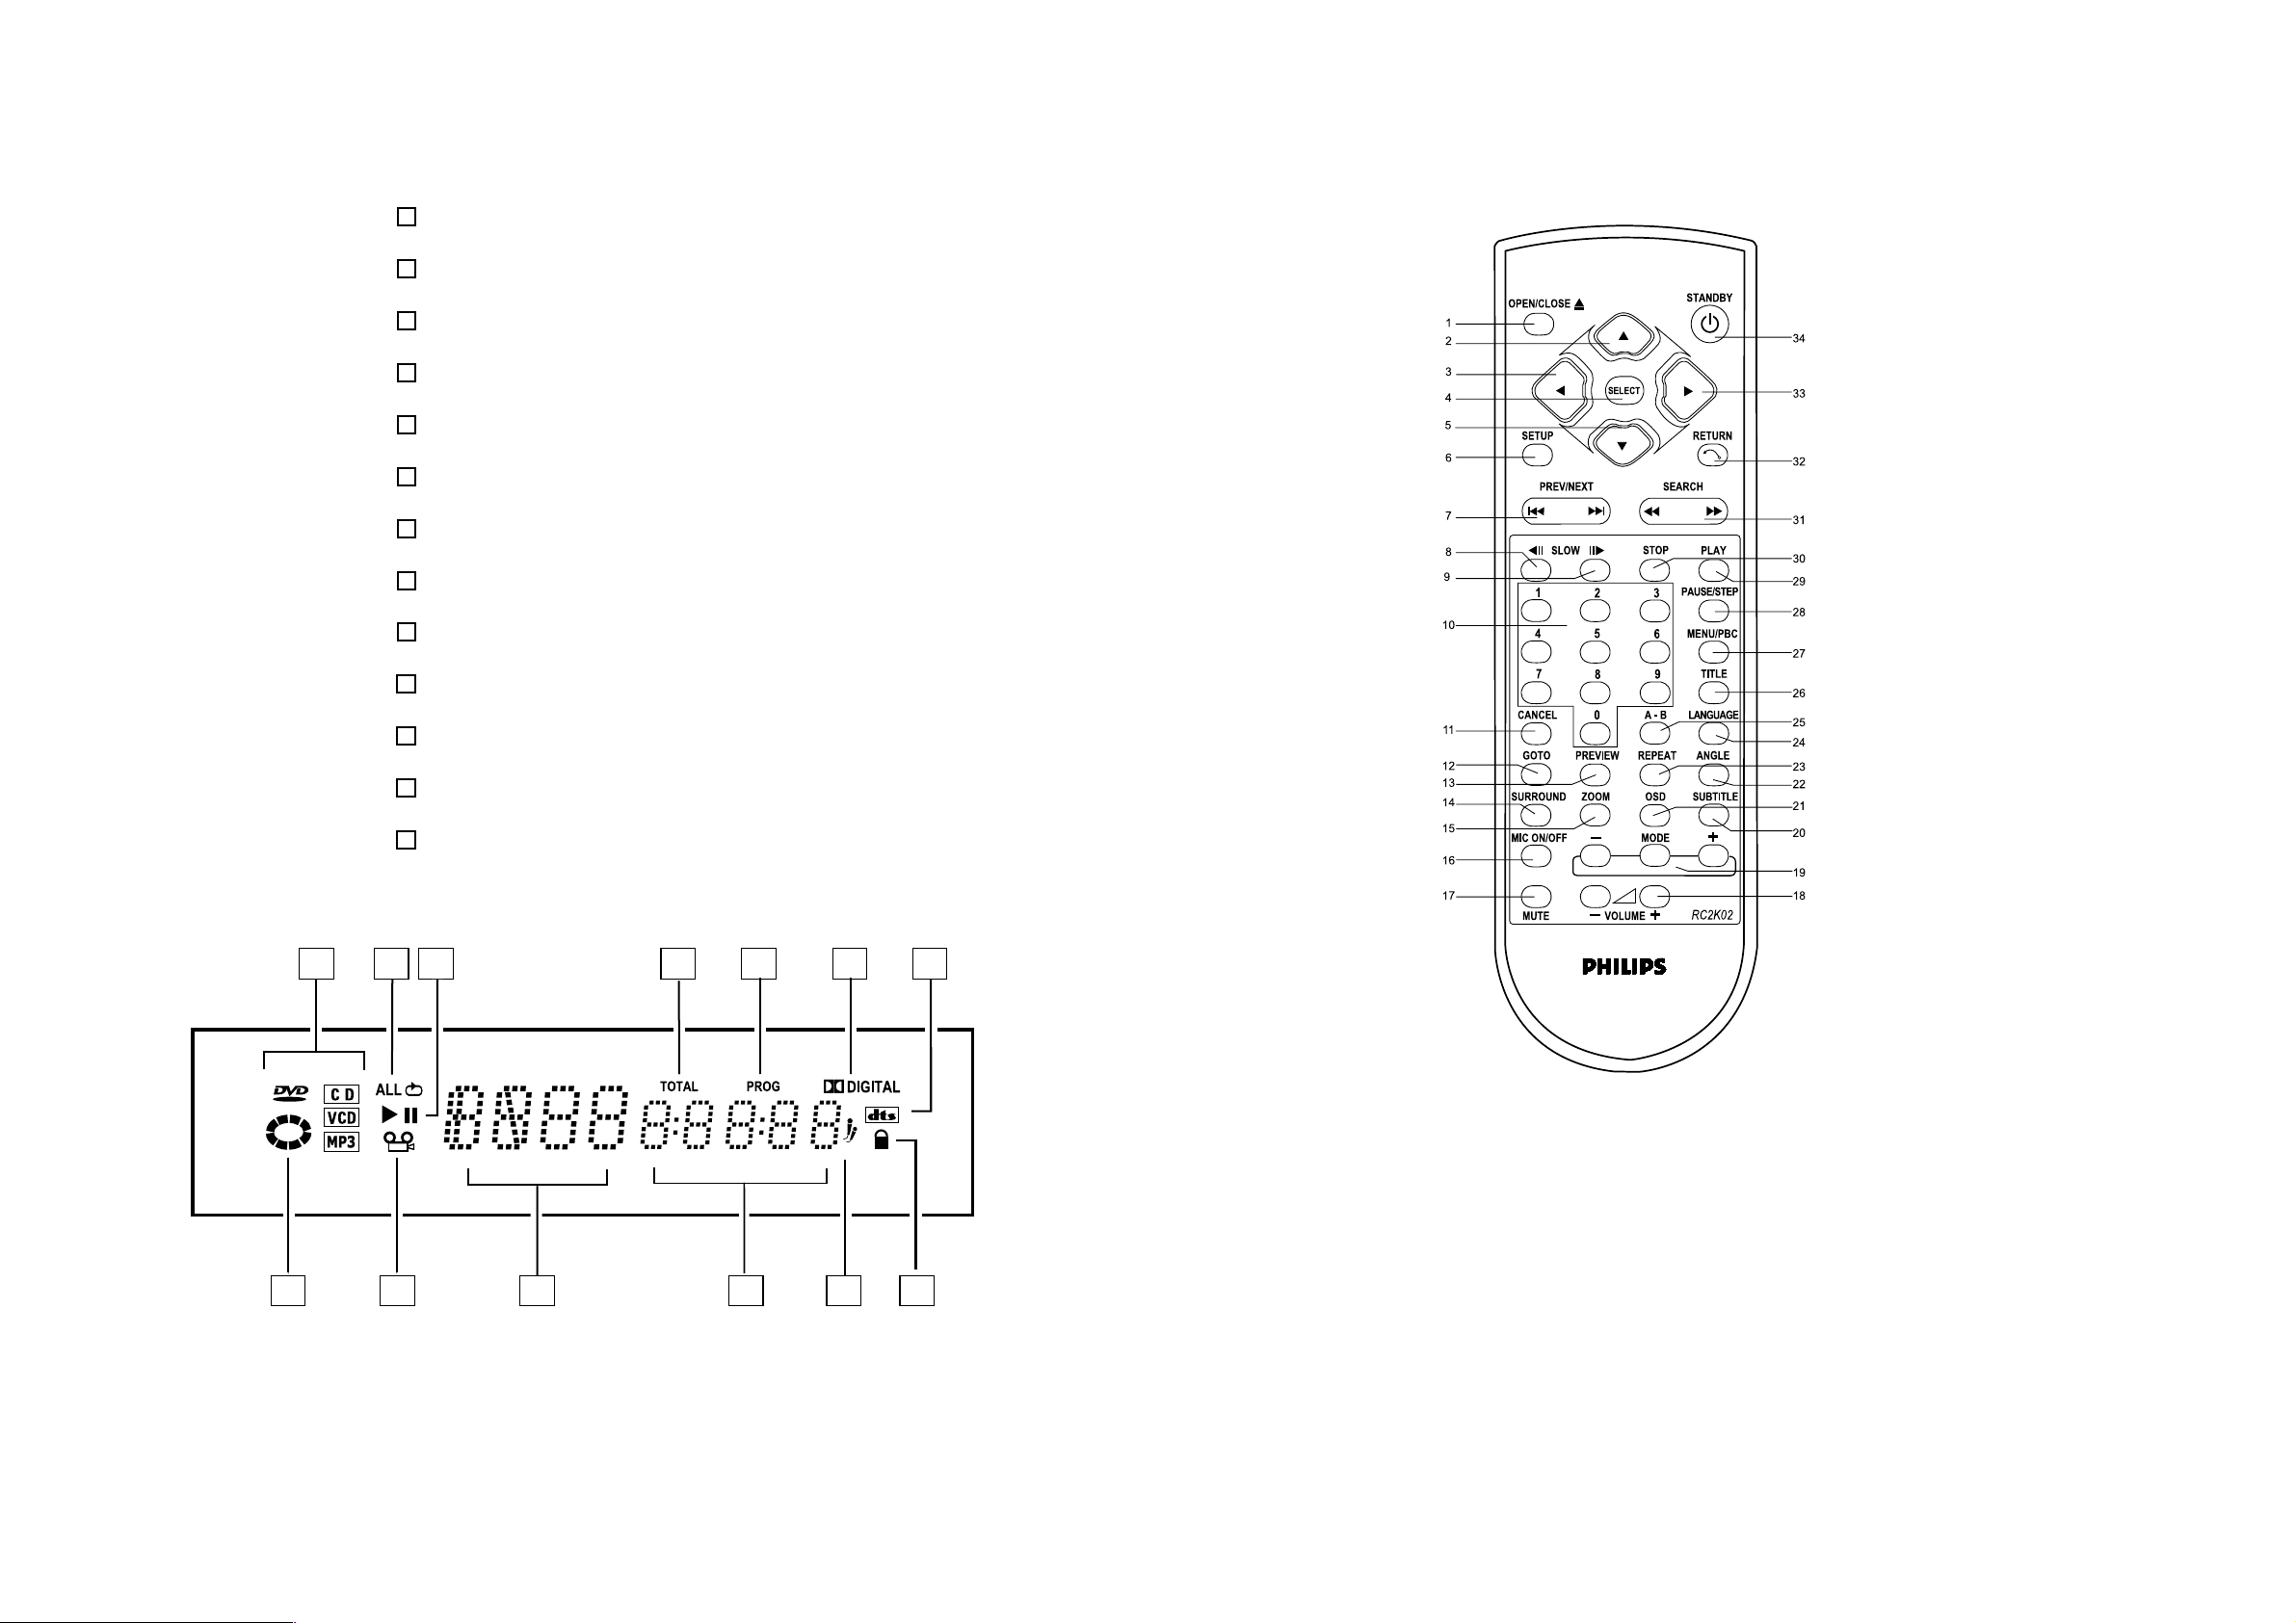
Display
Disc formate indicate
1
Repeat function active
2
PLAY/STOP
3
Total time in hours, minutes and seconds
4
Playback program
5
Dolby digital audio output active
6
reserved
7
Disc locked
8
Play karaoke
9
Time in hours, minutes and seconds
10
Statues indicate
11
Multi-angle of camera active (DVD only)
12
13
Unit is running
open/close .1
direction key (up) .2
direction key (left) .3
select .4
direction key (down) .5
setup .6
PREV/NEXT .7
Slow Rewind key .8
Slow forward key .9
number key .10
cancel .11
goto .12
preview.13
surround sound .14
zoom .15
MIC on/off .16
mute .17
Remote control
34. standby
33. direction key (right)
32. return
31. Fast Forward/Fast Rewind
30. STOP
29. PLAY
28. PAUSE/STEP
27. MENU/PBC
26. title
25. chapter repeat
24. audio language
23. repeat
22. angle
21. On-Screen Display (OSD)
20. subtitle
19. mode
18. volume
1 2
3
4
5 6
7
NOTE :
0 The usage of the key setup(6), cancel(11) and return(32), please refer to chapter [ Setup Menu ].
0 The usage of the key mode(19) please refer to chapter [ Mode key] and [ KARAOKE ].
10 912 1113
8
0 The rest keys are used for general operation, please see the chapter [ Playback DVD] and [ Playback
VCD ] for details.
PCS 103 088 PCS 103 088
6 6
Connection
DIGITAL AUDIO OUT
PCM/MPEG2/ dD
OPTICAL
COAXIAL
SURROUND FRONT
R
L
MULTICHANNEL AUDIO OUT
SUB WF
R
L
FRONT LCENTER
RSURROUND CR CBVIDEO S-VIDEO Y
VIDEO OUT
AUDIO OUT
VIDEO CABLE
TV
MAINS
S-VIDEO CABLE
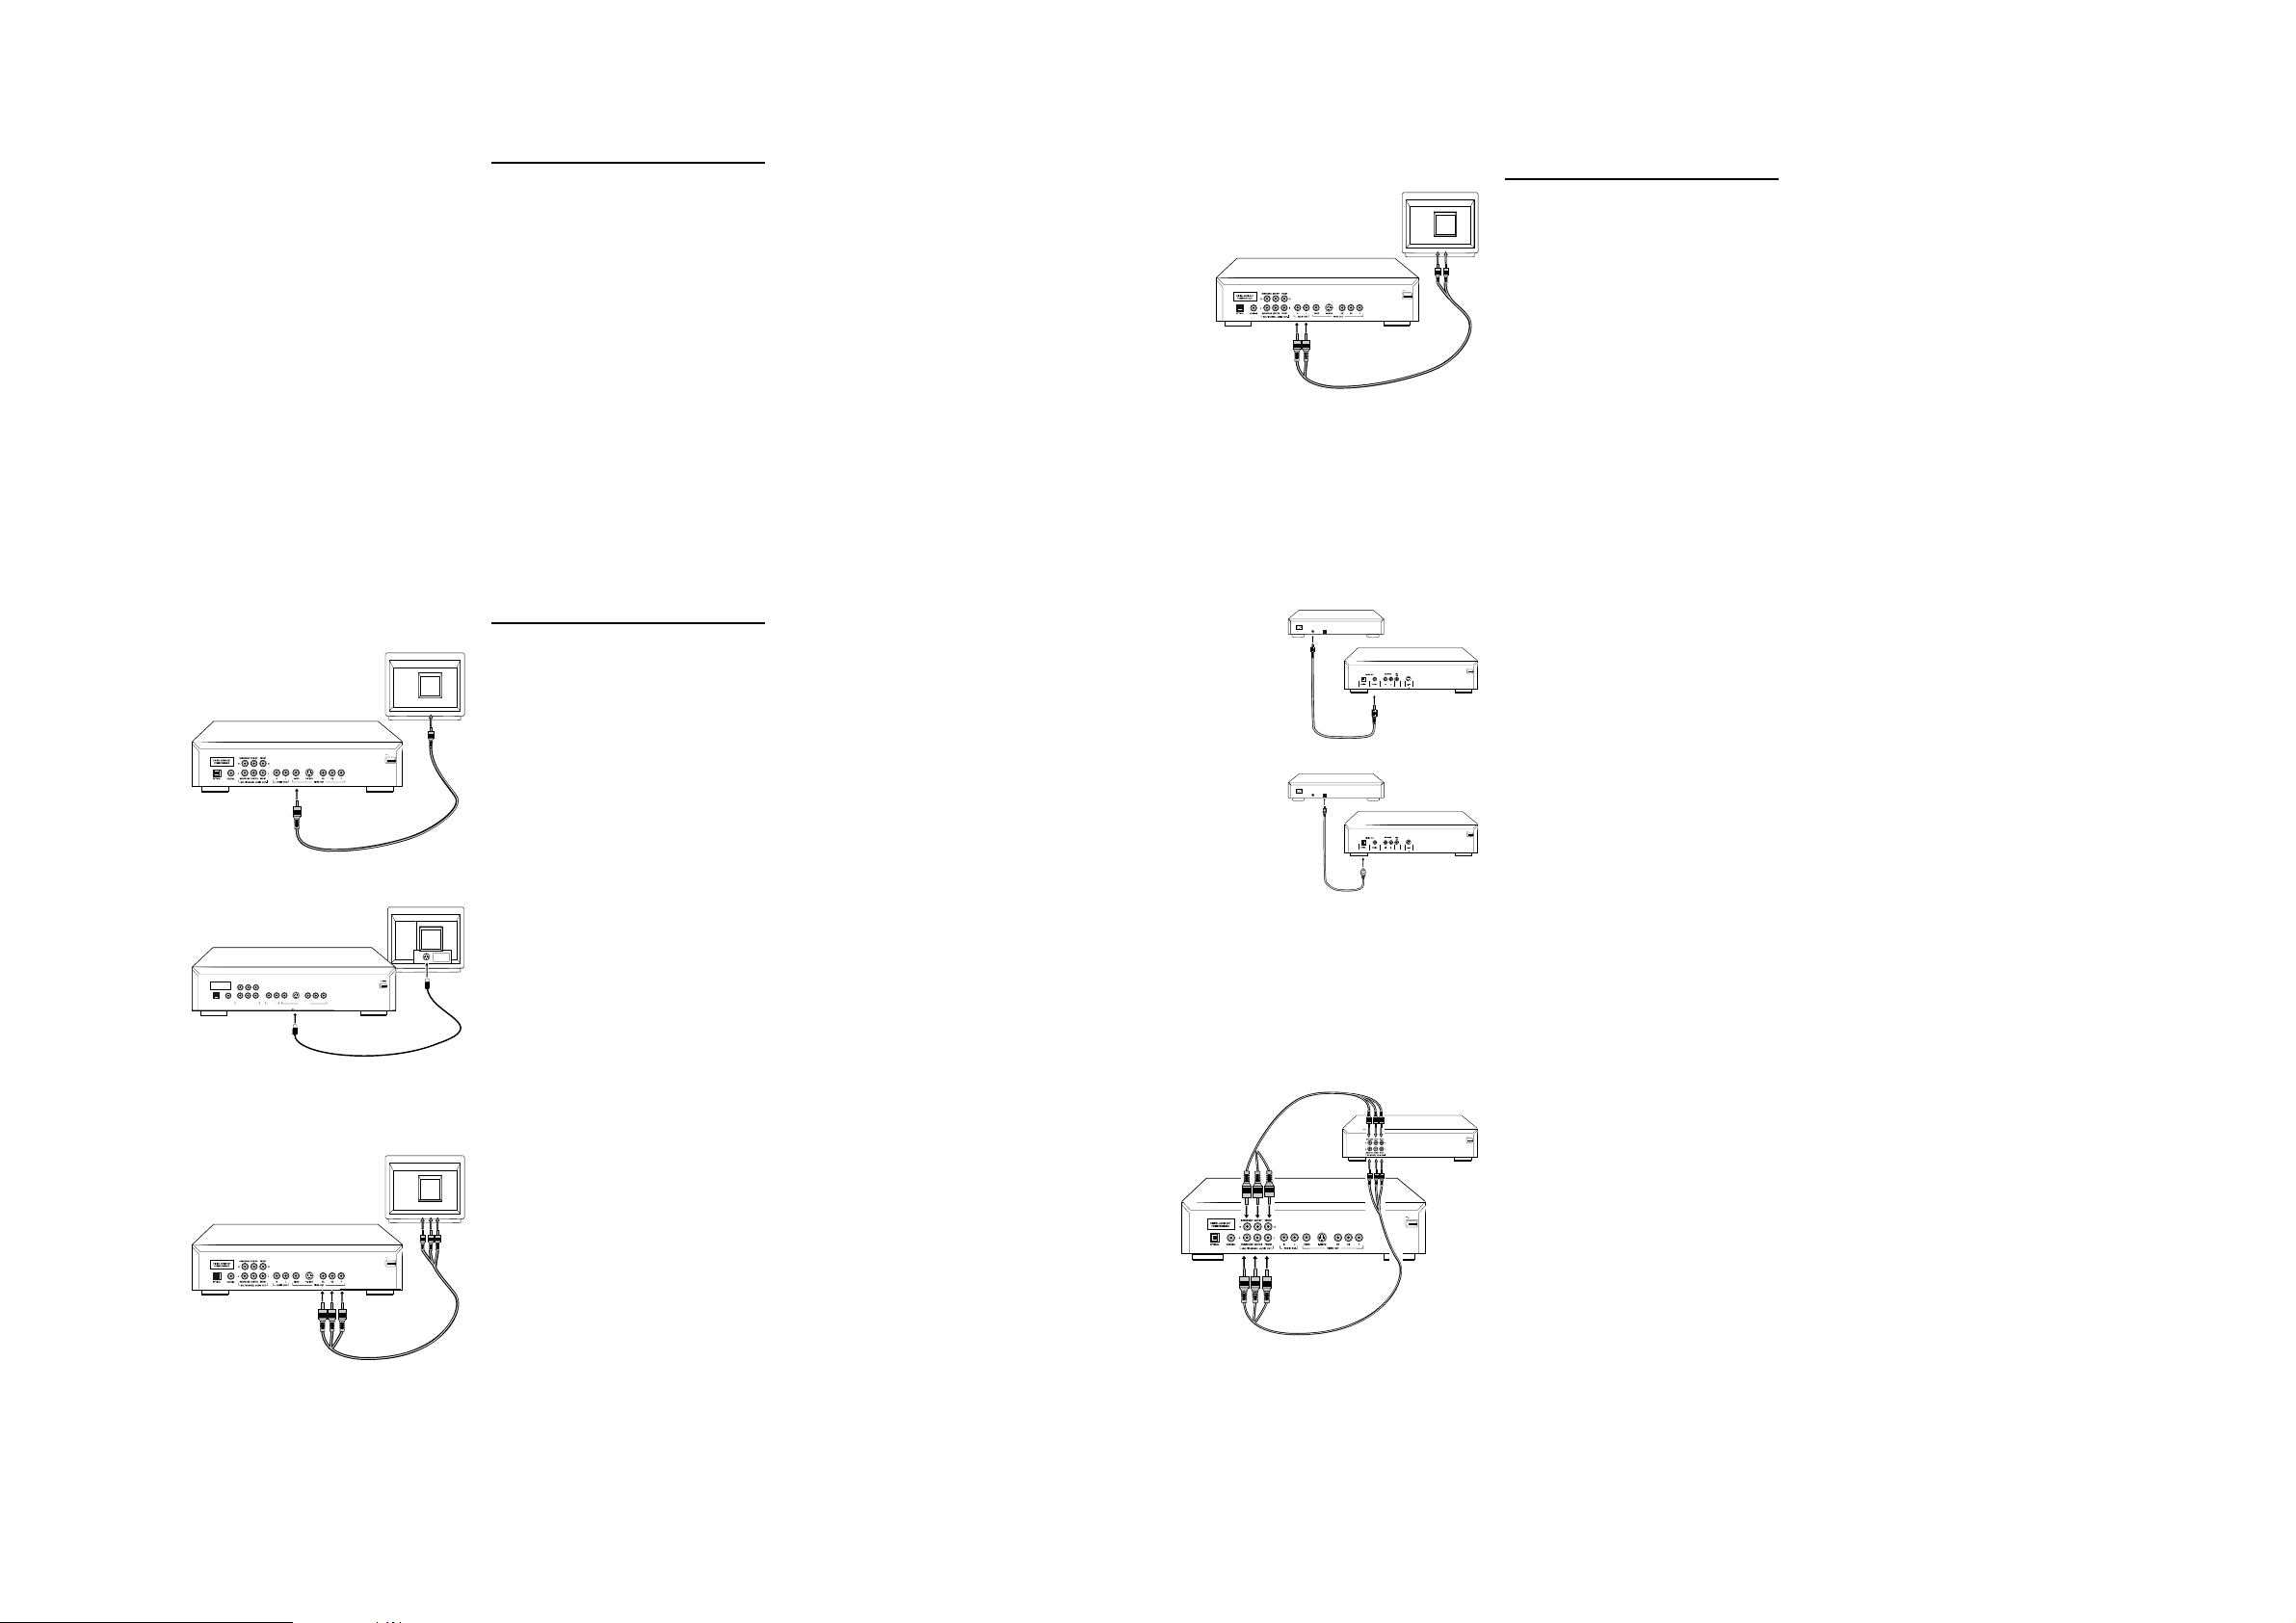
General explanation
0 Video connection and Audio connection can be totally separate. That means you
can connect the Video output to one equipment and connect the Audio output to
another with no problems. Depending on your TV and other equipment you wish
to connect, there are various ways you connect the player. Possible connections
are shown in the following drawings.
0 Please refer to the manuals of your TV,VCR,stereo system or other devices as
necessary to make the best connections.
0 Do not connect your DVD-player via your VCR. The video quality could be distorted
by the copy protection system.
0 For better sound reproduction,conncet the player's audio out jacks to the audio in
jacks of your amplifier,receiever ,stereo or A/V equipment. see [ Audio Connection].
Caution: Do not connect the player's audio out jack to the phono in jack of your
audio system.
Video connection
Video CVBS connection
0 CVBS video output is the most common video formate we are using now ,
it combines brightness signal and chroma signal together and only uses one
cable for output. Plugs of the cable are both in yellow.
0 connect the Video socket on the rear of the player to the corresponding
socket on the TV using the cable supplied.
S-Video connection.
0 S-video is a kind of component video output. It includes two separated
TV
signals, they are brightness and chroma. Reproducing high quality picture
is its advantage.
0 connect the S-V ideo connector on the rear of the player to the corresponding
connector on the TV using the S-Video cable(not supplied).
Connection
Audeo connection
TV
MAINS
R
L
AUDIO CABLE
RECEIVER
DIGITAL AUDIO
IN
IN
MAINS
DIGITAL AUDIO
CABLE (coaxial)
RECEIVER
DIGITAL AUDIO
IN
IN
MAINS
DIGITAL AUDIO
CABLE (optical)
Connect Audio output to TV
0 Use the TV speaker for sound reporduction, connect the audio left and right
channel sockets on the player rear panel to the corresponding sockets on your
LR
TV with the audio cable. (supplied)
Connecting to an A/V receiver equipment
Digital multi-channel connection provides the best sound quality. For this you
need a multi-channel receiver that supports one or more of the audio formats
supplied by your DVD player ( Dolby Digital(TM) (AC-3), MPEG 2 and DTS).
Check the receiver manual and the logos on the front of the receiver.
Connect to A/V receiver with digital coaxial cable
0 Connect the player's digital coaxial output to the corresponding input on the
receiver using the digital coaxial cable(not supplied), it is just the same as audio
cable which supplied in the package.
0 You might need to set the item[ DIGITAL OUTPUT] in setup menu for adapting
MAINS
your receiver. Please refer to the chapter [ Setup Menu] for details.
0 In this case, do not use the player's audio left and right output.
Connect to A/V receiver with digital optical cable
0 Connect the player's digital optical output to the corresponding input on the
MAINS
receiver using the digital optical cable(not supplied), it is just the same as audio
cable which supplied in the package.
0 You might need to set the item[ DIGITAL OUTPUT] in setup menu for adapting
your receiver. Please refer to the chapter [ Setup Menu] for details.
0 In this case, do not use the player's audio left and right output.
NOTE: If the audio format of the digital output does not match the capabilities
of your receiver, the sound will be muted.
Analog connection to a multi-channel A/V receiver with 6CH connectors
0 This DVD player contains a multi-channel decoder. This enables playback of
MAINS
DVDs recorded in multi-channel surround without the need of optional decoder.
R/CB connection.
TV
CR
MAINS
CR
YYY
YUV CABLE
0 Y/CR/CB is another kind of component video output. It includes three sort
Y
of signals, they are Y; CRED; CBLUE. This video formate can be compatible
with monochromatic TV. (use Y only)
0 connect the Y/CR/CB connector on the rear of the player to the corresponding
connector on the TV using the Y/CR/CB cable (not supplied).
MAINS
Caution: Y/CR/CB video and S-video can not work at the same time, so you
have to set one of them to be active in setup menu. Please refer to
Y/C
0 Connect the audio out jacks for center speaker; front speakers; surround
speakers and subwoofer to the corresponding jacks on your reciever.
0 Make the appropriate sound settings for [ Speaker settings] in the setup menu.
Please refer to the chapter [Setup Menu] for details.
0 Only DVD discs have the multi-channel audio output, SVCD; VCD and CD
have only audio left and right output.
NOTE : If the subwoofer is equipped with its own amplifier, the subwooder
connection should be connected dirctly to the subwoofer.
the chapter [Setup Menu] for ditails.
PCS 103 089 PCS 103 089
7 7
General operation
POWER ON/OFF
Turning on the power
0 Press the power on/off button on the front panel to turn on or turn off the
player.
Playing a DVD-video disc
Icons and menu bar
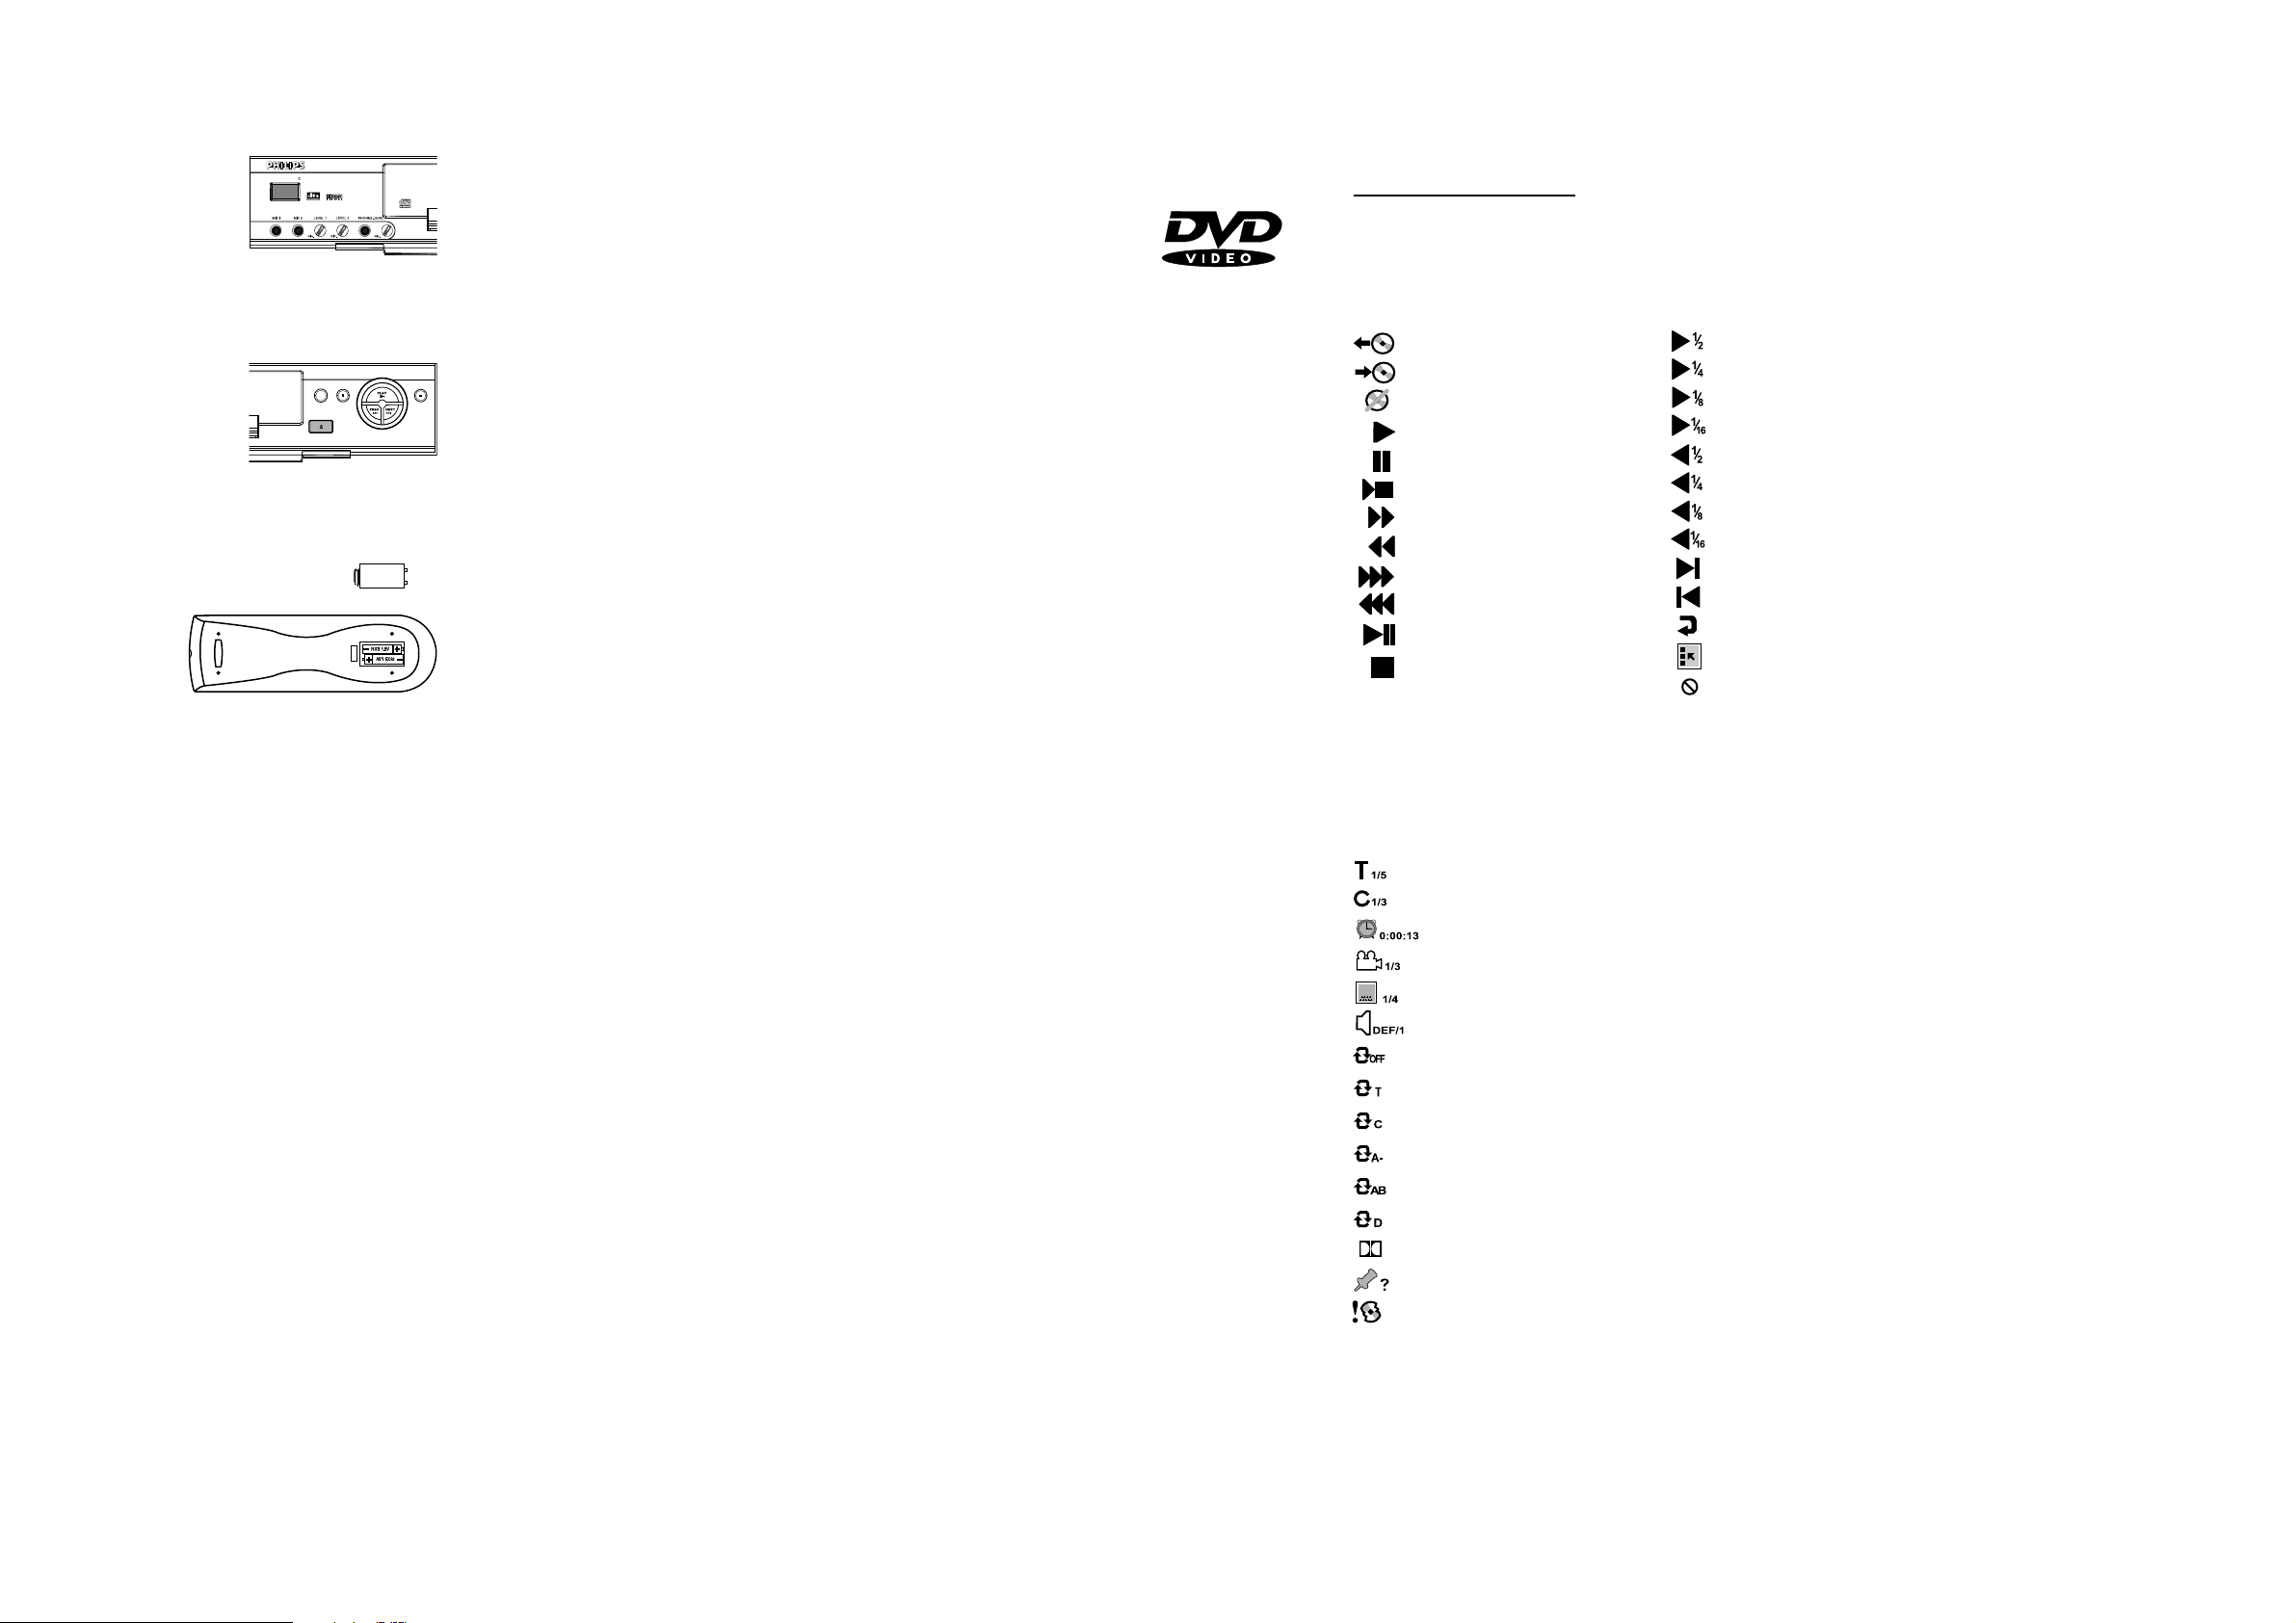
During play, various icons will appear on the TV screen to confirm
the function has been selected. You can get rid of these icons by
pressing OSD button on remote control.
SOUND PAUSE
OPEN / CLOSE
.................Open the disc tray
STOP
Loading discs
0 Press OPEN/CLOSE button on the front of the player, the disc tray opens.
0 Load your chosen disc in the tray , label side up (also when a double sided DVD
is inserted). Make sure the disc is placed properly in the correct recess.
0 Gently push the tray, or press OPEN/CLOSE button to close the tray.
................Close the disc tray
................No disc in disc tray
.......................................play
....................................pause
..........stop at current position
...............Search forward(X1)
Remote control battery installation
0 Open the battery compartment cover.
0 Insert two [ AA] batteries as indicated inside the battery compartment.
0 Close the cover.
Caution: Don’t mix old and new batteries. Never mix different types of batteries
...........Search backward(X1)
...............Search forward(X2)
...........Search backward(X2)
....Pause (Shows on display)
.......Stop(play from the start)
........................Slow forward 1/2
........................Slow forward 1/4
........................Slow forward 1/8
......................Slow forward 1/16
.....................Slow backward 1/2
.....................Slow backward 1/4
.....................Slow backward 1/8
...................Slow backward 1/16
............................................Next
............................................Prev
.........................................Return
...........................Menu Selection
...............Operation not available
(standard, alkaline, etc.)
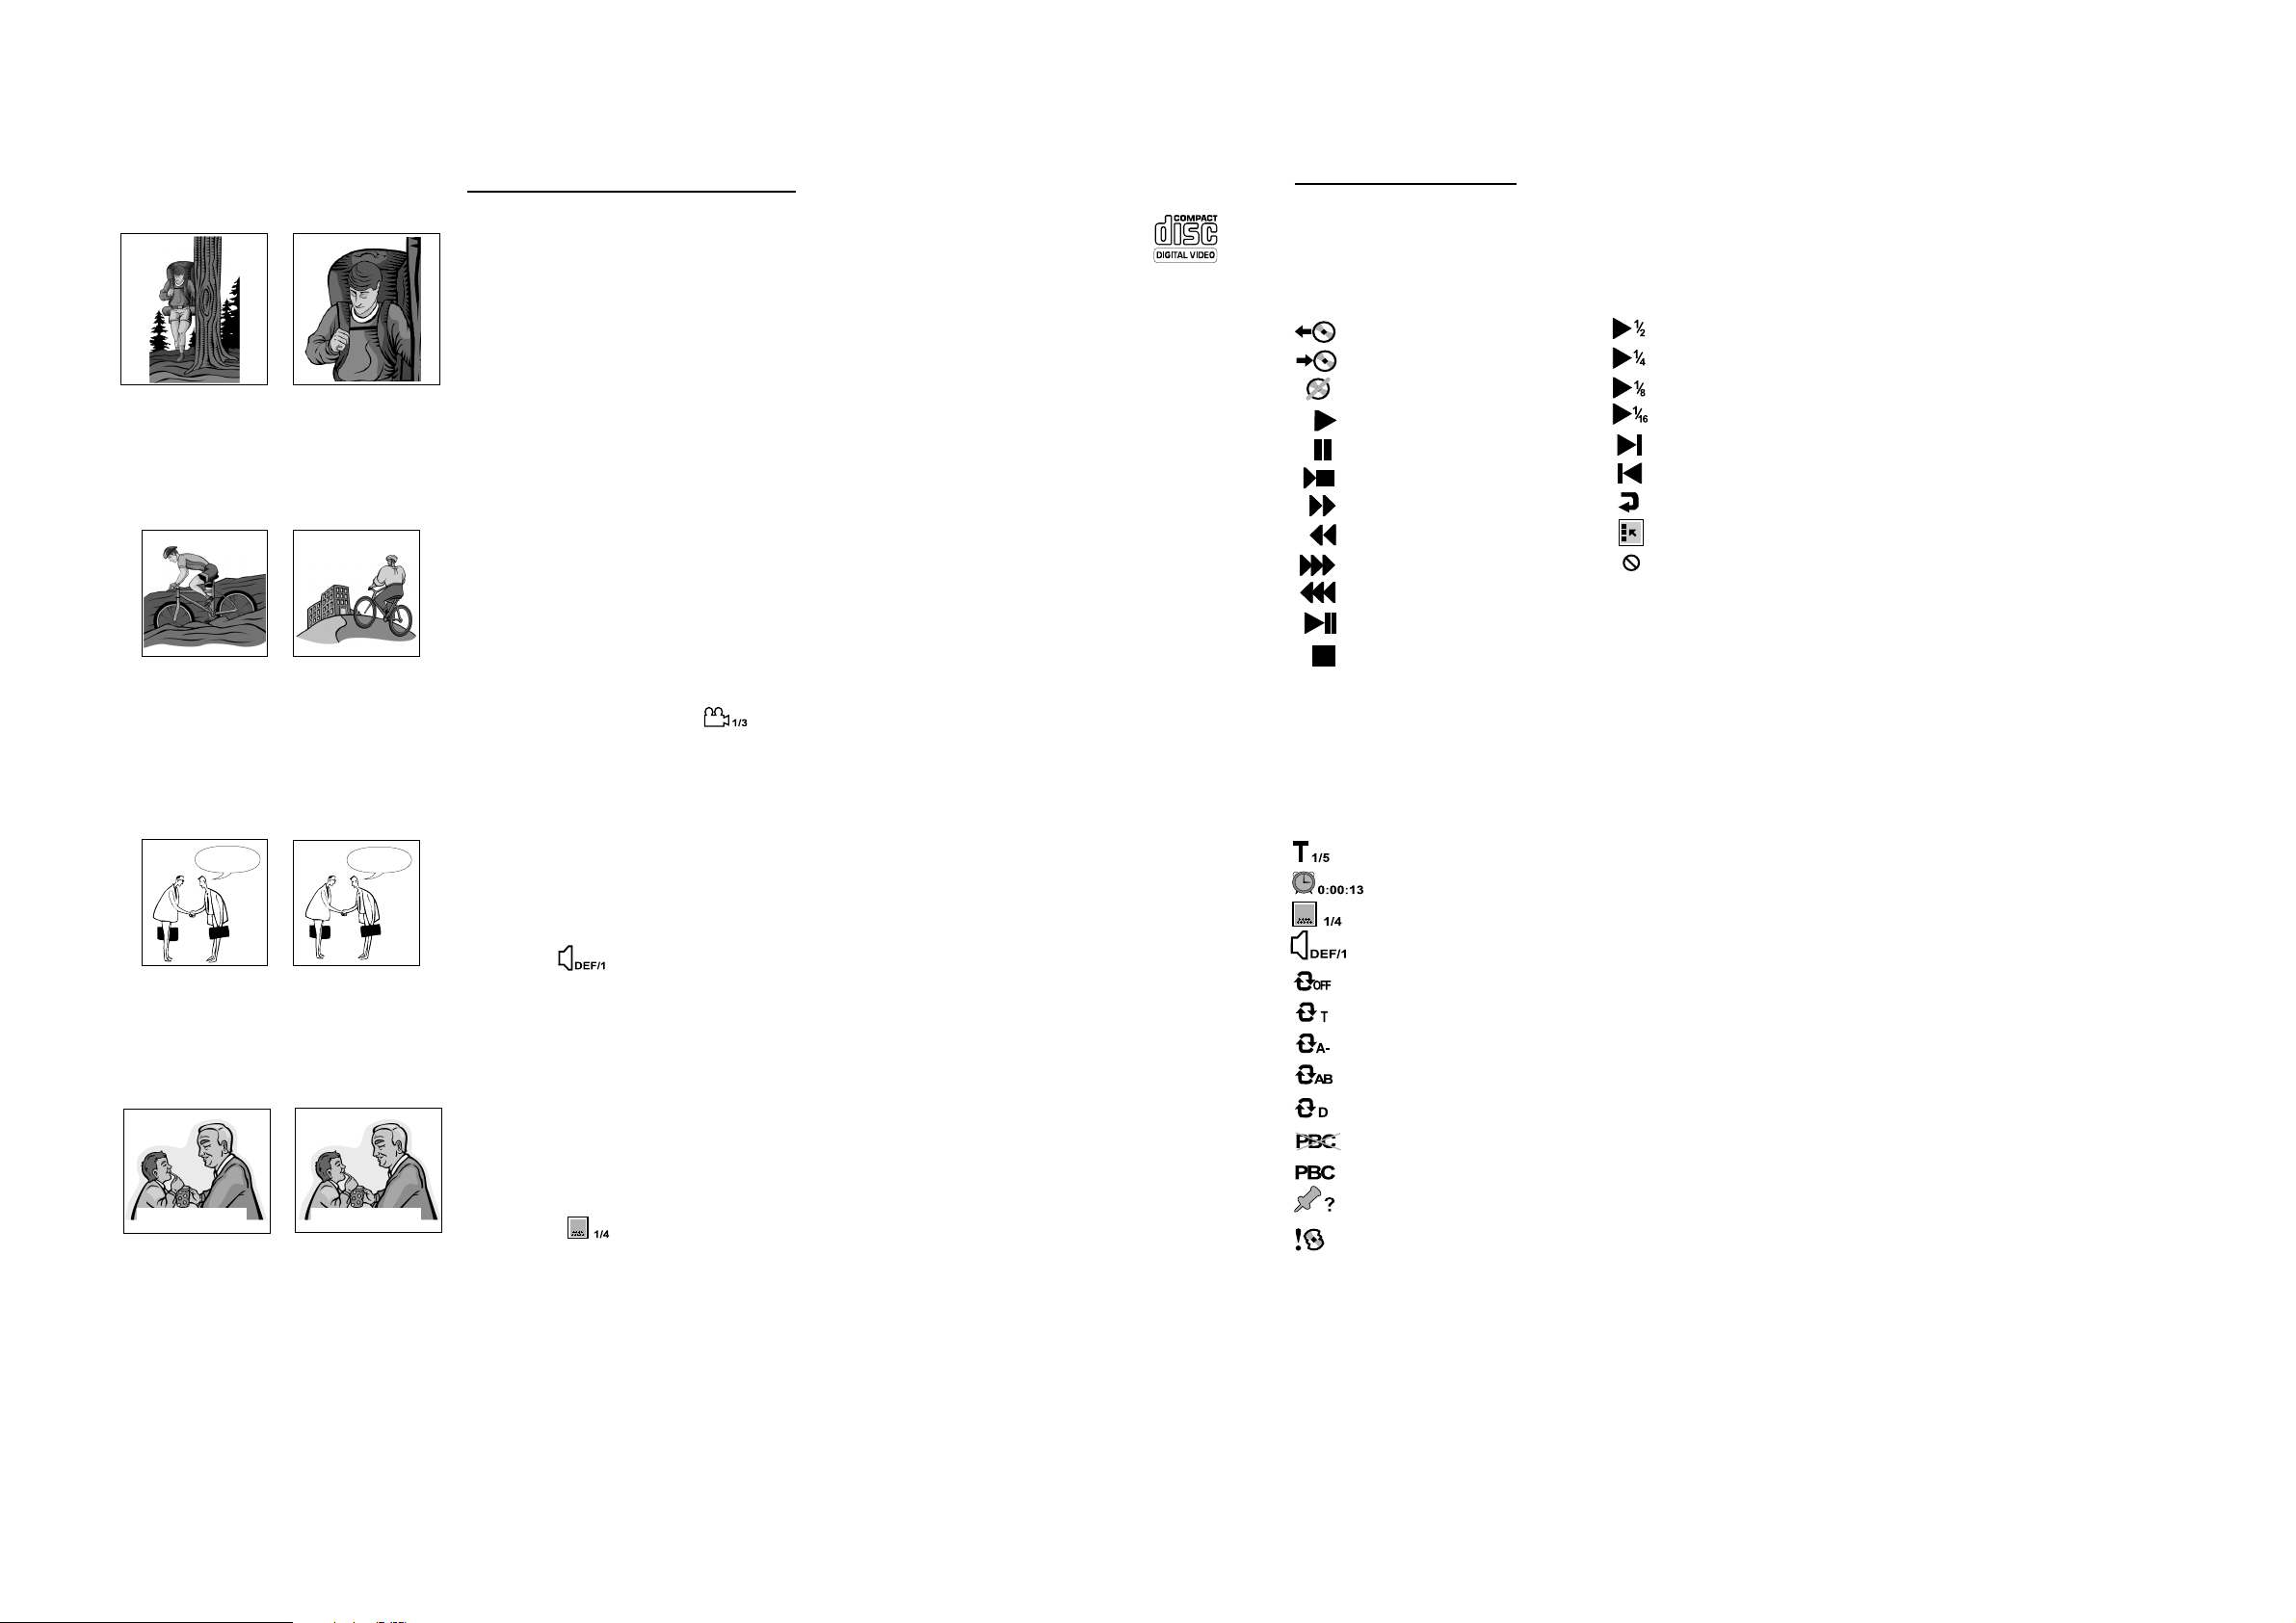
OSD (On Screen Display) banner icons
Remote control operation
0 Unless otherwise mentioned, all operations can be carried out with the remote
Any time during play, you can call up the OSD banner by pressing
OSD button on remote control to check which functions are active.
control. Always point the remote control directly at the player , making sure there
are no obstructions in the path of the infrared beam.
0 When there are corresponding keys in the front panel, they can also be used.
......................................................Title /Track
...........................................................Chapter
..............................Total time/Playing time
.............................................................Angle
..........................................................Subtitle
.....................................................Language
.........................................................Repeat off
.............................................Title/Track Repeat
................................................Chapter Repeat
..............................................Start point of A-B
...........................................Repeat from A to B
......................................................Repeat Disc
.................................Dolby digital audio output
..........................................................Program
...........................................................Bad disc
NOTE : The BAD DISC icon indicates you to clean the disc.
PCS 103 090 PCS 103 090
8 8
Playing a DVD-video disc
SLOW
SLOW
PREV/NEXT SEARCH
SLOW
STOP
STOP
STOP
PLAY
PAUSE/STEP
PLAY
PAUSE/STEP
MENU/PBC
PLAY
Video control during playback
STOP key on the remote control
0 You can resume the play from the point at which you stopped last time if you just
pressed the STOP key once. It will start from the begining if you pressed the STOP
key tewice to stop a play back.
0 If you unload the disc by press the key OPEN/CLOSE key on the remote control (or
OPEN/CLOSE button on front panel) during playback, you can also achieve the
resume play when you reload it again. Please pay attention to the mention ‘ resume’
on screen and press PLAY key at the moment.
0 The player can memorize five latest discs for resume play.
PAUSE/STEP key on the remote control
0 To get a still picture, press PAUSE/STEP key during play.
0 To step forward to the next picture frame, press PAUSE/STEP key again.
0 To return to play, press PLAY key.
Search
0 To search the content in fast speed, press SEARCH key for fast forward/rewind
searching.
0 Press the SEARCH key again to accelarite the speed during searching.
0 While you find the point you want, press PLAY key to return to the normal play state.
--------------- DVD disc -----------------y
Y
----- title 1-----y
Y
OPEN/CLOSE
SETUP
PREV/NEXT
chapter 1
SELECT
SLOW
chapter32chapter 1
STANDBY
RETURN
SEARCH
STOP
PLAY
PAUSE/STEP
MENU/PCB
TITLE
LANGUAGECANCEL A - B
Y--- title 2---y
CANCEL A - B
GOTO
PREVIEW
SURROUND OSDZOOM
chapter 2
REPEAT
LANGUAGE
ANGLE
SUBTITLE
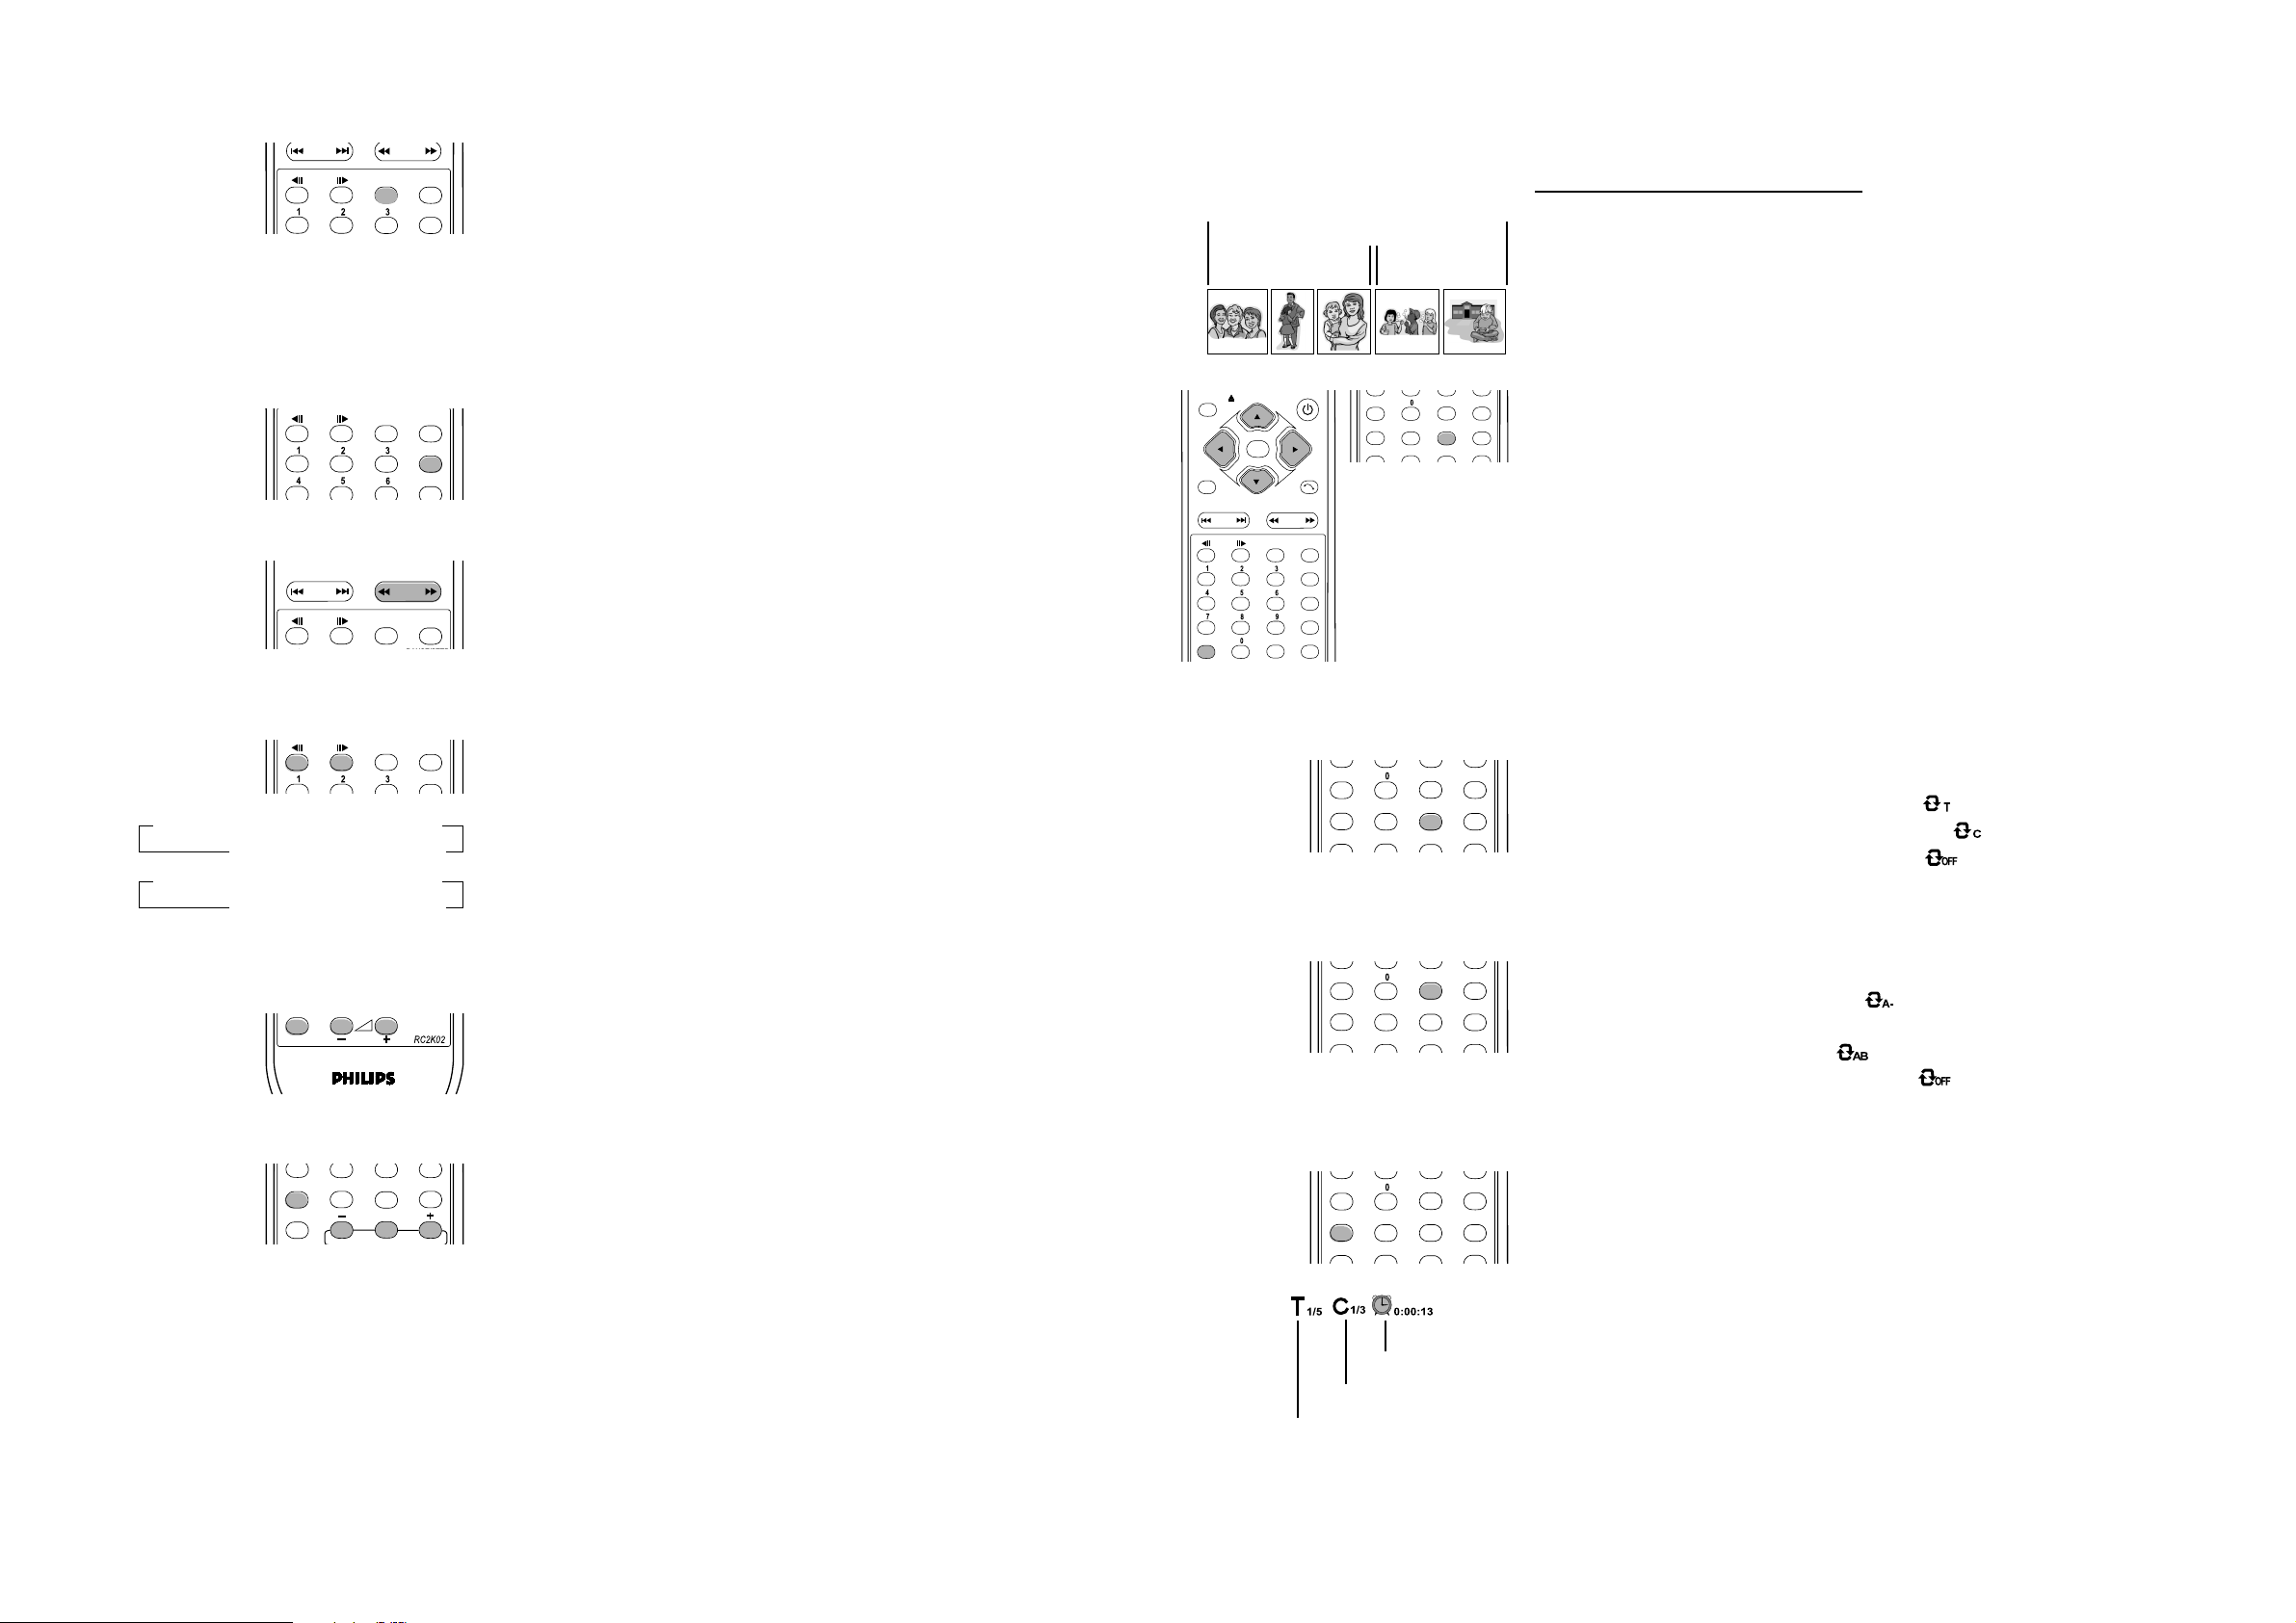
Playing a DVD-video disc
Playing title/chapter
Title & chapter
A DVD disc may have one or more titles , and each title may have one or more
chapters. It depends on the content (a movie, video clips, a drama series, etc) on
the disc.
Playing a title
0 After you load a disc, information about the content shows on the screen
waiting for your selection. Likewise, you can press the TITLE key on the
remote control to turn back to the title menu during playback.
0 If the items of the menu are numbered, press the appropriate number key on
the remote control, if not, use the 3412 keys to highlight your selection.
0 Press tahe SELECT key to confirm your selection.
Playing a chapter
0 While you have selected a title, it may include one or more chapters. To select a
chapter is the same as to select a title.
0 Any time you want to watch another chapter during playback, press MENU/PBC
key to turn back to the chapter menu and chose it again.
SLOW
STOP
PLAY
PAUSE/STEP
D PLAY D SF 1/2 D SF 1/4 D
C SF 1/16 C SF 1/8 C
D PLAY D SR 1/2 D SR 1/4 D
C SR 1/16 C SR 1/8 C
VOLUMEMUTE
SURROUND OSDZOOM
MIC ON/OFF
SUBTITLE
MODE
Slow Forward / Rewind
0 To get slow motion effect during playback, press SLOW forward/rewind key.
0 Press the SLOW key again, you can get different playback speeds.
0 Use the PLAY key to return to the normal play state.
0 Also you can return to the normal play state by just pressing the SLOW key.
Refer to the diagram of the function loop.
Audio control during playback
Mute
0 Press the mute key to switch on/off the sound ouotput.
Volume
0 Press the volume + or volume - to adjust the loudness.
Surround sound key
0 The DVD decoder circuit can simulate seven virtual surround sound effect.
they are stadium; Amphitheater; live; concert; church; passive; wide.
0 Press the surround key ( or the sound button in the front pamnel) to switch
the sound effect. Refer to the chapter [ Mode key] for details.
NOTE: The mute function; volume function and surround sound function
won’ t have effect on digital coaxial output or digital optical output.
CANCEL A - B
GOTO
PREVIEW
SURROUND OSDZOOM
CANCEL A - B
GOTO
PREVIEW
SURROUND OSDZOOM
CANCEL A - B
GOTO
PREVIEW
SURROUND OSDZOOM
playing time
current chapter / total
current title / total
REPEAT
REPEAT
REPEAT
LANGUAGE
ANGLE
SUBTITLE
LANGUAGE
ANGLE
SUBTITLE
LANGUAGE
ANGLE
SUBTITLE
REPEAT key
You can repeat playback a title or a chapter by press REPEAT key.
Pay attention to the hint on the screen.
0 Press the REPEAT key once, repeat the current title.
0 Press the REPEAT key twice, repeat the current chapter.
0 Press the REPEAT key third time, quit repeat state.
A-B key
A-B key enables you to chose a certain piece of program to repeat.
Pay attention to the hint on the screen.
0 Press the A-B key once to set a start point.
0 Press the A-B key twice to set an end point. At the same monent,
it begins to repeat from the start point.
0 Press the A-B key third time, quit A-B repeat state.
GOTO key
You can switch titles or chapters or play begining from any point of the disc by using
GOTO key.
0 Press the GOTO key once, you can set a certain title.
- Enter an available number then press the SELECT key to confirm it.
0 Press the GOTO key twice, you can set a certain chapter.
- Enter an available number then press the SELECT key to confirm it.
0 Press the GOTO key third times, you can set a start piont time.
- Enter an available number( e.g. 0:34:27) then press the SELECT key to confirm it.
0 Press the GOTO key fouth times, quit the state.
NOTE: GOTO key may have no effect on some DVD disc.
PCS 103 091 PCS 103 091
9 9
Playing a DVD-video disc
Playing a SuperVCD/VCD/CD
original size zoomed size
angle 1 angle 2
Special DVD feature
Zoom
0 Press the ZOOM key on the remote control, you will get the picture twice than the
original size, press it again, you get it four times in size. Use the 3412 key to
view the rest part of the zoomed picture.
0 Press the ZOOM key the third times to return to the original size.
Camera angle
0 Scenes which photoed from different camera angles can be recorded in a DVD
disc, it enables you to watch a scene from different angles. You can switch the
camera angles by just pressing the ANGLE key on your remote control.
NOTE: the function can only be achieved with a DVD which has recorded several
angles on it. When this kind of DVD disc is loaded, you can see the hint in
OSD bar on the screen.
Icons and menu bar
During play, various icons will appear on the TV screen to confirm
the function has been selected. You can get rid of these icons by
pressing OSD button on remote control.
.................Open the disc tray
................Close the disc tray
................No disc in disc tray
.......................................play
....................................pause
..........stop at current position
...............Search forward(X1)
...........Search backward(X1)
...............Search forward(X2)
...........Search backward(X2)
....Pause (Shows on display)
.......Stop(play from the start)
OSD (On Screen Display) banner icons
Any time during play, you can call up the OSD banner by pressing
OSD button on remote control to check which functions are active.
........................Slow forward 1/2
........................Slow forward 1/4
........................Slow forward 1/8
......................Slow forward 1/16
............................................Next
............................................Prev
.........................................Return
...........................Menu Selection
...............Operation not available
Hello
Good morning Bonsoir!
Bonjour
Changing audio languages
0 If the DVD is recorded with multi-language audio track, you can select the language
you want by pressing the LANGUAGE key on your remote control.
0 When this kind of DVD disc is loaded, you can see the hint in OSD bar on the
screen.
Changing subtitles
0 If the DVD is recorded with multi-subtitle track, you can select the subtitle you
want by pressing the SUBTITLE key on your remote control.
0 When this kind of DVD disc is loaded, you can see the hint in OSD bar on the
screen.
......................................................Title /Track
..............................Total time/Playing time
..........................................................Subtitle
.....................................................Language
........................................................Repeat off
.....................................Title/Track Repeatition
.........................................Chapter Repeatition
.............................................Start point of A-B
...........................................Repeat from A to B
........................................................PBC OFF
..........................................................PBC ON
..........................................................program
..........................................................Bad disc
NOTE : The BAD DISC icon indicates you to clean the disc.
PCS 103 092 PCS 103 092
10 10
Playing a SuperVCD/VCD/CD
Playing a SuperVCD/VCD/CD
PREV/NEXT SEARCH
SLOW
SLOW
STOP
STOP
PLAY
PLAY
PAUSE/STEP
D PLAY D SF 1/2 D SF 1/4 D
C SF 1/16 C SF 1/8 C
VOLUMEMUTE
SURROUND OSDZOOM
MIC ON/OFF
GOTO ANGLE
PREVIEW REPEAT
SURROUND OSDZOOM
SUBTITLE
MODE
SUBTITLE
Disc Specification Icons
This icon indicates the following description of functions are availible for CD.
This icon indicates the following description of functions are availible for VCD.
This icon indicates the following description of functions are availible for SVCD.
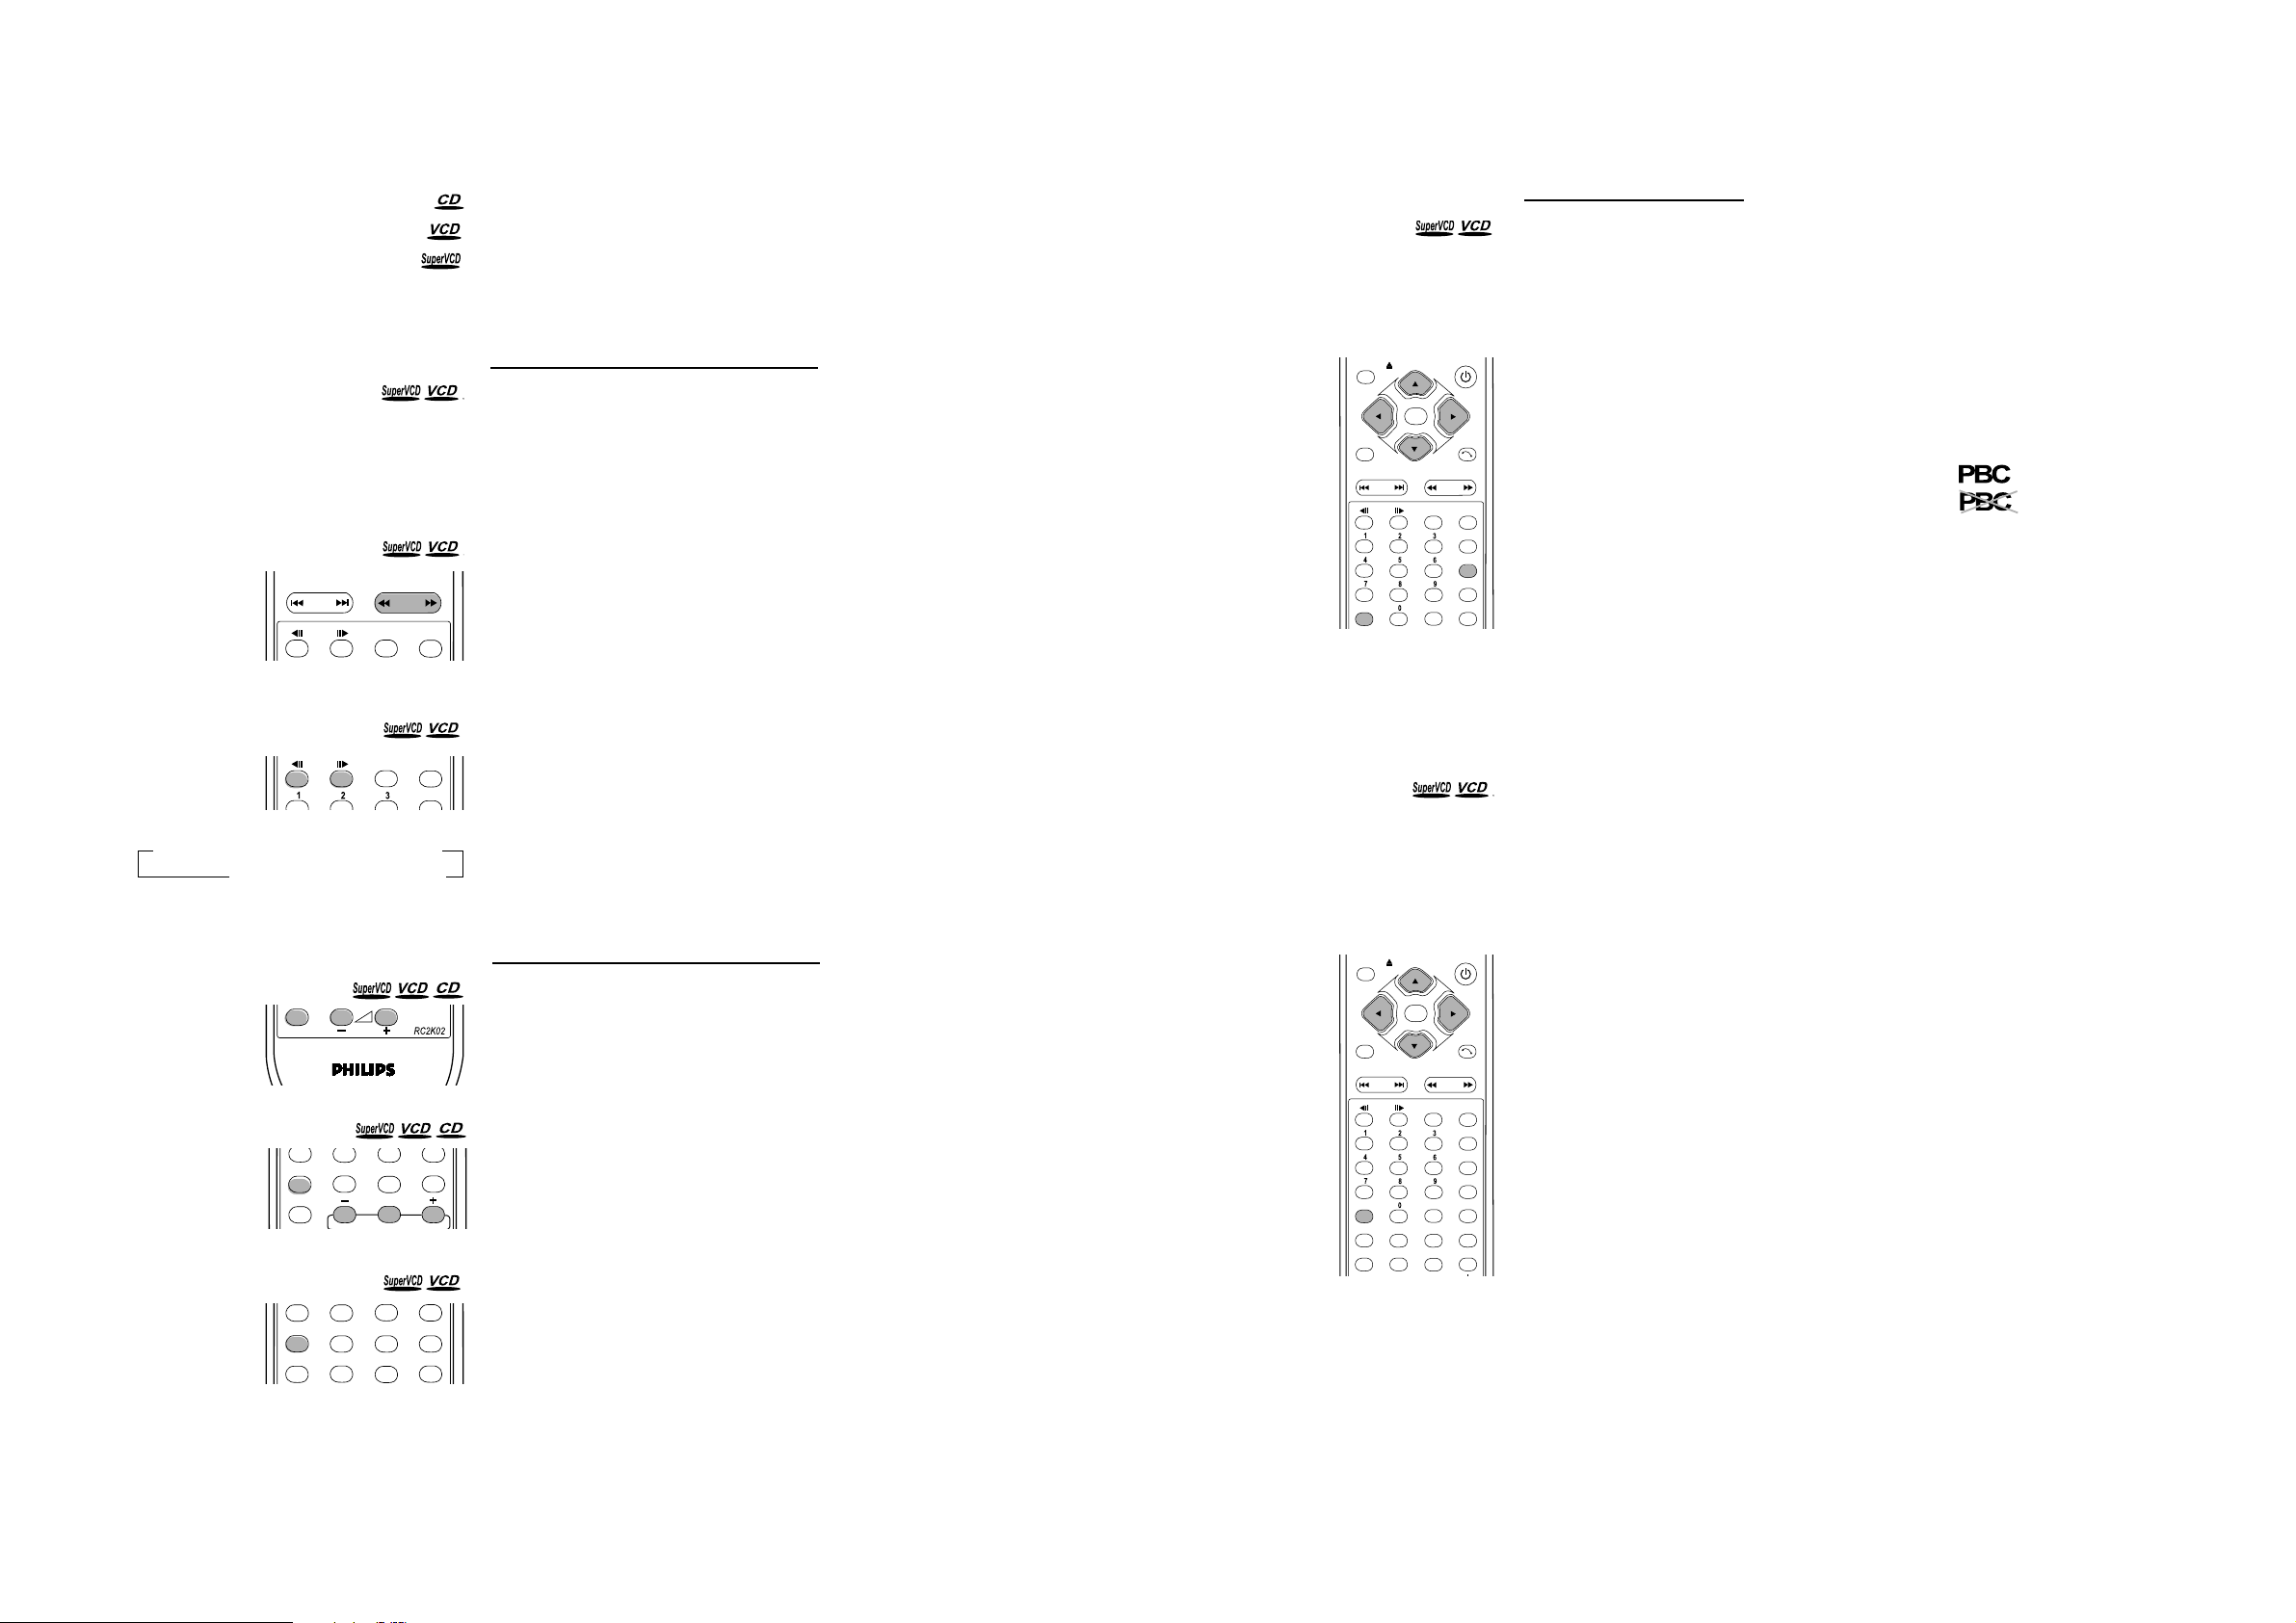
Video control during playback
PAUSE/STEP key on the remote control
0 To get a still picture, press PAUSE/STEP key during play.
0 To step forward to the next picture frame, press PAUSE/STEP key again.
0 To return to play, press PLAY key.
Search
0 To search the content in fast speed, press SEARCH key for fast forward/rewind
searching.
0 Press the SEARCH key again to accelarite the speed during searching.
0 While you find the point you want, press PLAY key to return to the normal play state.
Slow Forward
0 To get slow motion effect during playback, press SLOW key.
0 Press the SLOW key again, you can get different playback speeds.
0 Use the PLAY key to return to the normal play state.
0 Also you can return to the normal play state by just pressing the SLOW key.
Refer to the diagram of the function loop.
Audio control during playback
Mute
0 Press the mute key to switch on/off the sound output.
Volume
0 Press the volume + or volume - to adjust the loudness.
Surround sound key
0 The DVD decoder circuit can simulate seven virtual surround sound effects.
they are stadium; Amphitheater; live; concert; church; passive; wide.
0 Press the SURROUND key ( or the sound button in the front pamnel) to
switch the sound effect. Refer to the chapter [ Mode key] for details.
Audio channel selection
0 SVCD has two stereo audio channels which are used for playing karaoke
or the audio language selection. ( for a instance, you can chose one channel
for only the music background of the song while you play the karaoke.)
0 Press the LANGUAGE key on the remote control to select the audio
channels you want.
0 VCD has only one stereo audio channel, you can mute the left speaker or
the right speaker by pressing the LANGUAGE key on the remote control.
OPEN/CLOSE
SELECT
SETUP
PREV/NEXT
SLOW
OPEN/CLOSE
SELECT
SETUP
PREV/NEXT
SLOW
CANCEL A - B
GOTO
DIGEST
SURROUND OSDZOOM
STOP
STOP
REPEAT
SEARCH
SEARCH
STANDBY
RETURN
PLAY
PAUSE/STEP
MENU/PCB
TITLE
LANGUAGECANCEL A - B
STANDBY
RETURN
PLAY
PAUSE/STEP
MENU/PCB
TITLE
LANGUAGE
ANGLE
SUBTITLE
Playing title/track
Use PBC (PlayBack Control)
0 Playback control is a kind of title/track index protocol between player and
discs. When a disc is recorded with a standard VCD or SVCD format,
there will be a menu which include titles/tracks for user to select the content
of a moive or other video programs.
0 When you switch on the PBC function you will enter the index menu which
are aviliable for selection after loading the SVCD or VCD disc. On the
contrary, if you switch PCB function off, you will just start the disc from
the beginning.
0 You can switch the PCB function simply by pressing the MENU/PCB key
on the remote control. Pay attention to the icon in the menu bar on the
screen.
0 If the items of the index menu are numbered, press the appropriate number
key on the remote control, if not, use the 3412 keys to highlight it, then
press the SELECT key to confirm your selection.
Nine pictures preview
0 Some SVCD/VCD discs do not have standard menu structure, so you can’t
use PBC to select titles or tracks. But this player also offers you NINE
PICTURES DIGEST function for the content preview. Remember when
the NINE PICTURES DIGEST function is active, the PBC function is
turned off automatically.
0 The nine pictures function is a function which averagely divides the content
of the disc into nine parts and shows the start picture of every part on the
screen. With the nine pictures screen show, you can easy to search the part
you want to watch by pressing PREVIEW key on remote control.
0 Karaoke discs have their certain format, when you use this function, it
shows in tracks. In most cases the tracks in a disc will be more than nine, at
the moment you can use the keys PREV/NEXT to turn to the next page for
more pictures.
0 Not only you can view the tracks, but also view a track by pressing the
PREVIEW key again. The function will averagely divides the track into
nine parts as well as it does to the whole disc.
0 Press PREVIEW key on the remote control to view the nine pictures on
the screen, both you can use the number keys or the 3412 keys on the
remote control to select the start picture of the divided content which you
want to watch.
PCS 103 093 PCS 103 093
11 11

Playing a SuperVCD/VCD/CD
KARAOKE
CANCEL A - B
GOTO
PREVIEW
SURROUND OSDZOOM
CANCEL A - B
GOTO
PREVIEW
SURROUND OSDZOOM
CANCEL A - B
GOTO
PREVIEW
SURROUND OSDZOOM
REPEAT
REPEAT
REPEAT
LANGUAGE
ANGLE
SUBTITLE
LANGUAGE
ANGLE
SUBTITLE
LANGUAGE
ANGLE
SUBTITLE
A-B key
A-B key enables you to chose a certain piece of program to repeat.
Pay attention to the hint on the screen.
0 Press the A-B key once to set a start point.
0 Press the A-B key twice to set an end point. At the same monent,
it begins to repeat from the start point.
0 Press the A-B key third time, quit A-B repeat state.
REPEAT key
You can repeat to playback a track or a chapter by press REPEAT key.
Please turn the PBC off at the moment.
Pay attention to the hint on the screen.
0 Press the REPEAT key once, repeat the current track.
0 Press the REPEAT key twice, repeat the whole disc.
0 Press the REPEAT key third time, quit repeat state.
GOTO key
You can switch titles or play begining from any point of the disc by using the GOTO
key. The operation will be some different between PBC ON and PBC OFF.
With the state of PBC OFF:
0 Press the GOTO key once, you can set a certain title.
- Enter an available number then press the SELECT key to confirm it.
0 Press the GOTO key twice, you can set a start piont time.
- Enter an available number( e.g. 0:34:27) then press the SELECT key to confirm it.
0 Press the GOTO key the third times, quit the state.
POWER ON/OFF
LEVEL1
POWER ON/OFF
LEVEL2
General operation
0 Insert the plug of mirophone into MIC jack. Be sure the player has properly
connected to your TV or audio system.
0 Press the MIC key on the remote control to switch the karaoke function
on. Y ou can see the function menu appears on the screen shows the mention
of the reaction.
0 Load a karaoke disc, press PLAY key to start to play. Remember to turn
your microphone on.
Microphone volume adjustment
0 You can adjust the volume of microphone connected to MIC 1 jack by
turning the knob LEVEL 1.
0 You can adjust the volume of microphone connected to MIC 2 jack by
turning the knob LEVEL 2.
Extra functions
playing time
titles
With the state of PBC ON:
0 Press the GOTO key once, you can set a start piont time.
- Enter an available number( e.g. 0:34:27) then press the SELECT key to confirm it.
0 Press the GOTO key the again, quit the state.
You can enter the function menu by pressing the MODE key on the remote
control. The appeared menu enable you to play karaoke with different ways
and to simulate different sound effects. Likewise, there are some other
functions in three other pages ( you can turn the page by pressing MODE
key) which concern to more functions besides karaoke, you can find the
introduction of them in chapter [ MODE key].
NOTE: GOTO key may have no effect on some VCD/SVCD disc.
Playing a SuperVCD/VCD/CD
Special VCD feature
Zoom
0 Press the ZOOM key on the remote control, you will get the picture twice than the
Pressing the MODE key to active the function menu and turn to page karaoke.
You will see a menu with nine items appearing on the screen. In this menu
you can use 34keys on remote control to change the items, use the +/- key
to select choices you want, use the CANCEL key to quit the function menu.
original size. Use the 3412 key to view the rest part of the zoomed picture.
0 Press the ZOOM key the again to return to the original size.
MIC ON/OFF
MUTE
VOLUME
MODE
VOICE CANCEL available for only VCD and SVCD karaoke discs
0 Stereo audio output includes two channels, they are left channel and right
channel. The function VOICE CANCEL enables you to mute one or both
RESUME
0 At the state of PBC OFF, you can resume the play from the point at which you
stopPed last time if you just pressed the STOP key once. It will start from the
begining if you pressed the STOP key tewice to stop a play back.
0 If you unload the disc by press the key OPEN/CLOSE key on the remote control (or
of that two channels, so you can play karaoke only with music background
or vocal sound.
0 Press the key to turn to the item VOICE CANCEL, use the key to choose
the option.
OPEN/CLOSE button on front panel) during the playback, you can also achieve the
resume play when you reload it again. Please pay attention to the mention ‘ resume’
on screen and press PLAY key at the moment.
0 The player can memorize five latest discs for resume play.
PCS 103 094 PCS 103 094
12 12
Pitch control
MIC echo
KARAOKE
VOICE ACTIV ATE available for only VCD karaoke discs
0 This function is designed especially for karaoke. You can imagine the situation
that a song need both male and female singer to performance, how do you
enjoy it youself only? That is the point of the function.
0 First, switch the VOICE ACTIVATE on, turn back to item VOICE CANCEL
chosing the LR to mute vocal sound in /the song, then you will find that the
vocal sound still exist unless you start to sing. While you are singing, only the
music background is active, when you stop singing, the vocal soung comes
back immediately.
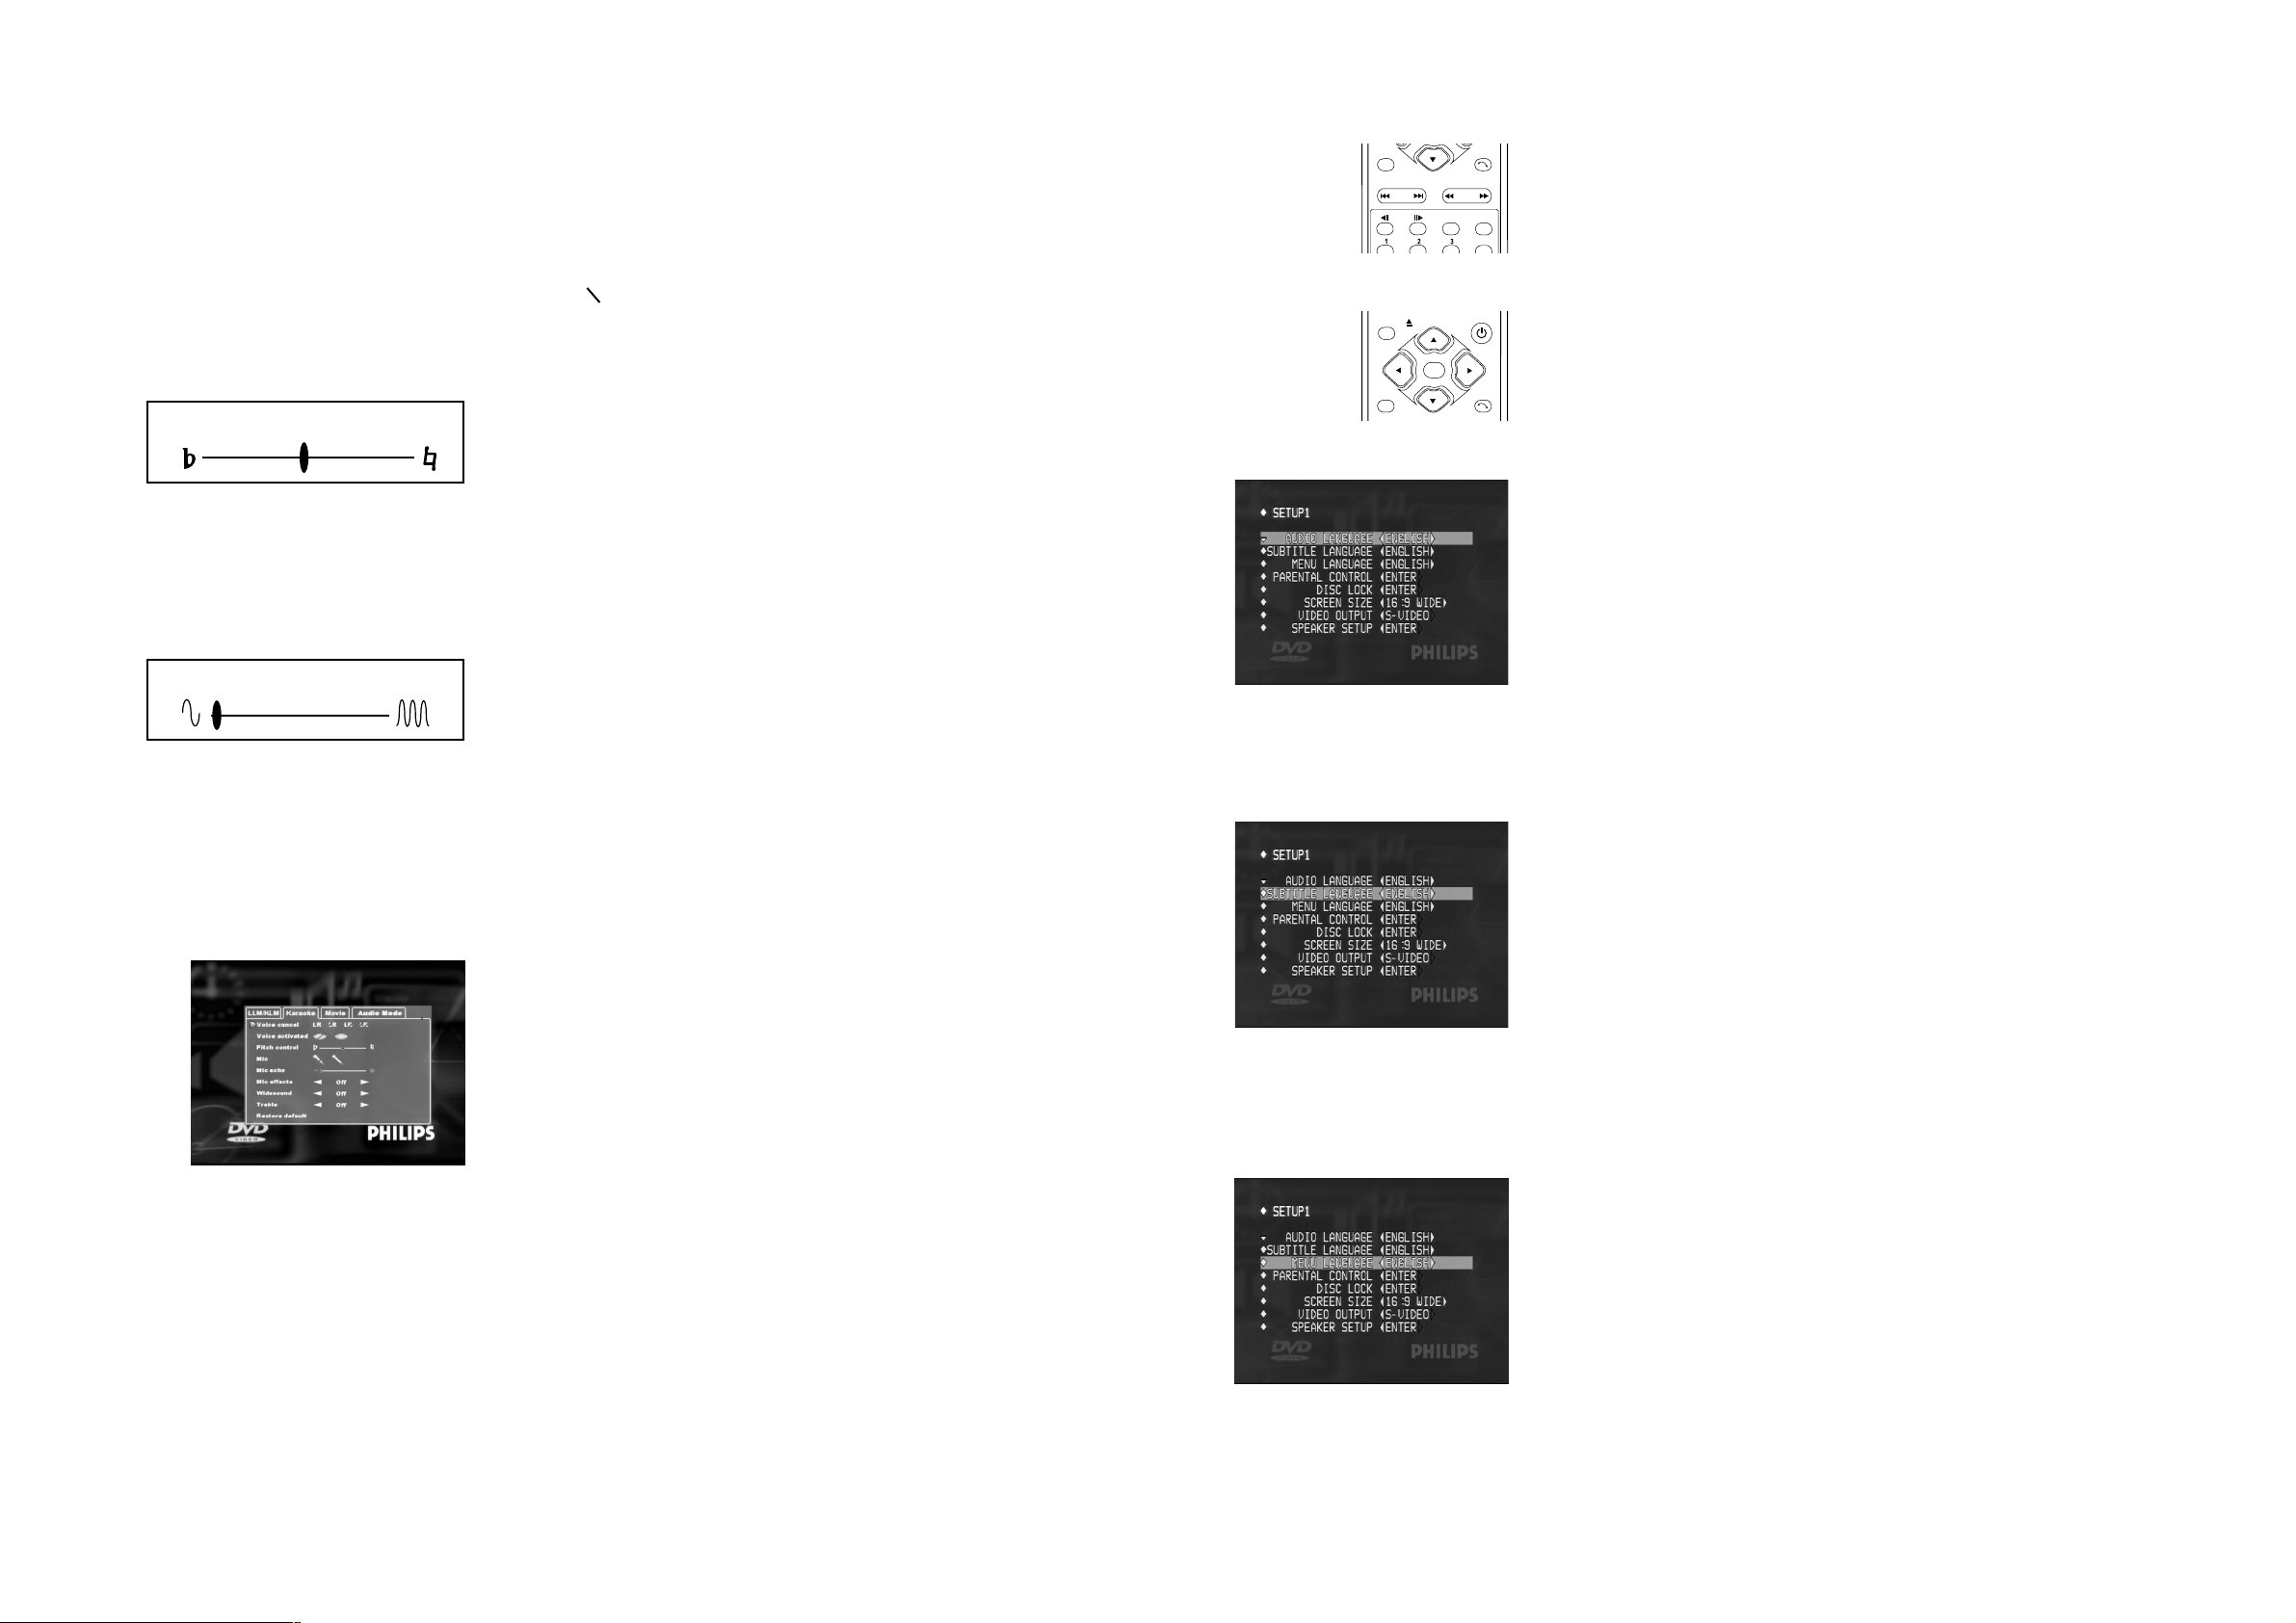
Pitch control
0 You can adjust the pitch to adapt your vocal by using the +/- key.
MIC
0 This item is the switch of turning on/off the microphone. The effect is just the
same as the key MIC on remote control.
0 Press the 34 key to select the item and use 12 key to turn on or turn off the
mirophone.
MIC echo
0 You can increse MIC echo or decrease it by pressing the 12 key.
Setup Menu
SETUP
PREV/NEXT
OPEN/CLOSE
SETUP
SLOW
SELECT
RETURN
SEARCH
STOP
PLAY
PAUSE/STEP
Enter setup menu --- Press STOP key first
0 Press the SETUP key on your remote control to enter the Setup Menu. Remember
that you can only enter the Setup Menu at the state of STOP, the SETUP key will
not have any respond if you press it during playback.
0 The setup menu will appear on the screen when you press the SETUP key , operation
in the menu only needs DIRECTION keys, SELECT keys, RETURN key and
STANDBY
SETUP key. You can use DIRECTION keys 34 to choose an item, use
DIRECTION keys 12 to select an option in the item, use SELECT key to enter a
submenu or confirm your selection, use the SETUP to save and quit setup.
RETURN
0 When you quit the setup, the setting will be stored in the player and it won’t lost
even if it is powered off.
Audio language
0 DVD discs are available for recording maximum to 8 audio languages. So this
item is used to choose one of them as default audio language.
0 You can use 34 keys to highlight it then use 12 keys to select one of the audio
languages in the list of the item. Press SETUP key to save and quit the Setup
Menu.
0 Your DVD disc may not include the audio language which you set in the Setup
Menu. If so, the player will use the first audio language track as the default audio
language.
0 You can use the LANGUAGE key on the remote control to switch the audio
languages you want. If the DVD records with multi_language, the icon will appear
on the screen. See the chapter [ Playing a DVD video disc] for details.
Mic effects
0 This function is used to simulate special effect of your vocal, it makes your
voice sounds like the harmony, chorus or flange.
0 Press the 34 key to select the item and use 12 key to chose the MIC effect.
Wide sound
0 This function simulates a wide environment space. There are three options for
you choose: low; medium; high.
0 Press the 34 key to select the item and use 12 key to set wide sound effect.
Treble
0 This function is used to increase the volume of treble. It makes you more relax
in singing a high pitch song.
0 Press the 34 key to select the item and use 12 key to chose a certain treble
increase.
Restore default
0 This item is used to reset all items to factory default, all your personal setting
will be erased.
0 Press the 34 key to select the item and then press the SELECT key to confirm
your decision.
Subtitle Language
0 DVD discs are available for recording maximum to 8 subtitle languages. So this
item is used to choose one of them as default subtitle language.
0 You can use 34 keys to highlight it then use 12 keys to select one of the subtitle
languages in the list of the item. Press SETUP key to save and quit the Setup
Menu.
0 Your DVD disc may not include the subtitle language which you set in the Setup
Menu. If so, the player will use the first subtitle track as the default subtitle language.
0 You can use the SUBTITLE key on the remote control to switch the subtitle
languages you want. If the DVD records with multi_subtitle, the icon will appear
on the screen. See the chapter [ Playing a DVD video disc] for details.
Menu Language
0 A DVD movie may have a menu which let you choose which chapter do you want
to start with or something. Also the menu may be made in different languages, so
the item is set for the selection of multi menu language.
0 You can use 34 keys to highlight it then use 12 keys to select one of the subtitle
languages in the list of the item. Press SETUP key to save and quit the Setup
Menu.
PCS 103 095 PCS 103 095
13 13
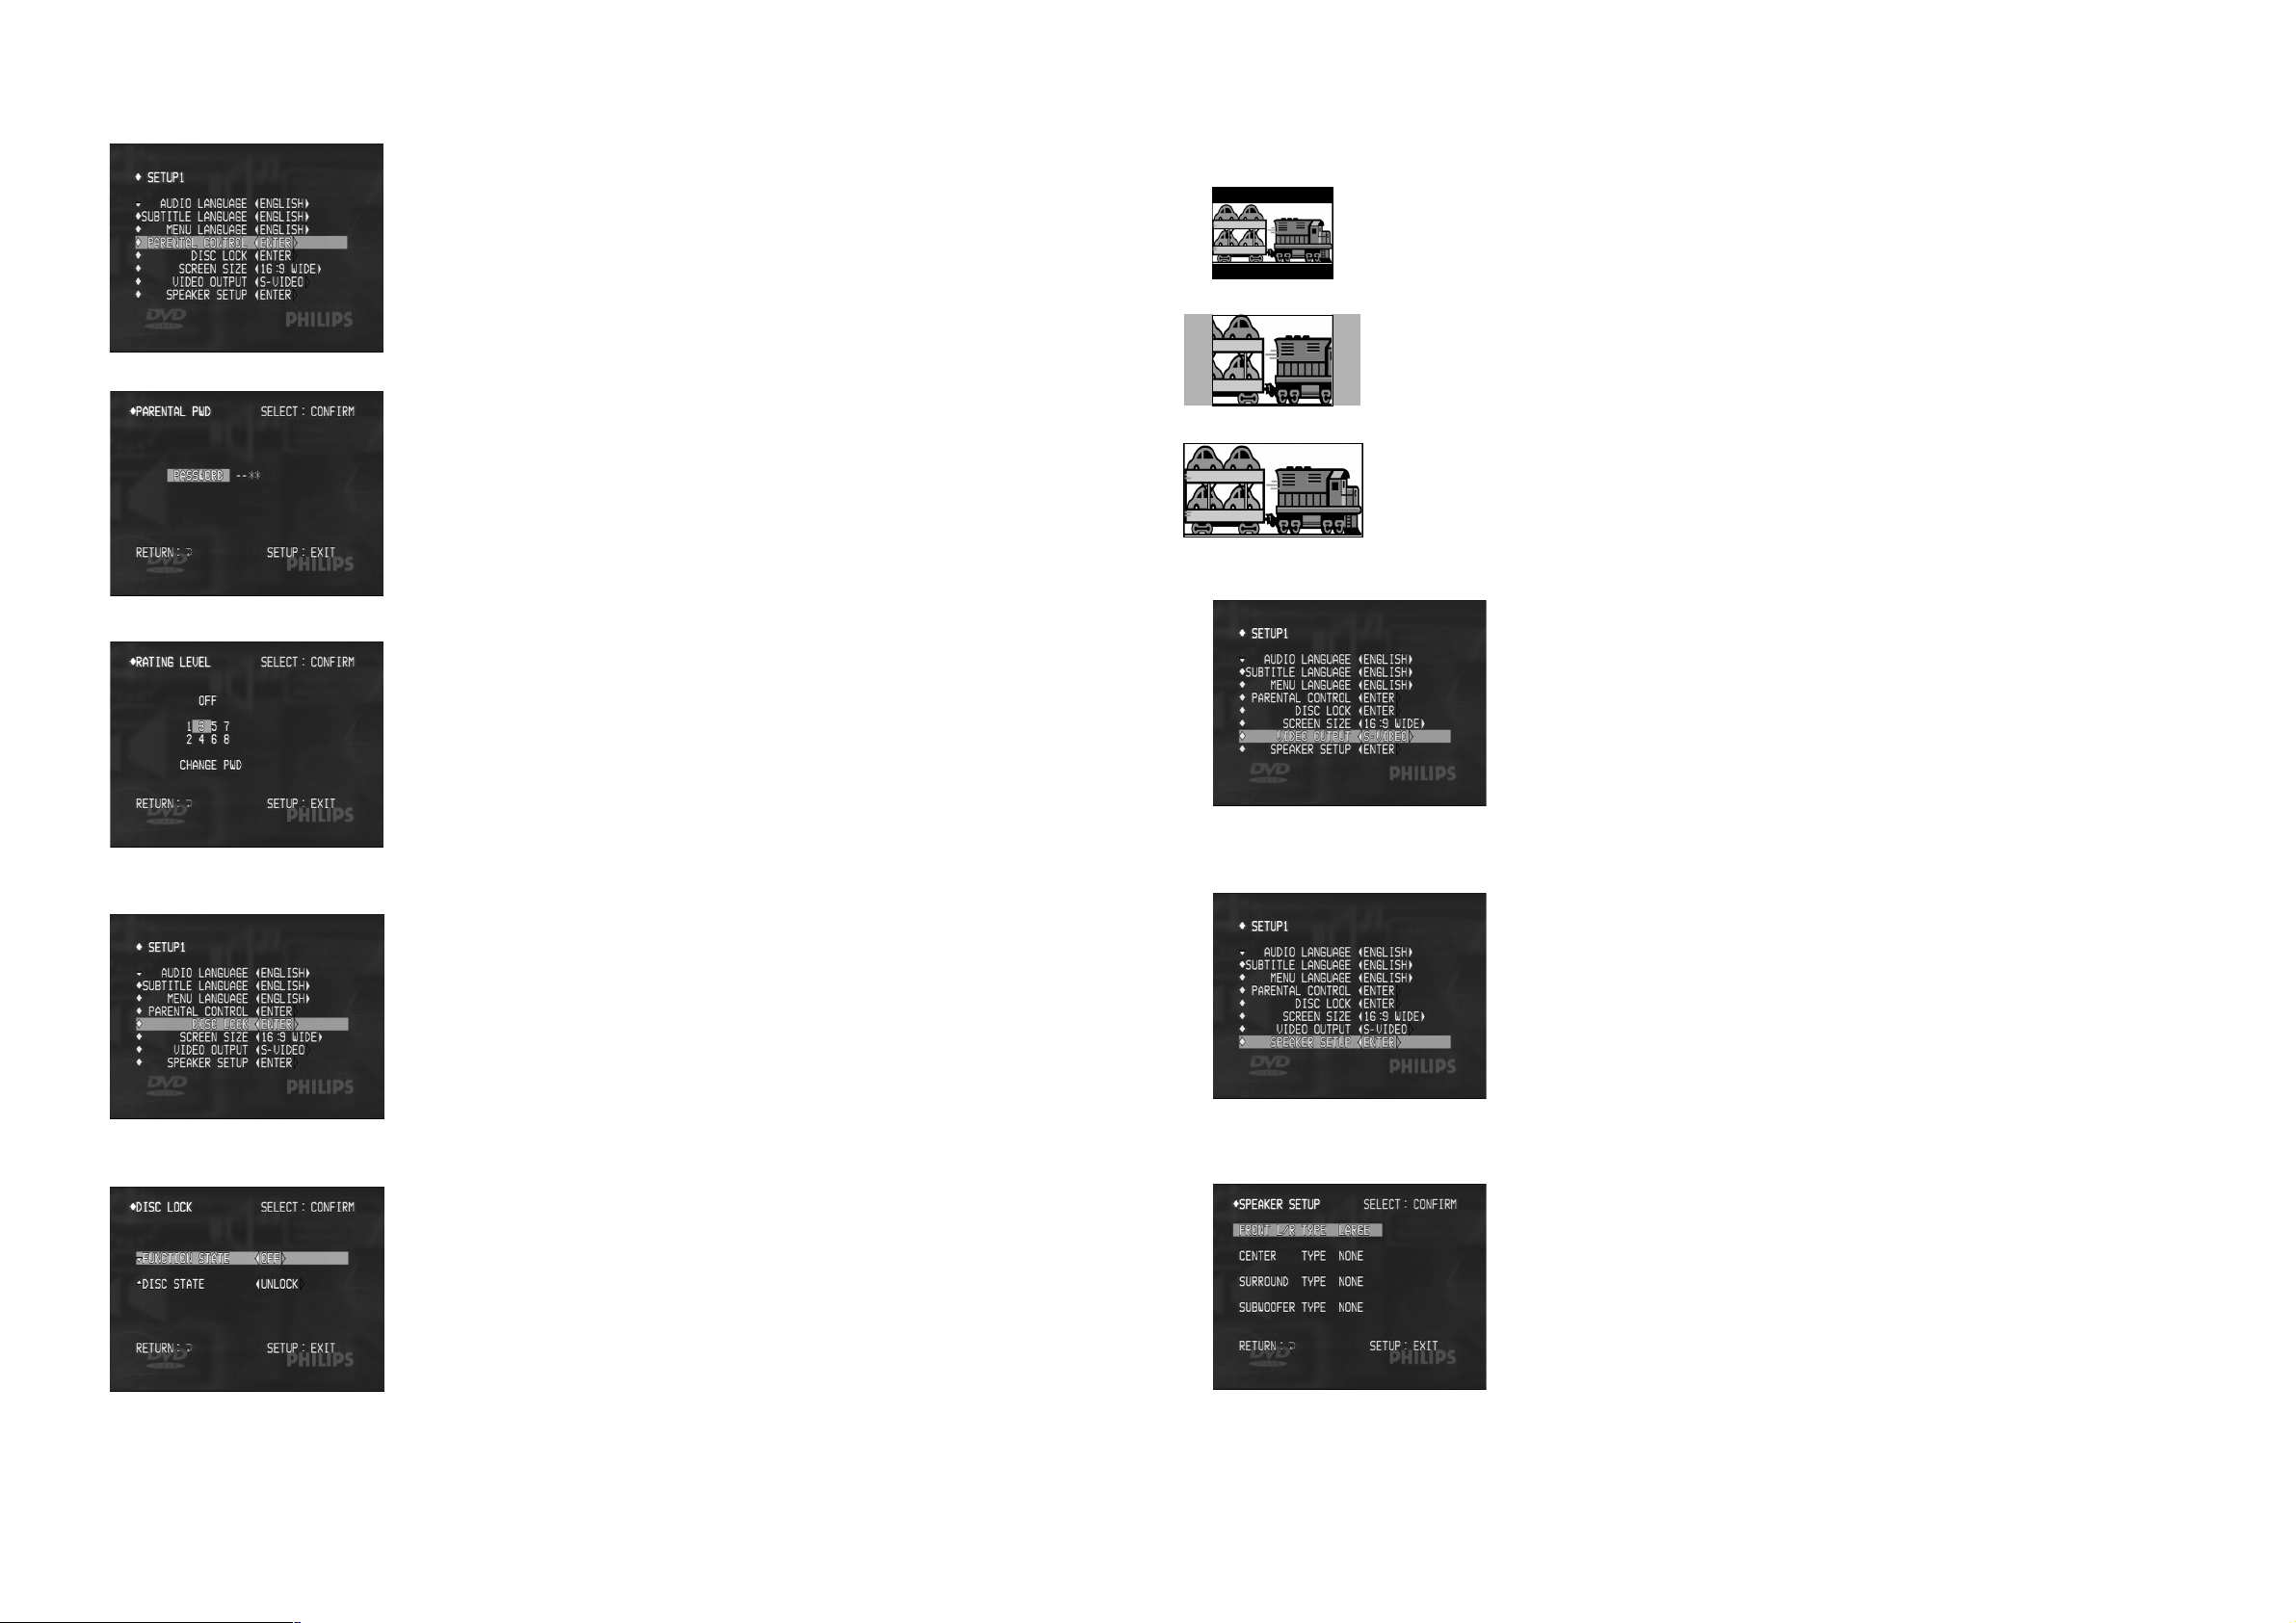
fig .1
fig .2
Setup Menu
Parental control
0 DVD disc can be set with levels which define the movie digrees of violence, horror
or iroticism. There are 8 degrees defined in a standard literature for the setting by
distributors. Form level 1 to level 8, the ponderance increases gradually. If the
parental control is activated, only the movies which the digree is lower than the
level you set can be admitted to show, ortherwise, you have to enter the password
for authorization.
0 VCD, SVCD, CD has no level defination, so parental control function has no
effect on those kind of discs. Most of illegal DVD discs don’t have level defination.
0 You can follow the steps below to setup the parental control:
1. Highlight the item PARENTEL CONTROL by using the 34 key , press the
key SELECT to enter the submenu. ( Refer to the illustration fig. 1)
2. Enter the password to log in. You can enter the superuser code 7890 to log in
the submenu at the first time by presssing the number keys on the remote control,
then press SELECT key to confirm it. ( Refer to the illustration fig. 2)
3. Use the 34 keys to set the item: OFF denotes parental control to be closed;
number 1- 8 denotes the authorized level; CHANGE PASSWORD enables you
to reset a user password by pressing SELECT key on the remote control to
enter the sub menu. ( Refer to the illustration fig. 3)
4. Press SETUP key to save and quit setup when you finish it. The parental control
is active right away.
NOTE:
a. You can use the superuser password 7890 log in or open the parental lock at any
time, even if you have set a password.
b. The parental control only limits the player to playback a high level DVD, it doesn’t
lock the DVD disc. So the disc can still be played in another apparatus.
Setup Menu
fig .1
fig .2
fig .3
4:3 LB
4:3 PS
16:9 wide screen
Screen size
0 The common TV screen size rate is 4:3, but there is also a kind of TV screen which its
size rate is 16:9, as wide as the screen in cenima. It is what we call ‘wide-screen’.
0 If a disc is recoded in the size of wide-screen, it will have some trouble in playing on
a normal TV set. That is what the function SCREEN SIZE is designed for.
0 There are three selections in the item to modify the distorted screen picture:
1. 4:3 LB --- used for 16:9 format movie discs play in 4:3 TV set. it sacrifices certain
top and bottom screen space for getting 16:9 picture size. ( refer to fig .1 )
2. 4:3 PS --- used for 16:9 format movie discs play in 4:3 TV set. it sacrifices certain
picture part for getting 4:3 effect. ( refer to fig .2 )
3. 16:9 wide-screen --- used for 16:9 format movie discs play in 16:9 TV set. if the
disc is recorded in 4:3 format, the picture will also have some distortion.
0 You can use 34 keys to highlight item SREEN SIZE then use 12 keys to select a
proper option. Press SETUP key to save and quit the Setup Menu.
Video output
0 The item is used to choose the way of the video output. There are two options in
the item: S-video and YUV ( Y/CR/CB). Refer to the chapter [ video connection].
0 You can use 34 keys to highlight item SREEN SIZE then use 12 keys to select a
proper option. Press SETUP key to save and quit the Setup Menu.
0 Whether you choose S-video or YUV output, the CVBS video output will work
as usual.
fig .3
fig .4
fig .5
Disc lock
0Although you can’t use parental control on VCD and SVCD disc, but you still have
the choise of using disc lock to limit them playing on your player.
0The function disc lock can lock discs maximum to 80s. When lock the current disc,
the player will record its serial number for the recognization. Next time it is loaded,
the user will be asked to enter password, if the password is wrong, it will be forbidden
to playback.
0The password is the same as it in parental control. Also, you can use the superuser
code 7890 to open the disc lock if you forget the password.
0 You can follow the steps below to set the disc lock:
1. Highlight the item DISC LOCK by using the 34 key , press the key SELECT
to enter the submenu. ( Refer to the illustration fig. 4)
2. Enter the password to log in. You can enter the superuser code 7890 to log in
the submenu at the first time by presssing the number keys on the remote control,
then press SELECT key to confirm it. ( Refer to the illustration fig. 5)
3. There are two items in the submenu, they are FUNCTION STATE and DISC
STATE. The first item, FUNCTION STATE, determines whether the disc lock
function is active or not; the DISC STATE determines the operation to the current
disc, you can chose LOCK or UNLOCK. If you see INVAILABLE showing in
the item, it means the disc can’t be lock.
4. Press the SETUP key to save and quit the setup when you finish setting.
Speaker setup
0 It is necessary for you to setup SPEAKER SETUP when you use multi_channel
audio output, turn on the center speaker, surround speaker and subwoofer. ( refer
to the chapter [ connection] )
0 You can use 34 keys to highlight item SPEAKER SETUP then press SELECT
key to enter the submenu.
0 After entering the submenu, you can see there are four items set in factory default.
It is for the stereo audio output, not for the multi_channel audio output. Changing
the option you can use 34 keys to highlight items then press SELECT key to
enter the second level submenu. Refer to the illustration.
PCS 103 096 PCS 103 096
14 14
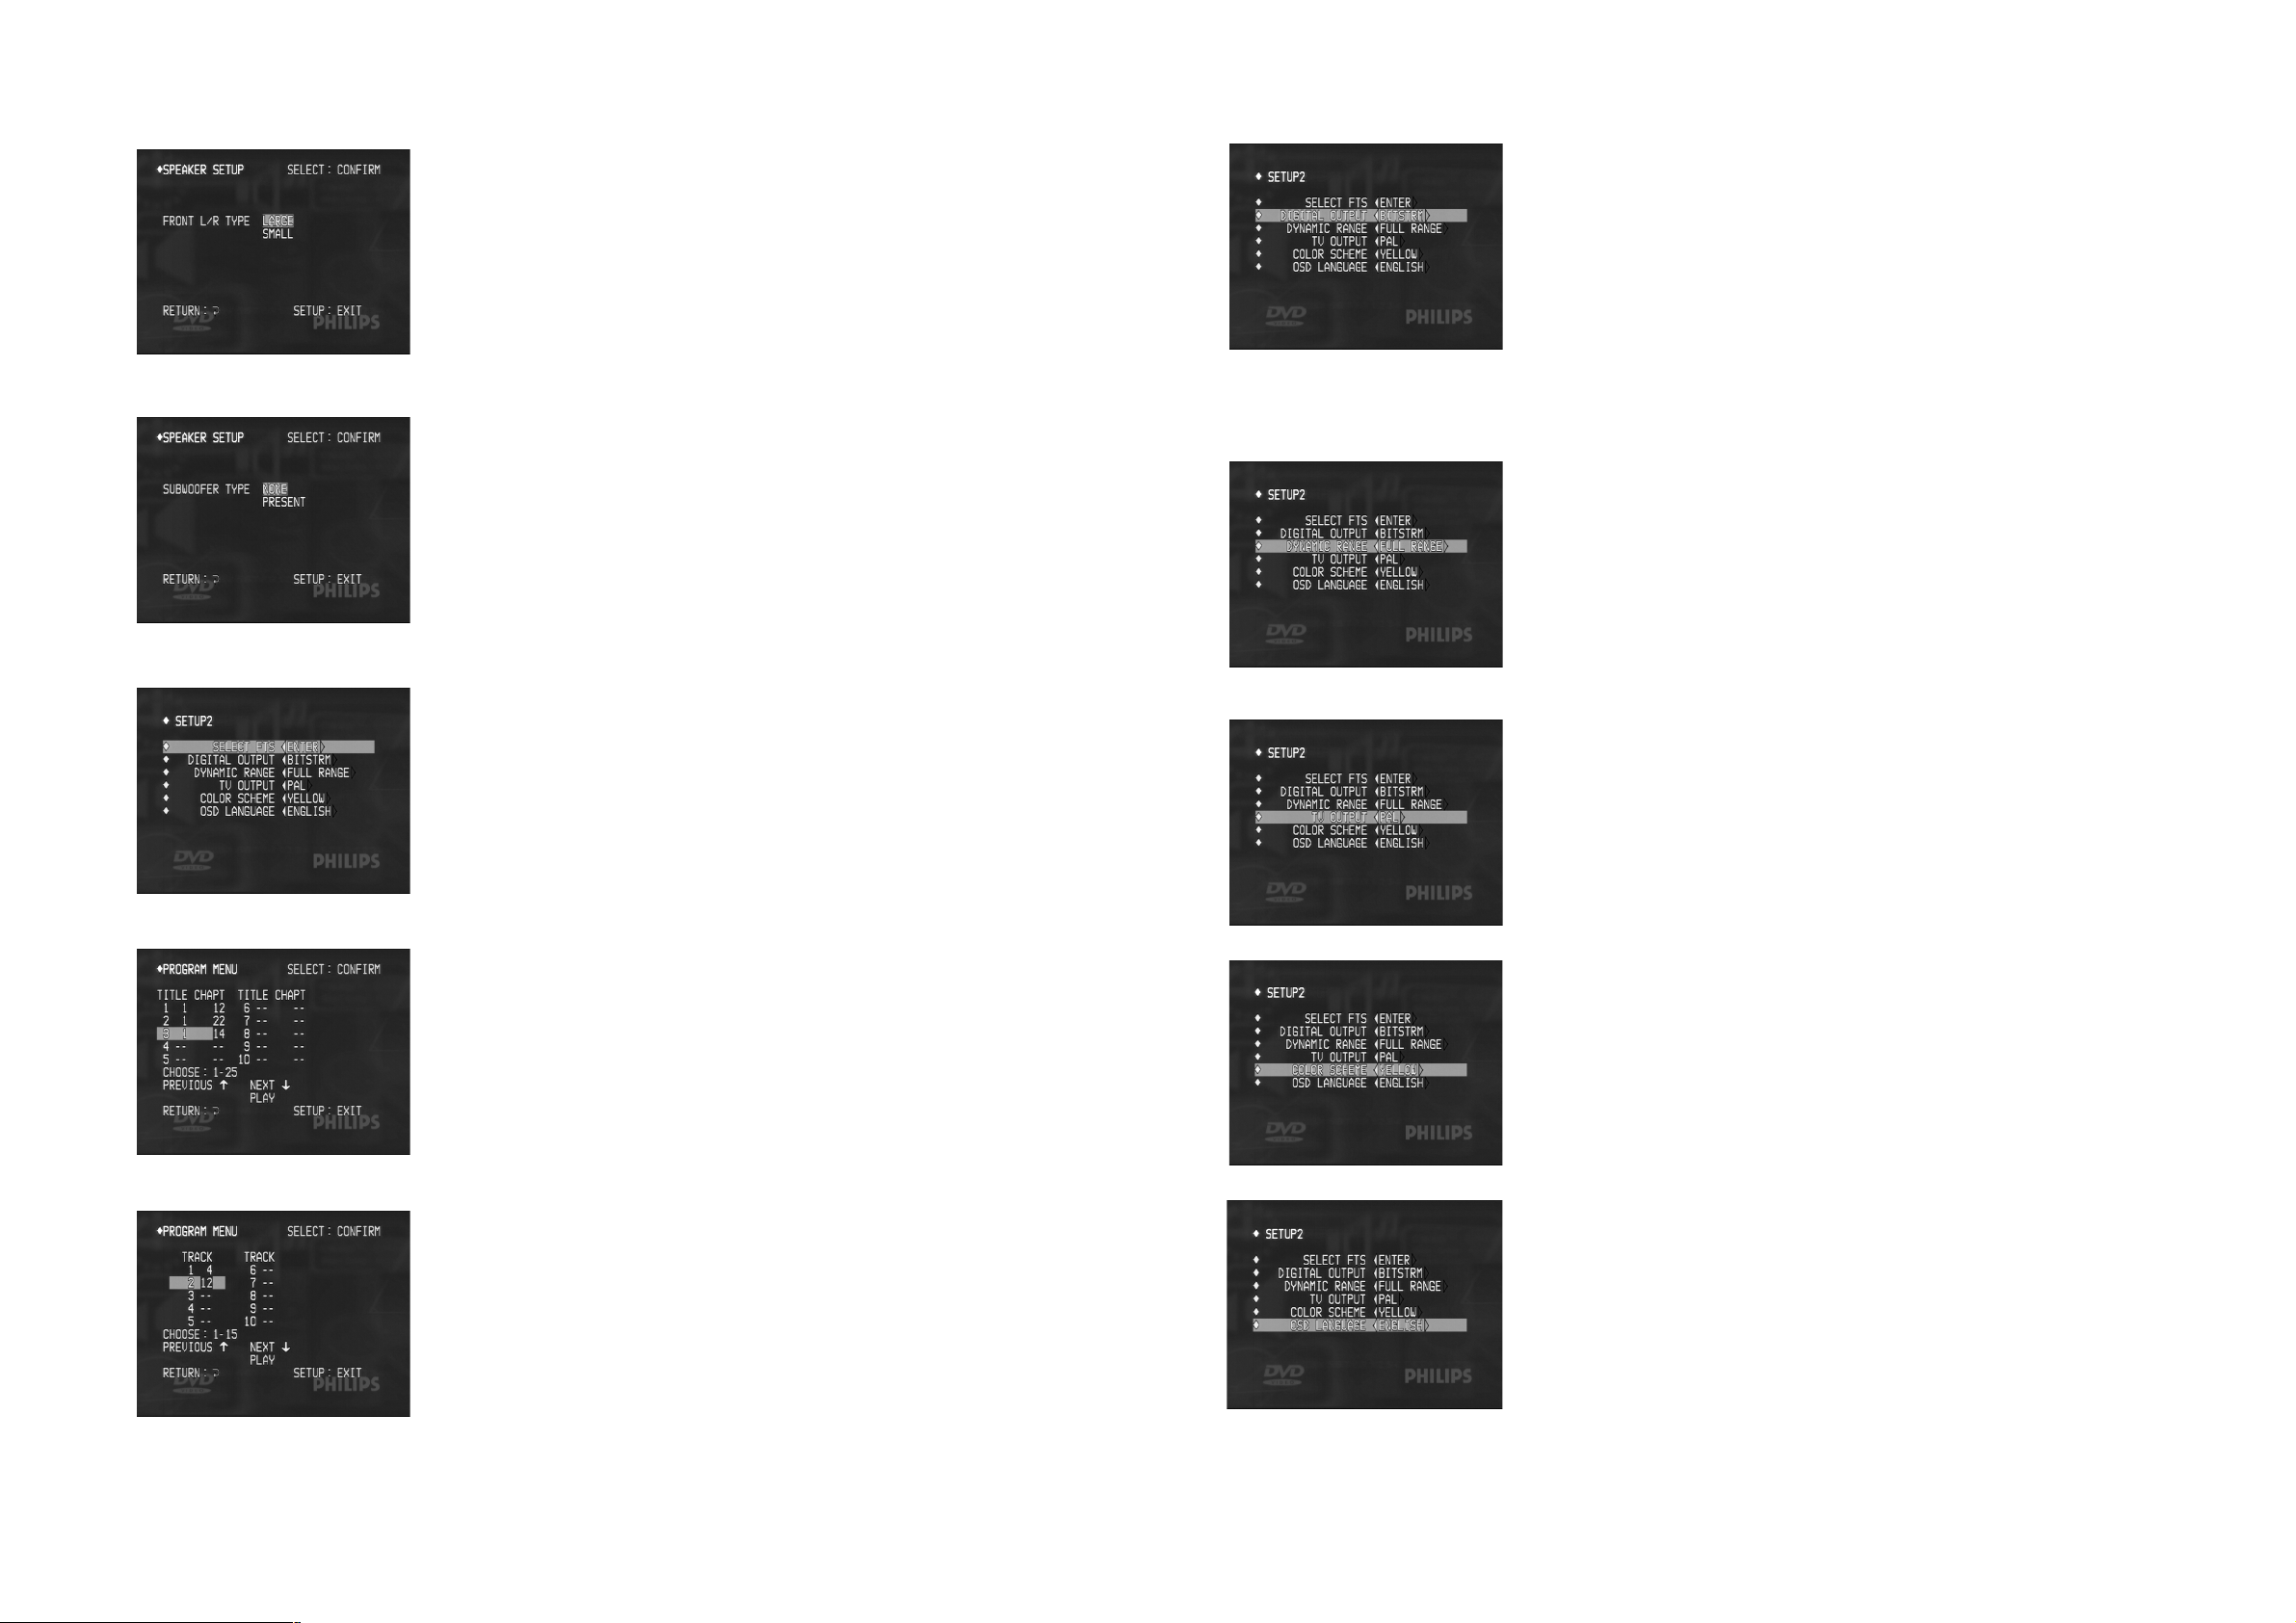
fig .1
Setup Menu
0 At second level submenu, you can simply use 34 key and SELECT key to change
and confirm options, use RETURN key to turn back to the main menu.
0 For a instance, set the front speaker. There are two options in the item, one is
LARGE, the other is SMALL. LARGE means the large speaker which can reproduce
the sound lower than 50Hz; small means the contrary, the speaker have no the
capability of reproducing bass. The option is set for the substitution of subwoofer,
if you don’t have subwoofer, the LARGE option makes the bass component output
from front speaker instead. Follow this way, you can set the items CENTER,
SURROUND and SUBWOOFER.
APPENDIX: Here are some useful information which can help you to setup speakers.
1. A standard DVD disc is recorded with multi_channel audio tracks, and these audio
channels cooperate reproducing the sound environment which is so called HOME
CINEMA. The center speaker is used to output dialogs in a movie. So if the item
CENTER TYPE is closed, you won’t hear the conversation of a movie.
2. Sound which comes from rear place is not as sensitive as it comes from front, so
it is enough to use small speaker for surround type.
3. People can’t distinguish the direction of low frequency sound, so you can furnish
the subwoofer in any place in the room.
FTS - Favorite Track Selection
0 FTS enables you to play a VCD or DVD karaoke disc in a certain order of tracks,
the maximum quantity can be 20 and every track can be stored several times.
0 You can set your FTS for a DVD karaoke disc following the steps below:
1. Use 34 keys to highlight item SELECT FTS then press SELECT key to enter
the submenu. ( Refer to fig .2)
2. In the submenu, you need to input titles and chapters you like. ( You can see the
hint on the screen which shows the range you can choose, if you enter a umber
which is out of the range, it won’t be accepted.)
3. Pressing the SELECT key on the remote control, input a number of title in the
highlighted line, then press SELECT key again. Now the cursor moves to the
chapter column. Input an available number of chapter, press SELECT key to
close setting this track.
4. Use 34 keys to move the cursor to next line, set another track in this way.
Pressing PLAY key to start playing FTS.
Setup Menu
Digital output
0 Audio output has two ways, they are digital audio output and analog audio output.
The digital audio output combines multi_channel analog audio output through an
optical cable or a coaxial cable, it can’t be reproduced directly to sound unless it is
analysised by a decoder circuit in the DVD player or a reciever.
0 Digital audio output has different format, one of them is bit-stream ( BITSTRM ),
it is for the Dolby Digital (also known as AC-3 or Dolby 5.1) decode; the other is
LPCM, it is for the Linear Palus Coder Modulate decoder.
0 After you verify your decoder instrument, you can setup the item by this way: Use
34 keys to highlight item DIGIT AL OUTPUT then use 12 keys to select a proper
option. Press SETUP key to save and quit the Setup Menu.
Dynamic range
0 Dynamic range is used to control original sound loudness of a movie automatically.
0 There are three options in the item:
1. FULL RANGE : Do not compress the dynamic range.
2. STANDARD TV : Compress the dynamic range for standard TV.
3. NIGHT TIME : Reduce the loud sound and increase faint soud, make it fit for
watching during night time.
NOTE: The D.R.C function compress only has effect on low frequency signal.
TV output
0 There are two major Television standards, one is PAL, it is popular in Asia; the
other is NTSC (National Television Systems Committee) which is popular in
America. Now most of TV can play with both of these two standards, but if your
TV is old fashioned, you should setup the item to make it fit your TV.
0 You can setup the item by this way: Use 34 keys to highlight item TV OUTPUT
then use 12 keys to select a proper option. Press SETUP key to save and quit the
Setup Menu.
Color scheme
0 You can choose the color of letters and icons as you like.
0 Setup the item by this way: Use 34 keys to highlight item COLOR SCHEME
then use 12 keys to select a proper option. Press SETUP key to save and quit the
Setup Menu.
0 VCD karaoke discs don’t have titles and chapters, only have tracks. So you need
only set the tracks.
fig .2
0 You can set your FTS for a DVD karaoke disc following the steps below:
1. Use 34 keys to highlight item SELECT FTS then press SELECT key to enter
the submenu. ( Refer to fig .3)
2. In the submenu, you need to input the number of your favorite tracks. ( Also see
the hint on the screen which shows the range you can choose, if you enter a
umber which is out of the range, it won’t be accepted.)
OSD language
0 You can change the On-Screen Display language.
0 Setup the item by this way: Use 34 keys to highlight item OSD LANGUAGE
then use 12 keys to select a proper option. Press SETUP key to save and quit the
Setup Menu.
3. Press SELECT key on the remote control, input an available nomber of tracks in
the highlighted line then press the SELECT key again to confirm it.
4. Use 34 keys to move the cursor to next line, set another track in this way.
Pressing PLAY key to start playing FTS.
fig .3
PCS 103 097 PCS 103 097
15 15
 Loading...