

Philips DCP750, DPC850 User Manual

Connecting and
using your iPod
player
1 Pull out the iPod
connector.
2 Dock your iPod player
with the top
entering first as
sho
wn.
3 Push in the iPod
connector.
This portable DVD player is designed with
a built-in lithium battery to supply power
to the player when you are on travel.
1 Slide the POWER switch to the OFF
position (charging of the DVD player only
possible in the power-off mode).
2 Connect the supplied power adaptor cord
(or the car adaptor) to the player and AC
mains (or the car cigarette lighter outlet)
to start charging.
➜ The CHG indicator turns green.
➜ When the battery is fully charged, the
indicator turns off.
3 Disconnect the power adaptor cord (or
the car adaptor) when the CHG indicator
turns off.
Notes:
– You can also connect the supplied power
adaptor cord (or the car adaptor) to the player
and AC mains (or the car cigarette lighter outlet)
directly wherever possible.
Charge your battery
1
Quick start guide
Docking Entertainment System
DVD Portable with dock for iPod
3 OPEN HERE
DCP750/850
Prepare your remote
control
2
Remove the protective plastic
tab (first time users only).
➜ Your remote control is
now ready for use.
1
SO
UR
CE
4 Switch on your iPod player and set:
1) "TV Out" to "On";
2) "TV Signal" to "NTSC";
3) "Widescreen" to "Off".
(See your iPod user’s manual for details.)
3
Enjoy (iPod with video)
Notes:
– This DVD player only supports 30G, 60G and
80G iPod player with video.
– Please take out the tab marked “for 30G iPod” in
the dock if you want to dock a 60G or 80G iPod
player.
– You need to press 2; on your iPod player in
order to start photo playback through this DVD
player.
VIDEO
2
5 Press the SOURCE key
repeatedly (or iPod on the
remote) for dock input.
6 Play files in your iPod player.
● To r echarge your iPod player, you
must connect your DVD player to AC mains (or
the car cigarette lighter outlet) and ensure:
Your DVD player is in the power-off mode.
OR
The DVD player is in the power-on mode and
the current source is “iPod”.
To r emove the iPod player
1 Pull out the iPod connector.
2 Lift up the handle marked 2 / EJECT to
5
SOURCE
2
1
CHGCHG
Music
Photos
Videos
Extras
Settings
Shuffle Songs
iPod
Video Playlists
Movies
Music Videos
Video Podcasts
Video Settings
Videos
TV Out On
TV Signal NTSC
Widescreen Off
Settings
REMOVE
3
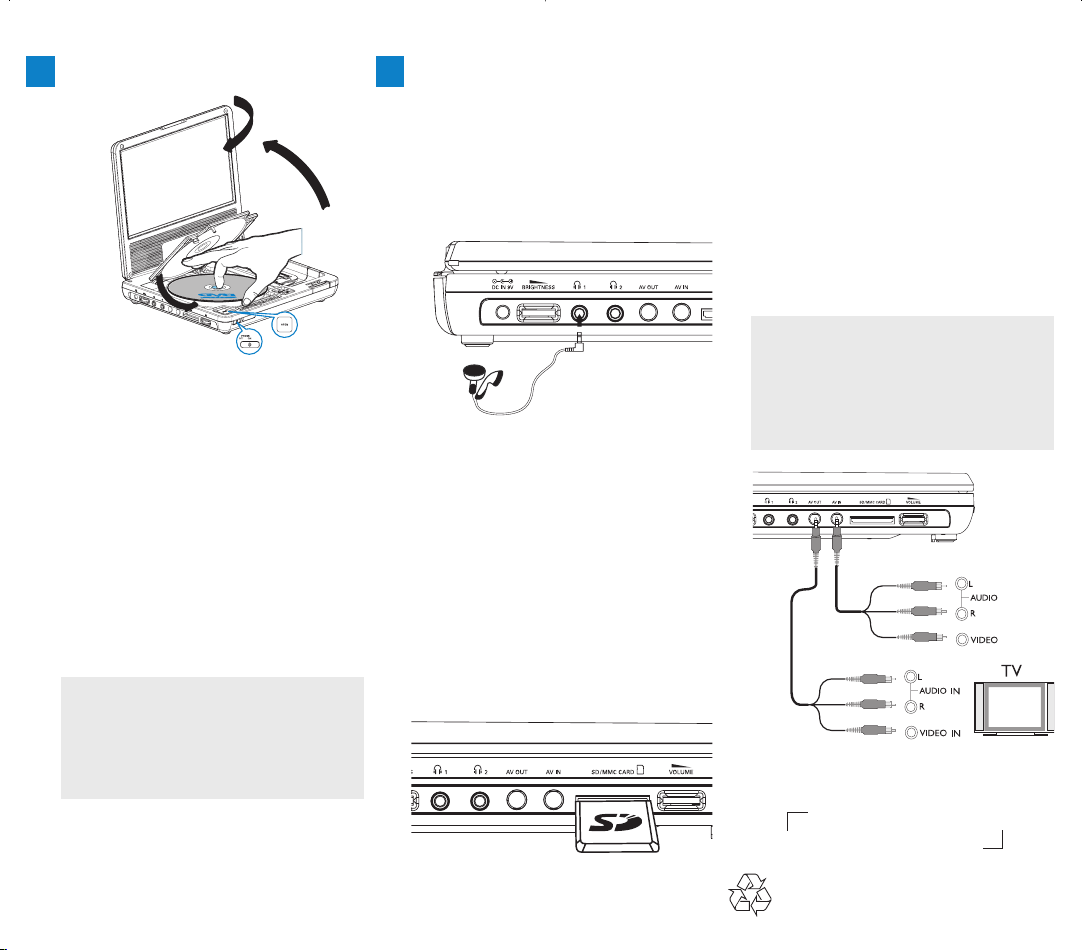
Connecting headphones (not
included)
● To enjoy your portable DVD player
without disturbing others, you can connect
one or more headphones to the n1 or
(and) n 2 jack on the set.
Connecting an SD/MMC card
1 Insert an SD/MMC card into the
SD/MMC CARD slot with the metal
contact facing down.
2 On the DVD player panel, press the
source key repeatedly (or SD/MMC
CARD on the remote) to select the
SD/MMC source.
3 Play video or audio files stored in the card
by selecting the desired file with 3 4 and
OK.
Connecting additional equipment
(TV for example)
1 Connect the AV OUT socket on the set to
the video and audio sockets on a TV as
shown directly.
2 Switch on the TV and set to the correct
video-in channel.
➜ You can consult the owner's manual of
your TV. (If your TV does not have Audio
and Video inputs, you will need to
purchase a RF modulator. Please consult
your dealer.)
Note:
– When connecting a device to the AV IN socket
on the DVD player, you need to press the source
key repeatedly on the front panel (or AV on the
remote) to select AV IN (AUX).
AV OUT
AV I N
Headphone
SD/MMC
OR
Printed in China WK652
1 Open the lid of the player and adjust the
swivel screen clockwise to your preferred
viewing angle.
2 Slide the POWER switch to ON to
switch on the DVD player.
➜ The POWER indicator turns on.
3 Press OPEN to open the disc door.
4 Remove the protective card (if any) and
load a disc with the label side facing up.
5 Close the disc door. Playback will start
automatically. If not, press 2;.
6 To stop playback, press 9 on the remote
control.
3
Enjoy (Disc operation)
3
Enjoy (Other options)
Note:
– Once the battery is running low (the power
indicator will flash as a prior warning),
immediately recharge it (regardless of whether
you plan to use the battery or not) in order to
maximize the battery life.
Max.180
4
5
2
0
1
3
White
Red
Yellow
White
Red
Yellow
OUT
OUT
 Loading...