

Page 1
@J)
©
=0
©
a
D
a
C
a
cc
0
0
I
0
S
h
iae
3;
Page 2
Page 3
Fod
out
this
page
Index
Bobbrn
Bobbin
Bobbin
case
thread
Buttonholing
Carrying
case
Cleanrng
feed
Dual
Electrical
Foot
Foot
Light
Machine
Master
connection
control
control
bulb
feed
selector
Needle
Needle
position
Oiling
Ornamental
Overlock
Presser
Reverse
Sewing
Sewing
seam
bar
sewing
feet
mechanism
Slot-threading
Special
Special
Stitch
Straight
Thread
Thread
Trouble
Upper
accessories
sewing
program
stitch
cutter
tensions
shooting
threading
Utility-stitch
stitches
Utility
Winding
support
Work
Zigzag
stitch
.
cover
receptacle
dial
stitches
lifter
feet
chart
combinations
Page
.3,4
5
3,
7
21
20,
1
23
10
2
2
1
23
9
8
3
1
9
23
5
1
19
18,
10
9
1
6
1
2,
3
6
22
1
7
26-30
8
7
11
24,
25
6
1
6
14
3,
1
4
5
8
-
-_
-
--
j
Page 4
Parts
of
your
1
Take-up
2
Thread
3
Eraser
4
Top
5
Spool pins
Pattern
6
7
Pattern
8
Bobbin
9
Balance
knob
10
Master
11
Needle
12Buttonhole
13Master
1
4
Baseofportable
1
5
Bed
1
6
Sewing
1
7
Sewing
1
8
Needle
1
9
Needle
20
Upper
21
Control
dropping
22
Presser
machine
23
Top
cutter
24
Needle
25
Needle
26
Free
27
Free
sewing
button
cover
selector
position
switch
cover
threader
threader
tension
feeding
holder
plate
arm
arm
sewing
ever
retainer stud
lid
start
selector
length
winder
foot
foot
for
bar
hook)
wheel
control
reverse
the
arm)
cover
selector
with
holder
feed
lifter
foot
with
with
dial
knob
machines
control
(on
with
(enclosing
machine
wheel
stop
sewing
dog
back
screw
guide
wheel
motion
thread
grooves
and
of
4
Some
safety
1,
Be
careful
fingers
needle.
2.
cord
change
or
oil
interrupt
machine
3.Besuretouse
bulb
IMPORTANTl
Valid
The
coloured
following
Brown:
As
mains
correspond
markings
your
The
must
which
coloured
The
must
which
coloured
Please
When
3-ampere
Make
plug
needle
the
in
wires
the
plug,
wire
be
wire
be
is
a
will
sure
whenever
needle,
plate,
machine,
sewing
forawhile,
the
for
in
code:
Live.
colours
lead
identifying
which
connected
is
marked
black.
which
connected
marked
red,
note:
13-ampere
fuse
rules
when
not
be
you
sewing
when
or
and
only
sewing
United
in
this
accordance
Blue:
of
of
this
with
the
proceed
is
with
is
with
has
sewing
injured
pull
out
you
want
foot,
you
when
you
leave
a
15-watt
lamp.
Kingdom
mains
lead
with
Neutral,
the
wires
appliance
coloured
the
terminals
as
follows:
coloured
to
the
the
coloured
to
the
the
plugisused
to
be
fitted.
that
by
the
the
power
to
bobbin
clean
have
the
are
the
in
may
blue
terminal
letter
brown
terminal
letter
your
and
light
only
the
N
L
a
to
not
in
or
or
Page 5
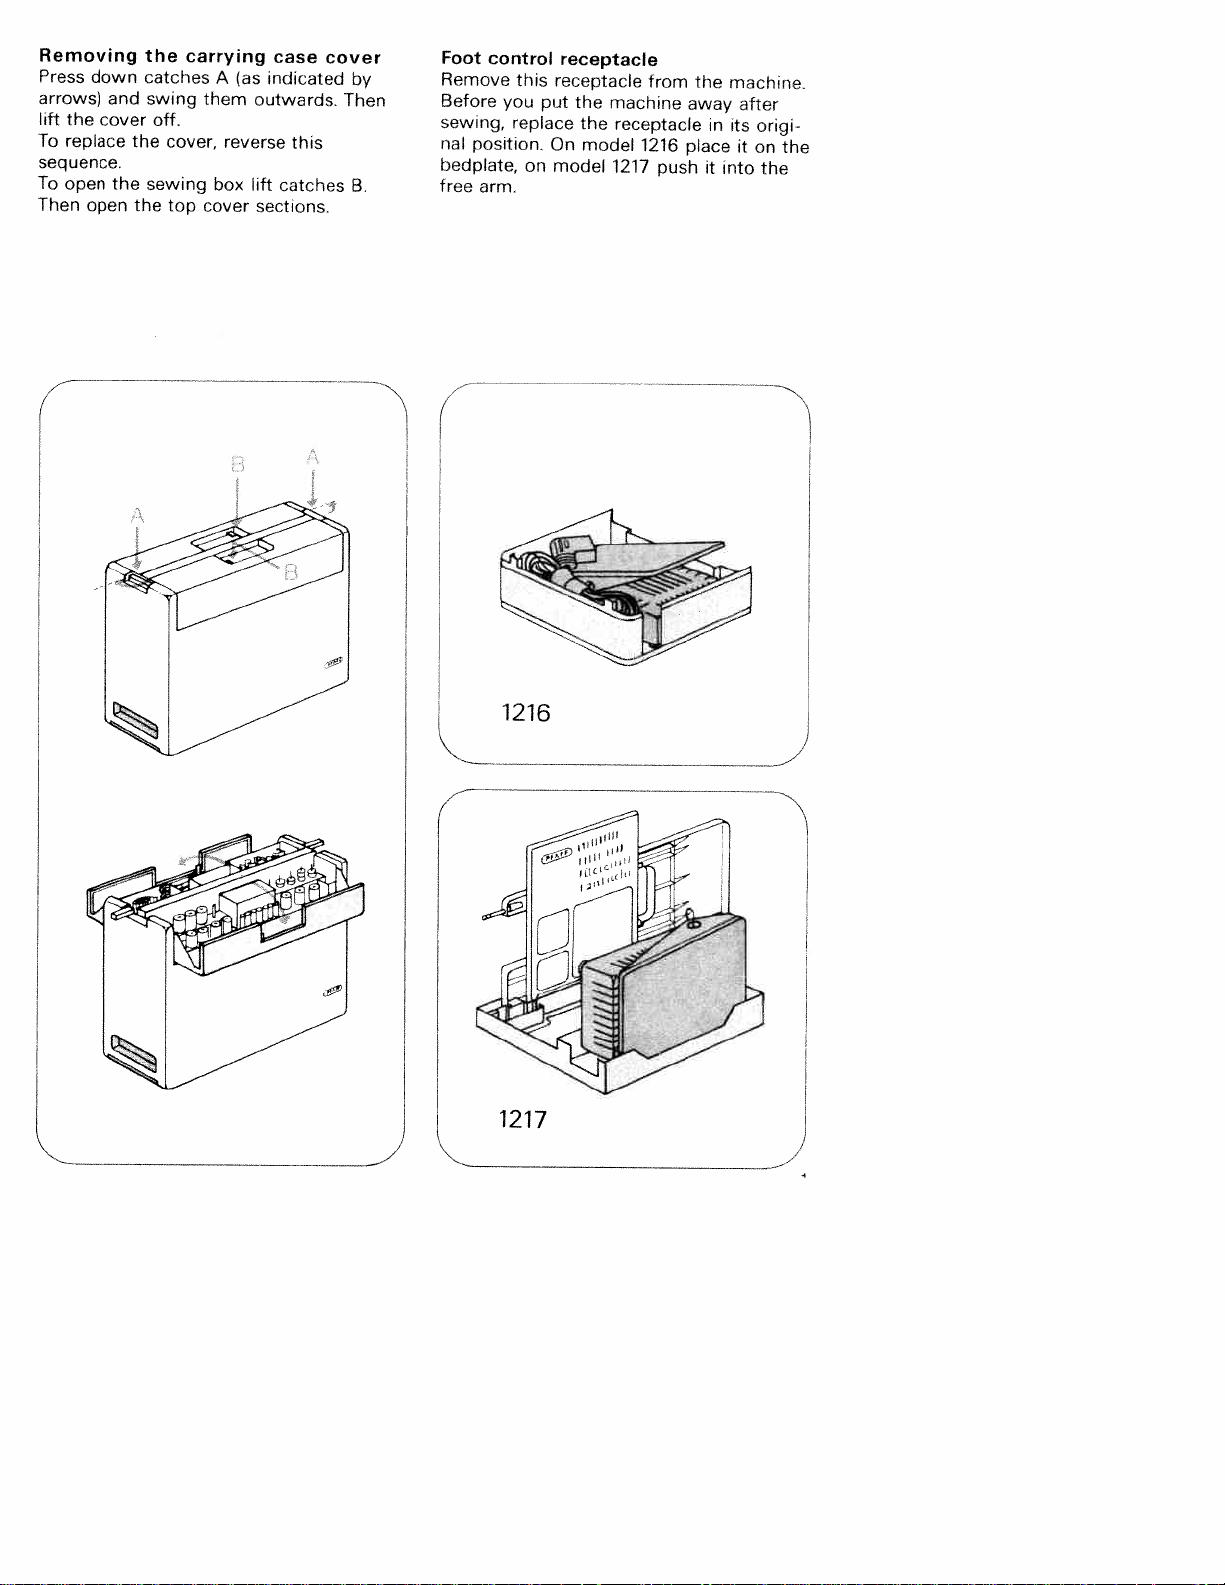
Removing
Press
down
arrows)
lift
the
To
replace
sequence.
To
open
Then
open
and
cover
the
the
catches
swing
off.
the
sewing
the
carrying
cover,
top
A
them
reverse
box
cover
indicated
(as
outwards.
lift
sections.
case
this
catches
cover
Then
by
B.
Foot
Remove
Before
sewing,
nal
position.
bedplate,
free
arm.
control
this
you
replace
on
put
On
model
receptacle
receptacle
the
machine
the
model
1217
from
receptacle
1216
push
the
away
place
it
machine.
in
its
it
into
after
origi
on
the
the
1216
1217
Page 6
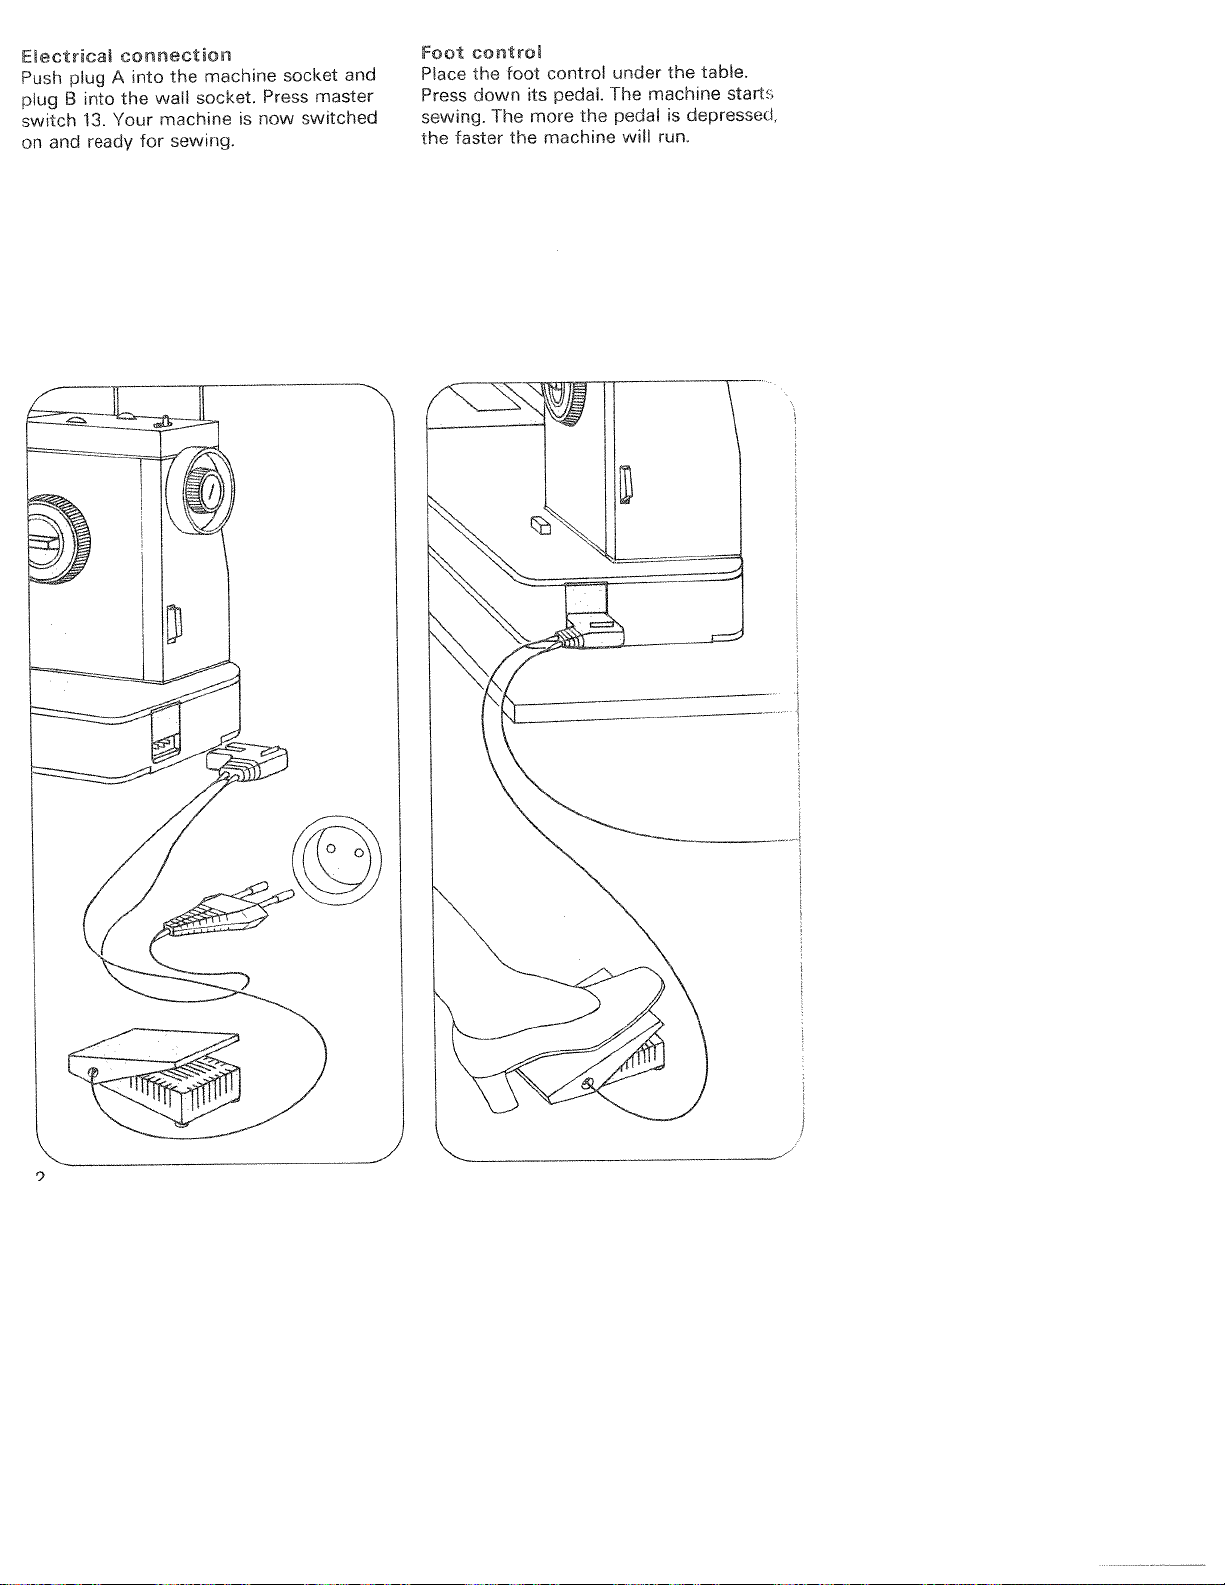
EIectrica
plug
Push
B
plug
switch
and
on
into
13.
ready
A
Your
connection
the
into
wall
the
machine
sewing.
for
machine
socket.
contre
Foot
The
Foot
the
control
pedal.
its
more
machine
the
the
socket
Press
now
is
and
master
switched
Place
Press
sewing.
faster
the
down
under
The
pedal
vvill
the
machine
depressed,
is
run.
table.
starts
Page 7
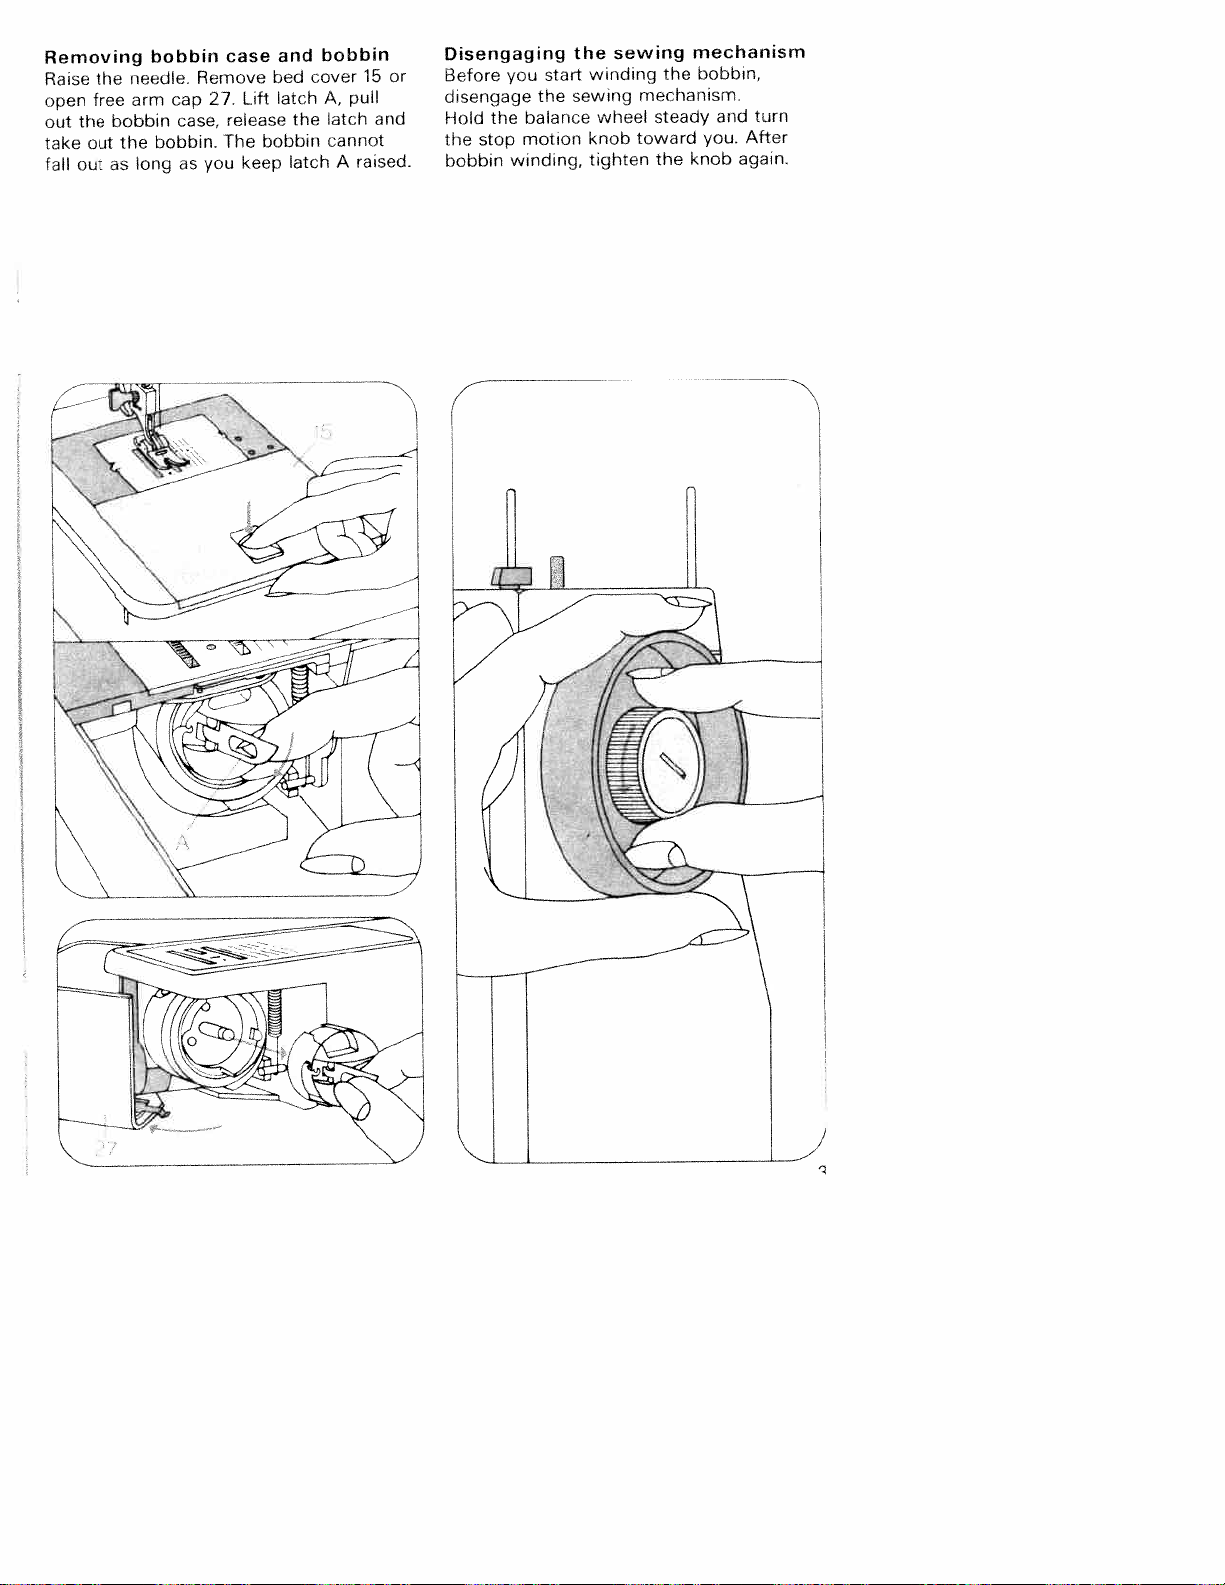
Removing
Raise
the
free
open
out
the
take
out
out
fall
needle.
arm
bobbin
the
long
as
bobbin
cap
case,
bobbin.
as
case
Remove
Lift
27.
release
The
keep
you
and
bed
larch
the
bobbin
latch
bobbin
cover
A,
latch
cannot
A
15
pull
raised.
arid
or
Disengaging
Before
disengage
Hold
the
bobbin
the
stop
you
motion
winding,
start
the
balance
the
winding
sewing
wheel
knob
tighten
sewing
mechanism.
steady
toward
the
mechanism
bobbin,
the
you.
knob
and
turn
After
again.
Page 8

Bobbin
Raise
pins5.Disengage
mechanism.
discAand
spool
pins.
retainer
a
Push
the
end
The
is
er
the
the
stud2,winditaround
few
times,
ever8against
bobbin
at
the
bobbin
full.Ifyou
earlier,
bobbin and
sewing
winding
Placeabobbin
a
spool
Pass
the
indicated
as
winder
beginning.
winder
wanttostop
pull
lever8forwards,
cut
mechanism.
the
sewing
on
of
thread
and
stops
the
thread
the
on
around
the
by
bobbintostart
hold
the
when
the
bobbin
thread. Re-engage
magnetic
oneofthe
thread
the
bobbin
arrow.
thread
the
bobbin
wind
Remove
Inserting
Insert
case
so
back
(A>.
under
and
the
the
filled
that
Then
the
bobbin
bobbin
the thread
draw
spring
the
into
into
unreels
thread
eye
the
bobbin
toward
into
C.
slot
the
B
Page 9
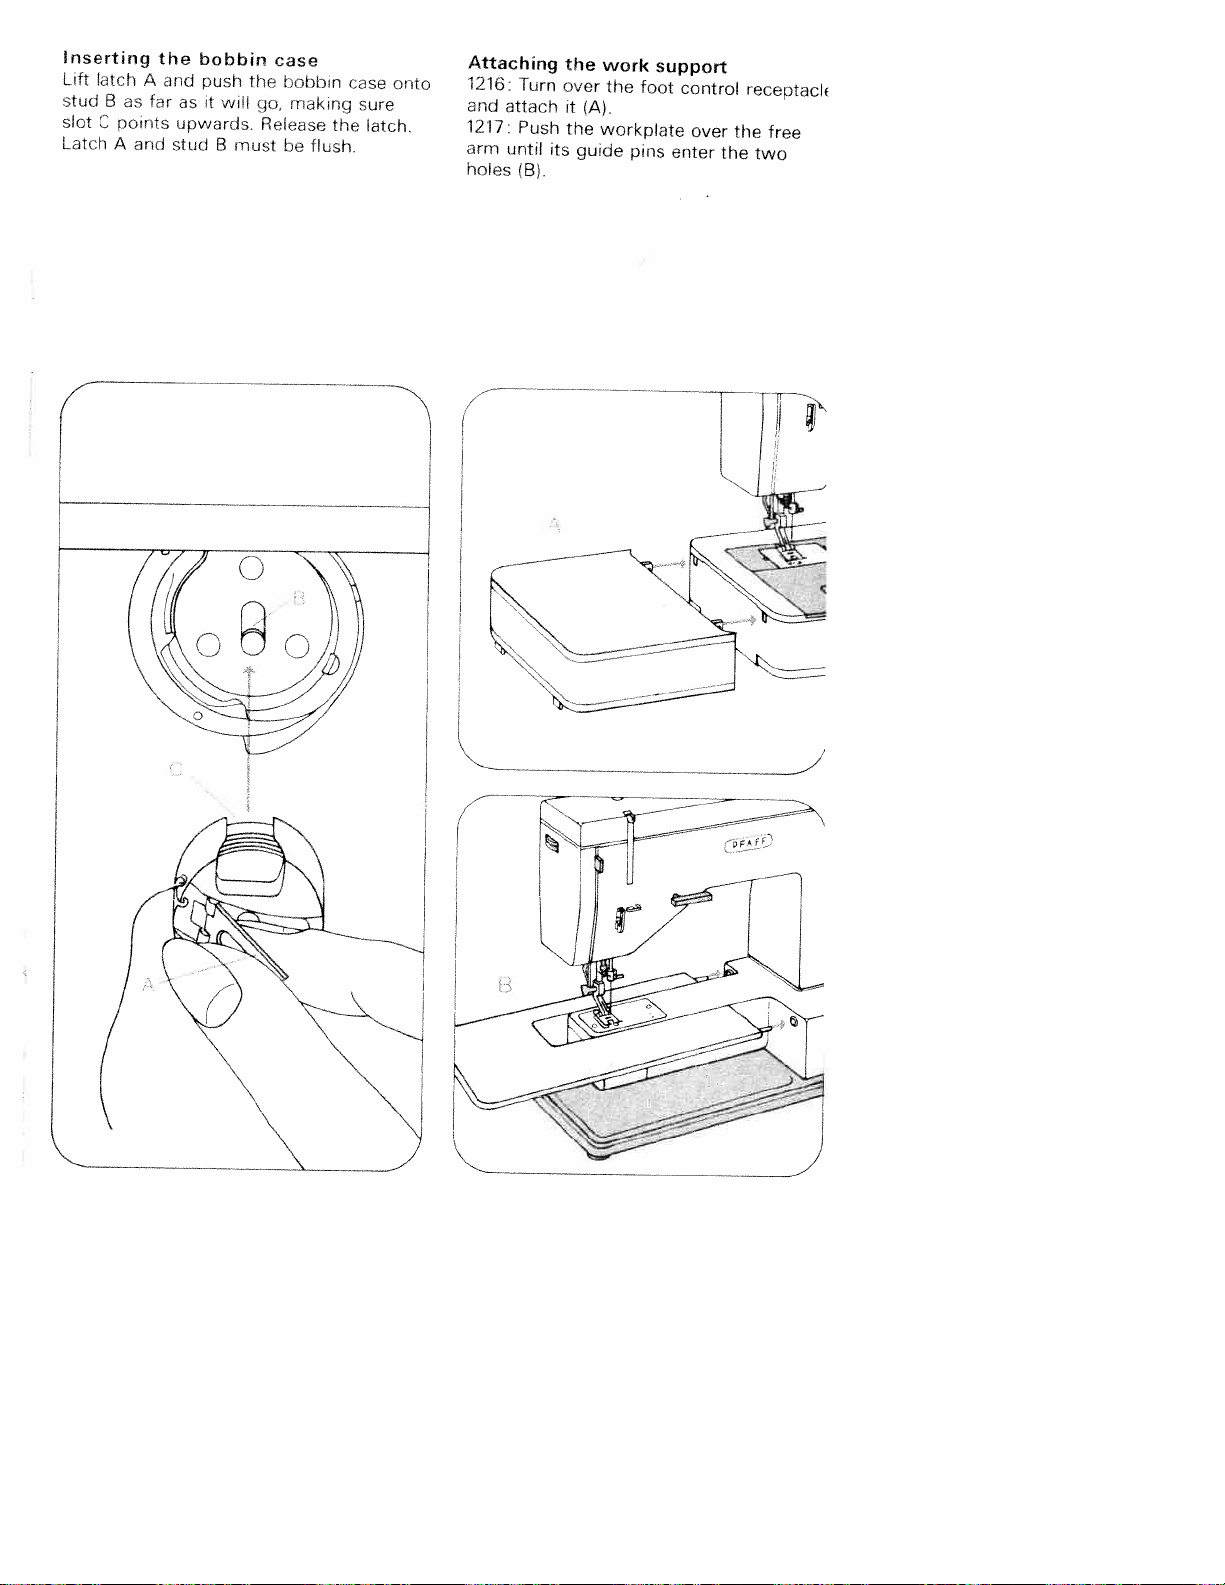
inserting
Lift
latch
stud
Bastar
slot
C
Latch
points
A
and
the
A
bobbin
and
push
as
upwards.
stud
case
the
bobbin
t
will
go,
Release
B
must
be
making
flush.
the
case
sure
onto
latch.
Attaching
1216:
Turn
and
attach
1217:
Push
arm
until
holes
(B).
its
the
over
t
the
guide
work
the
(A).
workplate
foot
pins
support
control
over
enter
receptack
the
the
free
two
Page 10
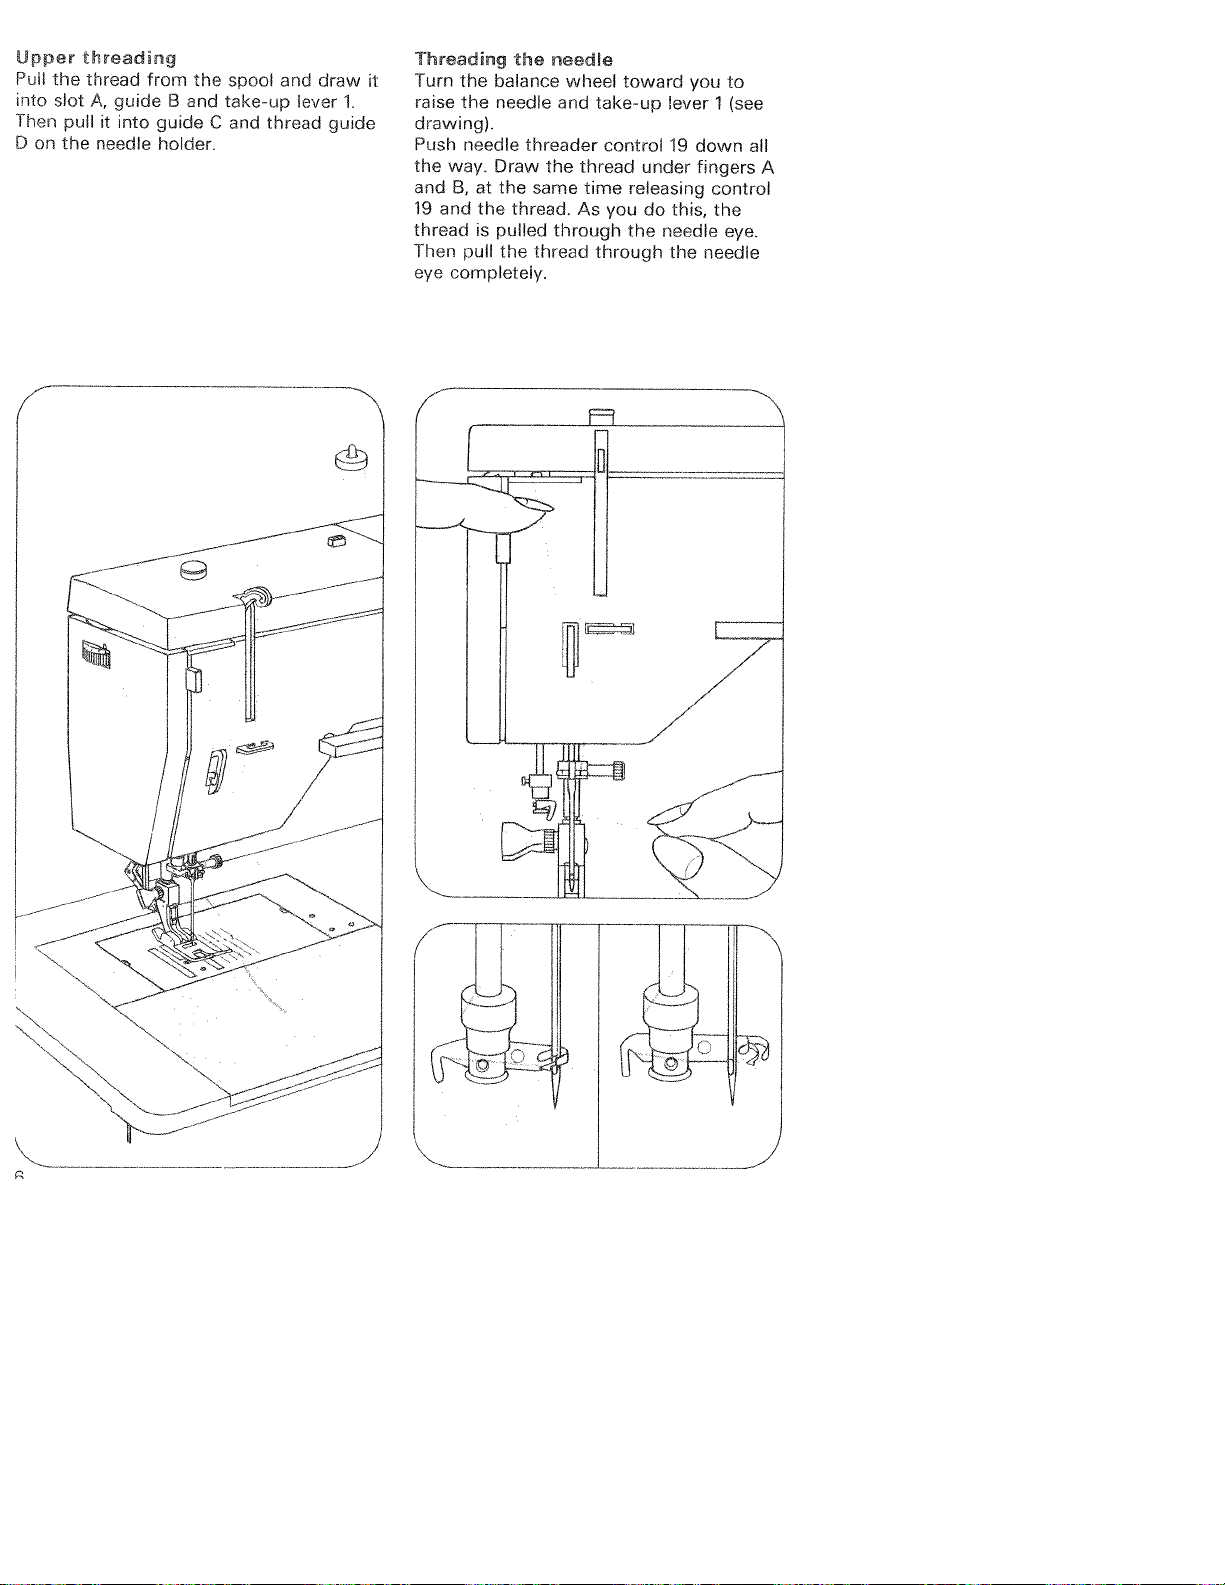
Upper
Pull
into
Then
D
on
the
slot
pull
the
threading
thread
A,
guide
it
into
needle
from
the
B
and
guideCand
holder,
spool and
take-up
thread
lever
draw
guide
Threadhig
Turn
it
1,
raise
the
the
the
balance
needle
neede
wheel
and
toward
take-up
you
lever
to
1
(see
drawing)
Push
needle
the
way.
and
8,
19
and
threadispulled
Then
pull
completely.
eye
Draw
at
the
the
thread.
the thread
threader
the
same
through
control
thread
time
releasing
As
youdothis,
the
through
under
needle
the
19
down
fingers
control
the
eye.
needle
all
A
Page 11
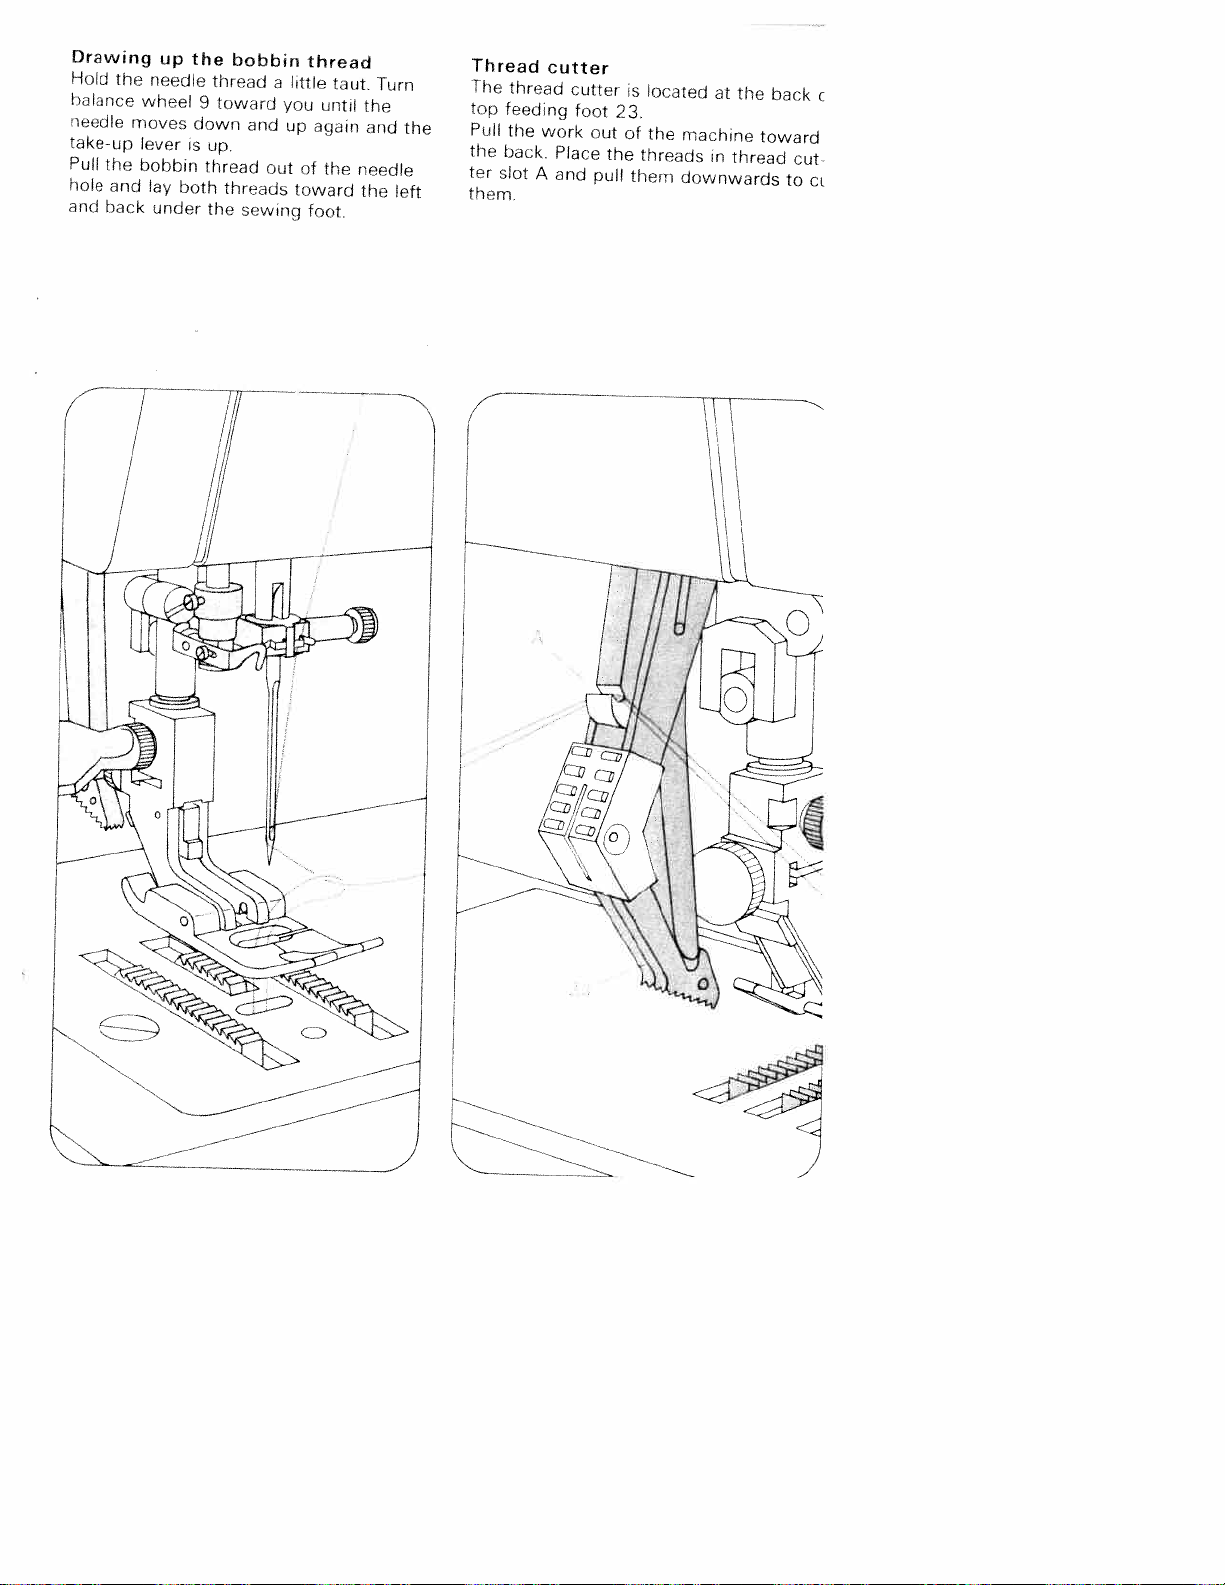
Drawing
Hold
balance
needle
takeup
Pull
the
hole
and
and
hack
the
needle
wheel
moves
lever
bobbin
lay
under
up
the
down
is
both
thread
toward
9
up.
thread
the
bobbin
and
threads
sewing
out
a
you
up
thread
little
aqain
of
toward
toot.
taut.
until
the
Turn
the
and
needle
the
left
the
Thread
The
top
Pull
the
ter
slot
them.
thread
feeding
the
work
back.
A
cutter
cutter
Place
and
foot
out
pull
the
is
23.
of
located
the
threads
them
at
the
machine
n
thread
downwards
hack
toward
cut
to
c
ci
Page 12

Master
Turn
the
straight
above
ed
Straight
Straight
from
0
selector
outer
zigzag
or
mark
stitch
stitches
or
4.
ring
A.
dial
stitch
are
until
located
(10)
the
desired
symbol
is
in
the
of
position
range
the
Zigzag
Setting
Zigzag
stitch
mark
stitches
=
marked5,6,7,8
range,
the
increasingly
5along,
the
left,
stitches
narrow
this
toward
become
and
made.
A
are
the
sewn
and
zigzag
9.
are
longer.
zigzag
in
the
At
the
close
stitches
In
ranges
stitch
ranges
right
together;
is
of
4
---------------
--------
Page 13

Needle
The
tions
Turn
needle
below
CED
CZD:
(EEC
needle
in
knob
position
mark
=
=
D
position
can
the
needle
11
A.
Central
Right
Left
until
desired
(normal)
needle
needle
be
set
hole.
the
position
position
to
different
symbol
is
positioned
needle
of
position
the
posi
Reverse
the
feed
Reverse-feed
positions:
A
=
Normal
B
=
As
the
backtacking
C
=
Vertical
permanently
D
=
The
(for
sewing
and
dog
control
position
long
a-s
machine
feed
embroidering,
the
sews
the
position.
in
dog
21
control
end
reverse.
is
dropped
dropping
has
the
is
backwards
of
a
The
machine
darning,
fol(owin
pressed,
(for
seam(.
etc
se
I.
c
D
4
4
7-
/
VI
Page 14

Presser
Lever
A
=
B
=
bar
has
22
Sewing
remove
wheel
needle
The
sewing.
lifter
two
footisraised.
the
toward
and
sewing
positions:
(Before
turn
to
the
raise
lever
work,
you
take-up
footislowered
balance
the
1.)
for
you
feed
Dual
(Synchronized
This
feed
mechanism prevents
from
creeping
Before
feed,
To
down
To
down
swing
you
raise
engage:
until
disengage:
slightly,
up.
the
top
ahead
engage
sewing
Push
it
snaps
Push
then
and
bottom
of
the
or
disengage the
foot,
top feeding
into
place.
the
top
back
pull
it
feed)
one
other.
foot
feeding
and
23
ply
foot
let
dual
it
Page 15

Upper
A
Lower
B
C
=
D
=
E
=
4
=
Setting
setting
range
on
ber,
=
Regulating
looser
tension.
Correct
Upper
tension
Lower
tension
tension
the
the
tension
(20)
mark.
is
in
between
work.
tighter
tension,
thread
tension
too
tension
too
The
the
3
The
the
screw.
or
tension.
too
tight.
too
tight.
normal
light-coloured
and
higher
Turn
right
loose
loose
5,
tension.
it
for
or
or
tension
depending
the
left
a
num
for
tighter
lower
upper
The
correct
Let
the
hang
down
not
slTde
should
you
Once
a
rectly,
gradually
jerk
the
adjust
bobbin
down
your
lower
‘ower
freely
hand
the
case
by
by
its
move
tension
upper
tension
with
the
own
downwards
upwards
has
tension
full
a
thread.
weight,
lightly.
been
bobbin
It
must
but
set
only.
wher
cor
4
4
/
\_\
1
I
4
)
Page 16

oj
4i
4004
4004
uonq
)jW
eq
sseid
osoJ
v
°n
puq
OS
6u!Ms
6LH6UeLI3
aq
uet
Spfl1S
JflS
puo
epoq
JMo1
ws
4L4
ooJ
sute6e
6uiMes
poq
9q4
ew
spns
soop
MeJDS
6U1M9S
DUIMOS
J04U9
4oo4
UI
41
UI
414
ou
a
OO4
404
6uiqou
P
S40S
pun
iessud
uoiisOdi
Ajipi
DPd
a
sos
qsnd
D
0q4
iq
D
cieus
6uiMes
44!”
ie14I
ii
ut
pw
ooj
6uiMes
inoA
pu
6uas
‘wjd
apnb
j
MJDS
JO
pesn
9J
6uqDeijr
pu
o6pe
u
Page 17

Changing
Raise
the
needle,
needle
new
System
flat
side
back)
and
er
as
far
needle
loosen
out
of
as
the
of
its
push
it
will
needle
bar.
screw
the
needle
130/705
shank
it
up
go.
Then
A
and
holder.
H
needle
facing
into
the
Tighten
hold
pull
toward
needle
screw
the
the
Insert
)with
the
hold
A.
the
Utility
Open
A
a
B
C
D
E
3
stitches
top
Elastic
Blindstitch
Elastic
triple
Overlock
Cross
stitch
Eraser
button
buttons,
cover
stitch
stitch
lid
4.
straight
for
stitch
releasing
pressed
Page 18

_±
___
UtiHty-stitch
The
setting
required
is
which
indicated
is
stitch
ton.
Setting:
Press
=
A
Turn
=
B
stitches
All
the
in
listed
26-30.
This
applications.
of
the
the
and
setting
master
master
stitch
chart
for
on
button
stitch
program
also
selector
specific
a
respective
the
selector
combinations
chart
contains
dial
utility
dial
possible
10/11
but
on
are
pages
Utiity-stitch
Pushing
new
duces
Honeycomb
I
Setting:
left
4,
Pullover
H
Setting:
left
4,
utility-stitch
For
conjunction
button
wheel
(see
buttons
two
utility-stitch
buttons
needle
stitch
buttons
needle
turn
J
to
6
page>.
next
combinations
simultaneously
patterns.
stitch
+
A
position.
B+C,
position.
combinations
ornamental-stitch
with
pattern
start-of-pattern
the
C,
start
straight
straight
selector
pro
stitch
stitch
to
A
symbol
in
E
0-2
/\
/‘
6
TO-2
jEED’
f\1
“I
H-
Page 19

Ornamental
Buttons
(They
are
The
pattern
ing
wheel
(When
mental
Wheel
beginning
drawing.)
Letters
Variations
by
right
1
turned
stitches
6
K
setting
position.
H
F
to
set
7
serves
of
and
of
the
stitches
J
as
length
in
the
to
the
L
the
needle
show
utility
can
range
symbol-
are
to
pattern.
denote
pattern
set
ornamental
stitches).
be
varied
from
o:;the
disengaged)
the
machine
(For
the
setting
can
at
its
left,
by
10
to
setting
be
central
stitches.
turn
18.
orna
at
see
marks.
obtained
the
or
The
following
pattern
OZsfl1D
Ornamentalstitch
Pushing
neously
patterns
pages
<>
<1Ii
UIUI
start
Beginning
One
Half
Beginning
sewing
Three
two
produces
(see
26-30).
symbols
selector
quarter
the
quarters
or
three
stitch
are
wheel:
of
pattern
of
pattern
of
small
ornamental
combinations
buttons
new
ornamental-stitch
program
used
pattern
of
pattern
chart
on
square
stitch
simulta
the
wF
H
on
HE
HZi
lI
iF
—
L
Page 20

6NES
0
=
=
7
J
JO—I
us
oj
UUON
s
eioecfs
oopetrj
eq
&
peso
P9W)S
ioj
MAJBj
suonnq
peso
‘auo
6U!MCS
6uas
buiMes
:oo
UCWUJO
:oo4
TUiW
31fl
6u!qs!u!4
:Tool
sqof
ool
ie6o
buifABS
qt
es)
)jDOjJ&AO
so6pe
6uuinbi
pu
s15&d
TOOT
ou
8L
Si
6uiMes
PJ
E
-
9
-pojJefo
(6L
A1epi
eqj
=
=
=
=
ueq
do
ispuq
TooJeddZ
OJOUUOi1fl
6uiuie
6uipee
buimes
eej
ooj
oo
‘0
TOOl
OOJ
uD
pu
eq
E
pesn
ei
po6eI5ue
‘V
7-
Page 21

Special
Zipper
Attach
Set
the
the
workpiece
foot
per
right
the
illustration:
Top
needle
moves
Bottom
position,
edge
needle
The
is
used
sewing
(and
the
needle
moves
or
left
in
along
illustration:
needle
of
foot
for
edge
offsettothe
foot
position
so
along
left,
Foot
position
zipper
moves
hole
inserting
feet
stitching)
accordingly.
the
that
the
respectively.
in
left-edge
Left
chain.
in
Foot
in
right
position.
along
in
the
middle
zippers
foot
rightorleft.
of
edge
zipper
edge
right-edge
zipper
of
concealed
Guide
the
chain
position.
of
foot
Right
chain.
foot
the
zip
on
so
to
resemble
as
the
attach
set
zipper
the
Top
foot
material
position
position
Bottom illustration: Push
over
holder
stud
needleinits
the
chain
sole
of
illustration:
is
used
along
is
knob
the
retaining
and
B
enters
seam.
a
footinthe
moves
the
sewing
When
guide
edge
regulated
accordingly.
forkofthe
it
push
slots
central
along
the
guideA.The
by
upatthe
C.
For
this
purpose,
central position
position.
the grooves
foot.
blindstitch
the
turning
the
edgeofth
needle
the
darning
sewing
front
so
folded
an
The
in
needi
fo
fool
thai
Page 22

i°’O
LIDT4V
U!
4004
S4!
9
M94
400
5J94U9
9144
(ii!
WOT
tiM
i
o15
iL14Nes
DOl9AO
P9J9M01
SUJfl4
)
Os
4U9W1409449
TOtS
LB
4d
9LT
pu
4004
UDOTTV
49144
81fl
ueTq6!T
(i1!
doj)
UO’4!SOd
6u!4unow
epeou
TU8W1DPTT
M8JC’S
UJflj
dn
iepoq
s
9A991
9144
MOJDS
qDT!4SJ3OiJ9AO
a
e6pu
-Toq)
s
jj
S
8t4T
eIj
peo
550
d
snw
jpu
J94s9w
eq
o
95
peeu
)jDojJeAo
:Wepodwt
oq
A1uo
pGquosep
NOOIJ9AO
je
JOO
poiq
wes
p966uesp
ej
pesn
UO
uonq
o
s!
8SeLT
a
uorjisod
UOSU9
fl!M
doT)
pue
Tt
UM8S
qm
q3psDojJaAo
9q
sed
s
tin
UJfl
tn
woTToq)
L1T
8UftD?W
eq
eS
doT
uewqc
es
Page 23

Overlook
The
overlock
an
along
with
it
material
E
guide
the
raise
F
lever
the
from
Remove
(ill,attop
rear
seam
edge
edge-thread
an
that
so
(top
sewing
(bottom
thread
the
stitch
and
ill.).
work
right)
its
At
foot.
ill.)
puller.
for
used
is
simultaneously
effect.
runs
edge
of
end
the
press
Then
release
to
by
pulling
and
it
trim
sewing
Insert
along
the
the
toward
the
finishing
the
edge
seam
ejector
thread
the
threads.
Edge-finshng
the
When
master
the
two
the
an
thread
trated
dots
edge-finishing
effect.
below,
seam
overlock
selector
in
range
The
Set
button
dial
seam
range
the
is
the
8
with
8
upper
released
is
turned
machine
an
setting
tension
to
edge
is
one
illus
at
and
of
sews
3.
10
Page 24

Buttonhole
taut,
the
buttons.
Place
and
arrow
to
ttach
push
lows:
it
sew,
serves
(bottom
settinq
buttonhole
it
clamp
C
moves
determine
ill.).
insert
over
rear
it
a
in
the
foot.
fiHer
lugA(top
front
along
buttonhole
Release
cord
lug
scale
B.
as
D.
the
fol
ill),
As
This
length
pull
you
knob
Turn
illustration
beginning
clockwise
knob
Regulate
master
range
from
must
es
Reduce
numbers.
2
Begin
by
scrap
of
4
ii
(top).
of
the
selector
+
packed
be
needle
the
sewing
material.
the
position
to
Restore
each
button
only.
stitch density
the
dial
in
(bottom
to
—
together
thread
buttonhole
a
shown
setting
this
bole.
turning
by
buttonhole
ill.).
The
closely.
tension
Turn
on
in
at
the
stitch
by1to
piece
a
the
the
the
)
Page 25

Sewhiq
afford
To
buttonhole
drawings
the
Pull
as
ward
Sew
=
E
the
Push
F
=
ed
to
release
Sew
=
G
length
machine
buttonholes
better
a
foot
below.
bottom
it
far
as
the
length
button
the
until
bartacking
6
the
the
as
view
has
the
of
will
first
desired.
12
machine
button.
second
the
set
is
been
buttonhole
first.
work
the
of
omitted
buttonhole
go.
seam
and
stitches,
seam
has
(For
sewn
then
the
this,
it
keep
automatically.>
the
from
foot
depress
4
same
the
H
the
and
but
has
stitches.
and
bar
remove
threads.
trim
open
careful
be
bartacks
the
lifter
machine
the
until
J
ed
to
release
tying
Raise
=
horizontal
work
filler
Cut
=
6
seam
do
the
bartacking
the
stitches.
the
and
cord
buttonhole
the
ripper,
damage
not
seams.
button
presser
position,
trim
taut
the
for
in
sewn
sew
it
Then
too.
with
a
to
the
Pull
that
4
few
the
the
your
you
and
it
depress
keep
and
12
button
Push
=
/
/
-I
21
Page 26

Special
special
The
obtained
available
holder.
accessories
accessories
from
your
as
snap-on
are
all
intended
the
sewing
Pfaff
listed
dealer.
below
Not
feet,Toattachaconventional
for
feet
sewing
special
listed
sewing
below
foot,
jobs.
are
at
remove the
They
present
sewing
can
be
foot
Accessory
Cording
set
Cording
foot,3grooves
(twin
Cording
(twin
Cording
(twin
Fringe
Straight-stitch foot
Needle
hole
Edge
Zipper
Felling
Cording
Zigzag
Eyeletting
Hemmer
Hemmer
Hemmer
with
needle
toot,5grooves
needle
with
foot,7grooves
with
needle
sewing
plate
for
free-arm
guide
with
toot
toot
toot
shirring
plate
foot
foot
toot
foot
-.-.-,
with
(shell-edge)
(rolled
2.5or3.0
1.8-,
1.4-,
round
models
screw
foot
mm
2.0-or2.5mm
or
1.8-mm
1.6
needle
mm
2.0
1.0mm
edge)
needle
needle
needle
gauge)
gauge)
gauge)
Ordering
93-107560-91
93-040948-31
93
93-040952-31
93-040943-31
93-847496-00
93-040
93-053077-25
98-501
93-040938-31
93-040915-35
93-847
93-040946-45
93-040934-31
93-847
93-84754700
4
0950
94’
,
000-27
520-06
546-00
No,
Sewing
Operation
For
cording
size
cording
size
fringes
topstitching
very
soft
fabrics
Jersey.
etc.)
stitching
edge
inserting
felled
seams
cording
shirring
eyeletting
hemming
work
80.
70)
and
delicate
zippers
and
appliqué
valances
edges
and
work
with
(needle
for
-
1
3
35
fine
needle
orie\ing
For
sewing
and
(silk
For
For
For
For
For
For
For
Bias
Darning
Zigzag
coated
eguide
binder
Teflon
foot
sole)
foot
—,-.--.-.-—.--,------
98-055
622-00
93-040960-91
93-040955-91
Darning
and
For
sewing
plastic
edge
-
stitching
Forsewingcoated
For
embroidering
materials
-
Page 27

Changing
the
Push
pull
and
that
its
nd
turn
light
it
pins
it
the
bulb
out.
move
tovvard
light
Insert
in
B.
up,
bulb
turn
the
slots
new
C.
it
toward
light
Push
bulb
it
up
Cleaning
A
so
1216:
forward
1217:
needle
remove
in
the
feed
Do
not
tenance-free,
drop
then.
Remove
and
Take
plate.
the
vicinity
with
dog
oil
of
oil
and
take
out
bobbin
the
into
oiling
cover
the
Open
of
the
a
soft
machine
All
you
the
15.
it
out.
screws
free
case.
sewing
hook
Pull
arm
brush.
because
have
needle
and
cover
Clean
hook
to
do
raceway
remove
27
the
parts
and
it
is
is
put
now
plate
the
and
the
main
a
and
0
.)
Page 28

rroube
shoothig
Cause:
Machine
1.
Needle
Wrong
Needle
Machine
Needle
2.
For
Thread
Poor-quality
or
excessive
3.
Needle
go.
Needle
Needle
not
needle
bent
too
Need’e
any
tension
thread
Needle
too
Needle
because
Bobbin
skips
inserted
or
threaded
thin
thread
of
the
that
storage.
breaks
pushed
not
bent.
thinortoo
bent
work
case
stitches
correctly.
used.
blunt.
improperly.
thread
for
breaks
above
strong.
too
knotty
or
has
become
up
strikes
and
is
pushed
improperly
used.
reasons.
thread
far
as
thick.
needle
or
inserted.
used,
too
as
pulled.
dry
it
plate
by
will
Remedy:
needle
Push
shank
flat
Insert
Insert
Check
Select
Thread
par.
See
Regulate
only
Use
Insert
it
will
as
Insert
Note
machine
Let
guide
Only
When
against
side
system
needle.
new
threading.
needle
Chart.
1
above.
thread
good-quality
needle
new
go.
needle.
new
Needle
the
inserting
it
until
as
up
facing
130/705
according
tensions.
Thread
and
feed
material
the
snaps
it
far
and
the
bobbin
it
as
toward
H
needle.
to
thread
push
Chart.
work
lightly.
into
will
go,
the
Needle
up
it
alone.
case,
place.
its
back.
and
as
press
far
Page 29

Cause:
Seam
4.
Tension
Thread
Bobbin
Kinks
material.
of
Machines
5.
has
Lint
rows
Feed
control
is
out
thick,
too
thread
appear
accumulated
of
feed
dropped.
dog
is
at
uniform
not
adjustment.
of
wound
top
on
feeds
dog.
left.)
knotty
or
unevenly.
bottom
and
irregulady
between
(Reverse-feed
hard,
or
tooth
notatall
Remedy:
Check
first-class
Use
During
thread
thread
Thread
tensions.
both
Remove
reverse-feed
Flick
upper
bobbin
hand,
in
retainer
machine
needle
lower
and
thread
winding,
but
stud.
properly
plate
only.
pass
and
control
tensions.
not
do
through
it
and
clean
the
to
hold
check
out
right.
N
lint.
Machine
6.
Thread
7.
Overlock-stitch
The
8.
Never
foot.
if
master
ends
Machine
does
seam
Fundamental
runathreaded
have
you
switch.
works
hook
in
skips
attachment
not
leave
to
This
heavily
stitches
look
rules
the
is
raceway.
neat.
machine
machine,
particularly
in
overlock
loose.
is
unless
even
important
seam
there
for
Remove
into
oil
Secure
tightening
thread
Check
is
piece
a
short
a
when
thread
raceway.
hook
attachment
screw
tensions.
fabric
of
be
while,
children
ends
B
sure
are
and
position
in
securely
under
to
around.
put
(page
the
switch
drop
a
by
sewing
off
of
18>
the
25
Page 30

Stitch
Jsted
-umber,
ines
seam
No.
I
01
program
in
this chart
the
ItoIV
patterns.
Stitch
Straight
chart
are
corresponding
the
settings
stitch
the
for
stitch
stitch
the
program
and
various
in
I
I
II
111
V
Application
For
The
application
the table
01
I
I
cz
2
<0>
all
sewing
individual
below.
02
.
.—
..
—
‘—.-.
+l:I—
9.T
<0>
operations.
are
03
<0>
stitch
described
04
—
--
---
--.
.—-
A
€D
0-2
<0>
programs
in
05
‘
7
S..
A
1-2
<0>
more
<0>
and
06
—
-.
‘::.._
tD
A
6
their
detail
07
\i\
/\/
\/\
A+C
€D
4
<0>
in
02
03
04
05
06
07
08
Zigzag
stitch
Buttonholes
Elastic
Scallop
stitch
stitch
Viennese
Honeycomb
stitch
Cord
Feather
stitch,
stitch
stitch Sewing
narrow
Versatile
appliqué
in
work,
embroidering,
Without
can
Inserting
he
turning
regulated
patches
fabrics.
Derorating
Decorating
cloth
A
loose
on
seams.
decorative
handkerchiefs,
napkins,
elastic
Ornamentations
decorative
seams.
application;
inserting
darning
the
accordingly.
and
threads
seam
resembling
etc.
fabric;
darning
for
for
edge
lace,
the
for
instance.
or
covering
dainty
for
handsewn
finishing,
satin
stitching,
stitch
rips
on
instance.
clothing.
density
elastic
tern/
Blindstitch
Invisible
of
fabric.
hems;
can
be
adjusted
to
any
type
Page 31

IT
m
V
-i
No,
11
1
1
14
1
08
A÷D
24
<o>
2
3
5
-
\/\
-1I
\/\
\/\
-
Stitch
Elastic
Elastic
Pullover
Florentine
Elastic
09
4
,
A÷E
.6
<0>
—
10
-
B
1-4
<0>
blindstitch
blindstitch,
stitch
stitch
triple
straight
11
(
-
<
(
‘zZ
(
B
9
<o>
adjustable
12
._
-
B
5
<0>
E___
stitch
13
—
-n
•.-.j
---ii
B÷C
4
<0>
14
—“
‘_-\
.-i’
—\\
i
.—,‘
B+D
-5
<0>
—
Application
Invisible
Invisible
length
can
Assembly
fabrics.
Decorative
Seams
under
exposed
stress.
15
HI
Ill
fl
fl
C
4
<0>
hems
hems
be
and
hems,
16
-
‘
“
C
9
<0>
on
elastic
on
elastic
adapted
edge
for
to
great
17
h
II
N
D
4
<0>
—
materials.
matenals;
the
to
finishing
instance,
stress
18
“
.“4
D
.6
<0>
—
fabric.
seams
on
which
—-J
bed
19
y
E
4
<0>
the
on
X
-
>4
+H
stitch
jersey
linen.
stretch
20
‘x:
‘<y-.
:x
A÷C
<0>
1
1
1
1
20
6
7
8
9
Elastic
triple
Overlock
Embroidery
Cross
stitch
Looped
stitch
stitch
stitch
zigzag
stitch
Flat,
elastic
corsetry
on
Elastic
on
assembly
knitted
Resembling
Reinforcing
Ornamental
panels.
reinforcing
and
edge
fabrics.
manual
flat
stitch
embroidery.
edgesofornamental
suitable
seams,
finishing
for
for
long
instance,
seams
borders.
fabric
Page 32

21
22
23
24
25
26
27
28
29
30F31
No.
21
22
23
24
2b
26
27
Eli
flT
v
Stitch
Staying
E
W
Balcony
Lattice
Hemming
Greek
A+D
il-
<o>
stitch
stitch
B+C
ö
<0>
stitch
stitch
stitch
stitch,
sttch
-S
B+C
6
<0>
narrow
C+E
/
D
D
F
F
F
F
i
and
borders
seam,
stitch,
blouses.
stitch,
stitch,
decorative
0
stabilizing
and
instance,
for
for
instance
for
instance,
for
instance,
ace.
stitch
stitch
11
for
for
for
for
for
jersey.
decoratng
damnsk
hemming
for
dainty
11
I
<0>
Appi
Decorative
Sewing
Decorative
place
Decorative
embroidered
Decorative
towels.
Ornamental
tablecloths.
A
materials.
<0>
icaton
on
mats.
conventional
28
29
30
31
32
Greek
Closed
Rick-rack
Diamond
Rick-rack
stitch,
overlock
stitch,
stitch
stitch,
wide
stitch
left
right
A
conventional
fabrics
Covering
seam.
Decorative
cushions.
Center
[or
pattern
instance,
Decorative
cushions.
folded
borders,
on
borders,
decorative
fabric
for
of
an
ornamental
children’s
for
stitch
edges
instance,
aresses.
instance,
with
for
plain
a
fancy
cuuch
on
border,
on
couch
Page 33

32
33
34
35
36
37
38
39
40
_
42
41
34
35
36
37
38
No.
33
@D
J_JL1L
Stitch
Fifled
small
Double
Filled
long
Rosette
Pearl
stitch
Rosette
c
scallop
scallop
scallop
stitch,
stitch,
c
stitch,
stitch
stitch,
left
right
€3
left,
right,
c
Application
Suitable
j
on
Floral
Floral
Decorative
Decorative
Decorative
room
WFF
+
for
children’s
patterns.
patterns.
fabrics,
l1
—
11
decorative
dresses.
border,
pattern,
borders,
for
for
on
on
j
+
:z
12
instance,
bed
linen,
curtains.
bed
c3
C3D
l:
12
€D
—
+
=
12
iz
+
—
+
12
borders,
for
instance,
for
instance,
for
instance,
40
41
42
Ladder
Domino
Ladder
Scallop
stitch,
stitch
stitch,
stitch,
left
right
small
Fancy
costumes.
Sevving
Border
Ornamental
or
J
cuffs.
stitch,
over
pattern,
for
instance,
rnulticoloured
for
instance,
borders,
for
for
national
wool
for
instance,
threads.
place
on
mats.
collars
Page 34

No.
43
44
46
47
ir
I
j
I
HI
43
X
i
F
J
+i:::i—
Stitch
Scallop
Picot
Picot
Wafer
Semi-dart
44
l+J
÷i1:I—
stitch,
stitch
stitch
stitch
45
F+J
÷II—
stitch,
7
large
left
46
h
H+J
+[—.
+—
47
F+
48
F+l
+—
+:—
11
Application
Decorative
grade
Border
shoulder
Border
bands.
Decorative
on
embroidered
Embroidery
blouses.
49
F+I
bed
pattern,
bags.
pattern,
50
F+l
+:—
11
borders,
linen.
for
for
borders,
motif,
51
G÷J
+II-
for
instance,
instance,
for
scarves.
for
52
:
D
4
<0
instance,
instance,
instance,
53
%
.,‘
.
<0>
on
embroidered
on
on
embroidered
on
.8
high-
summer
48
49
50
51
52
Semi-dart
Arrow
head
Semi-dart
Stretch
stitch
Overiock
edge-thread
Serging
seam
edge-thread
stitch,
stitch,
stitch
stitch
effect
with
effect
left,
right
with
small
Fancy
stitch,
Embroidery
bags.
Fancy
pattern,
Decorative
Flexible
at
the
same
Especially
Finishing
protects
seam
for
raw
the
for
motif,
motif,
for
time
knitted
edges.
edge
instance,
for
for
joining
finishing
against
for
instance,
instance,
instance,
fabrics.
The
for
for
two
their
edge
chafing.
nursery
for
wall
on
fabric
edges.
thread
fabrics.
shopping
hangings.
edges.
plies
and
Page 35

PFAFF-HANDELSGESELLSCHAFT
für
Haushaftnähmaschjrjen
7500
Karlsruhe
41
WestGermany
mbH,
Subject
to
&terabons
 Loading...