

Page 1
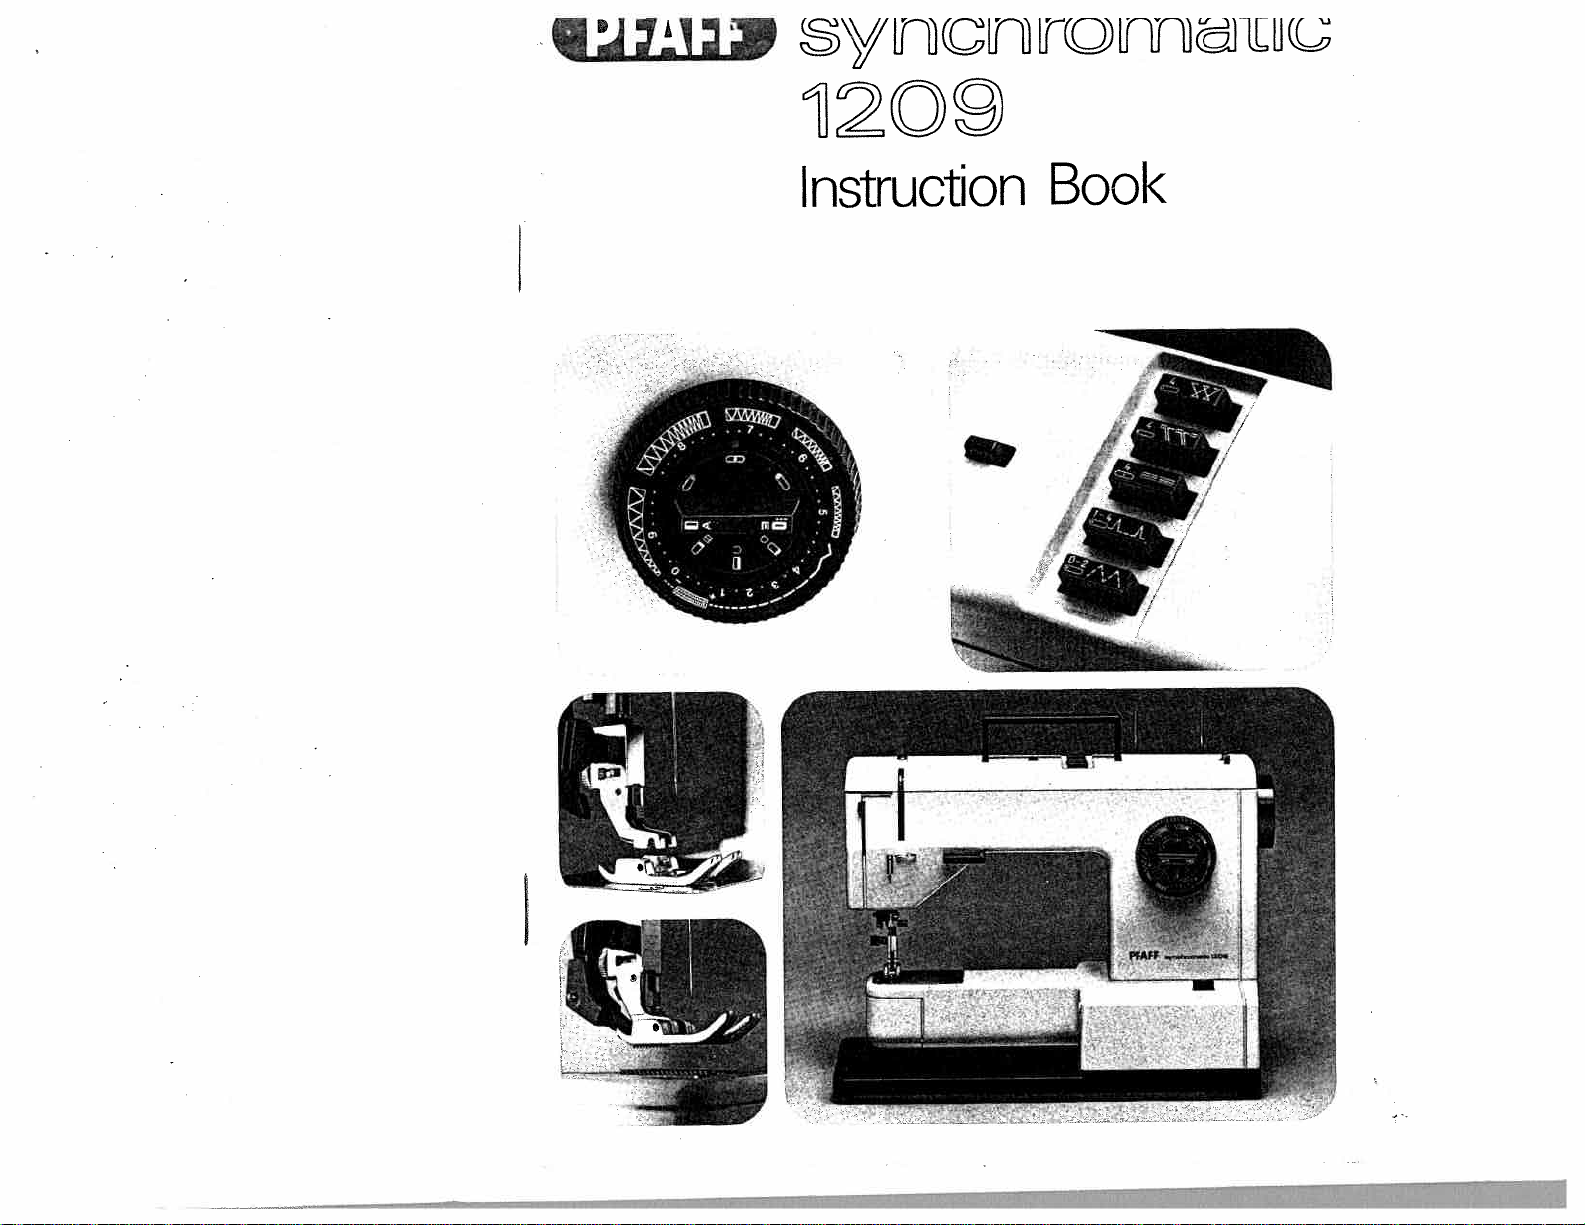
6OL
t1LJflJDJDLi1A\
UOiDflJ1SUI
)Ioo
Page 2
Zigzag
Utility
Utility-stitch
stitches
stitch
combinations
Thread
Trouble
Upper
threading
tensions
shooting
Thread
Threading
Straight
cutter
stitch
the
needle
Sewing
Special
Special
accessories
sewing
feet
feet
Removing
Reverse
Sewing
Removing
buttonholes
sewing
the
bobbin
carrying
and
case
dropping
case
and
bobbin
cover
the
feed
Presser
Needle
position
bar
lifter
Inserting
Master
Inserting
selector
the
the
bobbin
bobbin
dial
case
Foot
Handle
control
receptacle
Dualfeed
Electrical
Foot
control
connection
Cleaning
Drawing
Disengaging
and
up
the
the
oiling
bobbin
sewing
thread
mechanism
Changing
Changing
Changing
the
the
the
light
sewing
needle
bulb
foot
Accessories
Attaching
Bobbin
winding
the
drawer
work
support
Contents
_____________
Fold
dog
out
this
page
Page
20
21
1
24
18
1
22
14
1
5
8
10
6
7
17
1
8
2
9
6
11
4
1
6
5
8
9
1
1
11
3
3
7
1
3
4
2
20
2
5
Page 3
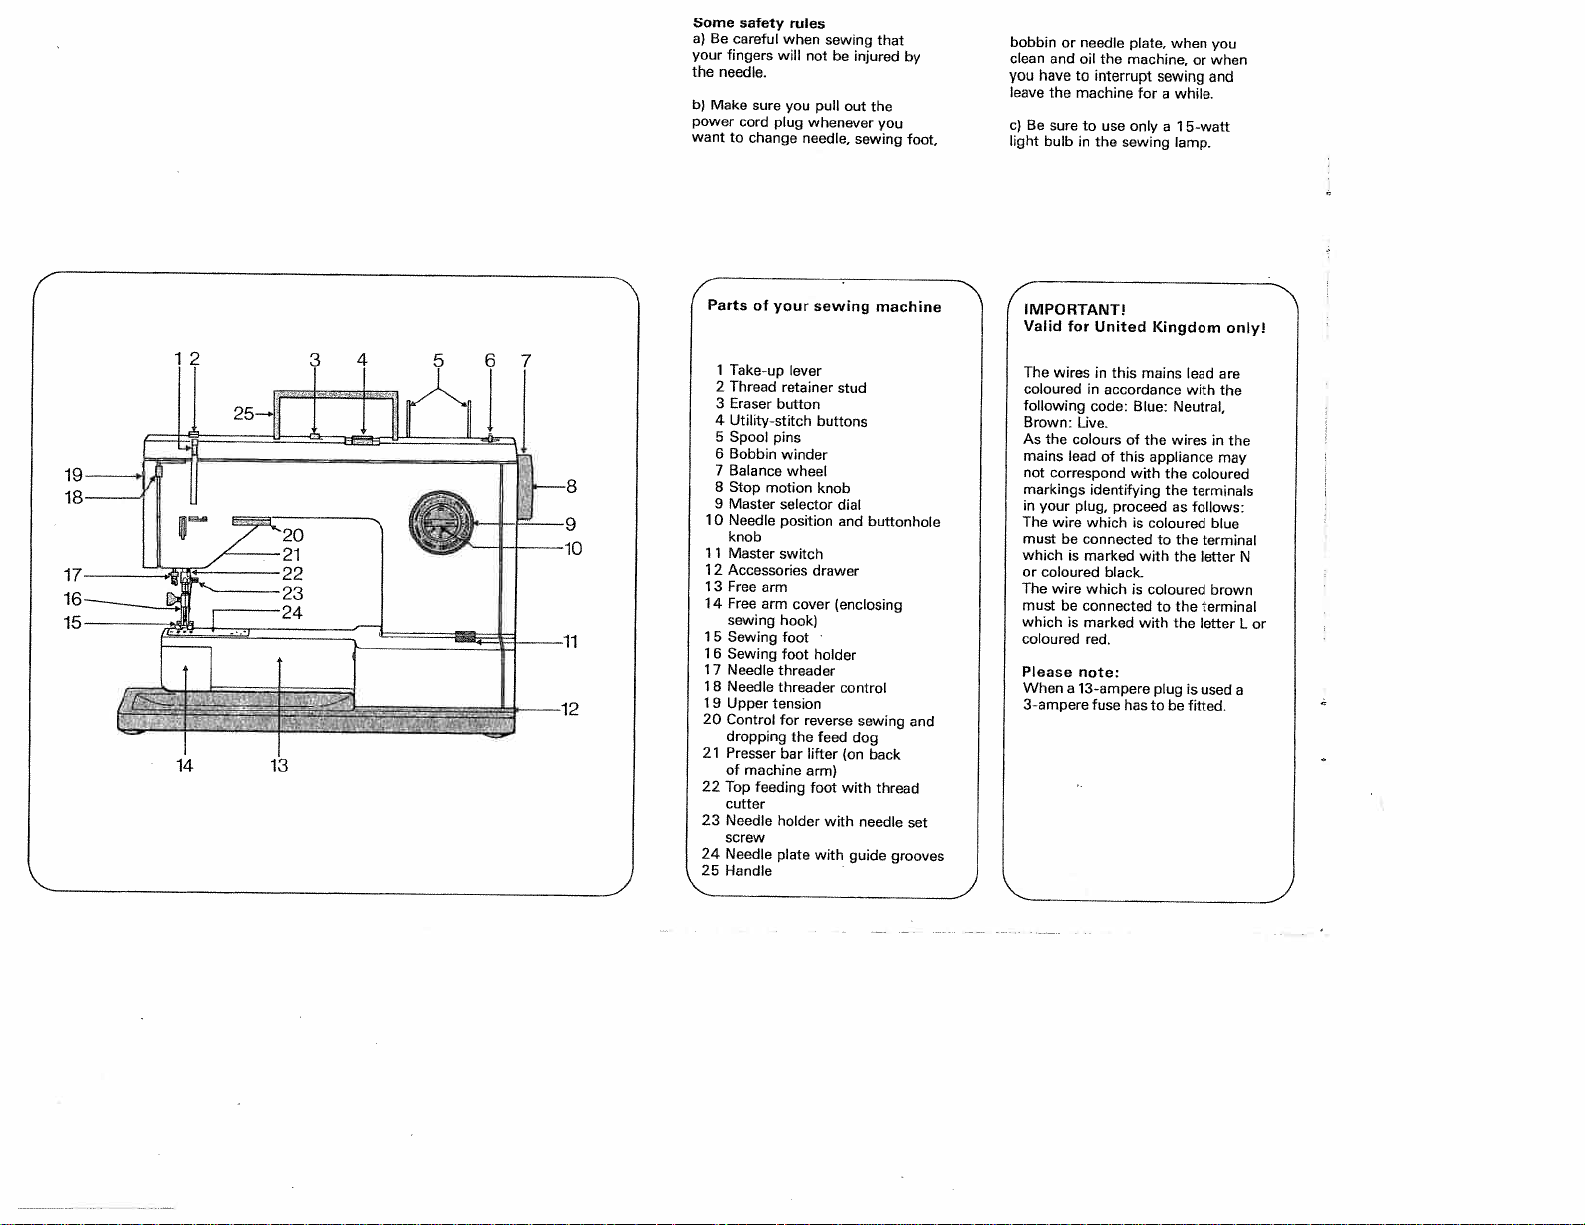
Some
safety
a>Becareful
your
fingers
the
needle.
Make
b)
want
power
to
sure
cord
change
when
will
plug
rules
you
needle,
sewing
not
be
pull
out
whenever
that
injured
the
you
sewing
by
foot.
bobbin
or
and
clean
you
havetointerrupt
leave
the
c)Besure
light
bulb
needle
oil
the
machine
to
use
in
the
plate,
machine,
for
only
sewing
when
sewing
while.
a
1
a
lamp.
or
5-watt
you
when
and
4
Parts
10
11
1
13
14
15
16
17
1
1
20
21
22
23
24
25
1
2
3
4
5
6
7
8
9
2
8
9
of
your
Take-up
Thread
Eraser
button
Utility-stitch
Spool
pins
Bobbin
Balance
motion
Stop
Master
Needle
knob
Master
Accessories
Free
arm
Free
arm
sewing
Sewing
Sewing
Needle
threader
Needle
threader
Upper
tension
Control
dropping
Presser
of
machine
Top
feeding
cutter
Needle
holder
screw
Needle
plate
Handle
lever
retainer
winder
wheel
selector
position
switch
cover
hook)
foot
foot
for
reverse
the
lifter
bar
arm)
foot
sewing
stud
buttons
knob
dial
and
drawer
(enclosing
holder
feed
with
with
control
sewing
dog
(on
with
needle
guide
machine
buttonhole
and
back
thread
set
grooves
N
IMPORTANTl
Valid
for
United
The
wires
coloured
following
Brown:
As
the
mains
not
correspond
markings
in
your
The
wire
must
be
which
or
coloured
The
wire
must
be
which
coloured
Please
When
3-ampere
in
in
code:
Live.
colours
lead
of
identifying
plug,
which
connected
marked
is
which
connected
is
marked
red.
note:
13-ampere
a
fuse
Kingdom
mains
this
accordance
Blue:
of
the
this
appliance
with
proceed
is
coloured
with
black.
is
coloured
with
plug
has
to
the
the
to
to
lead
with
Neutral,
wires
coloured
terminals
as
follows:
the
the
the
the
is
be
fitted.
onlyl
are
the
in
the
may
blue
terminal
letter
brown
terminal
letter
used
N
L
or
e
Page 4
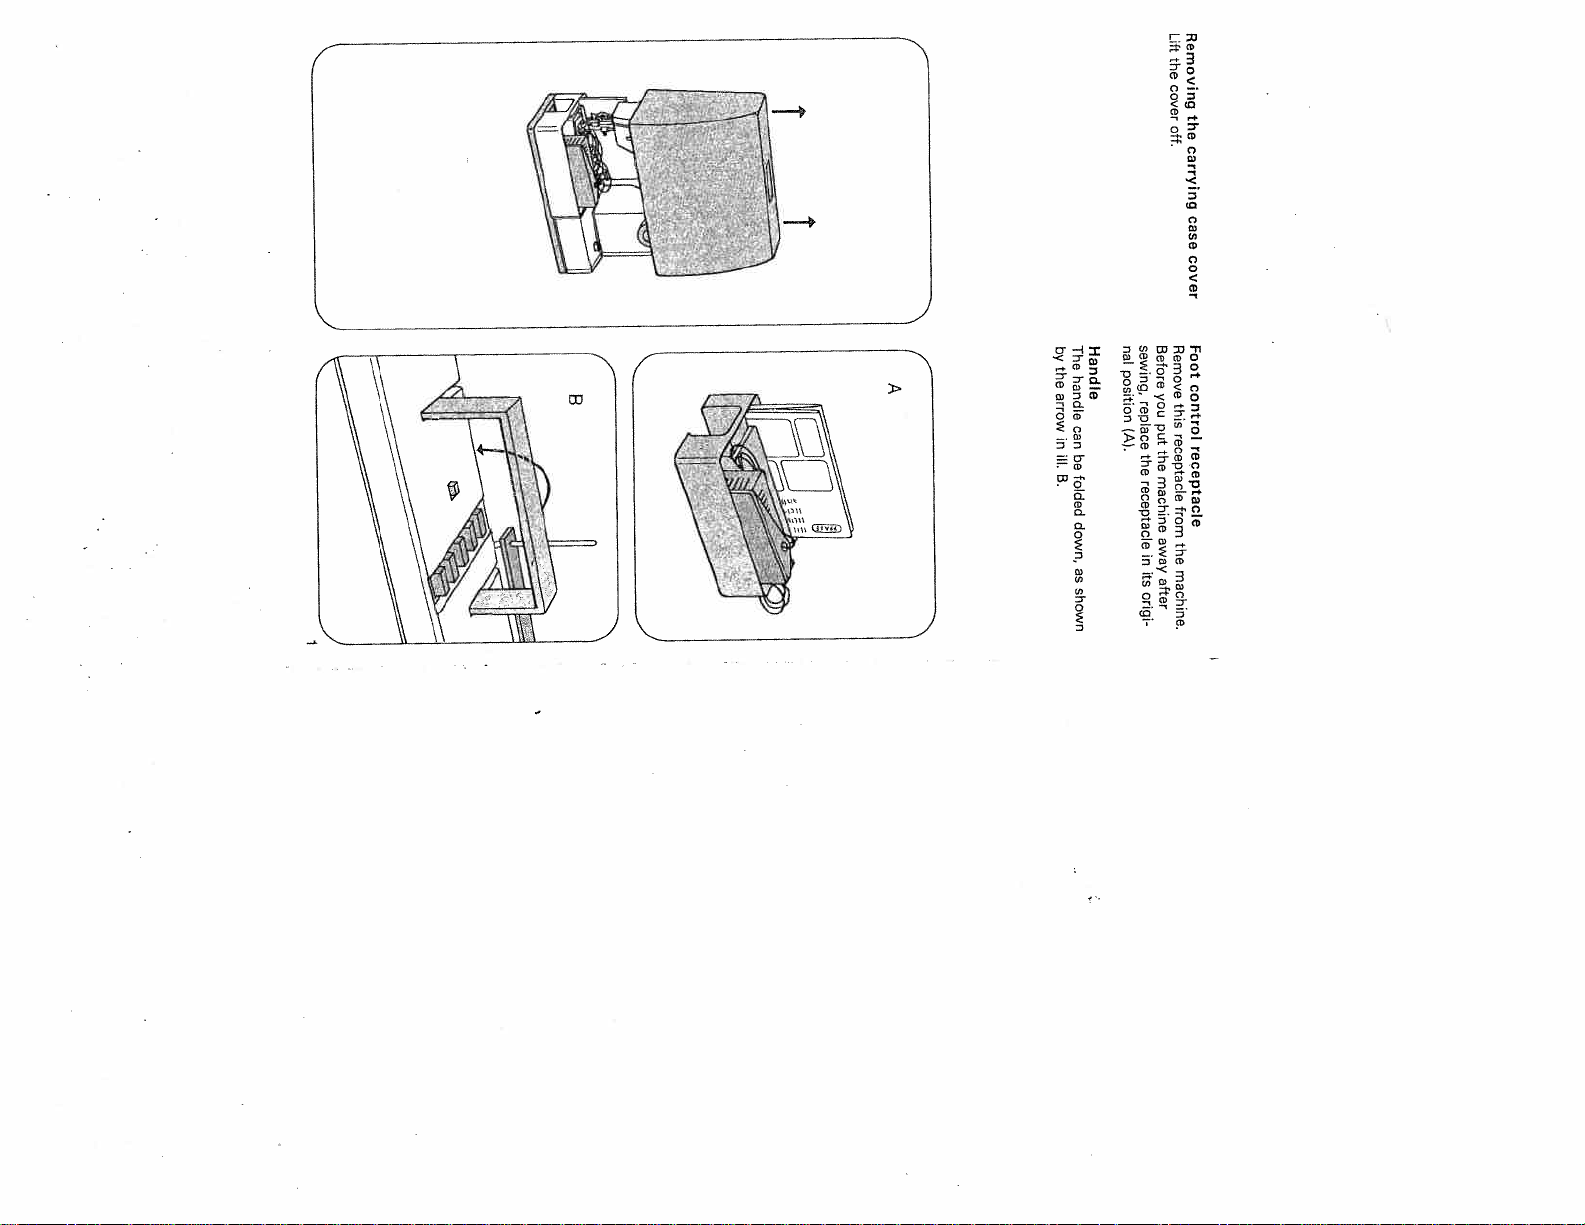
Jrrii(
Removing
Lift
the
cover
the
off.
carrying
:
The
nal
Handle
4
A
by
the
handle
arrow
can
in
be
ill.
B.
folded
down,
as
position
(A).
shown
Remove
sewing,
Before
you
replace
this
put
receptacle
the
the
machine
receptacle
from
away
the
in
machine.
its
after
origi
case
cover
Foot
control
receptacle
fl
Page 5
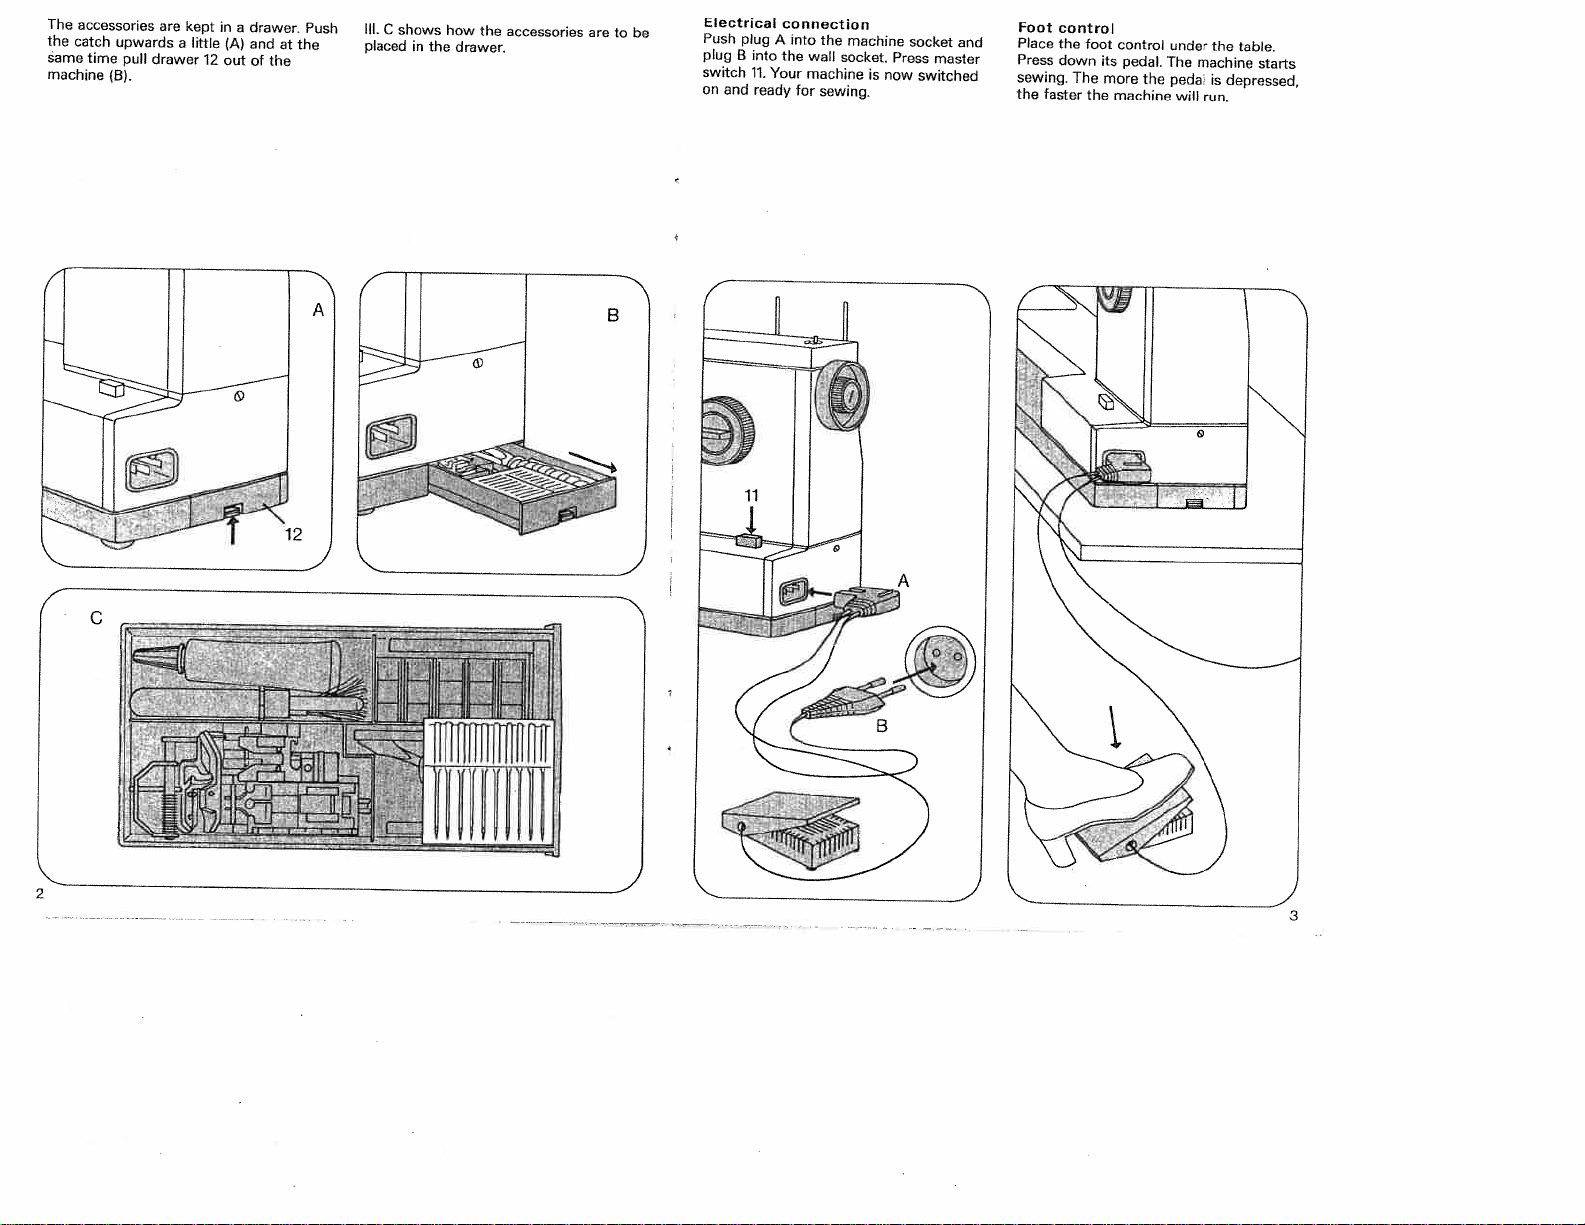
The
accessories
the
catch
same
machine
time
upwards
pull
(B).
are
drawer
a
kept
little
in
drawer.
a
(A)
12
out
and
of
the
Push
Ill.
shows
at
the
C
placed
how
the
drawer.
accessories
in
the
are
be
to
IectricaI
Push
plug
switch
on
and
plug
B
into
11.
ready
Your
connection
into
A
the
wall
machine
for
the
socket.
sewing.
machine
is
Press
now
socket
master
switched
and
Foot
Place
Press
sewing.
the
faster
control
the
foot
down
The
the
control
its
pedal.
more
machine
the
under
The
pedal
will
the
machine
depressed,
is
run.
table.
starts
C
Ii
J
3
Page 6
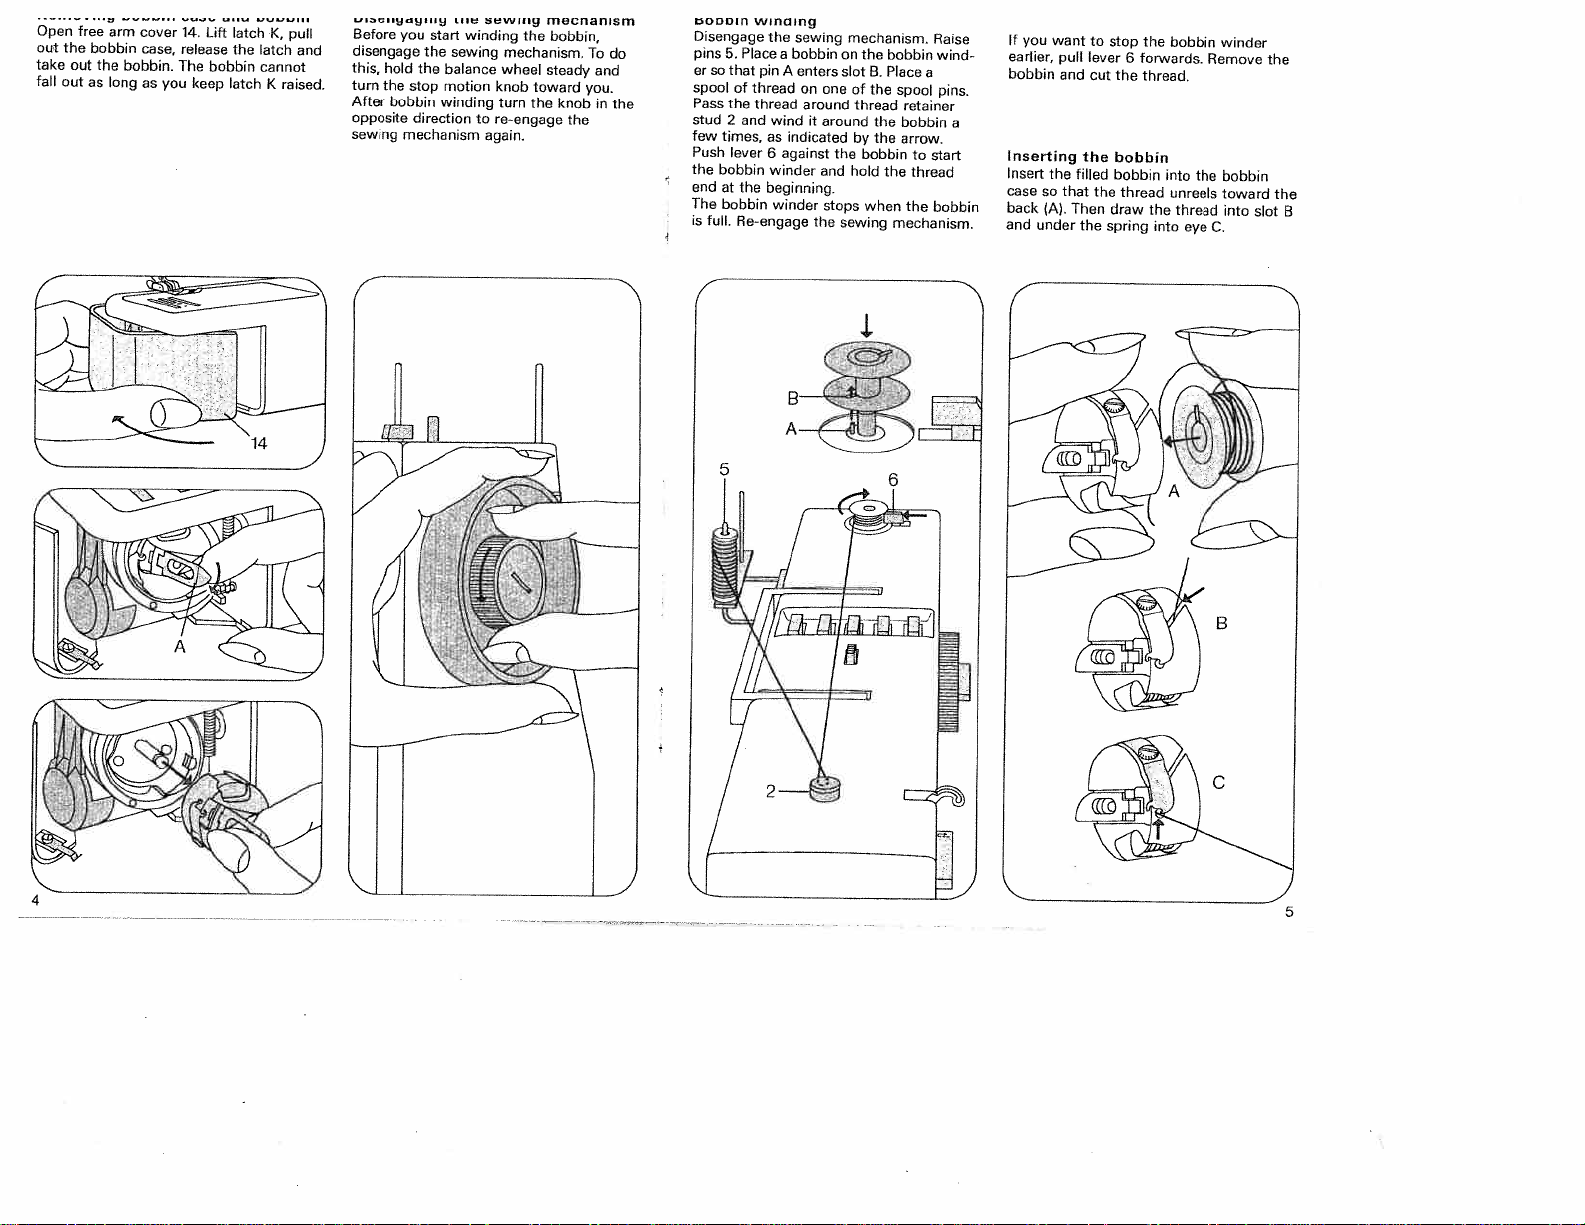
Open
out
the
take
fall
out
out
free
bobbin
as
the
arm
bobbin.
long
cover
case,
as
you
14.
release
The
keep
Lift
bobbin
latch
the
latch
K,
latch
cannot
K
raised.
pull
and
Before
disengage
this,
hold
turn
the
After
bobbin
opposite
sewing
you
start
the
the
balance
stop
motion
winding
direction
mechanism
LII
winding
sewing
to
SIwIfIg
mechanism.
wheel
knob
turn
re-engage
again.
mecnanlsm
the
bobbin,
steady
toward
the
knob
the
To
you.
and
in
b000in
Disengage
do
pins
er
spool
the
Pass
stud
few
Push
the
end
The
is
so
times,
bobbin
at
bobbin
full.
winaing
Place
5.
that
pin
of
thread
the
thread
2
and
lever
the
Re-engage
the
sewing
a
bobbin
A
enters
on
around
wind
it
indicated
as
6
against
winder
beginning.
winder
one
around
the
and
stops
the
mechanism.
on
the
slot
B.
of
the
thread
the
by
the
bobbin
hold
the
when
sewing
Raise
bobbin
wind
Place
a
spool
retainer
bobbin
arrow.
start
to
thread
the
bobbin
mechanism.
pins.
If
you
want
to
stop
the
bobbin
earlier,
bobbin
pull
and
lever
cut
6
the
forwards.
thread.
winder
Remove
the
a
Inserting
Insert
case
back
and
the
so
(A).
under
that
the
filled
Then
the
the
bobbin
bobbin
thread
draw
spring
the
into
into
unreels
thread
eye
the
bobbin
toward
into
C.
slot
the
B
5
Page 7

uiseit.iIy
Lift
stud
slot
Latch
latch
B
C
as
points
and
A
A
far
ne
and
as
upwards.
stud
ooouin
push
it
will
B
the
must
case
bobbin
go.
making
Release
be
flush.
latch
case
sure
A.
onto
Upper
Pull
into
Then
D
on
the
slot
pull
the
threading
thread
A,
guide
into
it
needle
from
guide
holder.
the
spool
and
draw
B
and
take-up
C
and
thread
lever
it
1.
guide
Threading
Turn
raise
Push
the
and
and
18
thread
the
the
needle
way.
B.
balance
at
the
is
the
needle
threader
Draw
the
thread.
pulled
the
same
needle
wheel
and
thread
time
As
through
toward
take-up
control
releasing
you
the
under
do
needle
lever
18
this,
you
down
fingers
to
1.
control
the
eye.
Drawing
Hold
balance
all
needle
A
take-up
out
threads
sewing
up
the
bobbin
and
Pull
left
and
a
you
up
the
back
little
lay
thread
taut.
until
again
bobbin
under
both
the
Turn
and
thread
the
the
the
needle
thread
wheel
8
lever
needle
toward
down
is
the
toward
up.
hole
moves
of
the
foot.
7
Page 8

iviaster
Turn
straight
ed
above
Straight
Straight
from
the
0
sejecior
outer
or
mark
stitch
stitches
4.
to
zigzag
ring
A.
are
aiai
until
stitch
the
desired
located
symbol
is
in
the
of
position
range
the
zigzag
Setting
Zigzag
marked
range
toward
become
and
made.
stitch
mark
stitches
5,6,
the
the
increasingly
5
a
long,
=
7,
stitches
left,
narrow
8
are
A
the
and
sewn
are
zigzag
At
9.
close
longer.
zigzag
in
the
the
stitches
ranges
right
together;
In
ranges
stitch
naeeciie
The
tions
of
this
Turn
needle
below
4
is
czz
position
can
needle
in
the
needle
knob11until
position
mark
A.
=
Central
=
Right
=
Left
needle
be
set
to
different
hole.
the
symbol
desiredispositioned
(normal)
needle
needle
position
position
of
posi
the
position
Reverse
the
feed
sewing
dog
Reverse-feed
positions:
A=Normal
8
long
=
As
the
machine
backtacking
=
Vertical
C
permanently
D
=
The
feed
)for
embroidering.
control
position
as
the
position.
dog
and
sews
the
in
is
dropping
has
following
the
20
controlispressed,
backwards
end
of
a
seam).
machine
The
reverse.
dropped
darning,
etc.).
(for
sews
I
I
9
Page 9

A
lower
B
C
O
=
=
=
=
Setting
ting
tween
work.
tighter
.oa,II
mark.
is
in
3
The
the
tension
Regulating
looser
tension.
Correct
Upper
tension
I)
The
the
light-coloured
and
5,
higher
tension.
screw.
tension,
thread
tension
too
tight.
normal
depending
the
number
Turn
or
right
tension.
too
loose
tension
range
on
it
left
for
or
the
the
a
tighter
lower
for
set
E
=
Lower
tension
too
loose
or
full
a
bobbin
weight,
lightly.
been
only.
It
set
upper
must
but
when
cor
be
a
The
Let
hang
not
should
you
Once
rectly.
correct
the
down
slide
jerk
the
adjust
tension
bobbin
freely
down
gradually
your
lower
too
lower
hand
the
tight.
case
by
by
its
move
tension
upper
tension
with
the
down
downwards
upwards
has
tension
thread.
Presser
Lever
A
B
=
bar
18
has
Sewing
remove
wheel
needle
The
sewing.
lifter
two
foot
the
toward
and
sewing
positions:
is
raised.
work,
you
take-up
foot
is
turn
raise
to
lever
lowered
(Before
the
the
t)
you
balance
for
Dual
feed
(Synchronized
This
feed
from
To
down
To
down
swing
mechanism
creeping
engage:
until
disengage:
slightly,
up.
Push
it
top
ahead
snaps
Push
then
top
and
into
the
pull
bottom
prevents
of
the
feeding
place.
top
it
out
feed>
one
other.
foot
feeding
and
ply
22
foot
let
it
N
D
11
Page 10
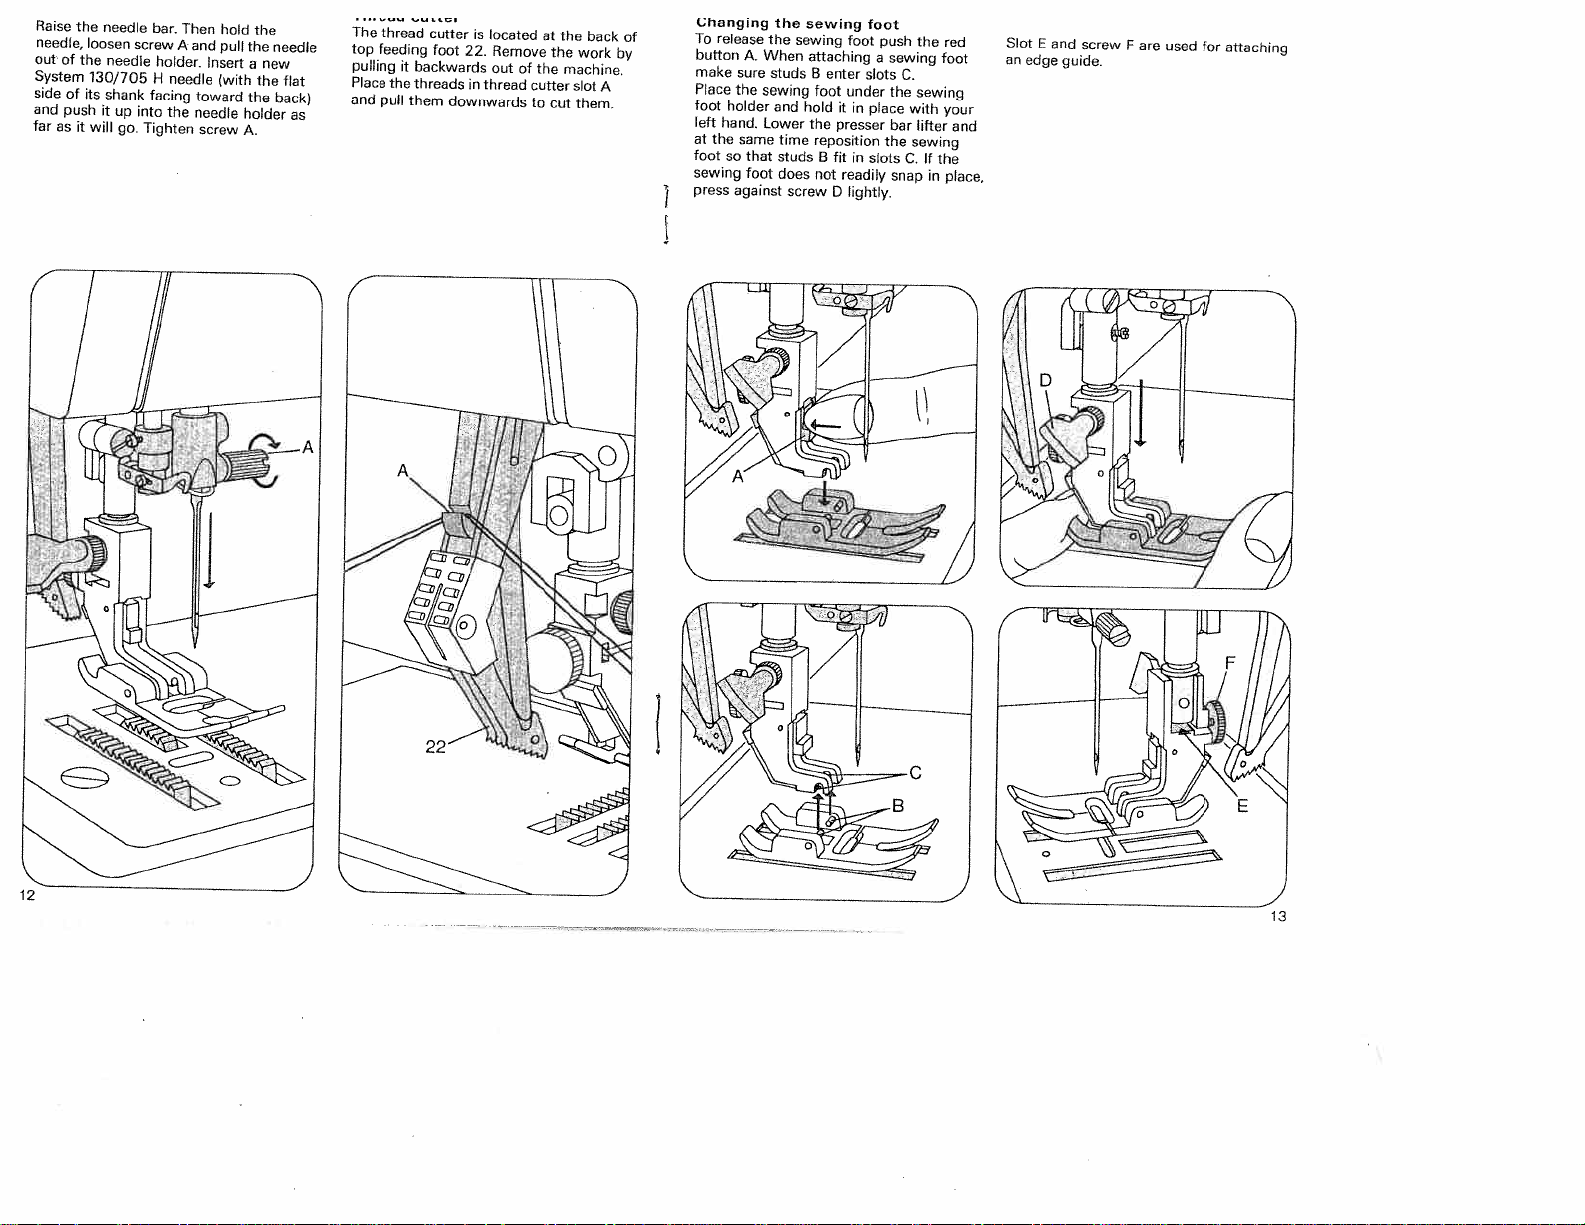
Raise
needle,
out
System
side
and
far
as
of
of
push
the
loosen
the
130/705
its
it
will
needle
needle
shank
it
up
go.
bar.
screw
H
facing
into
Tighten
Then
A
holder.
needle
the
and
Insert
toward
needle
screw
hold
pull
lwith
the
the
a
the
the
holder
A.
needle
new
back)
flat
The
thread
cutter
is
located
at
the
back
top
feeding
foot
22.
Remove
pulling
it
the
pull
backwards
threads
them
downwards
in
thread
Place
and
as
out
of
the
cutter
to
the
machine.
Cut
work
slot
them.
of
by
A
Changing
To
button
make
Place
foot
left
at
the
foot
sewing
press
I
release
sure
the
holder
hand.
same
so
against
A.
that
foot
the
the
When
studs
sewing
and
Lower
time
studs
does
screw
sewing
sewing
attaching
B
foot
hold
the
reposition
8
not
enter
it
presser
fit
0
foot
slots
under
in
in
readily
lightly.
foot
push
a
place
slots
sewing
C.
the
bar
the
C.
snap
the
sewing
with
lifter
sewing
If
in
red
foot
your
the
place,
and
Slot
an
E
edge
and
guide
screw
are
F
used
for
attaching
13
Page 11

Utility
Elastic
A
Blindstitch
B
Elastic
C
D
Overlock
E
Cross
Eraser
3
buttons.
stitches
stitch
triple
stitch
button
stitch
straight
for
stitch
releasing
the
pressed
Utility-stitch
The
settingofmaster
which
is
stitch
is
indicated
ton.
Setting:
=
A
Press
B
=
Turn
required
the
the
setting
selector
foraspecific
on
the
button
master
selector
dial
utility
respective
dial
9/10
but
Utility-stitch
Pushing
duces
new
I
Honeycomb
Setting:
4,
left
II
Pullover
Setting:
4,
left
two
buttons
utility-stitch
buttons
needle
stitch
buttons
needle
combinations
simultaneously
patterns.
stitch
A
+C,straight
position.
B
+
C.
position.
straight
pro
stitch
stitch
Ill
IV
stitch
E
Setting:
left
needle
vertical
Jersey
Setting:
left
needle
buttons
position,
position.
stitch
buttons
position.
-I-
____
St-C.
straight
stitch
20
stitch
0,
to
2.
N
8+0,
turn
control
straight
Ill
iIi
+
Lifi.
JLJLI
iv
d±b1AAA
\
15
Page 12
.vvIlIy
o
2
3
4
5
=
=
Overlock
=
=
Zipper
=
98—694:or
lees
Normal
For
all
sewing
special
Clear-view
For
ornamental
on
buttons.
Is
used
Blindstitch
foot
Buttonhole
sewing
foot.
foot:
foot:
for
overcasting
foot
foot
foot:
jobs
sewing
requiring
and
edges.
no
sewing
967—00
The
when
f
top
sewing
feeding
feet
foot
can
be
engaged
and
0,
2
are
used.
3
Special
Zipper
Attach
Set
the
per
the
Top
needle
moves
Bottom
position,
edge
3
98—894
866—00
sewing
(and
the
foot
the
needle
workpiece
foot
moves
right
or
illustration:
in
left
along
illustration:
needle
foot
of
edge
offset
position
so
along
left,
position.
zipper
moves
feet
stitching)
to
accordingly.
that
the
the
respectively.
Foot
in
left-edge
Left
chain.
Foot
right
in
position.
along
the
right
edge
zipper
edge
in
right-edge
zipper
foot
or
of
the
chain
position,
of
foot
Right
chain.
left.
Guide
zip
on
The
is
used
to
as
attach
set
the
zipper
the
sole
Top
foot
material
position
position
Bottom
foot
edge
needle
hole
for
inserting
resemble
the
foot
needle
chain
of
the
illustration:
is
used
along
regulated
is
knob
illustration:
is
used,
guide
B.
in
the
a
seam.
in
the
in
its
moves
along
sewing
When
guide
the
edge
accordingly.
When
guide
the
middle
zippers
For
central
central
foot.
the
folded
guide
by
turning
fabric
of
concealed
this
purpose,
position
position.
the
grooves
b)indstitch
edge
A.
The
the
the
overlock
edge
the
of
needle
needle
along
foot
so
and
The
in
the
2
98—694
861—00
5
99—694
870—00
7
17
Page 13

sewing
Attach
push
buttons.
lows:
Place
it
taut,
sew,
arrow
serves
to
Turn
knob
illustration
ting
at
the
Turn
the
the
stitch
selector
—The
+
to
gether
closely.
buttonholes
the
buttonhole
it
and
clamp
I
determine
10
(bottom
beginning
knob
density
dial
stitches
Insert
over
moves
to
the
clockwise
in
the
foot.
filler
a
rear
in
front
it
along
the
position
left>.
of
turning
by
buttonhole
must
Release
cord
lug
G
(top
lug
scale
buttonhole
shown
Restore
each
buttonhole.
only.
Regulate
the
be
packed
as
H.
J.
this
master
range
the
fol
ill.),
As
This
length.
in
to
you
set
from
pull
the
Reduce
numbers.
2
Begin
of
scrap
A
Sew
the
the
B
Turn
bartacking
C
Turn
reverse
same
needle.
the
by
sewing
material.
the
balance
needle.
the
the
length
needle
first
knob
knob
until
a
buttonhole
wheel
to
stitches,
to
the
the
as
thread
buttonhole
toward
symbol
raise
symbol
second
first.
tension
seam.
you
B.
the
C.
seam
Raise
on
Sew
Sew
by
piece
a
Turn
to
4-6
needle.
in
is
the
the
1
raise
to
0
E
F
Cut
Turn
the
bartacking
Turn
the
tying
stitches.
toward
to
its
highest
rial,
Pull
both
ends.
buttonhole
you
the
knob
knob
7-
to
stitches.
to
Turn
to
bring
point.
filler
open.
symbol
Raise
symbol
the
the
Remove
thread
0.
the
E.
Sew
balance
take-up
taut
Sew
the
and
4-6
needle.
few
a
wheel
lever
mate
trim
To
the
foot
from
afford
work
has
the
D
better
a
the
buttonhole
been
omitted
drawings.
view
of
19
Page 14
Turn
push
over
it
over
the
tii
wur
the
foot
free
control
arm
support
receptacle
as
far
and
will
as
it
1,Mangrng
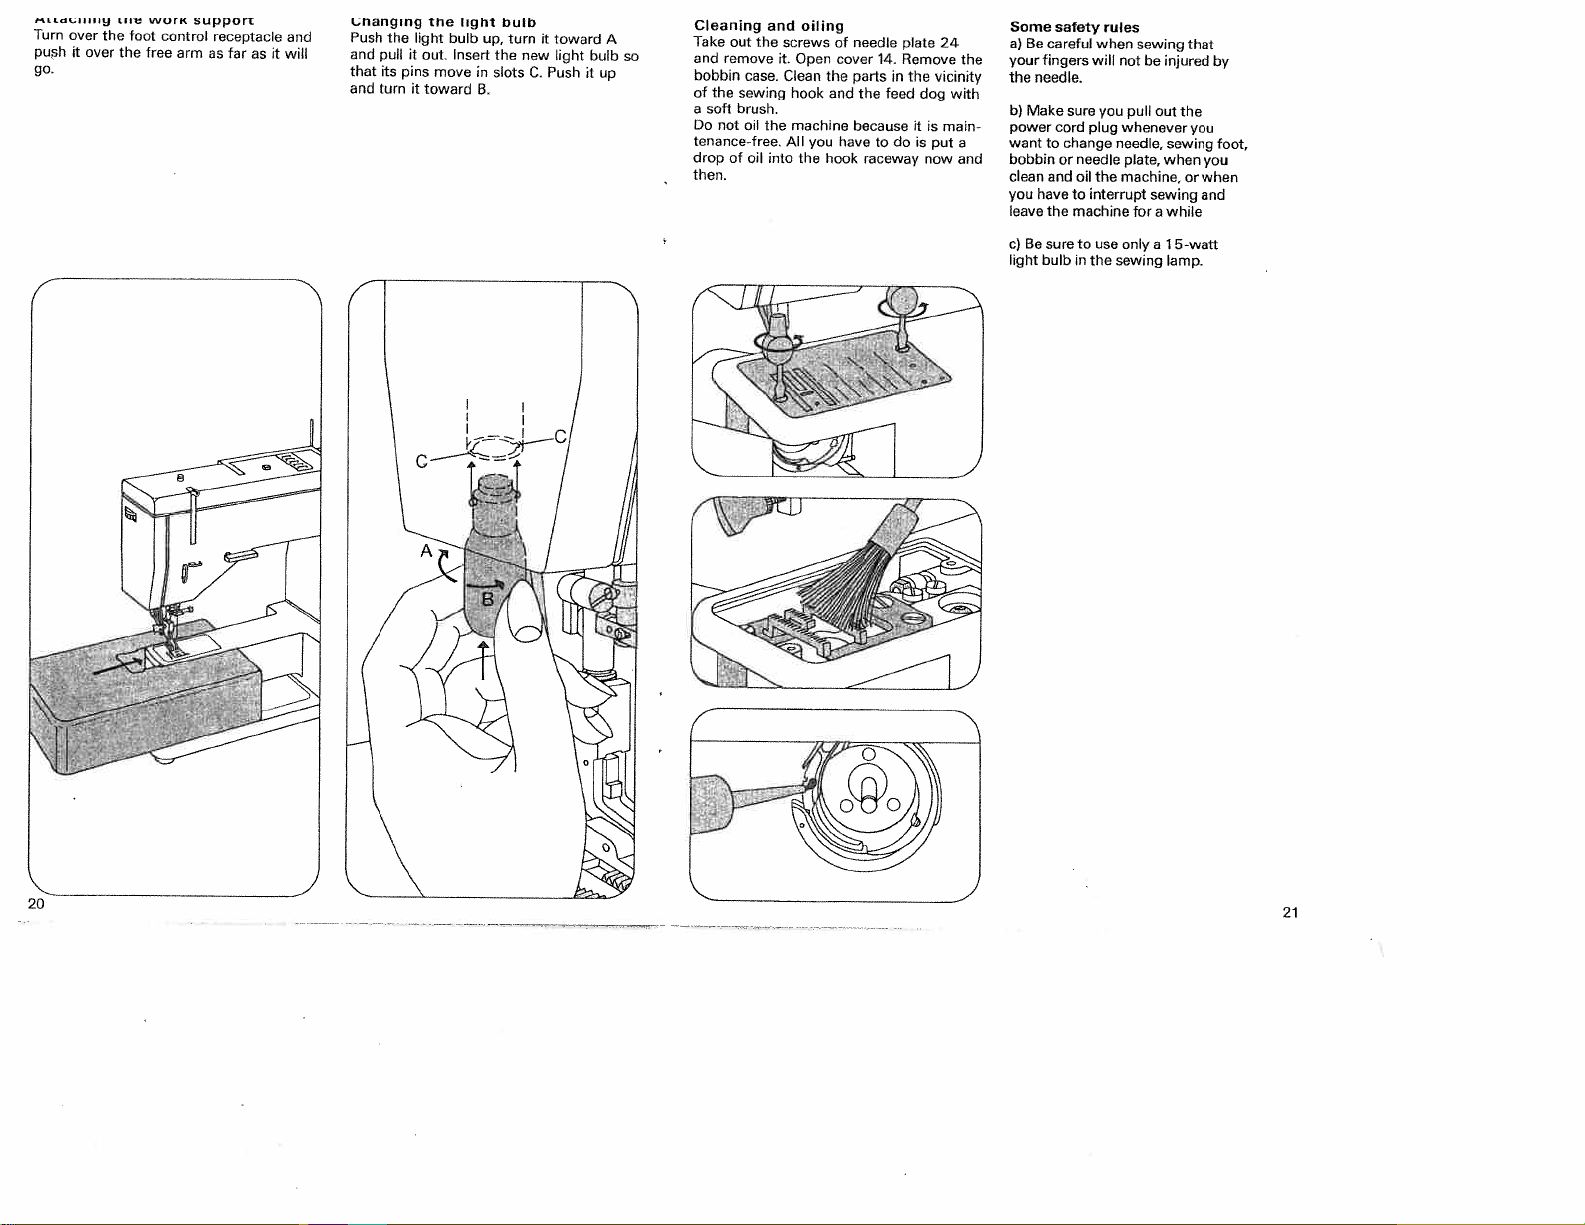
Push
the
pull
and
that
its
turn
and
it
pins
light
out
it
toward
tile
move
light
bulb
Insert
bulb
turn
up,
it
toward
light
Push
bulb
it
A
so
up
the
new
in
slots
C.
B.
Cleaning
Take
Out
and
remove
bobbin
case.
of
the
sewing
soft
brush.
a
Do
not
oil
tenance-free.
drop
of
oil
then.
the
and
the
into
screws
Open
it.
Clean
hook
machine
All
the
oiling
you
of
cover
the
and
have
hook
needle
14.
parts
the
because
to
raceway
plate
Remove
in
feed
do
the
dog
it
is
24
vicinity
is
main
put
now
the
with
a
and
Some
safety
a)
Be
careful
your
fingers
the
needle.
b)
Make
sure
power
cord
want
to
change
bobbin
or
clean
and
havetointerrupt
you
leave
the
Be
sure
c)
light
bulb
rules
when
will
you
plug
needle
oil
the
machine
to
use
in
the
sewing
notbeinjured
pull
out
whenever
sewing
needle,
plate.
when
machine,
sewing
for
while
a
only
a
5-watt
1
sewing
lamp.
the
or
that
by
you
foot,
you
when
and
21
Page 15

iruuiie
snooting
Cause:
Machine
1.
Needle
not
Wrong
needle
Needle
bent
Machine
Needle
too
2.
Needle
For
any
of
Thread
tension
Poor-quality
or
thread
excessive
3.
Needle
Needle
not
go.
Needle
bent.
too
Needle
bent
Needle
because
Bobbin
case
skips
inserted
or
threaded
thin
thread
the
or knotty
that
storage.
breaks
pushed
thin
and
work
improperly
stitches
correctly.
used.
blunt.
improperly.
for
thread
breaks
above
reasons.
strong.
too
thread
has
become
up
too
thick.
or
strikes needle
is
pushed
used.
too
as
far
or pulled.
inserted.
used.
dry
asitwill
plate
by
Remedy:
Push
needle
flat
shank
side
Insert
system
Insert
new
needle.
Check
threading.
needle
Select
Thread
Chart.
See
par.
1
above.
Regulate
Use
Insert
asitwill
Insert
Note
Let
Only
When
Only
new
go.
new
Needle
machine
guide
inserting
thread
good-quality
needle
needle.
the
againstituntil
upasfar
facing
130/705
according
tensions.
and
and
Thread
feed
the
material
the
it
snaps
it
as
toward
needle.
H
to
thread
push
Chart.
work alone.
lightly.
bobbin
into
will
the
Needle
it
upasfar
case,
place.
go,
back.
and
press
Cause:
not
4.
Seam
Tension
Thread
Bobbin
Kinks
of
material.
5.
Machine
Lint
has
rows
of
Feed
dog
the
left.
6.
Machine
Thread
7.
Fundamental
Never
there
Out
too
thread
appear
accumulated
feed
ends
run
is
a
its
uniform
is
adjustment.
of
thick,
knotty
wound
on
top
and
irregularly
feeds
dog.
dropped.
Lever
works
hook
raceway.
in
rules
a
threaded
pieceoffabric
or
unevenly.
bottom
between
20
heavily
machine
under
hard.
it
notatall
or
tooth
at
unless
the
sewing
Remedy:
Check
first-class
Use
During
thread
thread
Thread
both
Remove
Flick
Remove
oil
into
upper
bobbin
in
hand,
retainer
machine
tensions.
needle
lever
thread
hook
and
20
raceway.
lower
thread
winding,
but
stud.
properly
plate
to
the
ends
pass
right
and
tensions.
only.
do
and
not hold
it
through
and
check
clean
Out
putadrop
lint.
of
foot.
to
have
while,
switch.
children
leave
the
be
machine,
suretoswitch
Thisisparticularly
are
around.
even
the
off
important
for
If
you
a
short
master
when
22
23
Page 16

special
The
obtained
available
holder.
accessories
from
snap-on
as
your
Pfaff
feet.
listed
dealer.
To
below
attach
are intended
all
Not
a
the
sewing
conventional
for
feet
sewing
special
listed
foot,
sewing
below
remove
jobs.
are
at
the
They
present
can
sewing
be
foot
Accessory
Cording
Cording
(twin
cording
(twin
cording
(twin
Fringe
Edge
Straight-stitch
Nendle
hole
hole
Edge
Zipper
Falling
Zigzeg
Eyeletting
Hemmer
Hemmer
Hemmer
8iau
Darning
ZaTe
Roller
Spuol holder
24
needle
needle
needle
goide
fur
fnr
guide
binder
sewir,g
pINe
tout
fun)
shirrieg
foul
set
foot.
3
wrth 2.5
foot
5
with
7
tent,
with
toot
wit
free-arm
flatbed
(Fastening
plate
foal
(shell-edge(2Omm
foal
toot
(mol(ed
lnnt
gronnes
grooves
grooves
foot
h
models
font
toot
1,8-.
t.4-.
roond
models
or
edge)
*
3.0
2.0-
1.6-
screw
needle
ee
nirn
or
or
1.0
needle
2.5-mm
1.8-mm
93—040
mm
gauge)
needle
needle
959—2b(
gairgel
geuge)
Ordering
93—107
93-040
93—040
93—040
93—040
98—Old
93.040
93040
St
—053
98—501
93—040
93—847
a3—o4o
93—040
93—847646—00
93—847
98—055
-
93—040
93—040
93—100
93—040
No.
560—91
948—31
850—31
952-31
843—31
005—00
940—35
93935
077—25
000—27
838—31
520—06
9d8—45
934—31
547—00
622—00
960—91
9h5—9)
91
2—21
b64—45
Sewing
cordin
9
For
(needle
for
fine
mreedle
Edge
tnpstilching
Fur
seWing
and soft
emzo,
—
(silk
For
mige
inserting
Fn,
For
fulled
shirrmng
For
Far
eyelettisg
Fuhemosgedges
hrm)8a9en
Darning
sewing
Fur
sewing
For
spnthelmc
sawing
For
Operation
sine
cording
sine
stitching
oer’y
fabrics
stitching
arrd
work
80.
70)
fringes
delicate
etc.)
zippers
snanrs
nalarmues
embrnidering
plastic
coated
materials
with
nod
end
2
and
qodtmng
mitE
meterizls
spools
Page 17

PFAFF—HAN
Haushaltnähmaschinen
für
7500
DELSGESELLSCHAFT
Karlsruhe
West-Germany
41
mbH.
Sobect
Nr.
Printed
22429
alterations
to
WI
W-Gerrnany
in
108t
oogl
 Loading...