

Page 1
Embroidery preparations
Page 2
B
F
A
B
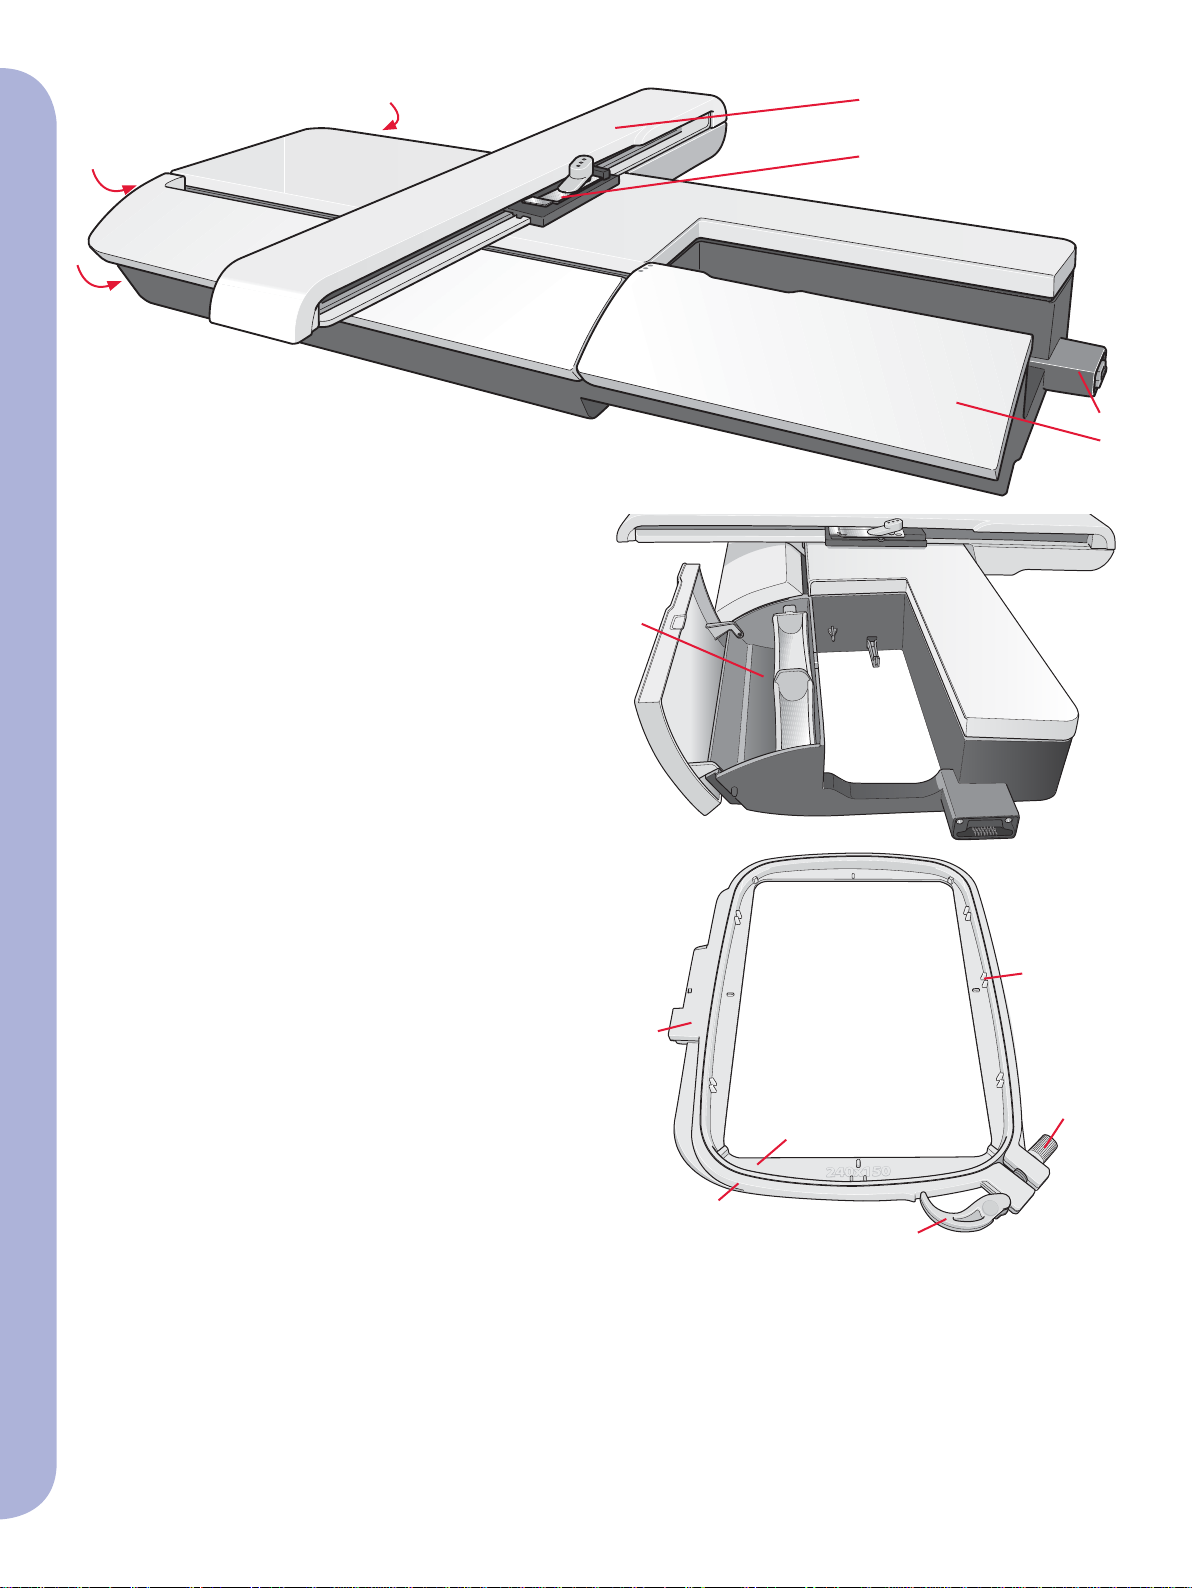
Embroidery unit overview
(type BE15)
A Embroidery unit release button
B Level adjusting feet
C Embroidery unit accessory tray
D Embroidery unit socket
E Embroidery hoop connection assembly
F Embroidery arm
Note: A smaller embroidery unit, 260x200mm, is
available to purchase at your local authorized PFAFF®
dealer.
E
D
C
C
Embroidery unit accessory tray
Use the tray in the embroidery unit to store
accessories used for embroidering.
Built-in designs
Embroidery Mode - Preparations
Over 200 designs are included in the memory
in your machine. All these designs are also
included on the creative vision™ CD for backup
if you temporarily want to remove them from the
machine memory.
Embroidery hoop overview
G Embroidery hoop connector
H Outer hoop
I Inner hoop
J Quick release
K Retaining screw
L Ribs for fi tting the clips
L
G
K
I
H
J
7:2
Page 3

creative vision™ Embroidery collection
Page through the creative vision™ Embroidery
collection for designs and fonts.
The design number, stitch count (number of
stitches in the design) and the design size are
displayed next to each design. The suggested
thread colors for each color number are shown.
Connect the embroidery unit
There is a covered socket behind the free-arm, see
picture. The cover will open automatically when
connecting the embroidery unit.
1. Slide the accessory tray off.
2. Slide the embroidery unit onto the free arm
of the machine until it plugs fi rmly into the
socket. If needed, use the level adjusting feet
so that the machine and embroidery unit are
even. If the machine is turned off, turn it on.
3. A pop-up tells you to clear the embroidery
area and remove the hoop for positioning.
Touch OK. The machine will calibrate and
the embroidery arm will move to the ready
position. This calibration will set your
embroidery functions each time you slide on
the embroidery unit.
Make sure not to calibrate the machine with the
embroidery hoop attached as this can damage the
needle, presser foot, hoop and/or the embroidery
unit. Be sure to clear all materials from around the
machine before calibrating so that the embroidery
arm does not bump into anything while calibrating.
Embroidery Mode - Preparations
Remove the embroidery unit
1. To store the embroidery unit in the embroidery
case, move the embroidery arm to park
position by selecting park position on the
screen in either embroidery edit or embroidery
stitch-out.
2. Press the button at the left, underneath the
embroidery unit (A) and slide the unit to the
left to remove it.
3. The cover of the socket closes automatically.
4. Store the embroidery unit in the original
packing material, place in the soft carrying bag.
A
7:3
Page 4

To hoop the fabric
For the best embroidery results, place a layer
of stabilizer beneath the fabric. When hooping
stabilizer and fabric make sure that they are
smooth and securely hooped.
1. Open the quick release (A) on the outer hoop.
Remove the inner hoop. Place the outer hoop
on a fi rm fl at surface with the screw on the
lower right. There is a small arrow in the center
of the lower edge of the hoop which will line
up with a small arrow on the inner hoop.
2. Place stabilizer and the fabric, with the right
sides facing up, on top of the outer hoop. Place
the inner hoop on top of the fabric with the
small arrow at the bottom edge.
3. Push the inner hoop fi rmly into the outer hoop.
4. Close the quick release. Adjust the pressure of
the outer hoop by turning the retaining screw
(B). The fabric should be taut in the hoop for
the best results.
Note: When embroidering additional designs on the
same fabric, open the quick release, move the hoop to the
new position on the fabric and close the quick release.
When changing type of fabric, you might need to adjust
the pressure using the retaining screw. Do not force the
quick release.
B
A
Slide on the hoop
Make sure that the accessory tray on the
embroidery unit is closed. Slide the hoop onto the
embroidery unit from front to back until it clicks
into place.
Embroidery Mode - Preparations
The marked center point on the design should
match the starting point of the needle. If minor
adjustments are needed use the icons on the screen
(See chapter 8).
To remove the hoop from the embroidery arm,
press the grey button on the hoop connection
assembly and slide the hoop towards you.
7:4
Page 5

Getting started embroidering
1. After attaching the embroidery unit and
e
mbroidery foot, insert a bobbin with
lightweight bobbin thread.
Note: Make sure that the IDT is disengaged.
2. Hoop a piece of fabric and slide on
3. Open selection menu (A) to select a design.
Touch it once to load to embroidery edit.
4. The machine automatically switches to
embroidery edit. The design is placed in the
center of the hoop.
the hoop.
Embroidery Mode - Preparations
5. Switch from embroidery edit to embroidery
stitch-out by touching the embroidery toggle
icon (B) on the task bar.
6. Thread the machine with the fi rst color in the
color list (C).
BA
C
B
7:5
Page 6

7. Clear suffi cient space to accommodate
movement of the embroidery arm and the
hoop. Hold the needle thread and touch the
start/stop button (D) or the foot control. The
machine starts embroidering.
8. After stitching a few stitches, the machine stops
and a pop-up appears on the screen asking you
to cut the thread end. Cut the thread and press
start/stop to continue embroidering.
9. When the fi rst color is completed, your
machine stops. A pop-up appears asking you
to change color. Re-thread with the next color
and continue embroidering by pressing start/
stop.
Each color segment is tied off at the end and
the needle thread is cut.
D
10. When the embroidery is completed, your
Embroidery Mode - Preparations
machine cuts the needle and bobbin thread
and stops. The needle and presser foot raise
automatically for easy removal of the hoop.
A pop-up informs you that your embroidery is
fi nished. Touch OK to clear your design from
the screen.
7:6
 Loading...