

Page 1
rrrr
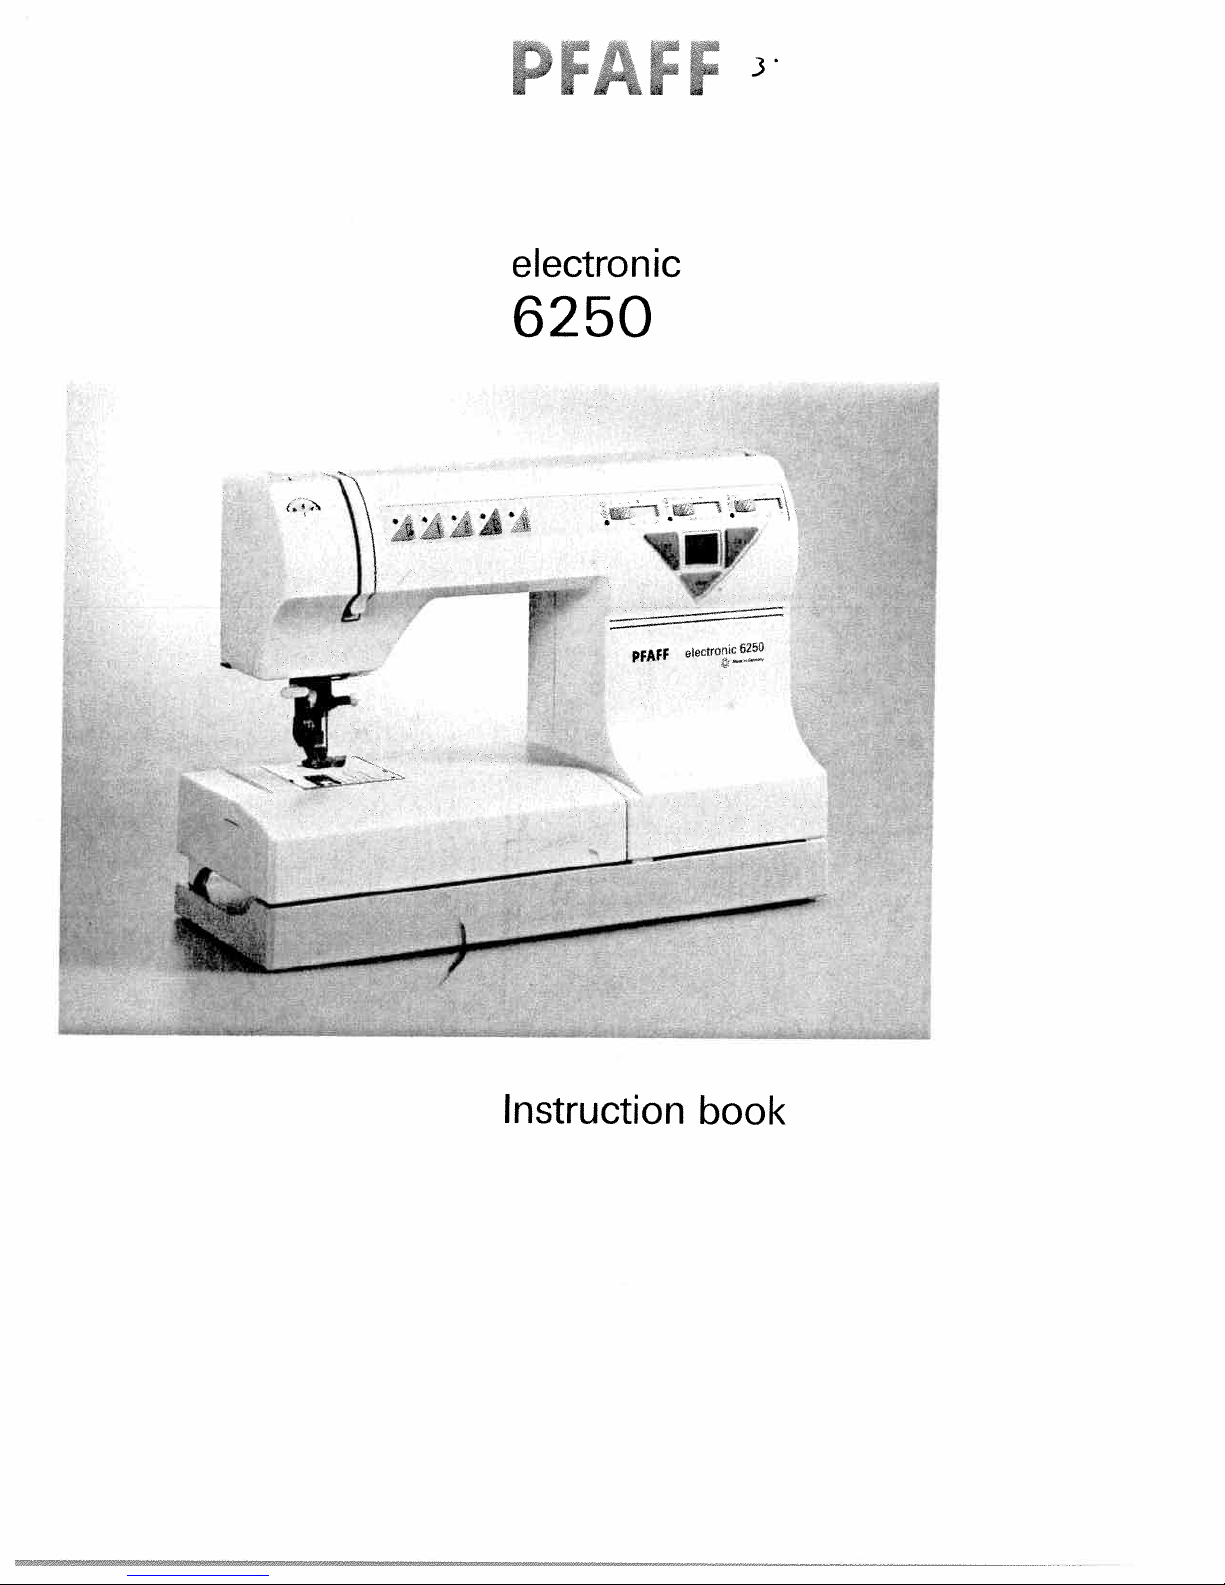
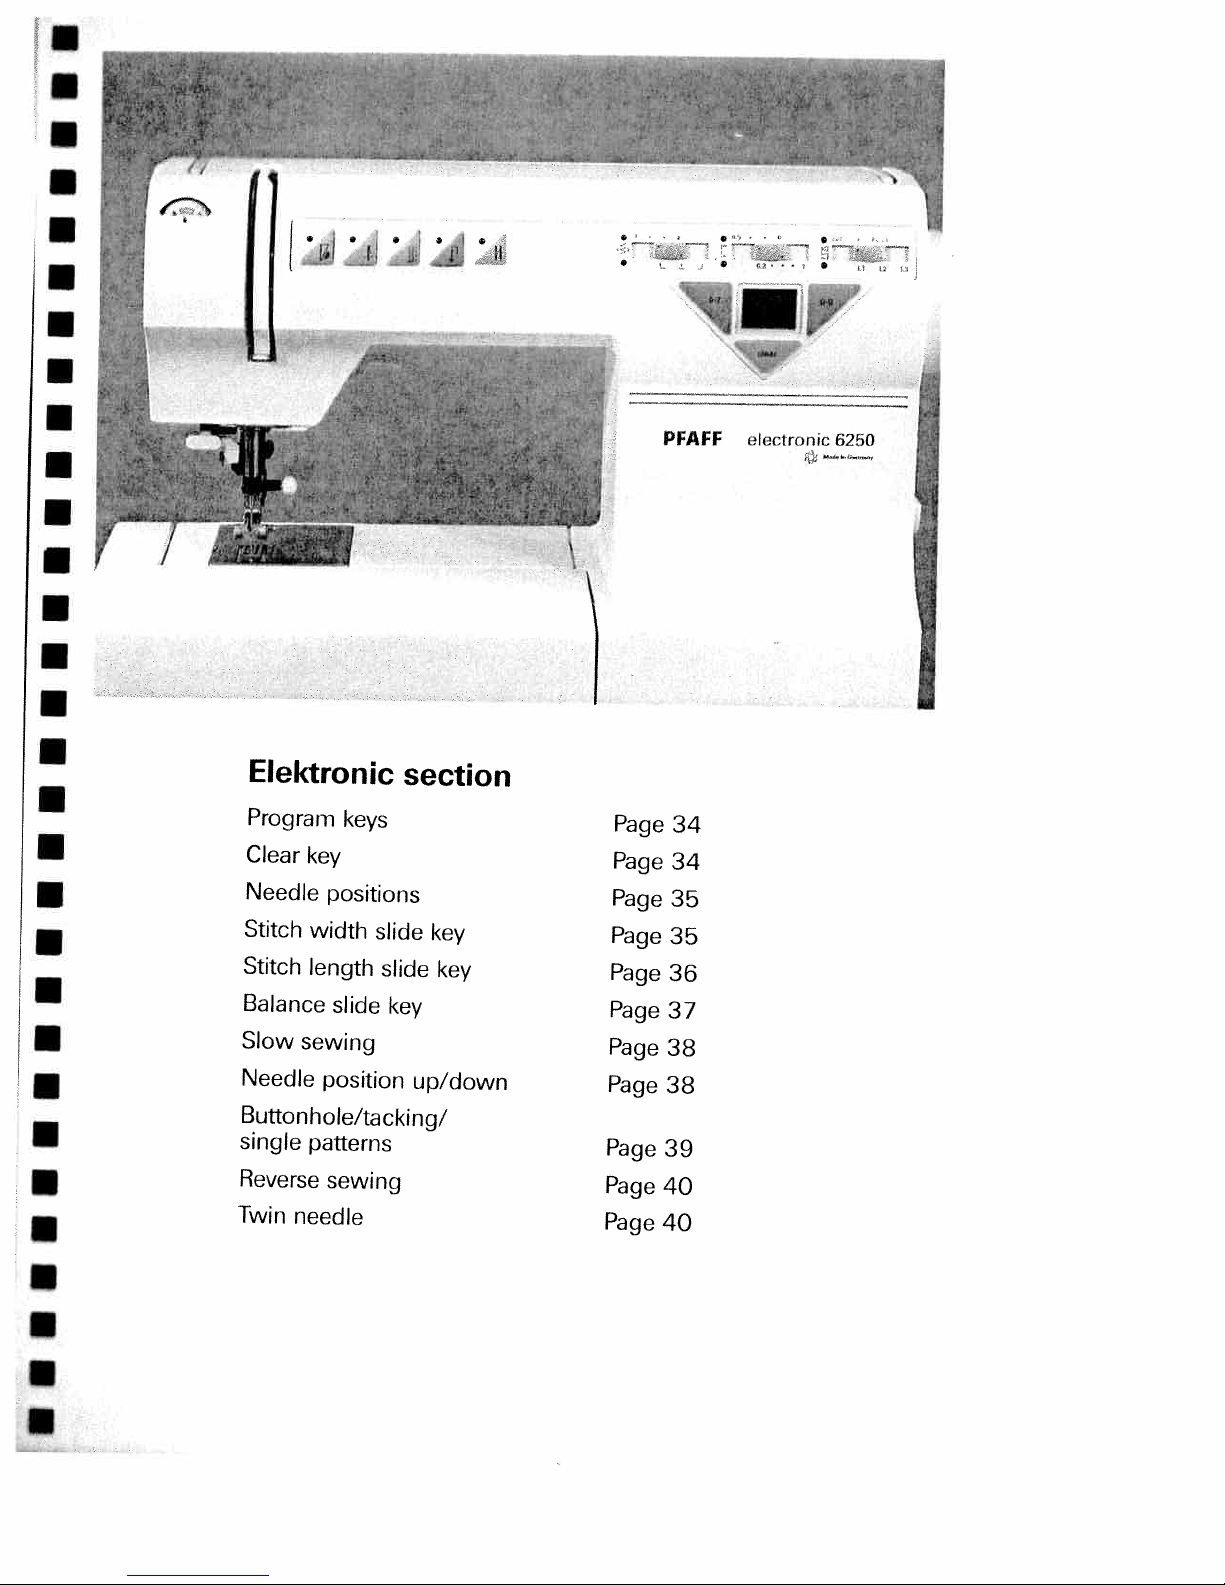
electronic
6250
PFAFF
.‘
eiectro
20
-
Instruction
book
Page 2
I
easier
For
-
please
understanding
fold
this
page
open
of
when
this
instruction
reading
it.
book
I
I
LL
Safety
For
the
The
leads
with
plug
The
wiresinthe
As
the
with
the
wire
The
marked
The
wire
marked
rules
United
must
three
Blue:
Brown:
colours
colour
which
with
which
with
Kingdom
definitely
pins.
mains
Neutral
Live
the
of
coding
is
the
lettter
is
the
letter
lead
wires
of
coloured
N
coloured
L
or
only
not
are
in
the
blue
or
coloured
brown
coloured
be
connected
coloured
the
mains
terminals
must
must
red.
lead
in
be
black
be
to
the
according
of
this
your
plug,
connected
connected
safety-lead
the
to
appliance
proceed
to
the
to
the
following
terminal
may
as
follows:
terminal
terminal
I
nor
code:
correspond
not
which
which
I
:
to
a
I
I
I
is
is
i
I
Cut-oft
Defective
Only
3
and
the
plug
The
electrical
froiii
Please
mains
mains
A
spare
fuse
must
also
plugs
leads
fuses
cover
never
suppliers
observe
are
definitely
must
must
must
be
used
be
or
the
general
Contents
be
be
used
marked
without
the
PFAFF
on
-
not
to
replaced
as
3
safety
pages
-
be
used,
complete.
approved
A
or
with
fuse
cover.
agencies.
notes
and
4
on
but
ASTA
by
the
corresponding
Spare
page
5
-
disposed
according
fuse
2.
immediately.
of
covers
to
BS
colour
are
1362
code.
available
I
I
I
I
i
I
I
I
I
I
I
Page 3

Important
the
For
Li
This
appliance,
Read
Li
DANGER
L
L
LI
L
1
2.
3.
4.
AIARNING
I
1
2.
3.
I
1
4
5
6
7.
8
9
0.
l
I
11.
1
2.
3.
1
1
4
15.
1
6
7.
1
U
k
U
L
L
United
sewing
The
the
Always
Do
Do
or
machine
basic
instructions
all
sewing
electnc
unplug
reach
not
place
not
into
drop
allow
not
Do
children.
near
this
Use
recommended
operate
Never
dropped
been
service
or
operate
Never
sewing
drop
Never
not
Do
not
Do
To
disconnect
operate
Never
riot
Dv
lingers
Keep
Always
not
Do
not
Do
Switch
needle,
Always
making
plug
Hold
States
safety
To
machine
outlet
for
or
water
sewing
center
machine
or
out
use
operate
unplug
the
use
bent
use
or
pull
sewing
the
changing
unplug
any
when
safety
only
designed
is
precautions
before
reduce
should
irrirriediately
before
sewing
a
stoie
other
or
reduce
To
used
be
to
machine
the
by
sewing
this
damaged,
or
examinatron.
for
sewing
the
and
mnsett
doors.
of
where
all
turn
soft
on
a
pulling
by
from
away
proper
blunt
or
push
machine
needle,
sewing
user
othei
rewinding
instructions
manufactured
and
should
sewing
this
using
electric
of
risk
the
be
never
after
machine
machine
liquid.
risk
the
toy.
a
for
only
machine
dropped
or
machine
control
(spray>
cord.
on
rnovmnq
plate.
needles
while
of[(”O’>
threading
into
Replace
Close
its
repair.
free
into
to
such
stitching.
from
adjustments
cord
relamping.
sewing
a
as
manufacturer
foot
object
any
aerosol
controls
suttace
all
needle
fabric
machine
servicing
always
left
usiiig
that
burns,
of
intended
as
if
with
any
off
(“0”)
To
patts
The
Use
when
bobbin,
machine.
shock:
unattended
and
bulb
has
where
attention
contained
has
it
into
electrical
any
from
opening.
products
position,
bed
a
as
unplug,
Special
wrong
needles
It
making
electric
the
reel.
for
adhered
be
before
with
fallen
can
it
electric
tire,
use
damaged
a
water,
air
openings
accumulation
the
are
or
grasp
plate
recommended
niay
changing
or
mentioned
not
Do
HOUSEHOLD
into
is
as
in
Return
or
being
then
couch
care
deflect
any
outlet
allow
as
to
plugged.
when
cleaning.
type
same
water
or
be
fall
shock,
necessary
described
manual.
this
cord
the
mnechirncal
blocked.
used
remove
where
pIng,
the
required
is
cause
can
the
adjustments
presser
when
in
plug
the
use
follows
rated
Unplug
pulled
or
when
ii
plug,
or
appliance
adjustment.
lint,
of
where
or
plug
the
not
the
by
needle,
foot,
removing
instruction
whip
to
only
Always
5
1
immediately.
into
injury
this
manual.
tIns
it
it
Keep
dust
horn
openings
air
cord.
the
around
needle
nianufacturer
the
causing
the
in
etc.
when
When
unplug
Watts.
tub
a
persons
to
sewing
not
is
the
to
ventilatmon
loose
and
oxygen
outlet
sewing
the
to
it
needle
covers,
manual.
rewinding.
you
this
sink.
or
machine
Use
oilli
working
nearest
openings
cloth
being
is
be
may
break.
only.
break
to
area,
lubricating,
an
use
appliance
not
Do
used
is
attachments
pioperly,
authorized
administered.
blocked.
machine
such
or
electric
place
of
needle
threading
as
when
by
if
the
from
in
or
it
has
dealer
notes
general
observe
also
Please
the
safety
on
page
2.
SAVE
THESE
INSTRUcTIONS
Page 4
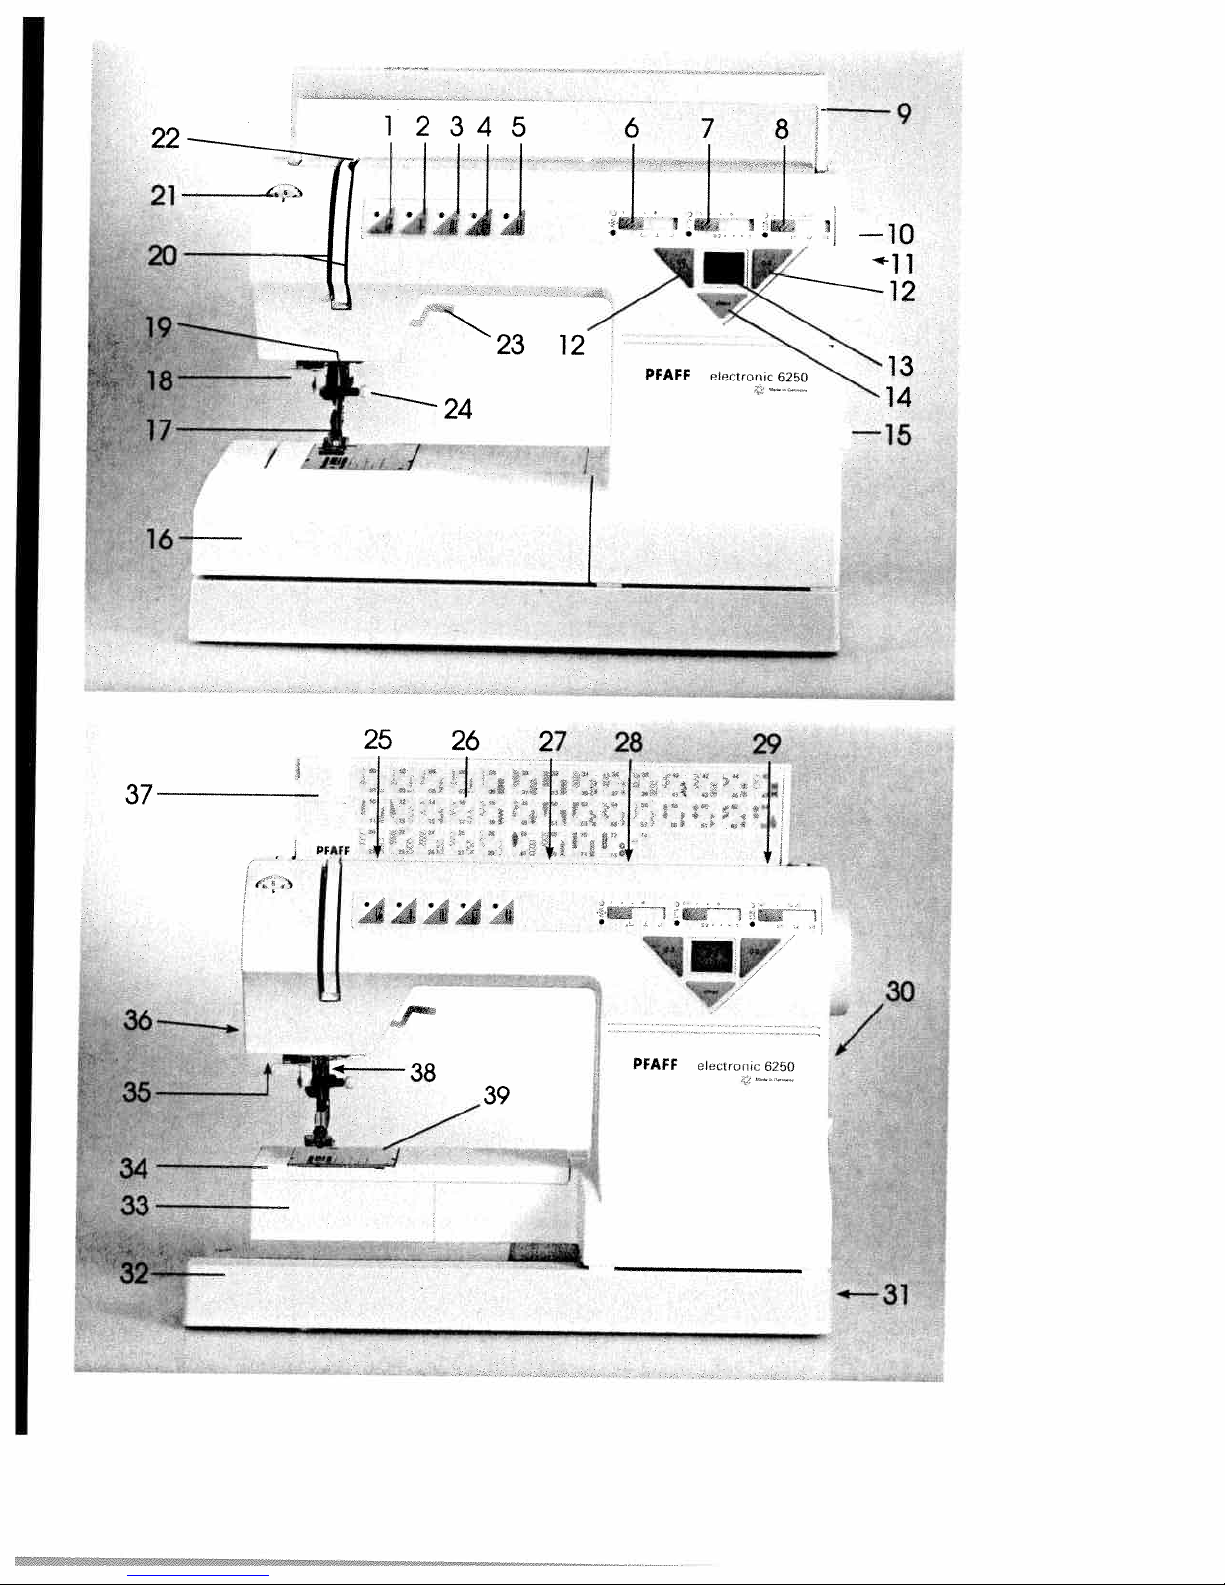
22
1
2345
6
7
8
9
37
16
p;16
J
27
12
PFAFF
26
23
,
24
I
F
25
26
!i
ertronic
29
6250
—10
‘i
14
—15
V
4
1W
38
I
PFAFF
-_
electro
•
30
cc
6250
Page 5
(18)
(19)
(20)
(21)
(22)
(23)
(24)
(25)
(26)
(27)
(28)
(29)
(30)
(31)
(32)
(33)
(34)
(35)
(36)
(37)
(38)
(39)
Parts
(1)
(2)
(3)
(4)
(5)
Twin
Stitch
(6)
Stitch
(7)
(8)
Balance
(9)
Carrying
(10)
Hand
(11)
Handwheel
(12)
Program
(13)
Liquid
(14)
Clear
(15)
Main
(16)
Accessory
(17)
Sewing
Needle
Thread
Threading
Needle
Takeup
Presser
Needle
Thread
Program
Reel
Second
Bobbin
Connection
Connection
Base
Hook
Free
Sewing
Thread
Top
Dual
Needle
Key
Key
Key
Key
arm
cover
feed
of
the
sewing
for
“slow
for
“needle
for
“tacking/buttonhole/single
for
“reverse
needle
width
length
wheel
crystal
key
switch
foot
threader
guide
thread
lever
bar
holder
guide
table
holder
spare
winder
plate
cover
lamp
trimmer
(top
plate
sewing”
up/down
sewing”
indicator
slide
slide
slide
key/pattern
handle
release
keys
0
to
display
“beginning
box
holder
slot
tension
lifter
with
for
bobbin
with
unwinding
reel
socket
socket
feed)
key/needle
key/buttonhole
disk
7/0
with
fixing
holder
“mains
“foot
machine
to
9
of
pattern”
sewing
screw
winding
cord”
control”
position”
pattern”
positions
length
length
foot
disk
Page 6

I.
/
Notes
Notes
machines
Section
1.
2.
3.
4.
5
The
according
specification
6.
Do
the
7.
Do
—
—
—
8
Do
socket
If
9.
purpose
wrongly
liability
1
0.
To
open
inside
repair,
our
11.
Be
on
on
safety
according
28
or
The
user must
with
regard
needle
area
When
maintenance
mechanical
disconnect
by
The
sewing
The
adjusted
this
during
pulling
maximum
tension
machine
not
machine
not
there
its
function
it
is
wet,
not
appliance
avoid
the
the
qulified
sure
and
leaving
lamp
by
place
use
is
pull
by
than
operated,
for
the
machine.
This
to
safety
for
IEC
to
the
constantly
work
work
parts
the
out
permissible
is
the
of
a
Ptaff
must
to
the
plate.
any
the
visible
is
e.g.
with
the
its
cord.
that
any
damage
risk
machine
is
solely
service
use
only
domestic
to
DIN
335,
Section
exercise
up-
the
machine,
or
or
accessories,
machine
the
mains
1
5
Watts.
drive
mechanic.
be
put
indications
objects
sewing
damage,
disturbed,
condensation.
mains
plug
is
used
intended
we
will
of
electric
There
which
the
staff.
original
sewing
57
700,
28
adequate
and
down
observe
the
during
when
changing
from
the
plug.
wattage
belt
must
into
operation
on
in
openings
machit
for
out
another
or
not
te
of
if
it
accept
caused.
shock,
are
rio
the
user
responsibility
PFAFF
caution
moving
only
the
if:
the
is
do
parts
can
sewing
always
mains
for
the
be
on
any
not
of
parts.
Environment
The
recommended
Ambient
Humidity
This
sewing
temperature
20%
machine
electronicmechanical
for
supervised
operated
to:
dust,
static
corrosive
rhe
machine
for
ventilation
electricity,
in
such
severe
chemicals
must
purposes,
use
even.
Treatment
Always
hitting
protect
or
dropping.
the
Cleaning
onsi
H
ii
g:
To
clean
the
housing,
cloth
which
stubborn
paraffin.
Please
Do
not
products
for
cleaning
dirt,
Note!
use
such
is
free
use
any
insecticides
as
the
environn
1
0
to
80%
is
appliance;
in
the
a
way
that
dampness,
heat-producing
or
be
used
machine
use
of
fluff
a
soft
cloth
petrol
(gas)
housing.
ient
to
C
40
a
high-quality
home.
it
is
direct
liquids.
on
a
which
is
against
a
dry,
To
remove
with
or
chemical
or
thin
is.
it
It
not
free
both
clean
alcohol
should
objects,
C
is
a
machine
be
subjected
sunlight,
surface,
firm
damage
and
soft
any
or
cheniicals
and
by
Page 7
Modern,
uncomplicated
Sewing
—
control
by
—
touch-key
Congratulations!
high-quality
advantages.
take
can
sew
will
features
It
technology,
as
just
sewing
If
the
wrong.
After
the
make
If
no
at your
you
So
you
your
now
you
instruction
all,
things
full
have
you
problem!
need.
now
many
fashion
product
Your
any
through
the
and
uncomplicated
machine.
take
this
is
the
use
any
service
you
can
enjoyable
ideas.
You
new
material
thick
ver’
latest
this
time
book,
the
only
machine
them.
of
further
PFAFF
Your
with
get
have
offers
that
sewing
in
its
stride
thin
and
in
desgin
instruction
your
as
enough
nothing
way
can
questions,
dealer
help
any
started!
hours
of
bought
unique
machine
for
book
PFAFF
study
to
can
learn
to
and
do,
will
or
advice
We
creating
a
and
you.
and
go
to
that
wish
is
all
is
be
Page 8
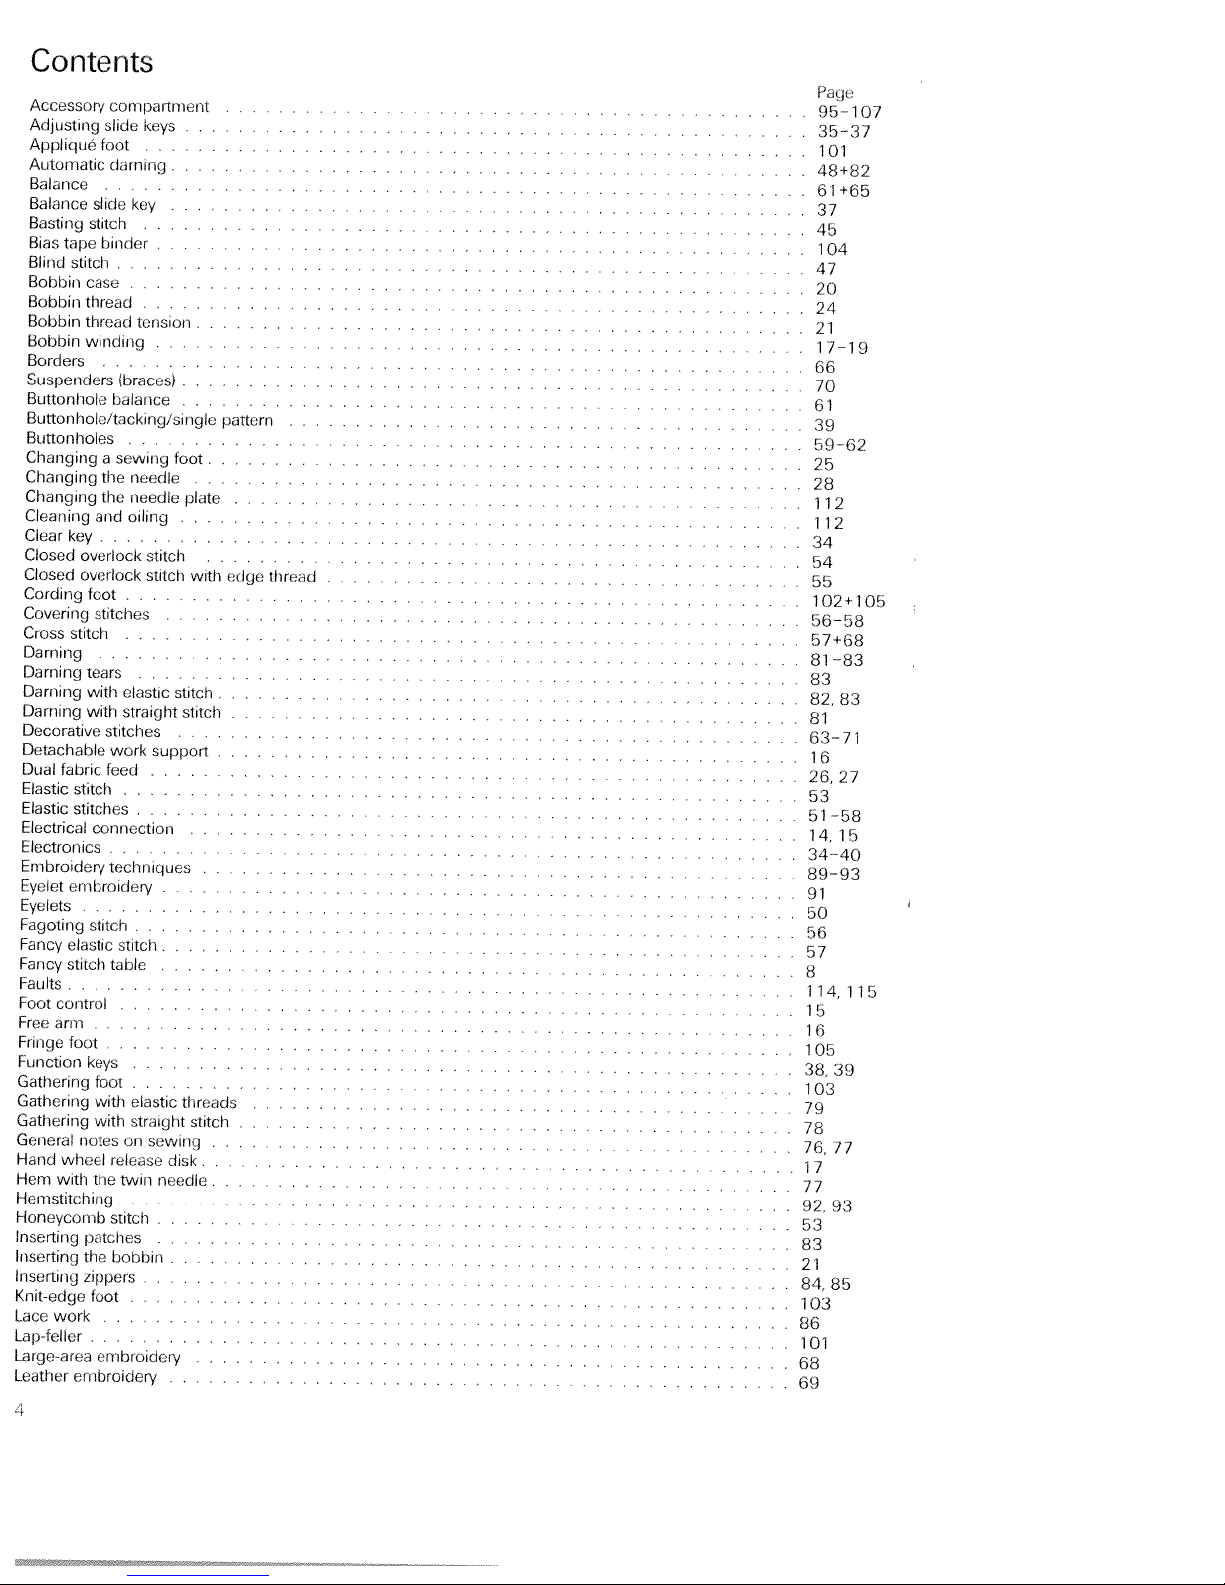
Contents
Accessory
Adjusting
Applique
Automatic
compartment
,lide
keys
foot
dirning
Balance
Balance
Basting
Bias
Blind
Bobbin
Bobbin
Bobbin
Bobbin
tape
stitch
slide
stitch
binder
case
thread
thread
winding
key
.
tension
Borders
Suspenders
Buttonhole
Ibraces)
balance
Buttonhole/tacking/single
Buttonholes
Changing
Changing
Changing
Cleaning
Clear
Closed
Closed
Cordingfoot
Covering
Cross
and
key
overlock
overlock
stitches
stitch
a
the
the
sewing
needle
needle
oiling
stitch
stitch
.
.
Darning
Darning
Darning
Darning
Decorative
Detachable
Dual
Elastic
Elastic
Electrical
Electronics
Embroidery
Eyelet
tears
with
with
stitches
fabric
feed
stitch
stitches
connection
techniques
embroidery
elastic
straight
work
.
support
Eyelets
Fagoting
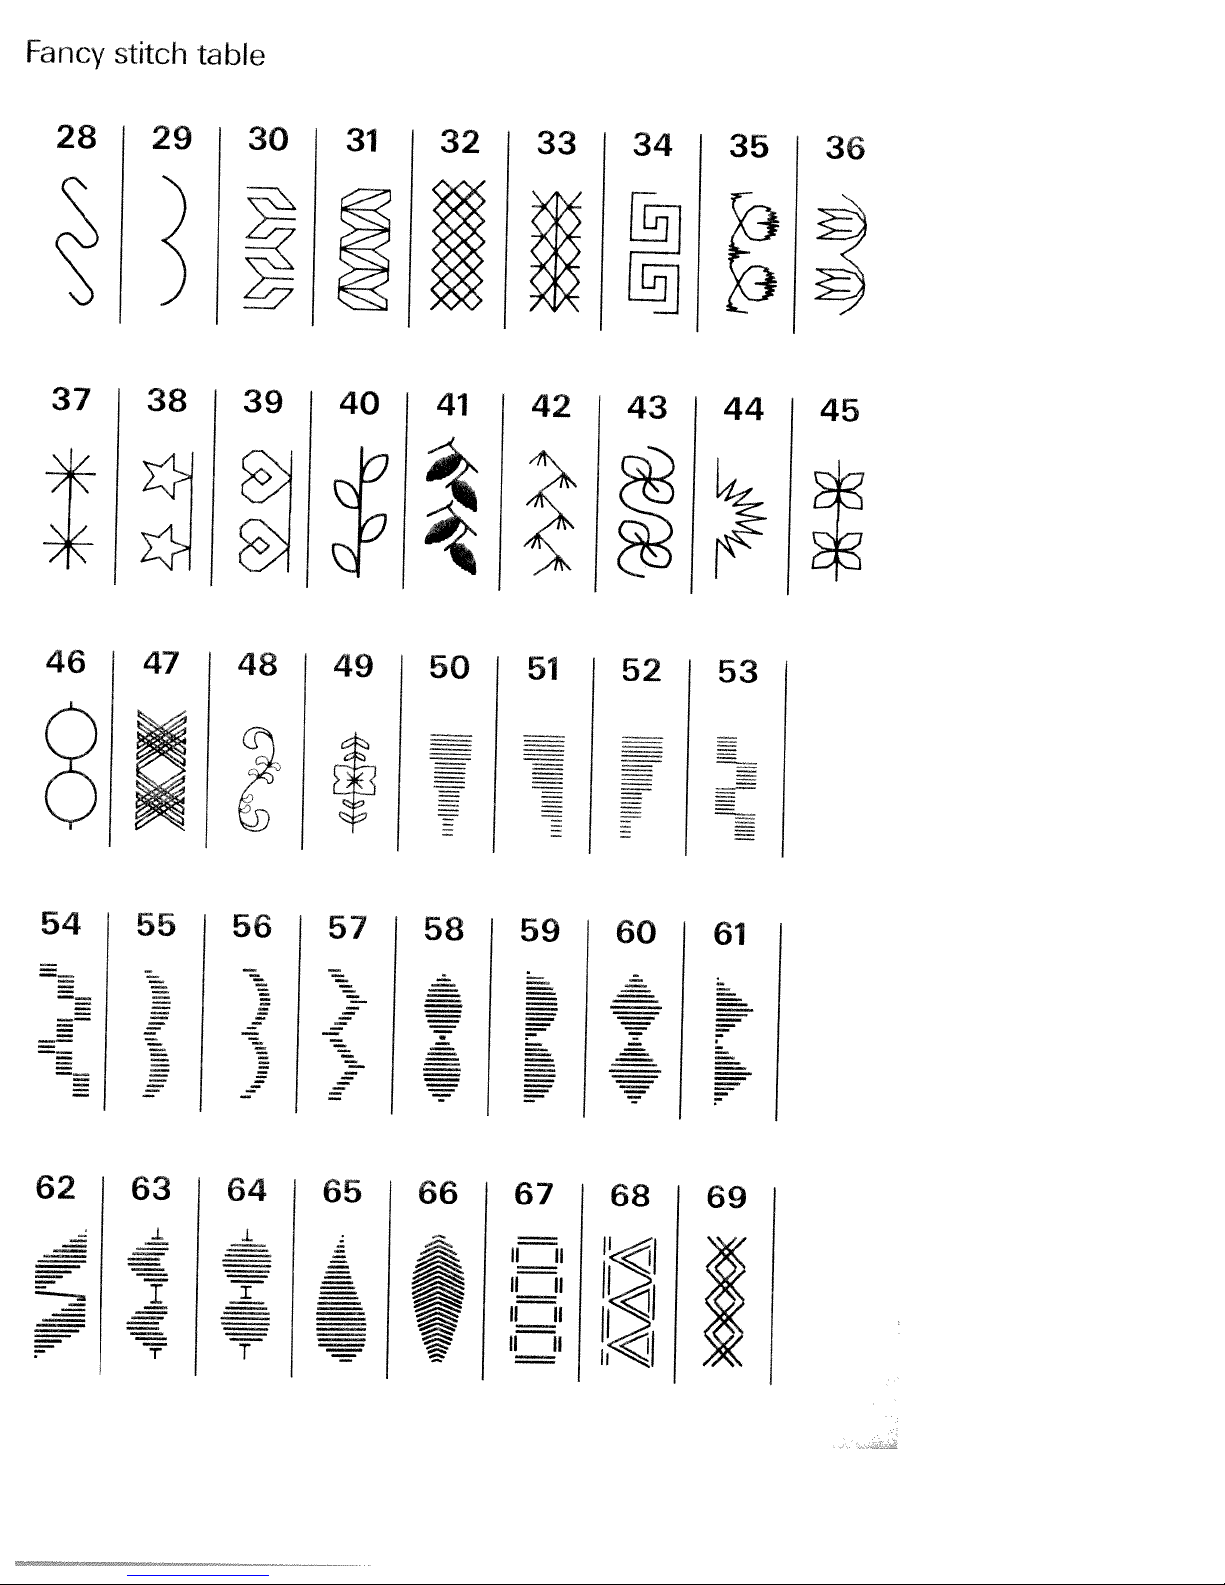
Fancy
Fancy
stitch
eldstic
stitch
stitch
table
Faults
Foot
control
Free
arm
Fringe
foot
Function
Gathering
Gathering
Gathering
General
Hand
Heni
wheel
with
keys
foot
with
with
notes
the
elastic
straight
on
relcise
twin
sewing
Hemstitching
Honeycomb
Inserting
Inserting
Inserting
Knit-edge
Lace
work
stitch
patches
the
bobbin
zippers
foot
Lap-feller
Large-area
Leather
embroidery
eribroidery
.
.
foot
plate
.
stitch
stitch
.
threads
disk...
needle.
.
. .
with
.
.
stitch
pattern
edge
.
.
.
thread
.
.
95
.
.,...,....
.....
.
.
35—37
107
101
48+82
61
+65
.
.
.
.
.
.
.
.
37
45
104
.
.
.
47
20
24
21
1
.
.
.
7—19
66
70
61
.
.
39
59—62
25
28
112
.
11
2
34
54
55
102+105
.
.
.
56—58
.
57+68
81
83
83
82,
83
81
63—11
16
.
.
. .
.
. .
.
.
26,
2/
53
51
—58
4,
1
.
1
5
.
34
-40
89—93
.
.
.
.
.
.
.
91
.
50
56
57
.
.
8
.
114,115
.
1
5
1
6
1
05
38,
. .
.
39
103
79
.
.
.
.
.
.
.
.
.
.
.
.
.
.
.
.
78
76,
71
1
7
.
77
.
.
92,
93
.
53
.
83
21
.
84,
85
1
03
86
.
.
.
.
1
01
68
69
Page 9
I
I
I
I
a
I
U
a
I
a
a
a
a
I
a
a
a
a
I
a
a
I
a
a
a
a
a
a
Left
needle
Light—kiit
butiunhole
Linen
buttonhole,
Linen
Linen
embroidery
Lowering
Maintenance
Monograms
Needle
chart
Needie
Needle
thredd
Needle
threader
Needle
up/down
Non
elastic
Oiling
Ovui
Open
Overlock
Pattern
Iuigth
Pattern
sldfl
Pattern
width
Plain
stcni
Practical
Presser
bar
Progiam
Pullover
Quilting
Reverse
Richelieu
Right
needle
Roll
hemming
Saddle
stitch
Safety
notes
Semi
automatic
Semiautomatic
Serging
Serging
Sewing
Sewing
Sewing
Sewing
Sewing
Sewing
Sewing
Shell
Single
Slow
with
with
and
chart
taults
feet
feet
Limp
on
edging
pattern
sewing
Smocking
Special
accessory
Stitch
density
Stitch
length
Stitch
width
Straight
Stretch
Stretch
Stretch
stitch
buttonhole
triple
triple
Tacking
Technical
Thread
reel
Fhread
tension
Thread
trimmer
Threading
Threading
Threading
Top
feed
Topstitching
Trouble
shooting
Twin
needle
Twin
needle
Utility
anrl
Utility
stitch
Winding
Zigzag
from
stitch
position
nending
the
pcsitions
stitches
.
luck
stitches
fclcar
stitch
sewing
lifter
keys
stitch
sewing
position
.
the
zigzag
emhroidenng
and
(special
(stdnddrd
buttons
slide
slide
straight
zigzag
section
the
needle
the
sewing
indicator
fancy
table
a
stitch
with
progran
dog
feed
sewing
and
. .
tension
position
stitch
key)
.
.
(buttonhole)
sewing
ovuriock
stitch
their
accessoriesl
.
.
.
.
table
.
. .
.
key
key
...
stitch
stitch
threarh
stitches
second
.
ginip
i
mable
faults
of
second
foot
. .
remedies
occessones)
...
.
.
machine
reel
holder
thread
.
.
tack
...
.
•
.
.
.
35+45
58
62
.
.
60
89
29
109—il
104
106,10
35
29
23
38
112
54
54.55
37+64
.
34
35+65
73-88
.
24
90
40
.
.
86
48
.
.
60
60
46+54,
.
46
71
44
‘
.
114,11
.
.
.
.
.
.
.
.
.
.
100
.
.
98,
.
99
.
.
113
88
39
38
80
100
.
36
3664
5+65
45
52
39
11
.
29
18
4
.
2
lb
.
Il
41
I
9
4t,
I
Page 10
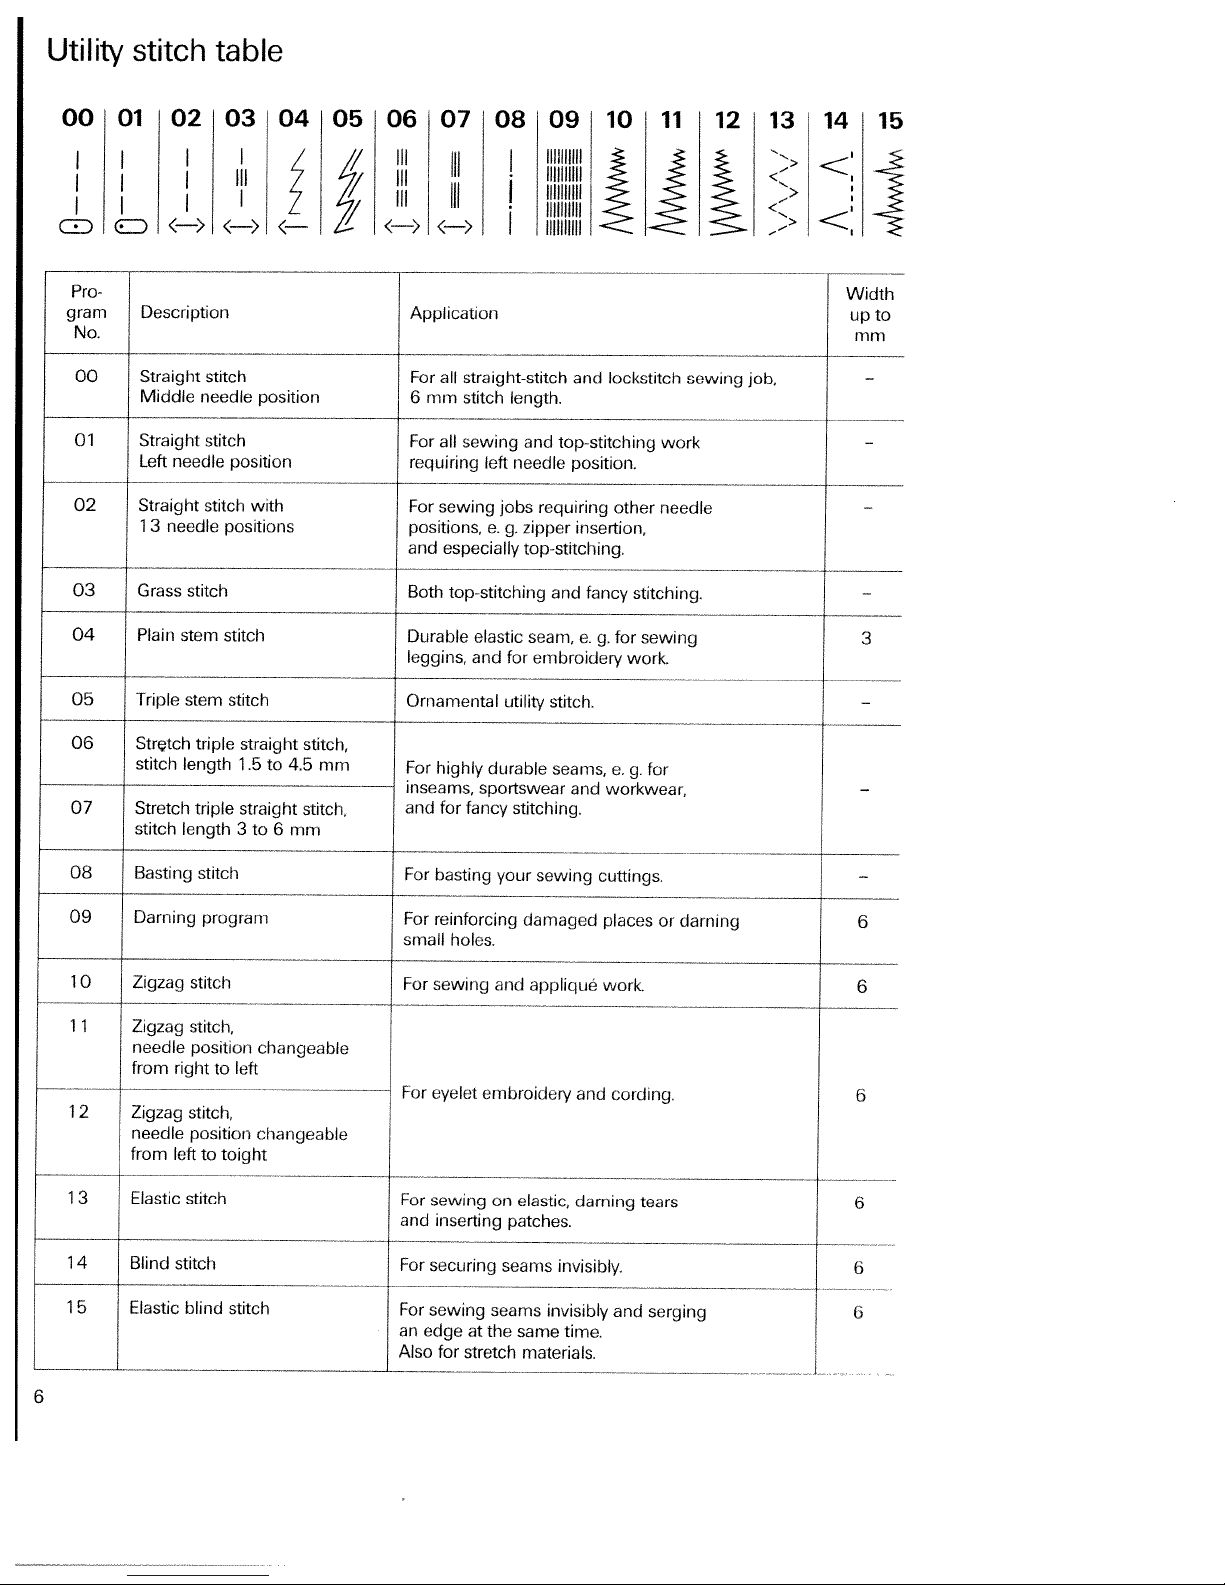
Utility
stitch
table
11
1213i14
15
Pro-
gram
No.
00
01
02
03
04
05
I
Description
Straight
Middle
Straight
Left
Straight
1
3
needle
Grass
Plain
Triple
I
needle
needle
stitch
stem
stem
stitch
stitch
position
stitch
positions
stitch
stitch
I
position
with
i
length.
and
needle
jobs
zipper
e.
g.
top-stitching.
seam,
for
utility
IIIIIIIIH
Bllllll
lockstitch
and
top-stitching
position.
requiring
insertion,
and
fancy
e.
embroidery
g.
stitch.
other
stitching.
for
sewing
work.
sewing
work
needle
ii>
job,
<>
><:
Width
to
up
mm
—
—
—
—
3
—
III
//
/
‘
I
Application
For
all
straight-stitch
mm
stitch
6
For
all
sewing
requiring
For
positions,
and
Both
Durable
leggins,
Ornamental
left
sewing
especially
top-stitching
elastic
and
—-
1
1
1
1
06
07
08
09
10
1 1
triple
length
triple
length
stitch
program
stitch
stitch,
position
to
stitch,
position
to
stitch
blind
straight
1
straight
3
left
toight
stitch
Stretch
stitch
Stretch
stitch
Basting
Darning
Zigzag
Zigzag
needle
from
right
——--—---
2
Zigzag
needle
from
left
3
Elastic
Blind
4
5
stitch
Elastic
stitch,
to
4.5
.5
stitch,
mm
to
6
changeable
changeable
mm
For
highly
inseams,
and
For
basting
For
reinforcing
small
For
sewing
For
eyelet
For
sewing
and
inserting
For
securing
For
sewing
an
edge
Also
for
for
holes.
stretch
durable
sportswear
fancy
stitching.
your
and
embroidery
on
patches.
seams
seams
at
the
seams,
sewing
damaged
appliqué
elastic,
invisibly.
invisibly
same
time.
materials.
and
cuttings.
and
darning
a
for
g.
workwear,
places
or
work
cording.
tears
and
serging
darning
—
—
6
6
6
6
6
(3
Page 11

Utility
stitch
table
:
16
Pro-
gram
No.
1
1
1
1
20
21
L._
22
6
7
8
9
17
Description
Shell-eding
Blind
Fancy
Stretch
Open
losed
with
Light-knit
18 19
stitch
elastic
triple
overlock
overlock
edge
thread
patchwork
stitch
stitch
zigzag
20
stitch
stitch
21
stitch
stitch
22 23
Application
For
e.g.for
j
Needle
For
of
For
materials.
For
For
oneorseveral
Lthat
For
Alsoasa
24
decorative
underwear.
position
over
stitching
fabric,
sewing
elastic
closing
simultaneously
sewing
materials.
comes
fancy-stitch
and
next
light-knit
25
26
hemsonlight
changeabletothe
two
butt
tape
onto
simultaneously
closing
labric
plies.Anoverlock
industrial
to
an
fabrics
seamonknitted
27
70
fabrics,
right.
joined
plies
elastic
serging
and serging
seam.
71
seam
fabrics.
72
73
V
23
24
25
26
27
70
71
72
—
73
74
Pullovei
Honeycomb
ft
Closed
Fagoting
Cross
1
Fully
buttonhole
Linen
-
Stretch
f
Fully
I
Button
stitch
stitch
-
overlock
stitch
automatic
buttonhole
buttonhole
automatic
sewing program
stitch
stitch
linen
eyelet
Elastic
closing
for
open
For
sewingonelastic
terry-cloth
-
-
For
materials
For
joining
overstitching
Flat
fabric
Also
The
pro
set
underwear
Stitch
thus
suchassilkorviscous
For
stretch
Canbere-called
Fully
in
various
closing
joining
plies.
suitable
buttonholeisstored
lengths,
length
very
automatic
and
knit
materials.
seams
and serging
that
fray
corsetry
that
seam
as
e.
and
blouses
and
suitable
materials,
sewing
sizes.
and
easily.
fray
for
a
fancy
g.
width
for
in
serging
threads,
for
seams
pans
easily
elastic
hem
in
for
bed
adjustable,
difficult
fabrics
different
of
seam
fancy
and
butt
three
linen,
matendls
sizes
bullons
covering
hems
-
for
for
joined
Page 12
01
L1JFi
1
rriw
Ill(1
Ill
0
hulk
a,
z
a,
g5
101
IIIHmp
IIi
-€4_
01
%%J
il
lIiJ
III
1
I
a
0,
II
liii!
II
‘I II
111111!
jJIil’’hiiIIIih
‘iIIIIIui’’iiIIIIIii
g
a,
P%J
‘‘liii
11101
11111
11111
111111
a,
qr
II
qr—’ip
‘qi
a,
.•.•
.•.•.•
.•.
Ii
hI’’’I’’J
—iIIIIIilI—ihiIIIIitI—
IIIfIIIHIIIjIIIF
tilillihi
‘‘‘II’’1V’’’’
)*)))
----
Page 13

S
S
S
S
S
S
S
S
S
S
S
S
I.....
5
S
S
I..’
I..’.’
•iI....
5:
a’
S..
I.’
5:
U..’
S
II
S
S
Page 14
..-
/
Page 15
Operating
the
sewing
machine
Tedmb&
Pages
11
secdon
to29
Page 16

I
I
I
I
I
I
I
I
I
I
I
I
I
I
I
I
I
I
I
I
I
I
I
I
I
I
I
I
I
I
Page 17
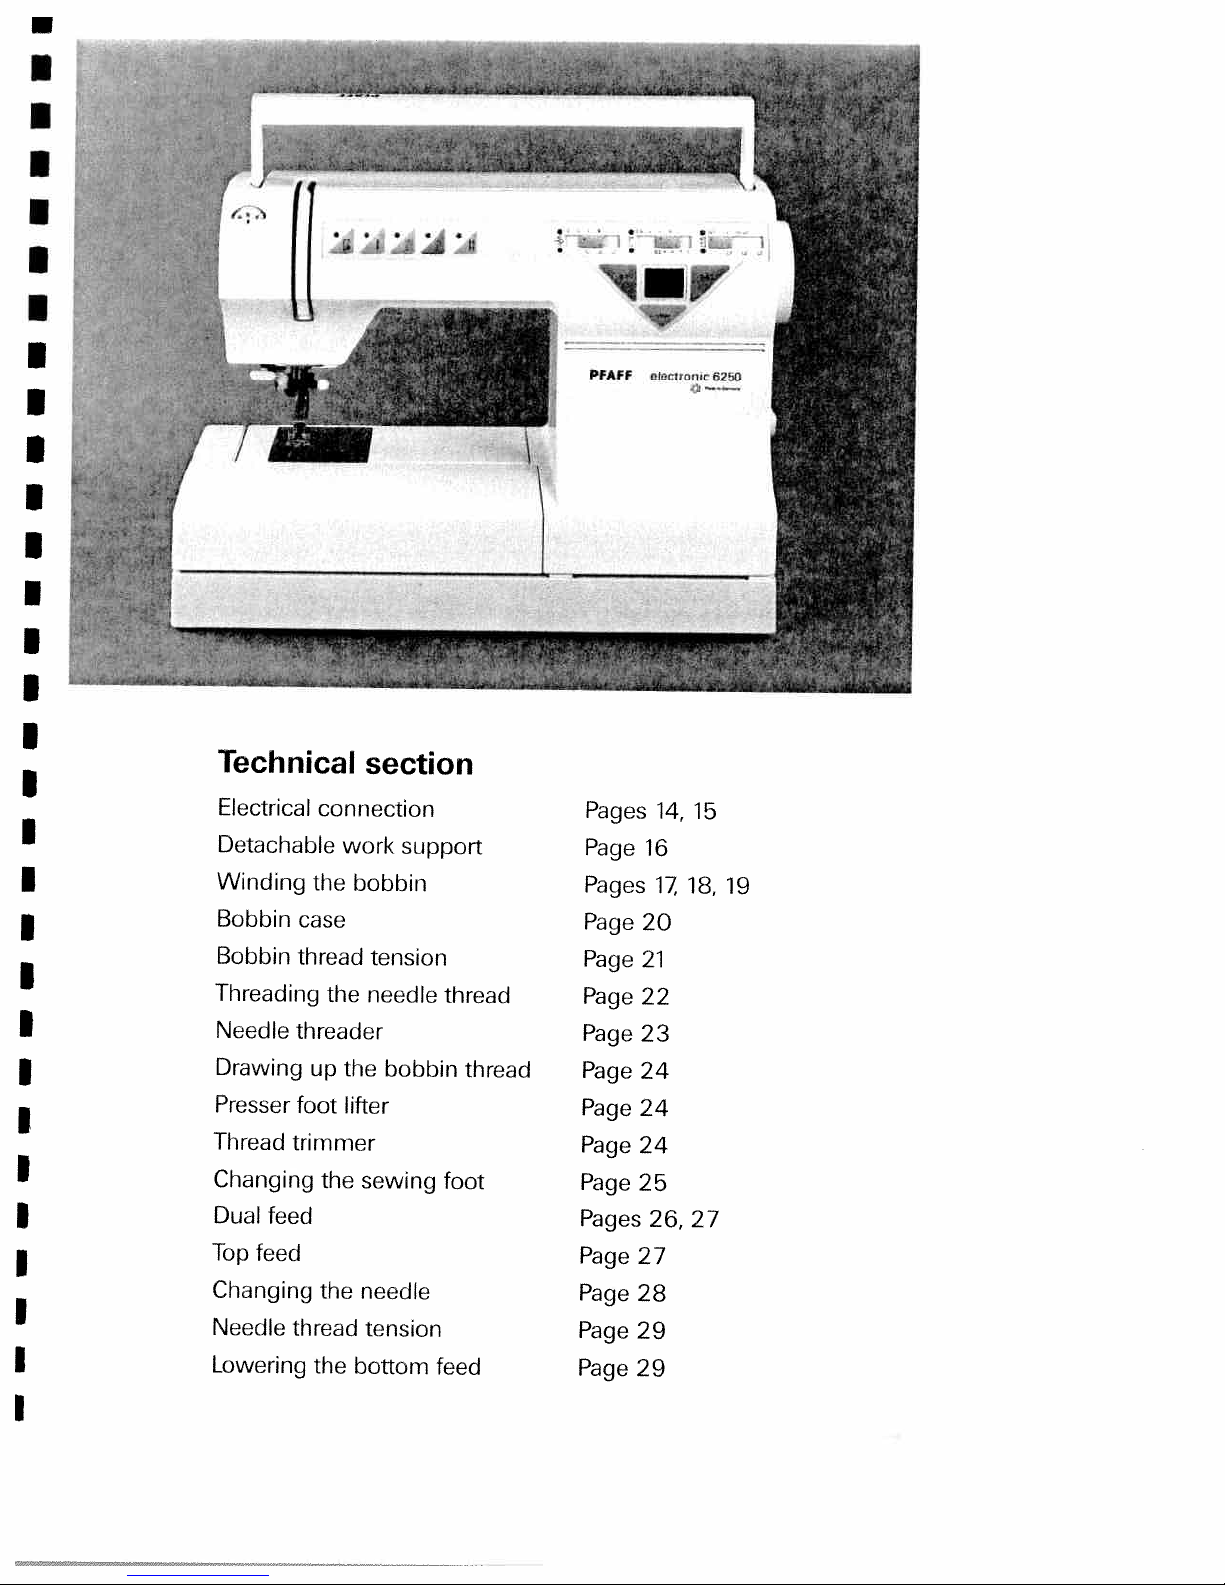
Technical
section
Electrical
Detachable
Winding
Bobbin
Bobbin
Threading
Needle
Drawing
Presser
Thread
Changing
Dual
Top
Changing
Needle
Lowering
threader
trimmer
feed
feed
thread
connection
work
the
bobbin
case
thread
the
the
up
foot
lifter
the
sewing
the
needle
the
bottom
support
tension
needle
bobbin
tension
thread
thread
foot
feed
Pages
Page
Pages
Page
Page
Page
Page
Page
Page
Page
Page
Pages
Page
Page
Page
Page
20
21
22
23
24
24
24
25
27
28
29
29
16
17
26,
14,
15
18,
27
19
Page 18
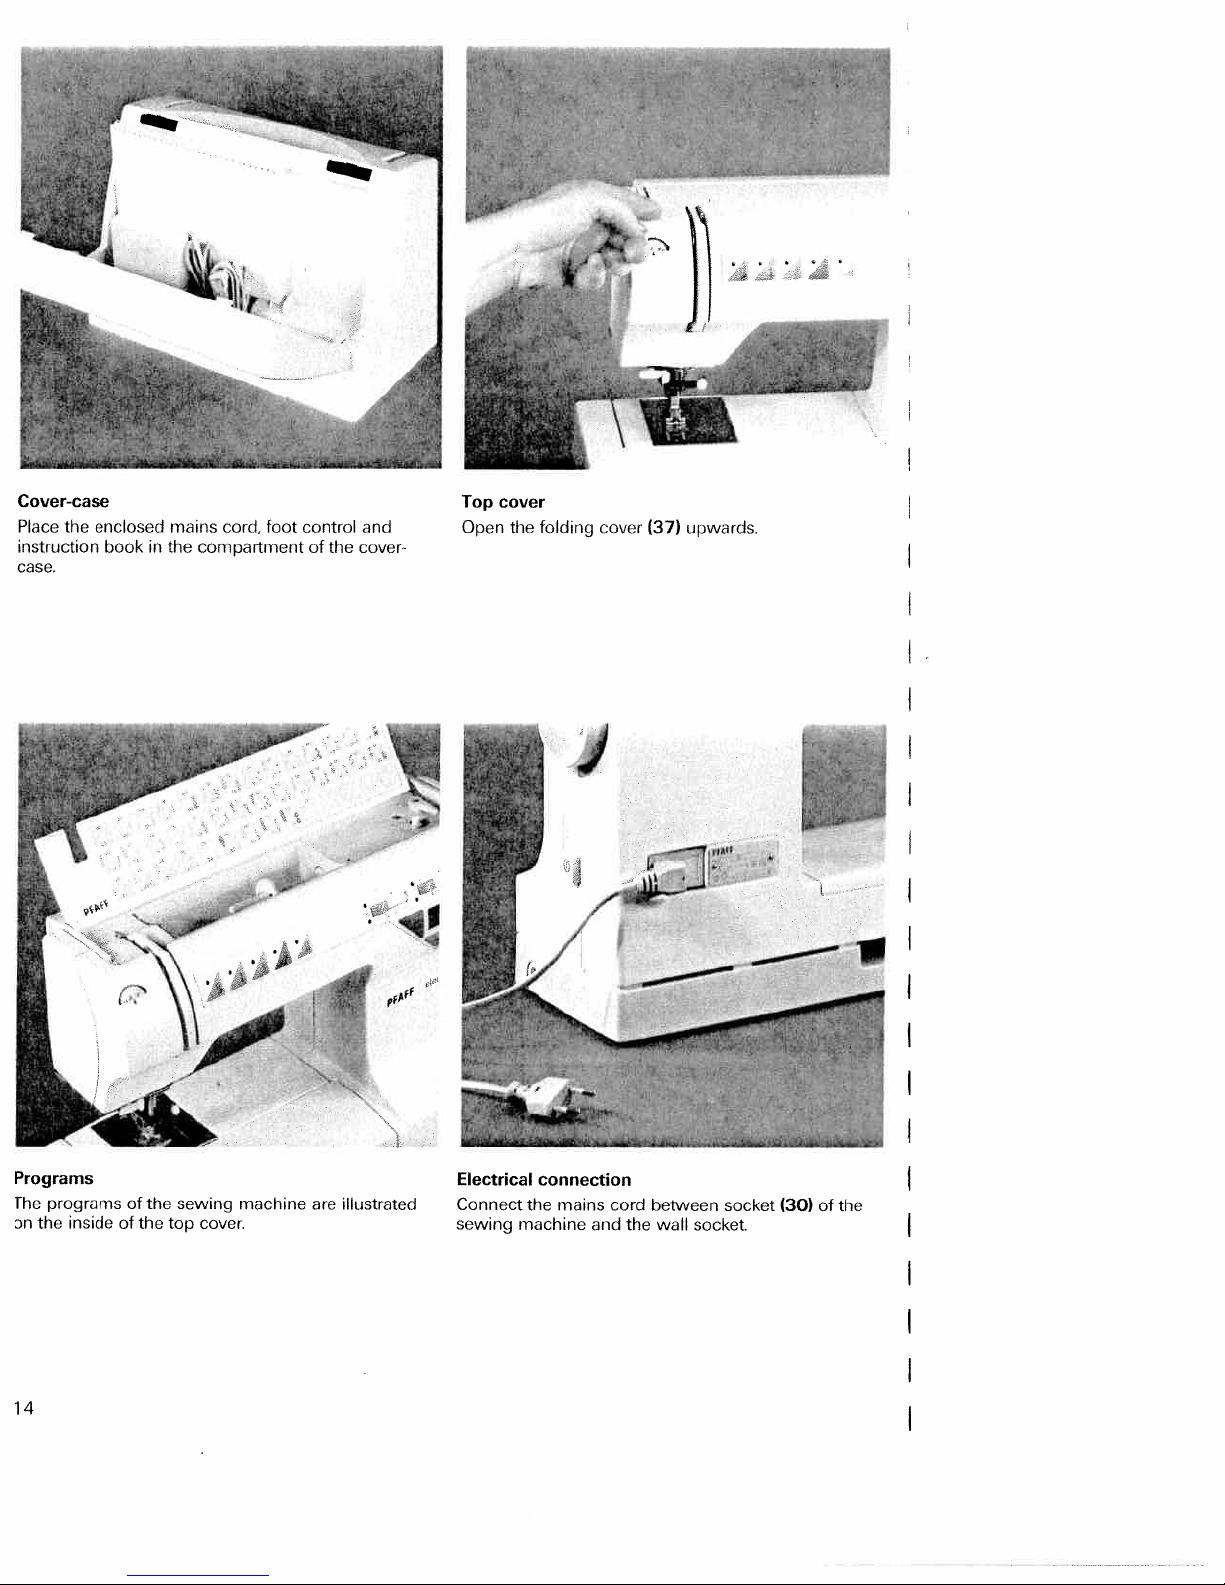
Cover-case
Place
the
instruction
case.
enclosed
bookinthe
mains
compartment
cord,
foot
control
of
the
and
cover-
I
Top
cover
Open the
folding
cover
(37)
upwards.
Programs
rhe
programsofthe
n
the
inside
of
the top
sewing
cover.
machine
are
illustrated
Electrical
Connect
sewing
connection
the
mains
machine
and
cord
the
between
wall
socket
socket
(30)
of
the
Page 19
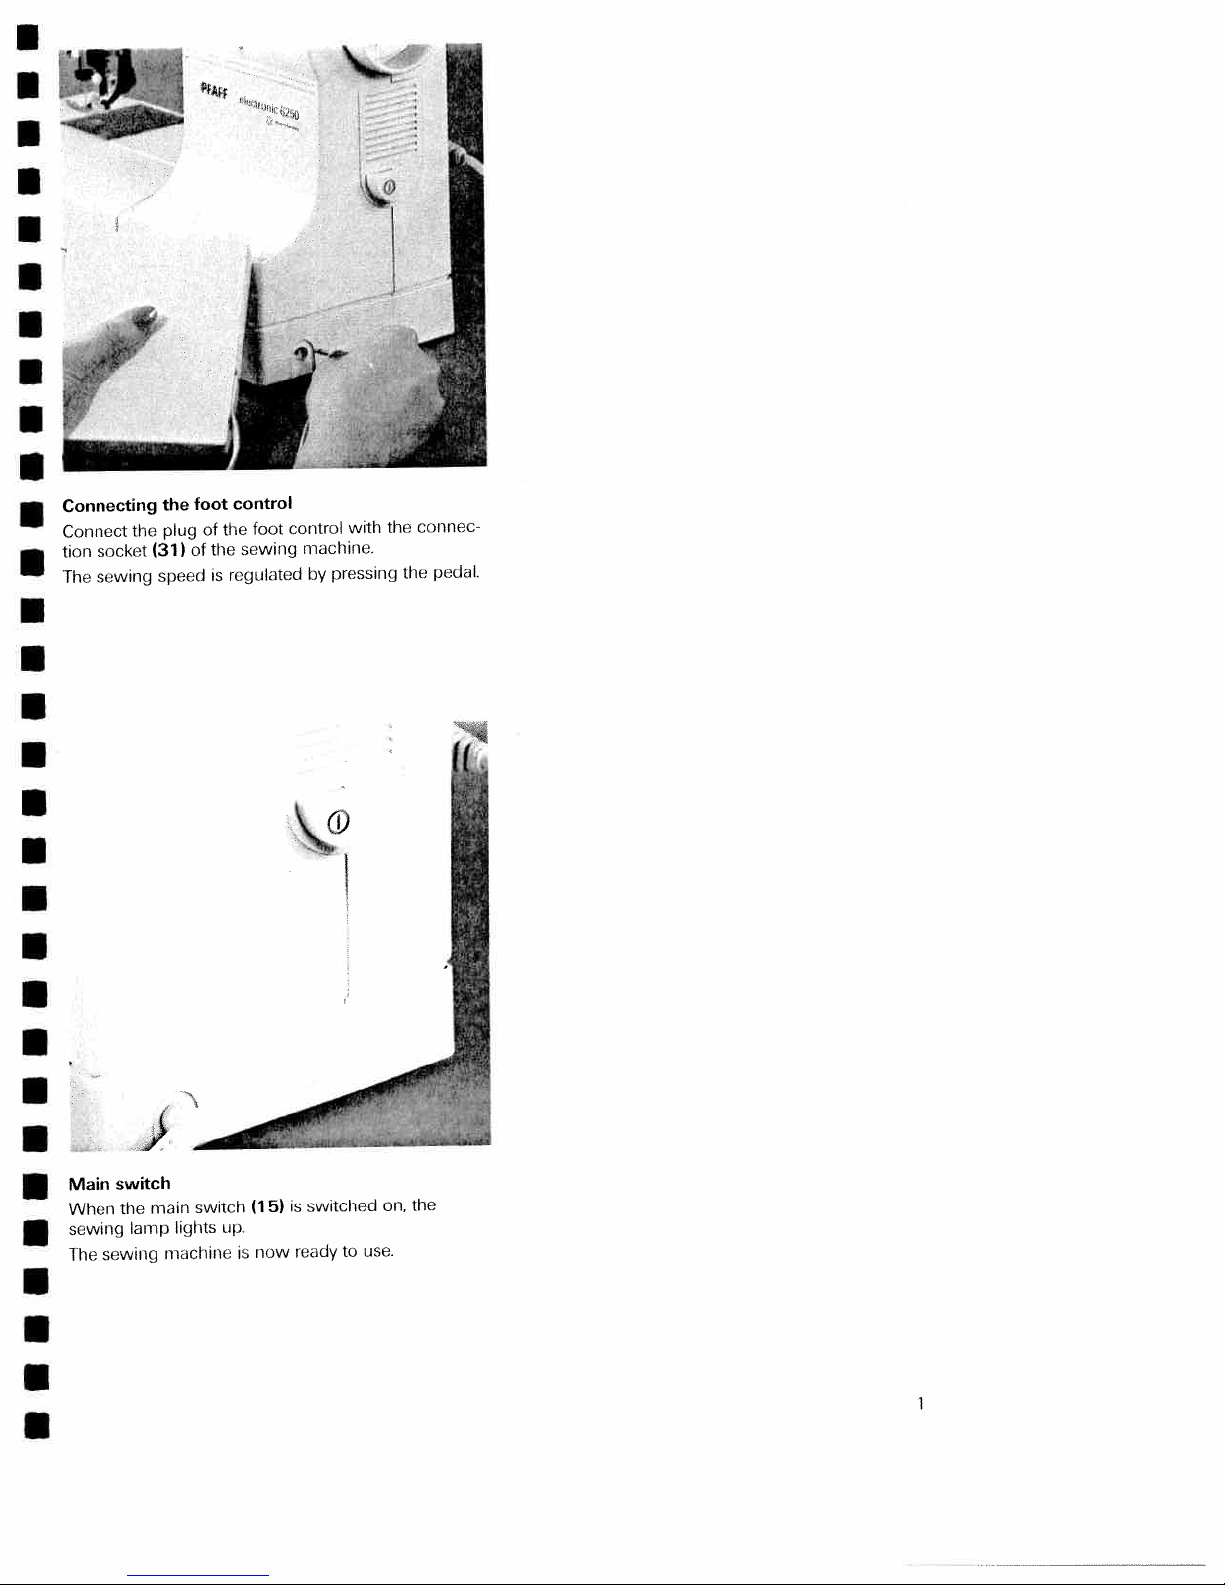
Connecting
Connect
socket
tion
sewing
The
the
the
plug
(31)of
speed
foot
of
control
the
sewing
the
regulated
is
foot
control
machine.
by
with
pressing
the
connec
the
pedal.
switch
Main
the
is
(1
now
5)
switched
ready
When
sewing
The
lamp
sewing
lights
machine
up
i
switch
main
the
on,
use.
to
Page 20
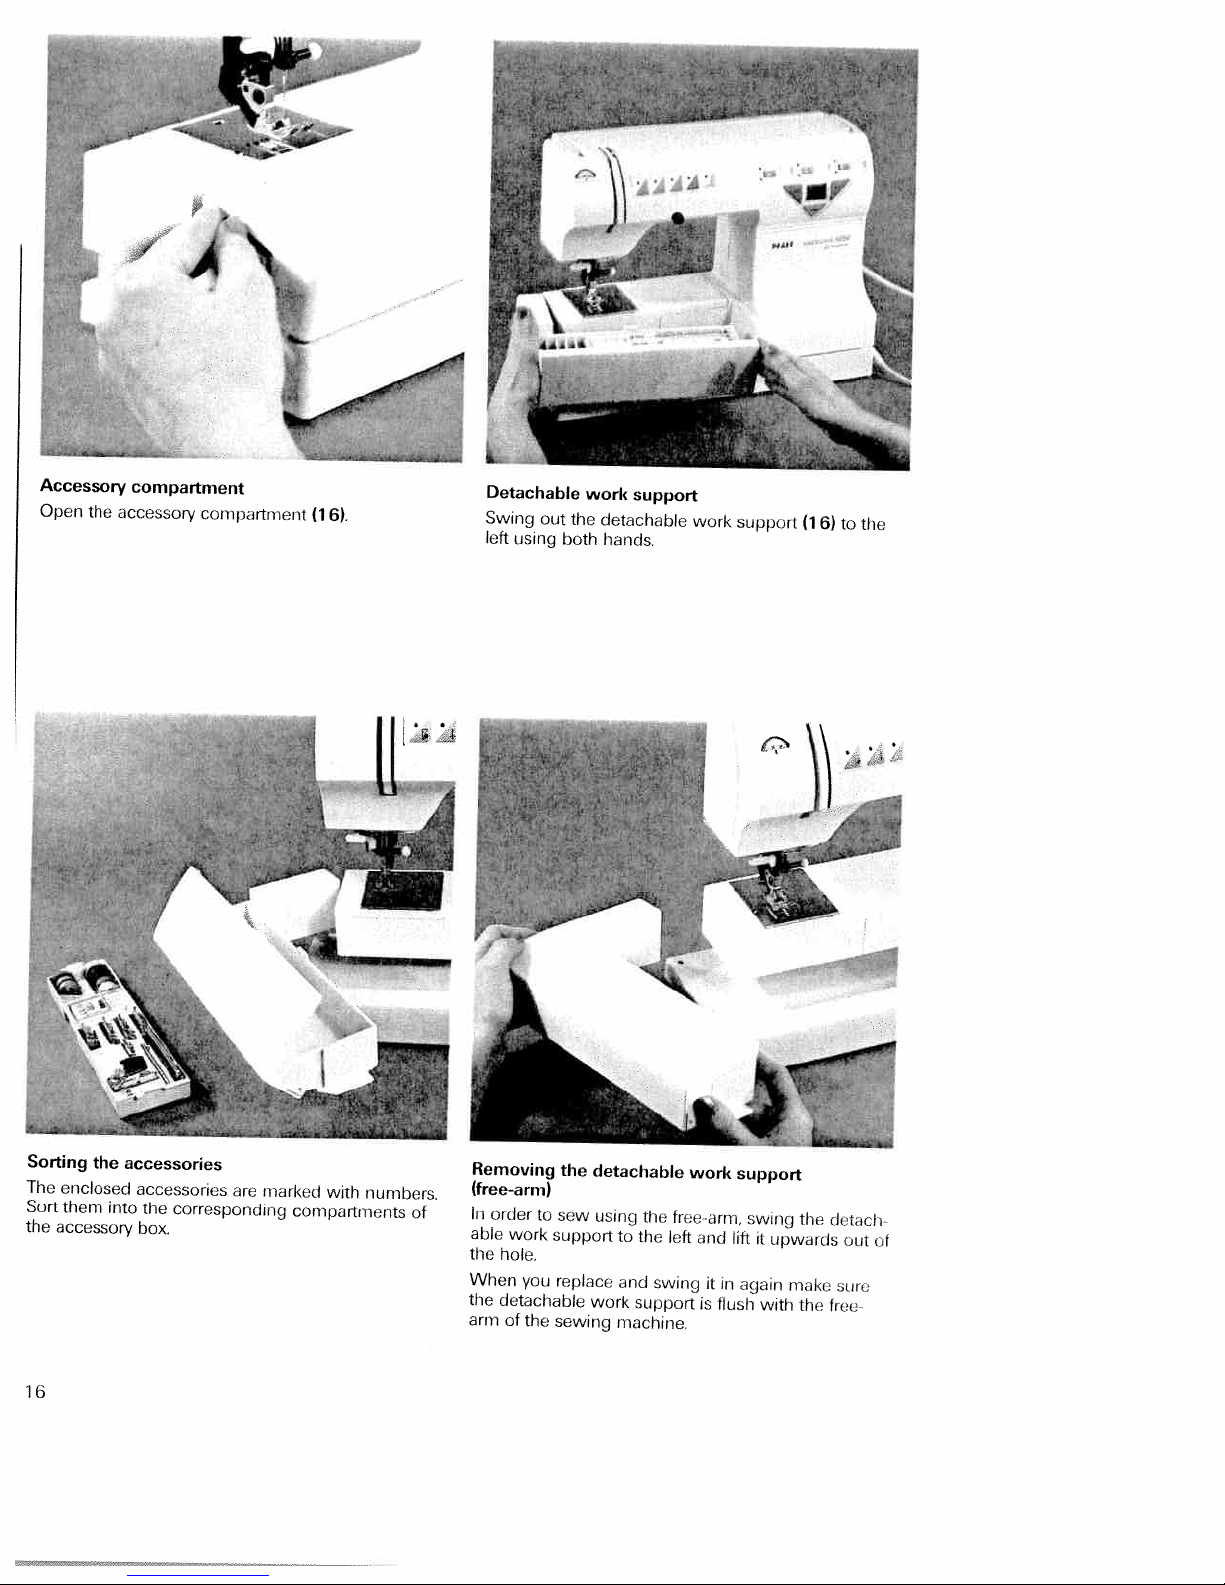
A
Accessory
Open
the
compartment
accessory
compartment
(16).
Detachable
Swing
out
left
using
work
the
both
support
detachable
hands.
work
support
to
(1
6)
the
Sorting
The
Sort
the
the
enclosed
them
into
accessory
accessories
accessones
the
corresponding
box.
are
marked
compartments
with
numbers.
of
Removing
(free-arm)
In
order
able
work
the
hole.
When
you
the
detachable
arm
of
the
to
support
sewing
the
sew
replace
detachable
using
the
to
the
and
work
support
machine
free-arm,
left
swing
work
and
it
is
lift
in
flush
support
swing
it
upwards
again
with
the
make
the
clutch
out
u1:
tree
of
Page 21
I
I
a
a
I
a
a
a
I
I
a
a
a
Preparing
Hold
the
disk
(11)
bobbin
the
hand
fully
winding
machine
wheel
in
the
the
for
firmly
(1
0)
direction
needle
bobbin
of
will
and
the
not
winding
turn
arrow.
move.
the
During
release
a
a
a
a
a
a
a
a
a
a
Placing
Switch
Place
bobbin
off
the
winder
the
empty
bobbin
the
main
bobbin
(29)
switch
snaps
so
that
into
the
the
black
slot
I’
Push
the
bobbin
to
the
right
pin
of
the
the
bobbin.
of
Note:
The
the
bobbin
right
can
only
be
wound
if
it
is
moved
fully
I
Page 22
L
e
holder
reel
the
thread
fit
an
reel.
from
on
the
of
unwinding
the
thread
reel
holder
and
disk
hold
of
(27).
the
To
the
right
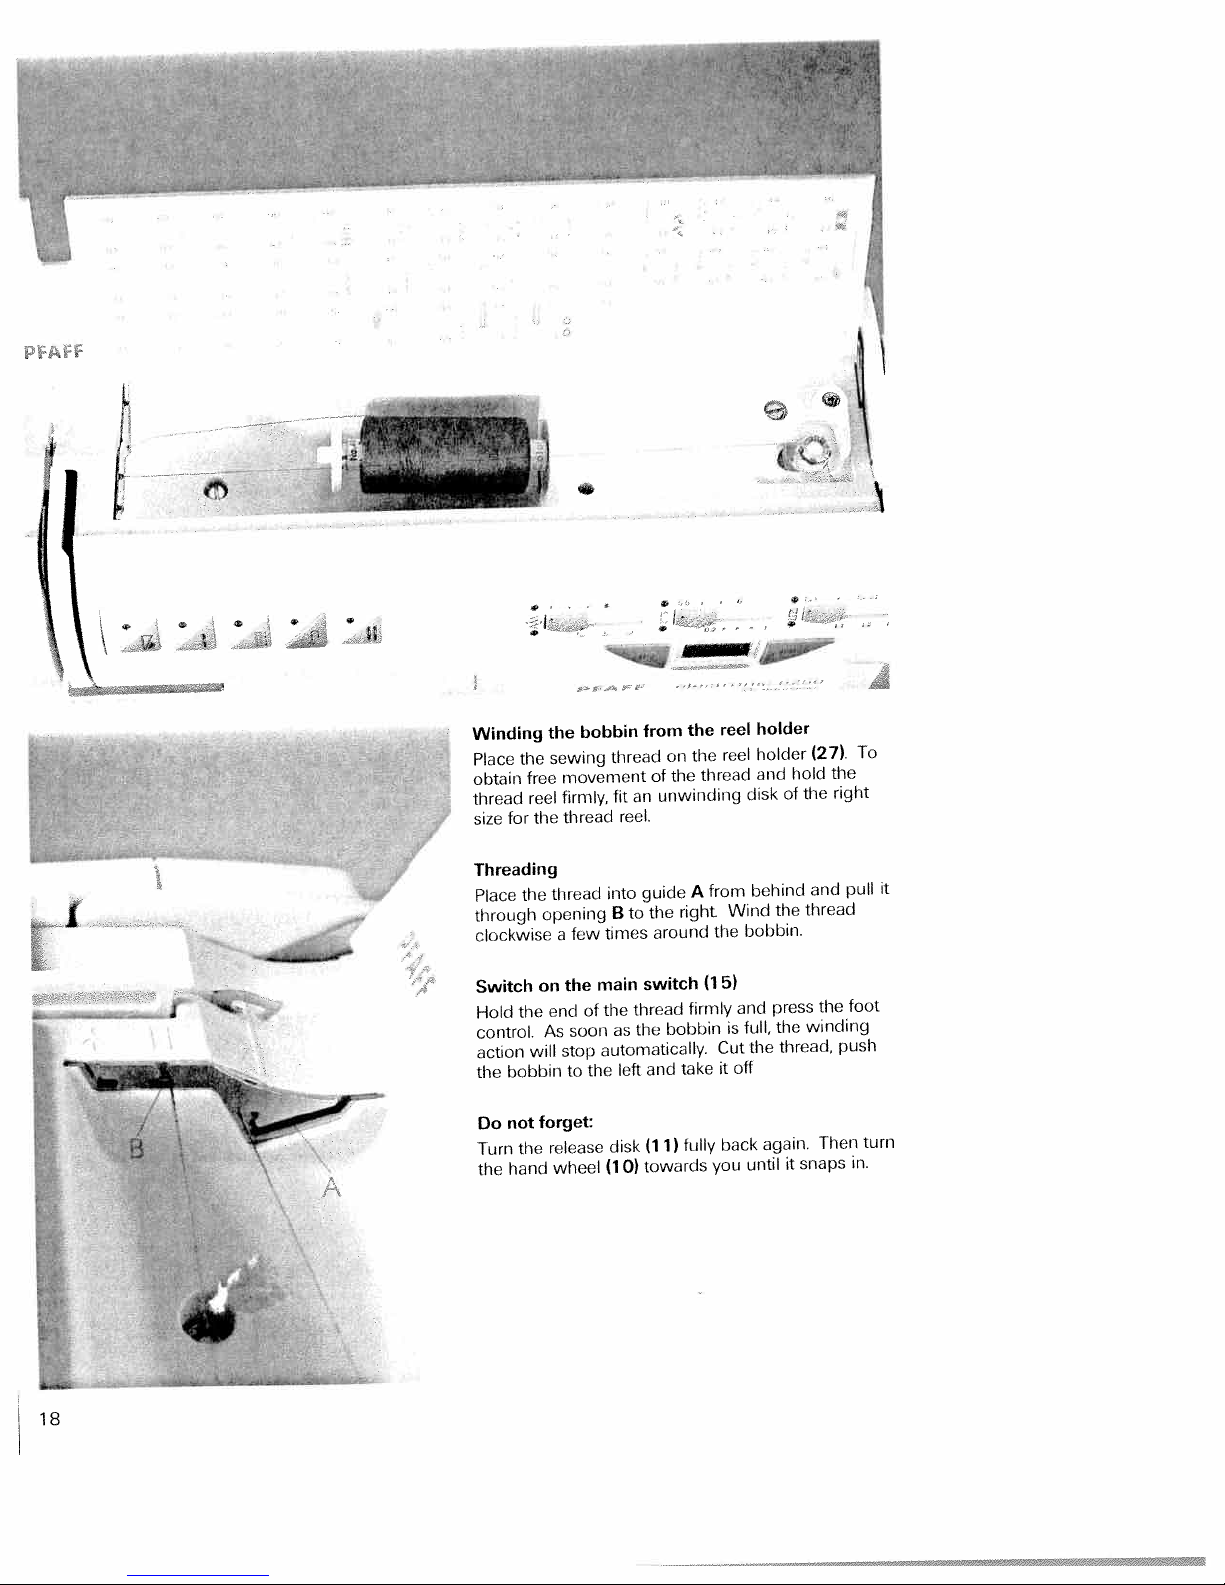
Winding
the
Place
obtain
thread
for
size
the
free
reel
the
bobbin
sewing
movement
firmly,
thread
Threading
Place
through
clockwise
Switch
Hold
control.
action
the
I
Do
Turn
the
on
the
will
bobbin
forget:
not
the
hand
opening
few
a
the
end
soon
As
stop
to
release
wheel
of
the
the
B
to
around
times
switch
main
thread
the
automatically.
(1
as
left
disk
the
towards
0)
bobbin
and
(11)
right
firmly
take
fully
(1
the
5)
Cut
it
back
you
Wind
bobbin.
and
full,
is
off
the
until
the
press
the
thread,
again.
it
thread
the
winding
Then
snaps
foot
push
turn
in.
it
pull
and
behind
from
A
guide
into
thread
the
0
Page 23
fr
4iIi
,
41
3
I
I
S
S
I
I
I
S
I
S
I
S
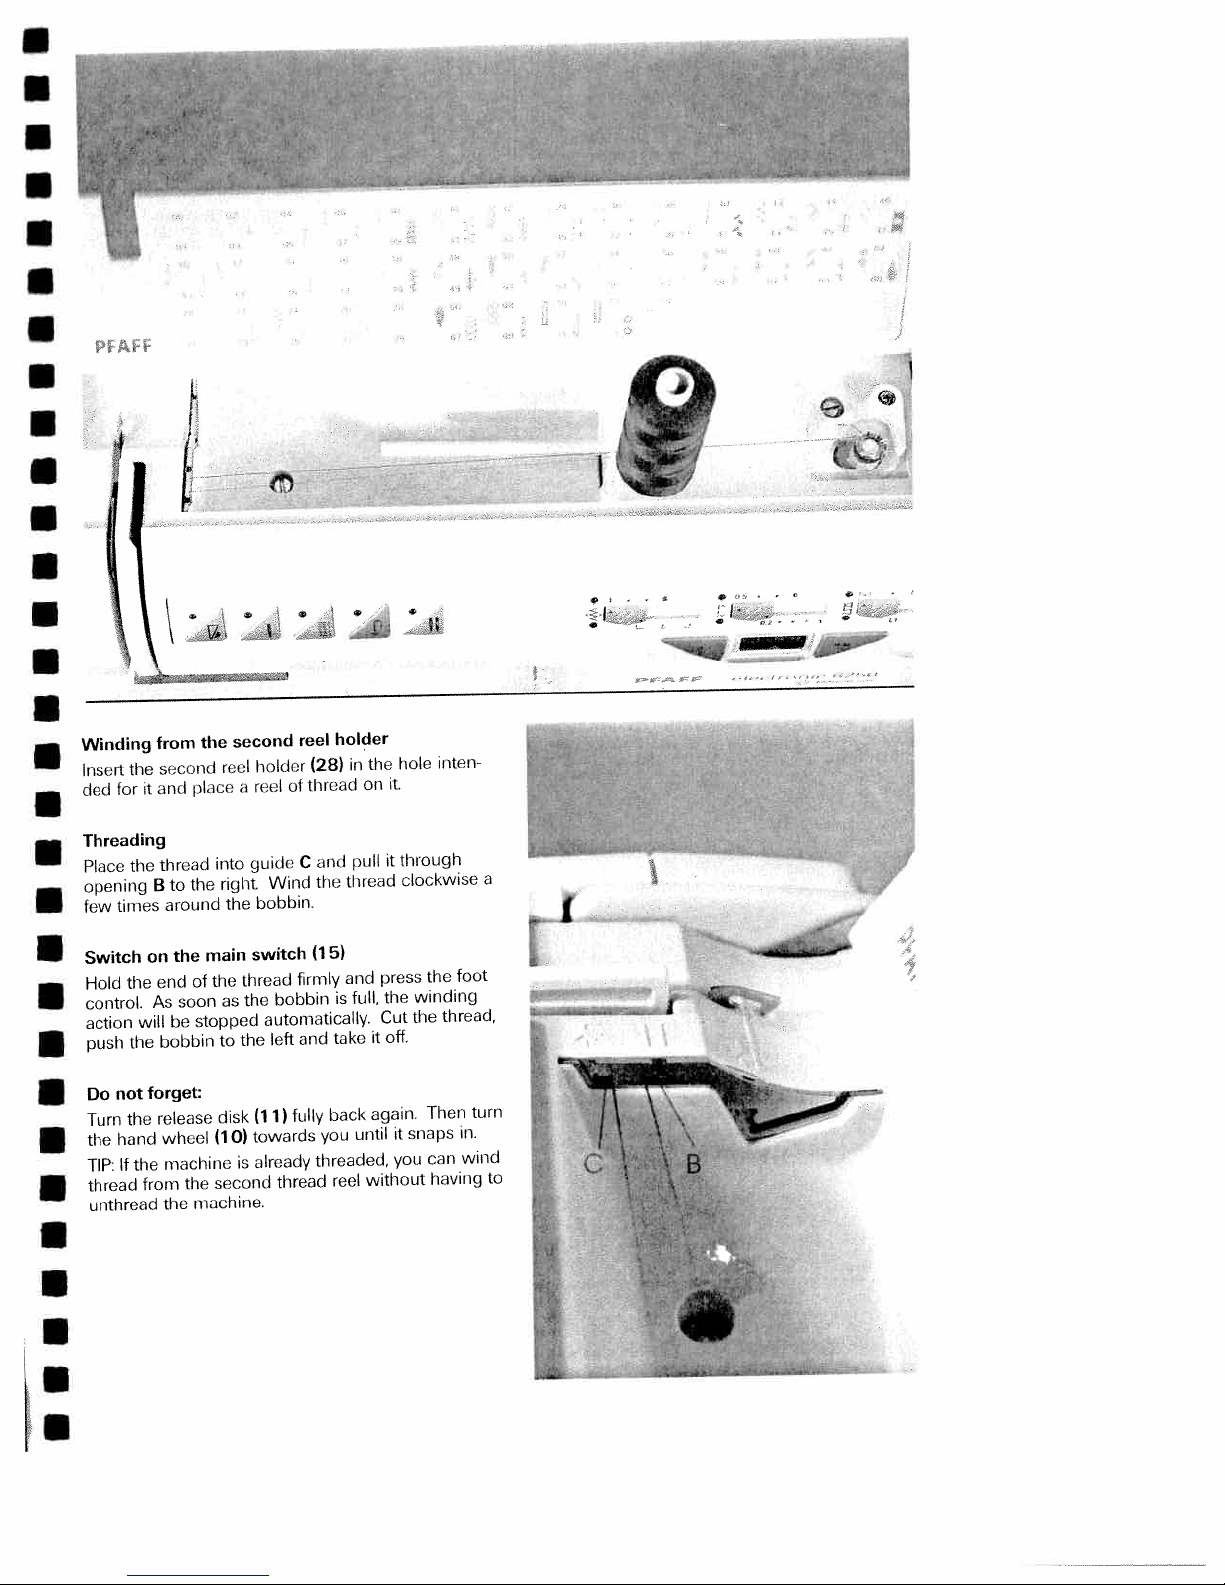
Winding
the
Insert
for
ded
Threading
the
Place
opening
times
few
Switch
the
Hold
control,
action
the
push
not
Do
the
Turn
hand
the
the
If
TIP:
thread
unthread
from
second
and
it
thread
B
on
end
As
will
bobbin
forget:
release
from
the
place
to
the
around
main
the
of
soon
stopped
be
wheel
machine
the
machine.
the
second
reel
a
into
right
the
thread
the
the
as
the
to
disk
(1
0)
is
second
reel
(28)
holder
thread
of
reel
and
C
guide
bobbin.
switch
(11)
towards
already
the
Wind
(1
firmly
bobbin
automatically.
and
left
fully
you
threaded,
thread
holder
in
pull
thread
5)
and
full,
is
take
back
reel
the
on
it
press
the
Cut
off
it
again.
until
without
hole
it.
through
clockwise
the
winding
the
Then
snaps
it
can
you
having
inten
foot
thread,
in.
wind
a
turn
ri
I
43
I
I
I
to
I
S
S
I
Page 24

Hook
Switch
—loki
he
front.
cover
the
off
hook
the
main
cover
switch
(33)
Taking
at
the
side
and
open
it
to
Lift
case
bobbin
the
out
out
latch
the
of
Release
bobbin
the
bobbin
the
case
latch
case
and
and
take
pull
out
the
the
bobbin
empty
I
I
I
I
I
I
read
tension
obtain
optimum
rectly
adjusted
buttonholes
I
the
to
seam
each
thread
appearance
other.
ic.
interlace
and
tne
shoulrl
durability
threads
be
are
visible
make
interlaced
on
sure
the
the
needle
between
underside
tIre
of
two
the
and
bobbin
fabric
fabric.
thread
plrvs.
For
tensions
fancy
seaiTrs
are
I
I
I
I
I
I
I
1
Page 25
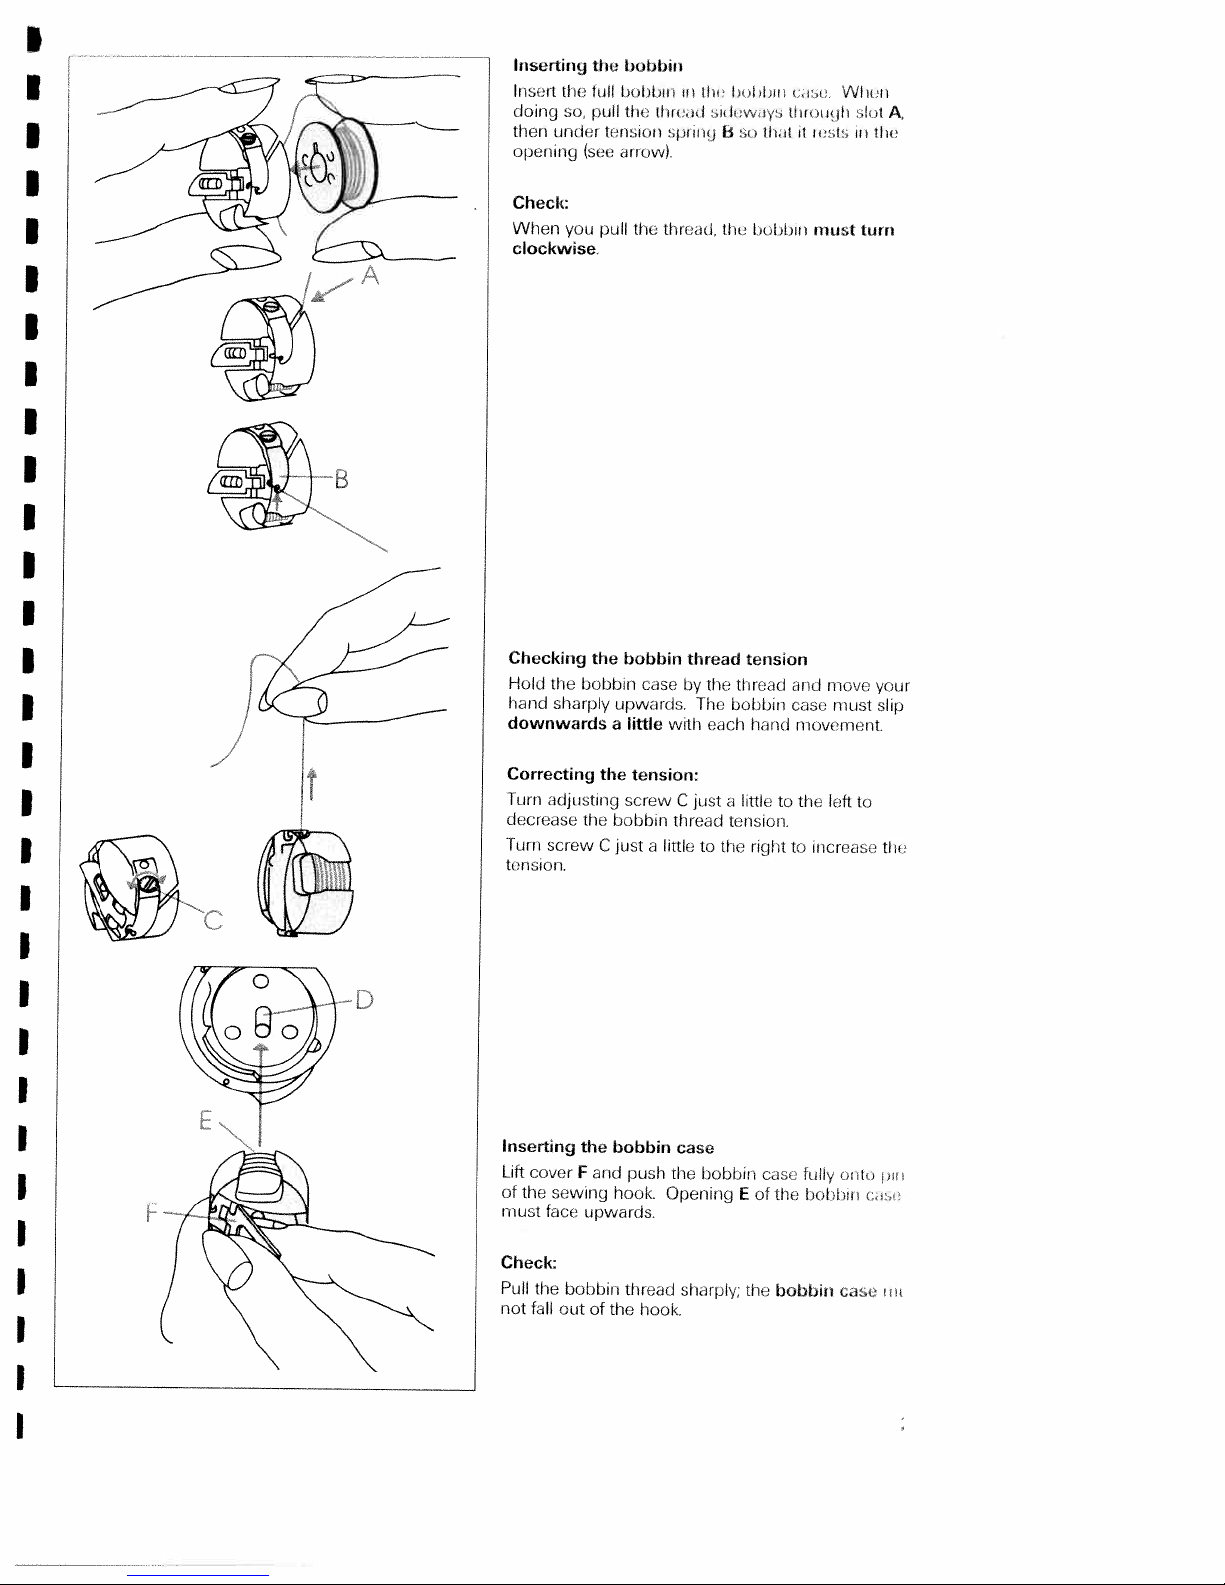
lnsertinj
Iris(3rt
tli(
doing
50,
iri(1(r
ther
opening
Check:
you
When
clockwise.
the
lull
pull
(see
pull
bobbin
Inibtun
tire
tt’risrcnr
arrow)
tho
tIm
iriii(j
thread
iii
l,ll,ir
ii
il
11ri
b
the
lrln
When
ririi
,iul
ii
i”t’
niust
A,
iii
turn
it
Checking
Hold
the
hand
sharply
downwards
Correcting
Turn
adjusting
decrease
Turn
screw
tension.
Inserting
Lift
cover
of
sewing
the
must
face
the
bobbin
upwards.
a
the
the
bobbin
C
just
the
bobbin
F
and
hook
upwards.
bobbin
case
little
tension:
screw
a
push
thread
by
The
with
C
just
thread
little
to
case
the
bobbin
Opening
the
eucti
the
tension
thread
uobbn
baud
a
little
tension.
right
E
of
to
cac
the
and
move
case
must
movement.
the
left
to
increase
oiili
fully
bobbin
your
slip
to
thu
pu
Ce
Check:
Pull
not
fall
the
bobbin
out
threud
of
the
sharply,
hook.
the
bobbin
can
Page 26
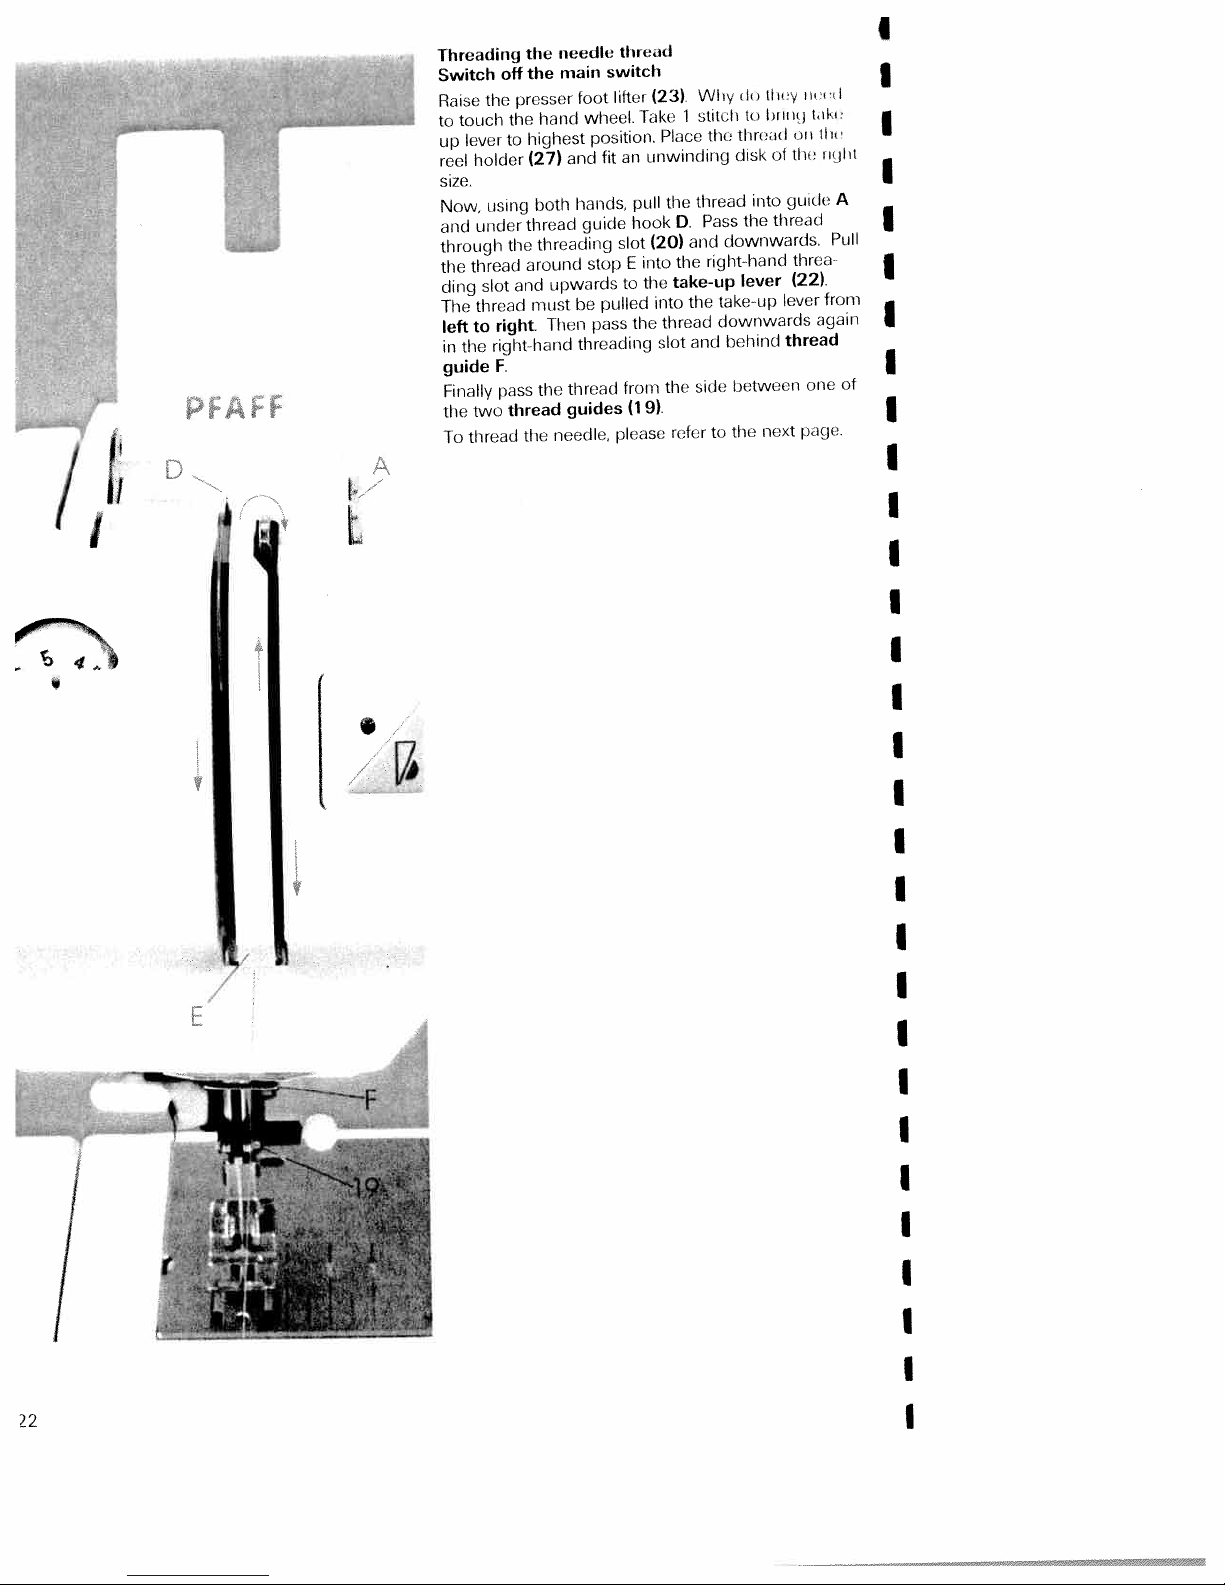
Threading
Switch
the
Raise
touch
to
lever
up
holder
reel
size.
using
Now,
under
and
through
thread
the
slot
ding
thread
The
to
left
right-hand
the
in
F.
guide
Finally
two
the
thread
Jo
off
presser
the
to
the
and
right.
pass
thread
needle
the
main
the
hand
highest
(27)
both
thread
threading
around
upwards
must
Then
the
needle,
the
loot
wheel.
position.
fit
and
hands,
guide
stop
pulled
be
pass
threading
thread
guides
th,e.id
switch
lifter
an
pull
hook
slot
E
to
the
from
(19).
please
(23>
1
Take
Place
unwinding
the
D.
(20)
the
into
take-up
the
the
into
thread
slot
the
refer
\Nliv
stitoli
the
thread
Pass
downwards.
and
right
take-up
downwards
and
side
to
do
u
rood
tI
disk
into
the
hand
lever
behind
between
next
the
LI
ma
of
guide
thread
lever
thread
y
RI
to
tin
threa
(22).
one
page.
t,11
ill
from
again
it
jI
a
A
Poll
I
it
I
I
of
I
I
/
I
Page 27
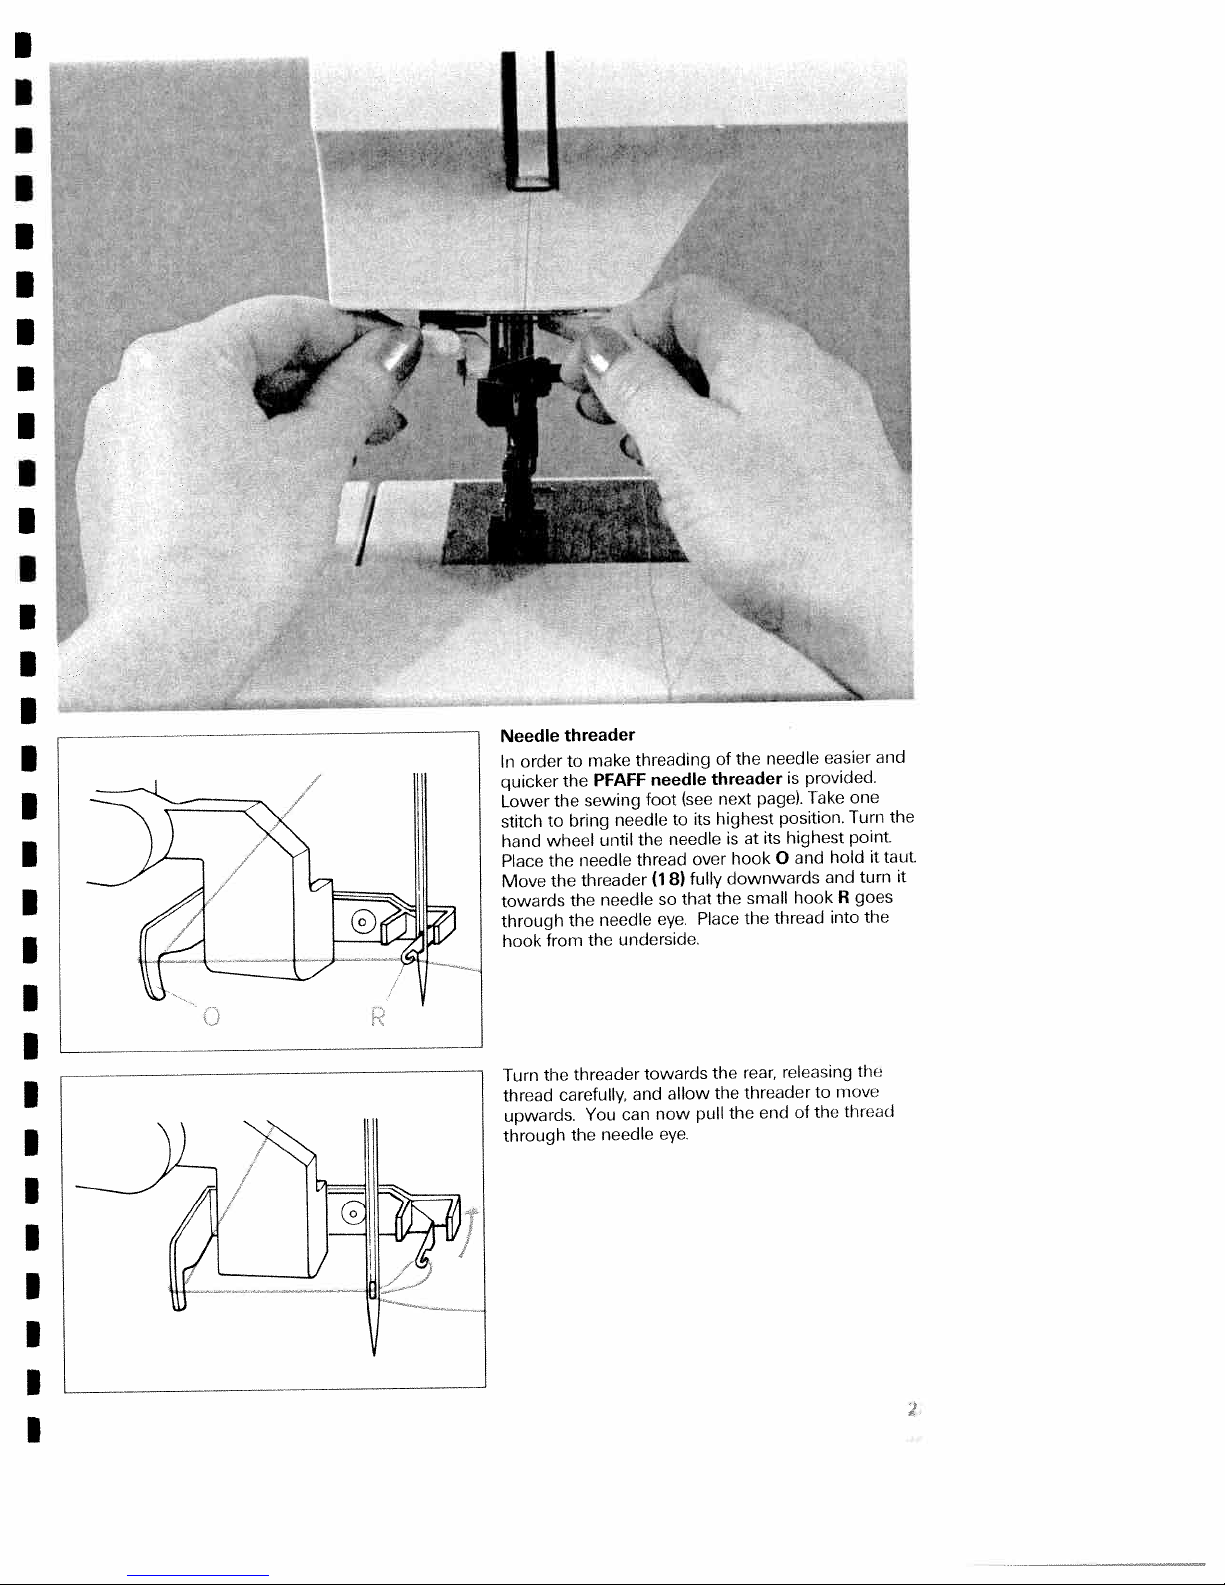
Needle
order
In
quicker
Lower
stitch
hand
Place
Move
towards
through
hook
threader
to
the
the
bring
to
wheel
the
the
the
the
from
make
PFAFF
sewing
needle
until
needle
threader
needle
needle
underside.
the
threading
needle
foot
(see
to
needle
the
thread
8)
(1
that
so
eye.
threader
its
over
fully
Place
of
next
highest
the
needle
the
is
page).
position.
highest
its
at
is
hook
and
0
downwards
hook
small
thread
the
easier
provided.
one
Take
Turn
point.
hold
and
goes
R
into
it
turn
the
and
the
taut.
it
the
Turn
thread
upwards.
through
threader
carefully,
You
needle
the
and
can
towards
allow
now
eye.
pull
the
the
rear,
threader
the
releasing
end
the
move
to
threud
the
of
Page 28
I
I
I
—
.
I
Presser
The
sewing
bar
lifter
bar
(23).
lifter
foot
is
raised
or
lowered
with
the
presser
Drawing
Raise
take
one
top
again
Pull
the
the
up
sewing
stitch
and
needle
the
towards
the
I
bobbin
foot.
bobbin
thread
I
thread
Hold
you
to
the
until
thread
draw
needle
the
has
up
the
thread
needle
formed
bobbin
is
a
and
at
the
loop.
thread.
I
I
I
I
I
I
I
I
I
I
I
I
I
obbin
lose
sewing
e
the
thread
hook
foot
cover
the
to
(33)
left
and
pull
the
thread
under
Thread
Pull
thread
the
trimmer
trimmer
threads
from
(36).
the
back
I
I
I
I
I
I
I
to
the
front
over
the
I
I
I
I
I
I
Page 29
A.
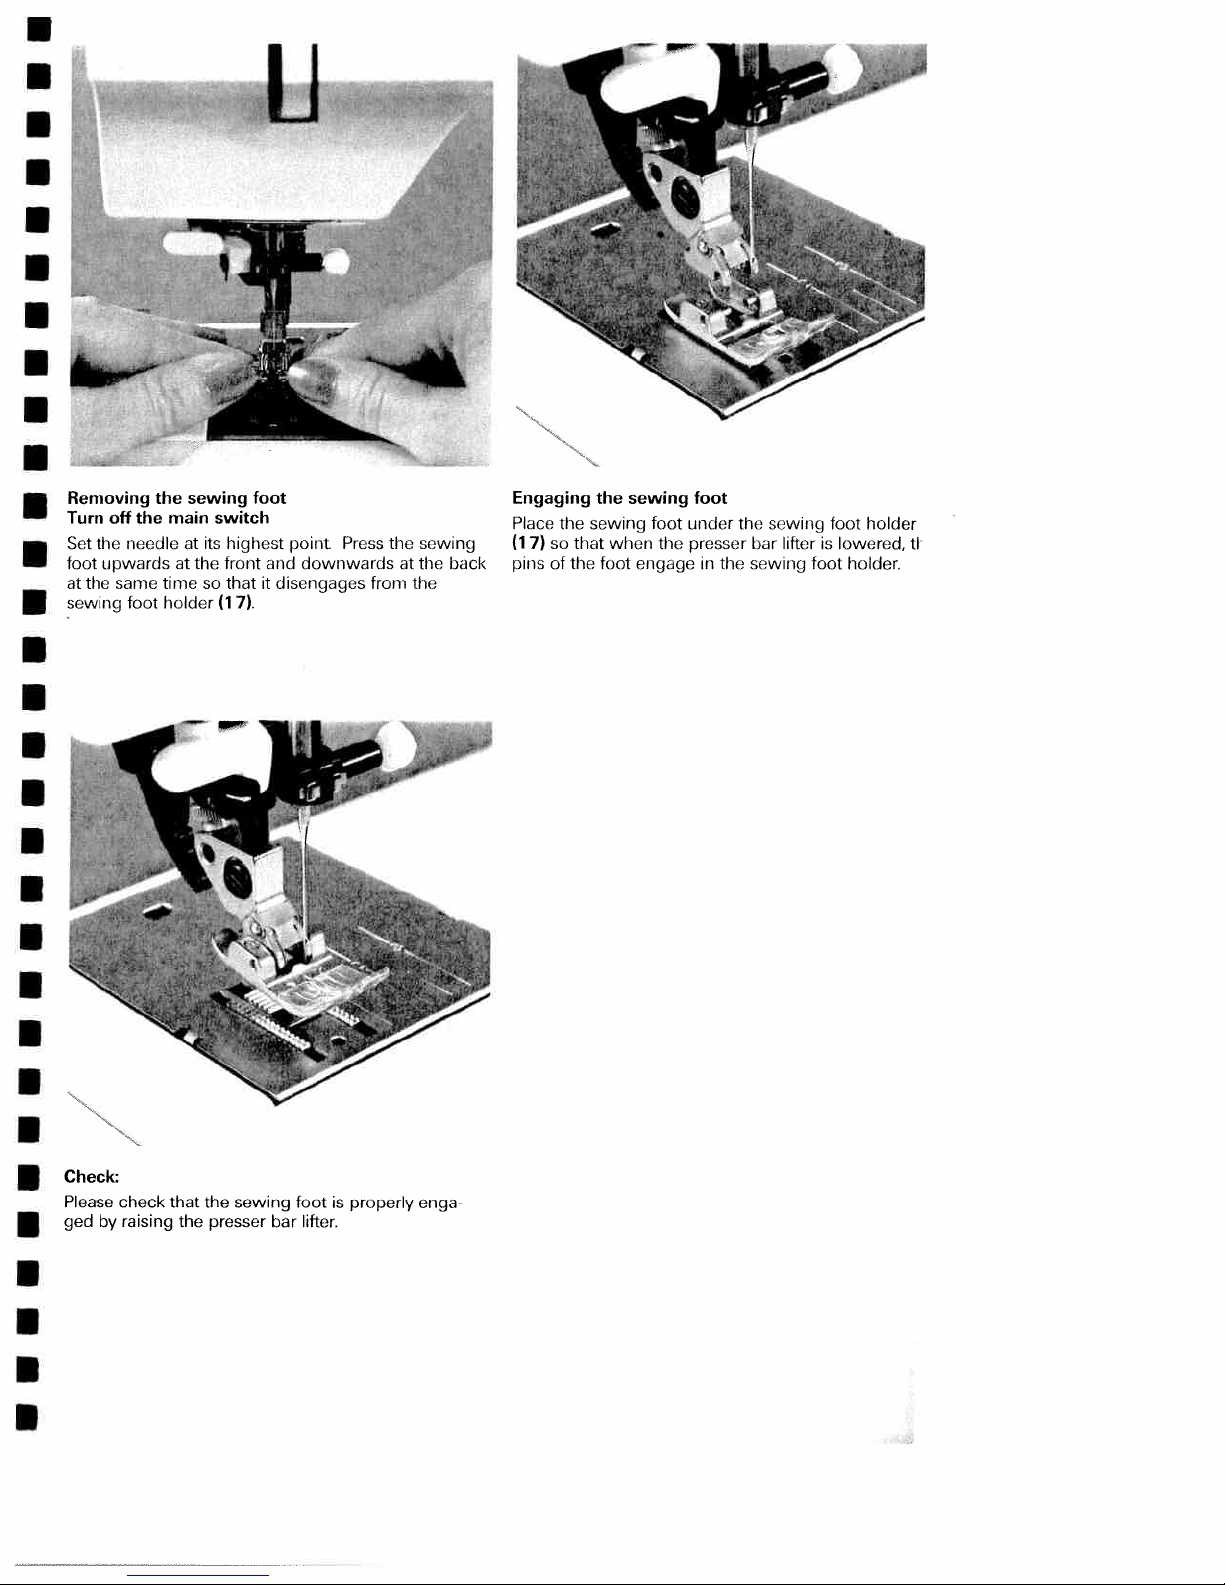
Removing
Turn
off
Set
the
foot
upwardsatthe
at
the
same
sewing
the
the
needle
timesothat
foot
holder
sewing
main
at
switch
its
front
(1
toot
highest
7).
point
and
downwards
it
disengages
Press
the
from
at
the
sewing
the
back
Engaging
Place
the
so
(1
7)
pins
of
the
sewing
sewing
that when the
the
foot
foot
engageinthe
foot
under
presser
the sewing
bar
lifterislowered,
sewing
holder
foot
foot holder.
tl
Check:
Please
check
gedbyraising
that the
the
sewing
presser
footisproperly
lifter.
bar
enga
Page 30
I
I
I
I
I
I
I
I
i
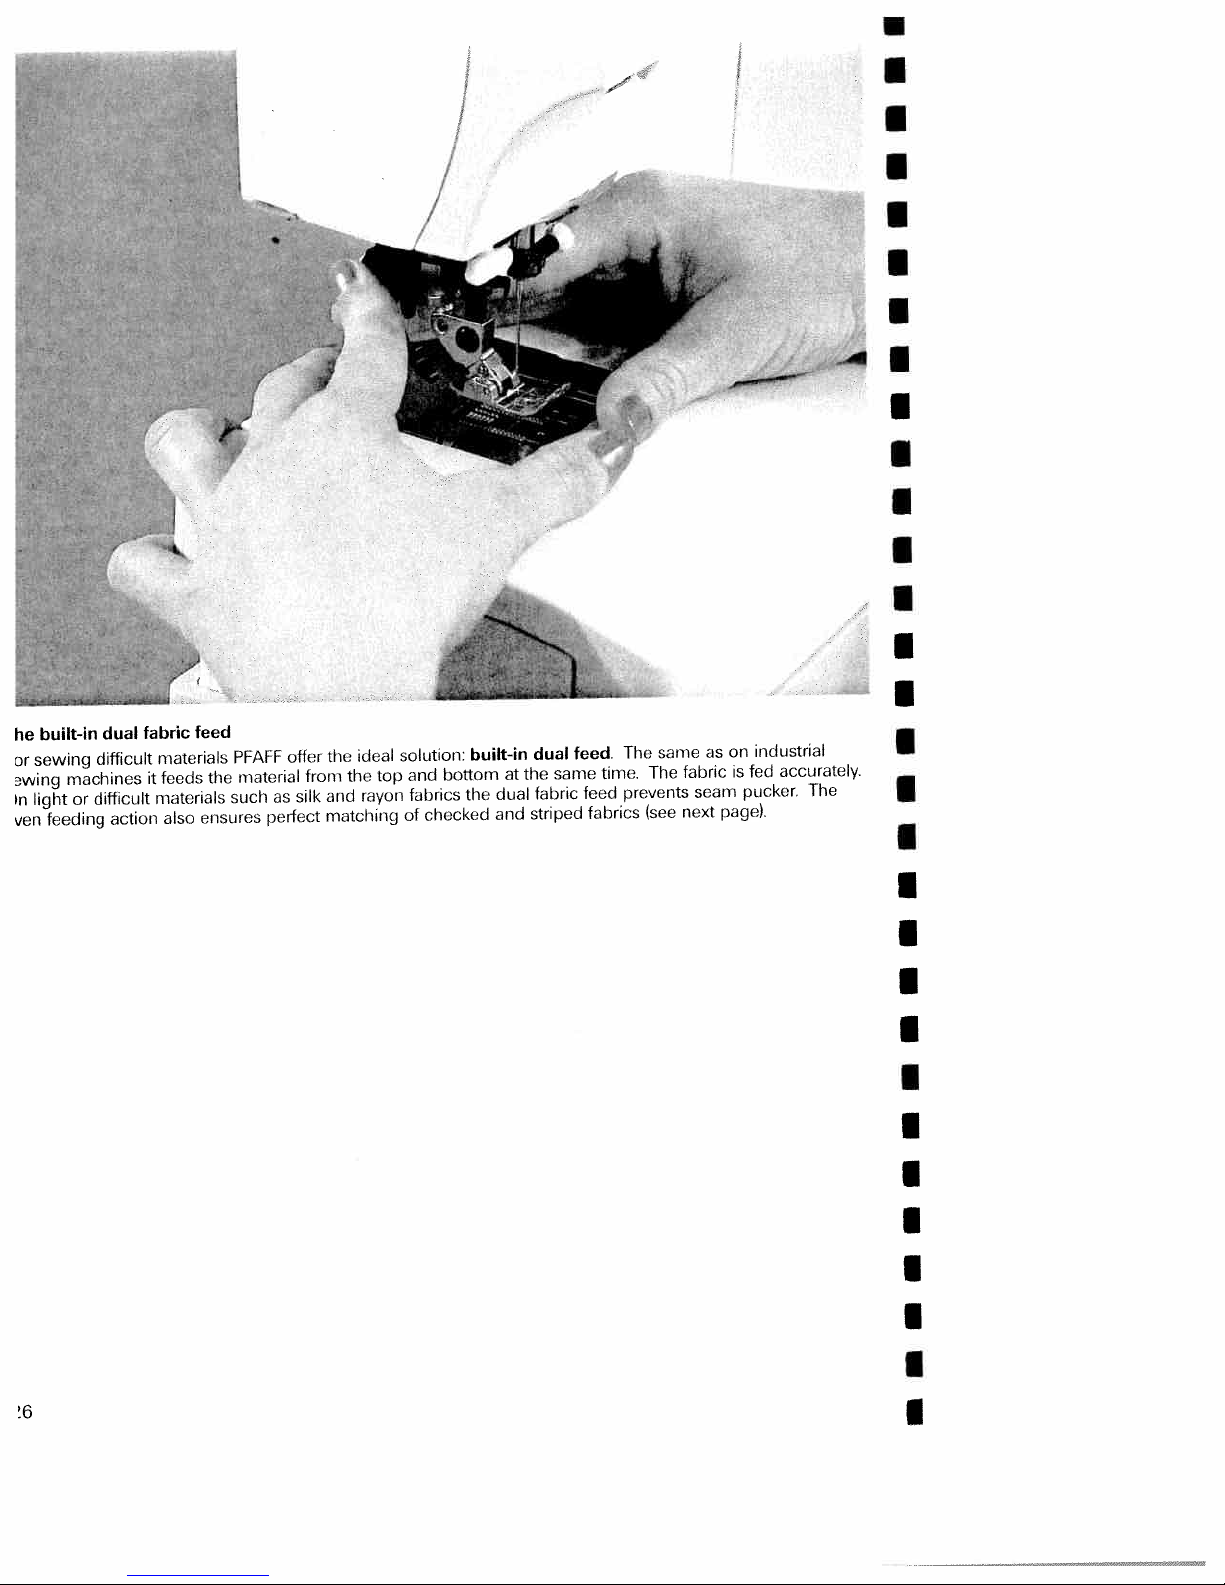
built-in
he
sewing
or
ewing
light
n
yen
machines
or
feeding
dual
difficult
difficult
action
fabric
materials
feeds
it
materials
also
feed
the
ensures
PEAFF
material
such
offer
silk
as
perFect
the
from
and
matching
the
ideal
rayon
solution:
top
and
fabrics
checked
ol
built-in
bottom
the
at
dual
and
dual
the
fabric
striped
same
feed.
feed
fabrics
time.
same
The
The
prevents
(see
fabric
seam
next
as
on
is
pucker,
page).
industrial
accurately.
fed
I
I
The
I
I
I
I
I
I
I
I
I
I
I
I
I
Page 31

Engaging
the
Raise
that
so
sewing
snaps
it
the
top
in
feed
foot
place.
Now
push
the
top
feed
(38)
Disengaging
top
the
Hold
places.
to
the
Push
rear,
the
illustration
and
the
teed
the
on
let
top
with
top
page
it
feed
two
feed
move
26>.
fingers
(38)
slowly
down
upwards
marked
the
at
little
a
and
(see
out
also
important!
feed,
top
the
with
jobs
sewing
all
For
only
use
sewing
feet
with
cutout
back
the
at
2/
Page 32

$ø
Changing
Switch
/
/
/
/
/
/
To
needle
screw
To
insert:
the
needk:,
needle
off
remove:
at
(24)
rear.
pushing
and
the
main
Lower
its
and
The
Lower
tightet
needle
highest
pull
flat
the
it
switch
thc
point.
the
side
sewing
rip
tire
sewing
A
as
fixing
Now
needle
of
foot
tar
as
II
te
screw
foot
out
tiedIe
and
it
will
dnd
loosen
downards.
insert
gu.
(24)
set
the
must
Hold
fit
th
fixing
the
ily.
n
face
tu
thu
Page 33
I
I
I
I
I
I
I
U
I
I
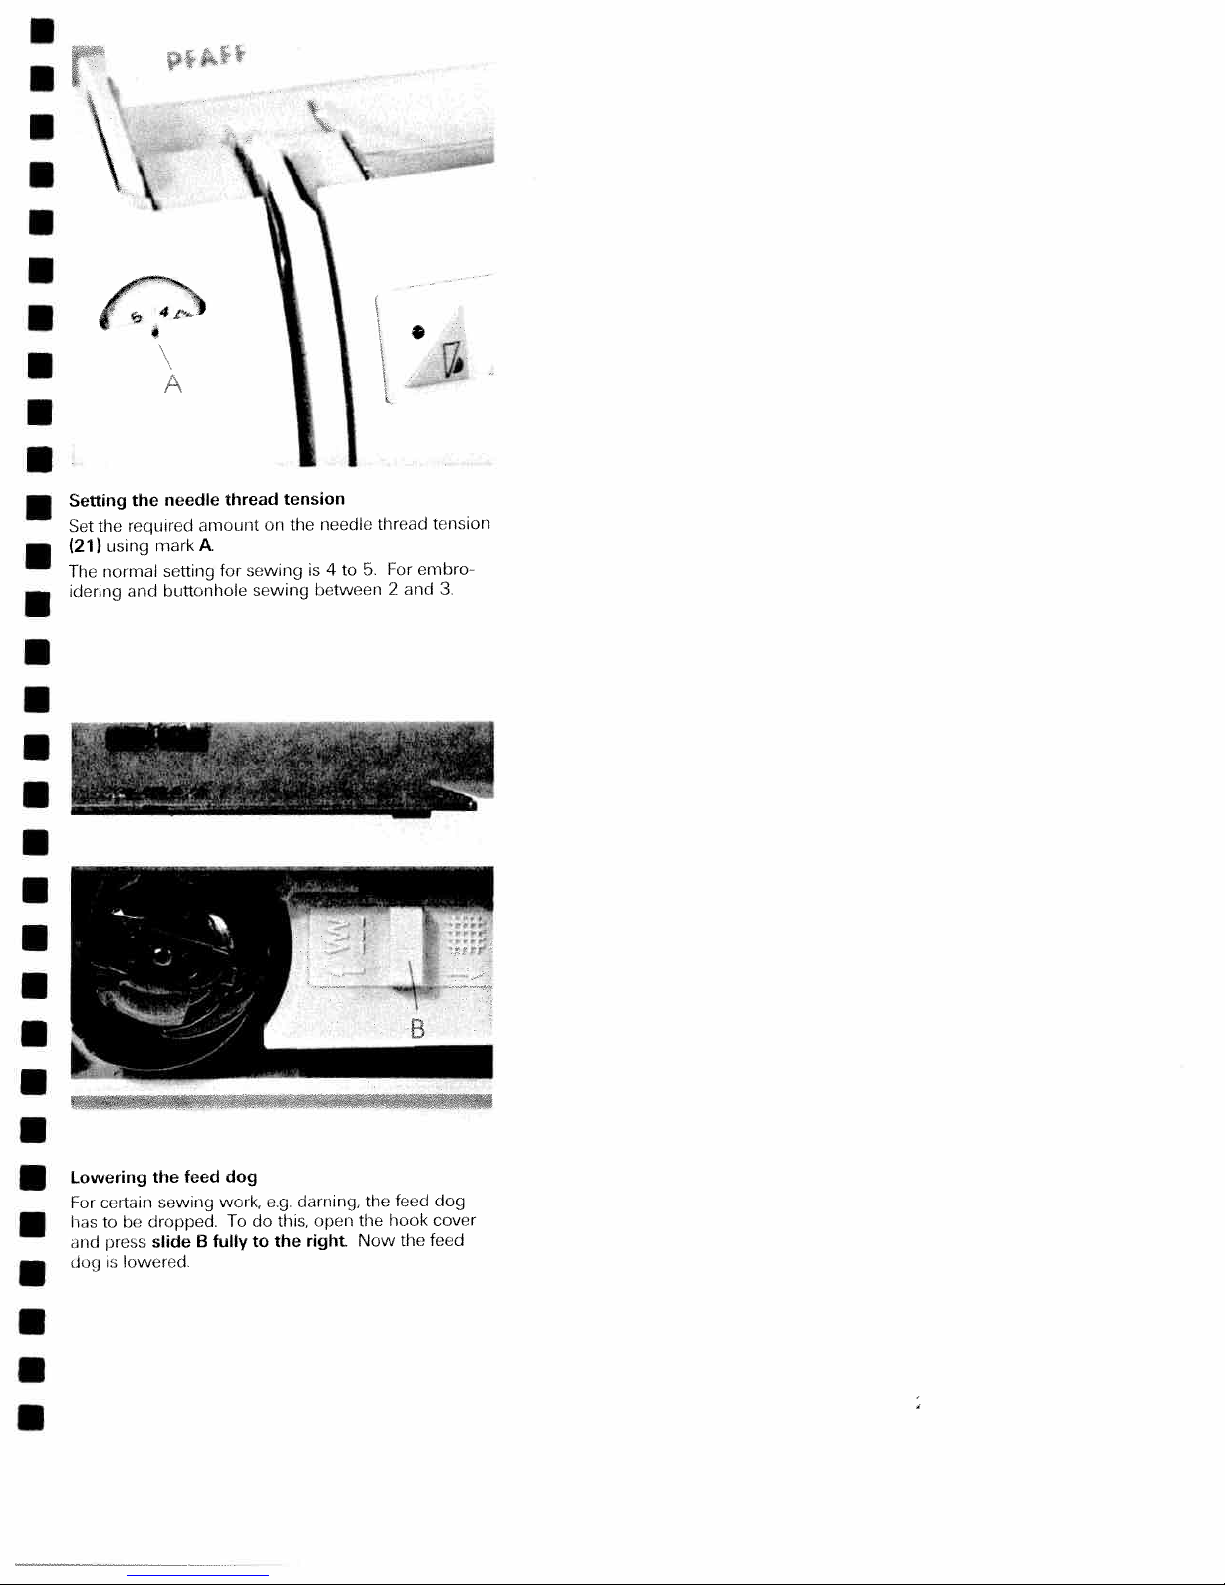
Setting
Set
the
(21)
The
idering
the
required
using
normal
and
needle
amount
A.
mark
setting
buttonhole
thread
for
on
sewing
sewing
tension
the
is
between
needle
4to5.
thread
For
and
2
tension
embro
3.
I
U
I
I
U
I
I
U
U
I
U
U
U
I
Lowering
For
ccrtain
tobedropped.
ii,s
arid
press
lowered
dog
is
the
sewing
slide
feed
B
dog
work,
Todothis,
fully
to
e.g
the
darninq,
open
right
the
the
Now
teed
hook
the
dog
cover
feed
I
B
B
Page 34

——
——————
——
—
—
—
—————
————
————
———
—
Page 35

Operating
the
sewing
machine
Program
Function
Control
Pages
31
keys
keys
slide
to
keys
40
Page 36

Page 37
S
S
S
S
S
S
S
1
:-
:--
:
S
•
•
•
5
•
U
5
S
S
S
S
S
S
S
Elektronic
Program
Clear
Needle
Stitch
Stitch
Balance
Slow
Needle
Buttonhole/tacking!
single
Reverse
Twin
keys
key
positions
width
length
slide
sewing
position
patterns
sewing
needle
section
slide
slide
key
key
key
up/down
Page
Page
Page
Page
Page
Page
Page
Page
Page
Page
Page
PFAFF
34
34
35
35
36
37
38
38
39
40
40
electronic
6250
S
S
S
S
Page 38

_______
•
•
I
PFAFF
automatically
the
automatically
machine
the
from
keys
electronic
left
29
program
to
rogram
rhe
appear
Jse
return
9
e.g.
1
LL
does
20).
--—
PFAFF
6250
liquid
the
in
key
(12)
number
to
jump
not
selected
The
—-—
has
to
to
two
crystal
select
0.
the
program
Use
•Ob
l
•
program
display
tens
the
next
L-
right
tens
cannot
6
—---
electronic
When
keys.
3).
(1
from
digits
program
(e.g.
be
from
changed
digit
Li
•
—
LL
•
Li
L2
LS
J
6250
Geemany
in
Made
will
machine
After
9.
digit
00
number
stays
will
as
is
it
program
number
from
selected
on,
0
7
to
tens
the
switched
30).
you
units
is
reach
digits
the
but
sewing.
machine
the
After
7.
to
0
key
to
29
select
to
during
Clear
The
1.
2.
34
clear
You
You
key
can
can
key
(14)
a
set
cancel
two
has
program
previously
a
functions.
have
you
saved
started
buttonhole-
back
at
the
darning
or
beginning
program.
again.
Page 39

_____
0
Setting
The
When
1
0
Please
stitch
to
stitch
the
width
you
6
mm;
observe
•
width
slide
move
infinitely
the
I
key
the
note
L
has
(6)
key
slide
variable.
concerning
4.
two
the
•0.5_V
•
.J
functions:
upper
slide
diode
key
lights
(6).
r
O2’’1
up
and
you
can
•
La
L2
13
Ii
from
width
set
the
required
stitch
Setting
2.
‘
I
Note
Whenever
‘
program
The
I
moved
the
When
is
This
concerning
green
back
needle
you
possible
the
setting.
diode
to
,c
move
slide
machine
does
the
position
the
programs
in
not
basic
L
slide
key
switched
is
light
setting
key
(6):
J
(6)
02,
up
again.
the
03,
on
until
lower
06
or
the
.0.5
•
and
program
a
slide
diode
07.
key
O2’i
lights
selected,
is
moved.
is
6
and
up
the
It
•
you
electronic
goes
L.1
•
set
can
again
out
Li
to
up
system
as
L2
1
soon
needle
3
will
make
as
positions.
the
basic
a
slide
key
is
Page 40

4’
*
ioddn
“1
90
-
:suorpun4
poip
lUeJJ4!p
sq6i
9
‘
dii
stii6uai
JC)
pun
!/
Lvvv•O
-
nbA
P9•
i
1
tr’
•
ueo
os
SOOqUOfli1q
UI
‘
.z_
11
oqi
L2
‘c
tI
paiinhoj
01
itii’iiioid
El
qiis
l15ui
F
so
woij
*
-
ii+
-
111!1S
a’\Ow
qi6u
(L)
Op!(S
eqi
A1ovu!ju
jo
LflfiU0
Aoi
noA
(L)
apils
ajq?IJeA
uco
Olli
li
u
g
01
‘!flS
qi
1(lItliOi
ii
nutS
:ww
n
npi;
A
seq
Aa
7
os
r
00J41
oq
oquonq
is
ttu
0ON
cro
1htIflI
1
A
iII(I
oft
p
o
I
II)
GIl)
B
L
3110’)
1
1(1
I
iusqo
-
.
OP!IS
I-
f5U!UJOUOO
-
so.
aou
ooq
‘
-
*
T:_
U)
Aj
9
.
I
. .
i.
Li
-I
i
/4
A3!suap
epijs
:(L)
iq6ij
613111BS
Aa
pOqOl!Ms
dii
(L)
OqI
UO
iun
uin6n
n
pop
1OMO
e
Jo
oq
opis
6
si
iuei6njd
Ao(
si
dn
‘p0130(05
ii
paAbLu
jue
noA
soo6
i’o
pio
lOS
D!uOJjDcI(a
SC
u!C6C
uioisAs
ji
UbOS
piiflbw
SC
O)(eUi
Olfl
qDlils
Aieuip
oiouo
wu’
0[II
(W1
fiuiIiJ
0111
oqi
opqs
O1ftJ3’
SO()()
Aovuiui
Aoj
!
TOU
DISPq
I
I
I
I
I
B
)J
I
I
__
I
Page 41

C
Setting
The
1
The
wi!
The
wilt
the
buleuce
When
stitcl
res.
farther
he
r
larthoryon
he
loss
you
you
rore
dense
Please observe
•
bldnce
slide
move
move[Iin
iSe.
do
0ev:
the
key
II
note
(8)
s
the
hos
ol!(i
key
key
be’ow
two
key
right,
ieft,
functions
the
upper
the
longer
shorter
[he
concerning
0-7
diode
the
slide
the
0.2
lights up
reverse
reverse
key
stitches
shtches
(8).
rind
-
•
1
H
Li
0-9
11w
II
liflC311
htclIoS
otitches
of
of
otthe
tho
pork
poh’IH
you
will
will
con
he
ho
detso
soWn.
sewn.
ii:
:o
Setting
2.
When
seven
Note
concerning
Wliiiiover
qroei(
hi’
iv’!
the
hoik
pattern
you
steps
the
setting.
diode
move
frour
machurt’
Ici
the basic
length
the slide l’j’
Li
slide
does
not
In
L3
key
swtr’h’:l
light
selling
(8):
up
again.
(8)
on
until
rh:
07
[lie
lwe
Ii)
-
I
I
09
—
ii
I)
I)
I
l:hits
diojo
-
P0(11)
key
slide
is
:slectt’rh,
is
moved.
up
arid
It
the
goes
you
can
eheCtiOflic
out
set
apron
he
SWO
0)
eWili’
1’:
‘i”
‘l
‘I
Page 42
I
I
I
I
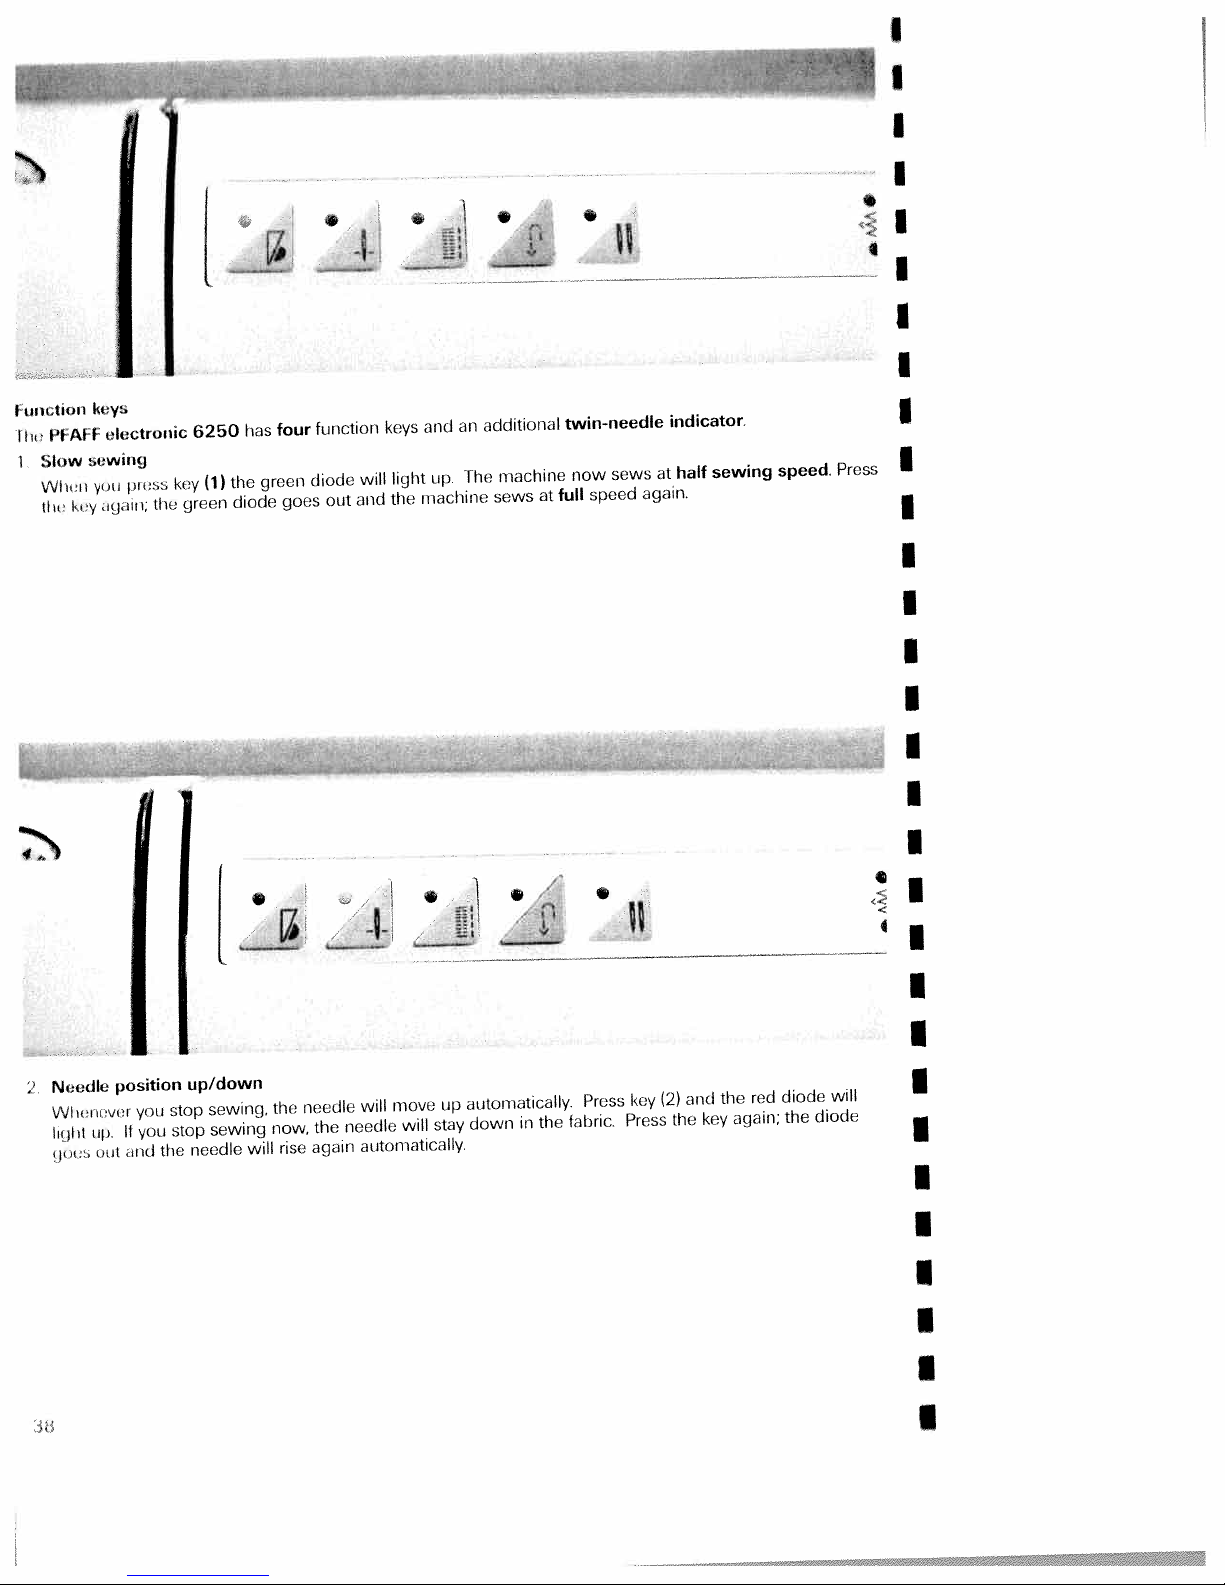
unction
F
lh
1
PFAFF
Slow
WIeu
h
sewing
ky
keys
electronic
pius
you
dgdlu;
tIm
key
green
6250
(1)
has
the
diode
four
green
goes
function
diode
out
-
will
and
keys
light
the
.1
and
up.
machine
additional
an
The
machine
sews
twin-needle
now
full
at
sews
speed
at
again.
indicator.
sewing
half
speed.
Press
I
I
I
I
I
I
I
I
I
I
I
I
I
Needle
WIii’,u’vt’i
tip.
light
uut
;o,s
position
you
you
If
iiid
stop
stop
the
up/down
sewing,
sewing
needle
will
a
V
the
now,
rise
needle
the
again
-
-
move
will
will
needle
automatically.
__
up
stay
‘
automatically.
down
the
in
Press
fabric.
key
Press
(2>
the
and
key
the
again;
red
diode
the
will
diode
I
I
I
I
I
I
I
I
I
I
I
S
I
Page 43

___
___
Buttonholes/tacking/single
3.
three
has
(3)
Key
Buttonholes
1.
2.
3,
With
Tacking
this
If
the
Single
If
pattern
pattern,
this
this
key
patterns
key
is
key
is
is
sewn
pressed
is
pressed
functions:
can
you
tacked
the
at
1
•
17’
vu
patterns
determine
sewing
before
automatically,
sewing,
during
The
end.
and
green
+
save
is
then
the
ft
begun,
the
green
diode
your
own
the
diode
diode
goes
buttonhole
green
goes
out
will
again.
a
diode
out
light
will
again.
rip.
a
lengths
light
A
seam
in
up.
programs
seam,
The
is
sewn
/2.
/
71
beginning
or
immedidlely,
l
dud
Page 44

I
I
I
I
4.
Reverse
Before
As
soon
again.
hold
sewing,
If
the
sewing
as
you
you
key.
press
Then
press
press
the
the
key
the
key
green
(4);
key
during
ri
11a
the
again,
diode
green
sewing,
does
the
-,-
diode
green
not
the
lights
diode
PFAFF
light
up.
will
up.
The
machine
go
out
electronic
n
and
6250
now
the
sews
machine
will
sew
backwards.
forwards
sews
backwards
I
4
I
I
I
long
as
as
you
I
I
I
I
I
I
Twin
In
some
the
twin
needle.
needle
indicator
of
the
needle.Ifyou
programs
t.
the
reduce
diode
the
of
stitch
the
*
twin
width
needle
and
v
the
indicator
diode
goes
•/‘
lights
out,
up.
I
This
means
that
you
must
not
it
is
then
possible
to
sew
with
nsc
twin
I
I
I
I
I
I
Page 45

Sewing
and
embroidering
Utility
Pages
and
41
fancy
to
stitches
71
41
Page 46

I
I
I
I
I
I
I
I
I
I
I
I
I
I
I
I
I
I
I
I
I
I
I
I
I
I
S
Page 47
Utility
Non-elastic
Elastic
Overlock
Covering
Buttonholes
Fancy
Sewing
stitches
stitches
table
and
stitches
stitches
stitches
fancy
stitches
Pages
Pages
Pages
Pages
Pages
Pages
Page
45
51
54
56
44
59
63
to
to
to
to
to
to
50
53
55
58
62
71
Page 48

I
I
I
I
I
S
Explanation
recommendations
Whenever
basic
automatically.
You
and
the
following
recommend
These
sewing
foot
and
engaged
rog
p
A
stitch
can
change
sewing
tables
the
you
need,
whether
a
selected
or
Program
Stitch
Stitch
Top
tables
of
program
length,
purpose
for
disengaged.
tables
give
the
you
feed
stitch
these
using
you
different
you
programs:
needle
should
number
length
width
engaged
disengaged
for
is
selected,
settings
will
sewing
further
thread
sew
in
mm
in
mm
sewing
width
according
slide
keys
find
the
purposes.
information
the
with
the
machine
and
6,7and
settings
type
tension
the
top
•
0
balance
to
required
of
sewing
setting,
feed
sets
material
In
8,
we
for
a
I
I
I
a
I
U
I
I
U
I
I
I
a
I
Needle
thread
tension
E.1
Sewing
44
foot
number
I
S
a
I
I
S
Page 49

Basting
With
trying
machine
stitch
Lower
—
feed.
Place
—
Sew
—
the
Repeat
—
the
To
TIP:
dress
fabrics
mm).
(6
feed.
stitch
program
on.
it
will
have
you
the
the
one
required
work.
prevent
pins
are
Then
08
When
only
to
bottom
fabric
stitch,
amount
as
this
the
crosswise
easier
you
you
you
make
press
under
then
many
material
to
baste
do
can
press
feed
to
not
one
the
and
the
pull
times
the
with
need
baste
the
stitch.
foot
sewing
the
plies
basting
/
garment
a
toot
For
control
disengage
fabric
you
as
from
dirction.
long
lower
to
/
control
each
each
loot
to
need
shifting,
straight
the
the
the
before
the
further
time.
rear
finish
to
Light
stitches
bottom
top
insert
by
LLzi
6
to
needle
with
left
stitch
00
position.
mm
sewing
in
a
use
always
You
slide
needle
Straight
Program
needle
up
Some
the
sewing
position,
position,
point.
ens
with
the
is
required.
as
jobs
position,
fastener.
zip
program
make
can
set
key
position
The
(6).
basic
stitch
can
e.g.
up
02.
sure
to
straight
length
done
be
top-stitching
change
To
Before
the
different
3
1
Program
cannot
that
stitch
can
easier
you
needle
01
LL
1
with
increased
be
changing
by
collar
a
needle
the
change
isatits
needle
straight
a
is
changed.
be
middle
or
its
highest
positi
stitch
Page 50

1
\
ZI
1O-12
L_L_.
Zigzag
Zigzag
edges
all
of
the
Sure
alternately
edge
oqr
pr
In
tInt’
from
I)osltionl
toward
2
1
one
to
work
stitch
stitch
needle
ml
muddle
hanges
side,
1—2
10
Whilo
10
left,
e.g.
3—6
L
cart
set
(JUl’’
width
tIre
outwards.
toward
the
i.e.
eyelet
for
=rJ
ht
11110
tisl
qu
stitch
ig
of
the
•
fur
ar
II)aterial
the
zhgiag
prograni
In
right,
width
ennibrondt’ry
trouble
dge,
stitcl
,ind
can
3
always
Slid
m
11
in
Is.
anal
h
free
nkike
ilvIl
changes
the
program
regulated
trdnmrtj
i
Ii
sergirig
the
needle
.EW
LFlJ
For
very
thu’
1
[Is’
You
A.
Important:
11.
a
i
serging
‘
nst’lnl
JtrVvl’miJlIi(J
sm
iii
edge
raw
adjust
can
—?J
materials,
hea
has
this
limIlllI(J
in
tim
to
iii’
n
st’wmnrg,
I
he
etlrjm
flit’
difficult
linnnnmntj
‘w
Only
l\
j_L_J.IJ
is
No.
over
In
grade
rg
program
this
pin
screw
3
C,
way
B.
tIme
ol
smooth
guided
u
‘
blind
flit
blind
ihre,nd
tabrnc
seams.
It’
will
.tik
along
snichi
edge.
is
I
It
Ii
lies
edge
ljnstrr
tot
Tool
ri
I
I
Page 51

*
,..
,
IIIIFII.zLL
—)
—
edge
adjust
side,
f:ce
the
on
visthle
sthches
the
It
are
14,15
stitch
Bllnd
stitch
Blind
sewing
—
—
—
—
—
by
Serge
the
Fold
unfold
Now
protrudes
place
Now
the
that
When
pick
only
hand
the
the
Z5j4J
suited
best
is
4
1
unnecessary.
is
the
of
edge
inwards
edge
hem
the
half
about
by
fabric
the
crease
needle
up
one
line
runs
enters
fibre
hem.
by
again
an
under
of
for
the
so
inch.
along
the
the
invisible
hem
that
sewing
the
edge
crease
fabric.
hems;
width.
the
guide
line
hem
foot
it
edge
so
B.
must
i
Program
hem
The
not
is
is
15
is
sewn
necessary
a
1
Th
Th<
blind
ar
seige
to
<
1
stttd
scrgt’ti
tht
k
dl
tdlJnI
4
4
(
t&
H
II
t
Page 52

I
I
I
I
I
I
I
I
I
I
prog
03
Saddle
Saddle
jackets
an
with
ned
buautiful
J_
stitch
stitch
and
other
pattern
I
is
03
coats.
fancy
combinations.
best
If
stitches,
suited
you
use
you
for
top
grass
can
stitching
stitch
also
work
combi
produce
I
1
/
I
I
09
over
the
darning
saved.
saved
as
you
program
darning
is
areas
reverse
darning
need.
is
mainly
fabric.
of
the
damaged
program
length
cancelled
intended
key;
the
and
can
by
for
area
machine
darning
the
now
pressing
strengthening
required
the
at
finishes
length
repeated
he
the
clear
sewing
is
as
ky
I
I
I
I
I
Automatic
Program
damaged
Stitch
—
length.
—
Press
the
thus
The
often
The
I
I
I
I
I
I
I
I
I:iIIi
Illi
Il
11111
Ill
ii
b
tin
nrii’I
Ii
II
ii
II
II
II
‘liii
!IIIIiI
II
ill
jIftiLJ
II,
Lepending
patterii
pattein
lttlitp.itltiii
1
Fe)
•1
Fit;
Ii
It
iiiay
again
t)Ii,
Oil
sluiH
1
title)
2
I
I
1
1
iyp
II
Uil
iii
Flit
liti,
Ii
Ii
t
in
i
a
i
ki
0i
Li
II
(H)
I
I
I
I
Page 53

Sewing
With
buttons
Remove
—
—
Place
—
Turn
the
in
Now
—
held
Now
—
needle
The
—
completed.
TIP:
teed
the
on
buttons
program
with
the
button
the
hand wheel
the
buttonsothat
button.
the
lower
by
the
sew
also
machine
can
You
dog.
74
problem
no
sewing
the
shank
the button.
on
enters
sews
on
sew
you
in
the
presser
of
buttons
can
foot
the
towards
the
the
tack
a
sew
all.
at
place
needle
bar
foot
Make
right
on
lifter,
hole
and
easier
two
marked.
you
enters
the
sure
in
the
program
still
and
the
and
position
the
button
that
if
you
four-hole
left
the
button.
lower
hole
is
is
now
Sewing
Insert
Place
and
buttons
on
the sewing
match
a
on
sew
it
with
foot
between
described
as
stems
the
holes
at
left
of
the
button
—
—
Remove
apart
V’Vrap
the
the
steni
match
with
and
ot’wiio;
hi
tIP
t
it
01
I
I
,ttl
oaf
tint
a,of
ltI1
t,iI
a
49
Page 54

p>g
iiJ
2
ul
iii
k
t
t
I;i(
I)
/(Ct
3
73
III
11(1
Ii
)lII
i(ICI
-;i/CC
•
)ruJimI
th
iI1I/
(itkCCIIt
(jtIRIy
IIlt
IIiIIC
(CI
IC
pCC.
b2iO
Ill
IC(,
thC
ii
I(fJu1C
Page 55

prog
Stretch
program
This
strength
great
sleeve
and
stitch
the
Program
program
longest
the
sutching
I
triple
length
06
07
edges
-.
3
straight
is
is
seams.
can
up
stitch
>
>
L
used
needed,
The
you
be
6
to
length
lapels
for
-‘-I
-
—t
stitch
sewing
for
e.g.
heavier
need.
lengthened
This
nni.
suitable
is
on
.
aH
inside
thr’
up
is
why
classic
3—5
seams
trouser
fabric,
4.5
to
progi
for
juckets
the
fancy
where
seams
longer
mm,
am
tup
and
Lj
0/1
and
07
coats.
I
If
.I
you
yoi
iii
4-6
wish
07,
pattern”.
reach
i
thus
material.
the
function
use
stops
top
to
the
Do
the
switches
stitch
functions
not
stitch
last
after
Now
press
the
a
stitch,
toni
itself
collar
“needle
the
before
the
off.
edge
single
the
and
fabric;
07
L
TIP:
program
“single
until
machine
stays
pattern”
at
with
down”
pattern
corner,
the
the
0/1
and
needle
“sir
key
tIi
igle
Page 56

I
I
I
I
I
I
I
I
I
prog
Phnii
ii
II’
prog
-
I
iL
3—b
I
.1
stein
stitch
i
ii
5
/iJ/ap
I
i
‘
I
wing
‘—ji
1
i(
h
i
I
ut
ii
like
seams
rtswear.
IsO
strdin,
stitch,
on
SLiitable
e.g.
this
elastic
foi
crotch
plograin
materials,
sewiilcj
enis
is
seams
on
very
0/1
u
9
I
19
Stretch
The
elastic
ft
lien,
I-shirts
—
Suig:
—
Fold
—
Top
stretch
and
Cii
L
triple
i
id
thu
the
stitch
2-3
zigzag
triple
zigzag
decorative
underweui
edge
hem
inwards
thii
hem
of
4-6
stitch
thu
n
stitch
seam
I
roil
hum.
at
i
thin
•
produces
which
the
is
required
tjc
s
3—5
very
(lu.
liigl
a
suitable
width.
0
ily
I
I
I
foi
I
I
I
I
I
I
I
I
I
I
I
a
I
$
a
a
Page 57

A
l\
A
l
1
V
v
V
V
t\\A
A
A
‘
v’
v
‘i
v
A
I
J
A
A
A
V
V
‘1
‘J
Ar’
13
Elastic
Owing
sewing
—
Cut
—
Gather
—
Push
elastic
firmly
—
Sew
elastic
with
—
On
the
stitch
to
its
elastic,
the
off
the
the
tape,
in
place.
it
on
tape
elastic
skirts
prepared
I
1
Li
high
elasticity
eg.
old
fabr
part
prepared
or
with
elastic
overlapping
stitches.
ci
trousers
edge
on
elastic
with
c
place
6
this
underwear
close
6
mm
in
it
underneath,
stitch
a
the
elastic
with
elastic
•
to
this
little
stitch
the
long
way
Leave
and
stitch.
I3—5
Ii
is
edge.
steagl
tape
used
between
and
pin
the
ends
sew
over
is
sewn
it
for
stitcl
I3
O/1
iL
ms
the
it
of
tIm
them
onto
Lr°h
24
Honeycomb
Honeycomb
hemming,
wear
—
Fold
stitch
and
1
the
and
I-shirts
edge
it.
2
stitch
stitch
is
is
very
of
6
used
suitable
the
hem
for
•
elastic
for
over
L
arid
hems
donhk
3-5Ui
iJeiii
on
I
id’
or
ii
Page 58
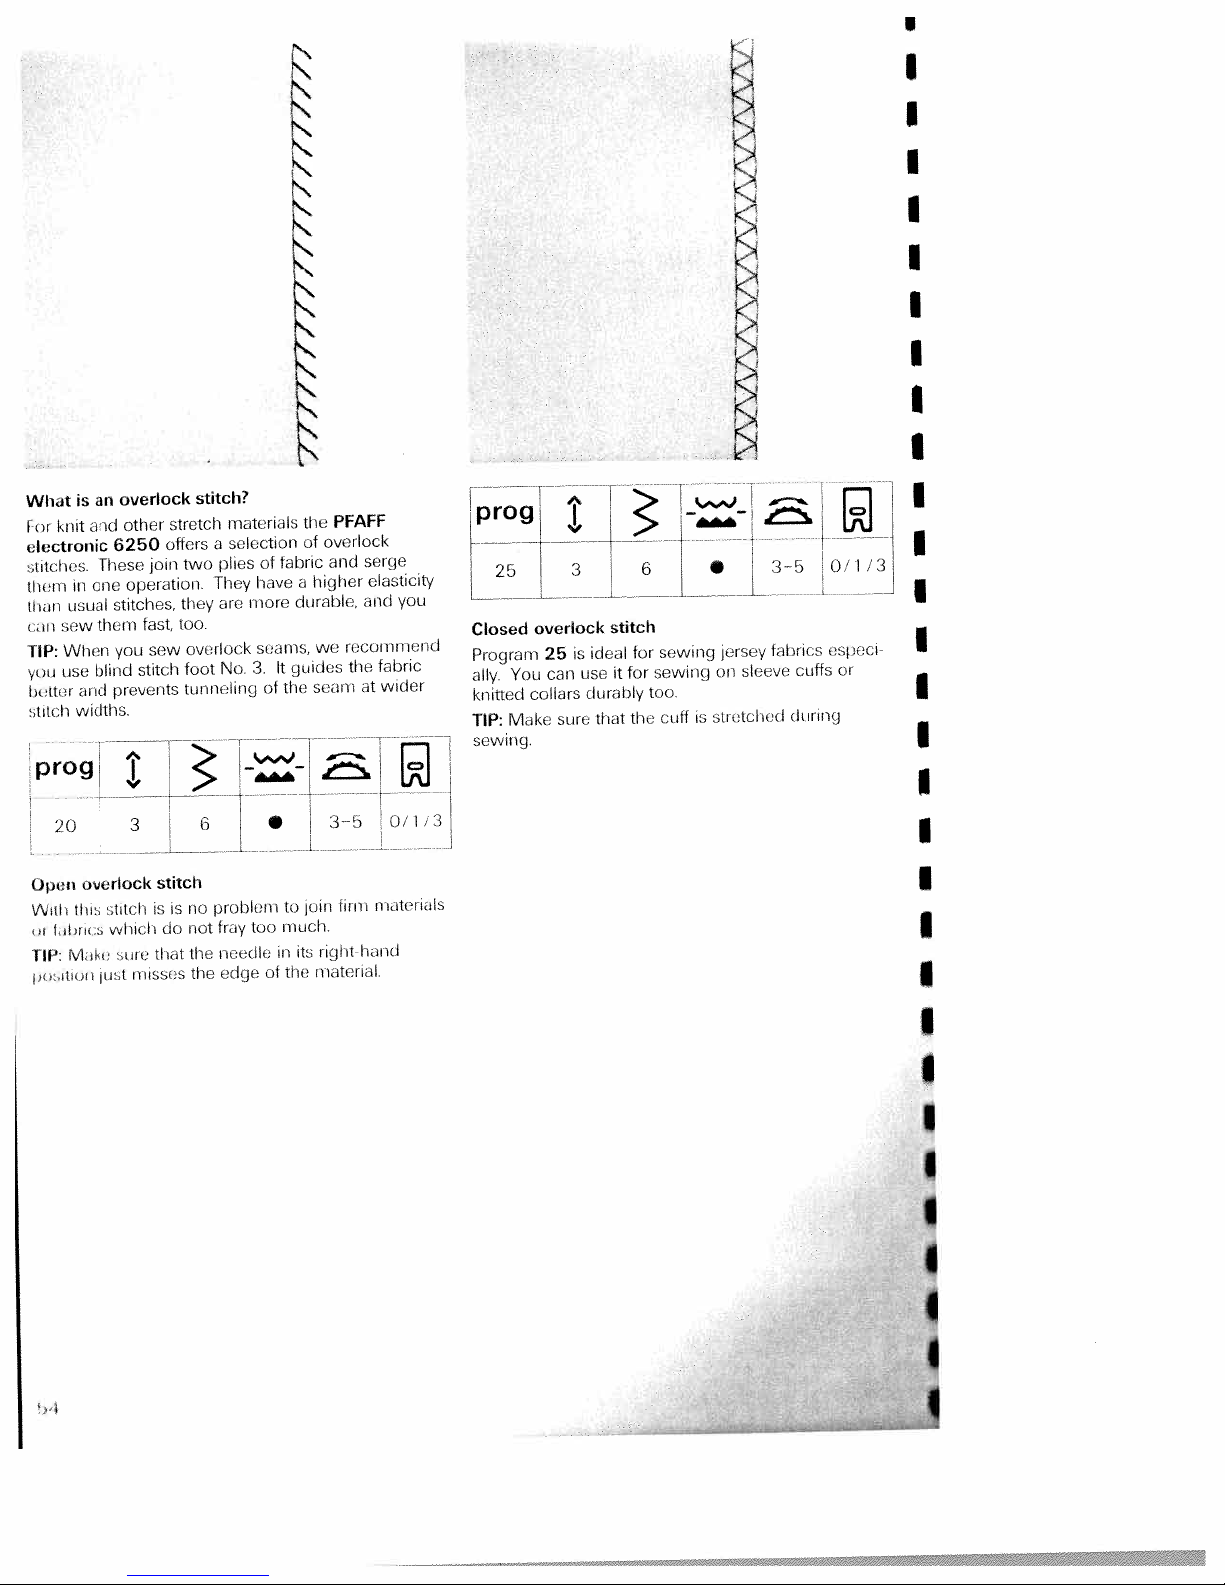
N
I
I
I
I
I
I
I
I
I
I
I
is
What
knit
or
electronic
ditl
cs.
in
tlu’ni
usual
than
SOW
LOt
When
TIP:
use
you
and
better
widths.
stitch
prog
20
overlock
Open
ilti:,
ttvirl
ia
fat
M,il’,a’
lIP
p1
itioi
an
and
These
one
them
blind
‘,ttch
:
iji
overlock
other
6250
operation
stitches,
fast,
you
stitch
prevents
3
vvhrcl
ore
niisscs
st
join
sew
stitch
ri
i
do
that
stretch
offers
two
they
too.
overfock
foot
tunneling
no
is
riot
the
the
stitch?
a
plies
They
are
No
6
problem
tray
needle
edge
materials
selection
of
have
more
scorns,
3.
of
•
,
too
of
fabric
durable,
guides
It
the
to
much.
in
the
the
of
higher
a
we
scant
1
oiri
right
its
nratcriol
PFAFF
overlock
serge
and
and
recommend
th
at
:3—b
tim
bond
elasticity
you
fabric
wider
0,1
nioteri,afs
‘3
Closed
Program
You
ally
knitted
IVldke
TIP:
rig.
sew
overlock
is
25
can
collars
sure
I
stitch
ideal
use
durably
that
I
—
I
-
o’1’3
6
3-5
L
fabrics
cuffs
during
esteci
or
is
jersey
on
stiritci
sleeve
ed
sewing
for
sewing
for
it
too
cull
the
I
I
I
I
I
I
I
I
I
a
I
I
I
a
a
Page 59

progL
;k
j3o/1/
3
Closed
If
you
program
thread
overlook
wish
21.
protects
to
use
With
the
stitch
matreial
a
this
fabric
with
stitch
edge
edge
that
an
additional
against
thread
frays
easily,
edge
fraying.
select
Pullover
togethei
Used
accessory,
open-knit
joined
he
TIP:
To
joining,
tension.
slight
stitch
this
fabrics.
with
prevent
advisable
it
is
with
the
stitch
Fashion-knit
this
stitch
the
seam
knitted-edge
can
even
without
from
to
add
he
garment
any
stretching
a
woolen
used
foot
effort.
(special
for
sections
open
thread
sewing
cdii
duiing
under
55
Page 60
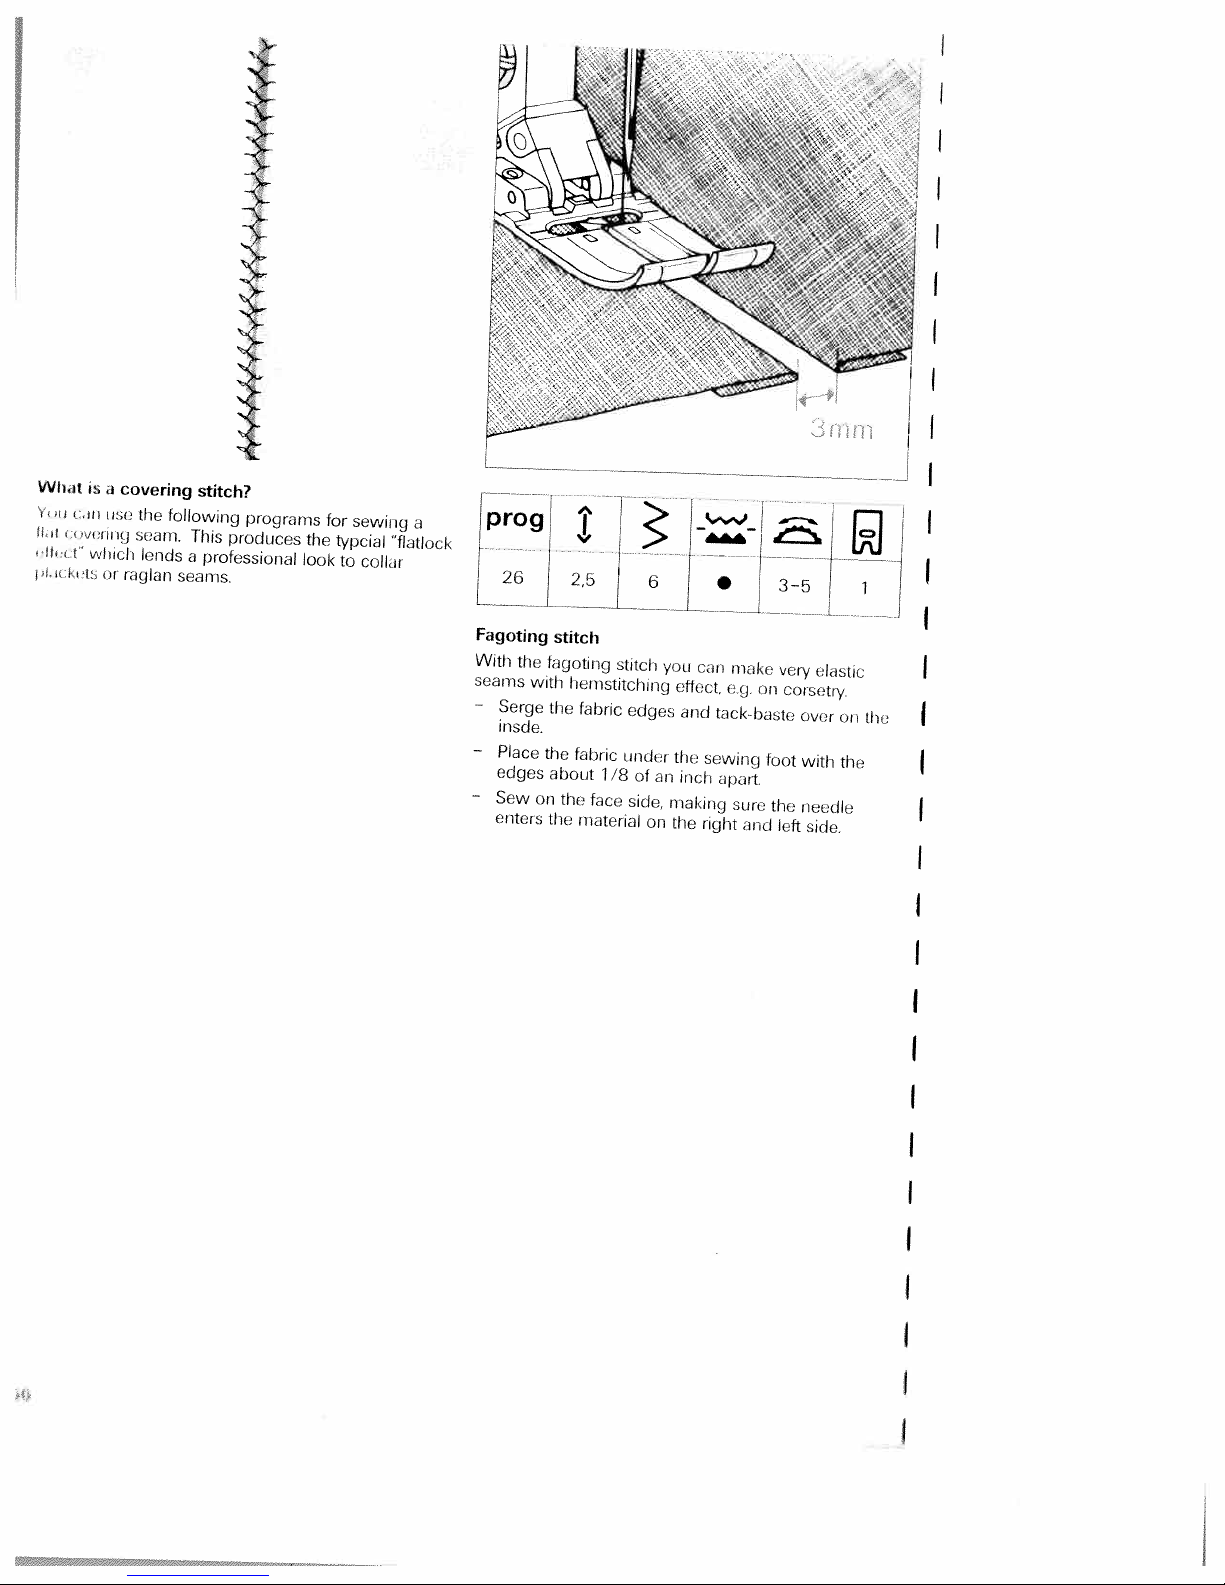
I
What
a
i
s
s
ii
i
viliicl
t’,
i
covering
uce
ig
ii
oi
raglan
the
seam.
lends
stitch?
following
This
a
professional
seams.
programs
produces
the
look
for
typcial
to
sewing
collai
a
“flatlock
‘prog
[26
Fagoting
With
seams
—
Serge
i
nsde.
—
Place
edges
—
Sew
enters
the
with
on
A
I
j25
-
stitch
fagoting
liemstitcliing
the
fabric
the
fabric
about
the
the
material
1/8
face
stitch
edges
under
of
side,
6
an
on
I
you
effect,
and
the
inch
making
the
-
can
tack
sewing
apart
nghi
make
eg.
sum
and
on
baste
foot
the
3—5
very
elastic
cotsetr’y
over
with
needle
left
side.
I33
eu
the
the
ii
Page 61

I
Fancy
Fancy
need
-
Place
about
with
elastic
elastic
a
flat
fancy
the
3/4
A
16
stitch
seam,
two
of
elastic
stitch
an
is
very
eg.terry
fabric
nch
stitch.
4
useful
cloth.
edges
and
HJ-
•
for
so
over-stitch
..L
materials
that
LI
3_bj
they
each
that
overlap
edge
r,1
1
by
—
Cross
stitch
Owing
for
decorative
—
Serge
—
Baste over
—
Stitch
doing
over-stitched.
-
-fl--
high
to
its
the
over
so,
hems,
fabric
the
the
make
elasticity,
e.g.
edge.
seam
margin
hem
from
sure
the
on
this
T-shirts
the
fabric
stitch
to
the
face
edge
is
and
left
side.
very
suit,ihli
underwe,u
When
is
prop’rly
Page 62

I
I
I
I
I
I
I
I
I
I
1)01(1
I
I
I
1LH)LI
II
I
)I(Il’
i)
H
CI)
HA(
iIL’
II’
‘H
)
)
II
H
H1
i
1UiLil1S
SJfl)
I(’
)l
IH
‘J(Ic
‘I
lilt’
I
H
I
I
I
I
I
I
I
I
I
I
I
S
I
I
S
Page 63

Httonhoes
PFAFF
lh
buttonhole
[)t’pending
choose
Buttonholes
doubled
organza
stabilizer
during
To
darning
Mark
magic
buttonhole
Note:
guide
that
between
sewing.
produce
the
pen
Before
of
the
threads
ied
eletronic
sewing
on
fabric.
and
prevent
to
starting
or
first
the
material
the
three
generally
are
However,
viscous
beautiful
are
point
Uss
di
starhng
buttonhole
is
arrow
6250
programs
different
sewn
for
fabric,
material
the
seams,
ideally
the
ot
and
pin,
buttonhole,
any
foot
the
at
offers
to
type
and
buttonhole
onto
some
necessary
is
it
from
good
suitable.
buttonhole
always
fullytothe
red
first
diftuient
you
choose
from.
work,
of
piece
a
mateiials,
to
puckering
embroidering
either
a
sew
always
front,
mark.
you
programs.
of
eg.
use
with
nple
sai
push
so
in.
can
silk,
a
or
a
the
I
Page 64

oIly
aulI)matc
jruiri
(Ii
O
3
mm
(I)
It)
(1)
IInun
I/I
1
v>
it
Ii
ft
mm
ruddk.
njhI
linen
iy
>1
iii>
,‘vii
buttonhole
suitable
linen.
Led
i
with
automatically.
buttonholi;
lii’
I
ponds
n
responds
s
3
1
I
a
,
cOi
for
length
with
I
will
1
sewing
sewing
VVlien
a
with
wli
>.l
.1
tIn
ii
1
(J
l>Ot
,iiiloniuti(
herd
L
buttonholes
program
a
13
of
You
>isii’g
buttonhole
buttonhole
butloiliclI.
,>
Ii
itdil_lt
juttrnirhc,iu
arid
ole
mm
cai
tlu
sew
ally
slim
and
slide
TI
the
secure
is
is
Self-defined
difficult
On
machine
the
do
seaiiis
With
stored
help
of
the
of
length
“buttonhole”.
in
“7”
the
slowly
Inst
st’,iiir
As
tb>
puss
secrinil
It
(s>hIy
U
Tb>
ye>
hititlorihr>l’
you
y
I
l33>rt>k
wish
again
3
point
>u>iiot
materials
nut
buttoi
semi
the
the
botor>’
mmii
key
to
switt
tU
li,>s
second
feeds
turn
second
A
point
display
,>s
i>priir
,ir>
st’w
n
his,ipp
si’
5>
cecil
=
bar-tack
such
d;fferently
the
out
iholes
automatic
hartack
then
Tb.’
siid
the
Iii,
1w>>
TI>>’
53511
I
next
the
1
illy
hi
to
<irs
,idtOii>,it,
‘itri
‘,t>ire>l
(semi-automatic)
as
sill’
and
seine
i
can
yoi
ci
intrul
yourself,
appe
machine
13’
>1
tI
iriS,
5>,
rir,iIiii
ii
buttonhole
tratic
<nile
progr<ur>s
Ia
ii
it
the
length.
correct
at
irs
,1COiiCl
sic
will
i>
r>i>trSi
C
my
happen
buttunhole
Ti>
define
press
the
will
now
uf
u>tudl
i>Vt
I
fully
ircing
h
71
until
this
key
right
l>uttoi
sew
autom,iu
and
with
sew
the
the
side
ihlOht’
length
that
3
the
72
the
I
.1
II
I
I
I
I
I
I
of
I
I
I
I
I
I
I
I
I
i,
.
d.I
--
i.i
I
I
I
I
I
I
I
I
Page 65

Compensating
balance
the
correction
further
A
balance
long
If
to
the
left
If
to
fewer
seam
buttonhole
the
the
more
seam
the
the
key.
seam
left
right
reverse
will
left
seam
left
reverse
will
automdtically
The
buttonhole
the
(8)
key
possibility
this
With
seams.
is
too
farther
The
stitches
automatically
too
is
farther
stitches
you
short
long
you
the
(Fig.
you
the
(Fig.
move
machine
be
can
move
machine
be
made
seam
offered
is
also
a)
made
b).
correct
push
the
push
slide
the
sews,
shorter.
length
by
the
slide
sews,
longer.
the
with
the
uneqUally
slide
key
i.e.
slide
key
left
i.e.
the
key
right.
the
key
the
left
j
Programmable
program
In
and
—
—
—
—
The
buttonholes
length
the
density
the
Push
the
Sew
the
Press
the
sews
seam.
machine
soon
As
same
sews
now
secures
buttonhole
You
clear
71
the
of
buttonhole
righthand
‘buttonhole’
first
Shortly
sews
as
length,
the
it
autotnaticall.
are
can
key.
linen
can
you
buttonhole
bartack
before
autoanitically
two
the
press
second
length
sewn
now
cancel
buttonholes
determine
yourself,
fully
slide
at
seam
key
(3).
the
and
second
the
buttonhole
again.
key
(3)
buttonhole
stored.
now
is
automatically
saved
the
the
to
the
Now
second
slower.
seams
length
length,
front.
the
required
the
bartack
The
seam
All
weflh
length
madiiiw
buttoilllol4
thi
Hi
are
macbite
and
ii
fuifi
Us
at
‘
po
by
Page 66

I
I
a
I
I
I
I
I
I
ptuu
lOirtuihidO
1
1
With
ii
111(1(1
it
i
I
ii
Iii
I
thread
tJ1111
I
iiIi)littUillt()lf(S
using
l’.
too,
l1H(l
1
01(101
ilo
-Ite
1011,0
Osil
U(
ovOl
the
tim
left
friIi
ii1tiiri’iiii,tiitiiitt,n
tin
a
iii
ool
3
ecj
qiiuip
a
threadsvery
giinp
tcThingfthe
idgeAana
iiuk
$f’win(J
fnv’)nJ
n’qllt
i
foot
Ii
for
thruad
if
rdqe
ti
i:I1
prog
—
very
sin
,elt
hnttu
tI
o
Iungth
I
(mimi
useful
Iecorotoie
hlonses
the
u;u
bortaur.
the
OWN
tWo
ress
sECOnd
sewn
ON
1)
e
g
Iii
11011’
‘rund
S
SluIioi.
h)nttonl
koy
isIow
shite
[is’
sewing
for
jogging
in
iljti
fnIi
1,111
hi
(3)
thi’
of
Los
aglif.
(3)
buttunhinlu
stored
mliii
.v’ii
bnrtoi
ii
in
h
ui
Lot
uk
huttoni
suits
111)1(0
wi
itt
,
I’
i
ti
(‘I
sun
Fli
SoolO
4-411
aticahly
k’Iigth
ii’.’
i
St
of
lilt
ii
is
further
at
by
It
can
eq.
tie
‘qi
ill
Iii
1’
III
ii
.ir
ni.,liilo
md
the
prssing
oks
I
thu
11001
oil’’
same
in
also
I
ii
I
I
I
I
I
I
I
I
I
5
to
the
B.
Soy’)
/2
Stretch
Program
stretchable
usdfor
be
notional
oun
You
buttonhole
—
Push
Sew
length
Piiss
soo
Oitl’J
Si
)utoil
As
soul
—
semu
flow
suouros
Tin
tiuttunhule
burtonfloles
length
[hi
clear
buttonhole
72
is
matenals,
making
t
ostunie
ili’terii
von
buttonhole
tin
the
first
Tim
bununt
ti
fiist
o
L)uture
,TIC)illV
longth,
sovis
the
IT
dutunItluahly.
ro
‘‘ou
con
key
I
I
I
I
I
I
I
Page 67

I
Vecorative
cnhdnce
In
I
PFAFF
icy-
li
I
I
I
I
I
I
produce
can
selecting
embroidery
For
embroidery
dealer.
Ptaff
the
For
an
use
material
the
out
mark
or
marking
few
a
recommendations
work:
I
prog
I
I
I
stitch
The
required.
I
stitches
your
electronic
decorative
and
different
threads
parts
iron-on
from
the
chalk.
hours
length
own
6250
greater
even
combinations,
work
which
embroidered
be
to
tear
or
tunneling
embroidery
These
be
can
or
:i:
and
home
stitches
we
away
ironed
apply
stitch
textiles
you
offers
choose
to
embroidery
colours
recommend
available
are
you
stabilizer.
puckering.
or
with
pattern
will
lines
away.
embroidery
all
to
width
garments
or
whole
a
variations
using
should
This
a
dissolve
The
be
can
host
from.
or
sizes.
special
your
from
either
prevents
You
magic
after
following
varied
the
of
You
by
can
pen
as
I
I
I
I
I
I
I
I
I
I
I
I
I
I
I
I
p
Page 68

I
4
Il__f
fa
r
I
I
I
/
I
I
I
1
.th
n
is
ii
I
ki;tli.
m
ii
ii
(1)
lot
lhIttern
I
SR
diode
is
length,
liu
to
hued,
th
specific
lights
pressed,
Fhe
too.
II
embroidery
length
is
switched
the
stitch
PFAFF
to
up
it
is
length
on
the
program.
whet
possible
patterns
and
electronic
the
stitch
to
is
changed
can
when
6250
change
be
new
a
length
the
and
changed
sets
thus
Changing
density
In
some
stitch
this
the
density.
case
programs
pattern
density
with
stitch
Independently
the
In
the
the
pattern
length
The
of
the
using
lower
you
lower
pattern
diode
length
can
slide
diode
the
at
change
key
length
stitch
lights
(8)
then
the
the
dn(J
lights
you
length
up,
same
pdttern
con
too.
retein
slide
stitch
length
the
up.
change
key
I
I
a
(7).
a
a
a
a
I
I
I
I
I
I
a
I
a
I
a
I
I
Page 69

4
4
pattern
Changing
When
the
machineisswitched
the
programisselected,
automatically
This
basic
stitch width
sets
setting
slide
up.
this
Exceptions
to
width
PFAFF
the
a
basic pattern
canbeinfinitely
are
Then
(6).
programs
the
key
on
and
whenanew
electronic
6250
width.
with
varied
upper
the
diode
32,41and46to
lights
49.
Balance
Embroiders’
different
materials;
differently
the
pattern
electronic
PFAFF
called
“Balance.” This
feed
reverse
diode then
farther
The
shorter the
opened
The
up
farther
longer the
closed
up
patterns
to
silk,Inorder
you
may
woollen
a
needinthe optimum
6250
allows
inanumber
lights
up.
you
move
reverse
the
stitches
more.
move
you
reverse
the
stitches
more.
turn
fabric
that
has
a
you
of
programs;
slide
are
slide
are
out
differently
is
you
can
correction
to
change
key
(8)
sewn,
key
to
sewn,
fed
embroider
way,
system,
the
the
to
i.e.
the pattern
the
right,
i.e.
the
on
the
the
upper
left,
pttei
tlu
il
I
Page 70

•i
I
.
LI1.
L4
I
S
a
4’>:
:(1r
1J
I
r
S
A
‘d
cj
1I
II
ti
7
Oflit
711’
,IIIII
1k
L
UJU
VI
1(111
51(1
t1r(e1s
,HJt[
II.,
I’/
iIl7i
ii
VlIj
I.V
StI)Ii1(I
vtt
i,iii
(.oourt(i
U
[
‘US
II
LII
I
1
(III
•
stl[TUUIC.
[V
1.1
II
II
lii
I
/
(l[ff(U([[1
VIIV
151
ILl
UI
K.
ki
tI
ki
1
h(
SI/VU
1)1
Il
1
Fniin
till
.
17
1
V
54
HIlt
5.3
77
LIft.
i
I
‘I
lint
1
vJ
tIVI
U
[II
VII
[I
II
)lI
‘;h
1
1117
tIlilij
t[I
IIlI1i(li&
H
U
i
Ill
UI
5
a
I
5
a
a
111
[1111
l(J
tttIi
7
wIth
slq
II
(II
s
U
II
((1
15011
II
17
I_1P
‘
11
57
I
I
I
I
I
I
I
I
I
I
I
I
I
Page 71

c
_________
needle
Twin
ii
to’
with
(5)
programs.
twin
irtah
ulior
)rogmdn4
lights
It
width
set
needle.
a
and
a’
lilt)
you
slide
I
‘
I
.;
-
You
tVVin
tilt)
borders
Note:
soon
As
twin
not
width
will
stitch
pattern
needle
use
using
go
width
iiOedle,
can
as
the
out
using
uclireve
edO
titini
1
much’
he
embroidery
indicator
needle.
twin
stitch
the
some
in
been
has
the
up
remlirem
Then
you
l
ma’)
amr
key
/
can
th
w
‘.
lii
(6).
an
wl,rl
ti
lIp
sew
Ir
mm,,
l
1’
0
riO
t’
ud’t
.‘imtc
is
optmn
ii
ls’,ititn
d
ati
hr
run
the
Itim
tIn
I
(b)
i
_____________
4,
a
.
4.
(1
‘:
I
4,
4
j
‘,
c
tIll
_f
‘
c.j
A
I
4,
ii
if
14
U
j
4
4!
h
4,
0
t
ii
,J
I
4,
;1,-,,!
I
needle
twin
the
the
Iii
disk
one
disk
Carry
sure
Pull
(19)
the
the
second
oii
left
During
C.
thread
C.
on
the
the
and
twin
each
threading
left
threading
threads
threads
thread
needle.
holder
reel
holder.
slot
threading,
one
and
in
not
are
right
needles.
the
the
and
aimd
(20)
make
thread
usual
twisted
left
place
you
into
sure
right
way,
with
one
will
that
over
hut
each
thread
reel
find
you
tei1mm
mn,ml’m’
gurdr
of
tension
ima’
S
nIh’
m
Threading
Insert
—
Fit
—
thread
—
—
Page 72

t,
H
:
C’
H
I
-
I
I
stitch
Cross
VjiI
)
IlVi
IV
I
I
II
IllitIl
UI
Ill
lltt
VII
ik
H1
IVV
V(LIiVFIVVV(ViiI(VI
Vt
I.
IV
UllicIl
ViV
II
(
UI
1
VijiVilli
(Il
Nh
JI
IISII1I)
Its
I
VIVIII.IVVILIVVH
1
IV
II
I
III
I)(i(IVI
IV
t
lt
(IV
IlL
VV
II
[([I
VI
I
(Vi’
(III
itIl
I
I
I
VIVII1I
till
lU
IVIUVIHIIU
VII
Ii
ii
1
IlL
VV
VI
V
V
VV
V
1
Vi
V
Ii
I
v
IV
It
ilL
iIIlLjI
ViVtJ
69
VI
Vi,
V
NV
III
nI
VI
62b0
II,
11th
I
(IIIIIV(l
IHRV
I
ii
tII
Ii
.11
(V
.(
II
VU1II
I
U
I
1
,VI
V
I
ill
IV
IItt.
I
N
((I
I
III
(Iii
((IV.
_itl
Ni
Vt
V
1)1
I
e;trOnlc
ii
I•1’tVIt(I
1’,
Li
ii
lU
II
rj)I
-t
64
1
l(j,t
ULII1L
(IV
‘I
t
U
JU
1
iL
I
lit
lit
PFAFI
Vi
lilt
iii
(IV
IVLIIHVHV
liii
P
UP
Hy
V
I
•V
ti
Iii
Fit
ill
VU
ji
I
Pr
III’
P
t.
F
U
IL
(V
II
t,1
I
IlL
it
ii
Hi
VII
I
VIII
Viii
IU(lOrIItq
((I
I
SI(iVjVii
(1
(Ii
Ili
Vi
V
VVIVV
tlt
Ill
V
Ill/i
V
I
VV(i
Eit
Vi
V
VIV
iiIi
Ii
I
.1(1
liIT1IIII1
(hUlk
i
I
It
1
I
HR
I
II
(I
I
II
I
I
I
I
I
I
I
I
I
I
I
I
I
I
I
I
I
Page 73

Embroidering
With
leather
Since
backing
on
The
leather
leather
stitch
with
length
tears
PFAFF
the
Embroidering
teflon
a
using
the
allows
Depending
we
thread,
with
needle
forget
not
Do
leather.
no
stretches
place
or
between
leather
sewing
foot
on
reconu
large
a
that
leather
electronic
problem
two
should
slide
to
thickness
the
nend
eye
uriruelled
easily,
stitch
can
foot
easily
(1
at
layers
not
he
usa
30
6250
all.
be
holes
made
The
of
ig
you
of
over
a
N)
scm
you
should
stabilizer
set
too
easily,
teflon
the
tile
special
s
can
even
leather.
leithei
show
embroider
use
under
short,
too.
easier
covering
and
needle
up
irore
an
it.
because
by
or
a
on
This
Apply
—
underlay.
Embroider
—
of
Sew
single
Fit
—
thread
and
Finally,
—
the
TIP:
eyelets
the
is
the
the
cordiig
Leave
way
ironon
belt
dots
the
pattern
cording
with
density).
embroider
enough
which
to
do
or
program
with
ku)
foot
program
seam
punched
ire
it:
tear
program
and
tire
with
space
away
(extended)
62
over
51
triangular
program
in
stabilizer
64
stitch
(reduced
the
later.
in
as
over
not
(do
the
stitch
in
border
61.
embroidery
an
the
forget
gimp
parallel
for
centre
the
width
to
the
69
Page 74

wLh
d
thfference
tly
<i(
;
ir
p
to
to
hpe.
nlmund
iiPti
of
Suspeiidrs
your
in
own
To
apptyng
nnderiay.
thu
(f
and
tsto?
strnqihon
an
Suspenders
iron
I
I
I
I
I
I
I
I
I
I
I
I
I
ih
on
wet
attul
55.
aw
to
Iloprum
thu
73
strap
s
jI
p
tel
I
pa
qrufn
it
with
this
I
1
I
I
I
I
Page 75

Monograms
matter
No
with
fabric,
monogram
Freehand
beginning.
the
Transfer
—
be
to
Lower
—
Place
—
Tauten
—
embroider
the
use
Knot
—
waste
If
ou
TIP:
stitches
terry
On
narrow
with
wider
a
are
loops
whether
darning
the
initials
any
guiding,
initials
the
embroidered.
feed
the
of
piece
a
part
the
it
with
darning
threads
the
dissolved
is
fast
sew
made
be
will
the
cloth
zigzag
stitch.
zigzag
properly
work
you
foot
your
of
however,
with
and
dog
stabilizer
water
embroidery
an
in
program
position.
pull
and
in
water).
move
but
dense.
monogram
stitches
This
covered.
on
and
own
needs
the
insert
off
the
must
and
makes
terry
program
design.
a
magic
the
on
Do
50.
the
material
then
sure
cloth
50
prdctice
little
to
pen
darning
fabric.
the
hoop
not
stabilizer.
be
first
oversewii
the
woven
or
you
the
foot
and
forget
(Any
slowly,
pre
terry
can
part
to
the
sewn
with
cloth
i.e.
to
50.
no
do
proqi
TIm
hue
is
undui
stitch
in
embroider
to
easier
little
a
does
marked
iron-on
monograri
the
k
embroider
are
not
required.
is
backing
need
lines
the
be
to
All
using
or
on
i
niarked
lowered,
you
program
place
the
have
stabilizer
fabric.
lines
with
capitals
Block
dog
feed
guiding
hand
the
along
Apply
—
in
—
—
neath.
Mat
Now
50.
Page 76

Page 77

Application
examples
Practical
Traditional
Pages
73
sewing
embroidering
93
to
techniques
C
U
Page 78

—
—
—
—
—
—
—
—
—
—
—
—
—
—
—
—
—
—
—
—
—
—
—
—
—
—
—
—
Page 79

I
Practical
Traditional
General
Hems
Gathering
Shirring
Darning
Inserting
Roll-hemming
Sewing
Shell
Rcliolwu
Luut
QuItiric;
[yelut
Henistitching
notes
twin
with
zippers
lace
edging
erubroLdery
i
enilriideiy
sewing
embroidering
sewing
on
needle
techniques
77
Page
Page
Page
Page
Fije
Rg
77
80
86
87
88
76,
78,
81,
84,
89
89
90
91
79
82,
85
92,
Pages
Page
Pages
Page
Pages
Pages
Page
Page
83
93
Page 80

I
I
I
I
I
I
‘I
liii
.d
iu5
thi
tension
1
ii
ad
h
othe.
sion
two
plies
lies
edle
ut
hiobbin
perfect
tensions
using
the
on
tkieid
the
thirc
ads
the
iethli
ewing
The
a
tel)
tension
id
wide
n
inst
I
iumial
must
side
tliiitl
P
nsion
results
be
zigzag
lie
of
is
correctly
setting
in
the
too
lOioon
pksea
the
stitch
the
t
tight
needle
for
TIe
inohhhi
hric,
If
o
St
clii
utility
thus
it
lies
to
oh
too
Top-stitchmg
With
program
positinil
sewing
work
this
tIe
guide
tixiiidla.mew
siniply
n.
salle
is
in
toot
If
yen
instil
such
along
wish
gueh
pluk
F
02
S
I
I
I
you
ui
ii
lop
that
fabric
huh
mic
k
chango
yen
It
Ig
C
way
a
the
ii
the
om
into
tb
iii
Ii
along
Ii
iud
ii
can
ud
5
ml
the
In
riiIi
ie
ahway
i
gosh
II
8
i
ic
p
0
edhe
,tim
wehti
1
guide
I
n
dgi
vSitk
thin
au
I
the
S
s
Oil
I
a
a
I
I
a
I
I
I
I
I
a
S
I
a
I
I
I
Page 81
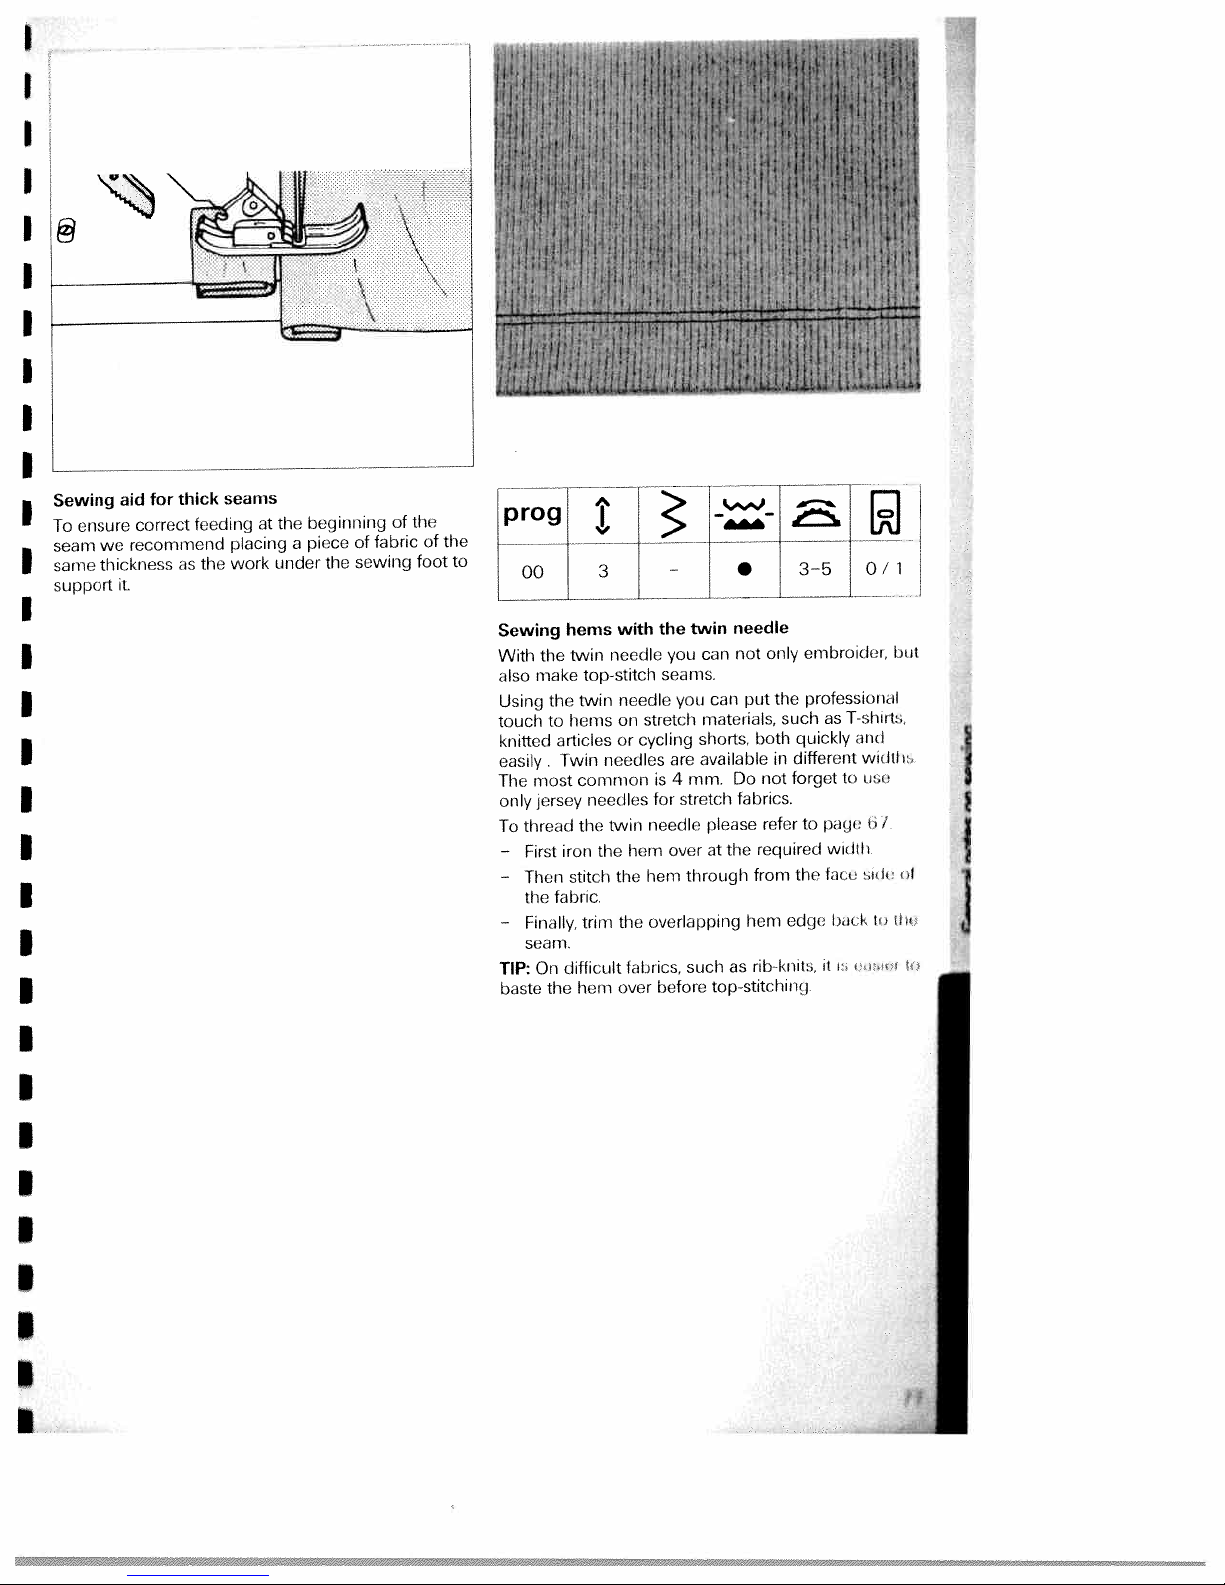
Sewing
ensure
To
seam
same
support
aid
correct
recommend
we
thickness
it.
for
thick
feeding
as
the
seams
placing
work
at
the
a
under
beginning
of
piece
sewing
the
of
fabric
the
foot
j
Proij
the
of
to
jJO/1
•
LJL
needle
Sewing
With
also
Using
touch
knitted
easily.
The
only
thread
To
First
—
Then
—
the
Finally,
—
seam.
TIP:
baste
the
make
the
to
most
jersey
fabric.
On
the
hems
twin
top-stitch
twin
hems
articles
Twin
common
needles
the
iron
stitch
trim
difficult
hem
with
needle
needle
on
or
needles
twin
the
the
the
fabrics,
over
horn
twin
the
you
seams.
you
stretch
cycling
are
mm.
4
is
for
stretch
needle
over
through
horn
overlapping
such
before
not
can
can
put
materials,
both
shorts,
available
Do
fabrics.
please
the
at
from
hem
rib
as
top-stitching
only
the
such
quickly
different
in
forget
not
refer
required
the
edge
knits,
embroider,
professional
shirt:
I
as
and
widtle
ie
to
page
to
widilt
sr
tart
Isa
1
i
but
bi
1
I
I
I
Page 82

prog
I
I
I
1)1.)
(‘athering
Program
iii
)HHH
gathers
n
a
a
Mark
id
ti
a
uji
toot
Now
ihii
Ii
Ilk
,leeves,
the
stitch
read
carl
width
gather
,nls.
SUIt.
ily
il
6
with
00
skirts
you
tirst
along
protruding
now
using
You
tnot
ci.
straight
a
at
should
line
it.
stitch
the
part
the
determine
thread
the
stitch
valances.
or
on
Leave
at
the
first
stitch
sew
the
by
length
tace
about
the
utfier
one
pulling
the
ends
•
two
er
amount
together
id.
sear
as
To
or
side
the
of
three
four
a
mm
6
obtain
of
or
al
i
is
guide.
bottom
of
gathering
the
five
sewing—
gather
secure
to
you
neat
fabric
inches
can
and
:
I
I
I
I
I
I
I
a
I
I
I
I
a
a
Page 83

jg
241
Gathering
Gathering
elastic
with
wound
Mark
—
the
of
Make
—
then
needle
Raise
around
Lower
stitches,
tliwad
from
by
After
41o
b
t
onto
leave
the
llt
2
with
sleeves
threads.
the
first
the
fabric.
few
a
must
the
the
the
but
until
then
amount
sewing
r
by
knot
t
elastic
bobbin.
gathering
starting
the
be
sewing
needle.
sewing
do
these
on
you
pulling
the
waist
or
The
needle
at
foot
not
you
you
threads
•1
6
threads
seams
elastic
seam
stitches
down
middle
the
and
again
foot
pui
1
sewn.
are
determine
pull
still
can
elastic
both
•3—510/1
thread
using
in
place
ends
the
the
on
change
and
is
no
the
on
tee
the
of
the
and
the
elastic
threads.
elastic.
the
pioblem
must
reverse
piograni
fabric.
sewing
elastic
sew
the
of
amount
thread.
amount
the
1
few
a
elastic
not
The
of
at
be
side
24,
foot.
thread
more
gather
of
all
TIP:
gathering.
for
elastic
The
cording
evenly
toot
The
during
(special
grooves
the
in
sewing
accessory)
foot
this
action.
is
guide
h,u
idtl
thi
Page 84

:
:
I
I
prog
Ui)
turruig
Ii
I
1
k
ii
wi
I
I
it
it
fine
tibrics,
ig
with
sit
Sii
is
lust
bobbin
you
‘sw
iii
I
.1
.1
with
and
bobbin
ice
ibbi
be
obtain.
if
iii
ith
wa
Its
3-4
elastic
a
first
Ii
mw
III
elastic
light
you
elastic
th
n
set
thread
test
along
using
vera!
stitch
iicj
mateiials,
can
thread
case
threads
rem
is,
very
seam
line
tin
it.
stitch
the
sean
sewing,
threads
make
and
the
louse.
tension
to
the
thi
first
is
the
iiiitCnil
otherwise
-‘a
such
beautiful
you
wind
are
tens
However,
the
(leterliiiil(’
f,icii
other
one
one
as
shouiri
the
mud
ui
greater
di
Si.
illiS
as
ii
bes
to
batiste,
elastic
i
on
of
guide.
rio
its
tlit
shirring.
use
in
thickei
the
I
tile
tighter
the
the
511
the
sewnicj
it
the
origiiiil
slnrniig
viscous
thread
tisiii
mbhi
shii
eliot
fabric
otto
For
will
n
ring
you
of
by
2
I”.
L
heginrung
at
side.
iiiil
cod
of
the’
Page 85

Darning
Insert
the
Set
of
pin
this,
do
Wire
bar.
tighten
Darning
Lower
rear.
(darning
Place
—
Lower
—
Draw
—
when
Darn
—
evenly
move
tearing
When
area,
üver
You
inovin
by
TIP:
iiieaiis
with
darning
the
needle
darning
the
guide
must
E
screw
position:
presser
the
positions
This
position>.
the
the
up
you
over
in
the
of
you
turn
damaged
the
detvriniiiie
thin
ig
small
If
hive
you
straight
at
fork
D.
darning
feed
bobbin
the
start
the
inquired
the
part
the
have
the
thin
part
knots
stitch
toot:
highest
its
fully
foot
places
G
behind
be
hitter
bar
the
work
dog
sowing.
damaged
iii
shallow
later.
darn
stitched
fabric
area
stitch
back
appear
been
positrol
into
itself
and
presser
iii
thread
area
direction.
evenly
through
again
leirqthi
aid
on
iiir)vilig
hole
fixing
push
bar
the
and
curves.
90
for
forth.
the
tire
anc
i
C.
around
screw
it
lifter
darning
hold
moving
by
When
This
over
do
thus
underside,
b°t-
I
WIsii
the
F
lightly
into
hoop.
the
doing
prevents
the
iees
work
too
I
.I
ycic
“sri
pu
Now
to
notch
threads
the
damn
and
yourself
this
slowly.
cc
the
part
so,
dan
E
ig
ii
Page 86

I
S
I
I
I
I
I
I
I
I
/
1
sure
I
I
I
I
I
I
I
I
I
I’
Lu:
(Pt
I
*J
darnuig
,
H
is:
H
i
:1:1011
((1.
nainly
fabric.
ol
damagurl
‘orse
wogram
length
5100110(1
6
nitencled
key:
and
the
can
l)
•
[or
area
mactune
the
now
))0(j
3
strengthening
the
at
finishes
tang
dot
npeited
Ito
tln
required
length
clear
1
/
svwinq
is
is
key
13
Darning
Darning
means
Sew
until
the
with
with
Of
over
it
stitch
6,2
iel)aiIIil(J
is
ro
f
elastic
1h
well
mows
J
elastic
C
1J4
6
stitch
stitch
(knnaqv(
ige
c
a
oveied.
lap
ovei
is
I
re
I
\Nliei
each
•
also
very
a
witl
(10110)
otliem
mows
i
3b
suitable
50,
of
make
0
stitches
I
ii[1rti
lllIlII
II
nii:’;
illillIll
II
a
I
I
idjJ
I
2
darning
the
ial,
ni
Yan
is
way,
ii
koy
can
(8).
yon
straighten
have
balance
to
the
move
key
I
I
I
I
I
I
Page 87

_________
-
J
Sewing
The
I
I
I
I
13
best
damaged
Baste
—
ged
Over-stitch
Now
seam
ti
liP:
‘needle
If
0,2-1
on
way
area
the
area
cut
on
order
patches
darn
to
with
piece
from
its
hack
the
turn
to
down”
6
larger
a
of
the
edges
the
reverse
at
function.
holes
of
piece
material
new
side.
face
with
damaged
side.
corners
the
zI
new
elastic
material
3-5
to
is
material.
onto
stitch.
ntore
I
cover
the
up
easily,
0/1
the
darna
to
_J
the
use
13
Darning
tears,
For
a
place
fabric.
much
Place
—
fabric.
than
Now
—
of
Cut
—
the
TJ*JIJZ
0,2-1
tears
frayed
piece
strengthens
This
darn.
better
piece
a
The
damaged
the
over-stitch
tear.
the
back
edge.
of
piece
the
6
edges
material
material
of
must
the
material
smaller
or
on
the
always
area.
damaged
on
•
the
fabric
on
the
3-5
L_
holes
underside
and
underside
the
a
be
area
underside
easier
is
it
of
provides
bigger
little
the
by
c)ose
0/1
the
of
004
to
a
tho
jtII
I
lo
I
Page 88

Sewing
are
There
recommend
we
both sides,
one
on
shops
we
all
For
close
foot
to
side.
and
recommend
other
all
types
to
canbeengaged
right,
depending
U:ing
one
the
ilL
needle
lit’
zipper
mjla
side,
the
right.
only
mu
t
zippers
in
different
and
Different
stores.
materials.
of
the
teeth
of
the13
so
teeth.
needle
the
lIthe
be
moved
ways
inserting
for
men’s
For
metal
zippers
of
on
that
If
the
foot
sew
to
the
or
types
firm
materials,
zippers.
itisimportant
zipper.
the
foot
iii
the
method
the
needle
enters
it
sewing
position
is
engaged
left.
the
to
zippers.
in
concealed
zipper
slacks
ladies’
zippers
of
positions,
suchasjeans,
and
plastic
to
is
This
holder
insertion.
of
closetothe
footisengaged
must
only
left,
are
sew
why
to
you
be
the
For
skirts
on
concealed
available
zippers
right
zipper
the
the
left
can
also
edge
on
changed
needle
I
S
I
I
I
I
I
I
I
the
can
raise
can
zipper
zipper
set
of
and
concealed
toot
under
side
the
the
zipper,
the
sewing
sew
the
stitch
to
the
of
the
needle
rest
the
on
right
the
sewing
foot.
the
at
leave
foot
the
of
crosswise
both
the
and
sides
side.
foot
Using
required
needle
close
seam
so
program
the
the
to
seam.
that
in
the
the
end
I
I
I
I
I
I
I
I
I
I
Inserting
—
—
in
for
up
or
of
the
zippers
Engage
Place
the
runatthe
teeth
you
02,
position.
Sewinhalt
material,
zipper.
you
Now
zipper
of
the
I
I
I
I
I
I
I
I
a
a
Page 89

and
sewing
the
at
leave
foot
V
parallel
zipper
the
of
the
before
the
in
half
material.
zipper.
sew
the
end
the
to
Raise
of
the
the
seam.
seam
the
of
end
—
—
—
same
Stop
the
and
You
distance.
shortly
needle
open
can
now
second
the
Sew
Close
the
Afterwards
To
TIP:
iii
41
other
achieve
t
the
I
zipper
zipper
atitch
dcc
,i.
th
I;ati
and
half.
l
a;
tie
alor
urati
Ii
un
ire
Page 90

hemming
Roll
the
With
fabrics
without
Hemming
pro(lLIci’;
old
I
—
101(1).
Place
—
and
Leave
—
foot
hemmer.
Lower
—
evenly
the
sewing
hemmer
valances
or
having
llio
the
sew
the
and
fabric
secures
luly
liluic
folded
few
a
needle
push
sewing
the
the
in
does
foot
you
with
iron
to
the
111(1
m
stitches.
the
hemmer.
can
the
edges
(luril)Ie
gv
fabric
in
fahric
foot
not
no
uv’I
the
run
hem
roll
problem
edges
against
mkje
lut
edge
material.
into
and
When
under
blouses,
at
beforehand.
fraying
hnish.
ihl’
(ihout
under
Raise
scroll
the
the
guide
doing
right
the
all
tIm
and
luinin’i
of
fabric
so,
silk
and
/
the
make
side
per
sewing
the
edge
of
sure
the
TIP:
looks
For
better
silk,
rayon
with
or
zigzag
chiffon
stitches
mit
t
‘ii.
Page 91

prog
.liiknnnj
nr1s
the
of
the
small
of
to
way.
01
fdbnc
niaijui
middle
and
desigrnng
first
the
with
at
new
side
over
the
on
side
a
lace
lace
ways
it
same
;
la’
narrow
at
with
up
diagonally.
inserts
produce
can
other
or
baste
open
Cut
iron
and
Stitch
dense
back
Cut
edges
trimmings
enhancing
the
is
First
Stitch
2,5
both
over
zigzag
way
serge
the
a
children’s
lace
the
edges
fabric
the
over
it
both
stitches.
waste
the
provide
home
to
the
lace
beautiful
clothes
the
to
the
of
under
the
to
edges
material.
many
textiles.
it
do
edges.
raw
the
onto
lace
side.
of
eftect
face
the
the
face
00
Lace
You
wear
First
—
Stitch
—
—
—
—
Lace
.
Lace
and
This
—
—
corner.
stitch
and
corner
the
Fold
—
are
sides
other
All
—
done
in
Page 92

puq
1
45
1
a
I
I
I
I
I
I
I
I
TIP:
If
you
you
pretty
,
0/1
thread
fabric
stroiiqthioii
can
contrast
you
underneath.
add
can
coloured
a
thicsun
at
also place
(lie
wool
shell
iotino
a
thiouditthe
shjiilq
Ii
different
aiol
istoad
coloured
ohtin
of
a
shje
u
woolo
light
ii
I
it
is
very
uris
)ii
undeowear,
hread
w
edge
k
It
ni
q,
winj
more
effective
materials.
tension the
and
ike
sure
foot
pronuic
I
I
I
The
farther
sm
the
foot
shell
it
soft
am
fabric
fabrics,
tighter
the
width
edging
for
thin,
frequently
It
is
too.
iron
the
that
half
the
at
used
shell
margin
runs
such
as
you
only
I
I
I
I
I
I
I
I
I
I
I
I
Page 93

I
I
I
I
I
I
I
I
I
I
I
I
Richelieu
This
very
to
easy
Transfer
—
fabric
Then
under
fabric
make
To
contours
all
mm
After
areas
along
backing
Embroider
The
work
Finally,
in
water,
nibroidery
artistic
make
your
using
place
the
and
the
stitch
that,
that
their
material.
backing
with
all
and
form
your
with
pattern
magic
the
plies
two
to
area
backing
embroidery
double
length>.
carefully
form
will
contours,
contours
the
material
much
have
you
your
ready.
is
bar-
of
sewing
onto
pen.
of
embroidered
be
an
in
straitgh
in
out
cut
the
but
provides
shape
more
do
to
piece
eyelet
and
machine.
face
the
soluble
water
embroidery
stable,
more
stitch
fabric
the
cutouts
not
do
a
with
this
and
dissolve
is
individually
of
side
and
about
at
cut
dense
partofthe
stability.
embroidery
the
of
stabilizer
tauten
hoop.
around
sew
about
(at
the
from
mm
2
the
away
zigzag
stabilizer
the
made
the
1
stitch.
is
embroidery
Linen
embroidering
Linen
technique
and
bed-
its
to
Due
appearance,
popularity.
different
—
—
—
—
stitches
Transfer
side
face
Iron
on
an
as
Embroider
choice.
pattern”
the
Knot
silk
the
which
linen
table
simple
linen
More
your
the
of
fabric
underlay.
your
recommended
is
It
and
threads
paper.
a
is
earlier
in
production.
production
embroidery
more
and
combinations
and
pattern,
fabric.
backing
pattern
“needle
on
very
times
using
or
with
down”
the
well-known
was
exquisite
and
rapidly
is
variants
the
tear-away
use
programs
use
to
keys
reverse
widely
are
them.
of
magic
the
for
side
popular
and
used
in-creasing
created
to
pen,
stabilizer
your
of
single
this.
remov’
and
in
in
with
the
I
I
I
I
I
I
$
Page 94

I
I
I
I
I
I
I
I
I
I
do
you
what
is
this
in
Lots
the
oi
also
of
And
youi
huts
made
or
should
piirts
the
that
then
quilt.
the
allowances
smoothed
quilts
together
and
stitching
stitches
quilt
a
Ii
wall
of
—
—
le
bought
have
cm
0,7
of
templates.
out
Spread
squares
small
squares
surface
The
ip
In
are
but
sewing
is
Embroidered
cob
When
ci
are
of
seam
just
but
traditional
sewn
quicker
is
it
machine
always
dniateria
ri
ii
your
s,
si
i
ioi
the
out
Cut
already
is
you
sewn
these
by
more
with
e.g.
about
I.
finished
is
ups
i
g
(lull
yourself.
be
the
in
can
together
quilts
of
-
out
three
hand
practical
the
3
look
or
with
A
included
pattern
match
never
with
program
rum
very
you
I
icc
seam
together.
to
are
ironedf
layers
small
beside
good
can
I
covers.
templates
form
not
with
make
allowance
the
in
form
arul
the
neatened
material
of
stitches
the
03.
the
plain
on
you
These
There
seam.
into
it
it
t
iil
)i
settlers
remnants
enthusiasts
material.
of
material
the
onto
connected
consists
quilt
individual
The
when
The
to
is
has
are
form
middle
often
bits
double
joined
to
of
doing
l.iy;
ii
ii
ii
ito
il
lie
make
tistic
(0
illy
1
iihtional
wives
use
hobby
consists
shaped
ntinually
quilt.
polyester
if
the
of
material.
back
the
wi
irk
I
oust
it
particular
sewing
of
changing
This
quilt
piecing
of
Amencan
material
of
with
three
of
pieces
is
padding
that
The
layer.
very
be
technique.
many
layers
of
patterns
tacked
and
usually
entire
the
precise.
assistance
I
I
I
I
I
I
I
I
I
I
I
I
I
a
I
I
I
I
I
I
Page 95

embroidery
Eylet
Traditional
made
be
with
easily
accessory).
very
is
This
Practically
are
6250
stitch
elastic
classic
For
suitable.
width,
stitch
cut-in
the
the
Set
—
Lower
—
Remove
Place
making
nuedle
hunt
Mdcc
tiuup
h
embroidery
eyelet
laboriously
help
the
effective
stitch
all
sutiable
fancy
or
eyelet
needle
the
Set
the
and
portion.
presser
dog.
teed
sewing
the
eyeletting
the
pin
sure
plate.
marked
the
one
Cut
fabric
the
must
lubnc
the
up
hand
by
eyeletting
an
of
blouses,
on
of
types
zigzag
this:
for
stitches.
embroidery,
at
machine
lifter
bar
foot
plate
in
fits
A
push
Then
fabric
two
or
the
over
snugly
fit
thread
bobbin
the
its
at
taut
of
which
can
on
the
the
the
pin
be
plate
bed-
PFAFF
stitch
program
position,
left
stitches
darning
the
the
middle
plate
an
in
fabric
the
in
around
and
ago
long
made
(special
table
or
electronic
blind
2
1
evenly
needle
cutout
down
embroidery
threads
eyeletting
pin.
the
hold
had
quite
linen.
stitch,
very
is
select
around
position.
plate,
of
the
at
and
the
for
it
to
the
the
plate.
first
you
If
TIP:
the
57,
To
all.
at
afterwards
beautiful
how
choose
will
cut
complete
and
another
be
only
this,
stitch
blossoms
partly
just
evenly
can
program,
stitched
select
around
made,
be
64,
e.g.
around,
program
cut
the
too.
55
12
TIns
or
net
or
selected
with
cut
this
do
evenly.
ether.
Iraght
the
it
The
important
is
stitches
stitch.
new
Vvht:n
wtj
t
you
and
t,cl
around
stitch
willi
turn
to
should
Page 96

I
!jtiizi!i
?fl
Ih
n
>•c.
•
4
L%?.
•:
•
_.j,
t
•
•
I
a
3
2
t
a
I
4
..
,.
I
IllihIll
iii
1111
gh
Jill
I
•
•.
:
•<;.
:
1
:
:
.‘r•.
a4
..1
it
1
wq
4
4
•
•
••
••
1
.
.
••.‘!.
‘
ex’
t.
.•
I
I
‘r
r
•,
F
•!
.
441t
:.i.-...
;n,):
4
u’
...:‘
•
t
I4J
fji
idi
:i.
:.
•..
‘,.q
—
:
•
•:a
‘.T::—:’:
;::2
—:
•:‘—“.
•f.....
.
4!!
;i
t
LIi1t
a
I
C
g
4n
I
.‘..:.41fr
¼
:‘.
,:
Wu.17_a
fiø?
j
q
ii
ii
—
a a
I
•
—4
4
.7.•.
•
“:
rk.
:
.
a
— —
•
.
•“
4%
—4
—
—
•l
—
—
4’
I
a
I
F
I
5
.83
184
ii
.fl=
in
U
flt
Page 97

I
S
I
S
U
S
Making
Iron
—
threads
Stitch
the
enter
threads
the
face
hem
a
along
the
hem
above
side.
hem
the
to
with
over
the
the
When
hem
to
left.
hemstitch
a
twice
hem.
with
you
right
the
and
program
do
and
pull
this
seam
one
the
tie
off
or
67
needle
the
more
or
pulled
68
from
must
Hemstitching
finish
edge
This
materials.
need
no
is
using
Sew
—
edge
the
off
Cut
—
edge
with
It
to
the
is
pull
of
a
edge
an
as
is
used
suitable
very
any
program
fabric.
the
protruding
small
for
threads.
67
fabric
of
pair
finish
very
for
or
scissors.
68
light
frills
at
at
and
or
foot
the
thin
Tliiii
ruffles.
width
hemstitcfud
aloij
S
S
S
S
S
S
S
ES
Page 98

4,
a
‘41
—
S
‘
I
r
4
‘4
4,
N
,Th
/
4
I
Page 99

-
—
—
—
CD
0
Ct,
Ct,
Ct,
yr
—
r
—
—
—
—
—
—
—
CD
CD
Ci)
-
—
—
_
•
-w__w
Page 100

I
S
S
S
I
I
I
I
I
I
I
I
I
I
I
a
I
I
a
I
I
I
I
a
I
4
S
S
I
1
a
 Loading...