

Page 1

Creative
4
753w
.4
13o
1
PFAFF
,
’fv
=
S
,
•
j
II
4
•
-.
-G
9
9
•4
A
Instruction
manual
Page 2

Please
of
th
fold
this
insftuon
page
manu&
open
to
when
simplify
reachng
the
understanding
ft.
[
I
I
I
I
Safety
For
the
The
leads
The
wires
As
the
coding
The
wire
or
coloured
The
wire
or
coloured
Cut-off
must
be
Dnly
3
A
nust
be
The
plug
uppliors
‘lease
also
United
must
in
Blue:
Brown:
colours
of
the
which
which
red.
mains
replaced
spare
marked
must
or
the
observe
rules
Kingdom
the
of
terminals
is
black.
is
plugs
fuses
never
PFAFF
definitely
mains
Neutral
Live
the
wires
coloured
coloured
are
complete.
must
3
A
or
with
be
agencies.
the
only
not
lead
are
in
in
your
blue
brown
definitely
be
the
used
without
general
be
connected
coloured
the
mains
plug,
proceed
must
be
must
not
to
used
as
approved
corresponding
fuse
safety
notes
to
according
lead
of
connected
be
connected
be
used,
cover.
on
the
this
as
by
colour
Spare
the
safety-lead
to
appliance
follows:
to
to
but
disposed
ASTA
code.
fold
the
following
the
terminal
the
according
fuse
out
terminal
may
terminal
of
covers
page.
I
nor
code:
not
correspond
which
is
which
immediately.
to
BS
1362
are
available
to
a
marked
is
marked
Defective
and
from
plug
with
with
with
with
the
electrical
the
the
mains
fuse
three
colour
letter
the
cover
pins.
letter
leads
N
L
I
I
C
Contents
on
pages
C
C
4—7
C
Page 3

I
Important
For
the
United
This
sewing
appliance,
Read
all
instructions
machine
basic
DANGER
1.
The
sewing
the
electric
2.
3.
4.
Always
Do
Do
or
not
not
drop
unplug
reach
place
into
.AIIRNING
1.
Do
not
allow
near
children.
2.
Use
this
recommended
3.
Never
been
or
4.
Never
sewing
5,
Never
6.
Do
7.
Do
B.
To
9.
Never
).
Do
I.
Keep
.
Always
Do
Do
Switch
needle,
Always
making
Hold
ise
also
not
not
sewing
operate
dropped
service
operate
machine
drop
not
use
not
operate
disconnect,
operate
not
unplug
fingers
use
use
bent
pull
or
the
sewing
changing
unplug
any
other
plug
when
observe
center
or
out
away
the
States
safety
To
machine
outlet
for
or
water
to
by
this
or
the
insert
of
where
turn
on
by
proper
or
push
needle,
sewing
user
rewinding
the
safety
only
is
precautions
before
reduce
immediately
before
a
sewing
store
or
other
To
reduce
be
used
machine
the
sewing
damaged,
for
examination,
sewing
and
foot
any
doors.
aerosol
all
controls
a
soft
pulling
from
needle
blunt
fabric
machine
machine
servicing
general
instructions
designed
using
the
risk
should
never
relamping.
machine
a
sewing
liquid.
the
risk
as
a
toy.
only
machine
machine
control
object
on
moving
while
off
into
safety
for
or
dropped
into
(spray)
to
such
cord.
plate.
stitching.
(“0”)
from
adjustments
cord
notes
manufacturer
surface
all
needles.
threading
and
manufactured
should
this
sewing
of
electric
be
after
using
Replace
that
machine
of
Close
its
intended
as
if
repair,
with
tree
any
products
off
(“0”)
as
To
unplug,
parts.
The
Use
needles
when
bobbin,
the
reel.
always
left
has
where
burns,
attention
contained
it
has
into
electrical
any
from
opening.
position,
a
bed
Special
wrong
It
may
making
or
electric
mentioned
Do
on
the
be
machine.
shock:
unattended
and
before
bulb
with
fallen
it
fire,
electric
use
in
a
damaged
water.
or
air
openings
the
accumulation
are
being
then
or
couch
grasp
care
plate
recommended
deflect
any
changing
outlet
not
allow
fold
out
for
HOUSEHOLD
adhered
when
cleaning.
same
into
water.
can
fall
is
necessary
as
described
this
manual.
cord
Return
mechanical
used
remove
where
the
plug,
is
required
can
cause
the
adjustments
presser
when
in
the
plug
page.
to
plugged.
type
or
he
shock,
or
the
appliance
blocked.
of
or
the
not
the
by
needle,
foot,
removing
instruction
to
whip
as
follows:
/
rated
Unplug
pulled
or
injury
when
in
this
plug,
adjustment.
Keep
lint,
dust,
where
plug
from
air
openings
the
cord.
around
needle
the
manufacturer
caLising
in
the
etc.
when
use
only.
Always
1
5
Watts.
immediately.
into
a
to
persons:
this
sewing
manual.
if
it
is
not
to
the
ventilation
and
oxygen
outlet.
the
sewing
to
it
to
needle
covers,
manual
rewinding.
When
unplug
tub
or
sink.
machine
Use
working
nearest
openings
loose
cloth.
is
being
may
be
machine
break.
only.
break.
area,
such
lubricating,
you
use
this
appliance
Do
is
only
attachments
properly,
authorized
administered.
blocked.
as
or
when
an
electric
not
place
used
by
if
dealer
of
the
needle.
threading
I
2
from
in
or
it
has
SAVE
THESE
INSTRUCTIONS
Page 4

36
______
______
35
34
33
!!
29
12345
c
PAF
—,
eative
26
7530
=
23?
22
217i%k13
24
6
B
/191
20
7
8
9
$
1u
u
[.
f
17\
15
18
16
1
14
0
52
49
48
37
a-,
PFAFF
i
1
;
38
Greative
——
7530
3940
H
A
41
S
=
:‘
42
‘C
43
4
44
45
47
46
Page 5

Parts
(1)
of
the
Bobbin
thread
function
(2>
“Twin
needle”
(3)
(4)
(5)
(6)
(7)
(8)
(9)
(10)
(11)
(1
2)
(1
3)
(14)
“Slow
“Needle
“Tacking”
Multi
Numbered
“Display”
“ciear>”
“dj”
“Clear”key
Key
“o.k.”
“Pattern
sewing”
function
key
key
“0—9”
key
(15)“P-Memory”
(16)
(1
(18)
(1
(20)
(21)
(22)
(23
(24)
(25)
(26)
(27)
7)
9)
)“i”
“Single
“M-Memory”
“Pattern
“Buttonhole”
“Pattern
“A—z”
“Info”
Brightness
On/off
Presser
“Reverse”
key,
pattern”
key
key
straight
switch
foot
“Bartack”
(28)
(29)
(30)
(31)
(32)
(33)
(34)
(35)
(36)
(37)
(38)
(39)
(40)
(41)
(42)
(43)
(44)
(45)
(46)
(47)
(48)
(49)
(50)
(51)
(52)
(53)
(54)
Needle
Detachable
Sewing
Needle
Thread
Threading
Needle
Take-up
Carrying
Thread
Program
Reel
Second
Hole
Bobbin
Hand
Hand
Connection
Connection
Base
Hook
Free-arm
Sewing
Thread
Top
Dual
Needle
holder
foot
threader
guide
thread
lever
handle
guide
table
holder
reel
for
third
winder
wheel
wheel
plate
cover
lamp
trimmer
cover
feed/IDT-System
plate
creative
monitor
light
“reverse
key
key
up/down”
key
display
keys
key
for
pattern
start”
key
key
key
mirror”
key
mirror”
for
alphabet
control
lifter
key
buttonhole
with
work
holder
slots
tension
for
with
holder
reel
release
socket
socket
(sewing
7530
and
sewing”
key
selection
key
key
(lateral
key
(axial
selection
stitch
for
the
key
fixing
support
with
sewing
bobbin
unwinding
holder
for
swinging
disk
“mains
“foot
hook
winding
control”
sewing
mirror
mirror
display
screw
with
disk
(extra
cord”
behind)
image>
image)
accessory
foot
up
accessory)
compartment
Page 6

Saf
I
L
I
I
L
L
L
L
Forth’
The
The
As
codin
The
or
col
The
or
col
Cut-o
must
Only
must
The
suppi
Please
le
w
thE
w
w
Modern
uncomplicated
at
the
touch
Congratulations!
p
quality
ages.
any
through
Its
and
PFAFF
to
to
product
Your
material
thick
features
technology
sewing
operate
read.
as
and
new
in
and
are
machine
this
of
You
that
offers
sewing
its
stride
thin
the
very
and
you
instruction
—
a
have
machine
and
for
latest
will
is
just
Sewing
button
bought
unique
you.
will
in
find
as
book
advant
can
sew
design
that
simple
a
is
high-
take
your
It’s
worth
way
to
do
and
If
you
Your
any
help
So
now
many
fashion
it,
see
everything
make
to
have
any
PFAFF
enjoyable
or
you
ideas.
dealer
advice
because
full
questions,
can
get
hours
there
use
is
at
you
started!
is
the
machine
of
its
no
your
may
need.
creating
no
other
features.
problem!
service
We
wish
your
L
L
L
L
L
L
can
L
with
you
If
you
take
tion
book
wrong.
2
little
a
thoroughly,
time
to
read
nothing
the
can
instruc
go
Page 7

I
I
Notes
Notes
machines
section
.
The
1
with
needle
sewing
2.
When
maintenance
mechanical
always
the
plug.
The
3.
the
The
4.
adjusted
5.The
according
specification
6.
Do
the
7.
Do
—
there
—
its
—
it
8.
Do
socket
No
9.
age
any
intended.
is
1
To
0.
open
inside
repair.
our
Only
11.
on
safety
on
in
accordance
28
and!
user
must
regard
and
constantly
area
leaving
disconnect
mains
maximum
sewing
tension
machine
not
machine.
not
function
is
not
liability
causedifthis
purpose
avoid
the
qualified
original
place
use
is
wet,
pull
by
the
This
by
lamp
of
a
by
to
the
visible
e.g.
the
its
will
the
risk
machine.
machine
is
safety
for
domestic
or
IEC
exercise
to
the
while
working.
the
work
parts
pulling
permissable
is
the
drive
Pfaff
is
to
be
the
indications
plate.
any
objects
sewing
damage
is
disturbed
with
mains
cord.
accepted
be
machine
other
than
of
There
solely
service
PFAFF
sewing
with
DIN
335,
section
adequate
and
up
machine,
or
15
mechanic.
condensation.
electric
which
the
parts
down
observe
or
when
accessories,
the
machine
out
the
wattage
watts.
belt
put
into
in
openings
machine
plug
out
for
is
that
shock,
are
the
responsibility
staff.
may
may
on
for
no
57700,
28
caution
moving
the
during
changing
from
mains
only
operation
the
if:
of
the
any
dam
for
used
which
do
parts
user
can
be
used.
for
on
not
of
be
To
To
with
Please
Do
products
to
it
Environment
The
recommended
Ambient
Humidity
This
nic-mechanical
supervised
ated
dust,
electricity,
chemicals
The
even
purposes.
Treatment
Always
which
dropped.
Cleaning
Housing
clean
lint-free
remove
clean
sewing
in
severe
machine
surface
could
alcohol
note!
not
use
temperature
20%
such
heat-producing
or
protect
and
the
cloth.
any
such
the
to
machine
appliance;
in
use
a
way
dampness,
liquids.
is
to
which
the
be
caused
display:
housing
stubborn
or
paraffin.
any
insecticides
as
petrol
housing.
environment
—1O
80%.
isahigh-quality
home.
the
that
it
is
direct
be
used
is
open
machine
by
use
a
dirt,
or
C
to
is
it
It
should
not
sunlight,
objects,
on
a
for
against
it
being
dry,
use
chemical
or
liquid
is:
+400
C
electro
machine
a
be
subjected
corrosive
firm
and
ventilation
damage
hit
or
clean,
soft,
soft
a
chemicals
FJ1
I
for
oper
to:
static
cloth
3
Page 8

Index
j
Sal
For
The
The
A-zkey
Accessories
Accessory
Adding
Alphabet
Alphabets
Decorative
Appliqué
Appliqué
Automatic
Automatic
Balance
Bartack
Basting
Battery
Battery
Bias
j
Blind
Bobbin
Bobbin
Bobbin
Bobbin
Borders
Buttonhole
th
Buttonhole
le
Buttonhole
Buttonholes
stitches
stitch
change
message
tape
stitch
case
monitor
thread
winding
and
needles
compartment
to
program
stitches
foot
bartack
darning
binder
tension
balance
guide
key
the
card
and
end
of
traditional
pattern
a
embroidery
techniques
13,
47,
1/0
86
52,
140
1
33
1
146
1
100
1
100,
114
100
171
68
1
99
24,
25
40
25
21—23
137,
1
38
11
109
42
108—119
42
20
84
91
65
64
00
96
38
[
4
As
cod
The
col
or
The
or
col
u
must
Only;
must
The
suppl
Pleas
Carrying
th
Changing
in
Changing
Changing
Changing
Cleaning
Clear
clear)
Code
Contrast
Cording
Cording
Covering
p
Creative
Cross
Cross
Darning
Darning
Deleting
Deleting
Detachable
Display
Display
Drawing
Dropping
Dual
key
key
lock
stitch
stitch
Feed
case
the
the
the
the
and
in
the
foot
foot
seams
Designer
buttonhole
tears
P-Memory
a
stitches
work
key
patterns
the
(IDT
needle
needle
sewing
sewing
lubricating
display
support
feed
dog
System)
plate
foot
lamp
142—145
100,125,
32
72
1
29
1
73
172
42
41
49—51
38
165
166
106
61—91
11
126
126
84
83
20
38
41
65—68
33
30
1
8
L
6
edit/Z.
Elastic
Elastic
4
key
buttonhole
stitch
41
11
104
6
Page 9

Index
Electrical
Electronic
Embroidering
Embroidering
Embroidery
Eyelet
Eyelet
Eyelets
Fagoting
Fancy
Felling
Foot
control
Free-arm
Fringe
Gathering
General
General
Hems
Hemstitching
Honeycomb
Hook
cover
IDT-System
Info
Inserting
Joined
Keyhole
Knit-edge
Lace
Languages
Light,
sewing
Light-knit
Linen
embroidery
Lubricating
€key
Maintenance
Monograms
Multi-stitch
Needle
Needle
Needle
Needle
Notes
Number
Oiling
okkey
On/off
Operational
Overlock
chart
stop
thread
threader
on
switch
connection
section
stitch
embroidery
plate
stitch
elastic
foot
foot
sewing
tips
on
with
the
stitch
stitches
patterns
buttonhole
foot
lamp
mending
and
and
gathering
tension
safety
keys
help
stitches
on
leather
programs
stitch
help
embroidering
twin
needle
stitch
cleaning
trouble
shooting
18—19
35—59
1
1
52,
1
52,
122,
149—151
42,
75—78
118
167
130
173
107
147
1
42
171—175
141
1
67
169,
170
40
33,
120
27
41
172
42
1
48
105
1,
153
1
102
1
106
1
1
123
1
1
121
104
24
30
48
83
39
72
1
9
139
1
39
1
53
06
64
19
20
65
20
36
it:
[
.
2
5
Page 10

Index
key.
Patching
Pattern
Pattern
Pattern
Pattern
Pattern
Pattern
Pattern
Pattern
Pattern
Practical
Programming
Programming
Programming
Pulling
Pullover
alteration
density
length
mirror
selection
selection
sequence
start
width
sewing
the
up
stitch
key
P-Memory
a
sheet
bobbin
thread
into
an
M-Memory
[
79-81
43,
42,
53b9
93-131
73,
71,
105
42
126
46
45
42
44
44
42
45
74
85
72
28
.
65,
67,
Sa
For
The
The
As
codli
The
or
The
or
Cut-
mus
Only
mus
The
sup
Plea
ti
I
tl’
cc
Special
Spool
Stabilizers
Standard
Start-up
Stitch
Stitch
Stitch
Straight
Stretch
Stretch
Stretch
Quilting
Reverse
Richelieu
Roll
Round
Round
Saddle
Selecting
Semi-automatic
Sewing
Sewing
Sewing
Sewing
Sewing
Sewingonbuttons
Sewing
Shell
Single
Single
Slow
Smocking
key
hemming
buttonhole
hole
stitch
a
problems
feet
foot
function
help
zippers
on
edging
pattern
stem
sewing
accessories
holder
buttonhole
functions
length
points
width
stitch
stitches
triple
triple
needle
P-Memory
lifter
stitch
straight
zigzag
and
keys
plate
solutions
chart
stitch
stitch
154,
74,
1
1
60
40-42
127,
22,
111,
103-107
1
162
191
1
131
104
1
1
1
11
1
1
148
1
11
1
03
70
11
1
75
28
48
28
42
40
24
63
23
36
38
45
67
45
96
03
04
40
29
97
55
2
1
3
j
1L
p
L
A
9
Tacking
Technical
Thread
Thread
Threading
Threading
section
tension
trimmer
the
the
needle
twin
thread
needle
6
24,
25,
33,
1
533
1
40
1
20
28
2
3$
‘f
A
Page 11

Index
C
Topcover
Topfeed
Topstitching
Twin
needle
Utility
stitch
Utility
stitches
Zigzag
stitch
programs
40,
97,
121,
138
8—10
93—119
I
18
31
1
20
98
—
I
I
I
7
Page 12

_—
-
Utility
0001
I,’
<—>
<—>
‘Ii
stitch
02
-
-->
<
>
programs
04
03
>
..—>
.
07
06
I
r-i
LI
-
L
16
08
09
10
11
12
13
r
I
0
I
I
‘
<
>
<
>
r—
14
::
15
I0,
Sal
Forth
The
The
As
codin
The
or
The
or
Cut-c
must
Only
must
The
supp
Pleas
thi
col
col
1€
Program
No.
00
‘‘
02
03
,
u’+
,-
u
f’6
u
07
08
09
1
0
1
1
Description
Straight
19
Stretch
with
15
stitch
.
Zigzag
Elastic
a
=
Blind
Elastic
Closed
Basting
Fully
Program
sewing
Reverse
19
Saddle
15
stitch
needle positions
triple
needle
length
.
stitch
stitch
2
stitch points
.
.
stitch
.
.
blind
overlock
stitch
automatic
for
on
straight
needle
needle
positions
stitch
positions
with
straight
positions,
1.5-6
.
stitch
stitch
eyelets
buttons
stitch
with
mm
stitch
with
Application
straight
For
all
topstitching
highly
For
strength
sports
stitching.
For
inserting
For
and
For
shell-edging.
For
the same
at
For
an
edge
For
Various
For
various
For
and
For
leggings
durable
is
and
finishing
lace,
sewingonelastic,
inserting
securing
sewing
sewing
thread.
basting
sizesinthe
sewing
sizes.
combinationsinpattern
stitch
continuous
on
seams
etc.
stitch
jobs
needed,
work
seams,
sewing
patches.
seams
seams
time.
and
your
buttons,
on
stretch
and
upto6
seams
e.g.
wear
appliqué
invisibly
invisibly
Also
finishing
sewing
memory.
sewing
fabric
decorative
mm
where
for
and
for
with
darning
stretch
for
seams
cuttings.
fully
in
reverse.
wide.
great
trouser
decorative
work,
fringe
foot,
tears
and
for
and
serging
with
automatic,
such
as
seams,
etc.
an
materials.
sequences
edge
Width
uptomrn
—
—
7
—
9
6
—
—
10
10
10
10
10
10
I
I
L
L
L
L
2
3
4
5
6
Shell
Elastic
shell-edging
Honeycomb
Elastic
stitch
b=1
stitch
Purl
stitch
stitch
stitch
point
1
1
1
1
1
8
edging stitch
For
decorative
For
decorative
For
sewing
terry-cloth
(smocking
sewingonelastic, darning
For
inserting
and
appliqué
For
hems
hemsonstretch
elastic
on
and
seams
effect).
patches.
work.
on fine
threads,
for
fabrics.
fabrics.
covering
decorative
tears
hems
6
6
7
L
L
L
7
6
L
[
Page 13

Utility
stitch
programs
17
Program’
No.
1
7
1
8
1
9
20
21
22
18
Description
Fagoting
Fancy
Cross
Stem
Stem
Stretch
zigzag
19
20
stitch
elastic
stitch
stitch,
stitch,
triple
stitch
21
stitch
narrow
wide
22
23
Application
For
Provides
For
Provides
Durable
leggings
For
embroidery
For
e.g.
light-knit
25
24
joining
overstitching
embroidering
sewing
corsetry
decorative
a
highly
a
elastic
and
elastic
sportswear.
materials).
26127
I
two
elastic
seam
embroidery
in
programs.
tape
(Extremely
i
I
I
I
I
I
parts.
hemstitching
different
seam
for
e.g.
work.
connection
onto
28129
QUllfllilil
11111111*1
I
HIllIhIlIll
fllfiHlHlli
lllllllflllll
flflfllflftli
I
llililili
I
llllllHlllll
llflfiflhilH
I
fabric
for
sportswear.
working
with
elastic
elastic
I
I
lHHllW
I
I
effect.
plies.
on
the
materials,
seam
30131
for
32
I
Width
uptomm
7
6
7
—
—
6
23
24
25
26
27
28
29
30
31
Stretch
elastic
Closed
Pullover
Bartack
Embroidery
Darning
lengthwise
Darning
lengthwise
Closed
Edge
triple
stitch
overlock
stitch
program
program
overlock
binding
stitch
and
stitch
program
crosswise
stitch
stitch
For
e.g.
light-knit
For
Elastic
1
open-knit
For
loops
For
For
For
For
that
For
sewing
sportswear.
materials).
decorative
closing
materials
sewing
zipper
and
decorative
mending
mending
closing
easily.
fray
serging
elastic
(Extremely
overstitching
and
bartacks
ends.
work.
damaged
holes
serging
and
embellishing
and
tape
serging
and
on
and
onto
elastic
seam
jersey.
pockets,
areas.
torn
seams
elastic
seam
of
areas.
on
edges.
materials,
seam
edge.
for
loops,
belt
materials
for
6
6
9
9
9
6
7.5
a
For
Also
with
needle
stitch
position
32
Variable
from
zigzag
right
embroidery
edge
as
overlock
the
and
stitch
bourdoning
connection
in
foot.
work.
6
9
I
Page 14

Utility
33
34
stitch
35
programs
36
37
38
L
39
1.
lb
Sal
For
The
The
As
codir
The
or
co
The
or
co
Cut
must
Only
must
The
supp
Plea
Program
No.
33
34
35
Description
Light-knit
mending
Overlock
Linen
buttonhole
7.0
and
44
stitch
stitch
mm
between
Application
For
sewing
(underwear
For
sewing
For
buttonhole
Tip:
For
sewing
materials
recommend
and
engaging
and
etc.).
and
or
darning
serging
sewing
buttonholes
very
fine
using
dual
fabrics
sewing
feed.
light-knit
in
one
in
bed
foot
operation.
linen.
in
light-knit
we
No.
fabrics
1
a
Width
up
to
7.5
7.5
5.5
mm
lb
lb
lb
lb
lb
36
ti’
k
37
38
39
th
v
Stretch
Stretch
Round
Keyhole
buttonhole,
buttonhole
buttonhole
buttonhole
enforced
For
buttonholes
For
buttonholes
.
(jersey
For
buttonholes
For
buttonholes
etc.).
Also
on
open-knit
on
stretch
as
fancy
in
leisurewear
in
jackets
fabrics.
materials
buttonhole.
and
and
trousers.
blouses.
5.5
5
7
85
5
1.
L
[
t
v
L
10
1
Page 15

Embroidery
stitch
programs
40
54
68
41
55
69
42
56
70
43
57
71
44
58
72
45
59
73
46
60
74
47
61
75
48
62
76
49
63
77
50
64
78
51
65
79
52
66
80
53
I
67
I
81
82
83
97
84
98
85
99
86
100
87
101
88
102
89
103
90
104
91
105
92
106
93
107
94
108
95
109
11
Page 16

Embroidery
stitch
programs
Sal
For
The
The
110
111
112
113
114
115
116
117
118
119
120
121
122
123
1
124125126127128
129
130
131
132
133
134
135
136
137
ji
iIi
th
le
138I1391140I141142
I
143
144
145
146
147
148
149
150
151
II
I
As
codin
The
orcol
The
orco
Cut
must
Only
must
Thei
supp
Pleat
th
I152I153I154I155j156I157158
I
I166.167
I
I
I
I
168
I
I
169
I
170
I
I
171
I
172
159
173
160
174
161
175
162
1761177
163
164
178
165
179
I
L
L
L
12
L
4L
L
Page 17

Alphabets
[.
aA
aO
aa
bA
Z
bO
S
cA
cO
dA
dO
I
I
I
I
Ii
I
I
I
131
Page 18

Sai
lb
I
L
I
I
I
I
I
For
The
The
As
codin
The
or
The
or
Cut
must
Only
must
The
supp
Ple
co
co
th
IE
I
I
th
y
I
I
v
c
I
I
I
I
Page 19

section
Technical
Electronic
I
(DO
q
designer
creative
sewing
fikid
Cl’
j
ii
,,
Page 20

C
c
r
I:
c
ort
ho
he
stI
od
ho
r
ho
rc
:ut
flus
>nI
flUE
ho
UPI
IeL
C
I
C
c
C(
C
C
C
C
16
C
r
L
Page 21

/
Contents
I
PFAFF
creative
7530
Jz
—
7
II
•
•
S
I
%1
/#
‘€‘\
I—
C
a
I
I
:1
Electrical
Detachable
Winding
Bobbin
Bobbin
Threading
Needle
Sewing
Pulling
Thread
Changing
Dual
Changing
Needle
Dropping
case
thread
threader
foot
up
trimmer
feed
thread
connection
work
the
bobbin
tension
the
needle
lifter
the
bobbin
the
sewing
needle
the
tension
the
feed
support
thread
thread
foot
dog
Pages
Page
Pages
Page
Page
Page
Page
Page
Page
Page
Page
Pages
Page
Page
Page
18,
19
20
21—23
24
25
26
27
28
28
28
29
31
30,
32
33
33
ji
11,
Ii
17
Page 22

L
S
For
The
The’
As
codi
The
or
The
or
Cut
us
m
a
t
I
ti
ca
ct
Caring
Place
the
Creative
programming
carrying
Designer,
case.
PFAFF
case
enclosed
sheets
creatve7o
ii
0—
mains
the
in
cord,
instruction
the
compartment
flsusul1
—
foot
control,
manual
4
and
L
PFAFF
creative
7530
1
H
in
ía
a
L
I
Top
cover
the
of
the
the
Open
the
folding
cover
(52)
upwards.
I
—
L
L
L
L
L
L
I
Programs
The
programs
ed
the
on
groups.
Menu
—
Gr.
Gr.
Gr.
Gr.
Gr.
18
utility
—
overlock
1
2—buttonholes
3
—
scalloped
4
—
fancy
5—stretch
inside
stitches
stitches
of
the
of
stitches
edging
stitches
sewing
the
top
Gr.
Gr.
Gr.
Gr.
A-z
cover
6
7
8
9
machine
and
—
hem
stitches
—
leaves/flowers
—
edges
—
decorative
—
alphabets
are
divided
illustrat
stitches
into
Electrical
Connect
socket
socket.
connection
the
of
the
mains
sewing
cord
machine
between
(45)
the
and
connection
the
wall
1.
E
E
[
L
Page 23

Pt
C
1
Foot
Pull
The
reel.
control
the
foot
foot
control
—
—
—
—
—
cord
control
cord
hasanautomatic
—
—
—
—
—
outofthe
foot
cord
control.
rewind
Connecting
Connect
connection socketofthe
the
the
plugofthe
foot
control
foot
sewing
control
machine
with
I
the
(46).
On/off
When
sewing
now
switch
the
ready
on/off
lamp
to
lights
use.
switch
up.
(25)
The
is
switched
sewing
on,
machine
the
is
19
Page 24

L
I
I
I
Sal
s
th
odw
rho
Co
r
[ho
Jr
CO
ut
List
fl
Dnly
iLust
[ho
sUpp
Plod
v
(
Detachable
out
Swing
the
left.
work
the
support
detachable
work
pFAFF
;
ii
support
‘‘.-
(29)
I
the
accessory
compartment
compartment
(29).
Accessory
to
Open
1
I
pFAF
10
I
into
the
the
accessories
accessories
corresponding
box.
numbered.
are
compartments
Sorting
The
enclosed
them
the accessory
20
Sort
I
I
the
Removing
(free-arm)
of
In
order
to
detachable
When
you
the
detachable
free-armofthe
detachable
sew
with
the
work
support
swingitback
work
support
sewing
free-arm,
to
in
again,
machine.
work
the
is
support
left
make
flush
swing
and
with
the
lift
sure
the
it
up.
that
I
[
[
Page 25

b
Preparing
Hold
the
release
needle
will
procedure.
jj_4J
0
19
—
hand
disk
9
15
16
the
not
152
machine
wheel
(44)inthe
move
4 455
i1j
2
463
3
(43)
direction
during
J
J
joj’
do
Illi
!i’,,’
111
1
/
for
I6
3
bobbin
firmly
and
the
bobbin-winding
DJ
oA
5
I
of
the
winding
turn
the
arrow.
The
350
15
jfljH1iP1j!
14
159
154jj4
l52o
j*}
160J361j
157
:jj
155
450
474
17
1
6
Id
464
173
14
ItS
jj1
I
I
_J
i
—
Placing
Switch
Place
the
the
bobbin
the
off
empty
bobbin
the
on/off
winder
bobbin
(42)
switch.
so
that
snaps
the
into
black
the
slot
pin
of
bobbin.
of
the
I
Push
Note:
The
fully
the
bobbin
to
the
bobbintothe
can
only
right.
be
right.
wound
when
itismoved
21
Page 26

L
Sal
For
The
The
•
‘S
-
C
*—
-“-
•j
;;
i!I
1
Ji
.n’
L
L
I
I
(_,i
I
I
creative
7530
I
t
k
F
L
L
A5
codir
The
or
The
or
Cut
InhJ3t
Only
must
The
U
j)
S
Plea
th
CO
CC
Winding
Place
the
To
guarantee
give
additional
unwinding
thread
Threading
Place
the
thread
thread
Push
the
Switch
Hold
the
foot
control.The
matically
thread,
Don’t
forget:
Turn
the
turn
the
snaps
into
the
bobbin
sewing
free
disk
spool.
thread
tension
clockwise
bobbin
on
the
end
of
as
soon
push
the
release
hand
wheel
place.
from
thread
on
movement
hold
to
the
corresponding
into
guide
disk
on/off
the
disk
B
a
few
to
the
thread
winding
as
the
bobbin
(44)
(43)
with
times
right.
switch
action
bobbin
to
fully
towards
the
the
of
thread
C
and
both
around
(25)
firmly
the
back
spool
reel
the
to
will
is
left
holder
thread
spool,
the
pull
hands.
and
stop
full.
and
again.
you
holder
fit
size
it
under
Wind
the
press
auto
Cut
remove
until
(39).
and
an
of
the
the
the
bobbin.
the
the
Then
it
L
to
C
it.
-
L
22
L
4
L
Page 27

Itit
4i
4!f
1L!i
:
.
h!II
iIJiJ
41
*I)J
p
a
JLU
AO
rJ
41
p
I
I
ii
PFAFF
CrOatjve
a
7530
11=
Winding
Swing
a
spool
unwinding-disk
Threading
Place
thread
thread
Push
Switch
Hold
foot
matically
thread,
Don’t
Turn
turn
snaps
the
of
the
tension
clockwise
the
on
the
control.
push
forget:
the
release
the
hand
into
from
thread
bobbin
end
as
second
thread
the
of
The
soon
the
wheel
place.
the
reel
with
on
it.
into
disk
a
few
to
the
on/off
the
winding
as
bobbin
disk
second
holder
the
guide
B
with
times
right.
switch
thread
the
(44)
(43)
reei
holder
(40)
corresponding
C
and
both
around
(25)
firmly
action
will
bobbin
to
the
fully
towards
is
left
back
up
pull
hands.
and
stop
full.
and
again.
you
and
it
under
Wind
the
press
auto
Cut
remove
until
place
the
the
bobbin.
the
the
Then
it
LI)
it.
I
1
23
I
I
Page 28

I
I
I
I
I
1
The
As
codh
ihe
or
The
or
Cut
(1141$
Only
mus
The
supr
Plea
t
cc
CC
Hook
Switch
Hold
towards
cover
off
hook cover
the
the
the
front.
on/off
switch.
(48)atthe
side and
open
Taking
Lift
it
bobbin
the
out
the
latchofthe
case
empty
the
out.
bobbin.
bobbin
bobbin
Release
case
the
case
latch
and
and
pull
the
take
out
1
I
I
I
I
I
I
I
Thread
To
correctly
seams
24
tension
obtain optimum
adjustedtoeach
and
buttonholes,
seam
appearance
other;
the
thread
i.e.
interlace
the
and
durability,
threads
are
shouldbevisibleonthe
make
sure
interlaced
needle
between
and
the
reverse
bobbin
two
fabric
sideofthe
thread
tensions
layers.
fabric.
For
ire
fancy
I
I
I
I
L
r
Page 29

bobbin
the
so,
then
opening
you
the
full
pull
under
(see
pull
bobbin
thread
the
tension
arrow).
the
in
thread,
bobbin
the
sideways
spring
the
through
so
B
bobbin
case.
that
it
must
When
slot
rests
turn
‘0
A
in
‘-0
Inserting
Insert
doing
and
the
Check:
When
clockwise,
I
I
I
the
little
tension
thread
bobbin
with
each
and
move
case
hand
I
bobbin
the
hand
slip
the
bobbin
sharply
downwards
Checking
1
I
/
Hold
your
must
movement.
thread
by
case
upwards.The
a
Correcting
adjusting
Turn
clockwise
adjusting
Turn
increase
Inserting
latch
Lift
of
D
pin
bobbin
cover
Check:
the
Pull
not
must
to
the
the
F
the
case
bobbin
fall
tension:
the
screw
decrease
screw
bobbin
bobbin
and
sewing
must
thread
out
push
face
of
just
C
the
just
C
thread
case
the
hook.
upwards.
sharply;
the
little
a
bobbin
little
a
tension.
bobbin
Opening
hook.
counter
thread
clockwise
case
E
Close
bobbin
the
fully
of
the
the
tension
to
onto
hook
case
ji
I
I
25
I
Page 30

1
P1
Threading
Switch
Raise
the
until
the
highest
Place
the
the
corresponding
Now
pull
arrows.
tension
threading
Pull
the
threading
(35).
The
lever
(35)
in
the
right
Finally,
of
the
pass
two
the
off
the
sewing
take
position.
thread
thread
the
Pass
the
disk
B
slot
thread
slot
thread
from
hand
the
thread
needle
on/off
up
on
thread
and
(33).
around
and
must
left
thread
thread
switch
foot
and
lever
(35)
the
unwinding
into
downwards
stop
upwards
be
to
right
threading
guides
reel
guide
to
pulled
from
turn
has
holder
the
E
to
and
slot.
(32).
the
reached
disk.
following
A,
right
through
into
the
into
downwards
the
side
hand
(39)
the
take
or
the
right
the
behind
wheel
its
and
the
up
take
fit
the
left of
left
hand
lever
up
again
one
L
L
I
I
I
I
I
Sa
For
The
The
As
codi
The
Of
The’
or
Cut
mus
Only
mus
1
he
sup
Plea
I
I
t
I
a
lb.
Ii
C(
c
/
I
I
I
I.
I
[
[
[
[
26
[
[
[
[
Page 31

-
*
r
I
I
I
Needle
In
sier
provided.
Tap
needle
needle thread
the
turn
R
intothe
threader
ordertomake
and
quicker
Lower
the
foot
control
willbein
needle
goes
threader
it
towards the
through
hook
the
threadingofthe
the
PFAFF
the
sewing
to
the highest
under
hook0and
needlesothat
needle
the
from
below.
take
(31)
needle
foot
one stitch
position.
fully
downwards
eye.
(see
hold
the
Place
needle
threader
next
and
Place
it
taut.
small
the
ea
is
page).
the
the
Move
and
hook
thread
/rV
H
Turn
the
needle
ing
the thread
move
upwards.
through the
threader
carefully,
You
needle
and
can now
eye.
towards
allow
pull
the
the
the
rear,
threader
thread
releas
to
27
I
I
Page 32

1/
I
L
‘C
C
C
Sal
Foi
ihe
Ihu
As
cod
Thu
or
CO
Thu
01
CO
Cut
must
Only
must
11w
supp
Pleat
Presser
The
sewing
presser
th
k
th
in
v
v
lifter
foot
footisraised
foot
lifter
(26).
and lowered
with
the
Pulling
Raise
tap
the
the
bobbin
needle
up
the
foot
thread
the
sewing
control
thread
bobbin
foot.
has
to
bring
once
thread
Hold
to take
formed
up
the
the
needle
one
a
loop.
bobbin
thread,
stitch
Pull
thread.
the
and
C
[
[
[
C
[
[
Bobbin
Close
under
28
the
the
thread
hook
sewIng
cover
foot
(48)
to
the
and
left.
pull
the
thread
Thread
Pull
the
thread
the
trimmer
threads
trimmer
from
the
(51).
backtothe
front
over
[
[
f
IE
I
Page 33
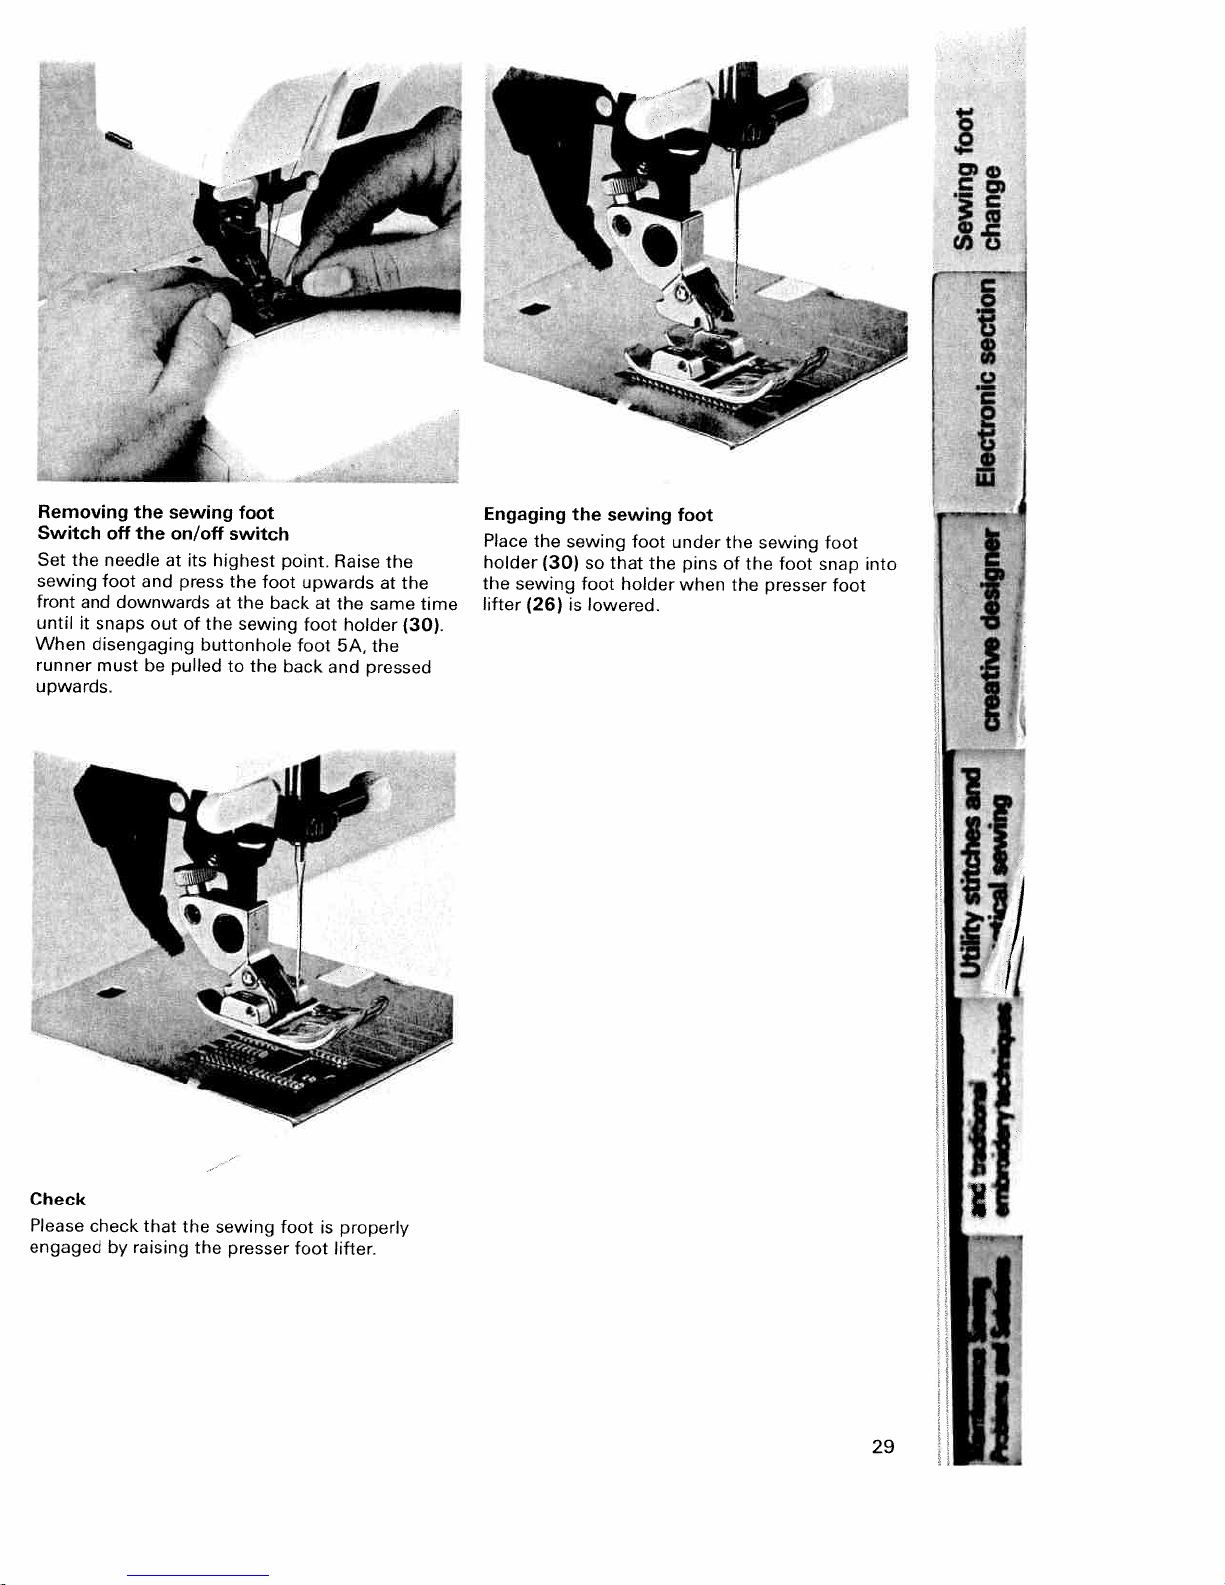
Removing
Switch
Set
the
sewing
front
and downwards
until
it
When
disengaging
runner
upwards.
the
off
the
needle
foot and
snaps
must
out
be
sewing
on/off
at
its
press
of
pulled
foot
switch
highest
the
foot
at
the
the
sewing
buttonhole
to
the
point,
back
back
Raise
upwards
at
the
foot
foot
5A,
and
same
holder
the
pressed
the
at
the
time
(30).
Engaging
Place
the
holder
the
sewing
lifter
(26)
(30)
the
sewing
so
foot
is
lowered.
sewing
foot
that
holder
the
foot
under
pins
when
the
of
the
sewing
the
presser
foot
foot
snap
toot
into
Check
Please
check
that
the
engaged
by
raising
the
sewing
presser
foot
foot
is
properly
lifter.
29
Page 34
Sal
if
II
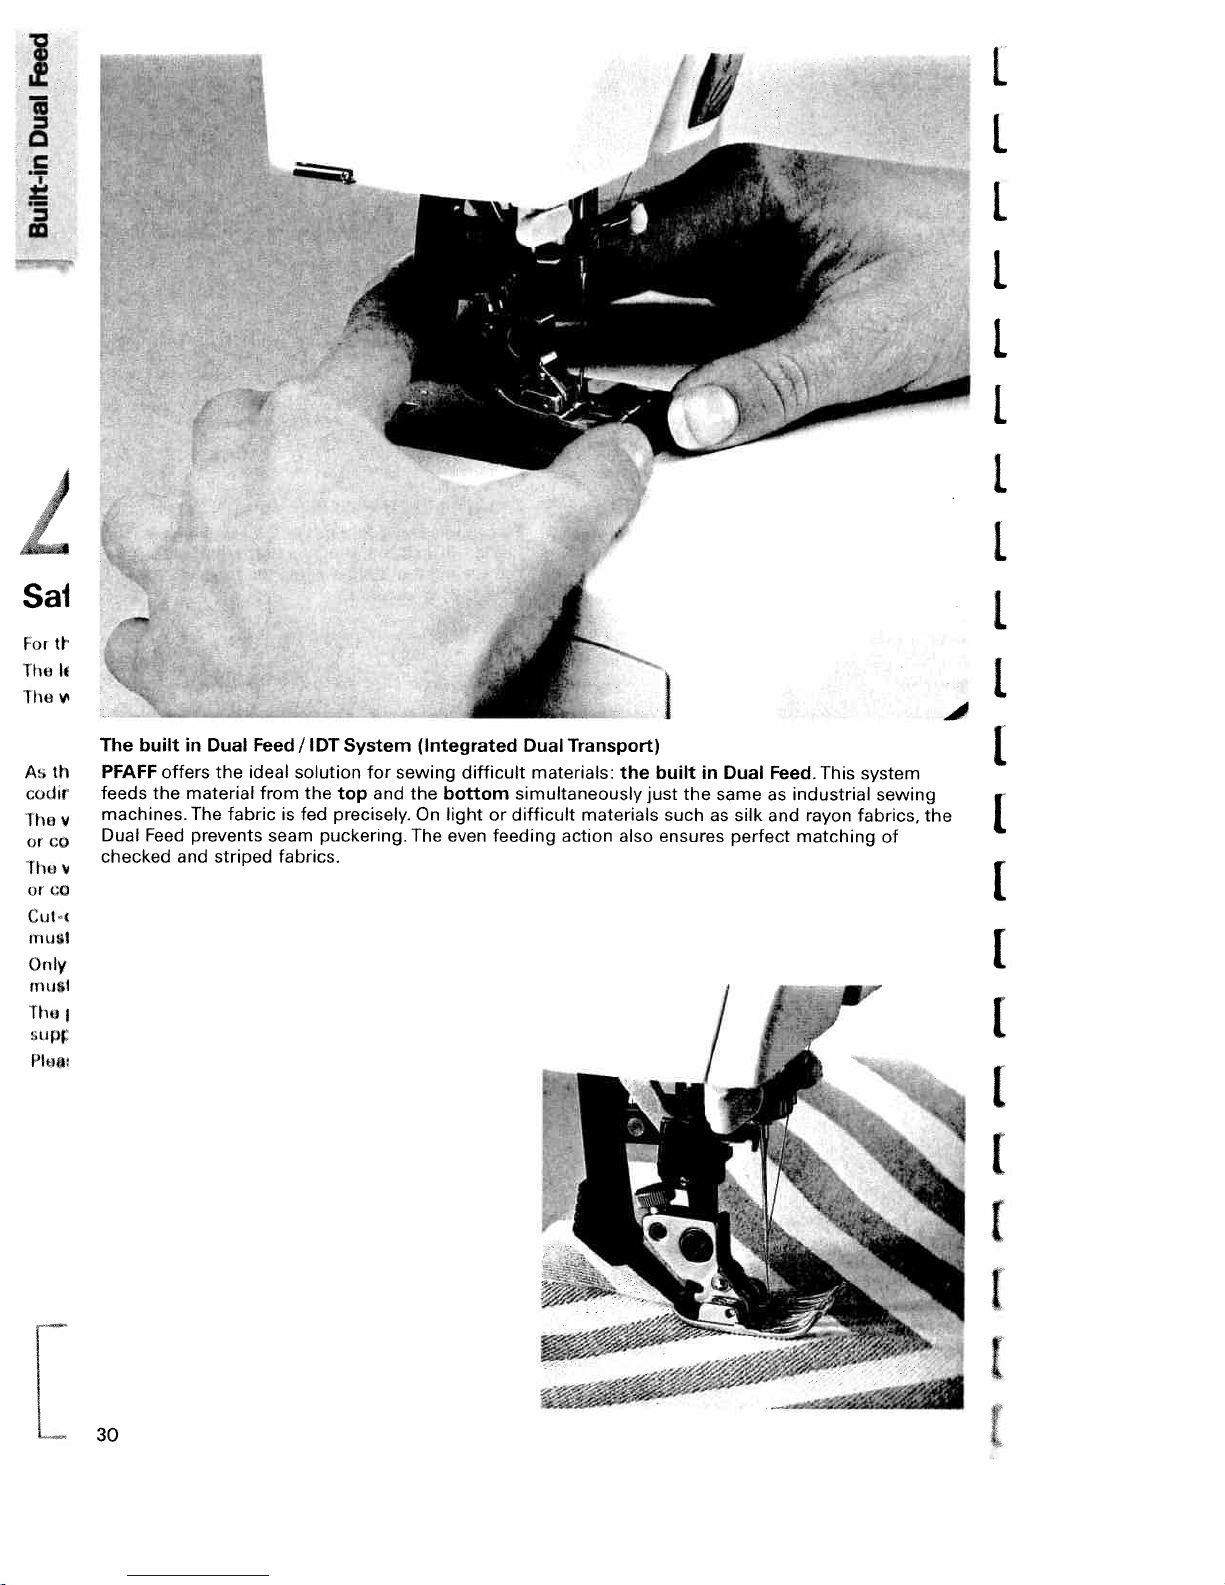
The
builtinDual
PFAFF
feeds
the
machines.
Dual
Feed
checked
offers
material
and
the
The
fabric
prevents
striped
Feed/lDTSystem
solution
ideal
the
from
seam
is
fed
fabrics.
top
precisely.
puckering.
for
and
(Integrated
sewing
the
On
The
difficult
bottom
light
even
DualTransport)
materials:
simultaneously
or
difficult
feeding
materials
action
the
just
also
built
in
Dual
the same
suchassilk
ensures
perfect
Feed.
as
industrial
and
This
rayon
matching
system
sewing
fabrics,
of
[
the
[
I
I
30
I
L
Page 35
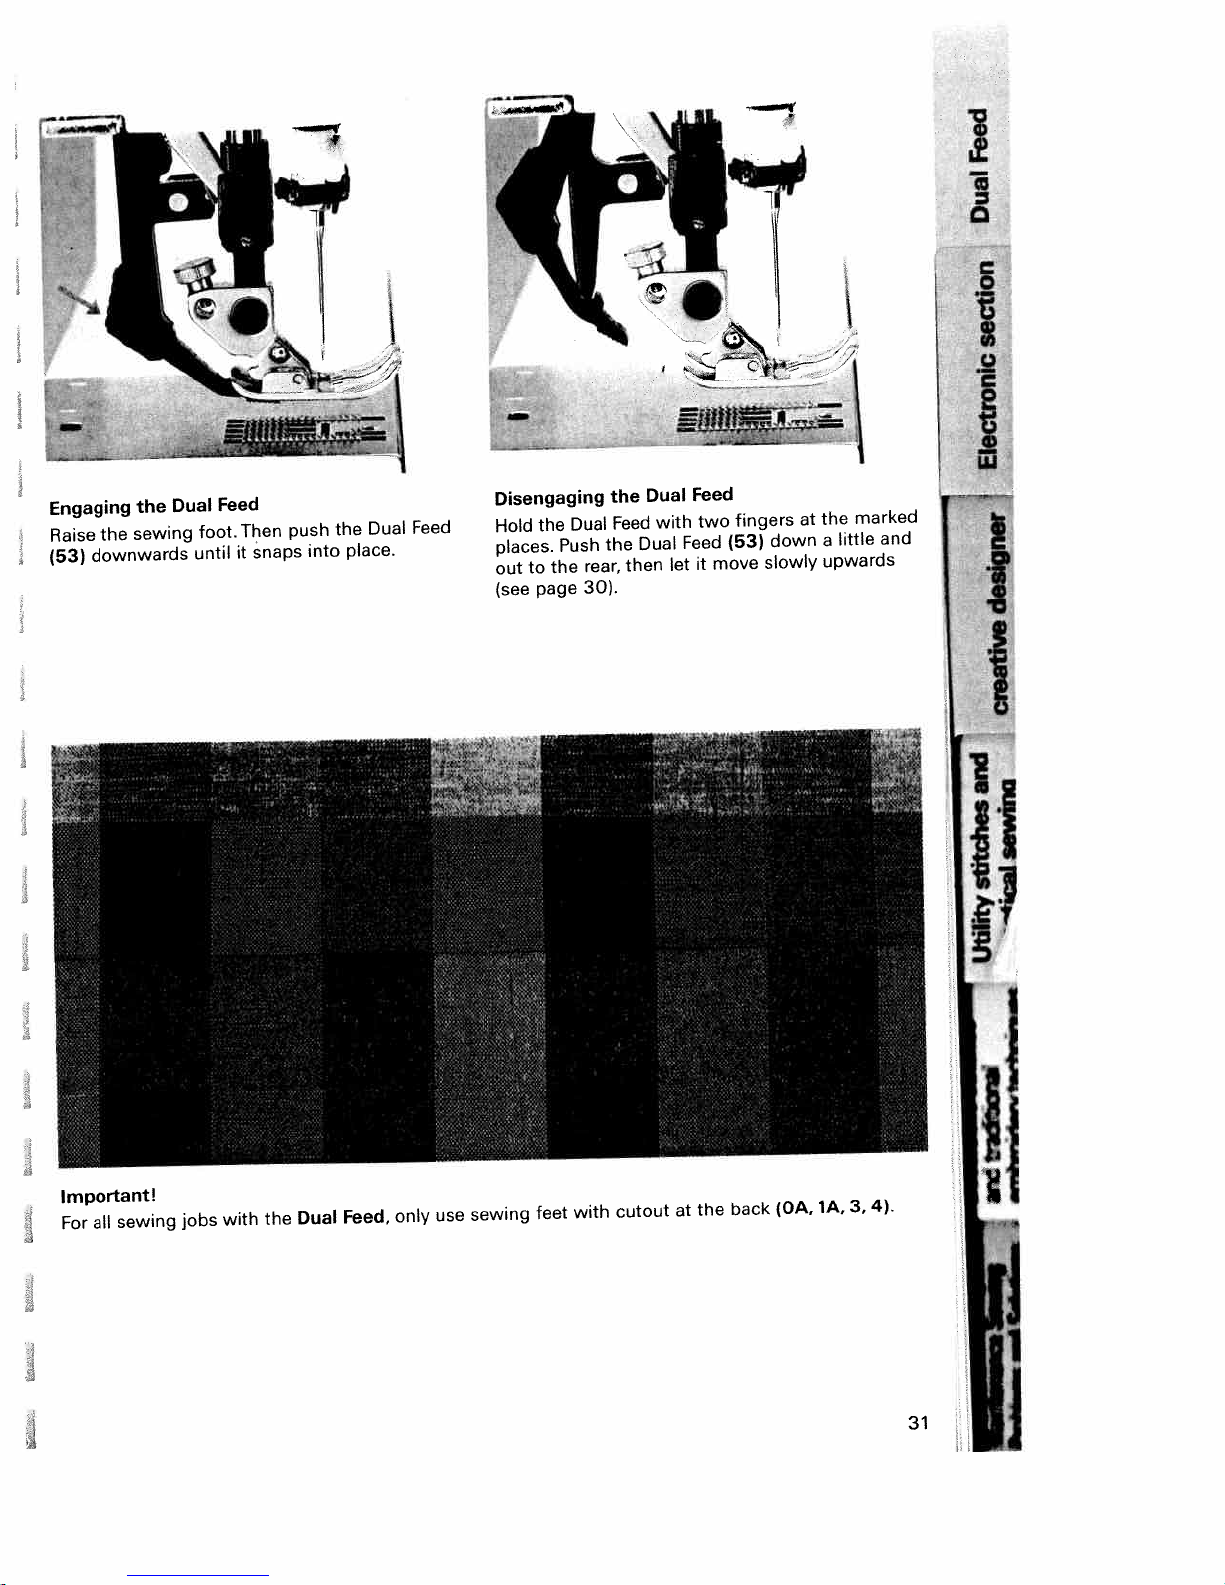
Engaging
the
Raise
downwards
(53)
the
sewing
Dual
foot.
until
Feed
it
Then
snaps
push
into
the
place.
Dual
Feed
Disengaging
Dual
the
Hold
places.
out
(see
to
page
Push
the
rear,
30).
the
Feed
the
Dual
then
Dual
with
let
Feed
two
Feed
it
fingers
(53)
move
at
down
slowly
marked
the
little
a
upwards
g
I
I
and
I
I
ji
Important!
sewing
all
For
jobs
with
the
Dual
Feed,
only
use
sewing
feet
with
cutout
1’
4).
3,
1A,
(OA,
back
the
at
31
Ii
Page 36
Sat
I
I
wi
As
I
ho
01
Fhn
Ut
Cut
rutist
Only
tTiU*t
I
he
supp
Pled:
th
COI
CO
c
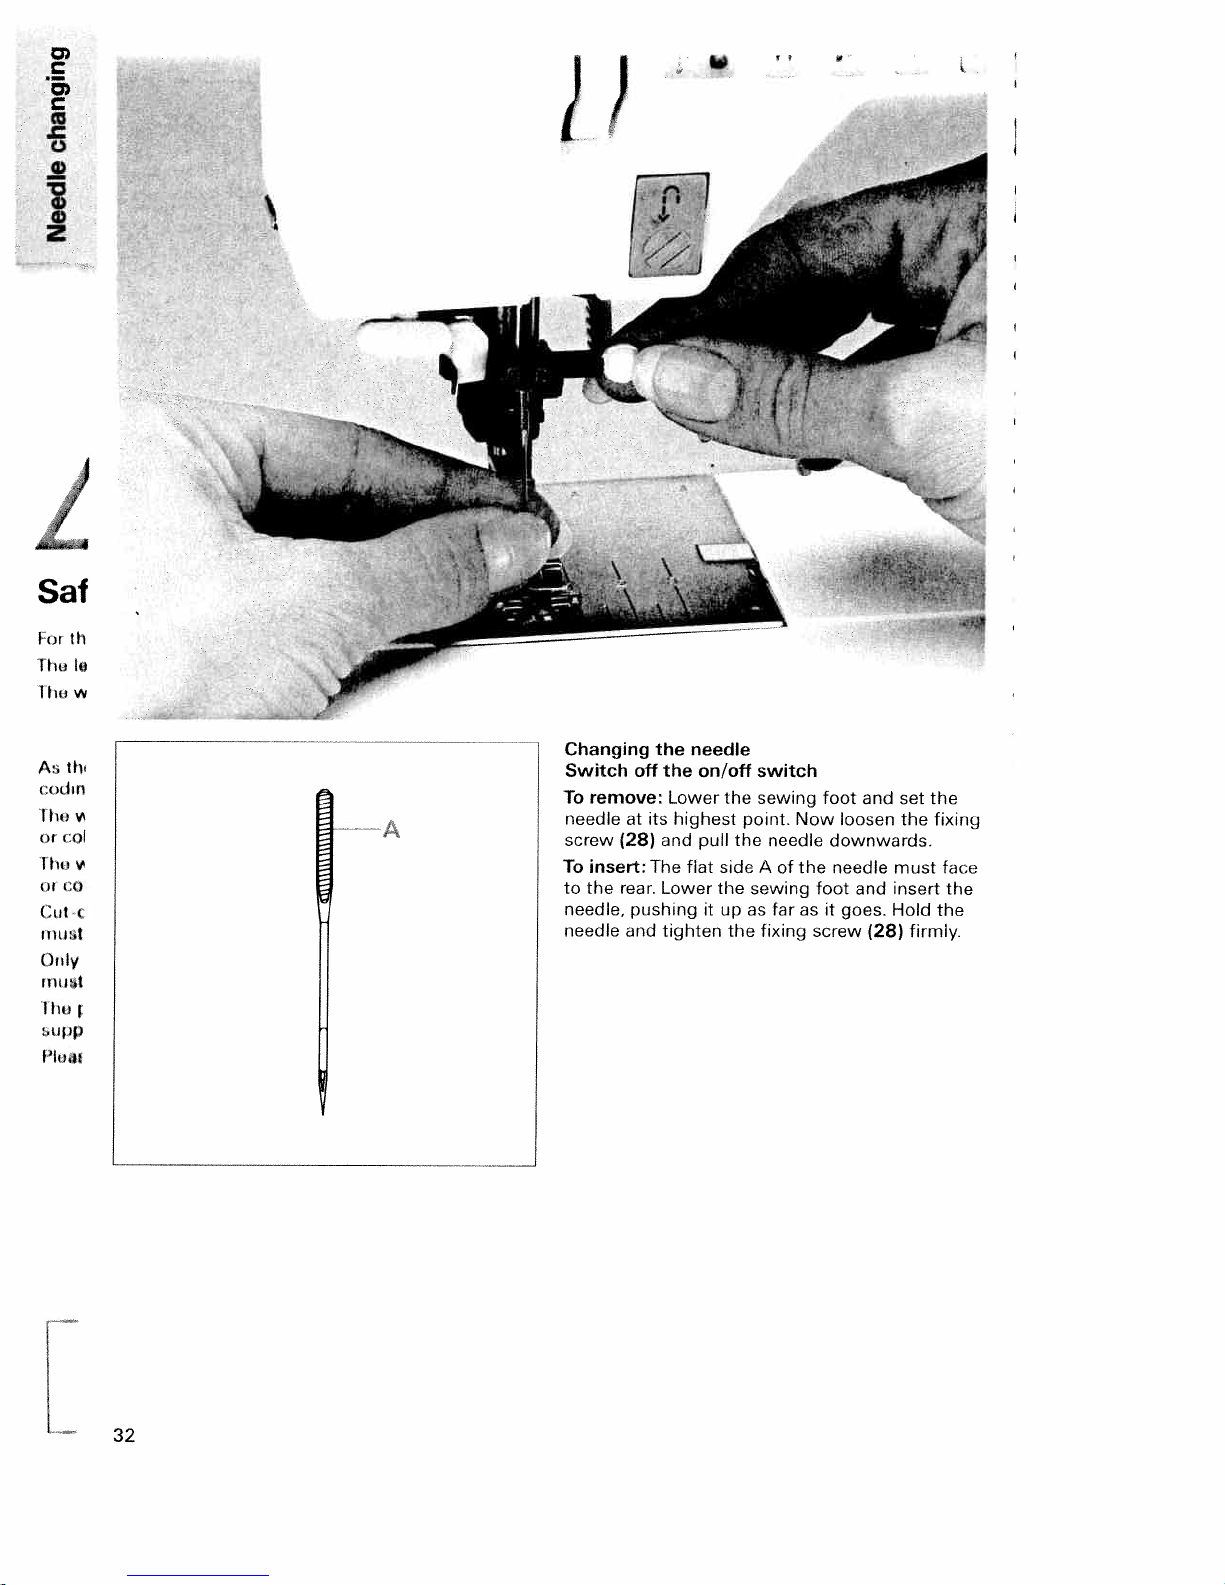
Changing
Switch
To
remove:
needle
screw
insert:
To
to
the
needle,
needle
off
at
its
(28)
The
rear.
pushing
and
the
the
Lower
highest
and
Lower
tighten
needle
on/off
pull
flat
it
switch
sewing
the
potnt.
the
needle
sideAof
the
sewing
far
up
as
fixing
the
foot
Now
loosen
downwards.
the
needle
foot
it
as
screw
and
and
goes.
(28)
set
the
must
insert
Hold
firmly.
the
fixing
face
the
the
32
Page 37
PFAF
I
‘U
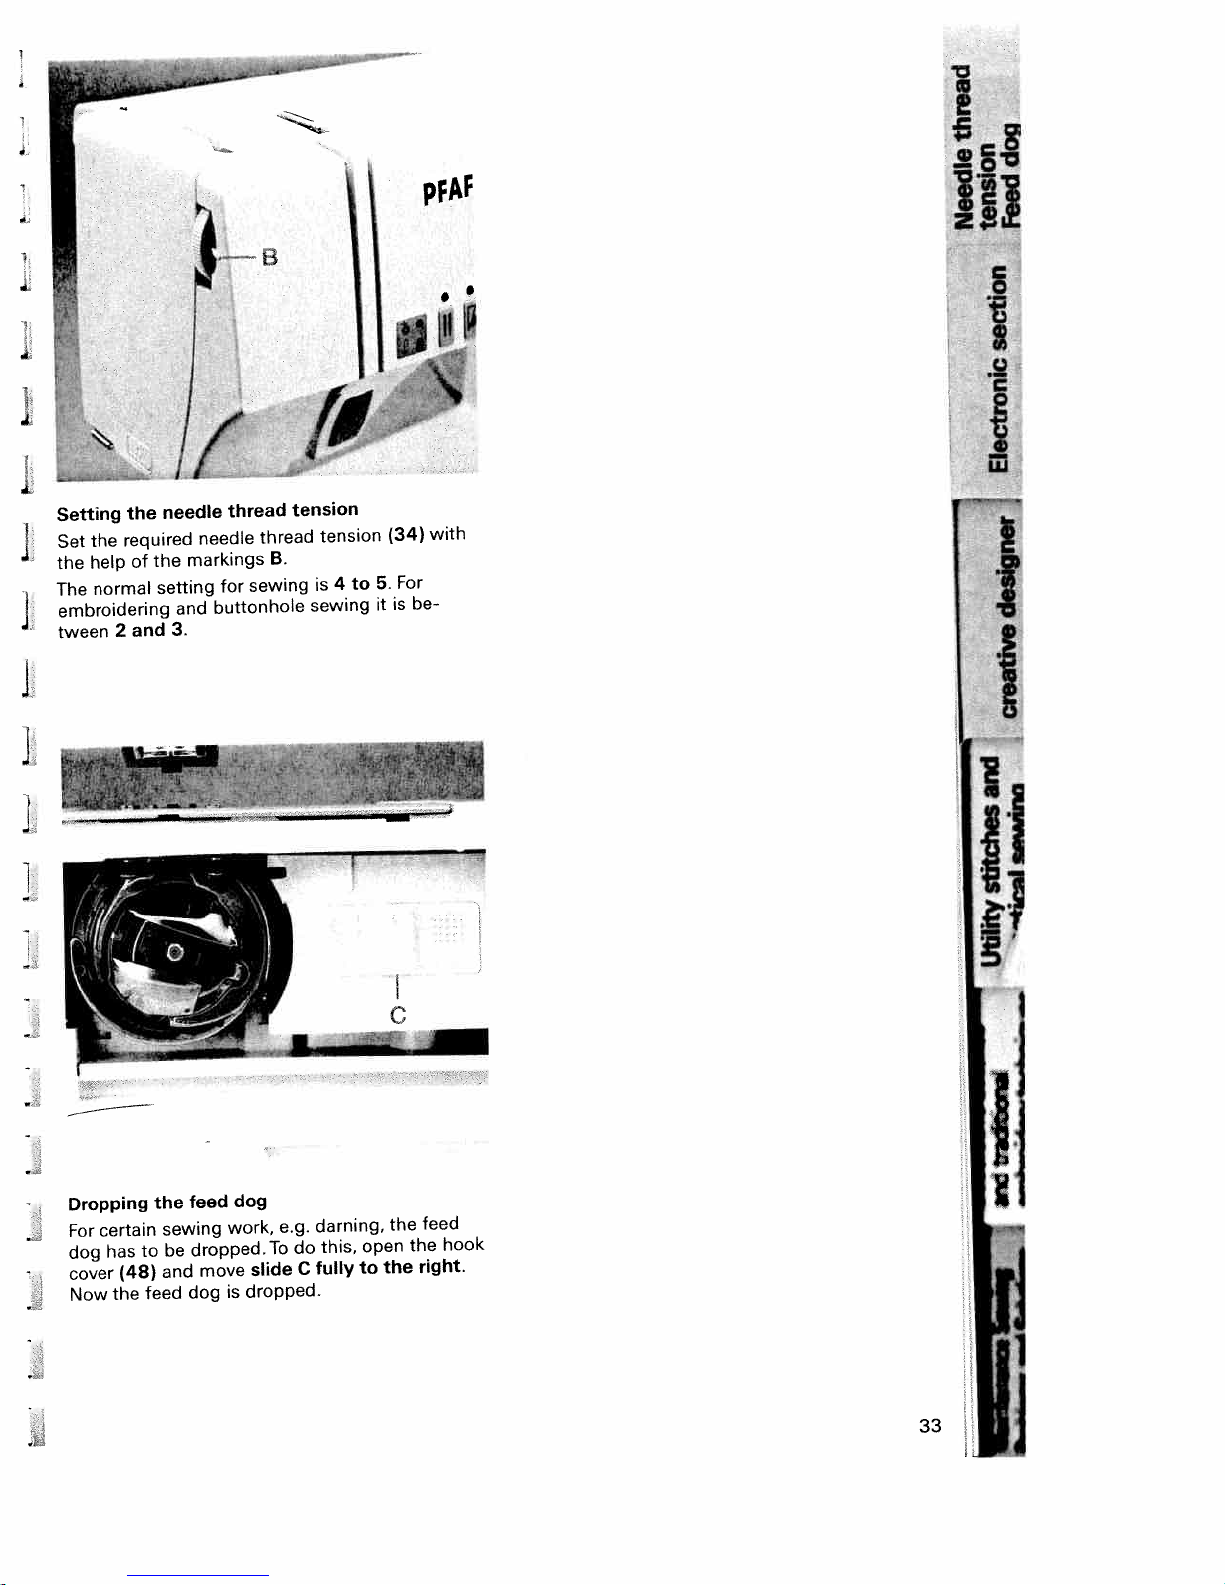
Setting
Set
the
The
embroidering
J
tween
the
help
normal
2
needle
the
required
the
of
setting
and
needle
markings
and
3.
thread
thread
B.
sewing
for
buttonhole
tension
tension
is
sewing
0
g
I
with
(34)
For
5.
to
4
is
be
it
I
I
Dropping
certain
For
has
dog
(48)
cover
the
Now
the
to
feed
feed
sewing
dropped.
be
move
and
dog
dog
work,
slide
dropped.
is
To
e.g.
darning,
do
fully
C
this,
open
to
the
C
the
feed
the
right.
F”
hook
33
Page 38
L
L
I
I
I
1
I.
1.
I
I
[
[
[
I
I
Page 39

-
.
•1Z
CD-..
C)
Cy
CD
zoR-I
03Z0zC’,
In
and
jtche
-
—
-
CA,
C7
Page 40
LI)
:
-
0)
I
Page 41

Contents
I
Start-up
Language
Sewing
Pattern
Stitch
Pattern
Balance
Operational
Activating
Alphabets
Pattern
functions
function
selection
length
density
sequence
selection
keys
and
Help
code
the
width
Page
Page
Pages
Pages
Page
Page
Page
Page
Pages
Page
Pages
38
39
40—42
44
43,
45
46
47
48
49—5
52
53—59
ji
1
I
ii
I
37
Page 42

Adjusting
contrast
The
some
after
transported.
the
use
contrast
setting
or
due
L
[edft1
Lt
iI
J
I
:
L
L
L
L
L
L
display
the
in
bright
the
readjusted
be
regulator
can
(24).
setting
change
display
the
in
the
to
can
machine
being
This
ness
with
L
L
Battery
When
inserted,
been
appear
will
machine
grammed
Insert
lost.
without
sew
message
the
on.
=
batteries
the
in
the
If
the
P-designs
batteries
new
batteries.
are
message
display
batteries
and
weak
when
the
(see
batteries
no
or
“Change
switch
you
weak,
too
are
M-sequences
171).
page
batteries”
the
the
will
You
have
pro
can
be
Simply
control.
ci’
push
the
“o.k.”
Li1
activate
or
key
the
foot
L
L
L
L
[
[
L
[
[
L
L
38
[
Page 43

___
Language
Press
and
machine.
display.
the
selection
hold
choice
A
=
key
of
“1”
and
four
languages
switchonthe
appears
H>i
sewing
in
i;i
IAJ
cii
I
“3
next
the
“display”
any
in
the
the
displayed.
are
language
description
selected
By
pressing
languages
desired
your
on
now
shown
key,
Select
using
keys
the
in
language.
the
display
number
“1—0”
will
four
of
From
be
cii
have
You
German,
Swedish,
choice
the
English,
Dutch
French,
and
A
V
of
the
Danish.
following
Spanish,
languages:
Italian,
I.
ii
39
Page 44

L
L
£
Sai
JL!1t
Description
Reverse
When
lights
pressing
forwards.
off,
To
tie
In
addition,
bartack
darning
Bobbin
red
The
nearing
Twin
Press
this
stitch
width
2
mm
If
twin
the
with
the
the
needle
subsequently
the
display:
the
up
and
this
hold
for
program.
diode
its
needle
key
to
avoid
program
of
the
key
reverse
the
key
this
you
can
buttonhole
a
thread
blinks
end.
key
when
will
the
needle
position.
selected,
Twin
Round
(27)
keyispressed,
machine
again,
key
monitor
automatically
needle
key
00,
needle
hole
sewing
pressed
use
when
(2)
sewing
is
it
is
If
another
the
function
sews
the
machine
this
key
or
the
(1)
the
with twin
hitting
pressed
not
message
needle
L
the
backwards.
a
little
to
define
length
bobbin
be
decreased
the
in
combination
possible
pattern
plate?
keys
green
sews
while.
of
a
thread
needles.
sewing
to
is
appears
diode
By
the
is
by
foot.
change
in
PFAFF
Now
twin
canbeselected.
Slow
By
pressing
machine
Needle
[
With
needle
or
at
ing
By
your
“Tie-off
pressing
The
key (2)
needle
this
its
the
seam
sewing
is
stop
key
should
highest
foot
will
creative
must
be
function
(3)
this
key,
reduced.
(4)
you
can
stop
in
point
control.
key
(5)
this
key,
be
automatically
pressed
and
then
the
sewing
determine
the
fabric
(up
position)
the
beginning
7530
Made
to
disengage
another
speed
whether
(down
tied-off.
in
Germany
when
and
the
pattern
of
the
the
position)
releas
end
of
L
L
L
I
I
L
L
I
I.
[
I
L
[
[
[
40
L
[
Page 45

I
LI
J
JHLH
Numbered
numbered
The
each
the
with
1
3
B
5
which
of
settings
—.
With
select
2
and
the
With
4 select the
In
the alphabet,
select the
B
With
width and
6
J
keys
(7)
keys
1—0
has
two
are
increased
the
numbered
the
stitch
typeofalphabet
numbered
the
stitch
letters
these
keys
the
needle
,J
consistof5
inscriptions.Ingeneral,
with
keys1and2you
programsingroupsoften
keys3and4you
programs
these
keys
(Program
you
determine
position.
key
+
and
decreased
(Program
individually.
canbeused
keys).
the
pairings,
keys).
stitch
Display
a)
b)
c)
clear)
to
The
confirmation,aselected pattern
selected
(8)
With
this
key
you
In
the
display
the
information
patterns
This
key
pattern
Allofthe languages
this
keyinthe
(9)
“clear)”
P-memory.
you
and
the recommended
switches
sequence
key
deletes,
callupthe
will
about
the
onoroff.
“select
see,
the
correct
revolving
are
displayed
language”
after
asking
sewing
from
lefttoright,
thread
displayinthe
mode.
sequence
help.
sewing
by
for
your
foot,
tension.
pressing
and
IL
a
0
With
these
keys
7
stitch
8
B
B
9
0
length and
With
the
determine
balance.
numbered
the
can
you
pattern
stitch density
determine
keys9and 0
length.
and
the
you
the
edit(1O)
With
this
gramming
key you
screen
can
and
move
the
between
sewing
the
screen.
pro
41
Page 46

creative
7530
?
\
\
L
/530
I
ll4
,
— —
0
I
I
1
4
I
a
Instruction
manual
Page 47

a
4j
info
5
6
7
i?J
_9J
LJ
L
[
L
L
L
L
L
L
“info”
(22)
For
certain
etc.),
the
description
A
next
of
the
file
can
“program”
“o.k.”
key.
Pattern
W
(axial
The
selected
i.e.
the
Pattern
(lateral
selected
The
Pattern
a)
Using
of
an
b)
For
buttonhole
grammed
clear
(11)
a)
if
the
you
can
with
help
be
key,
mirror
end
start
this
already
wrong
this
sewing
files
of
step
closed
a
Mirror
pattern
of
the pattern
Mirror
mirror
pattern
(14)
key
length
pattern
delete
key.
sections
under”info”
work
the
appear
at
any
“pattern
inversion
image)
will
inversion
image)
will
can
you
started
and
will
the
number
step
in
the
time
selection”
be
will
be
sewn
return
program.
darning
be
deleted.
number
(buttonholes,
can
be
and
a
display.
pressing
by
key
(20)
sewn
back
sewn
be
(18)
as
a
the
to
programs
been
has
from
right
alphabets
called
description
This
help
a
or
the
to
front,
first.
mirror
image.
beginning
pro
the
entered,
to
left
up.
This
b)
sequence
mow
Straight
(23)
This
key
straight
A-z
(21)
The
A-z
of
alphabets.
Buttonhole
This
key
buttonholes.
m
key
This
key
key
This
key
(12)
0-9
After
pressing
number
board.
“o.k.”
(13)
This
key
key
deletes
or
stitch.
takes
stitch
key
is
is
the
(17)
gives
(15)
gives
of
your
confirms
the
stitch
you
in
the
key
direct
you
you
key
choice
the
last
directly
needle
direct
(19)
selection
access
access
0-9
your
pattern
last
stitch
to
position
selection
all
to
all
to
you
can
using
the
selection.
in
in
program
a
a
selected
center.
key
key
for
M-memories.
P-memories.
enter
the
number
pattern
00,
for
all
types
program
all
key
P-Me-
types
L
I
[
F
of
L
F
[
42
r
Page 48

______
Iay
I
01
9
8
7!
4
1
3
J
—
8
5
—
-
I
Summary
have
You
creative
the
Selection
a)
soon
As
straight
position
The
gram
the
In
number
pattern
density
right.
The
of
various
7530.
as
stitch
appears
upper
type.
bottom
the
length
or
machine
the
using
you
line
line
stitch
balance
is
options
options
program
the
switch
(prog.
00)
automatically.
display
the
of
of
the
width
stitch
or
displayed
are
to
ready
for
select
to
the
with
display,
or
length
sew
program
a
keys:
machine
center
shows
needle
and
with
selection
program
on,
the
the
position,
the
from
program
the
needle
pro
program
stitch
left
to
on
00.
the
H
2
Ijf
(
84,
f
—
=
,jl
L
1
Fj
ci
a
#
141
4info
(
a
m
Isiso
t
S
i
\%%
\/
//
/Lø\N
dear
c
‘c
The
next
numbered
3,
keys
programs
keys
4.
with
up
and
called
be
single-program
the
can
1,
2
the
‘14
J
43
Page 49
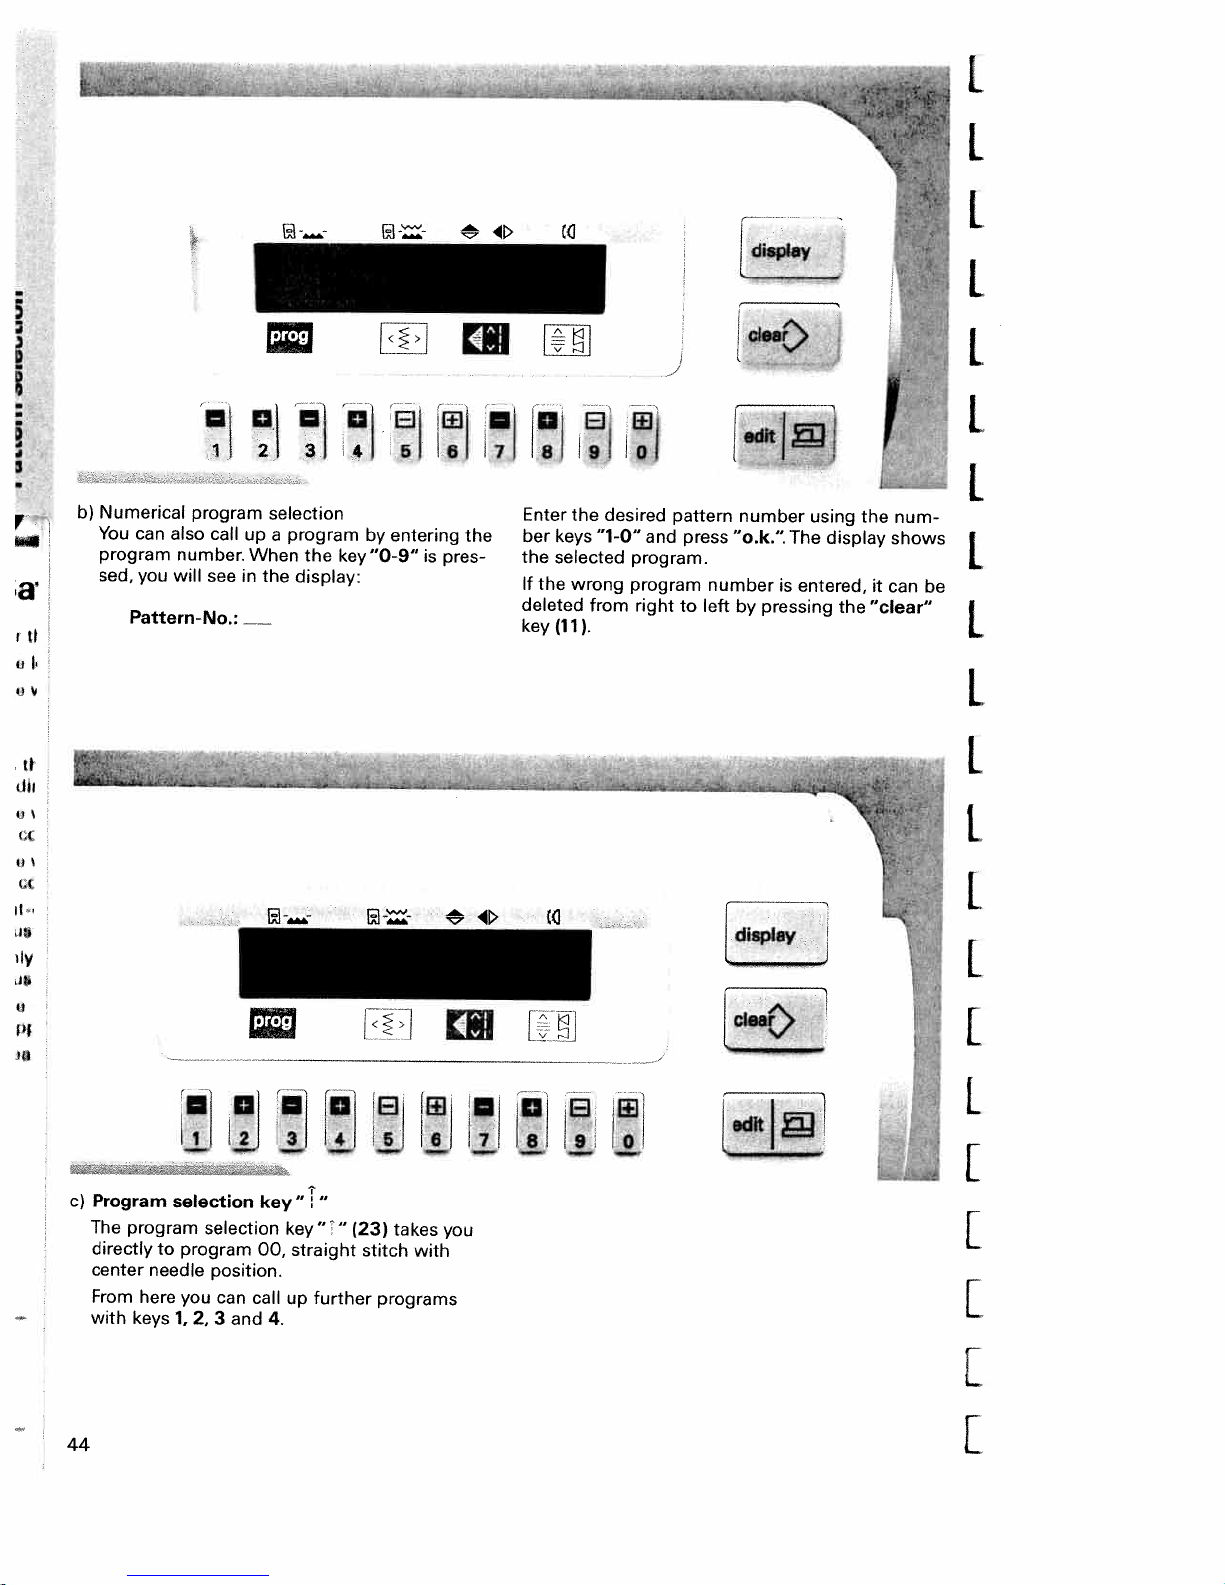
____
I
I
display
ear
1..
,
U
1
2
U
8
3
5
4
U
17
6
U
8
1
91
8
IGJ
fednj
b)
Numerical
You
program
sed,
program
can
also
call
number.
you
will
see
Pattern-No.:
up
When
in
-
selection
program
a
the
the
display:
by
entering
key”0-9”
[;J
Enter
the
ber
is
pres
j
the
If
the
deleted
key
[]
the
keys
“1-0”
selected
wrong
from
(11).
desired
program.
program
right
and
pattern
press
number
left
to
number
“o.k.”.
by
display
L
[ciear
The
is
entered,
pressing
using
display
the
the
it
“clear”
num
shows
can
:
I
be
I-
Program
c)
The
directly
center
From
with
44
selection
program
to
needle
here
keys
selection
program
position.
you
1,
2,
3
can
and
key
00,
call
key””
up
4.
“i”
straight
further
(23)
stitch
programs
takes
with
you
—
—
_
—
I
[
[
r
L
E
Page 50

=
Altering
machine
The
stitch
gram
reduced
and
the
pattern
or
selected.
is
stitch
selects
width,
with
width
automatically
every
values
These
number
the
LJ
Pattern
/
IL
time
can
keys
width
the
new
a
be
5
ri
I,d
i<j
j
default
pro
increased
and
6.
—
7
8
0
9
Ii
H
symbol
this
11,
and
10
01,
19
must
in
the
needle
00,
the
stitch
always
the
display.
width
positions
be
needle
Now
can
to
its
in
position.
the
changed.
be
choose
highest
needle
from.
position
posi
You
I
In
“—
tion
have
The
when
the
-“
and
needle
programs
appears
not
max.
changing
I
rdiaY
Lr
cieaf
f
E
1I
5
length
default
new
increased
and
6
pro
8.
31
Pattern
/
time
4
can
keys
the
a
be
7
2
I1
stitch
selects
length
with
length
automatically
every
values
number
the
Altering
The
stitch
gram
and
the
machine
pattern
or
selected.These
is
reduced
øfl;
7
19
8
1!
45
Page 51
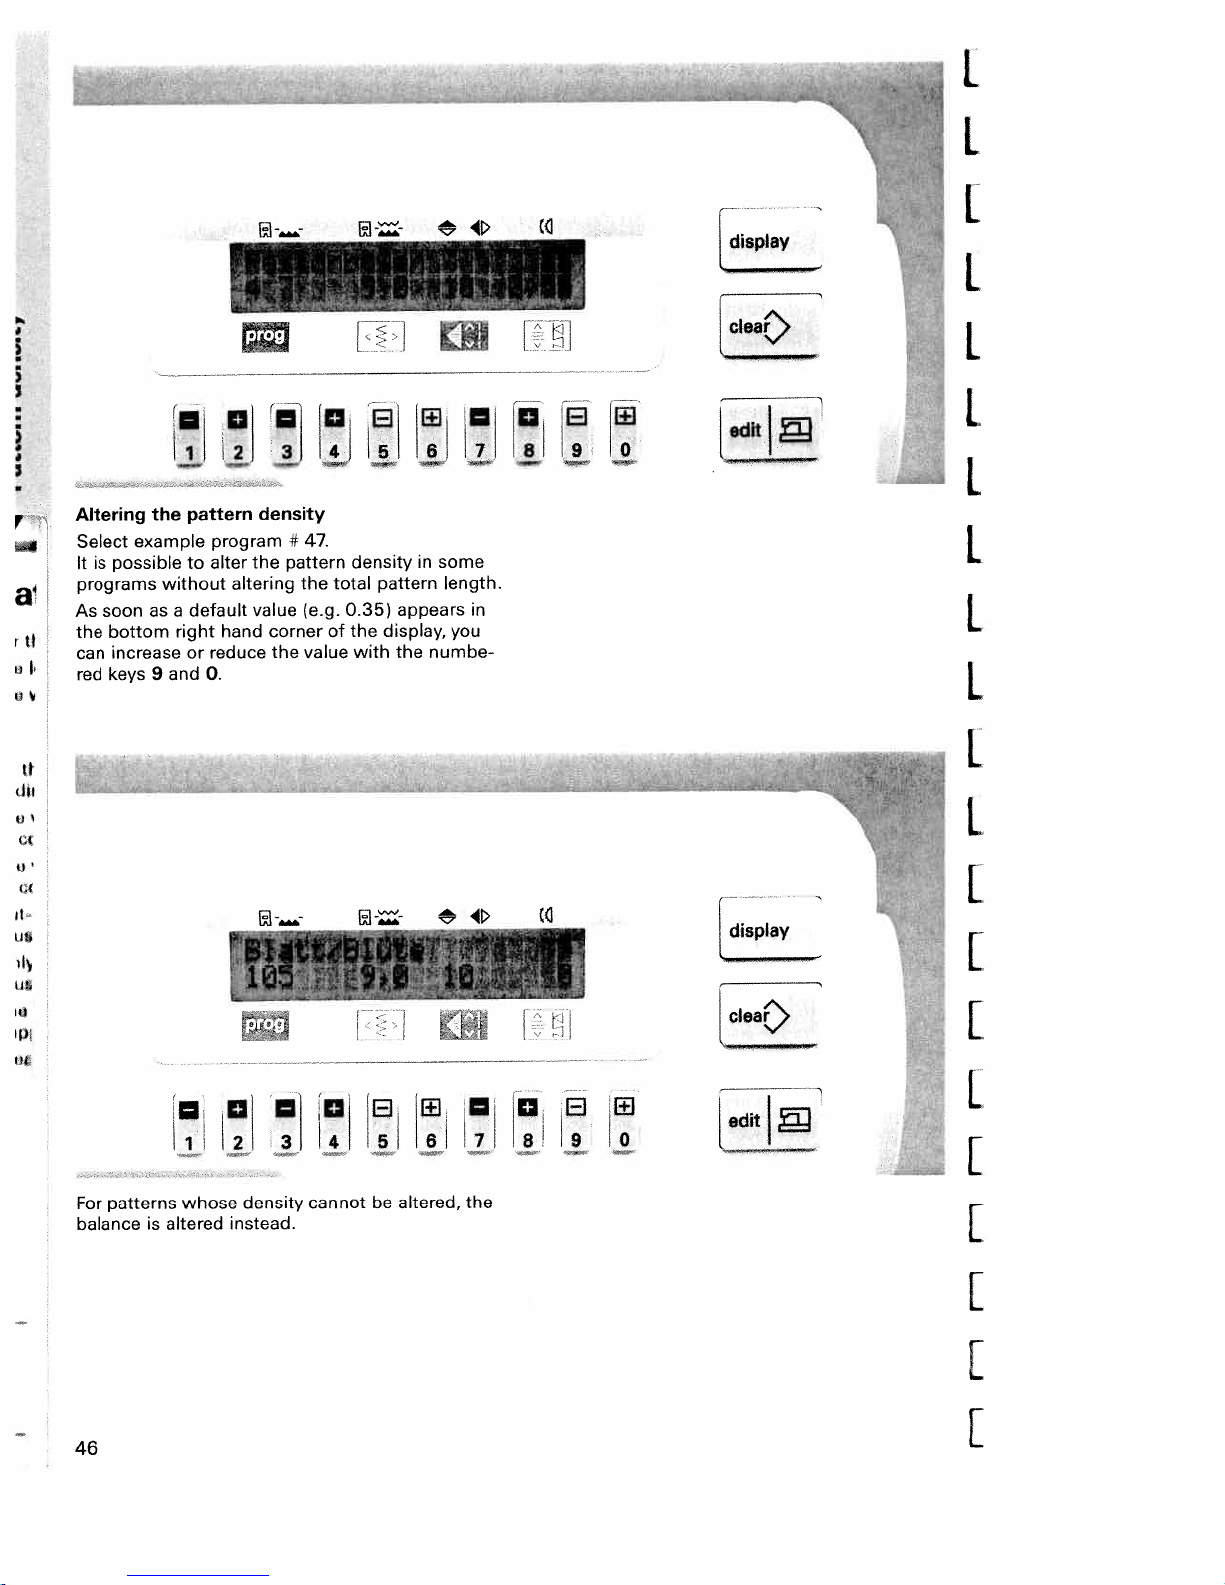
Ii
____
______
r
display
0
9
81
il
6
41
5
3
i2
Altering
Select
possible
is
It
programs
soon
As
bottom
the
increase
can
keys
red
the
example
without
a
as
right
and
9
pattern
program
alter
to
default
hand
reduce
or
0.
density
the
altering
value
corner
the
#
47.
pattern
the
(e.g.
value
total
of
density
pattern
0.35>
the
with
in
appears
display,
the
some
length.
you
numbe
I
in
L
L
I
I
[
display
[
mnDDUDD
4
3
density
instead.
is
whose
altered
patterns
For
balance
46
cannot
51
be
altered,
the
it
Th
L
[
[
[
[
Page 52
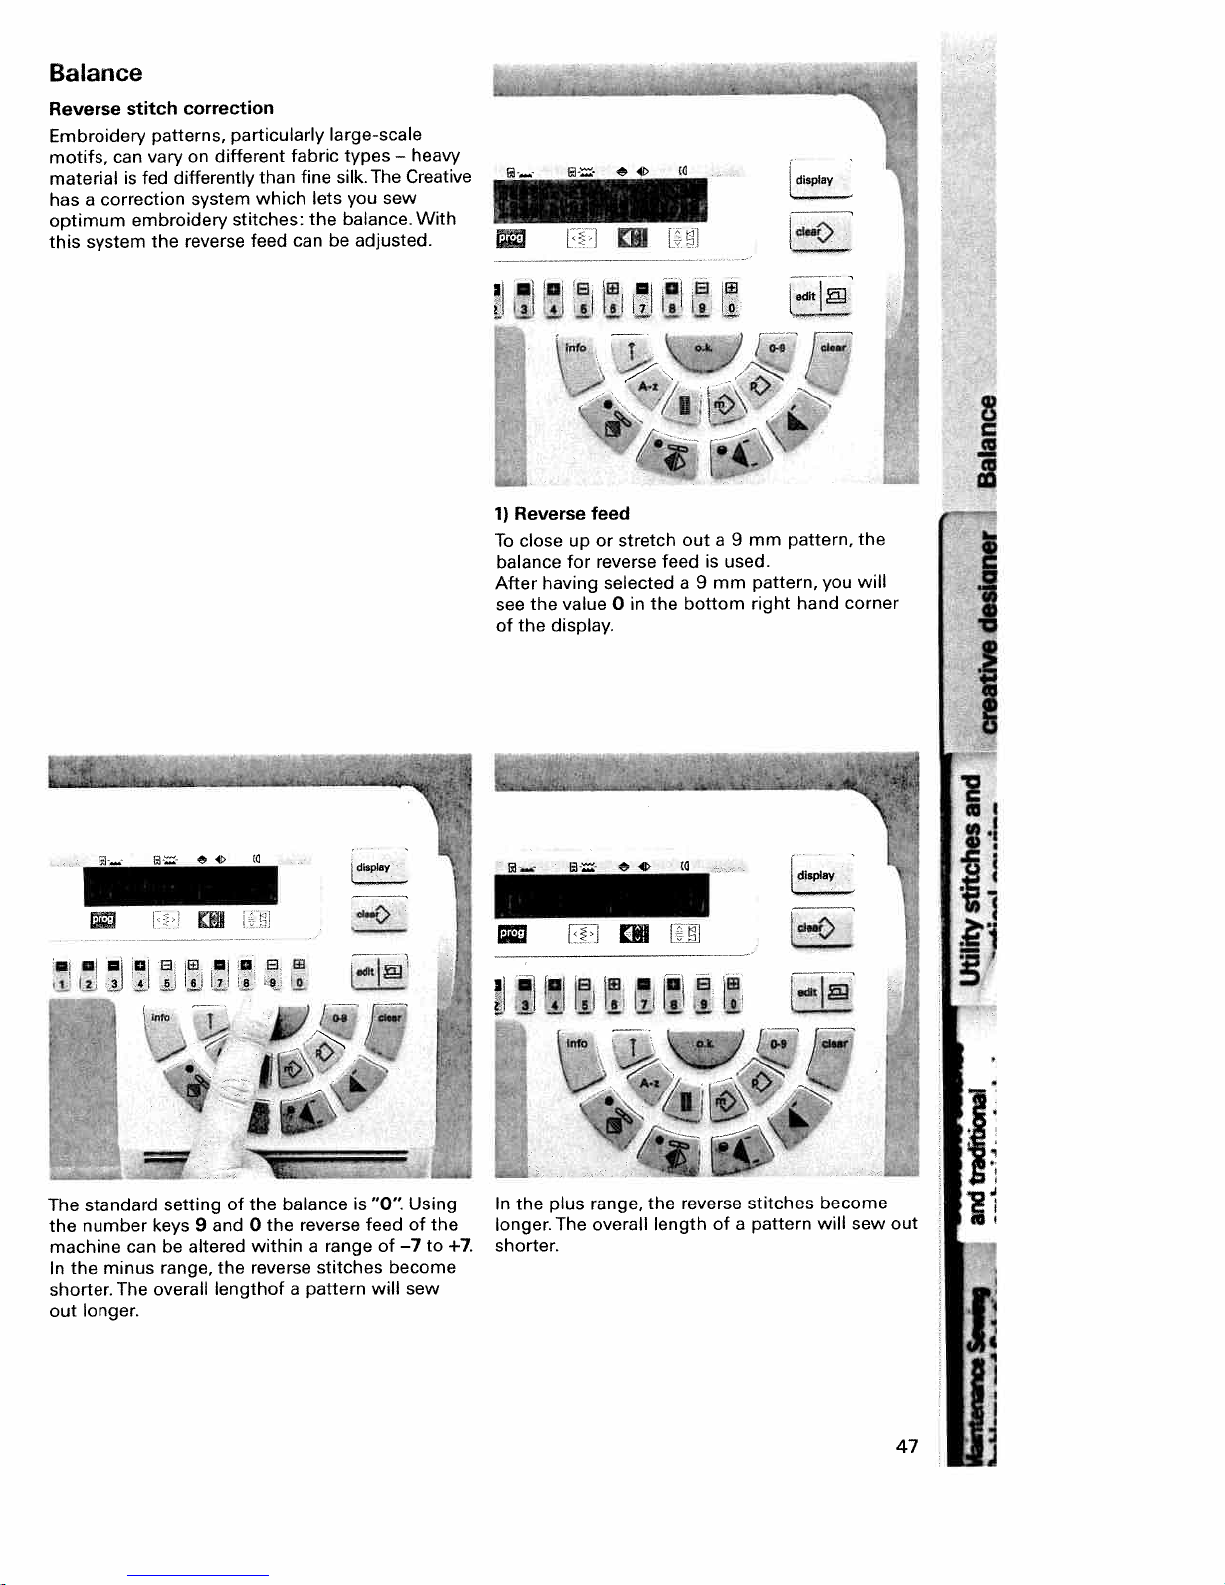
Balance
Reverse
Embroidery
motifs,
material
has
optimum
this
can
a
correction
system
correction
stitch
patterns,
vary
differently
is
fed
embroidery
the
reverse
on
different
system
particularly
fabric
fine
than
which lets
stitches:
can be
feed
large-scale
types
silk.
you
balance.
the
—
Creative
The
sew
adjusted.
heavy
With
ay
[cea
[d$PIaY
*
1)
Reverse
close
To
balance
After
the
see
the
of
a
n
info
\.‘
up
for
having
value
display.
a
feed
stretch
or
reverse
selected
0
—
a
a
T
:“
you
the
will
corner
mm
outa9
used.
is
feed
mm
a
9
bottom
in
the
pattern,
pattern,
right
hand
0
C
I
I
1
2
standard
The
the
number
machine
the
In
shorter.
longer.
out
3
can
minus
The
a
info
—,—.
setting
keys
be
range,
overall
a
u
/
9
and
altered
the
lengthof
a
of
a
.9
balance
the
the
0
within
reverse
ii
Ii
reverse
a
stitches
pattern
a
range
is
“O’
feed
of
will
Using
of
the
—7
to
become
sew
I
+7.
3
In
the
longer
shorter.
4
plus
The
a.
516
range,
overall
w
0
i
a
t
the
length
.9
reverse
of
a
0
a
stitches
pattern
[edft1
become
will
sew
ii
out
L
47
Page 53
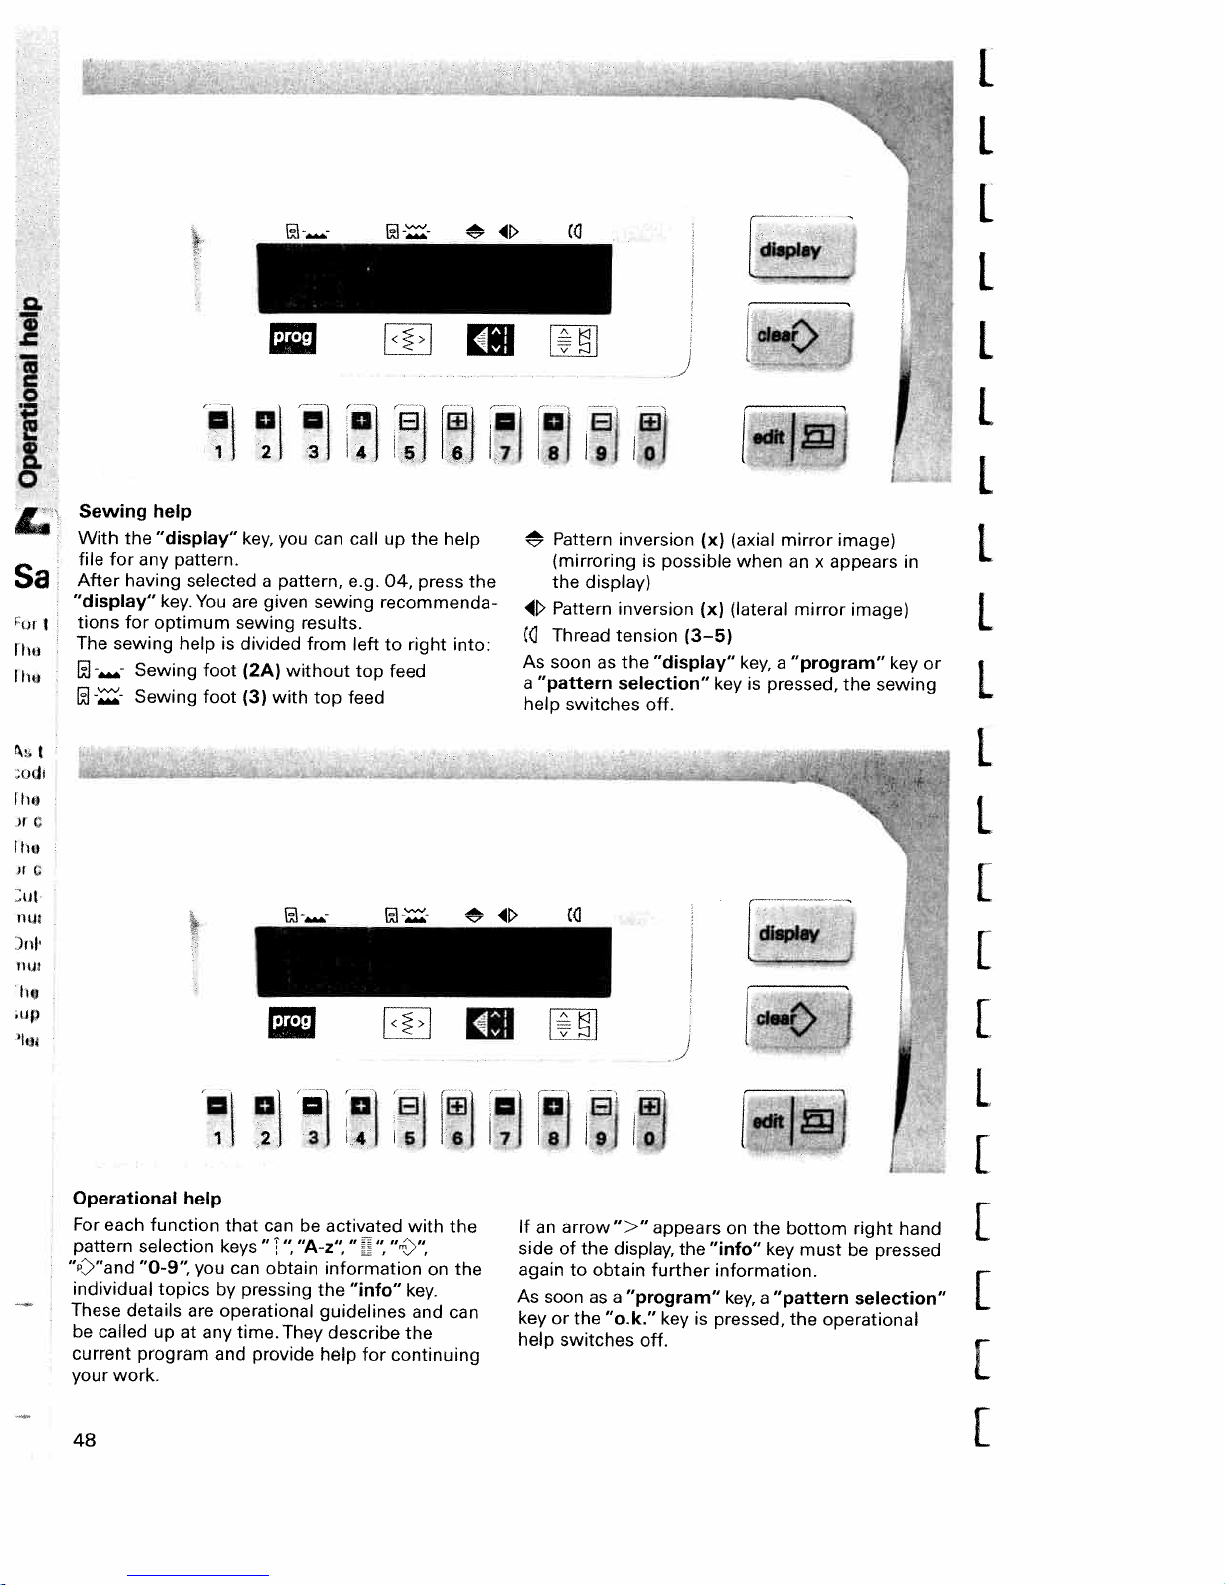
dy
I
L
I
Sa
lhu
II
t
C,
Sewing
With
the
file
for
After
having
“display”
tions
for
sewing
The
1--
help
“display”
pattern.
any
key.
optimum
Sewing
Sewing
1
selected
You
help
foot
foot
key,
are
sewing
is
divided
(3)
2
a
given
(2A)
=
you
pattern,
without
with
31
can
sewing
results.
from
top
ELi
4
call
up
04,
e.g.
recommenda
left
to
top
feed
feed
5
the
right
press
6
help
into:
the
7
8
‘4t
C
As
“pattern
a
help
Thread
soon
9!
Pattern
(mirroring
display)
the
Pattern
tension
as
switches
Ia
inversion
is
possible
inversion
the
“display”
selection”
off.
(x)
(x)
(3—5)
key
(axial
when
(lateral
key,
is
pressed,
mirror
appears
an
x
mirror
a
“program”
image)
image)
the
-
in
key
sewing
I
I
I
or
I
I.
1
Operational
For
each
pattern
“Y’and
individual
These
be
current
your
48
selection
“O-9”
details
called
program
work.
help
function
you
topics
are
at
up
1
that
keys
can
pressing
by
operational
any
time.
and
a
2
can
‘
“1
obtain
They
provide
3
activated
be
“A-z’
information
the
guidelines
describe
help
a
4
‘
“
“info”
for
8
1
w
5
6
with
the
“rn)’
on
key.
and
can
the
continuing
the
Ii
If
an
side
again
As
key
help
0
8
arrow”>”
of
to
soon
or
the
switches
8
1910
the
obtain
as
“o.k.”
El
appears
display,
further
“program”
a
key
off.
the
“info”
information.
is
pressed,
H1i
on
the
bottom
key
key,
“pattern
a
the
must
operational
right
hand
pressed
be
selection”
[
[
L
{
[
[
[
Page 54
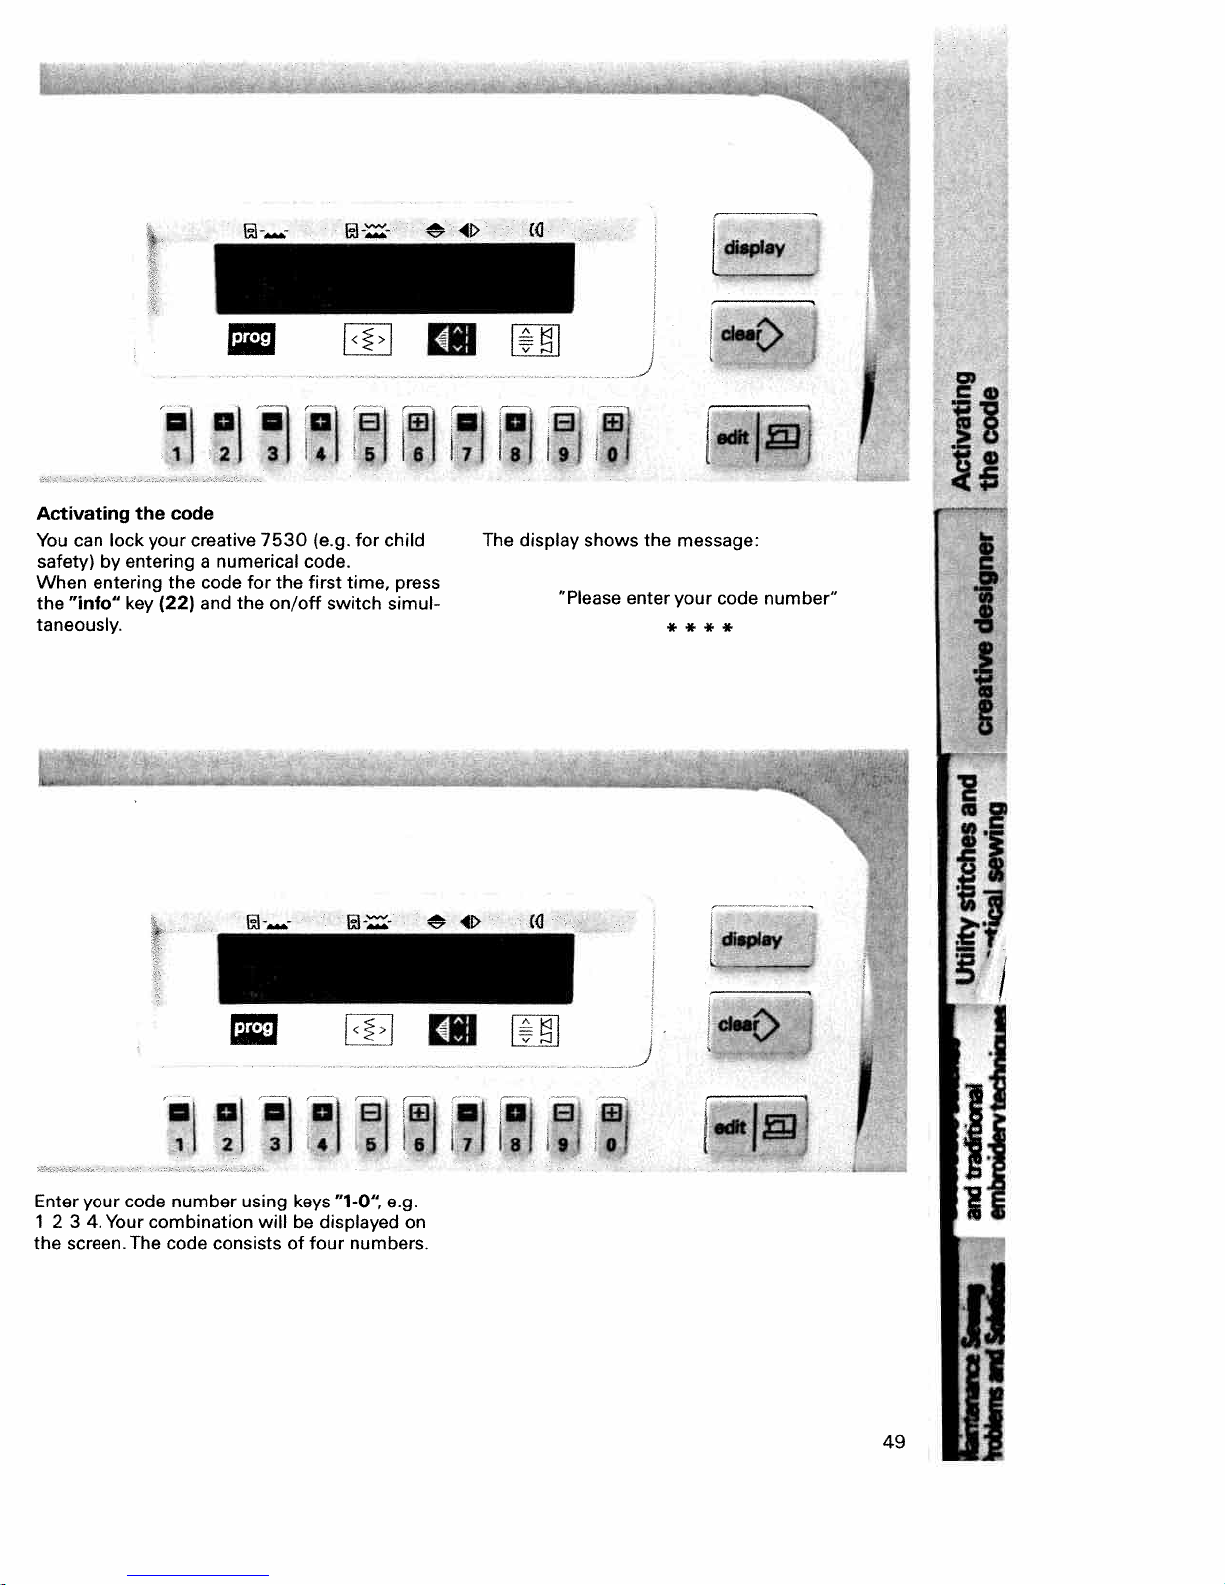
i,,
—
w
—
m
1
the
key
your
the
(22)
code
creative
code
and
Activating
You
can
lock
safety>byenteringanumerical
When
entering
the
“info”
taneously.
21
the
for
öì
J
7530
the
on/off
i
*1
(e.g.
code.
first
switch
i<>i
for
child
time,
simul
161
press
cii
IJ
181
The
[ê1
191
display
iii
shows
“Please
the
enter
message:
your
code
ft
number”
I
I
j1
Enter
your
code
1234,Your
the
screen.
1
number
combination
The
code
a
a
3
2
using
consistsoffour
41
keys
willbedisplayed
si
J
“1-O’
numbers.
e.g.
183
on
i,j
01
181
L
S
It
1
oJ
I
49
I
Page 55

ru
i
w)
n
m
n
s
3
2
4
6
6
info
a
7
w
el
sl
;;j
01
7jf7
1
I
I.
I
If
the
correct
message
nit
I
code
appears:
has
“esc”
“info”
been
continue
=
delete
=
change
entered,
code
the
Confirm
The
sewing
(straight
ready
Every
message
to
time
your
machine
stitch,
sew.
the
appears:
“please
entry
center
machine
enter
by
pressing
switches
needle-position)
is
switched
your
code
****
the
to
Prog.
number”
“o.k.”
on,
No.
and
the
key.
00
is
ii
‘I
1.
Enter
The
changes
50
I
your
numbers
to
code.
will
“+“.
[
8
U
lila
8
aJo
*
L
not
be
displayed,
the
“*“
simply
E
I
I
I
Page 56
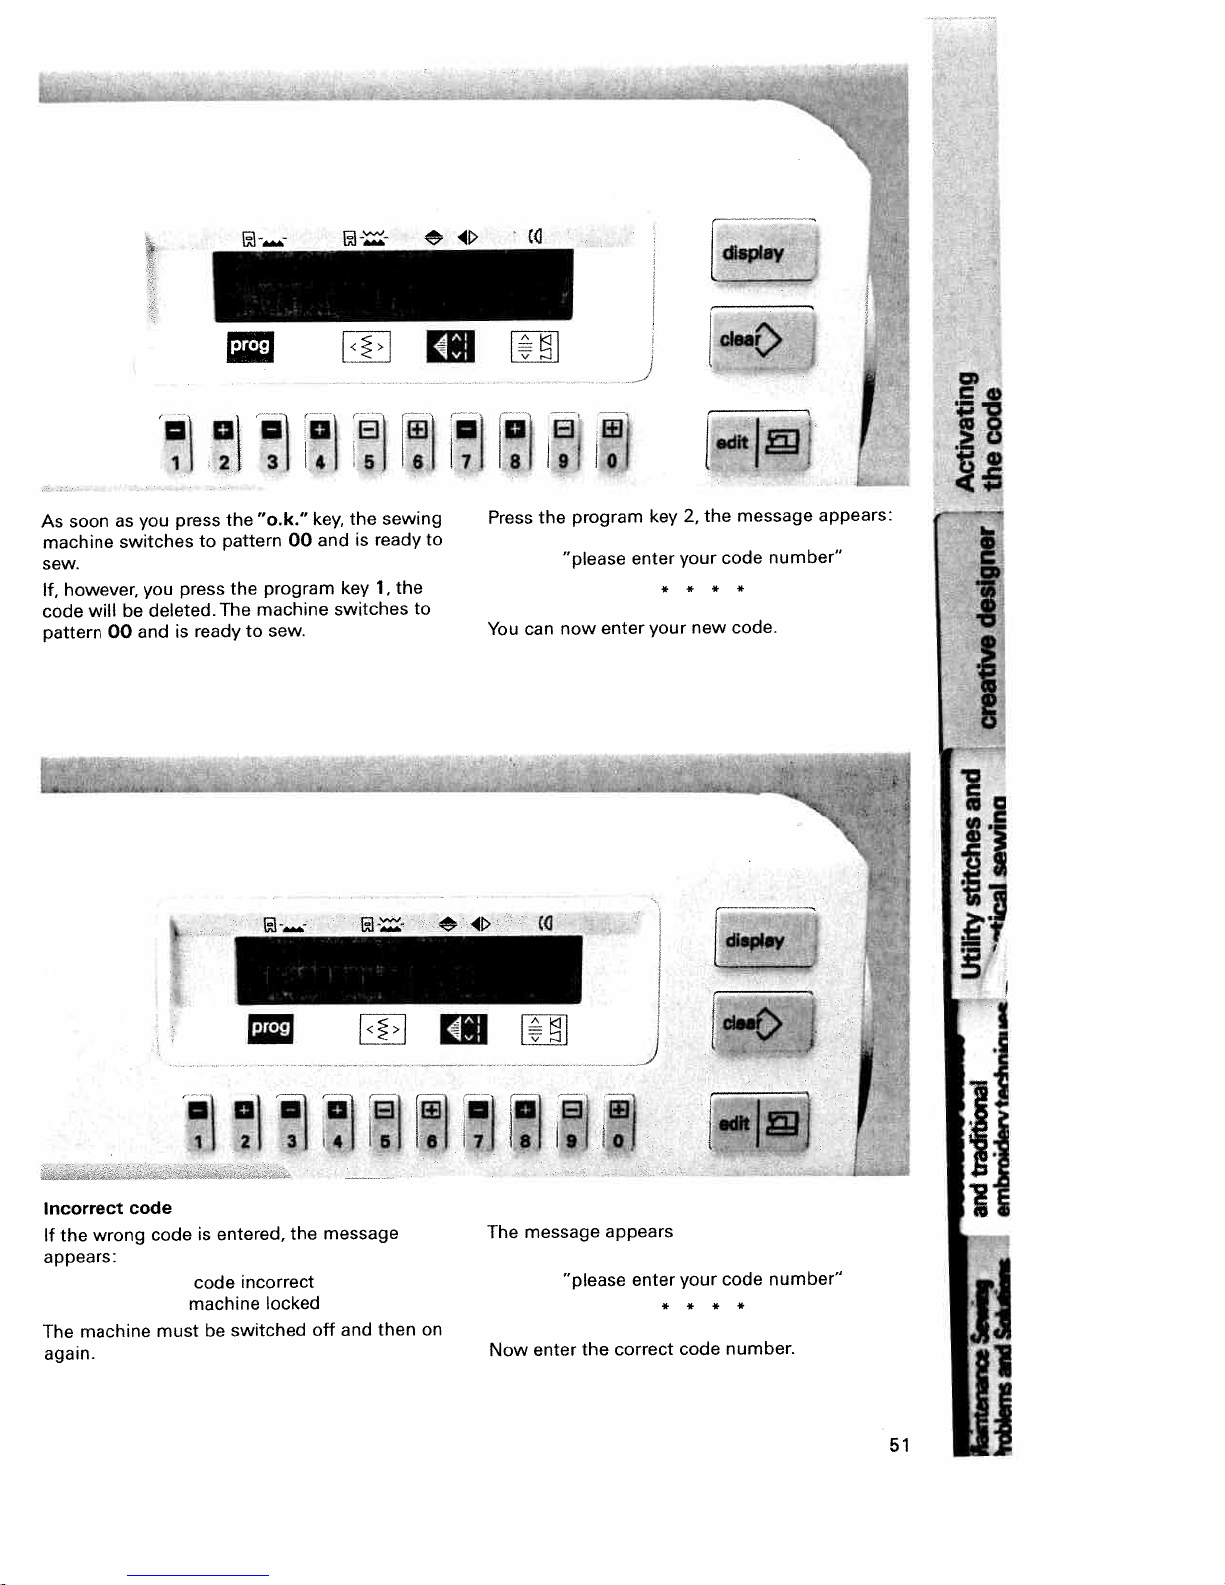
spIay
fdea’
soon
As
machine
sew.
however,
If,
code
pattern
will
you
as
switches
you
be
00
and
a4E
0
1
2
press
to
press
deleted.The
ready
is
“o.k”
the
pattern
the
machine
to
ö’q
3
00
program
sew.
4
key,
and
switches
5
the
key
is
sewing
ready
the
1,
m
6
to
7
(;;jj
$
9IO3
:11
U
message
the
2,
enter
key
enter
your
* *
your
new
*
code
*
code.
program
the
Press
to
You
can
“please
now
appears:
number”
I
I
ii
0
i
1
wrong
machine
code
code
must
is
entered,
code
machine
be
Incorrect
If
the
appears:
The
again.
2
incorrect
locked
switched
31
the
n1
41
message
and
off
1
Ig)
then
on
j
i
i
91
sJ
71
6
OJ
fi
T
14l
i
t
I
ii
“please
the
appears
enter
correct
number”
code
your
*
*
*
*
code
number.
I
I
51
1
The
Now
message
enter
Page 57
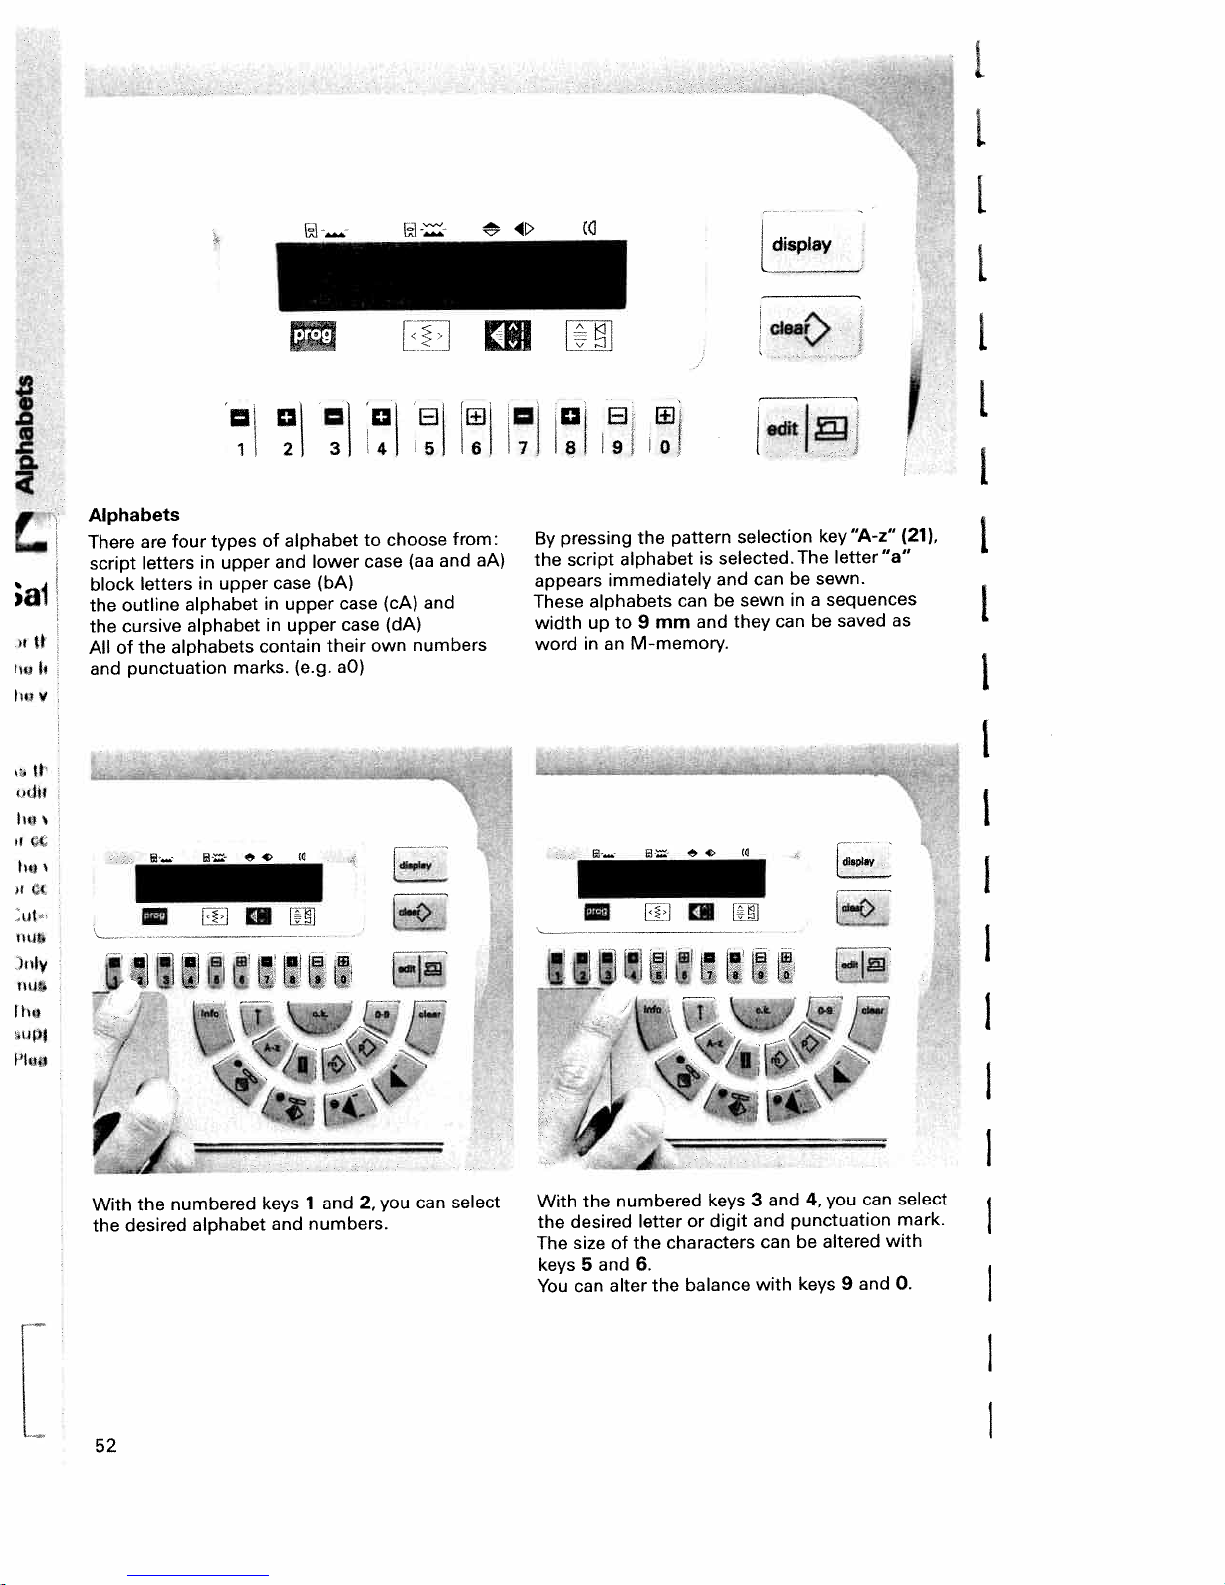
____-
[dis
L
I
1.
Alphabets
are
There
letters
script
letters
block
outline
the
cursive
the
the
of
All
punctuation
and
types
four
in
upper
in
upper
alphabet
alphabet
alphabets
ii
of
in
contain
marks.
2
alphabet
and
case
upper
upper
in
(e.g.
m
3
lower
(bA)
their
aO)
case
case
0
4
to
case
own
ricii
choose
(aa
(cA)
(dA)
numbers
8
5
and
and
8
6
from:
aA)
0
8!
7
pressing
By
script
the
appears
These
width
wordinan
8
the
alphabet
immediately
alphabets
9
to
up
M-memory.
:
01
pattern
mm
can
is
and
be
and
dear
‘edftI
selection
selected.The
be
can
sewnina
can
they
key”A-z”
letter”a”
sewn.
sequences
saved
be
(21),
as
1
I
I
1
I
nuq
_
With
the
52
the
desired
numbered
alphabet
keys
and
and2,you
1
numbers.
{ii
can
select
With
the
desired
the
size
The
keys5and
can
You
A
numbered
letterordigit
characters
of
the
6.
alter
the
keys
balance
and4,you
3
punctuation
and
be
can
keys
with
altered
9
can
and
select
mark.
with
0.
Page 58

Creating
order
Designer
to
or
(MO-Mi
Creative
In
patterns
M-memory.
disposal
programmed
a
pattern
create
letters
There
1
each
in
qããáth
2
sequence
pattern
a
must
be
16
are
to
5).
Up
memory.
41
3
J
without
sequence,
combined
M-memories
patterns
84
5
the
several
an
in
your
at
can
I
Ia
91
8
7
6
I
key,
“€“
sequence
h.
0
C
I
be
After
appears
pressing
the
in
Pattern
MO
the
display:
message
the
I
0
5
31
sequence
“edit
the
display:
2,5
4
with
the
“
key
E
/
2
1
desired
the
Select
program
get
The
keys.
the
to
message
programming
pattern
Now
appears
Ml
00
press
in
screen.
the
÷--
tI
Tdeer1
I
L
J
flj
7
6
The
to
the
straight
appears.
A
are
the
sequence”
display
the
9110
8
selected
display.
stitch
pattern
sequence
programming
the
in
programming
but
number
memory
the
In
00
does
rather
of
the
bottom
with
screen
not
only
selected
appears
stitch
can
appear
the
only
in
the
the
of
line
position
created
be
screen.You
fact
the
by
in
the
abbreviation
pattern
top
display,
center
can
that
line
top
“P”
sequence.
of
line
the
you
when
recognize
“Pattern
of
the
and
53
I
Page 59

press
Now
alphabet
the
With
letter,
with
numbered
digit
“A—z”
the
the
punctuation
or
‘‘2
key.
numbered
keys
(314
Select
and
3
mark.
keys
4,
,ø
the
1
select
8
desired
and
518
2.
your
I7
I
[
display
[ear)
8
8
i
9
8
[itj
I..
L
L
I
II
i
It
it
Ji
II
7
U’
8191
o
HIi
pressing
By
symbol
initial
sequence.
The
the
“
message
M<P
cP
“ok”
<“
1
entered
is
0
2
key,
3
your
appears
9,0
U
selection
into
in
4
the
the
0
B
5
and
pattern
display:
8
(
the
L
I
I
54
Page 60

=
_
_________
I
The
should
the
in
before
Enter
this
In
stitch
word.
entering
your
example
width
remain
entire
‘
:1
whichisset
valid
stitch
The
the
text.
“PFAFF’
for
width
letter.
aiwo
2
j
for
allofthe
must
‘5
4J
first
the
following
altered
be
letter
letters
9
j
j
j
f;ftjjj
I
I
I
F
sew
to
want
sewing
in
sequence
<PFAFF
display
pattern
shows
is
you
screen
the
shows
sequence.
the
stored
display.
M-memory
the
in
appears
Pattern
Ml
the
in
display
and
“when
what
Press
“edit!
nowinthe
are
You
message
ing
lineofthe
top
The
saved
are
the
of
line
in
are
you
the
follow
the
and
5
that5patterns
bottom
The
which
memory.
word.
If
more
entered
with
again
key
ginning
pressed,
sequence.
the
than6patterns,
moving
the
“display”
key
the
stops
seworwhen
to
the
display
the
16
display
(8).
moving
the
jumps
numbers
or
letters
canbeswitched
the
the
When
J”
/
beginning
Pressing
display.
“edit
to
on
“display”
be
is
key
of
are
55
I
I.
I’
II
Page 61

sp1ay
)aa
Delete
If
you
delete
With
pattern
sure.
are
pattern
enter
from
“cear)”
the
sequence
The
1
the
wrong
riht
message
Entire
delete
000
2
sequence
left
to
key
(9),
after
pattern
o.k.?
3
letter
with
you
the
computer
appears:
sequence
or
the
can
4
pattern,
“clear”
delete
8[
5
asks
you
key
the
6
can
entire
if
(11).
you
0
7
fl8IJ
8
If
you
sequence
delete
“cIearY’
pattern
If
the
“clear”
will
be
you
if
91
press
now
will
the
entire
key
or
sequence
machine
(11),
key
deleted
are sure.
you
be
“€Y’
is
all
without
the
deleted.
pattern
switched
“o.k.”
If
sequence
and
the
sewing
will
appear
M-memories
the
the
key,
you
do
in
the
while
on
computer
entire
not
press
screen
display.
holding
and
pattern
wish
to
the
of
your
the
P-memories
asking
EIE
0
010
2
only
Select
lZZ?’
press
31
letters
an
key
key”O—9’
1
You
can
combine
in
pattern
a
ry
press
and
gramming
56
sequence.
the
“edit
screen.
not
Now
4
but
empty
to
get
.5
also
BflB
6
patterns
M-memo-
to
the
pro
17
The
8
message
9
al
appears:
Ml
Pattern
L-ii
No.:
Page 62

—
I.
Enter
number
message
The
the
pattern
keys
1
number
“1—0”
appears
Ml
83
2
(e.g.
9,0
4
3
5
17
6
9
8
0
I
be
still
patterns
(20).
and
number
with
press
can
the
“o.k.’
once
can
After
taken
is
initial
again
the
be
this,
in
into
I
its
I
balance
the
more,
is
the
the
and
sequence
soon
As
will
and
keys
be
some
(18)
pattern
along
you
as
displayed
of
83)
the
in
and
display:
20
press
0
choice
your
using
“o.k.”
altered.
mirrored
press
the
symbol”<’
Important:
attered
original
What
“o.k.”
pattern
with
pattern
settings.
length
width,
The
the
[J
4J
I
your
or
2
density
<83
3,4
9,0
of
(e.g.
still
can
display:
the
in
150
9,0
Now
program
and
length
“o.k.”
Press
message
The
keys
stitch
1.
appears
Ml
150
pattern
the
select
L
choice
150).The
altered.
be
0.35
with
width,
6
the
81
With
return
further
3,4.
i
IJ
pattern
the
immediately
patterns
Jr-Q1j4,
can
selection
to
the
with
Prog.
numbered
key”
00
i”
and
(23),
you
keys
you
can
1,
select
or
2
J
57
II
Page 63

__
_____
disIa
L
Sa
With
the
select
already
(see
page
following
‘j
pattern
42).
message
selection
existing
After
appears:
Ml
P0
i
patterns
pressing
<83
9,0
key”)”
the
150
3,0
from
0
Li
key”
(15),
the
P-memory
)“the
you
cii
can
[I
Select
your
P-memories.
altered.
be
desired
The
pattern
width,
[dear
from
length and
the
16
available
balance
can
Press
the
the
58
“o.k.”
pattern
display:
=
1
and
the
sequence.
Ml
P0
0
á
2
P-pattern
The
<83
9,0 3,0
‘0
3J
will
message
150
0
4
P0
‘t
taken
be
appears
L
cii
‘
5
6
into
in
[l
1j
91
8
7
L#J
I
Page 64

l!iI
I<>I
cii
Li
J
[ci
r
I
I
Pattern
If
you
memory,
sequence
to
try
the
MO
Memory
11
save
message
150
full
is
more
32
full
than
appears:
64
31
84
41
patterns
122
51
delete
the
to
“edit
fii
selected
the
patterns
/
1”
or
exit
key.
pattern
the
,
pat
I
is
71
6
“o.k.”
one
in
With
sequence
sequence
tern
93
and
teJ
you
return
can
with
I
I
I(I
ii
59
Page 65
.‘j
II
a
Ittj
i
It
ii
ri
fl”
1111
I
A
1
__
—3
a
Page 66
;Dc)
I
ca
I,
z
CD
design
creatj
and
Sewing
Stitches
ICal
Ut!,
0)
Page 67
I
n
r—
r
ri
Page 68
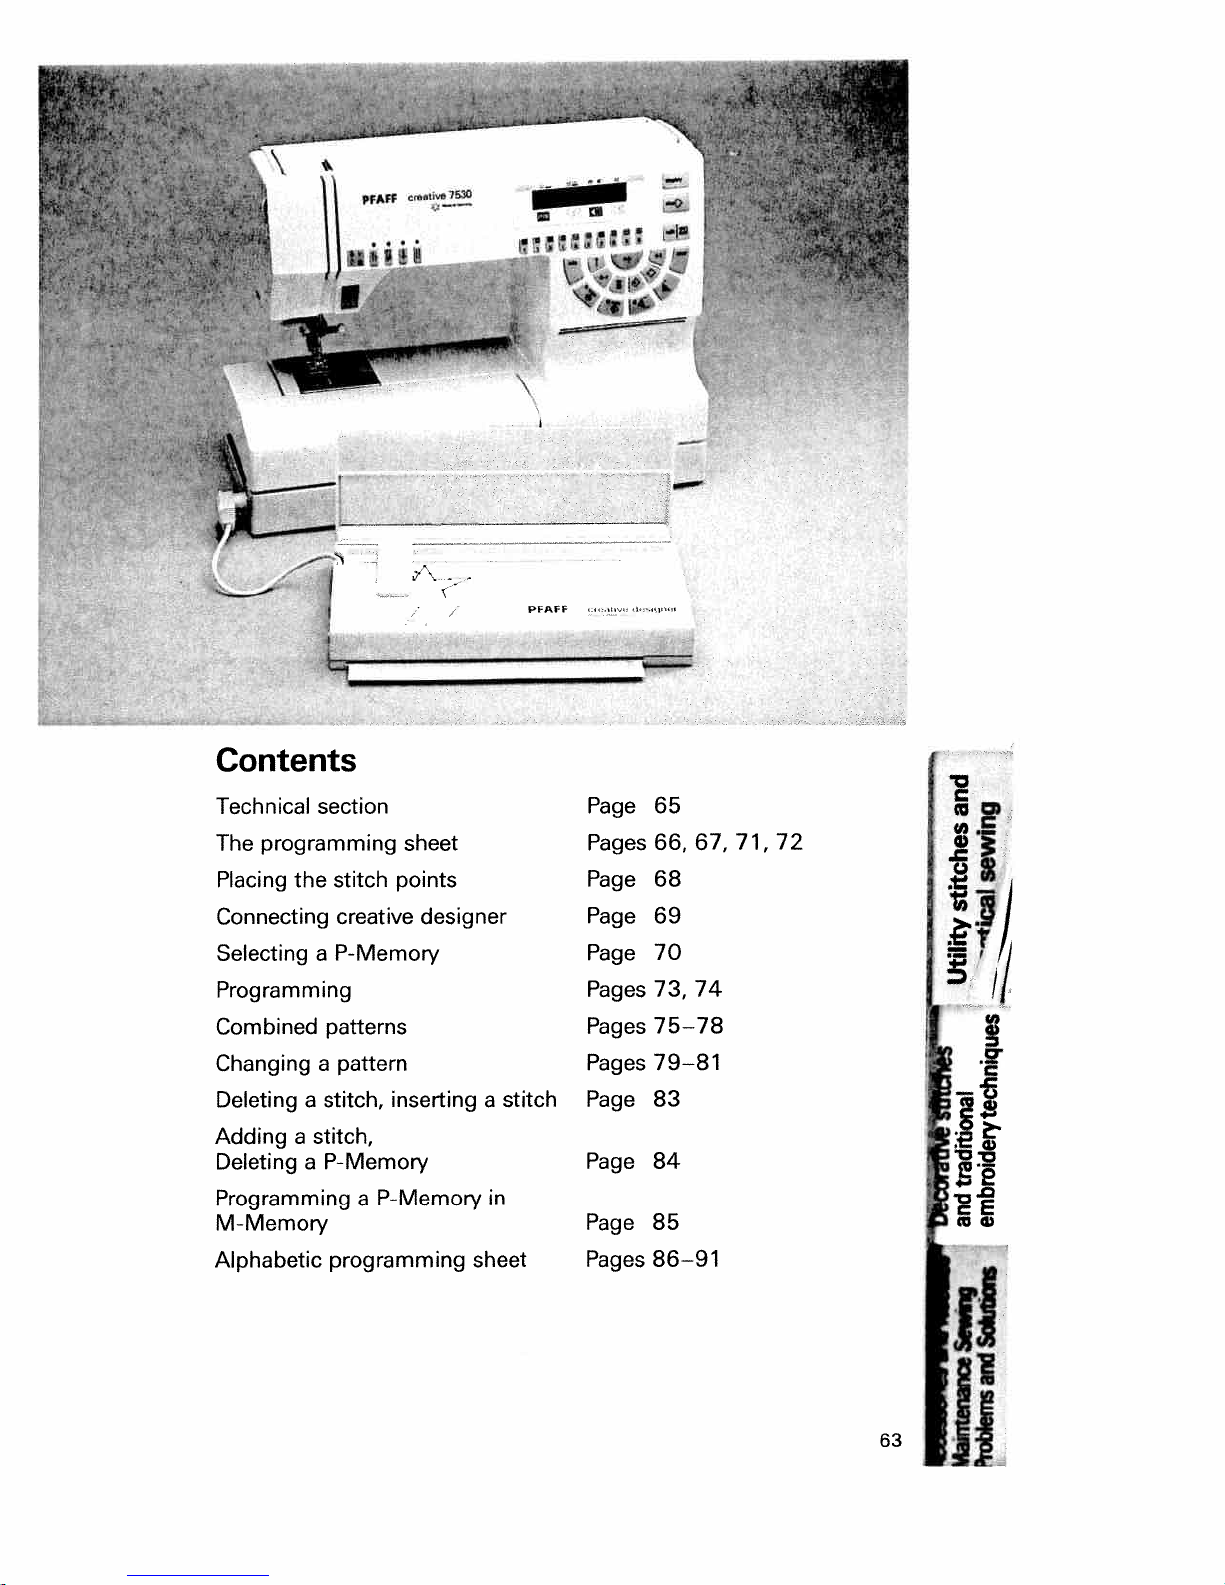
PFAFF
creatwe1°
-
-
‘—
Contents
Technical
The
Placing
Connecting
Selecting
Programming
Combined
Changingapattern
Deleting
Addingastitch,
DeletingaP-Memory
Programming
M-Memory
Alphabetic
section
programming
the
stitch points
creative
P-Memory
a
patterns
stitch, inserting
a
a
programming
P-Memory
sheet
designer
stitch
a
in
sheet
Page
Pages
Page
Page
Page
Pages 73,
Pages
Pages
Page
Page
Page
Pages
65
66,67,71,72
68
69
70
75—78
79—81
83
84
85
86—9
74
11
Si/
?
,9”
C
4,
-C
[E
1
63
Ii’
Page 69
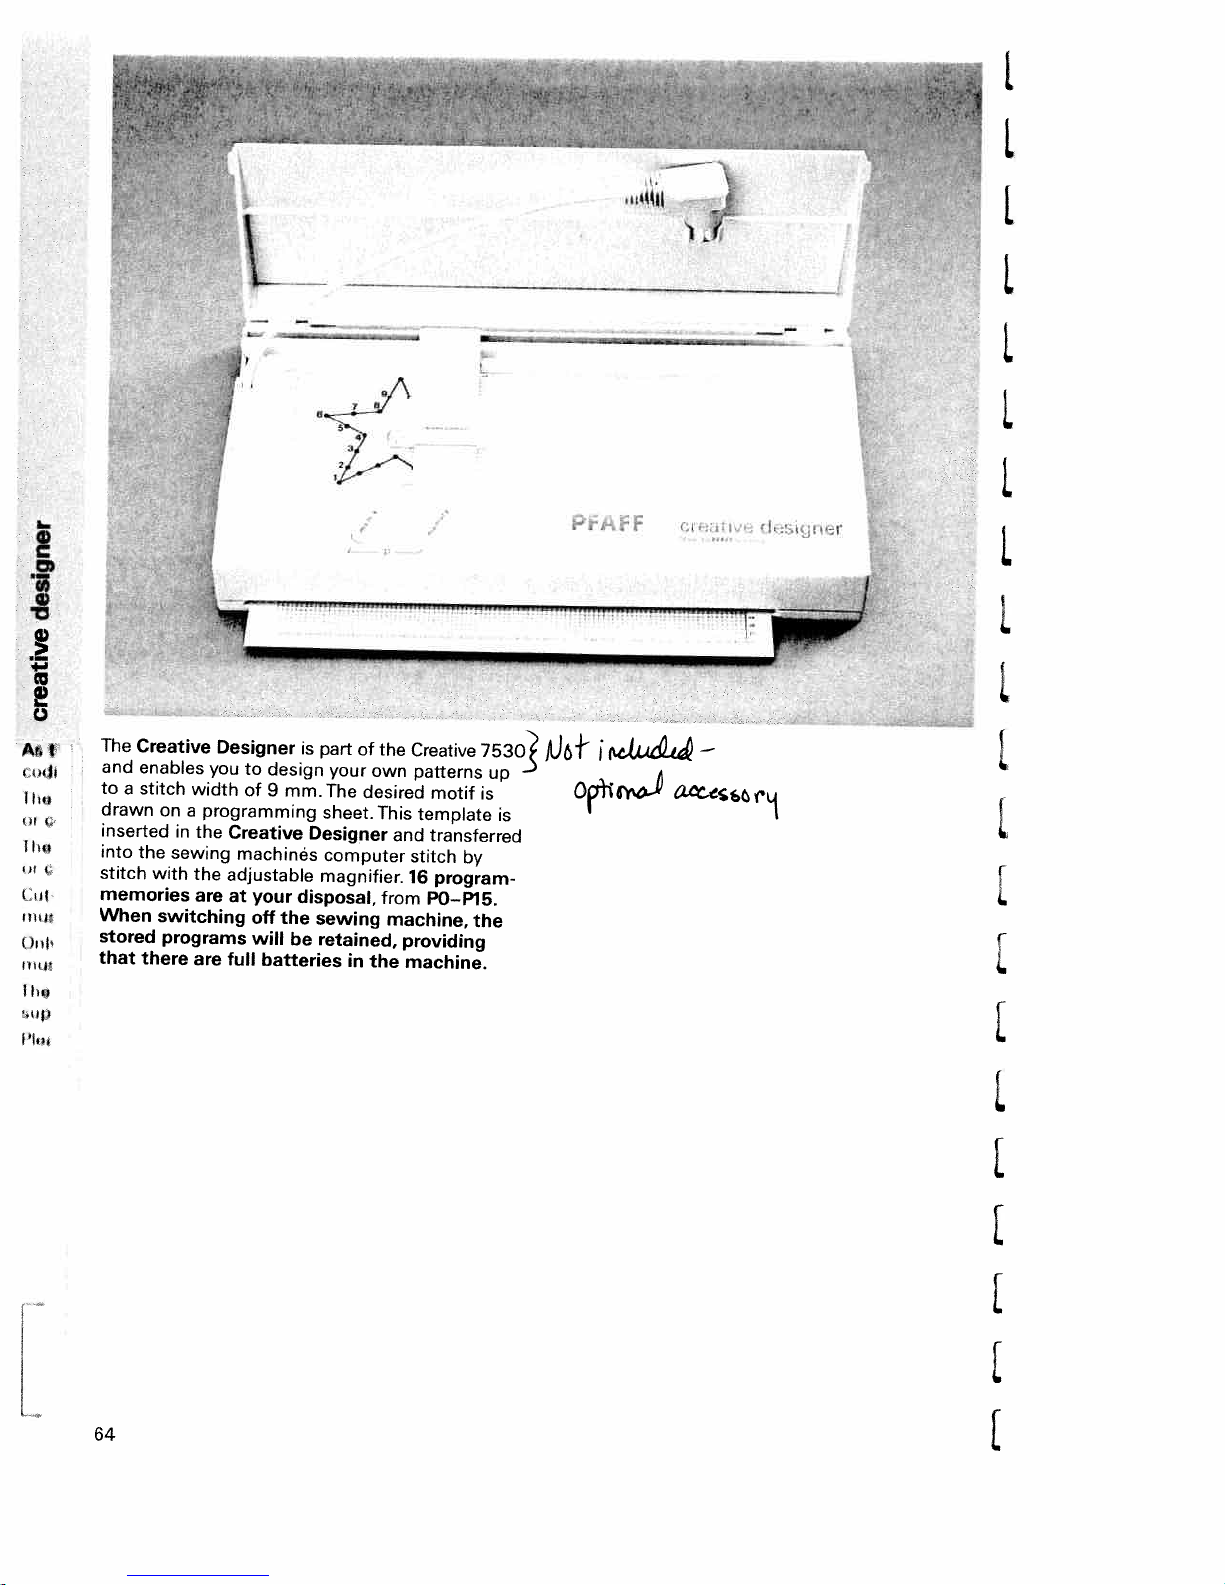
-
—
-É
‘p
L
‘p
I
I
The
Creative
and
enables
to
stitch
a
drawn
inserted
into
the
stitch
with
memories
When
stored
that
there
you
width
on
programming
a
in
the
sewing
the
are
switching
programs
are
Designer
to
design
of
9
Creative
machines
adjustable
at
your
off
will
full
batteries
is
mm.
Designer
disposal,
the
be
part
of
your
own
The
desired
sheet.
computer
magnifier.
sewing
retained,
in
the
the
Creative
patterns
This
template
and
stitch
16
from
machine,
providing
machine.
7530}
up
motif
is
transferred
by
program-
PO—P15.
the
is
AJo+
I
01
,j-14J
—
I
C
L
I
I
I
64
I
E
Page 70

-v
—
F’i
C.)
.
0)01
-
CD
0
‘OOO
0
)øCl)
section
Tehflica1
m
C.)
CD
—.
—
-
C.)
CD
-
2.
CD
-‘
(I
-4,
3
C.
CD
CD
—
C(D
(Dcs
0
to
CD
Cl)
—
CD3
‘—3
p
and
sewing
0
0
0
Q.
CD
CO
—
(DO
CD
CD
C,
0)
CO
CD
stitches
Utility
I
4if
!
sutas
traditional
uecorauve
and
embroderytechniques
Sans
and
0,
O)
Obems
Page 71
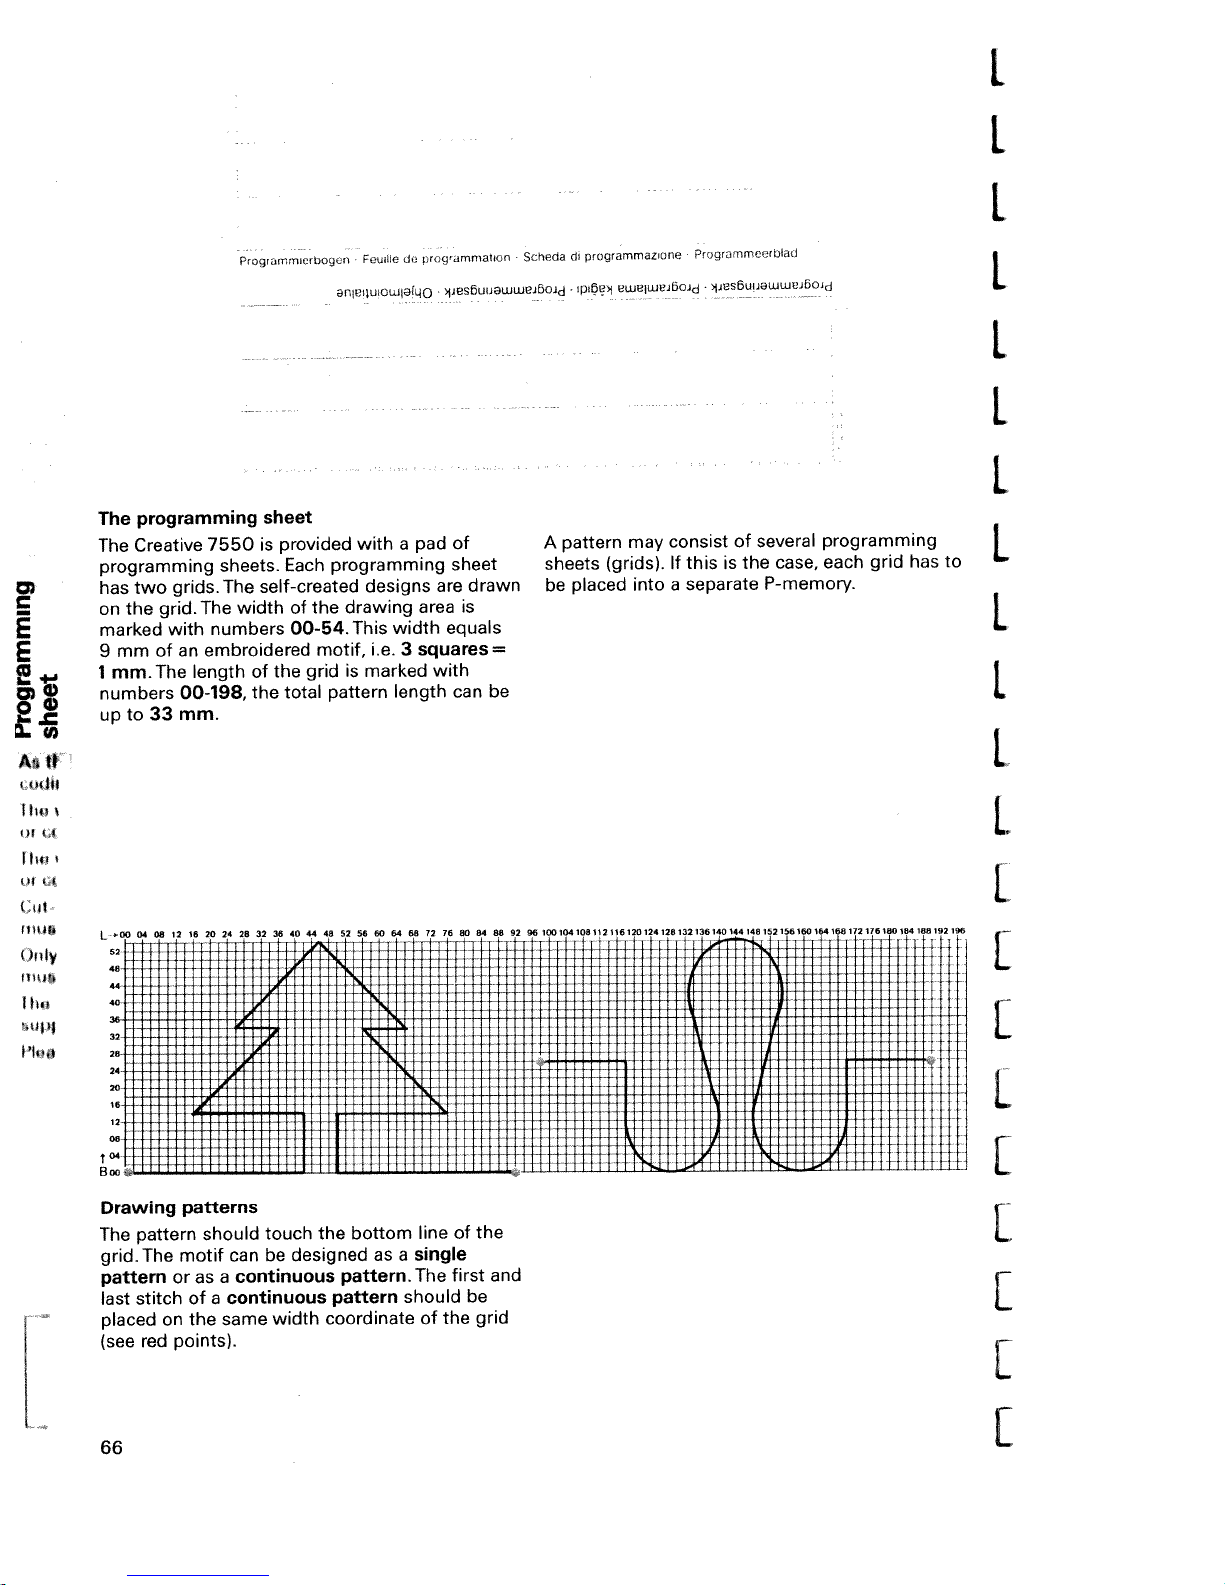
I
I
1
a,r,a-4
,fl5OQ1lWJJ11bCi
np
Ohjelmontiolue
uClCWWPA5OJO
‘P
ePaPDS
ká,d,
Programmerinysark
aUOZUUJWU,OOd
Proqramlama
pjO,’UW15C
Programmertngsark
1
I
I
1
eeqs
euj
eqj
OMJ
z
3
3
CD
seq
eq
uo
peew
6
L
dn
ww
o
ue
40
eqww
sieqwnu
6uiwwe6oid
099L
eAieeJ
6u!wwei6oJd
qJiM
ww
eqspu6
eqpu6
q6ue
‘861-00
S!
sleeqs
o
as
qp!m
seqwnu
peJepoJqwe
eq
eq
qoe
eqo
ts-oo
P!i6
jeo
q1M
pep!AoJd
peeeJo-4f
siqj
‘4110W
ey
S!
uleBed
ped
e
6uiwwei6ojd
su6isep
6uiMeJp
qpiM
peiew
q6ue
jo
eie
earn
qiM
eeqs
S!
saenbs
ue
ueip
sjenbe
=
eq
eq
uieed
seeqs
(spus)
peoeld
Aew
e
0U!
S!SU03
S!
SUfi
Jo
oq
eeiedes
ieieos
‘eseo
pu6
qoee
Aiowew-d
6uiwwej6oid
seq
1
o
1
1
flpO)
1
I
l9L
99111
91.1
Ll
5I
1
00
91
90 60
91
C
99 89
09
09 60
06
99
96
6
88
88
08
91.
U
09
99
09 99
S
l1
801601001
9E1
6816016819,1
681601081681
991691091991
6l
091691081
1
961
]
]
1.—I”
I
I
I
I
I
]
99
eqj
sei
ees)
6uiMeJcJ
eqjpu6
uieBed
io
qoms
peoeicl
uo
pei
uieed
se
e
o
eq
jiow
e
(suiod
suJe3ed
pnoqs
eq
ueo
ewes
eq
qono
snonuiwoo
snonuiwoe
qpM
wouoq
e
se
peu6isep
uleBed
uieed
e4eu!pJOo
aqj
o
euq
pnoqs
jo
ai6u,s
sJi4
eq
-n
eq
pue
pu6
Page 72

24
IS
20
.00
04 08
L
4036
32
28-f
08
12
28
44
44
32
485256
24
646468
72 16
60
L00
04 08 12
16 242426
22
40 44
36
44
68
60
48
64
52
64
12
20
‘6
t
There
are
three
grid: Example
1.
Vertically
pattern
ways
of
drawing
of
a
simple
asacontinuous
tree
a
pattern
max.
max.
pattern
or
height
width
a
into
single
9
33
the
mm
mm
2.
Horizontally
a
single
as
pattern
max.
max.
height
width
33
mm
9
mm
C
E
E
C
co
tO.E
0
C,
3.
Combined
key
(18):
pattern
by
pressing
max.
max.
mirror
height
width
image
33
1
mm
8
mm
ii
67
ii
Page 73
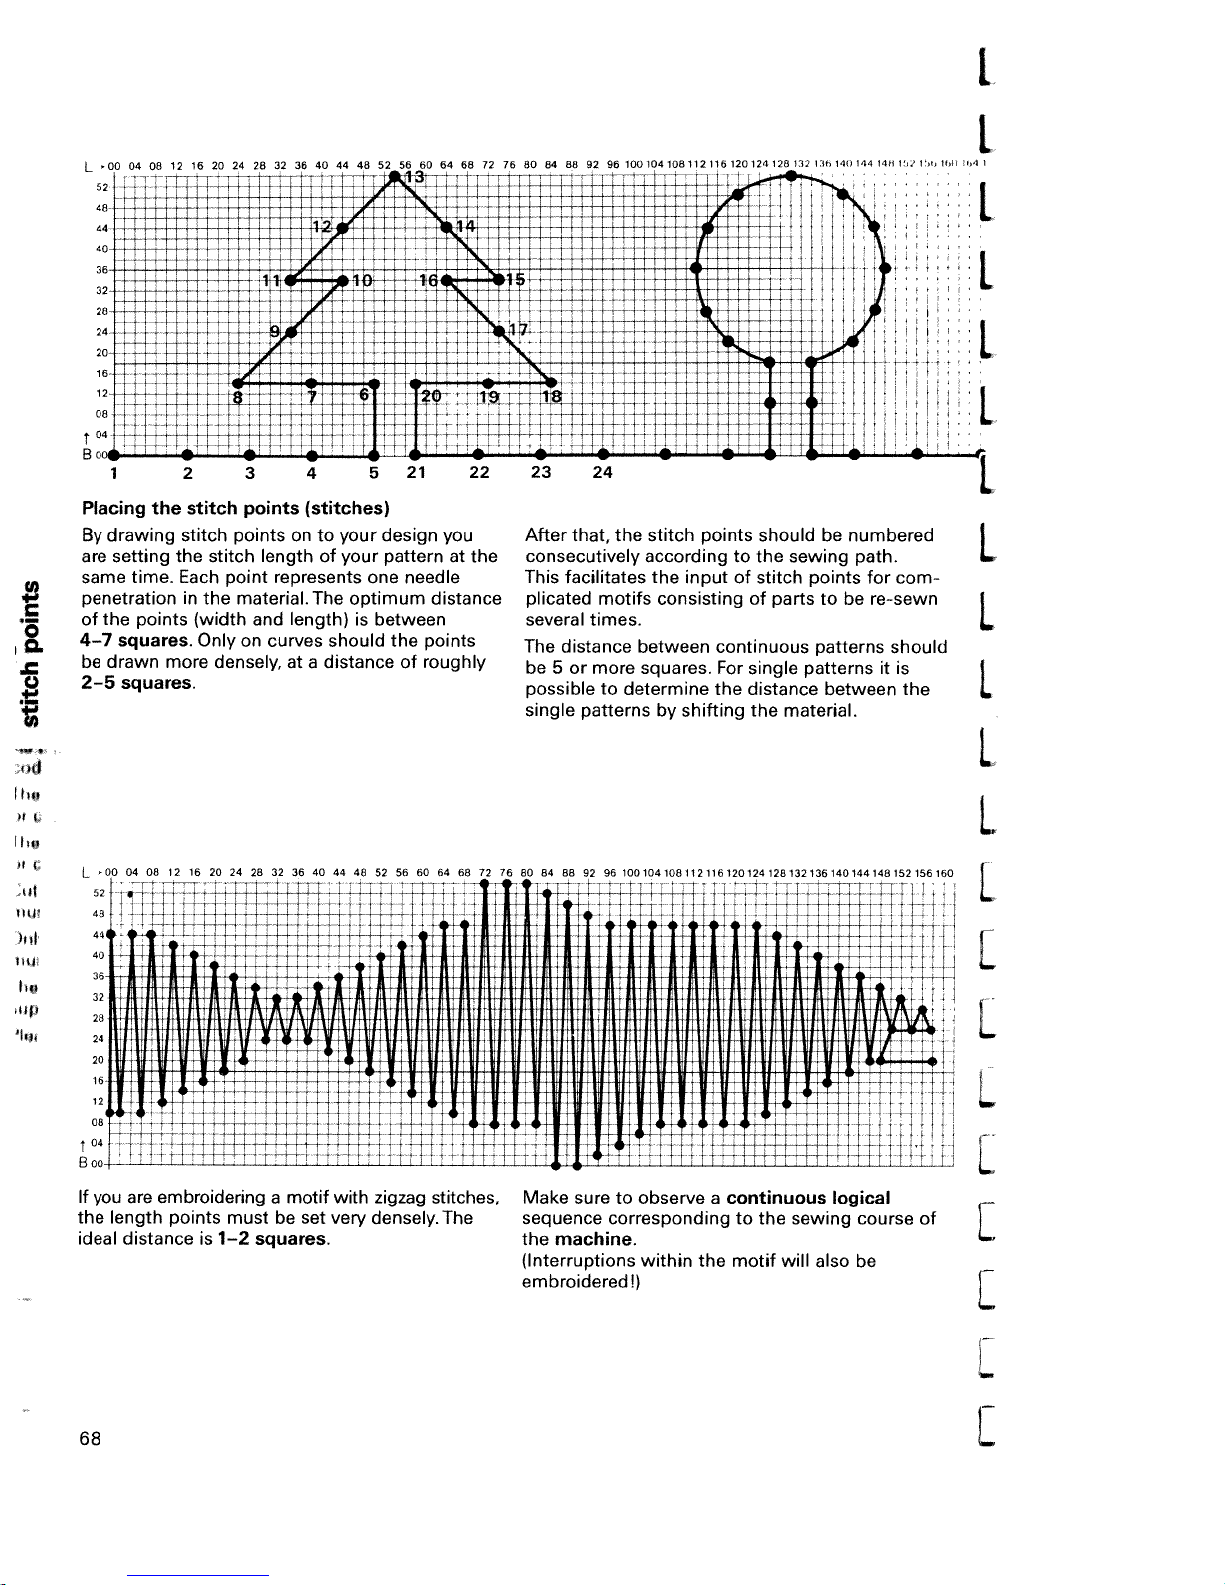
[
__
00 04 08
121620
____
_______
24 28 32 36
4044485256
606468
_
___
7276808488 92 96
__
100104108112116120124128
__
____
[
6(1
Y12
116
140
14448l.’
64
l6
E
12
of
The
521
your
design
your
patternatthe
one
optimum
needle
the
1
Placing
drawing
By
are
setting the
‘
same
penetrationinthe
of
the
4—7
squares.
be
drawn
2—5
squares.
the
time.
points
2 3
stitch
points
stitch
pointsonto
stitch
Each
point
material,
(width
Onlyoncurves should
more
densely, atadistanceofroughly
4
(stitches>
length
represents
and
length>isbetween
you
distance
points
22 23
After
consecutively accordingtothe
This
plicated
several
The
be
possible
single
T
JttU
24
that,
the
facilitates
motifs
times.
distance
5ormore
to
patterns
stitch points
the
consisting
between
squares.
determine
by
shifting
shouldbenumbered
inputofstitch
of
partstobe
continuous
For
single
the distance
the
sewing
points
patterns
patterns
between
material.
path.
for
re-sewn
it
H
corn-
should
is
the
L
L
L
00
04 08
L
40
2o4J
If
are
you
the
length points
ideal
distance
121620 24 28
embroidering
mustbeset
is
1—2
32 364044 48
t
rUt
tttfJIfl
a
motif
squares.
with
very
52 56
6064687276 80
zigzag
densely.
if
stitches,
The
84 889296
Make
sequence
the
machine.
(Interruptions
embroidered!)
1001041081121161201241291321361401441491521551150
suretoobserveacontinuous
corresponding
within
j
the
to
motif
E
the
sewing
will
also
logical
course
be
L
EH
t1
L
L
of
[
L
68
L
Page 74

Important
The
Creative
before
is
the
only
recognize
“p
the
PFAF
Designer
sewing
way
the
machine
for
the
Creative
7530
must
sewing
Designer.
—
S
connected
be
is
switched
machine
•.
open.
2
to
I
on,
to
this
Lift
cover
H
Take
into
connecting
socket
plug
(10)ofthe
from
machine.
retainer
•0
JJ
=
I
ii
on/off
straight
switch
stitch
(25).
00
with
center
H
at
the
insert
it
The
needle
3
and
Switch
on
display
position.
shows
69
I’
ii
Page 75

The
(15).
(P0
When
the
—
for
key
have
You
P15).
to
pressing
display:
.,
selection
your
at
key”
P-pattern
P0
A.r/
rn
ri
,
)
of
a
disposal
n)”
the
P-memory
16
following
_
L
i!:
-
key”
is
P-memories
appears
0
I
I.
I
I
p)”
on
I
[
numbered
With
P-memory
choose
We
keys
selected.
is
in
P1
P-pattern
P1
our
3
2,
1,
example.
and
I
[
desired
the
4
0
[
70
[
Page 76

Inserting
Creative
the
Slide
sides.
(8).
slot
upwards
it
under
area.
ming
Designer
clip
Insert
Take
the
programming
the
slides
pattern
the
care
the
until
top
the
7
and
not
top
cutout
to
sheet
forwards
12
programming
sheet.
the
fold
the
of
edge
edge
the
of
into
on
paper
program
the
both
sheet
Slide
slides
in
ii
right
fully
sheet
up
with
to
or
down
the
the
knob
left
and
and
programming
side.
the
the
slide
(4)
slide
adjustable
slide
(5)
left
fully
moved
is
or
slide
down.
Adjusting
Magnifier
justable
the
Push
magnifier
Ii
ad
on
the
ill
71
Iii
Page 77

V
1.
I
I
I
Now
red
cross-hairs
aligned
position
with
the
the
11,
I
J
programming
magnifier
of
the
the
cross
I
by
pushing
I
at
sheet
point
(6)
are
00.
that
so
exactly
the
Then
clip
clamp
slide
(12)
the
to
sheet
the
into
rear.
position
I.
6
L
L.
[
r
L
until
sheet
the
slide
with
line
magnifier
this
in
rear.
00
right
the
clamp
slide
the
as
(7)
adjustable
possible
sheet
lineofthe
the
to
Move
the
Move
horizontal
Then
clip
72
(4)
the
far down
as
magnifier
aligns
cross.
position
with
by
and
slide.
the
pushing
red
to
Check:
Push
the
00
and
magnifier
sary).
magnifier
check
aligns
that
with
back
the
red
line
to
the
horizontal
(Adjust
00
bottom
line
if
left
neces
point
of
the
L
r
L
r
L
r
L
Page 78

V
having
ter
dit/”
ie
Creative
in
pears
P-pattern
P1
)U
ngas“edit”
)rner
the
know
of
bottom
you
the
i
1
—
selected
key
to
Designer
display:
the
are
canbeseen
display.
line
go
in
of
_
2
a
to
BO
the
the
1
i)
—
—
P-memory,
the
programming
is
active.
now
10
programming
in
the
display
-
top
you
II
_
press
The
edit
right
can
the
message
.1
screen
see
EJ
l
S
screen.
as
hand
the
—
8119!
—
e
selected
ordinates
next
of
the
Creative
the
press the
display:,,
the
Now
you
Creative
the
points,the
the
edge
‘
—
P-memory.
are
in
the
stitch
Designer
“edit/1”
creative
turn
must
Designer.
magnifier
programming
of
to
[i
The
middle
entered
be
is
key,
machine
the
Before
slide
horizontal
and
is
connected
not
the
message
designer?
entering
(5)
must
field
the
on
off
(9).
and
stitch
the
and
be
vertical
number
right.
you
and
appears
connect
stitch
the
slid
along
co
If
in
I
motif
point
that
on
by
sure
to
in
+“
the
the
the
each
of
the
stitched.>
be
number
and
the
can
stitch
sheet
individual
key
+“
sequence
machine.
every
point
be
now
elect
amming
nfirm
“mem
e
e
logical
3th
so
ie
d
)int
of
points
with
on
The
time
shows
programmed.
adjustable
the
stitch
CD.
the
corresponding
(Interruptions
stitch
the
you
Be
number
“mem
pro
the
and
slide
pressing
maintain
to
sewing
the
motif
a
progresses
pres
key
is
stitch
next
will
a1
73
Page 79

display
I
[
L
After
your
you
that
wing
appears
the
In
on
and
have
having
pattern,
are
machine
in
top
the
been
1
entered
press”edit/
now
is
display:
the
P-pattern
P1
on
line
right
entered
3
2
of
all
sewing
in
the
to
ready
9,0
you
left
the
the number
The
(23).
the
sew
3,0
4
stitch
and
screen.The
and
see
will
stitches
of
selected
>j
51
points
you
the
23
0
P-pattern
P-memory
:iii
l
of
will
see
se
message
which
rn.}
81
on
is
(P1)
mm)
(9.0
middle
(0).
Important:
sewing
the
key.
and
machine
programming
the
and
on
No
of
left
the
the
patterns
is
without
[cIear
the
length
right
switched
bottom
(3.0
you
will
will
pressing
be
off
line,
mm)
see
saved
during
the
are
the
if
or
the”ed
width
the
in
balance
the
after
it!
L
1..
L
L
The
The
The
if
than
74
the
width,
pattern
sewing
distance
mm.
6
length
adjusts
machine
between
L
[
j
i
61
altered.
:0
I7
8
01
0
21
to
adds
13
balance
new
fit
the
stitches
stitchesislonger
two
1
and
0
4151
still
can
values.
automatically
lB
be
:9
W
0
9
[ckear
Page 80
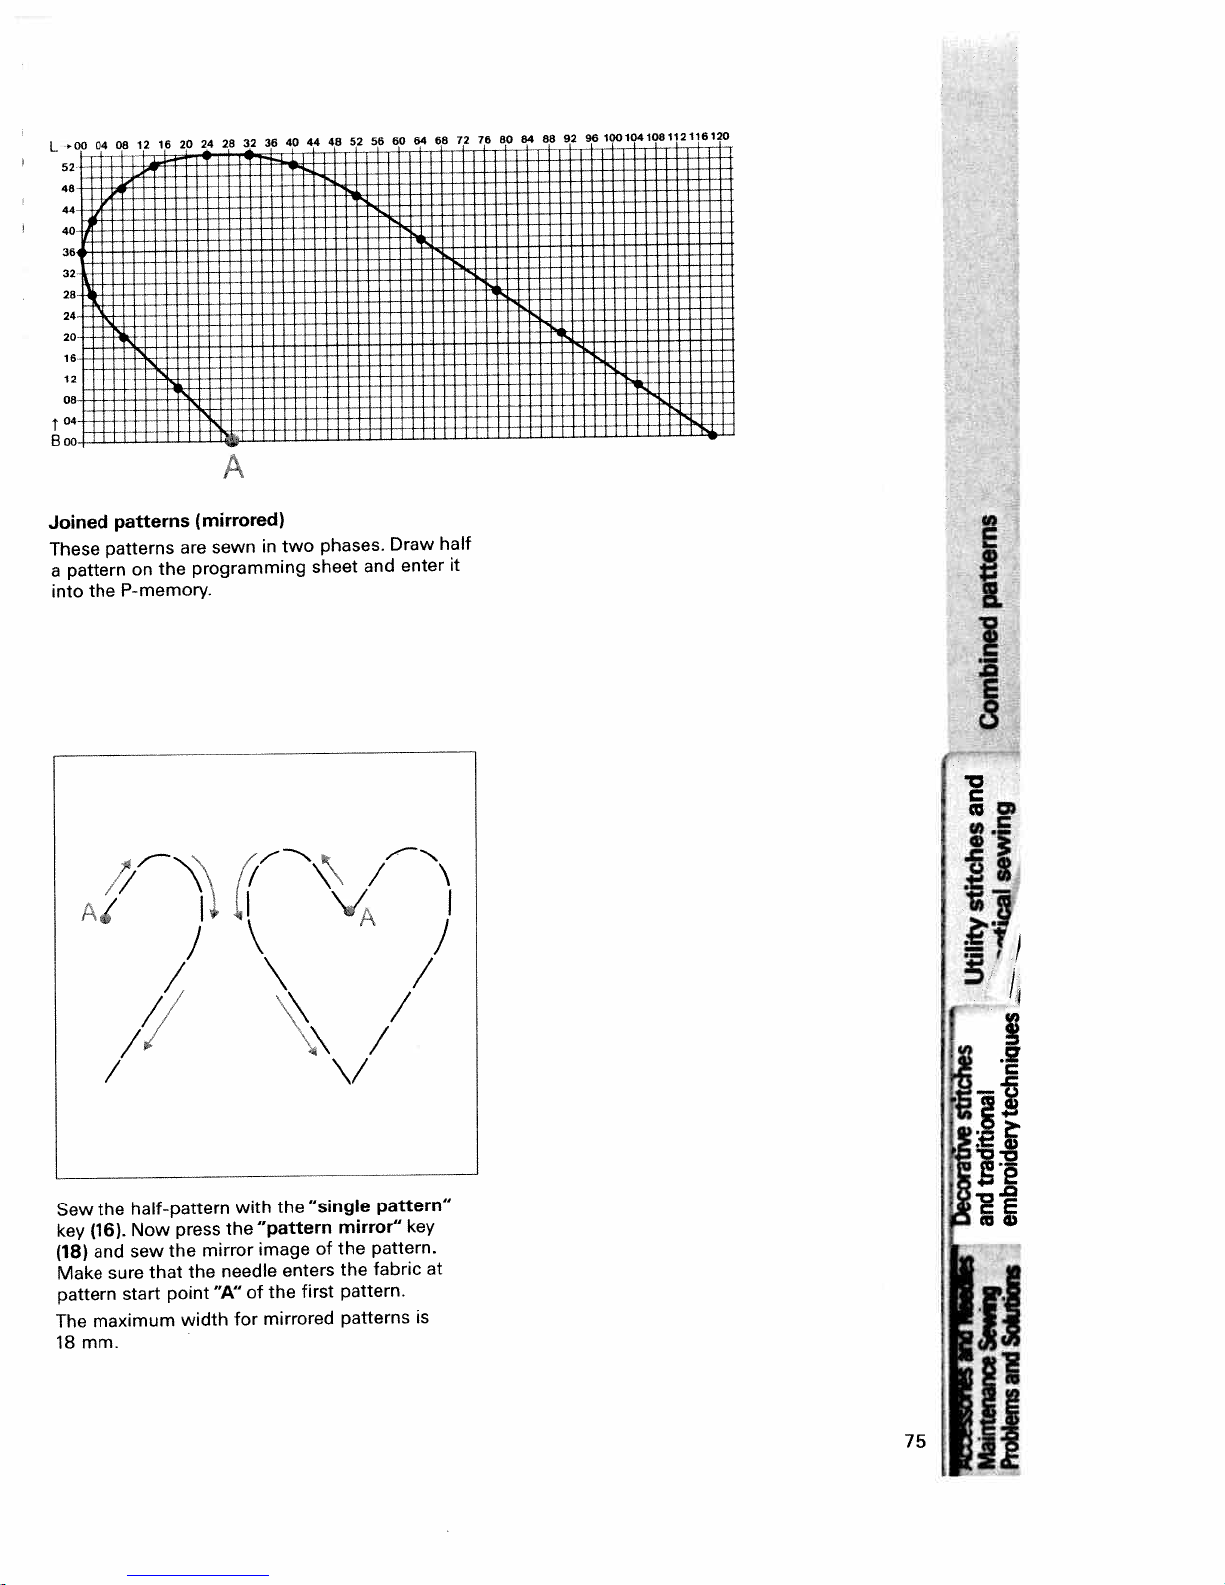
____________________
00
L
10812116120
100104
96
92
88
84
80
76
72
68
64
60
56
52
48
44
40
36
28
32
24
20
16
12
04
08
Boo
Joined
These
pattern
a
into
patterns
the
hi
/
patterns
the
on
P-memory.
7N\\
/
/
ni
(mirrored)
sewn
are
programming
,/\\
1,41
half
and
Draw
enter
it
phases.
two
in
sheet
£
I
0
C
/‘
V
t1
/
I
/
/
“single
the
press
the
width
with
the
mirror
needle
“A”
for
“pattern
image
the
of
mirrored
of
enters
first
half-pattern
the
Sew
Now
(16).
key
and
(18)
Make
pattern
The
maximum
mm.
18
sure
start
sew
the
that
point
pattern”
mirror”
pattern.
the
fabric
the
pattern.
patterns
key
4
at
is
*
II
Page 81

cD
LI
:
tt:
.
*•-•
i:
•
•.I.I•
T.
••
I
-
1-I
Joined
is
It
more
two
together
4)
Decide
each
patterns
possible
than
more
or
upon
individual
1L
ii:
in
design
to
P-memory
one
programming
draw
and
and
mark
programming
two
wider
your
a
more
or
for
sheets
design
pattern
11!Hil1
P-memories
patterns
design.
the
(in
on
start
sheet.
by
our
the
“A”
:IL
iHiHI
using
Tape
example
grid.
for
Ensure
in
one
bottom>.
the
that
direction
:1
sewing
our
(in
-4
machine
example
only
from
has
top
[I
sew
to
to
[
I
L
76
Page 82

ii
j’Ht
ft
It
p
I
•
I
t
4
stitch
second
IU
the
pattern
P-memory.
(number
the
UI
eparate
iave
eparate
rogramming
y
narks
)rogramming
he
H
I1
programming
sections.
sheet
of
the
end
sheet.
P-memory
and
the
FE
I
sheets
Enter
Start
at
point
enter
pattern
pattern
Enter
beginning
if
section
the
p
so
that
section
each
“A”ofthe
the
pattern
necessary).
on
second
hereatpoint
FE
you
in
a
right
stitch
“E”
each
section
in
“A”
same
also.
way.
Enter
the
rest
H
H
f
of
the
sections
in
the
Ii
I
1/
i!I
jI
77
ii
Page 83
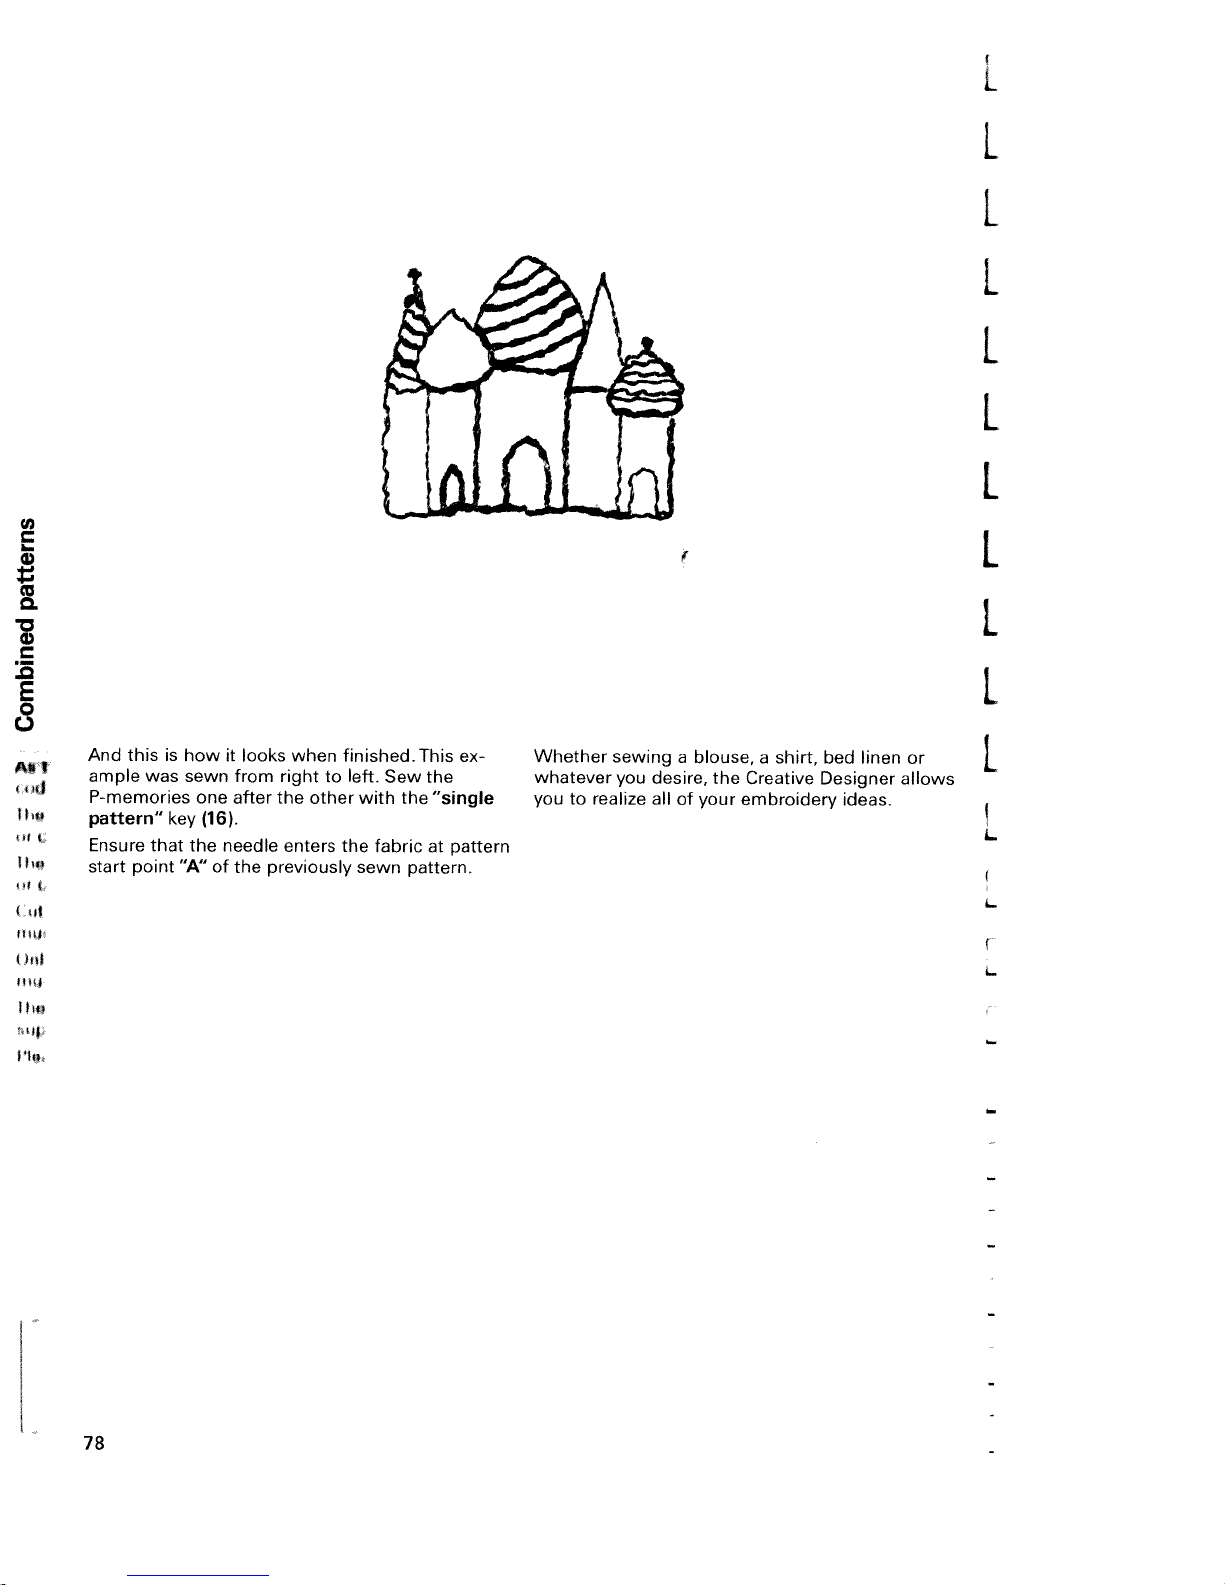
L
L
1
L
L
L
L
L
L
“I
lift
t
(
Ihs
f
>d
“Li
I.
this
And
ample
was
P-memories
pattern”
Ensure
start
that
point
is
key
how
sewn
one
the
“A”
(16).
of
it
looks
from
after
needle
the
when
right
to
the
other
enters
previously
finished.
left.
Sew
with
the
fabric
sewn
This
the
the
“single
at
pattern.
ex
pattern
Whether
whatever
to
you
sewing
you
realize
a
desire,
all
of
blouse,
the
your
shirt,
a
Creative
embroidery
linen
bed
Designer
ideas.
or
allows
L
L
L
L
4-
78
Page 84
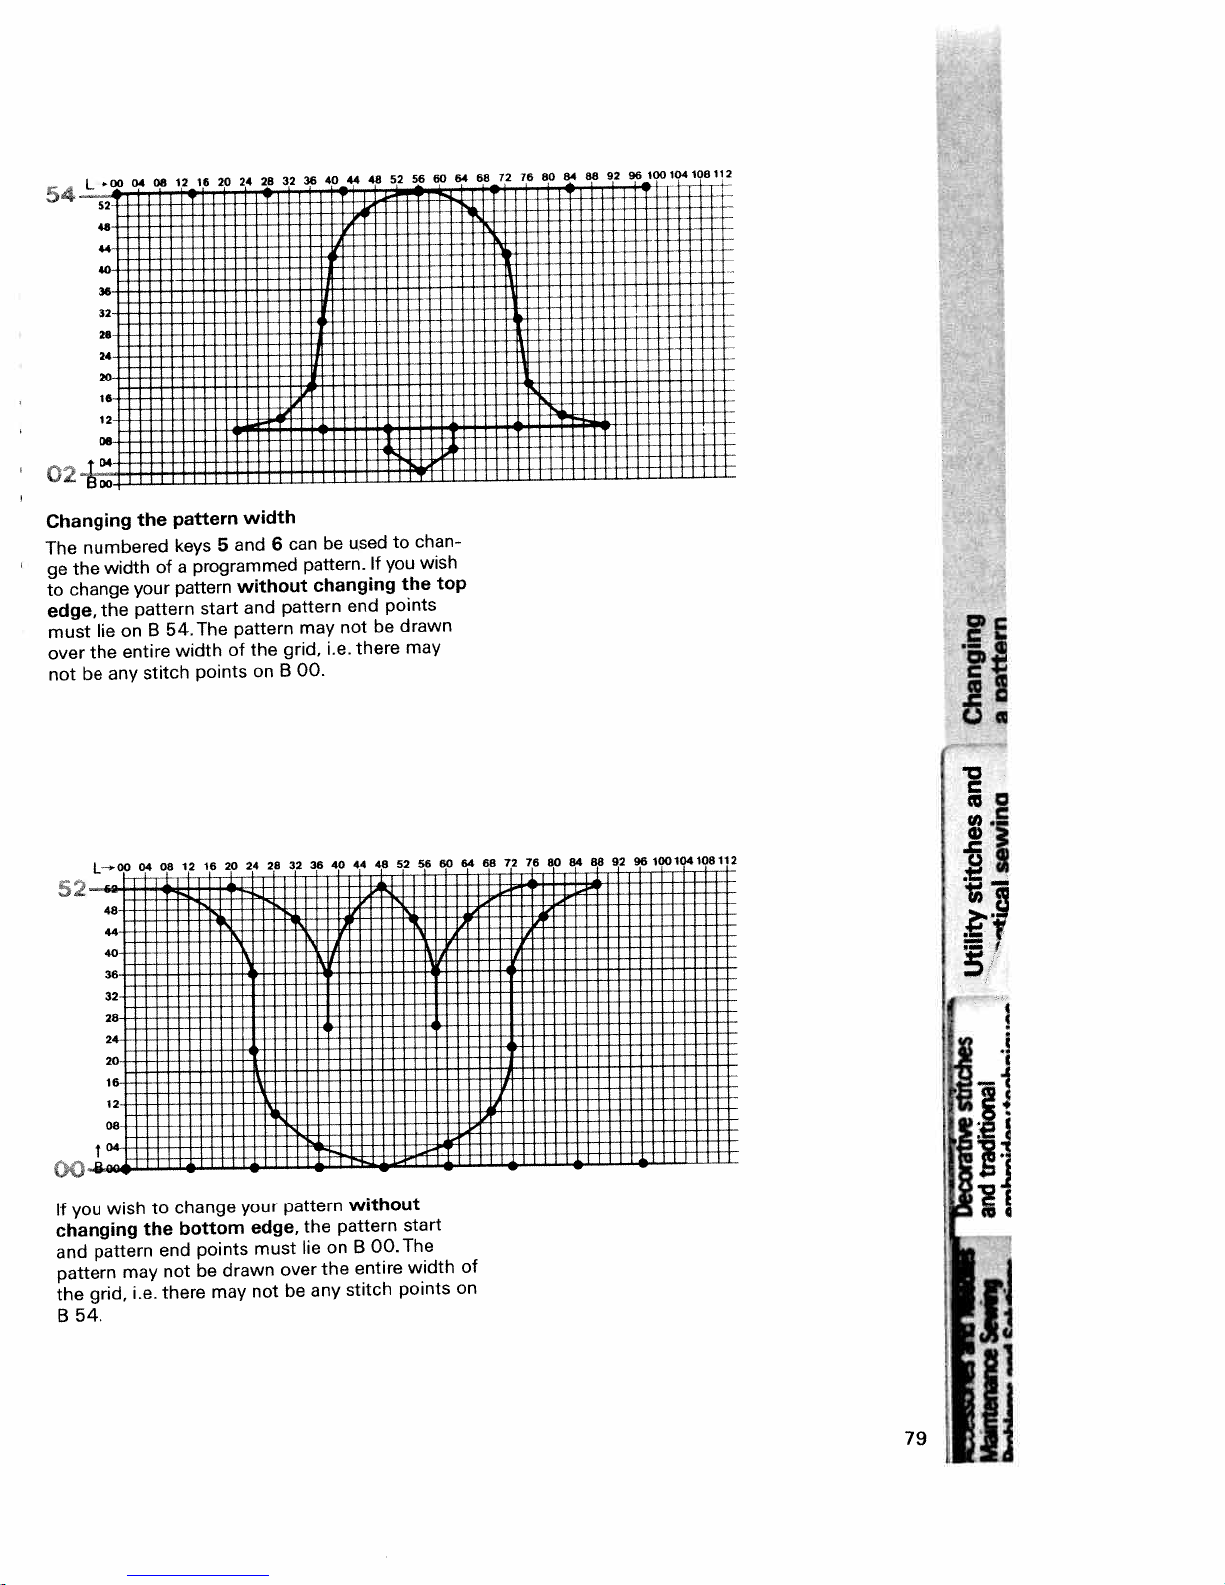
Changing
numbered
The
the
ge
change
to
edge,
lie
must
the
over
be
not
L—oo
2
S
you
If
changing
pattern
and
pattern
grid,
the
54.
B
width
the
on
entire
any
-
40
36
32
28
24
20
16
12
08
04
wish
the
your
pattern
B
stitch
04
the
may
i.e.
of
54.
08
to
end
not
there
pattern
keys
a
pattern
width
12
change
bottom
width
6
and
5
programmed
without
and
start
pattern
The
the
of
on
points
drawn
may
28
your
edge,
must
not
162024
points
be
can
pattern.
changing
pattern
may
grid,
00.
B
36
32
pattern
the
lie
over
any
be
be
not
i.e.
40
pattern
on
the
used
If
you
points
end
be
there
48
44
without
00.
B
entire
stitch
chan
to
the
drawn
may
52
start
The
width
points
wish
top
56
C
I!
gO
100104108112
96
88
92
84
76
80
72
64
68
60
ii
of
on
.1
11
Page 85
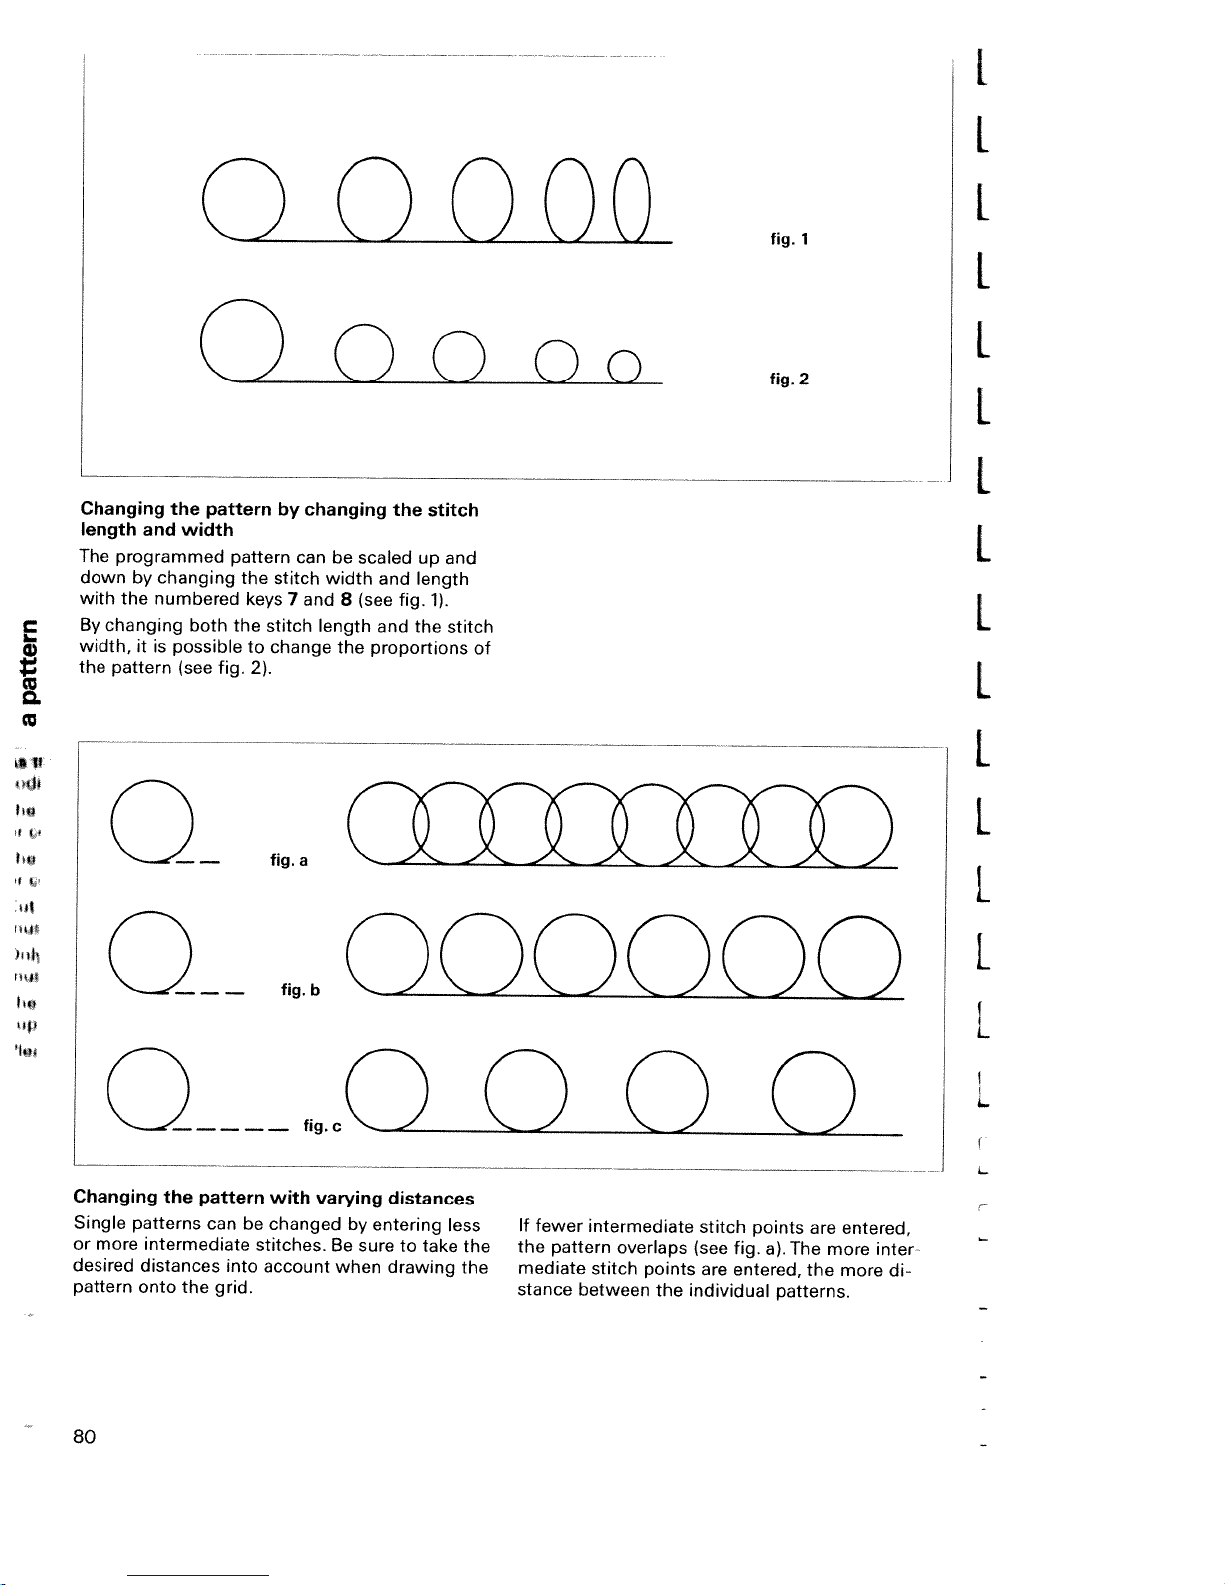
[
[
Changing
length
The
programmed
down
with
the
changing
By
width,
the
pattern
the
and
by
changing
numbered
it
is
00000
00000
pattern
width
both
possible
(see
fig.
pattern
the
the
keys
to
2).
by
can
stitch
7
stitch
change
changing
be
width
and
8
length
the
the
scaled
and
(see
fig.
and
proportions
stitch
up
length
1).
the
and
stitch
L
1
fig.
L.
fig.
2
I
L
L
of
L
L
0
Changing
Single
or
more
desired
pattern
—
the
pattern
patterns
intermediate
distances
onto
the
can
grid.
into
fig.
with
changed
be
stitches.
account
a
fig.b
000000
less
the
the
0
If
the
mediate
stance
fI9CO
varying
by
Be
when
distances
entering
sure
drawing
to
take
fewer
pattern
0
intermediate
overlaps
stitch
points
between
the
stitch
(see
fig.
are
entered,
individual
0
points
a).The
patterns.
are
the
entered,
more
more
L
L
L
L
inter
di
80
Page 86
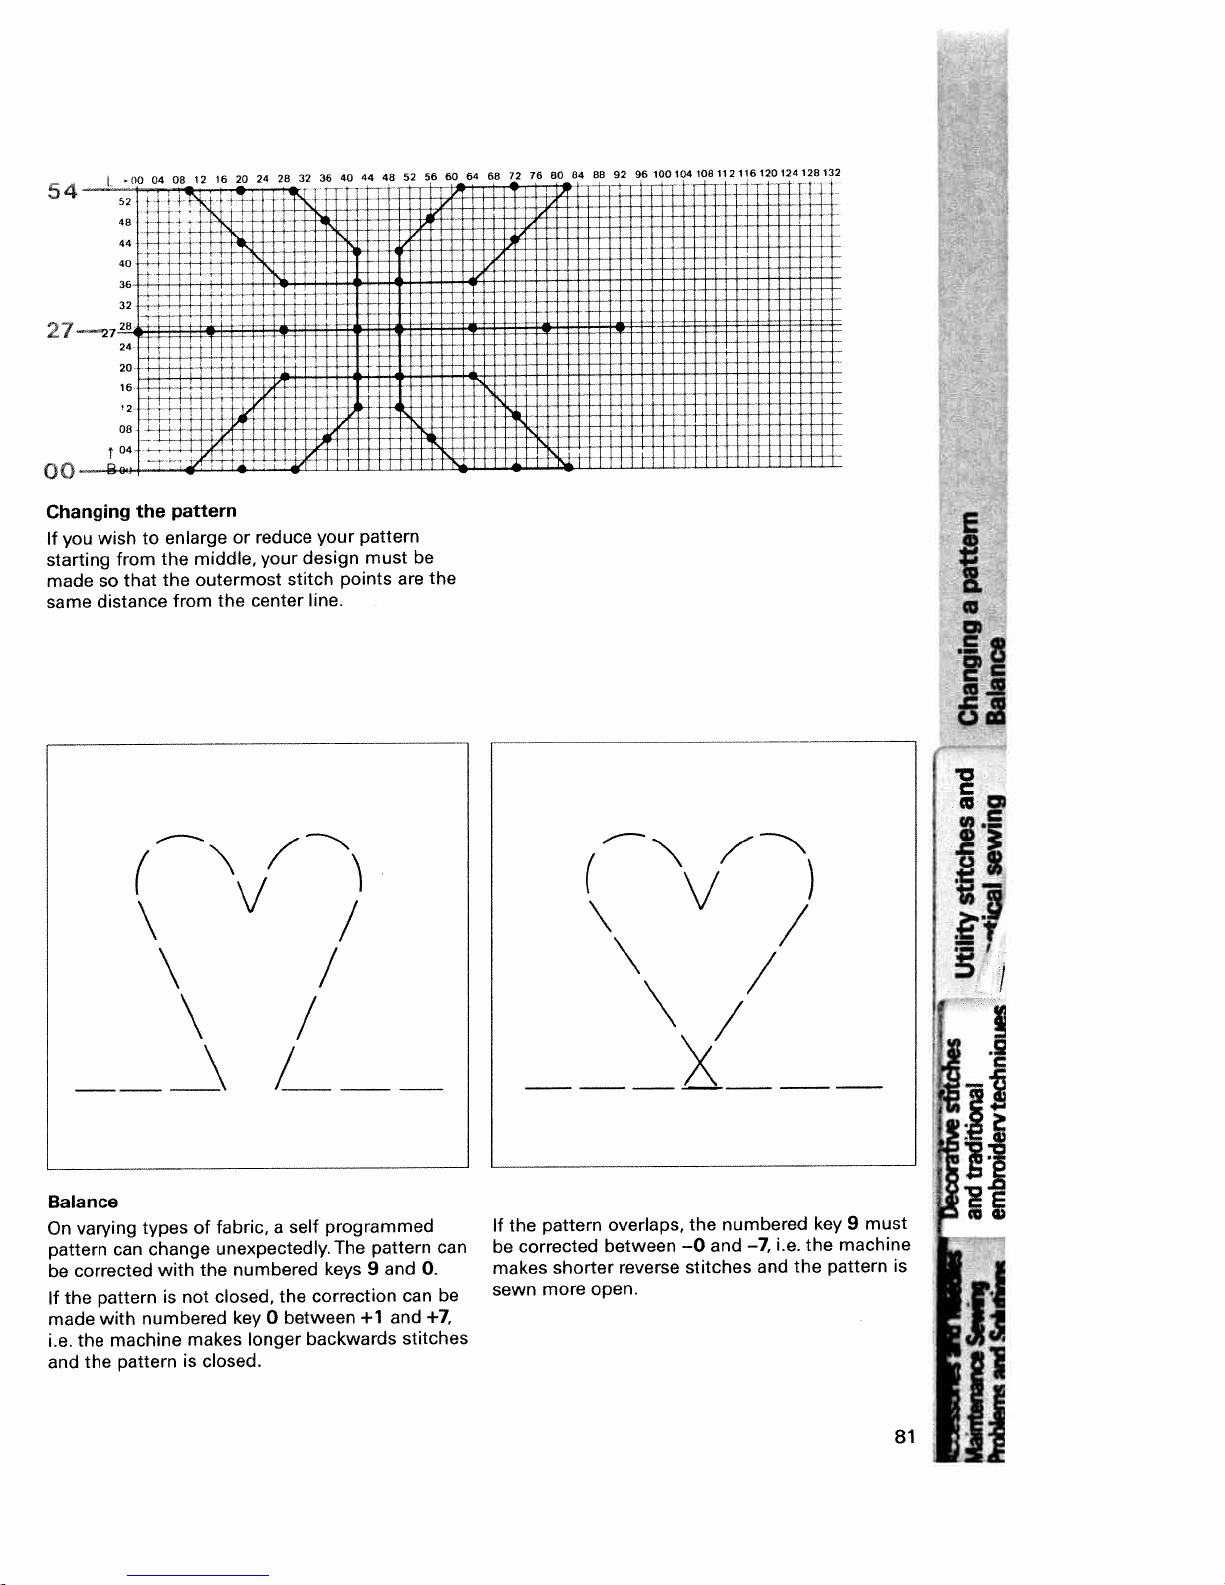
27
Changing
wish
you
If
starting
so
made
distance
same
I
32
from
.00
21
that
the
to
04
08
pattern
enlarge
the
the
from
20
16
12
or
middle,
outermost
the
center
28
24
reduce
your
stitch
32 36
your
design
line.
_
40 44
pattern
points
48 52
must
are
be
56
the
100104108112116120124128132
96
92
84 88
76
80
72
68
64
60
t
(I
——\
Balance
varying
On
corrected
pattern
the
with
the
the
can
machine
pattern
pattern
be
If
made
i.e.
and
\
\
of
types
change
with
is
not
numbered
makes
is
N
\/
fabric,
unexpectedly.
numbered
the
closed,
key
0
longer
closed.
/
/
self
a
the
between
backwards
“I
/
/
programmed
pattern
The
9
keys
correction
+1
and
can
and
stitches
0.
+7,
can
be
the pattern
If
corrected
be
makes
more
sewn
(V/)
shorter
open.
overlaps,
between
reverse
/
the
and
—o
stitches
numbered
—7
i.e.
and
the
key
the
9
machine
pattern
must
4
U
F
I
—:
ii
is
I’
81
ii
Page 87
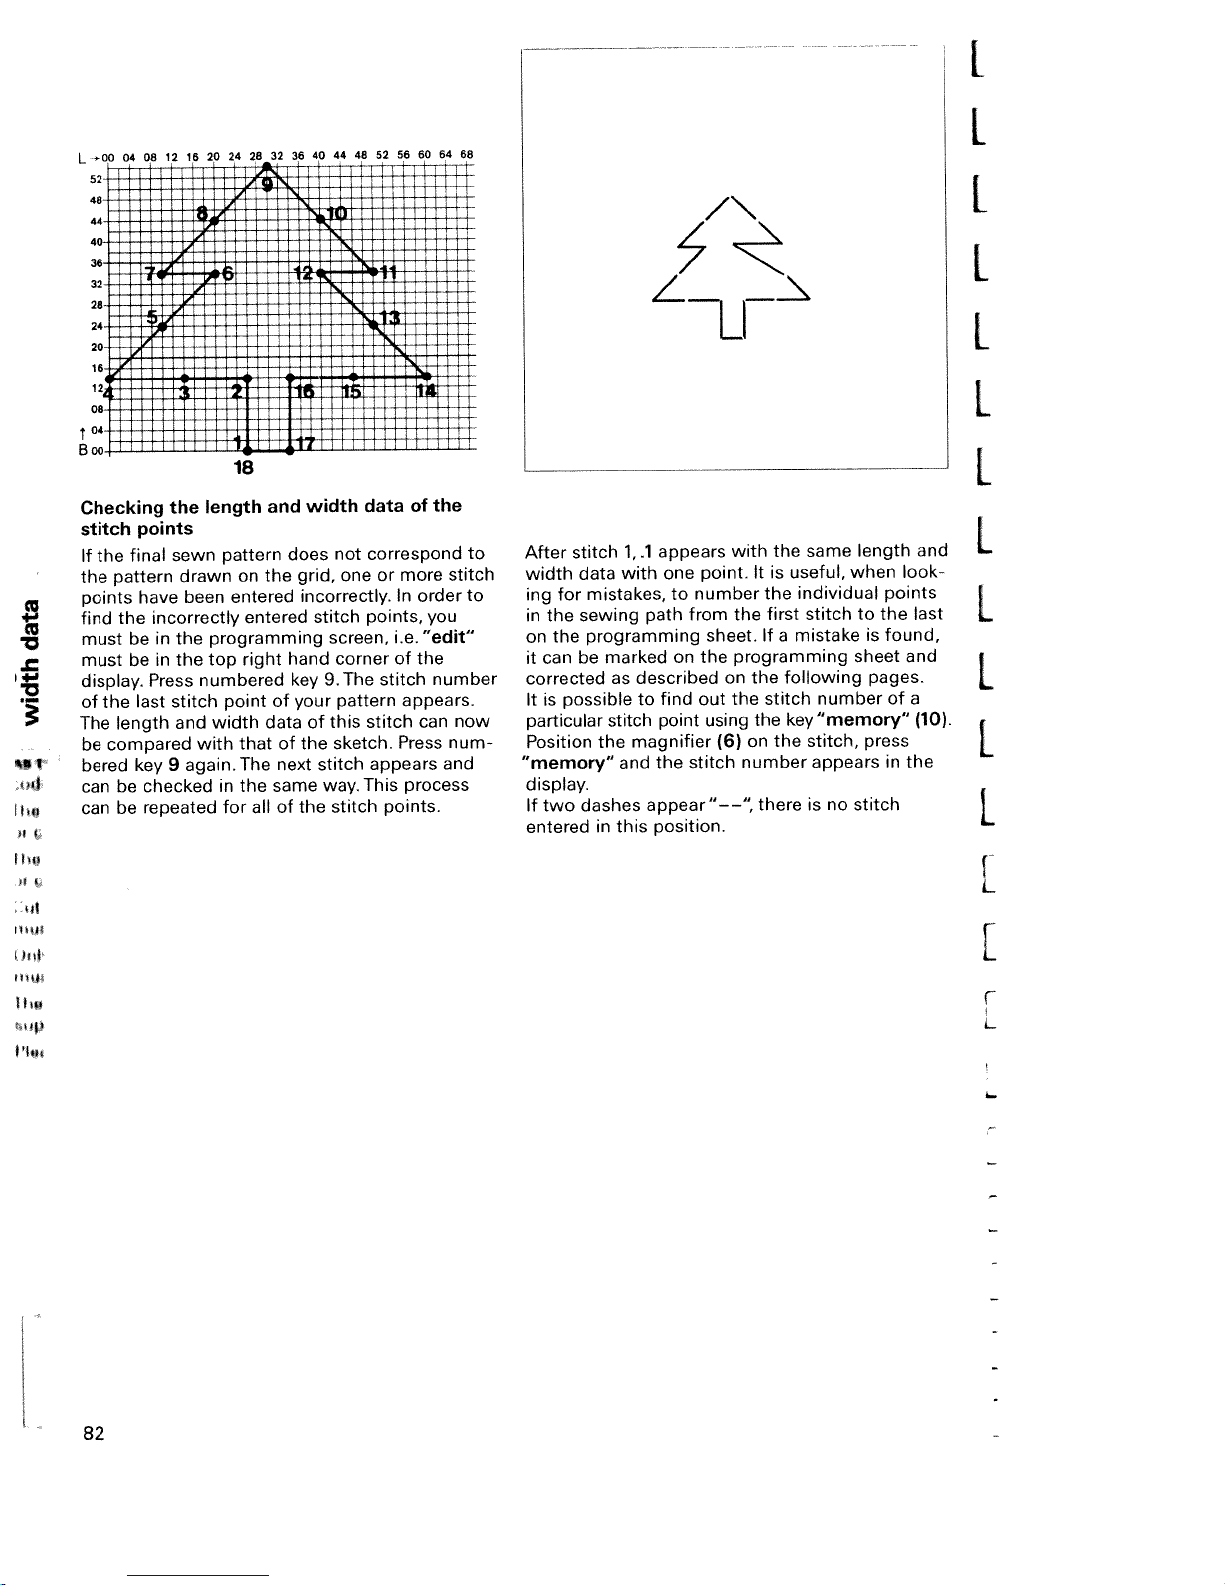
_
I
.00
04 06
L
52
48
44
40
36
32
28
24
20
16
08
04
Boo
Checking
stitch
If
the
the
pattern
points
the
find
must
must
display.
of
the
length
The
compared
be
bered
be
can
be
can
12
the
points
final
have
incorrectly
in
be
in
be
Press
last
key
9
checked
repeated
20
16
length
pattern
sewn
drawn
been
programming
the
top
the
numbered
stitch
width
and
with
again.The
in
for
24
26
18
on
entered
entered
right
point
that
the
allofthe
32
•
.__L
and
the
of
data
next
same
36
does
grid,
hand
key
your
of
44
48 52
40
—
LL
data
width
correspond
not
one
incorrectly.
points,
stitch
screen,
corner
9.The
pattern
stitch
of
this
sketch.
the
appears
stitch
This
way.
stitch
56
more
or
In
i.e.
of
stitch
appears.
Press
points.
64 68
60
of
the
order
you
“edit”
the
number
can
and
process
to
stitch
to
now
num
stitch
After
data
width
ing
for
sewing
in
the
on
the
be
it
can
corrected
possible
It
is
particular
Position
“memory”
display.
dashes
If
two
entered
appears
1,
.1
one
with
mistakes,
programming
marked
as
stitch
the
in
to
path
described
find
to
point
magnifier
and
the
appear”——’
this
position.
/
7
number
from
on
stitch
point.
the
out
/\
with
It
the
sheet,
programming
on
the
the
the
using
(6)onthe
number
there
same
the
useful,
is
individual
the
first
stitch
mistake
If
a
following
number
stitch
key”memory”
stitch,
appears
is
no
length
when
to
is
sheet
pages.
press
stitch
look
points
the
found,
and
of
a
in
the
and
last
(10).
L
L
L
L
L
L
L
L
I
1
L
82
L.
F
Page 88
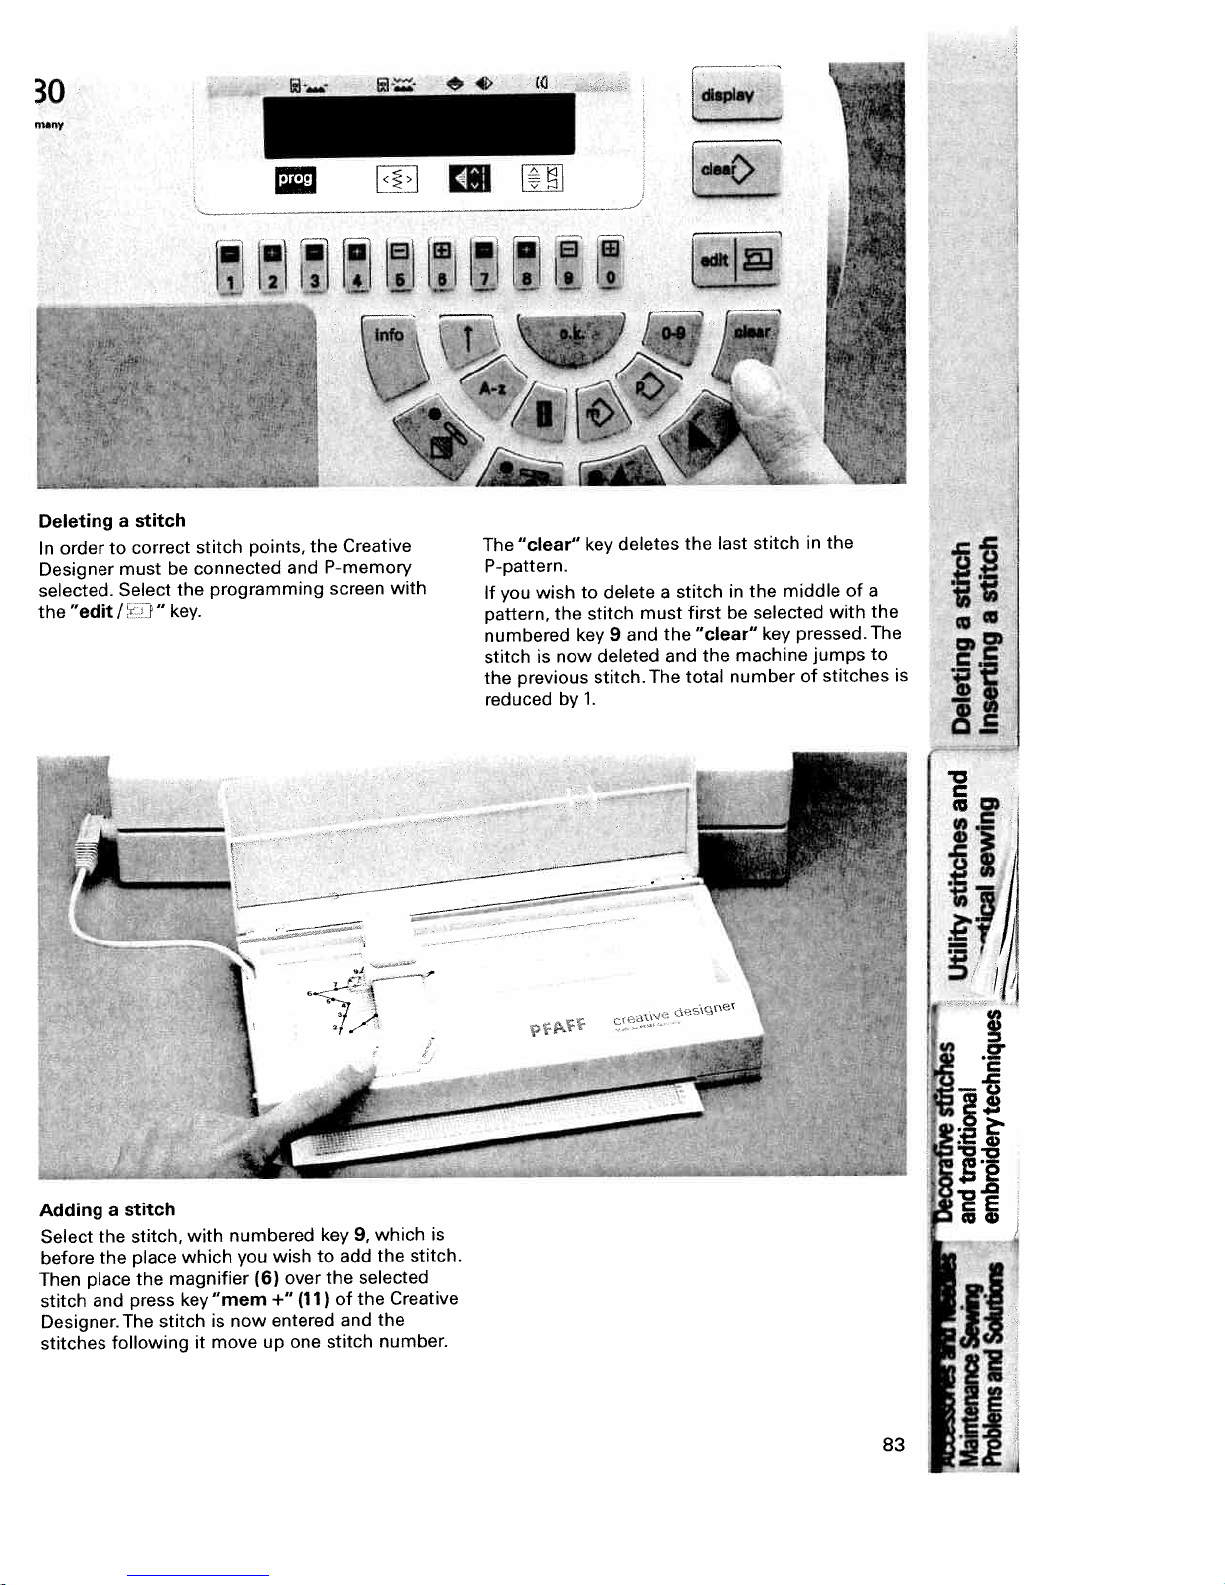
30
many
Idy
Deleting
order
In
Designer
selected.
the
“edit!
a
to
must
Select
stitch
correct
r
“
stitch
connected
be
programming
the
key.
=
points,
ljJ
the
and
B
0
£
Creative
P-memory
screen
L
with
W
,!J
iJ
The
P-pattern.
you
If
pattern,
numbered
stitch
the
reduced
“clear”
wish
the
now
is
previous
by
W
deletes
key
delete
to
stitch
key
9
deleted
stitch.The
1.
and
must
a
the
and
L1
the
stitch
first
“clear”
the
total
i4
last
in
be
machine
number
rr
stitch
middle
the
selected
key
the
in
with
pressed.
jumps
stitches
of
of
a
the
The
to
H
mN
is
Adding
Select
before
place
Then
stitch
Designer.
stitches
stitch
a
the
the
press
and
The
following
stitch,
place
the
stitch
with
which
magnifier
“mem
key
is
moveupone
it
numbered
wish
you
over
(6)
+“
entered
now
(11)
key
to
the
stitch
9,
add
of
and
which
the
selected
Creative
the
the
number.
is
stitch.
1
J
C
m0
u,.C
tdt
ji
LI
83
It
Page 89
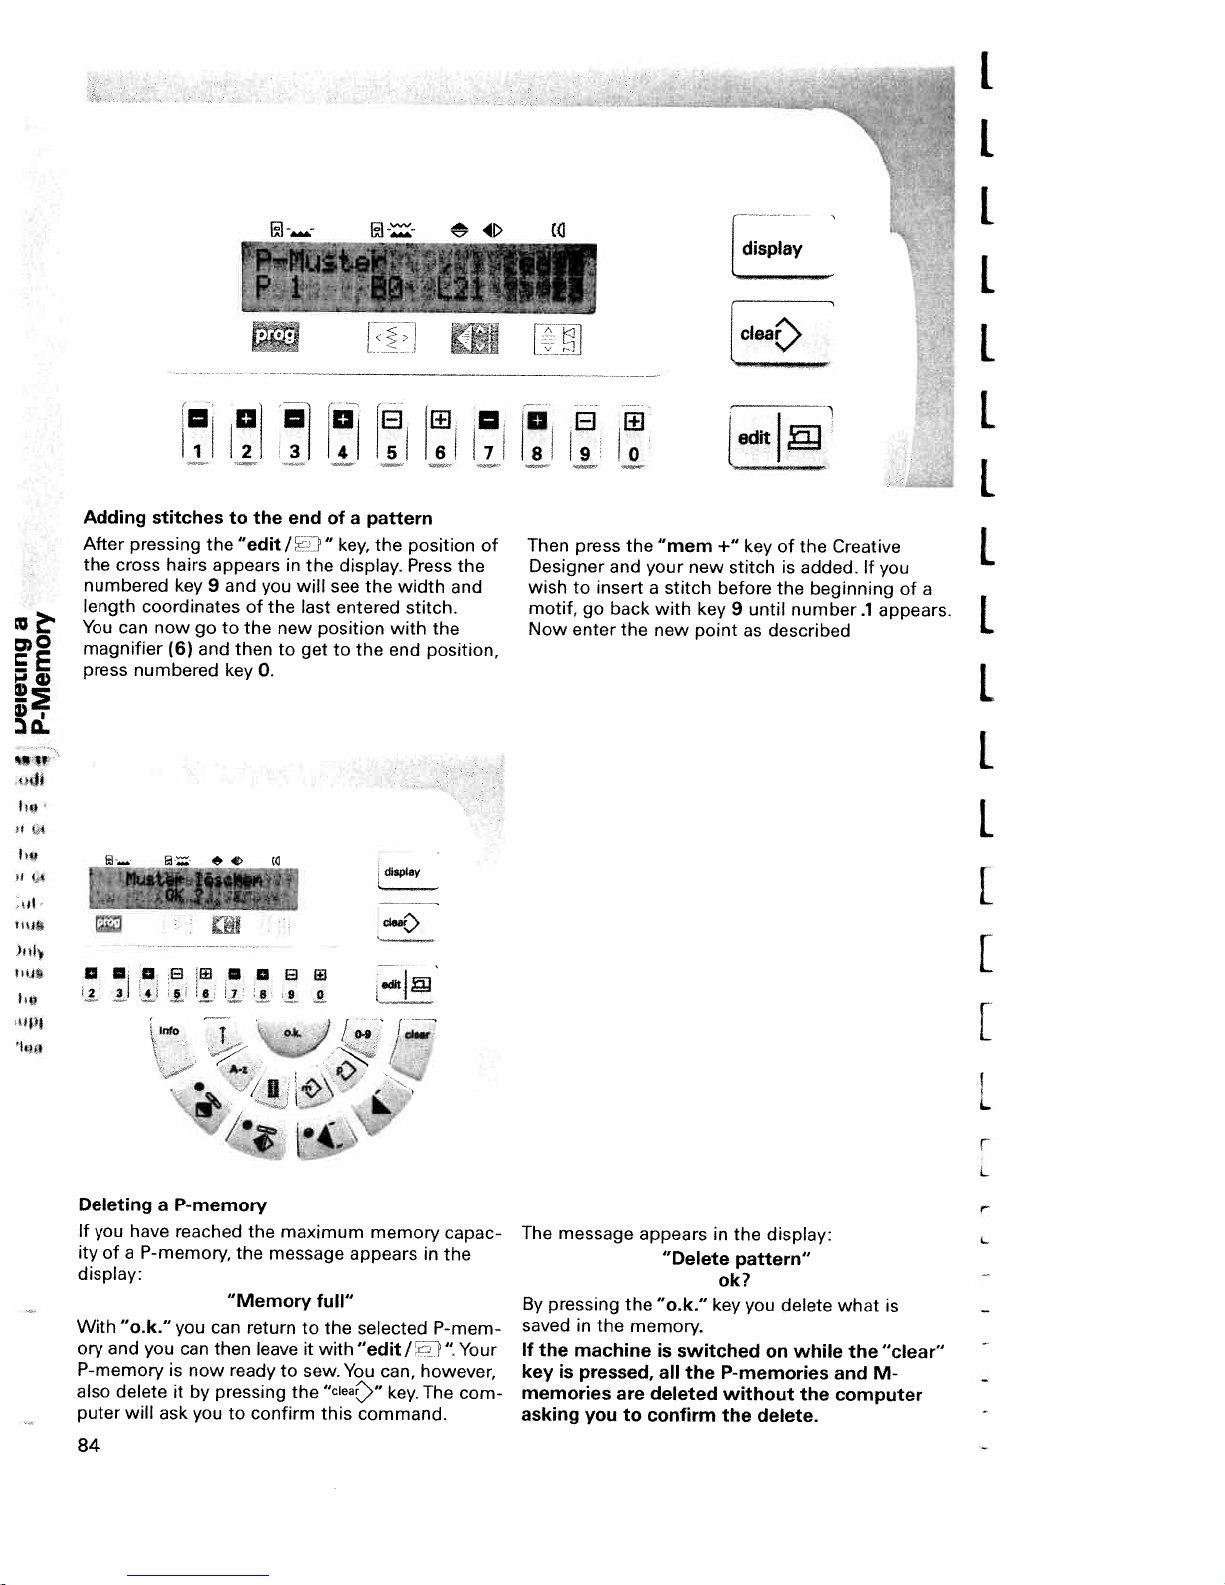
splay
clear
[
[
I
1.
I
7,
Adding
After
pressing
the
cross
numbered
length
You
can
magnifier
numbered
press
2
3
UflBWU8W
1
stitches
the
hairs
appears
key
9
coordinates
now
go
and
(6)
-
._2*
4
6
5
and
to
key
to
“edit
then
7
2
of
the
the
0.
8
you
the
3
end
/
in
new
to
9
1”
the
will
last
position
get
0
4
of
a
key,
display.
see
entered
to
the
5
pattern
the
the
width
with
end
dispy
iøt1
6
position
Press
stitch.
the
position.
the
and
7
of
8
Then
press
Designer
to insert
wish
motif,
Now
enter
I..
9
0
“mem
new
stitch
+“
before
key
point
key
stitch
until
9
as
of
the
is
added.
the
beginning
number
described
Creative
If
you
appears.
.1
L
of
a
I
go
the
and
back
the
your
a
with
new
I
II
info
T
ot,I/o4’jd..r
:
•
the
message
return
leave
•_\
maximum
full”
to
the
with
it
to
sew.
“cIear’”
the
this
memory
appears
selected
“edit!
You
can,
key.
command.
/•
Deleting
If
you
ity
of
display:
With
ory
and
P-memory
also
puter
84
a
have
P-memory,
a
“o.k.”
you
delete
will
ask
P-memory
reached
“Memory
you
can
can
then
is
now
it
by
pressing
you
the
ready
to confirm
capac
in
the
P-mem
“.Your
however,
The
com
The
message
By
pressing
in
saved
the
machine
If
key
is
memories
asking
the
the
pressed,
are
you
to
appears
“Delete
“o.k.”
memory.
is
switched
all
deleted
confirm
in
ok?
key
the
P-memories
the
the
pattern”
you
without
delete.
display:
delete
on
while
the
what
is
the
“clear”
M
and
computer
[
L
r
L
L
Page 90

[cieac
ai[ni
—
—
Programming
wish
you
If
pattern
must
M-memory.
the
75).
with
save
pattern
1
12
—
P-memory
combine
to
programs
the
corresponding
the
Select
sequence
an
jJ
your
empty
(in
this
151
4
M-memory
into
programmed
stitch
the
in
P-memory
M-memory
example
83,
61
table,
into
and
150,
1
—
you
an
enter
i’;
l
Existing
selected
pressing
After
appears:
sage
your
Select
P-memories.
i
patterns
with
MI
P0
desired
In
the
the
within
pattern
key”O”,
<83
this
iit1
the
150
9,0
pattern
example
P-memory
selection
the
75
3,0
from
P1.
key”
fol)owing
of
one
can
the
be
0”
mes
E2
0
16
P
coo’
4)
E
êUSE1
14
*
—
length
width,
The
pressing
By
end
the
“o.k.”
pattern
of
the
Ml
P1
L
2
—
and
the
<83
1
—
balance
P-pattern
sequence.
150
9,0
5
—
—
*
altered.
be
still
can
entered
be
will
P1
75
3,0
0
?
—
at
rui
8119
—
—
10
—
[cieae
ii
85
ii
Page 91

A
U
Alphabet
The
four
the
machine
the
code
code
number
letters
contains
(block
/
program
alphabets
numbers
in
script
two
lettering
L!vWXYZ
A
/5
Li
/
11
/
are
alphabets
,
2
/
shown
1
contains
lettering.
and
1
A
/
card
and
1—3
outline).
6
CE
2
/1
A
numbering
on
the
(top
left
upper
The
code
with
varying
4
56789
-
A
/
/J
lists
program
hand
and
lower
number
1
A
i
00
saved
card
corner).
case
lettering
dA
7
2
1D
/11
/
ci0
in
with
The
1
?
/
,
;
2
‘
-
/
1.1
/
,
/
LI
7
,
-
)
0°
V°
1
/
)
L
1
L
The
code
the
cursive
special
M-memory
86
number
lettering.The
characters
or
sewn
3
contains
letters,
can
be
individually.
a
entered
further
numbers
into
alphabet:
and
an
L
1
/
L1.
I.
[1
J
Page 92

e
II
nserting
reative
ee
also
;lide
the
ides.
or
3
ke
care
I
the
>p
cutout
Insert
in
slot
top
the
alphabet
Designer
page
71)
clip
slides
the
(8).
not
to
edge
edge
*,
desired
fold
of
the
of
the
‘
program
7
and
12
alphabet
the
card.
paper
programming
I—
forwards
Slide
slides
cards
on
program
it
upwards
under
area.
p
into
both
the
card
the
the
un
1,
Position
and
the
as
possible
the
adjustable
magnifier
slide
slide
(5)
PAFF
(4)
as
far
to
the
as
far
to
the
right
bottom
11
if’
creative
PAF1
justing
ition
n
cross
clamp
also
the
page
the
left
hairs
the
program
vertical
slide
alphabet
71>
axis
of
the
(12)
to
program
card
in
is
in
magnifier
the
back
such
the
(6).
to
card
a
way
middle
Then
clamp
that
of
slide
the
the
the
the
v
JNIVJdJ
f3V*f
Page 93

a
1
1
Slide
the
corner
the
programming
the
cutout
right
clamp-slide
program
program
in
such
card.
Oq
Vq
71!
card
to
the
a
way
that
field
Creative
7
up
to
Aisparallel
of
the
bottom
the
bottom
Designer.
the
back
to
to
border
the
Then
clamp
right
edge
slide
hand
of
in
of
the
the
J4
1
H
display
r
0
j
1
2
3)4
Connect
turn
M-memory
the
The
88
the
Creative
the
sewing
(see
programming
following
message
Designer
machine
53).
p.
screen.
MO
aa
on.
Press
Then
appears
7,0
(see
Select
“editI
press
in
0
,
p.
your
the
5
69)
f”
key
display:
desired
to
“A-z”.
6
and
go
to
7
0
8
As
soon
message
8
9
I
fo
as
you
appears
move
Select
cIear
[edit
the
magnifier
in
the
display:
program
-CDPROG
card
slide,
the
Page 94

Now
slide
programming
hairs
ming
hand
above
6
field.
side
the
The
of
the
magnifier
field
9.
the
code
code
bottom
slide
Position
number
number
line
along
5
the
of
appears
of
the
the
magnifier
program
the
on
display.
edge
the
of
cross-
left
.0
1
2
—
hen
press
“mem
+“
11
he
following
message
MO
1
CD
of
the
appears
PROG
4
-
Creative
in
1
—
the
5
6
—
Designer.
display:
7
8
19
—
—
Your
selected
of
the
display.
the
right
The
letters,
programming
are
now
sequence.
of
at
your
0
M-memory
The
PROG.
CD
numbers
field
disposal
El!
code
number
and
belonging
for
appears
special
to
entering
in
the
is
now
characters
the
code
your
top
also
number
pattern
line
to
of
ii!
-O
‘
the
P1
89
iI
Page 95

Creating
Creative
Example:
Position
letter
(in
11
key
now
saved
this
procedure
can
always
a
Designer
Pfaff
the
this
on
the
pattern
magnifier
example
Creative
and
appears
for
deleted
be
sequence
cross-hairs
P)
Designer.
the
other
with
and
in
press
the
letters.
the
with
over
the
The
display.
The
“clear”
the
the
“mem
letter
Repeat
key.
last
first
P
letter
d
After
having
“edit!
be
+“
is
sewn
“key.
with
entered
Now
the
“single
your
text,
the
programmed
pattern”
press
the
key.
text
can
I
H
H
El
r
:
lo
1
121
Combining
sewing
The
programs
numbered
gramming
number
hairs
“mem
magnifier
Press
90
machine
177.
over
+“
“mem
the
row
fields
Position
number
key
over
+“
card
00—179
on
1—3.
on
the
the
once
programs
are
the
left
Enter
the
1
in
Designer.
7
and
again
31
entered
hand
magnifier
the
press
for
row
and
4
with
with
side
example,
and
Then
“mem
the
lI
5
those
the
of
the
cross-
press
position
+“
pattern
Ij
61
pattern
the
twice.
of
the
vertical
pro
the
will
7
8
be
saved
sired
text
Press
“edit
sequence
key.
When
display
number.
place
a0in
in
the
pattern
and
program
P”
/
once
by
entering
automatically
For
the
programs
front
of
and
you
engaging
programs
places
the
[editj
sequence.
177
as
can
the
20
a
up
to
number.
Enter
described
sew
the
single
to
99,
0infront
19,
you
the
above.
pattern
pattern
the
of
the
must
de
Page 96
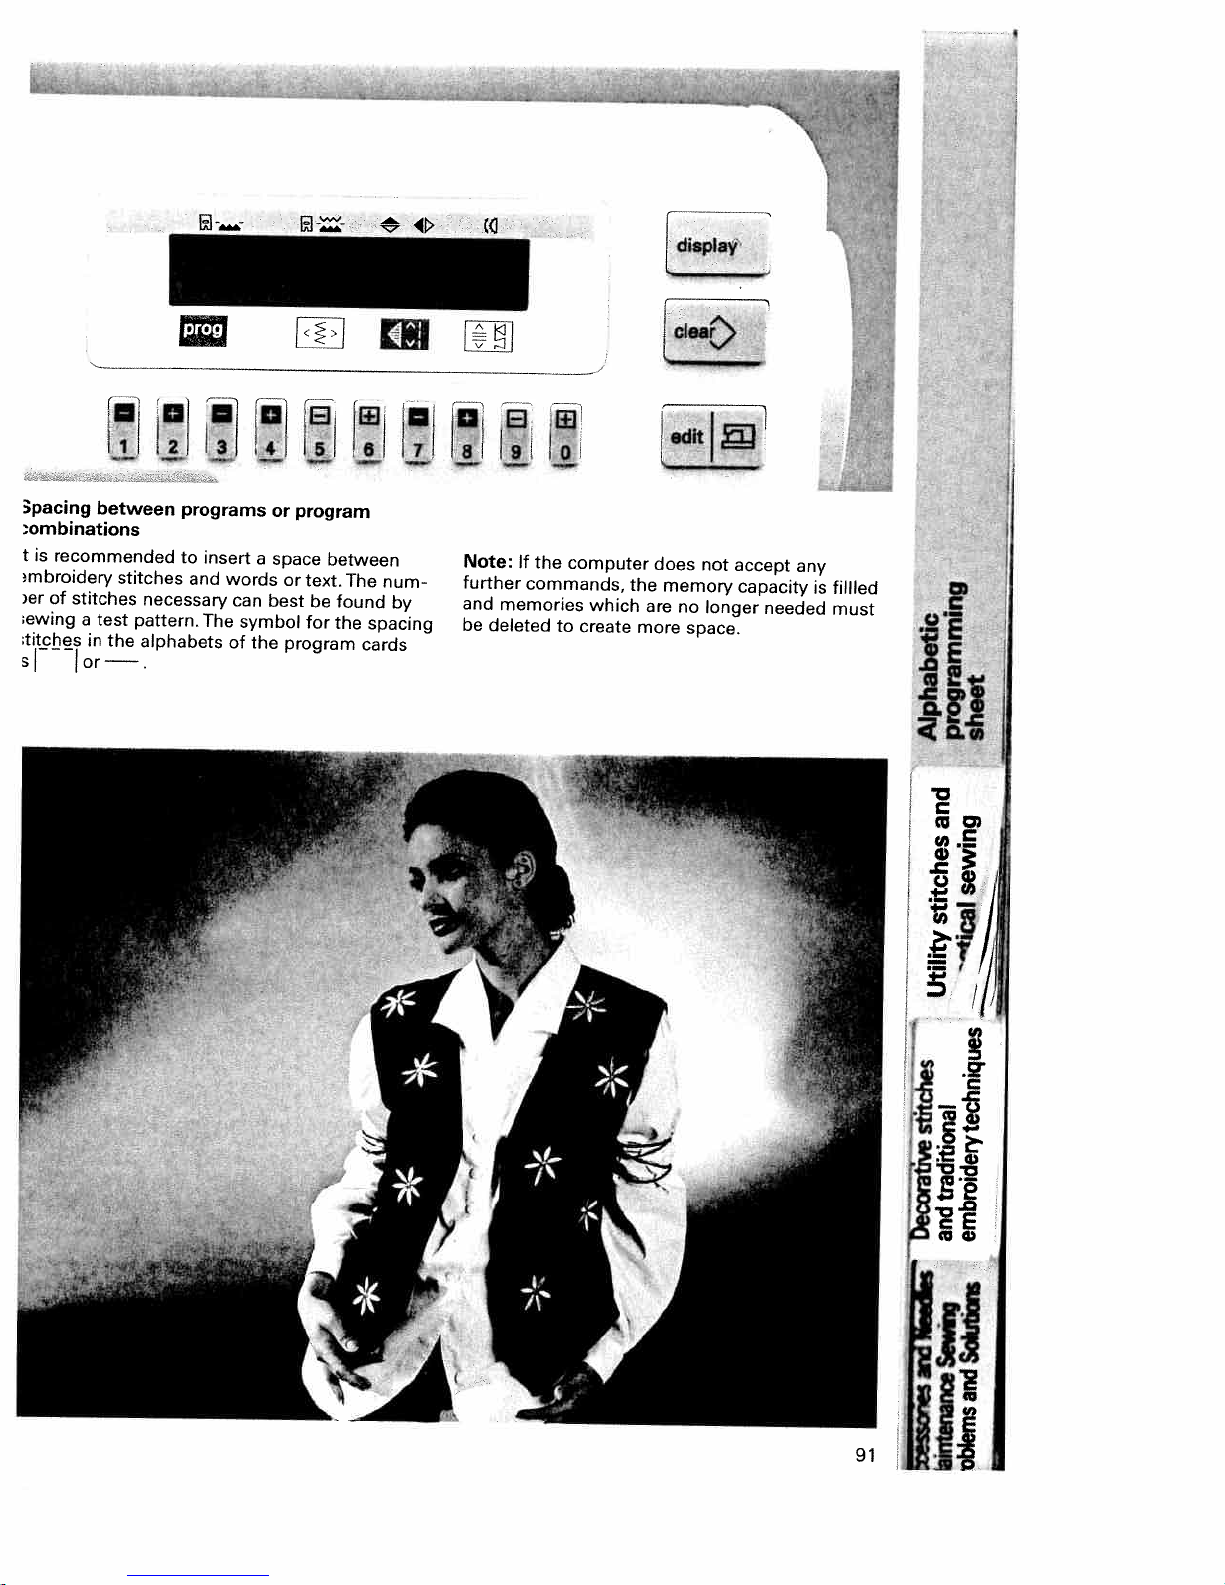
IIJ12iI3jH6ll7ll8L9i!
—
—
—
3pacing
ombinations
t
is
mbroidery
er
;ewing
titches
si
between
recommended
of
stitches
a
test
in
br—.
stitches
necessary
pattern.The
the
alphabets
programs
to
insert
and
words
can
of
or
a
space
best
symbol
the
program
between
or
text.
be
for
program
The
found
the
cards
num
by
spacing
Note:
further
and
be
deleted
If
the
commands,
memories
to
computer
which
create
the
more
does
memory
are
no
space.
not
longer
accept
capacity
needed
any
is
fillled
must
S
,
E
III
cnt
i9
91
ii
ij
Page 97

—
—
E”
—
F’
—
r
—
r—
—
r—
r—’
•Ab
r
r
— — —
r-i
—
r
—
—
Page 98
—.
Cl)
CD—‘0
p.
IC,
CA)
-
CD
.Cn
CD)
d
techniques
stitches
rtiona
tra
an
embroidery
Decorative
Solutions
and
Qblems
0
A)
aintenan
Page 99
.
—
r—r—
— —
— —
—
!
r-.-r-r—r—
—
r—r——r—r—
Page 100

Contents
I
Utility
Elastic
Overlock
Flatlock
Buttonholes
Trouble
Hem
Gathering
Smocking
Darning
Sewing
Roll
Lace
Shell
stitches
stitches
shooting
with
in
hemming
trimmings
edging
stitches
stitches
twin
zippers
needle
Pages
Pages
Page
Pages
Pages
Page
Page
Pages
Page
Pages
Pages
Page
Page
Page
96—102
103—107
105
106,
107
108—119
120
21
1
122,
123
124
100,
125,
127,
128
129
30
1
131
126
11
I
I
4”
Hi’
44
95
i1
 Loading...