


PFAFF
coverlock
4872
I
‘F
U
U
482
coe10Ck
PFAFF
Instruction
Manual

N

Parts
of
the
coverlock
4872
10
11
12
13
14
15
16
17
18
19
20
21
22
1
2
3
4
5
6
7
8
9
23
24
Upper
Upper
Carry
Thread
Thread
Thread
cover
Tension
needle-thread
needle-thread
handle
tension/upper
tension/lower
tension/two
stich
keys
display
LCD
sewing
for
Slide
Tension
Program
release
selection
MemorykeyM
Memory
Looper
Blade
Looper
Standard
Needle
Swivel
selection
cover
guard
disengaging
presser
plate
plate
Adjusting
Seam
Needle
Sewing
width
holder
light
Adjusting
looper
+
knob
viewing
cover
knob
and
key
for
for
thread
—
speed
keys
key
foot
seam
the
tension
tension
looper
looper
chainstitch
pre-selecfion
and
EE
P
lever
width
window
pressure
thread
thread
e
foot
looper!
pressure
25
26
27
28
29
30
31
32
33
34
35
36
37
Upper
Lower
overedge
overedge
Swiveling
Two-thread
Threading
cover
stitch
Movable
Fixed
Clamp
Needle
lower
spring
plate
Handwheel
Tweezers
Converter
Allen
key
stitch
chainstitch
for
aid
looper
upper
blade
for
disengaging
for
looper
looper
width
two
the
blade
serging
lowering
latch
looper
thread
thread
the
lever
upper
chainstitch
chains
blade
looper!

For
pease
easier
f&d
Safety
the
For
eads
The
terminal
wires
The
following
Blue:
the
As
may
your
in
The
terminal
The
terminal
Cut-off
immediately.
of
pletely.
Only
according
with
The
covers
agencies.
Please
understanding
this
out
ru’es
Kingdom
United
must
to
nor
the
in
code:
Neutral
of
colors
correspond
not
wire
wire
plug
plug,
which
which
which
which
mains
spare
A
3
to
corresponding
the
must
are
also
proceed
plugs
BS
available
observe
the
and
definitely
plug
a
mains
Brown:
wires
the
with
colored
is
marked
is
colored
is
marked
is
are
Defective
fuses
1362
never
from
the
of
only
with
lead
follows:
as
definitely
must
and
color
used
be
general
this
bst
be
not
three
are
Live
the
in
color
the
blue
with
brown
with
mains
be
the
code.
electrical
instruction
page
connected
pins.
colored
mains
coding
must
letter
the
must
letter
the
not
leads
as
used
cover
fuse
without
suppliers
safety
when
according
lead
connected
be
N
be
L
be
to
must
approved
fuse
notes
book
reading.
the
to
this
of
the
of
colored
or
connected
colored
or
used,
be
be
must
cover.
or
on
safety
the
to
appliance
terminals
to
but
replaced
ASTA
by
marked
Spare
PFAFF
the
page
lead
the
black.
the
to
red.
disposed
com
fuse
2.
or
A
3
You
wiN
Important
For
If
•
manufacturer
person
The
•
•
•
•
find
Australia
the
appliance
infirm
Young
play
not
Switch
Before
machine.
the
safety
only
supply
order
in
persons
children
with
or
off
servicing
contents
instructions
is
cord
or
its
avoid
to
not
is
without
should
appliance.
the
unplug
the
on
damaged,
service
a
intended
supervision.
be
machine
the
appliance
page
must
it
agent
hazard.
for
supervised
or
and
4
be
similarly
a
or
by
use
to
when
replacing
5.
replaced
young
ensure
leaving
lamps,
by
qualified
children
they
that
it
unattended.
unplug
the
or
do
the

DANGER
sewing
The
1.
appliance
2.
3.
4.
this
Always
Do
Do
Do
not
not
not
unplug
reach
place
place
V!ARNNG
allow
not
Do
1.
used
only
2.
Only
Never
3.
properly,
ce
mechanical
Never
4.
openings
dust
Never
5.
Do
6.
7.
Do
administered.
To
8.
9.
blocked.
10.
11.
12.
13.
14.
15.
16.
17.
Please
by
use
use
the
to
and
not
not
disconnect,
Never
not
Do
Keep
machine
Always
not
Do
not
Do
Switch
such
etc.
Always
ting,
manual.
Hold
also
or
this
attachments
operate
if
nearest
operate
of
loose
drop
use
operate
operate
unplug
fingers
needle.
use
use
pull
the
threading
as
unplug
when
or
plug
observe
To
reduce
machine
from
before
a
for
store
or
or
in
To
be
to
children.
near
sewing
this
been
has
it
authorized
adjustment.
the
sewing
the
cloth.
insert
or
of
out
where
turn
on
by
away
proper
the
or
bent
push
or
sewing
sewing
making
rewinding
when
the
mportant
For
This
HOLD
wing
Read
the
should
electric
the
relamping.
sewing
sewing
a
into
drop
reduce
used
machine
recommended
sewing
dropped
sewing
anything
doors.
aerosol
controls
all
soft
a
pulling
from
needle
blunt
fabric
machine
needle,
any
general
the
sewing
risk
never
machine
water
the
toy.
a
as
machine
dealer
machine
machine
surface
on
moving
all
needles.
while
off
changing
machine
other
into
United
use
basic
instructions
all
of
outlet
machine
risk
Great
for
or
and
into
(spray)
to
such
cord.
plate.
stitching.
(“0”)
from
user
cord
safety
machine
only.
safety
electric
left
be
immediately
Replace
that
other
or
burns,
of
intended
its
by
it
if
damaged,
service
or
with
foot
any
products
off
(“0”)
as
unplug,
To
parts.
The
Only
when
needle,
servicing
reel.
notes
safety
States
When
precautions
shock:
unattended
bulb
has
where
liquid.
care
the
has
any
control
opening.
position,
bed
a
Special
wrong
use
It
electric
the
Do
on
only
designed
is
use
you
before
after
same
with
into
fallen
can
it
electric
fire,
necessary
is
purpose
manufacturer
damaged
a
or
dropped
center
openings
air
free
being
are
couch
or
the
hold
care
plate
needles
deflect
may
threading
outlet
adjustments
allow
not
Page
any
2.
making
instructions
manufactured
and
electric
an
should
using
when
using
type
water.
or
tall
shock,
when
described
as
as
cord
into
examination,
for
blocked.
from
used
remove
then
where
plug,
is
required
cause
can
recommended
the
adjustments
bobbin,
when
plug
always
sewing
this
plugged
and
rated
Unplug
pulled
be
or
this
contained
or
water.
the
or
the
not
needle,
oi
removing
mentioned
whip
to
appliance,
before
injury
plug,
accumulation
where
plug
the
around
the
changing
be
machine.
Always
in.
Watts.
5
immediately.
into
to
sewing
this
in
in
itisnot
if
Return
repair,
ventilation
Keep
oxygen
from
openings
air
cord.
needle
the
by
causing
the
in
covers,
in
when
HOUSE
for
follo
the
adhered
unplug
cleaning.
or
tub
a
persons:
machine
manual.
manual.
this
working
applian
the
electrical
lint,
of
is
socket.
may
sewing
the
break.
to
manufacturer.
break.
to
it
needle
presser
lubrica
instruction
the
rewinding.
to:
sink.
is
or
being
be
area,
foot,
KEEP
THESE
1NSTRUC11ONS
N
A
SAFE
PLACE

Notes
Notes
according
The
1.
tion
movement
observe
When
2.
tenance
ical
nect
by
wall
The
3.
the
The
4.
adjusted
The
5.
according
fication
Do
6.
the
Do
7.
there
—
its
—
it
—
can
brought
Do
8.
socket
If
9.
pose
operated,
for
10.To
open
inside
repair.
of
11.Be
The
12.
on
safety
on
EN
to
must
user
regard
with
the
leaving
work
or
parts
machine
the
unplugging
outlet.
maximum
sewing
tension
by
machine
plate.
place
not
machine.
use
not
is
function
wet,
is
occur
into
pull
not
by
appliance
this
than
damage
any
avoid
the
the
This
qualified
our
to
sure
machine
safety
domestic
for
60335-2-28
exercise
the
of
sewing
the
or
accessories,
the
permissible
lamp
the
of
PFAFF
a
must
the
to
any
sewing
the
visible
is
with
e.g.
when
warm
a
the
cord.
its
that
cannot
we
risk
the
machine.
machine
the
is
use
is
the
to
needle
area
machine,
when
from
lead
watts.
5
is
belt
mechanic.
be
indications
objects
damage,
defective,
condensation
cold
a
room.
mains
used
is
intended
caused.
electric
of
There
which
exclusive
service
original
only
designated
sewing
IEC
or
adequate
up
and
during
changing
always
the
cord
drive
into
put
in
machine
machine
plug
for
or
accept
are
staff.
machines
335-2-28.
and-down
constantly
work.
during
mechan
discon
power
main
from
wattage
must
operation
the
on
openings
if:
is
of
out
another
is
it
if
liability
any
shock,
no
user
the
responsibility
PFAFF
a
for
cau
main
the
for
only
speci
on
which
the
pur
wrongly
do
parts
can
parts.
mains
be
not
supply
and
10
%
When
13.
outer
the
nically
85°
to
up
therefore
is
damage,
avoid
Environment
recommended
The
Ambient
(40°
Humidity
Storage
+
The
but
vicinity
radios,
etc.
C)
140°
machine
it
This
temperature
20
temperature
F
)60°
should
of
televisions,
machine
nic-mechanical
supervised
operated
dust,
to:
ted
sunlight,
permit
be
even
corrosive
kept
objects,
To
must
and
Treatment
Always
make
machine
Cleaning
Housing
the
clean
To
cloth
soft
stubborn
any
paraffin.
or
hol
Notel
Please
use
Never
such
petrol
as
housing.
the
an
with
a
rated
a
properly,
used
components
controlled
C.
not
to
%
C).
is
not
electronic
use
such
in
severe
static
adequate
unblocked
surface.
sure
knocking
by
display:
and
housing,
which
dirt,
insecticides
nominal
frequency
foot
Constant
permitted
environment
50°
%.
80
-
insensitive
used
be
appliances
PCs,
high
is
a
appliance,
home.lt
the
in
a
way
dampness,
electricity,
chemicals
ventilation
not
free
is
use
or
(gas)
voltage
temperature
the
a
of
control
use
F
(10°
F
13°
1-
to
the
in
radio
quality
is
it
that
t
heat-producing
or
and
damage
to
dropping
or
a
dry,
use
lint.
of
soft
a
chemical
or
chemic,tls
thin
+1—
of
4%.
of
+1—
non-electro
can
low
a
at
in
order
is:
104
to
C)
to
25°
C)
interference,
direct
such
as
transmitters,
electro
machine
a
should
subjec
is
not
direct
liquids.
machine
the
on
used
your
st.
clean
remuv”
To
with
cloth
products
reach
speed
to
be
firm
a
ml
.1
to
of
°F
for
cle

Simpe,
Congratulations!
coverlock
PFAFF
as
you
certainly
is
to
make
you
help
now
that
and
and
this
now
find
have
dealer.
will
technology,
instruction
take
manual
full
or
let’s
hours
product
new
stride
Your
design
use
If
instruction
It
way
and
If
PFAFF
any
So
enjoyable
ideas!
up4odate
have
You
provides
can
4872
through
sew
coverlock
of
bit
a
nothing
well
time
what
just
out
of
further
is
happy
started
creating
all
use
any
He
advice.
get
bought
unique
take
features
and
manual
time
spent,
your
its
questions,
to
We
I
your
sewing
advantages.
any
thick
the
just
is
it
to
is
study
to
go
can
since
machine
features.
of
be
wish
very
highquality
a
material
thin
and
very
as
follow.
the
wrong.
it
just
service
you
own
is
ask
many
Your
for
latest
easy
the
can
fashion
in
your
with
its
you.
in
to
only
do
3

Contents
Accessories
Accessories,
Accessory
Adjusting
Changing
spring
Clamp
Cleaning
thread
Cone
Converter,
stitch,
Cover
Differential
Differential
Electrical
Electrical
Error
control,
Foot
functions
Key
Language,
Display
LCD
bulb
Light
Loopercover
Lubricating
Machine
Maintenance
Needle
Needle
Needle
Needle
Needle
Needle
Needle,
Power
Presser
Presser
Presser
Presser
Program
Programmable
Programmable
.
special
box
the
spool
a
machine
the
adapter
attaching
important
feed
feed
connection
power
choice
(sewing
the
cover
holder
inserting
plate
plate,
position
threader
changing
table
foot
foot
foot
foot,
overview
machine
on
setting,
master
connecting
lamp),
machine
tool
disengaging
removing
lifter
pressure
changing
memories,
memories,
to
threaded
a
notes
switch
Prog.
on
changing
changing
lever
deleting
notes
2,
1,
machine
sewing
and
on
3,
all
storing
4
storing
Page
6
68,
6
36,
24
30
65
10
33
51,
38,
42
7
7
44
7
40
41
40
67
8
65
6
65-
13
13
64
64
12
25
13
37
11
10
29
29
69
37
52
39
67
-
48
46
44
44
4

Contents
feet,
Rubber
Safety
Seam
Seam
Seam
Sewing
Sewing
Sewing
cleaning
instructions
adjusting
width
width
viewing
width,
setting
light
cover
probiems
speed
window
and
pre-se(ection
Specifications
disc
5
pooi
holder
Spool
formation
Stitch
Stitch
length
length
Stitch
Stitch
length,
Stitch
programs
width
Stitch
Telescoping
Tension
settings,
Thread chain
Thread
chart
Thread
guide,
Thread
Thread
Thread
net
tension,
unreeling
Threading
adjustment
setting,
adjusting
latch,
thread
cutter
Clip-on
aid
for
correction
changing
programmable
swiveling
guide
changing
setting
disc
the
Threading paths/overview
lower
needle(s)
two
thread
upper
overedge
overedge
Threading the
Threading the
Threading the
Threading
the
Threading,
important
Threading/Thread guides
blade,
blade,
blade,
container
changing
disengaging
securing
Upper
Upper
Upper
Waste
...,.,....,...,...,......................
knob
their
solutions
measures
knob
and
storing
memories,
and
storing
thread
two
chainstitch looper/cover
looper
(yellow>
chainstitch looper cover
looper
(pink)
note
activating
stitch
stitch
looper
looper.
(violet)
...
. .
Page
65
1,
34
34
34
67
70,
29
72
10
7
49
35
42
35
41
32
9
43
30
63
10
9
45
9
19,
26-28
16,
22,
.
18
15
24
14
66
31
35
8
2
71
62
21
17
23
-
21
5

Accessory
the
Open
sing
the
lowing
1
Overlock
no.
2
Thread
Thread
3
Screw
4
Needle
5
Wrench
6
Needle
7
Replacement
8
Clip-on
9
Transparent
10
stitch
Machine
11
Cleaning
12
Edge
13
box
accessory
bottom
accessories
needle
2002
nets
unreeling
driver
threader
inserting
thread
two-thread
and
oil
brush
guide
box56by
the
of
can
(5>
upper
guide
presser
box
be
system
discs
tool
blade
inwards.
found
EL
(5>
foot
(F>
chainstitch
gently
in
X
705,
for
The
the
cover
pres
fol
box:
cat.
lock
Further
following
The
hind
Converter
1
Tweezers
2
Allen
3
Machine
The
from
process
thread
must
41
machine,
attached.
machine.
the
in
behind
accessories
swivel
the
key
cover
machine
dust
is
guide
be
accessory
the
accessories
plate
cover
dirt.
and
finished,
39
pushed
regardless
the
Place
accessories
The
swivel
19:
protects
When
push
together.
to
of
cover
or
box
plate.
be
can
the
sewing
the
telescoping
the
spool
The
extent
full
its
whether
the
over
should
compartments
found
machine
stand
into
spool
a
stored
be
be
the
is
6
I
(/____•S\
1I1!II!!IIII
/
III11I1
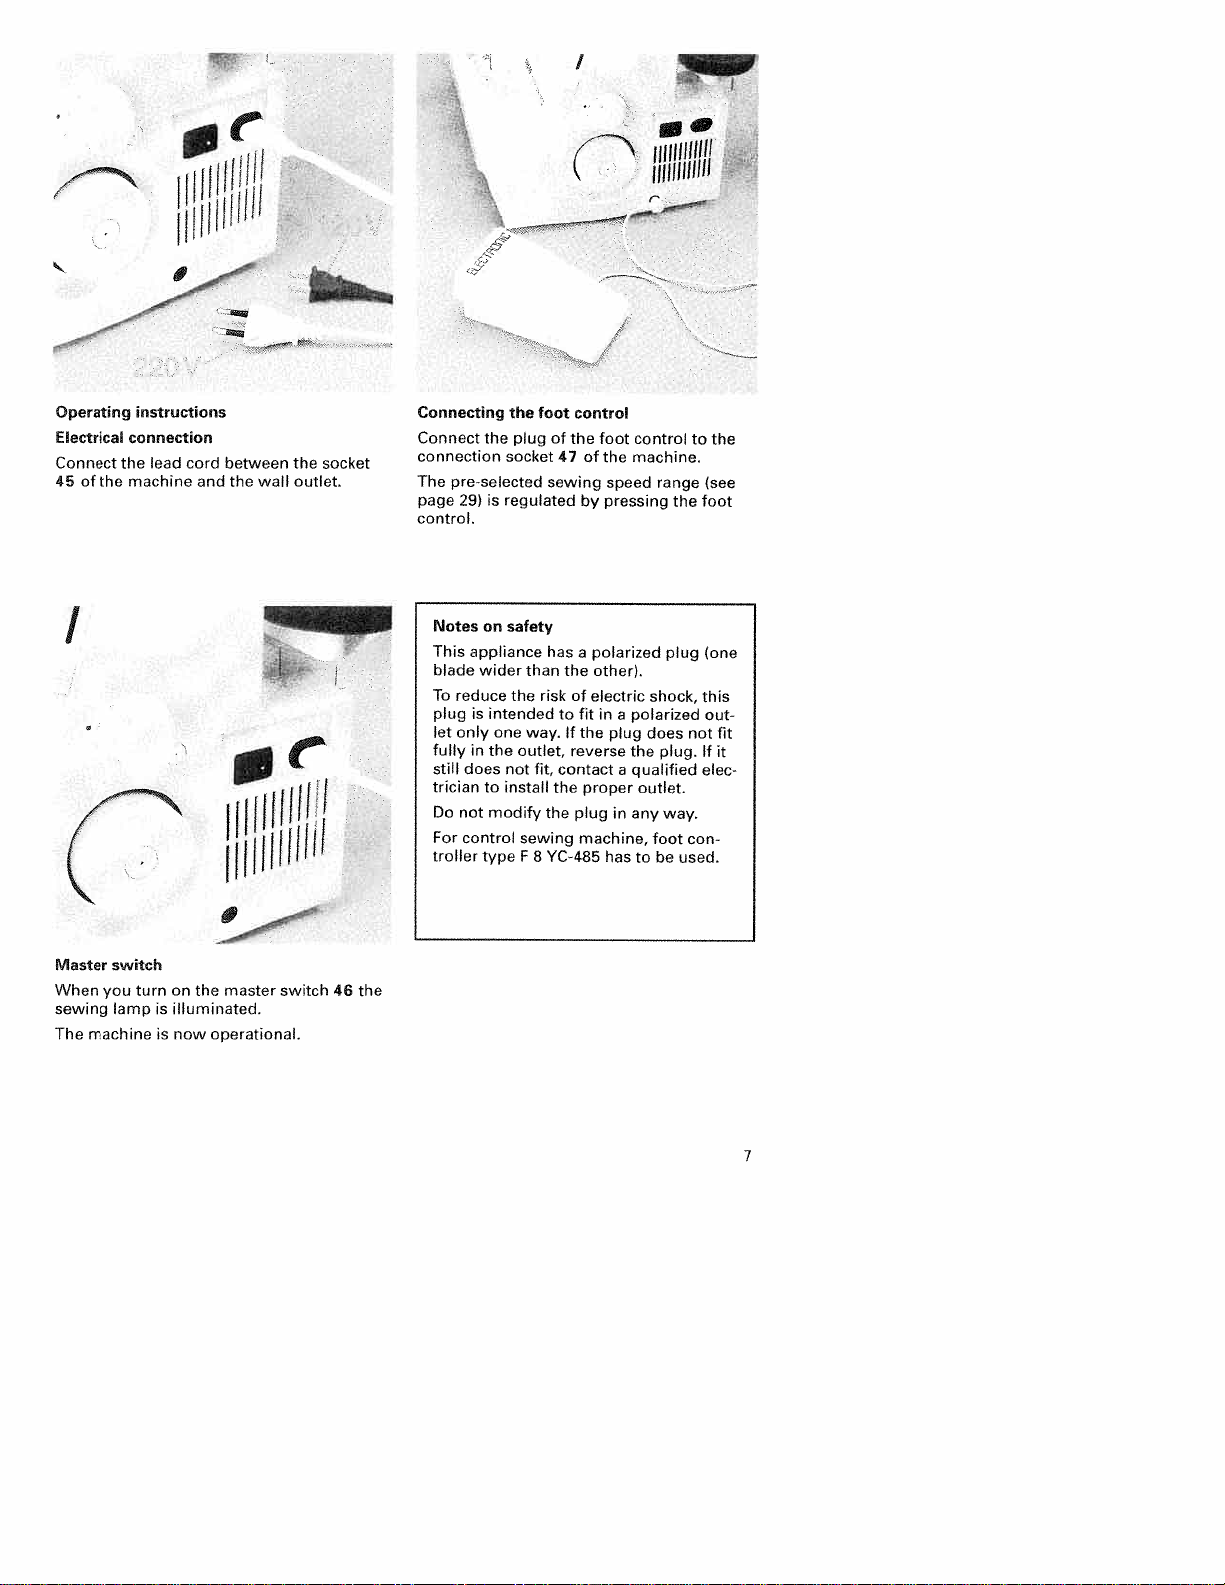
Operating
Electrical
Connect
45
of
I
Master
When
sewing
The
machine
the
the
switch
you
lamp
instructions
connection
lead
machine
turn
on
illuminated.
is
now
is
cord
and
the
operational.
between
wall
the
master
the
outlet.
switch
socket
Ii
Connecting
Connect
connection
The
page
control.
Notes
This
blade
To
plug
let
fully
still
trician
Do
For
troller
46
the
the
the
socket
pre-selected
is
regulated
29)
on
safety
appliance
wider
reduce
is
intended
only
one
in
the
does
not
install
to
not
modify
control
type
foot
plug
of
47
sewing
has
than
risk
the
to
way.
outlet,
fit,
contact
the
the
sewing
F8VC-485
control
the
of
by
polarized
a
the
other).
of
electric
fit
If
the
reverse
proper
plug
machine,
foot
the
speed
pressing
in
polarized
a
plug
the
a
in
has
control
machine.
range
the
plug
shock,
does
plug.
qualified
outlet.
way.
any
foot
to
be
to
not
con
used.
(see
foot
(one
this
out
If
elec
the
fit
it
7
cjr
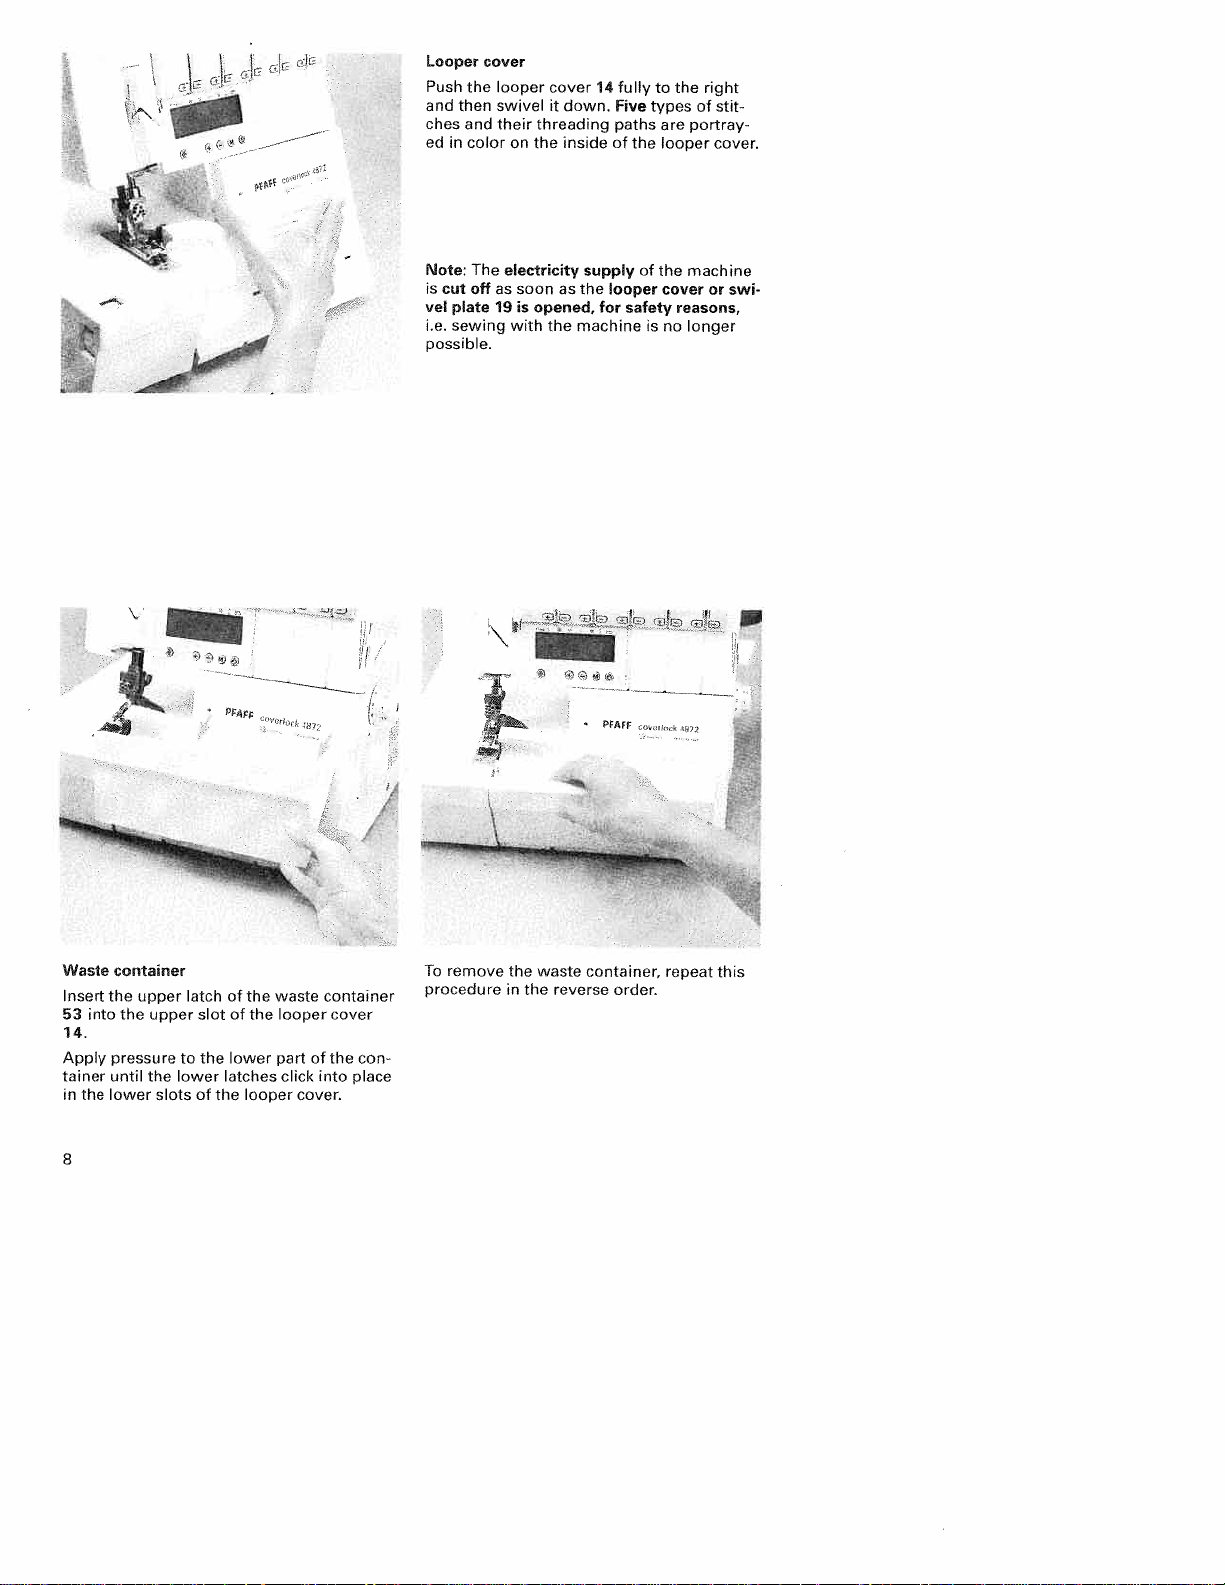
Looper
Push
and
then
ches
and
ed
in
Note:
is
cut
vel
plate
i.e.
sewing
possible.
cover
the looper
swivel
their
color
on
The
electricity
offassoon
19 is
with
cover14fully
it
down.
threading
the
insideofthe
supply
as
the
opened,
the machine
Five
paths
looper
for
to
types
are
looper
of
the machine
cover
safety
isnolonger
the
right
of
portray
reasons,
stit
cover.
or
swi
Waste
Insert
53
14.
Apply
tainer
in
the
8
into
container
the
upper
the
pressure
until
the
lower
latchofthe
upper
slot
to
the
lower
slotsofthe
of
the
lower
latches
looper
waste
looper
part
click
of
into
cover.
container
cover
con
the
place
To
remove
procedure
-‘
!
PFAFF
the
waste
in
the
container,
reverse
order.
repeat
this

Spool
Before
machine
fully
holder
away
placing
you
from
must
—
—
thread cones/spools
pull
the
the
spool holder
backofmachine.
_1
Pcnrc
Telescoping
on
Pull
41
the
upwards
To
ensure
telescoping
locking
thread
telescoping
to
its
optimum
parts
balls
click
highest
slowly
into
guide
thread
thread
place.
guide
position.
feed,
until
you
39
turn
hear
the
the
Thread
Synthetic
quickly
have been
se
threads.
the
accessory
low.
Place
ching
the
pin.
spool
net
threads
from
the
thread
includedtoallow
Pull
the
box)
the
spool
bottomofthe
generally
thread
over
on
the
&
unwind too
spool.
net
the
spool
spool
thread
Thread
easy
(located
net
use
from
holder
with
nets
of
Thread
unre&ing
The
thread
used
is
box)
the
cat
notchedorrough
spool
the
discontop
disc44is
spool
in
be
unreeling
for small
pin
42.
of
the
disc
ends.
Place
spool.
used
disc
(in
the
spools/spools
Place
the
the
thread
Make
under
the
accessory
spool
unreeling
sure the
spool.
with
on
the
9

Spool
It
is
advantageous
ling
disc
(5,000
cone
42.
With
take
up
and
guarantee
disc/cone
44
—
10,000
thread
synthetic
any
when
m).
adapter
play
excellent
thread
to
sewing
To
threads,
or
surplus
/
43
use
do
ill!
adapter
the
with
this,
onto
the
in
thread
thread
large
place
the
spool
the
feed.
spool
thread
unree
spools
the
discs
pin
Clip-on
Use
the
when
this
onto
and
thread
lustration.
unreeling
thread
clip-on
sewing
the
with
telescoping
the
Use
disc.
guide
thread
decorative
machine
the
thread
\
guide
thread
as
accessory
shown
net
thread.
guide
and
the
Clip
39
the
in
il
thread
Presser
The
presser
using
mum
foot
for
achieved
towards
10
foot
the
presser
vertical
particularly
by
the
lifter
foot
can
lift
of
pressing
rear.
foot
be
6.5
thick
lifter
the
raised
mm
51.
for
fabrics
presser
and
The
the
can
foot
lowered
maxi
presser
be
lifter
Once
ted,
to
be
the
same
cient
ser
foot
under
fabric
The
into
control.
the
to
the
an
presser
raised
gently
using
the
machine
initial
if
thread
raised
is
automatically
thread
foot
you
lift
your
continue
and
the
thumb.
part
when
chain
lifter
presser
front
of
the
you
has
longer
no
working
foot,
part
Slide
presser
taken
activate
been
of
the
up
It
the
crea
needs
with
is
fabric
foot.
and
the
suffi
pres
fed
foot

•\
‘4
Presser
With
setting
foot
(Progs.
(Prog.
(Prog.
seam
The
\
‘
accessories
stitch
chainstitch
For
presser
spring-loaded
foot
the
standard
“A”
latch
for
1,
2,
the
4),
191
and the
(Prog.
transparent
(Prog.1,2,
all
other
foot10and
the
of
the
the
3),
4-thread
20)-
can
(Prog.
programs
presser
presser
spring-loaded
cover
stitch
two-thread
safety-stitch
5-thread
presser
also
be
and the
3)
4).
use
the
foot
foot
safety-stitch
foot
used
two-thread
the
setting
latch.
10
presser
programs
chainstitch
F
from
for
the
standard
“B”
use
seam
the
for
the
cover
the
I
Changing
Switch
off
To
remove:
highest
towards
press
foot
until
holder
from
To
perpendicular
Pivot
the
presser
presser
necessary,
place.
Check:
ensure
locked
the
holder.
the
you
attach:
the
pin
position
you.
front
and
of
foot
foot
Please
that
into
the
presser
the
eectricaI
Raise
Raise
lever
A
Pivot
half
remove
towards
Place
the
to
presser
footisdirectly
the
holder
lever and
until
the
lift
the
presser
place.
foot
the
needle(s)
turning
by
presser
the
rearofthe
at
the
presser
the
of
presser
sliding
by
of
back
presser
the
sewing
foot
counterclockwise
clamp.
press
then
foot
presser
the
foot
power
the
machine.
foot
Lower
is
to
the
handwheel
foot and
presser
foot
clockwise
foot
clears
foot
away
behind and
foot
holder.
under
the
the
leverA,if
clicks
into
foot
lever
properly
until
to
11

o
1L2R2
1L21R2
0
EU
12
1R2
0
Need’e
position
one
above
with
time.
are
needles
the
has5needle
a
left
This
machine
can
sew
any
at
concerned
tightening/fastening
directly
Note:Ifthe
inserted,
the
three.
maximum
The
Li,
LO,
screw
the
corresponding
LO,
needle
positions
of
three
positions
needle
L2,
Ri
and
is
located
Li
andL2have
willbethe lowest
needles
R2.
needle.
and
The
been
of
needle
The
different
inaschematic
manual.
and
the
Note:Ifboth
been
mewhat
If
the
the
If
the
right
Also
Insert
below.
display.
LCD
inserted,
higher
1L21fl2
0
EILU
the
needles
left
needle
right
needle.
the needle
left
needle
needle.
positions
drawinginthe
refertothe
the
needles
the
than
L1
and
willbesomewhat
LO
andL2have
will
examples
the
needle(s)
R2
left
needle
right
the
1R2
1L2
0
o
1L2
1R2
UJ’EJ
1L21R2
have
L2
alsobelower
are
instruction
as
Ri
and
willbeso
needle.
V
been
lower
been
than
depicted
above
shown
have
inserted,
inserted,
the
on
than
12
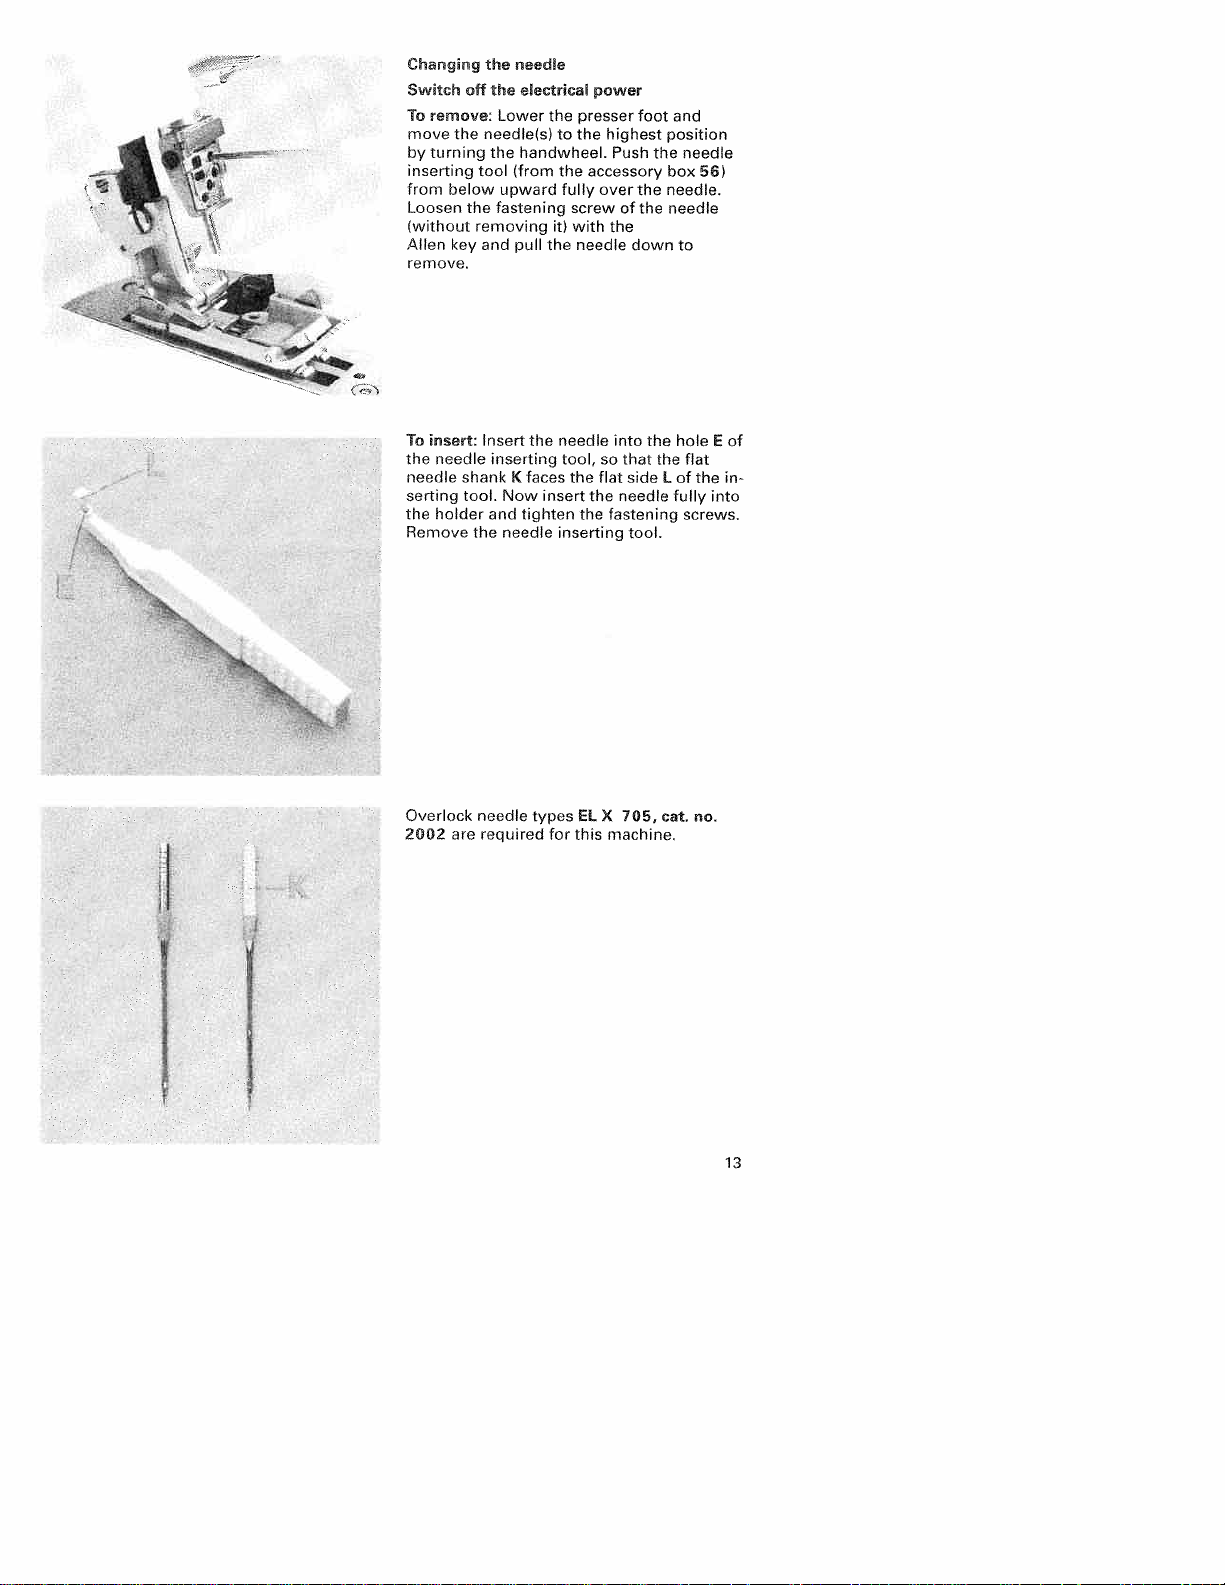
Changing
Switch
To
remove:
move
the
by
turning
inserting
from
below
Loosen
(without
Allen
key
remove.
To
insert:
the
needle
needle
serting
the holder
Remove
the
needle
the
eectrica
off
Lower
needle(s)tothe
handwheel.
the
tool
(from
upward
the
fastening
removing
and
pull
Insert
the
inserting
the
and
needle
K
Now
laces
tighten
shank
tool.
the
the
fully
it)
the
needle
tool,
insert
inserting
power
presser
accessory
screw
with
needle
the
the
the
highest
Push
over
of
the
into
so
that
flat
side
needle
fastening
tool.
foot
the needle
the
the
down
the
the
L
and
position
box
56)
needle.
needle
to
hole
flat
of
the
fully
screws.
E
into
of
in
I
I
I
Overlock
2002
are
needle
required
types
for
EL
this
705,
X
machine.
cat.
no.
13

Threading
I
‘tj
11
r
Place
will
ad
adapter
the
front
the
the
spoolsonthe
information
find
unreeling
on
pages9and
thread guides
following
disc,
thread
the
reel
38
colored
guides
spool
on
disc
from
the
10.
the
pins
thread
and
cone
Thread
backtothe
threading
42.
You
net,
thread
through
paths.
thre
Pull
the carry
through
through
and
both
hands
slips
under
thread
down
the
tension
its
original
\\
I
handle3upwards.
the
underside
the
to
the
through
untilitis
discs.
position.
of
thread guides52using
rear
pull
the
thread
thread
guide.
tension
the
positioned
Return
the
carry
Guide
discs and
firmly
carry
the
down
Thread
handle
until
the
between
handle
pull
it
it
to
ria-
Note:
Threadina
sequenceof1to5.
14

(pink)
overedge
upper
the
make
the
handwhe&
overedge
Thread
this
be
can
task
found
looper
in
a
easier,
towards
sequence
behind
Threading
i
If
—
11
Turn
upper
position.
Note:
To
which
‘ooper
until
highest
its
1
of
tweezers
swivel
the
to
9.
plate.
you
in
25
is
the
use
the
3I
I
L
—
5-.
I
;___
4
4
5
6
.1
1.
Thread
which
I
through
are
marked
the
thread
with
guides1to
pink
a
dot.
of
through
from
overedge
(10
cml
the
looper9.Pull
thread
of
left
the
under
8,
Thread
upper
4”
ly
and
foot.
placeitto
front
through
the
approximate
the
presser
the
eye
looper
the
15

Threading
(yeflow)
Turn
7
1
lower
right.
the
handwheel
overedge
the
‘ower
looper 26
overedge
towards
‘ooper
you
until
the
the
extreme
is
on
Threadinasequenceofi
,-
in
2
JJL
Note:
To
make
which can
this
task
found behind
be
easier,
use
to
10.
tweezers
the
the
swivel
plate.
5
—
16

Thread
marked
I
—
through
yellow.
5
thread
6
guides
I
I
1
to
8,
Press
thread
the
Note:
The
tion
the
into
drawing
lever
as
soon
lever
the
below.
returns
as
A
downwards
guide
B.
automatically
you
start
Please
sewing.
and
also
to
hook
refer
its
the
to
posi
7
the
Thread
lower
10>.
from
overedge
the
front
looper
through
C
1=
the
threading
eyeofthe
point
Pull
approximately
through
under
the
the
presser
looper
4”
and
foot.
>10
cm)ofthread
place
it
to
the
left
17

r
Threadng
ooper
Turn
the
two
thread
extreme
Thread
the two
and
handwheel
right.
in
a
thread
cover
sttch
chainstitch looper28isonthe
sequenceof1to11.
baper
towards
chanstftch
you
(vioet)
until
the
U
U
U
1
Note:
To
make
which canbefound
this task
easier,
behnd
use
the
the
tweezers
swivel
plate.
ji!
I
4
6
18

4
Thread
with
a
the
violet
rt
guides
thread
squareina
which
sequence
—5
are
marked
of
refer
and
hook
to
Push
to
1
9.
into
ad
below.
the
slot
Also
B.
upward
A
lever
the
the
thre
the
drawing
Note:
its
posi
The
tion
lever
as
soon
returns
as
automatically
start
you
to
sewing.
Thread
two
the
cover
from
thread
stitch
the
chainstitch
looper.
front
through
looper
the
and
eye
the
Pull
of
C
approximately
through
under
the
the
presser
looper
4”
and
foot.
(10
cm)
place
of
it
the
left
to
19
thread
11
‘Ic
Exceptwn:
Threading
looper
stitch
(Prog,
Turn
two
extreme
Thread
Note:
To
make
/
which
the
and
cover
(violet)
1,
2,
3)
the
handwheel
thread
chainstitch looper
right.
in
sequence
a
this
canbefound
task
two
thread
stitch
towards
easier,
behind
looper
of
chainstitch
you
1
to
10.
use
the
the
for
28
tweezers
swivel
the
until
is
cover
the
on
the
plate,
2
,j
J
JF.
I
LEJ
//4
6
20

Thread
diagram,
the
threads
square.
the
8,
in
thread
a
sequence
guides
guides,
are
as
of
1
marked
shown
Some
to
8.
withaviolet
/
in
the
of
Press
into
slot
Note:
position
lever
The
A
upward
B.
Also
refer
lever
returns automatically
as
soon
as
you
and
to
the
start
hook
drawing
sewing.
the
thread
below.
to
its
Thread
twothread
stitch
looper
from
the
front
chainstitch
C.
through
looper
the
and
eyeofthe
the
cover
Pull
approximately
through
under
the
the
presser
looper
4”
and
foot.
(10
cm)
placeitto
/
(..
of
thread
the
left
21

‘iri
Threading
Thread
Note:
To
which
j
3
mc’,
I
cnr
Pl’AF
mm
inasequence
make
can
this
the
be
needles
task
found
easiet
behind
of
1to8.
use
the
the
tweezers
swivel
plate.
The
lower
22
thread
slot
7
must
of
5
thread
be
guided
guide
through
5.
the
Pull
approximately
through
under
tension
the
release
the
presser
F
looper
key
and
foot
4”
10,
(10cm>
place
necessary
(if
also
see
of
thread
it
to
the
left
activate
page
40>.

Exception:
;Z
Threading
ad
safety-stitch
chainstitch
Thread
needie
safety-stitch
in
a
seam
seam
(Prog.
sequence
L2
(Prog.
4)
when
(Prog.
of
19)
1
sewing
20),
and
to
8.
a
4-thread
a
2-thread
a
5-thre
Note:
To
make
this
task
easier,
use
the
which
can
be
found
behind
the
tweezers
swivel
plate.
5
The
upper
thread
slot
must
of
jw
the
be
guided
thread
guide
through
5.
the
Pull
approximately
through
under
tension
the
the
presser
release
looper
key
and
foot
4”
10,
(10cm>
place
necessary
(if
also
see
of
thread
it
to
the
left
activate
page
40>.
23

mportant
The
so
the
instead
in
drawing2.Should this
followed,
stitches
needle(s)
that
looper
the
over
can
noteonthreading
must
needle
thread
the
looper
thread
breakageormissed
occur.
alwaysbethreaded
threads
as
do
not
in
drawing
seen
threadasdepicted
sequence
run
not
under
1,
but
be
last
If
the
the
needle
rethread
rethread
looper
the looper
the
threads
threads
needle
break,
outofthe
thread
threads.
you
and
must
needle,
then
pull
Changingaspo&
Cut
the
threads
place
with
ads
which
new
threads,
needles,
(also
threads
(15
the
threads
The
ously
left
24
Activate
refer
until
past
cm)
needles.
through the
looper
past
underneath
off
new
spools.
are
stillinthe
and
tension release
to
page
the
knots
the
last
Cut
the
threads
the looper
the
on
threaded
a
closetothe
Tie
together
machine
pull
the
threads
Pullonthe
40).
are
about6inches
thread
knots
off
respective
canbepulled
eye
and
presser
machine
spool
with
outofthe
key
needle
guide
in
and
pull
needle
continu
placedtothe
foot.
the
front
and
10
re
thre
the
of
the
eyes.

I
Need!e
Move
the
and lower
from
right
threader
of
One
wards.
threader
needle(s)
the
to
(to
the
two
presser
left
be
into
in
notch
found
triangles
foot.
in
the
Aofthe
the
must
highest
Place
accessory
point
the
needle
position
thread
boxi.
up
Place
groove
threader
it
lightly
small
A
needle
threaded.
the
back.
the
of
down
against
metal
eye
threader
needle
the needle.
to
the needle.
pin
the needle
and
Thread
the
is
loops
Slide
needle
pushed
must
onto
the
the
needle
eye
through
is
automatically
be pulled
and
front
press
the
to
25

Overview
Program
cover
stich,
of
01:
2-needle,
the
threading
narrow
paths
and
threading
—
sequences
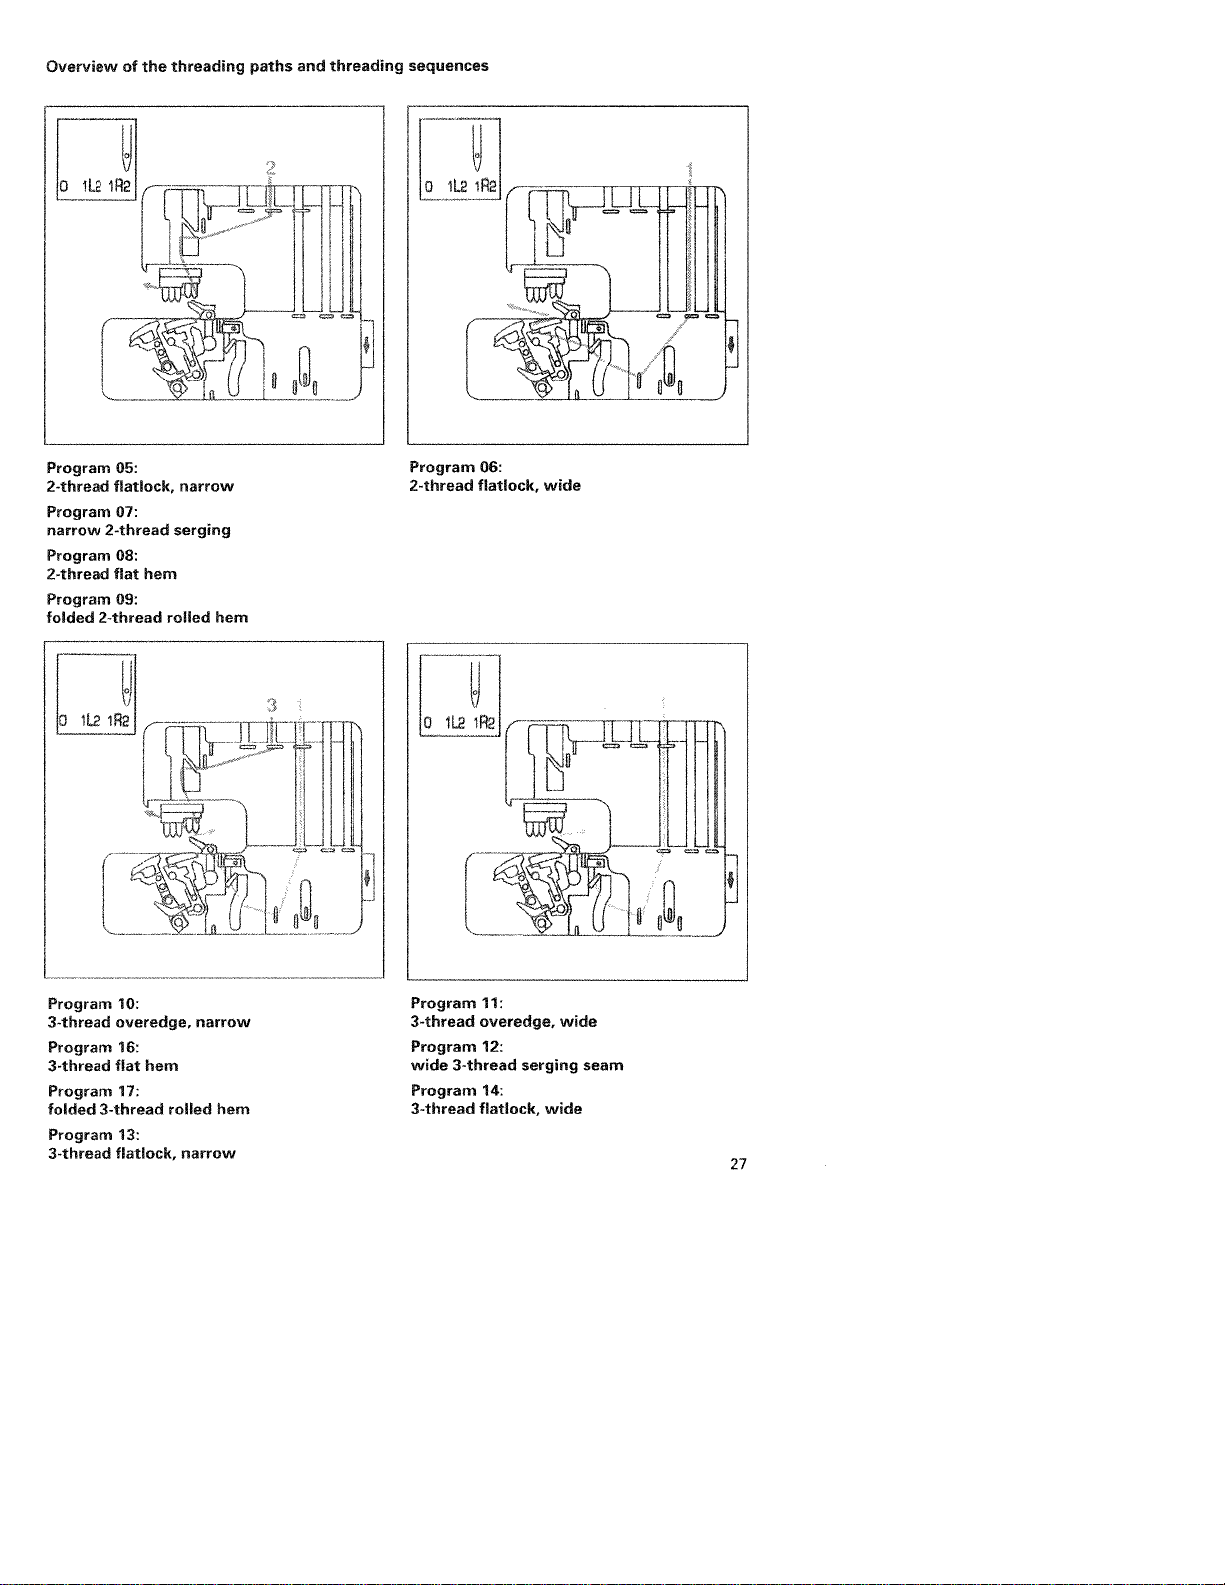
Program
cover
stitch,
02:
2-needle,
wide
Program
cover
26
stitch,
03:
3-needle
4-thread
Ei
Program
2-thread
i)
v
04:
chainstitch
Overview
threading
of
the
paths
and
threading
sequences
Program
2-thread
Program
narrow 2-thread
Program
2-thread
Program
folded
Program
3-thread
Program
3-thread
Program
folded
Program
3-thread
05:
flatlock,
07:
08:
flat
09:
2-thread
10:
overedge,
16:
flat hem
17:
3-thread
13:
flatlock,
hem
narrow
serging
rolled
rolled
narrow
hem
narrow
hem
Program
2-thread
Program
3-thread
Program
wide
Program
3-thread
06:
flatlock.
11:
overedge,
12:
3-thread
14:
flatlock,
wide
serging
wide
wide
seam
27

Overviewofthe
threading
paths
and
threading
sequences
Program
2-needle 3-thread
Program
4-thread
15:
19:
safety-stitch
overedge
seam
seam
Program
4-thread
Program
5-thread safety-stitch
18:
overedge seam
20:
seam
28

4
A’
Sewing
Using
the
maximum
anywhere
rev/mm.
1500
pre-seection
speed
sewingspeed
speed
between
pre-selection
canbeadjusted
700
rev/mm.
slide 9,
and
Presser
pre-set
The
machine
fabrics.
need
are
working
may
‘
you
case,6setting
you
can
the
presser
setting
I
pressure
foot
pressure
presser
with
to
positions
using
foot
for
foot
for
light or
adjust
the
pressure
medium-heavy
pressure
most
heavy
the
are
adjusting
24.
presser
is
suitable
The
adjusted
to
be
need
select
foot
is
“N”.
fabrics,
fabrics
pressure.
available
The
on
the
does
If
In
which
knob
standard
not
you
then
this
for
29

Thread
chain
After
finishing
6”
-8”
(15
thread
the
the
the
cm>
from
Pull
thread
thread
spring
this
seam.
long
foot.
the
-20
chain
feature
the
the
over
off
Cbmp
Using
chainatthe
into
(10
presser
fully
27.
clampitunder
cutter
the
seam,
long
cm>
from
chain
chain.
for
serging
you
start
of
Stitch
thread
Remove the
swiveling
thread
chain
spring.
the
sewanapprox.
thread
the
backtothe
cutter
40.
thread
can
serge
the
fabric,bypulling
offaminimum
chain
and raise
thread
stitch width
forwards
chain.
This
chain
the
chain
and
Pull
front
will
thread
4”
the
latch
cut
32
it
care
Place
the
fabric
I
30
needle(s).
1.5”
(3cm>
cut-line
presser
chain
pulls
the
seam.
Note:
This
feature
five-thread safety-stitch
thread
safety-stitch
chainstitch
If
necessary,
cut
using
a
foot
and
automatically
cannot
or for
rightinfront
into
the
pairofscissors.
start
be
seam,
the
of
into
seam,
the
the
along
The
the
for
either the
the
two-thread
hem.
Lower
makeanapprox.
fabric
sewing.
used
rolled
the
thread
inside
four-
the
of

Disengaging
Switch
off
Move
the
highest
Remove
looper cover
the
upper
positionbyturning the
the
handwheel
blade
the
&ectrical
the
movable
waste
and
34.
upper
upper
container
swivel
the
fullytothe
bbde
power
blade30into
handwheel.
and
plate.
right
to lower
open
Now
its
the
turn
the
Turn
the
blades
bladeisnow
knob
clicks
towards
into
place
disengaged.
you
below.
until
The
the
upper
upper
1
Engaging
Push
to
clicks
Close
and
the
the
knob
the
right
and
into
the operating
the looper cover
remount
upper
for
lowering
swivel back
waste
the
bbde
and
the
the
position
the
container.
upper
blade
again.
swivel
blade
until
plate
it
31

stitch
width
to
width
width
when
seams
the
latch
seams:
right
latch
latch
27
sewing
lexception:
and
27
downwards.
remains
all
swivel
types
the
Swiveling
For
standard
The
swiveling
in
the
of
standard
Program
‘
For
rolled
the
Pull
swiveling
basic
knob
Position
overlock
1,
2,3,4),
hems:
stitch
overlook
stitch
(A)
This
rolled
setting
hems.
allows
you
all
to
types
of
sew
32
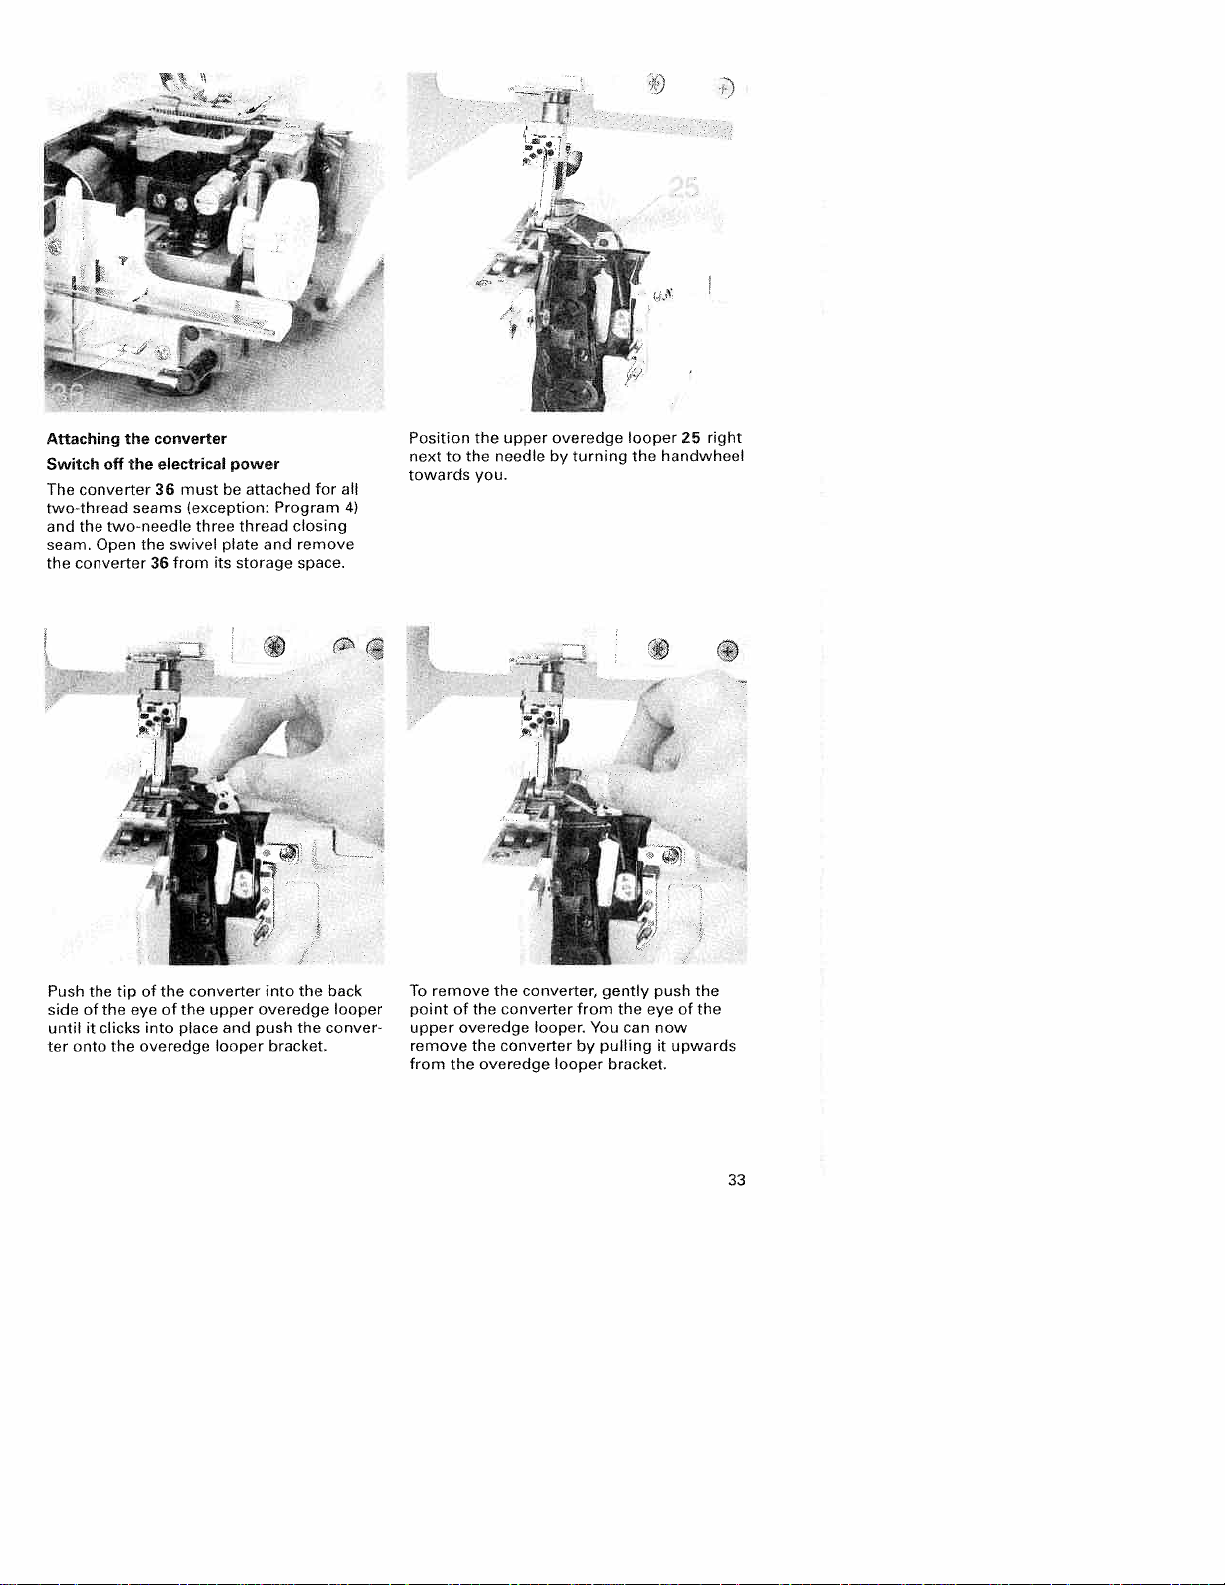
Attaching
Switch
The
twothread
and
seam.
the
Push
sideofthe
until
ter
the
off
the
converter
twoneedle
the
Open
converter36from
the
tip
clicks
it
onto
the
converter
eIectrcaI
36
seams
swivel
the
of
the converter
of
eye
into
overedge
must
be
(exception:
three
plate
its
the
upper
place and
looper
power
attached
thread
storage
push the
Program
closing
and
remove
space.
01
into
the
overedge
bracket.
for
back
conver
all
4)
I
looper
remove
the
the
needle
you.
the
overedge
Position
nexttothe
towards
To
pointofthe
upper overedge
remove the
from
overedge
upper
by
turning
converter, gently
converter
converter
from
looper.
by
looper
looper25right
the
handwheel
push
the
of
eye
You
can
now
pullingitupwards
bracket.
the
the
33

the
required
seam
seam
Setting
The
anywhere between
adjusting
the
setting
The
21.
clearance
a
Note:
The
seam
is
increased
completely
knob
canbeseen
two-thread
of
6.5
width
by
adjustable
width
width
3.5
for
at
chainstitch
to9mm.
settings
mm
2.0
can
and6mm
seam
the
viewing
nm
3
5
mm
ftO
3.5
when
from
be
adjusted
by
width
20.
window
sewn
is
mm
and
using
5.5mmto
turning
The
with
6.0
needle
8.0
mustration
the
workpiece,
blade 30
width
IllustrationB:Should
tight,
left
by
knob
are
Ri,
mm.
i.e.
only
you
mm
A:
the
to
adjusting
move
the
turning
downwards.
relevant
haveaseam
loops
Should
move
the
rightbyturning
upwards.
knob
the
movable
the seam
needle
for
width
project
the
out
upper
seam
movable
stitchingbetoo
upper
bladetothe
adjusting
width
R2.
This
which
set-value
is
of

Securing
Switch
Itisrecommended
upper
brics.
tion
screw
should
ter
blade
Raise
and
fully
sewing
the
off
the
open
always
heavy
upper
30
the
using
Note:
The
seam
width
the
upper
once
blade
master
switch
to
secure
before
sewing
needle(s)
the
the
be
can
bladeissecured.
to
swivel
plate.
Allen
slightly
fabrics.
loosened
longerbeadjusted
no
its
key.
the
heavy
highest
Tighten
movable
This
fa
screw
again
posi
the
af
*3
lb.
Adjusting
You
can
ween
0.5
stitch
length
Note:
For
the
should
stitch
the
set
the desired
mm
to
adjustment
two-thread
be
3.0
or
length
stitch
4.0
mmbyturning
knob
chainstitch, the
higher.
length
50.
bet
the
setting
35

Adjusting
(Prog.
/
/
S
(Prog.
This
trim
according
Open
blade
Lower
page
(see
is
disengaged
is
the
the
guard
32)
page
1,
4)
only
the
the
2,
3)
necessary
fabric
to
looper
swiveling
and
31).
machine
and
edge.
LCD
the
cover
15
by
disengage
Ensure
turning
by
two
Insert
pulling
stitch
to
thread
if
you
display
and
the
that
the
cover
the
chainstitch
do
the
(see
remove
it
towards
width
upper
the
handwheel.
want
not
needle(s)
page
the
latch
blade
upper
stitch
to
13).
you.
Isee
blade
Disengage
Move
lowest
Move
the
gaged
f
Thread
and
21)
23).
left.
the
and
the
position
the
Ensure
by
the
cover
then
the
upper
looper
turning
two
the
upper
overedge
by
turning
disengaging
that
the
thread
stitch
needle(s)
overedge
the
looper
handwheel.
chainstitch
looper
looper
the
(see
(see
looper.
25
hdndwheel.
lever
16
is
disen
looper
pages
page
into
22
its
to
18
to
and
36

k
PFAFF
Press
the
Close
Note:
Please
looper
power
To
return the
settings
two
Open
power
the power
designated
looper
ensure
is
disengaged
table
after
thread
the looper
table.
table
slot
on
cover.
that
the
57.
machinetoits
sewing
chainstitch.
cover
57
the
upper
before
with
and
downwards
looper
overedge
attaching
previous
the
cover
remove
cover.
stitch
the
into
the
or
lv
LJ
the
thus
the
basic
upper
the
close
looper
re-engaging
swiveling
position
blade
blade
guard
it.
disengaging
the
stitch width
page
(see
page
(see
into
lever
upper
latch
32)
and
31).
the looper
to
the
overedge
into
engage
cover
Move
right,
looper.
Bring
the
the
Push
and
I

Differential
The
dogs
feed
feed
material
the
between
The
movementofthe
synchronized
This
same
Note:
The
independent
type
differential
+
B),
(A
fabric.
the
dog
(A)
to
regulator
0.5
standard
means
amount
function
of
fabric
feed
one
and
be
wheel
and
setting
with
that
of
of
being
feed
consists
behind
The
movement
thus
the
canberegulated
fed
49.
2.0.
is
front
feed
the
rear
front
the
of
fabric
as
the
differential
stitch
the
set
used.
the
amount
The
10,
feed
the
where
feed dog
feed
of
two
other, which
the
of
of
using
range
setting
the
dog
rear
feed
length
(A)
is
feeds
feed
is
and
dog
front
is
(B).
the
dog.
the
Set
feed
half
that
much
the
38
the
49
as
the
fabric
fabric
regulator
0.5.
to
fast
as
front
to
Here
the
feed
as
the
stretch.
wheel
the
rear
dog
rear
for
front
feed
feeds
feed
the
differential
feed
dog.
only
dog,
dog
This
half
causing
feeds
means
as
Here
when
as
(A)
You
with
the
A
you
working
and
silk
will
can
the
wavelike
avoid
will
taffeta.
achieved.
be
achieve
also
differential
effect
ruffling
with very
Instead,
feed
when
in
light
smooth seam
a
fashionable
dog,
using
the
fabrics,
effects
for
example
rib
a
seam
knit
such
(B).

A
B,
the
Set
49to2.0.
feed
Here
the
the
as
feed
front
rear
the
gather.
The
following
should
Type
Very
Normal
fine
Light
tricot,
Heavy
fabrics,
Stretch
jerseys,
skirt
Gathering:
for
curves,
flaps,
(shoulders>,
regulator
front
rear
dog
feed
always
of
fabnc
light
fabrics:
cords,
knitwear:
fine
knitwear:
heavy
-
knitwear,
hems,
stretching
wheel
feed
dog.
feed
feeds
causing
dog,
table
test
.
effect
I
fabrics:
light
thermal-wear,
jerseys,
knitwear
sweatshirt
knitwear.
wavelike
dense
ruffling
arches
or
sleeve
dog
This
twice
contains
your
silk,
and
and
effect:
ruffled
stitch
light
on
gentle
widths
for
the
feeds
twice
means
much fabric
as
the
rnformation
setting
satin,
medium-heavy
polo
gathered
fleece,
medium
sleeve
lengths.
materials
blouses,
ruffling
for
differential
as
that
material
on
first
poplin,
fabrics,
fabrics.
heavy
and
and collar
and
shirts,
of
cuffs
fast
the
to
a
taffeta,
cut-pile
light
lace,
skirts,
arched
or
gathered
as
on
the
piece
cottons,
gathered
edges,
Here
when
jerseys
smooth
You
with
the
fabrics
differential
of
scrap
linings.
pullovers,
knitwear,
seam
round
sleeves
fabrics.
will
you
working
gathered
or
seam
can
also
differential
the
gathering
(B).
fabric.
allowances
pockets,
stretchinginthe seam
avoid
knitwear,
with
fabrics.
be
will
(A)
effect
fashionable
feed
when
settings.
gather
——
9
9
Differential
2
achieve
feed
such
Instead,
achieved.
for
dog,
using
However,
normal
very
feed
1’-
9
as
a
effects
example
light
you
setting
stretch
9
39

Prog
•
3F
LCD
1
2
3
4
5
6
7
8
9
Display
Program
Name
Stitch
Differential
Needle
Swiveling
—-—
.
3
Upper
Thi
Power
with
without
Upper
blade
upper
no.
of
stitch
length
feed
position
stitch
stitch
position
stitch
width
overedge
looper
looper
Converter
table
position
power
position
blade
in
mm
setting
width
width
looper
engaged
lowered
engaged
power
latch
latch
table
table
engaged
latch
in
lowered
position
position
basic
Key
10
11
12
13
10
functions
Tension
1
For
tension
Tension
When
thread
lows
from
leased,
programm
Program
The
with
preset
pressed
matically
switched
gram
Memory
for
stitch
thread
key.
Memory
you
can
ii
a
d
the
programmable
C.
keys
increasing
release
this
tensions
the
thread
the
machine.
the
selection
desired
these
for
your
down,
run
off
sewn
key
length,
tension
selection
activate
+
and
key
is
thread
selected.
program
keys.
use.
the
on.
and
will
appear.
M:
can
11
and
-
reducing
key
pressed
are
released.
chain
When
tensions
key
can
There
If
the
programs
When
back
The
adjusted
differential
be
stored
key
the
program
memories
to
+
are
on,
P:
and
be
the
and
be
keys
the
the
With
1213
thread
held,
This
easily
key
reset
—
selected
20
programs
are
will
machine
last
settings
feed
using
this
memory
A,
B
al
pulled
is
for
kept
auto
pro
and
this
key,
and
the
re
the
is
upper
10
11
2_.
Seam
Setting
A
or
display,
from
B
the
width
of
spring
—
As
the
accessories
blade
in
mm
presser
long
as
transparent
disengaged
foot
appears
E
presser
can
also
latch
in
be
the
foot
used.
40

Choiceoflanguage
The
following
Czech,
-
cicD_
French,
se.
both
Keep
simultaneously
The
desired
using
the
language
once.
Each
description
selected
languages
Danish,
German,
Italian,
Dutch,
the+and—keys
and
language
+
and—keys.
pressing
by
language.
English,
Polish,
switchonthe
can
Program the
the
will
then
canbeselected:
Spanish,
and
Portugue
pressed
thenbeselected
memory
appearinthe
down
machine.
desired
key
M
Activating
Activate
mory
selection
on
the
sions
must
program
stitch
the
the
desired program
display.
not
will
appearonthe
programs
keyPonce,
The
tensions,
be
threaded.
programmaNe
using
can
you
marked
thereisno
If
display
program
the
activate
with
again.
the
*
are
change
memories
selection
program
valid
not
made
keys+and.By
memory.
for
within10seconds,
The
this program,
set
pressing
tensions
i.e.
these
name
the
the
appear
ten
of
me
the
41

(M)
Prog
—————----—--—-—-
‘i’
tff:
Changing
length
setting
Activate
gram
mory
BorC
the
—-—---——---—---
the
selection
selection
appear
memory
Prog
(
Changing
setting
Activate
gram selection
mory
B
the
will
activate
or
C
memory
flash.
the
selection
appear
the
and
storing
desired
keys
key
on
key
3
and
storing
desired
keys
key
on
key
Using
differential
the
stitch
program
-.
+
and
the
P
until
the
display,Bypressing
M,
the
stitch
:
differential
the
program
+
-,
and
P
until
the
display.
the
M,
the
stitch
the
program
teed
using
Press
memories
length
using
Press
memories
By
pressing
length
selection
display
the
the
the
the
ie.
pro
me
display
feed
pro
me
display
key
the
will
flash.
+,
you
changed
pressing
Using
can
adjust
stitch
the memory
the
the
length
program
stitch
can
key
length.
now
M.
selection
The
stored
be
key
by
A,
——------------——
Prog
:
:1
differential
program
feed
by
pressing
can
feed
selection
now
he
the
display
key
adjusted
memory
+,
will
the
key
flash.
differential
then
and
M.
Using
stored
the
A,
-,
42

Prog
[
—‘—-r
:‘r’.,
Changing
differential
Activate
program
memory
or
A,
B
the
memory
will
flash.
+,
the
stitch
the
program
feed
display
differential
program
tings
can
using
the
settings
key
M.
storing
and
feed
and
the
desired
selection
selection
C
appear
key
Using
the
length
selection
will
feed
can
selection
be
adjusted
tension
canbestored
keys
key
on
M,
be
key
keys
the
tension
program
+
P
display.
the
the
stitch
program
can
be
key—,
activated
changed
be
÷.
in
±
using
stitch
settings
using
and
—.
until
the
length
selection
changed.
the
and
The
tension
increments
and
—.
The
the
length,
the
Press
the
memories
pressing
By
display
Using
differential
the
the
using
set
of
two
adjusted
memory
key
Prog
Storing
Select
memory
and
press
4
only
the
selection
‘2
adjusted
desired
the
memory
key
memory
tension
P.
Change
key
using
M
settings
the
twice.
the
tension
—--.
Adjusting
If
would
you
whilst
sewing,
adjustment,
tension
adjusted
keys
as
the
like
simply
+
desired.
tension
to
without
or—.
without
adjust
press
All
E1
the
having
one
tensions
IE?
storing
tension
to
store
of
the
can
now
e.g.
this
be
43

Notes
memories
If
the
while
tically
memory
If
all
the
settings
ries
can
on
storing
memory
storing,
be
stored
key
memories
will
not
Prog
selection
the
M.
not
be
in
programmable
new
in
a
are
be
accepted.
deleted,
key
settings
free
occupied,
only
P
memory
Single
overwritten.
is
will
not
the
pressed
automa
using
new
memo
the
Deleting
Switch
selection
ry
key
switch
ries
will
M.
the
off
be
all
the
the
keys
Keep
machine
deleted.
programmable
machine.
+
and
-
as
the
keys
back
Press
the
well
as
depressed
All
on.
memories
program
the
memo
and
the
memo
Error
If
one
tension
appear
second
thread
ERROR
having
on
again,
your
44
of
the
adjustment
on
the
stepping
tension
appears
switched
your
authorized
stepping
display.
motor
does
the
machine
PFAFF
fails,
on
motors
‘ERROR’
Error
of
not
function.
the
display
machine
must
dealer
the
for
2
means:
green
off
be
for
the
thread
will
needle
If
after
and
taken
service.
the
back
to

/
Setting
This
thread
the
As
needle
seam
the
tensions
K
—
thread
machine
tension
type
size
quality,
may
fr—L
tension
offers
for
fabric,
of
vary
require
each
and
the
“e
automatic
separate
thread
greatly
can
setting
slight
i
•
41
setting
program.
and
quality
influence
thread
the
of
adjustments.
7
described
is
on
piece
a
loops.
necessary
U
RI
II
of
4J
a
-
test
check
tension
62).
settings
seam
the
thread
if
page
sew
fabric
the
pages
the
43.
off
and
thread
49
Changing
on
the
of
Tip
Always
scrap
Adjust
(see
tension
45
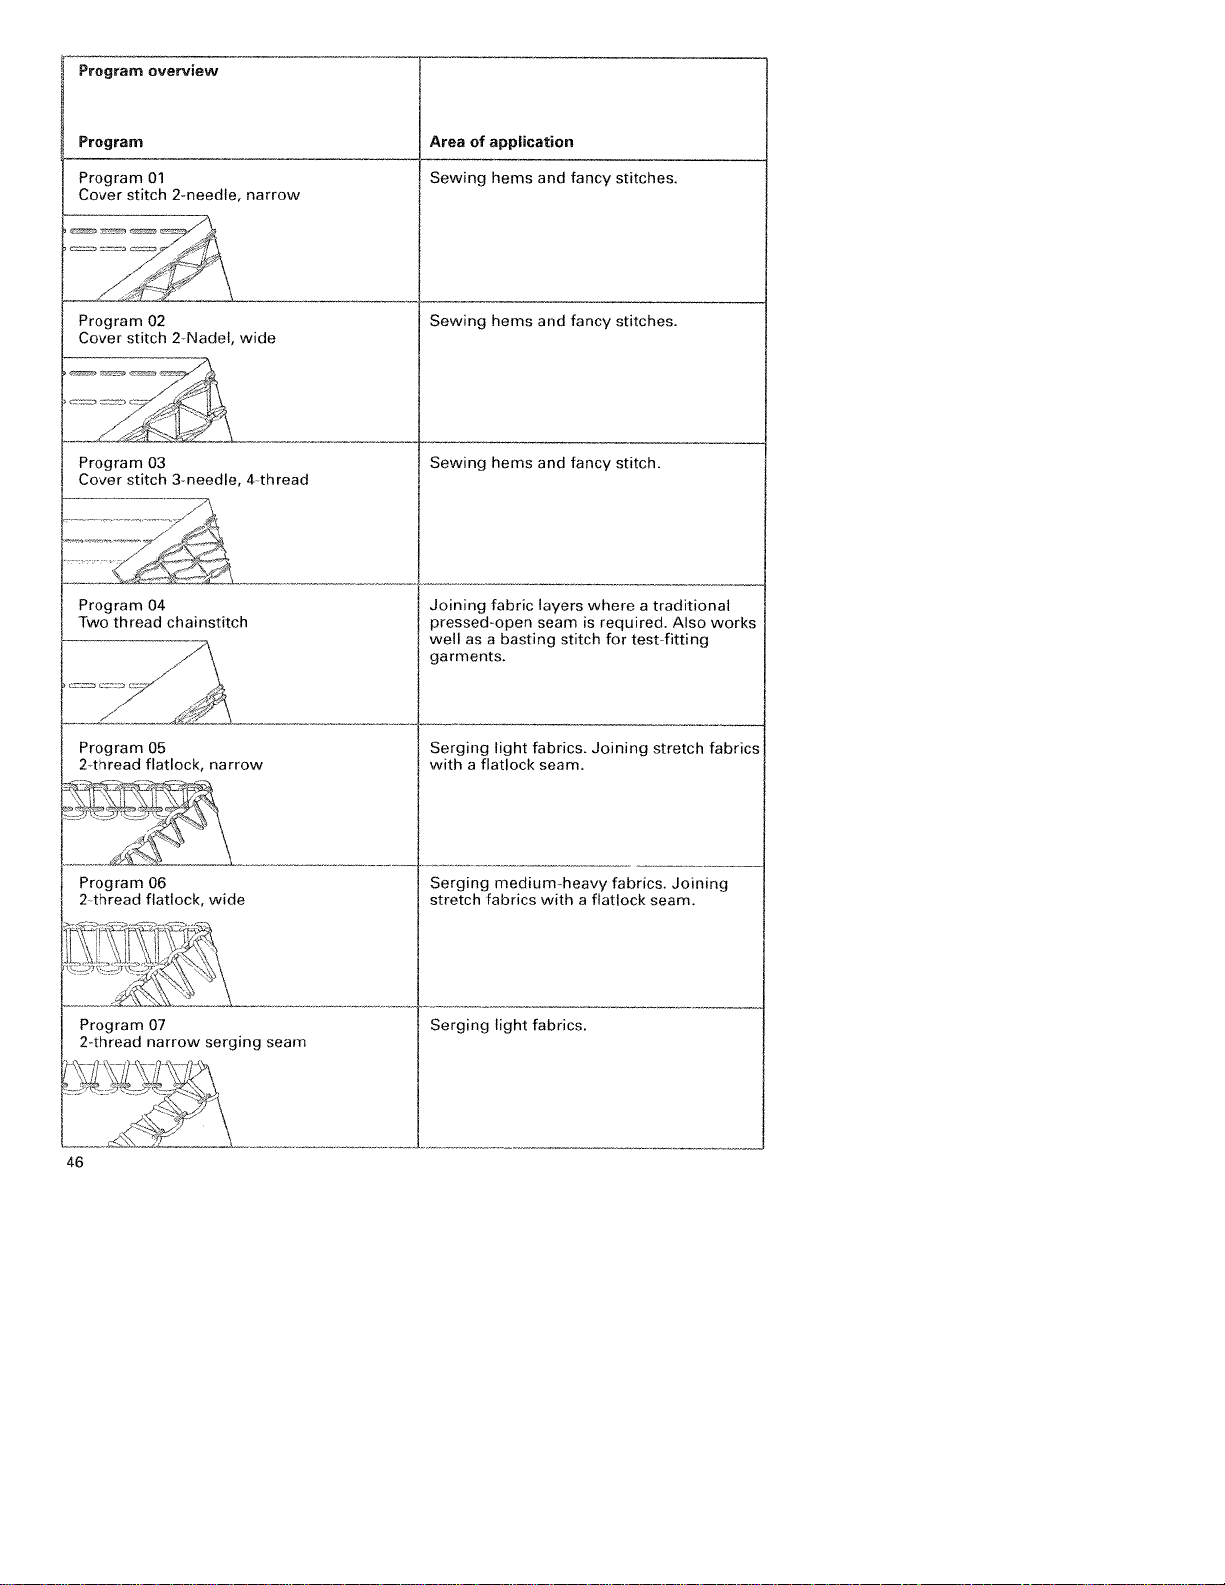
Program
overview
Program
Program
Cover
rz
Program
Cover
r
Prograrrr
Cover
Program
Two
:z
----------—---
Program
2-thread
01
stitch
02
stitch
03
stitch
04
thread
V
05
flatlock,
2-needle,
-,
2-Nadel,
narrow
wide
3-needle, 4-thread
chainstilch
7
—
I
narrow
Areaofapplication
Sewing
Sewing
Sewing
Jr
pessed-opin
well
unhrrq
as
hems
hems
hems
fabric
basting
a
and
and
and
Ijyers
seam
garments.
Serging
withaflatlock
light
fabrics.
seam.
fancy
fancy
fancy
stitch
wirer
required.
is
Joining
stitches.
stitches.
stitch.
n
for
traditional
a
test
stretch
Also
fitting
works
fabrics
:‘
1--
Program
2
Prngrzrrn
thread
06
flatlock,
07
2-thread narrow
-
-
46
-
-
wide
serging
I
-
-
Serging
stretch
medium-heavy
labrics
Strgriglight
_.____
with
fabrics.
flatlock
a
fabrics.
Joining
seam.
seam

Program
overview
Program
Program
2-thread
Program
Folded
Program
3-thread
Th
Program
3-thread
c
t
\
08
fiat
09
2
thread
10
overedge
11
overedge
hem
rolled
narrow
wide
hem
Area
Serging
Serging
Serging
Serging
fabrics.
of
appAcation
very
very
light
tightly
light
light
(easily
woven
fabrics.
fabrics.
frayed)
(easily
Decorative
Decorative
fabrics.
frayed)
edges
1
edges
\
[\/
Program
wide
Program
3-thread
1
Program
3-thread
3-thread
13
flatlock,
I
I
____\_____
14
flatlock,
J
12
serging
seam
narrow
wide
Serging
Serging
stretch
decorative
Joining
decorative
tightly
woven
medium-heavy
fabrics
with
edges.
fabrics
with
edges.
(non-fraying)
fabrics.
flatlock
a
flatlock
a
seam
seam
fabrics.
Joining
and
and
47

.
Program
Program
Program
2-needle,
•—----r
—‘(.
Program
3-thread
-
Program
Folded
Program
4
thread
t-
3-thread
overview
15
3-thread
16
hem
flat
17
18
overedge
overedge
rolled
seam
hem
seam
of
Area
Joining
stretchy
very
Serging
Decorative
Serging
Decorative
Joining
fabrics,
application
simultaneous
and
fabrics.
to
light
edges.
light
to
edges.
simultaneous
and
particular
in
serging
medium-heavy
medium-heavy
stretchy
serging
fabrics.
of
fabrics.
fabrics.
of
light,
all-
•-5:
Program
Wide
-
Program
Wide
48
.c
19
4-thread
—
20
5-thread
‘
-.
sniety-stitch
safnty-stitch
simultaneous
tightly
and
woven
and
woven
fabrics.
simultaneous
fabrics.
Joining
seam
seam
.-.
tightly
Joining
serging
serging
of
of

Stitch
formation
cover
stitch,
2-need’e,
Program
When
needle
slightly
bric.
The
01,
all
tensions
threads
visible
looper
02
(green
on
looselyinbetween.
The
right
causing
needle
large
loopsonthe
fabric.
Set the
green
thread
value.
correction
narrow
are
correctly
and
the
undersideofthe
thread
(violet)issituated
thread
(green)
tension
measures
and wide
set, the
blue)
are
just
fa
is
too
loose,
undersideofthe
toahigher
The
needle
too
tightly
Set
the
green
lower value.
threads
causing
and
(green
foldsinthe
blue
thread
and
blue)
fabric.
tension
are
set
to
a
49
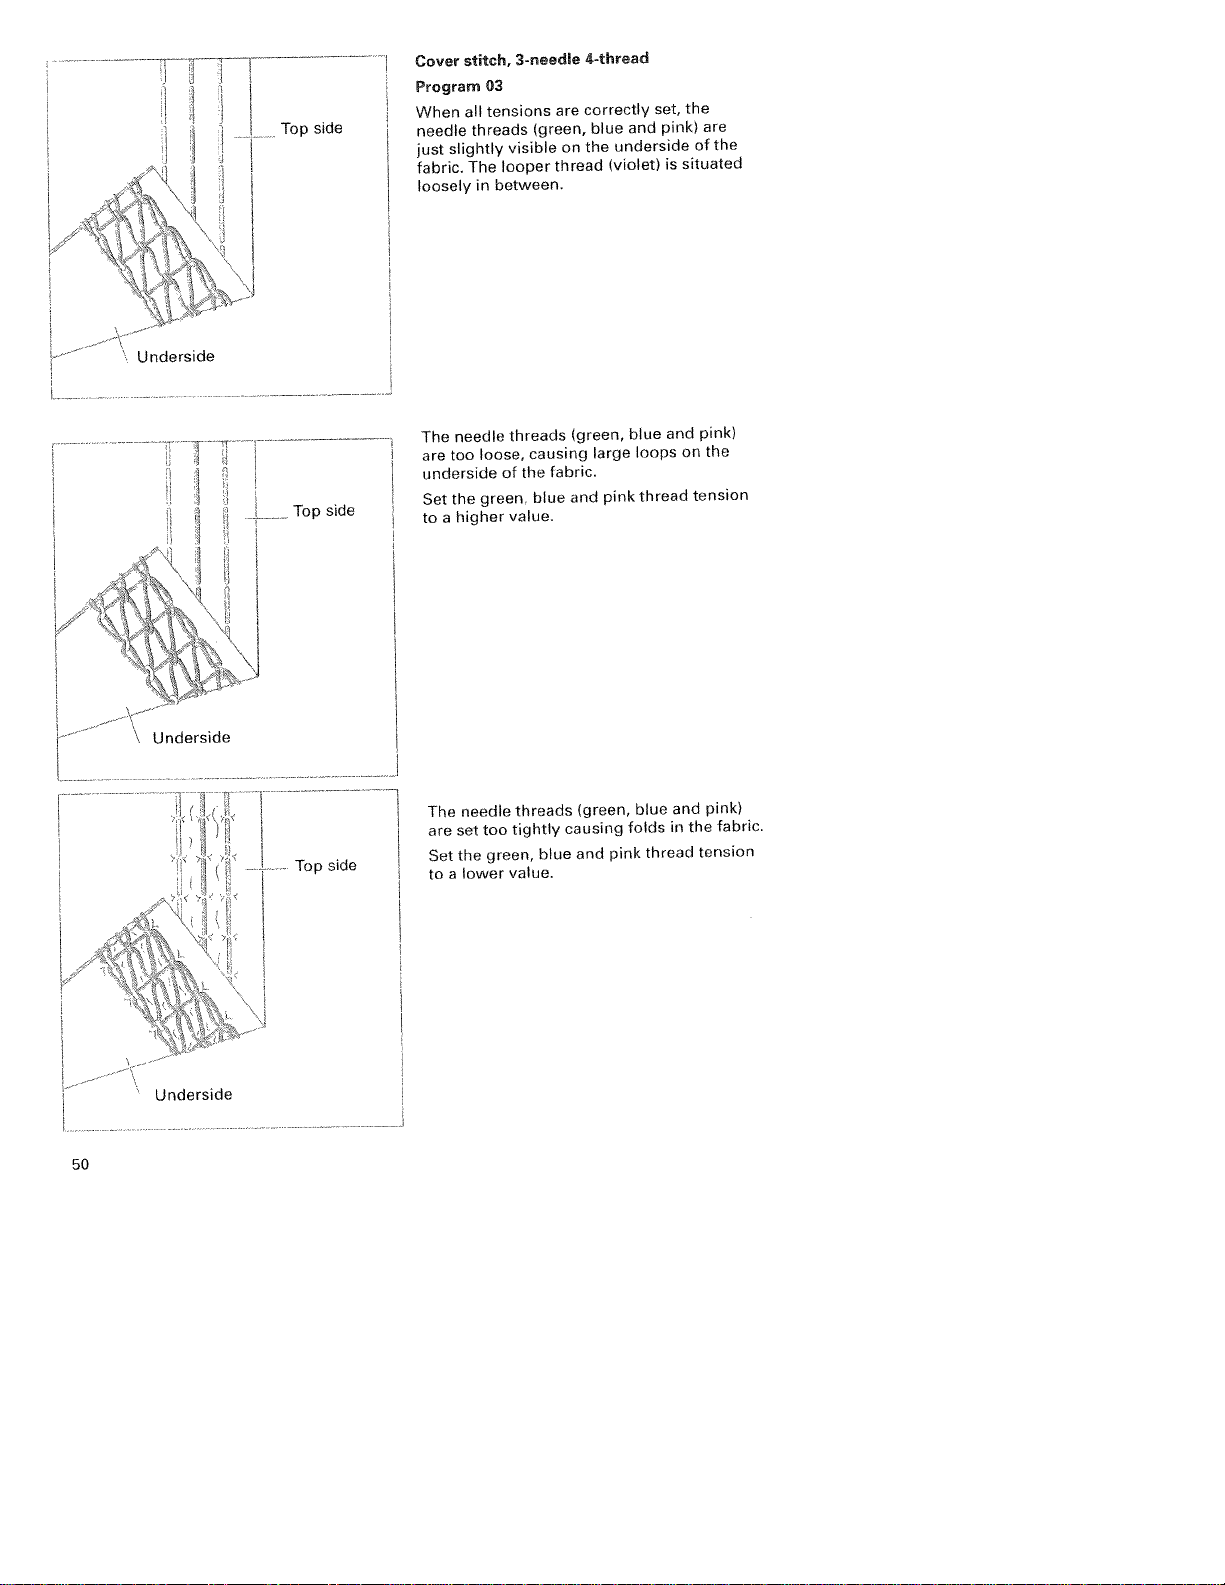
—
—
Underside
Topside
Topside
-
Cover
Program
When
needle
slightly
just
fabric.
loosely
The
too
are
underside
the
Set
to
a
stitch,
all
threads
The
in
needle
loose,
green,
higher
3-need’e
03
tensions
visible
looper
between.
threads
of
value.
(green,
causing
the
blue
are
on
thread
(green,
fabric.
and
4-thread
correctly
blue
underside
the
(violet)
large
pink
and
blue
loops
thread
set,
pink)
situated
is
and
on
the
are
of
pink)
the
tension
the
50
Underside
----
If
II)
Underside
1
I
-Topside
The
are
Set
to
needle
set
the
a
lower
too
green,
threads
tightly
value.
blue
(green,
causing
and
pink
blue
folds
thread
and
in
pink)
the
tension
fabric.

Important
stitch
power
The
units
of
in
are
Note:
special
a
you
sory
without
to
prior
notes
table
measurement.
The
cm.
hemmer
The
accessory,
hem
can
having
sewing
on
is
lower
to
the
sewing
marked
figures
guide
With
your
press
cover
—
The
fabric
under
with
with
upper
H2
this
stitch.
the
various
figures
in
are
available
is
special
effortlessly
the
cover
inches.
acces
hem
as
edge
(4’
Preparing
When
guide,
before
edge
pressed
be
to
the
than
Press
sew
to
Note:
not
is
it
finished
under
a
Set
the
using
useful
hemming
a
finished
the
fabric:
the
under
one
seam
to
hem
inch
hem
H2
press
must
width
special
The
it.
width.
(2.5
3/4
of
under
be
cm)
inch
3.5
at
accessory
the
width
cm
0.5
Example:
fabric
(2
cm.
fabric
of
wider
cm>.
fabric
width
start
To
the
Raise
under
the
fabric
the
bricatthe
guidelines
sew,
to
ing
and
rear
creased
sewing:
presser
presser
for
desired
on
pull
sew
you
as
first
the
the
the
slowly.
sew
foot
foot
width
power
fabric
further
and
so
stitch.
The
place
the
using
table.
taut
speed
needles
Position
the
When
towards
along
the
may
the
fabric
pierce
the
marked
start
be
fabric.
the
When
hold
Sew
the
sewing:
sewing
the
slowly
threads
the
to
threads
off
toward
the
end
at
fabric
of
the
the
the
end
while
rear
fabric:
of
of
the
lightly
the
Finishing
1.
Tightly
fa
seam.
pulling
machine.
be
to
need
may
to
Test
fabric.
feed
allow
your
your
fabric
settings
to
first
lie.
on
51
in
Note:
adjusted
perfectly
piece
a
slightly
smooth.
scrap
of
differential
The

If
not
2.
sewing
4-5
Sew
ring
the
wards
and
you
before
(just
position>.
to
tubular
stitches
last
you
have
sew
until
the
to
stitch,
heard
the
fabrics:
on
turn
the
needles
end
top
of
the hand
needles
each
areinthe
of
the
each
pierce
needle
fabric,
other.
wheel
“click”
lowest
the
eg.
Du
to
fabric
After
cover
3-needle
away
highest
Press
Hold
seam
Cut
the
the
backofthe
the
second”click”
stitch>
cover
from
position.
and
hold
the
threads
and
pull
threads.
you
4I
or
the
the
stitch>
until
Raise
the
tightly
fabric
Pull
fabric
third
turn
the
the
Tension
the
and
(if
sewrng
“click”
the
needles
at
the
from
threads
knot
handwheel
presser
Release
end
the
them.
a2needle
(if
sewing
are
foot.
Key
of
machine.
through
a
in
their
10.
the
to
Edge
Push
box,
The
sliding
52
guide
the
into
edge
edge
the guide
guide
it
to
the
guide,
can
left
from
holder
A
be
setasrequired
or
right.
the
from
accessory
the
left.
by
The
at
two
edge
regular
thread
guideisuseful
intervals
with
chainstitch.
the
for
serging
cover
seams
stitch
or

5-thread
Program
Since
of
sisis
thread
correction
and
low
2-thread
Program
When
needle
the
on
safety-stitch
20
5-thread
the
2-thread
the
overedge
possibilities
on
chainstitch
04
tensions
all
thread
underside
page
safety-stitch
chainsttch
seam,
55.
are
(blue)
of
seam
you
of
correctly
just
is
the
can
these
fabric.
seam
and
refer
seams
slightly
set,
con
the
to
be
the
visible
3-
the
4-thread
Program
Since
sists
thread
tion
page
on
Note:
when
The
causing
underside
Set
VaILie.
safety-stitch
19
4-thread
the
2-thread
of
the
flaflock,
possibilities
57.
Attach
sewing
needle
larger
of
blue
the
you
the
4-thread
a
thread
the
thread
safety
chainsttch
can
these
of
converter
(blue)
needle
fabric.
seam
refer
safety-stitch
thread
tension
stitch
seams
(see
too
is
to
to
seam
and
the
below
page
loose,
loops
a
the
correc
on
higher
con
2-
and
33),
seam.
the
53

4-thread
Program
When
loops
(ow>
The
upper
underside
the
Set
the
and/or
value.
are
all
of
pink
the
both
directly
overedge
18
tensions
looper
ooper
of
thread
yellow
are
on
thread
the
thread
seam
correctly
thread
the
fabric.
tension
(pink
edge
(pink>
toahigher
tension
set,
of
the
appears
to
and
the
yel
fabric.
lower
a
on
value
The
loose,
on
Set
higher
The
on
Set
lue
value.
needle
the
the
ower
the
the
and/or
threads
causing
underside
blue
value.
ooper
top
side
yellow
the
and
pink
larger
green
thread
of
thread
of
the
thread
(blue
loops
the
fabric.
tension
and
fabric.
thread
(yellow>
tension
of
green>
needle
tension
to
a
are
thread
appears
higher
to
a
too
to
va
lower
a
54

3-thread
narrow
Program
When
loops
low)
aH
of
are
overedge
and
10
tensions
both
directly
wide
and
looper
loose,
the
of
thread
causing
fabric.
tension
a
to
is
seam
11
the
(pink
of
set,
the
and
fabric.
yel
correctly
are
threads
edge
on
the
The
loops
Set
higher
the
on
relevant
value.
the
underside
thread
needle
too
needle
The
the
Set
and/or
value.
upper
underside
pink
the
the
looper
of
thread
yellow
thread
the
thread
fabric.
tension
lpink)
to
tension
appears
higher
a
tension
to
appears
higher
a
to
a
va
lower
on
value
lower
a
to
The
on
Set
lue
va
the
the
and/or
I
Lie.
top
yellow
side
the
of
thread
pink
the
thread
fabric.
tension
(yellow)
thread
looper
lower
55

3-thread
narrow
Program
The
upper
underside
the
the
Set
lue.
flatlock
and wide
13
and
boper
pink
thread
The
needle
threadistoo
needle
Set
the
value.
14
thread
(pink)
to
appears
a
of
fabric,
the
tension
higher
on
va
lower
The
loose.
Set
lue.
lower
the
looper
yellow
thread
thread
tension
thread
tensiontoa
tight.
(yellow)
(blue)toa
is
too
higher
va
56

2-thread
narrow
Program
When
and
all
flatlock
05
tensions
loopsofboth
underside
Note:
If
you
seam,
lock
converter
of
then
(see
wide
and
threads
the
want
06
you
page
are
fabric.
to
correctly
are
sew
will
33).
directly
the
need
set,
on
2-thread
attach
to
the
the
flat-
the
The
needle
looper
thread
Set
relevant
the
higher
value
tensiontoa
The
lower
loose
and/or
Set
yellow
the
lue
and/or
sion
lower
to
a
thread
and/or
lower
looper
the
the
is
(yellow)
needle
value.
thread
needle
thread
relevant
value.
loose
too
is
too
thread
yellow
the
(yellow)
threadistoo
tension
needle
tight.
tension
to
thread
or
the
thread
is
a
lower
too
tight.
higher
ten
to
a
va
57

34hread
Program
flat
16
hem
The
Set the
va ue
ri9ht
needle
thread
green
thread tensiontoa
(green)istoo
higher
loose.
The
upper
undersideofthe
the
the
pink
Set
and/or
the
value.
58
looper
thread
yellow
thread
fabric.
tension
thread
appears
(pink)
a
higher
to
tensiontoa
on
value
lowei
the
on
the
Set
tie
vaItie.
lowr
the
and/oi
top
yellow
looper
thread
sideofthe
thread
the
pink
fabric.
tension
thread
(yellow)
to
ten.iontoa
sppeai,
higher
a
va
lower

3-thread
Program
rolled
17
hem
(folded)
The
Set
value.
right
the
needle
green
thread
thread
(green)
tension
too
loose.
is
a
higher
to
The
loops
Set
and/or
value.
upper
the
around
pink
the
looper
the
thread
yellow
thread
fabric
tension
thread
(pink>
edge.
tension
toahigher
lower value.
to
a
appears
59
lower
the
the
top
yellow
and/or
(ooper
sideofthe
thread
pink
the
fabric.
tension
one
partly
only
value
a
lower
to
higher
to
a
The
on
Set
value
(yellow)
thread

read
2-th
Program
Note:
hem,
converter
right
The
the
Set
value
lower
If
then
flat
08
you
(see
green
and/or
value.
hem
want
you
need’e
will
page
thread
the
sew
to
need
331.
thread
yellow
the
to
(green>
tension
thread
2-thread
attach
to
the
is
too
higher
a
tension
fIat
loose.
a
to
is
(yellow)
thread
‘ooper
‘ower
The
loose.
tension
thread
yellow
the
Set
value.
60
too
higher
to
a

2-thread
Program
Note:
then
hem,
converter
right
The
the
Set
value
lower
rolled
If
you
green
and/or
value.
09
you
(see
needle
want
the
hem
will
page
thread
(folded)
sew
to
need
33).
thread
yellow
the
to
(green>
tension
thread
2-thread
attach
to
the
is
too
higher
a
tension
rolled
loose.
to
a
The
loose.
Set
value.
lower
the
looper
yellow
thread
thread
(yellow>
tension
too
is
a
too
higher
61

2-needle
Program
Note:Ifyou
3-thread
attach
to
3-thread
15
wanttosew
overedge
the
converter
overedge
seam,
(see
the
then
seam
2-needle
you
page
33).
will
need
The
Set the
value.
left
needle
blue
thread
thread
is
(blue)
tensiontoa
too loose.
higher
The
Set
value.
62
right
the
needle
green
thread
thread
(green)istoo
tension
loose.
higher
to
a
The
tight.
Set
value.
lower
the
looper
yellow
thread
thread
(yellow)
tension
is
too
lower
to
a

Fabric
Light
organdy,
taffeta,
fabrics:
fine
silk,
knitwear,
lining
Thread
fabrics
chart
for
Thread
Cotton
Synthetic
2-,
3-
and
thread
4-thread
overedge
no.
no.
seams
‘ength
Stitch
4.0
-
-
50
-
140
70
2.0
70
mm
Medium-heavy
tricot,
cotton,
fabrics
dress
fabrics:
Heavy
suit
tweed,
heavy
denim,
Knitwear:
or
3-thread
2
fabrics:
linen,
fabrics,
cloth
rolled
hems
Cotton
Synthetic
Cotton
Synthetic
Cotton
Synthetic
Polyester
Mercerized
thread
thread
thread
thread
thread
(bulk
no.
no.
no.
no.
no.
no.
no.
40
70
30
70
40
70-
120-
thread(
4.0
-
2.0
60
140
-
-
-
140
-
2.0
50
2.0
60
mm
mm
-
4.0
mm
4.0
-
140
2.0
-
140
1.0
mm
63

Removing
Raise
the
needle(s)
the
presser
Press
down
lever
33.
mount.
its
left.
to
the
Note:
machine
The
removing
the
presser
to
foot
the
The
The
the
the
needle
should
needle
needle
foot
highest
and
needle
needle
plate
and
position.
open
plate
plate
plate
unthreaded
be
plate.
move
swivel
the
disengaging
is
raised
18
can
the
Remove
be
removed
plate.
out
when
of
needle
press
into
plate
plate
to
down
place.
rearonthe
the
at
the
front
gui
until
pin
the
hear
(A
the
needle
and
it
click
Inserting
Place
de
you
64

Machine
Cleaning
Switch
Remove
looper
the
the
ge
the
ve
the
Use
remove
lower
and
the
looper
maintenance
the
the
off
trimming
the
cover
upper
presser
accessory
waste
any
blades,
area.
machine
electrical
and
blade
foot
the
waste
swivel
(see
and
brush
thread
differential
power
page
the
provided
from
box
plate.
31>
needle
and
the
Disenga
and
plate.
to
upper
feed
open
remo
and
Lubricating
off
Switch
Move
the
highest
above
accessory
position.
with
machine.
machine
manufactured
require
not
the
upper
box>
One
oil
the
electrical
the
or
are
from
any
machine
overedge
Lubricate
oil
provided
every
time
two
drops
sufficient.
special
lubrication.
power
looper
the
you
All
materials
points
(located
clean
PFAFF
of
other
into
shown
in
the
sewing
parts
and
(
feet
rubber
the
the
This
rubber
ensures
feet
from
good
time
stability.
with
to
time
65
Cleaning
Clean
its
the
alcohol.
are
do

blade
upper
remove:
width
(see
accessory
the
blade.
insert:
the
the
the
the
off
Set
to
page
screw
Attach
tighten
handwheel
lowest
electrical
adjusting
the
mm.
3.5
35)
with
A
box.
the
fastening
the
position.
before
Then
new
until
power
Fasten
the
upper
the
knob
the
loosening
wrench
remove
blade
screw.
upper
for
upper
the
provided
the
Then
blade
up
and
is
-
Changing
Switch
To
seam
blade
fastening
in
per
To
gently
turn
in
66
this
In
blade
cutting
upper
can
Loosen
blade.
must
fully
position
edge
blade
tighten
the
be
of
has
screw
0.5
the
the
to
been
the
to
front
1.0
lower
properly
fastening
the
edge
lower
mm
blade.
movable
the
of
When
inserted
screw.
upper
than
upper
the
the
you

Changing
Switch
Using
the
loosen
light
cover
Push
the
ring
which
counterclockwise
move.
o
off
the
light
light
the
the
electrical
screw
fastening
23
until
bulb
pin
A
bulb
driver
this
fully
moves
through
in
screw
can
power
the
to
be
into
its
upward.
half
accessory
the
sewing
removed.
socket,
Rotate
turn
a
and
box
du
re
P
Guide
socket
click
socket,
securely
Replace
the
fastening
the
and
into
twisting
place.
fixed.
the
new
twist
sewing
light
Press
it
screw.
bulb
until
both
the
clockwise
light
(max.
pins
bulb
cover
until
5W)
on
right
and
the
it
into
into
is
tighten
the
bulb
the
67

Special
This
your
Special
Multi-purpose
foot
Lace
braiding
Accessories
machine
PFAFF
accessory
M
and
guide
offers
dealer.
Hi
a
wide
Order
29
29
924
924
range
No.
993
993
of
special
82-002
82-003
accessories
Use
Foot,
to
H2
and
Guide
the
(to
which
H3
for
under
for
guides
can
applying
side
be
special
attached
lace
of
the
Hi,
or
serging
braiding
fabric(
details.
Consult
Hemmer
guide
H2
Bias-tape
guide
H3
Clear
foot
Faggoting
guide
F2
Lace
guide
Flat-felled-seam
guide
F4
Fancy-stitch
guide
Ni
Cording
Cording
Cording
foot
tongue
guide
29
924
993
82-001
29
924
993
82-004
N
F3
K
K2
29
924
993
82-006
29
924
993
82-008
29
924
993
82-005
924
29
993
82-009
29
924
993
82-007
924
9
993
82-011
Ki
29
924
993
82-012
29
924
993
010
Guide
while
Guide
Presser
It
can
Guide
consistent
foot
F
Guide
of
the
foot
F
Guide
Use
transparent
the
accessory
For
stitching
3-thread
decorative
For
serging
tongue
For
serging
For
serging
for
hemming/turns
serging
for
applying
foot
be
used
for
joining
clearance.
from
the
for
applying
fabric>.
from
the
for
sewing
overedge
effects
cording
Ki
and
pintucks
cording
with
together
accessory
Use
accessory
box
down
the
bias
groove
two
Use
lace
transparent
flat-felled
presser
double
a
seam
with
guide
with
tape
with
pieces
(on
foot
and
the
K2
gimp
under
as
edging
guide
of
fabric
transparent
box
the
upper
presser
box
seams
F
from
chainstitch
for
cording
thread
one
Ni
inch
with
presser
side
or
a
Strap
belt-loop
Universal
tape
binder
Beading
Bead
needle
68
and
toot
foot
P
plate
924
29
993
993
993
993
82-013
82-014
82-015
82-016
L
29
924
29
924
P
924
29
For
sewing
and
For
binding
of
pre-made
For
serging
The
bead
beading
and
make
for
ornamental
foot
belt
on
needle
P
a
rolled
fabric
bias
allows
loops
edges
tape
beading
plate
hem
stitches
P
you
and
straps,
with
with
various
and
sequins
together
simultaneously.
with
to
serge
on
cover
a
the
beading
stitch
widths

SDedaI
accessory
Multi-purpose
Elastic
tape
7.5
mm
Elastic
tape
10mm
footC29
insert
insert
Order
No.
924 993 82-017 For
29
924
993
82-034
29
924 993
82-035
Use
sewing
elastic
thread
with
the various
For
sewing
up to
7.5
mm
For
sewingonelastic
from
7.5mm
on
on
bands,
and
elastic
-
10mm
fishing
elastic
elastic
line
tape
tape
tape
tape,
together
inserts
withawidth
withawidth
Elastic
13
mm
tape
insert
Shirring/Gathering
foot
G
Blindstitch foot
Band
and
braiding
Accessory
Retaining
Edge
units
guide
of
foot
screw
Q
holder
with
measurement
Gathering!
Shirring
Tape
40
tongue
binder
mm
Swiveling arm
29
924
993
82-036
29
924 993 82-018 For
0
29
924
993
82-019
29
924
993
82-020
29
29
29
29
29
29
924 993
924
924
924
924 993
924
82-021
993
82-023
993
82-022
993 82-027 For
82-031
993
82-024
For
sewingonelastic
from10mm-13
shirring/gathering
of
fabric
simultaneously
For
serging
ornamental
For
sewingonbands
thread
stitched
Holder,
together
swiveling
For
securing
the
accessory
For
guiding
widths
cut
(use
blind
seams
and
bands
over using this
to
which
with
arm
the
the
and
the
machine’s
the
holder
gathering/shirring
fabric
of
standard
For
Binding
standard
For
the
simultaneously
presser
binding
the
width
presser
attaching the
accessory
holder
withawidth
tape
mm
and joining
hems
and
braiding.
and
with
decorative
foot
the
following
retaining
screw
canbeattached.
following
fabric
seam
accessories
edge
widths
standard presser
and joining
(use
foot).
fabric
edge
10-12
mm.
(Use
foot.)
following
two
Gimp
threads
together
with
accessories
and
and
measuring
simultaneously
foot>
two
the
machine’s
with
40mmtape.
the
machine’s
accessories
pieces
cords
the
to
pieces
to
can
guide
and
be
K2
Curved-seam guide
Piping
and
welting
Piping
welting
foot
and
accessory
E
29
29
29
924
924
924
993 82-025
82-028
993
82-030
993
For
sergingacurved
fabric
(use
Presser
in
foot
piping
Together
guiding
of
piping
fabric
the
and
with
machine’s
for
guiding and
welting
piping
and
piece
standard presser
footE,for
gimp
between
to
sewing
straight
a
binding
two
piece
and
layers
of
foot>.
69

Sewing
This
machine
tings
needtobe
minor
of
structions.
prob’ems
has
adjustment
and
been
made.
their
solutions
developed
Sewing
operating errors.
and
with
easeofoperationinmind.
problemsofthe
They canbeeasily
kind
described
No
below
adjusted
difficultortricky
may
occurasa
by
following
the
set
result
in
Problem
Needle
Thread
Skipping
breakage
breaks
stitches
Cause
The
needle
point
damaged.
The
needle
inserted.
fabric
The
firmly.
too
Incorrectly
Thread
Thread
Needle
Incorrect
Needle
Needle
was
was
was
pulled
threaded.
has caught.
tension
not
fully
needle used,
bent
or
not
fully
bentorthe
not
fully
tight.
is
too
inserted.
point
damaged.
inserted.
Soution
Insert
new
page
(see
Insert
needle
(see
page
Do
not
pull on
when
sewing.
Thread
properly
page
(see
Checkifthe
caught
on
Correct
the
(see
page
Insert
needle correctly
page
(see
Use
needle
ELX705.
Insert
new
page
(see
Insert
needle
(see
page
needle
131
13).
14
-
thread
the
tension
49
--
13).
system
needle
13).
13).
fully
the
fabric
23).
spool
62).
correctly
is
stand
etc
Stitch
faulty
or4thread
3
overedge
an
irregular
ance
looper
interlocked
the
seam.
70
formation
seam
and
the
thread
appear
upper
has not
in
has
Incorrect
Incorrectly
Incorrect
thread
The
needle
threaded.
setting
tensions
converterisattached.
used.
of
Use
needle
ELX705.
Thread
page
(see
Re-set
thread
page
(see
The
converter must
removed
system
correctly
14
49
(see
23).
tensions
—
62>.
page
be
33).

Prob’em
Cause
Souton
Machine
not
operate
master
Fabric
neatly
Puckered
Fabric
through
will
switch
not
trimmed
seams
not
fed
evenly
although
is
on.
Power
Waste
thread
upper
and
Upper
blade
Thread
Incorrect
differential
Thread
to
incorrect
Stitches
Sewing
for
heavy
Sewing
high
for
supply
lower
is
tension
setting
feed.
has
caLight
threading.
too
short
foot
pressure
fabrics.
foot
pressure
lightweight
interrupted
between
blade
blunt.
too
tight.
of
due
fabrics.
too
too
(ow
Close
page
(see
Clean
Replace
page
(see
Reduce
Re-adjust
pages
(see
Thread
(see
pages
Increase
see
page
Increase
page
(see
Reduce
page
(see
looper
8)
blades.
upper
66).
thread
differential
38,
correctly
14-
stitch length
35)
sewing
291.
sewing
29).
cover
blade
tension
39)
23).
foot
foot
feed
pressure
pressure
71

Specifications
Maximum
Seam
Cover
Stitch
Presser
Lubrication
Presser
Overedge
Needle
Needle
Numberofthreads
Dimensions
Weight
width
stitch
length
foot
foot
system
size
sewing
width
height
stroke
(width
speed
x
heightxdepth)
1500
stitches/mm.
1.4
mm
9.0
2.5
mm,5mm
0.5
mm4mm
exchangeable
manual
4,5
mm
2.0
mm
ELX705,
80/12,
2, 3,
355x290x300
10kg
4,
cat
90/14
5
mm
no.
2002
mm
Packing
1
1
1
1
1
1
1
72
contents
machine
foot
control
instruction
waste
container
machine
accessory
power
table
manual/guarantee
cover
box
card


Parts
of
the
coverlock
4872
38
39
40
41
42
43
44
45
46
47
48
49
50
51
52
Thread
Telescoping
Thread
Thread
Thread
Cone
Spool
Machine
Electrical
Machine
Handwheel
Regulator
Stitch
Presser
Rear
guides
chain
spool
spool
thread
disc
length
foot
thread
thread
adapter
socket,
power
socket,
whee’
adjustment
lifter
guides
with
cutter
stand
pin
power
master
foot
for
color
guide
coding
cord
switch
control
differential
knob
feed
53
54
55
56
57
Waste
Foot
Power
Accessory
Power
container
control
cord
table
box

52I
51
49—
N
4o
N
55
44<;[
4<,
N
*44
—53
N
54
41
42
56
/
57

M.
G.
Pfaff
AktiengeseHschaft
Werk
Karisruhe-Durlach
Gritznerstra1,e
76227
Karlsruhe
11
PnntedinGermany.
Druckerei
76356
nformaton
No.:29629
Englisch
Gablenz
Weingarten,
subjecttochange
989-54/000
11/98
GmbH
Stettiner
Strasse
without
17
notice.
 Loading...