

Page 1
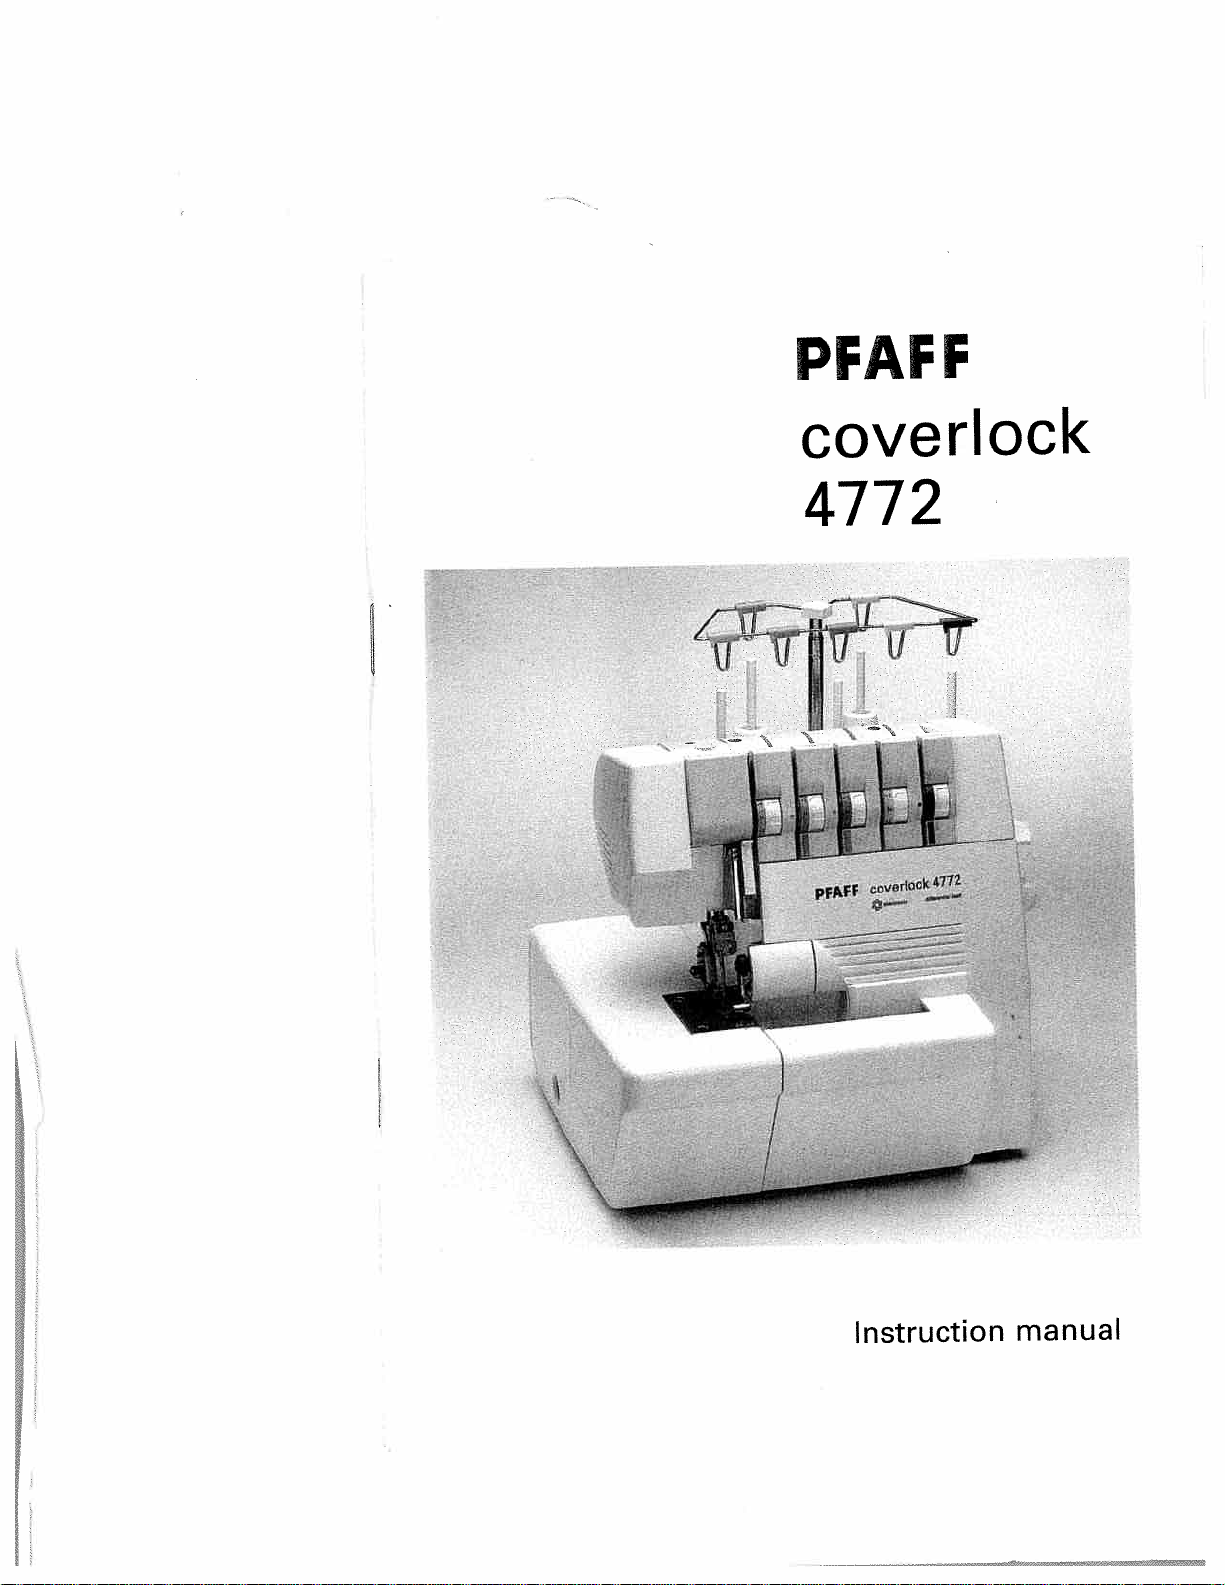
PFAFF
coverlock
4772
I:.t
i:i
cover10
I
Instruction
L.
4772
manual
Page 2
For
please
easier
understanding
fold
out
rules
Safety
For
the
United Kingdom only
leads
The
terminal
The
wing code:
As
may
your
The
nal
The
minal
Cut-off
of
pletely.
Only3A
dingtoBS
the
The plug
covers are
cies.
Please
I
wiresinthe
Blue:
Neutral
the
colorsofthe
not
correspond
plug,
wire whichiscolored
whichismarked
wire whichiscolored
whichismarked
mains
immediately.
spare
corresponding
must
also
of
and
this
must
nor
proceedasfollows:
1362
available
observe
the
definitely
plug
a
mains
wiresinthe
with
with
are
Defective
mustbeused
and
the
color
from
with
lead
with
definitely not tobeused,
the
to
plugs
fuses
neverbeused
the
the
mains
fuse cover
code.
electrical
instruction
this
page
when
last
notbeconnected
three
pins.
are
colored
color
blue
mustbeconnected
letterNor
brown
the
letterLor
without
general safety
accordingtothe
Brown:
mains
leadofthis appliance
coding
colored
mustbeconnectedtothe
leads
mustbereplaced
approved
as
mustbemarked
fuse
suppliersorthe
reading.
to
Live
of
the
colored
cover.
notes
book
the
terminals
black.
red.
but
by
Spare
on
safety
lead
follo
to
the
termi
disposed
com
ASTA
accor
3 Aorwith
fuse
PFAFF
page
in
ter
agen
2.
will
Important safety instructions
For
find
Australia
•Ifthe supply
manufacturer
soninordertoavoidahazard.
•
The
infirm
•
Young
not play with
•
Switch
ded.
•
Before
the
Contents
the
only
applianceisnot
persons
children
offorunplug the machine when
servicing
machine.
cordisdamaged,itmustbereplaced
or
its
service
agent
intended
without
the
on
supervision,
shouldbesupervised
appliance.
applianceorreplacing
the
pages4and
for
similarly
or
a
usebyyoung
to
ensure
leavingitunatten
lamps,
by
qualified
children
that they
unplug
the
per
or
do
Page 3
Page 4

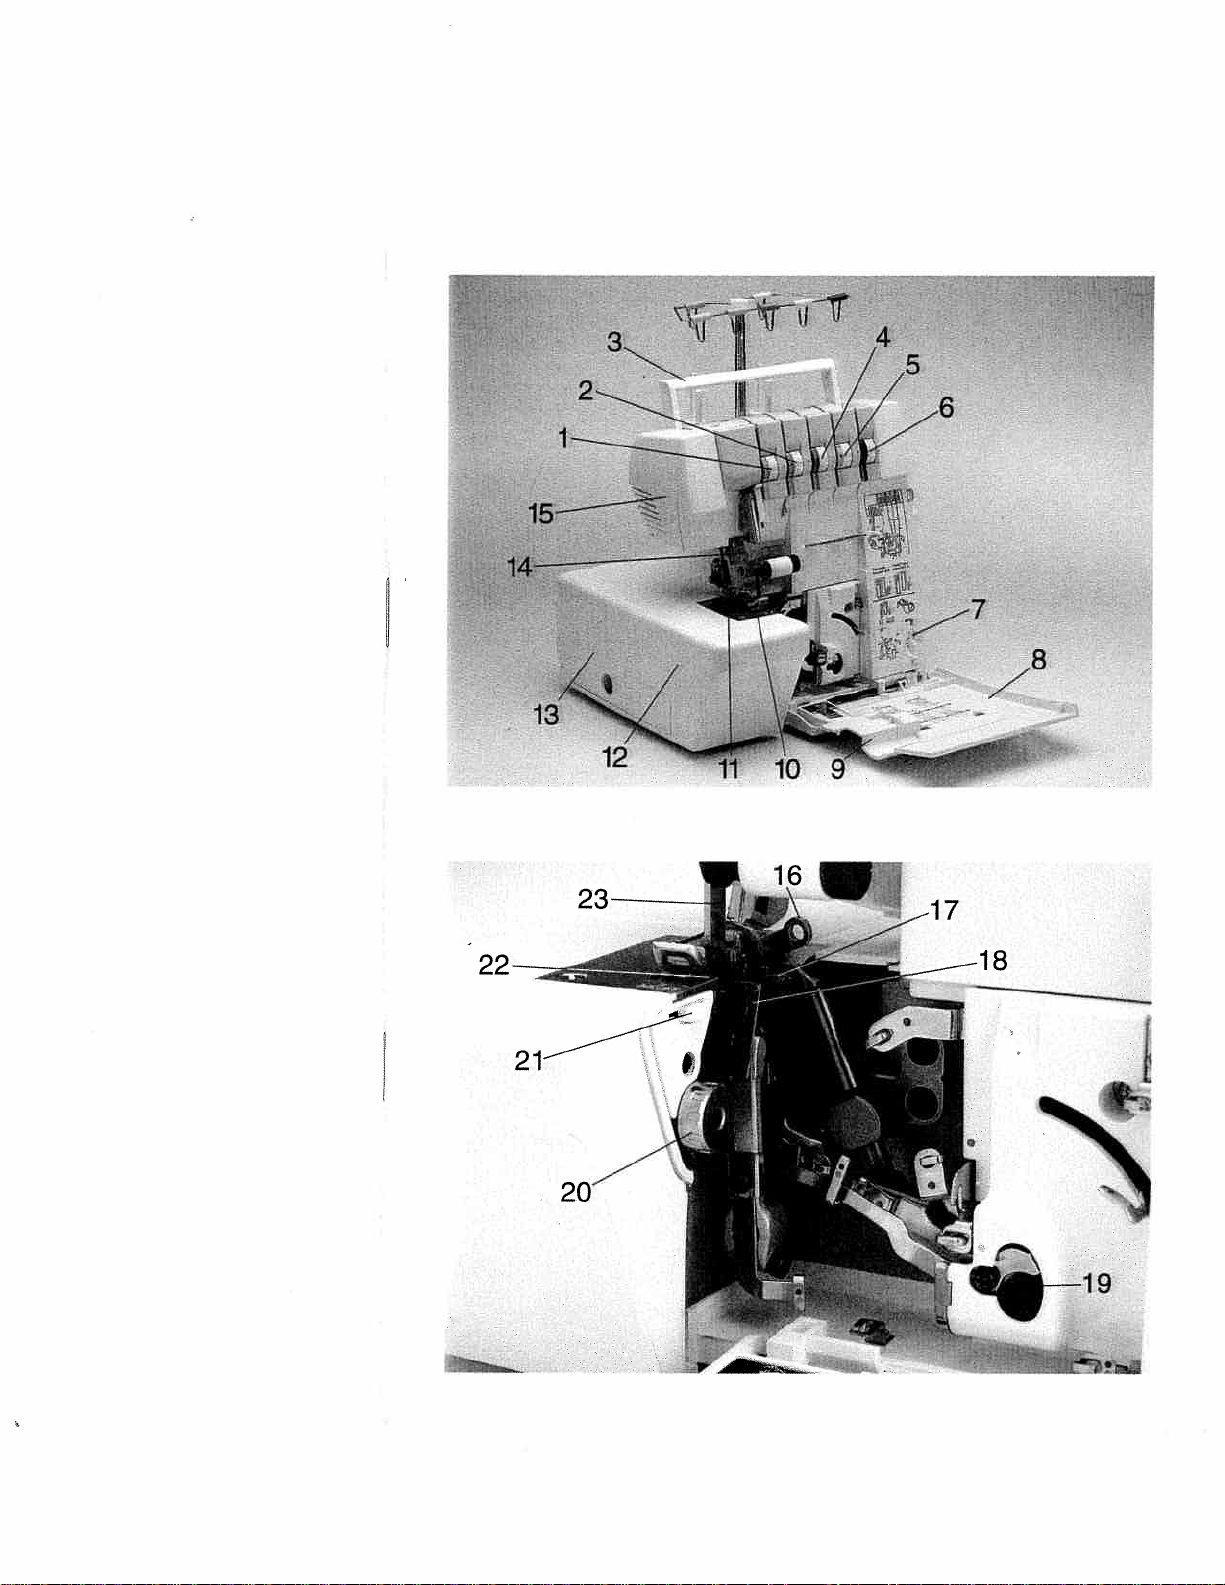
Parts
(5)
(6)
(7)
(8)
(9)
(10)
(11)
(12)
(13)
(14)
(15)
of
(1)
Upper
(2)
Upper
(3)
Carrying
(4)
Thread
Thread
Thread
Converter
Looper
Blade
Standard
Standard
Detachable
Accessory
Needle
Sewing
the
coverlock
thread
thread
handle
tension/upper
tension/lower
tension/Two-thread
cover
guard
presser
needle
work
box
holder
light
cover
4772
tension
tension
foot
plate
support
looper
looper
thread
thread
chainstitch
looper
(16)
(17)
(18)
(19)
(20)
(21)
(22)
(23)
Upper
Lower
Two-thread
Retaining
Adjusting
Bed
Fixed
Movable
overedge
overedge
slide
lower
chainstitch
screw
knob
for
stitch
blade
upper
looper
looper
for
for
blade
upper
seam
width
looper
overedge
width
latch
looper
Page 5
Important
United
For
the
This
sewing
EHOLD
wing
Read
use
basic
all
instructions
only.
safety
States
machine
When
safety
only
is
designed
you
precautions
before
instructions
and
manufactured
electric appliance,
use
an
always
should
using
this
sewing
adhered
be
machine.
for
the
HOUS
follo
to:
DANGER
1,
The
sewing
this
appliance
2.
Always
3.Donot reach
4.Donot
Do
unplug
placeorstore
placeinor
not
NARNING
1.Donot allow
used
2.
Only
Only
3.
Never
properly,
ce
mechanical
4.
Never
nings
and
5.
Never
6.
Do
7.
Do
administered.
To
8.
9.
Never
blocked.
10.
Do
11.
Keep
machine
12.
Always
13.
Do
14.
Do
15.
Switch
such
etc.
Always
16.
ting,
manual.
Hold
17.
Please also
or
by
this
use
use
attachments
operate
if
the
nearest
to
operate
the
of
loose
droporinsert
not
use out
not
operate
disconnect,
operate
unplug
not
fingers
needle.
use
not
use
not
pullorpush
the
as
threading
unplug
or
when
plug
when
observe
near
it
cloth.
bent
sewing
reduce
To
machine
from
before
forasewing
To
tobeused
sewing
this sewing
has
adjustment.
the
sewing machine
of
where
turn
onasoft
by
away
the proper
sewing machine
making
the
should
the
electric
relamping.
sewing
a
into
drop
reduce
children.
as
machine
recommended
been
dropped
authorized
sewing
anything
doors.
aerosol
all
controls
surface
pulling
all
from
needle
or
blunt
fabric
machine
needle, changing
any
rewinding
general
the
risk
never
machine
water
the
risk
a
toy.
for
machine
dealer
machine
and foot
into
(spray)
on
cord.
moving
plate.
needles.
while
off
other user
into
safety
electric
of
left
be
immediately
outlet
Replace bulb
that
machine
or
other
burns,
of
careisnecessary
Great
intended
its
by
ifithas
or
damaged,
or
service
with
control
opening.
any
products
off
to
(“0”)
asabedorcouch
such
To
unplug,
parts.
The
Only
use
stitching.
when
(“0”)
needle,
from
the
servicing
cord
reel.
notes
shock:
unattended
fallen
has
where
liquid.
fire,
manufacturer
the
a
damaged
or
center
any
air
free
position,
hold
Special
wrong
needles recommended
It
may
making any
threading
electric
not
Do
on
Page
when
after
with
same
into
water. Unplug
fall
it
can
electric
purpose
dropped
for
openings
from
are being
then
the
plug,
careisrequired
plate
can
deflect
bobbin,
outlet
adjustments
allow
plug
2.
as
plugged
using
type
or
shock,
when this
described
as
cord or
into
examination,
blocked.
the
used
remove
where
cause
the
adjustments
when removing
before
and
rated15Watts.
be
pulled into
or
injurytopersons:
sewing machine
contained
plug,
water.
Keep
accumulation
where
or
plug from
air
the
the
cord.
not
around
the
by
needle, causing
or
changing
mentioned
to whip
in,
Always
cleaning.
immediately.
a
tub
in
this manual.
in
this
not
ifitis
the
Return
repair,
ventilation
of
oxygenisbeing
socket.
openings
the
needle
to
the
manufacturer.
it
in
the
needle
presser
covers,
in
the
rewinding.
when
unplug
or sink.
manual.
working
applian
electrical
dust
lint,
may
sewing
break.
break.
to
area,
lubrica
instruction
is
or
ope
be
foot,
KEEP
THESE
INSTRUCTIONS
IN
A
SAFE
PLACE
Page 6
Notes
Notes
machines
IEC
1.
2.
3.
4.
5.
tion
6.
the
7.
Do
-
-
-
can
brought
8.
Do
cket
9.Ifthis
pose
gly
bility
10.
To
open
side
pair.
our
11.
Be
parts.
12.
The
cal
10
2
on
safety
according
335-2-28.
The
user
tion
with
vement
wing
area
while
working.
When
leaving
maintenance
mechanical
disconnect
tric
power
The
maximum
the
sewing
The
tension
be
adjusted
The
machine
as
indicated
plate.
Do
not
place
machine.
not
use
there
is
its
function
it
is
wet,
occur
into
not
pull
by
its
appliance
than
operated,
for
any
avoid
the
the
the
machine
This
qualified
sure
to
machine
supply
and
%
on
for
must
regard
of
the
under
work
parts
the
by
lamp
of
by
should
any
the
visible
is
e.g.
with
when
a
warm
the
cord.
that
intended
we
damage
risk
machine.
the
exclusive
service
use
only
is
with
rated
a
safety
domestic
to
EN
exercise
to
the
needle
constant
the
machine,
or
or
accessories,
machine
pulling
permissible
is
15
the
drive
a
PFAFF
be
on
the
objects
sewing
damage,
defective,
condensation
a
cold
room.
mains
plug
is
used
cannot
caused.
of
electric
There
which
staff.
original
designated
nominal
a
frequency
sewing
60
335-2-28
adequate
up
and
and
down
keep
observation
during
when
changing
from
the
the
plug.
out
wattage
Watts.
belt
should
mechanic.
put
into
specification
in
openings
machine
machine
out
of
for
another
or
if
it
is
accept
shock,
are
no
the
user
responsibility
PFAFF
for
an
voltage
of
+1-
the
opera
if:
which
is
the
wron
any
parts
can
electri
of
4%.
or
cau
se
always
elec
for
only
so
pur
lia
do
not
re
of
+/-
mo
on
in
When
13.
the
outer
nically
up
to
is
therefore
avoid
Environment
The
recommended
Ambient
Humidity
Storage
The
temperature
machine
interference
lations;
however
near
electronic
PCs,
broadcasting
This
sewing
tro-mechanical
supervised
operated
posed
to:
sunlight,
objects,
To
must
and
permit
be
even
corrosive
kept
Treatment
Always
chine
make
by
knocking
Cleaning
Housing
To
soft
clean
cloth
and
the
stubborn
or
paraffin.
Please
Note!
Never
use
such
an
the
petrol
as
housing.
used
components
controlled
85°
C.
damage.
temperature
20%
to
is
suppressed
according
devices
machine
appliance;
use
in
in
such
dust,
severe
static
electricity,
adequate
unblocked
surface.
sure
display:
housing,
that
is
free
dirt,
use
insecticides
(gas)
properly,
foot
Constant
not
permitted
environment
10°C
80%
-25°C
it
should
transmitters
is
the
home.
way
a
dampness,
chemicals
ventilation
not
to
or
dropping
use
of
fluff.
a
soft
or
or
thin
the
temperature
of
a
control
use
at
in
40°C
to
to
+60°C
and
international
to
not
be
such
as
a
high-quality
it
is
a
It
should
that
it
is
heat-producing
or
the
and
used
damage
it.
a
dry,
To
cloth
with
chemical
chemicals
non-electro
can
a
low
order
is:
immune
operated
radios,
etc.
machine
not
ex
direct
liquids.
machine
on
a
your
clean
and
remove
alcohol
products
to
of
reach
speed
to
to
regu
TVs,
elec
for
be
firm
ma
any
cle
Page 7
that
and
PFAFF
and
this
now
find
it
have
dealer.
help
any
let’s
up-to-date
will
coverlock
technology,
instruction
take
out
to
any
hours
Simple,
Congratulations!
product
coverlock
new
stride
Your
design
as
use
If
you
manual
tion
certainly
is
It
to
way
put
and
If
you
PFAFF
with
now
So
enjoyable
ideas.
You
provides
4772
sew
bit
a
nothing
time
just
use.
full
further
They
or
advice.
started!
get
creating
can
for
well
what
are
have
unique
take
you
features
and
manual
of
time
go
can
spent,
questions,
happy
We
sewing
bought
advantages.
any
through
the
is
it
is
to
amiss.
since
machine
your
to
wish
very
your
a
material
very
just
to
study
just
be
you
high-quality
Your
in
and
thick
latest
easy
as
follow.
instruc
the
the
it
is
can
your
ask
service
of
many
fashion
own
its
thin.
in
to
only
do
3
Page 8
Contents
Accessories
Accessories,
Accessory
Adjusting
Bed
slide for
Blade
guard
.
special
box
the
machinetocover
stitch
width
Changingaspoolona
Chainstitch
Converter,
Cover
Cover
Differential
Edge
Foot
Free
Light
Looper
Lower
Lower
Lubricating
Machine
stitch,
stitch
guide
control,
arm
bulb
cover
blade,
overedge
cover
looper
(violet),
attaching
important notesonsewing
and
2-thread chainstitch,
feed
connecting
(sewing
lamp),
changing
looper
the
machine
Maintenance
Master
switch
Needle
changing
Needle
holder
Needle plate,
Needle
position
Needle(s),
Needle,
Power
Presser
Presser
changing
table
foot
foot
Presserfoot
Presser
foot,
Program
overview
Rubber feet,
Safety
instructions
width,
Seam
aid
changing
threading
lifter
pressure
changing
cleaning
setting
latch,
threaded
threading
changing
(yellow),
stitch
setting
machine
threading
and
2-thread chainstitch
setting
the
machine
Page
6
59-69
6
30-33
25
32
20
17
16,
24
34,
35
30-33
28,
29
35
7
27
58
8
57
14,
15
56
6
56-58
7
11
11
30
10,
11
18,
19
11
32, 34
22
21
21
22
36-41
56
1,2,7
26
4
Page 9
Contents
Serging
problems
Specifications
Spool
centering
Spool
holder
Spool
net
Stitch
length,
Stitch
width
Telescopic
Thread
chain
Thread
changing
Thread
chart
Thread
guides,
Thread
tensions,
Thread
unreeling
Threading,
Trimming
Trouble
shooting
Two-thread
Upper
blade,
Upper
overedge
and
their
piece
setting
latch,
setting
thread
guide
trimmer
onathreaded
threading
setting
disc
important
waste
chainstitch
note
container
looper
disengaging/engaging
looper
(pink),
solutions
machine
(violet),
threading
threading
Page
72,
74
9
9
9
27
25
9
22
20
70
12
42
10
20
8
72,
16,
23
13
73
-
55
73
17
5
Page 10
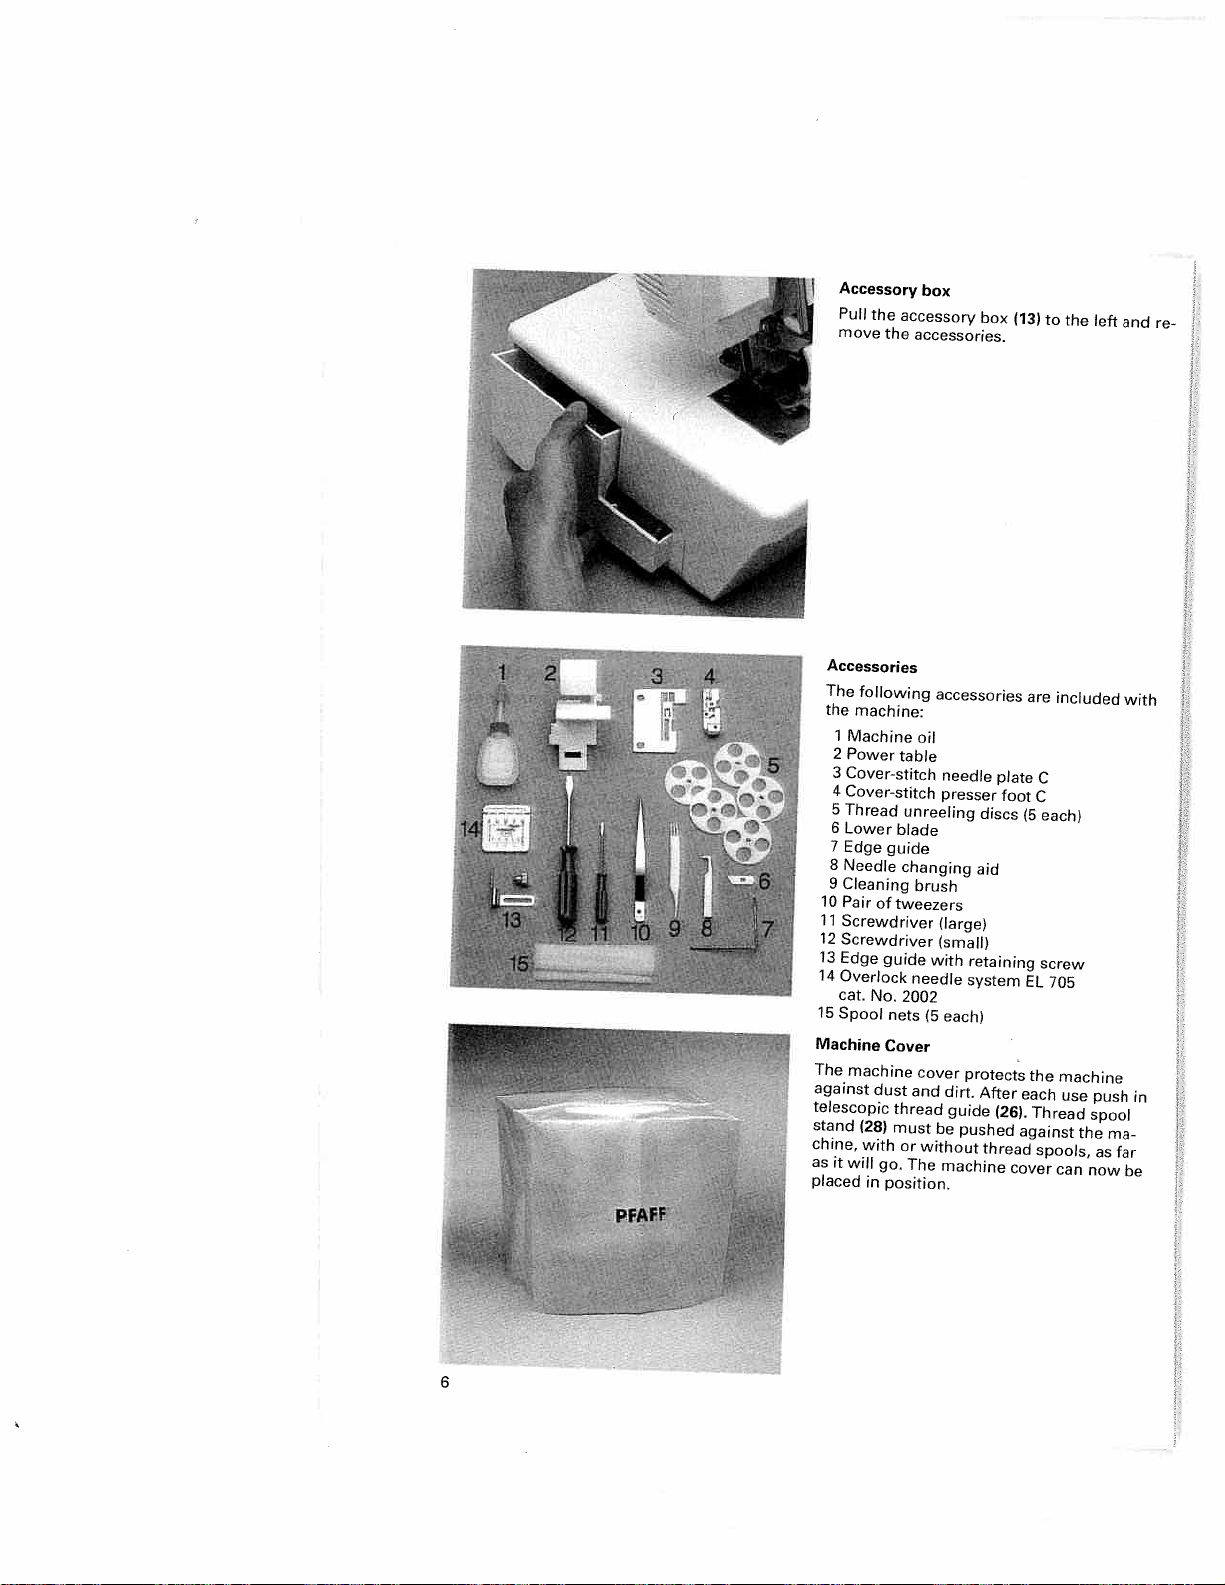
Accessory
Pull
move
Accessories
The
the
machine:
1
Machine
2
Power
3
Cover-stitch
4
Cover-stitch
Thread
5
6
Lower
7
Edge
8
Needle
9
Cleaning
10
Pair
11
Screwdriver
12
Screwdriver
13
Edge
14
Overlock
cat.
15
Spool
Machine
The
machine
against
telescopic
stand
chine,
as
will
it
placed
the
accessory
the
following
table
unreeling
blade
guide
changing
of
tweezers
guide
No.
2002
nets
Cover
dust
thread
(28)
must
with
or
go.
in
position.
box
accessories.
accessories
oil
needle
presser
brush
(large)
(small)
with
needle
(5
each)
cover
and
dirt.
guide
be
without
The
machine
box
discs
aid
retaining
system
protects
After
pushed
thread
plate
foot
(26).
(13)
are
(5
EL
each
against
cover
to
C
C
eachl
screw
705
the
Thread
spools,
the
left
included
machine
use
push
spool
the
as
can
now
ma
far
and
with
be
re
in
6
Page 11
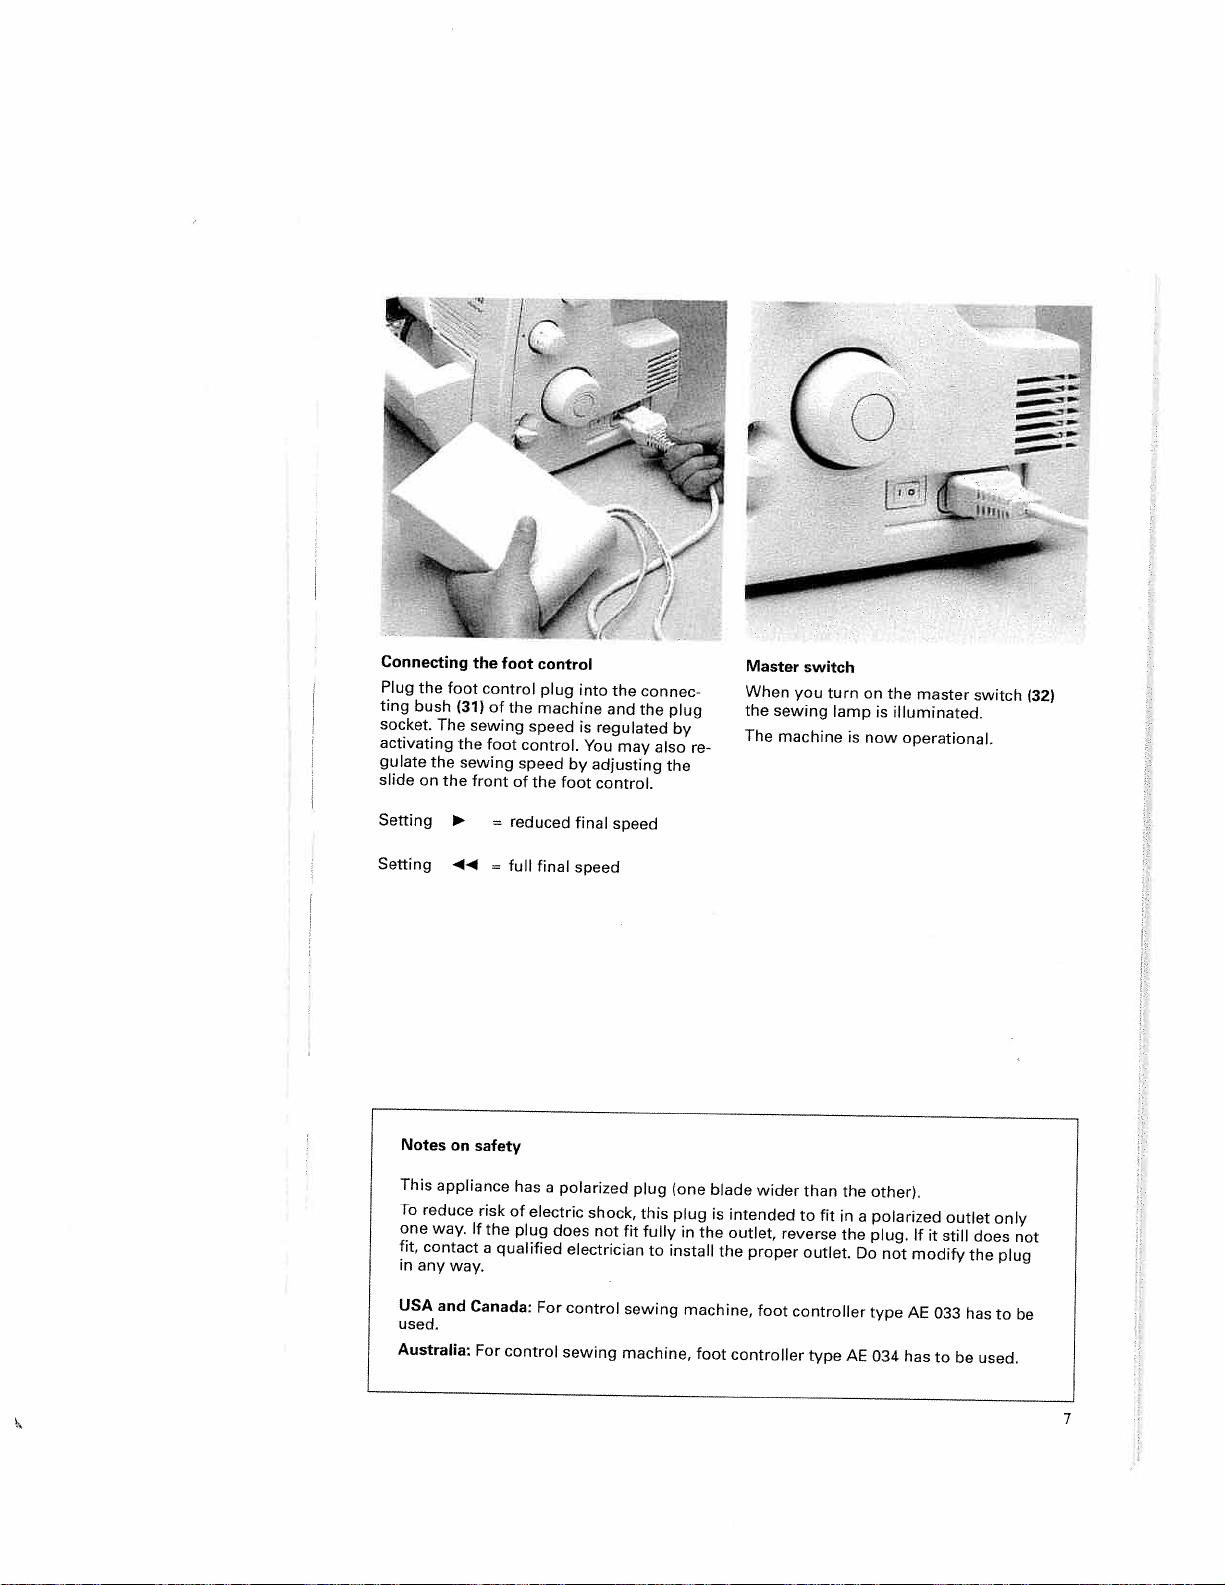
Connecting
Plug
the
ting
bush
socket.
The
activating
gulate
the
slide
on
foot
(31)
the
the
the
control
sewing
foot
sewing
front
of
foot
the
control
plug
machine
speed
control.
speed
of
the
by
foot
into
and
is
regulated
You
adjusting
control.
the
may
connec
the
also
plug
by
the
Master
switch
When
you
turn
on
the
master
switch
the
sewing
lamp
is
illuminated.
The
re
machine
is
now
operational.
(32)
Setting
Setting
Notes
This
To
one
fit,
in
USA
used.
Australia:
41
on
appliance
reduce
way.
contact
anyway.
and
=
=
safety
risk
If
the
qualified
a
Canada:
For
control
reduced
full
final
has
of
electric
plug
For
speed
a
polarized
does
electrician
control
sewing
final
speed
shock,
not
plug
this
fit
fully
to
sewing
machine,
(one
plug
in
install
machine,
foot
blade
the
intended
is
outlet,
the
controller
wider
proper
foot
than
to
reverse
outlet.
controller
type
the
other),
fit
in
polarized
the
AE
Do
a
plug.
not
type
034
If
modify
AE
has
it
033
to
outlet
still
be
the
has
does
used.
only
plug
to
not
be
7
Page 12
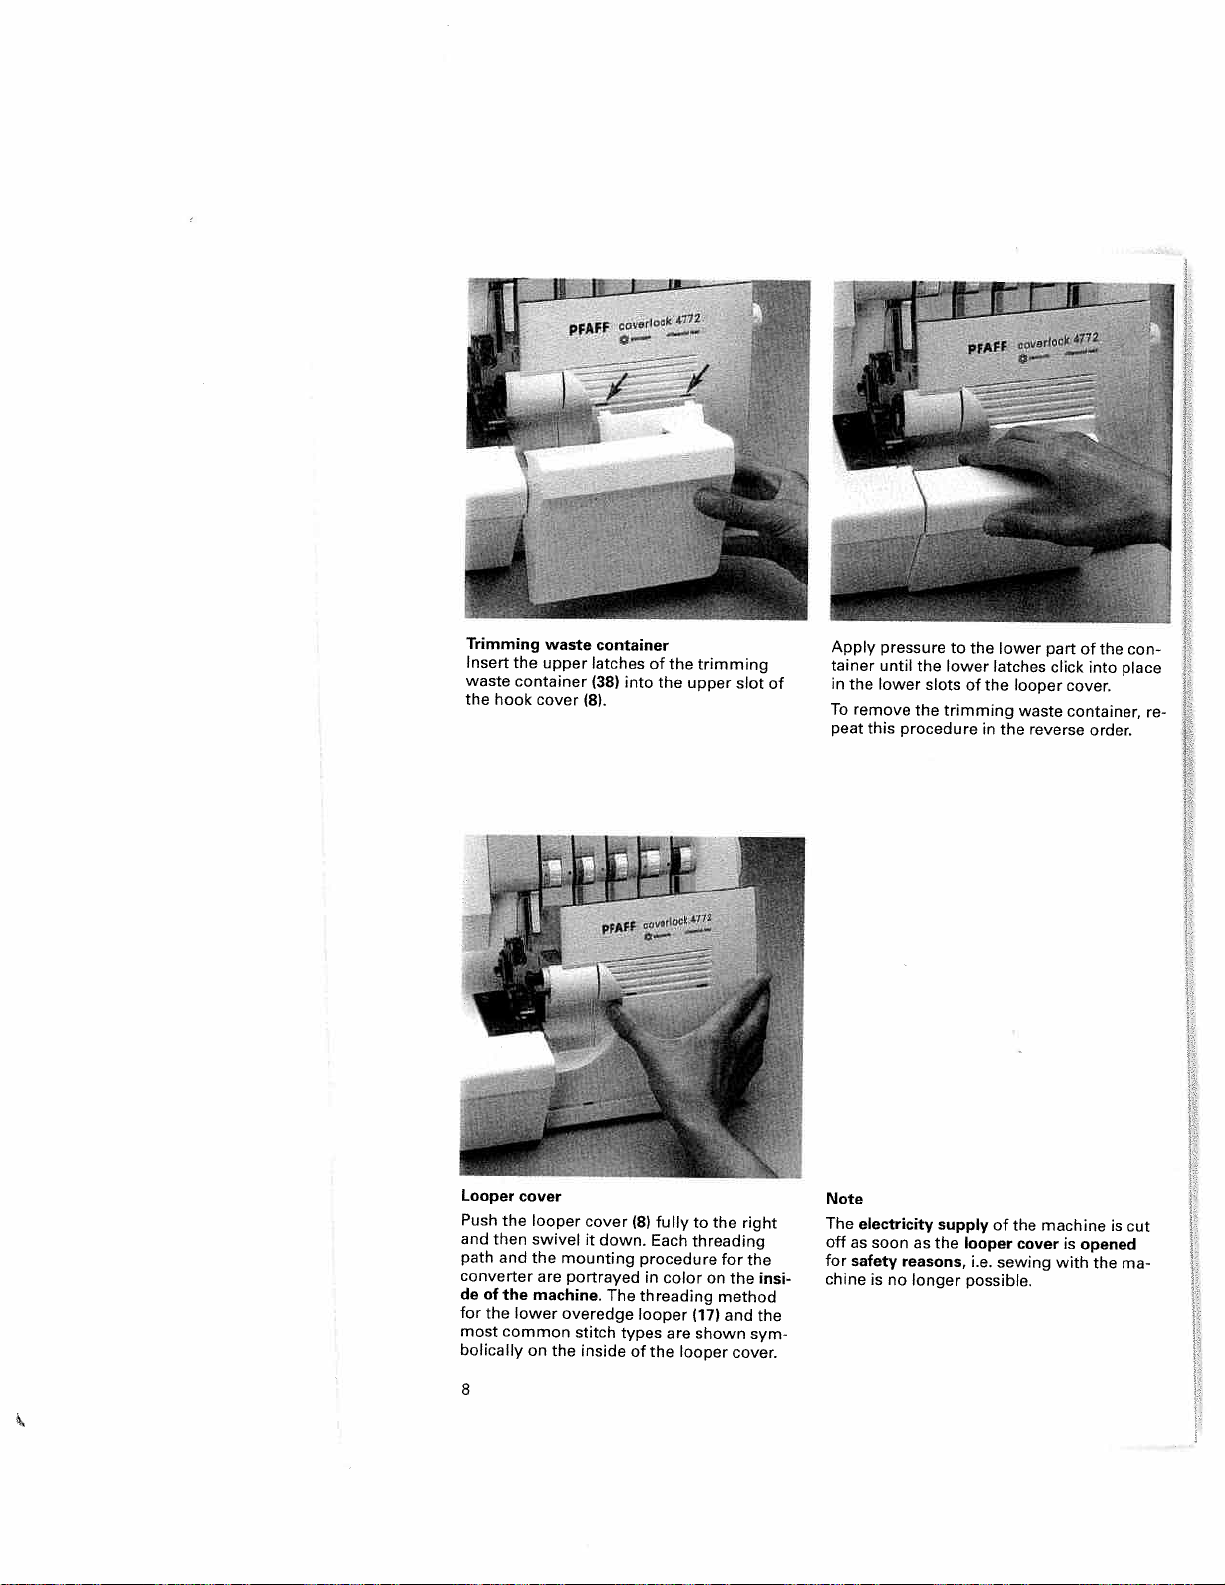
Trimming
Insert
waste
the
hook
Looper
Push
the
and
then
path
and
converter
de
the
of
for
the
most
common
bolically
waste
the
upper
container
cover
cover
looper
swivel
the
are
machine.
lower
on
the
container
latches
(38)
18).
cover
it
down.
mounting
portrayed
The
overedge
stitch
inside
of
into
<8)
Each
procedure
in
threading
looper
types
of
the
the
the
fully
color
are
trimming
upper
the
to
threading
on
117)
shown
looper
slot
right
for
the
the
method
and
sym
cover.
insi
the
Apply
pressure
tainer
of
in
To
peat
Note
The
off
for
chine
until
the
lower
remove
this
electricity
as
soon
safety
is
no
the
lower
slots
the
trimming
procedure
supply
as
the
reasons,
longer
to
the
of
looper
i.e.
possible.
lower
latches
the
in
the
of
sewing
looper
waste
reverse
the
cover
part
click
cover.
container,
machine
is
opened
with
of
into
order.
the
the
is
con
place
re
cut
ma
S
Page 13
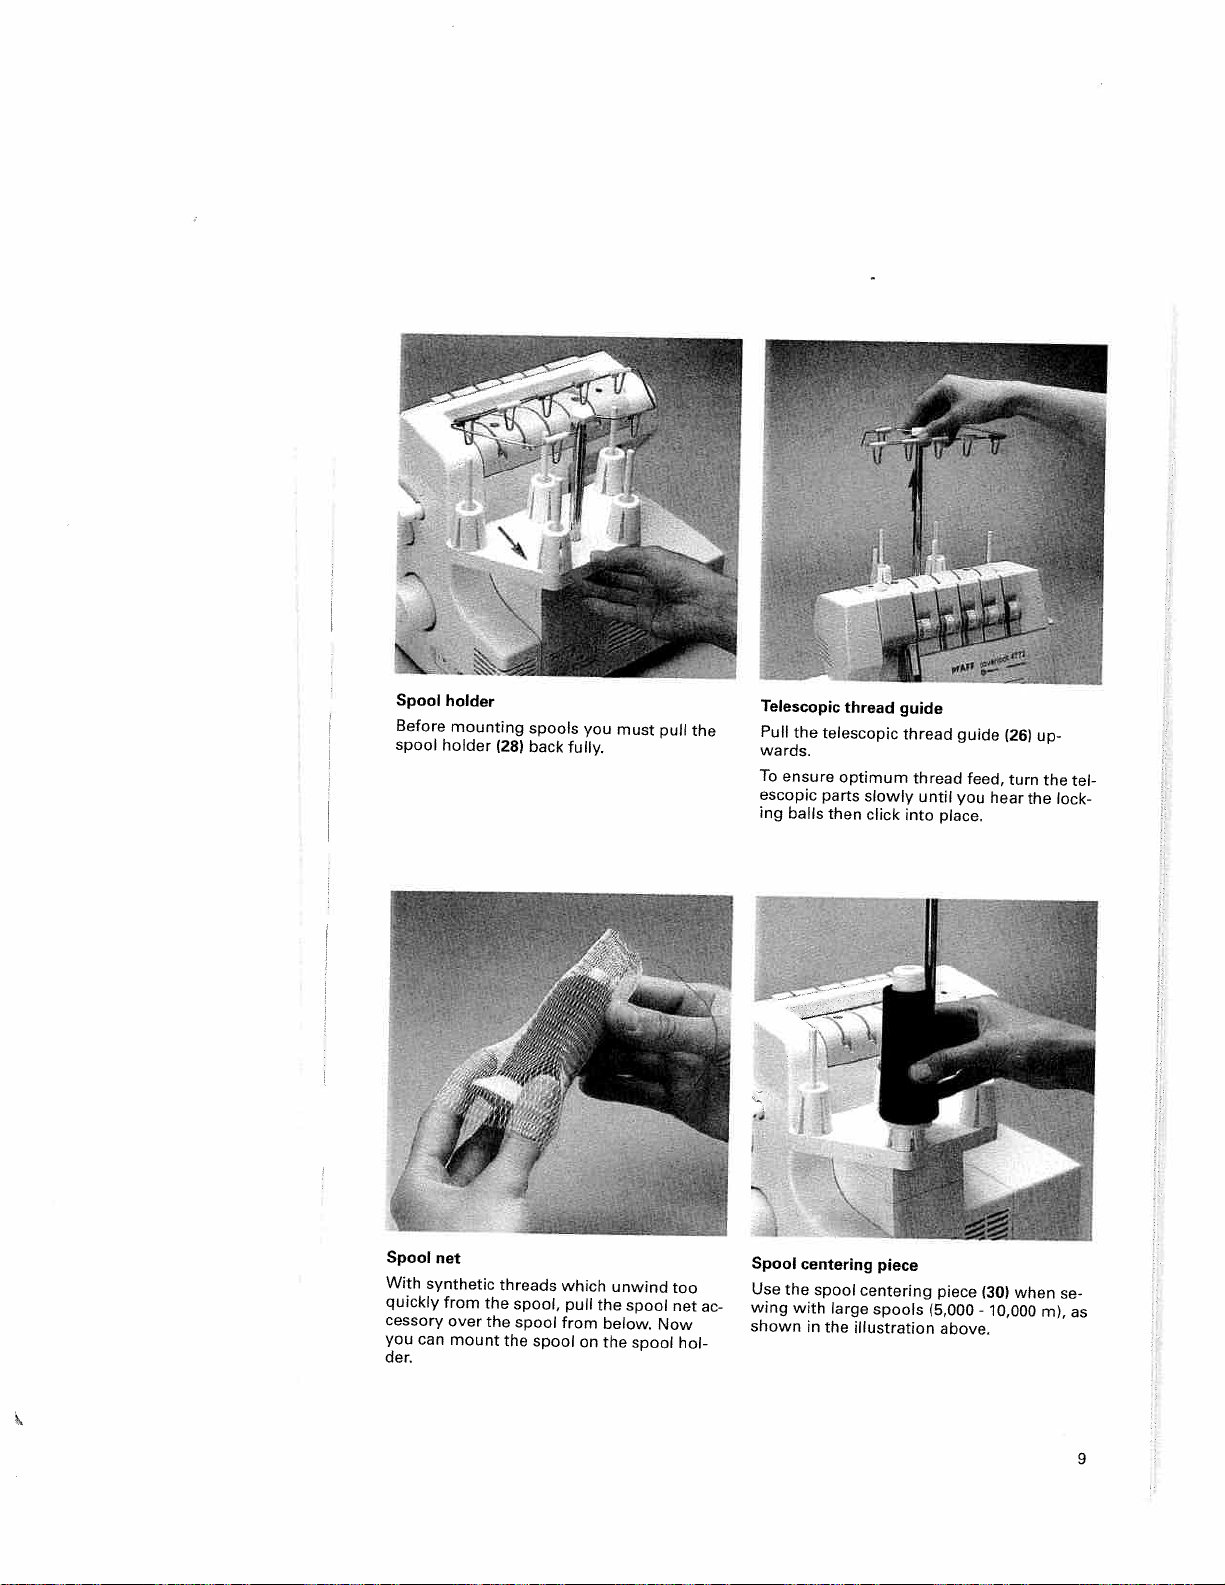
Spool
Before
spool
Spool
With
quickly
cessory
you
can
der.
holder
mounting
holder
net
synthetic
from
over
mount
(28)
threads
the
the
spool,
spool
the
spoois
back
spool
you
fully.
which
pull
from
on
must
unwind
the
below.
the
spool
spool
pull
too
net
Now
hol
the
ac-
Telescopic
Pull
the
wards.
To
ensure
escopic
ing
balls
Spool
Use
the
wing
with
shown
thread
telescopic
optimum
parts
then
centering
spool
large
in
the
guide
thread
slowly
click
into
piece
centering
spools
illustration
thread
until
piece
(5000
guide
feed,
you
place.
above.
hear
(30)
10,000
(26)
turn
when
the
up
the
ml,
tel
lock
se
as
9
é
Page 14
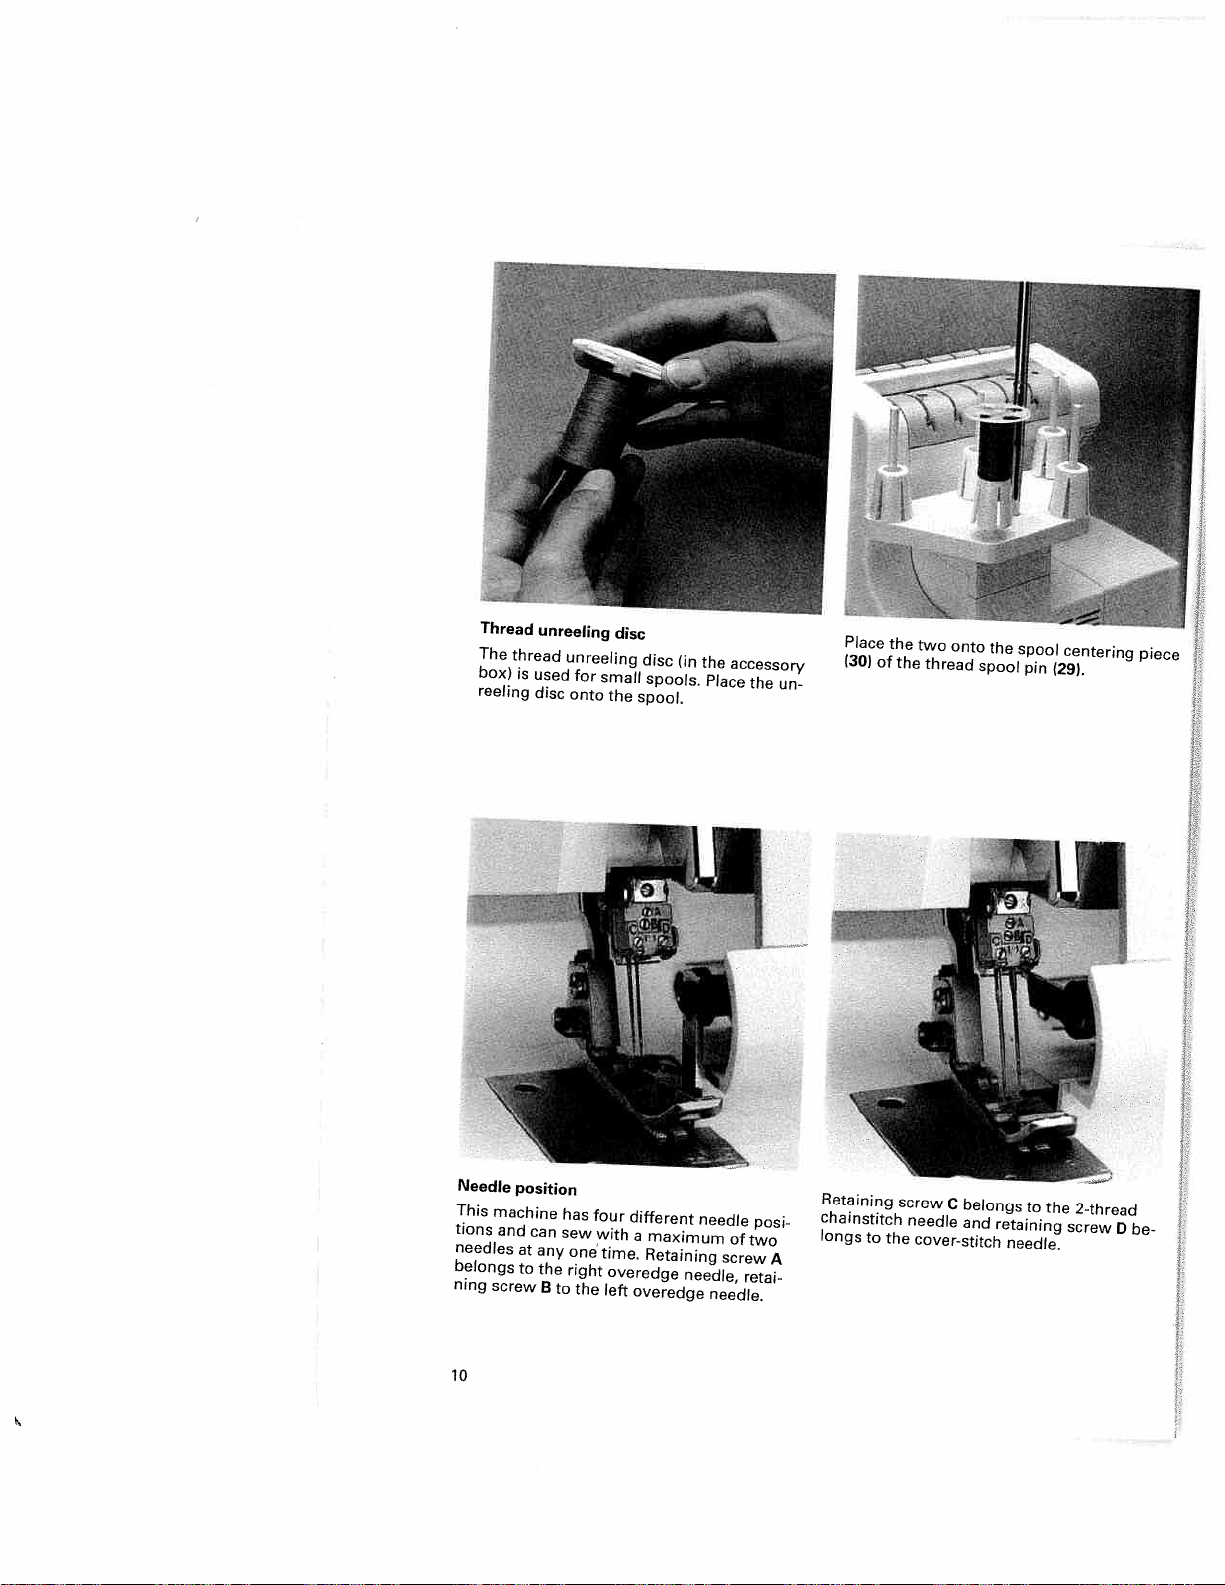
Thread
The
box)
reeling
Needle
This
tions
needles
belongs
ning
thread
is
position
machine
and
at
to
screw
unreeling
unreeling
used
disc
has
can
sew
any
the
B
to
for
onto
one
right
the
disc
small
the
four
with
time.
overedge
left
disc
spools.
spool.
different
a
maximum
Retaining
overedge
(in
the
needle
needle,
accessory
Place
of
screw
needle.
the
posi
two
retai
A
un
Place
(30)
Retaining
chainstitch
longs
to
of
the
the
screw
the
two
onto
thread
C
belongs
needle
and
cover-stitch
the
spool
retaining
spool
pin
to
needle.
centering
(29).
the
screw
2-thread
piece
0
be
10
Page 15
cLD
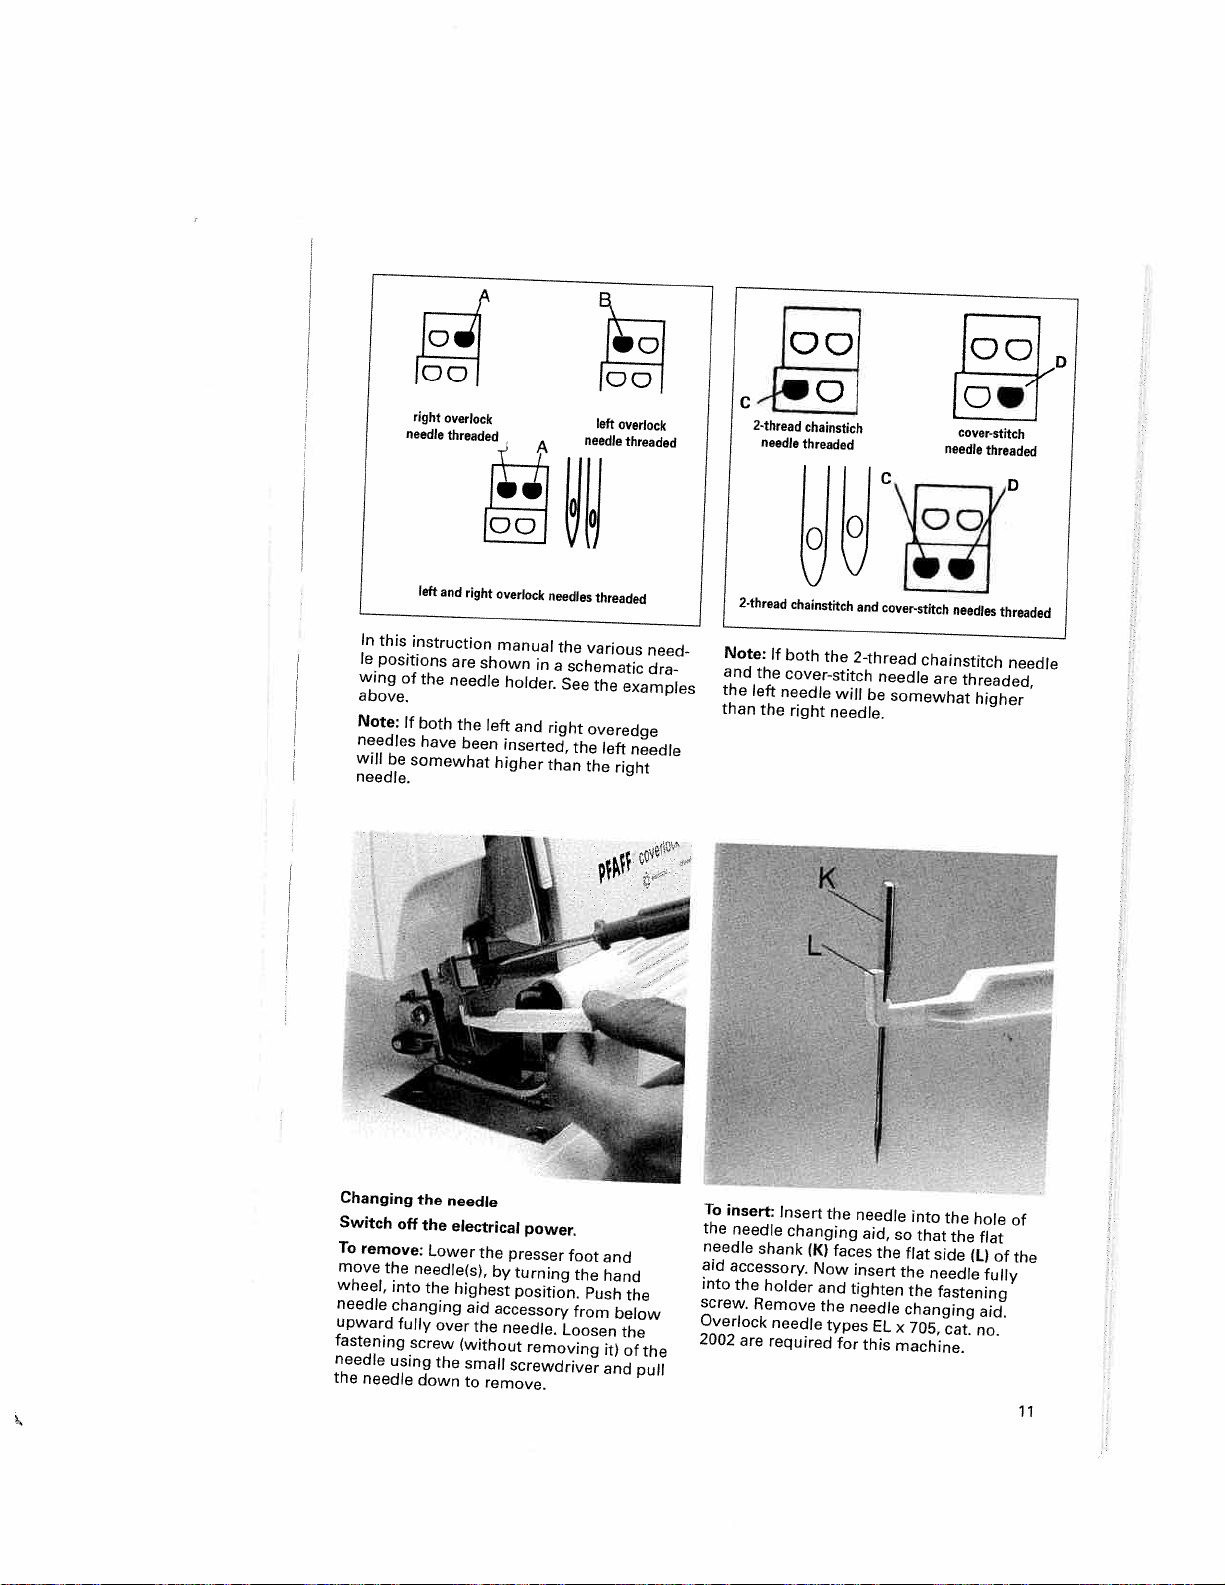
In
this
le
positions
wing
above.
Note:
needles
will
needle.
right
needle
left
instruction
of
If
both
be
somewhat
the
have
overlock
threaded
and
right
are
needle
the
been
!I
SI
Ioöl
overlock
manual
shown
holder.
left
and
inserted,
higher
A
needles
in
right
than
needle
the
various
a
schematic
See
overedge
the
the
left
overlock
threaded
threaded
the
examples
left
right
need
dra
needle
C-I—c
2-thread
Note:
and
the
than
2-thread
needle
If
both
the
cover-stitch
left
needle
the
chainstich
threaded
chainstitch
the
will
right
needle.
and
cover-stitch
2-thread
needle
be
somewhat
os]
cover-stitch
needle
needles
chainstitch
are
threaded,
higher
threaded
threaded
needle
Changing
Switch
To
remove:
move
wheel,
needle
upward
fastening
needle
the
needle
the
off
the
the
needle(s),
into
changing
fully
screw
using
down
needle
electrical power.
Lower
the
over
the
highest
aid
the
(without
small
to
remove.
by
accessory
the
presser
turning
position.
needle.
removing
screwdriver
foot
the
Push
from
Loosen
and
hand
below
it)
and
the
the
of
the
pull
To
insert:
the
needle
needle
aid
accessory.
into
the
screw.
Overlock
2002
are
Insert
changing
shank
holder
Remove
needle
required
(K)
Now
and
the
faces
the
types
tighten
needle
for
needle
aid,
the
insert
EL
this
into
so
that
flat
side
the
needle
the
fastening
changing
x
705,
machine.
the
the
cat.
hole
(LI
no.
flat
fully
aid.
of
of
the
11
Page 16
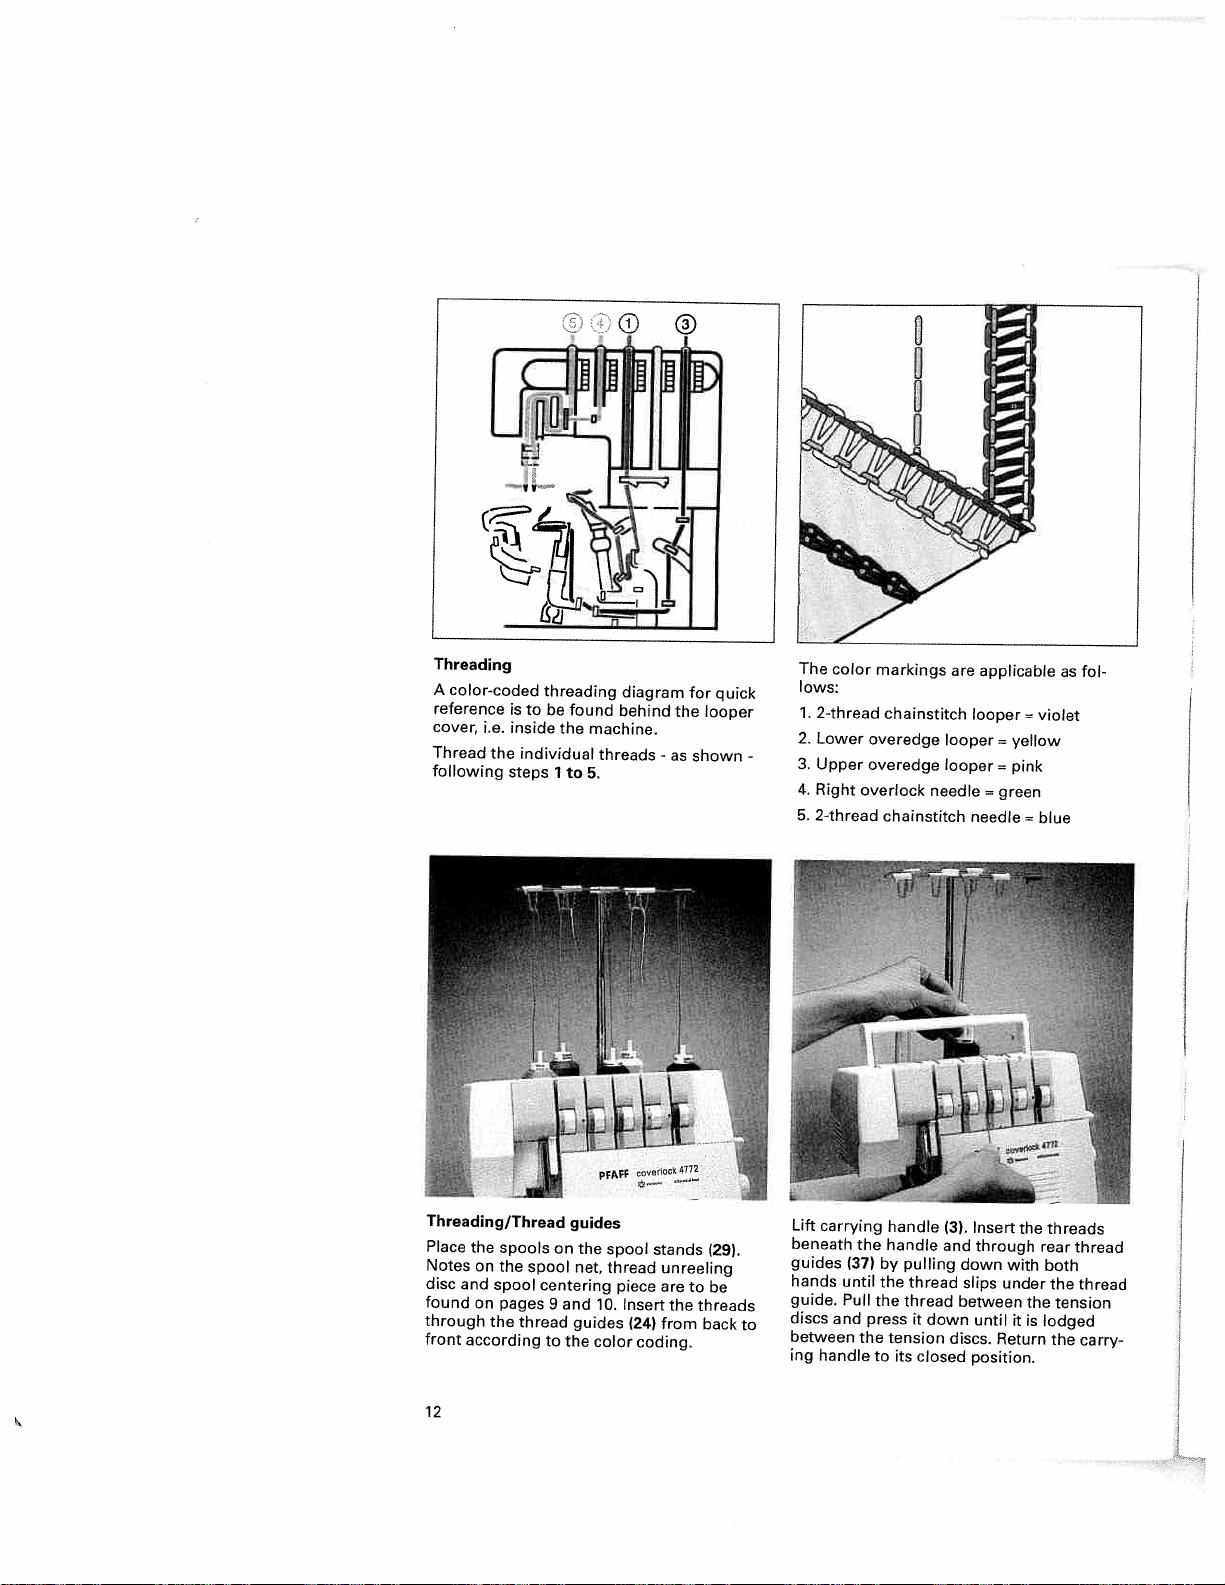
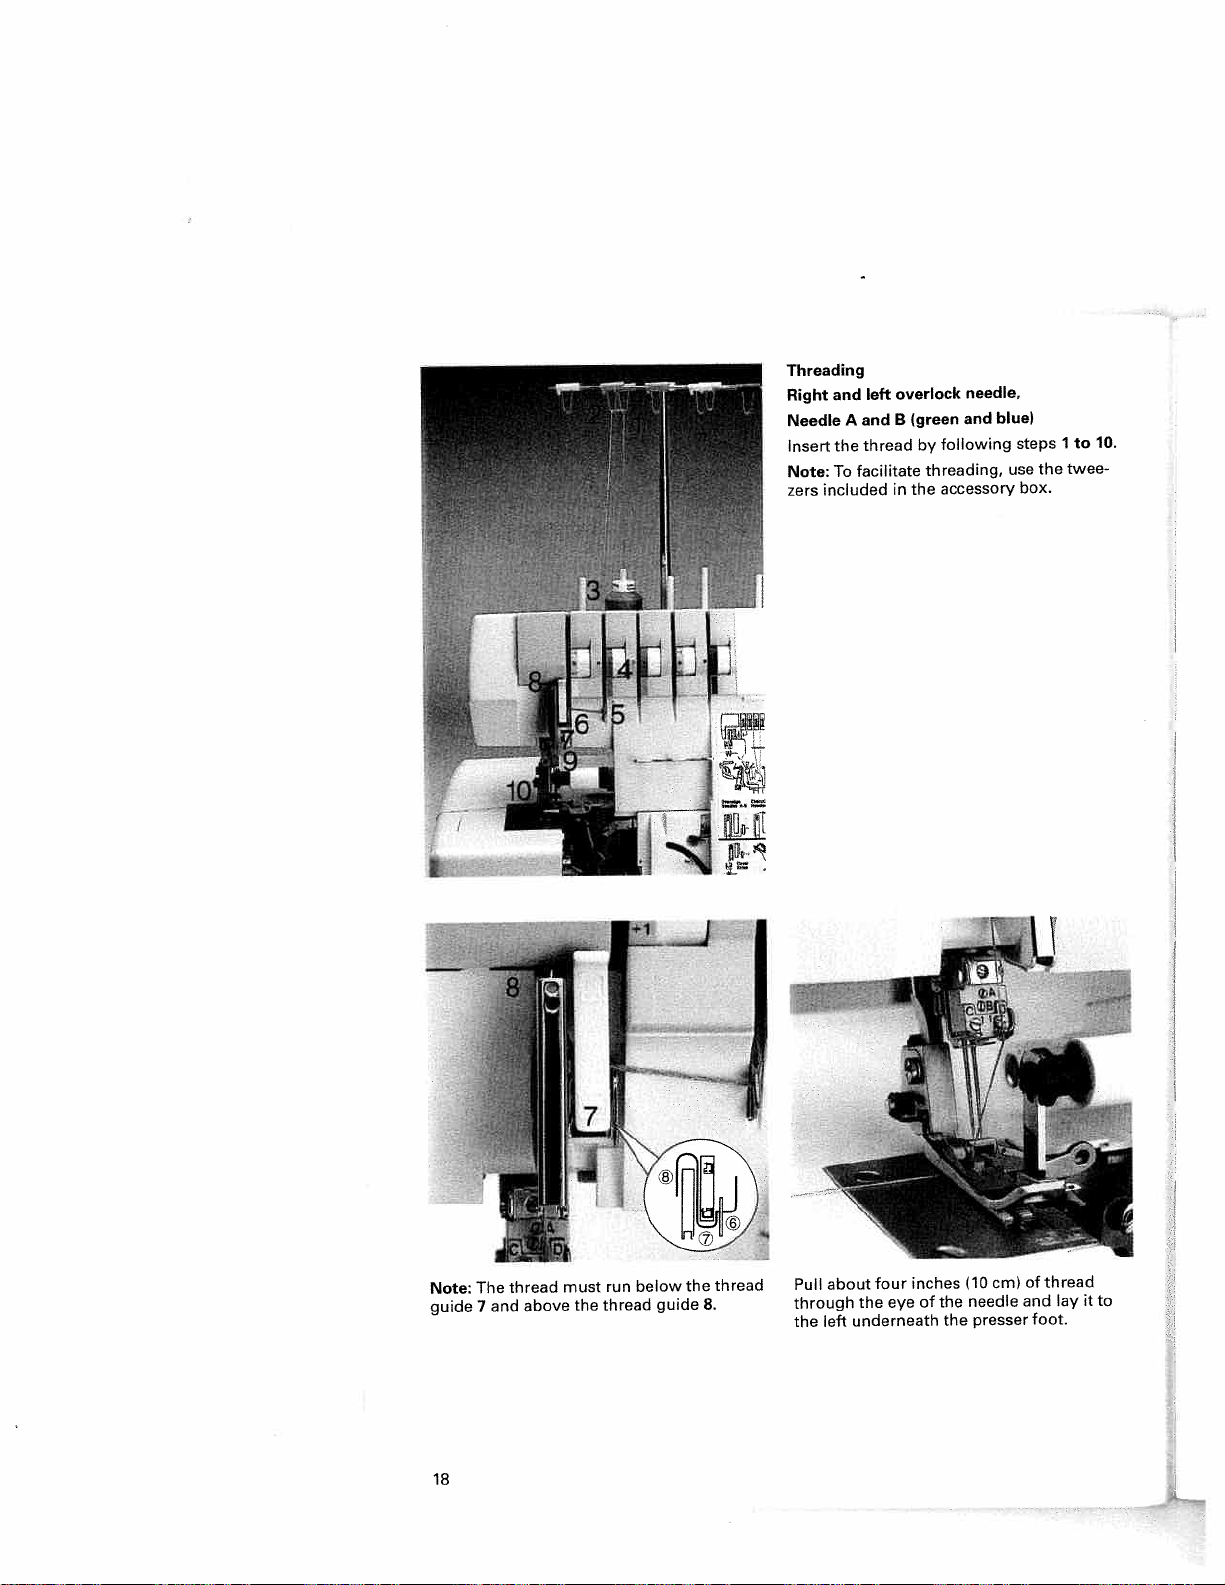
Threading
A
color-coded
reference
cover,
Thread
following
i.e.
the
threading
is
tobefound
inside
individual
steps
1
the
to
diagram
behind
machine.
threads
5.
PFArF
The
color
for
quick
the
looper
-
as
shown
lows:
1.
2-thread
2.
-
Lower
3.
Upper
4.
Right
5,
2-thread
chainstitch
overedge
overedge
overlock
chainstitch
markings
are
looper
looper
needle
applicable
looper
=
yellow
=
pink
=
green
needle
=
=
violet
blue
as
fol
Threading/Thread
Place
the
Notes
disc
found
through
front
spools
on
the
and
spool
on
pages
the
according
spool
thread
12
guides
on
the
net,
centering
9
and
guides
the
to
spool
thread
10.
color
piece
Insert
(24)
stands
unreeling
are
the
from
coding.
(29).
to
be
threads
back
Lift
carrying
beneath
guides
hands
guide.
discs
to
between
ing
handle
and
(371
until
Pull
the
the
by
the
the
press
to
handle
handle
pulling
thread
thread
it
tension
its
down
closed
(3).
and
down
slips
between
discs.
Insert
through
with
under
until
it
Return
position.
the
the
is
threads
rear
both
the
tension
lodged
the
thread
thread
carry
Page 17
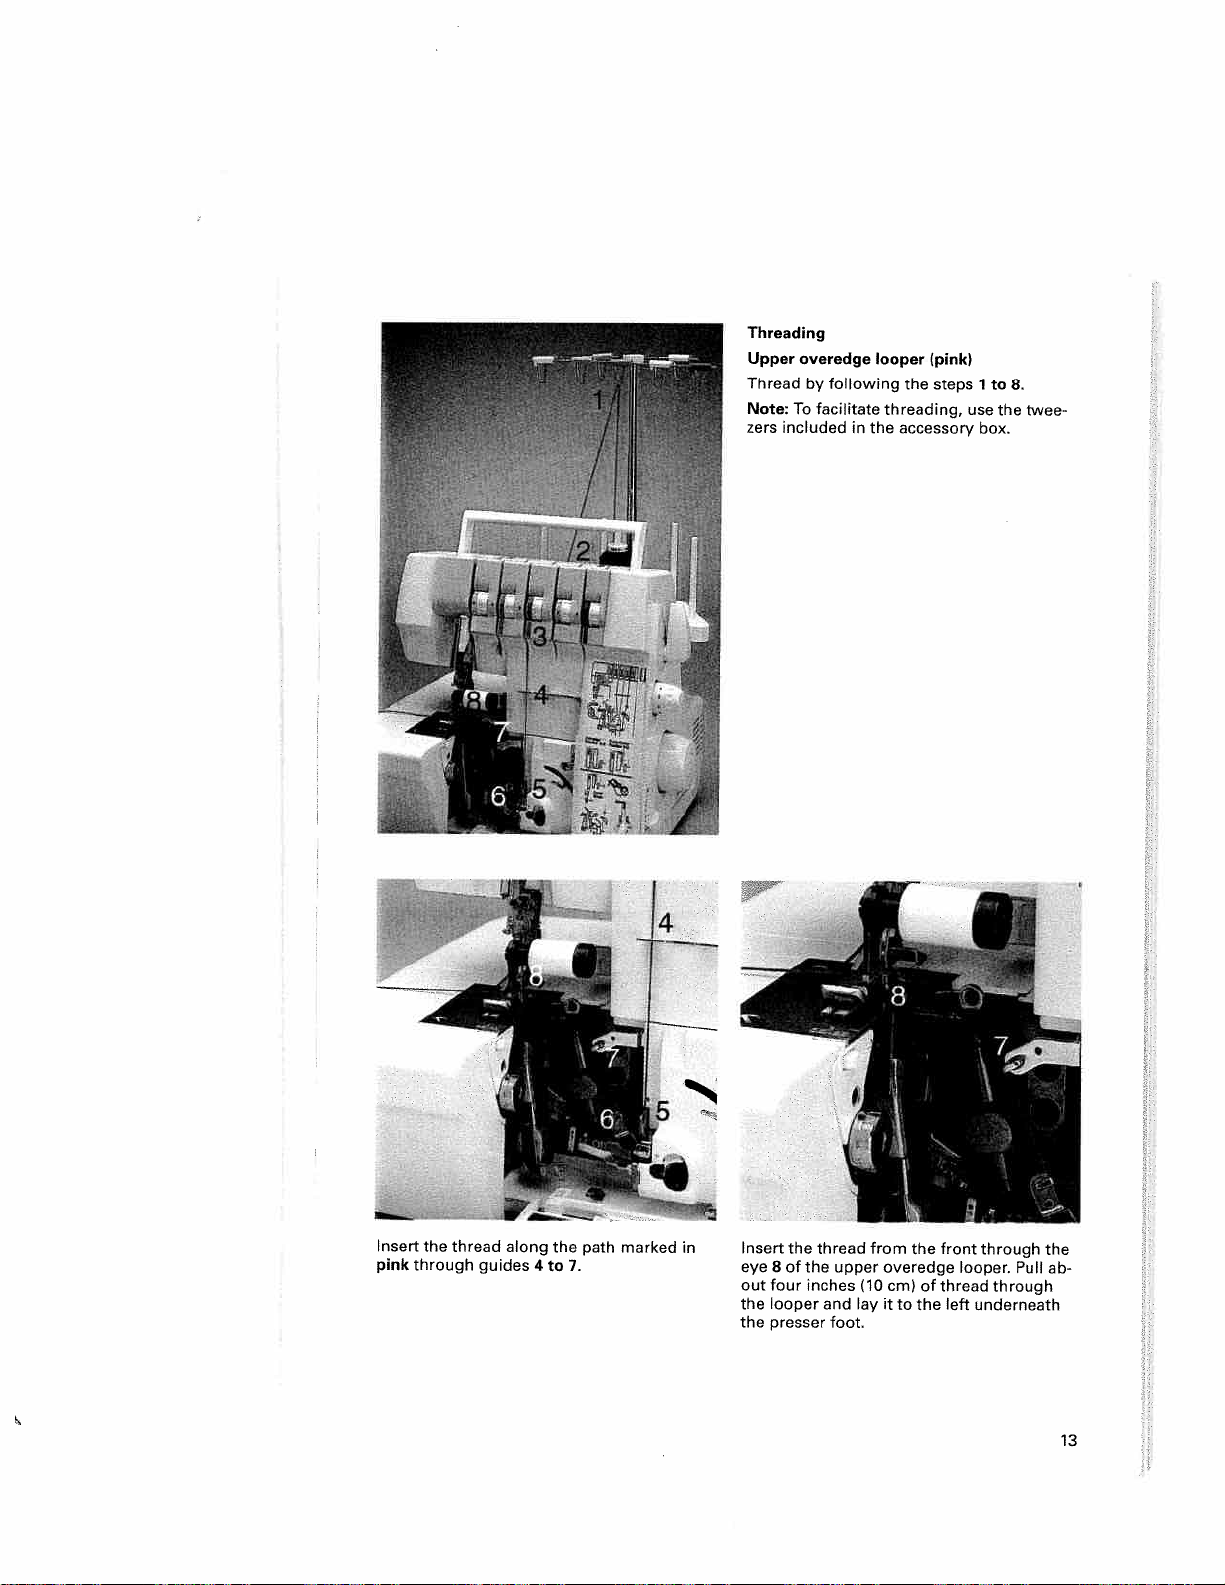
Threading
Upper
overedge
looper
Threadbyfollowing
Note:Tofacilitate
zers
included
in
the
(pink)
the
steps
threading,
accessory
use
1
to
box.
the
8.
twee
Insert
pink
the
through
thread
along
guides
the
4
to
7.
path
marked
in
Insert
the
8
of
eye
out
the
the
four
looper
presser
the
inches
thread
upper
and
foot.
from
(10
lay
the
overedge
cml
of
it
to
the
front
looper.
thread
left
through
Pull
through
underneath
the
ab
13
Page 18
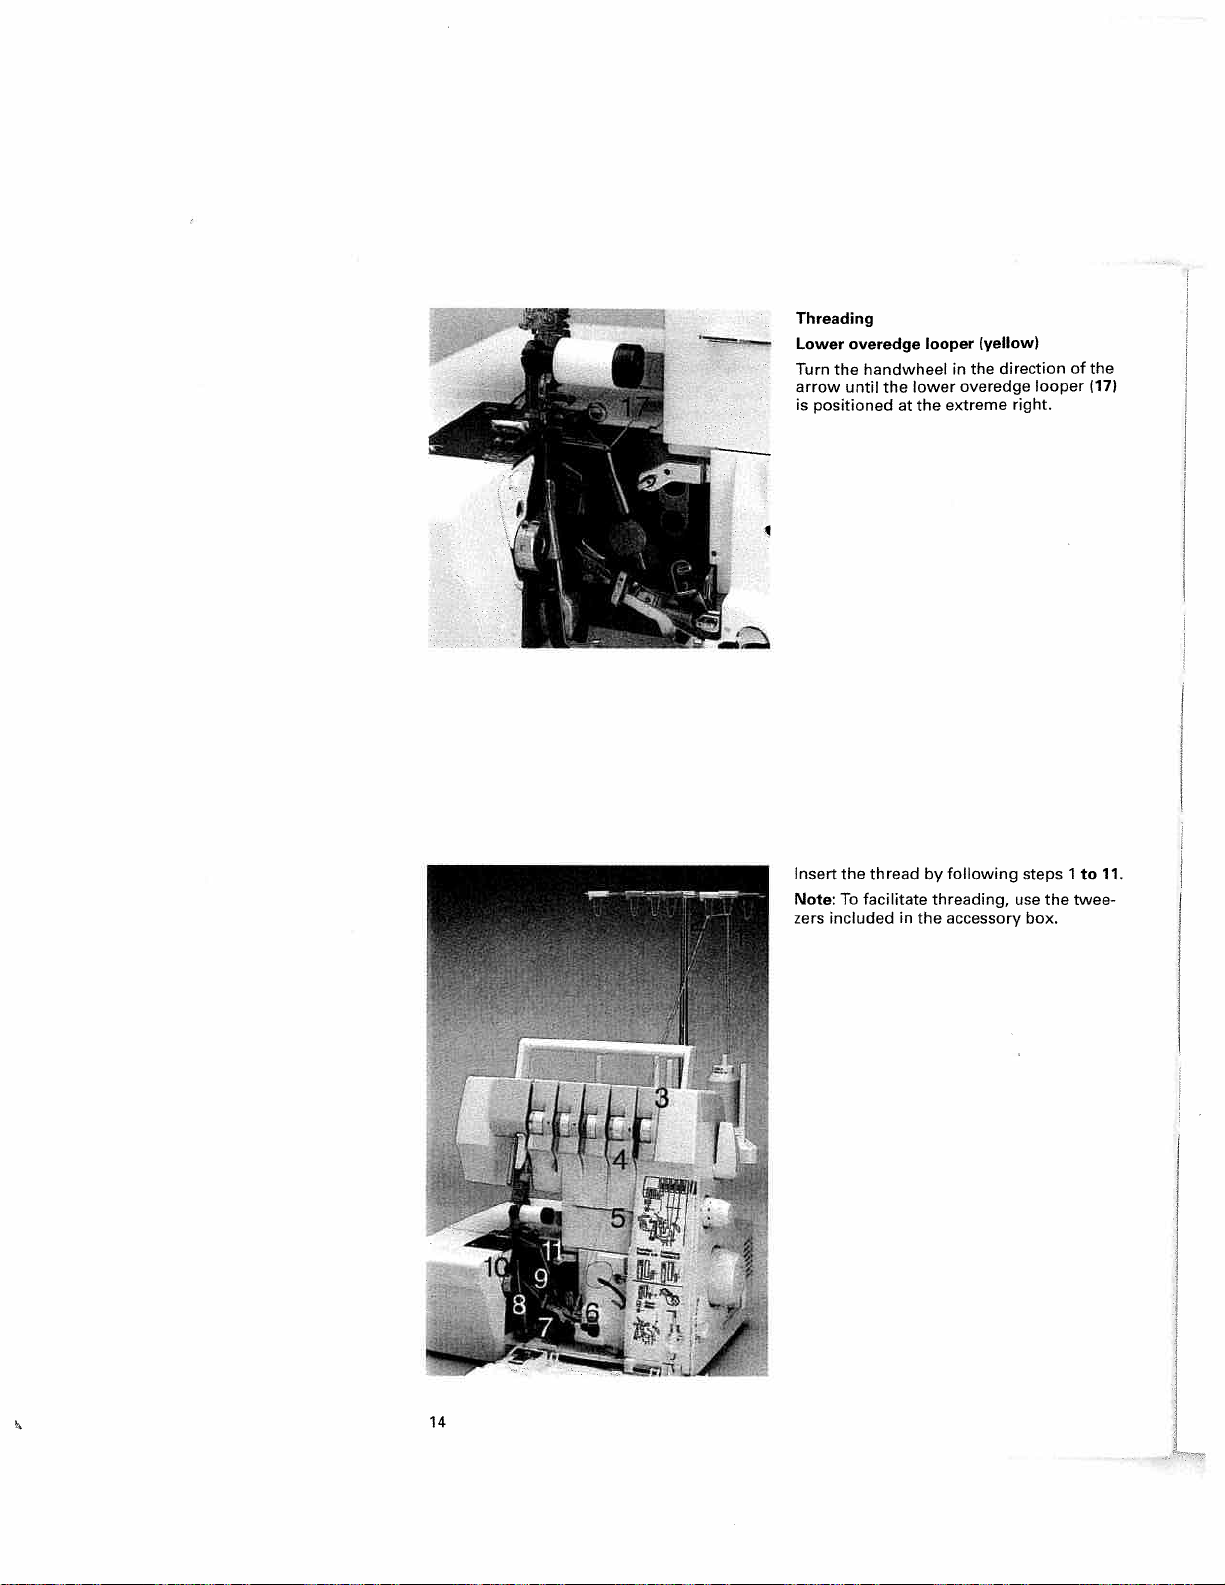
1
Threading
overedge
Lower
Turn
arrow
is
Insert
Note:
zers included
the
until
positioned
the
To
hanc(wheel
facilitate
the
thread
looper
in
lower
extreme
at
the
following
by
threading,
the accessory
in
(yellow)
direction
the
overedge
right.
steps
use
box.
looper
the
of
1
to
twee
the
(17)
11.
14
Page 19
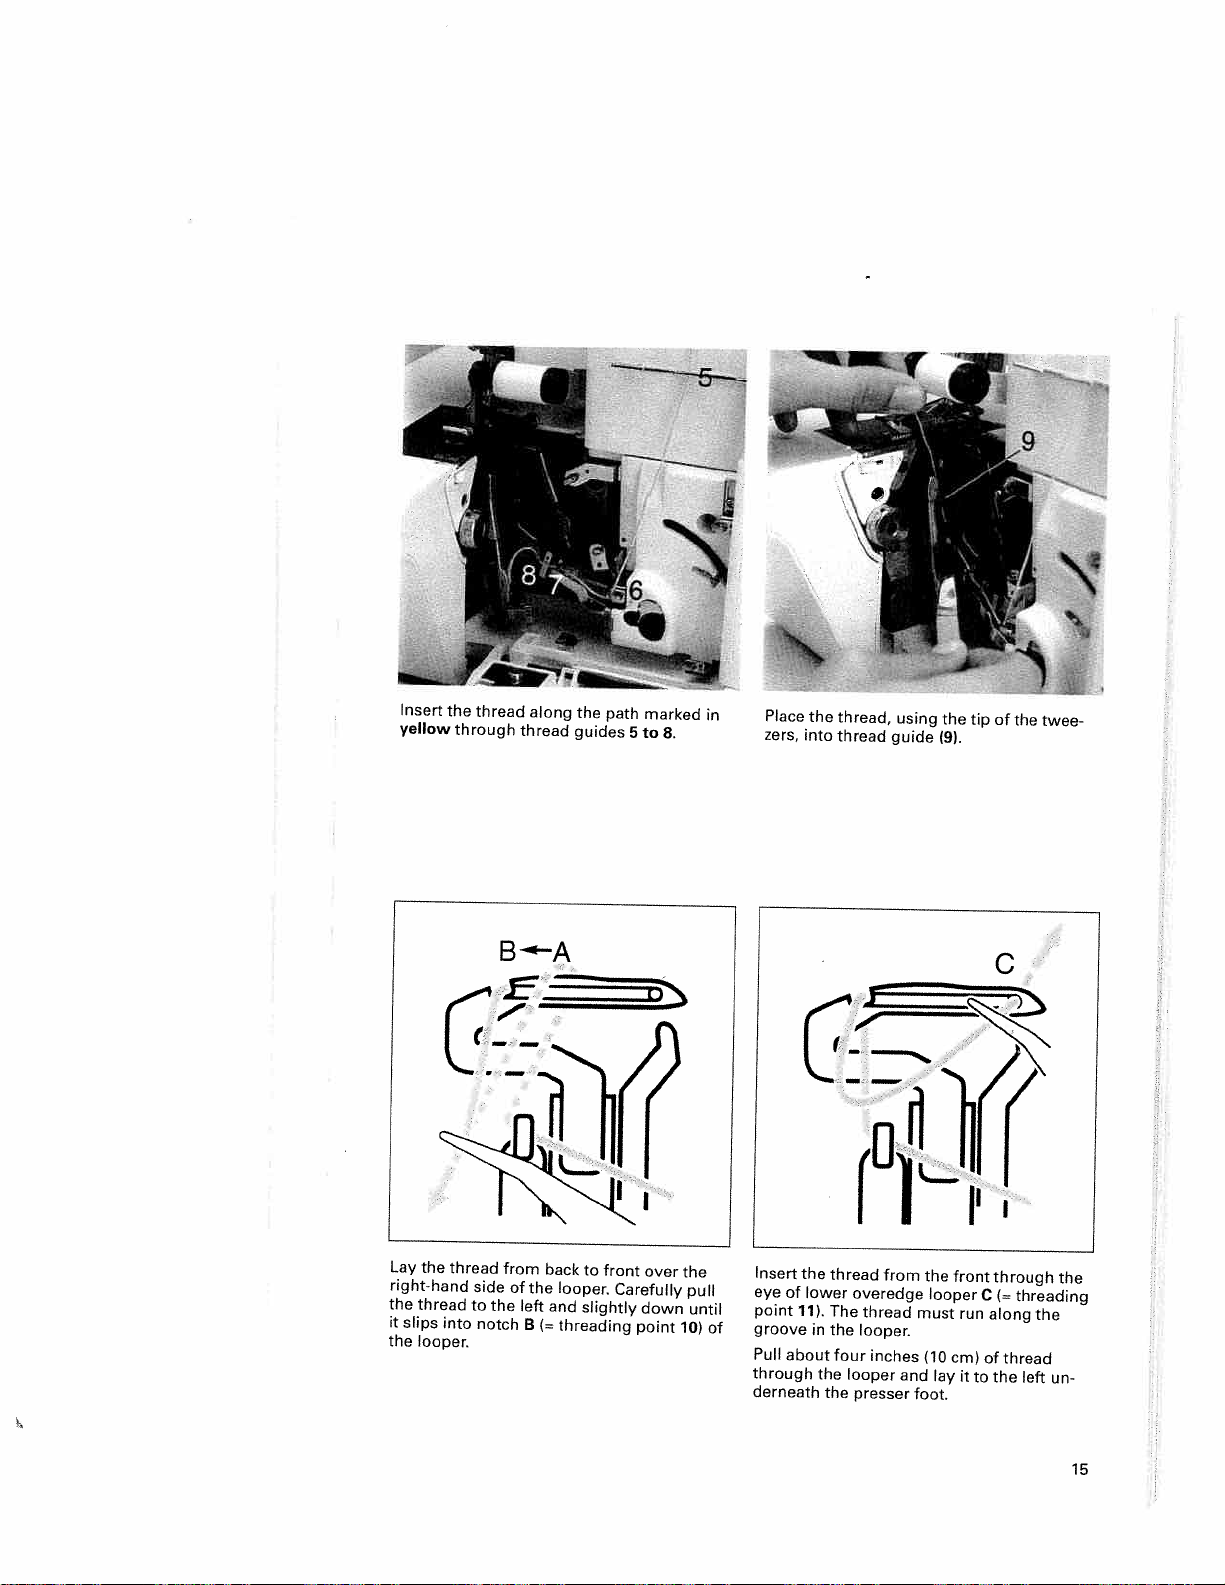
Insert
yellow
thread
the
through
along
thread
the
guides
path
marked
5
to
in
Place
the
thread,
using
the
tip
of
the
8.
zers,
into
thread
guide
(9).
twee
Lay
the
right-hand
the
thread
it
slips
the
looper.
thread
into
side
to
notch
the
B---A
from
back
of
the
left
and
B
(=
to
front
looper.
slightly
threading
over
Carefully
down
point
the
10)
pull
until
C
Insert
the
thread
from
the
front
lay
run
it
C
of
to
through
(=
along
the
eye
lower
of
point
of
groove
Pull
about
through
derneath
11).
in
the
The
the
four
the
overedge
thread
looper.
inches
looper
presser
looper
must
(10cm)
and
foot.
threading
the
thread
left
the
un
15
Page 20
Threading
2-thread
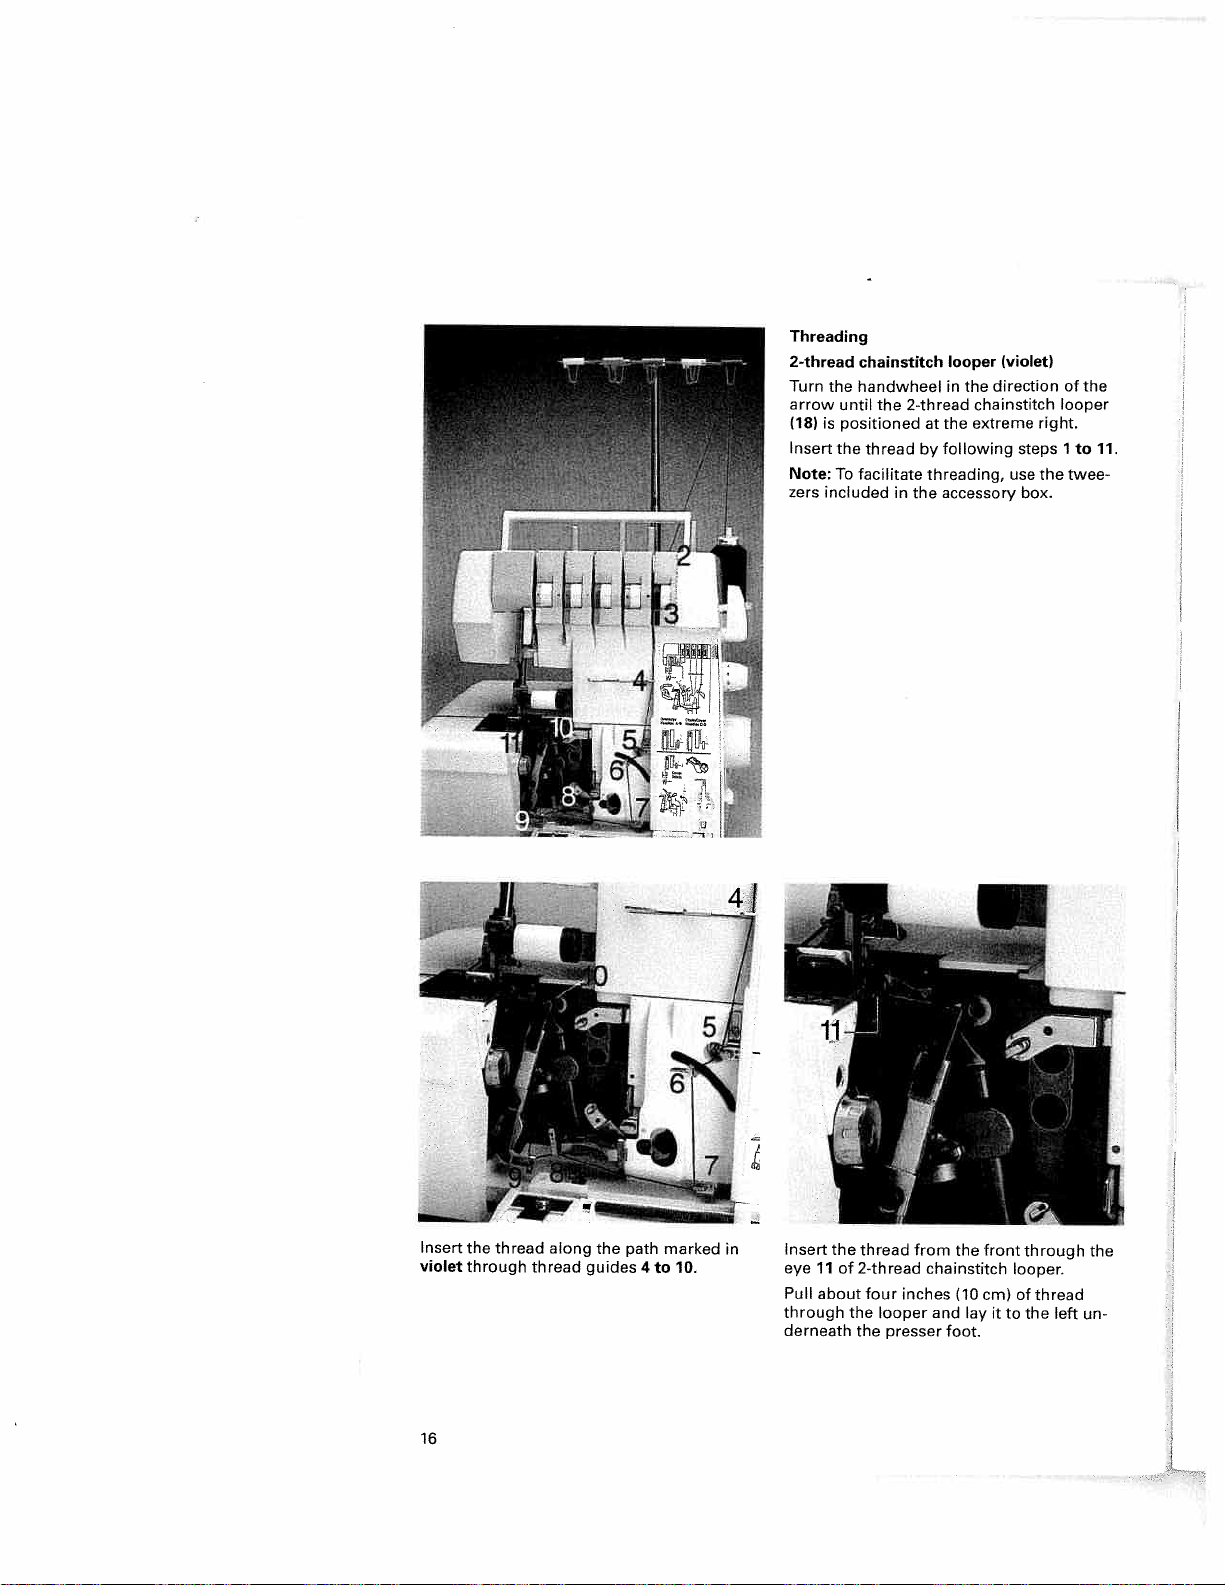
Turn
the
arrow
is
(18)
Insert
the
Note:
To
zers
included
chainstitch
handwheel
until
the
positioned
thread
facilitate
2-thread
by
in
the
looper
the
in
extreme
at the
following
threading,
accessory
(violet)
direction
chainstitch
steps
use
box.
right.
the
of
the
looper
1
to
twee
11.
Insert
violet
16
the
thread
through
along
thread
the
guides
path
4
marked
to
10.
Insert
in
eye
11
Pull
about
through
derneath
the
of
thread
2-thread
four
the
the
inches
looper
presser
from
chainstitch
and
foot.
the
front
(10cm)
lay
it
through
looper.
of
to
the
thread
left
the
un
Page 21
Exception:
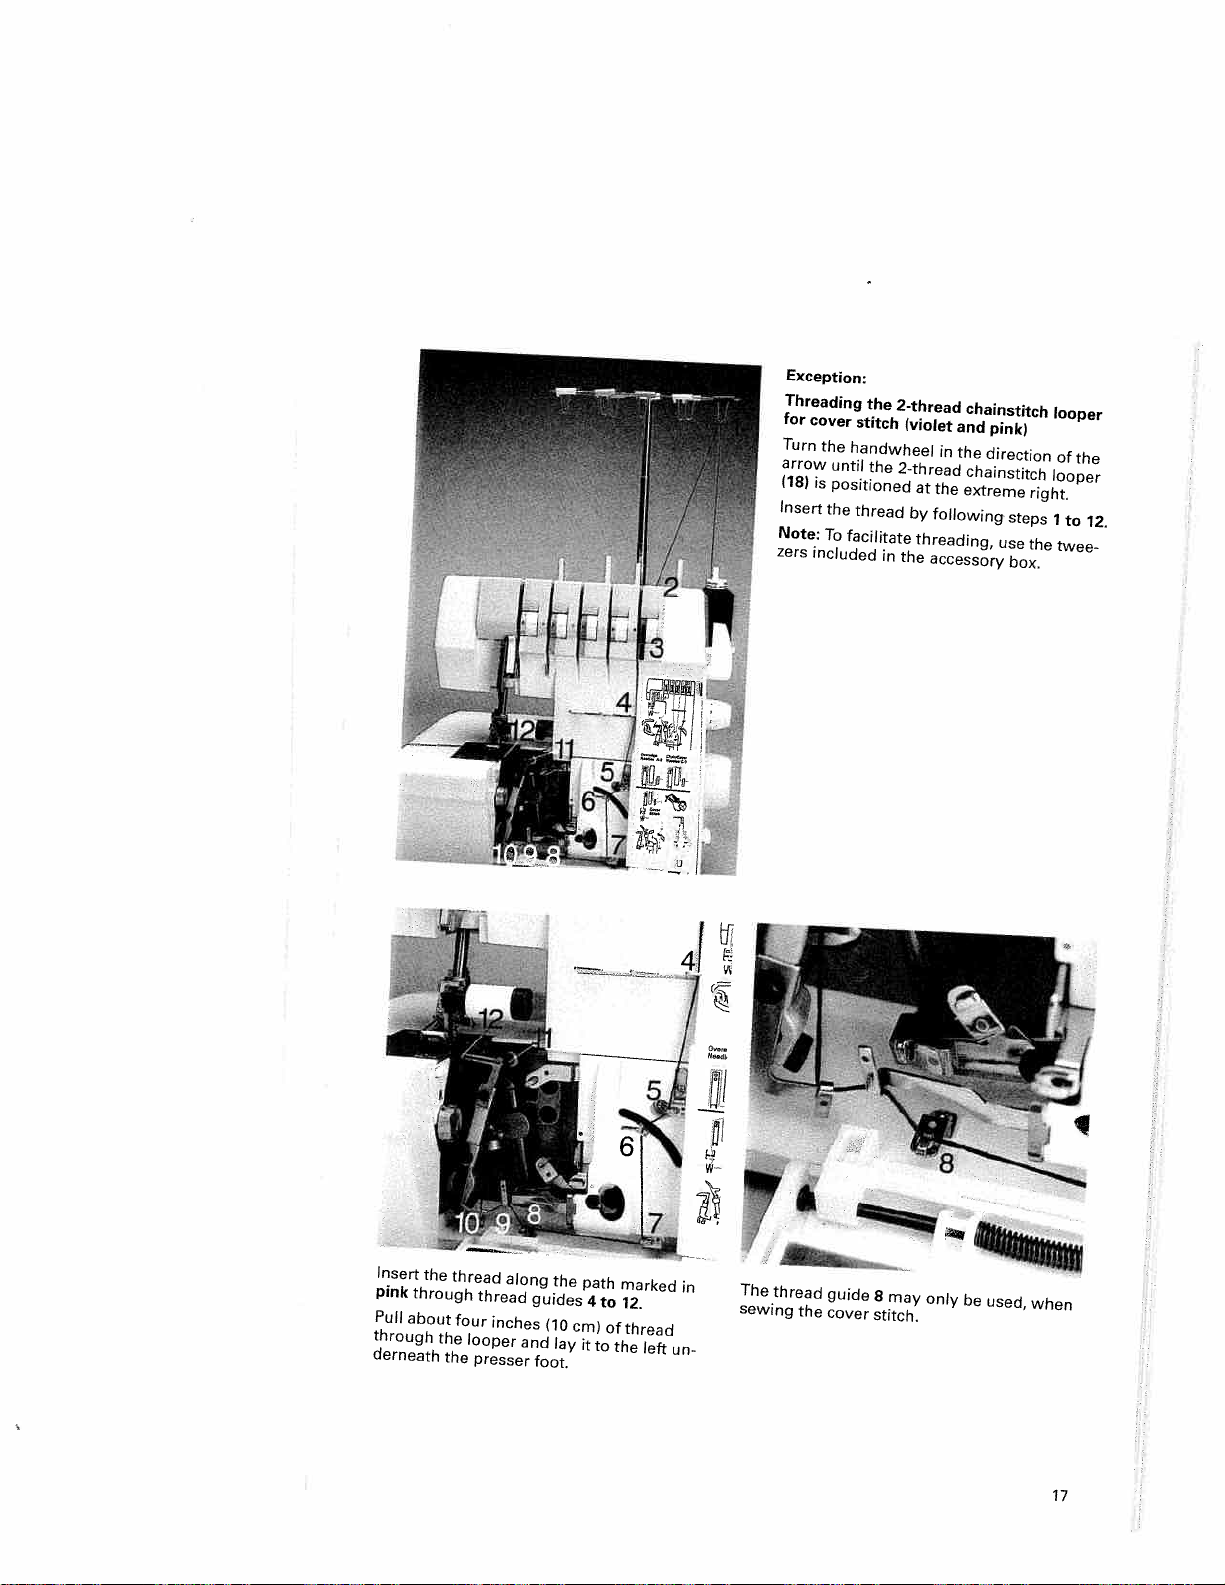
Threading
for
cover
Turn
the
arrow
(18)
is
Insert
Note:
zers
included
the
stitch
handwheel
until
the
positioned
the
thread
To
facilitate
2-thread
(violet
2-thread
in
the
in
at
the
by
following
threading,
accessory
chainstitch
and
pink)
the
direction
chainstitch
extreme
use
steps
box.
right.
the
looper
of
the
looper
1
to
twee
12.
Insert
pink
through
Pull
about
through
derneath
the
the
the
thread
thread
four
looper
presser
along
inches
guides
and
foot.
(10
the
lay
cm)
path
4
it
to
to
of
marked
12.
thread
the
left
un
0
in
The
thread
guide
8
may
sewing
the
cover
only
stitch.
-
be
used,
when
17
Page 22
Threading
and
Right
Needle
the
Insert
To
Note:
included
zers
left
and
A
thread
facilitate
overlock
(green
B
by
threading,
in
the
needle,
and
following
accessory
blue)
use
steps
box.
the
1
twee
10.
to
Note:
guide
18
The
7
and
thread
above
must
the
run
thread
below
guides.
the
thread
about
Pull
through
left
the
four
eye
the
underneath
inches
of
the
the
(10
needle
presser
cm)
of
and
foot.
thread
lay
it
to
Page 23
Threading
2-thread
needle
Needles
Insert
the
Note:
To
zers
included
chainstitch
and
C
D
thread
facilitate
in
needle
(blue
following
threading,
accessory
the
and
and
green)
steps
use
cover-stitch
1
to
the
twee
box.
8.
Note:
guides
The
5
thread
and
run
must
6.
above
thread
To
sew
illustration
the
2-thread
stitch
seam
seam,
thread
shown
ches
(10
the
needle
the
presser
cover
the
A,
and
in
illustration
cml
and
foot.
stitch,
into
thread
chainstitch,
the
4-thread
into
thread
of
thread
it
lay
B.
through
to
the
thread
guide
the
guides
Pull
,
5-thread
safety
about
left
underneath
8.
the
as
7
shown
To
stitch
and
four
eye
sew
safety-
8,
in
of
in
as
19
Page 24
Important
needles
The
that
so
looper
the
instead
in
drawing
followed,
will
ches
the
over
note
must
needle
thread
the
2.
thread
occur.
on
as
looper
Should
breakage
threading
always
threads
seen
thread
this
threaded
be
not
do
in
drawing
as
sequence
missed
or
last
under
run
1,
depicted
not
stit
but
be
If
the
the
ad
needle
looper
needle
the
looper
threads.
threads
threads
threads
break,
out
and
you
needle,
the
of
then
rethread
rethre
the
pull
must
20
Changing
the
Cut
mount
are
,that
threads,
needles.
needle
inches
of
front
the
pull
needle
continuously
led
placed
foot.
a
threads
new
still
and
Raise
threads
cm)
(15
the
threads
eyes.
the
to
spool
off
spools.
the
in
pull
the
until
past
needles.
through
The
left
threaded
a
on
close
together
lie
machine
threads
the
presser
the
last
the
Cut
looper
the
past
underneath
the
to
foot.
knots
thread
the
the
threads
looper
machine
spool
the
the
with
of
out
Pull
about
are
knots
respective
can
eye
presser
the
and
threads
new
the
on
guide
off
be
and
the
6
in
and
pul
Page 25
Presser
The
with
vertical
the
presser
can
be
presser
foot
presser
presser
clearance
achieved
foot
lifter
foot
foot
foot
lifter
can
lifter
of
for
particularly
by
also
towards
be
(36).
1/4
raised
The
inch
(6.0
depressing
the
back.
and
lowered
maximum
mm)
thick
the
for
fabrics
Once
a
thread
presser
raised
if
same
thread
gently
to
thumb.
raised
part
automatically
chine
when
Presser
foot
The
pre-set
machine
terials.
The
presser
changed
be
working
you
may
re.
In
this
event,
from
the
for
the
presser
sure
is
adjusted
left
or
right.
crease
pressure
screw
to
Note:
Turn
until
strikes
it
the
screw
Now
the
set.
foot
lifter
you
continue
and
lift
the
Now
slide
of
you
pressure
presser
is
suitable
foot
for
with
lighter
however
insert
accessory
For
the
right.
the
against
back
standard
chain
has
no
presser
presser
the
the
presser
taken
up
activate
foot
for
pressure
most
materials.
or
need
the
box
foot
pressure
turning
by
heavyweight
turning
by
regulator
the
to
the
left,
presser
been
longer
created,
needs
working
foot.
foot
using
fabric
under
foot.
and
fed
the
foot
pressure
medium-heavy
does
heavy
materials
to
reset
small
screwdriver
into
regulator
(25).
the
screw
fabrics:
the
regulator
screw
to
top
lid.
rotating
foot
pressure
with
It
The
into
not
If
the
is
the
Then
to
be
the
sufficient
your
the
fabric
the
control.
on
the
need
you
are
pressu
screw
The
to
in
right
it
6
times.
the
is
ma
ma
to
then
pres
the
turn
is
21
Page 26

foot
presser
off
remove:
position
white
holder.
insert:
sewing
the
the
of
Please
that
into
the
the
lever
to
Lift
presser
foot
place.
Raise
and
The
from
the
the
foot
the
electrical
the
lift
the
at
sewing
the
left.
spring
under
foot
locks
lift
the
presser
power
needle(s)
presser
the
rear
foot
holder
do
To
slightly
the
lever
the
into
presser
toot
the
of
will
this,
holder
is
presser
is
the
to
foot.
presser
be
and
lift
and
so
lowered,
foot
properly
hig
released
can
the
insert
that
foot
lever
Press
be
spring
the
to
lock
Changing
Switch
To
hest
the
foot
automatically
removed
slightly.
To
the
when
pin
holder.
Check:
ensure
\
ed
Presser
Use
cessory
Use
further
the
On
extension
the
le(s)
used
Thread
After
8
to
Pull
front
This
foot
cover-stitch
box
standard
the
programs
presser
istobe
aid
an
as
chain
finishing
(15
inch
the
thread
over
the
will
cut
presser
sewing
when
presser
(see
feet,
which
of
positioned.
when
trimmer
seam,
the
cm)
—20
chain
thread
off
the
page
there
is
sewing.
long
from
chain
thread
foot
cover
foot
are
where
These
sew
the
chain.
from
C
stitch.
1O)
36-
41).
markings
the
markings
an
thread
back
trimmer
the
all
for
need
approx.
chain.
to
(27).
ac
A,
can
6
the
22
Page 27

an
Disengaging
Switch
S
Raise
sition
ad
trimming
per
vable
Turn
you
zontal
cover.
upper
the
until
position.
off
upper
by
head
the
the
the
blade
rotating
waste
Now
blade
of
upper
upper
electrical
(23)
the
container
slide
fully
the
upper
blade
blade
power
to
its
handwheel.
and
the
holder
towards
blade
locks
uppermost
Detach
open
of
the
the
right.
away
into
a
hori
the
from
po
the
loo
mo
Engaging
Slide
towards
until
it
the
looper
waste
the
the
holder
the
locks
cover
container.
upper
right
into
of
and
its
and
blade
the
movable
swing
working
re-attach
upper
the
blade
position.
the
trimming
blade
back
Close
23
Page 28

Fitting
Switch
converter
The
seams,
closing
stitch
container
verter
chine
Insert
ture
of
converter
the
the
off
the
for
seam
seam.
and
is
(7)
housing.
hub
the
must
and
Detach
open
located
of
A
upper
electrical
be
2-needle,
for
the
the
in
it
Pull
the
converter
overedge
power
fitted
3-thread
the
trimming
looper
the
out.
for
4-thread
front
into
looper.
all
overedge
waste
cover.
the
of
2-thread
safety-
Con
ma
A
aper
the
Rotate
arrow
positioned
is
blade.
per
Rotate
press
that
eye
The
der.
handwheel
the
until
the
upper
the
the
tip
of
the
converter
upper
the
the
to
converter
the
of
looper.
can
right
part
converter
be
the
in
overedge
of
towards
slightly
removed
direction
looper
movable
the
the
the
to
locks
in
of
and
left
rear
into
reverse
the
(16)
up
so
the
or
24
Page 29

Setting
latch
For
Set
to
For
Set
to
standard
the
position
rolled
the
position
bed
the
bed
hems
slide
R.
bed
overlock
slide
S.
and
for
slide
for
stitch
the
stitch
for
seams:
cover
the
width
width
stitch
stitch
latch
latch
width
(21)
(21)
Stitch
All
with
Stitch
ward.
can
width
standard
this
width
All
be
sewn
setting.
rolled
latch
overlock
latch
with
A
hems
this
A
will
will
and
be
seams
be
the
setting.
pushed
can
pushed
cover
forward.
be
back
stitch
sewn
25
Page 30
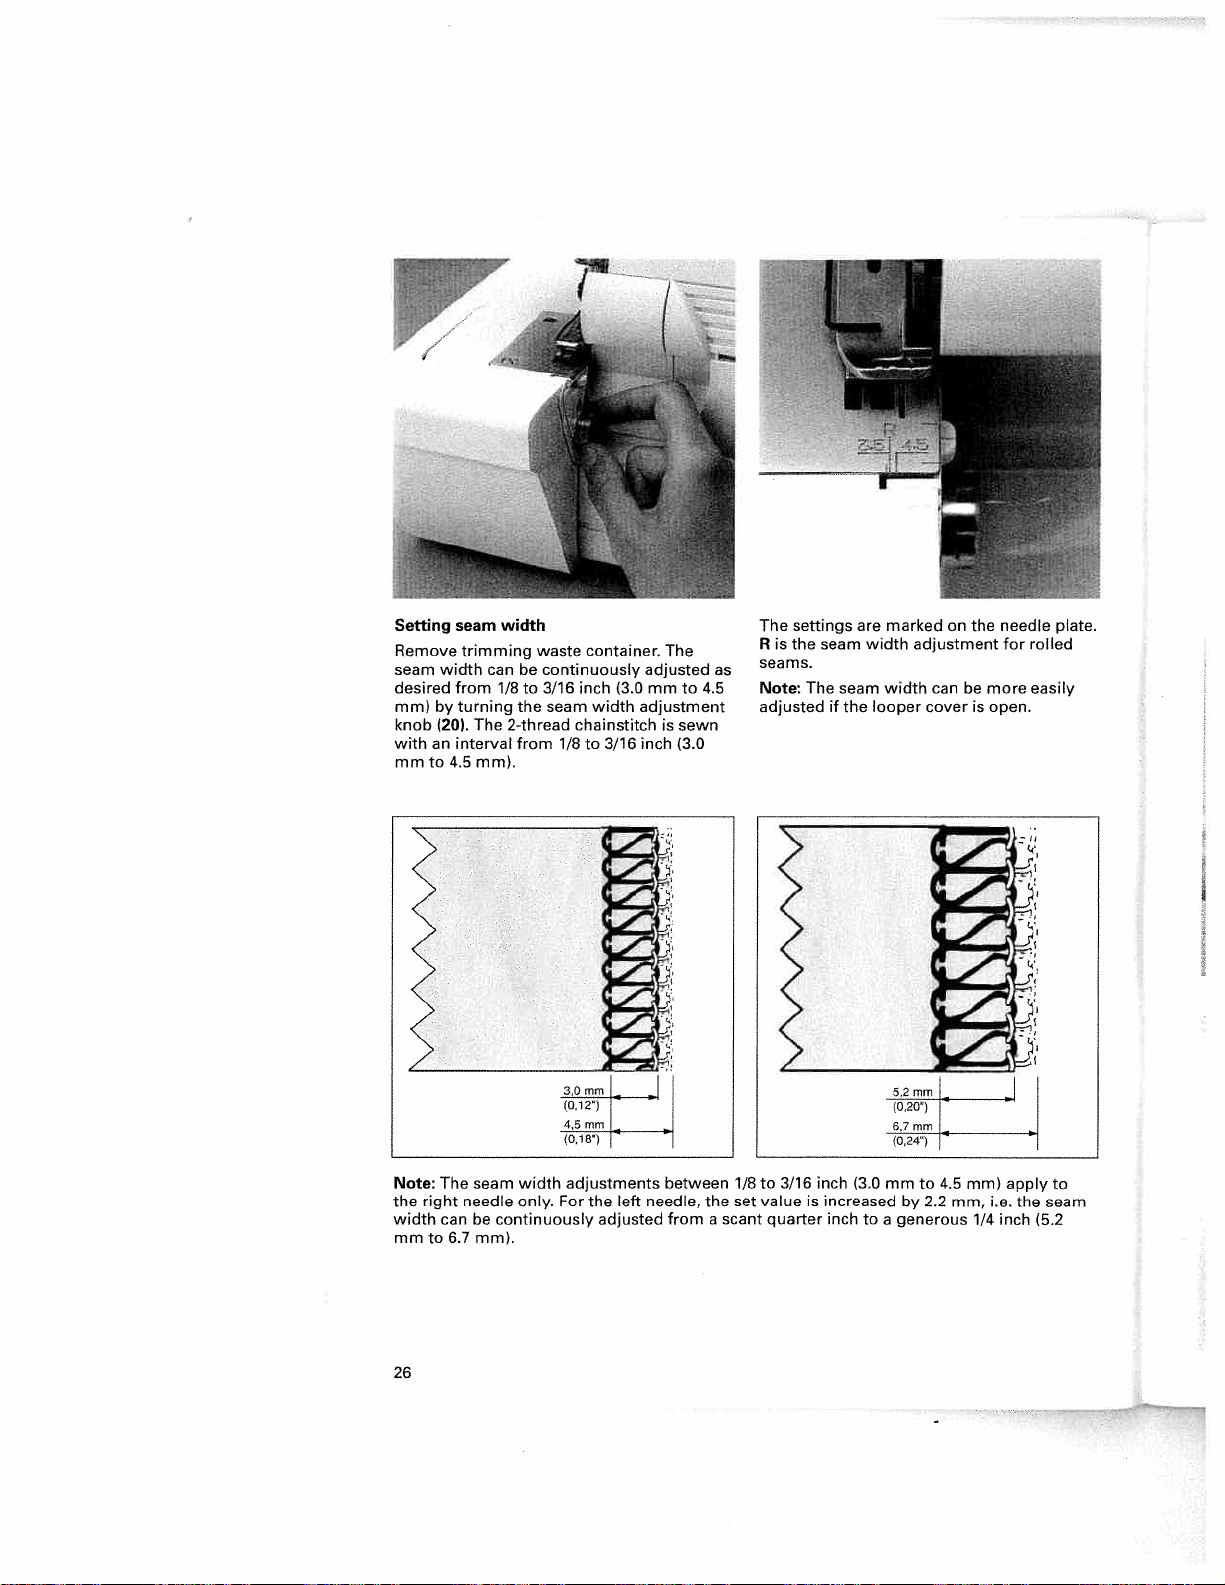
Setting
Remove
seam
desired
mm>
knob
withaninterval from
mm
Note:
the
by
(20).
to
right
seam
width
trimming
width
canbecontinuously
from
1/8to3/16
turning
The
2-thread
4.5
mm>.
The
seam
needle
waste
the
seam
1/8to3/16
width
only. For
3,0mm
(0.12’)
4,5
(0,18)
width canbecontinuously
mmto6.7
mm>.
container.
inch
(3.0
width
chainstitch
—
•
mm
adjustments
the
left
adjusted
The
adjusted
mmto4.5
adjustment
is
sewn
inch
(3.0
between
needle, the
fromascant
The
Risthe
seams.
as
Note:
adjustedifthe
1/8to3/16
set
valueisincreased
quarter
settings
seam
The
inch
marked
are
width
adjustment
seam
width canbemore easily
looper cover
mmto4.5
(3.0
by
inch
toagenerous
2.2
on
mm,
the
is
mm)
1/4
needle
for
open.
apply
i.e.
inch
the
plate.
rolled
to
seam
(5.2
26
Page 31

Setting
The
it
the
stitch
1
F
mm>
(4
adjustment
most
For
justment
working
with
justment
the
the
slightly,
with
detachable
Sewing
Detach
Pull
ward
Note:Ifyou
tainer
beforehand,
detachable
length
to
knob
sewing
knob
knob
work
work
can
mm
4
(35).
work,
should
close-knit
to
4
free
the
support
and
detach
support.
be
by
be
mm.
arm
work
remove
the
is
it
as
set
turning
stitch
the
at
set
fabrics,
support
this
trimming
easier
desired
stitch
mm.
3
set
to
remove
to
length
the
(12)
the
waste
from
length
ad
When
ad
for
left.
con
the
length
stitch
free
The
tubular
wing
sleeves.
Reattaching
Position
it
is
that
it
to
slide
tion.
arm
Insert
the
level
the
particularly
is
such
items
article
the
work
the
detachable
the
with
until
right
as
over
support
work
machine
it
locks
useful
trouser
the
support
for
free
cover,
into
legs
posi
se
and
arm.
so
then
27
Page 32

Differential
differential
The
dogs
(A
move
which
regulates
(34)
dog
feed
fed
be
to
range
the
standard
The
feed
front
the
with
feed
rear
fabric.
of
The
Note:
feed
also
and
ted
feed
arranged
B),
+
the
the
and
(A),
through.
and
0.5
setting
dog
feed
rear
dogs
effectiveness
depends
type
the
feed
fabric.
movement
thus
It
2.0.
moves
(A)
dog
both
on
of
consists
one
Adjustment
the
can
1.0,
is
(B),
move
the
fabric
two
of
behind
the
of
amount
adjusted
be
which
by
synchronously
the
i.e.
same
the
differential
of
the
length
stitch
used.
the
lever
front
of
front
feed
other,
fabric
within
the
and
amount
selec
differential
If
0.5,
to
set
fastasthe
feeds
dog
rear
the
as
Asaresult,
28
/
feed
front
the
rear
through
feed
the
adjustment
feed
feed
only
dog.
fabric
dog,
is
lever
moves
dog
the
i.e.
half
as
stretched.
front
much
(34)
half
is
feed
fabric
fabrics
a
is
when
ga
when
silk
seam
way,
rib
knit
the
sewing
and
(A).
touches
such
(B).
taffeta.
as
delicate
very
result
The
alsobeintroduced
can
wave
the
effect
as
as
such
smooth
Fashionable
this
in
using
prevents
This
thered
becoming
from
seam
Page 33

ther
Inc
(tin
tnd
nt
iu
al
alec-
Set
2.0
as
feed
bric
As
fast
differential
so
that
as
dog
as
the
a
result,
the
the
feeds
rear
the
feed
front
rear
through
feed
fabric
adjustment
feed
feed
dog,
dog.
is
gathered.
dog
twice
moves
i.e.
as
lever
the
much
twice
front
(34)
fa
to
This
prevents
stretched
as
Jersey
a
smooth
Fashionable
in
this
way,
using
very
when
and
seam
touches
such
delicate
the
sewing
rib
(C).
seam
stitch
as
can
the
fabrics
from
knitted
goods.
also
gather
(D).
becoming
fabrics
The
result
be
introduced
effect
such
is
when
ted
The
following
should
Type
always
of
fabric
table
test
I
effect
contains
your
setting
information
first
on
a
on
piece
the
Very_light_fabrics:_silk,_satin,_poplin,_taffeta,_linings.
Normal
thermal-wear.
Light
fine
Heavy
heavy
Stretch
sleeve
Gathering:
for
flaps,
sleeve
kniwear:
knitwear
knitwear:
knitwear.
and
curves,
stretching
widths
fabrics:
-
wavelike
collar
ruffling
arches
light
jerseys,
and
or
for
and
polo
gathered
sweatshirt
effect:
edges,
light
on
blouses,
gentle
cuffs
or
medium-heavy
fabrics,
materials.
fleece,
medium
skirt
hems,
materials
shirts,
ruffling
gathered
heavy
and
dense
and
of
arched
fabrics.
cut-pile
light
lace,
skirts,
cottons,
pullovers,
gathered
knitwear
stitch
seam
round
sleeves
differential
of
scrap
fine
materials,
ruffled
lengths.
allowances
pockets,
(shoulders),
fabric.
cords,
tricot,
teed
settings.
gather
<2.0>
•
However,
Differential-feed
normal
<1.0?-
you
setting
stretch
<0.5>
29
Page 34

Adjusting
and
Switch
For
cover
Turn
arrow
position.
(see
container
gage
the
stitch
For
cover
Remove
screwing
ver
from
of
the
plate
slightly.
the
two-thread
off
eIectrica
stitch:
the
handwheel
until
the
Remove
page
22).
and
the
upper
width
stitch:
the
standard
screw
the
accessory
needle
machine
needle(s)
Detach
open
blade.
latch
A
plate.
Then
to
chainstitch.
power
in
the
the
standard
the
the
looper
Set
to
R
needle
using
the
box.
This
raises
remove
the
direction
in
is
the
trimming
the
bed
(see
page
plate
large
Press
the
it
to
cover
presser
cover.
screwdri
on
the
stitch
of
highest
waste
Disen
slide
25).
by
un
area
needle
left.
the
foot
for
B
30
For
cover
Raise
the
sert
cover
“C”)
from
Re-tighten
needle
C
(see
foot
(marked
box
(see
D
page
stitch:
finger
stitch
the
the
and
page
protection
needle
accessory
screw.
two-thread
11).
Attach
with
“C”)
22).
slightly
plate
box.
Insert
cover-stitch
chainstitch
cover-stitch
from
(marked
the
accessory
and
with
needle
presser
in
I
Page 35

handwheel
the
needle(s)
two-thread
Insert
11).
page
trimming
the
looper
latch
chainstitch:
the
in
waste
cover
(the
is
at
set
direction
in
are
chainstitch
container
bed
Disengage
S).
the
slide
the
of
highest
need
for
and
the
the
two-thread
For
the
Turn
until
arrow
position.
le
C(see
Remove
the
open
width
ot
stitch
upper
blade.
cover
For
Disengage
Move
position
west
direction
the
cover
For
the
Turn
redge
out
mes
the
that
looper
ge
handwheel
Thread
pages
(see
needle(s)
upper
looper
upper
the
stitch
upper
overedge
by
of
stitch
retaining
(19)
the
of
disengaged
are
in
two-thread
16
(see
two-thread
and
overedge
turning
arrow.
the
two-thread
and
screw
anti-clockwise,
looper’s
blade
and
direction
the
and
17)
page
19).
looper
looper
handwheel
the
of
the
drive
the
by
of
chainstitch
then
and
chainstitch:
into
(16)
chainstitch:
upper
until
lever.
upper
turning
arrow.
the
the
(16).
Ensure
overed
the
looper
its
ove
it
lo
in
co
31
Page 36

pFAF
For
Remove
power
above
Screw
table
Note:
the
the
For
cover
The
units
left
are
inches.
the
needle,
mm.
3.5
interval
fabric.
the
lv,
cover
blade
table,
into
the
beforehand.
It
is
upper
power
stitch
power
of
measurement.
in
mm,
These
This
between
stitch
guard
from
the
slot
edge
absolute
overedge
table.
table
and
values
when
is
an
Adjust
two-thread
and
upward.
(9)
accessory
the
looper
of
the
tight
guide
Close
necessarytodisengage
and
is
marked
those
the
aid
the
the
looper
looper,
two-thread
with
The
figures
on
show
the distance
stitch
width
to
determine
needle
edge
guide
onto
when
the
and
chainstitch:
Push
from
box,
cover.
the
power
cover.
attaching
chainstitch:
various
on
the
right
are
is
set
at
the
the
edge
according
the
in
to
of
32
Page 37

stitch:
the
ro
ower
gage
thing
For
cover
stitch
and
two-thread
On
m
completing
set
the
machine
lows:
Open
the
wer
table
F
looper
upward.
cover
in
cover
the
stitch
basic
and
or
chainstitch,
position
remove
chainstitch:
as
fol
the
po
stitch:
the
are
e
to
t
at
ge
rding
For
cover
stitch
and
two-thread
Turn
the
arrow,
handwheel
until
the
push
looper
stitch:
bed
page
position
the
needle
retaining
looper
screw.
slide
25).
cover-stitch
the
in
overedge
Tighten
(9)
For
Set
S
into
and
the
cover
the
(see
of
highest
Remove
the
cover-stitch
standard
foot.
Close
needle.
the
cover.
needle
looper
is
blade
for
Bring
and
foot
in
the
screw
in
its
Engage
guard
the
the
raise
plate.
and
cover.
stitch
presser
standard
direction
A
highest
the
needles
the
Attach
Remove
chainstitch:
of
the
position.
upper
from
width
presser
foot
of
upper
blade
above
latch
into
foot.
and
the
presser
the
the
to
the
33
Page 38

I
Important
stitch
The
units
left
inches.
These
le,
when
To
start
Raise
under
the
fabric
onto
of
the
fabric
because
sew,
34
power
of
measurement.
are
in
values
sewing:
the
presser
the
the
power
seam.
taut
the
feeds
notes
table
mm
the
stitch
presser
for
the
When
towards
machine,
the
and
show
first
table
fabric
on
is
marked
those
width
foot
foot
starting
the
slowly.
sewing
The
on
the
distance
is
and
place
so
the
stitch.
according
rear
when
with
with
figures
the
set
needles
Place
to
and
you
to
sew,
sew
the
various
right
to
at
3.5
the
the
the
start
on
the
mm.
fabric
pierce
fabric
width
pull
slowly,
to
cover
the
are
need
the
in
Preparing
It
is
hemming
the
seam
press
Note:
ble
as
fabric
press
Finishing
1.
When
Hold
the
tightly
which
wards
Note:
to
be
useful
under
The
special
with
under
sewing
sewing
threads
and
sew
the
thread
the
rear.
In
most
adjusted.
the
fabric:
to
press
it.
Depending
must
be
1/4
inch
cover-stitch
accessory.
it
at
ease,
the
fabric
to
at
slowly
should
cases
Sew
under
stitched
(0.5
without
the
the
off
the
trial
a
the
on
as
down,
cm)
guide
set
You
can
beforehand.
edge
of
end
of
the
the
fabric
pulled
be
differential
seam
fabric
how wide
to
wider.
is
having
the
seam
first.
before
you
obtaina
hem
to
fabric:
during
lightly
feed
must
your
to
has
2.
bric,
Sew
ring
wards
and
(just
position)
Edge
Push
box,
can
de
the
left
If
into
A
you
i.e.
4
the
you
heft
K
guid
the
he
or
-
y
c
Page 39

I
st
a
sr
2.
If
you
bric,
i.e.
Sew
4
ring
the
wards
and
you
(just
before
position).
A<
-
you
are
by
5
stitches
last
have
not
tubular
stitch,
until
heard
the
to
sew
fabrics:
on
turn
the
needles
to
top
the
needles
each
are
the
edge
of
each
handwheel
pierce
needle
in
the
of
other.
the
“click”
lowest
the
Du
to
fabric
fa
After
the
second
“click”
turn
the
back,
sition.
ads.
knot
the
until
Pull
them.
fabric
Raise
the
the
the
needle
Hold
tightly
needles
presser
the
and
are
foot.
threads
threads
remove
in
to
the
Cut
the
at
the
the
handwheel
highest
the
thre
back
and
end
of
fabric.
po
Edge
guide
Push
the
edge
guide,
from
the
box,
into
the
guide
de
can
be
10
10-
as
the
left
set
or
right.
as
holder
required
A.
by
accessory
The
moving
edge
gui
it
to
The
edge
at
regular
two-thread
guide
is
intervals
chainstitch.
useful
with
the
for
serging
cover
seams
stitch
or
35
Page 40

Thread
The
values
normal
blue
-
1.5
tension
refer
polyester
preen
-1.5
to
medium-heavy
thread
pink
fabrics
yellow
and
violet
-1.5
Stitchlength
3-4
Stitchwidth
4.5
of
for
Position
bed
slide
stitch
latch
R
width
Converter
•
=
with
E
=
with-
out
-1.5
N
N
-1.5
-1.5
-1.5
-4
-2
-3
-2
-3
-2
-1.5
-3
-1
÷3
+3
÷3
3-4
3
3
3
3
3.5
3.5
3.5
3.5
S
5
S
S
5
C
I
C
C
C
N
-1.5
-1.5
3
3.5
S
C
37
Page 41

Program
summary
Programs
Cover-stitch
5-thread
4-thread
w\
2-thread
seam
safety-stitch
safety-stitch
chainstitch
seam
seam
seam
Application
Sewing
stitches
Joining
woven fabrics
Joining
woven
Joining
fabrics
and
hems
and
and
fabrics
pieces
for
denim,
and
serging
simultaneously
serging
simultanously
of
tightly
upholstery
without
ornamental
of
tightly
of
tightly
woven
covers
serging
Needle
position
[
ç
L-o
I
[.01
ol
I
I
1
=;
4-thread
3-thread
I
3-thread
cTc\
36
overedge
overedge
overedge
seam
seam
seam
(wide)
(narrow>
Joining
serging
ously,
rics
Serging
Serging
pieces
all
particular
in
easily
easily
fabrics
frayed
frayed
of
fabric
and
simultane
elastic
fabrics
fabrics
fab
[.0
1001
j
I
i°
1
1
Page 42

Thread
The
normal
blue
N
-
4.5
val
-4
38
Page 43

39
2
Page 44

Application
Serging
flatlock
As
stretch
Serging
finished
tive
lightweight
seam
fabrics
delicate
edges.
for
together.
fabric.
fabrics.
sewing
Decora
40
Sewing
serging
ous
highstretch
together
of
fabrics.
simultane
and
lightweight,
Page 45

Thread
The
and
blue
tension
values
normal
refer
to
polyester
green
medium-heavy
thread
pink
fabrics
yelllow
violet
Stitchlength
Stitchwidth
for
Position
of
bed
stitch
latch
slide
width
Converter
•
=
with
LI
=
with-
out
I
I
-4
N
N
-3.5
-1
-3.5
-1.5
-O5
-4
-1
3
3
3
F
F
3.5
3.5
3.5
R
R
S
S
S
R
R
B
B
B
B
-1
-2
-4
3
3.5
S
B
41
Page 46

a
Adjusting
The
the
The
and
seam
settings.
Note:
summary
Cover
blue
-1.5
all
If
threads
sible
per
thread
ween.
42
following
tension
settings
needle
to
All
Stitch
tensions
(green
on
the
the
by
for
gauge
check
further
on
green
-1.5
are
underside
(yellow>
thread
pages
turning
adjusting
the
pages
optimally
and
tension
contain
will
interlocking
settings
36
to
pink
blue>
of
is
situated
the
tensioning
thread
influence
required
41.
yellow
set,
are
just
the
fabric.
directions
tension
seam
of
threads.
for
the
needle
slightly
The
loosely
for
wheel
results.
individual
violet
-1.5
vi
loo
in
bet
setting
until
the
are
recommendations.
For
this
It
may
be
programs
The
Set
lue.
thread
dot
reason
necessary
right
the
green
tensions
marker
are
needle
is
it
to
to
thread
thread
for
is
at
Fabric
always
correct
be
tension
all
the
found
programs.
desired
type,
best
the
in
(green>
yarn
thread
the
to
sew
to
program
is
too
a
higher
Adjust
setting.
quality
tension
loose.
test
a
va
Page 47

The
tight
Set
lower
needle
and
the
value.
the
green
threads
material
and
blue
(green
puckers.
thread
and
blue)
tension
are
too
to
a
5-Thread
blue
-1.5
Since
sists
thread
correction
pages
4-Thread
blue
-1.5
Since
sists
of
thread
correction
pages
Note:
when
the
of
the
overedge
44
Safety-Stich
the
4-thread
the
overedge
44
and
Attach
sewing
Safety-Stitch
green
-1.5
5-thread
2-thread
possibilities
and
46.
green
-4
2-thread
stitch,
possibilities
51.
the
converter
4-thread
Seam
pink
-3
safety-stitch
chainstitch
seam,
you
of
Seam
pink
safety-stitch
chainstitch
you
of
these
safety-stitch
these
can
(see
yellow
can
yellow
-1
seam
and
seams
page
-3
seam
and
refer
seams
refer
violet
con
the
to
24),
seam.
violet
con
the
to
+3
on
+3
3-
the
on
2the
43
Page 48

Two-Thread
Chainstitch
B
B
Top
side
blue
-1.5
When
needle
the
The
Set
lue.
lower
needle
the
all
thread
blue
green
tension
edge
thread
thread
units
blue
of
the
(blue)istoo
pink
are
is
just
fabric.
tension
yellow
correctly
slightly
to
a
visible
loose.
higher
violet
set,
+3
the
on
va
44
\
Undo
rs
ide
Underside
Top
4-Thread
side
When
loopsofboth
low)
blue
N
all
are
Overedge
green
-2
tension
looper
directly
units
on
Seam
pink
-2
are
threads
the
edgeofthe
yellow
-2
correctly
(pink
violet
set,
and
fabric.
the
yel
Page 49

The
The
the
Set
and/or
value.
left
needle
upper
underside
the
pink
the
looper
of
thread
yellow
thread
thread
the
thread
(blue>istoo
material.
tension
(pink>
to
tension
appears
higher
a
to
loose.
a
lower
on
value
The
Set
lue.
The
on
Set
lue
value.
right
the
lower
the
the
and/or
green
top
yellow
needle
looper
side
the
thread
of
thread
pink
thread
thread
the
thread
(green>
tension
(yellow>
material.
tension
tension
to
to
is
too
a
higher
appears
higher
a
to
a
loose.
va
va
lower
45
Page 50

3-Thread
•
wide
narrow
Overedge
blue
N
blue
green
green
N
Seam
pink
-3
pink
-1.5
yellow
-1.5
yellow
-1.5
violet
violet
The
Set
higher
needle
the
relevant
value.
thread
is
needle
too
loose.
thread
tension
a
to
The
the
Set
and/or
value.
46
upper
underside
pink
the
the
looper
thread
yellow
to
tension
appears
higher
a
to
a
va
lower
The
on
Set
lue
value.
the
the
and/or
top
yellow
side
the
of
thread
pink
the
thread
fabric.
tension
higher
to
a
on
value
lower
(pink>
to
tension
appears
a
thread
fabric.
of
the
tension
thread
(yellow>
thread
looper
lower
Page 51

The
looped
Set
and/or
value.
upper
the
around
pink
the
looper
thread
yellow
the
thread
edge
tension
thread
(pink)
of
the
to
tension
is
fabric.
a
lower
to
only
a
partly
value
higher
The
on
Set
lue
value.
The
Increase
le
thread.
lower
the
the
and/or
needle
face
yellow
looper
side
the
the
thread
pink
thread
tension
thread
of
the
thread
is
of
(yellow)
fabric.
tension
too
loose.
the
to
tension
respective
is
visible
a
higher
to
a
need
va
lower
47
Page 52

3Thread
FLATLOCK
TjTje
.
wide
.
narrow
The
upper
underside
the
the
Set
pink
lue.
Decorative
blue
looper
of
thread
green
green
-4.5
thread
the
Serging
fabric,
tension
pink
-1
pink
N
(pink)
to
Seam
yellow
+3
yellow
+2
visible
is
a
higher
violet
violet
on
va-
The
Set
a
lower
The
loose.
Set
lue.
needle
the
lower
the
thread
respective
value.
looper
yellow
thread
thread
is
too
needle
tension
loose.
thread
(yellow>
to
tension
is
too
higher
a
to
Va-
48
Page 53

The
the
Set
and/or
value.
3-Thread
-
blue
upper
underside
the
pink
the
Rolled
L
looper
thread
yellow
green
-1
of
thread
the
tension
thread
Hem
pink
+1.5
fabric.
(pink)
to
tension
is
a
yellow
-0.5
visible
higher
to
a
value
lower
violet
on
The
on
Set
lue
value.
The
Set
lue.
lower
the
the
and/or
right
the
top
yellow
green
looper
side
the
needle
of
thread
pink
thread
thread
the
thread
thread
fabric.
tension
(green)
tension
(yellow)
tension
is
too
loose.
to
a
higher
va
is
visible
to
a
higher
va
to
a
lower
49
Page 54

Folded
The
loops
Set
and/or
value.
blue
upper
around
the
3-Thread
pink
the
green
-1
looper
the
thread
yellow
Rolled
thread
edge
tension
thread
pink
-1
Hem
(pink)
of
the
tension
to
yellow
+3.5
only
fabric.
lower
a
to
partly
a
higher
violet
value
The
Set
I
ue.
The
on
Set
lue
value.
right
the
lower
the
the
and/or
green
top
yellow
needle
looper
side
the
thread
of
thread
pink
thread
thread
the
thread
tension
(yellow)
fabric.
tension
(green>
to
to
tension
a
is
a
is
too
higher
visible
higher
to
a
loose.
va
va
lower
50
Page 55

Underside
Top
side
2-Thread
wide
Overedge
blue
—
blue
PoH
Attach
Note:
sewing
when
(FLATLOCK).
thread
needle
The
thread
looper
respective
the
Set
a
sion
higher
to
value
a
lower
I
green
I
I
green
I
I
the
the
(yellow)
and/or
value.
Seam,
I
I
I
I
I
converter
2-thread
is
too
is
needle
the
FLATLOCK
pink
I
pink
(see
overedge
loose
tight.
too
thread
yellow
yellow
—1.5
yellow
-0.5
page
or
tension
thread
the
viole
I
I
violet
24),
seam
lower
I
I
I
I
to
ten
lower
The
loose
the
Set
and/or
lue
siontoa
or
yellow
looper
the
the
lower
needle
thread
respective
value.
thread
thread
(yellow)
tension
needle
is
too
tight.
too
is
va
higher
to
a
ten
thread
51
Page 56

2-Thread
wide
L
narrow
Note:
when
The
needle
Set
the
higher
a
sion
to
Roiled
blue
j
N
blue
Attach
sewing
thread
respective
value
lower
a
Hem
I
green
I
green
the
converter
2-thread
and/or
value.
N
is
needle
too
pink1yellowI
I
pink
I
I
(see
serging
loose.
thread
yellow
the
-
Iyellow
I
I-I
page
seams.
tension
thread
I
I
24)
violet
violet
to
ten
I
I
I
52
The
loose.
Set
lue.
lower
the
looper
yellow
thread
thread
(yellow)
tension
is
too
higher
to
a
va
Page 57

2-Thread
Rolled
Hem
blue
Note:
when
The
Set
lue
higher
Attach
sewing
right
the
and/or
needle
green
value.
green
-3.5
the
the
converter
2-thread
thread
thread
yellow
pink
tension
thread
rolled
Igreen)
yellow
-1
page
(see
hems.
is
too
lower
to
a
tensiontoa
violet
24)
tight.
va
The
tight.
Set
lue
her
lower
the
and/or
value.
looper
yellow
the
thread
green
thread
tensiontoa
thread
(yellow)
tensiontoa
is
lower
too
va
hig
53
Page 58

Folded
blue
Note:
when
The
Set
lue
wer
2-Thread
Attach
sewing
right
the
and/or
value.
green
needle
green
-1
the
the
folded
thread
yellow
Rolled
pink
converter
2-thread
thread
tension
thread
Hem
(green)
yellow
-1.5
(see
rolled
to
tension
page
is
a
violet
24)
hems.
too
higher
to
loose.
va
a
lo
54
The
loose.
Set
lue.
lower
the
looper
yellow
thread
thread
(yellow)
tension
too
is
va
higher
a
to
Page 59

______________________________________
2-Needle,
blue
1
Note
when
closing
e
the
Set
lue.
3-Thread
Attach
sewing
right
green
green
seam.
needle
2
the
the
Overedge
pink
converter
2-needle,
thread
thread
(green>
tension
Closing
yellow
4
(see
3-thread
to
page
a
is
Seam
violet
241
overed
too
higher
loose.
va
The
Set
lue.
The
tight.
Set
lue.
left
the
needle
blue
lower
the
thread
looper
yellow
thread
thread
(blue>
tension
thread
to
(yellow>
tension
is
too
a
higher
to
a
loose.
is
too
lower
va
va
55
Page 60

Machine
Cleaning
Switch
Remove
looper
the
remove
and
plate.
the
Use
any
ve
blades,
wer
area.
maintenance
machine
the
electrical
off
trimming
the
cover.
the
accessory
thread
waste
the
power
waste
Disengage
presser
brush
from
differential
the
foot
provided
the
feed
box
and
upper
and
upper
the
to
and
open
blade
needle
remo
and
looper
lo
Lubricating
off
Switch
the
Move
highest
with
above
every
box
two
One
or
sufficient.
are
oil
factured
any
require
56
the
the
upper
position.
the
time
drops
from
lubrication.
machine
electrical
overedge
Lubricate
providedinthe
oil
clean
you
of
PFAFF
other
All
special
materials
power
looper
the
the
sewing
parts
into
point
accessory
machine.
are
and
its
shown
machine
manu
do
not
Cleaning
Clean
alcohol.
the
the
rubber
This
rubber
feet
ensures
feet
from
good
7
time
stability.
with
time
to
Page 61

Changing
Switch
remove:
To
and
open
upper
highest
the
from
retaining
lower
the
To
insert:
recess
screw.
the
looper
the
off
the
the
blade
position.
accessories
screw
blade.
Insert
provided
Engage
cover.
lower
electrical
Detach
looper
and move
Use
A.
new
a
and
the
blade
trimming
the
cover.
the
the
to
Remove
lower
tighten
upper
power
Disengage
needle(s)
large
loosen
the
blade
waste
screwdriver
lower
screw
blade
retaining
the
and
to
into
close
box
the
the
blade
and
the
57
Page 62
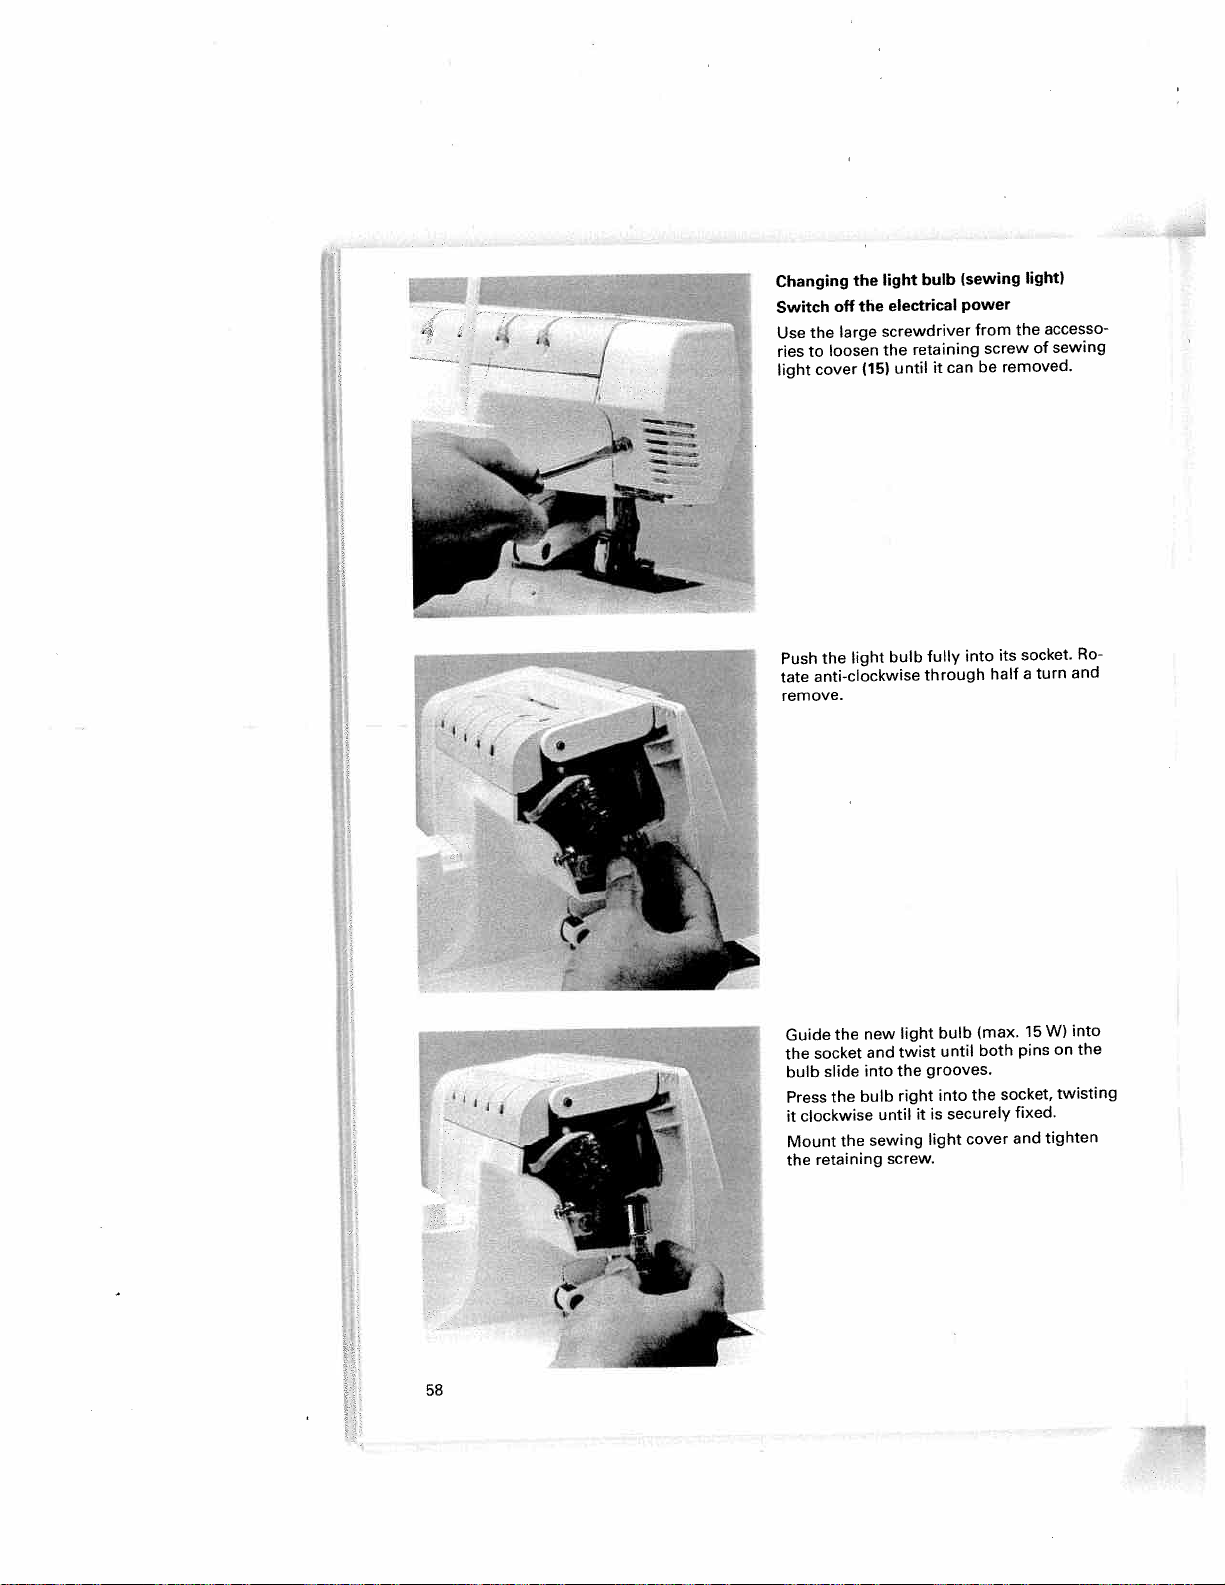
from
into
screw
removed.
be
its
half
light)
the
of
socket.
turn
a
accesso
sewing
Ro
and
Changing
Switch
the
Use
to
ries
cover
light
the
Push
anti-clockwise
tate
the
off
large
loosen
light
light
electrical
the
screwdriver
the
until
(15)
bulb
bulb
retaining
can
it
fully
through
(sewing
power
remove.
14
58
Guide
socket
the
bulb
Press
it
clockwise
Mount
retaining
the
the
slide
the
the
new
and
into
bulb
until
sewing
light
twist
the
right
screw.
bulb
until
grooves.
into
securely
it
is
light
(max.
both
the
cover
15W)
pins
socket,
fixed.
and
into
on
twisting
tighten
the
Page 63

pecial
the
n
ssories
can
I...
.1!
special
Ihe
Special
Blindstitch
1
I.
Cover-stitch
f
Gimp
Elastic
Shirring
Cording
Beading
Lace
accessories
following
help
to
perform
accesories
accessory
thread
tape
foot
foot
foot
foot
foot
pages
you
various
guide
foot
foot
ac
special
these
perfect
506-23/000
560-84/000
70/000
507
21/000
506
20/000
506
22/000
506
506-24/000
-69/000
507
as
presser
serging
feet,
results.
59
available
feet
sewing
all
your
saving
from
of
coverlock
time
PFAFF
your
and
4772.
ensuring
dealer.
By
Order
93-4
93-415
93
93
93
93
93-415
93-415
using
No.
15
415
415
415
415
you
the
get
to
steps
be
can
set
from
best
one,
in
purchased
thus
descriptions
find
will
Page 64

blindstitch
invisible
of
thick
and
the
the
overedge
length
needle
the
the
insert
inwards.
outwards
1
cm.
foot
beneath
run
foot
foot
fabrics.
“blind”
machine
left
4.
blindstitch
Position
so
edge
along
needle.
to
Now
so
that
guide
the
ideal
is
seams
The
stitched
seam
its
fold
that
the
edge
for
medium-hr
on
seam
in
your
Set
(narrow>
uppermost
foot.
the
seam
the
edge
seam
the
folded
2.
Crease
2
professiei.
trimmer’
is
single
a
machr
and
posi1io
Fold
onc
protrudr
under
seam
4
of
the
(Jr
r-’i
the
th
part
nrrer
gur
Blindstitch
The
sewing
vy
and
serged
ration.
Setting
Remove
3-thread
stitch
Working:
Raise
and
1
2
seam
again
approx,
sewing
lies
thereby,
edge
adjust
and
1
that
one
seam.
upon
thread
screw
penetration
the
of
the
upper
nerrr
trt[rr
guide
catches
Sewatest
60
only
retaining
Loosen
so
2
Page 65

Cover-stitch
You
can
accessory
this
hem
guide
T-shirts,
set.
set
sweatshirts
etc.
with
D
Setting
Set the
page
Note:
the
machine
30
Use
-
33).
machine
guide
the
D.
and
C
(see
stitch
cover
to
Working:
Loosen
and
shown
fully
of
the
should
te
close
in
illustration
and
the
washer.
guide
open
under
guide
looper
fasten
C
needle
the
the
illustration
in
the
flush.
both
Turn
according
looper
needle
and
cover.
2,
the
Fully
onto
using
up
plate
Place
the
to
cover.
1,
along
plate.
edge
tighten
the
the
the
by
screw
Push
position
The
of
the
the
guide
cover-stitch
small
seam
and
width
C,
of
half
guide
lower
needle
screw
as
screw
adjust
the
turn
a
D,
‘x”
edge
pla
and
shown
foot
and
seam.
as
C
Place
the
guide
seam
and
the
presser
D,
and
D.
fabric
foot.
the
on
with
The
crease
completion
the
top
hemmed
isinguide
remove
side
seam
C.
up
Sew
guides
under
is
the
in
C
61
Page 66

Cover-stitch
Open-edged
etc.,
can
Setting
Set
the
page
30
Note:
the
machine
-
Use
be
machine
33>.
guides
guide
seams
bound
set
on
T-shirts,
with
to
the
cover
B
and
C.
bias
sweatshirts,
tape
stitch
or
band.
(see
Working:
Place
guide
C,
as
shown
in
the
onto
using
Place
under
using
the
cover-stitch
the
guide
the
the
small
B,
presser
small
screw
as
screw
shown
foot
foot
and
and
and
and
washer.
in
the
tighten
washer.
illustration,
tighten
illustration,
this
this
B
C
62
Adjust
binding.
Place
bric
and
The
crease
edge
remove
the
is
guide
binding
place
in
guide
guides
of
C
according
both
the
binding
B.
B
and
around
under
On
C.
to
the
the
edge
the
is
in
completion
width
presser
guide
of
of
of
the
foot.
C.
The
sewing
the
fa
Page 67

set
30
Use
the
side.
guide
can
be
machine
the
machine
-
33>.
guides
seams
Push
shown
as
this
as
this
guide
top-stitched
to
and
guide
using
from
A
shown
using
A
the
and
in
the
the
in
the
with
cover
B.
underpress
under
left
B
illustration,
the
screw
small
right
illustration,
the
screw
small
stitch
under
this
(see
them
the
and
the
and
special
on
pres
and
was
pres
and
was
Cover-stitch
Seams
accessory.
Setting
the
Set
U
B
page
Note:
Working:
Serge
one
foot,
ser
tighten
her.
Push
foot,
ser
tighten
her.
Place
ser
faces
lie
as
A
move
the
foot,
the
the
in
required.
guides
fabric,
so
left.
inner
that
The
On
A
top
the
edge
and
side
up,
seam
of
crease
guide
of
completion
B.
on
under
the
the
A,
underside
seam
adjust
sewing
of
the
pres
should
guide
re
63
Page 68

Gimp
This
threads
thickness
hem
fling
Setting
Set
your
led
hem.
Working:
Raise
and
insert
gimp
opening
thread
ects
approx.
back.
few
stitches,
presser
side
of
Sew
a
thread
presser
finish
dresses
the
thread
under
Hold
foot
the
test
(cords,
of
the
machine
needle
the
2
into
the
fabric
seam
foot
foot
1.0
in
delicate
and
machine
gimp
into
lateral
guides
4
inches
gimp
then
and
is
used
synthetic
mm.
bridal
to
to
its
thread
guide
guide
4
(10
thread
lay
the
continue
should
for
threads)
It
creates
fabrics
gowns
the
folded
uppermost
foot.
1
and
3.
and
5
cm)
in
fabric
sewing
be
upwards).
sewing
a
e.g.
Insert
pull
Then
so
that
towards
place
under
up
wavelike
for
of
curtains.
3-thread
position
it
through
lay
it
with
the
(the
in
to
eve-
the
the
proj
the
face
gimp
a
rol
a
64
Note:
The
by
setting
cutting
threadline.
your
wave
the
differential
workpiece
effect
can
be
feed
diagonal
accentuated
to
0.5
and
the
to
Page 69

Elastic
presser
This
elastic
is
bric
by
red
Setting
your
Set
seam.
width
Working:
Raise
insert
and
screw
sen
opened
4
into
wing
ches
screw
the
greater
elastic
the
her
effect.
a
Sew
tape
tape.
trimmed
the
the
machine
The
of
the
needle
the
by
opening
foot
cm)
(10
The
1.
test
foot
is
foot
the
In
and
contracting
machine
width
seam
elastic
to
elastic
the
that
so
1
approx.
and
2
that
so
behind
more
pressure
the
and
tape
seam.
used
same
serged,
the
to
tape.
its
tape
brake
mm.
2
pull
it
protrudes
the
the
thus
sewing
for
operation,
and
elastic
4-thread
is
determined
uppermost
sewing
at
3
Insert
beneath
it
latter.
screw
brake
greater
the
also
tape.
overedge
foot.
opening
elastic
approx.
Re-tighten
tightened,
is
exerts
3
on
the
fa
gathe
by
position
2
the
4
the
the
Loo
is
tape
se
in
on
gat
The
elastic
your
(see
Sewing
ching
stretch
Loosen
can
drance.
step
next
towards
tape
machine’s
illustration>.
a
on
seams
the
of
fabrics.
screw
through
pass
normally
is
the
elastic
non-elastic
(e.g.
until
1
opening
stitch
to
with
left
(expandable)
tape
shoulder
non-elastic
the
without
2
the
one
prevents
seams>
of
stitches
stret
in
tape
hin
65
Page 70

Shirring
The
sewn
automatically
dren’s
valances
skirts.
Setting
Set
seam
Working:
Raise
and
foot
(face
(face
that
1
wer
plies
Sew
shirring
together,
wear,
your
and
the
insert
and
side
side
plate
the
presser
together.
a
test
foot
for
the
machine
machine
the
needle
the
insert
up).
down)
1
lies
seam.
foot
enables
whereby
gathered.
as
well
curtains,
to
differential
its
to
shirring
the
fabric
Insert
under
between
foot
attaching
as
table
the
uppermost
foot.
the
second
the
the
and
sew
two
the
bottom
It
is
ideal
linen
4-thread
feed
Lift
ply
to
presser
two
the
fabrics
for
gathered
or
overedge
to
2.0.
position
the
be
shirred
fabric
plies.
two
to
ply
chil
tiered
sewing
ply
foot
fabric
be
is
so
Lo
66
Note:
ged
The
by
adjusting
degree
shirring
of
the
differential
can
be
feed.
chan
Page 71

Cording
This
fabric
two
them,
wear,
Setting
Set
seam
foot
sewing
in
sports
your
and
foot
plies
one
the
machine
seam
allows
with
operation.
and
bags
machine
width
a
the
to
to
you
cording
Ideal
upholstery
4-thread
mm.
4.5
for
sew
tape
together
between
casual
covers.
overedge
Working:
the
Raise
insert
and
plies
bric
side)
face
ween
beneath
cording
foot.
the
Sew
the
a
test
needle
the
top
on
and
two
cording
the
(piping)
seam.
to
cording
of
insert
plies.
runs
uppermost
its
toot.
one
the
Position
foot
through
Place
another
cording
ensuring
the
groove
position
two
the
side
(face
bet
tape
workpiece
that
fa
to
the
in
1
67
Page 72

Beading
This
ding
lead
Setting
Set
seam
size>
4
Working:
2
Raise
and
of
approx.
foot.
ches,
sewing
vage.
foot
presser
sequins
and
the
your
(narrow
Stitch
the
insert
beads
2
Hold
then
foot
is
foot
used
strass
and
ordinary
machinetothe
needle
into
inches
machine
length
the
guide
the
lay
and
cords.
wide
or
should
to
beading
(5
beads
fabric
the
sew
its
1
cm)
in
for
bands
3-thread
depending
be
uppermost
foot.
beneath
and
behind
place
face
beads
the
sewing
as
between
Insert
the
with
up
onto
on
well
overedge
on
bead
position
the
guide
sewing
few
a
under
the
bea
as
3
and
string
2
stit
the
sel
68
For
Note:
commend
with
pers
if
sion
between
wish
you
If
bric
as
tension
material
the
guide
sewing.
on
now
Sew
a
sewingonlead
threading
thread
bulk
necessary.
and
2.
F
to
sew
shown
to
be
must
reverse
crease
the
Pull
top.
seam.
test
The
the
the
loose
side
past
fabric
the
and
stitch
beading
left,
(approx.
to
the
apart;
beading,
overedge
two
correcting
length
needle
the
reverse
upper
the
into
-5).
side
blade
beading
we
the
is
the
thread
Lay
re
loo
ten
fa
the
and
while
is
Page 73

Lace
The
wide
piece.
foot
lace
bands
foot
enables
together
you
or
onto
to
sew
another
lace
and
work-
Setting
your
Set
seam
ween
Working:
Raise
and
insert
screwdriver
ge
screw
sen
needle
edge
lace
onto
a
distance
seam
and
sew
When
the
two
edge
guide
the
machine
machine
(narrow)
F
and
2.
the
needle
the
1
penetrates
possible.
as
the
of
allowance)
it
on.
sewing
halves
3.
and
lace
from
and
fabric,
1.5
two
must
to
select
to
its
sewing
adjust
the
Tighten
face
to
2.0
away
lace
3-thread
uppermost
the
accessories
guide
lace
screw
side
cm
from
workpieces
guided
be
overedge
stitch
a
foot.
Use
2
so
as
close
1.
to
face
(depending
the
selvedge
flush
length
position
the
to
that
to
the
lay
the
side,
on
together,
along
bet
lar
loo
the
at
69
Page 74

Fabric
Light
organdy,
taffeta,
fabrics:
fine
silk,
knitwear,
lining
Thread
fabrics
chart
for
2-,3-and
Thread
Cotton
Synthetic
thread
4-thread
overedge
no.
no.
50-70
70-
140
seams
Stitch
2.0
-
4.0
length
mm
Medium-heavy
coton, tricot
dess
linen,
fabrics:
Heavy
suit
tweed,
heavy
denim,
Knitwear:
2or3-thread
fabrics:
materials
materials,
cloth
rolled
hems
Cotton
Synthetic
Cotton
Synthetic
Cotton
Synthetic
Polyester
Mercerized
thread(
(bulk
thread
thread
thread
thread
thread
no.
no.
no.
no.
no.
no.
no.
40
-
70-140
30
-
-
70
40
-
70-140
-
120
140
60
140
60
50
2.0
2.0
2.0-
1.0-
-
4.0
mm
mm
4.0
2.0
mm
mm
-
4.0
70
Page 75

i
Page 76

Sewing
These
problems
machines
settings
sult
of
minor
instructions.
need
and
have
to
be
made.
adjustment
their
been
solutions
developed
Sewing
and
problems
operating
with
errors.
ease
of
of
the
They
operaticn
kind
described
can
in
mind.
No
below
difficult
be
easily
may
adjusted
occur
by
following
or
tricky
as
re
a
the
Problem
Needle
Thread
Skipping
breakage
beaks
stitches
Cause
The
needle
was
or
the
point
The
needle
fully
inserted.
The
fabric
too
firmly.
Incorrectly
,
Thread
has
Thread
tension
Needle
not
Incorrect
Needle
point
Needle
Incorrect
needle
bent
damaged.
not
needle
Incorrectly
damaged.
was
was
pulled
threaded.
caught.
is
fully
or
fully
threaded.
bent
not
too
inserted.
used.
inserted.
used.
tight.
Solution
Insert
(see
Insert
(see
Do
when
Thread
(see
Check
is
caught
stand
Correct
(see
Insert
(see
Use
Insert
(see
Insert
(see
Use
system
Thread
(see
new
page
needle
page
not
sewing,
page
if
etc.
page
needle
page
needle
new
page
needle
page
needle
EL
correctly
pagel2
needle
11).
11).
pull
on
properly
12-
the
thread
on
the
tension
42
11).
system
needle
11).
11).
X
705.
-
fully
the
20)
the
spool
-
55).
correctly
correctly
20)
fabric
EL
X
705.
Stitch
faulty
3
edge
irregular
and
thread
locked
72
or
formation
4
thread
seam
the
upper
has
in
over-
has
an
appearance
looper
not
inter
the
seam.
Incorrect
tensions
The
converter
setting
of
is
attached.
thread
Re-set
(see
The
be
thread
page
converter
removed.
42
tensions
-
55>.
must
Page 77

Problem
Machine
operate
master
on
is
fabric
trimmed,
Puckered
Fabric
through
will
although
switch
neatly
not
seams.
not
not
fed
evenly.
Cause
Power
Waste
upper
Lower
Thread
too
supply
thread
and
blade
tight.
Incorrect
diffential
Thread
incorrect
Stitches
Sewing
heavy
for
Sewing
for
interrupted.
between
lower
is
tension
setting
feed.
caught
has
threading.
short.
too
foot
fabrics.
foot
lightweight
blade.
blunt.
of
pressure
pressure
fabrics.
due
Solution
cover
looper
Close
(see
Clean
Replace
(see
to
low
to
high
too
page
blades.
page
Reduce
Re-adjust
pages
(see
Thread
(see
Increase
(see
Increase
(see
Reduce
(see
8>.
lower
thread
correctly
pages
page
page
page
blade
57>.
tension.
differential
29).
28,
-
12
stitch
27>.
presser
21).
presser
21).
20).
length
foot
foot
feed
pressure
pressure
73
Page 78

Specifcations:
Maximum
width
Seam
length
Stitch
foot
Presser
Lubrification
foot
Presser
Overedge
system
Needle
size
Needle
Number
of
Dimensions
Weight
sewing
height
stroke
threads
(width
speed
x
hight
x
depth)
stitches/mm.
1300
mm
-
6.7
3
1
mm)
F
(=
exchangeable
manual
mm
4.5
mm
1.5
705,
EL
X
90/14
80/11,
4,
5
2, 3,
285
x
300
kg
6.5
cat.
x
-
275
mm
4
2002
no.
mm
Packing
machine
1
foot
1
instruction
1
trimming
1
machine
1
74
contents
control
waste
cover
manual/guarantee
box
card
Page 79

Parts
of
the
coverlock
4772
(24)
(25)
(26)
(27)
(28)
(29)
(30)
(31)
(32)
(33)
(34)
(35)
(36)
(37)
Thread
Regulator
Telescopic
Thread
Thread
Thread
Thread
Machine
Electrical
Handwheel
Regulator
Stitch
Presser
Rear
guides
chain
spool
spool
spool
length
foot
thread
screw
thread
cutter
socket,
power
lever
adjustment
lifter
guides
with
color
for
guide
stand
pins
centering
foot
master
for
differential
presser
pieces
control
switch
coding
foot
knob
with
feed
pressure
power
cord
(38)
(39)
(40)
(41)
Trimming
Foot
control
Foot
control
Power
plug
waste
plug
box
for
machine
Page 80

/1
o€:
6e
017
Page 81

M.
G.
Pfaff
Aktiengesellschaft
Werk
Karisruhe-Durlach
GritznerstraIe
Weingarten,
29429
Karlsruhe
GmbH
Stettiner
subjecttochange
98976/OOO
9.98
Strafte
76227
PrintedinGermany
IJruckerei Gablenz
76356
Information
Nr.:
englisch
11
without
17
notice
 Loading...