

Page 1

(
r
315$
CPFAFFD
)
C-
aFardz
‘132
Page 2
Dear
Housewife,
At
last
you
are
the
proud
owner
of
this
Sewing
Mochinel
The
machine
was
fully
explained
to
you
and
you
were
delighted
with
the
many
useful
and
wonder
ful
things
performed
on
this
true
wonder
of
en
gineering.
Although
everything
is
quite
cleartoyou
now,
it
is
possible
that
in
time
some
of
the
directions
given
to
you
for
making
the
various
adjustments
may
escape
your
memory
—
because,itis
unlikely
that
you
will
immediately
try
your
handatall
the
different
kinds
of
sewing
your
machine
can
do.
We
have
therefore
prepared
this
informative
in
struction
book
and
hope
you
will
find
it
a
useful
guide.
Before
putting
the
machine
to
work
we
vise
you
to
glance
briefly
at
the
pages
of
fhis
book,
so
that
you
will
hove
a
rough
idea
of
the
contents.
This
will
help
you
when
reverting
later
on
to
any
one
of
the
chapters.
It
is
a
good
plan
to
open
out
to
the
left
page
1,
for
the
information
given
on
that
page
should
be
read
in
conjunction
with
the
directions.
The
same
appliestopage
2.
Your
attention
is
drawn
particularlytosections
1,
2
and
4.
After
reading
the
information
contained
in
those
three
chapters
you
will
be
thoroughly
ac
quainted
with
the
working
of
your
sewing
machine;
it
will
becomealiving
thing
to
you,
placed
under
your
care
and
protection.
The
more
you
understand
your
machine,
the
greater
willbeyour
appreciation
of
its
scope
and
capacity.
Page 3
The
following
accessories
are
available
at
slight
additional
charge
1
box
for
housing
accessories,
No.
1466
a
1
edger
with
guide
Z—153a
5
1
feller
No.
823
1
hemmer
No.
Z—824,
4
mm
•
“
bobbins
No.
970
6
sewing
machine
needles,
System
No.
130
R
1
threader,
No.
188
•
11
1
screwdriver,
No.
140
c
(medium
size)
1
screwdriver,
No.
533
(small
size)
•
14
1
oil
can
(plastic),
with
oil,
No.
132
a
18
1
quilter
guide,
No.
101
1
quilter
guide
holder,
complete
with
screws,
No.
Z—1016
24
1
hemmer
2
mm
No
827
4
1
ruffler,
No.
116
1
guide
No
535
1
thumb
screw,
No.
410
1
hemmer
No.
Z—827
(2
mm)
Contents
I
Important
Hints
Choice
of
Needle
Sizes
and
Thread
Numbers
1.
To
Prepare
for
Sewing
2.
Sewing
3.
Cleaning
and
Oiling
4.
Cause
of
Faults
and
Simple
Home
Service
The
Electric
Motor
3
Page 4
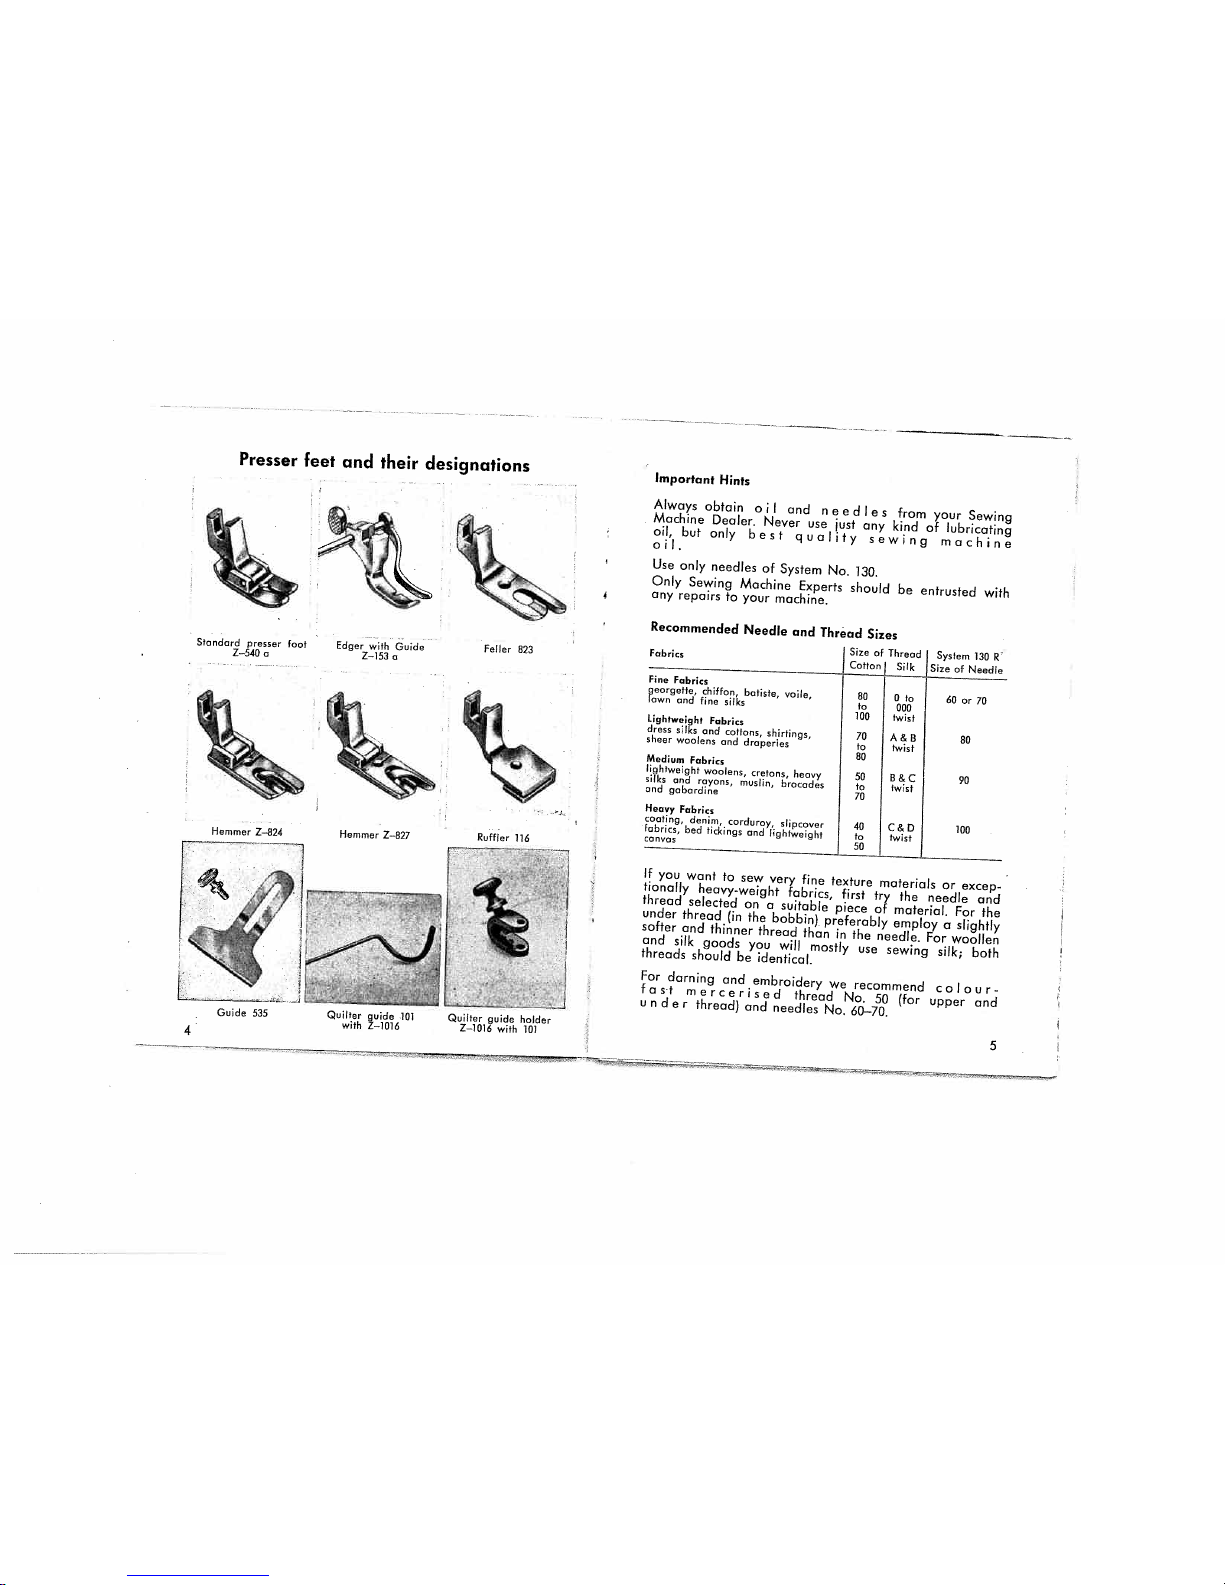
Presser
feet
and
their
designations
Important
Hints
Always
obtain
a
I
and
n
eed
I
e
s
from
your
Sewing
Machine
Dealer.
Never
use
just
any
kind
of
lubricating
oil,
but
only
best
quality
sewing
machine
oil.
Use
only
needles
of
System
No.
130.
Only
Sewing
Machine
Experts
should
be
entrusted
with
any
repairs
to
your
machine.
Recommended
Needle
and
Thread
Sizes
Size
of
Thread
System
130
R
Cotton
Silk
Size
of
Needle
Fine
Fabrics
georgette,
chiffon
botiste,
voile,
80
0
to
60
or
70
lawn
and
fine
silks
to
000
100
twist
LighIweyhi
Fabrks
dress
silks
and
cottons,
shirtings,
70
A
&
B
80
sheer
woolens
and
draperies
to
twist
80
Medium
Fabrics
lightweight
woolens,
cretons,
heavy
50
B
&
C
90
silks
and
rayons,
muslin,
brocades
to
twist
and
gabardine
70
Heavy
Fabrics
coating,
denim,
corduroy,
slipcover
40
C&D
100
fabrics,
bed
tickings
and
lightweight
to
twist
anvos
50
For
darning
and
embroidery
we
recommend
c
o
I
o
u
r
-
f
a
st
m
e
r
Ce
r
i
s
e
d
thread
No.
50
(for
upper
and
u
n
d
e
r
thread)
and
needles
No.
60—70.
Standard
presser
foot
Edger
with
Guide
Feller
823
Z—540
a
Z—153
a
Fabrics
Hemmer
Z—824
Hemmer
Z—827
RuttIer
116
Guide
535
If
you
want
to
sew
very
fine
texture
materials
or
excep
tionally
heavy-weight
fabrics,
first
try
the
needle
and
thread
selected
on
a
suitable
piece
of
material.
For
the
under
thread
(in
the
bobbin)
preferably
employ
a
slightly
softer
and
thinner
thread
than
in
the
needle.
For
woollen
and
silk
goods
you
will
mostly
use
sewing
silk;
both
threads
should
be
identical.
Quilter
guide
holder
Z—1016
with
101
4
Quilter
guide
101
with
Z—1016
5
Page 5
Under
Threading
To
prepare
for
sewing
I
‘
I
Before
despatch
from
the
works,
each
machine
is
subjected
to
a
severe
test
run.
Therefore,
should
you
experience
any
trouble
with
the
machine,
the
cause
may
well
be
due
to
wrong
manipulation.
Do
not
interfere
with
any
settings
without
first
carefully
checking
the
upper
and
under
thread
ing,
the
tensions,
the
needle
and
the
position
of
the
feed
dog,
the
control
of
which
should
be
set
at
“Sewing”.
Inserting
the
Needle
Raise
the
needle
bar
to
its
highest
point.
With
thumb
and
forefinger
of
your
left
hand
insert
the
needle
into
the
clomp.
Push
the
needle
up
as
far
as
it
will
go.
T
h
e
fIa
side
of
the
needle
shank
must
be
to
the
right.
Then
tighten
the
thumb
screw.
Attaching
the
Presser
Foot
Slide
the
foot
on
to
the
presser
bar,
right
up
against
the
screw
and
firmly
tighten
the
latter
with
a
screwdriver.
All
other
types
of
presser
feet
supplied
for
use
with
the
machine
ore
attached
and
secured
in
the
same
manner
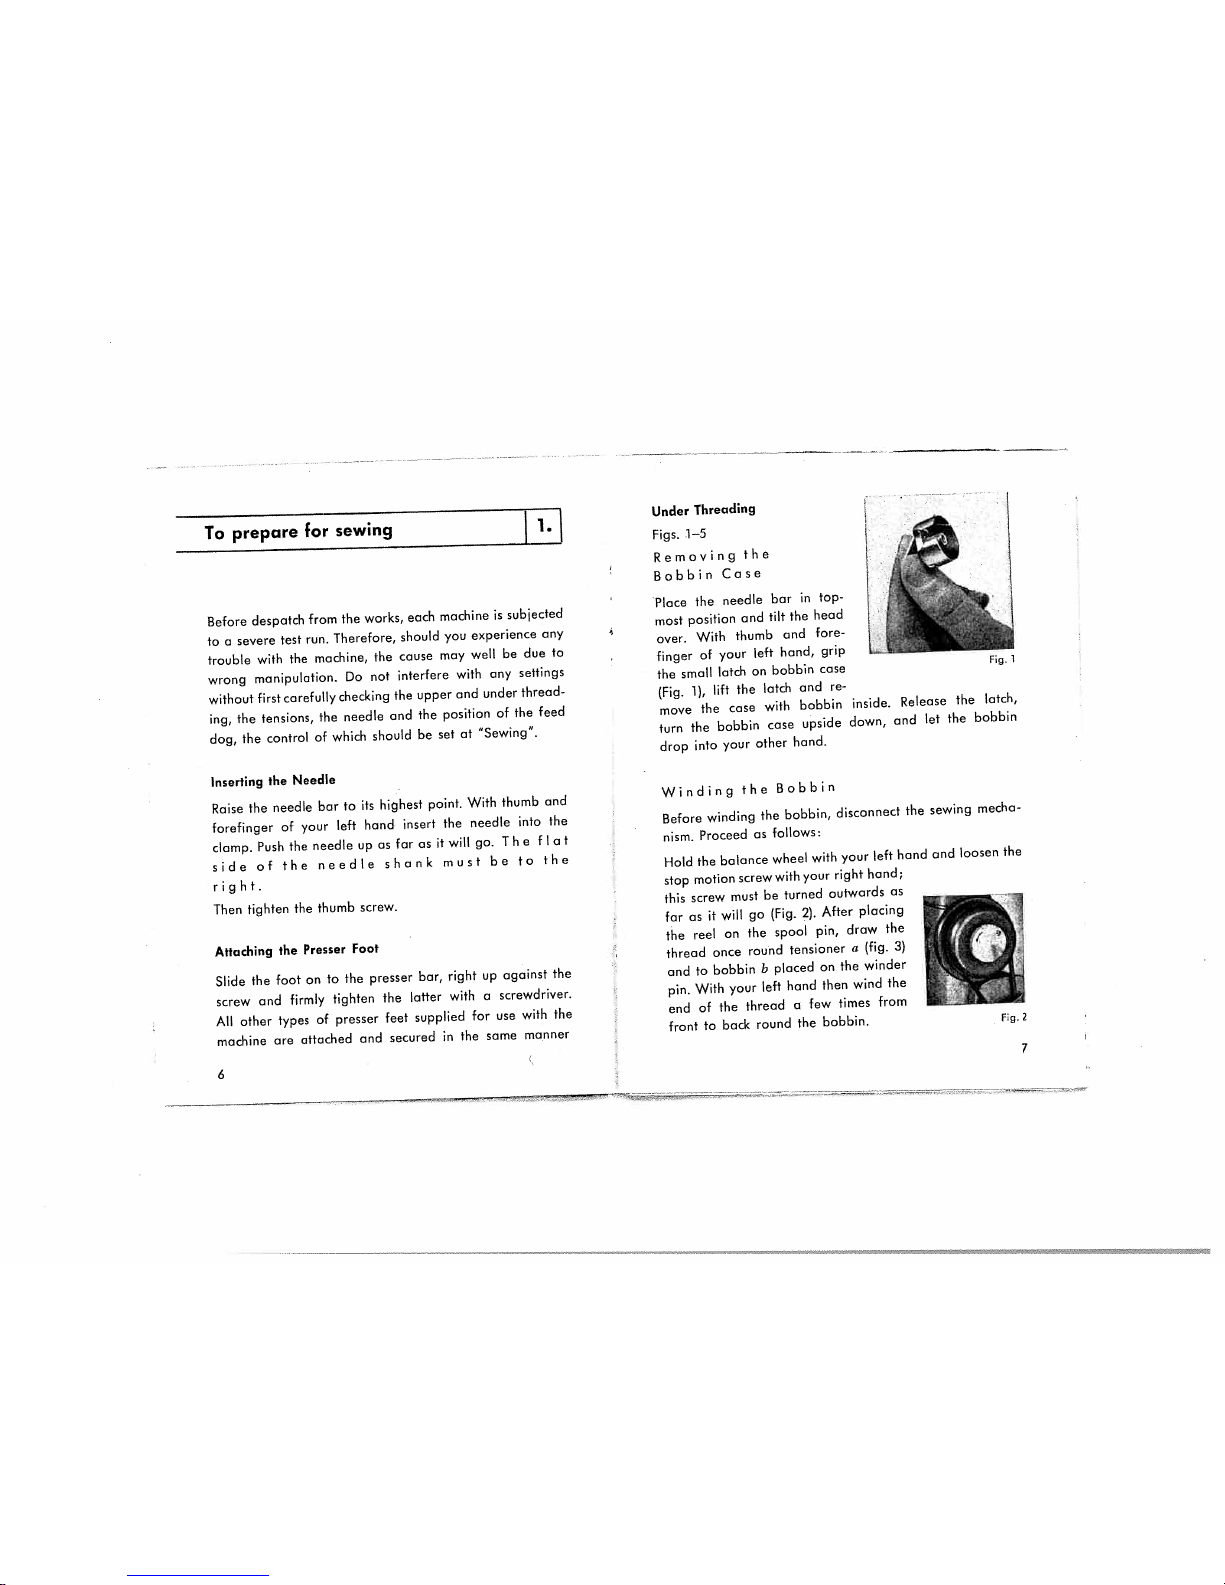
Place
the
needle
bar
in
top
most
position
and
tilt
the
head
over.
With
thumb
and
fore
finger
of
your
left
hand,
grip
the
small
latch
on
bobbin
case
(Fig.
1),
lift
the
latch
and
re
move
the
case
with
bobbin
inside.
Release
the
latch,
turn
the
bobbin
case
upside
down,
and
let
the
bobbin
drop
into
your
other
hand.
Winding
the
Bobbin
Before
winding
the
bobbin,
disconnect
the
sewing
mecha
nism.
Proceed
as
follows:
Hold
the
balance
wheel
with
your
left
hand
and
loosen
the
stop
motion
screwwith
your
right
hand;
this
screw
must
be
turned
outwards
as
far
as
it
will
go
(Fig.
2).
After
placing
the
reel
on
the
spool
pin,
draw
the
thread
once
round
tensioner
a
(fig.
3)
and
to
bobbin
b
placed
on
the
winder
pin.
With
your
left
hand
then
wind
the
end
of
the
thread
a
few
times
from
front
to
back
round
the
bobbin,
Fig.
2
Figs.
1—5
Removing
the
Bobbin
Case
Fig.
1
6
7
Page 6

Upper
Threading
Fig.
6
Place
the
spool
of
thread
on
the
spool
pin
and
bring
the
thread
below
the
guide
and
to
the
left,
then
from
left
to
right
into
the
upper
slot
in
guide
b
and
from
right
to
left
through
the
lower
slot.
From
there
pass
the
thread
down
and
from
right
to
left
through
the
slot
in
thread
tensioner
and
take-up
spring
c,
then
up
again
and
from
right
to
left
through
the
take-up
leverd,then
down
and
through
the
guideinnee
dle
bar
a
and
finally
from
lefttoright
through
the
eyeofthe
needle.
Replacing
the
Bobbin
Case
With
thumb
and
forefinger
of
your
left
hand
hold
the
bobbin
case
(complete
with
bobbin)
by
its
latch
(Fig.
1)
and
slide
the
caseonto
the
small
stud
in
the
center
of
the
hook
(Fig.
5).
Now
press
that
the
latch
clicks
into
pa-
Fig
5
the
bobbin
case
down
so
sition.
Fig.3
Now
press
on
the
winder
by
means
of
latch
and
turn
the
free
balance
wheel
over
towards
you
to
set
it
in
motion
as
you
start
treadling.
The
winder
action
stops
automatically
when
the
bobbin
is
fully
loaded.
Finally,
the
stop
motion
screw
is
firmly
retightened
by
screwing
it
inwards
against
the
balance
wheel.
Threading
the
Bobbin
Case
Fig.
4
Hold
the
case
with
its
open
side
up
and
insert
the
bobbin
as
indicated
by
the
arrow,
i.
e.
so
that
the
thread
un
winds
from
left
to
right
(Fig.
4).
Pass
the
thread
through
slot
a,
along
and
underneath
the
spring
b
and
out
through
opening
c
in
the
side
of
the
bobbin
case.
Fig.
6
8
9
Page 7

Picking
up
the
Lower
Thread
—
Fig.
7
General
Turn
the
balance
wheel
to
move
the
thread
take-up
lever
to
its
highest
point.
Place
the
material
under
the
presser
foot,
lower
the
presser
bar
and
commence
to
sew.
When
4
making
the
first
few
stitches,
hold
the
ends
of
bath
threads
in
your
hand,
so
that
they
do
not
get
sewn
down
or
get
drawn
into
the
race.
Never
force
the
material
along
by
either
pushing
or
pulling
it,
but
merely
guide
the
work;
otherwise
the
needle
may
break.
It
is
best
to
always
make
a
short
practice
run
on
a
remnant
before
commencing
on
your
work.
When
sewing
hard
or
thick
pieces
of
material,
or
when
stitching
across
seams,
assist
the
needle
by
carefully
turning
the
balance
wheel
with
your
hand.
This
practice
will
guard
against
the
needle
bending
or
breaking.
Before
sewing
the
corner
of
a
seam,
with
a
hand
sewing
needle
draw
a
thread
through
the
fabric
and
sew
along
one
edge.
At
the
corner
leave
the
needle
in
the
fabric
to
act
as
a
pivot,
turn
the
material
and
continue
to
sew
while
holding
both
ends
of
the
tacking
thread.
This
way
you
will
prevent
stoppages
at
corners
which,
otherwise,
easily
occur.
Setting
the
Length
of
Stitch
—
Fig.
8
The
machine
has
in
front,
on
the
r
i
g
h
I,
a
stitch
regulating
lever
a
with
thumb
screw
b,
with
which
the
required
stitch
length
may
be
selected
on
the
scale
c.
Before
you
can
make
any
adjustment
the
thumb
screw
must
be
turned
to
the
left.
The
more
you
loosen
this
screw,
the
greater
the
up
and
down
movement
of
the
regulating
lever
will
be,
and
the
stitches
will
increase
or
decrease
accordingly.
For
re
verse
sewing
you
must
move
the
lever
to
the
top.
[
2.
Sewing
With
your
left
hand
hold
the
end
of
the
upper
thread
above
the
bed-
plate,
leaving
the
thread
slack.
Turn
the
balance
wheel
towards
you
to
allow
the
needle
to
travel
down
and
up
again
to
its
high
est
point;
the
lower
thread
will
be
brought
up
in
a
loop
through
the
needle
plate.
Place
the
ends
of
both
threads
under
the
presser
foot
to
the
back.
Do
not
move
the
threaded
needle
unlessa
piece
of
ma
terial
has
been
placed
beneath
it.
Fig.
7
4i
Fig.
8
—a
—b
10
11
Page 8

Regulating
the
Thread
Tensions
—
Figs.
9—li
The
Upper
Thread
Tension
is
regulated
by
turning
the
setting
flange
of
upper
thread
tensioner
a
(Fig.
6).
—
Clockwise
turning
increases
the
tension;
anti-
clockwise
turning
loosens
the
tension.
The
U
n
d
erT
h
r
e
a
d
T
e
nsI
o
n
is
regulated
by
turn
ing
the
small
screw
a
(Fig.
4)
with
a
screwdriver.
Here
too
the
tension
is
increased
by
clockwise
adjustment
and
decreased
by
anti-clockwise
adjustment.
It
is
generally
only
necessary
to
adjust
the
upper
thread
tension.
Satisfactory
stitching
is
possible
only
if
upper
and
under
thread
tensions
are
correctly
set.
After
you
have
sewn
an
inch
or
two,
inspect
the
stitching
on
top
and
underneath.
The
tensions
are
satisfactory
if
both
threads
are
drawn
into
the
material
e
q
u
a
II
y
and
lock
in
the
center
of
the
work
(see
Fig.
9).
If,
however,
loops
have
formed
on
the
underside,
the
upper
thread
is
too
slack
and
must
be
given
more
tension
by
turning
the
setting
flange
a
(Fig.
6)
to
the
right
(Fig.
10).
If
loops
continue
to
be
formed
on
the
u
n
d
ers
i
d
e
of
the
work,
it
is
possible
that
the
under
thread
has
been
tensioned
too
severely
and
this
must
be
corrected
by
turning
the
small
screw
a
(Fig.
4)
a
little
to
the
left.
If,
on
the
other
hand,
the
thread
is
lying
fIat
o
n
to
p
of
h
e
m
a
t
eri
a
I
(Fig.
ii),
or
if
loops
hove
formed,
the
upper
thread
may
be
too
tight
and
you
must
loosen
the
Regulating
the
Presser
Foot
The
presser
foot
must
exert
on
the
material
sufficient
pressure
to
ensure
satisfactory
feeding
of
the
material.
The
presser
barisset
for
oIl
regular
sewing
work
on
light
and
medium
weight
goods.
Heavy
or
hard
texture
materials
require
more
pressure.
To
increase
the
pressure,
turn
the
setting
screw
to
the
right;todecrease
the
pressure,
turn
the
screw
to
the
left,
I.
e.
upwards.
Removing
the
Work
from
the
Machine
Raise
the
take-up
lever
to
its
highest
and
lift
the
presser
foot.
Draw
the
work
to
the
back
of
the
machine,
away
from
the
needle.
The
ends
of
the
thread
should
be
cut
approx.
3’
from
the
needle
and
be
placed
under
the
foot
to
the
back,
thus
leaving
the
machine
ready
for
the
next
run.
b
-J
tension
by
turn
ing
the
flange
a
—
Fig.
6
—
to
the
left.
If
this
adjustment
does
not
improve
the
stitch
forming,
the
under
thread
must
then
re
ceive
more
ten
sionbyturning
__
the
screw
a
—
Fig.
4
—
to
the
right.
F;g.
9
Fg.
10
Fig.
11
12
13
Page 9

[
After
cleaning
apply
a
few
drops
of
high-grade
sewing
I
machine
oil
to
all
working
parts.
Do
not,
however,
apply
too
much
oil;
a
few
drops
at
the
right
places
will
prove
ode
(
quote.
After
oiling
run
the
machine
rapidly
for
a
short
while
and
then,
before
you
start
to
sew,
wipe
all
parts
]
clear
of
any
surplus
oil.
If
the
machine
has
not
been
used
for
some
time,
or
if
it
has
been
used
continuously,
a
few
drops
of
paraffin
should
be
applied
to
all
lubrication
points
and
the
mach
ine
worked
rapidly
for
a
minute
or
two.
Then
clean
the
mochine
with
a
soft
rag
and
oil
the
mechanism.
Fig.
12
Machine
Head
The
following
points,
which
ore
marked
thus
0
in
the
illu
with
open
stration
must
be
cleaned
and
oiled
in
proper
sequence:
Face
Cover
Plate
Regular
oiling
is
essential
for
the
smooth
running
of
the
machine.
Lint
and
thread
ends
settle
in
the
working
me
chanism
ond
eventually
impede
the
free
running
of
the
machine.
It
is
necessary,
therefore,
to
give
all
parts
specified
here
after
a
regular,
thorough
cleaning.
Never
use
a
screw
driver
or
other
metal
instrument
for
cleaning,
not
even
a
needle,
but
only
a
small
pointed
stick,
so
that
no
damage
is
done
to
the
sewing
mechanism.
Cleaning
and
oiling
Fig.
13
Machine
Head
with
removed
Arm
Cover
Plate
14
15
Page 10
1.
The
Head
(Fig.
12).
Open
the
hinged
face
cover
plate.
2.
The
Arm
(Fig.
13).
Lubricate
all
points
marked
thus
0.
3.
The
Needle
Plate.
Take
out
the
screws
and
remove
the
plate.
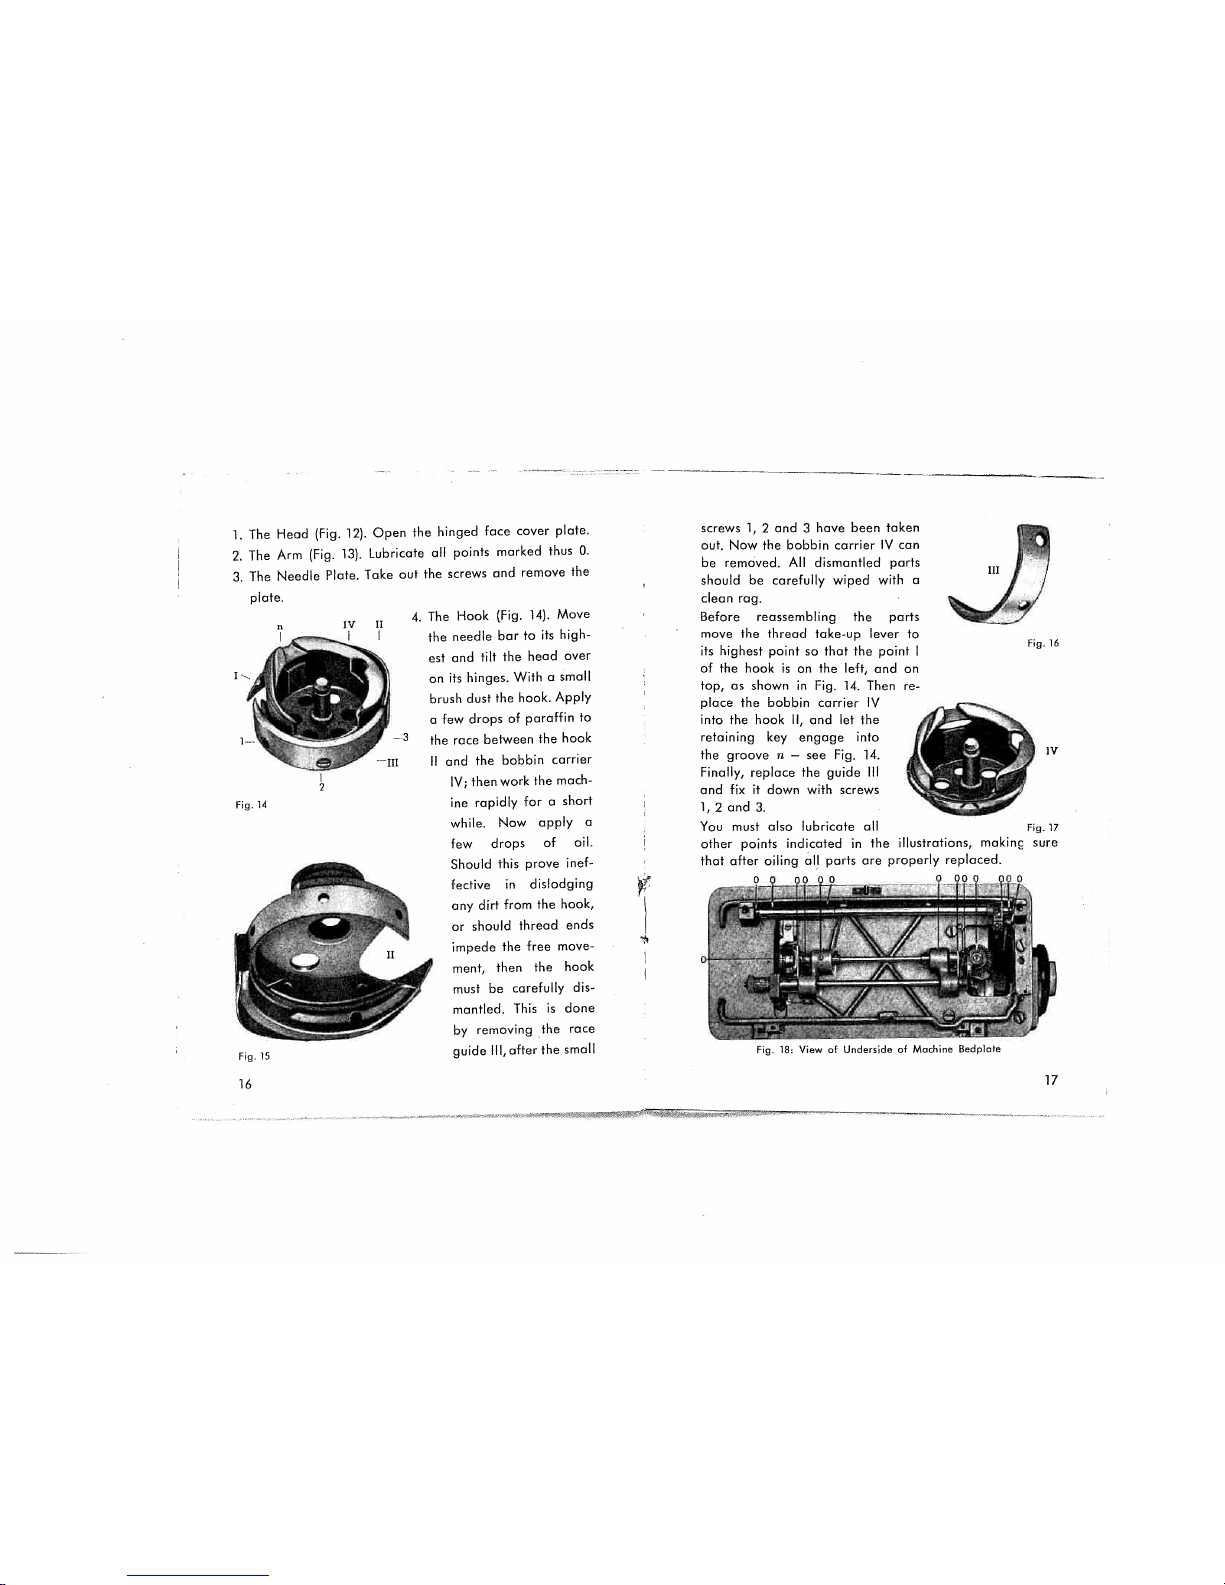
4.
The
Hook
(Fig.
14).
Move
the
needle
bar
to
its
high
est
and
tilt
the
head
over
on
its
hinges.
With
a
small
brush
dust
the
hook.
Apply
a
few
drops
of
paraffin
to
the
race
between
the
hook
II
and
the
bobbin
carrier
IV;
then
work
the
mach
ine
rapidly
for
a
short
while.
Now
apply
a
few
drops
of
oil.
Should
this
prove
inef
fective
in
dislodging
any
dirt
from
the
hook,
or
should
thread
ends
impede
the
free
move
ment,
then
the
hook
must
be
carefully
dis
mantled.
This
is
done
by
removing
the
race
guide
Ill,
after
the
small
screws
1,
2
and
3
have
been
taken
out.
Now
the
bobbin
carrier
IV
can
be
removed.
All
dismantled
parts
should
be
carefully
wiped
with
a
clean
rag.
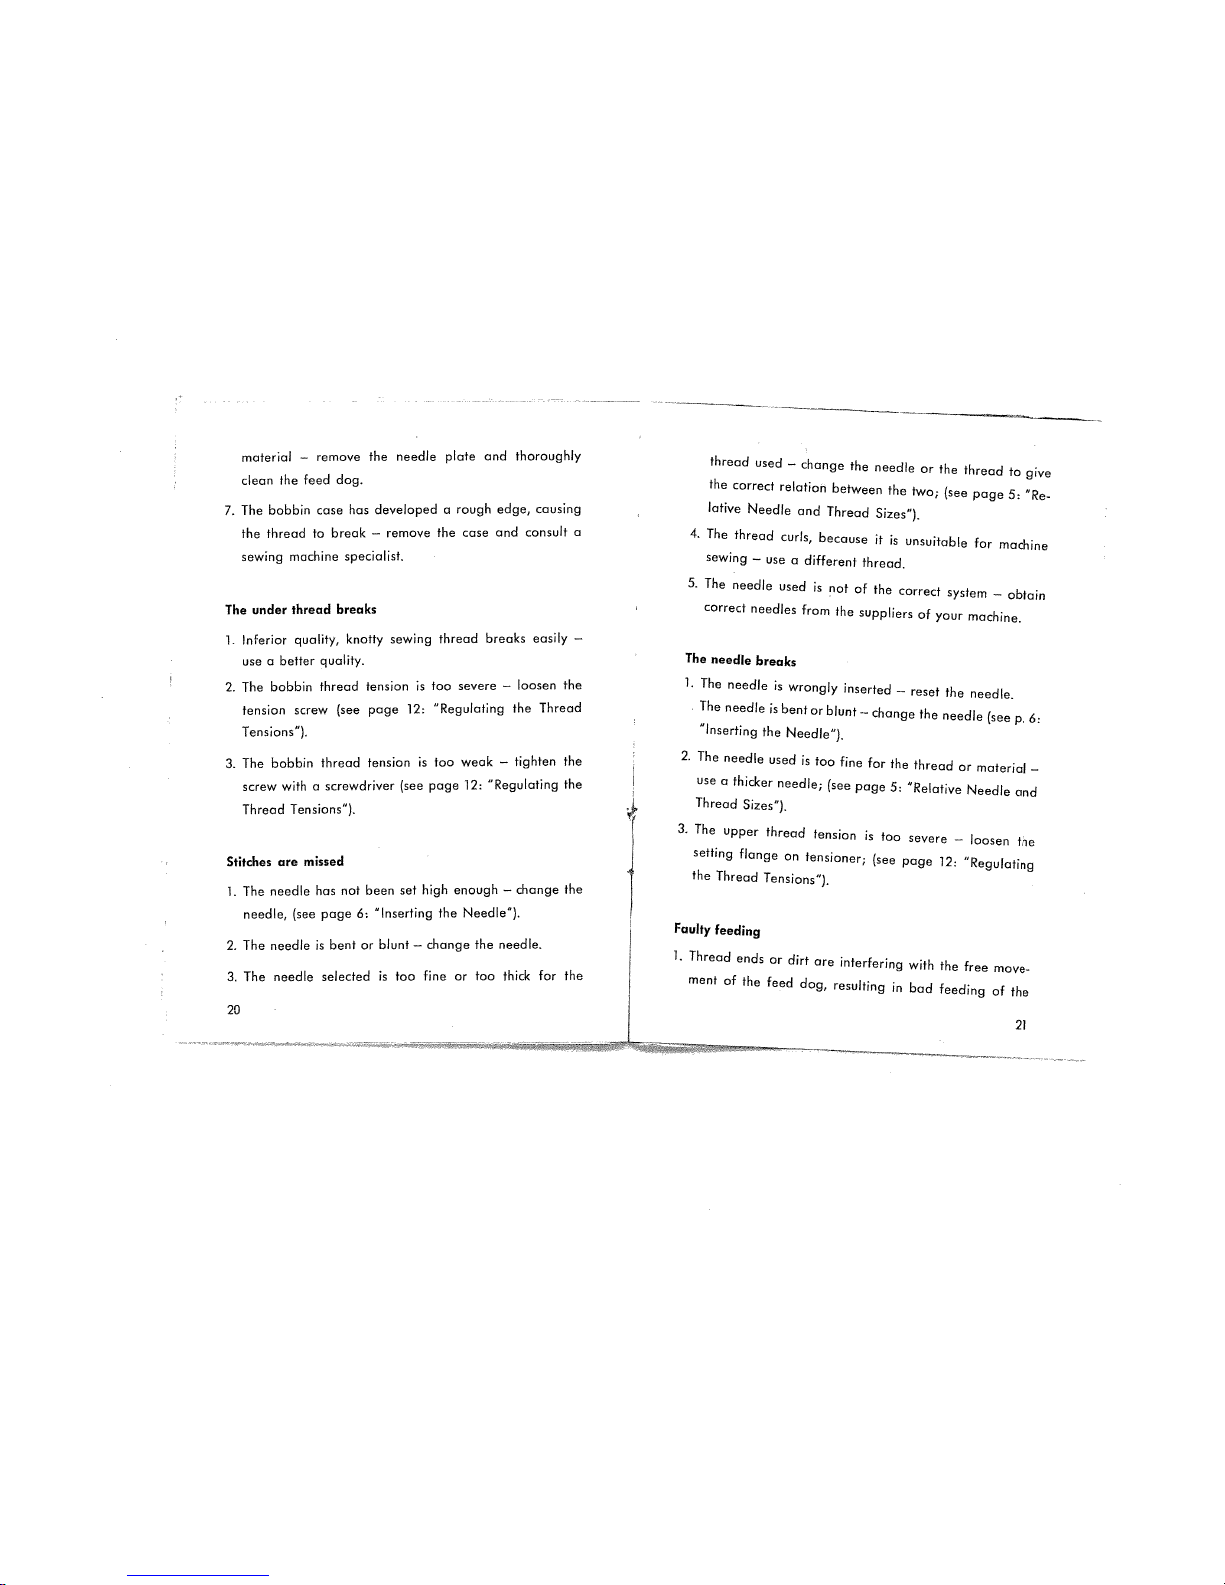
Before
reassembling
the
parts
move
the
thread
take-up
lever
to
•
•
.
.
Fig.
16
its
highest
point
so
that
the
point
I
of
the
hook
is
on
the
left,
and
on
top,
as
shown
in
Fig.
14.
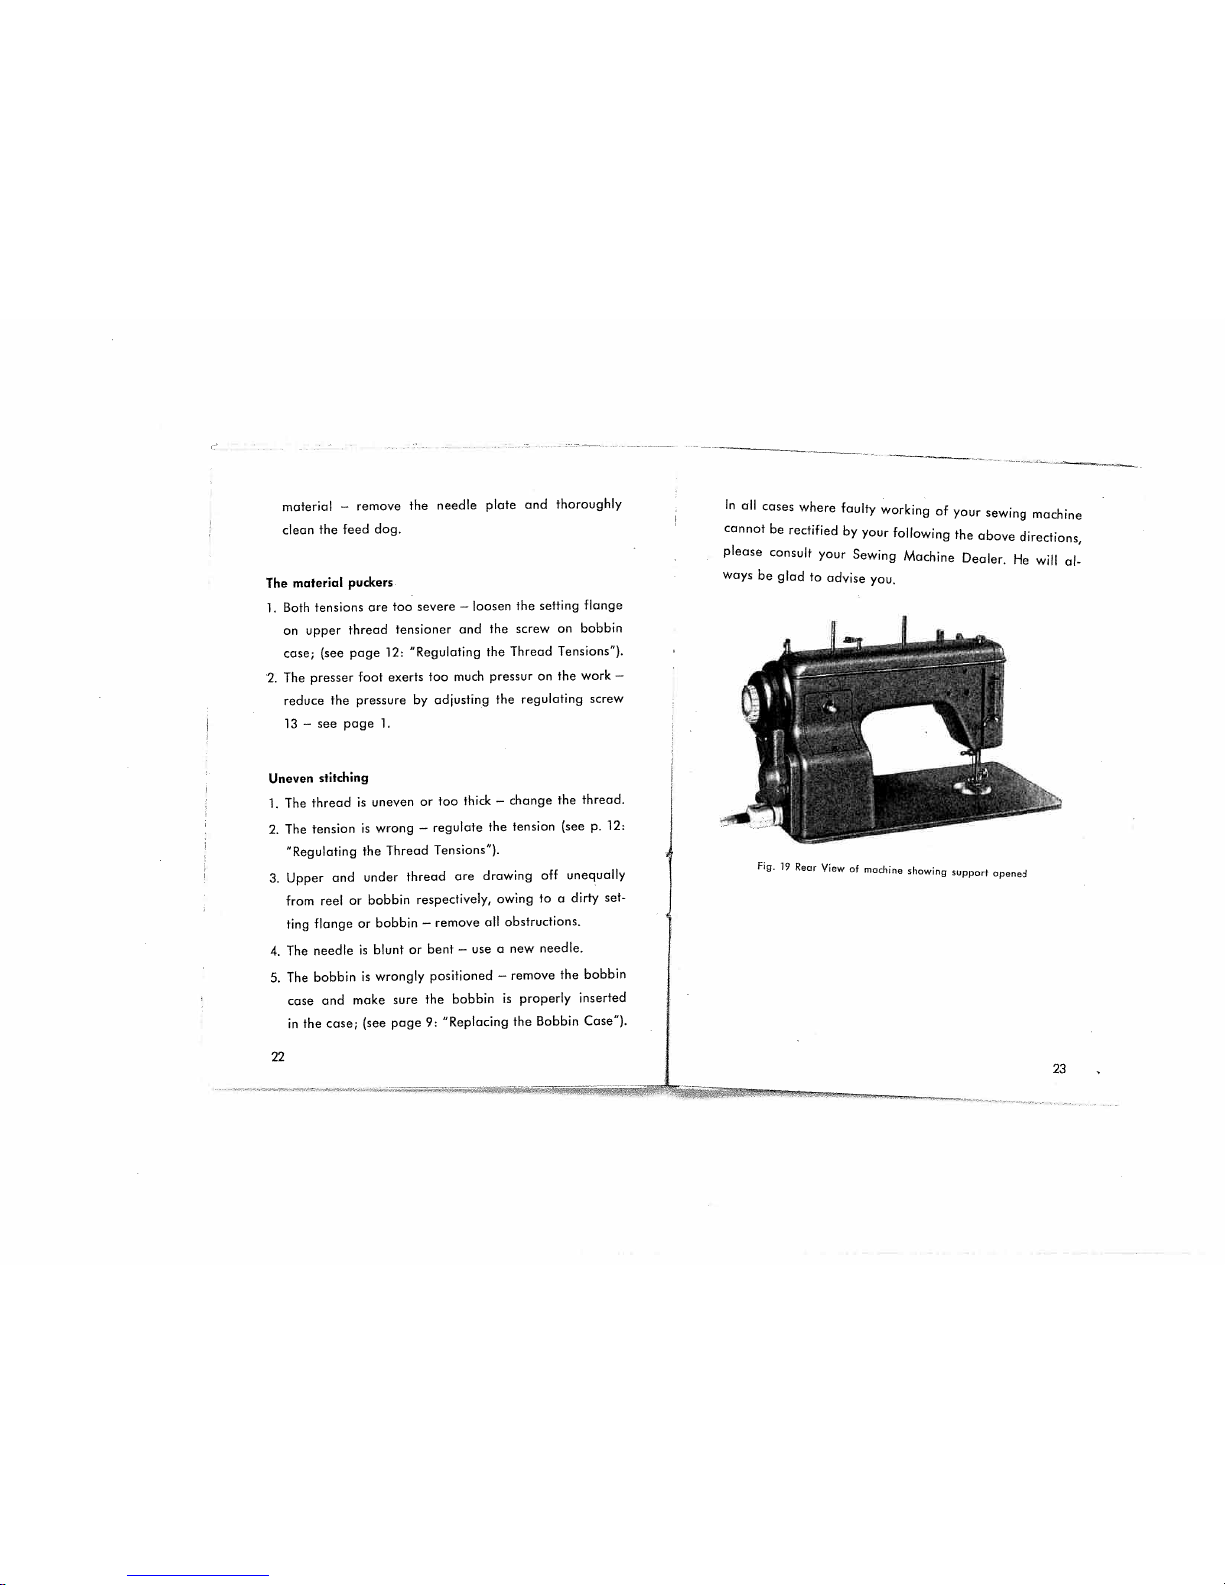
Then
re
place
the
bobbin
carrier
IV
into
the
hook
II,
and
let
the
retaining
key
engage
into
the
groove
n
—
see
Fig.
14.
Finally,
replace
the
guide
Ill
and
fix
it
down
with
screws
1,
2
and
3.
You
must
also
lubricate
all
Fig.
17
other
points
indicated
in
the
illustrations,
making
sure
that
after
oiling
oIl
ports
ore properly
replaced.
Ii’
Fig.
14
Fig.
15
Fig.
18
View
of
Underside
of
Machine
Bedplote
16
17
Page 11

2.
Certain
working
ports
of
the
machine
are
dry
—
apply
Cause
of
faults
and
simple
home
service
4.
___________________________________________________
a
few
drops
of
oil.
3.
A
component
part
has
worked
itself
loose
—
retighten
it
with
a
screwdriver
Please
always
remember:
many
machine
troubles
may
be
caused
by
your
not
carefully
following
these
working
instructions.
In
many
cases,
faulty
working
of
your
mach-
The
upper
thread
breaks
me
canberemedied
merely
by
cleaning
and
oiling.
1.
Inferior
quality,
knotty
sewing
thread
breaks
easily
—
use
a
better
quality.
Machine
works
heavily
2.
The
needle
selected
is
too
fine
for
the
thread
or
ma
terial
used
—
use
a
thicker
needle
(see
page
5:
“Relat
1.
Thread
ends
have
become
entangled
in
the
hook
race
—
ive
Needle
and
Thread
Sizes”).
remove
all
obstructions.
2.
Certain
working
parts
of
the
machine
are
dry
—
apply
The
upper
thread
tension
is
too
severe
—
loosen
the
a
few
drops
of
oil,
setting
flange
on
tensioner
(see
page
12:
“Regulating
the
ThrecidTensions”)
3.
The
machine
is
dirty
—
thoroughly
clean
it.
4.
The
needle
is
wrong
inserted,
or
it
is
bent
—
change
4.
The
wrong
kind
of
oil
has
been
used
—
clean
the
mach
ine
with
paraffin.
the
needle
(see
page
6:
Inserting
the
Needle)
5.
The
eye
of
the
needle
has
a
knife
edge
—
change
the
needle.
The
machine
is
noisy
1.
Thread
ends
have
become
entangled
in
the
hook
race
—
6.
Thread
ends
or
dirt
are
interfering
with
the
free
move
remove
all
obstructions.
ment
of
the
feed
dog,
resulting
in
bad
feeding
of
the
18
19
i.
.
Page 12
material
—
remove the
needle
plate
and
thoroughly
thread
used
—
change
the
needle
or
the
thread
to
give
clean
the
feed
dog.
the
correct
relation
between
the
two;
(see
page
5:
“Re-
7.
The
bobbin
case
has
developed
a
rough
edge,
causing
lative
Needle
and
Thread
Sizes”).
the
thread
to
break
—
remove
the
case
and
consult
a
4.
The
thread
curls,
because
it
is
unsuitable
for
machine
sewing machine
specialist.
sewing
—
use
a
different
thread.
5.
The
needle
used
is
not
of
the
correct
system
—
obtain
The
under
thread
breaks
correct
needles
from
the
suppliers
of
your
machine.
1.
Inferior
quality,
knotty
sewing
thread
breaks
easily
—
use a
better
quality.
The
needle
breaks
2.
The
bobbin
thread
tension
is
too
severe
—
loosen
the
1.
The
needle
is
wrongly
inserted
—
reset
the
needle.
tension
screw
(see
page
12:
“Regulating
the
Thread
The
needle
isbentorblunt
change
the
needle
(see
p.6:
Tensions”).
“Inserting
the
Needle”).
3.
The
bobbin
thread
tension
is
too
weak
—
tighten
the
2.
The
needle
used
is
too
fine
for
the
thread
or
material
—
screw
with
a
screwdriver
(see
page
12:
“Regulating
the
use
a
thicker
needle;
(see
page
5:
“Relative
Needle
and
Thread
Sizes”).
Thread
Tensions”).
3.
The
upper
thread
tension
is
too
severe
—
loosen
the
setting
flange
on
tensioner;
(see
page
12:
“Regulating
Stitches
are
missed
the
Thread
Tensions”).
1.
The
needle
has not
been
set
high
enough
—
change
the
needle,
(see
page
6:
“Inserting the
Needle”>.
Faulty
feeding
2.
The
needle
is
bent
or
blunt—change
the
needle.
1.
Thread
ends
or
dirt
are
interfering
with
the
free
move
3.
The
needle
selected
is
too
fine
or
too
thick
for
the
ment
of
the
feed
dog,
resulting
in
bad
feeding
of
the
20
21
Page 13
material
—
remove
the
needle
plate
and
thoroughly
clean
the
feed
dog.
The
material
puckers
1.
Both
tensions
are
too
severe
—
loosen
the
setting
flange
on
upper
thread
tensioner
and
the
screw
on
bobbin
case;
(see
page
12:
“Regulating
the
Thread
Tensions”).
2.
The
presser
foot
exerts
too
much
pressur
on
the
work
—
reduce
the
pressure
by
adjusting
the
regulating
screw
13
—
see
page
1.
Uneven
stitching
1.
The
thread
is
uneven
or
too
thick
—
change
the
thread.
2.
The
tension
is
wrong
—
regulate
the
tension
(see
p.
12:
“Regulating
the
Thread
Tensions”).
3.
Upper
and
under
thread
are
drawing
off
unequally
from
reel
or
bobbin
respectively,
owing
to
a
dirty
set
ting
flange
or
bobbin
—
remove
all
obstructions.
4.
The
needle
is
blunt
or
bent
—
use
a
new
needle.
5.
The
bobbin
is
wrongly
positioned
—
remove
the
bobbin
case
and
make
sure
the
bobbin
is
properly
inserted
in
the
case;
(see
page
9:
“Replacing
the
Bobbin
Case”).
22
In
all
cases
where
faulty
working
of
your
sewing
machine
cannot
be
rectified
by
your
following
the
above
directions,
please
consult
your
Sewing
Machine
Dealer.
He
will
al
ways
be
glad
to
advise
you.
Fig.
W
Rear
View
of
machine
showing
support
opened
23
Page 14
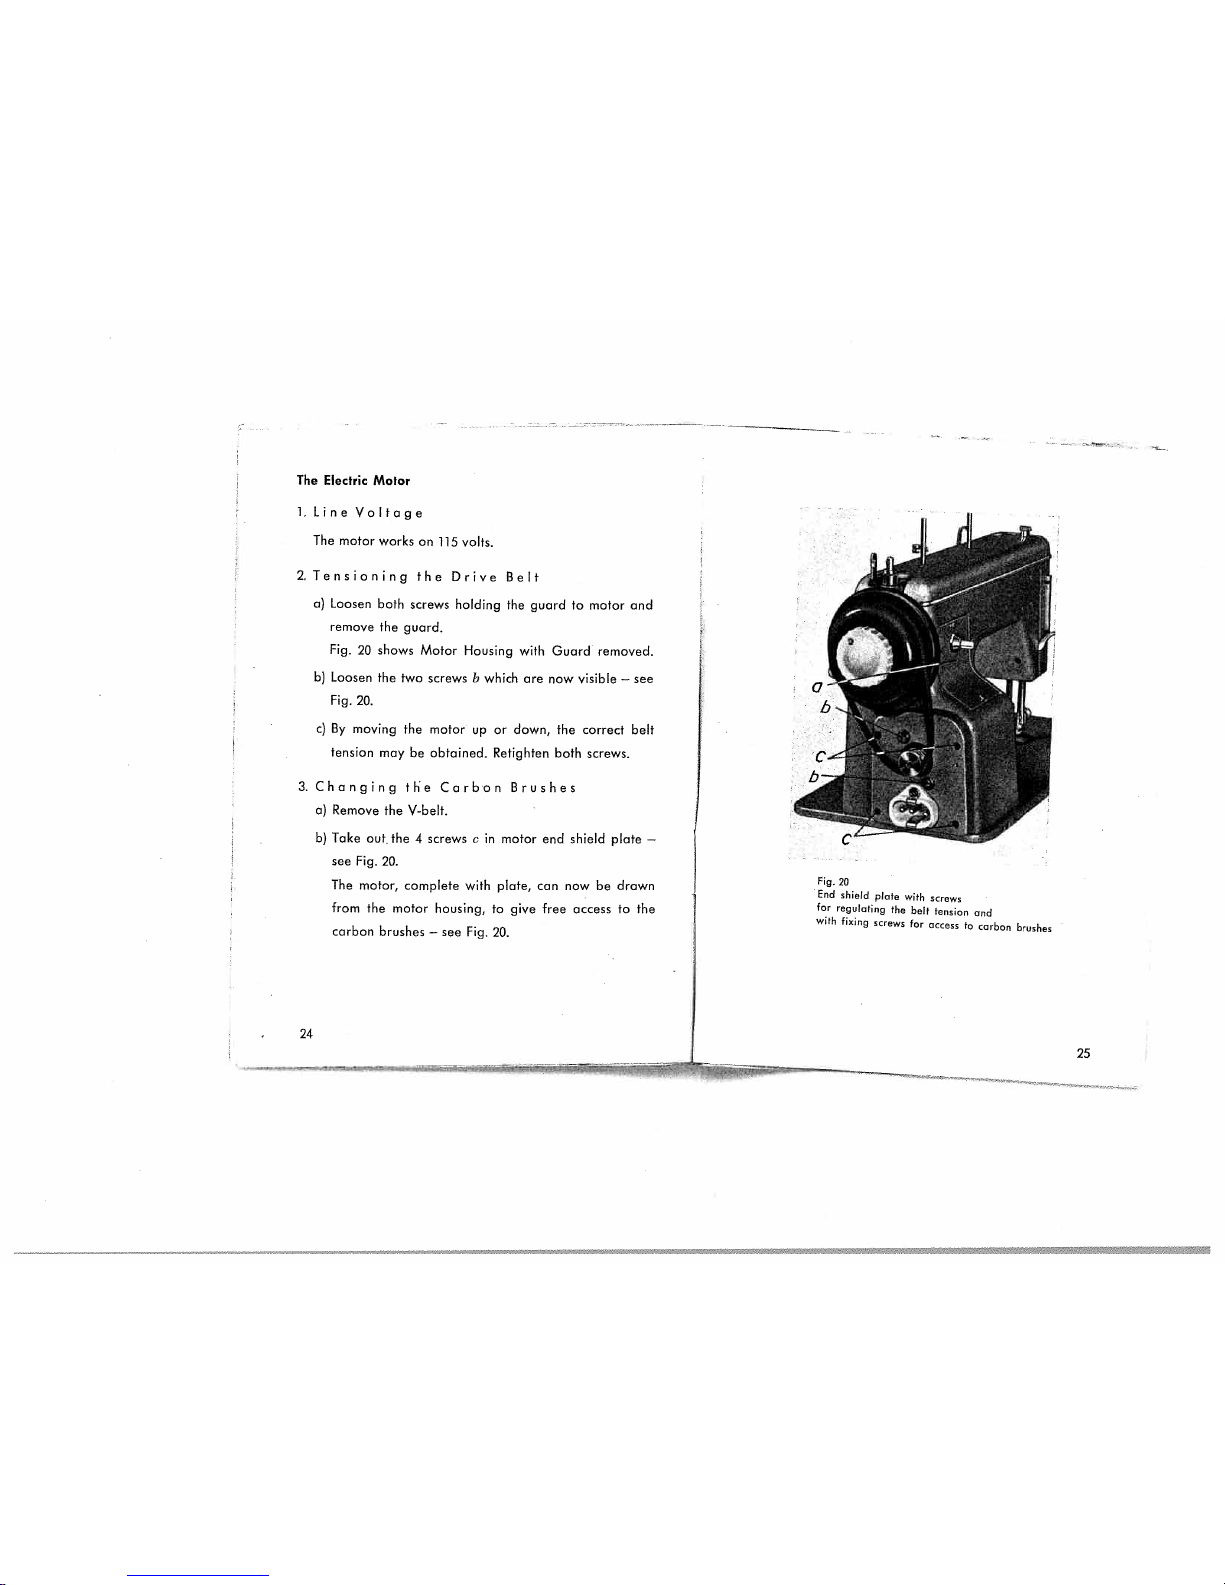
The
E’ectric
Motor
1.
Line
Voltage
The
motor
works
on
115
volts.
2.
Tensioning
the
Drive
Belt
a)
Loosen
both
screws
holding
the
guard
to
motor
and
remove
the
guard.
Fig.
20
shows
Motor
Housing
with
Guard
removed.
b)
Loosen
the two
screws
b
which
are
now
visible
—
see
Fig.
20.
c)
By
moving
the
motor
up
or
down,
the
correct
belt
tension
may
be
obtained.
Retighten
both
screws.
3.
Changing
the
Carbon
Brushes
a)
Remove
the
Vbelt.
b)
Take
out
the
4
screws
c
in
motor
end
shield
plate
—
see
Fig.
20.
The
motor,
complete
with
plate,
can
now
be
drawn
from
the
motor
housing,
to
give
free
access
to
the
carbon
brushes
—
see
Fig.
20.
24
c
Fig.
20
End
shield
plate
with
screws
for
regulating
the
belt
tension
and
with
fixing
screws
for
access
to
carbon
brushes
25
Page 15

-e
-
9?
paq
Id,
II)
paq
black
0
0
DC
Jo
012
6)
CC
WnJUOfQ
6
U!4!M
a
a
0
a
 Loading...