

Pfaff 145, 151, 153, 143, 541 Instruction Manual
...
R
6499
( PMff f
141;
143|
145;
151;
153
541; 543;
543-712;
545;
555
Single-needle
flatbed
sewing
machines
142;
144;
146
542;
542-748/01;
544; 546;
546-748/01
Two-needle
flatbed
sewing
machines
Instruction
Book
/
' •
Contents
, ^
Page
1.
General
®
2.
Fundamentalsofmachine
operation
3
3.
Cleaning
and
oiling
^
4.
Winding
the
bobbin
®
5.
Changing
the
bobbin
and
threading
the
bobbin
case 7
6.
Selecting
the
correct
needle
3
Needle
systems
®
Needle
point
styles
®
Needle
and thread sizes 8
7. Changing
the
needle
8.
Threading
the
needle
^
9. Drawing up the bobbin thread
10. Regulating the thread tensions
Adjusting the upper tension
Adjusting the lower tension
11. Regulating the stitch length
12.
Regulating
the
pressureonthe
material
''S
13. Cleaning
the
sewing hook
14.
The
safety
clutch
Additional
instructions
for
Pfaff
machines'141-705/03
and
141-705/03-725/01
. 16-18
15. Regulating the stitch length
16.
Changing
the
feed
gears
'•8
17. Adjusting
the
trimmer * *
^18.
Operating
the
trimmer
^
Additional
Instructions
for
Pfaff
machines
143-705/03
21
19.
Regulating
the
stitch
length
21
Additional
Instructions
for
Pfaff
machines
145
22-24
20.
Exchanging
the
alternating
pressers
22
21.
Lubricating
the
machine
24
0-22. Setting
the
foot lift
-
Additional
Instructions
for
Pfaff
machines
151
and
153
(
Additional
Instructions
for
Pfaff
machines
142,
542-748/01,
144
and
146
25-^
r23.
Threading
the
needles
25
.
24.
Adjusting
the
puller
feedofthe
Pfaff
542-748/01
26
Additional
Instructions
for
Pfaff
machines
543-712/01
and
543-712/02
...
27
"25. Threading the needle of the Pfaff
543-712
-.-Additional
Instructions
for
Pfaff
machines
546-748/01
28—29
^26.
Setting
the
foot
lift
. . . ; ^
't27.
Adjusting
the
puller
feed
29
^Additional
instructions
for
Pfaff
machines
4141
and
4145
. -
30
^^^28.
Threadingofthe
Pfaff
4141
and
4145
8®
^
Additional
Instructions
for
Pfaff
machines
fitted
with
thread
puller/trimmer
900/».31
"
'!'29.
Pedal
operation
Guards
Trouble
shooting
^
t
..
^i2

t.
General
•
Since
the
operationofthe
machines
listedonthe
title
pageismoreorless
the
same
the
general
instructions
compiledinthis
book
applytoallofthem.
Additional
instructions
for
the
Pfaff
141-705/03;
141-705/03-725/01;
142;
143-705
03-
144;
145;
146; 151;
153;
552-748/01;
543-712/..;
546-748/01;
4141;
4145
and
-900'..
appearatthe
backofthis
booklet.
We
reserve
the
righttomake
alterations
serving
progress.
The
illustrationsinthis
book
are also subject to change.
Itisrecommendedtorun
these
machinesatthe
following
top
speeds:
3
000
s.p.m.
Pfaff
4141
2
200
s.p.m.
Pfaff
141
and
144
2
900
s.p.m.
Pfaff
545
H3
2100
s.p.m.
2
800
s.p.m.
Pfaff
546
H2
1
300
s.p.m.
Pfaff
151
and
544
2
700
s.p.m.
Pfaff
546
H3
i
800
s.p.m.
Pfaff
153
and
542
2
600
s.p.m.
Pfaff
545
H4
i
700
s.p.m.
^ 2
500
s.p.m.
Pfaff
4145
1
600
s.p.m.
Pfaff
145
and
541
2
400
s.p.m.
Pfaff
546
H4
2
300
s.p.m.
and
543-712/..
1400
s.p.m.
When
sewing
tightly
woven
and
heavily
dressed
materials,
the
sewing
speed
should
be
reducedInorderto
prevent
overheating
of the
needle.
The
maximum
speedoftwo-needle
machines
decreasesasthe
needle
gauge
increases.
The
maximum
speeds
which
canbeattained
with
machines
fitted
with
special
attach
mentsortrimming
mechanisms
are
often
far
below
the
recommended
top
speeds
be
cause
the
natureofthe
work
and
the
thicknessofthe
material
tendtolimit
the
ma
chinescapacity.Ifthe
maximum
speedisexceeded,
trouble
may
develop
chieflyinthe
trimming mechanism.
To
avoid
troubleinthe
mechanism,
run
the
machineatabout75per
centofits
top
speed
until
the
parts
which
areinmovable
contact
have
become
thoroughly
glazed
by
their
action
upon
each
other.
This
should
normallybethe
case
after
about
two
weeks'
constant
use.
All
machines
are
regularly
equipped
withafixed
pulley
whichiscastinone
with
the
ba
ance
wheel.Ifdesired,
however,
these
machines
canbesupplied
withadisengage-
ible pulley.
If
fitted
with
the
latter
type
pulley,
the
machineisdispatched
with
the
sewing
mecha
nism
disengaged.Toengage
this
mechanism
for
sewing,
hold
the
balance
wheel
steady
with
your left hand and turn the large
lock
nut
clockwise.
2. Fundamentals of machine operation
Before
you
put
the
machineinoperation
for
the
first
time,
carefully
remove
all
dust
which
has
accumulatedintransit
and
oil
the
machine
thoroughly
(see
Chapter
3).
on
the
machine
only
with
Pfaff
sewing
machine
oil
whichIsnon-resinous
and
acid-free.
Checktomake
sure
the
finger,
take-up
lever
and
belt
guards
are
properly
fitted.
Never
runathreaded
machine
unless
you
have
fabric
under
the
presser
footorthe
vibrating
presser.
Before
you
start
sewing,
lay
both
threads
back
under
the
presser
foot
To
prevent
thread
jamming,
hold
both
thread
ends
until
the
machine
has
madeafew
stitches. . „
Do
not
pull
the
material
during
sewing:
the
machine
wiil
feed
the
fabric
automatically.
Use needlesofthe correct
system
only
(see Chapter
6).
Never
use
rusty
needles.
Use high-quality threads
only.
Always
bring
the
take-up
levertoits
highest
point
before
you
remove
the
material.
3. Cleaning
and
oiling
Careful
cleaning
and
regular
oiling
will
Increase
the
service
lifeofyour
machine.
After
you
have
removed
the
dust
which
has
accumulatedonthe
machineintransit,
take
a
clean
rag
and
remove
the
grease
from
all
nickel-plated
and
polished
Parts.
Apply
a
few
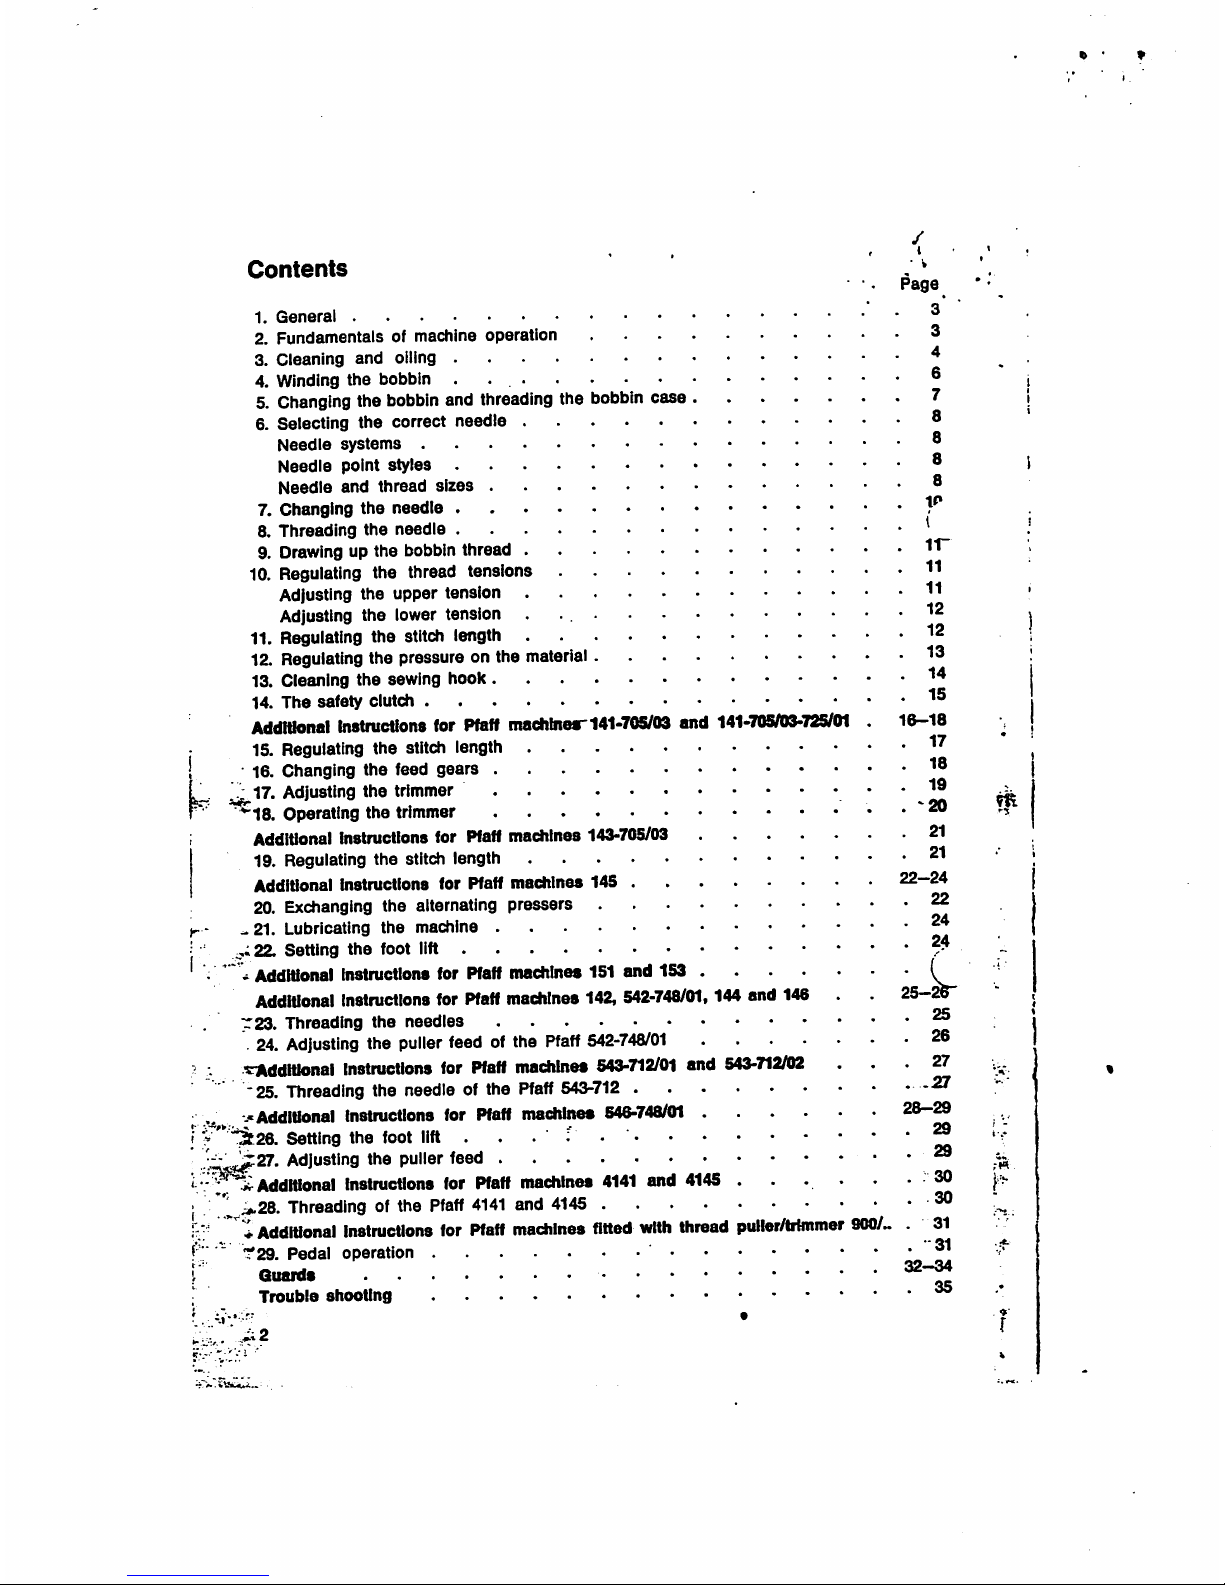
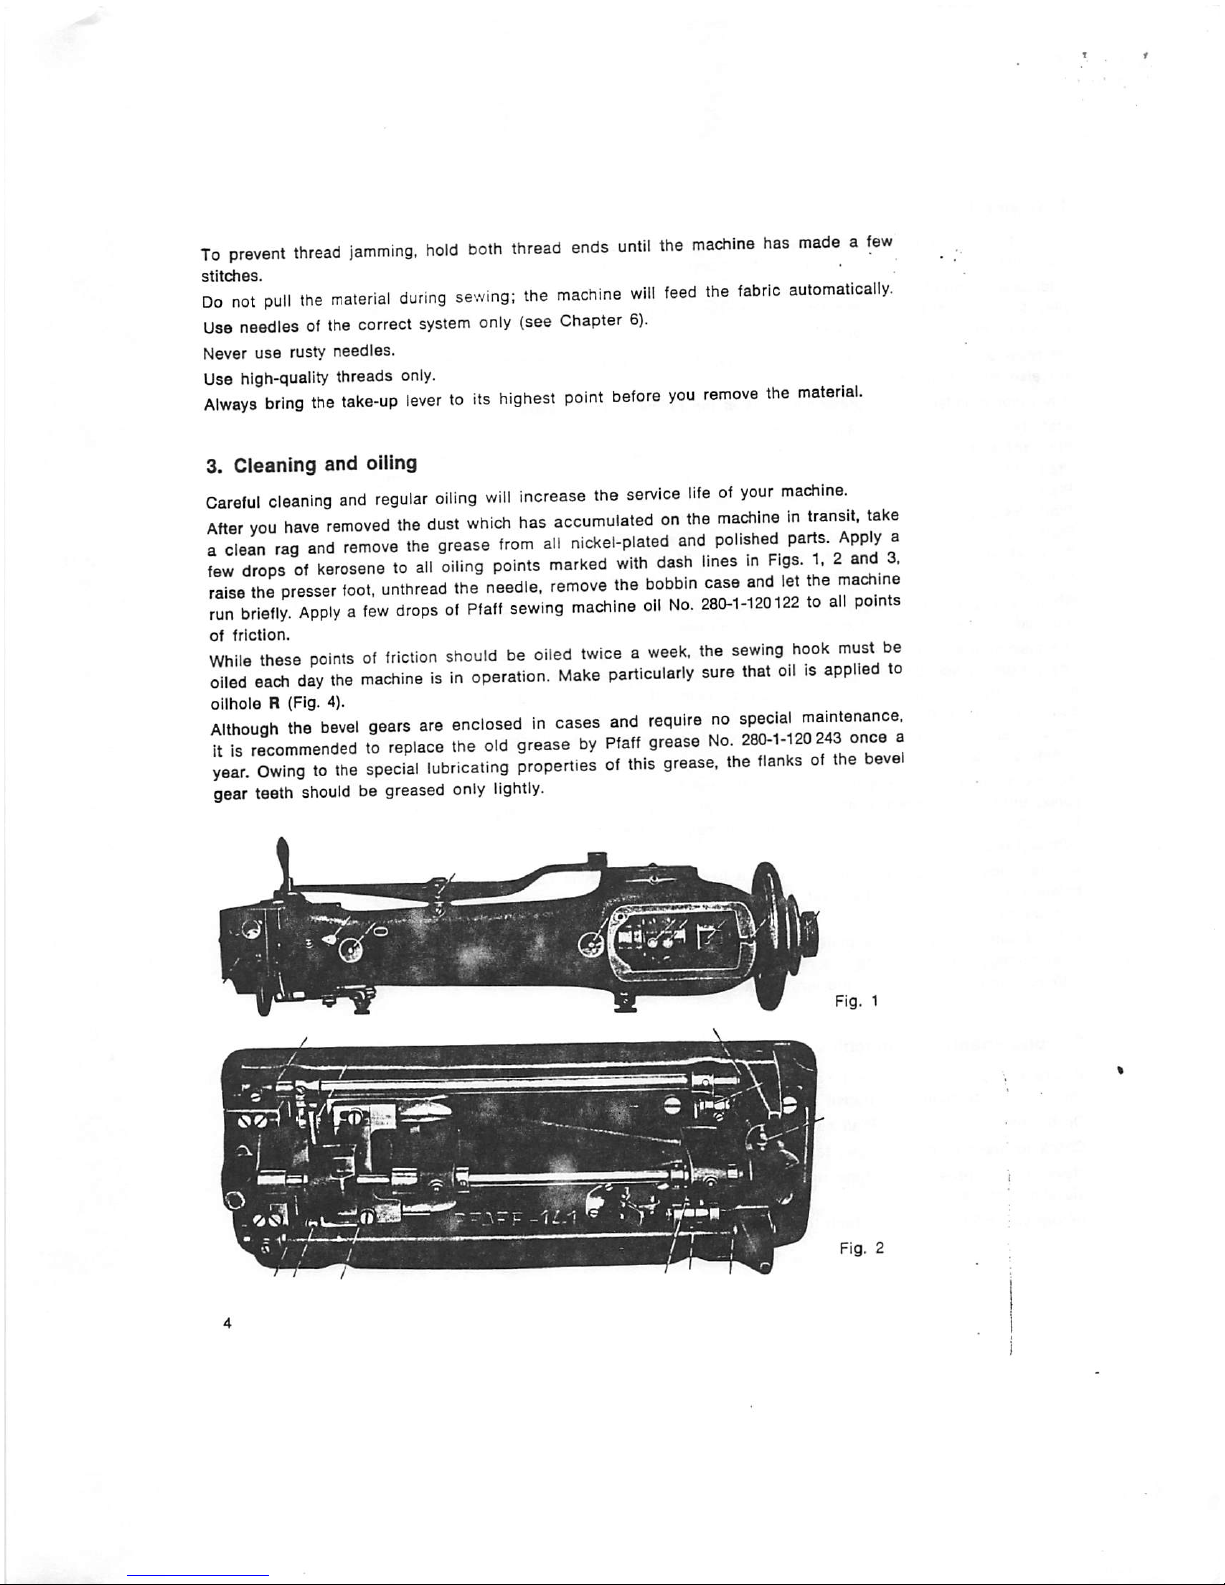
dropsofkerosenetoall
oiling
points
marked
with
dash
linesinFigs.1.2
and
3.
raise
the
presser
foot,
unthread
the
needle,
remove
the
bobbin
case
and
let
the
J^achine
run
briefly.
Applyafew
dropsofPfaff
sewing
machine
oil
No.
280-1-120122toall
points
of
friction.
While
these
pointsoffriction
shouldbeoiled
twiceaweek,
the
sewing
hook
"lUSt
be
oiled
each
day
the
machineisin
operation.
Make
particularly
sure
that
oilisapplied
to
oilhoie R (Fig. 4).
Althougti
the
bevel
geers
ere
enclosedinceses
and
requirenospeclel
mamtenence.
itisrecommendedtoreplace
the
old
greasebyPfaff
grease
once
a
year.
Owingtothe
special
lubricating
propertiesofthis
grease,
the
flanksofthe
beve
gear teeth
shouldbegreased
only
lightly.
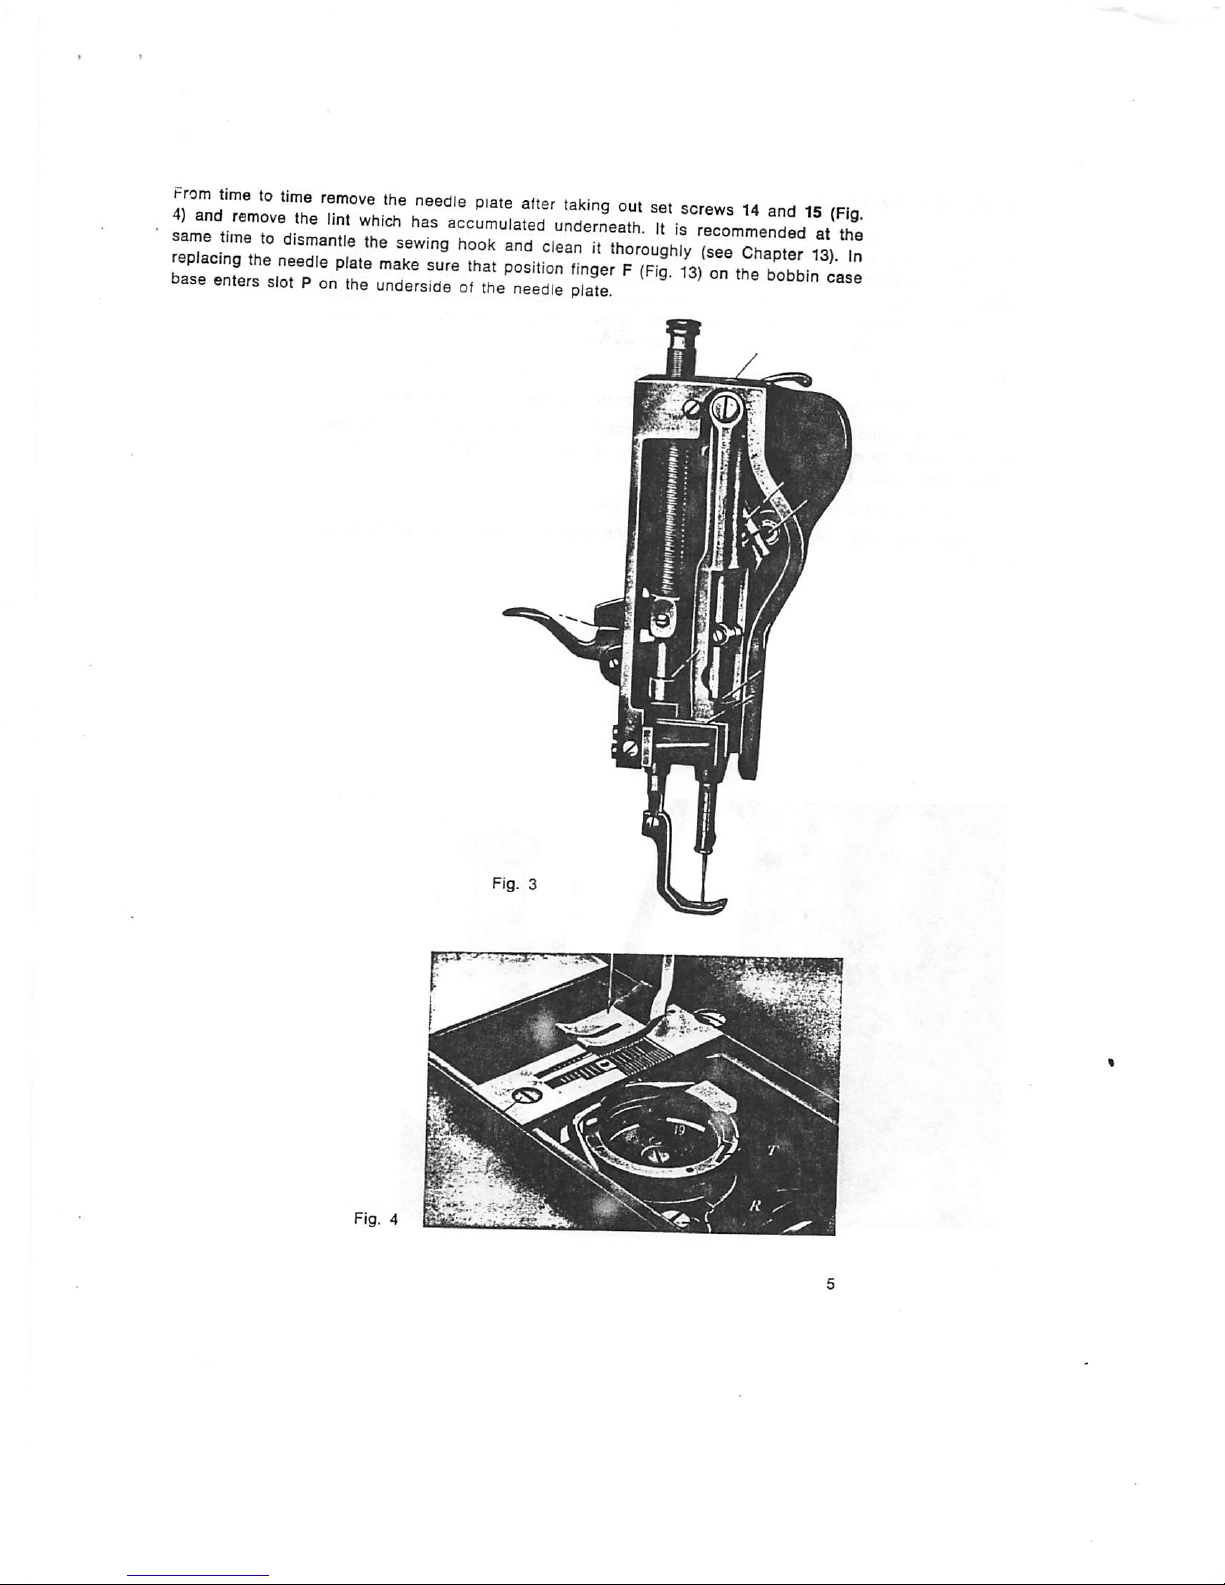
^rom
timetotime
remove
the
needle
plate
alter
taking
out
set
sorevvs14andisrpi.
repT
^-Tng'tortnd
dearnhTrougWy
(sarcTaTte?
13')
7n
jse::Lrs,rrhi\rr3ror.t~
^ -
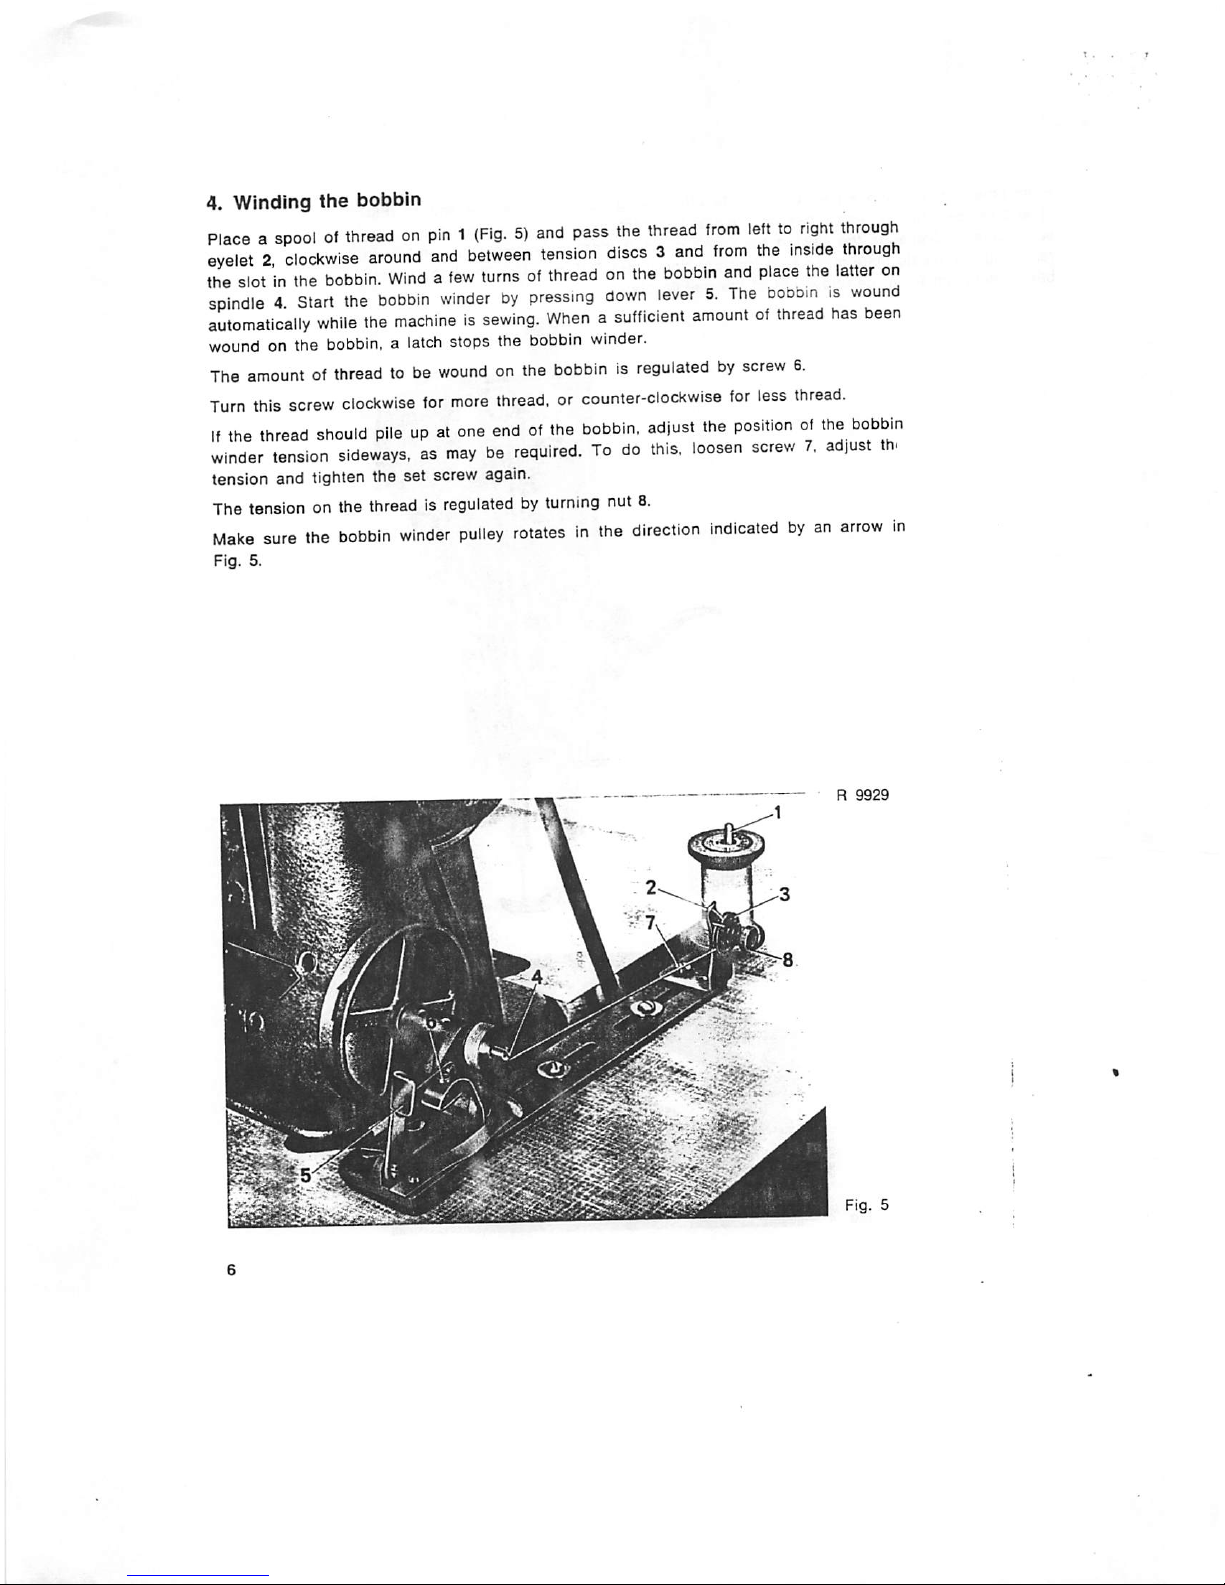
4. Winding
the
bobbin
Placeaspoolofttfreadonpin1(Fig.5)and
pass
the
thread
from
lefttoright
through
eyelet2,clockwise
around
and
between
tension
discs3and
from
the
inside
through
the
slotinthe
bobbin.
Windafew
turnsofthreadonthe
bobbin
and
place
the
latter
on
spindle4.Start
the
bobbin
winderbypressing
down
lever5.The
bobomiswound
automatically
while
the
machineissewing.
Whenasufficient
amountofthread
has
been
wound
on the
bobbin,alatch
stops the
bobbin
winder.
The
amountofthreadtobe
woundonthe
bobbinisregulatedbyscrew
6.
Turn
this
screw
clockwise
for
more
thread,orcounter-clockwise
lor
less
thread.
If
the
thread
should
pileupat
one
endofthe
bobbin,
adjust
the
positionofthe
bobbin
winder
tension
sideways,asmayberequired.Todo
this,
loosen
screw7,adjust
th.
tension and tighten the set screw again.
The tension on the thread is
regulatedbyturning
nut 8.
Maks
sure
the
bobbin
winder
pulley
rotatesinthe
direction
Indicatedbyan
arrow
in
Fig.
5.
R
9929
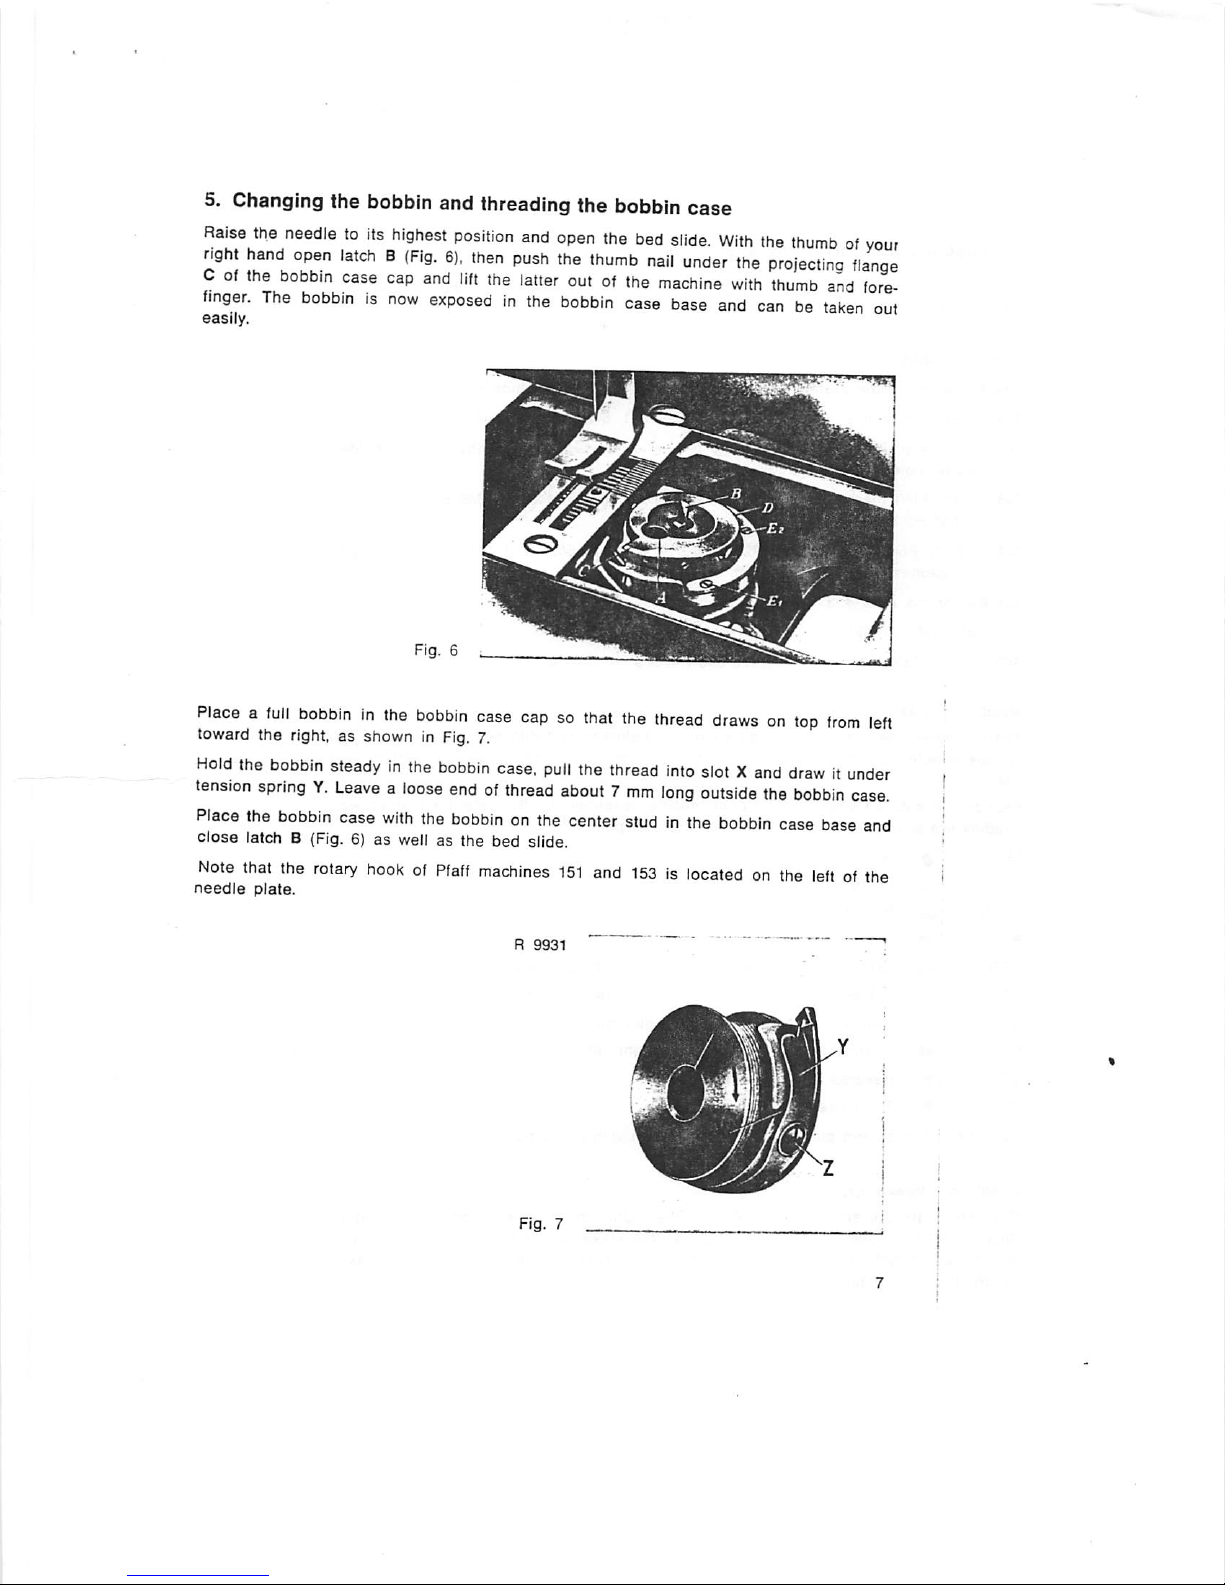
5. Changing the bobbin and threading the bobbin case
Raise
the
needletoits
highest
position
and
open
the
bed
slide.
With
the
thumbofyou:
right
hand
open
latchB(Fig.
6),
then
push
the
thumb
nail
under
the
projecting
flange
Cofthe
bobbin
case
cap
and
lift
the
latter
outofthe
machine
with
thumb
and
fore
finger.
The
bobbinisnow
exposedinthe
bobbin
case
base
and
canbetaken
out
easily.
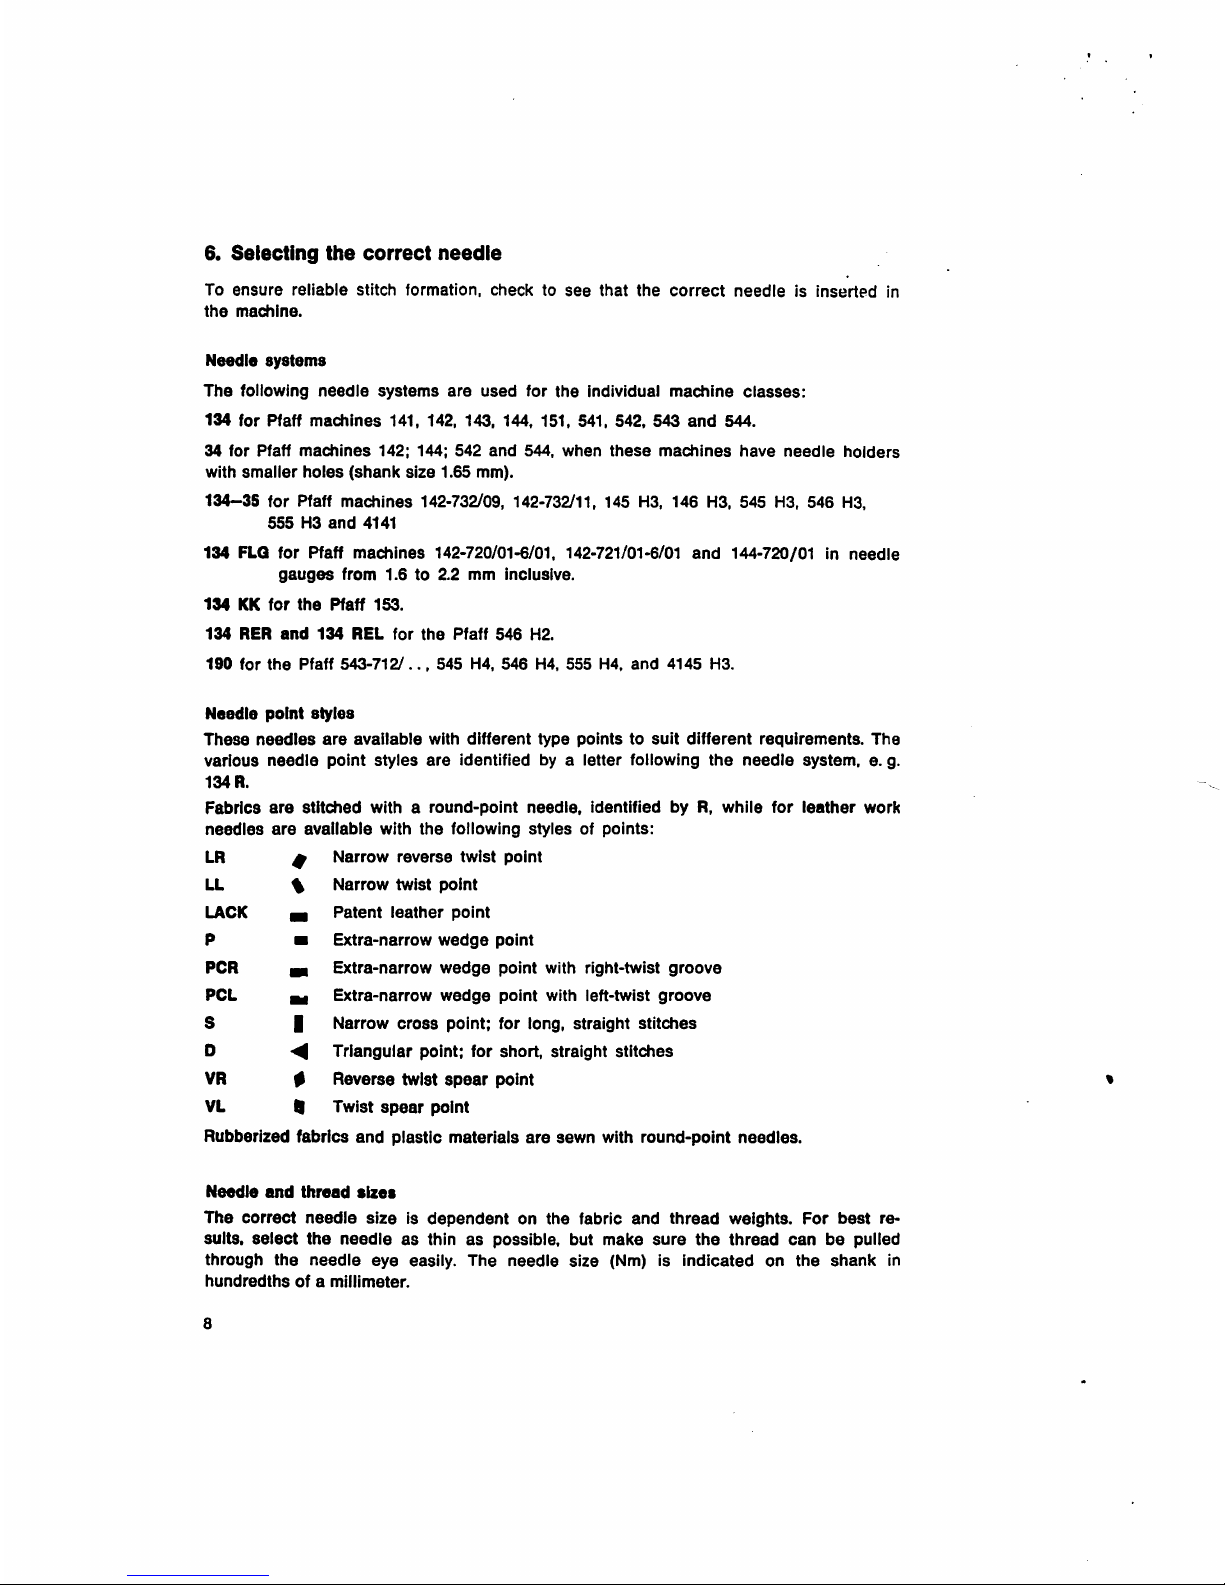
Placeafull
bobbininthe
bobbin
case
capsothat
the
thread
drawsontop
from
left
toward the right, as shown in
Fig.
7.
Hold
the
bobbin
steadyinthe
bobbin
case,
pull
the
thread
into
slotXand
drawitunder
tension
springY.Leavealoose
endofthread
about7mm
long
outside
the
bobbin
case.
Place
the
bobbin
case
with
the
bobbinonthe
center
studinthe
bobbin
case
base
and
close
latch B (Fig. 6) as well as the bed slide.
Note
that
the
rotary
hookofPfaff
machines
151
and
153islocatedonthe
leftofthe
needle
plate.
R
9931
6.
Selecting
the
correct
needle
To
ensure
reliable
stitch
formation,
checktosee
that
the
correct
needleisinserted
in
the
machine.
Needle
systems
The
following
needie
systems
are
used
for
the
individual
machine
classes:
134
for
Pfaff
machines
141, 142,
143,
144. 151. 541,
542,
543
and
544.
34
for
Pfaff
machines
142; 144;
542
and
544,
when
these
machines
have
needle
holders
with
smaller
holes
(shank
size
1.65
mm).
134-35
for Pfaff
machines
142-732/09, 142-732/11, 145 H3, 146 H3, 545 H3, 546 H3,
555H3and
4141
134 FLQ for Pfaff
machines
142-720/01-6/01, 142-721/01-6/01
and
144-720/01 in
needle
gauges
from
1.6to2.2
mm
inclusive.
134
KK
for
the
Pfaff
153.
134
RER
and
134
REL
for
the
Pfaff
546
H2.
190
for
the
Pfaff
543-712/...
545
H4.
546
H4.
555
H4.
and
4145
H3.
Needle
point
styles
These
needles
are
available
with
different
type
pointstosuit
different
requirements.
The
various
needle
point
styles
are
identified
by a
letter
following
the
needle
system,
e. g.
134
R.
Fabrics
are
stitched
witharound-point
needle,
identified
by R,
while
for
leather
work
needles
are
available
with
the
following
stylesofpoints:
LR
Narrow
reverse
twist
point
LL
%
Narrow
twist
point
LACK
m
Patent
leather
point
P
m
Extra-narrow
wedge
point
PGR
m
Extra-narrow
wedge
point
with
right-twist
groove
POL
m
Extra-narrow
wedge
point
with ieft-twist
groove
S
1
Narrow
cross
point;
for
long,
straight
stitches
D
Triangular
point;
for
short,
straight
stitches
VR
#
Reverse
twist
spear
point
VL
9
Twist
spear
point
Rubberized
fabrics
and
plastic
materials
are
sewn
with
round-point
needles.
Needle
and
thread
sizes
The
correct
needle
sizeisdependent
on
the
fabric
and
thread
weights.
For
best
re
sults.
select
the
needleasthinaspossible,
but
make
sure
the
thread
can
be
pulled
through
the
needle
eye
easily.
The
needle
size
(Nm) is
indicated
on
the
shank
in
hundredths
ofamillimeter.
a
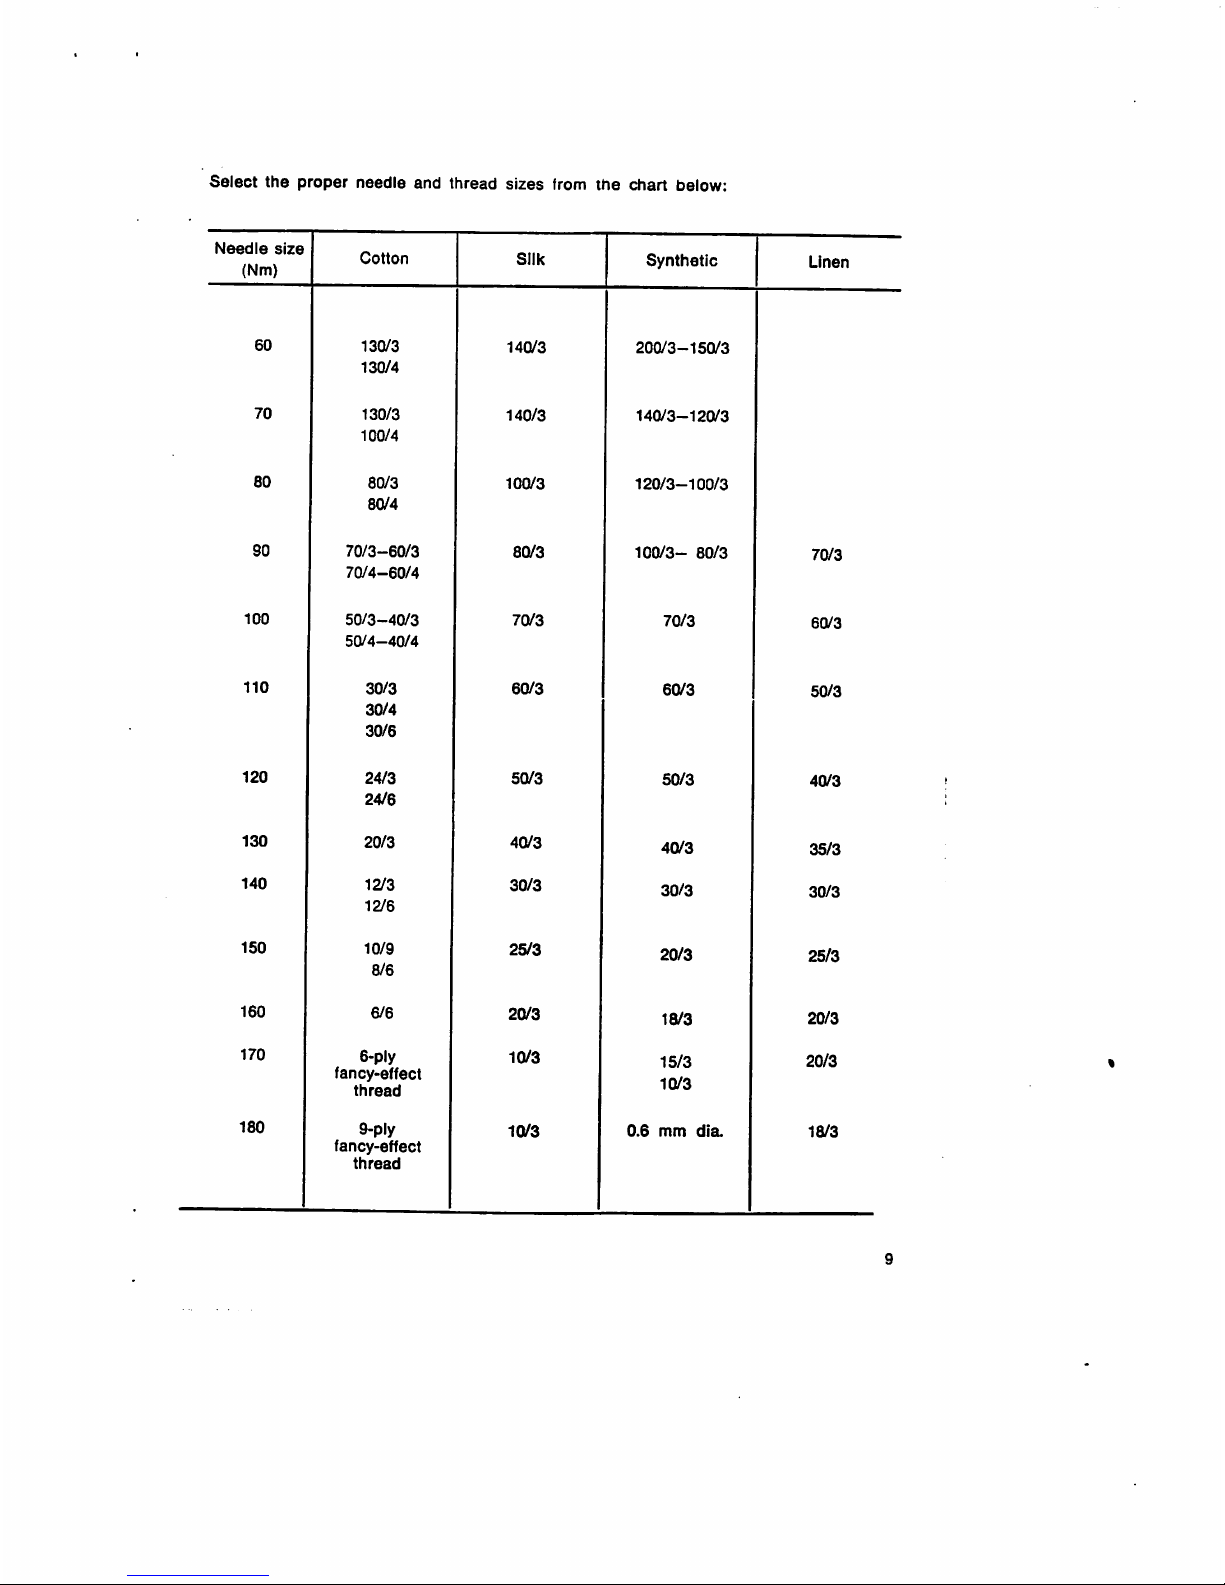
Select
the
proper
needle
and
thread
sizes
from
the
chart
below:
Needle
size
(Nm)
Cotton
Silk
Synthetic
Linen
60
130/3
130/4
140/3
200/3-150/3
70
130/3
100/4
140/3
140/3-120/3
60
80/3
80/4
100/3
120/3-100/3
SO
70/3-60/3
70/4-60/4
80/3
100/3-
80/3
70/3
100
50/3-40/3
50/4-40/4
70/3
70/3
60/3
110
30/3
30/4
30/6
60/3
60/3
50/3
120
24/3
24/6
50/3
50/3
40/3
130
20/3
40/3
40/3
35/3
140
12/3
12/6
30/3
30/3
30/3
150
10/9
8/6
25/3
20/3
25/3
160
6/6
20/3
18/3
20/3
170
6-ply
fancy>effect
thread
10/3
15/3
10/3
20/3
180
9-ply
fancy-effect
thread
10/3
0.6
mm
dia.
18/3

The
needle
size
should
be
selectedtomatch
not
only
the
thread
weight,
but
also
the
machine
model,asfollows:
ModelA:Needle
sizes
60—
70
Model
B:
Needle
sizes
80—100
Model
C:
Needle
sizes
110—140
Model
D:
Needle
sizes
160—180
The
needle
sizeisindicated
on
the
shankinhundredths
of
millimeters.
Thus,
a No.
100
needle
hasashaft
diameter
of
100/100
= 1
mm.
7.
Changing
the
needle
Raise
the
needle
bar
to its
highest
point,
loosen
the
needle
set
screw
half a turn, anc
pull
the
damaged
needle
outofthe
needle
clamp.
Insert a new
needle
into
the
clamp,
making
sure
that
its
short
groove
faces
toward
the
sewing hook.
Push
the
needle
up as far as it will go and tighten
the
needle
set
screw
securely.
Never
use
rusty
needles.
8.
Threading
the
needle
Pass
the
thread
from
spool
1 (Fig. 8)
through
the
holesinstud2and
thread
guide
3,
around
thread
retainer4,clockwise
around
between
te'"'ion
discs5,under
thread
controller
disc
6, through
thread
check spri up and th igh
thread
guide
8, from
right to left through the hole in take-up lever j. then down and through thread guides
10, 11
and
12,
and
from left to
right
through
the
eyeofthe
needle.
The spool
holder
on top of the machine arm w'
">6
suppli'^'f on
special
request
only
because
the
thread
stand
which is
supplied
the
m
le
regularly
ensures
a
smoother
passage
of
the
threadtothe
needle.

9,
Drawingupthe
bobbin
thread
HCd
t.e
endott.e
needle
thread
^ trne\V.~
rp;^rr:f.r:'.:e\r:.c.co..
r;:;Tr.rorHoTd".h?e:crr:;p°;'
.treads
un,,,
.he
.achma
has
.adea.a«
stitches.
10.
Regulating
the
thread
tension
Adlustlng
the
upper
tension
counter-clockwise
tor
less
Turn
tension
nutM(Fig.8)clockw.se
for
more
tens.on,
K^Khin
thread
will
draw
the needle thread
down
^or
r.Tr:iv:.ra
re
unde.s.de
o.
.he
.a.eda,.
as
shown
,n
^.
„
,ne
upper
.ensionis.00
.iph.,
.he
hobbln
.hread
winbepu.ledup(Fig.
10)
:::r::
r.,—•
-
centerofthe
material,asshownmF.g.
11.
upper
tension
too
looseorlower
tension
too
tight
Fig. 10
tension
too
tightorlower
tension
too
loose
jliCZJ
Fig.
11
Both
tensions
properly
balanced
-:rsr,vrr."-r
=».s
rcrr
.r«s
r-™
™—•
«•
pingofstitchesorthread
breaking.
 Loading...