

Page 1
;•. ?w
•i
•:.•
^
( PFAfF ) 341;
^ .(5)
( PFAFF )
56-12-09661
engl.
P 770
PrintedinGermany
^^(s)
Single-Needle
and
342;
Two-Needle
Instruction
343;
Cylinder-Bed
344;
Cylinder-Bed
Book
345
346
and
Sewing
and
Sewing
353
Machines
"
354
Machines
Page 2
C)
1.
General
The
Pfaff 341. 343. 343 U-12
hand
balance
wheel
whose
Pfaff 353 with left-hand
needle.
Both
the
Pfaff 341
and
353
are
feature
All
of
c
oeginning or ending a seam. Observation of this rule prevents
of
of
The
It is
Pfaff
Pfaff
Pfaff
Pfaff
Pfaff
Pfaff
Pfaff
Pfaff
unison
the
afore-mentioned machines
the
top
shaftistransmittedtothe
is
recommendedtomake
the
needle
holding
both
maximum
recommendedtorun
341
342
343
343
U-12
344
344
U-12
345
346
and
fitted with
feed.
eye
and
threads
stitch
lengthofstandard
and
vertical
balance
342
are
ordinary
sure
thread
jamming in
when
beginningtosew.
the
machinesatthe
345
are
all cylinder-bed
hookisarrangedtothe
wheel
has
the
sewing
equipped
drop
are
that
with
feed
equipped
hook
shaftbybevel
the
take-up
the
machines
compound
only.
The
with
hook raceway. It eliminates
is 4.5 mm (5V2 s.p.i.).
following
2.600
2.500
2.700
1.400
2,600
1.400
2.500
2.400
sleeve
leverisat
hook
Pfaff
top
s.p.m.
s.p.m.
s.p.m.
s.p.m.
s.p.m.
s.p.m.
s.p.m.
s.p.m.
sewing
feed
345
take-up.
gears.
machines
right of
the
arrangedtothe
while
the
Pfaff 343. 344
and
the
Pfaff
The
rotating motion
its
highest
the
thread slipping
the
speeds:
with right-
needle.
left of
346
point
necessity
The
the
both
before
out
o
When sewing tightly woven or heavily
reducedtoprevent
overheatingofthe
dressed
needle.
fabrics,
the
sewing
speed
must be
On two-needle machines, the maximum sewing speed diminishes as the needle gauge
«creases.
To avoid trouble,
all parts in movable
other.
This
All machines
balance wheel. If desired, however, the machines
pulley.
should
are
these
machines should be run at about 70% of their top
contact
normally
regularly
have
be
the
equipped
become
thoroughly glazed by their action upon each
case
after
about
two
with a fixed pulley which is
can
be supplied with a disengageable
weeks'
constant
castinone
speed
use.
with
until
the
If fitted with a disengageable pulley, the machine is dispatched with the sewing mecha
nism disengaged. To engage this mechanism, hold the balance wheel steady with your
left
hand
and
The
only
better
spool
because
thread
tighten
holderonthe
the
control.
the
thread
large
locknut by turning it clockwise.
machine
stand
armissuppliedonspecial
which is regularly
supplied
request
with
andatextra
the
machine
cost
ensures
Page 3
Setting
3
machineisdrivenbya
machines, is a squirrel-cage induction motor conforming to German
deifications.
ransmitted
elt for the
e
36
or
or
-quires some experience to correctly adjust the
3ssive
"le machine. v J
beltiscorrectly
9, by about 2 cm (abt.
'is
1
machineisfitted
'e
Up
Voltage
from
first
rapidly.
bolt (d in
until
pulleys.
the
All
Fig.
V-belt
pressureonthe
position,
with
the
securely
machine
the
Machine
V3-HP
clutch
motor
which,
like
all
motors
and
typeofcurrent
the
motortothe
time,
do not force it onto the
motors
are
pivotally
1). Loosen the nut of the hinge bolt or clamp screw k and
can be
arm
easily
shaft
tensionedifyou
V*')
midway
tighten
the
at the
factory
class and the permissible top speed.
are
sewing
machinebya
connected
placed in the
bearings
can
hinge
with
and
compressitwith
between both
bolt
the
correct
determinedbylocal
V-belt.
pulley
because distorted
to the
motor
bracketbymeans
grooves
tension
the
pulleys.
nut or
motor
of the balance
on the belt so as to
resultant
clamp
overheating
two
fingers,
screw k
and
motor
requirements.
When
without
(Fig.
supplied
DIN
with
42691
Power
mounting
V-belts
lift
wheel
and
sei2ln(^^
wear
of a
the
and
avoid
applying
1).
pulleyinaccor-
the
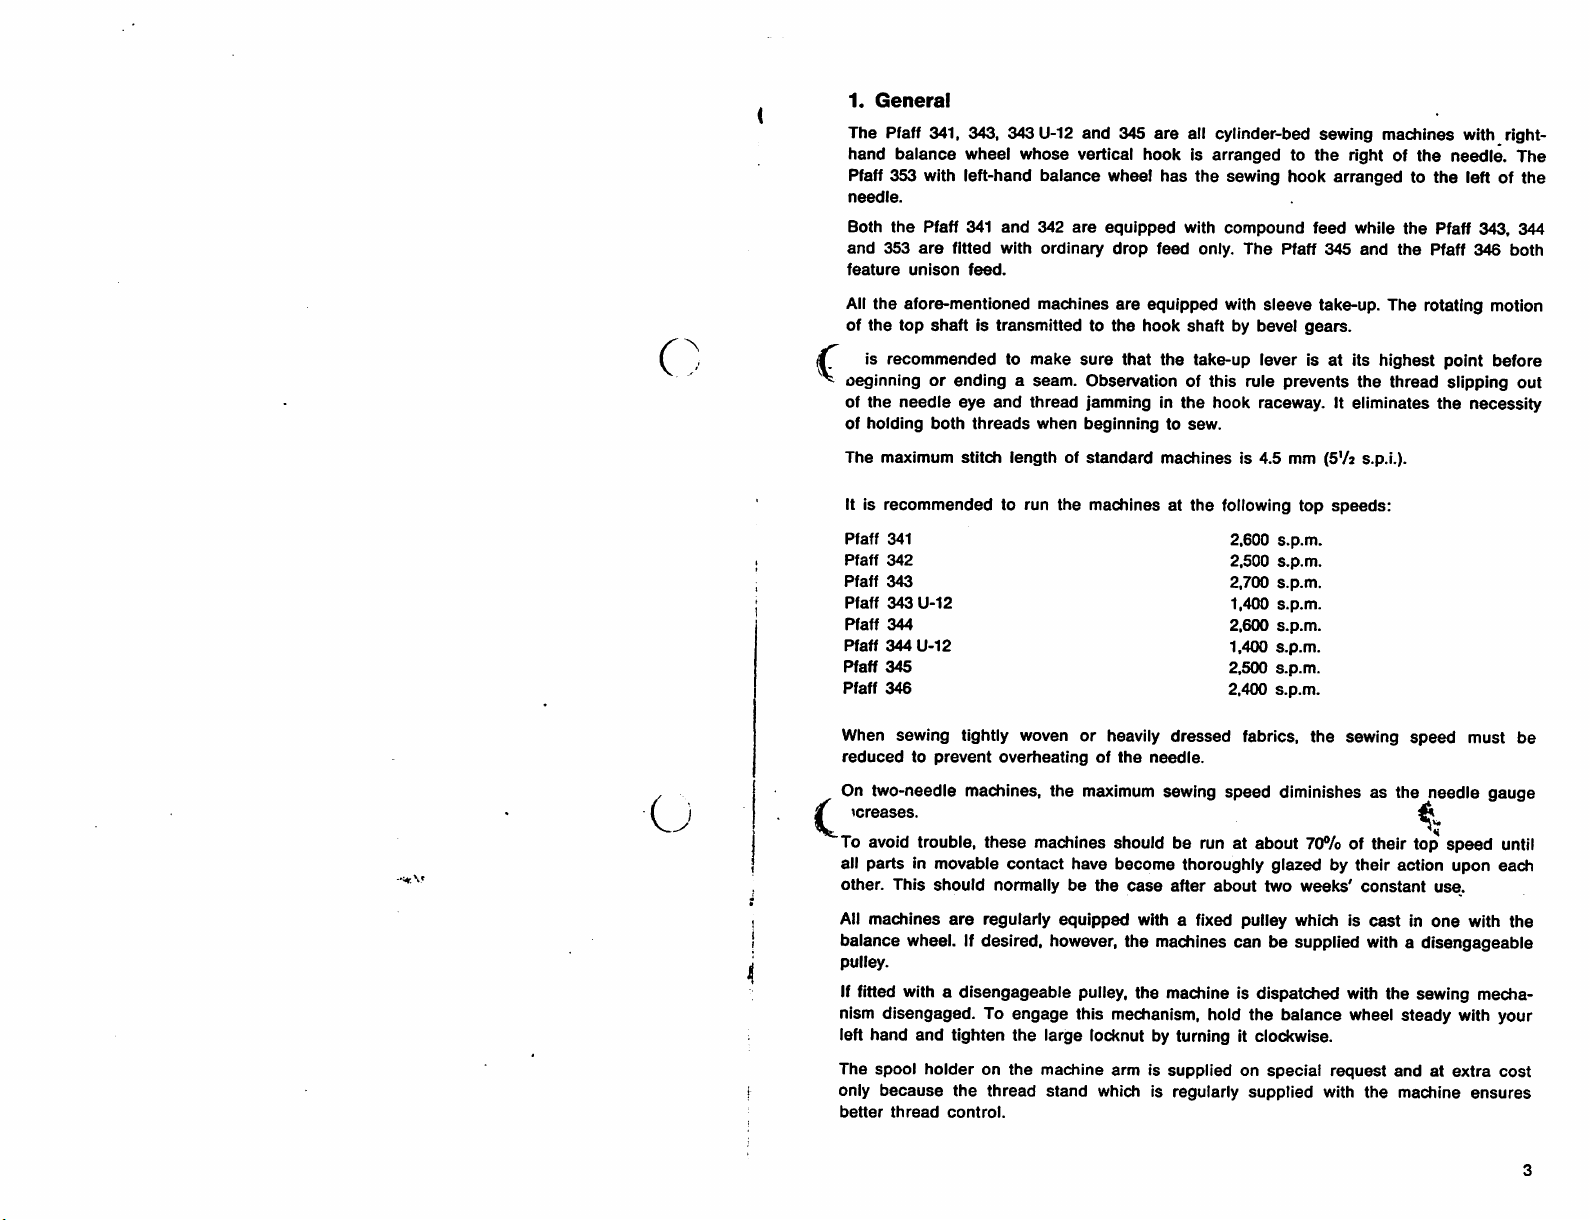
3.
Cleaning
Proper cleaning and regular
you put the machine into operation for the first time, take a clean rag and remove the
dust
accumulatedintransitaswell
and polished parts. Then apply a few drops of kerosene to all oiling points marked in
red on the
foot and run the
sewing machine oil No. 280-1-120122 for this purpose.
All
oiling
pointsinthe
2),
and
tilt the machine back, resting it on
he cotton inthe hook
soaked
the
similar
When replacing the needle plate, make sure that position finger F of the bobbin case
base enters slot P on the underside of the needle plate
The
the grease in the cases should be
grease
the flanks of the bevel gear teeth should be greased only
lint
bevel
with
which
wooden
No.
and
Oiling
oiling
will
increase the service life of your
as the rust
machine
points
oil every day. Once a week, unscrew needle plate and feed dog and remove
and unthread the needle. Place a piece of
machine
are
cylinder
has accumulated in the
object.
briefly.
Next,
apply
markedbyarrowsinthe
arm
of the
machine,
raceway,
which
is accessible
vicinity
gears are enclosedincases and
c^ianged
280-1-120243.
Thanks to the special lubricating properties of this grease,
preventative
oil to
all
pertinent
loosen
wing
the
wooden machine rest.
through
of the
sewing
requirenospecial
once a year. For this purpose, use soda
covering
fabric
points of
illustrations.Toget at the
nutF.swing
hole O
hook,
(Fig.
15).
maintenance,
lightly.
machine.
all
nickel-plated
under the presser
friction,
away
(Fig.
usingatoothpick
using
latchG(Fig.
16).
should be
except
Before
Pfaff
oiling
that
or
R
6835
R
6977
Page 4
R
6976
.ing trouble, suchasskipping of stitches and thread breaking,
cannot
be remedied
applying excessive quantities of oil. Excessive oiling may result in soiling of
?rial and heavy working of the machine
strongly
•re
aasthat
ction.
direction
idicated
recommended
you
plug
the
machine
indicatedonthe
of motor pulley rotation is
by an
arrow
to test-run
in,
motor
in Fig. 3.
however,
rating
caused
the
machine
checktomake
plate,
and
correctifthe
by a mixture of oil residues
without
the
balance
thread
sure
motor
and
the
pulley
wheel
bobbin
line
voltageisth(
turnsinthe
turns
case.
right
toward
direction of pulley rotation is best checked before mounting the V-belt. If the V-belt
already
lightly tipping on
•3
.viresatthe
r run a
ser
been
pulley
turnsinthe
threaded
footIsraised.
mounted,
motor
dieck
the
pedal
while holding
wrong direction,
terminal
machine
board.
unless
the
direction of rotation by switching on
the
the
you
balance
maintenance
have
fabric
wheel
man
under
fast.
has
the
merely to
presser
the
motor
exchange
footorthe
the
and
you,
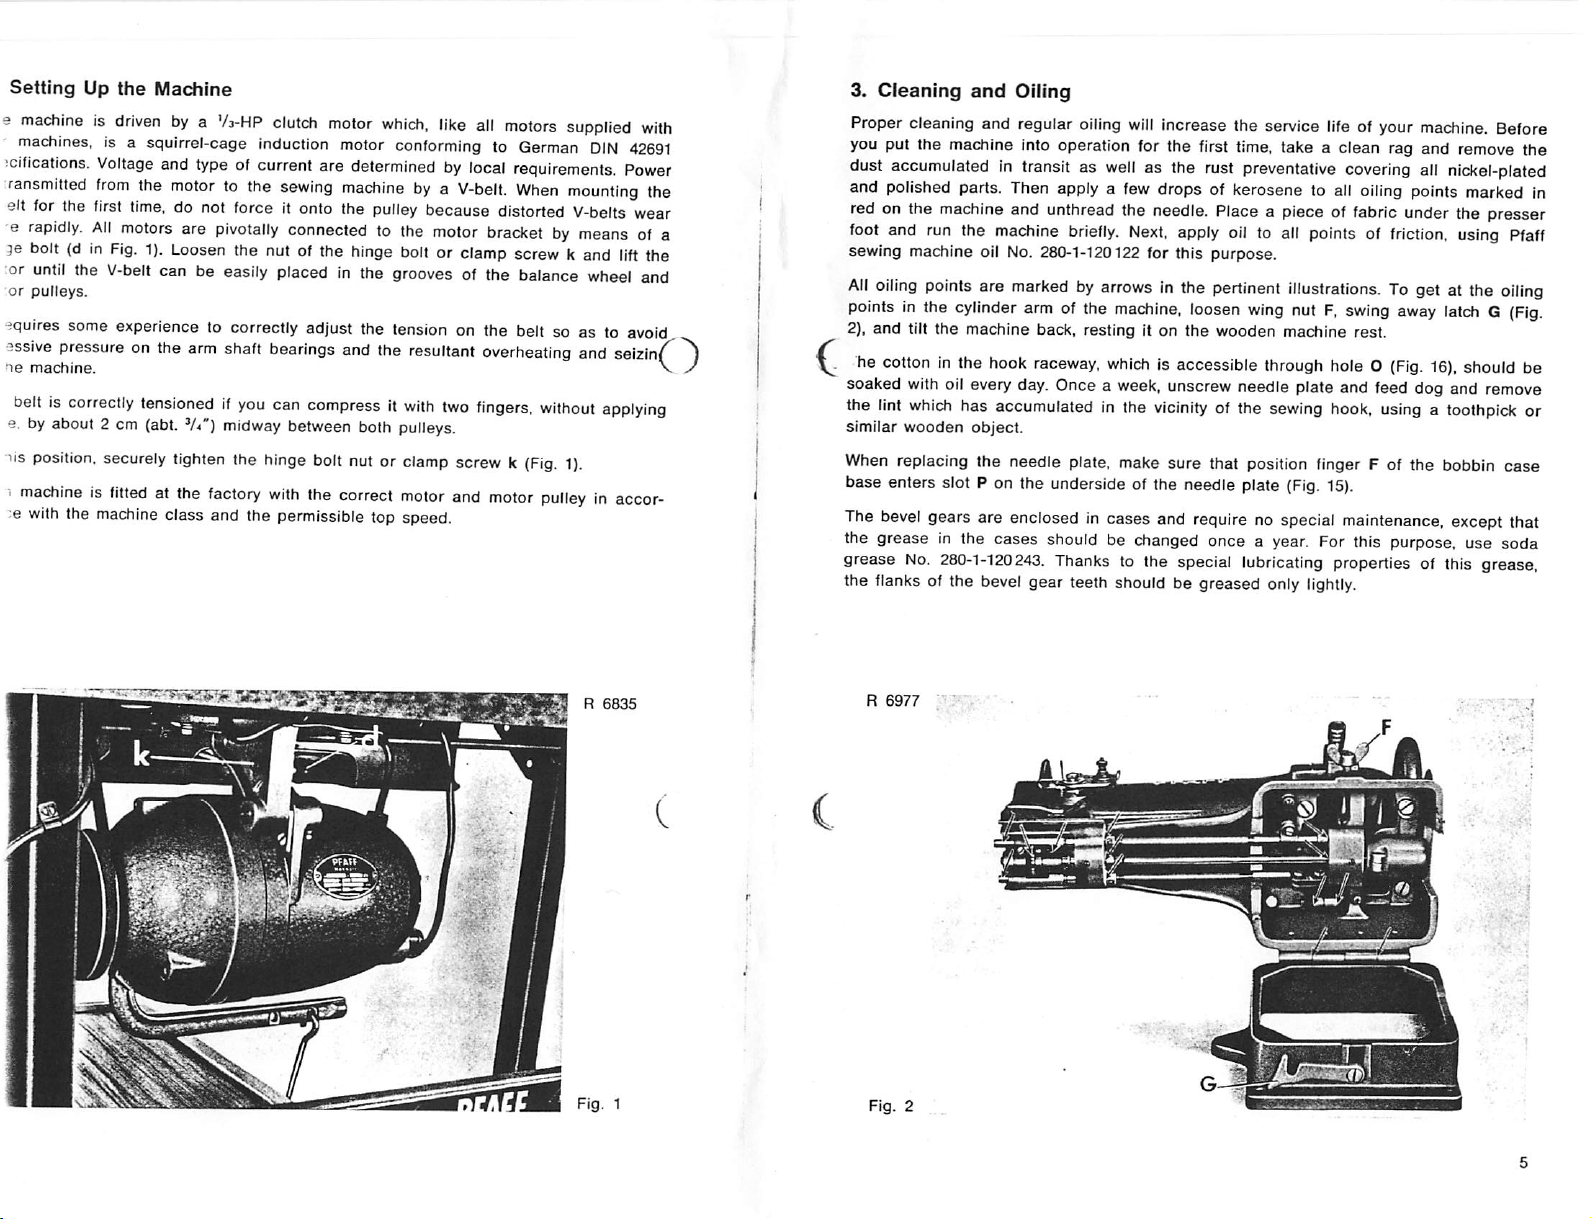
5.
Removing
Raise
the
your
thumb.
illustrated
and
forefinger.
j
Winding
c^.
The
bobbinIswoundonthe
Placeaspoolofthread
between
few
bobbin
Start
matically
regulated
for
If the
positionofthe
tension
turnsofthread
winder
the
less
thread.
thread
the
take-up
above,
bobbin
when
by
lever
Slightly
and
the
Bobbin
discs3and,
on
spindle.
winderbypressing
the
bobbin
screw7.Turn
should pile up at
bobbin
Bobbin
lift
takeitoutofthe
Case
to its
highest
the
bobbin
power-driven
on pin 1.
the
Pass
from
bobbininclockwise
is full.
The
this
screw
one
winder
tension
position
case
the
the
down lever 6.
amountofthreadtobe
end
bracket,asappropriate.
and
open
with
the
forefingerofyour
machine,
bobbin
thread
inside,
clockwise
together
winder
through
through
direction,
The
for
more
of the bobbin, loosen
latch
B (Fig. 4) with
with
the
bobbin,
shown
in Fig. 5.
eyelet2,clockwise
the
slotinthe
and
place
the
bobbin
thread,
winder
wound
or
counter-clockwise
screw
on
4 and
the
right
hand,
with
around
bobbin.
latteronthe
will
stop
the
bobbin
adjust
nail of
thumb
Wind
auto
as
and
a
is
the
Page 5

Threading
3 the
full
TOW in
Fig.6when
the
bobbin
ension
spring
--
the
bobbin
:•
latch
B (Fig. 4).
and
Replacing
bobbin in the bobbin case so that it turns in the direction indicated by
you
fastinthe
and
into
case
with
the
pull
the
bobbin
delivery
the
bobbinonthe
thread.
case,
eye
Bobbin
pull
Y.
Case
the
center
thread
studofthe
into
slotX,and
bobbin
drawItunder
case
base
and
8.
Selecting
All
Pfaff
meterof2.0mm(approx.
High-lift
4.0 mm (approx.
Pfaff
cylinder-bed
sizes
indicated.
The
number
-
shaft,orblade,inhundredthsofa
meter
of '""/loo mm = 1 mm.
The
correct
Thread Chart on
System
134
applicationsofthe
For
fabncs.
styles
are
134
Lr
134
P m
134
Lack
134
PCI
134
S I
134
D ^
134
Vr
134
Vr
the
Correct
machines
machines,
available
341, 343.
e.g.
Vsz")
sewing
Model A for
Model B for
Model C for
indicating
needle
page
and
134-35
machine
all
machines
#
Narrow
to
the
nally
V«").
the
longer.
machines
the
size
foragiven
10.
needles
use
for
leather
reverse
rightofthe
toward
Pfaff
for
Extra-narrow
the
lineofstitching;
left.
m
Needle
with
Extra-narrow,
angle of 90 degrees to the
Narrow
makes
Triangular
straight
«
Reverse-twist
the
cross
long, straight stitches.
point;
stitches.
rightofthe
345
point
Needle
and
353
while
the
345inModelH3.
are
needle
sizes
needle
sizes
needle
sizes
needle
sizeisidentical
millimeter.
thread
are
availableinseveral
fabric
and
round-point
work:
twist
point;
lineofstitching,
the
left.
wedge
point;
makes
for
patent
left-twist
point;
spear
lineofstitching;
cutting
flat
point;
groove,
side
use
Pfaff
System
Pfaff
343
U-12isfitted
use
System
suppliedinthree
60 to 80
90 to 110
120 to 160
with
Thus,aNo.
shouldbeselected
leather
stitching.
needles,
cutting
while
edge
setatan
makes
cutting
edge
setatan
stitches
lineofstitching;
cutting
leather
wedge
edge
set
facing
edge
supersedes
which
(narrow
point;
paralleltothe
toward
setatan
134
needles
with
134-35
models
the
diameterofthe
100
needle
point
stylestosuit
the
following
stitches
angleof90
extend
diagonally
cross
cutting
for coated
the
sewing
angleof45
134Sand
withashank
System
fitted
190
needles
for
which
the
hasashaft
from
the
Needle
different
needle
angleof45
which
degrees
extend
degrees
toward
point).
edge
setatan
fabrics.
lineofstitching:
hook;
degrees
134Dneedles.
dia
needles.
are
needle
needle
dia
and
point
diago
to
the
makes
to
The
appearanceofthe
correct relationship between needle, thread and fabric.
Lightweight
punctures.
When
thread
The
tableonpage10is
fabrics
thick
threadisusedina
usedina
thick
finished
shouldbesewn
seam
and
withathin
thin
needle,
needleislikelytocause
merely
intendedasa
trouble-free
needleinordertoavoid
the
threadislikelytobreak,
skippingofstitches.
guide
for
sewing
selecting
greatly
the
correct
dependonthe
ugly
needle
while
thin
needle
size.
Page 6

edie
and
Thread
Chart
Synthetic
10.
Lead
3,
thread
Threading
the thread
the
Needle
from
the spool
through
the holesof thread guide 2
retainer 4, clockwise around and
between
tension
{Fig.
7),
thread guide
discs5.under
thread
controller disc 6. through thread check spring 7. up and through thread guide 8. from
right to left (on
Pfaff
353 machines
from
left to
right)
through the hole of take-up lever
9. down and through guides 8, 10 and 11. and from left to right (on Pfaff 353 machines
from right to left) through the
in Fig. 13.)
needle
eye. (Upper threading of the Pfaff 353 is illustrated
R
6978
18/2
:hanging
.
the
e
outofthe
.
the
Its
ce
nes
0
set
needle
new
short
wheel
the
screw
the
bar
needle
needle
groove
the
short
again.
Needle
to its
highest
clamp.
Into
the
faces
toward
sewing
hookisarranged
grooveofthe
needle
needle
point.
Loosen
clamp
and
the
right. On Pfaff
to
must
the
face
the
needle
push
It upasfarasit will
353
leftofthe
toward
the
set
screw
machines
needle.
left.
Securely
and
with
Hence,
pull
go,
making
left-hand
on
tighten
the
these
the
11. Drawing Up
Hold
the end of the needle thread and
the
Bobbin
Thread
slowly
turn the balance wheel toward you
the bobbin thread comes up through the needle hole in a loop.
Lay
both
threads
back
under
the
presser
foot.
6 M
until
Page 7

12.
Regulating
Regulating
i"urning tension nut M (Figs. 7 and 13) clockwise
:iockwise
t
the
lat
: the
">e
-oth
material,asillustrated in Fig. 10. /
oper
jper
decreases
upper
it forms small kinks on
upper
materialorthe
tensions
tension
tension
the
the
needle
it.
tensionistoo
tension
is too tight,
needle
are
correctly
too
looseorlower
too
tightorlower
Thread
thread
thread
Tensions
tension
loose,
the
the
undersideofthe
the
bobbin
breaks
balanced
tension
tension
bobbin
threadisdrawn
(Fig. 9).
if
both
too
tight.
too
loose.
increases
thread
material,asshown
threads
the tension, turning it
draws
Interlockinthe
the
up to
needle
the
thread
in Fig. 8.
upper
center
counter-
down
surface
of
the
13.
Regulating
the
Stitch
Length
On all cylinder-bed machines with right-hand balance wheel, the stitch lenght is regu
lated by turning
counter-clockwise
so
of
lengthinmillimeters.
All machines, with the exception of the Pfaff 343
spring-return feed regulator. A tension spring incorporated in this mechanism
nently holds the feed regulator lever down in forward feeding position. To backtack
the
end
of a
released,
C'f
;edal which makes it
forward
desired,
screw
S (Fig. 11). Turn this
for
longer
seam,
simply
sewingisresumed
all
machines
possible
R
screw
clockwise for
stitches.
push
featuring
to reverse the direction of feed by foot action.
7000
The
numbers
this iever up as far as it will go. When the lever is
instantly.
this
typeoffeed
on
the
U-12
and 353,
regulator
scale
are
canbeequipped
shorter
indicate
stitches, or
the
stitch
regularly fitted with a
perma
with
a
Fig. 10
tensions
ith
-len
the
-3
work
?
back
the
needle,
egulating
<e
the
g. 6)
e tension is
en
pulling
Duckering
56
both
correctly
presser
canbeeasily
(in
forward
skippingofstitchesorthread
tlie
bobbin
bobbin
clockwisetoincrease
correct
the
occurs
tensions
balanced.
footisraised,
removed
feeding
thread
case
outofthe
if a
noticeable
thread
outofthe
on
delicate
slightly.
the
upper
tensionisautomatically
from
the
machine.Toremove
direction),
tension
the
never
toward
breaking.
machine
tension,orcounter-clockwise
fabrics
and,
using
resistanceofspring
bobbin
case.
although
you.asthis
the
hook
the
tension
the
screwdriver,
to
Y (Fig. 6)
has
releasedsotha^
work, pull it
might
cause
turn
decrease
has
been
to be
set
It.
overcome
correctly,
toward
bending
screw
Z
Fig.
:0m
11
Page 8

Hough
the
He!atthe
^
Pfaff
353
Pfaff 353 is Identical with
left, its feed
sews
forwards
regulator
only.
differs
the
Pfaff 343,
considerably.
except
thatithas
the
balance
this machine, the stitch length is regulated as follows; Press button K (Fig. 12) with
thumbofyour
ction
indicated
ncrease
the
stitch length,
right
by an
hand
arrow
and,
until
keep
with
your
the
button
button K
left
hand,
drops
engaged
rotate
the
in noticeably.
and
continue
balance
turning
wheelinthe
the
balance
el in the direction indicated by an arrow until the number corresponding to the
red
stitch
length
appearsinthe
small
window
above
button
K.
14.
Regulating
Turning in screw V (Figs. 7. 13 and 18)
and
harder
materials.
the
Pressure
on
the
Material
increases
the
Lightweight and delicate materials require a lighter
turning
Some
arm
pressure
turningitdownwards.
screwVout.
variantsofthe
insteadofthe
Pfaff 345
conventional
are
presser
equipped
bar
with
spring.
oneortwo
On
is increased by turning knurled nut V upwards (Fig. 14), and
presser
pressure
leaf
these
foot
pressure
for heavier
which is obtained by
springsonthe
machines,
the
presser
decreased
machine
foot
by
iecrease
number
)ting
)uble-headed arrow together with a " + " and a symbol
the
stitch length, turn
appearing in the
the
longest
stitch.
the
window
balance
wheelinthe
indicates the
opposite
stitcSi
lengthinmillimeters,
direction.
engraved
with
.
with
in a small
• on the fiat top cover further facilitate the regulation of the stitch length. Turning
balance wheel toward *+ "
ises
the
stitch
length.
increases
the stitch length, turning it toward ' de-
-4V
"40^
R
Fig.
6972
M 1
i-Kf H
0
mum.
^wm
13
Fig.
12
Page 9

5.
Changing
}
change
len
ten
dersideofthe
>ver
3
take
replacing
run
bobbin
the
out
the
case
the
feed
both
the
needle
machine
and
Feed
dog,
feed
needle
bobbin
Dog
take
out
screwsaandband
dog
screwscanddand
plate,
plate
(Fig.
with
the
needle
case
openerL(Fig.
make
15).
plate
sure
removed
remove
position
16).
remove
since
the
the
feed
fingerFenters
this
needle
dog
(Fig.
may
resultindamage
plate
(Fig.
16).
slotPon
R
6974
15).
the
Clean
the
sewing
checktomake
replaceitand
Replace
again
to
R
the
enters
6975
hook
sure
soak
bobbin
slot P on
thoroughly,
the
cottoninholeOhas
the
new
cotton
case
baseinthe
the
undersideofthe
particularly
with
oil.
sewing
needle
the
not
hook,
hook
become
making
plate
raceway.
matted
sure
(Fig. 15).
that
At
(Fig.
position
the
same
15). If it
finger
time,
has,
F
Ng.15^
Cleaning
dismantle
e2
and
.vly
turn
3way N of
ed
out
it
upwards,
the
e3,
the
the
easily.
the
Sewing
sewing
and
remove
balance
sewing
Todothis,
while
hook,
wheel
hook
rocking
Hook
bring
the
hook
until
(Fig. 15). In
take
the
the
gib
point
the
balance
needle
(Fig. 15).
S of
this
center
wheel
bar
the
position,
stud
back
to its
bobbin
between
and
highest
the
point,
case
baseisabouttoenter
bobbin
case
thumb
and
forth.
take
out
base
forefinger
screws
can
and
be
Fig.16_
%
Page 10

17.
Changing
Raise
the
balance
Loosen
right
and
When
and
positionitso
the
presser
wheel.
screwf(Fig.
left.
replacing
the
the
Vibrating
bar
vibrating
that
lifter
and
bring
17)
and
pull
presser.
the
needleisproperly
Presser
the
out
take
-mm
on
unison-feed
needle
the
vibrating
care
that
centered
K.'-.M
machines
bar
to its
highest
presser,
you
in its
turningitslightlytothe
pushitupasfarasit will
needle
positionbyturning
hole.
go
18.
Adjusting
In
ordertoadapt
sewn,
loosen
slotofthe
Move
this
The
arrowsinFigs.
the
the
wing
lifting
crank
connection
Foot
lift of
nutFand
(Fig.
upwards
17, 18
R
Lift
on
unison-feed
the
vibrating
adjust
the
18).
for a
higher
and22indicate
6965
presser
position
to
of lifting
lift,ordownwards
the
oiling
machines
the
thicknessofthe
eccentric
for a
pointsofunison-feed
t, -
materia'
connection
lower
H
lift.
machine
m
F»0-
•'7
Fig.
18
Page 11

Additional
Instructions
for Pfaff 342, 344 and 346 two-needle, cylinder-bed sewing machine with right-hand
balance
wheel
and
the
Pfaff 354
two-needle
machine
with
left-hand
balance
wheel
The basic instructions given for the single-needle machines analogously apply to the
corresponding
containedonthe
19.
Upper
two-needle
following
Threading
versionsofthese
pages.
of
Two-Needle
machines,
Machines
too.
Additional
instructions
are
Thread the right needle like on a single-needle sewing machine, leading it from 1 to 12
as
illustratedinFig.
To thread the left needle, pass the thread
thread
guide2,the
19.
upper
holeofthread
from
spool 13 (Fig. 19) through the holes of
guide3.thread
retainer
14,
clockwise
around
anc
between tension discs 15,around the rear thread controller disc 16, through thread check
spring 7, up and through thread guide 8,
take-up lever. 9. down and through thread guides 8 and 10, the left hole of
holder
17,
an^from
is
regulatedbyturning
righttoleft
nut
through
2.
from
right to left through the upper hole of
the eye of the left needle
R
8320
18.
The thread tension
needle
20.
Cleaning
The
instructions
applytothe
bobbin
from
thatofthe
The
needle
by
screwscandd(Fig.
R
8317
sewing
case
opener
plateissecuredinpositionbyscrewsaand
h
the
given
other
Sewing
for
cleaning
hooks
L of
the
bobbin
20).
HooksofTwo-Needle
the
of
two-needle
second
case
sewing
hookisarranged
opener
hook
machines.Itshould
(Fig.
20).
of a
in a
Machines
single-needle
be
position
b (Fig. 21)
machine
noted,
diagonally
and
however
the
feec
iiv
a
Fig. 19
Fig.
R
8316
Fig. 21
20
Page 12

To dismantle the sewing hook, take out screws
el,
e2
and
e3
(Fig.
20)
and remove
the hook gib. Then rotate the balance wheel until point S (Fig. 21) of the bobbin
base is about to enter raceway N of the sewing hook. In this position, the bobbin
base
canbetipped
out
easily.
The second sewing hook Is dismantled in the same sequence.
The cotton in hole O of every sewing hook
(Fig.
21) should regularly be soaked
so as to ensure proper lubrication of this vital part over a longer period of time.
After
tilting
the
machine
back,
oil
the
oiling
points
markedbyarrowsinFig.
22.
with
case
case
oil
Additional
for
Pfaff
The Pfaff 343 U-12/02 is a
Stop
motor
squirrel-cage
an
extra-large
Other
than
ordinary
applytothe
21.
Pfaff
Threading
machines
andaroller
induction
vertical
that,
343sothat
former,
Instructions
343
U-12/02
thread
motor
rotary
the
mechanical
all
the
only
the
Needleofthe
and
343
U-12/03
single-needle
tension,
andadisc-type
hook.
setupofthe
operating
exception
and
being
Pfaff
sewing machine
while
the
Pfaff
tension.
Pfaff
servicing
Chapters10and
343
Both
343U-12isidentical
instructions
U-12
equipped
343
U-12/03isfitted
machines
are
given
13.
with a two-spr
wif
equipped
with
that
for
the
latter
"t.ead the thread from the spool up and over the thread guide at the top of the thrc
^'itand,
down
and
through
tainer
leaditclockwise
Then
through
and
es,
through
The
needles and
es.
single-needle
stud.
pass
through
and
Pfaff
It is
the
thread
Now
it around the
the
thread
both
from
the
needle
344
twin
threaded
through
winditonce
retainer,
around
the
holeofthe
making
and
around
between
thread
guide, from right to left
thread
guid
left
to
right
eye.
U-12
has
two
thread
guid-
just
like
a
machine,
ex-
sure
angular
that
the
the
the
roller
tension
thread
thread
tension
enters
discs
controller disc, through the
through
the
III
guideonthe
the
slotinthe
of a
subcl.
of a
subcl.
thread
check spring, up a
eyeofthe
machine
-12/02
-12/03
take-up
arm.
thread
machine
machif
lever, do
of
a
i-.
R
8319
Fig.
22
needleisthreaded
to left,
the
right
needle
from
R
9770
Fig.
right
from
a
23
ft
Page 13

22.
Trouble
SkippingofStitches
Cause
Wrong
Needle
Needle Inserted incorrectly.
Incorrect
Thread
Cause
For
anyofthe
Thread
Knotty
thread.
Needle
Thread
snarled
Faulty
Stitch
Cause
Improper
Wrong
needle
Piecesofthread
or
under
Needle
Breaks
Cause
Wrong
needle
Needle
Needle
Machine Works Heavily
Cause
Lackofoil.
Wrong
Hook
thread.
bent.
too
lubricant.
race
Shooting
needle
system.
bent.
threading.
Breaks
reasons
tensions
too tight.
poiT^bluntordamaged.
up.
Formation
tension.
size
and/or
between
bobbin
case
tension
system.
thin.
obstructedbypieces
indicated
thread
tension
above.
used
discs
spring.
of
Remedy
For
correct
Insert new
Orient
toward
Thread
10.19and
Remedy
See
remedies
Regulate
Use high-quality
Replace
Check
to
needle.
Remedy
Regulate
Correlate
in
tableinChapter
Remove
structedinChapter
Remedy
Insert
in
Chapter
Insert
Insert
Remedy
Oil machineasinstructed in
and
18.
needle
system
see
Chapter
needleasinstructed in
needle
upper
needleofcorrect
new
thicker
so that its
the
sewing
needle(s)asinstructedinChapters
21.
listed
tensionsasinstructedinChapter
thread
needle.
threading
tensionasinstructedinChapter
needle,
thread
thread
8.
and
8. . .
needle.
needle.
short
hook.
above.
only.
from
and
re-adjust
12.
systemasinstructed
Chapter
groove
spoolofthread
fabricasshown
tension
Chapters
8.
faces
as
3. 16
Use only non-resinous and acid-free sewing
machine
oil.
Try to free the jammed threadasyou rock
the
balance
action fails,
instructedinChapter
wheel
dismantle
back
16.
the
and
sewing
forth.Ifthis
hook
as
12.
12.
in
Contents
1.
General
9.
2. Setting Up the Machine
3. Cleaning and Oiling
7,
4. Test-Running
5.
Removing
6. Winding
the
the
Bobbin
Bobbin
Case
.
7. Threading and Replacing the Bobbin Case
^
Selecting
9.
Changing
10. Threading the Needle
11. Drawing Up
12. Regulating the Thread
the
the
the
Correct
Needle
Bobbin
Needle
. .
....
Thread
Tensions
.
.
13. Regulating the Stitch Length .
14. Regulating the Pressure on the Material
15. Changing the Feed Dog
....
16. Cleaning the Sewing Hook
17. Changing the Vibrating Presser
18. Adjusting the Foot Lift
Additional
for
with
with
19.
"^Cleaning
Additional
for Pfaff machines 343
21.
Threading
Instructions
Pfaff
342,
344
and
right-hand
left-hand
Upper
balance
balance
ThreadingofTwo-Needle
the
Sewing
instructions
the
Needle
346
wheel
U-12/02
....
two-needle,
wheel
and the
cylinder-bed
Pfaff
354
Machines
HooksofTwo-Needle
and 343
of the
Pfaff
U-12/03
343
U-12
sewing
two-needle
Machines
machines
machine
22. Trouble Shooting
24
 Loading...