

Page 1

PEUGEOT PARS
PEUGEOT PARS
PEUGEOT PARS ELX
PEUGEOT PARS BI - FUEL
Owner’s Manual
This manual has been prepared to inform you of how to optimize the use of the
vehicle and contains important notes on safety, operation and maintenance.
Please keep this manual in your car at all times and be diligent in maintaining it.
Page 2

OWNER’S MANUAL
PARS
In The Name of God
Page 3
2
DEAR BUYER
We're thankful for choosing Iran Khodro product and we congratulate you for this good selection. We hope this new vehicle contributes
in happy moments of your life.
This manual helps you enjoy driving. Therefore to have an easy access, it would be advisable to be kept in your glove compartment.
The manual is divided into some sections for your convenience, and deals with various aspects of driving or maintenance of the car.
Before driving: Includes seat adjustment, Safety belts, heating and ventilation control system and also every other thing you needed
to know in order to settle comfortably.
Driving Controls: explain functions of switches, equipment and precautions.
Maintenance: Includes information about the checks you should carry out regularly.
Note:
Please refer to maintenance and guaranty services manual to know about the vehicle maintenance, regulation & condition
of guaranty services and periodic services.
Technical emergencies: Help solve some of unavoidable small emergencies occurring occasionally like replacing lamps fuses or changing wheels.
Technical data: It includes some information about engine, dimensions, capacities and weights.
WARNING, CAUTION and NOTE have special meanings. These special meanings apply except when laws or regulations require that
the signal words be used with a different meaning. Pay special attention to the messages highlighted by these signal words:
In the meanwhile consumptive material must be provided through authenticated representatives of IKCO.
WARNING: Indicates a potential hazard that could result in death or injury.
CAUTION: Indicates a potential hazard that could result in vehicle damage.
NOTE: Indicates a serious damage to your vehicle in the case of not paying attention to the warning and caution signals.
Important Point: The specication of each vehicle will vary according to its type. Therefore some information of this manual may not
be true about your vehicle. For any more information, you can consult with IRAN KHODRO dealers.
Reminder: Information about other varieties of this product have been mentioned in this manual and denoted by asterisk (*).
Page 4

3
INDEX
1
2
3
4
5
6
7
PEUGEUT PARS AT A GLANCE
BEFORE DRIVING
DRIVING
MAINTENANCE
TECHNICAL EMERGENCIES
TECHNICAL DATA
INDEX
Page 5

4
*
If equipped
OVERVIEW
LOCKING / UNLOCKING DOORS .................................................................................................................................. 24
CHILD SAFETY ................................................................................................................................................................. 38
LAMPS / ِDISPLAYMENTS................................................................................................................................................ 44
WINDSHIELD WIPER AND WINDSHIELD WASHER ..................................................................................................... 46
AUDIO SYSTEM ............................................................................................................................................................... 50
HEATING / VENTILATION ............................................................................................................................................... 61
AUTOMATIC AIR CONDITIONING ................................................................................................................................... 65
INTERIOR EQUIPMENT ................................................................................................................................................... 72
AIRBAG ............................................................................................................................................................................. 73
DIGITAL DISPLAY PANEL ................................................................................................................................................ 85
STARTING AND DRIVING ................................................................................................................................................ 86
ENGINE COMPARTMENT ................................................................................................................................................ 98
BRAKES ......................................................................................................................................................................... 102
BATTERY .......................................................................................................................................................................... 104
TECHNICAL EMERGENCIES (CHANGING WHEELS, TOWING, CHANGING FUSES, CHANGING LAMPS) ....... 109
MAINTENANCE, SERVICE AND CHARGE OF THE BATTERY ................................................................................. 131
TECHNICAL DATA .......................................................................................................................................................... 137
Page 6
5
PICTORIAL LIST
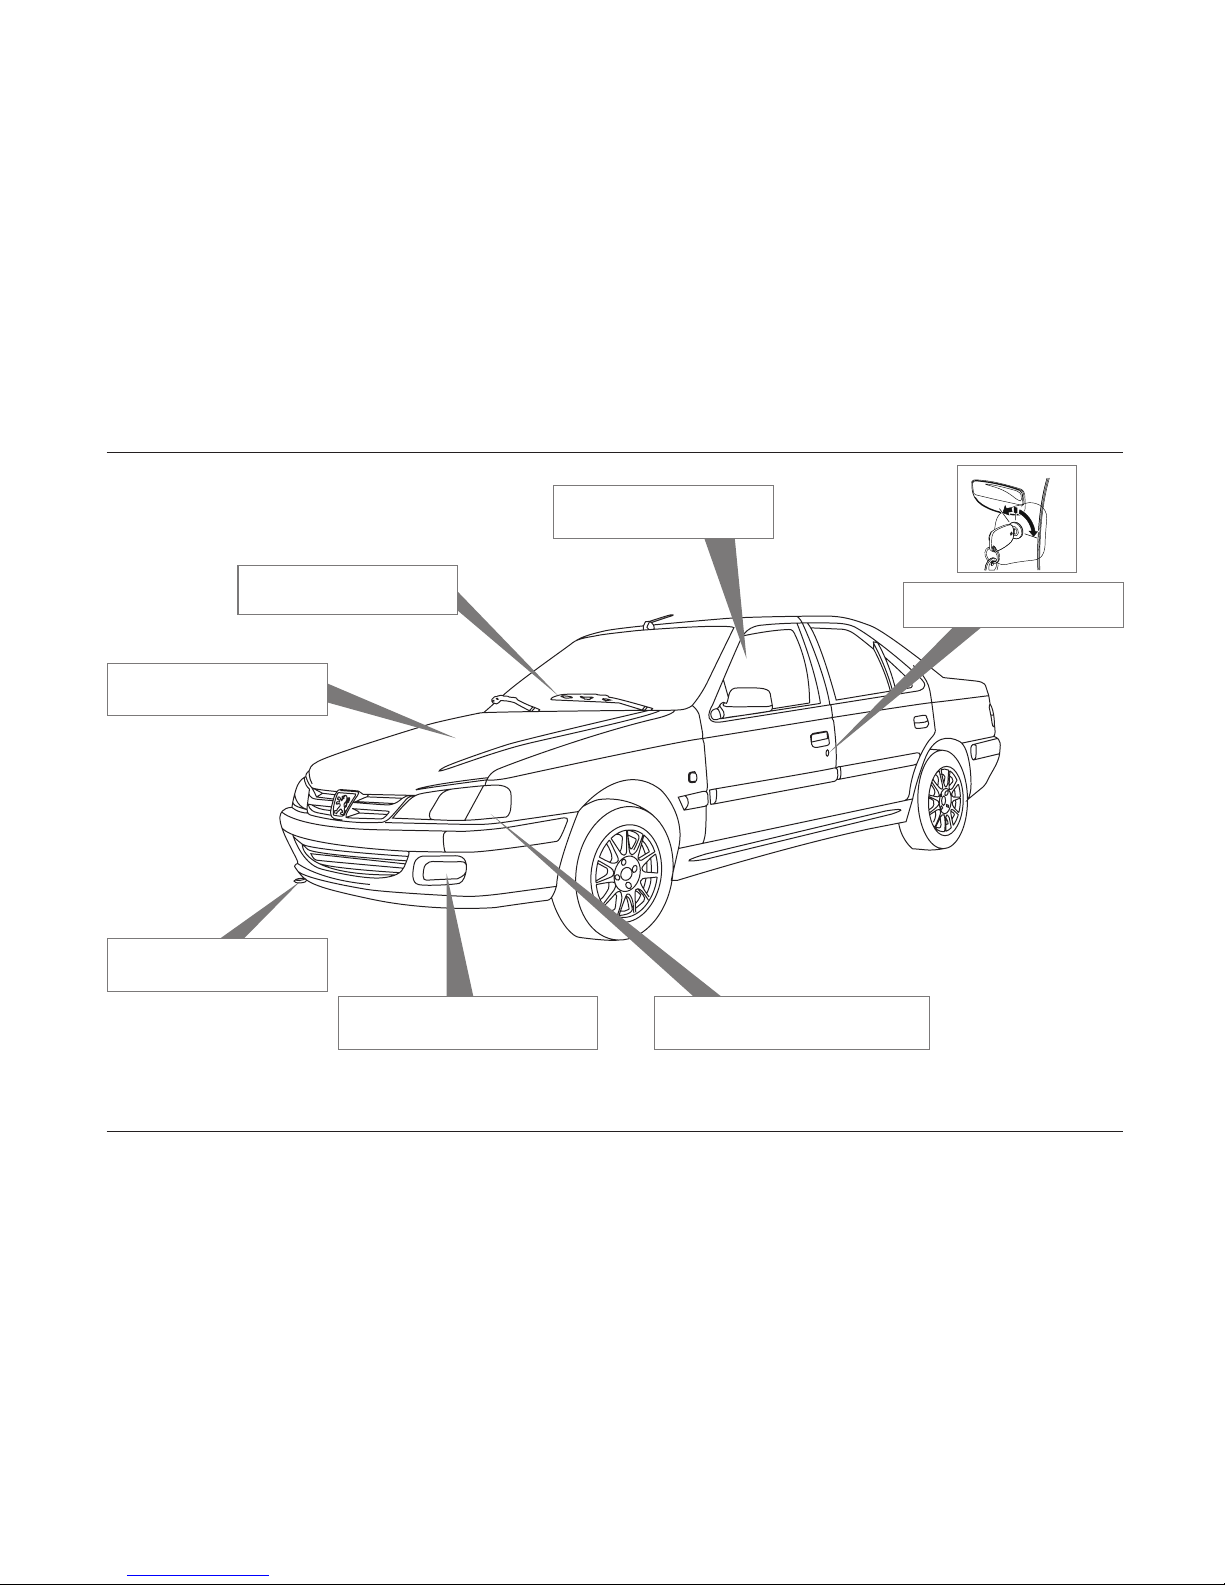
Front fog lamps ...................... 45
Front fog lamps replacement . .115
Ignition switch ................ 86
Hea dl ig ht s ..................................... 44
Headlights replacement ........ 115
Auto towing .................... 110
Engine compartment .... 98
Windows lifter keys ......... 29
Snow wipers .................... 46
Page 7
6
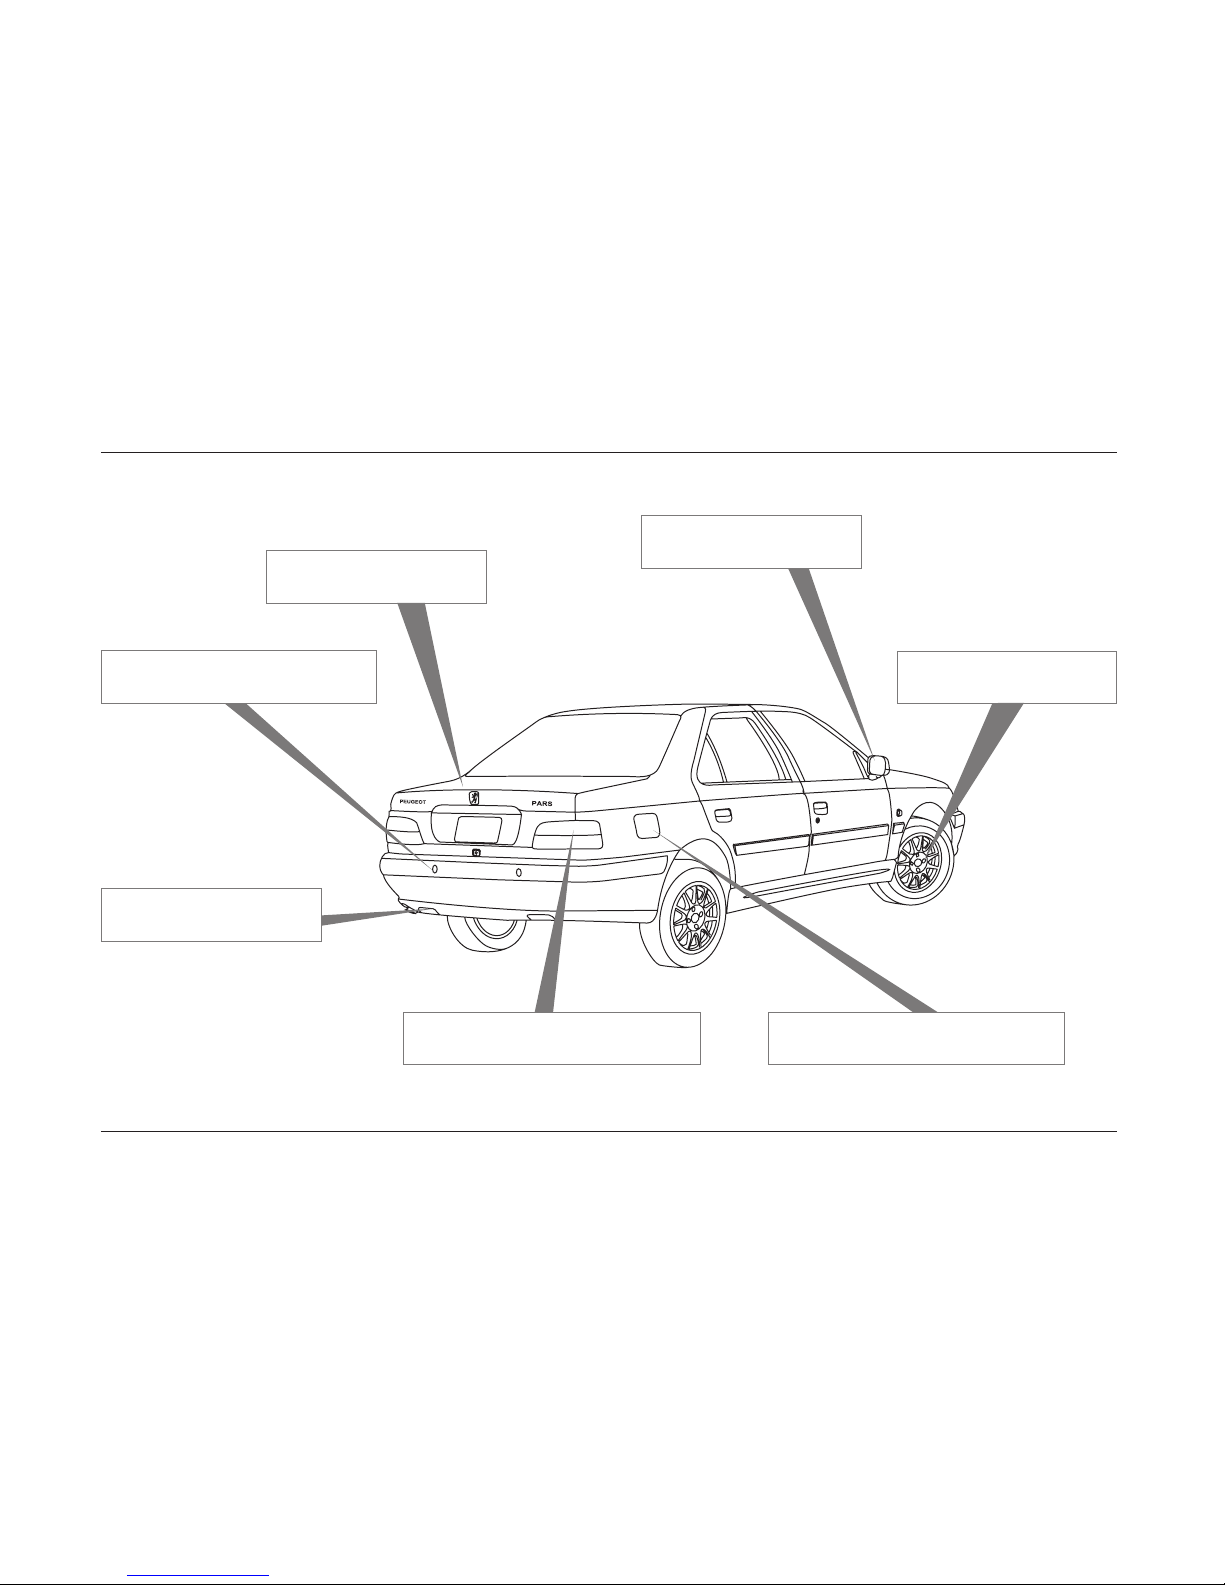
ABS .................................. 68
Wheels Replacement .. 112
Rear Fog Lamps .............................. 45
Rear Fog Lamps Replacement .....116
Tank Cap .......................................... 27
Fuel Consumption Reduction ......88
Rear Obstacle Warning System ..... 47
Opening of the trunk ........ 70
Mirrors ............................. 40
Towing of the Vehicle .... 110
PICTORIAL LIST
Page 8

7
Engine Compartment
Engine Technical Information ... 140
Fuel Consumption ........................ 141
Brake Fluid ..................... 102
Hydraulic Steering Wheel ...103
Engine Compartment Fuse
Box ............................... 117
Battery ........................... 104
Engine Oil Measuring Rod .......... 99
Engine Oil ...................... 99Cooling System ............ 101
Vehicle Identication Number
(VIN) ................................... 138
Glass Washing Liquid Tank ... 100
PICTORIAL LIST
Page 9

8
Engine Compartment *
Engine Technical Information ........... 140
Brake Fluid .................... 102
Hydraulic Steering Wheel ........ 103
Engine Compartment Fuse
Box ................................. 117
Battery ............................ 104
Engine Oil Measuring Rod ..........99
Engine Oil ..................... 99
Cooling System ............. 101
Vehicle Identication Number
(VIN) .................................. 138
Glass Washing Liquid Tank ... 100
*If equipped
PICTORIAL LIST
Page 10

9
PARS AT A GLANCE
1
CONTROLS ..............................................................10
LOCKING/UNLOCKING DOORS .......................... 12
ANT-THEFT SYSTEM (IMMOBILIZER) .................13
INDICATORS AND LIGHTS KEY ...........................14
WINDSHIELD WIPER ............................................. 14
SEATS .......................................................................15
AUTOMATIC AIR CONDITIONING ........................ 16
ELECTRIC WINDOW .............................................. 17
ELECTRICAL MIRRORS ........................................18
AIR BAG ...................................................................19
CHILD SAFETY LOCK ............................................20
HANDS FREE CELL PHONE ................................20
CNG FUEL MODE (STARTING/DRIVING)* ........... 21
FUEL TYPE ............................................................... 21
Audio System Control Panel .............................. 22
*
If equipped
Page 11
10
1
PARS AT A GLANCE
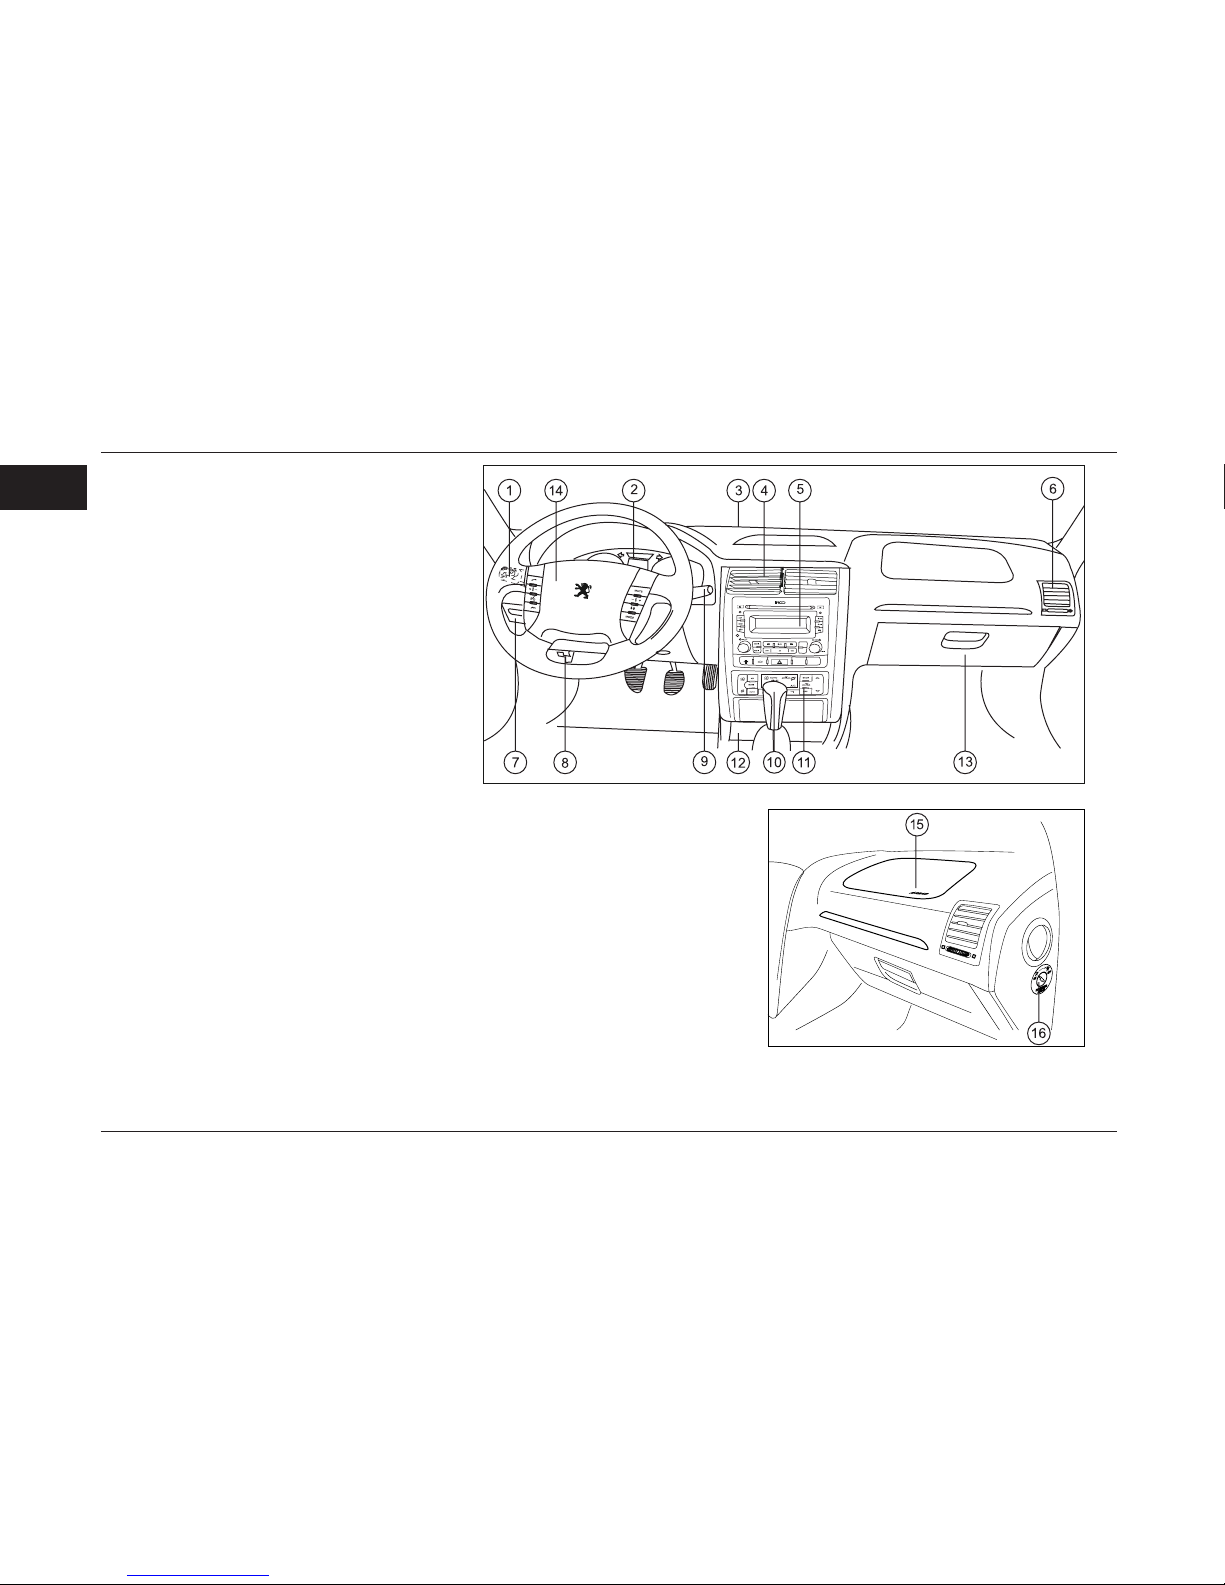
CONTROLS:
1- Horn, front light button and side lights
lever handle.
2- Front dashboard digital monitor.
3- Air vents to avoid freezing and sweating
of the front glass.
4- Middle adjustable air vent for Air condition.
5- Sound systems
6- Sides adjustable air vent for Air condition.
7- Fuse box.
8- Handle lever for releasing engine cover door.
9- Windscreen wipers and glass cleaners.
10- Gear lever (Gear shift).
11- Automatic A/C system.
12- Ashtray and lighter.
13- Dashboard box.
14- Driver Air Bag.
15- Passenger Air Bag
16- Passenger Airbag Deactivation Key
Page 12
11
1
PARS AT A GLANCE
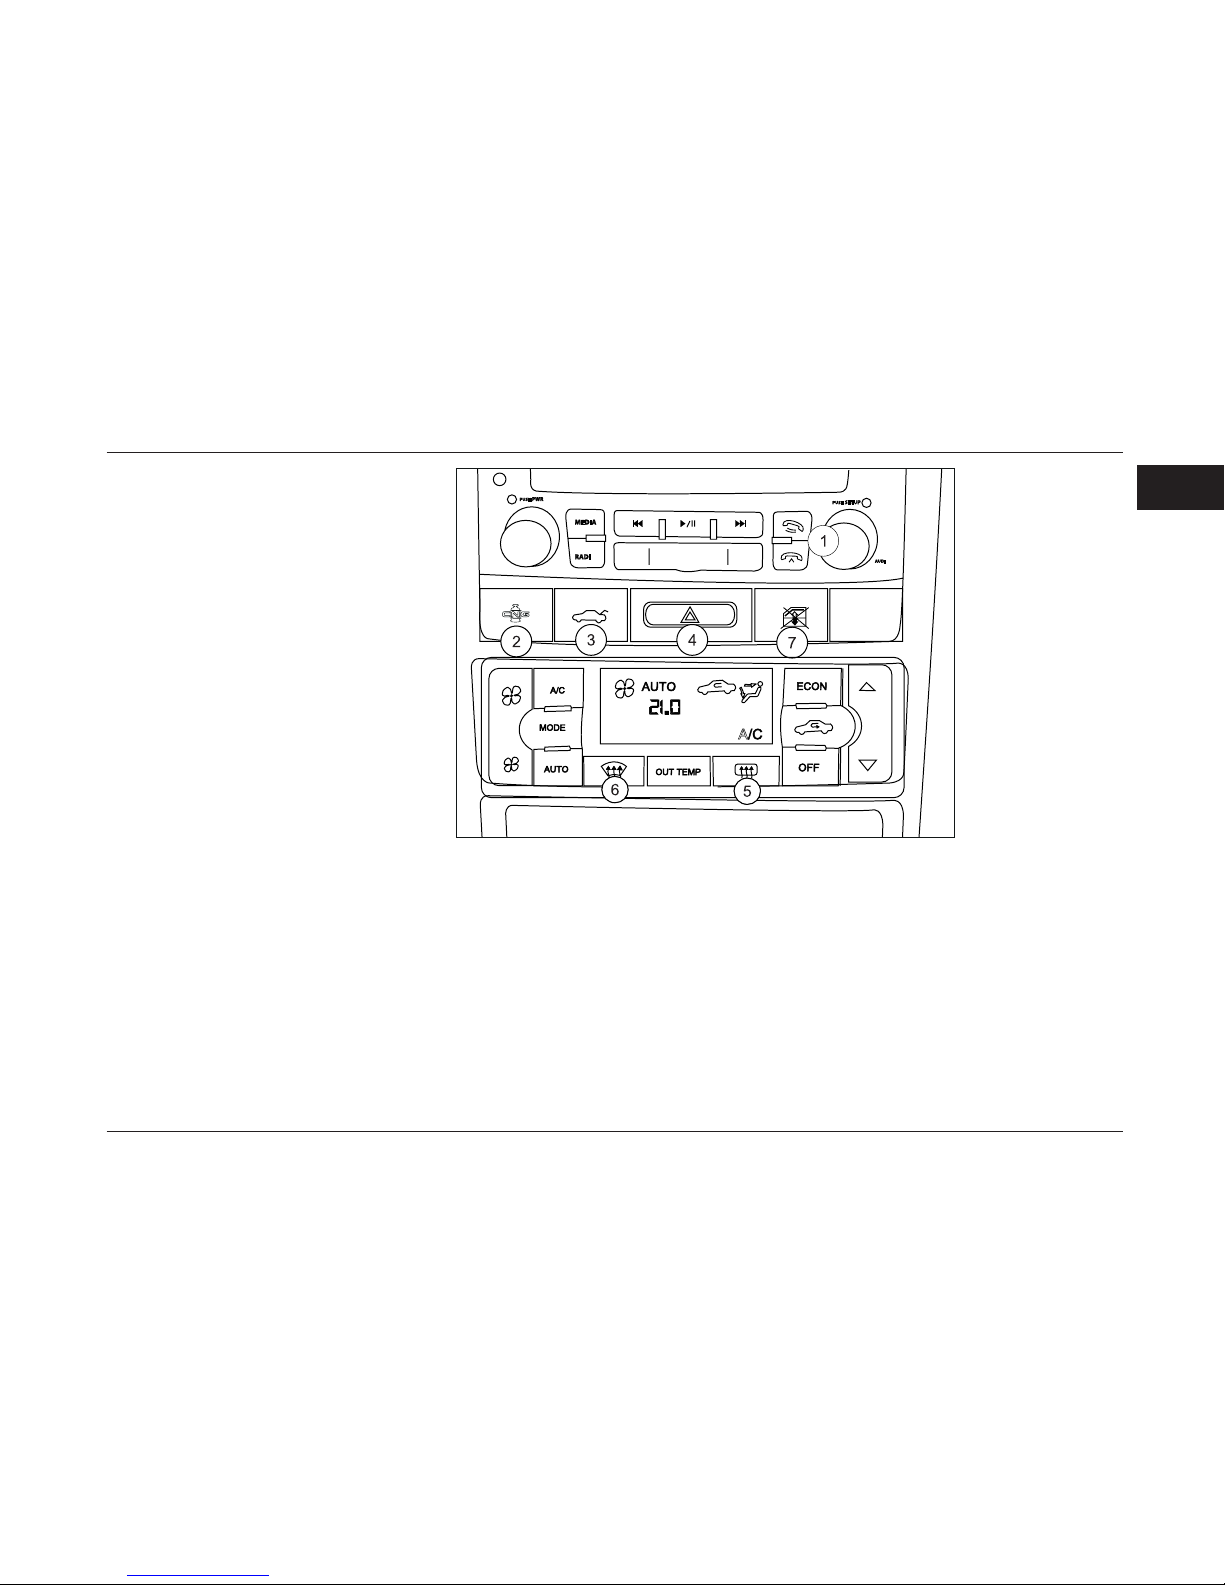
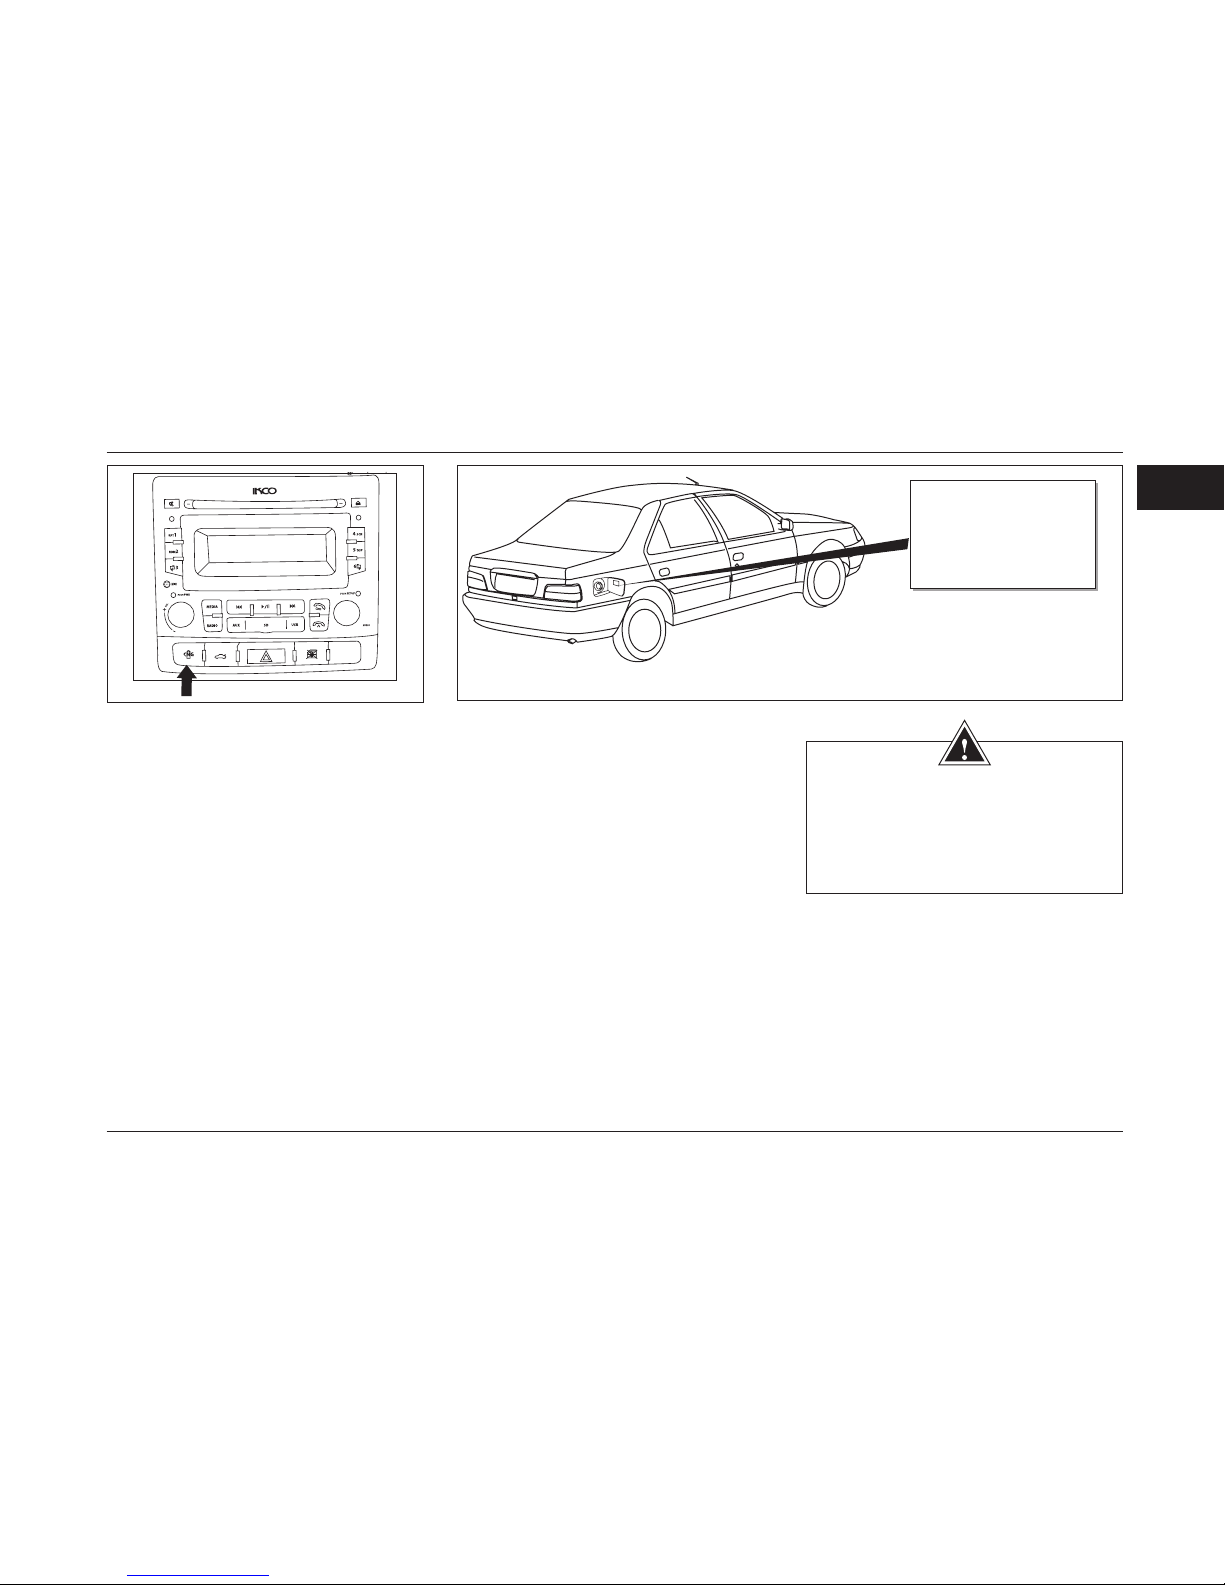
CONTROLS:
1-Hands free mobile.*
2- Button for transforming types of fuel in
bi-fuel vehicles.*
3-Oppening key for the boot.
4-Emergency light button (Flasher).
5- Button for Rear glass heater .
6- Button for Front glass heater
7- Locking Switch for the Rear Lifting
Glass.
*
If equipped
Page 13

12
1
PARS AT A GLANCE
*
If equipped
Locking and unlocking of the doors:
Side doors, rear trunk, fuel tank cap cover:
With the use of key:
For opening the door, pull up the external
handle.
From inside:
Push down the interior locking button, door will
be locked. For opening the lock, pull up the
same button and for opening the door, pull the
interior handle.
With the use of key (switch) and central
locking system:
All doors, rear trunk and fuel tank cap cover, can
be opened or closed simultaneously with the help
of switch key from outside and the locking buttons
on front doors from inside.
Meanwhile, by using the front doors lock button,
we can only lock the trunk lid. For opening that,
we should use the switch.*
3- With the use of remote control:
The operation of this device is like switch key.
To operate the device, hold it towards the direction
of the receiver which is situated above the interior
mirror and push the button.
- Button 3 (Jack knife*) switch blade will get open
clockwise.
locking and unlocking of doors:
Engine cover door:
1-From inside: Pull the interior handle below the
dashboard until the lock is released.
2- From outside: pull the safety holder beneath
the engine cover door towards
yourself until the safety lock is released.
To keep the engine door open, use the leaning
rod. To close the engine door, bring down the
leaning rod and leave the door to drop by
itself from a distance about 30 centimeters.
Make sure that the door is completely locked.
Fuel Filler Flap
3- To open fuel ller ap, press the frontal ap
of tank valve.
Opening the fuel ller ap in emergency
situations
4- If the central locking system does not
operate, you can open the ap from inside the
trunk.
Lock and unlocking by remote controller*
Keep the remote control towards the vehicle :
key no.1 is for unlocking
key no.2 is for locking
key no.3 is for unlocking of boot
(The boot will get open by two successive pressing
or in some models holding the key for 5 seconds).
WARNING
The fuel inside the tank, might be
pressurized. Therefore to avoid fatal
damages, do not open the fuel cap
rapidly. Slowly and precisely turn to open
the cap and wait for a sound of "Hiss" to
stop. Then open the cap completely
NOTE
Frequent pressing of the keys in short
intervals will cause the keys functioning
cessation for 20 seconds.
1
۳
2
1
2
Page 14
13
1
PARS AT A GLANCE
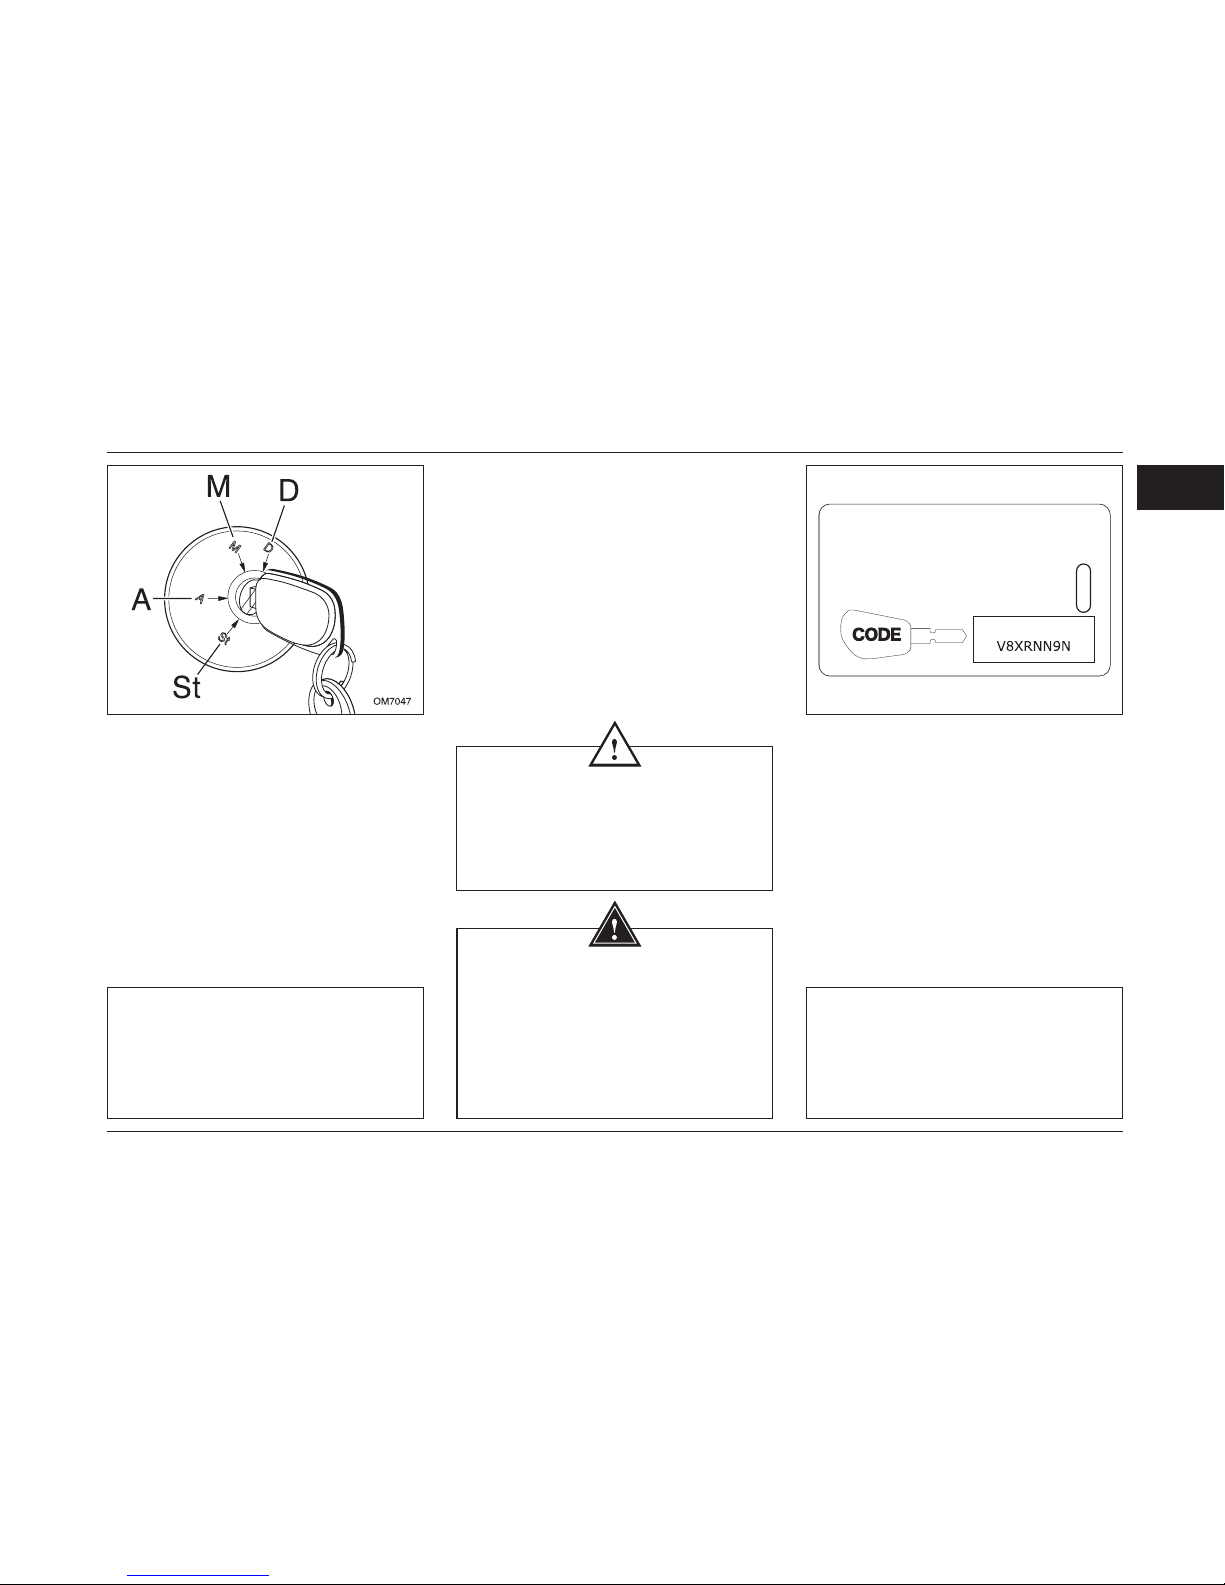
Ignition Switch
POSITION St: St is off, switch is closed.
POSITION A: The steering wheel is
unlocked. Just electrical accessories and
equipment operate.
POSITION M: The switch is open.
POSITION D: Turning on the engine (start)
Steering wheel lock
Open the steering wheel lock before
starting the engine if it is necessary ,turn
the steering wheel gently while you are
rotating the key.
It is recomended to press the clutch at the
time of starting, so that ignition get easier.
Anti- Theft Security System (Immobilizer)
The vehicle with immobilizer system
can only start up with two keys which is
delivered to customer with the vehicle.
To copy of key is not enough for start up.
It is possible to have more keys
if the customer requests and only in IRAN
KHODRO dealers with the DIAG tool.
CAUTION
- Never drive when the engine of your
vehicle is cold.
- Never start engine in closed area
- Never do any alterations in steering lock.
NOTE
There is possibility of breakage for
internal parts of the remote controller in
case of sever impact and subsequently
not functioning of the immobilizer.
WARNING
Avoid keeping the battery or remote
controller in infants' access, because
swallowing of the battery can cause
death. In case of swallowing the
battery, refer to health care centers
immediately.
NOTE
A number has been carved on the key
plate for replacing the key. Therefore
keep the plate in a safe place an never
inside the car.
Page 15
14
1
PARS AT A GLANCE
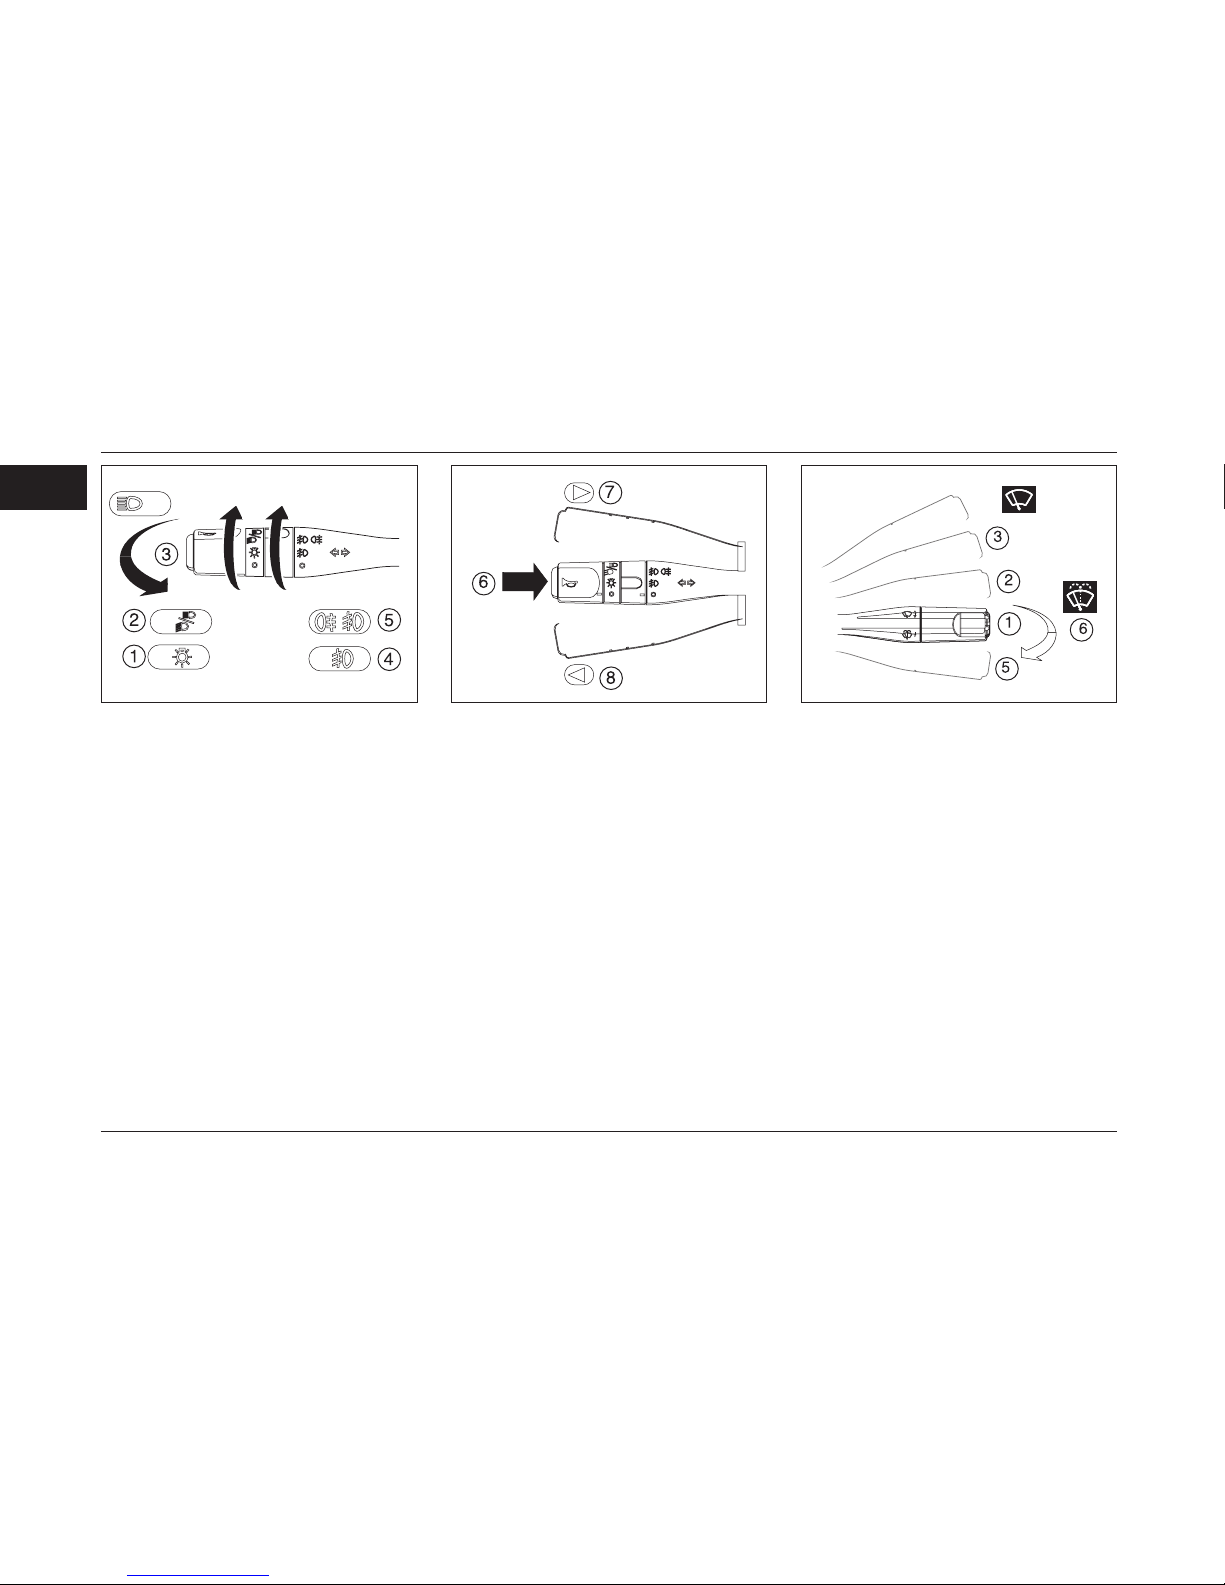
The key buttons for lights, side light
lever handle and horn:
1-Small, rear lights and digital trip recorder.
2- Head light, downward/upward beam.
3- Head light, upward beam (pulling the
lever toward the driver)
4- Front fog lamp
5- Front / rear fog lamp
6- Horn
7- Right side blinker
8- Left side blinker
Windscreen Wipers and Glass Cleaners:
1- Off
2- Time controlled window wipers. (Is
adjusted according to the vehicle speed)
3- Slow speed window wiper.
4- High speed window wiper.
5- Intermittent move of the window wiper.
6- Glass cleaners. (pulling the lever toward
the driver)
Page 16
15
1
PARS AT A GLANCE
*
If equipped
Page 17
16
1
PARS AT A GLANCE
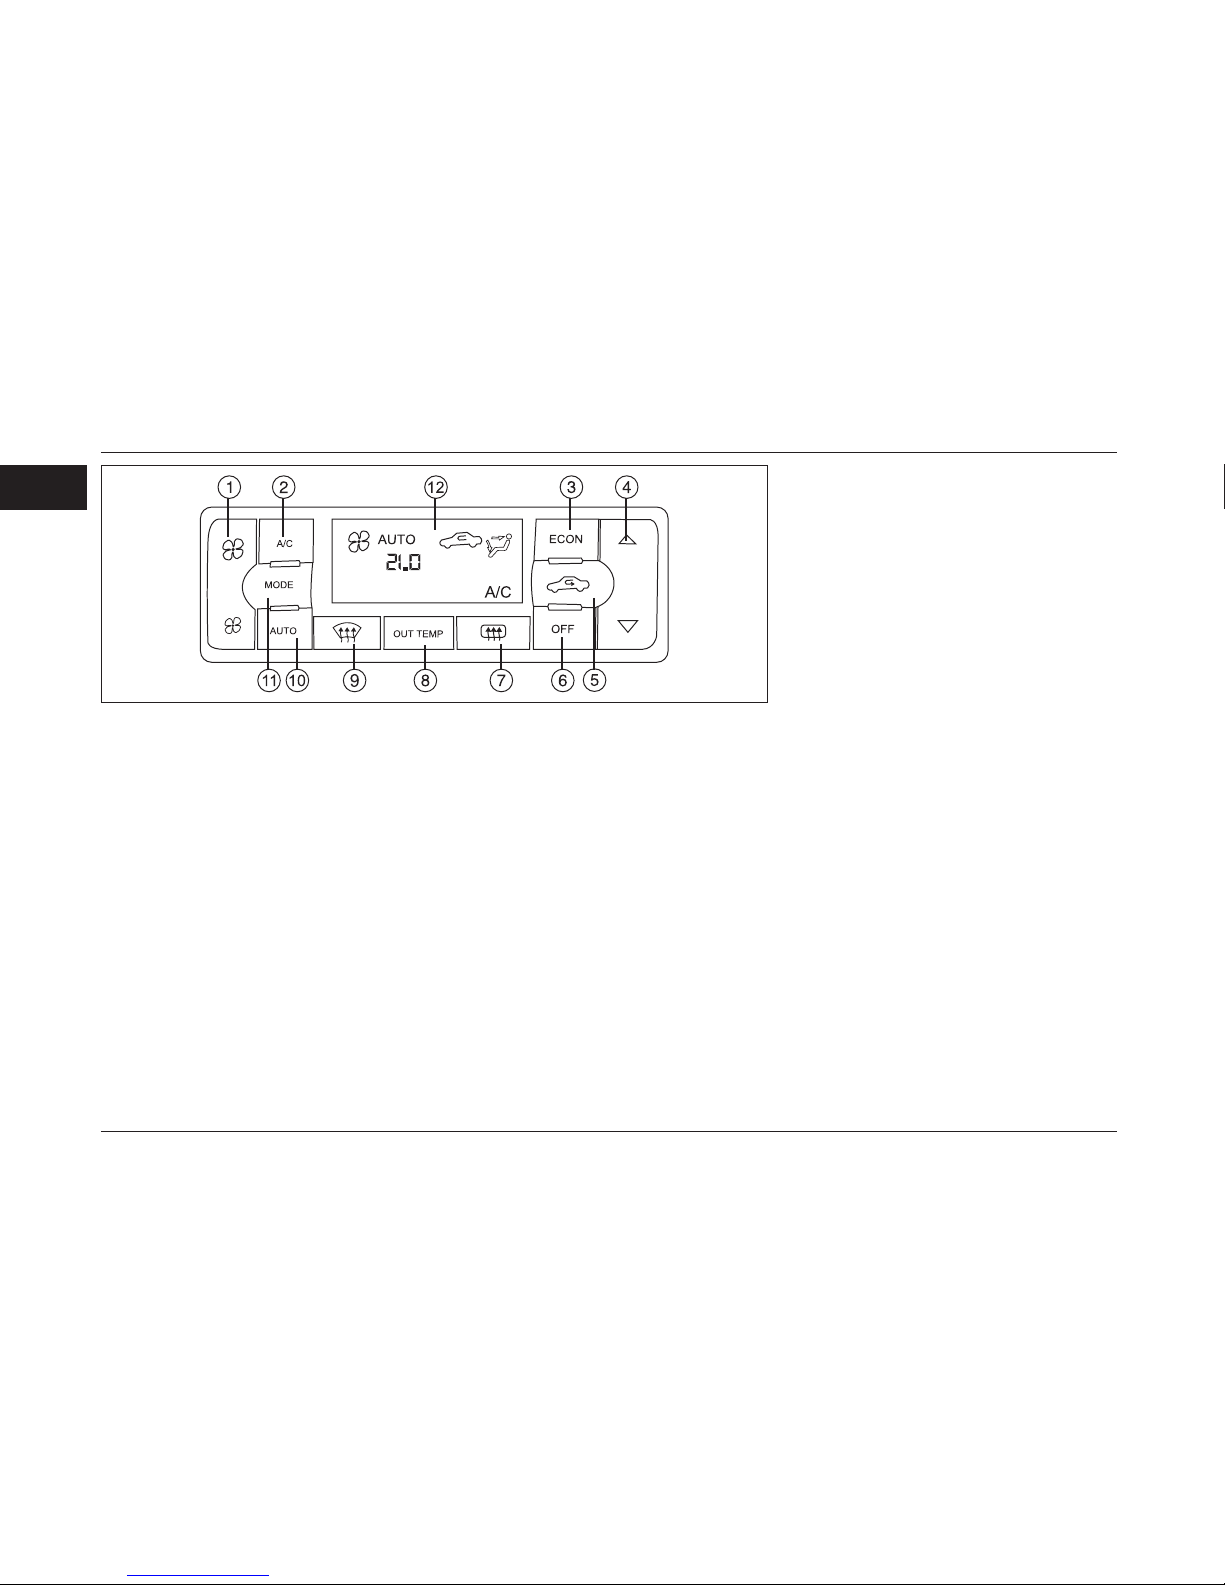
Automatic pleasant ventilation
1- Control of non- automatic fan.
2- Cooler
3- Economic consumption.
4- Adjusting temperature
5- Internal circulation of the Air.
6- Off.
7- Rear window heater .
8- Outside Temperature indicator
9- Front window vent(wiping vapor)
10- Automatic mode .
11- Selection of non-automatic vent
control.
12- Display screen (LCD)
Page 18
17
1
PARS AT A GLANCE
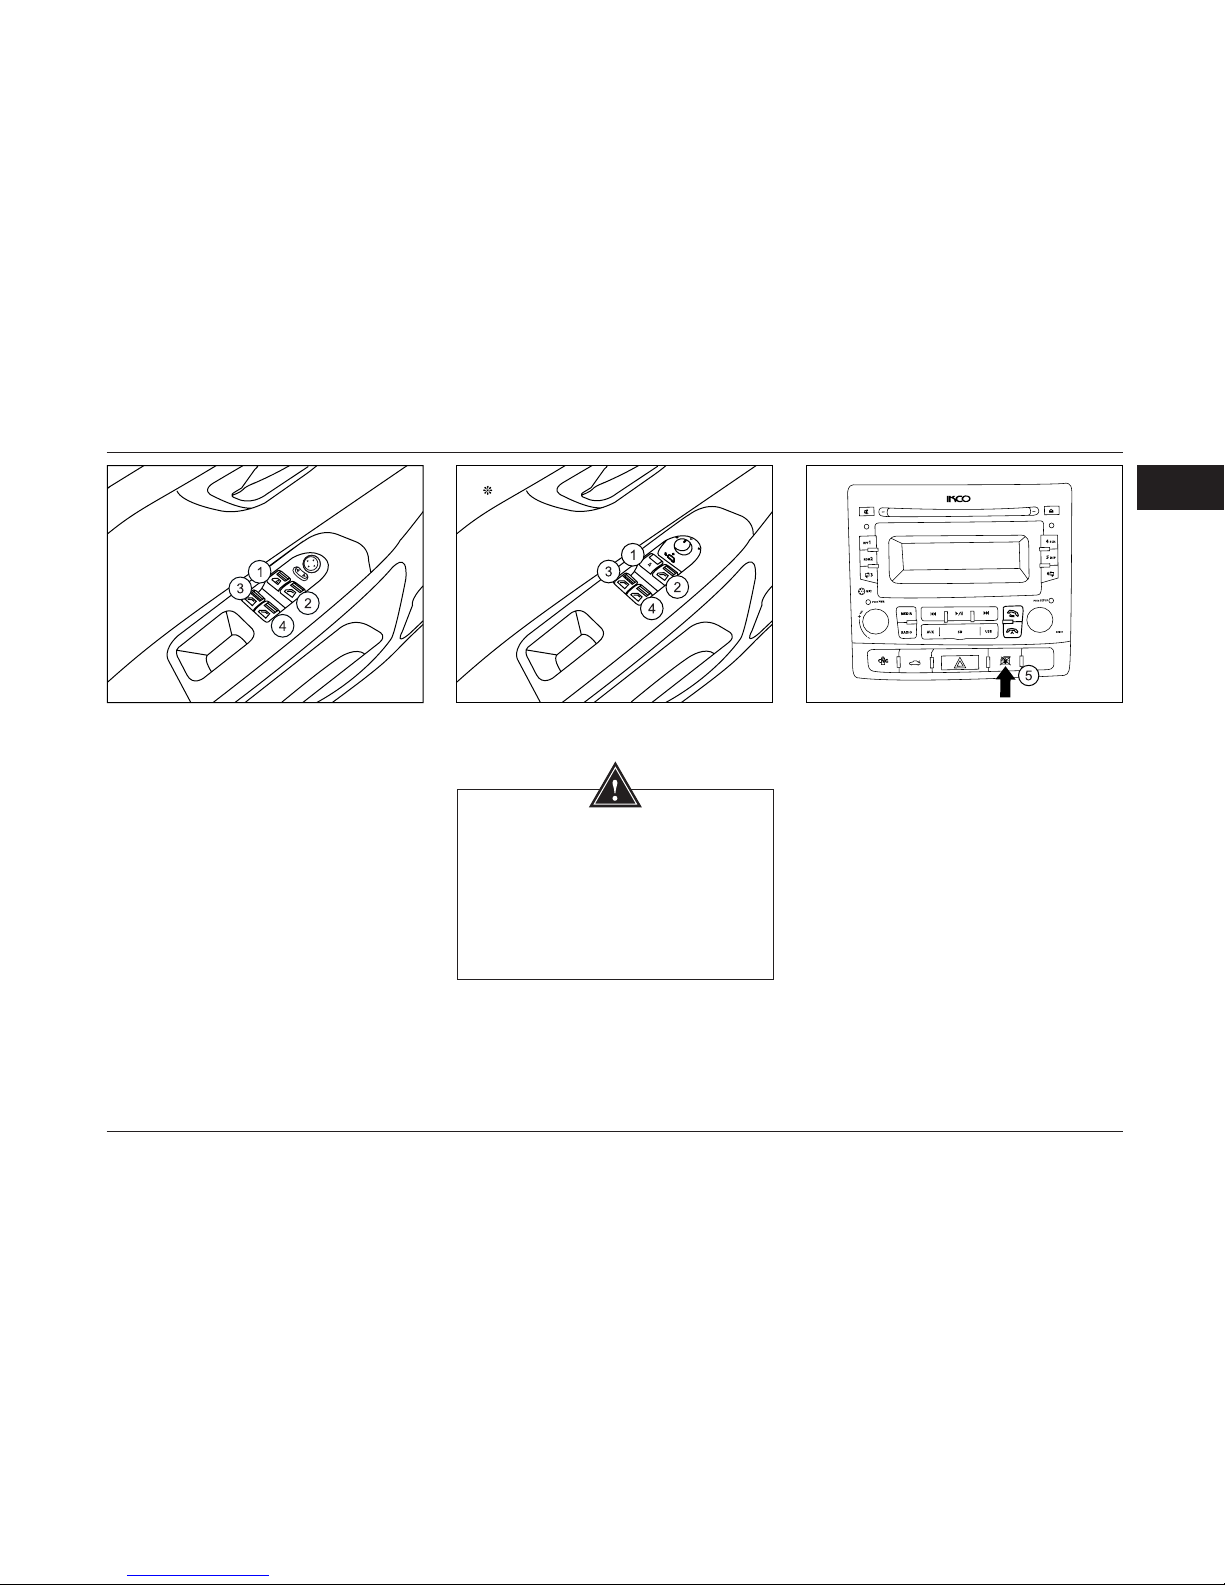
Electric side glass lifter *
1- Electric Side glass lifter of driver
Manual mode: Press or pull the key
gently; the glass stops moving soon after
realizing the key.
Auto mode: Press or pull the key
severely and continuously; the glass gets
opened or closed completely.
(Automatic opening of glass is possible in
all switch modes). *
(For closing of glass automatically, the
engine must be turned on).*
2- Electric side glass lifter of
passenger.
3-left and rear side Electric glass lifter.
4- Right and rear Electric glass lifter.
Electrically regulating the mirror
WARNING
The electric side glass lifters of
the vehicle, with using Anti pinch
safety system, only avoids the large
damages due to excessive forces.
Therefore, it is advised that always
take usual precautions.
5- locking key of rear glass lifter :
This key prevent the function of rear glass
lifter keys .
Rear and front electric side glass lifters
will function ,while the ignition switch is
on.
Glasses keys *
Any passenger can open or close his/her
own side glass.
*
If equipped
Page 19
18
1
PARS AT A GLANCE
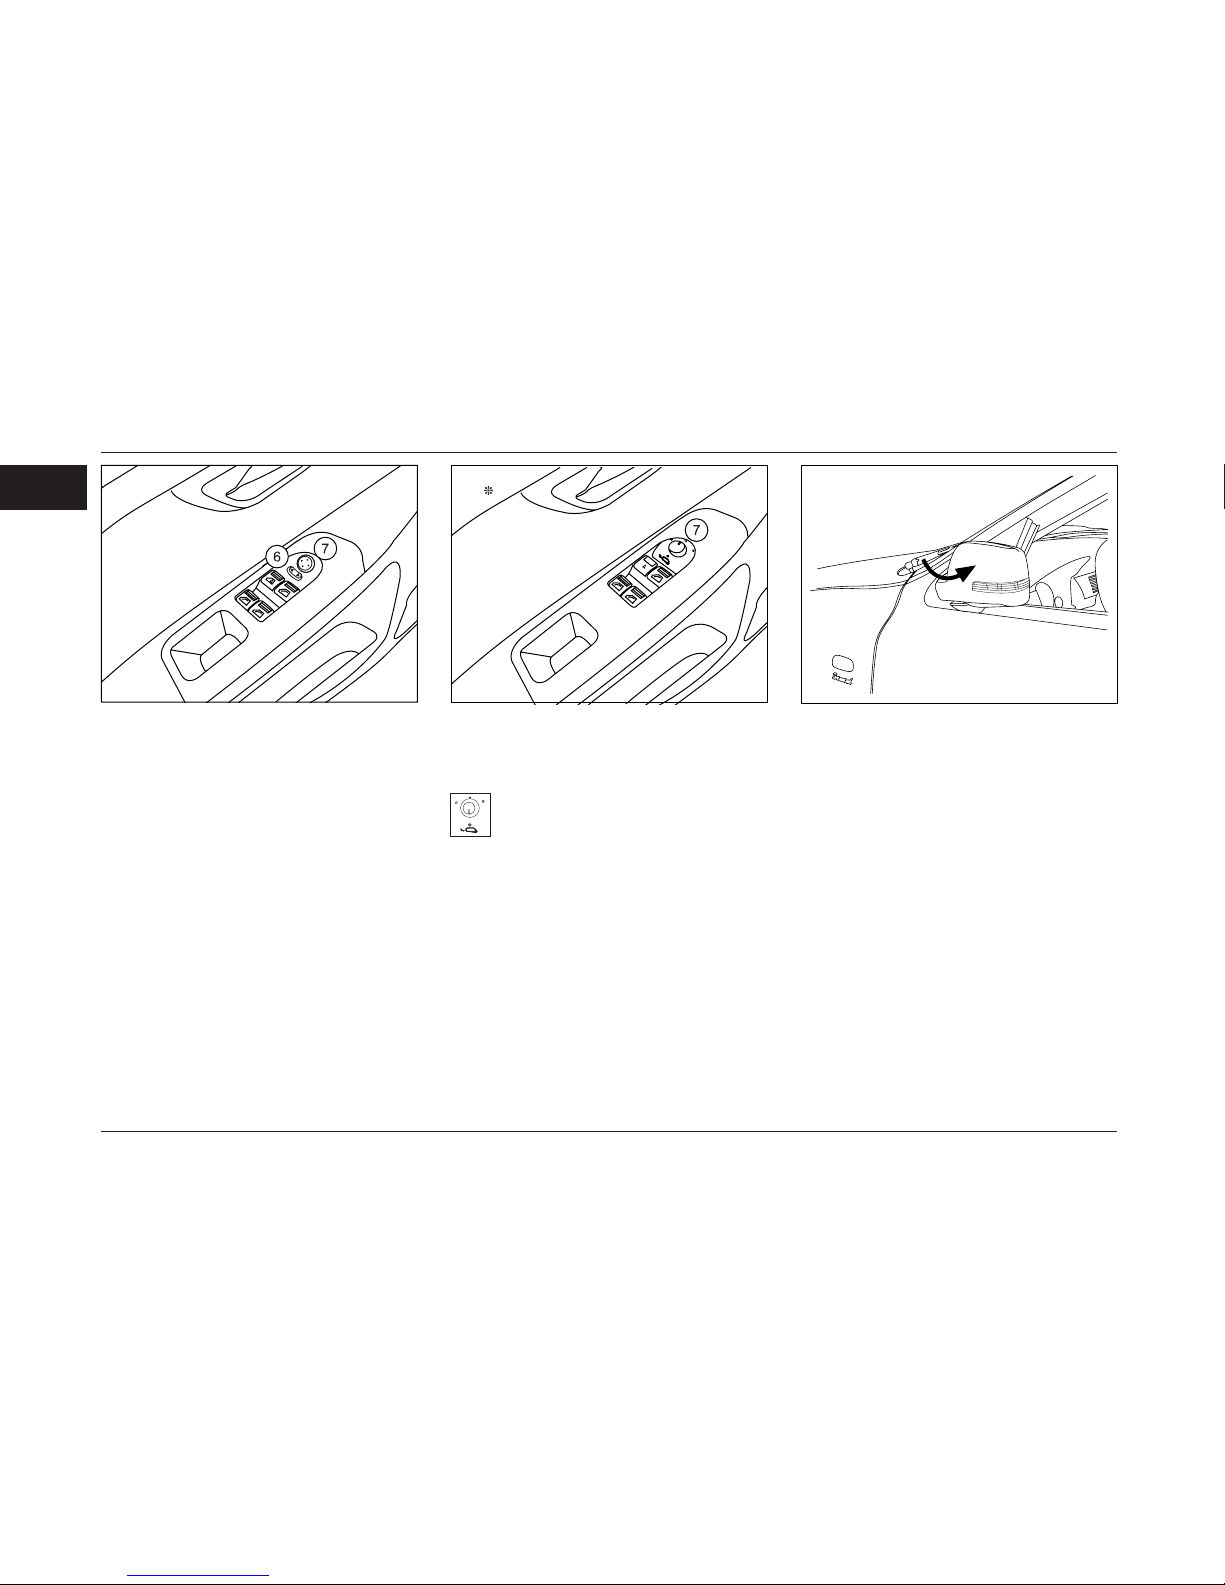
Adjusting Electric mirrors:
Before adjusting, bring the mirror to it’s
normal position with your hand, from
outside.
6- Selecting the right or left mirror for
adjustment:
By pushing the switch to the right or left,
the mirror on the same side will be ready
to get adjusted.
7- Electrical adjusting of the mirrors:
With the help of related switch, which can
be moved in all four directions, adjust
the mirror at your desired position. Then
bring back the switch no.6 to it’s middle
position.
*
If equipped
Turn the switch 7 to right or left, then
adjust the desired mirror in four directions
by pressing the same switch.
In addition to open and close the
Mirror via radio remote control,
rotating 90 degrees key 6 clockwise and
counterclockwise, mirrors alternatively
open and closed.
Electric folding mirror:*
In electric folding mirrors, without any
need to use hands, simultaneously open
and close with opening and closing of
vehicle doors trough remote control
automatically.
The folding mirror is closed after 2 seconds
of the rst remote and 10 seconds by the
2nd remote. But the mirrors and doors are
opened together, soon after soon after
pressing of the opening button on remote.
If the asher is used ,then the lamps
on the folding mirrors starts blinking
simultaneously with relevant asher.
Page 20
19
1
PARS AT A GLANCE
Air Bag
If your car is equipped with air bag, in
addition to the use of new design seat belt
, the system has a module air bag for the
driver and passengers.
When the ignition switch is placed in the
ON position, the air bag indicator light on
the instrument panel is turned on and after
6 times blinking, is turned off. Otherwise,
(as below) suggests a fault in the air bag
system which should be referred to the
dealer of the car and x it.
- Air bag light stay on after blinking 6
times.
- When the ignition switch is placed in the
ON position, the air bag light does not
light up and does not blink.
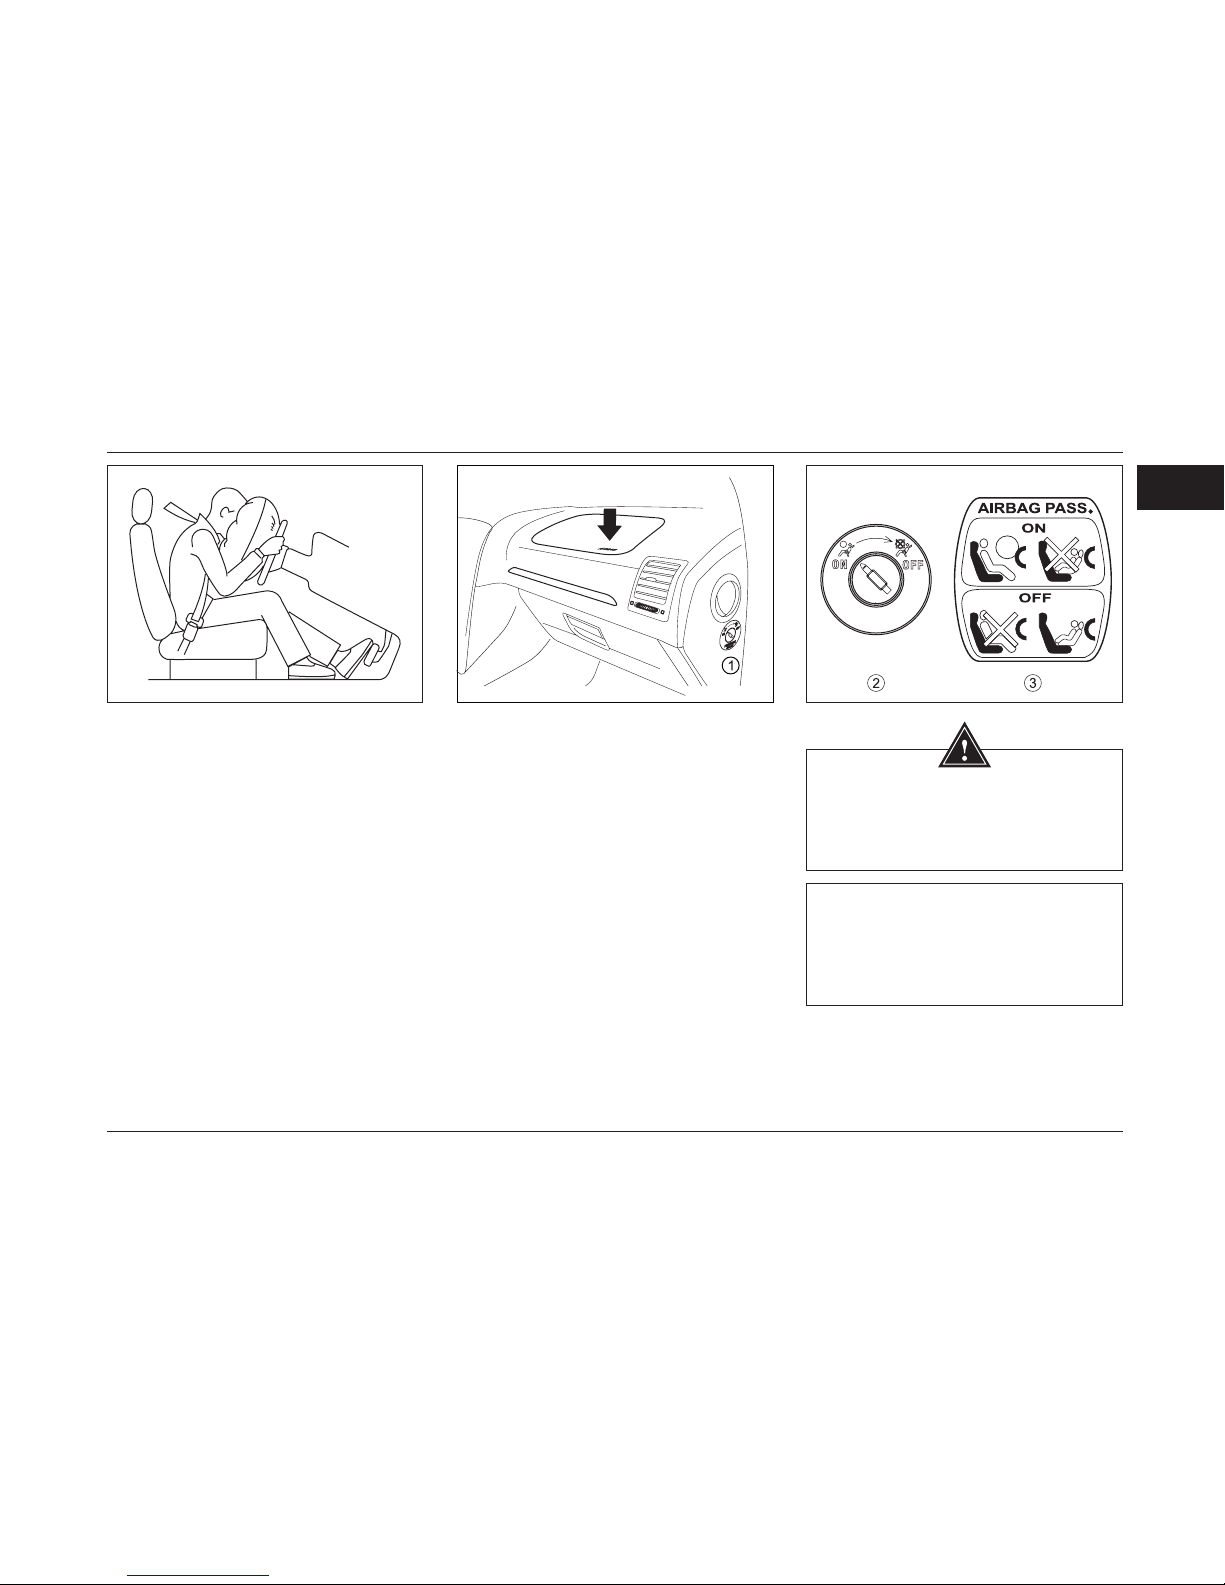
Front passenger air bag :
Deactivation switch of air bag is located at
the side of dashboard .
1- You can turn the switch clockwise to
deactivate the air bag.
2- Avoid keeping the child seat (back to face)
in the front seat while the air bag switch is on.
3- If the air bag operates ,while the child seat
has been kept in front seat ,there is every
possibility of serous injury or death for the
child.
WARNING
- All the parts of the air bag must be
changed by the authorized dealer of IKCO,
If it is operated once.
- Keep your belt fastened so that the air
bag operates in a best condition.
Note:
To control the air bag indicator ashes, in
case of any two consecutive placing the
switch in ON position, it should be placed
at least three seconds on the off position
as well.
Page 21

20
1
PARS AT A GLANCE
Child safety locks
Positioned under the each rear door lock.
The child locks prevent the opening of rear
doors from the inside and act independent
of the central (door) locking system.
To latch the children just push the lever
down to operate.
Hands-free cellphone (Bluetooth)
Equipping your car with Hands-Free
telephone (with Bluetooth) means
that Hands-Free kit can manage your
communication without usage of your cell
phone in the regular way.
Even if the mobile phone is inside the
attaché-case or the pocket of the user, the
call acceptance or refusal key is located on
the dashboard console.
Page 22
21
1
PARS AT A GLANCE
Ignition and driving on CNG fuel mode*
The engine is always ignited on gasoline.
The fuel conversion is carried out by the
conversion key on the middle console.
The CNG fuel selection is possible in the
following situation:
a) Before starting
b) While driving
c) Igniting the car on the gas mode directly
Fuel type
The fuel used on your car unleaded
premium gasoline with octane number
(RON) of 95. In the event a fuel other than
that specied above is used, the internal
parts may get damaged because of the
auto-ignition and knocking.
A premium petrol with octan(RON)
95 must be used. Avoid entering
the nozzle into the tank completely.
Applying the fuel additives aren't
permitted for this vehicle.
WARNING
The failure to use non-leaded premium
gasoline will damage the catalytic
converter. Avoid strictly of combining
any liquid with the standard fuel.
*
If equipped
Page 23
22
1
PARS AT A GLANCE
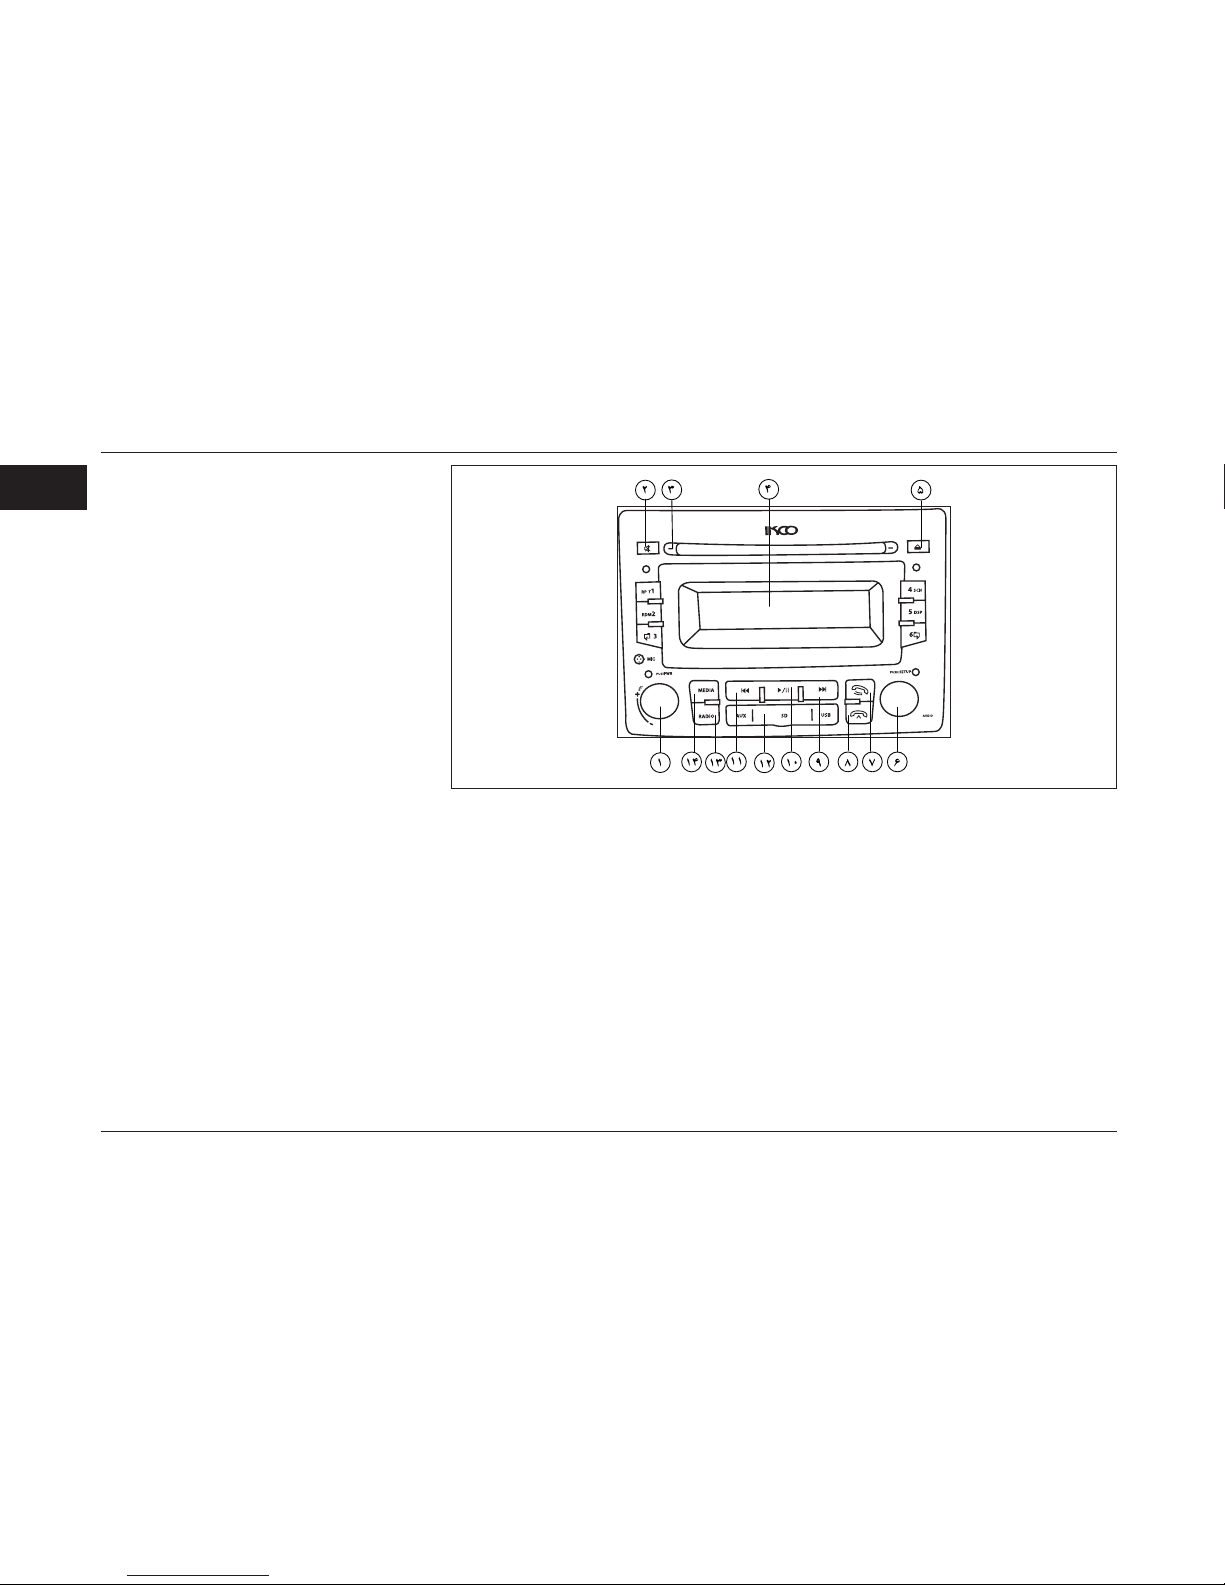
Audio system control panel
1- Off/ On
- volume turning :Sound adjustment .
2- Mute
3- Disc Input
4- Disply screen
5- Eject button.
6- Manual adjustment of frequency .
- Selecting previous/next music.
7-Response to received call.
8- rejection.
9- Automatic search for stations by
increase of frequency.
- Selecting next music.
10- play/stop
11-Automatic search for stations by
decrease of frequency..
- Selecting previous music.
12- USB/SC/AUX cap
13- Exchange of radio bands.
14- Selecting of player(CD/USB/SD/
AUXIN)
Page 24

23
BEFORE DRIVING
2
LOCKING/UNLOCKING ...................................................24
IMMOBILIZER ...................................................................28
ELECTRIC SIDEGLASS LIFTER ....................................29
INTELLIGENT WINDSCREEN* .......................................31
SEATS ............................................................................... 33
SAFETY BELTS ................................................................36
CHILD SAFETY ............................................................... 38
MIRRORS ......................................................................... 40
FOLDING EXTERIOR MIRROR(ELECTRICAL)* ...........41
FIRE EXSTINGUISHER * ............................................... 42
LIGHTS AND INDICATORS ........................................... 44
GLASS CLEANERS AND WINDSHIELD WIPER ..........46
REVERSE GEAR WARNING SYSTEM .........................47
HANDSFREE CELL PHONE ...........................................48
AUDIO SYSTEM ...............................................................50
AUTOMATIC AIR CONDITIONING ................................. 63
CNG PARTS * ...................................................................66
ANTI-LOCK BRAKING SYSTEM ....................................68
INTERIOR EQUIPMENT ...................................................70
AIR BAG ........................................................................... 73
*
If equipped
Page 25
24
2
LOCKING / UNLOCKING
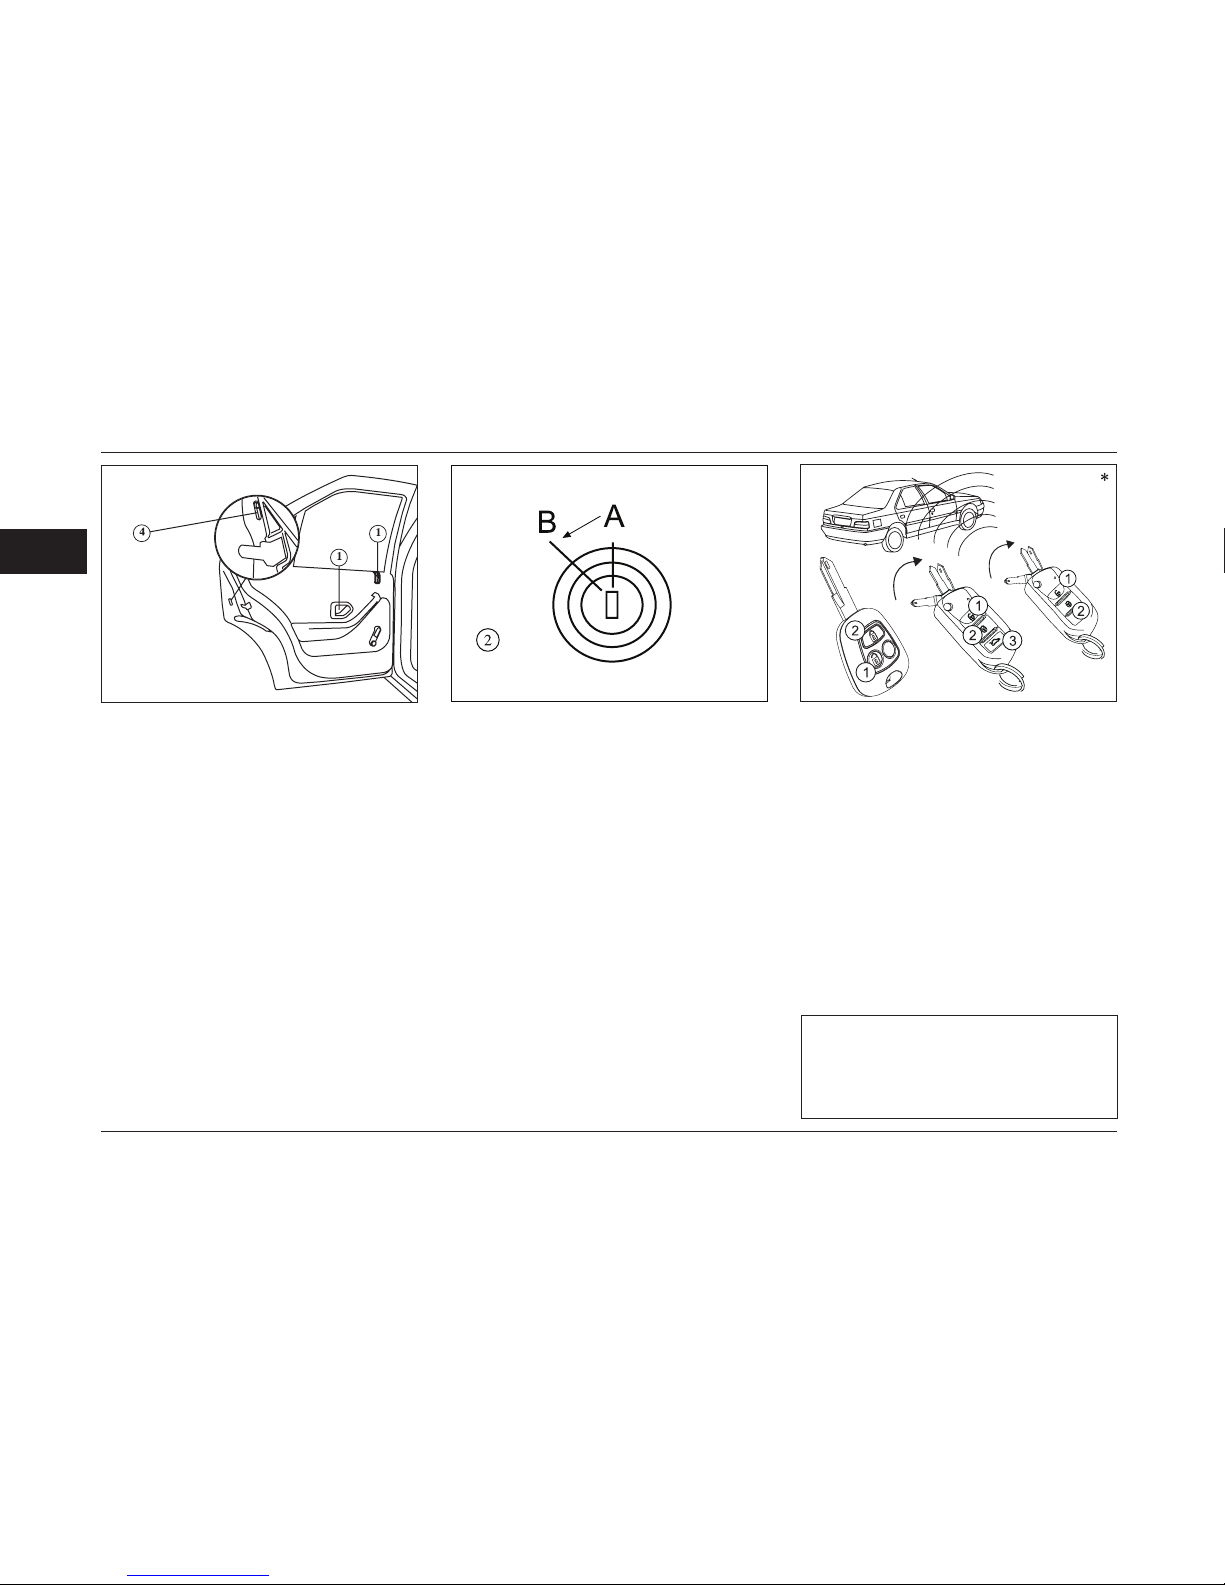
Locking and unlocking of the doors:
Side doors, rear trunk door, fuel tank
cap cover:
1- With the use of key:
For opening the door, pull up the external
handle.
From inside:
Push down the interior locking button,
door will be locked. For opening the lock,
pull up the same button and for opening
the door, pull the interior handle.
NOTE
Frequent pressing of the keys in
short intervals will cause the keys
functioning cessation for 20 seconds.
2- With the use of key (switch) and
central locking system:
All doors, rear trunk and fuel tank cap cover,
can be opened or closed simultaneously with
the help of switch key from outside and the
locking buttons on front doors from inside.
Meanwhile, by using the front doors lock
button, we can only lock the trunk lid. For
opening that, we should use the switch.*
Vehicle: after locking doors by central
locking system , the rear trunk door can
be opened by the use of main switch key
and it’s turning anti clockwise (from A to
B).
3-With the use of remote control: *
Keep the remote control key towards the
car:
- Press the key no.1 to open the door.
(anti theft system will be turned off)
- Press the key no.2 to luck the door.
(anti theft system will be turned on)
- The boot will get open by two successive
pressing or in some models holding the key
for 5 seconds.
4- Children safety lock:
To avoid opening of rear doors from
inside, push down the safety lock button.
*
If equipped
Page 26

25
2
LOCKING / UNLOCKING
Battery Replacement of the Remote
Control Switch
If the indicator light on switch is not blinked
or the key is not functioned correctly, it is
necessary the battery be replaced.
1- Separate the part 1 and 2 with the help
of hand pressing from the described line.
2- Then separate the upper and Lower part
of the section 2 by hand pressing (g B).
3- Remove the discharged battery and
replace the new one. Ensure the battery
has been inserted properly(g C).Use the
battery of CR 2032.
4- Put the upper and lower part on each
other and insert it by hand pressing.
5- Put part 1 and 2 on each other and
insert it by hand pressing.
WARNING
Never discard used batteries in nature.
Give them to organizations responsible for
collecting and recycling this kind of batteries.
WARNING
Avoid keeping the battery or remote controller
in infants' access, because swallowing of
the battery can cause death. In case of
swallowing the battery, refer to health care
centers immediately.
Battery replacement of the remote
control*
If the key is not functioned correctly, it is
necessary the battery be replaced. For
replacement of the battery, rst open
the buckle and separate the switch
back frame with proper pressure to gap
between up/down frame. Conrmed
battery is CR2032.
Remember, even, when the remote
control batteries have been discharged,
central key system operates by the key.
If it's possible, don't utilize used batteries.
Page 27
26
2
LOCKING / UNLOCKING
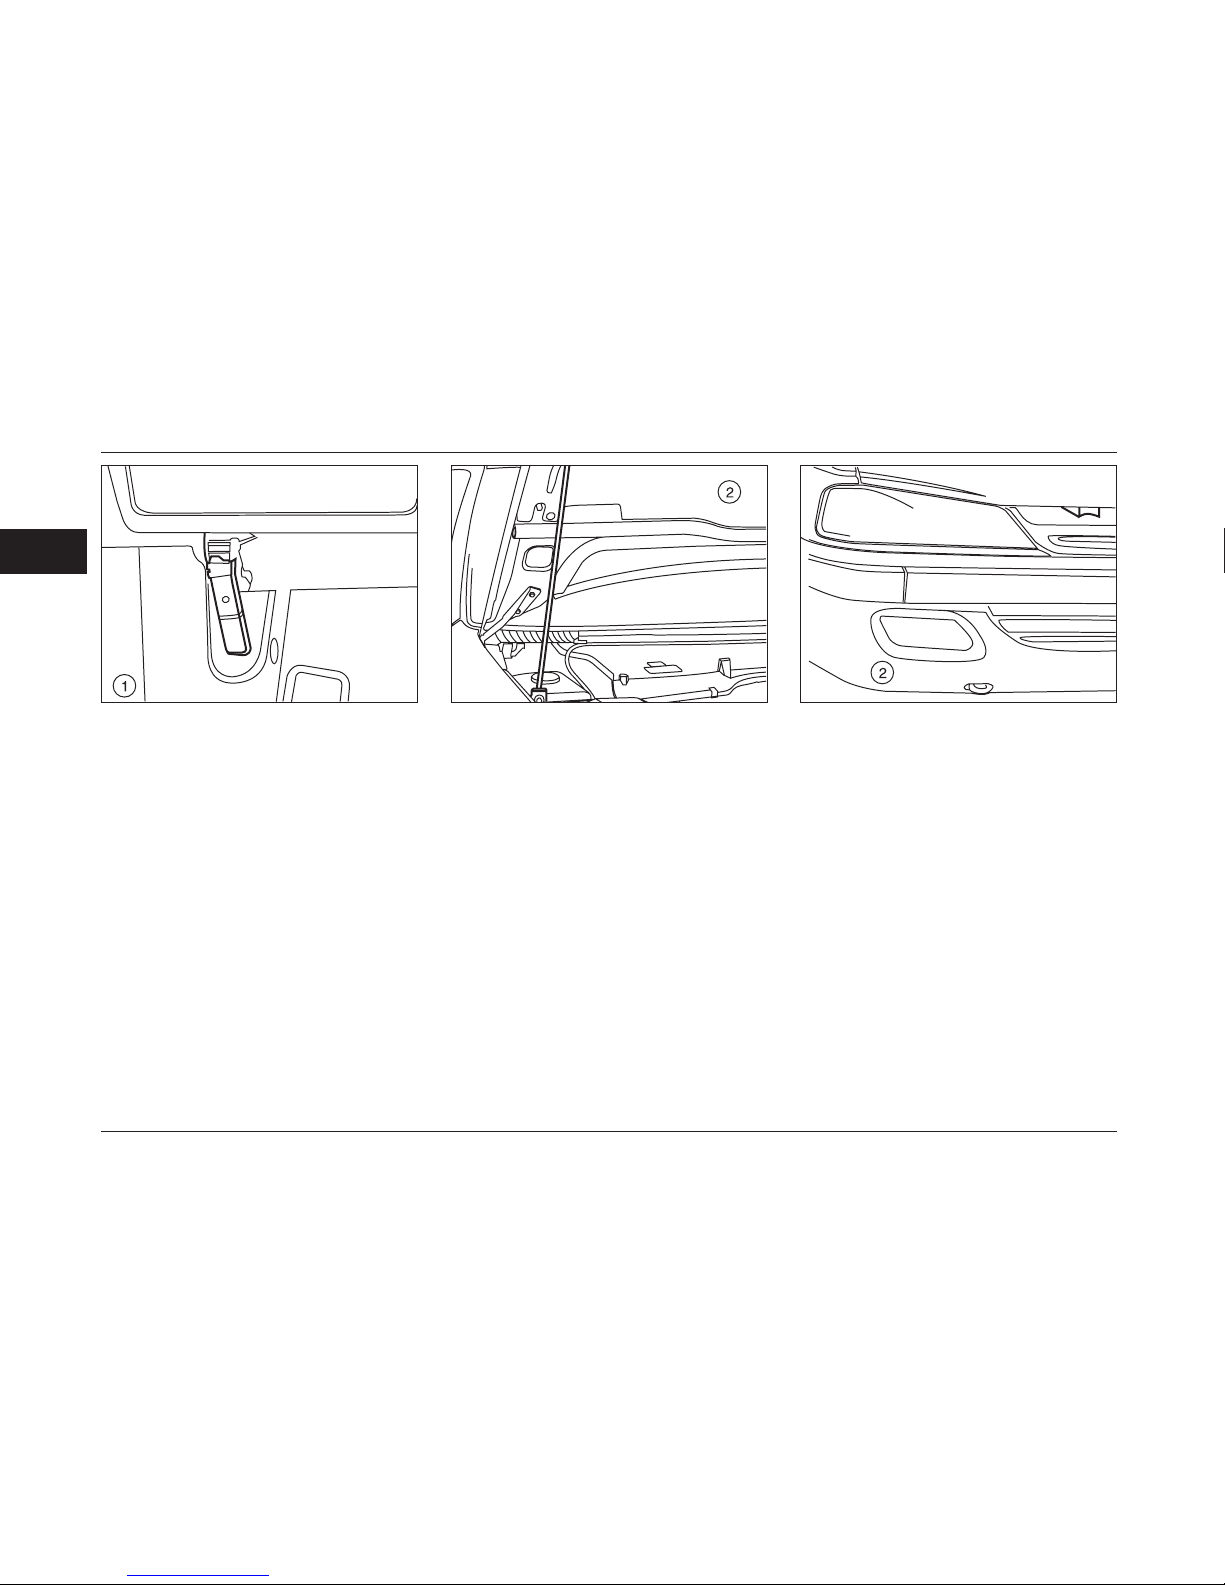
Locking and unlocking of the engine
cover door:
1- From inside: Pull the interior handle
below the dashboard until the lock is
released.
2- From outside: pull the safety holder
beneath the engine cover door towards
yourself until the safety lock is released.
To keep the engine door open, use the
leaning rod. To close the engine door,
bring down the leaning rod and leave the
door to drop by itself from a distance
about 30 centimeters. Make sure that
the door is completely locked.
Page 28

27
2
LOCKING / UNLOCKING
Fuel Filler Flap
3- To open Fuel Filler Flap press the
frontal ap of tank valve. There is a place
on internal side wall of valve to keep the lid
to prevent being lost.
(Before completely removing of tank lid
wait for a few moments until the present
gases in the tank gets out.)
Fuel ller ap has been joint to the Tank
vent to prevent to be lost.
Opening the fuel ller ap in emergency
situations
4- If the central locking system does not
operate, you can open the ap from inside
the trunk.
- Remove the upholstery of the inner right
wall of the trunk.
- Pull back the tongue of the fuel ller-ap lock.
CAUTION
The utilizable gasoline in engines is
unleaded gasoline octane 95. If any
other fuel is consumed, it is possible to
damage internal parts due auto-ignition
phenomenon and impact.
Avoid entering the nozzle into the tank
completely. Applying the fuel additives
aren't permitted for this vehicle.
WARNING
Since the gasoline in the fuel tank
maybe under pressure, never open the
fuel cap suddenly in order to prevent
danger. Loose the cap slowly and
carefully till the HISS sound stops, and
then open tthe cap fully. Considering
the danger of gas mist, never ll the fuel
tank while the engine is running. Please
keep away of any sparkles, ames…
near the spilt gas.
3
Page 29
28
2
*
If equipped
ANTI-THEFT SECURITY SYSTEM (IMMOBILIZER)
Anti-Theft SecuritySystem (Immobilizer)
The vehicle with immobilizer system,
can only start up with two keys which is
delivered to customer with the vehicle.
NOTICE:
- Copying key is not enough for start up. It is
possible to have more keys if the customer
requests and only in IRAN KHODRO dealers
with the DIAG tool.
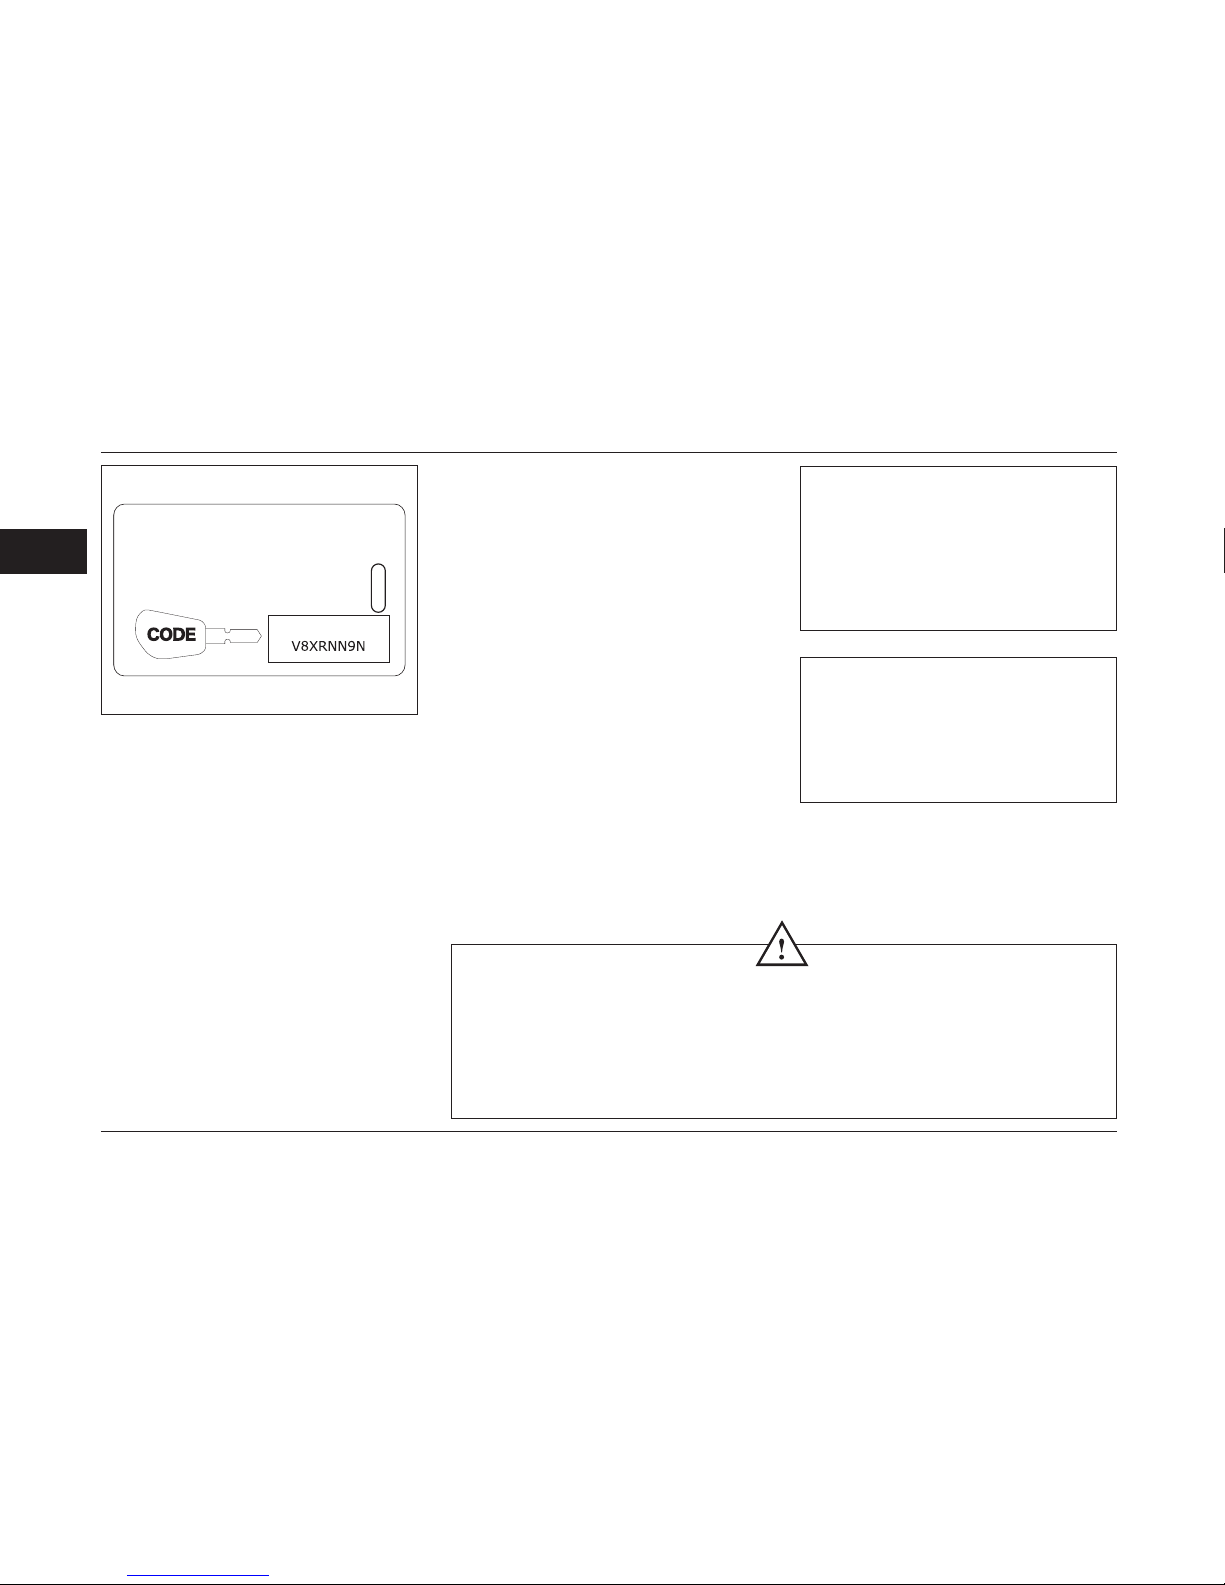
- A number has been carved on the key
plate for replacing the key. Therefore keep
the plate in a safe place an never inside the
car.
To maintain better and usage of your
vehicle, it is necessary to pay attention to
the following tips:
1. Keys have electronic chip inside which
contains information of key codes, so avoid
putting them near powerful electro magnetic
and electrical scopes.
2.When delivery the vehicle, there is a card
which is shown in left picture with the keys.
Existence of this card is necessary in cases
like multiplying the key (from 2 up 5 at max)
or replacement of lost key, replacement of
electronic unit ofAnti-theftsecurity system
(immobilizer) or replacement of ECU with
ownership document of vehicle. Above
functions are impossible if the card is lost and
leads to replace whole security system. All
costs due to careless keeping must be paid
by owner.
ATTENTION
This system will check the engine's
electronic system, a little after the
engine is turned off and thus prevent
anyone without the main key from
turning on the engine.
NOTE
There is possibility of breakage for
internal parts of the remote controller in
case of sever impact and subsequently
not functioning of the immobilizer.
CAUTION
-The anti-theft system your vehicle is equipped with is one of the soundest security systems,
increasing the vehicle's security ratio, without need of doing any special functions. Naturally
this should not make the vehicle owner careless regarding proper and adequate protection of
his car.
-Any repairs or changes in the ant burglary system (electronic box, wiring, etc.) are strictly
forbidden.
Page 30

29
2
ELECTRIC WINDOW
Electric side glass lifter
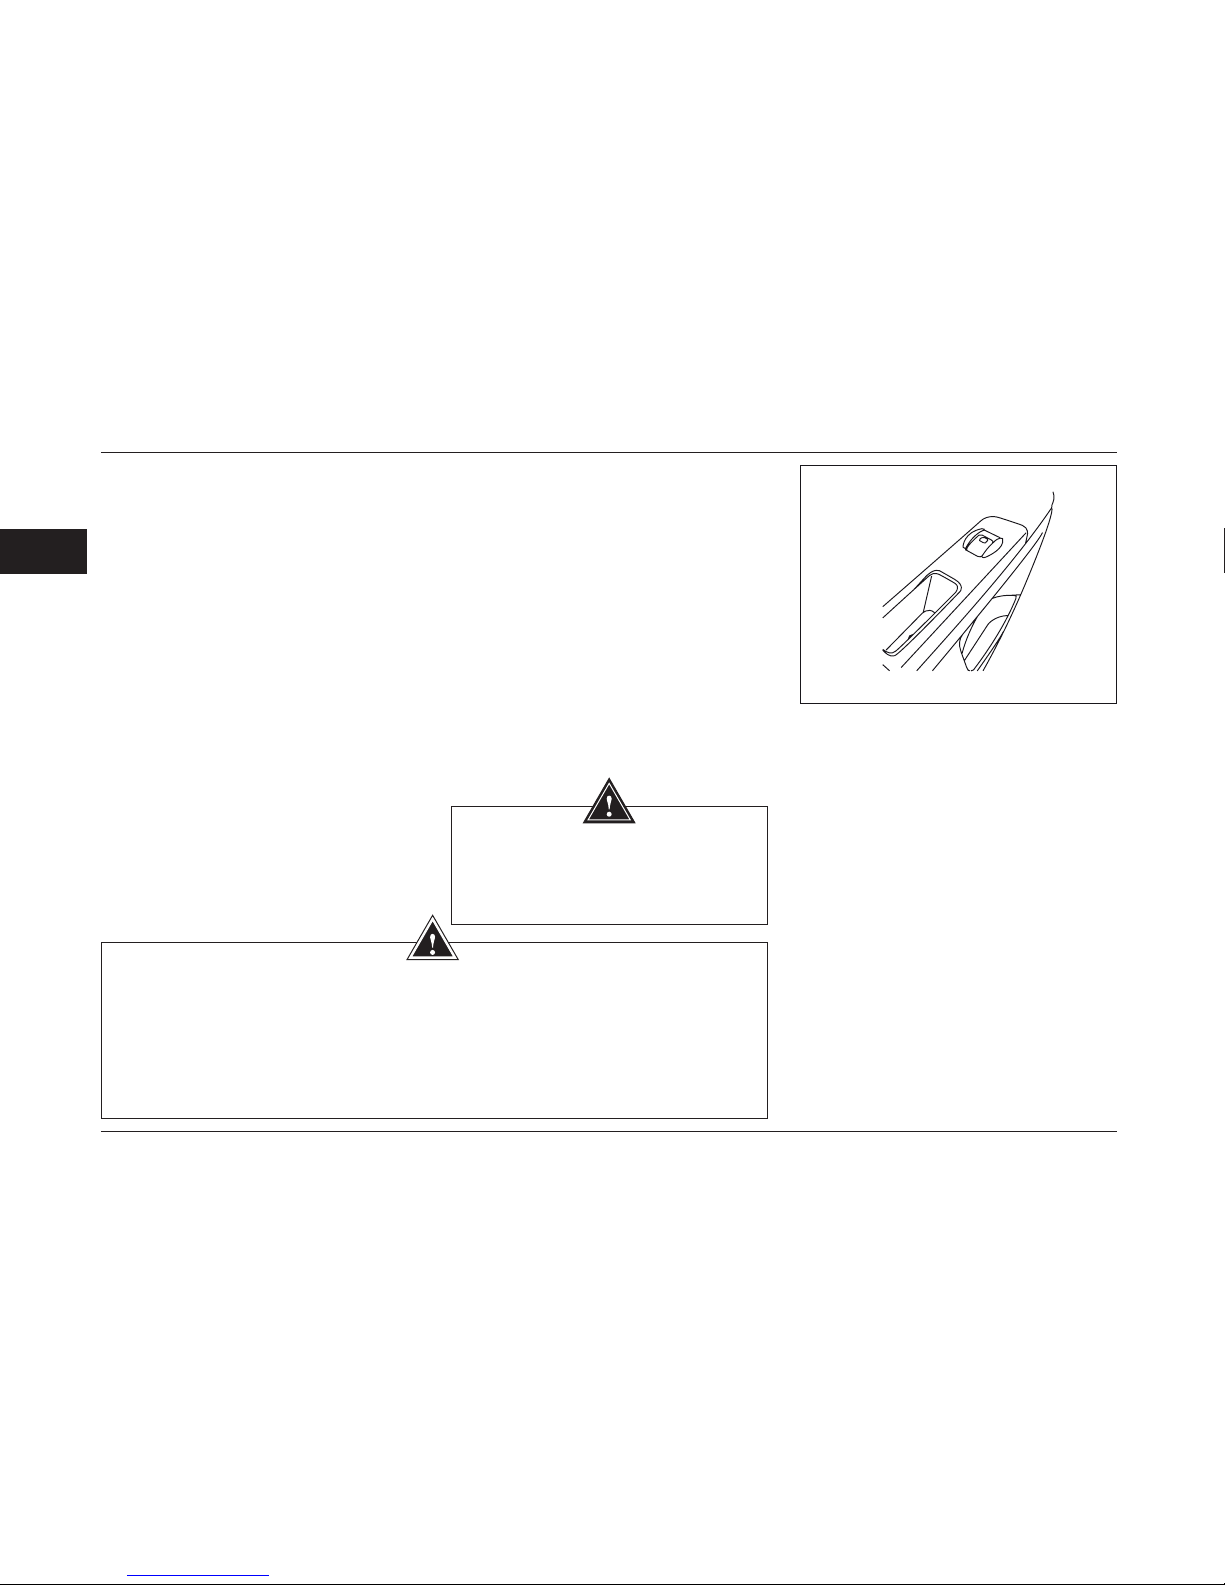
1- Electric Side glass lifter of driver
Manual mode : Press or pull the key gently;
the glass stops moving soon after realizing
the key.
Auto mode : Press or pull the key severely
and continuously ; the glass gets opened
or closed completely .
(Automatic opening of glass is possible in all
switch modes). *
(For closing of glass automatically, the
engine must be turned on).*
2- Electric side glass lifter of passenger.
3-left and rear side Electric glass lifter.
4- Right and rear Electric glass lifter.
3
1
7
2
4
*
If equipped
5- locking key of rear glass lifter :
This key prevent the function of rear glass
lifter keys .
Rear and front electric side glass lifters will
function, 30 seconds after deactivating
ignition switch or while it is on.
Page 31
30
2
WARNING
- Never leave a car in which an infant or pet animal is seated with the switch card in the car.
Indeed the infant or the pet animal can operate the electrical windscreen switch and get caught
(by head, arm, hand etc) in the opened windscreen, thereby inicting heavy injuries to oneself.
In the event the windshield has caught the infant or the pet animal, immediately operate the
windscreen in the reverse direction.
-A power window won’t stop if your ngers, hand(s) or head getin theway. you or others could
be seriously injured.
WARNING
The electric side glass lifters of the vehicle,
with using Anti pinch safety system, only
avoids the large damages due to excessive
forces. Therefore, it is advised that always
take usual precautions.
ELECTRIC WINDOW
Glasses keys
Any passenger can open or close his/her
own side glass.
Page 32
31
2
*
If equipped
INTELLIGENT WINDSCREEN SWITCHES
Intelligent windscreen Switches*
The new intelligent windscreen switch
installed in your vehicle is endowed
with an electronic board providing the
following advantages:
1- Anti-Pinch safety system
2- Automatic closing the windscreens
while leaving the vehicle
3- Automatic shift command of the four
windscreens
4-Slow coming to a halt of the windscreen
at the end of the course.
Anti-pinch safety system
This is a safety system which prevents
the body parts from getting caught while
the windscreen switch is on its upward
course. In this system if the windscreen
gets in contact with an obstacle while
in its upward course, it comes to a halt
immediately and moves in the reverse
direction, thus it will prevent the inicting of
heavy injuries to the infant. Furthermore,
the above system will insure the longer
useful life of the windscreen switches.
Automatic window closing
When the vehicle is turned off and its
doors locked using remote control, this
system will check the car windows one
by one and raise the windows that are not
closed properly. This security system will
take care of security risks of forgetting to
close all the car windows and will let the
driver leave his car with peace of mind.
WARNING
Despite the anti pinch safety system,
the electrical windscreen switches
can only prevent the inicting of heavy
injuries caused by the application of the
undue force. Therefore, it is advisable
to respect the necessary precautions in
this regard.
CAUTION
Always make sure all four windows are
automatically closed, before leaving
car's parking place.
Page 33
32
2
*
If equipped
INTELLIGENT WINDSCREEN SWITCHES
Automatic order for movement of the
four windows
This system will provide the option to lower
or raise the windows, both manually and
automatically for each window. In ordinary
vehicles only raising of the driver's window
is automatic.
- Manual mode:
Press the button of the respective windscreen
and press it consecutively. As soon as the
application of pressure on the button ceases,
the windscreen will stop.
-Automatic mode:
By pressing the button once, the windscreen
will open or close completely. The new
windscreen switches will make you able
to open or close manually/ automatically
the four windscreens simultaneously. In
the event the button is pushed once, the
windscreen will automatically go upward or
downward course.If the button is pressed
consecutively (for a longer time), the
windscreen is operated in the upward or
downward direction till the pressure exerts
on the button; in that case the movement
come to a standstill immediately.
NOTE
While adjusting the system, the
anti-pinch system is deactivated.
Slow coming to a half of the windscreen
at the end of the course*
In this system the pace of the window
screen will automatically reduce at the end
of the course till it stops gradually at the end.
In this case, there will be no or less impact
on the door. This system eliminates the
unpleasant noise arising from the sudden
stoppage of the switch at its nal course and
increases the useful life of the internal door
parts. (Obviously the anti-pinch system is
operated automatically and in the event the
windscreen gets in contact with an obstacle
while in its upward course, it comes to a
halt immediately and moves in the reverse
direction).
note: The intelligent windscreen switch
is equipped with a sensor which precisely
registers the windscreen position at any
moment. To distinguish the starting and
nishing points of the windscreen movement
domain, the preliminary readjustments of
the windscreen electronic system are made
in the factory. If for any reason such the
opening of the battery leads the permanent
energizing of the window switch ceases,the
preliminary adjustments are wiped from
the memory and the new abilities of the
intelligent window switch cease to operate.
Following the permanent re-energizing of
the system, the preliminary readjustments
and start-up of the windscreen switch have
to be made again.
This includes the following stages and
could be easily done by the owner in the
following manner:
1- Lower the windscreen to the end of the
course.
2- Raise the windscreen manually to the
end of the course (In automatic mode, it
will be deactivated).
3- Upon the movement of the windscreen
to the end of the course, hold the button
just for a second.
Page 34
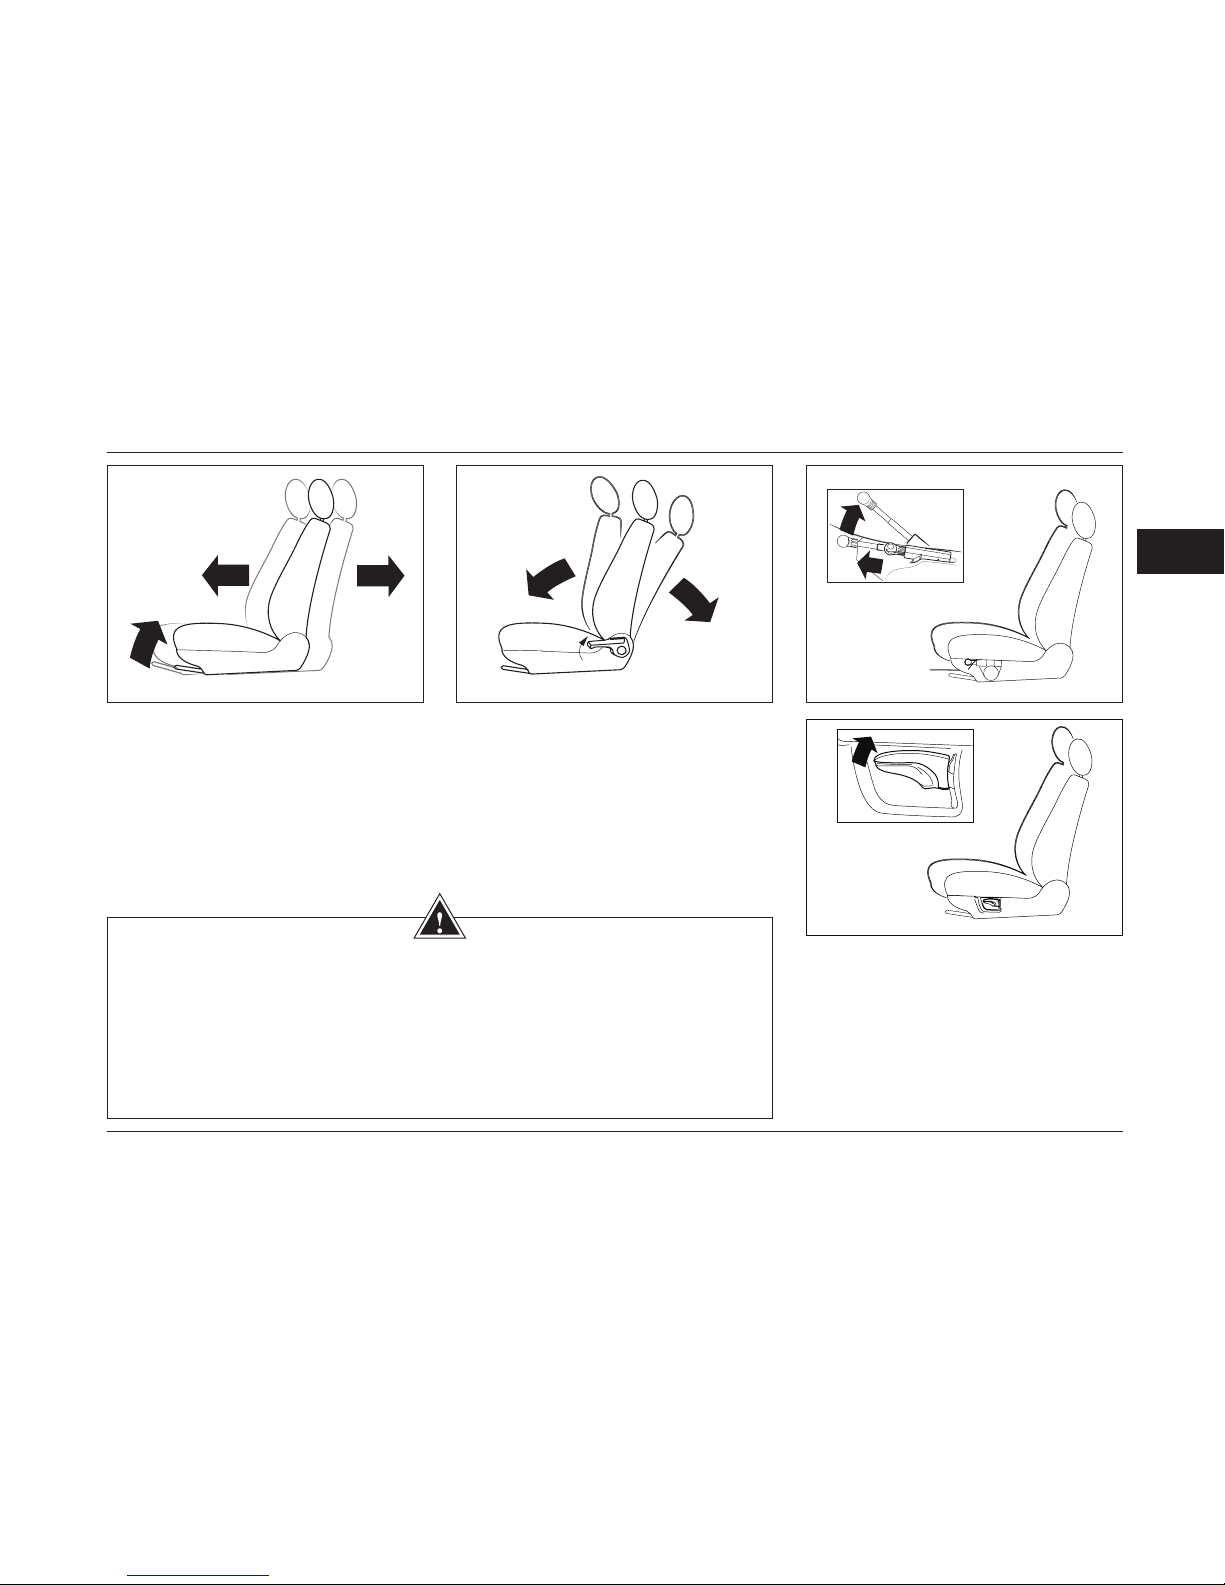
33
2
*
If equipped
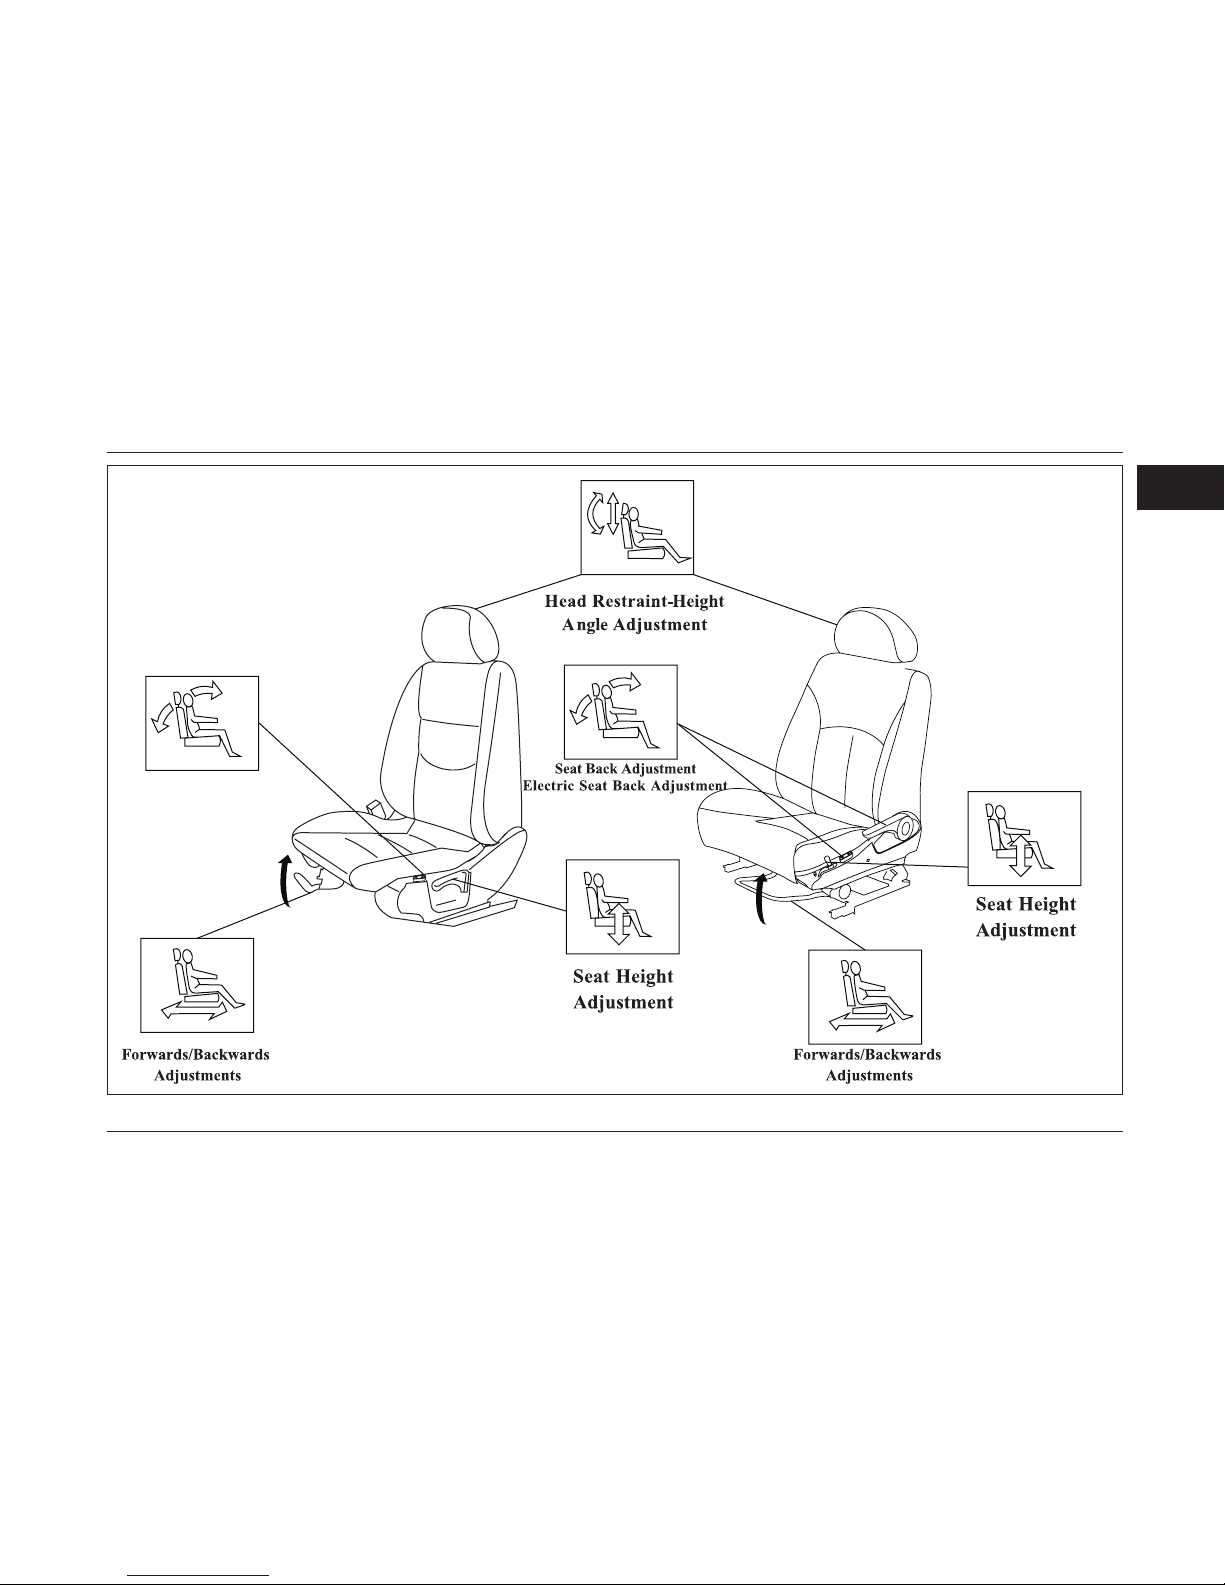
For Driver Seat
SEATS
Forwards and backwards of the seat
1- Pull the control lever upwards.
2- Take the seat to the favorite position
with the help of your body.
3- Release the lever until it gets locked.
ensure the seat is tighten on its own
position rmly before moving
Adjustment of seat back
1-Turn the control lever upwards.
2- Take the seat to the favorite position
with the help of your body.
3- Release the lever until it gets locked.
Ensure the seat is tighten on its own
position rmly before moving.
Seat height adjustment *
To adjust the seat ;pull the lever upwards
(for increase of height) and press the
lever downwards (for decrease of height)
while you're sitting on the seat.
WARNING
- Seatbacks should always be in upright position when vehicle is moving. Seat belts are
designed to offer maximum protection when seatbacks angle with vertical line is about 25
degrees.
- Do not adjust the seat when vehicle is moving.
- In order to install the seat cover for the second time, be careful that the seat cover clamps are
not being hindering of the action of the driver's seat regulation rods.
- Open and close the chair must be performed in accordance with procedures and safety tips. If
necessary to open and close the seat, must certainly refer to authorized repair shops.
For Front Seats*
Page 35
34
2
*
If equipped
WARNING
Make sure the leg of the rear passenger
is not under the seat when you lower
your seat.
Do not adjust the seat while driving.
Since the head restraint is a safety
device, make sure it is properly secured
in its place.
WARNING
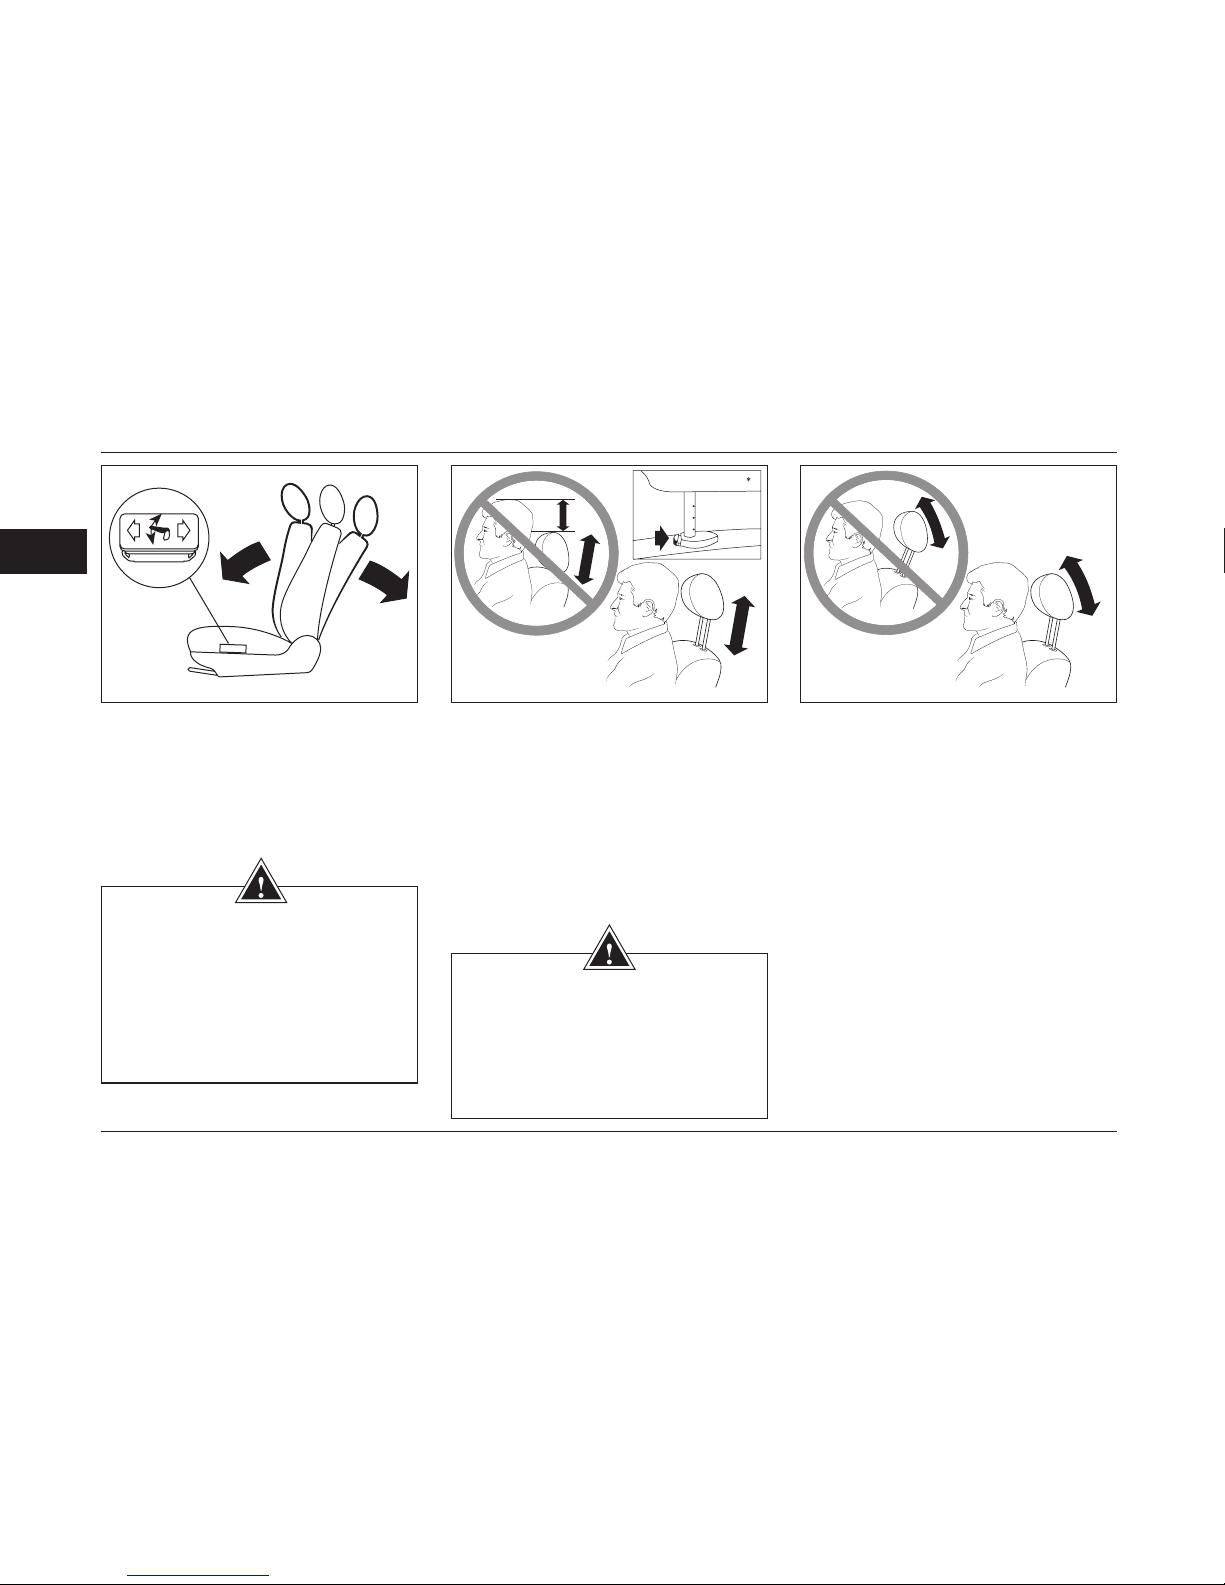
It is necessary to adjust the height of the
head restraint with the head position,
as per the above illustrations, in order
to reduce safety hazards to driver and
front passenger.
Electrical adjustment of Seat back
Press the electrical adjusting key for seat
back adjustment after you turning on the
ignition switch; so that the seat back is
located in your favorite position.
Adjusting head restraints
Pull head restraint upward to be level
with the head. To lower the restraint, push
down on the restraint.
(Press the lock latch towards the
inside rst; and then pull the seat back
downwards or upwards)*
Note: since removing of the head restraint
is very difcult and may damage the seat.
Except in emergency cases do not remove
head restraint.
Head position
Head restraints are designed to protect
the head from being thrown back in case
of an accident or sudden stops. Its proper
adjustment reduces the risk of head and
neck injuries.
Meanwhile the head restraint is movable
forwards and backwards in its position
(see above gure)
SEATS
Page 36
35
2
SEATS
*
If equipped
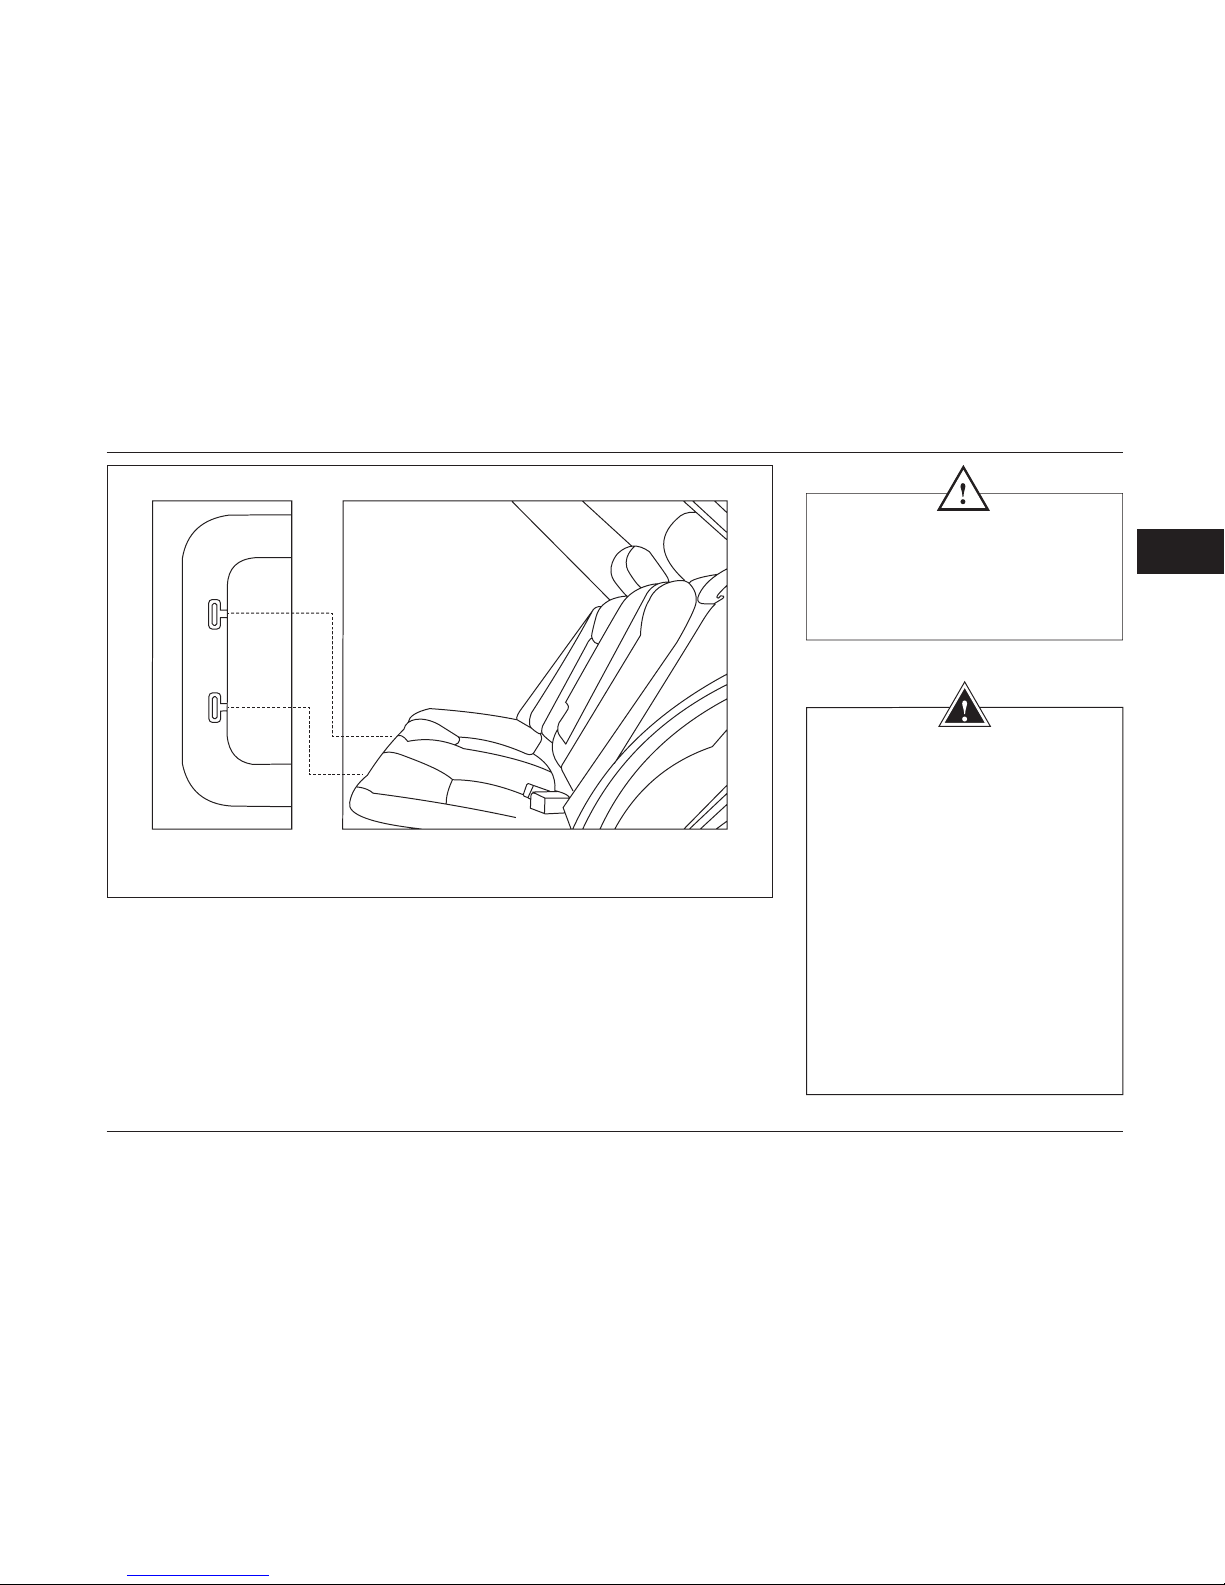
Side Hooks
Rear Seats:
In PEUGEOT PARS, the back seat is in
one piece. To take the seat out, pull up
the middle front edge of the seat a little
bit until the peaks of the hooks on sides
of the seat comes out. Then take out the
seat away from leaning part. To take out
the leaning part, from the rear trunk , bring
the carpet to a side, with the help of an
especial hook, dislocate the peaks of the
hooks on leaning part and simultaneously
pull up the leaning part, so that the upper
hooks are also released.
CAUTION
Do not put extra or thick matt under the
Driver’s feet, because none standard
matt restricts the complete course of
clutch and smooth changing of gears.
WARNING
Make sure that during lowering the
seat, the foot of the back passenger
dose not come under the seat.
-In spite of the fact that the headrest is
a safety device, make sure about it’s
presence, correct location and correct
position.
-There should not be any device placed
on the oor ( In front of Driver side),
because in case of intense braking,
these devices can be shifted beneath
thePedals and restrict using of them.
- Do not adjust the seat when vehicle
is moving.
Page 37
36
2
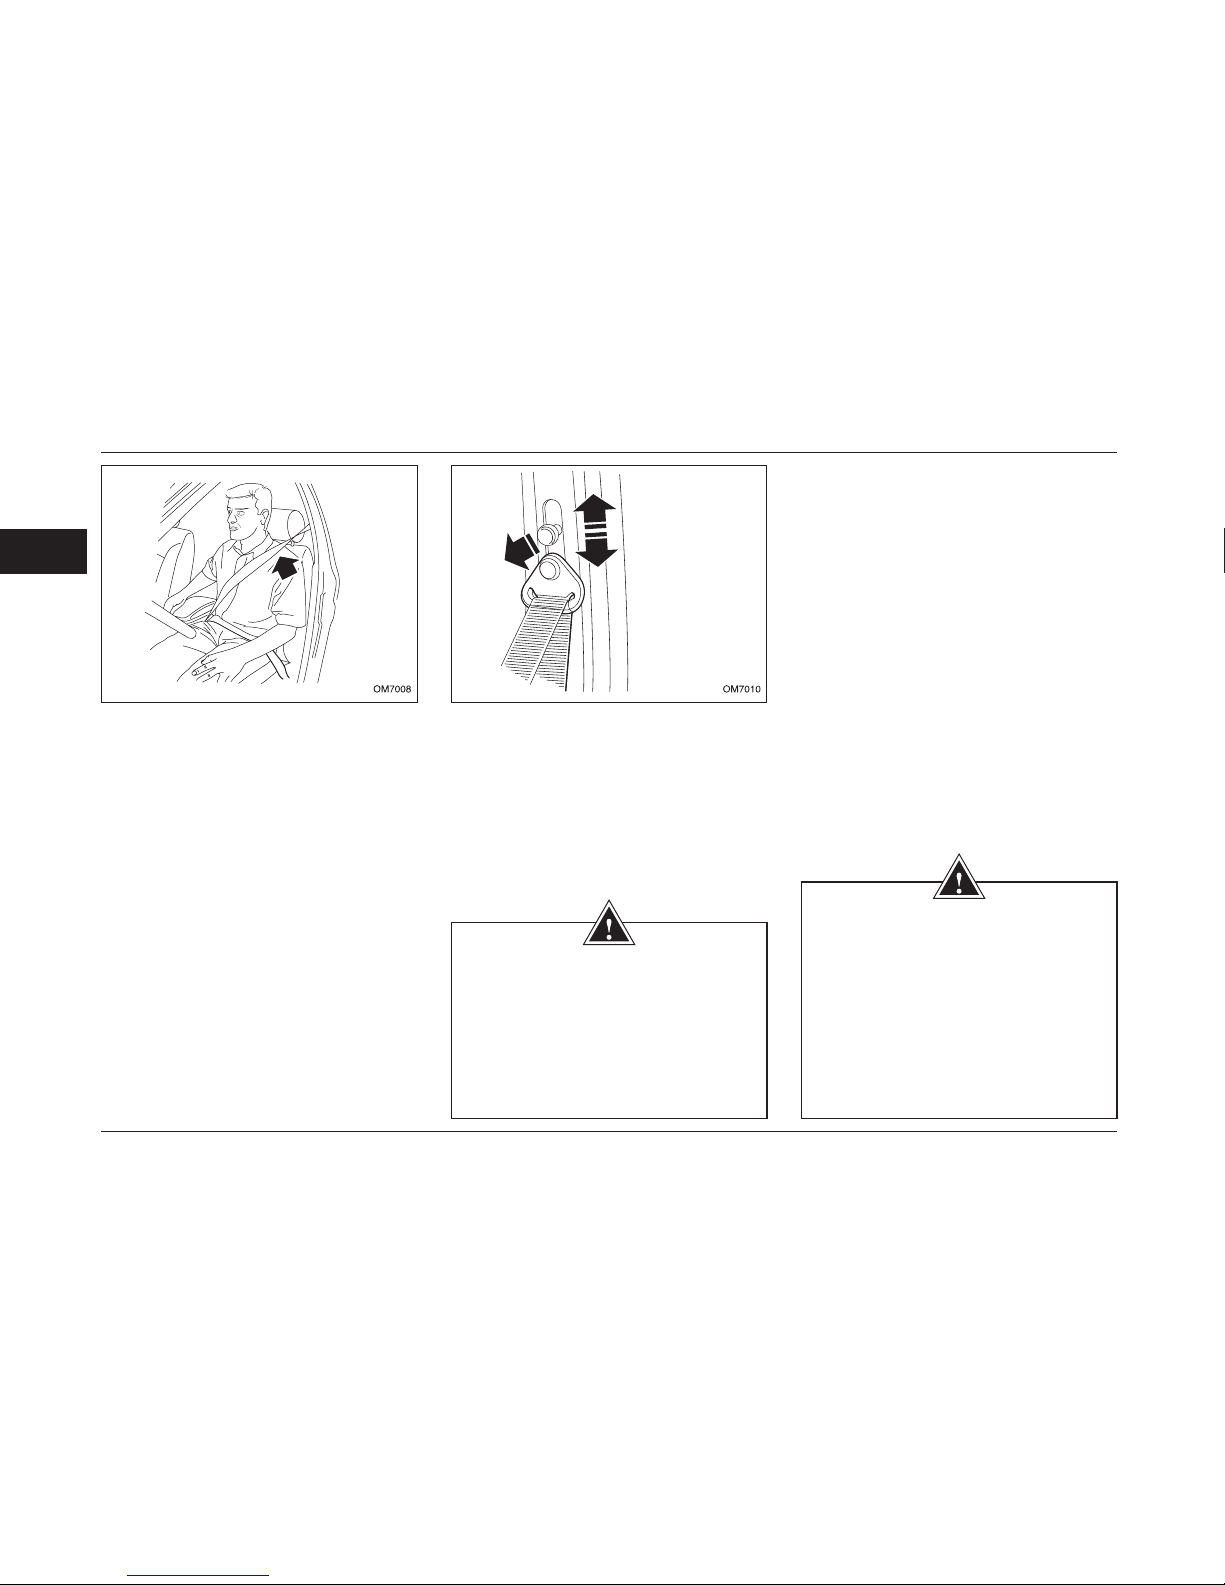
Fastening the belt :
Pass the seat belt across the shoulder and
the chest and assure not to be twisted.
Insert the metal latch in the special lock
so that you can hear the sound of clop
after insertion .By doing this the relevant
warning light of seat belt gets off on
instrument cluster.
Release of the seat belt :
Press the red knob on the belt lock.
Belt are designed in such a manner to
include the whole body and are useful
only while they're in vertical position.
WARNING
Seat belt are useful only while they're
near to the vertical position .Don't
allow the front passengers to use the
seat with declined position. By doing
this the relevant warning light of seat
belt gets off on instrument cluster.
WARNINGS
To not reduce the effectiveness of
safety belts and to prevent injury, place
belt shoulder pad on the shoulder.
Make sure that the backrest is placed
in the proper location.
Avoid any external or sticky material to
enter the lock slit; causing the improper
function of the lock .
Height adjustment of front seat belt :
Pull out the adjusting knob and take it up or
down for a few scale.
It's better for the children to use only from rear
seat belts.
The belt equipped with power restricting
system
At the time of accident the safety will be
increased via this system and the impact result
in accident will be decreased on the chest by
utilizing the system.
the belt equipped with power restricting system
functions only once at the time of air bag being
activated and after one function ,it must be
changed by authorized IKCO representatives.
SAFETY BELTS
Page 38

37
2
SAFETY BELTS
Seat Belts Safety Tips
Seat belts are designed for people of adult
size, and they must be used by only one
person at a time. Always make sure that all
passengers' belts are fastened (properly),
and consider the following.
Precautions:
- Do not let passengers recline the seats
extremely rearwards. The complete
performance is gained when backrest angle
is about 25 ° from vertical axis.
- Adjust safety belts to eliminate any slacks.
Do not pull the belt away from the body
while running. To operate properly, safety
belts should be worn as tightly as possible.
- The lap part of the belt should not go over
the abdomen but pelvic bones. The shoulder
belt should go over the shoulder and across
the chest without any pressure to the neck.
- Remove hard, sharp or fragile objects
as keys, pens, glasses and etc. from your
clothes. The belt should not be twisted, and
there would be no obstacle in between.
- Replace seat belts if they are worn, lost
their sensitivity or damaged.
- Use the seat belts to x luggage carried
on the seats. Throwing loose packages
in passengers’ compartment during an
accident can cause serious injuries.
- In most countries, all passengers are
legally obligated to wear safety belts
unless be exempted on medical certicate.
- Pregnant women should pass the shoulder
portion across the shoulder, breast cleavage
and from one side of the fetus. If in doubt,
consult your physician.
-The belt is equipped with power restricting
system to control the impact incurred to the
passenger chest in any probable accidents.
Page 39
38
2
NOTICE:
People under the age of 7or 8 considered
children because of the different ratio of
head to body weights.
In violent deceleration, the weight of the
head and relatively weakness of neck
muscle can make serious spinal injuries.
They can be considered as young children
till reached 10 years of age or at a height
of more than135 centimeters.
This is why most countries have envisaged
some rules for the purpose of using and
selling suitable child restraints.
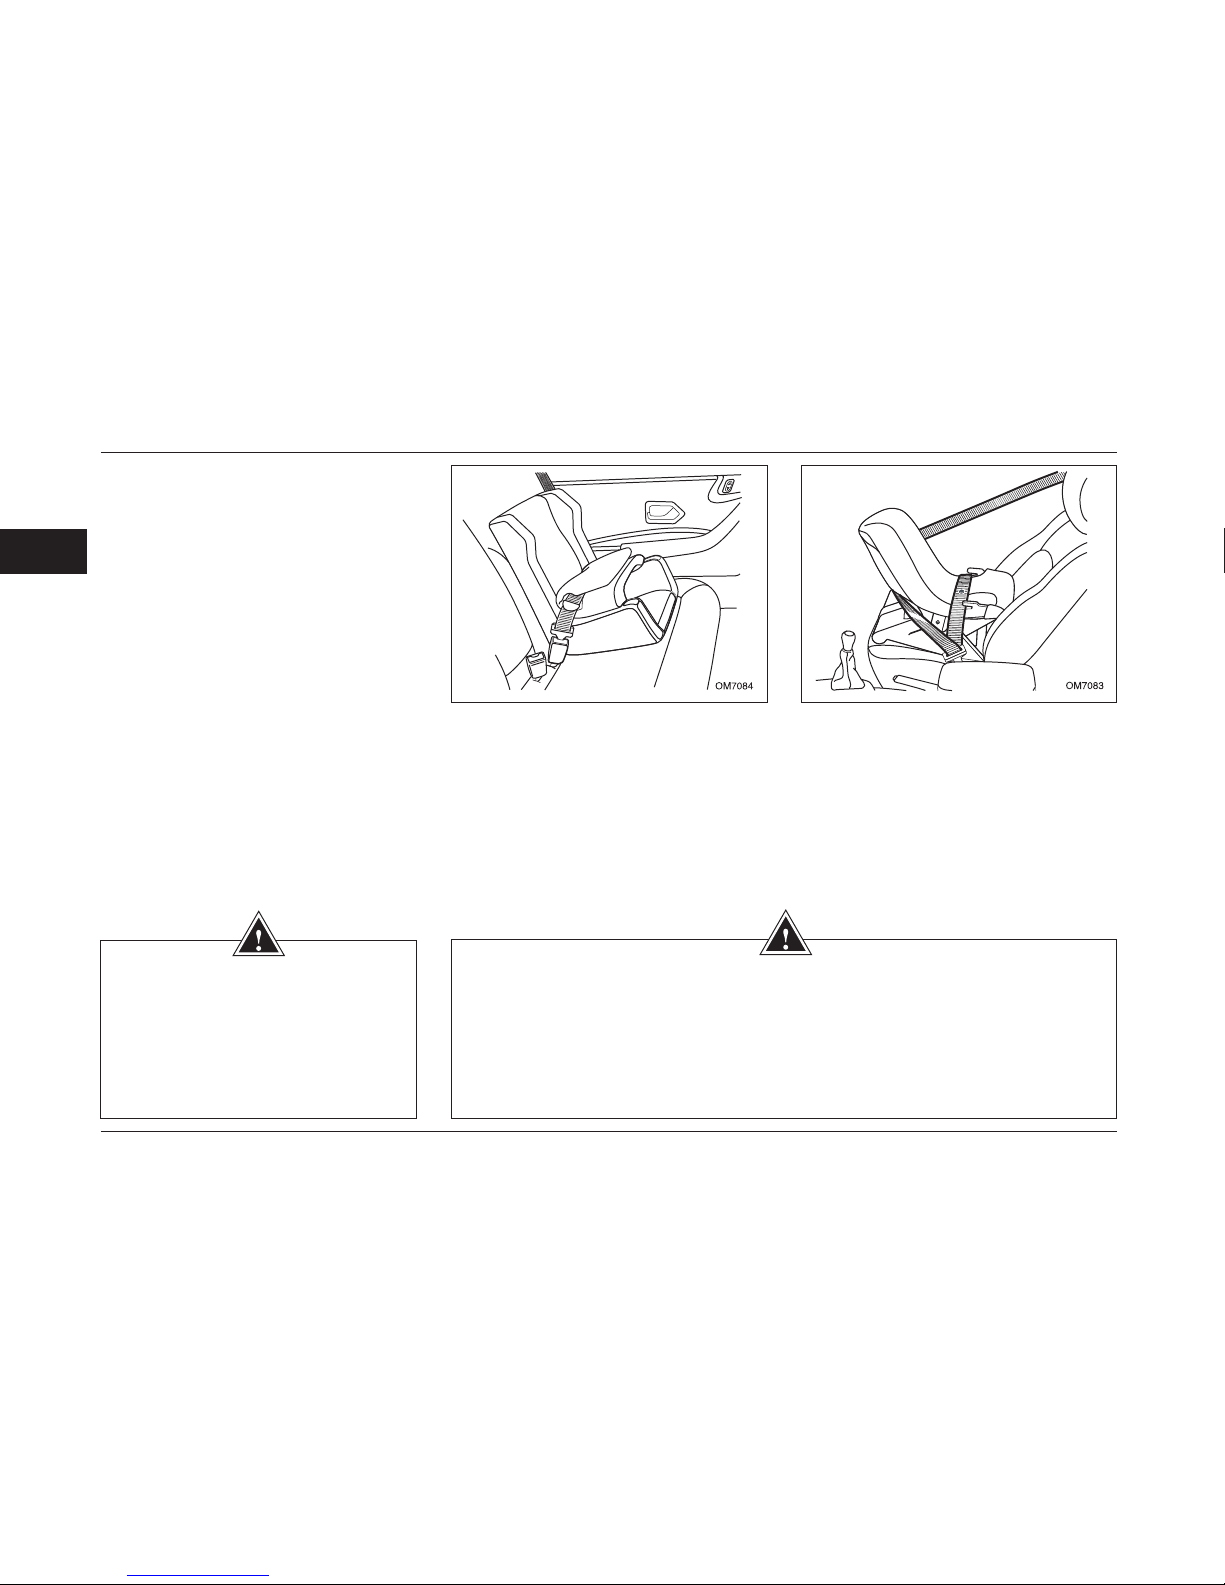
The seat of the child from 9 months to
3 years (up to 18 Kg) should be placed
forward-facing in the rear of the car and
xed with a three-point belt (lap-andsash
or inertia reel belt).
Babies under the 9 months (and less than
10 kg) must be secured on a rear-facing
seat in front of the car. Actually infant
restraints provide restraint with the
seating surface against the back of the
car with a three-point belt-seat belt with
locking mechanisms (or inertia reel belt).
WARNING
Nothing should be placed under the
driver’s feet; otherwise it may slide
under the pedals by a sharp braking
and lead to malfunction of the brake
in an emergency situation.
WARNING
Make sure of air bag deactivation while the infant seat back is located towards the
road in front passenger seat; otherwise there is every possibility of sever injury or
even death of the infant due to air bag being opened. locate the seat in the middle
position, longitudinally, adjust the back vertically and activate the air bag while the
infant seat is towards the road in front passenger seat.
CHILD SAFETY
Page 40
39
2
CHILD SAFETY
WARNING
-The children shall not be seated on
the lap of the passengers; otherwise
they may be hurt by an accident.
-Never fasten a seat belt at a time for
two persons.
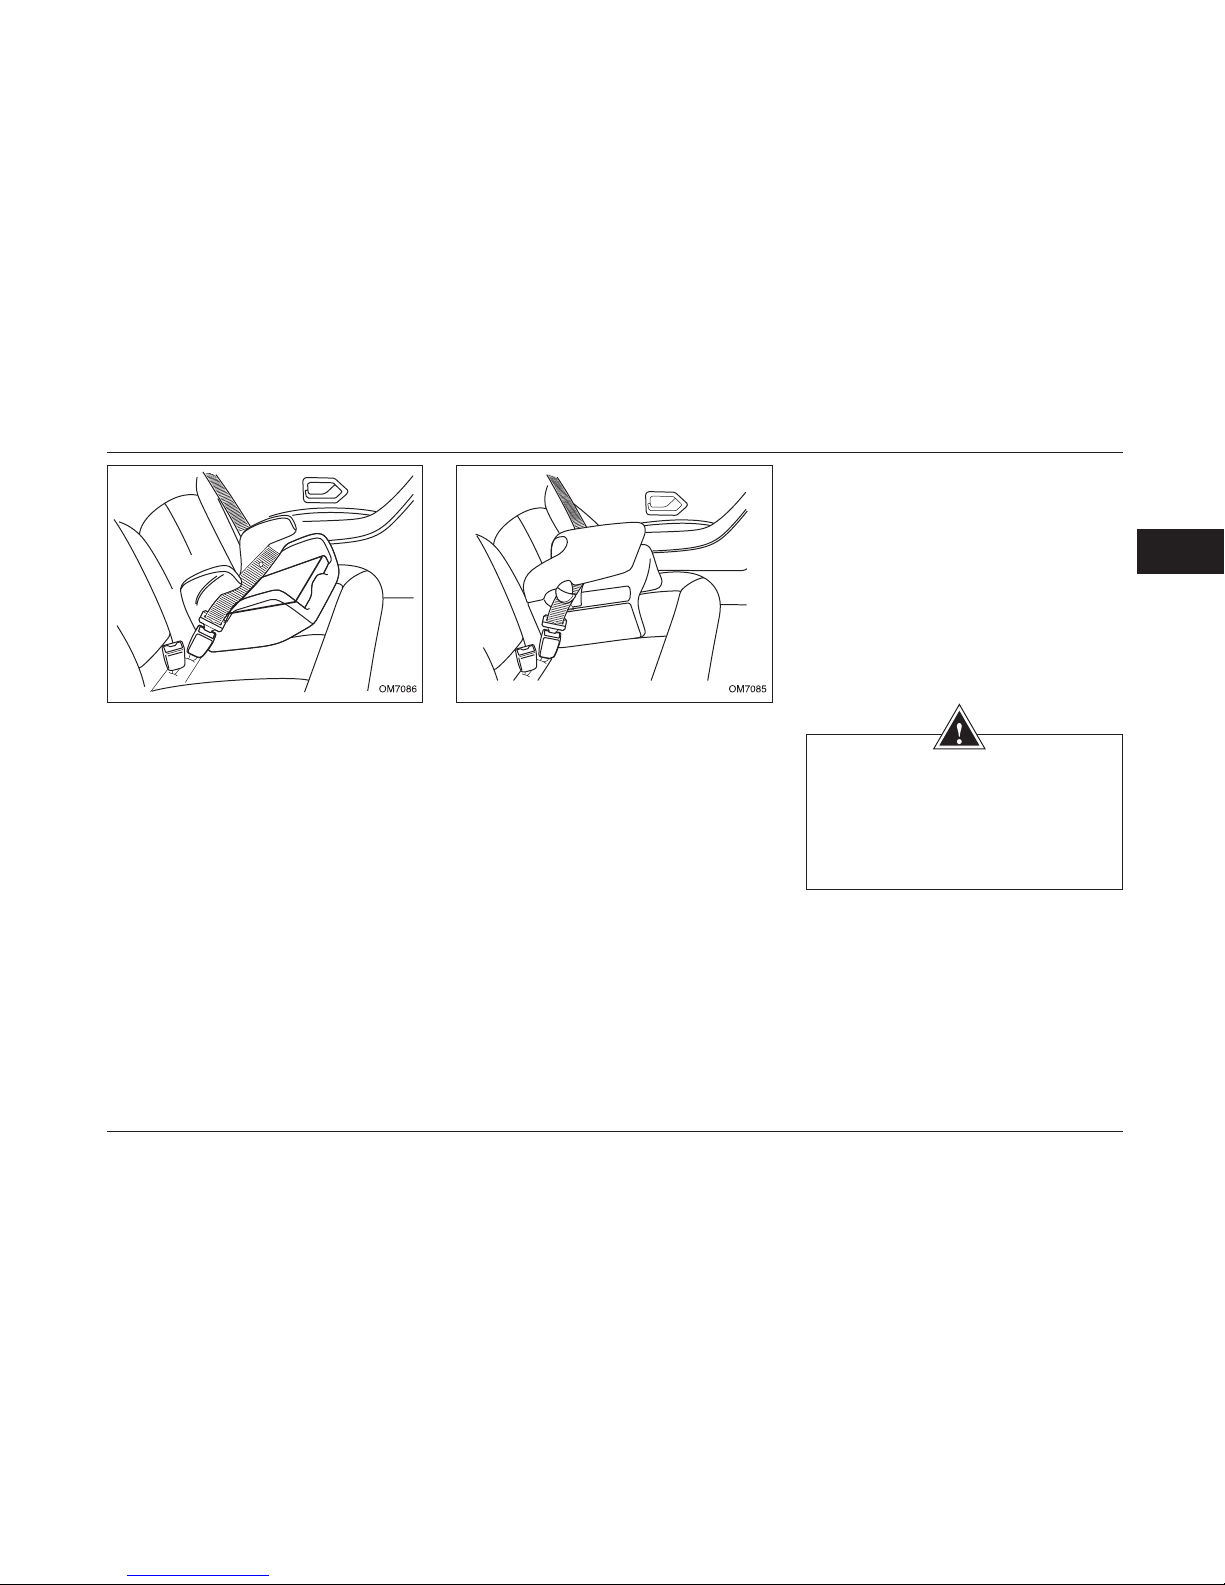
For children (weighing more than 15 kg)
equal or greater than 3 years old (more
than 15 Kg), a booster seat can be used
in the rear of the car, facing forward, using
a 2 or 3 point (lap or inertia reel) seat belt
(especially suitable for children roughly 3
to 6 years old).
For heavy children – whose weight exceeds
the limits of standard seat- who are equal or
greater than 3 years old should be seated,
a forward- facing booster cushion, in the
rear of the car, using a 2 or 3 point (lap or
inertia reel) seat belt. (Especially suitable
for children roughly 3 to 6 years old).
Page 41
40
2
MIRRORS
WARNING
The reect of the objects in the mirror
seems farther than their real distance.
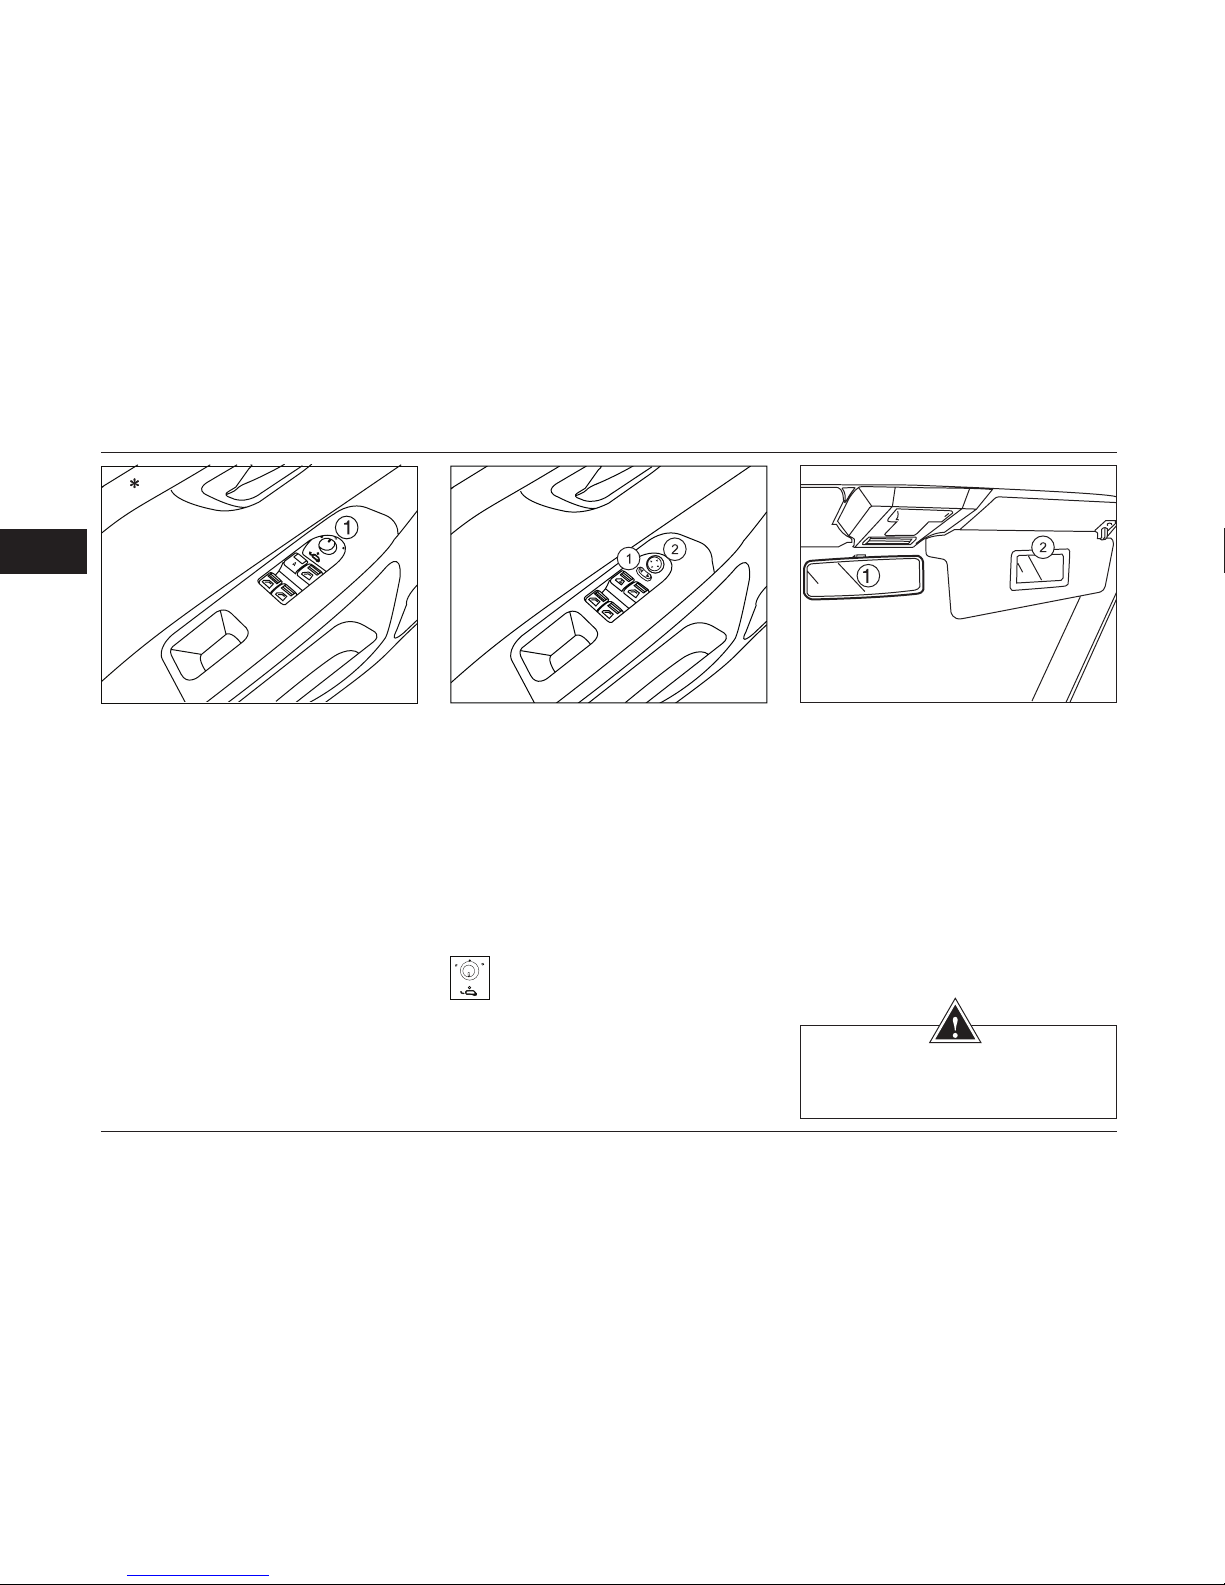
Adjusting Electric mirrors:
1- Selecting the right or left mirror for
adjustment:
By pushing the switch1 to the right or left,
the mirror on the same side will be ready
to get adjusted.
2- Electrical adjusting of the mirrors:
With the help of switch1, which can be
moved in all four directions, adjust the
mirror at your desired position.
Heaters for side mirrors:
To avoid sweating or freezing of side
mirrors, switch on the key for heater of
the rear glass.
*
If equipped
Adjusting Electric mirrors:
1- Selecting the right or left mirror for
adjustment:
By pushing the switch1 to the right or left,
the mirror on the same side will be ready
to get adjusted.
2- Electrical adjusting of the mirrors:
With the help of switch1, which can be
moved in all four directions, adjust the
mirror at your desired position.
In addition to open and close the
Mirror via radio remote control,
rotating 180 degrees key 1 clockwise and
counterclockwise, mirrors alternatively
open and closed.
Mirrors:
Rear view mirror: (Inside Mirror)
1- The rear view mirror can be adjusted for
driving during daytime or during night time.
2- Make up mirror: It is xed on the right
hand side Parasol.
Page 42
41
2
FOLDING EXTERIOR MIRROR (ELECTRICAL)
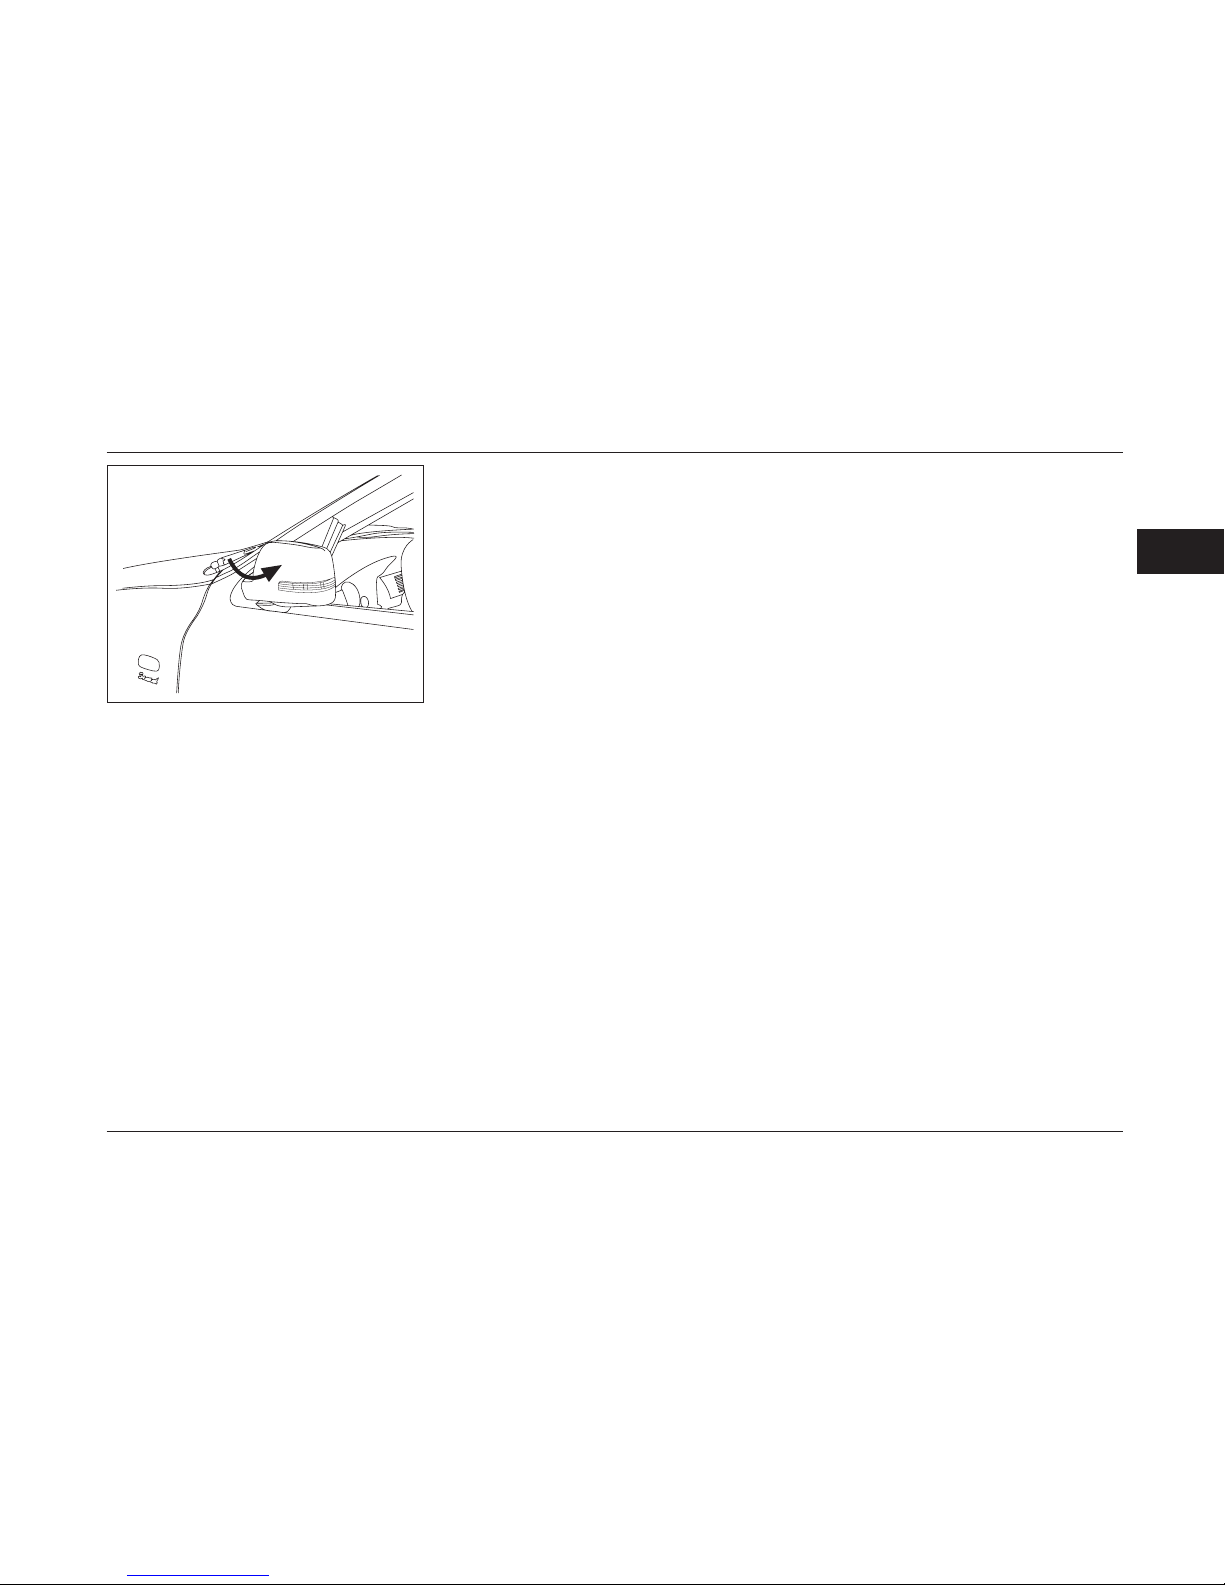
Folding Exterior mirror (Electrical) *
Many of car owners are aware of the
advantages of the folding side mirrors
especially when the car is parked in a
passage. To mention the advantages,
one may point to the increase in safety
coefcient of the mirror when leaving the
car as well as the lower space required
for parking the car. Parallel with these
and with a view to increasing the comfort
of the drivter, the electrical exterior folding
mirrors are automatic and it can be folded
\ unfolded simultaneously by closing the
vehicle doors by remote control, no need
to manual control.
The folding mirror is closed after 2
seconds of the rst remote and 10
seconds by the 2nd remote. But the
mirrors and doors are opened together,
soon after soon after pressing of the
opening button on remote.
The manufacturing technology of these
mirrors’ motors (called “folding motors”)
is designed in such a manner that in the
event of any impact, the motor will be
locked and current voltage will be cut off.
This mechanism prevents the damage of
the motor as well as the destruction of the
mirror in itself by the application of undue
force.
If the asher is used ,then the lamps
on the folding mirrors starts blinking
simultaneously with relevant asher.
*
If equipped
Page 43
42
2
*
If equipped
Fire Extinguisher*
It is necessary that owners learn about
usage of car extinguisher.
Product Specication:
1. This kind of capsule contains dry chemical
powder with 16 gr high pressure CO2
cartridge (capsule). During operation, after
release cotter pin, gas inside cartridge will
mixed with dry powder and mixture is ready
to void.
2. Maintenance and operational accordance
within -30 to 90° C temperature.
3. This kind of capsule doesn’t need to be
checked for 5 years and if it is used, it will
be easy to recharge again.
4. Non conglomeration of powder in the
case of any car vibration, high temperature
and car accident is one of the pros of this
capsule.
How to use:
Activation procedure of capsule is written
in English language on it’s body as follow
which must be read carefully.
- Pull out cotter pin
- Pull out cap cotter pin upward
- Aim the nozzle toward re center and press
handle downward for powder discharge
NOTICE
To prevent of re expanding due to air
feeding in engine compartment, do not
open the hood completely. After release
cotter pin and activation the capsule,
open the hood about 10 to 15 cm with
discretion and care then simultaneously
discharge the mixture in re center
about 1 to 2 seconds. After that open
the hood and completely discharge
the capsule in re center. Pay attention
that the capsule weight is 1 kg and
it’s discharge duration is about 7 –10
seconds. there fore paying attention
during operation is so necessary.
FIRE EXTINGUISHER
Page 44
43
2
FIRE EXTINGUISHER
Important tips:
1.Never open discharge valve of re
extinguisher. This cause to lose quality
of material inside re extinguisher and
reduces it’s power.
2.If the door and windows are locked and
impossible to open due to re emergency
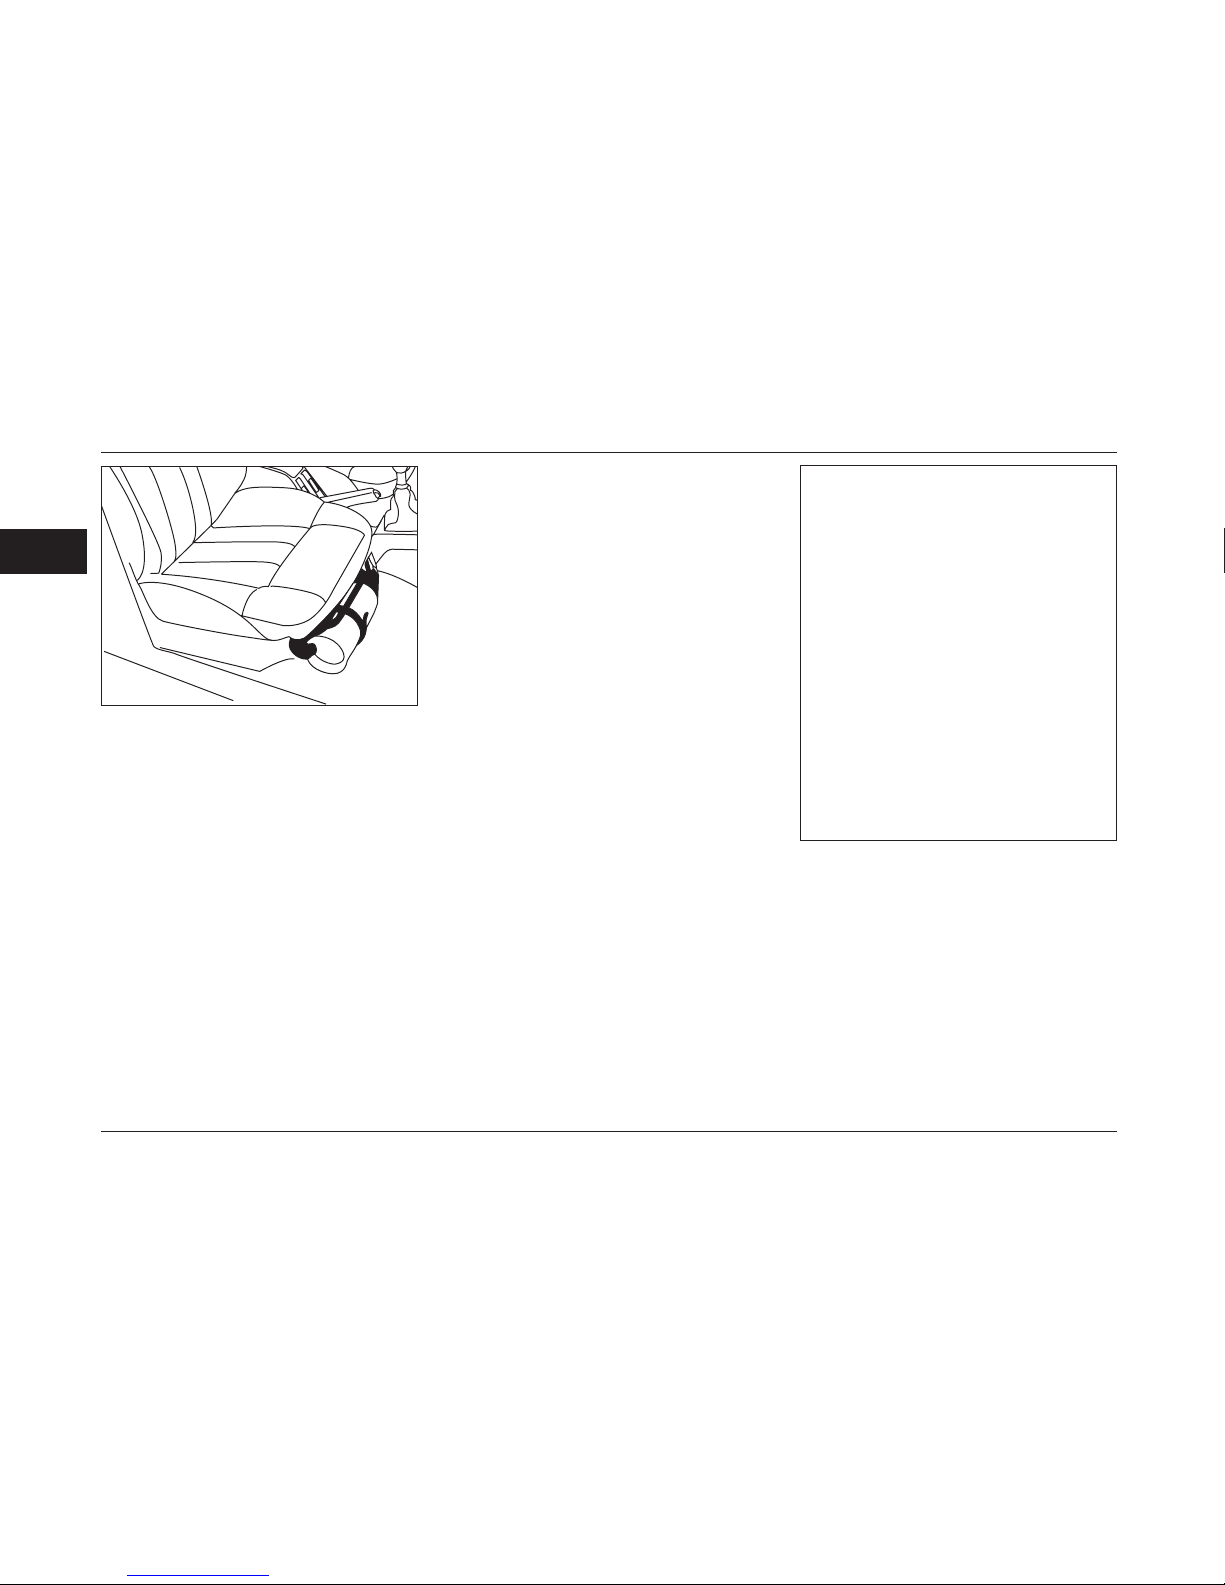
or emergency conditions, take the re
extinguisher which is placed under front
passenger seat and break the window by
its end then exit the car.
3.Although the material inside re extinguisher
is not poisoning, never discharge it toward
face and eyes.
4.During installation inside the car, pay
attention that re extinguisher is well
placed and it’s plastic mounting belt is
properly locked, otherwise in case of
impact or accident it moves from it’s place.
5.During re emergency, always be cool
and follow the procedure carefully.
6.The 1 kg re extinguisher is just designed
for control and restrains the re at beginning
so in case of re emergency which expands
in large area, notify the re department to
help and control the re. The mentioned re
extinguisher has no efciency in above case.
CAUTION
Experience and coolness are two
fundamental skills during usage of re
extinguisher, so car manufacturer has
no commitment to owner due to non
correct usage of re extinguisher.
CAUTION
- Avoid parking your car in unattended
on- street parking spaces.
- Avoid parking in dark places.
- Never leave the car's documents or
spare keys in your vehicle.
- Park in your garage if you have one,
and take the switch with you.
Safety precautions to avoid stealing of
vehicle:
Always follow these safety precautions
even when you are leaving your car for
few minutes:
1- Close the glass windows completely.
2- Take your valuable belongings with you,
or hide them at the rear trunk.
3- Do not leave the switch key inside.
4- Lock the steering wheel (when the engine
is off, the steering wheel will be locked by
slight turning it to the sides)
5-Lock all the doors.
Other than above precautions, you can
also think about ways to reduce possibility
of stealing your car.
Page 45
44
2
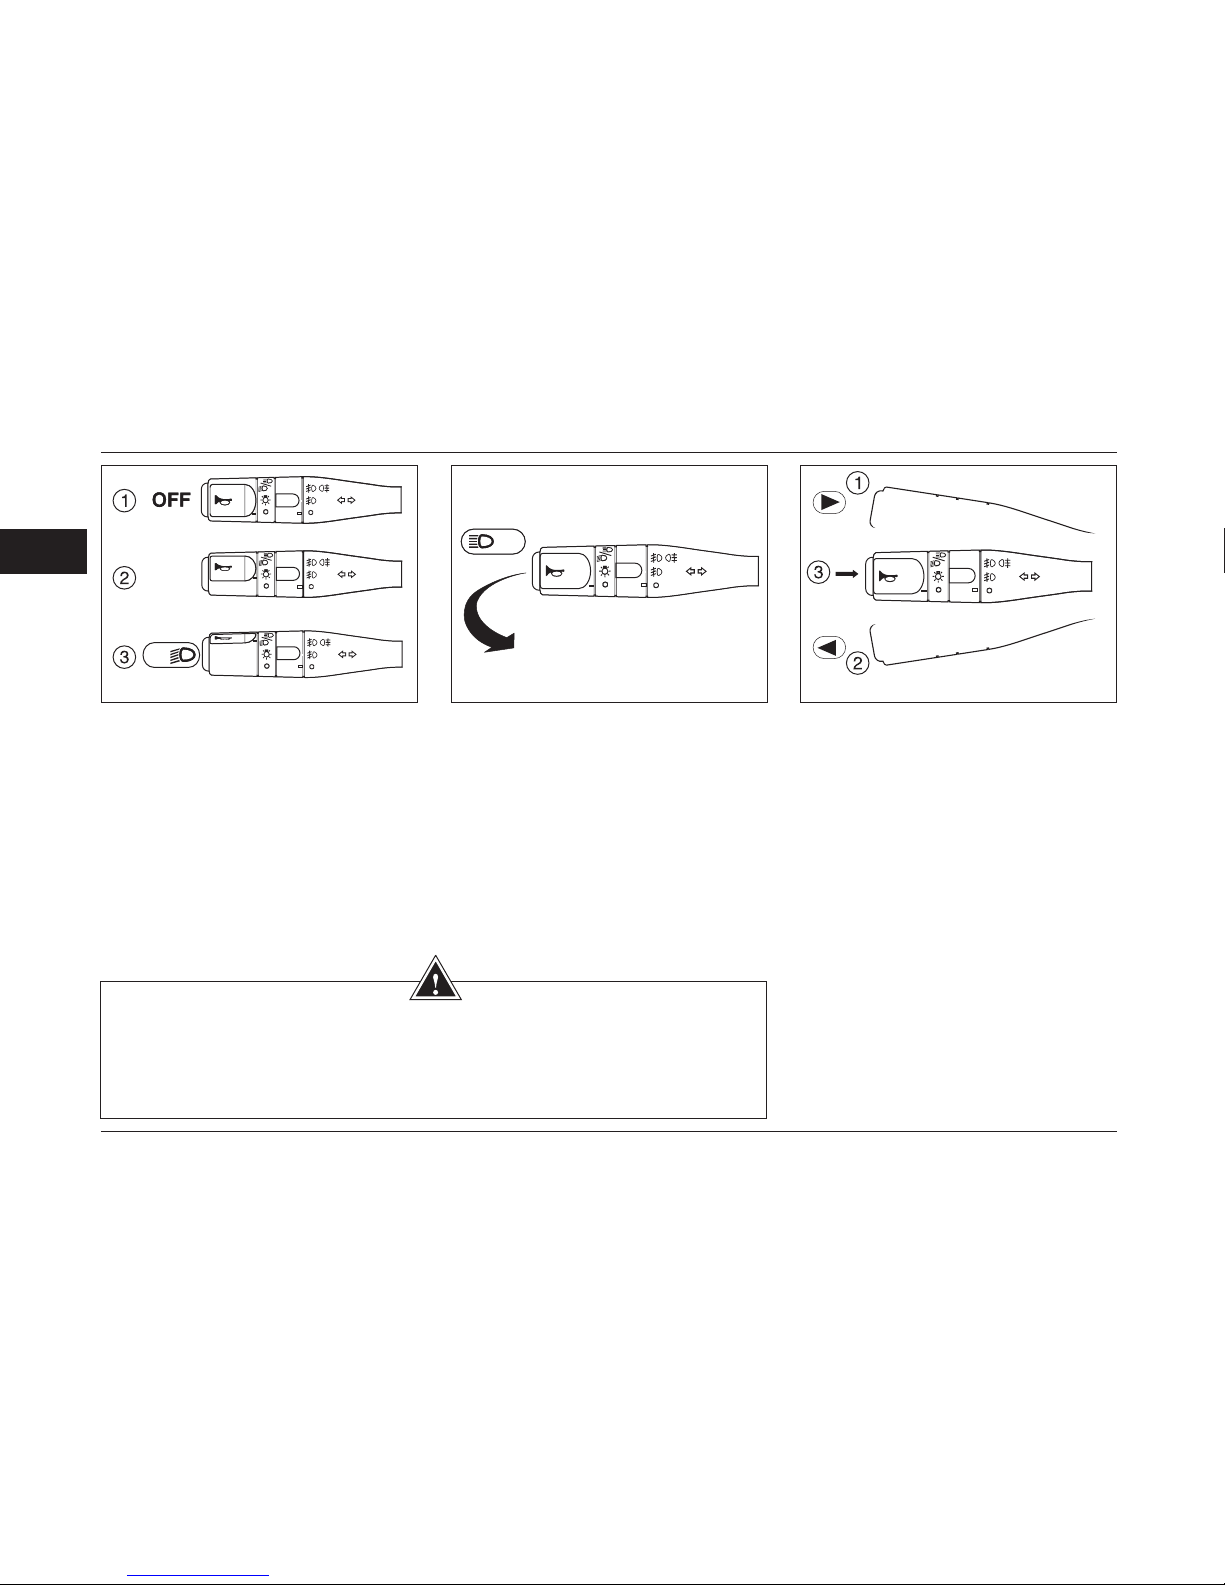
Lever's setting for lights
Status 1: all lights on.
Status 2: passing beam, tail light,
instrument panel
Status 3: headlights on
Warning beep
This warning beep will be heard if the driver
is leaving the car while the headlights are
on, the driver's door (and or passenger)* is
open and the switch is off.
High & Low Beam
Push the lever completely towards the
steering wheel in order to change the
status of low/high beam. (blue indicator
light will be displayed to show high beam
status). In order to ash high beam at
once, push the lever near the steering
wheel and release it immediately.
Left and right indicator light
Status 1 & 2: Push the turn signal level on
downside before turning to left, and to the
upside before turning to right. (the green
indicator light on instrument panel will ash
on turning direction)
Tapping the lever on desired direction will
activate the indicator lights for 3 ashes.
(number of ashes is adjustable by
troubleshooter device.)
Horn
Status 3: Push the end bottom of turn
signal lever to horn.
WARNING
Ensure the following items before driving at night:
Please be ensured of correct performance of electrical equipment and vehicle lights.
In case of vehicle overload, please make sure that the lights are not covered. (make
sure that some dirty material, snow or other things are not covering the lights.)
LAMPS / INDICATORS
*
If equipped
Page 46
45
2
LAMPS / INDICATORS
*
If equipped
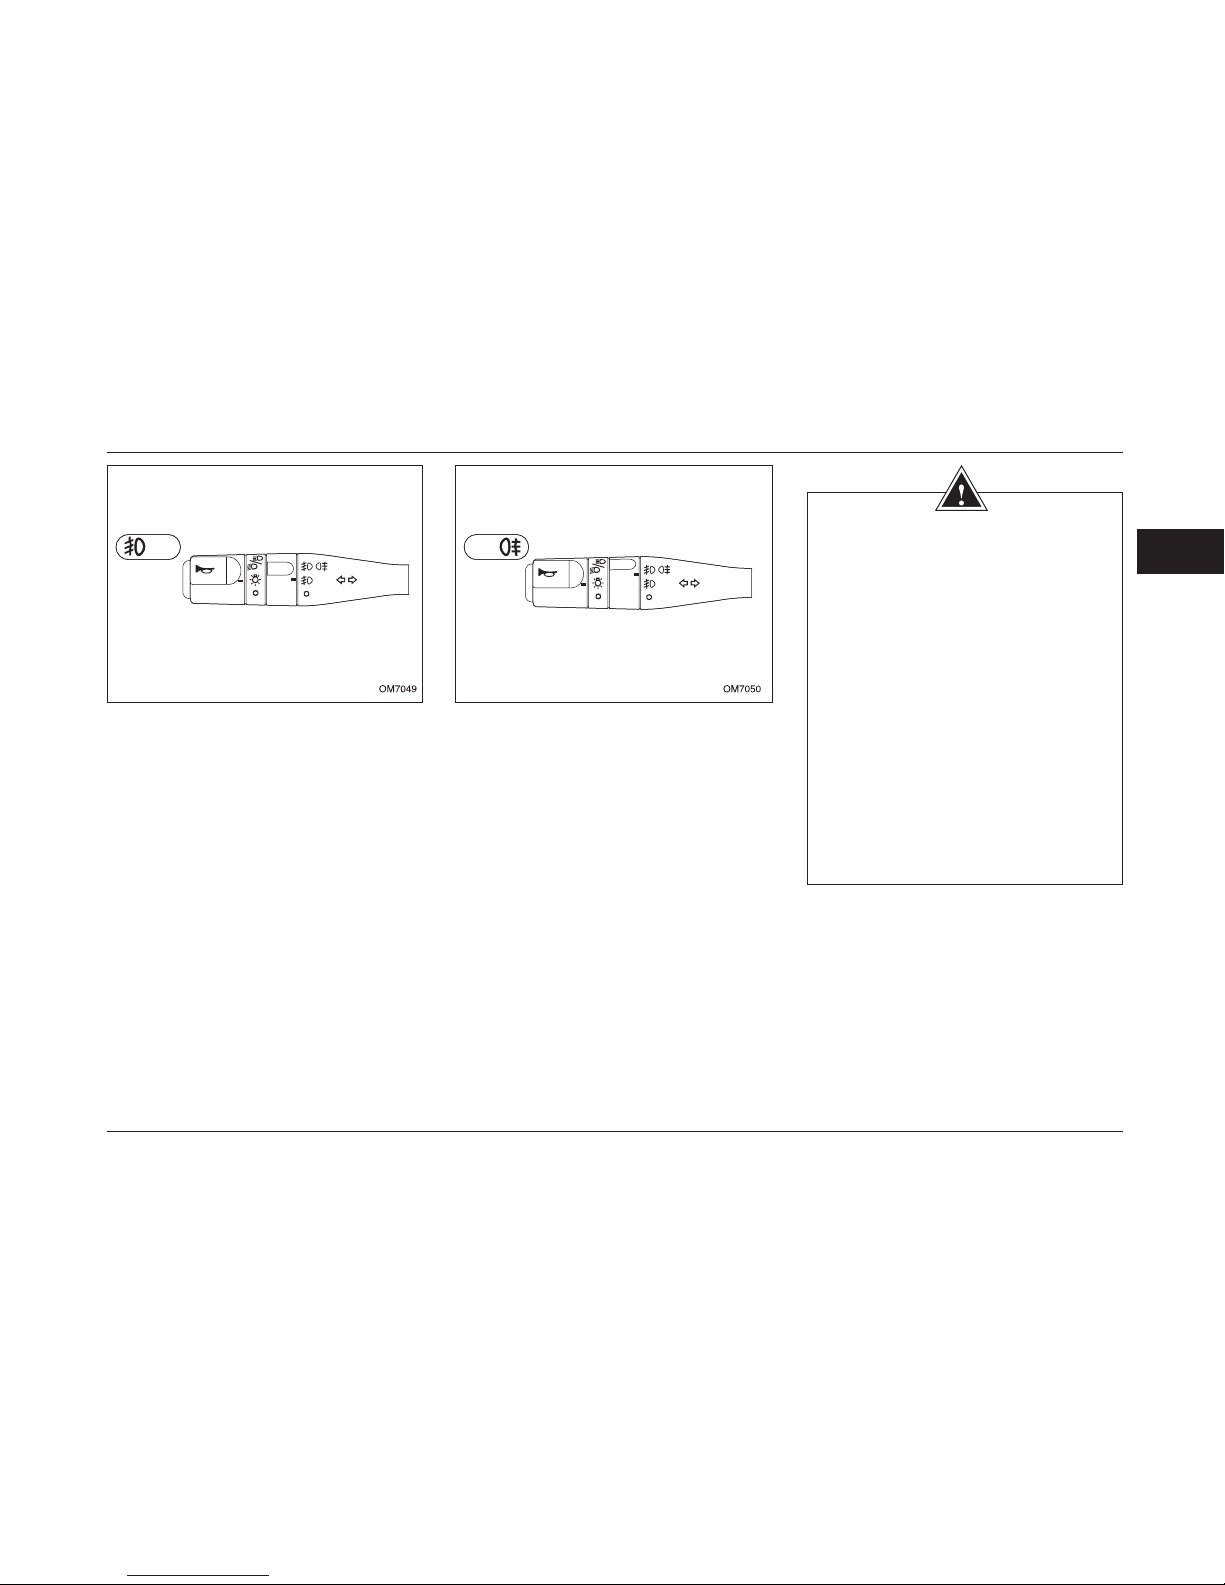
Front Fog Lamps*
Rotate up one level the center part of the stalk
to turn on the front fog lights. The warning
indicator on the instrument panel lights up
simultaneously when fog lights are on.
The lights operate only when the indicator
lights are on.
Rear Fog Lamps
Rotate up two levels the center part of the stalk
to turn on the front fog lights. The indicator on
the instrument panel lights up when the fog
lights are on. The lights operate if:
- Small lights are on
- The sidelights and front fog lights are on
(if they are installed)
Fog lights should be used only when
the visibility area is severely limited since
drivers get dazzled when using fog lights in
normal conditions.
WARNING
- Before starting to drive at night:
Ensure proper operation of the
electrical equipment and adjust the
car's lights. (In case of exceeding
normal load), make sure that the
lights are not covered. (dirty, mud,
snow, or any object on them.)
- Do not use front or rear fog lamp
in daylight and night time and rain.
Because their gazing lights reduce
look of other drivers and increase
the likelihood of an accident.
- Fog lamps should be used in snowy
and foggy weather.
Page 47
46
2
*
If equipped
GLASS CLEANER & WINDSHIELD WIPER
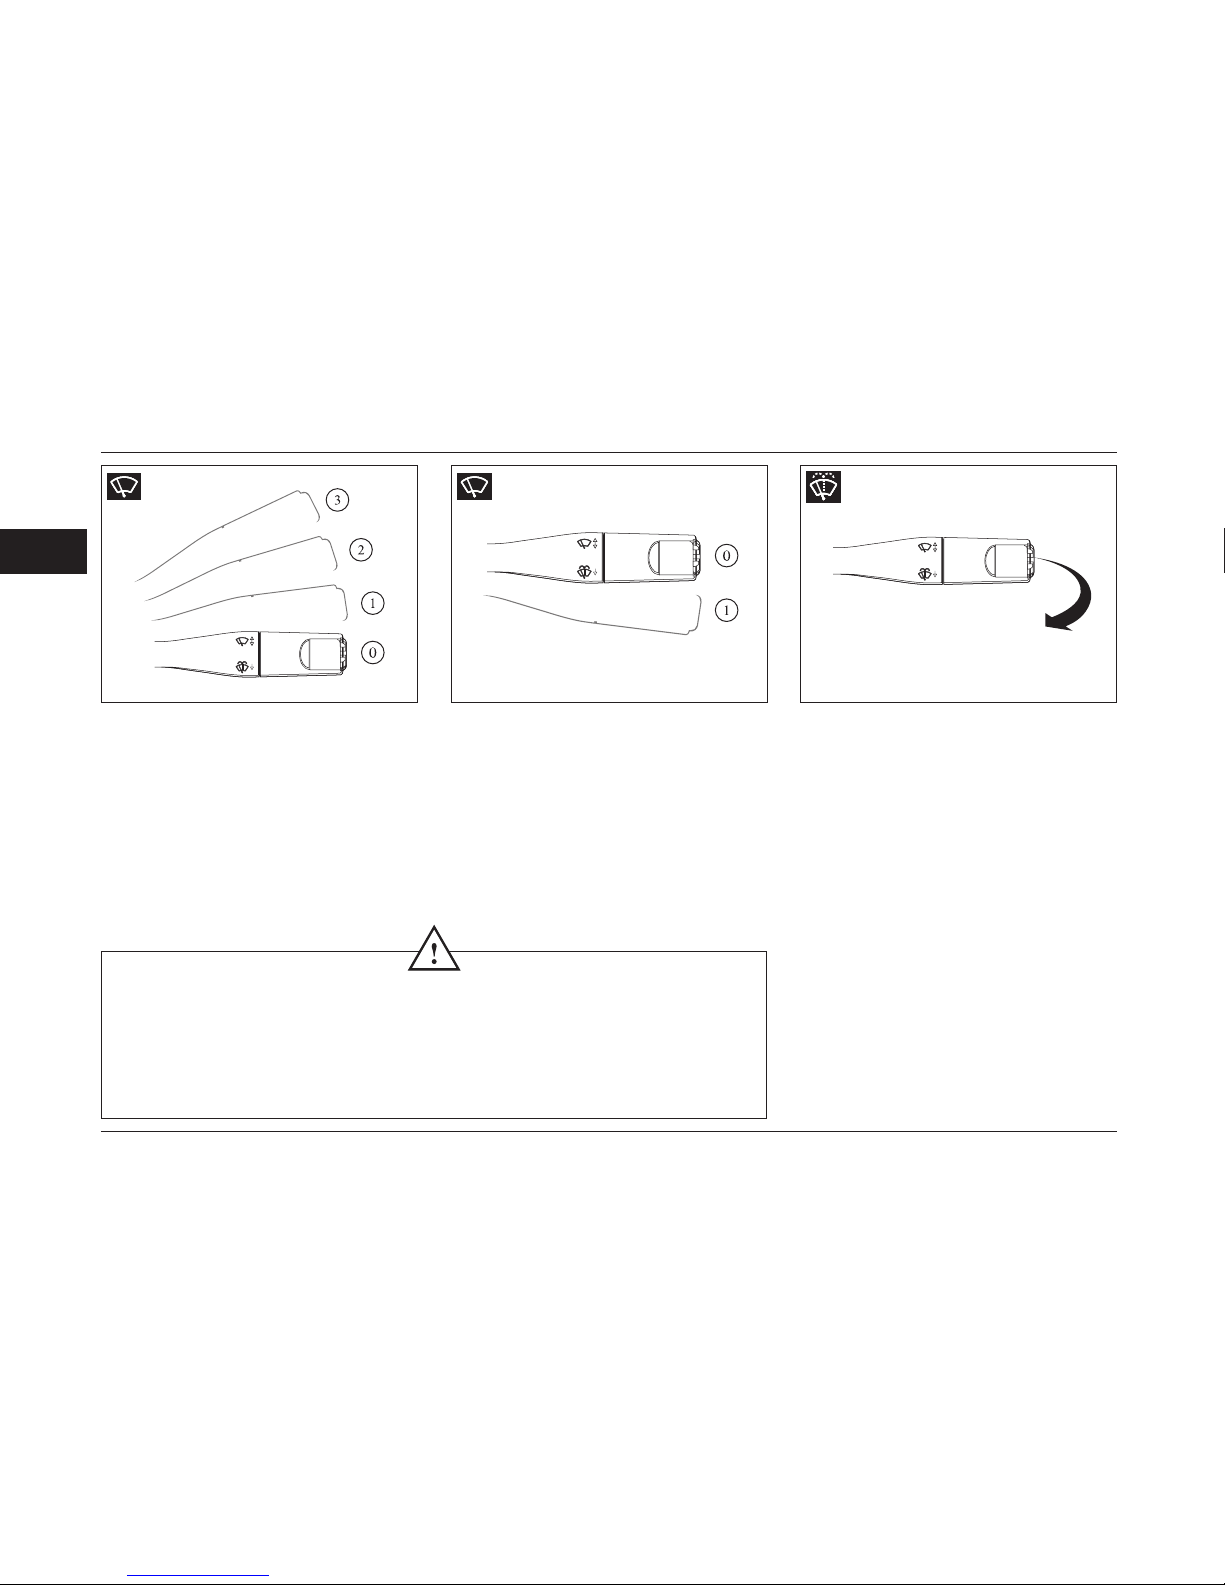
Windshield washing
Push the lever towards yourself in order
to wash the windshield. The windshield
wiper will move thrice. The windshield
wiper will keep working while you hold the
lever.
The water spraying will be started for 0.7
seconds after pushing the lever, then the
wipers will start their cycle. But the wipers
will stop when after three cycles when
you release the lever. The fourth cycle to
clean the windshield will be started after
three seconds from wipers stop.*
Windshield wiper single cycle
Push the lever once on downside and
release it for a single cycle action of the
wiper.
Holding the lever down keeps the wiper
moving continuously.
Windshield wiper
Windshield wiper and washer control will be
performed by the lever located on right side of
the steering wheel when the switch is open.
0- Off status:
1- Time dependent windshield wiper * (interval
between two wiper movements will be
increased by increasing of vehicle speed.
2- Low speed
3- High speed
CAUTION
In freezing climate please be ensure that the wipers are not frozen. (risk of wipers engine overheat)
Check the wipers status. In case of wipers low performance, you'd better to replace them. (approximately
once a year)
Keep the vehicle windshield clean. If you turn off the engine before turning off the wipers (0 status), the
wipers will stop immediately in their current position. In this condition, you should changes the wipers to 0
status, then the wipers will move to their normal position.
Make sure that the wipers are on 0 status, before you take action to open the hood. (risk of injury)
Page 48
47
2
REVERSE GEAR WARNING SYSTEM
Reverse Gear
Warning system:
This system gives the Driver the possibility
of an easy, condent, precise and ensured
parking, in all conditions and situations.
Details of operation:
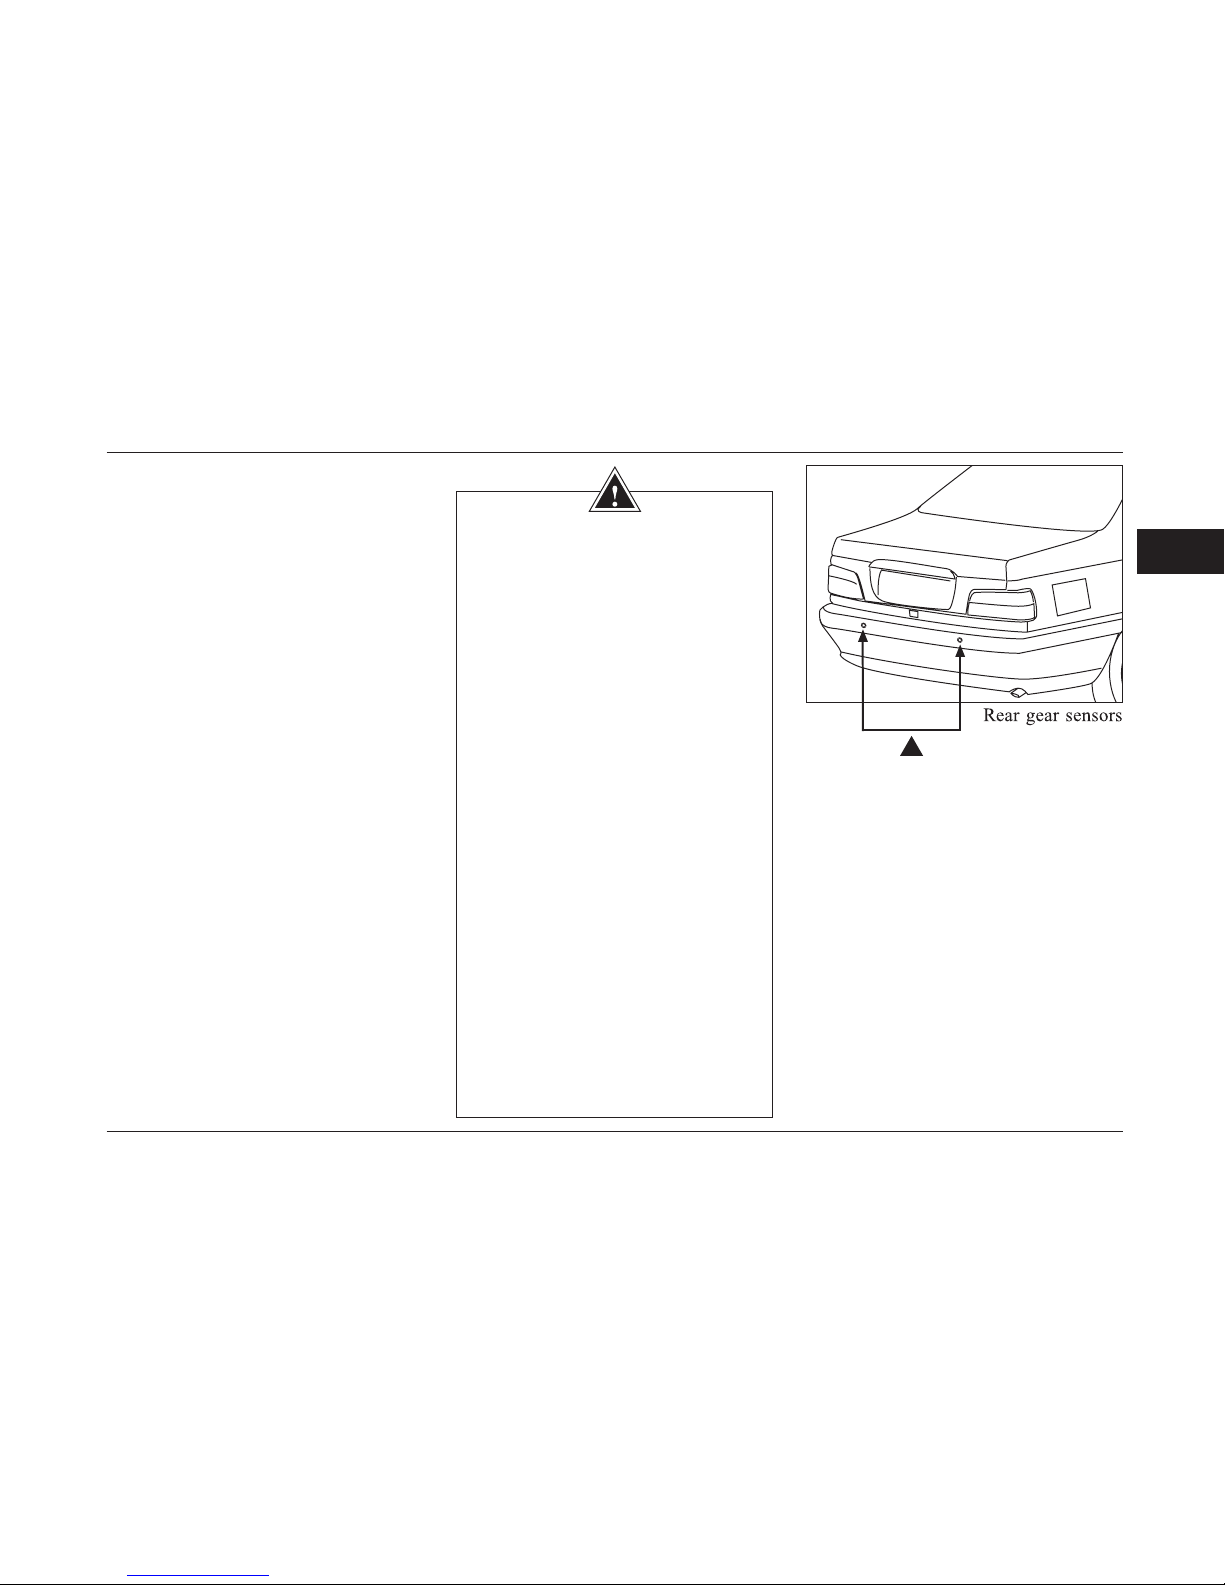
Reverse gear sensors are installed in
the rear bumpers of the car and will be
activated only when the engine is in reverse
gear situation and warns the Driver of
obstructions by sounding the whistle. The
less is the distance between the car and
the obstruction, the more is the sensitivity
of the system and more number of whistles
will be heard in a dened period so that the
Driver comes to know out the situation of
his car in relation to the obstruction.
-Specication of the system:
This system in PEUGEOT PARS,consists
four eye sensors installed in the rear bumpers
of the car which inform the driver about the
obstruction within following distances:
-Distance between 92 to 138 centimeters:
Three alarms in two seconds.
-Distance between 46 to 92 centimeters:
Three alarms in one second.
-Distance between 05 to 46 centimeters:
Continuous alarms.
-Trouble shooting of the system:
In case of malfunctioning or disconnection
of any sensors, this system sounds a
different alarm to 3 mentioned above
alarms. To rectify the problem take the car
to an authorized workshop.
WARNINGS
-This system is meant to help the
Driver to distinguish the objects (from
behind during parking), within 150
centimeters with speed of less than 5
kilometers per hour. It also has limitations
regarding estimation of detectable
distance and the obstructions, therefore
Driver’s precaution, in cases of having
undetectable obstructions, is necessary.
-This system uses the sound signals
to help facilitation of parking and
obtaining the approximate distance
to the obstruction, during movements
with reverse gear.
Therefore existence of this system,
should never cause sudden
movement and careless driving back
side. (Reverse gear).
-The Driver should always take
precautions about sudden cases
that might happen during usage of
reverse gear. Mobile obstructions
(Kids, trolleys, bicycles, pets, ...) or
short and very tin obstructions ( Road
blocks, tin guard rails, ...)
- In case the sensors being covered
with mud or any other obstructions,
this system will face disconnection or
malfunction problems.
It is recommended that the surface of
the sensors always kept clean.
Page 49
48
2
Hands free mobile with the Bluetooth
technology
Avoid talking with phone for your safety
as far as possible.
Bluetooth is used in short distance.
It can only connected to the devices
supporting the Bluetooth facilities.
After connection you can control your
mobile via the device.
pairing or mobile coordination with
hands free system:
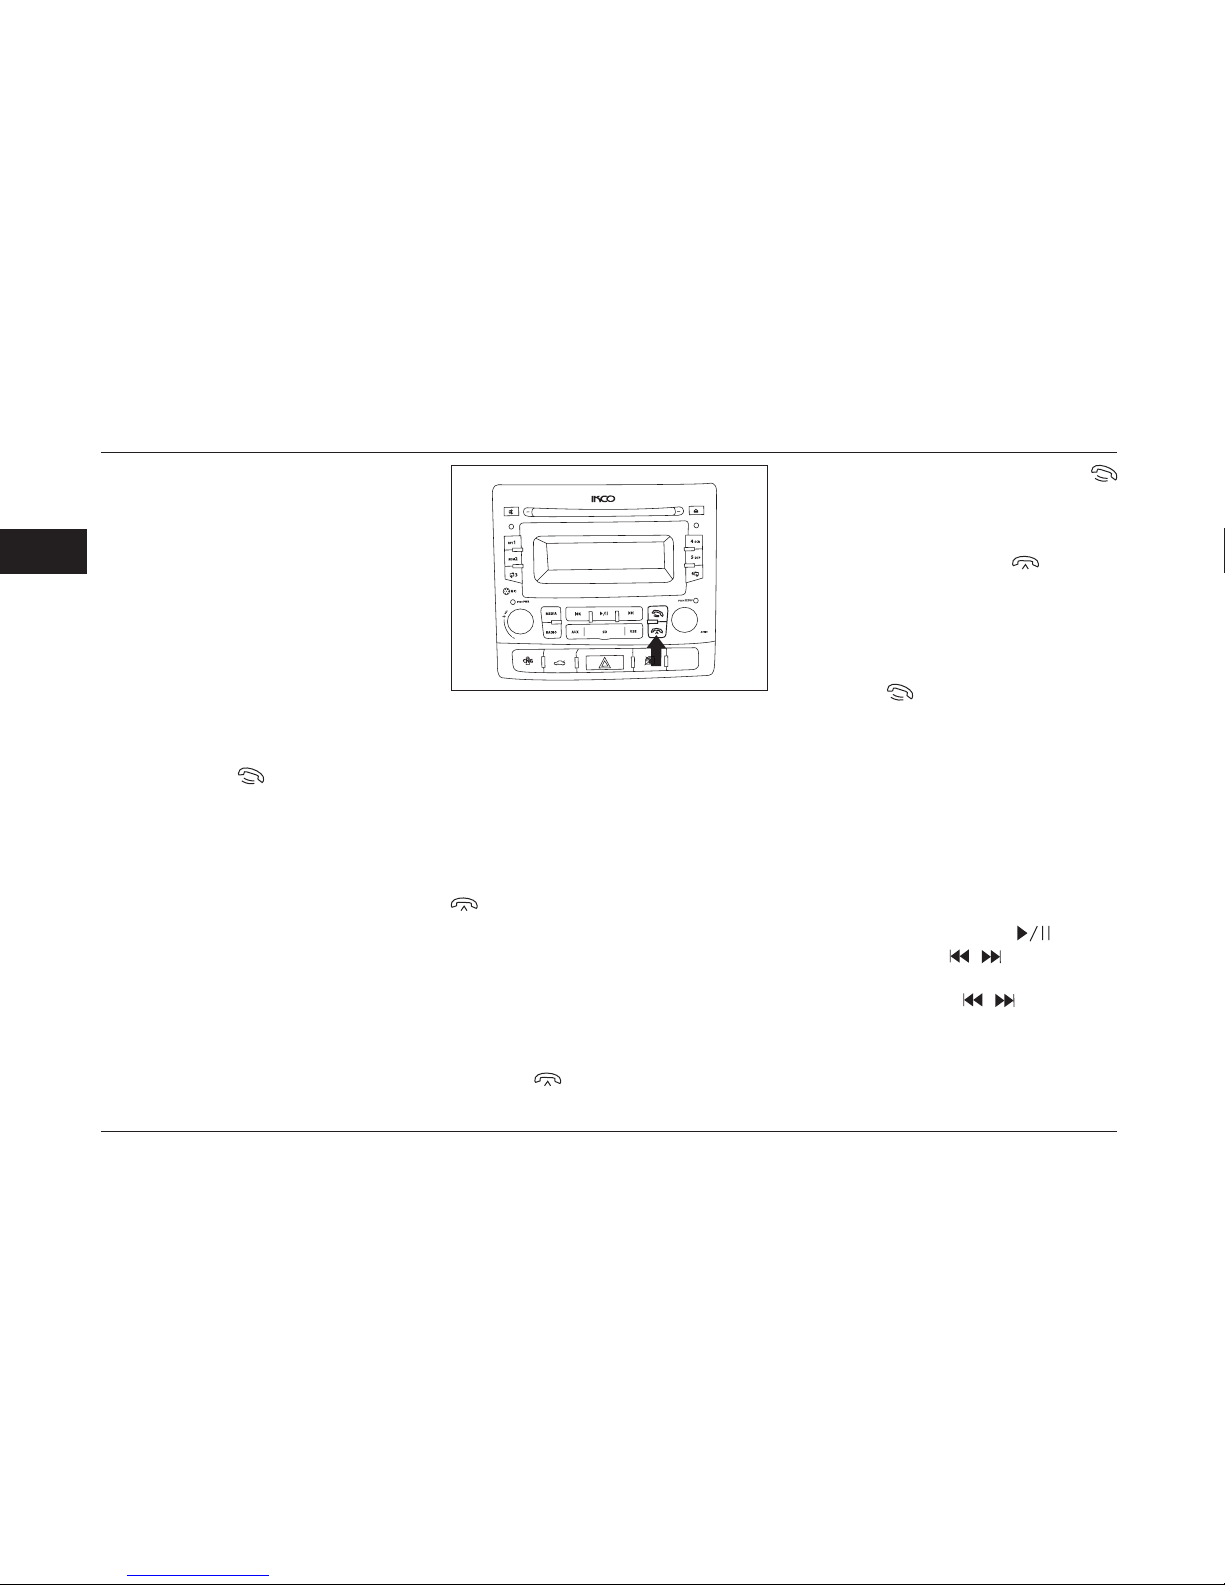
To connect with mobile phone use this
function.
1- Turn on the device.
2- Hold the button
for a few seconds
to activate bluetooth device sign of
bluetooth will appears and blinking on
the top of display screen.
3- Turn on your mobile bluetooth and
keep your mobile in a distance less than
3 m, and search for bluetooth devices.
4- Select the name "IKCO" from the
list .in case of need enter the code of
"1234". Connection will be established
automatically.
In case of observing the two options
of "connect" or "disconnect" in
some mobile devices, please select
the connect option.some devices
don't need to enter the code. aftter
connection of your mobile set with that of
vehicle device the sign of bluetooth stops
blinking and stays in stationary position
on display screen.
How to disconnect mobile set with the
device
If you wish to disconnect the mobile set
from the bluetooth ;just press the button
and hold it.
Receiving a call
1- After connecting with the bluetooth
and receiving a call ,device will go on BT
mode and the received no. will be shown
on display screen .
2- If you wish to reject the call ;just press
the button
. Display screen will show
the "REJCALL"
3- To receive a call press the button
Display screen will show the "TALKING "
after connection .
4- After conversation and to disconnect
the call ,press the button
. Diplsay
screen will show the " END CALL".
Call Transfer
To transfer the call from the device to
mobile while you're talking ;just press
the button
. Dislay screen will show
"PRIVATE". To transfer the call from the
mobile to the device press the same
button again.
Audio Bluetooth (BT AUDUIO)
1- To listen the music via the mobile set
and controlling it by the device press the
button "MEDIA " frequently so that you
can select the option of " BT AUDIO "
2- To make a pause or play the music
again ; just press the button
3- Press the button To change the
track.
4- Press the button
to review or
front the music tracks .
HANDS FREE MOBILE
Page 50
49
2
HANDS FREE MOBILE
*
If equipped
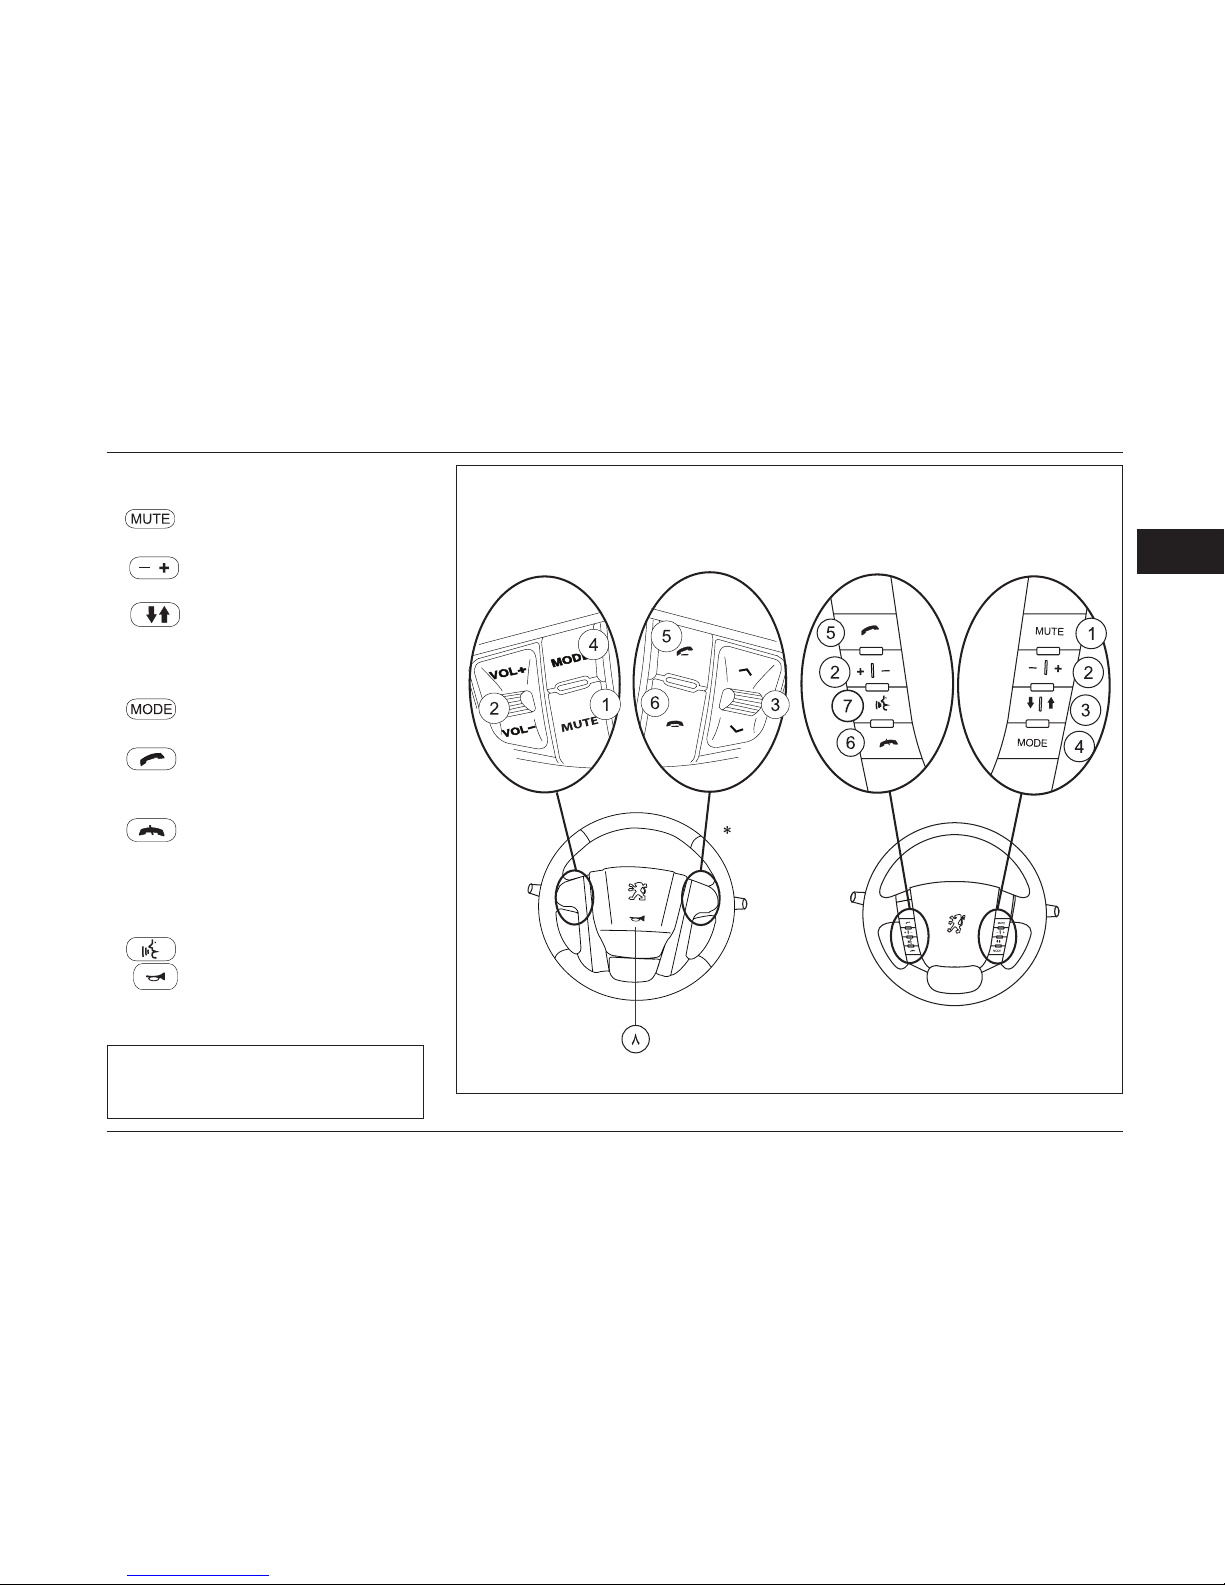
Audio equipment buttons installed on
the steering wheel *
1-
The sound will be connected and
disconnected by pressing of this button.
2-
To increase and decrease the
volume.
3-
a) selecting the previous and
next track (USB/CD)
b) Automatic search for the stations (in
radio mode)
4-
To enter to the menus of
RADIO >CD PLAYER> USB>AUX>BT
5-
response to the received call (in
case of receiving any call) by pressing the
button for 2 seconds, pairing is possible.
6-
disconnection of the device with
mobile phone.
To disconnect the Bluetooth connection
between your mobile phone and radio,
press and hold the button.
7-
Private conversation.
8 -
To use the horn, press steering
wheel cover nearly every one of the
foundations of the command button.
Note :
The background of key light are white and
it gets on by turning the SIDE LAMP on.
Page 51
50
2
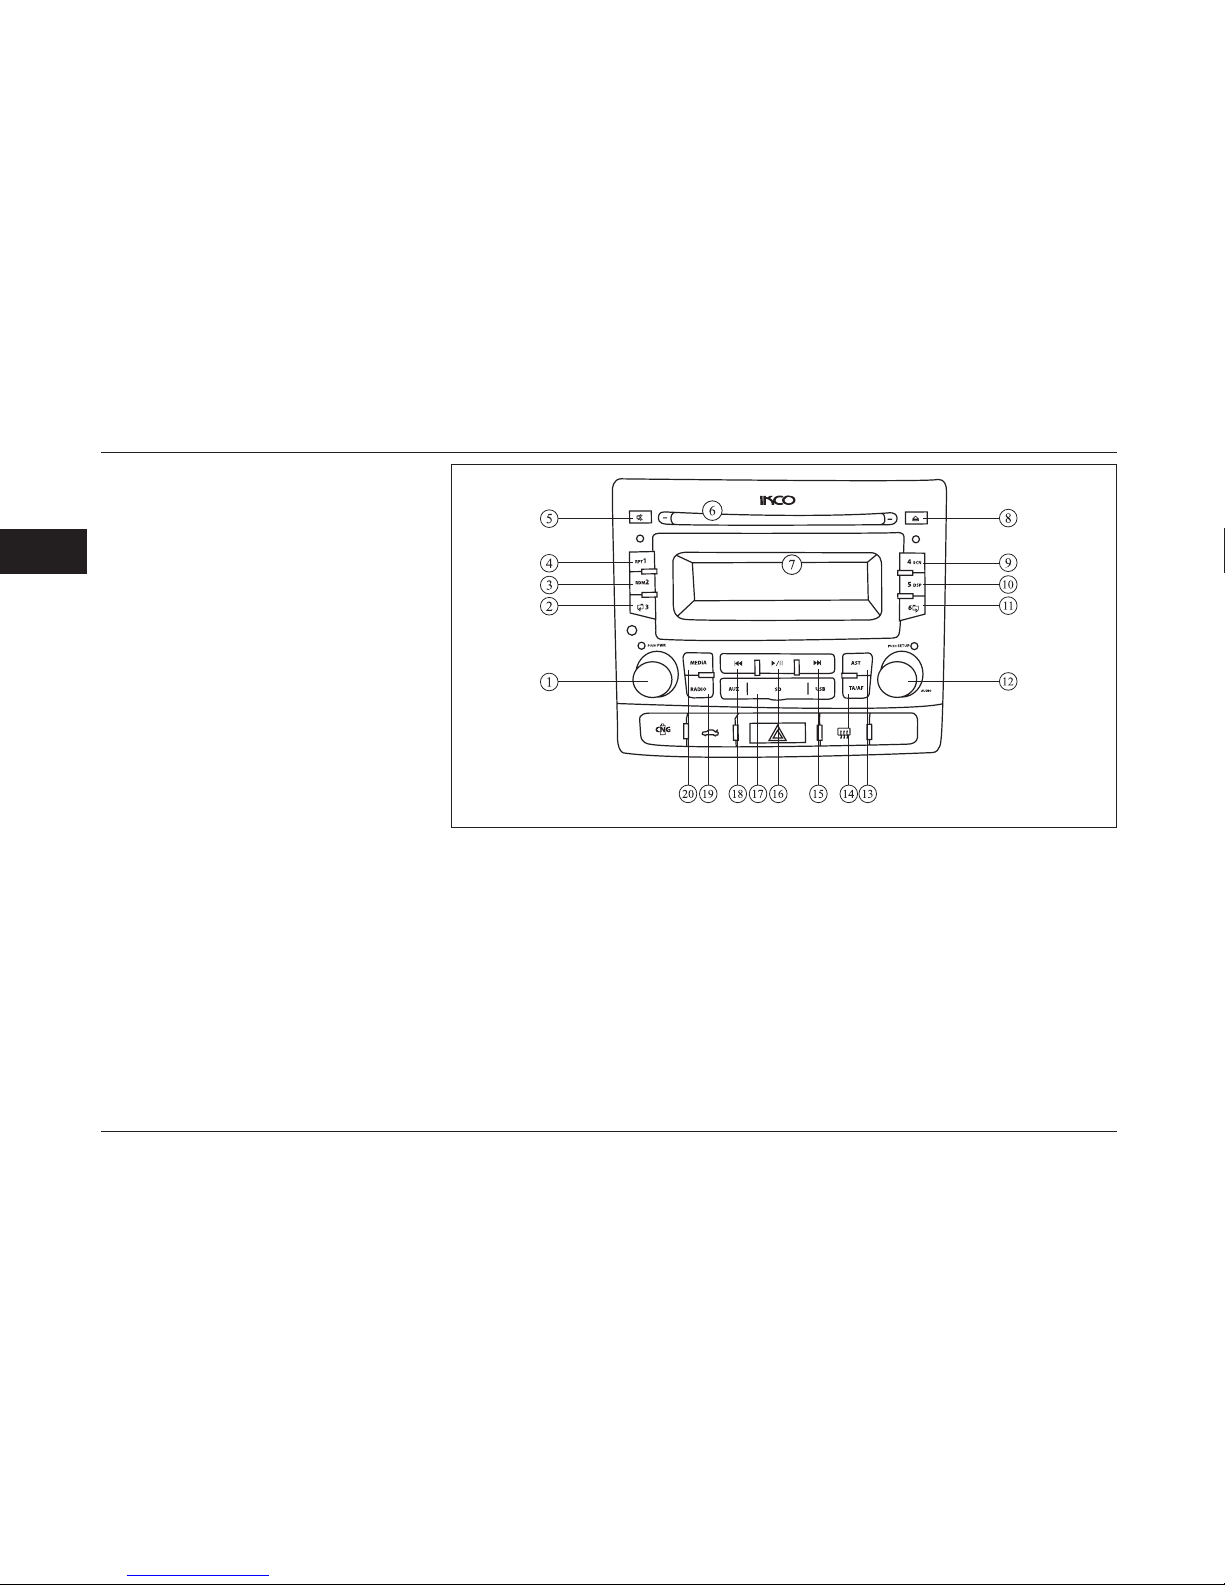
Audio System Control Panel
1- Short Pressing: Turning on.
- Prolonged pressing more than 2 seconds:
Turning off.
- Volume Turning: Sound adjustment.
2- Radio Mode:
- Short Pressing: Memory No. 3
- Prolonged Pressing: Recording of current
frequency in memory No. 3
CD/USB/SD mode
- Short Pressing: Selection of the previous
folder in MP3/WMA les.
- Prolonged Pressing: Selection of 10 former
les in current folder.
3- Radio Mode:
- Short Pressing: Memory No. 2
- Prolonged Pressing: Recording of current
frequency in memory No. 2.
CD/USB/SD mode
- Random playing of melodies.
4- Radio Mode:
- Short Pressing: Memory No. 1
- Prolonged Pressing: Recording of current
frequency in memory No. 1
CD/USB/SD mode
- Repeating of the le/playing folder.
5-Disconnection of Sound output (MUTE)
6- Disc Input
AUDIO SYSTEM
7- Monitor
8- Disc eject button
9- Radio Mode:
- Short Pressing: Memory No. 4
- Prolonged Pressing: Recording of current
frequency in memory No. 4
CD/USB/SD mode
- Introducing of the audio les (10 seconds
playing).
10- Radio Mode:
- Short Pressing: Memory No. 5
- Prolonged Pressing: Recording of current
frequency in memory No. 5
CD/USB/SD mode
- Introducing the audio les (playing 10
seconds).
- Displaying of the audio le information with
MP3/WMA Format.
11- Radio Mode:
- Short Pressing: Memory No. 6
- Prolonged Press: Recording of current
frequency in memory No. 6
CD/USB/SD mode
- Short Pressing: Selection of the next folder in
Page 52

51
2
AUDIO SYSTEM
MP3/WMA les.
- Prolonged Pressing: Selection of 10 recent
les in current folder.
12- Short Pressing: Selection of the audio
Adjustments.
- Prolonged Pressing: Entering to the system
adjustments.
- Turning: Radio Mode: Frequency adjustment
manually.
CD/USB/SD mode: Selection of the previous/
next melody.
13- Short Pressing: Automatic searching &
saving of the radio stations.
- Prolonged Pressing: The button introduces
the radio stations t(10 seconds playing)
14- Short Pressing: Activation/Deactivation
of TA.
- Prolonged Pressing: Activation/Deactivation
of AF.
15- Radio Mode:
Short Pressing: Automatic searching of
the radio stations in order to increase the
frequency.
CD/USB/SD mode
- Short Pressing: Selection of the next melody.
- Prolonged Pressing: Rapid forwarding of the
melody while it’s playing.
16- Short Pressing: Play/Stop the melody.
- Prolonged Pressing: Selection of the rst
track.
17- USB/SD/AUX Cover
18- Radio Mode:
Short Pressing: Automatic searching of
the radio stations in order to decrease the
frequency.
CD/USB/SD mode
- Short Pressing: Selection of the previous
melody.
- Prolonged Pressing: Rapid backward of the
melody while it’s playing.
19- Replacing of the Radio Band
20- Selection of the player (CD/USB/AUX IN)
Page 53

52
2
PRECAUTIONS
Make sure of the speaker negative terminal
to be connected to the connector negative
terminal. Avoid connecting the speaker
positive and negative terminal to each other or
to the device body.
Make sure of the fuse ampere, if it is required
to be replaced. Using the higher ampere will
cause the device to be seriously damaged.
Make sure of the tiny parts and things not to be
entered into the device. In the case of entering,
it will cause malfunction of the device,
electric shock or laser radiation. The device
sound should be kept to such an extent that
external sounds especially the warning alarms
(The other vehicles horn sound etc) to be
heard.
Stop the car, before doing any complex action
on the device.
Do not adjust or open the device ,in case of any
problem. Refer to the Iran Khodro Authorized
Dealers to solve any probable defect.
CD UTILIZATION POINTS
- Do not use dusty /damaged CD; it will cause
the sound noises.
- Do not touch the CDs surface but the edge
to carry them.
- Avoid sticking any labels on both sides of the
CDs.
- Avoid putting the CD against direct sunlight
and heat consumedly.
- To clean the CD, use soft tissues rubbing it
from the CD center towards the edges.
- To clean the dirty panel or display, use silky
tissue and natural cleanser.
Using of coarse tissue and chemical
substances like alcohol will cause the surface
of it to be damaged and scratched
- The device may not be able to display the
labeled CDs. So, before inserting the CD,
remove the label.
- The 3-inch (8cm) CDs are not useable for
the device. Never use rugged and 3-inch Cds
instead in 8cm to 12 cm convertor .Otherwise,
the device will not be able to eject it.
- Dust existing inside of the CD holding
frame will cause the CD to be damaged and
scratched. So, clean the CD frame in an
denite intervals.
AUDIO SYSTEM
Page 54

53
2
AUDIO SYSTEM
ANTI-THEFT SYSTEM OF THE AUDIO
SYSTEM
How to enter the password
For more security, your device is equipped with
4 digit code. In case of electrical disconnection
of the device for any reason and, after
reconnecting and turning on the device, the
monitor displays the phrase “PWD****”. To turn
on the device, the correct 4 digit code should
be entered through the buttons 1 to 4 on the
panel.
To enter the 1st No. from the left side of
(****PWD), press the radio button No. 1
frequently to display the correct number. (For
example: For selection the No.5, press the
button No. 1, 5 times. After correct adjusting
of the rst number, to enter the 2nd number
of (****PWD), press the radio button No. 2
frequently to display the correct number. To
enter 3rd and 4th Nos. press the same buttons
as previous ones. To conrm the password,
press the SETUP/AUDIO button. In case of
the correct password, the device turns on;
otherwise, displays (Error). After short seconds,
the system requests the password again on
which entering the correct password, the
device is turned on. If the incorrect password
is entered for six times, ERR20 is displayed
on panel which is indicating the blockage of
the system. Here, you should refer to the Iran
Khodre authorized dealers.
Note: The default password by Iran Khodro is
1111.
CHANGING THE PASSWORD
Whereas, the default password before
changing is considered 1111 by Iran Khodro,
it is better changing it for more security. To
change the password, hold the “RADIO” and
“RPT/1 buttons for 2 seconds simultaneously.
The “****PWD” message demands the
adjusted password. In case of entering the
correct 4 digit password, the “****PWD”
message is displayed to enter the new 4 digit
password. Enter the new code and press the
SETUP/AUDIO button. Now, the “****PWD”
message demands again the new 4 digit
password for comparing. Select the previous
new 4 digit code and press the SETUP/AUDIO
volume button. If the entered password are
matched, the “****PWD” message is displayed
and means that the password has been
changed. While the 2 entered password is not
the same, the “SETFAIL” message is displayed
and it means there is an error in changing the
password. Now, all the changing process
should be repeated again.
Page 55
54
2
GENERAL INSTRUCTION
On/Off the device
- To turn on the device, press the PWR button.
- To turn off the device, press and hold the
same key.
POINT:
When the vehicle is not running, by pressing
the “PWR” button or inserting the CD the
device could be turned on for 30 minutes.
Pay attention the device is not turned on by
entering USB/SD/AUX. After 30 minutes the
device turns off and by pressing the “PWR”
button you can turn on the device again.
MEDIA button
Press the “MEDIA” button, to switch the disc
(when the disc is situated in the device), USB
(when the USB is connected to the device), SD
card (when the card is inside the device) and
AUX IN (when AUX IN socket is connected).
MUTE button
While the device is on, press the key for a
moment. The mute mode is activated and
output sound is disconnected. To exit, press
again the same key.
VOLUME ADJUSTMENT
Turn the volume to adjust the sound . Turn
the volume clock wise (right) to increase, and
turn it counter clock wise (left) to decrease the
sound level.
THE SOUND QUALITY ADJUSTMENT
To access the following, press AUDIO
repeatedly:
To adjust each of these, turn the AUDIO
volume.
While adjusting, there is no change for more
than 5 seconds, the device automatically
returns to its last mode. BASS and TREBLE
are just adjustable in EQ OFF mode.
HOW TO USE THE RADIO
The band changing
To select the radio, press the same key.
By frequent pressing of the “RADIO” button
when playing, you could choose one of the
bands with following sequence:
FM1 FM2 FMAS AM AMAS
AUTOMATIC SEARCHING OF THE RADIO
STATIONS
By pressing the
and buttons, you could
activate the automatic searching system to
increase/decrease the radio frequencies. After
receiving the desired radio station, you could
save the station in one of the memories from
1- 6.
To save the desired station, press and hold the
related number for 2 seconds.
THE RADIO STATIONS MANUAL
SEARCHING
To increase the radio frequency manually, turn
the AUDIO key clock wise and to decrease
counter clock wise.
AUDIO SYSTEM
Page 56

55
2
AUDIO SYSTEM
AUTOMATIC SAVING OF THE RADIO
STATIONS
To select automatically 6 powerful radio
stations and saving them instead of the present
stations, press the AST key. The present
stations are replaced instead of the previous
saved ones
The received stations in FM band are saved in
memories 1- 6 of FMAS band and in AM band
are saved in memories 1- 6 of AMAS band.
Tip: By using this order, the previous saved
memories are erased and the new stations are
replaced instead of them. By pressing the AST
key for more than 2 seconds each accessible
radio station is played for 10 seconds and then
shifts to the next station.
SAVING THE STATION ON THE MEMORY
To save the new radio stations on the memory
of CD player, you should hold the number of
desired memory for 2 seconds after receiving
the radio station. After hearing the beep sound
, current frequency is saved on the memory.
RDS DATA
Disposal services through RDS system (Radio
Data System) are as follow:
PS PROGRAM SERVICE NAME)
This service displays the current station name
on the panel in the case of forwarding by the
forwarder.
ALARM MESSAGES (PTY ALARM)
In the case of sender the urgent warnings by
the sender, the messages will be displayed on
the panel.
TA (TRAFFIC ANNOUNCEMENTS)
By this the driver will receive the important
trafc announcement.
By short pressing on TA/AF key, TA service is
activated or deactivated.
AF (ALTERNATIVE FREQUENCY)
By using this service the device automatically
searches and receives the more power
frequency of the current radio station. By
pressing TA/AF key for more than 2 seconds,
AF service is activated or deactivated.
Point: The abovementioned services should be
forwarded by the central forwarder. At present,
PS is the only active service in Iran.
HOW TO USE CD/USB/SD/AUX
Inserting the disc
While inserting, the disc labeled surface should
be upwards. Insert the disc such an extent
that the internal mechanism of the CD player
automatically pull it inside. The rst le on the
disc is automatically played.
Note: The device has been designed just for
playing the 5 inch (12 cm) standard discs.
Avoid using 3 inch (8 cm) discs. Inserting of
such CDs by using/not using of the adaptor will
damage the device or the disc.
PAUSE BUTTON
In CD/USB/SD switch, if press the button
for a moment pause switch is activated and
the audio le that is playing will be stopped.
Repressing the button, the system comes back
to its normal playing. To play the rst le of the
disc, hold the button for 2 seconds.
Page 57

56
2
SCN BUTTON
While playing CD/USB/SD, press “4SCN” to
present exiting les. By pressing of this key
each le will be played for 10 seconds. By
repressing of the key, the system comes back
to the normal position of playing.
RPT BUTTON
While playing CD/USB/SD switch, to repeat
the playing le press “RPT1” button to select
the “RPTFILE” mode. To repeat all of the les
inside the current folder repress this key to
select the “RPT DIR” mode. The playing is
continued so long as the “RPT1” key is pressed
to choose the “RPTOFF” mode.
RDM BUTTON
While the playing CD/USB/SD switch, press
“RDM2” button to select the random playing
of the les. To stop random playing mode and
coming back to the normal position, repress
the “RDM2” button.
SEARCHING OF THE FILE & FOLDER
Disc Playing Mode (TRACK/MP3):
To select previous/next le, press and
keys. In case of pressing and holding the
above keys, you could play the le forwards/
backwards.
MP3 playing le
To select previous/next folder, press and
keys. In case of pressing and holding the
above buttons, you could choose 10 previous/
next le.
EJECT BUTTON
To eject the disc, press button.
THE MONITOR DATA
While the les MP3 and WMA are playing,
by pressing of the button “5DSP”, the panel
displays the data related to the playing le as
the following: FILE, FOLDER.
While the le/folder name is displaying, by
repressing of the button, the panel displays
the data related to the ID3 label like a movable
tape which consists of: TITLE, ARTIST AND
ALBUM. Then the device comes back to the
normal position.
PLAYING OF THE SD FILES
Open the USB/SD/AUX port cover. Insert
SD memory card .After several seconds, the
device automatically plays music.
FLASH MEMORY
Open the USB/SD/AUX port cover. Connect
the ash memory to the USB connector. The
device automatically plays the saved music in
Flash Memory.
POINTS ABOUT MP3 FILES
- The device could be able to display just
English characters of
“- , +, A, Z, 0-9”.
- Maximum, 16 characters is used to display
the name of an album or le.
- In case of recording MP3 les on the disc
make sure the saving format is the data type
not audio.
- In order to enjoy the best quality sound, it is
recommended the les switched to MP3 les
with sampling frequency of KHZ 44.1.
AUDIO SYSTEM
Page 58

57
2
AUDIO SYSTEM
POINTS ABOUT USB/SD
- The les with *WMA, *MP3, *Mp3 are
readable.
- Fat 16/Fat 32 is readable.
- The device maximum readable memory is
32GB.
- Sampling frequency 8KHZ- 48KHZ
- Bit rate 8-320kbps
Points: While the playing in USB mode does
not cut off the USB suddenly. This causes the
USB to be damaged. First change the source
and then cut off the USB. Or turn off the device
and then cut off the USB.
THE SOUND AUXILIARY INPUT
Open the USB/SD/AUX port cover. Connect
the sound auxiliary input socket. The device
automatically plays AUX IN socket input le.
THE SYSTEM ADJUSTMENTS
By pressing of the “AUDIO” volume for more
than 2 seconds you will enter the system
adjustments as the following: Then, by each
pressing of this button there is one of the
following:
S-VOL->TIME->TIME AD->RDS->REG>NEWS->EON->L-OUT->LCD
To change each of the above adjustments turn
the “AUDIO” volume. To exit the adjustments
menu press the “AUDIO” volume for more than
2 seconds.
Point:
The CD player is automatically exited from the
system adjustments menu if there is no action
after 5 seconds.
S-VOL
By this switch you could adjust the rst sound
volume such an extent that not to exceed the
xed volume when the device turns on. The
volume is adjustable from 5 to 25.
- If the sound volume is less than the above
before the device turns off, the sound volume
will be adjusted the last one when the device
turns on again.
- If the sound volume is more than the above
before the device turns off, the sound volume
will be automatically like the adjusted one
when the device turns on again.
- If the sound volume is less than 5 before
the device turns off, the sound volume will be
adjusted 5 when the device turns on again.
CLOCK (RDS/MAN) ADJUSTMENT
In case of selection the “RDS” from “RDS
clock” and “MAN” it is possible to adjust the
clock manually.
(TIME)DISPLAY ADJUSTMENT
This switch could be adjusted as one of the
following: 12/24 hour.
Page 59

58
2
RDS (ON/OFF) ADJUSTMENT
You could activate or deactivate RDS (Radio
Data System).
REG (ON/AUTO/0FF) ADJUSTMENT
In case of selection of ON switch the regional
stations is received. In case of selection of
AUTO switch the power stations is searched.
In case of selection of OFF switch the rst radio
station received by the system regardless input
signal power is played. The REG switch is just
adjustable in RDS ON mode.
NEWS (ON/0FF) ADJUSTMENT
The NEWS switch could be activated or
deactivated. The NEWS switch is just
adjustable in RDS ON mode.
EON (DX/LO) ADJUSTMENT
In case of selection of LO switch the power
stations is just received. In selection of DX
switch the rst radio station received by the
system regardless input signal power is played.
The REG switch is just adjustable in RDS ON
mode.
L-OUT (ON/OFF) ADJUSTMENT
You could activate/deactivate the Line-out
output.
LCD (0 ~7) ADJUSTMENT
By selecting of this switch you could change
the LCD lighting intensity.
MAINTENANCE
- Avoid any liquids inside the device. If so,
dry it rapidly. Because the liquids will cause
malfunction or electrical shock.
- Keep the device out of dust and pollution.
These will cause external disadvantages.
- Precaution to carry the device. Strike or falling
down could likely cause damages.
- To clean the dirty panel/monitor use silk tissue
and natural substances.
AUDIO SYSTEM
Page 60
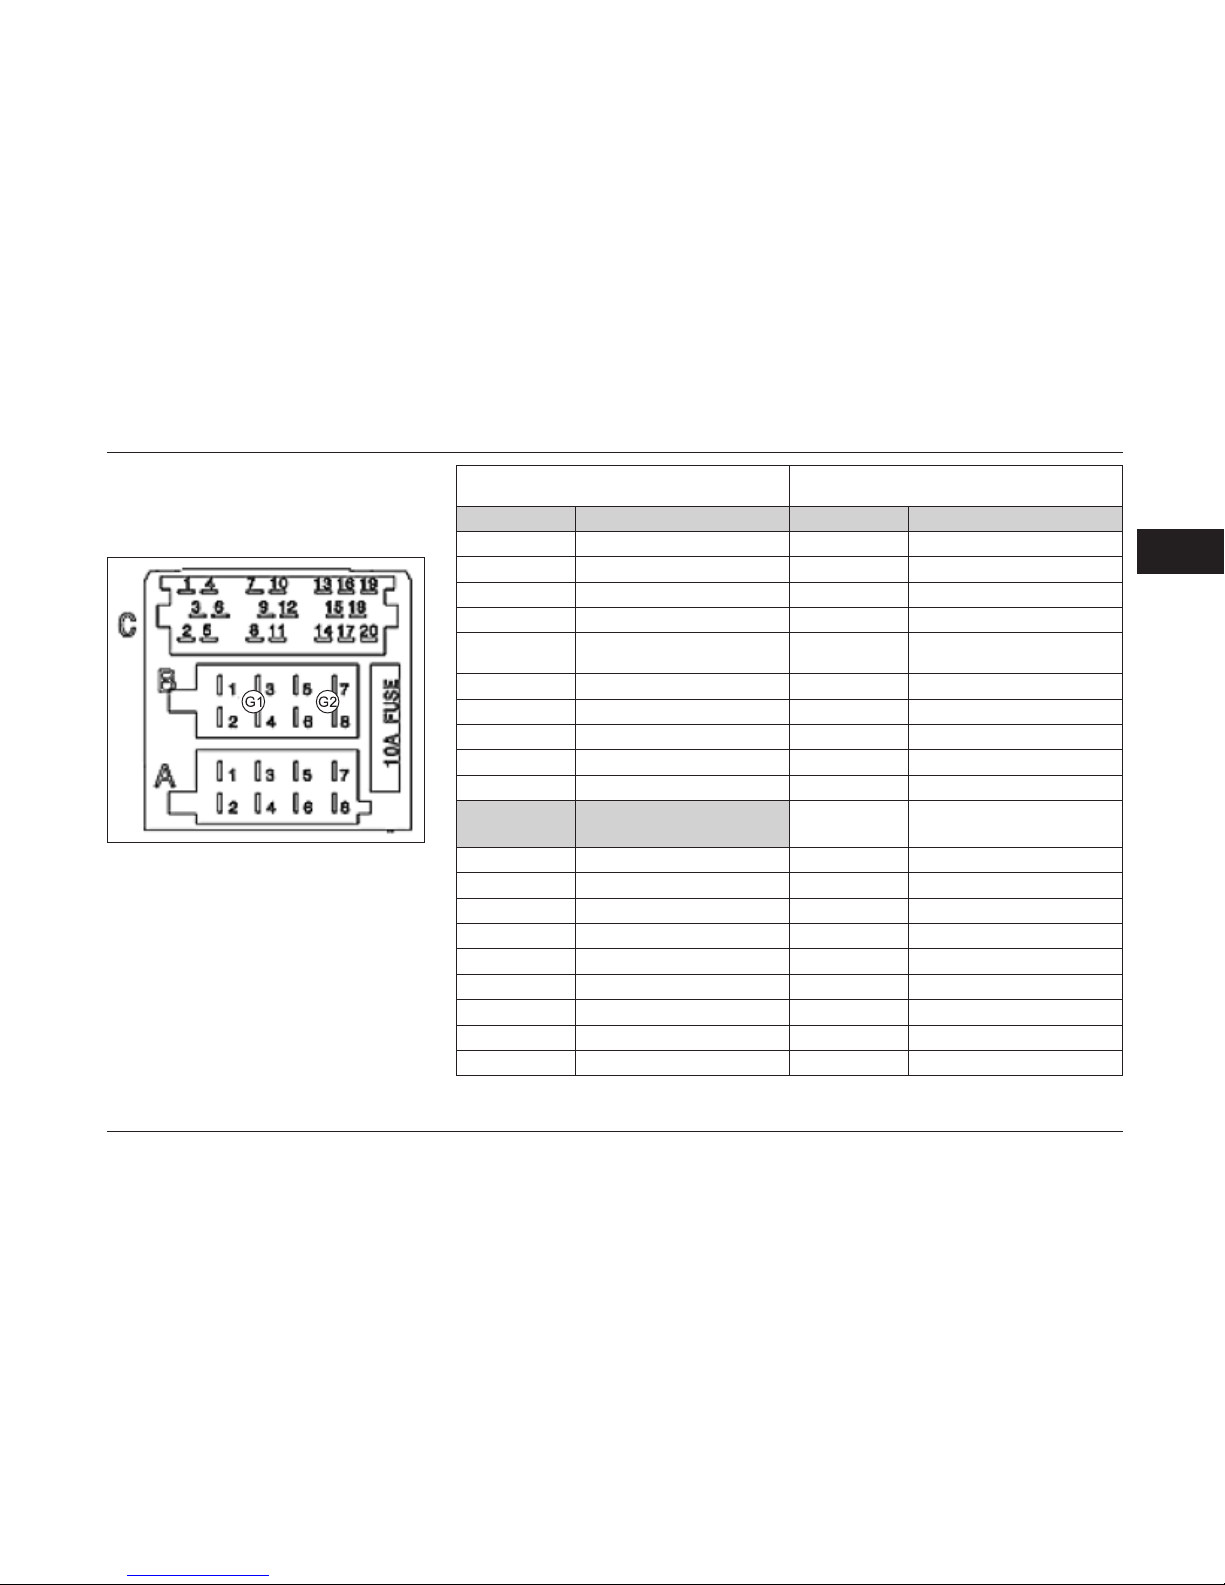
59
2
AUDIO SYSTEM
ELECTRIC CONNECTORS
Diagram of bases of the CD player connector
as follow:
Connector C
Connector A
PerformancePositionPerformancePosition
LINE OUT LEFT OUTPUT
C1
-
A1
LINE OUT RIGHT OUTPUT
C2
-
A2
LINE OUT EARTH
C3
INTENSITY CONTROL INPUT
A3
-
C4
BATTRY
A4
-
C5
ANTENA CONTROL
(ANT)
A5
Amplier steering output
C6
LIGHTING (ILL)
A6
-
C7
ACC VOLTAGE
A7
Control Input on the Steering
C8
EARTH
A8
-
C9
CONNECTOR B
-
C10
Control circuit earth on the
steering
C11
PerformancePosition
-
C12
REAR RIGHT SPEAKER +
B1
-
C13
REAR RIGHT SPEAKER
-
B2
-
C14
FRONT RIGHT SPEAKER +
B3
-
C15
FRONT RIGHT SPEAKER -
B4
-
C16
FRONT LEFT SPEAKER +
B5
-
C17
FRONT LEFT SPEAKER -
B6
-
C18
REAR LEFT SPEAKER +
B7
-
C19
REAR LEFT SPEAKER -
B8
-
C20
Page 61
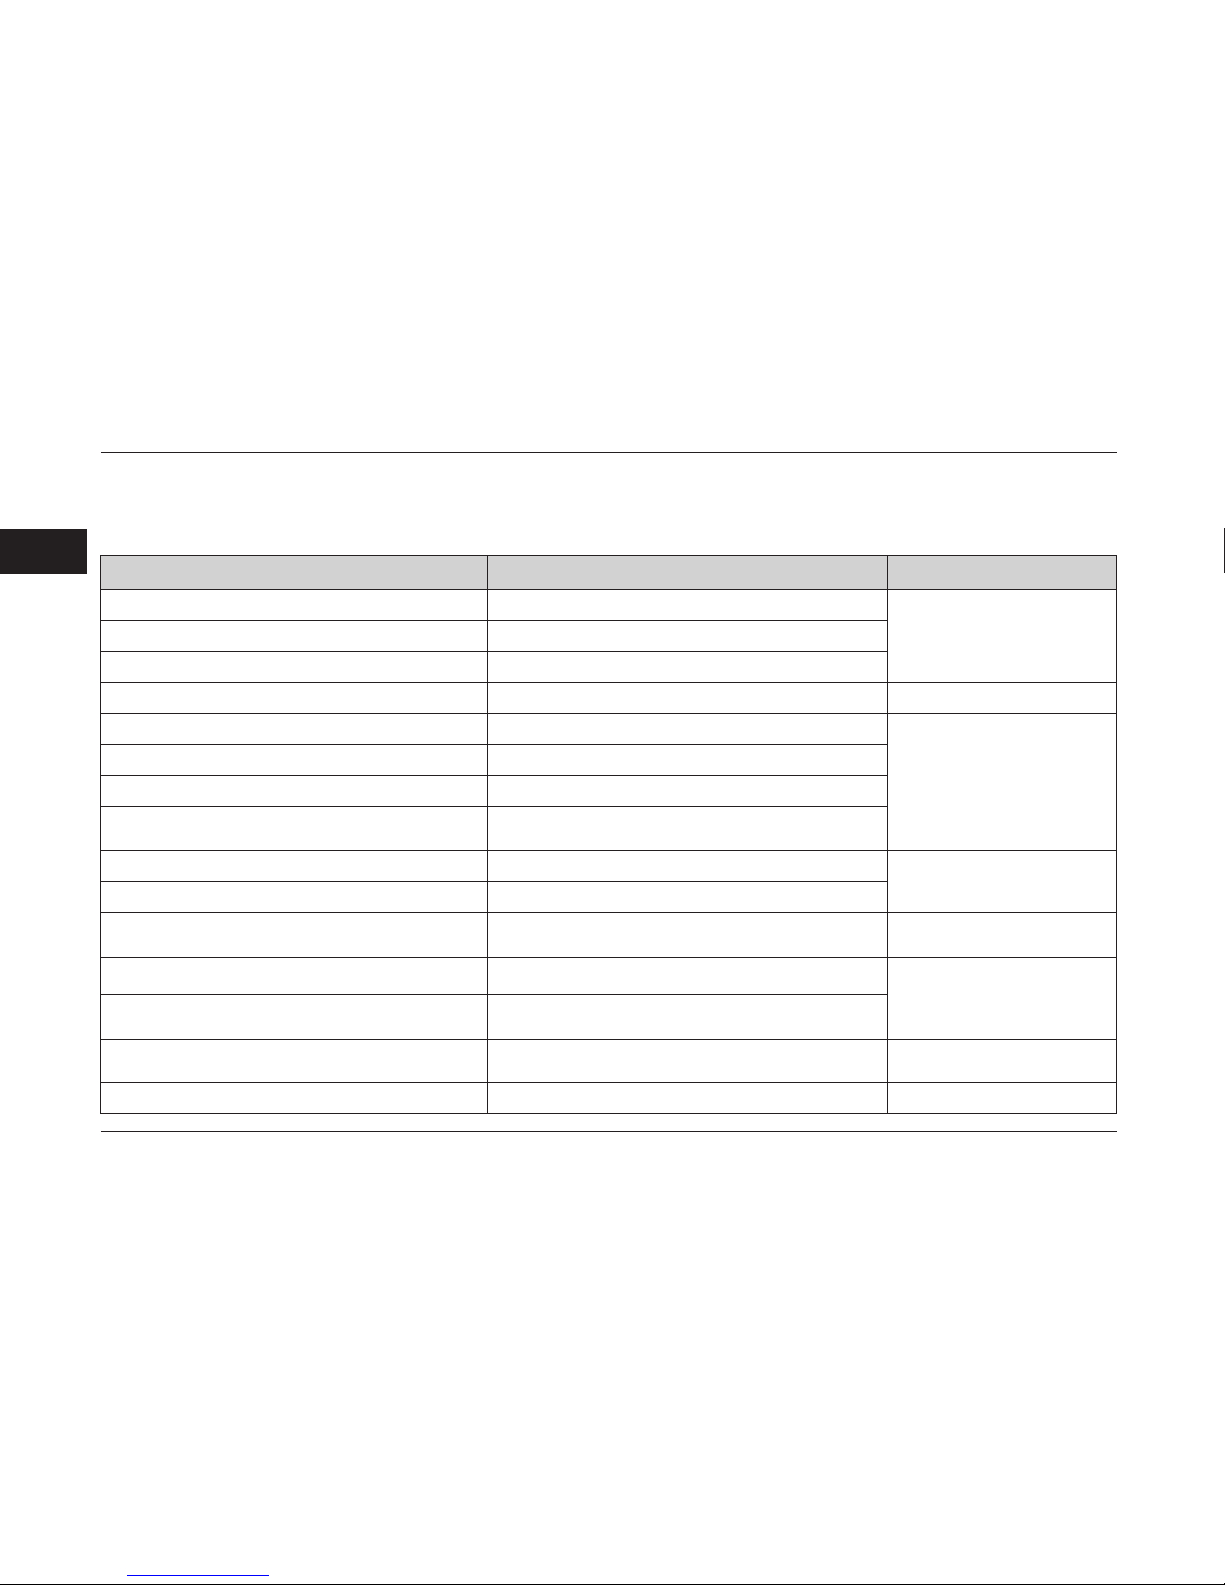
60
2
AUDIO SYSTEM
DEFECT FINDER
The following controlled list could help you to solve some problems that may be occurred at the time of using the device. Before using, control all the
connectors and the manual. Do never use the device at unusual conditions such as when the device is mute, at the time of fume or singe that may cause
re or electric shock. Here, you should turn it off immediately and contact to after sales agencies (Refer to the guarantee manual).
THE PROBLEMDEFECTSOLUTION
The device is not turned on
The switch offOn the switch
Not correct connection of the cablesControl the cables connection
The fuse is burnedChange the fuse with the same fuse
The disc is not inserted
There is another disc inside the deviceEject the previous disc
The disc is not readable
The disc is in reverse positionInsert the disc in correct position
The disc is dirty or damagedClean the disc or use another disc
High temperature inside the vehicleWait the cabin temperature decreases
The le format is not readable
Check the disc format with the formats mentioned in
the manual
Mute
Minimum adjusting the sound volume or Mute modeControl the sound volume or deactivate the mute
Incorrect connection of the cablesControl the cables connection
While running the vehicle, vibration
causes the sound cut on/off
The device installation place is not rmInstall the device rmly with side parts
It does not receive the radio
stations or with low quality
Install the antenna correctly
Incorrect installation of the antenna
Open the antenna completely or in case of broking
change to a new one
The memory saved stations
have been erased
The antenna is not completely opened or broken
Connect the device battery power input to the vehicle
battery
Incorrect connection of the battery cable
Page 62
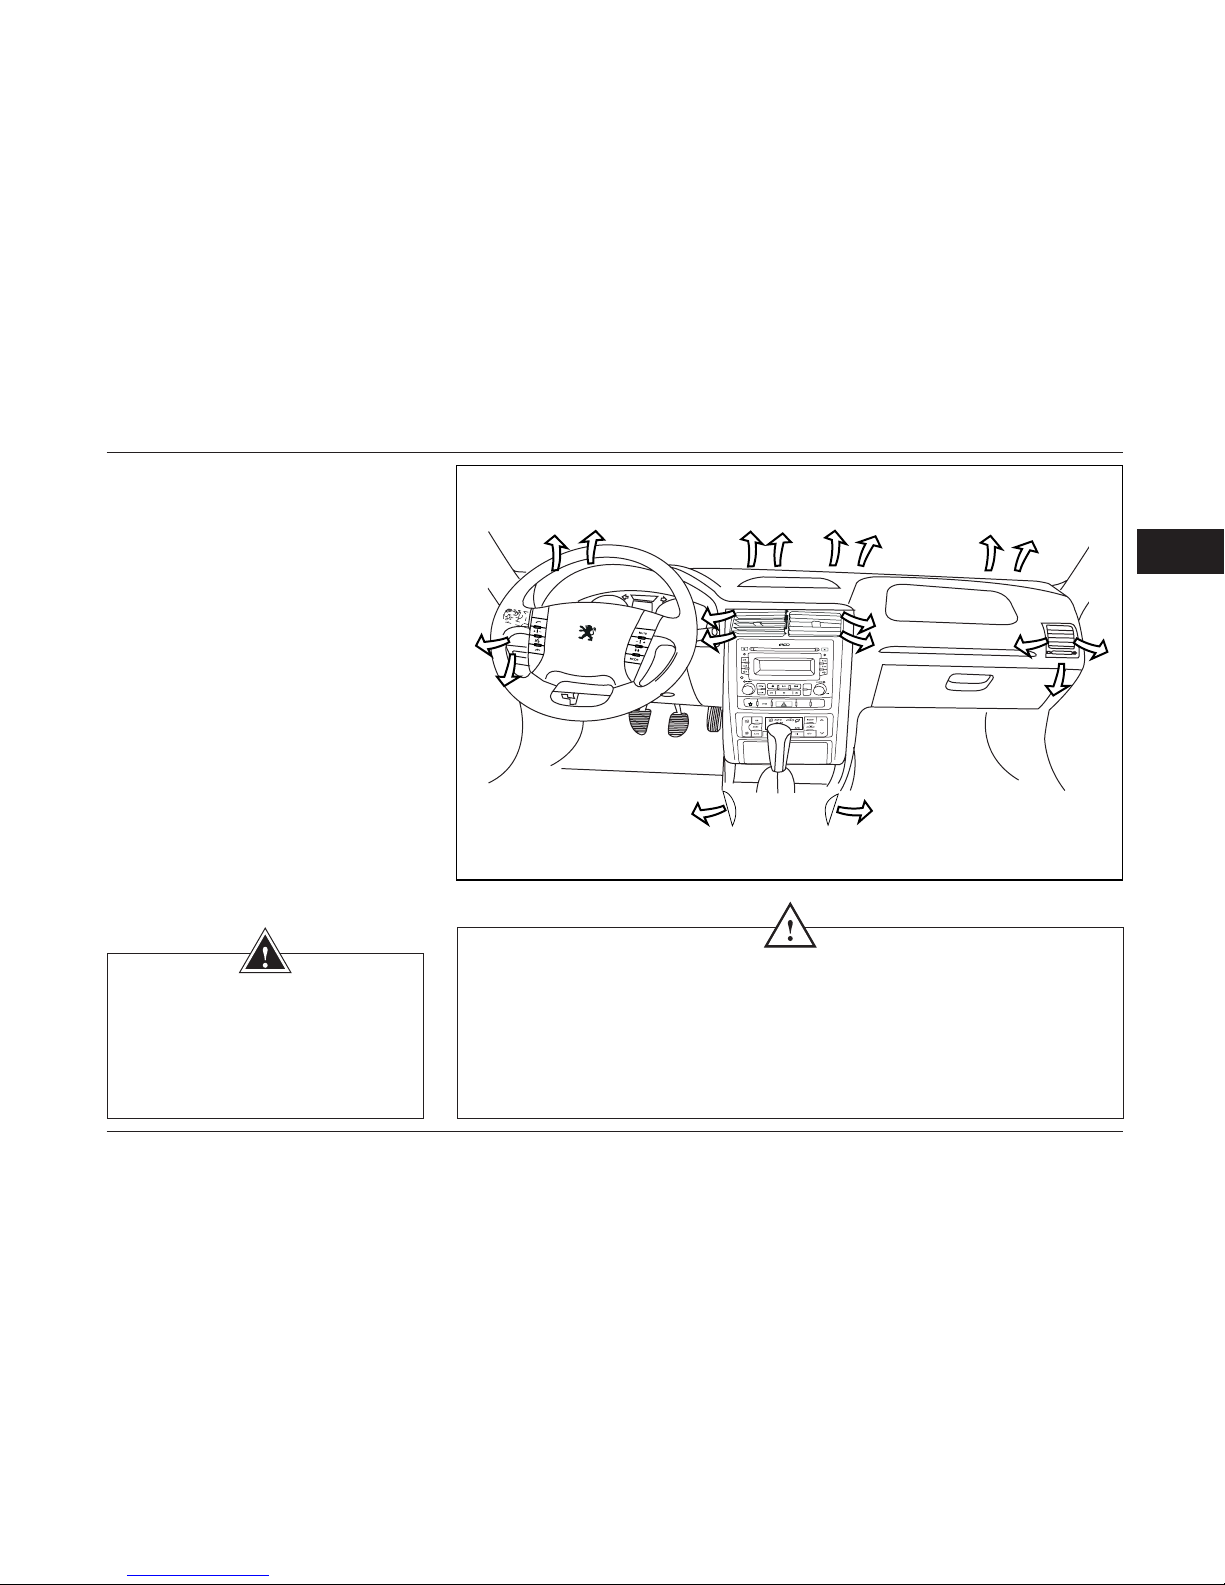
61
2
HEATING / VENTILATION
Heating and Ventilation
The heating and ventilation system
provides fresh or heated air to the interior
of the car from the intake grille in front of
the windshield.
NOTE: Keep the air grille in the rear
window shelf uncovered to enable air ow
through the whole of the interior.
CAUTION
Heating and Air Conditioning System
- To prevent the probable damage, use the distilled water in radiator.
- To help maintain optimum performance and durability of your air conditioner (even in winter),
it needs to be operated at least once for about 10 minuets each 15 days .
- It is recommended the A/C system should be turned off before the engine. Charging of
A/C gas will be harmful to your A/C system.(except R-134a gas which is compatible with
environment and non-destructive of Ozone layer)
WARNING
Do not open the coolant uid circuit.
This uid is dangerous to the eyes
and skin.
Page 63
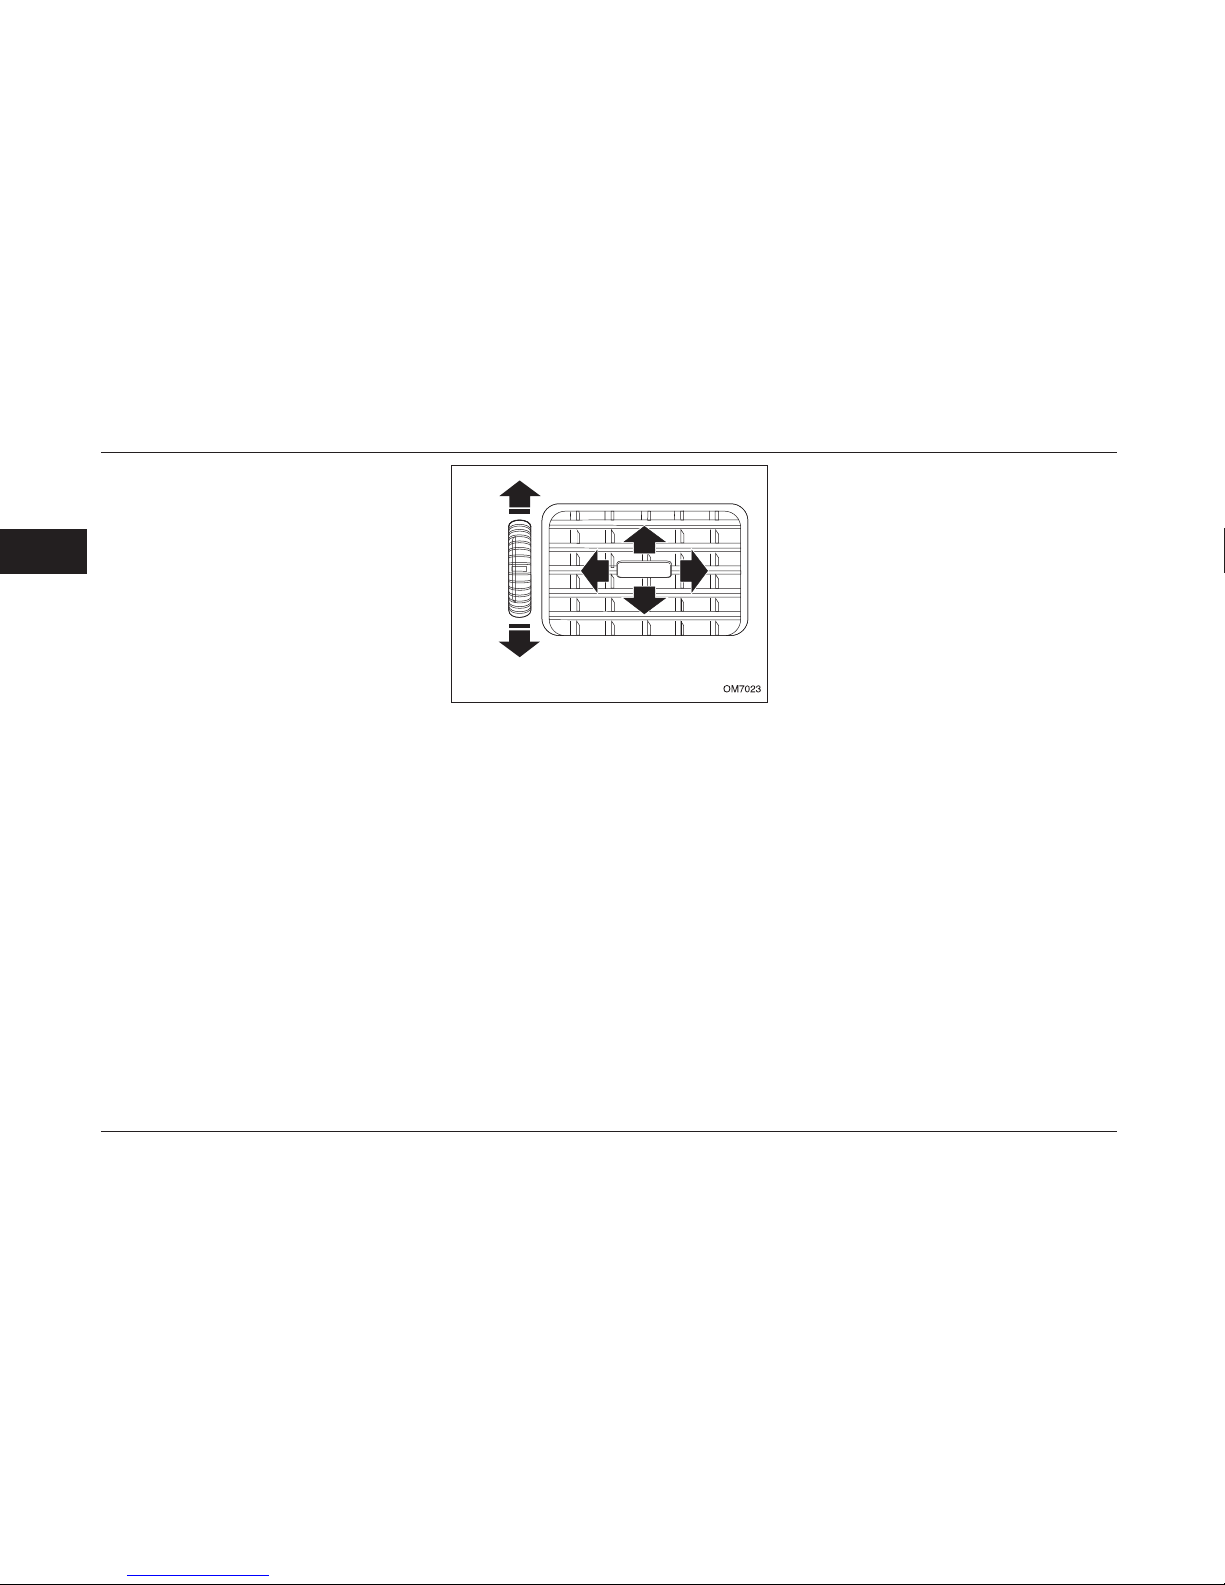
62
2
HEATING / VENTILATION
The following procedures will enable you
to gain maximum benet from the heating
and ventilation system.
Maximizing Heating System
- Set all air vents towards foot wells.
- Slide temperature control lever to the
red section.
- Slide blower speed control level to the
right as needed.
Maximizing Cooling and Air Flow
System
- Set the airow-adjusting key on
"face ward" position and be sure that the
grilles are open.
- Slide temperature control lever to the
blue section.
- Slide blower speed control lever to the
right as needed.
- Turn on air conditioning.
Center and Side Vents
Rotate the thumbwheel down to close
the grill, and rotate up to open the grille.
Move the grille button to sides, up or
down to adjust air ow.
Page 64
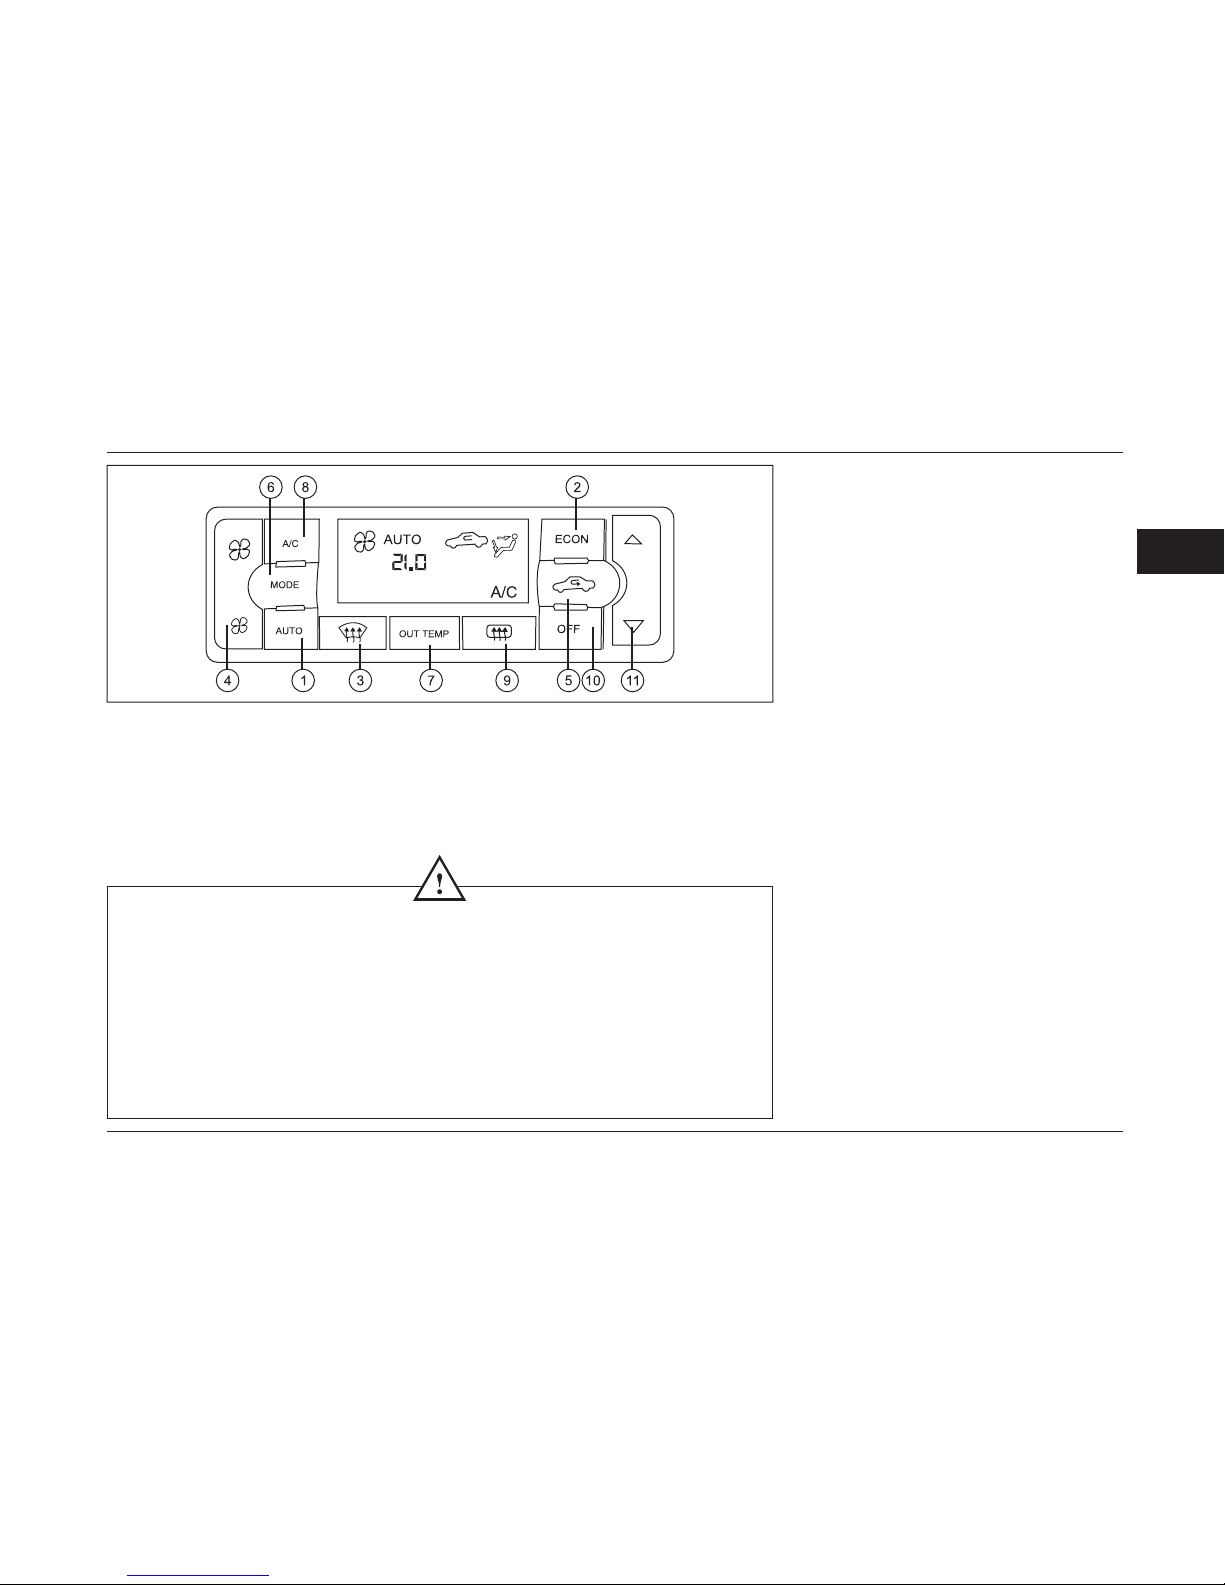
63
2
HEATING AND AUTOMATIC VENTILATION
Automatic ventilation system
Turn on the engine and activate the
keys.
1- Automatic functioning mode (Auto ) :
Cooling or heating along with demisting
(Automatic)
This mode can be used through entire year
and the temperature can be controlled
according to the passenger wish.
- Setting the fan speed current are
automatically done.
1 - Press the automatic (AUTO) button.
CAUTION
- Cooler functions only when the engine is on .
- Don't keep the children , old people and animals alone in the vehicle.
- The temperature goes on fast in n the hot and sunny days. The severe heat can
harm or even cause to the death of the passengers.
- The circulation mode should not be used for a long time ;otherwise it causes the
suffocation and the glasses to be vapory .
- Avoid switching the heating and ventilation system buttons while driving to for
complete attention to driving .
2. Set the desired temperature. (Red arrows
temperature increase and Blue arrows
temperature decrease)
- Adjust the normal temperature on 25 ° C .
- The temperature of the cabin will be
automatically xed. Air vents and fan speed
are also controlled automatically.
2- Heater (ECON)
use ECON mode in winter and in cooler
silent mode (minimum fuel consumption).
1. Press the ECON button. Switch to the
desired temperature.
ECON sign on the screen will be shown.
-The temperature inside the cabin will be
automatically kept constant.
Air vents and fan speed will be also
controlled automatically.
Page 65
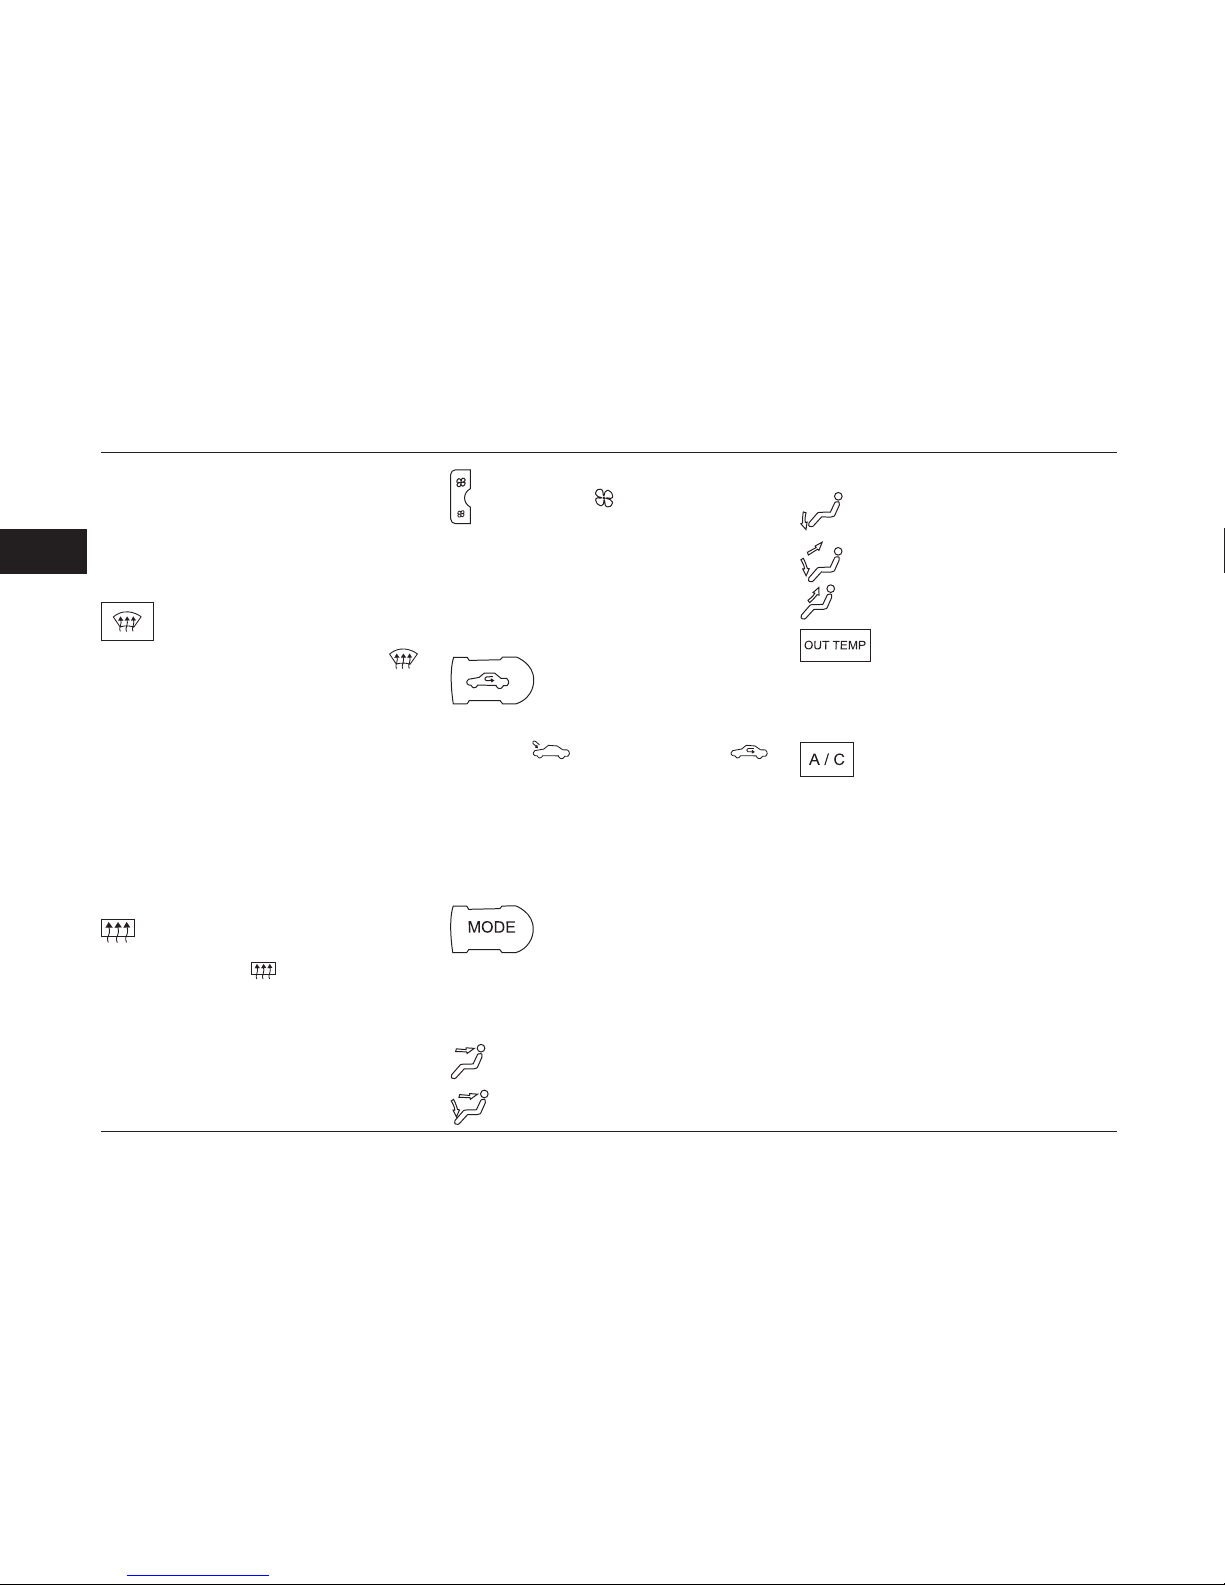
64
2
- Do not set the temperature lower than
the temperature outside,
otherwise, the system may not work
properly
- If the windows get vapory ,it's not
recommended.
3- demisting, defrost the
windshield
1- Press the windshield air valves
(DEF) button and turn it on .
indicator on the LCD (display) will light
on .
2- Switch to the desired temperature
(select the high temperature to
accelerate the demisting).
- Soon after the windshield gets cleared
of vapor and ice, press the automatic
button (AUTO) so that the system
returns to the automatic mode.
Demisting and rear window
defrosting mode
Press the button (the symbol will
appear on the screen) rear glass will be
activated by electric heating elements
for 12 minutes and at the end it turns
off automatically.
4- Non-automatic function of fan
speed control
* Press the fan control button to get
fans as usual (Non-automatic) control.
Press the AUTO button to control the
fan speed automatically .
- Press the AUTO button so that the
system goes on to automatic mode.
5-Air ow control button
press the cabin air control
button. The air circulation
is adjustable to the fresh air (AIR
FRESH)
or ow cabin
according to the passenger selection.
Press the AUTO button to switch the
system to automatic mode. When the
temperature in the cabin is high. to cool
the cabin faster in AUTO mode select
the air ow of cabin key.
6- Control of outlet vent
By pressing the MODE
button control standard
(non-automatic) vents (word MANUAL
will be displayed) conducts the air into
5 cases
Exhaust air from the front (face) is
blown.
Exhaust air from the front (face)
and the leg is blown.
The main stream of air is blown
through the outlet side of the
legs.
The air is blown beneath of the
glass and foot.
The air is blown out of the glass.
7-Outside temperature (OUT
TEMP button)
press the outside air temperature OUT
TEMP button. The weather outside is
visible on screen about 5 seconds .
8- Air Condition Service (Cooler)
Cooler system in your car
has been with a cooling gas which
is meeting the environment principle
rules .
"The cooling gas will not harm the
ozone layer around the earth," though it
may have little inuence on the Earth's
warmth. Special tools are required to
charge and lubrication at the time of
charging and service.
Using inappropriate oil or gas will harm
air conditioning system. Authorized
representative is allowed to service or
repair the air conditioners.
HEATING AND AUTOMATIC VENTILATION
Page 66
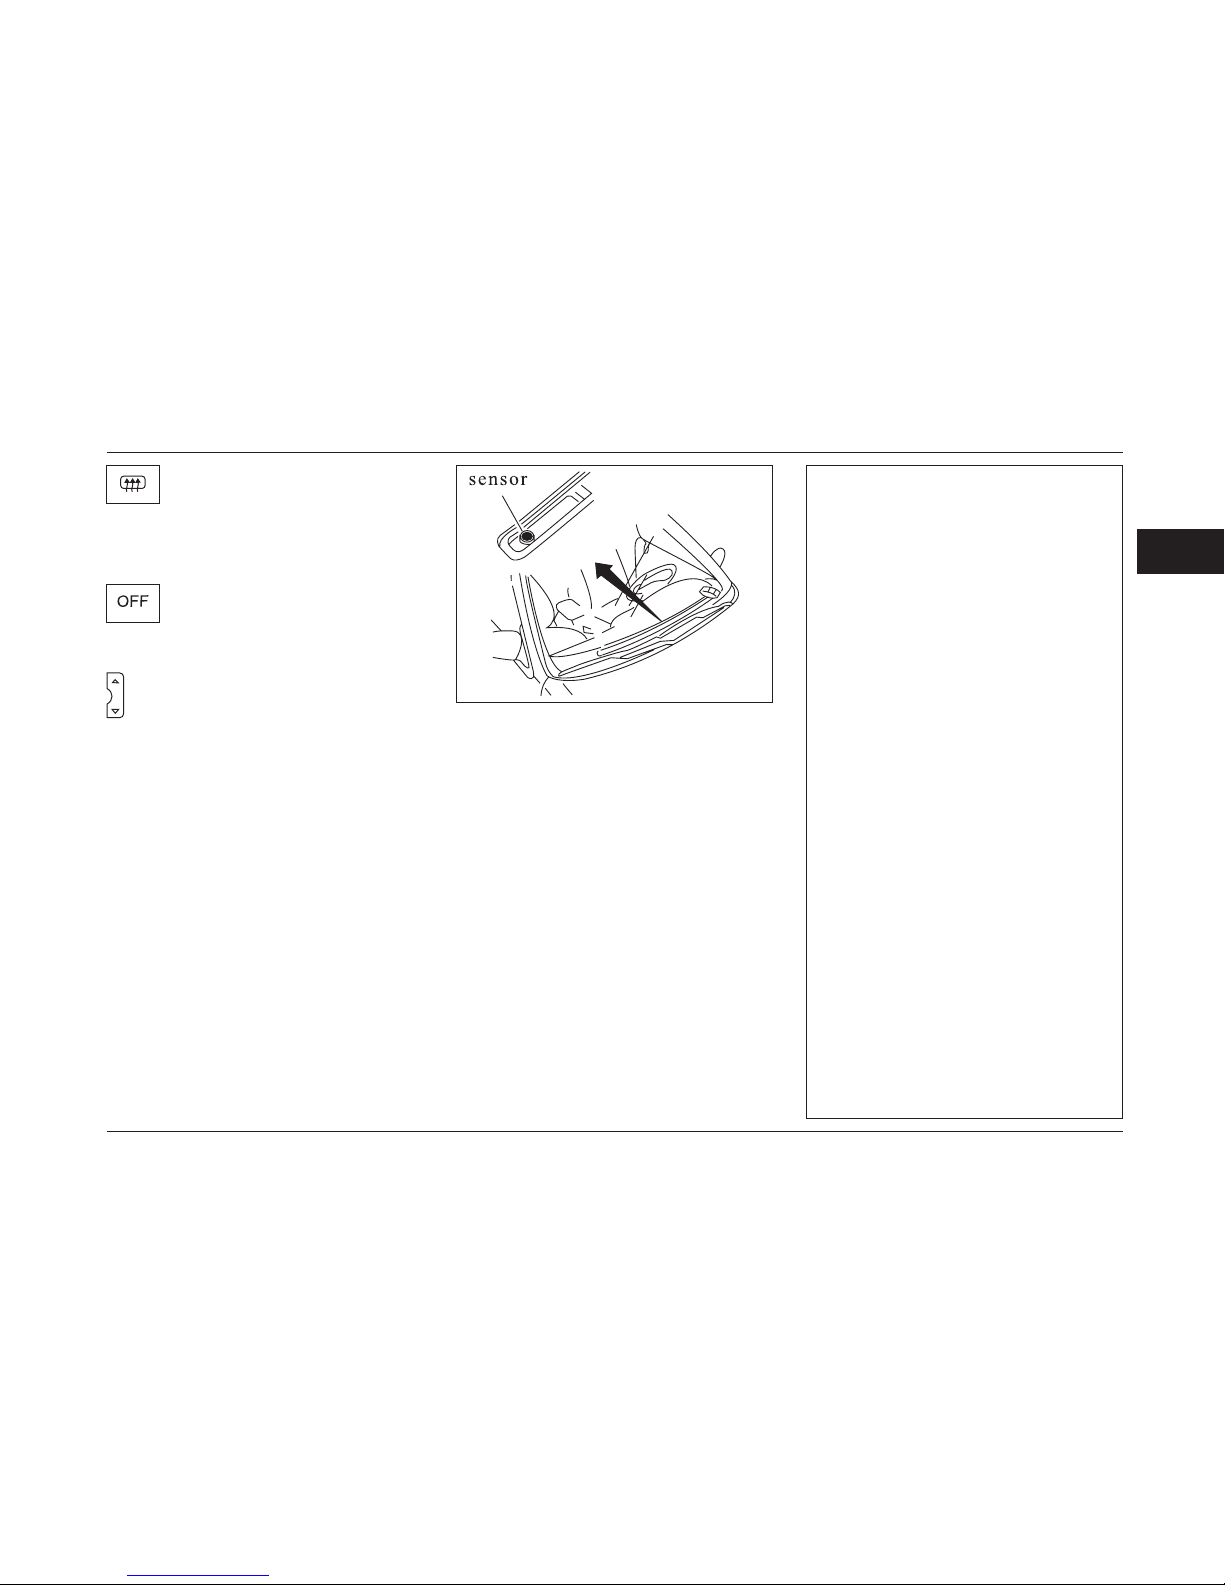
65
2
HEATING AND AUTOMATIC VENTILATION
9- Rear window heater
It's used to demisting and
defrosting of rear window and side
mirrors
10-Power off
Automatic air conditioning
system gets off by this key off.
11- Temperature regulation
Press the temperature setting button
to get the temperature controlled (nonautomatic) If you press the AUTO
button, the temperature is automatically
controlled.
Automatic air condition system
sensor
The system is equipped with sensors that
controls the ventilation automatically.
1. The light intensity sensor
- Location: Beneath of the windshield on the
dashboard
Note: Avoid placing objects on the sensor.
2-Sensor for inside the cabin:
Location: under the steering wheel frame
-Don't create a barrier for the air ow to the
sensor .
3. Defrosting Sensor
Location: Inside the HVAC ventilation
system.
4. The outside temperature sensor
- Location: on the front bumper
5. Sensor for temperature of Engine water.
Note :
In the winter, when the engine and
the outside temperature is low ;
ventilation system fan will not work
for 3 minutes until the engine
temperature reaches to the desired
limitation.
Automatic ventilation system is
equipped with an air lter to prevent
the entry of contaminated air and
dust and smoke. Note to replace it
according to the manual on its own
proper time.
If the fan speed is poor or bad
odor or incomplete demisting is
observed; replace the lter.
Press the OFF button to turn off the
ventilation system and then turn off
the engine. prevent the blocking of
the windshield valves.
Avoid placing the objects on light
intensity sensor in the middle of the
dashboard beneath the windshield;
and the outside temperature sensor
on front bumper.
Page 67
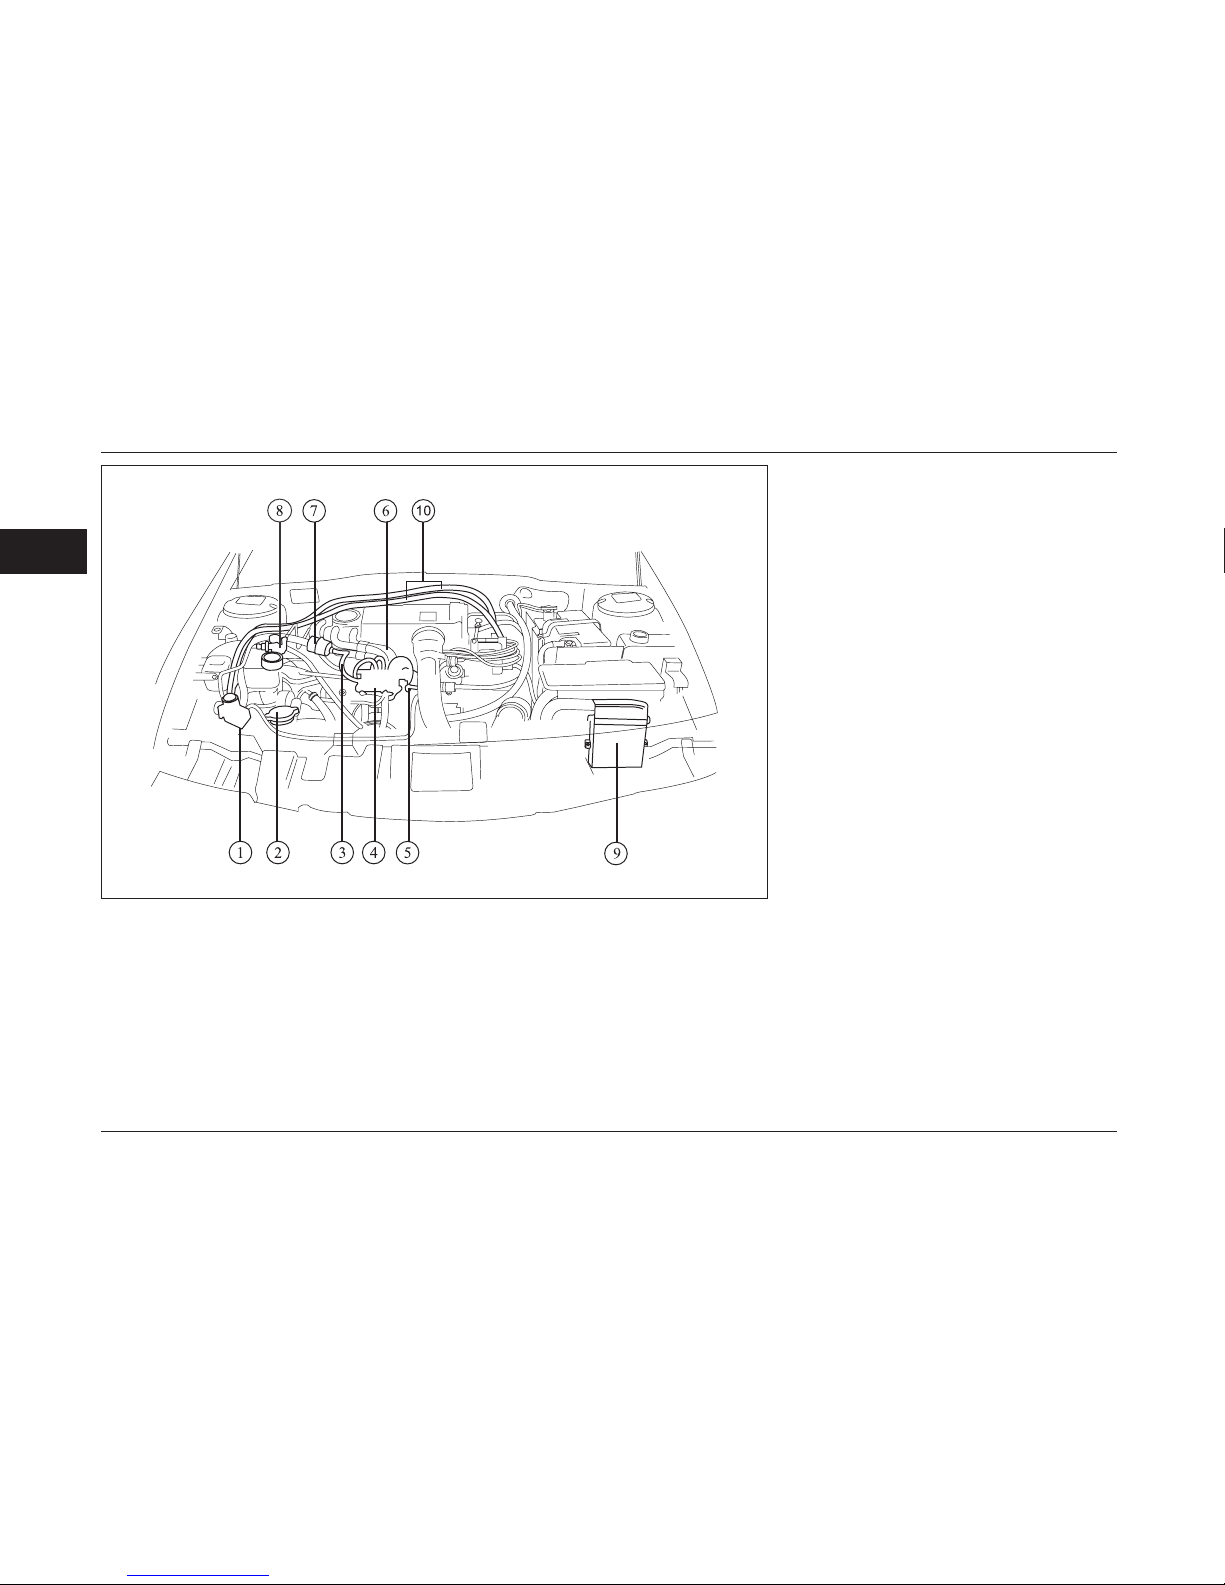
66
2
CNG PARTS
CNG System: Engine Compartment
Overview *
1. Regulator: Reduces the gas pressure
from a maximum of 200 bar to 2 bar.
2. Hose (transferring gas to gas lter):
Transfers the reduced pressure
gas from the regulator to the fuel lter*.
3. Hose (transferring gas to fuel rail):
Transfers the reduced pressure gas
from the regulator to the fuel rail.
4. Fuel Rail: Gas entering the manifold
passes through the fuel rail, and enters
the manifold when the gas injectors
open in the indicated times.
5. PT( Pressure- Temperature) Sensor:
This sensor is mounted on the fuel rail
and transfer the data to the ECU*.
6. Gas Hoses (Fuel Rail to Injector
Nozzel): These exible tubes allow gas
to enter the intake manifold*.
7. Gas Filter: A device for screening the
gasoline to remove the impurities from
the fuel rail*.
8- Service manual Tap :
The input gas track to engine
compartment is opened and closed
through this tap.
9. Electrical Control Unit (ECU): Adjusts
the moment and time length of injector
sprinkling and the timing of sparking in
different engine conditions.
10. Input / Output Hot Water Hoses
(Regulator): Transfers the heater water to
the regulator to warm up and to prevent
the regulator from freezing when operating
on gas mode.
Page 68
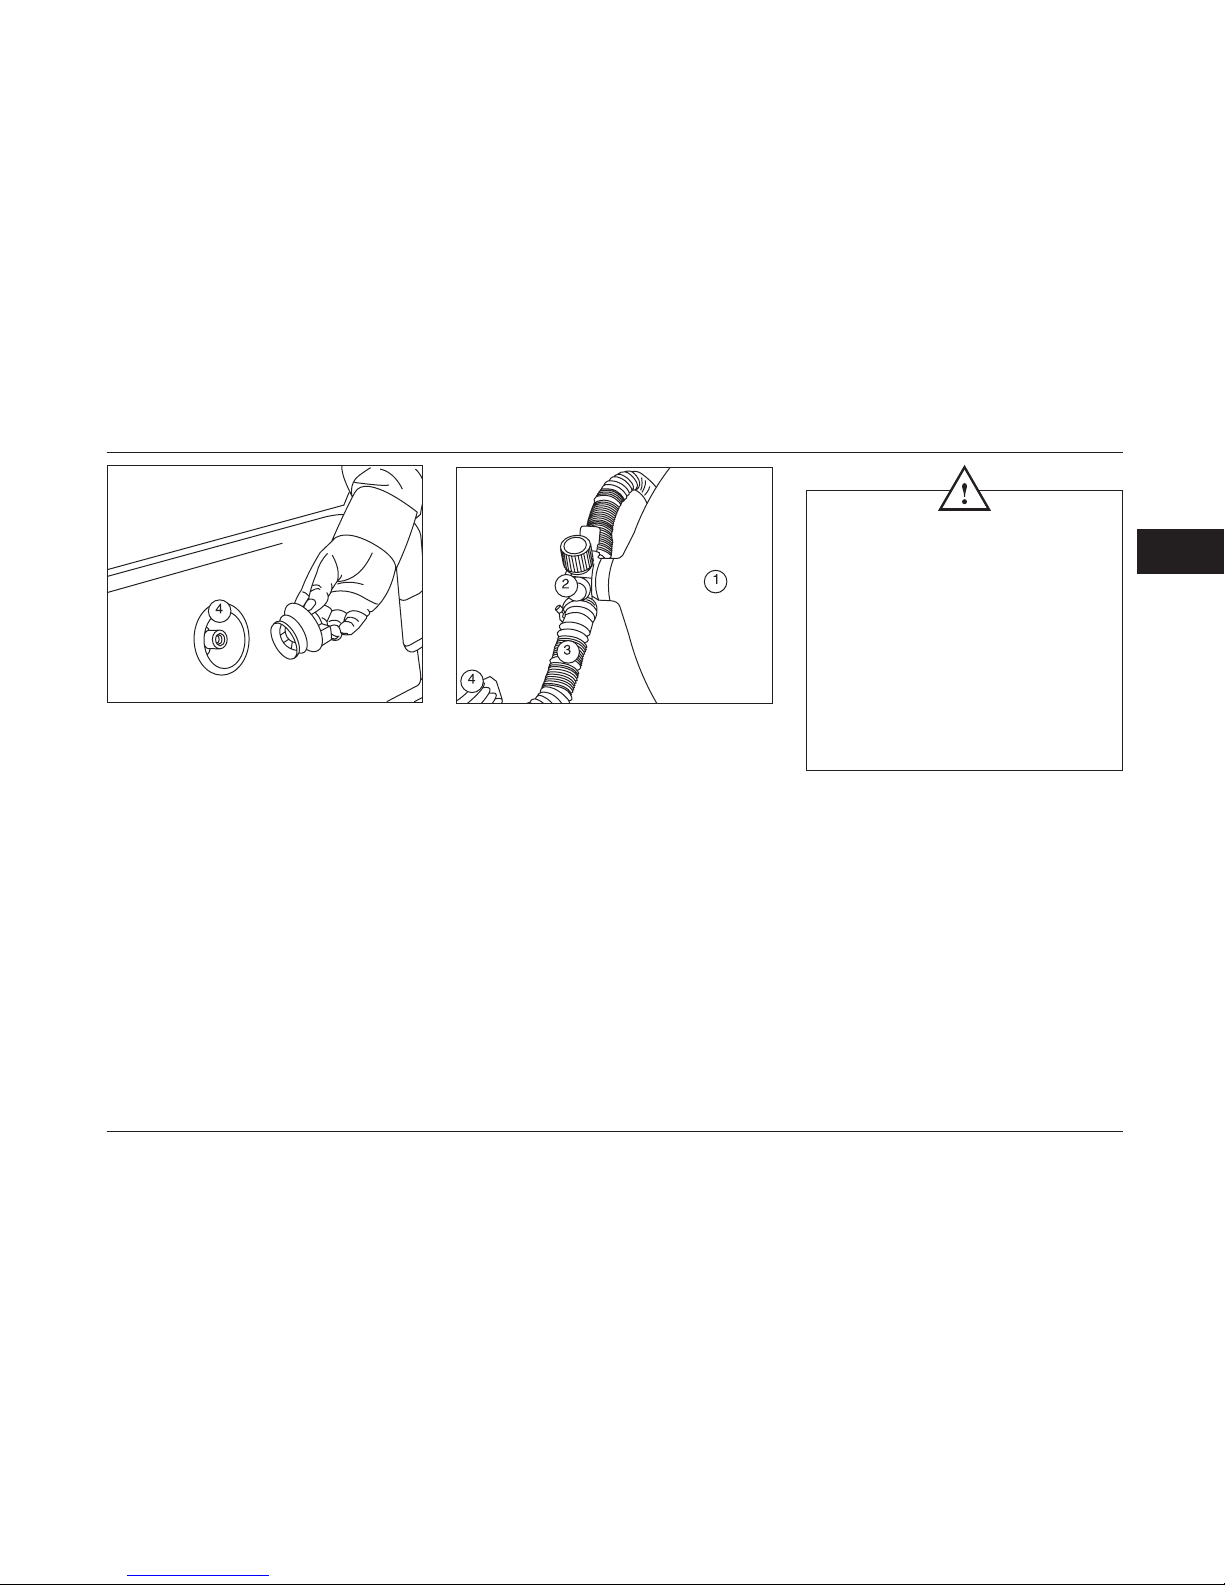
67
2
*
If equipped
CNG FUEL SYSTEM
Introducing CNG Fuel syatem placed in
trunk lid*
1. Tank (Tanks): CNG is contained by
200 bar pressure at highest.
2.Tank Valve: Limits and opens the gas
passage at the end of the tank, and
includes equipment which evacuate
the gas tank when gas pressure and
temperature exceeds the standard limit.
If the pipes are cut, it limits the gas
escape from the tank.
3. Pipes & Gas Ventilation System:
It transfers the High Tension Pipe of
CNG to the regulator through outlet of
reservoir valve with the pressure of 200
bar.
Ventilation system transfer the gas
outside the trunk if any leakages happen
in connections.
4. Filler: It is a part installed on the
automobile for fueling the gas tank and
it is connected to the fuel nozzle in the
gas station.
CAUTION
- Avoid keeping any object on the
tank beside the tap or on the high
tension pipe.
- Avoid keeping any sharp objects
beside the tank ,which cause the
damage to the CNG equipment in
the boots.
-ensure that tank tap is closed before
ant repair process.
Page 69

68
2
Anti-Lock Braking System (ABS)
Anti-lock braking system is one of the car
new and control systems preventing the
wheels from locking on slippery roads, or
by intense braking on dry roads. Therefore,
it reduces the brake distance, steer ability,
improves stability, and increases car safety
in general.
When using a car equipped with anti
lock brake system always consider the
following points:
−Since the anti lock braking system is only
for balancing the brake force, therefore
when braking sufciently press the brake
pedal.
− Feeling brake pedal vibrations under the
foot while braking over unstable roads or
sudden braking is normal and caused by the
operation of the anti-lock braking system.
In this situation press sufciently the brake
pedal with condence making sure of
proper function of braking system.
−Hearing beating wise noise from front
and rear wheels when braking over
slippery roads or sudden braking is normal
and due to the correct operation of the antilock braking system.
−Anti-lock braking system is equipped with
an automatic defect nding system that will
light the anti-lock braking system warning
indicator, on displaying instrument panel
in case of a problem.
−When the car is turned on, the anti-
lock braking system warning indicator on
displaying instrument panel gets on and
will turn off after a few seconds. If the
warning indicator does not light when the
car is turned on or remains lit, it's a sign of
problem in the anti-lock braking system. In
this situation the car should be directed to
an authorized workshop for diagnosis by
computerized system of defect nder.
It's good to bring to your notice in case of
damage or presence of any problem in antilock braking system, your vehicle has just
the capability of an ordinary braking system.
−If the handbrake is completely released
and both the handbrake indicator and antilock braking system warning indicator are
lit, on displaying instrument panel, stop the
car with precaution and contact a nearest
authorized workshop.
The brake dragging distance will be more
while you're driving on sloppy surfaces.
Make sure of proper functioning of the
brake after washing the vehicle or while
you're passing from the puddles.
ANTI - LOCK BRAKING SYSTEM
Page 70
69
2
ANTI - LOCK BRAKING SYSTEM
CAUTION
-Operation of ABS brake system is independent of pressure imposed to the brake
pedal. Therefore in emergency situations, it is recommended to use a strong and
continuous pressure on the brake pedal. It is not necessary to apply pressures one after
another. (Filling or pressurizing the brake pump).
-For trouble shooting and servicing of Anti Brake System, denitely approach
authorized workshops and strictly avoid attending in sundry places.
WARNINGS
-This system shall never be considered as a factor to encourage sudden acceleration
and driving with more speed.
Therefore it can not substitute the accuracy, precautions and responsibilities during
driving .
This operation is an auxiliary aid which during driving in emergency situations, controls
it’s behavior proportional to the existing conditions of driving.
-Seriously Avoid driving with unpermitted speed in passage ways, specially in slippery
loads with reliance to the Anti Brake System and always follow the safety factors.
Page 71
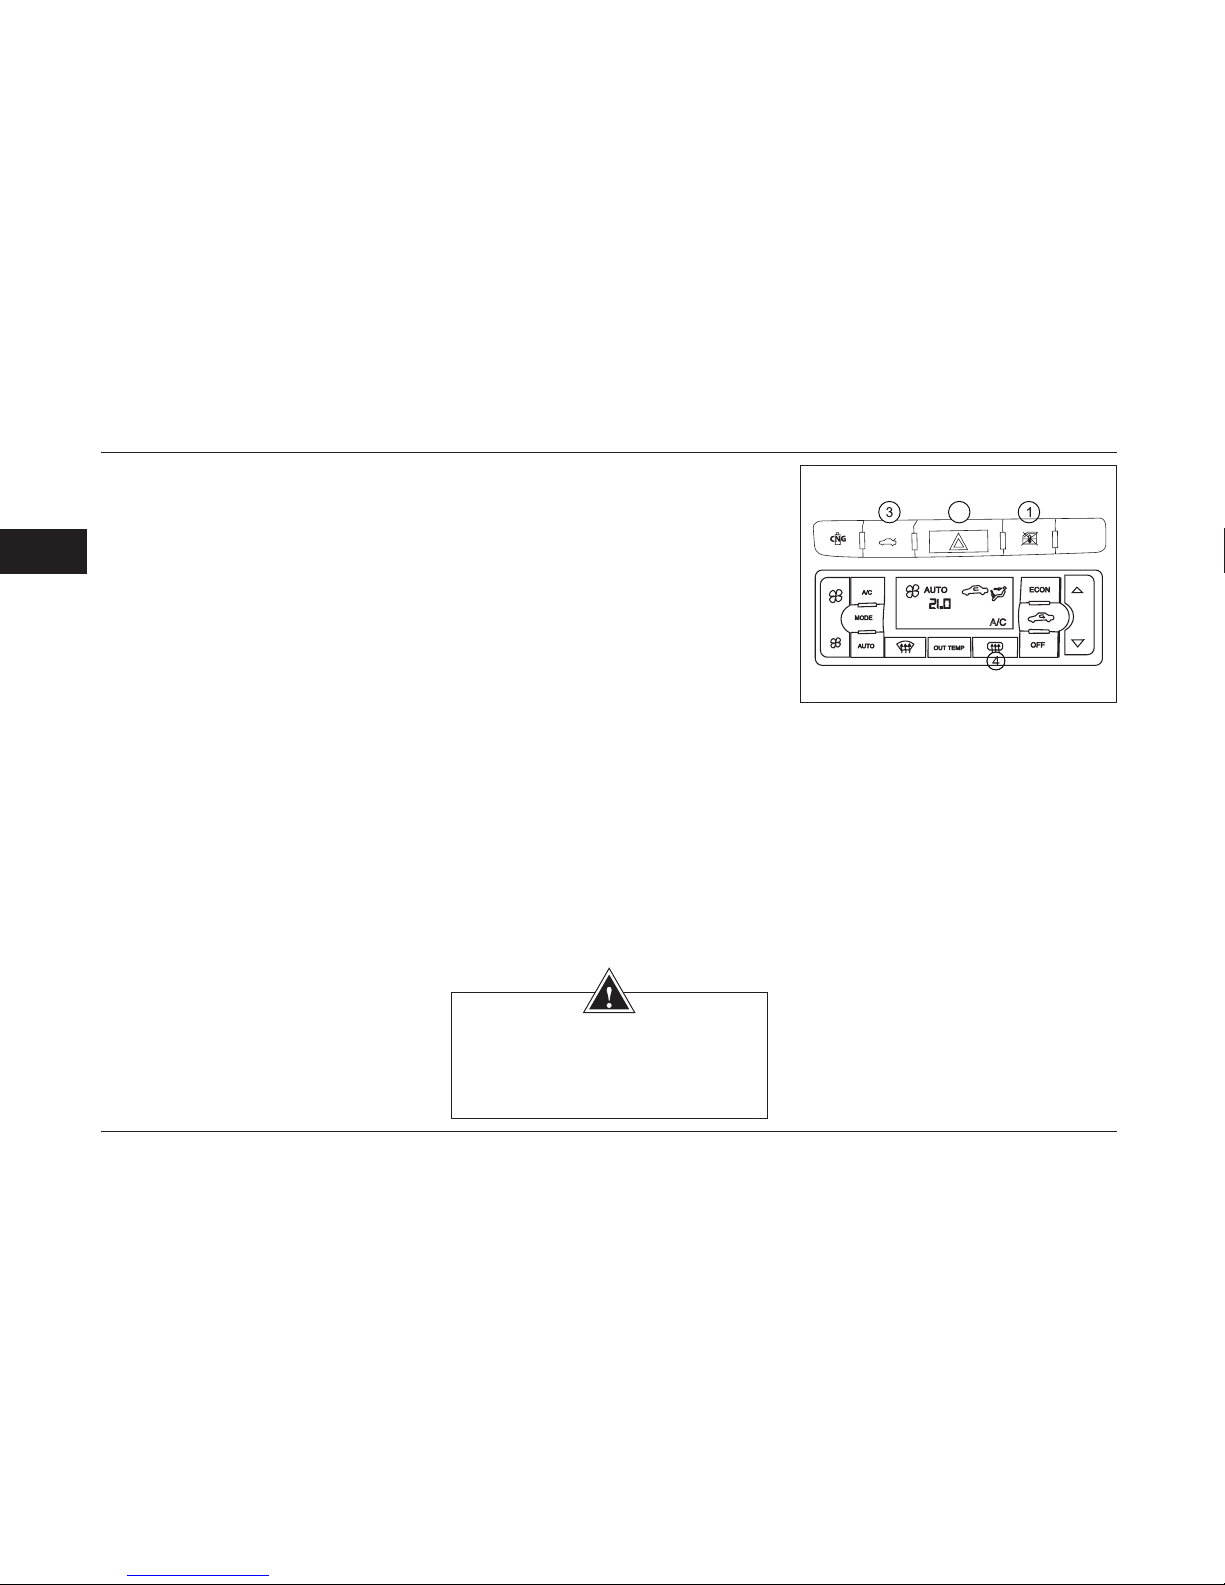
70
2
1- Locking Switch for Rear windows
(Child Safety)
By pressing this button, rear lifting window
switch (Left/Right) is deactivated.
By the rst pressing, the keys are locked
and by repressing of keys operation, is
reactivated.
2- Flasher
Push the asher button. All indicator
lights and turn signal lights will ash
simultaneously on instrument panel.
This is an emergency action. Use this
mechanism when your car is on crossing
barrier position, or when you are in danger.
Flashers will keep ashing even when the
engine is off, therefore, turn them off after
emergency.
3- Trunk opener button*
After the ignition switch is on, to open
the trunk from inside the cabin press the
button for about 1.5 seconds the trunk lid
door will be opened.
WARNINGS
Avoid rubbing and scratching the rear
window and pasting any kind of label to
protect the heater elements.
4- Rear window heater
Push the related button to turn the heater
on. One LED will light on the button when
it is on.
Note: Only when the engine is switched
on, rear glass heating can be activated.
Side view mirrors heater
Push the rear window heater button in
order to protect side view mirrors against
vapor and freeze effects.
INTERIOR EQUIPPMENTS
Page 72
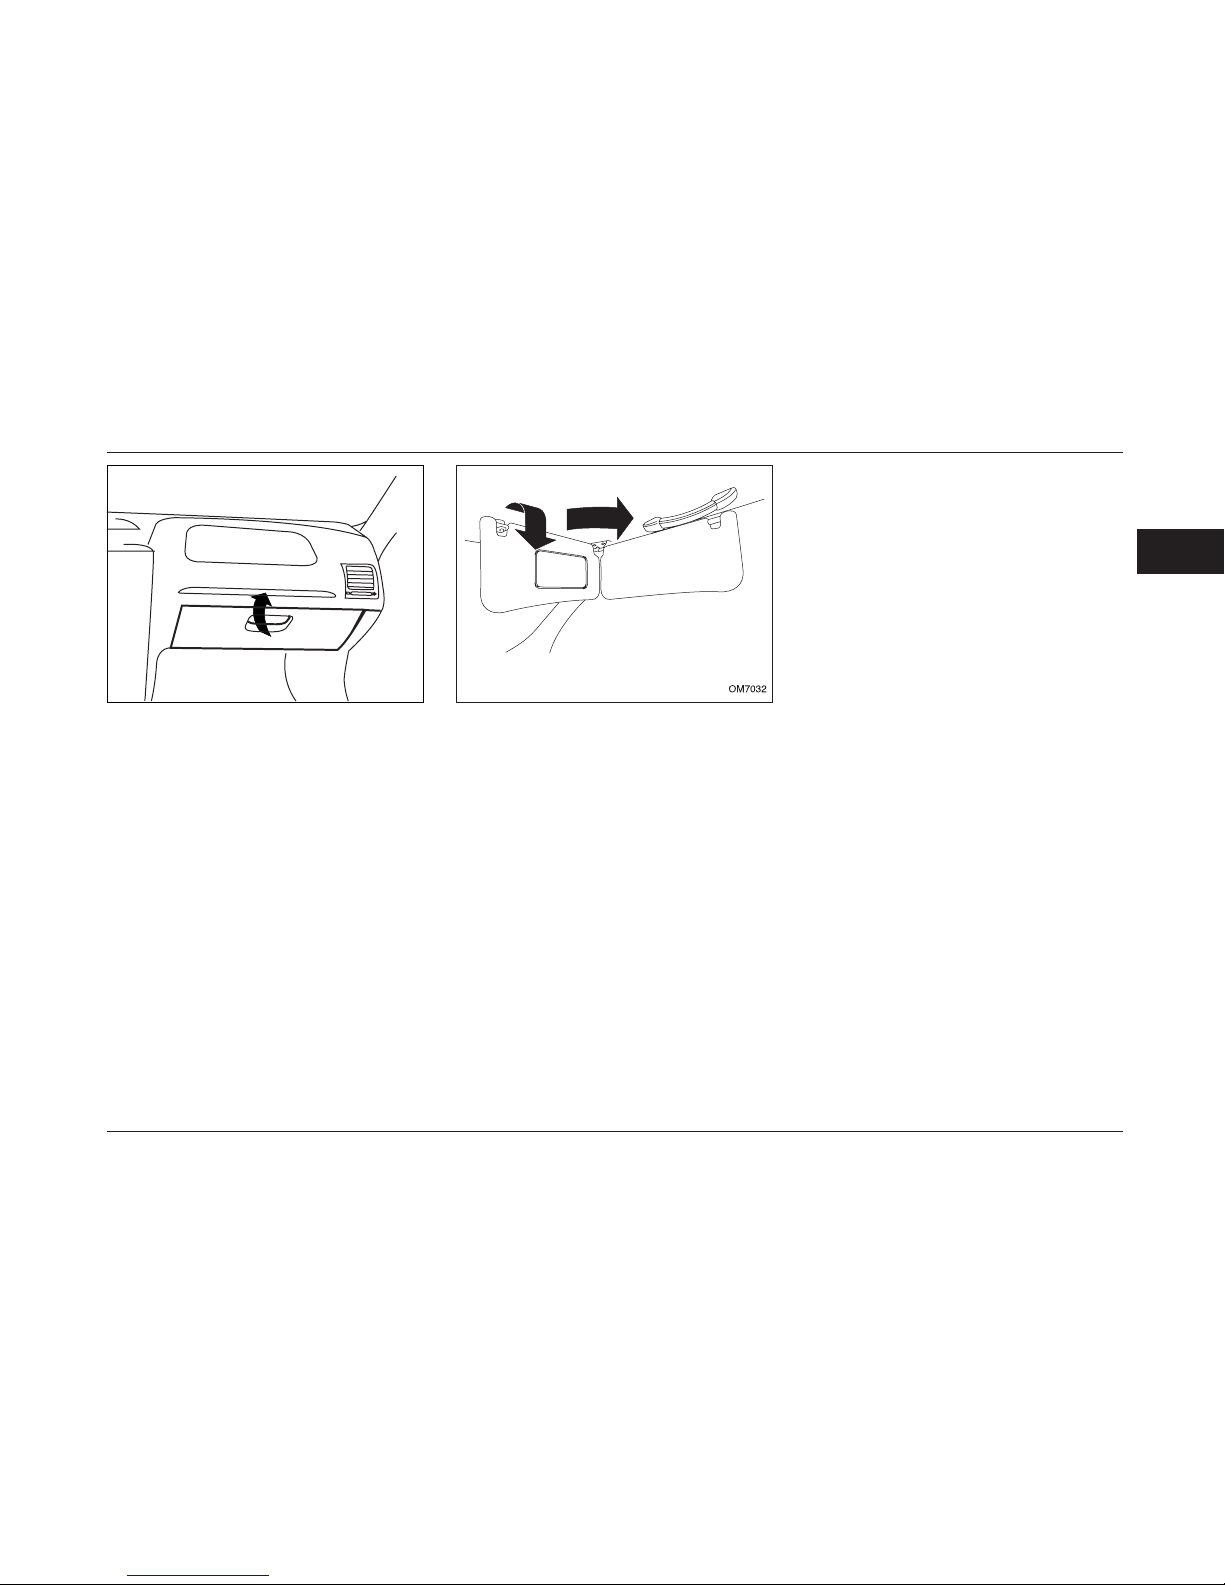
71
2
INTERIOR EQUIPPMENTS
Opening dashboard
- Push the related lever to open the
dashboard.
- A light will be turned on by opening the
dashboard, which will be turned off after
closing.
Note: Vehicle user manual booklet shall
be usually kept in dashboard.
Sun visor
Push the sub visor downside in order to
protect your eyes from direct sunlight.
Sun visors are designed to be used for
windshield and side shields.
Page 73
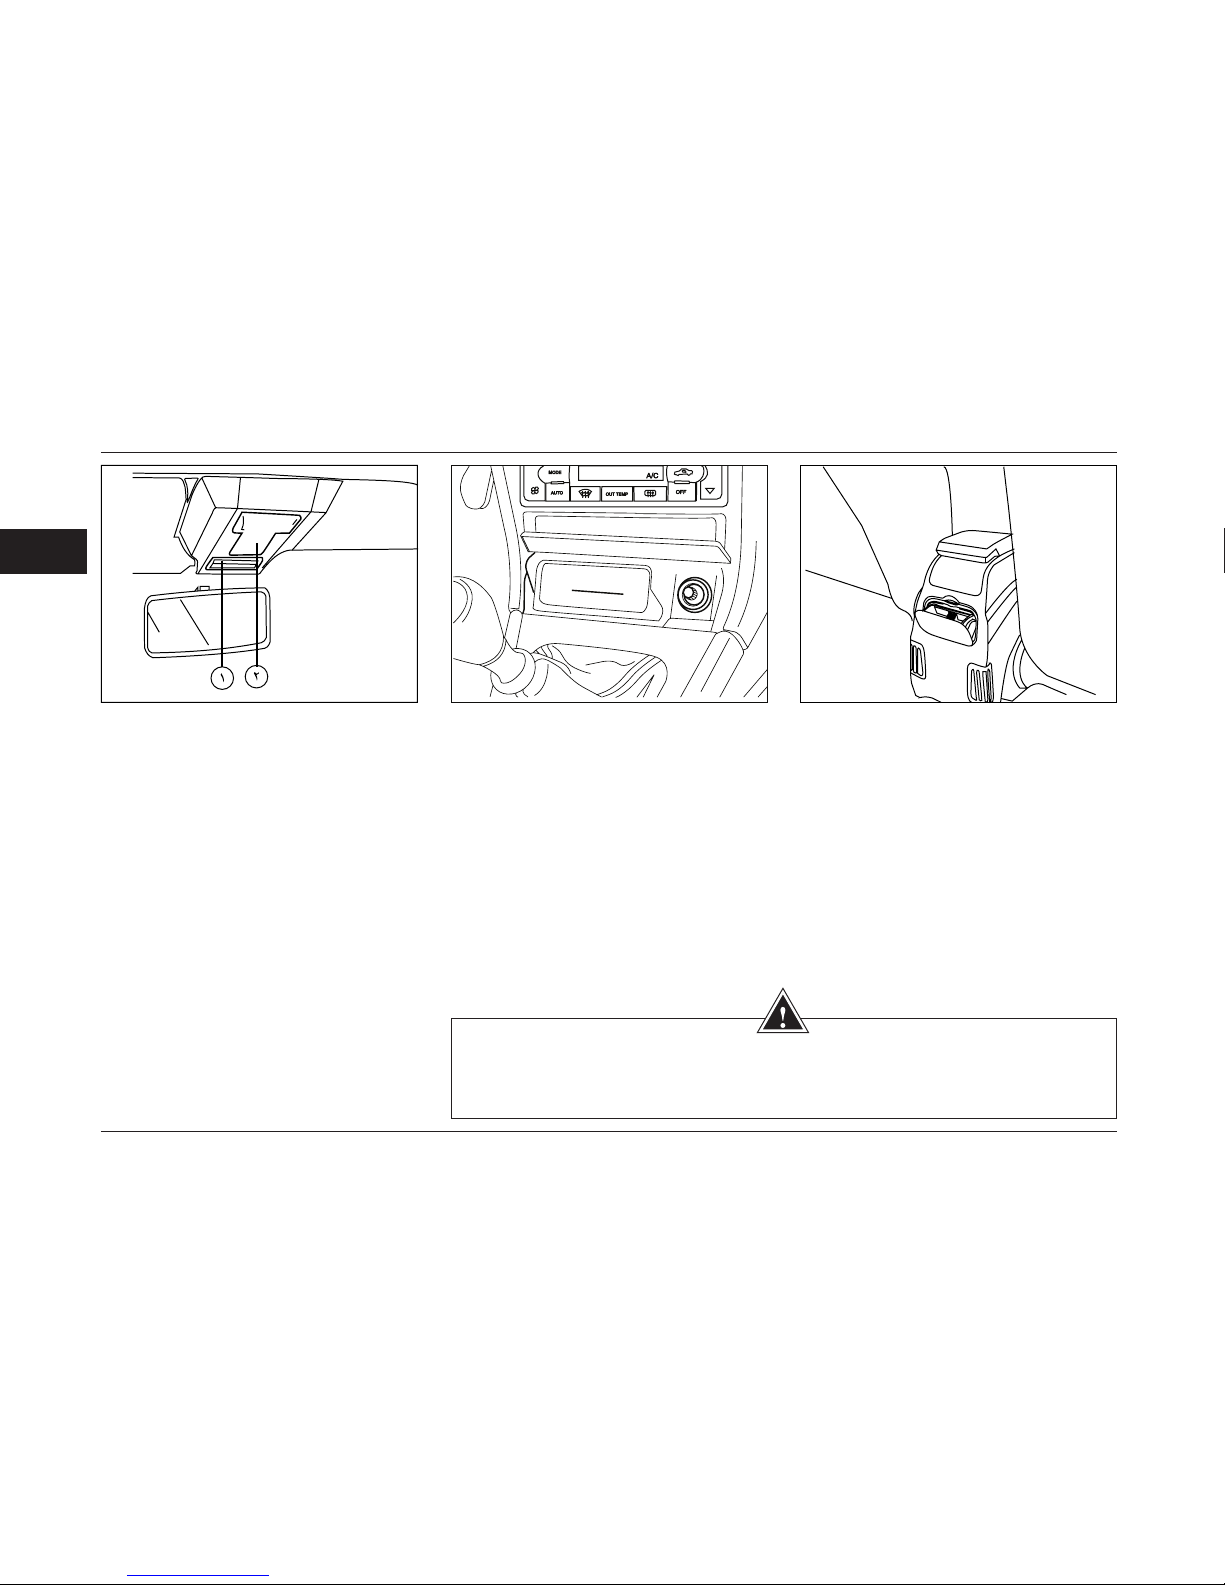
72
2
INTERIOR EQUIPMENT
Interior Equipment
1-Front and rear ceiling lights:
- Pressing forward :Continuous light.
- Middle position :The ceiling lights will be
on and off by opening and closing of the
front/rear doors.
-Pressing backward: Off.
2- Map reading light ( Study light ): Turn
the switch key to the right or left.
Front ashtray and lighter:
Press ashtray door to open the trap
door. To discharge,pull out the ashtray.
Rear ashtray:
Press the upper edges of the ashtray
to open it and pull it out to discharge it.
WARNING
Ashtrays are dangerous spaces from re catching point of view. Avoid putting paper
pieces or other inammable materials in it.
Page 74
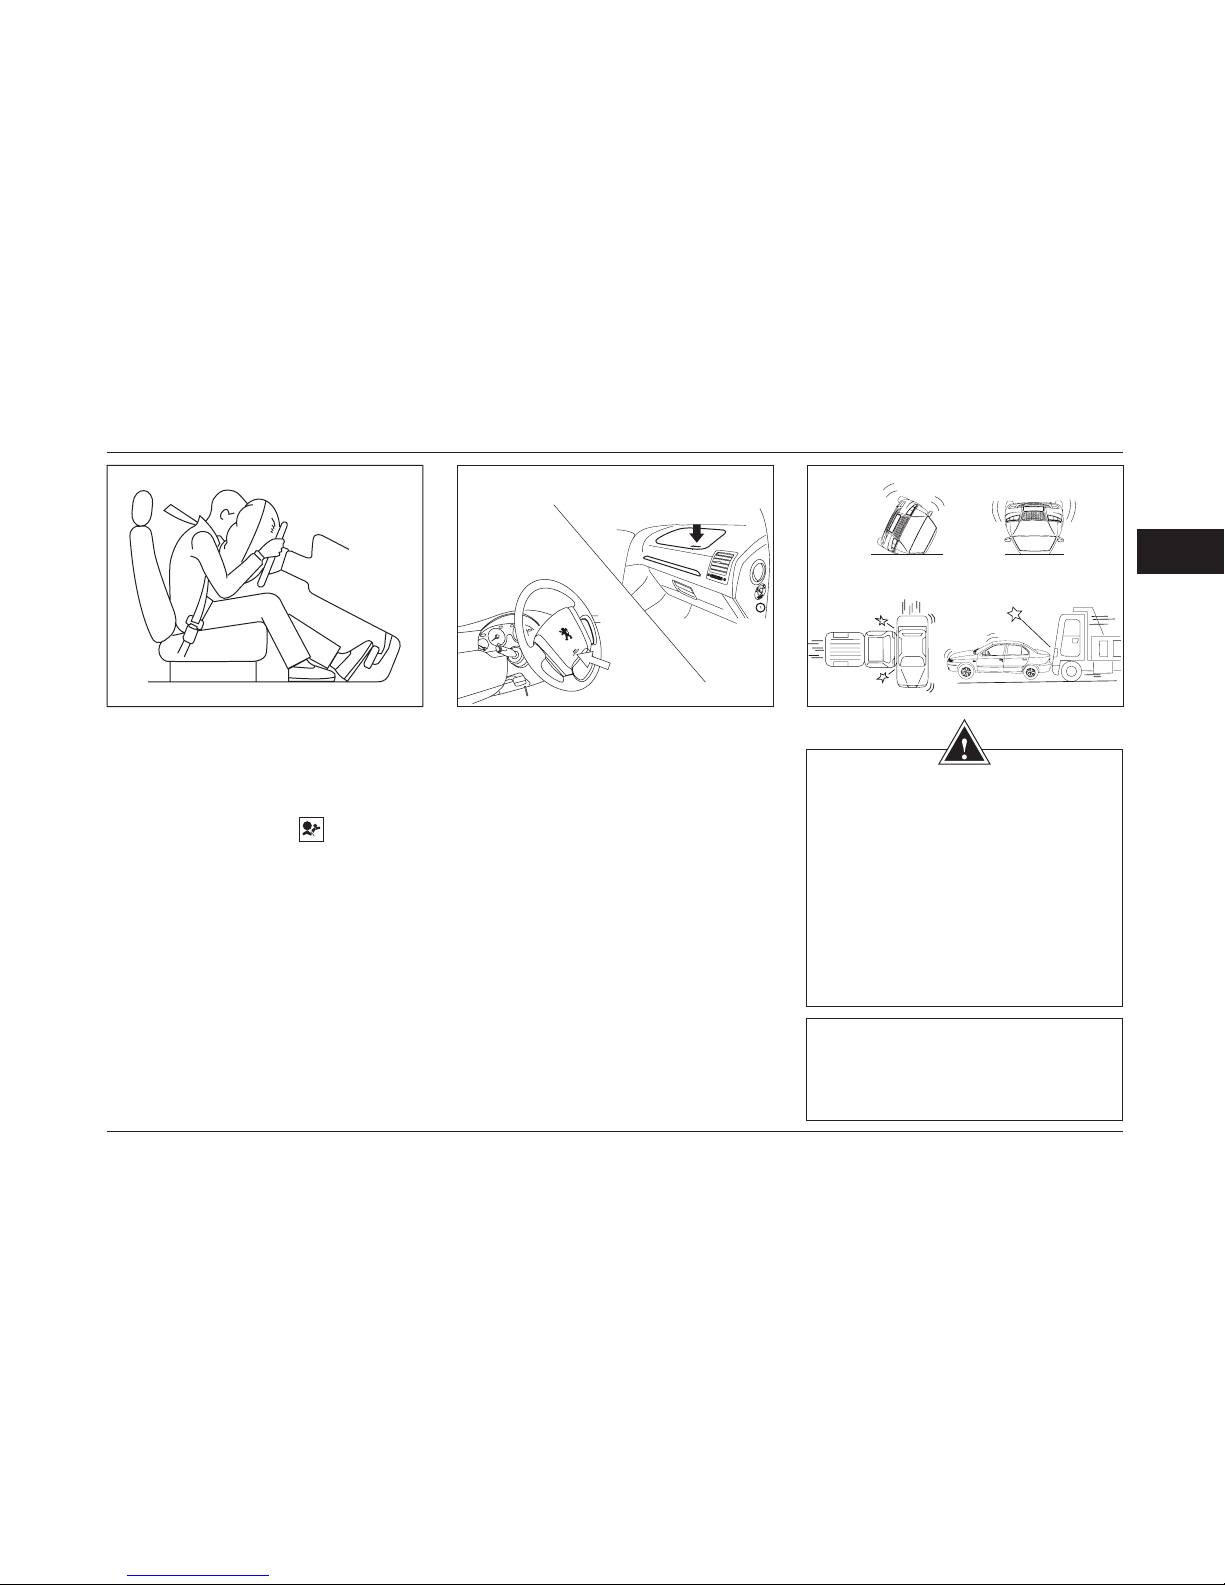
73
2
WARNING
- if the air bag light, which is located on
the instrument cluster, stays on after
6 times blinking, or when the ignition
switch is placed in the ON position, the
air bag light does not light up and does
not blink 6 times, vehicle’s owner should
have the air bag system inspected by an
authorized Iran Khodro dealer as soon as
possible, otherwise vehicle’s owner shall
be responsible for any and all loss due
to ignorance and delay in referring to an
authorized dealer.
with air bag system.
Passenger air bag is located in the upper
right hand dashboard and SRS AIRBAG
carved on it.
The air bags are designed to inate only
in severe frontal collisions. They are not
designed to inate in rear impacts, side
impacts, rollover or minor frontal collision.
The air bags deploy only one time during
an accident. They inates and deates so
quickly that you may not realize that it has
activated. An activated air bag does not
prevent you view and is not so tough that
you could not exit the vehicle.
Be aware that no system can prevent
all possible injuries that may occur in an
accident.
AIRBAG
Airbag
In addition to safety belt and force limiter,
your vehicle is equipped with air bag too.
When you turn the ignition switch to
the “ON” position, the Air Bag light on
the instrument cluster
comes on.
Otherwise, (as below) suggests a fault
in the air bag system or safety belt pretension which should be referred to the
dealer of the car and x it. Otherwise, the
vehicle owner will be responsible.
- Air bag light stay on after blinking 6
times.
- When the ignition switch is placed in the
ON position, the air bag light does not
light up and does not blink.The driver’s
front air bag is located behind the center
pad of the steering wheel. The words
“SRS Airbag” are molded into the air bag
covers to identify the vehicle is equipped
NOTE:
To control the air bag indicator ashes, in case
of any two consecutive placing the switch in
ON position, it should be placed at least three
seconds on the off position as well.
Page 75
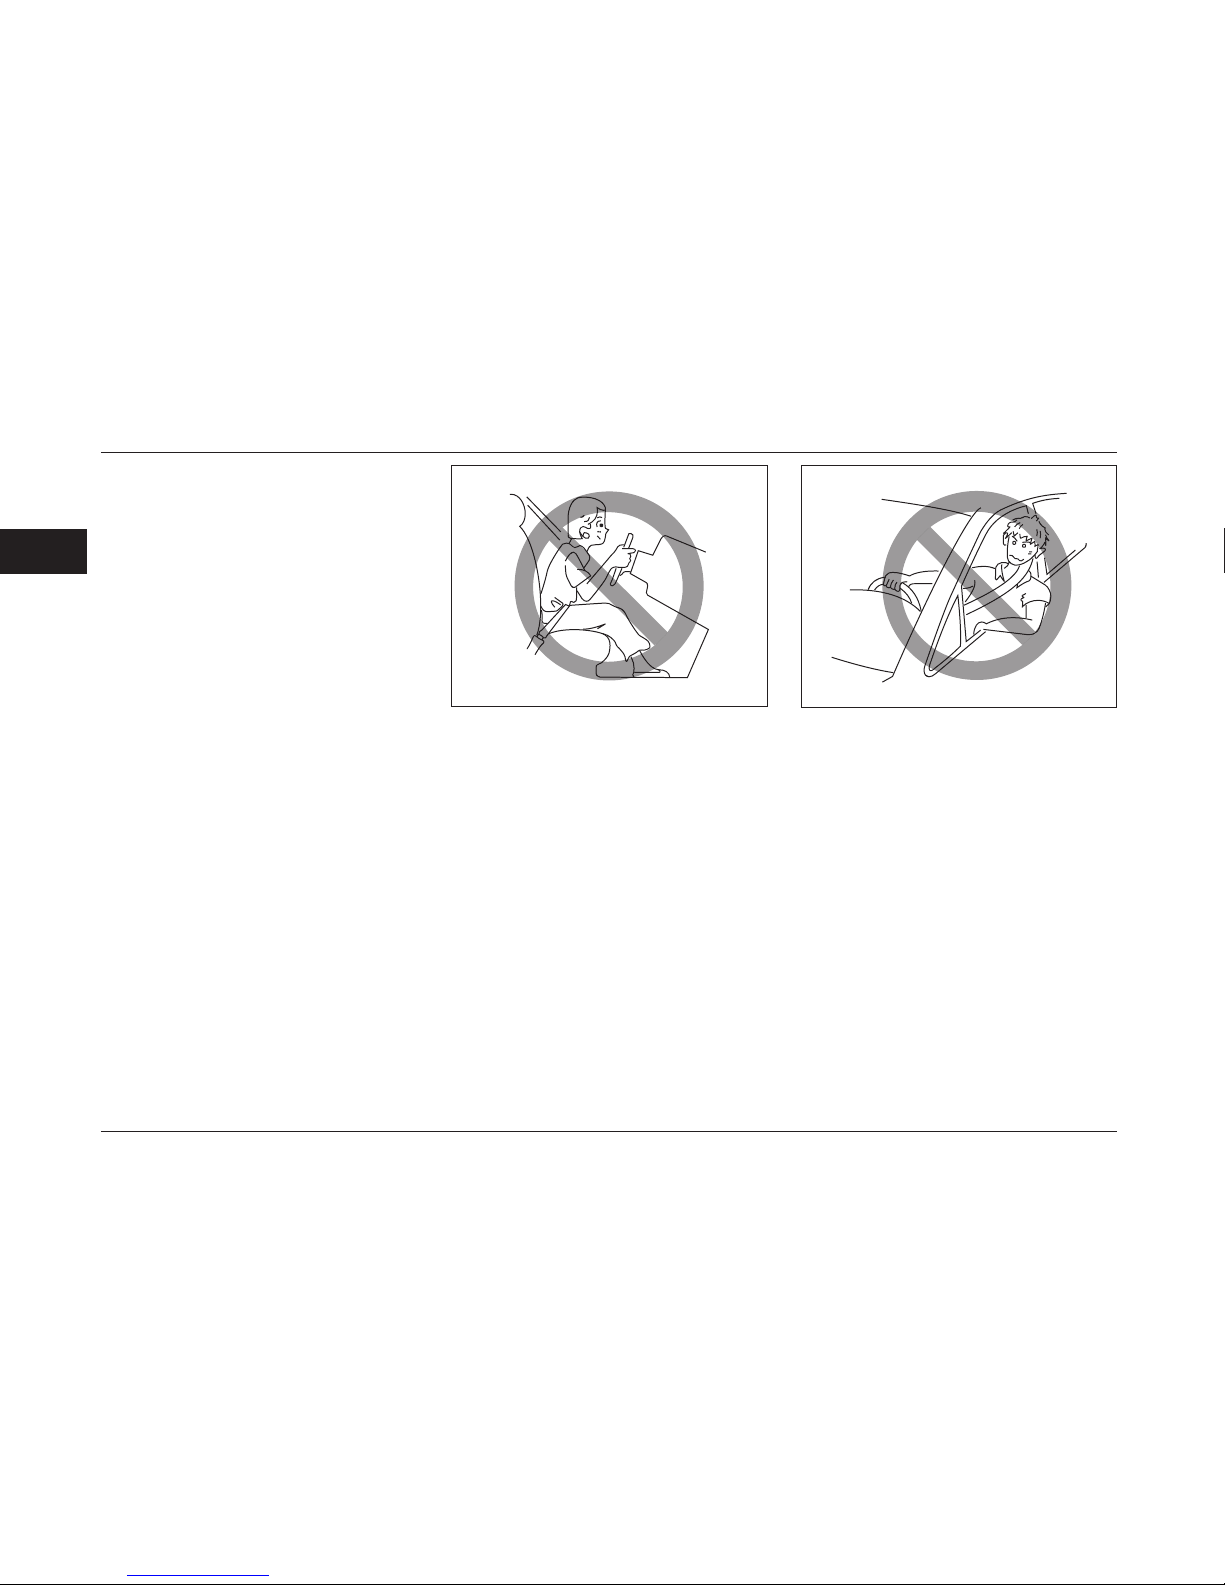
74
2
Servicing and maintenance of the air
bag system
If the air bags inate once, have the air
bags and related components replaced
by an authorized Iran Khodro dealer as
soon as possible.
To prevent damage or unintended ination
of the air bag system, be sure the battery
is disconnected and the ignition switch
has been in “LOCK” position for at least 90
seconds before performing any electrical
service work on your vehicle.
Scrapping a car that has an uninated
air bag can be hazardous. Have an Iran
Khodro dealer to deactivate the trigger of
the air bag.
When driver is properly restrained by
wearing seat belts, the air bag has its
maximum protection effect. So adjust the
your seat to the most rear position, sit up
straight and fully back in your seat.
Never lean over the vehicle’s steering
wheel or door.
Passengers are not in their position, very
close to the air bags inating and may
cause injury.
AIRBAG
Page 76
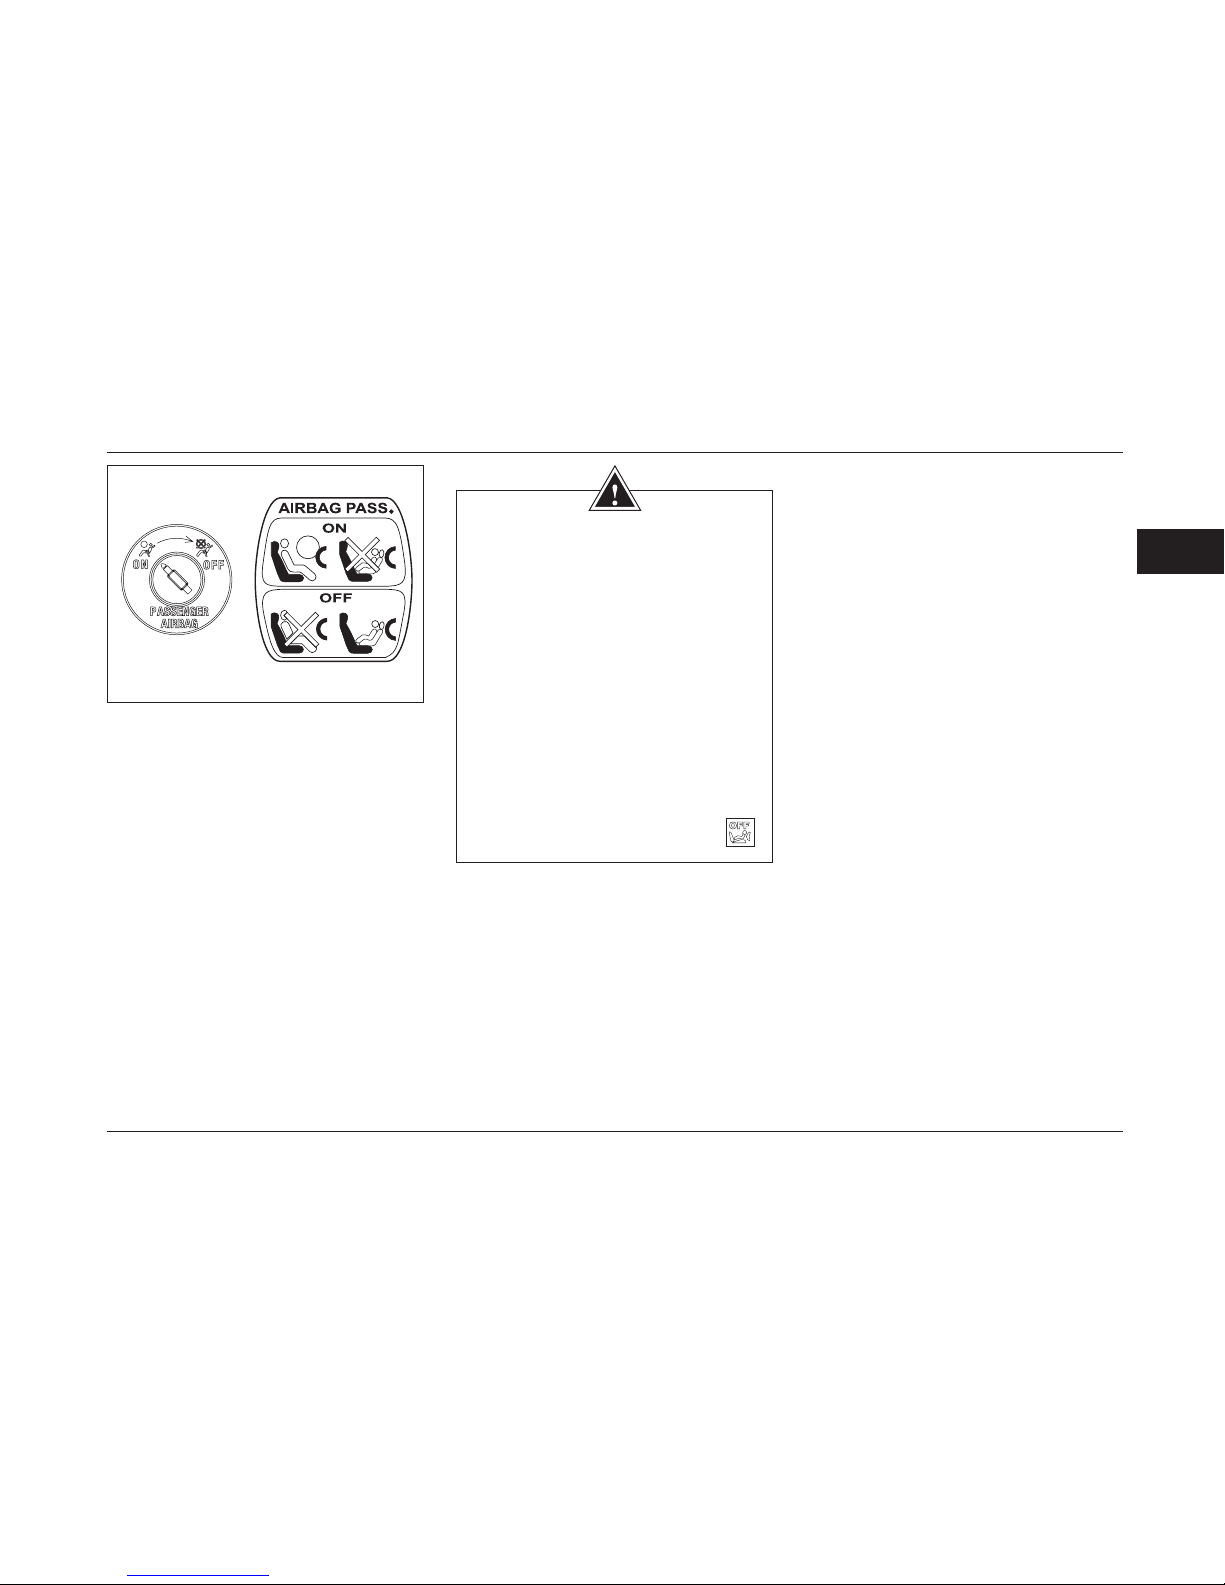
75
2
AIRBAG
Passenger Air Bag Label*
This label is on the side part of the glove
box and it means if the air bag arming key
is in ON position, do not install rear facing
child restraint in the front passenger’s seat.
It is dangerous for passenger sitting on the
front seat while air bag arming key is in
OFF position.
Arm the air bag to protect the front
passenger as soon as taking out the child
restraint from front passenger’s seat. Make
sure that the front passenger air bag’s
disarming light on instrument cluster to be
off.
WARNING
- Make the seat belt as tight as possible
on the passenger body. If so, the seat
belt enjoy of better performance.
- To achieve the greater safety and better
performance of the seat belt at the time of
air bag activation, always keep close the
seat belt.
- Do not install child safety seat in the
front passenger seat. Because if the front
passenger side air bag operation, the
probability of death or serious injury to a
child on the seat (rear facing) is very high.
If forced to use the front seat, deactivate
the air bag by deactivator which is located
in dashboard side. In which case the
indicator light on the front panel regarding
deactivation of the air bag will be on.
Page 77
76
2
Warning
- Any servicing on the passenger security system (pre-tensioner, air bag, electronic control unit,
wiring) or re-use of this system in another vehicle, even if is the same vehicle, is expressly
forbidden.
- Use only factory standard steering wheel and never replace it.
- Covering of the air bag is expressly forbidden
- Do not attach anything (clip, logo, watch, mobile stalk, etc.) on the steering wheel air bag.
- No alteration is allowed on the air bag system.
- Opening of the steering wheel is forbidden.
- Have all securing equipments to be inspected after any collision
- in order to insure proper performance and avoid sudden ination of the air bag and pre-tensioner
system, only trained personnel of the Iran Khodro dealers are permitted to repair or service the
air bag and/or pre-tensioner system.
- Arming or disarming front passenger air bag should be done only when the vehicle is off.
- Do not install rear-facing child restraint system on the front passenger seat when there is a fault
in function of the air bag arming or disarming switch.
- Non-use of safety belts by front seat passengers, if the air bag acts, will cause damages.
-When driving never get your hands on the steering wheel spokes and or not the central part
of the steering wheel.
- Putting feet on the dashboard, please avoid.
- One of the inevitable consequences of opening air bags, irritation of the skin in exposed
areas. In conjunction with the opening of the air bag, a sound is heard and the amount of
powder is released that is natural.
- Note that the air bag components after opening (action), are hot for a while.
- Air bags, are supplement safety belt protection system against accident. Driver and all
passengers must fasten their seat belt at all times to minimize the risk of severe injuries or
death in case of accident.
Page 78

77
DRIVING
3
*
If equipped
DIGITAL INSTRUMENT PANEL ............................78
WARNING LAMPS .................................................82
DIGITAL DISPLAY INSTRUCTION ........................85
STARTING AND DRIVING ..................................... 86
FUEL ECONOMY....................................................88
DRIVING & ENVIRONMENT ...................................90
WINTER PRECAUTIONS .......................................91
STARTING AND DRIVING (CNG MODE)* .............. 92
Page 79

78
3
*
If equipped
DIGITAL INSTRUMENT PANEL
Instrument panel indicators
Warning and indicator lights (above gure)
1- Low fuel warning light
2- Fuel gauge
3- Engine oil pressure warning light
4- Battery charge warning light
5- Brake oil level or handbrake applied warning light (two lights)
6- Brake pads wear warning light
7- Emergency stop warning light
8- Proof-meter warning light
9- Coolant uid temperature indicator
10- High temperature of the coolant uid warning light
11- Intelligent speed control system indicator *
12- CNG fuel indicator *
13- CNG engine digital instrument panel indicator *
14- ABS and EBD braking system indicator
15- Open door warning light
16- Air bag system activation indicator
17- ABS braking system warning
18- Immobilizer Indicator
Indicator lights and gages (below gure)
1- Anti-glare headlights
2- Tachometer
3- Left side asher
4- Right side asher
5- Engine digital indicator
6- Speed indicator
7- Adjusting the instrument panel illumination intensity
8- High beam headlight
9- Front fog lamp
10- Rear fog lamp
11- Anti-theft system indicator *
12- Driver seat belt
13- Activating gear box indicator *
14- Driver air bag indicator
15- Passenger air bag system deactivation warning
16- intensity of display light indicator
17- Fueling side indicator
Page 80
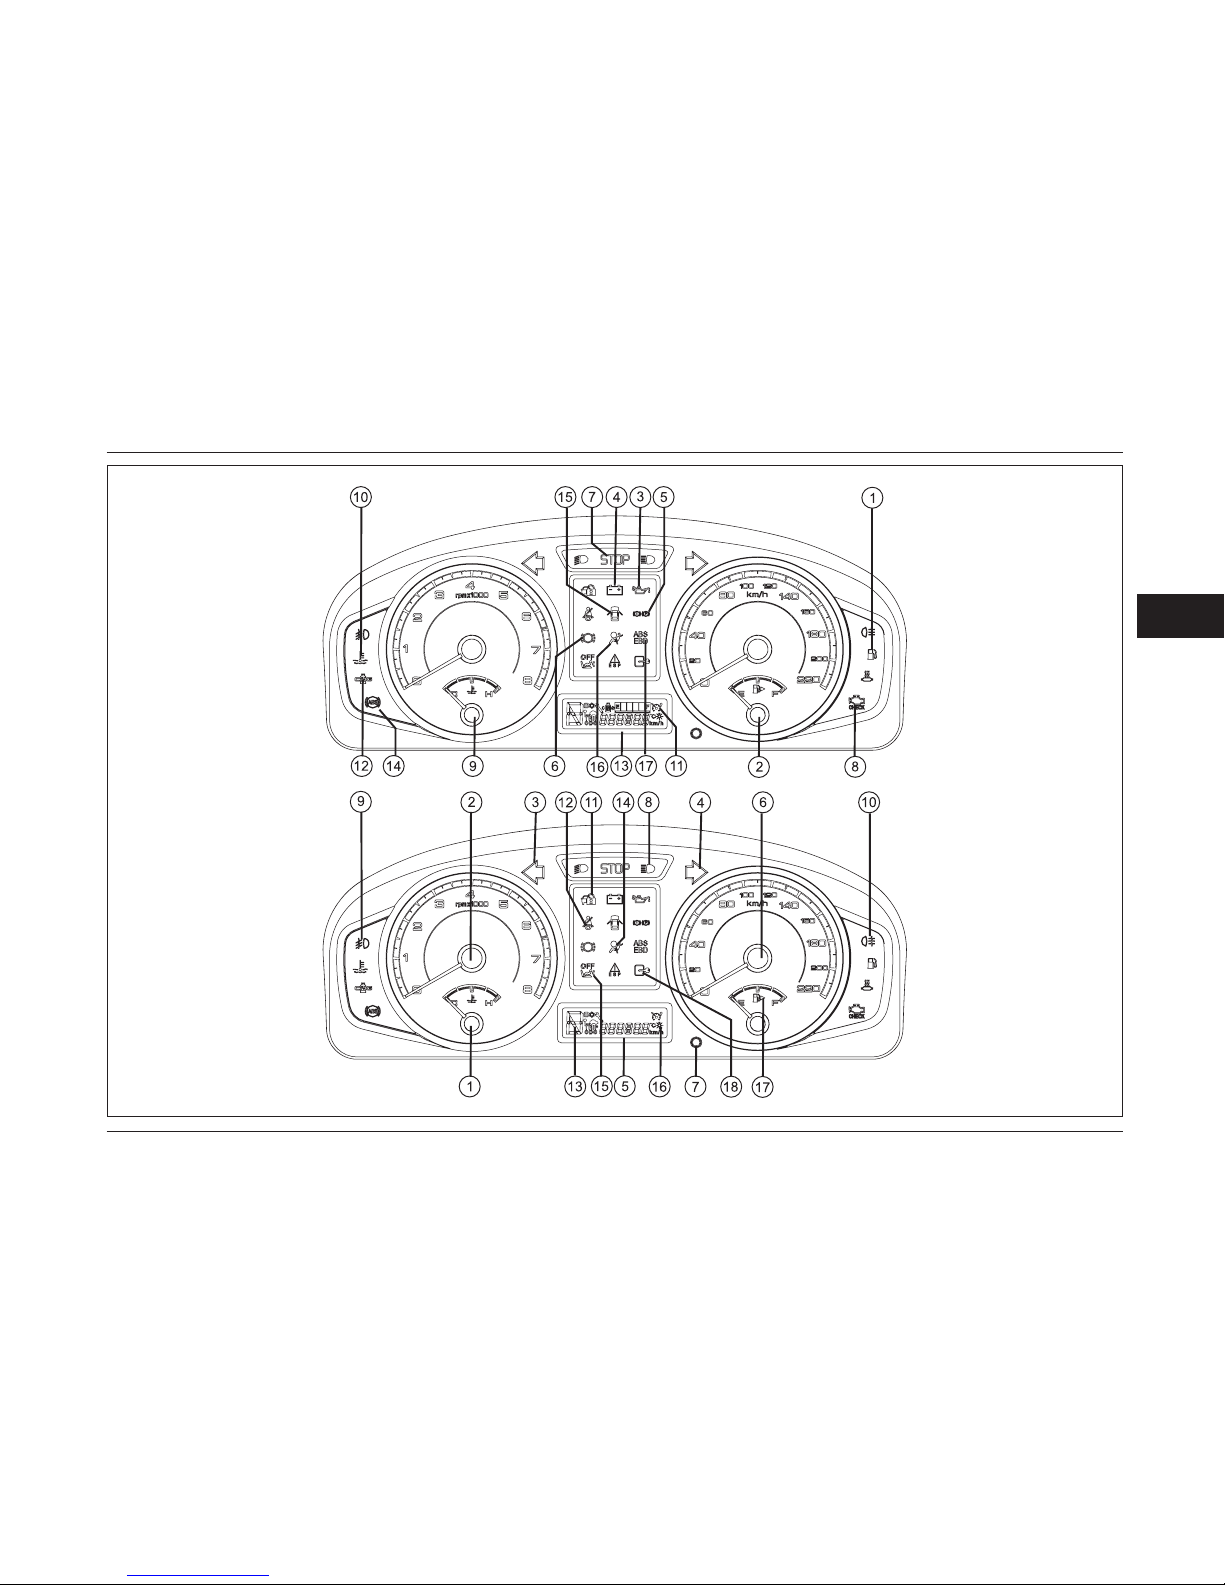
79
3
DIGITAL INSTRUMENT PANEL
Page 81

80
3
DIGITAL INSTRUMENT PANEL
Fuel Gauge:
The pointer falls to zero when the ignition
switch is off, but it shows the tank fuel
level when the switch gets on.
A warning indicator light in the fuel gauge
lights up when the fuel level falls to 7 litters.
Refuel as soon as possible. Fuel tank
capacity is 70 liters.
Tachometer:
It shows the engine speed in revolutions
per minute. To avoid engine damage,
never let the tachometer pointer remain in
red section for a long time.
Speedometer:
It shows the speed of vehicle in Km/h.
Coolant Temperature Gauge:
This gauge indicates the temperature
of the engine coolant, When the engine
warms up, the pointer rises to the middle
of the gauge, and it remains until the
engine operates in normal condition.
If the pointer reaches the red section, it
shows that coolant is overheated causing
damage to the engine. In this situation
stop the vehicle immediately considering
safety conditions and seek help from
qualied persons to repair.
Possible Causes:
- A faulty fan- Check fuses, and change
them if necessary.
-The coolant system leakage; let the
engine cool down, and then check the
coolant liquid level.
-A fault in the water pump operation
Distance Recorder Reset Button (Trip
Recorder Reset Button):
It is used to show different situations in the
digital display panel and reset information
in the related condition.
Page 82
81
3
WARNING LAMPS
*
If equipped
Direction Indicators-Green
The directions of indicators (turning to the right and turning to the left) are dened by arrows. When you turn on the left or
right signals, the corresponding green arrow on the instrument panel will ash along with the respective turn signal lights.
If the asher (hazard warning light) is used, both indicators ash together. If either warning light ashes very rapidly, this means that
the corresponding direction indicator is not operating.
NOTICE: This situation occurs only when one of the front or rear direction lights does not work properly, but if one of the side lights is
not working, it will have no effect on the warning light ash frequency.
NOTE: If the vehicle experiences an excessive speed fall, the alarm system automatically turns on the asher for at least 5
seconds.
This is a warning sign for excessive speed fall.*
Headlamp Dipped Beam - Green
It lights up when using dipped (dimmed) headlights
Headlamp Main Beam – Blue
It lights up when using main-beam headlights
Front Fog Lamp – Green
It lights up when using front fog lights – green
Rear Fog Lamp – Orange
It lights up when using rear fog lights.
Page 83
82
3
Instant Stop Warning – Red
Should this indicator lights on, stop immediately and switch off the engine. Contact with dealer or authorized representative.
Warning
If the
light comes on for any reason, driver should stop the vehicle. In case he continues driving, vehicle owner will be responsible
for any resulted damages.
Automatic Engine Troubleshooting Device – Orange
This indicator lights up when the engine troubleshooting device detects a failure.
When the switch is in the second position (on), as a sign of system check up, this light turns on and after the engine is turned on it will
turn off. It will resume lighting if any engine problem occurs while driving.
NOTICE: If the indicator lights up and the car operate normally, refer to an authorized dealer, although, you can still drive.
If the indicator lights up, the car does not operate normally. Do not drive on high speed and refer to an authorized workshop immediately.
Oil Pressure-Red
It lights up when the ignition switch is in the second position to indicate correct operation and it will turn off when the engine
starts. If the oil light stays on when starting the engine or turns on when driving the car, the engine is exposed to a serious damage,
the vehicle should be stopped immediately and the engine turned off while taking into account safety considerations . Get help from an
authorized expert before moving the vehicle once again
Battery Charging – Red
It lights up as a bulb functioning check when the ignition switch is in second position and it will turn off immediatyely when the
engine starts. If it remains on when starting or lights up when driving, there is a problem in the battery charging system. Immediately
refer to the workshop to conduct repair.
WARNING LAMPS
Page 84
83
3
WARNING LAMPS
Doors Open-Red
It lights up when at least one of doors is not closed properly. It operates even when the engine is off. Avoid driving when indicator
lights up.
Brake System Alarm – Red
This indicator is turned on for a few seconds while starting the engine and then it turns off, and it turns on when the hand brake slides
up or when the brake uid level is low. If the indicator of brake system alarm doesn’t work or remains on while starting the vehicle or
after sliding down of hand brake, without delay ll the brake liquid reservoir and if the indicator remains on after lling the reservoir and sliding
down of the hand brake, while considering safety precautions, transfer the vehicle to an authorized workshop for evaluation and repair.
Driver Safety Belt – Red
By locking of the metal tongue of the driver safety belt in the special buckle and with a “click”, we make sure of its locking. With
this action the indicator on the panel is turned off.
Anti – Lock Brake Warning System (ABS) – Orange
It lights up when starting the car and keeps on for a few seconds, and then it turns off. If it does not turn on when starting
the engine or stays on after the engine starts running, it indicates that there is a problem in the anti-lock brake system.
In such a condition move the car immediately and with safety considerations to the authorized workshop for inspection and repair.
Driver’s air bag system warning – red
Starting the vehicle the indicator light blinks 6 times and then the vehicle must be turned off. Otherwise, (as below) suggests
a fault in the air bag system which should be referred to the dealer of the car and x it. Otherwise, the vehicle owner will be
responsible.
- Air bag light stay on after blinking 6 times.
- When the ignition switch is placed in the ON position, the air bag light does not light up and does not blink.
Warning disabled passenger air bag - Orange
Turn on the lights indicate the passenger air bag is deactivated. Until the passenger air bag is deactivated, it remains light. In case of
activating the ashing lights of the vehicle, please contact one of the Iran Khodro authorized dealers.
Page 85
84
3
*
If equipped
WARNING LAMPS
Brake Pads – Orange
It lights up to alert that the brake pads should be check and replaced if necessary.
Low Fuel Level Warning- Orange
Next to the fuel gauge there is a warning light, when the light is on it shows that less than 7 liters of fuel remains in the fuel tank.
Refuel as soon as possible.
High Coolant Temperature Warning – Red
Beside the coolant temperature indicator, there is a warning light, if the coolant temperature pointer stands in the red section
and the lamp lights up, stop immediately ( without the engine turning off) and seek help from an authorized expert.
Theft Deterrent System- Red
It indicates that the theft deterrent system is activated when blinking.
CNG Fuel Position Indicator – Green*
If fuel consumption changes from gasoline to CNG the indicator will blinks, and if the CNG mode is running, the indicator turns on.
Immobilizer Indicator - Red
After turning off the car, the indicator ashes once per 4 second to indicate that the vehicle immoblilizer system is activated.
Page 86
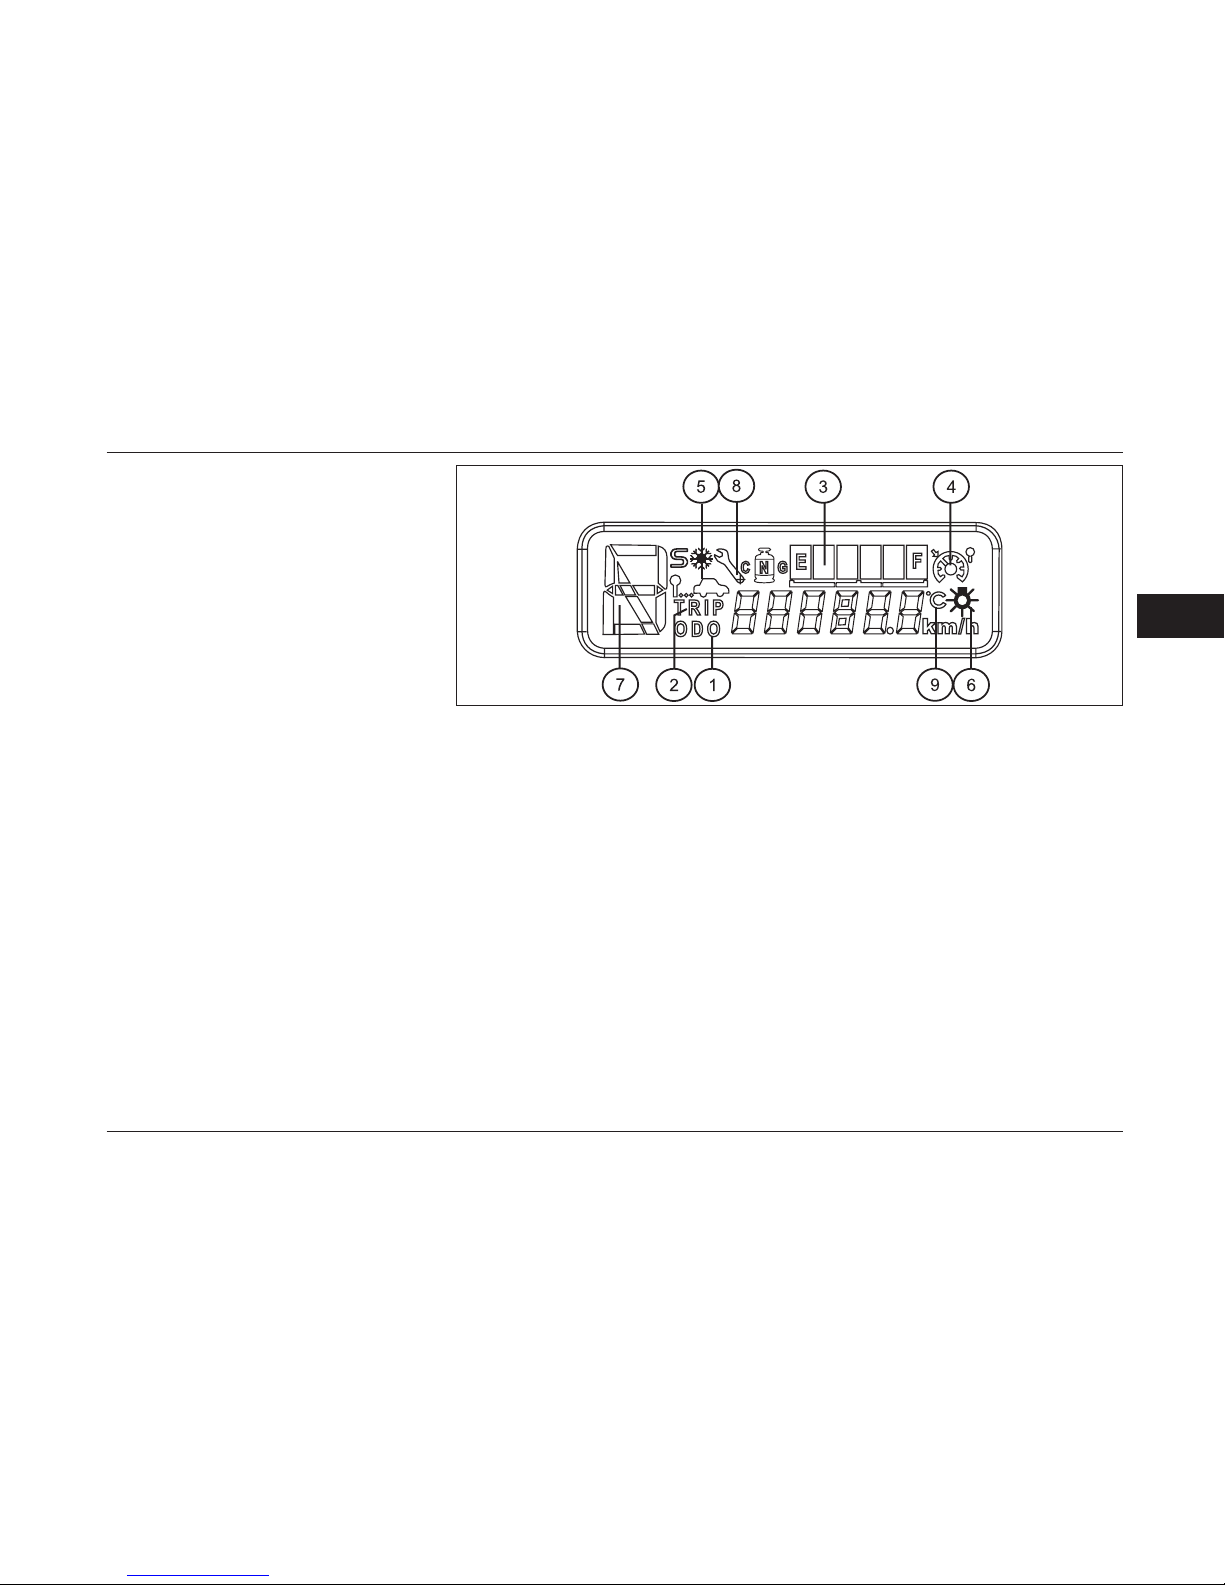
85
3
*
If equipped
DIGITAL DISPLAY
Digital display screen guide
This display is located at bottom of the
instrument panel (below the speed indicator)
and shows you following information by
pressing reset and change mode.
Push change mode knob quickly to switch
between different modes. If you push it
for about 2 second information of the
same mode is reset to zero (information
could be changed to zero).
Following information could be reset to
zero:
1-When the ignition switch is turned to “ON”
the display shows odometer. odometer
records the total distance (km) the vehicle
has been driven since being
delivered to the owner. The tripmeter
could not be reset to zero.
2-Trip meter indicates the distance (km)
the vehicle has been driven since it has
been reset to zero. Push reset knob for 2
second to reset the distance.
3-This indicates the pressure of the gas in
the LCD and is made
of 6 black stripes. When gas pressure is full
the 6 stripes are active and by decreasing
the gas pressure the number of these
stripes decreases. Gas tank insufcient
warning is indicated by the blinking of
the rst stripes in LCD and gas pressure
become zero the last stripes goes off*.
4-If this indicator is on it means the
intelligent speed control system is active
and if it is off it means the intelligent speed
control system is inactive.*
5-This indication shows the average speed
since it has been reset to zero. Push reset
knob for 2 second to have it reset to zero.*
6-This indicates the intensity of the
instrument panel illumination which could
be changed by the illumination control
knob. Push reset knob for 2 second, the
indication starts to blink. Then every time
that you push the knob one of the symbols
comes on and the illumination intensity
of the instrument panel increases. To exit
this state, just push the knob for 2 second.
7-Indicator of the automatic gear box position*
8- Service Indicator: If ABS، Brake Pads and
or Air bag light lights, the indicator on the LCD
turns on.
9- Outside Temperature Display
Page 87
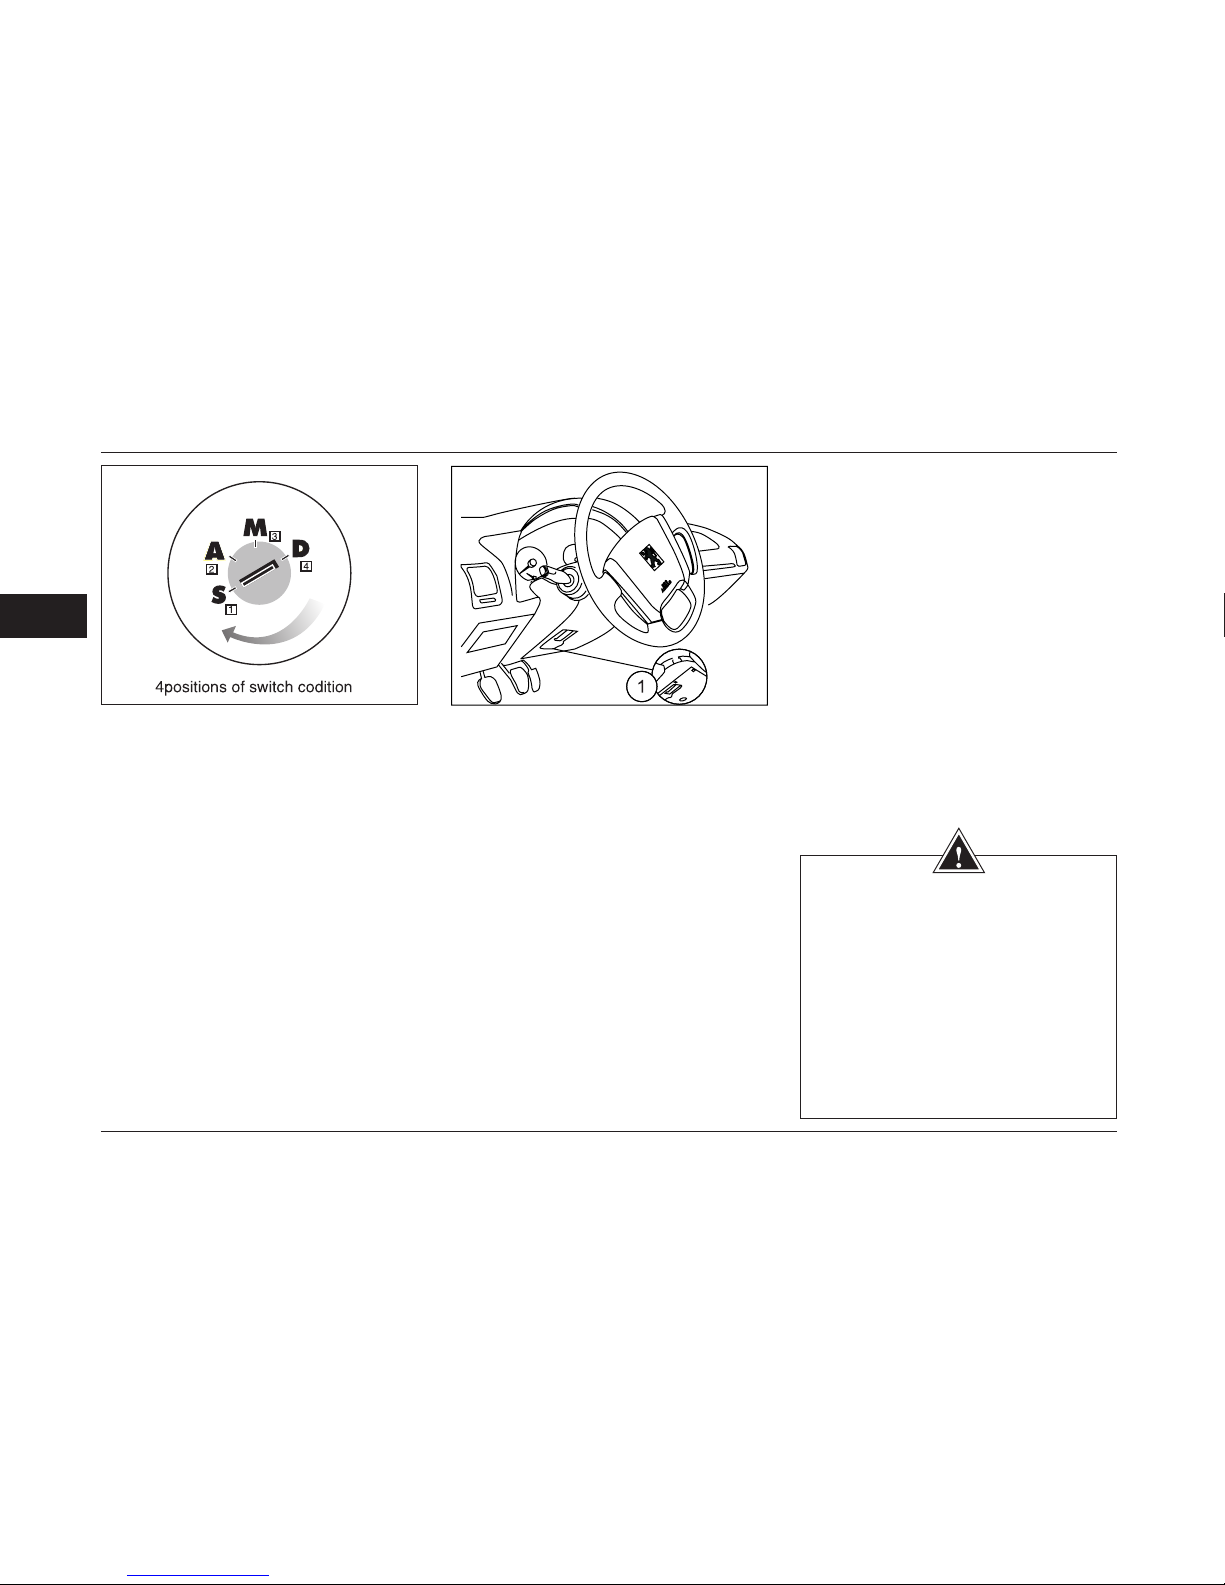
86
3
STARTING AND DRIVING
Ignition of Injector type Motors
Releasing of the lock for steering wheel:
Move the steering wheel slowly and turn
the key in the switch hole.
Ignition switch
Has four positions
1- Position S: Main switch is closed.
(Shut)
2- Position A: Electric circuit forelectrical
equipments is connected but ignition circuit
is disconnected. In this situation, the warning
sign for charging battery lights up. (Aids)
3- Position M ignition of engine:
The ignition circuit is connected. In this
situation, the following warning lights turn on:
-Reduction in motor oil pressure.
-Increase in temperature of liquid in
cooling system.
-Charge of battery.
-Emergency stop. (Stop)
-Decrease in brake oil level or engagement
of hand brake.
-Trouble shooter.
4- Position D Starting the engine:
- Immediately leave the switch key, after
starting of the engine.
- When the engine is on, the warning
lights will turn off.
Adjusting the steering wheel
To adjust height of the wheel:
-Press the lever until the wheel is out of lock.
-Move the wheel up and down, as desired.
-After adjustment, pull the lever until it
gets locked.
WARNINGS
-Never adjust the steering wheel during
driving. This is a very dangerous action.
-strictly avoid starting of engine and
keeping it on for long time in conned
spaces.
-when the vehicle is moving , avoid
switching off the engine or taking out
the switch key , because the steering
wheel gets locked and steering will
not be possible.
Page 88
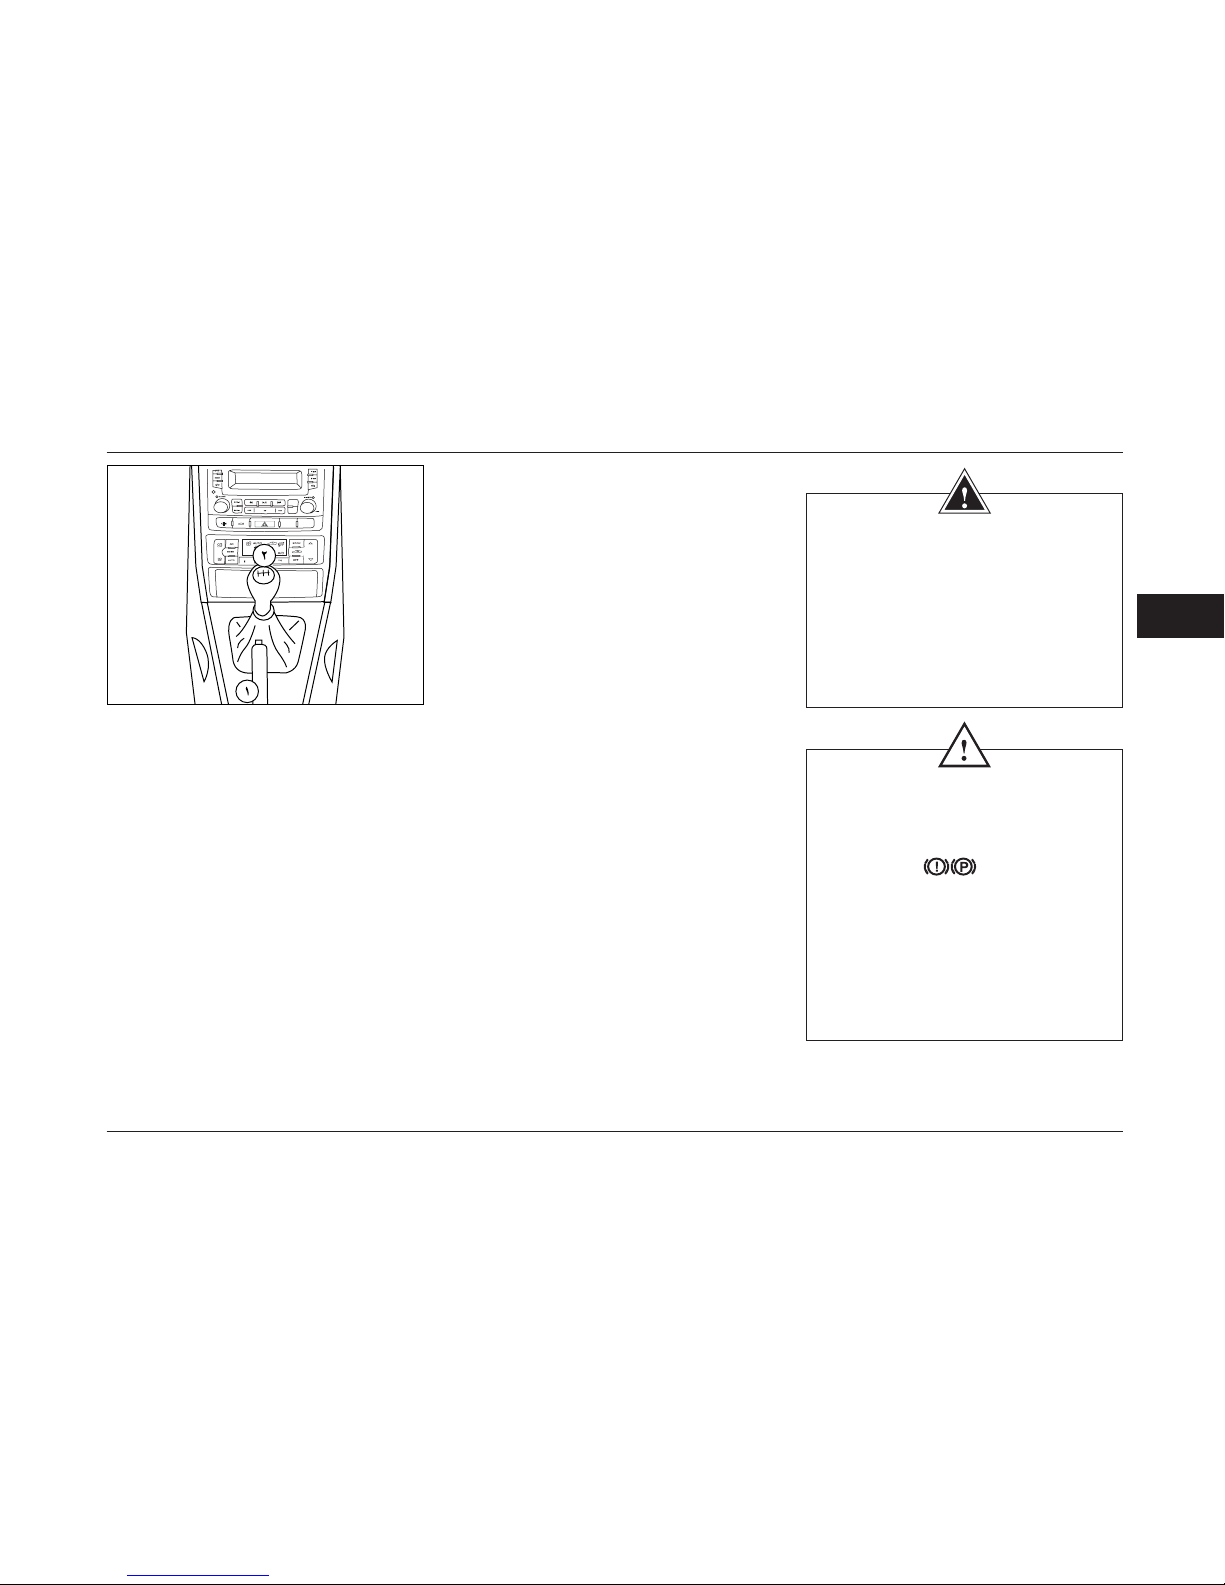
87
3
STARTING AND DRIVING
Manual gear box (Gear shift)
Useful recommendations:
Never intend to drive with cold engine. Never
keep the engine working in conned spaces.
When the temperature drops below zero
degrees, push the clutch completely so that
the engine starts easily.
Manual brake
1-To lower the hand brake, press it’s button.
Gear lever (Gear Shift):
2-The modes of changing Gear Lever is
sketched on the head of Gear Lever.
The reverse gear should be engaged only
when the car is completely stopped and
engine is running calmly.
WARNING
If the engine is off, the auxiliary brake
system dose not work and more
pressure should be imposed to the
brake pedal. In this situation the
stopping distance of the vehicle will
be increased. Before moving your
vehicle, take all safety precautions.
CAUTIONS
-When parking in a slopped place,
turn the wheels towards the
pavement and put on the hand brake.
-When icons
and STOP lights
up, it shows that the hand brake is
not released or badly released.
-During driving take care that the hand
brake is fully released (the brake sign
will be off), because there is possibility
of warming up the linings.
Page 89
88
3
*
If equipped
FUEL ECONOMY
Saving in fuel consumption
Four main factors in fuel consumption
1-Mechanical conditions of the engine:
Air lter: Dirty or obstructed air lter
reduces the efciency of the engine.
Change the air lters at dened Distances.
2- Fuel system:
Check the injector system and fuel pump
for any leaking.
Petrol: Quality of petrol not only effects
the consumption of fuel, but also, in long
terms, effects the mechanical conditions
and operation of your car.
3- Conditions of the vehicle:
Air pressure of the tires:
Lack of enough air pressure in the tires,
increases in fuel consumptions by 3%.
Carrying weights:
Carrying 100 kg of weight inside the city,
will increase the fuel consumptions by 3%.
4- Resistance against the wind:
Driving with empty roof weight space ,
increases in fuel consumptions by 10%.
Therefore immediately after nishing
your job with roof weight space take it out
along with wind breaker and it’s mirrors.
During Driving void opening the windows.
it is better if you use the air vent channels.
WARNING
Do not place your car, when engine is
still running, in spaces which there is
possibility of contact with inammable
substances .(like dry grass, leaves,...)
CAUTIONS
The suitable petrol in your car, is the
super petrol without plumb with gure
of Octane of 95.
Page 90
89
3
FUEL ECONOMY
Saving in fuel consumption
-Driving:
Starting to move: Do not intend to drive
fast, immediately after starting of engine.
Drive slowly. Do not warm up the engine
when you are not moving, but try to drive
rst few kilometers with average speed
until the engine warms up.
Revolution per minute (RPM):
Driving with too high or too low RPM will
increase in fuel consumption. To avoid
unnecessary increase of RPM, quickly
use the higher gear. Always use the gear
which is suitable with the road conditions
and calm driving conditions. Avoid sudden
acceleration.
Before reduction of speed in a sloped
road, and before over taking and
accelerating, come down to lower gear.
(specially from gear no.5)
Electrical devices: Use the electrical
equipments, only when you need them.
The rear glass heater, to remove sweating
and freezing of the glass, increase in fuel
consumption by 10 %.
The weather and road conditions:
Short distances: if the engine is cold in
rst 5 kilometer of driving, it will increase
in fuel consumption by 25 %.
Spinal and unsmooth roads:
Driving in such roads, will increase in fuel
consumption by 10 %.
Wind: Existence of wind during driving
will increase the fuel consumption .
Drop your speed in these situations. The
optimum fuel consumption takes place in
speed of 90 kilometer per hour.
WARNING
-To avoid excessive increase in RPM, in
RPMs more than 6500, the fuel injection
to the engine will be disconnected.
-Never put the engine under pressure
before warming up. (Do not drive speedy)
If the engine dose not stop with the
switch key, push on the brake pedal,
engage the gear and leave your foot
from clutch until the engine turns off.
Page 91
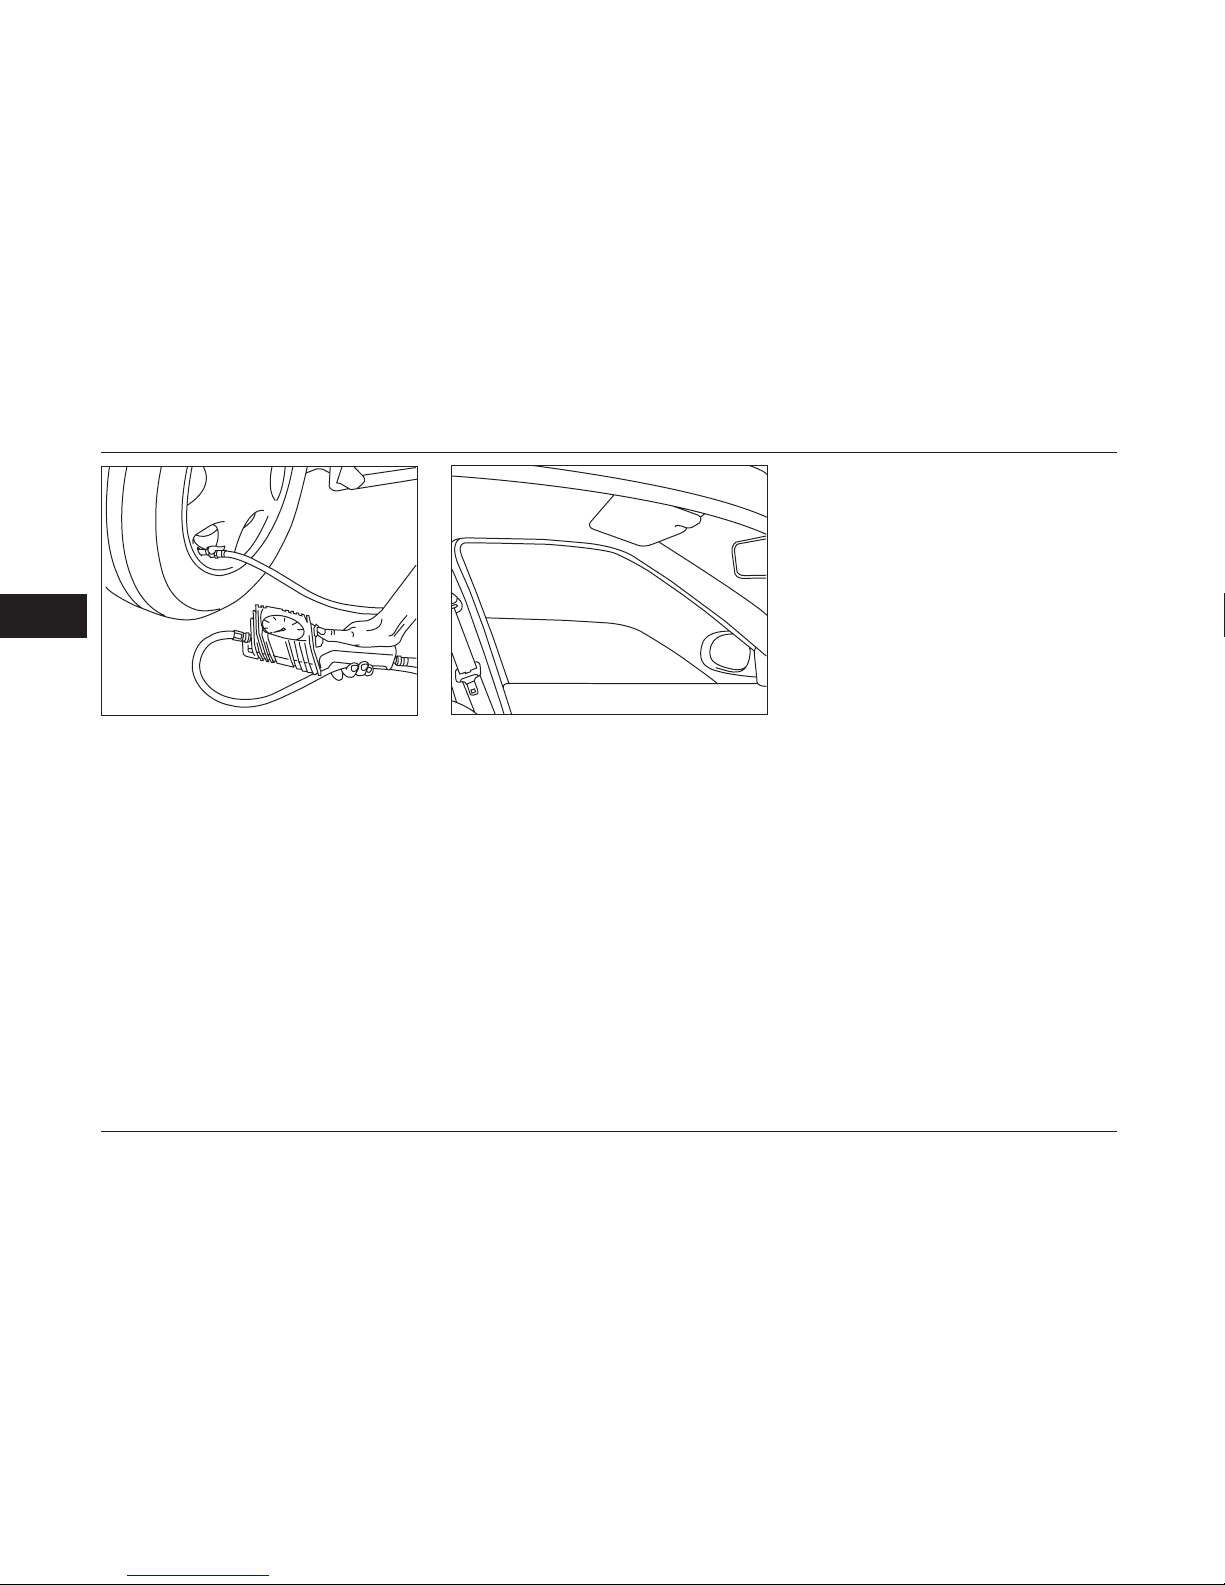
90
3
DRIVING & ENVIRONMENT
Driving & environment
You can reduce environmental pollution
and drive more safely and economically
by observing following advices:
- Use the factory recommended gasoline
and engine oil.
- Prevent gasoline overow while lling
the tank.
- Do not forget to conduct periodic checks
on your vehicle
- Check that the exhaust, oil and fuel system
do not have any leakage.
- Begin driving slowly and right after turning
on the engine.
- Turn off the engine for stops longer than
2 minutes (i.e in trafc jam or behind red light)
- Press the gas pedal slowly and do
not speed up suddenly.Try to keep a
steady speed to reduce not only exhaust
pollutants, but to prevent mechanical
parts erosion.
- Pay attention to the maximum allowed
speed.
- Adjust tires pressure and balance them
if necessary.
- Minimize using the air conditioner to
reduce fuel consumption.
- If you changed the engine oil by yourself,
do not drain the used oil and deliver it to
the rell oil stations for recycling.
- Plan your trips, and combine them
together.
- Avoid driving in busy streets or rush
hours as much as possible.
- Use electronic equipment when strictly
necessary.
- Under- inated or non- standard tires
raise fuel consumption.
- Avoid driving with open windows; it is
preferable to use the ventilation ( it raises
to fuel consumption).
- Avoid fastening the empty roof weights
pace on the vehicle.
- Tire is not approved by the manufacturer
can increase fuel consumption.
- Non- balanced tires will increase fuel
consumption.
Page 92
91
3
WINTER PRECAUTION
Winter precaution
Tires:
Winter tires: if you are using the car in hard winter
conditions like in snowy, freezing and slippery
loads, to select the required equipments, with
regards to the conditions, consult authorized
IRAN KHODRO representatives.
Four season tires:
To gain a higher speed in favorable weather
conditions, all four wheels of the vehicle should
be equipped with four season tires, so that the
stability of the car can be maintained better.
Wheel chains:
In PEUGEOT PARS ,the wheel chains should
be attached to the front wheels. The chains
should be same size of the wheels and be xed
to it, otherwise they cause severe damage to
the brake system
Motor:
Battery: Specially in winters ,make sure the
battery is charged.
Engine cooling system: In cooling system of
your car, a kind of cooling liquid is used that
can ensure resistance against freezing or
system internal chemical erosion. This solution
which to be used in all four seasons of the year,
protects the system in temperatures down to
minus 20 degrees centigrade.
In any case the system can be protected
in temperatures down to minus 35 degrees
centigrade, which in this case, the authorized
representatives should be consulted.
Safety of vehicle
Detach the tag of the key no of your vehicle
from the key hole and keep it in a safe place.
After removing the switch key, turn the steering
wheel until it gets locked.
Safety of the road
Safety belts
According to regulations, use of Safety Belts
are compulsory. There should not be any
modications to it’s installations.
-in wet roads, lack of adhesiveness of the tires
with the road and also delay in brake operation
due to wetness, causes slipping of the car and
increase in stopping distance.
Tires:
Check the air pressure of the tires, regularly.
The difference in air pressure of tires can effect
in returning the steering wheel.
Front lights and side lights
Take care that the front lights and side lights
are in good working conditions and clean and
their lights are adjusted at correct and suitable
height.
Safety in vehicle movement:
Hand brake:
At freezing temperatures, avoid parking your
car for long times. In these kinds of situations,
obstruct the front wheels with something or
clutch the gear on gear no.1 or the back gear.
Main lights and side lights: The front lights
and other lights should be always clean.
Interior and exterior equipments of the vehicle:
The locks and the rubber packings of the doors:
Grease the door locks with a little Graphite
contained oil and Oil the Rubber packings with
parafn.
The aps for entering air into the cabin:
Take care that the outer channels for letting Air
inside the cabin ( beneath the front glass) is not
obscured by snow, ice or leaves in any case.
Front Wind shield wiper:
Before operating the wipers, clean the ice
patches on the front glass.
The front glass cleaner:
To avoid freezing of liquid inside the container,
add a little anti freezing solution to the glass
cleaning liquid.
THE BODY:
At the end of winter season, wash the car
completely and pay required attention in washing
beneath of the body and the mudguards.
WARNING
Never intend to drive in slopped grounds
with engine OFF. The brake booster dose
not operate in this situation.
CAUTION
In vehicles exported to cold climate areas,
having very difcult winter conditions, a
kind of cooling solution is used which can
protect the cooling system of the car up to
minus 35 degrees centigrade.
Page 93
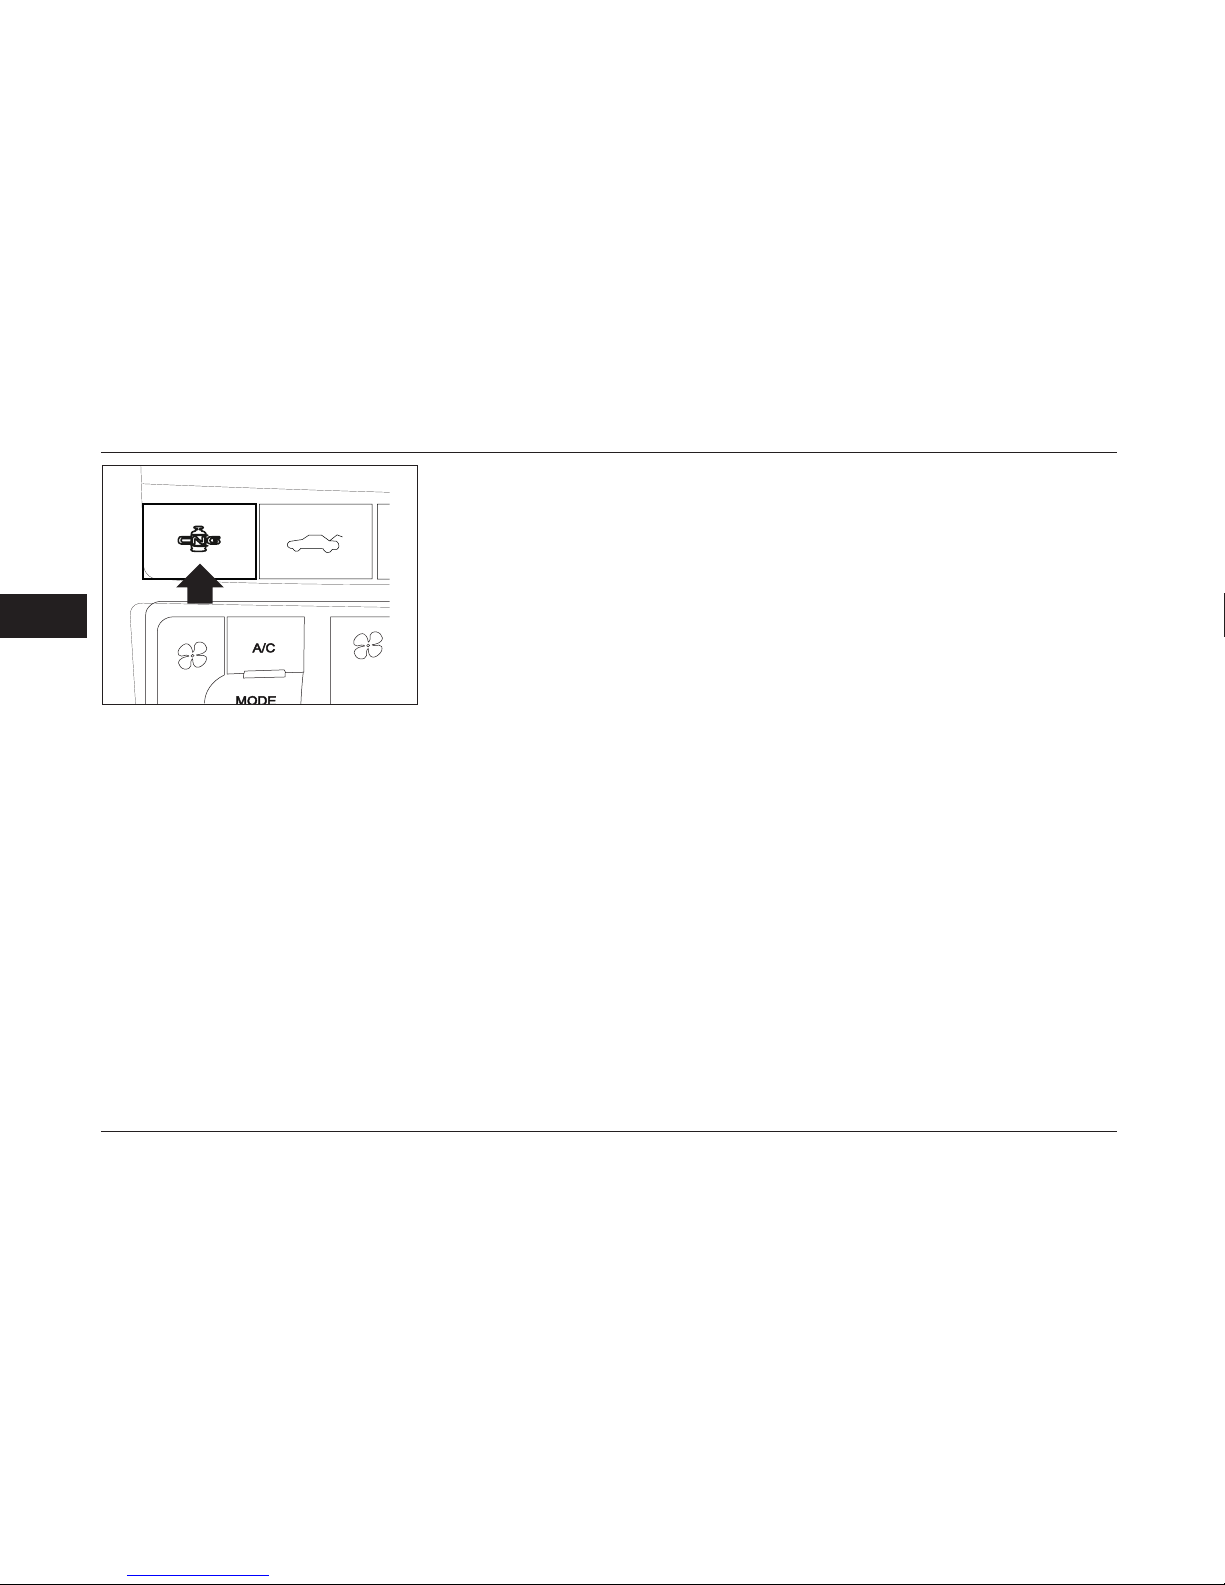
92
3
*
If equipped
STARTING / DRIVING (CNG)
Starting the Engine on CNG Mode*
To remind you, this method is used only for
special situations like gasoline shortage.
Firstturned the switch on, and then press
the conversion key for 5 seconds till the
green light will appear on instrument
panel the green light, appears on the
instrument panel. Then start. If there is no
technical malfunction in the gas system,
the engine will start on CNG.
Fuel Conversion Key
The fuel conversion key is on the middle
console next to the digital clock and it is
used from switch from gasoline to gas
and vice versa mode. By pressing the
related key, the fuel type can be changed.
Starting & Driving On CNG Mode*
Changing the type of fuel is done by the
fuel conversion key located on the middle
console and you can choose the type of
fuel as follows:
A. Before moving (at rst the car will start
on gasoline then it will switch to gas)
B. During driving
C. Starting the car directly on gas mode**
Starting the Engine
The engine starts on gasoline mode.
Since gasoline pump is turned on, even
when the car runs on gas, and also to cool
fuel injectors, it is necessary to have at
least 5 liters of gasoline in the fuel tank.
In the case of any damage to gasoline
system, the engin nally starts on gas mode.
Page 94
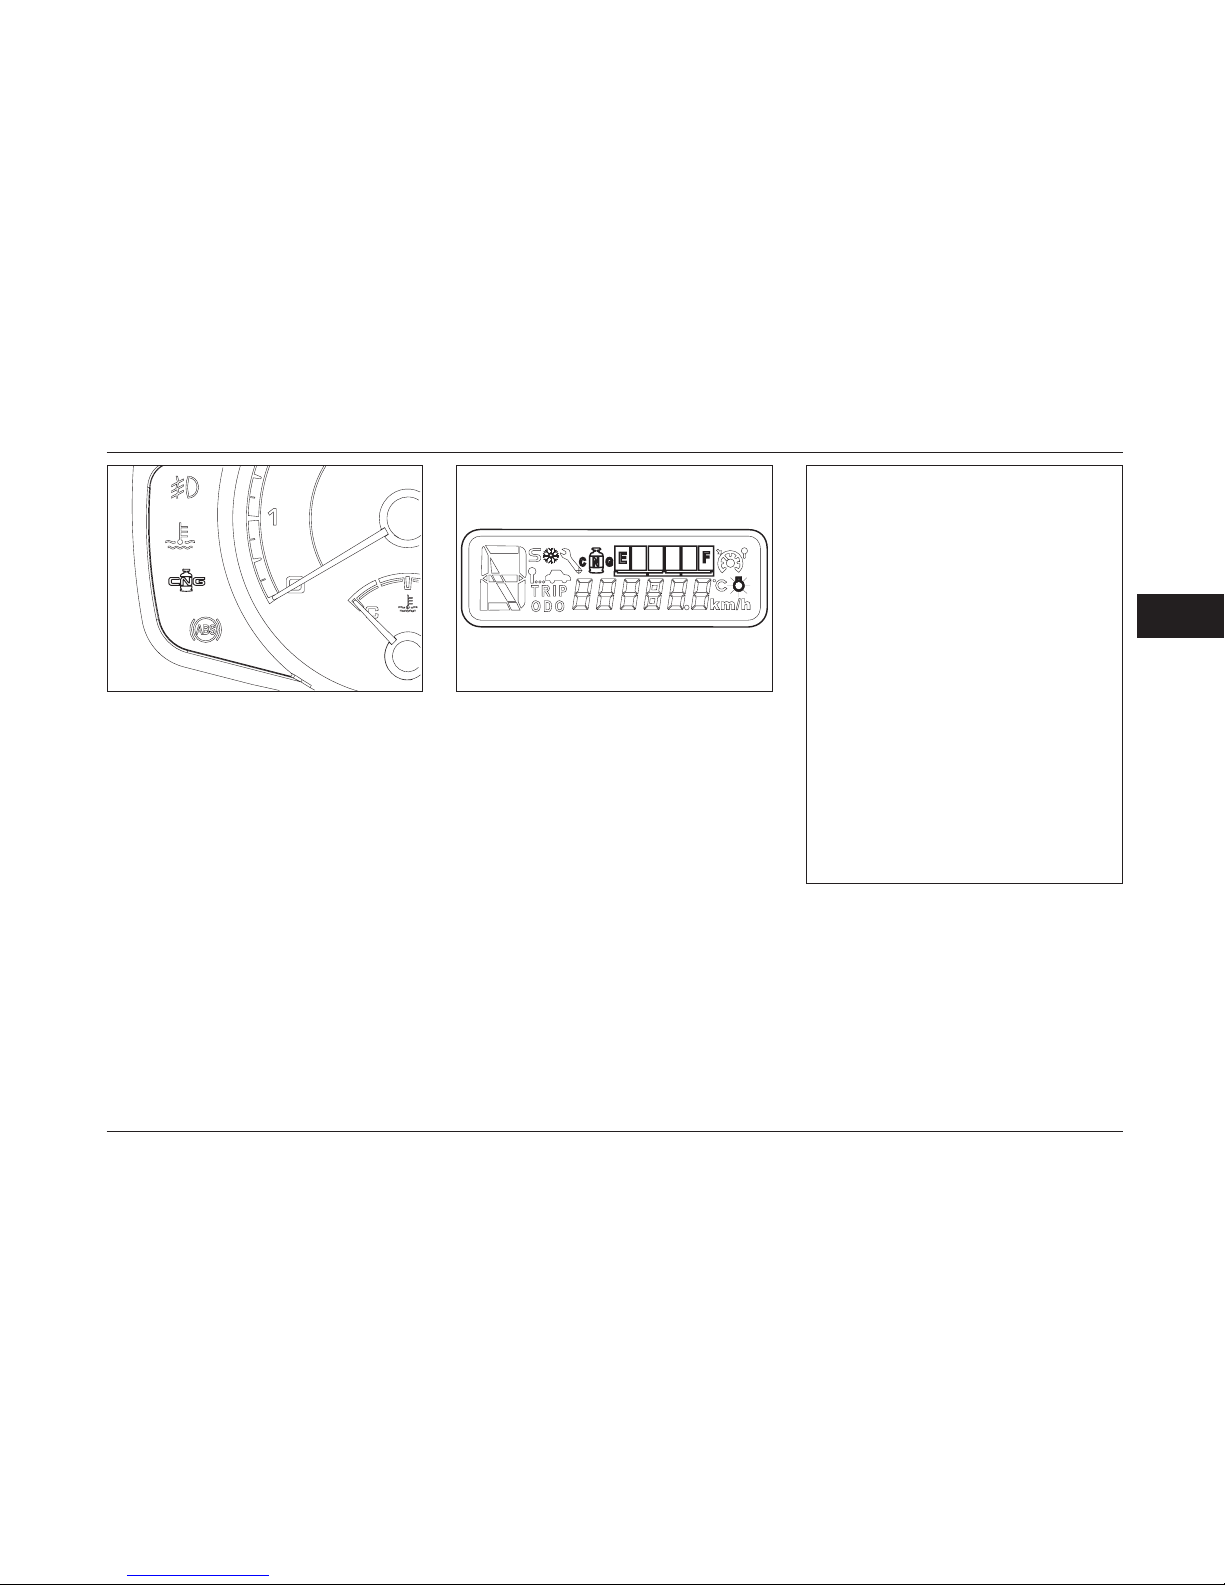
93
3
*
If equipped
STARTING / DRIVING (CNG)
Conversion from Gasoline to Gas*
While the engine is operating on the
gasoline mode, by pressing and releasing
of fuel conversion button, the corresponding
indicator on the instrument panel LED will
start blinking which denotes that the fuel
conversion has not taken place. After a
while which depends on the engine water
temperature at the moment, the conversion
button is pressed down (e.g. under the engine
water temperature of 25 °C, this time will be
equal to 150 seconds, while under higher
temperatures the conversion time will be
shorter), the CNG indicator will stop blinking
and the light comes on permanently. This
implies that the fuel conversion has taken
place completely. Now the engine is working
on CNG mode .
NOTE
In the event the engine REV is higher
than 4000 revolutions per minute and
it is accelerating up at the moment the
conversion button is pressed down, the
LED indicator will start blinking and the
engine will remain on CNG as long as it
has not left the REV domain, after which it
will convert to gasoline.
In the event the engine REV is higher
than 4,000 revolution per minute and it
is accelerating on up, by pressing of the
conversion button, the indicator on the
LED will start blinking and the engine will
remain on gasoline as long as it has not
left the REV domain, after which it will
convert to CNG. It is worth mentioning
that in the cases above, the conversion to
CNG will take place automatically without
the need to press the conversion button.
Conversion from Gas to Gasoline*
By pressing the fuel conversion button,
in the case that there is no engine failure
and enough gasoline in the fuel tank,
the director on the instrument panel will
light off. This implies that the conversion
from CNG to gasoline has done properly.
It is necessary to remind that under the
two following circumstances , the engine
will automatically convert from CNG
to gasoline option( no need to press
conversion button) :
- Breakdown of CNG consumption system
- Non- availability of sufcient gasoline in
the fuel tank.
Page 95
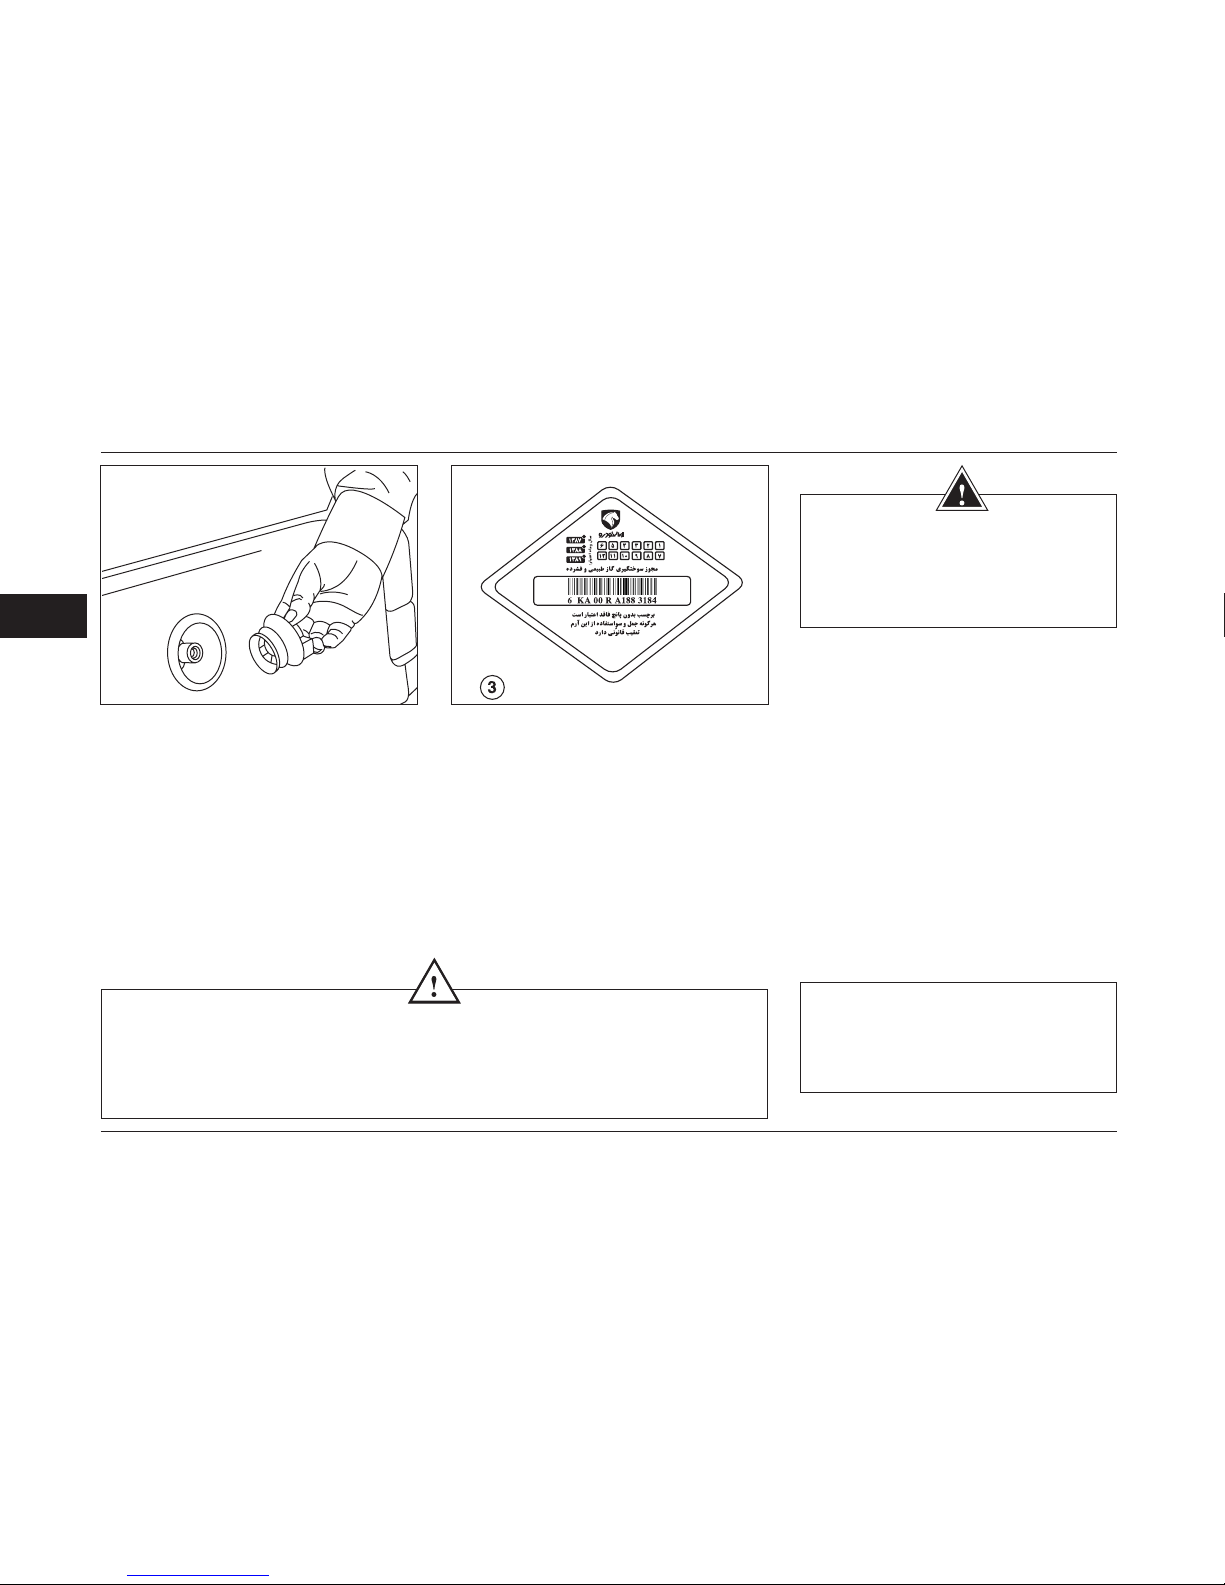
94
3
*
If equipped
STARTING / DRIVING (CNG)
Steps of receiving CNG fuel: *
1- Before arrival to the Gas station and
during stay in there, strictly avoid smoking
and operating your mobile phone.
2- After arrival to the Gas station **, the
Driver should switch off the engine and
make sure that the car is completely
stationary. (Put on hand brake).
3- the operator of the station, after
CAUTIONS
-The maximum number of fueling operation in the tank is 1000 cycle per year. Charging of the tank should not
take place more than 3 times a day, approximately.
-Strictly Avoid fueling in Gas stations specialized for buses and heavy vehicles because there is possibilities
of malfunctioning in manifold valve of the tank and it’s accessories, with regards to higher outlet Debbie of
the station.
**to get latest information regarding
conditions of active CNG stations, you can
refer to web sight: related to Association for
improving fuel consumption or contact with
following telephone numbers: 88604760- 5.
controlling the permit sticker for fueling
the vehicle, performs fueling Operations.
4- After every fueling make sure that the Gas
lling manifold cover is completely closed.
(closing the cover properly is necessary,
to avoid entrance of dust and dirt and
subsequently, problems in Gas system ).
5-The maximum authorized pressure for
fueling is 200 Bars.
The method of renewing the permit
sticker for fueling the vehicle*:
Expiry period of permit sticker for fueling
from the time of issuance, is 12 months
and without fueling permit, permission for
fueling will not be granted in Gas stations.
Therefore one month before date of
expiry of the sticker, attend the authorized
centers for inspections of binaural fuel
consuming cars.
WARNING
The CNG gas and the other equipment
must be assessed through assessing
centers(approved by ISIRI), every 36
months.
Page 96

95
VEHICLE MAINTENANCE
4
MAINTENANCE ...............................................................96
ENGINE COMPARTMENT ..............................................98
COOLING SYSTEM ........................................................101
BRAKES ..........................................................................102
HYDRAULIC STEERING ................................................103
BATTERY ........................................................................104
CLEANING & CARING VEHICLE ................................105
Page 97

96
4
MAINTENANCE
Owner Care & Maintenance
In addition to regular services and checks
described before, some simple periodical
checks should also be done. By paying
attention to the recommendations in the
next pages, you, yourself, can perform
these checks.
Daily checks
- Performance of lights, horn, indicator
lights, window wipers, window washer
and alarm lights
- Performance of safety belts and brakes
- Any drips of any liquids that may indicate the
leakage of engine liquids under the vehicle.
Weekly checks
- Engine oil level
- Coolant level
- Brake uid level
- Steering wheel hydraulic oil level
- Window washer liquid level
- Air pressure in tires and their condition
- A/C performance
Special Conditions
If your vehicle is constantly used under
special conditions such as places with a lot
of dust or in very cold weather or very hot
places, it needs extra care. Contact your
authorized representative in this regard.
Safety in the Garage
If you need to carry out maintenance,
consider the following safety advices:
- Keep away your hands and clothing
from moving belts and pulleys.
- If the engine has been turned off recently,
do not touch the exhaust, cooling system
and its auxiliaries.
- Do not touch electrical connections or
its other components when the engine is
running or the switch is on.
- Never leave the engine running or start
in a closed place since exhaust emissions
are poisonous and very dangerous.
- Do not work underneath the car when
jack is the only means of support.
- Ensure that bare wires and all sparking
tools are away from the engine.
- Use protective clothes and impermeable
gloves for maintaining operation.
- Put off the metal wristbands and jewelry
before working in the engine compartment.
- Prevent tools or metal objects contacting
battery poles and terminals.
Page 98
97
4
MAINTENANCE
Routine Services
The safety, reliability and performance
of your car is partly dependant on your
maintenance skills, and you should become
ensured that maintenance operations, oil
services, checks, brake uid and coolant
topping up are carried out in accordance
with the proposed schedules of the
manufacturer if required.
Poisonous Fluids
All uids used in a car engine are poisonous
and should not get any contact with open
wounds. These liquids include battery acids,
anti-freeze, brake and hydraulic uids,
gasoline, oil and the washer additives. Pay
attention to instructions written on the labels
and containers lled with these uids.
WARNING
The cooling fan is an electrical device,
and may continue operating for a few
minutes after the vehicle has been
turned off. Keep out of the operating
fan when working in the engine.
A long contact with engine oil may
cause serious skin disorders as
dermatitis and cancer. Wash your
skin carefully if contacted.
WARNING
- If the vehicle moves at high speed
for a long time, check the engine oil's
level regularly.
- Any sudden or signicant decrease
in the vehicle's liquid level or uneven
friction of the tires should be reported
to the authorized representative as
soon as possible.
Page 99
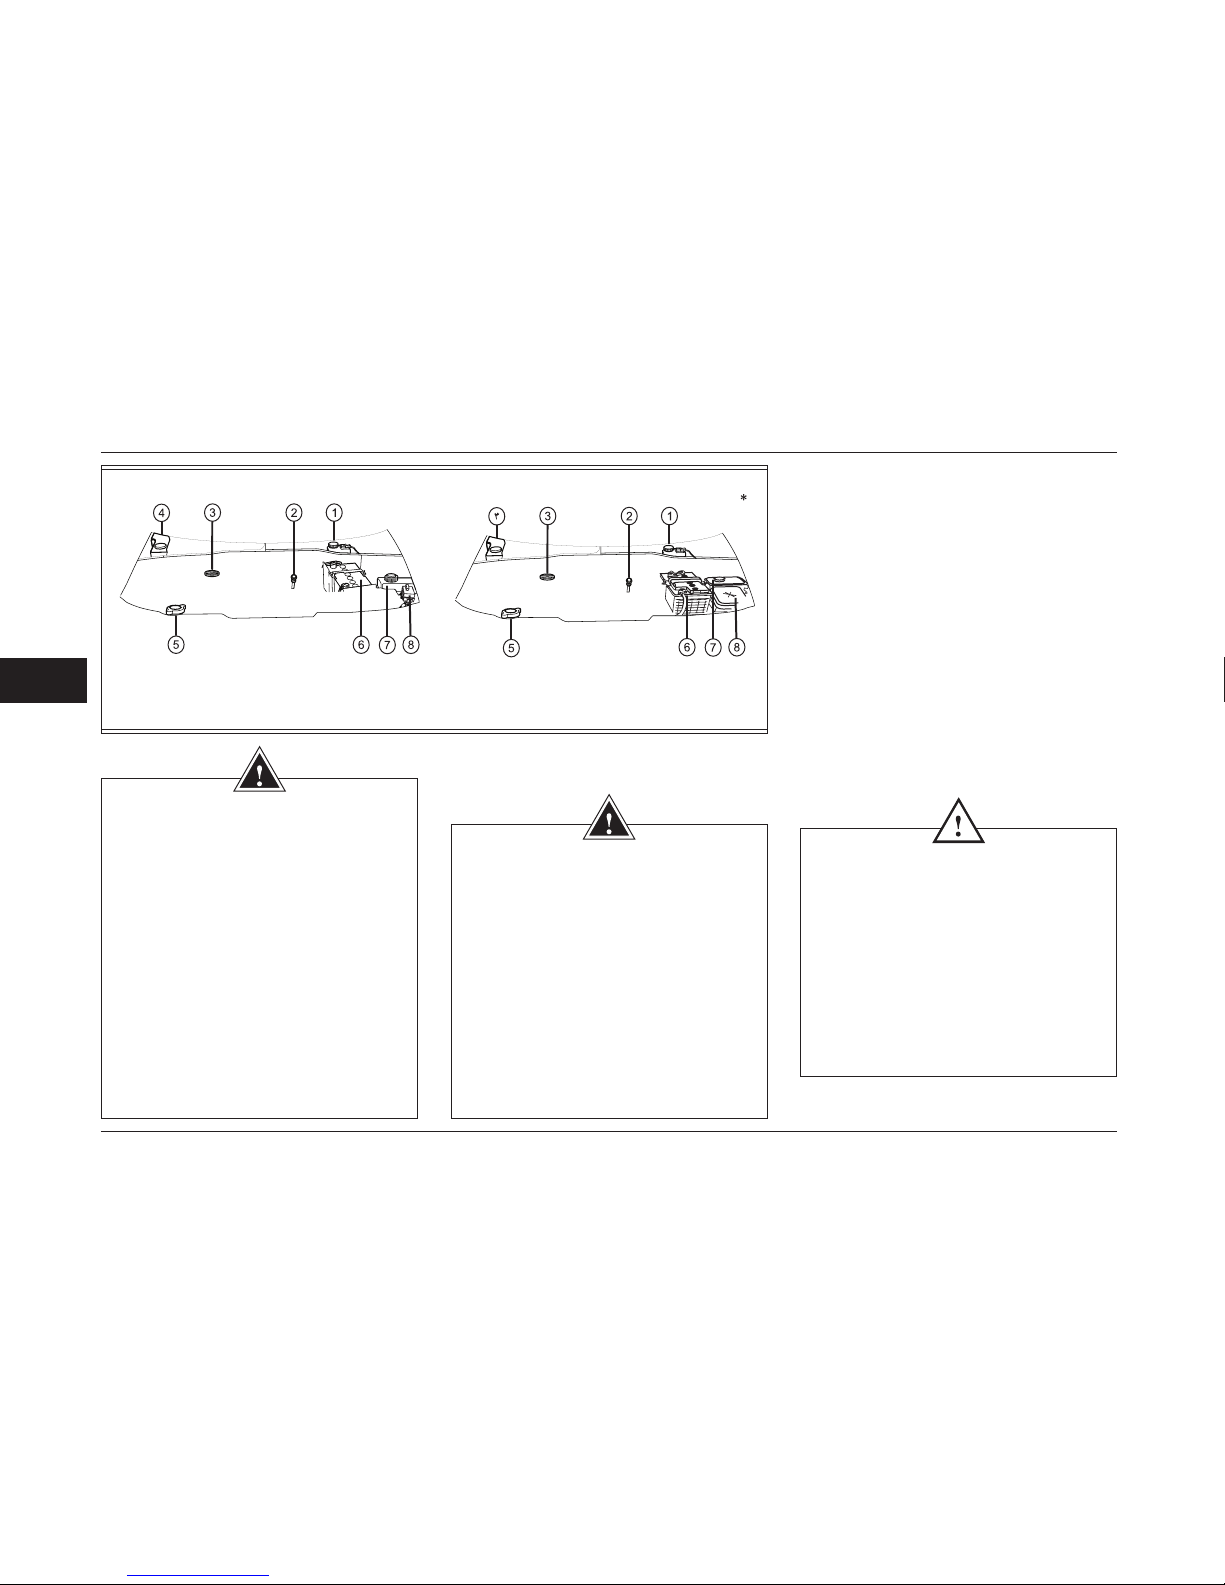
98
4
ENGINE COMPARTMENT
The Parts in the Engine Compartment
1- Brake Fluid Reservoir
2- Oil Dipstick
3- Oil Filler Cap
4- Washer Reservoir
5- Radiator Cap
6- Battery
7- Hydraulic Fluid Reservoir
8- Engine compartment fuse box
CAUTION
Adding: when adding oil, ensure that
it is not spilt on engine parts there
may be danger of re.
Do not forget to close the lid since
there is the danger of re due to oil
splashing on the hot sueface of the
engine parts.
The indicator will only warm in engine
oil goes below the required level and
never shows any increase over the
maximum amount, which can only be
determined by reading the gauge.
WARNING
- The cooling fan is an electrical
device, and may continue operating
for few minutes after the vehicle
has been turned off. Keep out of the
operating fan when working in the
engine.
- A long contact with engine oil may
cause serious skin disoeders as
dermatitis and cancer. Wash your
skin carefully if contacted.
WARNING
- If the vehicle moves at high speed
for a long time, check the engine oil's
level regularly.
- Any sudden or signicant decrease
in the vehicle's liquid level or uneven
friction of the tires should be reported
to the authorized representative as
soon as possible.
*
If equipped
Page 100
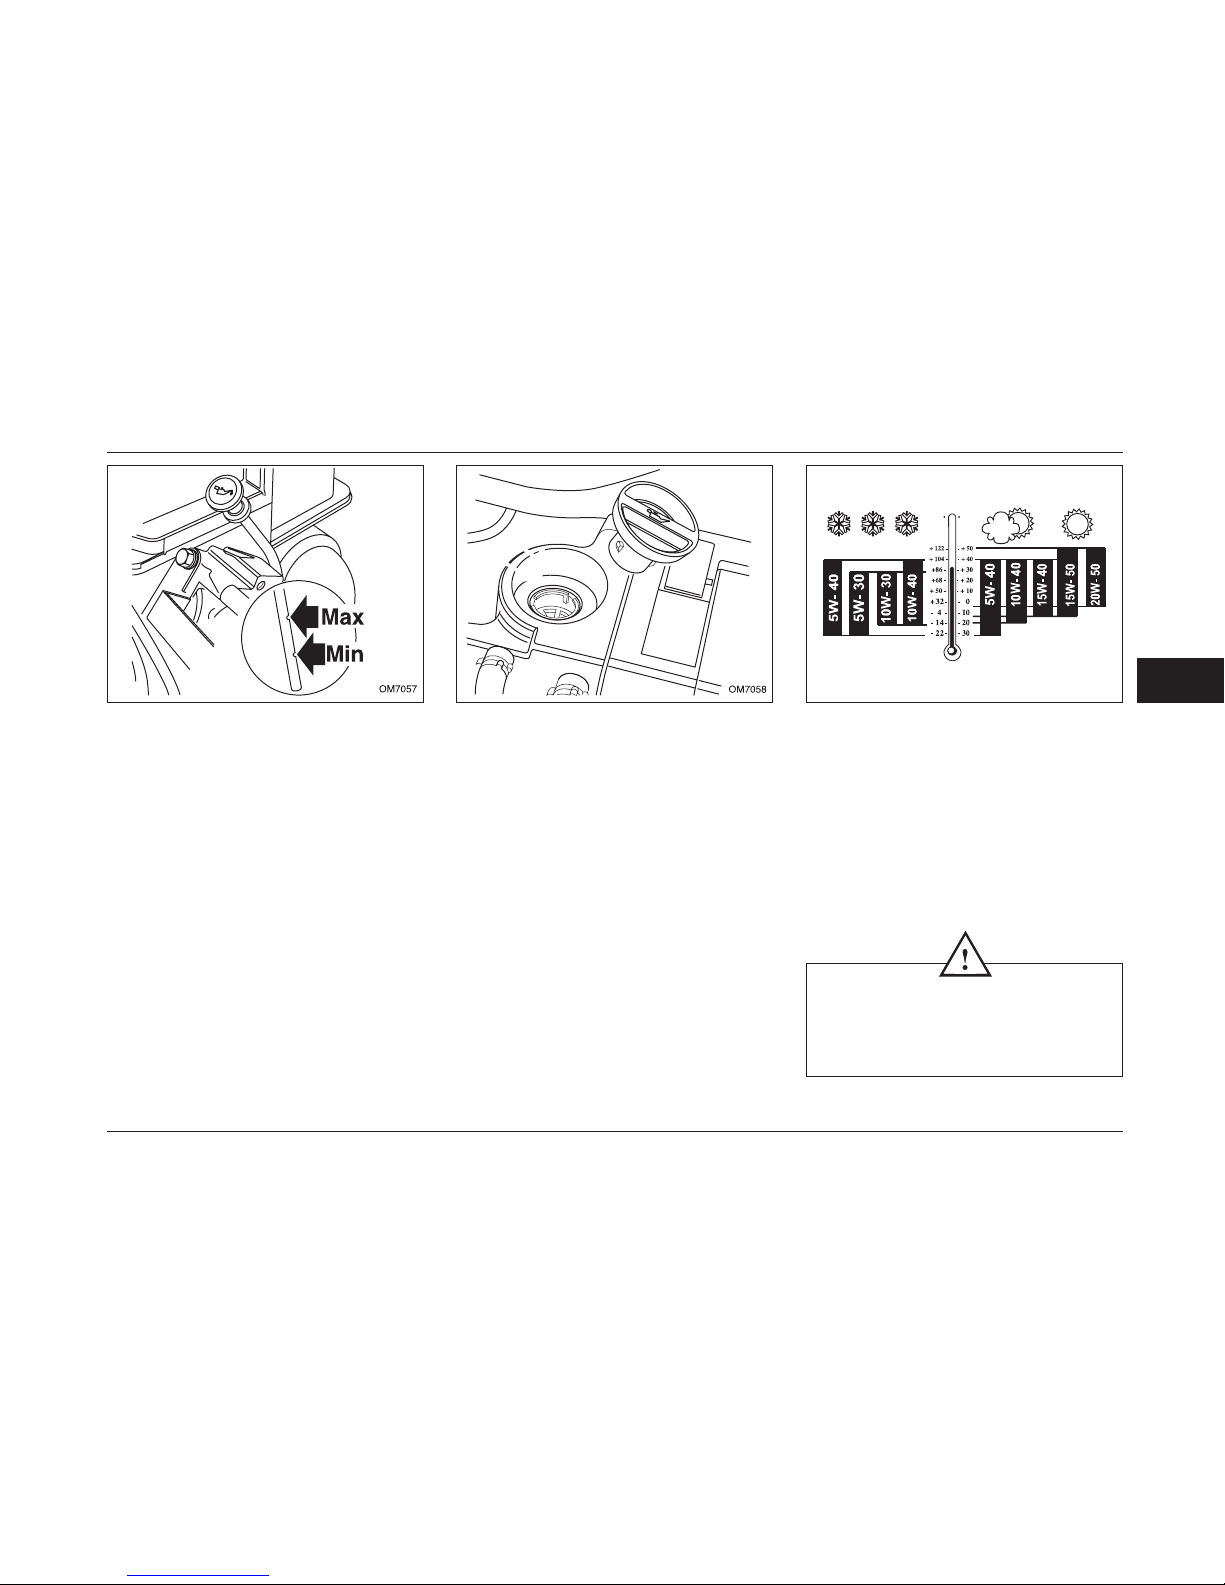
99
4
*
It's recommended to use the approved brands and packages, offered by the Isaco.
ENGINE COMPARTMENT
Checking the motor oil level:
Check the motor oil level weekly or in
case of continuous usage of the car,
check it several times per week.
Check the oil level when the engine is hot
and vehicle is situated completely horizontal
and the oil is stationary in the cartel.
Inspection of Engine Oil Level
Put the car on a at surface. Turn the
engine to warm it up. Turn off the engine
and then measure the oil level after 5
minutes.
Purring motor oil:
Take out the cap for motor oil manifold.
Pure the oil into the tank space. The level
of the oil should never exceed the sign
of (MAX) on the oil measuring rod. To
get information regarding specication
and volume of required motor oil, refer to
section of Technical information.
The applicable engine oil in this vehicle
must be 20W50 SL / SJ, 10W40SL.*
CAUTION
Never mix the Motor oil with additive
materials. This can cause serious
damage to the engine.
 Loading...