

Peugeot IOn 2015 Owner's Manual
Handbook

On-line handbook
Select one of the following means of access to view your
handbook on-line...
Find your handbook on the PEUGEOT website, under
"MyPEUGEOT".
This personal space offers advice and other useful information for
the care and maintenance of your vehicle.
Referring to the handbook on-line also gives you access to the latest information available, easily identified by the bookmark, associated with
this symbol:
Scan this code for direct access to your handbook.
If the "MyPEUGEOT" function is not available on the PEUGEOT
public website for your country, you can find your handbook at the
following address:
http://public.servicebox.peugeot.com/ddb/
Select:
the language,
the vehicle, its body style,
the print edition of your handbook appropriate for the date of registration of
your vehicle.
WELCOME
Your vehicle is fitted with only some of the equipment described
in this document, depending on its trim level, version and the
specification for the country in which it was sold.
We draw your attention to the following point:
The fitting of electrical equipment or accessories which are
not recommended by PEUGEOT may result in a failure of your
vehicle's electronic system. Contact a PEUGEOT dealer to be
shown the recommended equipment and accessories.
Key
Thank you for choosing an ION, a symbol of confidence, passion and
inspiration.
ION is the first 100% electric vehicle for PEUGEOT, 0% pollutant
emissions when driving and particularly quiet.
This handbook has been designed to enable you to make the most of
your ION in all circumstances.
Warning:
this symbol marks warnings which it is essential to observe for your
own safety, for the safety of others or to avoid any risk of damaging
your vehicle.
Protection of the environment:
this symbol accompanies advice relating to protection of the
environment.
Information:
this symbol draws your attention to additional information for better
use of your vehicle.
Page reference:
this symbol invites you to refer to the pages which provide details of
the function.
Contents
Overview
Eco-driving
Monitoring
Instrument panel 9
Indicator and warning lamps 10
Operation indicator lamps 11
Main battery state of charge indicator 18
Energy consumption / generation indicator 19
Distance recorder 20
Trip distance recorder 20
Lighting dimmer 21
Service indicator 21
Range indicator 23
.
.
Access
Remote control key 24
Doors 27
Boot 28
Electric windows 29
Charging aps 30
Comfort
Front seats 31
Rear seats 33
Mirrors 35
Interior ttings 37
Ventilation 40
Heating 42
Air conditioning 42
Front demist - defrost 45
Rear screen demist - defrost 45
Driving
Driving recommendations 46
Starting - stopping the vehicle 47
Parking brake 48
Drive selector 49
Visibility
Lighting controls 51
Automatic illumination of headlamps 53
Headlamp adjustment 53
Wiper control 54
Courtesy lamp 55
Contents
Safety
Direction indicators 56
Automatic operation of brake lamps 56
Hazard warning lamps 56
Horn 57
Emergency or assistance call 57
Under-ination detection 58
Braking assistance systems 62
Trajectory control systems 64
Front seat belts 65
Airbags 68
Child safety
Child seats 72
Deactivating the passenger's front airbag 75
ISOFIX child seats 81
Child lock 84
Practical info rmat ion
Charging the main battery 85
Ancillaries battery 93
Temporary puncture repair kit 97
Changing a wheel 101
Snow chains 105
Changing a bulb 106
Changing a fuse 114
Changing a wiper blade 119
Towing the vehicle 119
Precautions for washing 120
Accessories 120
Checks
Bonnet 123
Front compartment 124
Rear compartment 125
Checking levels 126
Checks 128
Technical data
Motor and main battery 129
Weights 130
Dimensions 131
Identication markings 132
Audio equipment and telematics
Emergency or assistance 133
Audio system / Bluetooth 135
Visual search
.
Alphabetical index
.
Overview
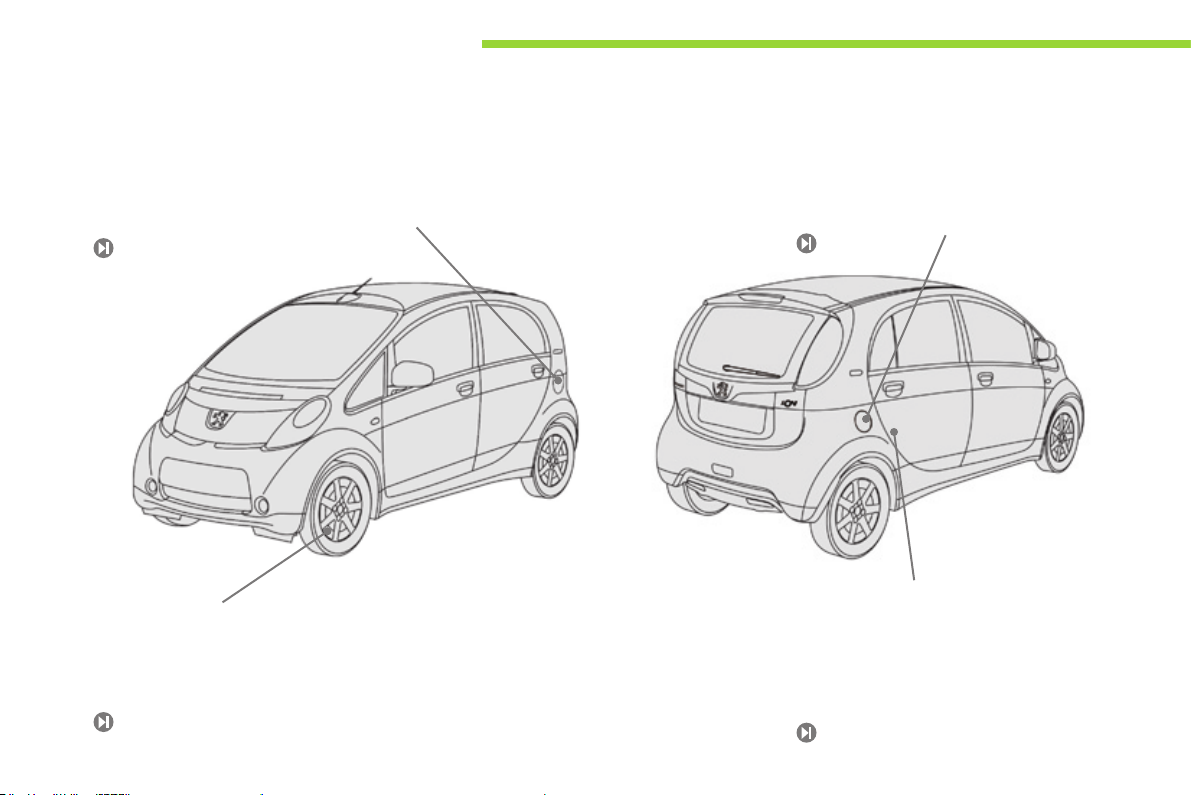
Exterior
Fast charging ap
Available according to equipment, this flap
should be used to recharge your vehicle from a
special fast charging station.
91
ASR and ESP systems
These are associated systems that assure the
directional stability of the vehicle, within the
limits of the laws of physics.
64
4
Normal charging ap
This flap should be used to recharge your
vehicle from a domestic power point.
85
Temporary puncture repair kit
This kit is a complete system consisting of a
compressor and a sealant cartridge, to allow
the temporary repair of a tyre.
97
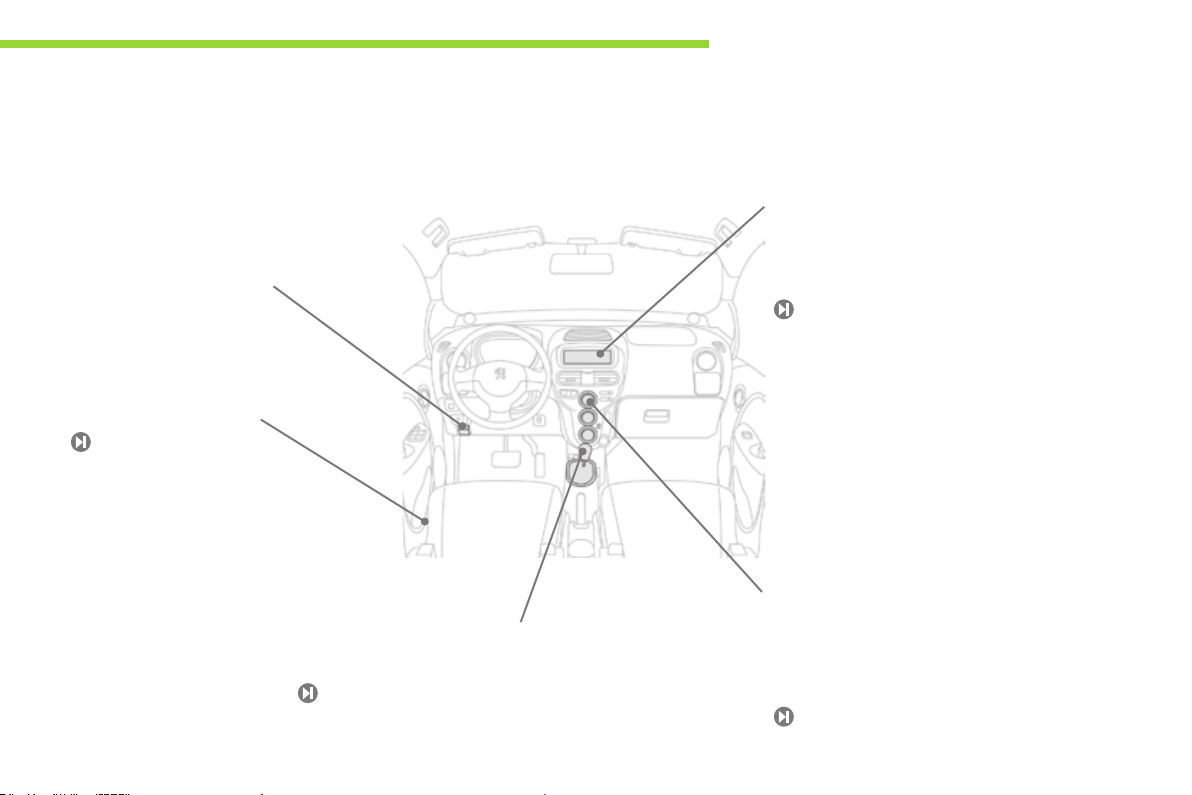
Interior
Overview
.
Charging ap interior opening
controls
Normal charging flap.
Fast charging flap (according to equipment).
30
Drive selector
Four-position drive selector: P, R, N and D.
49
Audio system
This system benefits from the latest
technology: MP3 compatible audio system,
USB player, Bluetooth hands-free system, ...
135
Air conditioning
After setting the desired level of comfort,
the system controls this level according to the
exterior climatic conditions.
42
5

Overview
Instruments and controls
1. Lighting and direction indicator stalk
2. Instrument panel.
3. Driver's airbag.
Horn.
4. USB port.
5. Opening control for the fast charging flap
(vehicle left hand side).
6. Electric window switches and switch
for deactivating the the front and rear
passenger electric window controls.
7. Fusebox.
8. Opening control for the normal charging
flap (vehicle right hand side).
9. Headlamp height adjustment.
ASR/ESP deactivation switch.
10. Door mirror controls.
11. Cup holder.
12. Side vents.
13. Window demisting vent.
6
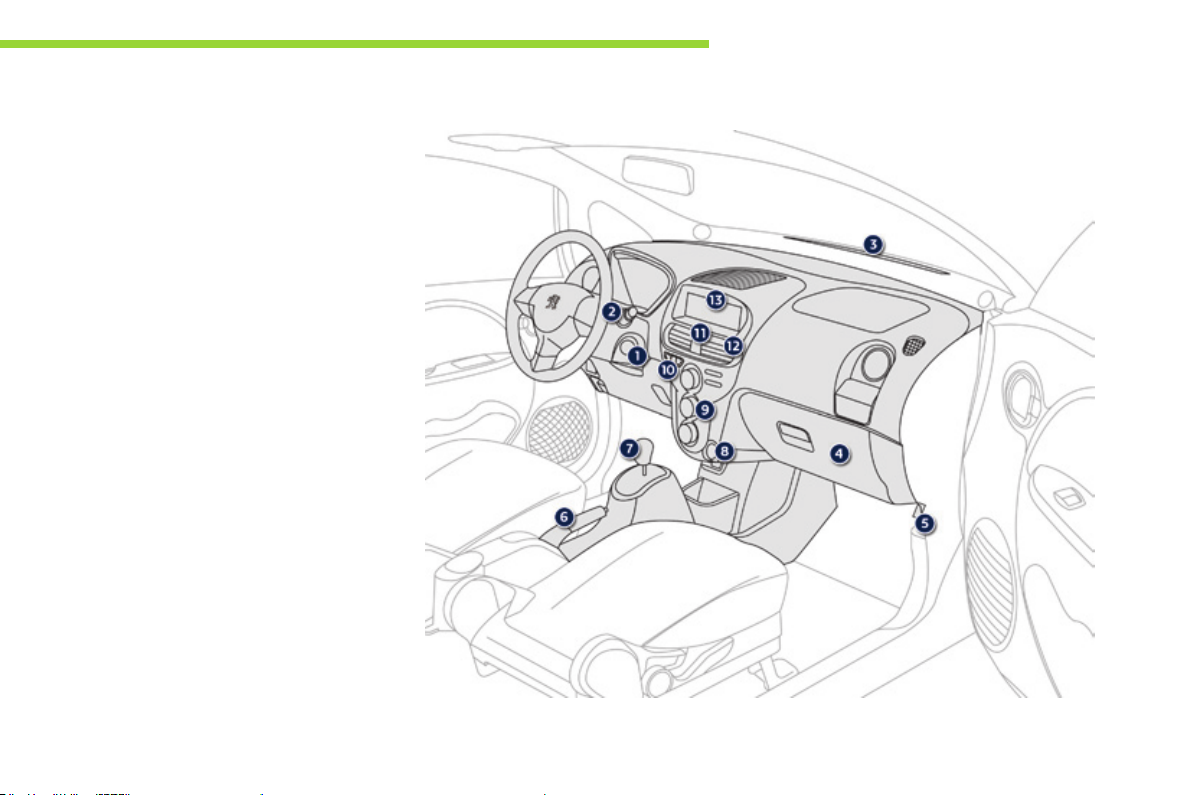
Instruments and controls
1. Steering lock and ignition switch.
2. Wiper stalk.
3. Windscreen demisting vents.
4. Glove box.
Passenger's airbag deactivation.
5. Bonnet release lever.
6. Parking brake.
7. Drive selector.
8. 12 V accessory socket.
9. Heating / air conditioning controls.
10. Emergency or assistance call.
11. Hazard warning switch.
12. Centre vents.
13. Audio system.
.Overview
7

Eco-driving
For more economical driving, and increased range
Practical advice for everyday use to optimise the range of your vehicle by conserving battery power.
Adopt a smooth driving
style
The electrical consumption of your vehicle
depends greatly on your journey, your driving
style and your speed.
In all cases, adopt a smooth driving style.
Stay in the "Eco" zone indicated in the energy
consumption / generation meter: depress
the accelerator pedal progressively, without
sudden movement, and if the conditions permit,
drive at steady and moderate speed.
8
Recover energy
Anticipating the driving conditions allows you to
recover energy and increase the range of your
vehicle.
Use the "Charge" zone of the energy
consumption / generation meter whenever
possible: anticipate the traffic slowing
down and if the the conditions permit, use
deceleration rather than the brakes.
Control the use of your
electrical equipment
The heating and air conditioning systems
operate on energy from the main battery.
Excessive use of these systems greatly
reduces the range of your vehicle. Remember
to switch them off once the desired level of
comfort is reached and check their settings
every time you set off.
Control also the use of demisting / defrosting
and the heated seat.
Limit the causes of excess
consumption
As with any vehicle, limit the loads carried
in the vehicle and reduce wind resistance
(windows open above 30 mph (50 km/h), roof
bars, roof box, …).
Observe the recommendations
on maintenance
Check the tyre pressures regularly and
follow the schedule for routine servicing
recommended by PEUGEOT.
Monitoring
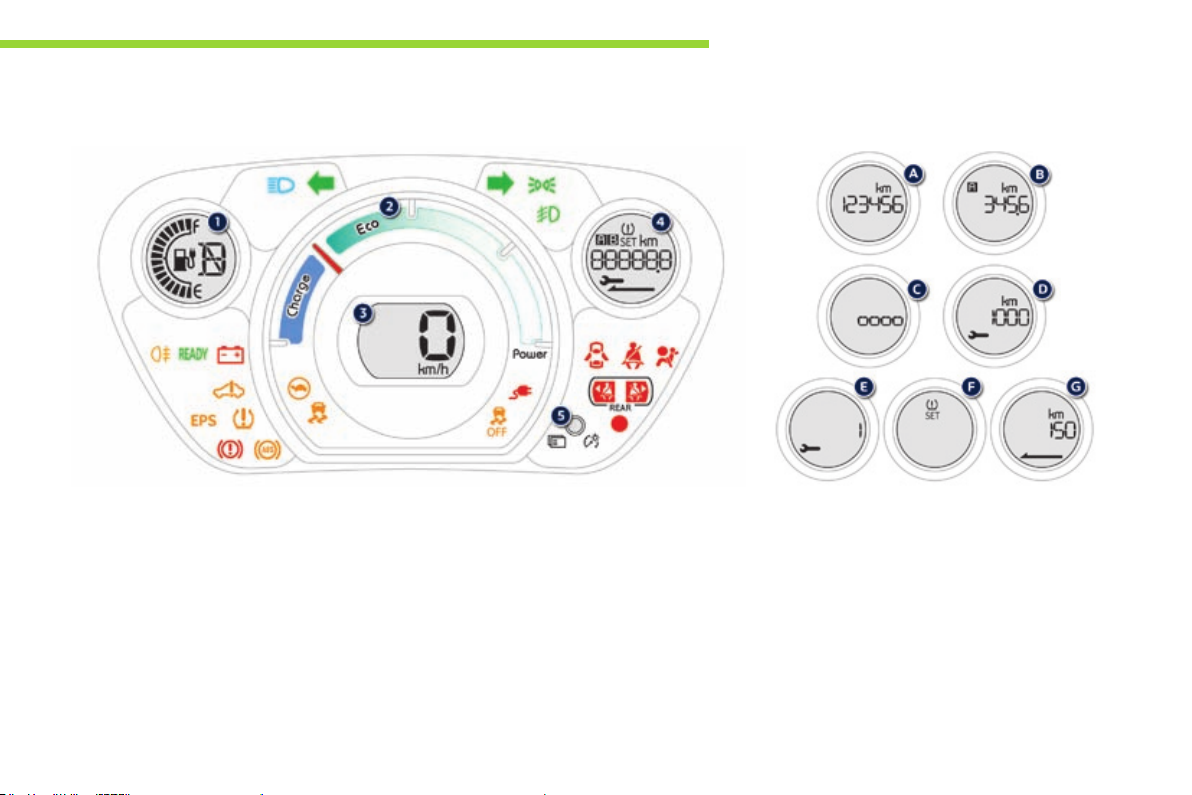
Instrument panel
Panel bringing together the various gauges and indicators for the operation of the vehicle.
Gauges and indicators
1. State of charge indicator for the main
battery.
Drive selector position indicator.
2. Energy consumption / generation
indicator.
3. Speedometer
4. Screen.
5. Screen control button.
Display the various functions in turn.
Reset the function selected (trip recorder
or service indicator).
Adjust the level of instrument lighting.
For more information, refer to the
corresponding section.
1
Screen
A. Total distance recorder.
B. Trip distance recorder (Trip A or B).
C. Instrument panel lighting dimmer.
D. Distance remaining to the next service.
E. Time remaining to the next service.
F. Under-inflation detection.
G. Remaining range.
9

Monitoring
Indicator and warning lamps
Visual indicators informing the driver that
a system is in operation, is deactivated or has
a fault.
When the ignition is switched on
Certain warning lamps come on for a few
seconds when the vehicle's ignition is
switched on.
These same warning lamps go off after a few
seconds.
If you notice one of these warning lamps
remaining on, refer to the information on the
warning lamp in question.
Associated warnings
The illumination of certain warning lamps may
be accompanied by an audible signal.
The warning lamps may come on continuously
(fixed) or flash.
Certain warning lamps may come on in
one of two modes. Only by relating the
type of lighting to the operating status
of the vehicle can it be ascertained
whether the situation is normal or
whether a fault has occurred.
10
Monitoring
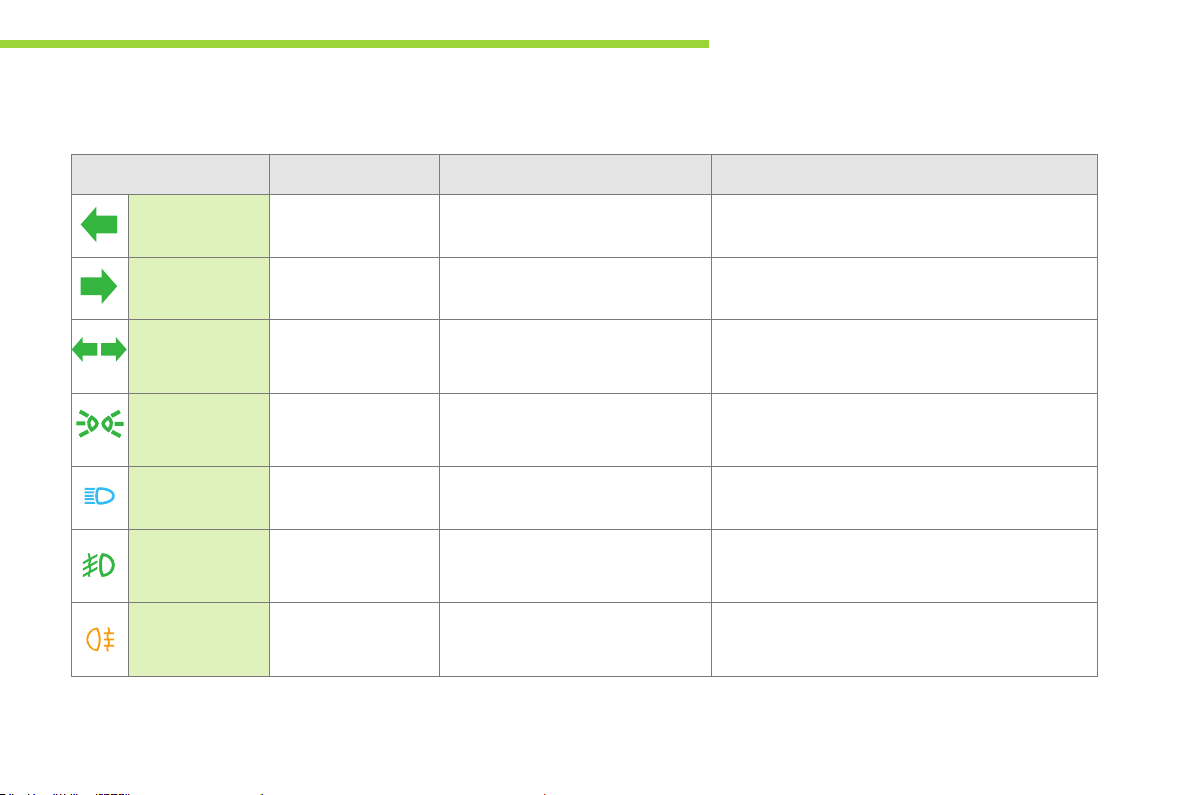
Operation indicator lamps
If one of the following indicator lamps comes on in the instrument panel, this confirms that the corresponding system has come into operation.
Warning / indicator lamp State Cause Action / Observations
Left-hand
direction indicator
Right-hand
direction indicator
Hazard warning
lamps
Sidelamps and/
or dipped beam
headlamps
Main beam
headlamps
Front foglamps On fixed. The front foglamps are switched on. Turn the ring on the stalk rearwards twice to switch off
Rear foglamp On fixed. The rear foglamp is switched on. Turn the ring on the stalk rearwards to switch off the
Flashing with audible
signal.
Flashing with audible
signal.
Flashing with audible
signal.
On fixed. The sidelamps and/or dipped beam
On fixed. The lighting stalk is pulled towards
The lighting stalk is pushed down.
The lighting stalk is pushed up.
The hazard warning lamps switch,
located on the dashboard, has been
operated.
headlamps are on.
you.
The left-hand and right-hand direction indicators and
their associated indicator lamps flash simultaneously.
Pull the stalk to return to dipped beam headlamps.
the front foglamps.
rear foglamp.
1
11
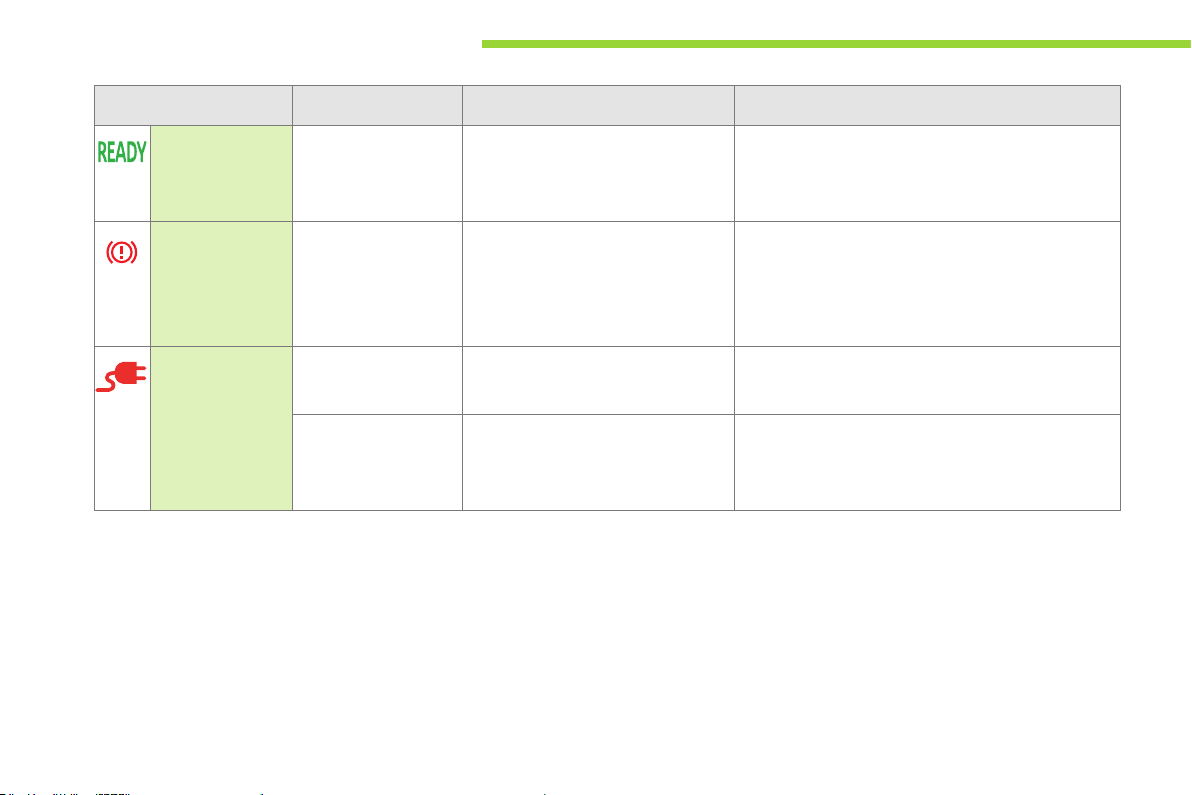
Monitoring
Warning / indicator lamp State Cause Action / Observations
Ready
(ready to move
off)
Parking brake On fixed. The parking brake is applied or not
Main battery
charge (normal
or fast)
On fixed,
accompanied by an
audible signal when it
comes on.
On fixed. The main battery is on charge. On completion of the charge, the lamp goes off.
Flashing. The charging cable is connected to
The vehicle is ready to move off and
you can press the accelerator.
properly released.
the vehicle but the main battery is not
yet charging.
The illumination period corresponds to the poweringup of the vehicle.
Release the parking brake to switch off the warning
lamp, keeping your foot on the brake pedal.
Observe the safety recommendations.
For further information on the parking brake, refer to
the "Driving" section.
Check the connection of the charging cable.
12
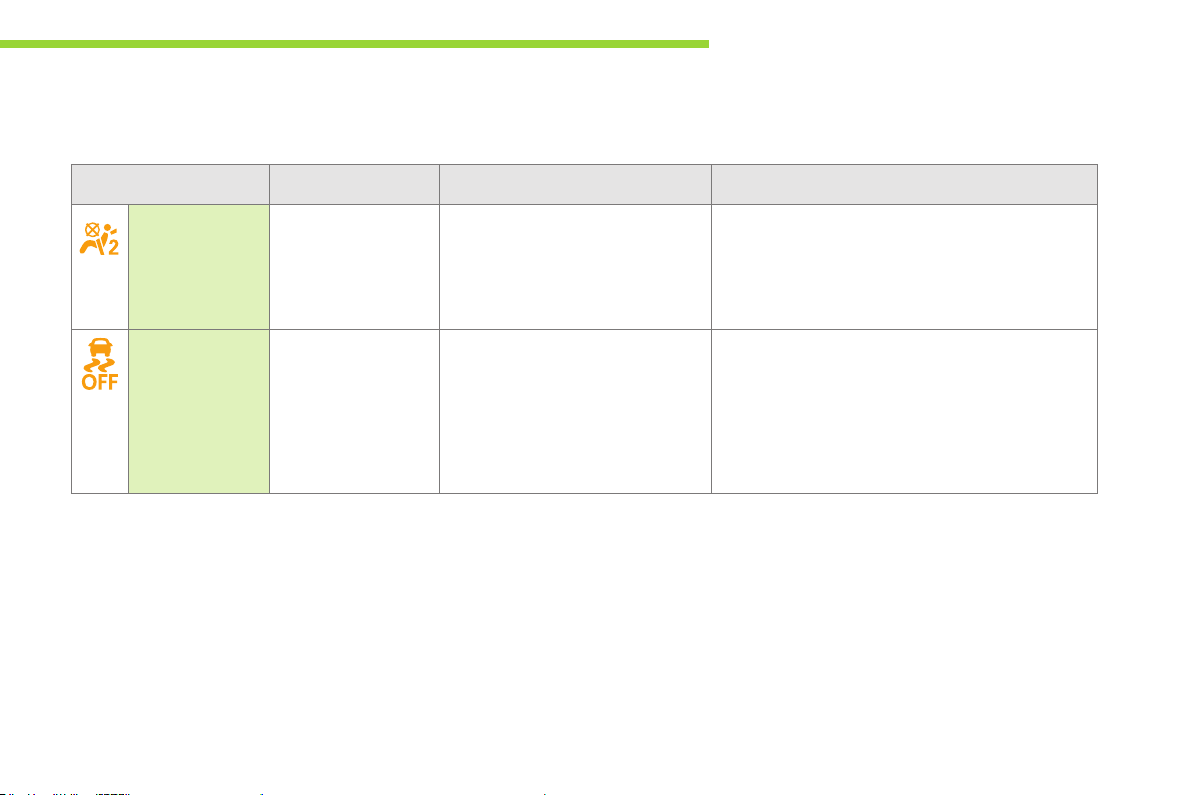
Monitoring
Deactivation indicator lamps
If one of the following indicator lamps comes on, this confirms that the corresponding system has been switched off intentionally.
This is may be accompanied by an audible signal.
Warning / indicator lamp State Cause Action / Observations
Passenger's
airbag system
ESP/ASR On fixed. The ESP/ASR off switch, located at
On fixed, on the
centre console.
The control switch, located in the
glove box, is set to the OFF position.
The passenger's front airbag is
deactivated.
the bottom of the dashboard (driver's
side) is activated.
The ESP/ASR is deactivated.
ESP: electronic stability programme
ASR: anti-slip regulation.
Set the control switch to the ON position to activate
the passenger's front airbag. In this case, do not fit a
child seat in the rear-facing position.
Remember to check the state of the control switch
before starting your vehicle.
Press the button to activate the ESP/ASR.
The ESP/ASR system is automatically activated on
starting the vehicle.
1
13
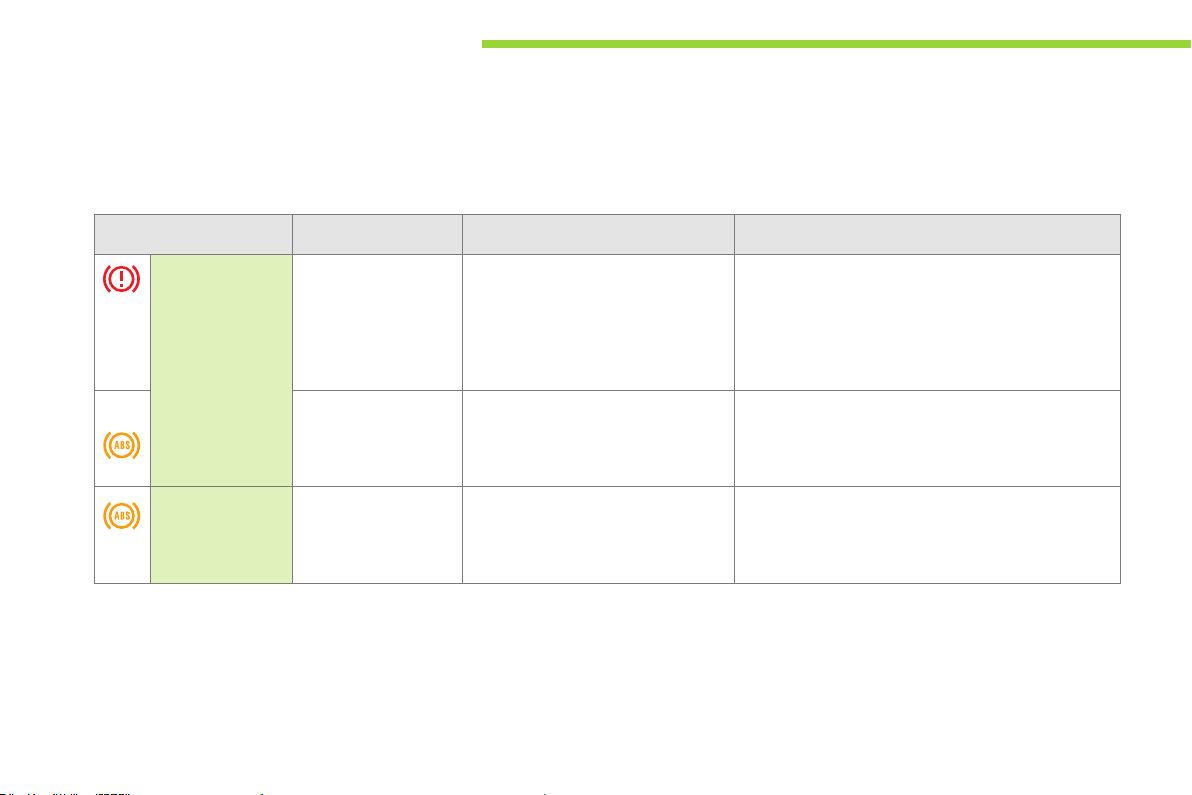
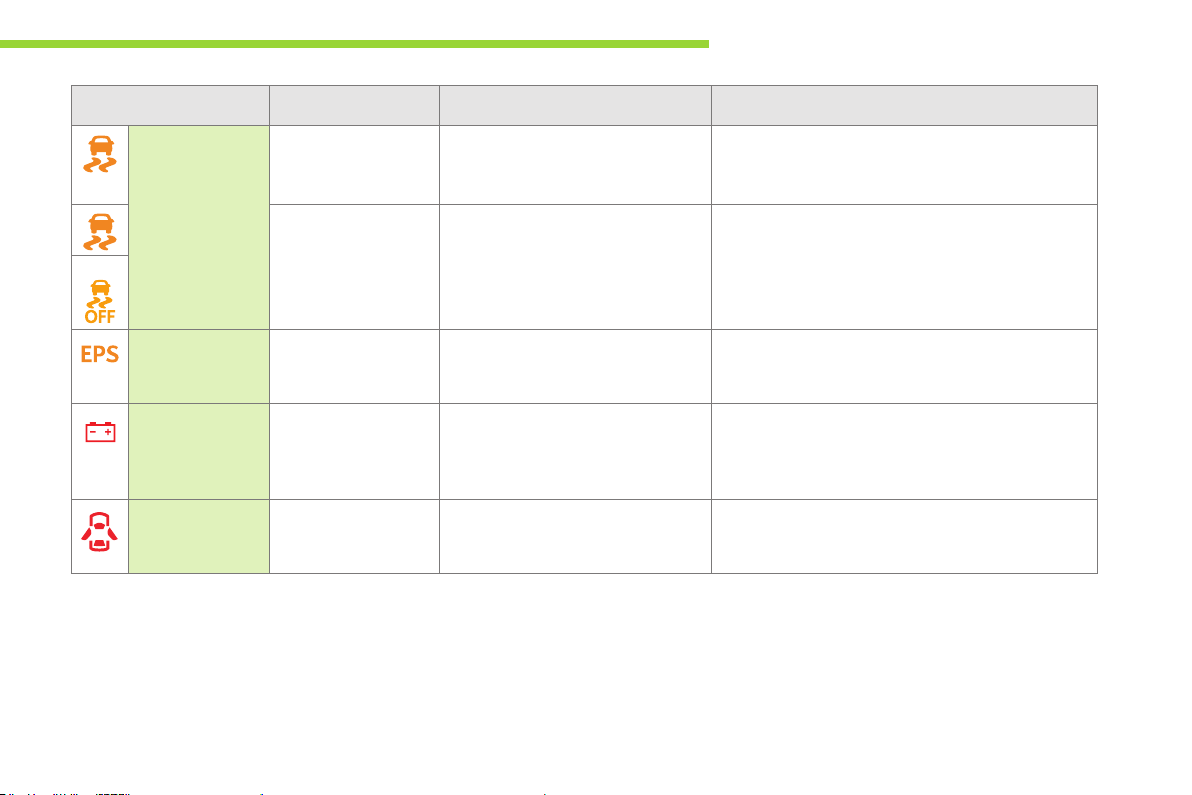
Monitoring
Warning lamps
When the engine is running or the vehicle is being driven, illumination of one of the following warning lamps indicates a fault which requires action on
the part of the driver.
Any fault resulting in the illumination of a warning lamp must be investigated further.
If you encounter any problems, do not hesitate to contact a PEUGEOT dealer or a qualified workshop.
Warning / indicator lamp State Cause Action / Observations
14
Braking On fixed. The braking system fluid level has
+ On fixed, associated
Anti-lock
Braking System
(ABS)
with the ABS warning
lamp.
On fixed. The anti-lock braking system has
dropped significantly.
or
Braking assistance system fault.
The electronic brake force distribution
(EBFD) system has a fault.
a fault.
You must stop as soon as it is safe to do so.
Top up with brake fluid listed by PEUGEOT.
If the problem persists, have the system checked by a
PEUGEOT dealer or qualified workshop.
You must stop as soon as it is safe to do so.
Have it checked by a PEUGEOT dealer or a qualified
workshop.
The vehicle retains conventional braking.
Drive carefully at reduced speed and contact a
PEUGEOT dealer or a qualified workshop without
delay.
Monitoring
Warning / indicator lamp State Cause Action / Observations
Electronic
stability
programme
and anti-slip
regulation
(ESP/ASR)
+
Electric power
steering
Ancillaries
battery charge
Door(s) open On fixed,
Flashing. Activation of the ESP/ASR systems. The systems optimise traction and improve the
On fixed. Fault in the ESP/ASR systems. Have it checked by a PEUGEOT dealer or a qualified
On fixed. The electric power steering has a
fault.
On fixed. The ancillaries battery charging
circuit has a fault (dirty or loose
terminals, slack, transformer fault, ...).
A door or the boot is still open. Close the door or boot.
accompanied by an
audible signal.
directional stability of the vehicle.
Adapt your driving and moderate your speed.
workshop.
Drive carefully at reduced speed.
Have it checked by a PEUGEOT dealer or a qualified
workshop.
The warning lamp should go off when the motor is
started.
If it does not go off, contact a PEUGEOT dealer or
qualified workshop.
1
15
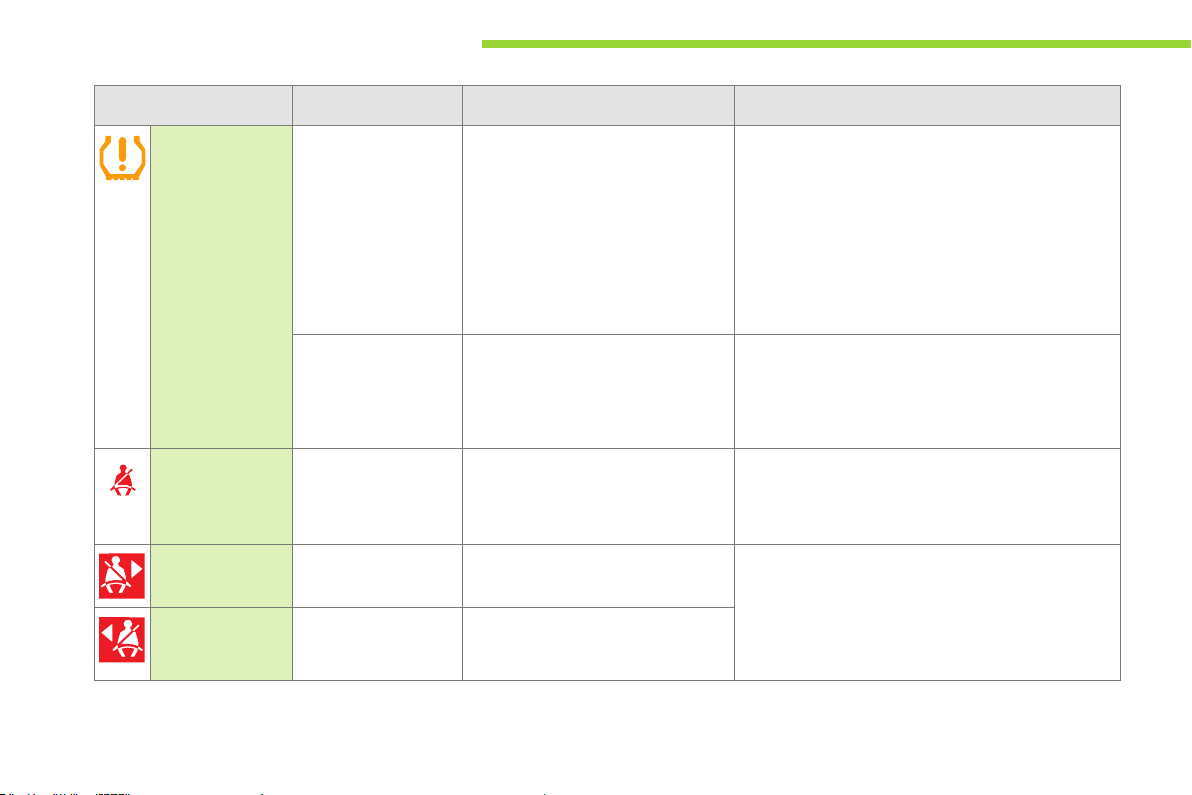
Monitoring
Warning / indicator lamp State Cause Action / Observations
Under-inflation fixed. The tyre pressure for one or more
wheels is too low.
Check the tyre pressures as soon as possible.
This check should preferably be done with the tyres
cold.
You must reinitialise the system after every adjustment
of one or more tyre pressures and after replacing one
or more wheels.
For more information refer to the "Under-inflation
detection" section.
16
Front seat belt
not fastened /
unfastened
Right hand rear seat
belt unfastened
Left hand
rear seat belt
unfastened
flashing then fixed. The system has a fault and/or one
On fixed, then
flashing, accompanied
by an audible signal.
On fixed. The right hand rear passenger has
On fixed. The left hand rear passenger has
or more wheels does not have a
detected sensor.
The driver and/or the front passenger
has not fastened or has unfastened
their seat belt.
unfastened their seat belt.
unfastened their seat belt.
The tyre pressures are no longer monitored.
Have the system checked by a PEUGEOT dealer or a
qualified workshop.
Pull the strap, then insert the tongue in the buckle.
Pull the strap then insert the tongue in the buckle.
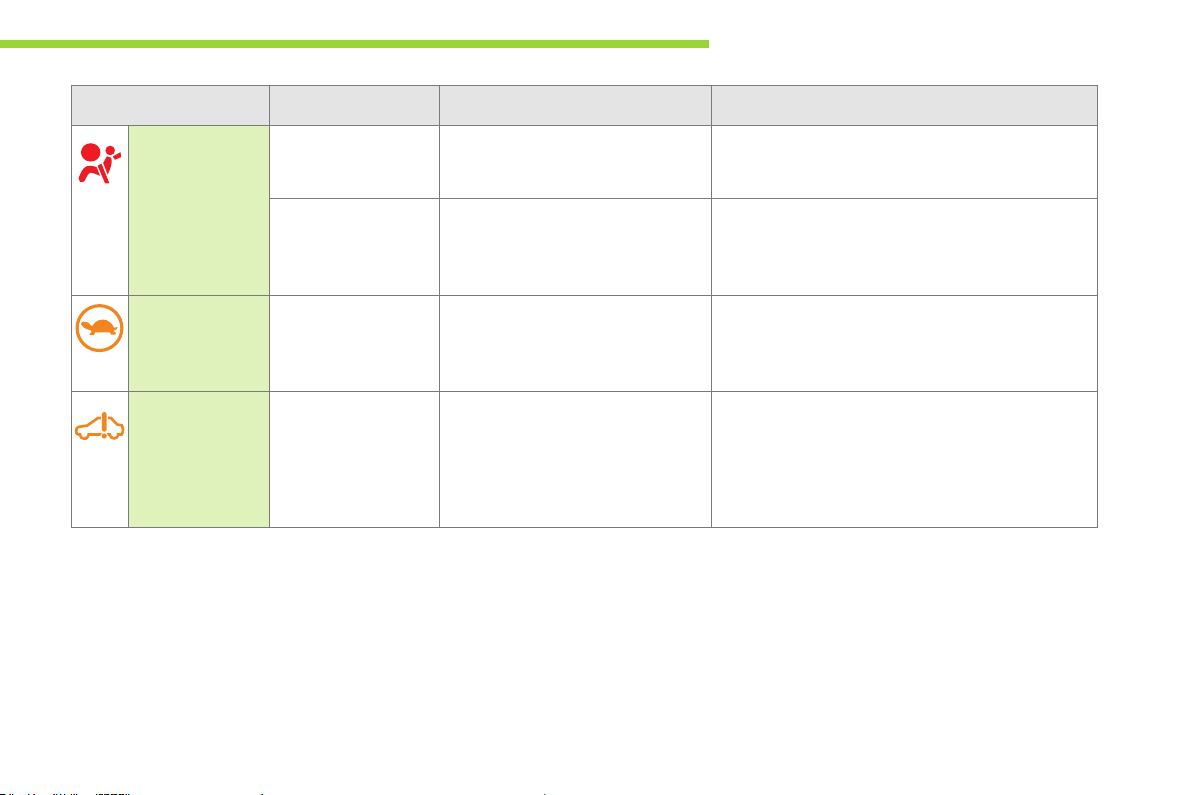
Monitoring
Warning / indicator lamp State Cause Action / Observations
Airbags On temporarily. When you switch on the ignition, this
On fixed. Fault with one of the airbag or seat
Protection
system for the
main battery
Self-diagnosis
system of the
main electrical
circuit
On fixed. The state of charge of the main
On fixed. Fault in the main electrical circuit. You must stop as soon as it is safe to do so.
warning lamp comes on for a few
seconds, then goes off.
belt pretensioner systems.
battery is too low or the temperature
of the main battery is too low...
If it does not go off, contact a PEUGEOT dealer or a
qualified workshop.
Have it checked by a PEUGEOT dealer or a qualified
workshop.
The power from the motor is limited.
Charge the main battery as soon as possible.
If the warning lamp does not go off, contact a
PEUGEOT dealer or qualified workshop.
Have it checked by a PEUGEOT dealer or a qualified
workshop.
1
17
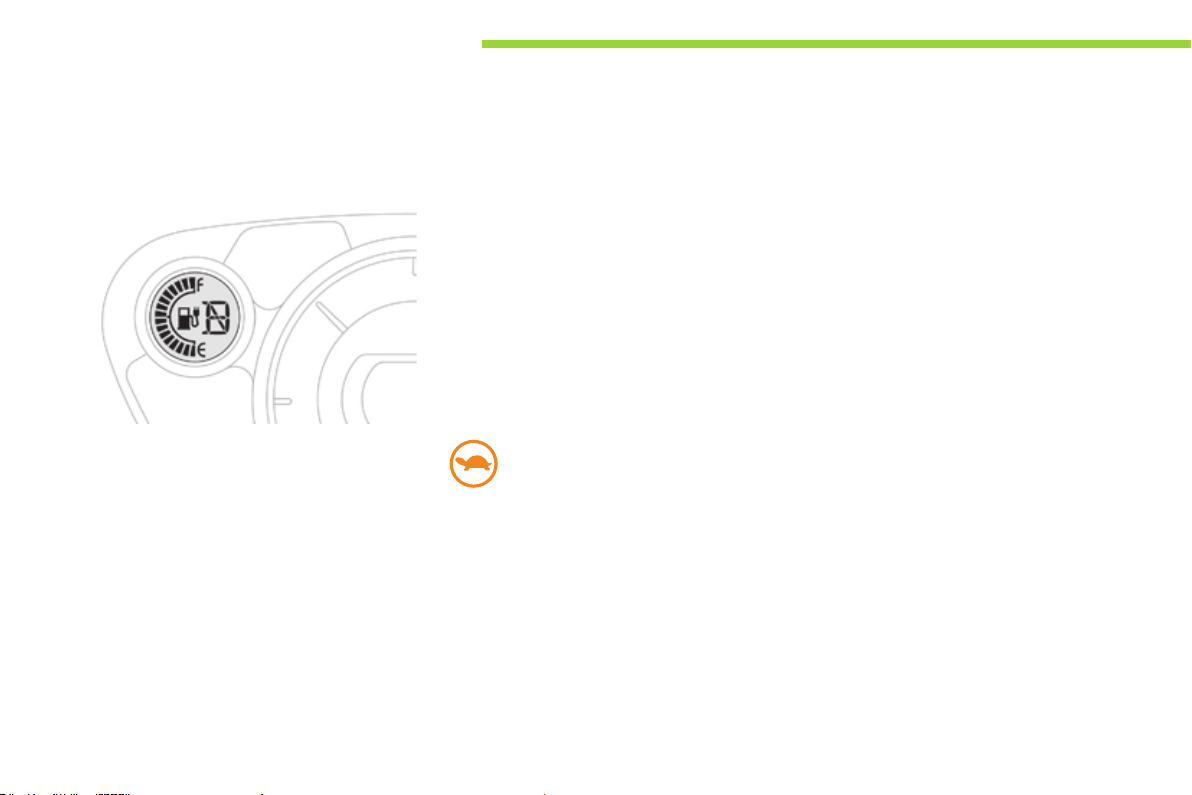
Monitoring
Main battery state of charge indicator
Display
The state of charge of the main battery is
displayed continuously in the instrument panel.
Low energy alerts
Four successive alerts indicate that the energy
available in the main battery is dropping to a
low level:
- 2 bars of the state of charge gauge in the
instrument panel, on and flashing: starting
to use the reserve.
- The last bar in the state of charge gauge
flashing.
- The last bar disappears: display of the
range disappears; the heating and air
conditioning are switched off.
- Display of this warning lamp in
the instrument panel: progressive
reduction in the power available
from the motor.
18
Monitoring
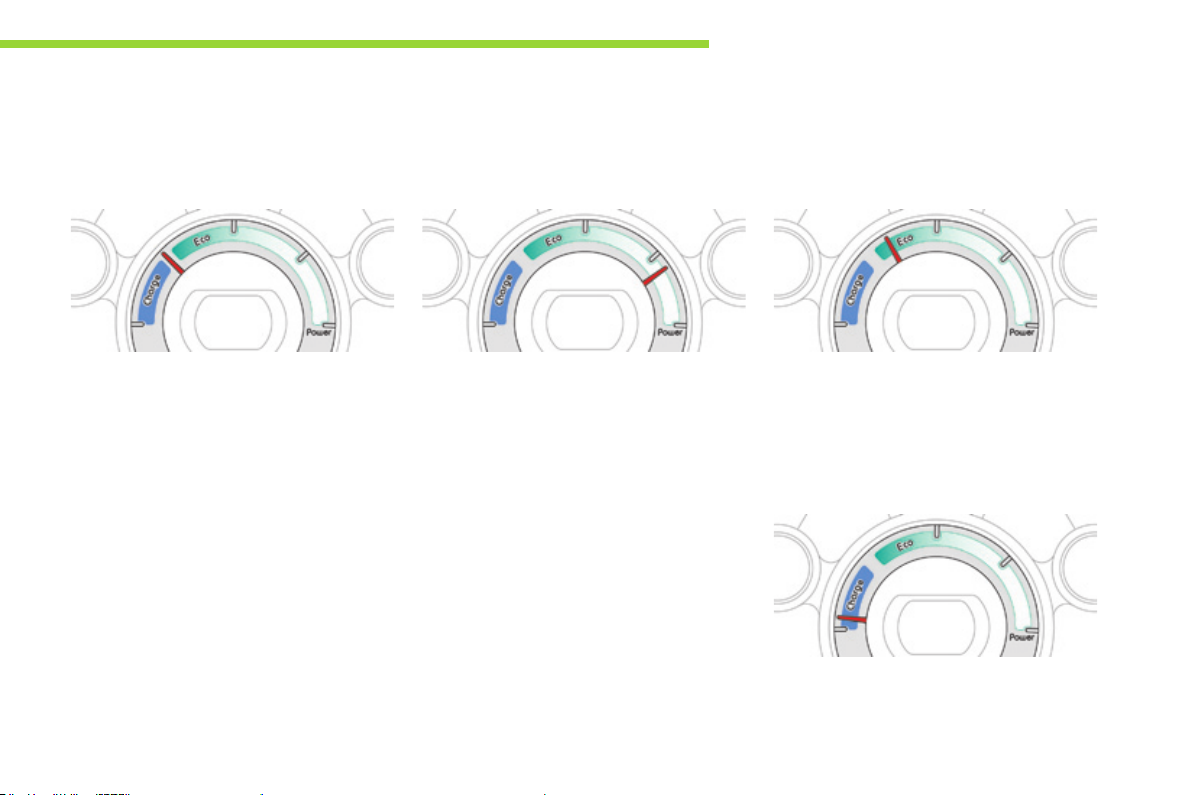
Energy consumption / generation indicator
A system that informs the driver of the level of energy consumption or generation of the main battery.
"Neutral" position
On switching on the ignition, your vehicle
neither consumes nor generates energy in its
electric traction system: the needle is in the
"neutral" position (provided that the heating and
air conditioning are off).
Energy consumption
The needle moves to the right in proportion to
the energy consumption by the vehicle.
1
"E c o" z one
The needle is in this zone when the vehicle is
used so as to moderate electric consumption
and optimise its range.
"Charge" zone
The needle moves to the left in proportion to
the level of charge sent to the main battery,
during period of deceleration and braking.
19

Monitoring
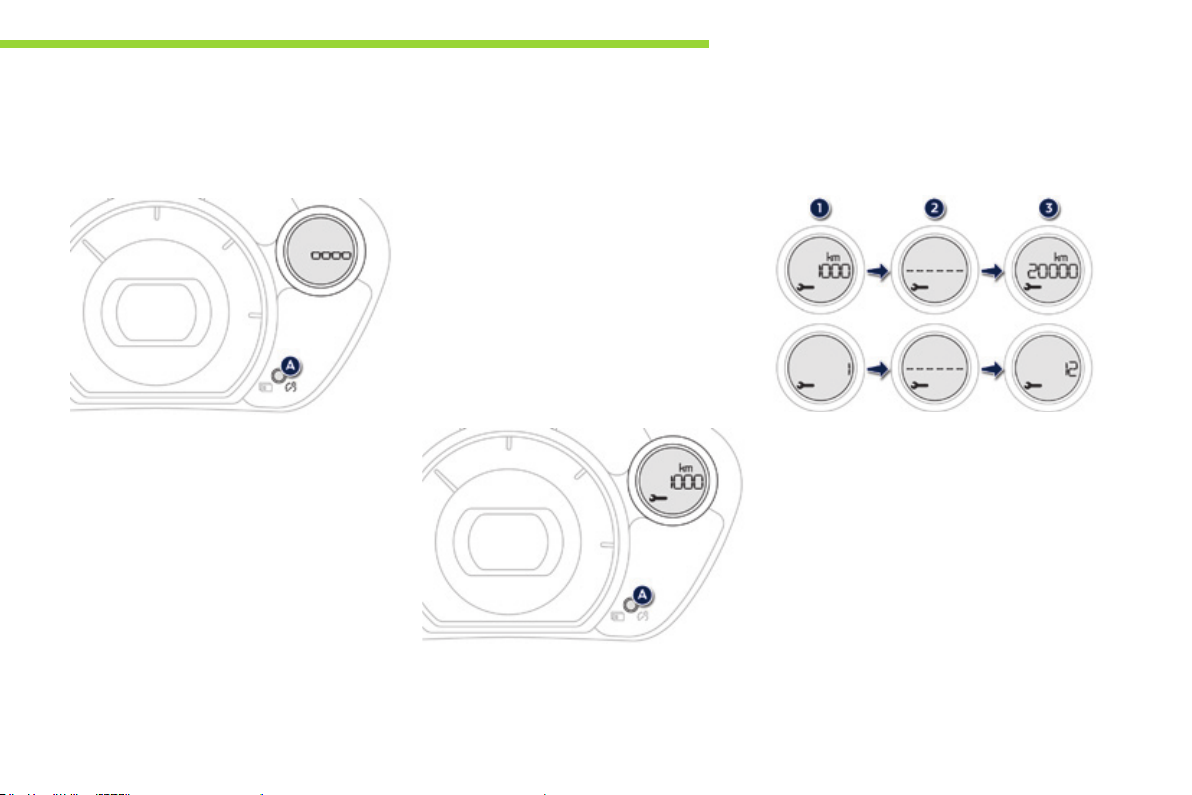
Instrument panel screen
When the ignition switch is in the "ON" position, press button A repeatedly to display the following information in turn.
Distance recorder
System for measuring the total distance
travelled by the vehicle during its life.
Press button A.
The total distance appears in the screen.
Trip distance recorder (Trip A or B)
Each of these trip recorders indicates the
distance travelled since the last reset.
Press button A to display the desired trip.
Reset to zero
With the ignition on and either trip A or B
displayed, press the button for more than
2 seconds.
20
Monitoring
1
Lighting dimmer
System for manual adjustment of the
brightness of the instruments and controls in
relation to the exterior brightness.
With the lighting on or off, press button A to
select the function, then hold down to change
the intensity of the lighting of the instruments
and controls in "day" or "night" mode.
The intensity of the lighting increases each time
button A is pressed.
When the lighting reaches the maximum
setting, press again to change to the minimum
setting.
When the lighting reaches the required
intensity, release button A.
The setting is saved when you release button A
and retained when the ignition switch is turned
to OFF.
Service indicator
System which informs the driver when the
next service is due in accordance with the
manufacturer's servicing schedule.
The point at which the next service is due is
calculated from the last service indicator zero
reset.
This point can be indicated in one of two ways:
- the miles (km) remaining,
- the time remaining to the next service.
When the ignition is switched on, press
button A several times in succession until the
service indicator is displayed in the desired
units.
Operation
1. The screen indicates that 620 miles
(1000 km) or 1 month remain before the
next service.
2. The screen indicates that the date for the
service has been exceeded.
Every time the ignition is switched on,
the service spanner is displayed for a
few seconds to remind you that a service
should be carried out as soon as possible.
3. Once the service has been carried out, the
distance or the number of months to the
next service is displayed again.
21
Monitoring
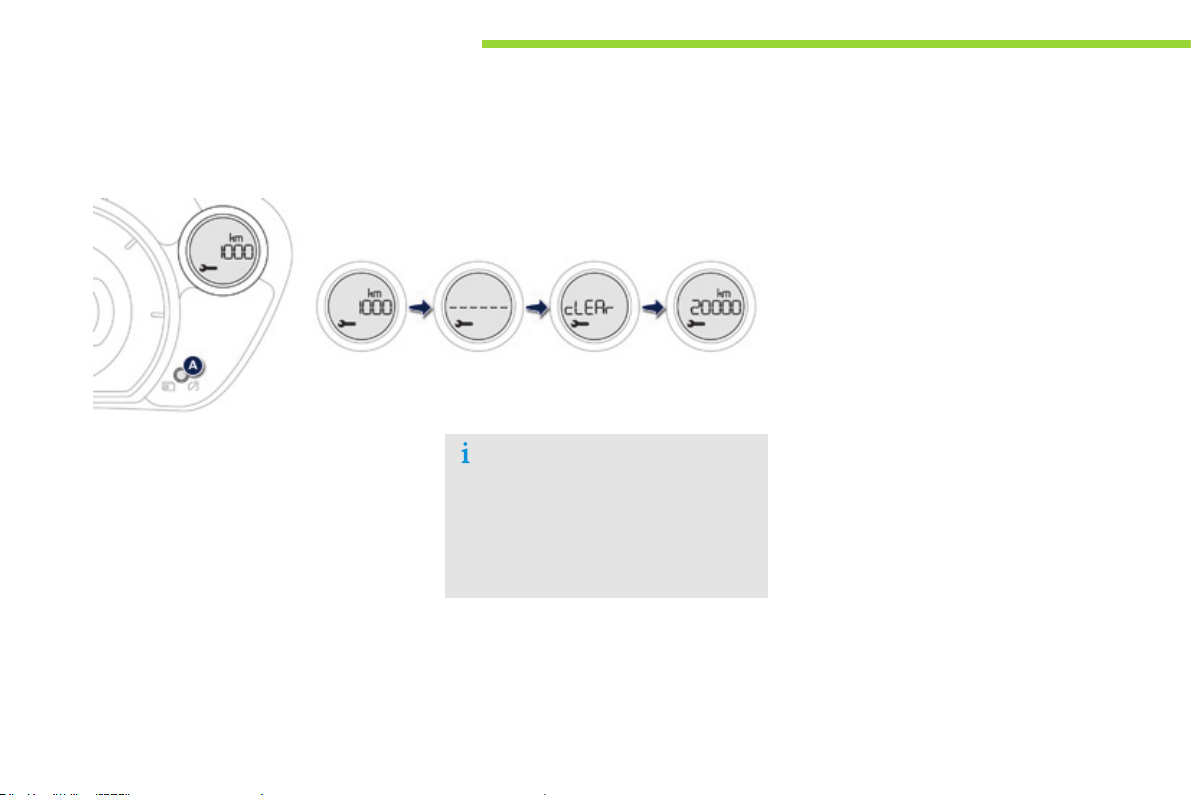
Resetting the service indicator to zero
22
After each service, the service indicator should
be rest to zero.
The procedures is as follows:
F Switch off the ignition (switch in the LOCK
or ACC position).
F Press the reset button A several times in
succession until the service indicator is
displayed.
F Press and hold the reset button for a few
seconds until the spanner flashes.
F Press the reset button while the spanner is
flashing to change the display from "---" to
"CLEAR".
The distance (or time) remaining before the
next service is due is displayed.
The display of "---", indicating that the
service date has arrived, comes on
automatically after a certain time and
distance travelled. The screen then
indicates the time remaining before the
next service is due.
Monitoring
1
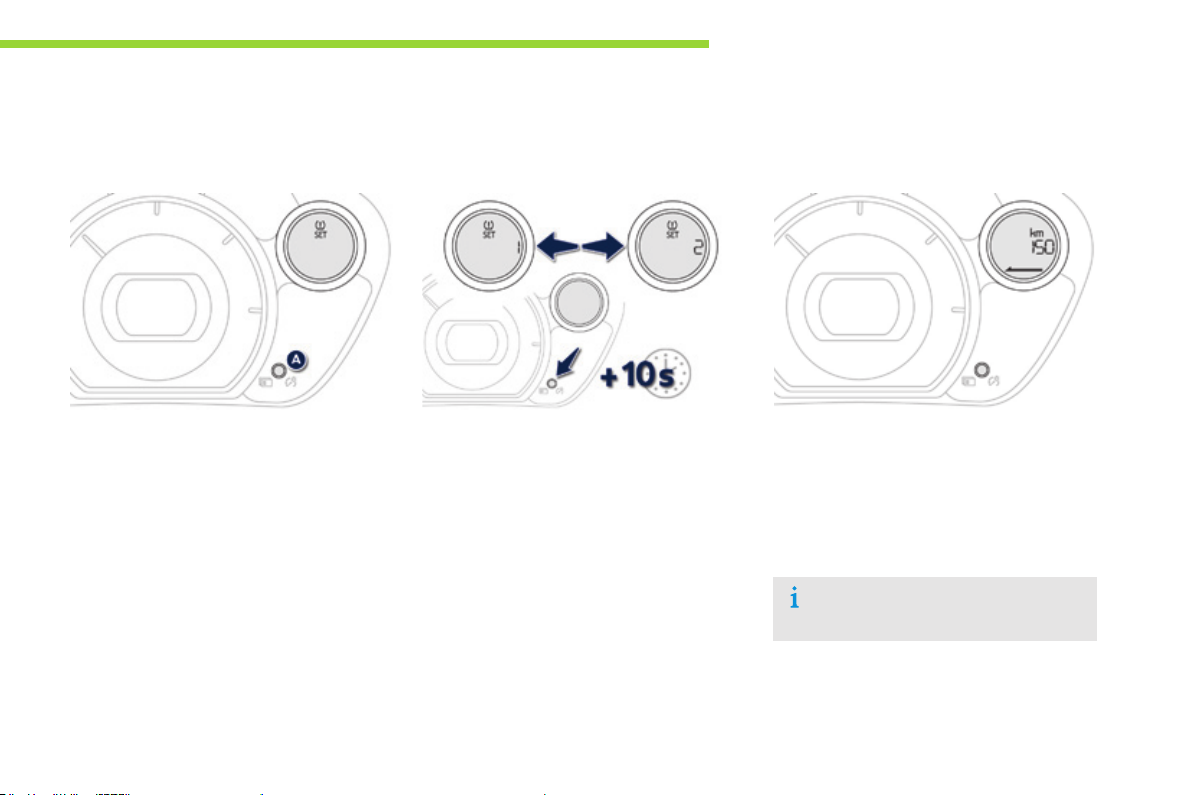
Under-inflation detect ion
You have to reinitialise the under-inflation
detection system after adjusting one or more
tyre pressures or after changing one or more
wheels.
Carry out the following procedure to do this.
F Press button A to select the system.
F Press and hold button A for at least
3 seconds.
There is an audible signal and the underinflation warning lamp flashes slowly until the
initialisation is complete.
Selecting the set of wheels and
tyres tted
If you have previous registered a second set
of wheels and tyres with sensor, you have to
select the corresponding set in the instrument
panel screen after fitting them.
Carry out the following procedure to do this.
F Press button A to select the system.
F Press and hold button A for more than
10 seconds, to change from set of tyres
and wheels 1 to set 2 or the other way
round.
Range indicator
This function gives an estimate of the number
of miles (km) that your vehicle can still cover,
based on the recent conditions of use (driving
style, use of heating, air conditioning...).
When the remaining range falls to a low level,
"- - -" is displayed in the instrument panel.
23
Access
Remote control key
System used for centralised locking or unlocking of the vehicle using the door lock barrel or from a distance. It is also used to start the vehicle, as well
as providing protection against theft.
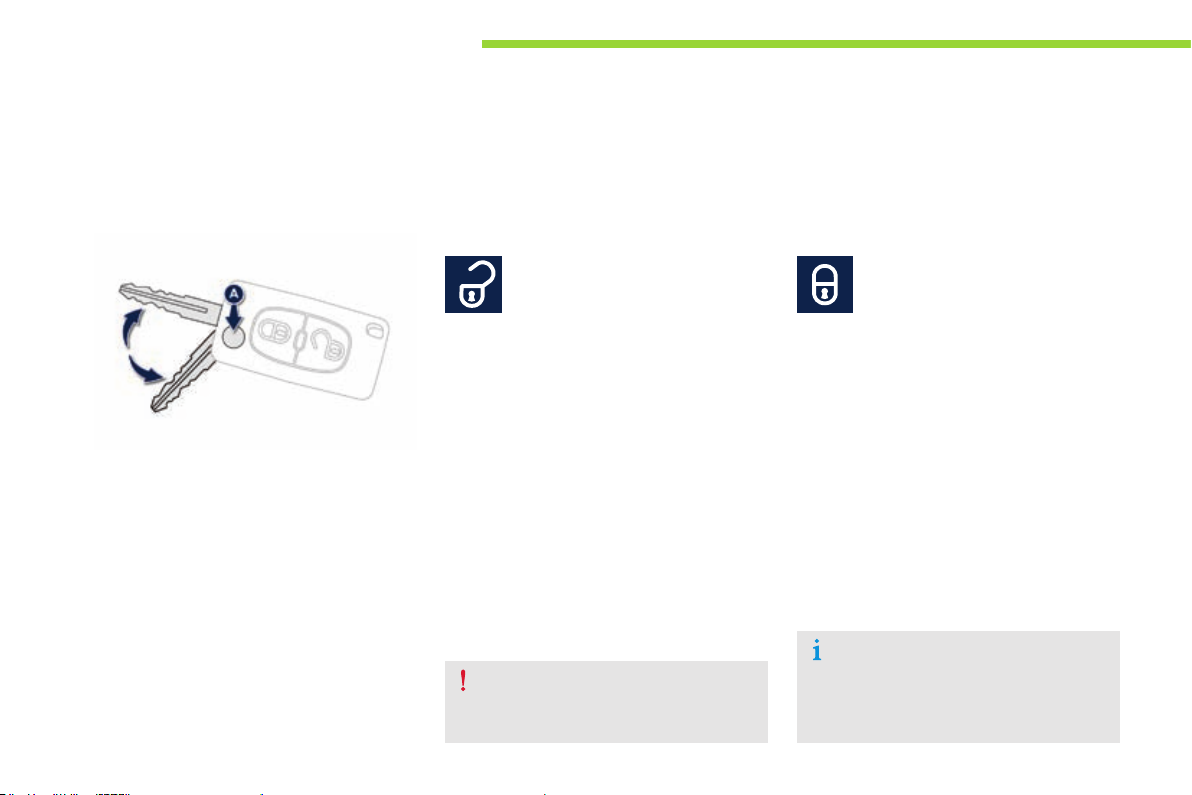
Unfolding / Folding the key
F First press button A to unfold or fold the
key.
Unlocking the vehicle
Unlocking using the remote
control
F Press the open padlock to unlock
the vehicle.
Unlocking is confirmed by the interior lighting
which comes on for approximately 15 seconds
and the direction indicators which flash twice.
Depending on version, the door mirrors unfold
at the same time.
Unlocking using the key
F Turn the key to the right in the driver's
door lock to unlock the vehicle.
Locking is confirmed by the interior lighting,
which comes on for about 15 seconds and the
direction indicators, which flash twice.
On the other hand, the door mirrors are not
unfolded (see the "door mirrors" section).
The passenger's door lock barrel does
not lock or unlock the other doors or
the boot.
Locking the vehicle
Normal locking using the remote
control
F Press the closed padlock to lock
the vehicle.
Locking is confirmed by the direction indicators
which come on once.
Depending on version, the door mirrors fold at
the same time.
Normal locking using the key
F Turn the key to the left in the driver's door
lock to lock the vehicle.
Locking is confirmed by the direction indicators,
which flash once.
On the other hand, the door mirrors are not
folded (see the "door mirrors" section).
The vehicle will lock itself again
automatically after thirty seconds
unless a door or the boot is opened.
This function avoids inadvertent
unlocking.
24

Access
Anti-thef t p rotection
Electronic immobiliser
The key contains an electronic chip which has
a special code. When the ignition is switched
on, this code must be recognised to permit
starting.
This electronic immobiliser locks the control
system a few moments after the ignition is
switched off and prevents starting by anyone
who does not have the key.
In the event of a malfunction and if your vehicle
does not start, contact a PEUGEOT dealer as
soon as possible.
Remote control problem
In the event of a remote control malfunction,
you can neither unlock nor lock your vehicle.
F First of all, use the key in the driver's door
lock to unlock or lock your vehicle.
F Then, contact a PEUGEOT dealer to check
the operation of the remote control and
replace the battery if necessary.
2
25

Access
Lost keys
Visit a PEUGEOT dealer with the vehicle's V5 registration document and your personal
identification documents.
The PEUGEOT dealer will be able to retrieve the key code and the transponder code
required to order a replacement key.
Remote control
The high frequency remote control is a sensitive system; do not operate it while it is in your
pocket as there is a possibility that it may unlock the vehicle, without you being aware of it.
Do not repeatedly press the buttons of your remote control out of range and out of sight of
your vehicle. You run the risk of stopping it from working.
The remote control does not operate when the key is in the ignition, even when the ignition
is switched off.
Locking the vehicle
Driving with the doors locked may make access to the passenger compartment by the
emergency services more difficult in an emergency.
As a safety precaution (with children on board), remove the key from the ignition when you
leave the vehicle, even for a short time.
Anti-thef t p rotection
Do not make any modifications to the electronic immobiliser system; this could cause
malfunctions.
26
When purchasing a second-hand vehicle
Have the key codes memorised by a PEUGEOT dealer, to ensure that the keys in your
possession are the only ones which can start the vehicle.
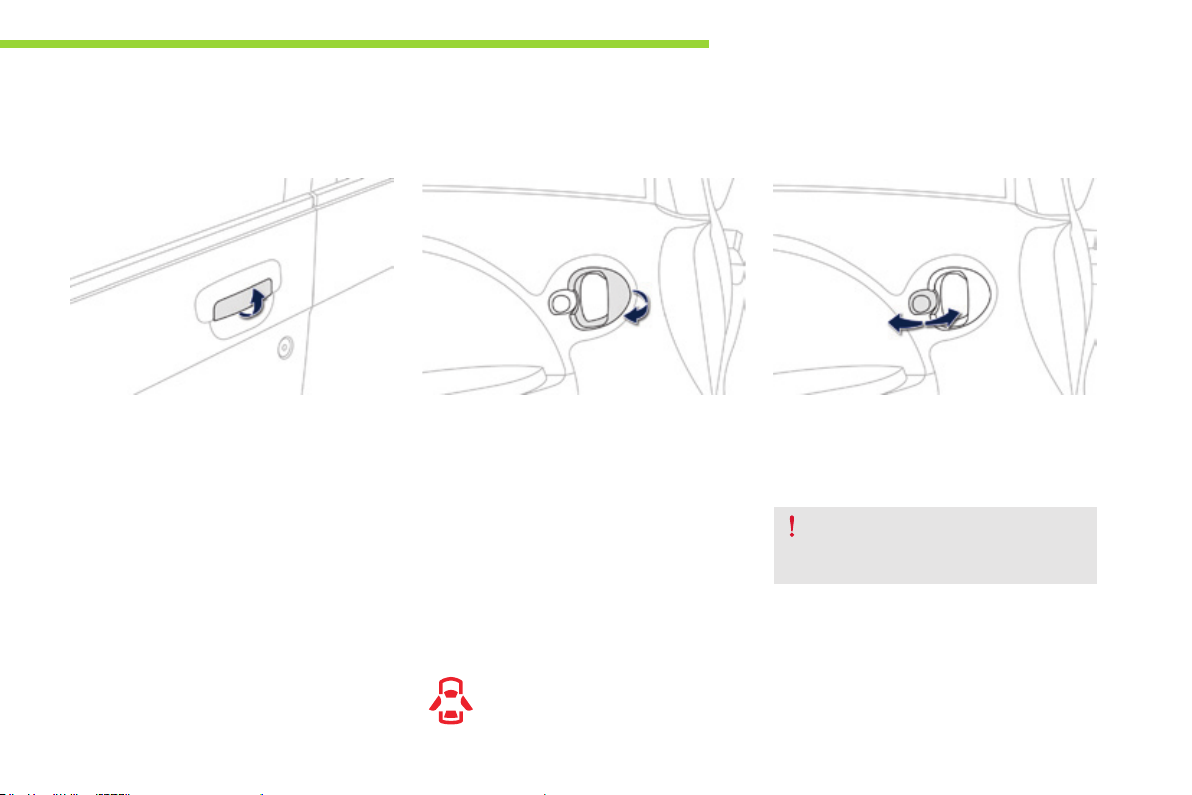
Doors
Opening
Access
Locking/ unlocking from the
inside
2
From outside
F After unlocking the vehicle using the
remote control or the key, pull the door
handle.
From inside
F Pull the front or rear door control to open
the door.
If the doors are locked:
- opening the driver's door unlocks the other
doors,
- the front passenger or rear doors must
then be unlocked manually using the front
locking control before they can be opened.
Closing
If a door or the boot is not closed
correctly, this warning lamp comes on
in the instrument panel until the door
in question or the boot is closed.
F Press the button on the driver's door
towards the front to lock and towards the
rear to unlock the vehicle completely.
The buttons on the front and rear
passenger doors only lock / unlock the
door in question.
27
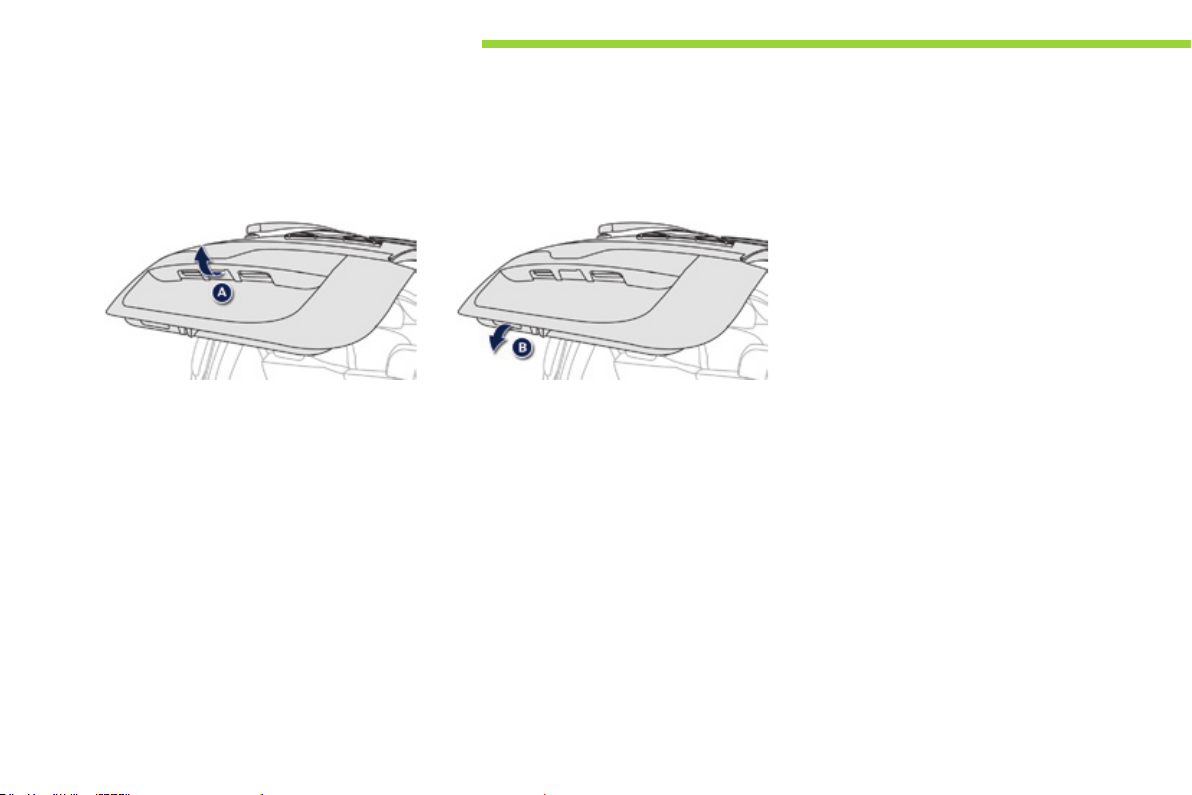
Access
Boot
Opening
Closing
28
F After unlocking the vehicle using the
remote control or the key, press the
handle A and open the tailgate.
F Pull the handle B downwards to guide the
tailgate down,
F release the handle and press the exterior
surface of the tailgate gently to close it.
 Loading...