


Peugeot IOn 2012 Owner's Manual
You can find your user guide on the PEUGEOT website, under the
heading "P
f
address
P
n
r
Selec
sio
ersonal space".
This personal space offers advice and other useful information for
the care and maintenance of your vehicle.
Referring to the user guide on-line also gives you access to the
latest information available, easily identified by the bookmarks,
associated with this pictogram:
lease note the following point:
The fitting of electrical equipment or accessories which are
ot recommended by PEUGEOT may result in a failure of your
vehicle's electronic system. Please note this specific warning.
It is advisable to contact a PEUGEOT dealer to be shown the
ecommended equipment and accessories.
If the heading "Personal space" is not available on the public website
or your country, you can find your user guide at the following
:
http://public.servicebox.peugeot.com
t:
the link in "Private customer access",
the language,
the model,
the edition date appropriate for the date of registration of your vehicle.
You w ill find your user guide, presented in the same way as the paper ver
n.
WELCOME
Key
s
a
add
use of
y
p
functio
y
c
O
O
g
This handbook h
y
circumstances
O
s
y
y
A
s
h
y
abilities
equip
g
s
sold
Thank
ou for choosing an ION, a symbol of
onfidence, passion and inspiration.
I
N is the first 100% electric vehicle for
PEUGE
drivin
intended to make it easier for
familiar with
vehicle and allow
Your vehicle is fitted with only some of the
dependin
Find out more from the PEUGEOT dealer network.
T, 0% pollutant emissions when
and particularly quiet.
as been designed to enable
ou to make the most of your ION in all
.
n the first few pages, you will find a detailed
ummary, followed by a quick reference guide
ou to become
our electric vehicle.
ll of the details specific to your ION, comfort,
afety, driving, are then presented in this
andbook to increase your appreciation of the
ou to make full use of its
.
ment described in this document,
on its trim level, version and the
pecification for the country in which it was
.
Warning:
this symbol marks warnings which it
is essential to observe for your own
afety, for the safety of others or to
void any risk of damaging your vehicle.
Information:
this symbol draws your attention to
itional information for better
our vehicle.
Protection of
the environment:
this symbol accompanies advice
relating to protection of the environment.
Page reference:
this symbol invites you to refer to the
ages which provide details of the
n.
Contents
1
8
1
9
M
2
6
E
dicato
2
7
ecorde
2
8
2
8
Lig
2
9
S
2
9
Rang
3
0
R
3
3
3
3
seats
3
seats
4
4
e
defros
5
5
5
5
A
5
5
Familiarisation
Instruments and controls
Instrument panel
Indicator and warning lamps
ain battery state of charge indicator
nergy consumption / generation
r
in
Distance r
Trip distance recorder
hting dimmer
ervice indicator
e indicator
r
.
emote control key 3
Electric windows
oors
Boot
harging fl aps
ront
Interior fi ttings 44
V
eating 4
Air conditioning 4
r
rrors
ntilation 4
r screen demist -
t
Access
Comfort
tarting - stopping the vehicle
4
anual parking brake 54
Drive selector
6
Visibility
ting controls
utomatic illumination of headlamps
eadlamp adjustment
Wiper controls 6
ourtesy lamp 6
Driving
Contents
6
7
dicators
7
7
7
7
7
7
o
seat belts
7
Airbag
7
8
8
9
9
9
0
1
1
1
ccessories
11
1
1
1
2
2
12
12
2
A
2
ISOFIX child seats
hild lock
rection in
azard warning lamps
rn
mergency or assistance call
Braking assistance systems
Trajectory control systems
Fr
nt
s
Child safety
Safety
Practical information
Charging the main battery
Ancillaries battery
Tem pora ry puncture repair kit
hanging a wheel
hanging a bulb
hanging a fuse 1
hanging a wiper blade 1
Tow ing the vehicle 1
recautions for washing 1
A
Checks
Bonnet 1
ront compartment 1
Rear compartment 11
Checking levels 1
hecks 1
4
Technical data
otor and main battery 1
Weights
Dimensions
dentifi cation markings 12
4
Audio equipment and telematics
Emergency or assistance 1
udio system 1
Visual search
.
Alphabetical index
.
Familiarisation
2
y
A
y
f
4
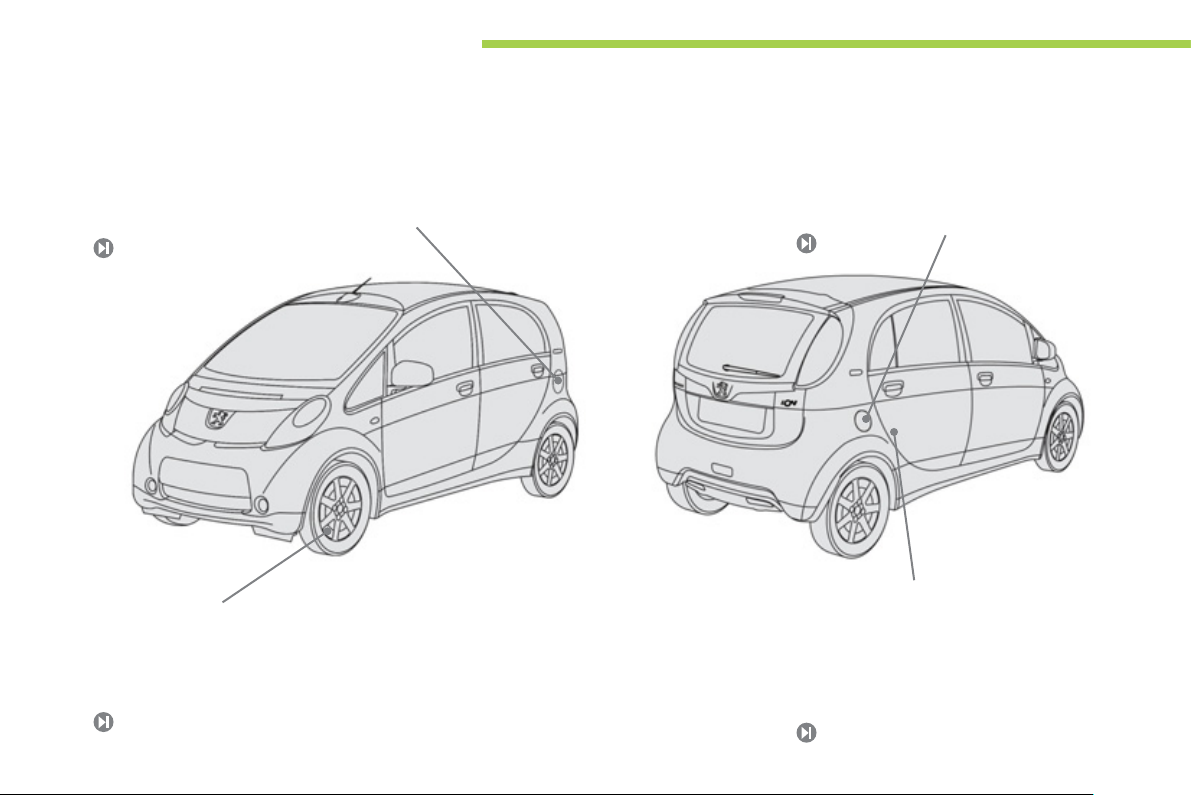
Exterior
Fast charging fl ap
Available according to equipment, this flap
hould be used to recharge your vehicle from a
pecial fast charging station.
Normal charging fl ap
This flap should be used to recharge your
vehicle from a domestic power point.
8
Tempor ary puncture repair kit
SR and ESP systems
These are associated systems that assure the
directional stabilit
limits o
the laws of physics
7
4
of the vehicle, within the
This kit is a complete system consisting of a
ompressor and a sealant cartridge, to allow
the temporar
2
repair of a tyre.
Access
.
6
ease leve
.
A.
.
ches
.Familiarisation
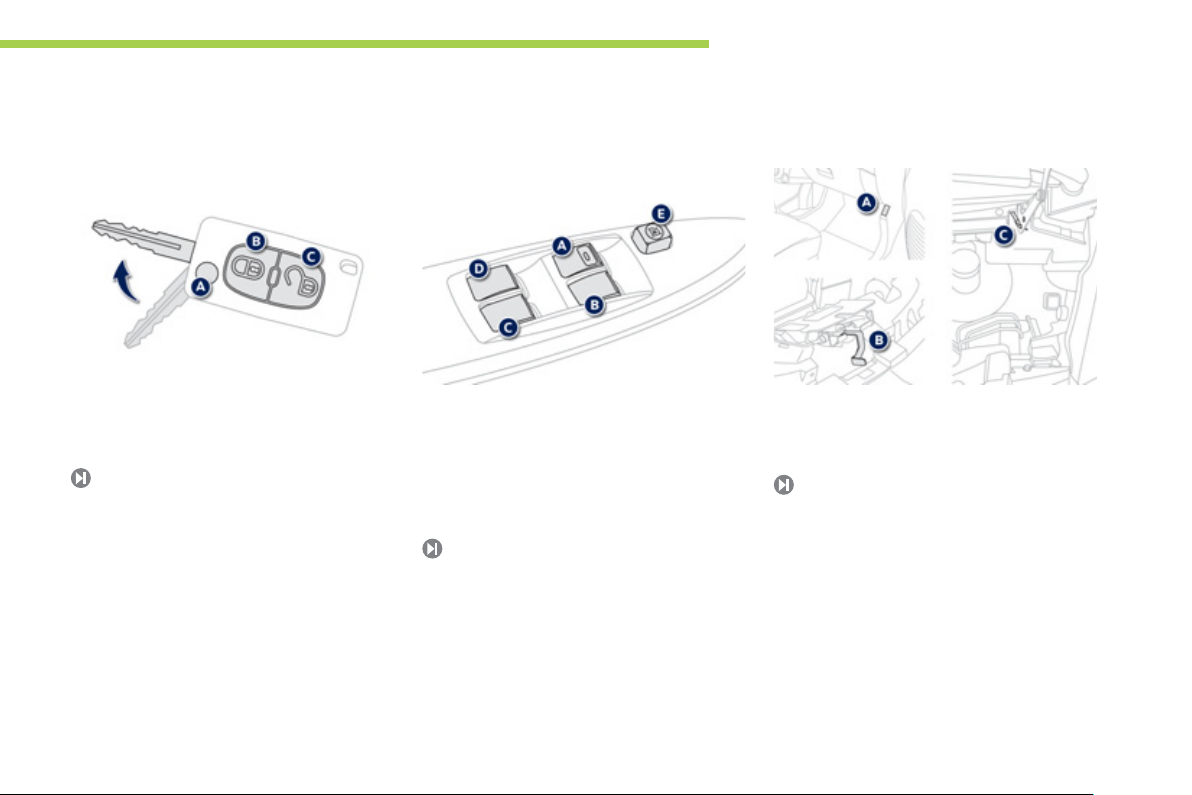
Remote control key Bonnet
A.Unfolding / Folding the key.
B
Locking the vehicle.
Unlocking the vehicle.
Electric windows
Driver's electric window.
B
Passenger's electric window.
Right hand rear electric window.
Left hand rear electric window.
Deactivating the passenger and rear
tric window swit
.
A.Rel
B
Safety catch.
Bonnet stay.
11
r.
5
Familiarisation
, R ,
g
y
e exterior c
gy
5749
9
ging f
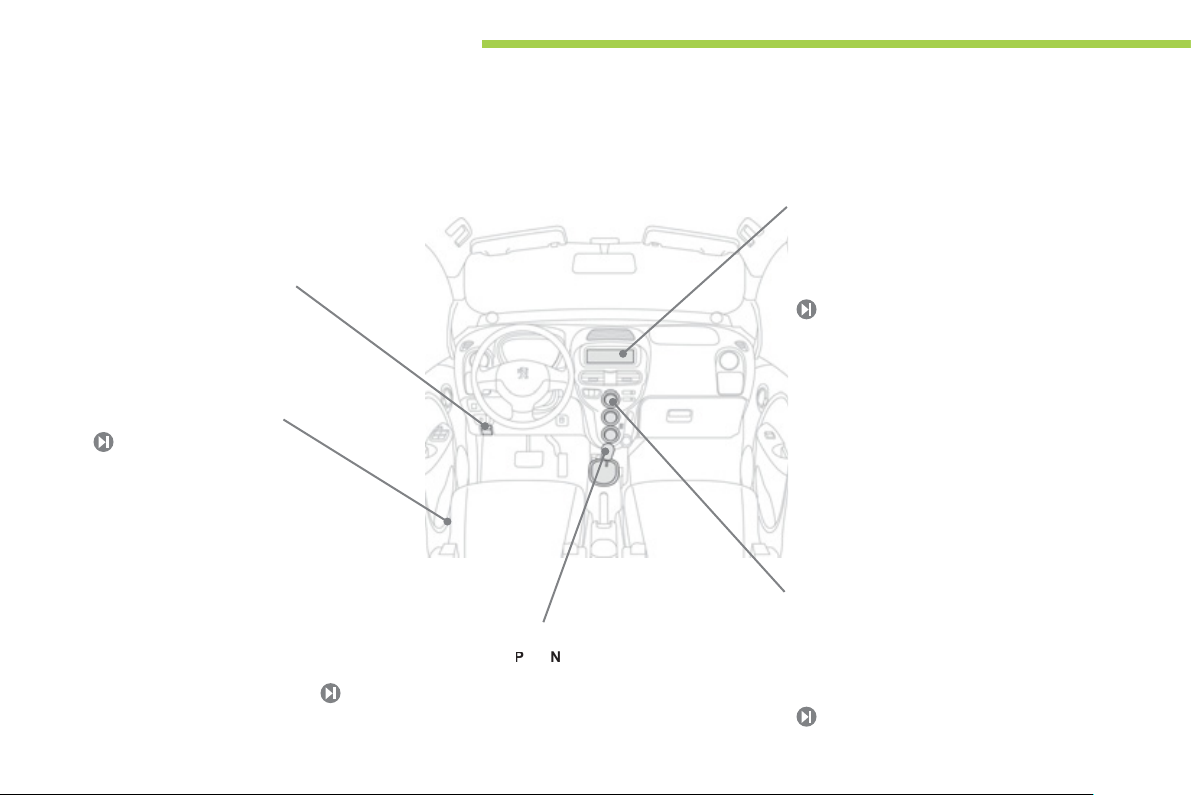
Interior
6
Charging fl ap interior openin
ontrols
Normal charging flap.
lap (according to equipment).
Fast char
Drive selector
Four-position drive selector:
5
and
Audio system
This system benefits from the latest
technolo
SB player, Bluetooth hands-free system, ...
: MP3 compatible audio system,
12
Air conditioning
After setting the desired level of comfort,
the s
.
stem controls this level according to
th
limatic conditions.

o
.
.
f
.
usebo
O
(
igh
SR/ESP deac
.
Doo
ols
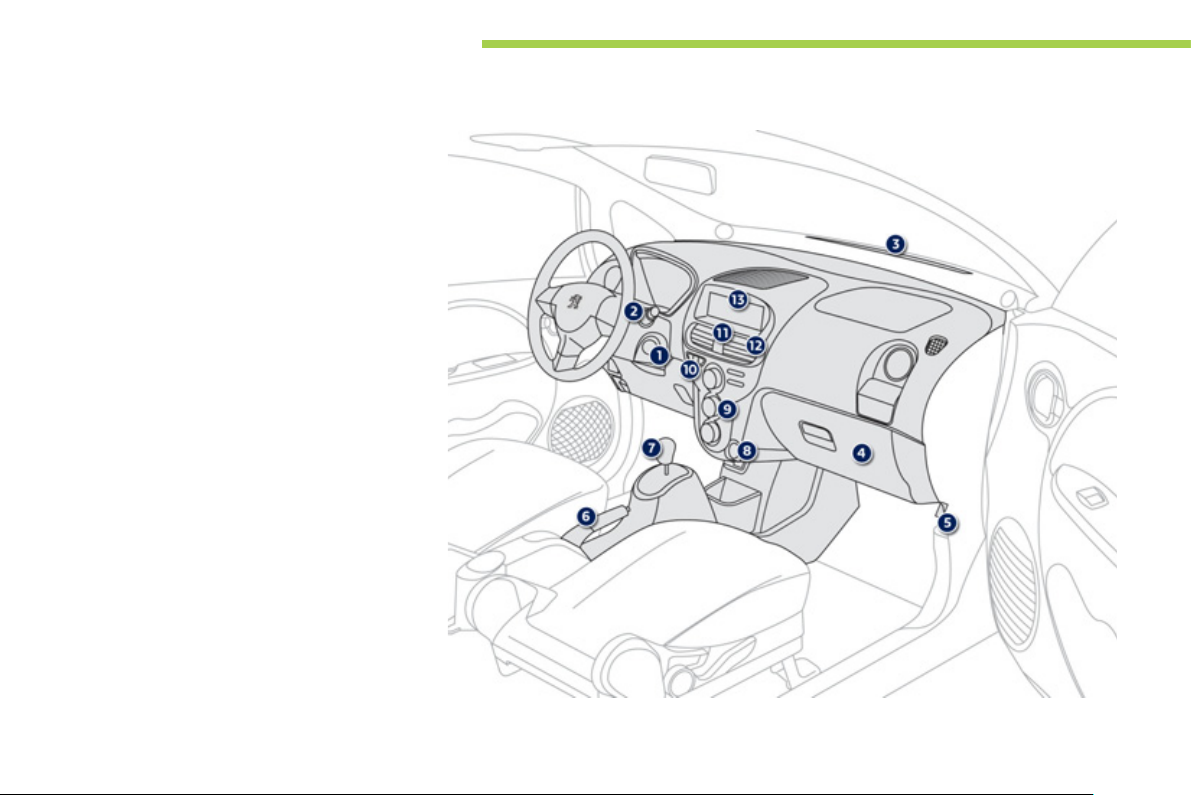
Instruments and controls
Lighting and direction indicator stalk
Instrument panel.
Driver's airbag.
rn.
H
USB port.
5
Opening control for the fast charging flap
vehicle left hand side).
6
Electric window switches and switch
or deactivating the the front and rear
assenger electric window controls.
7
F
Headlamp he
A
0
1. Cup holder.
2. Side vents.
3.Window demisting vent.
x.
pening control for the normal charging
flap
vehicle right hand side).
t adjustment.
tivation switch.
r mirror contr
.
.Familiarisation
7
Familiarisation
P
elease leve
.
Parking brak
.
C
.
Audi
Instruments and controls
Steering lock and ignition switch.
Wiper stalk.
Windscreen demisting vents.
Glove box.
assenger's airbag deactivation.
Bonnet r
6
7
Drive selector.
12 V accessory socket.
Heating / air conditioning controls.
0.Emergency or assistance call.
1. Hazard warning switch.
entre vents.
3
o system.
r.
e.
8
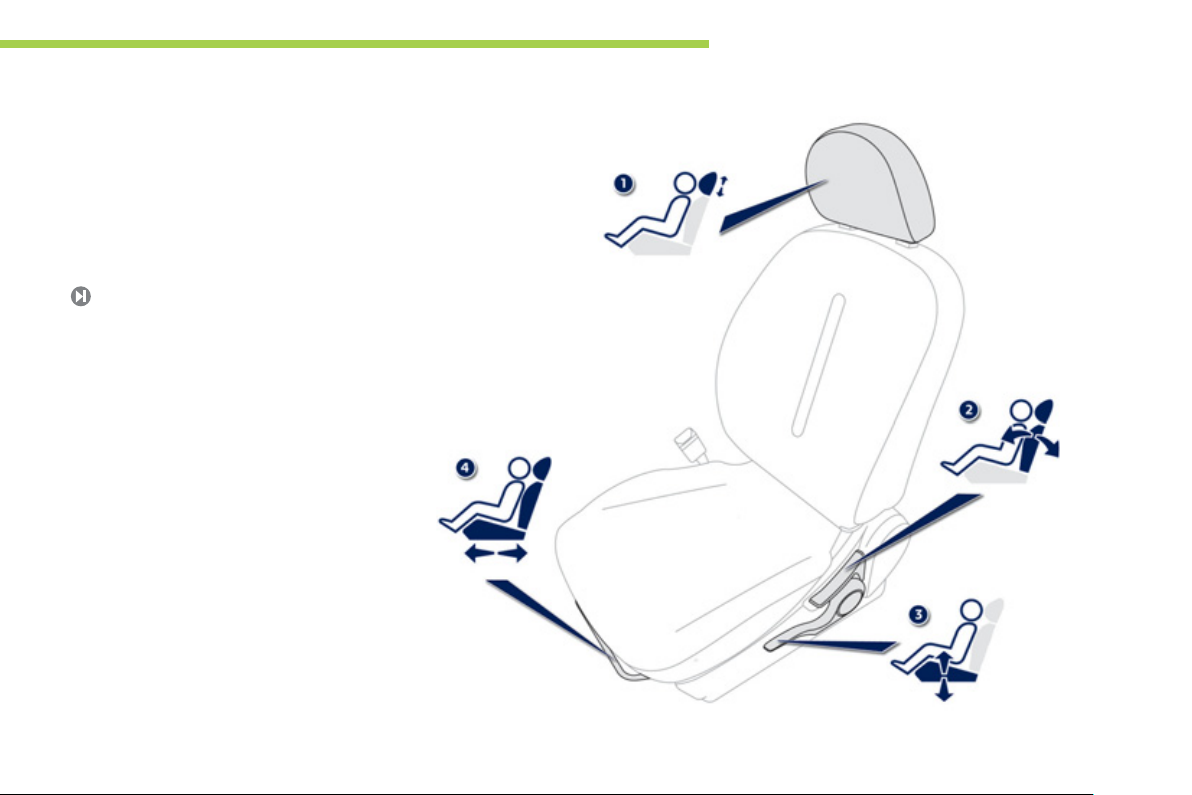
Sitting comfortably
4.
Front seats
Head restraint height adjustment.
Backrest angle adjustment.
Driver's seat cushion height adjustment.
Seat forwards-backwards adjustment.
.Familiarisation
9
Familiarisation
A.
g
5
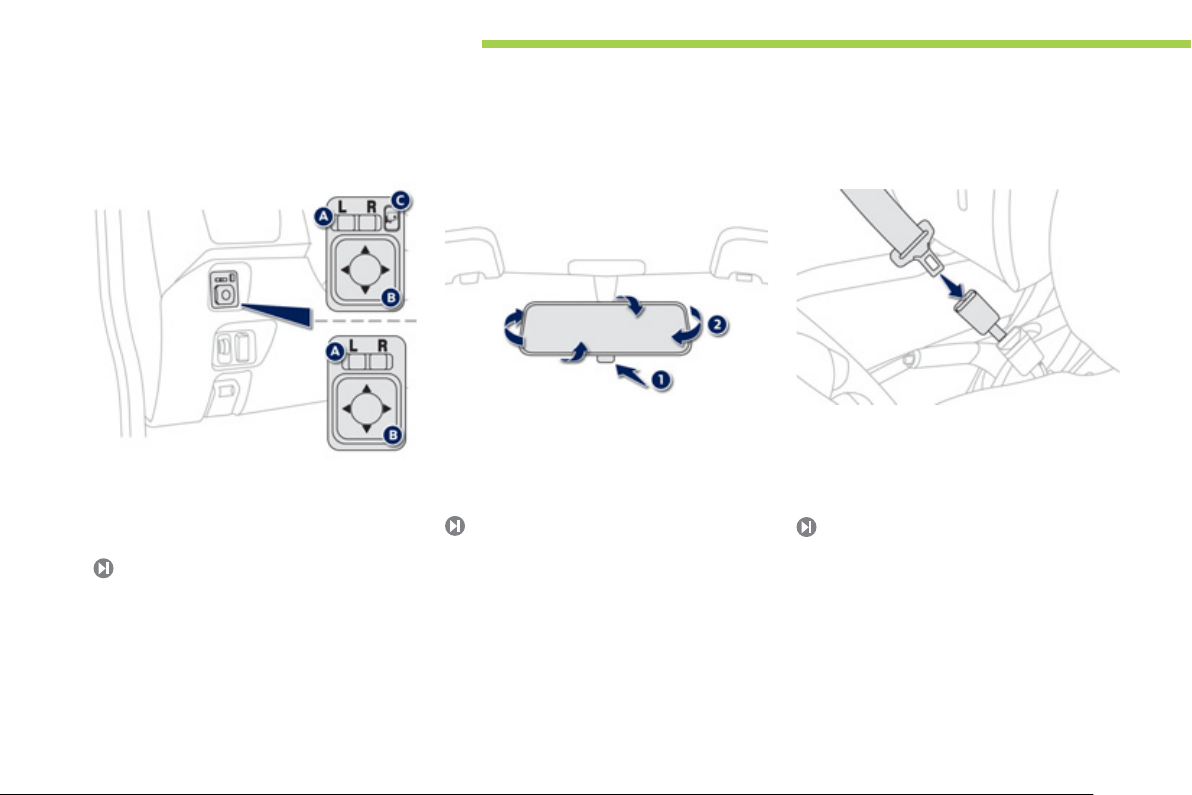
Sitting comfortably
Door mirrors
Selection of the mirror.
Adjusting the position of the mirror glass.
Folding/ Unfolding.
Rear view mirror
Manual day/night type
1.electing the "day" position of the rear view mirror.
2. Rear view mirror adjustment.
3
Seat belts
Fitting the belt.
Fastening the buckle.
Checking the fastening by pulling on the
belt webbin
7
.
10
Seeing clearly
g
0
Dipped
S
fog
a
S
Park
(
y)
S
Fas
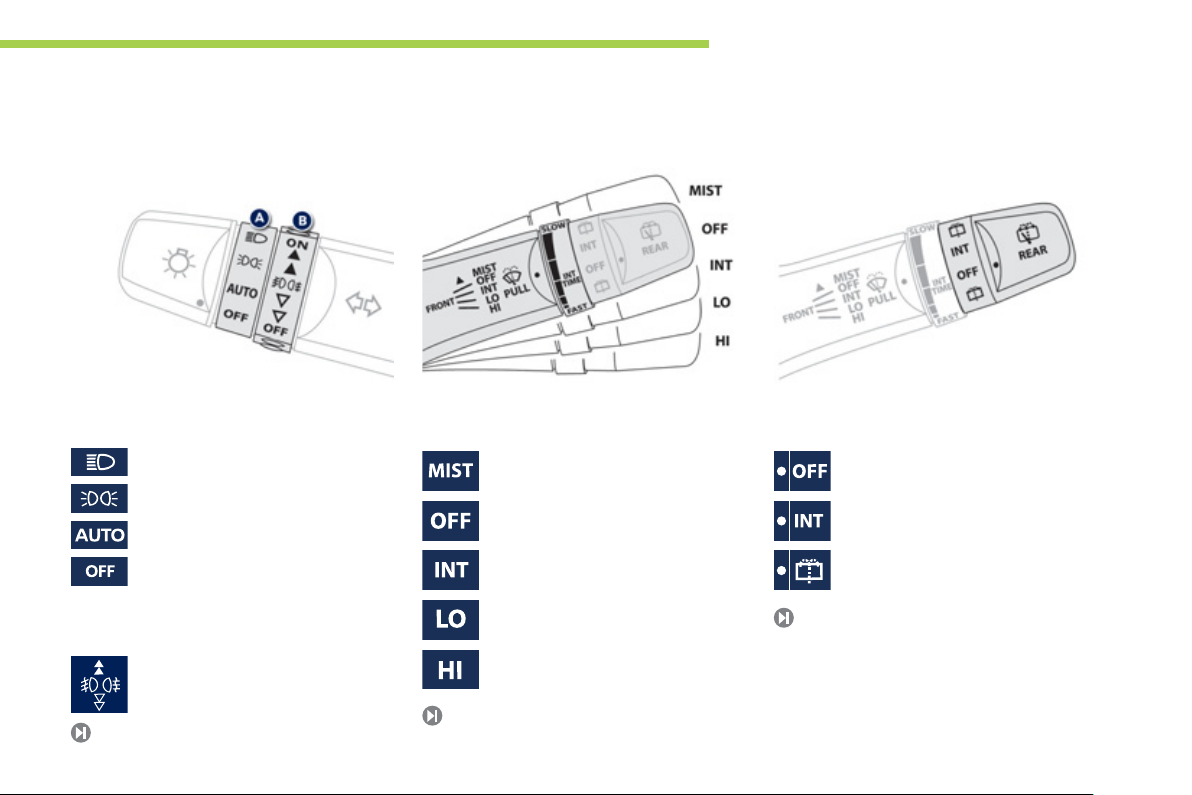
.Familiarisation
Lightin
Ring A
Ring B
57
or main beam headlamps.
idelamps.
Automatic illumination of headlamps.
Lighting off.
Front and rear
lamps.
Wipers
Windscreen wiper
ingle wipe.
.
Intermittent wipe
manuall
6
.
low.
t.
speed adjustable
Rear wiper
P
rk.
Intermittent wipe.
Wash/wipe.
60
11

Familiarisation
A
j
Off
49
Ventilation
Heating / Ventilation
Air conditioning
Temp e ratu re ad justm e nt.
ir flow adjustment.
Air distribution ad
Air intake / Air recirculation.
"MAX" button.
Air conditioning On /
ustment.
.
12

Passenger safety
f
sea
SO
sea
A
he
R
A.
.
0
.Familiarisation
Front passenger's airbag
Open the glove box.
Insert the key.
Select position:
ON"(activation), with front passenger or
"
orwards facing" child seat,
OFF" (deactivation), with "rear facing"
t.
79
Child lock
Child lock on.
B
Child lock off.
7
ISOFIX mountings
Two rings A , located between the seat cushion
and backrest are used to secure an I
hild
t.
ring
is used to secure an upper strap called
t
OP TETHE
67
FIX
13
Familiarisation
g
g
f
.
.
y
o
gy gaug
f
ing
gy gauge f
pp
y of
g
Prog
Monitoring
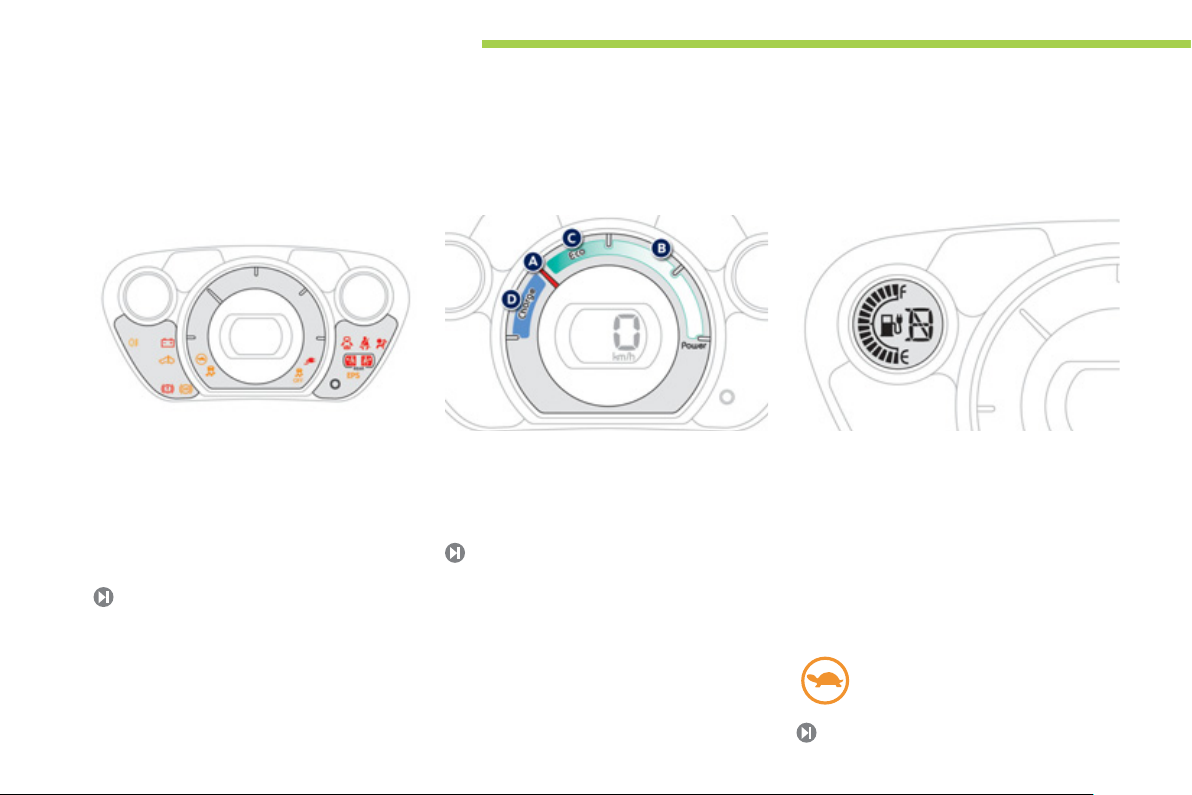
Warning lamps
With the ignition on, the orange and red
warnin
lamps come on.
With the engine running, these warnin
amps go off.
I
a warning lamp remains on, refer to the
elevant page.
19
Energy consumption /
eneration indicator
A
"Neutral" position.
B
Energy consumption
"Eco" zone.
"Charge" zone.
Low energy alerts
Four successive alerts indicate that the energy
available in the main batter
l
w level:
- 2 bars of the ener
instrument panel, on and
start
- The last bar in the ener
- The last bar disa
displa
to use the reserve.
the range disappears; the heatin
nd air conditioning are switched off.
- Display of this warning lamp in
the instrument panel:
ressive reduction in the
power available from the motor.
is dropping to a
e in the
lashing :
lashing.
ears:
14
Driving safely
Neutral
.
y
)
.
" l
ied by
dibl
Rel
y
.
T
.Familiarisation
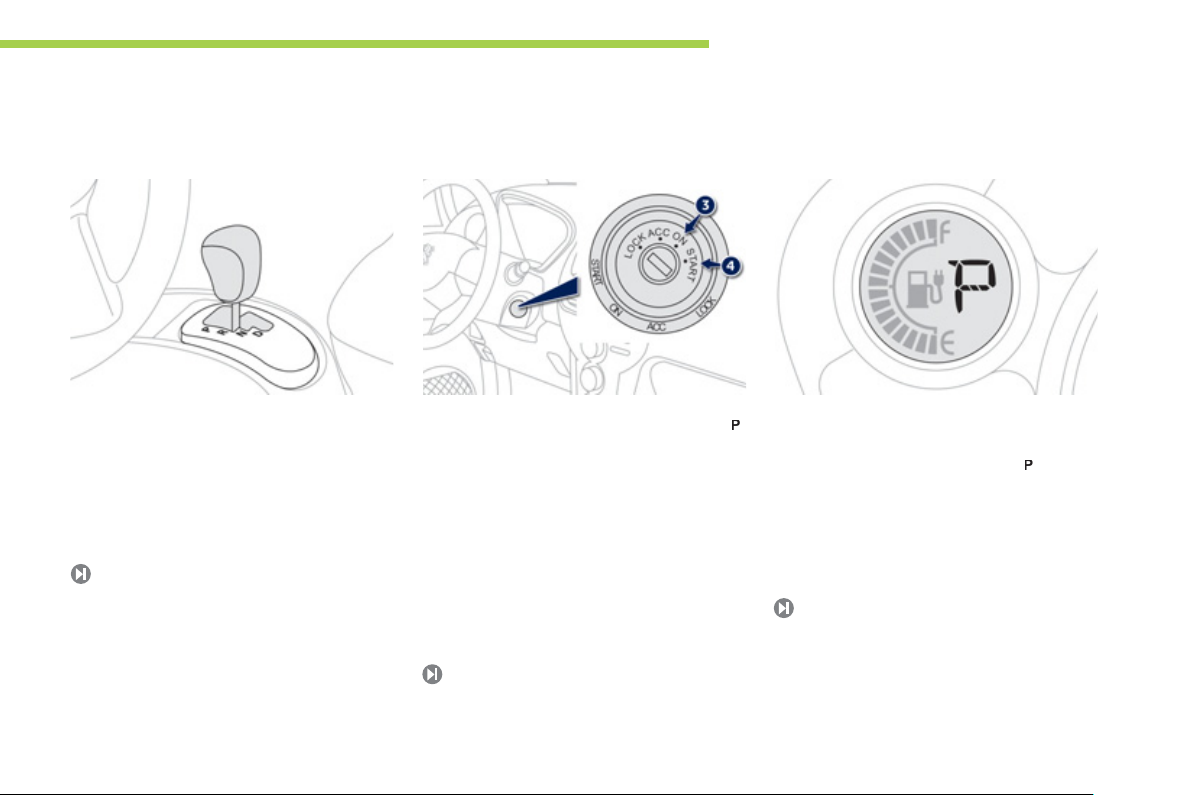
Drive selector
Parking.
Press the brake pedal to come out of this
osition.
Reverse.
.
Drive (forward).
55
Starting the motor
- Check that the drive selector is in position
- Insert the key in the ignition switch.
- Turn the ke
- Hold it in this position for a few seconds,
ntil the "
accompan
-
ease the key.
The switch returns automatically to
position
to position 4 (START
amp comes on,
an au
(ON) .
e signal.
Stopping the motor
- Stop the vehicle.
- Keep
- Put the drive selector in position
- Apply the parking brake.
-
our foot on the brake pedal.
urn the key anti-clockwise to the LOCK
osition.
53
15

Familiarisation
ging
I
Socket cove
e cable to use is
6
g
f
hicl
A.
.
.
.
f
)
w
y
d
.
use an electrical
y
Charging your vehicle
16
Normal charge
This procedure consists o
ve
e to a domestic power point.
Interior opening control.
B
Exterior flap (right hand side of the vehicle).
C
Socket cover.
Before making any connection, check
that the power point you want to use
eets standards * and is compatible
with the current rating on the control
unit of the charging cable .
n all cases, it is recommended that
ou have your installation checke
a qualified electrician before use
nd then on a regular basis
*
For example, for France: standard NF C 15-100).
2
connecting the
You must always use a genuine
EUGEOT charging cable.
Do not
xtension lead, multi-wa
onnector, adaptor or timer.
o optimise the service life of the
ain battery, recharge it completely
every 15 days
For a recharge to be
ollow the procedure for a normal
echarge (domestic power point
ithout interruption, until it switches off
utomatically (charging lamp goes off in
the instrument panel).
omplete ,
Fast charge **
This procedure consists of connecting the
vehicle to a special fast char
nterior opening control.
Exterior flap (left hand side of the vehicle).
Th
harging station.
Ensure that the charging station and its
** Dependin
8
r.
the one attached to the
able are compatible with your vehicle.
on equipment.
station.
For more economical driving, and increased range
g
g
g
y
l
ehicle
gy
f
y
y
o s
desired level o
C
g
heated sea
e vehicle and reduce
)
f
Practical advice for everyday use to optimise the range of your vehicle by conserving battery power.
.Familiarisation
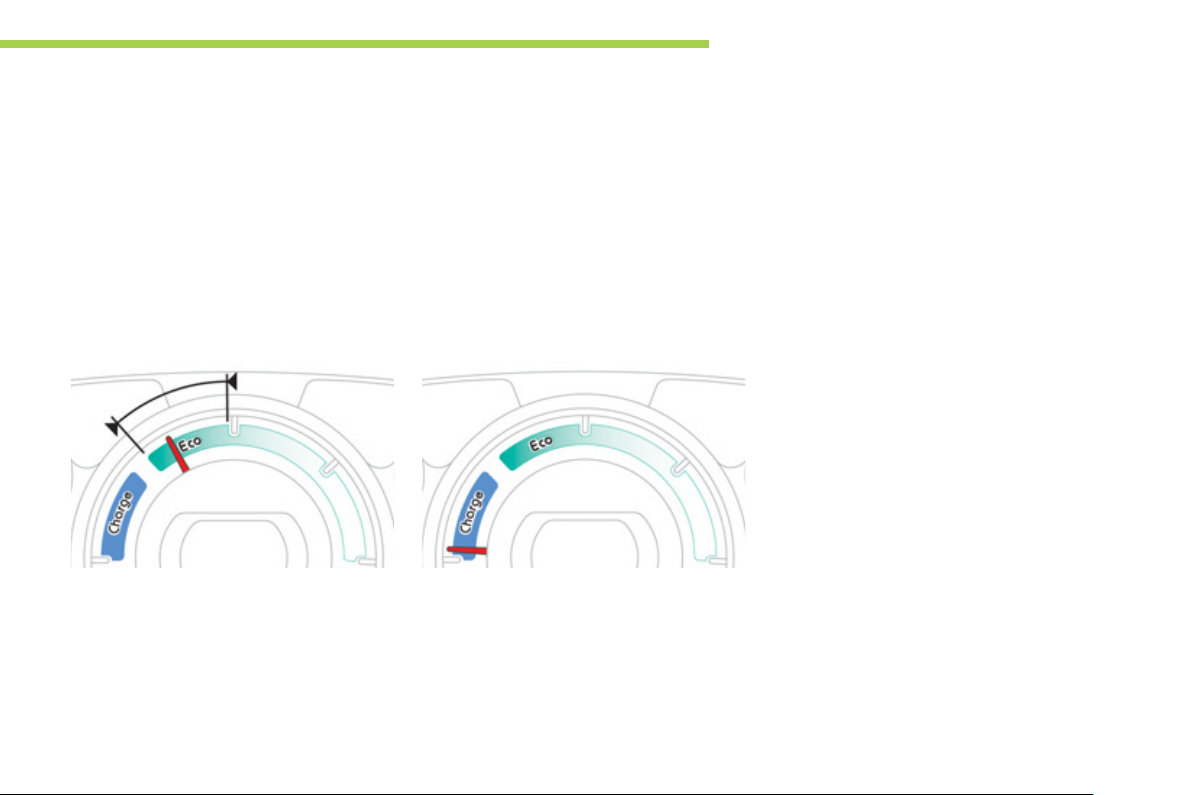
Adopt a smooth drivin
style
The electrical consumption of your vehicle
depends
tyle and your speed.
In all cases, adopt a smooth drivin
Sta
onsumption / generation meter: depress the
acce
ovement, and if the conditions permit, drive at
teady and moderate speed.
reatly on your journey, your driving
style.
in the "Eco" zoneindicated in the energy
erator pedal progressively, without sudden
Recover energy
Anticipating the driving conditions allows you to
ecover energy and increase the range of your
v
.
se the "Charge" zoneof the ener
onsumption / generation meter whenever
ossible: anticipate the traffic slowing
down and i
the the conditions permit, use
leration rather than the brakes.
Control the use of your
lectrical equipment
The heating and air conditioning systems
perate on energy from the main battery.
Excessive use of these s
reduces the range of your vehicle. Remember
t
witch them off once the
omfort is reached and check their settings
very time you set off.
ontrol also the use of demisting / defrostin
nd the
stems greatl
f
t.
Limit the causes of excess
onsumption
As with any vehicle, limit the loads carried
in th
windows open above 30 mph (50 km/h), roof
bars, roof box, …
wind resistance
.
Observe the
recommendations on
aintenance
heck the tyre pressures regularly and
ollow the schedule for routine servicing
recommended by PEUGEOT.
17
Instruments and controls
p
.
.
.
.
).
.
.
ice.
.
.
(
j
,
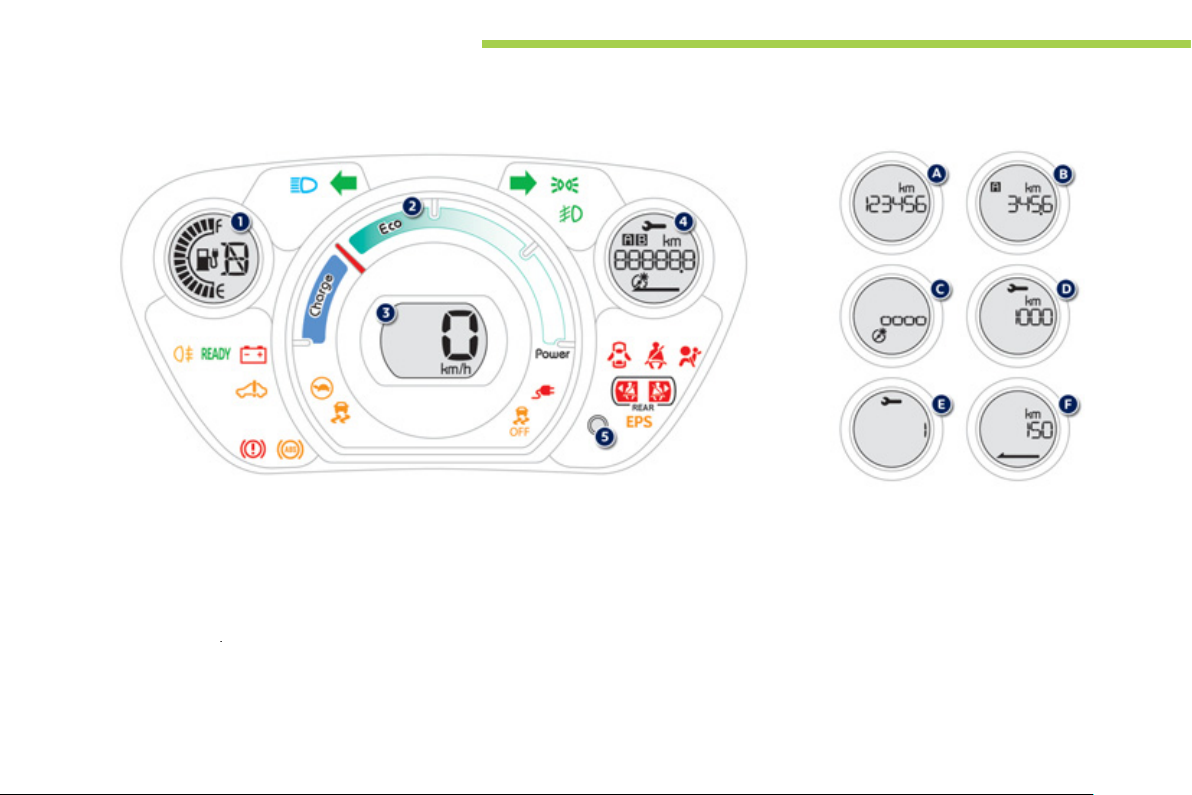
Instrument panel
Panel bringing together the various gauges and indicators for the operation of the vehicle.
18
Gauges and indicators
State of charge gauge for the main
attery.
Drive selector
Energy consumption / generation
ndicator
Screen
osition indicator
Screen
5.creen control button
Displays the various functions in turn.
Resets the function selected
r service indicator).
Ad
usts the level of instrument lighting.
For more information
orresponding section.
refer to the
trip recorder
A.otal distance recorder
B.rip distance recorder (Trip A or B
C.Instrument panel lighting dimmer
Indicator of distance remaining to the
next service
Indicator of time remaining to the next
serv
Indicator of remaining range

ndicator and warning lamps
fau
g
g
y
g
ing l
A
y
g
C
ascertained
occurred
Visual indicators informing the driver that a
stem is in operation, is deactivated or has a
lt.
ssociated warnings
The illumination of certain warning lamps may
be accompanied b
The warnin
ixed) or flash.
an audible signal.
lamps may come on continuously
Instruments and controls
1
When the ignition is switched on
Certain warning lamps come on for a few seconds
when the vehicle's i
These same warnin
If
remainin
warn
nds.
ou notice one of these warning lamps
on, refer to the information on the
amp in question.
nition is switched on.
lamps go off after a few
ertain warning lamps may come on in
one of two modes. Only by relating the
type of lighting to the operating status
f the vehicle can it be
whether the situation is normal or
whether a fault has
.
19
Instruments and controls
e
e
A
o
g
ps
g
d
g
f
/
On f
s
On f
g
On f
fog
O
yo
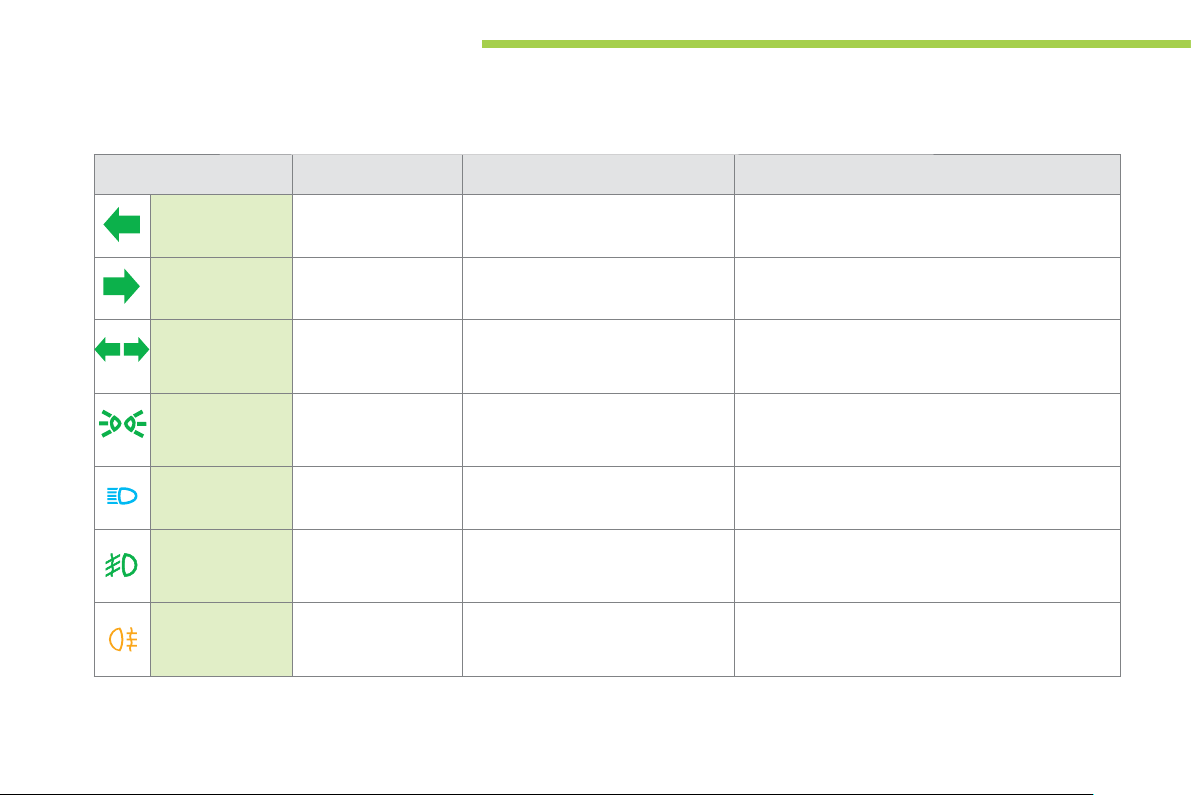
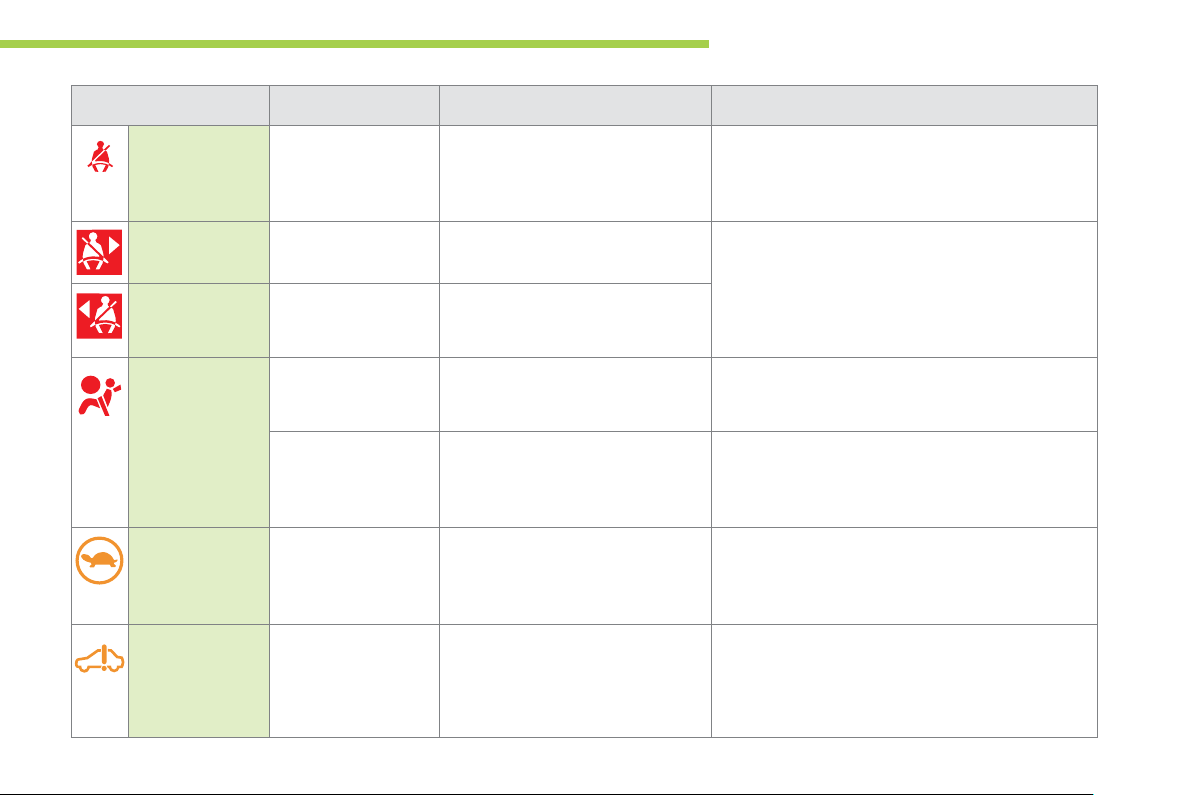
Operation indicator lamps
If one of the following indicator lamps comes on in the instrument panel, this confirms that the corresponding system has come into operation.
Warning / indicator lampStat
eft-hand
direction indicat
ight-hand
direction indicator
azard warning
am
Sidelampsnd
or dipped beam
headlamps
ain beam
eadlamps
Front foglamp
ear foglamp
Flashing with audible
ignal.
Flashing with audible
ignal.
Flashing with audible
n fixed. The lighting stalk is pulled towards
Caus
hting stalk is pushed down.
The li
The lighting stalk is pushed up.
nal.
ixed. The sidelamps and/or dipped beam
ixed. The front foglamps are switched on. Turn the ring on the stalk rearwards twice to switch off
ixed. The rear foglamp is switched on. Turn the ring on the stalk rearwards to switch off the
The hazard warnin
ocated on the dashboard, has been
operate
.
eadlamps are on.
u.
lamps switch,
ction / Observations
The left-hand and ri
their associated indicator lamps
Pull the stalk to return to dipped beam headlamps.
the front fo
rear
lamp.
ht-hand direction indicators and
lash simultaneously.
lamps.
20

Instruments and controls
e
e
y
)
y
g
y
y
g
e
g
g
O
f
y
)
Th
O
g
y
y
ging
Warning / indicator lamp Stat
Read
ready to move
ff
arking brak
ain batter
harge (normal
or fast
On fixed,
accompanied b
audible si
On fixed. The parking brake is applied or not
On fixed.
Flashin
Caus
The vehicle is read
an
nal when it
mes on.
. The charging cable is connected to
ou can press the accelerator.
roperly released.
e main battery is on charge.
the vehicle but the main batter
et charging.
to move off and
Action / Observations
The illumination period corresponds to the powerin
up of the vehicle.
Release the parkin
lamp, keeping your foot on the brake pedal.
bserve the safety recommendations.
For
urther information on the parking brake, refer to
the "Driving" section.
n completion of the charge, the lamp goes off.
Check the connection of the char
is not
brake to switch off the warnin
1
-
cable.
21
Instruments and controls
dibl
e
e
A
On f
sole
Th
g
S
g
emembe
f
On fixed
SP/AS
f
SP/AS
y
g
ess
SP/AS
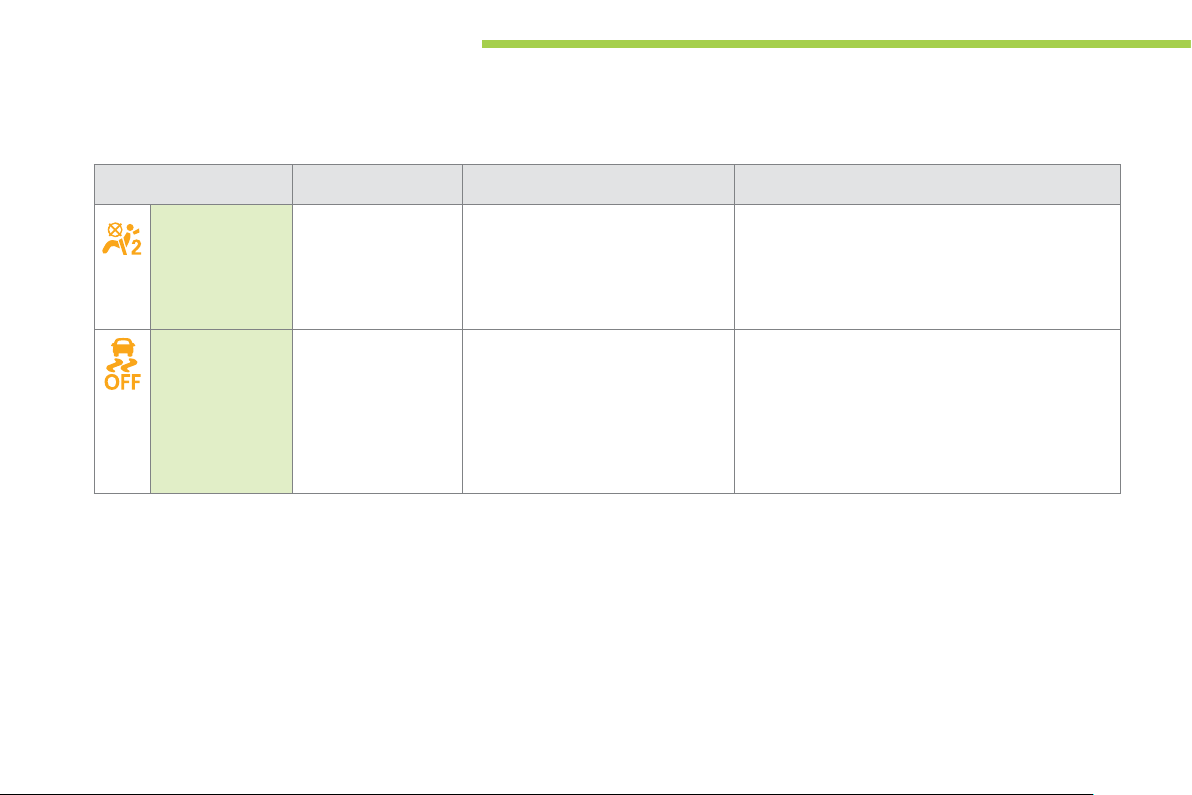
eactivation indicator lamps
If one of the following indicator lamps comes on, this confirms that the corresponding system has been switched off intentionally.
s is may be accompanied by an au
e signal.
Warning / indicator lamptat
assenger's
rbag system
SP/ASR
Caus
ixed, on the
ntre con
.
.The E
e control switch, located in the
ove box, is set to the OFF position.
The passen
tivated.
the bottom o
ide) is activated.
The E
ESP: electronic stabilit
ASR: anti-slip re
er's front airbag is
R off switch, located at
the dashboard (driver's
R is deactivated.
programme
ulation.
ction / Observations
et the control switch to the ON position to activate
the passen
hild seat in the rear-facing position.
R
be
ore starting your vehicle.
Pr
The E
tarting the vehicle.
er's front airbag. In this case, do not fit a
r to check the state of the control switch
the button to activate the ESP/ASR.
R system is automatically activated on
22
Instruments and controls
W
p
A
y
e
e
g
gnif
f
f
GEO
S
g
e electronic brake force dis
f
y
ksh
Anti-lock
)
Th
fau
Th
f
GEO
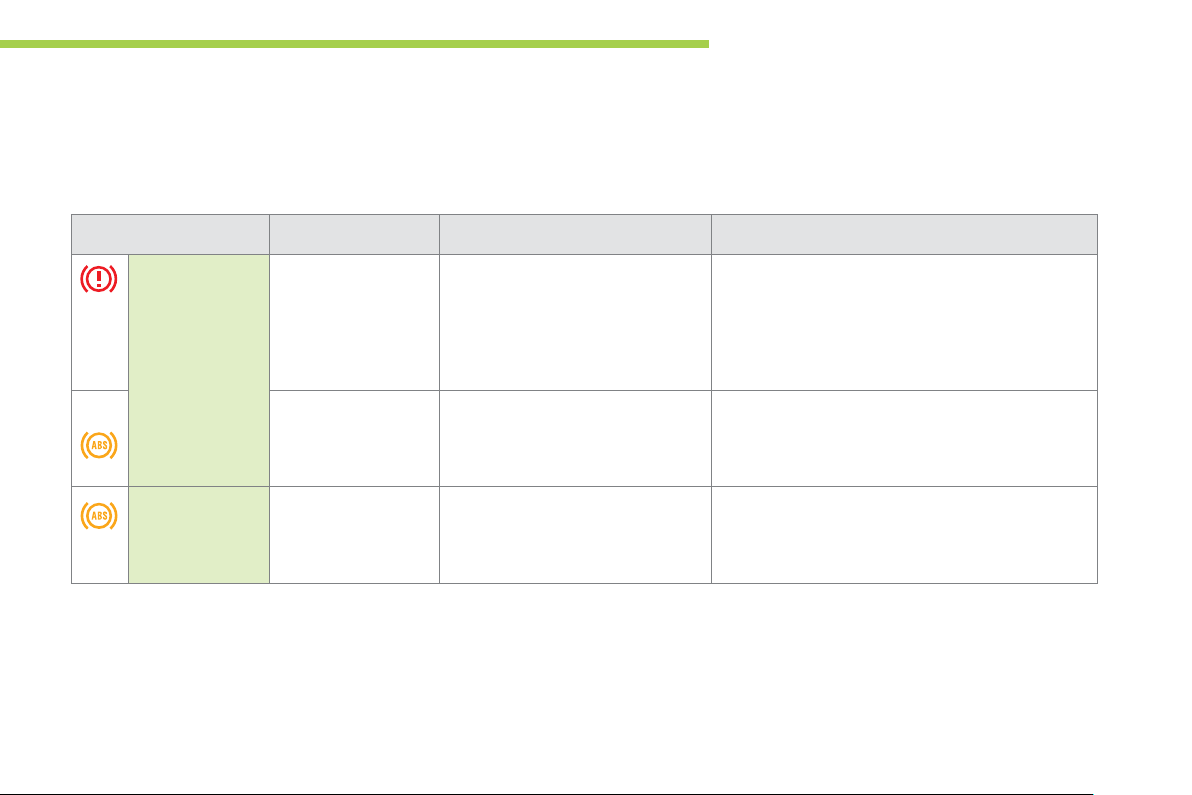
arning lamps
When the engine is running or the vehicle is being driven, illumination of one of the following warning lamps indicates a fault which requires action on
the
art of the driver.
ny fault resulting in the illumination of a warning lamp must be investigated further.
If
ou encounter any problems, do not hesitate to contact a PEUGEOT dealer or a qualified workshop.
Warning / indicator lamp
Brakin
+ On fixed, associated
Braking System
ABS
tat
On fixed. The braking system fluid level has
with the AB
amp.
On fixed.
warnin
Caus
dropped si
raking assistance system fault.
Th
EBFD) system has a fault.
e anti-lock braking system has a
lt.
icantly.
tribution
Action / Observations
You must stop as soon as it is safe to do so.
Top up with brake
I
the problem persists, have the system checked by a
PEU
You must stop as soon as it is sa
Have it checked b
wor
Drive care
PEU
delay.
T dealer or qualified workshop.
op.
e vehicle retains conventional braking.
T dealer or a qualified workshop without
luid listed by PEUGEOT.
e to do so.
a PEUGEOT dealer or a qualified
ully at reduced speed and contact a
1
23
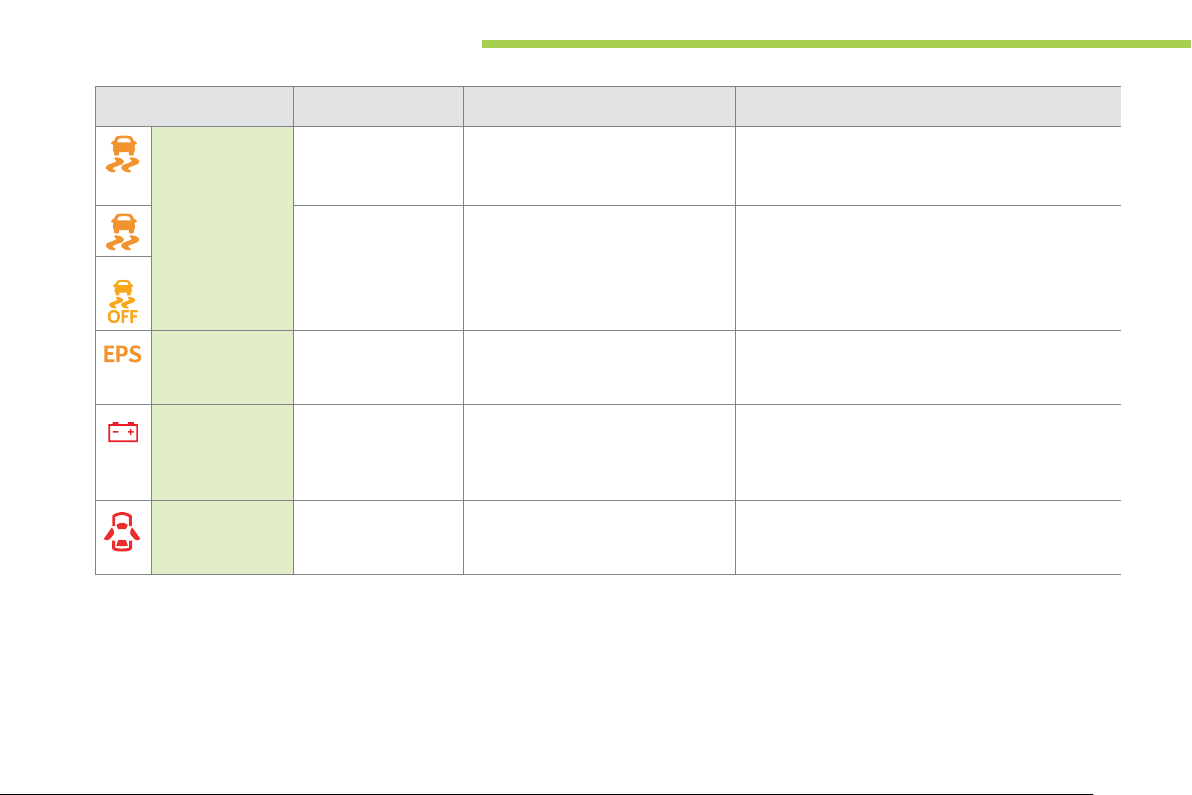
Instruments and controls
e
e
A
bility
ASR)
Flashing
Th
y of
Ad
On f
O
C
A
ge
On f
)
ff
g
g
O
fau
y
y
ksh
Warning / indicator lampStat
ectronic
sta
nd anti-slip
egulation (ESP/
+
lectric power
steerin
ncillaries
attery char
oor(s) open
n fixed. The electric power steering has a
n fixed,
ccompanied by an
udible signal.
Caus
. Activation of the ESP/ASR systems.
ixed. Fault in the ESP/ASR systems. Have it checked by a PEUGEOT dealer or a qualified
lt.
ixed. The ancillaries battery charging
ircuit has a fault (dirty or loose
terminals, slack, transformer fault, ...
A door or the boot is still open.
ction / Observations
e systems optimise traction and improve the
directional stabilit
apt your driving and moderate your speed.
workshop.
Drive carefull
Have it checked b
wor
op.
The warning lamp should go o
tarted.
If it does not
.
qualified workshop.
lose the door or boot.
the vehicle.
at reduced speed.
a PEUGEOT dealer or a qualified
when the motor is
o off, contact a PEUGEOT dealer or
24
Instruments and controls
e
e
y
g
g
y
GEO
y
f
f
C
f
GEO
t
y
O
g
y
g
ed
seat be
g
fastened
seat be
g
On f
seat be
Warning / indicator lamp Stat
Front seat belt
not fastened /
nfastened
ight hand rear seat
elt unfastened
eft hand
ear seat belt
nfastened
Airbags On temporarily. When
rotection
system for the
ain batter
Self-diagnosis
system of the
ain electrical
ircui
n fixed, then
flashin
, accompanied
b
an audible signal.
On fixed. The right hand rear passenger has
ixed. The left hand rear passenger has
On fixed. Fault with one of the airbag or seat
On fixed. The state of charge of the main
On fixed. Fault in the main electrical circuit. You must stop as soon as it is safe to do so.
Caus
The driver and/or the front passen
not fastened or has unfasten
their
n
nfastened their
warnin
econds, then goes off.
belt pretensioner s
attery is too low or the temperature
o
the main battery is too low...
lt.
their
ou switch on the ignition, this
lamp comes on for a few
lt.
lt.
stems.
Action / Observations
Pull the strap, then insert the ton
er
Pull the strap then insert the ton
If it does not
ualified workshop.
Have it checked by a PEU
workshop.
The power
harge the main battery as soon as possible.
I
the warning lamp does not go off, contact a
PEU
Have it checked b
workshop.
o off, contact a PEUGEOT dealer or a
rom the motor is limited.
T dealer or qualified workshop.
a PEUGEOT dealer or a qualified
1
ue in the buckle.
ue in the buckle.
T dealer or a qualified
25

Instruments and controls
y
gy
ge gaug
g
g
use
eserve
f
f
y of
g
.
g
fro
g
Main battery state of charge indicator
Displa
The state of char
splayed continuously in the instrument panel.
e of the main battery is
Low energy alerts
Four successive alerts indicate that the ener
available in the main battery is dropping to a
w level:
- 2 bars of the state of char
instrument panel, on and flashin
to
- The last bar in the state o
- The last bar disappears: displa
the r
lashing.
ran
e disappears; the heating and air
onditioning are switched off
- Display of this warning lamp in
.
the instrument panel: pro
eduction in the power available
m the motor.
e in the
: startin
charge gauge
the
ressive
26
Instruments and controls
(
g
g
gy
e needle is
g
f
f
f
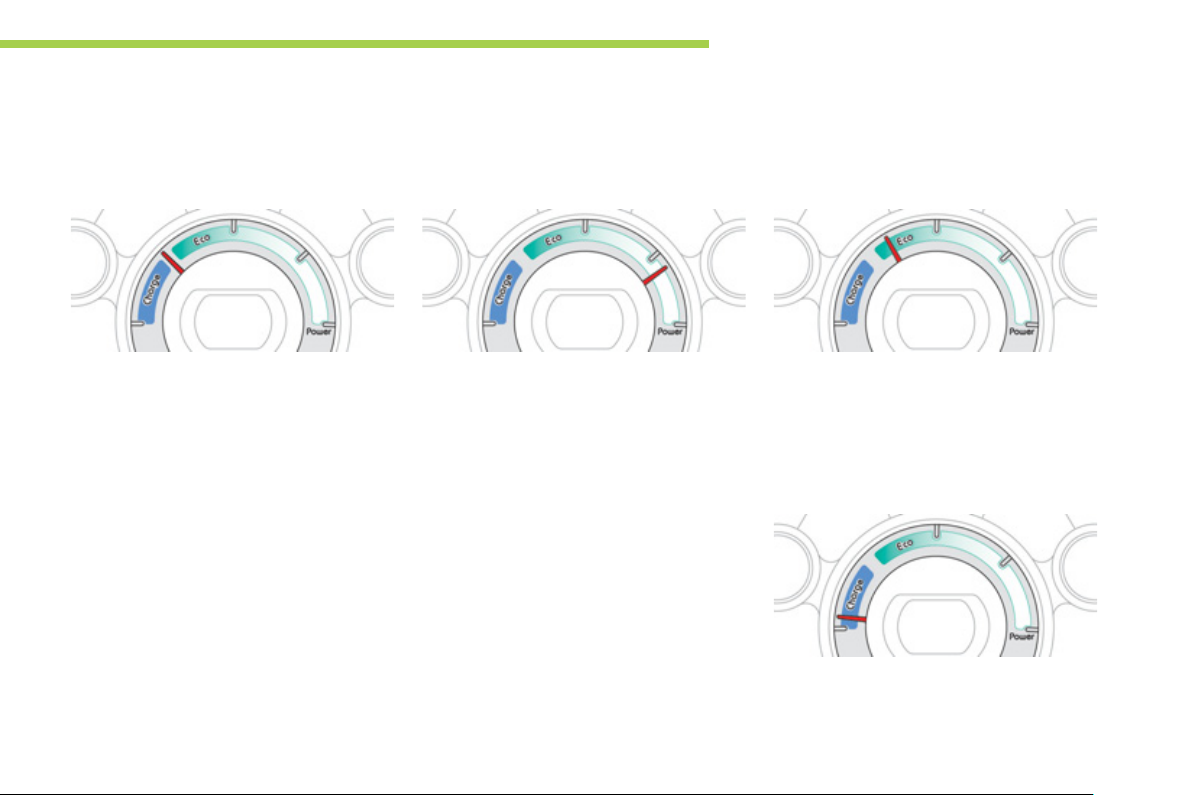
Energy consumption / generation indicator
A system that informs the driver of the level of energy consumption or generation of the main battery.
"Neutral" position
On switching on the ignition, your vehicle
either consumes nor generates energy in its
lectric traction system: the needle is in the
"neutral" position
air conditionin
provided that the heating and
are off).
Energy consumption
The needle moves to the right in proportion to
the ener
consumption by the vehicle.
"Eco" zone
Th
used so as to moderate electric consumption
and optimise its ran
"Char
The needle moves to the le
the level o
during period o
in this zone when the vehicle is
e.
e" zone
t in proportion to
charge sent to the main battery,
deceleration and braking.
1
27

Instruments and controls
Sy
y
Press butto
seconds
)
ese
Press butto
Instrument panel screen
When the ignition switch is in the "
" position, press button A repeatedly to display the following information in turn.
istance recorder
stem for measuring the total distance
travelled b
The total distance appears in the screen.
the vehicle during its life.
n
rip distance recorder (Trip A or B
Each of these trip recorders indicates the
istance travelled since the last r
n
to display the desired trip.
t.
Reset to zero
With the ignition on and either trip or
displayed, press the button for more than
2
.
28