

Peugeot 807 2006 Owner's Manual
Interior overview
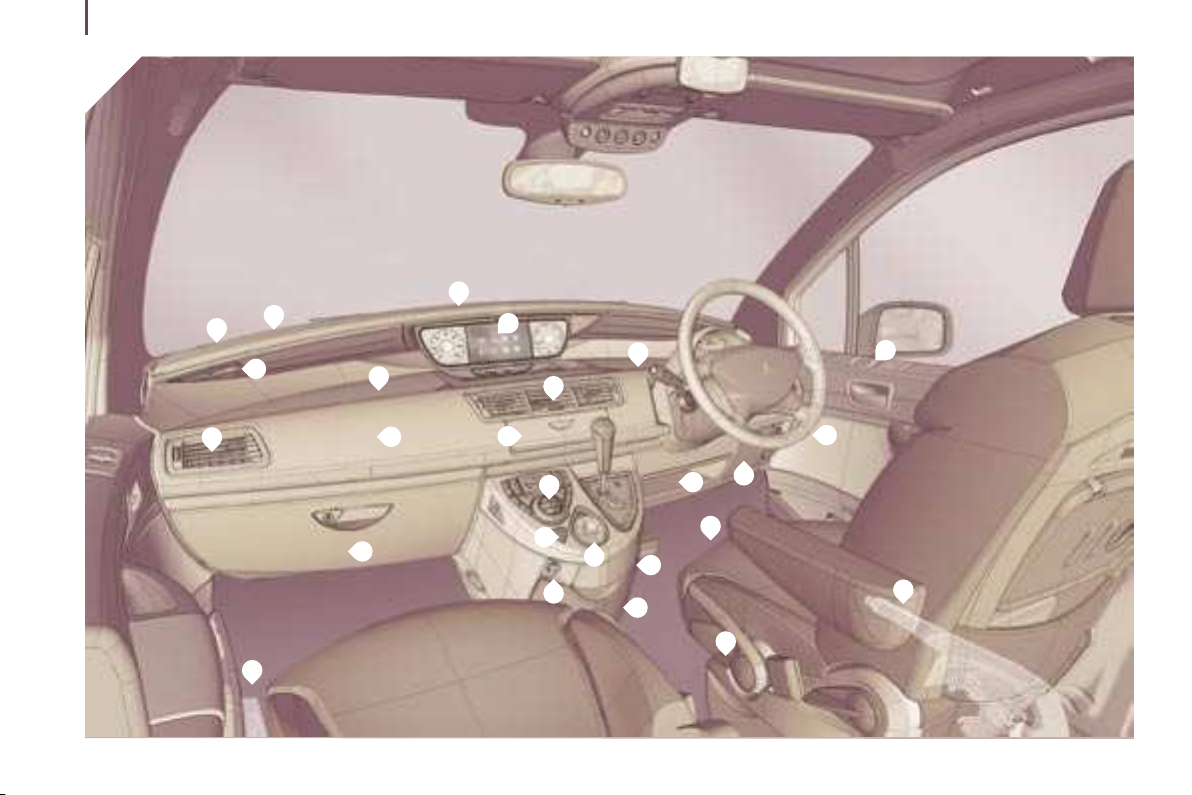
4
6
8
9
10
7
5
2
3
1
12
26
15
14
4
24
16
18
19
17
23
13
21
20
22
11
25

INTERIOR OVERVIEW
Interior overview
5
1 - Electric mirror controls.
- Electric window controls.
- Deactivation of the rear electric
controls.
2 - Driver’s upper glove box.
3 - Central adjustable vents.
4 - RD4 audio equipment or RT3 GPS
audio/telephone with flap.
5 - Instrument panel/Large colour display.
6 - Sunshine and passenger compartment
temperature sensor.
7 - Passenger’s upper glove box.
8 - Windscreen demisting vents.
9 - Speaker (tweeter).
10 - Front window demisting vents.
11 - Passenger air bag disarming switch*.
12 - Side adjustable vent.
13 - Battery/Fuse box.
14 - Passenger air bag.
15 - Passenger’s lower glove box.
16 - Air conditioning controls.
17 - Lighter/12 V accessories socket.
18 - Hazard warning lights switch.
19 - Storage compartment or additional
telematics control.
20 - Cooled compartment.
21 - Ashtray/Can holder.
22 - Seat adjustment control.
23 - Storage compartment.
24 - Fuse box.
25 - Handbrake - on the right.
26 - Bonnet release under cover - on the left.
SETTING THE DATE
AND TIME
To find out more about this
setting, refer to the "Setting the
date and time" part of
the "In-Car Technology" section.
AT A GLANCE
* According to country.
1
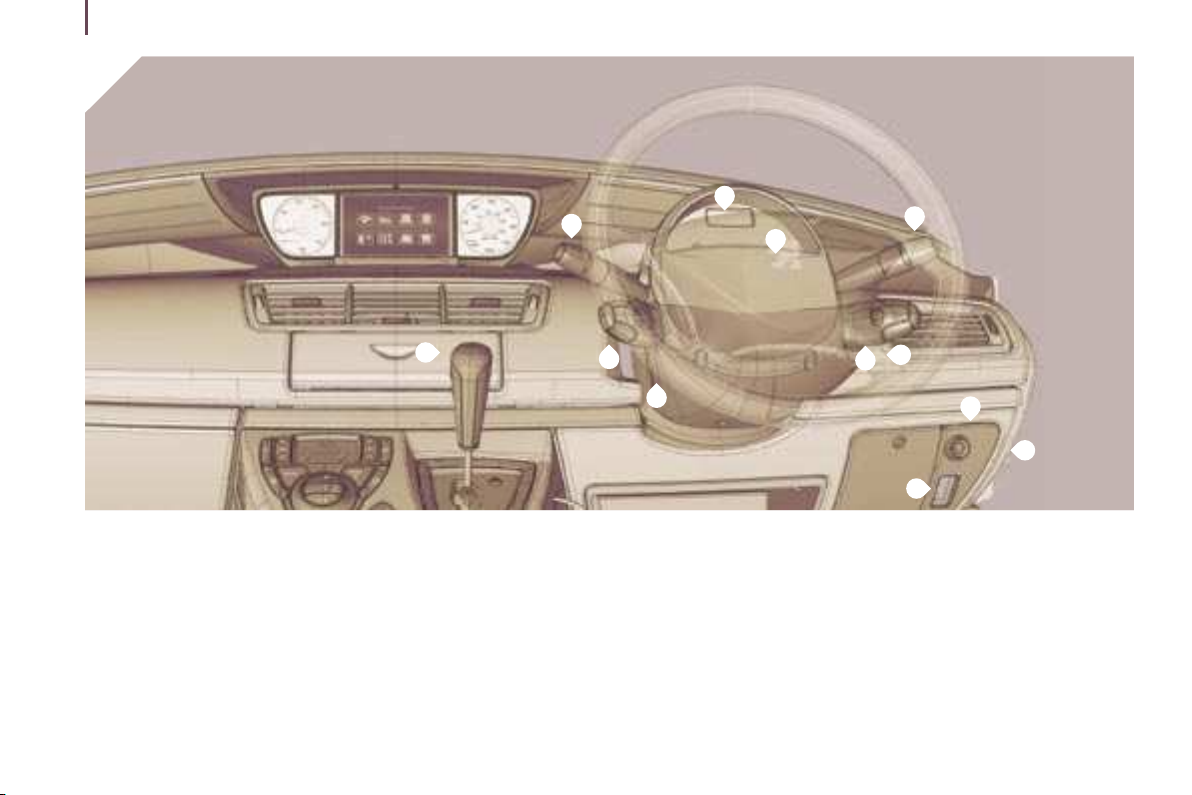
Instruments and controls
6
5
3
4
7
8
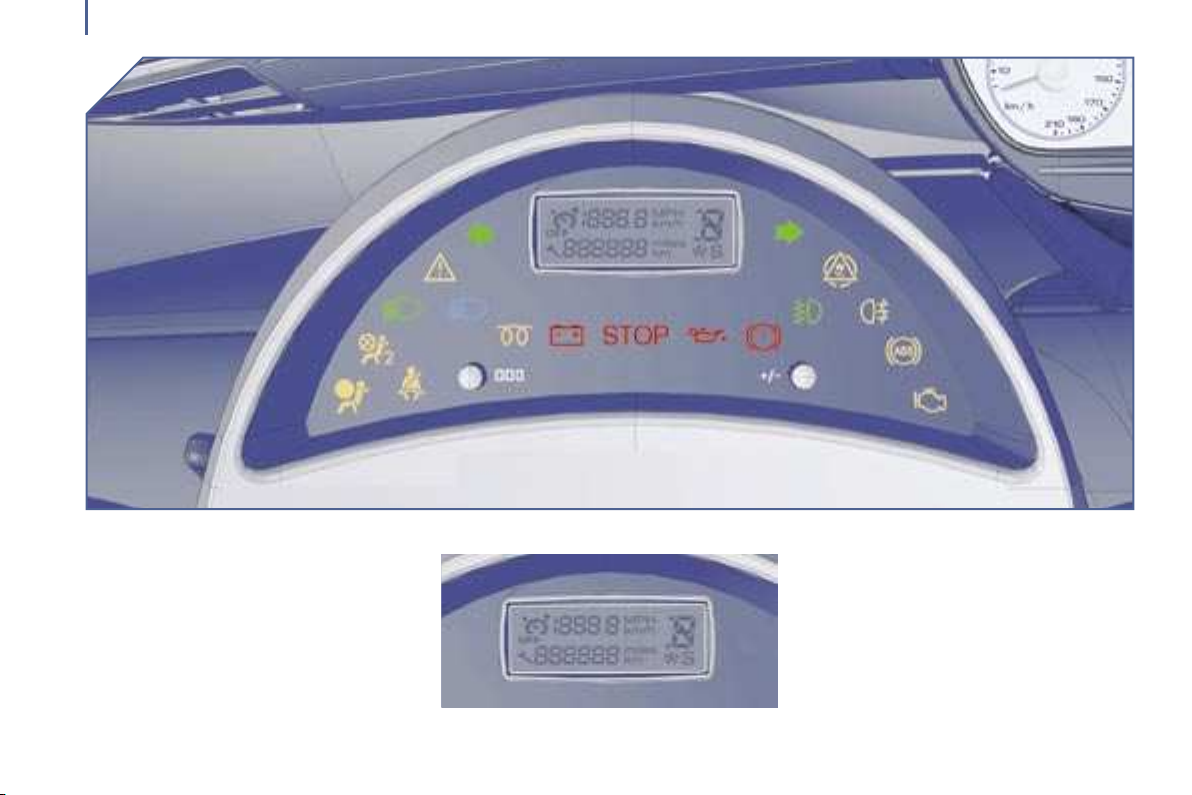
INSTRUMENTS AND CONTROLS
1 - Interior protection alarm deactivation
button.
2 - Speed limiter/cruise control switches.
3 - Lights, direction indicators controls.
2
12
4 - Driver’s air bag.
Horn.
5 - Control block.
6 - Audio equipment steering wheel
controls.
7 - Wipers/wash-wipe/trip computer
controls.
9
6
11
1
10
8 - Gear lever.
9 - Ignition.
10 - Headlamp height adjuster.
11 - Dynamic stability control button
(ESP/ASR).
12 - Steering wheel adjustment control.
Familiarisation
7
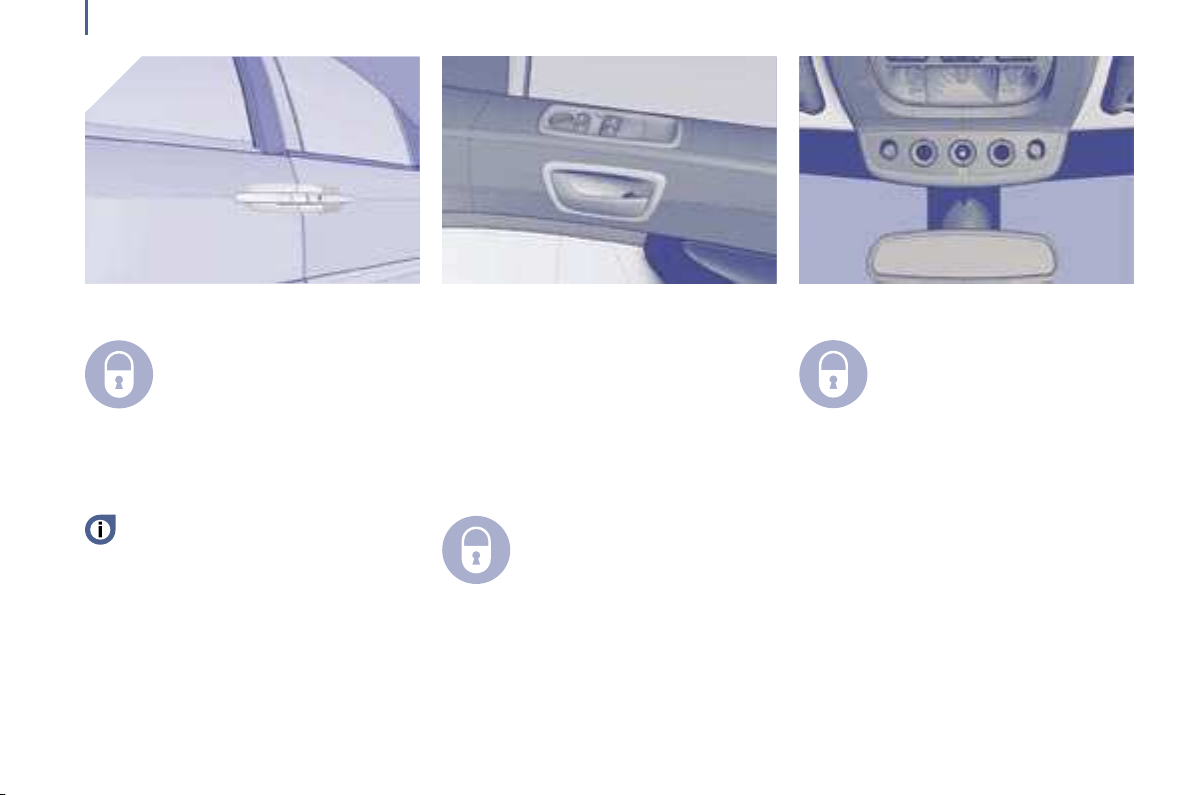
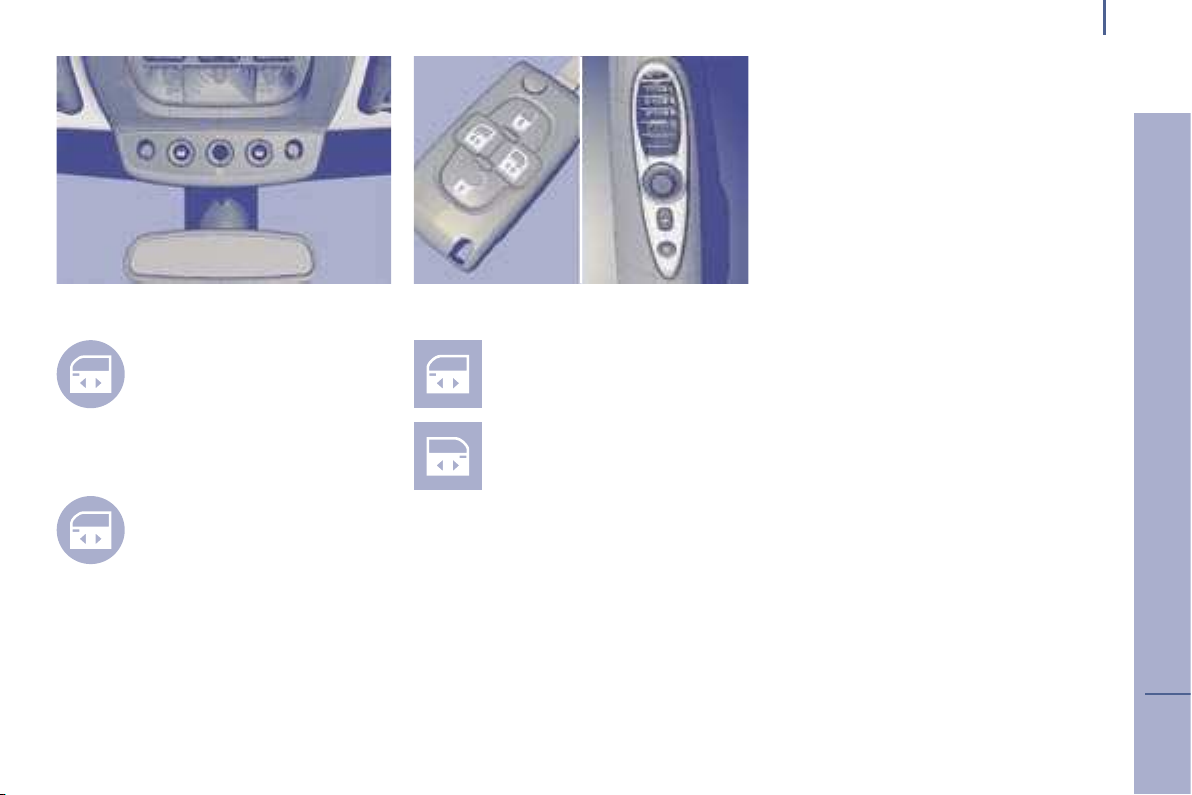
FAMILIARISATION
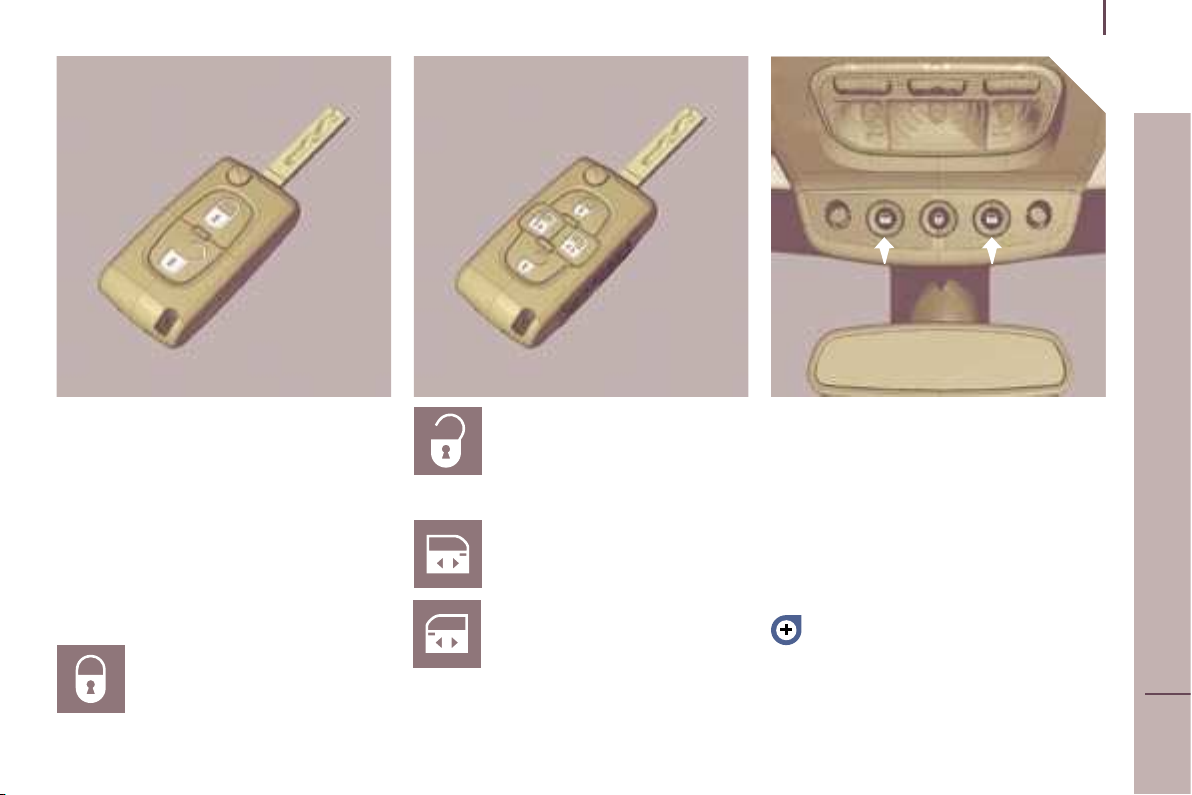
KEYS
The keys allow you to switch on the ignition
and to independently operate the locks on
the driver and passenger doors, the fuel
filler cap, the glove box and the passenger
air bag disarming switch.
Normal locking
Press the button to lock the
vehicle.
Unlocking
Press the button to unlock the
vehicle.
Opening/Closing the
electric sliding side doors
Press the button to open or close
the right or left rear door.
ELECTRIC SLIDING SIDE DOORS
Opening/Closing from the front:
press the corresponding switch to open or
close.
An audible signal accompanies the opening
and closing of the door.
The opening and closing of the doors
can also be controlled from the 2nd
row. For further information regarding this
equipment, refer to the "Accesses" section
of the "Ergonomics and Comfort" chapter.
AT A GLANCE
1
Familiarisation
8
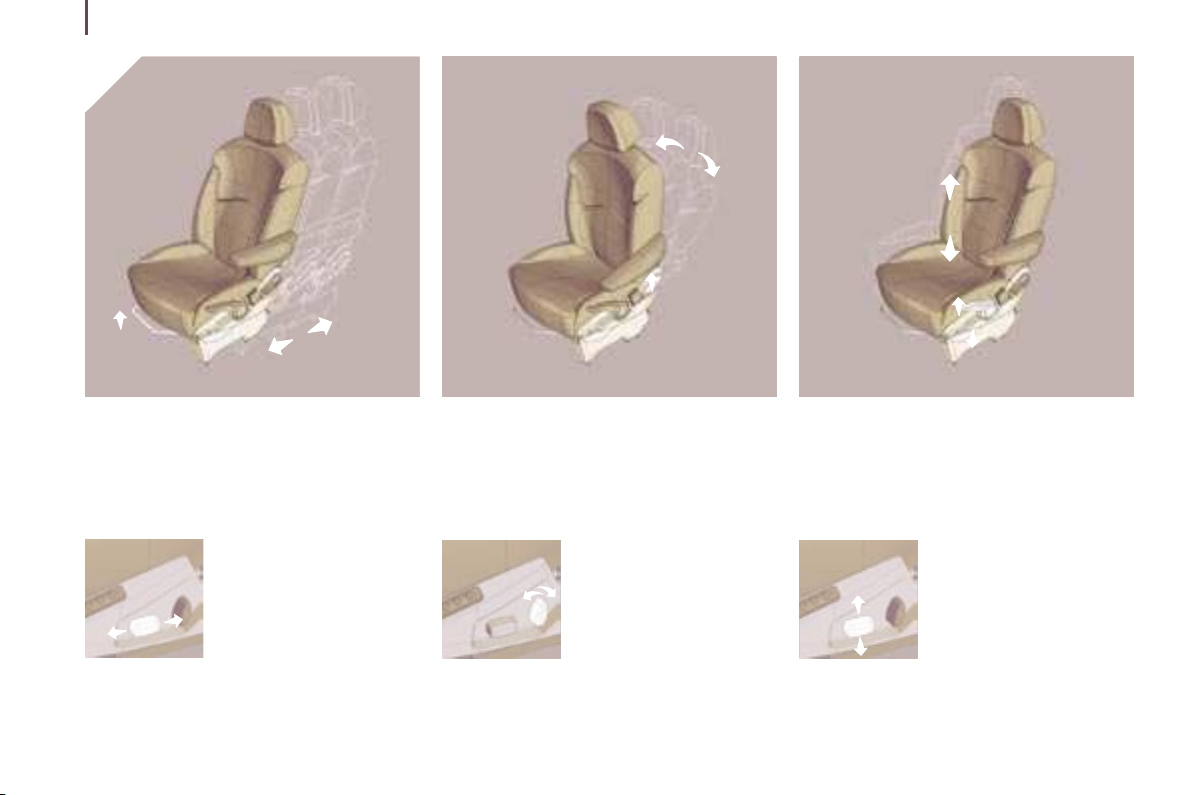
FRONT SEAT ADJUSTMENT
Fowards-backwards
Manual: raise the bar to slide the seat
forwards or backwards.
Seat back angle
Manual: tilt the lever upwards then adjust
until the required angle is obtained.
Driver’s seat height
Manual: push the control upwards or
downwards to the required position.
Electric: push the control
forwards or backwards to
slide the seat.
Electric: tilt the control
forwards or backwards to
obtain the required angle.
Electric: push the rear part
of the control upwards or
downwards to obtain the
correct height.
Familiarisation
9
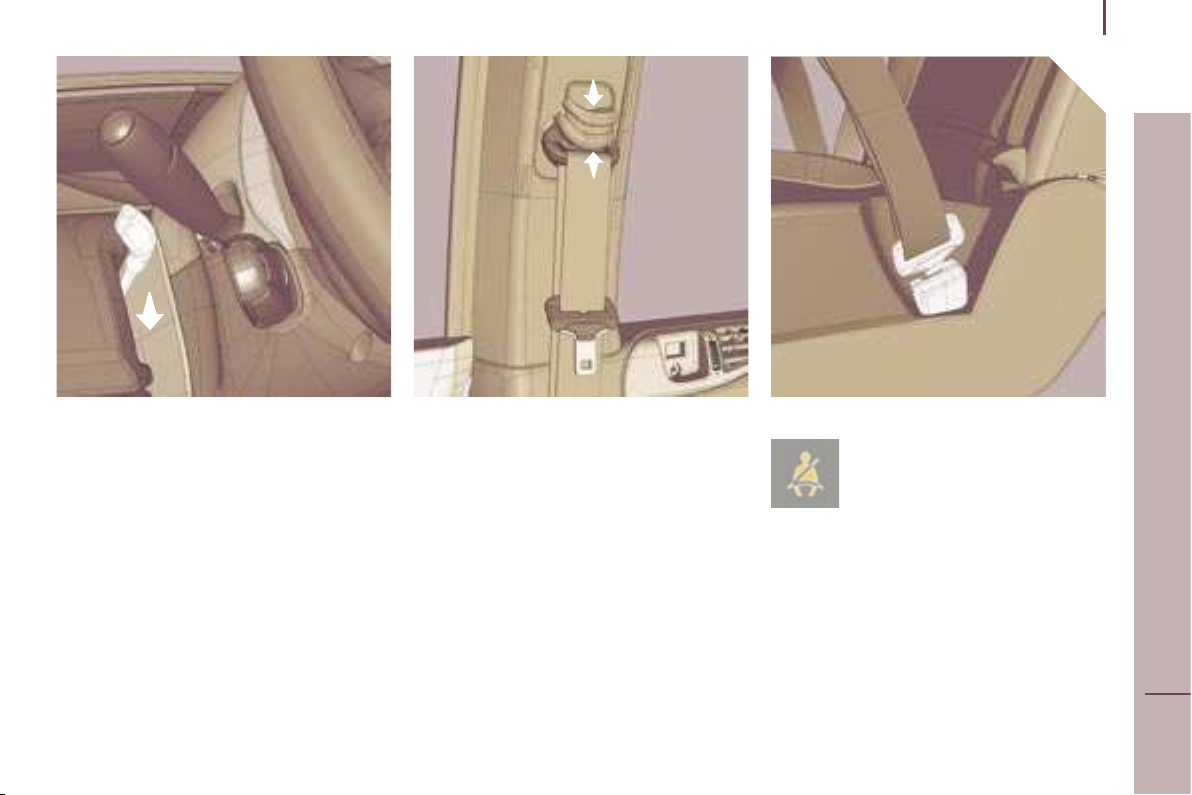
STEERING WHEEL HEIGHT AND
DEPTH ADJUSTMENT
When the vehicle is stationary, unlock the
steering wheel by lowering the lever.
Adjust the height and depth of the steering
wheel, then lock by pushing the lever fully
upwards.
SEAT BELTS
Fastening
Pull the strap then insert the buckle in the
clasp.
Front and 2nd row rear side seat
belt height adjustment
To raise or lower the seat belt attachment
point, squeeze the control and slide it
upwards or downwards.
Front seat belt not
fastened
The warning light comes on when
the ignition is switched on. If the
driver and/or the front passenger
has not fastened his seat belt, this warning
light comes on. Then, at a speed above
15 mph (25 km/h), it flashes accompanied
by an audible warning of increasing volume
(for approximately 90 seconds) and the
message "Seat belt reminder" on the display.
AT A GLANCE
1
Familiarisation
10
B
2
1
A
3
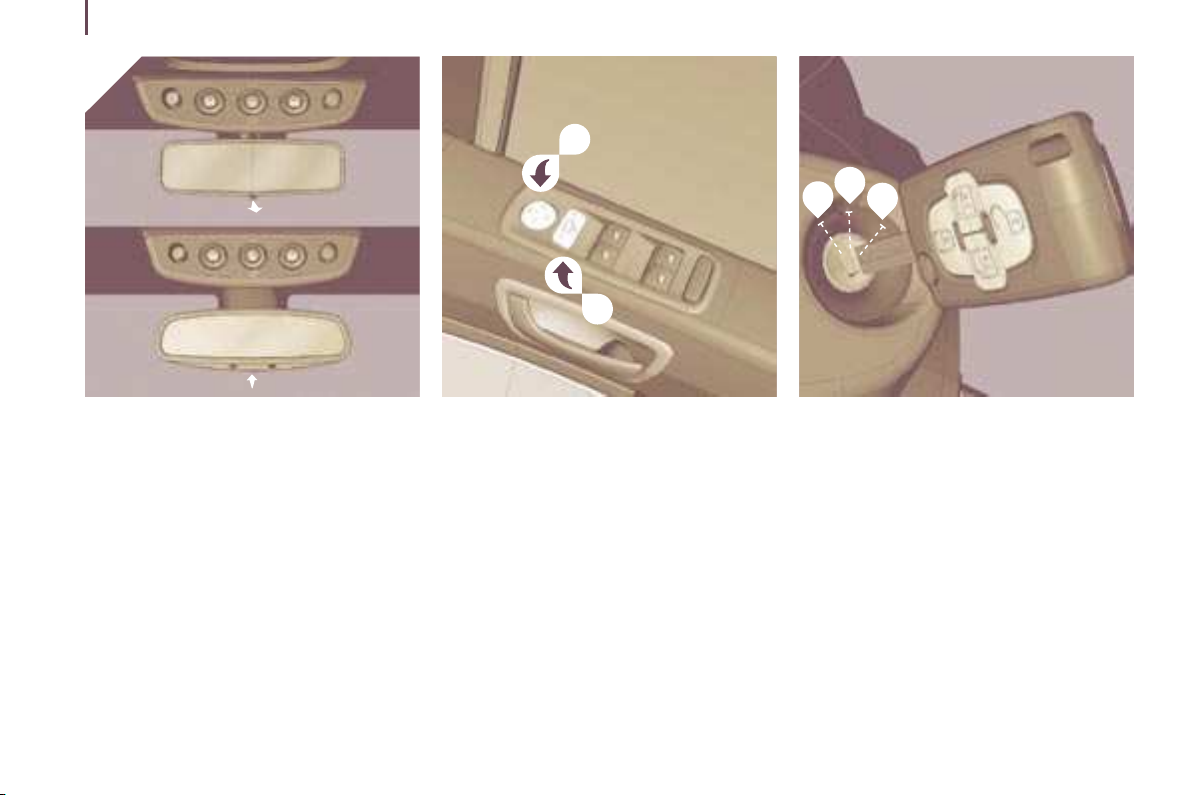
MIRRORS
Interior mirror
This has two positions: day and night.
Manual mirror: push or pull the lever on the
lower edge to change position.
Automatic mirror: with the ignition on,
press the switch on the lower edge. The
indicator light indicates the activation of the
automatic operating mode.
Exterior mirrors
Control A permits selection of the right or
left mirror.
Move control B
adjust.
Remember to return control A to the central
position afterwards.
in the four directions to
STARTING
1 - STOP position:
the ignition is off.
2 - Running and accessories position:
the ignition is on and the accessories
can be used.
3 - Starting position:
the starter is operated.

Accesses
12
ACCESSES
KEYS
The keys allow you to switch on the ignition
and to independently operate the locks on
the driver’s door and passenger door, the
fuel filler cap, the glove box, the passenger
air bag disarming switch and the child safety
lock.
Central locking
From the driver’s door or passenger door,
the keys allow you to lock, deadlock or
unlock the doors and tailgate, as well as fold
back the exterior mirrors.
If one of the doors or the tailgate is open,
the central locking does not work.
The remote control performs the same
functions at a distance.
The remote control
Normal locking
Press the closed padlock to lock
the vehicle.
This is confirmed by fixed lighting
of the direction indicators for
approximately two seconds.
Deadlocking*
A second press on the closed
padlock within five seconds
of locking changes this to
deadlocking.
This is confirmed by fixed lighting of the
direction indicators for approximately two
seconds.
Deadlocking renders the internal
and external door locking controls
inoperative. Never leave anyone inside the
vehicle when it is deadlocked.
If the deadlocking is operated from inside
the vehicle, it will change to normal locking
when the vehicle is started.
* According to equipment.

Pressing the closed padlock for
more than 2 seconds, in addition
to locking or deadlocking, permits
automatic closing of the windows
and places the sunroofs in the partially open
position, if they were open. To close them
completely, you must press their switch
before leaving the vehicle.
Unlocking
Press the open padlock to unlock
the vehicle.
This is confirmed by rapid
flashing of the direction indicators.
If the vehicle is locked and unlocking is
activated inadvertently, unless the doors are
opened within 30 seconds, the vehicle will
lock automatically.
Opening/Closing the electric
sliding side doors
Pressing one of the buttons opens
or closes the corresponding rear
door (right or left).
This press unlocks the vehicle before
opening the corresponding door.
Folding/opening out the key
To tuck away the key blade, press
the button, then fold it down into
the remote control module.
To open out the key, press the button.
Locating your vehicle
To locate your vehicle, if you have
locked it, in a car park:
press the closed padlock, the courtesy
lights come on and the direction indicators
flash for a few seconds.
Key in ignition
A buzzer sounds on opening the driver’s
door, if the key has been left in the ignition.
Changing the battery of the remote
control
Battery ref.: CR1620/3 volts.
The information "battery flat" is given by an
audible signal, accompanied by a message
on the multifunction display.
To replace the battery, unclip the casing
using a coin at the ring.
If the remote control does not work after the
battery has been changed, re-programme
the remote control.
Accesses
Do not discard the remote control batteries,
they contain metals which are harmful to the
environment.
Take them to a PEUGEOT dealership, or to
any other approved collection point.
Programming the remote control
Following changing of the remote control
battery or disconnection of the vehicle
battery, the remote control must be
reprogrammed.
Wait at least one minute before
using the remote control.
Switch on the ignition.
Press one of the two padlocks
for at least five seconds within
the next ten seconds.
Switch off the ignition.
Wait at least one minute before
using the remote control.
The remote control is now
working again.
13
ERGONOMICS and COMFORT
2
Accesses
ELECTRONIC ENGINE
14
IMMOBILISER
This locks the engine control system as
soon as the ignition has been switched off
and therefore prevents starting of the vehicle
by anyone who does not have the key.
The ignition key has an electronic chip which
has a special code. When the ignition is
switched on, the code must be recognised
for starting to be possible.
If the system does not function correctly,
the central locking button indicator light,
situated on the courtesy light console,
flashes rapidly when the ignition is switched
on (2nd notch).
In this case your vehicle will not start.
Contact a PEUGEOT dealer as soon as
possible.
CONFIDENTIAL CARD
This is given to you on delivery of your
vehicle with the duplicate keys.
It contains the identification code necessary
for any work carried out by a PEUGEOT
dealer on the electronic immobiliser system.
This code is hidden by a film, which should
be removed only if necessary.
Keep your card in a safe place, never
inside the vehicle.
When undertaking a long trip or journey,
however, it is advisable to take it with you
along with your personal papers.
Depending on the circumstances, a
PEUGEOT dealer will carry out his
work more efficiently and quickly if you give
him this confidential card:
- if the keys are lost, if you have made a
note of the number coded on the label
attached to the key.
- if the anti-theft socket (alloy wheels) is lost,
if you have made a note of the code etched
on the head of the socket.
The high frequency remote control is a
sensitive system; do not operate it while it is
in your pocket as there is a possibility that it
may unlock your vehicle, without you being
aware of it.
The remote control does not operate
when the key is in the ignition, even when
the ignition is switched off, except for
reprogramming.
Do not operate the deadlocking function if
there is anyone inside the vehicle.
Driving with the doors locked may make
access to the passenger compartment by
the emergency services more difficult in an
emergency.
As a safety precaution (with children on
board), remove the ignition key when you
leave the vehicle, even for a short time.
Do not repeatedly press the buttons of your
remote control out of range and out of sight
of your vehicle. You run the risk of stopping
it from working and the remote control would
have to be reprogrammed.
When purchasing a second-hand vehicle:
ensure that you are given the confidential
card and the anti-theft socket for alloy
wheels;
have the key codes memorised by a
PEUGEOT dealer, to ensure that the keys
in your possession are the only ones
which can start the vehicle.
Do not make any modifications to the
electronic engine immobiliser system.
A
ALARM*
This provides two types of protection:
- exterior protection: it sounds if a door, the
tailgate or the bonnet is opened.
- interior protection: it sounds if the volume
inside the passenger compartment
changes (breaking of a window or a
movement inside the vehicle).
A red indicator light, located in the centre of
the fascia, indicates the information detailed
below.
Setting the alarm
Switch off the ignition and get out of the
vehicle.
Set the alarm within five minutes of
getting out of the vehicle, by locking or
deadlocking using the remote control
(the red indicator light flashes once per
second).
To lock your vehicle without setting the
alarm, insert the key in the lock then
lock the vehicle (eg. for washing).
When the alarm is triggered, the siren
sounds and the direction indicator lights
flash for thirty seconds.
Warning - alarm triggered: the red indicator
light flashes rapidly, insert the key and
switch on the ignition to switch it off.
When the alarm has been triggered ten
times in succession (on the eleventh time)
the alarm is deactivated. Repeat the rules
for setting the alarm.
Disarming
Unlock the vehicle with the remote control
(the red indicator light goes out).
To set the alarm with exterior
protection only
If, while you are away from the vehicle, you
wish to leave a window partially open or a
pet inside the vehicle, you should choose
exterior protection only.
Close the sunroofs,
Switch off the ignition,
In the next ten seconds, press button
A, located on the left-hand side of the
fascia, until the red indicator light is on
continuously,
Get out of the vehicle,
Accesses
Within the next five minutes, set the
alarm by locking or deadlocking using
the remote control (the red indicator light
flashes once a second).
When the alarm is set but the remote
control does not operate:
Unlock the doors with the key and open
the door. The alarm is triggered.
Switch on the ignition in the next ten
seconds. The alarm is disarmed.
Incorrect operation
When the ignition is switched on, if the red
indicator light remains on for ten seconds,
there is a fault in the siren connection.
Contact a PEUGEOT dealer to have the
system checked.
Automatic setting of the alarm*
The alarm is set automatically 2 minutes
after the last door or the tailgate is closed.
To prevent triggering of the alarm when
a door or the tailgate is opened, it is
imperative to press the remote control
unlocking button again.
Do not make any modifications to
the alarm system as this could cause
faults.
* According to country.
15
ERGONOMICS and COMFORT
2
16
Accesses
Opening the doors from outside
DOORS
Locking/Unlocking from
the inside
Press the padlock, the red
warning light comes on when the
vehicle is locked and switches off when it is
unlocked.
This locks/unlocks the doors and the
tailgate.
If the vehicle is locked or deadlocked
from the outside, the red warning light
flashes and the padlock does not function. In
this case, use the key or the remote control
to unlock from the outside.
The door opening switches do not function
when the vehicle is deadlocked.
Opening the doors from inside
Automatic central locking
The doors can lock automatically when you
are driving (at a speed of more than 6 mph
(10 km/h)).
You can activate or deactivate this function.
To activate
With the ignition on, press and
hold the padlock.
Activation of the function is
accompanied by an audible signal and the
message "Automatic locking of the doors
activated" on the display.
To deactivate
With the ignition on, press and
hold the padlock.
Deactivation of the function is
accompanied by an audible signal.
"Door open" alert
If a door or the boot is not closed properly:
- when the engine is running, you are
warned by a diagram and a message on
the display for a few seconds,
- when the vehicle is moving (speed above
6 mph (10 km/h)), the service warning light
comes on. It is accompanied by an audible
signal, a message and a diagram on the
display for a few seconds.
Accesses
object is preventing the required operation,
either inside or outside the vehicle.
Do not lean through an open window, do not
leave any object protruding through the door
during opening or closing.
Do not leave children or pets near the
opening and closing controls without
supervision.
17
>Visuel à venir
ELECTRIC SLIDING SIDE DOORS
Opening/Closing from the
front:
press the corresponding
control.
An audible signal accompanies the opening
and closing of the door.
Opening/Closing from the
2nd row:
press the corresponding
control.
Opening/Closing using the
remote control:
Press one of the buttons to open
or close the corresponding rear
door (right or left).
Remember to close the sliding doors when
your vehicle is parked for long periods,
the electric open door monitoring system
consumes power.
General recommendations
It is imperative that the doors are only
operated when the vehicle is stationary.
Always ensure that the door is operated
safely. Check that no person, animal or
Obstacle detection
The detection system is triggered when
an obstacle which has a certain physical
resistance hinders the movement of the
door.
If an obstacle is detected during:
- closing of the door, the door opens fully,
- opening of the door, the door stops.
When the obstacle has been removed,
complete or restart the action using the
remote control or the interior controls.
Failure to observe these recommendations
may result in injury or damage if part of
the body or an object becomes jammed or
caught.
ERGONOMICS and COMFORT
2
Accesses
18
A
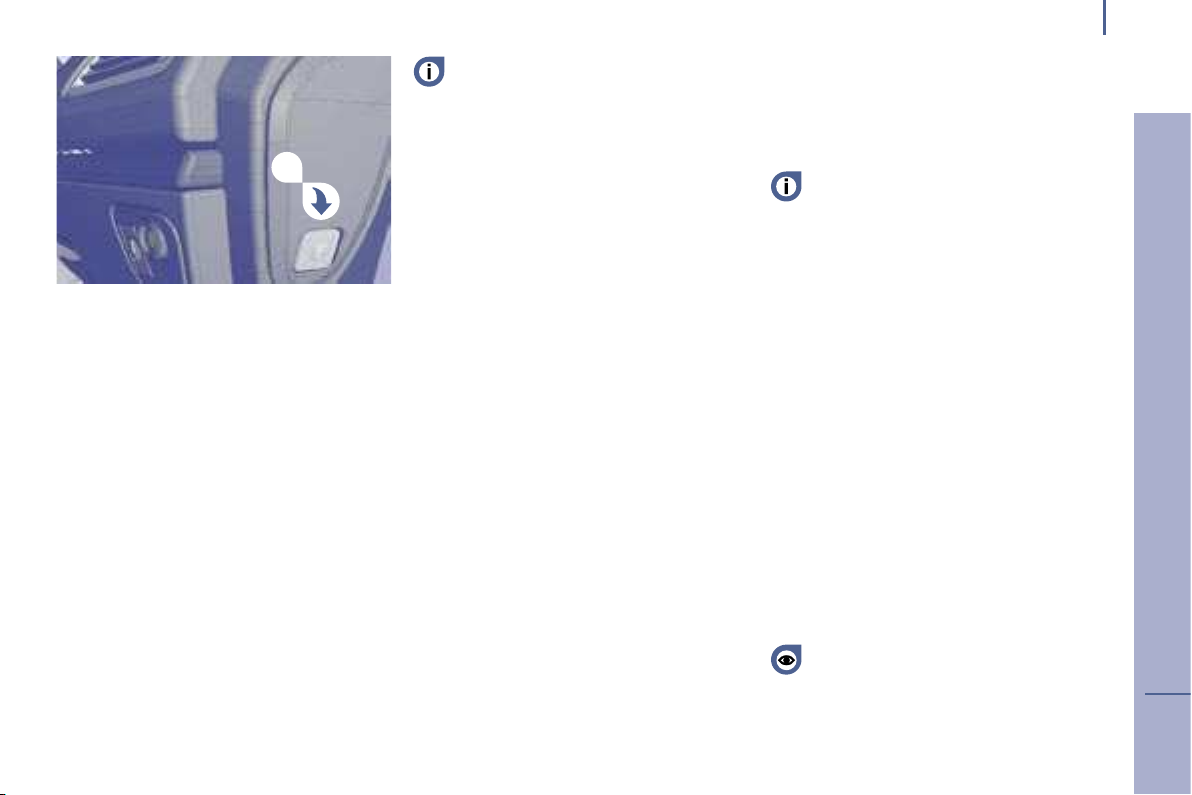
ELECTRIC CHILD SAFETY
This disarms all the electrical controls in the
rear:
electric windows,
sliding side doors,
sunroofs in the 2nd and 3rd row.
With the ignition on, press button A.
The message "Child safety activated"
appears on the display, accompanied by an
audible signal.
Always remove the ignition key when
leaving the vehicle, even for a short
time.
C
TAILGATE
Simultaneous locking or unlocking
of the tailgate and the doors
The tailgate is locked or unlocked by the
remote control or the driver ’s door or
passenger door lock.
To open, operate the handle C and lift the
tailgate.
The tailgate locks automatically when
the vehicle is being driven at more than
6 mph (10 km/h) and unlocks when one of
the front doors is opened.
"Tailgate open" warning
When the engine is running or the vehicle is
being driven, you are warned if the tailgate
is not closed correctly by a diagram on the
display, accompanied by an audible signal.
D
>Visuel à venir
Tailgate release
This enables the tailgate to be unlocked in
the event of a central locking fault.
Fold back a 2nd row rear seat,
Fold back a 3rd row rear seat or the bench
seat to gain access to the lock from inside
the boot,
Insert a small screwdriver into hole D in
the lock and push it towards the left to
unlock the tailgate.
Accesses
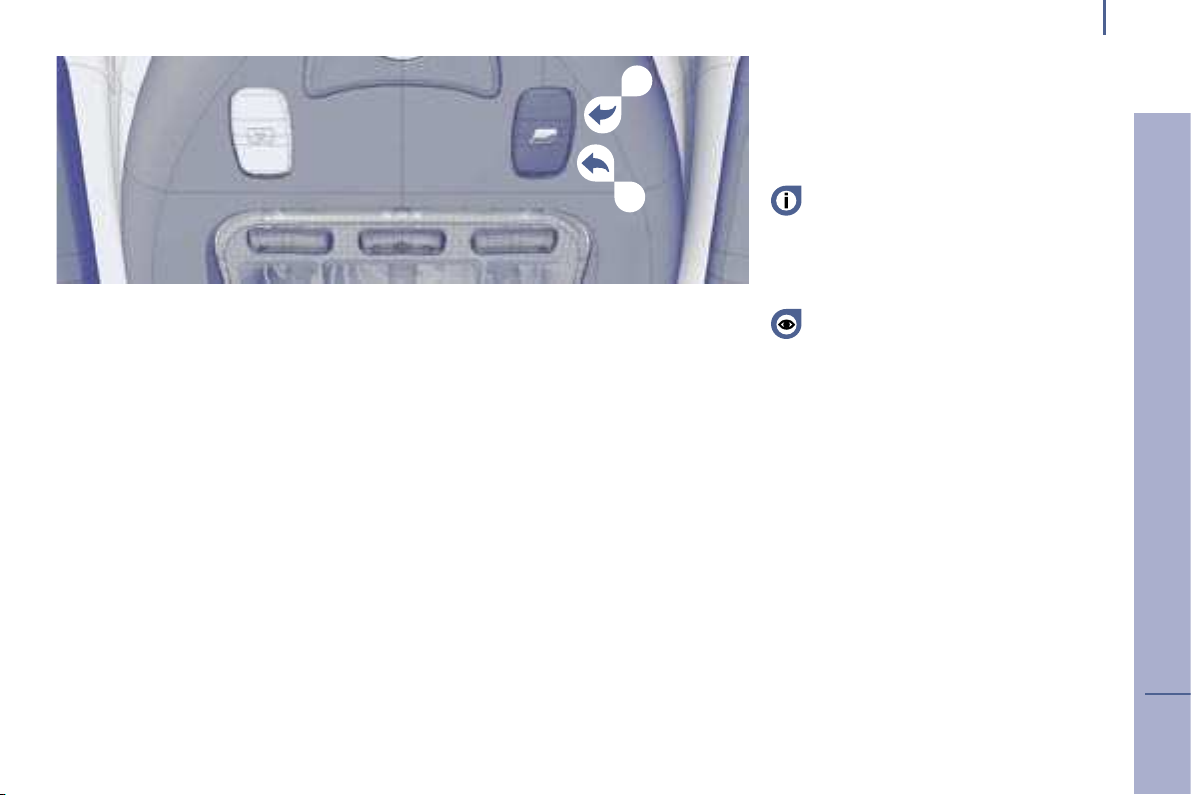
SUNROOFS
You have three sunroofs each with an
independent control.
However, the front passenger’s control
can also operate the two rear sunroofs
simultaneously.
to partially open the roof: press and
hold part A of the control.
to open the roof completely: press
part A of the control briefly.
to close it completely: press part B of
the control briefly to slide it, then press
the control again continuously to close it
completely.
Safety auto-reverse
When the sunroof is sliding closed and
meets an obstacle, it stops then partially
opens again.
A
B
Malfunction
In the event of a malfunction, unwanted
opening of the roof on closing (for
example, in the presence of ice), following
reconnection of the battery or if the sunroof
does not close:
press A until the roof is fully open,
press B within one second to close the
roof,
if the roof does not close, press B several
times until the roof is fully closed.
release then continue to press the
control B for approximately five seconds
after closing of the roof.
The safety auto-reverse function is not
active during these operations.
Disarming of the 2nd and 3rd row
controls
press the rear electrical functions
disarming switch.
The sunroof shutter is manual.
To open it, lift the handle and slide it
rearwards.
To close it, slide it forwards until the handle
locks.
Do not open the sunroofs immediately
after a shower or immediately after
washing the car.
Always remove the key from the ignition
when leaving the vehicle, even for a short
time.
Always ensure that the sunroofs are closed
correctly before leaving the vehicle.
In the event of contact during operation of
the roof, you must reverse the movement
of the roof. To do this, press the switch
concerned.
When the driver operates the roof switch,
he must ensure that no one is preventing
correct closing of the roof. Be aware of
children when operating the roof.
The driver must ensure that the passengers
use the sunroof correctly.
19
ERGONOMICS and COMFORT
2
Instruments and controls
20
INSTRUMENTS AND CONTROLS
CONTROL BLOCK
Display

Instruments and controls
4
21
1
2 3
4
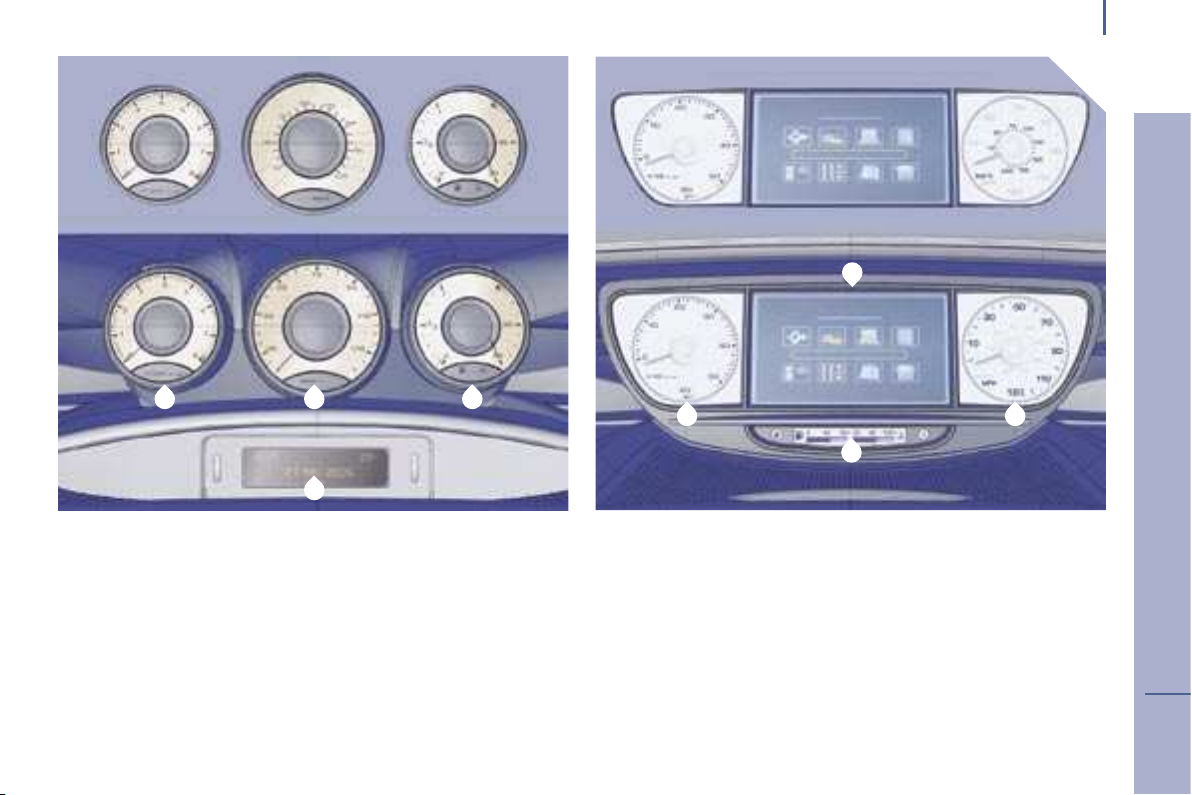
INSTRUMENT PANELS
1. Rev counter.
2. Speedometer*.
3. Level and temperature control block.
4. Display.
* Version in kilometres, according to country.
1
3
With monochrome display With colour display
2
Warning lights
A warning light continuously lit, or flashing,
with the engine running, is an indication of a
malfunction in the relevant unit.
Some warning lights may be linked to
buzzers and a message on the display. Do
not ignore this warning: contact a PEUGEOT
dealer as quickly as possible.
If the central STOP warning light comes
on when you are driving, stop immediately
where it is safe to do so.
ERGONOMICS and COMFORT
2
Instruments and controls
4
21
1
2 3
4
INSTRUMENT PANELS
1. Rev counter.
2. Speedometer*.
3. Level and temperature control block.
4. Display.
* Version in kilometres, according to country.
1
3
With monochrome display With colour display
2
Warning lights
A warning light continuously lit, or flashing,
with the engine running, is an indication of a
malfunction in the relevant unit.
Some warning lights may be linked to
buzzers and a message on the display. Do
not ignore this warning: contact a PEUGEOT
dealer as quickly as possible.
If the central STOP warning light comes
on when you are driving, stop immediately
where it is safe to do so.
ERGONOMICS and COMFORT
2
Instruments and controls
22
Central STOP warning
This comes on for a few seconds each time
the ignition is switched on.
It is linked to the "engine oil pressure",
"brake fluid level", "electronic brake force
distribution fault" and "power steering fault"
warning lights, the coolant temperature
gauge and the puncture warnings, indicated
by a message on the display.
Stop immediately.
Contact a PEUGEOT dealer.
Engine oil pressure
This is linked to the central STOP warning light.
If it comes on with the engine running, it is
accompanied by an audible signal and the
message "Oil pressure insufficient" on the
display.
Stop immediately. Contact a PEUGEOT
dealer without delay.
Park and switch off your engine. Allow the
lubricating circuit to cool in order to check its
level and in the case of a lack of oil, top up
the level with the engine cold.
For further information regarding the oil
level, refer to the "Checking the levels"
section of the "Maintenance" chapter.
Service
This comes on for a few seconds each
time the ignition is switched on. If the
warning light remains on or comes on while
the engine is running, accompanied by
an audible signal and a message on the
display, it indicates one of the following:
- an engine immobiliser system fault,
- an engine management system fault,
- a rear parking assistance system fault,
- an automatic switching on of the lights
system and rain sensor fault,
- a tyre under-inflation detection system
warning,
- a brake pad wear warning,
- a flat remote control battery,
- one or more doors open at a vehicle speed
above 6 mph (10 km/h),
- a lack of engine oil.
To consult the corresponding warning
message, refer to "Warning log".
Anti-lock braking system
(ABS)
This comes on for a few seconds each time
the ignition is switched on.
If it remains on or comes on above 8 mph
(12 km/h), it indicates a malfunction of the
ABS.
However, the vehicle retains conventional
servo-assisted braking.
Illumination of this warning light is
accompanied by an audible signal and the
message "ABS fault" on the display.
Contact a PEUGEOT dealer.
Dynamic stability control
(ESP/ASR)
This comes on for a few seconds each time
the ignition is switched on.
It flashes when the system is activated
and is lit continuously when the system is
switched off.
If it remains on or comes on with the
engine running and the vehicle moving, it is
accompanied by an audible signal and the
message "ESP/ASR not functioning" on
the display.
Contact a PEUGEOT dealer.
Instruments and controls
Battery charge Emission control system
This comes on for a few seconds each time
the ignition is switched on.
If it comes on with the engine running, it is
accompanied by an audible signal and the
message "Battery charge fault" on the
display.
It indicates faulty operation of the charging
circuit (loose battery terminals, a cut or slack
alternator belt, an alternator fault).
Contact a PEUGEOT dealer.
Front seat belt not fastened
This comes on for a few seconds each time
the ignition is switched on.
If the driver and/or front passenger has/have
not fastened his/their seat belt, this warning
light comes on when the engine is running.
Then at a speed in excess of 15 mph
(25 km/h) it flashes accompanied by an
audible signal of increasing volume (for
approximately 90 seconds) and the message
"Seat belt reminder" on the display.
This comes on for a few seconds each time
the ignition is switched on.
If it comes on with the engine running,
accompanied by an audible signal and
the message "Antipollution fault" on the
display, it indicates a malfunction in the
emission control system.
If it flashes with the engine running,
accompanied by an audible signal and the
message "Catalytic converter fault" on
the display, it indicates a malfunction in the
injection or ignition system. There is a risk
of damage to the catalytic converter (petrol
engines only).
Contact a PEUGEOT dealer without delay.
Following prolonged operation of the
vehicle at very low speed or at idle, you
may, in exceptional circumstances, notice
emissions of water vapour at the exhaust
on acceleration. This does not have any
effect on the vehicle’s performance or on the
environment.
Passenger air bag disarmed
23
This comes on for a few seconds each time
the ignition is switched on.
Illumination of this indicator light is
accompanied by an audible signal and the
message "Passenger air bag deactivated"
on the display.
If the passenger air bag is disarmed, the
indicator light comes on when the ignition is
switched on and remains on.
In all cases, if the indicator light flashes,
contact a PEUGEOT dealer.
Front, side and curtain air
bags
This comes on for a few seconds when the
ignition is switched on.
Illumination of this warning light, with the
engine running, is accompanied by an
audible signal and the message "Air bag
fault" on the display, indicating a front, side
or curtain air bag fault.
Contact a PEUGEOT dealer.
ERGONOMICS and COMFORT
2
Instruments and controls
24
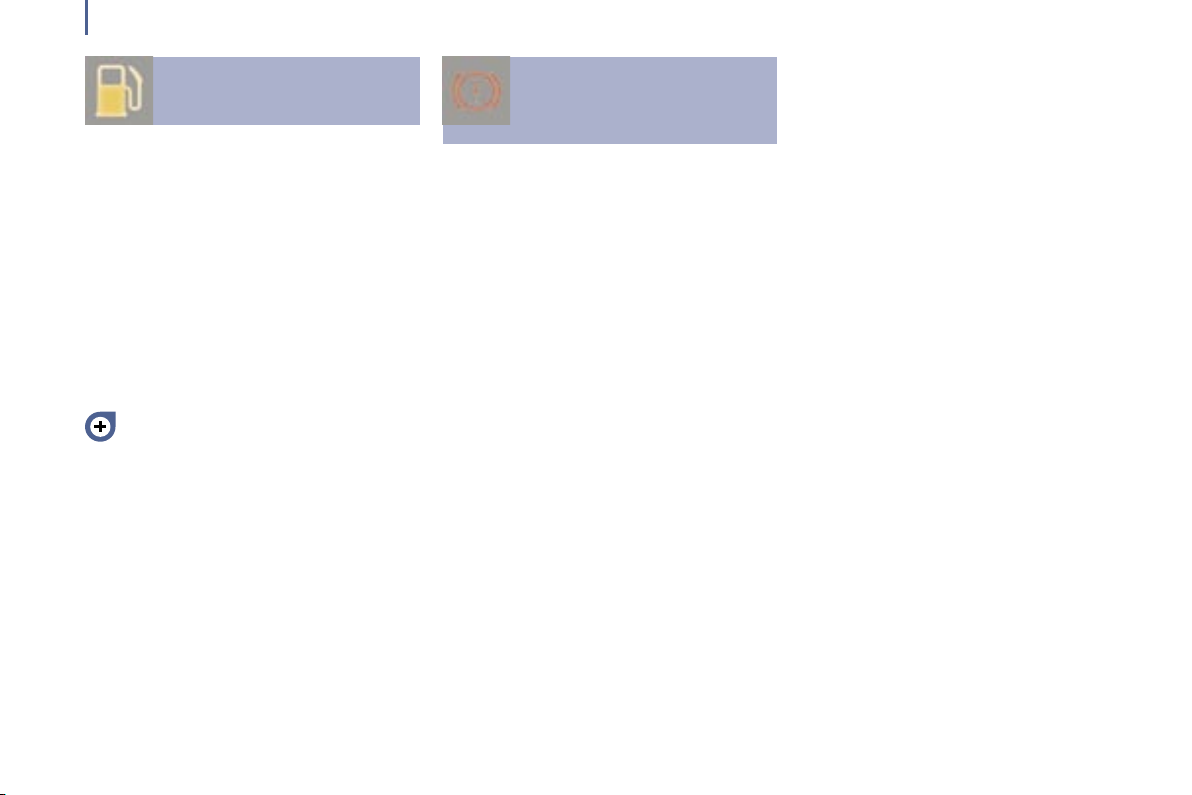
Low fuel level
This comes on for a few seconds each time
the ignition is switched on.
When the warning light comes on,
accompanied by the message "Fuel level
low" on the display, there is enough fuel
remaining to drive approximately 30 miles
(50 km) (the tank capacity is approximately
80 litres).
This light flashes to indicate a malfunction
of the fuel gauge or cutting-off of the fuel
supply, if it is accompanied by the message
"Fuel circuit neutralised" on the display.
Restore the supply (refer to the "Fuel"
section of the "Maintenance" chapter)
or contact a PEUGEOT dealer, depending
on the circumstances.
Handbrake, low brake fluid
level and electronic brake
force distribution
This is linked to the central STOP warning
light.
It comes on for a few seconds each time the
ignition is switched on.
This warning light is accompanied by an
audible signal and a message on the display
indicating the cause of the warning:
- "Handbrake on", if the handbrake is on or
not released correctly while driving,
- "Brake fluid level low" in the event of an
excessive drop in the brake fluid level (if
the warning light remains lit even with the
handbrake released),
- "Braking fault", displayed at the same
time as the ABS warning light, indicating an
electronic brake force distribution system
fault.
Stop immediately.
Contact a PEUGEOT dealer.
Diesel: specific warning lights
Pre-heat
This comes on for a few seconds each time
the ignition is switched on.
In cold weather, wait until it goes out before
trying the starter.
If the temperature is high enough, the
warning light comes on for less than one
second, you can start without waiting.
Service
This comes on for a few seconds each
time the ignition is switched on. If the
warning light remains on or comes on while
the engine is running, accompanied by
an audible signal and a message on the
display, it indicates one of the following:
- a low coolant level,
- a low diesel additive reservoir level,
- the start of clogging of the particulate
emission filter.
- the presence of water in the diesel fuel.
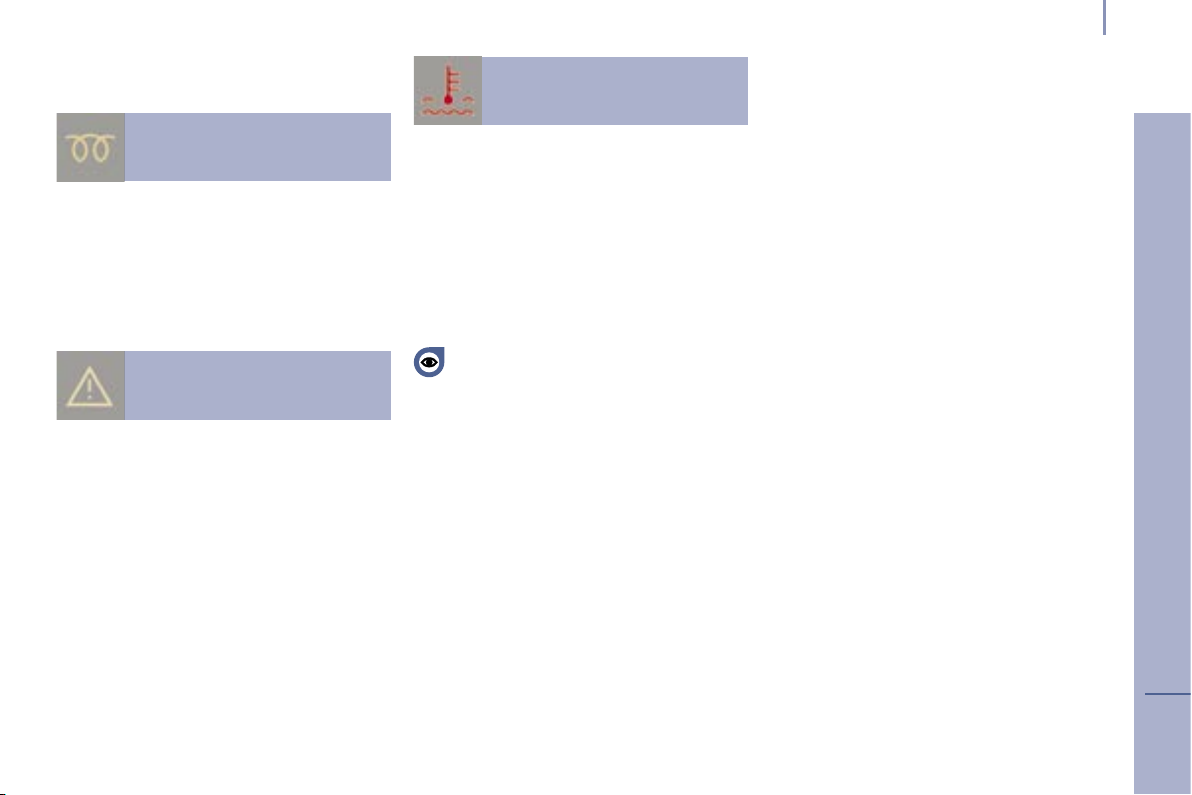
Low coolant level
This is linked to the central STOP warning
light and the service warning light.
It comes on for a few seconds each time the
ignition is switched on.
Illumination of this warning light, with the
engine running, is accompanied by an
audible signal and the message "Top up
engine coolant level" on the display.
Stop immediately.
Allow the engine to cool before topping
up. The cooling system is pressurised.
To prevent the risk of scalding, unscrew
the cap by two turns to allow the pressure
to drop. Once the pressure has dropped,
remove the cap and top-up the level.
Contact a PEUGEOT dealer.
Instruments and controls
Particulate emission filter saturation
warning
The message "Diesel additive minimum
level" or "Risk of clogging of the
particulate emission filter" on the display,
accompanied by an audible signal and
displaying of the service warning light,
indicates a particulate emission filter fault.
When this occurs with the engine running,
this is due to the particulate emission filter
starting to become clogged (exceptionally
prolonged urban driving conditions: reduced
speed, long traffic jams, ...).
In order to regenerate the filter, you are
advised to drive, as soon as possible, when
traffic conditions permit, at a speed of
35 mph (60 km/h) or more for at least five
minutes (until the message is cleared and
the service warning light is switched off).
During regeneration of the particulate
emission filter, relay noise may be heard
under the fascia.
If the message is still displayed and the
service warning light remains lit, contact a
PEUGEOT dealer.
25
ERGONOMICS and COMFORT
2
Instruments and controls
26
B
A
With monochrome screen
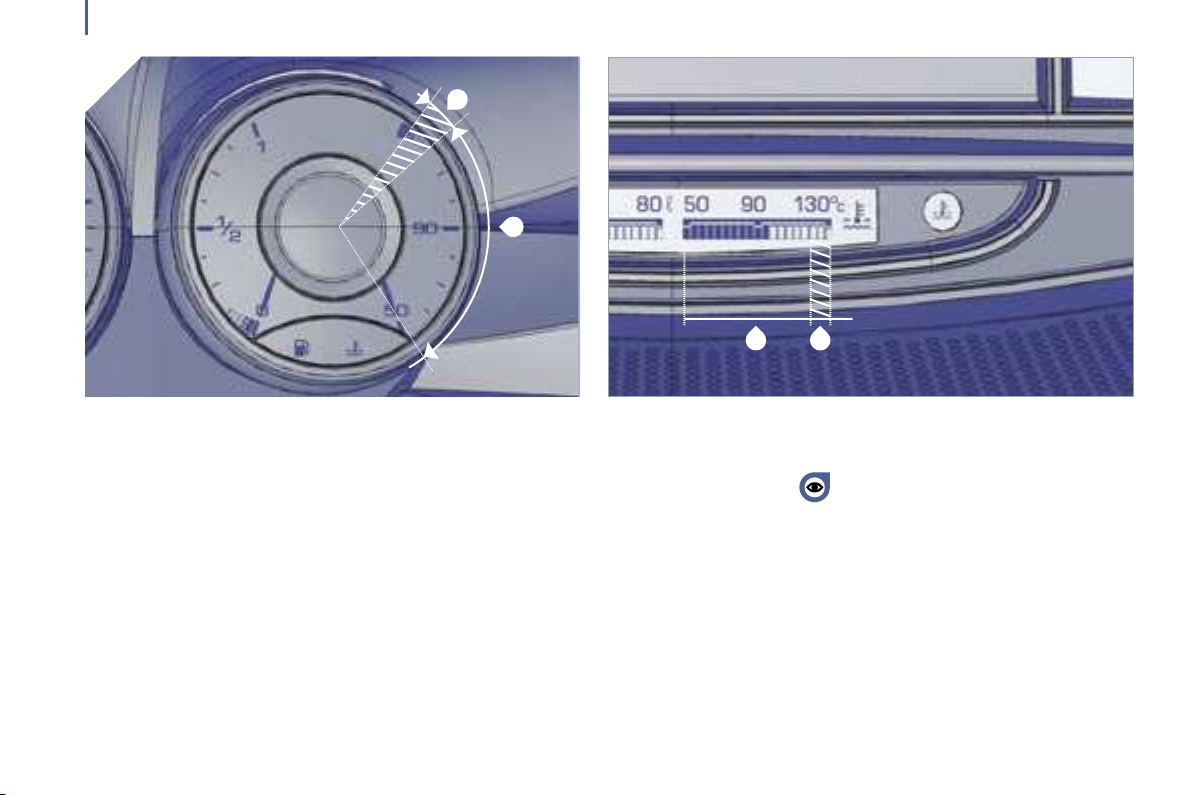
COOLANT TEMPERATURE INDICATOR
A
In zone
A, the temperature is correct.
In zone B, the temperature is too high.
The central STOP warning light and the
maximum coolant temperature warning light
1 come on, accompanied by an audible
signal and the message "Engine coolant
temp. too high" on the display.
You must stop immediately.
B
With colour screen
Wait for the engine to cool before
topping up the level.
The cooling system is pressurised.
In the event of a breakdown and in order to
avoid any risk of scalding, unscrew the cap
two turns to allow the pressure to drop.
When the pressure has dropped, remove the
cap and top up the level.
Contact a PEUGEOT dealer.
Instruments and controls
INSTRUMENT PANEL DISPLAY
After switching on the ignition, three
functions are shown in succession:
- service indicator,
- engine oil level indicator (see
corresponding section),
- total distance recorder (total and trip
distances).
It also displays the automatic gearbox
positions and programmes selected (see
opposite).
The total and trip distances are
displayed for thirty seconds, when
the ignition is switched off, on opening the
driver’s door as well as on locking and
unlocking the vehicle.
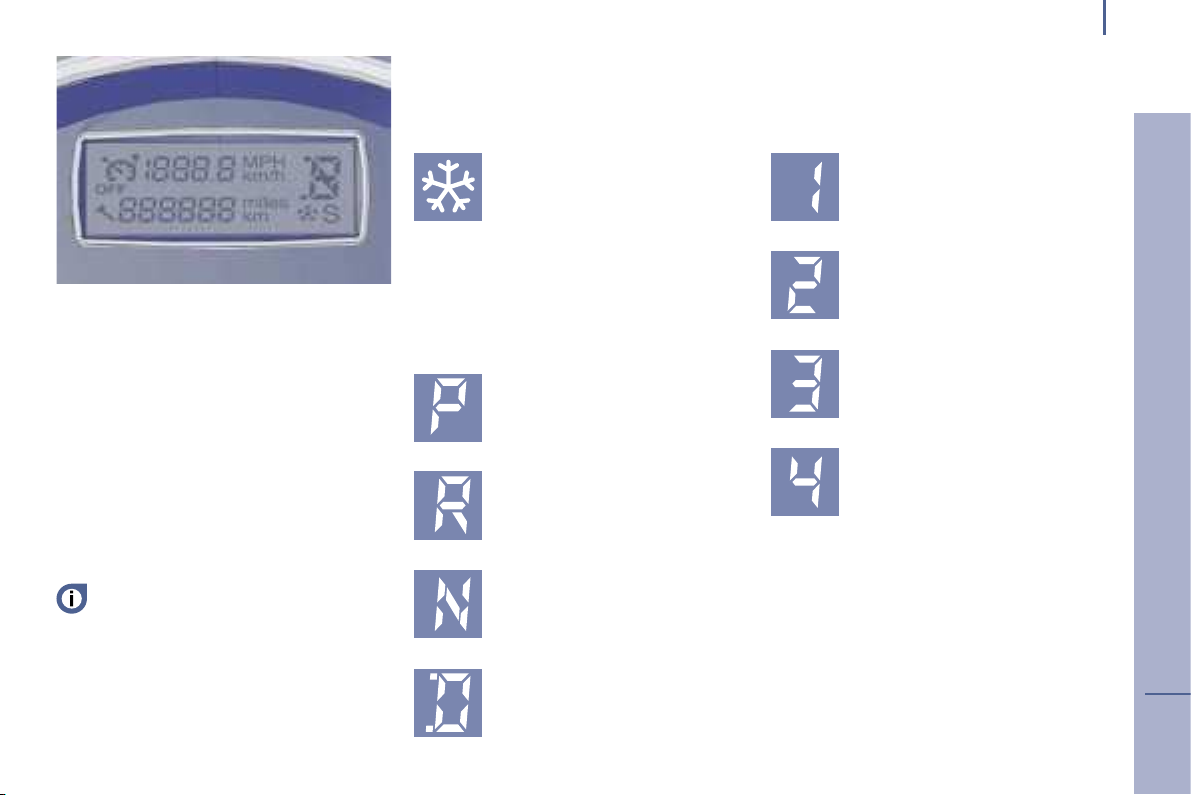
Automatic gearbox indicator
Automatic gearbox indicator light:
"SNOW" indicator light
This comes on when the
automatic gearbox "SNOW"
operating programme is selected.
Automatic gearbox lever positions:
"Park"
"Reverse"
"Neutral"
"Drive"
27
"Manual" mode:
1st gear engaged
2nd gear engaged
3rd gear engaged
4th gear engaged
ERGONOMICS and COMFORT
2
Instruments and controls
Service indicator
28
Located in the instrument panel with
the total distance recorder (total and
trip distances), this programmes service
intervals according to the use of the vehicle.
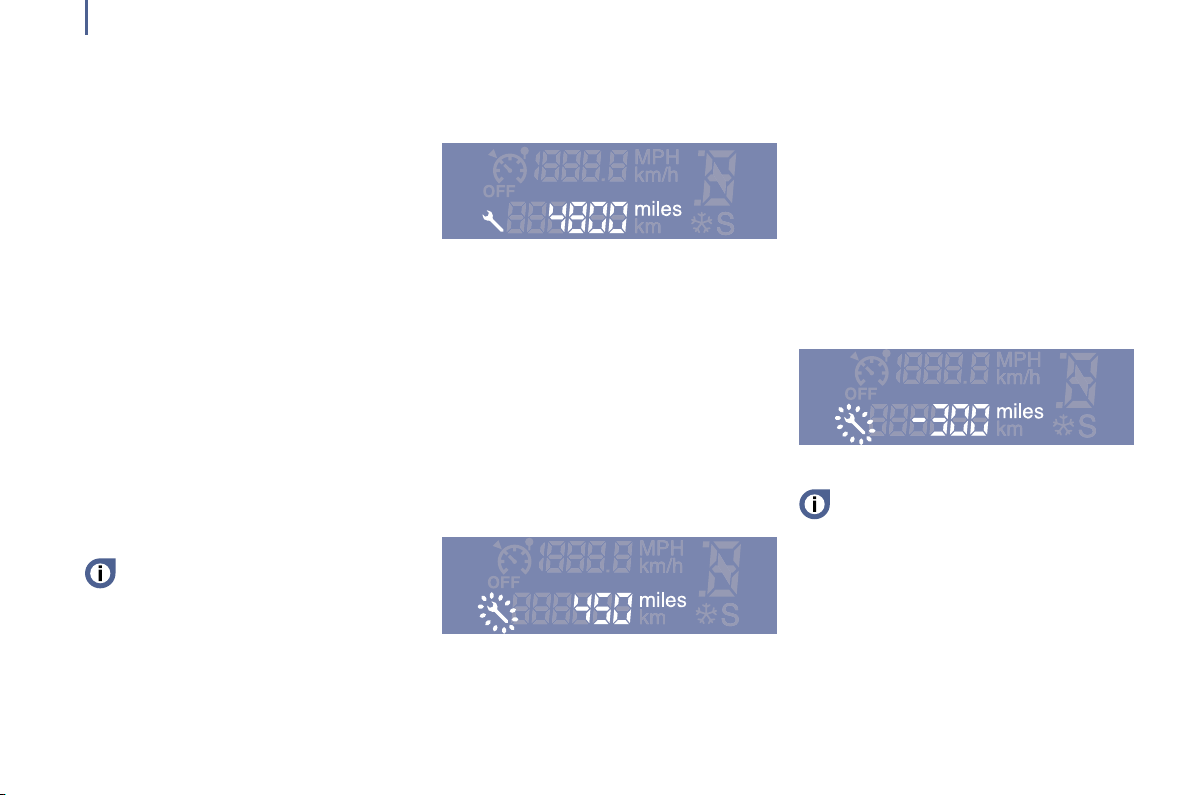
Example: 4 800 miles/km remain before
the next service is due. When the ignition
is switched on and for a few seconds, the
display shows:
A few seconds after the ignition is switched
on, the oil level is displayed, then the total
distance recorder resumes normal operation
and the spanner remains lit. This indicates
that a service should be carried out shortly.
Operation
A few moments after the ignition has been
switched on, the spanner indicating a
service operation lights up; the display for
the total distance recorder tells you (in round
figures) the distance remaining before the
next service.
The points at which a service is due are
calculated from the last indicator zero reset.
The point at which a service is due is
determined by two parameters:
the distance travelled.
the time which has elapsed since the last
service.
The distance remaining before the next
service may be weighted by the time
factor, depending on the driver’s driving
habits.
A few seconds after the ignition is switched
on, the oil level is displayed, then the total
distance recorder resumes normal operation
showing the total and trip distances.
The distance remaining before the next
service is less than 500 miles/1 000 km.
Each time the ignition is switched on and
for a few seconds, the spanner flashes and
the number of miles/kilometres remaining is
displayed:
The service is overdue*.
Each time the ignition is switched on and for
a few seconds, the spanner flashes and the
excess distance is displayed.
With the engine running the spanner
remains lit until the service has been
carried out.
* First of the two terms reached: the spanner
also lights up if the two-year interval has
elapsed.
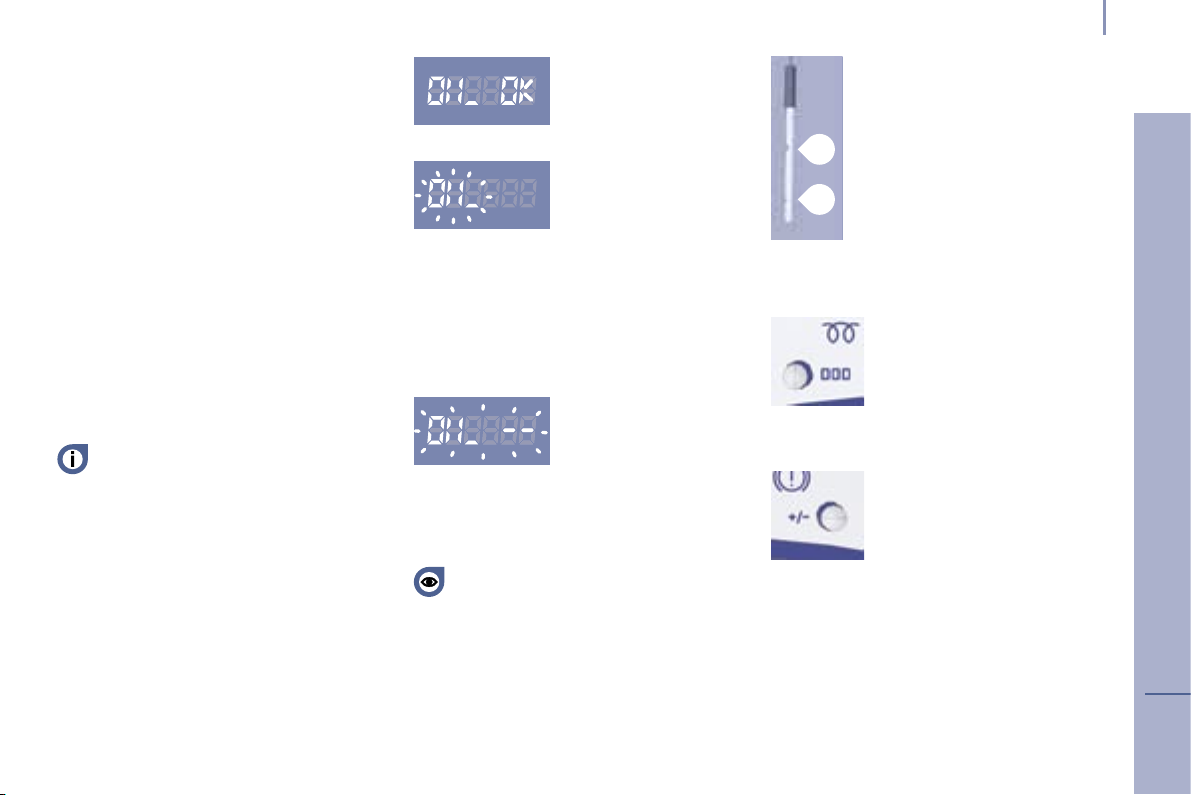
Zero re-set
Your PEUGEOT dealer carries out this
operation after each service.
However, if you carry out the service
yourself, the re-set procedure is as follows:
Switch off the ignition,
Press and hold the trip recorder re-set
button,
Switch on the ignition.
The display begins a countdown.
When the display shows "= 0", release the
button; the spanner disappears.
After this operation, if you wish to
disconnect the battery, lock the vehicle
and wait for at least five minutes, otherwise
the zero re-set will not be registered.
Engine oil level indicator
When the ignition is switched on, the engine
oil level is indicated for a few seconds, after
the service information.
Oil level correct
Lack of oil
Flashing of "OIL", linked
with the service warning
light, accompanied by
an audible signal and a
message on the display, indicates a lack of
oil which could damage the engine.
If the lack of oil is confirmed by a check
using the dipstick, it is essential that the
level is topped up.
Oil level gauge fault
Flashing of "OIL --"
indicates a malfunction
of the engine oil level
gauge. Contact a
PEUGEOT dealer.
The level read will only be correct
if the vehicle is on level ground and
the engine has been off for more than
15 minutes.
Instruments and controls
Dipstick
A = maximum, never exceed
this level as a surplus of oil may
damage the engine.
Contact a PEUGEOT dealer
A
without delay.
B = minimum, top up the level via
B
the oil filler cap, using the type of
oil suited to your engine.
Trip recorder zero reset
button
With the ignition on, press the
button until the zeros appear.
Lighting rheostat
With the lights on, press the
button to vary the intensity of
the lighting of the instruments
and controls. When the lighting
reaches the minimum (or maximum) setting,
release the button then press it again to
increase (or reduce) the brightness.
As soon as the lighting is of the required
brightness, release the button.
29
ERGONOMICS and COMFORT
2

Gearboxes
30
GEARBOXES
"PORSCHE TIPTRONIC SYSTEM" AUTOMATIC GEARBOX
The four-speed automatic gearbox offers
a choice between the comfort of integral
automatic operation, enhanced by a snow
programme, or the pleasure of manual gear
changing.
Gear selection gate
Move the lever in the gate to select a position.
Once the position is selected, the
corresponding indicator light appears on
the instrument panel display.
: snow programme
Park: to immobilise the vehicle or start the
engine, with the handbrake on or off.
Reverse: to reverse (select this position with
the vehicle stationary, engine at idle).
Neutral: to start the engine and to park,
with the handbrake on.
If position N is engaged inadvertently
while driving, allow the engine to
return to idle before engaging position D to
accelerate.
Drive: for driving in automatic mode.
Manual: for driving in manual mode.
If the battery is flat and the lever is
in position
change to another position.
P, it will be impossible to

Moving off
With the engine running, to move off from
position P:
it is essential to press the brake pedal
to exit position P,
select position R, D or M, then gradually
release the pressure on the brake pedal;
the vehicle moves off immediately.
You can also move off from position N:
release the handbrake, with your foot on
the brake
select position R, D or M, then gradually
release the pressure on the brake pedal;
the vehicle moves off immediately.
When the engine is at idle, brakes
not applied, if position R, D or M is
selected the vehicle moves even without the
accelerator being pressed.
For this reason, do not leave children
unsupervised inside the vehicle, with the
engine running.
When maintenance operations need to be
carried out with the engine running, apply
the handbrake and select position P.
Automatic operation
Automatic changing of the four gears:
select position D in the gate.
The gearbox always selects the most
suitable gear according to the following
parameters:
the style of driving,
the road profile,
the vehicle load.
The gearbox is then operating in
auto-adaptive mode, without any action on
your part.
Never select position N when the
vehicle is moving.
Never select positions P or R unless the
vehicle is stationary.
Never change between positions to optimise
braking on a slippery surface.
Gearboxes
For immediate maximum acceleration
without touching the gear lever, press
the accelerator pedal down as far as it will
go to the end of its travel passing the point
of resistance (kickdown). The gearbox will
automatically change down or maintain the
gear selected until maximum engine speed
is reached.
On a descent, the gearbox will automatically
change down in order to provide efficient
engine braking and good re-acceleration.
If you take your foot off the accelerator
suddenly, the gearbox will not change to a
higher gear for reasons of safety.
Snow programme
In addition to the auto-adaptive programme,
there is a special programme.
The programme is displayed on the
instrument panel screen.
The Snow programme improves starting and
drive when traction is poor.
Press button once the vehicle has
been started and position D selected.
The gearbox adapts to driving on slippery
roads.
31
2
ERGONOMICS and COMFORT
Gearboxes
32
You can return to the auto-adaptive
programme at any time.
Press button
the programme you are in.
again to switch off
Manual operation
Manual changing of the four gears:
select position M in the gate,
push the lever to the + sign to change to a
higher gear,
pull the lever to the - sign to change to a
lower gear.
You can change from position D (driving in
automatic mode) to position M (driving in
manual mode) at any time.
Operating abnormality
Any operating abnormality is indicated by
an audible signal, accompanied by the
message "Automatic gear fault" on the
display and flashing of the Snow warning
light on the instrument panel.
In this situation the gearbox operates in
downgrade mode (locked in 3rd gear). You
may feel a substantial knock when changing
from P to R and from N to R (this will not
cause any damage to the gearbox).
Do not exceed 60 mph (100 km/h), keeping
within the limit of local speed restrictions.
Contact a PEUGEOT dealer as soon as
possible.
It is only possible to change from one
gear to another if the vehicle speed
and engine speed permit. If they do not, the
vehicle will operate temporarily in automatic
mode.
When the vehicle is stationary or moving
very slowly, the gearbox automatically
selects gear M1.
The (snow) programme does not operate
in manual mode.
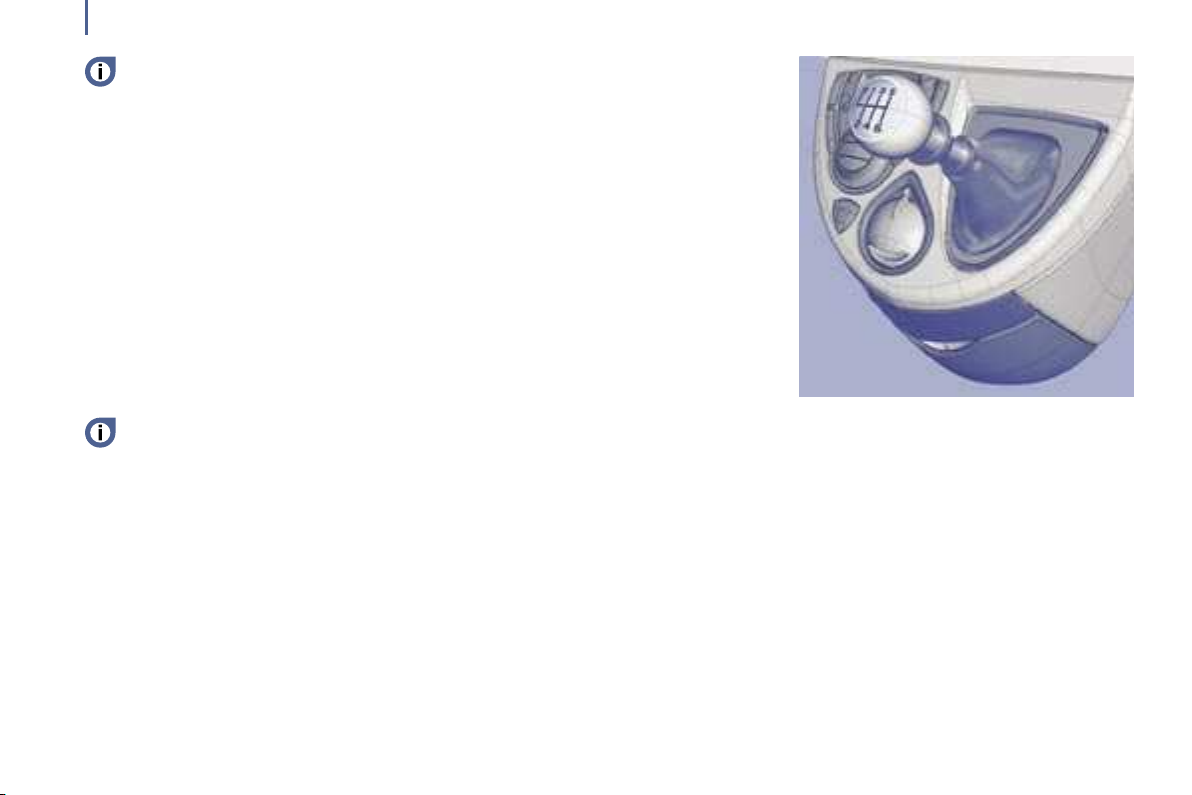
MANUAL GEARBOX
Reverse*
To change to reverse gear, lift the ring under
the gear lever knob and push the gear lever
to the left then to the front.
Reverse gear can only be engaged when
the vehicle is stationary with the engine
idling.
* According to engine.

Gearboxes
32
You can return to the auto-adaptive
programme at any time.
Press button
the programme you are in.
again to switch off
Manual operation
Manual changing of the four gears:
select position M in the gate,
push the lever to the + sign to change to a
higher gear,
pull the lever to the - sign to change to a
lower gear.
You can change from position D (driving in
automatic mode) to position M (driving in
manual mode) at any time.
Operating abnormality
Any operating abnormality is indicated by
an audible signal, accompanied by the
message "Automatic gear fault" on the
display and flashing of the Snow warning
light on the instrument panel.
In this situation the gearbox operates in
downgrade mode (locked in 3rd gear). You
may feel a substantial knock when changing
from P to R and from N to R (this will not
cause any damage to the gearbox).
Do not exceed 60 mph (100 km/h), keeping
within the limit of local speed restrictions.
Contact a PEUGEOT dealer as soon as
possible.
It is only possible to change from one
gear to another if the vehicle speed
and engine speed permit. If they do not, the
vehicle will operate temporarily in automatic
mode.
When the vehicle is stationary or moving
very slowly, the gearbox automatically
selects gear M1.
The (snow) programme does not operate
in manual mode.
MANUAL GEARBOX
Reverse*
To change to reverse gear, lift the ring under
the gear lever knob and push the gear lever
to the left then to the front.
Reverse gear can only be engaged when
the vehicle is stationary with the engine
idling.
* According to engine.
 Loading...