

Peugeot 807 2002 Owner Manual
YOUR 807 AT A GLANCE
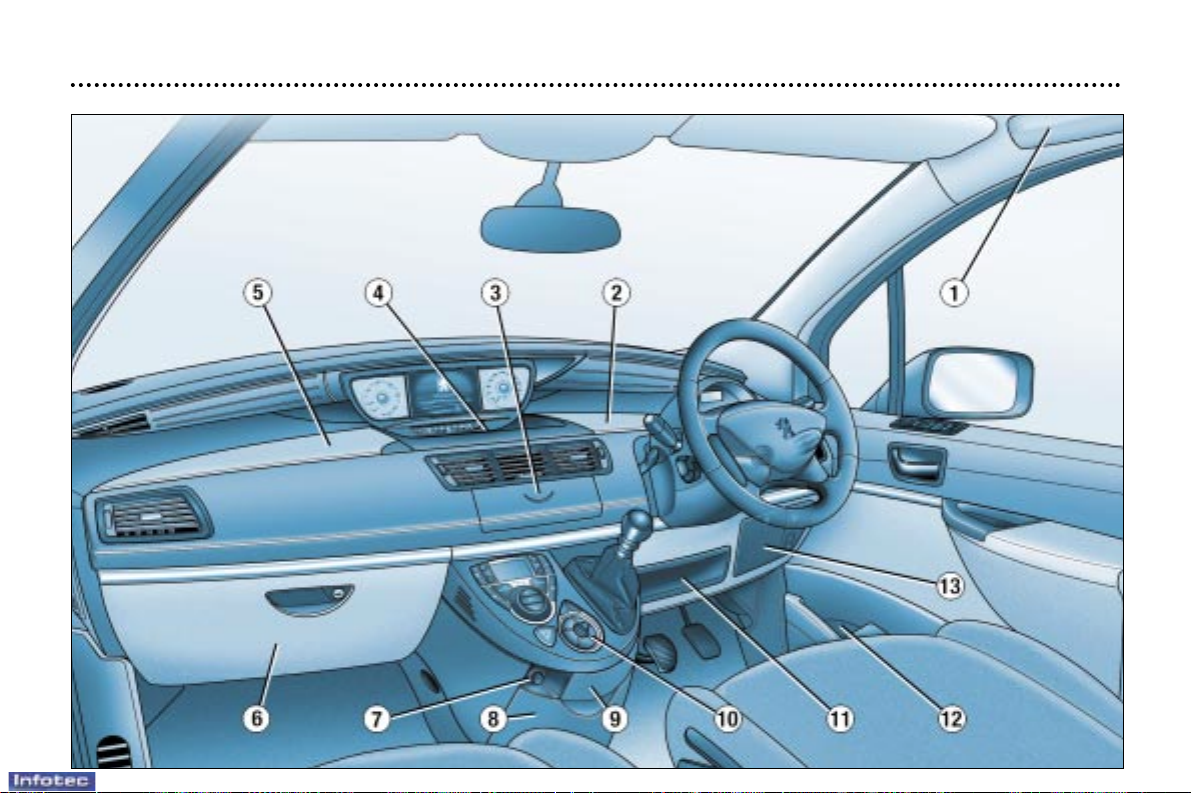
10
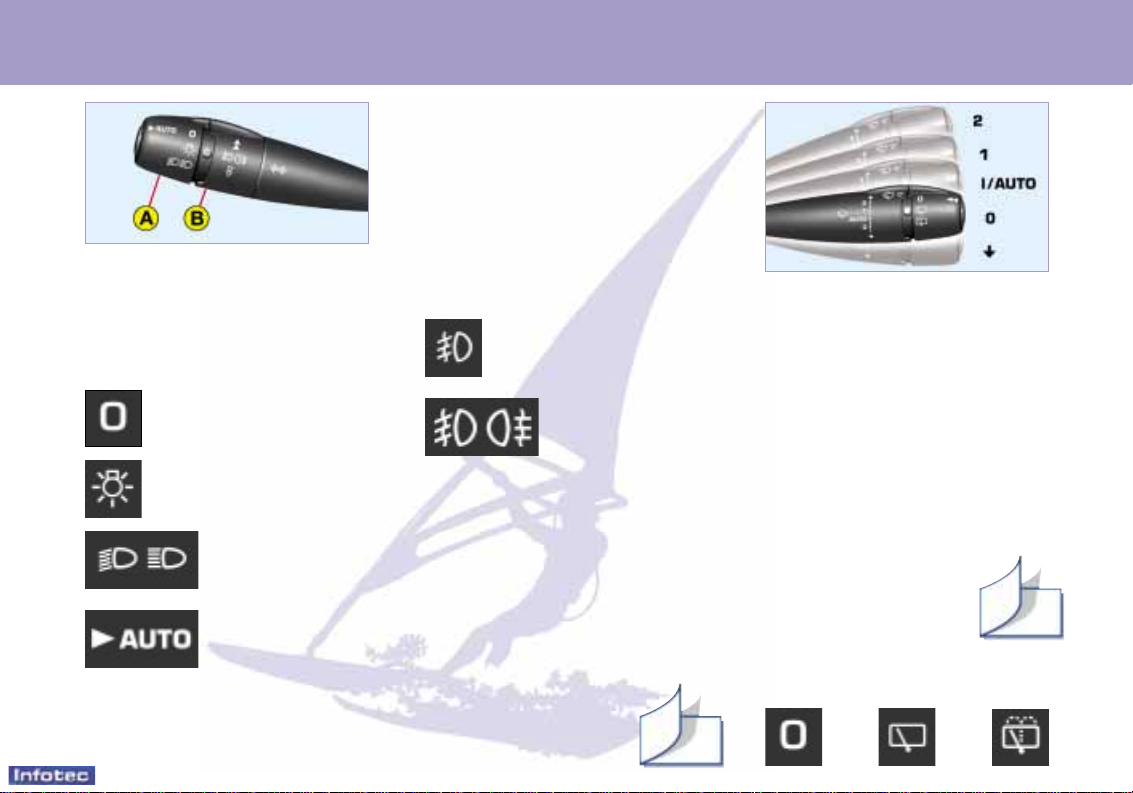
STEERING WHEEL STALKS
LIGHTING
Front and rear lights (ring A)
Lights off.
Side lights on.
Dipped / main
beam headlamps
on.
Automatic
switching on of
lights.
Automatic switching on of
lights
To activate or disarm this function, place the key in the accessories position, the lighting stalk
in position 0 and press for more
than two seconds on the end of
the stalk.
Front fog lamps and rear fog
lamps (ring B)
Front fog lamps (1
st
rota-
tion of the ring forwards).
Front fog lamps
and rear fog
lamps (2ndrotation
of the ring forwards).
To switch off: rotate the push ring
B rearwards.
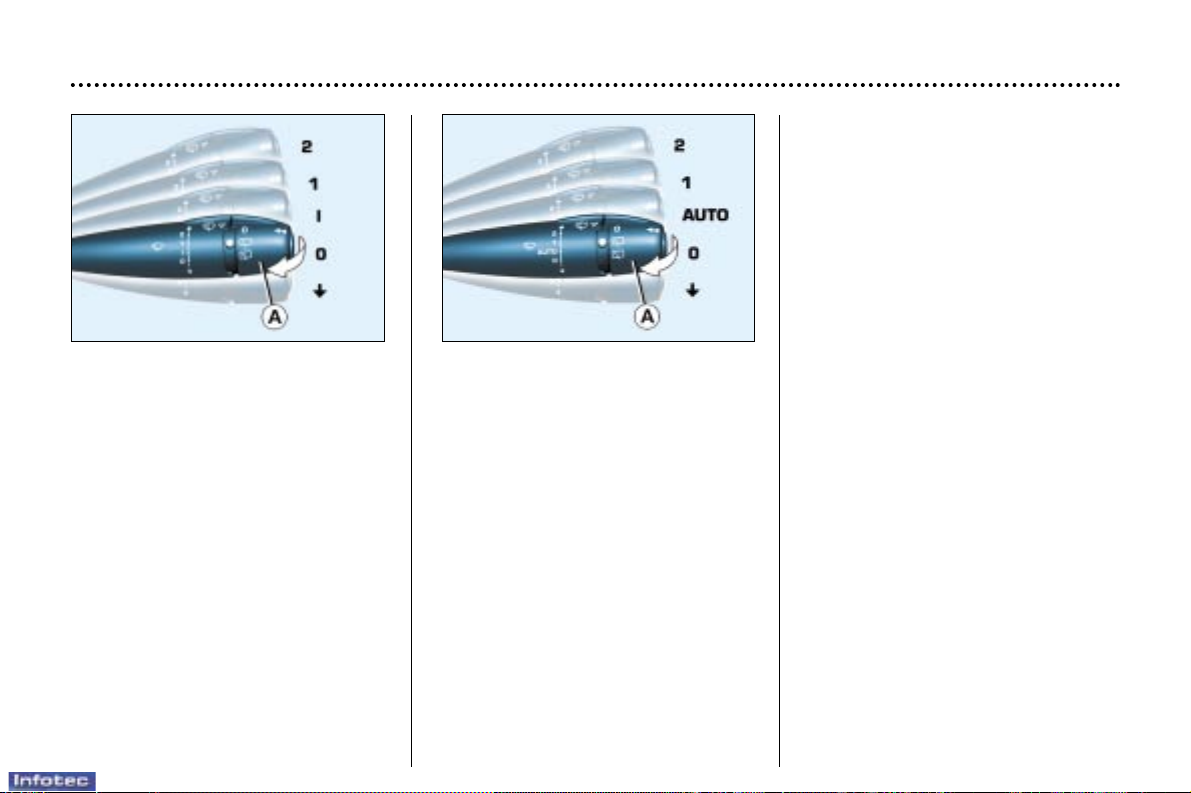
WINDSCREEN WIPERS
Front
2 Rapid wipe
1 Normal wipe
l Intermittent wipe
or
AUTO Automatic wipe
0 Stop
Single wipe
Wash-wipe: pull the stalk towards you.
Automatic wipe
In the AUTO position, a
rain sensor controls the
automatic operation of
the wipers. The wipers
adapt their speed to
the intensity of the
rainfall.
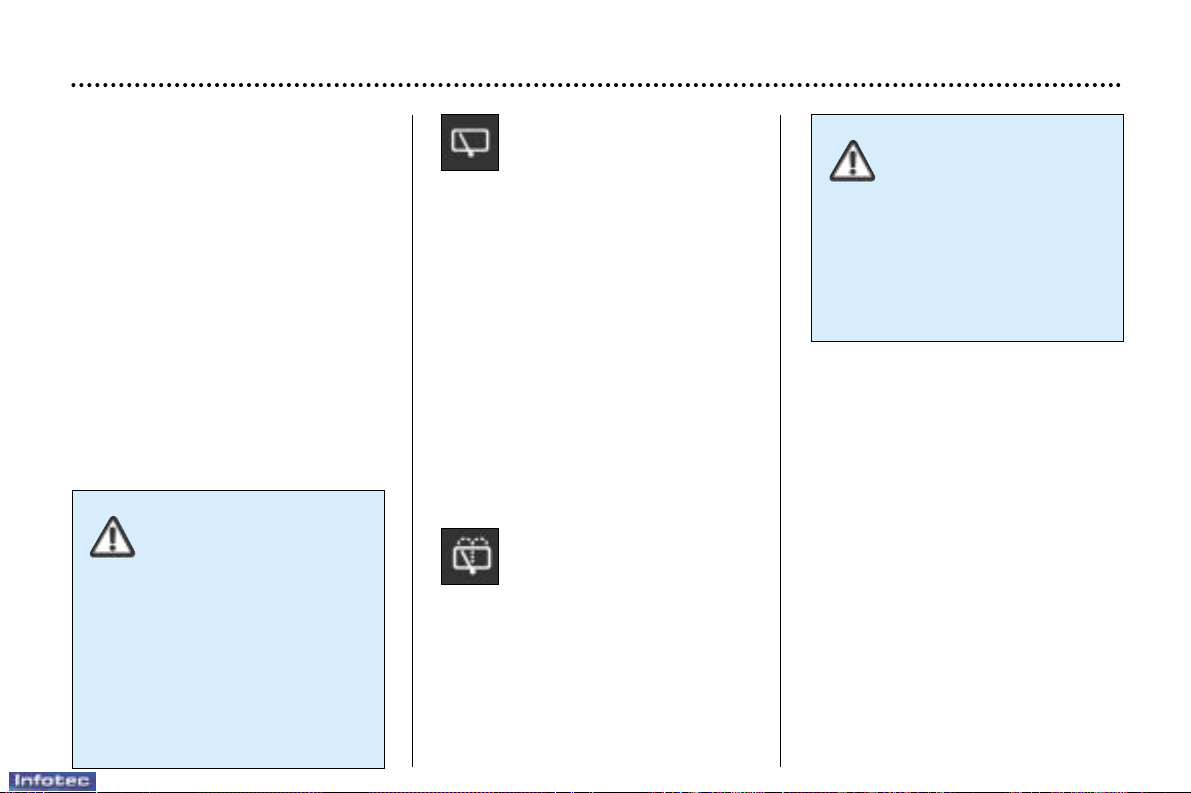
Rear
Stop Intermittent Wash-
wipe wipe
112
114
18-11-2002
YOUR 807 IN DETAIL
100
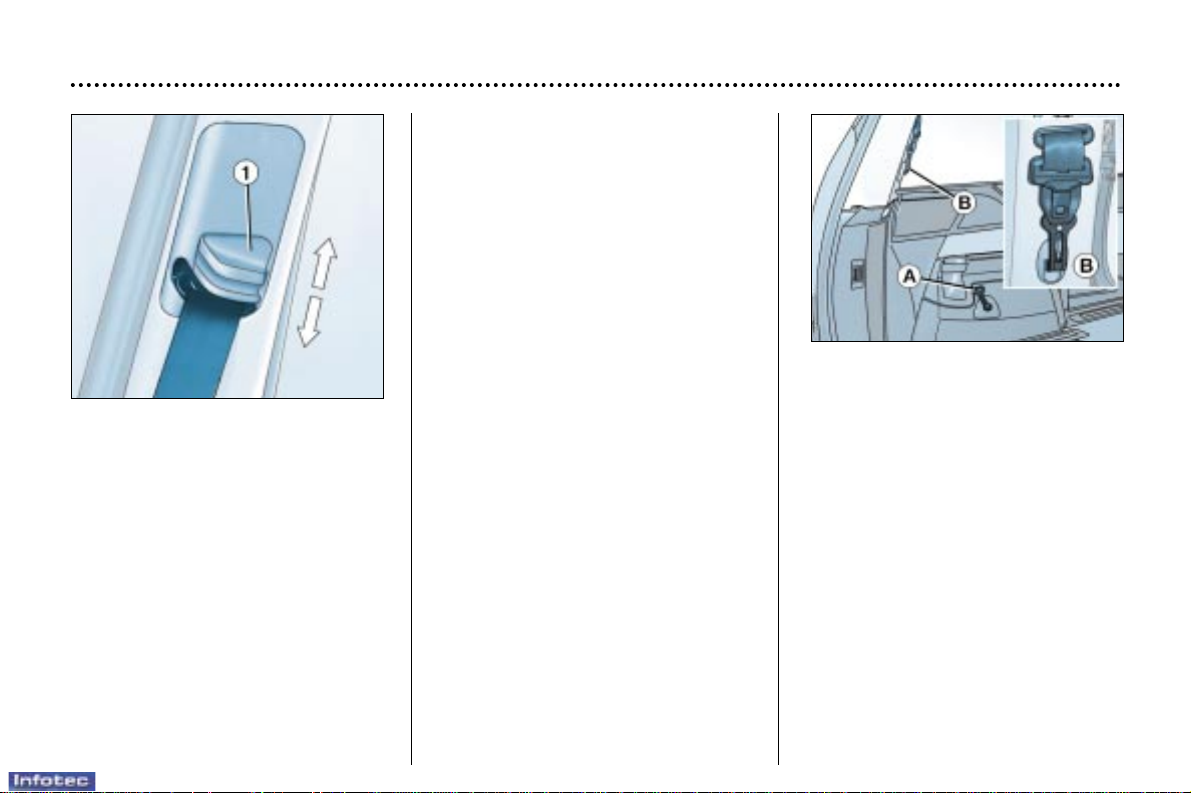
SEAT BELTS
2
nd
row front and rear side seat
belts
The 2ndrow front and rear side seats
are fitted with pre–tensioners and
force limiters.
To adjust the height :
☞ To lower the attachment point,
squeeze control 1 and slide it
downwards.
☞ To raise the attachment point,
slide control 1 upwards.
To lock
☞ Pull the strap, then insert the
buckle into the stalk.
Pre-tensioning and
force-limiting seat belts
Safety in the event of a frontal impact
has been improved by the introduction of pre-tensioning and force-limiting seat belts. Depending on the
seriousness of the impact, the
pre-tensioning system instantly tightens the seat belts firmly against the
body of the occupant.
The pre-tensioning seat belts are
armed when the ignition is on.
The force-limiting device reduces the
pressure of the seat belt against the
occupant's body in the event of an
accident.
3rdrow rear side seat belts
The 3rdrow rear side seats are fitted
with two seat belts which are both
three-point inertia reel belts with
force limiter.
To install the seat belt, move the
spring hook from position B to position A then insert the buckle into the
stalk.
2ndand 3rdrow rear centre
seat belts
The 2ndrow rear centre seat and the
rear bench seat centre seat have an
integrated three-point inertia reel
seat belt.
18-11-2002
YOUR 807 IN DETAIL
101
To be effective, a seat belt
must be tightened as
close to the body as possible.
If the seats are fitted with armrests, the lap section of the seat
belt must always pass under the
armrest.
Sitting with your back to the road
while the vehicle is moving is prohibited.
Depending on the nature and the
seriousness of the impact, the pretensioners may be triggered
before and independently of the air
bags.
In all cases, the air bag warning
light comes on.
Following a collision, have the
system checked by a PEUGEOT
dealer.
The system has been designed to
be fully operational for ten years.
For greater safety, have it checked
by a PEUGEOT dealer after this
period.
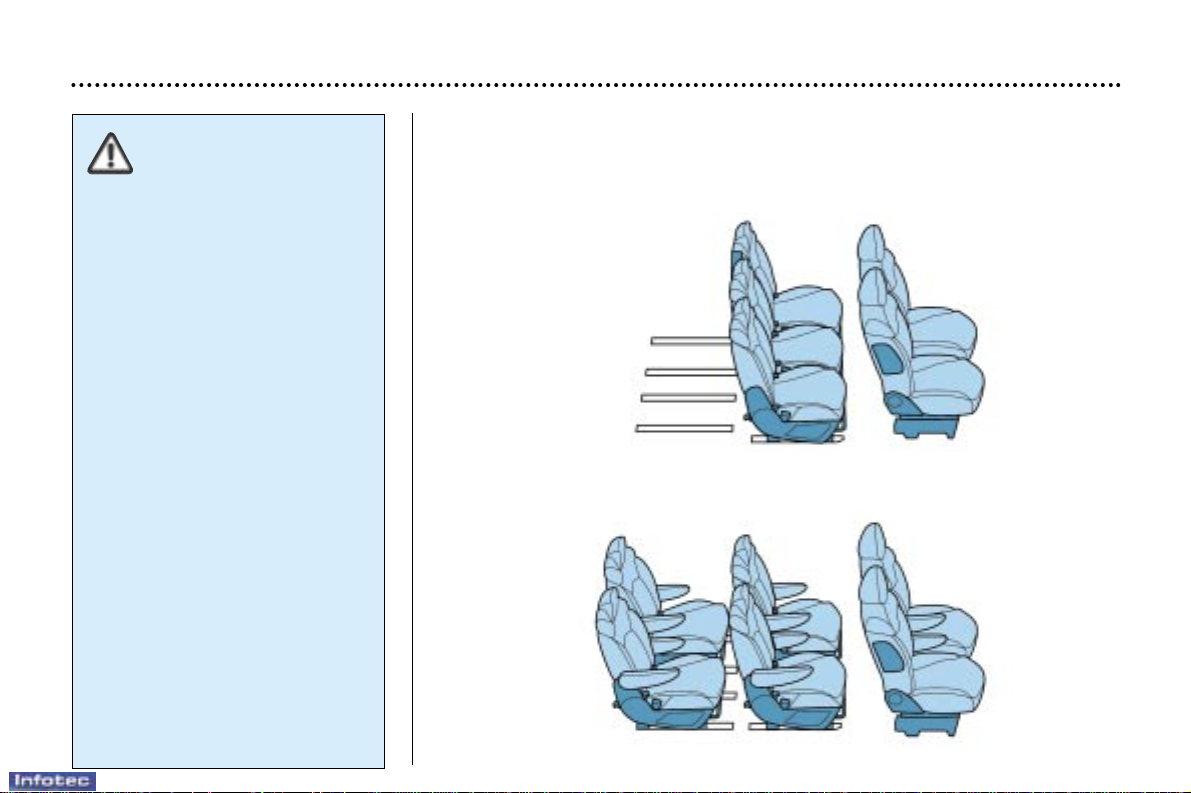
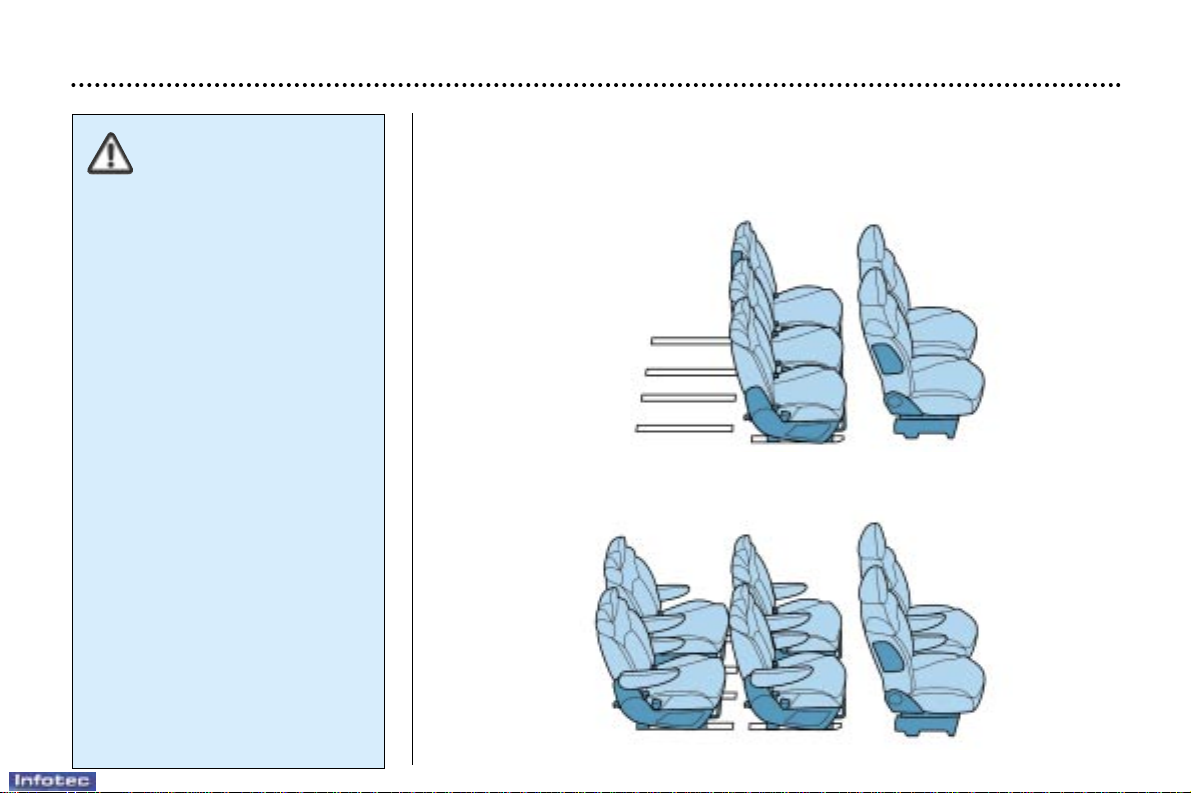
POSSIBLE SEAT CONFIGURATIONS
Examples of various arrangements combining pleasure and practicality:
5 seats
6 seats "Pullman"
18-11-2002
YOUR 807 IN DETAIL
101
To be effective, a seat belt
must be tightened as
close to the body as possible.
If the seats are fitted with armrests, the lap section of the seat
belt must always pass under the
armrest.
Sitting with your back to the road
while the vehicle is moving is prohibited.
Depending on the nature and the
seriousness of the impact, the pretensioners may be triggered
before and independently of the air
bags.
In all cases, the air bag warning
light comes on.
Following a collision, have the
system checked by a PEUGEOT
dealer.
The system has been designed to
be fully operational for ten years.
For greater safety, have it checked
by a PEUGEOT dealer after this
period.
POSSIBLE SEAT CONFIGURATIONS
Examples of various arrangements combining pleasure and practicality:
5 seats
6 seats "Pullman"
18-11-2002

Note: the centre seat may be installed in the centre position of the 2nd row and in the left side position of the third row.
7 seats with access to 3
rd
row
8 seats with bench seat
5 seats with picnic position
"Cargo" configuration
YOUR 807 IN DETAIL
102
The various operations modifying the existing configuration must be carried out with the engine switched off
(see section on ''Seats'').It is prohibited to be in a rearwards facing position when the vehicle is being driven.
18-11-2002
THE KEYS
The keys allow you to switch on the
ignition and to independently operate
the locks on the driver's door and
passenger door, the fuel filler cap,
the glove box, the passenger air bag
disarming switch and the child safety
lock.
Central locking
From the driver's door or passenger
door, the keys allow you to lock,
deadlock or unlock the doors and
tailgate, as well as fold back the
exterior mirrors.
If one of the doors or the tailgate is
open, the central locking does not
work.
The remote control performs the
same functions at a distance.
YOUR 807 IN DETAIL
103
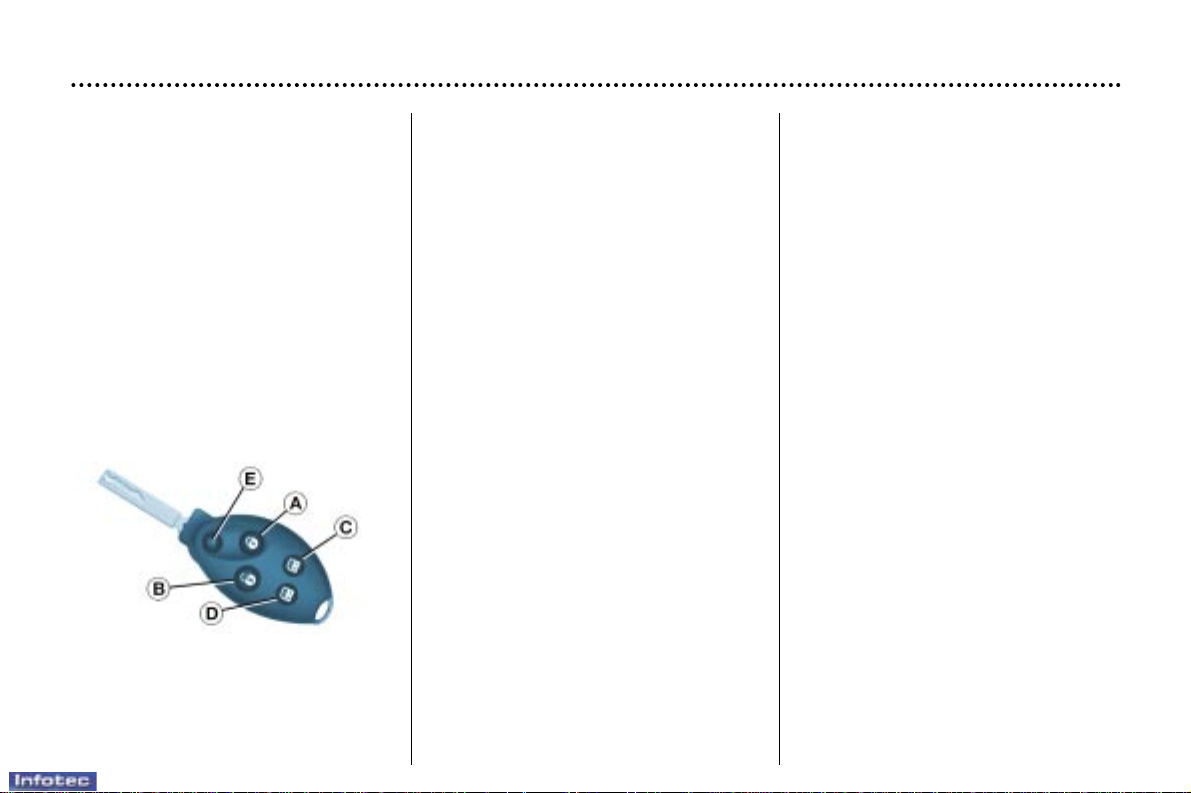
The remote control
Version with single locking
Press button A to lock the vehicle.
This is confirmed by fixed lighting of
the direction indicators for approximately two seconds.
Vehicles fitted with deadlocking
Warning: deadlocking renders the
internal and external door locking
controls inoperative.
Never leave anyone inside the vehicle when the vehicle is deadlocked.
Pressing button A deadlocks the
vehicle. This is confirmed by fixed
lighting of the direction indicators for
approximately two seconds.
A second press on button A within
five seconds of deadlocking changes
this to single locking. This is confirmed by fixed lighting of the direction indicators for two seconds.
Note: the driver operates the deadlocking from inside the vehicle. On
starting the vehicle deadlocking
changes to single locking.
Note: presing button A, in addition to
locking or deadlocking, permits automatic closing of the windows and the
sunroof. However, the sunroof stops
in a partially open posiition.
Unlocking/Ventilation
Press button B to unlock the vehicle.
This is confirmed by rapid flashing of
the direction indicators.
A second press on button A within
five seconds of deadlocking opens
the windows.
Note : if the vehicle is locked and
unlocking is activated inadvertently,
unless the doors are opened within
30 seconds, the vehicle will lock
automatically.
Opening/Closing the electric
sliding side doors
A long press on button C opens or
closes the rear right door.
A long press on button D opens or
closes the rear left door.
Note : this press unlocks the vehicle
before opening the corresponding
door.
Folding/opening out the key
To tuck away the key blade, press
button E, then fold it down into the
remote control module.
To open out the key, press button E.
18-11-2002

Changing the battery
of the remote control
The information "battery flat" is given
by an audible signal accompanied by
the message "Remote control bat-
tery low" on the multi–function display.
To replace the battery, unclip the
casing using a coin at the ring
(CR1620/3 volt battery).
If the remote control does not work
after the battery has been changed,
re- programme the remote control.
Programming the remote
control
☞ Switch off the ignition.
☞ Switch the ignition on again.
☞ Press button A immediately.
☞ Switch off the ignition and remove
the remote control key from the
ignition lock. The remote control is
now working again.
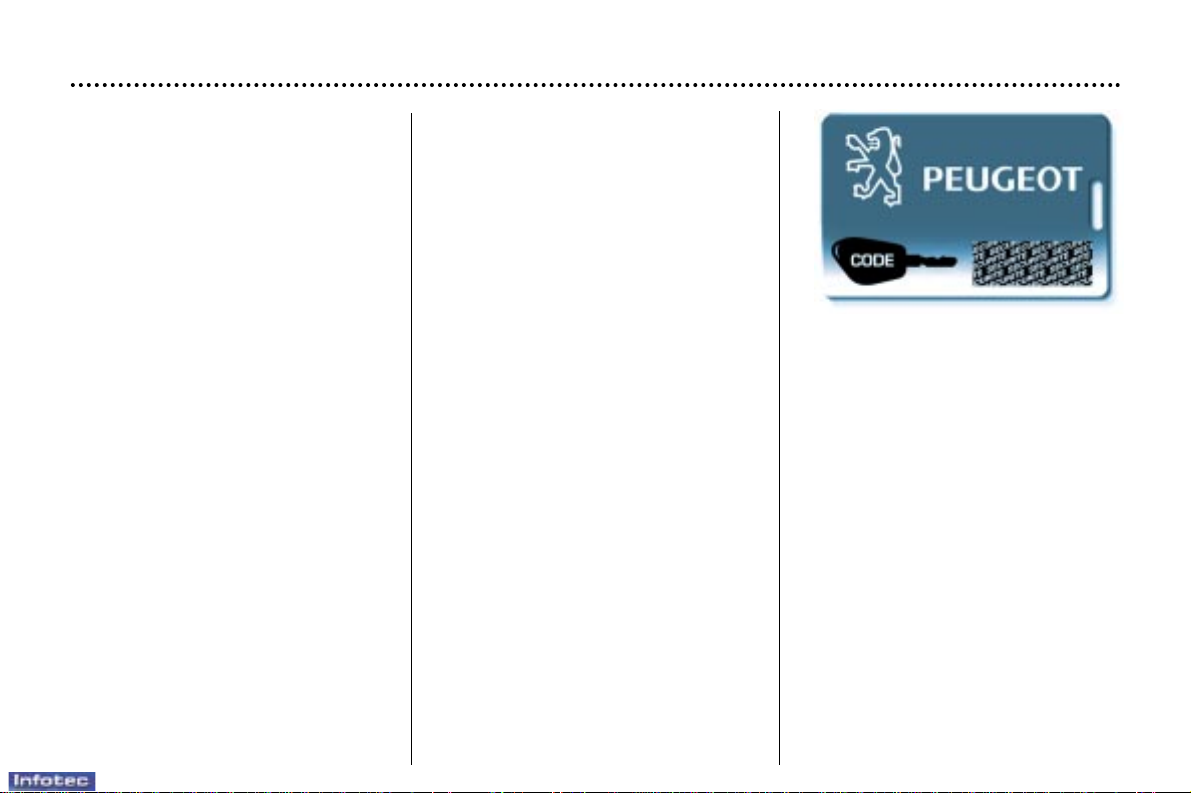
CONFIDENTIAL CARD
The confidential card contains the
identification code necessary for any
work carried out by a PEUGEOT
dealer on the system. This code is
hidden by a film, which should be
removed only if necessary.
Keep your card in a safe place,
never inside the vehicle.
Key in ignition
The message "Key in ignition" on
the multi–function display, accompanied by a buzzer on opening the
driver's door, indicates that the key
has been left in the ignition.
YOUR 807 IN DETAIL
104
ELECTRONIC ENGINE
IMMOBILISER
This locks the engine control system
a few moments after the ignition has
been switched off and therefore
prevents starting of the vehicle by
anyone who does not have the key.
The ignition key has an electronic
chip which has a special code. When
the ignition is switched on, the code
is recognised and starting is possible.
If the system does not function
correctly, the message "Anti-theft
device fault" appears on the
multi–function display, accompanied
by an audible signal.
WARNING : your vehicle is no
longer protected.
Contact a PEUGEOT dealer as soon
as possible.
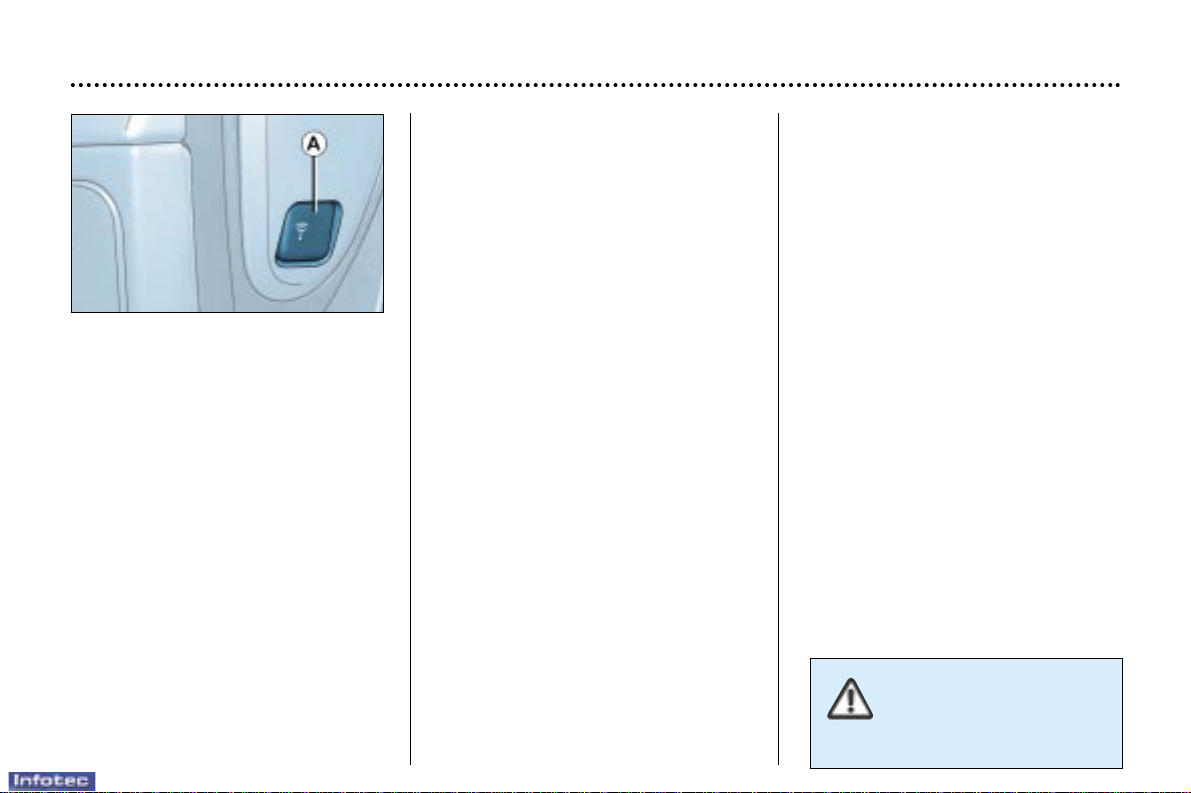
Locating your vehicle
To locate your vehicle, if you have
locked it, in a car park :
☞ press button A. The courtesy
lights come on and the direction
indicators flash for a few seconds.
18-11-2002
YOUR 807 IN DETAIL
105
Make a careful note of the number on each key. The key number is coded on the label attached to the key. If
the key is lost, your PEUGEOT dealer can rapidly supply you with new keys.
The high-frequency remote control is a sensitive system; do not operate it while it is in your pocket as there is
a possibility that it may unlock your vehicle without your knowledge.
The remote control cannot operate if the key is in the ignition, even if the ignition is switched off, except for reprogramming.
Do not operate the deadlock if there is someone inside the vehicle.
Driving with the doors locked or deadlocked may mean it is difficult for the emergency services to access the
passenger compartment in the event of an emergency.
As a safety measure (when there are children on board), remove the ignition key when leaving the vehicle, even for a
short time.
Do not handle the buttons of your remote control when out of range of your vehicle, as you run the risk of stopping it
from working.
It would then be necessary to reprogramme the remote control.
When buying a second-hand car:
– Ensure that you are given the confidential card;
– have the key codes memorised by a PEUGEOT dealer, to ensure that the keys in your possession are the only ones
that can start your vehicle.
Do not make any modifications to the electronic engine immobiliser system.
18-11-2002
Changing the battery
of the remote control
The information "battery flat" is given
by an audible signal accompanied by
the message "Remote control bat-
tery low" on the multi–function display.
To replace the battery, unclip the
casing using a coin at the ring
(CR1620/3 volt battery).
If the remote control does not work
after the battery has been changed,
re- programme the remote control.
Programming the remote
control
☞ Switch off the ignition.
☞ Switch the ignition on again.
☞ Press button A immediately.
☞ Switch off the ignition and remove
the remote control key from the
ignition lock. The remote control is
now working again.
CONFIDENTIAL CARD
The confidential card contains the
identification code necessary for any
work carried out by a PEUGEOT
dealer on the system. This code is
hidden by a film, which should be
removed only if necessary.
Keep your card in a safe place,
never inside the vehicle.
Key in ignition
The message "Key in ignition" on
the multi–function display, accompanied by a buzzer on opening the
driver's door, indicates that the key
has been left in the ignition.
YOUR 807 IN DETAIL
104
ELECTRONIC ENGINE
IMMOBILISER
This locks the engine control system
a few moments after the ignition has
been switched off and therefore
prevents starting of the vehicle by
anyone who does not have the key.
The ignition key has an electronic
chip which has a special code. When
the ignition is switched on, the code
is recognised and starting is possible.
If the system does not function
correctly, the message "Anti-theft
device fault" appears on the
multi–function display, accompanied
by an audible signal.
WARNING : your vehicle is no
longer protected.
Contact a PEUGEOT dealer as soon
as possible.
Locating your vehicle
To locate your vehicle, if you have
locked it, in a car park :
☞ press button A. The courtesy
lights come on and the direction
indicators flash for a few seconds.
18-11-2002

YOUR 807 IN DETAIL
105
Make a careful note of the number on each key. The key number is coded on the label attached to the key. If
the key is lost, your PEUGEOT dealer can rapidly supply you with new keys.
The high-frequency remote control is a sensitive system; do not operate it while it is in your pocket as there is
a possibility that it may unlock your vehicle without your knowledge.
The remote control cannot operate if the key is in the ignition, even if the ignition is switched off, except for reprogramming.
Do not operate the deadlock if there is someone inside the vehicle.
Driving with the doors locked or deadlocked may mean it is difficult for the emergency services to access the
passenger compartment in the event of an emergency.
As a safety measure (when there are children on board), remove the ignition key when leaving the vehicle, even for a
short time.
Do not handle the buttons of your remote control when out of range of your vehicle, as you run the risk of stopping it
from working.
It would then be necessary to reprogramme the remote control.
When buying a second-hand car:
– Ensure that you are given the confidential card;
– have the key codes memorised by a PEUGEOT dealer, to ensure that the keys in your possession are the only ones
that can start your vehicle.
Do not make any modifications to the electronic engine immobiliser system.
18-11-2002
THE ALARM
This provides two types of protection:
– exterior protection: it sounds if a
door, the tailgate, the bonnet or a
sunroof is opened.
– interior protection: it sounds if the
volume inside the passenger compartment changes (breaking of a
window or a movement inside the
vehicle).
Setting the alarm
☞ Switch off the ignition and get out
of the vehicle.
☞ Set the alarm within five minutes
of getting out of the vehicle, by
locking or deadlocking using the
remote control (the red indicator
light, located in the centre of the
fascia and visible from the outside, flashes once per second).
Note: if you wish to lock your vehicle
without setting the alarm, use the
door lock.
When the alarm is triggered, the
siren sounds and the direction indicator lights flash for thirty seconds.
After triggering, the alarm remains
set.
Warning: if the alarm has been triggered ten times in succession, on
the eleventh time it becomes inactive.
Note: if the red warning light, located
in the centre of the fascia, flashes
rapidly, the alarm has been triggered
while you were away from your vehicle. To stop it flashing, insert the
remote control key and switch on the
ignition.
Disarming
Unlock the vehicle with the remote
control key (the red indicator light,
located in the centre of the fascia,
goes out).
To set the alarm with exterior
protection only
If, while you are away from the vehicle, you wish to leave a window
partially open or a pet inside the
vehicle, you should choose exterior
protection only.
☞ Close the sunroofs,
☞ Switch off the ignition,
☞ In the next ten seconds, press
button A, located on the left-hand
side of the fascia, until the red
indicator light is on continuously,
☞ Get out of the vehicle,
☞ Within the next five minutes, set
the alarm by locking or deadlocking using the remote control (the
red indicator light, located in the
centre of the fascia, flashes once
a second).
Note: when the alarm is set but the
remote control does not operate:
☞ Unlock the doors with the key and
open the door. The alarm is
triggered.
☞ Switch on the ignition in the next
ten seconds. The alarm is disarmed.
Incorrect operation
When the ignition is switched on, if
the red indicator light, located in the
centre of the fascia, comes on for ten
seconds, there is a fault in the siren
connection.
Contact a PEUGEOT dealer to have
the system checked.
Do not make any modifications to the alarm system as this could cause
faults.
YOUR 807 IN DETAIL
106
18-11-2002
YOUR 807 IN DETAIL
109
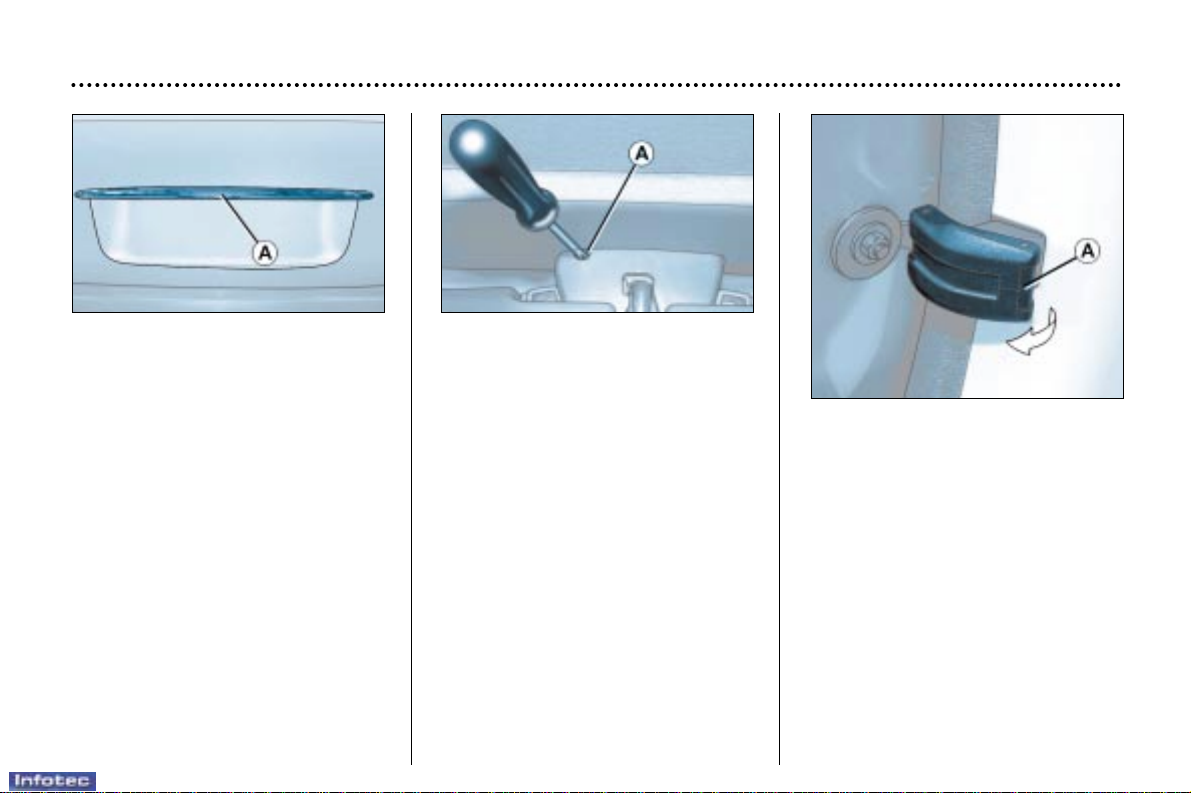
Tailgate release
This enables the tailgate to be
unlocked in the event of a central
locking fault.
☞ Fold back a 2
nd
row rear seat,
☞ Fold back a 3rdrow rear seat or
the bench seat to gain access to
the lock from inside the boot,
☞ Insert a small screwdriver into
hole A in the lock and push it
towards the left to unlock the
tailgate.
TAILGATE
Simultaneous locking or unlocking of the tailgate and the doors
The tailgate is locked or unlocked by
the remote control or the driver's
door or passenger door lock.
To open, operate the handle A and
lift the tailgate.
Note: The tailgate locks automatically when the vehicle is being driven at
more than 6 mph (10 km/h) and
unlocks when one of the doors is
opened.
"Tailgate open" warning
When the engine is running or the
vehicle is being driven, you are
warned if the tailgate is not closed
correctly by a diagram on the
multi–function display, accompanied
by an audible signal.
Partially opening rear
windows
To partially open the rear windows,
tilt the lever A and push it fully to
lock the windows in the open position.
18-11-2002
YOUR 807 AT A GLANCE
11
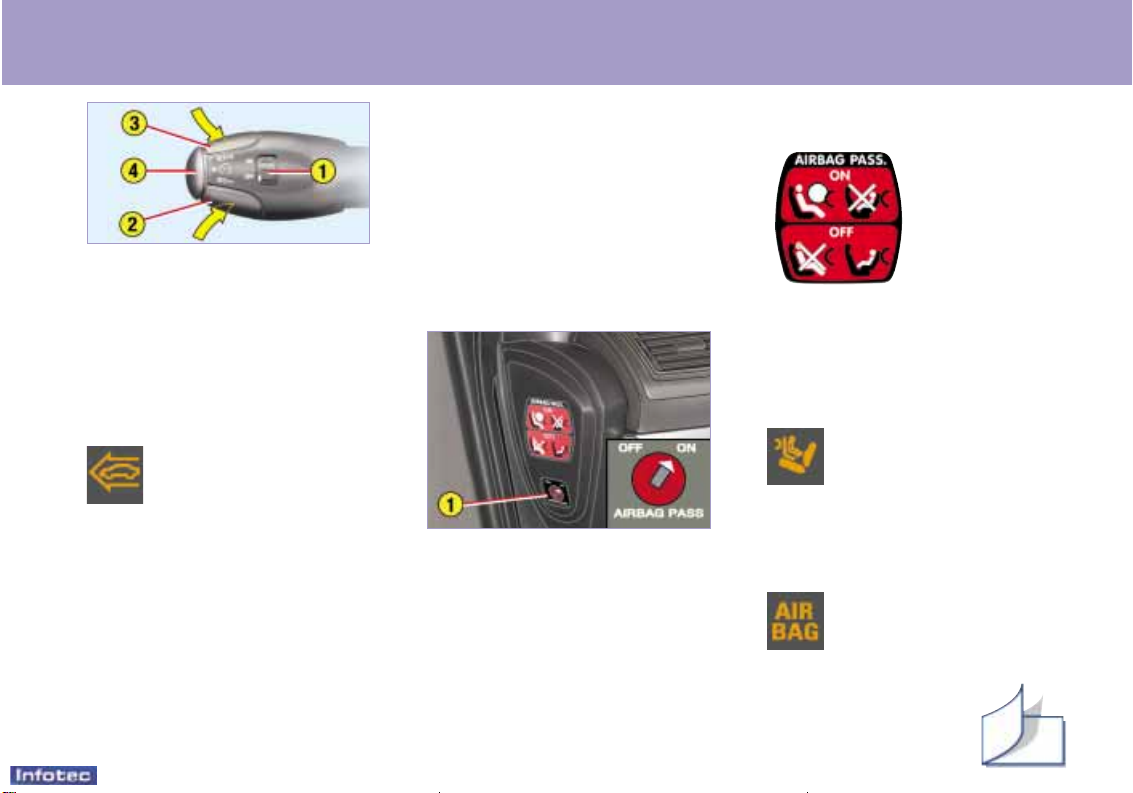
CRUISE CONTROL
The cruise control makes it possible to maintain a constant vehicle
speed programmed by the driver
(above 25 mph [40 km/h] with 4
th
or 5thgear engaged), without the
accelerator pedal being pressed.
Switching on
➜ Place the knob 1 in the
ON position. The
warning light comes
on, accompanied by
an audible signal.
Storing a speed
➜
Press button 2 or 3 to store the
speed at which you are driving.
➜
Press button 2 to reduce the
stored speed or button 3 to
increase it.
Deactivating the stored speed
➜
Press button 4 or the brake or
clutch pedal.
Recalling the stored speed
➜
Press button 2 or 3.
Cancelling the stored speed
➜
Place the knob 1 in the OFF
position.
Note: the stored speed is cancelled when the ignition is
switched off.
FRONT, SIDE AND
CURTAIN AIR BAGS
Disarming the passenger air
bag*
➜
With the ignition off, insert the
key into control 1 and turn it:
– "ON" position, passenger air
bag activated,
– "OFF" position, passenger air
bag disarmed.
Precautions regarding the
passenger air bag
➜
activate the
air bag for an
adult passenger,
➜
disarm the
air bag if you
install a rear
facing child
seat.
Do not place your feet or any
object on the instrument panel.
Operating check
When the passenger air
bag is disarmed, the
warning light comes on
when the ignition is
switched on (2
nd
key
notch), accompanied by an audible signal and the message
"Passenger air bag disarmed".
Air bag fault
If this warning light
comes on, accompanied
by an audible signal and
the message "Air bag
fault", consult a
PEUGEOT dealer to
have the system
checked.
* According to country.
134
18-11-2002
YOUR 807 IN DETAIL
110
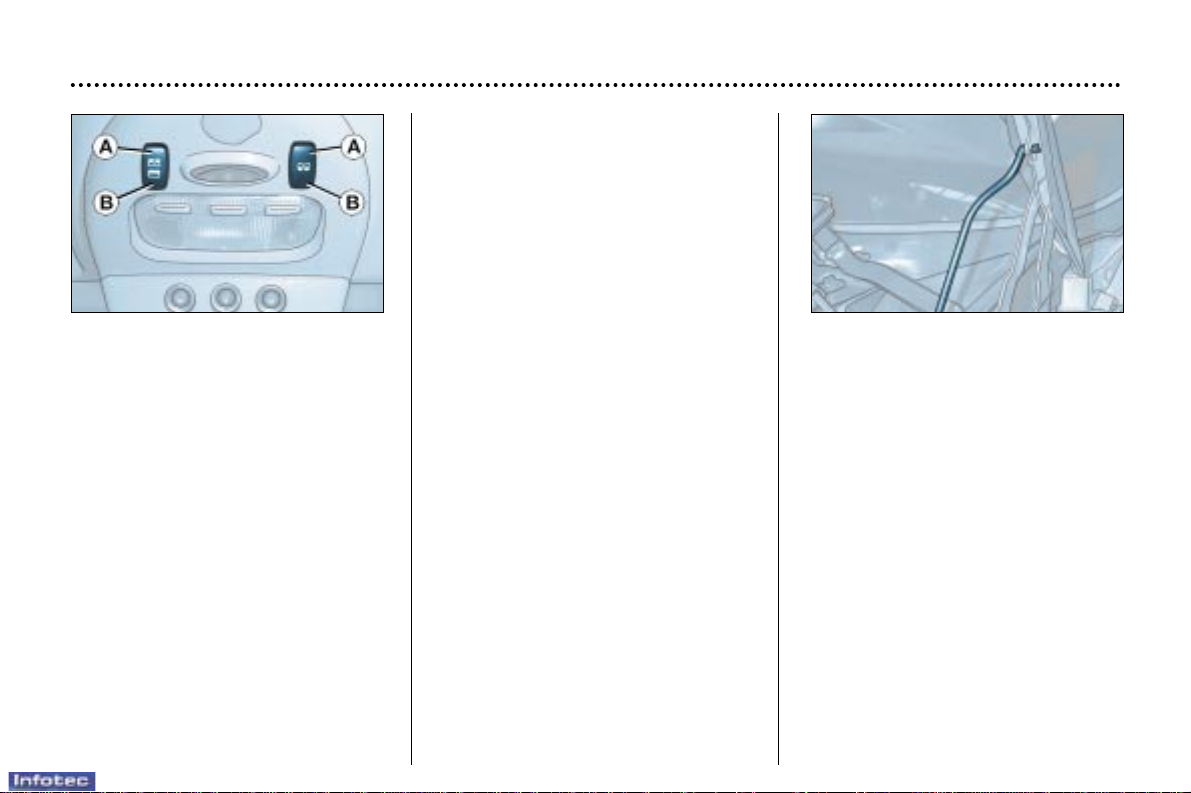
SUNROOFS
You have three sunroofs each with
an independent control.
However, the front passengers' control can also operate the two rear
sunroofs simultaneously.
•
partially open the roof: press and
hold part A of the switch.
•
to open the roof completely:
press part A of the switch briefly.
•
to close it completely: press part
B of the switch briefly, then keep it
pressed.
•
safety auto-reverse
When the sunroof is sliding closed
and meets an obstacle, it stops then
opens again.
Note: in the presence of ice, if the
sunroof does not close, press the
control until the roof is fully open,
then close the roof.
Note: following reconnection of the
battery, if the sunroof does not close,
release the control and press it several times until the roof is fully
closed. Continue to press the control
for approximately five seconds after
closing.
Disarming of the 2
nd
and 3rdrow
controls:
– press the rear electrical functions
disarming switch.
Note: the sunroof shutter is manual.
To open it, lift the handle and slide it
rearwards.
To close it, slide it forwards until the
handle locks.
OPENING THE BONNET
From inside:
– lift the cover at the left foot of the
passenger seat.
– pull the control upwards.
From outside: lift the catch and
raise the bonnet.
Bonnet strut
Secure the strut to hold the bonnet open.
Before closing the bonnet, replace
the strut in its housing.
To close
Lower the bonnet and release it at
the end of its travel. Check that the
bonnet is properly locked.
"Bonnet open" warning
This warning is linked to the alarm
option only.
With the engine running or the
vehicle moving, a diagram on the
multifunction display, accompanied
by an audible signal, warns you that
the bonnet is not properly closed.
18-11-2002
YOUR 807 IN DETAIL
111
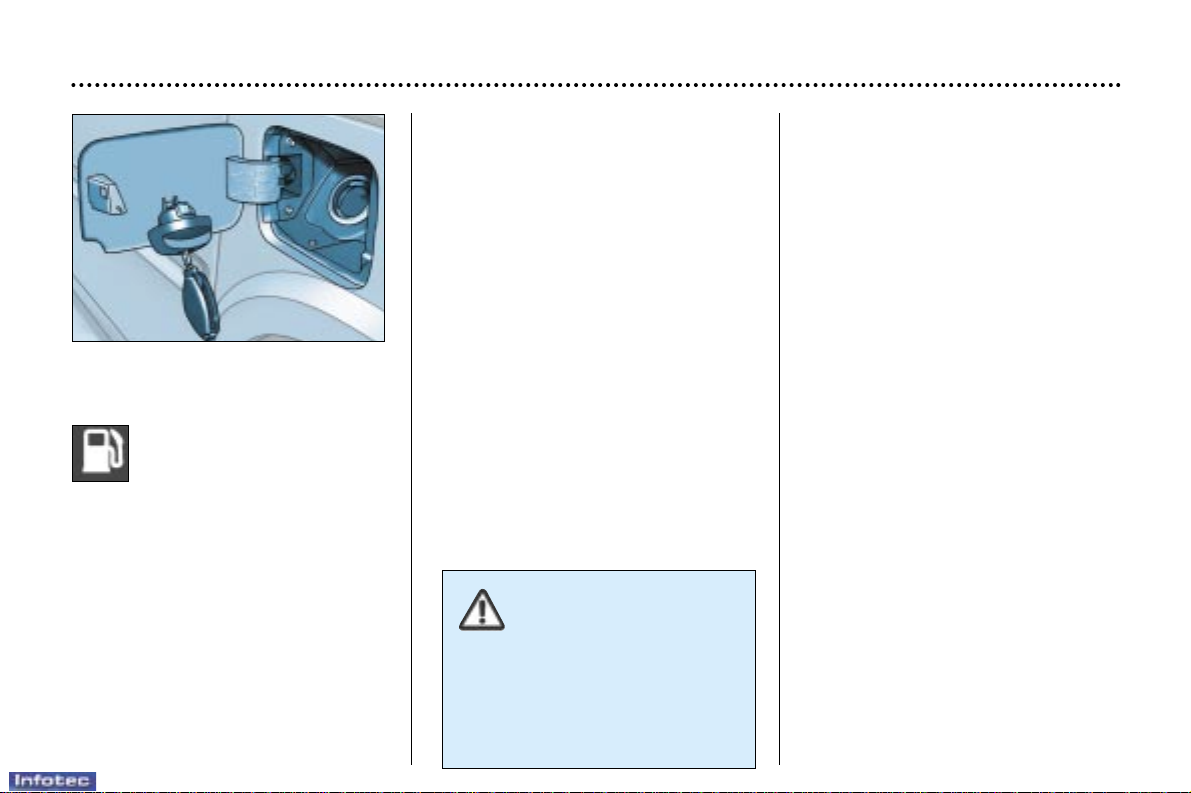
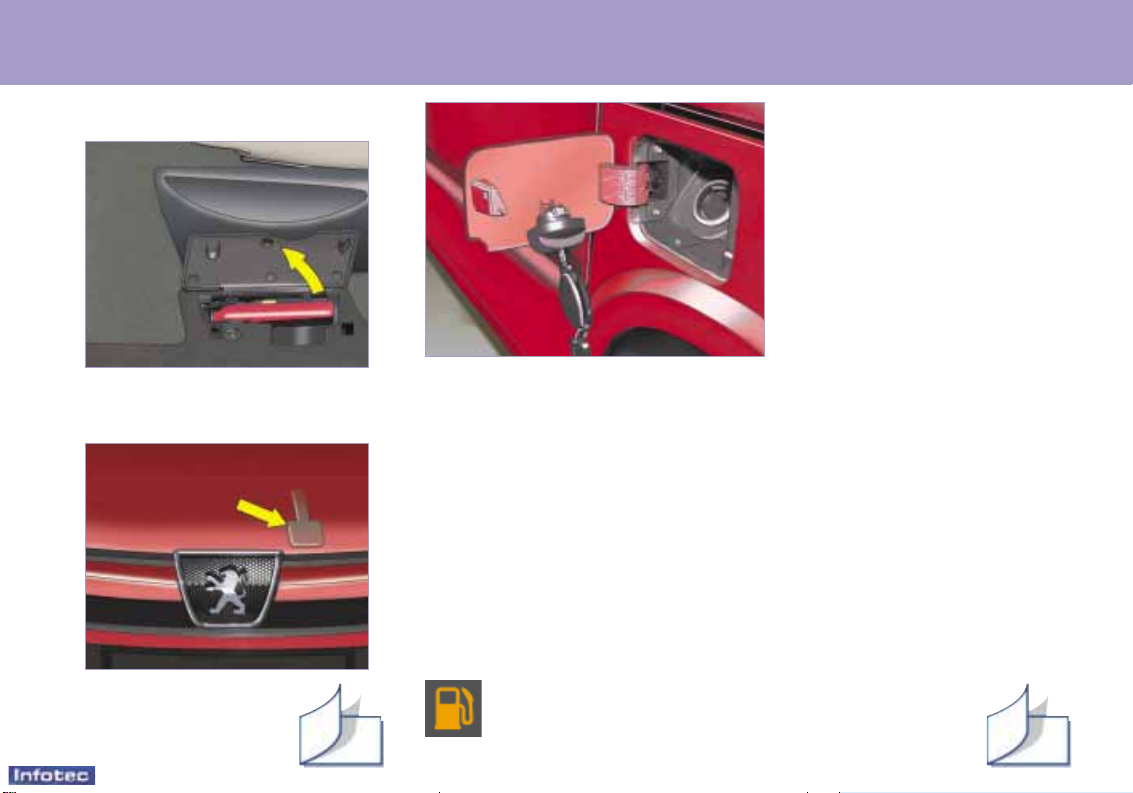
FILLING THE
FUEL TANK
Low fuel level
When the tank's minimum
level is reached, this warning light comes on, accompanied by the message
"Fuel level low" on the
multi–function display.
You have enough fuel left to cover
approximately 30 miles (50 km).
If the warning light flashes, this
indicates a fuel gauge malfunction.
Contact a PEUGEOT dealer.
If the warning light flashes, accom-
panied by the message "Fuel circuit
disarmed", this indicates that the
fuel supply has been cut off.
Restore the supply (refer to the
corresponding section).
The tank must be filled with fuel with
the engine off.
☞ Open the fuel filler flap.
☞ Insert the key then turn it to the
left.
☞ Remove the cap and attach it to
the clip located on the inside of
the flap.
A label on the inside of the flap indicates which type of fuel to use.
If you fill your tank, do not continue
after the third cut-off of the pump
nozzle. This could result in vehicle
malfunctions.
The capacity of the tank is approximately 18 gallons (80 litres).
☞ After filling the tank, lock the cap
and close the flap.
When the fuel filler flap is
open, a system limits the
opening of the rear left
sliding side door. The key
cannot be removed from
the cap’s lock until the cap is refitted on the tank.
18-11-2002
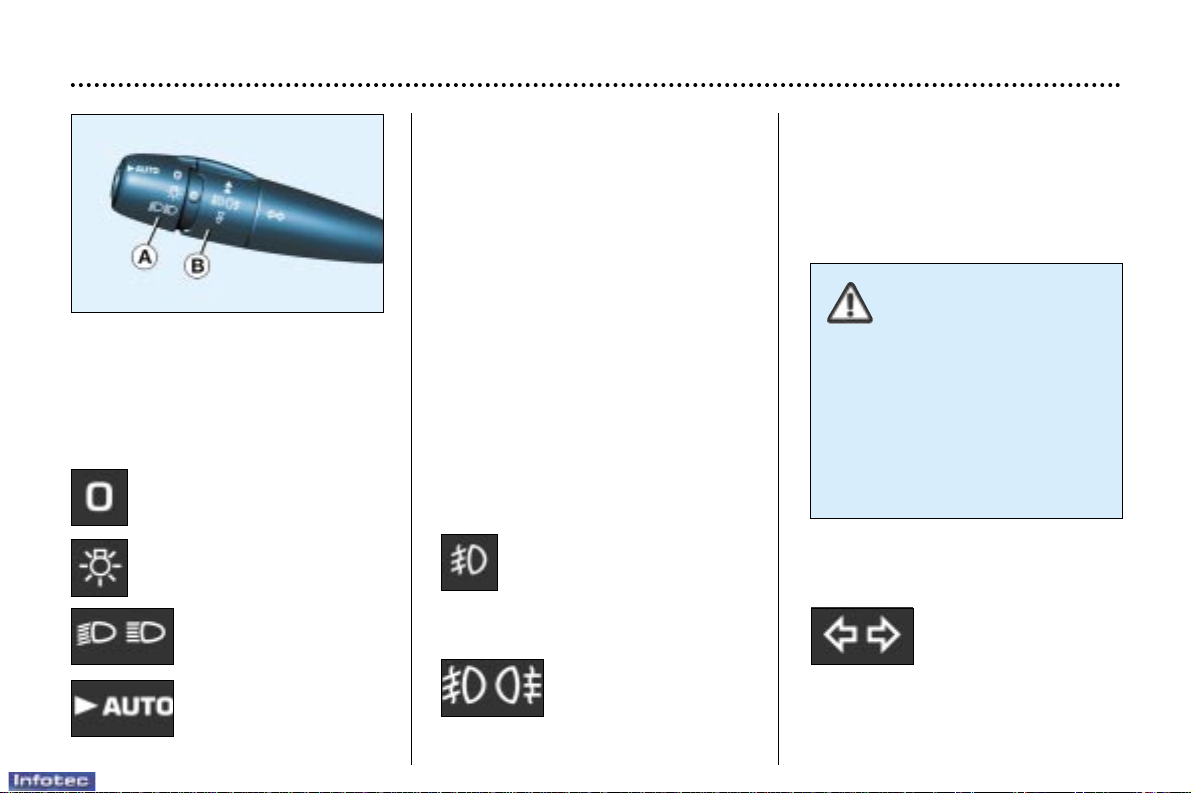
Direction indicators
(flashers)
Left: downwards.
Right: upwards.
YOUR 807 IN DETAIL
112
LIGHTING CONTROL
Front and rear lights
Selection is by turning ring A.
Lights off
Side lights on
Dipped beam/Main
beam
Automatic switching
on of lights
Dipped beam/main beam change
Pull the stalk fully towards you.
Lights-on buzzer
When the ignition is switched off,
when the driver's door or front passenger door is opened, a buzzer
sounds, accompanied by the message "Side lights on" on the
multi–function display if you have left
your lights on.
Front and rear fog lights
Rotate ring B forwards to switch on
and rearwards to switch off. The status is confirmed by the light on the
instrument panel.
Front fog lights (1
st
rotation
of the ring forwards)
These operate with the side lights
and the dipped beam headlamps.
Front and rear fog
lights (2
nd
rotation of
the ring forwards)
These operate with the side lights
and the dipped beam headlamps.
Note: to switch off the front and rear
fog lights, turn the ring rearwards
twice in succession.
In clear weather or in
rain, both day and night,
rear fog lights dazzle and
are prohibited.
Do not forget to switch
them off when they are no longer
needed.
Automatic switching on of the
lights switches off the rear fog
lamps, but the front fog lamps
remain on.
18-11-2002

AUTOMATIC SWITCHING ON
OF LIGHTS
Side lights and dipped beam headlamps switch on automatically if the
light is poor, or during continuous
operation of the windscreen wipers.
They switch off when the light
becomes bright enough or the windscreen wipers stop.
Note: In foggy weather, the brightness sensor can detect sufficient
light. As a consequence, the lights
will not come on automatically.
This function is active when the
vehicle is supplied to the customer.
To disarm or activate the function :
☞ Start with the key in the acces-
sories position (1st notch),
☞ Place the lights stalk in position 0,
☞ Press the end of the stalk for more
than two seconds.
Note: after the ignition is switched off
and depending on the brightness,
the lights remain on for approximately 45 seconds or until the vehicle is
locked.
Do not cover the brightness sensor located in the centre of the
fascia. It is used for automatic
switching on of the lights.
Operating check
Activation
Activation of this function is accompanied by an audible signal and the
message "Automatic lighting
active" on the multi–function display.
Disarming
Disarming of the function is accompanied by an audible signal.
Note: the function is disarmed
temporarily when the driver uses the
manual lighting controls.
YOUR 807 IN DETAIL
113
18-11-2002
YOUR 807 IN DETAIL
114
WINDSCREEN WIPER STALK
Front windscreen wiper stalk with
intermittent wipe
2 Fast wipe
(heavy rain).
1 Normal wipe
(moderate rain).
l Intermittent wipe.
0 Off.
Single wipe
(press downwards).
Front windscreen wiper stalk with
automatic wipe
2 Fast wipe
(heavy rain).
1 Normal wipe
(moderate rain).
AUTO Automatic wipe.
0 Off.
Single wipe
(press downwards).
Operation
In position 1 or 2, when the vehicle
stops, the windscreen wiper
changes to a lower wiping speed,
then resumes its initial speed when
the vehicle starts again.
In the Intermittent position, the wiping speed is proportional to the
speed of the vehicle.
In the AUTO position, the wiping
speed is proportional to the heaviness of the rain.
When the ignition has been
switched off for more than one
minute with the stalk in the wipe
position, it is necesary to reactivate this function. To do this, move
the stalk to any position, then move
it back to the required position.
Windscreen and headlamp wash
Pull the windscreen wiper stalk
towards you.
The windscreen wash then the windscreen wipers operate for a fixed
period.
The windscreen wash and headlamp
wash operate simultaneously for a
few seconds, only if the dipped
beam or main beam headlamps
are on.
18-11-2002
YOUR 807 IN DETAIL
115
Maintenance position of front
windscreen wiper
This position allows the front windscreen wiper blades to be removed.
In the minute following switching off
of the ignition, any action on the
stalk positions the wipers against the
windscreen uprights (for Winter
parking, cleaning of the windscreen
or replacing the blades).
To park the wipers after this has
been done, switch on the ignition
and operate the stalk.
Rear windscreen wiper
Turn ring A to the first notch.
The wiping speed is
inversely proportional to the
speed of the vehicle.
Automatic rear windscreen wiping
☞ place the front wipers stalk in a
position other than 0.
☞ engage reverse gear.
☞ the rear wiper operates with inter-
mittent wiping.
Note: this function cannot be disarmed if a bicycle carrier is fitted.
Therefore, you must fit a special bicycle carrier, approved by PEUGEOT,
or contact a PEUGEOT dealer.
Rear windscreen wash
Turn ring A past the first
notch: the windscreen wash
then the windscreen wiper
operate for a specified time.
Do not cover the rain
sensor located at the bottom centre of the windscreen.
When using an automatic car
wash, switch off the ignition or
check that the wiper control is not
in the automatic position.
In winter it is advisable to wait for
the windscreen to completely
clear of ice before operating the
automatic wipe.
In winter, in the presence
of a considerable
amount of snow or ice,
switch on the rear screen
demister. Once de-icing
is complete, remove the snow or
ice which has accumulated on the
rear wiper blade. You can now
operate the rear windscreen
wiper.
Automatic timed windscreen
wipers
The automatically timed wiping is
controlled by a rain sensor fitted on
the windscreen.
In the AUTO position, the windscreen wipers operate automatically
and adapt their speed to the inten-
sity of the rainfall.
Operating check
Activation
When the function is activated, the
message "Automatic windscreen
wipers activated" appears on the
multi–function display.
18-11-2002

YOUR 807 IN DETAIL
119
ELECTRIC WINDOWS
1 - Driver's electric window switch.
2 - Passenger electric window
switch.
3 - Rear right electric window
switch.
4 - Rear left electric window switch.
5 - Rear electric windows disarm-
ing switch (child safety).
- red strip visible: switches activated.
- red strip covered: switches disarmed.
You have two options:
Manual operation:
☞ press or pull switch 1, without
going beyond the point of resistance. The window stops when
the switch is released.
Automatic operation:
☞ or pull switch 1 beyond the point
of resistance. One touch completely opens or closes the window.
Note: the electrical functions of the
electric windows are disarmed one
minute after switching off the
ignition.
Safety auto-reverse
When the window rises and meets
an obstacle, it stops and lowers
again.
Note: in the event of ice, if the window does not rise, press the switch
until the window is fully open, then
pull it again until the window closes.
Note: following reconnection of the
battery, if the window does not rise,
release the switch and pull it several
times until the window is fully
closed. Continue to hold the switch
for approximately one second after
the window has closed.
Disarming
For the safety of your children, press
switch 5 to disarm all of the electrical
controls in the rear:
☞ electric windows,
☞ sliding side doors,
☞ sunroofs.
Always remove the ignition key on leaving the
vehicle, even for a short
time.
18-11-2002
YOUR 807 AT A GLANCE
12
Inside the vehicle: lift the cover
at the left foot of the passenger
seat and pull the control upwards.
FILLING WITH FUEL
This operation must be carried out with the engine switched off.
➜ Open the fuel filler cap.
➜ Insert the key then turn it to the left.
➜ Remove the cap and hook it onto the clip on the inside of the flap.
A label on the inside of the flap shows which type of fuel to use.
When you fill your tank, do not continue after the third cut-off of the pump.
This could cause a malfunction.
The capacity of the tank is approximately 17 gallons (80 litres).
➜ After filling the tank, lock the cap and close the flap.
Low fuel level warning light
From the time this light comes on, accompanied by the
message "Fuel level low", the range remaining is
approximately 30 miles (50 km).
OPENING THE BONNET
Outside the vehicle:
lift the control, raise the
bonnet and secure the
strut to keep the bonnet
open.
111110
18-11-2002
YOUR 807 IN DETAIL
120
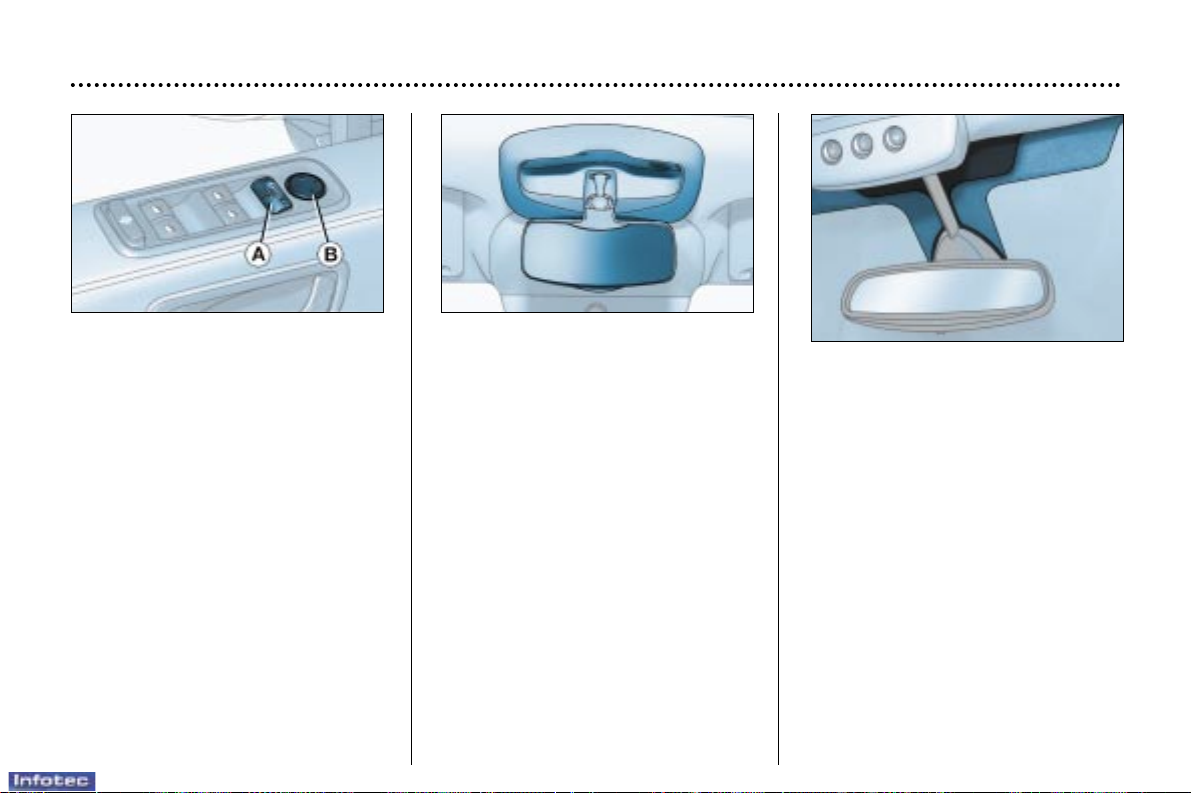
MIRRORS
Electric rear view mirrors
☞ Move switch A to the right or to
the left to select the corresponding mirror.
☞ Move knob B in all four directions
to adjust.
☞ Return switch A to the centre
position.
When parked, the mirrors can be
folded back manually or electrically
by pulling switch A rearwards or
automatically when locking the
vehicle.
Electric unfolding of the mirrors is
possible with the key from the On
postion (2
nd
notch).
Note: the folding back function on
locking the vehicle can be activated
or disarmed by pulling switch A rearwards for approximately three seconds.
Manual interior mirror
The interior mirror has two positions :
– day (normal),
– night (anti-dazzle).
To change from one to the other,
push or pull the lever on the lower
edge of the mirror.
Areas for toll cards /
car park tickets
The athermic windscreen has two
non-reflective zones located either
side of the base of the interior mirror.
They are intended for affixing toll
cards and/or car park tickets.
Child monitoring mirror
This mirror enables the driver or front
passenger to observe all the rear
seats.
Fitted on its own ball joint and able to
retract into its housing in the roof, it
provides a panoramic view of the
rear interior of the vehicle.
18-11-2002
YOUR 807 IN DETAIL
121
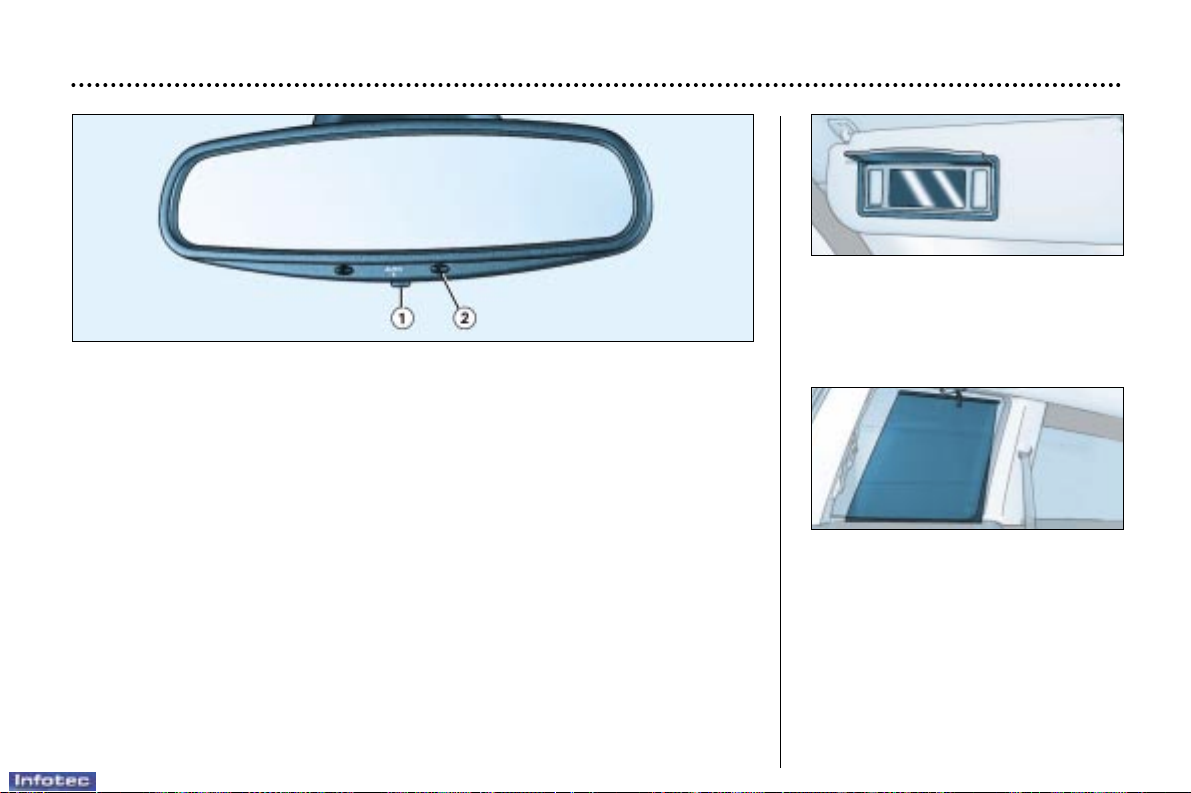
Automatic day/night interior mirror
This automatically and gradually changes between the day and night positions.
To prevent dazzling, the glass of the mirror darkens automatically depending on
the intensity of the light from behind. It clears as the light (headlamps of following vehicles, sunlight) decreases, ensuring maximum visibility.
Operation
Switch on the ignition and press switch 1:
– Indicator light 2 lit (switch pressed): automatic operation.
– Indicator light 2 off: automatic system off. The mirror remains at its most clear.
Special feature
To ensure maximum visibility during manoeuvres, the mirror clears automatically when reverse gear is engaged.
Sun visor with illuminated
courtesy mirror
With the ignition on, the mirror is
automatically lit up when the flap is
opened.
Rear screen sun blind
Pull the blind by the central tab, and
then position its attachments on the
corresponding hooks.
Side blinds
Side blinds are available in the rear
2ndand/or 3rdrows.
Pull the side blind by the centre tab.
Position the blind's attachment(s) on
the corresponding hook(s).
18-11-2002
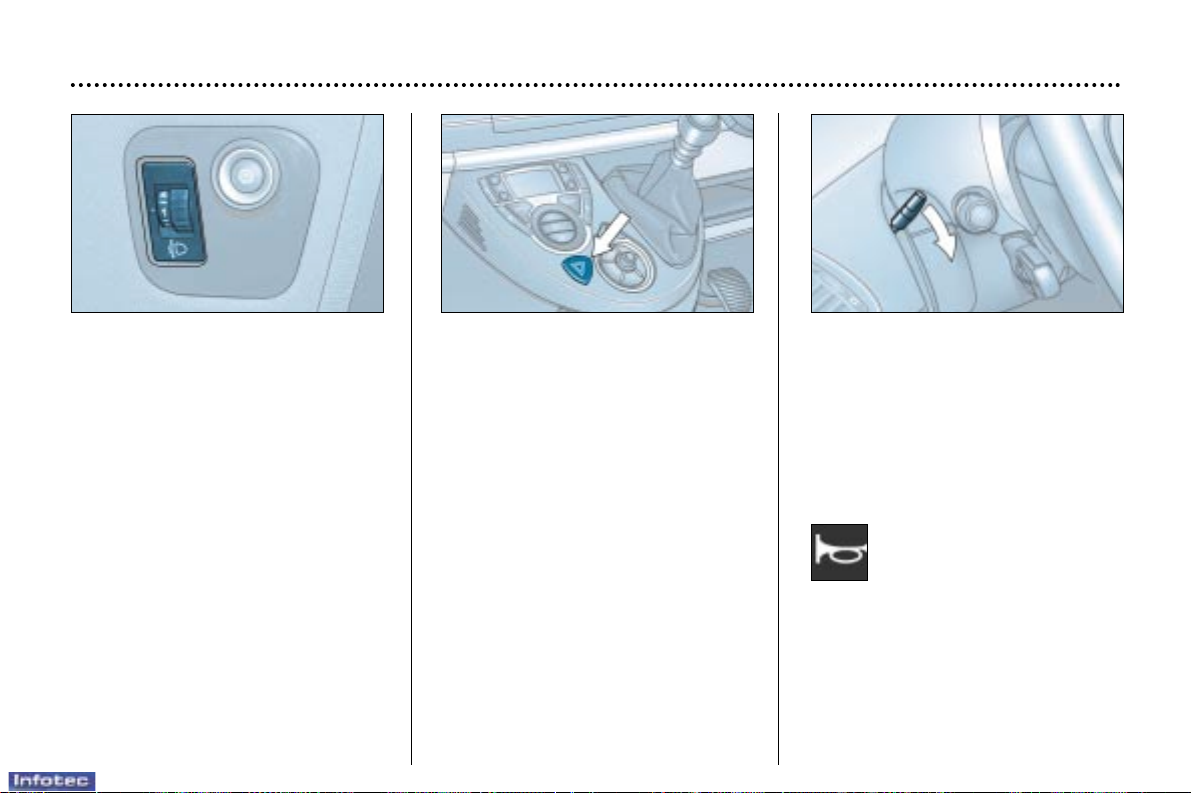
Horn
Press one of the spokes or
the centre of the steering
wheel.
YOUR 807 IN DETAIL
122
Manual adjustment of the
headlamps
Depending on the load in your vehicle, adjusting the beam of your headlamps is recommended.
0-1 or 2 people in the front seats.
1-5 people.
2-6 to 8 people.
3-Driver + maximum authorised
loads.
Initial setting is position 0.
Automatic adjustment of
headlamps
Refer to the paragraph on Lighting
under the section entitled 'Towing a
trailer...'.
Hazard warning lights
Press the button, the direction indicators flash.
They can operate with the ignition
off.
Steering wheel height and
depth adjustment
When the vehicle is stationary,
unlock the steering wheel by lowering the lever A.
Adjust the height and depth of the
steering wheel, then lock by pushing
lever A fully upwards.
Automatic lighting of hazard
warning lights*
When braking in an emergency,
depending on the force of deceleration, the hazard warning lights come
on automatically. They switch off
automatically the first time you accelerate.
It is also possible to switch them off
by pressing the button on the fascia.
*According to destination.
18-11-2002
YOUR 807 IN DETAIL
123
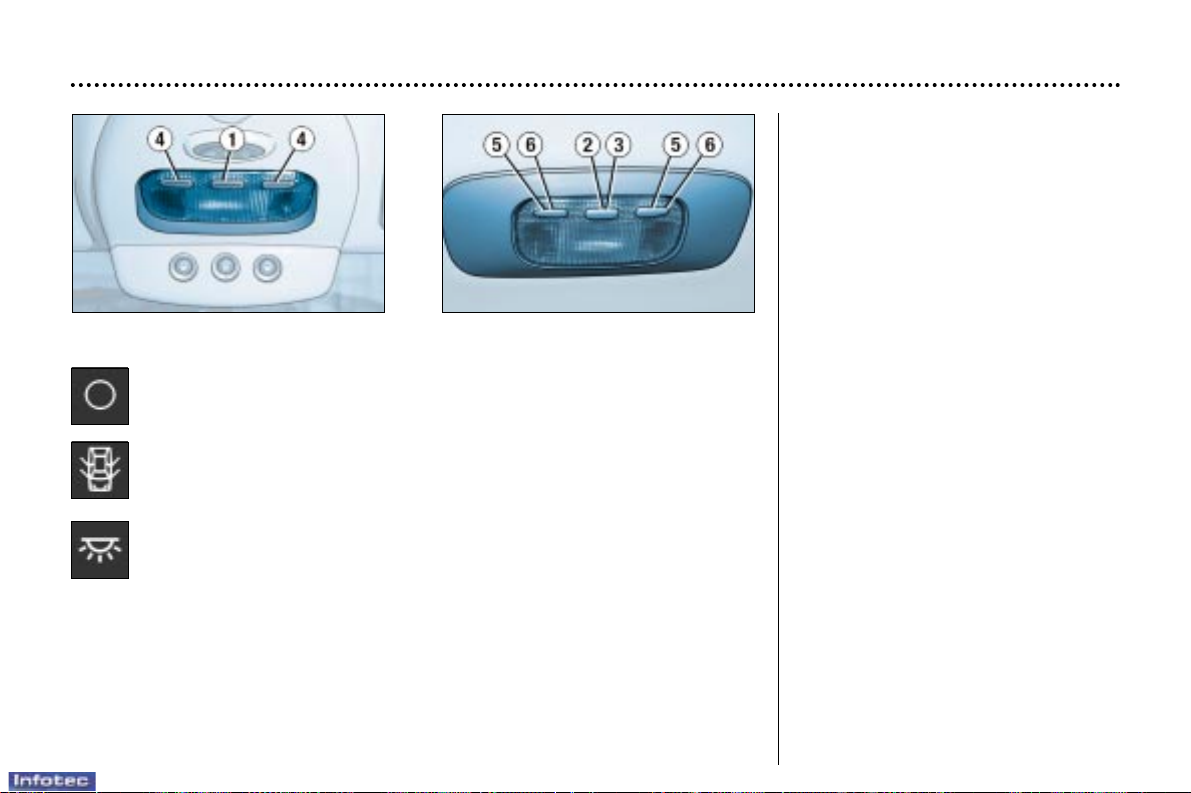
COURTESY LIGHTS
Off.
Comes on on opening one of the doors.
Permanently on, with the key in the accessories position or the ignition on.
1 - Front courtesy light
2 - 2nd row rear courtesy light
3 - 3rd row rear courtesy light
4 - Front map reading lights
5 - 2nd row rear map reading lights
6 - 3rd row rear map reading lights
The front and rear courtesy lights
come on when the ignition key is
removed, on unlocking the vehicle or
on opening one of the doors.
They gradually go off after the ignition has been switched on, after the
vehicle is locked or after the last door
is closed.
☞ With the ignition off, pressing
switch 1 turns on the front
and rear courtesy lights for ten
minutes.
☞ With the ignition off, pressing
switch 2 or 3 turns on the corresponding rear courtesy light for
ten minutes.
The front and rear map reading lights
are switched on by operating the corresponding switch. These are active
when the key is in the accessories
position (1st notch) or the ignition is
on.
18-11-2002
YOUR 807 IN DETAIL
124
18-11-2002
 Loading...