

Peugeot 307 CC Dag 2006 Owner's Manual
4
FAMILIARISATION
INSTRUMENTS AND
CONTROLS
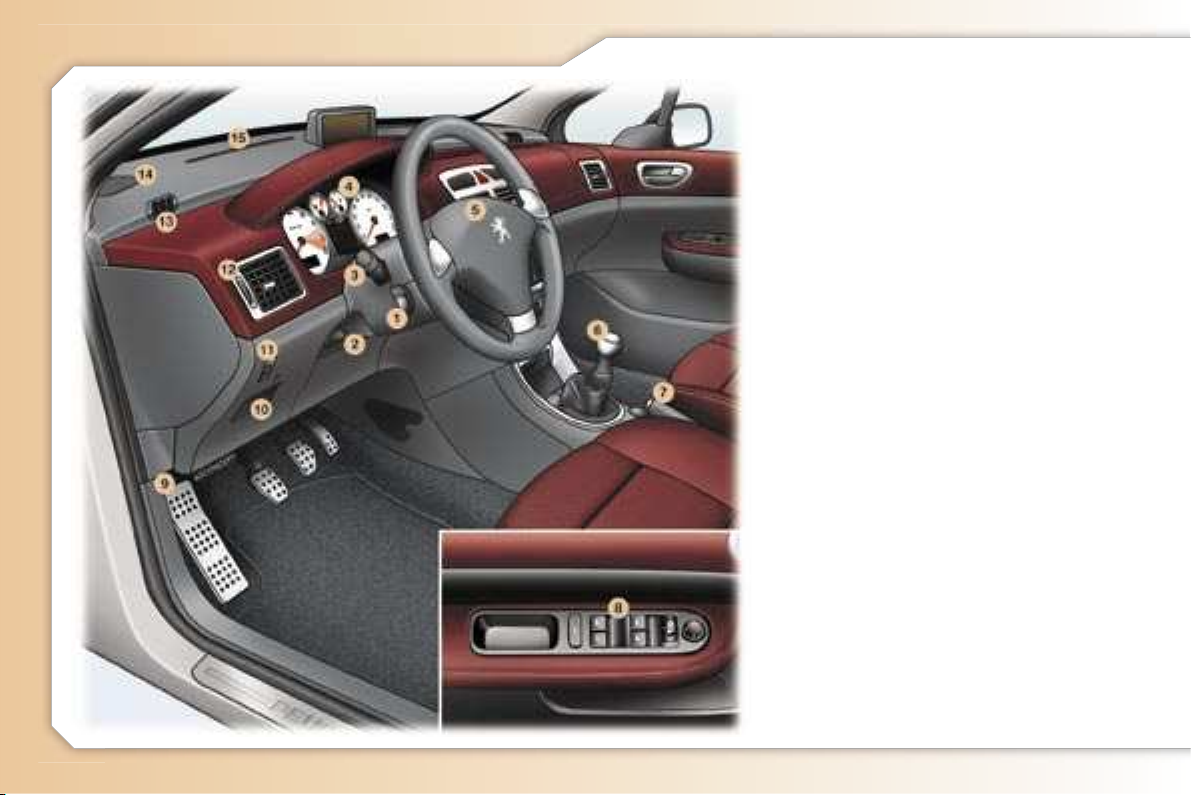
1. Cruise control / speed limiter.
2. Steering wheel adjustment
control.
3. Lights and direction indicators
stalk.
4. Instrument panel.
5. Driver's air bag.
Horn.
6. Gear lever.
7. Handbrake.
8. Electric mirror controls.
Window controls.
Rear window disarming control.
9. Bonnet opening control.
10. Fuse box.
11. Headlamp height adjustment.
12. Side adjustable and closing
vent.
13. Side window demisting vent.
14. Speaker (tweeter).
15. Windscreen demisting vent.
5
FAMILIARISATION
INSTRUMENTS AND
CONTROLS
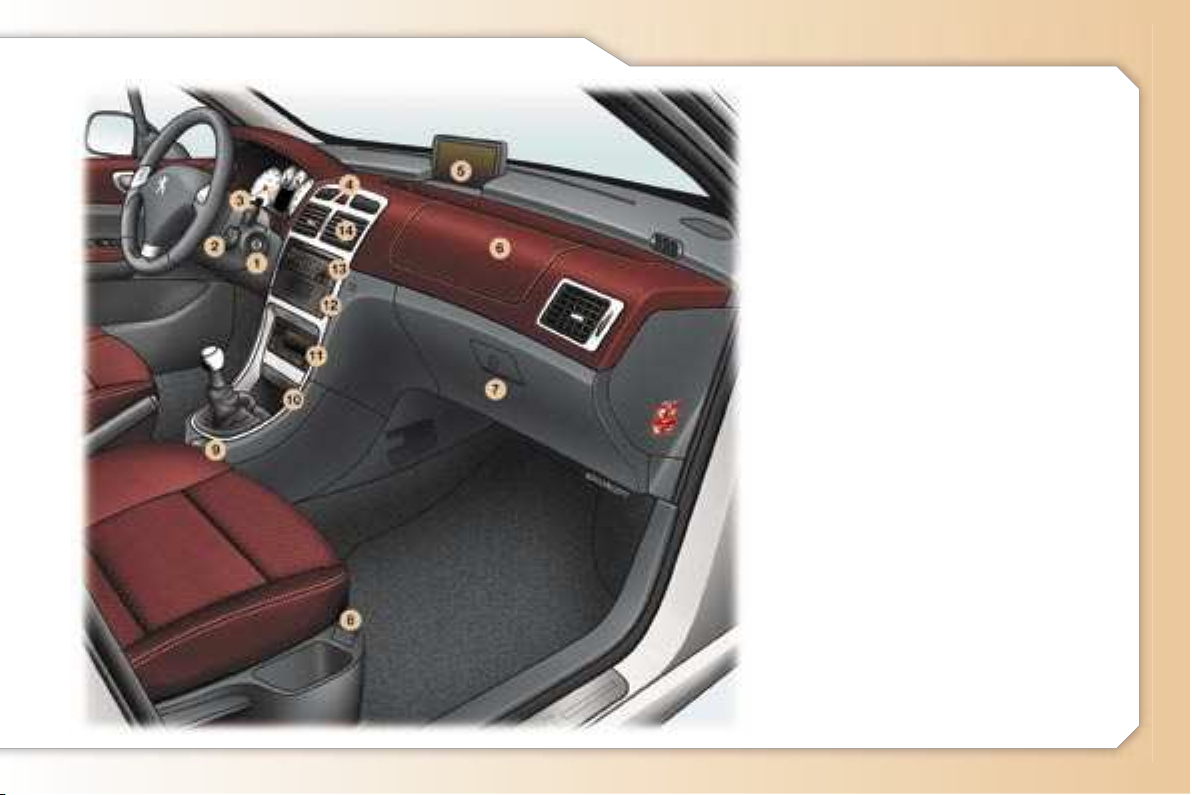
1. Steering lock and ignition.
2. Audio remote control stalk.
3. Windscreen wipers / wash-
wipe / trip computer stalk.
4. Alarm button.
Central locking button.
Hazard warning lights switch.
Electronic stability control
(ESP/ASR) button.
Front seat belts unfastened /
not fastened warning light.
5. Multifunction display.
6. Passenger air bag.
7. Glove box / Audio/video
sockets.
8. Heated seat switches.
9. 12 volt socket.
10. Front ashtray.
11. Heating / automatic air
conditioning controls.
12. CD changer.
13. RD4 audio equipment or RT3
GPS audio/telephone.
14. Central adjustable and closing
vents.
6
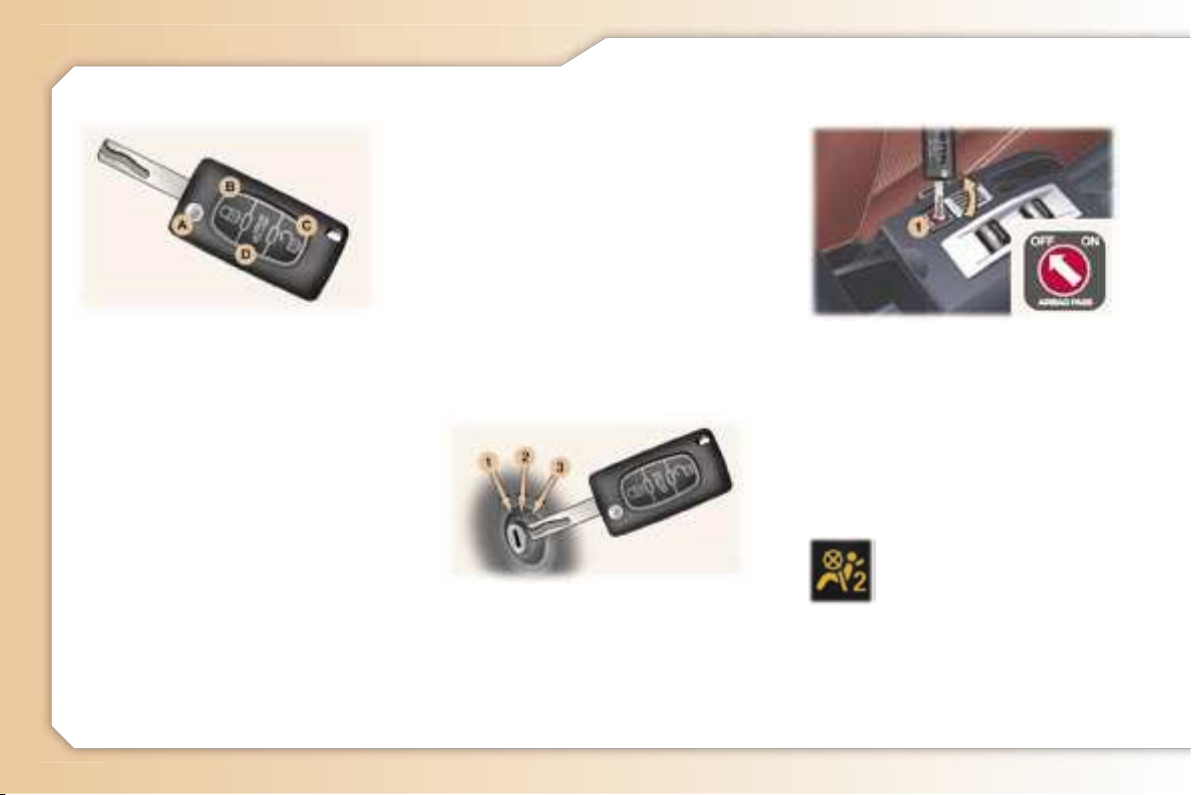
FAMILIARISATION
The remote control permits locking,
deadlocking, unlocking and locating
of the vehicle, folding and unfolding of the exterior mirrors and partial
opening of the boot.
The key allows you to switch on the
ignition and mechanically and independently operate the lock on the
glove box, the fuel filler cap, the passenger air bag disarming switch and
the boot opening button disarming
switch.
From the driver's door, the key allows
you to electrically control the locking, deadlocking and unlocking of
the doors, as well as the folding and
unfolding of the exterior mirrors.
Locking
Press button B to lock the vehicle.
This is confirmed by fixed lighting of
the direction indicators for approximately two seconds.
Partial opening of the boot
Press button D.
52
With the ignition off, insert the key
in the passenger air bag disarming
switch 1, turn it to the "OFF" position, then remove it keeping it in this
position.
As soon as you remove the child
seat, turn the air bag switch to the
"ON" position, to activate the air bag
again.
With the ignition on, illumination of this warning light
indicates that the passenger air bag is disarmed
(switch in the "OFF" position).
The warning light remains on throughout the duration of disarming.
Disarming check
Unfolding / Folding the key
First press button A.
Unlocking
Press button C to unlock the vehicle.
This is confirmed by rapid flashing of
the direction indicators for approximately two seconds.
* According to country.
80
1. STOP position:
The ignition is off.
2. Running position:
The ignition is on and the
accessories can be used.
3. Starting position:
Operates the starter.
REMOTE CONTROL KEY
STARTING
DISARMING THE
PASSENGER AIR BAG*
7
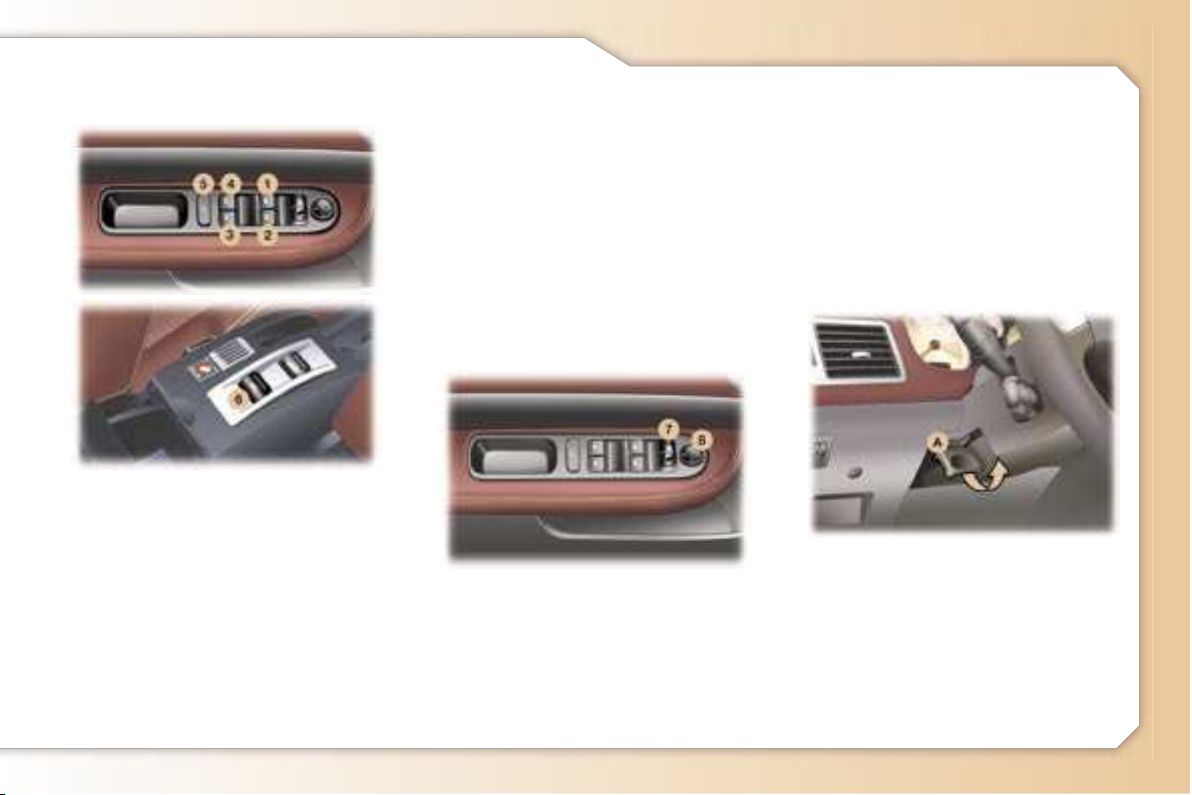
FAMILIARISATION
Move control 7 to the right or left to
select the mirror to be adjusted.
Move control 8 in all four direc-
tions to adjust.
Return control 7 to the centre
position.
When stationary, pull handle A to
unlock the steering wheel.
Adjust the height and depth of the
steering wheel.
Lock it by pushing handle A in
fully.
43
1. Driver's electric window
2. Passenger's electric window.
3. Rear right electric window.
4. Rear left electric window.
5. Disarming the rear window
switches.
6. Simultaneous control of all
four windows.
Manual operation:
Press or pull the switch lightly.
The window stops as soon as the
switch is released.
Automatic operation:
Press or pull the switch firmly. One
touch completely opens or closes
the window.
56
When parking the vehicle, the mirrors
can be folded back electrically, by
pulling control 7 rearwards or automatically on locking the vehicle using
the remote control or the key.
42
ELECTRIC WINDOWS
ELECTRIC MIRRORS
STEERING WHEEL HEIGHT
AND DEPTH ADJUSTMENT
8
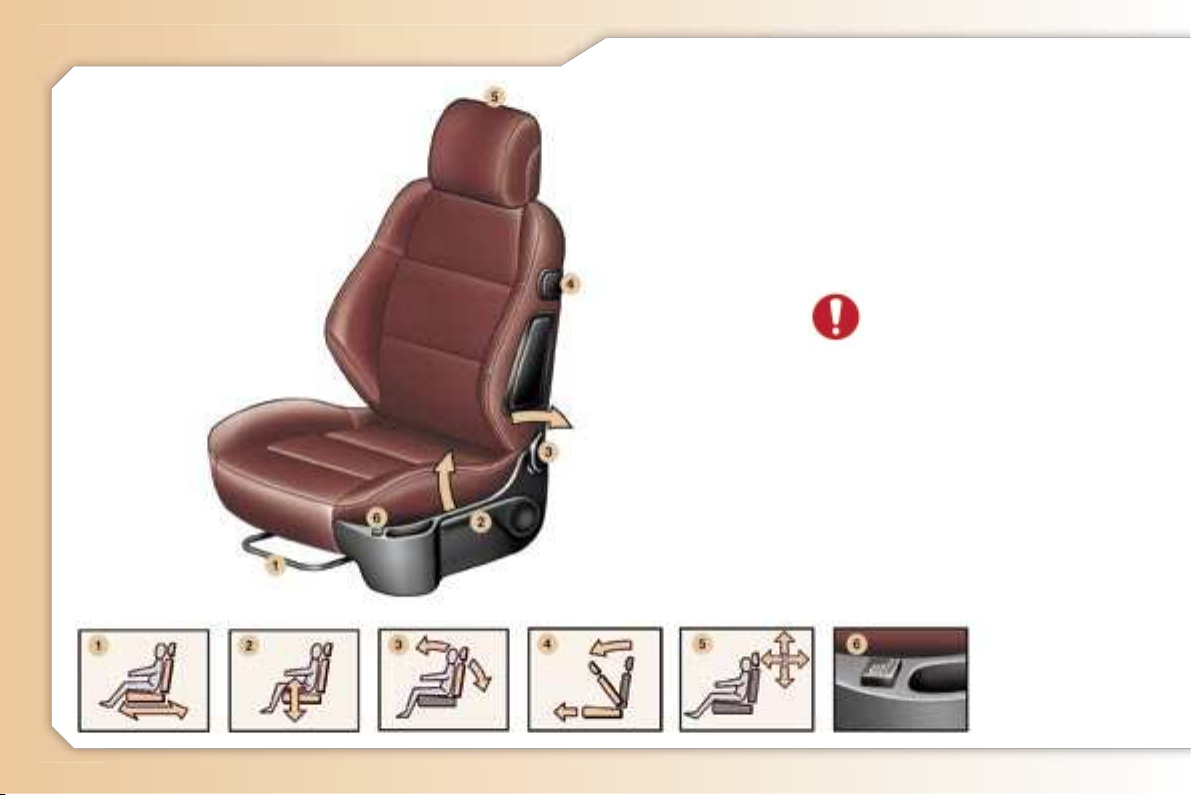
FAMILIARISATION
FRONT SEATS
1. Forwards-backwards
adjustment.
2. Driver or passenger seat height
adjustment.
3. Seat back angle adjustment.
4. Access to the rear seats.
5. Head restraint height and angle
adjustment.
Never drive with the head
restraints removed.
6. Heated seats control.
44
9
FAMILIARISATION
Before operating the roof
It is advisable to park the vehi-
cle on level ground; however, it
is possible to carry out the operation at a speed below 6 mph
(10 km/h).
Ensure that the screen 1 is hooked
on securely.
Check that no object could hinder
the movement of the roof:
- no objects should be placed
on the rear parcel shelf
(behind the head restraints),
on the screen 1 or on or near
the hinged covers 2,
- if luggage is transported in the
boot, this must not push the
screen upwards,
- any object placed in the boot,
such as a jacket or an umbrella,
must be retained by the luggage
retaining net 3.
Opening the roof
Pull button 4 until the roof opening
operation is complete, confirmed
by an audible signal and a message on the multifunction display.
Closing the roof
Press button 4 until the roof clos-
ing operation is complete, confirmed by an audible signal and a
message on the multifunction display.
When carrying out roof opening or closing operations,
to avoid any risk of injury,
ensure that there is no one
in the proximity of the moving parts.
Operation of the roof is the sole
responsibility of the driver.
Carry out one complete roof manoeu-
vre at least once a month to keep it in
perfect working order.
To guarantee correct operation,
do not release button 4 when the
roof is in an intermediate position
(neither completely open nor completely closed).
However, in the event of danger,
release the control button and the
operation will stop instantly. Once
the danger has been eliminated,
complete the operation.
61
Close the boot correctly.
Turn the ignition key to position M.
It is advisable to carry out the
operation with the engine running.
When washing your
vehicle:
- do not forget to lock it to
avoid any risk of automatic
partial opening of the windows,
- avoid spraying the upper part of
the windows.
When washing your vehicle using
high pressure equipment, it is
advisable to keep the end of the
nozzle at least 1 metre from the
windows and door seals.
RETRACTABLE ROOF
If you continue to pull or
press button 4 once the cycle
is complete, the four windows
rise again.
10
FAMILIARISATION
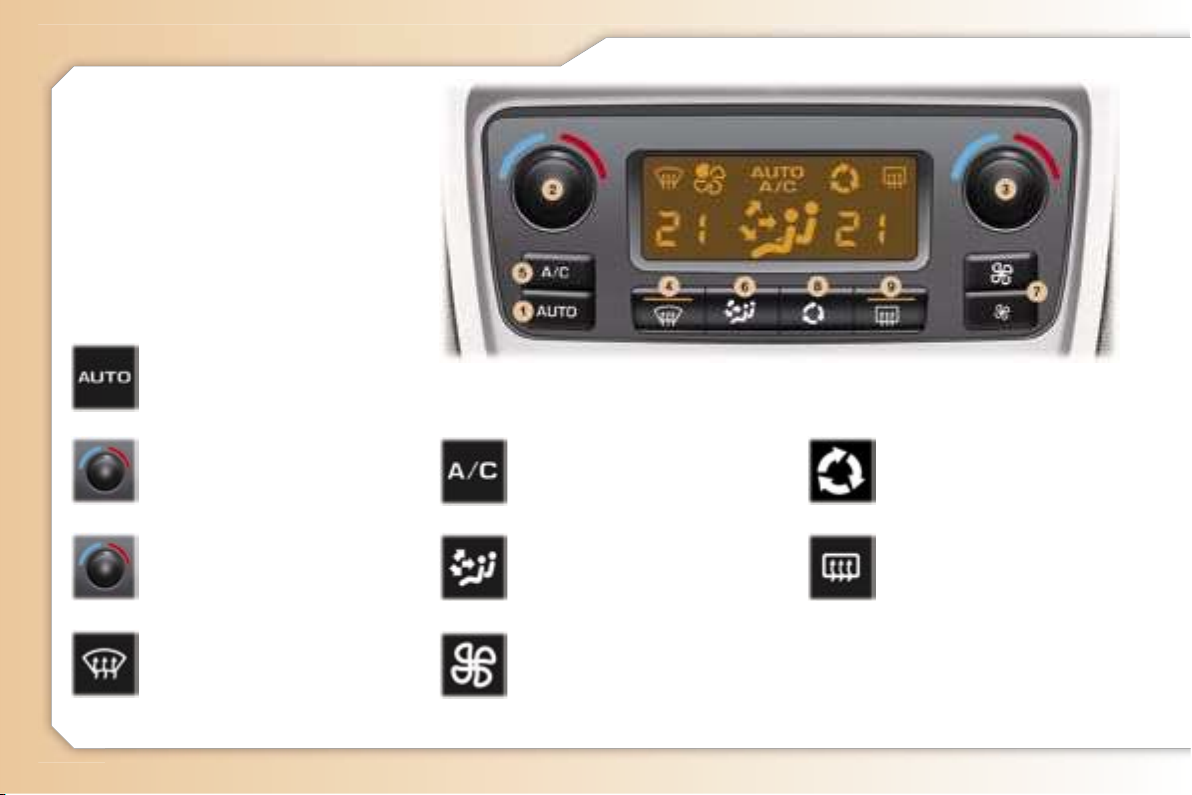
40
1. Automatic comfort
programme.
DUAL ZONE AUTOMATIC AIR
CONDITIONING
The driver and his front passenger
can each adjust the temperature to
their requirements.
It is preferable to use automatic
mode, which optimises all of the
functions: temperature, air flow, air
distribution and air recirculation.
Note: in the cabriolet position, the
effectiveness of the system may be
reduced.
2. Driver's temperature
adjustment.
3. Passenger temperature
adjustment.
4. Automatic visibility
programme.
5. Air conditioning
On / Off.
6. Air distribution
adjustment.
7. Air flow adjustment.
8. Air intake /
Air recirculation.
9. Rear screen and
mirrors demisting.
11
FAMILIARISATION
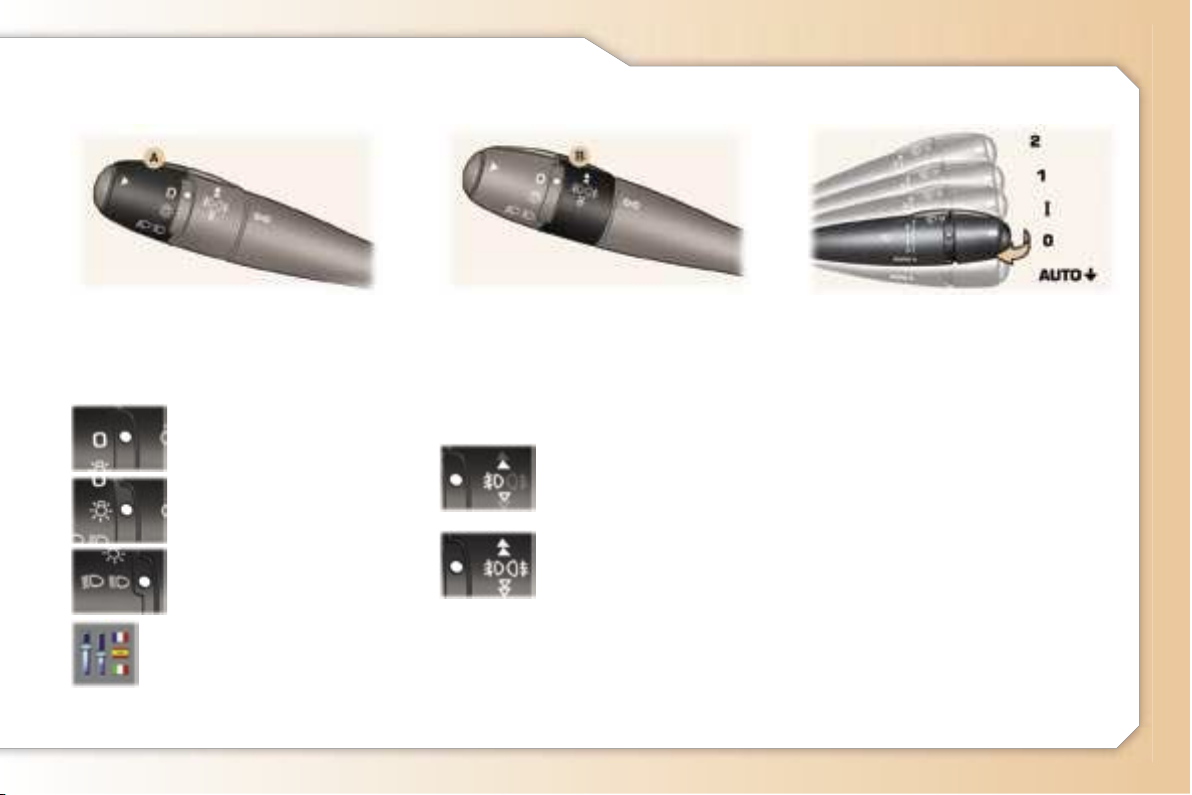
2 Rapid wipe.
1 Normal wipe.
I Intermittent wipe.
0 Off.
AUTO Automatic or single wipe.
Windscreen wash-wipe: pull the stalk
towards you.
67
The position is indicated on the
instrument panel by the corresponding indicator light.
Front and rear lights (ring A)
Lights off.
Side lights.
Dipped / main beam
headlamps.
Front fog lamps (first
rotation of the ring forwards)
Front fog lamps and
rear fog lamp (second
rotation of the ring forwards)
Switching off: rotation of the ring
backwards.
64
Automatic switching on of
the lights.
Activate or deactivate this
function by going to the
multifunction display configuration menu.
Front fog lamps and rear fog lamp
(ring B)
LIGHTS STALK WINDSCREEN WIPERS
STALK
12
FAMILIARISATION
1. Function Selection / Off.
2. Decreasing of the speed.
3. Increasing of the speed.
4. Activation / Deactivation of the
system.
The settings must be programmed with the engine running.
85
CRUISE CONTROL*
* According to country.
The cruise control or speed limiter
function appears on the instrument
panel when it is activated.
Pressing the button enables you to
alternate between the display of the
activated function and the distance
recorder displays.
SPEED LIMITER*
1. Function Selection / Off.
2. Storing of a speed / Decreasing
of the stored speed.
3. Storing of a speed / Increasing
of the stored speed.
4. Deactivation / Reactivation of
the cruise control.
In order to be memorised or activated, the vehicle speed must be
greater than 25 mph (40 km/h), with
at least fourth gear engaged on the
manual gearbox (second gear on the
automatic gearbox).
87
89
Instrument panel display
13
FAMILIARISATION
Instrument panel display
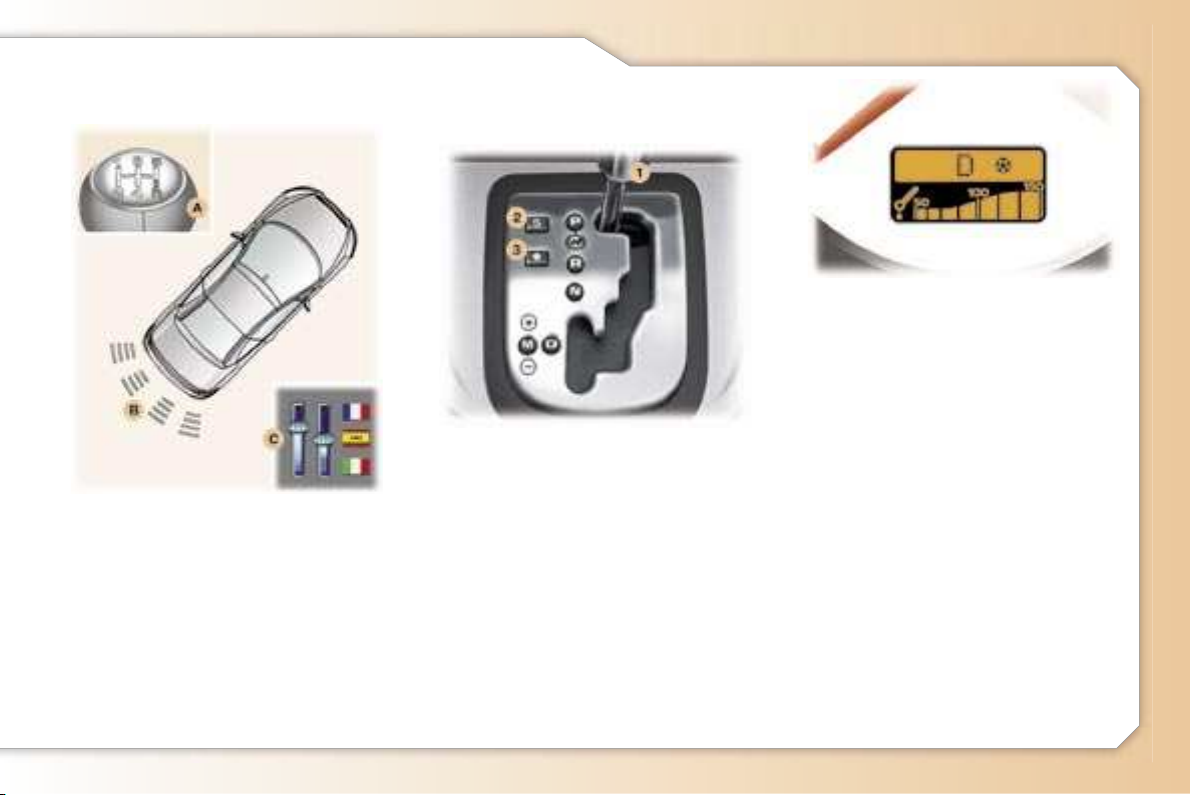
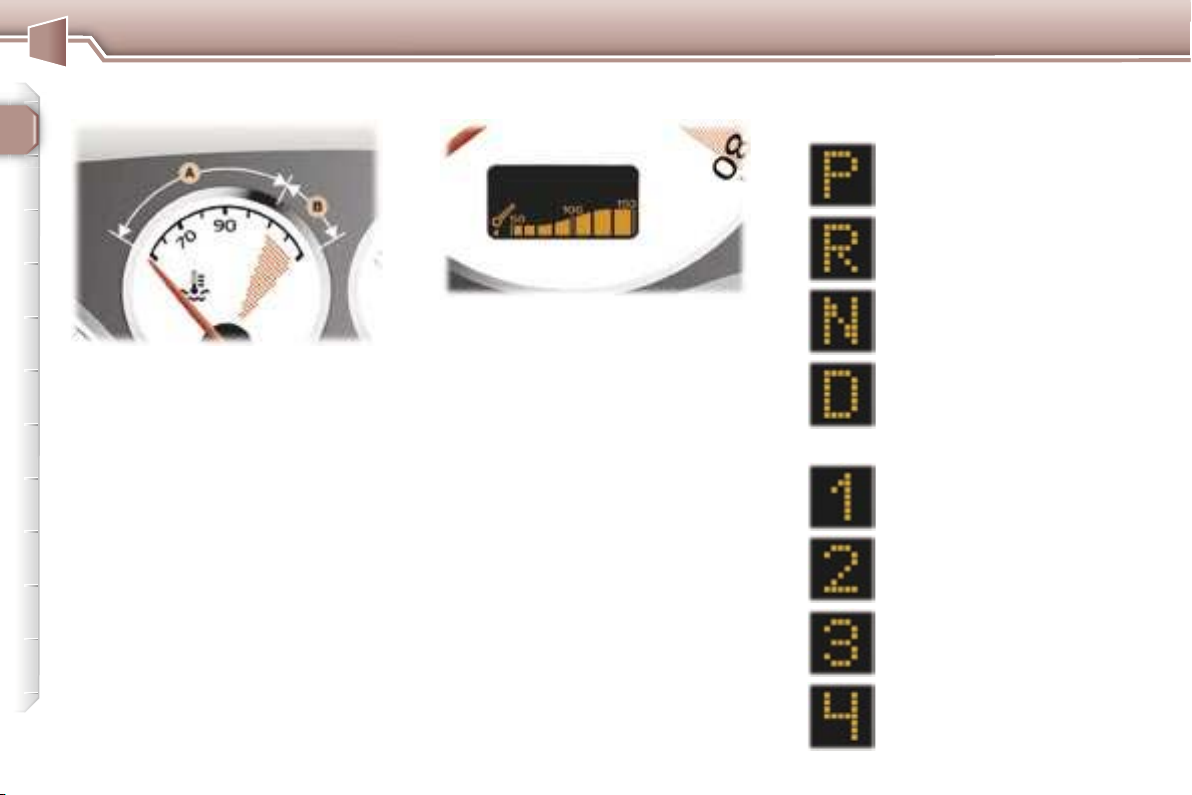
P: Park
R: Reverse
N: Neutral
D: Drive
M: Manual mode
S: Sport programme
: Snow programme.
1 2 3 4: gears engaged.
1. Gear lever.
2. "SPORT" button.
3. "SNOW" button.
A. Switching on.
B. Detection.
C. Activation / Deactivation.
Activate or deactivate
this function by going to
the multifunction display
configuration menu.
When reverse gear is engaged, you
are guided by an audible signal and
a graphic on the multifunction display
during reversing manoeuvres.
91
Gear selection gate
Move the lever in the gate to select
a position.
Once selected, the indicator light
which corresponds to the position is
displayed on the instrument panel
display.
Starting the engine
With the handbrake on, select position P or N.
Switch on the ignition.
Moving off
With the engine running, in P or N,
with your foot on the brake, release
the handbrake.
Select position R, D or M.
Gradually release the brake pedal;
the vehicle moves off immediately.
82
REAR PARKING ASSISTANCE "PORSCHE TIPTRONIC
SYSTEM" AUTOMATIC
GEARBOX
14
FAMILIARISATION
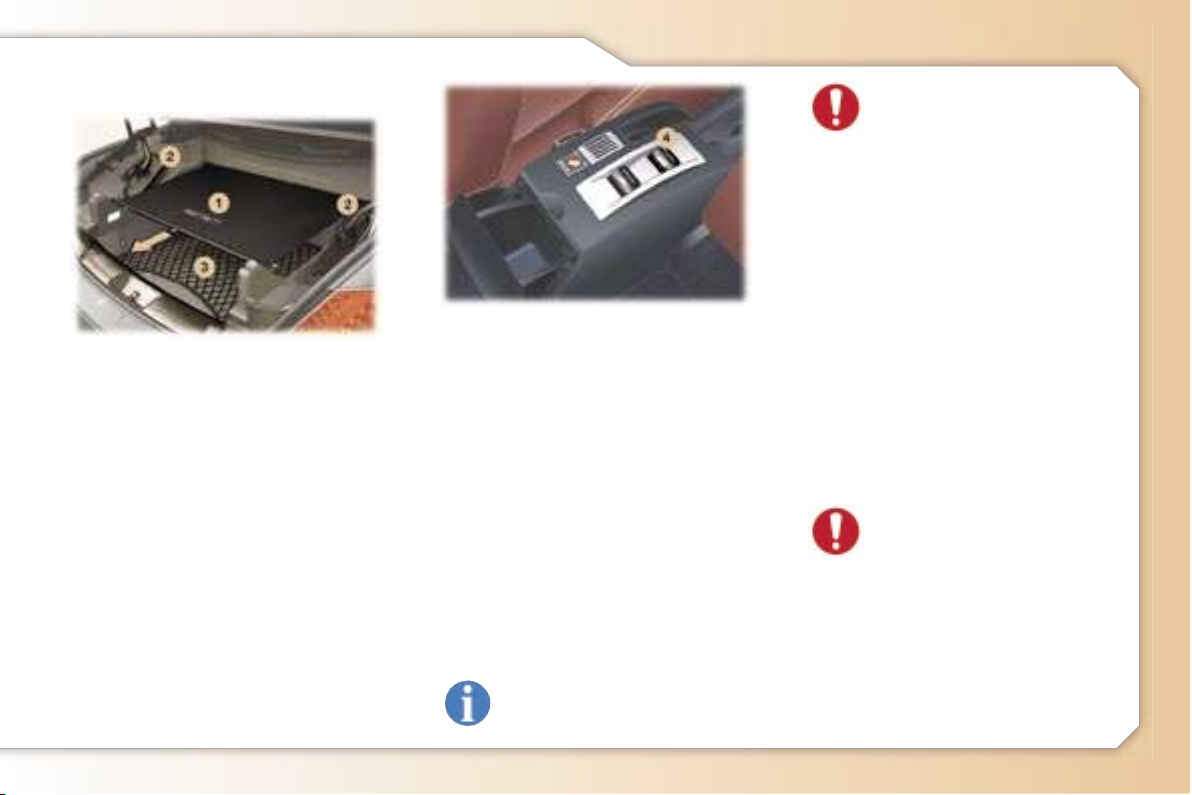
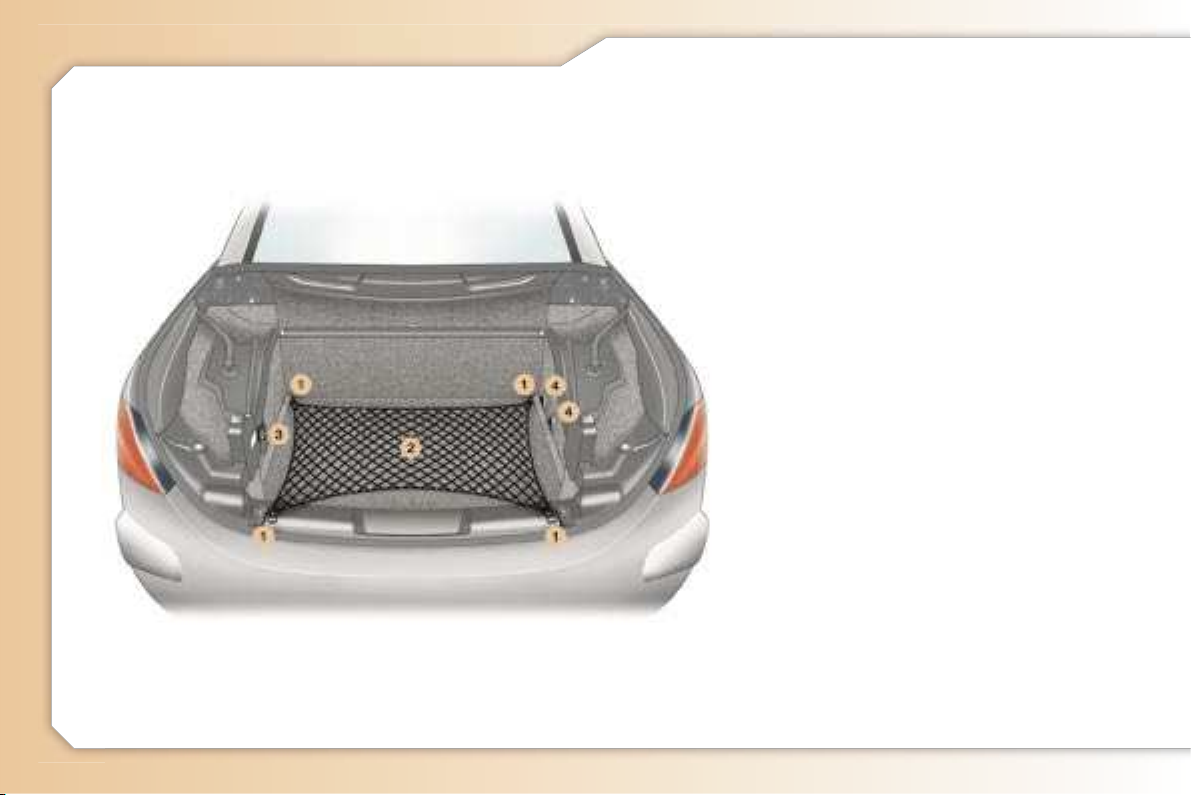
BOOT LAYOUT
1. Stowing rings.
2. Luggage retaining net.
3. 12 volt socket.
4. Warning triangle*.
72
* According to country.
15
FAMILIARISATION
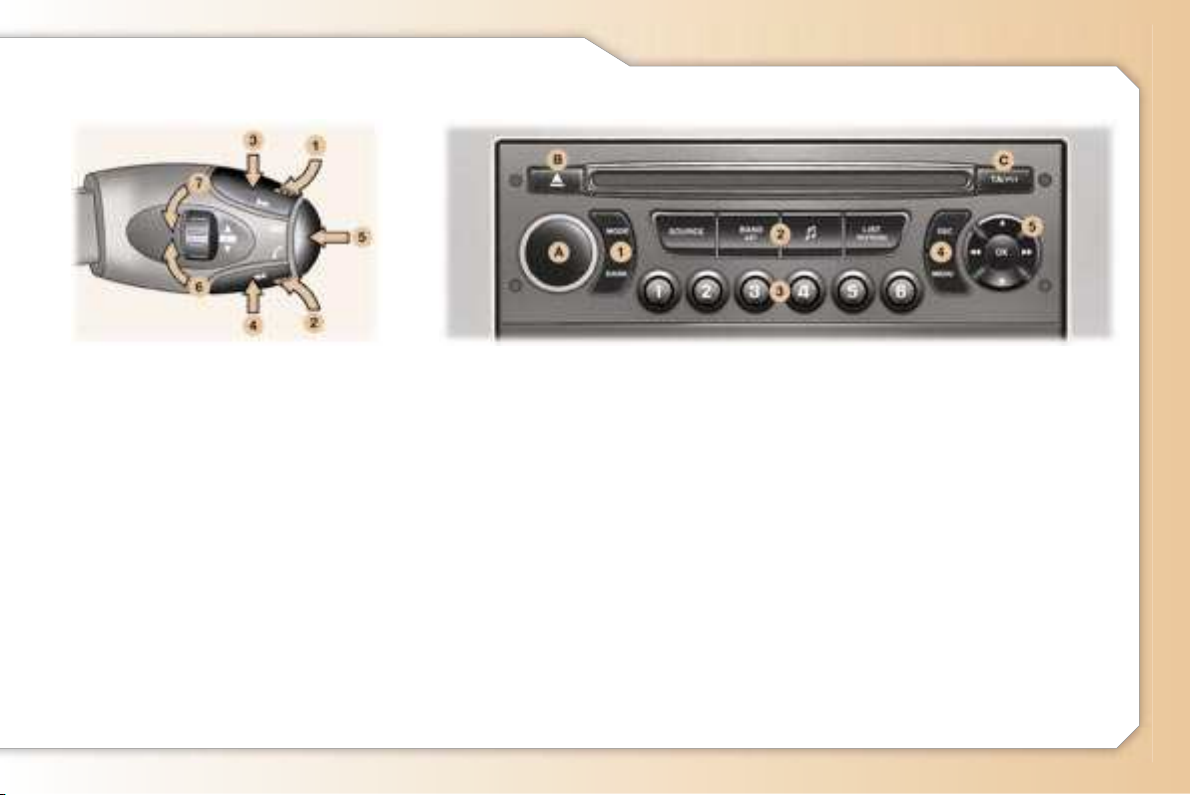
Volume adjustment
1. Increase by pressing the back
2. Decrease by pressing the back
1+2. Cutting off / Restoring of the sound
Search / Selection by pressing
3. Higher radio frequency - CD /
CD changer: next track
4. Lower radio frequency - CD /
CD changer: previous track
Sound sources
5. Change of sound source
Access to the telephone
displays
Selection of stations / CD in the
changer by rotation
6. Higher stored station - Next CD
7. Lower stored station - Previous
CD
Keypad (4)
ESC (Escape): cancellation of the operation in progress.
MENU: displaying of the general menu.
Keypad (1)
MODE: changing of the display of the
permanent application (audio equipment, trip computer, ...).
DARK: 1st press: black screen under
the banner - 2nd press: completely
black screen - 3rd press: return to
the display.
LIST REFRESH: displaying and
updating of the list of stations
received, of the tracks on the CD.
Keypad (3)
Storing of the radio station.
Selection of the stored station, of the
CD in relation to the position in the
CD changer.
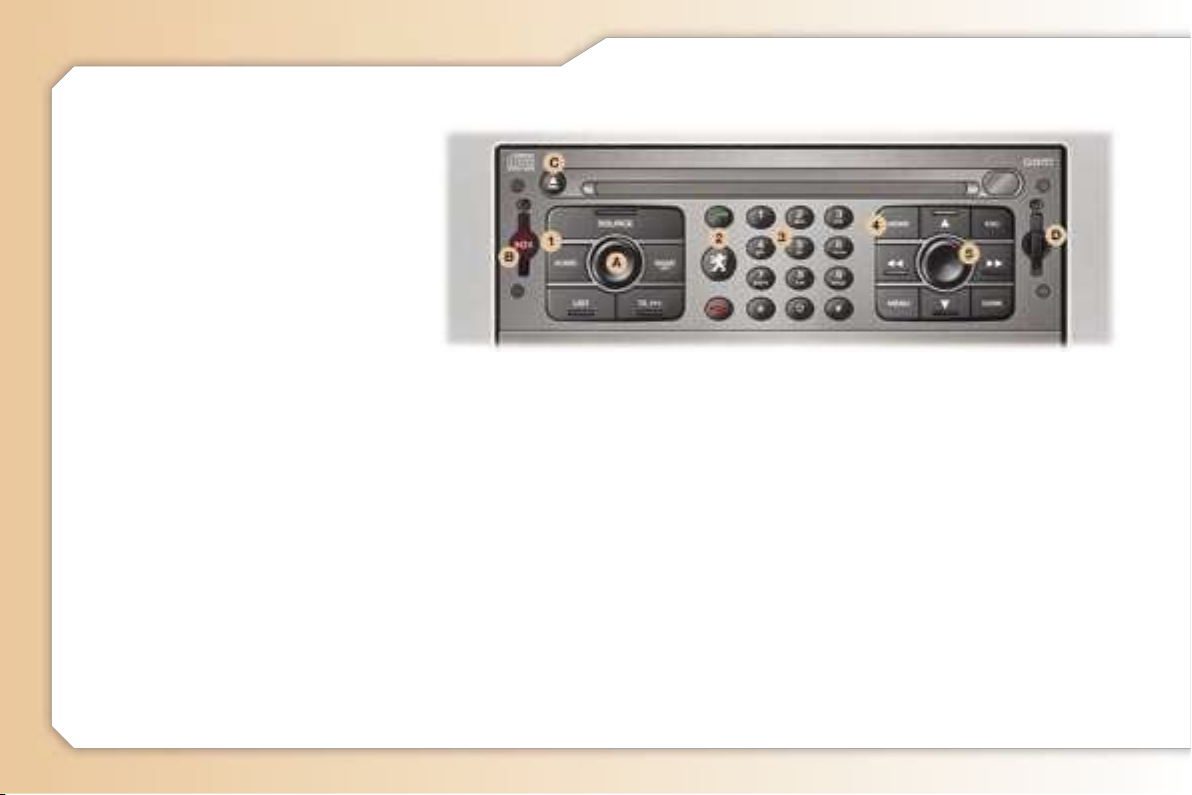
RD4 CONTROL PANEL
Keypad (5)
Navigator.
Button (A)
ON / OFF and volume adjustment.
Button (B)
CD eject.
Keypad (2)
SOURCE: change of source between
radio, CD, CD changer.
BAND AST: selection of the frequency wavebands.
: access to the musical ambience
settings.
Button (C)
TA: traffic information priority on / off.
PTY: access to the search by type of
programme.
156
AUDIO EQUIPMENT
STEERING WHEEL CONTROL
FAMILIARISATION
RT3 CONTROL PANEL
Button (A)
ON / OFF and volume adjustment.
Button (B)
Emergency call.
Button (C)
CD eject.
Keypad (1)
SOURCE: change of source between
radio, CD, CD changer.
AUDIO: access to the musical ambience settings.
LIST: displaying and updating of the
list of stations received, of the tracks
on the CD.
TA/PTY: TA function on / off (traffic
information priority) - access to the
PTY function (search by type of programme).
BAND AST: selection of the frequency wavebands.
Keypad (2)
TEL (green): pick up an incoming
call.
LION: access to the PEUGEOT services menu.
TEL (red): hang up.
Keypad (3) (alphanumeric block)
Storing of the radio station.
Selection of the stored station, of the
CD in relation to the position in the
CD changer.
Telephone keypad - description inputting alphanumeric keypad.
Keypad (4)
MODE: changing of the display of the
permanent application (audio equipment, navigation, ...).
MENU: displaying of the general
menu.
ESC (Escape): cancellation of the
operation in progress.
DARK: 1st press: black screen under
the banner - 2nd press: completely
black screen - 3rd press: return to
the display.
Keypad (5)
Navigator.
Movement by rotation of the dial or
by pressing the arrows.
Confirmation or displaying of the con-
textual menus by pressing the dial.
Location (D)
SIM card flap.
133
16
WARNING LIGHTS AND INDICATORS
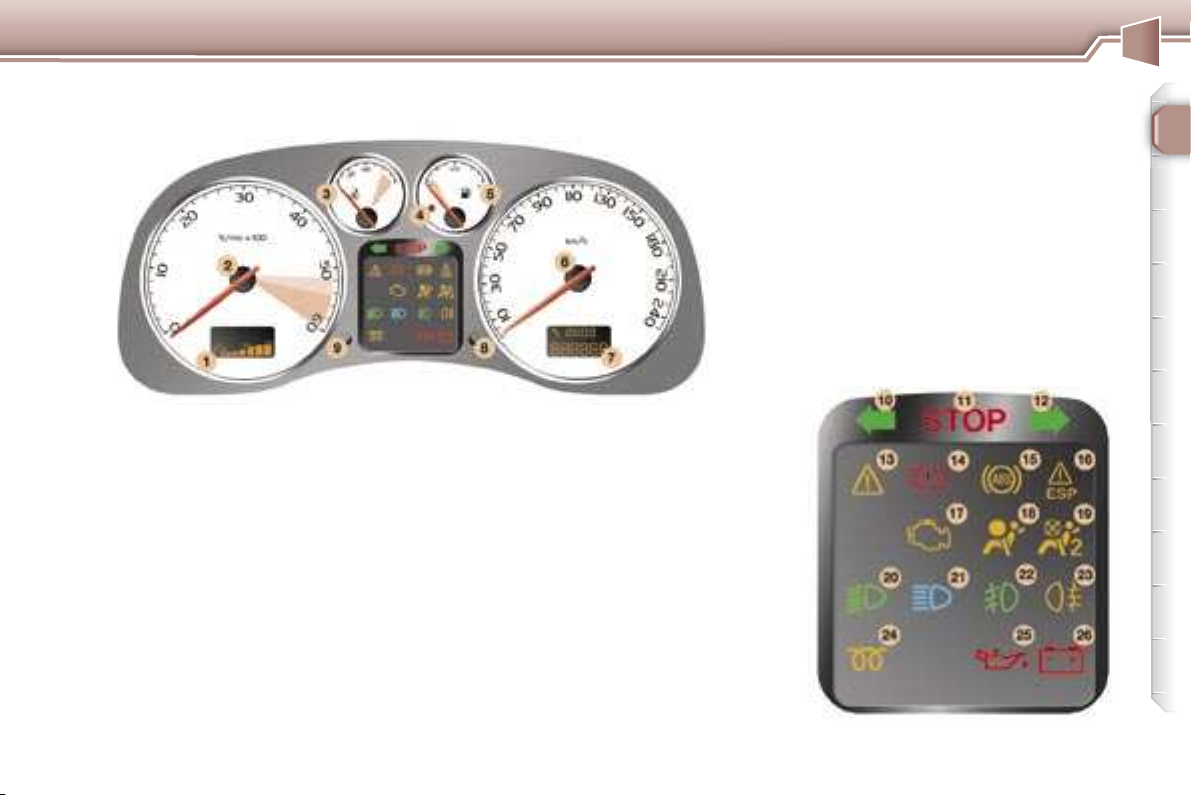
1
PETROL-DIESEL INSTRUMENT PANEL DIALS: MANUAL
GEARBOX
1. Engine oil temperature indicator.
2. Rev counter.
3. Coolant temperature indicator.
4. Low fuel level warning light.
5. Fuel gauge.
6. Speedometer.
7. Service indicator, oil level
indicator, distance recorder and
cruise control / speed limiter.
8. Trip recorder zero reset button.
9. Lighting rheostat button.
10. Left-hand direction indicator.
11. Central STOP warning light.
12. Right-hand direction indicator.
13. Service warning light.
14. Handbrake, brake fluid level
and electronic brake force
distribution warning light.
15. Anti-lock braking system (ABS)
warning light.
16. Electronic stability control
(ESP/ASR) warning light.
17. Emission control system
warning light.
18. Air bags and rear, protective
pop-up roll-over hoops warning
light.
19. Passenger air bag disarmed
indicator light*.
20. Dipped beam headlamps
indicator light.
21. Main beam headlamps indicator
light.
22. Front fog lamps indicator light.
23. Rear fog lamp indicator light.
24. Diesel engine pre-heat warning
light.
25. Engine oil pressure warning
light*.
26. Battery charge warning light*.
* According to country.
17
1
WARNING LIGHTS AND INDICATORS
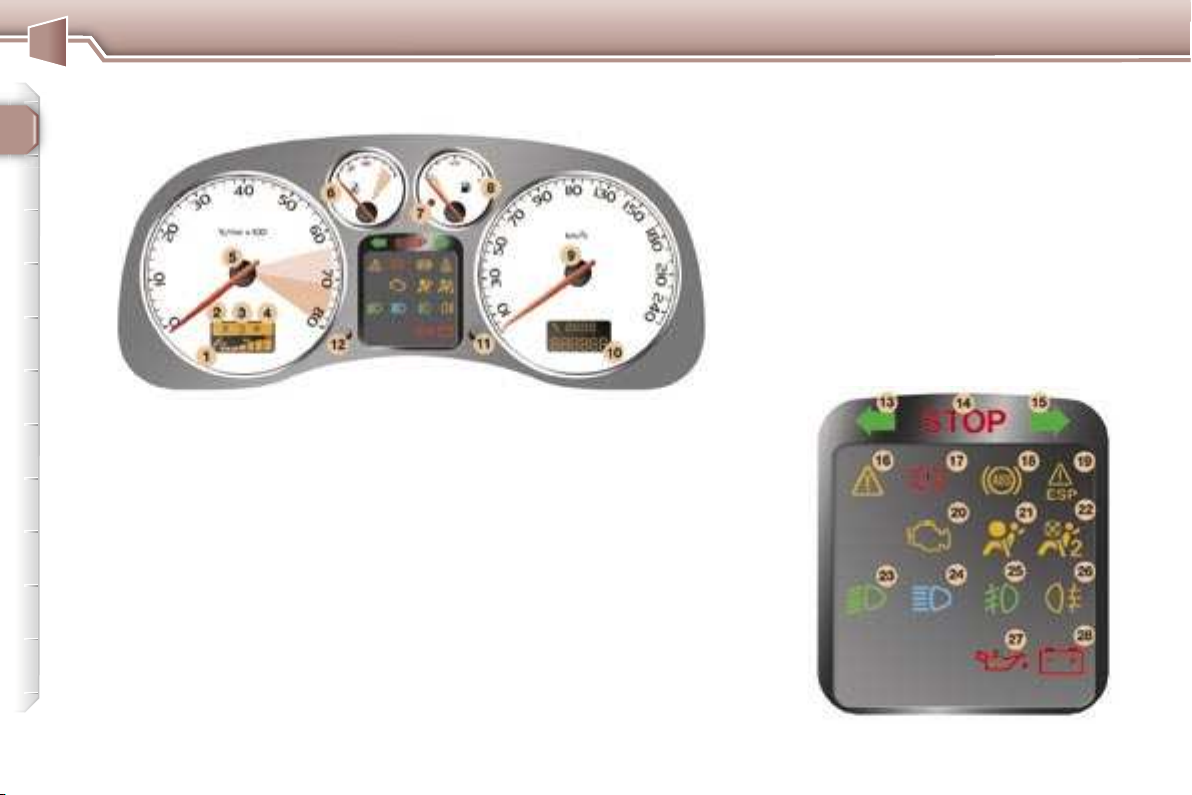
18
1. Engine oil temperature indicator.
2. Sport programme indicator light.
3. Gear lever position indicator.
4. Snow programme indicator light.
5. Rev counter.
6. Coolant temperature indicator.
7. Low fuel level warning light.
8. Fuel gauge.
9. Speedometer.
10. Service indicator, oil level
indicator, distance recorder and
cruise control / speed limiter.
11. Trip recorder zero reset button.
12. Lighting rheostat button.
13. Left-hand direction indicator.
14. Central STOP warning light.
15. Right-hand direction indicator.
16. Service warning light.
17. Handbrake, brake fluid level
and electronic brake force
distribution warning light.
18. Anti-lock braking system (ABS)
warning light.
19. Electronic stability control
(ESP/ASR) warning light.
20. Emission control system
warning light.
21. Air bags and rear, protective
pop-up roll-over hoops warning
light.
22. Passenger air bag disarmed
indicator light*.
23. Dipped beam headlamps
indicator light.
24. Main beam headlamps indicator
light.
25. Front fog lamps indicator light.
26. Rear fog lamp indicator light.
27. Engine oil pressure warning
light*.
28. Battery charge warning light*.
PETROL INSTRUMENT PANEL DIALS: AUTOMATIC GEARBOX
* According to country.
WARNING LIGHTS AND INDICATORS
19
OPERATION WARNING
LIGHTS
A permanently lit warning light or
one that flashes with the engine
running, indicates an operating
fault in the relevant unit. Some
warning lights may be linked to
buzzers and a message on the
multifunction display. Do not
ignore this warning: contact a
PEUGEOT dealer as soon as possible.
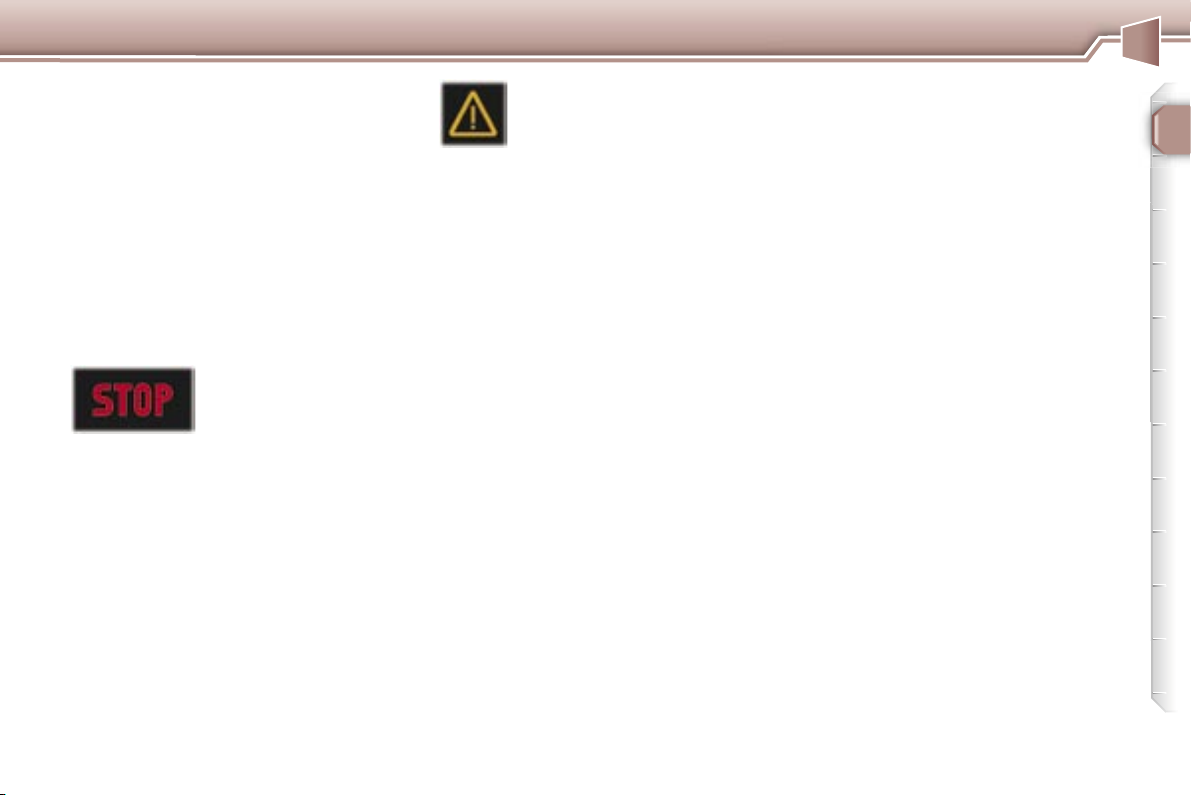
If the Central STOP warning light
comes on when you are driving,
stop immediately where it is safe
to do so.
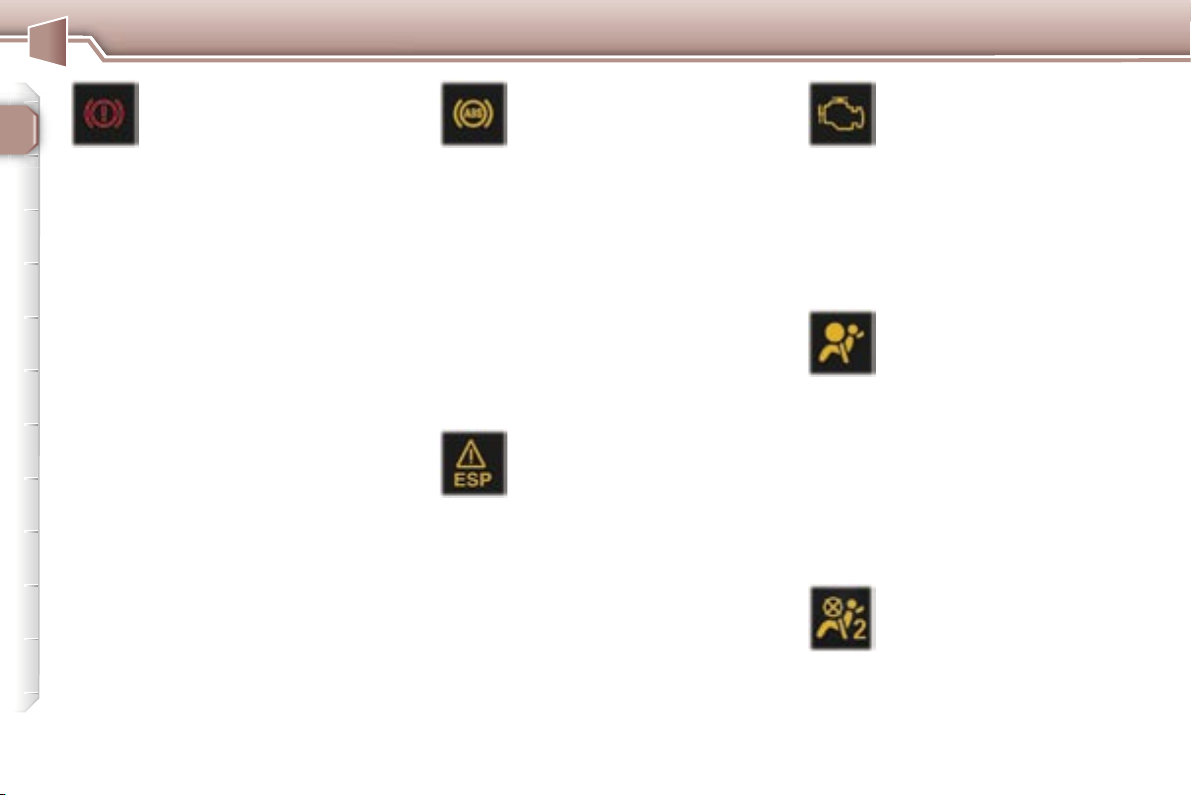
Central STOP
warning light
This light comes on
for a few seconds
each time the ignition is switched on.
It is linked to the "engine oil pressure"*, "low brake fluid level'' and
"electronic brake force distribution
fault'' warning lights and the ''coolant
temperature'' gauge.
Stop immediately if it flashes with
the engine running.
Contact a PEUGEOT dealer.
It also comes on if a wheel is punc-
tured, accompanied by an audible
signal and a message on the multifunction display locating the wheel
concerned.
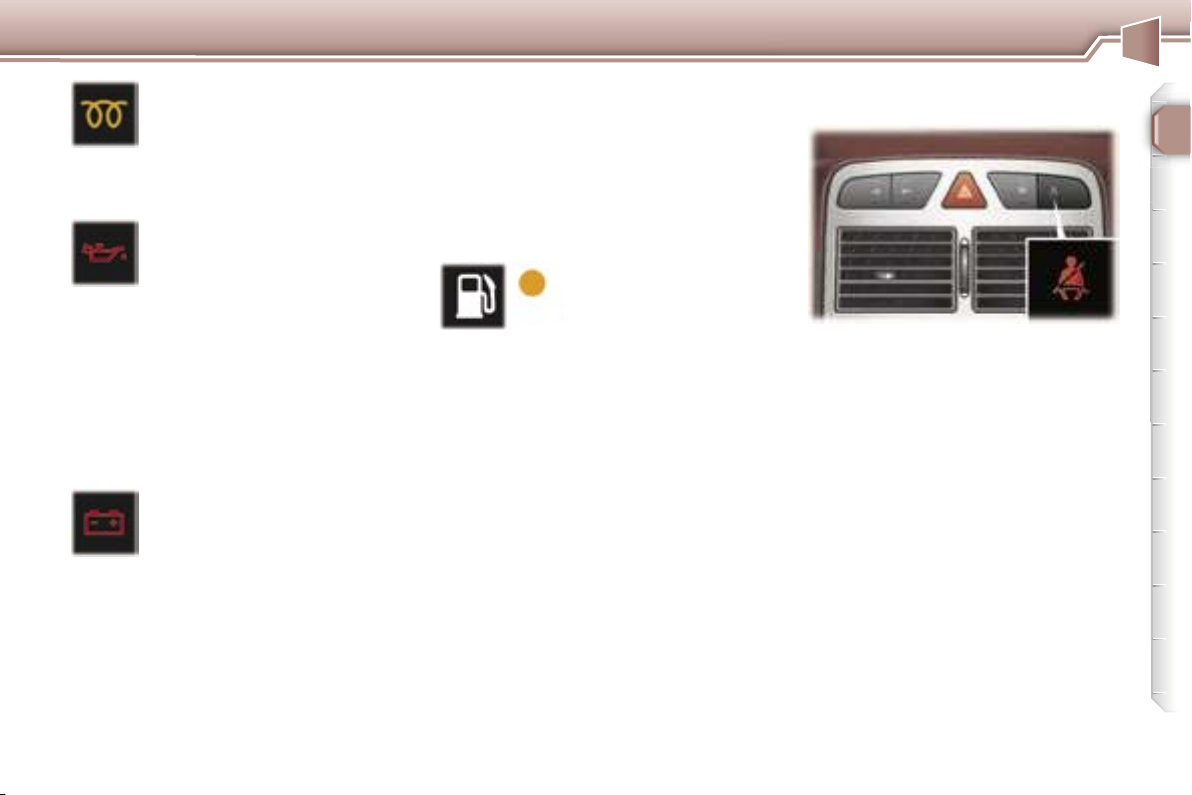
Service warning light
This light comes on for a
few seconds each time the
ignition is switched on. If
it remains on or comes on
when the engine is running, accompanied by an audible signal and a
message on the multifunction display, it indicates one of the following:
- a battery charge fault*,
- an automatic gearbox operation
fault,
- an engine immobiliser system
fault,
- an engine management system
fault,
- a speed control system fault (cruise
control / speed limiter),
- a rear parking assistance system
fault,
- an automatic switching on of the
lights system fault,
- an automatic headlamp adjustment
system fault,
- a tyre under-inflation detection sys-
tem fault,
- a deflated wheel,
- a flat remote control battery,
- one or more door(s) open at
a vehicle speed above 6 mph
(10 km/h),
- a low diesel additive reservoir level
(Diesel),
- a lack of engine oil,
- the start of saturation of the parti-
cle emission filter (Diesel) due to
exceptionally prolonged urban driving conditions: low speed, long traffic jams, ...
* According to country.
** According to engine.
In order to regenerate the filter, it
is advisable to drive at a speed of
40 mph (60 km/h) or more for at
least five minutes (until the warning light is switched off) as soon
as possible when traffic conditions
permit. If the warning light remains
on, contact a PEUGEOT dealer.
During regeneration of the particle
emission filter, relay noise may be
heard under the fascia panel.
- the presence of water in the diesel
filter (Diesel)*.
There is a risk of damage to the
injection system.
Contact a PEUGEOT dealer as
soon as possible.
- a low coolant level**.
Stop immediately.
Warning: wait for the engine to
cool before topping up the level.
The cooling system is pressurised.
In order to avoid any risk of scald-
ing, unscrew the cap by two turns
to allow the pressure to drop. When
the pressure has dropped, remove
the cap and top up the level.
Contact a PEUGEOT dealer.
1
1
WARNING LIGHTS AND INDICATORS
20
Air bags and rear,
protective, pop-up rollover hoops warning light
This comes on for a few seconds each time the ignition is
switched on.
Illumination of this warning light, with the
engine running, is accompanied by an audible signal and a message on the multifunction display indicating:
- a fault in the front air bags or side air bags,
or
- a fault in the pop-up roll-over hoops, located
in the rear head restraints.
Contact a PEUGEOT dealer.
Passenger air bag
disarmed indicator light*
This comes on for a few
seconds each time the ignition is switched on.
If the passenger air bag is disarmed,
the indicator light remains on.
In all cases, if the indicator light
flashes, contact a PEUGEOT dealer.
Emission control system
warning light
This comes on each time the
ignition is switched on.
It should switch off a few sec-
onds after the engine is started.
If the light comes on when the engine
is running, accompanied by an audible
signal and a message on the multifunction display, this indicates a malfunction of the emission control system.
Contact a PEUGEOT dealer as soon
as possible.
Anti-lock braking system
(ABS) warning light
This light comes on for a
few seconds each time the
ignition is switched on.
If it remains on or comes on above 8
mph (12 km/h), this indicates a malfunction of the ABS.
However, the vehicle retains conventional servo-assisted braking.
Illumination of this light is accompanied by an audible signal and a message on the multifunction display.
Contact a PEUGEOT dealer.
Electronic stability
programme (ESP/ASR)
warning light
This comes on for a few
seconds each time the igni-
tion is switched on.
If the light remains on or comes on
when the engine is running and the
vehicle is moving, it is accompanied
by an audible signal and a message
on the multifunction display; contact
a PEUGEOT dealer.
When the engine is running and the
vehicle is moving, it flashes if the
system is activated.
It is lit permanently when it is disarmed.
Handbrake, low brake
fluid level and electronic
brake force distribution
fault warning light
Linked to the central STOP warning
light.
This comes on for a few seconds
each time the ignition is switched
on.
Illumination of this light is accompanied by an audible signal and a message on the multifunction display
indicating:
- that the handbrake is applied or
has not been released correctly,
when the vehicle is moving,
- an excessive drop in the brake fluid
(if the light remains on even with
the handbrake released),
- a malfunction of the electronic
brake force distribution, if linked to
the ABS warning light.
Stop immediately in the last two
cases.
Contact a PEUGEOT dealer.
WARNING LIGHTS AND INDICATORS
21
Engine oil pressure warning*
Linked to the central STOP warning
light.
When the engine is running, the
engine oil pressure warning message is accompanied by an audible
signal.
Stop immediately.
If there is a lack of oil in the lubrication circuit, top up the level.
Contact a PEUGEOT dealer as soon
as possible.
When the ignition is switched on, the
light comes on if the driver and/or the
front passenger has not fastened his
seat belt.
With the engine running and the
doors closed, the light goes out
automatically after 30 seconds.
If the seatbelt is unfastened:
- below 12mph approx. (20 km/h),
the light comes on constantly,
- above 12 mph approx. (20 km/h)
and for two minutes, the light flashes
accompanied by an audible signal
of increasing volume. Once these
two minutes have elapsed, the light
remains on until the driver and/or
the front passenger fastens his seat
belt.
Diesel engine pre-heat
warning light
This comes on for a few
seconds each time the ignition is switched on.
Wait until it is switched off before
operating the starter.
Battery charge warning
light
*
This comes on for a few
seconds each time the ignition is switched on.
The illumination of this warning light
when the engine is running is accompanied by an audible signal and a
message on the multifunction display.
Depending on the country, this warning light may be replaced by the service warning light.
It may indicate:
- faulty operation of the charging circuit,
Low fuel level
warning light
This comes on for a
few seconds each
time the ignition is
switched on.
When this light comes on with the
engine running, it is accompanied by
an audible signal and a message on
the multifunction display.
When the warning light comes on,
you have enough fuel to drive approximately 30 miles (50 km). The tank
capacity is approximately 60 litres.
Engine oil pressure
warning light
*
Linked to the central STOP
warning light.
The illumination of this warning
light, when the engine is running, is
accompanied by an audible signal
and a message on the multifunction
display.
Stop immediately.
If there is a lack of oil in the lubrication circuit, top up the level.
Contact a PEUGEOT dealer as soon
as possible.
* According to country.
Seat belt unfastened / not
fastened warning light
- slack battery or starter terminals,
- a cut or slack alternator belt,
- an alternator failure.
Contact a PEUGEOT dealer.
1
1
WARNING LIGHTS AND INDICATORS
22
When the engine is running, this indicates the oil temperature.
The temperature is too high if the
maximum graduation is reached.
You must stop immediately.
Contact a PEUGEOT dealer.
Park
Automatic gearbox lever
positions indicator
Reverse
Neutral
Drive
Manual mode:
1st gear engaged
2
nd gear engaged
3
rd gear engaged
4
th gear engaged
When the needle is in zone
A, the
temperature is correct.
When the needle is in zone B, the
temperature is too high. The central
STOP warning light flashes, accompanied by an audible signal and a
message on the multifunction display.
You must stop immediately.
Warning: wait for the engine to cool
before topping up the level.
The cooling system is pressurised.
In order to avoid any risk of scalding,
unscrew the cap two turns to allow
the pressure to drop.
When the pressure has dropped,
remove the cap and top up the level.
Contact a PEUGEOT dealer.
Coolant temperature indicator Engine oil temperature
indicator
WARNING LIGHTS AND INDICATORS
23
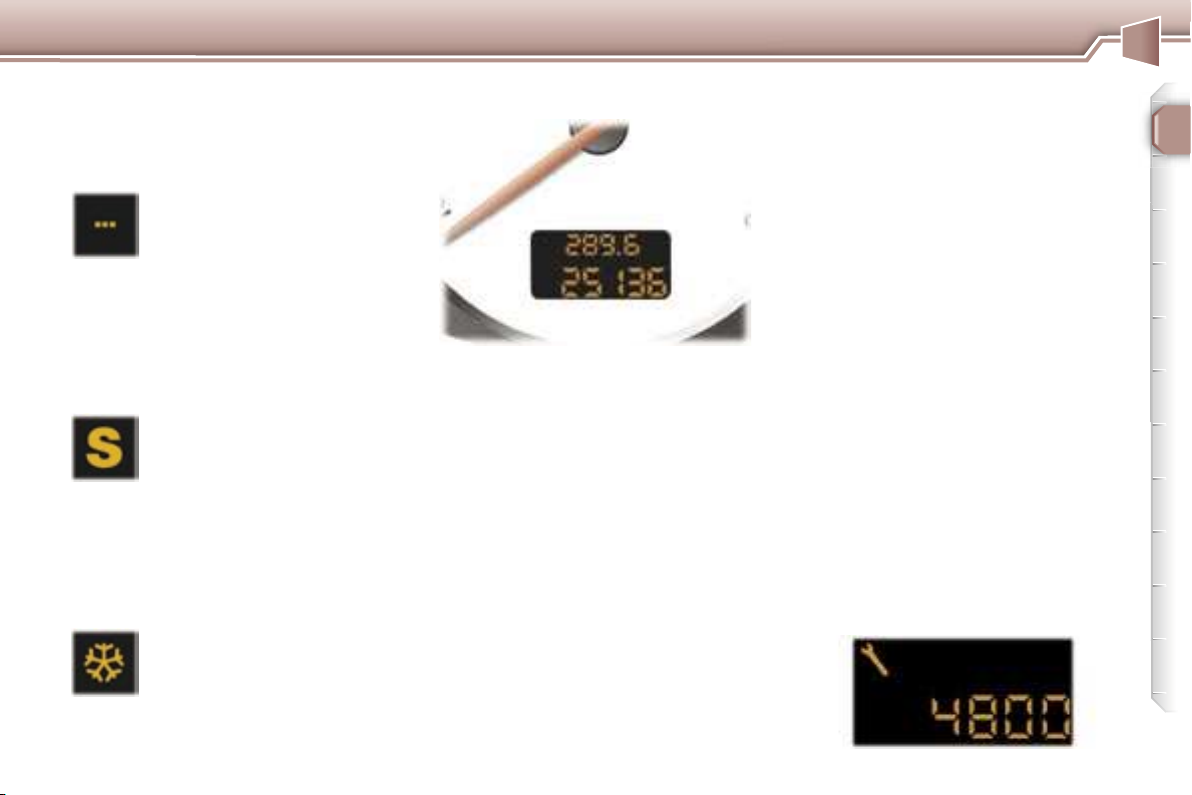
After switching on the ignition, three
functions are shown in succession:
- service indicator,
- engine oil level indicator,
- total distance recorder (total and
trip distances).
Note: the total and trip distances are
displayed for 30 seconds when the
ignition is switched off, on opening
the driver’s door, as well as on locking and unlocking the vehicle.
It also displays the information relating to the cruise control or speed limiter, when either of these is activated
(see corresponding section).
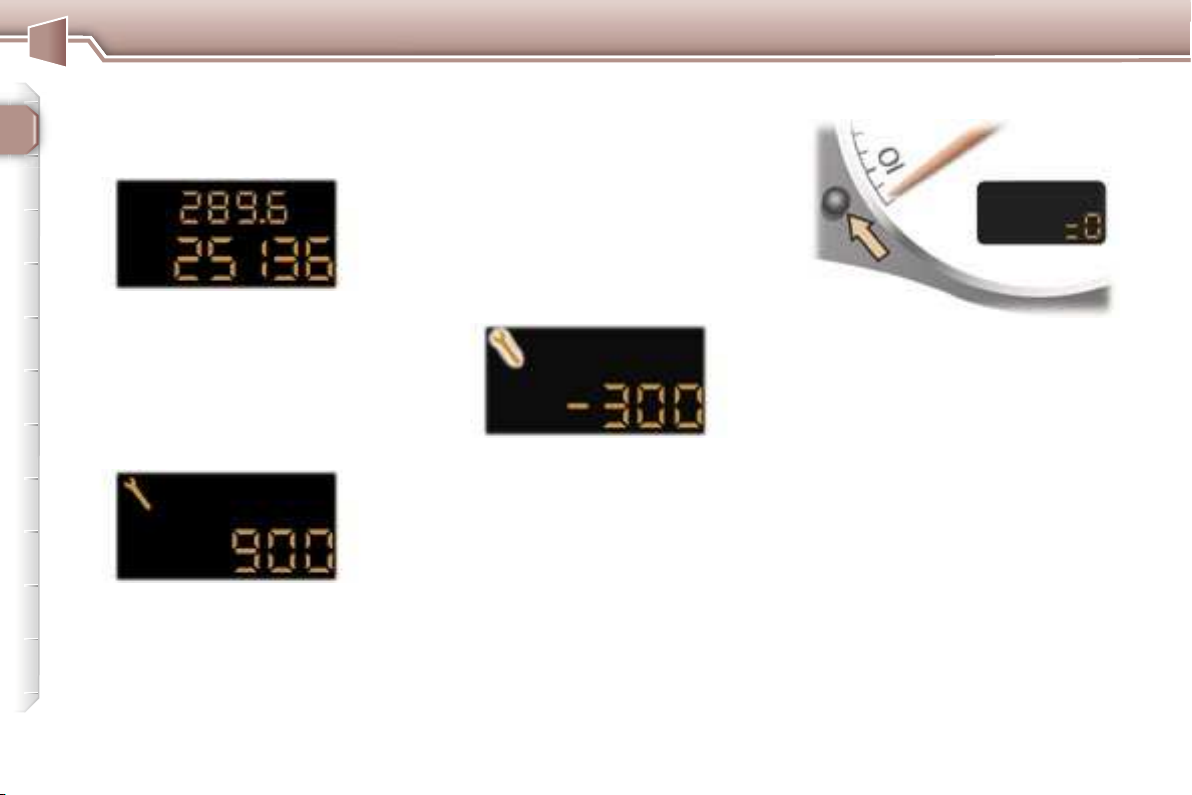
Service indicator
This indicates when the next service
is due in accordance with the manufacturer's servicing schedule.
The point at which the next service
is due is calculated from the last indicator zero reset (see corresponding section). It is determined by two
parameters:
- the distance travelled,
- the time which has elapsed since
the last service.
Note: the distance remaining before
the next service may be weighted
by the time factor, depending on the
user's driving habits.
Operation
For 5 seconds after the ignition is
switched on, the spanner symbolising the servicing operations comes
on; the distance recorder display
indicates the number of miles [kilometres] (rounded off) remaining until
the next service.
Example: 4,800 miles/km remain
before the next service. For five seconds after the ignition is switched on,
the display indicates:
In the event of under-revving or overrevving, the gear selected flashes for
a few seconds, then the actual gear
engaged is displayed.
This comes on when
the automatic gearbox
"SPORT" operating programme is selected.
This comes on when
the automatic gearbox
"SNOW" operating programme is selected.
Automatic gearbox indicator
lights
"SNOW" indicator light
Invalid value during
manual operation
This is displayed if a gear
is not engaged correctly
(selector between two positions).
"SPORT" indicator light
INSTRUMENT PANEL
DISPLAY
1

1
WARNING LIGHTS AND INDICATORS
24
Your PEUGEOT dealer carries out
this operation after each service.
However, if you carry out the service
yourself, the re-set procedure is as
follows:
Switch off the ignition,
Press and hold the trip recorder
re-set button,
Switch on the ignition.
The display begins a countdown.
When the display shows "=0",
release the button; the service symbol disappears.
Important: after this operation, if you
wish to disconnect the battery, lock
the vehicle and wait for at least five
minutes, otherwise the zero re-set
will not be registered.
The service is overdue.
The service spanner flashes for
5 seconds after the ignition is
switched on.
Example: the service is overdue by
300 miles/km, your vehicle must be
serviced as soon as possible.
For 5 seconds after the ignition is
switched on, the display indicates:
5 seconds after the ignition was
switched on, the distance recorder
resumes its normal operation and
the service spanner remains lit. The
display indicates the total and trip
distance.
Note: the service spanner may also
come on if more than two years have
elapsed since the last service.
The distance remaining to the
next service is less than 500 miles
(1,000 km).
Example: 400 miles (900 km) remain
before the next service.
For 5 seconds after the ignition is
switched on, the indicator displays:
5 seconds after the ignition was
switched on, the distance recorder
resumes its normal operation and
the spanner remains lit.
It indicates that a service must be
carried out soon. The display indicates the total and trip distance.
5 seconds after the ignition was
switched on, the distance recorder
resumes its normal operation and
the display indicates the total and trip
distance.
Service indicator zero re-set
WARNING LIGHTS AND INDICATORS
25
With the lights on, press the button
to vary the intensity of the lighting of
the instruments and controls. When
the lighting reaches the minimum (or
maximum) setting, release the button then press it again to increase (or
reduce) the brightness.
As soon as the lighting is of the
required brightness, release the button.
With the ignition on, press the button
until the zeros appear.
Pressing the button enables you
to alternate between the distance
recorder and cruise control or speed
limiter displays, when either of these
is activated.
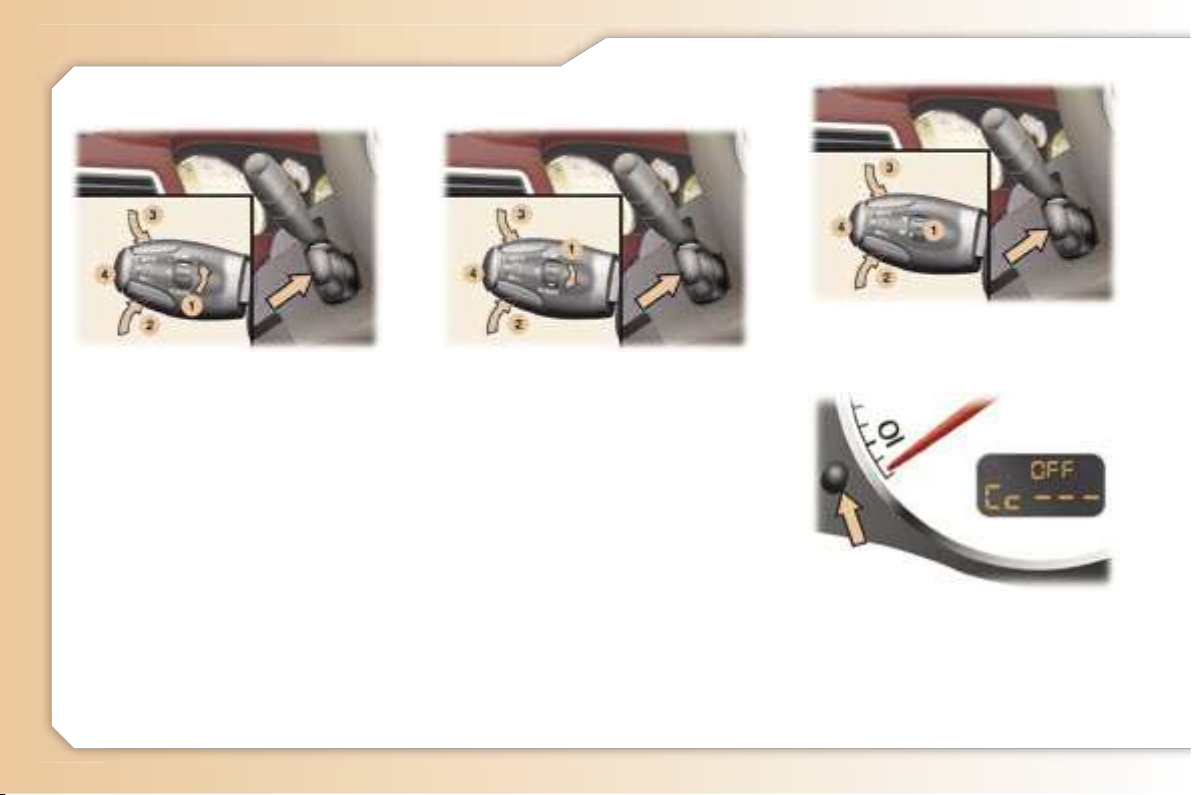
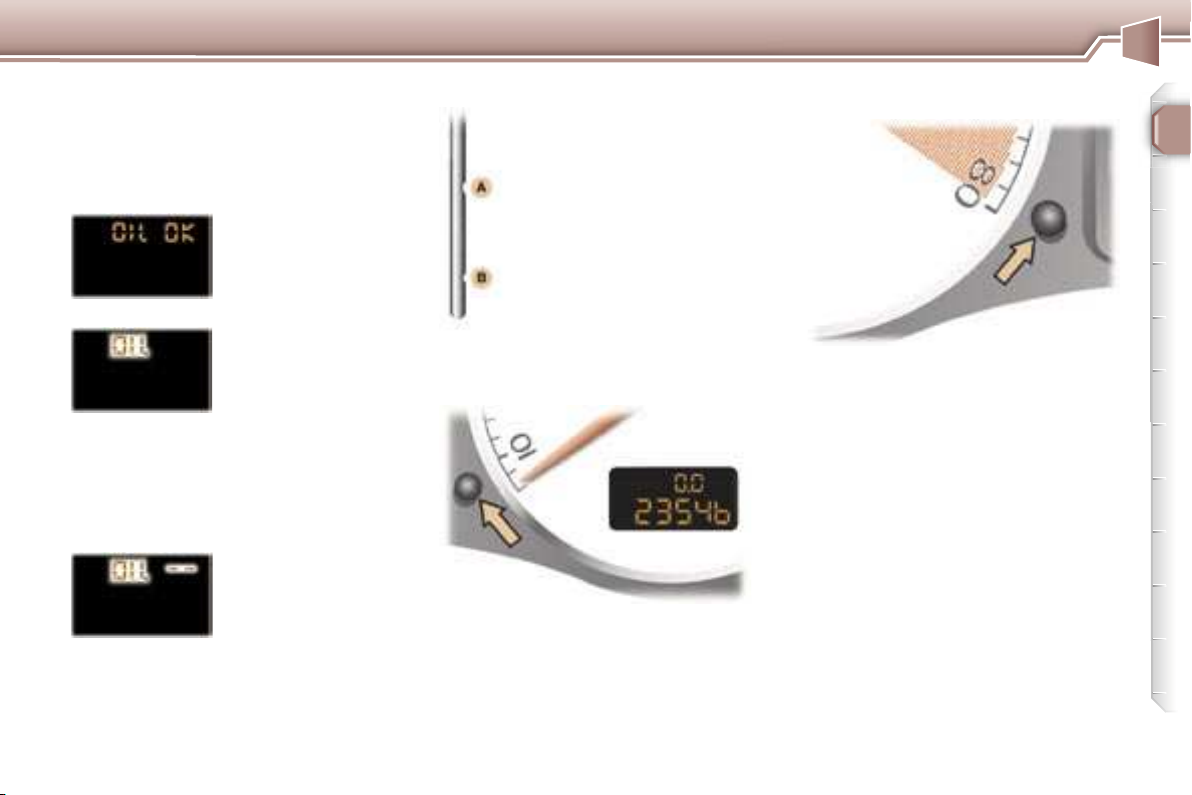
Engine oil level indicator
When the ignition is switched on, the
engine oil level is indicated for a few
seconds, after the service information.
Oil level correct
Oil level gauge fault
Flashing of
"OIL ---" indicates
a malfunction of
the engine oil level
gauge.
Contact a PEUGEOT dealer.
The level read will only be correct
if the vehicle is on level ground
and the engine has been off for
more than 15 minutes.
Flashing of "OIL",
linked with the
service warning
light, accompanied
by an audible sig-
nal and a message
on the multifunction display, indicates
a lack of oil which could damage the
engine.
If the lack of oil is confirmed by a
check using the dipstick, it is essential that the level is topped up.
Lack of oil
Dipstick
There are 2 marks on the
dipstick:
- never exceed level A,
- in position B, top up the
level via the oil filler cap,
using the type of oil suited
to your engine.
A = max.
B = min.
Lighting rheostat
Trip recorder zero reset
button
1

WARNING LIGHTS AND INDICATORS
23
After switching on the ignition, three
functions are shown in succession:
- service indicator,
- engine oil level indicator,
- total distance recorder (total and
trip distances).
Note: the total and trip distances are
displayed for 30 seconds when the
ignition is switched off, on opening
the driver’s door, as well as on locking and unlocking the vehicle.
It also displays the information relating to the cruise control or speed limiter, when either of these is activated
(see corresponding section).
Service indicator
This indicates when the next service
is due in accordance with the manufacturer's servicing schedule.
The point at which the next service
is due is calculated from the last indicator zero reset (see corresponding section). It is determined by two
parameters:
- the distance travelled,
- the time which has elapsed since
the last service.
Note: the distance remaining before
the next service may be weighted
by the time factor, depending on the
user's driving habits.
Operation
For 5 seconds after the ignition is
switched on, the spanner symbolising the servicing operations comes
on; the distance recorder display
indicates the number of miles [kilometres] (rounded off) remaining until
the next service.
Example: 4,800 miles/km remain
before the next service. For five seconds after the ignition is switched on,
the display indicates:
In the event of under-revving or overrevving, the gear selected flashes for
a few seconds, then the actual gear
engaged is displayed.
This comes on when
the automatic gearbox
"SPORT" operating programme is selected.
This comes on when
the automatic gearbox
"SNOW" operating programme is selected.
Automatic gearbox indicator
lights
"SNOW" indicator light
Invalid value during
manual operation
This is displayed if a gear
is not engaged correctly
(selector between two positions).
"SPORT" indicator light
INSTRUMENT PANEL
DISPLAY
1
1
WARNING LIGHTS AND INDICATORS
24
Your PEUGEOT dealer carries out
this operation after each service.
However, if you carry out the service
yourself, the re-set procedure is as
follows:
Switch off the ignition,
Press and hold the trip recorder
re-set button,
Switch on the ignition.
The display begins a countdown.
When the display shows "=0",
release the button; the service symbol disappears.
Important: after this operation, if you
wish to disconnect the battery, lock
the vehicle and wait for at least five
minutes, otherwise the zero re-set
will not be registered.
The service is overdue.
The service spanner flashes for
5 seconds after the ignition is
switched on.
Example: the service is overdue by
300 miles/km, your vehicle must be
serviced as soon as possible.
For 5 seconds after the ignition is
switched on, the display indicates:
5 seconds after the ignition was
switched on, the distance recorder
resumes its normal operation and
the service spanner remains lit. The
display indicates the total and trip
distance.
Note: the service spanner may also
come on if more than two years have
elapsed since the last service.
The distance remaining to the
next service is less than 500 miles
(1,000 km).
Example: 400 miles (900 km) remain
before the next service.
For 5 seconds after the ignition is
switched on, the indicator displays:
5 seconds after the ignition was
switched on, the distance recorder
resumes its normal operation and
the spanner remains lit.
It indicates that a service must be
carried out soon. The display indicates the total and trip distance.
5 seconds after the ignition was
switched on, the distance recorder
resumes its normal operation and
the display indicates the total and trip
distance.
Service indicator zero re-set

WARNING LIGHTS AND INDICATORS
25
With the lights on, press the button
to vary the intensity of the lighting of
the instruments and controls. When
the lighting reaches the minimum (or
maximum) setting, release the button then press it again to increase (or
reduce) the brightness.
As soon as the lighting is of the
required brightness, release the button.
With the ignition on, press the button
until the zeros appear.
Pressing the button enables you
to alternate between the distance
recorder and cruise control or speed
limiter displays, when either of these
is activated.
Engine oil level indicator
When the ignition is switched on, the
engine oil level is indicated for a few
seconds, after the service information.
Oil level correct
Oil level gauge fault
Flashing of
"OIL ---" indicates
a malfunction of
the engine oil level
gauge.
Contact a PEUGEOT dealer.
The level read will only be correct
if the vehicle is on level ground
and the engine has been off for
more than 15 minutes.
Flashing of "OIL",
linked with the
service warning
light, accompanied
by an audible sig-
nal and a message
on the multifunction display, indicates
a lack of oil which could damage the
engine.
If the lack of oil is confirmed by a
check using the dipstick, it is essential that the level is topped up.
Lack of oil
Dipstick
There are 2 marks on the
dipstick:
- never exceed level A,
- in position B, top up the
level via the oil filler cap,
using the type of oil suited
to your engine.
A = max.
B = min.
Lighting rheostat
Trip recorder zero reset
button
1
1
WARNING LIGHTS AND INDICATORS
26
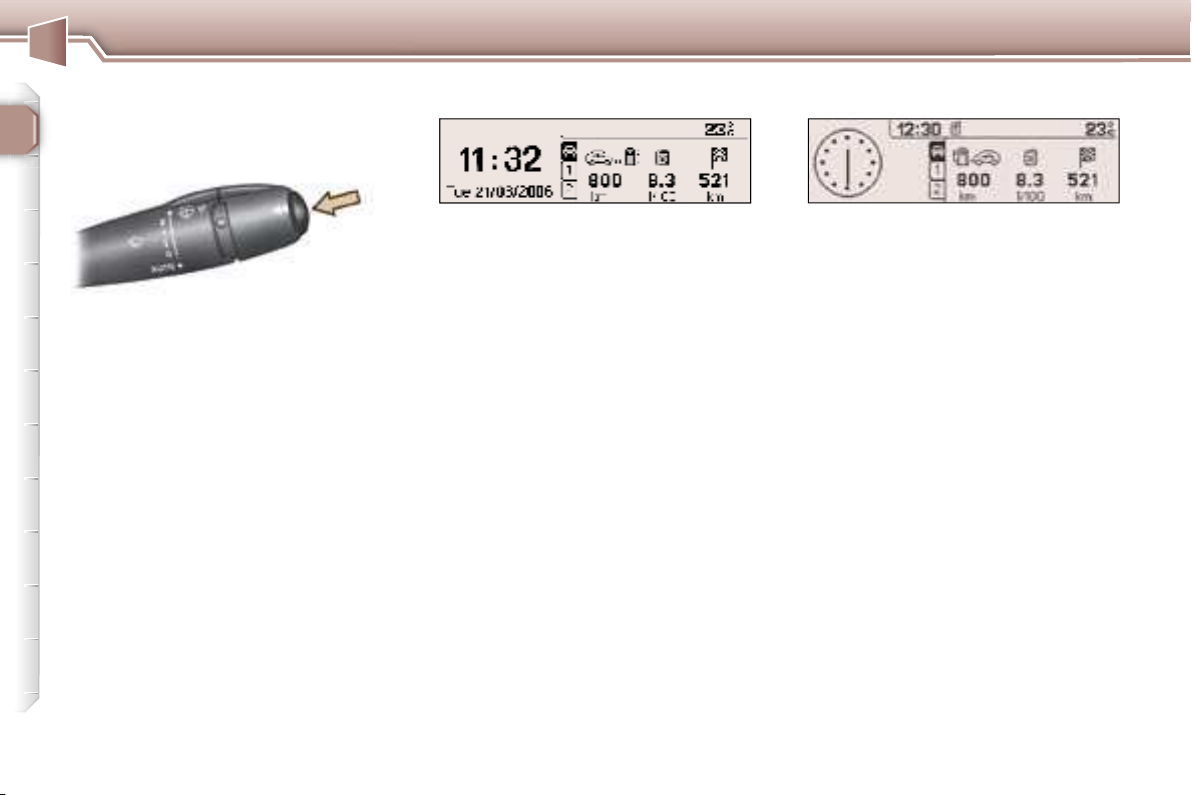
TRIP COMPUTER
Each time the button on the end of
the wiper stalk is pressed, the various items of trip computer data are
displayed in succession, depending
on the multifunction display.
Monochrome screen CT
- the "vehicle" tab with:
• the range, the current consumption
and the distance still to be
driven,
- tab "1" (route 1) with:
• the average speed, the average consumption and the distance driven calculated over
route "1"
- tab "2" (route 2) with the same fea-
tures for a second route.
Zero re-set
When the required route is displayed,
press the button for more than two
seconds.
Monochrome screens C
- the "vehicle" tab with:
• the range, the current consumption and the distance still to be
driven,
- tab "1" (route 1) with:
• the average speed, the average consumption and the distance driven calculated over
route "1",
- tab "2" (route 2) with the same fea-
tures for a second route.
Zero re-set
When the required route is displayed,
press the button for more than two
seconds.
WARNING LIGHTS AND INDICATORS
27
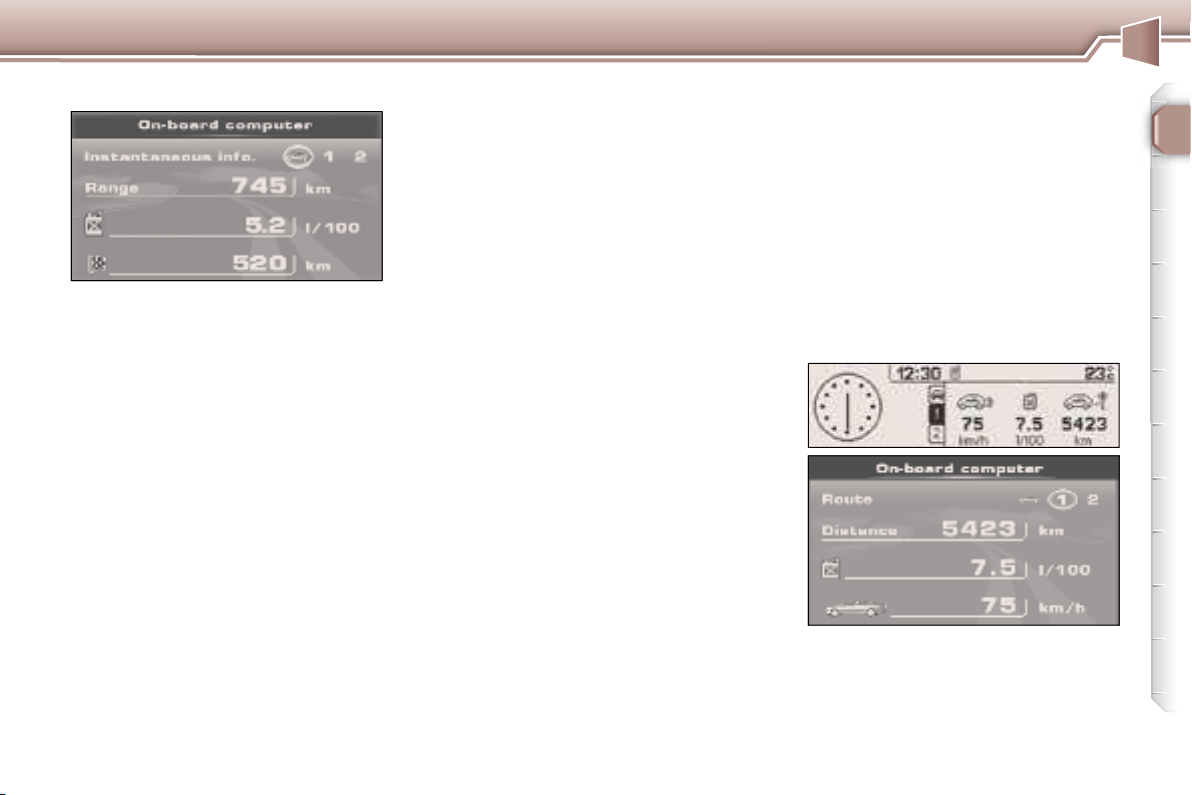
Colour screen DT
- the "Current information" with:
• the range,
• the current consumption,
• the distance still to be driven.
- "Route 1" with:
• the distance travelled,
• the average consumption,
• the average speed,
- "Route 2" with the same features
for a second route.
1
Zero re-set
When the required route is displayed,
press the button for more than two
seconds.
Range
This shows the distance that can still
be covered with the fuel remaining in
the tank in accordance with the average consumption over the last few
miles (kilometres) driven.
This figure may increase if there is
a change in the style of driving or
the road surface, producing a significant drop in current consumption.
When the range is less than 20 miles
(30 km), dashes are displayed. After
filling with at least 5 litres of fuel, the
range is recalculated and is displayed
when it exceeds 62 miles (100 km).
If dashes are displayed for long
periods instead of digits, contact a
PEUGEOT dealer.
Current consumption
This is the average quantity of fuel consumed during the last few seconds.
This function is displayed only when
the vehicle is travelling at a speed
greater than 20 mph (30 km/h).
It can be displayed in litres/100,
km/litre or mpg (refer to on-board computer configuration).
Average consumption
This is the average fuel consumption
since the computer was last set to
zero.
It can be displayed in litres/100,
km/litre or mpg (refer to on-board
computer configuration).
Distance travelled
This indicates the distance travelled
since the computer was last set to
zero.
Distance remaining to be
travelled
This is the distance remaining to the
final destination. It can either be calculated continuously by the navigation system if guidance is activated,
or entered by the user.
If the distance is not entered, dashes
are displayed in place of the digits.
Average speed
This is the average speed calculated
since the computer was last set to
zero (with the ignition on).
The routes
The routes "1" and ''2'' are independent but have identical application.
Route "1" for example allows you to
make daily calculations and route "2"
monthly calculations.
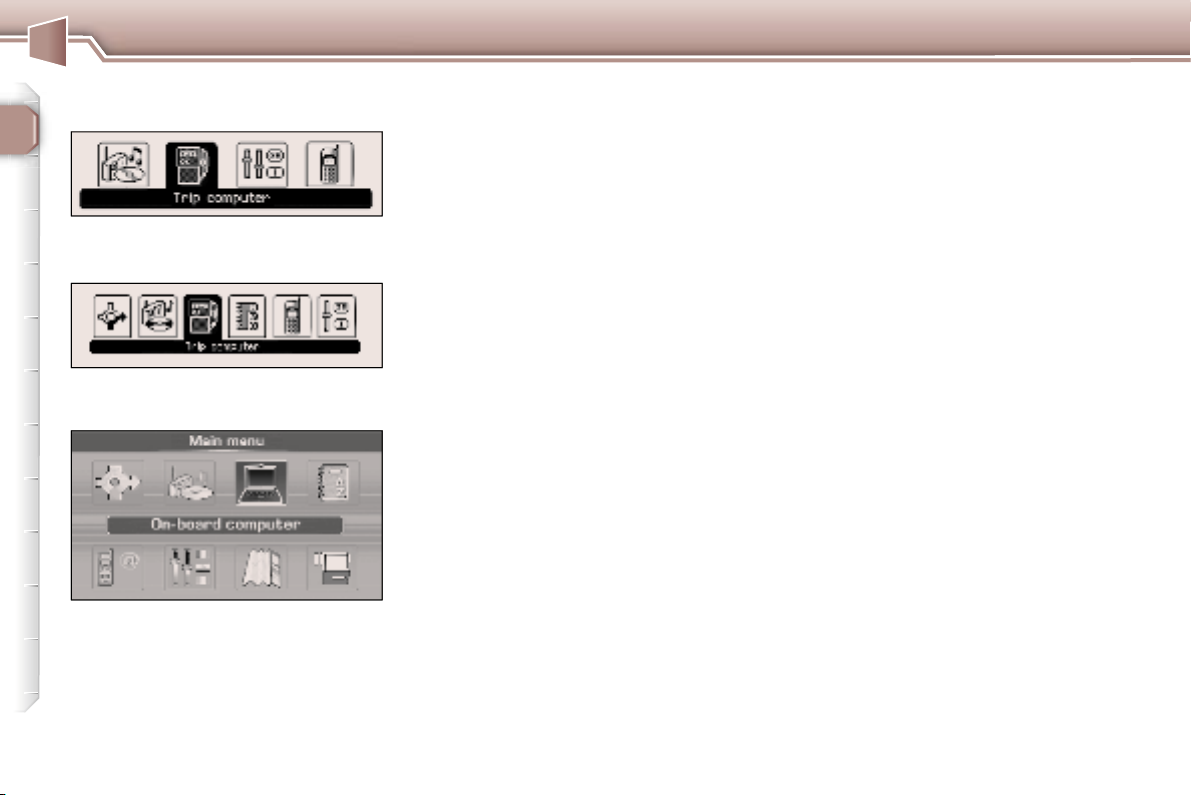
1
WARNING LIGHTS AND INDICATORS
Access via the general menu
Screen C
Screen CT
Screen DT
"On-board computer" menu
Press the "MENU" button to access
the general menu.
Select the icon ''On-board com-
puter'', then validate to access its
menu.
Depending on the multifunction
display, this menu offers various
choices:
- Enter distance to destination,
- Warning log.
- Status of the functions.
or
- On-board computer configuration.
- Diagnostics,
- Status of the functions.
Enter distance to destination
If guidance has not been activated,
this enables you to enter an approximate distance to final destination
value, to permit all of the on-board
computer calculations.
Warning log
This summarises the active warning
messages, displaying them in succession on the multifunction display.
Status of the functions
This summarises the active or not
active status of the functions present
on the vehicle.
On-board computer configuration
This function allows the distance to
the destination to be input (when
guidance is not activated; otherwise
this information is given by the navigation system) and also changing of
the units of measurement (°C or °F,
km and litres or miles and gallons).
The consumption values (current
or average) can be displayed in
litres/ 100, km/litre or mpg.
Diagnostics
This presents the information relating to the warning log, as regards
the energy remaining in the back-up
battery and the number of satellites
which can be seen by the GPS system.
28
 Loading...