

Peugeot 306 2002, 306 2003, 306 2001 Owner Manual
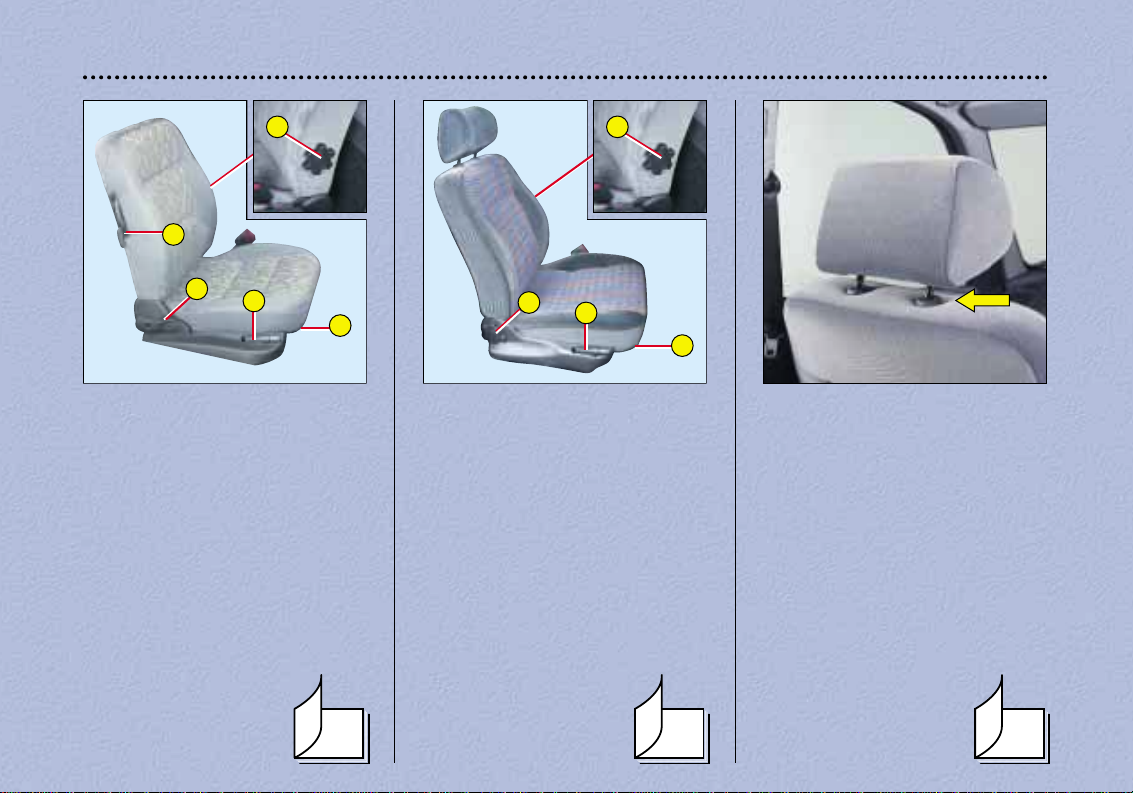
ADJUSTING THE FRONT
SEATS (3-door)
1 Forwards-backwards adjust-
ment.
2 Seat back angle adjustment.
3 Drivers seat height adjust-
ment: pull the telescopic
handle and pivot it.
4 Lumbar adjustment.
5 Access to rear seats.
ADJUSTING THE FRONT
SEATS (4/5-door and estate)
1 Forwards-backwards adjust-
ment.
2 Seat back angle adjustment.
3 Drivers seat height adjust-
ment: pull the telescopic
handle and pivot it.
4 Lumbar adjustment.
YOUR 306 AT A GLANCE
10
HEAD RESTRAINTS
- Height adjustment: slide them.
- Adjusting the angle: tilt them.
T o remove the head restraint, position it at maximum height and
press the tab.
83 83 83
5
1
4
2
3
2
3
1
4
YOUR 306 IN DETAIL
100
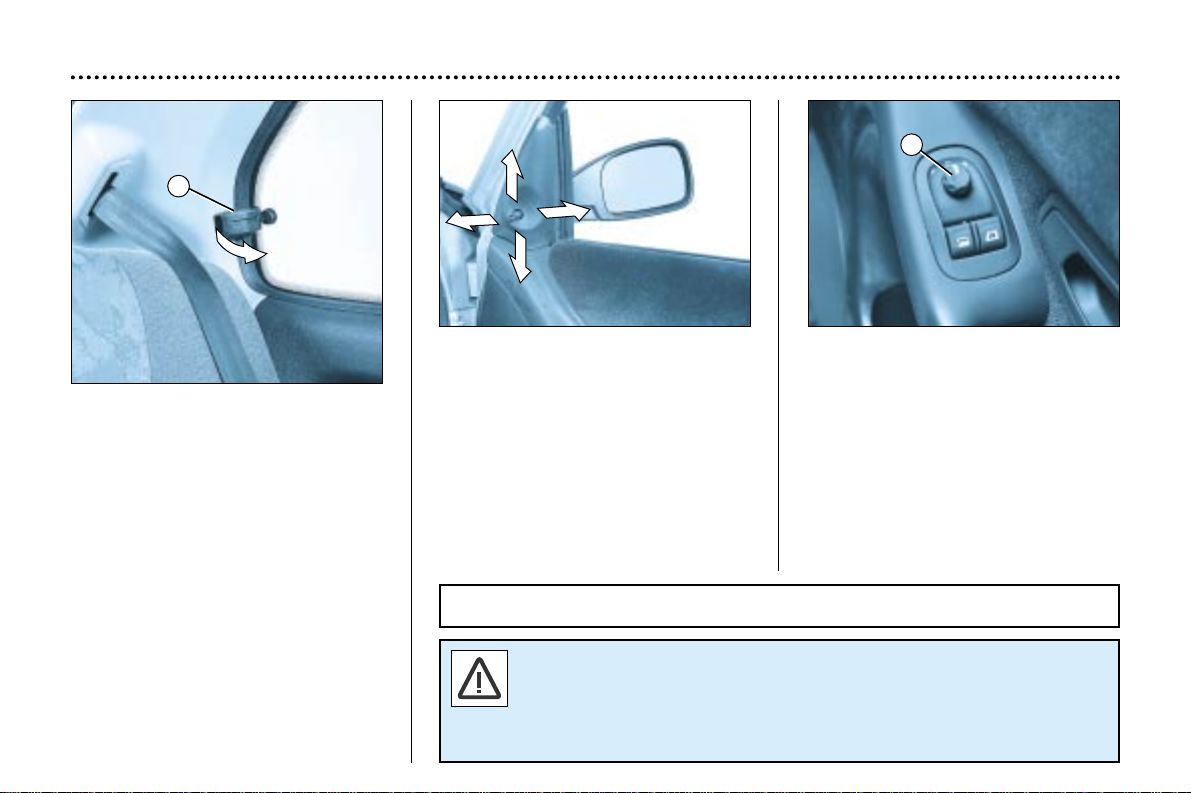
Tilting windows (3-door)
T o open the rear side windows, tilt the
lever A and push the window outwards.
A
The driver’s mirror is “non-spherical*” in order to reduce the “blind
spot”. As a result, objects observed in the mirror are closer than they
appear. This must be taken into account to correctly judge the distance of vehicles approaching from the rear.
* According to country.
When parked, the mirrors can be folded back manually.
Manual mirrors
Operate the adjusting lever in all four
directions to adjust.
Electric mirrors
Turn the control 2to the right or to the
left to select the corresponding mirror.
Move the control 2 in all four directions to adjust.
2
101
YOUR 306 IN DETAIL
Adjusting the height of the
steering wheel
Push the handle to unlock the steering wheel.
Adjust the steering wheel to the
desired height and pull the handle to
lock it into position.
1 - Lighting rheostat*
Dim or brighten the instrument panel lighting by
turning the knob. This only
operates when the exterior lights are
on.
2 - Headlamp height
adjustment*
Depending on the vehicle’s
load, it is advisable to adjust
the headlamp beam.
0 - 1 or 2 people in the front seats.
- - 3 people.
1 - 5 people.
2 - 5 people + maximum authorised
load.
3 - Driver + maximum authorised
load.
This adjustment can only be carried
out with the lighting stalk in the
dipped/main beam headlamps position.
Initial setting: 0.
* According to specification.
1
2
YOUR 306 IN DETAIL
102
Rear screen demisting
Rear screen (and mirrors)*
electric demisting control.
Goes out automatically after
approximately 12 minutes to avoid
excessive power consumption.
Pressing the button again will operate
the demisting for another
12 minutes.
* According to specification.
Digital clock*
Setting:
1 - Adjusting of hours.
2 - Adjusting of minutes.
Outside temperature display*
This indicates the outside temperature. When the temperature is
between minus 3 °C and + 5 °C, the
°C symbol flashes indicating a risk of
ice.
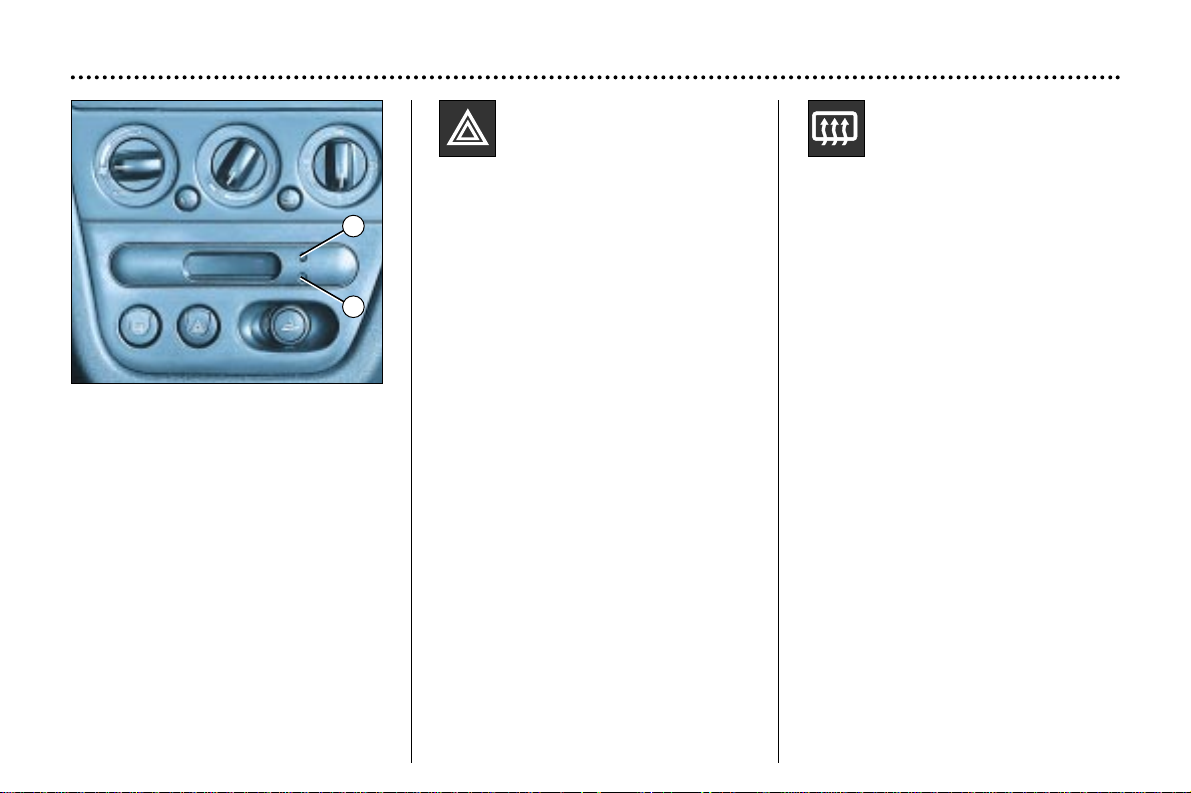
Hazard warning lights
The switch and the direction
indicators flash.
This controls the indicator
lights simultaneously and continuously.
Only use in case of danger, in an
emergency stop or for driving in
unusual conditions.
They can operate with the ignition off.
1
2
YOUR 306 IN DETAIL
103
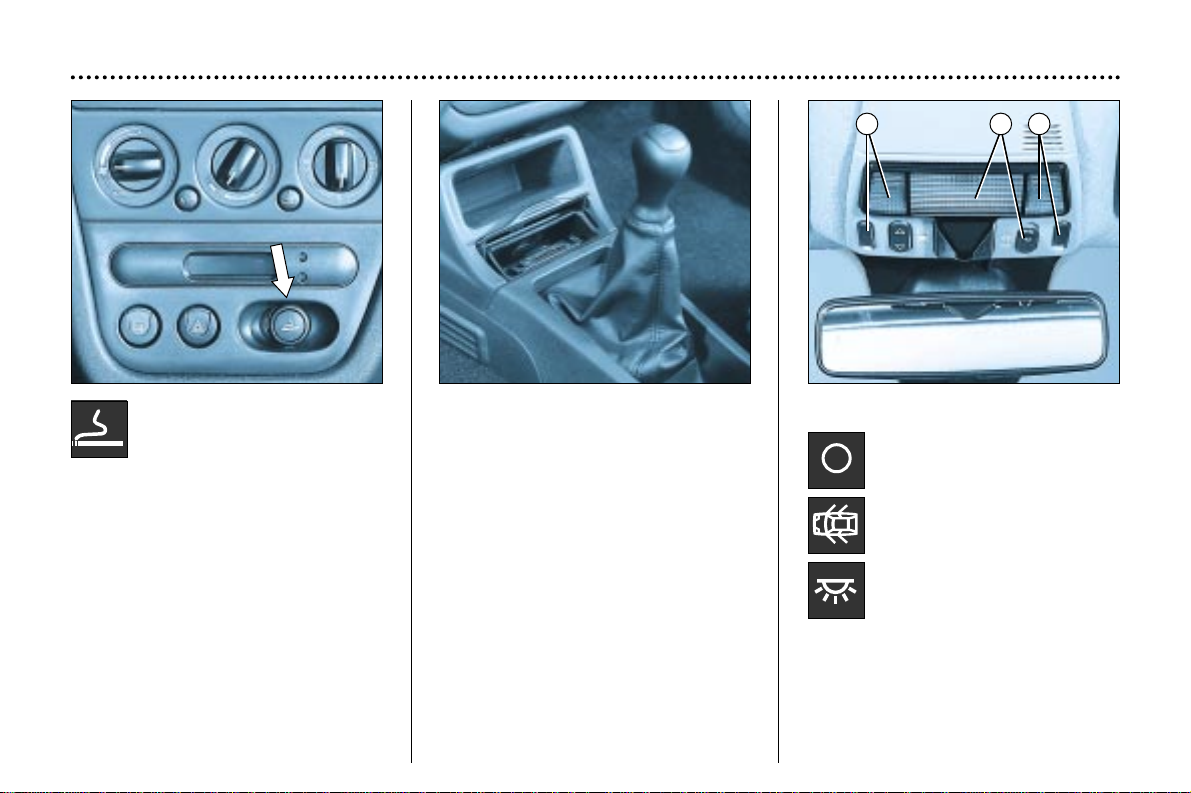
Front ashtray
To empty:
- open and pull the unit.
To replace:
- push in fully.
Rear ashtray
T o empty, open and pull towards you.
Lighter
Press and wait a few
moments until it pops out
automatically.
Off.
Front and rear courtesy lights
1 - Front courtesy light.
2 - Left map-reading light.
3 - Right map-reading light.
With the key in the accessories or
ignition on position, press the corresponding switch.
Gradual illumination on
opening or closing a door.
Lights permanently on with
the key in the accessories
position or with the ignition
on.
2 1 3
104
YOUR 306 IN DETAIL
Storage compartments (estate)
There are two storage compartments,
fitted with elastic retaining straps,
behind the boot side trims.
To gain access to a storage compartment, pull the handle towards you.
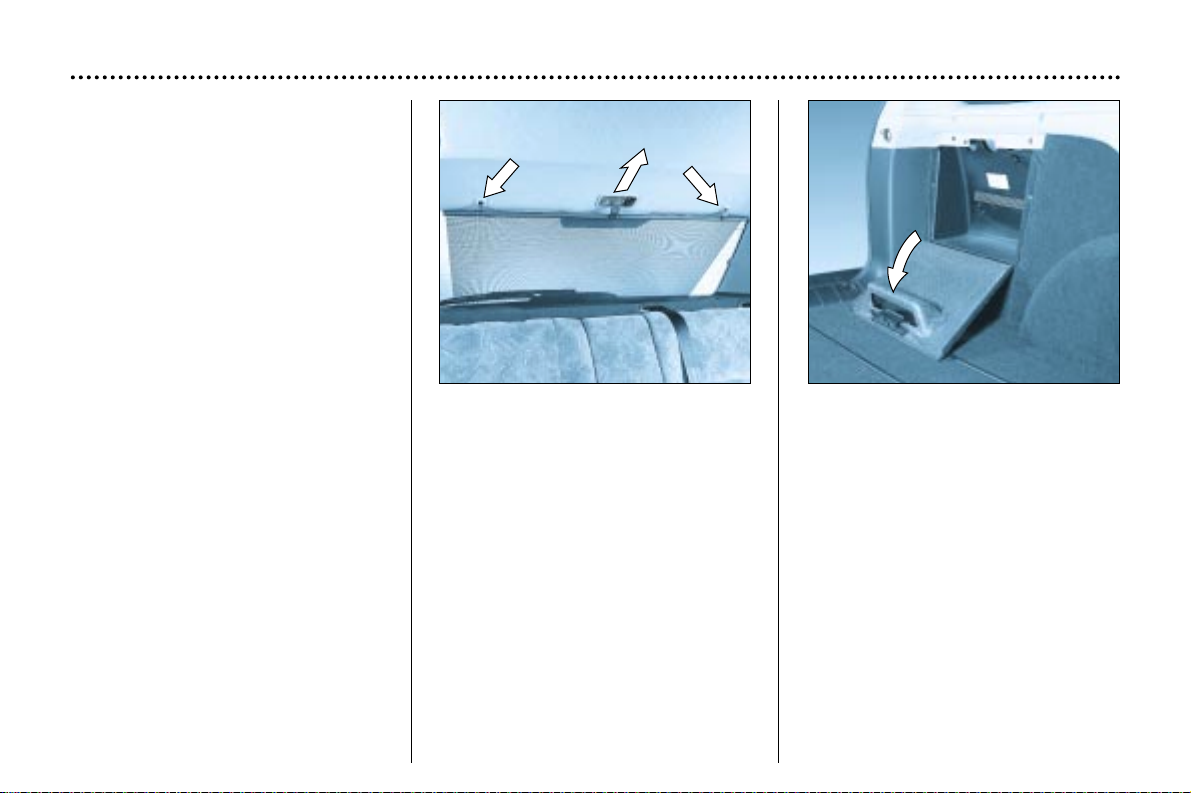
Rear screen blind (4 door)*
Pull the blind by the central tab then
position the hooks in the locations.
Support it as it returns.
Athermic windscreen*
The windscreen has two non-reflective zones located either side of the
base of the interior rear-view mirror.
These are for affixing toll cards or
parking passes.
Note: the athermic glass reduces the
effect of the sun’s rays, by limiting
the heating of the passenger compartment, but its reflective coating
blocks radio signals.
* According to specification.
DRIVING YOUR 306
105
1
B
A
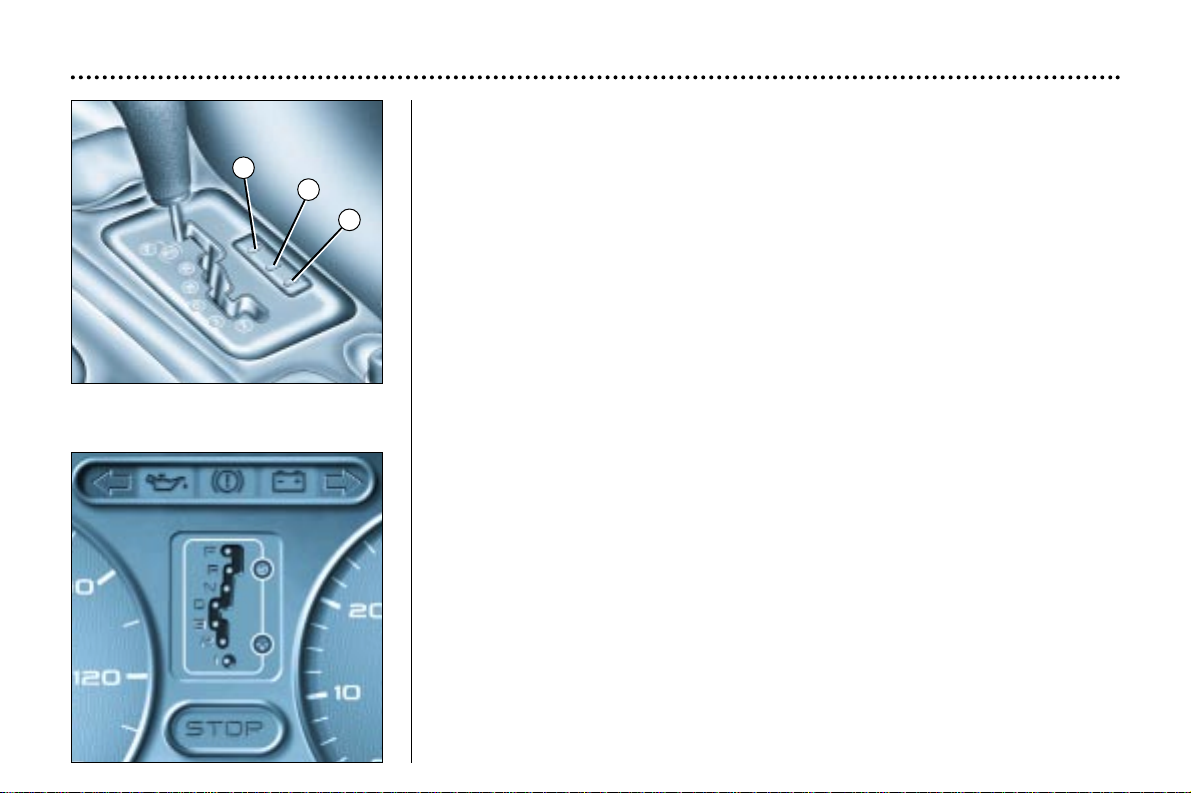
AUTOMATIC AUTOADAPTIVE GEARBOX
Starting
To start the engine, put the selector lever in N or P.
Press the brake pedal when starting the engine and to exit position P.
Positions of the selector lever
These positions are displayed on the instrument panel.
P. Park: use with the handbrake when parked.
R. Reverse: this must only be engaged when the vehicle is stationary and the
engine idling.
N. Neutral: if N is engaged by mistake while the car is moving, allow the engine
to return to idling speed before engaging a new forward gear.
D. Drive: in this position, the four gear ratios change automatically. The gear
change points vary depending on the programme selected.
3. Automatic changes of the first three gears only.
Select this position when you notice frequent changes between third and fourth
gear (town driving or on winding roads).
2 Automatic changes of the first two gears only.
This position is particularly suitable for mountain roads, when going uphill (to
make the best use of the engine's power) and downhill (engine braking).
1. Selection of first gear only.
For use on steep gradients, especially when towing a trailer.
Selection of first gear is by pressing switch 1 with the lever in position 2.
To exit position 1, press switch 1 again or move the selector lever.

DRIVING YOUR 306
106
Any disruption of the
system is signalled by the
simultaneous flashing of the
Sport and Snow lights on
the instrument panel. In
such a case, the gearbox will operate
in downgraded mode. You may feel
a substantial knock when reverse is
selected from Por N(without any risk
of damage to the gearbox).
Do not exceed 60 m.p.h.
(100km/h).
Contact a PEUGEOT dealer
without delay.
When the engine is idling with the
car in gear, the car will move even
without you accelerating.
Do not accelerate while a gear is
being selected, when the vehicle is
stationary.
When stationary, have your foot on
the brake pedal when selecting a
gear.
Do not accelerate in gear with the
brakes on.
If work needs to be done with the
engine running, apply the handbrake and select position P.
Do not change down to brake on
slippery roads.
Never select position N when the
vehicle is moving.
Never engage P or Rif the vehicle
is not stationary.
Do not allow children inside the
vehicle unsupervised when the
engine is running.
Operating programmes
You have a choice of three operating
programmes:
- Auto-adaptive (normal).
- Sport.
- Snow.
One press on button A or Bwill select
Sport or Snow respectively. The
selection is displayed on the instrument panel. Pressing the button a
second time will return to the autoadaptive (normal) programme.
Auto-adaptive programme
(normal)
Gear changes are carried out on the
basis of various parameters, such as:
- driving style,
- road characteristics,
- the vehicle’s load.
The gearbox continuously scans the
different programmes in the memory
and selects the one most suitable for
the driving conditions at any given
moment.
Sport programme
The Sport programme favours performance for sporty driving and more
dynamic acceleration.
Snow Programme
In position D the Snow programme
provides smooth driving suited to slippery roads in order to improve traction and stability. Starting is in 2nd
gear and changing down is at low
engine speeds.
Special operating features
During prolonged braking, the
gearbox changes down automatically,
so as to provide efficient engine
braking.
- If you take your foot off the accelerator suddenly (when you are
taken by surprise, for example), the
gearbox will not change up, so as to
improve safety.
-
When the engine is cold, the
gearbox automatically selects a
special programme which enables
the engine to reach its ideal temperature more quickly to decrease
pollution.
Kickdown
For immediate maximum acceleration
without touching the gear lever, press
the accelerator pedal down as far as
it will go. The gearbox will change
down automatically or stay in the gear
selected, up to maximum engine
speed.
107
DRIVING YOUR 306
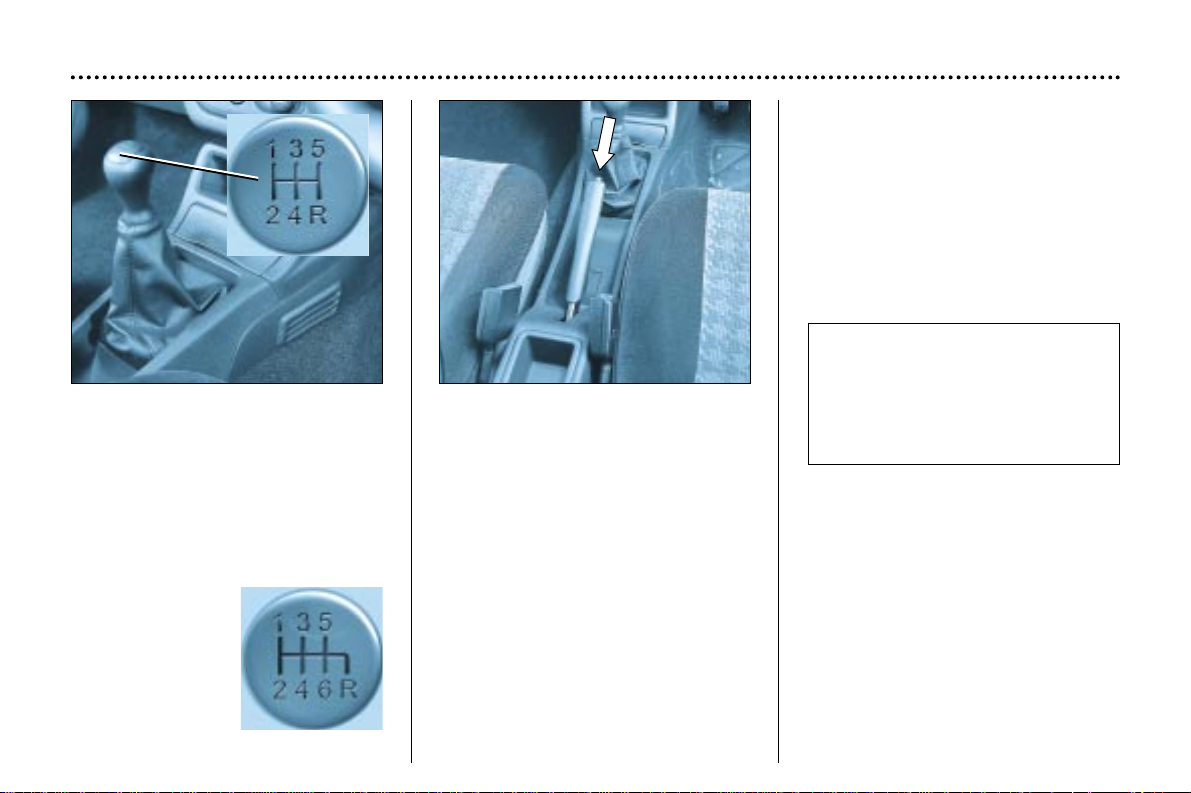
Handbrake
Application
When you have parked the vehicle,
pull up the handbrake to apply it.
T o ease application and release of the
handbrake, press the brake pedal and
pull up the handbrake with the engine
running.
Release
Press the button before releasing the
handbrake.
THE ABS ANTI-LOCK
BRAKING SYSTEM*
In conjunction with tyres of an
approved make and in good condition, the ABS system with electronic
brake force distribution improves the
stability and handling of your vehicle,
particularly on an uneven or slippery
surface.
The anti-lock braking system comes
into operation automatically when
there is a risk of wheel lock.
Manual gearbox
The positions are indicated on the
gear lever knob.
Reverse gear can only be engaged
from neutral when the vehicle is
stationary, with the engine idling.
Special features of the six
speed
gearbox*
Raise the lock
ring under the
knob before
engaging reverse.
In the event of emergency braking,
press very firmly without reducing
the pressure. In some conditions
the normal operation of the ABS
may be felt as vibrations of the
brake pedal.
* According to specification.
Power steering
This is a comfort device which offers
the best compromise for parking, and
for driving at high speeds.
108
DRIVING YOUR 306
AIRBAGS*
The airbag system has been
designed to maximise the safety of
the occupants in the event of serious
collisions. It works in conjunction with
the seat belts.
The electronic detectors register and
analyse any abrupt deceleration of the
vehicle; if the triggering threshold is
reached the airbags inflate instantly
and come between the occupants and
the vehicle.
Immediately after the impact, the
airbags deflate rapidly, so that they do
not hinder the visibility of the occupants and their exit if necessary from
the vehicle.
The airbags are not deployed in the
case of collisions which are not
serious, for which the seat belt is sufficient to ensure maximum protection.
The seriousness of a collision
depends on the nature of the obstacle
and the speed of the vehicle at the
moment of the collision.
Airbags only operate when the
ignition is switched on.
Note: the gas escaping from the
cushion can be a minor irritant.
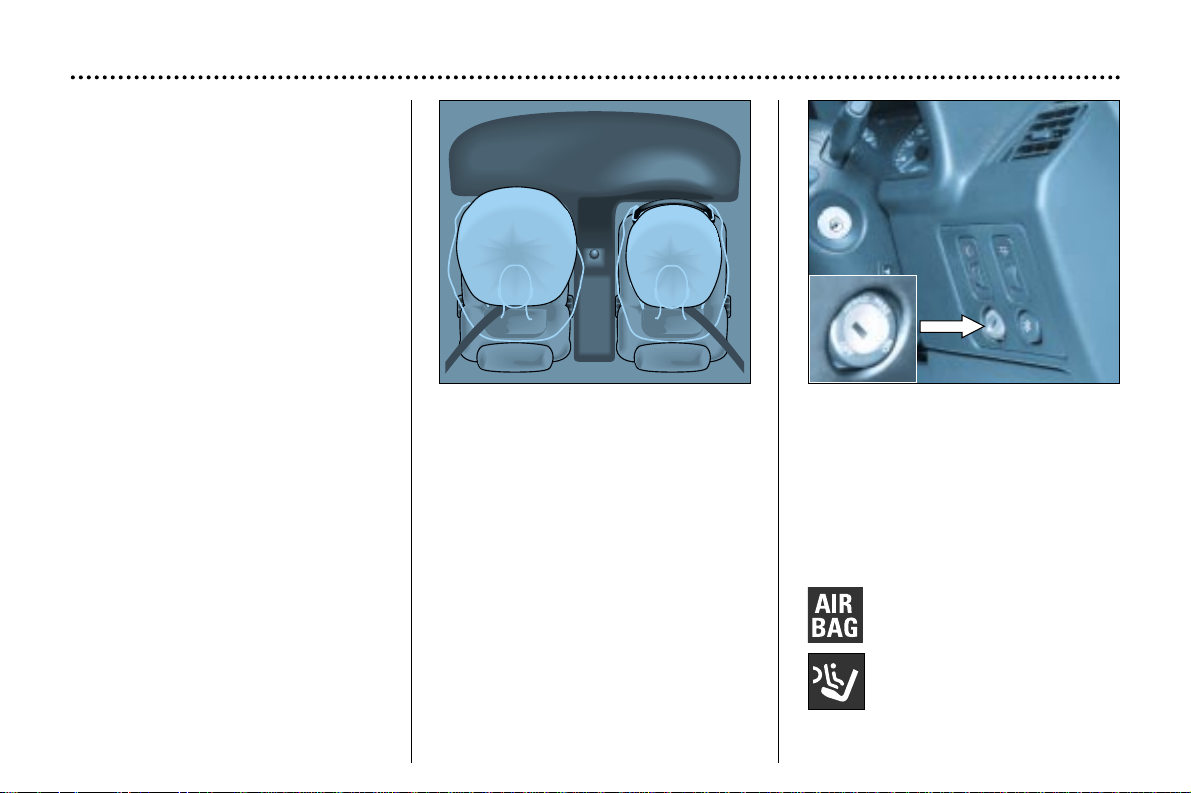
FRONT AIRBAGS*
These are folded in the centre of the
steering wheel for the driver and in
the fascia for the front passenger.
They are deployed simultaneously
(except in cases where the airbag is
disarmed), for frontal impacts where
there is a risk of injury to the head or
chest.
DISARMING THE
PASSENGER AIRBAG*
To ensure the safety of your child,
it is essential to disarm the passenger airbag when you install a
rearwards-facing child seat on the
front passenger seat.
Remove the ignition key, insert it into
the passenger airbag switch 1 and
turn it to the “OFF” position.
One of these two warning
lights* on the instrument panel
is lit throughout the disarming
procedure.
* According to specification.
109
DRIVING YOUR 306
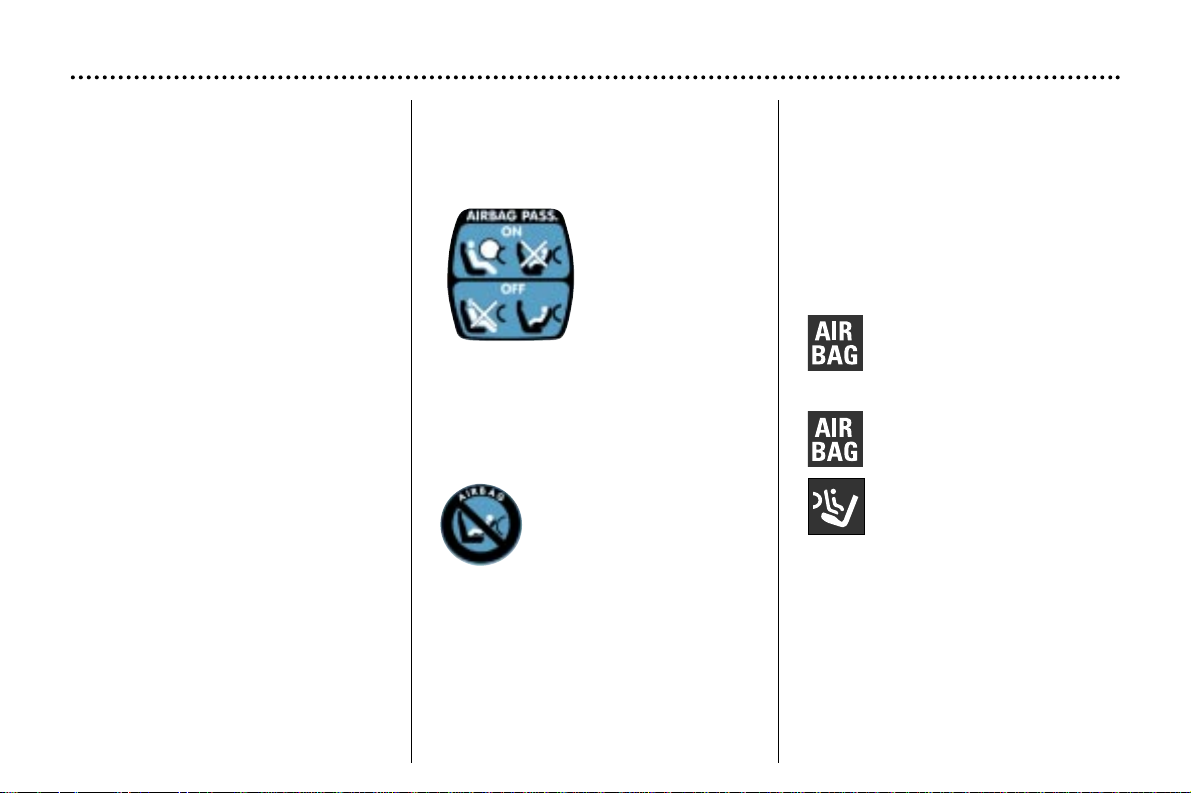
In the “OFF” position, the passenger
airbag will not be triggered in the
event of an impact.
As soon as you remove the rearwards-facing child seat from the front
passenger seat, turn the airbag switch
to the “ON” position, to arm the airbag
and thus ensure the safety of your
passenger in an impact.
Passenger airbag precautions
Vehicle fitted with a passenger airbag
disarming switch:
- disarm the airbag
if you install a
rearwards-facing
child seat on the
front passenger
seat,
- arm the airbag
when you transport an adult on
the front passenger seat.
Vehicle not fitted with a passenger
airbag disarming switch:
- do not install a rearwards-facing child seat
on the front passenger
seat.
Never place your feet or any object
on the fascia.
Operating check
It is indicated by one of the lights on
instrument panel.
If the passenger airbag is armed (passenger airbag switch in the “ON” position), the light will come on for
6 seconds when the ignition is
switched on.
If the passenger airbag is disarmed
(passenger airbag switch in the “OFF”
position), the light will stay on.
Only the airbag warning light
remains on,
or,
the airbag warning light
comes on for six seconds
after the ignition is switched
on and the airbag disarming
ilight remains on permanently.
In any case, if the light flashes,
contact a PEUGEOT dealer.
* According to specification.
110
SIDE AIRBAGS*
DRIVING YOUR 306
This is indicated by one of the lights
on the instrument panel.
It comes on for 6 seconds, each time
the ignition is switched on.
Operating check
If one of the switches:
– does not light up when the ignition
is switched on, or,
– does not go out after 6 seconds or,
– flashes for 5 minutes then stays on,
contact a PEUGEOT dealer.
* According to specification.
** During model year and depending
on model.
These are incorporated into the front
seat back frame on the door side.
They are deployed independently of
each other depending on which side
the collision occurs, in collisions which
could cause injury to the chest, the
abdomen or the head.
* *

111
DRIVING YOUR 306
WARNING
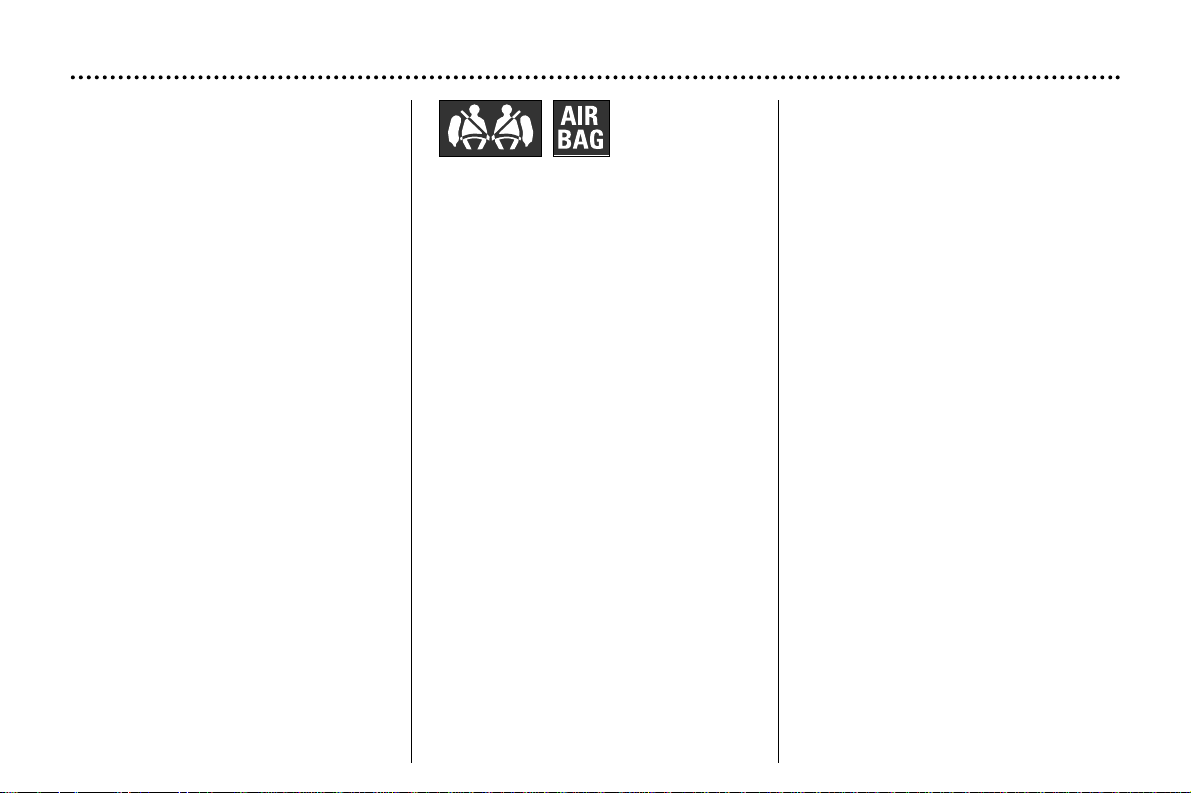
For the front and side airbags to be fully effective, observe the following safety rules:
• Wear a correctly adjusted seat belt.
• Sit in a normal upright position.
• Do not leave an accessory, or any other object between the occupants of the front seats and the airbags. It could
hamper the operation of the airbags or injure the occupants.
• All work on the airbag system is strictly forbidden unless it is carried out by qualified personnel of the PEUGEOT
network.
• After an accident or if the vehicle has been stolen or broken into, have the airbag systems checked.
• The airbag systems have been designed to be fully operational for 10 years after the vehicle has been registered.
Have them checked by a PEUGEOT dealer at this time.
• Front airbags*
• Do not drive holding the steering wheel by its spokes or resting your hands on the centre part of the wheel.
• Smoke as little as possible; deployment of the airbags can cause burns or the risk of injury from a cigarette or pipe.
• Never remove or pierce the steering wheel or hit it violently.
• Side air bags*
• Fit only approved covers to the front seats
• Do not fix or glue anything to the front seat backs. This could cause injury to the chest or arms when the side airbag
inflates.
• Do not sit with the upper part of the body any nearer to the door than necessary.
* According to specification.
YOUR 306 AT A GLANCE
11
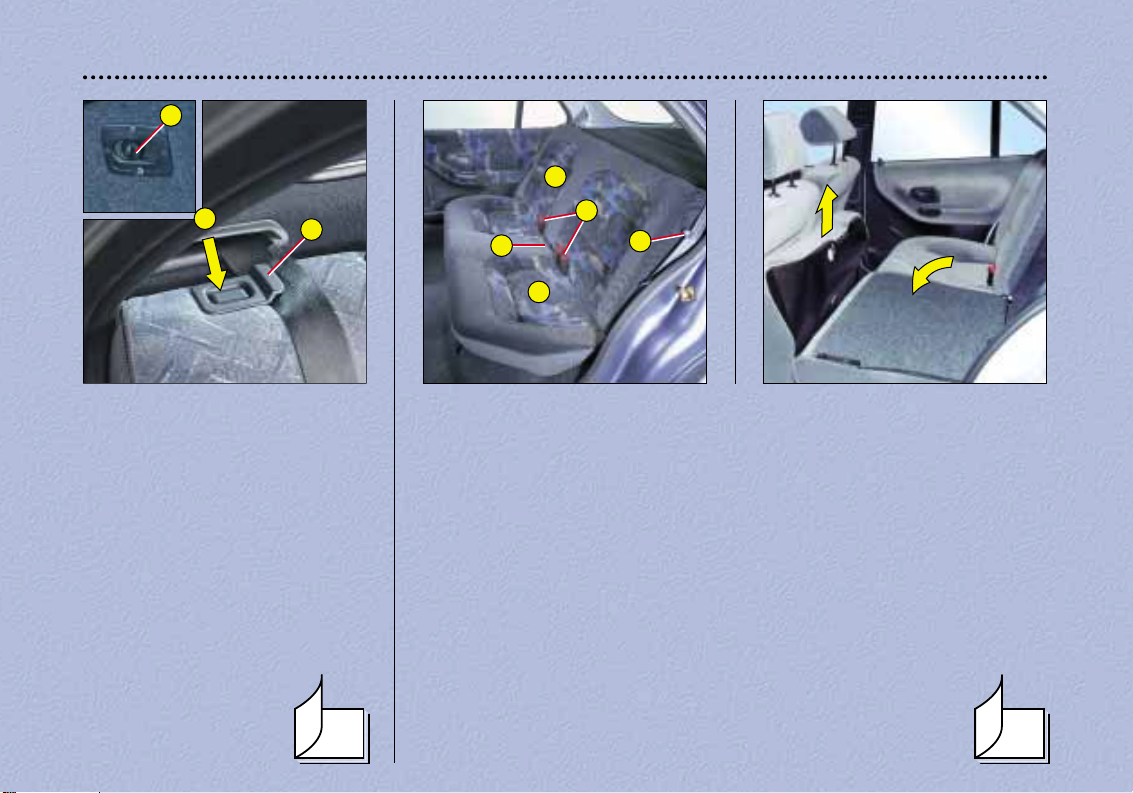
FOLDING REAR SEAT
BACK
To fold the seat back:
- from inside the boot, release
control 1.
- position the seat belt under the
strap guide B.
- unlock the seat back by pressing button A.
- tilt the seat back.
When repositioning the seat back,
ensure that the seat belts
are positioned correctly
and the seat back is
secured correctly.
FOLDING REAR SEATS (all models)
To fold the rear seats:
- insert the seat belt stalks in the hooks A.
- pull the strap 1.
- tilt the seat cushion 2 against the front seats.
- position the seat belt under the lever 3 (5-door and estate) or on the top
of the seat back (3-door).
- unlock the seat back using the controls on the side 3 (5-door and estate)
or on the seat back 4 (3-door).
- tilt the seat back 4.
To tilt the rear seats, always start with the seat cushion, never
with the seat back (risk of damage).
When repositioning, take care to avoid trapping the seat belts
under the seat cushion or behind the seat back.
8586
1
4
3
A
2
A
B
1

110
SIDE AIRBAGS*
DRIVING YOUR 306
This is indicated by one of the lights
on the instrument panel.
It comes on for 6 seconds, each time
the ignition is switched on.
Operating check
If one of the switches:
– does not light up when the ignition
is switched on, or,
– does not go out after 6 seconds or,
– flashes for 5 minutes then stays on,
contact a PEUGEOT dealer.
* According to specification.
** During model year and depending
on model.
These are incorporated into the front
seat back frame on the door side.
They are deployed independently of
each other depending on which side
the collision occurs, in collisions which
could cause injury to the chest, the
abdomen or the head.
* *

111
DRIVING YOUR 306
WARNING
For the front and side airbags to be fully effective, observe the following safety rules:
• Wear a correctly adjusted seat belt.
• Sit in a normal upright position.
• Do not leave an accessory, or any other object between the occupants of the front seats and the airbags. It could
hamper the operation of the airbags or injure the occupants.
• All work on the airbag system is strictly forbidden unless it is carried out by qualified personnel of the PEUGEOT
network.
• After an accident or if the vehicle has been stolen or broken into, have the airbag systems checked.
• The airbag systems have been designed to be fully operational for 10 years after the vehicle has been registered.
Have them checked by a PEUGEOT dealer at this time.
• Front airbags*
• Do not drive holding the steering wheel by its spokes or resting your hands on the centre part of the wheel.
• Smoke as little as possible; deployment of the airbags can cause burns or the risk of injury from a cigarette or pipe.
• Never remove or pierce the steering wheel or hit it violently.
• Side air bags*
• Fit only approved covers to the front seats
• Do not fix or glue anything to the front seat backs. This could cause injury to the chest or arms when the side airbag
inflates.
• Do not sit with the upper part of the body any nearer to the door than necessary.
* According to specification.

112
TECHNICAL DATA
(1) With air conditioning. (2) Without air conditioning.
PETROL ENGINES
ENGINES 1.4 litre 1.6 litre 1.8 litre 1.8 litre 16V
Capacity ( cm3) 1360 1587 1761 1761
Bore x stroke 75 x 77 78,5 x 82 83 x 81,4 83 x 81,4
Number of valves 8 8 8 16
Max. power:
EU standard (KW) 55 72,6 70 81
at engine speed (r.p.m) 5500 5750 6000 5500
Max. torque:
EU standard (Nm) at r.p.m 120 at 3400 137,8 at 3250 142 at 3000 155 at 4250
Fuel Unleaded Unleaded Leaded Unleaded
allowed
Catalytic converter yes yes no yes
7CKFW
7CNFT
7CL6A
7CLFY
7AKFW
7ANFT
7AL6A
7ALFY
7SKFW
7BNFT
7BL6A
7BLFY
7BKFW
7ENFT
7EL6A
7ELFY
7EKFW
CAPACITIES (in litres)
Engines (with filter replacement) 3,2 3,2 3,2 4,25(1) - 4,75(2) 4,25(1) - 4,75(2)
Gearbox - Final drive 2 2,4 - 2 2
Manual Manual Automatic Manual Manual
(5-speed) (5-speed) (4-speed) (5-speed) (5-speed)
MODELS:
Model codes
GEARBOX

113
TECHNICAL DATA
(1) With air conditioning. (2) Without air conditioning.
PETROL AND DIESEL ENGINES
ENGINES 1,8 litre 16V 2 litres 16 V Diesel DieselTurbo
1,9 litre 2 litres HDI
Capacity (cm3) 1761 1998 1868 1997
Bore x stroke 83 x 81,4 86 x 86 82,2 x 88 85 x 88
Number of valves 16 16 8 8
Max. power:
EU standard (KW) 81 97,4 51 66
at engine speed (r.p.m) 5500 5500 4600 4000
Max. torque:
EU standard (Nm) at r.p.m 155 at 4250 180 at 4200 125 at 2500 205 at 1900
Fuel Unleaded Unleaded Diesel Diesel
Catalytic converter Yes Yes
7ALFYE 7CWJY
7ALFYT 7AWJY
7BLFYE 7CRFV 7SWJY 7CRHY
7BLFYT 7ARFV 7BWJY 7ARHY
7ELFYE 7BRFV 7EWJY 7BRHY
7ELFYT 7ERFV 7TWJY 7ERHY
CAPACITIES (in litres)
Engines (with filter replacement) 4,25(1) 4,25(1) 4,25(1) 4,5(1) 4,25
4,75(2) 4,75(2) 4,75(2) 4,75(2)
Gearbox - Final drive 2 2 - 1,9 1,9
GEARBOX Manual Manual Automatic Manual Manual
(5-speed) (5-speed) (4-speed) (5-speed) (5-speed)
MODELS:
Model codes

114
TECHNICAL DATA
PETROL ENGINE FUEL CONSUMPTION
7CRFV
2 litres 16 V Manual
7ARFV
22.0 (12.8) 40.4 (7.0) 31.0 (9.1) 219 g/km
7BRFV
7ERFV
In accordance with directive 93/116 in MPG (litres/100km)
Engines Gearbox Model Urban Inter-urban Mixed Emission
codes driving driving driving of CO2by mass
7CKFW
7AKFW
1,4 litre Manual 7SKFW 32.8 (8,6) 51.4 (5.5) 42.8 (6.6) 156 g/km
7BKFW
7EKFW
7CNFT
1,6 litre Manual
7ANFT
31.0 (9.1) 50.4 (5.6) 40.9 (6.9) 165 g/km
7BNFT
7ENFT
7CLFYT
7ALFYT 24.4 (11.6) 46.3 (6.1) 34.9 (8.1) 193 g/km
7BLFYT
1,8 litre 16 V Manual 7ELFYT 24.1 (11.7) 45.6 (6.2) 34.4 (8.2) 196 g/km
7CLFYE
7ALFYE 23.5 (12.0) 44.8 (6.3) 34.0 (8.3) 198 g/km
7BLFYE
7ELFYE 22.8 (12.1) 44.1 (6.4) 33.6 (8.4) 198 g/km
7CRFVW
2 litres 16 V Automatic
7ARFVW
20.6 (13.7) 43.5 (6.5) 30.7 (9.2) 221 g/km
7BRFVW
7ERFVW
7CNFT
1,6 litre Automatic
7ANFT
25.7 (11.0) 47.9 (5.9) 36.2 (7.8) 185 g/km
7BNFT
7ENFT
Consumption

115
TECHNICAL DATA
The fuel consumption values given are correct at the time of going to press.
CONSUMPTION FOR PETROL/LPG ENGINES
According to directive 93/116 (litres/100 km)
Engine Gearbox Model Urban Inter-urban Mixed Emission of
codes roads roads roads C02 by mass
7CWJY
7AWJY
Diesel 1,9 litre Manual
7BWJY
34.0 (8.3) 56.5 (5.0) 44.8 (6.3) 166 g/km
7EWJY
7SWJY
7TWJY
7CRHY
Diesel turbo
Manual
7ARHY 40.4 (7.0) 64.2 (4.4) 53.3 (5.3) 143 g/km
2 litres HDI 7BRHY
7ERHY
Consumption
116
TECHNICAL DATA
* The speed of a towing vehicle is limited to 60 mph (100 Km/h).
TOWING WEIGHTS AND LOADS (IN KG)
Engines 1.4 litre 1.6 litre 1.6 litre 1.8 litre 2 l 16 V 2 l 16 V 1.9 l D 2 l HDI
Gearbox
Manual Manual Auto. Manual Manual Auto. Manual Manual
Model codes : 7C…
KFW NFT NFT LFY/L6A RFV RFV WJY RHY
•
Kerb weight
1 013 1 071 1 108 1 096 1 160 1 208 1 100 1 142
• Gross vehicle weight (GVW) 1 460 1 535 1 550 1 560 1 625 1 650 1 530 1 585
•
Gross Train weight (GTW)*
2 360 2 435 2 450 2 560 2 625 2 650 2 480 2 585
• Unbraked trailer 540 570 575 580 610 630 570 600
•
Braked trailer (within GTW)
1 200 1 200 1 200 1 200 1 200 1 200 1 200 1 200
Engines 1.4 litre 1.6 litre 1.6 litre 1.8 litre 1.8 l 16 V 2 l 16 V 2 l 16 V 1.9 l D 2 l HDI
Gearbox
Manual Manual Auto. Manual Manual Manual Auto. Manual Manual
Model codes : 7A…
KFW
NFT NFT
LFY/L6A
FYE/FYT
RFV
RFV WJY RHY
•
Kerb weight
1 043 1 106 1 125 1 116 1 116 1 194 1 242 1 118 1 213
• Gross vehicle weight (GVW) 1 480 1 580 1 600 1 600 1 670 1 640 1 650 1 580 1 630
•
Gross Train weight (GTW)*
2 380 2 480 2 500 2 600 2 670 2 640 2 650 2 530 2 630
• Unbraked trailer 550 580 585 590 625 620 640 580 610
•
Braked trailer (within GTW)
1 200 1 200 1 200 1 200 1 200 1 200 1 200 1 200 1 200
5 DOOR
Engines 1.4 litre 1.9 l D 1.8 l 16 V 1.9 l D
Gearbox
Manual Manual Manual Manual
Model codes : 7S… / 7T…
KFW WJY FYE/FYT WJZ
•
Kerb weight
1 013 1 100 1 096 1 118
• Gross vehicle weight (GVW) 1 460 1 530 1 670 1 580
•
Gross Train weight (GTW)*
2 360 2 480 2 670 2 530
• Unbraked trailer — — – –
•
Braked trailer (within GTW)
1 200 1 200 1 200 1 200
3 DOOR VAN 7S... 5 DOOR VAN 7T...
3 DOOR
117
TECHNICAL DATA
* The speed of a towing vehicle is limited to 60 mph (100 Km/h).
TOWING WEIGHTS AND LOADS (IN KG)
Engines 1.4 litre 1.6 litre 1.6 litre 1.8 litre 1.8 l 16 V 2 l 16 V 2 l 16 V 1.9 l D 2 l HDI
Gearbox
Manual Manual Auto. Manual Manual Manual Auto. Manual Manual
Model codes : 7B… KFW NFT NFT LFY/L6A
FYE/FYT
RFV RFV WJY RHY
•
Kerb weight
1 042 1 117 1 180 1 162 1 162 1 198 1 225 1 227 1 225
• Gross vehicle weight (GVW) 1 515 1 575 1 610 1 615 1 695 1 635 1 660 1 590 1 635
•
Gross Train weight (GTW)*
2 415 2 475 2 510 2 615 2 695 2 635 2 660 2 540 2 635
• Unbraked trailer 555 585 605 600 640 630 650 590 620
•
Braked trailer (within GTW)
1 200 1 200 1 200 1 200 1 200 1 200 1 200 1 200 1 200
4 DOOR
Engines 1.4 litre 1.6 litre 1.6 litre 1.8 litre 1.8 l 16 V 2 l 16 V 2 l 16 V 1.9 l D 2 l HDI
Gearbox
Manual Manual Auto. Manual Manual Manual Auto. Manual Manual
Model codes : 7B…
KFW NFT NFT LFY/L6A
FYE/FYT
RFV RFV WJY RHY
•
Kerb weight
1 088 1 150 1 165 1 185 1 185 1 195 1 225 1 172 1 260
• Gross vehicle weight (GVW) 1 550 1 605 1 635 1 645 1 725 1 665 1 675 1 625 1 655
•
Gross Train weight (GTW)*
2 450 2 505 2 535 2 645 2 725 2 665 2 675 2 575 2 655
• Unbraked trailer 570 590 620 630 675 640 650 600 635
•
Braked trailer (within GTW)
1 000 1 000 1 000 1 000 1 000 1 000 1 000 1 000 1 000
ESTATE
4267 mm
118
TECHNICAL DATA
815 mm 2580 mm
4030 mm
1462 - 1465 mm
635 mm
1680 mm
1380 mm
1431 - 1435 mm
815 mm 2580 mm 872 mm
1386 mm
1433 - 1439 mm
1680 mm
1454 - 1462 mm
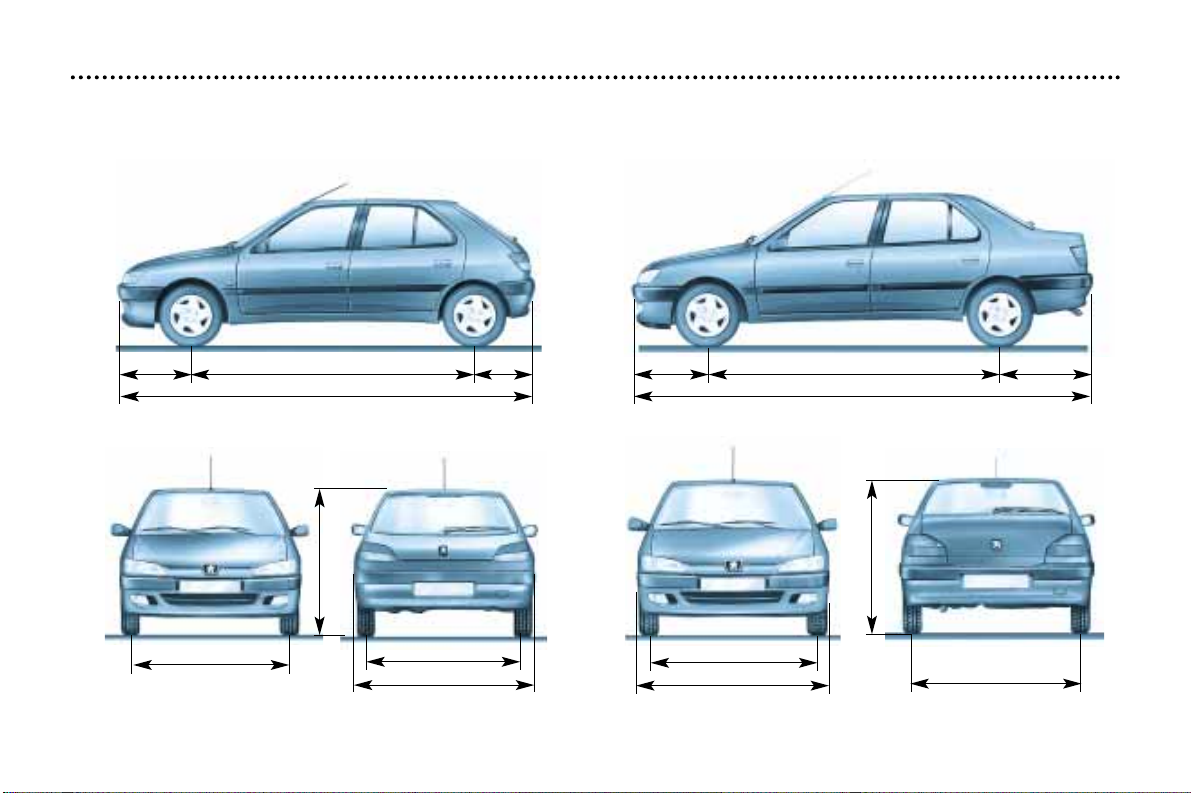
Dimensions 3 or 5 door Dimensions 4 door
119
TECHNICAL DATA
815 mm 2580 mm
4338 mm
1423 - 1433 mm
943 mm
1680 mm
1424 - 1432 mm
1415 mm
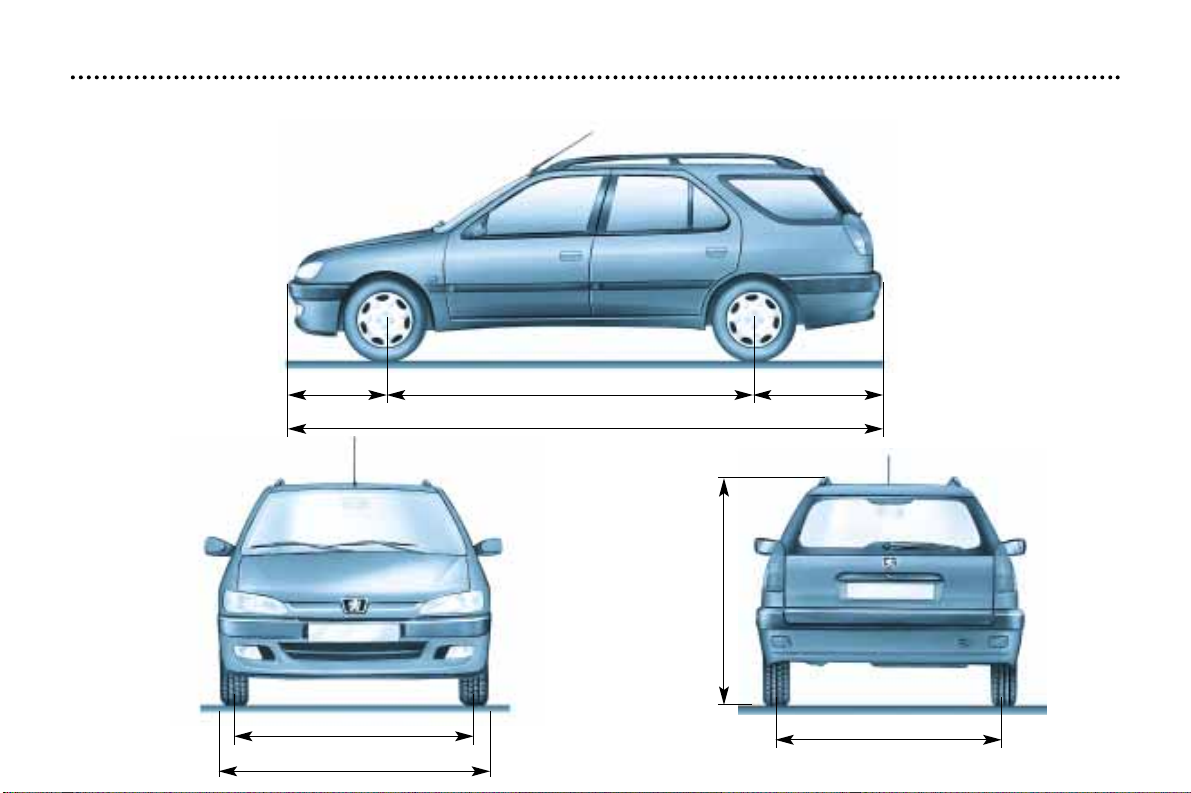
Dimensions estate
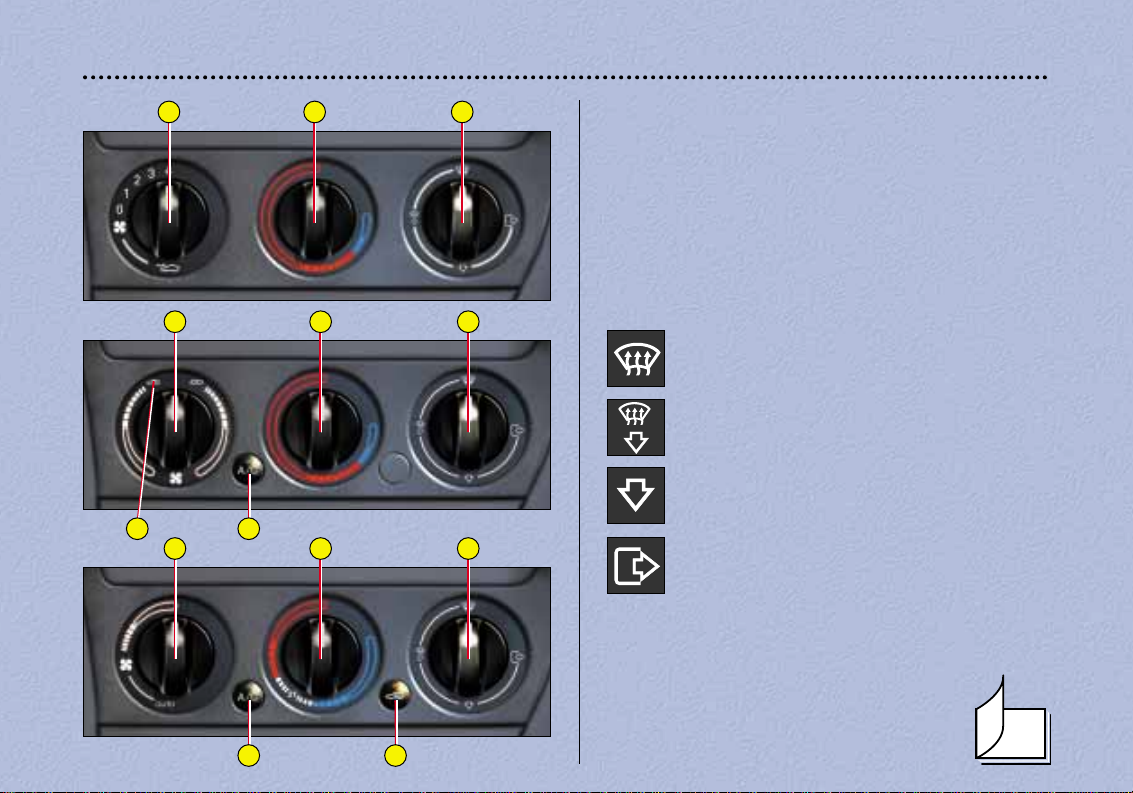
YOUR 306 AT A GLANCE
12
5 - Recirculation of interior air.
VENTILATION/HEATING/AIR CONDITIONING
1 - Air flow adjustment.
2 - Temperature adjustment.
3 - Air distribution.
Windscreen and side windows.
Windscreen, side windows and footwells.
Footwells.
Central and side vents.
4 - Air conditioning on/off.
52
1 2 3
1 2 3
4
1 2 3
4 5
5
IDENTIFYING FEATURES OF YOUR 306
A. Manufacturer’s plate.
B. Model serial number.
C. Tyre pressures and paint colour code.
The label C affixed to the centre pillar of the driver’s side door indicates:
– the wheel and tyre sizes,
– the brands of tyres approved by the manufacturer,
– inflation pressures (the inflation pressure check must be carried out cold, at least once a month).
– the paint colour code.
120
TECHNICAL DATA
C
A
B
B
B
C
C
A
A
SPECIAL FEATURES
124
DEADLOCKING*
Deadlocking is an additional security device which means that the interior and
exterior door controls cannot open the doors, when deadlocked.
Deadlocking can be carried out in two ways:
- With the remote control.
- With the ignition key.
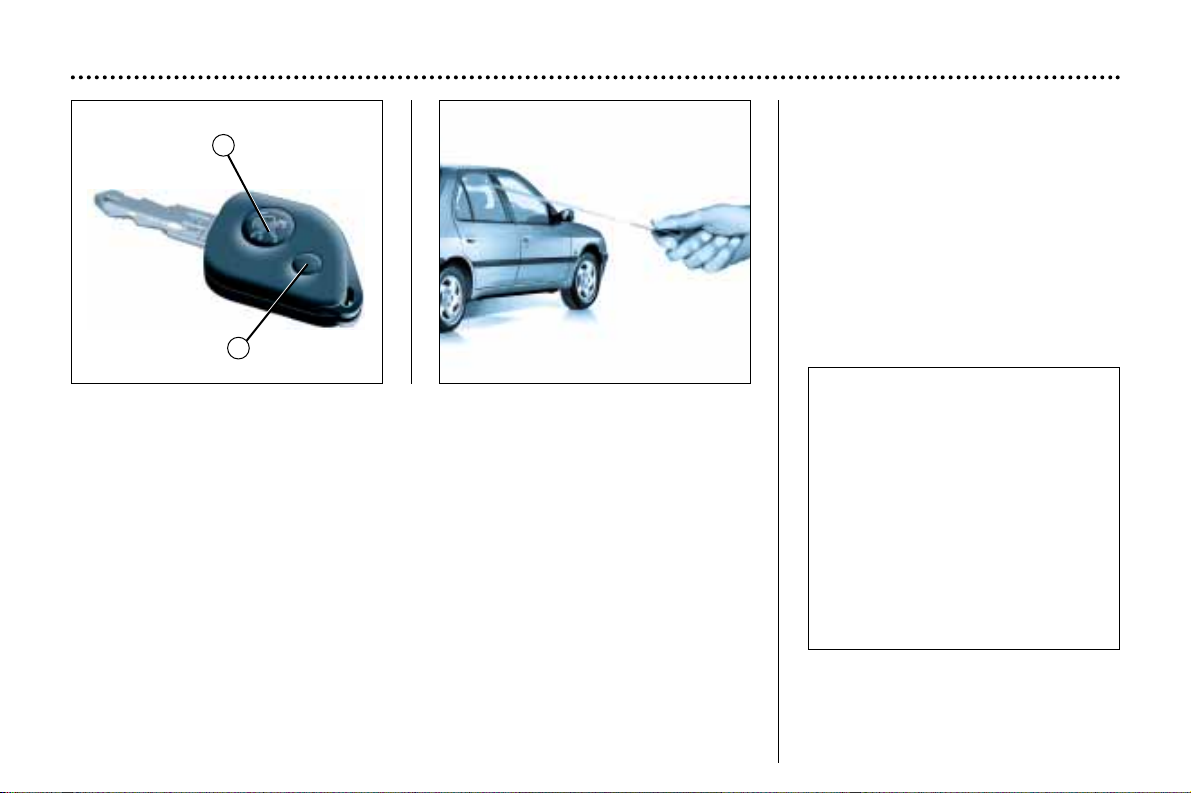
To operate deadlocking
After locking the doors you have five seconds in which to operate the deadlocking.
If using the remote control:
- press button 1 once to lock your vehicle, the direction indicators stay on for
2 seconds.
- press button 1 for a second time within the five seconds to deadlock your vehicle, the direction indicators flash once.
- press button 2 to unlock your vehicle, the direction indicators flash several times.
If using the ignition key, keep the key in the lock of one of the front doors, with the
key turned towards the rear of the vehicle (turn the key towards the front to unlock).
To unlock the doors and boot
or tailgate
Place the ignition key in the lock of
one of the front doors and turn it
towards the front of the vehicle.
Alternatively, press button 2 on the
remote control.
* According to specification.
Important
After deadlocking, anybody inside
the car, and without the remote
control, will not be able to get out
by themselves. The doors can
only be unlocked by using the
remote control, or the ignition key
in the door lock.
If the battery is disconnected
deadlocking remains activated. It
is still possible to open one of the
front doors using the ignition key,
but the key will only open that particular door.
1
2

SPECIAL FEATURES
125
To programme the remote
control(s)
To programme the deadlocking
remote controls key(s) (on first use):
- the doors must be unlocked.
- use the key with remote control to
turn on the ignition (to position A
“accessories”).
- immediately press the large button
on the key.
- turn off the ignition.
To check that programming
has been correctly carried out:
- press button 1 on the remote control key (or one of the remote control keys*).
- the doors and boot or tailgate will
lock.
- if this is not the case: repeat the
programming.
Do not operate the deadlocking if there is someone inside the vehicle.
Keep your key reference
number in a safe place.
This will enable you to order a
new key if the key is lost or stolen.
Check that the batteries are in
good condition.
If the red indicator light comes on
this indicates correct operation of
the transmitter but not that the
doors have been opened or
locked; wait at least one second
between each attempt.
* According to specification.

SPECIAL FEATURES
126
ALARM SYSTEM*
Setting and disarming the
alarm
Switching off the siren
The alarm completes the security
equipment of your vehicle. It comprises two types of protection:
- exterior protection: when this is
set, the alarm sounds if a door,
the bonnet, the boot or the tailgate are opened.
- interior sensor protection: when
it is set, the alarm sounds if the
sensors detect a variation in the
air movement inside the vehicle
(breaking of a window) or a
movement inside the vehicle.
It is also equipped with an antitamper function.
If an attempt is made to neutralise
the leads to the siren, the central
control or the battery:
- the alarm is triggered,
- the siren sounds, the headlights
come on*.
To set the alarm (exterior and
interior protection)
The ignition must be switched off.
You must be outside the vehicle
Press the locking button of the
remote control key (if your vehicle
has deadlocking, you then need to
press this button again).
The doors will lock.
The direction indicators come on
continuously for two seconds.
The red lamp on the switch flashes
once a second.
Five seconds afterwards : the exteri-
or protection is set.
Fifty seconds afterwards : the interi-
or protection is set.
Note : when the alarm is triggered,
the siren sounds for thirty seconds.
It then stops, but the alarm remains
set.
Warning
If, on setting the alarm, a door, the
boot, tailgate or the bonnet are not
properly closed, the siren will be triggered briefly. If the vehicle is properly closed within forty five seconds
after this, the alarm is set, the direction indicators come on continuously
for two seconds.
In all cases the alarm is set forty five
seconds afterwards.
To disarm the alarm (exterior
and interior protection)
Press the unlocking button on the
remote control.
The doors unlock.
The direction indicators flash for two
seconds.
The red lamp on the switch goes out.
Note : if the lamp continues to flash
after disarming the alarm, it is
because it has been triggered. This
flashing will stop on switching on the
ignition.
* According to specification.
 Loading...