

Peugeot 3008 2012 User Manual
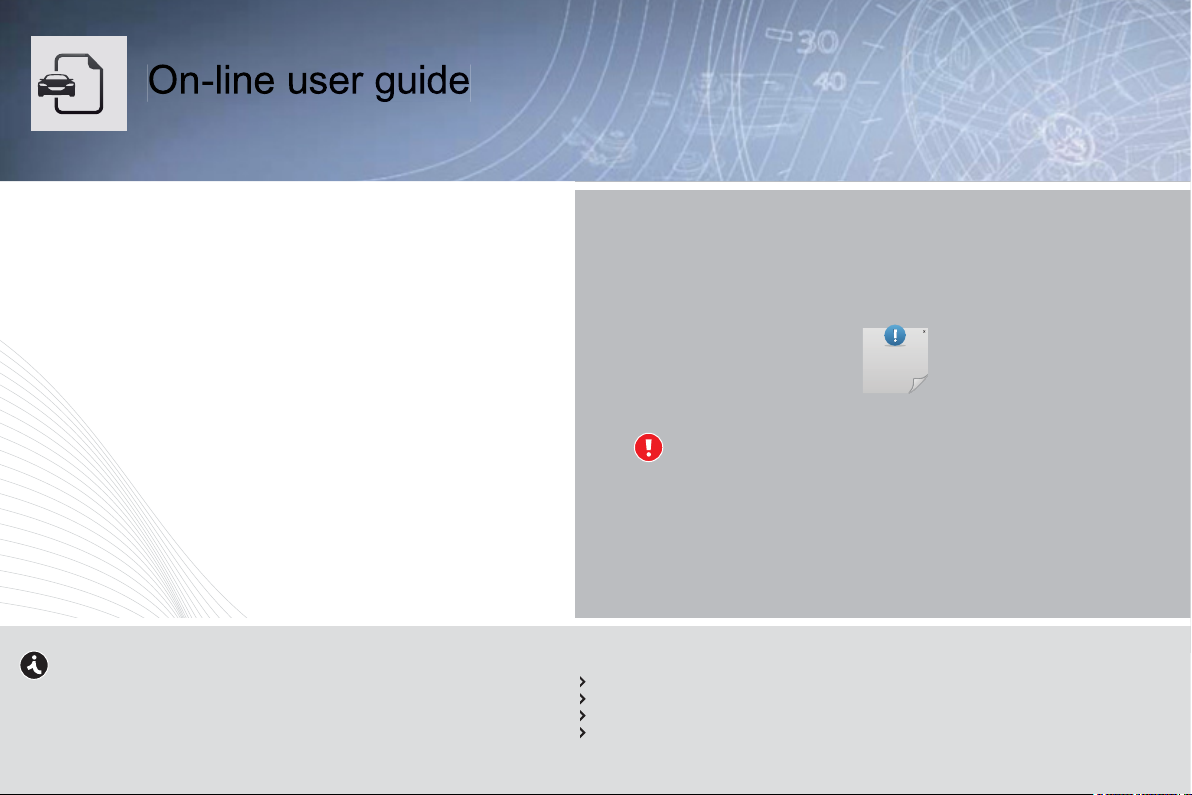
You can find your user guide on thePEUGEOTwebsite, under
f
address
P
n
r
Selec
the heading "Personal space".
This personal space offers advice and other useful information for
the care and maintenance of your vehicle.
Referring to the user guide on-line also gives you access to the
latest information available, easily identified by the bookmarks,
associated with this pictogram:
lease note the following point:
The fitting of electrical equipment or accessories which are
ot recommended by PEUGEOT may result in a failure of your
vehicle's electronic system. Please note this specific warning.
It is advisable to contact a PEUGEOT dealer to be shown the
ecommended equipment and accessories.
If the heading "Personal space" is not available on the public website
or your country, you can find your user guide at the following
:
http://public.servicebox.peugeot.com
t:
the link in "Private customer access",
the language,
the model,
the edition date appropriate for the date of registration of your vehicle.
You will find your user guide, presented in the same way as the paper version.

Thank you for choosing a 3008, a
symbol of confi dence, passion and in-
spiration.
This handbook has been designed to
enable you to make the most of your
3008.
On the fi rst few pages, you will fi nd a
detailed summary, followed by a quick
reference guide intended to make it
easier for you to become familiar with
your vehicle.
All of the details specifi c to your 3008,
comfort, safety, driving, are then presented in this handbook, to increase
your appreciation of the vehicle and
help you make the most of it.
At the end of the handbook, illustrations
of the interior and exterior of the vehicle
will assist you in locating equipment or a
function by means of the page indexed.
Each model may only be fi tted with
some of the equipment mentioned in
this handbook, depending on the trim
level, model, version and the specifi ca-
tion for the country in which it is sold.
WELCOME
Key
Warning:
this symbol marks warn-
ings which it is essential to
observe for your own safety, for the
safety of others or to avoid any risk
of damaging your vehicle.
Information:
this symbol draws your atten-
tion to additional information
for better use of your vehicle.
Protection of
the environment:
this symbol accompanies
advice relating to protection of the
environment.
Page reference:
this symbol invites you to re-
fer to the pages which provide
details of the function.
CONTENT
S
6
1
C
S
3
S
6
1
A
6
V
8
1
2
2
9
3
7
Adj
4
1
seats
2
2
6/9
5
2
12
2
4
Ty
2
2
2
13
A
3
5
5
seats
6
6
7
7
7
7
8
8
8
8
8
8
8
9
9
9
9
p
9
9
9
9
10
0
FAMILIARISATION 4-2
CO-DRIVING 25
INSTRUMENTS and
CONTROLS 27-4
Instrument panels
Indicator and warning lamps
Indicators
ustment buttons
MULTIFUNCTION
SCREEN
creen A without audio equipment 4
creen A with audio equipment 4
creen C (Peugeot Connect Sound
RD5)) 4
1
retractable colour screen
Peugeot Connect Navigation
RT6) or Peugeot Connect Media
Navigation (NG4 3D)) 4
Trip computer
42-55
COMFORT 56-7
eating and Ventilation 5
anual air conditioning
ear screen demist - defrost
ual-zone digital air conditioning 6
Front seats 6
r
irrors
teering wheel adjustment
CCESS 72-8
emote control key
Alarm
lectric windows
oors
Boot
Lower tailgate
Fuel tank
isfuel prevention (Diesel)
ISIBILITY 87-9
Lighting controls
LED lamps
Automatic illumination
of headlamps
eadlamp adjustment
irectional lighting
Wiper controls
Automatic rain sensitive wi
Courtesy lamps
Interior mood lighting
ers
FITTINGS 99-11
Interior fittings
ront armrest
ear multimedia 1
Panoramic sunroof 10
Boot fittings 10
HILD
AFETY 112-12
hild seats 1
ISOFIX child
hild lock 1
1
SAFETY 124-13
Direction indicators 1
azard warning lamps
rn 1
re under-inflation detection 1
system 1
rip control 1
ront seat belts
irbags 1
4

CONTENT
S
1
4
6
4
T
6
13
assis
1
5
5
5
15
A
15
6
17
7
7
17
8
8
9
9
20
0
0
0
Very
20
0
0
0
0
21
1
1
1
1
1
V
8
RIVING 137-165
Electric parking brake
ill start
ead-up display 14
Distance alert 14
peed limiter 14
ruise control 1
anual gearbox 1
ear shift indicator 1
-speed electronic gear control
earbox
utomatic gearbox
top & Start 16
Parking sensors 16
t
CHECKS 166-17
Bonnet 1
unning out of fuel (Diesel) 16
Petrol engines 16
Diesel engines
hecking levels 1
hecks 1
RACTICAL
INFORMATION 175-20
4
4
Temporary puncture repair kit
hanging a wheel 1
Changing a bulb 1
Changing a fuse 1
12 V battery 1
Energy economy mode
Changing a wiper blade 202
Towing the vehicle 2
Towing a trailer 2
Fitting roof bars 2
cold climate screen
Accessories 2
ECHNICAL
ATA 207-21
etrol engines 2
etrol weights 2
iesel engines 2
iesel weights
imensions 2
Identification markings 2
2
AUDIO EQUIPMENT and
ELEMATICS 215-33
mergency or assistance 2
Peugeot Connect
edia Navigation (NG4 3D) 2
Peugeot Connect Navigation
RT6) 26
Peugeot Connect Sound (RD5) 3
ALPHABETICAL
INDEX 337-34
ISUAL
SEARCH 342-34
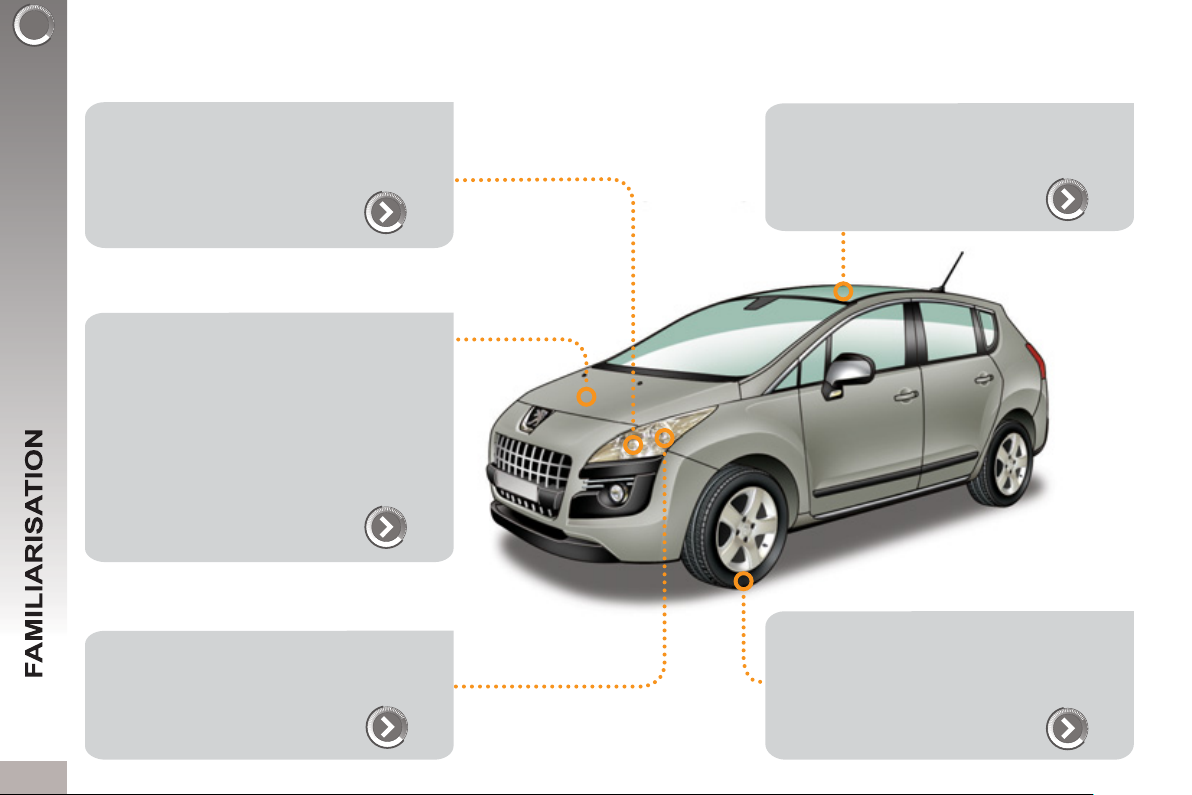
EXTERIOR
Welcome lighting
This additional exterior and interior lighting, controlled remotely, makes your approach to the vehicle easier when the
light is poor.
89
Stop & Start
This system puts the engine temporarily
into standby during stops in the traffi c (red
lights, traffi c jams, etc....). The engine re-
starts automatically as soon as you want to
move off. The Stop & Start system reduces
fuel consumption, exhaust emissions and
provides the comfort of complete silence
when stationary.
161
Directional lighting
This lighting automatically provides additional visibility when cornering.
Panoramic sunroof
This roof provides incomparable visibility
and light in the passenger compartment.
105
Grip control
This special traction control system improves the traction of 2 wheel drive vehicles in snow, mud and sand.
92
128
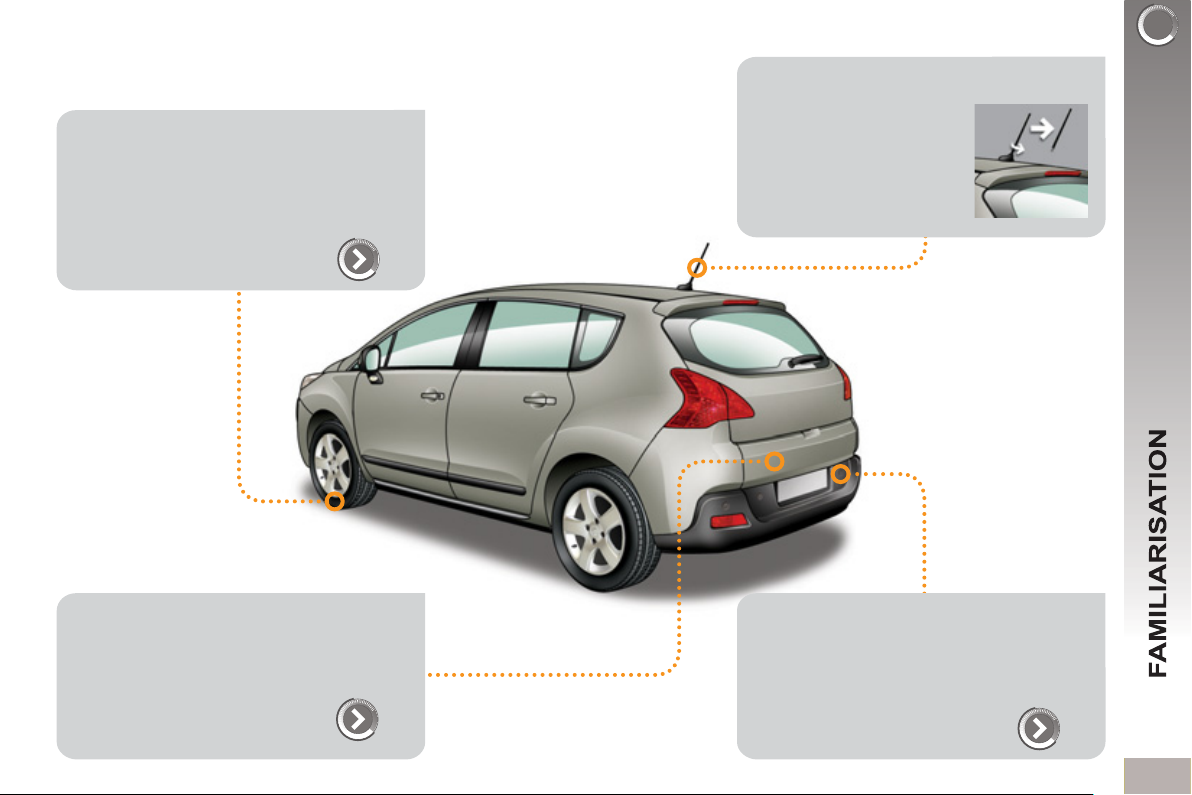
EXTERIOR
Temporary puncture repair kit
This kit is a complete system, consisting
of a compressor and an integral sealant
cartridge, for the temporary repair of a
tyre.
Lower tailgate
This lower tailgate permits remarkable
accessibility and makes the loading of
bulky objects easier.
175
84
When using an automatic car wash:
- unscrew the aerial,
- fold back the mirrors.
Visual and audible front and/or rear
parking sensors
This system warns you if an obstacle is
detected behind or in front of the vehicle
in reverse or forward gear.
164
y
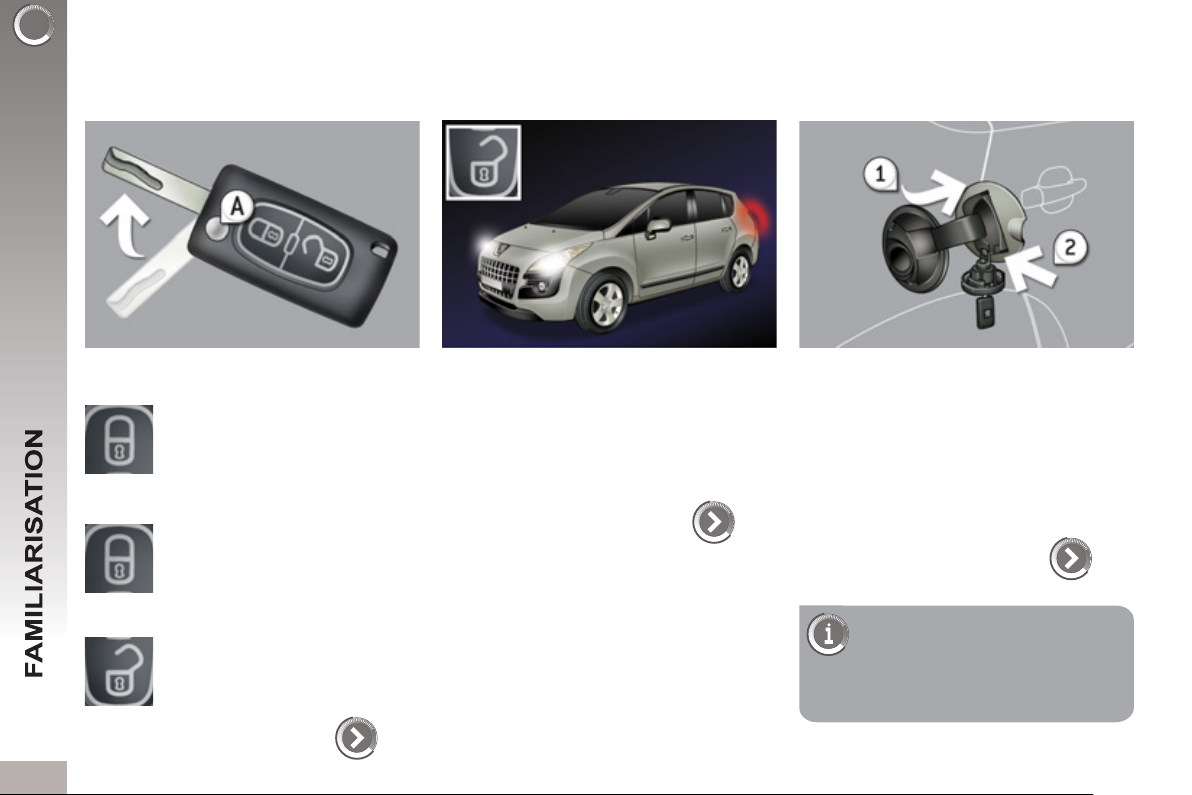
ACCESS
Remote control ke
Welcome lighting
Fuel tank
A. Unfolding / Folding the key.
Normal locking
(press once; fi xed lighting of
the direction indicators).
or
Deadlocking the vehicle
(press twice in succession;
fi xed lighting of the direction
indicators).
Complete or selective unlocking
of the vehicle
(rapid fl ashing of the direction
indicators).
When the light is poor, detected by a
sensor, the remote switching on of the
dipped headlamps and sidelamps makes
your approach to the vehicle easier.
This function can be programmed via
the confi guration menu.
72
1. Opening the fuel fi ller fl ap.
2. Opening and hooking the fuel fi ller
cap.
The type of fuel to be used is indicated
on the inner face of the fuel fi ller fl ap.
Capacity of the tank: approximately
60 litres.
89
On Diesel vehicles, the fuel
fi ller neck incorporates a misfuel prevention device which
prevents fi lling with petrol.
85
A
CCESS
ilg
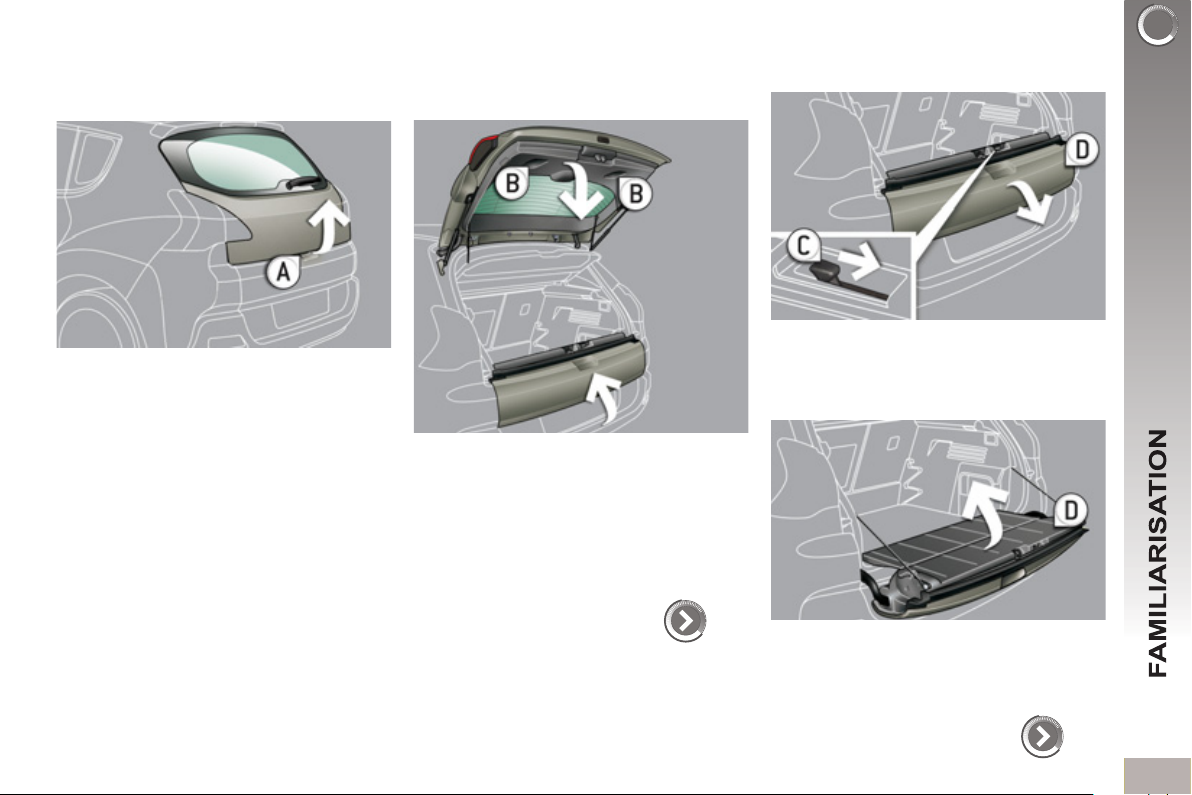
Boot
Opening
F After unlocking the vehicle using the
remote control or the key, press the
handle A and lift the tailgate.
Closing
F After closing the lower tailgate, pull
the handle B downwards to guide
the tailgate.
Lower ta
Opening
F Push the handle C to the right and
tilt the tailgate D .
83
Closing
F Raise the tailgate D , push it fully to
close it, check that it is locked correctly.
ate
84
INTERIOR
Head-up display
This system projects certain information
into the fi eld of vision of the driver: speed,
cruise control/speed limiter and Distance
alert.
Audio and communication systems
These systems benefi t from the latest tech-
nology: MP3 compatible Peugeot Connect
Sound (RD5), Peugeot Connect USB, Bluetooth, Peugeot Connect Media Navigation
(NG4 3D) or Peugeot Connect Navigation
(RT6) with 16/9 retractable colour screen,
JBL audio system, auxiliary sockets.
145
Electric parking brake
This combines the functions of auto-
matic application on switching off the
engine and automatic release on accel-
eration.
Manual application/release is possible.
137
Peugeot Connect Media
Navigation (NG4 3D)
Peugeot Connect
Navigation (RT6)
Sound (RD5)
219
263
317 Peugeot Connect
Peugeot Connect USB
Bluetooth
PEUGEOT
Assistance
242,
298,
324
247,
285,
327
216
Dual-zone digital air conditioning
This systems allows different levels of
comfort to be set for the driver and front
passenger. It then controls these level
automatically according to the ambient
conditions.
60
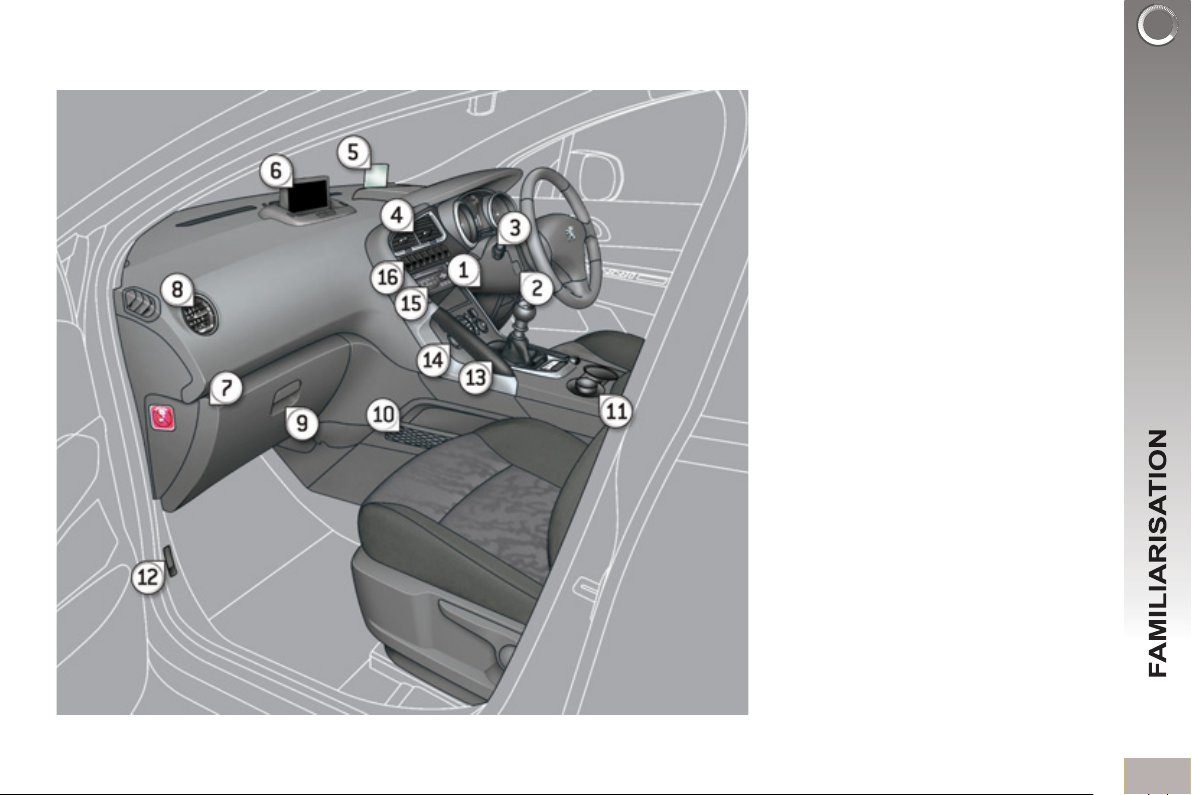
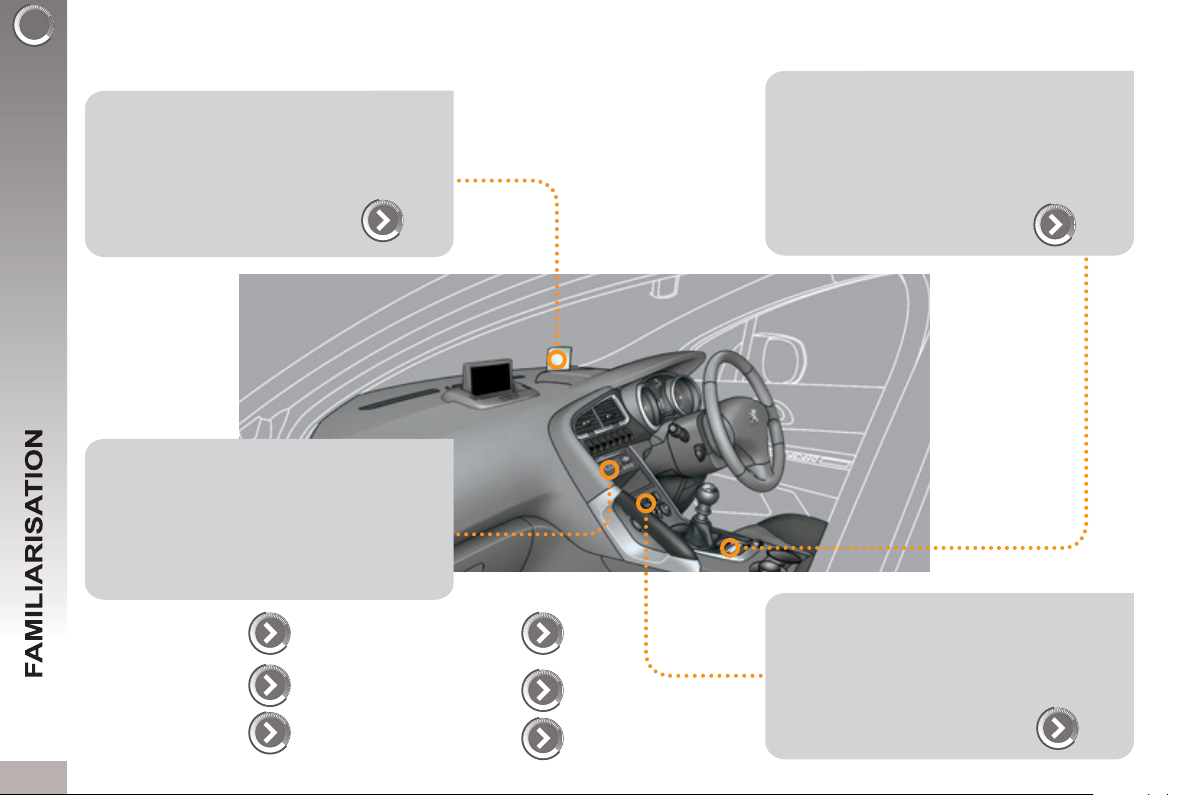
INSTRUMENTS AND CONTROLS
1. Steering wheel adjustment control.
2. Cruise control / speed limiter
switches.
3. Lighting and direction indicators
control stalk.
4. Central adjustable air vents.
5. Head-up display.
6. Multifunction screen.
7. Passenger's airbag deactivation.
8. Side adjustable air vent.
9. Glove box - Audio/video sockets.
10. Storage compartment with net.
11. Grip control switch.
12. Bonnet release.
13. Grab handle.
14. Heating / air conditioning controls.
15. Audio and telematic system.
16. Switches:
- head-up display,
- hazard warning lamps,
- Distance alert,
- central locking.
0
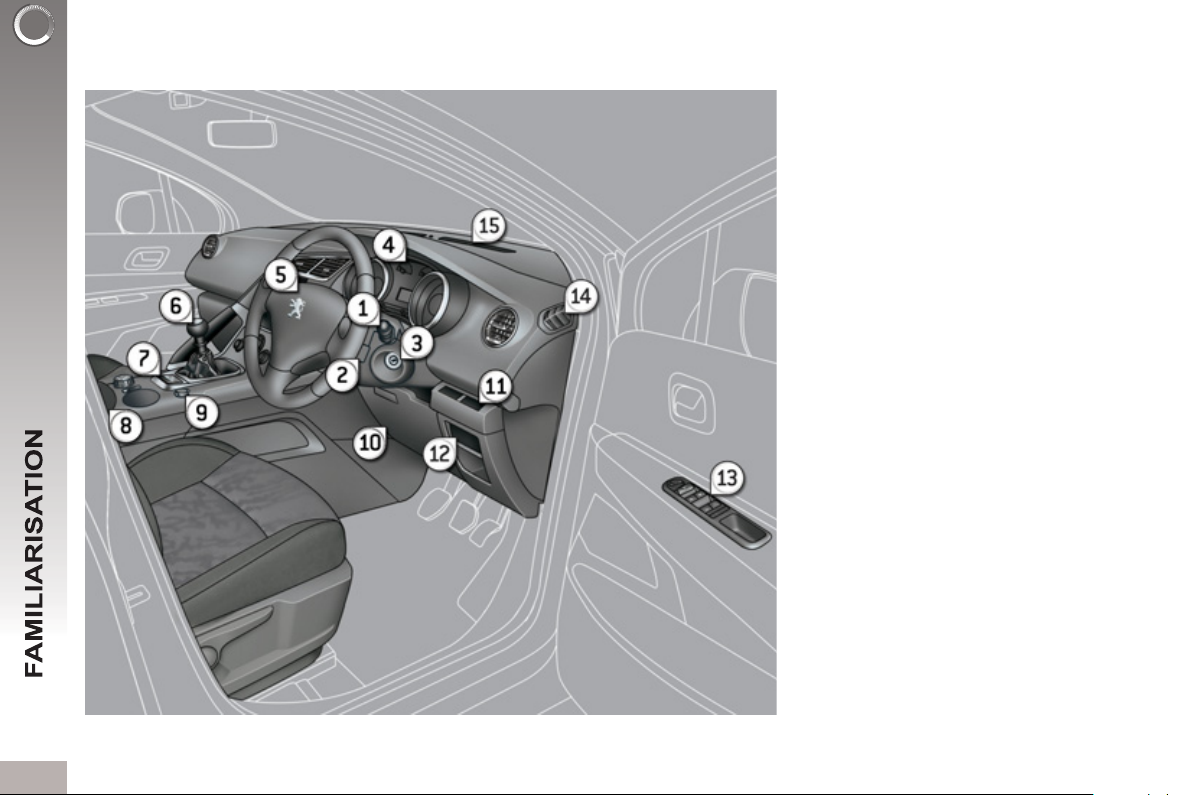
INSTRUMENTS AND CONTROLS
1. Wiper / screenwash / trip computer
control stalk.
2. Audio and telematic system
steering mounted control.
3. Steering lock and ignition.
4. Instrument panel.
5. Driver's airbag.
Horn.
6. Gear lever.
7. Electric parking brake.
8. Front armrest - Peugeot Connect
USB and/or JACK auxiliary socket.
9. 12 V accessory socket.
10. Driver's storage compartment
(Handbook).
11. Alarm switch.
Parking sensors switch.
Dynamic stability control switch
(ESC/ASR).
Stop & Start deactivation switch.
12. Manual headlamp adjustment.
Instrument panel navigator
associated with the Peugeot
Connect Media Navigation (RT6).
13. Door mirror controls.
Electric window controls.
Child lock.
14. Front side window demisting vent.
15. Windscreen demisting vent.
1
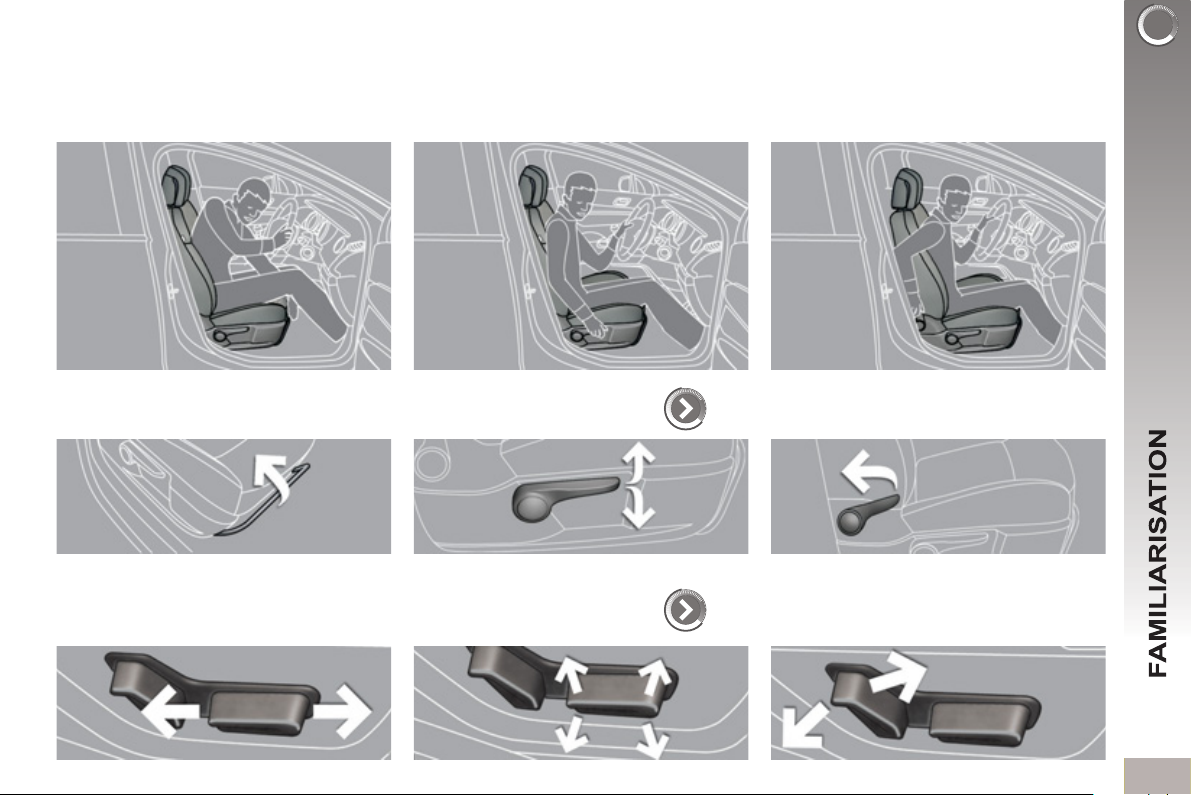
SITTING COMFORTABLY
Driver's seat
Forwards-backwards Height
Manual adjustment
Electric adjustment
Seat back angle
63
64
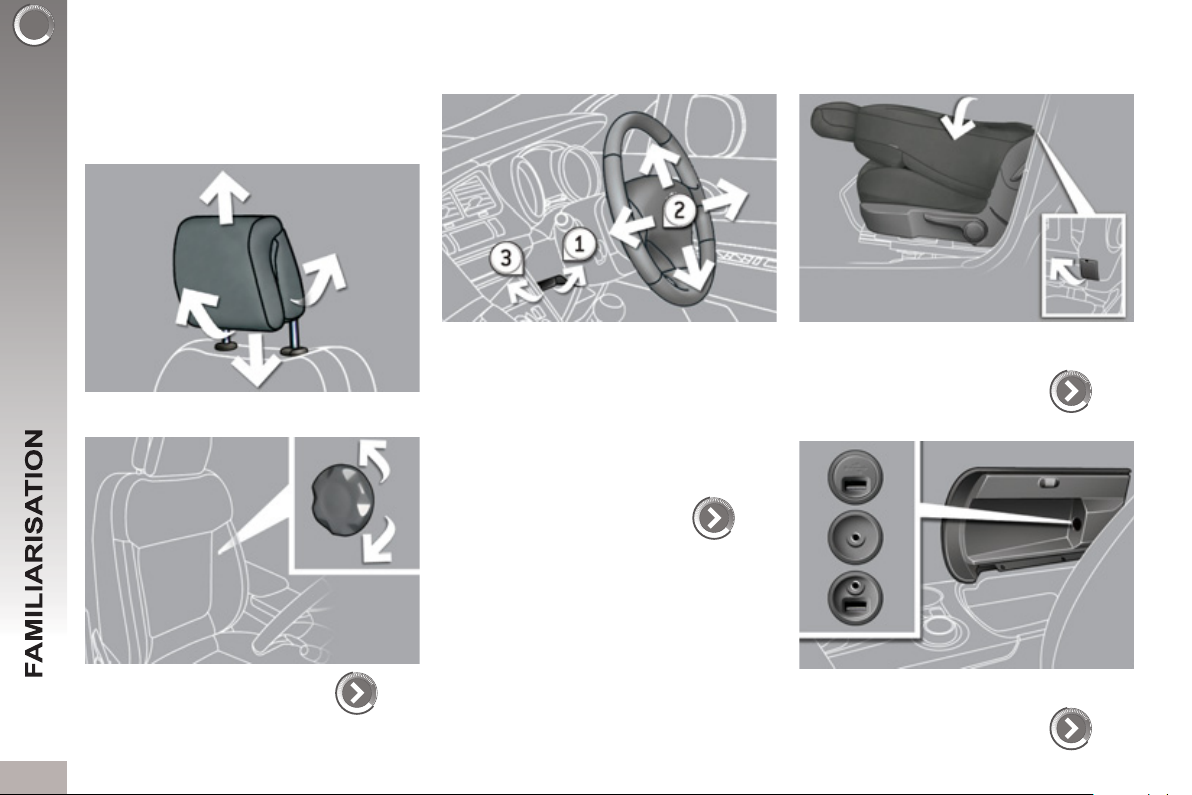
SITTING COMFORTABLY
)
Front seats
Head restraint height and
angle
Steering wheel adjustment
Table position
front passenger seat
Lumbar
1. Release the steering wheel.
2. Adjust for height and reach.
3. Lock the steering wheel.
To place objects on the table or to make
the loading of long objects in the vehicle
easier.
66
Front armrest
As a safety precaution, these operations must only be carried out when stationary.
71
65
This incorporates the Peugeot Connect USB
and/or a JACK auxiliary socket.
101
SITTING COMFORTABLY
F
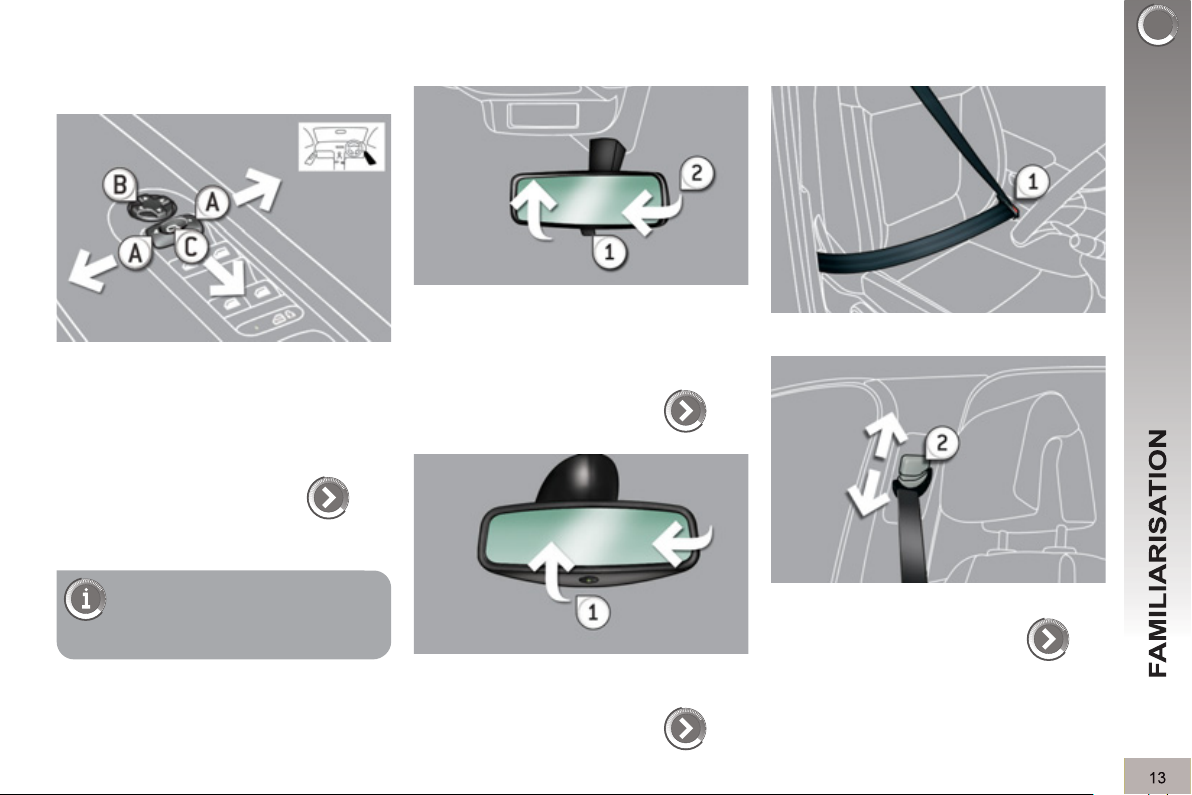
Door mirrors
Adjustment
A. Selection of the mirror to be adjusted.
B. Adjustment of the position of the
mirror in the four directions.
69
Rear view mirror
Manual model
1. Selection of the "day" position of the
mirror.
2. Adjustment of the mirror.
ront seat belts
1. Fastening of the buckle.
70
Also...
C. Folding /
Unfolding.
Automatic day/night model
1. Adjustment of the mirror.
2. Height adjustment.
130
70
SEEING CLEARLY
g
hting
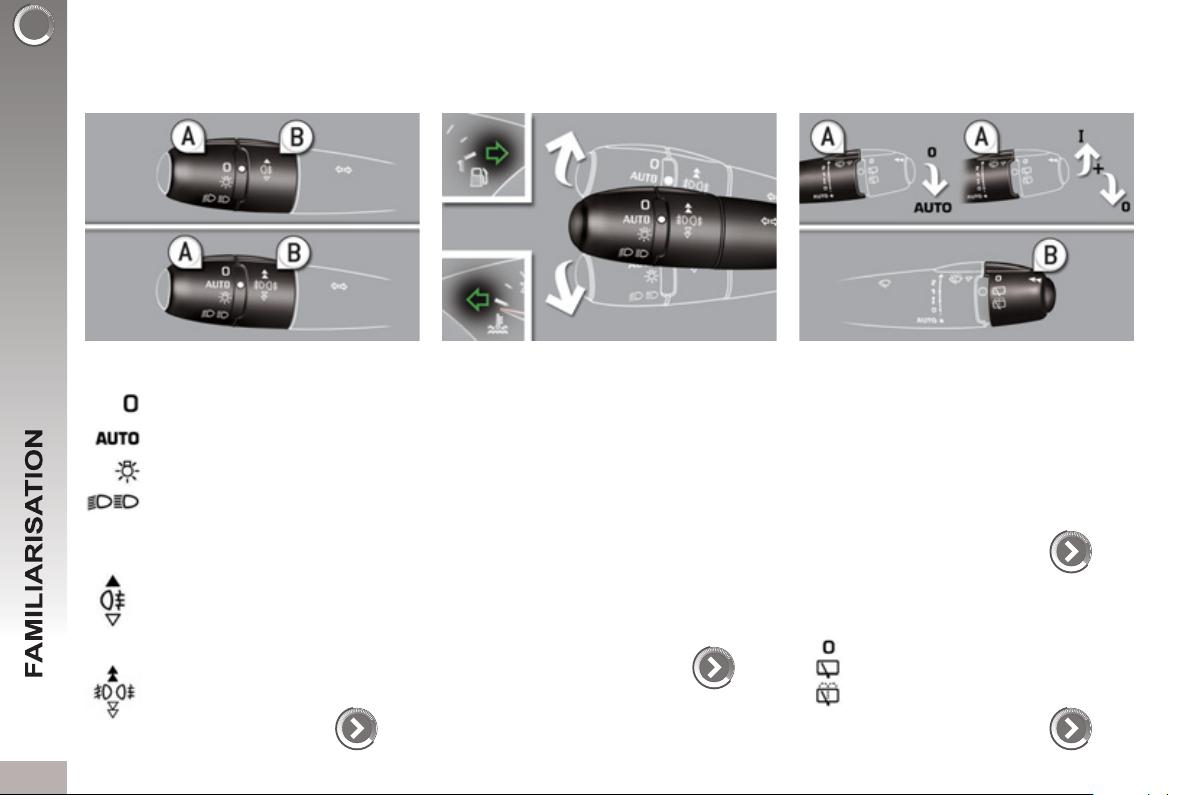
Li
Direction indicators
Wipers
Ring A
Lighting off.
Automatic illumination of head-
lamps.
Sidelamps.
Dipped / main beam headlamps.
Ring B
Rear foglamp.
or
Front and rear foglamps.
Raise or lower the lighting stalk passing
the point of resistance; the corresponding
direction indicators will fl ash for as long as
the stalk remains in this position.
"Motorway" function
Press the lighting stalk up or down once,
without passing the point of resistance;
the corresponding direction indicators
will fl ash three times.
This function can be used at any speed,
but it is particularly useful when changing lane on high-speed roads.
87
Stalk A: windscreen wipers
Switching on "AUTO"
F Press the stalk down and release it.
Switching off "AUTO"
F Push the stalk up and return it to po-
sition "0" .
Ring B: rear wiper
Park.
124
Intermittent wipe.
Wash-wipe.
93
94
V
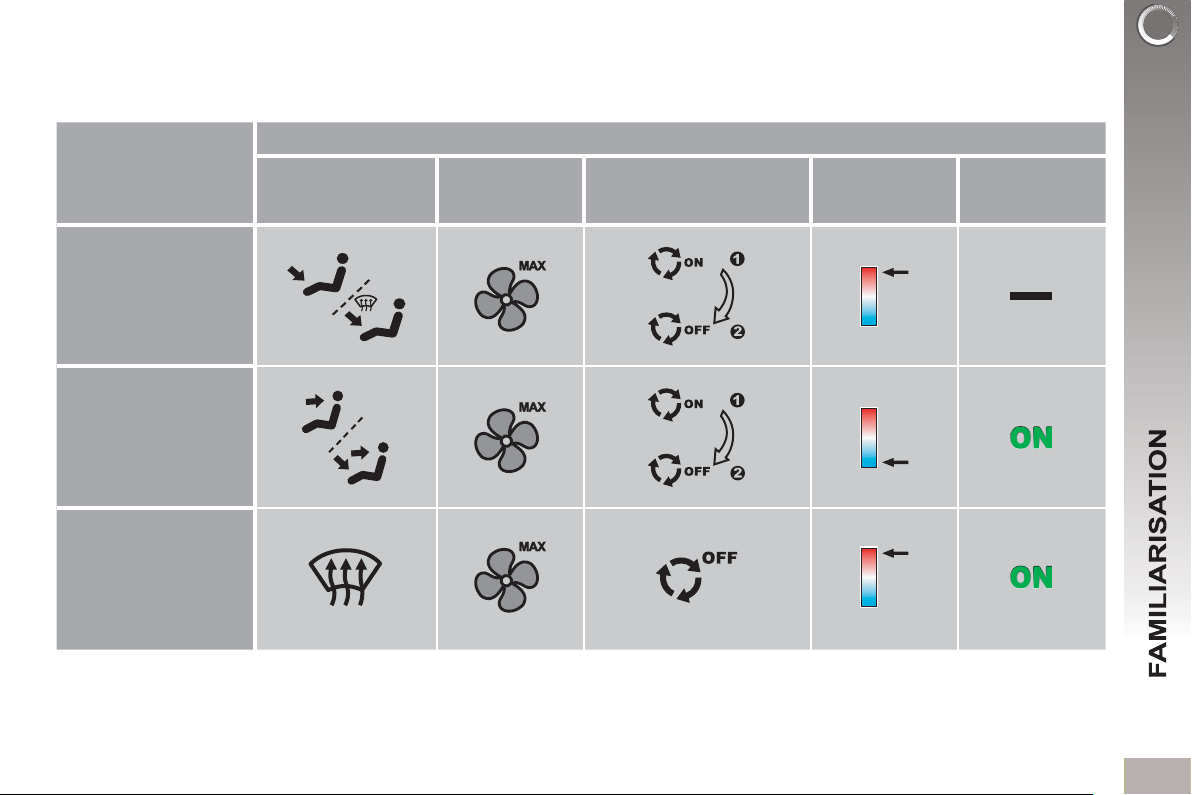
ENTILATION
R
ecommended interior settings
Heating or Manual Air Conditioning
I require...
HOT
COLD
DEMISTING
DEFROSTING
Digital air conditioning: we recommend use of the fully automatic mode by pressing the "AUTO" button.
Air distribution Air fl ow
Air recirculation /
Intake of outside air
Temperature Manual A/C
15

6
MONITORING
p
Instrument
anel
Switch panels
Lower
Lighting of the indicator lamp indicates
the status of the corresponding function.
A. Visual and audible
parking sensors.
164
B. ESC/DSC OFF
(without Grip control).
C. Child lock.
D. Deactivating the
Stop & Start system.
E. Volumetric alarm.
A. With the ignition on, the needle should
indicate the level of fuel remaining.
B. With the engine running, its associated
low level warning lamp should go off.
C. With the ignition on, the oil level in-
dicator should display "OIL OK" for
a few seconds.
If the levels are not correct, top up the
levels which are low.
1
1. With the ignition on, the orange and
red warning lamps come on.
2. With the engine running, these
warning lamps should go off.
If warning lamps remain on, refer to the
page concerned.
27
Central
29
F. Head-up display.
G. Hazard warning lamps.
H. Distance alert.
I. Central locking.
127
80, 123
162
77
145
124
147
82
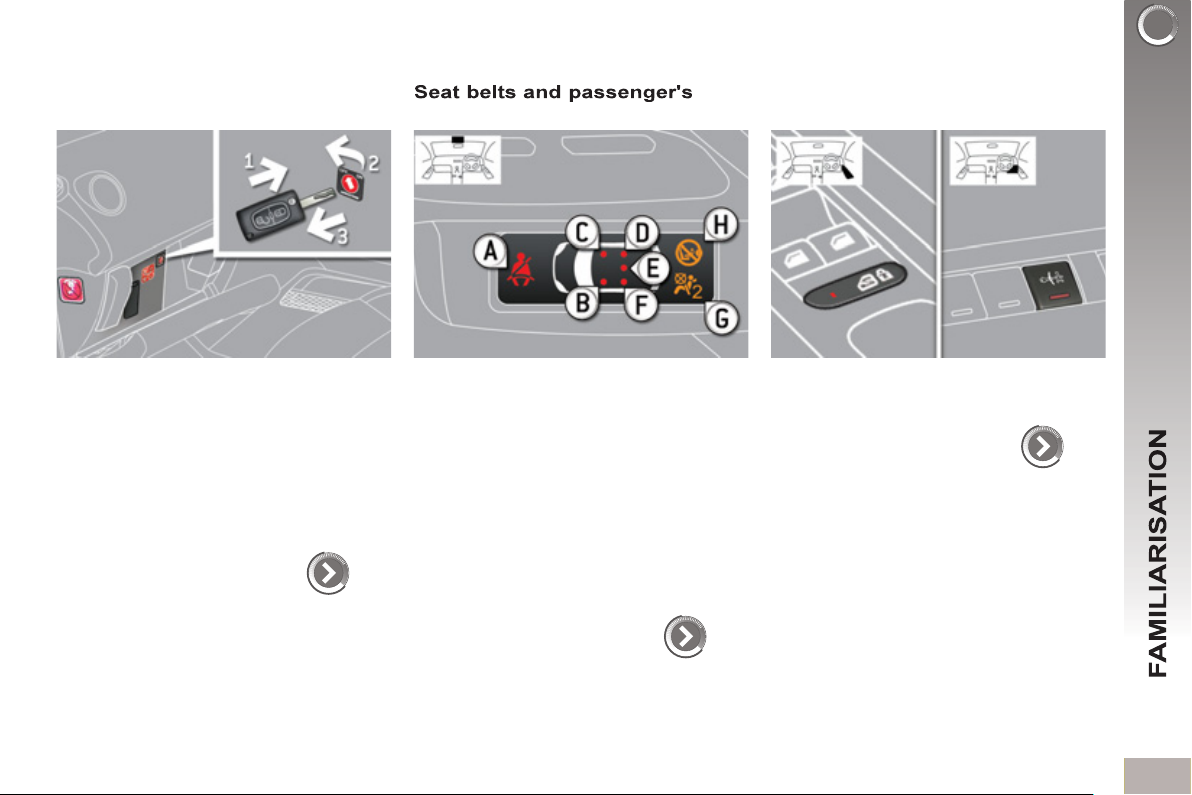
PASSENGER SAFETY
g
f
g
)
Passen
er's front airbag
ront airba
Child lock
locking of the rear doors
1. Insert the key.
2. Select the position:
"OFF" (deactivation), with "rear fac-
ing" child seat,
"ON" (activation), with front passen-
ger or "forwards facing" child seat.
3. Remove the key keeping the switch
in the new position.
A. Front and/or rear seat belts not fas-
tened / unfastened warning lamp.
B. Front left seat belt warning lamp.
C. Front right seat belt warning lamp.
D. Rear right seat belt warning lamp.
E. Rear centre seat belt warning lamp.
F. Rear left seat belt warning lamp.
G. Passenger's front airbag deactivated
warning lamp.
H. Passenger's front airbag activated
134
warning lamp.
Illumination of the indicator lamp indicates
the status of the corresponding function.
123
131
8
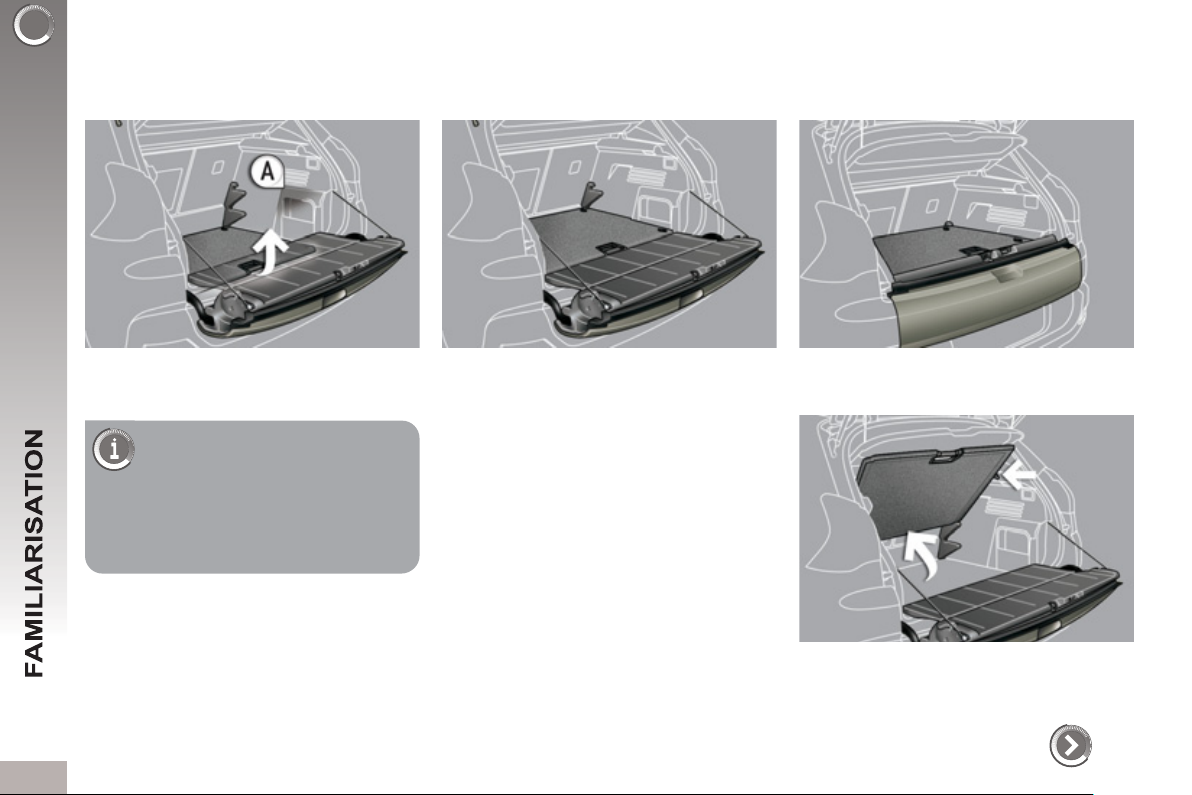
ARRANGE YOUR BOOT
j
3 position ad
ustable boot
Low position (150 kg max).
F To release the fl oor, push
slightly forwards then
raise.
F Use the stops A , placed on each
side of the boot to change the
height of the fl oor more easily.
1
Intermediate position (100 kg max). High position (50 kg max) with the lower
tailgate closed to isolate the lower part
of the boot.
From the high position, place the fl oor
in this position (at an angle), two stops
support it to allow access underneath it
or to the spare wheel.
110
9
A
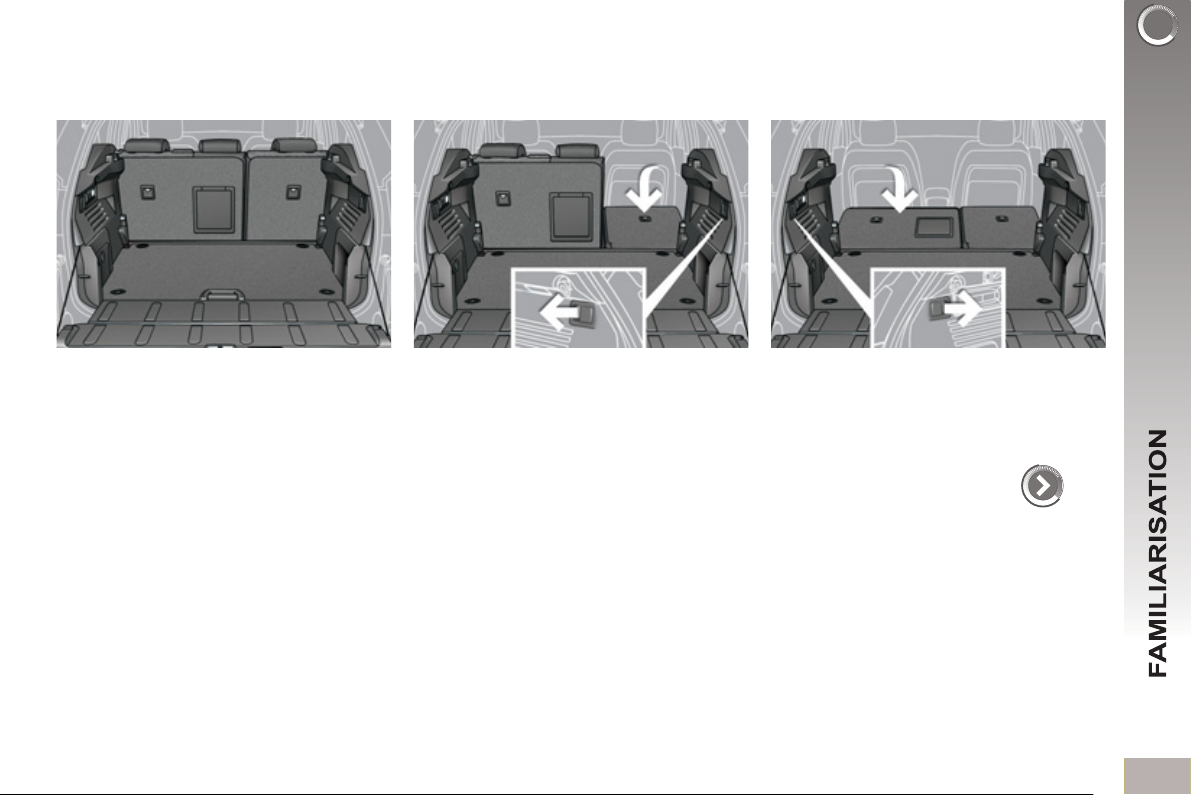
RRANGE YOUR BOOT
Rear seats
F Place the adjustable fl oor in the in-
termediate position .
F Check that nothing is preventing
the seat backs from folding (front
seats suffi ciently advanced, head
restraints, seat belts, ...).
F Check also that no object on or
under the seat could hinder its
movement.
F Pull the control of the 1/3 section,
from the boot.
F Pull the control of the 2/3 section,
from the boot.
The seats are aligned with the adjustable fl oor and the lower tailgate.
67
1

0
DRIVING SAFELY
p
Sto
& Start
Going into engine STOP mode
The "ECO" warning lamp comes
on in the instrument panel and
the engine automatically goes
into standby, with a 6-speed
electronic gear control gearbox and at
speeds below 4 mph (6 km/h), press the
brake pedal or put the gear lever in position N .
In some circumstances, STOP mode
may not be available; the "ECO" warn-
ing lamp fl ashes for few seconds, then
goes off.
Going into engine START mode
The "ECO" warning lamp goes
off and the engine restarts automatically with a 6-speed elec-
tronic gear control gearbox :
- gear lever in position A or M , release
the brake pedal,
- or gear lever in position N and the
brake pedal released, move the
gear lever to position A or M ,
- or engage reverse.
In some circumstances START mode
may be invoked automatically; the
"ECO" warning lamp fl ashes for a few
seconds, then goes off.
161
Deactivation / Reactivation
You can deactivate the system at any
time by pressing the "ECO OFF" but-
ton; the warning lamp in the button
comes on.
The system is reactivated automatically at every new start
using the key.
Before refuelling or doing anything under the bonnet, you
must switch off the ignition
using the key.
2

DRIVING SAFELY
Electric parking brake
Manual application / release
The parking brake can be applied man-
ually by pulling the control lever A .
When the ignition is on, the parking
brake can be released manually by
pressing the brake pedal and pulling
then releasing the control lever A .
Before getting out of the
vehicle, check that the
braking warning lamp
( red ! ) and the warning
lamp P in the control lever A , are on
(not fl ashing).
If you get out of your vehicle
with the engine running, apply
the parking brake manually.
Automatic application / release
Press the accelerator and release the
clutch, the parking brake is released
automatically and progressively on acceleration.
When the engine is switched off , the
parking brake is applied automatically.
If this warning lamp is on in the
instrument panel, the automatic
application/release function is
deactivated .
Before getting out of the
vehicle, check that the
braking warning lamp
( red ! ) and the warning
lamp P in the control lever A are on (not
fl ashing).
Do not leave a child alone in
the vehicle with the ignition on;
they could release the parking
brake.
137
Your vehicle is equipped with a system
which keeps it immobile for a short time
(approximately 2 seconds) to assist you
when starting on a hill, the time required
for you to move your foot from the brake
pedal to the accelerator pedal.
This function is only active:
- when the vehicle has been immobilised completely with your foot on the
brake pedal,
- on certain gradients,
- when the driver's door is closed.
Do not get out of the vehicle
during the hill start assist temporary hold phase.
142
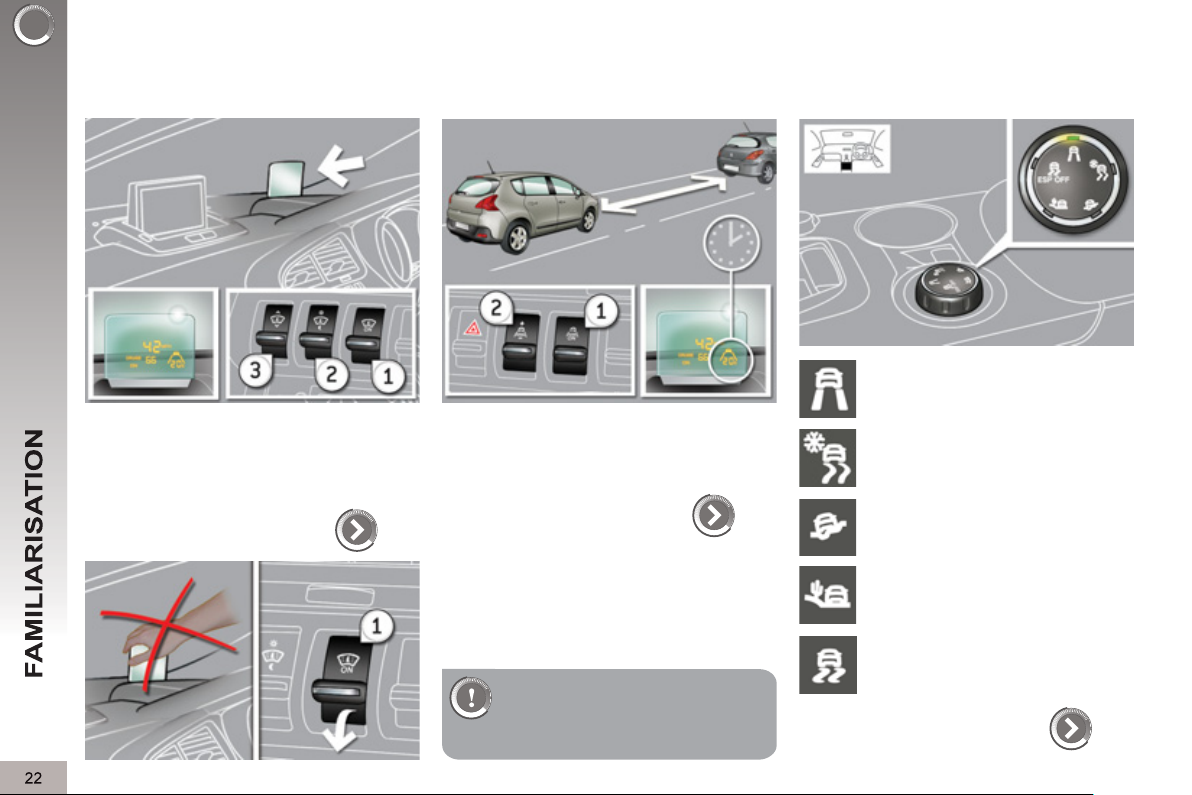
DRIVING SAFELY
y
Head-up displa
Distance alert
Grip control
Normal mode.
1. Head-up display on / off.
2. Brightness adjustment.
3. Display height adjustment.
1. Distance alert on /off.
2. Alert value increase / decrease.
145
The adjustments must be
made with the engine running
and the vehicle stationary.
147
Snow mode.
Mud mode.
Sand mode.
ESP OFF.
128
3
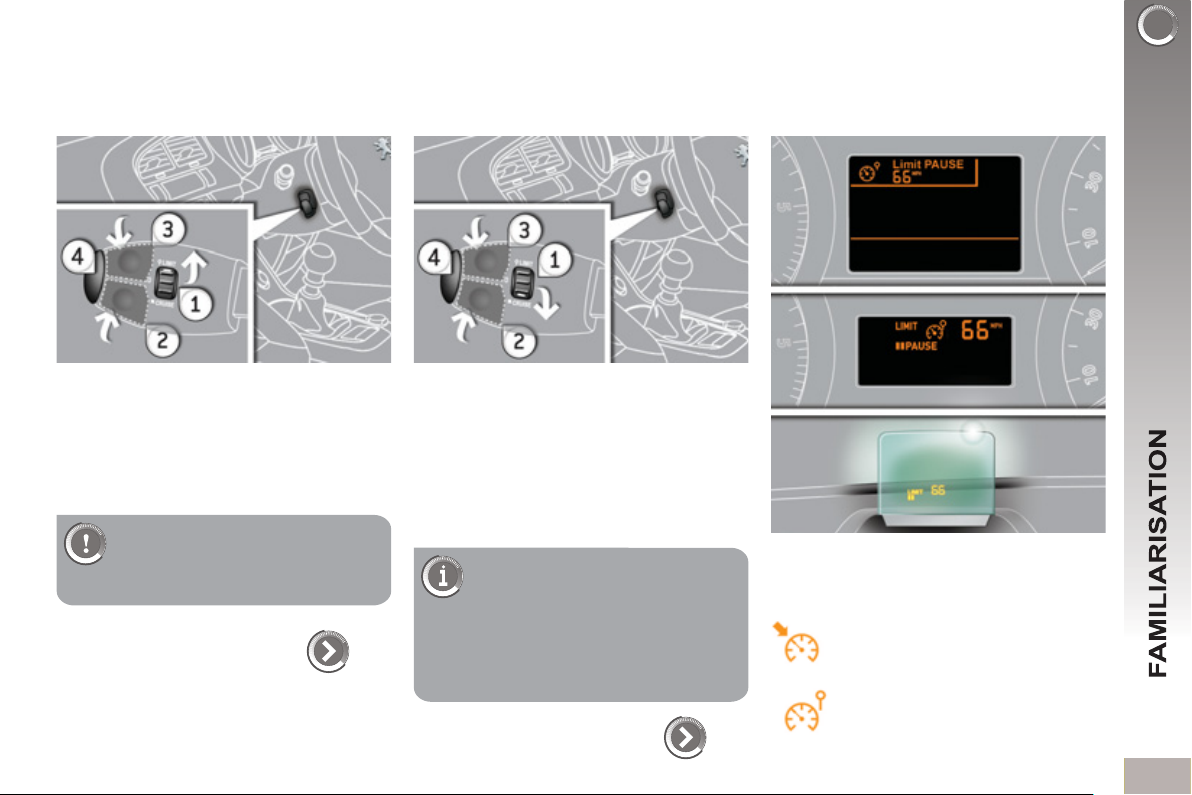
DRIVING SAFELY
p
S
S
eed limiter "LIMIT"
Cruise control "CRUI
E"
Display in the instrument panel
1. Limiter mode Selection / Off.
2. Decreasing the programmed value.
3. Increasing the programmed value.
4. Speed limiter On / Off.
The values must be set with
the engine running.
1. Cruise control mode Selection / Off.
2. Programming a speed / Decreasing
the programmed value.
3. Programming a speed / Increasing
the programmed value.
4. Cruise control Off / Resume.
In order to be programmed or
activated, the vehicle speed
must be higher than 25 mph
(40 km/h), with at least fourth gear
engaged on the manual gearbox
149
(second gear for the 6-speed electronic gear control gearbox or automatic gearbox).
The cruise control or speed limiter mode
appears in the instrument panel when it
is selected.
Cruise control
Speed limiter
151
2
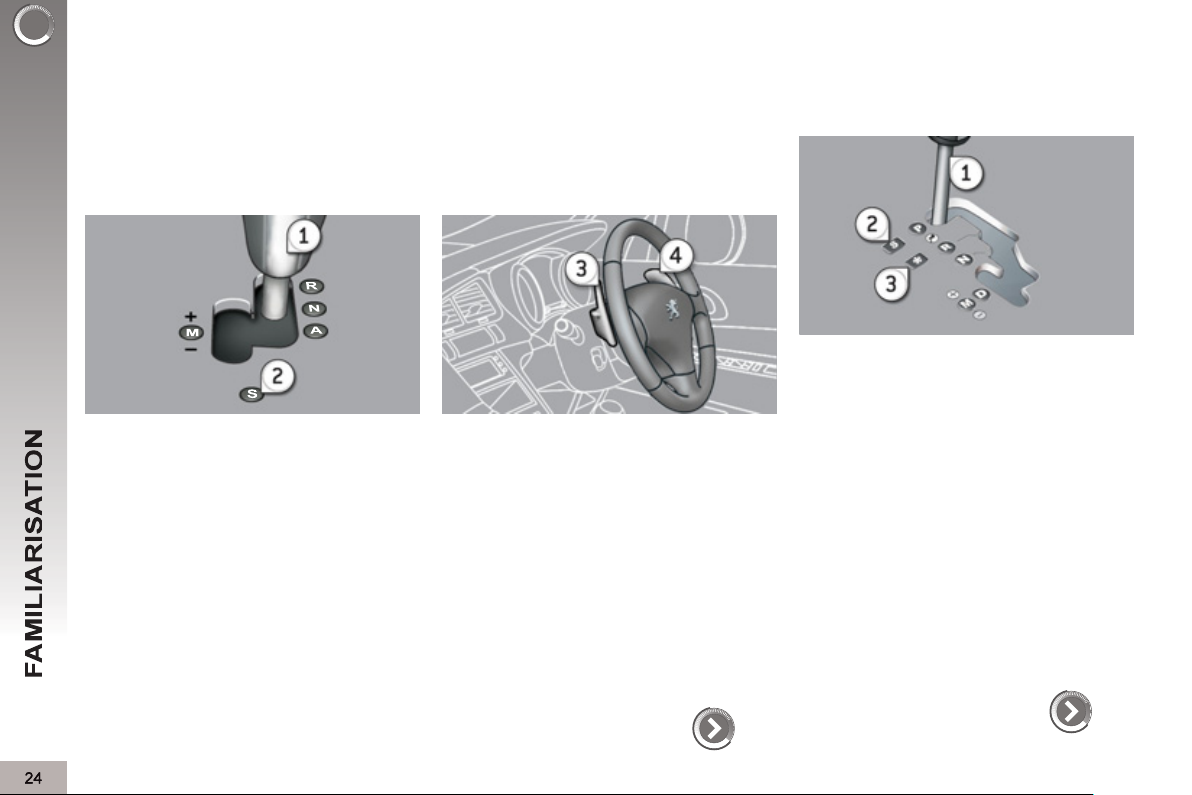
DRIVING SAFELY
p
eed electronic
6-s
ear control gearbox
This 6-speed gearbox offers a choice
between the comfort of fully automatic
operation or the pleasure of manual
gear changing.
1. Gear lever.
2. Button "S" (sport) .
3. Steering mounted "-" paddle.
4. Steering mounted "+" paddle.
"Porsche Tiptronic System"
utomatic gearbox
This six-speed gearbox offers a choice
between the comfort of fully automatic
operation or the pleasure of manual
gear changing.
1. Gear lever.
2. Button "S" (sport) .
3. Button " T " (snow) .
Moving off
F Select position N and press the
brake pedal fi rmly while starting the
engine.
F Engage fi rst gear (position A or M )
or reverse (position R ) using the
gear lever 1 .
F Take your foot off the brake pedal
then accelerate.
Moving off
F Select position P or N and press the
brake pedal fi rmly while starting the
engine.
F Select position R , D or M .
F Take your foot off the brake pedal,
then accelerate.
158
154

your
y
CO-DRIVING
Eco-driving is a range of everyday practices that allow the motorist to optimise their fuel consumption and CO
emissions.
2
Optimise the use of
earbox
With a manual gearbox, move off gently, change up without waiting and
drive by changing up quite soon. If
your vehicle has the system, the gear
shift indicator invites you to change up;
it is displayed in the instrument panel,
follow its instructions.
With an automatic or electronic gearbox, stay in Drive "D" or Auto "A" , ac-
cording to the type of gearbox, without
pressing the accelerator pedal heavily
or suddenly.
Drive smoothly
Maintain a safe distance between vehicles, use engine braking rather than
the brake pedal, and press the accelerator progressively. These practices
contribute towards a reduction in fuel
consumption and CO2 emissions and
also helps reduce the background traffi c noise.
If your vehicle has cruise control, make
use of the system at speeds above
25 mph (40 km/h) when the traffi c is
fl owing well.
Control the use of
Before moving off, if the passenger
compartment is too warm, ventilate it by
opening the windows and air vents before using the air conditioning.
Above 30 mph (50 km/h), close the windows and leave the air vents open.
Remember to make use of equipment
that can help keep the temperature in
the passenger compartment down (sunroof and window blinds...).
Switch off the air conditioning, unless
it has automatic digital regulation, as
soon as the desired temperature is attained.
Switch off the demisting and defrosting
controls, if not automatic.
Switch off the heated seat as soon as
possible.
our electrical equipment
Switch off the headlamps and front
foglamps when the level of light does
not require their use.
Avoid running the engine before moving off, particularly in winter; your vehicle will warm up much faster while
driving.
As a passenger, if you avoid connecting your multimedia devices (fi lm, mu-
sic, video game...), you will contribute
towards limiting the consumption of
electrical energy, and so of fuel.
Disconnect your portable devices before leaving the vehicle.
25

Limit the causes of excess
6
onsumption
Spread loads throughout the vehicle;
place the heaviest items in the bottom
of the boot, as close as possible to the
rear seats.
Limit the loads carried in the vehicle
and reduce wind resistance (roof bars,
roof rack, bicycle carrier, trailer...). Use
a roof box in preference.
Remove roof bars and roof racks after
use.
Observe the recommendations
n maintenance
Check the tyre pressures regularly,
when cold, referring to the label in the
door aperture, driver's side.
Carry out this check in particular:
- before a long journey,
- at each change of season,
- after a long period out of use.
Don't forget the spare wheel and the
tyres on any trailer or caravan.
When refuelling, do not continue after
rd
the 3
cut-off of the nozzle to avoid
any overfl ow.
At the wheel of your new vehicle,
it is only after the fi rst 1 800 miles
(3 000 kilometres) that you will see
the fuel consumption settle down to a
consistent average.
At the end of winter, remove snow
tyres and refi t your summer tyres.
2
Have your vehicle serviced regularly
(engine oil, oil fi lter, air fi lter...) and ob-
serve the schedule of operations recommended by the manufacturer.
S
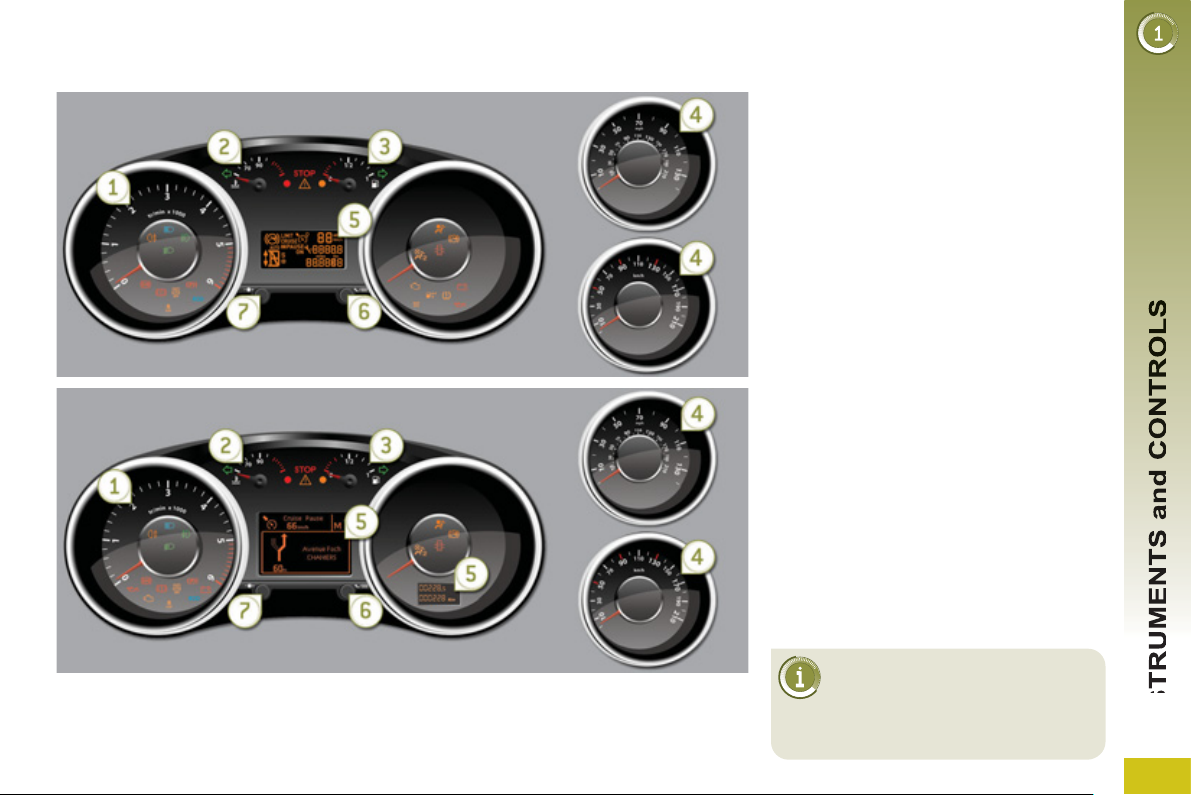
INSTRUMENT PANELS
Dial
s
1. Rev counter.
Indicates the engine speed (x 1 000 rpm).
2. Coolant temperature.
Indicates the temperature of the en-
gine coolant (°Celsius).
3. Fuel level.
Indicates the quantity of fuel remain-
ing in the tank.
4. Speedometer.
Indicates the current speed of the
moving vehicle (mph or km/h).
5. Screen.
6. Display zero reset or service indi-
cator re-display button.
Resets the selected function to zero
(trip distance recorder or service indicator) or displays the service indicator again.
7. Instrument panel lighting dimmer.
Adjusts the brightness of the ligh-
ting of the instruments and controls,
if the vehicle lighting is on.
Panel grouping together the vehicle operation indication dials and warning lamps.
For more information, refer to
the section corresponding to
the button or function and its
associated display.
IN
S
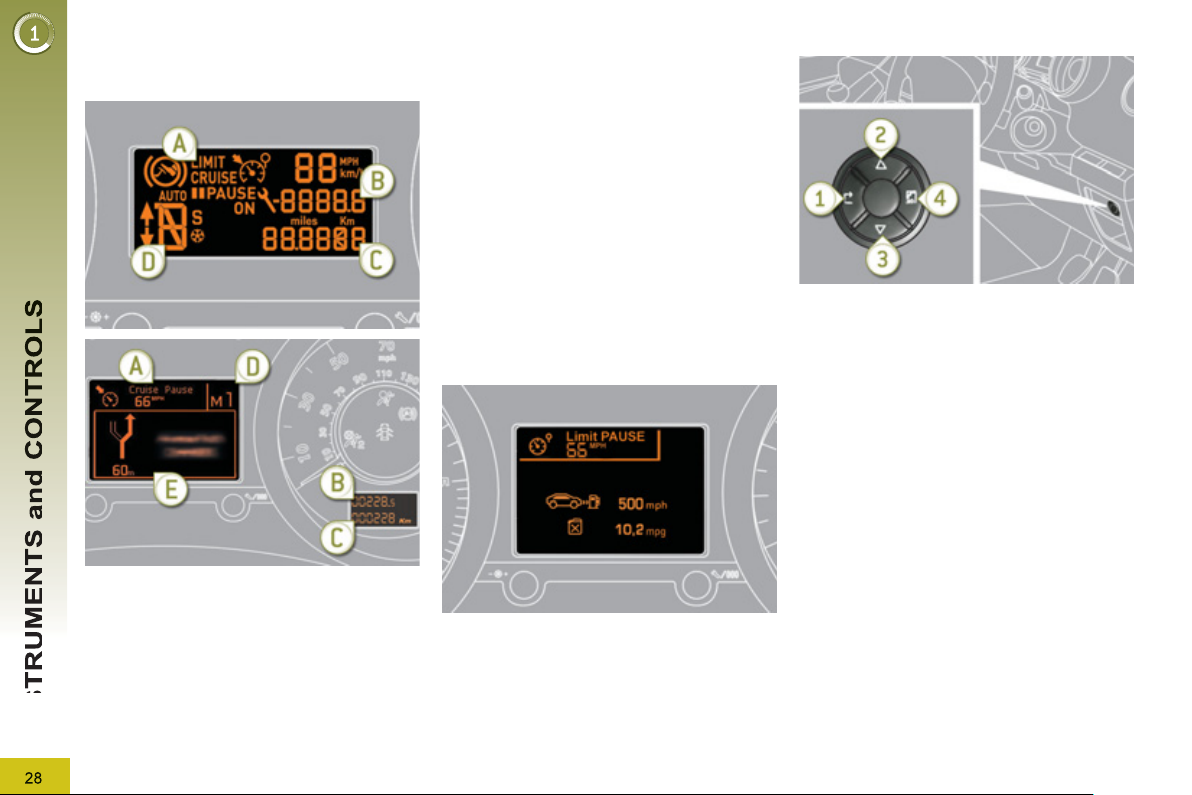
g
Screen(s)
A. Speed limiter
or
Cruise control.
(mph or km/h)
B. Trip distance recorder.
(miles or km)
IN
C. Service indicator.
(miles or km) or,
Engine oil level indicator.
or
distance recorder.
(miles or km)
D. 6-speed electronic gear control
or automatic gearbox.
E. Warning messages and function
status messages, trip computer,
GPS navigation information.
nstrument panel navi
This group of buttons permits:
- When stationary , confi guration of
the vehicle's equipment and the
screen settings (languages, units...),
- While driving , scrolling of the ac-
tive functions (trip computer, navigation...).
ator
Controls
There are four buttons to control the
screen in the instrument panel:
1. Access the main menu, confi rm the
selection.
2. Move up through the menu.
3. Move down through the menu.
4. Return to the previous display, exit
from the menu.
 Loading...