

PEUGEOT 208 R2 User Manual
1 / 21
208 R2 USER GUIDE
Update of the 3rd February 2014

2 / 21
SUMMARY
ENGINE Page 3
Start
Crank
Oil Level
Belts
TRANSMISSION Page 4
BRAKE Page 6
Circuit bleeding
Limiter
Bedding-in
Thickness
WHEEL NUTS Page 8
FUEL LEVEL Page 9
WINTAX4 SOFTWARE Page 11

3 / 21
ENGINE
START
The first start of the engine must be done following this procedure:
- Master switch ON
- Power OFF
- Push the horn button
- Push the start button in the 5 following seconds and keep pushing
- Repeat this operation as long as the oil pressure is under 3.5 bars
- Then follow the process detailed below
Every start in tempered condition must be done as defined below:
- Master switch ON
- Power ON during 3 seconds minimum
- Clutch
- Push the start button. Do not keep pushing; the starter is on as long as
the engine has not started and during a maximum time of 5 seconds.
By cold weather especially when the cooling liquid is under 0°C, we recommend to
follow the specific procedure detailed below:
- Master switch ON
- Power ON then wait during 3 seconds minimum
- Power OFF
- Power ON then wait during 3 seconds (the 3 last points are necessary to
get the fuel pressure in the injection rail)
- Push the horn button and the flash lights buttons to "wake up" the battery
- Clutch
- Push the start button. It is not necessary to keep pushing.
If the engine does not start, reset the system:
- Power OFF
- Master switch OFF
- Master switch ON
- Power ON
Then try a new start of the engine.

4 / 21
If the engine does not start after 2 tries, do a crank procedure as detailed below:
CRANK
If you can’t start your engine after few tries, we recommend you to do the following
procedure:
- Master switch ON
- Power OFF
- Push the horn button
- Push the start button in the 5 following seconds and keep pushing.
This procedure switch on the starter and the engine is turning without injection or
ignition, to remove the fuel present in excess in the cylinders. This procedure is can
also be used to put oil in the circuit after an oil filter replacing, a first start or a start
of an engine rebuilt.
OIL LEVEL
The recommended oil level is the maximum level of the gauge.
BELTS
We remind you the recommended mileage of accessories and water pump belts is
400 km. We remind you to be attentive to these belts during rallies.
Moreover, we remind you that a water pump belt failure lead to a fast increase of
the water temperature, which can damaged the engine if this one is not stopped
immediately.
In case of water temperature alarm, stop the engine. Before restarting the engine,
check if the water pump belt is in position.

5 / 21
TRANSMISSION
DRIVESHAFTS BEDDIN-IN
We recommend you to run in your driveshaft before the first use:
Step 1
Car ready to run, on stands, engine running at 3000 rpm in 5th gear during 5
minutes, without playing with the steering wheel.
Step 2
Same as step 1, in same time turn the steering wheel left and right by a half turn.
Step 3
Same as step 2, turn the steering wheel left and right by a complete turn.
Step 4
Drive 10 km; avoid turning the steering wheel up to the stop end.
BRAKING
BRAKE CIRCUIT BLEEDING
The bleeding must be done by 4 persons:
- 1 person in the driver seat
- 1 person to ensure a correct level in the brake reservoirs
- 1 person to bleed the front calliper
- 1 person to bleed the rear calliper
We recommend you to bleed as detailed below:
- Push 3-4 times slowly on the brake pedal then keep pushing
- Open in the same time a bleeding screw of the front calliper and of the
rear calliper.
- Push the pedal up to the stop end and keep pushing
- Close the bleeding screw
- Repeat as long as the liquid of the calliper is not clean and without
bubbles

6 / 21
Do this procedure as detailed below:
- Front right and rear right callipers, outside bleeding screw
- Front right and rear right callipers, inside bleeding screw
- Front left and rear left callipers, outside bleeding screw
- Front left and rear left callipers, inside bleeding screw
Then tight the bleeding screw:
- 18 N.m for cold calliper
- 14 N.m for hot calliper
Once the bleeding is done, check if the travel of the brake pedal is correct and
adjust the liquid level.
BRAKE LIMITER
To read the setting of the brake limiter, first push 3-4 times on the brake pedal.
Then push up to 60 bars on the front circuit and read the pressure of the rear circuit.
Modify the setting without pushing the brake pedal.
BRAKES BEDDIN-IN
Front pads bedding-in
During the bedding-in, the measured temperature must not exceed 500/550°C. In
case of overheating, drive without braking and use the handbrake to slow down the
car.
Set the brake limiter 2 laps more to the rear to ease the rear brakes bedding-in.
The bedding-in must be done during 10 km at an average speed of 100 km/h. It
represents about 50 braking.
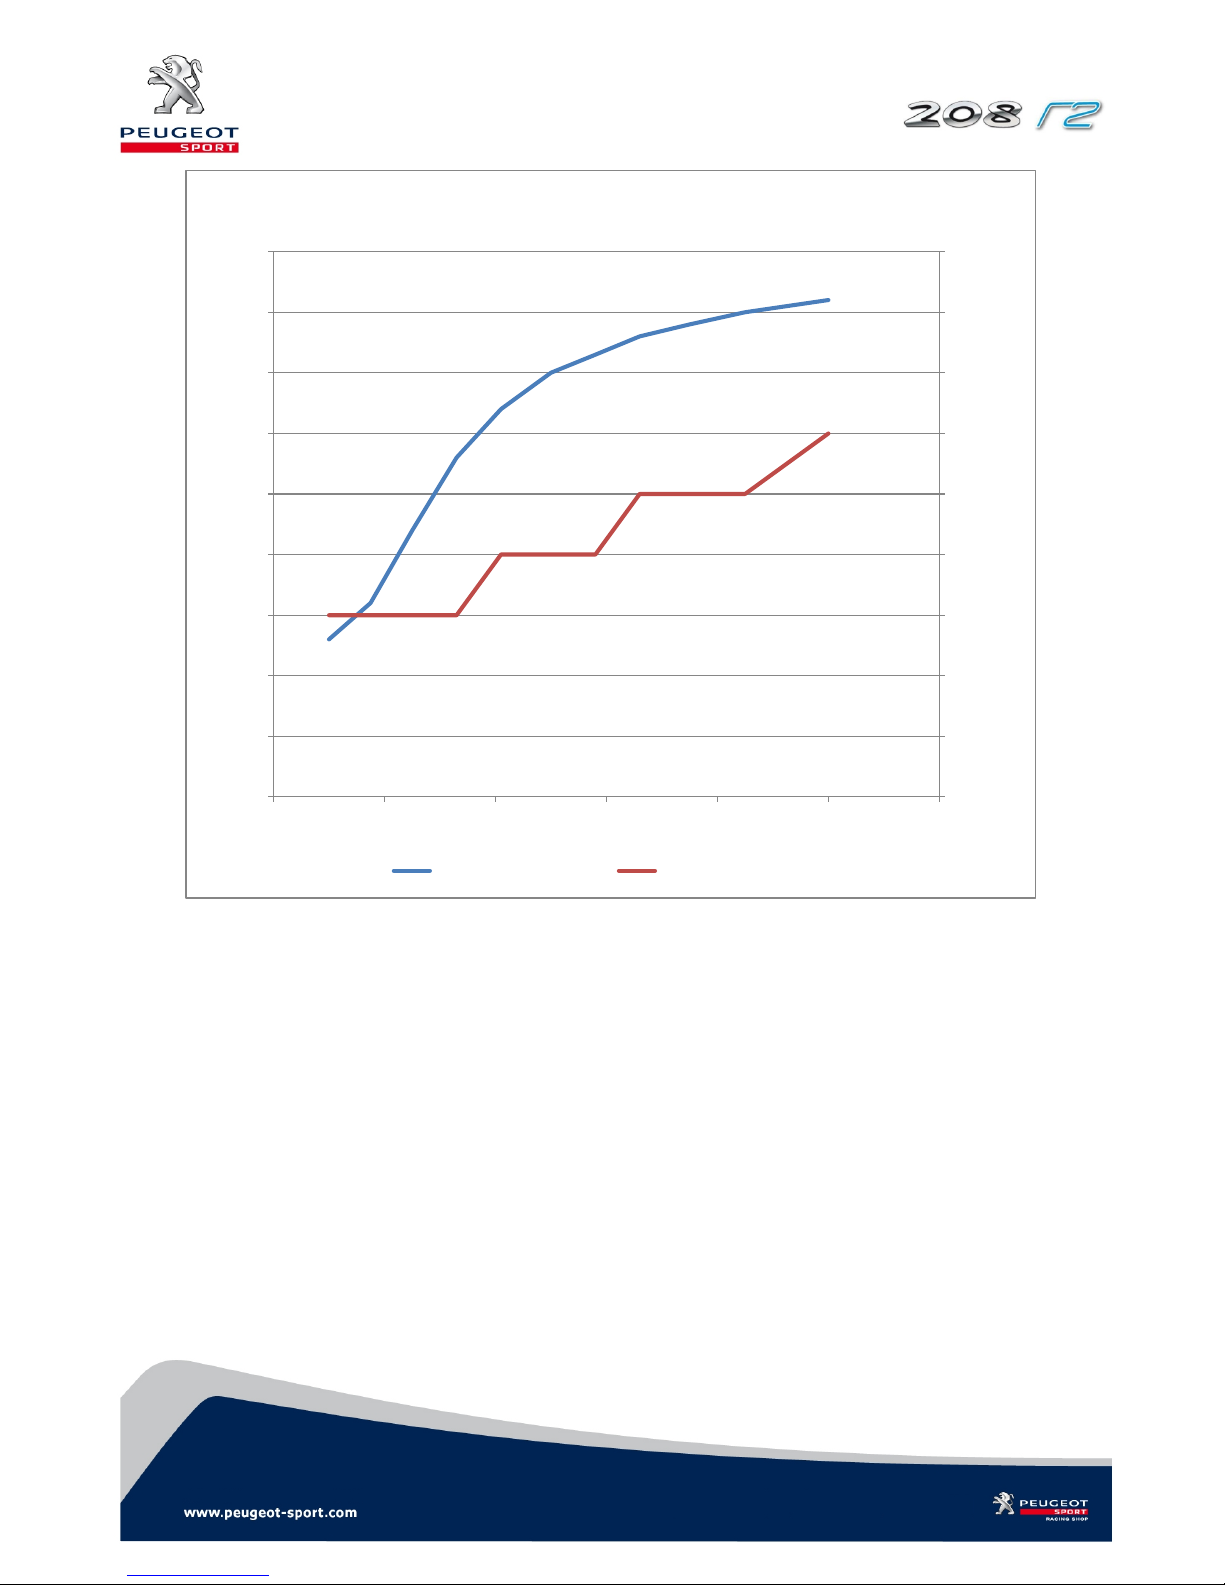
You must do "normal" braking following the pressure target as defined in the graph
below to get a deceleration from 150 to 100 km/h for example. You must not brake
and accelerate in the same time.
If the deceleration is not related to the effort on the brake pedal, release the brake
pedal.
7 / 21
At the end of bedding-in, drive 3 km at medium speed to cool down discs and pads.
Then set you brake limiter to the initial setting.
Case of discs and pads not bedding-in together
When pads and discs have not been bedding-in in the same time, you must do a
specific bedding-in to associate discs and pads.
During 8 km, warm up gradually the brakes but do not brake and accelerate in the
same time. Then do 5 braking in 5th gear.
0
5
10
15
20
25
30
35
40
45
0
50
100
150
200
250
300
350
400
450
0 2 4 6 8 10 12
Pressure
Temperature (°C)
Distance (km)
Targets for pads bedding-in
Pads temperature Front brake pressure
 Loading...