

Page 1
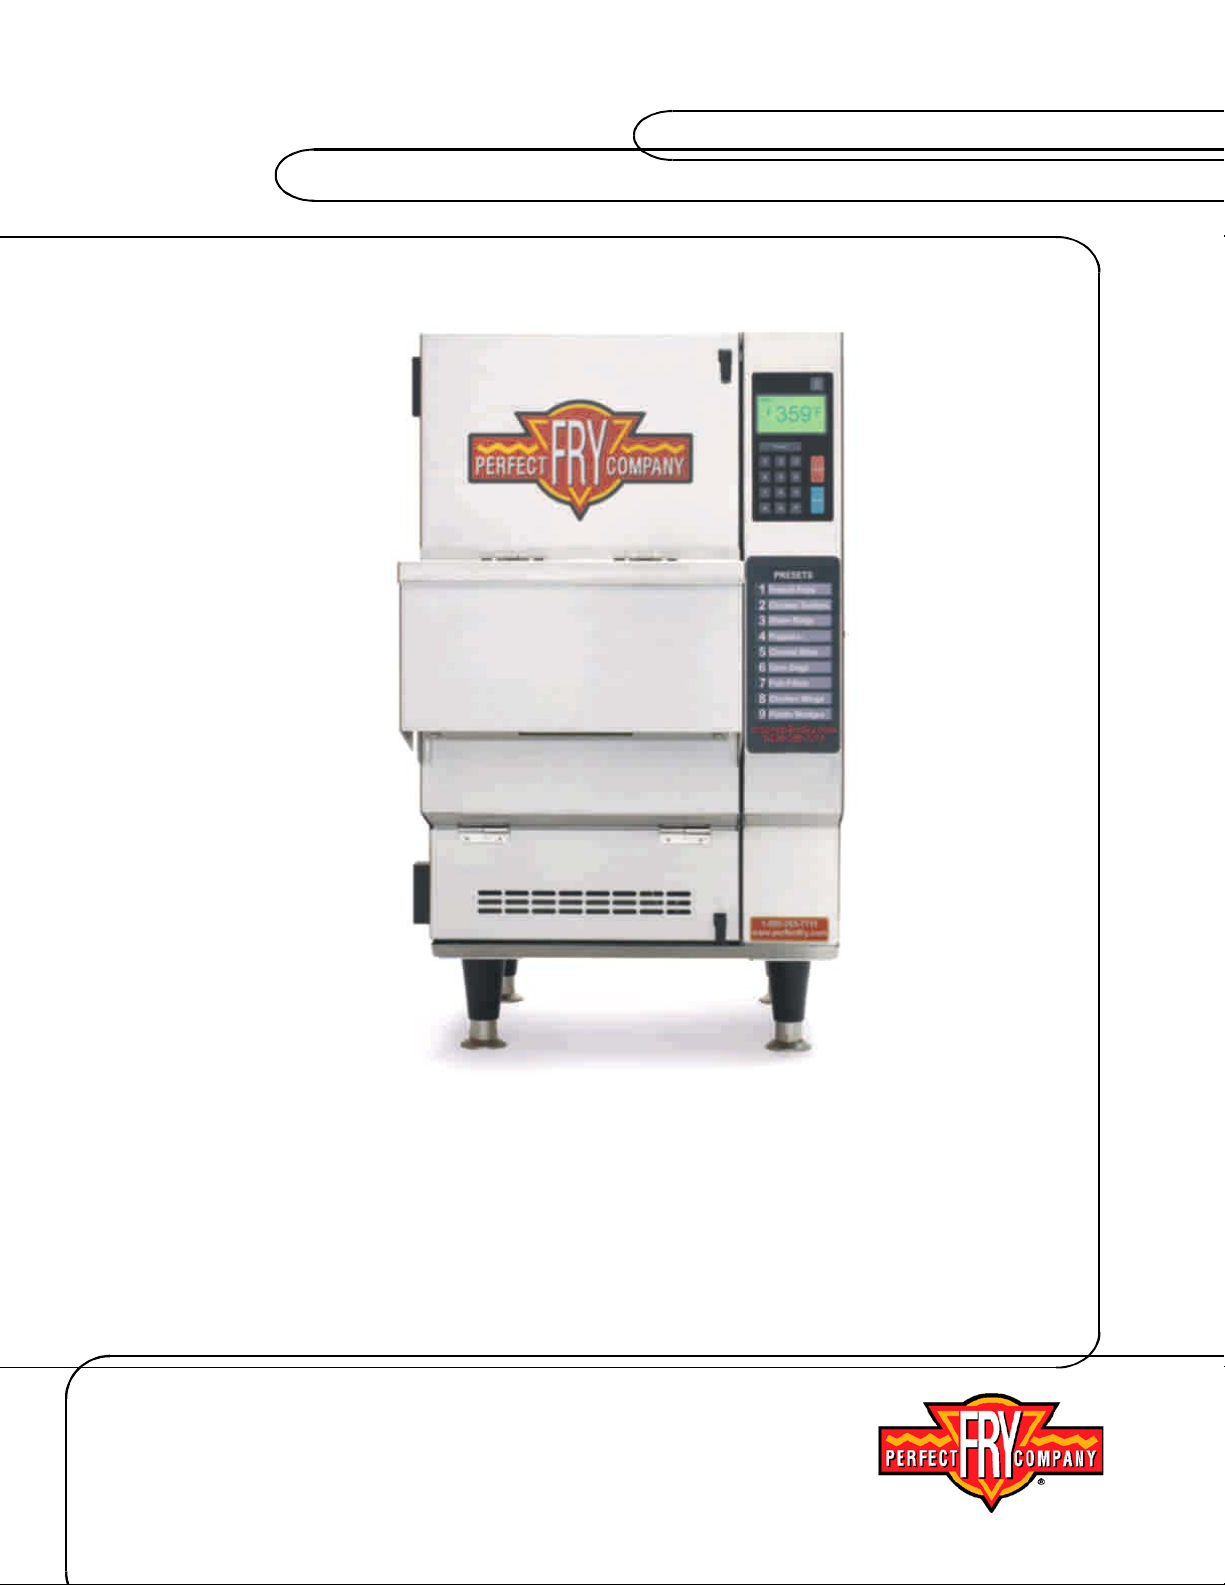
DSA SERIES MODELS
OWNER’S MANUAL
Be sure ALL operators read, understa nd a nd
have access to this manual at all times.
PHONE: 603-225-6684
MAILING ADDRESS: P.O Box 501, Concord, NH 03302-0501
SHIPPING ADDRESS: 10 Ferry St., Concord, NH 03301
FAX: 603-225-8472
GENERAL INFORMATION: [email protected]
CUSTOMER SUPPORT: [email protected]
WEB: www.perfectfry.com
©2013 PERFECT FRY COMPANY
L20-395 R1
Page 2

OWNER’S MANUAL FOR ALL DSA MODELS
TABLE OF CONTENTS
OWNERS RESPONSIBILITIES .............................................................................................................................. 1
REGULATIONS & RECYCLING ............................................................................................................................ 2
SAFETY FIRST ....................................................................................................................................................... 3
INSTALLATION ...................................................................................................................................................... 4
ELECTRICAL POWER SUPPLY .................................................................................................................................. 4
ELECTRICAL SPECIFICATIONS ................................................................................................................................. 4
PREPARE COUNTER-TOP AREA ............................................................................................................................... 5
UNPACK ................................................................................................................................................................ 5
ASSEMBLY............................................................................................................................................................. 8
COOKING ............................................................................................................................................................. 14
CLEANING ............................................................................................................................................................ 15
DAILY MAINTENANCE ............................................................................................................................................ 15
WEEKLY MAINTENANCE ........................................................................................................................................ 15
PERIODIC MAINTENANCE ...................................................................................................................................... 17
TIPS ON DEEP FRYING ....................................................................................................................................... 18
OIL FACTS............................................................................................................................................................ 19
OPERATING INSTRUCTIONS ............................................................................................................................. 22
STARTING UP ....................................................................................................................................................... 23
MANUAL MODE .................................................................................................................................................... 23
PRESET TIMES ..................................................................................................................................................... 24
PRESET MODE ..................................................................................................................................................... 24
PRESET LOCKED MODE ........................................................................................................................................ 25
RAPIDFRY
RAPIDFRY
TM
MODE .............................................................................................................................................. 25
TM
2GO ................................................................................................................................................ 26
DUAL LOAD .......................................................................................................................................................... 27
COOKING TIME CORRECTION ................................................................................................................................ 28
OPEN DRAWER LID – PAUSED COOK CYCLE ......................................................................................................... 28
STANDBY MODE ................................................................................................................................................... 29
SHUTTING DOWN ................................................................................................................................................. 29
USER DEFINED OPTIONS .................................................................................................................................. 30
BACKGROUND MENU - ACCESSING ....................................................................................................................... 31
TM
CTS
(COOK TIME SENSITIVITY) ......................................................................................................................... 31
BACKGROUND MENU - MAP .................................................................................................................................. 31
OPTION CHANGES ................................................................................................................................................ 36
CUSTOMIZING PRESETS ....................................................................................................................................... 37
HELP ..................................................................................................................................................................... 38
SYSTEM ERROR CONDITIONS ............................................................................................................................... 38
TROUBLE-SHOOTING TABLE .................................................................................................................................. 40
DECLARATION OF CONFORMITY ..................................................................................................................... 42
THE PERFECT FRY 1 2 3 WARRANTY ............................................................................................................ 43
II
Page 3

OWNER’S MANUAL FOR ALL DSA MODELS – 3/1/2013
OWNERS RESPONSIBI LIT IES
It is the owner’s responsibility to:
• Insure the PERFECT FRYER is properly maintained.
• Allow only properly trained personnel to operate, clean and
maintain a PERFECT FRYER.
• Contact local authorities having jurisdiction to insure that the
installation conforms to all local fire, building and health
regulations.
• Insure that the model ready for installation matches the supply
voltage.
• Insure that the main power supply is disconnected before the
PERFECT FRYER is serviced.
• Insure that all safety devices are intact.
• Insure that a proper surface is provided for the PERFECT
FRYER to sit on.
• Insure that proper clearances are kept.
• Return the PERFECT FRYER for recycling when it reaches end
of life
- 1 -
Page 4
OWNER’S MANUAL FOR ALL DSA MODELS – 3/1/2013
STANDARD
DESCRIPTION
LISTING MA RK
REGULATIONS & RECYCLING
Installation of your PERFECT FRYER must conform to all local fire and health regulations
and building codes.
The table below describes the standards that your PERFECT FRYER has been tested to and
the corresponding listing marks.
NSF 4
EN60335-1
EN60335-2-37
EN61000-6-1
EN61000-6-3
Commercial Cooking, Rethermalization, and Powered Hot Food
Holding and Transport Equipment.
Safety of Household and Similar Electrical Appliances Part 1.
General Requirements
Amendment 8913 - October 1995
Amendment 9475 - May 1997
Safety of Household and Similar Electrical Appliances Part 2.
Commercial Electric Deep Fat Fryers
Electromagnetic Compatibility (EMC) – Emissions & Immunity for
Light Industrial Environments
The table below describes the recycling procedures for your PERFECT FRYER.
WEEE
(Waste Electrical &
Electronic
Equipment)
2002/96/EC
When your PERFECT FRYER has reached end of life, please
deliver the fryer to your local distributor. They will prepare and
deliver the fryer for recycling to the WEEE collection system in
your country. Most of the fryer’s materials can be recycled.
DO NOT DISPOSE OF THE FRYER IN MUNICIPAL WASTE!
- 2 -
Page 5

OWNER’S MANUAL FOR ALL DSA MODELS – 3/1/2013
LIFTING & MOV ING:
Your PERFECT FRYER’s gross shipping weight is 125 lb. (57 kg). Net weight = 110 lb.
(50 kg).
DEEP FRYING:
Cooking oil is very hot (350ºF or 177ºC). Hot oil can cause severe burns. DO NOT
TOUCH THE COOKING OIL UNLESS YOU ARE SURE IT HAS COOLED.
HEATER MODULE:
DO NOT DROP
DO NOT IMMERSE IN WATER
CLEANING:
DO NOT OPEN DRAWER LID OR FRONT PANEL WHEN PRODUCT IS LOADING
Before cleaning fryer or removing oil, let fryer cool to 122ºF (50ºC). DO NOT TOUCH
HEATER MODULE, VAT OR OIL UNLESS YOU ARE SURE IT H AS COOLED.
Lubricate rails of shovel and bottom of drawer using an approved food grade grease or
silicone lubricant
COOKING OIL MAINTENANCE:
For sanitation and safety, we recommend that the cooking oil is replaced once a week,
more often for higher volume usage. Use a commercial grade deep-fryer formulated
cooking oil. OLD OIL HAS A REDUCED FLASHPOINT. OLD OIL AND OVER-WET
FOOD ARE PRONE TO SURGE BOILING.
SERVICING:
DISCONNECT THE POWER SOURCE BEFORE SERVICING THE FRYER. There is no
need to unplug your PERFECT FRYER for normal cleaning or maintenance.
SAFETY FIRST
- 3 -
Page 6
OWNER’S MANUAL FOR ALL DSA MODELS – 3/1/2013
MODEL
VOLTS
AMPS
AMPS
WATTS
NUMBER
RECEPTACLE
For use on an individual branch circuit
A rated). This fryer must be
ted to a grounded,
according to local installation standards
and codes.
For use on an individual branch circuit
rated 30A minimum. For supply
connectors, use minimum no. 10 AWG
properly connected to a grounded,
dedicated 240 VAC single phase circuit
according to local installation standards
and codes.
For use on an individual branch circuit
rated 20A minimum. For supply
minimum no. 12 AWG
wire (20A rated min). This fryer must
be properly connected to a grounded,
dedicated 240 VAC single phase circuit
according to local installation standards
and codes.
INSTALLATION
Your PERFECT FRYER is NOT to be operated in North America as it not certified for
those areas.
A portable restaurant kitchen extinguisher is necessary as a safety precaution and
should be located nearby.
The procedures for operation and maintenance are contained in this manual. Perfect Fry
Company LLC.. shall not be liable for injury or damage to property other than this fryer.
Electrical Power Supply
•
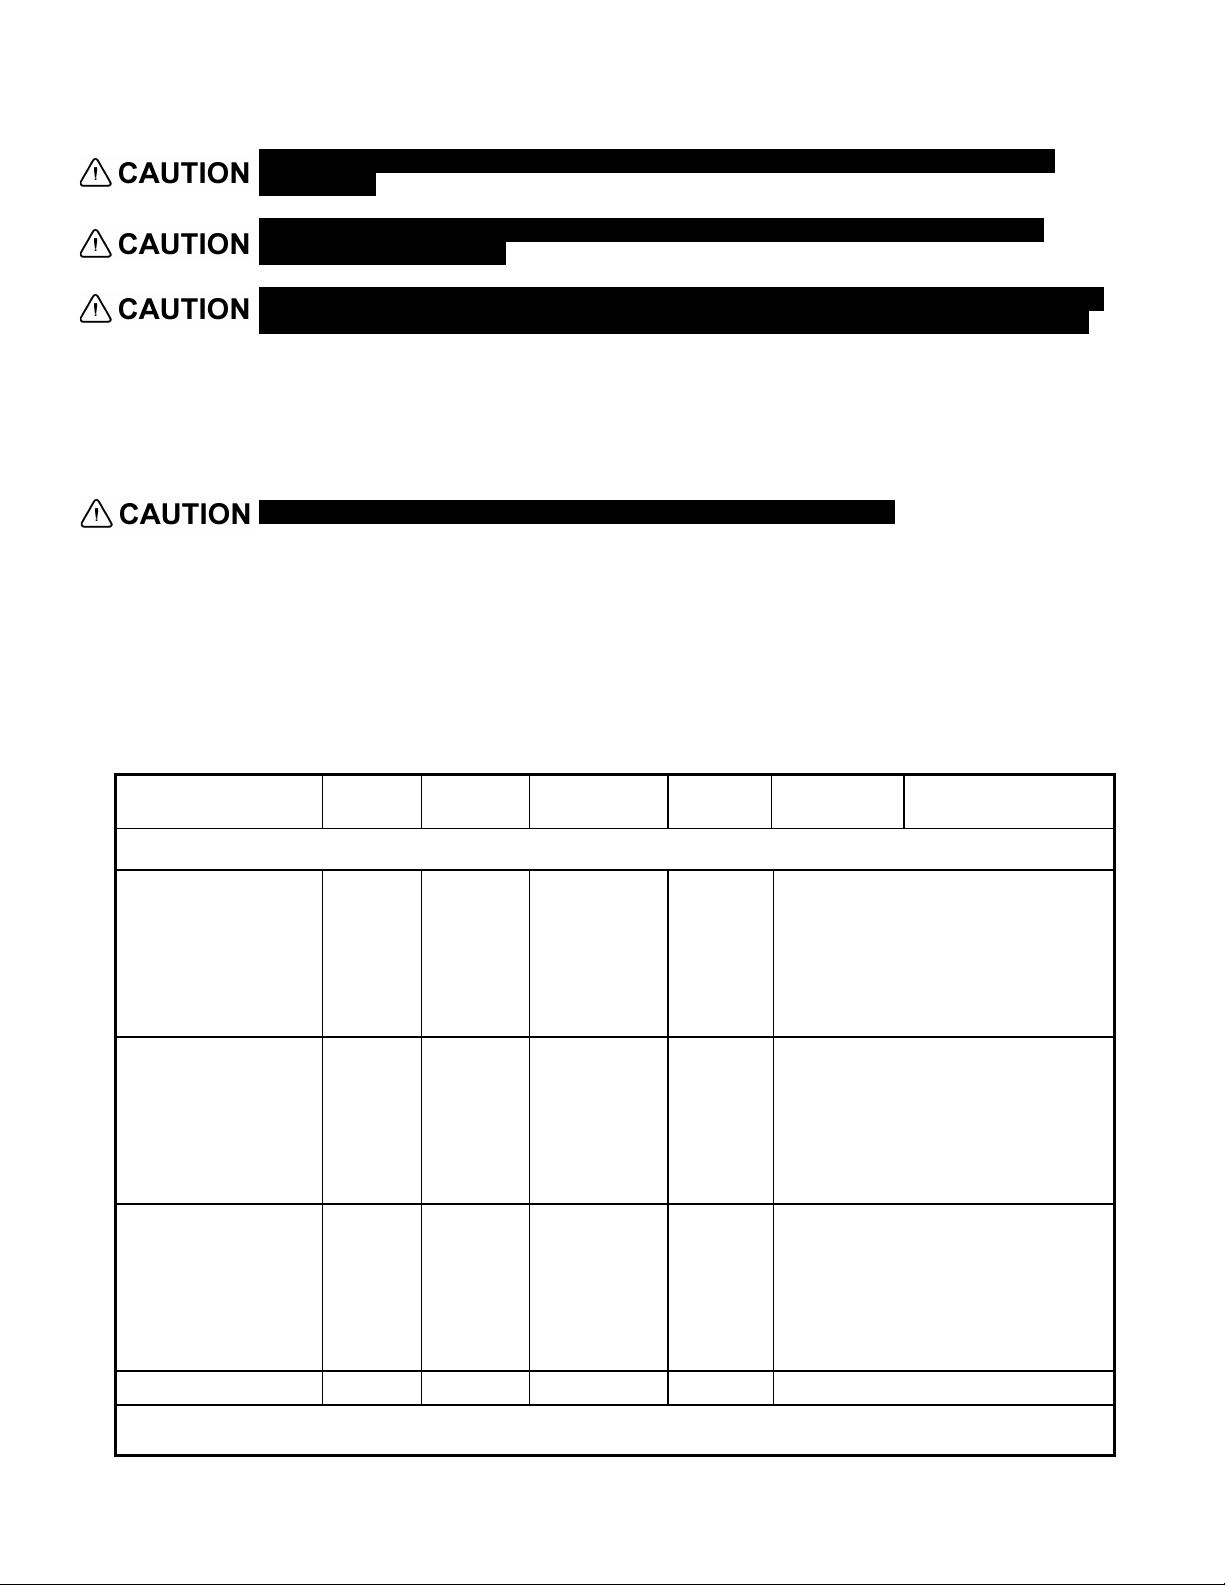
Your PERFECT FRYER must be connected to a dedicated electrical circuit that meets
your fryer’s requirements (see table below).
Improper Installation may damage the fryer and void your warranty
• If your PERFECT FRYER’s plug does not fit your wall outlet receptacle, have an
electrician install the appropriate NEMA receptacle within 4 feet of the fryer.
See the manufacturer’s label on your PERFECT FRYER for the electrical Model No.
•
DSAXXX, then check off your Model Number.
Electrical Specifications
PERFECT FRY
Put a check mark in the box beside the Model Number of your PERFECT FRYER.
□
DSA720
□
DSA570
□
DSA375
240 30.0
240 24.0
240 16.0
CIRCUIT
Minimum
30
Minimum
30
Minimum
20
7200
5700
3750
NEMA
rated 30A minimum. For supply
connectors, use minimum no. 10 AWG
wire (30
properly connec
dedicated 240 VAC single phase circuit
wire (30A rated). This fryer must be
connectors, use
NEMA
All models are single phase; 50/60 hertz.
- 4 -
Page 7
OWNER’S MANUAL FOR ALL DSA MODELS – 3/1/2013
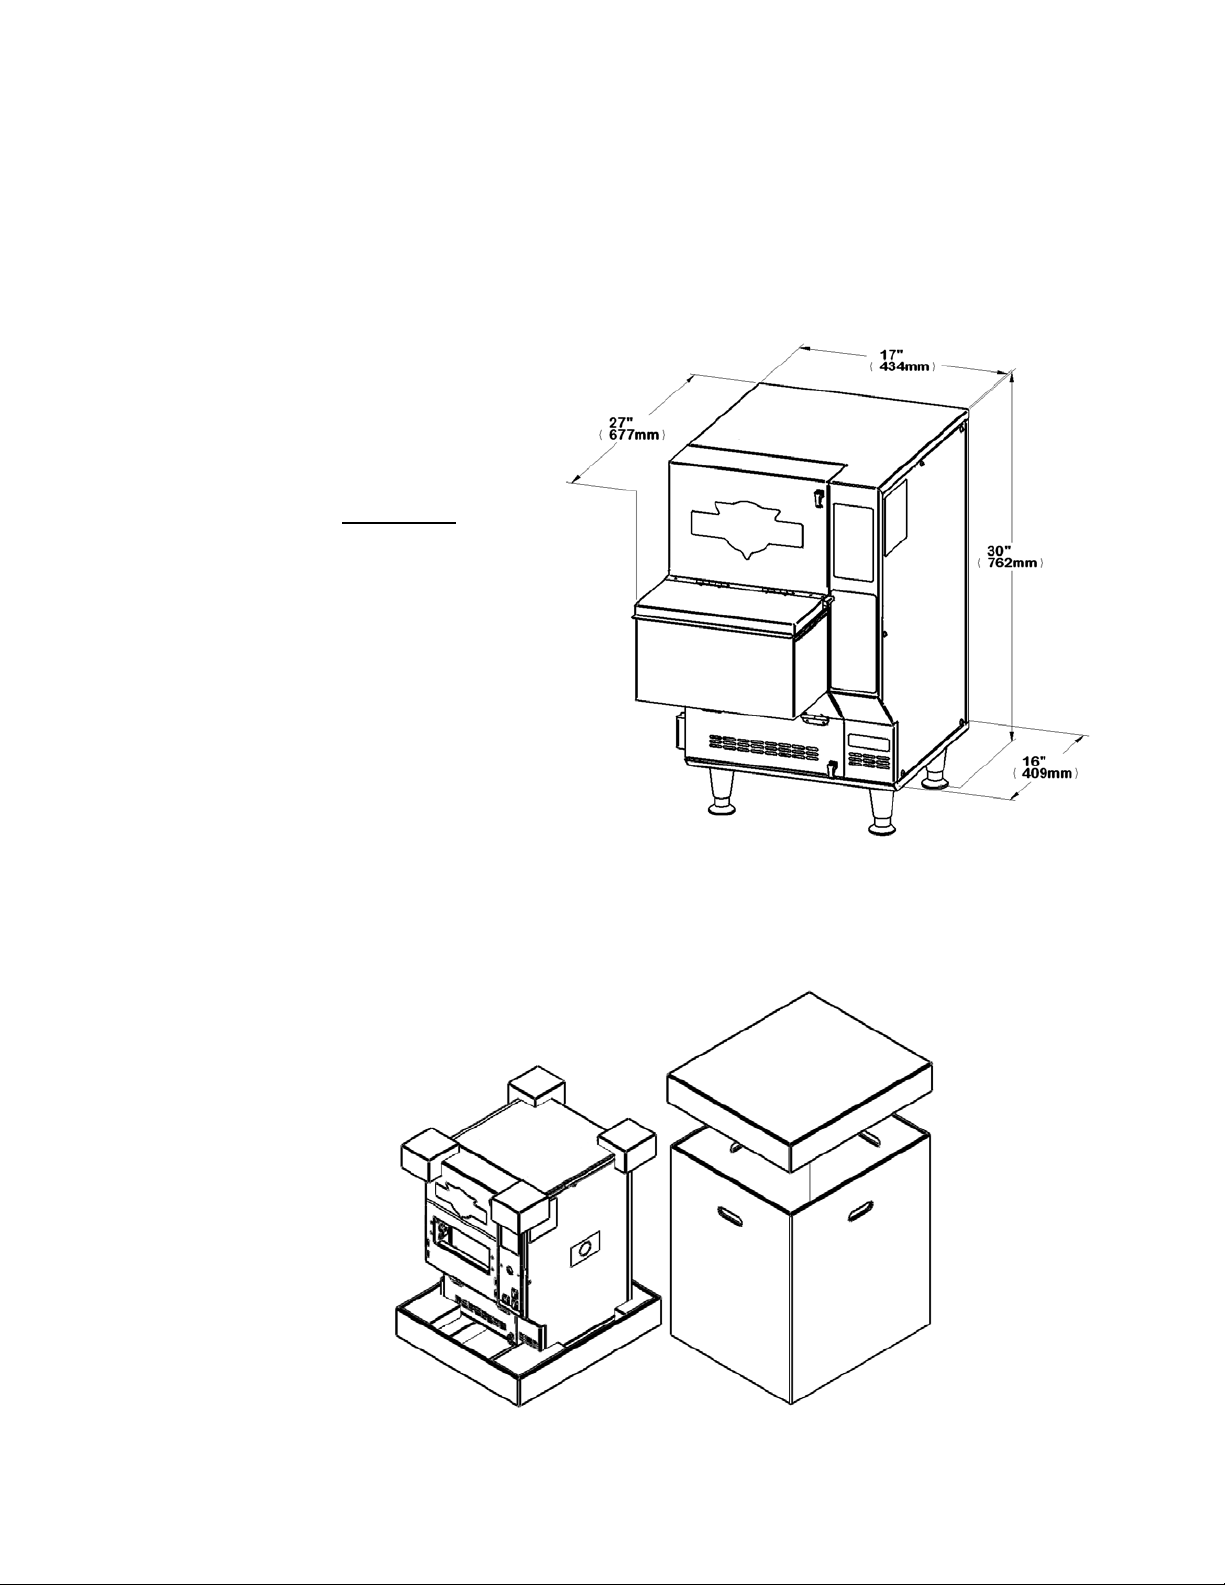
Clearances:
INSTALLATION (Continued)
Prepare Counter-top Area
Unpack
1” on sides
2” on back
0” on top
1) Cut straps on shipping box
2) Remove box top and body
3) Remove outer plastic wrapping and keep box along with foam corners and
sides
- 5 -
Page 8
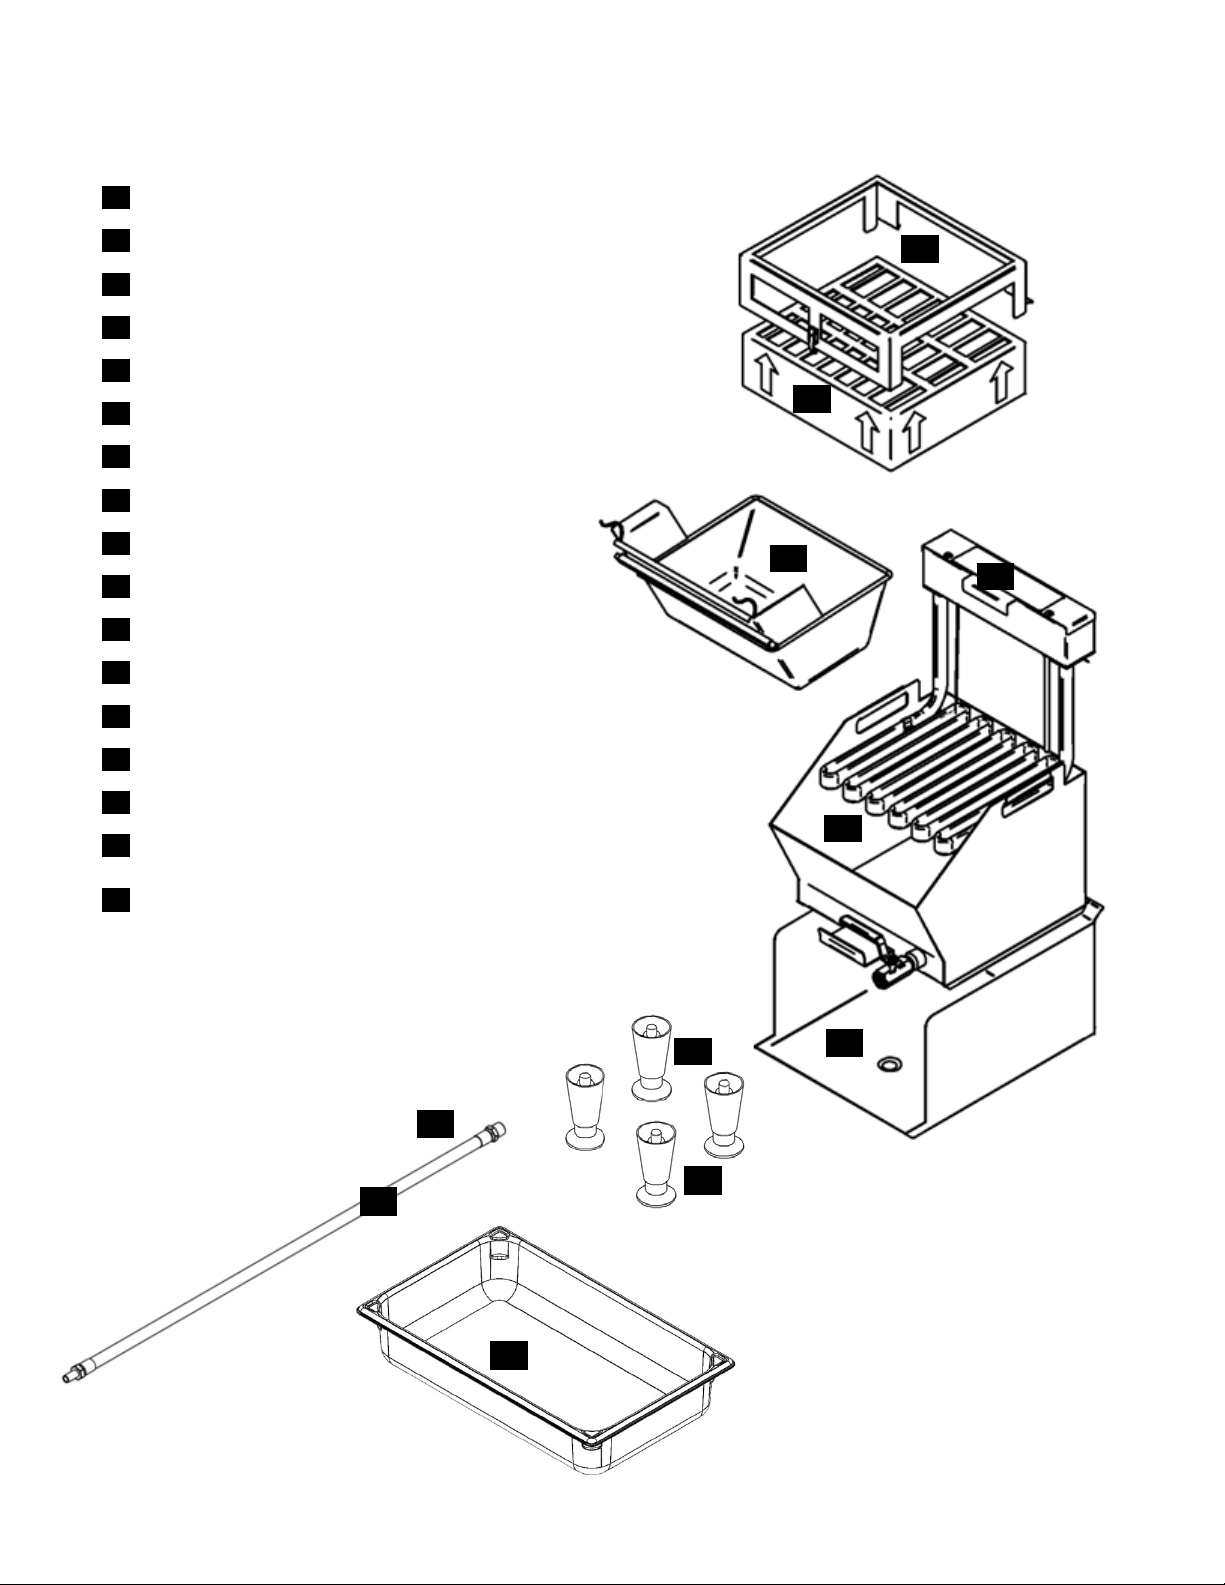
1 Air Filter Cage
2 3 4 5 6
10 9 17
1 7 8
2 Air Filter Cartridge
3 Basket
4 Heater Module
5 Oil Vat
6 Oil Spill Tray
7 Oil Hose
8 Legs (x4)
9 Front Panel
10 Shovel
11 Drawer Cover
OWNER’S MANUAL FOR ALL DSA MODELS – 3/1/2013
4) Remove all foam stuffing and parts
5) Put check mark in box once the part is removed
12 Drawer Sleeve
13 Drawer Ramp
14 Heat Lamp
15 Basket Ramp
16 Basket Ramp Spring (x2)
Receiving Tray (not included)
17
4” high full size pan recommended
- 6 -
Page 9
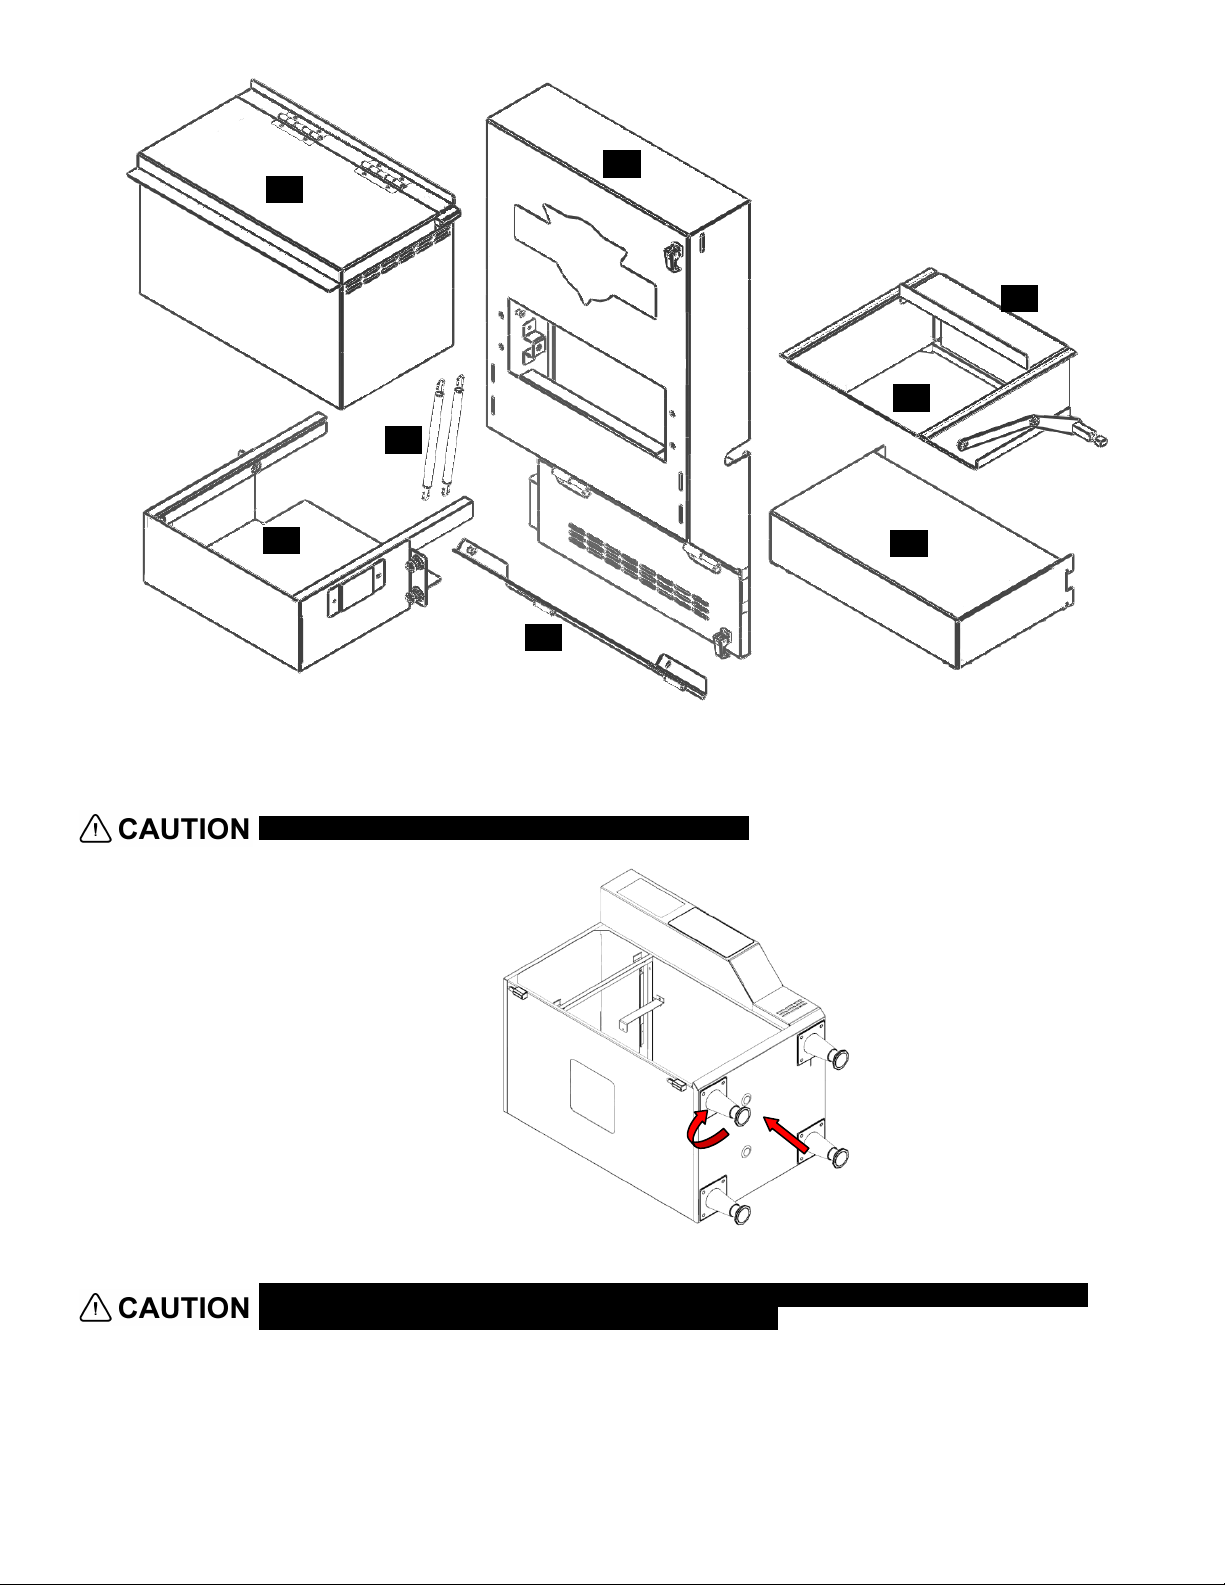
OWNER’S MANUAL FOR ALL DSA MODELS – 3/1/2013
11
13 9 12
10
14
15
16
6) Tilt PERFECT FRYER to one side and install 2 adjustable legs, repeat
process for other side
Do not operate your PERFECT FRYER without legs.
7) Lift your PERFECT FRYER onto countertop and adjust legs as necessary
Your PERFECT FRYER weighs 110 lb. (50 kg). Lift it carefully with your legs or with the
help of another person and place it in its final location.
8) Go to ASSEMBLY section (next page)
- 7 -
Page 10
OWNER’S MANUAL FOR ALL DSA MODELS – 3/1/2013
ASSEMBLY
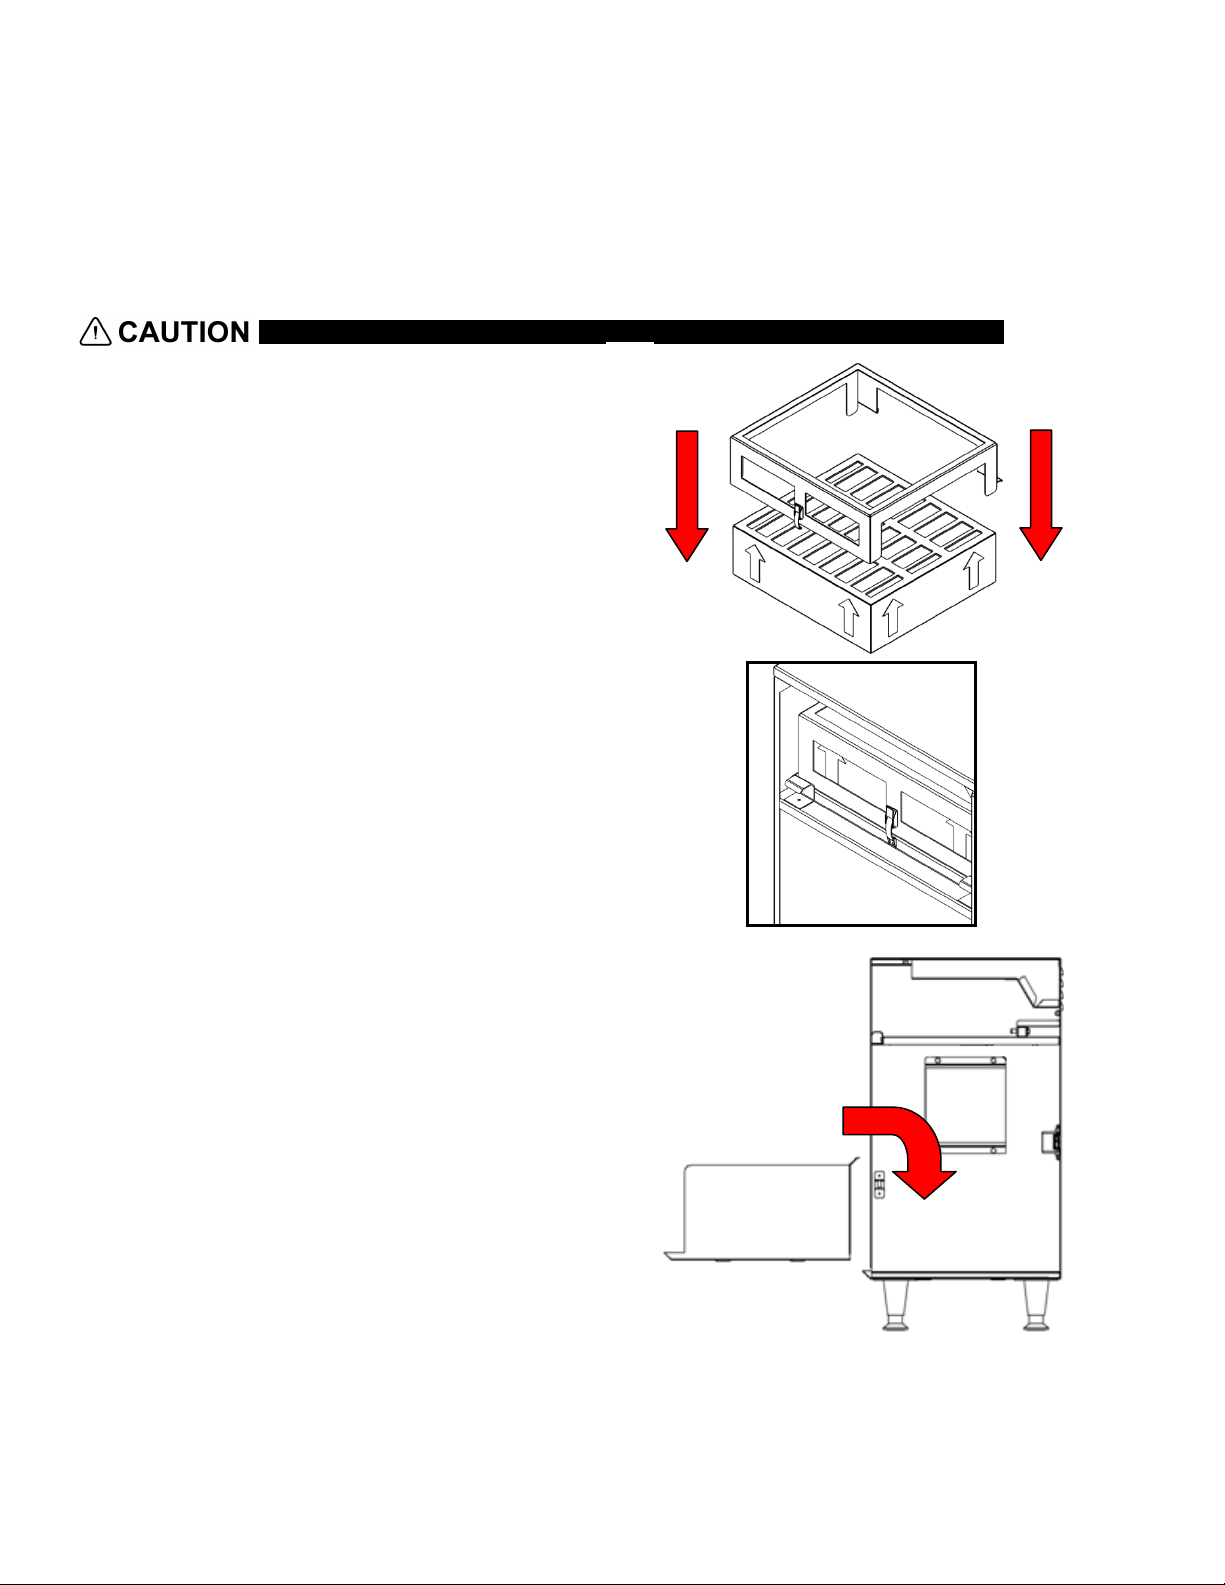
1) Clean parts and inside of cabinet (all except air filter cartridge)
a) Wash in warm soapy water
b) Rinse with hot water
c) Rinse with vinegar solution (1 part vinegar to 2 parts water)
The heater box and heat lamp must NOT be immersed in water or other liquid.
2) Fit air filter cage over air filter cartridge
Note: Make sure arrows are pointing up
3) Slide air filter cartridg e fir mly back into
filter compartment and fasten down with
latch.
4) Install spill tray into bottom cooking
compartment
Note: Indents on bottom of spill tray
should fit into indents on bott om of
cabinet
- 8 -
Page 11
OWNER’S MANUAL FOR ALL DSA MODELS – 3/1/2013
COLD
HOT
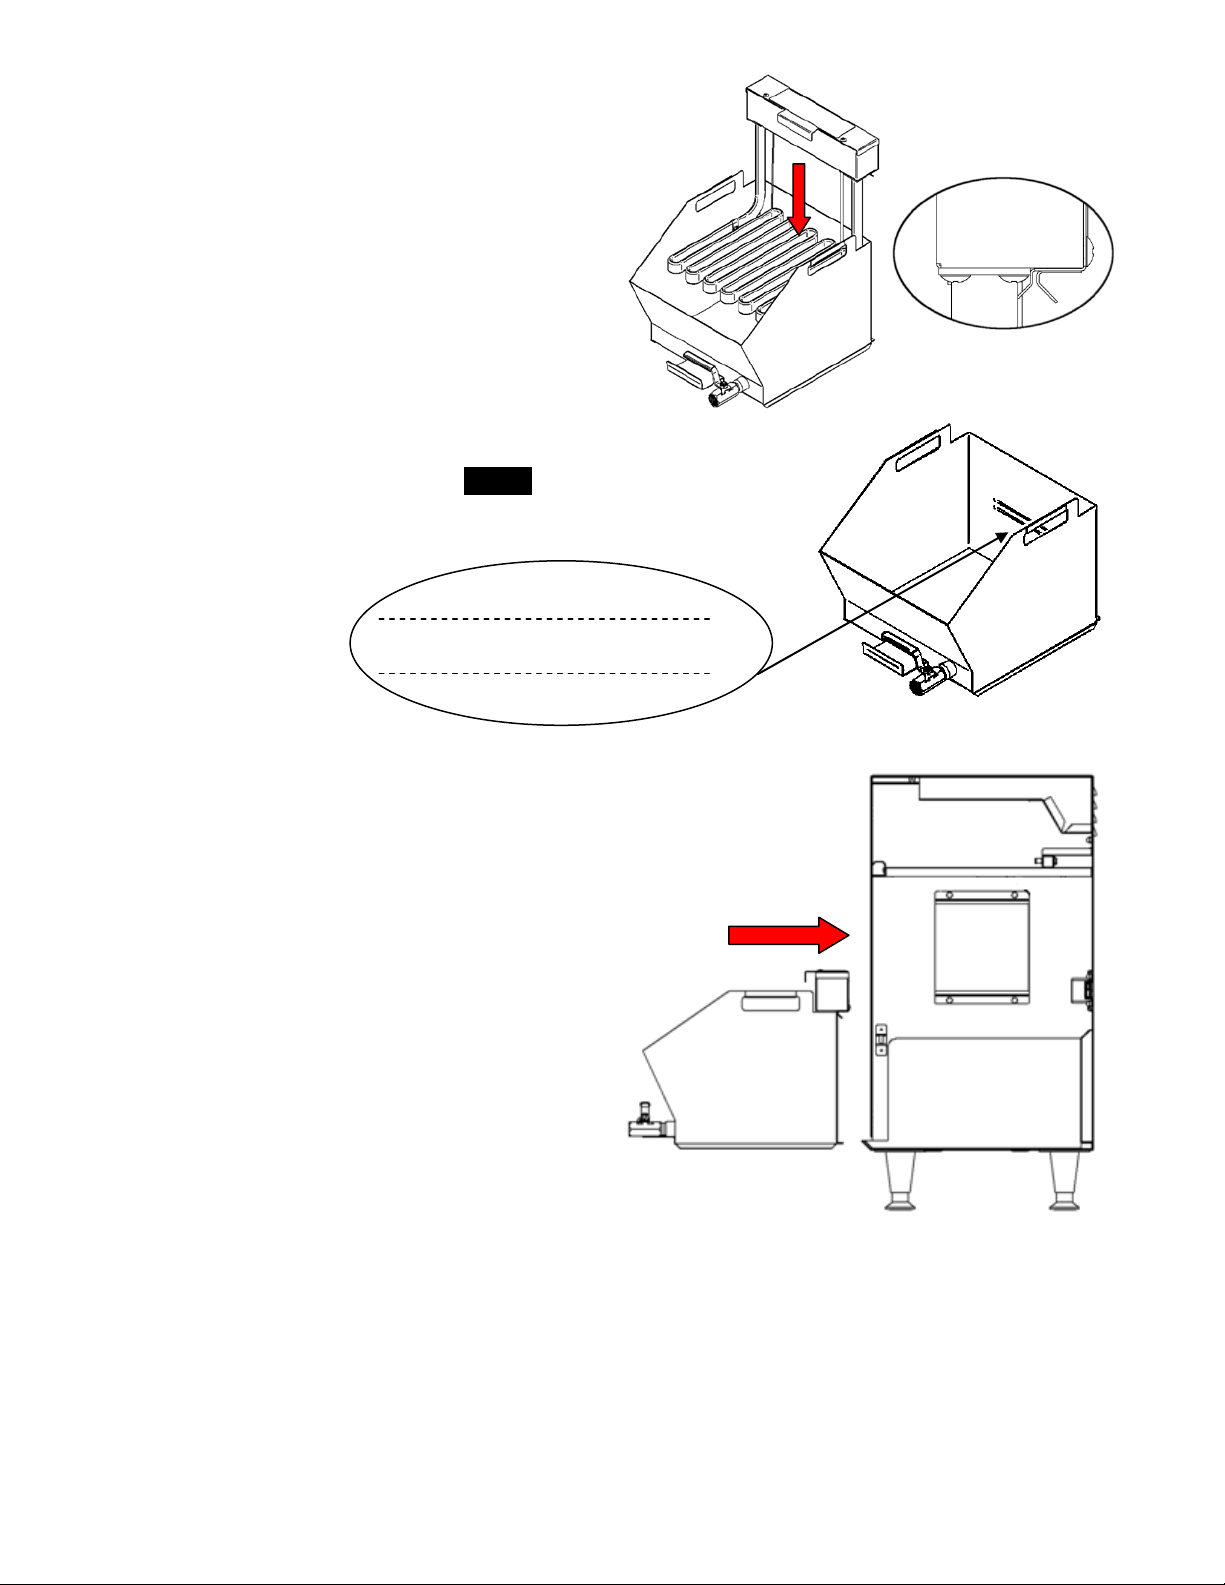
5) Set heater module onto vat
Note: “^” grooves on bottom of heater
module should fit onto back of v at
6) Pour frying oil into vat. Fill to COLD
level mark. Use commercial grade deep
fryer cooking oil. DO NOT OVERFI LL .
7) Slide heater module/vat into cooking
compartment and push in all the way.
Ensure electrical connection is complete
with firm push on heater module.
- 9 -
Page 12
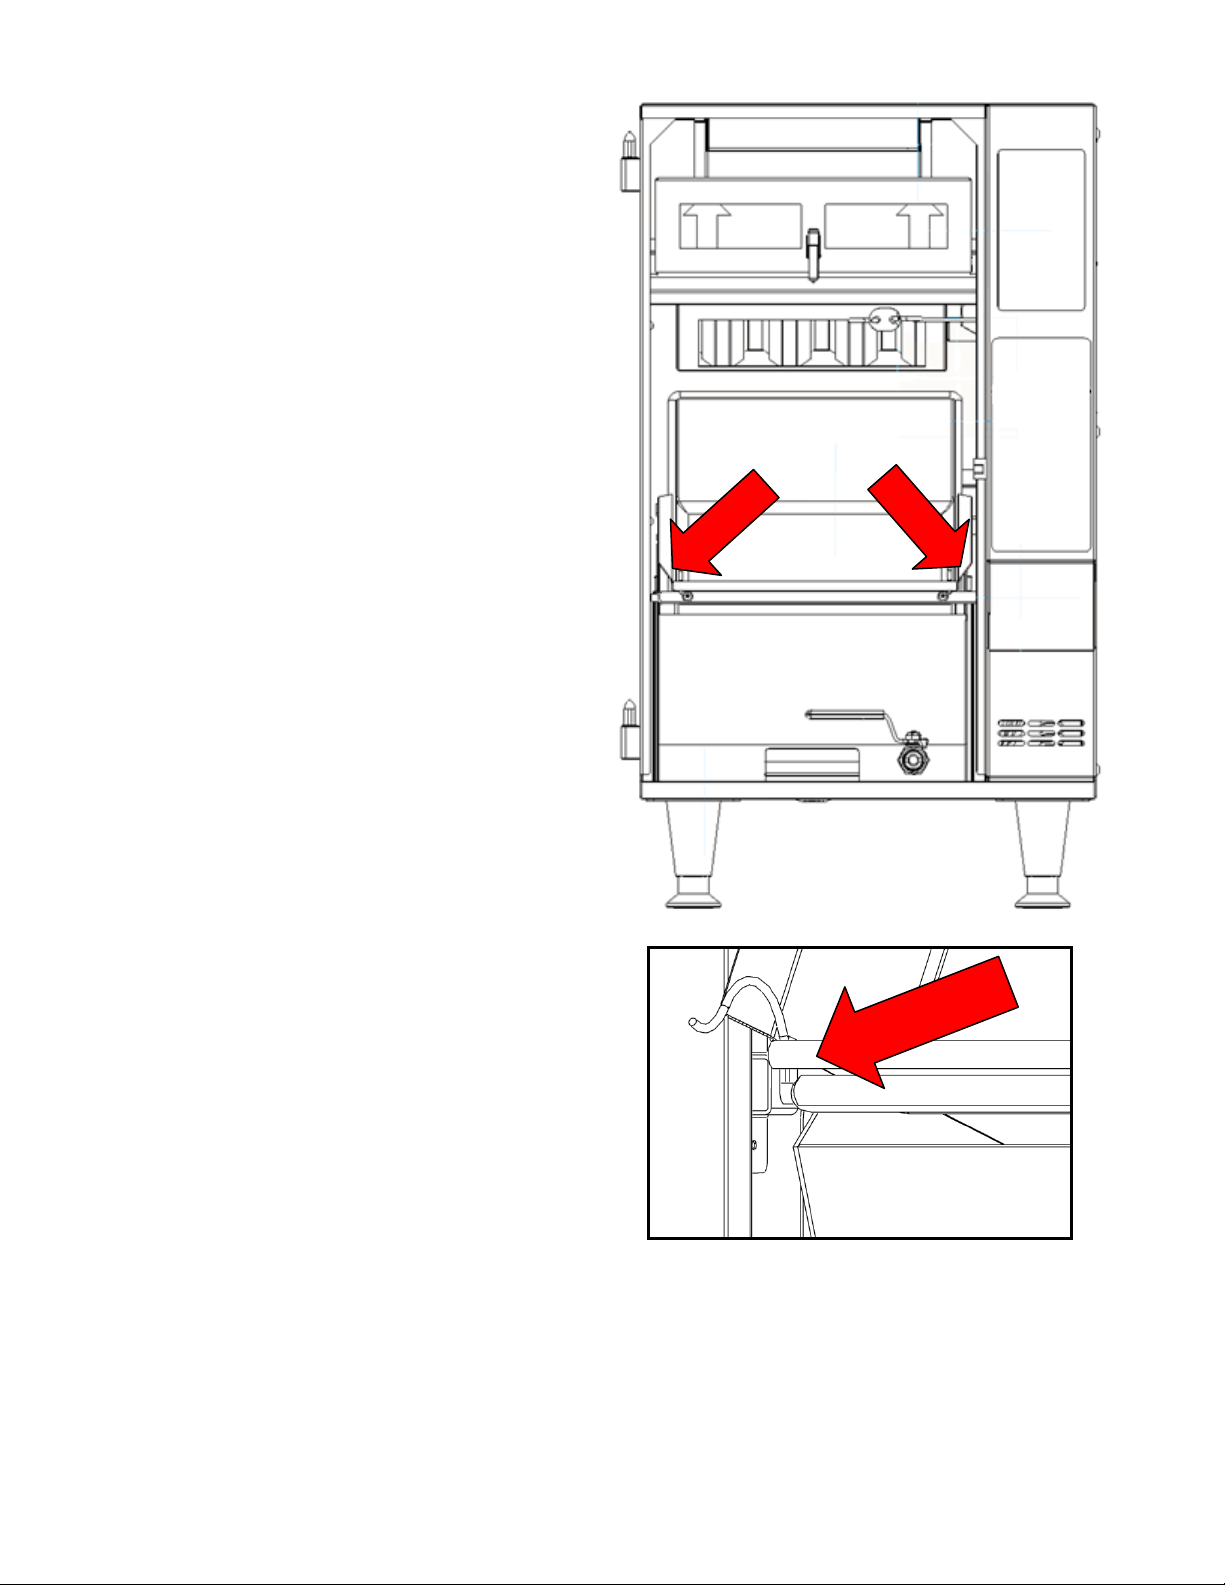
8) Install basket
a) Tilt basket bottom forward and
maneuver rod past cabinet
flanges
OWNER’S MANUAL FOR ALL DSA MODELS – 3/1/2013
b) Install rod into pivot slot – left side
- 10 -
Page 13
OWNER’S MANUAL FOR ALL DSA MODELS – 3/1/2013
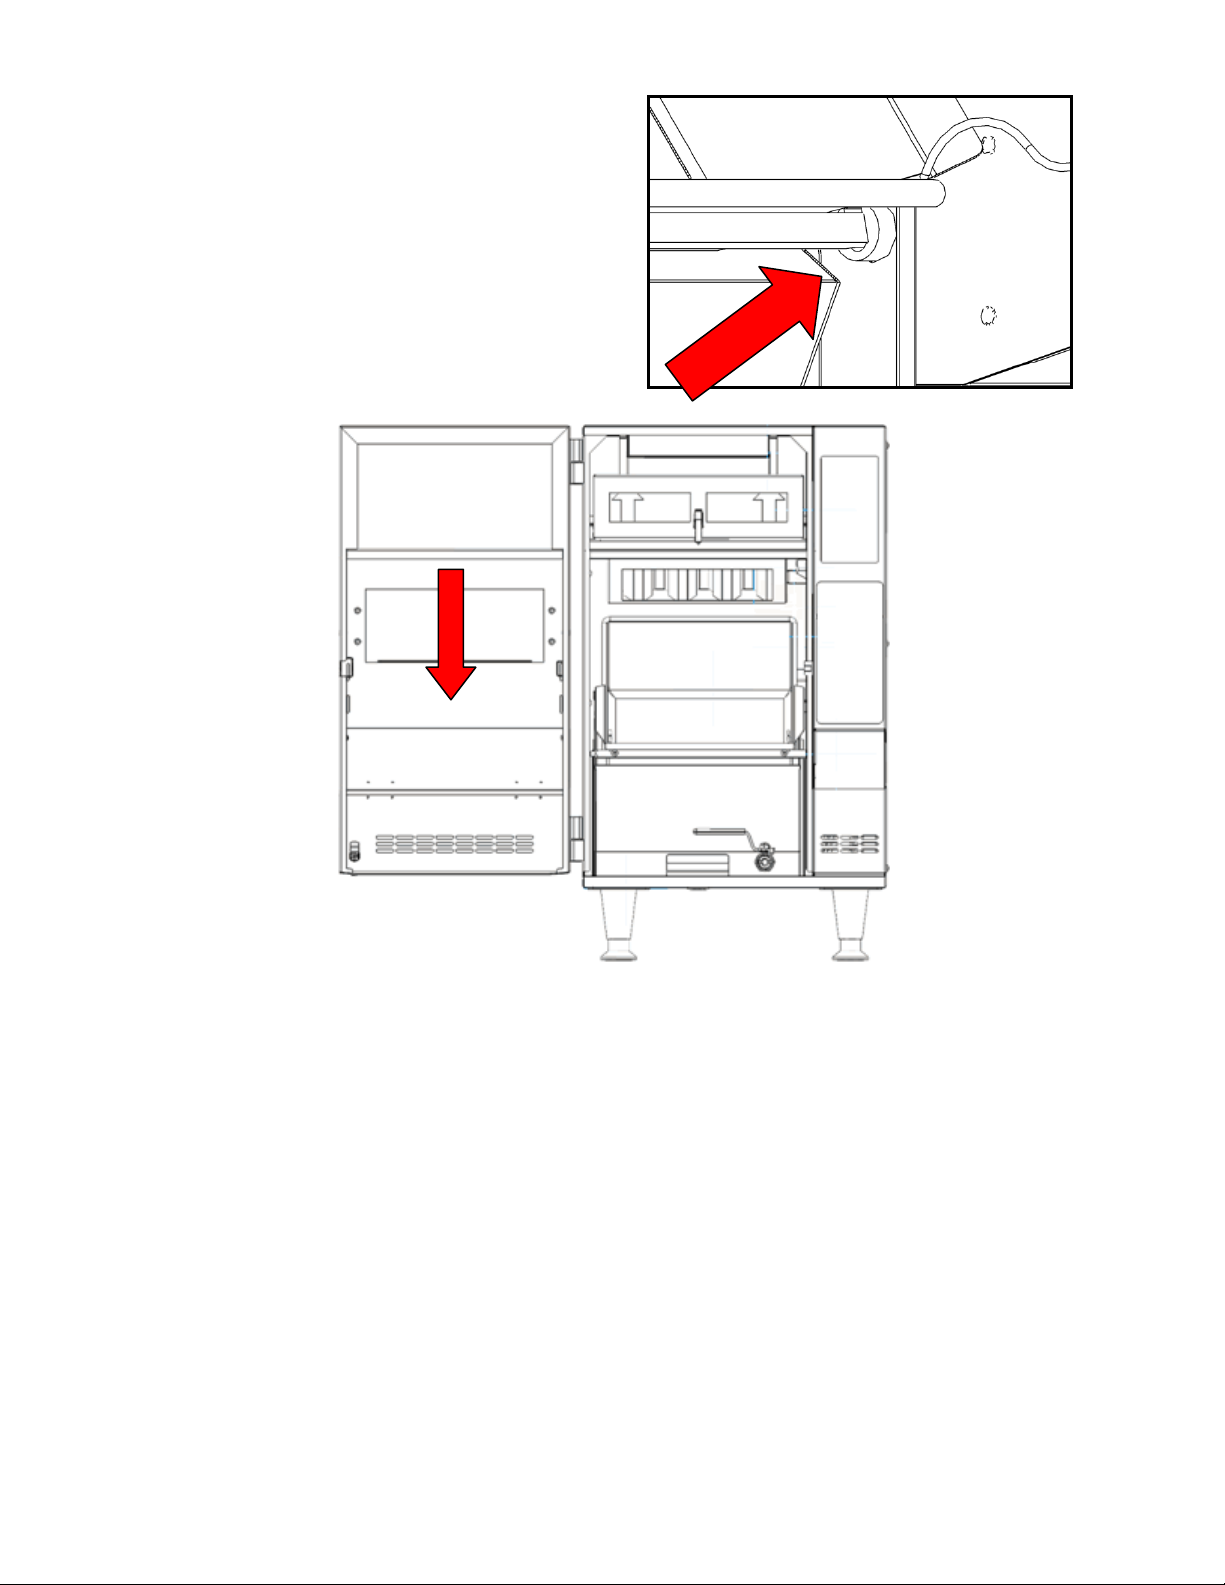
c) Install rod into motor coupler –
right side
9) Install front panel using lift off hinges and close front panel. Turn latches ¼ turn clockwise
and press down.
- 11 -
Page 14
OWNER’S MANUAL FOR ALL DSA MODELS – 3/1/2013
13) Install heat lamp. Connect cord set to
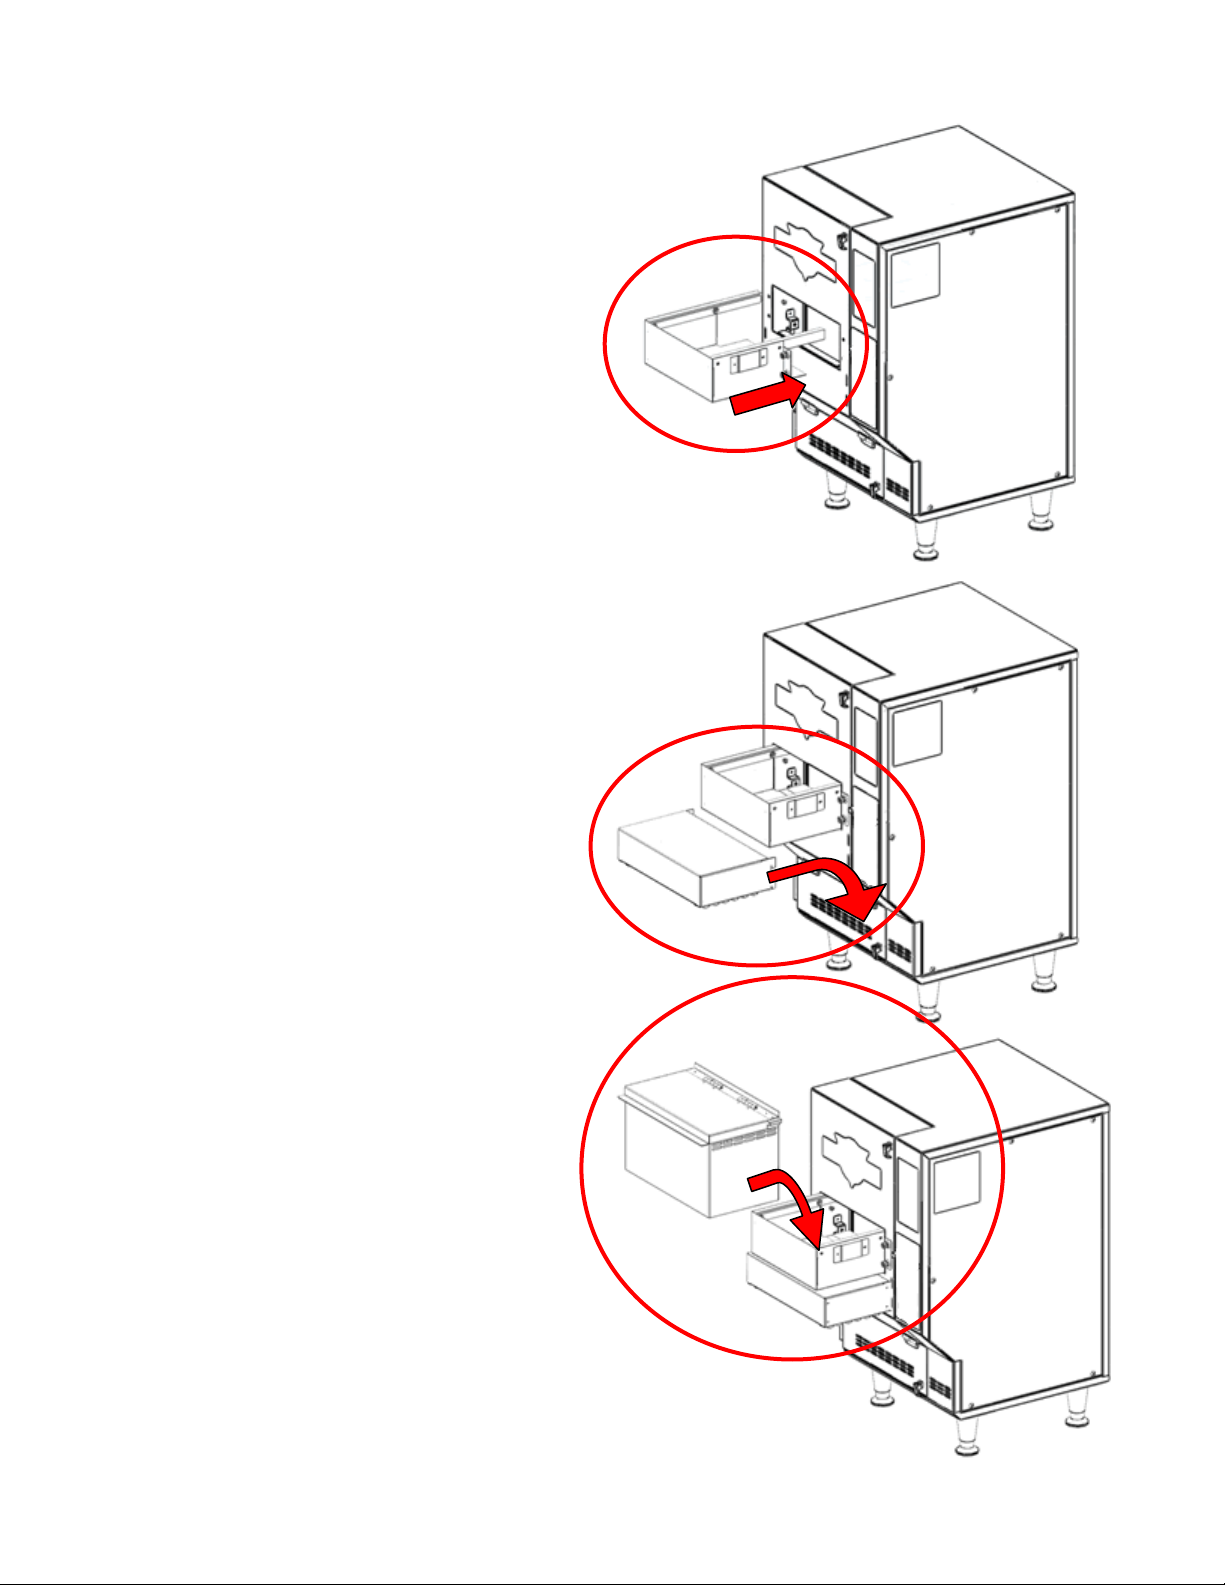
ASSEMBLY (Continued)
12) Install drawer sleeve using 4 captive
screws. Tighten securely.
Note: Bottom of drawer sleeve should sit
tight on front panel.
connector on left side of heat lamp and
back electrical outlet.
Note: Tabs on back of heat lamp should
fit into slots on front panel
14) Install drawer cover
Note: Tabs on inside of cover should fit
into slots on sides o f drawer
sleeve
- 12 -
Page 15
OWNER’S MANUAL FOR ALL DSA MODELS – 3/1/2013
ASSEMBLY (Continued)
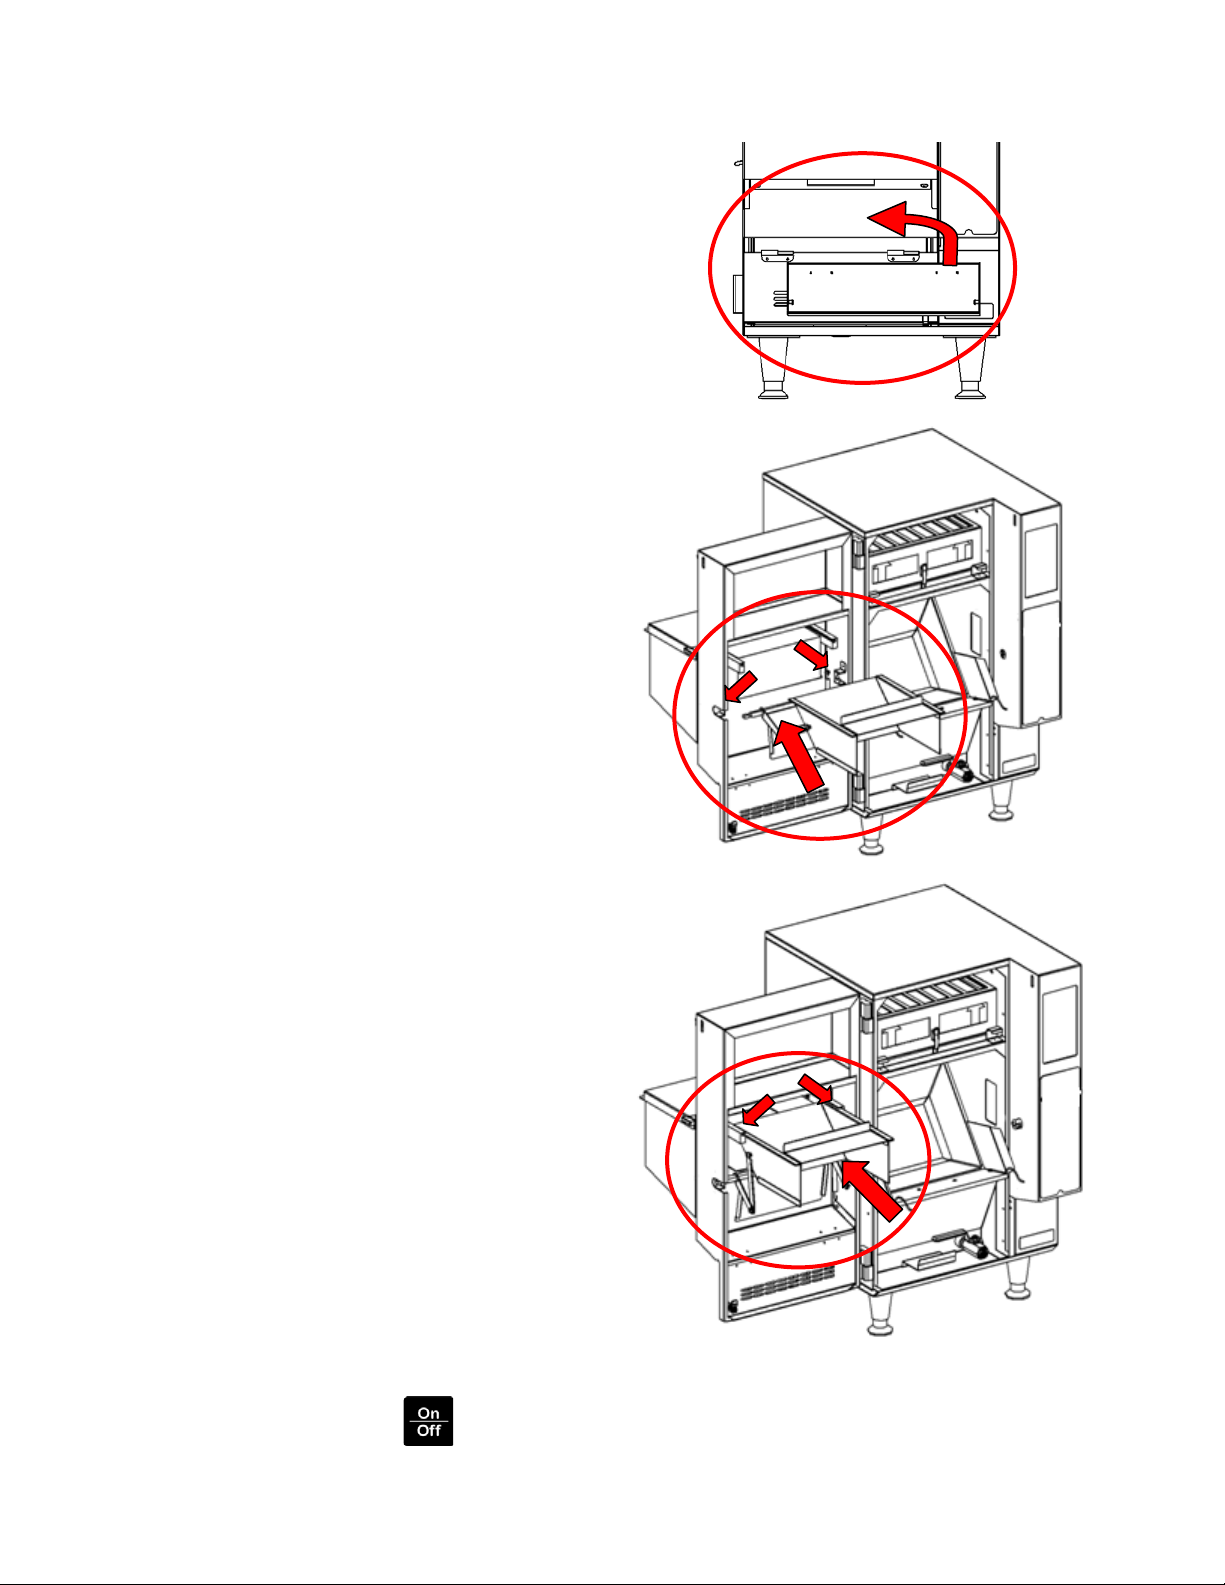
15) Install basket ramp using hinges. Install
basket ramp springs onto mounts
provided. For proper airflow and
sanitation, basket ramp must always be
installed.
16) Install drawer ramp into hole on right
side and slots on left side of inside of
front panel.
17) Install drawer shovel into guides and
push shovel in completely.
18) Close and lock the front panel by turning latches ¼ turn clockwise and pressing down.
Plug in fryer and press . The fryer will now begin heating. In a few minutes, you will
be ready to start cooking!
- 13 -
Page 16
OWNER’S MANUAL FOR ALL DSA MODELS – 3/1/2013
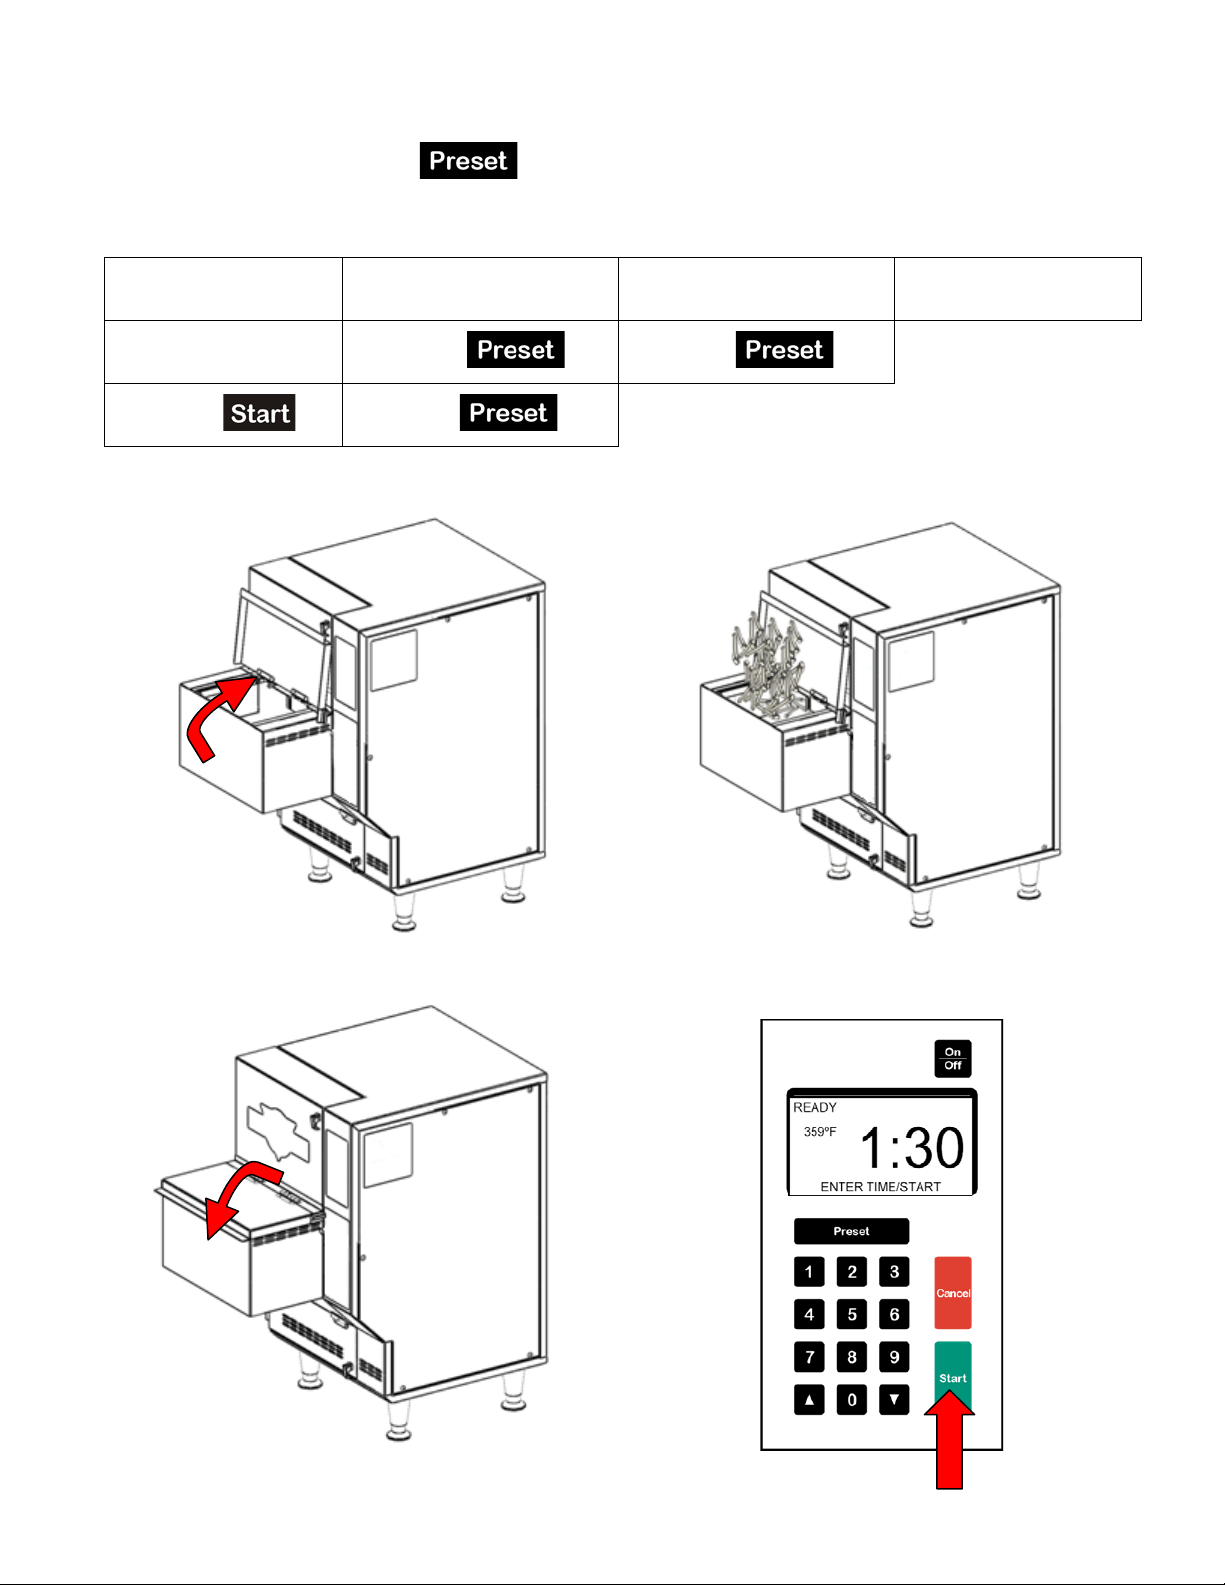
COOKING
Press to toggle bet ween modes
Manual Mode Preset Mode Preset Locked Mode RapidFryTM Mode
Load Food Load Food Load Food Load Food
Select Time
Press Select #
Press Select #
1. Open Drawer Lid 2. Fill Drawer
Manual Mode shown below
3. Close Drawer Lid 4. Enter Time/Press Start
- 14 -
Page 17
OWNER’S MANUAL FOR ALL DSA MODELS – 3/1/2013
CLEANING
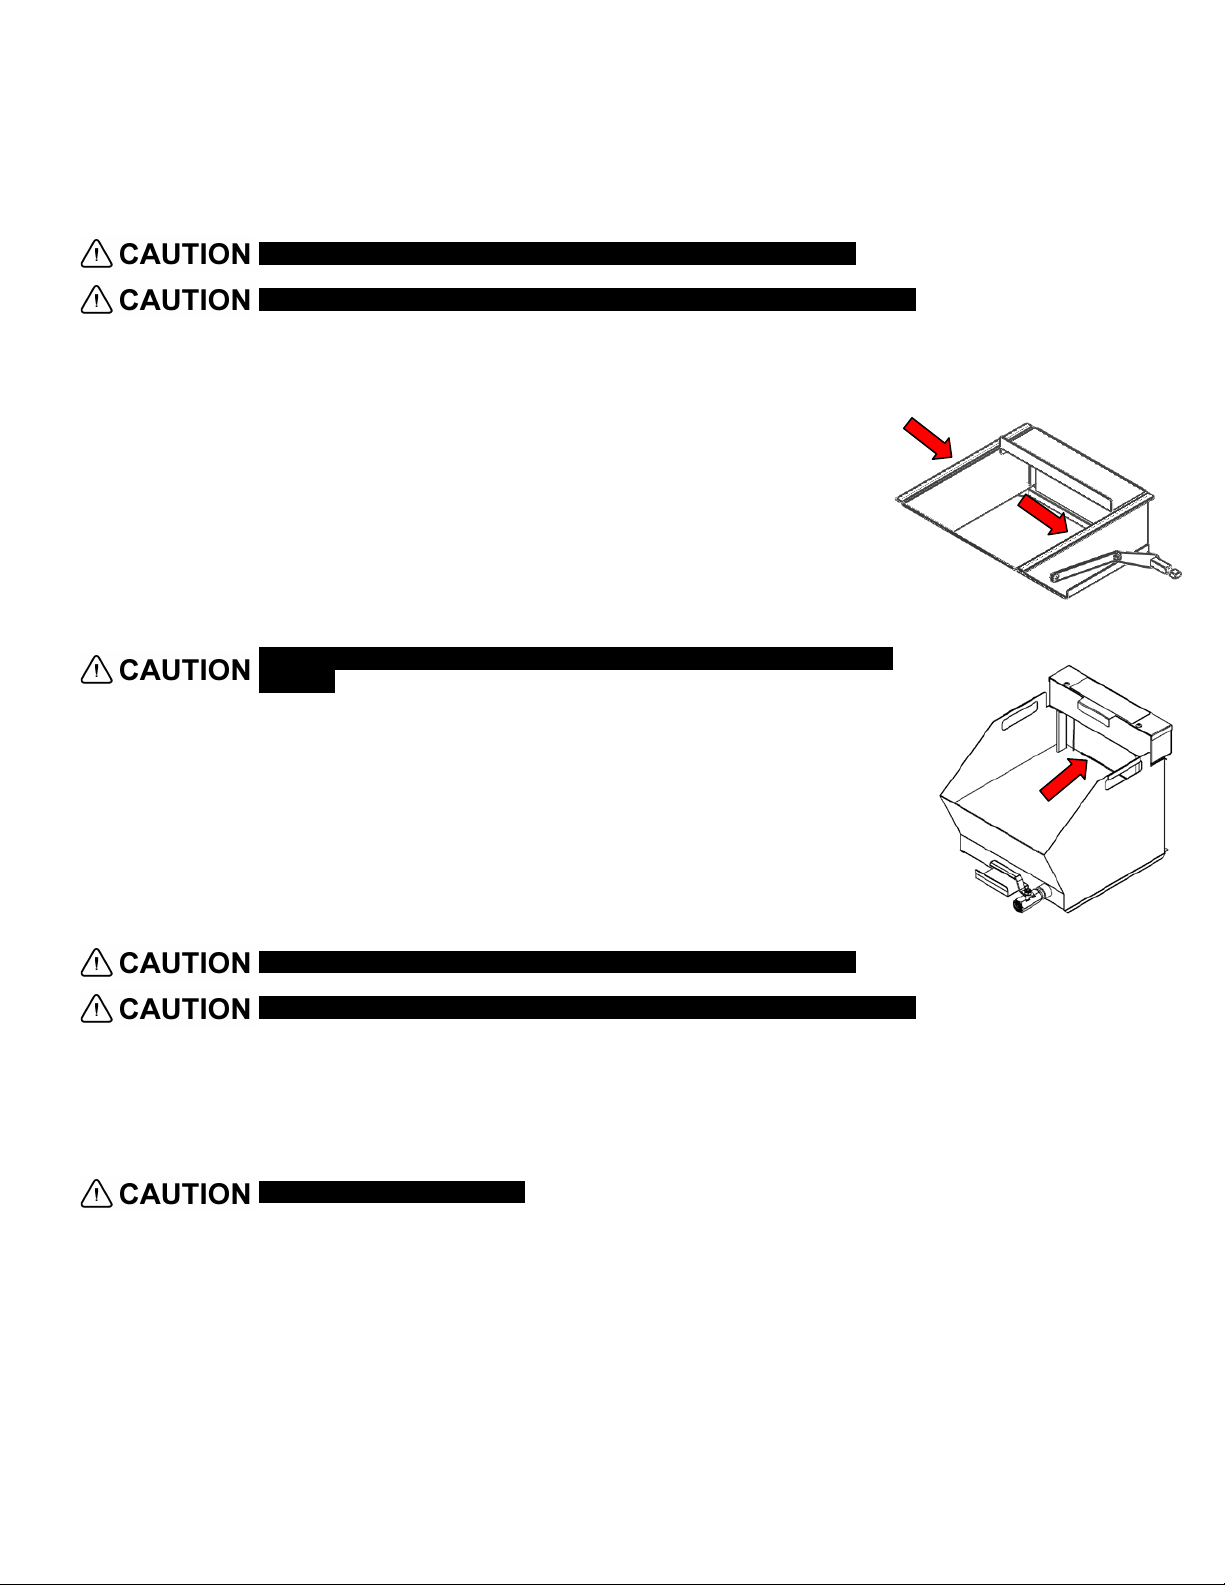
Daily Maintenance
Do not unplug the fryer and always make sure the fryer is turned off
Do not touch heater module, oil vat or oil unless you are sure it has cooled
1) Wipe basket with paper towel to remove crumbs and food particles
2) Wipe crumbs, oil and any other food m at ter fr om insi de of drawer
using a paper towel
3) Clean outside of fryer with a good stainless steel cleaner and wipe
dry
4) Lubricate rails of shovel and bottom of drawer using an approved
food grade grease or silicone lubricant
Do not clean the outside or any other stainless steel part using abrasive
cleaners
5) Check oil level on the back of vat to make sure it is up to cold line (at
room temperature). If not, add oil as necessary. Replace the cooking
oil once a week or more often if necessary. Use a COMMERCIAL
GRADE DEEP FRY COOKING OIL.
Weekly Maintenance
Do not unplug the fryer and always make sure the fryer is turned off
Do not touch heater module, oil vat or oil unless you are sure it has cooled
1) Open front panel by lifting and turning latches. Remove drawer parts and wash in soap
and hot water. Rinse well in hot water and dry.
2) Remove air filter cartridge and set aside (for replacement, see page 17).
Do not wash air filter cartridge
- 15 -
Page 18
OWNER’S MANUAL FOR ALL DSA MODELS – 3/1/2013
CLEANING (Contin ued )
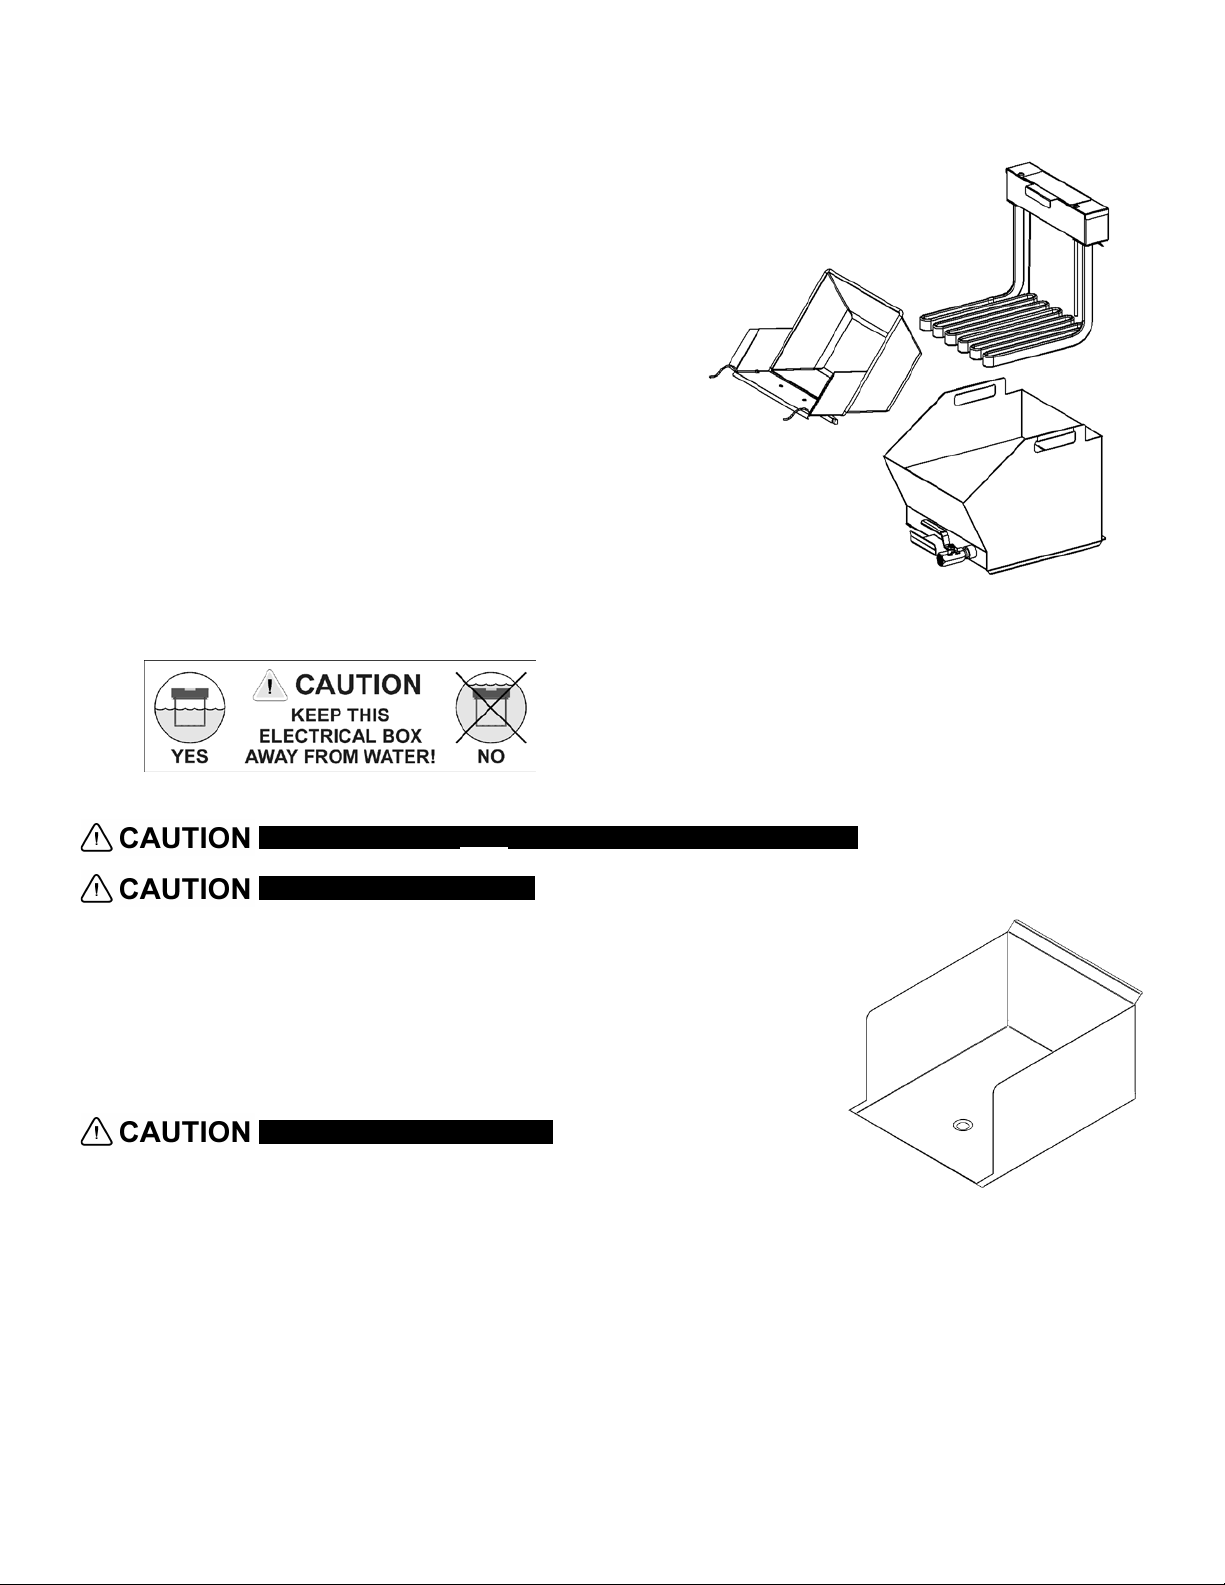
3) Attach oil hose and drain cooking oil from vat into
containers for disposal. Have empty containers
handy for proper disposal of used cooking oil. A
rendering company can help with proper disposal.
4) Remove basket lift, oil vat and heater module
(picture right). Spray parts with oven cleaner,
enclose with plastic bag for at least one hour or
leave overnig ht if possi bl e. Wash in soap and hot
water and rinse well in hot water. Rinse parts in a
solution of: 1 part white vinegar [5% acetic acid]
and 2 parts water. The vinegar rinse is very
important. It neutralizes soap residue that causes
oil breakdown foaming. Soap residue turns oil
dark and reduces its performance significantly.
Clear water rinse parts. Clean the male and
female terminals on connectors with rubbing
alcohol and cotton swab.
The heater box must NOT be immersed in water or other liquid.
Do not spray male connector
5) Remove spill tray and drain any oil that has accumulated.
Wash in soap and hot water. Rinse well in hot water and dry.
6) With internal components removed, clean cooking and filter
compartments with grease cutting soap or oven cleaner if
necessary. Rinse with damp cloth and dry.
Do not spray female connector
7) Clean countertop and external surfaces.
8) Re-install all parts (see ASSEMBLY page 8)
- 16 -
Page 19
OWNER’S MANUAL FOR ALL DSA MODELS – 3/1/2013
CLEANING (Contin ued )
Periodic Maintenance
Air Filter Cartridge Replacement
• Replace the air filter cartridge at least once every 2
months, more often for hig her vol ume usag e.
Replacement is safer and easier when the fryer is
cool rather than hot.
• Only PERFECT FRY filters may be used in your
PERFECT FRYER.
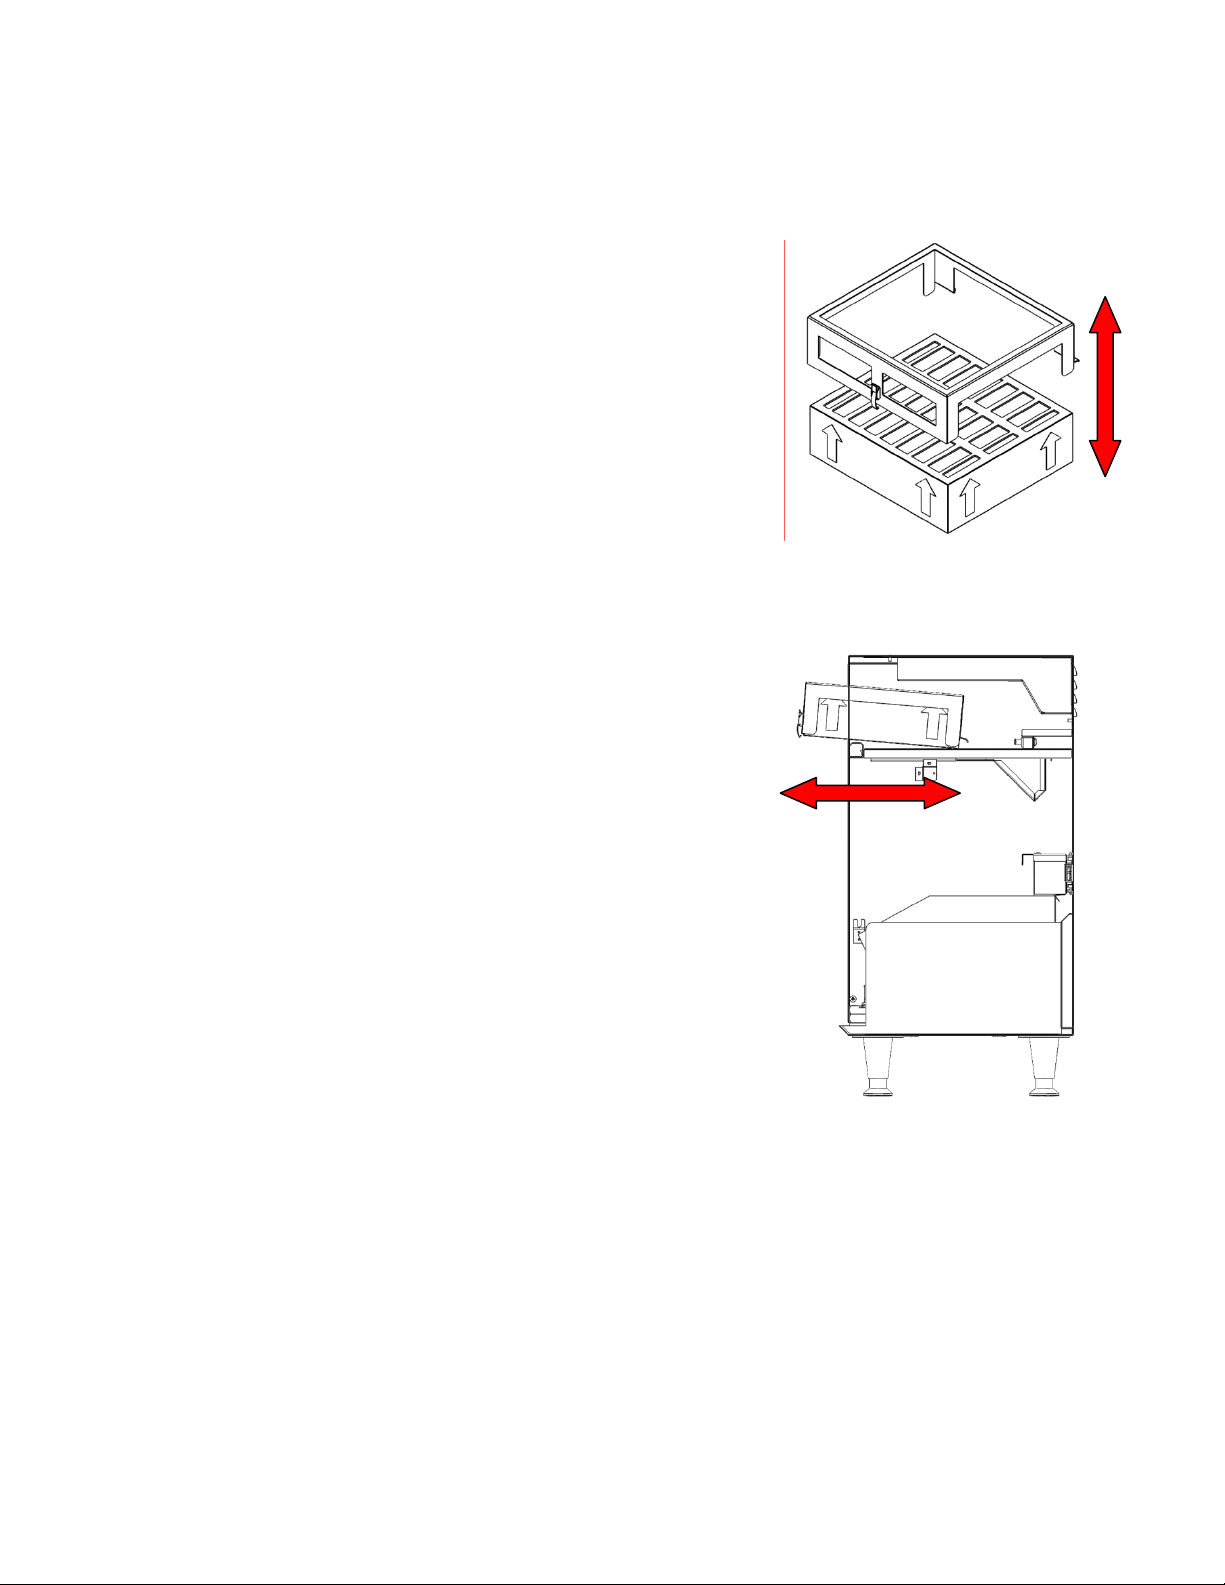
Steps to replace air filter cartridge:
1) Open front panel by lifting and turning latches
2) Release latch on air filter cage, and remove air filter cage and air filter cartridge
from filter compartment
3) Remove old used air filter cartridge from air filter
cage
4) Wipe air filter cage clean
5) Fit air filter cage over new air filter cartridge and
write date on cartridge
( Arrows up)
6) Install air filter cage and new air filter cartridge
firmly back into filter compartment and latch in
place
7) Close front panel and latch shut
- 17 -
Page 20

OWNER’S MANUAL FOR ALL DSA MODELS – 3/1/2013
MINIMIZE THE MOISTURE
MAXIMIZE THE PROFIT
TIPS ON DEEP FRYING
Great Food in Less Time
•
Use premium quality commercial deep frying oil. Canola and Soybean oils are
recommended. Do not use household cooking oils from your local supermarket. Poor
quality oils may shorten the life of the air filter cartridge.
• Keep food frozen until ready to fry. Frozen product will absorb less oil during the
cooking process.
• Remove ice from food. Ice results in excess bubbling and spillage of oil out of the
vat.
• Minimize the moisture. Excess moisture extends the
cooking time. Water, ice, sugar and breading all
contribute to shortening the life of the oil.
• Try to reduce the amount of breading that falls off of the food. Breading often has
sugar and other ingredients that will reduce the oil’s life and darken the appearance of
food. Consider filtering the oil to remove the breading particles.
Do not overfill the drawer. Excess food may not be cooked properly.
•
REDUCE THE COOKING TIME
Common Questions
•
How Much Oil to Use?
The PERFECT FRY has a capacity of 2.75 gallons of oil (11L). Fill the oil vat to the
cold line only.
• How Much to Fry?
Fill the drawer to the top only. The drawer has an approximate capacity of 3 lbs (1.5
kg) of product per cycle. Whatever you can fit in the drawer is what you can fry.
• What is the Ideal Temperature Range for Cooking?
The ideal temperature range for cooking product is between 350°F and 360°F (177°C
and 182°C). The factory default setting for cooking temperature is 350°F (177°C).
• Should Frozen Food Be Defrosted?
DO NOT THAW FROZEN FOOD! Frozen foods only should be put directly into the
fryer in order to minimize moisture.
• Can I Refreeze Frozen Foods?
NO, do not refreeze frozen foods. Foods that are refrozen can absorb more oil, which
will result in a dry, brittle and tasteless product.
- 18 -
Page 21

OWNER’S MANUAL FOR ALL DSA MODELS – 3/1/2013
OIL FACTS
Frying oil is especially formulated to withstand high temperatures. For this reason, you must ensure you are
using the right product. Liquid vegetable shortening is produced by several companies; the oil has an additive
and/or has been formulated to increase the performance during high temperature usage.
DO NOT USE OIL THAT IS RECOMMENDED BOTH FOR SALAD AND FRYING!
Fill the oil vat to the cold line only. The oil expands as it heats and if overfilled, the bottom of the basket will
remain in the oil when in the up/serve position.
How Much to Fry?
• Fill the drawer no higher than the top. Do not overfill the drawer.
• Keep drawer and basket clean and free of breading/batter build up.
• Remove ice crystals or excess water before frying.
• Do not salt or season before frying.
• Remove surplus and/or batter before frying.
• Do not allow frozen food to thaw before frying.
• Drain fried foods before serving.
How Hot is TOO Hot?
Ideal frying temperature range is between 350°F and 360°F (177°C and 182°C). Factory default setting is
350°F (177°C). When frying at too low a temperature, food absorbs more oil which increases oil consumption.
Excessive Oil Usage?
The fried product is absorbing oil. Possible reasons for this include:
• Excess breading or batter, shake off excess before frying.
• Allow basket to drain longer, adjust the drain time.
• Food is being allowed to thaw before frying.
Cleaning Your Fryer?
• Refer to the Cleaning section of this owner’s manual. Remember to clean the basket and drawer daily.
Filtering Your Oil?
The most important procedure you can do is to maintain the oil, extending its life:
• Filter at least once a day, preferably first thing in the morning when the oil is at room temperature.
• Filtering removes all the contaminants from the previous days cooking.
• Clean the oil vat.
Points to Remember:
• Clean the cooking chamber at least once a week and rinse thoroughly.
• Filter oil daily.
• Do not overheat oil.
• Use the standby mode when possible.
• Do not salt product prior to frying.
• Remove ice crystals and moisture before frying.
• Maintain oil level in vat, check to ensure it is at the hot line often.
• The oil is dead when foaming appears continuously on the oil surface
Your oil, product taste, and customer s dep end on you.
- 19 -
Page 22

OWNER’S MANUAL FOR ALL DSA MODELS – 3/1/2013
OIL FACTS (Continued)
If the oil temperature is set too high, the food will cook on the exterior and the interior will be undercooked.
When the interior is cooked completely, the exterior will be overdone or burnt. The higher temperature will also
cause the oil to break down faster and smoke.
During slow periods, take advantage of the standby mode which allows the oil to cool down to 275°F (135°C),
prolonging the oil life and reducing energy costs while allowing quick recovery time when required.
The oil temperature should not be adjusted when cooking different products. Adjust the cooking time instead.
Frozen Foods
Put frozen foods directly into the fryer. DO NOT THAW FROZEN FOODS! Blot excess water from food before
frying. Remove ice crystals that may be at the bottom of the product bag.
OIL AND WATER DO NOT MIX! Water reacts with oil and makes it break down rapidly resulting in darkening,
smoking and foaming (a process called hydrolysis). Excess water in the oil can cause the following problems:
• Unnecessary temperature drop meaning longer cooking times.
• More energy usage to maintain cooking temperature.
• Excessive splattering inside the fryer resulting in a mess to clean up.
• Decreased life of the air filter and the oil.
Refreezing Frozen Foods?
Frozen foods should be fried frozen. Foods that are refrozen can absorb more oil and make your fried foods
taste greasy. Refrozen food forms excessive ice and these ice crystals can bond food pieces together causing
clumping. Remember:
• Always FRY FOOD FROZEN.
• NEVER REFREEZE thawed food.
• REMOVE ice crystals from product before frying.
• DO NOT accept thawed or refrozen product from supplier.
Excessive Foaming?
The main reason for foaming is improper rinsing of oil vat after cleaning:
• To remove soap residue, rinse 3 times with water after cleaning or neutralize with a water and vinegar
solution (1 part white vinegar to 2 parts water).
• Take care of your oil; use standby mode during slow periods. High temperature and oxygen contribute
to oil breakdown. Filter oil and clean vat at least once a day when using heavily breaded products.
Excessive Smoking/Oil Darkening?
• Oil is too hot, check temperature.
• Inadequate filtering, breading or batter build-up in vat causes oil breakdown, giving food a bitter taste.
• Moisture content is too high. Use precooked frozen products only. Remember to remove ice crystals.
Grease Soaked Food?
• Frozen food is being allowed to thaw before frying.
• Oil is in the advanced stages of breakdown, replace immediately.
• Oil temperature is too low, check temperature.
• Product has too much breading or batter, remove excess.
- 20 -
Page 23

OWNER’S MANUAL FOR ALL DSA MODELS – 3/1/2013
OIL FACTS (Continued)
Food Not Browning Properly?
• New oil may not brown the product; check color again after a few basket loads.
• Too much product is in the basket; fill no higher than the fill line.
• Product is not frying long enough, follow manufacturers suggested cooking times.
• Oil temperature is too low, check oil temperature.
• Product is frying in excess foam.
• Oil level is too low, check the oil level.
Premature Oil Breakdown?
• Oil is at full temperature during slow periods, use standby mode.
• Oil is contaminated. Never use wire brushes, copper pads or steel wool for cleaning. Use a hard
bristle brush and filter oil regularly. Rinse with water vinegar solution.
• Also, see section; HOW HOT IS TOO HOT?
Statements used in OIL FACTS section are taken from:
• NAFEM Food Service Industry
• Canola Research Foundation
• Sysco Oil Publication
- 21 -
Page 24
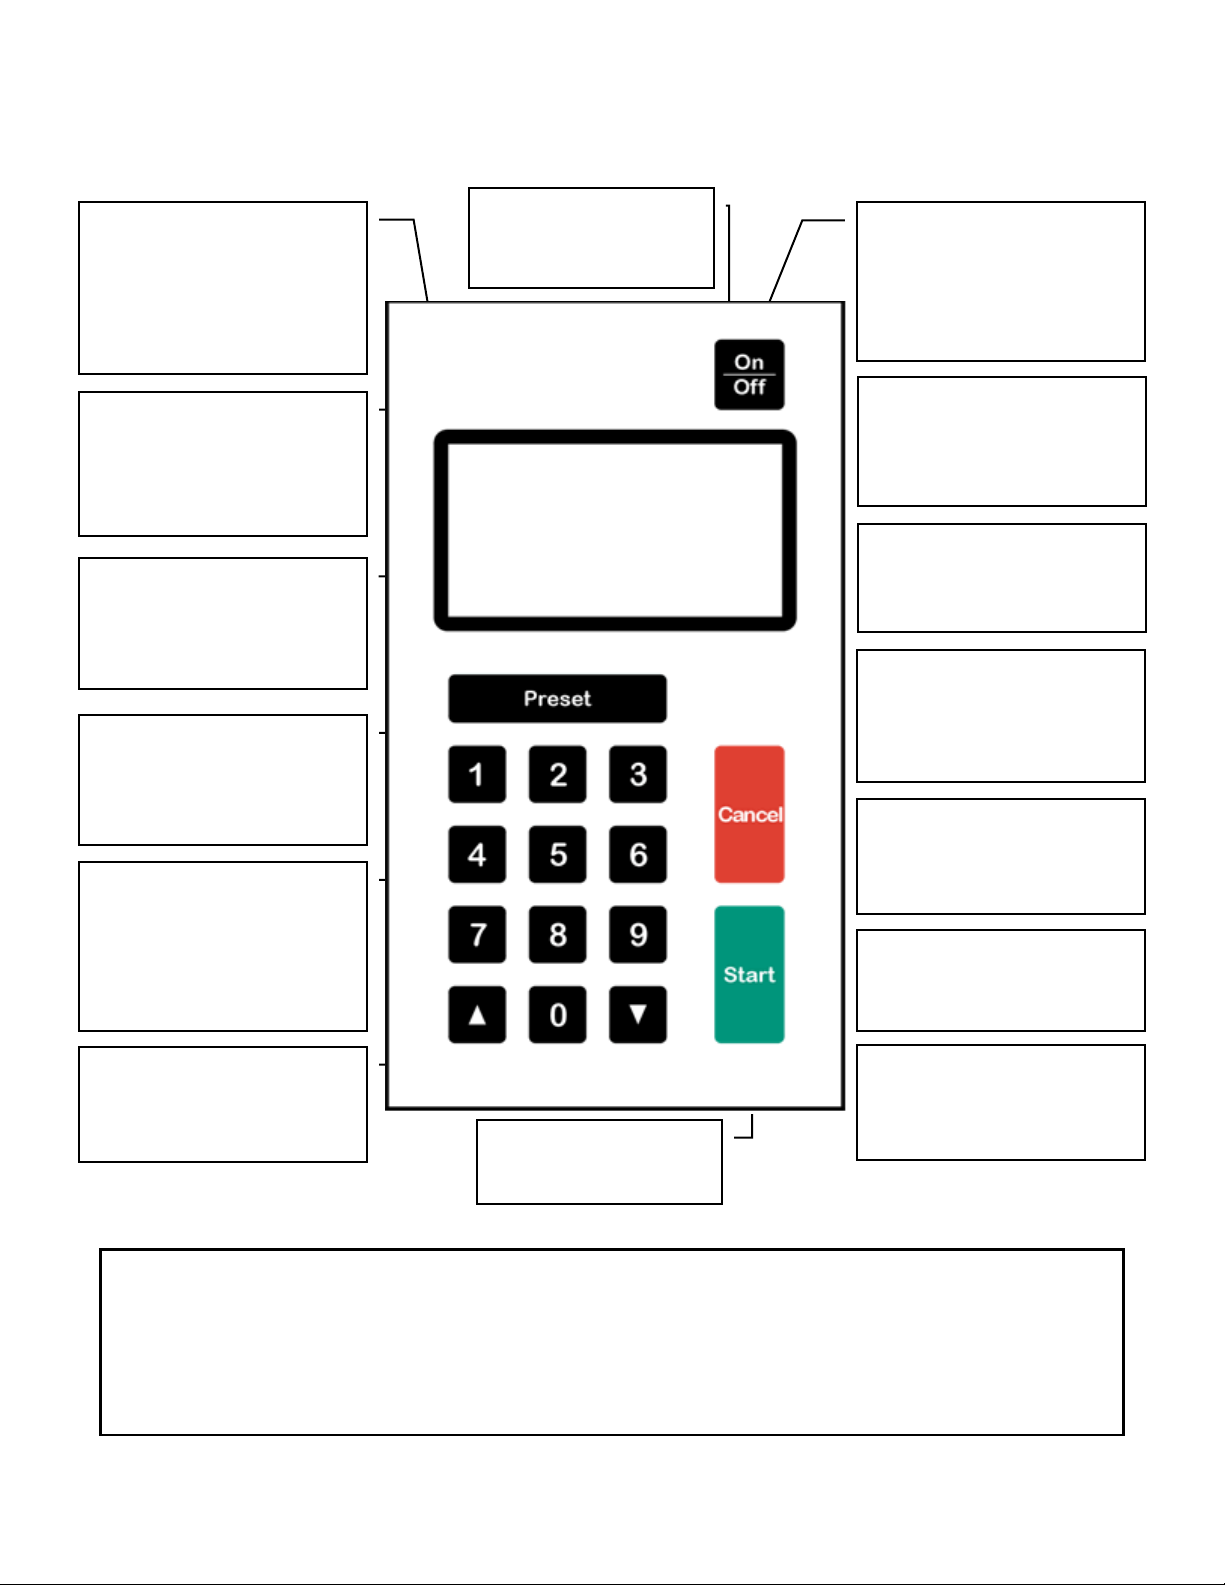
OWNER’S MANUAL FOR ALL DSA MODELS – 3/1/2013
Table 1 Preset Mode Functionality
Feature
Manual
Mode
Preset
Mode
Preset Locked
Mode
RapidFryTM
Mode
Manually enter cook time
Automatically enters preset time
Remains in same mode after cook cycle
Eliminates need to use keypad
READY PRESET
KEYPAD
PRESET NAME
PRESET KEY
(See page 24)
CANCEL KEY
START KEY
ON/OFF KEY
RIGHT ARROW KEY
LEFT ARROW KEY
PRESET MODE
ACTIVE MODE
LCD SCREEN
information
350ºF
2:00
READY
RAPIDFRYTM 2GO &
product (see page 26 & 27)
OIL TEMPERATURE
COOK TIME
cycle
NUMBER KEYS
• 0 to 9
OPERATING INSTR UCTIONS
• Easy to use, just a firm
touch with your finger tip
• A smooth flat surface
that’s easy to keep
Shows which of six modes
•
your PERFECT FRYER is
in
DUAL LOAD
• Cooking time of pre-loaded
• See page 24 for defaults
• See page 37 to customize
clean
• Displays user
3:00
FRENCH FRIES
• To turn ON
• To turn OFF
• To put in STANDBY
(see page 29)
• Shows which preset mode
your PERFECT FRYER is
in (See page 24)
• Time remaining in cook
• Always displayed
• Choose between ºC & ºF
(See page 36)
• Choose any one of 9 preset
cooking times
• Toggle between preset
modes
• Adjusts cook time up by 10
second increments
• Stops a co ok cycle
• Resets the screen
• Begins a cook cycle
• Adjusts cook time down by
10 second increments
- 22 -
Page 25
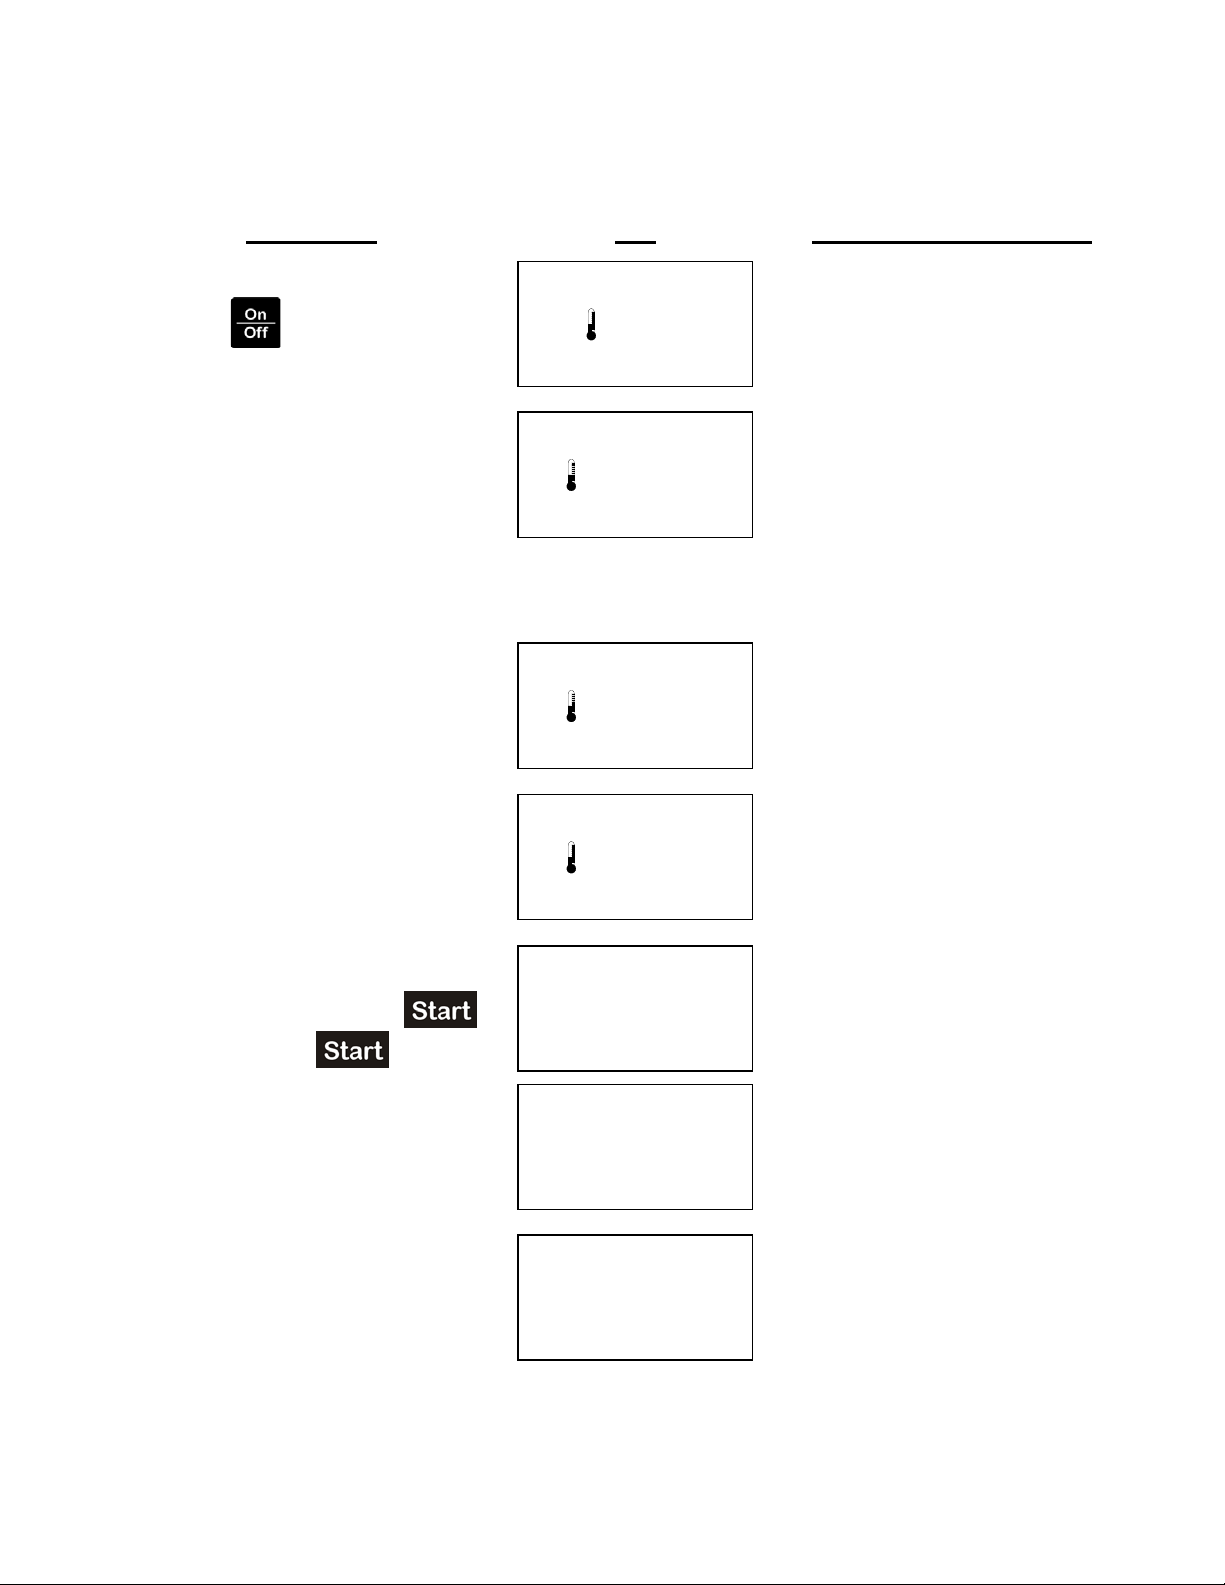
OWNER’S MANUAL FOR ALL DSA MODELS – 3/1/2013
350ºF
350ºF
350ºF
OPERATING INSTRUCTIONS (Continued)
YOU DO THIS LCD PERFECT FRYER DOES THIS
1) Press for ½ second.
2) Allow 10 to 15 minutes for oil to
reach operating temperature
350ºF or 177ºC).
(
Starting Up
HEATING MANUAL
70
OPEN LID/LOAD FOOD
READY MANUAL
350
OPEN LID/LOAD FOOD
ºF
ºF
Manual Mode
1) Now in HEATING mode
2) Oil temperature rising to operating
temperature
3) Once operating temperature is
reached, now READY to start
cooking.
1) Open drawer lid
2) Fill drawer with food product
3) Close drawer lid
4) Enter cook time and press
ex:
Note: DO NOT OPEN DRAWER LID
OR FRONT PANEL WHEN
PRODUCT IS LOADING
0
11 33 0
READY MANUAL
350
OPEN LID/LOAD FOOD
READY MANUAL
350
CLOSE LID
READY MANUAL
ºF
ºF
1:30
SELECT TIME/START
READY MANUAL
1:30
LOADING
1) LCD displays OPEN LID/LOAD
FOOD
2) Basket lowers into oil
3) LCD displays CLOSE LID
4) LCD displays SELECT
TIME/START
5) Drawer loads food into oil
6) COOKING cycle begins
7) Fryer counts down time remaining
8) Basket raises out of oil
9) Food drains (time adjustable)
10) Fryer “beeps” to let you know that
food is cooked
11) Fryer dumps food into warming
tray
5) Serve food from warming tray
COOKING MANUAL
12) COOKING cycle is complete
0:00
- 23 -
Page 26
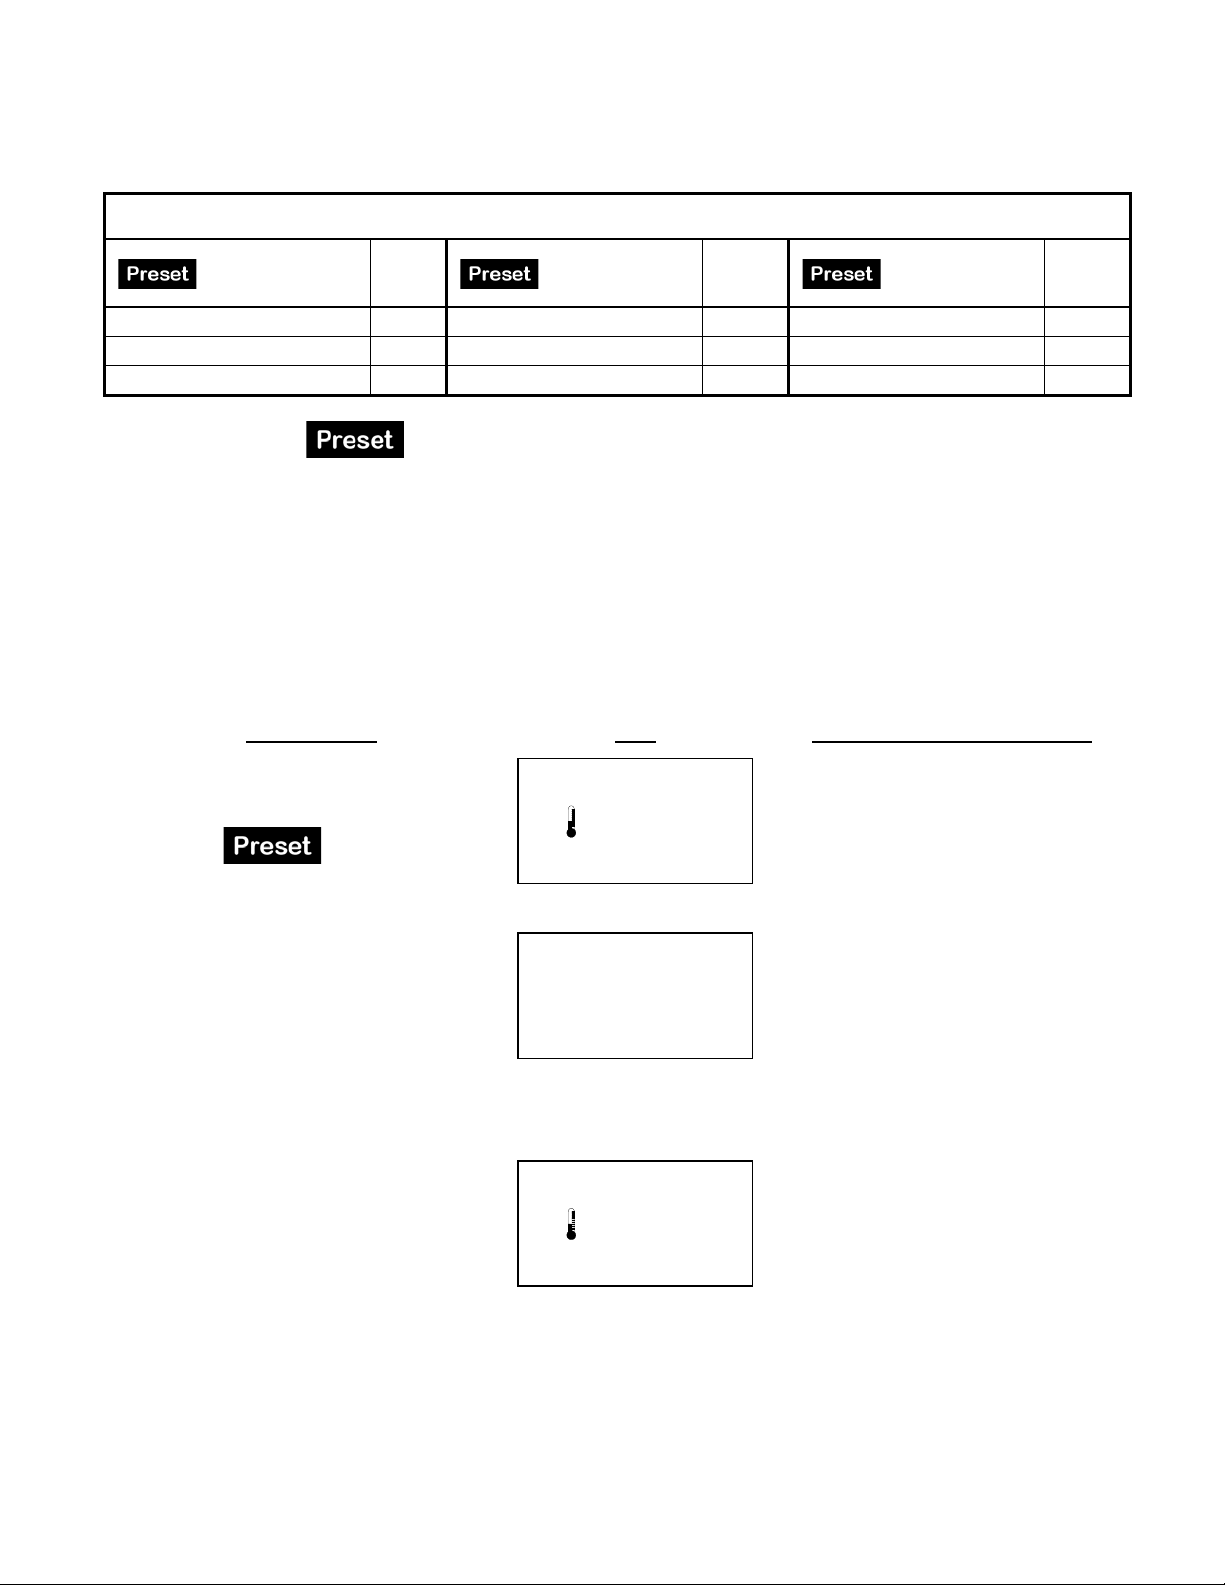
OWNER’S MANUAL FOR ALL DSA MODELS – 3/1/2013
1
1
3:00
4
4
3:00
7
7
4:00
2
2
4:00
5
5
2:00
8
8
4:00
3
3
2:30
6
6
3:00
9
9
4:00
YOU DO THIS
LCD
PERFECT FRYER DOES THIS
PRODUCT IS LOADING
8) Basket raises out of oil
14) Fryer returns to MANUAL mode
350ºF
OPERATING INSTRUCTIONS (Continued)
Preset Times
Cooking Times & Names (fact ory defaults)
Name
FRENCH FRIES
CHICKEN TENDERS
ONION RINGS
NOTE: Pressing
PRESET LOCKED mode and RAPIDFRY
NOTE: The default presets are programmed and displayed to show you the PERFECT
FRYER’s capabilities. We recommend that you change the presets to match your
own requirements. Please refer to page 37.
Time
repetitively will toggle between MANUAL mode, PRESET mode
Name
POPPERS
CHEESE BITES
CORN DOGS
TM
mode.
Time
Name
FISH FILLETS
CHICKEN WINGS
CHICKEN & FRIES
Preset Mode
1) Open drawer lid
2) Fill drawer with food product
3) Close drawer lid
4) Press
READY PRESET
350
OPEN LID/LOAD FOOD
ºF
1) Now in PRESET mode
LCD displays PRESET
2)
3) Basket lowers into oil
Time
5) Press
Cook cycle starts automatically
Note: You can choose between 9
Note: DO NOT OPEN DRAWER LID
6) Serve food from warming tray
1 (for example)
1
different presets
OR FRONT PANEL WHEN
COOKING PRESET
3:00
FRENCH FRIES
READY MANUAL
350
OPEN LID/LOAD FOOD
ºF
4) LCD displays FRENCH FRIES
(default is 3:00)
5) Drawer loads food into oil
6) COOKING cycle begins
7) Fryer counts down time remaining
9) Food drains (time adjustable)
10) Fryer “beeps” to let you know that
food is cooked
11) Fryer dumps food into warming
tray
12) COOKING cycle is complete
13) Fryer returns to READY mode
- 24 -
Page 27
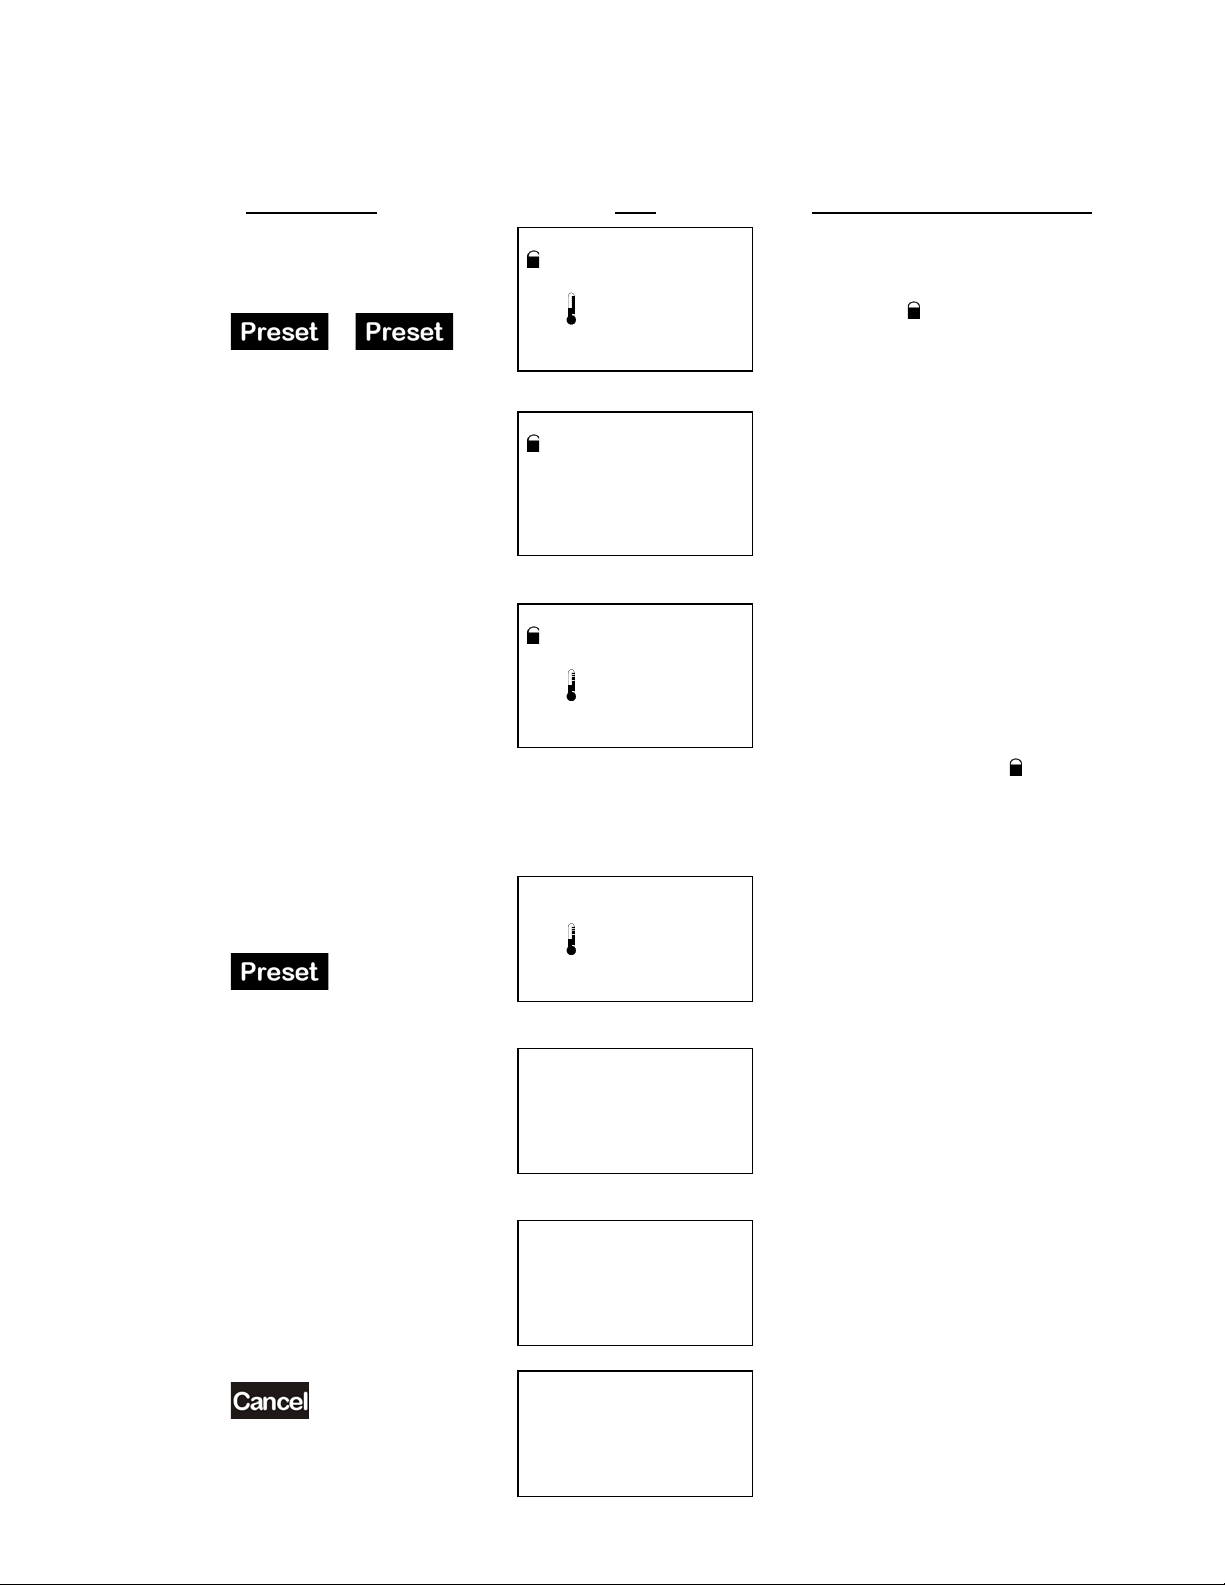
OWNER’S MANUAL FOR ALL DSA MODELS – 3/1/2013
YOU DO THIS
LCD
PERFECT FRYER DOES THIS
22
IS LOADING
7) COOKING cycle is complete
Note: Still in PRESET mode
6) Serve food from warming tray
cycle.
7) Basket raises out of oil
11) COOKING cycle is complete
350ºF
350ºF
350ºF
350ºF
OPERATING INSTRUCTIONS (Continued)
Preset Locked Mode
1) Open drawer lid
2) Fill drawer with food product
3) Close drawer lid
4) Press +
5) Press
Cook cycle starts automatically
Note: You can choose between 9
Note: DO NOT OPEN DRAWER LID
OR FRONT PANEL WHEN PRODUCT
6) Serve food from warming tray
7) Follow steps 1 through 3 and press
desired preset number to cook
another order this way
(for example)
different presets
READY PRESET
350
OPEN LID/LOAD FOOD
COOKING PRESET
ºF
4:00
CHICKEN TENDERS
READY PRESET
350
OPEN LID/LOAD FOOD
RapidFryTM Mode
ºF
1) Now in PRESET LOCK mode
2) PRESET is displayed on LCD
3) LCD displays CHICKEN
TENDERS (default is 4:00)
4) Drawer loads food into oil
5) COOKING cycle begins.
6) Fryer counts down time remaining
8) Basket raises out of oil
9) Food drains (time adjustable)
10) Fryer “beeps” to let you know that
food is cooked
11) Fryer dumps food into warming
tray
12) COOKING cycle is complete
1) Open drawer lid
2) Fill drawer with food product
3) Close drawer lid
4) Press 3 times
5) Press
Note: You can choose between 9
Note: DO NOT OPEN DRAWER LID
WHEN PRODUCT IS LOADING
7) Follow steps 1 through 3
Note: If you are using the same preset
8) Press to change the
9) Press
22 (for example)
Cook cycle starts automatically
different presets
repetitively, there is no need to
use the keypad. The movement
of the drawer lid controls the cook
preset used for RAPIDFRY
1 (for example)
1
READY RAPIDFRY
350
OPEN LID/LOAD FOOD
COOKING RAPIDFRY
ºF
4:00
CHICKEN TENDERS
COOKING RAPIDFRY
4:00
CHICKEN TENDERS
COOKING RAPIDFRY
3:00
FRENCH FRIES
1) Now in RAPIDFRY mode
2) RAPIDFRY is displayed on LCD
3) LCD displays CHICKEN
TENDERS (default is 4:00)
4) Drawer loads food into oil
5) COOKING cycle begins.
6) Fryer counts down time remaining
8) Food drains (time adjustable)
9) Fryer “beeps” to let you know that
food is cooked
10) Fryer dumps food into warming
tray
Note: Still in RAPIDFRY mode and a
new cook cycle time for existing
preset. The existing preset remains
until it is cancelled and changed.
- 25 -
Page 28
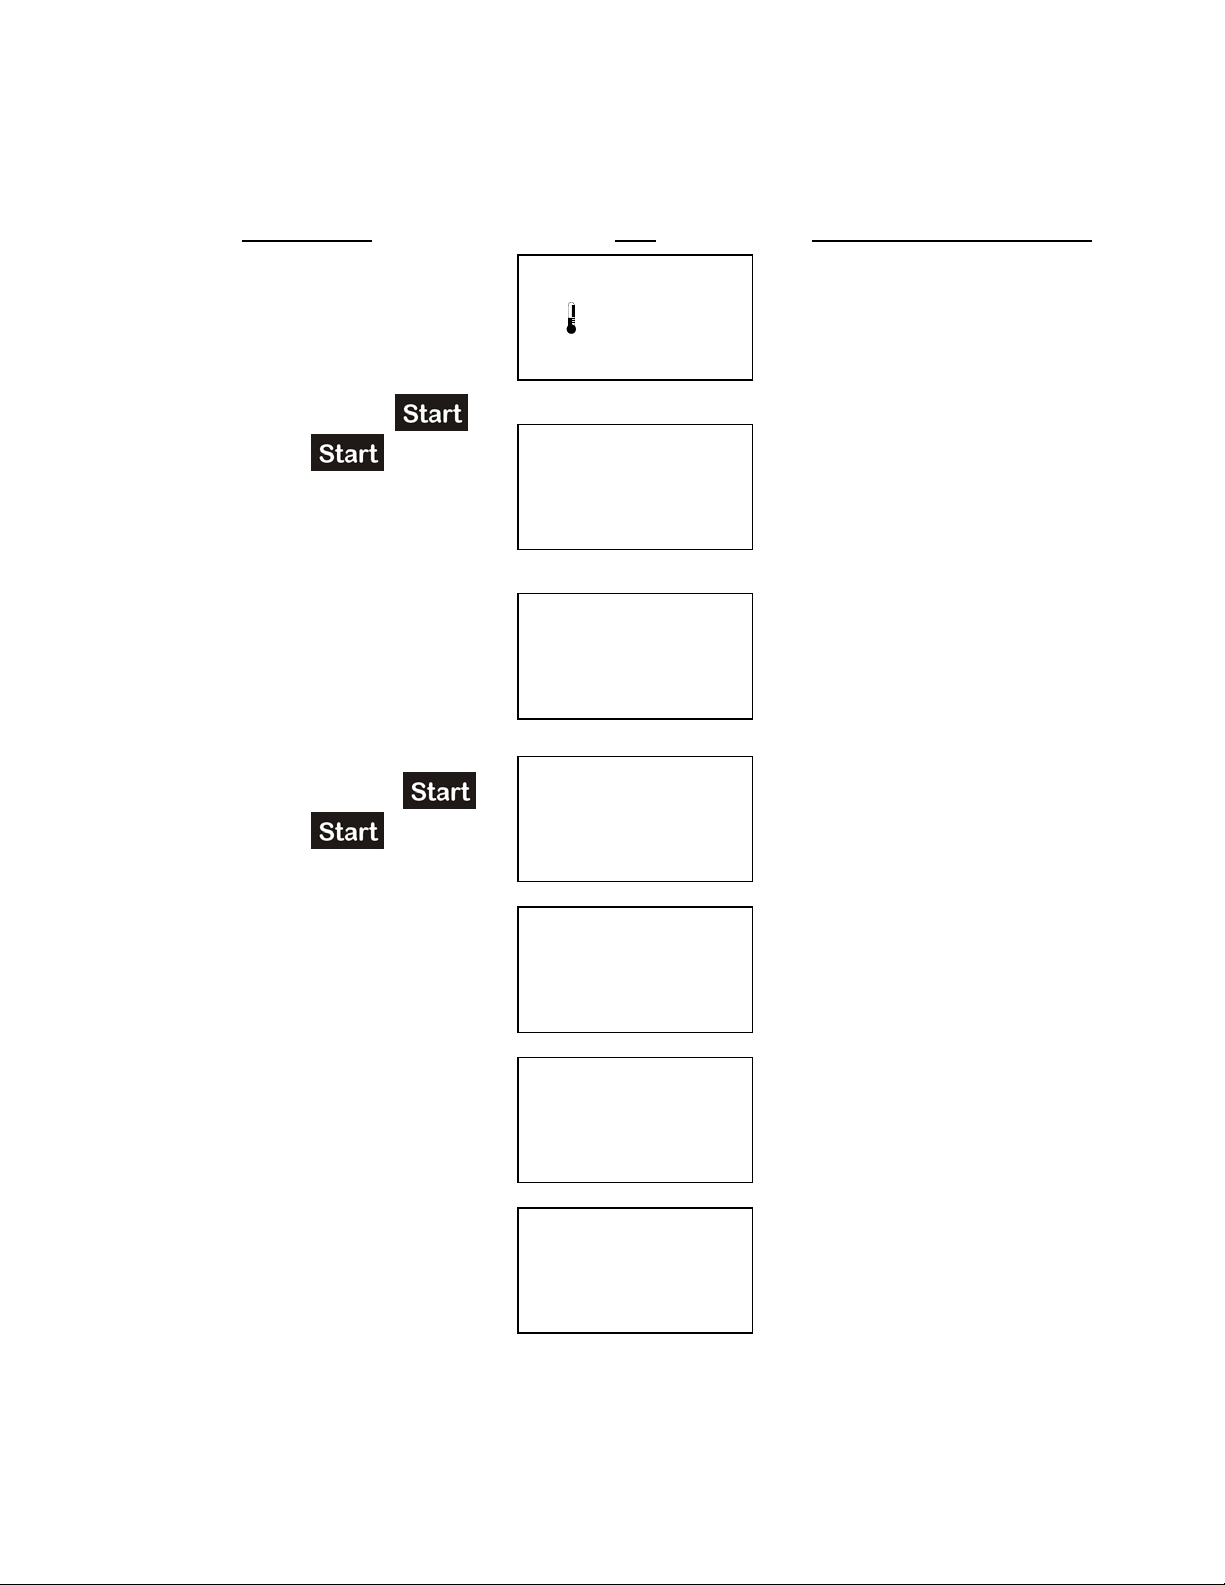
OPERATING INSTRUCTIONS (Continued)
YOU DO THIS
LCD
PERFECT FRYER DOES THIS
IS LOADING
350ºF
350ºF
2:00
READY
350ºF
0:00
LOAD
350ºF
350ºF
2:00
READY
350ºF
4:00
READY
1) Open drawer lid
2) Fill drawer with food product
3) Close drawer lid
OWNER’S MANUAL FOR ALL DSA MODELS – 3/1/2013
RapidFryTM 2GO
READY MANUAL
350
OPEN LID/LOAD FOOD
ºF
1) Basket lowers into oil
4) Enter cook time and press
ex:
Note: DO NOT OPEN DRAWER LID
OR FRONT PANEL WHEN PRODUCT
5) Open drawer lid after product is
finished loading
6) Fill drawer with food product
7) Close drawer lid
8) Enter cook time and press
ex:
9) Serve food from warming tray
0
11 33 0
22 00 00
READY MANUAL
1:30
ENTER TIME/START
COOKING MANUAL
1:20
COOKING MANUAL
1:20
COOKING MANUAL
0:00
2) Drawer loads food into oil
3) COOKING cycle begins
4) Fryer counts down time remaining
5) LCD displays time and status of
preloaded COOKING cycle
6) Basket raises out of oil
7) Food drains (time adjustable)
8) Fryer “beeps” to let you know that
food is cooked
9) Fryer dumps food into warming
tray
10) Follow steps 5 through 8 to preload
another COOKING cycle
RAPIDFRY
for RAPIDFRY
preloaded cooking cycle.
TM
COOKING MANUAL
10) Preloaded COOKING cycle
2:00
COOKING MANUAL
1:50
2GO works with all the different preset modes and behaves according to the mode. Example:
TM
mode, simply opening and closing the drawer lid will display the time and status for a
begins automatically after original
COOKING cycle is finished
- 26 -
Page 29
OWNER’S MANUAL FOR ALL DSA MODELS – 3/1/2013
LCD
99
IS LOADING
12) Basket raises out of oil
16) COOKING cycle is complete
350ºF
350ºF
2:00DL
WAIT
350ºF
2:00DL
LOAD
350ºF
2:00DL
READY
OPERATING INSTRUCTIONS (Continued)
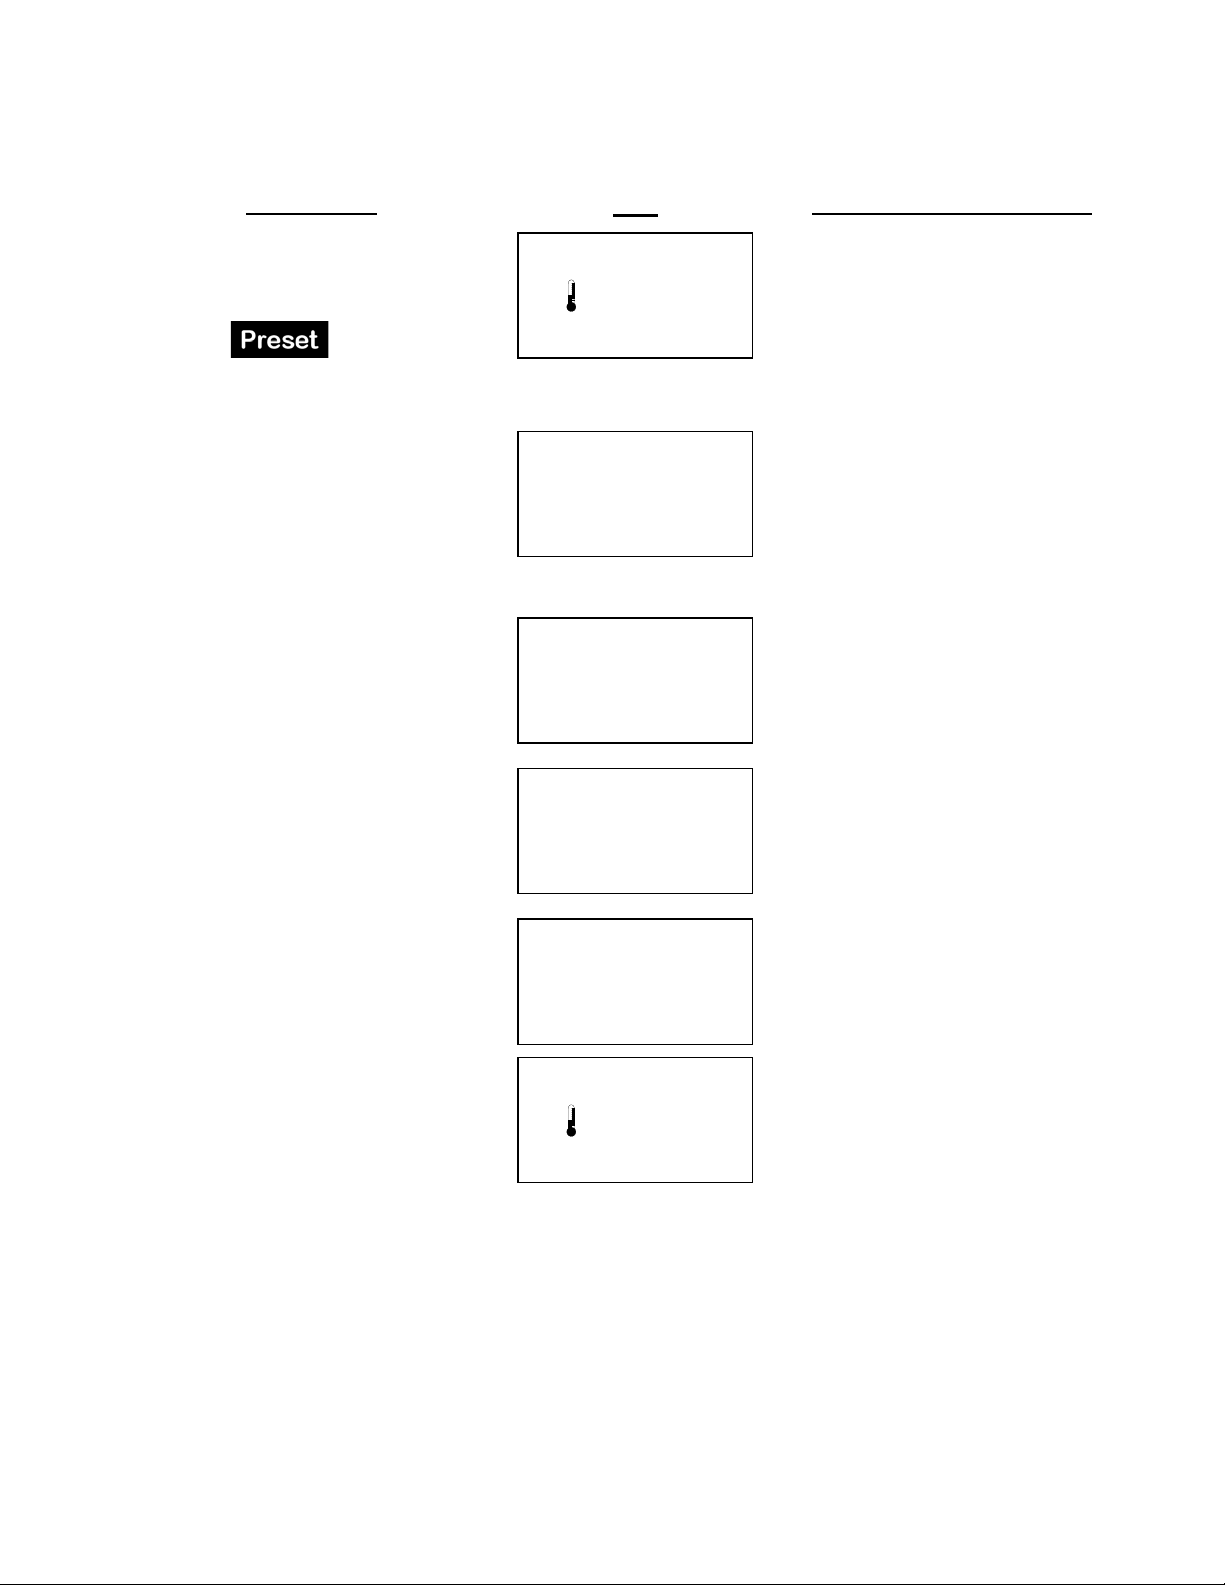
Dual Load
YOU DO THIS
PERFECT FRYER DOES THIS
1) Open drawer lid
2) Fill drawer with first food product
(ex: chicken)
3) Close drawer lid
4) Press
5) Press
Cook cycle starts automatically
Note: Preset 9 has been programmed
Note: DO NOT OPEN DRAWER LID
OR FRONT PANEL WHEN PRODUCT
6) Open drawer lid
7) Fill drawer with second food
product (ex: fries)
8) Close drawer lid
(for example)
for dual load time (refer to page
37)
READY PRESET
350
OPEN LID/LOAD FOOD
COOKING PRESET
4:00
CHICKEN & FRIES
COOKING PRESET
3:45
CHICKEN & FRIES
COOKING PRESET
3:30
CHICKEN & FRIES
ºF
1) Basket lowers into oil
2) LCD displays CHICKEN & FRIES
(default is 4:00 for chicken)
3) LCD displays 2:00DL and WAIT
(default is 2:00 for fries)
4) Drawer loads chicken into oil
5) COOKING cycle begins.
6) Fryer counts down time remaining
7) LCD displays 2:00DL and LOAD
8) Fryer “beeps” every 10 seconds
to remind you to load second
product (ex: fries).
9) LCD displays 2:00DL and READY
9) Serve food from warming tray
DUAL LOAD TIME
RAPIDFRY
refer to page 37. Example: for RAPIDFRY
time and status for a preloaded cooking cycle.
TM
THE COMBINATION OF BOTH LOADS SHOULD NO T BE GREATER THAN A
DRAWER FULL. ONE DRAWER FULL IS EXACTLY HOW MUCH THE BASKET CAN
ACCEPT.
COOKING PRESET
10) At 2:00 drawer loads fries into oil
11) Time and status of dual load
2:00
CHICKEN & FRIES
READY MANUAL
350
OPEN LID/LOAD FOOD
works with all the preset modes (regular preset mode, preset locked mode and
mode) and behaves according to the mode. To program a preset DUAL LOAD TIME, please
TM
mode, simply opening and closing the drawer lid will display the
ºF
disappears
13) Food drains (time adjustable)
14) Fryer “beeps” to let you know that
food is cooked
15) Fryer dumps both food products
into warming tray
- 27 -
Page 30
OWNER’S MANUAL FOR ALL DSA MODELS – 3/1/2013
350ºF
359ºF
350ºF
350ºF
350ºF
OPERATING INSTRUCTIONS (Continued)
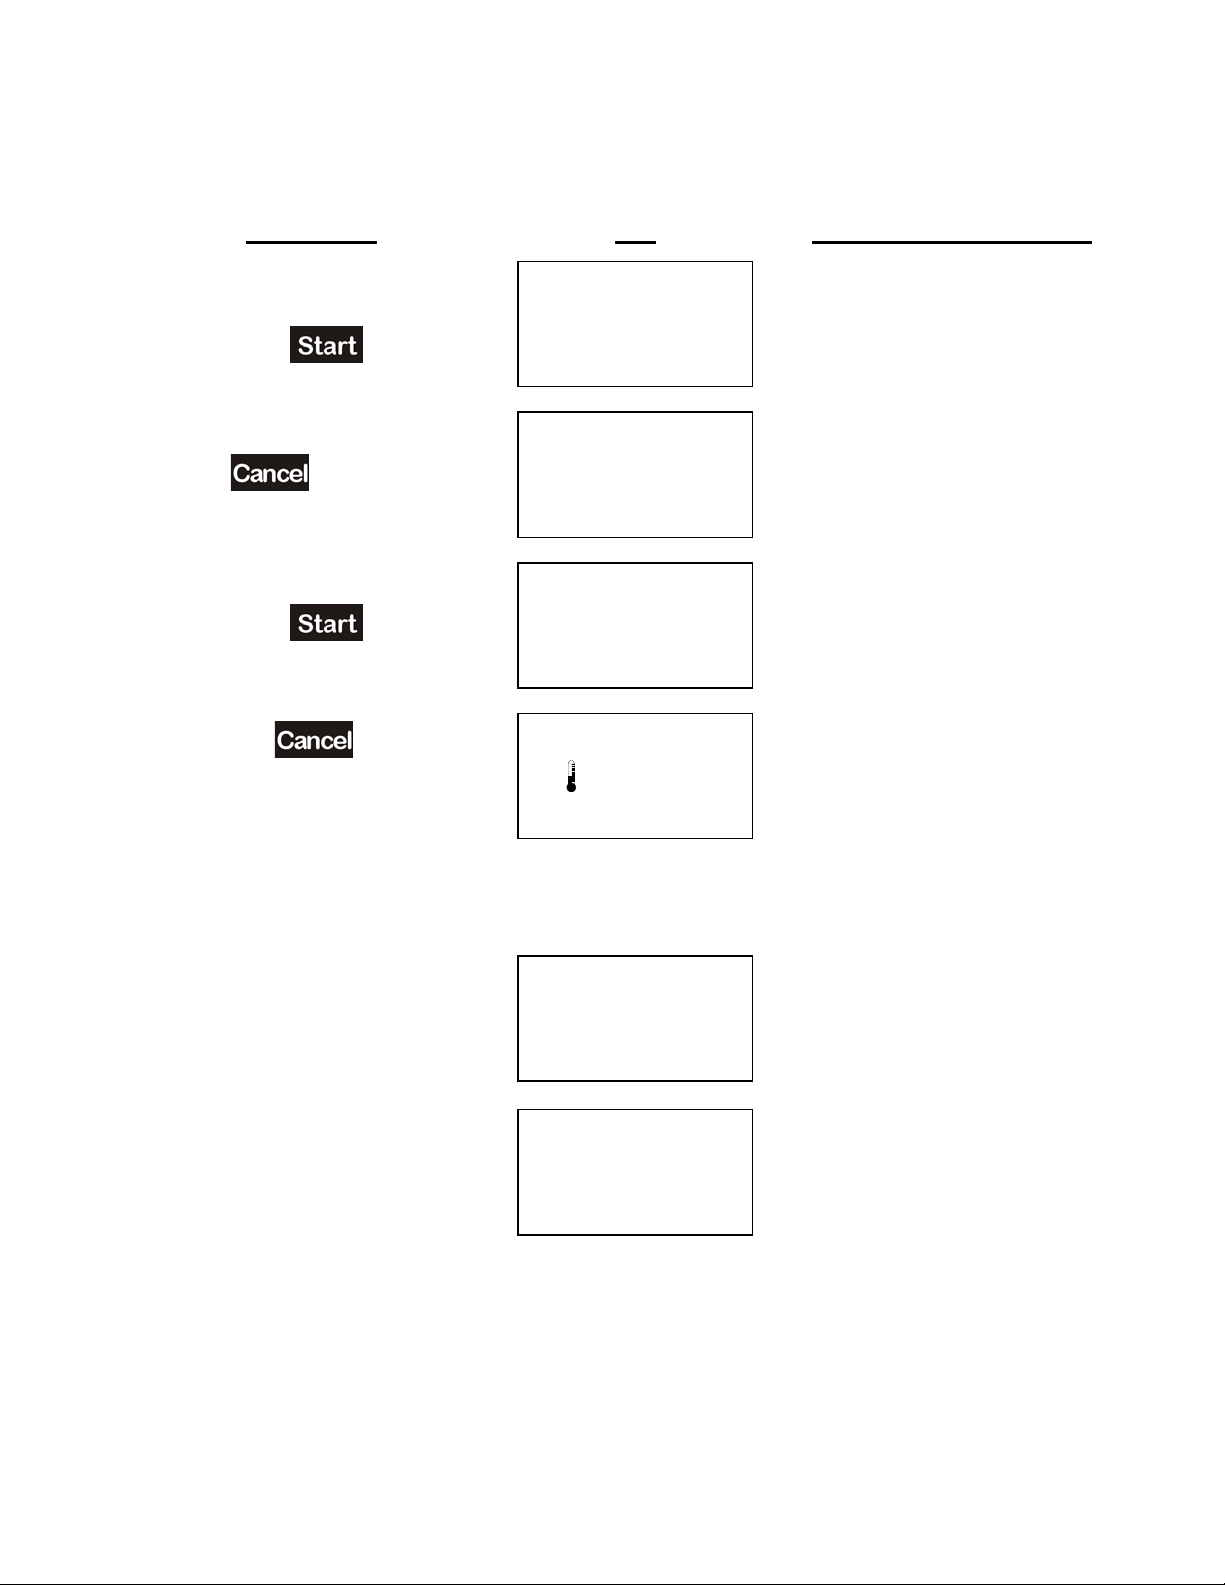
Cooking Time Correction
YOU DO THIS LCD PERFECT FRYER DOES THIS
1) Enter incorrect cooking tim e
(4:30 instead of 3:30 for example)
2) Press
3)
Press
4) Press
Note: Pressing instead of
entering a new time will complete the
cook cycle and dump the food product
into the warming tray
0
44 33 0
0
33 33 0
COOKING MANUAL
4:30
PAUSE MANUAL
4:29
PRESS START/C AN C EL
PAUSE MANUAL
3:30
PRESS START/C AN C EL
READY MANUAL
350
OPEN LID/LOAD FOOD
ºF
7) Drawer loads food into oil
8) COOKING cycle begins
9) Fryer counts down time remaining
4) COOKING cycle PAUSE
5) Basket raises out of oil
6) LCD displays PRESS
START/CANCEL
6) LCD displays new time
7) Basket lowers into oil
8) Fryer counts down new time
remaining
Open Drawer Lid – Paused Cook Cycle
READY MANUAL
1) Open dra w er lid duri ng product
loading
2) Close drawer lid to continue
cooking cycle
DO NOT OPEN DRAWER LID OR FRONT PANEL WHEN PRODUCT IS LOADING
1:24
CLOSE LID
COOKING MANUAL
1:24
1) COOKING cycle PAUSE
2) Basket raises out of oil
3) Brief pause, basket lowers into oil
4) Drawer completes l oad ing produc t
5) COOKING cycle begins
6) Fryer counts down time remaining
- 28 -
Page 31
OWNER’S MANUAL FOR ALL DSA MODELS – 3/1/2013
SEE THIS LCD
DO THIS
GET THIS LCD
OPERATING INSTRUCTIONS (Continued)
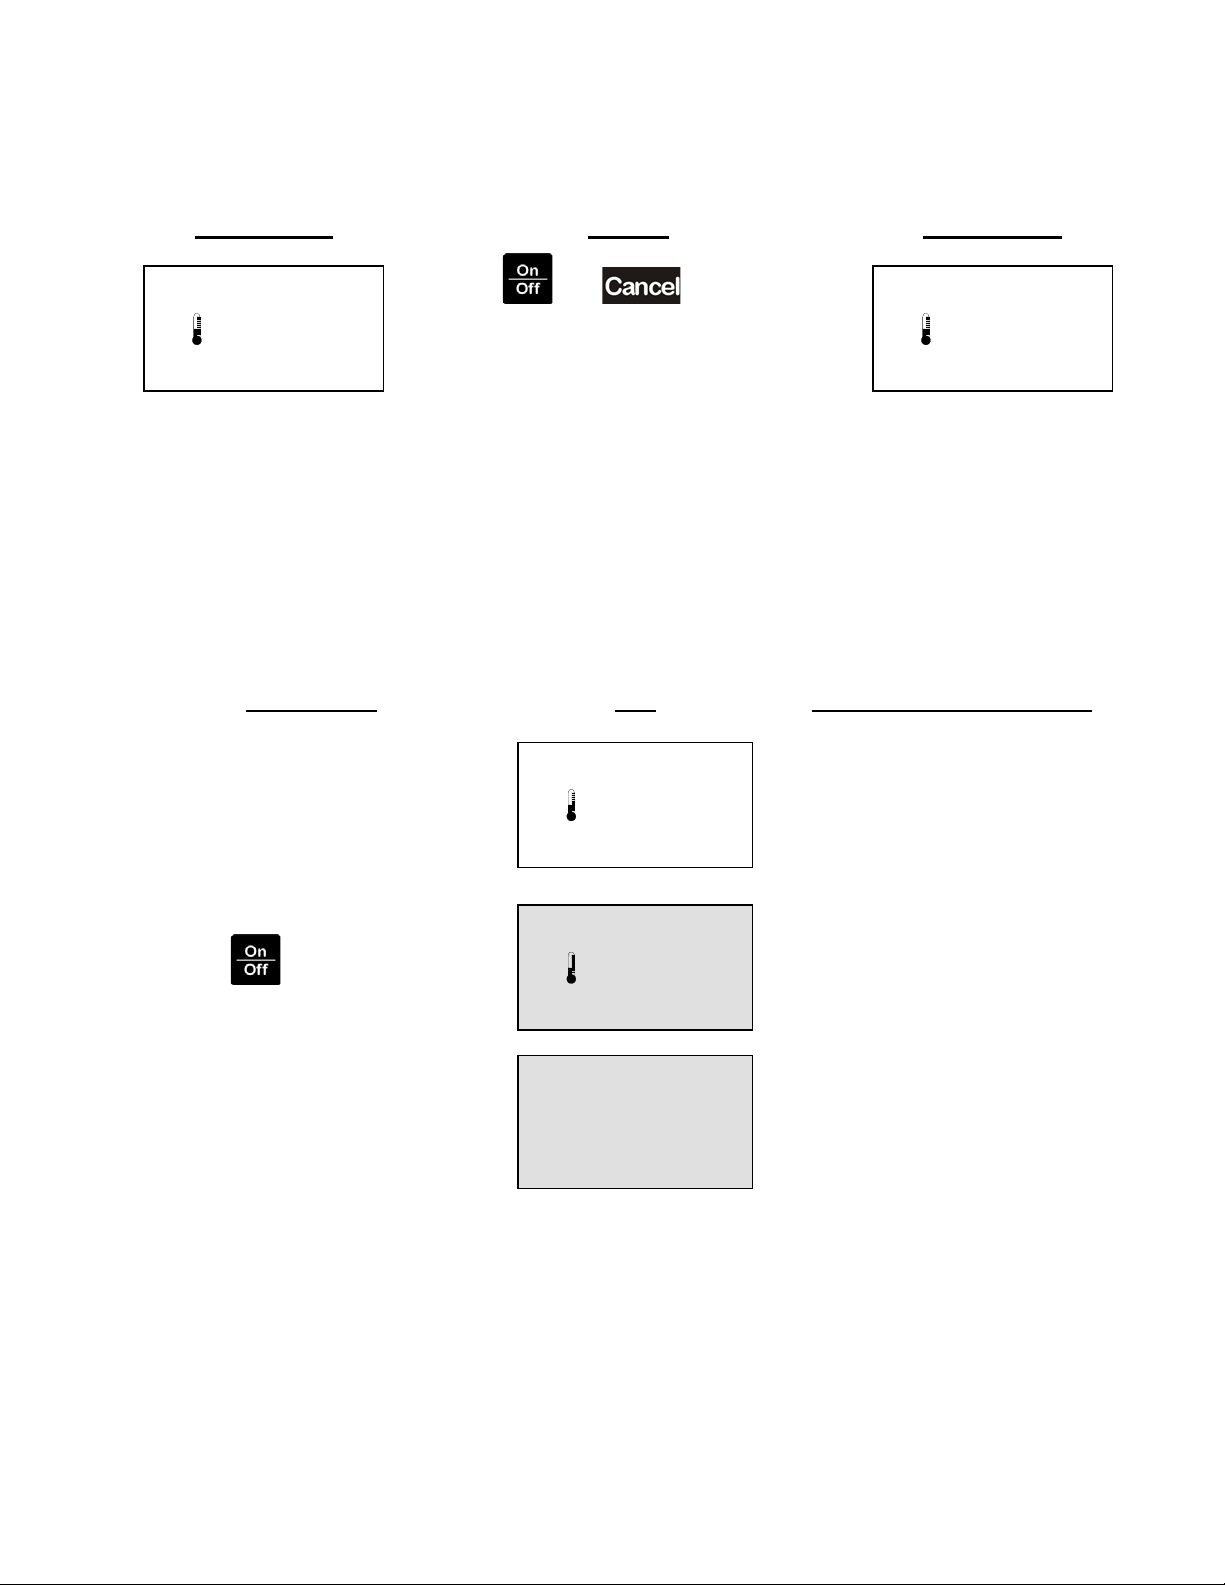
Standby Mode
READY MANUAL
350
OPEN LID/LOAD FOOD
Note: During slow periods, using standby mode reduces energy costs, allows a quick
recovery and minimizes oil breakdown.
ºF
1) Press and together
2) Release both
Note: Temperature will decr ease to 275 ºF
(135°C) to set default standby
temperature, see page 31 for more
information
STANDBY MANUAL
275
PRESS (ON) TO RESUME
ºF
Shutting Down
YOU DO THIS LCD PERFECT FRYER DOES THIS
TURN YOUR PERFECT FRY OFF:
• At end of day
• To replace deep fry oil
• To clean
• For other service or maintenance
READY MANUAL
350
OPEN LID/LOAD FOOD
ºF
1) Now in READY mode
1) Press
DO NOT UNPLUG FRYER
Fans must remain ON
during COOLDOWN mode
READY COOLDOWN
350
OPEN LID/LOAD FOOD
ºF
2) Now in COOLDOWN mode
3) No power to heater element
4) Fans continue to cool fryer
5) Fryer counts down temperature
6) LCD backlighting goes off
7) Temperature decreases to
122 ºF (50ºC)
8) Fans stop
9) LCD goes blank
10) Your PERFECT FRYER is off
- 29 -
Page 32
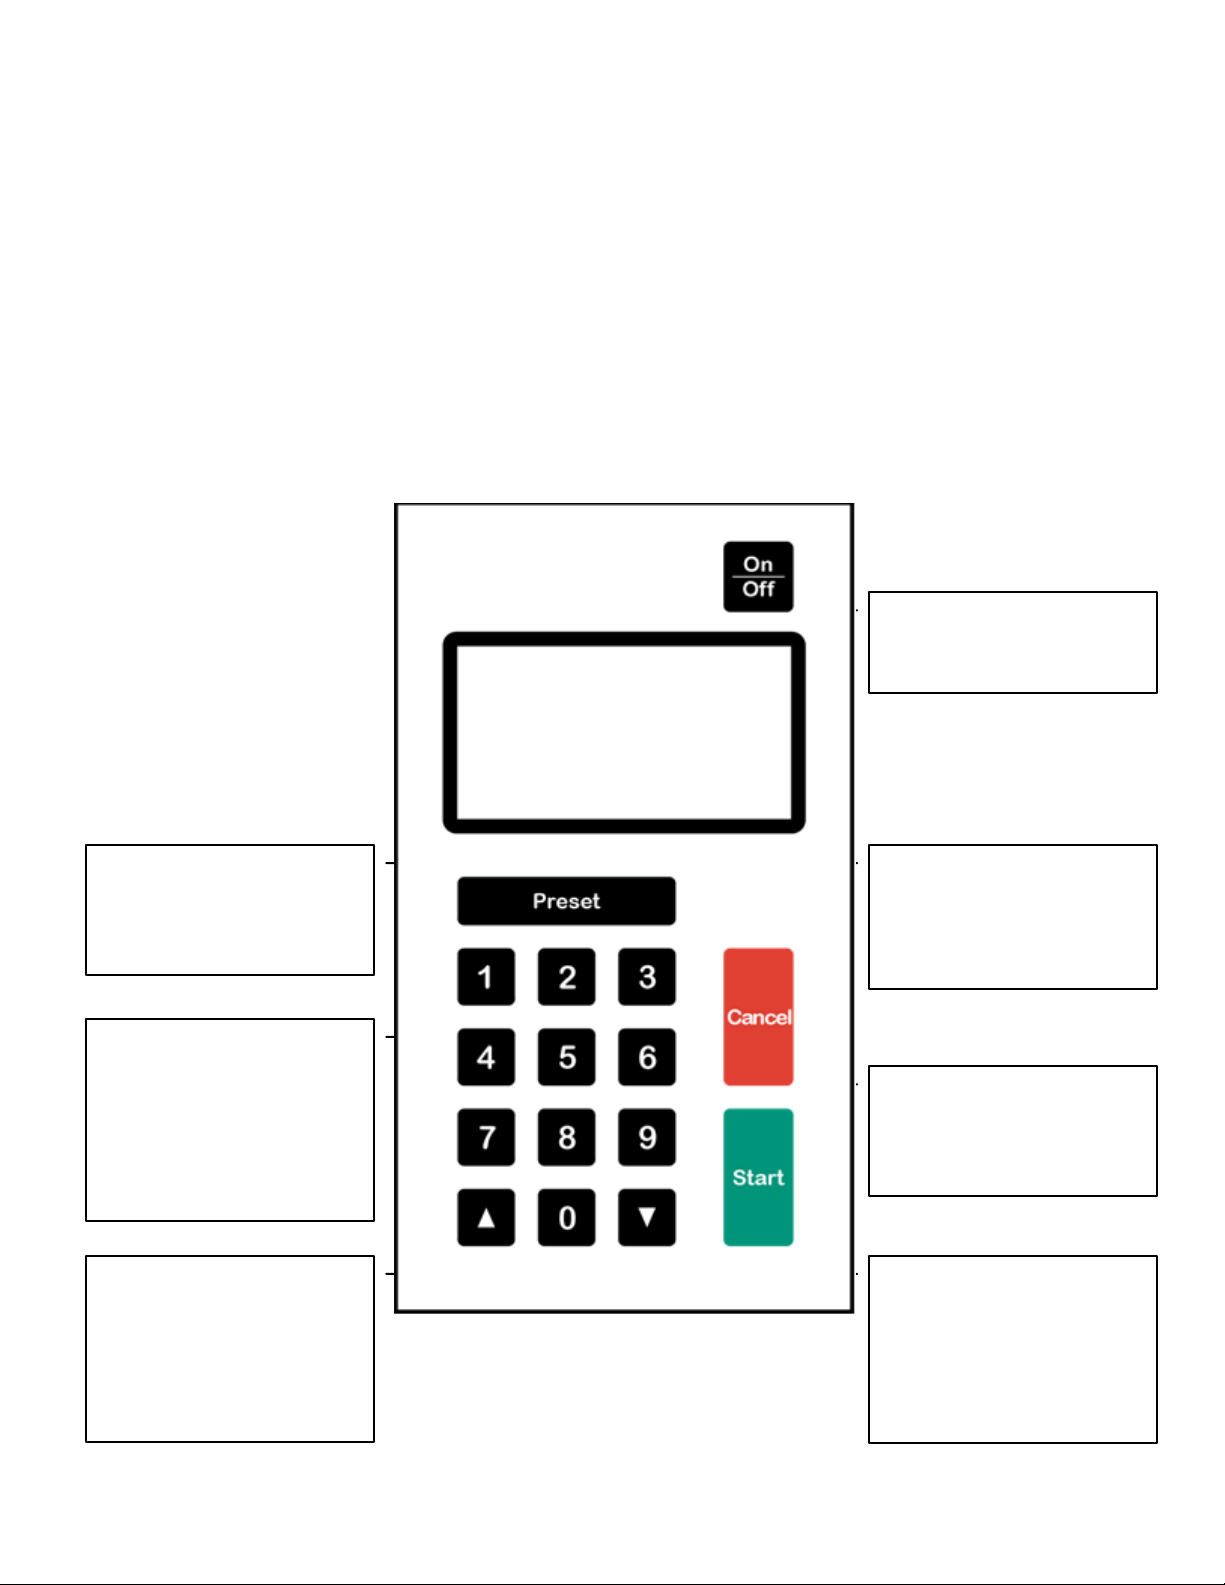
OWNER’S MANUAL FOR ALL DSA MODELS – 3/1/2013
MAIN MENU
▲,▼ START TO SELECT
PRESET KEY
CANCEL KEY
START KEY
Acts like an “enter” key
NUMBER KEYS
RIGHT ARROW KEY
LEFT ARROW KEY
MAIN MENU SCREEN
USER DEFINED OPTIO NS
CUSTOMIZE YOUR PERFECT FRYER WITH YOUR OWN SETTINGS
• CTSTM Cook Time Sensitivity
• Temperature read-out: ºC or ºF
• Preset Cooking Times
Cooking Oil Standby Temperature
•
• Count of Cook Cycles
• Cooking Oil Temperature
• Basket Drain Time
• Sound Volume
• And Much More
LANGUAGE
OPERATION OPTIONS
PRESETS
USER COUNTERS
PRESET COUNTERS
<MORE ▼>
• Home screen
• Use in combination with
START & CANCEL to
access background menu
• Use to enter password
(See page 31)
• Use to enter cook or
standby temperature
• Use to enter preset times
• Moves menu selection up
• Toggles character selection
up in making preset names
• Goes back a screen
• Resets the screen
• Acts like an “escape” key
• Goes forward a screen
• Selects an option
•
• Moves menu selection
down
• Toggles character selection
down in making preset
names
- 30 -
Page 33
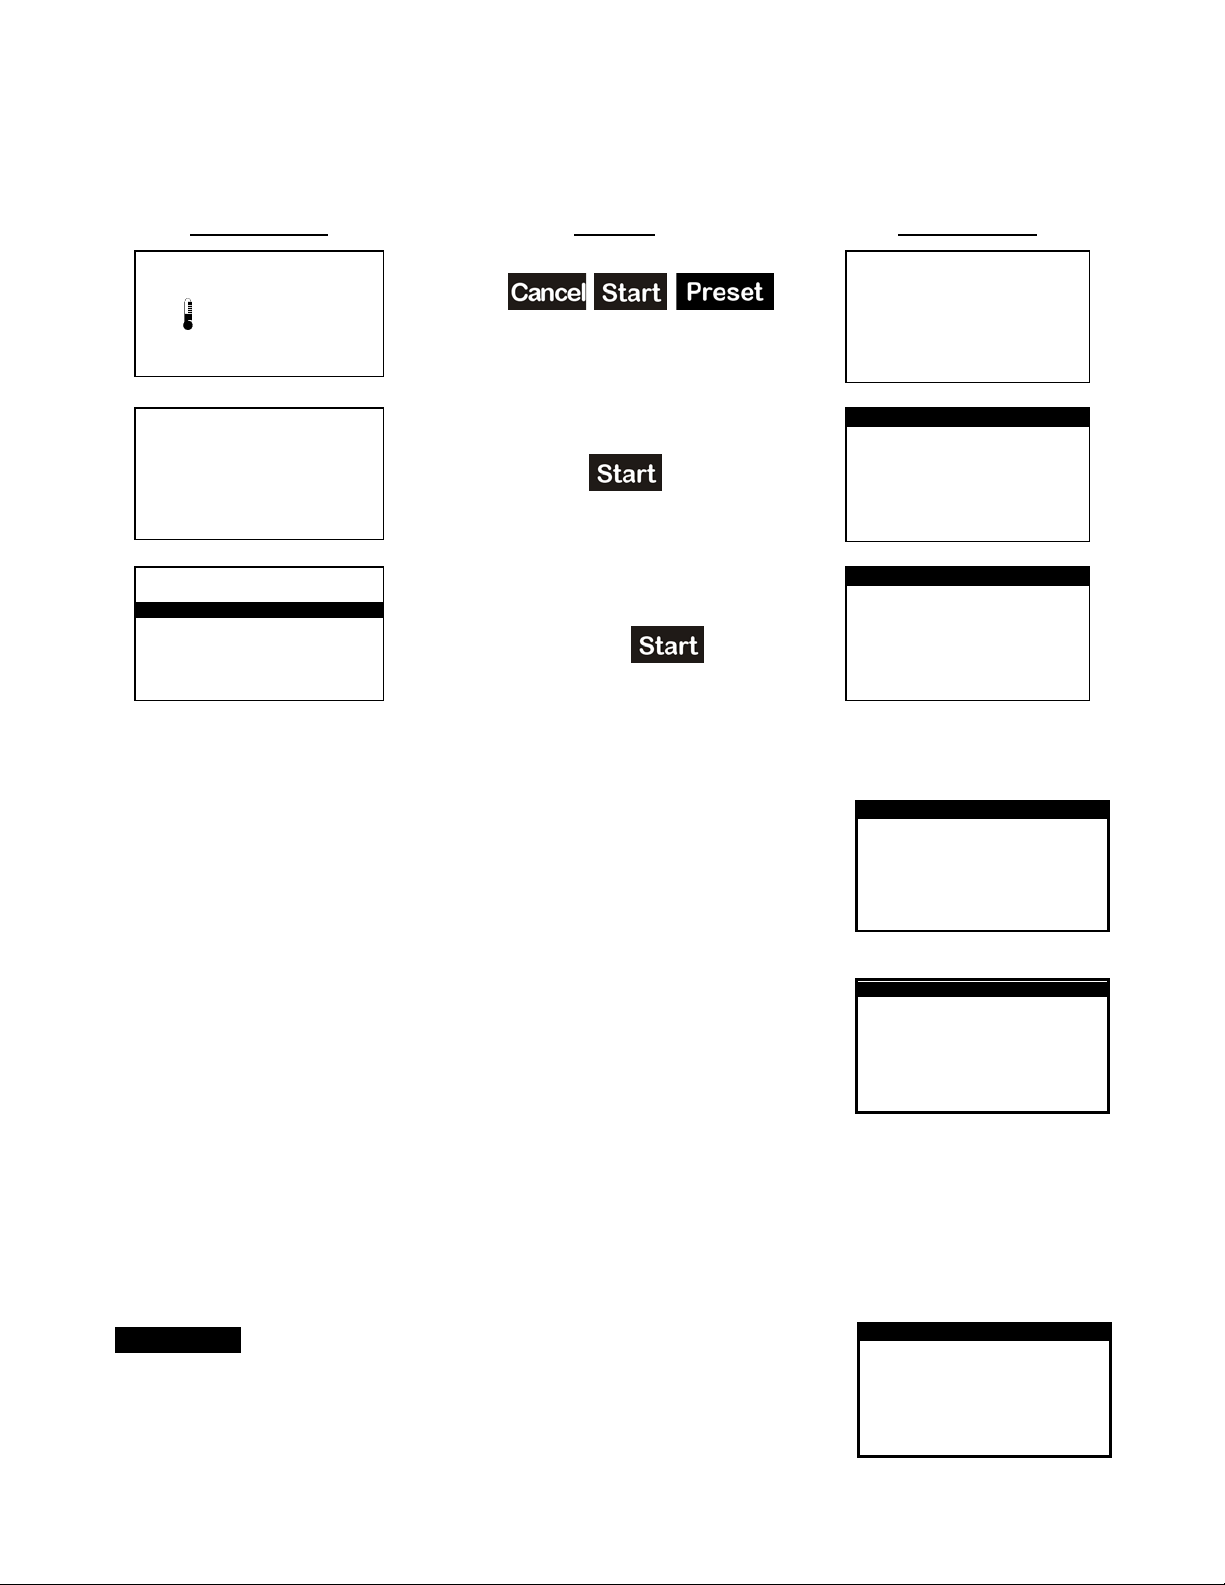
OWNER’S MANUAL FOR ALL DSA MODELS – 3/1/2013
SEE THIS LCD
DO THIS
GET THIS LCD
OPERATION OPTIONS
CTS
MELT CYCLE
HOLD TIME
FTS
MANUAL DRAWER
▲,▼ START TO SELECT
FRENCH FRIES
TIME
TEMPERATURE
CTS
NAME:
▲,▼ START TO SELECT
LANGUAGE
ENGLISH
ESPANOL
FRANCAIS
▲,▼ START TO SELECT
USER DEFINED OPTIONS (Continued)
Background Menu - Accessing
READY MANUAL
350
OPEN LID/LOAD FOOD
ºF
PFC VER.: 6.X.X
FRYER SN# XXXXX
ENTER PASSWORD:
LANGUAGE
OPERATION OPTIONS
PRESETS
USER COUNTERS
PRESET COUNTERS
▲,
▼
MAIN MENU
<MORE ▼>
START TO SELECT
1) Press
together
2) Release together
3) Press
44 77 55 0
0
4) Scroll down to the desired menu
selection and press
PFC VER.: 6.X.X
FRYER SN# XXXXX
ENTER PASSWORD:
LANGUAGE
OPERATION OPTIONS
PRESETS
USER COUNTERS
PRESET COUNTERS
▲,
▼
OPERATION OPTIONS
WAIT MODE
STANDBY MODE
PRESET MODE
BUZZER VOLUME 9
KEY VOLUME 4
▲,
▼
MAIN MENU
<MORE ▼>
START TO SELECT
<MORE ▼>
START TO SELECT
CTSTM (Cook Time Sensitivity)
TM
• CTS
oil temperature when a basket of product is placed into the fryer.
CTS
adjusts cooking time to compensate for the drop in cooking
TM
increases cooking time to accommodate for differences in
product moisture content, basket-load size, and initial temperature.
• A proper CTSTM setting will ensure a high quality product. For
example; 2 lbs of French fries will cook to the same quality as only
6 ounces of French Fries.
• In addition to having a “global” CTS
TM
Options menu for manually entered cook cycles, each preset can
be programmed with its own individual setting. This provides for a
lot of flexibility among different food products.
• Some experimenting with the range of 1 to 9 may be required to achieve optimum quality. A
value of 5 is a good place to start and is the default.
• A setting of 0 means no CTS
TM
whatsoever.
setting under the Operation
5
3
: 3:00
: 5
FRENCH FRIES
0M
<MORE ▼>
: 350ºF
<MORE ▲>
LANGUAGE
Background Menu - Map
ENGLISH (factory default)
ESPANOL
FRANCAIS
- 31 -
Page 34
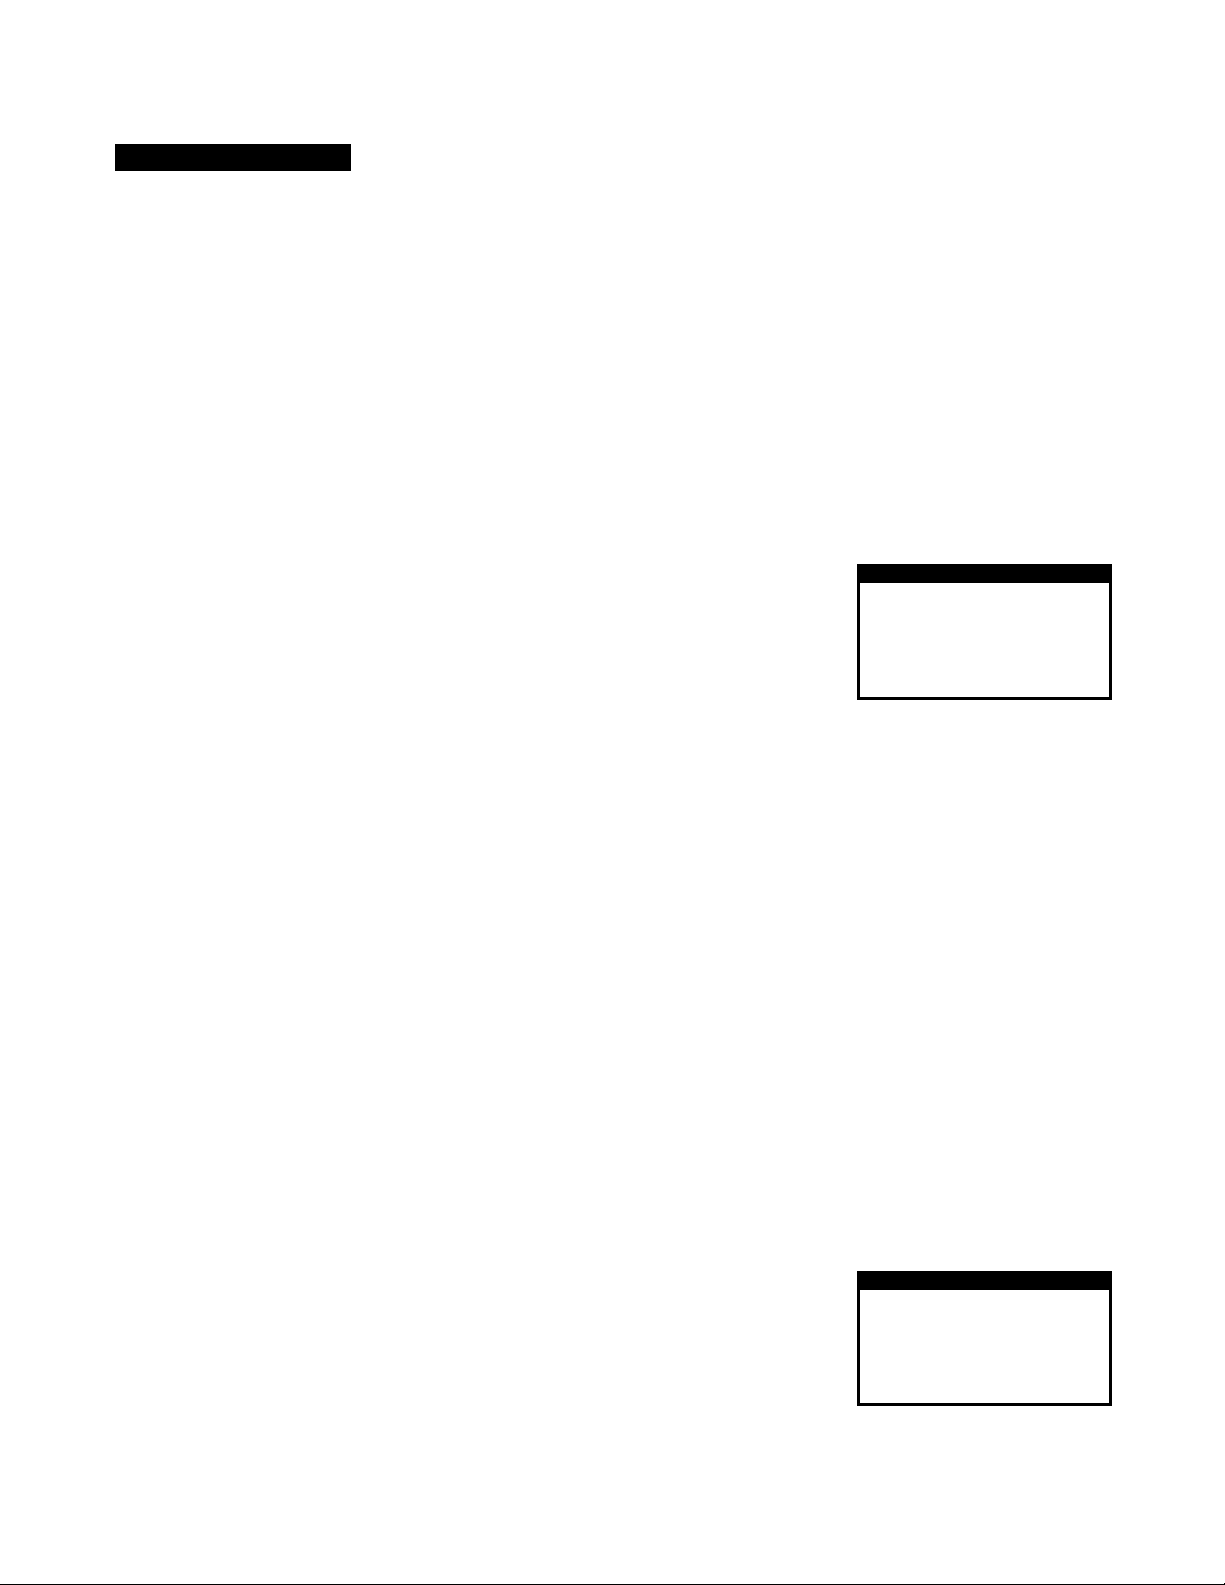
OWNER’S MANUAL FOR ALL DSA MODELS – 3/1/2013
OPERATION OPTIONS
WAIT MODE
STANDBY MODE
PRESET MODE
BUZZER VOLUME
KEY VOLUME
▲,▼ START TO SELECT
OPERATION OPTIONS
UNITS
DRAIN TIME
COOK TEMP
STANDBY TEMP
LCD CONTRAST
▲,▼ START TO SELECT
USER DEFINED OPTIONS (Continued)
OPERATION OPTIONS
WAIT MODE
When , will not allow cooking until oil has reached operating temperature
Default is
STANDBY MODE
When , gives user ability to put fryer into standby mode
This is an energy saving feature which holds oil temperature at desired standby temperature
Default is
PRESET MODE
When , only PRESET LOCKED mode and RAPIDFRYTM mode are available
This allows the operator to better control inventories as manual cook cycles are not permitted
Default is
BUZZER VOLUME
Intensity of “beep” for finish of cook cycle and system errors
Choose between 0 and 9
Default is 9
KEY VOLUME
Intensity of “beep” when a key is pressed
Choose between 0 and 9
Default is 4
UNITS
Temperature of oil in the vat
Choose between ºC (Celsius) and ºF (Fahrenheit)
DRAIN TIME
Time a basket of cooked food sits out of the oil before finishing the cook cycle
Choose between 0 and 30 seconds
Default is 15 seconds
COOK TEMPERATURE
Operating temperature of the oil
Choose between 275ºF (135ºC) and 375ºF (190ºC)
Note: Between 350°F and 360°F (177°C and 182°C) is ideal. If the temperature is set too
low, the food will absorb too much oil and taste greasy. If the temperature is set too high, the
food will cook too quickly on the outside and will be too dark once the inside is cooked. It
may also cause the oil to breakdown quicker and cause smoking.
Default is 350ºF (177ºC)
STANDBY TEMPERATURE
Oil temperature when fryer is in standby mode
Choose between low (ambient room temperature) and high (cook temperature)
Default is 275ºF (135ºC)
LCD CONTRAST
Visibility of screen
Choose between 0 and 9
9
4
<MORE▼>
ºF
15S
350ºF
275ºF
5
<MORE▼>
- 32 -
Page 35
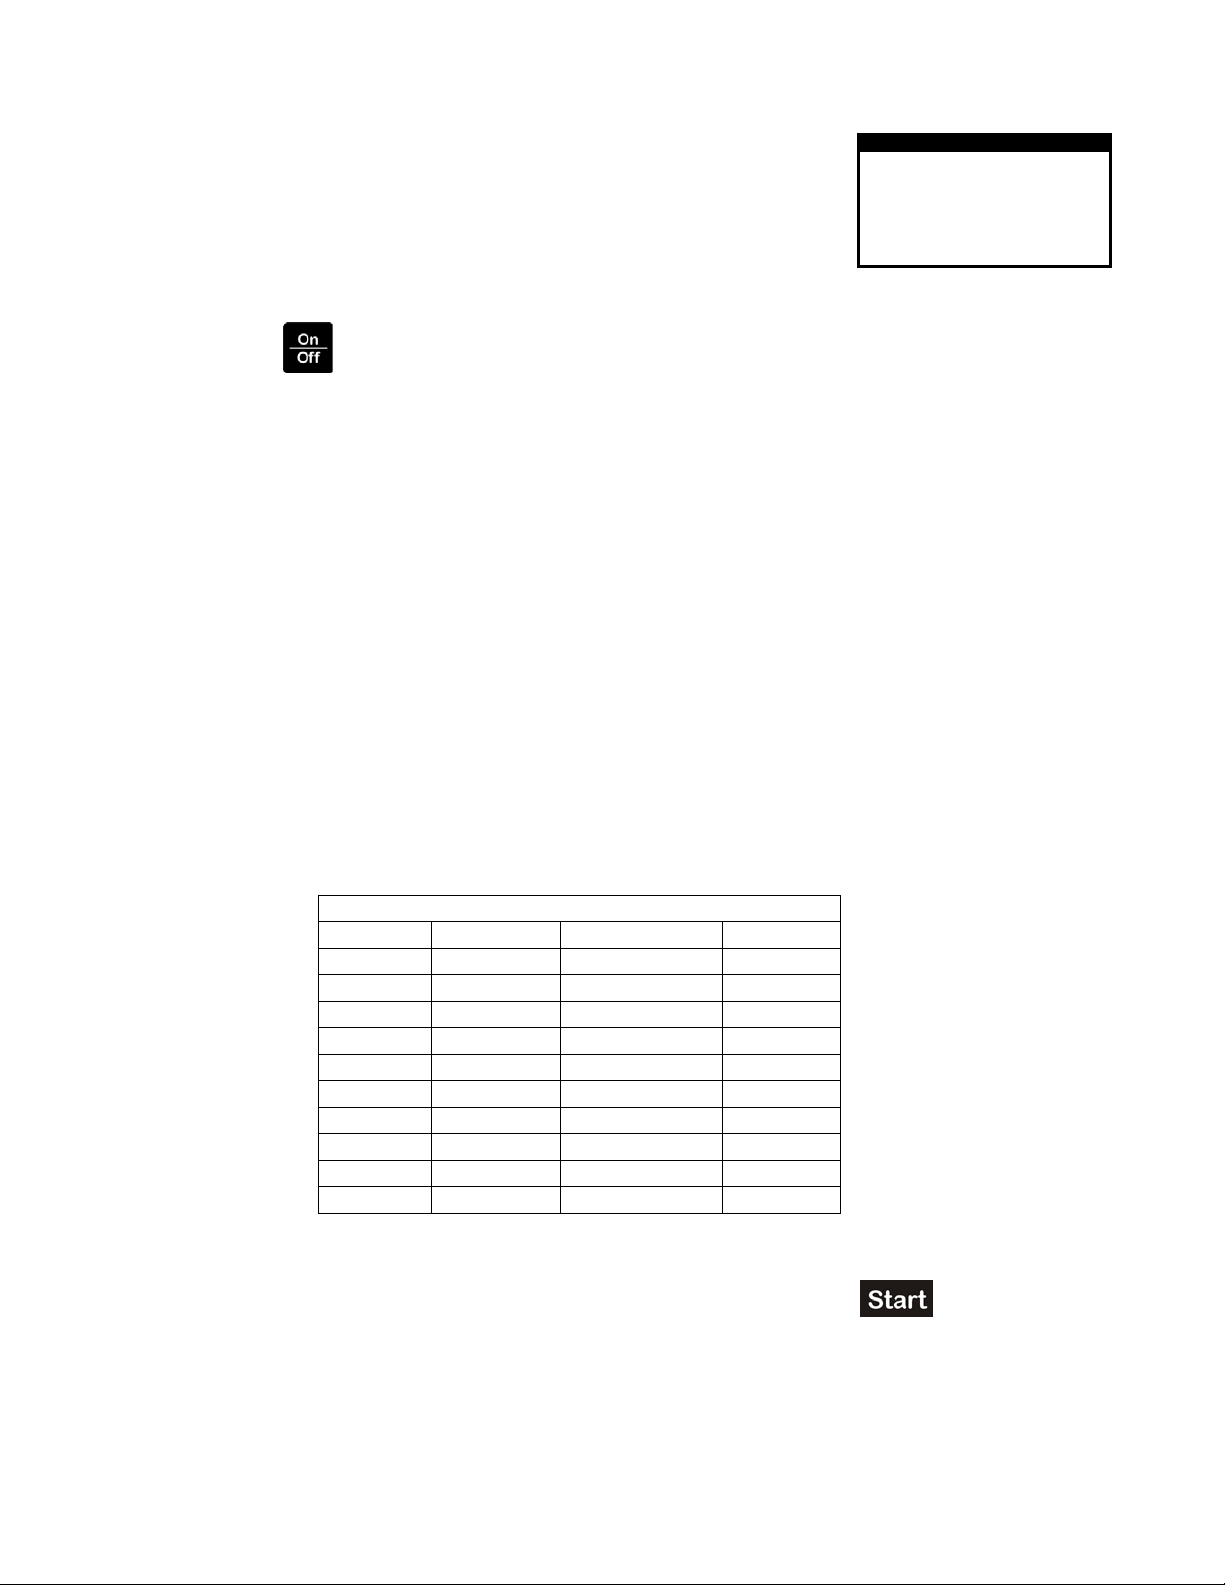
OWNER’S MANUAL FOR ALL DSA MODELS – 3/1/2013
OPERATION OPTIONS
CTS
MELT CYCLE
HOLD TIME
FTS
MANUAL DRAWER
▲,▼ START TO SELECT
Table 2 – FTS Values
FTS Value
Basket Start
# of Shakes
# of Unloads
1
In Oil 0 1
2
In Oil 0 2
3
In Oil
1 (15 seconds in)
2
4
In Oil
1 (45 seconds in)
2 5 In Oil
2 (15 & 45 in)
3
6
Drain position
0
1
7
Drain position
0
2
8
Drain position
1 (15 seconds in)
2
9
Drain position
1 (45 seconds in)
2
USER DEFINED OPTIONS (Continued)
CTS
MELT CYCLE
HOLD TIME
FTSTM FOOD TYPE SENSITIVITY
MANUAL DRAWE R
TM
COOK TIME SENSITIVITY
Adjusts cooking time to compensate for drop in cooking oil
temperature when basket of product is placed into fryer. Refer to
page 31 for more information.
5
0M
3
<MORE▲>
When , fryer will gradually melt solid blocks of shortening until temperature reaches 212ºF
(100ºC). It is designed to prevent scorching shortening and overheating element.
Press to cancel and heat regularly. DO NOT CANCEL IF USING SOLID
SHORTENING!
Default is
Time elapsed after cook cycle is finished
Allows operator to monitor time since product has finished cooking
“Beeps” and flashes hold time elapsed on LCD
Choose between 0 and 99 minutes
Default is 0 (disabled)
Adjusts cook cycle loading and unloading sequences to compensate for differences among
food products being cooked.
In addition to having a “global” FTS
TM
setting under the Operation Options menu for manually
entered cook cycles, each preset can be programmed with its own individual setting. This
provides for a lot of flexibility among different food products.
Some experimenting with the range of 1 (normal) to 9 (very battered) may be required to
achieve optimum performance. For example, chicken tenders will work well under a setting
of 1 since they don’t tend to stick together. However, battered french fries will need to set to
5 as they tend to stick together when they’re cooked.
3 is the default. Please refer to chart.
When , will allow drawer to load during cook cycle simply by pressing
When , will disable RAPIDFRY
TM
2GO
Default is
- 33 -
Page 36
OWNER’S MANUAL FOR ALL DSA MODELS – 3/1/2013
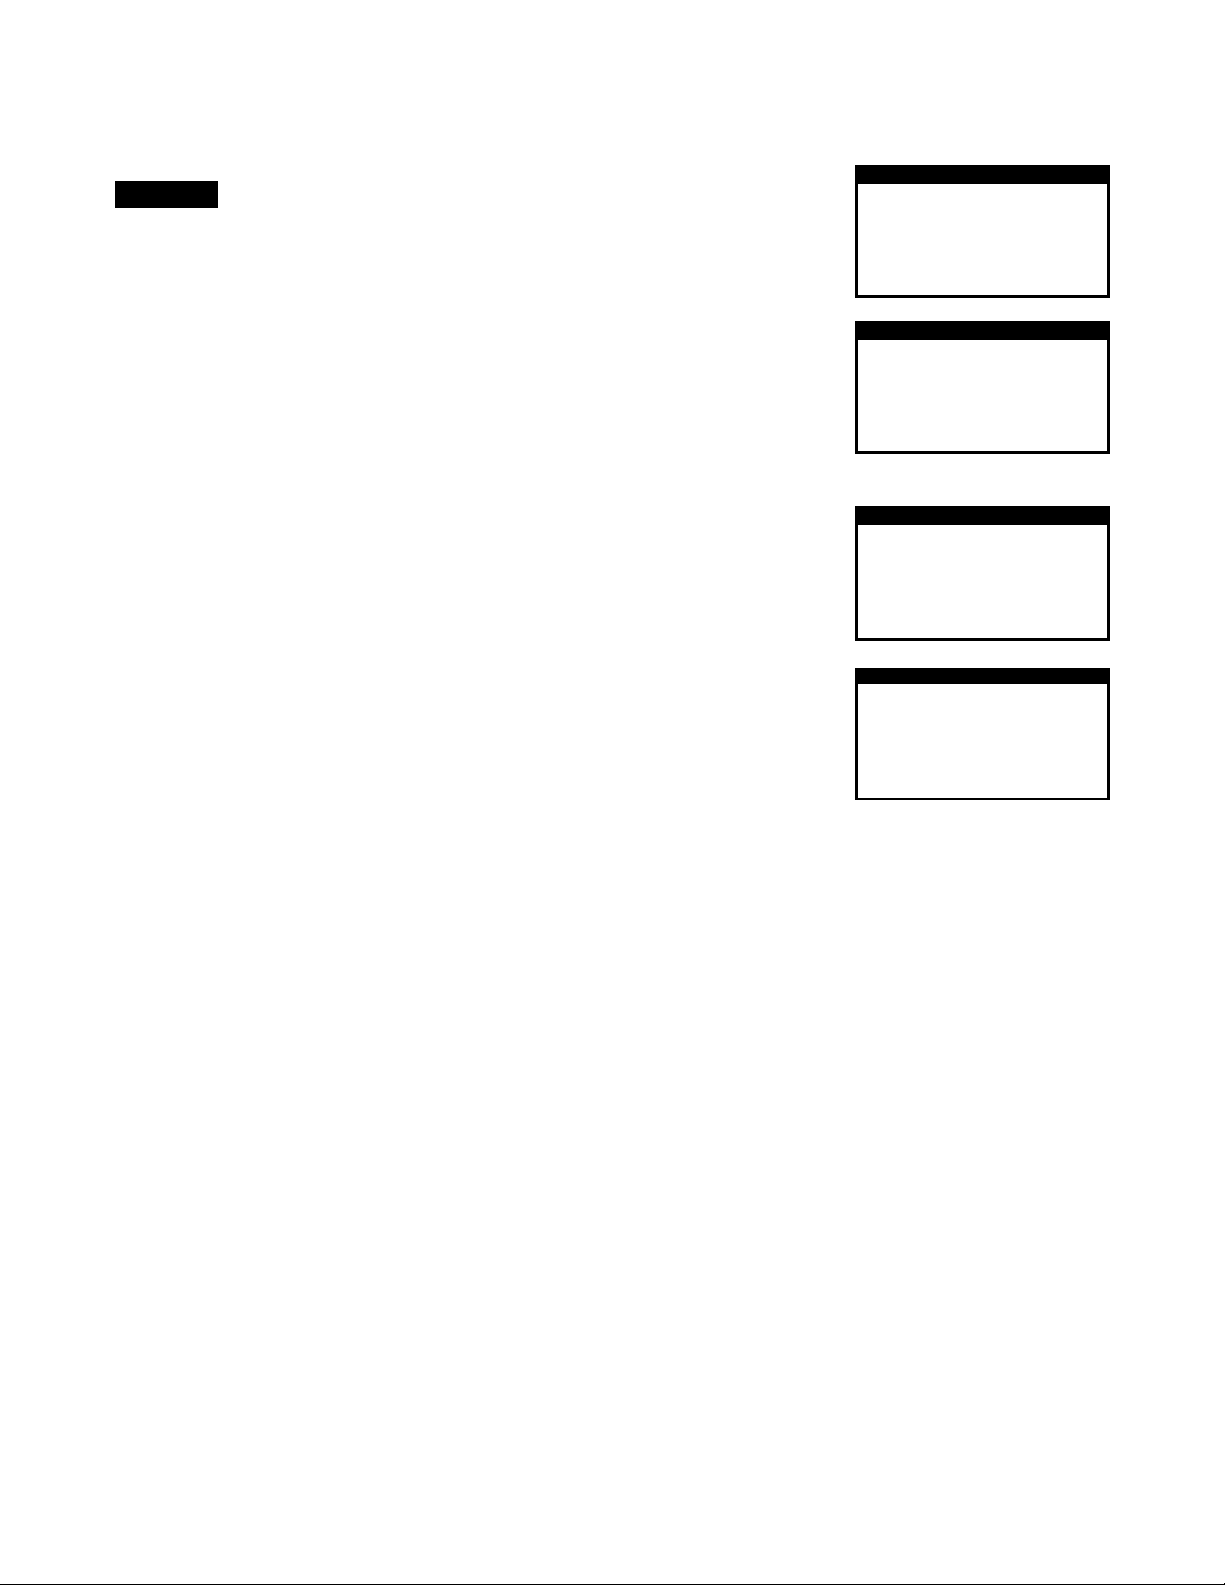
PRESETS
1:
2: CHICKEN TENDERS
3: ONION RINGS
4: POPPERS
5: CHEESE BITES
▲,▼ START TO SELECT
PRESETS
6: CORN DOGS
7: FISH FILLETS
8: CHICKEN WINGS
9:
▲,
START TO SELECT
FRENCH FRIES
TIME:
TEMP
NAME:
▲,▼ START TO SELECT
RRRRRRRRR
FRENCH FRIES
CTS:
FTS:
DUAL LOAD TIME:
▲,▼ START TO SELECT
USER DEFINED OPTIONS (Continued)
PRESETS
1: FRENCH FRIES
2: CHICKEN TENDERS
3: ONION RINGS
4: POPPERS
5: CHEESE BITES
6: CORN DOGS
7: FISH FILLETS
8: CHICKEN WINGS
9: CHICKEN & FRIES
Preset properties that can be changed (refer to page 37)
TIME
Cook Cycle Time
TEMP
Cook Cycle Temperature
NAME
Preset Name
CTS
Cook Time Sensitivity (refer to page 31)
FTS
Food Type Sensitivity (see abo ve)
DUAL LOAD TIME
Dual Load Time (refer to page 27)
FRENCH FRIES 3:00
3:00
<MORE ▼>
CHICKEN & FRIES 4:00
<MORE ▲>
3:00
: 350ºF
FRENCH FRIES
<MORE ▼>
5
3
<MORE ▲>
4:00
2:30
2:00
3:00
4:00
4:00
0:00
- 34 -
Page 37
OWNER’S MANUAL FOR ALL DSA MODELS – 3/1/2013
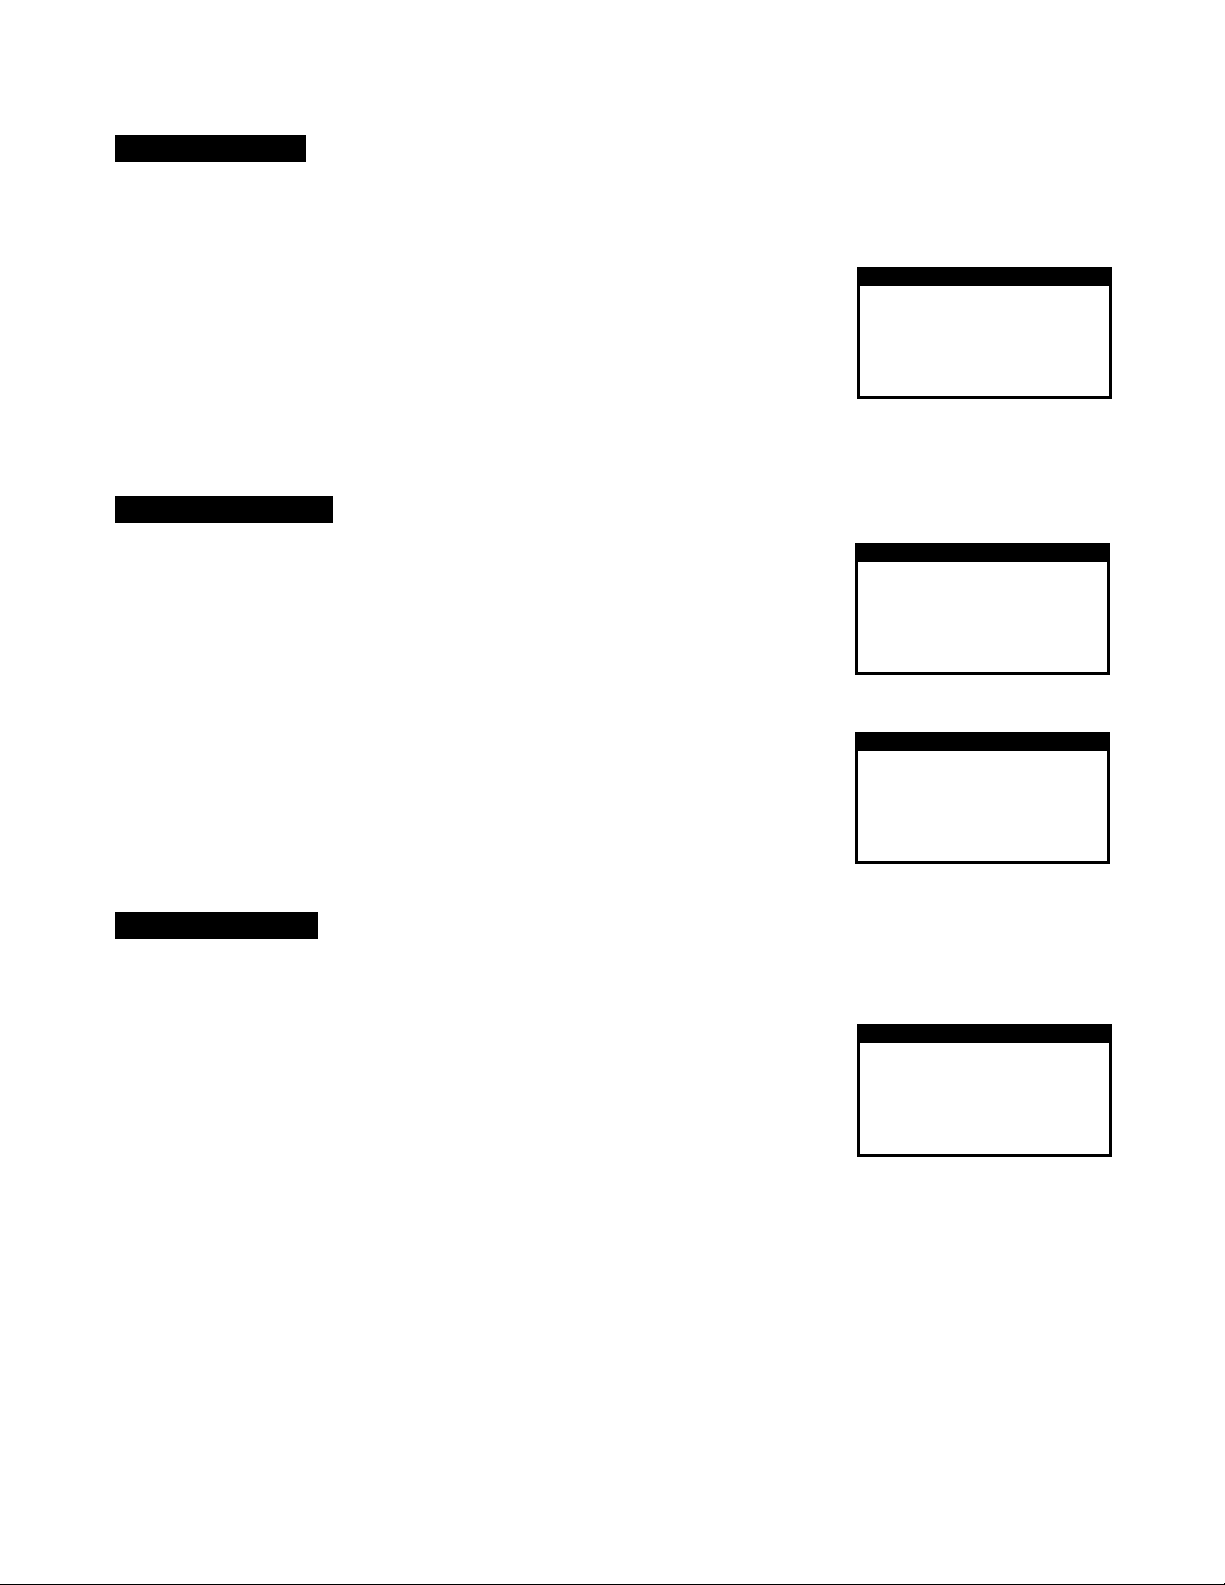
USER COUNTERS
COOK TIME:
NO. CYCLES:
ON TIME:
RESET ALL
▲,▼ START TO SELECT
PRESET COUNTERS
1: FRENCH FRIES
2: CHICKEN TENDERS
3: ONION RINGS
4: POPPERS
5: CHEESE BITES
▲,▼ START TO SELECT
PRESET COUNTERS
6: CORN DOGS
7: FISH FILLETS
8: CHICKEN WINGS
9: CHICKEN & FRIES
RESET ALL
▲,▼ START TO SELECT
TOTAL COUNTERS
COOK TIME:
NO. CYCLES:
ON TIME:
▲,▼ START TO SELECT
USER DEFINED OPTIONS (Continued)
USER COUNTERS
COOK TIME
Accumulated cook cycle time in hours
NUMBER OF CYCLES
Accumulated number of cook cycles
ON TIME
Accumulated on time in hours
RESET ALL
To reset all values to 0
PRESET COUNTERS
NUMBER OF CYCLES
Accumulated number of cook cycles
RESET ALL
To reset all values to 0
TOTAL COUNTERS
COOK TIME
Accumulated cook cycle times in hours, cannot be
reset
NUMBER OF CYCLES
Accumulated number of cook cycles, cannot be
reset
ON TIME
Accumulated on time in hours, cannot be reset
0HR
0
0HR
115
230
138
221
121
<MORE ▼>
32
56
223
<MORE ▲>
0HR
0HR
61
0
- 35 -
Page 38
OWNER’S MANUAL FOR ALL DSA MODELS – 3/1/2013
SEE THIS LCD
DO THIS
GET THIS LCD
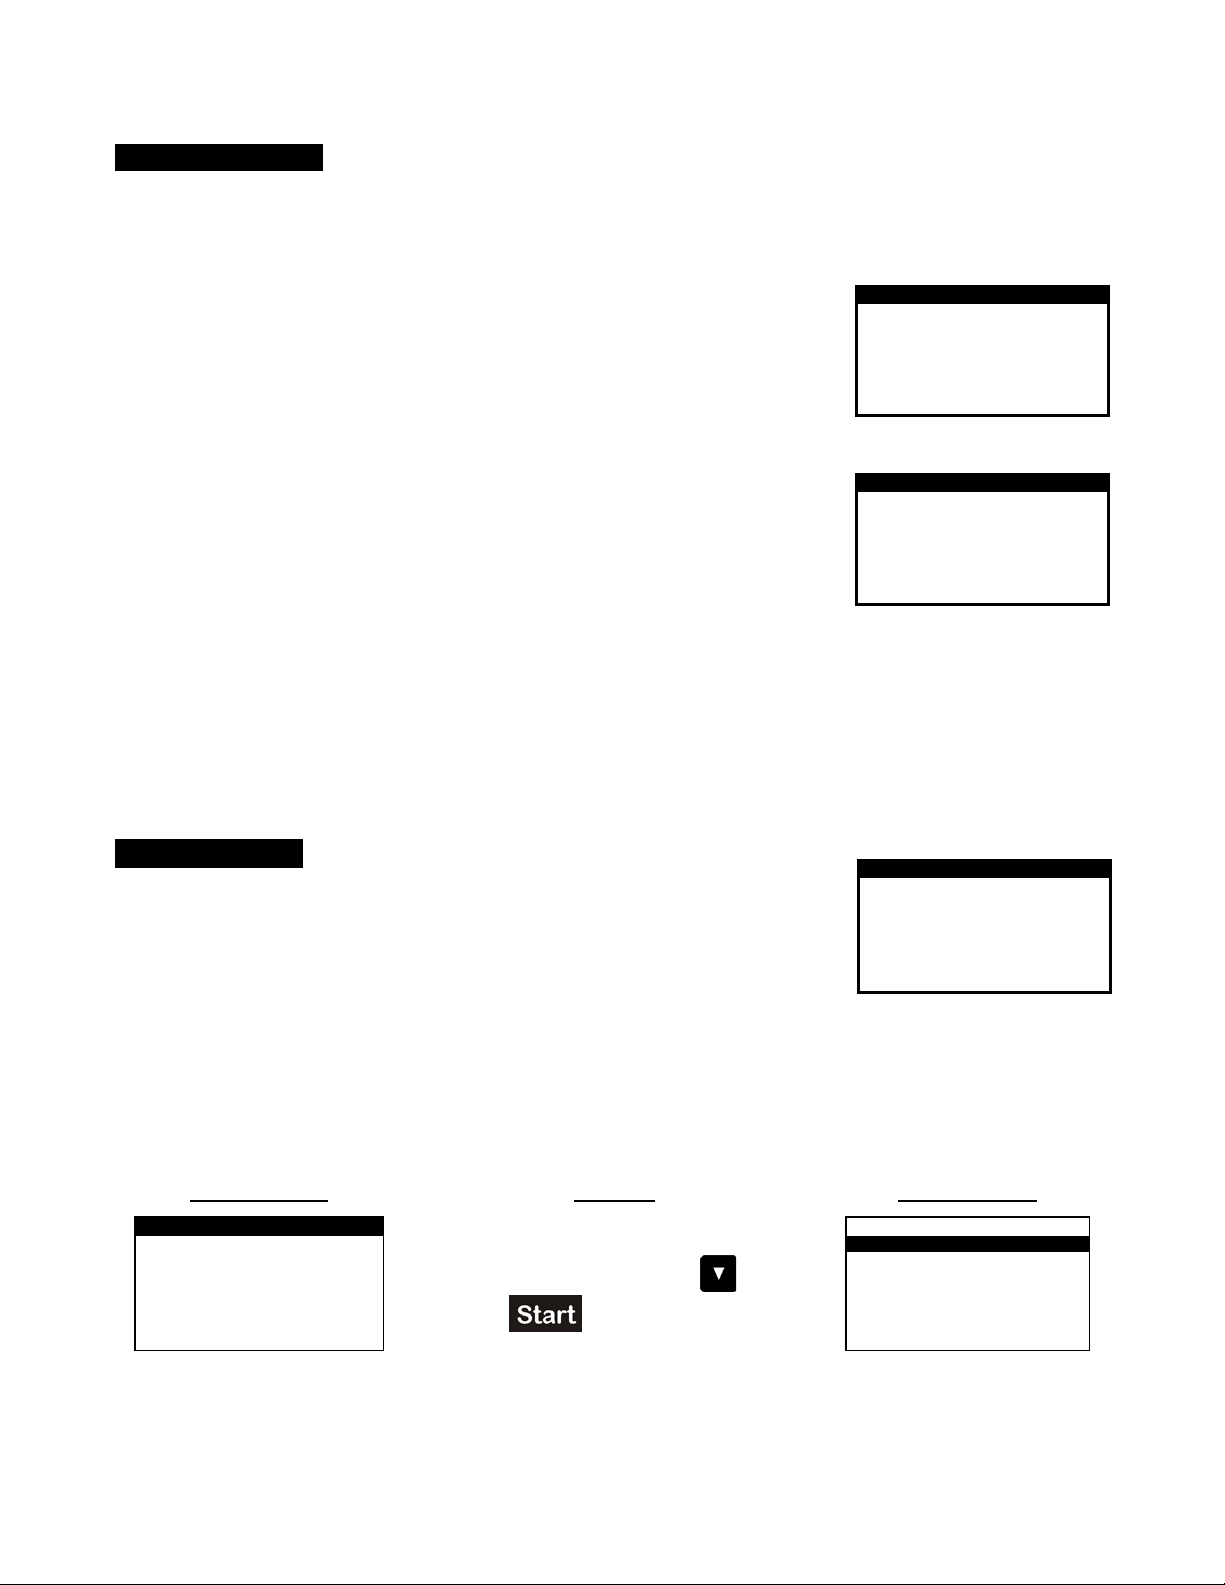
OPERATION TESTS
FANS
INTERLOCKS
BASKET
DRAWER
HEATER
▲,▼ START TO SELECT
OPERATION TESTS
DISPLAY
CIRCUIT BOARD
▲,
START TO SELECT
SET DEFAULTS
USER DEFINED OPTIONS (Continued)
OPERATION TESTS (for service personnel)
FANS
Use the arrow keys to turn fans on and off [note: oil
temperature must be below 122ºF (50ºC)]
Monitor rpm and current values of each fan
INTERLOCKS
To view interlocks and if they’re open or closed
= Open, = Closed
BASKET
Use the arrow keys to move basket up and down
DRAWER
Use the arrow keys to move drawer in and out
HEATER
For factory heater calibration. Do not adjust.
DISPLAY
Use START and CANCEL to turn all the pixels of the
LCD on and off
CIRCUIT BOARD
Monitor the circuit board temperature
SET DEFAULTS
Press start to reset options and presets to factory
defaults
PRESETS and UNITS will not change
Option Changes
(Example ºF to ºC)
<MORE ▼>
<MORE ▲>
PRESS START TO RESET
OPTIONS AND PRE SETS
TO FACTORY DEFAULTS
WAIT MODE
STANDBY MODE
PRESET MODE
BUZZER VOLUME 9
KEY VOLUME 5
Note: All OPERATION OPTIONS menu items can be customized by following this basic
OPERATION OPTIONS
1) From OPERATION OPTIONS menu,
scroll down to UNITS using
<MORE ▼>
▲,
START TO SELECT
▼
2) Press
procedure (some use the arrow keys).
key
- 36 -
OPERATION OPTIONS
UNITS ºC
DRAIN TIME 15S
COOK TEMP 350ºF
STANDBY TEMP 275ºF
LCD CONTRAST 6
<MORE ▼>
▲,
START TO SELECT
▼
Page 39
OWNER’S MANUAL FOR ALL DSA MODELS – 3/1/2013
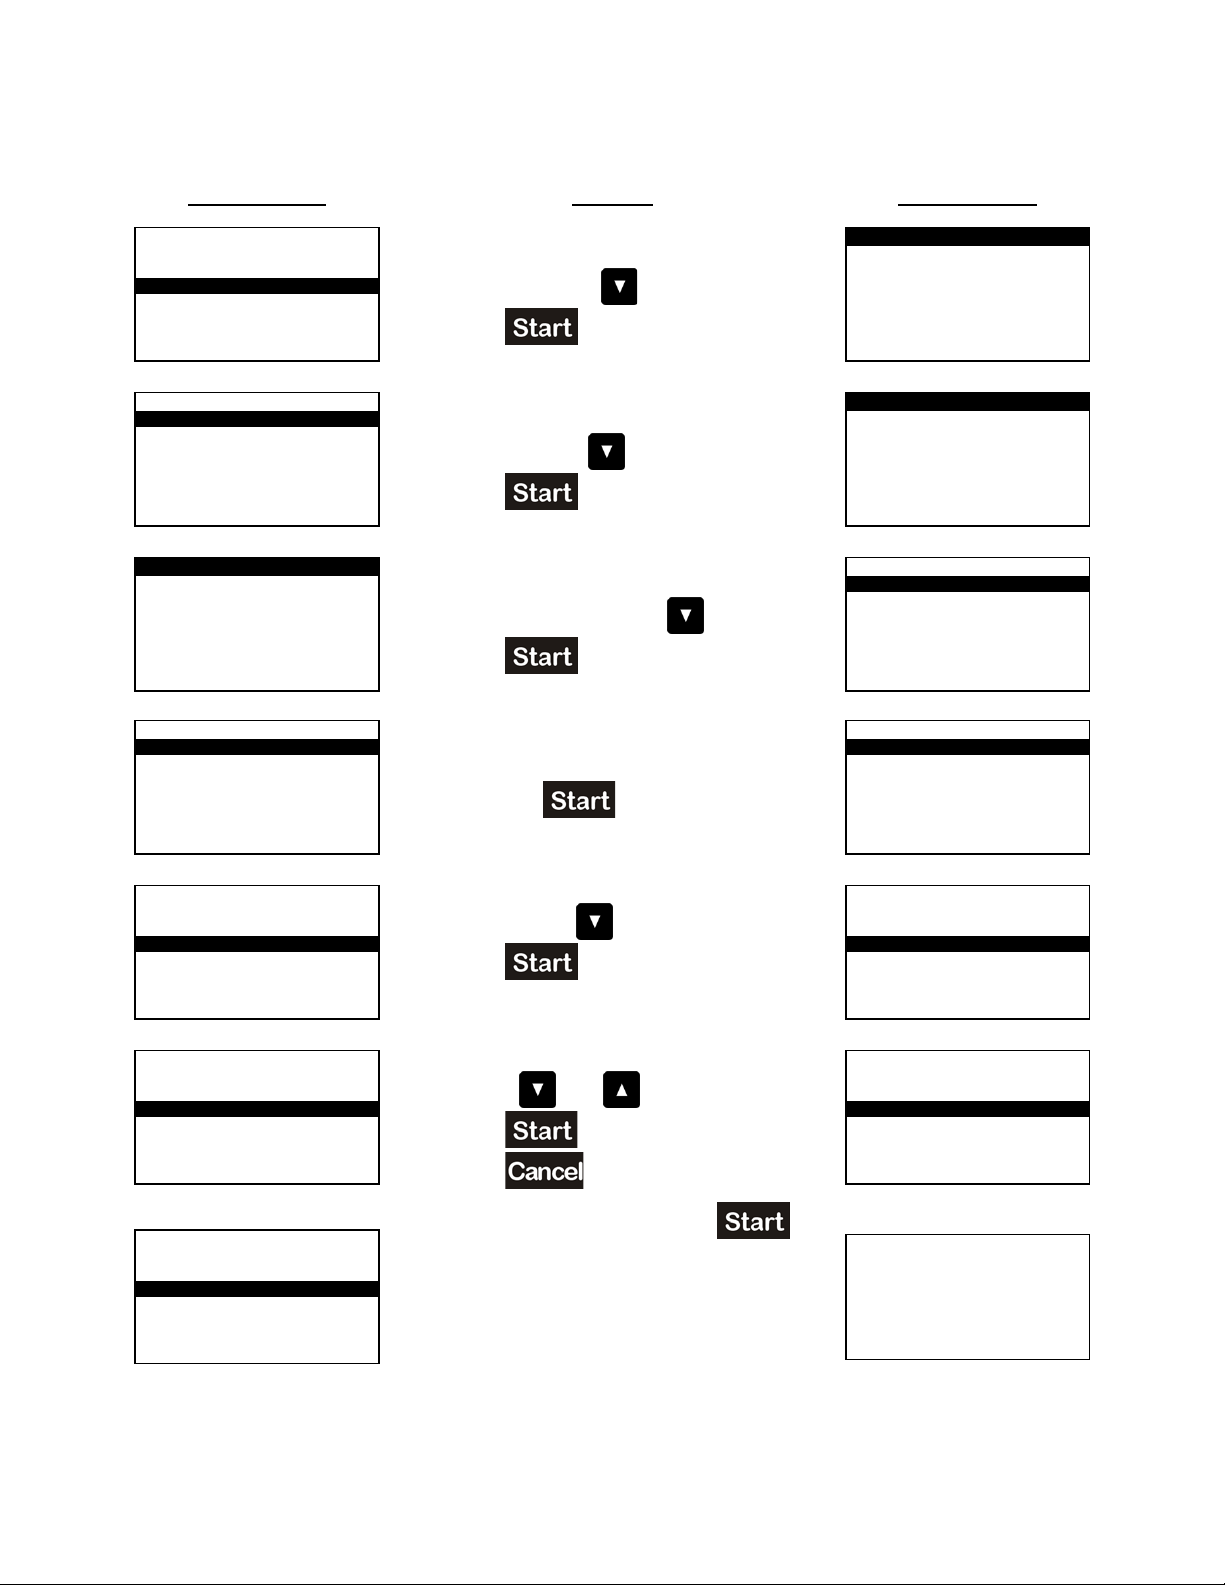
Note: maximum 20 characters
SEE THIS LCD DO THIS GET THIS LCD
LANGUAGE
OPERATION OPTIONS
PRESETS
USER COUNTERS
PRESET COUNTERS
1:FRENCH FRIES 3:00
2:CHICKEN TENDERS 4:00
3:ONION RINGS 2:30
4:POPPERS 3:00
5:CHEESE BITES 2:00
TIME: 3:00
TEMP: 350ºF
NAME:
FRENCH FRIES
MAIN MENU
<MORE ▼>
▲,
START TO SELECT
▼
PRESETS
<MORE ▼>
▲,
START TO SELECT
▼
FRENCH FRIES
<MORE ▼>
▲,
START TO SELECT
▼
USER DEFINED OPTIONS (Continued)
Customizing Presets
1) From main menu, scroll down to
PRESETS using
key
2) Press
3) Change PRESET 1’s settings by scrolling
down using the key
4) Press
5) Change PRESET 1’s cook time by
scrolling down using the
key
6) Press
1:FRENCH FRIES 3:00
2:CHICKEN TENDERS 4:00
3:ONION RINGS 2:30
4:POPPERS 3:00
5:CHEESE BITES 2:00
▲,
TIME: 3:00
TEMP: 350ºF
NAME:
FRENCH FRIES
▲,
TIME:
TEMP: 350ºF
NAME:
FRENCH FRIES
▲,
PRESETS
<MORE ▼>
START TO SELECT
▼
FRENCH FRIES
<MORE ▼>
START TO SELECT
▼
FRENCH FRIES
<MORE ▼>
START TO SELECT
▼
3:00
FRENCH FRIES
TIME:
TEMP: 350ºF
NAME:
FRENCH FRIES
TIME: 0:55
TEMP: 350ºF
NAME:
FRENCH FRIES
TIME: 0:55
TEMP: 350ºF
NAME:
FRENCH FRIES
TIME: 0:55
TEMP: 350ºF
NAME:
<MORE ▼>
▲,
START TO SELECT
▼
FRENCH FRIES
<MORE ▼>
▲,
START TO SELECT
▼
FRENCH FRIES
<MORE ▼>
▲,
START TO SELECT
▼
QUICK FRIES
QUICK FRIES
<MORE ▼>
▲,
START TO SELECT
▼
0:55
7) Set new COOK TIME (ex:: 55 seconds)
8) Press
5
5
5
5
9) Change PRESET 1’s name by scrolling
down with the key
10) Press
(A small cur sor appears under first let ter
of the name
PRESET 1.)
11) To change character above small cursor,
use the and keys
12) Press
to move forward
13) Press to move back
14) To enter your selection, press
after underscore mark ( _ ) appears
15) “QUICK F RIES” will now appear on
bottom left of LCD during PRESET
modes
- 37 -
FRENCH FRIES
TIME: 0:55
TEMP: 350ºF
NAME:
FRENCH FRIES
TIME: 0:55
TEMP: 350ºF
NAME:
TIME: 0:55
TEMP: 350ºF
NAME:
<MORE ▼>
▲,
START TO SELECT
▼
FRENCH FRIES
FRENCH FRIES
<MORE ▼>
▲,
START TO SELECT
▼
FRENCH FRIES
FRENCH FRIES _
<MORE ▼>
▲,
START TO SELECT
▼
COOKING PRESET
0:55
QUICK FRIES
Page 40
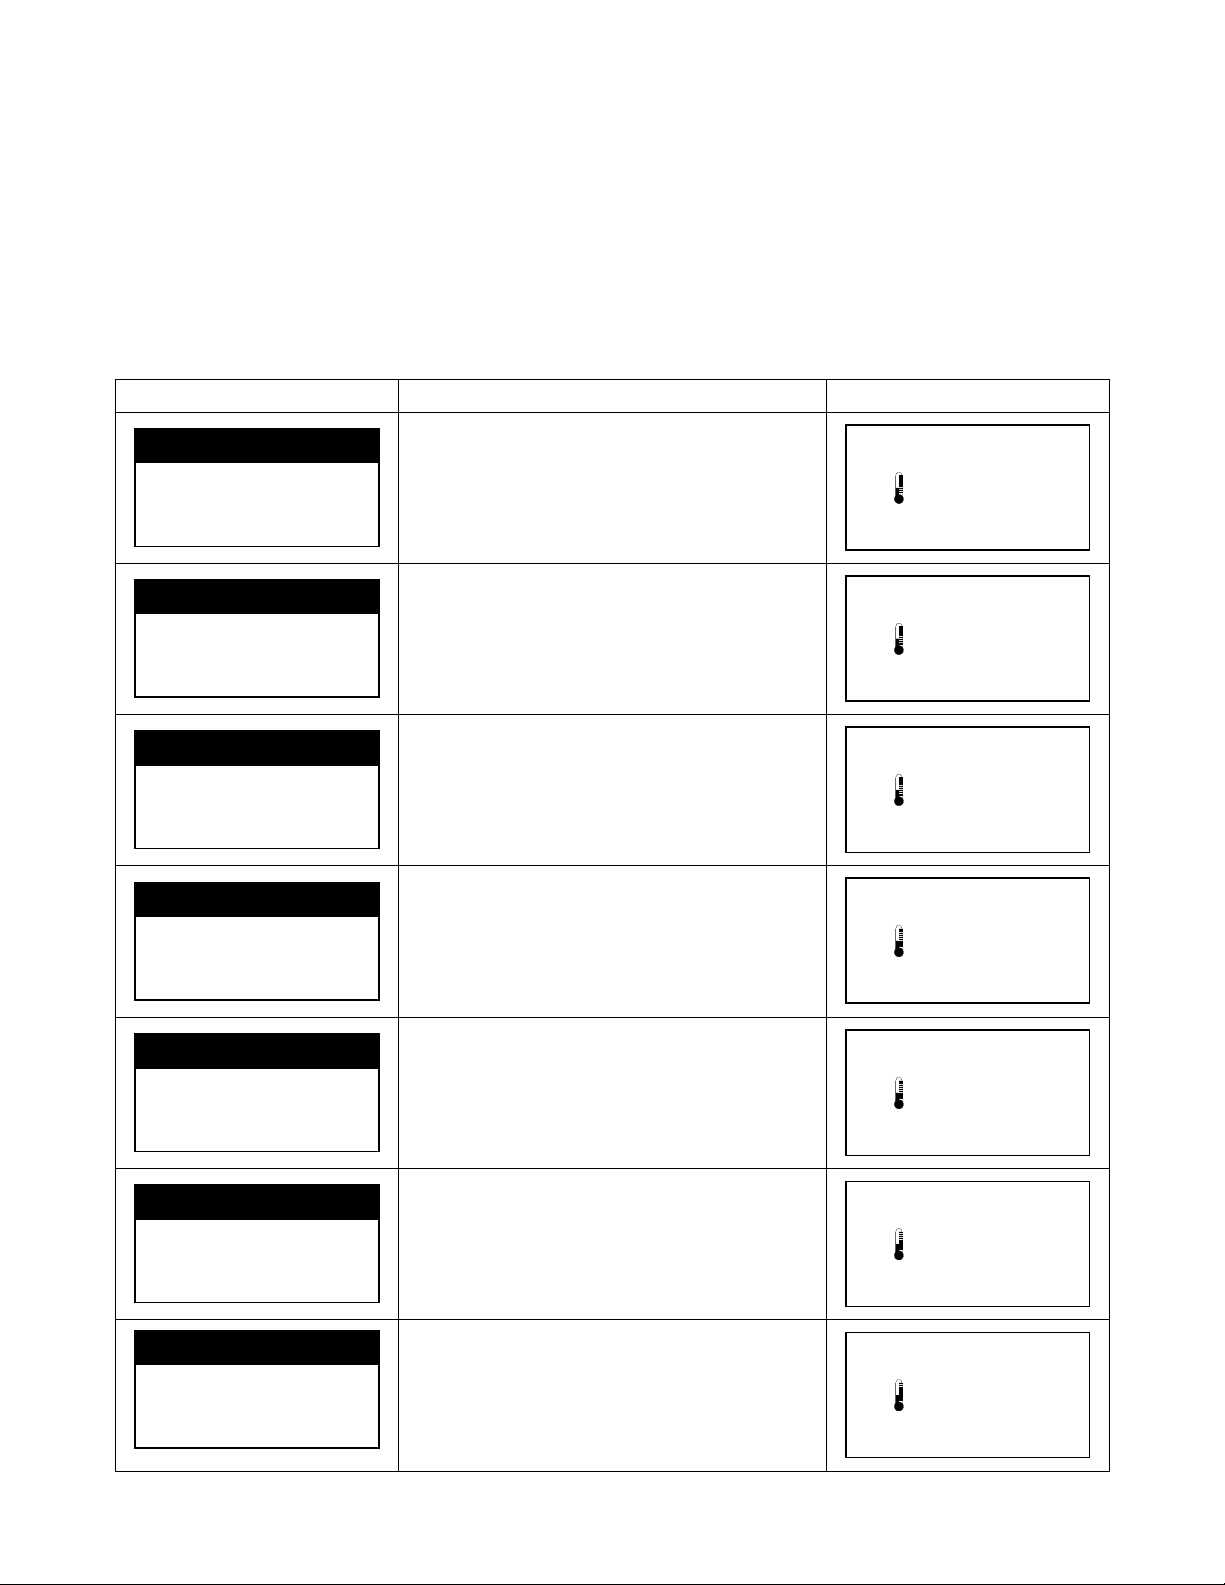
OWNER’S MANUAL FOR ALL DSA MODELS – 3/1/2013
SEE THIS LCD
CAUSED BY DO THIS
GET THIS LCD
• Heating Element is not installed properly
with rubbing alcohol and cotton swab.
• Heating Element is not installed properly
with rubbing alcohol and cotton swab.
HELP
• Your PERFECT FRYER “beeps” twice to signal an error condition. When the error condition is corrected, two beeps
signal OK.
• It is possible to have more than one SYSTEM ERROR displayed at the same time. When that happens, all error
conditions will be displayed on the LCD. All must be corrected.
• When a SYSTEM ERROR condition exists, the PERFECT FRY de-energizes the heat ing e leme nt, but the fans con tin ue
to run.
• When there appears to be a problem, but no SYSTEM ERROR message is displayed, refer to the trouble-shooting table
on page 40. If the solution suggested doesn’t solve the problem, call your service rep. or PERFECT FRY at 1-603-225-
6684.
System Error Conditions
SYSTEM ERROR
PLEASE CHECK
FRONT PANEL
SYSTEM ERROR
PLEASE CHECK
FILTER PLACEMENT
SYSTEM ERROR
PLEASE CHECK
GREASE FILTER
SYSTEM ERROR
PLEASE CHECK
HEATER BOX
• Hinged front panel is not installed or shut properly
• Check to see that front panel is closed sec urel y with
two black latches
• Air filter cartridge is not installed properly
• Check to make sure cartridge is properly installed
( up) in air filter cage, and cage is securely latched
in place
• Grease filter is not installed properly
• Check to see that it sits in grease tray (magnet on
right hand end of grease filter), and that filter and tray
are properly installed in filter chamber
• Check to see that heater module has been properly
placed on oil vat
• Check to see the electrical connection between heater
module and connector is made at inside back of fryer
compartment
• Clean the male and female terminals on connector
HEATING
84
OPEN LID/LOAD FOOD
HEATING
84
OPEN LID/LOAD FOOD
HEATING
84
OPEN LID/LOAD FOOD
HEATING
84
OPEN LID/LOAD FOOD
ºF
ºF
ºF
ºF
SYSTEM ERROR
PLEASE CHECK
AIRFLOW/AIR FILTER
SYSTEM ERROR
PLEASE CHECK
FIRE EXTINGUISHER
SYSTEM ERROR
PLEASE CHECK
PRIMARY OVERTEMP.
• There is improper air flow
• Make sure air intake (front) and exhaust (rear) vents
are not obstructed
• Clean grease filter thoroughly
• Replace the air filter cartridge
• Loss of pressure in the Fire Extinguisher, system
needs to be recharged
• Call PERFECT FRY at 1-603-225-6684 for
recommended fire Service Company near you.
• Check to see that heater module has been properly
placed on oil vat
• Check to see the electrical connection between heater
module and connector is made at inside back of fryer
compartment
• Clean the male and female terminals on connector
- 38 -
HEATING
84
OPEN LID/LOAD FOOD
HEATING
84
OPEN LID/LOAD FOOD
HEATING
84
OPEN LID/LOAD FOOD
ºF
ºF
ºF
Page 41
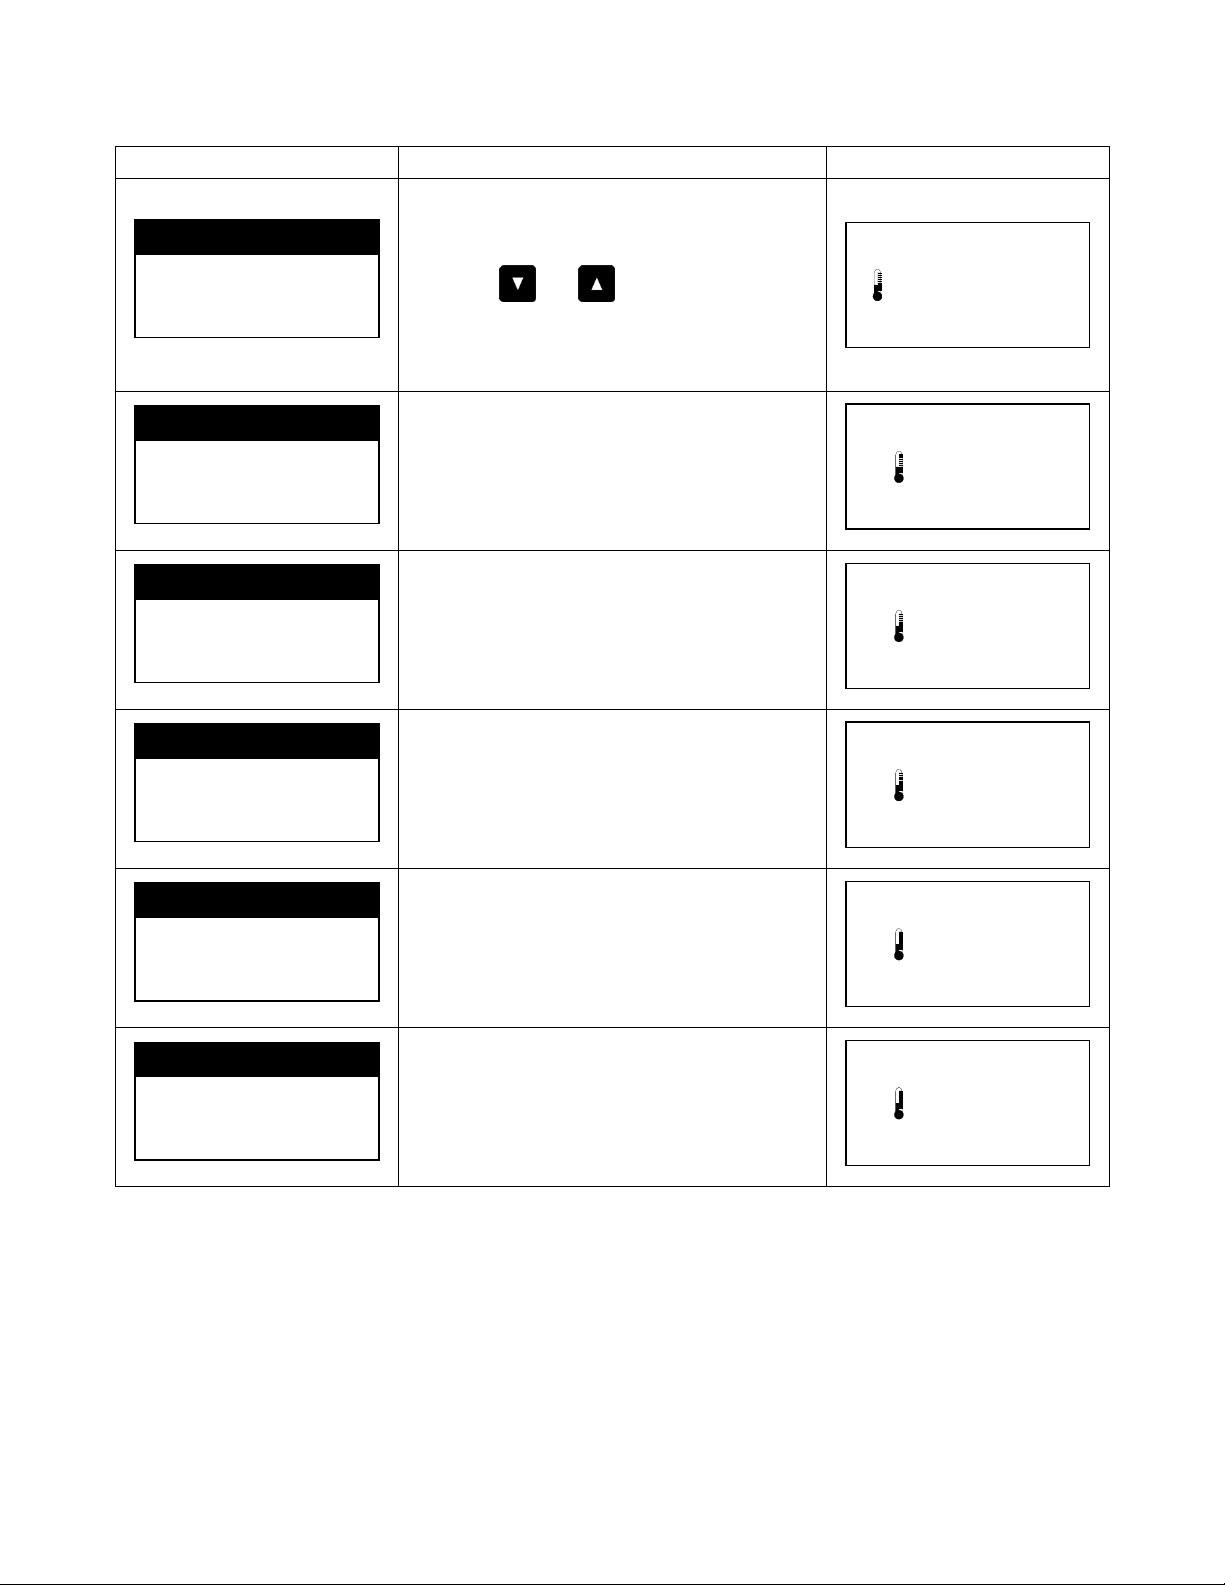
OWNER’S MANUAL FOR ALL DSA MODELS – 3/1/2013
SEE THIS LCD
CAUSED BY DO THIS
GET THIS LCD
• Cooking oil level is too low.
1-603-225-6684
HELP (Continued)
SYSTEM ERROR
PLEASE CHECK
SECONDARY OVERTEMP.
SYSTEM ERROR
PLEASE CHECK
SYSTEM ERROR
PLEASE CHECK
SYSTEM ERROR
PLEASE CHECK
MAIN FAN
CONTROL FAN
EBOX FAN.
• Make sure oil level is between the hot and
cold lines at rear of vat.
• Cooking oil has overheated.
• Press and keys together and
release to reset
• Is it possible the heater modul e w as
submerged in water? If so, call
• Main ventilation fan is not functioning properly
• Check main ventilation fan to see if it is
moving air and the fan blades are moving
• Remove obstruction and/or check electrical
connection
• Control fan is not functioning properly
• Check control fan to see if it is moving air and
the fan blades are moving
• Remove obstruction and/or check electrical
connection
• Electronics box fan is not functioning properly
• Check main ventilation fan to see if it is
moving air and the fan blades are moving
• Remove obstruction and/or check electrical
connection
HEATING MANUAL
378
ºF
HEATING MANUAL
84
OPEN LID/LOAD FOOD
ºF
HEATING MANUAL
84
OPEN LID/LOAD FOOD
ºF
HEATING MANUAL
84
OPEN LID/LOAD FOOD
ºF
SYSTEM ERROR
PLEASE CHECK
DRAWER MOTOR
SYSTEM ERROR
PLEASE CHECK
BASKET MOTOR
• Drawer motor has been obstructed
• Basket motor has been obstructed
HEATING MANUAL
84
OPEN LID/LOAD FOOD
ºF
HEATING MANUAL
84
OPEN LID/LOAD FOOD
ºF
- 39 -
Page 42
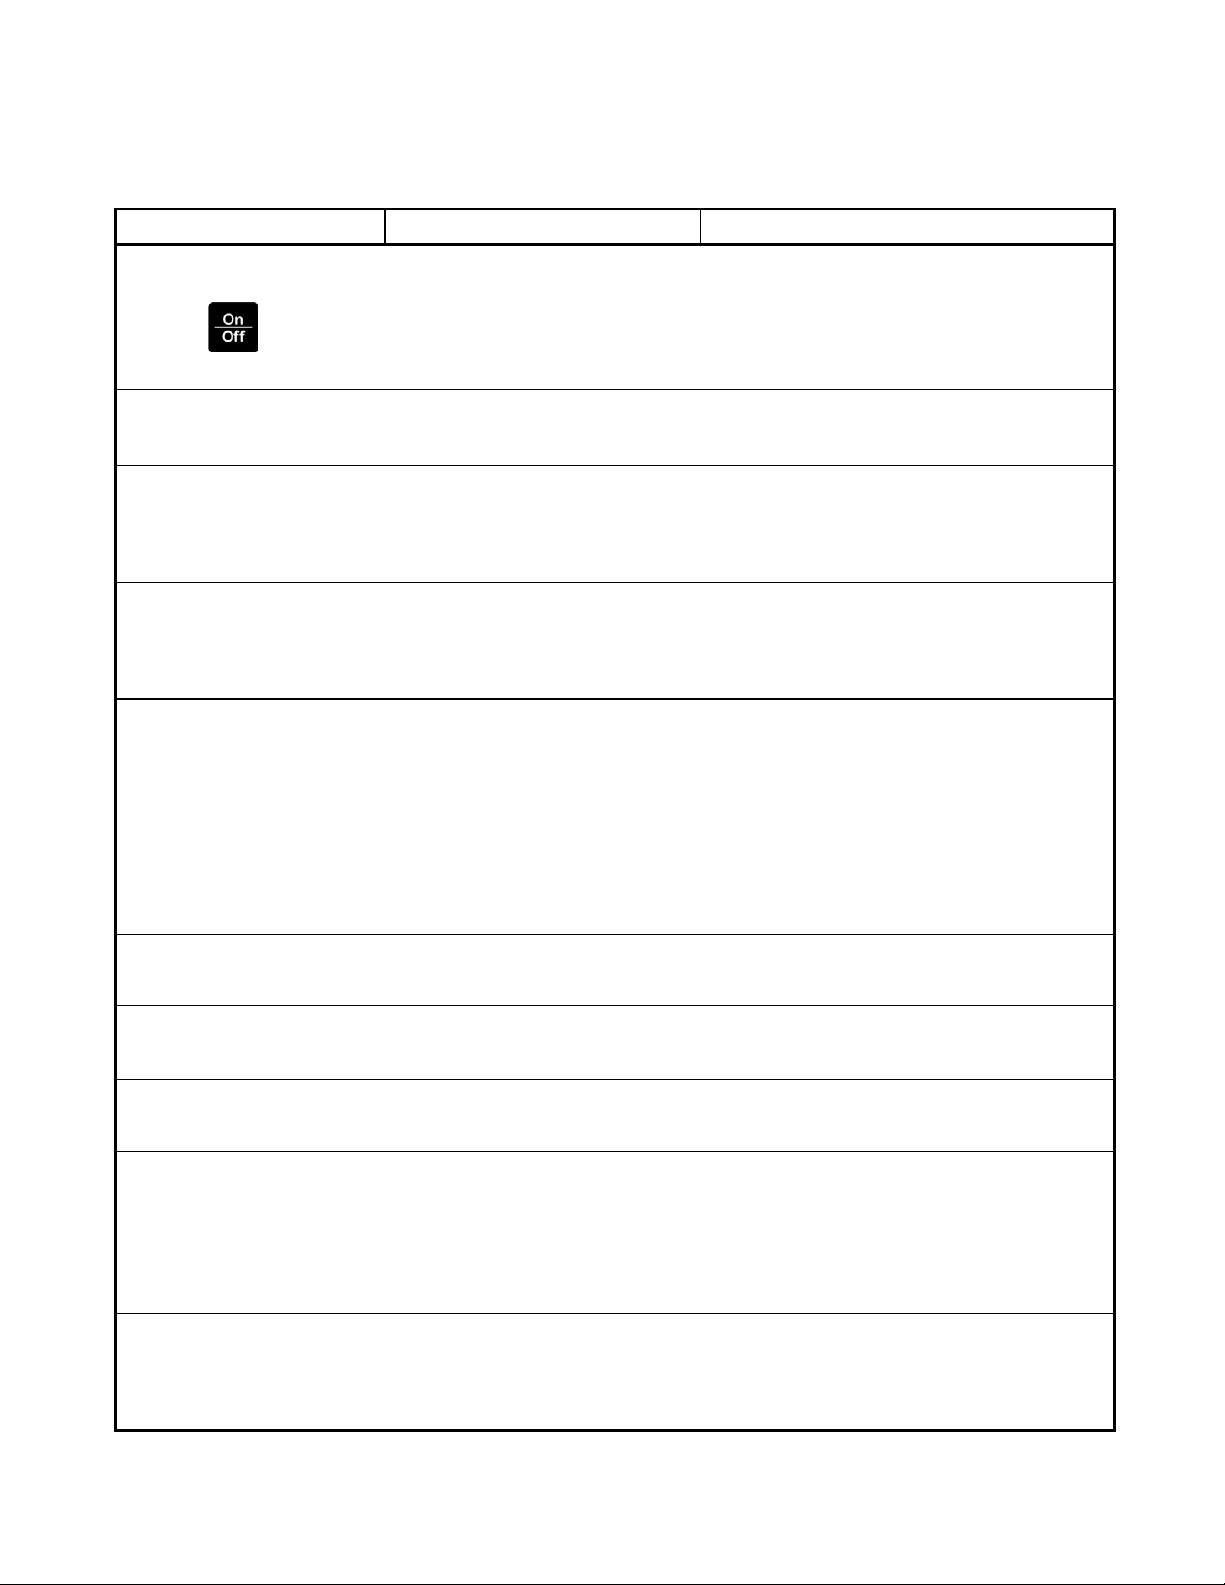
OWNER’S MANUAL FOR ALL DSA MODELS – 3/1/2013
“PROBLEM”
PROBABLE CAUSE
PROBABLE SOLUTION
1) Basket not installed properly
4) Drawer motor not working
1) Remove some oil (when oil is cold it
5) Close valve
1) Too much food was inserted
battered product was cooked
1) Too much food was inserted
installed correctly
HELP (Continued)
Trouble-shooting Table
Won’t turn ON when you
press the key
ON but will not heat
Motors will not move
drawer or basket.
Outer surface is unusually
hot
Cooking oil spills into spill
tray, excessively
1) Not plugged in
2) Circuit breaker or fuse
3) Wiring
1) Connector on heater module
2) Electronics box module
2) Front panel/drawer not
installed properly
3) Basket motor not w orking
1) Dirty grease filter
2) Air filter cartridge plugged
3) Fans not operating
1) Too much oil in vat
2) Too much ice or water in
food
3) Too much food in basket
4) Oil has reached end of its life
5) Drain valve is open
1) P lug in fryer
2) Check circuit breaker or replace fuse
3) Make sure PERFECT FRYER is
plugged in according to its electrical
specifications (see page 4)
1) Replace heater module
2) Replace electronics box module
1) Make sure that the basket is installed
properly (see page 10)
2) Check wiring
3) Replace motor
1) Remove and clean grease filter
2) Replace air filter cartridge
3) Check rear of fryer for air flow
should not be above cold oil line inside
vat)
2) Cook only frozen foods recommended
for use in deep fryers; remove excess
ice from food before placing food in
basket
3) Do not fill food above top of basket
4) Change oil
Food floats out of basket
Excessive smoking
Excessive foaming
Food does not come out
Food does not go in
1) Too much cooking oil in vat.
1) Oil has “broken down”
2) Moisture
1) Soap residue
2) Oil has “broken down”
using a dual load or manual
drawer
2) The basket was not installed
or installed correctly
3) Large volume of heavily
2) Front panel is not closed
properly
3) Drawer shovel was not
- 40 -
1) Remove some oil; do not fill above cold
oil line.
1) Replace the cooking oil
2) Too much moisture or ice crystals
1) Rinse parts with vinegar solution
2) Replace the cooking oil
1) Only enter the amount of food that totals
one drawer full per cook cycle
2) Make sure that the basket is installed
properly (see page 10)
3) Try adjusting FTS value to 5 (see page 33)
1) Do not overfill the drawer
2) Close front panel fully and latch closed
3) Install drawer shovel properly ( see page 13)
Page 43
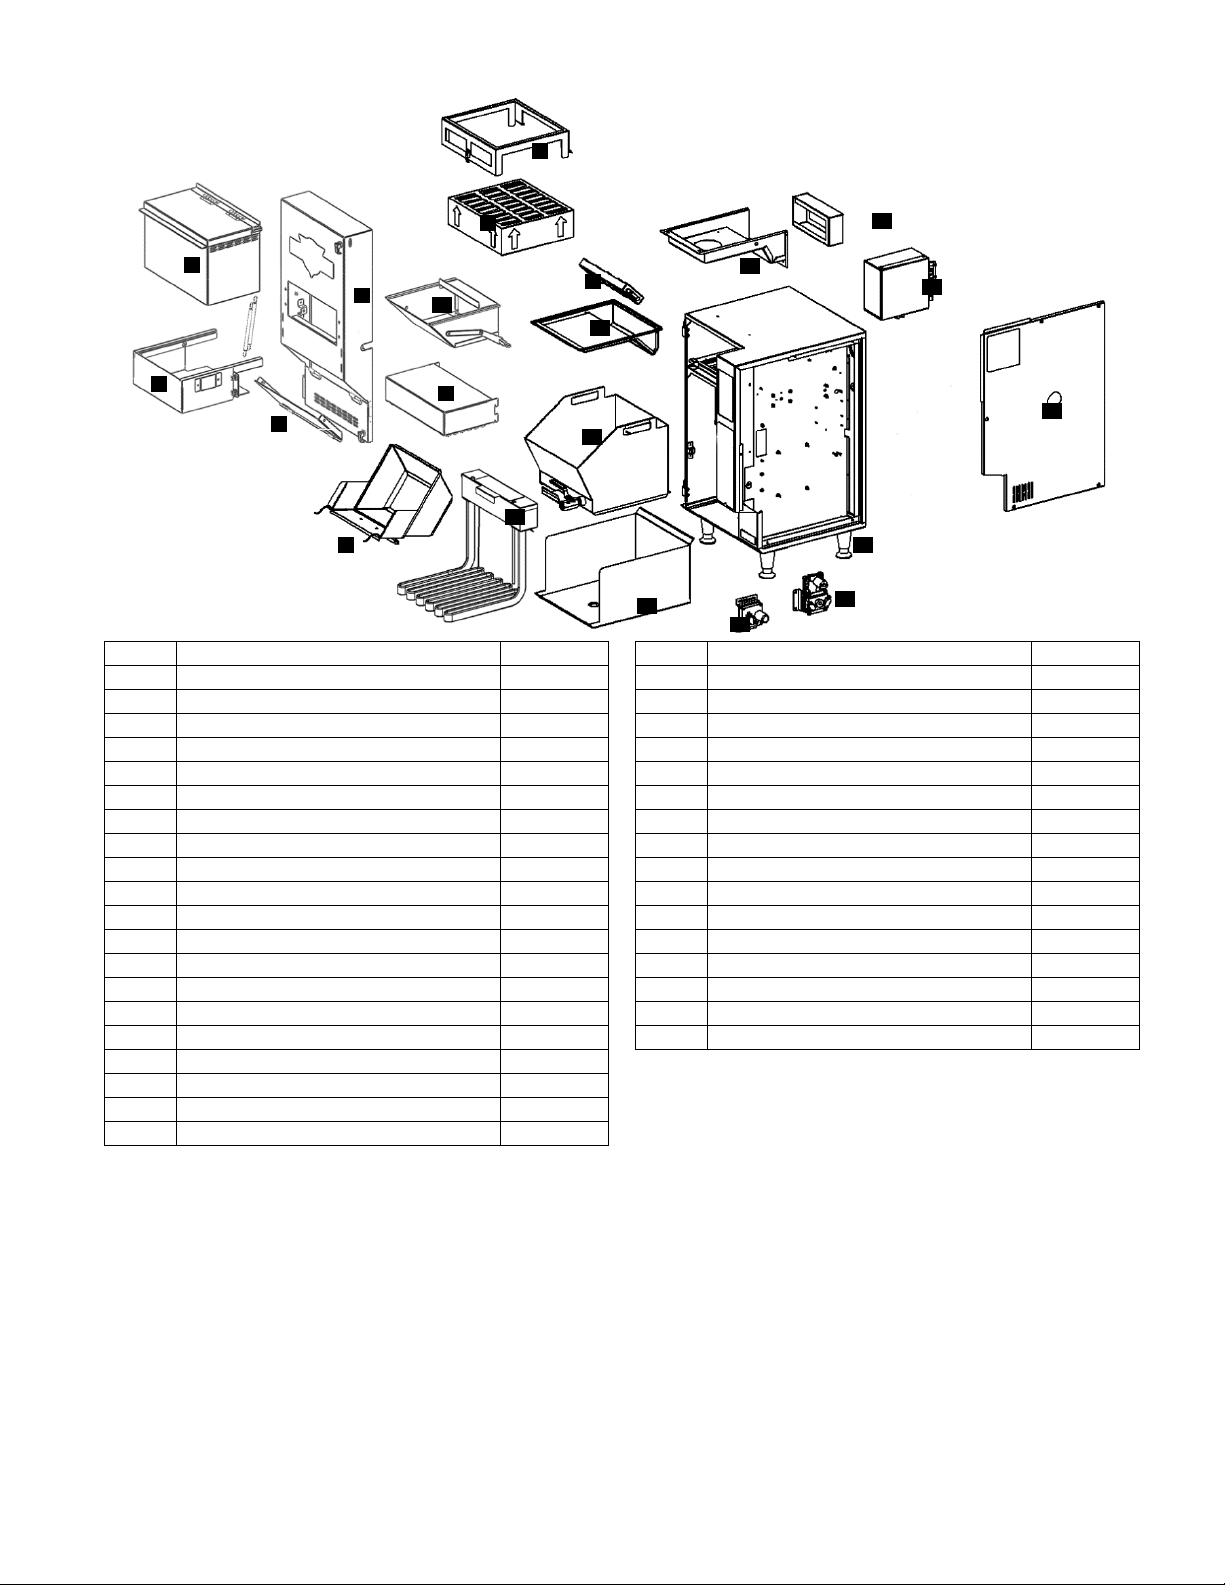
OWNER’S MANUAL FOR ALL DSA MODELS – 3/1/2013
Item
Description
Part #
Item
Description
Part #
1
Front Panel
6SA002
18
Motor Module - Drawer
2HA001
2
Basket Ramp
6SA021
19
Motor Module - Basket
2HA002
3
Drawer Cover
6SA011
20
Control Access Panel Assembly
6SA014
4
Basket
6HA001
21
Leg
6HA003
5
Heat Lamp
Please call
NS
Blow-off Cap
6GT014
6
Drawer Sleeve
6SA010
NS
Hose Oil Drainage
6HT739
7
Filter Cage
6ST730
NS
Kit Basket PFA
2DT940
8
Air Filter Cartridge
2FV803
NS
Kit Front Panel
2DT950
9
Grease Filter Assembly
3HT727
NS
Kit Control Fan
2DT952
10
Grease Filter Tray
6ST728
NS
Kit Main Fan
2DT951
11
Drawer Shovel
6SA009
NS
Kit Air Filter Switch Assembly
2DT955
12
Oil Vat
6SA003
NS
Kit Grease Filter Switch
2DT954
13
Heater Module 7200W/240V
2EA001
NS
Kit Door Switch
2DT954
NS
Heater Module 5700W/240V
8ET900
NS
Kit Front Panel S wit c h
2DT953
NS
Heater Module 5700W/208V
2ET922
NS
Airflow Switc h
6HT646
NS
Heater Module 3750W/240V
2ET763
NS
Gasket - Front Perimeter
2DT965
14
Spill Tray
6SA022
15
Airflow Module
2HT723
16
Fire Damper
6HT588
17
Electronics Box Module
2WS800
6
1
2
3 7 8
9
12
13
14
15
16
17
18
19
20
4
11
5
10
21
- 41 -
Page 44

OWNER’S MANUAL FOR ALL DSA MODELS – 3/1/2013
DECLARATION O F CONFORMITY
(FOR CE PERFECT FRYERS ONLY)
Application of Council Directive(s): Low Voltage Directive (93/68/EEC & 72/23/EEC)
EMC Directive (2004/108/EC & 89/336/EEC)
WEEE Directive (2002/96/EC)
Standard(s) to which Conformity is declared: EN 60335-1, EN 60335-2-37
EN 61000-6-1, EN 61000-6-3
Manufacturer’s Name: Perfect Fry Company
Manufacturer’s Address: P.O. Box 501
Concord, NH USA
03302-0501
Importer’s Name: ________________________________
Importer’s Address: ________________________________
________________________________
Type of Equi pment: Commercial Electric Deep Fat Fryer
Model Number: ________________________________
Serial Number: ________________________________
Year of Manufacture: ________________________________
I, the undersigned, hereby declare that the equipment specified above conforms
to the above Directive(s) and Standard(s)
Place: Perfect Fry Company LLC.
Concord, NH, USA
Date: ___/___/___ ________________________________(Signature)
_________________ _ ______________(Ful l N ame)
________________________________(Position)
- 42 -
Page 45

1
2
3
OWNER’S MANUAL FOR ALL DSA MODELS – 3/1/2013
THE PERFECT FRY 1 2 3 WARRANTY
During the first year after purchase, a ll labor required in
repairing or replacing a defective part will be provided free
of charge.
During the first 2 years after purchase, all parts of the fryer
which prove to be defective in materials or workmanship
will be replaced free of charge (parts only).
During the first 3 years after purchase, if the electronics
module proves to be defective in materials or
workmanship, it will be replaced free of charge (parts only).
year
years
years
Labor
Parts
Electronics
1) Perfect Fr y Company LLC. warrants this f ryer to be free from defect s in materials and workmanship
and will repair or replace it at Perfect Fry Company LLC.'s option for a period of two years after
purchase providing th e purchaser follows the manufacturer 's recommended procedures for operati on
and maintenance cont ained in this m anual. Perfect F ry Company LLC . shall not be lia ble for injur y or
damage to property other than this fryer.
2) The warranty app lies to materials at the factor y for two years (3 years electronic s) and labor for one
year from date of purchas e. The warranty does not in clude materials and labor employed in cleaning
the fryer. An y and all trans portation and shi pping charges a nd expenses ar e the respons ibility of the
Purchaser. The warranty card must be completed and registered with Perfect Fry Company LLC.
within 30 days of purchase to validate the warranty. The warrant y will cease to exist if maintenance
has not been perform ed according to the manufacturer’s instructi ons. This warranty does not cover
damage arising from or caused by improper maintenance, directly or indirectly, transportation, accident,
misuse, im proper insta llati on, f ire, f lood, or ac ts of God . Parts rep aire d or rep laced und er th is warrant y
are warranted througho ut the remainder of the original warranty period onl y. The warranty does not
apply to parts and service supplied or obtained from other than Perfect Fry or its authorized
distributors.
3) Other than the warranty expressed in clause 1) hereof, Perfect Fry Company LLC. expressly disclaims
all conditions and warranties, express or implied, including, without limitation, the implied warranties of
merchantability and fitness for a particular purpose. Perfect Fry shall not be responsible for, nor does
this warranty extend to, any consequential or incidental damages or expenses of any kind or nature,
regardless of the cause thereof or any knowledge which Perfect Fry may have regarding the probability
of the occurrence of such damages or expenses including, without limitation, injury to persons or
property, loss of life, loss of use of the products, lost goodwill, loss of income, lost resale profits, work
stoppage, impairment of other goods, breach of contract, negligence or such other actions as may be
deemed or alleged to be the cause of a loss or damage.
TERMS OF WARRANTY
- 43 -
Page 46

OWNER’S MANUAL FOR ALL DSA MODELS – 3/1/2013
Perfect Fry Company LLC.
Mailing Address: P.O. Box 501, Concord, NH 03302-0501
Shipping Address: 10 Ferry St., Concord, NH 03301
Tel: 603-225-6684
Fax: 603-225-8472
General Information: [email protected]
Customer Support: [email protected]
Internet: www.perfe ctfry.com
© 2013 PERFECT FRY COMPANY LLC
PRINTED IN USA
L20-395 R1
- 44 -
 Loading...