


 Loading...
PFC SERIES MODELS
OWNER’S MANUAL
Be sure ALL operators read, understand and have access to this manual at all times.
ADDRESS: 42 Allen Martin Drive, Essex Junction, VT 05452
PHONE: 802-658-6600
FAX: 802-864-0183
GENERAL INFORMATION: profits@perfectfry.com
CUSTOMER SUPPORT: service@perfectfry.com
WEB: www.perfectfry.com
©2020 PERFECT FRY COMPANY
83539 Rev A (1/2020)
OWNER’S MANUAL FOR ALL PFC MODELS |
|
TABLE OF CONTENTS |
|
THANK YOU FOR PURCHASING A PERFECT FRYER!............................................................................................. |
1 |
WARRANTY REGISTRATION .................................................................................................................................................. |
1 |
FRYER ACTIVATION .............................................................................................................................................................. |
1 |
OWNERS RESPONSIBILITIES.......................................................................................................................................... |
2 |
REGULATIONS & RECYCLING....................................................................................................................................... |
3 |
SAFETY FIRST ..................................................................................................................................................................... |
4 |
INSTALLATION ................................................................................................................................................................... |
5 |
ELECTRICAL POWER SUPPLY ................................................................................................................................................ |
5 |
ELECTRICAL SPECIFICATIONS ............................................................................................................................................... |
5 |
PREPARE COUNTER-TOP AREA.............................................................................................................................................. |
6 |
UNPACK ................................................................................................................................................................................ |
6 |
ASSEMBLY.......................................................................................................................................................................... |
10 |
COOKING ............................................................................................................................................................................ |
14 |
CLEANING .......................................................................................................................................................................... |
15 |
DAILY MAINTENANCE ........................................................................................................................................................ |
15 |
WEEKLY MAINTENANCE..................................................................................................................................................... |
15 |
PERIODIC MAINTENANCE.................................................................................................................................................... |
17 |
TIPS ON DEEP FRYING.................................................................................................................................................... |
18 |
OIL FACTS .......................................................................................................................................................................... |
19 |
OPERATING INSTRUCTIONS ........................................................................................................................................ |
22 |
STARTING UP ...................................................................................................................................................................... |
23 |
MANUAL MODE .................................................................................................................................................................. |
23 |
PRESET TIMES ..................................................................................................................................................................... |
23 |
PRESET MODE ..................................................................................................................................................................... |
24 |
PRESET LOCKED MODE....................................................................................................................................................... |
24 |
COOKING TIME CORRECTION .............................................................................................................................................. |
25 |
OPEN DOOR – PAUSED COOKING ........................................................................................................................................ |
25 |
STANDBY MODE ................................................................................................................................................................. |
26 |
SHUTTING DOWN ................................................................................................................................................................ |
26 |
USER DEFINED OPTIONS ............................................................................................................................................... |
27 |
BACKGROUND MENU - ACCESSING..................................................................................................................................... |
28 |
CTSTM (COOK TIME SENSITIVITY)...................................................................................................................................... |
28 |
BACKGROUND MENU - MAP ............................................................................................................................................... |
28 |
OPTION CHANGES ............................................................................................................................................................... |
32 |
CUSTOMIZING PRESETS....................................................................................................................................................... |
33 |
CUSTOMIZING PRESETS ON THE FRONT LABEL ................................................................................................................... |
34 |
................................................................................................................................................................................................ |
34 |
HELP..................................................................................................................................................................................... |
35 |
SYSTEM ERROR CONDITIONS .............................................................................................................................................. |
35 |
TROUBLE-SHOOTING TABLE................................................................................................................................................ |
37 |
PFS AUTOMATIC EXTINGUISHER............................................................................................................................... |
38 |
DECLARATION OF CONFORMITY .............................................................................................................................. |
40 |
ORIGINAL STANDARD EQUIPMENT LIMITED WARRANTY................................................................................. |
41 |
II

OWNER’S MANUAL FOR ALL PFC MODELS –1/20/2020
Thank You for Purchasing a Perfect Fryer!
Warranty Registration
To ensure that you receive the highest quality service & support;
1.Simply fill out the online warranty registration form anytime at www.perfectfry.com and automatically receive your warranty activation code.
OR
2.Fill out the enclosed warranty registration form and mail or fax it to Perfect Fry Company then phone Toll Free 603-225-6684 (Monday-Friday 8:00-5:00 EST) to receive your warranty activation code.
SEE THIS LCD
THANK YOU FOR
PURCHASING A PERFECT
FRYER SN# XXXXX
CALL OR GO ONLINE
ENTER WARRANTY CODE
AND PRESS START:
Fryer Activation
DO THIS
1)Enter your warranty activation code
2)Press 
3)Your Perfect Fryer is now permanently activated
GET THIS LCD
HEATING 70ºF
70ºF
For temporary access, enter 123456 then press .
.
Temporary access is valid for 90 days.
Now that you have registered and activated your fryer;
•Take advantage of our food program partners whose rebates help offset the cost of your newly purchased Perfect Fryer. Food program rebates will be sent to you, however if you wish to view our current partners immediately, please visit www.perfectfry.com.
•Take comfort in knowing that your Perfect Fryer is backed by an industry leading 1..2..3 warranty (see page Error! Bookmark not defined. for further details).
•Take comfort in knowing that the management and staff at Perfect Fry Company are dedicated to ensure that you, the owner and operator of a Perfect Fryer, receive a top quality product that is thoroughly inspected and tested prior to shipment.
•Take comfort in knowing that our local distribution network is committed to supplying your service and warranty needs. Each distributor has dedicated service staff that is able to answer any questions you may have regarding the operation of your Perfect Fryer. We also have an online knowledgebase available 24/7/365 at perfectfry.com with many great tips and solutions.
Page 1 of 41
OWNER’S MANUAL FOR ALL PFC MODELS –1/20/2020
OWNERS RESPONSIBILITIES
It is the owner’s responsibility to:
•Insure the PERFECT FRYER is properly maintained.
•Allow only properly trained personnel to operate, clean and maintain a PERFECT FRYER.
•Contact local authorities having jurisdiction to insure that the installation conforms to all local fire, building and health regulations.
•Schedule and maintain documentation that the appropriate inspection and maintenance of the PFS Automatic Extinguisher has been completed.
•Insure that the model ready for installation matches the supply voltage.
•Insure that the main power supply is disconnected before the PERFECT FRYER is serviced.
•Insure that all safety devices are intact.
•Insure that a proper surface is provided for the PERFECT FRYER to sit on.
•Insure that proper clearances are kept.
•Operate and store the PERFECT FRYER above 32°F (0°C).
•Return the PERFECT FRYER for recycling when it reaches end of life.
Page 2 of 41

OWNER’S MANUAL FOR ALL PFC MODELS –1/20/2020
REGULATIONS & RECYCLING
Installation of your PERFECT FRYER must conform to all local fire and health regulations and building codes. The installation use and maintenance is to be in accordance with the
Standard for Ventilation Control and Fire Protection of Commercial Cooking Operations, NFPA 96 - 2004.
The table below describes the standards that your PERFECT FRYER has been tested to and the corresponding listing marks.
STANDARD |
DESCRIPTION |
LISTING MARK |
UL 197 |
Commercial electric cooking appliances. |
|
UL 197 SB |
Commercial electric cooking appliances with recirculating systems. |
|
(UL 710B) |
UL 197 & UL 197 SB supplement also reference the following |
|
|
|
|
|
standards which your PERFECT FRYER meets applicable parts thereof: |
|
|
• UL 1046: Grease Filters for Exhaust Ducts. |
|
|
• UL 300: Fire Testing of Fire Extinguishing Systems for Protection |
|
|
of Restaurant Cooking Areas. |
|
|
• NFPA 17A: Wet Chemical Extinguishing Systems. |
|
|
• NFPA 96: Standard for Ventilation Control and Fire Protection of |
|
|
Commercial Cooking Operations. |
|
|
• EPA 202: Determination of Condensable Particulate Emissions for |
|
|
Stationary Sources. |
|
CSA 22.2 |
Commercial Cooking Appliances forming part of |
|
No. 109-M1981 |
Canadian Electrical Code, Part 2 Safety Standards |
|
|
for Electrical Equipment. |
|
|
|
|
NSF 4 |
Commercial Cooking, Rethermalization, and Powered Hot Food |
|
|
Holding and Transport Equipment. |
|
|
|
|
EN60335-1 |
Safety of Household and Similar Electrical Appliances Part 1. |
|
|
General Requirements |
|
|
Amendment 8913 - October 1995 |
|
|
Amendment 9475 - May 1997 |
|
EN60335-2-37 |
Safety of Household and Similar Electrical Appliances Part 2. |
|
|
Commercial Electric Deep Fat Fryers |
|
EN61000-6-1 |
Electromagnetic Compatibility (EMC) – Emissions & Immunity for |
|
EN61000-6-3 |
Light Industrial Environments |
|
|
|
|
The table below describes the recycling procedures for your PERFECT FRYER.
WEEE
(Waste Electrical & Electronic Equipment) 2002/96/EC
When your PERFECT FRYER has reached end of life, please deliver the fryer to your local distributor. They will prepare and deliver the fryer for recycling to the WEEE collection system in your country. Most of the fryer’s materials can be recycled.
DO NOT DISPOSE OF THE FRYER IN MUNICIPAL WASTE!
Page 3 of 41
OWNER’S MANUAL FOR ALL PFC MODELS –1/20/2020
SAFETY FIRST
LIFTING & MOVING:
Your PERFECT FRYER’s gross shipping weight is 92 lb. (42 kg). Net weight = 80 lb. (36 kg).
DEEP FRYING:
Cooking oil is very hot, 350ºF (177ºC). Hot oil can cause severe burns. DO NOT
TOUCH THE COOKING OIL UNLESS YOU ARE SURE IT HAS COOLED.
HEATER MODULE:
DO NOT DROP
DO NOT IMMERSE IN WATER
CLEANING:
Before cleaning fryer or removing oil, let fryer cool to 122ºF (50ºC). DO NOT
TOUCH HEATER MODULE, VAT OR OIL UNLESS YOU ARE SURE IT HAS COOLED.
COOKING OIL MAINTENANCE:
For sanitation and safety, we recommend that the cooking oil is replaced once a week, more often for higher volume usage. Use a commercial grade deep-fryer formulated cooking oil. OLD OIL HAS A REDUCED FLASHPOINT. OLD OIL AND OVER-WET FOOD ARE PRONE TO SURGE BOILING.
SERVICING:
DISCONNECT THE POWER SOURCE BEFORE SERVICING THE FRYER.
There is no need to unplug your PERFECT FRYER for normal cleaning or maintenance.
STORAGE:
Do not store your PERFECT FRYER below 0°C (32°F)
Intended for indoor use only
Page 4 of 41

OWNER’S MANUAL FOR ALL PFC MODELS –1/20/2020
INSTALLATION
Electrical Power Supply
•Your PERFECT FRYER must be connected to a dedicated electrical circuit that meets your fryer’s requirements (see table below).
 Improper Installation may damage the fryer and void your warranty
•If your PERFECT FRYER’s plug does not fit your wall outlet receptacle, have an electrician install the appropriate NEMA receptacle within 4 feet of the fryer.
•See the manufacturer’s label on your PERFECT FRYER for the electrical Model No. PFCXXX, then check off your Model Number.
Electrical Specifications
PERFECT FRY |
VOLTS |
AMPS |
CIRCUIT |
WATTS |
NEMA |
|
NEMA |
|||
MODEL |
AMPS |
NUMBER |
|
RECEPTACLE |
||||||
Put a check mark in the box beside the Model Number of your PERFECT FRYER. |
|
|||||||||
□ PFC 187 |
120 |
16.0 |
20 |
1875 |
5-20 |
|
|
|
|
|
|
|
|
|
|
|
|
|
|
|
|
□ PFC 375 |
240 |
16.0 |
20 |
3750 |
6-20 |
|
|
|
|
|
|
|
|
|
|
|
|
|
|
|
|
□ PFC 570 |
240 |
24.0 |
30 |
5700 |
6-50 |
|
|
|
|
|
|
|
|
|
|
|
|
||||
|
|
|
|
|
For use on an individual branch circuit |
|||||
|
|
|
|
|
rated 30A minimum. For supply |
|||||
|
|
|
Minimum |
|
connectors, use minimum no. 10 AWG |
|||||
□ PFC 570 |
208 |
27.0 |
5700 |
wire (30A |
rated). |
This |
fryer must be |
|||
30 |
properly |
connected to |
a grounded, |
|||||||
|
|
|
|
dedicated 208 VAC single phase circuit |
||||||
|
|
|
|
|
||||||
|
|
|
|
|
according to local installation standards |
|||||
|
|
|
|
|
and codes. |
|
|
|||
All models are single phase; 50/60 hertz. |
|
|
|
|
|
|
|
|||
|
|
|
|
|
|
|
|
|
|
|
|
|
|
Page 5 of 41 |
|
|
|
|
|
|
|
OWNER’S MANUAL FOR ALL PFC MODELS –1/20/2020
INSTALLATION (Continued)
Prepare Counter-top Area
Clearances:
1” on sides 2” on back 0” on top
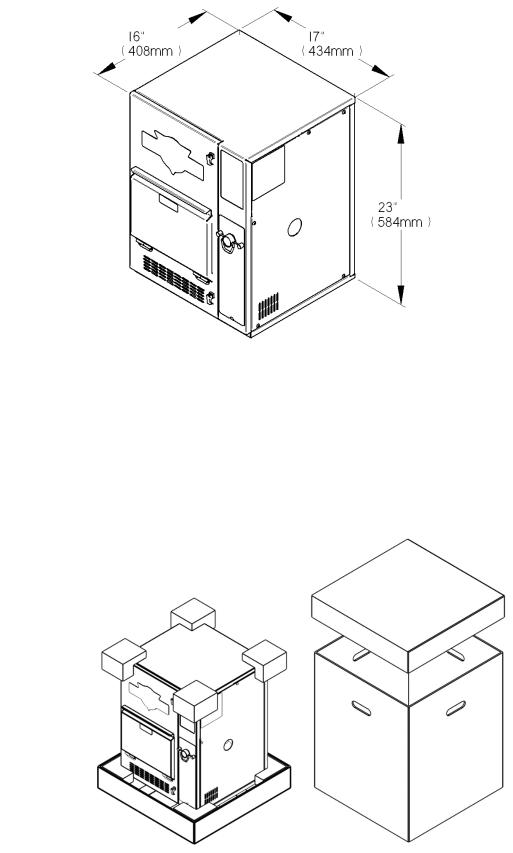
Unpack
1)Cut straps on shipping box
2)Remove box top and body
3)Remove outer plastic wrapping and keep box along with foam corners and sides
Page 6 of 41

OWNER’S MANUAL FOR ALL PFC MODELS –1/20/2020
4) Lift your PERFECT FRYER onto counter-top
Your PERFECT FRYER weighs 80 lb. (36 kg). Lift it carefully with your legs or with the help of another person and place it in its final location.
|
|
5) |
Remove all foam stuffing and parts |
|
|
6) |
Put check mark in box once the part is removed |
|
|
Air Filter Cage |
|
1 |
|||
|
|
Air Filter Cartridge |
|
2 |
|||
|
|
Grease Filter |
|
3 |
|||
|
|
Grease Filter Tray |
|
4 |
|||
|
|
Basket Lift |
|
5 |
|||
|
|
Heater Module |
|
6 |
|||
|
|
Oil Vat |
|
7 |
|||
|
|
Oil Spill Tray |
|
8 |
|||
|
|
Front Panel |
|
9 |
|||
|
|
Door |
|
10 |
|||
|
|
Door Spring (2) |
|
11 |
|||
|
|
Large Basket |
|
12 |
|||
|
|
(PFC187 & PFC375 only) |
|
|
|
Extra Large Basket |
|
13 |
|||
|
|
(PFC570 & PFC570 only) |
|
14 Oil Drainage Kit (Optional)
15 |
XL Basket Cover (Optional) |
(PFC570 & PFC570 only) |
Page 7 of 41

OWNER’S MANUAL FOR ALL PFC MODELS –1/20/2020
1
2
3
4
5
6
14 |
7 |
8
Page 8 of 41
OWNER’S MANUAL FOR ALL PFC MODELS –1/20/2020
9
10
11
15
13
12
7)Ensure that blow-off caps on fire extinguisher nozzles are kept in place
8)Go to ASSEMBLY section (next page)
Page 9 of 41

OWNER’S MANUAL FOR ALL PFC MODELS –1/20/2020
ASSEMBLY
1) Clean parts and inside of cabinet (all except air filter cartridge)
a)Wash in warm soapy water
b)Rinse with hot water
c)Rinse with vinegar solution (1 part vinegar to 2 parts water)
 The heater box must NOT be immersed in water or other liquid.
2)Plug in fryer and press 
Note: LCD will display what is missing and will beep twice when part is installed
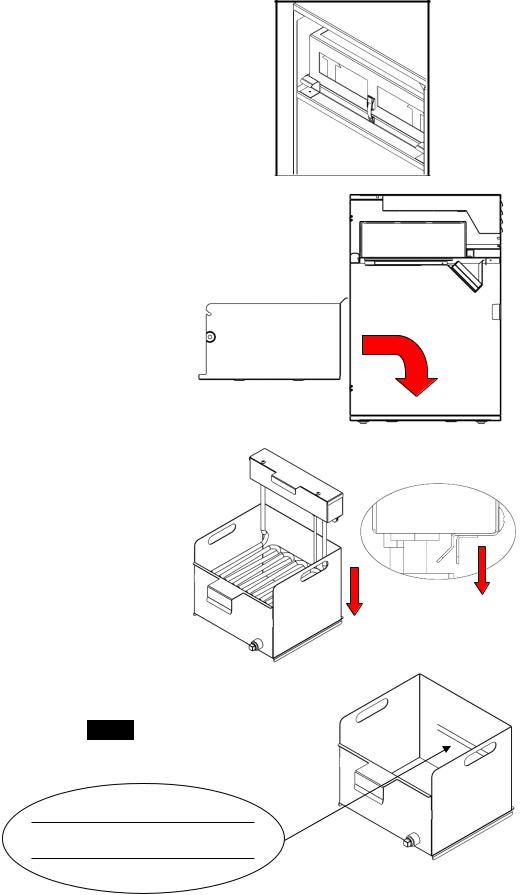
3)Install grease filter into grease filter tray Note: magnet should be on right side
SYSTEM ERROR
PLEASE CHECK/CHANGE
HEATER BOX
GREASE FILTER
AIR FILTER PLACEMENT FRONT PANEL
4)Install grease filter/grease filter tray into filter compartment by sliding along rails and towards back
5)Fit air filter cage over air filter cartridge
Note: Make sure arrows are pointing up
Page 10 of 41
OWNER’S MANUAL FOR ALL PFC MODELS –1/20/2020
ASSEMBLY (Continued)
6)Slide air filter cartridge firmly back into filter compartment and fasten down with latch.
7)Install spill tray into bottom cooking compartment
Note: Indents on bottom of spill tray should fit into indents on bottom of cabinet
8)Set heater module onto vat
Note: “^” grooves on bottom of heater module should fit onto back of vat
9)Pour frying oil into vat. Fill to COLD level mark. Use commercial grade deep fryer cooking oil. DO NOT OVERFILL.
HOT
COLD
Page 11 of 41

OWNER’S MANUAL FOR ALL PFC MODELS –1/20/2020
ASSEMBLY (Continued)
10)Slide heater module/vat into cooking compartment and push in all the way.
Ensure electrical connection is complete with a firm push on the heater module.
11)Install drip tray in-front of oil vat. Drip tray will fit snug between front edge of oil vat and inside edge of spill tray.
Note: If drip tray does not fit, press heater module in further to complete connection
12)Install basket lift
a)Hold basket tray vertical
b)Install rod into pivot hole – left side
c)Install rod into motor coupler – right side
Page 12 of 41
Loading...