

Page 1
Part # L20-361 R2
EX257375
10/1/2013
PFS
OWNER’S MANUAL
INSTALLATION, INSPECTION,
MAINTENANCE & RECHARGE
PHONE: 603-225-6684
ADDRESS: P.O. Box 501 Concord, NH 03302-0501
FAX: 603-225-8472
GENERAL INFORMATION: [email protected]
CUSTOMER SUPPORT: [email protected]
WEB: www.perfectfry.com
©2013 PERFECT FRY COMPANY
Page 2
PFS INSTALLATION, INSPECTION, MAINTENANCE & RECHARGE MANUAL
TABLE OF CONTENTS
PFS AUTOMATIC EXTINGUISHER ....................................................................................................................... 1
GENERAL DESCRIPTION ................................................................................................................................................. 2
OPERATION ....................................................................................................................................................................... 2
PFS INSTALLATION .............................................................................................................................................. 3
INSPECTION & MAINTENANCE ........................................................................................................................... 8
PFS REMOVAL & RECHARGE ........................................................................................................................... 10
NOZZLE CLEANING ............................................................................................................................................ 14
PARTS LIST.......................................................................................................................................................... 16
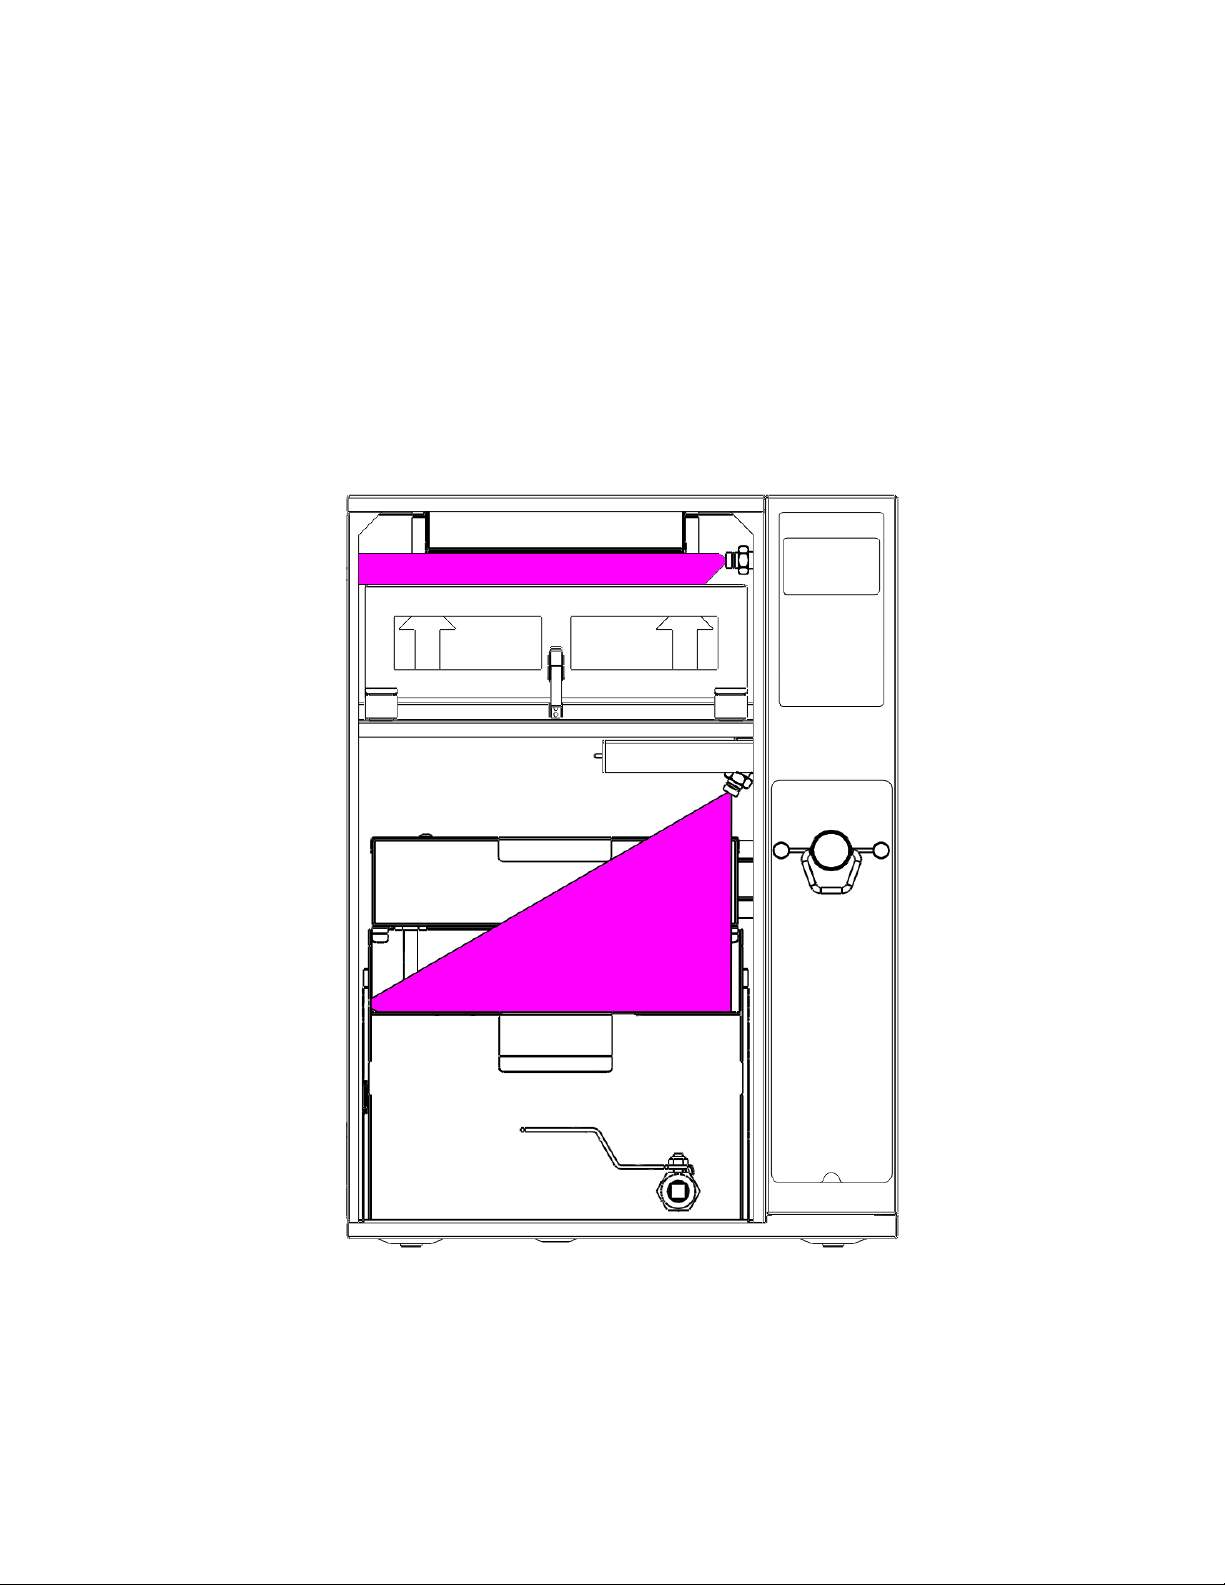
Figure 1: PFS shown in PFC Series Fryer
II 10/1/2013
EX257375
Page 3

PFS INSTALLATION, INSPECTION, MAINTENANCE & RECHARGE MANUAL
y
k
k
t
g
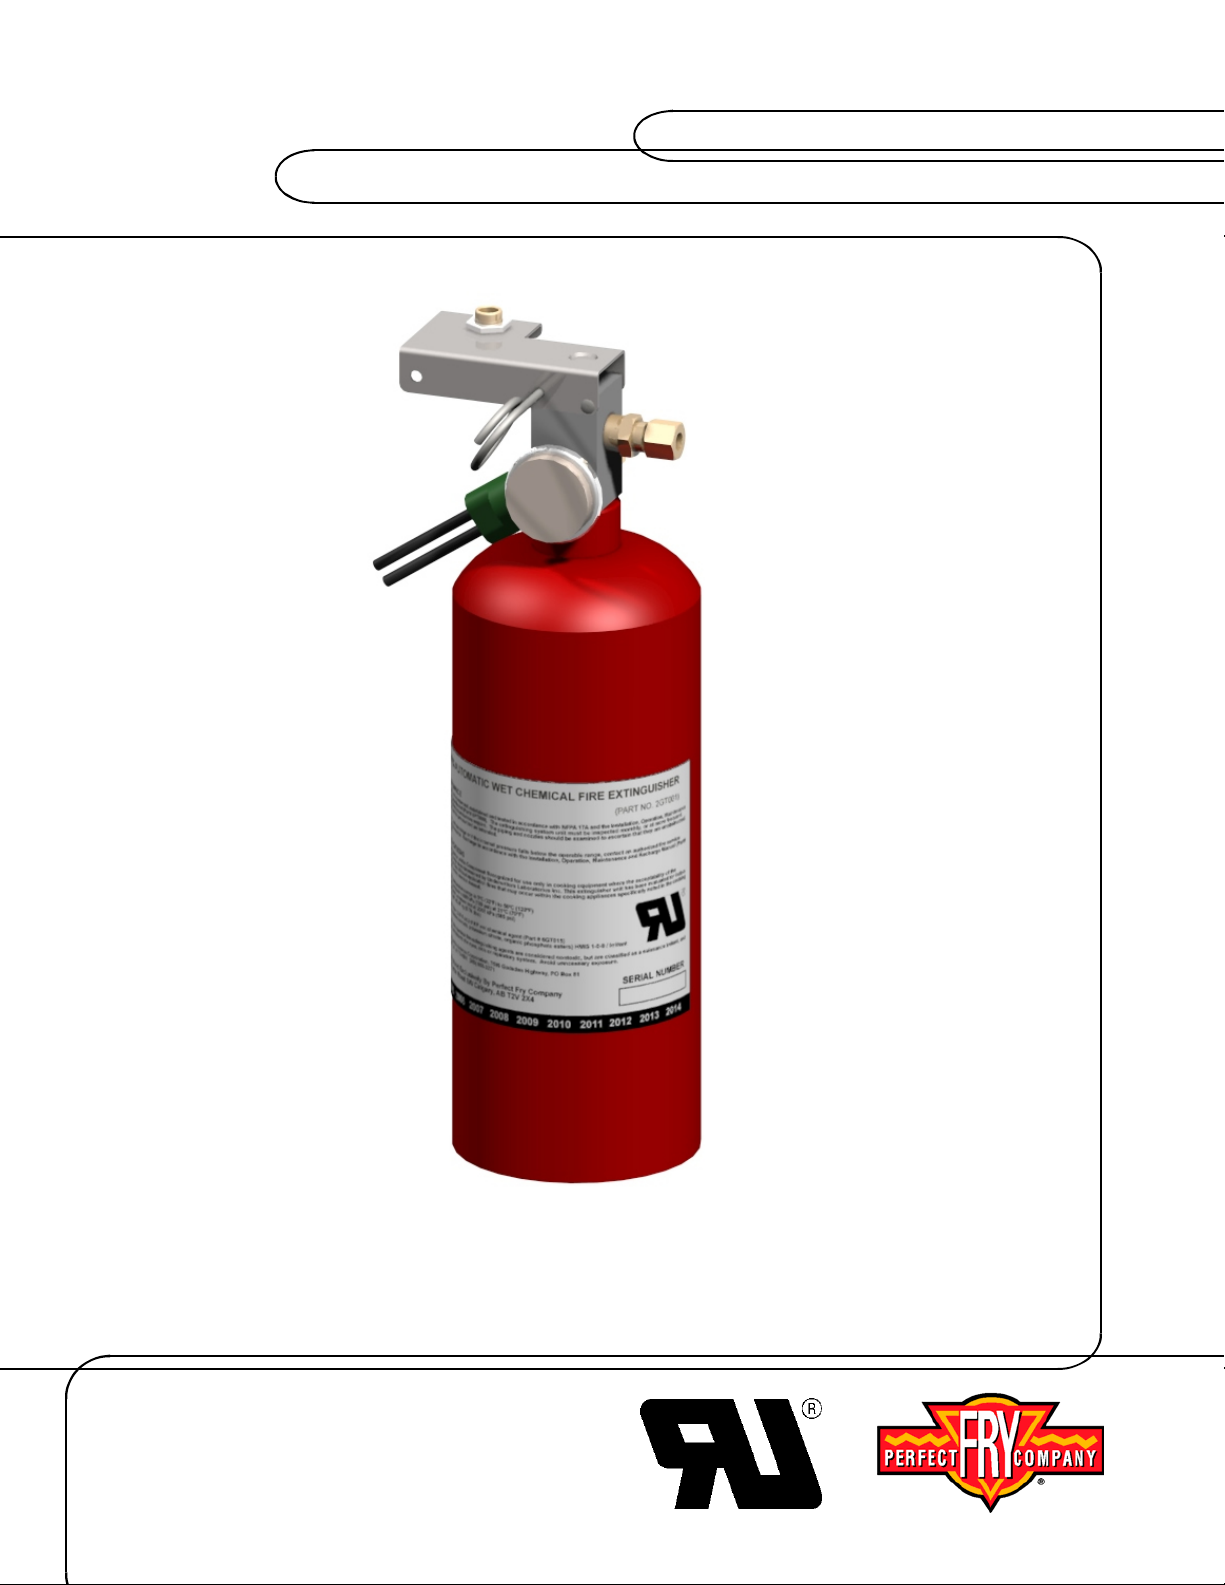
PFS Automatic Extinguisher
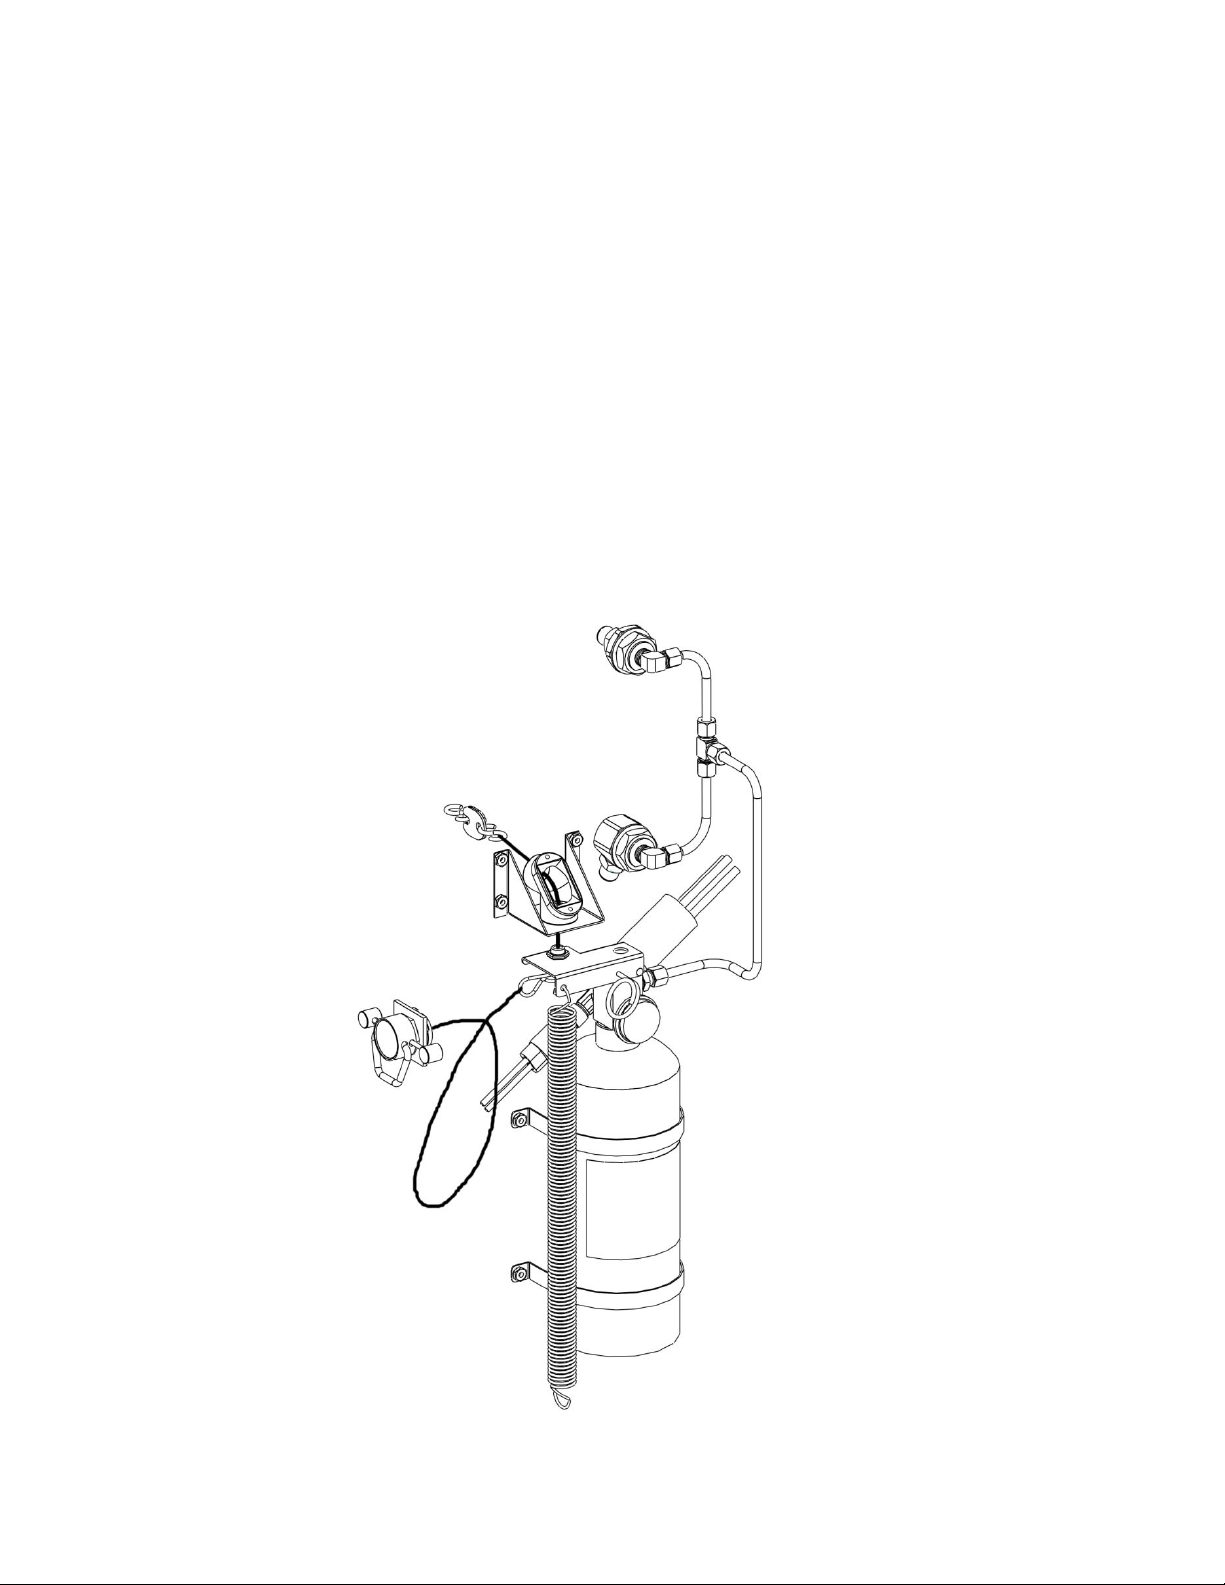
This manual is intended for use with the PFS automatic extinguisher. Those who install,
operate, inspect or maintain the PFS should read this entire manual. Specific sections will be
of particular interest depending on one’s responsibilities.
The installation limitations for the PFS are outlined in this manual. The installation,
inspection, testing, maintenance and recharge of the PFS is to be performed by Perfect Fry
Company authorized service personnel only.
Upper nozzle
Upper nozzle adapter
¼” elbow compression fitting
¼” tee compression fitting
S-hoo
Fusible lin
Fusible link cable
Corner pulle
Corner pulley bracke
Hitch pin clip
Manual pull
Pressure switch
Lower nozzle adapter
¼” copper tubin
lower nozzle
¼” straight compression fitting
Safety pin
Actuating lever
Pressure gauge
Head
Cylinder
Label
Manual pull cable
Extension spring
- 1 - 10/1/2013
EX257375
Mounting bracket
Page 4
PFS INSTALLATION, INSPECTION, MAINTENANCE & RECHARGE MANUAL
GENERAL DESCRIPTION
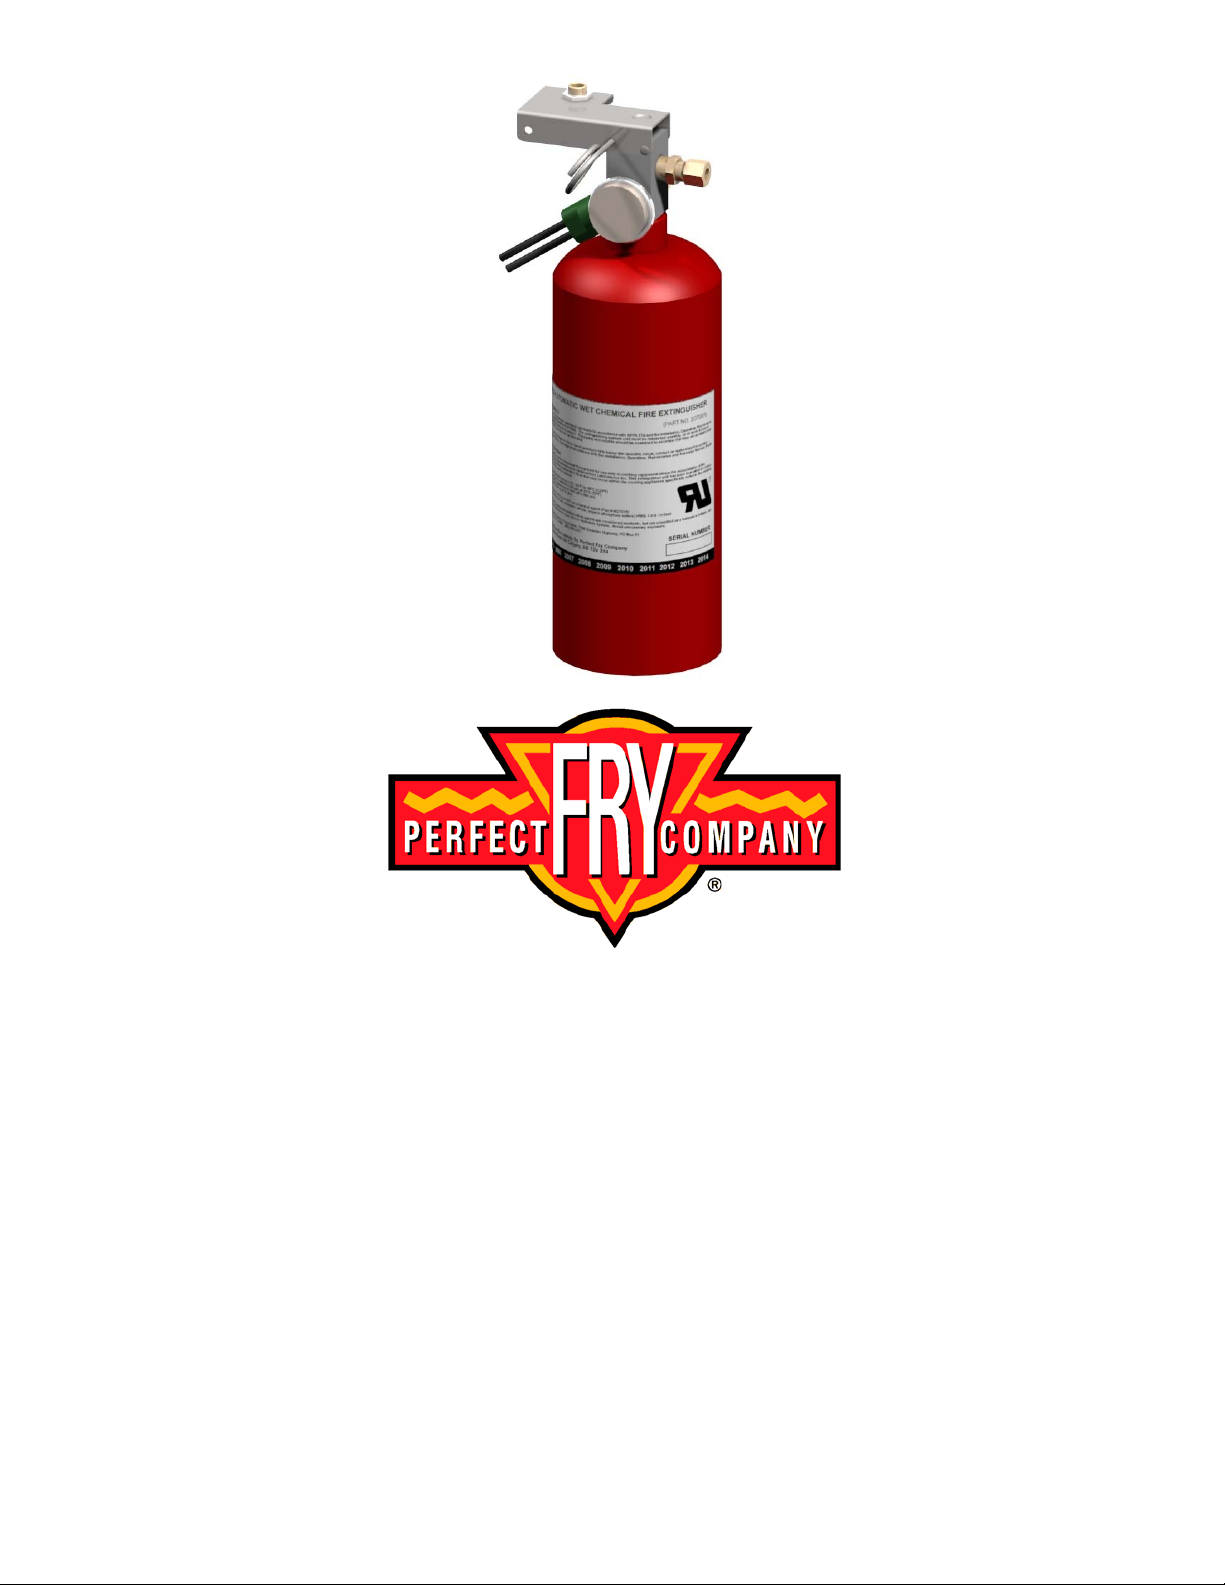
The PFS consists of a cylinder assembly (with pressure switch and gauge), actuating
lever, fusible link assembly, manual pull station, and two nozzles. It is designed and
acceptable for use in areas that have ambient conditions between 0°C (32°F) and 50°C
(120°F).
The PFS must be stored above 0°C (32°F)
OPERATION
Automatic Operation
Upon the detection of a fire, the PFS will automatically operate. The fusible link rated at
138ºC (280ºF) will operate when exposed to the fire and operate the PFS automatic
extinguisher unit. When operated, the PFS unit will discharge wet chemical agent through
the provided discharge piping and distribution nozzles.
Manual Operation
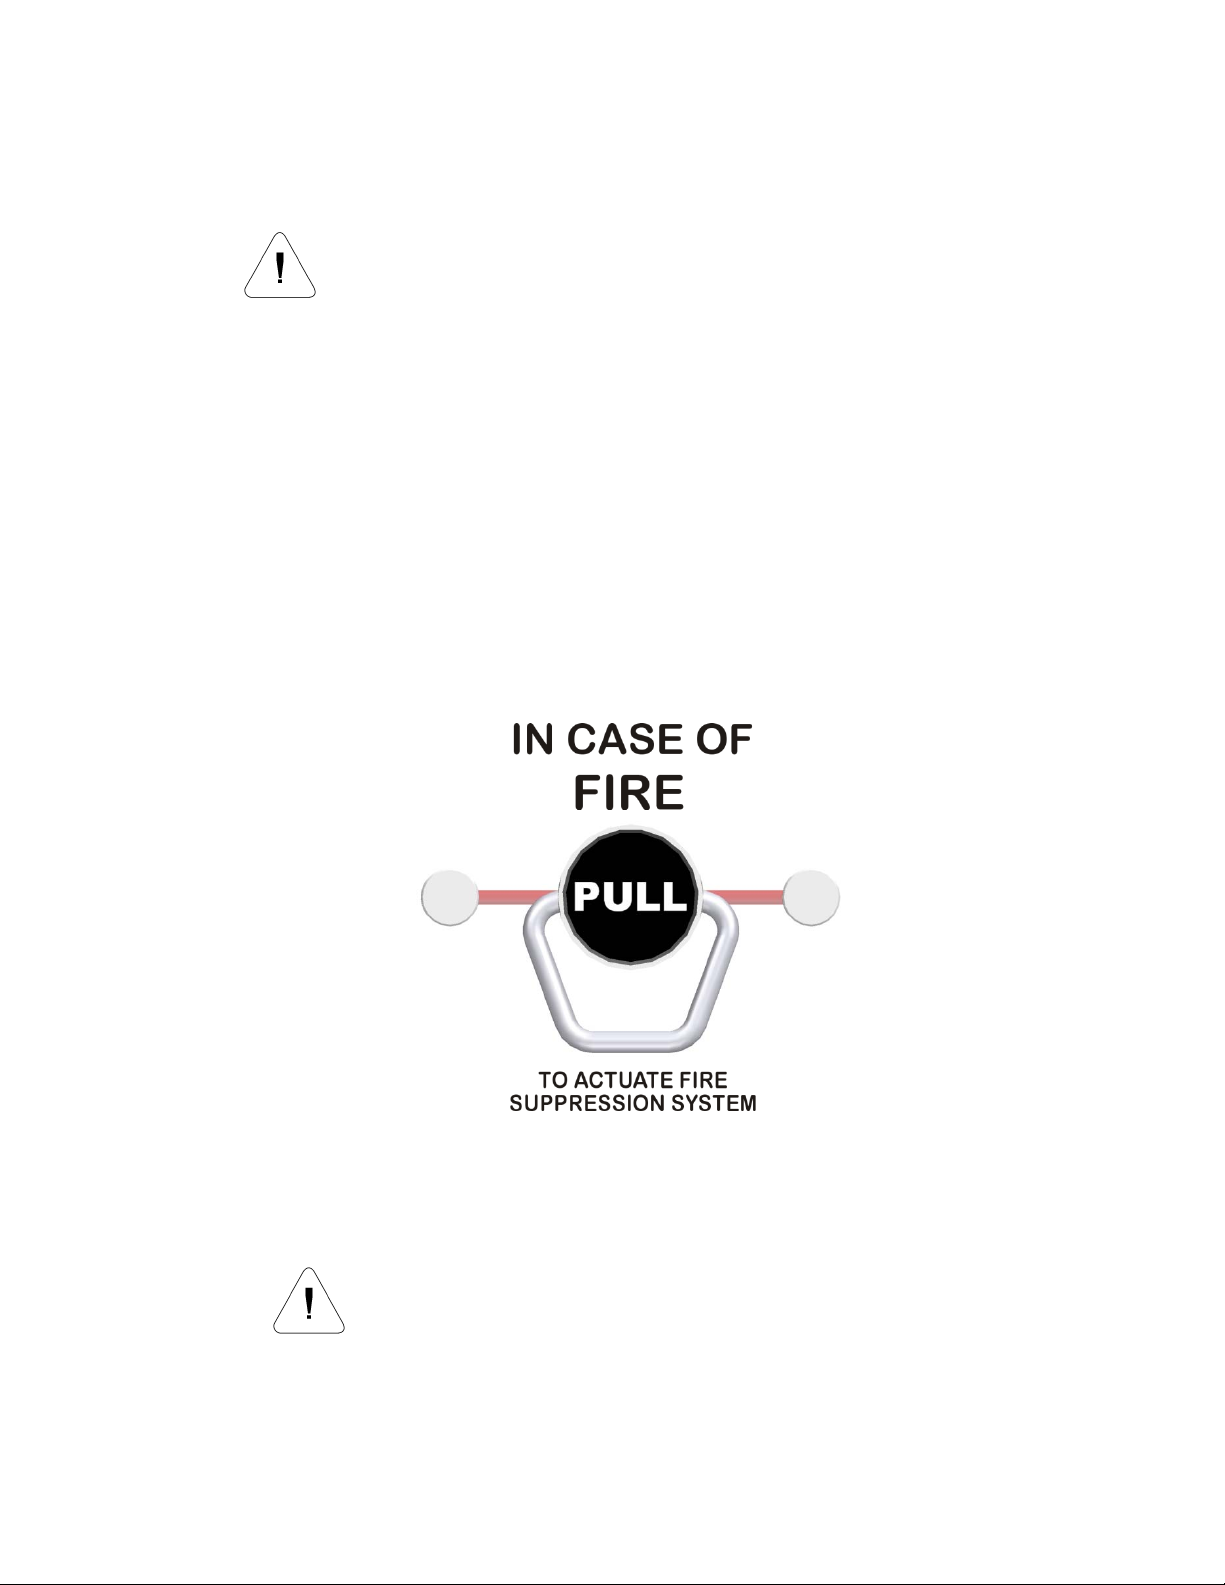
The PFS unit can also be operated manually by pulling the remote lever (to be mounted
on the front of the cooking appliance) that is clearly marked “In Case Of Fire - PULL”.
Power shut-off is also achieved by system operation. If the
pressure in the cylinder(s) drops below 92 psi, the pressure
switch opens, deactivating the power relay causing the appliance
to de-energize.
- 2 - 10/1/2013
EX257375
Page 5
PFS INSTALLATION, INSPECTION, MAINTENANCE & RECHARGE MANUAL
7
t
7
r
PFS Installation
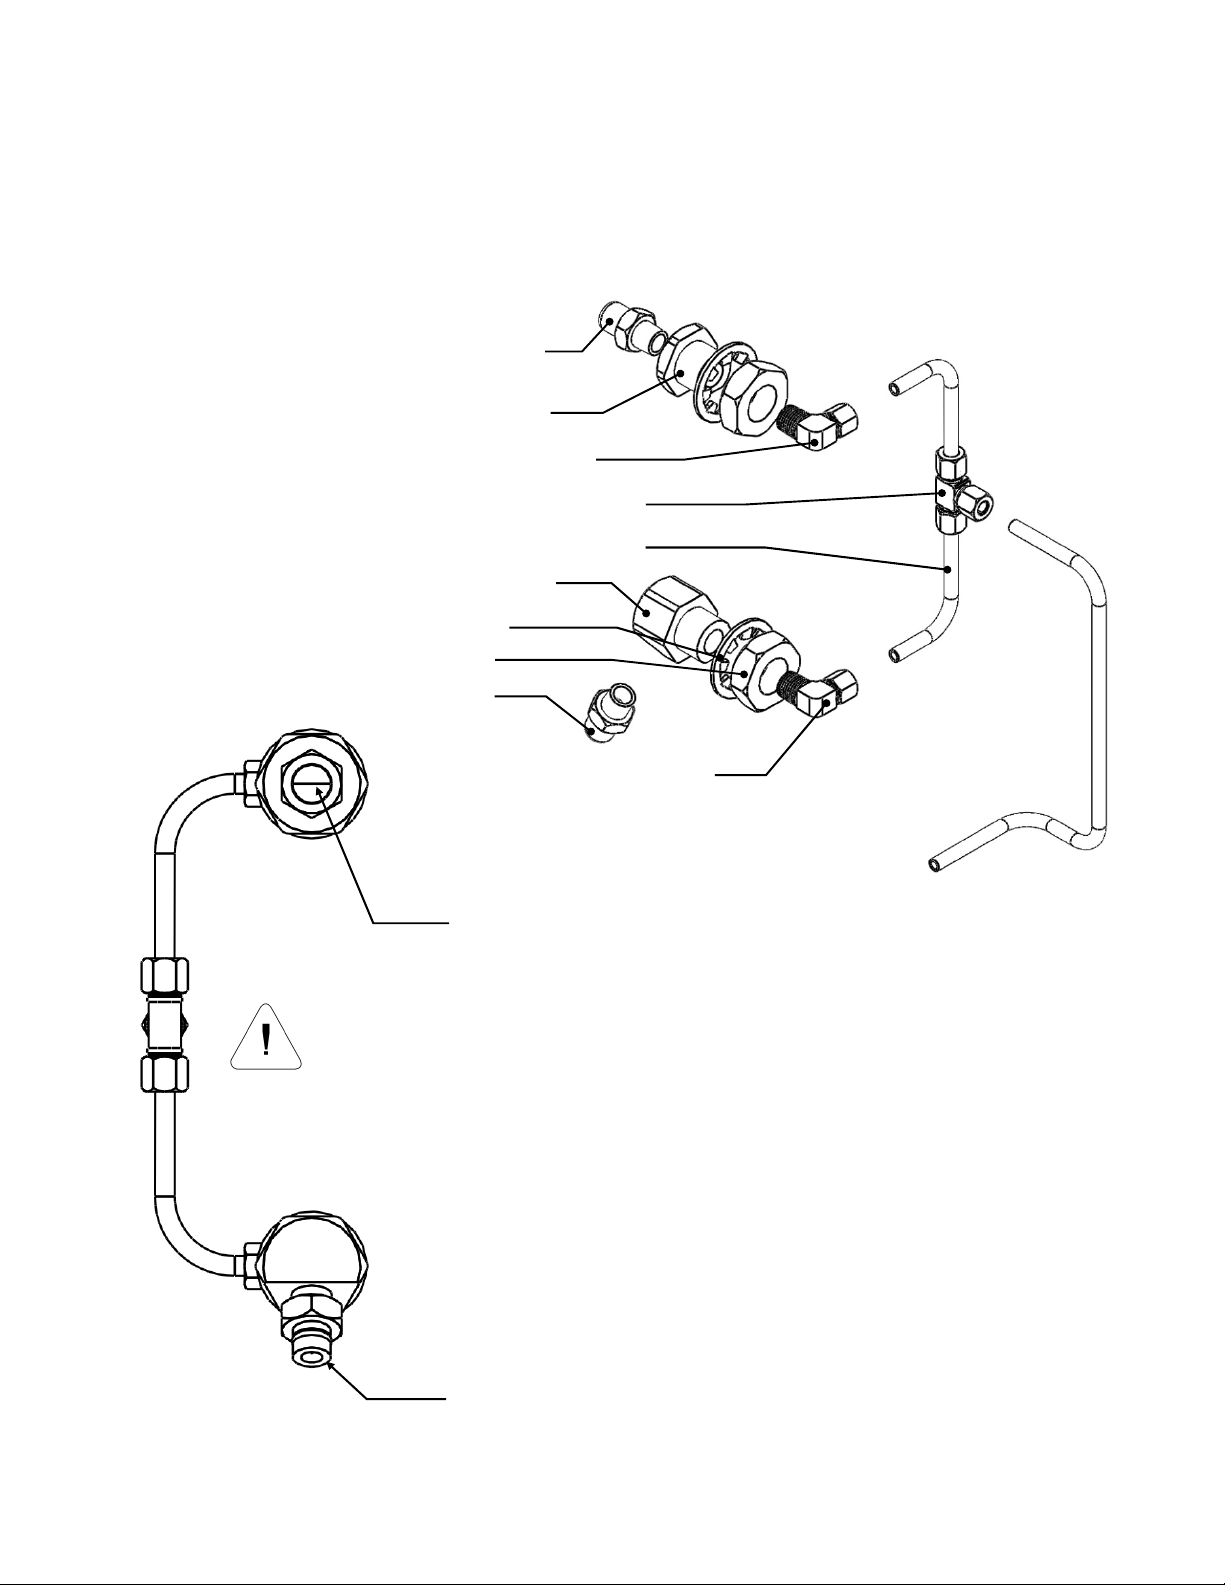
1. Install nozzle adapters, nozzles, and tubing and compression fittings as shown below.
Appliance wall should be located between adapters and lock washer. Tighten all
adapters, compression fittings and pipe threads securely. 1-5/16”, ¾” & ½” open end
wrenches are required.
Upper nozzle
Upper nozzle
¼” elbow compression fitting
¼” tee compression fitting
¼” copper tubing
Lower nozzle
/8 lock washe
/8-9 jam nu
Lower nozzle
¼” elbow compression fitting
Upper nozzle slit is horizontal. Fan
pattern sprays above air filter
cartridge and below fan. Blow-off
cap removed for illustration only.
Be sure to install the nozzles properly.
Failure to do so will prevent them from
working properly in the event of system
actuation.
Lower nozzle sprays full cone
pattern and is directed at oil vat.
Blow-off cap removed for
illustration only.
- 3 - 10/1/2013
EX257375
Page 6
PFS INSTALLATION, INSPECTION, MAINTENANCE & RECHARGE MANUAL
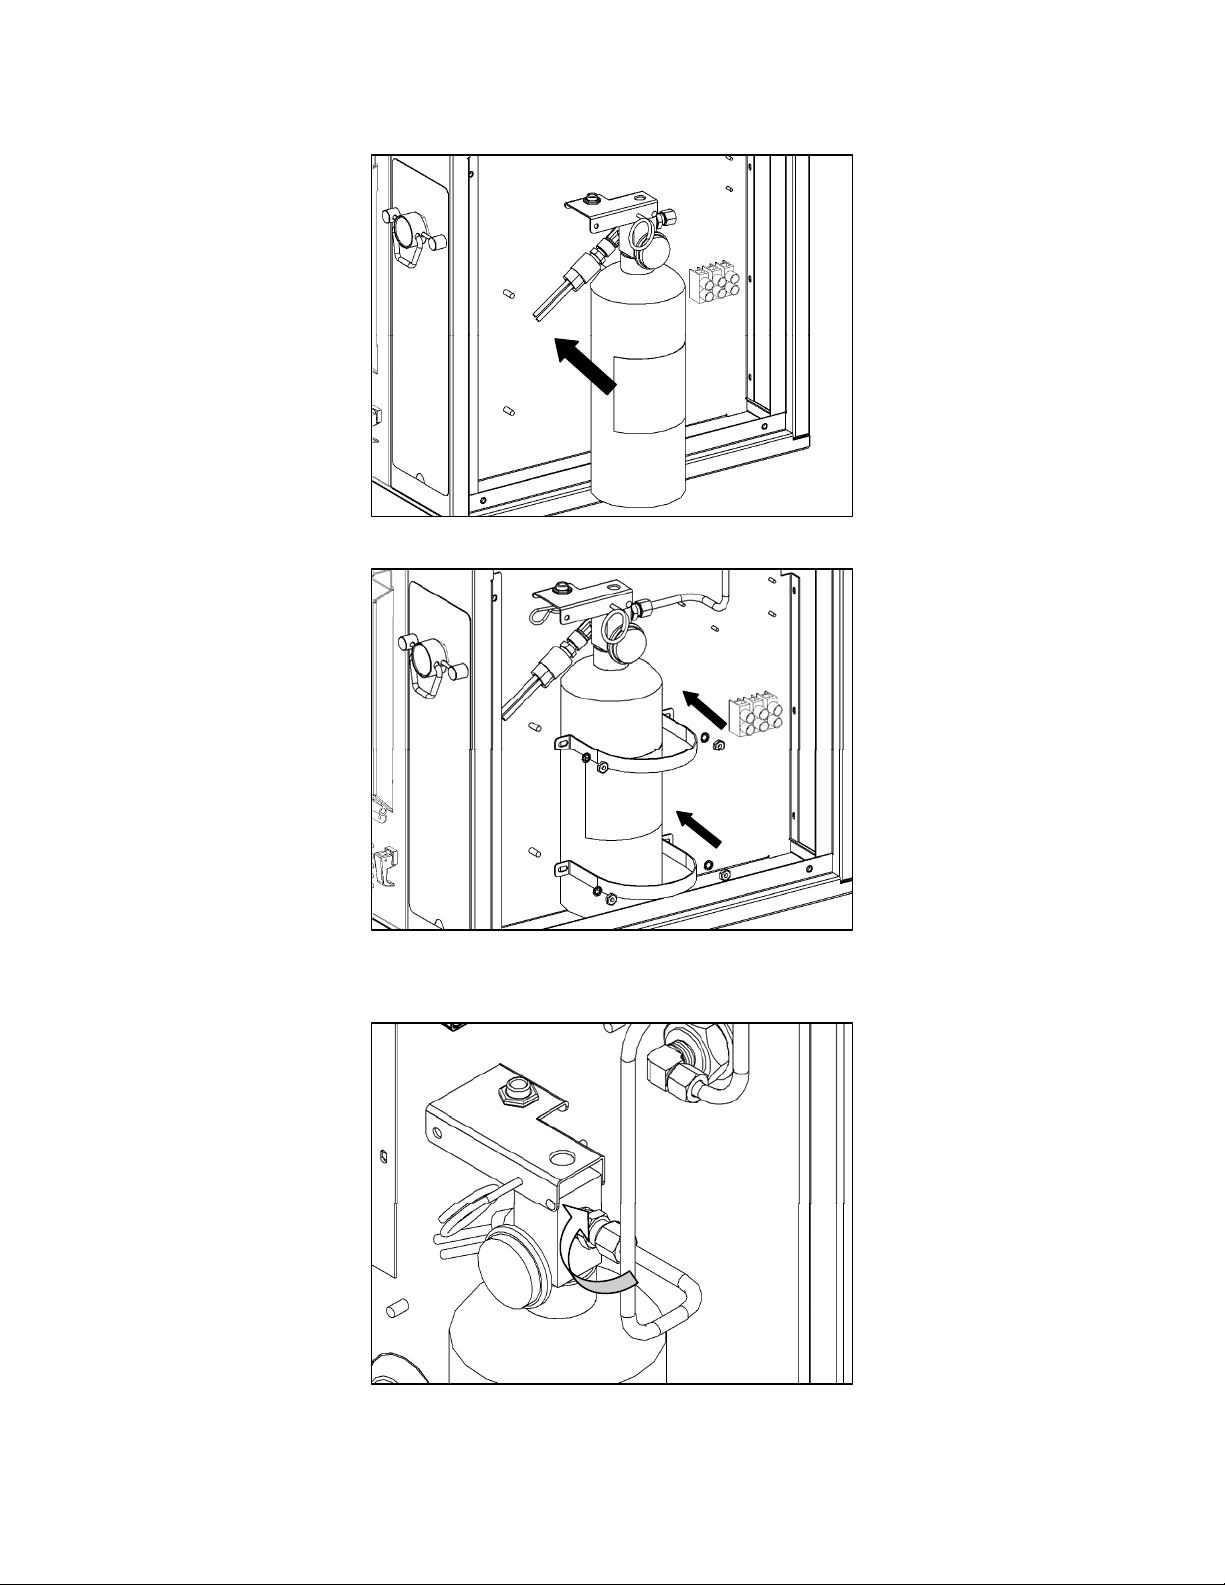
2. Install PFS to appliance with mounting brackets and hardware. Tighten nuts with 3/8”
nut driver or open end wrench.
3. With ½” open end wrench, attach tubing to ¼” compression fitting.
- 4 - 10/1/2013
EX257375
Page 7
PFS INSTALLATION, INSPECTION, MAINTENANCE & RECHARGE MANUAL
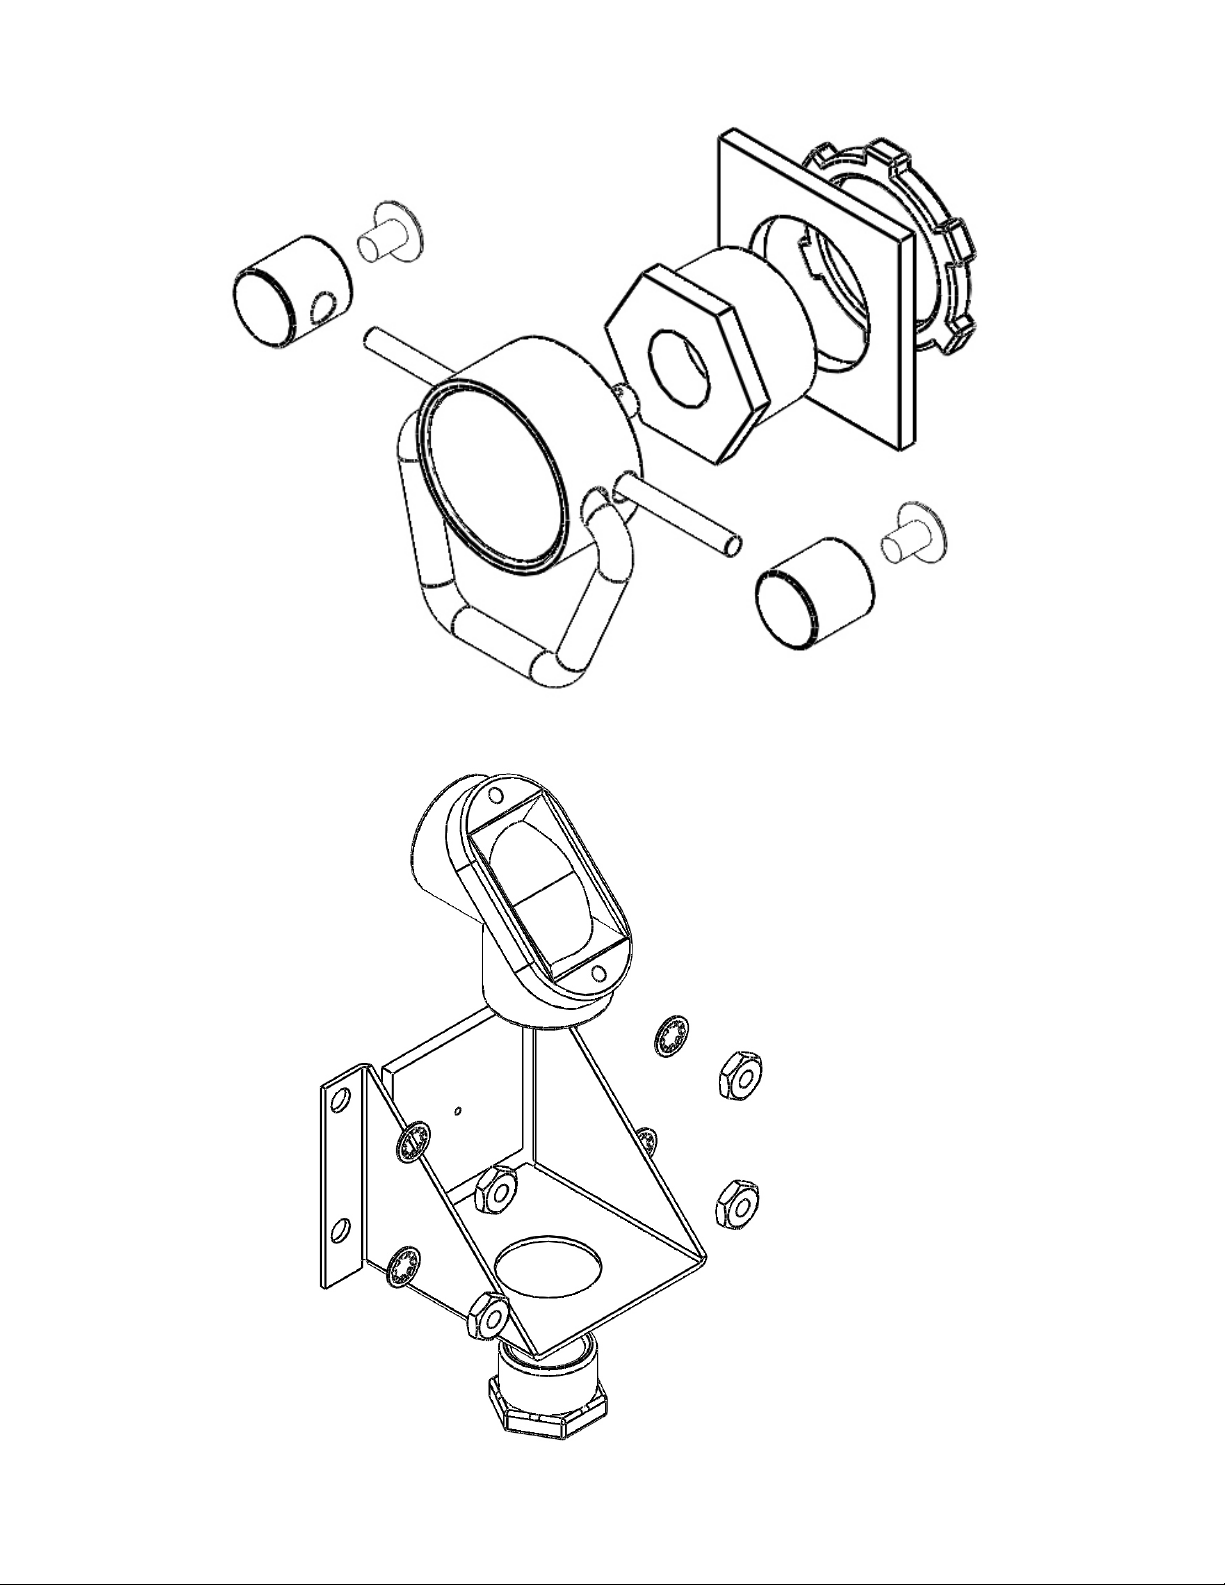
4. Install manual pull.
5. Install corner pulley. Tighten nuts with 3/8” nut driver or open end wrench.
- 5 - 10/1/2013
EX257375
Page 8
PFS INSTALLATION, INSPECTION, MAINTENANCE & RECHARGE MANUAL
k
t
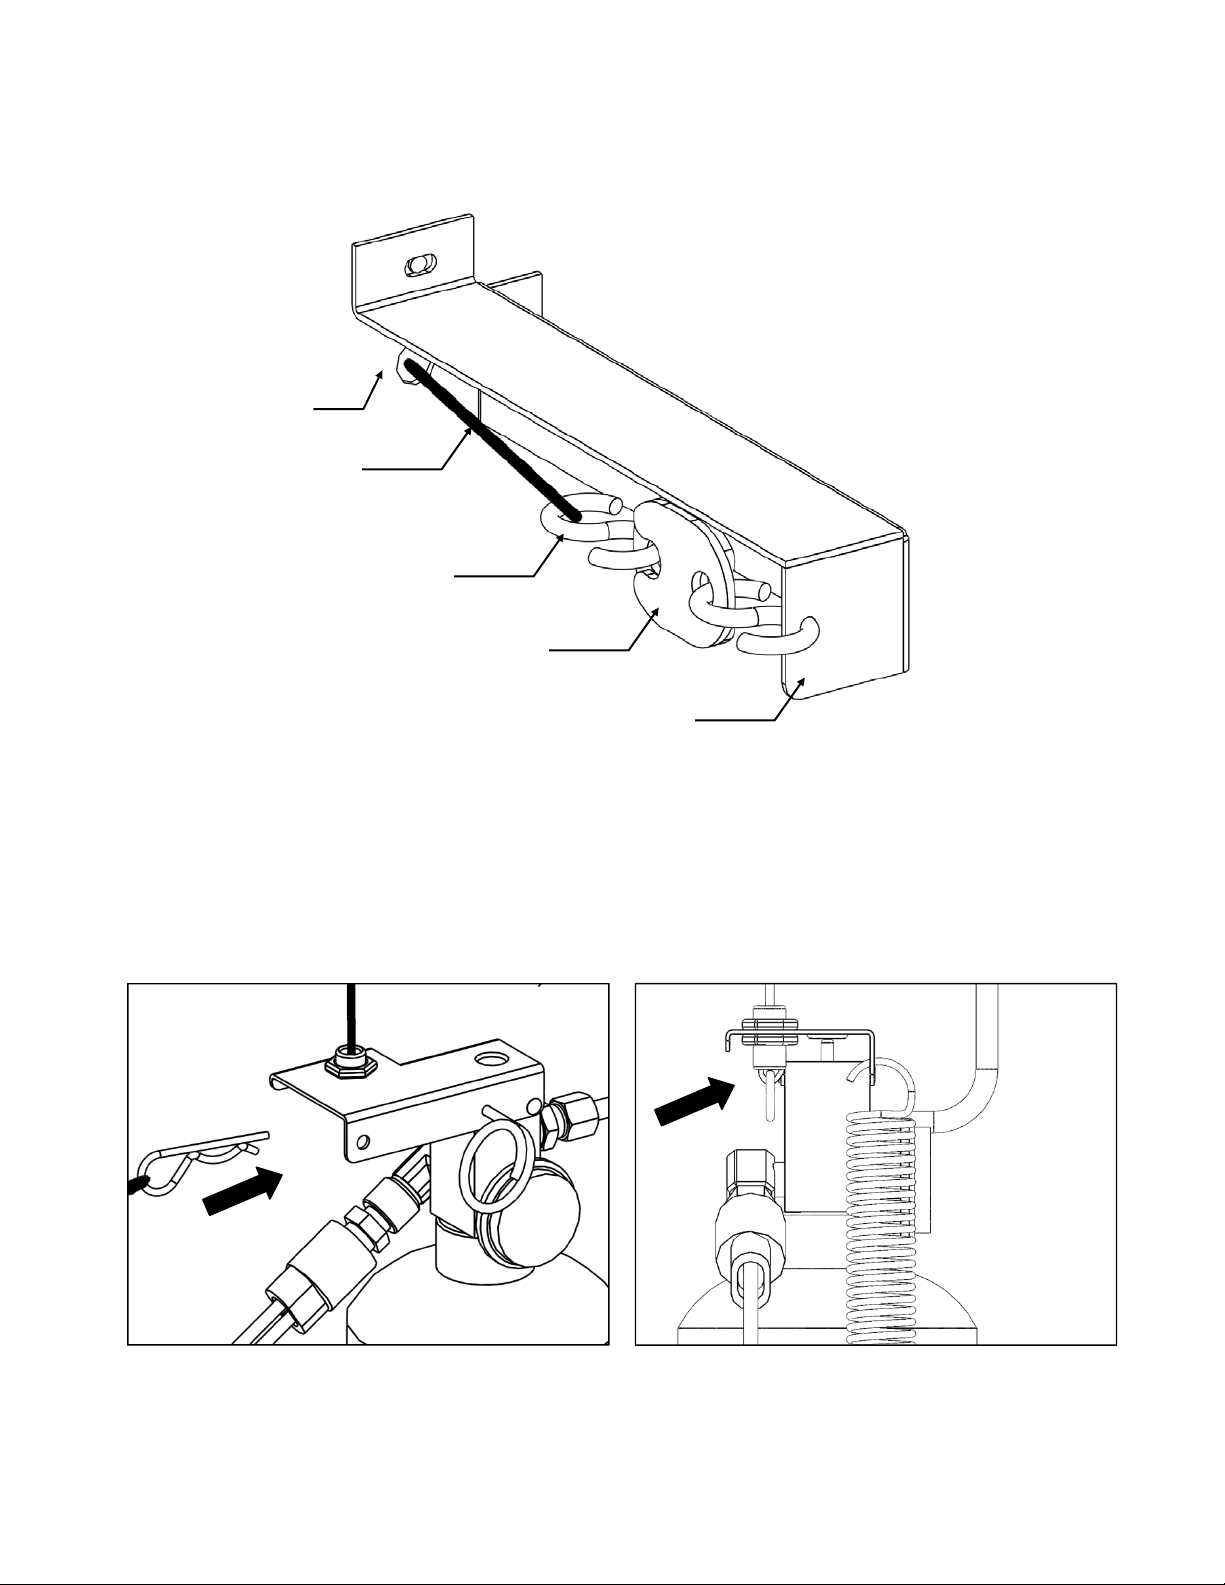
6. Install 138C / 280F fusible link (6GT587) between two s-hooks and attach far ends to
fusible link bracket and fusible link cable (6GT599-2). Route fusible link cable through
appliance wall. Use small flat screwdriver or small pliers to help pull cable through if
necessary.
Appliance wall
Fusible link cable
S-hoo
Fusible link
Fusible link bracke
7. INSTALL SAFETY PIN.
8. Run fusible link cable through adjuster and attach hitch pin clip from manual pull cable
to underside of actuating lever. Move adjuster as needed to ensure proper tension on
cable and keep actuating lever horizontal.
- 6 - 10/1/2013
EX257375
Page 9
PFS INSTALLATION, INSPECTION, MAINTENANCE & RECHARGE MANUAL
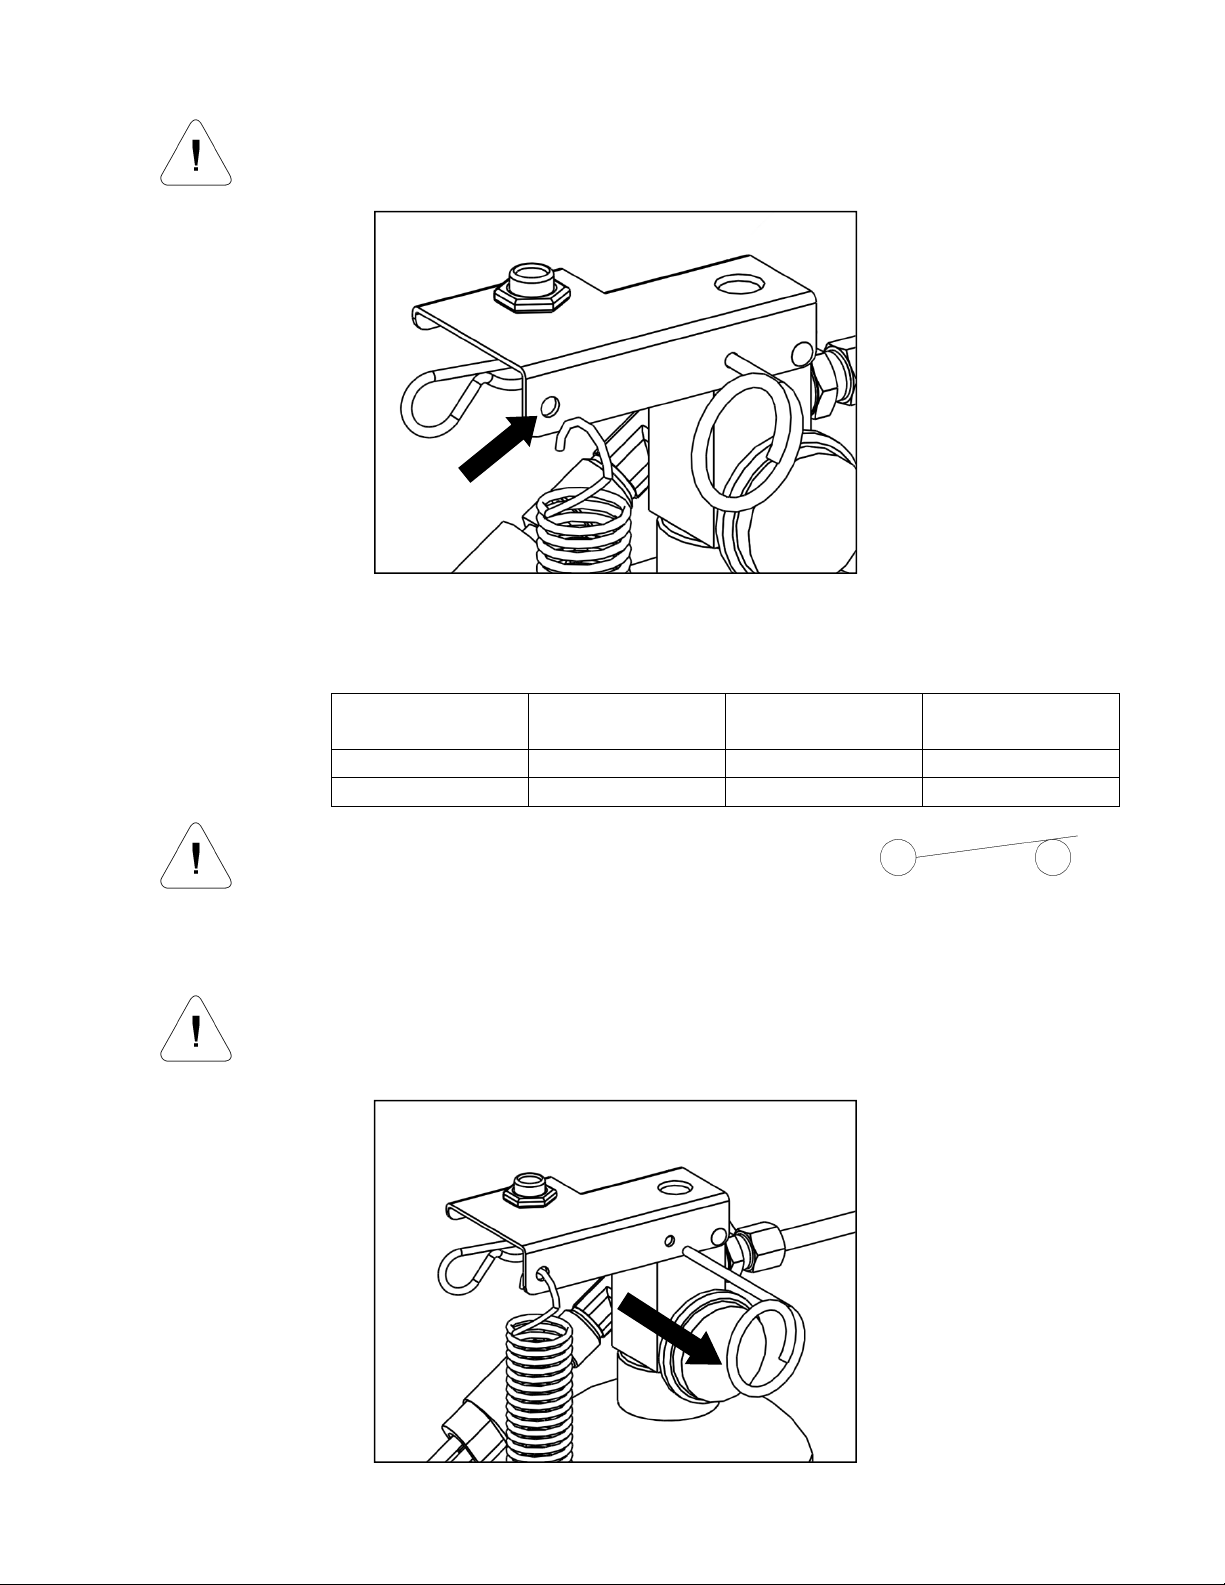
9. Attach extension spring to actuating lever and appliance cutout.
Before arming the PFS, ensure that the safety pin is in
place under the actuating lever.
10. Connect pressure switch wires. Switch is designed for normally closed operation
within appliance to control relay/controller (and therefore shut down appliance). It
must be installed according to ratings listed in table below.
Switch Ratings
Switch
Operation
Switch
Configuration
Application
Voltage
Electrical
Current
AC Voltage Auto Reset SPST (NC) 5-28 VDC 5-400 mA
DC Voltage Auto Reset SPST (NC) 120/240 5.8/2.9 A
The appliance will not operate and will display a system
error message if wires are not connected.
Normally Closed SPST Switch
11. Remove safety pin. The PFS is now armed.
The safety pin is for maintenance purposes only. If the
safety pin is not removed, the PFS will not operate. THE
PIN MUST BE REMOVED.
- 7 - 10/1/2013
EX257375
Page 10

PFS INSTALLATION, INSPECTION, MAINTENANCE & RECHARGE MANUAL
Inspection & Maintenance
The PFS Automatic Extinguisher must be serviced on a regular basis. Three types of
servicing are required:
Monthly - an inspection or “quick check” must be conducted by the owner/operator and
include verification of the following:
1) The PFS is in its proper location.
2) The PFS shows no physical damage or condition that might prevent operation.
3) The pressure gauge is in the green operating range.
4) The maintenance tag is in place and is up to date.
5) The manual pull is unobstructed.
6) The nozzle blow-off caps are intact and undamaged.
Semi-Annually / Yearly – maintenance must be conducted by authorized service
personnel (as per NFPA 17A) and include the following:
1) A check to see that the hazard has not changed.
2) Examination of the fusible link, cylinder, tubing, nozzles and all auxiliary equipment.
3) Fusible links must be replaced at least annually from the date of installation. They
must be destroyed when removed. They need to be replaced with the proper rated
link (6GT587). A fusible link loaded with grease or other material can result in an
excessive delay in actuation.
4) Verification that the agent distribution piping is not obstructed. Remove the blowoff caps (6GT014) from the nozzles to ensure that they are free of grease build-up
and inspect them for deterioration. Replace them as necessary.
5) Where semi-annual maintenance of any wet chemical containers or PFS
components reveals conditions such as, but not limited to, corrosion or pitting in
excess of manufactured limits, structural damage or fire damage, repairs by
soldering, welding, or brazing, the affected part(s) shall be replaced or
hydrostatically tested. The hydrostatic testing of wet chemical containers shall
follow the applicable procedures outlined in NFPA 17A.
6) All wet chemical systems must be tested for proper operation. A discharge of the
wet chemical is normally not part of the test. Simply remove one lead from the
pressure switch to initiate appliance shut-down.
- 8 - 10/1/2013
EX257375
Page 11
PFS INSTALLATION, INSPECTION, MAINTENANCE & RECHARGE MANUAL
7) Where the maintenance of the PFS reveals defective parts that could cause an
impairment or failure of proper operation of the PFS, the affected parts must be
replaced or repaired.
8) The maintenance report, with recommendations if any, shall be filed with the owner
or with the designated party responsible for the PFS.
9) The PFS must have a tag or label indicating the month and year the maintenance
is performed and identifying the person performing the service. Only the current
tag or label must remain in place.
Twelve Year – maintenance must be conducted by authorized service personnel (as per
NFPA 17A) and include the following:
1) The wet chemical extinguishing agent must be removed and discarded.
2) The cylinder needs to be hydrostatically tested to 300 psi.
3) If the cylinder shows no signs of rupture or distortion, recharge the PFS as directed
in the recharging instructions.
- 9 - 10/1/2013
EX257375
Page 12
PFS INSTALLATION, INSPECTION, MAINTENANCE & RECHARGE MANUAL
PFS Removal & Recharge
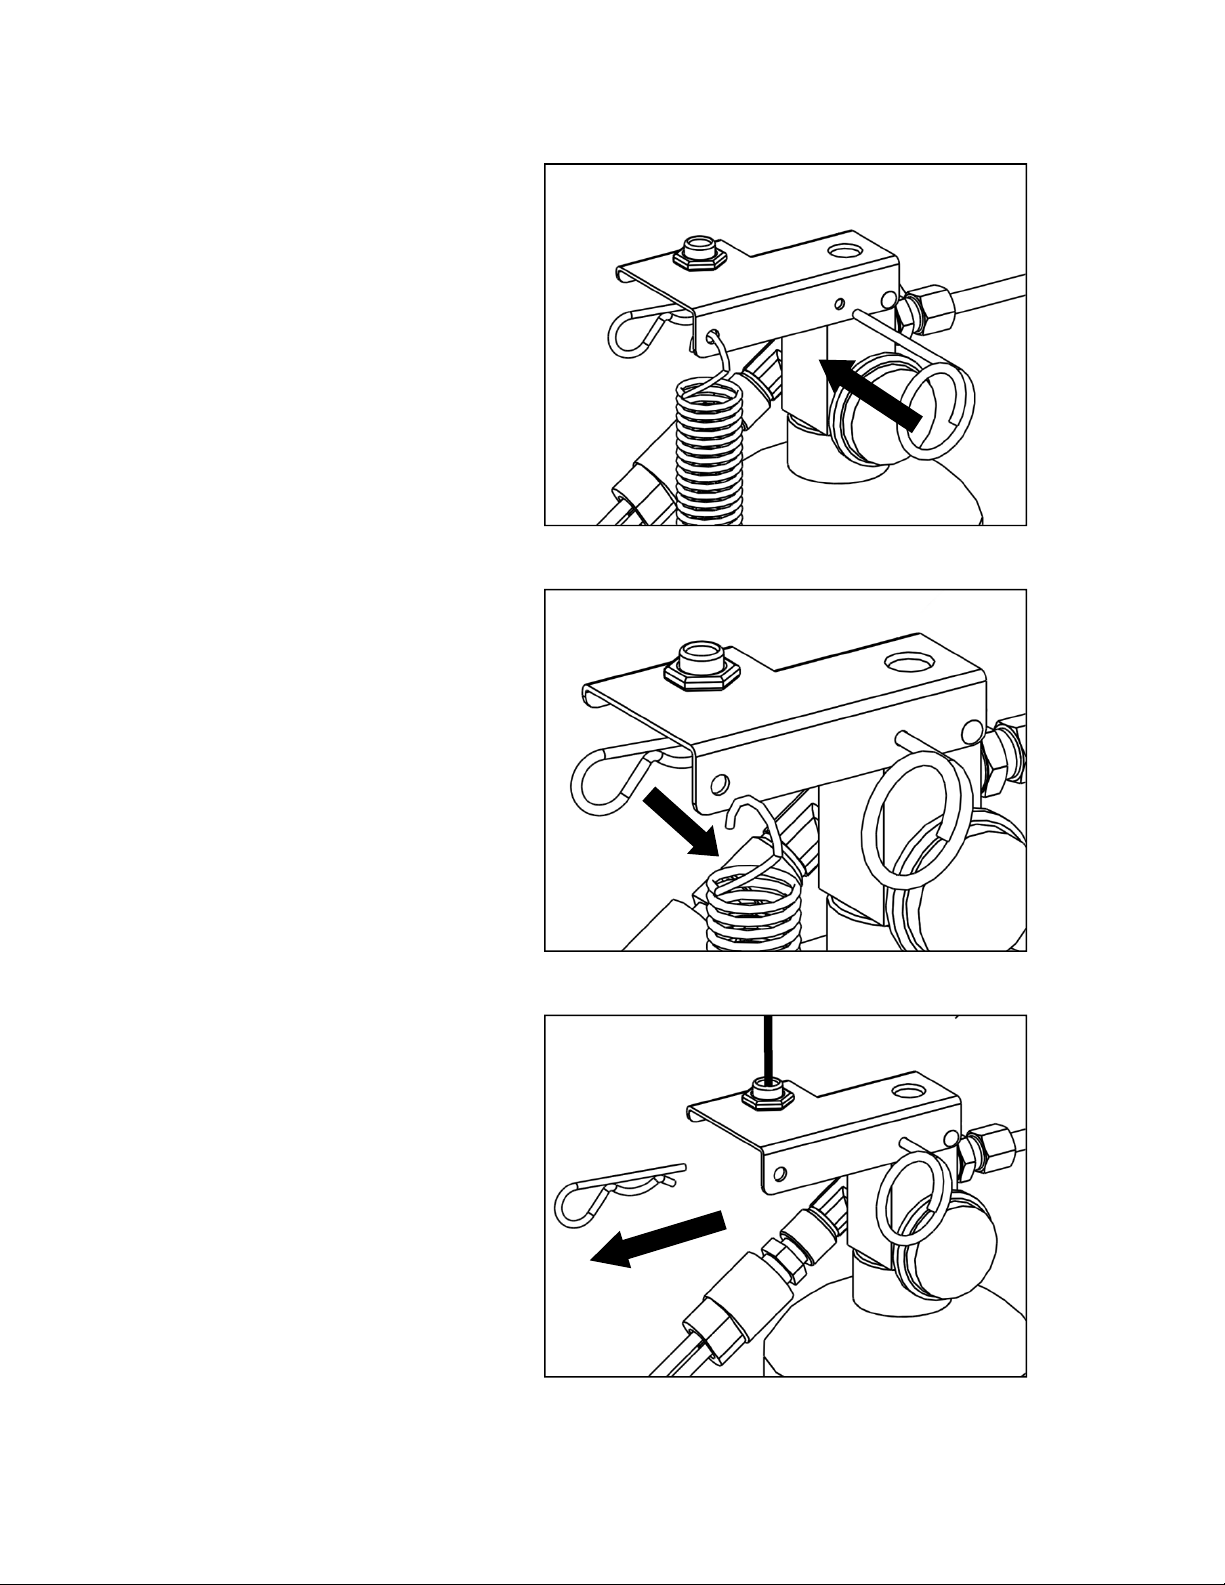
1. INSTALL SAFETY PIN.
2. Detach extension spring.
3. Remove hitch pin clip.
4. Disconnect pressure switch wires.
- 10 - 10/1/2013
EX257375
Page 13
PFS INSTALLATION, INSPECTION, MAINTENANCE & RECHARGE MANUAL
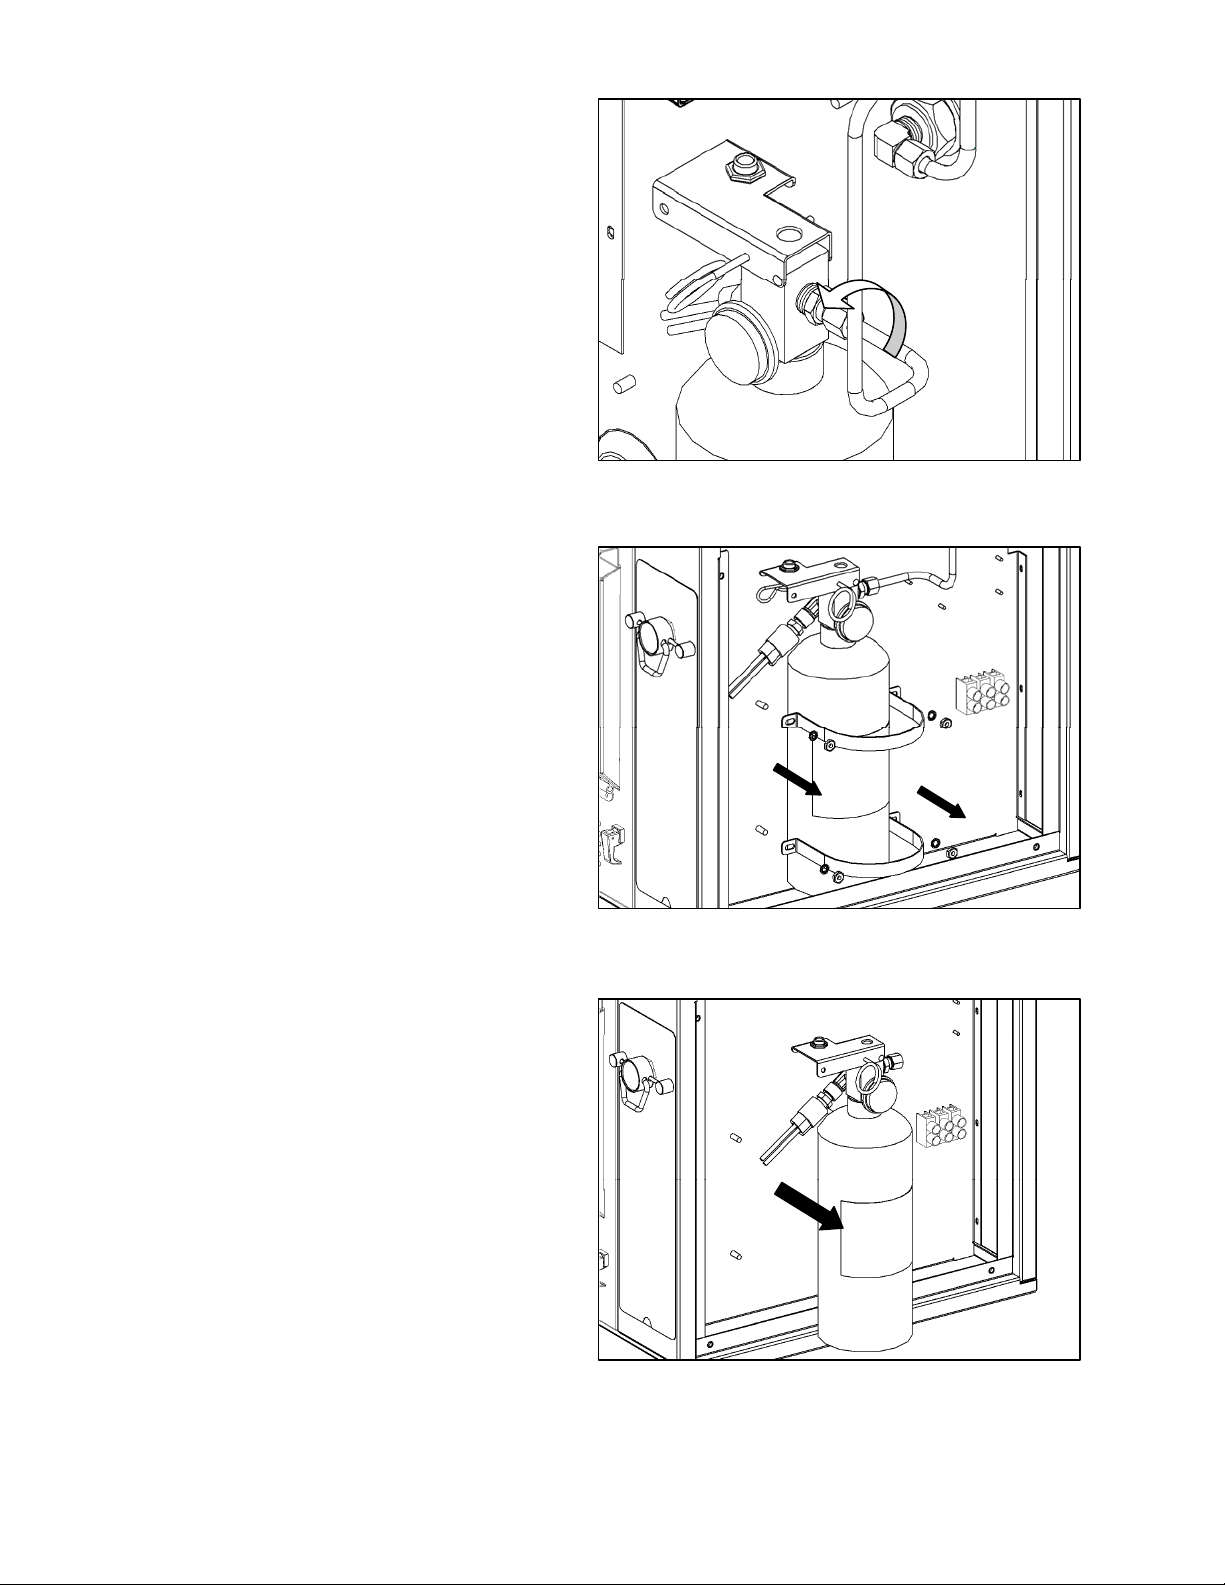
5. With ½” open end wrench, remove
tubing from ¼” compression fitting.
6. Remove mounting brackets and
hardware.
7. Remove PFS from appliance.
8. Obtain replacement PFS from Perfect Fry or follow steps 9-20.
- 11 - 10/1/2013
EX257375
Page 14
PFS INSTALLATION, INSPECTION, MAINTENANCE & RECHARGE MANUAL
r
Ensure the system has fully discharged. If the system is
still pressurized, bleed slowly by unscrewing the head from
the cylinder until dry nitrogen begins to escape. Failure to
do so could cause personal injury or property damage.
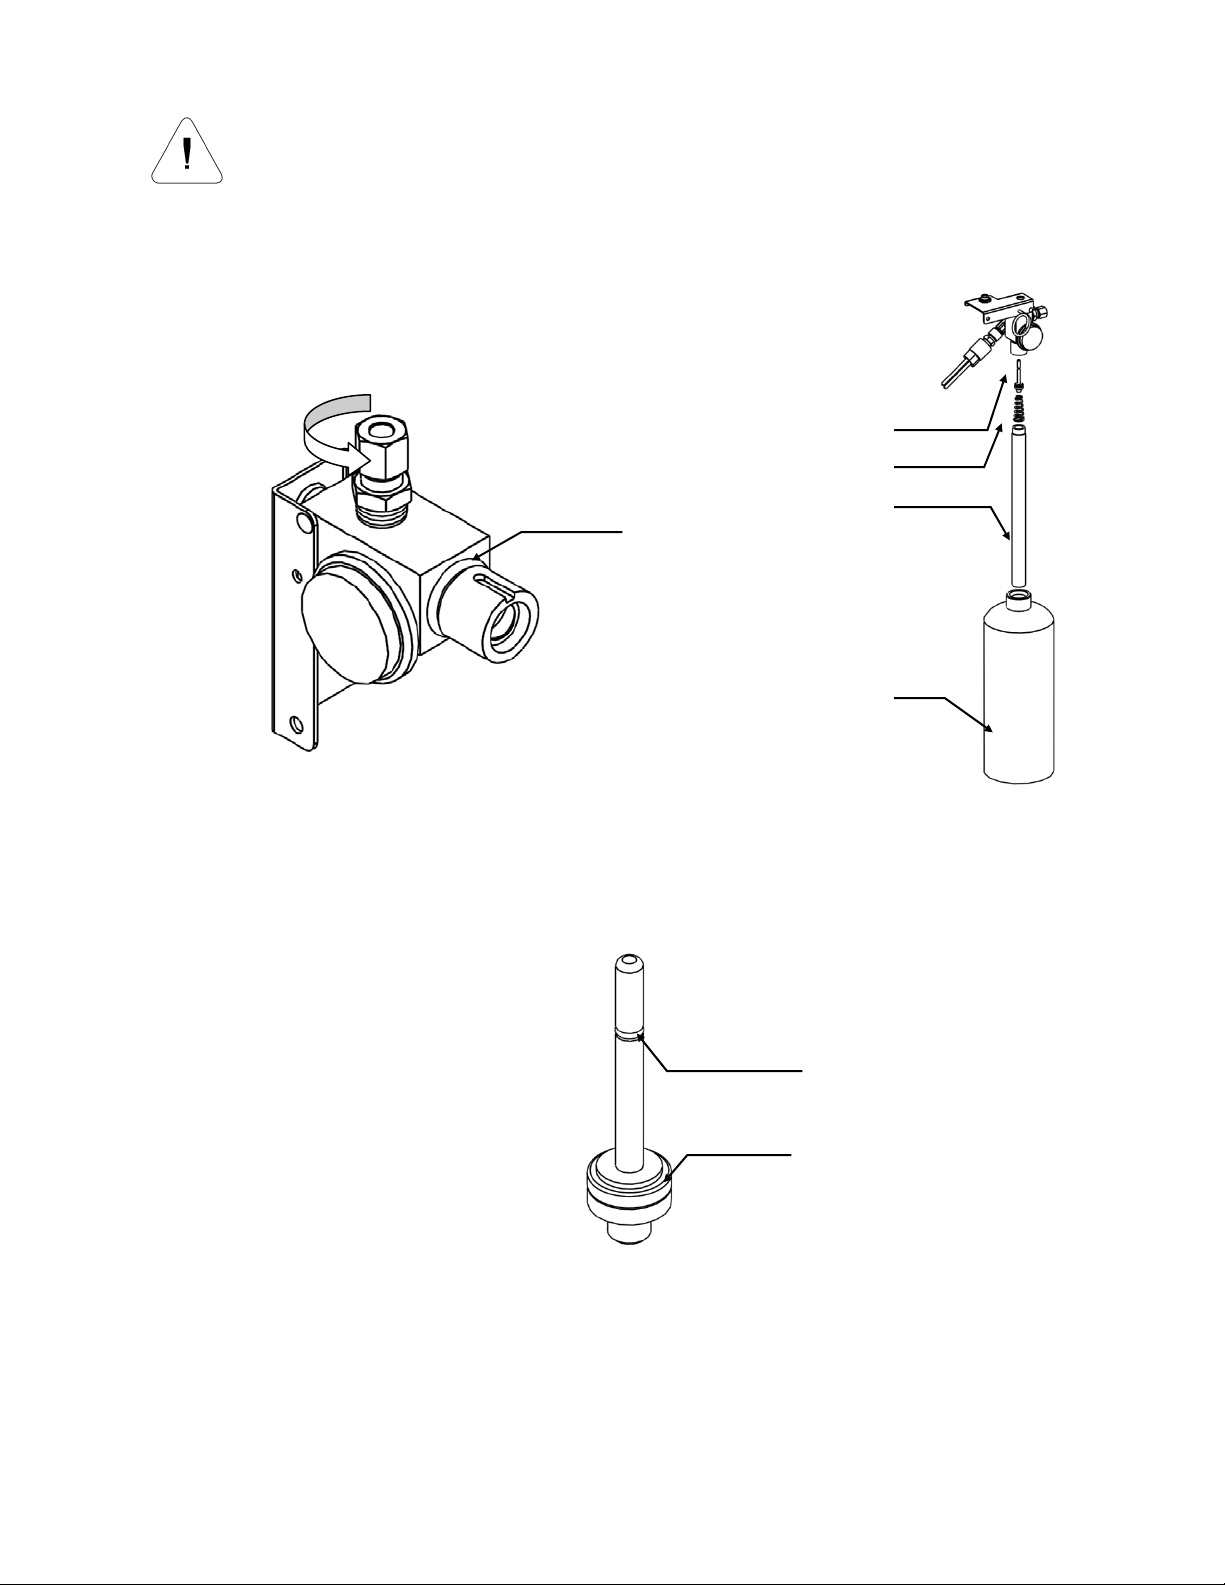
9. Unscrew aluminum head from cylinder. Unscrew siphon tube and
remove spring from head.
10. Remove main o-ring (6GV064) from head assembly and inspect
for damage. Replace if necessary.
Valve stem
Main o-ring
Valve spring
Siphon tube
Cylinde
11. Remove valve stem (6GT591) by pressing down on actuating lever. Be careful not to
damage seating area or o-ring. Thoroughly rinse all parts with warm water and let dry.
Apply a high quality o-ring lube (Parker O-Lube) to all o-rings (two on valve stem and
one main one).
Upper o-ring
O-ring seating area
12. Remove straight compression fitting from head assembly using a ½” open end wrench.
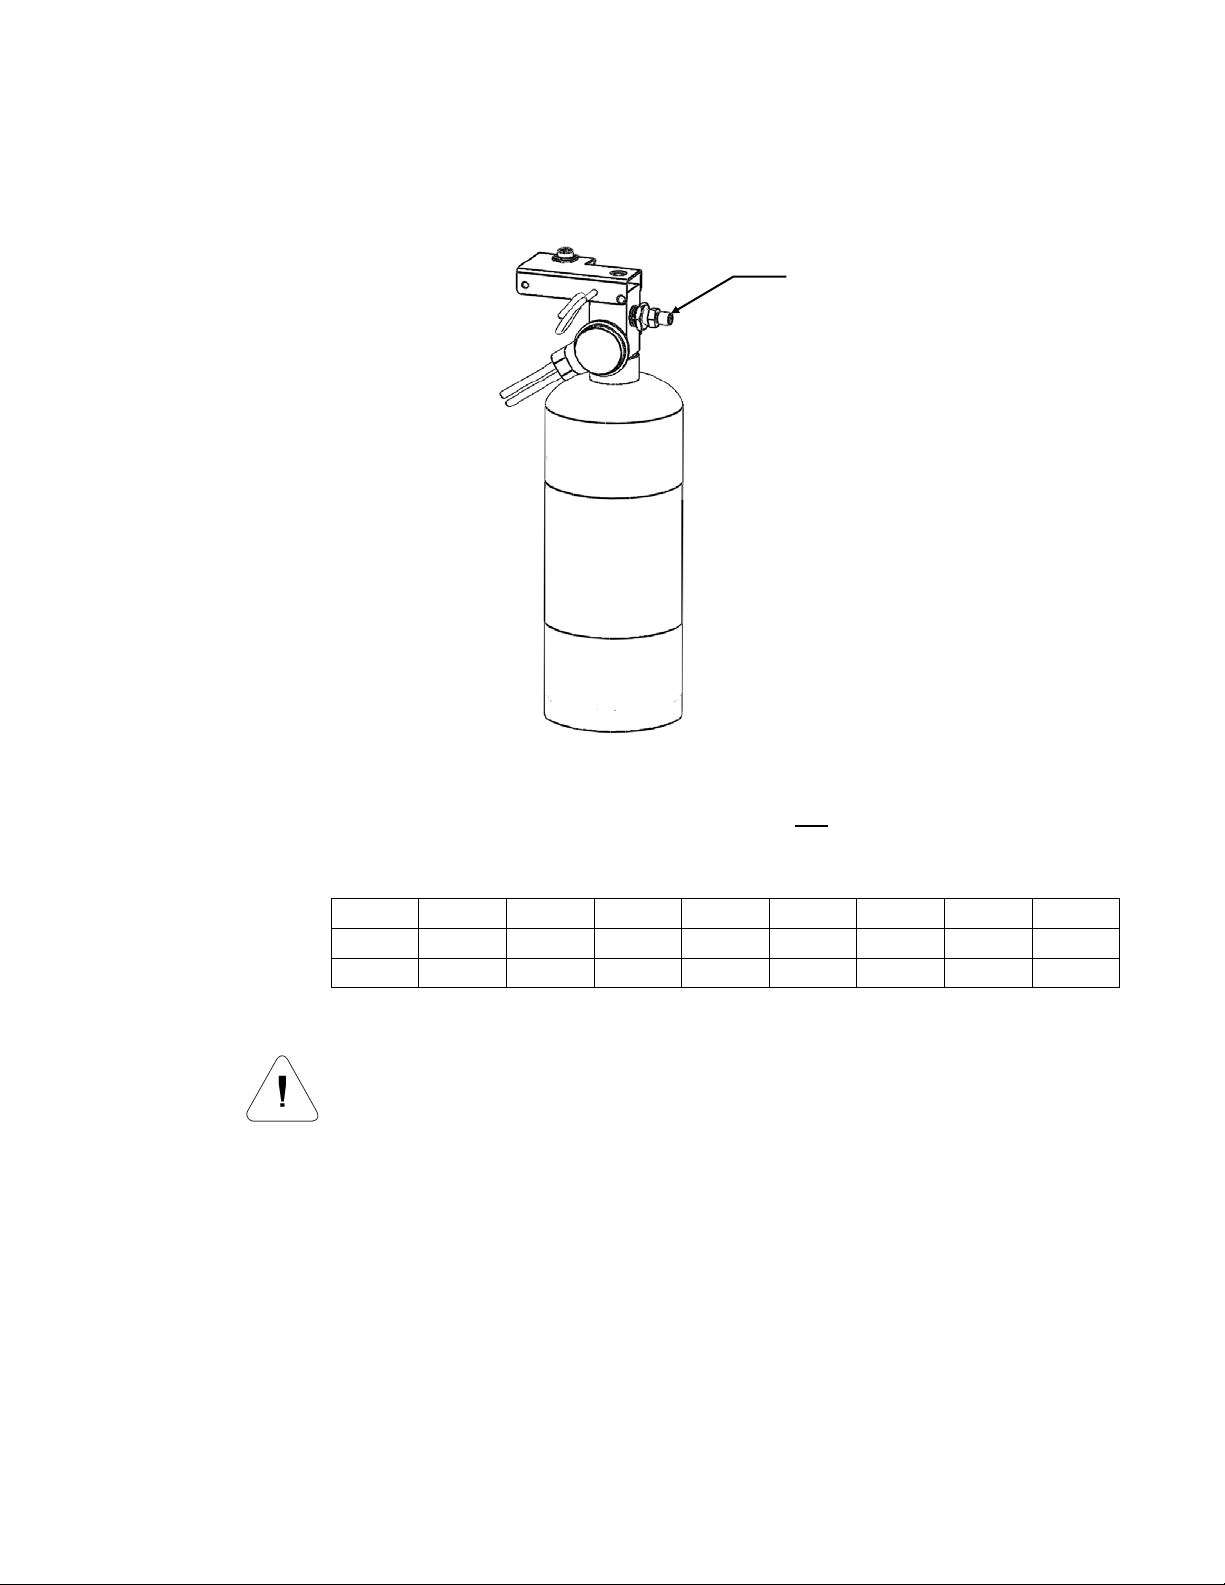
Use a ¼” NPT male fitting with a standard air valve as a recharge adapter.
- 12 - 10/1/2013
EX257375
Page 15
PFS INSTALLATION, INSPECTION, MAINTENANCE & RECHARGE MANUAL
13. Fill cylinder to rated capacity (1000 mL ±5mL or 33.8 oz. ± ¼ oz.) using only Amerex
KP Wet Chemical Agent (6GT015). With a soft cloth, clean any spilled agent from
main o-ring seating area, threads of cylinder and cylinder exterior.
14. Reassemble head assembly and thread it back onto cylinder. Tighten head so that it
is firmly hand tight.
Charging Adapter
15. Thread charging adapter (6GTXXX) into head. Set regulator to required pressure
based on chart shown below. The normal operating pressure of PFS is 100 psi at
21C / 70F. Press actuating lever and pressurize it with dry nitrogen from regulated
source until required pressure is reached on in-line calibrated pressure gauge on fill
line.
Temperature (C)
Temperature (F)
0 5 10 15 20 25 30 35 40
32 41 50 59 67 77 86 95 104
Pressure (psi) 93 95 97 98 100 102 103 105 107
The pressure gauge attached to the extinguishing unit should not be
used to determine when the intended charging pressure has been
reached. Use the calibrating gauge on the recharge system to
determine if the correct pressure is being applied.
16. INSTALL SAFETY PIN before removal of regulated nitrogen source. Release
actuating lever.
17. Remove charging adapter. Attach straight compression fitting to head assembly using
a ½” open end wrench.
18. Check for leaks. Repeat steps 9-17 if PFS is leaking.
19. Re-install PFS (refer to page 3)
- 13 - 10/1/2013
EX257375
Page 16
PFS INSTALLATION, INSPECTION, MAINTENANCE & RECHARGE MANUAL
r
Nozzle Cleaning
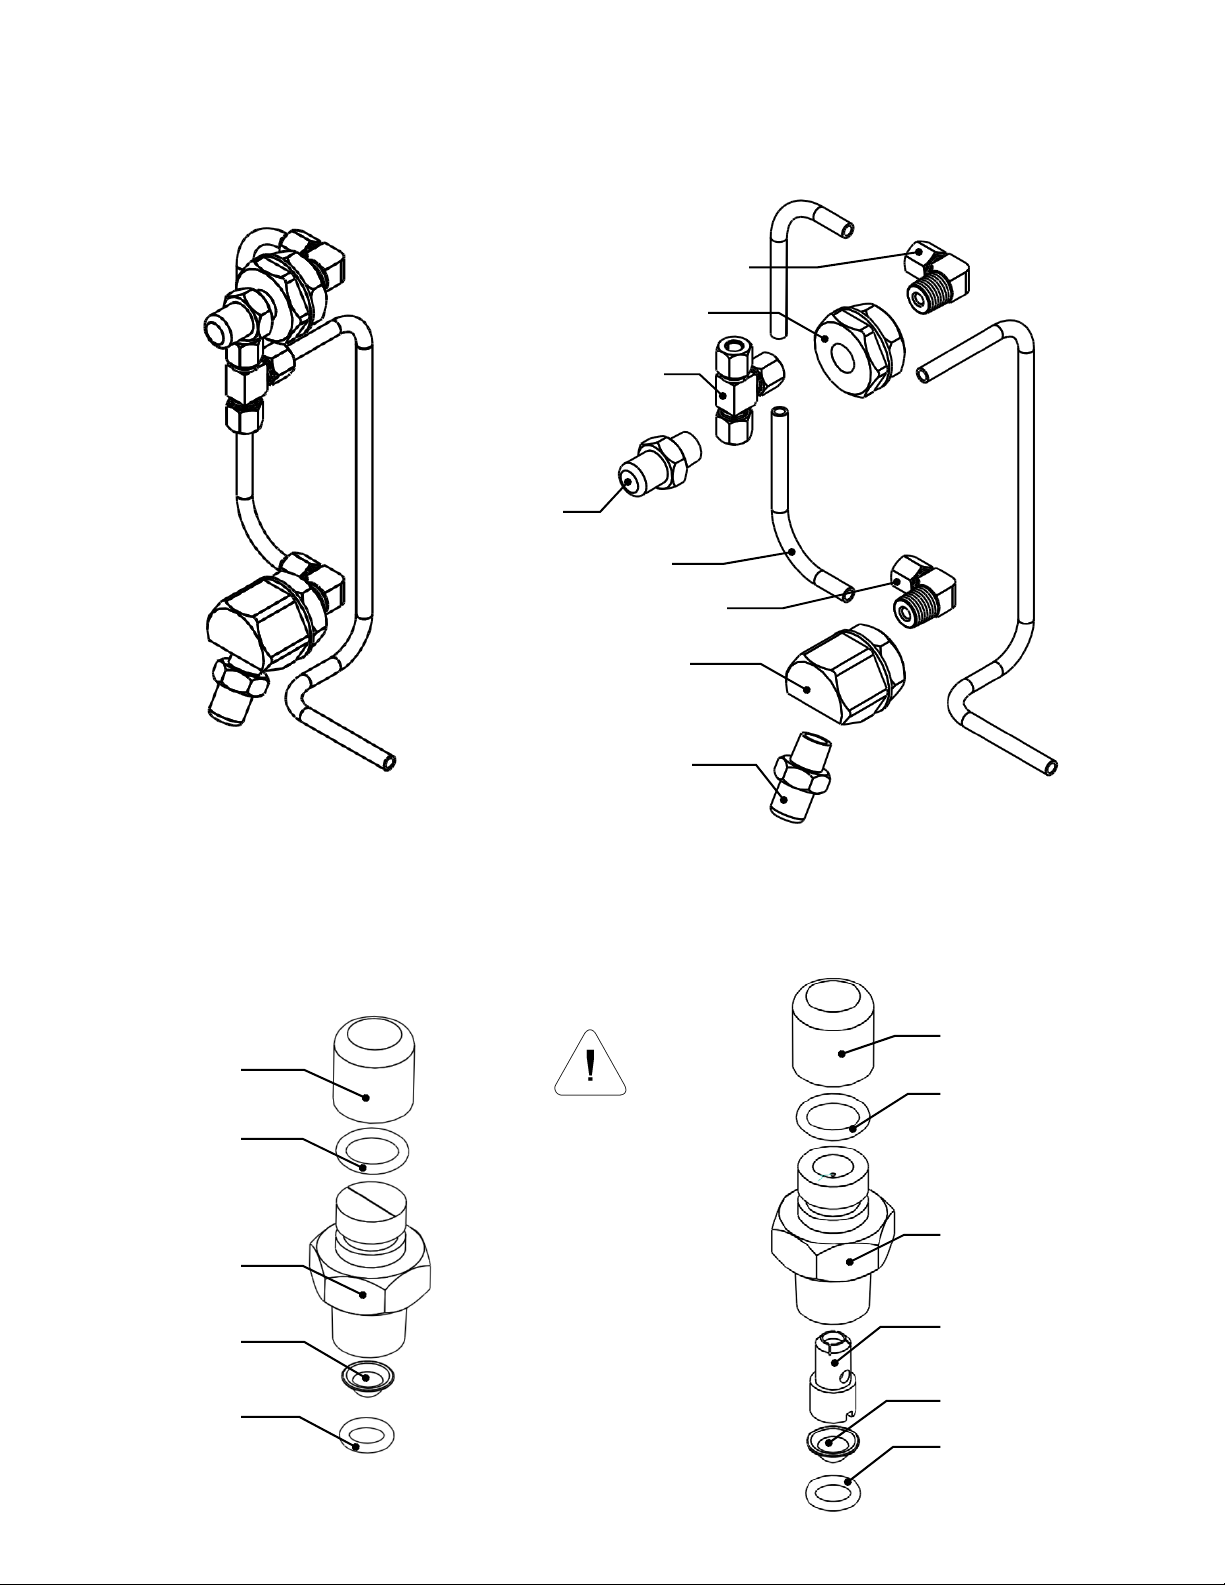
20. Remove nozzles from wall adapters and disconnect tubing from compression fittings.
¼” elbow compression fitting
¼” tee compression fitting
Upper nozzle
¼” elbow compression fitting
21. Clean tubing and compression fittings with warm soapy water then rinse. Blow filtered
compressed air through all pieces to dry.
22. Disassemble both upper and lower nozzle, wash with warm soapy water then rinse.
Use filtered compressed air to dry.
Blow-off cap
Upper nozzle
¼” copper tubing
Lower nozzle
Lower nozzle
Blow-off cap
Outer nozzle o-ring
Outer nozzle o-ring
Upper nozzle
Nozzle straine
Inner nozzle o-ring
- 14 - 10/1/2013
EX257375
Be sure to reassemble the
nozzles properly. Failure to do
so will prevent them from
working properly in the event of
system actuation.
DO NOT USE O-RING LUBE
ON INNER O-RINGS AS THEY
ARE DESIGNED TO HOLD
STRAINERS IN PLACE.
Lower nozzle
Lower nozzle insert
Nozzle strainer
Inner nozzle o-ring
Page 17
PFS INSTALLATION, INSPECTION, MAINTENANCE & RECHARGE MANUAL
23. Reinstall tubing, compression fittings and nozzles in original positions. Use pipe
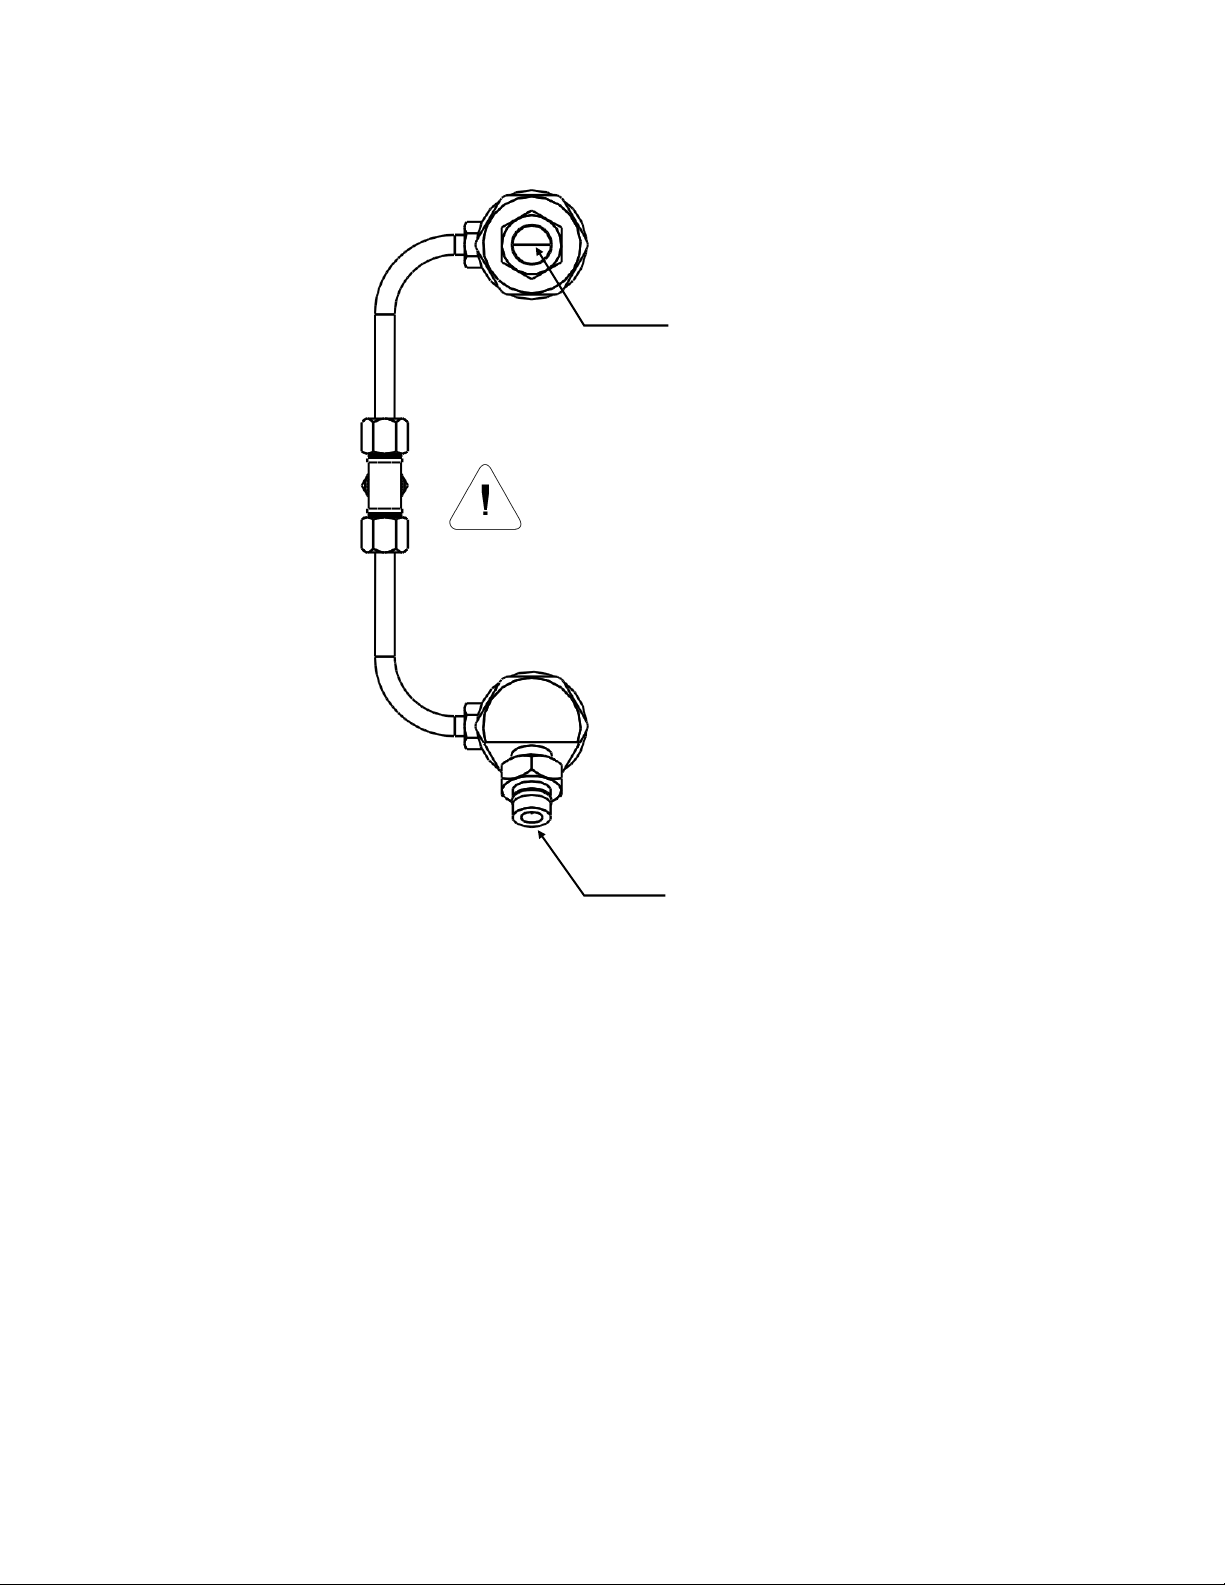
thread sealant tape on pipe threads if necessary. Make sure upper nozzle flat is
horizontal.
Upper nozzle slit is horizontal. Fan
pattern sprays above air filter
cartridge and below fan. Blow-off
cap removed for illustration only.
Be sure to install the nozzles properly.
Failure to do so will prevent them from
working properly in the event of system
actuation.
Lower nozzle sprays full cone
pattern and is directed at oil vat.
Blow-off cap removed for
illustration only.
24. If nozzle blow-off caps are damaged, replace.
- 15 - 10/1/2013
EX257375
Page 18
PFS INSTALLATION, INSPECTION, MAINTENANCE & RECHARGE MANUAL
23
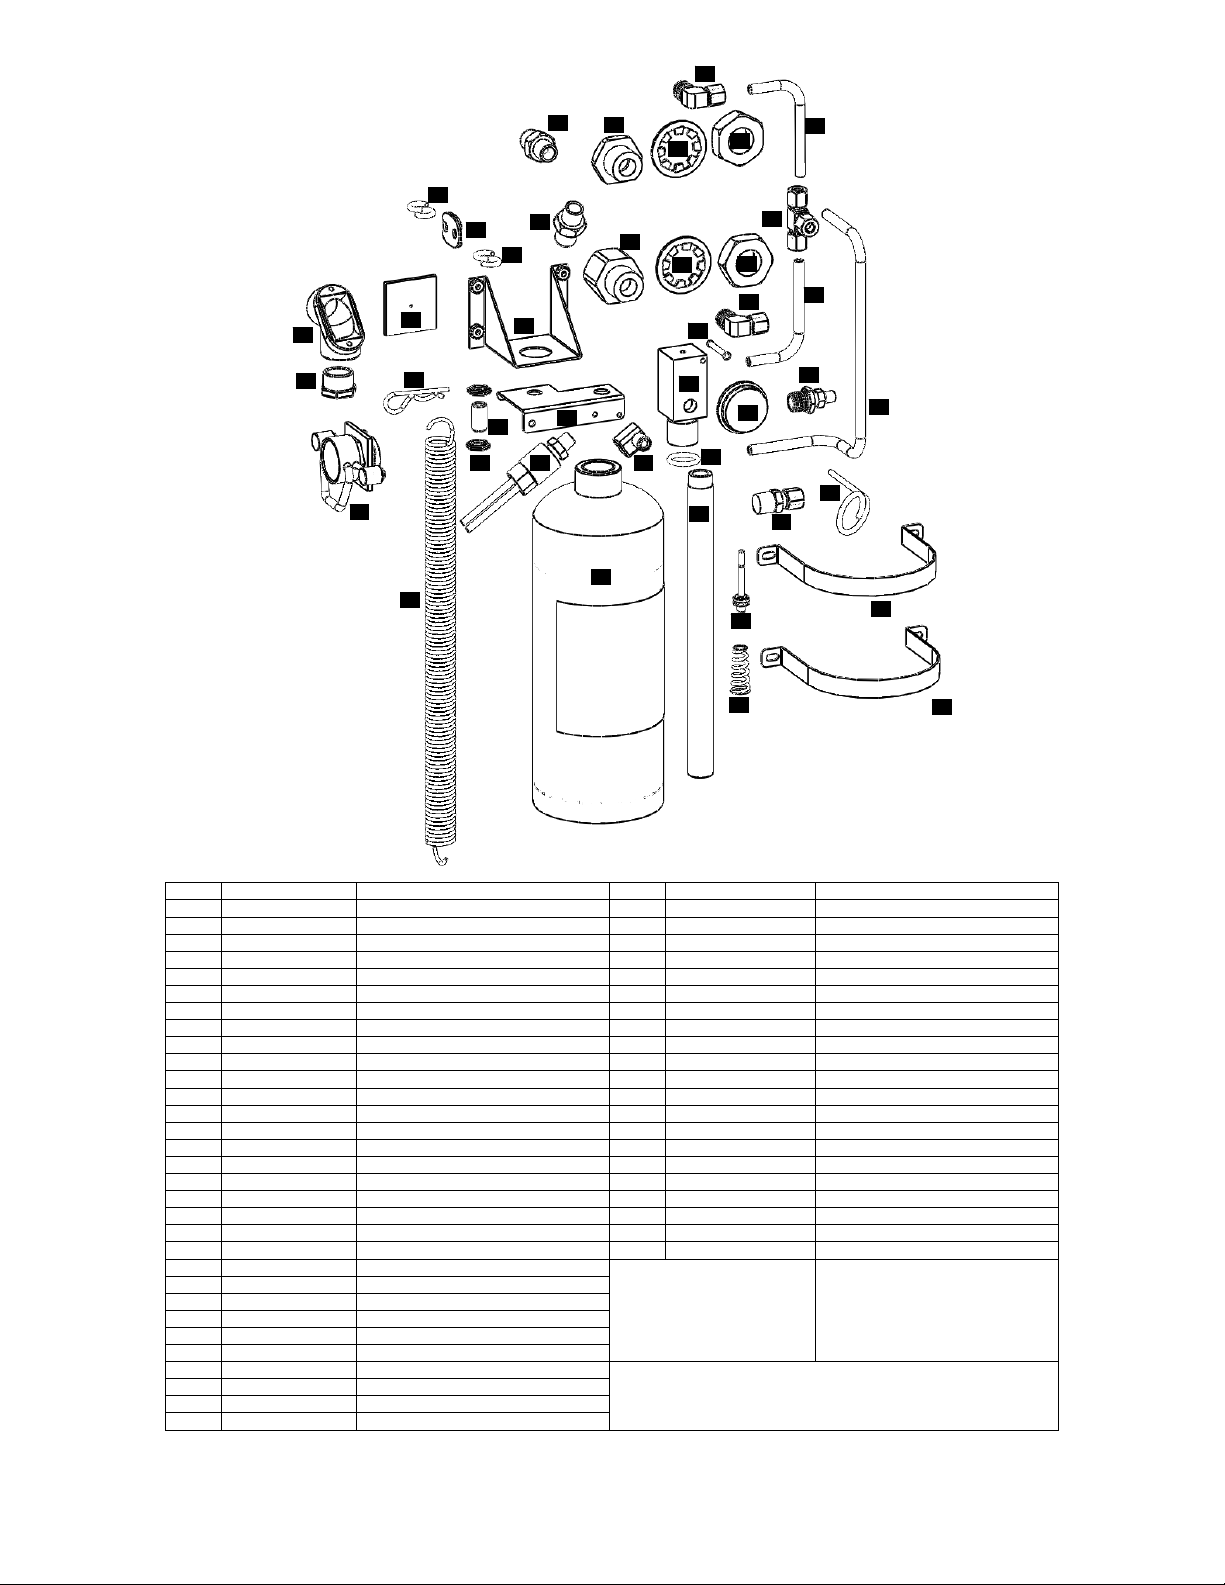
Parts List
30
31
33
28
27
26
29
34
35
32
34
5
4
6
7
9
8
10
25
26
25
23
16
11
18
13
1
2
3
12
14
22
24
22
36
21
19
20
17
15
17
# Part# Description # Part# Description
1 6GT669 manual pull 32 N/A lower nozzle assembly
2 6GT674 extension spring NS 6GT006 lower nozzle
3 6GT008 cylinder NS 6GT007 lower nozzle insert
4 6GT671 hitch pin clip NS 6GT017 nozzle inner o-ring
5 6ST665 corner pulley bracket NS 6GT016 nozzle outer o-ring
6 6GT800 adjuster NS 6GT018 nozzle strainer
7 6GT801 adjuster nut NS 6GT014 blow-off cap
8 6ST002 actuating lever 33 N/A upper nozzle assembly
9 6GV128 pressure switch NS 6GT005 upper nozzle
10 6GV068 brass elbow NS 6GT017 nozzle inner o-ring
11 6GT001 head – w et chemical NS 6GT016 nozzle outer o-ring
12 6GT002 siphon tube – wet chemical NS 6GT018 nozzle strainer
13 6GV064 main o-ring NS 6GT014 blow-off cap
14 6GT591 valve stem 34 6GT597 s-hook
15 6GT592 valve spring 35 6GT587 fusible link
16 6GT664 lever rivet 36 6GT019 charging adapter
17 6ST001 mounting bracket NS 6GT599-1 manual pull cable
18 6GT009 pressure gauge NS 6GT599-2 fusible link cable
19 6GT594 safety pin NS 6GV013 inspection tag
20 6GT010 ¼” straight compression fitting NS 6GV071 epoxy thread sealant
21 6GT011-03 or -04 lower tube (-03 PFC/SFC, -04 PFA) NS 6GT015 wet chemical agent
22 6GT011-01 or -02 upper tube (-01 PFA/PFC, -02 SFC)
23 6GT012 ¼” elbow compression fitting
24 6GT013 ¼” tee compression fitting
25 6NT005 7/8-9 jam nut
26 6NT006 7/8 lock washer
27 6GT004 upper nozzle adapter
28 6GT673-1 fusible link gasket Mildly irritating to the eyes, skin, and respiratory system.
29 6GT003 lower nozzle adapter
30 6GT596 corner pulley
31 6GT666 corner pulley bushing
Amerex Corporation
P.O. Box 81
Trussville, AL
35173-0081
1-205-655-3271
Symptoms may include coughing, shortness of breath, and eye
and skin irritation. Ingestion, although unlikely, may cause
gastrointestinal disturbance.
Contains:
Water, potassium acetate,
potassium citrate, organic
phosphate esters, pink pigment
- 16 - 10/1/2013
EX257375
Page 19
PFS INSTALLATION, INSPECTION, MAINTENANCE & RECHARGE MANUAL
Perfect Fry Company LLC.
Mailing Address: P.O. Box 501, Concord, NH 03302-0501
Shipping Address: 10 Ferry St., Concord, NH 03301
Tel: 603-225-6684
Fax: 603-225-8472
General Information: [email protected]
Customer Support: [email protected]
Web: www.perfectfry.com
© 2013 PERFECT FRY COMPANY
PRINTED IN USA
L20-361 R2
- 17 - 10/1/2013
EX257375
 Loading...