

Page 1
TL6120
User Guide
5-2 Programmable Thermostat
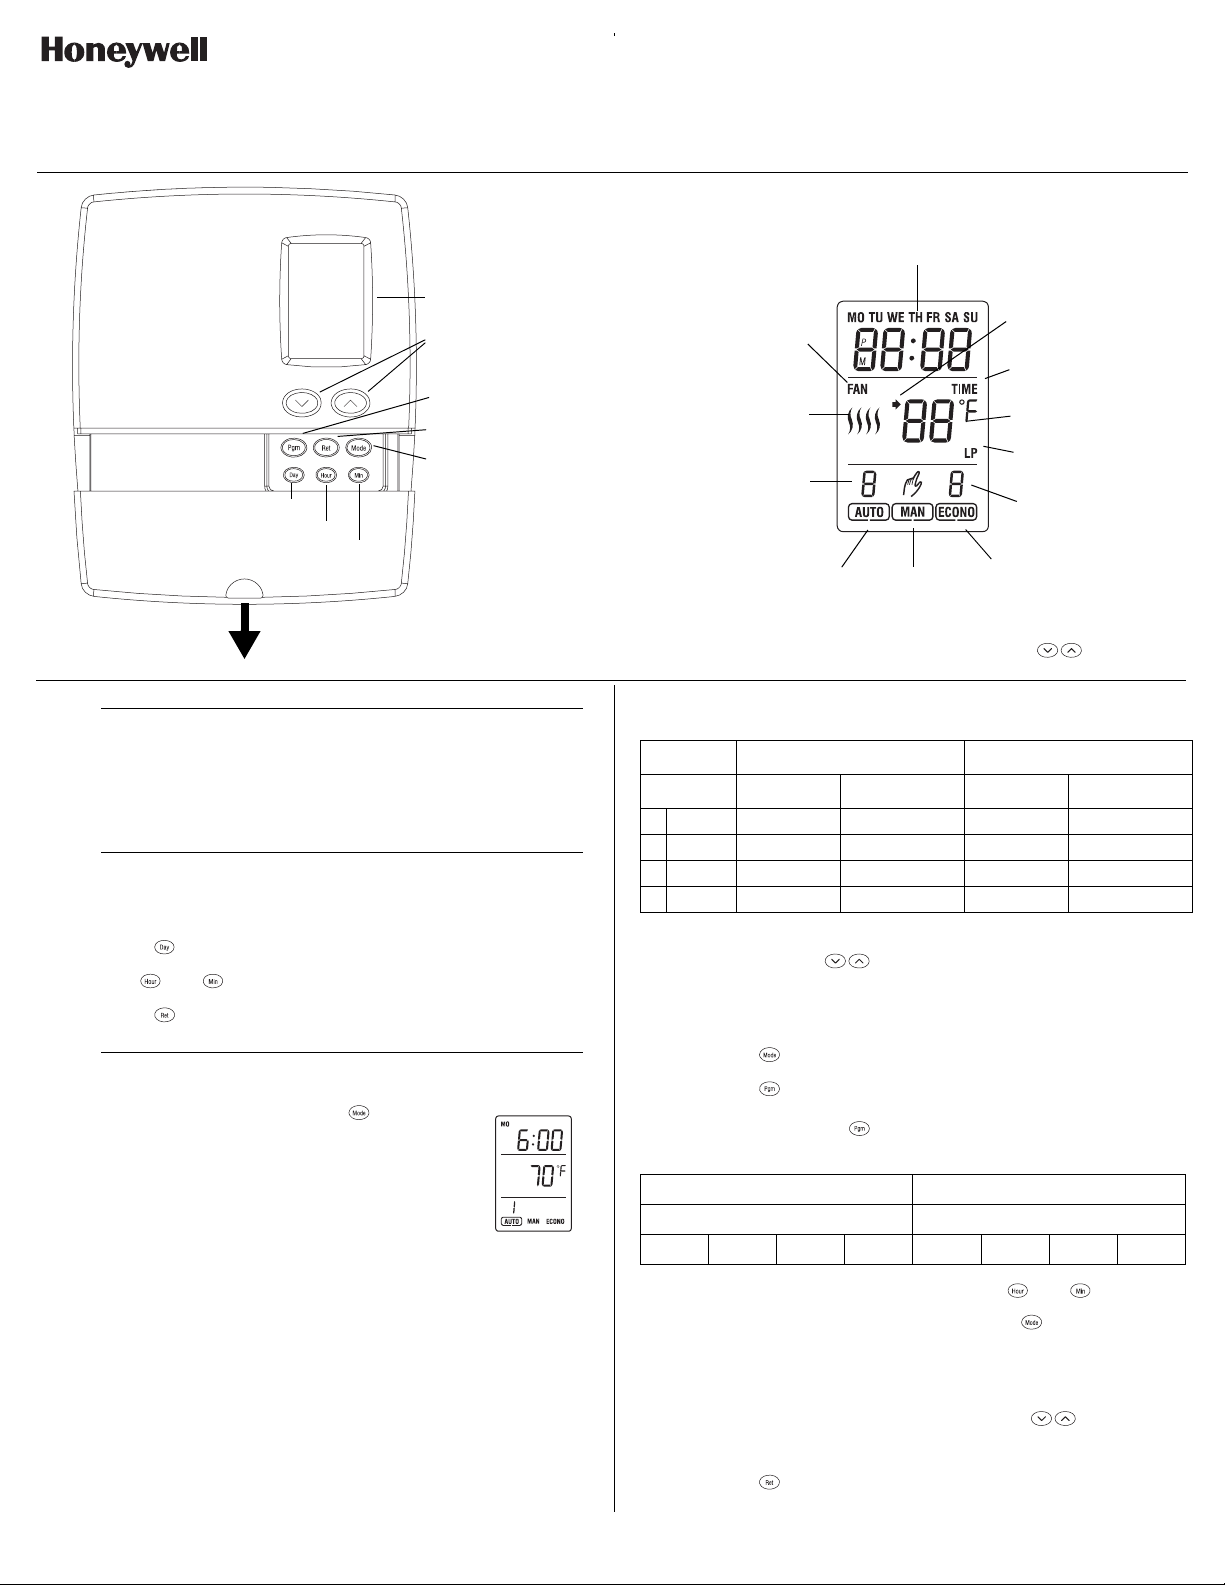
Display
Time and day
Screen
Up/Down buttons
Program button
Return button
Mode button
Day button
Hour button
Minute button
Pull cover down
n
The TL6120 thermostat can be used to control an electric heating
system such as a baseboard heater, a radiant floor, a radiant ceiling,
a convector, a fan-forced heater, etc.
o
The clock must be set when TIME flashes on the screen.
Description
Clock and Day Setting
n Press the button to set the day.
o Use the and buttons to set the clock.
p Press the button to exit.
p
To use the Automatic mode, press the button until
AUTO is selected (outlined) on the screen. The current
period number will appear.
In this mode, the thermostat automatically adjust its
temperature setpoint according to the period of the day
(wake up, leave for work, return home and sleep).
You can program up to 4 periods in a day. You can set 2 different
programs: one for the weekdays (Monday to Friday) and another one
for the weekend (Saturday and Sunday).
Automatic (programmable) mode
Appears if the
thermostat is configured
for a fan-forced heater
Heating power
indicator
Period no. in
automatic mode
Automatic
mode
* The thermostat normally displays the actual (measured) temperature.
T o view the set temperatu re (se tpoint), press eith er of the buttons once.
1.
2.
3.
The thermostat is preprogrammed with the following schedule:
Period Monday to Friday Saturday & Sunday
Start Time Temperature Start Time Temperature
1 Wake 6:00 a.m. 70°F (21°C) 6:00 a.m. 70°F (21°C)
2 Leave 8:00 a.m. 62°F (16°C) -- -3 Return 6:00 p.m. 70°F (21°C) -- -4 Sleep 10:00 p.m. 62°F (16°C) 10:00 p.m. 62°F (16°C)
To temporarily override the current setpoint, set the desired
temperature using the buttons. The new setpoint will be used
until the beginning of the next period.
To modify the schedule:
n Press the button until AUTO is selected.
Manual
mode
Appears when the
setpoint is displayed
Flashes when the
clock has been reset
Temperature *
Appears during
a power failure
Period no. in
economy mode
Economy
mode
o Press the button.
Each time you press the button, the thermostat displays one of
the periods in the following order (from left to right):
Monday to Friday Saturday and Sunday
MO TU WE TH FR SA SU
12341234
p Set the start time for the period using the and buttons.
NOTE: To disactivate the period, press the button. Instead
of displaying the start time of the period, the thermostat will display --:--. During operation, the thermostat will skip over that
period.
q Set the temperature for the period using the buttons.
r Repeat steps 2 to 4 for the remaining periods.
s Press the button to return the thermostat to normal display.
TL6120 69-1908ES 1/16/06 1/2
Page 2
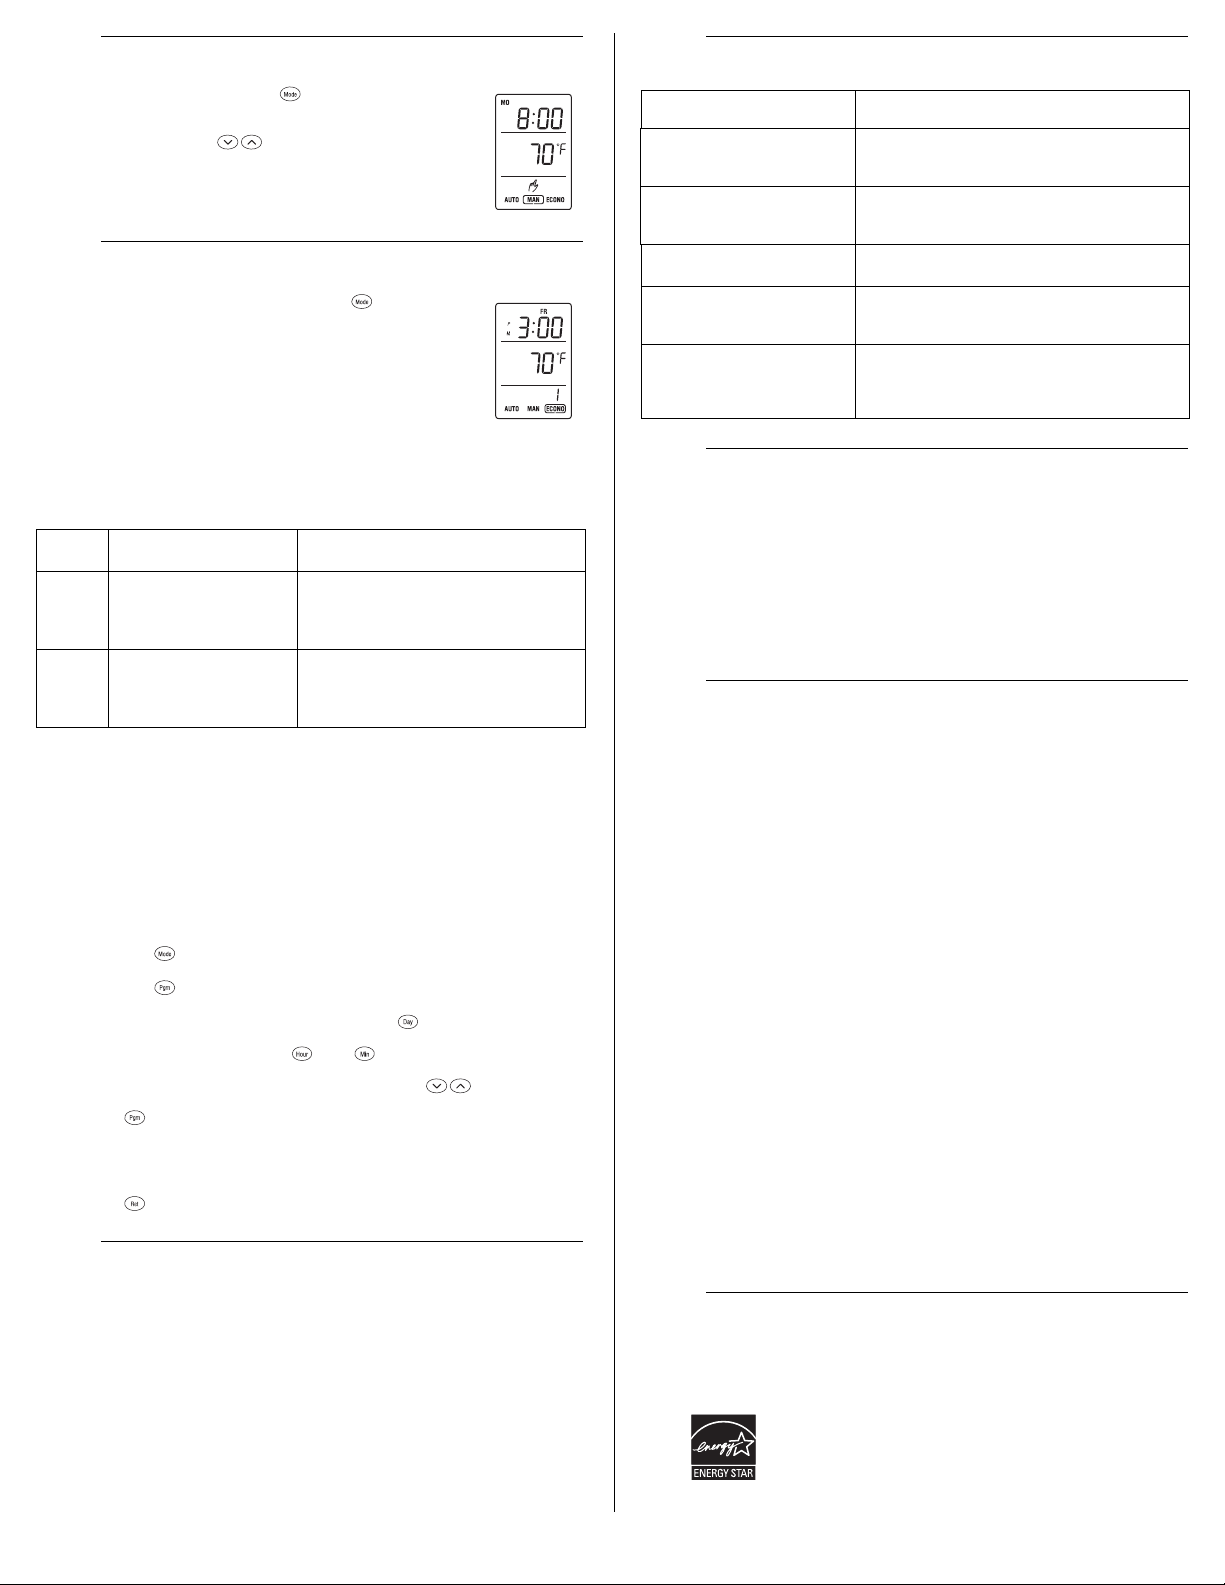
q
Manual (hold) mode
To use this mode, press the button until MAN is
selected (outlined) on the screen. Then, set the desired
temperature using the buttons.
In this mode, any modification to the temperature
setpoint must be done manually.
r
Economy mode
To use the economy mode, press the button until
ECONO is selected (outlined) on the screen. This
mode is ideal for weekend residences as it can be
used as follows: The temperature is kept at an
economy level during most of your absence and is
raised to a comfortable level by your usual arrival. If
you do not show up, the temperature returns to the
economy level until next weekend.
The economy mode has two periods which should be set as follows:
Period Temperature Setting Start Time Setting
Set to a comfortable
1
level.
Set to an economy
2
level.
Set a time where the temperature
starts to rise to reach a comfortable level by the time you arrive.
Set a time where the temperature
starts to drop to an economy level
if you do not show up.
The economy mode should be used as follows:
Place the thermostat in economy mode during your absence.
When you arrive, place the thermostat in automatic mode or in
manual mode before the temperature drops back to the
economy level.
When you leave, switch the thermostat back to economy mode.
To program the two periods of the economy mode:
n Press the button until ECONO is selected.
o Press the button. Period 1 is displayed.
p Set the start day for the period using the button.
q Set the start time using the and buttons.
r Set the temperature for the period using the buttons.
s Press to select period 2.
t Repeat steps 3 to 5 to set the day, time and temperature for
period 2.
u Press to return the thermostat to normal display.
s
During a power outage, the thermostat display remains lit for
approximately the first 15 minutes during which the LP (low power)
indicator appears. The settings are saved in memory. However, if the
power failure exceeds 5 hours, only the thermostat’s clock must be
re-adjusted. When power returns, the thermostat returns to the mode
of operation preceding the power outage.
Power Outage
4.
t
Troubleshooting
7.
PROBLEM SOLUTIONS
Thermostat is hot.
Wrong temperature is dis-
5.
6.
played.
Wrong time is displayed.
Temperature does not change
according to the programmed
schedule.
The normal display disappears
and reappears after a few minutes.
u
Supply: 240 VAC, 50/60 Hz
Minimum load: 500 W (2 A resistive only)
Maximum load: 3000 W (12.5 A resistive only)
Display range: 32°F to 99°F (0°C to 70°C)
Setpoint range: 40°F to 80°F (5°C to 27°C)
Resolution: 1°F (1°C)
Storage: -4°F to 120°F (-20°C to 50°C)
Dimensions: 5.0 x 4.8 x 1.3 inches (126 x 121 x 33 mm)
Approval: c UL us
;
Honeywell warrants this product, excluding battery, to be free from defects in the
workmanship or materials, under normal use and service, for a period of five (5) years
from the date of purchase by the consumer. If at any time during the warranty period the
product is determined to be defective or malfunctions, Honeywell shall repair or replace it
(at Honeywell's option).
If the product is defective,
(i) return it, with a bill of sale or other dated proof of purchase, to the place from which
(ii) call Honeywell Customer Care at 1-800-468-1502. Customer Care will make the
This warranty does not cover removal or reinstallation costs. This warranty shall not
apply if it is shown by Honeywell that the defect or malfunction was caused by damage
which occurred while the product was in the possession of a consumer.
Honeywell's sole responsibility shall be to repair or replace the product within the terms
stated above. HONEYWELL SHALL NOT BE LIABLE FOR ANY LOSS OR DAMAGE OF
ANY KIND, INCLUDING ANY INCIDENTAL OR CONSEQUENTIAL DAMAGES
RESULTING, DIRECTLY OR INDIRECTLY, FROM ANY BREACH OF ANY WARRANTY,
EXPRESS OR IMPLIED, OR ANY OTHER FAILURE OF THIS PRODUCT. Some states
do not allow the exclusion or limitation of incidental or consequential damages, so this
limitation may not apply to you.
THIS WARRANTY IS THE ONLY EXPRESS WARRANTY HONEYWELL MAKES ON
THIS PRODUCT. THE DURATION OF ANY IMPLIED WARRANTIES, INCLUDING THE
WARRANTIES OF MERCHANTABILITY AND FITNESS FOR A PARTICULAR
PURPOSE, IS HEREBY LIMITED TO THE FIVE-YEAR DURATION OF THIS
WARRANTY. Some states do not allow limitations on how long an implied warranty lasts,
so the above limitation may not apply to you.
This warranty gives you specific legal rights, and you may have other rights which vary
from state to state.
If you have any questions concerning this warranty, please write Honeywell Customer
Relations, 1985 Douglas Dr, Golden Valley, MN 55422 or call 1-800-468-1502. In
Canada, write Retail Products ON15-02H, Honeywell Limited/Honeywell Limitée, 35
Dynamic Drive, Scarborough, Ontario M1V4Z9.
Specifications
Warranty
you purchased it, or
determination whether the product should be returned to the following address:
Honeywell Return Goods, Dock 4 MN10-3860, 1885 Douglas Dr N, Golden Valley,
MN 55422, or whether a replacement product can be sent to you.
Customer Assistance
Under normal operation, the thermostat housing
may reach a temperature between 95°F (35°C)
and 104°F (40°C).
Verify that the sticker on the thermostat’s screen
has been removed. If the thermostat is exposed to
air draft, eliminate the draft.
The thermostat was probably without power for
more than 5 hours.
Check that the thermostat is in automatic mode.
Check the schedule and clock settings.
The thermal protection device on the heater might
be open. This can happen if the heater is
obstructed by furniture or curtains and has overheated.
8.
9.
10.
If you have any questions about the operation of your thermostat, please go to http://
yourhome.honeywell.com, or call Honeywell Customer Care toll-free at 1-800-468-
1502.
As an ENERGY STAR® partner, Honeywell has
determined that this product meets the E
guidelines for energy efficiency.
NERGY STAR
TL6120 69-1908ES 1/16/06 2/2
Page 3

TL6120
Guía del usuario
5-2 Termostato programable
Visor
Hora y día
Pantalla
Botones arriba/abajo
Botón de programación
Botón de retorno
Botón modo
Botón día
Botón hora
Botón minuto
Empuje la tapa hacia abajo
n
El termostato TL6120 puede ser utilizado para controlar sistemas d e
calefacción eléctrica como calefacción por zócalo, suelo radiante,
techo radiante, convectores, calefactor de ventilación forzada, etc.
o
El reloj debe estar configurado cuando HORA destella en la pantalla.
Descripción
Configuración del reloj y del día
n Presione el botón para ajustar el día.
o Use los botones y para ajustar el reloj.
p Presione el botón para salir.
Aparece cuando el termostato
está configurado para
un calefactor de
ventilación forzada
Indicador del encendido
de la calefacción
Número de período
en modo automático
Modo
automático
* El termostato normalmente muestra la temperatura real (medida).
Para ver la temperatura establecida (control de ajuste), presione alguno de los botones
una vez.
1.
2.
El termostato se preprograma con el siguiente cronograma:
Período Lunes a viernes Sábado y domingo
Hora de inicio T emperatura Hora de inicio Temperatura
1
Levantarse
2
Irse
3
Regresar
Dormir
4
Para cancelar temporalmente el control de ajuste actual, establezca la
temperatura deseada mediante los botones . El nuevo control
de ajuste será utilizado hasta el comienzo del próximo período.
Para programar el cronograma:
6:00 a. m.
8:00 a. m.
6:00 p. m.
10:00 p. m.
Modo
manual
70 ºF (21 ºC)
62 ºF (16 ºC)
70 ºF (21 ºC)
62 ºF (16 ºC)
Aparece cuando se
muestra el control
de ajuste
Destella cuando se
restablece el reloj
Temperatura *
Aparece durante
una falla eléctrica
Número de período
en modo económico
Modo
económico
6:00 a. m.
-- --
-- --
10:00 p. m.
70 ºF (21 ºC)
62 ºF (16 ºC)
p
Para usar el Modo automático, presione el botón
hasta que se seleccione (trazado) AUTO en la pantalla.
Aparecerá el número del período actual.
En este modo, el termostato ajustará automáticamente
su control de ajuste de temperatura de acuerdo con el
período del día (levantarse, ir a trabajar, regresar a casa
y dormir).
Puede programar hasta 4 períodos en un día. Puede establecer
2 programas diferentes: uno para los días de semana (de lunes a viernes)
y otro para el fin de semana (sábado y domingo).
Modo automático (programable)
3.
n Presione el botón hasta que se seleccione AUTO.
o Presione el botón .
Cada vez que presione el botón , el termostato mostrará uno
de los períodos en el siguiente orden (de izquierda a derecha):
Lunes a viernes Sábado y domingo
MO TU WE TH FR SA SU
12341234
p
Establezca la hora de inicio para el período mediante los botones y .
NOTA: Para desactivar el período, presione el botón .
En lugar de mostrar la hora de inicio del período, el termostato
mostrará --:--. Durante la operación, el termostato se salteará
ese período.
q
Ajuste la temperatura para el período mediante los botones .
r Repita los pasos 2 a 4 para los períodos restantes.
s
Presione el botón para regresar el termostato a su pantalla normal.
TL6120 69-1908ES 1/16/06 1/2
Page 4

q
Modo manual (sostener)
Para usar este modo, presione el bot ón hasta que se
seleccione (trazado)
MAN
en pantalla. A continuación,
establezca la temperatura deseada mediante los
botones .
En este modo, las modificaciones realizadas al control
de ajuste de la temperatura deben realizarse manualmente.
r
Modo económico
Para usar el Modo económico, presione el botón hasta
que se seleccione (trazado)
ECONO
en pantalla. Este modo
es ideal para las residencias de fin de semana, ya que puede
ser utilizado de la siguiente manera: La temperatura se
mantiene en el nivel económico durante la mayor parte de su
ausencia y se aumenta a un nivel confortable en el momento
en el que usted suele llegar. Si no llega, la temperatura vuelve
al nivel económico hasta el próximo fin de semana.
El modo económico tiene dos períodos que deben ser establecidos
de la siguiente manera:
Período Ajuste de la temperatura
Ajuste de la hora de inicio
Establecer una hora en la que
Establecer en un nivel
1
confortable.
la temperatura debe comenzar
a aumentar hasta llegar a un nivel
confortable en el momento en que
usted suele llegar.
Configure una hora en que la
Configúrela en el nivel
2
económico.
temperatura debe empezar a bajar
hasta el nivel económico si usted
no llega.
El modo económico debe ser utilizado de la siguiente manera:
Coloque el termostato en modo económico durante su ausencia.
Cuando llega, coloque el termostato en modo automático o en
modo manual antes de que la temperatura descienda de nuevo
hasta el nivel económico.
Cuando se va, cambie el termostato de nuevo al modo
económico.
Para programar los dos períodos:
n Presione el botón hasta que se seleccione ECONO.
o Presione el botón . Se muestra el período 1.
p Establezca el día de inicio para el período mediante el botón .
q Ajuste la hora de inicio mediante los botones y .
r Ajuste la temperatura para el período mediante los botones .
s Presione para seleccionar el período 2.
t Repita los pasos 3 a 5 para ajustar día, hora y temperatura del
período 2.
u Presione para regresar el termostato a su pantalla normal.
s
Durante un corte de luz, el visor del termostato permanece encendido
aproximadamente los primeros 15 minutos durante los cuales aparece
el indicador LP (baja potencia). Los ajustes se guardan en la memoria.
Sin embargo, si la falla eléctrica excede las 5 horas, sólo se debe volver
a ajustar el reloj del termostato. Cuando vuelve la electricidad,
el termostato regresa al modo de operación anterior al corte de luz.
Corte de luz
4.
t
Resolución de problemas
7.
PROBLEMA SOLUCIONES
El termostato está caliente.
La temperatura que se
5.
6.
muestra es errónea.
La hora que se muestra
es errónea.
La temperatura no cambia de
acuerdo con el cronograma
programado.
El visor normal desaparece
y vuelve a aparecer después
de unos minutos.
u
Fuente: 240 VAC, 50/60 Hz
Carga mínima: 500 W (sólo resistiva 2 A)
Carga máxima: 3,000 W ( sólo resistiva 12,5 A)
Rango del visor: 32 ºF a 99 ºF (0 ºC a 70 ºC)
Rango de los controles de ajuste: 40 ºF a 80 ºF (5 ºC a 27 ºC)
Resolución: 1 ºF (1 ºC)
Almacenamiento: -4 ºF a 120 ºF (-20 ºC a 50 ºC)
Dimensiones: 5,0 x 4,8 x 1,3 pulgadas (126 mm x 121 mm x 33 mm)
Aprobación: c UL us
;
Honeywell garantiza este prod ucto, con excepción de la batería, por el término de cinco (5)
años contra cualquier defecto de fabricación y materiales, a partir de la fecha de compra por
parte del consumidor, bajo condiciones normales de uso y servicio normal. Si en cualquier
momento durante el período de garantía se verifica que el producto tiene un defecto o mal
funcionamiento, Honeywell lo reparará o reemplazará (a ele cció n de Honey well).
Si el producto tiene defectos,
(i) devuélvalo, con la factura de venta u otra prueba de compra fechada, en el lugar
(ii) comuníquese con el Centro de atención al cliente de Honeywell al 1-800-468-1502.
Esta garantía no cubre los costos de extracción o reinstalación. Esta garantía no se aplicará si
Honeywell demuestra que el defecto o mal funcionam iento fue causado por daños ocurridos
mientras el producto estaba en posesión del consumidor.
La única responsabilidad de Honeywell será reparar o reemplazar el producto dentro de los plazos
establecidos anteriormente. HONEYWELL NO RESPONDER A POR LA PERDIDA O DAÑO
DE NINGUN TIPO, INCLUIDO EL DAÑO INCIDENTAL O INDIRECTO QUE DERIVADO,
DIRECTA O INDIRECTAMENTE, DEL INCUMPLIMIENTO DE LAS GARANTIAS,
EXPRESAS O IMPLICITAS, O DE OTRAS FALLAS DE ESTE PRODUCTO.
no permiten la exclusión o limitación del daño incidental o indirecto, entonces esta limitación puede
no resultar aplicable a su caso.
LA PRESENTE GARANTIA ES LA UNICA GARANTIA EXPRESA QUE HONEYWELL
PROPORCIONA RESPECTO DE ESTE PRODUCTO. LA DURACION DE LAS GARANTIAS
IMPLICITAS, INCLUIDAS LAS GARANTIAS DE COMERCIABILIDAD Y APTITUD PARA UN
OBJETIVO PARTICULAR, ESTA LIMITADA A LA DURACION DE CINCO AÑOS DE LA
PRESENTE GARANTIA.
período de una garantía implícita, entonces la limitac ión anterior puede no r esult ar aplicable
a su caso.
Esta garantía le brinda derechos legales específicos, y usted podrá tener otros derechos
que varían según el estado.
Si tiene preguntas sobre la presente garantía, sírvase escribir a Honeywell Customer
Relations, 1985 Douglas Dr, Golden Valley, MN 55422 o llamar al 1-800-468-1502.
En Canadá, escriba a Retail Products ON15-02H, Honeywell Limited/Honeywell LimitŽe,
35 Dynamic Drive, Scarborough, Ontario M1V4Z9.
Especificaciones
Garantía
donde lo compró; o
Atención al cliente decidirá si se debe devolver el producto a la siguiente dirección:
Devolución de mercaderías de Honeywell, Dock 4 MN10-3860, 1885 Douglas Dr. N.,
Golden Valley, MN 55422, o si se le puede enviar un producto en reemplazo.
Algunos estados no permiten las limitaciones sobre la duración del
Atención al cliente
Cuando funciona normalmente, la carcasa del
termostato puede llegar a una temperatura
de entre 95 ºF (35 ºC) y 104 ºF (40 ºC).
Verifique que se haya extraído la calcomanía de
la pantalla del termostato. Si el termostato está
expuesto a una corriente de aire, corte esa corriente.
El termostato probablemente estuvo sin
electricidad durante más de 5 horas.
Verifique que el termostato esté en modo automático.
Verifique los ajustes del cronograma y del reloj.
El dispositivo de protección térmica del calefactor
podría estar abierto. Esto puede ocurrir si el calefactor
está obstruido por muebles o cortinas y se recalentó.
Algunos estados
8.
9.
10.
Si tiene preguntas sobre el funcionamiento de su termostato, por favor visite
http://yourhome.honeywell.com, o comuníquese con el número gratuito de Atención
al cliente de Honeywell 1-800-468-1502.
Como socio de ENERGY STAR®, Honeywell determinó
que este producto cumple con las pautas
de E
NERGY STAR de eficacia energética.
TL6120 69-1908ES 1/16/06 2/2
 Loading...