

Page 1

User Guide
VisionPRO® Wi-Fi Model TH8320WF
Touchscreen Programmable Thermostat
Page 2

69-2734EFS—03 1
Page 3

Welcome
Congratulations on your purchase of a
Honeywell Wi-Fi touchscreen programmable
thermostat. When registered to Honeywell’s
Total Connect Comfort Solutions, you can
remotely monitor and control the heating and
cooling system in your home or business—you
can stay connected to your comfort system
wherever you go.
Honeywell’s Total Connect Comfort is the
perfect solution if you travel frequently, own
a vacation home, a business or manage an
Investment property or if you are simply looking
for peace of mind.
Page 4

Table of contents
About your new thermostat
Home screen quick reference .....................5
Message center messages ......................... 6
Connecting to your Wi-Fi network ...............8
Registering your thermostat online ........... 13
Preset energy-saving schedules ............... 20
Operation
Setting the clock ........................................ 17
Setting the fan ........................................... 18
Selecting system mode ............................. 19
Adjusting program schedules .................... 21
Overriding schedules temporarily .............22
Overriding schedules permanently ........... 23
Setting vacation hold ................................. 24
Screen Lock .............................................. 25
Cleaning the screen .................................. 26
69-2734EFS—03 3
Setting filter reminder intervals ................. 27
Unregistering thermostat........................... 28
Disconnecting Wi-Fi .................................. 29
Special features ........................................30
Setting functions and options ....................31
System Setup
System setup ............................................ 29
Appendices
Frequently asked questions ......................37
Troubleshooting ......................................... 40
Limited warranty ........................................ 45
Page 5

Features of your Wi-Fi thermostat
With your new thermostat, you can:
• Connect to the Internet to monitor and control your heating/cooling system
• View and change your heating/cooling system settings
• View and set temperature and schedules
• Receive alerts via email and get automatic upgrades
Your new thermostat provides:
• Adaptive Intelligent Recovery (AIR) - the thermostat learns your system so it
can turn the heat or cool on early to reach your desired temperature at your
desired time.
• Compressor protection - the compressor waits a few minutes before restarting,
to prevent equipment damage.
• Heat/cool auto changeover - the thermostat automatically changes from
heating to cooling to keep you comfortable.
4 69-2734EFS—03
Page 6
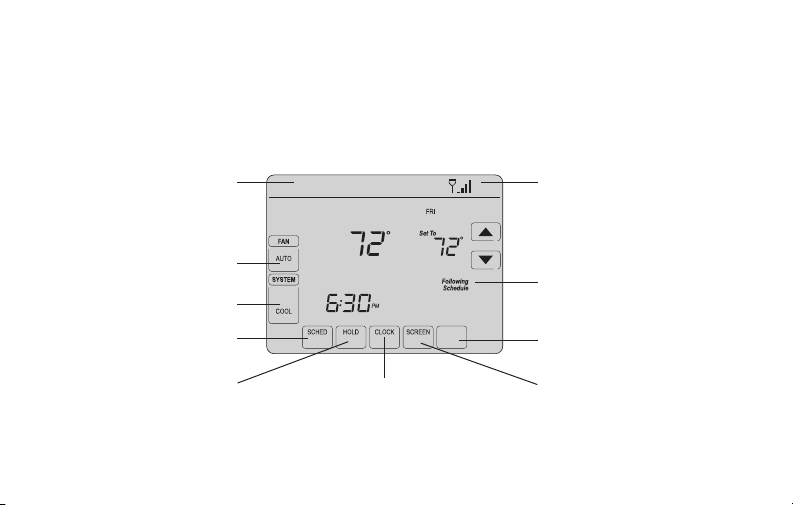
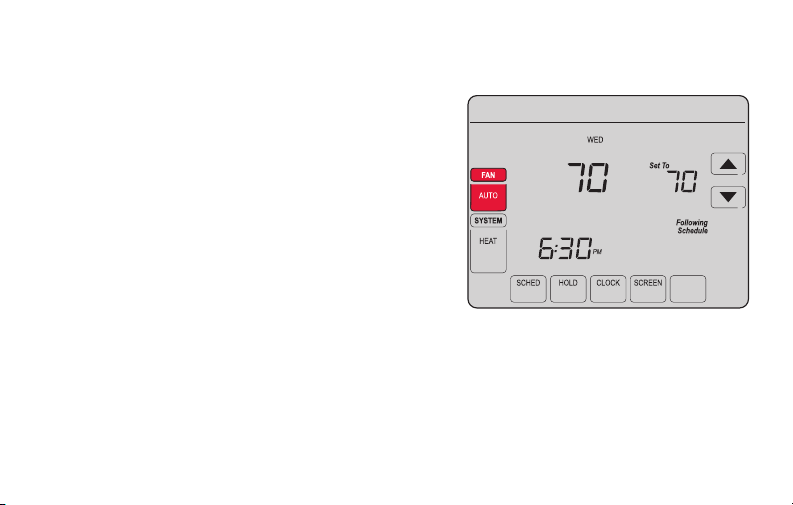
Home screen quick reference
Once your Wi-Fi thermostat is installed, it will display the home screen. Portions of this
display will change depending on how you are viewing it. To change settings, simply press
the appropriate area lightly with your finger.
Message center
Inside
Wi-Fi status
Select fan mode
Schedule is on (does not
Select system mode
Program schedules
Override schedule
MORE
Set clock
display when off)
M31565
Additional settings
Lock screen for cleaning
Unless you change the lighting function, the screen is always lit at low intensity. When you
touch the screen, the screen brightens.
69-2734EFS—03 5
Page 7
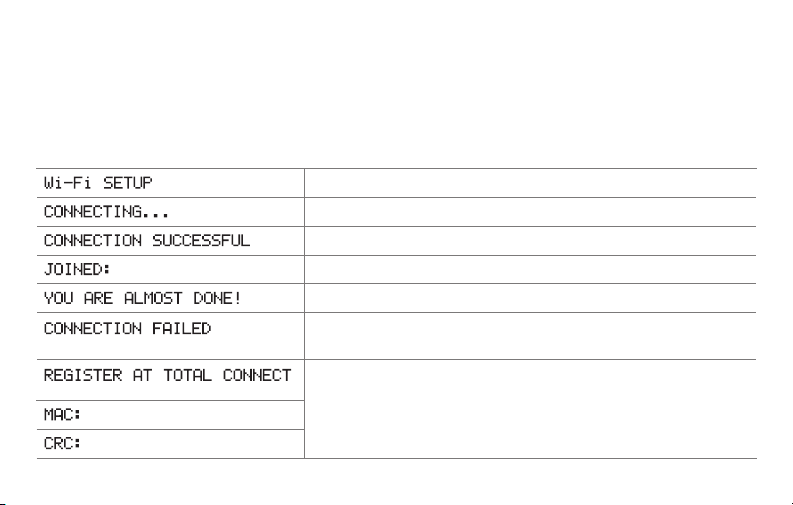
Message center messages
The Message Center at the top of the screen communicates Wi-Fi connection and
registration status. It also displays the MAC ID and MAC CRC for registering the
thermostat at mytotalconnectcomfort.com
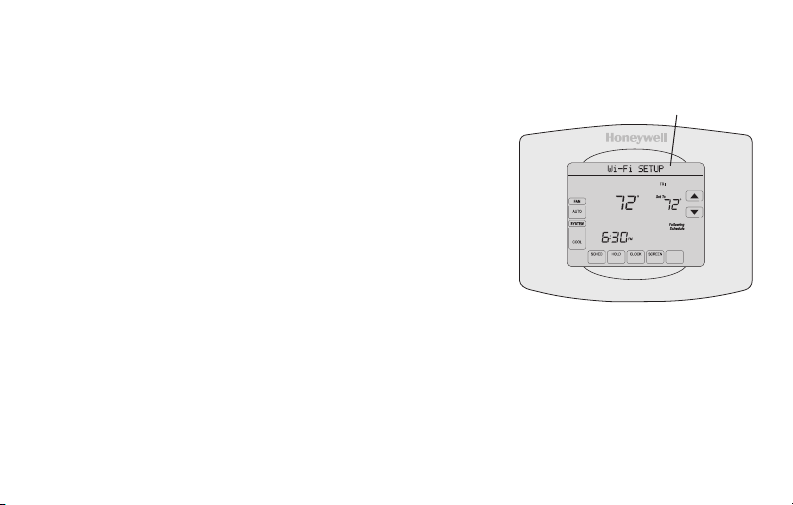
Displayed before you begin Wi-Fi setup.
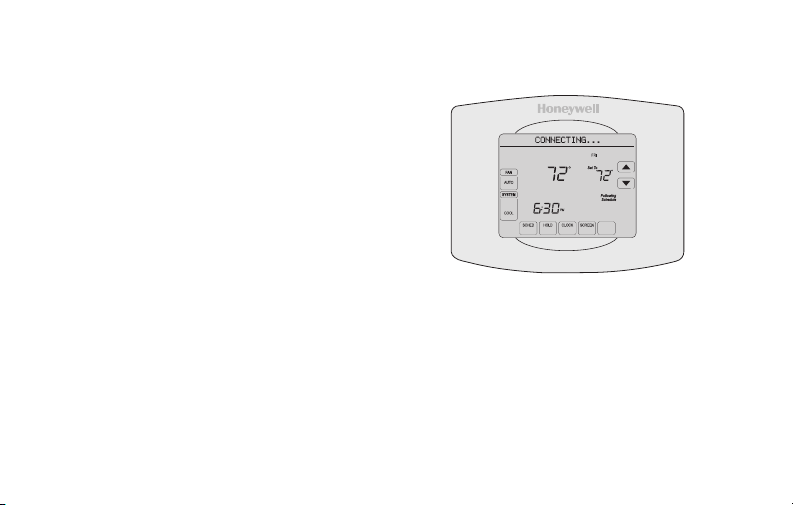
Displayed while connecting to the Wi-Fi network.
Displayed after connecting to the Wi-Fi network.
[Wi-Fi network name]
[Found on your ID card]
[Found on your ID card]
6 69-2734EFS—03
Displayed when connected to the Wi-Fi network.
Displayed when Wi-Fi connection is complete.
Displayed when the thermostat fails to establish a connection
to the Wi-Fi network.
Displayed when the thermostat is connected to the Wi-Fi
network but not registered at mytotalconnectcomfort.com
Displays the thermostat’s MAC ID and MAC CRC for
registering at mytotalconnectcomfort.com
Page 8

Message center messages
Displayed when the thermostat is registered at
mytotalconnectcomfort.com
Displayed when the thermostat is removed from your Total
Connect Comfort account.
Wi-Fi signal strength. Displayed when the thermostat
is connected to the Wi-Fi network and registered at
mytotalconnectcomfort.com
Displayed if there is no Wi-Fi signal.
Displayed if the home Wi-Fi password is entered incorrectly.
Displayed if no IP Address is supplied by the router.
Displayed if there is no Wi-Fi signal.
69-2734EFS—03 7
Page 9

Connecting to your Wi-Fi network
Connect your wireless device to your home network. Any of these device types will work:
• Tablet (recommended)
• Laptop (recommended)
• Smartphone
If you get stuck... At any point in this process, restart the thermostat by removing
the thermostat from the wallplate, wait for 5 seconds, and snap it back into place. Go
to Step 1 in this procedure, starting on page”Connecting to your Wi-Fi network” on
page 9.
8 69-2734EFS—03
Page 10
Connecting to your Wi-Fi network
1 Connect to your thermostat.
1a Make sure the thermostat message center displays
Wi-Fi SETUP
1b On the wireless device (tablet, laptop,
smartphone), view the list of available Wi-Fi
networks.
1c Connect to the network called
NewThermostat_123456 (the number will vary).
Note: If you are asked to specify a home, public, or
office network, select Home Network.
69-2734EFS—03 9
Message Center
Inside
MORE
M31566
Page 11

Connecting to your Wi-Fi network
2 Join your home network.
2a Open your web browser to access the
Thermostat Wi-Fi Setup page. The browser
should automatically direct you to the correct
page; if it does not, go to http://192.168.1.1
2b Find the name of your home network on this
page and select it.
Note: Some routers have enhanced features such as
guest networks; use your home network.
2c Complete the instructions for joining your Wi-Fi
network and click on the Connect button.
(Depending on your network setup, you may see
an instruction such as Enter Password for your home network.)
Note: If you did not correctly connect to the thermostat, you may see your home
router page. If so, return to Step 1.
10 69-2734EFS—03
M31567
Page 12

Connecting to your Wi-Fi network
Note: If your Wi-Fi network does not appear in the list on the Thermostat Wi-Fi Setup
page:
• Try performing a network rescan by pressing the Rescan button. This is helpful in
areas with a lot of networks.
• If you are connecting to a hidden network, then enter the network SSID in the
textbox, select the encryption type from the drop down menu, and click on the
Add button. This manually adds the network to the top of the list. Click on the new
network in the list and enter the password if necessary. Click on Connect to join the
network.
69-2734EFS—03 11
Page 13
Connecting to your Wi-Fi network
3 Make sure your thermostat is connected.
The message center on your thermostat
will now display CONNECTING… for up
to 30 seconds.
3a Look at the thermostat display. Verify
that the message center displays one
of the following:
CONNECTION SUCCESSFUL
JOINED: [WI-FI NETWORK NAME]
YOU ARE ALMOST DONE
REGISTER AT TOTAL CONNECT
If you don’t see these messages,
see page 8.
Note: If you see CONNECTION
FAILURE or Wi-Fi SETUP in the
message center, confirm you
correctly entered your home
network password in step 2.
To register online for remote access to
your thermostat continue on page 13.
12 69-2734EFS—03
Inside
MORE
M31568
Page 14

Registering your thermostat online
To view and set your Wi-Fi thermostat remotely,
you must have a Total Connect Comfort account.
Follow the instructions below.
1 Open the Total Connect Comfort web site.
Go to www.mytotalconnectcomfort.com
69-2734EFS—03 13
M31570
Page 15

Registering your thermostat online
2 Login or create an account.
If you have an account, click Login
– or –
click Create An Account
2a Follow the instructions on the screen.
2b Check your email for a response from
My Total Connect Comfort. This may
take several minutes.
Note: If you do not receive a response,
check your junk mailbox or use an
alternate e-mail address.
2c Follow activation instructions in the
email.
2d Log in.
14 69-2734EFS—03
M31571
Page 16

Registering your thermostat online
3 Register your Wi-Fi thermostat.
After you are logged in to your Total Connect Comfort account,
register your thermostat.
3a Follow the instructions on
the screen. After adding your
thermostat location, you must
enter the thermostat’s unique
identifiers:
• MACID
• MACCRC
Note: These IDs are listed on
the Thermostat ID Card included
in the thermostat package. The
IDs are not case sensitive.
69-2734EFS—03 15
Thermostat ID Card
Use the MAC ID and CRC ID to register
this product at mytotalconnectcomfort.com
Carte d’identification de thermostat
Utilisez l’identication MAC et l’identication CRC pour
enregistrer ce produit à mytotalconnectcomfort.com
Tarjeta de identificación del termostato
Utilice la identicación MAC y la identicación CRC para
inscribir este producto en mytotalconnectcomfort.com
® U.S. Registered Trademark.
© 2012 Honeywell International Inc.
69-2723EFS—01 M.S. 04-12
Printed in U.S.A.
MAC ID MAC CRC
HONEYWELL MODEL: TH8320WF
MAC ID: MAC CRC:
69-2723EFS-01
Page 17
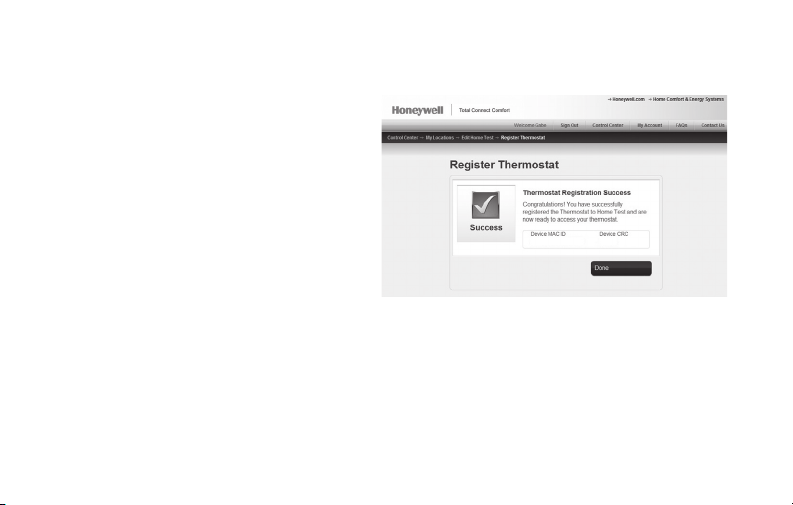
Registering your thermostat online
3b Notice that when the thermostat
is successfully registered,
the Total Connect Comfort
registration screen will display a
SUCCESS message.
In the thermostat message
center you will see:
CONGRATULATIONS
SETUP COMPLETE
16 69-2734EFS—03
Page 18
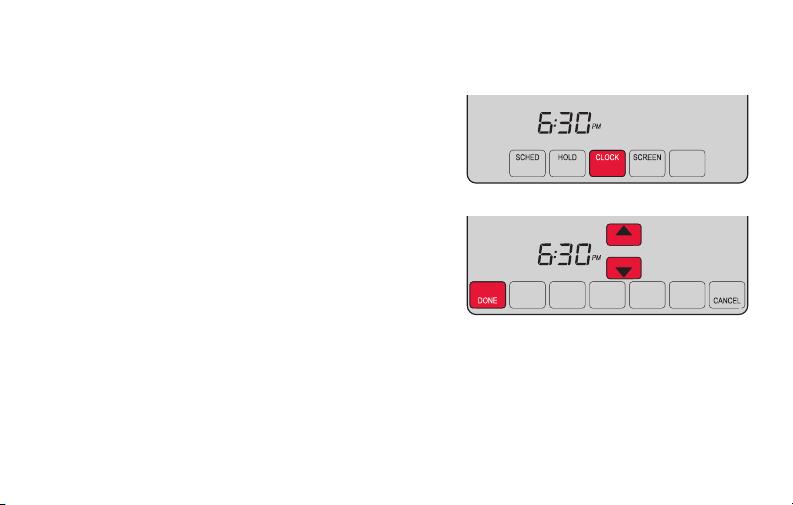
Setting the clock
1 Press CLOCK to display setting arrows.
2 Press s or t to adjust the time. (You can
advance the time more quickly by holding the
s or t buttons.)
3 Press DONE to save and exit (or press
CANCEL to exit without changing the time).
Note: When registered to Total Connect
Comfort the thermostat automatically sets
the time on the thermostat as well as
automatically adjusting for Daylight Savings
Time.
Note: To change the current week day format,
see “Setting functions and options” on page
31.
69-2734EFS—03 17
MORE
Page 19
Setting the fan
1 Press FAN to select fan operation.
2 Press FAN again to select ON or AUTO (toggle
to re-select). The selected option blinks.
3 Press DONE to save setting. Your selection
appears under FAN.
ON: Fan is always on.
AUTO: Fan runs only when the heating or
cooling system is on.
CIRC: Fan runs randomly approximately
35% of the time. Use this setting for
improved air circulation or for more
efficient central air cleaning when you do
not want the fan running continuously.
18 69-2734EFS—03
Inside
MORE
MCR31582
Page 20
Selecting system mode
MCR31583
1 Press SYSTEM to display options.
2 Press SYSTEM again to select an option.
You may need to press two or three times to
make a selection—the selected option blinks.
3 Press DONE to save setting.
Possible system modes:
HEAT: Controls only the heating system.
COOL: Controls only the cooling system.
OFF: Heating/cooling systems are off.
AUTO: Selects heating or cooling
depending on the indoor temperature.
EM HEAT (heat pumps with aux. heat):
Controls auxiliary/emergency heat.
Compressor is locked out.
Inside
MORE
Note: The AUTO and EM HEAT
system settings may not
appear, depending on how
your thermostat was installed.
69-2734EFS—03 19
Page 21
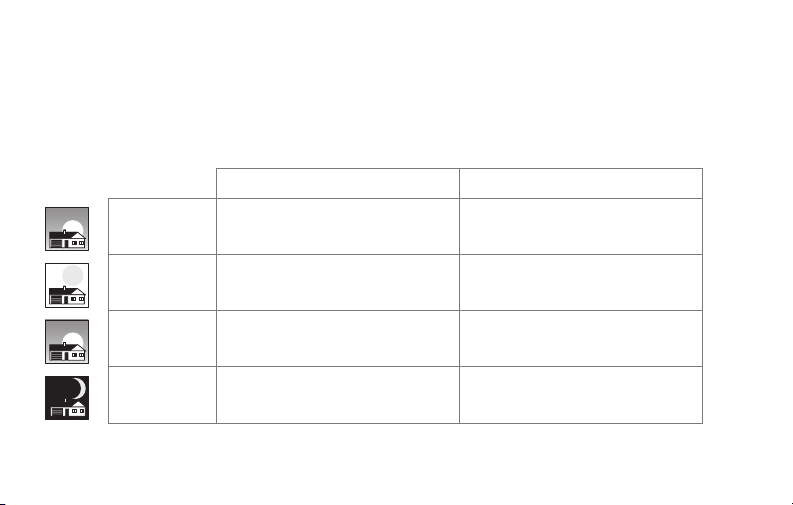
Preset energy-saving schedules
This thermostat is pre-set with energy-saving program settings for four time periods.
Using the default settings can reduce your heating/cooling expenses if used as directed.
Savings may vary depending on geographic region and usage.
Default Heat Settings Default Cool Settings
WAKE
6:00 am
LEAVE
8:00 am
RETURN
6:00 pm
SLEEP
10:00 pm
To change the settings, see pages 21–24.
20 69-2734EFS—03
70
62
70
62
°
°
°
°
78
85
78
82
°
°
°
°
Page 22
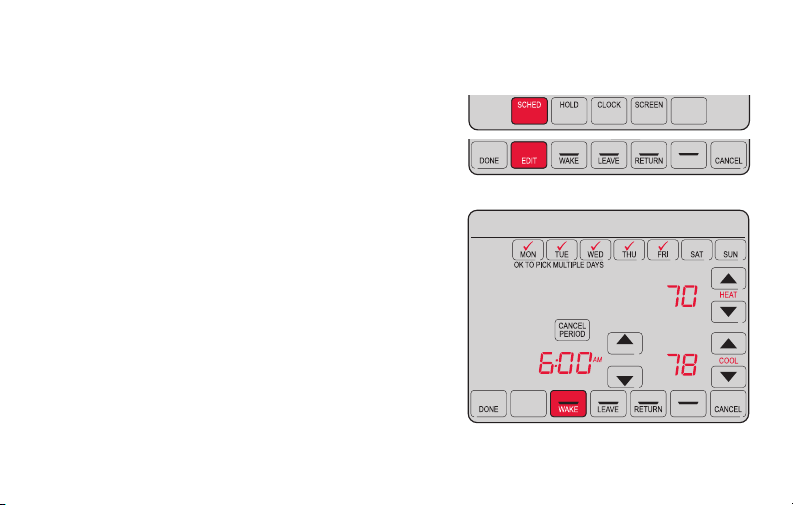
Adjusting program schedules
1 Press SCHED, then EDIT. Screen displays day
buttons at top.
2 Press day buttons (MON–SUN) to select days.
3 Press s or t to set Wake time for selected
day(s).
4 Press s or t to set Heat and Cool
temperature for this time period.
5 Press another period (LEAVE, RETURN, SLEEP)
and set time and temperatures for each.
6 Press DONE to save and exit (or press CANCEL
to exit without saving changes).
Note: You can press CANCEL PERIOD to eliminate
any unwanted time period.
69-2734EFS—03 21
MORE
SLEEP
SLEEP
MCR31584
Page 23
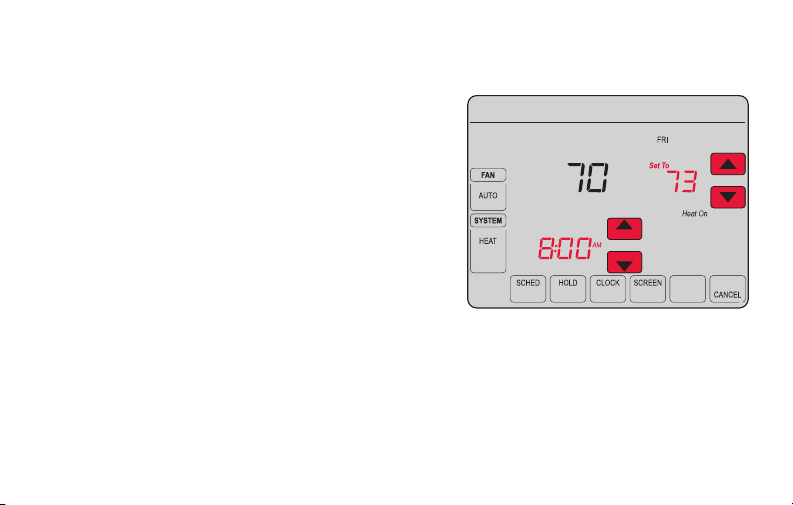
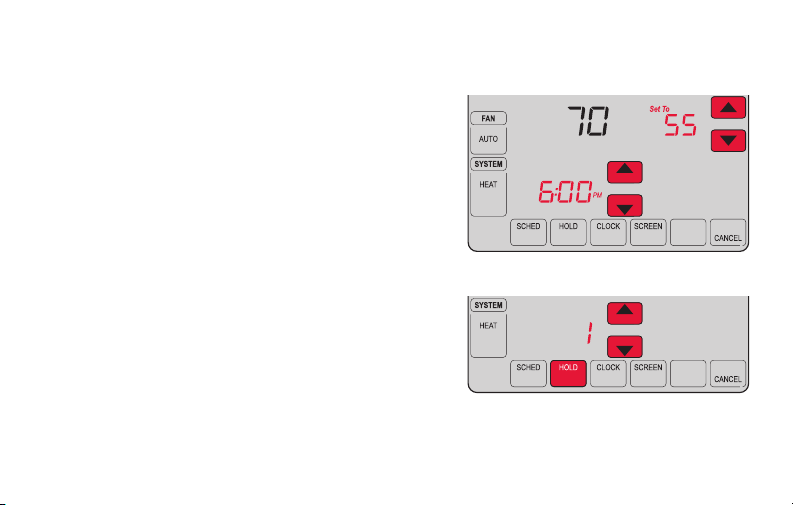
Overriding schedules temporarily
1 On the home screen, press s or t to
immediately adjust the temperature.
2 Adjust the time to when you want the hold
to end (the default is the end of the current
period).
The new setting will be maintained until the
time shown under Hold Until. When the timer
expires, the schedule will resume, and the
temperature will return to the setting for the
current time period.
To cancel the temporary setting at any time,
press CANCEL (or SCHED). The program
schedule will resume.
22 69-2734EFS—03
Inside
Temporary Hold
Hold Until
MORE
MCR31556
Page 24
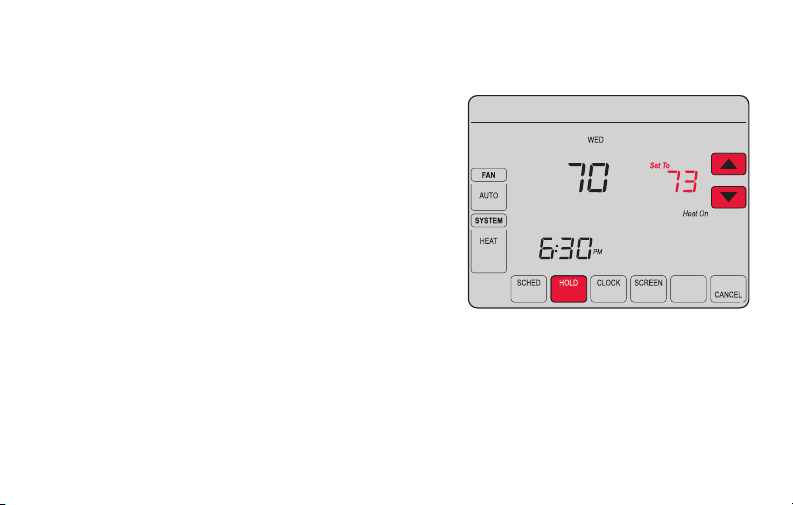
Overriding schedules permanently
1 Press HOLD to permanently adjust the
temperature. This will turn off the program
schedule.
2 Whatever temperature you set will be
maintained 24 hours a day until you
manually change it or press CANCEL
(or SCHED) to cancel “Hold” and resume
the program schedule.
69-2734EFS—03 23
Inside
Permanent Hold
MORE
MCR31585
Page 25
Setting vacation hold
Use this function to suspend the program schedule
Inside
while you are away for an extended period.
1 Press s or t to set the temperature.
2 Press s or t to set the time of day you want
Hold Until
the schedule to resume on the day you return.
3 Press HOLD twice. Hold Until appears.
MORE
4 Press s or t to select the number of days.
The selected temperature will be maintained 24
hours a day for the number of days you select.
Hold Until
DAYS
After the selected number of days has elapsed, the
previously programmed schedule will resume at
MORE
the time you set.
Note: You can press CANCEL (or SCHED) to resume
normal schedule.
24 69-2734EFS—03
MCR31558
Page 26
Screen lock
WED
FAN
Inside
AUTO
70
SYSTEM
HEAT
6:00
SCHED HOLD CLOCK SCREEN MORE
See advanced function
0670 (page 25) for
screen lock options
69-2734EFS—03 25
SCREEN LOCKED
Set To
70
Following
Schedule
PM
M29357
To prevent tampering, the screen can be partially
or fully locked.
When partially locked, the screen displays
SCREEN LOCKED for several seconds if a locked
key is pressed. To unlock the screen, press any
unlocked key while SCREEN LOCKED appears on
the screen.
When the screen is fully locked, no keys function.
To lock or unlock the screen, see advanced
function 0670 on page 25.
Page 27
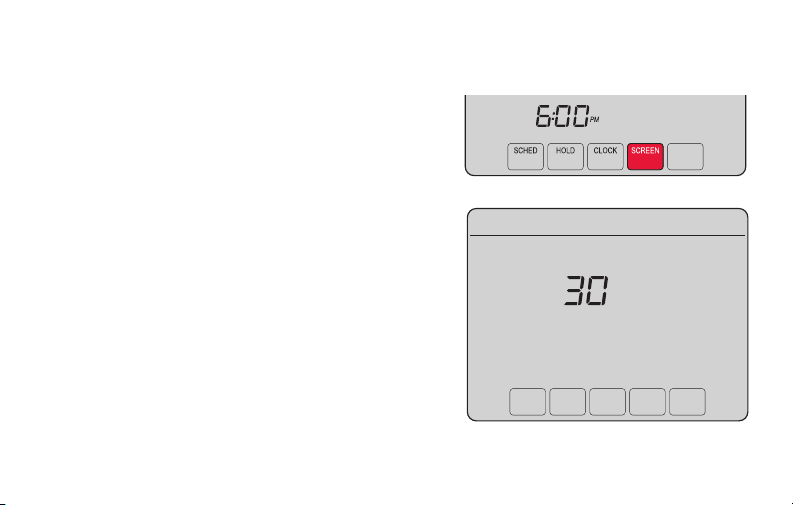
Cleaning the screen
1 Press SCREEN to lock the screen for cleaning.
The screen will remain locked for 30 seconds
so you can clean the screen without changing
any settings.
2 After 30 seconds, press DONE to resume
normal operation, or press SCREEN again if
you require more time for cleaning.
Note: Do not spray any liquid directly on the
thermostat. Spray liquid onto a cloth, then use
the damp cloth to clean the screen. Use water
or household glass cleaner. Avoid abrasive
cleansers.
26 69-2734EFS—03
MORE
MCR31560
Page 28
Setting filter reminder intervals
Inside
If activated during installation, the filter reminder
alerts you with a message above the time when
it is time to replace your filter.
Press RESET after changing the filter, to restart
the timer.
To change the reminder interval:
1 Press MORE, then EDIT.
2 Press s or t to select the desired interval
(in days), then press DONE.
3 Press RESET.
4 Press DONE to save and exit.
Note: System setting function 0500 governs the
filter interval. See “User setup” on page 36.
69-2734EFS—03 27
RESET
CHANGE FILTER
MORE
SLEEP
DAYS
FILTER
MCR31559
Page 29
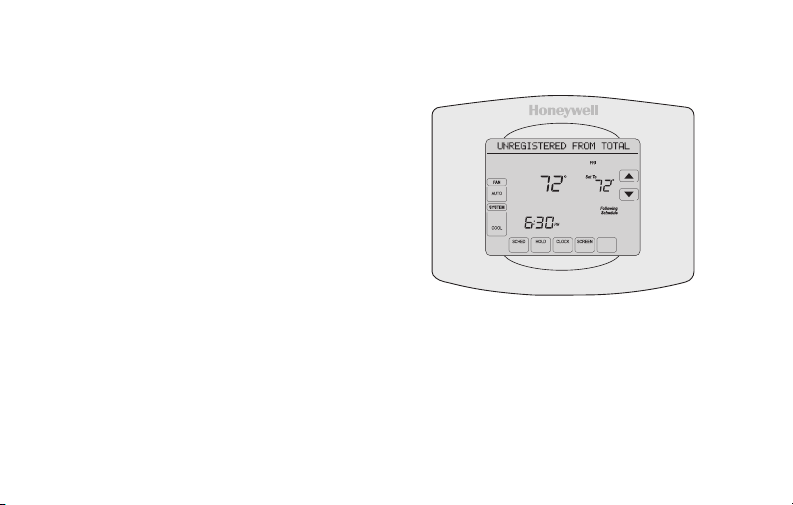
Unregistering thermostat
If you remove the thermostat from your
Total Connect Comfort website account (for
example, you’re moving and leaving the
thermostat behind), the message center
will scroll UNREGISTERED FROM TOTAL
CONNECT for 3 minutes.
After that, it will alternate displaying
REGISTER AT TOTAL CONNECT, the MAC
ID and the MAC CRC.
28 69-2734EFS—03
Inside
MORE
M31572
Page 30
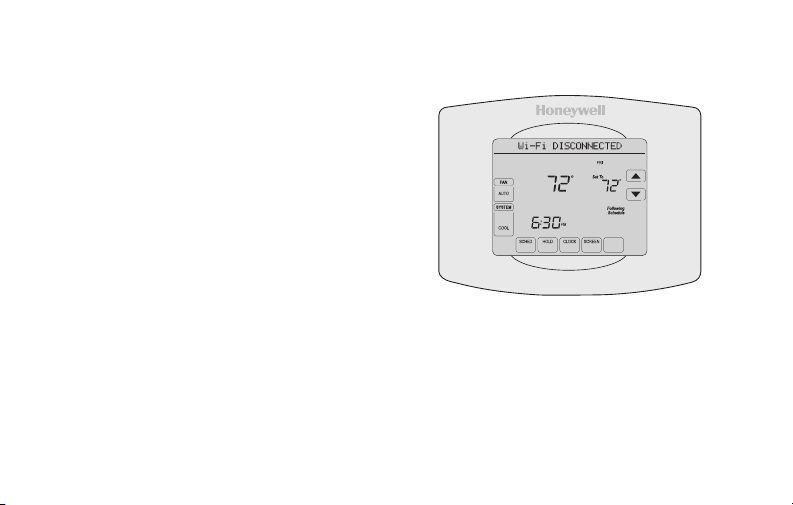
Disconnecting Wi-Fi
If you disconnect the thermostat from your
Wi-Fi network (for example, you’re replacing
your router):
1 Enter system setup (see page 31).
2 Change setting 900 to 0 (see page 36).
The Message Center will display Wi-Fi
DISCONNECTED for 1 minute.
After that it will display Wi-Fi SETUP.
69-2734EFS—03 29
Inside
MORE
M31573
Page 31

Special features
Adaptive Intelligent Recovery (AIR)
This feature allows the thermostat to “learn” how long the heating/cooling system takes to reach
programmed temperature settings, so the temperature is reached at the time you set. For example:
Set the Wake time to 6:00 am, and the temperature to 70°. The heat will come on before 6:00 am,
so the temperature is 70° by 6:00 am. The message “Recovery” is displayed when the system is
activated before a scheduled time period.
Note: System setting function 0530 controls AIR. See “User setup” on page 35.
Compressor protection
This feature forces the compressor to wait a few minutes before restarting, to prevent equipment
damage. During the wait time, the message “Wait” is displayed on screen.
Auto changeover
This feature is used in climates where both air conditioning and heating are used on the same day.
When the system is set to AUTO, the thermostat automatically selects heating or cooling depending
on the indoor temperature. Heat and cool settings must be at least 3 degrees apart. The thermostat
will automatically adjust settings to maintain this 3-degree separation.
Note: System setting function 0300 controls Auto changeover.
30 69-2734EFS—03
Page 32

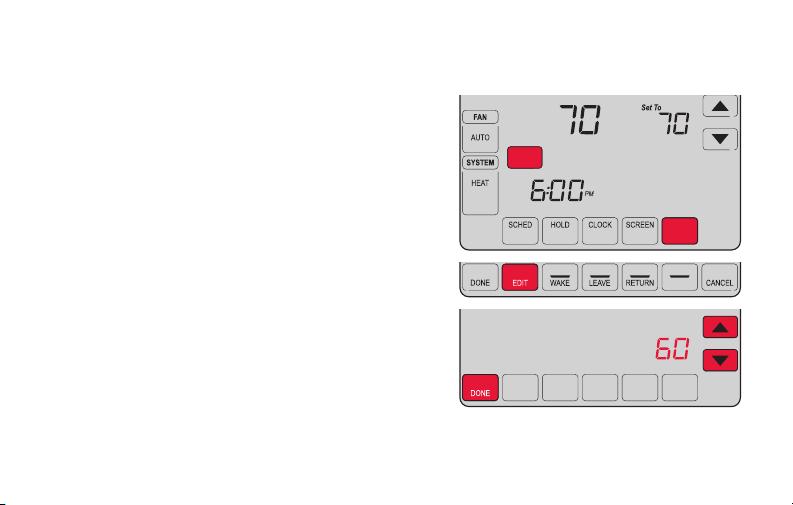
Setting functions and options
You can change options for a number of system functions. Available functions depend on
the type of system you have. The functions, designated with four-digit numbers, along with
available options are described on pages 32–36.
This thermostat is pre-set for a single-stage heating/cooling system.
Setting function 0170 for a heat pump will adjust the default settings.
1 Press SYSTEM. You’ll see several blank buttons
on the bottom of the display.
2 Press and hold the center blank key for
approximately five seconds until screen
changes.
3 Cycle through the functions, press st next to
the four digit number on the left.
4 As needed, change options for any function by
pressing st next to the number on the right.
5 When you have made all changes, press DONE
to save and exit.
69-2734EFS—03 31
SYSTEM
HEAT
DONE CANCEL
DONE
6:30
0120
PM
20
MCR31562
MCR31563
Page 33

User setup
Function Settings & Options
Device Name
0112
This name will
identify the
thermostat when you
view it remotely.
If you register
multiple thermostats,
give each one a
different name.
32 69-2734EFS—03
52 = Thermostat
1 Basement 18 Fireplace 35 Media Room 52 Thermostat
2 Bathroom 19 Foyer 36 Music Room 53 Upper Level
3 Bathroom 1 20 Game Room 37 Nursery 54 Utility Room
4 Bathroom 2 21 Garage 38 Office 55 Walk In Closet
5 Bathroom 3 22 Great Room 39 Office 1 56 Wine Cellar
6 Bedroom 23 Guest Room 40 Office 2 57 Workshop
7 Bedroom 1 24 Gym 41 Pantry 64 Conference Room
8 Bedroom 2 25 Kid's Room 42 Play Room 65 Dressing Room
9 Bedroom 3 26 Kitchen 43 Pool Room 66 Meeting Room
10 Bedroom 4 27 Kitchen 1 44 Porch 67 Machine Room
11 Boat House 28 Kitchen 2 45 Rec Room 68 Open Area 1
12 Bonus Room 29 Laundry Room 46 Sewing Room 69 Open Area 2
13 Computer Room 30 Library 47 Spa 70 Server 1
14 Den 31 Living Room 48 Storage Room 71 Server 2
15 Dining Room 32 Lower Level 49 Studio 72 Stock Room
16 Exercise Room 33 Master Bath 50 Sun Room
17 Family Room 34 Master Bed 51 Theater
Page 34

User setup
Function Settings & Options
Year Setting
0120
(rst two digits)
Year Setting
0130
(last two digits)
Month Setting 01–12 (i.e., January–December)
0140
Date Setting 01–31
0150
Schedule Options
0160
Restore Schedule
0165
Defaults
Backlight
0280
69-2734EFS—03 33
20 = Year 20xx
21 = Year 21xx
01–99 (i.e., 2001–2099)
4 Program schedule is on (7-day programmable).
0 Program schedule is off. Thermostat can not be programmed.
0 Continue using programmed schedule.
1 Restore thermostat program to energy saving settings
0 Backlight off, then on for approximately 8 seconds after keypress.
1 Backlight always on low intensity, full bright after keypress.
Page 35

User setup
Function Settings & Options
Temperature For-
0320
mat (°F/°C)
Automatic Daylight
0330
Saving Time Adjustment
Filter Change
0500
Reminder
The reminder
appears after
selected number of
days run time not
actual time.
34 69-2734EFS—03
0 Fahrenheit
1 Celsius
0 Off
1 On
0 Off (no reminder)
1 Reminder after 10-day run time (about 1 calendar month)
2 Reminder after 30-day run time (about 3 calendar months)
3 Reminder after 60-day run time (about 6 calendar months)
4 Reminder after 90-day run time (about 9 calendar months)
5 Reminder after 120-day run time (about 1 calendar year)
6 Reminder after 180-day run time (about 18 calendar months)
7 Reminder after 270-day run time (about 2 calendar years)
8 Reminder after 365-day run time (about 3 calendar years)
Page 36

User setup
Function Settings & Options
Humidier Pad
0510
Replacement Reminder
UV Lamp Replace-
0520
ment Reminder
Adaptive Intelligent
0530
Recovery (AIR)
0 Disabled
1 30-day run time (about 3 months)
2 60-day run time (about 6 months)
3 90-day run time (about 9 months)
0 Disabled
1 365 days
2 730 days
1 On
0 Off
Clock Format
0640
69-2734EFS—03 35
12 12-hour clock (i.e., “3:30 pm”)
24 24-hour clock (i.e., “15:30”)
Page 37

User setup
Function Settings & Options
Keypad lock
0670
Restore Original
0710
Settings
Wi-Fi On/Off
0890
Wi-Fi Connection
0900
36 69-2734EFS—03
0 Keypad unlocked (fully functional)
1 Partially locked (access to temperature settings only)
2 Fully locked
0 No
1 Disconnects thermostat from Wi-Fi and restores original settings (erases
customizations).
1 Wi-Fi is on and can be connected to a Wi-Fi network.
0 Wi-Fi is off. Thermostat cannot be connected to a Wi-Fi network. If you
are not connecting the thermostat to a Wi-Fi network this will remove the
text “Wi-Fi Setup” from the messaging center.
1 Connected to Wi-Fi network. This is set automatically when the
thermostat is connected to the Wi-Fi network.
0 Set to 0 to disconnect from the Wi-Fi network.
Page 38

Frequently asked questions
:Q Will my thermostat still work if I lose my Wi-Fi connection?
:A Yes, the thermostat will operate your heating and/or cooling system with or without Wi-Fi.
:Q How do I find the password to my router?
:A Contact the manufacturer of the router or check the router documentation.
:Q Why am I not seeing my Wi-Fi setup page?
:A You are probably connected only to your router, not to your thermostat. Try connecting to the
thermostat again.
:Q Why isn’t my thermostat connecting to my Wi-Fi router even though it is very close to the
thermostat?
:A Verify that the password entered for the Wi-Fi router is correct.
69-2734EFS—03 37
Page 39

Frequently asked questions
:Q Where can I find my MAC ID and MAC CRC codes?
:A The MAC ID and MAC CRC will show in the message center of the thermostat. The numbers are
also included on a card packed with the thermostat or on the back of the thermostat (visible when
removed from wallplate). Each thermostat has a unique MAC ID and MAC CRC.
:Q My thermostat is unable to register to the Total Connect Comfort website.
:A Verify that the thermostat is correctly enrolled on your homeWi-Fi network. The message center
will display “CONNECTION SUCCESSFUL” or “REGISTER AT TOTAL CONNECT.” You might also
see the Wi-Fi Signal strength icon. Verify that the Wi-Fi router has a good internet connection. On
your computer, verify that you can open the site at mytotalconnectcomfort.com If you cannot open
the site, switch off the internet modem for a few seconds, then power it back on.
38 69-2734EFS—03
Page 40

Frequently asked questions
:Q I registered on the Total Connect Comfort website but was unable to login using my new
account.
:A Check your email and ensure that you received an activation email. Follow the instructions to
activate your account and then login to the website.
:Q I have signed up on Total Connect Comfort website and have not received a confirmation
email.
:A Check for the email in your Junk or Deleted folder.
:Q Is there a way to extend the signal strength?
:A Most standard routers can be set up to be a repeater. You can also purchase and install a Wi-Fi
repeater.
69-2734EFS—03 39
Page 41

Troubleshooting
If you have difficulty with your thermostat, please try the following suggestions.
Most problems can be corrected quickly and easily.
Display is
blank
“Wait” appears
on the screen
• Checkcircuitbreakerandresetifnecessary.
• Makesurepowerswitchatheatingandcoolingsystemison.
• Makesurefurnacedoorisclosedsecurely.
• Compressorprotectionfeatureisengaged.Wait5minutesforthesystemto
restart safely, without damage to the compressor.
Button on
lower right of
screen is blank
Red light is on • IfthermostatisinEmergencyHeatmodetheredlightisnormal.Itshows
40 69-2734EFS—03
• Thisbuttonwillremainblankunlessthefurnacefilter,humidifierpad,orUV
bulb change reminder is activated or if an outdoor temperature sensor is
wired to your thermostat.
that the thermostat is in emergency heat mode.
• IfthermostatisnotinEmergencyHeatmode,contactaqualifiedservice
contractor for repair.
Page 42

Troubleshooting
Heating or
cooling system
does not
respond
• PressSYSTEM to set system to Heat. Make sure the temperature is set
higher than the Inside temperature.
• PressSYSTEM to set system to Cool. Make sure the temperature is set lower
than the Inside temperature.
• Checkcircuitbreakerandresetifnecessary.
• Makesurepowerswitchatheating&coolingsystemison.
• Makesurefurnacedoorisclosedsecurely.
• If“Wait”isdisplayed,thecompressorprotectiontimerison.Wait5minutes
for the system to restart safely, without damaging the compressor (see page
30).
Need help?
Visit http://yourhome.honeywell.com or call 1-855-733-5465 for assistance.
69-2734EFS—03 41
Page 43

Glossary
MAC ID, MAC CRC
Alphanumeric codes that uniquely identify your thermostat.
42 69-2734EFS—03
Page 44

Regulatory information
FCC Compliance Statement (Part 15.19) (USA only)
This device complies with Part 15 of the FCC Rules.
Operation is subject to the following two conditions:
1 This device may not cause harmful interference, and
2 This device must accept any interference received,
including interference that may cause undesired
operation.
FCC Warning (Part 15.21) (USA only)
Changes or modifications not expressly approved by the
party responsible for compliance could void the user’s
authority to operate the equipment.
FCC Interference Statement (Part 15.105 (b))
(USA only)
This equipment has been tested and found to comply
with the limits for a Class B digital device, pursuant to
Part 15 of the FCC Rules. These limits are designed
to provide reasonable protection against harmful
interference in a residential installation. This equipment
generates uses and can radiate radio frequency energy
and, if not installed and used in accordance with the
69-2734EFS—03 43
instructions, may cause harmful interference to radio
communications. However, there is no guarantee that
interference will not occur in a particular installation. If
this equipment does cause harmful interference to radio
or television reception, which can be determined by
turning the equipment off and on, the user is encouraged
to try to correct the interference by one of the following
measures:
• Reorientorrelocatethereceivingantenna.
• Increasetheseparationbetweentheequipmentand
receiver.
• Connecttheequipmentintoanoutletonacircuit
different from that to which the receiver is connected.
• Consultthedealeroranexperiencedradio/TV
technician for help.
Page 45

Regulatory information
Thermostats
To comply with FCC and Industry Canada RF exposure
limits for general population/ uncontrolled exposure, the
antenna(s) used for these transmitters must be installed
to provide a separation distance of at least 20 cm from
all persons and must not be co-located or operating in
conjunction with any other antenna or transmitter.
Section 7.1.2 of RSS-GEN
Under Industry Canada regulations, this radio transmitter
may only operate using an antenna of type and
maximum (or lesser) gain approved for the transmitter by
Industry Canada. To reduce potential radio interference
to other users, the antenna type and its gain should
be so chosen that the equivalent isotropically radiated
power (e.i.r.p.) is not more than that necessary for
successful communication.
Section 7.1.3 of RSS-GEN
Operation is subject to the following two conditions:
1 this device may not cause interference, and
2 this device must accept any interference, including
interference that may cause undesired operation of the
device.
44 69-2734EFS—03
Page 46

5-year limited warranty
Honeywell warrants this product, excluding battery, to be free from defects in the workmanship or materials, under normal use and
service, for a period of five (5) years from the date of purchase by the consumer. If at any time during the warranty period the product
is determined to be defective or malfunctions, Honeywell shall repair or replace it (at Honeywell’s option).
If the product is defective,
(i) return it, with a bill of sale or other dated proof of purchase, to the place from which you purchased it; or
(ii) call Honeywell Customer Care at 1-855-733-5465. Customer Care will make the determination whether the product should be
returned to the following address: Honeywell Return Goods, Dock 4 MN10-3860, 1885 Douglas Dr. N., Golden Valley, MN 55422, or
whether a replacement product can be sent to you.
This warranty does not cover removal or reinstallation costs. This warranty shall not apply if it is shown by Honeywell that the defect or
malfunction was caused by damage which occurred while the product was in the possession of a consumer.
Honeywell’s sole responsibility shall be to repair or replace the product within the terms stated above. HONEYWELL SHALL NOT
BE LIABLE FOR ANY LOSS OR DAMAGE OF ANY KIND, INCLUDING ANY INCIDENTAL OR CONSEQUENTIAL DAMAGES
RESULTING, DIRECTLY OR INDIRECTLY, FROM ANY BREACH OF ANY WARRANTY, EXPRESS OR IMPLIED, OR ANY OTHER
FAILURE OF THIS PRODUCT. Some states do not allow the exclusion or limitation of incidental or consequential damages, so this
limitation may not apply to you.
THIS WARRANTY IS THE ONLY EXPRESS WARRANTY HONEYWELL MAKES ON THIS PRODUCT. THE DURATION OF ANY
IMPLIED WARRANTIES, INCLUDING THE WARRANTIES OF MERCHANTABILITY AND FITNESS FOR A PARTICULAR PURPOSE,
IS HEREBY LIMITED TO THE FIVE-YEAR DURATION OF THIS WARRANTY. Some states do not allow limitations on how long an
implied warranty lasts, so the above limitation may not apply to you.
This warranty gives you specific legal rights, and you may have other rights which vary from state to state.
If you have any questions concerning this warranty, please write Honeywell Customer Relations, 1985 Douglas Dr, Golden Valley, MN
55422 or call 1-855-733-5465.
69-2734EFS—03 45
Page 47

46 69-2734EFS—03
Page 48

Automation and Control Systems
Honeywell International Inc.
1985 Douglas Drive North
Golden Valley, MN 55422
Honeywell Ltd
705 Montrichard Avenue
Saint-Jean-sur-Richelieu, Québec
J2X 5K8
http://yourhome.honeywell.com
® U.S. Registered Trademark.
Apple, iPhone, iPad, iPod touch and iTunes are trademarks of Apple Inc.
All other trademarks are the property of their respective owners.
© 2013 Honeywell International Inc.
69-2734EFS—03 M.S. Rev. 12-13
Printed in U.S.A.
69-2734EFS-03
Page 49

Guide de
l’utilisateur
VisionPRO® Modèle Wi-Fi TH8320WF
Thermostat programmable à écran tactile
Page 50

69-2734EFS—03 1
Page 51

Bienvenue
Nous vous félicitons de l’achat d’un thermostat
programmable à écran tactile Wi-Fi Honeywell.
Après vous être enregistré auprès du service
Total Connect Comfort de Honeywell, vous
pouvez surveiller et contrôler à distance le
système de chauffage et de refroidissement de
votre domicile ou de votre entreprise — vous
pouvez rester connecté à votre service confort
où que vous soyez.
Le Total Connect Comfort de Honeywell est la
solution parfaite si vous voyagez fréquemment,
possédez une maison de vacances ou
une entreprise ou gérez un immeuble de
placement, ou si tout simplement vous
recherchez la tranquillité d’esprit.
Page 52

Table des matières
À propos du nouveau thermostat
Référence rapide de l’écran d’accueil .........5
Message center messages ......................... 6
Connexion à votre réseau Wi-Fi..................8
Enregistrement de votre
thermostat en ligne ................................... 13
Programmes d’économie
d’énergie préconfigurés .......................... 20
Fonctionnement
Réglage de l’horloge ................................. 17
Réglage du ventilateur ............................. 18
Sélection du mode de
fonctionnement du système ..................... 19
Réglage des programmes ......................... 21
Dérogation temporaire
de la programmation ............................... 22
Dérogation permanente
de la programmation ............................... 23
69-2734EFS—03 3
Réglage du maintien
pendant les vacances ............................. 24
Verrouillage de l’écran ..............................25
Nettoyage de l’écran .................................26
Réglage des intervalles
de rappel de filtre .................................... 27
Annulation de l’enregistrement
du thermostat .......................................... 28
Déconnexion Wi-Fi .................................... 29
Caractéristiques spéciales ........................ 30
Fonctions et options de configuration .......31
Configuration du système
Configuration du système ......................... 31
Annexes
Questions fréquemment posées ............... 37
Dépannage ................................................40
Garantie limitée ......................................... 46
Page 53

Caractéristiques de votre thermostat Wi-Fi
Avec votre nouveau thermostat, vous pouvez :
• Vous connecter à Internet pour surveiller et contrôler votre système de
chauffage/refroidissement
• Consulter et modifier vos réglages du système de chauffage/refroidissement
• Consulter et régler la température et les programmes
• Recevoir des alertes par courrier électronique et obtenir des mises à jour
automatiques
Votre nouveau thermostat procure :
• Adaptive Intelligent Recovery (AIR) - le thermostat apprend à connaître votre
système pour enclencher le chauffage ou le refroidissement en avance pour
atteindre la température désirée au moment voulu.
• Protection du compresseur - le compresseur attend quelques minutes avant un
redémarrage, pour éviter d’endommager l’équipement.
• Commutation chauffage/refroidissement automatique - le thermostat passe
automatiquement du chauffage au refroidissement pour assurer votre confort.
4 69-2734EFS—03
Page 54

Référence rapide de l’écran d’accueil
Une fois votre thermostat Wi-Fi installé, il affichera l’écran d’accueil. Des parties de cet
écran seront modifiées en fonction de la manière dont vous le consultez. Pour modifier
des réglages, appuyez simplement légèrement sur la zone appropriée avec le doigt.
Fenêtre de messages
Inside
Statut Wi-Fi
Sélection du mode du
ventilateur
Sélection du mode de
fonctionnement du système
Horaires de programmation
MORE
Programme activé (ne
s’affiche pas lorsque le
programme n’est pas activé)
M31565
Réglages additionnels
Dérogation de
programmation
Réglage de l’horloge
Verrouillage de l’écran pour
le nettoyage
Sauf en cas de modification de la fonction d’éclairage, l’écran est toujours allumé à faible
intensité. Lorsque vous touchez l’écran, son intensité augmente.
69-2734EFS—03 5
Page 55

Messages de la fenêtre de messages
La fenêtre de messages du sommet de l’écran indique la connexion Wi-Fi et le
statut d’enregistrement. Il affiche également les codes MAC ID et MAC CRC pour
l’enregistrement du thermostat sur le site mytotalconnectcomfort.com
Affiché avant le début de la configuration Wi-Fi.
Affiché lors de la connexion au réseau Wi-Fi.
Affiché après la connexion au réseau Wi-Fi.
[nom du réseau Wi-Fi]
[Sur la carte d’identification]
[Sur la carte d’identification]
6 69-2734EFS—03
Affiché lorsque vous êtes connecté au réseau Wi-Fi.
Affiché lorsque la connexion Wi-Fi est réalisée.
Affiché lorsque le thermostat ne parvient pas à établir une
connexion au réseau Wi-Fi.
Affiché lorsque le thermostat est connecté au réseau Wi-Fi mais
n’est pas enregistré sur le site mytotalconnectcomfort.com
Affiche les codes MAC ID et MAC CRC du thermostat pour
l’enregistrement sur le site mytotalconnectcomfort.com
Page 56

Messages de la fenêtre de messages
Affiché lorsque le thermostat est enregistré sur le site
mytotalconnectcomfort.com
Affiché lorsque le thermostat est retiré de votre compte Total
Connect Comfort.
Force du signal Wi-Fi. Affiché lorsque le thermostat
est connecté au réseau Wi-Fi et enregistré sur le site
mytotalconnectcomfort.com
Affiché en cas d’absence de signal Wi-Fi.
Affiché si le mot de passe Wi-Fi du réseau domestique n’a
pas été entré correctement.
Affiché si aucune adresse IP n’as pas été fournie par le
routeur.
Affiché en cas d’absence de signal Wi-Fi.
69-2734EFS—03 7
Page 57

Connexion à votre réseau Wi-Fi
Branchez votre dispositif sans fil à votre réseau domestique. Tous ces types d’appareils
fonctionneront :
• Tablette (recommandé)
• Ordinateur portatif (recommandé)
• Téléphone intelligent
Si vous êtes bloqué... à tout moment dans cette procédure, redémarrez le
thermostat en le retirant de la plaque murale, attendez 5 secondes, et emboîtez-
le à nouveau sur la plaque murale. Passez à l’étape 1 de cette procédure, en
commençant à la page 9.
8 69-2734EFS—03
Page 58

Connexion à votre réseau Wi-Fi
1 Connectez votre thermostat.
1a Assurez-vous que le centre des messages du
thermostat affiche Wi-Fi SETUP (Configuration
Wi-Fi).
1b Sur votre appareil sans fil (tablette, ordinateur
portatif, téléphone intelligent), consultez la liste des
réseaux sans fil disponibles
1c Connectez-vous au réseau appelé
NewThermostat_123456 (le chiffre variera).
Remarque : s’il vous est demandé de spécifier un
réseau domestique, publique ou de bureau, sélectionnez
Home Network (Réseau domestique).
69-2734EFS—03 9
Fenêtre de messages
Inside
MORE
M31566
Page 59

Connexion à votre réseau Wi-Fi
2 Rejoignez votre réseau domestique.
2a Ouvrez votre navigateur Web pour accéder à la
page de configuration Wi-Fi du thermostat. Le
navigateur devrait automatiquement vous diriger
vers la page correcte; s’il ne le fait pas, entrez
l’adresse http://192.168.1.1
2b Trouvez le nom de votre réseau domestique sur
cette page et sélectionnez-le.
Remarque : Certains routeurs ont des caractéristiques
améliorées tels que les réseaux invités; utilisez votre
réseau domestique.
2c Suivrez les instructions d’enregistrement à votre
réseau Wi-Fi et cliquez sur le bouton Connect
(Connexion). (En fonction de la configuration de
votre réseau, vous verrez peut-être une instruction vous demandant d’entrer le mot
de passe de votre réseau domestique.)
Remarque : Si vous n’avez pas correctement branché le thermostat, la page du routeur
domestique s’affichera peut-être. Si c’est le cas, revenez à l’étape 1.
10 69-2734EFS—03
M31567
Page 60

Connexion à votre réseau Wi-Fi
Remarque : Si votre réseau Wi-Fi n’apparaît pas dans la liste de la page de configuration
Wi-Fi du thermostat :
• Essayez de scanner le réseau à nouveau en appuyant sur le bouton Rescan
(nouveau balayage). Ceci est utile dans les endroits avec plusieurs réseaux.
• Si vous êtes connecté à un réseau invisible, entrez alors le SSID du réseau dans
la boîte de dialogue, sélectionnez le type d’encryptage à partir du menu déroulant,
et cliquez sur le bouton Add (ajouter). Ceci ajoute manuellement le réseau en tête
de la liste. Cliquez sur le nouveau réseau de la liste et entrez le mot de passe si
nécessaire. Cliquez sur Connect (connecter) pour joindre le réseau.
69-2734EFS—03 11
Page 61

Connexion à votre réseau Wi-Fi
3 Vérifiez si votre thermostat est connecté.
Le centre des messages de votre thermostat affiche
maintenant CONNECTING… (Connexion en cours) pour
Inside
30 secondes maximum.
3c Regardez l’écran du thermostat. Vérifiez que le centre
MORE
des messages affiche l’un des messages suivants :
CONNECTION SUCCESSFUL (Connexion réussie)
JOINED: (Vous avez rejoint :)
[NOM DU RÉSEAU WI-FI]
YOU ARE ALMOST DONE
(Vous avez presque terminé)
REGISTER AT TOTAL CONNECT
(Inscrivez-vous à Total Connect)
Si ces messages n’apparaissent pas,
voir page 9.
Remarque : Si CONNECTION FAILURE
(Échec de la connexion) ou Wi-Fi
SETUP (Configuration Wi-Fi) s’affiche
dans le centre des messages, confirmez
que vous avez correctement entré le mot
de passe de votre réseau domestique à
l’étape 2.
Pour l’enregistrement en ligne de l’accès à
distance à votre thermostat, poursuivez à la page 13
12 69-2734EFS—03
M31568
Page 62

Enregistrement de votre thermostat en ligne
Pour visualiser et régler votre thermostat Wi-Fi à
distance, vous devez posséder un compte Total
Connect Comfort. Suivez les instructions ci-dessous.
1 Ouvrez le site web Total Connect Comfort.
Allez sur le site www.mytotalconnectcomfort.com
69-2734EFS—03 13
M31570
Page 63

Enregistrement de votre thermostat en ligne
2 Ouvrez une session ou créez un compte.
Si vous possédez un compte,
cliquez sur Login (Ouvrir une session)
– ou –
cliquez sur Create An Account (créer un compte)
2a Suivez les instructions à l’écran.
2b Consultez votre messagerie et recherchez
le message d’activation provenant de My Total
Connect Comfort. Ceci peut prendre plusieurs
minutes.
Remarque : Si vous ne recevez aucune réponse,
consultez votre boîte de pourriels ou utilisez une
autre adresse électronique.
2c Suivez les instructions d’activation figurant
dans le message.
2d Ouvrez une session.
14 69-2734EFS—03
M31571
Page 64

Enregistrement de votre thermostat en ligne
3 Enregistrez votre thermostat Wi-Fi.
Lorsque vous avez accès à votre compte Total Connect Comfort,
enregistrez votre thermostat.
3a Suivez les instructions à
l’écran. Après avoir ajouté
l’emplacement de votre
thermostat, vous devez entrer
les identifiants uniques de votre
thermostat :
• MACID
• MACCRC
Thermostat ID Card
Use the MAC ID and CRC ID to register
this product at mytotalconnectcomfort.com
Carte d’identification de thermostat
Utilisez l’identication MAC et l’identication CRC pour
enregistrer ce produit à mytotalconnectcomfort.com
Tarjeta de identificación del termostato
Utilice la identicación MAC y la identicación CRC para
inscribir este producto en mytotalconnectcomfort.com
® U.S. Registered Trademark.
© 2012 Honeywell International Inc.
69-2723EFS—01 M.S. 04-12
Printed in U.S.A.
HONEYWELL MODEL: TH8320WF
MAC ID: MAC CRC:
Remarque : Ces identifiants figurent
sur la carte d’identification du
MAC ID MAC CRC
thermostat fournie dans la boîte du
thermostat. Ces identifiants ne sont
pas sensibles à la casse.
69-2734EFS—03 15
69-2723EFS-01
Page 65

Enregistrement de votre thermostat en ligne
3a Lorsque le thermostat est
convenablement enregistré,
l’écran d’enregistrement Total
Connect Comfort affiche le
message SUCCESS (réussi).
Dans la fenêtre de messages du
thermostat apparaît :
CONGRATULATIONS SETUP
COMPLETE!
(Félicitations! Configuration
terminée.)
16 69-2734EFS—03
Page 66

Réglage de l’horloge
1 Appuyez sur CLOCK (horloge) pour afficher les
flèches de réglage.
2 Appuyez sur s ou t pour régler l’heure. (Vous
pouvez avancer plus rapidement en maintenant
la pression sur les boutons s ou t).
3 Appuyez sur DONE (terminé) pour enregistrer
et quitter (ou sur CANCEL (annuler) pour quitter
sans modifier l’heure).
Remarque : Une fois enregistré à Total
Connect Comfort, le thermostat règle
automatiquement l’heure sur le thermostat et il
se règle aussi pour passer automatiquement à
l’heure d’été/hiver.
Remarque : pour modifier le format du jour actuel,
voir « Fonctions et options de configuration » à la
page 31.
69-2734EFS—03 17
MORE
Page 67

Réglage du ventilateur
1 Appuyez sur FAN (ventilateur) pour sélectionner
le fonctionnement du ventilateur.
2 Appuyez à nouveau FAN pour sélectionner ON (en
Inside
fonction) ou AUTO (basculez pour resélectionner).
L’option sélectionnée clignote.
3 Appuyez sur DONE (terminé) pour enregistrer le
réglage. Votre sélection apparaît sous FAN .
ON : le ventilateur est toujours en fonction.
MORE
AUTO : le ventilateur fonctionne uniquement
lorsque le système de chauffage ou de
refroidissement est en fonction.
CIRC : le ventilateur fonctionne environ 35 % du temps. Quand
l’utilisateur ne souhaite pas que le ventilateur fonctionne en
continu, cette position permet d’obtenir une meilleure circulation
de l’air et une plus grande efficacité du filtre à air central.
18 69-2734EFS—03
MCR31582
Page 68

MCR31583
Sélection du mode de fonctionnement du système
1 Appuyez sur SYSTEM (système) pour afficher les options.
2 Appuyez à nouveau sur SYSTEM pour
sélectionner une option. Vous devrez peut-être
appuyer deux ou trois fois pour effectuer une
sélection — l’option sélectionnée clignote.
Inside
3 Appuyez sur DONE (terminé) pour enregistrer le
réglage.
Modes de fonctionnement possibles :
HEAT (chauffage) : commande uniquement le système
de chauffage.
COOL (refroidissement) : commande uniquement le
système de refroidissement.
OFF (arrêt) : les systèmes de chauffage et de
refroidissement sont arrêtés.
AUTO : sélectionne le chauffage ou le refroidissement en
fonction de la température intérieure.
EM HEAT (thermopompes avec chauffage auxiliaire) :
commande le chauffage auxiliaire/d’urgence. Le
compresseur est verrouillé.
69-2734EFS—03 19
Remarque : Les réglages
de système AUTO et EM HEAT
peuvent ne pas s’afficher, en
fonction de la manière dont votre
thermostat a été installé.
MORE
Page 69

Programmes d’économie d’énergie préconfigurés
Ce thermostat contient des programmes d’économie d’énergie préconfigurés pour quatre
périodes. L’utilisation des réglages par défaut peut vous permettre de réduire vos dépenses
de chauffage/refroidissement si vous suivez les instructions indiquées. Les économies
peuvent varier en fonction de la région géographique et de l’usage.
Réglages de chauffage
par défaut
WAKE (Réveil)
6h
LEAVE (Départ)
8h
RETURN (Retour)
18h
SLEEP (Coucher)
22h
Pour modifier les réglages, voir pages 32–20.
20 69-2734EFS—03
70
62
70
62
°
°
°
°
Réglages de
refroidissement par défaut
°
78
°
85
°
78
°
82
Page 70

Réglage des programmes
1 Appuyez sur SCHED (programme) puis sur EDIT
(modifier). Les boutons des jours s’affichent sur le
haut de l’écran.
2 Appuyez sur les boutons (MON–SUN (lundi-dimanche))
pour sélectionner les jours.
3 Appuyez sur s ou t pour régler l’heure de réveil
pour le(s) jour(s) sélectionné(s).
4 Appuyez sur s ou t pour régler la température de
chauffage et de refroidissement pour cette période de
temps.
5 Appuyez sur une autre période (LEAVE (départ),
RETURN (retour), SLEEP (coucher)) et réglez l’heure et
les températures de chaque période.
6 Appuyez sur DONE (terminé) pour enregistrer et quitter
(ou sur CANCEL (annuler) pour quitter sans enregistrer
les modifications).
Remarque : pour annuler toute période non souhaitée,
appuyez sur CANCEL PERIOD (annuler la période).
69-2734EFS—03 21
MORE
SLEEP
SLEEP
MCR31584
Page 71

Dérogation temporaire de la programmation
1 Sur l’écran d’accueil, appuyez sur s ou t
pour ajuster immédiatement la température.
2 Réglez l’heure jusqu’à laquelle vous voulez
Inside
maintenir la température (l’heure par défaut
est celle de la fin de la période actuelle).
Le nouveau réglage sera maintenu jusqu’à
Temporary Hold
Hold Until
l’heure affichée sous Hold Until (maintenir
jusqu’à). Lorsque le délai se termine, la
programmation est rétablie et la température
MORE
revient au réglage correspondant à la
période actuelle.
Pour annuler ce réglage temporaire à tout
moment, appuyez sur CANCEL (annuler)
(ou SCHED (programme)). L’horaire de
programmation est à nouveau en vigueur.
22 69-2734EFS—03
MCR31556
Page 72

Dérogation permanente de la programmation
1 Appuyez sur HOLD (maintien) pour
régler la température de façon
permanente. Ceci désactive l’horaire de
programmation.
2 La température sélectionnée sera
maintenue 24 heures sur 24 jusqu’à la
Inside
Permanent Hold
modification manuelle suivante ou une
pression du bouton CANCEL (annuler)
(ou SCHED (programme)) afin d’annuler
le maintien et de revenir à l’horaire de
programmation.
69-2734EFS—03 23
MORE
MCR31585
Page 73

Réglage du maintien pendant les vacances
Utilisez cette fonction pour suspendre un horaire de
programmation lorsque vous vous absentez pendant
Inside
une période prolongée.
1 Appuyez sur s ou t pour régler la température.
Hold Until
2 Appuyez sur s ou t pour régler l’heure à
laquelle vous désirez que la programmation
reprenne le jour de votre retour.
MORE
3 Appuyez deux fois sur HOLD (maintien).
Hold Until (maintenir jusqu’à) s’affiche.
4 Appuyez sur s ou t pour sélectionner le nombre
Hold Until
DAYS
de jours.
La température sélectionnée sera maintenue 24
MORE
heures sur 24 pendant le nombre de jours sélectionné.
Lorsque le nombre de jours sélectionné s’est écoulé,
l’horaire de programmation précédent est remis en vigueur à l’heure déterminée.
Remarque : vous pouvez appuyer sur CANCEL (annuler) (ou SCHED (programme))
pour revenir à la programmation normale.
24 69-2734EFS—03
MCR31558
Page 74

Verrouillage de l’écran
WED
FAN
Inside
AUTO
70
SYSTEM
HEAT
6:00
SCHED HOLD CLOCK SCREEN MORE
Voir Fonction évoluée 0670
(page 25) où figurent les
choix screen lock
69-2734EFS—03 25
SCREEN LOCKED
Set To
70
Following
Schedule
PM
M29357
Pour empêcher toute modification intempestive,
il est possible de verrouiller totalement ou
partiellement l’écran.
Lorsqu’il est partiellement verrouillé, l’écran
affiche SCREEN LOCKED pendant plusieurs
secondes si l’on appuie sur une touche
verrouillée. Pour déverrouiller l’écran, appuyez sur
n’importe quelle touche non verrouillée pendant
que SCREEN LOCKED apparaît sur l’écran.
Lorsque l’écran est entièrement verrouillé,
aucune touche ne fonctionne. Pour verrouiller ou
déverrouiller l’écran, voir fonction évoluée 0670 à
la page 25.
Page 75

Nettoyage de l’écran
1 Appuyez sur SCREEN (écran) pour verrouiller
l’écran en vue du nettoyage. L’écran restera
verrouillé 30 secondes pour que vous
puissiez le nettoyer sans modifier des
réglages.
2 Après 30 secondes, appuyez sur DONE
(terminé) pour reprendre le fonctionnement
normal, ou appuyez à nouveau sur SCREEN
si vous avez besoin de plus de temps pour le
nettoyage.
Remarque : Ne pulvérisez aucun liquide
directement sur le thermostat. Pulvérisez les
liquides sur un chiffon, puis utilisez le chiffon
humide pour nettoyer l’écran. N’utilisez pas d’eau
ni de nettoyant à vitres ménager. Évitez les
produits de nettoyage abrasifs.
26 69-2734EFS—03
MORE
MCR31560
Page 76

Inside
Réglage des intervalles de rappel de filtre
S’il a été activé au cours de l’installation, le rappel
de filtre affiche un message au-dessus de l’heure
lorsqu’il est temps de remplacer le filtre.
Appuyez sur RESET (réinitialiser) après le
remplacement du filtre pour relancer la minuterie.
Pour modifier l’intervalle de rappel :
RESET
CHANGE FILTER
MORE
1 Appuyez sur MORE (plus) puis sur EDIT
(modifier).
2 Appuyez sur s ou t pour sélectionner
l’intervalle désiré (en jours), puis appuyez sur
DONE (terminé).
FILTER
SLEEP
DAYS
3 Appuyez sur RESET.
4 Appuyez sur DONE pour enregistrer et quitter.
Remarque : La fonction de configuration système 0500 régit l’intervalle de remplacement
du filtre. Voir « Rappel de remplacement de filtre » à la page 35.
69-2734EFS—03 27
MCR31559
Page 77

Annulation de l’enregistrement du thermostat
Si vous retirez le thermostat de votre
compte Total Connect Comfort (par exemple,
si vous déménagez et laissez le thermostat
en place), la fenêtre de messages fera
défiler le message UNREGISTERED FROM
Inside
TOTAL CONNECT (enregistrement sur Total
Connect annulé) pendant 3 minutes.
Après ceci, il affichera alternativement
REGISTER AT TOTAL CONNECT
MORE
M31572
(enregistrer sur Total Connect) et les codes
MAC ID et MAC CRC.
28 69-2734EFS—03
Page 78

Déconnexion Wi-Fi
Si vous déconnectez le thermostat de
votre réseau Wi-Fi (par exemple, en cas de
remplacement du routeur) :
1 Entrez dans la configuration du système
(voir page 31).
2 Réglez la fonction 900 à 0 (voir page 37).
La fenêtre de messages affichera Wi-Fi
DISCONNECTED (Wi-Fi déconnecté) pendant
1 minute.
Il affichera ensuite Wi-Fi SETUP (configuration Wi-Fi).
69-2734EFS—03 29
Inside
MORE
M31573
Page 79

Caractéristiques spéciales
Adaptive Intelligent Recovery (AIR)
Celle-ci permet au thermostat « d’apprendre » combien de temps il faut à votre système de
chauffage/refroidissement pour atteindre le réglage de température programmé, afin que la
température voulue soit obtenue à l’heure programmée. Par exemple : réglez l’heure de réveil à 6
heures et la température à 70°. Le chauffage est mis en fonction avant 6 heures de manière à ce
que la température soit de 70° à 6 heures. Le message « Recovery » (reprise) s’affiche lorsque le
système est activé avant une période de temps programmée.
Remarque : La fonction de configuration système 0530 contrôle la AIR. Voir «
Recovery
Protection du compresseur
Cette fonction force le compresseur à attendre quelques minutes avant un redémarrage, pour éviter
d’endommager l’équipement. Pendant la durée d’attente, le message « Wait » (attendre) s’affiche à
l’écran.
Commutation automatique
Celle-ci est utilisée dans les climats où le conditionnement d’air et le chauffage sont utilisés le même
jour. Lorsque le système est réglé sur AUTO, le thermostat sélectionne automatiquement le chauffage
ou le refroidissement en fonction de la température intérieure. L’écart entre les réglages de chauffage
et de refroidissement doit être d’au moins 3 degrés. Le thermostat ajuste automatiquement les
réglages afin de maintenir ces 3 degrés d’écart.
Remarque : la fonction de configuration système 0300 contrôle la commutation automatique.
30 69-2734EFS—03
» à la page 36.
Adaptive Intelligent
Page 80

Fonctions et options de configuration
Vous pouvez modifier des options pour plusieurs fonctions du système. Les fonctions disponibles
dépendent de votre type de système. Les fonctions, désignées sous forme d’un nombre à quatre
chiffres, ainsi que les options disponibles sont décrites aux pages 32–37.
Ce thermostat est préréglé pour un système de chauffage/refroidissement à étage unique.
La fonction de configuration 0170 pour une thermopompe ajustera les réglages par défaut.
1 Appuyez sur SYSTEM (système). Vous verrez différents
boutons vierges s’afficher au bas de l’écran.
2 Appuyez sans relâcher sur la touche vierge au
centre pendant environ 5 secondes jusqu’à ce que
l’affichage change.
SYSTEM
HEAT
DONE CANCEL
6:30
PM
MCR31562
3 Faites défiler les fonctions en appuyant sur st à
côté du nombre à quatre chiffres sur la gauche.
4 Au besoin, modifiez les options d’une fonction en
appuyant sur st à côté du nombre sur la droite.
0120
DONE
20
MCR31563
5 Lorsque toutes les modifications ont été effectuées,
appuyez sur DONE (terminé) pour enregistrer et quitter.
69-2734EFS—03 31
Page 81

Configuration de l’utilisateur
Fonction Réglages et Options
Nom de l’appareil
0112
Cenomidentierale
thermostat lorsque
vous le consultez à
distance.
Si vous enregistrez
plusieurs
thermostats,
attribuez un nom
différent à chacun
d’entre eux.
32 69-2734EFS—03
52 = Thermostat
1 Basement 18 Fireplace 35 Media Room 52 Thermostat
2 Bathroom 19 Foyer 36 Music Room 53 Upper Level
3 Bathroom 1 20 Game Room 37 Nursery 54 Utility Room
4 Bathroom 2 21 Garage 38 Office 55 Walk In Closet
5 Bathroom 3 22 Great Room 39 Office 1 56 Wine Cellar
6 Bedroom 23 Guest Room 40 Office 2 57 Workshop
7 Bedroom 1 24 Gym 41 Pantry 64 Conference Room
8 Bedroom 2 25 Kid's Room 42 Play Room 65 Dressing Room
9 Bedroom 3 26 Kitchen 43 Pool Room 66 Meeting Room
10 Bedroom 4 27 Kitchen 1 44 Porch 67 Machine Room
11 Boat House 28 Kitchen 2 45 Rec Room 68 Open Area 1
12 Bonus Room 29 Laundry Room 46 Sewing Room 69 Open Area 2
13 Computer Room 30 Library 47 Spa 70 Server 1
14 Den 31 Living Room 48 Storage Room 71 Server 2
15 Dining Room 32 Lower Level 49 Studio 72 Stock Room
16 Exercise Room 33 Master Bath 50 Sun Room
17 Family Room 34 Master Bed 51 Theater
Page 82

Configuration de l’utilisateur
Fonction Réglages et Options
Réglage de l’année
0120
(deux premiers
chiffres)
Réglage de l’année
0130
(deux derniers
chiffres)
Réglage du mois 01–12 (janvier–décembre)
0140
Réglage de la date 01–31
0150
Options de
0160
programmation
Restaurer la
0165
programmation par
défaut
69-2734EFS—03 33
20 = Année 20xx
21 = Année 21xx
01–99 (2001–2099)
4 Horaire de programmation activé (programmable sur 7 jours).
0 Horaire de programmation désactivé. Le thermostat ne peut pas être programmé.
0 Continuer à utiliser l’horaire programmé.
1 Restaurer le programme du thermostat aux réglages d’économie
d’énergie
Page 83

Configuration de l’utilisateur
Fonction Réglages et Options
Rétroéclairage
0280
Unité de
0320
température (°F/°C)
Réglage
0330
automatique de
l’heure d’été
34 69-2734EFS—03
0 Rétroéclairage éteint, puis allumé pendant environ 8 secondes après
pression d’une touche.
1 Rétroéclairage toujours allumé à basse intensité, luminosité maximum
après pression d’une touche.
0 Fahrenheit
1 Celsius
0 Arrêt
1 En marche
Page 84

Configuration de l’utilisateur
Fonction Réglages et Options
Rappel de
0500
remplacement du
ltre
Le rappel après le
nombre de jours
de fonctionnement
sélectionné, et non
pas du nombre de
jours réel.
Rappel de
0510
remplacement
du tampon
humidicateur
Rappel de
0520
remplacement de la
lampe UV
69-2734EFS—03 35
0 Arrêt (pas de rappel)
1 Rappel après 10 jours de fonctionnement (environ 1 mois calendrier)
2 Rappel après 30 jours de fonctionnement (environ 3 mois calendrier)
3 Rappel après 60 jours de fonctionnement (environ 6 mois calendrier)
4 Rappel après 90 jours de fonctionnement (environ 9 mois calendrier)
5 Rappel après 120 jours de fonctionnement (environ 1 an calendrier)
6 Rappel après 180 jours de fonctionnement (environ 18 mois calendrier)
7 Rappel après 270 jours de fonctionnement (environ 2 ans calendrier)
8 Rappel après 365 jours de fonctionnement (environ 3 ans calendrier)
0 Désactivé
1 Durée de fonctionnement de 30 jours (environ 3 mois)
2 Durée de fonctionnement de 60 jours (environ 6 mois)
3 Durée de fonctionnement de 90 jours (environ 9 mois)
0 Désactivé
1 365 jours
2 730 jours
Page 85

Configuration de l’utilisateur
Fonction Réglages et Options
Adaptive Intelligent
0530
Recovery (AIR)
1 En marche
0 Arrêt
Format de l’horloge
0640
Temporisateur de
0650
ventilateur prolongé
(chauffage
Verrouillage du
0670
clavier
36 69-2734EFS—03
12 Format 12 heures (par exemple « 3:30 pm »)
24 Format 24 heures (par exemple « 15:30 »)
0 Arrêt
90 Le ventilateur tourne pendant 90 secondes après la fin de l’appel de
chauffage [Autres options : 30, 60, 120]
0 Le clavier est déverrouillé (entièrement fonctionnel)
1 Partiellement verrouillé (accès aux réglages de température uniquement)
2 Complètement verrouillé
Page 86

Configuration de l’utilisateur
Fonction Réglages et Options
Restauration des
0710
réglages originaux
Wi-Fi
0890
En marche/Arrêt
Connexion Wi-Fi
0900
69-2734EFS—03 37
0 Non
1 Déconnecte le thermostat du réseau Wi-Fi et restaure les réglages
d’origine (efface les personnalisations).
1 Le Wi-Fi est en marche et le thermostat peut être connecté à un réseau Wi-Fi
0 Le Wi-Fi est en marche. Le thermostat ne peut pas être connecté à un
réseau Wi-Fi. Si vous ne connectez pas le thermostat à un réseau Wi-Fi,
le texte « Wi-Fi Setup » (configuration Wi-Fi) sera supprimé de la fenêtre
de messages.
1 Connecté au réseau Wi-Fi. Il s’agit de la configuration automatique
lorsque le thermostat est connecté au réseau Wi-Fi.
0 Sélectionnez 0 pour le déconnecter du réseau Wi-Fi.
Page 87

Questions fréquemment posées
:Q Mon thermostat fonctionnera-t-il toujours si je perds ma connexion Wi-Fi?
:R Oui, le thermostat actionnera votre système de chauffage et/ou de refroidissement avec ou sans
Wi-Fi.
:Q Comment puis-je trouver le mot de passe de mon routeur?
:R Contactez le fabricant du routeur.
:Q Pourquoi ne vois-je pas ma page de configuration Wi-Fi?
:R Vous êtes probablement uniquement connecté à votre routeur, et non pas à votre thermostat.
Essayez de vous reconnecter au thermostat.
:Q Pourquoi mon thermostat ne se connecte-t-il pas à mon routeur Wi-Fi même si celui-ci est
très proche du thermostat?
:R Vérifiez si le mot de passe saisi pour le routeur Wi-Fi est correct.
38 69-2734EFS—03
Page 88

Questions fréquemment posées
:Q Où puis-je trouver mes codes MAC ID et MAC CRC?
:R Les codes MAC ID et MAC CRC seront affichés dans la fenêtre de messages du thermostat.
Les numéros figurent également sur une carte jointe au thermostat ou sur l’arrière du thermostat
(visibles lorsque celui-ci est retiré de la plaque murale). Chaque thermostat est doté de codes
MAC ID et MAC CRC uniques.
:Q Il est impossible d’enregistrer mon thermostat sur le site Total Connect Comfort.
:R Vérifiez si le thermostat est correctement inscrit dans le réseau Wi-Fi domestique. La fenêtre de
messages affichera « CONNECTION SUCCESSFUL » (connexion réussie) ou « REGISTER
AT TOTAL CONNECT » (enregistrer sur Total Connect). Vous devriez également voir l’icône de
force de signal Wi-Fi. Vérifiez si le routeur Wi-Fi dispose d’une bonne connexion internet. Sur
votre ordinateur, vérifiez si vous pouvez ouvrir la page mytotalconnectcomfort.com Si vous ne
pouvez pas l’ouvrir, coupez votre modem internet pendant quelques secondes, puis rallumez-le.
69-2734EFS—03 39
Page 89

Questions fréquemment posées
:Q Je suis enregistré sur le site Total Connect Comfort mais je n’ai pas pu ouvrir de session
en utilisant mon nouveau compte.
:R Consultez votre messagerie et vérifiez si vous avez reçu le message d’activation. Suivez les
instructions d’activation de votre compte, puis ouvrez une session sur le site web.
:Q Je me suis enregistré sur le site Total Connect Comfort et n’ai pas reçu de message de
confirmation.
:R Vérifiez si le message ne se trouve pas dans le dossier des spams ou des messages effacés.
:Q Y a-t-il un moyen d’accroître la force du signal?
:R La plupart des routeurs peuvent être configurés comme répéteur. Vous pouvez également
acheter et installer un répéteur Wi-Fi.
40 69-2734EFS—03
Page 90

Dépannage
En cas de difficultés avec le thermostat, essayer les suggestions suivantes.
La plupart des problèmes peuvent être réglés rapidement et facilement.
Rien n’apparaît à
l’écran
• Vérifiezledisjoncteuretréinitialisez-lesinécessaire.
• Assurez-vousquel’interrupteurdemarche-arrêtdusystèmede
chauffage et de refroidissement est sur marche.
• Assurez-vousquelaportedel’appareildechauffageestbienfermée.
« Wait » (attendre)
s’affiche à l’écran.
Le bouton du coin
inférieur droit de
l’écran est vierge
Le témoin rouge
est allumé
69-2734EFS—03 41
•Lafonctiondeprotectionducompresseurestactivée.Attendez5
minutes que le système se remette en marche en toute sécurité sans
endommager le compresseur.
• Ceboutonresteviergeàmoinsquelerappelderemplacementdu
filtre de la chaudière, du tampon de l’humidificateur ou de la lampe UV
soit activé, ou si un capteur de température extérieur est câblé sur le
thermostat.
• SilethermostatestenmodeChauffaged’urgence,letémoinrougeest
normal. Il indique que le thermostat est en mode de chauffage d’urgence.
• Silethermostatn’estpasenmodeChauffaged’urgence,contactezun
réparateur qualifié et faites-le réparer.
Page 91

Dépannage
Le système de
chauffage ou de
refroidissement
ne répond pas
• AppuyezsurSYSTEM (système) pour régler le système sur Heat (chauffage).
Vérifiez si le réglage de température est supérieur à la température
intérieure.
• AppuyezsurSYSTEM pour régler le système sur Cool (refroidissement).
Vérifiez si le réglage de température est inférieur à la température intérieure.
• Vérifiezledisjoncteuretréinitialisez-lesinécessaire.
• Assurez-vousquel’interrupteurdemarche-arrêtdusystèmedechauffage
et de refroidissement est sur marche.
• Assurez-vousquelaportedel’appareildechauffageestbienfermée.
• Si«Wait»(attendre)s’affiche,laminuteriedeprotectionducompresseur
est activée. Attendez 5 minutes que le système se remette en marche en
toute sécurité sans endommager le compresseur (voir page 30).
Besoin d’aide?
Consultez le site http://yourhome.honeywell.com ou appelez au 1-855-733-5465 pour
obtenir de l’aide avant de renvoyer le thermostat au magasin.
42 69-2734EFS—03
Page 92

Glossaire
MAC ID, MAC CRC
Codes alphanumériques identifiant de manière unique votre thermostat.
69-2734EFS—03 43
Page 93

Informations réglementaires
Déclaration de conformité à la FCC (partie 15.19)
(États-Unis uniquement)
Cet appareil est conforme à la partie 15 du règlement
de la FCC. Son fonctionnement est soumis aux deux
conditions suivantes :
1 Ce dispositif ne doit pas causer d’interférences
nuisibles, et
2 Ce dispositif doit accepter toutes les interférences
reçues, y compris celles pouvant causer un
fonctionnement non souhaité.
Avertissement de la FCC (partie 15.21) (États-Unis
uniquement)
Toute modification qui n’est pas autorisée expressément
par la partie responsable de la conformité de l’appareil
peut rendre l’utilisateur inapte à faire fonctionner
l’équipement.
Déclaration relative aux interférences de la FCC
(partie 15.105 (b)) (États-Unis uniquement)
Cet équipement a été testé et est conforme aux limites
des dispositifs numériques de Classe B, conformément
à la Partie 15 du règlement de la FCC. Ces limites
44 69-2734EFS—03
sont conçues pour fournir une protection raisonnable
contre les interférences nuisibles dans une installation
résidentielle. Cet équipement génère, utilise et peut
émettre de l’énergie de radiofréquence, et s’il n’est pas
installé et utilisé conformément aux instructions, peut
causer des interférences nuisibles aux communications
radio. Il n’y a toutefois aucune garantie qu’une
interférence ne se produira pas dans une installation
particulière. Si cet équipement cause des interférences
nuisibles à la réception radio et télévision, ce qui
peut être déterminé en éteignant le dispositif et en le
remettant en marche, il est recommandé à l’utilisateur
de tenter de corriger l’interférence par l’une des mesures
suivantes :
• Réorienteroudéplacerl’antenneréceptrice.
• Augmenterlaséparationentrel’équipementetle
récepteur.
• Brancherl’équipementdanslaprised’uncircuit
différent de celui auquel le récepteur est connecté.
• Consulterledistributeurouuntechnicien
radio/TV compétent pour obtenir de l’aide.
Page 94

Informations réglementaires
Thermostats
Pour être conformes aux limites d’exposition aux
radiofréquences établies par FCC et Industrie Canada
pour le grand public/l’exposition non contrôlée, la ou les
antennes utilisées pour ces transmetteurs doivent être
installées à au moins 20 cm de toutes les personnes et
ne peuvent être situées au même endroit qu’une autre
antenne ou fonctionner conjointement avec une autre
antenne ou un autre transmetteur.
Section 7.1.2 de RSS-GEN
Conformément aux normes d’Industrie Canada,
ce transmetteur radio ne peut fonctionner qu’avec
une antenne dont le type et le gain maximum sont
approuvés par Industrie Canada. Pour réduire les
risques d’interférence s radio encourus par d’autres
utilisateurs, le type et le gain de l’antenne doivent
être choisis de façon à ce que la puissance rayonnée
isotrope équivalente (p.i.r.e.) ne soit pas supérieure
à celle nécessaire à l’établissement d’une bonne
communication.
69-2734EFS—03 45
Section 7.1.3 de RSS-GEN
Le fonctionnement est soumis aux deux conditions
suivantes :
1 Ce dispositif ne doit pas causer d’interférences, et
2 Ce dispositif doit accepter toutes les interférences, y
compris celles pouvant causer un fonctionnement non
souhaité.
Page 95

Garantie limitée à 5 ans
Honeywell garantit ce produit, à l’exception des piles, contre tout défaut de pièce ou de main-d’œuvre, durant une période pour cinq
(5) ans an à partir de la date d’achat par le consommateur si le produit est utilisé et entretenu convenablement. En cas de défectuosité
ou de mauvais fonctionnement pendant la période de garantie, Honeywell remplacera ou réparera le produit, à sa discrétion.
Si le produit est défectueux,
(i) le renvoyer avec la facture ou une autre preuve d’achat date au lieu d’achat; ou
(ii) appeler le service à la clientèle de Honeywell en composant le 1-855-733-5465. Le service à la clientèle déterminera si le produit
doit être retourné à l’adresse suivante : Honeywell Return Goods, Dock 4MN10-3860, 1885 Douglas Dr. N., Golden Valley, MN 55422,
ou si un produit de remplacement peut vous être expédié.
La présente garantie ne couvre pas les frais de retrait ou de réinstallation. La présente garantie ne s’appliquera pas s’il est
démontré par Honeywell que la défectuosité ou le mauvais fonctionnement sont dus à un endommagement du produit alors que le
consommateur l’avait en sa possession.
La responsabilité exclusive de Honeywell se limite à réparer ou à remplacer le produit conformément aux modalités susmentionnées.
HONEYWELL N’EST EN AUCUN CAS RESPONSABLE DES PERTES OU DOMMAGES, Y COMPRIS LES DOMMAGES INDIRECTS
OU ACCESSOIRES DÉCOULANT DIRECTEMENT OU INDIRECTEMENT D’UNE VIOLATION QUELCONQUE D’UNE GARANTIE,
EXPRESSE OU TACITE, APPLICABLE AU PRÉSENT PRODUIT, OU TOUTE AUTRE DÉFECTUOSITÉ DU PRÉSENT PRODUIT.
Certaines provinces ne permettent pas l’exclusion ou la restriction des dommages indirects ou accessoires et, par conséquent, la
présente restriction peut ne pas s’appliquer.
CETTE GARANTIE EST LA SEULE GARANTIE EXPRESSE FAITE PAR HONEYWELL POUR CE PRODUIT. LA DURÉE DE TOUTE
GARANTIE IMPLICITE, INCLUANT LES GARANTIES DE QUALITÉ MARCHANDE OU D’ADAPTATION À UNE UTILISATION
PARTICULIÈRE, EST LIMITÉE PAR LES PRÉSENTES À LA PÉRIODE DE CINQ ANS DE LA PRÉSENTE GARANTIE. Certaines
provinces ne permettent pas de limiter la durée des garanties tacites et, par conséquent, la présente limitation peut ne pas s’appliquer.
La présente garantie donne au consommateur des droits spécifiques et certains autres droits qui peuvent varier d’une province à l’autre.
Pour toute question concernant la présente garantie, prière d’écrire aux Services à la clientèle de Honeywell à l’adresse suivante :
Honeywell Customer Relations, 1985 Douglas Dr, Golden Valley, MN 55422 ou composer le 1-855-733-5465.
46 69-2734EFS—03
Page 96

Systèmes d’automatisation et de régulation
Honeywell International Inc.
1985 Douglas Drive North
Golden Valley, MN 55422
Honeywell Ltd
705 Montrichard Avenue
Saint-Jean-sur-Richelieu, Québec
J2X 5K8
http://yourhome.honeywell.com
® Marque de commerce déposée américaine.
Apple, iPhone, iPad, iPod touch et iTunes sont
des marques de commerce de Apple Inc.
Toutes les autres marques de commerce sont
propriété de leurs propriétaires respectifs.
© 2013 Honeywell International Inc.
69-2734EFS—03 M.S. Rev. 12-13
Imprimé aux États-Unis
69-2734EFS-03
Page 97

Guía del usuario
VisionPRO® Modelo Wi-Fi TH8320WF
Termostato con pantalla táctil programable
Page 98

69-2734EFS—03 1
Page 99

Bienvenido
Felicitaciones por la compra del termostato
con pantalla táctil programable con conexión
WiFi de Honeywell. Cuando se registre
en Total Connect Comfort Solutions de
Honeywell, puede supervisar y controlar de
manera remota el sistema de calefacción y
refrigeración de su hogar o empresa; puede
permanecer conectado a su sistema de confort
dondequiera que vaya.
Total Connect Comfort de Honeywell es la
solución perfecta si usted viaja frecuentemente,
si posee un hogar de vacaciones o una
empresa, o si administra una propiedad de
inversión o, simplemente, busca tranquilidad.
Page 100

Índice
Acerca de su nuevo termostato
Referencia rápida de la pantalla
de inicio ....................................................... 5
Mensajes del Centro de mensajes .............6
Conexión a la red WiFi ................................8
Registro del termostato en línea ............... 13
Cronogramas de ahorro de
energía predeterminados .......................... 20
Funcionamiento
Configuración del reloj .............................. 17
Configuración del ventilador .....................18
Selección de la modalidad del sistema ....19
Ajuste de los cronogramas
del programa ............................................. 21
Anulación temporal de los cronogramas...22
Anulación permanente
de los cronogramas ..................................23
69-2734EFS—03 3
Configuración del mantenimiento
de la temperatura en vacaciones ..............24
Bloqueo de pantalla .................................. 25
Configuración de los intervalos
del recordatorio del filtro ........................... 27
Limpieza de la pantalla ............................. 26
Baja del termostato ................................... 28
Desconexión de la red WiFi ......................29
Características especiales ........................ 30
Opciones y funciones de configuración .... 31
Configuración del sistema
Configuración del sistema .........................32
Apéndices
Preguntas frecuentes ................................ 38
Localización y solución de problemas ......41
Garantía limitada ....................................... 40
 Loading...