

Pentax TH6320, TH6320R, YTH6320, YTH6320R Owner's Manual
FocusPRO®TH6320R
Wireless Thermostat
Termóstato inalámbrico
Thermostat Sans Fil
Operating Manual
69-2093EFS-05

Quick Reference Card
Grasp and pull to see basic
operating instructions at a
glance.
Need Help?
For assistance with this product please visit http://yourhome.honeywell.com
or call Honeywell Customer Care toll-free at 1-800-468-1502
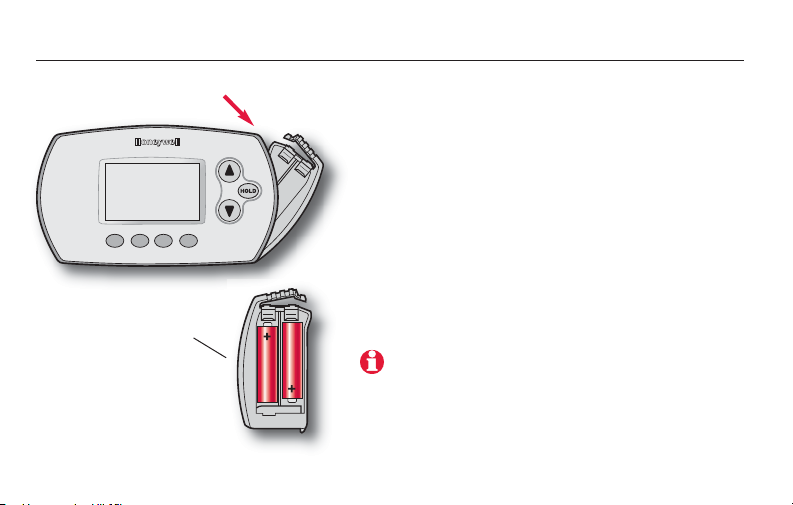
Battery Holder
Press down and pull to
remove batteries.
Batteries should be
replaced once a year
(see page 16).
CAUTION: EQUIPMENT DAMAGE HAZARD. To prevent possible compressor damage,
do not operate cooling system when outdoor temperature is below 50°F (10°C).
Read and save these instructions
® U.S. Registered Trademark. Patents pending.
Copyright © 2011 Honeywell International Inc. All rights reserved.

11
About your new thermostat
Programming at a glance............2
Quick reference to controls ........3
Quick reference to display..........4
Programming & Operation
Set time and day ........................5
Fan settings (auto/on) ................6
System settings (heat/cool)..........7
Program schedules ....................8
Program schedule overrides ....10
Auto-changeover (heat/cool) ....12
Remote control..........................13
Display outdoor climate............14
Find lost remote control............14
Special features ........................15
Appendices
Battery replacement..................16
In case of difficulty....................18
Limited warranty........................19
Regulatory information..............60
Contents Español: vea la página 20 • Français : voir la page 40

2
About your new thermostat
Your new thermostat is pre-programmed and ready to go. All you have to
do is set the time and day. Then check the settings below and change if
needed:
1 Set time and day (required for proper operation)...............See page 5
2 Select fan setting (Auto/On)....................................................See page 6
3 Select system setting (Heat/Cool) .........................................See page 7
4 Program schedules: Preset to energy-saving levels
while you’re at work or asleep (assumes you
wake at 6 am, leave at 8 am, return at 6 pm
and go to bed at 10 pm).........................................................See pages 8-9
ONE-TOUCH TEMP CONTROL: You can override the program schedule at any time,
and manually adjust the temperature (see pages 10-11).

3
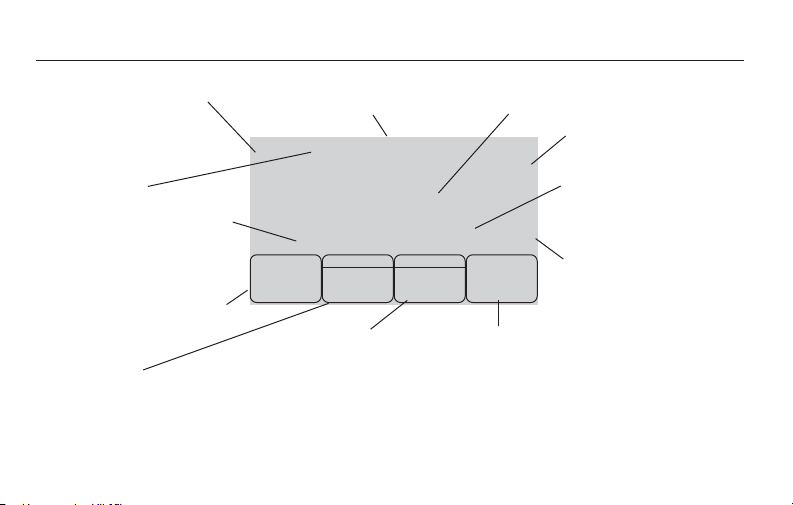
Quick reference to controls
Digital display (see page 4) Battery holder (see page 16)
Temperature buttons
Press to adjust temperature
settings (see page 10-11)
Hold button
Press to override programmed
temperature control (see page 11)
Function buttons
Press to select the function displayed just above each button.
(Functions change depending on the task.)
Quick reference to display screen
4
System setting
Heat/Cool/Auto/Off/Em
Heat (see page 7)
Fan setting
Auto/On (see page 6)
Current program period
Wake/Leave/Return/Sleep
(see pages 8-9)
Set Clock/Day/Schedule
(see pages 5 & 9)
Current inside temperature
Recovery
(see page 15)
Low battery warnings
(see pages 16-17)
System status
Heat On/Cool On
(If flashing, see p. 15)
Auxiliary heat
(Only for heat pumps
with auxiliary heat)
More
Press to view outdoor climate (if
outdoor sensor is installed), or to
find a misplaced remote control if
installed (see page 14)
Current time/day
(see page 5)
Temperature setting
(see pages 9-11)
Heat OnAux
Indoor Recovery Replace Battery
Heat
Setting
75
6:30
AM
75
Set
Clock/Day
Schedule
System
Heat
More
°
°
Fan
Auto
Wake
5
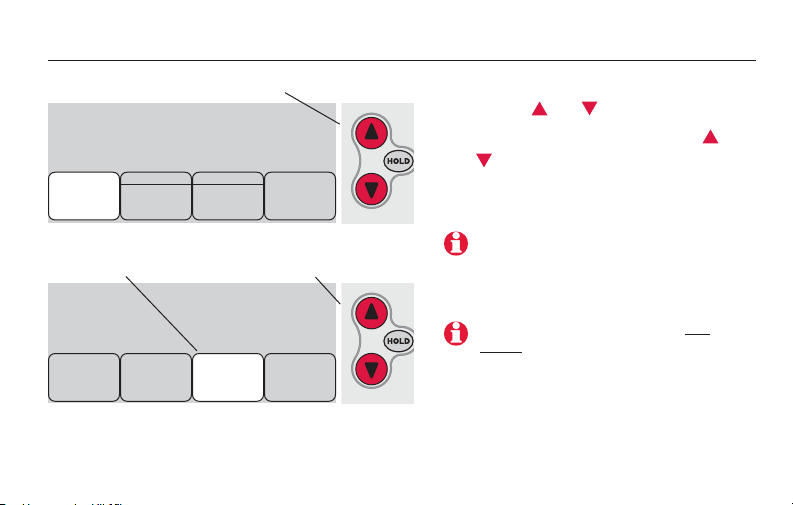
Set the time and day
1 Press
SET CLOCK/DAY/SCHEDULE
, then
press or to set clock.
2 Press
SET DAY
, then press or
to select the day of week.
3 Press
DONE
to save.
Press
SET CLOCK/DAY/SCHEDULE
, then adjust time
4:30
PM
Press
SET DAY
, then select current day
Wed
Done
Set
Day
Set
Schedule
Set
Clock/Day
Schedule
System
Heat
More
Fan
Auto
Note: If the
SET CLOCK/DAY/SCHEDULE
option is not displayed, press
DONE
or
CANCEL
.
Note: If the display flashes Set
Clock, the thermostat will follow your
settings for the weekday “Wake”
time period until you reset the time
and day.
6
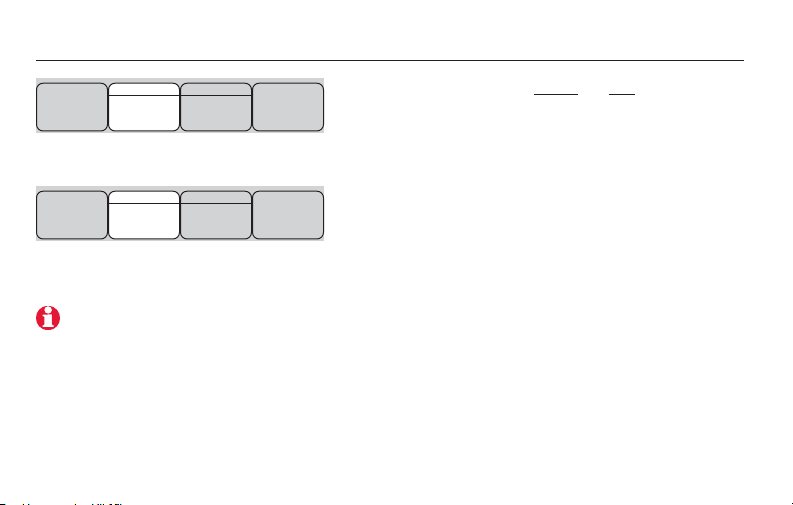
Select the fan setting
Press
FAN
to select Auto or On.
In “Auto” mode (the most commonly
used setting), the fan runs only when the
heating or cooling system is on.
If set to “On,” the fan runs continuously.
Set
Clock/Day
Schedule
System
Heat
More
Fan
Auto
Set
Clock/Day
Schedule
System
Heat
More
Fan
On
Note: Options may vary
depending on your heating/
cooling equipment.
7
Select the system setting
Note: Options may vary
depending on your heating/
cooling equipment.
Press
SYSTEM
to select:
• Heat: Thermostat controls only the
heating system.
• Cool: Thermostat controls only the
cooling system.
• Off: All systems are off.
• Auto: Thermostat automatically
selects heating or cooling depending
on the indoor temperature.
• Em Heat (only for heat pumps with
auxiliary heat): Thermostat controls
Emergency and Auxiliary Heat.
Compressor is locked out.
Set
Clock/Day
Schedule
System
Heat
More
Fan
Auto
Set
Clock/Day
Schedule
System
Cool
More
Fan
Auto
8
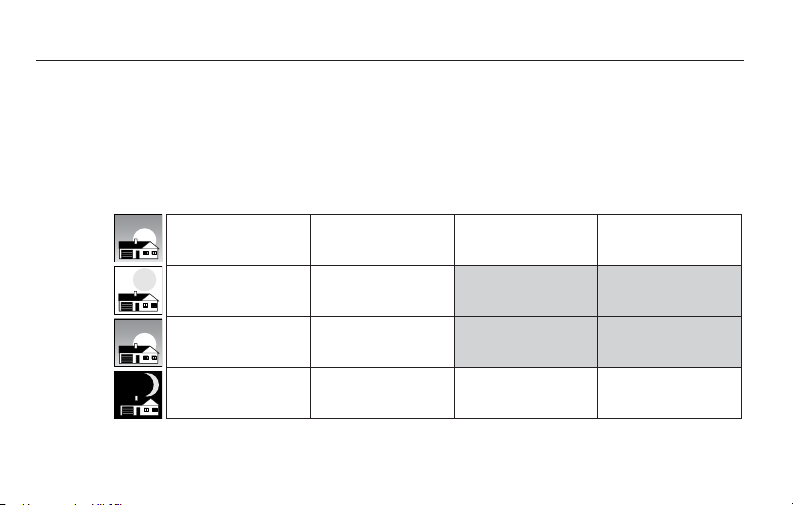
Energy-saving settings for maximum cost savings
70
°
78
°
70
°
78
°
62
°
85
°
62
°
85
°
70
°
78
°
70
°
78
°
62
°
82
°
62
°
82
°
Heat (Mon-Fri) Cool (Mon-Fri) Heat (Sat-Sun) Cool (Sat-Sun)
Wake
(6:00 am)
Leave
(8:00 am)
Return
(6:00 pm)
Sleep
(10:00 pm)
[Or cancel period]
[Or cancel period]
[Or cancel period]
[Or cancel period]
This thermostat is pre-set to use energy-saving program settings. We recommend these settings, since they can reduce your heating/cooling expenses by
as much as 33%. (See next page to adjust times and temperatures of each
time period.)
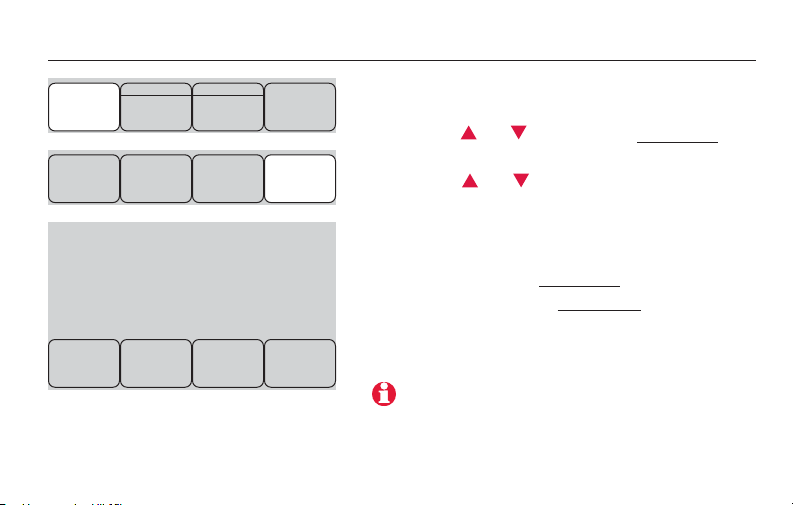
9
To adjust program schedules
1Press
SET CLOCK/DAY/SCHEDULE
, then
SET
SCHEDULE
.
2 Press or to set your weekday
Wake time (Mon-Fri), then press
NEXT
.
3 Press or to set the temperature
for this time period, then press
NEXT
.
4 Set time and temperature for the next
time period (Leave). Repeat steps 2
and 3 for each weekday time period.
5 Press
NEXT
to set weekend time
periods (Sat-Sun), then press
DONE
to
save & exit.
Heat
Setting
Set Schedule
6:00
AM
70
Wake
Mon Tue Wed Thu Fri
°
Done
Set
Day
Set
Schedule
Done Next
Cancel
Period
Note: Make sure the thermostat is set to the
system you want to program (Heat or Cool).
Set
Clock/Day
Schedule
System
Heat
More
Fan
Auto
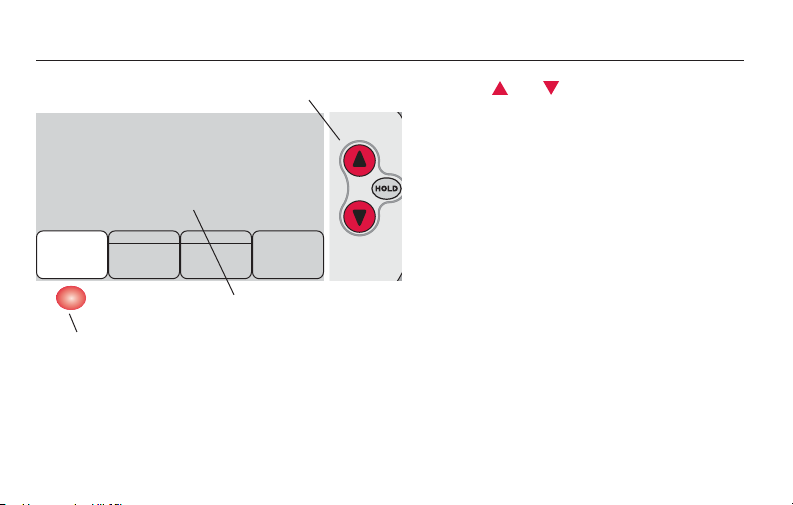
10
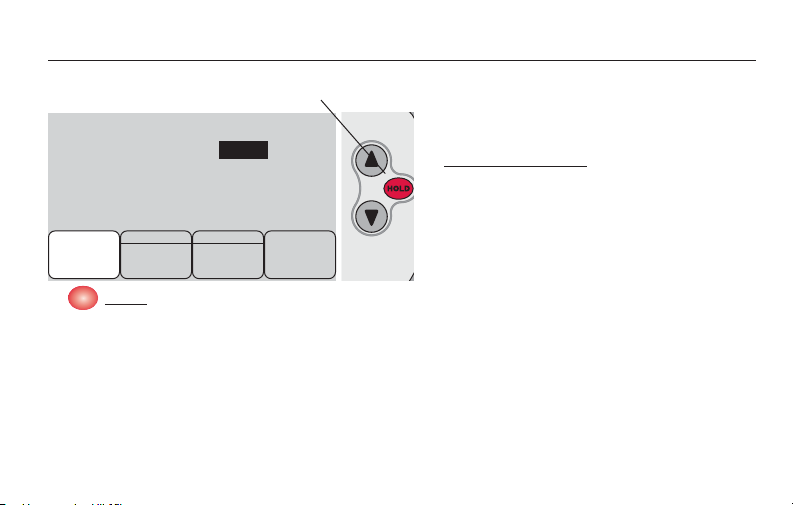
Program schedule override (temporary)
Press or to immediately
adjust the temperature. This will
temporarily override the temperature setting for the current time
period.
The new temperature will be
maintained only until the next
programmed time period begins
(see page 8).
To cancel the temporary setting
at any time, press
CANCEL
.
Temperature will be
maintained until time
shown
Press to resume
program schedule
Press to temporarily adjust temperature
Indoor
Heat
Setting
75
6:00
PM
75
Cancel System
Heat
More
°
°
Hold Until
Fan
Auto
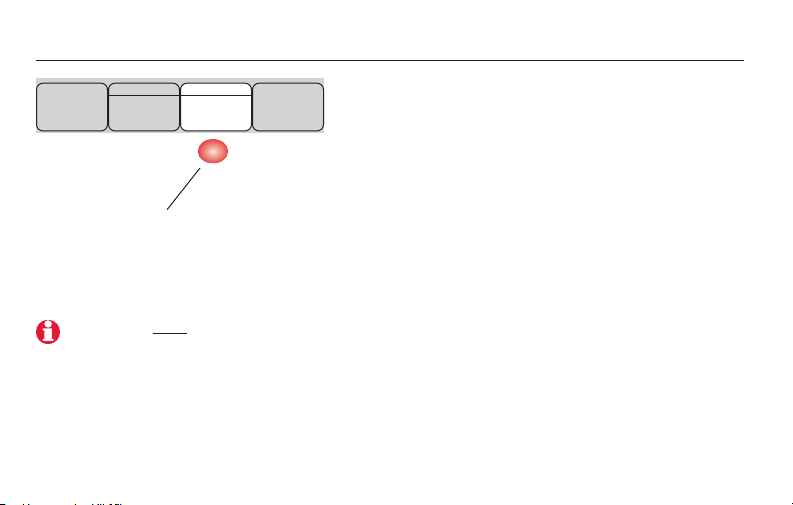
11
Program schedule override (permanent)
Press
HOLD
to permanently adjust
the temperature. This will override the temperature settings for
all time periods.
The “Hold” feature turns off the
program schedule and allows you
to adjust the thermostat manually,
as needed.
Whatever temperature you set
will be maintained 24 hours a day,
until you manually change it, or
press
CANCEL
to resume the pro-
grammed schedule.
Press to resume
program schedule
Press to permanently adjust temperature
Indoor
Heat
Setting
75
6:00
PM
75
°
°
Hold
Cancel System
Heat
More
Fan
Auto
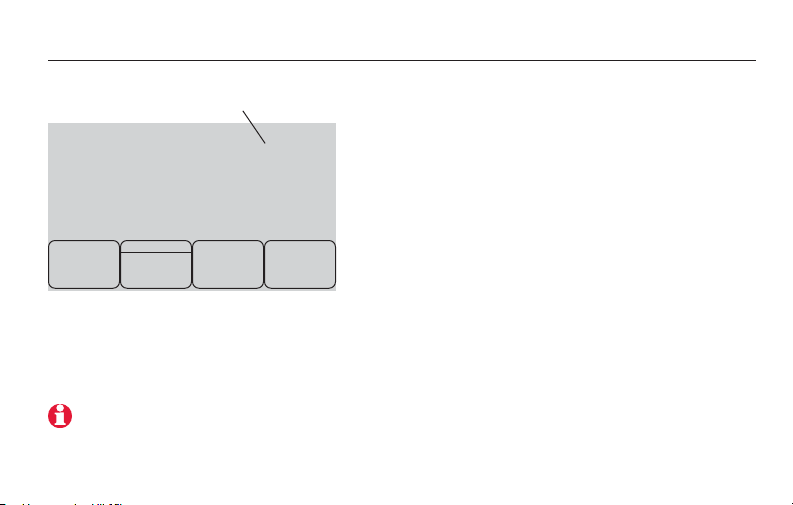
12
Auto Changeover (heat/cool)
Auto Changeover is a feature used in
climates where both air conditioning and
heating are often used on the same day.
When the system is set to Auto, the thermostat automatically selects heating or
cooling depending on the indoor
temperature.
Heat and cool settings must be at least 3
degrees apart. The thermostat will automatically adjust settings to maintain this
3-degree separation.
Press until screen
displays “Auto”
Note: The Auto system setting
may not appear, depending on
how your thermostat was
installed.
Set
Clock/Day
Schedule
System
Auto
More
Fan
Auto
13
Remote control
The optional remote control can act as a
mobile thermostat, to maintain a
comfortable temperature as you move
from room to room.
When the system is responding to
temperatures measured at the Remote,
the thermostat will display Remote has
Control.
Press
CANCEL
to restore temperature
control to the thermostat (the system will
only respond to temperatures measured
at the thermostat).
72
75
Cancel
°
°
Temperature is measured at
location of remote control
Reading
at Remote
at Thermostat
Remote has Control
More
Fan
Auto
Note: The thermostat may take up to 15 seconds to respond to commands entered at the
remote control. See Remote Control Operating Manual for more information.
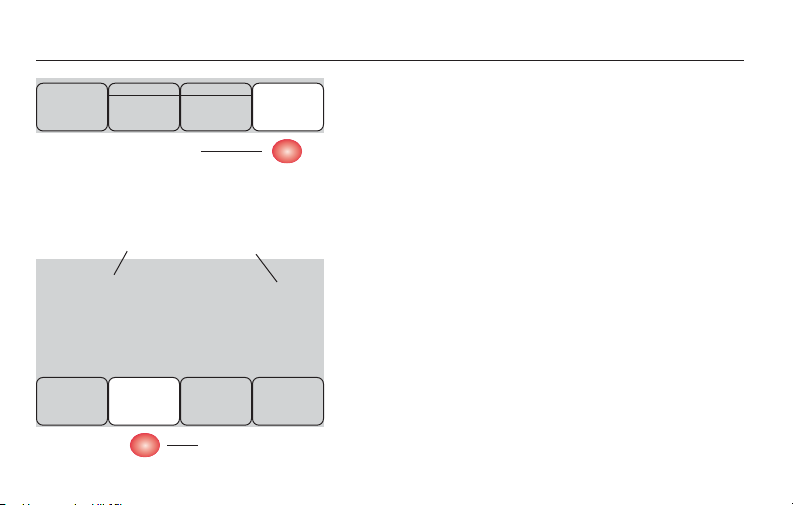
14
Additional features
To display outdoor climate
If you have an outdoor air sensor, press
MORE
to display the current outdoor tem-
perature and humidity. Press
DONE
to exit.
To find a lost remote control
If you misplace a remote control, press
MORE
, then
FIND REMOTE
. The remote will
beep for two minutes to help you locate
it. Press anywhere on the display screen
to stop the beeping.
Press to display
more options
Set
Clock/Day
Schedule
System
Heat
More
Fan
Auto
Outdoor
85
50
FindRemote
Done
°
%
Outdoor
temperature
Outdoor
humidity
Press to find a lost
remote control
Outdoor
Humidity

15
Special features
Built-in compressor protection: This feature helps prevent damage to the
compressor in your air conditioning or heat pump system. Damage can
occur if the compressor is re-started too soon after shutdown. This feature
forces the compressor to wait for a few minutes before restarting.
During the wait time, the display will flash the message Cool On (or Heat On
if you have a heat pump).
Adaptive Intelligent Recovery: This feature eliminates guesswork when
setting your schedule. It allows the thermostat to “learn” how long your furnace and air conditioner take to reach programmed temperature settings, so
the temperature is reached at the time you set.
Note: When Adaptive Intelligent Recovery is in effect, the thermostat
will display “Recovery”.
16
Battery replacement (thermostat)
Install fresh batteries when the
REPLACE
BATTERY
warning begins flashing. The warning flashes about two months before the
batteries are depleted.
Remove the battery holder and install 2
fresh AA alkaline batteries.
After batteries are installed, the thermostat will automatically restore communication with the wireless network within a
few minutes.
Press and pull to remove
Insert fresh AA alkaline
batteries, then reinstall
battery holder
Note: If batteries are inserted within t2 minutes,
the time and day will not have to be reset. All
other settings are retained in memory.
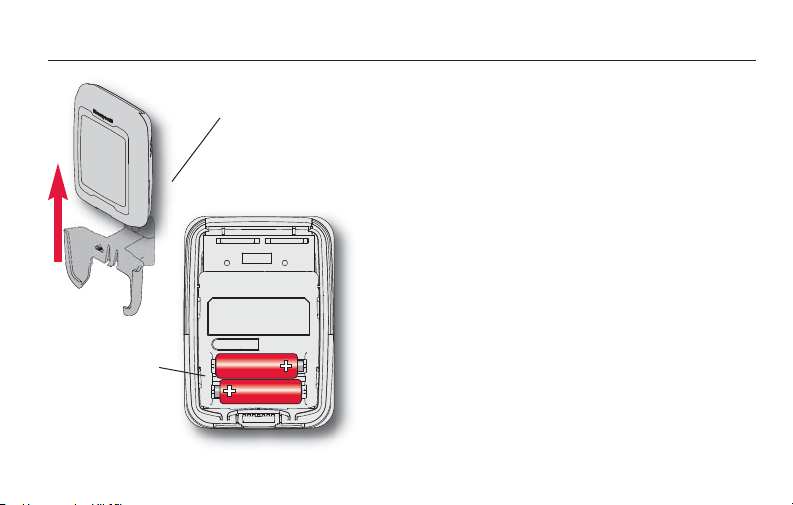
17
Replace outdoor sensor batteries when
the
REPLACE BATTERY OUTDOOR
warning begins
flashing on the thermostat. The warning
flashes about two months before the batteries are depleted.
Remove the sensor from the bracket,
remove the cover and install 2 fresh AA
lithium batteries.
After batteries are installed, the sensor
will automatically restore communication
with the wireless network within a few
minutes.
Remove cover
and install 2
fresh AA lithium
batteries
Battery replacement (outdoor air sensor)
Remove sensor
from bracket

18
Heating or
cooling system
does not respond
• Check circuit breaker and reset if necessary.
• Make sure power switch at heating & cooling system is on.
• Make sure furnace door is closed securely.
• Wait 5 minutes for the system to respond.
In case of difficulty
Screen displays
“No Signal”
Thermostat has lost radio contact with the wireless network (usually
because of a power outage). To restore power:
• Check circuit breaker and reset if necessary.
• Make sure power switch at heating & cooling system is on.
• Make sure furnace door is closed securely.
After power is restored, the thermostat will automatically restore wireless
communication within a few minutes.
 Loading...