

Page 1
Digital Camera
Operating Manual
To ensure the best performance from
your camera, please read the Operating
Manual before using the camera.
Page 2

Thank you for buying the PENTAX Digital Camera.
Please read this manual before using the camera in order to get the most
out of all the features and functions. Keep this manual safe, as it can be
a valuable tool in helping you to understand all the camera's capabilities.
Regarding copyrights
Images taken using the PENTAX Digital Camera that are for anything other than
personal enjoyment cannot be used without permission according to the rights as
specified in the Copyright Act. Please take care, as there are even cases where
limitations are placed on taking pictures even for personal enjoyment during
demonstrations, industrial enterprise or as items for display. Images taken with
the purpose of obtaining copyrights also cannot be used outside the scope of use
of the copyright as laid out in the Copyright Act, and care should be taken here
also.
To users of this camera
• There is a possibility that recorded data may be erased or that the camera may
not function correctly when used in surroundings such as installations
generating strong electromagnetic radiation or magnetic fields.
• The liquid crystal panel used in the LCD display is manufactured using
extremely high precision technology. Although the level of functioning pixels is
99.99% or better, you should be aware that 0.01% or fewer of the pixels may
not illuminate or may illuminate when they should not. However, this has no
effect on the recorded image.
Regarding trademarks
• PENTAX, Optio and smc PENTAX are trademarks of PENTAX Corporation.
• The SD logo is a trademark.
• All other brands or product names are trademarks or registered trademarks of
their respective companies.
This product supports PRINT Image Matching III.
PRINT Image Matching enabled digital still cameras, printers and software help
photographers to produce images more faithful to their intentions. Some functions
are not available on printers that are not PRINT Image Matching III compliant.
Copyright 2001 Seiko Epson Corporation. All Rights Reserved.
PRINT Image Matching is a trademark of Seiko Epson Corporation. The PRINT
Image Matching logo is a trademark of Seiko Epson Corporation.
Regarding PictBridge
PictBridge allows the user to connect the printer and digital camera directly, using
the unified standard for the direct printout of images. You can print images directly
from the camera through a few simple operations.
• There is a possibility that the illustrations and the display screen of the LCD
monitor in this manual are different from the actual product.
Page 3
FOR SAFE USE OF YOUR CAMERA
Sufficient attention has been paid to the safety of this product but please
pay particular attention to the warnings indicated by the following
symbols during use.
Warning
Caution
About the Camera
Warning
• Do not attempt to take the camera apart or remodel the camera. High
voltages are present within the camera, and there is therefore a danger of
electric shocks.
• If the inside of the camera should become exposed as a result of, for
example, the camera being dropped, please do not under any
circumstances touch such exposed portions, as there is a danger of
receiving an electric shock.
• Wrapping the strap of the camera around your neck is also dangerous.
Please take care that small children do not hang the strap around their
necks.
• To avoid the risk of it being swallowed by mistake, keep the SD Memory
Card out of the reach of small children. Seek medical attention immediately
if accidentally swallowed.
• Use an AC adapter that is of the power and voltage specified for exclusive
use with this product. The use of an AC adapter other than that specified
exclusively for use with this product may cause fire or electric shocks.
• If the camera emits smoke or a strange smell, or in the event of any other
irregularity, stop using the camera immediately, remove the battery or
disconnect the AC adapter and contact your nearest PENTAX service
center. Continued use of the camera may result in fire or electric shock.
These symbols indicate that it is possible that the user
may experience serious difficulties if the warnings are
not heeded.
These symbols indicate that it is possible that the user
may experience minor or middling difficulties or
physical difficulties if the warnings are not heeded.
1
Page 4

Caution
• Never try to disassemble or short the battery. Also, do not dispose of the
battery in fire, as it may explode.
• Do not charge any batteries other than rechargeable lithium-ion battery DLI8. The battery could explode or catch fire.
• Do not place your finger on the flash when it is discharging as there is a
risk of burns.
• Do not discharge the flash while it is touching your clothing as there is a
risk of discoloring.
• If any of the battery leakage should come in contact with your eyes, do not
rub them. Flush your eyes with clean water and get medical attention
immediately.
• If any of the battery leakage should come in contact with skin or clothes,
wash the affected areas thoroughly with water.
• Remove the battery from the camera immediately if it becomes hot or
begins to smoke. Be careful not to burn yourself during removal.
• Some portions of the camera heat up during use, so please take care, as
there is a risk of low temperature burns if such portions are held for long
periods of time.
• Should the LCD be damaged, be careful of glass fragments. Also, be
careful not to allow the liquid crystal to get on your skin or eyes or in your
mouth.
About the Battery Charging Stand and the AC Adapter
Warning
• Do not use the product at a voltage other than the specified voltage. Use
with a power source or voltage other than that designed can cause a fire
or electrical shock. The specified voltage is 100-240 V AC.
• Do not disassemble or modify the product. This can cause a fire or
electrical shock.
• If the generation of smoke or strange odor from the product or other
abnormality occurs, immediately discontinue using and consult a PENTAX
Service Center. Continuing to use the product can cause a fire or electrical
shock.
• If water should happen to get inside the product, consult a PENTAX
Service Center. Continuing to use the product can cause a fire or electrical
shock.
2
Page 5

• If lightning should be present during using, unplug the power cord and
discontinue using. Continuing to use the product can cause damage to the
equipment, fire or electrical shock.
• Wipe off the plug of the power cord if it should become covered with dust.
This can cause a fire.
Caution
• Do not place heavy objects on the AC plug cord, allow heavy objects to
drop onto it or allow the AC plug cord to become damaged due to
excessive bending. If the AC plug cord becomes damaged, consult a
PENTAX Service Center.
• Do not short or touch the output terminals of the product while it is still
plugged in.
• Remove the battery and unplug the AC plug cord when not using the
battery charging stand.
• Do not plug in the AC plug cord with wet hands. This can cause an
electrical shock.
• Do not subject the product to strong impacts or allow it to drop onto a hard
surface. This can cause a malfunction.
• To reduce the risk of hazards, use only CSA/UL Certified power supply
cord set, cord is Type SPT-2 or heavier, minimum NO.18 AWG copper,
one end with a molded-on male attachment plug cap (with a specified
NEMA configuration), and the other is provided with a molded-on female
connector body (with a specified IEC nonindustrial type configuration) or
the equivalent.
• Do not use the battery charging stand to charge batteries other than the
ones specified. This can cause overheating or malfunctions.
3
Page 6

Care to be Taken During Handling
• Take the international warranty card with you when you travel abroad.
Also take the Worldwide Service Network that is included in the package.
This will be useful if you experience problems abroad.
• When the camera has not been used for a long time, confirm that it is still
working properly, particularly prior to taking important pictures (such as at
a wedding or during travelling). Contents of a recording such as images
and sounds cannot be guaranteed if recording, playback or data transfer
from your camera to a computer, etc. is not possible due to a malfunction
of your camera or recording medium (SD Memory Card), etc.
• The lens on this camera is not exchangeable. The lens is not removable.
• Do not clean the product with organic solvents such as thinner or alcohol
benzene.
• Places of high temperature and humidity should be avoided. Particular
care should be taken regarding vehicles, which can become very hot
inside.
• Storing the camera where pesticides and chemicals are handled should be
avoided. Remove from case and store in a well-ventilated place to prevent
the camera from becoming moldy during storage.
• Do not use the camera where it may come in contact with rain, water or any
other liquid, because the camera is not weather, water, or liquid resistant.
Should the camera get wet from rain, splashing water, or any other liquid,
wipe it off immediately with a dry soft cloth.
• Ensure that the camera is not subjected to substantial vibrations, shocks
or pressure. Place the camera on a cushion for protection when the
camera is subjected to the vibrations of a motorbike, car, or ship, etc.
• The temperature range in which the camera can be used is 0°C to 40°C
(32°F to 104°F).
• The liquid crystal display will become black at temperatures of
approximately 60°C (140°F) but will return to normal when normal
temperatures are returned to.
• The response speed of the liquid crystal display becomes slow at low
temperatures. This is due to the properties of the liquid crystal and is not
a fault.
• Periodic checks are recommended every 1 to 2 years in order to maintain
high-performance.
4
Page 7

• If the camera is subjected to rapid temperature changes, condensation
may form on the inside and outside of the camera.
Therefore put the camera in a bag or plastic bag, and take the camera out
when the difference in temperature has subsided.
• Avoid contact with garbage, dirt, sand, dust, water, toxic gases, salt, etc.
as this may cause damage to the camera. If rain or drops of water get onto
the camera, please wipe dry.
• Refer to “Precautions when using an SD Memory Card” (p.21) regarding
the SD Memory Card.
• Please do not press forcefully on the LCD monitor. This could cause
breakage or malfunction.
• Be careful not to sit down with the camera in your back pocket as this may
damage the exterior of the camera or the LCD monitor.
• When using a tripod with the camera, be careful not to overtighten
the screw in the tripod socket on the camera.
5
Page 8

Contents
FOR SAFE USE OF YOUR CAMERA .................................................... 1
Care to be Taken During Handling.......................................................... 4
Contents of the Operating Manual .......................................................... 9
Checking the Contents of the Package ................................................. 10
Names of Parts...................................................................................... 11
Names of Operating Parts..................................................................... 12
Getting Started 13
Attaching the Strap .................................................................................... 13
Powering the Camera ................................................................................ 14
Installing the Battery.............................................................................. 14
Removing the Battery............................................................................ 14
Charging the Battery ............................................................................. 15
Using the AC Adapter (optional)............................................................19
Installing the SD Memory Card................................................................. 21
Image Size and Quality ......................................................................... 23
Initial Settings............................................................................................. 25
Setting the Display Language ............................................................... 25
Setting the Date and Time..................................................................... 26
Quick Start 28
Taking Still Pictures................................................................................... 28
Playing Back Still Pictures........................................................................ 30
Playing Back an Image..........................................................................30
Playing Back the Previous or Next Image ............................................. 30
Rotating the Displayed Image ............................................................... 31
Common Operations 32
Turning the Camera On and Off................................................................32
Playback Mode...................................................................................... 33
Voice Recording Mode.......................................................................... 33
Using the Button Functions ......................................................................34
Capture Mode........................................................................................34
Playback Mode...................................................................................... 36
Voice Recording Mode.......................................................................... 37
Setting the Menus ...................................................................................... 38
How to Set the Menus ........................................................................... 38
Menu List............................................................................................... 40
Taking Pictures 42
Taking Pictures .......................................................................................... 42
Taking Pictures by the Simplest Procedure (Green Mode)................... 42
Setting the Functions (Program Mode).................................................. 43
Selecting the Picture Mode According to the Shooting Scene (Picture
Mode) ................................................................................................ 44
Taking Pictures of Dark Scenes
(Night Scene Mode) .......................................................................... 46
6
Page 9

Taking Movies (Movie Mode) ................................................................ 47
Taking Panorama Pictures
(Panorama Assist Mode)................................................................... 49
Taking Soft-Contoured Pictures
(Soft Focus Mode)............................................................................. 51
Taking Pictures with Digital Filters
(Digital Filter Mode)...........................................................................52
Using Preset Function Settings (User Mode) ........................................ 54
Taking Underwater Pictures (Marine Mode).......................................... 55
Taking 3D Pictures (3D Image Mode) ...................................................57
Using the Self-Timer.............................................................................. 62
Using the Remote Control Unit (optional).............................................. 63
Continuous Shooting
(Continuous Shooting Mode)............................................................. 65
Using the Zoom to Change the Subject Size ........................................ 66
Taking Time-lapse Movies..................................................................... 68
Setting the Shooting Functions................................................................69
Changing the Mode............................................................................... 69
Selecting the Capture Mode.................................................................. 69
Displaying Shooting Information in Capture Mode ................................ 71
Selecting the Focus Mode.....................................................................72
Selecting the Flash Mode...................................................................... 75
Selecting the Recorded Pixels .............................................................. 76
Selecting the Quality Level.................................................................... 78
Adjusting the White Balance ................................................................. 79
Changing the Focusing Area................................................................. 81
Setting the Light Metering Range to Determine the Exposure.............. 82
Setting the Sensitivity............................................................................ 83
Setting the Instant Review Time............................................................ 84
Setting the Image Sharpness................................................................ 85
Setting the Color Saturation .................................................................. 86
Setting the Image Contrast....................................................................87
Setting the Exposure (EV Compensation)............................................. 88
Saving the Settings.................................................................................... 89
Saving the Menu Items (Memory) ......................................................... 89
Registering Functions in User Mode ..................................................... 90
Recording and Playback 91
Recording Sound (Voice Recording Mode) ............................................. 91
Playing Back Sound................................................................................... 92
Adding a Voice Memo................................................................................93
Setting the Record Voice Memo to [Off]................................................ 93
Playback/Deleting/Editing 94
Playing Back Images ................................................................................. 94
Playing Back Still Pictures..................................................................... 94
Zoom Display ........................................................................................ 94
Playing Back Movies ............................................................................. 96
Displaying Shooting Information in Playback Mode .............................. 97
Nine Image Display ............................................................................... 98
Slideshow ..............................................................................................99
7
Page 10

Deleting Images, Movies and Sound...................................................... 100
Deleting a Single Image or Sound....................................................... 100
Deleting All Images ............................................................................. 102
Protecting Images and Sounds from Deletion (Protect) ...................... 103
Viewing Images on a TV .......................................................................... 104
Playing Back an Image Using the Remote Control Unit (optional)...... 105
Setting the Printing Service (DPOF).......................................................106
Printing Single Images ........................................................................ 106
Printing All Images .............................................................................. 108
Direct Printing Using PictBridge............................................................. 109
Connecting the Camera to the Printer................................................. 109
Printing Single Images ........................................................................ 110
Printing All Images .............................................................................. 111
Printing Using the DPOF Settings....................................................... 112
Disconnecting the Camera from the Printer ........................................ 112
Editing Images.......................................................................................... 113
Changing the Image Size and Quality................................................. 113
Trimming Images................................................................................. 115
Copying Files............................................................................................ 116
Settings 118
Camera Settings....................................................................................... 118
Setting Up the Screen ......................................................................... 118
Formatting an SD Memory Card or the Built-in Memory ..................... 120
Changing the Sound Settings.............................................................. 121
Changing the Date and Time .............................................................. 122
Setting the World Time........................................................................ 123
Changing the Display Language .........................................................124
Changing the Video Output Format..................................................... 125
Changing the USB Connection Mode ................................................. 125
Sleep Timeout ..................................................................................... 126
Setting Auto Power Off........................................................................ 126
Registering a Function (Custom Function).......................................... 127
Setting the QUICK Button ................................................................... 128
Resetting to Default Settings............................................................... 129
Setting the Alarm ..................................................................................... 130
Checking the Alarm............................................................................. 130
Setting the Alarm................................................................................. 130
Turning the Alarm Off.......................................................................... 131
Appendix 132
List of City Codes..................................................................................... 132
Optional Accessories .............................................................................. 133
Messages ..................................................................................................134
Troubleshooting ....................................................................................... 136
Main Specifications.................................................................................. 138
WARRANTY POLICY ................................................................................ 141
Index.......................................................................................................... 145
8
Page 11
Contents of the Operating Manual
This operating manual contains the following chapters.
1 Getting Started –––––––––––––––––––––––––––––––––––––––––
This chapter explains what you need to do after purchasing the camera before you start
taking pictures. Be sure to read it and follow the instructions.
2 Quick Start ––––––––––––––––––––––––––––––––––––––––––––
This chapter explains the simplest way to take pictures and play back images. Use it if
you want to start taking pictures straightaway.
3 Common Operations ––––––––––––––––––––––––––––––––––––
This chapter explains common operations such as the functions of the buttons and how
to use the menus. For more details, refer to the respective “Taking Pictures”,
“Recording and Playback”, “Playback/Deleting/Editing” and “Settings” chapters.
4 Taking Pictures ––––––––––––––––––––––––––––––––––––––––
This chapter explains the various way of capturing images and how to set the relevant
functions, including how to use the Capture Mode screen to select the capture mode
best suited to the situation.
5 Recording and Playback –––––––––––––––––––––––––––––––––
This chapter explains how to record sound only or add a voice memo to an image, and
how to play back voice memos.
6 Playback/Deleting/Editing ––––––––––––––––––––––––––––––––
This chapter explains how to play back images on the camera or on a TV, how to
delete, resize and trim images, and how to print images directly to the printer.
7 Settings –––––––––––––––––––––––––––––––––––––––––––––––
This chapter explains how to set the camera-related functions.
8 Appendix––––––––––––––––––––––––––––––––––––––––––––––
This tells you about the messages displayed on the LCD monitor and what to do in the
event of trouble.
1
2
3
4
5
6
7
8
The meanings of the symbols used in this operating manual are explained below.
1
indicates the reference page number for an explanation of the
related operation.
indicates information that is useful to know.
indicates precautions to be taken when operating the camera.
9
Page 12
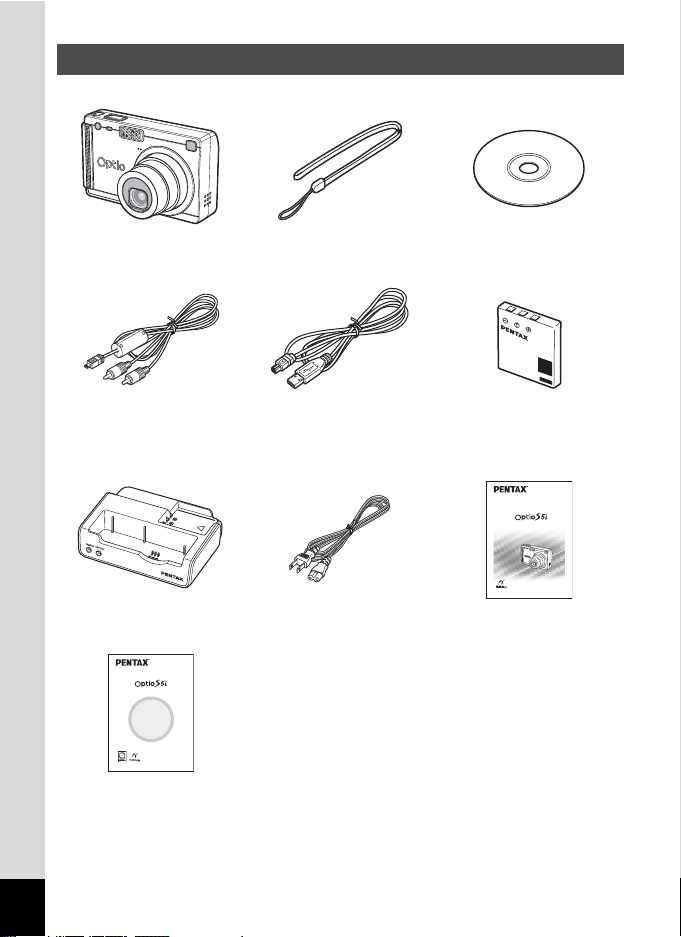
Checking the Contents of the Package
Camera
Optio S5i
AV cable
I-AVC7 (∗)
Strap
O-ST20 (∗)
USB cable
I-USB7 (∗)
Software (CD-ROM)
S-SW25
Rechargeable
lithium-ion battery
D-LI8 (∗)
Digital Camera
Operating Manual
To ensure the best performance from
your camera, please read the Operating
Manual before using the camera.
Battery charging stand
D-BC25 (∗)
(PC Connection Manual)
Enjoying Your Digital
Camera Images
On Your PC
AC plug cord
D-CO2 (∗)
Operating Manual
(this manual)
Operating Manual
(PC Connection Manual)
Items marked with an asterisk (∗) are also available as optional accessories.
For other optional accessories, refer to “Optional Accessories” (p.133).
10
Page 13
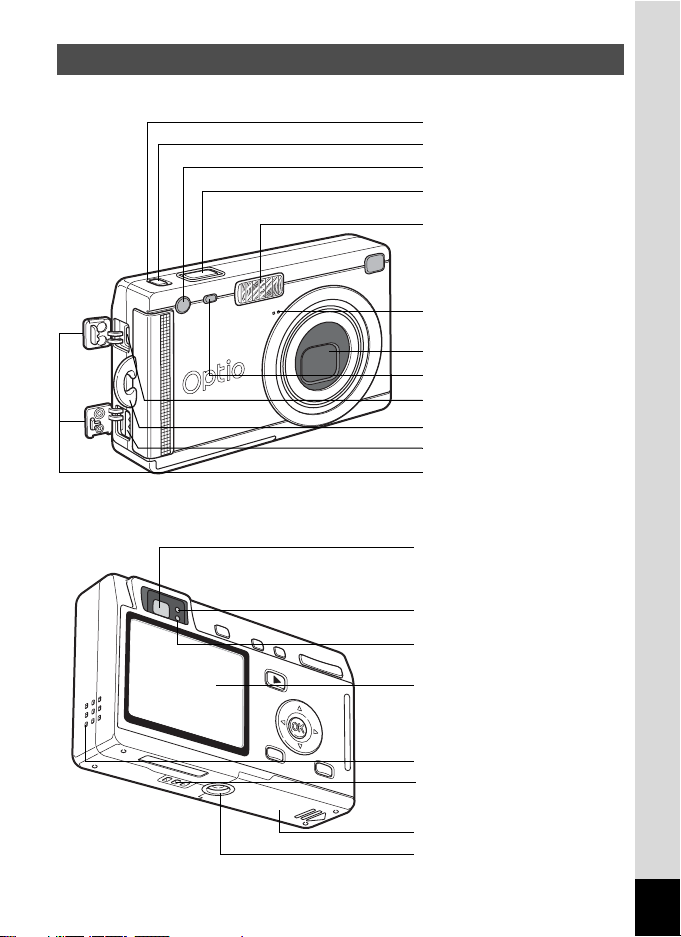
Names of Parts
Front
Back
Power indicator
Power switch
Remote control receiver
Shutter release button
Flash
Microphone
Lens
Self-timer lamp
USB/AV terminal
Strap lug
DC input terminal
Terminal cover
Viewfinder
Focus status lamp (green)
Flash status lamp (red)
LCD monitor
Speaker
Battery charging stand terminal
Battery/Card cover
Tripod socket
11
Page 14
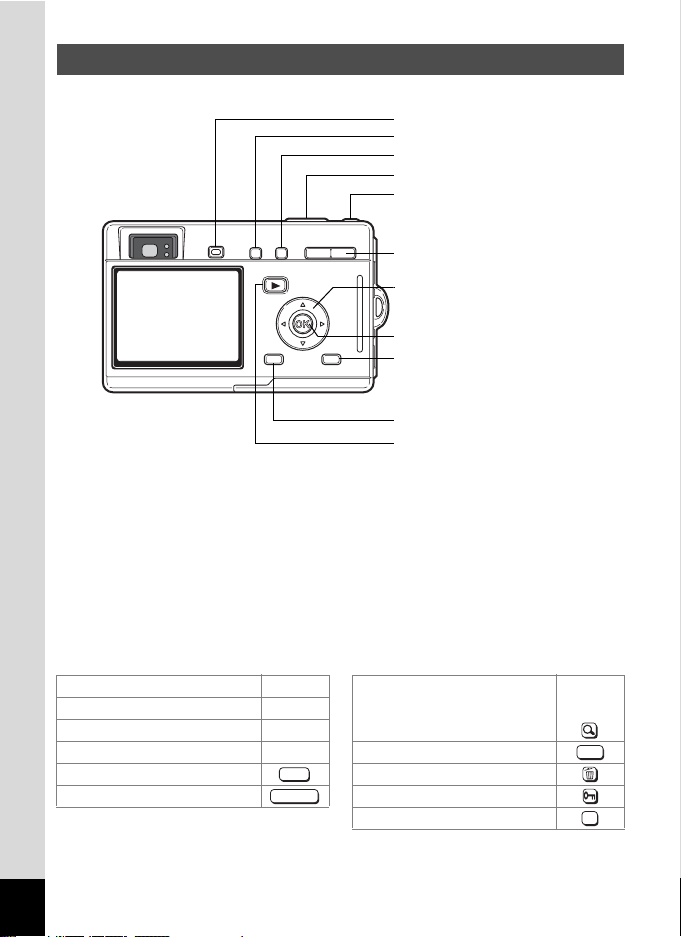
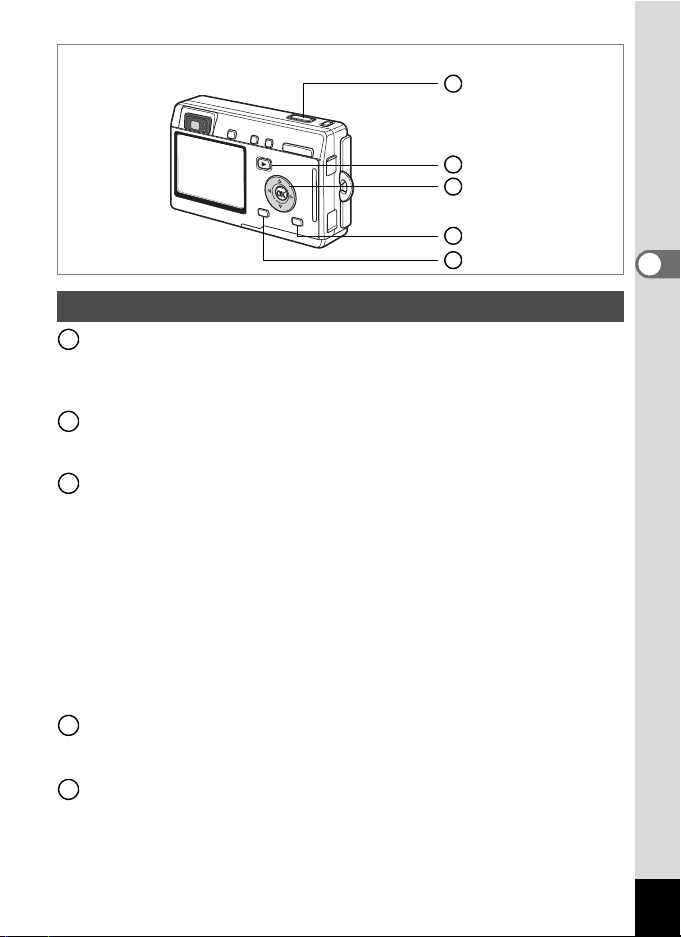
Names of Operating Parts
QUICK button
b/i button
qsz/Z button
Shutter release button
Power switch
f/y button
Zoom /
Four-way controller (2345)
OK button
DISPLAY button
MENU button
Q Playback button
Guide Indications
A guide to available button operations appears on the LCD monitor
during operation.
The buttons are indicated as shown below.
Four-way controller (2) 2 Zoom /f/y button
Four-way controller (3) 3 for digital zoom
Four-way controller (4) 4 for trimming
Four-way controller (5) 5 DISPLAY button
MENU button i button
Shutter release button Z button
MENU
SHUTTER
OK button
y
DISP
OK
12
Page 15
Getting Started
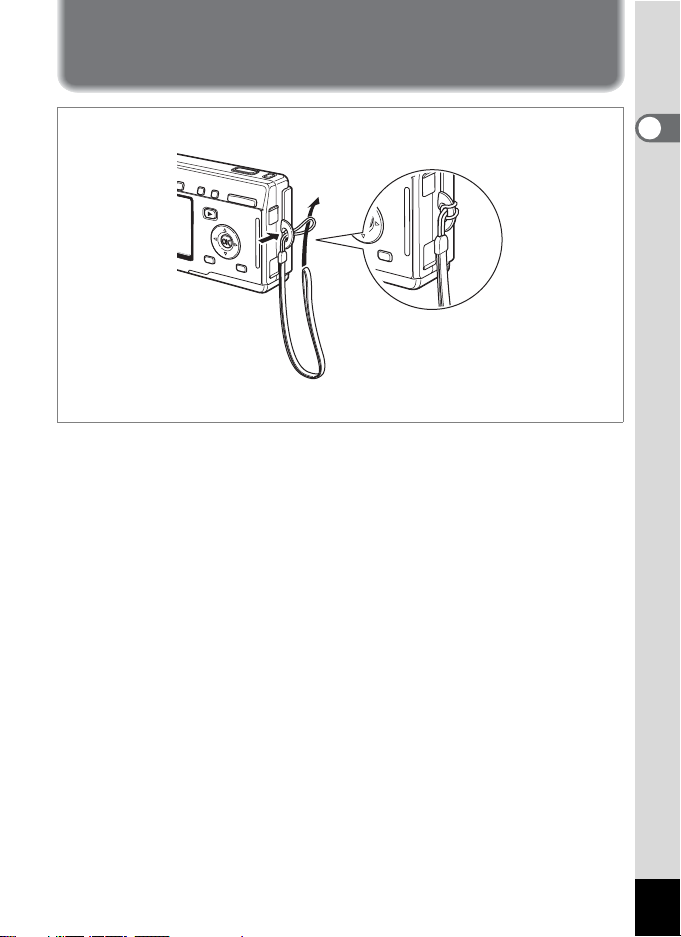
Attaching the Strap
Pass the narrow end of the strap through the strap lug and pass the other
end through the loop.
1
Getting Started
13
Page 16
Powering the Camera
1
Getting Started
2
Battery lock
lever
Battery
3
2
1
Battery/Card cover
1
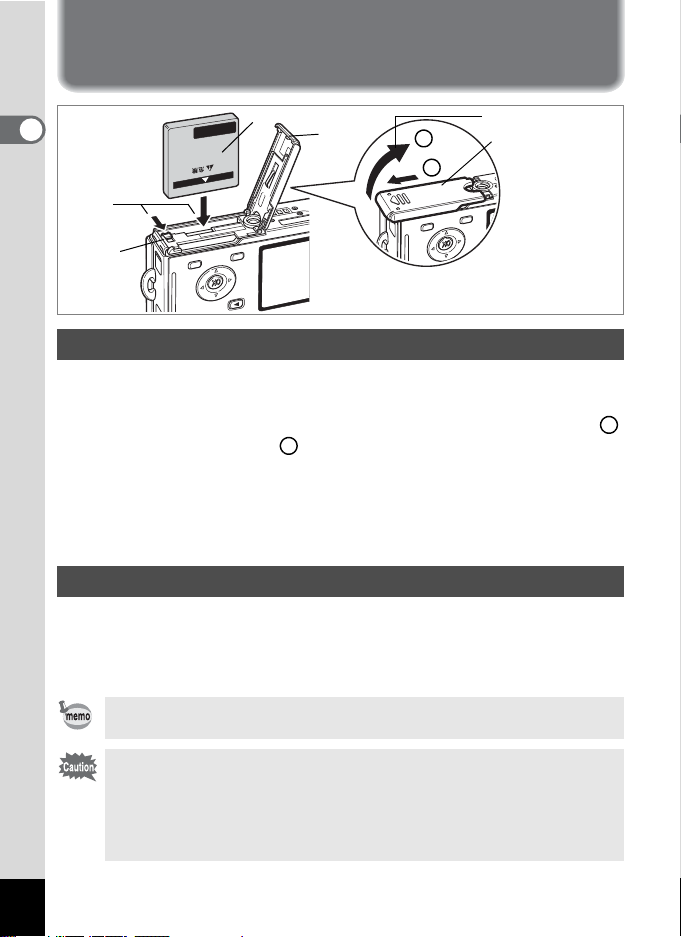
Installing the Battery
Install the battery provided with the camera.
1 Open the battery/card cover.
Slide the battery/card cover in the direction indicated by the arrow
and flip the cover open .
2
Insert the battery with the 2 symbol facing toward the LCD
2
monitor while using the side of the battery to press the
battery lock lever in the direction indicated by the arrow.
3 Close the battery/card cover.
Removing the Battery
1 Release the battery by using your finger to press the
battery lock lever in the same direction as when you
inserted the battery.
Pull the battery out.
If you intend to use the camera continuously for a long period, use
of the AC adapter D-AC8 (optional) is recommended. (1p.19)
1
14
• Insert the battery correctly. If the battery is incorrectly oriented, it
may cause malfunction.
• Do not remove the battery when the camera is turned on.
•
If you do not intend to use the camera for a long time, remove the battery.
• If the camera is left without the battery for a long time, the date will
be reset.
Page 17
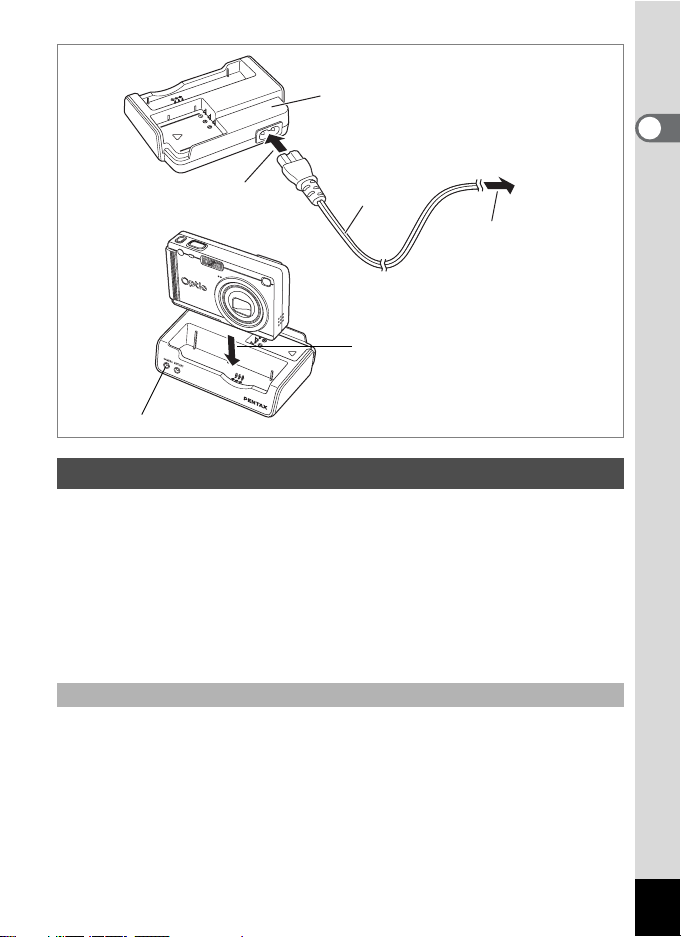
Battery charging stand D-BC25
To power outlet
1
CAMERA charging indicator
AC plug cord
2
4
Charging the Battery
Use the battery charging stand D-BC25 supplied with the camera to
charge the battery before using the camera for the first time or when the
[Battery depleted] message appears. You can charge the battery without
removing it from the camera.
1 Connect the AC plug cord to the battery charging stand
D-BC25.
2 Plug the AC plug cord into the power outlet.
1
Getting Started
Charging the Battery in the Camera
3 Turn the camera off.
4 Place the camera in the battery charging stand.
Position the camera so that the lens rests in the depression in the
case. The CAMERA charging indicator on the stand lights red while
the battery is being charged and goes out when charging is completed.
5 Remove the camera from the battery charging stand
when charging is completed.
15
Page 18
1
Getting Started
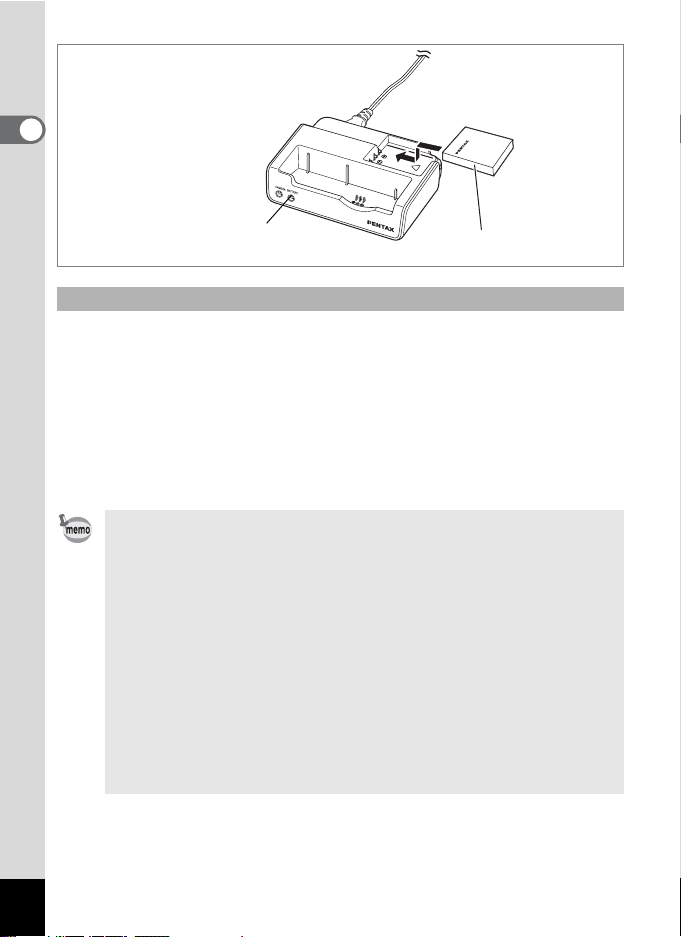
BATTERY charging
indicator
3
Charging the Battery by Itself
You can remove the battery from the camera and charge it.
3 Place the battery in the battery charging stand so that
the PENTAX name is visible.
The BATTERY charging indicator on the stand lights red while the
battery is being charged and goes out when charging is completed.
4 Remove the battery from the battery charging stand
when charging is completed.
• You can put the camera and the battery together on the battery
charging stand to charge the battery inside the camera and a
spare battery.
• The time required for full charge is about 100 minutes.
The appropriate ambient temperature range for charging the
battery is 0°C – 40°C (32°F to 104°F).
• The charging time may vary depending on the ambient
temperature and charging conditions.
• When the battery reaches the end of its service life, the time that
the camera can be operated becomes shorter even when the
battery is fully charged. In this event, replace the battery.
• You can also remove the battery from the camera and charge it
using the optional battery charger D-BC8 and AC plug code DCO2.
16
Page 19
• Always charge the battery before using the camera for the first
time or when the battery has not been used for a long time.
• Do not use the battery charging stand D-BC25 to charge batteries
other than D-LI8 rechargeable lithium-ion batteries, as the
charging stand may overheat or be damaged as a result.
• If the battery is inserted correctly but the charging indicator fails to
light red, the battery may be faulty. Replace with a new battery.
• Approximate Operating Time (when the D-LI8 battery is fully
charged)
Number of recordable images: Approx. 160 (at 23°C with the LCD
monitor on and the flash used for 50% of
shots)
Playback time: Approx. 130 min.
• The number of recordable images are based on CIPA standard
measurement and may vary depending on capture mode and shooting
conditions.
• In general, battery performance temporarily deteriorates as the
temperature decreases. When using the camera in a cold
environment, keep it warm by putting it in your pocket or inside
your coat. Battery performance that has deteriorated due to low
temperature will be restored when the battery is returned to room
temperature.
• Be sure to take a spare battery with you when traveling abroad or
to a cold region, or if you intend to take a lot of pictures.
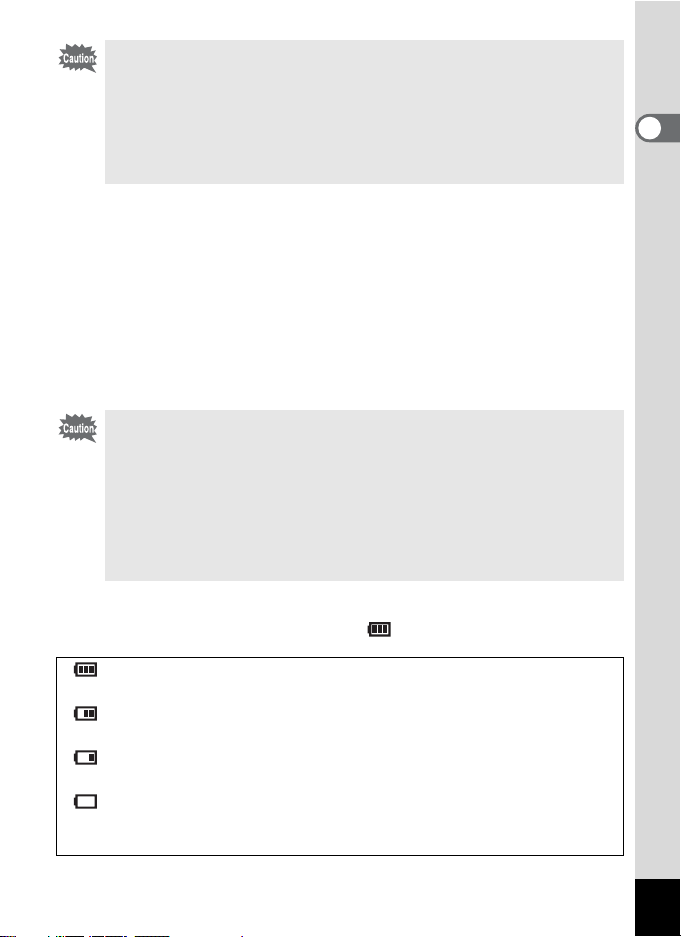
• Battery Level Indicator
You can check the battery level by the symbol on the LCD monitor.
1
Getting Started
(lit green) : Adequate power remains.
↓
(lit green) : Battery is running low.
↓
(lit yellow) : Battery is running very low.
↓
(lit red) : Battery is exhausted.
↓
[Battery depleted] : The camera will turn off after the message appears.
17
Page 20

• Recycling Batteries
1
Getting Started
This symbol indicates that the battery is recyclable.
Cover the terminals with insulating tape and take the
battery to a store displaying this symbol.
18
Page 21
4
AC plug cord
To power outlet
1
2
1
4 symbol
Getting Started
3
AC adapter
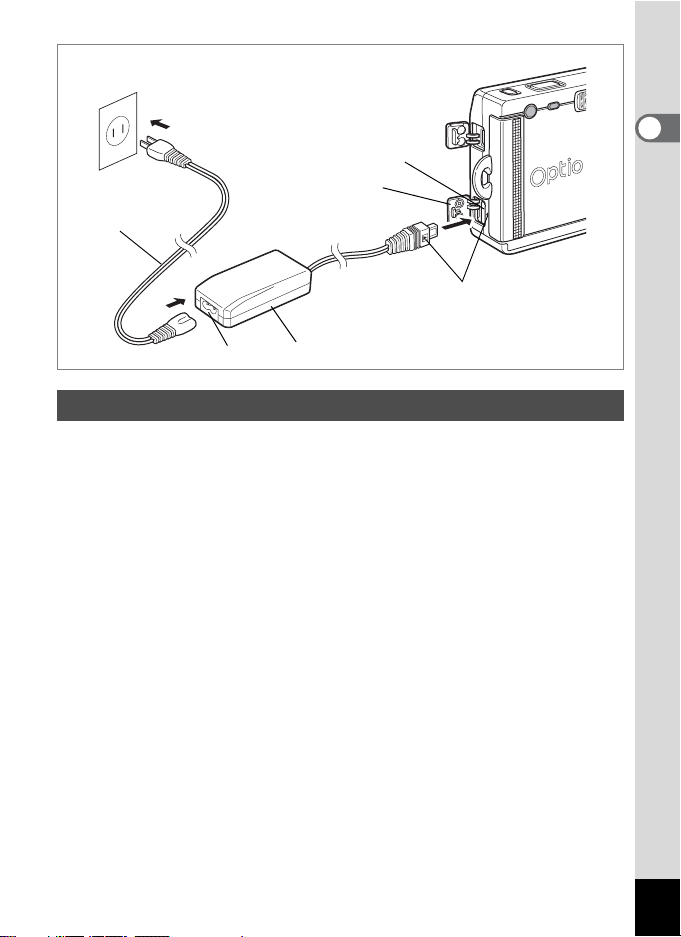
Using the AC Adapter (optional)
If you intend to use the LCD monitor for a long time or connect the
camera to a PC, use of the AC adapter D-AC8 (optional) is
recommended.
1 Make sure that the camera is turned off and open the
terminal cover.
2 Connect the DC terminal on the AC adapter to the DC
input terminal on the camera, being sure to match the
4 symbols.
3 Connect the AC plug cord to the AC adapter.
19
Page 22

4 Plug the AC plug cord into the power outlet.
• Make sure that the camera is turned off when connecting or
disconnecting the AC adapter.
1
Getting Started
• Make sure that the AC plug cord and connecting cable are
inserted securely. The data may be lost if the cable becomes
disconnected while you are taking pictures.
• Be sure to read the operating manual accompanying the AC
adapter before using the adapter.
Be sure to match the 4 symbols when connecting the DC terminals.
•
Inserting the plugs with too much force may damage them.
Precautions When Using the Battery Charging Stand or AC
Adapter
To avoid the risk of fire or electric shock when using the battery charging
stand or AC adapter, be sure to read the section on “FOR SAFE USE OF
YOUR CAMERA” on page 1. Refer to page 140 for the specifications of
the battery charging stand and AC adapter.
20
Page 23
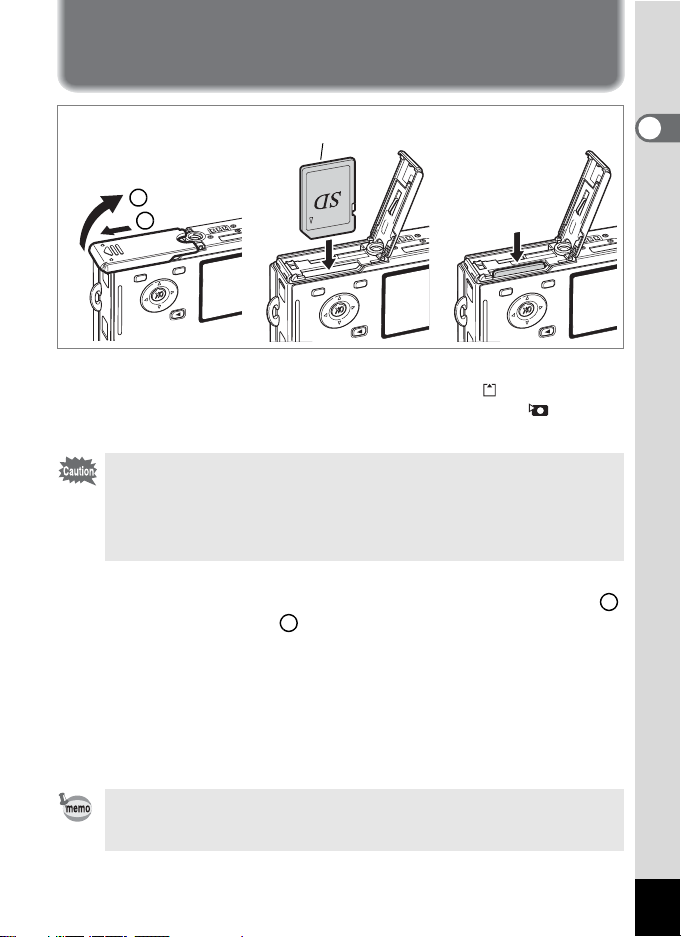
Installing the SD Memory Card
SD Memory Card
2
1
An SD Memory Card can be used with this camera. Captured images are
recorded on the SD Memory Card if a card is inserted ( appears on the
LCD monitor) or in the built-in memory if no card is inserted ( appears
on the LCD monitor).
• Make sure that the camera is turned off before inserting or
removing the SD Memory Card.
• Be sure to format unused cards or cards that have been used on
another camera. Refer to “Formatting an SD Memory Card or the
Built-in Memory” (p.120) for instructions on formatting.
321
To remove the
card, push in
and pull out
1 Open the battery/card cover.
Slide the battery/card cover in the direction indicated by the arrow
and flip the cover open .
2
1
2 Insert an SD Memory Card so the label (the side with the
2 symbol) is facing toward the LCD monitor and push
the card in until it clicks.
3 Close the battery/card cover.
To remove the card, eject the card by pressing it in the direction
indicated by the arrow and pull it out.
1
Getting Started
The number of recordable images varies depending on the capacity
of the SD Memory Card or built-in memory and the selected image
size and quality. (1p.23)
21
Page 24
Data Backup
Very occasionally, data stored in the built-in memory becomes unreadable. As a
backup measure, we recommend that you download important data to a PC or store
the data in a medium other than the built-in memory.
1
Getting Started
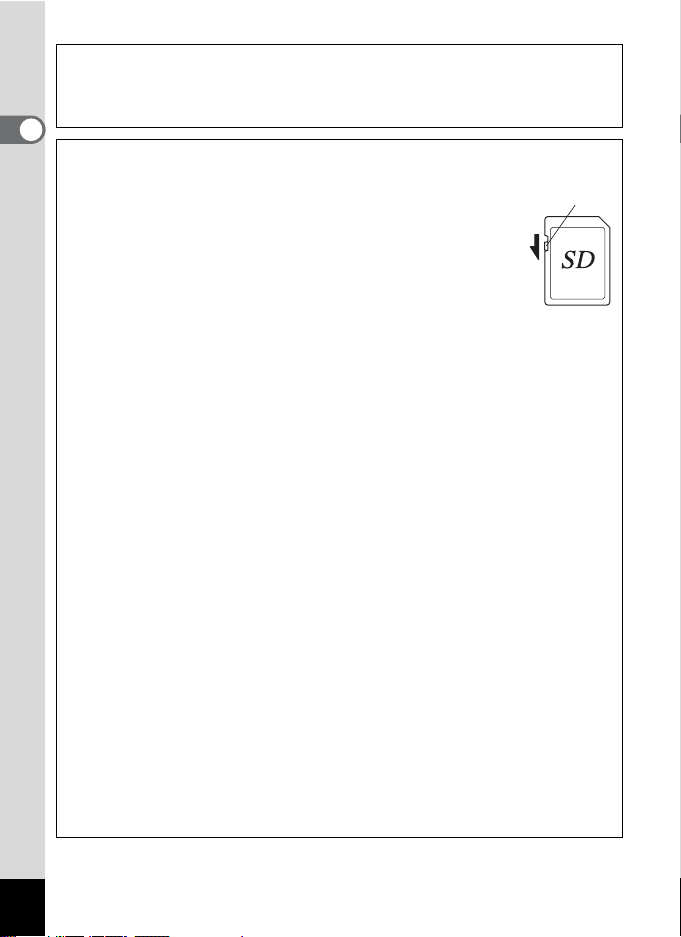
Precautions When Using an SD Memory Card
• Make sure that the camera is turned off before opening the card cover.
• The SD Memory Card is equipped with a write-protect switch.
Setting the switch to [LOCK] protects the existing data by
prohibiting recording of new data, deletion of existing data or
formatting of the card.
• Care should be taken if you remove the SD Memory Card
immediately after using the camera, as the card may be hot.
• Do not remove the SD Memory Card or turn the camera off
while data is being recorded on the card, images or sound
are being played back, or the camera is connected to a PC with the USB cable as
this may cause the data to be lost or the card to be damaged.
• Do not bend the SD Memory Card or subject it to violent impact. Keep it away from
water and store away from high temperature.
• Be sure to format unused cards or cards that have been used on another camera.
Refer to “Formatting an SD Memory Card or the Built-in Memory” (p.120) for
instructions on formatting.
• Do not remove the SD Memory Card during formatting as this may damage the
card and render it unusable.
• The data on the SD Memory Card may be deleted in the following circumstances.
PENTAX does not accept any liability for data that is deleted
(1) when the SD Memory Card is mishandled by the user.
(2) when the SD Memory Card is exposed to static electricity or electrical
interference.
(3) when the card has not been used for a long time.
(4) when the card is ejected, the AC adapter is disconnected or the battery is
removed while the data on the card is being recorded or accessed.
• The SD Memory Card has a limited service life. If it is not used for a long time, the
data on the card may become unreadable. Be sure to make a backup of important
data on a PC.
• Avoid using or storing the card where it may be exposed to static electricity or
electrical interference.
• Avoid using or storing the card in direct sunlight or where it may be exposed to
rapid changes in temperature or to condensation.
• When using an SD Memory Card with a slow recording speed, recording may stop
while you are taking movies even when there is adequate space in the memory, or
shooting and playback may take a long time.
• When you purchase the SD Memory Cards, access the PENTAX website and
confirm beforehand if they have compatibility with your camera. Inquiries on the
card compatibility can also be answered by your nearest PENTAX service center.
Write-protect switch
22
Page 25
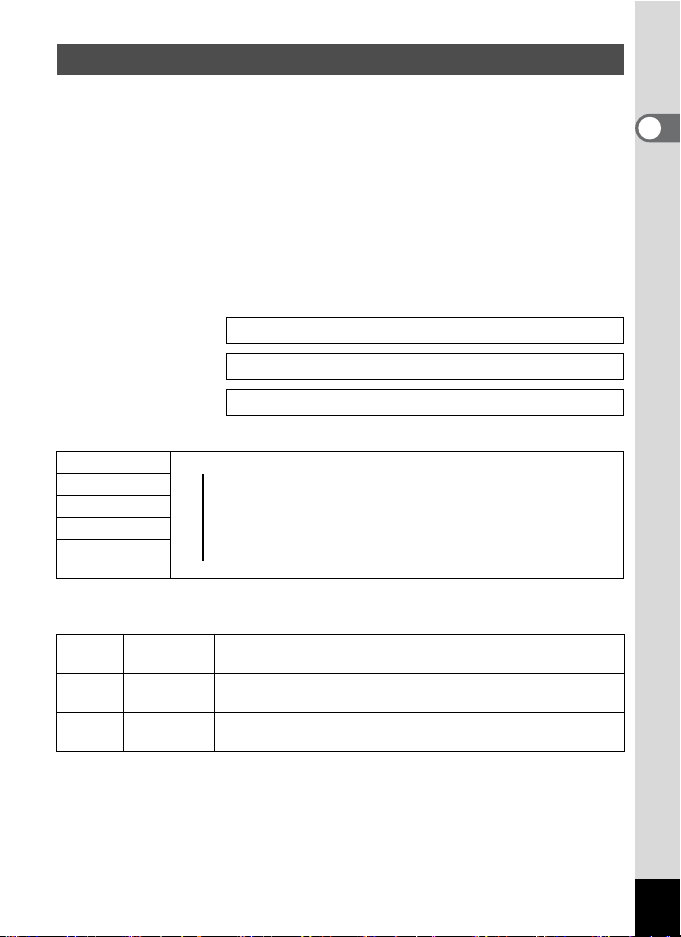
Image Size and Quality
Choose the image size and quality best suited to your purpose.
Higher quality levels and numbers of recorded pixels produce clearer
images for printing, but the resulting increase in data volume reduces the
total number of pictures that can be taken.
When you choose high image quality as well as a large image size, it
may take ten seconds or more for the camera to finish recording after
shooting.
Choose the appropriate number of recorded pixels and quality level on
the [A Rec. Mode] menu.
How to Set the Menus 1p.38
Selecting the Recorded Pixels 1p.76
Selecting the Quality Level 1p.78
Appropriate Sizes According to Use
2560×1920 Printing images with high-resolution settings in your printer,
2048×1536 Printing at A4 size or larger, Editing and processing images
1600×1200
1024×7680 Printing at postcard size
640×480
The default setting is 2560×1920.
Appropriate Quality According to Use
C Best
Better
D
Good
E
The default setting is D.
▲
Clear, Fine
For use as images on websites, For attaching images to
e-mail
Lowest compression ratio. Suitable for large A4-size photo
prints.
Standard compression ratio. Suitable for photo prints or
viewing images on a computer screen.
Highest compression ratio. Suitable for attaching to e-mails or
creating websites.
1
Getting Started
23
Page 26

Approximate Number of Recordable Images by Size and Quality
Quality Level
Recorded Pixels
2560×1920 18 36 61
1
Getting Started
2048×1536 30 56 82
1600×1200 51 88 123
1024×7680 112 206 268
640×480 247 386 515
•
The above table indicates the approximate number of images and recording time when
using a 64MB SD Memory Card.
• The above table is based on standard shooting conditions specified by PENTAX and
may vary depending on the subject, shooting conditions, capture mode, SD Memory
Card, etc.
Best
C
Better
D
Good
E
(320×240)
5 min. 32 sec.
Movie
24
Page 27
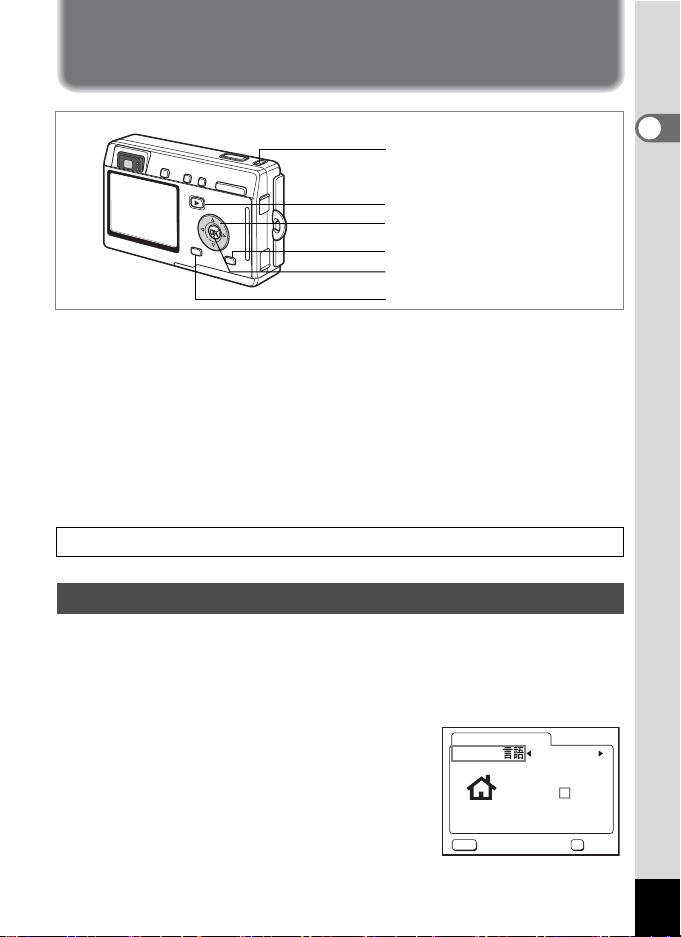
Initial Settings
Power switch
Q Playback button
Four-way controller
DISPLAY button
OK button
MENU button
If the Initial Settings screen or Date Adjust screen appears when you turn
the camera on, follow the procedure below to set the display language
and/or current date and time.
If the Initial Settings screen appears:
1p.25 - 26 “Setting the Display Language”, “Setting the
Date and Time”
If the Date Adjust screen appears:
1p.26 - 27 “Setting the Date and Time”
If neither screen appears, setting is not required.
Setting the Display Language
You can choose the language in which the menus, error messages, etc.
are displayed from the following: English, French, German, Spanish,
Italian, Russian, Korean, Chinese (traditional and simplified) and
Japanese.
1 Turn the camera on.
2 Use the four-way controller (45)
to choose the display language.
The default setting is English.
3 Press the OK button.
The Date Adjust screen appears.
Initial setting
Language/
City
DST
MENU
Exit
English
NYC
OK
OK
1
Getting Started
25
Page 28
Setting the Date and Time
Set the current date and time and the display style.
1 Use the four-way controller (23)
1
Getting Started
to choose the date and time
display style.
Date Adjust
Date Style
//
MENU
Exit
mm/dd/yy
1 20041
:
12 00
24h
OK
OK
2 Press the four-way controller (5).
2 and 3 appear above and below “24h”.
3 Use the four-way controller (23)
to select [24h] (24-hour display) or
[12h] (12-hour display).
4 Press the four-way controller (5).
2 and 3 appear above and below the
month.
5 Use the four-way controller (23)
to change the month.
6 Press the four-way controller (5).
2 and 3 appear above and below the day.
7 Use the four-way controller (23)
to change the day and press the
four-way controller (5).
2 and 3 appear above and below the year.
Date Adjust
Date Style
//
MENU
Exit
Date Adjust
Date Style
//
MENU
Exit
Date Adjust
Date Style
//
MENU
Exit
Date Adjust
Date Style
//
MENU
Exit
mm/dd/yy
1 20041
:
12 00
mm/dd/yy
1 20041
:
12 00
mm/dd/yy
1 20041
:
12 00
mm/dd/yy
1 20041
:
12 00
OK
AM
OK
AM
OK
AM
OK
24h
OK
12h
OK
12h
OK
12h
OK
26
Page 29

8 Repeat Step 7 to change the [year], [hour] and
[minutes].
AM and PM switches in accordance with time adjustment if you
selected [12h] in Step 3.
9 Press the OK button when you have finished the
settings.
The camera is ready to take pictures. If you set the date and time using
the MENU button, you will return to the Menu screen. Press the OK
button again.
• When you finish the settings and press the OK button, the camera
clock is reset to 00 seconds.
• To set the exact time, press the OK button when the time signal
(on the TV, radio, etc.) reaches 00 seconds.
• When the Initial Settings screen is displayed, you can cancel the
setting operation and switch to Capture mode by pressing the
MENU button. In this case, the screen will appear next time you
turn the camera on.
• You can change the settings after they have been made. Refer to
“Changing the Date and Time” (p.122).
1
Getting Started
27
Page 30
Quick Start
12:00
7/18/2004
Taking Still Pictures
2
Quick Start
Viewfinder
QUICK
button
LCD monitor
Shutter release button
Power switch
Zoom/f/y button
The simplest procedure for taking still pictures is described below. The
flash fires automatically depending on the light conditions.
1 Press the power switch.
The camera turns on.
2 Confirm the subject and shooting
information on the LCD monitor.
The focus frame in the middle of the LCD
monitor indicates the zone of automatic focusing.
You can change the size of the subject by
pressing the Zoom/f/y button.
x : makes the subject bigger.
w : makes the subject smaller.
You can check the size of the subject by looking through the viewfinder.
• As there is no focus frame in the viewfinder, be sure to check the
focusing area on the LCD monitor.
•
To switch to the Green mode and let the camera set all the shooting
functions automatically, press the QUICK button. Selecting the
Green mode is the easiest way to ensure that pictures come out well.
“Taking Pictures by the Simplest Procedure” (
1
p.42)
Focus frame
3 Press the shutter release button halfway.
The focus frame on the LCD monitor will light green when the camera
is in focus.
4 Press the shutter release button.
The image appears on the LCD monitor for one second (Instant
Review) and is recorded on the SD Memory Card or in the built-in
memory. (The green and red lamps on the right of the viewfinder blink
alternately while the image is being recorded.)
7/18/2004
7/18/2004
12:00
12:00
2
2
28
Page 31

Using the Shutter Release Button
The shutter release button works in a two-step action as follows.
Press halfway
The focus and exposure are locked when the shutter release button is
pressed lightly (halfway). The shutter speed and aperture settings only
appear on the LCD monitor when the shutter release button is pressed
halfway. The following information is indicated on the LCD monitor and
by the focus status and flash status lamps when the shutter release
button is pressed halfway.
1. Focus frame
The focus frame turns green if the subject is in focus. The frame does
not appear if the subject is out of focus.
2. Status lamps
Lit Subject is in focus Flash is charged
Blinks Subject is out of focus Flash is charging
Focus status lamp (green) Flash status lamp (red)
Pictures cannot be taken while the flash is charging.
Press down fully
Press the shutter release button all the way down (fully) to take a picture.
[Poor focusing conditions]
The camera may not be able to focus under the following conditions.
In this case, lock the focus on an object the same distance away as
the subject (by pressing the shutter release button halfway), then aim
the camera at your subject and press the shutter release button fully.
• Objects that lack contrast such as a blue sky or white wall
• Dark places or objects, or conditions that prevent light being reflected back
• Finely patterned object
• Fast moving objects
• When there is an object in the foreground and an object in the background
in the same picture
• Strongly reflected light or strong backlighting (bright background)
2
Quick Start
Instant Review
The Instant Review default setting is one second. During this time, you
can delete the image by pressing the
i button, selecting [Delete] when
the [Delete] menu appears and pressing the OK button. (1p.101)
You can also record a voice memo by pressing the OK button during
Instant Review. (1p.93)
Setting the Instant Review Time 1p.84
29
Page 32

Quick Start
100-0010
12:00
7/18/2004
Playing Back Still Pictures
Q Playback button
2
Quick Start
LCD monitor
Four-way controller
OK button
Playing Back an Image
You can display the still picture you have just taken.
1 Press the Q Playback button
after taking a picture.
The image appears on the LCD monitor.
Zoom Display 1p.94
Playing Back the Previous or Next Image
Still pictures can be played back one at a time, proceeding either forward
or backward.
1 Press the Q Playback button after taking a picture.
The image appears on the LCD monitor.
2 Press the four-way controller (45).
100-0010
100-0010
7/18/2004
7/18/2004
12:00
12:00
30
displays the previous image.
displays the next image.
Page 33

Rotating the Displayed Image
100-0015
Keep this rotated image?
100-0010
Exit
All
You can rotate a displayed image on the LCD monitor. The image will remain
rotated when displayed using zoom or during a slideshow.
1 Press the Q Playback button after taking a picture.
The image appears on the LCD monitor.
2 Press the four-way controller (3).
The image is rotated 90° clockwise each
time the button is pressed. Press the MENU
button to stop rotating the image and return
the camera to normal playback.
3 Press the OK button.
The setting for the rotated image will be
saved and the camera will return to normal playback.
Deleting the Displayed Image
You can delete the image displayed on the LCD
monitor by pressing the i button, using the fourway controller (2) to select [Delete] and pressing
the OK button.
Press the Q Playback button again or press the
shutter release button halfway to return to the
Capture mode.
Keep this rotated image?
Keep this rotated image?
MENU
Exit
Exit
Delete
Cancel
All
All
100-0015
100-0015
OK
OKOKOK
File No.
100-0010
100-0010
OK
OKOKOK
2
Quick Start
• The last picture taken appears on the LCD monitor when you
switch to the Playback mode.
• You can enlarge the image displayed on the LCD monitor by
pressing the Zoom /
• If there are no images stored, the [No image & sound] message
appears.
f/y button.
Deleting Images, Movies and Sound 1p.100
31
Page 34

Common Operations
Turning the Camera On and Off
3
Common Operations
Press the power switch.
1
The power switch is illuminated by a green light. The lens extends and
the camera turns on in the Capture mode.
The camera is ready to take pictures by pressing the shutter release
button.
• Press the Q Playback button to switch to the Playback mode and
view pictures while the lens is extended.
• Hold down the Q Playback button for more than two seconds to
activate the Playback mode with the lens retracted.
2 Press the power switch again.
The camera turns off.
Switching between Capture Mode and Playback Mode
1p.69
Power indicator
Power switch
Q Playback button
DISPLAY button
32
Taking Pictures 1p.42
Page 35

Playback Mode
1 Press the power switch while pressing the Q Playback
button.
The power indicator lights green and the camera turns on in the
Playback mode with the lens retracted.
• Press the Q Playback button to extend the lens and switch to the
Capture mode.
• Hold down the Q Playback button for more than two seconds in
the Capture mode or press the Q Playback button in the Voice
Recording mode to switch to the Playback mode with the lens
retracted.
Playing Back Still Pictures 1p.30
Voice Recording Mode
You can use the camera as a voice recorder.
There are two ways to activate the Voice Recording mode.
1 Press the power switch for more than two seconds.
The power indicator lights green and then changes to red, and the
camera turns on in the Voice Recording mode.
1 Press the power switch while pressing the DISPLAY
button.
The power indicator lights red and the camera turns on in the Voice
Recording mode.
• Press the Q Playback button to switch to the Playback mode.
Recording Sound 1p.91
3
Common Operations
33
Page 36

Using the Button Functions
3
Common Operations
Capture Mode
QUICK button
1
Switches to the Green mode, the easiest way to take pictures. (1p.42)
You can assign a different function to the QUICK button by selecting
[QUICK Button] on the [B Set-up] menu. (1p.128)
b button
2
Changes the flash mode. (1p.75)
qsz button
3
Changes the focus mode as follows. (1p.72)
Macro mode (1p.72) Super Macro mode (1p.72)
Pan Focus mode (1p.72) Infinity-Landscape mode (1p.72)
Manual Focus mode (1p.73) Focusing Area mode (1p.74)
Zoom button
4
Changes the size of the subject. (1p.28)
Q Playback button
5
Switches to the Playback mode. When pressed again, returns to Capture
mode. (
1p.30)
Four-way controller (45)
6
Changes the EV compensation. (1p.88)
You can assign a different function to the key by selecting
[Custom Function] on the [B Set-up] menu. (
Adjusts the ratio when the digital filter is set to the slim filter. (
1
2
3
4
5
,
6 7
8
9
10
1p.127)
1p.52)
34
Page 37

Four-way contro
7
(2) Selects self-timer mode, remote control mode and continuous shooting
mode.
(3) Displays the Mode Palette and changes the Capture mode.
(23) Adjusts the focus in Manual Focus mode. (
OK button
8
Selects a menu item. (1p.38)
DISPLAY button
9
Changes the information displayed on the LCD monitor. (1
MENU button
10
Displays the [A Rec.Mode], [Q Playback] and [B Set-up] menus.
(
1
p.38)
ller (23)
1p.73)
p.71)
3
Common Operations
35
Page 38

3
Common Operations
Playback Mode
QUICK button
1
Switches to the Green mode, the easiest way to take pictures. (1p.42)
You can assign a different function to the QUICK button by selecting
[QUICK Button] on the [B Set-up] menu. (1p.128)
i button
2
Deletes the image displayed on the LCD monitor. (1p.100)
Z button
3
Protects the image displayed on the LCD monitor from deletion. (1p.103)
Zoom/f/y button
4
Press f during normal playback to display nine images at once.
(1
p.98)
Press Zoom/f/y button during zoom playback to change the size of
the Zoom Display image displayed on the LCD monitor. (1
Q Playback button
5
Switches to Capture mode.
Four-way controller
6
(2) Sets the DPOF settings for the print service. (1p.106)
(
45) Displays the previous or next image. (1p.30)
(
3) Rotates the image. (1p.31)
OK button
7
Selects a menu item. (1p.38)
Records or plays back a voice memo. (1p.93)
DISPLAY button
8
Changes the information displayed on the LCD monitor. (1p.97)
MENU button
9
Displays the [A Rec.Mode], [Q Playback] and [B Set-up] menus
1
2
3
4
5
6
7
8
9
p.94)
. (1p.38)
36
Page 39
1
2
3
4
5
Voice Recording Mode
Shutter release button
1
When pressed, starts recording, and when pressed again, stops recording.
When pressed for more than one second, recording continues for as long
as the button is held down and stops when the button is released.
Q Playback button
2
Switches to Playback mode. (1p.33) When pressed again, returns to
Voice Recording mode.
Four-way controller (in Playback mode)
3
(2) Starts playback. When pressed again, pauses playback.
(
45)
Performs the following operations during playback. Selects a recorded
file before playback.
If there are no recorded indexes:
When (
4) is pressed during playback, rewinds five seconds.
When (
If there are recorded indexes:
DISPLAY button
4
Turns the LCD monitor off.
When pressed again, turns the LCD monitor on.
MENU button
5
When pressed during recording, an index can be added.
When pressed during standby or before recording or playing back, displays
the [Q Playback] and [B Set-up] menus. (1p.38)
5) is pressed during playback, advances five seconds.
When (
4) is pressed during playback, plays back starting from the
previous index.
When (
5) is pressed during playback, plays back starting from the
next index.
3
Common Operations
37
Page 40

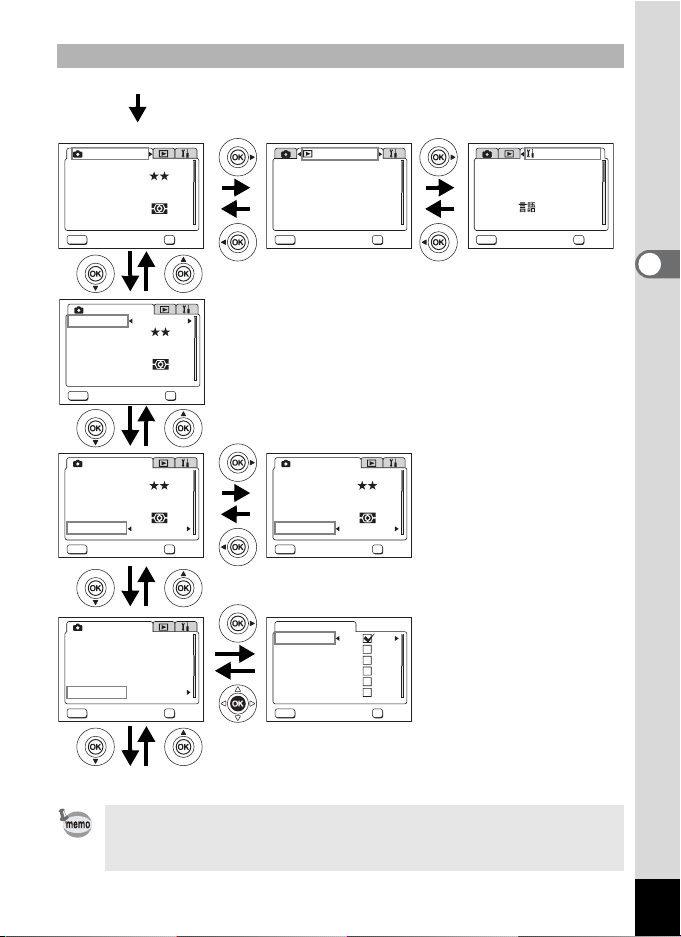
Setting the Menus
When you press the MENU button, the menus appear on the LCD
monitor. You can set functions, save the settings and change the camera
settings on these menus.
How to Set the Menus
When you are making settings from a menu, a guide to operation
appears on the LCD monitor.
3
Common Operations
1 Press the MENU button.
The [A Rec.Mode] menu appears when you display the menu from
Capture mode, and the [Q Playback] menu appears when you
display the menu from Playback mode.
The selected area appears in a green frame.
2 Press the four-way controller (45).
Changes the menu screen.
3 Use the four-way controller (23) to choose an item.
Moves the frame up or down.
4 Use the four-way controller (45) to change the setting.
4’ If there is a select screen, use the four-way controller
(5) to move to the select screen.
Press the OK button to return to the menu when you have finished
making the settings.
5 Press the OK button.
The settings are saved and the screen returns to capture or playback
status.
•
If you press any buttons before pressing the OK button to exit the
menu, any changes you have made to the settings will not be saved.
• Even after pressing the OK button to exit the menu, if you turn the
camera off incorrectly (such as by removing the battery while the
camera is turned on), any changes you have made to the settings
will not be saved.
• The menu is exited automatically one minute after the last
operation.
38
Page 41
Example of Menu Operation
MENU button
1
OK
2
Playback
Slideshow
Resize
Trim ming
Copy image & sound
Alarm
Record Voice Memo
MENU
Exit
3sec
Off
On
OK
[A Rec.Mode] Menu [Q Playback] Menu
Rec. Mode
Recorded Pixels
Quality Level
White Balance
Focusing Area
AE Metering
Sensitivity
MENU
Exit
2560x1920
AWB
Multiple
Auto
OK
3
Rec. Mode
Exit
Rec. Mode
Exit
2560x1920
AWB
Multiple
Auto
OK
OK
2560x1920
AWB
Multiple
Auto
OK
OK
4
4’
Rec. Mode
Recorded Pixels
Quality Level
White Balance
Focusing Area
AE Metering
Sensitivity
MENU
Exit
2560x1920
AWB
Multiple
100100
OK
Recorded Pixels
Quality Level
White Balance
Focusing Area
AE Metering
Sensitivity
MENU
3
Recorded Pixels
Quality Level
White Balance
Focusing Area
AE Metering
Sensitivity
MENU
3
Select Screen
Rec. Mode
EV Compensation
3D Mode
Time-lapse Movie
Digital Zoom
Instant Review
Memory
MENU
Exit
±0.0
Parallel
Off
On
1 sec
OK
OK
Memory
Flash
Drive
Focus Mode
Zoom Position
MF Position
White Balance
MENU
Exit
OK
3
OK
OK
OK
[
B Set-up] Menu
Set-up
Format
Sound
Date Adjust
World Time
Language/
Screen Setting
MENU
10/10/2004
English
Exit
On
Off
OK
OK
3
Common Operations
To the next screen
If you press the shutter release button halfway to exit the menu and
switch to Capture mode, any changes you have made to the settings
will not be saved.
39
Page 42

Menu List
[
A Rec.Mode] Menu
Yes ··· Adjustable
No ··· Any changes made are invalid. You can change the setting on the
menu, but any changes you make are invalid in actual operation.
Item Description
Recorded
Pixels
Quality Level
3
Common Operations
White
Balance
Focusing
Area
AE Metering
Sensitivity For setting the sensitivity
EV
Compensation
3D Mode For taking 3D pictures
Time-lapse
Movie
Digital Zoom
Instant
Review
Memory
Sharpness
Saturation For setting the saturation
Contrast For setting the contrast
For selecting the number
of pixels
For selecting the image
compression ratio
For adjusting the color
balance according to
lighting
For changing the area of
the autofocus
For setting the metering
method to determine the
exposure
For adjusting the
exposure between –2.0
and +2.0
For setting the frame rate
when recording movies
For taking digital zoom
pictures
For setting the Instant
Review time
For saving the shooting
function settings when
the camera is turned off
For setting the sharpness
Default
Setting
2560×1920
D
AWB
(Auto)
[]
(Multiple)
(Multi-segment)
Auto
±0.0
Parallel mode
1 sec.
Normal
Normal
Normal
L
Off
On
—
Green
Movie
Mode
Mode
No
320×240
No No Yes p.78
No Yes Yes p.79
No No Yes p.81
No Yes Yes p.82
No No Yes p.83
No Yes Yes p.88
No No
No Yes No p.68
No Yes Yes p.66
No No Yes p.84
No Yes Yes p.89
No No Yes p.85
No No Yes p.86
No No Yes p.87
Other
Modes
Yes p.76
Yes
(3D only)
Page
p.57
40
Page 43

Q Playback] Menu
[
Item Description Page
Slideshow For playing recorded images successively p.99
Resize For changing the size of images p.113
Trimming For trimming images p.115
Copy image & sound
Alarm For setting the alarm to ring at a specific time p.130
Record Voice Memo For adding a voice memo to an image p.93
Quick Zoom
Quick Delete
B Set-up] Menu
[
Item Description Page
Format For formatting the SD Memory Card or built-in memory p.120
Sound
Date Adjust For adjusting the date and time p.122
World Time For setting the world time p.123
Language/
Screen Setting
Video Out For setting the video output format p.125
USB Connection For changing the USB connection mode p.125
Sleep Timeout For setting the power saving function p.126
Auto Power Off For turning off the power automatically p.126
Custom Function For registering a function on the four-way controller (
QUICK Button For registering a function on the QUICK button p.128
Reset For returning the camera settings to defaults p.129
For copying files from the built-in memory to the SD
Memory Card and vice versa
For playing back images at the maximum zoom size by
pressing the Zoom/f/y button only once
For displaying the Delete screen with [Delete] or [Delete All]
highlighted when ON is selected
For adjusting the playback volume and setting the type and
volume of start-up sound, shutter sound, key operation
sound, etc.
For changing the language in which menus and messages
appear
For selecting the background color and the start-up screen
when the camera is turned on
45) p.127
p.116
p.95
p.101
p.121
p.124
p.118
3
Common Operations
41
Page 44

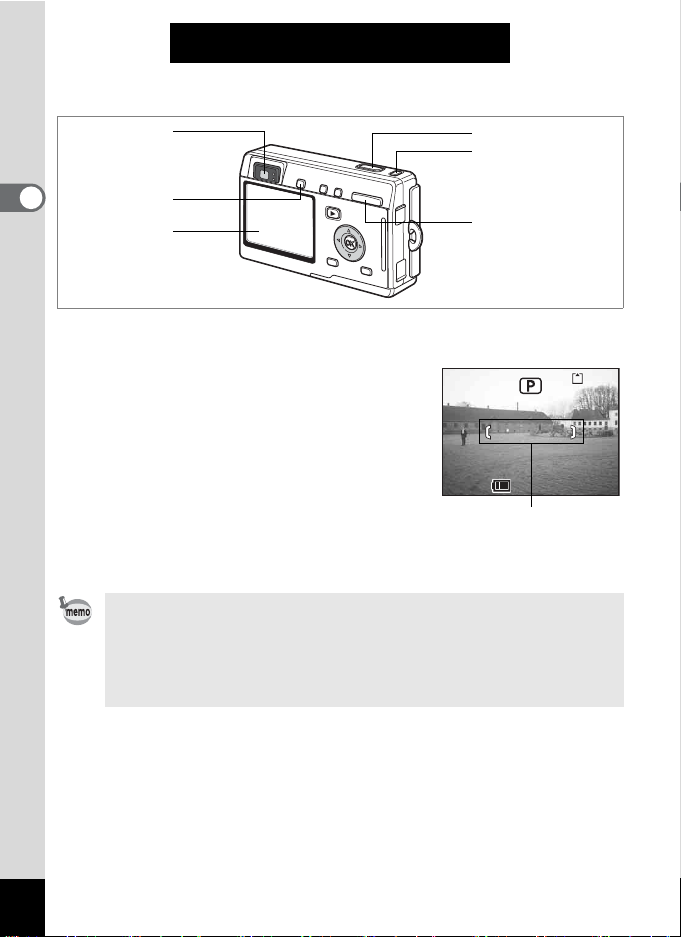
Taking Pictures
123
12:00
7/18/2004
Taking Pictures
1
2
Taking Pictures by the Simplest Procedure
4
Taking Pictures
(Green Mode)
The Green mode lets you take pictures quickly and easily, simply by
pressing the shutter release button. In Q (Green) mode, the camera
automatically sets all the functions, including the shutter speed and
aperture. You can use the zoom button to change the size of the subject.
1 Press the QUICK button in Capture
mode or Playback mode.
You can switch to the Green mode at any
stage of operation in Capture mode or
Playback mode.
Press the QUICK button again to return to the
mode before the Green mode was activated.
2 Press the shutter release button
halfway.
The focus frame on the LCD monitor will light green when the camera
is in focus.
3 Press the shutter release button.
The picture is taken.
• If the camera is turned off in the Green mode, it will turn on again
in the Green mode the next time the power switch is pressed. The
Green mode start-up screen will appear.
• When either the MENU button, DISPLAY button, OK button or the
four-way controller is pressed, will be displayed on the LCD
monitor. This icon means that your operation is invalid.
Taking Still Pictures 1p.28
42
123
123
7/18/2004
7/18/2004
12:00
12:00
Page 45

5
1, 2
3
4
Setting the Functions (Program Mode)
R (Program mode), the camera automatically sets the shutter speed
In
and aperture for taking still pictures. However, you can select other
functions such as the Flash mode or Continuous Shooting mode.
1 Press the four-way controller (3) in Capture mode.
The Mode Palette appears.
2 Use the four-way controller
(2345) to select R (Program
mode).
3 Press the OK button.
4 Set the functions you want to use.
Refer to “Setting the Shooting Functions”
(p.69 to p.88) for details of how to set the functions.
Program
OK
5 Press the shutter release button halfway.
The focus frame on the LCD monitor will light green when the camera
is in focus.
6 Press the shutter release button.
The picture is taken.
4
Taking Pictures
OK
Taking Still Pictures 1p.28
43
Page 46

4
1, 2
3
Selecting the Picture Mode According to the Shooting Scene (Picture Mode)
You can select the Picture mode according to the shooting scene. There
are 11 available modes in Picture mode.
4
Taking Pictures
Landscape Lets you capture the natural colors of landscape views.
H
Flower Lets you take brightly colored flower pictures.
I
Portrait
J
Self-portrait Lets you take pictures of yourself or be included in pictures.
S
Surf&Snow
L
Autumn Colors Lets you take colorful pictures of trees in autumn.
N
Sunset
K
J
Museum Lets you take pictures of works of art in museums and galleries.
W
Text Lets you take clear pictures of text or writing.
K
Food Lets you take appetizing pictures of prepared food.
Sport
Lets you take portraits with spatial effect, by emphasizing the person.
Lets you take photos against dazzling backgrounds like
beaches or snow-covered mountains.
Lets you reproduce the beautiful colors of the sunrise or sunset.
Lets you take clear pictures of moving subjects with a high
shutter speed.
1 Press the four-way controller (3)
in Capture mode.
The Mode Palette screen appears.
2 Use the four-way controller
(2345) to choose the desired
mode.
For example, select H (Landscape mode).
44
Program
OK
OK
Page 47

3 Press the OK button.
4 Press the shutter release button
halfway.
The focus frame on the LCD monitor will
light green when the camera is in focus.
5 Press the shutter release button.
The picture is taken.
In Picture mode, the EV compensation, saturation, contrast,
sharpness and white balance are automatically set to their default
settings. You can change the settings.
Landscape
OK
Picture mode
OK
4
Taking Pictures
45
Page 48

4
1, 2
3
Taking Pictures of Dark Scenes (Night Scene Mode)
You can take pictures of dark scenes, such as nightscapes, with the
4
appropriate settings.
Taking Pictures
1 Press the four-way controller (3) in Capture mode.
The Mode Palette appears.
2 Use the four-way controller
(2345) to select
Scene mode).
B (Night-
3 Press the OK button.
4 Press the shutter release button
halfway.
The focus frame on the LCD monitor will light green when the camera
is in focus.
Night Scene
5 Press the shutter release button.
The picture is taken.
OK
OK
46
Total recording time will be longer when the picture is taken at
slower shutter speed, because the noise reduction activates to
reduce noise.
The shutter speed is slower when taking pictures of dark scenes.
To prevent camera shake, secure the camera on a tripod or other
surface.
Page 49

Taking Movies (Movie Mode)
00:23
12:00
7/18/2004
This mode enables you to take movies and sound.
1 Press the four-way controller (3)
in Capture mode.
The Mode Palette appears.
4
1, 2
3
4
Taking Pictures
2 Use the four-way controller
(2345) to select
mode).
C (Movie
3 Press the OK button.
The following shooting information appears
on the LCD monitor and the camera is ready
to take movies.
1
Flash Off icon
2 Movie mode icon
3
Card/Built-in memory
4 Recordable time
4 Press the shutter release button.
Shooting starts. You can change the size of
the image using the Zoom button.
: makes the subject bigger.
x
w: makes the subject smaller.
5 Press the shutter release button.
Shooting ends.
Program
OK
OK
1 2 3 4
7/18/2004
7/18/2004
12:00
12:00
OK
OKMovie
00:23
00:23
47
Page 50

Keeping the Shutter Release Button Pressed
If you keep the shutter release button pressed for more than one second,
pictures will be taken for as long as you keep the button pressed.
Shooting stops when you take your finger off the shutter release button.
• The flash will not discharge in Movie mode.
• Continuous shooting is not possible in Movie mode.
• The LCD monitor cannot be turned off in Movie mode.
• Sound cannot be recorded when [Time-lapse Movie] is set to On.
• Only Autofocus mode, Infinity-Landscape mode and Manual
Focus mode can be set in Movie mode. The focus is set to a fixed
position in Autofocus mode.
4
Taking Pictures
• The digital zoom and optical zoom can both be used in Movie
mode, but only the digital zoom can be used to change the zoom
magnification once you start taking movies. When taking movies
using the digital zoom, use the LCD monitor.
• The Marine Movie mode enables you to record movies using the
waterproof case (optional).
Taking Time-lapse Movies 1p.68
48
Taking Underwater Movies
Playing Back Movies
1p.96
1p.56
Page 51

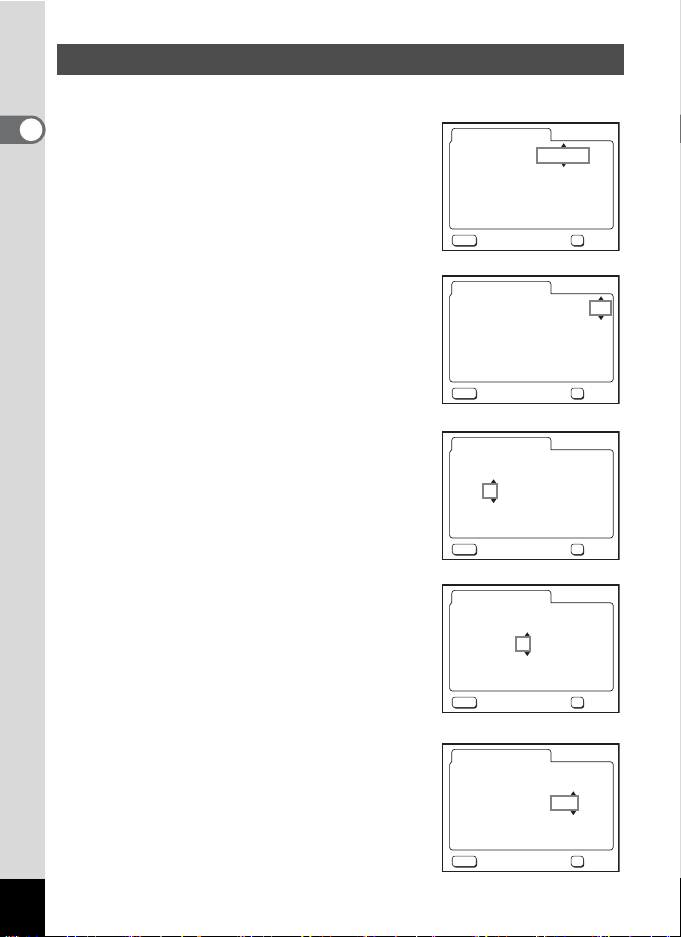
5, 6
Set shift direction
1, 2, 4
3, 7
Taking Panorama Pictures (Panorama Assist Mode)
You can take a number of images and join them together to form a
panorama picture. The panorama software supplied with the camera
(ACDSee for PENTAX) and a computer are necessary for joining the
images. The Panorama Assist mode enables you to overlap the edges
of the images so that they are easier to join together later into a
panorama picture.
1 Press the four-way controller (3) in Capture mode.
The Mode Palette appears.
2 Use the four-way controller
(2345) to select
Assist mode).
F (Panorama
3 Press the OK button.
4 Use the four-way controller to
choose the direction in which the
images will be joined.
4 Joins the images at the left.
5 Joins the images at the right.
2 Joins the images at the top.
3 Joins the images at the bottom.
The example shows the images when
5 is selected.
Set shift direction
Set shift direction
4
Taking Pictures
OK
OKPanorama Assist
49
Page 52

5 Take the first image.
11
7/18/2004
12:00
10
7/18/2004
12:00
Press the shutter release button to take the
first image. The right edge of the image
appears in half-transparent form on the left
of the LCD monitor.
6 Move the camera to the right and
take the second image.
Move the camera until the half-transparent
image and the actual view overlap and
press the shutter release button. Repeat
Steps 5 and 6 to take the third and
4
Taking Pictures
subsequent images.
7 Press the OK button.
The screen returns to Step 4.
To cancel Panorama Assist mode, change to another mode.
• The camera cannot join the images. Use the panorama software
supplied with the camera (ACDSee for PENTAX, ACD
photostitcher). Refer to “Enjoying Digital Camera Images on a PC”
for instructions on creating panorama pictures.
• Continuous shooting is not possible in Panorama Assist mode.
7/18/2004
7/18/2004
12:00
12:00
7/18/2004
7/18/2004
12:00
12:00
11
11
10
10
50
Page 53

4
12:00
7/18/2004
1, 2
3
Taking Soft-Contoured Pictures (Soft Focus Mode)
You can take pictures with a soft lens effect.
1 Press the four-way controller (3) in Capture mode.
The Mode Palette appears.
2 Use the four-way controller
(2345) to select V (Soft
Focus mode).
OK
3 Press the OK button.
4 Press the shutter release button
halfway.
The focus frame on the LCD monitor will
light green when the camera is in focus.
7/18/2004
7/18/2004
5 Press the shutter release button.
The picture is taken in Soft Focus mode.
OKSoft
12:00
12:00
4
Taking Pictures
2
2
51
Page 54

6
B&W
1, 2, 4
3, 5
Taking Pictures with Digital Filters (Digital Filter Mode)
The filters consist of color filters such as red, blue and green, a
posterization filter that takes posterization-type pictures, and a slim filter
4
that produces a slim effect. The Digital Filter mode enables you to take
Taking Pictures
pictures using these filters.
Taking Pictures with the Color Filter
1 Press the four-way controller (3) in Capture mode.
The Mode Palette appears.
2 Use the four-way controller
(2345) to select
mode).
D (Digital Filter
3 Press the OK button.
The Filter Options screen appears.
Digital Filter
4 Use the four-way controller (23)
to choose a color filter.
You can choose from eight color filters:
black-and-white, sepia, red, pink, violet,
blue, green and yellow. You can check the
filter effect on the LCD monitor when you
choose a color.
B&W
B&W
OK
OKOKOK
5 Press the OK button.
6 Press the shutter release button halfway.
The focus frame on the LCD monitor will light green when the camera
is in focus.
7 Press the shutter release button.
The picture is taken.
52
OK
OK
Page 55

Taking Pictures Using the Posterization filter ( )
Posterization
Slim
12:00
7/18/2004
Posterization is an effect that uses a limited range of color tones and
enables you to take posterization-type pictures.
4 Use the four-way controller (23) to select
(Posterization).
5 Press the OK button.
6 Press the shutter release button
halfway.
The focus frame on the LCD monitor will
light green when the camera is in focus.
Posterization
Posterization
OK
OKOKOK
7 Press the shutter release button.
The picture is taken with the Posterization filter.
Taking Pictures with the Slim Filter (O)
The screen for setting the slimness level appears when you select the
slim filter in Digital Filter mode.
4 Use the four-way controller (23)
to select O (Slim Filter mode).
5 Use the four-way controller (45)
Slim
Slim
to set the slimness.
= : Stretches the image up to twice its size
horizontally.
: Stretches the image up to twice its size vertically.
OK
OKOKOK
6 Press the OK button.
7 Press the shutter release button halfway.
The focus frame on the LCD monitor will
light green when the camera is in focus.
646464
8 Press the shutter release button.
The picture is taken with a slim filter effect.
7/18/2004
7/18/2004
12:00
12:00
4
Taking Pictures
The digital zoom cannot be used when the slim filter is selected.
53
Page 56

4
12:00
7/18/2004
1, 2
3
Using Preset Function Settings (User Mode)
In User mode, you can take pictures using the functions and settings
registered in advance in User mode.
4
1 Press the four-way controller (3) in Capture mode.
Taking Pictures
The Mode Palette appears.
2 Use the four-way controller
(2345) to select
mode).
E (User
3 Press the OK button.
4 Press the shutter release button
halfway.
The focus frame on the LCD monitor will
light green when the camera is in focus.
5 Press the shutter release button.
The picture is taken.
OK
OKUSER
7/18/2004
7/18/2004
12:00
12:00
121212
54
Registering Functions in User Mode 1p.90
Page 57

4
12:00
8/25/2004
+0.3
1, 2
3
Taking Underwater Pictures (Marine Mode)
In Marine mode, you can use the optional waterproof case to take
underwater pictures that capture the blueness of the sea.
Taking Underwater Still Pictures (Marine Mode)
1 Press the four-way controller (3) in Capture mode.
The Mode Palette appears.
2 Use the four-way controller
(2345) to select M (Marine
mode).
OK
3 Press the OK button.
4 Press the shutter release button
halfway.
The focus frame on the LCD monitor will
light green when the camera is in focus.
5 Press the shutter release button.
The picture is taken.
• The only flash modes available are flash on and flash off. Auto
flash and the red-eye reduction function are not available.
• Only single-frame or continuous shooting can be selected for the
Drive mode. Self-timer mode and remote control mode are not
available.
•
Only Autofocus or Macro mode can be selected for the focus mode.
+0.3
+0.3
8/25/2004
8/25/2004
OKMarine
12:00
12:00
4
Taking Pictures
2
2
55
Page 58

4
12:00
8/25/2004
+0.3
8/25/2004
12:00
+0.3
09:58
5, 6
1, 2
3
Taking Underwater Movies (Marine Movie Mode)
1 Press the four-way controller (3) in Capture mode.
4
Taking Pictures
The Mode Palette appears.
2 Use the four-way controller (2345) to select
M (Marine mode).
3 Press the OK button.
The Marine Mode screen appears.
4 Press the QUICK button.
The camera switches to N (Marine Movie
mode). Press the QUICK button again to
return to M (Marine mode).
5 Press the shutter release button.
Shooting starts.
You can change the size of the image using
the zoom button.
6 Press the shutter release button.
Shooting stops.
• Sound cannot be recorded with marine movies.
• In Marine mode, the QUICK button is used solely to switch
between Marine mode and Marine Movie mode. In any mode other
than Marine mode, pressing the QUICK button activates the
function set on [QUICK Button] on the [B Set-up] menu. (1p.128)
56
+0.3
+0.3
+0.3
+0.3
8/25/2004
8/25/2004
12:00
12:00
09:58
09:58
8/25/2004
8/25/2004
12:00
12:00
2
2
Page 59

4, 6
12
12:00
7/18/2004
1, 2
3
Taking 3D Pictures (3D Image Mode)
You can take 3D pictures and view them by the parallel method or cross
method.
The default setting is [Parallel]. If you print out 3D pictures for viewing by
the parallel method and look at them through the optional 3D image
viewer, the image will appear in three dimensions.
You can also take 3D pictures for viewing by the cross method. Refer to
“Selecting the Viewing Mode” (p.58) for instructions on taking pictures by
the cross method.
1 Press the four-way controller (3) in Capture mode.
The Mode Palette appears.
2
Use the four-way controller (
2345
) to select G (3D
Image mode).
3 Press the OK button.
The screen for taking the first image appears on the left of the LCD
monitor.
4 Take the first image.
Hold the camera so that the subject is in the
middle of the left half of the screen and
press the shutter release button. The image
appears in the left half of the LCD monitor.
The right half of the screen is for taking the
second image.
5 Move the camera to the right
without changing your stance.
7/18/2004
7/18/2004
12:00
12:00
12
12
121212
6 Take the second image.
Make sure that the subject is in the middle
of the right half of the screen and press the
shutter release button.
4
Taking Pictures
57
Page 60

Selecting the Viewing Mode
1 Press the MENU button.
4
Taking Pictures
The [A Rec.Mode] menu appears.
2 Use the four-way controller (23)
to select [3D Mode].
3 Use the four-way controller (45)
to select [Parallel] or [Cross].
To view pictures with the 3D image viewer,
select [Parallel].
You can view both [Parallel] and [Cross]
pictures without the image viewer.
4 Press the OK button.
The camera returns to the Capture Mode screen.
• To cancel the 3D Image mode, change to another Capture mode.
• A three-dimensional effect will not be achieved if the subject
moves before the second image is taken. When taking a person,
you are recommended to ask your model to stay as still as
possible and to take the second picture as quickly as you can. It is
easier to take the pictures if you use a tripod or appropriate base.
•
As a guide, the camera should be moved about 1/40 of the distance
between the camera and the subject. For example, if the subject is
3m away, the distance the camera should be moved will be
3m÷40=7.5cm. However, as the way people see three-dimensional
images differs from person to person, there is no need to be too
concerned. Refer to the table below for a simple guide to how far
to move the camera.
2, 3
4
1
Rec. Mode
EV Compensation
3D Mode
Time-lapse Movie
Digital Zoom
Instant Review
Memory
MENU
Exit
±0.0
Parallel
Off
On
1 sec
OK
OK
Distance to subject
Camera movement
58
0.1 m 0.3 m 0.5 m 1 m 3 m 5 m
0.5 cm 1 cm 1.5 cm 2.5 cm 7.5 cm 13 cm
Page 61
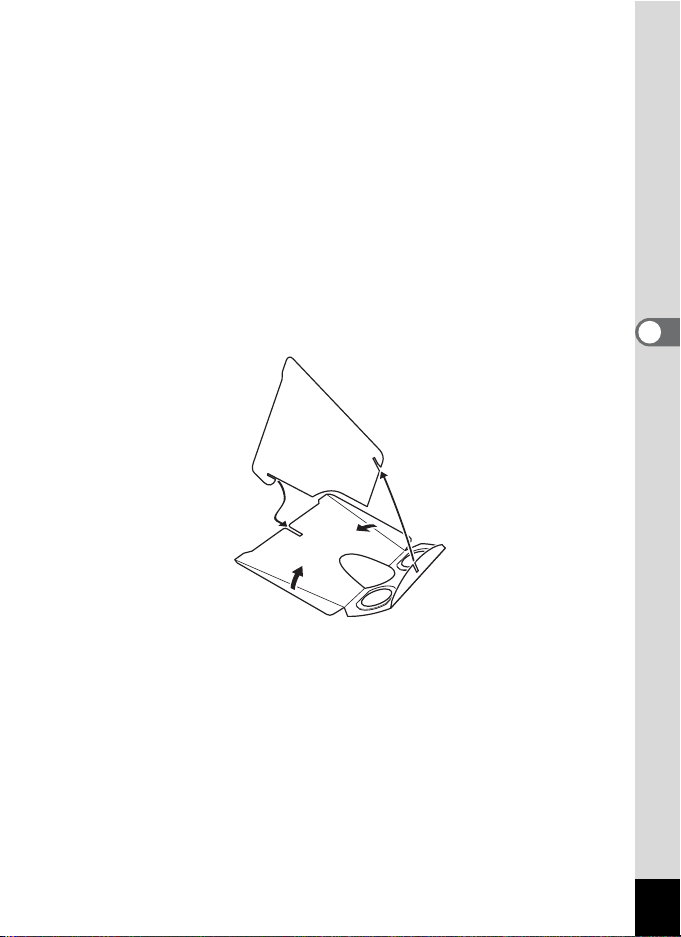
Viewing 3D Pictures by the Parallel Method and Cross Method
As our eyes are positioned about 6 cm or 7 cm apart, there is a very
slight deviation between what we see with our right eye and what we see
with our left eye. The difference is processed by our brain to produce a
three-dimensional image. This principle is applied to taking and viewing
3D pictures.
3D pictures can be viewed by the parallel method where the left and right
lines of vision are virtually parallel, as when looking at a distant scene,
or the cross method where the left and right lines of vision are crossed,
as when you cross your eyes. A certain amount of practice may be
necessary to view 3D pictures without using the viewer.
How to Assemble the 3D Image Viewer
Assemble the 3D image viewer (optional) as shown below.
4
Taking Pictures
59
Page 62

How to View 3D Pictures Using the 3D Image Viewer
Print out the pictures so that they are about 11 cm or 12 cm wide and
place the divider of the 3D image viewer in the middle of the two.
4
Taking Pictures
As the distance between the left and right eyes differs from person
to person, some people may have difficulty obtaining a threedimensional effect even when looking at prints that are the same
size. It may be especially difficult if the pictures are very large or very
small. Try different sizes until the right effect is achieved.
• Never look at the sun through the 3D image viewer.
• Do not leave the 3D image viewer where it is exposed to direct
sunlight as this may lead to fire.
60
Page 63

Example of a 3D Picture (Parallel Method)
4
Taking Pictures
61
Page 64

2
112
12:00
7/18/2004
1
Using the Self-Timer
In self-timer mode, the picture is taken ten seconds or two seconds after
the shutter release button is pressed.
4
1 Press the four-way controller (2) in Capture mode to
Taking Pictures
display g or r on the LCD monitor.
2 Press the shutter release button.
g The self-timer is engaged and the self-
timer lamp lights for about seven
seconds. The picture is taken
approximately three seconds after the
self-timer lamp starts to blink.
r The self-timer is engaged and the picture
is taken approximately two seconds after the self-timer lamp starts
to blink.
Focusing may be compromised if you move the camera while the
self-timer lamp is blinking.
112
112
7/18/2004
7/18/2004
12:00
12:00
62
• The second count appears if you turn the LCD monitor on.
• To cancel the self-timer, press the MENU button while the second
count is displayed.
• In 3D Image mode, both the first and second images will be taken
with the self-timer engaged.
Taking Pictures of Yourself 1p.44
Troubleshooting “Subject is not in focus”
1p.137
Page 65

1
112
12:00
7/18/2004
Using the Remote Control Unit (optional)
You can switch the Drive mode to Remote Control mode and take
pictures using the remote control unit E or F (optional).
Taking Pictures Using the Remote Control
1 Press the four-way controller (2)
in Capture mode to display
on the LCD monitor.
The self-timer lamp blinks slowly and the
camera is ready to take the picture.
i or h
7/18/2004
7/18/2004
2 Press the shutter release button
on the remote control unit.
i The self-timer lamp blinks quickly and the picture is taken after
approximately three seconds.
h The picture is taken immediately.
Focusing may be compromised if you move the camera while the
self-timer lamp is blinking.
112
112
12:00
12:00
4
Taking Pictures
63
Page 66
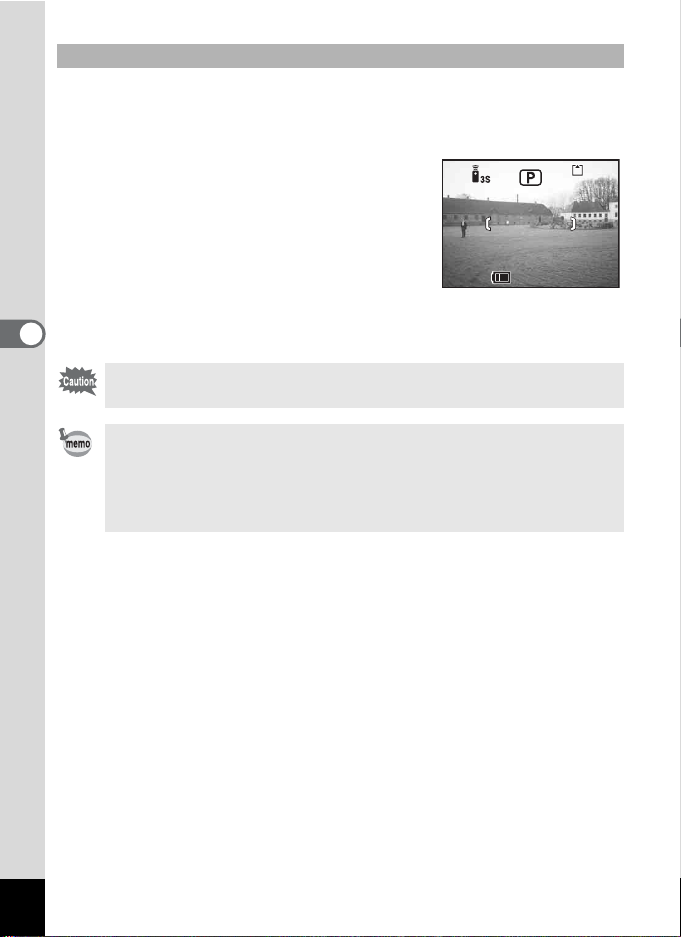
Changing the Magnification Using the Remote Control Unit
112
12:00
7/18/2004
You cannot only change the zoom magnification with the zoom button,
but also shoot images with the shutter button using the remote control
unit E (optional).
1 Press the four-way controller (2)
in Capture mode to display
on the LCD monitor.
The function is same either in i or h.
i or h
2 Press the zoom button on the
remote control unit.
4
Taking Pictures
Each time you press the zoom button, the zoom position will change
between tele, middle, and wide.
The zoom position will not change in Super Macro mode, even if you
press the zoom button.
• The buttons on the camera can be used in the normal way.
• Ensure that the remote control unit is no more than four meters
away from the front of the camera.
• You cannot change the digital zoom range with the remote control
unit; you can change only the optical zoom range.
Life of the Battery for the Remote Control Unit
A signal can be sent from the remote control unit to the camera
approximately 30,000 times. Contact your nearest PENTAX customer
service center if the battery needs changing. (A charge is made for
changing the battery.)
112
112
7/18/2004
7/18/2004
12:00
12:00
64
Page 67

2
12:00
7/18/2004
1
Continuous Shooting (Continuous Shooting Mode)
You can switch the Drive mode to Continuous Shooting mode. Pictures
are taken continuously while the shutter release button is pressed.
1 Press the four-way controller (2)
in Capture mode to display
j on
121212
the LCD monitor.
2 Press the shutter release button
7/18/2004
halfway.
The focus frame on the LCD monitor will
light green when the camera is in focus.
7/18/2004
12:00
12:00
3 Press the shutter release button.
Pictures are taken continuously while the shutter release button is
pressed.
Shooting stops when you take your finger off the shutter release
button.
• You can continue shooting until the SD Memory Card or the builtin memory is full.
• The interval will vary according to the [Recorded Pixels] and
[Quality Level] settings.
• The flash will not discharge in Continuous Shooting mode.
• Continuous shooting is not available for Movie, Panorama Assist
or 3D Image mode.
• The focus, exposure and white balance are locked with the first
image.
4
Taking Pictures
65
Page 68

1
198
198
Using the Zoom to Change the Subject Size
You can use the zoom to change the size of the subject and take pictures
in Tele or Wide mode.
4
1 Press the Zoom button in Capture
Taking Pictures
mode.
x Tele: makes the subject bigger.
w Wide: makes the subject smaller.
When the digital zoom function is disabled,
you can take pictures at up to three times
magnification using the optical zoom. When
the digital zoom function is enabled, you
can further enlarge the subject to a
maximum magnification equivalent to 12
times.
Zoom bar
198
198
Digital zoom
range
198
198
66
When digital zoom is enabled
Saving the Zoom Position 1p.89
You cannot use the optical zoom when taking movies.
Page 69

Enabling the Digital Zoom Function
1 Press the MENU button in Capture mode.
The [A Rec.Mode] menu appears.
2 Use the four-way controller (23)
to select [Digital Zoom].
3 Use the four-way controller (45)
to select [On].
4 Press the OK button.
The camera is ready to take the picture.
EV Compensation
3D Mode
Time-lapse Movie
Digital Zoom
Instant Review
Memory
MENU
Rec. Mode
Exit
±0.0
Parallel
Off
On
1 sec
OK
OK
• The digital zoom is disabled when you turn the LCD monitor off,
even if the digital zoom function is set to On.
• You cannot use the digital zoom if the slim filter has been selected
for the digital filter.
You should compose the picture on the LCD monitor when you use
the digital zoom function.
Saving the Digital Zoom Function Setting 1p.89
4
Taking Pictures
67
Page 70

5
12:00
7/18/2004
01:59
2, 3
4
1
Taking Time-lapse Movies
This mode lets you take movies at a delayed frame rate so that when you
play the movie back, the action appears speeded up.
4
1 Press the MENU button in Movie mode or Marine Movie
Taking Pictures
mode.
The [A Rec.Mode] menu appears.
2
Use the four-way controller (23
) to select [Time-lapse
Movie].
3 Use the four-way controller (45) to choose
[Off (×1)], [×2], [×5], [×10], [×20], [×50] or [×100].
4 Press the OK button.
5 Press the shutter release button.
Shooting in Time-lapse Movie mode starts.
• Off (×1) is the normal setting for movies (15 frames per second).
Each time ×2 or ×5 is selected, the number of frames taken per
second is reduced to 1/2 or 1/5.
• As movies are normally played back at the rate of 15 frames per
second, movies taken at ×2 appear to be played back at twice the
normal speed and movies taken at ×5 appear to be played back at
five times the normal speed.
• Sound cannot be recorded.
01:59
01:59
x5x5x5
7/18/2004
7/18/2004
12:00
12:00
68
Taking Movies 1p.47
Taking Underwater Movies
1p.56
Page 71

Setting the Shooting Functions
Changing the Mode
Capture mode is for taking pictures and Playback mode is for playing
back or deleting images.
Switching between Capture Mode and Playback Mode
• To change from Capture mode to Playback mode, press the
Q Playback button.
• To change from Playback mode to Capture mode, press the
Q Playback button or press the shutter release button halfway.
Selecting the Capture Mode
Pressing the QUICK button activates the Green mode. Other capture
modes are selected from the Mode Palette.
Capture Modes
Q Green mode Lets you take pictures quickly and easily.
Program mode The basic picture-taking mode.
R
Night Scene mode
B
Movie mode Lets you take movies and sound.
C
Panorama Assist
F
mode
3D Image mode Lets you take 3D pictures.
G
H
J
S
L
Landscape
mode
I
Flower mode Lets you take brightly colored flower pictures.
Picture mode
Portrait mode
Self-portrait
mode
Surf&Snow
mode
Lets you take dark scenes such as night views.
Lets you take a number of images to be joined into
a panorama picture using the software supplied
with the camera.
Lets you capture the natural colors of landscape
views.
Lets you take portraits with spatial effect, by
emphasizing the person.
Lets you take pictures of yourself or be included in
pictures.
Lets you take photos against dazzling
backgrounds like beaches or snow-covered
mountains.
p.42
p.43
p.46
p.47
p.49
p.57
p.44
4
Taking Pictures
69
Page 72

Autumn Colors
123
12:00
7/18/2004
mode
Picture mode
Sunset mode
Museum mode
W
Text mode Lets you take clear pictures of text or writing.
K
Food mode Lets you take appetizing pictures of prepared food.
Sport mode
Soft Focus mode Lets you take pictures with a soft lens effect.
Digital Filter mode
D
USER mode
Marine mode
Lets you take colorful pictures of trees in autumn.
Lets you reproduce the beautiful colors of the
sunrise or sunset.
Lets you take pictures of works of art in museums
and art galleries.
Lets you take clear pictures of moving subjects
with a high shutter speed.
Lets you take pictures with color filters, a
posterization filter or a slim filter.
Lets you activate the preset function settings
simply by turning the camera on.
Lets you take underwater pictures that capture the
blueness of the sea using the waterproof case.
4
Taking Pictures
N
K
J
V
E
M
Selecting the Green Mode
1 Press the QUICK button.
You can switch straight to the Green mode
from the Capture mode, Playback mode or
menu screens.
You cannot switch to the Green mode using the QUICK button if a
different function has been assigned to the QUICK button. (1p.128)
p.44
p.51
p.52
p.54
p.55
123
123
7/18/2004
7/18/2004
12:00
12:00
Selecting a Capture Mode other than the Green Mode
1 Press the four-way controller (3)
in Capture mode.
The Mode Palette appears.
2 Use the four-way controller
(2345) to choose the icon for
the mode you want to set.
The icon is surrounded by a green frame.
3 Press the OK button.
The camera is ready to take pictures in the selected mode.
70
Program
OK
OK
Page 73

Displaying Shooting Information in Capture Mode
12:00
1/160
F2.6
7/18/2004
1/160
F2.6
AWB
2560
AUTO
You can display shooting information on the LCD monitor when taking
pictures. The display mode can be changed by pressing the DISPLAY
button.
Display On
Shooting information is displayed when the
power is turned on.
1 Flash mode 2 Drive mode
3 Focus mode 4 Capture mode
5
Focus frame
6
Card/Built-in memory
7 Remaining number of recordable images
8 Date and time 9
10
Aperture
Battery indicator
11
Shutter speed
Histogram Display
The brightness distribution of the image is
displayed. The horizontal axis shows the
brightness (darkest at the left end and
brightest at the right end) and the vertical axis
shows the number of pixels.
1 Recorded pixels 2 Quality level
3 White balance 4 AE metering
5 Sensitivity 6 Histogram
Display Off
No shooting information is displayed.
• The focus frame appears in Autofocus
mode.
• If any of the modes are changed, such as
the flash mode, the mode you have
changed appears for a few seconds.
1/160
1/160
F2.6
F2.6
1/160
1/160
F2.6
F2.6
51 2 3 4 6 7
7/18/2004
7/18/2004
12:00
12:00
891011
1
2560
2560
AWB
AWB
AUTO
AUTO
6 45
2
2
2
1 1 1
4
Taking Pictures
3
LCD Monitor Off
The LCD monitor turns off.
• The display cannot be turned off in
Q,
C, G, F or D mode.
• The histogram cannot be displayed
in Q mode.
Saving the Display Mode 1p.89
Display On
71
Page 74

Selecting the Focus Mode
Focus mode
4
Taking Pictures
(No
Autofocus mode
icon)
Macro mode
q
Super Macro mode
r
Pan Focus mode
Infinity-Landscape
s
mode
Manual Focus mode Adjust the focus manually with the four-way controller.
z
Focusing Area mode The position of the autofocus area is changed.
u
The camera focuses on the object in the autofocus area
when the shutter release button is pressed halfway.
Use this mode when the distance to the subject is more
than 40 cm (16 in.).
This mode is used when the distance to the subject is
approx. 18 cm – 50 cm (7 in. – 20 in.). The camera
focuses on the object in the autofocus area when the
shutter release button is pressed halfway.
This mode is used when the distance to the subject is
approx. 6 cm – 20 cm (2.4 in. – 8 in.). The camera
focuses on the object in the autofocus area when the
shutter release button is pressed halfway.
This mode is used when shooting close and distant
subjects together. The camera will focus on a certain
place.
This mode is used for taking distant objects.
1
Saving the Focus Mode 1p.89
1 Press the qsz button in Capture mode.
The focus mode changes each time the button is pressed and the icon
appears on the LCD monitor.
The camera is ready to take pictures in the selected focus mode.
72
Page 75

• The default setting is Autofocus mode.
3m
0.3
.18
12:00
7/18/2004
• The zoom is fixed at the middle position and only the digital zoom
can be used in Super Macro mode.
• Only Autofocus, Infinity-Landscape and Manual Focus modes can
be selected in Movie mode (
1p.47).
• The flash does not fire in Super Macro mode.
If you take a picture while looking through the viewfinder when the
focus mode is set to Macro or Super Macro, the range of the
resulting picture will differ from what was seen in the viewfinder. Be
sure to check the image on the LCD monitor.
Manual Focus
When the mode is set to z (Manual Focus), the central portion of the
picture is enlarged to full screen on the LCD monitor for focus
adjustment. Use the four-way controller (23) to adjust the focus while
watching the indicator on the LCD monitor.
4
Taking Pictures
For distant focus
For closer focus
After the focus is set, press the OK button to
determine the focus position.
Press the OK button again to change the
previously determined focus position.
When focusing, hold down the four-way controller (23) to focus
quickly.
3m
3m
1
1
0.3
0.3
.18
.18
Indicator
OK
OKOKOK
7/18/2004
7/18/2004
12:00
12:00
2
2
73
Page 76

Changing the Focusing Point
In Autofocus mode, you can change the focusing point by moving the
focus frame.
1 In u (Focusing Area) mode, press the four-way
controller (2345).
Moves the focus frame [ ] (Focusing area).
2 Press the shutter release button halfway.
The focus frame is fixed in its new position.
To return the focus frame to its original location, press the qsz
button again.
4
Taking Pictures
Troubleshooting “Subject is not in focus” 1p.137
74
Page 77

1
Selecting the Flash Mode
Flash Modes
(No
Auto
icon)
Flash off
a
Flash on The flash discharges regardless of the brightness.
b
Auto +
c
red-eye reduction
Flash On +
d
red-eye reduction
The flash discharges automatically depending on the light
conditions.
The flash will not discharge, regardless of the brightness.
Use this mode to take pictures at dusk or in museums etc.
where flash photography is prohibited.
This mode reduces the phenomenon of red eyes caused by
the light from the flash being reflected in the subject’s eyes.
The flash discharges automatically.
This mode reduces the phenomenon of red eyes caused by
the light from the flash being reflected in the subject’s eyes.
The flash will discharge regardless of lighting conditions.
• The flash is off when the Capture mode is set to C (Movie mode),
N (Marine Movie mode), Continuous Shooting, InfinityLandscape, or Super Macro mode.
• The flash discharges a total of three times, two pre-flashes and the
third time to take the picture. (In the red-eye reduction modes, the
interval between the pre-flashes and the main flash is longer.)
1 Press the b button in Capture mode.
The flash mode changes each time the button is pressed and the icon
appears on the LCD monitor.
The camera is ready to take pictures in the selected flash mode.
Status of the Focus Status Lamp and Flash Status Lamp 1p.29
4
Taking Pictures
Saving the Flash Mode
1p.89
Using the flash in Macro mode may cause the image to be
overexposed.
75
Page 78

Rec. Mode
2, 3
4
1
MENU
Recorded Pixels
Quality Level
White Balance
Focusing Area
AE Metering
Sensitivity
MENU
Exit
2560x1920
AWB
Multiple
Auto
Selecting the Recorded Pixels
You can choose the number of recorded pixels from [2560×1920],
[2048×1536], [1600×1200], [1024×768] and [640×480].
The more pixels there are, the larger the picture and the bigger the file
4
Taking Pictures
size. The data volume also varies depending on the quality level setting
(1p.78).
Number of Recorded Pixels
2560×1920
2048×1536
1600×1200
1024×768
640×480
Printing images with high-resolution settings in your printer,
▲
Printing at A4 size or larger, Editing and processing images
Printing at postcard size
Clear, Fine
For use as images on websites, For attaching images to
e-mail
1 Press the MENU button in Capture mode.
The [A Rec.Mode] menu appears.
2 Use the four-way controller (23)
to select [Recorded Pixels].
3 Use the four-way controller (45)
to change the size.
4 Press the OK button.
The camera is ready to take the picture.
Rec. Mode
Recorded Pixels
Quality Level
White Balance
Focusing Area
AE Metering
Sensitivity
MENU
2560x1920
Exit
Multiple
AWB
Auto
OK
OK
OK
OK
76
Page 79

• The number of recorded pixels is fixed at 320×240 in the Movie
mode.
Selecting a large size produces a clear picture when it is printed out.
•
•
The Recorded Pixels setting is saved when the camera is turned off.
Image Size and Quality 1p.23
4
Taking Pictures
77
Page 80

Rec. Mode
2, 3
4
1
MENU
Recorded Pixels
Quality Level
White Balance
Focusing Area
AE Metering
Sensitivity
MENU
2560x1920
Multiple
Exit
Selecting the Quality Level
You can choose the image compression ratio.
The more stars, the clearer the quality and the larger the volume. The
recorded pixels setting also changes the picture volume (1p.76).
4
Taking Pictures
Quality Levels
C Best Lowest compression ratio. Suitable for photo prints.
D Better
E Good
Standard compression ratio. Suitable for viewing the image
on a computer screen.
Highest compression ratio. Suitable for attaching to e-mails
or creating websites.
1 Press the MENU button in Capture mode.
The [A Rec.Mode] menu appears.
2 Use the four-way controller (23)
to select [Quality Level].
3 Use the four-way controller (45)
to change the quality level.
4 Press the OK button.
The camera is ready to take the picture.
Rec. Mode
Recorded Pixels
Quality Level
White Balance
Focusing Area
AE Metering
Sensitivity
MENU
2560x1920
Exit
AWB
Auto
OK
AWB
Multiple
Auto
OK
OK
OK
78
The Quality Level setting is saved when the camera is turned off.
Image Size and Quality 1p.23
Page 81
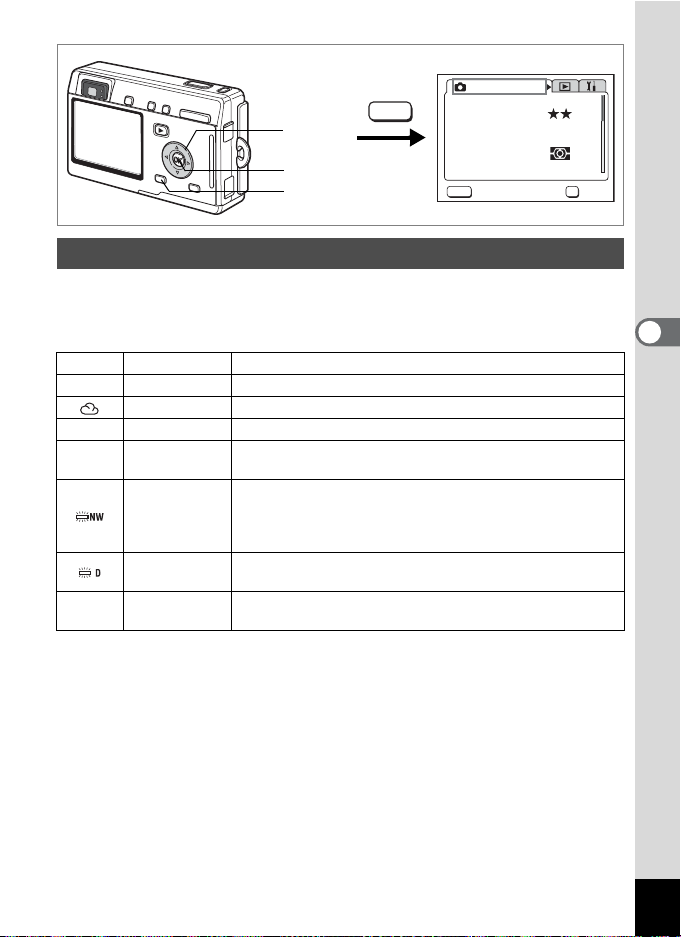
Rec. Mode
2, 3, 4
5
1
MENU
Recorded Pixels
Quality Level
White Balance
Focusing Area
AE Metering
Sensitivity
MENU
Exit
2560x1920
AWB
Multiple
Auto
OK
OK
Adjusting the White Balance
You can take pictures in natural colors by selecting the white balance
best suited to the light conditions at the time of shooting.
White Balance
Auto The camera adjusts the white balance automatically.
F
Daylight Use this mode when taking pictures outside in sunlight.
G
Cloudy Use this mode when taking pictures under a cloudy sky.
Shade Use this mode when taking pictures outside in the shade.
H
I
K
Tungsten Light
Fluorescent
Light (Neutral
White and
White)
Fluorescent
Light (Daylight)
Manual
Use this mode when taking pictures under electric or other
tungsten light.
Use this mode when taking pictures under neutral white or
white fluorescent light.
Use this mode when taking pictures under daylight
fluorescent light.
Use this mode when taking pictures by adjusting the white
balance manually.
1 Press the MENU button in Capture mode.
The [A Rec.Mode] menu appears.
2 Use the four-way controller (23) to select [White
Balance].
4
Taking Pictures
79
Page 82

3 Press the four-way controller (5).
OK
Exit
Auto
OK
Exit
Adjust
Manual
The White Balance screen appears.
4 Use the four-way controller
(2345) to change the setting.
5 Press the OK button twice.
The camera is ready to take the picture.
Saving the White Balance 1p.89
Manual Setting
Have a blank sheet of white paper ready.
1 Select [K] (manual) on the White
4
Taking Pictures
Balance screen.
2 Point the camera at the blank
sheet of paper so that it fills the
screen.
3 Press the DISPLAY button.
The white balance is automatically adjusted. [Complete] appears on
the LCD monitor and the display returns to the menu screen.
4 Press the OK button.
The camera is ready to take the picture.
White Balance
AWB
Auto
Auto
MENU
Exit
Exit
White Balance
AWB
Manual
Manual
MENU DISP
Exit
Exit
Adjust
Adjust
OK
OK
OK
OK
OK
OK
80
Page 83

Rec. Mode
2, 3
MENU
4
1
Recorded Pixels
Quality Level
White Balance
Focusing Area
AE Metering
Sensitivity
MENU
Exit
Changing the Focusing Area
You can change the autofocus area (Focusing Area).
Focusing Area
Multiple
Normal range
Spot
The autofocus range becomes smaller.
1 Press the MENU button in Capture mode.
The [A Rec.Mode] menu appears.
2 Use the four-way controller (23)
to select [Focusing Area].
3 Use the four-way controller (45)
to change the setting.
4 Press the OK button.
The camera is ready to take the picture.
The autofocus area does not appear in the viewfinder. Always check
the focusing area on the LCD monitor.
Rec. Mode
Recorded Pixels
Quality Level
White Balance
Focusing Area
AE Metering
Sensitivity
MENU
Exit
2560x1920
AWB
Multiple
Auto
OK
OK
2560x1920
AWB
Multiple
Auto
OK
4
Taking Pictures
OK
Saving the Focusing Area Setting 1p.89
81
Page 84

Rec. Mode
2, 3
MENU
4
1
Recorded Pixels
Quality Level
White Balance
Focusing Area
AE Metering
Sensitivity
MENU
Exit
Setting the Light Metering Range to Determine the Exposure
You can choose which part of the screen to use to measure the
4
brightness and determine the exposure.
Taking Pictures
AE Metering Modes
Multi-segment The exposure is determined by the entire screen.
L
Center-weighted
M
Spot
N
The exposure is determined mainly by the center of the
screen.
The exposure is determined by the small area in the
center of the screen only.
1 Press the MENU button in Capture mode.
The [A Rec.Mode] menu appears.
2 Use the four-way controller (23)
to select [AE Metering].
3 Use the four-way controller (45)
to change the AE metering mode.
4 Press the OK button.
The camera is ready to take the picture.
Rec. Mode
Recorded Pixels
Quality Level
White Balance
Focusing Area
AE Metering
Sensitivity
MENU
Exit
2560x1920
AWB
Multiple
Auto
OK
OK
2560x1920
AWB
Multiple
AutoAuto
OK
OK
82
When N is selected, the AE metering point moves in
correspondence with movement of the focusing area. (
Saving the AE Metering Mode 1p.89
1p.74)
Page 85

Rec. Mode
2, 3
4
1
MENU
Recorded Pixels
Quality Level
White Balance
Focusing Area
AE Metering
Sensitivity
MENU
Exit
2560x1920
AWB
Multiple
Auto
OK
OK
Setting the Sensitivity
You can select the sensitivity to suit the brightness of the surroundings.
Sensitivity
Auto
The camera sets the sensitivity automatically.
80
• The lower the sensitivity, the sharper the image and the less noise. The
100
200
400
shutter speed will be slower in low light conditions.
• The higher the sensitivity, the faster the shutter speed in low light
conditions to reduce camera shake, but the image may be affected by
noise.
1 Press the MENU button in Capture mode.
The [A Rec.Mode] menu appears.
2 Use the four-way controller (23)
to select [Sensitivity].
3 Use the four-way controller (45)
to change the sensitivity.
4 Press the OK button.
The camera is ready to take the picture.
Rec. Mode
Recorded Pixels
Quality Level
White Balance
Focusing Area
AE Metering
Sensitivity
MENU
2560x1920
Exit
AWB
Multiple
Auto
OK
OK
4
Taking Pictures
Saving the Sensitivity 1p.89
83
Page 86

Rec. Mode
2, 3
4
1
MENU
Recorded Pixels
Quality Level
White Balance
Focusing Area
AE Metering
Sensitivity
MENU
2560x1920
Multiple
Exit
Setting the Instant Review Time
You can choose the Instant Review time from 0.5 sec., 1 sec., 2 sec.,
3 sec., 4 sec., 5 sec. and Off (no display).
4
1 Press the MENU button in Capture mode.
Taking Pictures
The [A Rec.Mode] menu appears.
2 Use the four-way controller (23)
to select [Instant Review].
3 Use the four-way controller (45)
to change the display time.
4 Press the OK button.
Rec. Mode
EV Compensation
3D Mode
Time-lapse Movie
Digital Zoom
Instant Review
Memory
MENU
Exit
The camera is ready to take the picture.
The Instant Review setting is saved when the camera is turned off.
AWB
Auto
OK
±0.0
Parallel
Off
On
1 sec
OK
OK
OK
84
Page 87

Rec. Mode
2, 3
4
1
MENU
Recorded Pixels
Quality Level
White Balance
Focusing Area
AE Metering
Sensitivity
MENU
Exit
2560x1920
AWB
Multiple
Auto
OK
Setting the Image Sharpness
You can choose whether you want the image to have sharp or soft
outlines.
1 Press the MENU button in Capture mode.
The [A Rec.Mode] menu appears.
2 Use the four-way controller (23)
to select [Sharpness].
3 Use the four-way controller (45)
Rec. Mode
Sharpness
Saturation
Contrast
to change the setting from
[Normal] to [Hard (+)] or [Soft (–)].
MENU
Exit
OK
4 Press the OK button.
The camera is ready to take the picture.
The Sharpness setting is saved when the camera is turned off.
OK
4
Taking Pictures
OK
85
Page 88

2, 3
MENU
4
1
Setting the Color Saturation
You can set the color saturation.
1 Press the MENU button in Capture mode.
4
Taking Pictures
The [A Rec.Mode] menu appears.
2 Use the four-way controller (23)
to select [Saturation].
3 Use the four-way controller (45)
to change the setting from
[Normal] to [High (+)] or [Low (–)].
4 Press the OK button.
The camera is ready to take the picture.
The Saturation setting is saved when the camera is turned off.
Rec. Mode
Recorded Pixels
Quality Level
White Balance
Focusing Area
AE Metering
Sensitivity
MENU
Sharpness
Saturation
Contrast
MENU
2560x1920
Exit
Rec. Mode
Exit
AWB
Multiple
Auto
OK
OK
OK
OK
86
Page 89

Rec. Mode
2, 3
MENU
4
1
Recorded Pixels
Quality Level
White Balance
Focusing Area
AE Metering
Sensitivity
MENU
Exit
Setting the Image Contrast
You can set the image contrast.
1 Press the MENU button in Capture mode.
The [A Rec.Mode] menu appears.
2 Use the four-way controller (23)
to select [Contrast].
3 Use the four-way controller (45)
to change the setting from
[Normal] to [High (+)] or [Low (–)].
Sharpness
Saturation
Contrast
MENU
4 Press the OK button.
The camera is ready to take the picture.
The Contrast setting is saved when the camera is turned off.
2560x1920
Rec. Mode
Exit
AWB
Multiple
Auto
OK
OK
4
Taking Pictures
OK
OK
87
Page 90

Rec. Mode
2, 3
4
1
MENU
Recorded Pixels
Quality Level
White Balance
Focusing Area
AE Metering
Sensitivity
MENU
2560x1920
Multiple
Exit
Setting the Exposure (EV Compensation)
You can adjust the overall brightness of the picture.
Use this function to take pictures that are intentionally overexposed or
underexposed.
4
Taking Pictures
1 Press the MENU button in Capture mode.
The [A Rec.Mode] menu appears.
2 Use the four-way controller (23)
to select [EV Compensation].
3 Use the four-way controller (45)
to change the EV setting.
To brighten, set a positive (+) value. To
darken, set a negative (–) value.
Rec. Mode
EV Compensation
3D Mode
Time-lapse Movie
Digital Zoom
Instant Review
Memory
MENU
Exit
You can choose the EV setting in the range of –2.0 EV to +2.0 EV in
1/3 EV steps.
4 Press the OK button.
The camera is ready to take the picture.
AWB
Auto
OK
±0.0
Parallel
Off
On
1 sec
OK
OK
OK
88
EV Compensation is registered on the four-way controller (45) in
the Custom Function default settings in Capture mode, enabling you
to change the EV setting without displaying the menu (
1p.127) .
The AE metering mode is either center-weighted or spot when the
EV setting is adjusted.
Saving the EV Compensation Value 1p.89
Page 91

Saving the Settings
Saving the Menu Items (Memory)
You can choose whether you want the set values to be saved when the
camera is turned off. If you select O (On), the settings will be saved in
the status they were in immediately before the camera was turned off. If
you select
camera is turned off.
Flash The flash mode setting on the b button is saved.
Drive
Focus Mode
Zoom Position
MF Position The manual focus position is saved.
White Balance
AE Metering
Sensitivity
EV Compensation
Digital Zoom
DISPLAY The LCD monitor display mode is saved.
File #
P (Off), the settings will be reset to the defaults when the
Item Description
Default
Setting
O
The drive mode setting (gj, etc.) selected using the
four-way controller (2) is saved.
The focus mode setting on the ) button is
saved.
The optional zoom position setting on the Zoom
button is saved.
P
P
P
P
The [White Balance] setting on the [A Rec.Mode]
menu is saved.
The [AE Metering] setting on the [A Rec.Mode]
menu is saved.
The [Sensitivity] setting on the [A Rec.Mode] menu
is saved.
The [EV Compensation] setting on the
[A Rec.Mode] menu is saved.
The [Digital Zoom] setting on the [A Rec.Mode]
menu is saved.
P
P
P
P
O
P
The file number is saved. If a new SD Memory Card
is inserted, file numbers are assigned sequentially.
O
• Menu items not included in [Memory] will also be saved in the
settings selected on the menus for each function when the camera
is turned off.
• The zoom position setting in the digital zoom range will not be
saved even if [Zoom Position] is set to O(On) in [Memory].
• [Memory] can be set separately in User mode and other capture
modes.
4
Taking Pictures
89
Page 92

1 Press the MENU button in Capture mode.
The [A Rec.Mode] menu appears.
2 Use the four-way controller (23)
to select [Memory].
3 Press the four-way controller (5).
The [Memory] menu appears.
4 Use the four-way controller (23)
to choose an item.
5 Use the four-way controller (45)
to select O (On) or P (Off).
4
6 Press the OK button twice.
Taking Pictures
90
The camera is ready to take the picture.
Registering Functions in User Mode
Functions set with the Capture mode on E will be registered in User mode.
Functions Registered in User Mode
Items Registered in User Mode Default Setting Page
Flash mode Auto
Drive mode Normal
Focus mode Autofocus
Manual focus position Infinity
Recorded pixels 2560×1920
Quality
White balance AWB (auto)
Focusing area Multiple
AE metering L (Multi-segment)
Sensitivity Auto
Digital zoom On
Instant review 1 sec.
Memory All On
Sharpness Normal
Saturation Normal
Contrast Normal
EV compensation ±0.0
Custom function EV compensation
D
Rec. Mode
EV Compensation
3D Mode
Time-lapse Movie
Digital Zoom
Instant Review
Memory
MENU
Exit
Memory
Flash
Drive
Focus Mode
Zoom Position
MF Position
White Balance
MENU
Exit
±0.0
Parallel
Off
On
1 sec
OK
OK
p.75
p.63 – 65
p.72
p.73
p.76
p.78
p.79
p.81
p.82
p.83
p.66
p.84
p.89
p.85
p.86
p.87
p.88
p.127
OK
OK
Page 93

Recording and Playback
0 :
0 :0000
Start
00:57:30
Recording Sound (Voice Recording Mode)
You can record sound. The recordable time appears on the LCD monitor
according to how much space is available on the SD Memory Card.
Power
indicator
Microphone
1, 4
2, 3
Speaker
1 Press the power switch for more
than two seconds, or press the
power switch while pressing the
DISPLAY button.
The power indicator lights red.
The recordable time appears on the LCD
monitor.
1 Remaining recordable time
2 Recording time
00:
00:
00 : 00 : 00
SHUTTER
00:57:30
00:57:30
2 Press the shutter release button.
Recording starts. The self-timer lamp and flash status lamp light during
recording.
When the shutter release button is pressed for more than one second,
recording continues for as long as the button is held down and stops
when the button is released.
3 Press the shutter release button.
Recording stops. The remaining recordable time appears.
4 To exit Voice Recording mode, turn the camera off.
• When you press the power switch, the lens extends, then retracts
immediately and the camera enters the Voice Recording mode.
• Sound is saved in WAVE monaural files.
• The microphone is located on the front of the camera. Aim the
camera to obtain the best sound.
An index can be added by pressing the MENU button during recording.
•
12
Start
Start
5
Recording and Playback
91
Page 94

Playing Back Sound
0 :
0 :1111
0 :
0 :1414
100-0012
12:00
7/18/2004
You can play back the recording you made in Voice Recording mode.
1, 5
2, 3, 4
1 Press the Q Playback button in the Voice Recording
mode.
2
Use the four-way controller (45)
5
Recording and Playback
to choose the recording to play
back.
3 Press the four-way controller (2).
Playback starts.
• The following operations can be
performed during playback.
Four-way controller (2)
If there are no recorded indexes:
Four-way controller (
Four-way controller (
If there are recorded indexes:
Four-way controller (
Four-way controller (
Zoom/
f/y button (x) Increases the volume
Zoom/
f/y button (w) Reduces the volume
Pauses playback
Press again to resume playback
4) Rewinds five seconds
5) Advances five seconds
4) Plays back starting from the previous index
5) Plays back starting from the next index
00:
00:
00 : 00 : 11
00:
00:
00 : 00 : 14
Total file recording time
4 Press the four-way controller (3).
Playback stops.
5 Press the Q Playback button.
The camera switches to the Voice Recording mode.
If you entered the Playback mode from Capture mode, the camera will
switch to Capture mode in Step 5. To continue recording, turn the
camera off, then turn it on again in the Voice Recording mode. (
92
100-0012
100-0012
7/18/2004
7/18/2004
12:00
12:00
1
p.33)
Page 95

Adding a Voice Memo
100-0010
12:00
7/18/2004
You can add a voice memo to a captured image.
1
2, 3
1 Enter the Playback mode and use
the four-way controller (45) to
choose the image to which you
want to add a voice memo.
The voice memo screen appears on the
LCD monitor while the image is displayed.
2 Press the OK button.
Recording starts. You can record for up to 30 seconds.
3 Press the OK button.
Recording stops.
• U appears on the screen when a voice memo is added.
• A voice memo cannot be added to an image which already has a
voice memo. Delete the old voice memo and record a new one.
(1p.101)
A voice memo cannot be added to protected (Z) images.
Setting the Record Voice Memo to [Off]
1
Select [Record Voice Memo] on the [QPlayback] menu.
2 Use the four-way controller (45) to select [Off].
3 Press the OK button.
O disappears from the four-way controller guide and no voice memos
can be added.
100-0010
100-0010
7/18/2004
7/18/2004
12:00
12:00
5
Recording and Playback
93
Page 96

Playback/Deleting/Editing
Playing Back Images
You can play back images recorded on the SD Memory Card when a
card is inserted in the camera, or in the built-in memory when no card is
inserted.
2
1
3
Playing Back Still Pictures
Press the Q Playback button.
Refer to “Playing Back an Image” (p.30), or “Playing Back the Previous
or Next Image” (p.30) for instructions on playing back images.
6
Playback/Deleting/Editing
Zoom Display
You can display images magnified up to four times. A guide to operation
appears on the LCD monitor during magnification.
1 Enter the Playback mode and use the four-way
controller (45) to choose the image to magnify.
2 Press x/y on the Zoom/f/y
button.
The image is magnified (1× to 4×). Holding
down the button changes the magnification
continuously.
•
The following operations can be performed
while the magnified image is displayed.
Four-way controller (2345) Moves the position to be magnified
Zoom/
f/y button (x)
Zoom/f/y button (w) Makes the image smaller
DISPLAY button Turns the guide marks on/off
94
Makes the image bigger
Page 97

3 Press the MENU button.
Zoom playback ends.
Movies cannot be magnified.
Setting the Quick Zoom Function
You can display the image at maximum magnification simply by pressing
the Zoom/f/y button once during zoom playback.
1 Select [Quick Zoom] on the [Q Playback] menu.
2 Use the four-way controller (45) to select [On] or [Off].
On : Pressing y of the Zoom/f/y button once displays the image at
maximum magnification
Off : Pressing y of the Zoom/f/y button once magnifies the image
in steps
3 Press the OK button.
The camera is ready to take or play back images.
6
Playback/Deleting/Editing
95
Page 98

4
100-0010
12:00
7/18/2004
1, 2, 3
Playing Back Movies
You can play back movies. You can play back the recording you made
in Voice Recording mode at the same time. A guide to operation appears
on the LCD monitor during playback. Operations include playback,
frame by frame playback (forward or reverse), pause and volume
adjustment.
1 Enter the Playback mode and use the four-way
controller (45) to choose the movie to play back.
2 Press the four-way controller (2).
6
Playback/Deleting/Editing
Playback starts.
• The following operations can be
performed during playback.
Four-way controller (
Four-way controller (5)
Four-way controller (2) Pause
DISPLAY button Changes the display mode (1p.97)
Zoom button w/x Adjusts the volume
• The following operations can be performed while Pause is engaged.
Four-way controller (
Four-way controller (
Four-way controller (
DISPLAY button Changes the display mode (1p.97)
4)
Reverse playback
Forward playback
4) Frame reverse
5) Frame forward
2) Releases the Pause function
3 Press the four-way controller (3).
Playback stops and the screen returns to the first frame.
4 Press the Q Playback button.
The camera returns to Capture mode.
100-0010
100-0010
7/18/2004
7/18/2004
12:00
12:00
96
Page 99
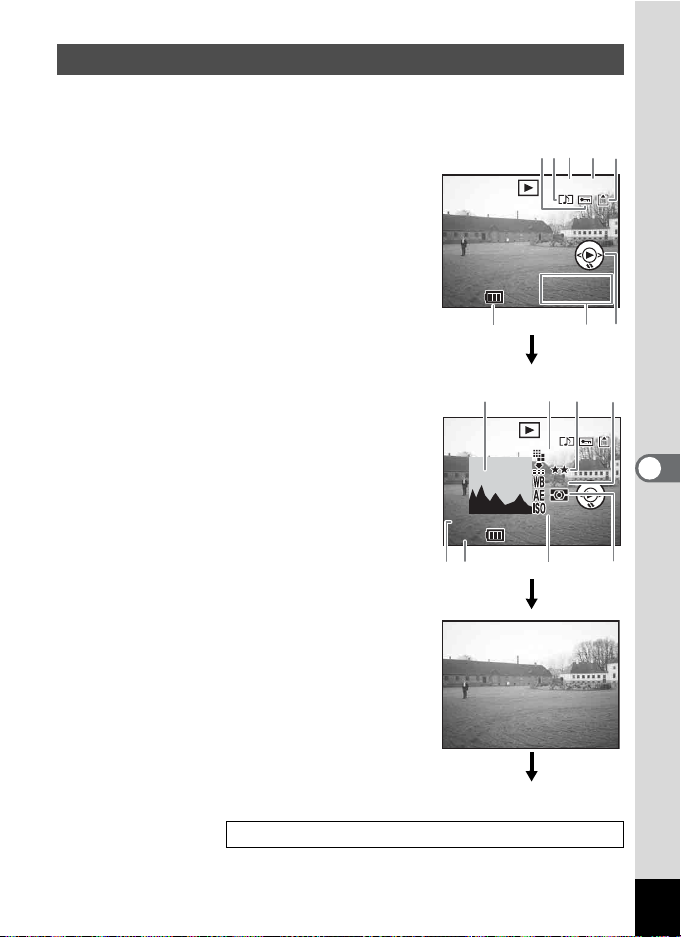
Displaying Shooting Information in Playback Mode
100-0010
12:00
7/18/2004
100-0010
12:00
7/18/2004
1/160
F2.6
AWB
2560
AUTO
Shooting information can be displayed on the LCD monitor in Playback
mode. Pressing the DISPLAY button changes the display mode.
Display On
Shooting information is displayed.
1 Protect icon 2 Voice Memo icon
3 Folder name 4 File name
Card/Built-in memory icon
5
6 Four-way controller operation guide
7 Shooting date and time
8 Battery indicator
2
1
100-0010
100-0010
7/18/2004
7/18/2004
43
12:00
12:00
78
5
6
Histogram Display
The brightness distribution of the image is
displayed. The horizontal axis shows the
brightness (darkest at the left end and
brightest at the right end) and the vertical axis
shows the number of pixels.
1 Histogram 2 Recorded pixels
3 Quality level 4 White balance
5 AE metering 6 Sensitivity
7 Aperture 8 Shutter speed
Display Off
No shooting information is displayed.
Saving the Display Mode 1p.89
1/160
1/160
F2.6
F2.6
1
Display On
3
2
100-0010
100-0010
2560
2560
AWB
AWB
AUTO
AUTO
7/18/2004
7/18/2004
12:00
12:00
678
4
6
Playback/Deleting/Editing
5
97
Page 100

2
1
3
Nine Image Display
You can display nine images at the same time.
1 Enter the Playback mode and use the four-way
controller (45) to choose an image.
2 Press w/f on the Zoom/f/y
button.
Nine images appear with the selected
6
Playback/Deleting/Editing
image in the center.
Use the four-way controller (2345) to
choose an image. When ten or more
images have been recorded, the previous
nine images appear when you press the
four-way controller (4) while an image on the left row is selected.
Similarly, the next nine images appear when you press the four-way
controller (5) while an image on the right row is selected.
3 Press the OK button.
The screen returns to full screen display of the selected image.
Selected image
98
Pressing the MENU button, i button, DISPLAY button or Zoom/f/
y button returns the screen to full screen display of the selected
image.
 Loading...