

Page 1
Digital Camera
Operating Manual
EN
To ensure the best performance
from your camera, please read
the Operating Manual before
using the camera.
Page 2

Page 3

Table of Contents
Preface ........................................................................................i
About this Manual ................................................................................... i
Regarding Copyrights ..................................................................................................... i
Trademark Recognition ................................................................................................... i
To users of this camera ...................................................................................................ii
Regarding Product Registration ....................................................................................ii
USING YOUR CAMERA SAFELY ..................................................................................ii
About the Camera ..........................................................................................................iii
Warning ........................................................................................................................iii
Caution .........................................................................................................................iii
About the AC Adapter ....................................................................................................iv
Caution .........................................................................................................................iv
Care to be Taken During Handling .................................................................................iv
Introduction ...............................................................................1
System Requirements ........................................................................... 1
Package Contents .................................................................................. 1
Main Features ......................................................................................... 1
Camera Views ......................................................................................... 2
Front View ...................................................................................................................... 2
Back View ......................................................................................................................2
Top View / Bottom View ................................................................................................ 3
Left / Right View ............................................................................................................. 3
LED Indicators ........................................................................................ 4
Camera Buttons ..................................................................................... 4
Navigation Buttons ......................................................................................................... 4
The Scene Button .......................................................................................................... 7
Function Buttons ............................................................................................................ 9
LCD screen ....................................................................................................................9
Capture/Video Mode Display ....................................................................................... 10
English
Page 4

Camera Setup ..........................................................................15
Attaching the Wrist Strap .................................................................... 15
Inserting the Battery ............................................................................ 15
English
Inserting an SD/SDHC Memory Card .................................................. 16
Charging the Battery ............................................................................ 17
Charging the battery with USB power ................................................ 17
Turning On ............................................................................................ 17
First Time Use ...................................................................................... 18
Getting Started ........................................................................19
Taking Photos ...................................................................................... 19
Anti-shake Function ..................................................................................................... 19
Using Macro Mode .......................................................................................................20
Using the Zoom in/out Function ................................................................................... 21
Using the Self-timer and Burst Photography ................................................................ 21
Using the AEB (Auto Exposure Bracketing) Function .................................................. 22
Setting the Scene Mode ............................................................................................... 23
Face and Smile Detection AF/AE Function .................................................................. 24
Recording Videos ................................................................................. 24
Recording Audio Files .........................................................................25
Recording Voice Memos ..................................................................... 25
Capture Settings ...................................................................... 26
The Capture Menu ................................................................................ 26
Image Resolution ......................................................................................................... 27
Image Quality ............................................................................................................... 27
Focus Zone .................................................................................................................. 27
EV Compensation ........................................................................................................ 28
AEB .............................................................................................................................. 28
M-Burst Interval ............................................................................................................ 28
White Balance .............................................................................................................. 28
ISO Speed ....................................................................................................................29
Page 5

AE Metering ................................................................................................................. 29
Color ............................................................................................................................. 29
Sharpness .................................................................................................................... 30
Saturation .....................................................................................................................30
Contrast ........................................................................................................................ 30
Setup ............................................................................................................................ 30
Video Capture Menu ............................................................................ 31
Video Resolution ..........................................................................................................31
White Balance .............................................................................................................. 31
Color ............................................................................................................................. 31
Saturation .....................................................................................................................31
Contrast ........................................................................................................................ 31
Setup ............................................................................................................................ 31
Photo, Video & Audio Playback ............................................. 32
Playback Mode Display ....................................................................... 32
Viewing Photos / Videos on the LCD Screen ..................................... 34
Viewing M-Burst Photos ............................................................................................... 35
Listening to Audio Files ................................................................................................35
Listening to Voice Memo .............................................................................................. 35
Viewing Photos/Videos on your TV .................................................... 35
Zooming In/Out During Playback ........................................................ 36
Deleting Photos/Videos/Audios .......................................................... 36
Using the Playback Menu .................................................................... 37
DPOF ...........................................................................................................................37
Slideshow ..................................................................................................................... 38
Resize .......................................................................................................................... 38
Rotate ........................................................................................................................... 39
Protect .......................................................................................................................... 39
Move ............................................................................................................................ 40
Divide ........................................................................................................................... 40
Transferring Photos/Videos to your PC ............................................. 41
English
Page 6

Camera Settings ......................................................................42
The Setup Menu ................................................................................... 42
LCD Brightness ............................................................................................................42
File Number ..................................................................................................................42
English
Digital Zoom ................................................................................................................. 43
Quick View ................................................................................................................... 43
Camera Sound ............................................................................................................. 43
Power Saving ............................................................................................................... 44
Auto Power Off ............................................................................................................. 44
Video Out ..................................................................................................................... 44
Date Stamp .................................................................................................................. 44
Date & Time ................................................................................................................. 45
Language ..................................................................................................................... 45
Image Storage ..............................................................................................................45
Format .......................................................................................................................... 46
Reset ............................................................................................................................ 46
Voice Memo ................................................................................................................. 46
Specifications .......................................................................... 47
Troubleshooting ......................................................................50
Page 7

Preface
About this Manual
Thank you for purchasing this PENTAX Digital Camera. Please read this manual before using the camera
in order to get the most out of all the features and functions. Keep this manual safe, as it can be a
valuable tool in helping you to understand all the camera capabilities.
Regarding Copyrights
Images taken using the PENTAX Digital Camera that are for anything other than personal enjoyment
cannot be used without permission according to the rights as specified in the Copyright Act. Please take
care, as there are cases where limitations are placed on taking pictures even for personal enjoyment
during demonstrations, performances or of items on display. Images taken with the purpose of obtaining
copyrights also cannot be used outside the scope of use of the copyright as laid out in the Copyright Act,
and care should be taken here also.
Trademark Recognition
• PENTAX and Optio are trademarks of HOYA CORPORATION.
• SDHC logo ( ) is trademark.
• Microsoft and Windows are registered trademarks of Microsoft Corporation in the United States
and other countries.
• Windows Vista is either a registered trademark or trademark of Microsoft Corporation in the
United States and/or other countries.
• Adobe, the Adobe logo, and Reader are either registered trademarks or trademarks of Adobe
Systems Incorporated in the United States and/or other countries.
• ArcSoft is the trademark of ArcSoft Inc.
• All other brands or product names are trademarks or registered trademarks of their respective
companies.
Preface i
English
About this Manual
Page 8
ii Preface
To u s er s o f t h is c am e ra
• There is a possibility that recorded data may be erased or that the camera may not function
correctly when used in surroundings such as installations generating strong electromagnetic
radiation or magnetic fields.
English
• The liquid crystal panel used in the display is manufactured using extremely high precision
technology. Although the level of functioning pixels is 99.99% or better, you should be aware that
0.01% or fewer of the pixels may not illuminate or may illuminate when they should not.
However, this has no effect on the recorded image.
• There is a possibility that the illustrations and the display screen in this manual are different from
the actual product.
• Do not use or store this device in the vicinity of equipment that generates strong electromagnetic
radiation or magnetic fields.
• Strong static charges or the magnetic fields produced by equipment such as radio transmitters
could interfere with the monitor, damage the stored data, or affect the product's internal circuitry
and cause camera misoperation.
Regarding Product Registration
In order to better serve you, we request that you complete the product registration, which can be
found on the CD- ROM (S-SW100) supplied with the camera or on the PENTAX website. Thank you for
your cooperation.
USING YOUR CAMERA SAFELY
We have paid close attention to the safety of this product. When using this product, we request your
special attention regarding items marked with the following symbols.
Warning This symbol indicates that violating this item could cause serious personal injuries.
Caution This symbol indicates that violating this item could cause minor or medium personal
injuries, or material losses.
About this Manual
Page 9

About the Camera
Warning
• Do not attempt to take the camera apart or remodel the camera. High voltages are present within
the camera, and there is therefore a danger of electric shocks if the camera is taken apart.
• If the inside of the camera should become exposed as a result of, for example, the camera being
dropped, please do not under any circumstances touch such exposed portions, as there is a
danger of receiving an electric shock.
• To avoid the risk of it being swallowed by mistake, keep the memory card out of the reach of
small children. Seek medical attention immediately if a card is accidentally swallowed.
• Wrapping the strap of the camera around your neck is also dangerous. Please take care that
small children do not hang the strap around their necks.
• Use an AC adapter that is of the power and voltage specified for exclusive use with this product.
The use of an AC adapter other than that specified exclusively for use with this product may
cause fire or electric shocks.
• If the camera emits smoke or a strange smell, or in the event of any other irregularity, stop using
the camera immediately, remove the battery or unplug the AC adapter, and contact your nearest
PENTAX Service Center. Continued use of the camera may result in fire or electric shock.
• During thunderstorms, unplug and discontinue use of the AC adapter. Continued use could
cause equipment failure, a fire, or electric shock.
Caution
• Never try to disassemble or short the battery. Also, do not dispose of the battery in a fire, as they
may explode.
• Do not charge any battery other than rechargeable lithium-ion battery D-LI95. The battery could
explode or catch fire.
• Do not place your finger on the flash when it is discharging as there is a risk of burns.
• Do not discharge the flash while it is touching your clothing as there is a risk of discoloring of the
clothing.
• If any leakage from the battery should come in contact with your eyes, do not rub them. Flush
your eyes with clean water and get medical attention immediately.
• If any leakage from the battery should come in contact with skin or clothes, wash the affected
areas thoroughly with water.
Preface iii
English
About this Manual
Page 10

iv Preface
• Precautions for D-LI95 Battery Usage:
- BATTERY MAY EXPLODE OR FIRE IF MISTREATED.
- DO NOT DISASSEMBLE OR DISPOSE OF IN FIRE.
- DO NOT CHARGE EXCEPT SPECIFIED CHARGING CONDITION.
- DO NOT HEAT ABOVE 140 °F/60 °C, OR SHORT CIRCUIT.
English
- DO NOT CRUSH OR MODIFY.
• Remove the battery from the camera immediately if it becomes hot or begins to smoke. Be
careful not to burn yourself during removal.
• Some portions of the camera heat up during use, so please take care, as there is a risk of low
temperature burns if such portions are held for long periods of time.
• Should the liquid crystal display be damaged, be careful of glass fragments. Also, be careful not
to allow the liquid crystal to get on your skin or in your eyes or in your mouth.
• Depending on your inherent factors or physical condition, the use of the camera may cause
itching, rashes or blisters. In case of any abnormality, stop using the camera and get medical
attention immediately.
About the AC Adapter
Caution
• Do not place heavy objects on the AC plug cord, allow heavy objects to drop onto it or allow the
AC plug cord to become damaged due to excessive bending. If the AC plug cord becomes
damaged, consult a PENTAX Service Center.
• Do not short or touch the output terminals of the product while it is still plugged in.
• Do not plug in the AC plug cord with wet hands. This can cause an electrical shock.
• Do not subject the product to strong impacts or allow it to drop onto a hard surface. This can
cause a malfunction.
Care to be Taken During Handling
• Take the Worldwide Service Network listing that is included in the package with you when
traveling. This will be useful if you experience problems abroad.
• When the camera has not been used for a long time, confirm that it is still working properly,
particularly prior to taking important pictures (such as at a wedding or during traveling). Contents
of the recording cannot be guaranteed if recording, playback or transferring your data to a
computer, etc. is not possible due to a malfunction of your camera or recording media (memory
card), etc.
About this Manual
Page 11

Preface v
• The lens on this camera is not interchangeable. The lens is not removable.
• Do not clean the product with organic solvents such as thinner, alcohol or benzene.
• Places of high temperature and humidity should be avoided. Particular care should be taken
regarding vehicles, which can become very hot inside.
• Storing the camera where pesticides and chemicals are handled should be avoided. Remove
from case and store in a well-ventilated place to prevent the camera from becoming moldy
during storage.
• As this camera is not waterproof, do not use the camera where it may come in contact with rain ,
water or any other liquid.
• Ensure that the camera is not subjected to substantial vibrations, shocks or pressure as this may
cause damage or malfunction. Place the camera on a cushion for protection when the camera is
subjected to the vibrations of a motorbike, car, ship, etc. If the camera is subjected to substantial
vibrations, shocks or pressure, take your camera to your nearest PENTAX Service Center and
have it checked.
• The temperature range in which the camera can be used is 0°C to 40°C (32°F to 104°F).
• The liquid crystal display will become black at a high temperature but will return to normal when
normal temperatures are returned to.
• The response speed of the liquid crystal display becomes slow at low temperatures. This is due
to the properties of the liquid crystal and is not a fault.
• Periodic checks are recommended every 1 to 2 years in order to maintain high performance.
• If the camera is subjected to rapid temperature changes, condensation may form on the inside
and outside of the camera. Therefore put the camera in a bag or plastic bag, and take the
camera out when the difference in te mperature has subsided.
• Be careful not to allow dirt, mud, sand, dust, water, toxic gases or salt to enter the camera as this
may damage the camera. Wipe away any raindrops or water droplets and allow the cam era to
dry.
• Please note that formatting a memory card or internal flash memory will delete all data; however
it may still be possible to recover that data using off-the-shelf data recovery software. Please
manage your camera memory at your own risk.
• Please do not press forcefully on the display. This could cause breakage or malfunction.
• Be careful not to sit down with the camera in your back pocket as this may damage the exterior
of the camera or the display.
• When using a tripod with the camera, be careful not to over tighten the screw in the tripod socket
on the camera.
English
About this Manual
Page 12

1 Introduction
Introduction
Congratulations on the purchase of your new digital camera. This manual provides step-by-step
instructions on how to use your camera, and is intended for your reference only.
System Requirements
English
In order to get the most out of your camera, your computer must meet the following system
requirements:
• OS: Windows 2000/XP/Vista
• Memory: 128MB or above
• HDD space: 40 MB or above
•USB port
Package Contents
Check the contents of your camera package. It should contain:
• Camera Optio E85
• USB/AV 3-in-1 cable
• Wrist strap
• Rechargeable Li-ion batter y
• AC adapter
• Quick start guide
• Application Software and Operating Manual (CD-ROM)
Main Features
• 12.1 mega pixels resolution
• 15x zoom (Up to 3x optical zoom and 5x digital zoom)
• 1/2.33 inch CCD image sensor
• 2.7 inch TFT LCD monitor
• 16MB internal flash memory, support SD/SDHC memory card from 32MB to 16GB
• Sleek and slim design
• Easy-to-use button interface
• Slideshow feature to review your pictures and movies
• AV output to view your pictures and movies on your TV
• USB port to transfer photos and movies to your PC
System Requirements
Page 13
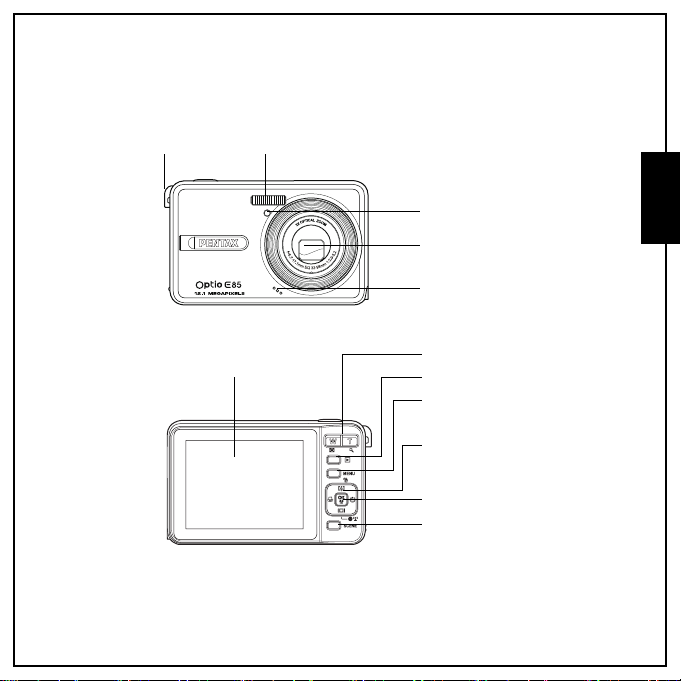
Camera Views
Front View
Wrist strap loop
Back View
LCD screen
Flash
Self-timer LED
Zoom l ens
Microphone
Zoom button
Playback button
Menu button
4-way navigation buttons
OK button
Scene button
Introduction 2
English
Camera Views
Page 14
3 Introduction
ON / OFF
3X OPTICAL ZOOM
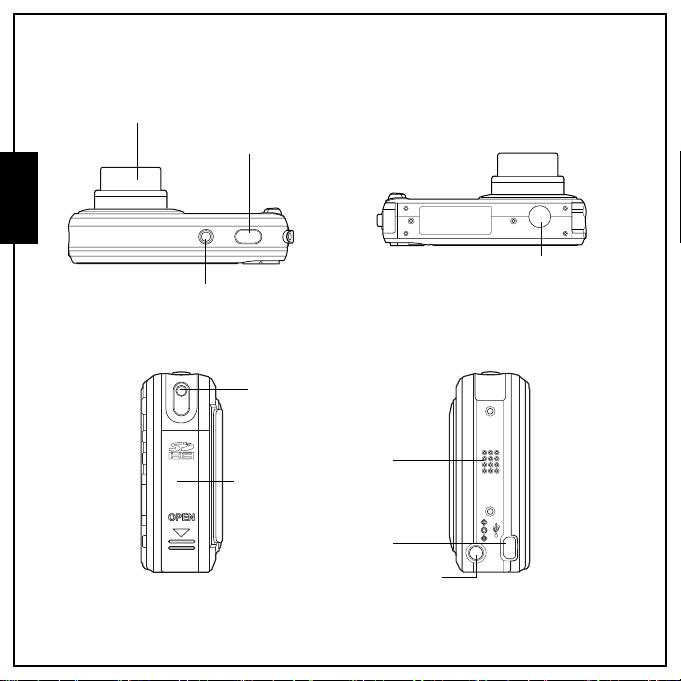
Top View / Bottom View
Zoom lens
English
Left / Right View
Shutter button
Tri p o d mo unt
Power button
Wrist strap loop
Camera Views
Battery/SD card
compartment
Speaker
USB/AV port
DC-in port
Page 15
Introduction 4
LED Indicators
LED LED Status Camera Status
Power/Flash LED Off Power Off.
Blue (steady) Ready to take picture.
Self-timer LED Off Self-timer off.
Blue (blinking) Camera busy.
Orange (blinking) (10 sec) Timer count down, flash after 10 seconds.
Orange (blinking) (2 sec) Timer count down, flash after 2 seconds.
Camera Buttons
Navigation Buttons
The 4-way navigation buttons and the OK button allow you to access the various options available from the
On Screen Display (OSD) menu. You can configure a wide range of settings to ensure maximum results from
your photos and videos.
Icon Button Function
1. Confirm a selection when using the OSD menus
2. In Capture mode:
• Press to enable/disable the Anti-shake in Auto mode
OK/
OK/
Anti-shake
• Press to enable AF area selection using 4-way
navigation buttons (except Auto, Auto Scene,
Landscape, Night Landscape, Fireworks, Self-portrait,
Frame Composite, and Video.)
3. In Video mode:
• Press to enable/disable the Anti-shake function
English
LED Indicators
Page 16

5 Introduction
English
Up/Flash/
Delete
Right/Selftimer/Burst
mode
4. In Playback mode:
• Press to start and pause the video playback
• Press to play and pause the audio playback
• Press to stop the voice memo playback
5. In USB mode:
• MSDC: N/A
1. Move up in the OSD menus
2. In Capture mode:
• Scroll through the flash mode options (Auto, Off, Fill and
Red-eye Reduction.)
• Press to pan up in AF area selection
• Press to delete during mark appears on LCD.
(QUICK VIEW has to be set “ON” at SETUP
mode.)
3. In Playback mode:
• Press to pan up in zoom in mode
• Press to move up in the thumbnail display
• Press to delete images
4. In USB mode:
• MSDC: N/A
1. Move right in the OSD menus
2. In Capture mode:
• Press to scroll through the Self-timer/Burst/Multi-Burst
mode
• Press to pan right in AF area selection
3. In Video mode:
• Press to scroll through the Self-timer options
4. In Playback mode:
• Press to pan right in zoom in mode
• Press to navigate to next image in single image display
• Press to move right in the thumbnail display
Camera Buttons
Page 17
Down/Screen/
Face
Detection/
Smile
Detection
Introduction 6
• Press to fast forward video playback during Pause
mode
5. In USB mode:
• MSDC: N/A
1. Move down in the OSD menus
2. In Capture mode:
• Press to enable the following functions: full icon, full icon
with histogram, face detection, smile detection, and
simple display (hide all icons except the mode icon).
Press again to turn all icons back on the LCD screen.
Note: Face and smile detection functions are not available in
Auto Scene, Sport, Landscape, Night Landscape, Fireworks,
Foliage, Aquarium, and Copy modes.
• Press to pan down in AF area selection
3. In Video mode:
• Press to turn off extra icons on the LCD screen, press
again to turn all icons back on the LCD screen
4. In Playback mode:
• Press to pan down in zoom in mode
• Press to move down in the thumbnail display
• Press to show the file information
5. In USB mode:
• MSDC: N/A
English
Camera Buttons
Page 18
7 Introduction
1. Move left in the OSD menus
2. Go up to the previous level in the OSD menus
3. In Capture mode:
• Press to enable Macro mode. Macro icon displays on the
LCD screen
English
Left/Macro
• Press to pan left in AF area selection
4. In Playback mode:
• Press to pan left in zoom in mode
• Press to navigate to previous image in image display
• Press to move left in the thumbnail display
• Press to fast rewind video playback during Pause
mode
5. In USB mode:
• MSDC: N/A
The Scene Button
The camera is equipped with a convenient SCENE button that takes you to the Scene Menu where you
can scroll between different modes and choose different scene options. Use the Left/Right/Up/Down
navigation buttons to scroll and use the OK button to select. Use the SCENE button to:
Mode Type Icon Function
Auto Scroll to Auto mode.
Auto Scene Scroll to Auto Scene mode.
P-Mode
(Program Mode)
Sport Scroll to Sport mode.
Landscape Scroll to Landscape mode.
Night Landscape Scroll to Night Landscape mode.
Portrait Scroll to Portrait mode.
Self-Portrait Scroll to Self-Portrait mode.
Scroll to Program mode.
Camera Buttons
Page 19
Night Portrait Scroll to Night Portrait mode.
Museum Scroll to Museum mode.
Snow Scroll to Snow mode.
Sunset Scroll to Sunset mode.
Fireworks Scroll to Fireworks mode.
Beach Scroll to Beach mode.
Party Scroll to Party mode.
Foliage Scroll to Foliage mode.
Aquarium Scroll to Aquarium mode.
Kids & Pets Scroll to Kids & Pets mode.
Copy Scroll to Copy mode.
Backlight Scroll to Backlight mode.
Frame Composite Scroll to Frame Composite mode.
Audio Scroll to Audio mode.
Video Scroll to Video mode.
Introduction 8
English
Camera Buttons
Page 20

9 Introduction
Function Buttons
Icon Button Function
MENU Menu Press to display the Menu options
English
T /
W /
LCD screen
The 2.7” TFT LCD screen shows all important information regarding camera settings as well as the visual
image for your photo or video.
Use the SCENE button to switch between screen modes. Press the Down/Screen / Face
Detection / Smile Detection button to switch among a Full display with histogram and without
histogram, Face detection, Smile detection or a Simple display (only mode icon and focus area are
shown while other icons are hidden).
Playback Press to review photo/video/audio clips saved in the internal
Zoom in In Capture mode:
Zoom out In Capture mode:
memory or on the memory card
• Press to zoom in on the subject to be taken
In Playback mode:
• Press to zoom in on saved photos
• Press to zoom out from the subject to be taken
In Playback mode:
• Press to zoom out of saved photos
• Press to view thumbnails of all current saved media
Camera Buttons
Page 21
Introduction 10
-1.0 EVF5.2
12M
00:00:00
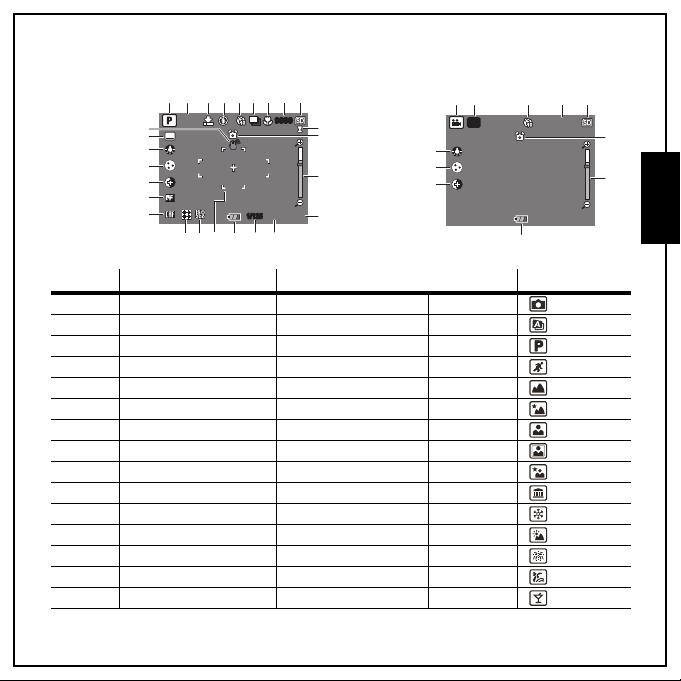
Capture/Video Mode Display
Capture Mode
123456 9
12M
26
25
24
23
22
21
20
No. Name Scene Icon
1 Scene indicator Auto
1/125
1/125
99999999
141516171819
87
10
11
12
13
-1.0EVF5.2
Auto Scene
P-Mode
Spor t
Landscape
Night Landscape
Portrait
Self-Portrait
Night Portrait
Museum
Snow
Sunset
Fireworks
Beach
Party
Video Mode
12 5 9
640
24
23
22
8
00:00:00
00:00:00
16
Camera Buttons
11
12
English
Page 22

11 Introduction
English
2 Image Resolution 12M
3 Image Quality
4Flash
Foliage
Aquarium
Kids & Pets
Copy
Backlight
Frame Composite
Audio
Video
10M
8.9M 3:2
8M
5M
3M
2.1M 16:9
2M
VGA
Best
Better
Good
Auto Flash
Flash Off
Fill Flash
Red-eye Reduction
Camera Buttons
Page 23

Introduction 12
5
6 AEB AEB OFF
7 Macro indicator Macro Mode
8 Image Counter
9 Memory Interface
10 Date Stamp -
11 Anti-shake -
12 Zoom Bar -
13 EV Compensation - -2.0EV ~ +2.0EV
14 Aperture Value 15 Shutter Speed - 1/2000~2 sec.
16 Battery Indicator
17 AF Frame - -
Self-timer/
Burst mode
Self Timer
Burst Mode
M-Burst
Capture Mode Quantity 9999
Video Mode Time 00:00:00
SD Card
Internal Memory
Battery Full
Battery Medium
Battery Low
Battery Insufficient
10 Seconds
2 Seconds
Blinking
Camera Buttons
English
Page 24

13 Introduction
English
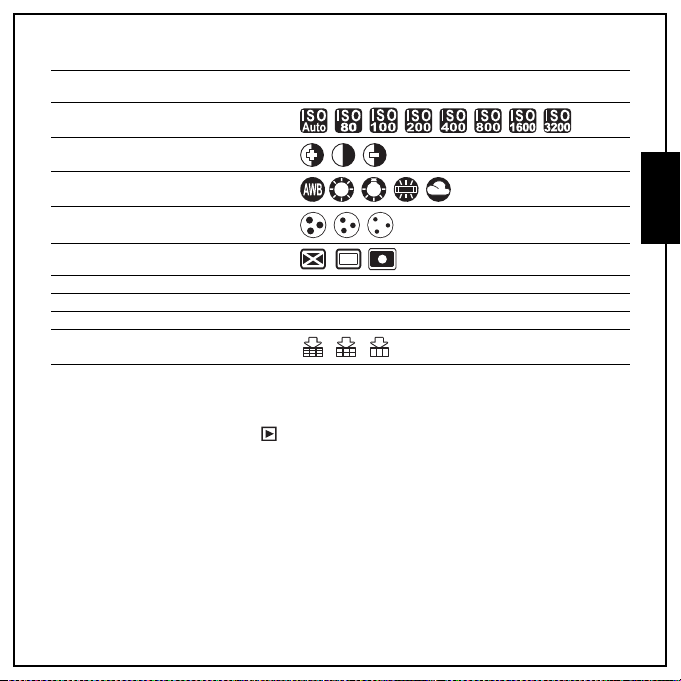
18 ISO Speed
19 Focus Zone
20 Sharpness
21 Contrast
22 Saturation
Auto
ISO 80
ISO 100
ISO 200
ISO 400
ISO 800
ISO 1600
ISO 3200
Multi-Zone
Center
Selected Area
High
Normal
Low
High
Normal
Low
High
Normal
Low
Camera Buttons
Page 25

23 White Balance
24 AE Metering
25 Camera Steady Warning -
Auto
Sunny
Tungsten
Fluorescent
Cloudy
Matrix
Center Weighted
Spot
Introduction 14
English
Camera Buttons
Page 26

15 Camera Setup
Camera Setup
Attaching the Wrist Strap
Follow these instructions to attach the wrist strap to your camera to facilitate easy carrying:
English
1. Insert the short loop of the strap in the strap eyelet.
2. String the larger loop of the strap through the short loop and pull tight to
attach the strap to the camera.
Inserting the Battery
Follow these instructions to insert one Li-ion battery into the battery compartment.
1. Open the battery compartment on the left of
the camera.
2. Insert the battery into the compartment
observing the correct polarity.
3. Close the battery compartment.
Note:
The Li-ion battery should be fully charged before using for the first time.
Attaching the Wrist Strap
Page 27

Camera Setup 16
Inserting an SD/SDHC Memory Card
The camera features 10 MB internal flash memory but you may also use an optional SD/SDHC memory
card for additional storage.
Follow these instructions to insert the SD/SDHC card.
1. Open the battery compartment on the left of
the camera.
2. Insert the SD/SDHC card into the memory
card slot as shown.
3. Close the battery compartment.
To remove the SD/SDHC card, gently push the card until it pops out. Pull out
the card carefully.
Note:
1. Please don't take in and out the SD card while camera is processing. It will make unexpected error or image
damaged.
2. Format memory cards via CAMERA before first use, and be sure t o reformat all memory cards after using them in a
computer or other device. For more information on formatting memory card s, see page 46.
English
Inserting an SD/S DHC Memory Card
Page 28
17 Camera Setup
3X OPTICA
L
ZOOM
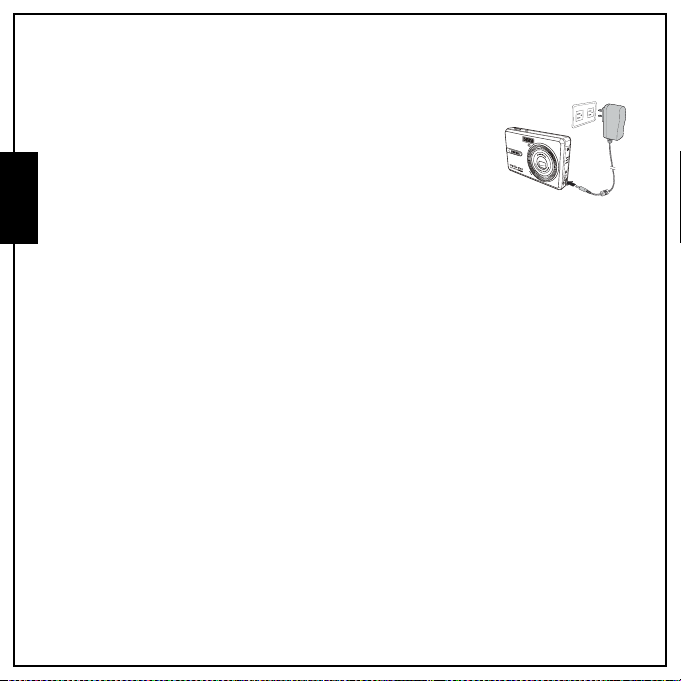
Charging the Battery
1. Insert the battery into the camera and connect the power adapter to
the DC-in port as shown in the picture.
2. Connect the power adapter to a live household outlet to start
English
charging. The power LED will blink during the charging process.
3. Disconnect the power adapter when the charging is done.
4. When the charging is done, Power LED turns off.
Charging the battery with USB power
1. Turn the power off and connect the USB cable with the camera and the computer.
2. The power LED will flicker during the charging process.
3. The power LED will turn off automatically when the charging is done.
Tur ni ng O n
Press and hold the Power button to turn on the camera. To turn off the camera, press the Power
button again.
Charging the Battery
Page 29
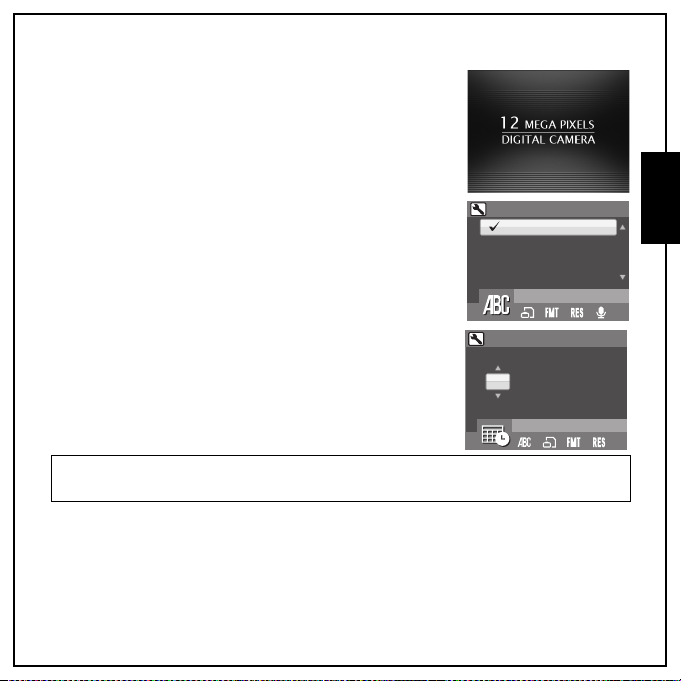
First Time Use
Press the Power button as described above, a welcome screen
displays momentarily on the LCD screen.
If the camera is turned on for the first time, the Language menu
pops up automatically after powering on the camera. Press the OK
button and select the desired language by Up/Down navigation
buttons,then press the OK button to confirm.
Camera Setup 18
ENGLISH
DEUTSCH
FRAN
ç
AIS
ITALIANO
LANGUAGE
English
After the desired language is selected, the Date and Time menu
pops up. Press the OK button. Select each field and adjust the value
using the navigation buttons. Press the OK button to confirm.
Note:
If the Date and Time is reset (when the battery die or is removed and the camera is not used for a long period), the Date
and Time setup screen displays automatically.
Press OK when done
(Year)
/ 09 / 01 12 : 00
2009
DATE & TIME
First Time Use
Page 30
19 Getting Started
Getting Started
Now that you are familiar with the layout of your camera, you are ready to start taking photos, movies
English
or recording sounds.
Taking Photos
Taking a photo with the camera is very simple.
Turn the camera on and press the SCENE button to access the Auto mode.
1. Frame the shot on the LCD screen and press the Shutter button halfway. The camera
automatically adjusts the focus and exposure. The AF Frame turns green when ready.
2. Press fully and hold the Shutter button to capture the image.
When a camera steady warning icon appears, hold the camera as still as possible, as a longer
exposure time is required.
Anti-shake Function
This function is available in Auto capture mode. Press the OK
button to enable the Anti-shake function, and press again to disable it.
An Anti-shake icon displays on the LCD screen when the function is
activated.
Taking Photos
Page 31

Getting Started 20
Using Macro Mode
Macro mode is designed for close-up photography and can capture all detail even when your subject is
very close to the camera. Press the Left/Macro navigation button. The Macro icon displays on
the LCD screen.
Note:
The camera supports seamless AF in Auto/ P-Mode/ Foliage with which a greater focus range is achieved without
selecting the focus mode manually.
1.In Auto/ P-Mode/ Foliage with Macro mode setting:AF scans objects from 70cm to the lens' closest focus distance
(wide:10cm, Tele:35cm). After completing this Macro scan, if no object is focused in Macro range, then AF will extend
to perform the normal scan.
2.In Auto/ P-Mode/ Foliage with no Macro mode setting:AF scans objects from infinity to normal range(0.6m) first. If
AF can't adjust focus in the first stage, then continues to scan from normal range to the closest focus distance (Macro
mode).
The benefit of seamless AF is that focus point is determined automatically for objects in a greater range. Note that,
however, due to scanning the wider range, longer scanning time may be required.
Setting the Flash Mode
You can choose from four flash modes to suit various lighting conditions.
Press the Up/Flash /Delete navigation button to scroll through the four modes on the LCD
screen. The flash setting remains the same for subsequent photos until you change it as described
above.
Auto flash: The flash fires automatically when needed.
Flash off: The flash is turned off.
Fill flash: The flash always fires.
Red-eye Reduction: The flash fires twice so as to reduce the red-eye effect.
English
Taking Photos
Page 32

21 Getting Started
Using the Zoom in/out Function
The camera comes equipped with 3x optical zoom and 5x digital zoom that allows you to zoom in on
your subject.
English
To use the zoom:
1. Press the right side of the Zoom button T to zoom in on your subject.
2. Press the left side of the Zoom button W to zoom out from your subject.
Using the Self-timer and Burst Photography
The camera comes equipped with a self-timer which allows you to take photos after a pre-defined delay.
The burst photography feature allows you to take multiple consecutive photos by pressing and holding
the Shutter button. The multi-burst photography feature allows you to take multiple (16) consecutive
VGA photos by pressing the Shutter button once.
To set the self-timer/burst mode:
1. Press the Right/Self-timer /Burst mode navigation button to cycle through the
selftimer( or ) and burst photography options ( or ) on the LCD screen.
2. Once you have selected an option, frame and take your shot. In self-timer mode, the icon will
flash until the time expires and the photo is taken.
3. After taking a photo, the Self-timer automatically switches off. If you want to use these functions
for the next photo, press the Right/Self-timer /Burst mode navigation button again to
activate the function.
Note:
: Burst Mode
Take photos until shutter is released.
: Multi-Burst Mode
16 photos continuously by pressing the shutter button once.
Taking Photos
Page 33

Getting Started 22
Using the AEB (Auto Exposure Bracketing) Function
When using the AEB (Auto Exposure Bracketing) function, the camera auto-matically takes 3
consecutive photos with different exposures by pressing the Shutter button once. For example, when
the current EV compensation value is +1.0 EV and the AEB bracket interval value is set to ±0.3, the
camera takes shots of the same scene with 3 varying levels of exposure: +0.7 EV, +1.0 EV, and +1.3 EV.
This function is only available in Auto, Auto Scene and P-Mode modes. To set the AEB mode:
1. Press the MENU button to display menu options.
2. Press the Left/Right navigation buttons to select AEB setting.
3. Press the Up/Down navigation buttons to select from the
available options:
• AEB: Select to enable (ON) or disable (OFF) the AEB
function.
• BRACKET: Select to set the bracket interval value ranging
from ±0.3 to ±2.0 EV in 0.3 or 0.4 EV increments.
• EXIT: Select to apply new settings to the camera and return to
the setup menu.
Note:
1. When taking AEB shots, hold the camera steadily. For the best result, use the tripod.
2. Flash, Burst, and M-Burst modes are not allowed when the AEB function is enabled.
AEB
BRACKET
EXIT
AEB
ON
0.3EV
English
Taking Photos
Page 34

23 Getting Started
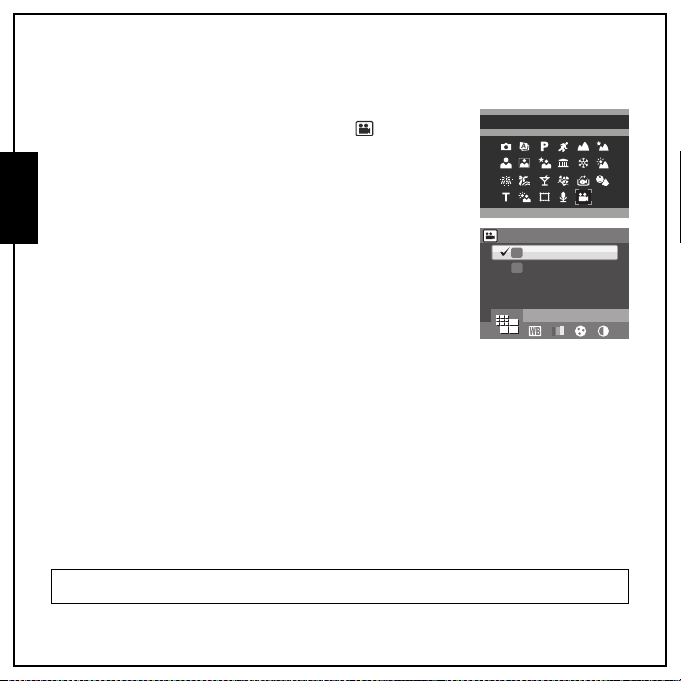
Setting the Scene Mode
The camera supports various preset modes for shooting in different
environments and conditions. Each setting is configured automatically
by the camera.
English
To select scene modes:
Press the SCENE button to access the Scene menu which displays the
Scene menu options.
1. Use the Left/Right/Up/Down navigation buttons to scroll
through the modes.
P-Mode
• Auto
• Auto Scene
• P-Mode
• Sport
• Landscape
• Night Landscape
• Portrait
• Self portrait
• Night Portrait
• Museum
• Snow
• Sunset
2. Press OK to confirm your selection.
Taking Photos
• Fireworks
• Beach
• Party
• Foliage
• Aquarium
• Kids & Pets
• Copy
• Backlight
• Frame composite
• Audio
• Video
Page 35

Getting Started 24
F2.9
Face and Smile Detection AF/AE Function
The face ( ) and smile ( ) detection functions can be set on and off
with each press of the Down/Screen navigation button in the
following capture modes:Auto, P-Mode, Portrait, Self portrait, Night
Portrait, Museum, Snow, Sunset, Beach, Party, Kids & Pets, Backlight.
When the subject’s face/ smile is detected, the white focus frame
appears to track faces/smiles while the camera or people are moving.
When the Shutter button is pressed halfway, the green focus frames
appear on the LCD screen. Then the camera automatically adjusts the focus point and exposure to the
optimized value. Press the Shutter button all the way to take pictures with detected face. When a
detected face smiles, the shutter automatically fires.
However, when the camera fails to detect your subject’s face, a white focus frame will be displayed
according to the selected focus mode.
To disable the face and smile detection function, press the Down/Screen navigation button again.
Recording Videos
You can also record video clips with the camera.
To record a video clip:
1. Turn the camera on and press the SCENE button. Use the 4-way navigation buttons to locate
Video mode. Press the OK button to select.
2. Frame your subject using the LCD screen and press the Shutter button to start recording.
3. Press the Shutter button again to stop recording.
4. In playback mode (Press the button), press the OK button to playback the video. Press the
Up/Flash /Delete navigation button to delete the recording if needed.
1/125 F2.91/125
F2.9
English
Recording Videos
Page 36

25 Getting Started
Recording Audio Files
You can also record audio files with the camera.
To record an audio file:
English
1. Press the SCENE button and select the Audio mode with 4-way navigation buttons, then press
the OK button to confirm.
2. Press the Shutter button to start recording. A counting up timer will be displayed during audio
recording.
3. Press the Shutter button again to stop recording, and ready to the next audio recording.
4. In playback mode (press the button), press the OK button to playback the audio. Press the Up/
Flash /Delete navigation button to delete the recording if needed.
Recording Voice Memos
The voice memo should be activated (ON) on the VOICE MEMO submenu of SETUP menu at first.
In Capture mode:
You can add voice memo for maximum 20 seconds to the image right after it’s taken.
1. Hold the Shutter button to start recording and release the Shutter button to stop recording.
2. While recording, the captured image and the elapsed time are shown on the LCD screen.
3. For the playback, press the button, and the playback of the voice memo automatically starts.
4. Press the OK button once for playback again.
In Playback mode:
1. Press the Shutter button to start recording and press again to stop recording.
2. While recording, the selected image and the elapsed time are shown on the LCD screen.
3. The playback of the voice memo automatically starts.
4. Press the OK button once for playback again.
Recording Audio Files
Page 37

Capture Settings 26
Capture Settings
This section describes the various settings you can modify to get better results when taking photos and
video clips.
The Capture Menu
To access the Capture menu:
1. Press the SCENE button. Use the 4-way navigation buttons to select the capture mode you need.
2. Press the MENU button to display menu options and use the
Left/Right navigation buttons to select the function you need,
then press the OK button to enter the selection function.
3. Press the Up/Down navigation buttons to highlight an option
and press the OK button to confirm.
Refer to the following sections for more detailed information about each
setting.
Note:
The displayed options in this section may vary according to t he mode selected.
12M
12M
10M
10M
8.9M 3:2
3:2
8M
8M
IMAGE RESOLUTION
12M
12M
10M
10M
8.9M 3:2
3:2
8M
8M
IMAGE RESOLUTION
Enter
OK
English
The Capture Menu
Page 38
27 Capture Settings
Image Resolution
The Image Resolution setting refers to the size of the image in pixels.
Use the Up/Down navigation buttons to select from the options. Nine
settings for image resolution are available:
English
• 12M (4000x3000)(default)
• 10M (3664x2748)
• 8.9M (3664x2442)
• 8M (3264x2448)
• 5M (2576x1932)
Image Quality
The Image Quality setting refers to the compression ratio of the JPG.
The higher image quality, more memory space is required. Use the Up/
Down navigation buttons to select from the options. Three settings for
image quality are available:
•BEST (default)
•BETTER
•GOOD
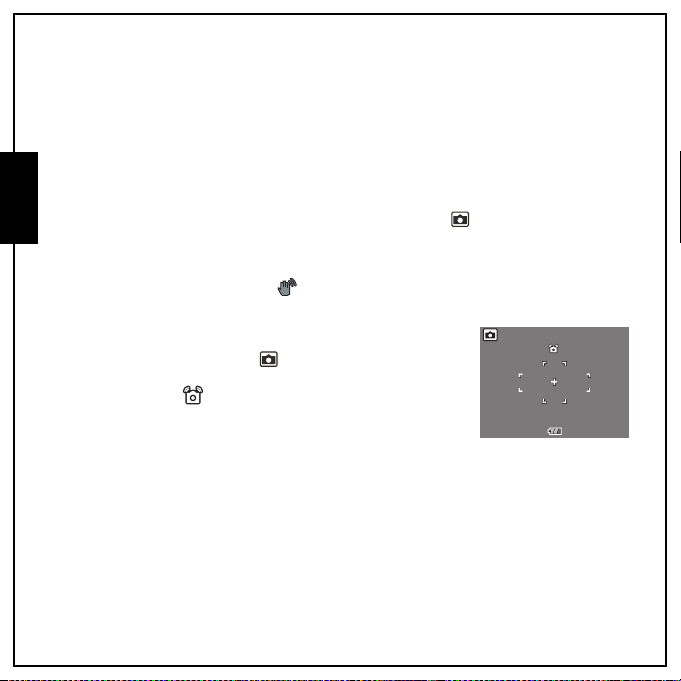
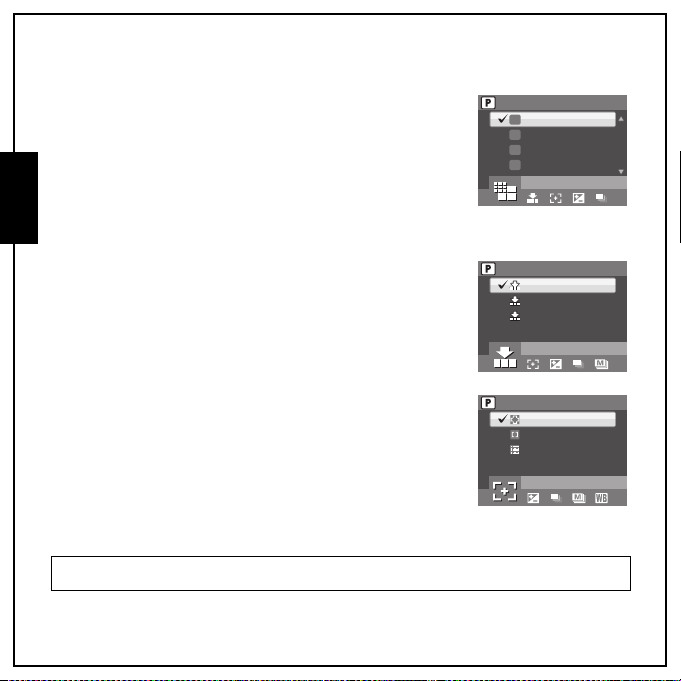
Focus Zone
The Focus Zone setting allows you to select the number of zones the
camera will focus on when taking a photo. Use the Up/Down navigation
buttons to select from the options. Three settings for focus zone are
available:
•MULTI-ZONE (default)
•CENTER
• SELECTED AREA: When this option is set, press the OK button to
enable AF area selection. The new setting is applied to the Live
View image each time navigation buttons are pressed. Press the
OK button to return to the capture mode and save the current
setting, which will take effect until it is changed again.
Note:
In Auto Mode, there is no “Selected Area” item.
• 3M (2048x1536)
• 2.1M (1920x1080)
• 2M (1600x1200)
• VGA (640x480)
12M
12M
10M
10M
8.9M 3:2
3:2
8M
8M
IMAGE RESOLUTION
BEST
BETTER
GOOD
IMAGE QUALITY
MULTI-ZONE
CENTER
SELECTED AREA
FOCUS ZONE
The Capture Menu
Page 39

EV Compensation
The EV Compensation menu allows you to adjust the exposure or
amount of light that enters the lens while capturing photos or videos.
Use this feature to take pictures that are intentionally overexposed or
underexposed.
Use the Up/Down navigation buttons to modify the value. To brighten,
select a positive (+) value. To darken, select a negative (-) value. This
setting can be modified from -2.0EV to +2.0EV in a 1/3EV increment/
decrement.
AEB
See “Using the AEB (Auto Exposure Bracketing) Function” on page 22 for more details.
M-Burst Interval
The M-Burst Interval setting allows you to adjust the burst interval
when the multi-burst function is enabled. Use the Up/Down navigation
buttons to select from the options. Three settings for M-Burst Interval
are avaliable:
• 1/30 SEC (default)
• 1/15 SEC
•1/7.5 SEC
White Balance
The White Balance setting allows you to adjust the camera setting
according to the ambient white light when shooting. White balance
represents the color temperature of the light. If the light has a yellowish
or reddish tinge, it is said to be warm; if it has a bluish tinge, it is said to
be cool. You can select the setting and preview it on screen before
confirming your choice. Use the Up/Down navigation buttons to select
from the options. Five white balance settings are available:
•AUTO (default)
•SUNNY
•TUNGSTEN
•FLUORESCENT
•CLOUDY
Capture Settings 28
+0.3EV
EV COMPENSATION
1/30 SEC
1/15 SEC
1/7.5 SEC
M-BURST INTERVAL
AUTO
SUNNY
TUNGSTEN
FLUORESCENT
WHITE BALANCE
English
The Capture Menu
Page 40
29 Capture Settings
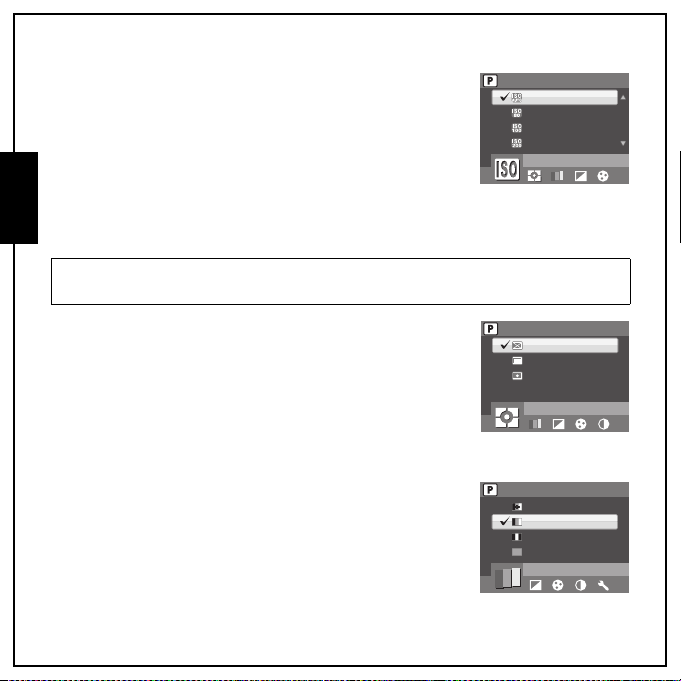
ISO Speed
The ISO Speed setting allows you to adjust the CCD light-sensitivity.
Use the Up/Down navigation buttons to select from the options. Eight
ISO settings are available:
•AUTO (default)
English
• ISO 80: For outdoor photography in bright sunlight.
• ISO 100: For outdoor photography in bright sunlight.
• ISO 200: For outdoor or indoor photography in bright light.
• ISO 400: For indoor photography or low light environments.
• ISO 800: For moving object photography or low light environments without using flash.
• ISO 1600: For moving object photography or low light environments without using flash.
• ISO 3200: For moving object photography or low light environments without using flash.
Note:
ISO 3200: Only capture at 3M image resolution when you select ISO 3200. If you wish to select larger image size, ISO will
go to default setting at Auto ISO. ISO 3200 will not support Burst, M-Burst and AEB function.
AE Metering
AE Metering allows you to select the area of the subject or frame that
the camera selects to measure light. Use the Up/Down navigation
buttons to select from the options. Three AE metering settings are
available:
• MATRIX (default): Camera metering is set for evaluating 16 zones
of objects with intelligent weighting in the frame.
• CENTER WEIGHTED: The metering puts more emphasis on the
center of the image while still looking at the entire scene.
• SPOT: Camera metering is set for the brightness of a single object in the center of the frame.
Color
The Color setting allows you to take photos and apply different colors or
color tones for an artistic effect. Use the Up/Down navigation buttons
to select from the options. Four color settings are available:
•Vivid
• Color (default)
The Capture Menu
•BLACK & WHITE
•SEPIA
AUTO
ISO 80
ISO 100
ISO 200
ISO SPEED
MATRIX
CENTER WEIGHTED
SPOT
AE METERING
VIVID
COLOR
BLACK & WHITE
SEPIA
COLOR
Page 41

Capture Settings 30
Sharpness
The Sharpness setting allows you to enhance the finer details of your
photos. Use a higher setting for very sharp photos and a lower setting
for a soft-toned photo. Use the Up/Down navigation buttons to select
from the options. Three sharpness settings are available:
•High
• Normal (default)
•LOW
Saturation
The Saturation setting allows you to adjust the saturation of the colors
in your photos. Use a high saturation setting for rich colors and a lower
saturation setting for more natural tones. Use the Up/Down navigation
buttons to select from the options.Three saturation settings are
available:
•High
• Normal (default)
•LOW
Contrast
The Contrast setting allows you to adjust the contrast of your photos.
Use the Up/Down navigation buttons to select from the options.Three
contrast settings are available:
•High
• Normal (default)
•LOW
Setup
See “The Setup Menu” on page 42 for more details on the setup menu options.
HIGH
NORMAL
LOW
SHARPNESS
HIGH
NORMAL
LOW
SATURATION
HIGH
NORMAL
LOW
CONTRAST
The Capture Menu
English
Page 42
31 Capture Settings
Video Capture Menu
To access the video menu:
1. Press the SCENE button and scroll to Video mode and press
English
the OK button to enable the Video function. Press again to enable
the Anti-shake function.
2. Press the MENU button to display the menu options.
3. Refer to the following sections for more detailed information
about each setting.
Video
Video Resolution
The Video Resolution setting allows you to adjust the resolution at
which your videos are recorded. 2 video size settings are available:
• 640X480(default)
• 320X240
White Balance
See “White Balance” on page 28 for more details on the setup menu
options.
Color
See “Color” on page 29 for more details on the setup menu options.
Saturation
See “Saturation” on page 30 for more details on the setup menu options.
Contrast
See “Contrast” on page 30 for more details on the setup menu options.
Setup
See “The Setup Menu” on page 42 for more details on the setup menu options.
Note:
The displayed options in the Capture Menu may vary according to the mode selected.
Video Capture Menu
640X480
640
320X240
320
VIDEO RESOLUTION
Page 43

Photo, Video & Audio Playback 32
2008/09/01
12M
2008/09/01
00:00:00
Photo, Video & Audio Playback
Playback Mode Display
Press the Down/Screen navigation button at Playback mode.
Photo Playback
Video Playback
1235648
12M
25
F2.9
24
1/125
23
-1.0EV
22
21
20
19
18
17
141516
123 5648
640
-1.0EV
22
20
19
18
1416
7
1/1401/140
IMGP0123.JPG
2008/01/01
2009/09/01
00:00:00
00:00:00
1213
7
2/302/3000:00:3700:00:37
IMGP0124.AVI
2009/09/01
00:00:00
00:00:00
1213
9
10
11
10
11
English
Playback Mode Display
Page 44
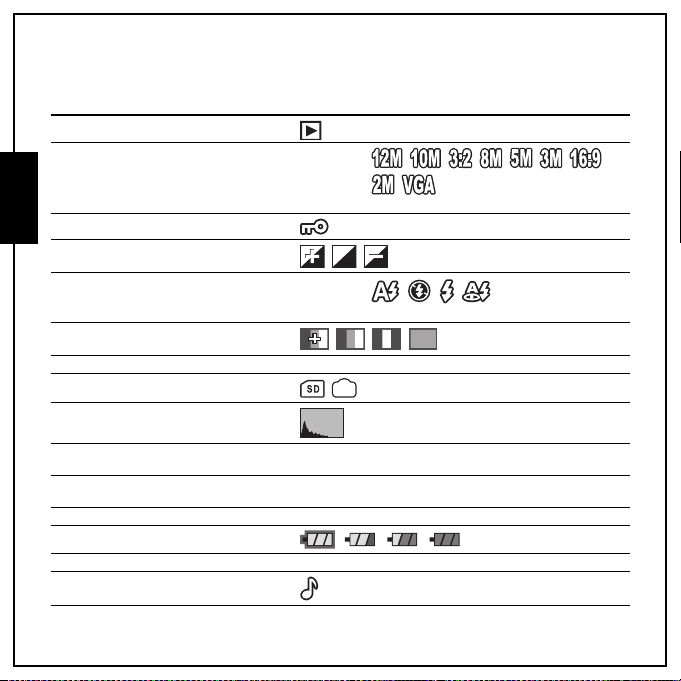
33 Photo, Video & Audio Playback
No. Name Icon
1 Playback mode
2 Image resolution
English
3Protect
4 Sharpness
5Flash mode
6 Color mode
7 File x of y number of files x/y
8 SD card / Internal memory
9 Histogram
Photo mode:
Video mode: 640 (640x480), 320 (320x240)
Photo mode:
Video mode: 00:00:00 (Length of the video clip.)
10 File Name Photo mode: IMGP0123.JPG
11 Date and Time 2009/09/01
12 Next Move to next item.
13 Battery status
14 Previous Move to previous item.
15 Voice memo
Playback Mode Display
Video mode: IMGP0124.AVI
00:00:00
Page 45
Photo, Video & Audio Playback 34
16 Mode icons Please see “Capture/Video Mode Display” on page 10 for
17 ISO Speed
18 Contrast
19 White balance
20 Saturation
21 AE Metering
22 EV Compensation -2.0EV ~ +2.0EV
23 Shutter speed 1/2000 sec. ~ 2 sec.
24 Aperture value
25 Image quality
detailed information.
Viewing Photos / Videos on the LCD Screen
To view your photos and video files on the LCD screen:
1. Press the Playback button . The most recent photo or video clip is displayed.
2. Use the Left/Right navigation buttons to scroll through photos and video clips.
3. Press the OK button to begin playback of a video clip.
4. Press the Left/Right navigation buttons at any time during playback to skip to the previous/next
photo or video.
5. Press the OK button then press the Left/Right navigation buttons to fast-rewind/fast-forward
during video playback.
6. Press the OK button at any time during playback to pause the video.
7. After the video clip finishes playing, the LCD screen displays the first frame of the clip.
Viewing Photos / Videos on the LCD Screen
English
Page 46

35 Photo, Video & Audio Playback
Viewing M-Burst Photos
To view your multi-burst photos on the LCD screen:
1. Press the Playback button . The most recent photo or video clip is displayed.
English
2. Use the Left/Right navigation buttons to scroll through photos.
3. When reviewing a multi-burst image, it will be displayed from the 1st frame to the 16th frame at 2
frames per second like a slideshow.
4. To stop the M-Burst slideshow, press the Left/Right navigation buttons and skip to the previous/
next image.
Listening to Audio Files
To listen to audio files:
1. Press the Playback button . The most recent photo or video clip is displayed.
2. Use the Left/Right navigation buttons to scroll through the files.
3. Press the OK button to begin playback of an audio file.
4. Press the Left/Right navigation buttons at any time during playback to skip to the previous/next
audio file.
5. Press the OK button and press the Left/Right navigation buttons to fast-rewind/fast-forward
during audio playback.
6. Press the OK button at any time during playback to pause.
Listening to Voice Memo
A voice memo plays simultaneously when playing a saved image with voice memo.
To stop a voice memo while reviewing an image, press the OK button.
To skip to previous/next image, press the Left/Right navigation buttons.
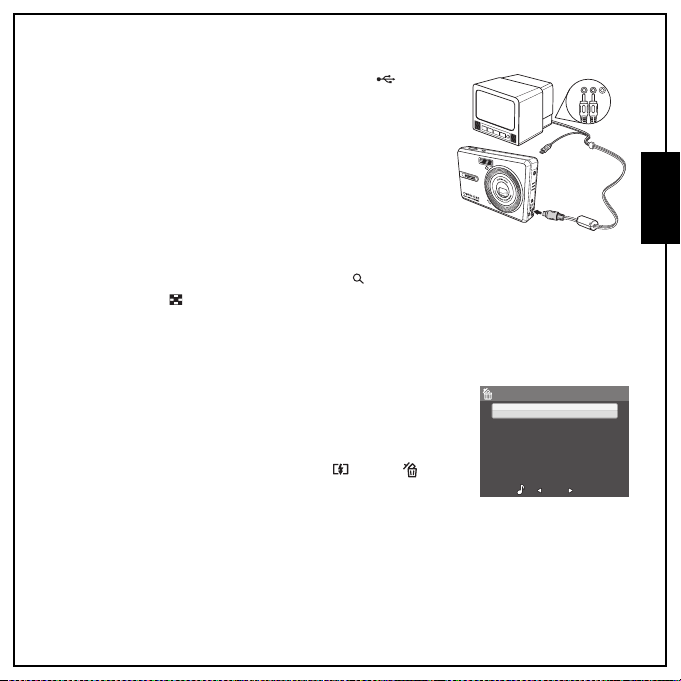
Viewing Photos/Videos on your TV
To view images stored on the camera on your TV, you must connect via the USB/AV port on the
side of the camera. To connect your camera to a TV:
1. Turn on the camera and make sure that the camera’s video out format is set to the same as that
of the TV. See “Video Out” on page 44 for more information.
Viewing Photos/Videos on your TV
Page 47
Photo, Video & Audio Playback 36
Audio
Video
2. Connect the USB/AV 3-in-1 cable to the USB/AV port on
the camera.
3. Connect the other end of the cable to the TV’s AV input
sockets.
4. The LCD screen turns black and all images and video clips are
displayed on the TV screen. Follow the same steps described
in “Viewing Photos / Videos on the LCD Screen” on page 34.
Zooming In/Out During Playback
The camera’s zoom feature can also be used during playback. This
allows you to view photos in greater detail.
To zoom in/out on saved photos:
1. Press on the right side of the Zoom button T to zoom in and on the left side of the Zoom
button W to zoom out of the photo.
2. Use the 4-way navigation buttons to pan across the image.
3. To crop an image, press the OK button, when zoomed in on a photo. The cropped image is saved
with a new name. When zoomed out to the minimum, the LCD screen will display all photos and
videos as a series of thumbnails.
Deleting Photos/Videos/Audios
The Delete function allows you to remove unwanted files stored on the
internal memory or on a memory card.
To delete a photo/video:
1. In Playback mode, press the Up/Flash /Delete
navigation button to display the Delete menu.
2. Press the Up/Down navigation buttons and the OK button to
select from the four available options:
• CANCEL: Select to cancel the action and exit to the main menu.
• VOICE MEMO (only available for images with voice memos attached): Select to delete the
voice memo.
• THIS IMAGE/VIDEO/AUDIO: Select to delete the current image/video/audio.
• ALL IMAGES: Select to delete all files.
DELETE
CANCEL
VOICE MEMO
THIS IMAGE
ALL IMAGES
English
Zooming In/Out During Playback
Page 48

37 Photo, Video & Audio Playback
12M
12M
Using the Playback Menu
Access the playback menu to view further information, configure printing
settings, view a slideshow, or delete photos or movies.
English
To access the playback menu:
1. Press the Playback button .
2. Press the MENU button to display the menu options. Use the
Left/Right navigation to select the function from the menu, and
press the OK button to enter.
3. Use the Up/Down navigation buttons to highlight an option and
press the OK button to confirm.
DPOF
DPOF (Digital Print Order Format) allows you to specify the number of copies of a certain image that
you want to print at a later date.
Use this function to tag pictures stored in your memory card with print information. You can tag all
pictures to be printed or just the current picture. You can also select how many copies to print.
To s et DP OF:
1. Press the MENU button to select DPOF from the menu in the
playback mode, then press the OK button to enter the DPOF
function.
2. Press the Up/Down navigation buttons and the OK button to
select from the available options:
• THIS IMAGE: Select to print the current image.
• ALL IMAGES: Select to print all images.
• EXIT: Select to exit to the main menu.
3. Use the Up/Down navigation buttons to set the number of copies
you wish to print.
12M
THIS IMAGE
ALL IMAGES
EXIT
DPOF
12M
THIS IMAGE
ALL IMAGES
EXIT
DPOF
Number of copies
88
1/1401/140
1/1401/140
Using the Playback Menu
Page 49

Photo, Video & Audio Playback 38
12M
12M
Slideshow
The Slideshow function allows you to view all stored photos in a
continuous sequence.
To view a slideshow:
1. Press the MENU button to select SLIDESHOW from the menu,
then press the OK button to enter the Slideshow function.
2. Press the Up/Down navigation buttons and the OK button to
select from the available options:
• START: Select to start the slideshow.
• INTERVAL: Select to set the interval time between each
photo during the slideshow. Use the Left/Right navigation buttons to set a value in
seconds. The default setting is 5 seconds.
• LOOP: Select to enable/disable a continuous loop of the slideshow. Select ON or OFF
(default) from the submenu.
• EXIT: Select to exit to the main menu.
12M
START
INTERVAL
LOOP
EXIT
SLIDESHOW
Resize
The Resize function allows you to change the image resolution.
To resize a photo:
1. Press the MENU button to select RESIZE from the menu, then
press the OK button to enter the Resize function.
2. Press the Up/Down navigation buttons and the OK button to
select the resize ratio you require: 6M, 4M, 2M, 1M, VGA and EXIT.
3. Select EXIT to return to the main menu.
Note:
It is only possible to scale-down image resolutions. If the curre nt image resolution is VGA, this menu item is disabled in
the Resize submenu. The ratio of the image (3:2 or 16:9) remains unchanged after resizing.
• This function only supports pictures taken with this camera
• Cropped images cannot be resized
• If there is not sufficient storage space, images cannot be resized
• If the SD/SDHC card is locked, images cannot be resized
• VGA images cannot be resized
12M
6 M
4 M
2 M
1 M
RESIZE
1/1401/140
5 SEC
OFF
1/1401/140
English
Using the Playback Menu
Page 50

39 Photo, Video & Audio Playback
1/140
12M
1/140
12M
Rotate
The Rotate function allows you to change the orientation of a saved
photo.
To rotate an image:
English
1. Press the MENU button to select ROTATE from the menu. Press
the OK button to enter.
2. Press Left/Right navigation button to rotate the selected image.
3. Use the Up/Down navigation buttons to select OK or .
• OK: Confirm the selection and save the image.
• : Select to discard the changes and return to the main
menu.
4. Press the OK button to confirm the one you needed.
Protect
You can lock a photo or video to protect it from being accidentally
erased. To lock a photo or video:
1. Press the MENU button to select PROTECT from the menu and press the OK button to enter.
2. Use the Up/Down navigation buttons to select Lock or EXIT, then press the OK button to
confirm the one you needed.
3. Lock icon displays at the top of the screen to indicate the photo/video is now locked.
4. To unlock a photo or video, perform the steps 1 and 2 again.
12M
1/140
1/140
12M
1/140
1/140
OK
Using the Playback Menu
Page 51

Photo, Video & Audio Playback 40
1/3
12M
1/140
00:00:37
640
00:00:37
Move
The Move function allows you to move images stored in internal
memory to a memory card.
To move an image:
1. Press the MENU button to select MOVE from the menu.
2. Press the Up/Down navigation buttons and the OK button to
select from the three available options:
• THIS IMAGE: Select to move the current image to a
memory card.
• ALL IMAGES: Select to move all images to a memory card.
• EXIT: Select to exit to the main menu.
Note:
The Move function is only available when you choose intern al memory as the storage media and an SD card has been
inserted into the camera.
12M
THIS IMAGE
ALL IMAGES
EXIT
MOVE
Divide
The Divide function allows you to cut unnecessary portions of a video.
This feature is useful when the memory capacity is insufficient or when
users want to trim video clips.
To divide a video:
1. Press the MENU button to select DIVIDE from the menu.
2. Press the OK button to enter the edit mode.
3. Use the Up/Down navigation buttons to select the portion of the
video you want to delet e.
• Beginning of the new video clip
• End of the new video clip
4. Press and hold the Left/Right navigation buttons to specify the
beginning and end position of the new video clip and release at
the frame you want to stop.
640
Press OK to enter
DIVIDE
00:00:37
00:00:37
00:00:37
00:00:37
1/140
1/140
1/3
1/3
English
Using the Playback Menu
Page 52
41 Photo, Video & Audio Playback
ON / OFF
3X OPTICAL
ZOOM
5. Press the Up/Down navigation buttons and the OK button to
select from the following options:
• Select to review the trimmed video clip.
English
• Select to save the trimmed video clip as a new file or
overwrite the original video. Select EXIT to discard
the changes.
• Select to return to the main menu.
Note:
The Divide function is only available when a video file is selected. Video clips shorter than one secon d cannot be edited.
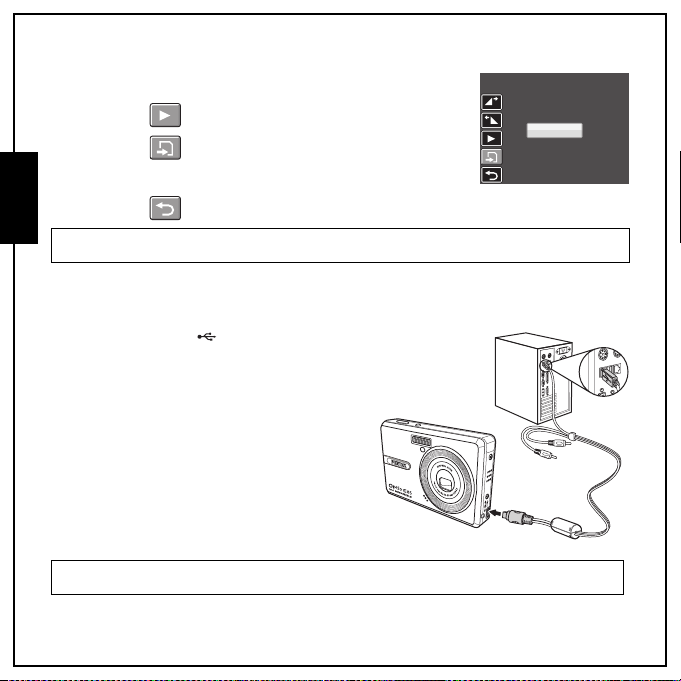
Transferring Photos/Videos to your PC
To transfer photos and videos to your PC, follow the on-screen instructions to complete the installation:
Connect the camera’s port to a free USB port on
your PC using the USB cable.
The camera’s internal memory and/or SD/SDHC card
appear as removable drives in the file manager. Copy
the files from the drives to the directory on your PC.
Use ArcSoft PhotoImpression and ArcSoft
VideoImpression (provided on the software CD) to
view or edit the photos and videos respectively.
Note:
The USB mode is only available in MSDC.
NEW FILE
OVERWRITE
EXIT
Transferring Photos/Videos to your PC
Page 53

Camera Settings
The Setup Menu
The setup menu, available in capture and playback modes, allows you to
configure the camera’s general settings according to your preferences.
To access the setup menu:
1. Press the MENU button when in Playback or any of the capture
modes.
2. Select SETUP from the menu. Press the OK button to enter, then
the submenu appears.
3. Use the Left/Right navigation buttons to scroll through the
options and press the OK button to enter further submenus and to
confirm your selection. Refer to the following sections for more detailed information about each
setting.
LCD Brightness
The LCD Brightness setting allows you to brighten or darken the LCD
backlight. Press the OK button to enter. Use the Left/ Right navigation
buttons to increase or decrease the brightness.
Camera Settings 42
Enter
OK
Press OK to enter
SETUP
LCD BRIGHTNESS
English
File Number
The File No. setting allows you to reset the file number to 0001 when
the camera creates a new folder. Otherwise, the next file number will be
used. Select RESET to reset or CONTINUE to set the file numbers in
continuous order.
RESET
CONTINUE
FILE NO.
The Setup Menu
Page 54

43 Camera Settings
Digital Zoom
The Digital Zoom setting allows you to turn the digital zoom function
on or off. Press the OK button to confirm. Select ON to enable the
function or OFF (default) to disable it.
English
Quick View
The Quick View setting allows you to view the photo that you have just
taken. Once you have taken your photo, it displays on the LCD screen. If
you are not satisfied with the result, you can press the button to
delete the photo immediately. Press the OK bu tton t o conf irm. S elect ON
(default) to enable the function or OFF to disable it.
Note:
The Quick View function is not available in Burst and M-Burst modes.
Camera Sound
The Camera Sound setting allows you to adjust the camera sound
level. You can also set the start-up and shutter sound when you turn on
the camera and press the Shutter button. Available options are as
follows:
• VOLUME: Off, Low, Normal (default) , High
• START-UP: Sound 1 (default), Sound 2, Sound 3
• SHUTTER: Sound 1 (default), Sound 2, Sound 3
• EXIT: Select to exit to the main menu.
The Setup Menu
ON
OFF
DIGITAL ZOOM
ON
OFF
QUICK VIEW
START-UP
SHUTTER
EXIT
CAMERA SOUND
NORMALVOLUME
1
1
Page 55

Camera Settings 44
Power Saving
The Power Saving setting allows you to adjust the length of time that
the LCD screen will turn dim to save battery power. 4 options are available:
•OFF
• 15 SEC (default)
•30 SEC
•1 MIN
Auto Power Off
The Auto Power Off setting allows you to adjust the length of time
after which the camera will power down when inactive. Use the Up/
Down navigation buttons to select from the menu options. Two options
are available:
• 5 MIN (default)
•2 MIN
Video Out
The Video Out setting allows you to adjust the video output, depending
on the type of your TV. Use the Up/Down navigation buttons to select
from the menu options. Two options are available:
• NTSC (default)
•PAL
Date Stamp
The Date Stamp setting allows you to adjust the format in which the
date will appear on each photo or video. You can also deactivate this
function if you wish. Setting a date stamp allows for easy sorting and the
date will appear on the photo when printed. Press the OK button to
confirm. Use the Up/Down navigation buttons to select from the menu
options. Four options are available:
•OFF (default)
• YYYY MM DD: year-month-day format
• MM DD YYYY: month-day-year format
• DD MM YYYY: day-month-year format
OFF
15 SEC
30 SEC
1 MIN
POWER SAVING
5 MIN
2 MIN
AUTO POWER OFF
NTSC
PAL
VIDEO OUT
OFF
YYYY MM DD
MM DD YYYY
DD MM YYYY
DATE STAMP
The Setup Menu
English
Page 56

45 Camera Settings
Date & Time
English
Language
Image Storage
The Date & Time setting allows you to set or adjust the date and time
on your camera. To set or adjust the date and time:
Press the OK button to confirm.
• Press the Left/Right navigation buttons to select the Year
field.
• Press the Up/Down navigation buttons to adjust the Year
value.
• In the same way, select the Month, Day, Hour and Minute
fields and adjust them accordingly.
The Language setting allows you to choose which language the OSD
menu uses. Scroll down the list and select your language. Press the OK
button to confirm. Use the Up/Down navigation buttons to select from
the menu options.
The Image Storage setting allows you to specify where photos and
video clips will be stored. The camera features 10 MB internal memory
but you can also insert an SD/SDHC card (See “Inserting an SD/SDHC
Memory Card” on page 16 for more details). Two options are available:
• AUTO (default): When selected, the camera chooses the
storage medium automatically. If an SD/SDHC card is inserted
in the camera, all photos and videos are stored on the card. If
an external card is not detected, all photos and videos are
stored in the internal memory.
• INTERNAL MEMORY: All photos and videos are stored in the
internal memory.
Press OK when done
(Year)
/ 09 / 01 12 : 00
2009
DATE & TIME
ENGLISH
DEUTSCH
FRAN
ç
AIS
ITALIANO
LANGUAGE
AUTO
INTERNAL MEMORY
IMAGE STORAGE
The Setup Menu
Page 57
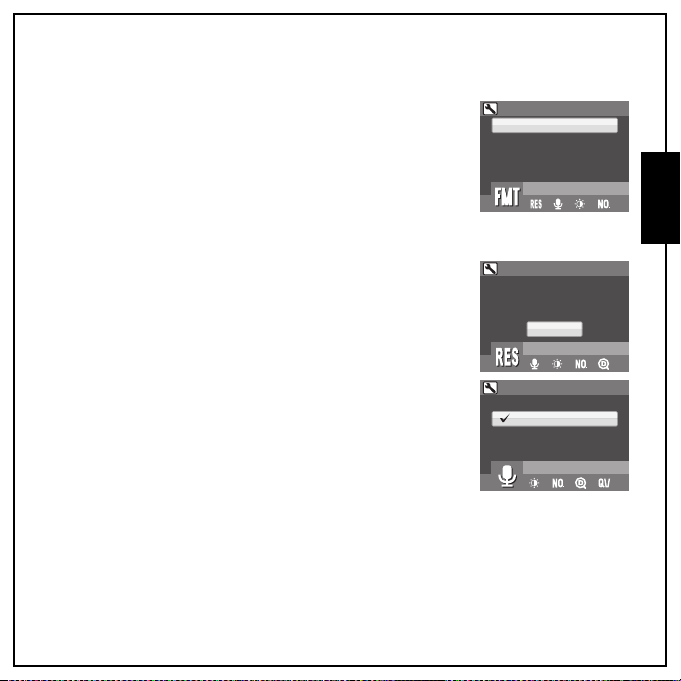
Format
The Format setting allows you to erase all data in the internal memory
or on the SD/SDHC card. Press the OK button to confirm. Use the Up/
Down navigation buttons to select from the menu options. Three
options are available:
• MEMORY CARD (default): All data on the SD/SDHC will be
formatted.
• INTERNAL MEMORY: All data in the internal memory will be
formatted.
• EXIT: Cancel format action.
Reset
The Reset setting allows you to reset the camera to the original factory
default settings except date&time, language, and video out format. This
means all modifications you have made to the camera settings will be
cleared.
Once selected, the reset screen displays a confirmation message. Press
the OK button to enter the selection function, select YES to proceed
with the Reset or EXIT (default) to cancel.
Voice Memo
The Voice Memo setting allows you to record a voice memo when a
photo is taken or in playback mode. Select ON to enable the Voice Memo
function or OFF (default) to disable it.
Camera Settings 46
MEMORY CARD
INTERNAL MEMORY
EXIT
FORMAT
Reset to camera
default setting?
YES
EXIT
RESET
ON
OFF
VOICE MEMO
English
The Setup Menu
Page 58

47 Specifications
Specifications
General Resolution / Image Type Approx. 12.1 M Pixels / 1/2.33 CCD
English
Optics Aperture Wide: F2.9, Tele: F5.2
Camera
Features
LCD 2.7”TFT, 230,000 Pixels
Dimensions Approx. 93(W) x 58(H) x 23.5(D)mm
Exterior Casing Plastic housing + Chromed plastic center frame
Optical Zoom Up to 3x
Digital Zoom Up to 5x
Focal Length f=5.7mm (W), 17.1mm (T), (f=32mm ~ 96mm, 35 mm
Photo Graphic Range Normal: 0.6 m ~ infinity
Shutter Speed 2 ~ 1/2000 Sec.
Viewfinder None
Auto Power Off / Time Out Yes
ISO Equivalent Auto, ISO80/100/200/400/800/1600/3200
External Memory Support SD/SDHC card from 32MB to 16GB
Flash Modes Auto, Off, Fill, Red-eye Reduction
Shooting Mode Auto, Auto Scene, P-Mode, Sport, Landscape, Night
Tripod Mount 1/4” Standard
Macro Yes
equivalent)
Macro: 10 ~ 70 cm (Wide), 35 ~ 70 cm (Tele)
Landscape: 0.1 m ~infinity
Support seamless AF in Auto/ P-Mode/ Foliage modes
Landscape, Portrait, Self-Portrait, Night Portrait, Museum,
Snow, Sunset, Fireworks, Beach, Party, Foliage, Aquarium,
Kids & Pets, Copy, Backlight, Frame composite, Audio,
Video
Page 59
Specifications 48
Image
Resolution
Capture
Features
Video Video Out PAL, NTSC
Image File Formats Still Image: JPEG (Exif2.2)
Image Quality Mode
Quality Levels Best, Better, Good
DPOF Version 1.1
Erase Protection Yes
Exposure Compensation Selectable +/-2.0 EV with 1/3 EV steps
Sharpness High, Normal, Low
Color Vivid, Color, Black&White, Sepia
AE Metering Matrix, Center Weighted, Spot
Focus Multi-Zone, Center, Selected area
Flash Range Wide: 0.6 ~ 3m, Tele: 0.6 ~ 1.8m
Anti-shake Yes, High ISO
Drive Mode Single Mode, Burst Mode, Multi-Burst (VGA@16 shots)
Quick Delete Yes
Quick View Yes
Self-timer 2 or 10 seconds
Playback Magnify Up to 6X (9 steps)
White Balance Auto, Sunny, Tungsten, Fluorescent, Cloudy
Speaker Mono
Movie File Format AVI (Motion JPEG with sound)
Movie Length Close to 80 min. Max. file size is 4G bytes
Microphone Mono
Audio Recording Wave format
Still Image: 4000x3000, 3664x2748,
Movie Mode: 640x480@30fps, 320x240@30fps
3664x2442, 3264x2448,
2576x1932, 2048x1536,
1920x1080, 1600x1200,
640x480
English
Page 60

49 Specifications
Power Battery D-LI95 Lithium-ion
Connectivity Camera Interface USB 2.0 (high speed)
Standards Operating Temperature 0°C ~ 38°C of room temperature
English
Battery Life CIPA 200 images
Host Platform Windows 2000/XP/Vista
Language English, German, French, Italian, Spanish, Portuguese,
Simplified Chinese, Traditional Chinese, Russian, Arabic,
Turkish, Japanese, Dutch, Czech, Polish, Hungarian,
Romanian, Slovakian, Greek, Bulgarian, Danish
Page 61

Troubleshooting 50
Troubleshooting
Problem Action
Camera does not turn on • The battery may be exhausted. Charge or replace the
Camera turns off automatically Press the Power button again to turn on the camera.
LCD turns off automatically Press any button to turn on the LCD when AUTO LCD Off
Empty battery icon is displayed on
the LCD then camera turns off
LCD screen displays ‘Card Requires
Formatting’
LCD screen displays ‘Card is Full’ Memory card is full. Replace the memory card with a new one
LCD screen displays ‘Card is Locked’ The card is protected by a protect switch mechanism. Move
Insufficient memory space to
complete request
No image displays on the TV screen Incorrect TV-out type was selected. Set correct TV-out type to
Insufficient space on the card Delete unnecessary images.
battery.
• The battery is installed incorrectly. Reinsert the battery
observing the correct polarity.
setting(30 SEC or 1 MIN) is activated.
Battery is exhausted. Charge or replace the battery.
Memory card format not recognized.
Reformat the memory card.
or delete unnecessary images from the existing card.
the switch to the unlock position.
Insufficient space in memory to rotate an image or divide a
video. Delete unnecessary images and videos.
match your TV system.
English
Page 62

51 Troubleshooting
Information for Users on Collection and Disposal of Old Equipment and Used Batteries
1. In the European Union
These symbols on the products, packaging and/or accompanying documents mean that used
English
electrical and electronic equipments and batteries should not be mixed with general household
waste.
Used electrical/electronic equipments and batteries must be treated separately and in accordance
with legislation that requires proper treatment, recovery and recycling of these products. Following
the implementation by member states, private households within the EU states may return their
used electrical/electronic equipments and batteries to designated collection facilities free of
charge*.
In some countries your local retailer may also take back your old product free of charge if you
purchase a similar new one. *Please contact your local authority for further details.
By disposing of this product correctly you will help ensure that the waste undergoes the necessary
treatment, recovery and recycling and thus prevent potential negative effects on the environment
and human health which could otherwise arise due to inappropriate waste handling.
2. In other countries outside the EU
These symbols are only valid in the European Union. If you wish to discard these items, please
contact your local authorities or dealer and ask for the correct method of disposal.
For Switzerland: Used electrical/electronic equipment can be returned free of charge to the dealer,
even when you don’t purchase a new product. Further collection facilities are listed on the home
page of www.swico.ch or www.sens.ch.
Note for the batteries symbol (bottom two symbol examples): This symbol might be used in combination with
a designation for the chemical element or compound in use. In this case you have to comply with the
requirement set by the Directive for the chemicals involved.
 Loading...