

Page 1

smc PENTAX-DA
INTERCHANGEABLE LENS
OPERATING MANUAL
Page 2

FOREWORD
Thank you for purchasing the smc PENTAX-DA lens.
This smc PENTAX-DA lens features a “Quick-Shift Focus System” that lets you finely
adjust the focus manually after the focus has been adjusted in addition to allowing
you to enjoy taking pictures using autofocus or manual focus by mounting on the
PENTAX -series digital SLR camera. For further information on the use of this
function, refer to p11.
smc PENTAX-DA lens can be used only with PENTAX -series SLR
cameras. It is not compatible with film SLR cameras.
Please read this operating manual carefully before using the lens to ensure that it is
used properly. In addition, also refer to your camera’s operating manual.
In this operating manual, “smc PENTAX-DA lens” is shortened to “DA lens.”
Illustrations shown herein may differ from the actual appearance.
Page 3

FOR SAFE USE OF YOUR LENS
Although we have carefully designed these lenses for safe operation, please pay special
attention to items marked with the following symbols when using this product.
1
WARNING This symbol indicates precautions that if not followed,
could result in serious injury to the user.
CAUTION This symbol indicates precautions that if not followed,
could result in minor or medium injury to the user or
damage to the equipment.
WARNING
• Never look at the sun through the lens or camera. Serious damage to the retina or
total loss of eyesight may occur.
CAUTION
• Do not leave the lens in direct sunlight without lens caps. Direct sunlight passing
through the lens will be intensified, and should it focus on flammable materials, fire
may occur.
Page 4

2
1. Storage and mildew prevention
•
Take the lens out of the protective case or camera bag, and store it in a dry, well-ventilated place.
•
Avoid storing the lens in a poorly ventilated location such as a closet, wardrobe, drawer, vehicle, or
where insect repellent or medicine is kept.
•
Avoid storing the lens in areas of high temperature and humidity, where there is a risk of mildew growth.
Store the lens with a desiccant in a dry cabinet, airtight container, or plastic bag. (Leaving a saturated
desiccant in the storage container can cause damage to the lens. Be sure to read the instructions that
come with the desiccant before use.)
2. The lens is not waterproof. When using the lens in a rain or mist, be careful not to allow it to get wet.
3. Never use any organic solvent such as thinner, alcohol, or benzine, etc. to remove dust on the lens.
4. The lens is a precise optical instrument. Be careful not to let it fall, or subject it to strong shocks or
pressure. Use a cushion or similar pad to protect the lens from the vibrations of motorcycles or other
vehicles, boats, etc.
5. Avoid subjecting the lens to rapid changes in temperature, otherwise condensation can occur on both
the inside and the outside of the lens. Put the lens in a plastic bag or camera bag, and take it out after
the lens has reached ambient temperature.
6. When the lens is not attached to the camera body, attach both the supplied lens cap and lens mount
cap to protect it from dust.
7. Do not leave the camera with the lens cap off attached to a tripod or other rigid camera support. The
inner parts of the camera can be damaged by direct sunlight.
8. Have the lens inspected by a dealer every one or two years to maintain its high performance.
PRECAUTIONS AND LENS MAINTENANCE
Page 5
CONTENTS
FOREWORD
°
FOR SAFE USE OF YOUR LENS ···························································································· 1
°
PRECAUTIONS AND LENS MAINTENANCE ········································································· 2
°
smc PENTAX-DA LENS ·········································································································· 4
°
• About the DA Lens Mount ····································································································· 5
MOUNTING AND REMOVING THE LENS ·············································································· 6
°
LENS CAP ······························································································································· 7
°
FOCUSING ······························································································································· 8
°
• Changing the Focus Mode ···································································································· 8
• Using Autofocus ···················································································································· 8
• Focusing with the OK Button ································································································ 9
• Using Manual Focus ············································································································ 10
• Using the Quick-Shift Focus System ( -series cameras only) ································· 11
• How to use the Quick-Shift Focus System ·········································································· 11
• Precautions on close-distance scale ··················································································· 13
ZOOM LENS··························································································································· 14
°
• About the zoom ring·············································································································15
ATTACHING THE LENS HOOD ····························································································· 16
°
• Screw-on Type ····················································································································· 16
• Bayonet Type ······················································································································· 16
• About the PL filter window ··································································································· 17
FILTERS ································································································································· 19
°
PRECAUTIONS WHEN USING THE LENS WITH A FLASH ················································· 21
°
• Built-in Flash ························································································································ 21
• External Flash ······················································································································ 21
• Compatibility of DA Lenses with the Built-in Flash ······························································ 23
MAIN SPECIFICATIONS ········································································································ 24
°
3
Page 6

4
Focusing ring
Distance scale
window
Depth-of-field scale
Mounting index
Lens hood
attaching index
Distance scale
Distance index
Depth-of-field scale
smc PENTAX-DA LENS
Note:
The DA lens does not have an aperture ring. Aperture settings are controlled
automatically as if set to the auto “A” position, so accessories without an auto “A”
setting cannot be used with this lens.
Page 7
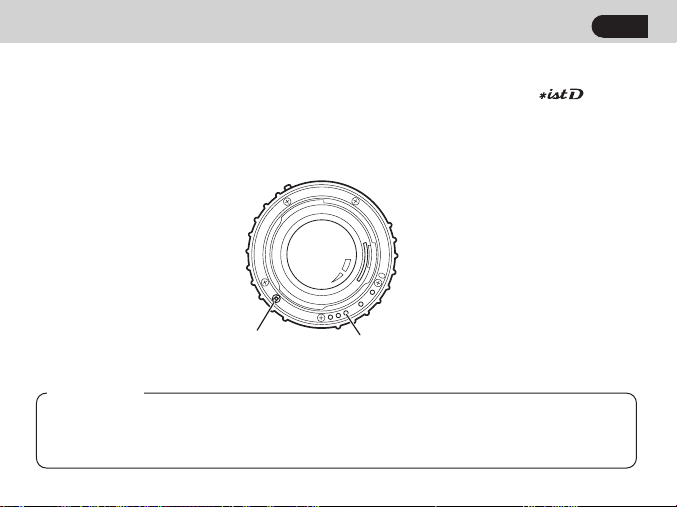
5
AF coupler
Lens-information
contacts
About the DA lens mount
The DA lens is an interchangeable lens specifically designed for the PENTAX - series
digital SLR camera.
The KAF -mount of the DA lens is similar to conventional SLR lenses, but the DA lens cannot
be used on 35 mm SLR cameras.
KAF-mount
CAUTION
Be careful not to damage or dirty the lens-information contacts and AF coupler
on the mount surfaces of the camera and lens. Otherwise, failure or
malfunction may result.
Page 8
6
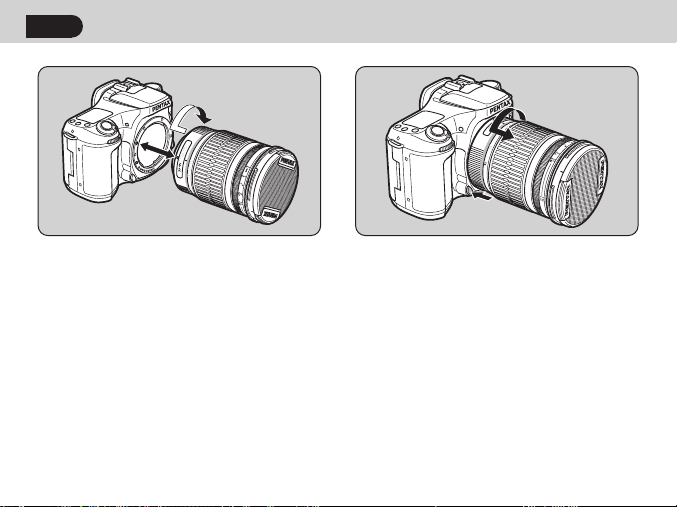
MOUNTING AND REMOVING THE LENS
1 2
1. To mount the lens on the camera body
Attach the lens while aligning the red dots on the lens and body, then turn the lens
clockwise until it clicks in place.
Memo:
✍
• Do not hold down the lens unlock button while mounting the lens, otherwise the lens will
not be properly mounted.
• After mounting the lens, gently turn the lens counterclockwise to make sure it is locked
in place.
2. To remove the lens
Hold down the lens unlock button on the camera body and turn the lens
counterclockwise.
Page 9

LENS CAP
22
1
1. Take off the lens cap by pressing the two tabs inward as shown above.
2. Attaching the dedicated lens cap to DA 40mm f/2.8 Limited
First screw the dedicated hood onto the front of the lens, then screw on the lens cap.
Memo:
✍
• When not using the lens, be sure to attach the lens cap.
• The lens cap for the DA FISH-EYE 10-17 mm f/3.5-4.5ED (IF) is mounted by fitting it
over the lens hood.
7
Page 10
8
FOCUSING
1
Changing the Focus Mode
Use the camera’s focus mode switch to change between the autofocus mode and manualfocus mode. For details, refer to your camera’s manual.
1. Using Autofocus
Set the camera’s focus mode to autofocus. Press the shutter button halfway to
autofocus.
With the camera, you can also press the AF button to autofocus.
Page 11

9
Focusing with the OK Button
With the
pressing the shutter button halfway will be disabled and the OK button can be used instead
to autofocus.
shooting”.
✍
• For details on the setting procedure, refer to the camera’s instruction manual.
//
Memo:
,
CAUTION
During autofocusing, the focusing ring of following lenses will rotate.
• To prevent malfunction, do not touch the focusing ring during autofocusing.
- DA FISH-EYE 10-17mm f/3.5-4.5ED (IF) - DA 12-24mm f/4ED AL (IF)
- DA 16-45mm f/4ED AL - DA 18-55mm f/3.5-5.6 AL
- DA 50-200mm f/4-5.6ED - DA 40mm f/2.8 Limited
or camera set as explained below, autofocusing by
: On the C Custom menu, select “Enable AF” for “OK btn when
Page 12

10
2
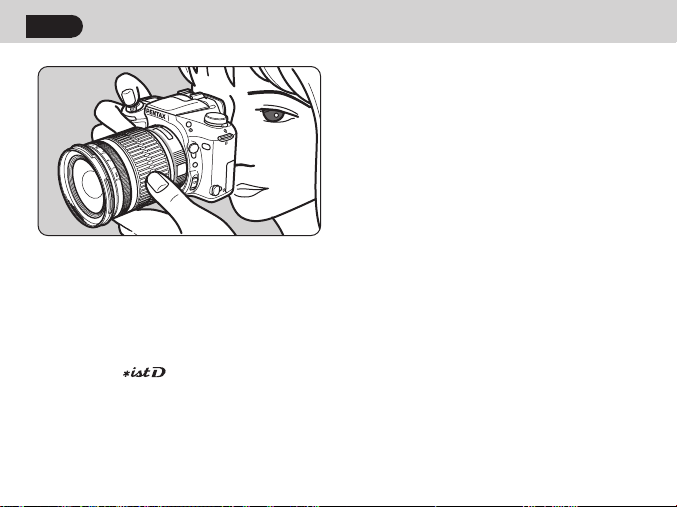
2. Using Manual Focus
Set to MF with the camera’s focus mode, and turn the focusing ring to focus manually.
Page 13

11
Using the Quick-Shift Focus System ( -series cameras only)
If you use the lens with an -series camera and the focus mode is set to autofocus,
you can focus manually after autofocus is achieved. Just turn the focusing ring to manually
touch-up the focus. You can do this without changing the focus mode to MF.
How to use the Quick-Shift Focus System
1. Using Autofocus
Set the camera’s focus mode switch to autofocus, then press the shutter button halfway
to autofocus.
With the camera, you can also press the AF button to focus.
With the
OK Button” on page 9, you can focus by pressing the OK button.
2. Hold down the shutter button halfway (or hold down the AF button or OK
button), then turn the focusing ring to focus.
3. Finally, press the shutter release button fully to take a picture.
,
or camera set as explained by “Focusing with the
Page 14

12
CAUTION
During autofocusing, the focusing ring of following lenses will rotate.
• To prevent malfunction, do not touch the focusing ring during autofocusing.
- DA FISH-EYE 10-17mm f/3.5-4.5ED (IF)
- DA 12-24mm f/4ED AL (IF)
- DA 16-45mm f/4ED AL
- DA 18-55mm f/3.5-5.6 AL
- DA 50-200mm f/4-5.6ED
- DA 40mm f/2.8 Limited
• When using the Quick-Shift Focus System, keep pressing the shutter button (or AF
button) after you achieve focus and before taking a picture. If you let go of the shutter
button before taking the picture, you will have to focus all over again when you press
the shutter button again.
In the following cases, you can take the picture without autofocusing after letting go
of the shutter button.
• With the , set the “AF with Press Halfway” Custom Function to off. To
autofocus, press the AF button.
• With the
set “Cansel AF” for “OK btn when shooting”. This will enable you to focus manually
while you hold down the OK button.
The setting procedure and more details are explained in the camera’s instruction
manual.
,
and the
camera, use the C Custom menu to
Page 15

13
Close-distance scale
Precautions on close-distance scale
(For DA 16-45mm f/4ED AL, DA18-55mm f/3.5-5.6 AL)
In the close-distance scale range (the distance scale in the orange area), when shooting at
the maximum aperture, image quality deterioration in the picture corners may result
because of the optical characteristics of the lens.
When taking a picture in this range, we recommend that you use a smaller aperture,
stopping down from wide open.
Page 16

14
Focusing ring
Distance scale
Zoom index
Mounting index
Zoom ring
Focal length scale
Focusing index
Lens hood
attaching index
ZOOM LENS
Page 17

15
The zoom lens has a focusing ring at the front and a zoom ring behind it.
Turn the zoom ring to set the desired angle of view (lens focal length).
Memo:
✍
• The focusing point may shift slightly by changing the focal length. First adjust the zoom
and then adjust focus.
About the zoom ring
Turn the zoom ring clockwise for telephoto and counterclockwise for wide-angle.
Page 18

16
Lens hood
attaching
index
In order to avoid the deterioration in image quality from internal reflection, use of the lens
hood is recommended.
ATTACHING THE LENS HOOD
12
1. Screw-on Type
If the lens hood is dedicated to the DA 40mm f/2.8 Limited, screw it onto the front of the
lens.
2. Bayonet Type
When attaching the lens hood, align the index on the lens hood with the attaching index
on the lens, and push both parts straight toward each other. Attach the lens hood on the
lens by turning the hood in the clockwise direction to lock it as viewed from the front of
the lens until it clicks into position.
Memo:
✍
• When attaching the lens hood, hold the focus ring and zoom ring securely to prevent
them from turning.
• When the lens hood is not in use, it can also be turned around and attached in the
reversed position.
Page 19

17
1
About the PL filter window
If a circular polarizing filter is attached to the DA lens, you can easily turn the filter via the
PL filter window on the bayonet-type hood.
Lens hood with [PL filter window]
- DA 14mm f/2.8ED (IF) - DA 16-45mm f/4ED AL
- DA 18-55mm f/3.5-5.6 AL - DA 50-200mm f/4-5.6ED
How to use the lens hood with polarizing filter window
1. Remove the PL filter window cap by sliding it in the direction as shown above.
2. Turn the outer rim of the circular polarizing filter from the PL filter window as shown
above.
2
Page 20

18
3
3. Attach the PL filter window cap.
Memo:
✍
• When shooting, be sure the PL filter window cap is in place to make that the lens hood
is being used to maximum effect.
Page 21

FILTERS
Make sure the filter size matches the lens, then screw the filter onto the front of the lens.
Memo:
✍
• The compatible filter size for all the lenses are listed on pages 24-26.
• Filters cannot be mounted on the DA FISH-EYE 10-17 mm f/3.5-4.5ED (IF).
Precaution on filters
• Since the filter becomes a part of the optics when attached on the lens, handle it in the
same way you handle the lens with care to dust, dirt and scratches. Normally, attaching
two or more filters on a lens is not recommended. However, attaching a circular polarizing
filter and another filter would not be a problem.
• Use a circular polarizing filter with Autofocus camera for proper exposure and
autofocusing.
Attaching the 30.5mm filter to the DA 40mm f/2.8 Limited lens
Normally, you attach the 49mm filter to the front of the lens. But as shown in the diagram,
you can also screw on a 30.5mm filter to the back of the dedicated hood.
19
Page 22

20
Compatibility table for PENTAX filters
Circular polarizing filter
Lens
DA FISH-EYE 10-17mm
f/3.5-4.5ED (IF)
DA14mm f/2.8ED (IF)
DA40mm f/2.8 Limited
DA12-24mm f/4ED AL (IF)
DA16-45mm f/4ED AL
DA18-55mm f/3.5-5.6 AL
DA50-200mm f/4-5.6ED
1 The lens hood cannot be mounted on some circular polarizing filters that are not produced
*
by PENTAX, depending on the type.
2 Vignetting occurs at focal lengths below 15 mm with other PENTAX filters (such as the
*
Skylight) besides circular polarizing filters.
Filters cannot be mounted.
3
*
3
*
1
*
*
1
*
1
*
1
*
Compatibility
2
*
(new type)
NO
Use a filter with a diameter
YES
of 49 mm.
Vignetting occurs at focal
*
YES
lengths below 15 mm.
YES
Notes
Circular polarizing filter
(old type)
Compatibility
NO
NOYES
Vignetting occurs.
Use a filter with a diameter
YES
of 49 mm.
Vignetting occurs at focal
*
YES
*
lengths below 15 mm.
Can be mounted and used.
*
However, when the old type
of circular polarizing filter is
mounted, the mount of the
YES
*
dedicated bayonet hood
interferes with the filter’s
mount so it cannot be
mounted on top of that.
Notes
Page 23

PRECAUTIONS WHEN USING THE LENS WITH A FLASH
Built-in Flash
The built-in flash can not be used when the distance is less than 0.7m. When the flash is
used within 0.7m, it causes incorrect exposure control and vignetting in the picture corners.
• Refer to the “Compatibility of DA Lenses with the Built-in Flash” chart on page 23 for
information on the compatibility of the built-in flash with the lens being used. Furthermore,
please note that when using the -series camera, a warning indication does not
appear even when taking a picture with a built-in flash that is incompatible with the lens
being used.
• If the built-in flash is used with the lens hood attached to the lens, the flash light will be
blocked by the lens hood. Always make sure to remove the lens hood before using the
built-in flash.
External Flash
The external flash can be used while the lens hood is attached. However, the following
conditions apply for some types of lens.
● DA 14mm f/2.8ED (IF)
The AF540FGZ and AF360FGZ external flash units can only be used when the wide-angle
panel is used (it is also possible to use the lens hood). Other external flash units are not
recommended because their coverage angle is not compatible with the angel of view of the lens.
● DA FISH-EYE 10-17 mm f/3.5-4.5ED (IF)
External flash units cannot be used because their coverage angle is not compatible.
21
Page 24

22
● DA 12-24 mm f/4ED AL (IF)
Pentax external flash units which support TTL auto flash and that cover a 24mm lens on a
35mm SLR or 16mm lens on a digital SLR can be used from 16mm to 24mm.
AF540FGZ and AF360FGZ can be used from 13mm to 24mm with the wide angle panel (In
both cases, it is possible to use the lens hood).
Please note that at focal lengths less than 13mm the corners of the picture will not be fully
illuminated.
Other external flash units are not recommended because their coverage angle is not wide
enough to cover the angle of view of the lens.
● DA 16-45 mm f/4ED AL
PENTAX external flash units which support TTL auto flash and that cover a 24mm lens on a
35mm SLR or 16mm lens on a digital SLR can be used (it is also possible to use the lens hood).
*For more information, refer to the manual for the external flash unit. Please check your
camera instruction manual for information on which flashes can be used with your PENTAX
Digital SLR.
Page 25

23
Compatibility of DA Lenses with the Built-in Flash
Lens
DA 14mm f/2.8ED (IF) No
DA 40mm f/2.8 Limited YES
DA FISH-EYE 10-17mm f/3.5-4.5ED (IF)
DA 12-24mm f/4ED AL (IF) No
DA 16-45mm f/4ED AL
DA 18-55mm f/3.5-5.6 AL
DA 50-200mm f/4-5.6ED
Except for the DA 40mm f/2.8 Limited, do not use the lens hood when using the built-in flash. This
is to prevent obstruction of the flash coverage by the lens hood.
Compatibility Notes
No
Vignetting may occur at a focal length
*
*YES
YES
YES
less than 28mm, and also may occur
at a focal length 28mm when object
distance is less than 1m.
Page 26

24
MAIN SPECIFICATIONS
Lens DA 14mm f/2.8ED (IF) DA 40mm f/2.8 Limited
(equivalent to
Focal length
Usable camera -series -series -series
Elements in groups
Angle of view 90° 39° 180°–100°
Aperture f/2.8 f/2.8 f/3.5-f/4.5
Minimum aperture
Mount type KAF-mount KAF-mount KAF-mount
Minimum focus
distance 2.5 cm from front of lens)
Maximum
magnification
Filter size 77mm 49mm or 30.5mm Cannot be mounted
Lens hood PH-RBH 77mm MH-RC 49mm Built-in
Max. Diameter 83.5mm × 69mm 63mm × 15mm
× Length (3.3in × 2.7in) (2.5in × 0.6in)
Weight
Soft case S100-120 Dedicated case S80-80
14 mm
21.5mm in 35mm format) 61mm in 35mm format)
12–11 5–4 10–8
f/22 f/22 f/22–f/32
0.17m (0.56ft) 0.4m (1.31ft)
Approx. 0.19× Approx. 0.13× Approx. 0.39×
N/14.8oz 90N/3.15oz
420
(with hood 455N/16oz) (with hood 100N/3.5oz)
40 mm
(equivalent to
DA FISH-EYE 10-17mm f/3.5-4.5ED (IF)
10-17 mm (35mm conversion not
possible)
0.14m (0.46ft) (Approximately
68mm × 71.5mm (2.7in × 2.8in)
320N/11.3oz
Page 27

25
Lens
Focal length
DA 12-24mm f/4ED AL (IF)
12-24 mm
18.5
(equivalent to
-37mm in 35mm format) 24.5-69mm in 35mm format) 27.5-84mm in 35mm format)
DA 16-45mm f/4ED AL DA18-55mm f/3.5-5.6 AL
16-45 mm
(equivalent to
18-55 mm
(equivalent to
Usable camera -series -series -series
Elements in groups
13–11 13–10 12–9
Angle of view 99°–61° 83°–35° 76°–29°
Aperture f/4 f/4 f/3.5-f/5.6
Minimum aperture
f/22 f/22 f/22-f/38
Mount type KAF-mount KAF-mount KAF-mount
Minimum focus
distance
Maximum
magnification
0.3m (0.98ft) 0.28m (0.92ft) 0.25m (0.82ft)
Approx. 0.12× Approx. 0.26× Approx. 0.34×
Filter size 77mm 67mm 52mm
Lens hood PH-RBI 77mm PH-RBL 67mm PH-RBA 52mm
Max. Diameter 84mm × 87.5mm 72mm × 92mm 68mm × 67.5mm
× Length (3.3in × 3.4in) (2.8in × 3.6in) (2.7in × 2.6in)
Weight
430N/15.2oz 365N/12.9oz 225N/7.9oz
(with hood 457N/16.1oz) (with hood 390N/13.8oz) (with hood 250N/8.8oz)
Soft case S100-120 S90-140 S80-120
Page 28

26
Lens
Focal length
Usable camera -series
Elements in groups
Angle of view 31.5°–8.1°
Aperture f/4–f/5.6
Minimum aperture
Mount type KAF-mount
Minimum focus
distance
Maximum
magnification
Filter size 52mm
Lens hood PH-RBB 52mm
Max. Diameter 66.5mm × 78.5mm
× Length (2.6in × 3.1in)
Weight
Soft case S80-120
DA 50-200mm f/4-5.6ED
50-200 mm
76.5-306mm in 35mm format)
11–10
f/22–f/32
1.1m (3.6ft)
Approx. 0.24×
255N/9oz
(with hood 285N/10oz)
(equivalent to
Page 29

For customers in USA
STATEMENT OF FCC COMPLIANCE
This device complies with Part 15 of the FCC Rules. Operation is subject to the following two conditions
: (1) This device may not cause harmful interference, and (2) this device must accept any interference
received, including interference that may cause undesired operation.
Changes or modifications not approved by the party responsible for compliance could void the user's
authority to operate the equipment.
This equipment has been tested and found to comply with the limits for a Class B digital device,
pursuant to part 15 of the FCC Rules. These limits are designed to provide reasonable protection
against harmful interference in a residential installation. This equipment generates, uses and can
radiate radio frequency energy and, if not installed and used in accordance with the instructions, may
cause harmful interference to radio communications. However, there is no guarantee that interference
will not occur in a particular installation. If this equipment does cause harmful interference to radio or
television reception, which can be determined by turning the equipment off and on, the user is
encouraged to try to correct the interference by one or more of the following measures :
• Reorient or relocate the receiving antenna.
Increase the separation between the equipment and receiver.
Connect the equipment into an outlet on a circuit different from that to which the receiver is
connected.
*Consult the dealer or an experienced radio/TV technician for help.
For customers in Canada
This Class B digital apparatus meets all requirements of the Canadian Interference-Causing Equipment
Regulations.
Cet appareil numérique de la classe B respecte toutes les exigences du Réglement sur le matériel brouilleur du
Canada.
27
Page 30

28
memo
Page 31

memo
29
Page 32

for your
precious moments
PENTAX
PENTAX Corporation 2-36-9,Maeno-cho, Itabashi-ku, Tokyo 174-8639, JAPAN (https://www.pentax.co.jp/)
PENTAX Europe GmbH Julius-Vosseler-Strasse, 104, 22527 Hamburg, GERMANY
(European Headquarters) (HQ - http://www.pentaxeurope.com) (Germany - http://www.pentax.de)
PENTAX U.K. Limited PENTAX House, Heron Drive, Langley, Slough, Berks SL3 8PN, U.K. (http://www.pentax.co.uk)
PENTAX France S.A.S. 12/14, rue Jean Poulmarch, 95106 Argenteuil Cedex, FRANCE (http://www.pentax.fr)
PENTAX Benelux B.V. (for Netherlands) Spinveld 25, 4815 HR Breda, NETHERLANDS (http://www.pentax.nl)
PENTAX (Schweiz) AG Widenholzstrasse 1 Postfach 367 8305 Dietlikon, SWITZERLAND (http://www.pentax.ch)
PENTAX Scandinavia AB P.O. Box 650, 75127 Uppsala, SWEDEN (http://www.pentax.se)
PENTAX Imaging Company
A Division of PENTAX of America, Inc.
PENTAX Canada Inc. 1770 Argentia Road Mississauga, Ontario L5N 3S7, CANADA (http://www.pentax.ca)
(for Belgium & Luxembourg) Weiveldlaan 3-5, 1930 Zaventem, BELGIUM (http://www.pentax.be)
(Headquarters)
600 12th Street, Suite 300 Golden, Colorado 80401, U.S.A.
(PENTAX Service Department)
12000 Zuni Street, Suite 100B Westminster, Colorado 80234, U.S.A.
(http://www.pentaximaging.com)
The CE Mark is a Directive conformity mark of the European Union.
Specifications and external dimensions are subject to change without notice.
57298ENG
Copyright ©PENTAX Corporation 2005
08-200511 Printed in Vietnam
 Loading...