


 Loading...
C O N F I G U R A T I O N
Endura® SM5200
System Manager
C5619M (8/12)

Contents
About the Web Configuration Application . . . . . . . . . . . . . . . . . . . . . . . . . . . . . . . . . . . . . . . . . . . . . . . . . . . . . . . . . . . . . . . . . . . . . . . . . . . . . . . . . . 4
Endura Application Compatibility . . . . . . . . . . . . . . . . . . . . . . . . . . . . . . . . . . . . . . . . . . . . . . . . . . . . . . . . . . . . . . . . . . . . . . . . . . . . . . . . . . . . . 4
Navigating the Web Interface . . . . . . . . . . . . . . . . . . . . . . . . . . . . . . . . . . . . . . . . . . . . . . . . . . . . . . . . . . . . . . . . . . . . . . . . . . . . . . . . . . . . . . . 4
Saving Configuration Settings . . . . . . . . . . . . . . . . . . . . . . . . . . . . . . . . . . . . . . . . . . . . . . . . . . . . . . . . . . . . . . . . . . . . . . . . . . . . . . . . . . . . . . . 5
System Tools. . . . . . . . . . . . . . . . . . . . . . . . . . . . . . . . . . . . . . . . . . . . . . . . . . . . . . . . . . . . . . . . . . . . . . . . . . . . . . . . . . . . . . . . . . . . . . . . . . . . . 5
Restarting the System . . . . . . . . . . . . . . . . . . . . . . . . . . . . . . . . . . . . . . . . . . . . . . . . . . . . . . . . . . . . . . . . . . . . . . . . . . . . . . . . . . . . . . . . . 5
Restoring Factory Defaults . . . . . . . . . . . . . . . . . . . . . . . . . . . . . . . . . . . . . . . . . . . . . . . . . . . . . . . . . . . . . . . . . . . . . . . . . . . . . . . . . . . . . 5
Logging On to the SM5200 . . . . . . . . . . . . . . . . . . . . . . . . . . . . . . . . . . . . . . . . . . . . . . . . . . . . . . . . . . . . . . . . . . . . . . . . . . . . . . . . . . . . . . . . . . . . . . 6 Changing Your Password . . . . . . . . . . . . . . . . . . . . . . . . . . . . . . . . . . . . . . . . . . . . . . . . . . . . . . . . . . . . . . . . . . . . . . . . . . . . . . . . . . . . . . . . . . . 6 Expiring Passwords . . . . . . . . . . . . . . . . . . . . . . . . . . . . . . . . . . . . . . . . . . . . . . . . . . . . . . . . . . . . . . . . . . . . . . . . . . . . . . . . . . . . . . . . . . . 6
System Status . . . . . . . . . . . . . . . . . . . . . . . . . . . . . . . . . . . . . . . . . . . . . . . . . . . . . . . . . . . . . . . . . . . . . . . . . . . . . . . . . . . . . . . . . . . . . . . . . . . . . . . . 7
Temperature Status . . . . . . . . . . . . . . . . . . . . . . . . . . . . . . . . . . . . . . . . . . . . . . . . . . . . . . . . . . . . . . . . . . . . . . . . . . . . . . . . . . . . . . . . . . . . . . . 7
Video Storage . . . . . . . . . . . . . . . . . . . . . . . . . . . . . . . . . . . . . . . . . . . . . . . . . . . . . . . . . . . . . . . . . . . . . . . . . . . . . . . . . . . . . . . . . . . . . . . . . . . . 8
Fan Status . . . . . . . . . . . . . . . . . . . . . . . . . . . . . . . . . . . . . . . . . . . . . . . . . . . . . . . . . . . . . . . . . . . . . . . . . . . . . . . . . . . . . . . . . . . . . . . . . . . . . . . 8
Disk Status . . . . . . . . . . . . . . . . . . . . . . . . . . . . . . . . . . . . . . . . . . . . . . . . . . . . . . . . . . . . . . . . . . . . . . . . . . . . . . . . . . . . . . . . . . . . . . . . . . . . . . 8
Power Status. . . . . . . . . . . . . . . . . . . . . . . . . . . . . . . . . . . . . . . . . . . . . . . . . . . . . . . . . . . . . . . . . . . . . . . . . . . . . . . . . . . . . . . . . . . . . . . . . . . . . 8
IP Settings . . . . . . . . . . . . . . . . . . . . . . . . . . . . . . . . . . . . . . . . . . . . . . . . . . . . . . . . . . . . . . . . . . . . . . . . . . . . . . . . . . . . . . . . . . . . . . . . . . . . . . . . . . . 9
Configuring the Primary Network Interface . . . . . . . . . . . . . . . . . . . . . . . . . . . . . . . . . . . . . . . . . . . . . . . . . . . . . . . . . . . . . . . . . . . . . . . . . . . . . 9
Configuring the Secondary Network Interface. . . . . . . . . . . . . . . . . . . . . . . . . . . . . . . . . . . . . . . . . . . . . . . . . . . . . . . . . . . . . . . . . . . . . . . . . . 10
System Manager Failover Cluster . . . . . . . . . . . . . . . . . . . . . . . . . . . . . . . . . . . . . . . . . . . . . . . . . . . . . . . . . . . . . . . . . . . . . . . . . . . . . . . . . . . . . . . . 11
Configuring the Failover Cluster IP Address. . . . . . . . . . . . . . . . . . . . . . . . . . . . . . . . . . . . . . . . . . . . . . . . . . . . . . . . . . . . . . . . . . . . . . . . . . . . 11
System Settings. . . . . . . . . . . . . . . . . . . . . . . . . . . . . . . . . . . . . . . . . . . . . . . . . . . . . . . . . . . . . . . . . . . . . . . . . . . . . . . . . . . . . . . . . . . . . . . . . . . . . . 12 Date and Time Configuration . . . . . . . . . . . . . . . . . . . . . . . . . . . . . . . . . . . . . . . . . . . . . . . . . . . . . . . . . . . . . . . . . . . . . . . . . . . . . . . . . . . . . . . 12 Using the System Manager as an Independent Time Server . . . . . . . . . . . . . . . . . . . . . . . . . . . . . . . . . . . . . . . . . . . . . . . . . . . . . . . . . . 13 Synchronizing with an External Time Server. . . . . . . . . . . . . . . . . . . . . . . . . . . . . . . . . . . . . . . . . . . . . . . . . . . . . . . . . . . . . . . . . . . . . . . 13 About Overriding Default DST Settings. . . . . . . . . . . . . . . . . . . . . . . . . . . . . . . . . . . . . . . . . . . . . . . . . . . . . . . . . . . . . . . . . . . . . . . . . . . 13 Pelco Web Viewer Configuration . . . . . . . . . . . . . . . . . . . . . . . . . . . . . . . . . . . . . . . . . . . . . . . . . . . . . . . . . . . . . . . . . . . . . . . . . . . . . . . . . . . . 14 Configuring the Pelco Web Viewer . . . . . . . . . . . . . . . . . . . . . . . . . . . . . . . . . . . . . . . . . . . . . . . . . . . . . . . . . . . . . . . . . . . . . . . . . . . . . . 14 User Permissions for Accessing the Pelco Web Viewer . . . . . . . . . . . . . . . . . . . . . . . . . . . . . . . . . . . . . . . . . . . . . . . . . . . . . . . . . . . . . . 14 Web Server Port Configuration. . . . . . . . . . . . . . . . . . . . . . . . . . . . . . . . . . . . . . . . . . . . . . . . . . . . . . . . . . . . . . . . . . . . . . . . . . . . . . . . . . . . . . 15 Changing the HTTPS Port. . . . . . . . . . . . . . . . . . . . . . . . . . . . . . . . . . . . . . . . . . . . . . . . . . . . . . . . . . . . . . . . . . . . . . . . . . . . . . . . . . . . . . 15 SNMP Configuration. . . . . . . . . . . . . . . . . . . . . . . . . . . . . . . . . . . . . . . . . . . . . . . . . . . . . . . . . . . . . . . . . . . . . . . . . . . . . . . . . . . . . . . . . . . . . . 16 Configuring SNMP v2c. . . . . . . . . . . . . . . . . . . . . . . . . . . . . . . . . . . . . . . . . . . . . . . . . . . . . . . . . . . . . . . . . . . . . . . . . . . . . . . . . . . . . . . . 16 configuring SNMP v3. . . . . . . . . . . . . . . . . . . . . . . . . . . . . . . . . . . . . . . . . . . . . . . . . . . . . . . . . . . . . . . . . . . . . . . . . . . . . . . . . . . . . . . . . 16
DHCP Setup . . . . . . . . . . . . . . . . . . . . . . . . . . . . . . . . . . . . . . . . . . . . . . . . . . . . . . . . . . . . . . . . . . . . . . . . . . . . . . . . . . . . . . . . . . . . . . . . . . . . . . . . . 17
Configuring DHCP Scopes. . . . . . . . . . . . . . . . . . . . . . . . . . . . . . . . . . . . . . . . . . . . . . . . . . . . . . . . . . . . . . . . . . . . . . . . . . . . . . . . . . . . . . . . . . 18
Managing Leases . . . . . . . . . . . . . . . . . . . . . . . . . . . . . . . . . . . . . . . . . . . . . . . . . . . . . . . . . . . . . . . . . . . . . . . . . . . . . . . . . . . . . . . . . . . . . . . . 18
Setting MAC Address Reservations . . . . . . . . . . . . . . . . . . . . . . . . . . . . . . . . . . . . . . . . . . . . . . . . . . . . . . . . . . . . . . . . . . . . . . . . . . . . . . . . . . 18
Deleting MAC Address Reservations . . . . . . . . . . . . . . . . . . . . . . . . . . . . . . . . . . . . . . . . . . . . . . . . . . . . . . . . . . . . . . . . . . . . . . . . . . . . 19
LDAP Setup . . . . . . . . . . . . . . . . . . . . . . . . . . . . . . . . . . . . . . . . . . . . . . . . . . . . . . . . . . . . . . . . . . . . . . . . . . . . . . . . . . . . . . . . . . . . . . . . . . . . . . . . . 20
Disabling Password Expiration . . . . . . . . . . . . . . . . . . . . . . . . . . . . . . . . . . . . . . . . . . . . . . . . . . . . . . . . . . . . . . . . . . . . . . . . . . . . . . . . . . . . . . 21
Configuring LDAP Authentication. . . . . . . . . . . . . . . . . . . . . . . . . . . . . . . . . . . . . . . . . . . . . . . . . . . . . . . . . . . . . . . . . . . . . . . . . . . . . . . . . . . . 21
Configuring Search Settings for Simple LDAP Authentication . . . . . . . . . . . . . . . . . . . . . . . . . . . . . . . . . . . . . . . . . . . . . . . . . . . . . . . . . 21
Configuring Search Settings for Two Stage LDAP Authentication . . . . . . . . . . . . . . . . . . . . . . . . . . . . . . . . . . . . . . . . . . . . . . . . . . . . . . 21
Testing LDAP Search Settings . . . . . . . . . . . . . . . . . . . . . . . . . . . . . . . . . . . . . . . . . . . . . . . . . . . . . . . . . . . . . . . . . . . . . . . . . . . . . . . . . . . . . . 21
Updating the SM5200 . . . . . . . . . . . . . . . . . . . . . . . . . . . . . . . . . . . . . . . . . . . . . . . . . . . . . . . . . . . . . . . . . . . . . . . . . . . . . . . . . . . . . . . . . . . . . . . . . 22
2 |
C5619M (8/12) |

List of Illustrations
1 SM5200 Web Interface . . . . . . . . . . . . . . . . . . . . . . . . . . . . . . . . . . . . . . . . . . . . . . . . . . . . . . . . . . . . . . . . . . . . . . . . . . . . . . . . . . . . . . . . . . . . 4 2 System Tools. . . . . . . . . . . . . . . . . . . . . . . . . . . . . . . . . . . . . . . . . . . . . . . . . . . . . . . . . . . . . . . . . . . . . . . . . . . . . . . . . . . . . . . . . . . . . . . . . . . . . 5 3 System Manager Logon . . . . . . . . . . . . . . . . . . . . . . . . . . . . . . . . . . . . . . . . . . . . . . . . . . . . . . . . . . . . . . . . . . . . . . . . . . . . . . . . . . . . . . . . . . . . 6 4 System Manager Status page . . . . . . . . . . . . . . . . . . . . . . . . . . . . . . . . . . . . . . . . . . . . . . . . . . . . . . . . . . . . . . . . . . . . . . . . . . . . . . . . . . . . . . . 7 5 IP Settings Page . . . . . . . . . . . . . . . . . . . . . . . . . . . . . . . . . . . . . . . . . . . . . . . . . . . . . . . . . . . . . . . . . . . . . . . . . . . . . . . . . . . . . . . . . . . . . . . . . . 9 6 System Page . . . . . . . . . . . . . . . . . . . . . . . . . . . . . . . . . . . . . . . . . . . . . . . . . . . . . . . . . . . . . . . . . . . . . . . . . . . . . . . . . . . . . . . . . . . . . . . . . . . . 12 7 Select System Permissions. . . . . . . . . . . . . . . . . . . . . . . . . . . . . . . . . . . . . . . . . . . . . . . . . . . . . . . . . . . . . . . . . . . . . . . . . . . . . . . . . . . . . . . . . 15 8 DHCP Page . . . . . . . . . . . . . . . . . . . . . . . . . . . . . . . . . . . . . . . . . . . . . . . . . . . . . . . . . . . . . . . . . . . . . . . . . . . . . . . . . . . . . . . . . . . . . . . . . . . . . 17 9 MAC Address Reservations Dialog . . . . . . . . . . . . . . . . . . . . . . . . . . . . . . . . . . . . . . . . . . . . . . . . . . . . . . . . . . . . . . . . . . . . . . . . . . . . . . . . . . 18 10 LDAP Settings Tab . . . . . . . . . . . . . . . . . . . . . . . . . . . . . . . . . . . . . . . . . . . . . . . . . . . . . . . . . . . . . . . . . . . . . . . . . . . . . . . . . . . . . . . . . . . . . . . 20
C5619M (8/12) |
3 |
About the Web Configuration Application
The SM5200 is a network appliance that serves as the system management component of the Endura® IP video management system. The SM5200 Web Configuration Application allows users to quickly and easily configure the SM5200 without installing additional software.
This guide is designed to assist Pelco-certified system administrators with the configuration of the SM5200.
ENDURA APPLICATION COMPATIBILITY
It is recommended that you note the minimum software version requirements for Endura applications comparable with the SM5200. Using software versions earlier than those listed below may result in unexpected system manager behavior.
•WS5200/WS5070: Version 2.5.3.10286 or later is required to configure operator access to the Pelco Web Viewer.
•Endura Mapping: Version 2.4.0.4959.
•Endura Utilities: Version 2.3.10.3.
NAVIGATING THE WEB INTERFACE
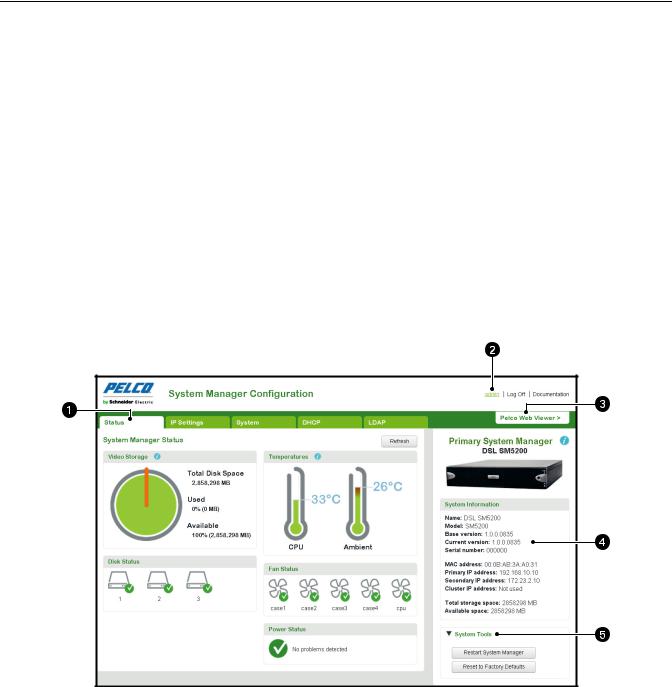
Settings in the SM5200 configuration interface are organized across five pages. Click any of the tabs to navigate pages in the interface. Additional information and settings are found in the page header, System Information, and System Tools areas of the Web interface.
NOTE: You can click Pelco Web Viewer to exit the configuration application and search, view, or download video clips.
Figure 1. SM5200 Web Interface
ì
î
ï
ñ
ó
Page: The SM5200 configuration interface consists of five pages. Click any of the tabs to access a different page.
System Name and Links: This area displays the system name, your User Name, and links to log off or access SM5200 documentation.
Pelco Web Viewer: Click to exit the configuration interface and view live and recorded video.
System Information: Displays information about the system manager.
System Tools: Click to reveal maintenance options for the SM5200.
4 |
C5619M (8/12) |

Icons throughout the Web interface will provide you with information about the status of the unit and the validity of your settings.
Tooltip: place your mouse pointer over this icon to view additional information about items within the interface
Indicates a valid setting or a component operating within a normal, safe range.
Indicates incomplete settings or a component in danger of failing; monitor closely
Indicates an invalid setting or a system manager component that has failed; requires immediate attention.
SAVING CONFIGURATION SETTINGS
Click Save in the lower-right corner of any page to commit your settings to the SM5200. You must click Save before navigating to another page within the Web interface or you will lose your changes.
Clicking the Cancel button in the lower-right corner will revert all settings on any page to their previously saved values.
NOTE: Some changes to configuration settings cause the system to restart.
SYSTEM TOOLS
The System Tools section of the Web interface contains options for system maintenance. Using any option under System Tools will take the system manager off line, potentially disrupting your Endura network. Do not use System Tools unless you have configured a failover cluster or have scheduled maintenance.
Figure 2. System Tools
RESTARTING THE SYSTEM
NOTES:
•The unit may require a restart following changes to certain system settings. If the unit must restart, the user will receive a prompt to restart the unit without following the steps below.
•If you have configured a failover cluster, restarting the primary system manager will cause the secondary system manager to take over the Endura network.
1.Click System Tools.
2.Click Restart System Manager.
3.Confirm your selection.
RESTORING FACTORY DEFAULTS
NOTE: Restoring factory defaults will revert your system manager to an unconfigured state. If you do not have a failover unit configured, your Endura network will fall off line.
1.Click System Tools.
2.Click Reset to Factory Defaults.
3.Click Reset Configuration to confirm your selection.
C5619M (8/12) |
5 |
Logging On to the SM5200
NOTES:
•The SM5200 Web Configuration Application is compatible with Microsoft® Internet Explorer® versions 9 and later, Mozilla® Firefox® versions 8 and later, and Google Chrome™ versions 16 and later.
•Only the admin user can access the SM5200 configuration and video viewing pages. All other users only have access to the Pelco
Web Viewer. If you have migrated from an SM5000 environment in which the admin user had been deleted or renamed, you must recreate the admin user and assign the user the administrative role to access the SM5200 Web configuration interface.
•You might receive a security certificate warning when accessing the system manager from a computer you have not used to access the system manager before. If this is the case, add an exception in your browser to allow unobstructed access to the system manager. The process for adding an exception depends on the browser you use to access the system manager.
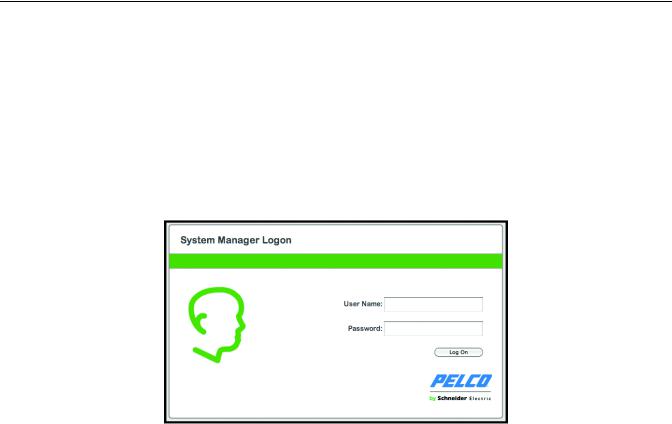
1.Open a Web browser on a computer with network access to the system manager.
2.Type the IP address or hostname of your SM5200 in the navigation bar and press Enter. The default IP address is 192.168.5.10.
Figure 3. System Manager Logon
3.Type your User name and Password in the appropriate boxes.
•The User Name is admin; this is the only user that can access the configuration interface.
•The default Password is admin; if you have migrated from an SM5000 environment with an existing admin user, you will log on using the password associated with your admin account.
4.Click Log On.
CHANGING YOUR PASSWORD
1.Click your user name in the upper-right corner of the interface. The password change prompt appears.
2.Type your current password in the Old password text box.
3.Type your new password in the New password box.
4.Confirm your new password in the final box.
5.Click Save Password.
NOTE: Users and passwords can be managed from the WS5200 application unless LDAP is enabled.
EXPIRING PASSWORDS
User passwords for the Endura network expire at a rate determined by settings in the WS5200 application. Users receive a password change reminder upon successful log on attempts within a number days of their password’s expiration date, which is also determined within the WS5200 application. Clicking Change Password or waiting until the password expires displays the Change Password prompt.
NOTE: If employing an LDAP server for user authentication, you must disable password expiration settings through the WS5200 application before enabling LDAP.
6 |
C5619M (8/12) |

System Status
Logging on to the SM5200 as an administrator or clicking the Status tab displays a page detailing the status of the system manager and its components.
The SM5200’s status does not update in real time. Click Refresh to gather current status information for your system manager.
Figure 4. System Manager Status page
TEMPERATURE STATUS
The two thermometer icons under Temperature display the core CPU temperature and ambient system temperature of the system manager. By default, temperatures appear in Celsius. Click a thermometer icon to switch between Celsius and Fahrenheit readings.
The thermometers fill in and change color from green to red as the temperature nears the alarm threshold. Alarm thresholds are as follows:
•72°C (161.6°F) for the CPU
•35°C (95°F) for ambient temperature
If either temperature reading nears the alarm threshold and the thermometer begins to turn red, take action to determine the cause and alleviate the problem: improve the rack cooling strategy; check and clean the air filter; or relocate the unit to an environment where an ambient temperature of 35°C (95°F) or lower can be guaranteed.
 WARNING: If either temperature reading crosses the temperature alarm threshold, take action immediately to prevent hardware failure and potential data loss.
C5619M (8/12) |
7 |

VIDEO STORAGE
From the Pelco Web Viewer, users export recorded footage onto the system manager’s integrated storage array for safekeeping and future access. The SM5200 supports up to 12 TB of video storage.
The video storage pie chart displays the percentages of used and available video storage.
NOTE: Users may free Video Storage by deleting videos from the Export Manager tab in the Pelco Web Viewer.
FAN STATUS
The SM5200 contains five fans. Each fan’s status appears under Fan Status. Fans that are working properly display a green check  ; fans that have failed display a red alarm
  .
.
 WARNING: Fan failures will cause the unit’s internal temperature to rise, which can potentially result in hardware damage. Contact your Endura system administrator or Pelco Product Support if any of your fans fail.
DISK STATUS
The SM5200 contains up to six hard disk drives depending on model. Disk Status displays the status of your system manager’s drives; functioning drives display a green check  ; failed drives display a red alarm
  .
.
Disks 1 and 2 are SSDs (Solid State Drives) containing the operating system in a RAID 1 configuration. Replace failed disks in drive bays 1 or 2 with Pelco-provided SSDs immediately to prevent a potential loss of system integrity. After replacing a failed drive, the new drive begins rebuilding automatically to re-establish RAID 1 parity.
Disks 3 through 6 are HDDs (Hard Disk Drives) used for video storage in JBOD or RAID 5 format, depending on your configuration. RAID 5 ensures data integrity with one disk failure. Replace failed disks before a second drive fails to prevent data loss.
For more information about the system manager’s drive array, refer to your installation manual.
POWER STATUS
Power Status shows whether the unit is drawing power from a primary AC source or, in the event of a power failure, an uninterruptable power supply (UPS). A green check  indicates that the unit is drawing primary power; a yellow exclamation point
  indicates that primary power has failed and the unit is drawing power from an UPS.
It is recommended that you connect your SM5200 to the APC SmartUPS unit to prevent system failures or data loss due to power outages.
8 |
C5619M (8/12) |
Loading...